
ЦИФРОВОЙ КЛАВИШНЫЙ ИНСТРУМЕНТ
УстановкаСправочникПриложение
Перед началом работы с инструментом прочитайте
раздел «МЕРЫ БЕЗОПАСНОСТИ» на стр. 5–7.
Руководство пользователя
RU

Руководство пользователя PSR-E263 YPT-260
2

OBSERVERA!
Apparaten kopplas inte ur växelströmskällan (nätet) så länge
som den ar ansluten till vägguttaget, även om själva apparaten
har stängts av.
ADVARSEL: Netspændingen til dette apparat er IKKE
afbrudt, sålænge netledningen sidder i en stikkontakt, som er
tændt — også selvom der er slukket på apparatets afbryder.
VAR OITUS: Laitteen toisiopiiriin kytketty käyttökytkin ei irroita
koko laitetta verkosta.
(standby)
Руководство пользователя PSR-E263 YPT-260
3

(bottom_ru_02)
Номер модели, серийный номер, требования
к источнику питания и пр. указаны на
табличке с названием изделия в нижней
части уст ройст ва ил и рядом с ней. За пишите
серийный номер в расположенном ниже
поле и сохраните данное руководство как
подтверждение покупки; это поможет
идентифицировать принадлежность
устройства в случае кражи.
Номер модели.
Cерийный номер.
Руководство пользователя PSR-E263 YPT-260
4
ПРАВИЛА ТЕХНИКИ БЕЗОПАСНОСТИ
Источник питания / блок питания
ВНИМАТЕЛЬНО ПРОЧТИТЕ, ПРЕЖДЕ ЧЕМ
ПРИСТУПАТЬ К ЭКСПЛУАТАЦИИ
Храните это руководство в надежном и удобном месте,
чтобы можно было обращаться к нему в дальнейшем.
Для блока питания
ПРЕДУПРЕЖДЕНИЕ
• Этот блок питания можно использовать только
с электронными инструментами компании Yamaha.
Не используйте его для других целей.
• Предназначен для использования только в помещениях.
Не используйте в условиях высокой влажности.
Для инструмента
ПРЕДУПРЕЖДЕНИЕ
Во избежание получения серьезных травм вплоть до наступления смерти от удара
электрическим током, а также во избежание короткого замыкания, повреждения оборудования,
пожара и других инцидентов, всегда соблюдайте основные правила безопасности,
перечисленные далее. Они включают принятие следующих мер (не ограничиваясь ими):
ВНИМАНИЕ
• Перед настройкой убедитесь, что доступ к используемой
розетке не затруднен. При возникновении какого-либо сбоя
или неисправности немедленно отключите питание
выключателем на инструменте и отсоедините блок питания от
электросети. Учтите, что когда блок питания подсоединен
к электросети, минимальный ток присутствует, даже если
выключатель питания находится в выключенном положении.
Если инструмент не используется в течение длительного
времени, отсоедините кабель питания от розетки электросети.
• Кабель питания не должен находиться рядом с источниками
тепла, такими как нагреватели и батареи отопления.
Кроме того, не допускайте перегибов и других повреждений
кабеля, не ставьте на него тяжелые предметы.
• Используйте только то напряжение, на которое рассчитан
инструмент. Это напряжение указано на наклейке
на инструменте.
• Используйте только указанный тип адаптера (стр. 44).
Использование неподходящего адаптера может привести
к его перегреву или к повреждению инструмента.
• Периодически проверяйте сетевую вилку адаптера
и очищайте ее от накопившейся пыли и грязи.
• В инструменте нет компонентов, которые должен
обслуживать пользователь. Не следует открывать
инструмент и пытаться разбирать его, а также каким-либо
образом модифицировать его внутренние компоненты.
При возникновении неисправности немедленно прекратите
эксплуатацию инструмента и обратитесь за помощью
к квалифицированным специалистам центра технического
обслуживания корпорации Yamaha.
• Не держите инструмент там, где он может попасть под
дождь, рядом с водой, а также в сырых и влажных
помещениях. Не ставьте на него емкости с жидкостью
(вазы, бутылки или стаканы), которая может пролиться
и попасть в отверстия. В случае попадания жидкости,
например воды, в инструмент немедленно отключите
питание и отсоедините кабель питания от розетки
электросети. Затем обратитесь за помощью к специалистам
центра технического обслуживания корпорации Yamaha.
• Ни в коем случае не вставляйте и не вынимайте сетевую
вилку инструмента мокрыми руками.
• Не ставьте на инструмент предметы, являющиеся источником
открытого огня, например свечи. Горящий предмет может
упасть и стать источником возникновения пожара.
• Выполняйте указанные ниже меры предосторожности.
Несоблюдение этих мер может привести к взрыву, возгоранию,
перегреву или вытеканию электролита из батарей.
— Не портите умышленно и не разбирайте батареи.
DMI-5 1/3
Руководство пользователя PSR-E263 YPT-260
5
— Не бросайте батареи в огонь.
Источник питания / блок питания
Правила безопасности при эксплуатации
— Не пытайтесь перезаряжать батареи, не предназначенные
для перезарядки.
— Храните батареи отдельно от металлических предметов,
таких как ожерелья, заколки, монеты и ключи.
— Используйте только батареи указанного типа (стр. 44).
— При применении новых батарей устанавливайте батареи
одинакового типа и одинаковой модели, изготовленные
одним производителем.
— Обязательно устанавливайте батареи согласно
маркировке, соблюдая полярность.
— При разрядке батарей или если инструмент не будет
использоваться в течение длительного времени, выньте
их из инструмента во избежание вытекания электролита.
— При применении никель-металлгидридных
аккумуляторных батарей следуйте инструкциям,
прилагаемым к батареям. Для зарядки используйте
только указанное зарядное устройство.
• Храните батареи в недоступном для детей месте.
• Если батареи все же протекли, избегайте контакта
с вытекшим электролитом. В случае попадания электролита
в глаза, рот или на кожу, немедленно смойте электролит
водой и обратитесь к врачу. Электролит, используемый
в батареях, – это агрессивное вещество, способное вызвать
потерю зрения или химические ожоги.
• При возникновении какой-либо из указанных ниже проблем
немедленно отключите питание инструмента и отсоедините
кабель питания от электросети. (В случае использования
батарей извлеките батареи из инструмента.)
Затем обратитесь за помощью к специалистам центра
технического обслуживания корпорации Yamaha.
— Износ или повреждение кабеля питания или вилки.
— Необычный запах или дым.
— Попадание в корпус инструмента мелких предметов.
— Неожиданное прекращение звучания во время
использования инструмента.
ВНИМАНИЕ
Во избежание нанесения серьезных травм себе и окружающим, а также повреждения
инструмента и другого имущества, всегда соблюдайте основные меры безопасности.
Они включают принятие следующих мер (не ограничиваясь ими):
• Используйте только подставку, предназначенную для
данного инструмента. При креплении подставки пользуйтесь
• Не подключайте инструмент к сетевой розетке через тройник
вместе с другими устройствами. Это может привести
к ухудшению качества звука или перегреву розетки.
• При отключении вилки от инструмента или из розетки
обязательно беритесь за вилку, а не за кабель.
Иначе можно повредить кабель.
• Отключайте инструмент от электросети, если он не будет
использоваться длительное время. Отключать инструмент
от электросети следует также во время грозы.
• Во избежание случайного падения инструмента
не оставляйте его в неустойчивом положении.
• Перед перемещением инструмента отсоедините все кабели
во избежание их повреждения или травмы в результате
спотыкания.
• При установке инструмента убедитесь в том, что
используемая электрическая розетка легко доступна.
При возникновении какого-либо сбоя или неисправности
немедленно отключите питание инструмента и отсоедините
кабель питания от электросети. Даже если переключатель
питания выключен, инструмент продолжает в минимальном
количестве потреблять электроэнергию. Если инструмент
не используется длительное время, отсоедините кабель
питания от сетевой розетки.
Руководство пользователя PSR-E263 YPT-260
6
DMI-5 2/3
только прилагаемыми винтами. При невыполнении этого
требования возможно повреждение внутренних компонентов
или опрокидывание инструмента.
• Перед подсоединением инструмента к другим электронным
компонентам отключите их питание. Перед включением или
отключением питания электронных компонентов установите
минимальный уровень громкости.
• Убедитесь также в том, что на всех компонентах установлен
минимальный уровень громкости, и во время игры на
инструменте постепенно увеличьте громкость до
нужного уровня.
• Не вставляйте пальцы или руки в отверстия инструмента.
• Никогда не засовывайте и не роняйте бумагу,
металлические и прочие предметы в отверстия на панели
и клавиатуре. Несоблюдение этого требования может
привести к получению серьезных травм, нанесению их
окружающим, повреждению инструмента и другого
имущества, а также к отказу во время эксплуатации.
• Не облокачивайтесь на инструмент, не ставьте на него
тяжелые предметы и не прикладывайте усилие к кнопкам,
переключателям и разъемам.
• Не следует долго пользоваться инструментом/устройством
или наушниками с установленным высоким или
некомфортным уровнем громкости, так как это может
привести к потере слуха. При ухудшении слуха или звоне
в ушах обратитесь к врачу.

Корпорация Yamaha не несет ответственности за повреждения, вызванные неправильной эксплуатацией или модификацией
инструмента, а также за потерю или повреждение данных.
Всегда выключайте питание инструмента, если инструмент не используется.
Даже если переключатель [ ] (Режим ожидания / вкл.) находится в положении режима ожидания (подсветка ЖК-дисплея
выключена), инструмент продолжает потреблять электроэнергию на минимальном уровне.
Если инструмент не используется в течение длительного времени, обязательно отсоедините кабель питания от розетки электросети.
Утилизацию использованных батарей необходимо выполнять в соответствии с действующим местным законодательством.
УВЕДОМЛЕНИЕ
Во избежание неисправности или
повреждения инструмента, повреждения
данных или другого имущества соблюдайте
приведенные ниже правила техники
безопасности.
Обращение с инструментом
• Не используйте инструмент в непосредственной
близости от телевизора, радиоприемника,
стереооборудования, мобильного телефона и других
электроприборов. В противном случае возможно
возникновение шума в инструменте, телевизоре или
радиоприемнике. Если инструмент используется
вместе с iPad, iPhone или iPod touch, рекомендуется
перевести устройство в режим полета, чтобы
избежать помех, создаваемых мобильной связью.
• Во избежание деформации панели, повреждения
внутренних компонентов и нестабильной работы
берегите инструмент от чрезмерной пыли и сильной
вибрации и не подвергайте воздействию очень
высоких или низких температур (например,
не размещайте его под прямыми солнечными
лучами, рядом с обогревательными приборами и не
держите в машине в дневное время). Утвержденный
диапазон рабочих температур: 5–40 °C.
• Не кладите на инструмент предметы из винила,
пластмассы или резины. Это может привести
к обесцвечиванию панели или клавиатуры.
Техническое обслуживание
• Для чистки инструмента пользуйтесь мягкой
тканью. Не используйте пятновыводители,
растворители, спирт, жидкие чистящие средства
и чистящие салфетки с пропиткой.
Сохранение данных
• Некоторые данные этого инструмента (стр. 33)
сохраняются даже при отключении питания.
Однако сохраненные данные могут быть утеряны
по причине сбоя, ошибочной последовательности
действий и т. п.
Информация
Авторские права
• Копирование коммерческих музыкальных данных,
включая MIDI-данные и/или аудиоданные,
но не ограничиваясь ими, строго запрещается,
за исключением использования в личных целях.
• Этот продукт включает компьютерные программы
и содержимое, авторские права на которые
принадлежат корпорации Yamaha или право на
использование которых получено Yamaha по лицензии
от других фирм. В соответствии с законами о защите
авторских прав и другими соответствующими
законами вам НЕ разрешается заниматься
распространением носителей, на которых сохранено
или записано такое содержимое, которое при этом
остается полностью аналогичным или очень похожим
на то, которое хранится в данном устройстве.
* Описанное выше содержимое включает
компьютерные программы, данные стиля
аккомпанемента, данные в формате MIDI и WAVE,
данные записи тембров, партитуру, данные
партитуры и т. п.
* Разрешение со стороны Yamaha не требуется,
если вы распространяете носитель, на котором
записано ваше выступление или музыкальное
произведение, созданное с помощью такого
содержимого.
О функциях/данных, встроенных
в инструмент
• Некоторые встроенные композиции были сокращены
или изменены с целью аранжировки и,
следовательно, могут не совпадать с оригиналом.
Об этом руководстве
• Иллюстрации и снимки ЖК-дисплеев приведены
в данном руководстве только в качестве примеров.
В действительности все может выглядеть
несколько иначе.
• iPhone, iPad, iPod touch являются товарными
знаками корпорации Apple Inc.,
зарегистрированными в США и других странах.
• Названия фирм и продуктов, используемые
в данном руководстве, являются товарными
знаками или зарегистрированными товарными
знаками соответствующих компаний.
DMI-5 3/3
Руководство пользователя PSR-E263 YPT-260
7
Благодарим за покупку цифрового клавишного инструмента Yamaha!
Внимательно прочтите данное руководство, чтобы в полной мере воспользоваться всеми
передовыми и удобными функциями инструмента.
Мы также рекомендуем держать это руководство под рукой для дальнейшего использования.
Описание руководств
Помимо данного руководства пользователя, в Интернете доступны следующие документы (PDF-файлы).
Сборник композиций Song Book (только на английском, французском, немецком
и испанском языках)
Содержит партитуры для встроенных композиций (за исключением демонстрационных
композиций) данного инструмента. Для бесплатной загрузки Song Book заполните
регистрационные данные пользователя на следующем веб-сайте.
Yamaha Online Member (Участник веб-сообщества Yamaha)
https://member.yamaha.com/myproduct/regist/
Для заполнения регистрационной формы пользователя потребуется PRODUCT ID
(Идентификатор продукта), который указан в регистрационной карте пользователя
Online Member Product Registration, поставляемой с данным руководством.
Принадлежности в комплекте
• Руководство пользователя (данная книга)
• Блок питания
• Пюпитр
• Регистрационная карта пользователя Online Member Product Registration
*1 Может не входить в комплект поставки в вашем регионе. Уточните у местного торгового представителя Yamaha.
*2 Идентификатор PRODUCT ID, указанный на карте, потребуется при заполнении регистрационной формы пользователя.
Руководство пользователя PSR-E263 YPT-260
8
*1
*2
Содержание
Описание руководств ……………………………………..8
Принадлежности в комплекте…………………………8
Установка
Элементы управления и разъемы
на панели 10
Установка 12
Требования к источнику питания…………………..12
Включение питания ………………………………………13
Настройка функции Auto Power Off
(Автоматическое отключение питания) …….13
Регулировка общей громкости ………………………14
Подключение наушников или внешнего
динамика………………………………………………….14
Использование педали (сустейн) …………………..14
Использование пюпитра………………………………..14
Отображаемые на экране элементы
и основные операции 15
Отображаемые на экране элементы ……………..15
Основные операции ………………………………………15
Справочник
Воспроизведение разных тембров
инструмента 16
Выбор тембра ……………………………………………….16
Забавные звуки…………………………………………….16
Игра в тембре рояля ……………………………………..16
Использование метронома…………………………….17
Воспроизведение с улучшенным, более
объемным звуком (Сверхширокое
стереофоническое звучание) ……………………17
Применение эффектов к звуку ……………………..17
Воспроизведение стилей 18
Вариации стиля — фрагменты ………………………19
Изменение темпа ………………………………………….19
Типы аккордов для воспроизведения стиля ….20
Поиск аккордов в словаре аккордов……………..21
Игра на клавиатуре вдвоем (режим Duo) 22
Воспроизведение композиций 23
Прослушивание демонстрационной
композиции ………………………………………………23
Выбор и воспроизведение композиции………….23
Воспроизведение BGM………………………………….23
Управление воспроизведением композиции:
перемотка вперед, перемотка
назад и пауза……………………………………………24
Изменение тембра мелодии…………………………..24
Повтор A-B ……………………………………………………24
Включение и выключение каждой
из партий………………………………………………….25
Прослушивание звуков аккордов
(Изучение аккордов) 26
Прослушивание звука одного аккорда…………..26
Прослушивание основных
последовательностей аккордов………………..26
Использование функции Song Lesson
(Разучивание композиций) 27
Прослушивание, ритмика и ожидание……………27
Упражнения с разучиванием композиций……… 27
Воспроизведение звука внешних
аудиоустройств с помощью встроенных
динамиков инструмента 28
Запись собственного исполнения
(Запись фразы) 29
Выбор настройки эквалайзера для
наилучшего звучания 30
Функции 31
Резервное копирование и инициализация
Параметры резервного копирования …………….33
Инициализация……………………………………………..33
33
Приложение
Поиск и устранение неисправностей ………. 34
Список тембров ……………………………………….. 35
Список наборов ударных ………………………… 38
Список композиций …………………………………. 41
Список стилей………………………………………….. 42
Список типов эффектов ………………………….. 43
Технические характеристики…………………… 44
Предметный указатель ……………………………. 45
УстановкаПриложение Справочник
Руководство пользователя PSR-E263 YPT-260
9

Элементы управления и разъемы на панели
q
w
e
t
r
i
o
!0
y
u
!1 !2 !3 !4 !5
!6
!7
!8
!9
@1 @2 @3
@4
@0
C1 C2 C3 C4 C5 C6
Установка
Передняя панель
Установка
(стр. 41)
Список тембров
(стр. 35)
Экран
(стр. 15)
Список стилей
(стр. 42)
Список композиций
Руководство пользователя PSR-E263 YPT-260
10
q
Переключатель [ ]
(Режим ожидания / вкл.)
w
Регулятор громкости
[ОБЩАЯ ГРОМКОСТЬ]
e
Кнопка [ДЕМО]
r
Кнопка [МЕТРОНОМ]
t
Кнопка [ТЕМП/ТЭППИНГ]
y
Кнопка [ЗАПИСЬ ФРАЗЫ]
u
Кнопка [1. СЛУШАЙ И УЧИСЬ]
i
Кнопка [2. РИТМИКА]
o
Кнопка [3. ОЖИДАНИЕ]
!0
ЧАСТЬ
Кнопка [Л]
Кнопка [П]
В режиме композиции
!1
Кнопка
!2
Кнопка [ПЕРЕМОТКА НАЗАД]
!3
Кнопка [ПЕРЕМОТКА ВПЕРЕД]
!4
Кнопка [ПАУЗА]
В режиме стиля
!1
Кнопка [АККОМП. ВКЛ./ВЫКЛ.]
!2
Кнопка [ВСТУПЛ./ФИН./ЗАМЕДЛ.]
!3
Кнопка [ОСНОВН./ПЕРЕХОД.]
!4
Кнопка [СИНХРОННЫЙ ЗАПУСК]
!5
Кнопка [ЗАПУСК/ОСТАНОВКА]
!6
Кнопка [КОМПОЗИЦИЯ]
!7
Кнопка [ТЕМБР]
!8
Кнопка [СТИЛЬ]
!9
Цифровые кнопки [0]–[9], [+], [-]
@0
Кнопка тембра рояля
[PORTABLE GRAND] (Тембр рояля)
@1
Кнопка [ULTRA-WIDE STEREO]
(Сверхширокое стереофоническое
звучание)
@2
Кнопка [ЗВУКОВОЙ ЭФФЕКТ]
@3
Кнопка [ФУНКЦИИ]
@4
Изображения ударных инструментов
для набора ударных
Каждый из этих значков изображает ударный
инструмент или инструмент перкуссии, который назначен
соответствующей клавише стандартного набора
«Standard Kit 1».
……………………стр. 13
………………………..стр. 14
………………………………….. стр. 23
………………………….стр. 17
……………………стр. 19
…………………. стр. 29
………….. стр. 27
……………………….. стр. 27
…………………….. стр. 27
…………………………………………. стр. 27
…………………………………………. стр. 27
[ПОВТОР A-B]
…………………………………………….стр. 17
……………………….. стр. 24
…………… стр. 24
………… стр. 24
………………………………… стр. 24
…………стр. 18
……..стр. 19
…………….стр. 19
……….стр. 18
………… стр. 23
……………………. стр. 23
………………………………….стр. 16
………………………………….стр. 18
…………стр. 15
……стр. 16
……………стр. 16
…………………………… стр. 31
…………………………..стр. 16
Элементы управления и разъемы на панели
Обозначение «Нажать и удерживать»
Кнопки, имеющие эту индикацию, можно
использовать для вызова альтернативной
функции путем нажатия и удержания
соответствующей кнопки. Удерживайте
данную кнопку нажатой до вызова функции.
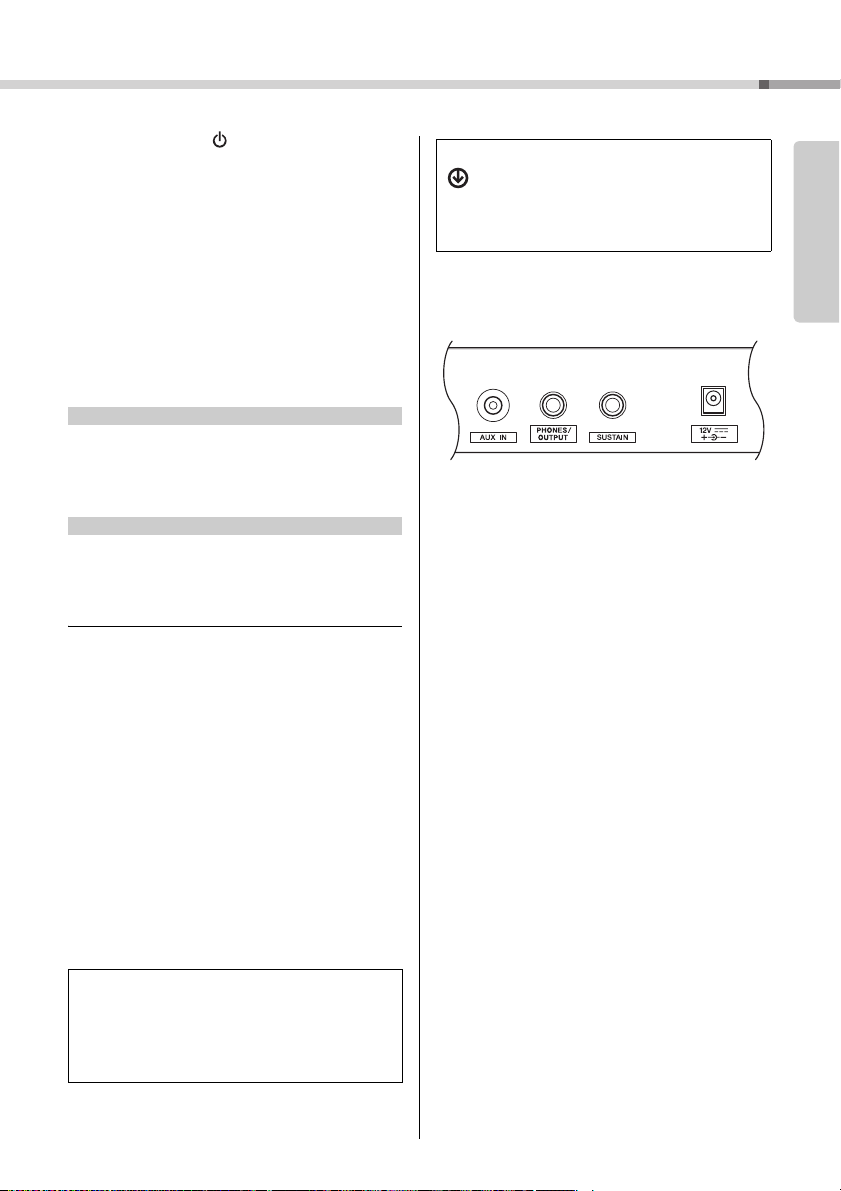
@5
Разъем [AUX IN]
@6
Разъем [PHONES/OUTPUT]
(НАУШНИКИ/ВЫХОД)
@7
Разъем [SUSTAIN] (ПЕДАЛЬ)
@8
Разъем DC IN
………………………………….стр. 28
…………………………стр. 14
……………… стр. 14
………………………………………стр. 12
Установка
Клавиатура
Поскольку данная клавиатура не обладает
чувствительностью к силе нажатия , громкость звука
не зависит от силы нажатия. Поэтому ваше
исполнение может отличаться от звучания
встроенных композиций.
Руководство пользователя PSR-E263 YPT-260
11
Установка
Розетка
Блок
питания
2
1
Разъем DC IN
(стр. 11)
Штекер
В разных странах используются разные формы штекеров.
Сдвиньте штекер,
как показано
на рисунке.
Требования к источнику питания
Хотя инструмент может работать как от блока
Установка
питания, так и от батарей, корпорация Yamaha
рекомендует по возможности использовать блок
питания. Блок питания наносит меньше ущерба
окружающей среде и не истощает ресурсы.
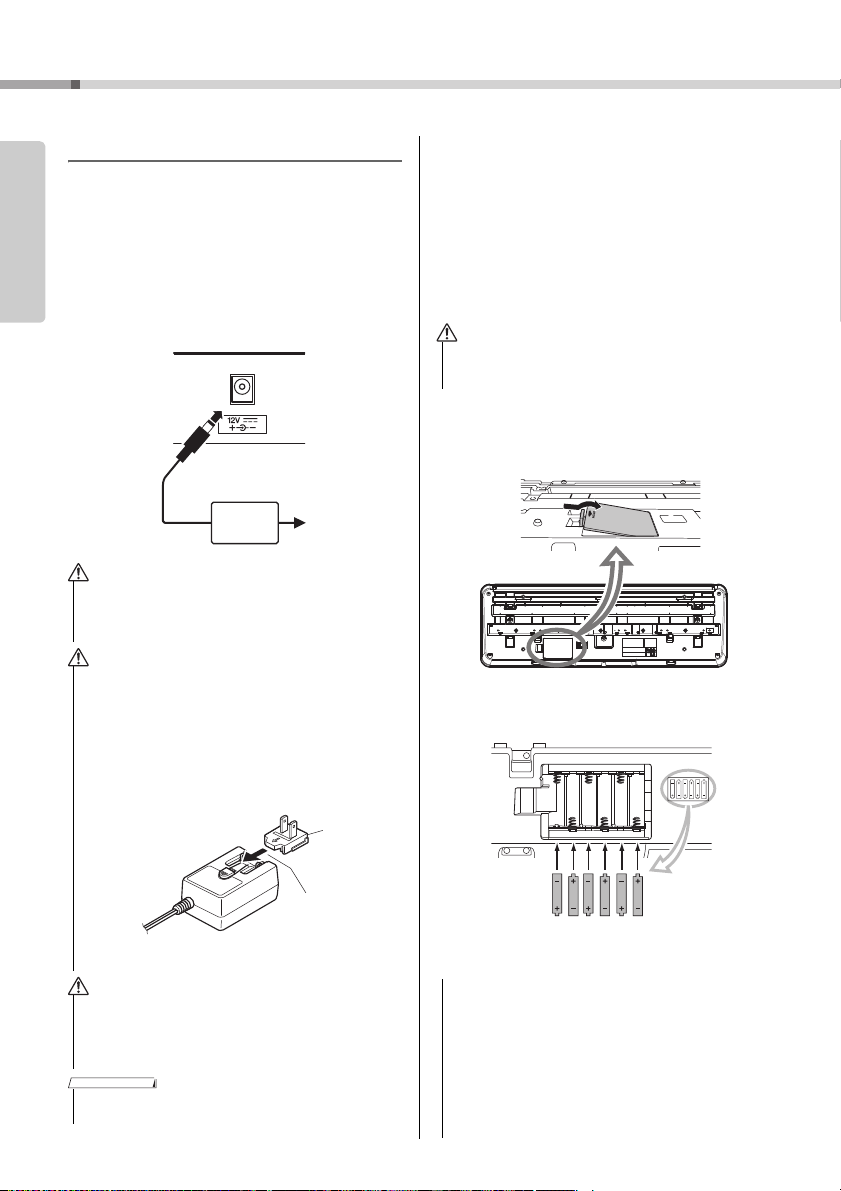
Использование блока питания
Подключите блок питания в порядке,
показанном на рисунке.
• Используйте только блок питания указанного типа
(стр. 44). Использование неподходящего блока
питания может привести к перегреву или
повреждению инструмента.
• При использовании блока питания со съемной вилкой
не забывайте подключить вилку к блоку питания.
Использование вилки отдельно может привести к
возгоранию или поражению электрическим током.
• При случайном отсоединении штекера от блока питания
вставьте его обратно до щелчка, не касаясь никаких
внутренних металлических частей. Во избежание
поражения электрическим током, короткого замыкания
или причинения ущерба следите за тем, чтобы между
вилкой и блоком питания не было пыли.
Использование батарей
Для работы инструмента требуется шесть
щелочных (LR6) / марганцевых (R6) батарей типа
AA или аккумуляторных гибридных никелевых
батарей (никель-металлгидридных
аккумуляторных батарей). Для этого
инструмента рекомендуется использовать
щелочные батареи или никель-металлгидридные
аккумуляторные батареи. Батареи других типов
могут иметь худшие показатели работы.
• При разрядке б атарей или если инс трумент не будет
использоваться в течение длительного времени, выньте
их из инструмента во избежание вытекания электролита.
1
Убедитесь, что питание инструмента выключено.
2
Откройте крышку отсека для батарей,
расположенную на нижней панели инструмента.
3
Вставьте шесть новых батарей. Обратите внимание
на маркировку полярности внутри отсека.
• При установке инструмента убедитесь в том,
что используемая розетка легкодоступна.
При возникновении какого-либо сбоя или
неисправности немедленно отключите питание
и отсоедините кабель питания от электросети.
• Выполните показанную выше процедуру в обратном
порядке при отсоединении блока питания.
Руководство пользователя PSR-E263 YPT-260
12
4 Закройте и защелкните крышку отсека.
• Если в инструмент вставлены батареи, подключение
или отсоединение адаптера питания может привести
к отключению питания, в результате чего могут быть
утеряны данные, записываемые в этот момент.
• Обязательно задайте правильный тип батарей (стр. 13).
• Если заряд батареи становится слишком низким для
нормальной работы инструмента, возможно снижение
громкости, искажение звука и возникновение ряда
других проблем. В этом случае необходимо заменить
все батареи новыми или предварительно
заряженными батареями.
Установка
• Этот инструмент не предназначен для зарядки батарей.
Для зарядки используйте только указанное зарядное
устройство.
• При подключении блока питания питание автоматически
начинает поступать от блока питания, даже если
в инструменте установлены батареи.
Установка типа батарей
Следует изменить настройки инструмента
в соответствии с типом используемых батарей.
По умолчанию выбраны щелочные
(и марганцевые) батареи. После установки
новых батарей и включения питания
обязательно задайте значение параметра
Battery Type (Тип батарей), указав, какие
батареи используются (аккумуляторные или
обычные), через функцию № 022 (стр. 32).
• Пренебрежение настройкой параметра Battery Type
(Тип батарей) может привести к сокращению срока
службы батарей. Обязательно задайте правильный
тип батарей.
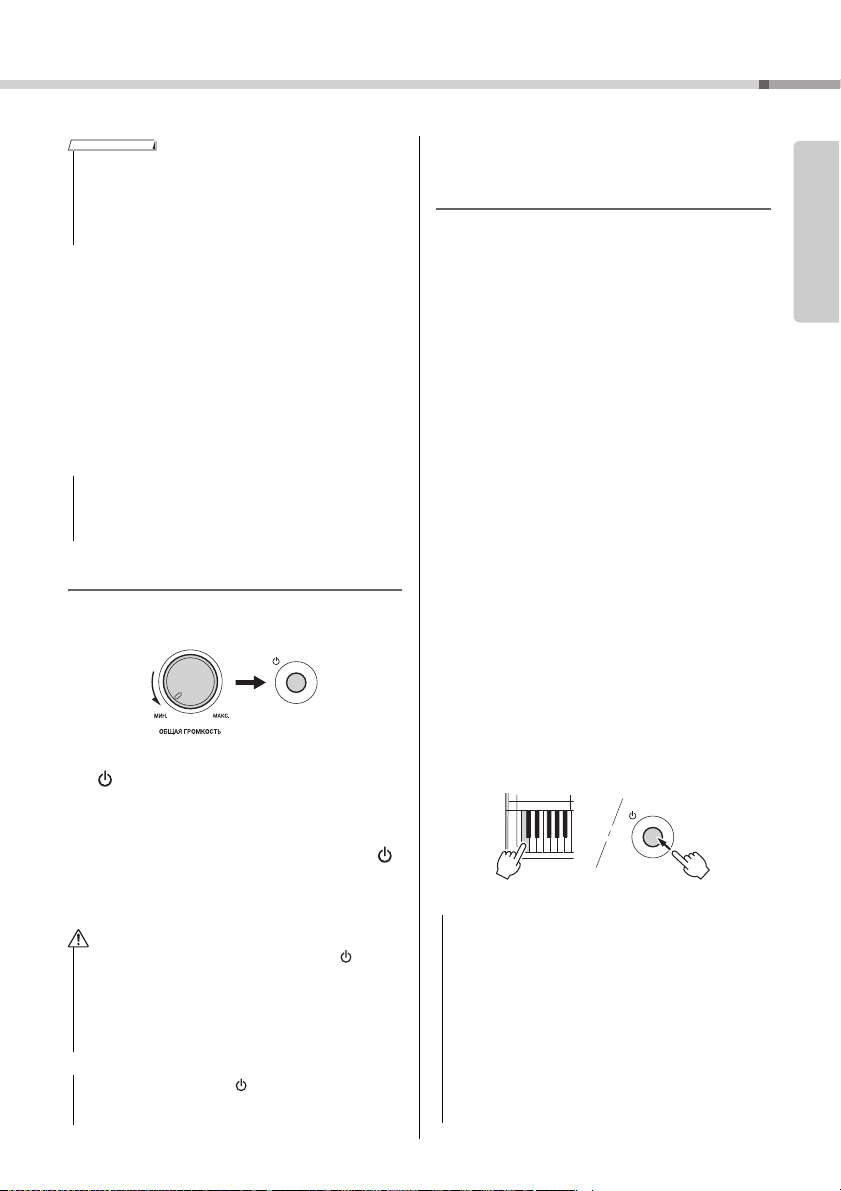
Включение питания
1 Поверните диск [ОБЩАЯ ГРОМКОСТЬ]
в положение MIN (Минимум).
2 Чтобы включить питание, нажмите кнопку
[ ] (Режим ожидания / вкл.).
На дисплее появится название тембра.
Во время игры на клавиатуре отрегулируйте
громкость.
3 Нажмите и удерживайте переключатель [ ]
(Режим ожидания / вкл.) около секунды,
чтобы перевести инструмент в режим
ожидания.
• Даже в тех случаях, когда переключатель [ ]
(Режим ожидания / вкл.) установлен в режим
ожидания, инструмент продолжает в минимальных
количествах потреблять электроэнергию.
Отключайте инструмент от электросети, если он не
будет использоваться в течение длительного
времени, а также во время грозы.
• Нажмите только кнопку [ ] (Режим ожидания / вкл.).
Все другие операции, например нажатие педали,
запрещены. Они могут привести к сбоям в работе.
Настройка функции
Auto Power Off (Автоматическое
отключение питания)
В целях энергосбережения этот инструмент
поддерживает функцию Auto Power Off
(Автоматическое отключение питания),
которая автоматически выключает питание,
если инструмент не используется в течение
определенного периода времени. По умолчанию
питание автоматически отключается через
30 минут, однако эту настройку можно изменить.
Задание периода времени до
автоматического отключения питания
Нажмите кнопку [ФУНКЦИИ] несколько раз,
пока не появится индикация AutoOff
(Автоматическое выключение) (функция 021;
стр. 32), и выберите нужное значение с помощью
кнопки [+] или [-].
Допустимые значения: OFF (Выкл.), 5, 10, 15,
30, 60, 120 (минут)
Значение по умолчанию: 30 (минут)
Отключение функции
автоматического отключения питания
Включите питание, удерживая нажатой крайнюю
левую клавишу на клавиатуре.
Появится сообщение «oFF AutoOff», которое
вскоре исчезнет. После этого инструмент будет
включен. Функция Auto Power Off (Автоматическое
отключение питания) будет отключена. Функцию
автоматического отключения питания также
можно выключить, выбрав значение Off (Выкл.)
в настройках функции 021 (стр. 32).
• В зависимости от состояния инструмента
автоматическое отключение питания может не
произойти даже по истечении указанного периода
времени. Всегда выключайте питание инструмента
вручную, если инструмент не используется.
• Если инструмент не используется в течение указанного
периода времени, когда он подключен к внешнему
устройству, такому как усилитель, динамик или
компьютер, обязательно следуйте инструкциям
в руководстве пользователя для выключения питания
инструмента и подключенных устройств с целью
защиты устройств от повреждения. Чтобы питание
инструмента не отключалось автоматически, когда
к инструменту подключено устройство, отключите
функцию автоматического отключения питания.
Установка
Руководство пользователя PSR-E263 YPT-260
13
Установка
Стандартный разъем для
стереофонических наушников
• Обычно данные и настройки сохраняются даже при
Установка
отключении питания с помощью функции Auto Power Off
(Автоматическое отключение питания). (Дополнительные
сведения приведены на стр. 33.)
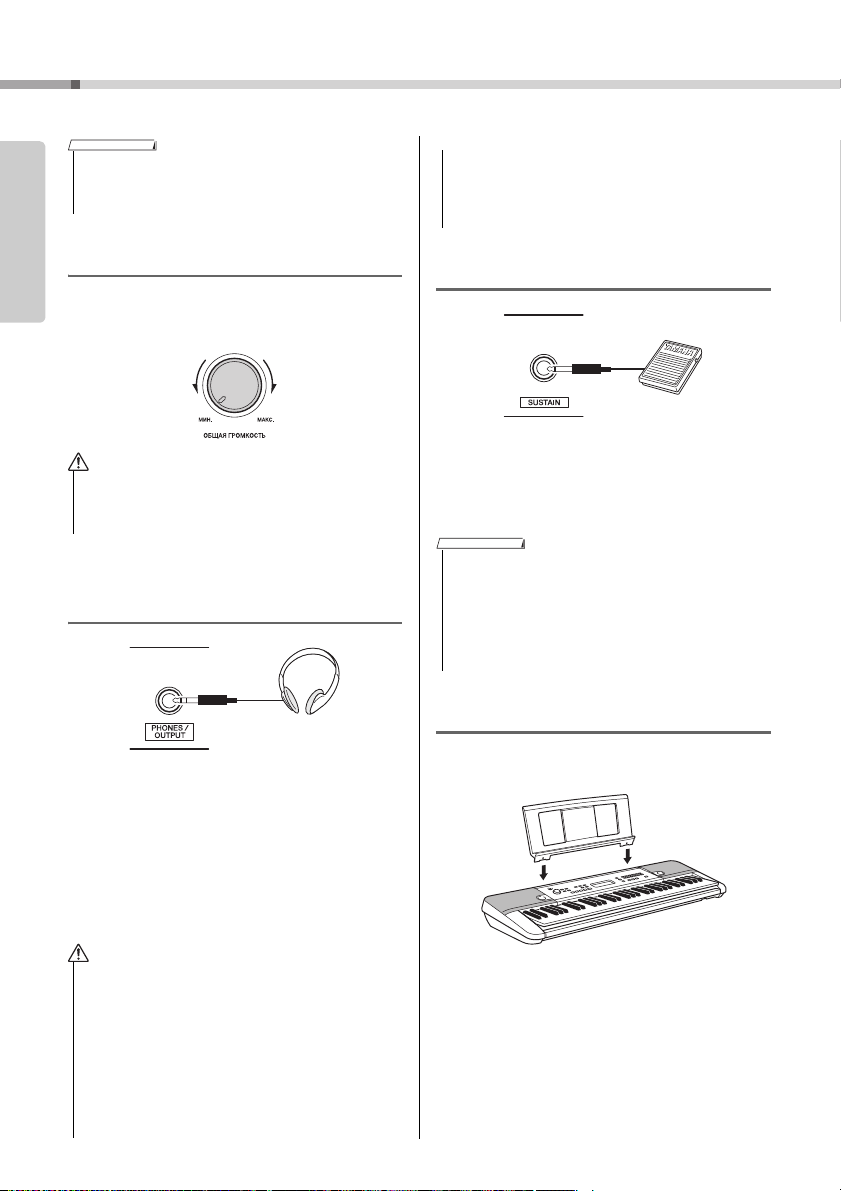
Регулировка общей громкости
Чтобы отрегулировать громкость всего звучания
клавиатуры, во время исполнения используйте
диск [ОБЩАЯ ГРОМКОСТЬ].
• Не используйте инструмент слишком долго на
высоком уровне громкости или уровне громкости,
доставляющем дискомфорт, так как это может
вызвать необратимую потерю слуха.
Подключение наушников или
внешнего динамика
Подключите наушники в гнездо [PHONES/
OUTPUT]. Этот разъем может также служить
внешним выходом. Подключив компьютер,
усилитель клавиатуры, магнитофон или другое
аудиоустройство, вы сможете воспроизводить
сигнал этого инструмента на подключенном
устройстве. При подключении штекера в это
гнездо динамики инструмента автоматически
отключаются.
• Во избежание повреждения подключенных устройств
следует сначала включать питание инструмента,
а затем питание внешнего устройства. Выключайте
электропитание устройств в обратном порядке:
сначала внешнее устройство, а затем инструмент.
Использование педали (сустейн)
Можно получить естественный сустейн
(длительное звучание нот), если нажать на
педальный переключатель (FC5 или FC4A,
продается отдельно), подключенный к разъему
[SUSTAIN] (Сустейн).
ПРИМЕЧАНИЕ
• Подключите или отключите педальный переключатель,
когда питание выключено. Не нажимайте на педальный
переключатель в момент включения питания.
В противном случае полярность ножного переключателя
будет распознана неверно, что приведет к его
инвертированному действию.
• Функция сустейна не влияет на стиль
(автоаккомпанемент; стр. 18).
Использование пюпитра
Установите пюпитр в прорези, как показано
на рисунке.
• Не следует пользоваться инструментом или
наушниками при высоком или некомфортном уровне
громкости в течение длительного периода времени,
так как это может привести к необратимому
повреждению слуха.
• Прежде чем подключать инструмент к другим
электронным компонентам, следует отключить их от
электросети. Прежде чем включать или выключать
какой-либо компонент, следует установить
минимальную громкость. В противном случае
возможно поражение электрическим током или
повреждение компонентов.
Руководство пользователя PSR-E263 YPT-260
14
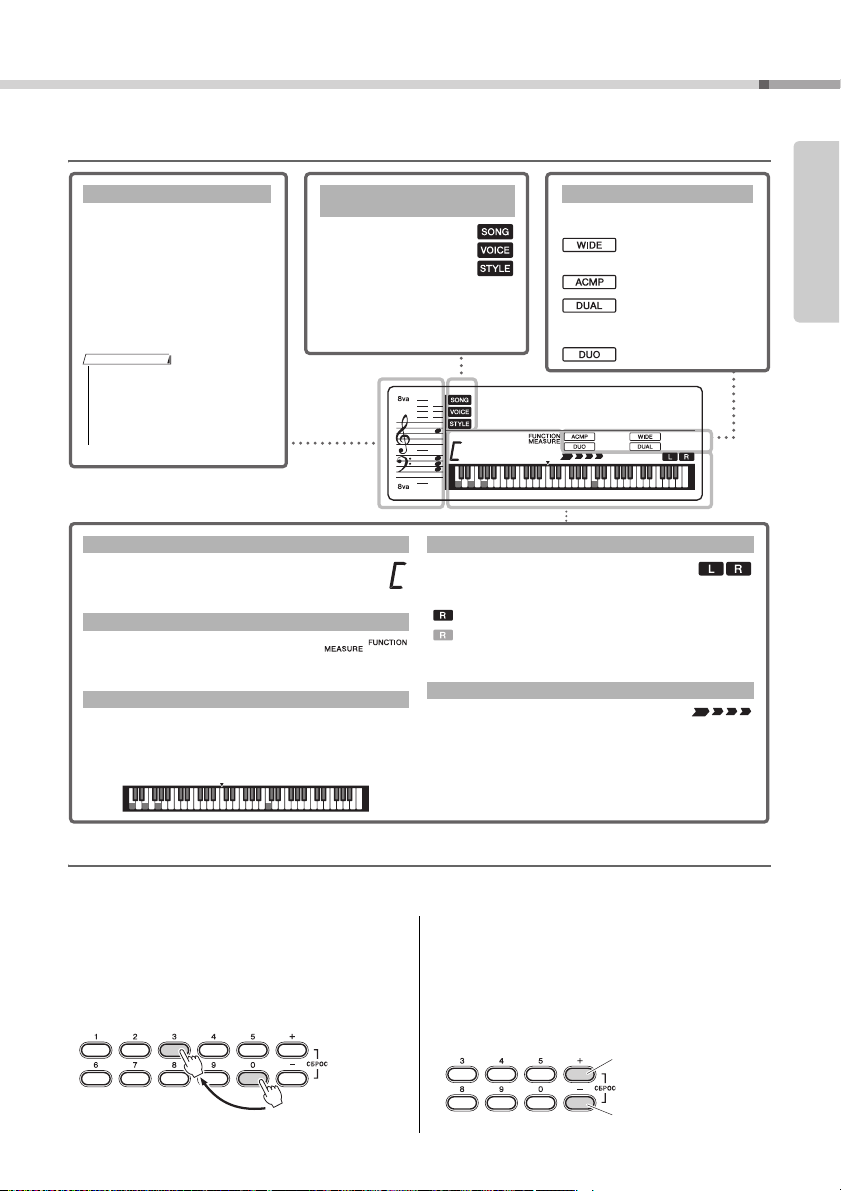
Отображаемые на экране элементы и основные операции
Отражают рабочее
состояние инструмента.
Song (Композиция) /
Voice (Тембр) / Style (Стиль)
Обычно отображаются проигрываемые ноты. При использовании
функции разучивания композиций
в этой области отображаются
текущие ноты и аккорд воспроизводимой композиции. При использовании функции Dictionary (Книга
аккордов) (стр. 21) в этой области
отображаются ноты указанного
аккорда.
Ноты
• Все ноты за пределами нотного
стана указываются символом «8va».
• В связи с ограничениями
отображаемой области для
некоторых аккордов могут быть
показаны не все ноты.
Индикация появляется, когда соответствующая функция включена.
…
Сверхширокое
стереофоническое
звучание (стр. 17).
…
Автоаккомпанемент
(стр. 18)
…
Показывает, что
выбрана функция Dual
Voice (Наложение тембров) (№ 321–335).
… Режим Duo (
стр. 22
).
Состояние вкл./выкл.
Показывает аккорд, который проигрывается
в диапазоне автоаккомпанемента (стр. 18) на
клавиатуре или указан с помощью функции
Song playback (Воспроизведение композиции).
Обычно отображает номер текущего такта
текущего стиля или композиции.
При нажатой кнопке [ФУНКЦИИ] (стр. 31)
отображает номер функции.
Отображает текущие ноты. Отображает ноты мелодии
и аккордов композиции, если используется функция
разучивания композиции. Также отображает ноты
аккорда — когда воспроизводится аккорд или
используется функция книги аккордов (стр. 21).
Аккорд
Такт или функция
Отображение клавиатуры
Указывает состояние вкл./выкл.
воспроизведения композиции или целевую
дорожку записи композиции (стр. 25).
Светится: дорожка содержит данные
Не светится: дорожка с отключенным звуком или
не содержит данных
Индикация текущей доли для
воспроизведения.
Состояние дорожки композиции
Доля
Нажмите кнопки
с номерами [0], [0],
[3] или просто [3].
Пример. Выбор тембра 003, Bright Piano (Четкий звук фортеп иано).
Кратковременно нажмите
для увеличения на единицу.
Кратковременно нажмите
для уменьшения на единицу.
Отображаемые на экране элементы
Установка
001
GrandPno
003
Основные операции
Перед использованием данного инструмента полезно ознакомиться с приведенными далее основными
элементами управления, которые используются для выбора элементов и изменения значений.
Цифровые кнопки
Кнопки с номерами используются для прямого
ввода элемента или значения. Можно опустить
первые нули, если номер начинается с одного
или двух нулей.
Кнопки [+] и [-]
Для увеличения значения на 1 кратковременно
нажмите кнопку [+], а для уменьшения значения
на 1 кратковременно нажмите кнопку [-].
Для непрерывного увеличения или уменьшения
значения удерживайте нажатой
соответствующую кнопку.
Руководство пользователя PSR-E263 YPT-260
15
Loading…
- June 5, 2024
- Yamaha
Table of Contents
- YAMAHA PSR-E263 DIGITAL KEYBOARD
- For this instrument
- Connections
- Information
- Setting Up
- Panel Controls and Terminals
- Let’s enjoy playing the keyboard
- Making detailed settings
- Specifications
- Effect Type List
- Read User Manual Online (PDF format)
- Download This Manual (PDF format)
YAMAHA PSR-E263 DIGITAL KEYBOARD

PLEASE READ CAREFULLY BEFORE PROCEEDING
WARNING
- This AC adaptor is designed for use with only Yamaha electronic instruments. Do not use for any other purpose.
- Indoor use only. Do not use in any wet environments.
CAUTION
When setting up, make sure that the AC outlet is easily accessible. If some
trouble or malfunction occurs, immediately turn off the power switch of the
instrument and disconnect the AC adaptor from the outlet. When the AC adaptor
is connected to the AC outlet, keep in mind that electricity is flowing at the
minimum level, even if the power switch is turned off. When you are not using
the instrument for a long time, make sure to unplug the power cord from the
wall AC outlet.
For this instrument
Power supply/AC adaptor
- Do not place the power cord near heat sources such as heaters or radiators. Also, do not excessively bend or otherwise damage the cord, or place heavy objects on it.
- Only use the voltage specified as correct for the instrument. The required voltage is printed on the name plate of the instrument.
- Use the specified adaptor (page 15) only. Using the wrong adaptor can result in damage to the instrument or overheating.
- Check the electric plug periodically
Do not open
This instrument contains no user-serviceable parts. Do not open the instrument
or attempt to disassemble or modify the internal components in any way. If it
should appear to be malfunctioning, discontinue use immediately and have it
inspected by qualified Yamaha service personnel.
Water warning
- Do not expose the instrument to rain, use it near water or in damp or wet conditions, or place on it any containers (such as vases, bottles or glasses) containing liquids which might spill into any openings. If any liquid such as water seeps into the instrument, turn off the power immediately and unplug the power cord from the AC outlet. Then have the instrument inspected by qualified Yamaha service personnel.
Never insert or remove an electric plug with wet hands.
Fire warning
Do not put burning items, such as candles, on the unit. A burning item may
fall over and cause a fire.
Battery
- Follow the precautions below. Failure to do so might result in explosion, fire, overheating or battery fluid leakage.
- Do not tamper with or disassemble batteries.
- Do not dispose of batteries in fire.
- Do not attempt to recharge batteries that are not designed to be charged.
- Keep the batteries separate from metallic objects such as necklaces, hairpins, coins, and keys.
- Use the specified battery type (page 15) only.
- Use new batteries, all of which are the same type, same model, and made by the same manufacturer.
- Always make sure all batteries are inserted in conformity with the +/- polarity markings.
- When the batteries run out, or if the instrument is not to be used for a long time, remove the batteries from the instrument.
- When using Ni-MH batteries, follow the instructions that came with the batteries. Use only the specified charger device when charging.
- Keep batteries away from small children who might accidentally swallow them.
- If the batteries do leak, avoid contact with the leaked fluid. If the battery fluid should come in contact with your eyes, mouth, or skin, wash immediately with water and consult a doctor. Battery fluid is corrosive and may possibly cause loss of sight or chemical burns
If you notice any abnormality
When one of the following problems occur, immediately turn off the power
switch and disconnect the electric plug from the outlet. (If you are using
batteries, remove all batteries from the instrument.) Then have the device
inspected by Yamaha service personnel.
- The power cord or plug becomes frayed or damaged.
- It emits unusual smells or smoke.
- Some object has been dropped into the instrument.
- There is a sudden loss of sound during use of the instrument.
Power supply/AC adaptor
- Do not connect the instrument to an electrical outlet using a multiple-connector. Doing so can result in lower sound quality, or possibly cause overheating in the outlet.
- When removing the electric plug from the instrument or an outlet, always hold the plug itself and not the cord. Pulling by the cord can damage it.
- Remove the electric plug from the outlet when the instrument is not to be used for extended periods of time, or during electrical storms
Location
- Do not place the instrument in an unstable position where it might accidentally fall over.
- Before moving the instrument, remove all connected cables, to prevent damage to the cables or injury to anyone who might trip over them.
- When setting up the product, make sure that the AC outlet you are using is easily accessible. If some trouble or malfunction occurs, immediately turn off the power switch and disconnect the plug from the outlet. Even when the power switch is turned off, electricity is still flowing to the product at the minimum level.
- When you are not using the product for a long time, make sure to unplug the power cord from the wall AC outlet.
- Use only the stand specified for the instrument. When attaching it, use the provided screws only. Failure to do so could cause damage to the internal components or result in the instrument falling over
Connections
- Before connecting the instrument to other electronic components, turn off the power for all components. Before turning the power on or off for all components, set all volume levels to minimum.
- Be sure to set the volumes of all components at their minimum levels and gradually raise the volume controls while playing the instrument to set the desired listening level.
Handling caution
- Do not insert a finger or hand in any gaps on the instrument.
- Never insert or drop paper, metallic, or other objects into the gaps on the panel or keyboard. This could cause physical injury to you or others, damage to the instrument or other property, or operational failure.
- Do not rest your weight on, or place heavy objects on the instrument, and do not use excessive force on the buttons, switches or connectors.
- Do not use the instrument/device or headphones for a long period of time at a high or uncomfortable volume level, since this can cause permanent hearing loss. If you experience any hearing loss or ringing in the ears, consult a physician
NOTICE
To avoid the possibility of malfunction/ damage to the product, damage to
data, or damage to other property, follow the notices below.
- Handling
- Do not use the instrument in the vicinity of a TV, radio, stereo equipment, mobile phone, or other electric devices. Otherwise, the instrument, TV, or radio may generate noise. When you use the instrument along with an application on your
- iPad, iPhone or iPod touch, we recommend that you set “Airplane Mode” to “ON” on that device in order to avoid noise caused by communication.
- Depending on the condition of surrounding radio waves, the instrument may possibly malfunction.
- Do not expose the instrument to excessive dust or vibrations, or extreme cold or heat (such as in direct sunlight, near a heater, or in a car during the day) to prevent the possibility of panel disfiguration, damage to the internal components or unstable operation. (Verified operating temperature range: 5° – 40°C, or 41° – 104°F.)
- Do not place vinyl, plastic or rubber objects on the instrument, since this might discolor the panel or keyboard.
- Maintenance
- When cleaning the instrument, use a soft cloth. Do not use paint thinners, solvents, alcohol, cleaning fluids, or chemical-impregnated wiping cloths.
- Saving data
- Some of the data of this instrument (page 14) are retained when the power is turned off. However, the saved data may be lost due to some failure, an operation mistake, etc.
Information
About copyrights
- Copying of the commercially available musical data including but not limited to MIDI data and/or audio data is strictly prohibited except for your personal use.
- This product incorporates and bundles contents in which Yamaha owns copyrights or with respect to which Yamaha has license to use others’ copyrights. Due to copyright laws and other relevant laws, you are NOT allowed to distribute media in which these contents are saved or recorded and remain virtually the same or very similar to those in the product.
- The contents described above include a computer program, Accompaniment Style data, MIDI data, WAVE data, voice recording data, a score, score data, etc.
- You are allowed to distribute medium in which your performance or music production using these contents is recorded, and the permission of Yamaha Corporation is not required in such cases.
About functions/data bundled with the instrument
- Some of the preset songs have been edited for length or arrangement, and may not be exactly the same as the original.
About this manual
- The illustrations and LCD screens as shown in this manual are for instructional purposes only, and may appear somewhat different from those on your instrument.
- iPhone, iPad, iPod touch are trademarks of Apple Inc., registered in the U.S. and other countries.
- The company names and product names in this manual are the trademarks or registered trademarks of their respective companies
Information for users on collection and disposal of old equipment and used
batteries:
- These symbols on the products, packaging, and/or accompanying documents mean that used electrical and electronic products and batteries should not be mixed with general household waste.
- For proper treatment, recovery and recycling of old products and used batteries, please take them to applicable collection points, in accordance with your national legislation.
- By disposing of these products and batteries correctly, you will help to save valuable resources and prevent any potential negative effects on human health and the environment which could otherwise arise from inappropriate waste handling.
- For more information about collection and recycling of old products and batteries, please contact your local municipality, your waste disposal service or the point of sale where you purchased the items.
- For business users in the European Union:
- If you wish to discard electrical and electronic equipment, please contact your dealer or supplier for further information.
- Information on Disposal in other Countries outside the European Union:
- These symbols are only valid in the European Union. If you wish to discard these items, please contact your local authorities or dealer and ask for the correct method of disposal.
Note for the battery symbol (bottom two symbol examples):
- This symbol might be used in combination with a chemical symbol. In this case it complies with the requirement set by the EU Battery
- Directive for the chemical involved.
About the Manuals
This instrument has the following documents and instructional materials.
Owner’s Manual (this book)
This book explains how to use the basic functions and how to make detailed
settings for the various functions of the instrument. The Appendix section
contains various important preset content lists such as Voices, Styles and
Effects.
Downloading the Song Book
- Song Book (only in English, French, German and Spanish)
- Contains music scores for the preset Songs (excluding the Demo Songs) of this instrument.
- After completing the user registration at the website below, you can download the Song Book free of charge.
Yamaha Online Member https://member.yamaha.com/
You will need the PRODUCT ID on the sheet
(“Online Member Product Registration”) packaged with this manual in order to
fill out the User Registration form.
Included Accessories
- Owner’s manual (this book)
- Music rest
- AC Adaptor
May not be included depending on your area. Please check with your Yamaha
dealer.
- Online Member Product Registration
The PRODUCT ID on the sheet will be needed when you fill out the User
Registration form..
Using the Music Rest
Setting Up
Power Requirements
- Although the instrument will run either from an AC adaptor or batteries, Yamaha recommends use of an
- AC adaptor whenever possible. An AC adaptor is more environmentally friendly than batteries and does not deplete resources.
Using an AC Adaptor
- Connect the AC adaptor in the order shown in the illustration.
WARNING
- Use the specified AC adaptor (page 15) only. Using the wrong AC adaptor can result in damage to the instrument or overheating.
- When using the AC adaptor with a removable plug, make sure to keep the plug attached to the AC adaptor. Using the plug alone can cause electric shock or fire.
- If the plug is accidentally removed from the AC adaptor, slide it back in until it clicks into place, taking care to avoid touching any internal metal parts. To avoid electric shock, short circuit or damage, also be careful that there is no dust between the AC adaptor and plug
Using Batteries
This instrument requires six “AA” size, Alkaline (LR6)/ Manganese (R6)
batteries, or rechargeable nickelmetal hydride batteries (rechargeable Ni-MH
batteries). The Alkaline batteries or rechargeable Ni-MH batteries are
recommended for this instrument, since other types may result in poorer
battery performance.
- Make sure that the power of the instrument is off.
- Open the battery compartment cover located on the instrument’s bottom panel.
- Insert the six new batteries, being careful to follow the polarity markings on the inside of the compartment.
- Replace the compartment cover, making sure that it locks firmly in place.
Setting the battery type
Depending on the battery type to be used, you may need to change the battery
type setting on this instrument. Alkaline (and manganese) batteries are chosen
by default. After installing new batteries and turning the power on, make sure
to set the Battery Type appropriately (rechargeable or not) via Function
number 022 (page 14).
Turning the Power On
- Set [MASTER VOLUME] to the MIN position, then press the [ ] (Standby/On) switch to turn on the power.
- Press and hold the [ ] (Standby/On) switch for about a second to set the instrument to standby mode.
Auto Power Off function
To prevent unnecessary power consumption, this instrument features an Auto
Power Off function that automatically turns the power off if the instrument is
not used for approximately 30 minutes. To disable the Auto Power Off function,
select “Off” in the Function settings (Function 021).
Panel Controls and Terminals
FRONT PANEL


- (Standby/On) switch
- Turns the instrument’s power on or off.
- [MASTER VOLUME] control
- Adjusts the overall volume.
- [DEMO] button
- Starts/stops the Demo.
- Holding down this button changes the playback group.
- [METRONOME] button
- Starts/stops the metronome.
- Holding down this button calls up the Time Signature display (Function number 016 on page 14.)
- [TEMPO/TAP] button
- Calls up the Tempo display. With this status, use the Number buttons to set the tempo of the Song,
- Style and metronome.
- You can set the tempo also by tapping this button several times at the desired tempo.
- [PHRASE REC] button
- Records your performance. See page 12.
- [1 LISTEN & LEARN] button
- Starts the Song with the Lesson 1 mode (page 11).
- [2 TIMING] button
- Starts the Song with the Lesson 2 mode (page 11).
- [3 WAITING] button
- Starts the Song with the Lesson 3 mode (page 11). Holding down this button calls up the Chord Dictionary display. In this status, the keyboard is divided into three sections, split at C3 and C6. Specify a chord root in the right section then a chord type in the middle section. As the notes to be played are shown in the display, play the corresponding notes in the left section. When you’ve played the chord properly, a bell sound signals your success.
- PART [L]/[R] buttons
- Selects a lesson part or a mute part of the current
- Song. Pressing the [L] button enters the Duo mode. See page 10.
- [A-B REPEAT] button
- Turns on/off Song Repeat playback.
- Pressing this a first time specifies the starting point
- A. Pressing this a second time specifies the ending point B. Pressing this again turns off Song Repeat playback.
- [REW] button
- Returns to the earlier measure of the Song.
- [FF] button
- Skips ahead to the next beat of the Song.
- PAUSE] button
- Stops Song playback at the current position.
- [ACMP ON/OFF] button
- Splits the keyboard into the Left hand (Chord) and
- Right hand (Melody) sections.
- [INTRO/ENDING/rit.] button
- By pressing this when the Style is stopped, you can start playback from the Intro.
- By pressing this during Style playback, you can switch playback to the Ending.
- By pressing this during Ending playback, you can apply a tempo ritardando to playback.
- [MAIN/AUTO FILL] button
- Switches between the Main A and Main B of the
- Style. During playback, the Fill-in is added when you press this button.
- [SYNC START] button
- Enables/disables the ability to start playback by simply playing the keyboard.
- [START/STOP] button
- Starts/stops Song playback in the Song mode, or Style playback in the Style mode.
- [SONG] button
- Calls up the Song selection display.
- Enters the Song mode.
- [VOICE] button
- Calls up the Voice selection display.
- If you hold down this button in the Song mode, the current
- Voice will be assigned to the Melody of the current Song.
- [STYLE] button
- Calls up the Style selection display.
- Enters the Style mode.
- Number buttons [0]–[9], [+], [-]
- Selects the setting value for items such as Voice, Style,
- Song and Tempo.
- PORTABLE GRAND] button
- Makes the appropriate settings for piano performance only.
- [ULTRA-WIDE STEREO] button
- Press this to turn on the ULTRA-WIDE STEREO Effect.
- Holding this down calls up the Master EQ Type selection display (Function number 013 on page 13.)
- [SOUND EFFECT] button
- Lets you play various Sound Effects from the keyboard.
- [FUNCTION] button
- Pressing this repeatedly calls up various parameters in sequence.
- Drum illustrations for the Drum Kit
- Indicates drum instruments assigned to each key when the
- Standard Kit 1 is selected.
- AUX IN jack
- For connecting an external audio device. See page 12.
- PHONES/OUTPUT jack
- For connecting headphones and external audio equipment
- SUSTAIN jack
- For connecting a Footswitch.
- DC IN jack
- For connecting the AC adaptor.
Let’s enjoy playing the keyboard
Simply playing as a piano
- Press [PORTABLE GRAND]
- Play the keyboard like a Pianist !
Playing a Voice
- Press [VOICE]
- Use the Number buttons to select a Voice.
- Play the keyboard.
One Touch Setting
The One Touch Setting feature automatically selects the most suitable Voice
when you select a Style or Song (excepting the Song inputted from the [AUX IN]
jack). Simply select Voice number “000” to activate this feature.
Playing the keyboard with two persons (Duo mode)
- When this mode is on, two different players can play the instrument simultaneously, with the same sound, over the same octave range—one person on the left and the other on the right.
- To do so, simultaneously hold down the PART [ ] button and press the [ ] (Standby/On) switch to turn on the power. To exit from the Duo mode, press the [ ] (Standby/On) switch to turn off the power, and turn the power back on again normally
Playing a Song
- Press [SONG]
- Use the Number buttons to select a Song.
- Press [START/STOP] !5 to start playback.
- Press the PART buttons !0 to mute the Melody part.
Playing with a Style
- Press [STYLE]
- Use the Number buttons to select a Style.
- Press [ACMP ON/OFF] !1 to turn accompaniment on.
- Press [SYNC START] !4 to turn Sync Start on.
- Press [INTRO/ENDING/rit.]
- Play a chord in the left area of the keyboard to start playback.
- Play a chord with your left hand and play a melody with your right hand.
- Press [INTRO/ENDING/rit.] !2.
- As desired, press [INTRO/ENDING/rit.] !2 again to apply ritardando.
Song Lesson
- Press [SONG] then use the Number buttons to select a Song.
- Press the PART buttons !0 to select the Lesson Part.
- Press the desired Lesson button.
- [ LISTEN & LEARN]
- Simply listen to the Song.
- TIMING]
- Learn to play the notes at the correct timing.
- [ WAITING]
- Learn to play the correct notes.
- See the evaluation on the display when playback finishes. (Only for [2 TIMING] and [3 WAITING])
Chord Study
A Song category for experiencing the sounds of chords. Simply play back a Song
from this category, then play the notes/chord indications shown in the
display.
Recording
Record your performance as a User Song (Song number 113, up to approx. 300
notes), which can then be played back on the instrument.
- Press [PHRASE REC] y to enter the Record mode.
- To exit from the Record mode, press this button again.
- Play the keys in the Record mode to start the recording.
- Stop the recording by pressing the [START/ STOP] !5.
- To listen to the recorded Song and stop the playing, use [START/STOP].
Playing an External Audio Device with the Built-in Speakers
- Turn off the power for both the external audio device and this instrument.
- Connect the audio device to the instrument’s [AUX IN] jack 25. Use an audio cable with no resistance having a stereo-mini plug on one side for connecting to this instrument, and a proper plug to match the output jack of the external audio device on the other side.
- Turn on the audio device, and then this instrument.
- Start play back of the connected audio device. The sound of the audio device is output through the speakers of this instrument.
- Stop playback of the audio device.
Making detailed settings
- Press [FUNCTION] @3 repeatedly to call up the desired setting from various items such as Transpose, Tuning, Split Point, Sustain, and Time Signature of the metronome.
- Use the Number buttons to set the value.
Function List
Func- tion Number| ****
Function name
| ****
Display
| ****
Range/Settings
| ****
Default Value
| ****
Descriptions
—|—|—|—|—|—
Volume
001| Style Volume| StyleVol| 000–127| 100| Determines the volume of the
Style. (page 11)
002| Song Volume| So n gV o l| 000–127| 100| Determines the volume
of the Song. (page 10)
Overall
003| Transpose| Transpos| -12–12| 0| Determines the pitch of the
instrument in semitone incre- ments.
004| Tuning| Tuning| 427.0Hz–453.0Hz| 440.0Hz
| Determines the fine tuning of the pitch of the entire instrument in approx.
0.2Hz increments.
005| Split Point| SplitPnt| 036–096 (C1–C6)| 54 (F#2)| Determines the
Split “point”—in other words, the key that sep- arates the auto accompaniment
range and Voice. (page 11)
Voice (page 1 0)
006| Volume| M.Volume| 000–127| | Adjusts the volume of keyboard
performance when perform- ing along with a Song or a Style.
007| Octave| M.Octave| -2 – +2| | Determines the octave range for the
Voice.
008| Chorus Depth| M.Chorus| 000–127| *| Determines how much of the
Voice’s signal is sent to the Cho- rus effect.
Effects
009
| ****
Reverb Type
| ****
Reverb
| 01–03 (Hall 1–3)
04–05 (Room 1–2)
06–07 (Stage 1–2)
08–09 (Plate 1–2)
10 (Off)
| ****
**
| ****
Determines the Reverb type, including off (10). (page 24)
010| Reverb Level| RevLevel| 000–127| 64| Determines how much of the
Voice’s signal is sent to the Reverb effect.
011
| ****
Chorus Type
| ****
Chorus
| 1 (Chorus1)
2 (Chorus2)
3 (Chorus3)
4 (Flanger1)
5 (Flanger2)
6 (off)
| ****
**
| ****
Determines the Chorus type, including off (6). (page 24)
012| Panel Sustain| Sustain| ON/OFF| OFF
| Determines whether the Panel Sustain function is on or off.
013
| ****
Master EQ Type
| ****
MasterEQ
| ****
1 (Speaker)
2 (Headphone)
3 (Boost)
4 (Piano)
5 (Bright)
6 (Mild)
| ****
1 (Speaker)
| Sets the equalizer applied to the speaker output for optimum sound in
different listening situations.
Master EQ types
014
| ****
Wide Type
| ****
Wide
| 1 (Wide1)
2 (Wide2)
3 (Wide3)
| ****
2 (Wide2)
| Determines the Ultra-Wide Stereo type.
Higher values produce a greater Wide effect. (page 9)
015
| ****
Voice Output
| ****
VoiceOut
| ****
1 (Normal)
2 (Separate)
| ****
2 (Separate)
| When the Duo mode (page 10) is on, this function is effective. If “Normal”
is selected, the performance sounds of the left section and the right section
will sound from both the left and right speak- ers. If “Separate” is selected,
the performance sound of the left section will sound from the left speaker,
and the performance sound of the right section will sound from the right
speaker.
Func- tion Number|
Function name
|
Display
|
Range/Settings
|
Default Value
|
Descriptions
—|—|—|—|—|—
Metronome ( page 
016| Time Signature Numerator| TimeSig| 00–15| | Determines the time
signature of the Metronome.
017| Metronome Vol- ume| MetroVol| 000–127| 100| Determines the volume of
the Metronome.
Lesson (page 1 1)**
018
|
Your Tempo
|
YourTemp
|
ON/OFF
|
ON
| This parameter is for the Lesson 3 “Waiting.” When set to ON, playback tempo
will change for matching the speed you are playing at. When set to OFF,
playback tempo will be main- tained regardless of the speed you are playing
at.
Demo (page
019
|
Demo Group
|
DemoGrp
|
1 (Demo)
2 (Preset)
3 (User)
|
1 (Demo)
| Determines the repeat playback group. With the default set- ting, pressing
the [DEMO] button will play back only three internal Demo Songs repeatedly.
This setting can be changed so that, for example, all internal Songs
(excepting Songs 101– 112) automatically play back, letting you use the
instrument as a background music source.
020| Demo Play Mode| PlayMode| 1 (Normal)
2 (Random)
| 1 (Normal)| Determines the repeat playback mode.
Auto Power Off (p age 7 )
021| Auto Power Off Time| AutoOff| OFF, 5/10/15/30/60/
120 (minutes)
| 30 minutes
| Specifies the time that will elapse before the instrument’s power is
automatically turned off.
Battery (page 6)
022
|
Battery Type
|
Battery
|
1 (Alkaline)
2 (Ni-MH)
|
1 (Alkaline)
| Selects the type of batteries you have installed to this instru- ment.
Alkaline: Alkaline battery/manganese battery Ni-MH: Rechargeable battery
Initialization
This operation initializes the backup parameters and the User Song. While
holding down the highest white key, press the [ ] (Standby/On) switch to turn
the power on.
Specifications
- Product Name
- Digital Keyboard
- Keyboards
- 61 standard-size keys (C1–C6)
- Display
- LCD display
- Voice
- 384 panel Voices + 16 drum/SFX kits
- Polyphony: 32
- Style
- 130 Preset Styles
- Style Control: ACMP ON/OFF, SYNC START,
- START/STOP, INTRO/ENDING/rit., MAIN/AUTO FILL
- Effects
- Reverb: 9 types
- Chorus: 5 types
- Ultra-Wide Stereo: 3 types
- Master EQ: 6 types
- Song
- 112 Preset Songs
- Recording
- 1 (up to approx. 300 notes)
- Amplifier
- 2.5W + 2.5W
- Speakers
- 12cm x 2
- Power Consumption
- 6W (When using PA-130 AC adaptor)
- Power Supply
- Adaptor: Yamaha PA-130 or an equivalent recommended by Yamaha
- Batteries: Six 1.5V “AA” size alkaline (LR6), manganese (R6) or six 1.2V “AA” size Ni-MH rechargeable batteries (HR6)
- Dimensions (W x D x H)
- 940mm x 317mm x 106mm (37” x 12-1/2” x 4-3/16”)
- Weight
- 4.0kg (8lbs 13oz.) (not including batteries)
Separately Sold Accessories
- Footswitch: FC4A/FC5
- Keyboard Stand: L-2C
- Headphones: HPH-50/HPH-100/HPH-150
- Adaptor: Yamaha PA-130 or an equivalent recommended by Yamaha
The contents of this manual apply to the latest specifications as of the
printing date. Since Yamaha makes continuous improvements to the product, this
manual may not apply to the specifications of your particular product. To
obtain the latest manual, access the Yamaha website then download the manual
file. Since specifications, equipment or separately sold accessories may not
be the same in every locale, please check with your Yamaha dealer
Voice List
| Voice No. | Voice Name |
|---|
PIANO
1| Grand Piano
2| Mono Grand Piano
3| Bright Piano
4| Mellow Piano
5| Honky-tonk Piano
6| Piano Strings
7| Dream
8| Harpsichord 1
9| Harpsichord 2
E.PIANO
10| Electric Piano 1
11| Electric Piano 2
12| Electric Piano 3
13| Electric Grand Piano
14| Chorus Electric Piano 1
15| Chorus Electric Piano 2
16| Detuned Electric Piano
17| DX + Analog Electric Piano
18| Clavi
19| Wah Clavi
ORGAN
20| Drawbar Organ 1
21| Drawbar Organ 2
22| 60s Drawbar Organ 1
23| 60s Drawbar Organ 2
24| 60s Drawbar Organ 3
25| 70s Drawbar Organ 1
26| 70s Drawbar Organ 2
27| Detuned Drawbar Organ
28| Percussive Organ 1
29| Percussive Organ 2
30| 70s Percussive Organ
31| Detuned Percussive Organ
32| 16+2’2/3 Organ
33| Organ Bass
34| Rock Organ
35| Rotary Organ
36| Slow Rotary Organ
37| Fast Rotary Organ
38| Pipe Organ 1
39| Pipe Organ 2
40| Pipe Organ 3
41| Organ Flute
42| Tremolo Organ Flute
43| Notre Dame
44| Cheezy Organ
45| Light Organ
46| Reed Organ
47| Puff Organ
ACCORDION
48| Accordion
49| Tango Accordion 1
50| Tango Accordion 2
51| Harmonica 1
52| Harmonica 2
GUITAR
53| Nylon Guitar
Voice No.| Voice Name
—|—
54| Steel Guitar
55| Nylon & Steel Guitar
56| Steel Guitar with Body Sound
57| Muted Steel Guitar
58| 12-string Guitar
59| Jazz Guitar
60| Jazz Amp
61| Jazz Man
62| Clean Guitar
63| Chorus Guitar
64| Funk Guitar
65| Guitar Pinch
66| Muted Guitar
67| Overdriven Guitar
68| Distortion Guitar
69| Feedback Guitar 1
70| Feedback Guitar 2
71| Guitar Feedback
72| Guitar Harmonics 1
73| Guitar Harmonics 2
74| Guitar Harmonics 3
BASS
75| Acoustic Bass 1
76| Acoustic Bass 2
77| Finger Bass 1
78| Finger Bass 2
79| Finger Dark
80| Finger Slap Bass
81| Pick Bass
82| Fretless Bass 1
83| Fretless Bass 2
84| Fretless Bass 3
85| Fretless Bass 4
86| Slap Bass 1
87| Slap Bass 2
88| Slap Bass 3
89| Jazz Rhythm
90| Bass & Distorted Electric Guitar
91| Muted Pick Bass
92| Modulated Bass
93| Punch Thumb Bass
94| Synth Bass 1
95| Synth Bass 2
96| Synth Bass 2 Dark
97| Techno Synth Bass
98| Mellow Synth Bass
99| Sequenced Bass
100| Click Synth Bass
101| Modular Synth Bass
102| DX Bass
STRINGS
103| Strings 1
104| Strings 2
105| Strings 3
106| Slow Strings
107| Stereo Strings
108| Stereo Slow Strings
Voice No.| Voice Name
—|—
109| Orchestra 1
110| Orchestra 2
111| 60s Strings
112| Suspense Strings
113| Legato Strings
114| Warm Strings
115| Kingdom
116| Tremolo Strings
117| Slow Tremolo Strings
118| Tremolo Orchestra
119| Pizzicato Strings
120| Violin
121| Slow Violin
122| Viola
123| Cello
124| Contrabass
125| Orchestral Harp
126| Synth Strings 1
127| Synth Strings 2
128| Orchestra Hit 1
129| Orchestra Hit 2
130| Impact
CHOIR
131| Choir Aahs
132| Voice Oohs
133| Stereo Choir
134| Mellow Choir
135| Choir Strings
136| Synth Voice 1
137| Synth Voice 2
138| Choral
139| Analog Voice
SAXOPHONE
140| Tenor Sax
141| Breathy Tenor Sax
142| Alto Sax
143| Soprano Sax
144| Baritone Sax
145| Sax Section
146| Clarinet
147| Oboe
148| English Horn
149| Bassoon
TRUMPET
150| Trumpet
151| Warm Trumpet
152| Muted Trumpet
153| Trombone 1
154| Trombone 2
155| Trumpet & Trombone Section
156| French Horn 1
157| French Horn 2
158| French Horn Solo
159| Horn Orchestra
160| Tuba
BRASS
161| Brass Section
162| Synth Brass 1
Voice No.| Voice Name
—|—
163| Synth Brass 2
164| Soft Brass
165| Resonant Synth Brass
166| Choir Brass
FLUTE
167| Flute
168| Piccolo
169| Pan Flute
170| Recorder
171| Blown Bottle
172| Shakuhachi
173| Whistle
174| Ocarina
SYNTH LEAD
175| Square Lead 1
176| Square Lead 2
177| LM Square
178| Sawtooth Lead 1
179| Sawtooth Lead 2
180| Thick Sawtooth
181| Dynamic Sawtooth
182| Digital Sawtooth
183| Fargo
184| Funky Lead
185| Sine Lead
186| Solo Sine
187| Calliope Lead
188| Chiff Lead
189| Charang Lead
190| Voice Lead
191| Fifths Lead
192| Bass & Lead
193| Hollow
194| Shroud
195| Mellow
196| Big Lead
197| Sequenced Analog
198| Pure Lead
199| Distorted Lead
200| Big Five
201| Big & Low
202| Fat & Perky
SYNTH PAD & EFFECT
203| New Age Pad
204| Fantasy
205| Warm Pad
206| Poly Synth Pad
207| Equinox
208| Choir Pad
209| Bowed Pad
210| Metallic Pad
211| Halo Pad
212| Sweep Pad
213| Soft Whirl
214| Itopia
215| Rain
216| Sound Track
217| Crystal
Voice No.| Voice Name
—|—
218| Atmosphere
219| Brightness
220| Goblins
221| Echoes
222| Sci-Fi
223| African Wind
224| Carib
225| Prologue
226| Synth Drum Comp
227| Popcorn
228| Tiny Bells
229| Round Glockenspiel
230| Glockenspiel Chimes
231| Clear Bells
232| Chorus Bells
233| Soft Crystal
234| Air Bells
235| Warm Atmosphere
236| Hollow Release
237| Nylon Electric Piano
238| Nylon Harp
239| Harp Vox
240| Atmosphere Pad
241| Goblins Synth
242| Creeper
243| Ritual
244| To Heaven
245| Night
246| Glisten
247| Bell Choir
248| Bell Harp
PERCUSSION
249| Vibraphone
250| Soft Vibraphone
251| Marimba
252| Soft Marimba
253| Sine Marimba
254| Balimba
255| Log Drums
256| Xylophone
257| Steel Drums
258| Celesta
259| MusicBox 1
260| MusicBox 2
261| Church Bells
262| Carillon
263| Tubular Bells
264| Timpani
265| Glockenspiel
266| Tinkle Bell
267| Agogo
268| Woodblock
269| Castanets
270| Melodic Tom 1
271| Melodic Tom 2
272| Real Tom
273| Rock Tom
274| Electronic Percussion
Voice No.| Voice Name
—|—
275| Analog Tom
276| Synth Drum
277| Taiko Drum
278| Gran Cassa
279| Gamelimba
280| Glass Percussion
281| Reverse Cymbal
WORLD
282| Banjo
283| Muted Banjo
284| Fiddle
285| Bagpipe
286| Dulcimer 1
287| Dulcimer 2
288| Cimbalom
289| Santur
290| Kanoon
291| Oud
292| Rabab
293| Kalimba
294| Harmonium 1 (Single Reed)
295| Harmonium 2 (Double Reed)
296| Harmonium 3 (Triple Reed)
297| Tanpura
298| Sitar 1
299| Sitar 2
300| Detuned Sitar
301| Pungi
302| Shehnai
303| Gopichant
304| Tabla
305| Er Hu
306| Di Zi
307| Pi Pa
308| Gu Zheng
309| Yang Qin
310| Shamisen
311| Koto
312| Taisho-kin
313| Mandolin
314| Ukulele
315| Bonang
316| Altair
317| Gamelan Gongs
318| Stereo Gamelan Gongs
319| Rama Cymbal
320| Thai Bells
**DUAL*
321| Octave Piano
322| Piano & Pizzicato Strings
323| Piano & Flute
324| Piano Pad
325| Octave Honky-tonk Piano
326| Harpsichord & Strings
327| Electric Piano Pad 1
328| Electric Piano Pad 2
329| Electric Piano Pad 3
330| Octave Strings
Voice No.| Voice Name
—|—
331| Octave Brass
332| Orchestra Tutti
333| Octave Choir
334| Jazz Section
335| Flute & Clarinet
SOUND EFFECTS
336| Fret Noise
337| Breath Noise
338| Cutting Noise 1
339| Cutting Noise 2
340| String Slap
341| Flute Key Click
342| Bird Tweet 1
343| Bird Tweet 2
344| Telephone Ring 1
345| Telephone Ring 2
346| Phone Call
347| Shower
348| Thunder
349| Wind
350| Stream
351| Seashore
352| Bubble
353| Feed
354| Dog
355| Horse
356| Maou
357| Door Squeak
358| Door Slam
359| Scratch Cut
360| Scratch Split
361| Wind Chime
362| Car Engine Ignition
363| Car Tires Squeal
364| Car Passing
365| Car Crash
366| Siren
367| Train
368| Helicopter
369| Jet Plane
370| Starship
371| Burst
372| Roller Coaster
373| Submarine
374| Laugh
375| Scream
376| Punch
377| Heartbeat
378| Footsteps
379| Applause
380| Gunshot
381| Machine Gun
382| Laser Gun
383| Explosion
384| Firework
DRUM KITS
385| Standard Kit 1
386| Standard Kit 2
Voice No.| Voice Name**
—|—
387| Room Kit
388| Rock Kit
389| Electronic Kit
390| Analog Kit
391| Dance Kit
392| Jazz Kit
393| Brush Kit
394| Symphony Kit
395| StdKit 1 + Chinese Perc.
396| Indian Kit
397| Arabic Kit
398| SFX Kit 1
399| SFX Kit 2
400| Sound Effect Kit
Drum Kit List
| Voice No. | 385 | 386 | 387 | 388 | 389 | 390 |
|---|---|---|---|---|---|---|
| Keyboard | Standard Kit 1 | Standard Kit 2 | Room Kit | |||
| Rock Kit | Electronic Kit | Analog Kit | ||||
| Note# | Note | |||||
| 25 | C# 0 | Surdo Mute | Surdo Mute | Surdo Mute | Surdo Mute | Surdo Mute |
Mute
26| D 0| Surdo Open| Surdo Open| Surdo Open| Surdo Open| Surdo Open| Surdo
Open
27| D# 0| Hi Q| Hi Q| Hi Q| Hi Q| Hi Q| Hi Q
28| E 0| Whip Slap| Whip Slap| Whip Slap| Whip Slap| Whip Slap| Whip Slap
29| F 0| Scratch H| Scratch H| Scratch H| Scratch H| Scratch H| Scratch H
30| F# 0| Scratch L| Scratch L| Scratch L| Scratch L| Scratch L| Scratch L
31| G 0| Finger Snap| Finger Snap| Finger Snap| Finger Snap| Finger Snap|
Finger Snap
32| G# 0| Click Noise| Click Noise| Click Noise| Click Noise| Click Noise|
Click Noise
33| A 0| Metronome Click| Metronome Click| Metronome Click| Metronome Click|
Metronome Click| Metronome Click
34| A# 0| Metronome Bell| Metronome Bell| Metronome Bell| Metronome Bell|
Metronome Bell| Metronome Bell
35| B 0| Seq Click L| Seq Click L| Seq Click L| Seq Click L| Seq Click L| Seq
Click L
36| C 1| Seq Click H| Seq Click H| Seq Click H| Seq Click H| Seq Click H| Seq
Click H
37| C# 1| Brush Tap| Brush Tap| Brush Tap| Brush Tap| Brush Tap| Brush Tap
38| D 1| Brush Swirl| Brush Swirl| Brush Swirl| Brush Swirl| Brush Swirl|
Brush Swirl
39| D# 1| Brush Slap| Brush Slap| Brush Slap| Brush Slap| Brush Slap| Brush
Slap
40| E 1| Brush Tap Swirl| Brush Tap Swirl| Brush Tap Swirl| Brush Tap Swirl|
Reverse Cymbal| Reverse Cymbal
41| F 1| Snare Roll| Snare Roll| Snare Roll| Snare Roll| Snare Roll| Snare
Roll
42| F# 1| Castanet| Castanet| Castanet| Castanet| Hi Q 2| Hi Q 2
43| G 1| Snare Soft| Snare Soft 2| Snare Soft| Snare Noisy| Snare Snappy
Electronic| Snare Noisy 4
44| G# 1| Sticks| Sticks| Sticks| Sticks| Sticks| Sticks
45| A 1| Bass Drum Soft| Bass Drum Soft| Bass Drum Soft| Bass Drum Soft| Bass
Drum H| Bass Drum H
46| A# 1| Open Rim Shot| Open Rim Shot 2| Open Rim Shot| Open Rim Shot| Open
Rim Shot| Open Rim Shot
47| B 1| Bass Drum Hard| Bass Drum Hard| Bass Drum Hard| Bass Drum H| Bass
Drum Rock| Bass Drum Analog L
48| C 2| Bass Drum| Bass Drum 2| Bass Drum| Bass Drum Rock| Bass Drum Gate|
Bass Drum Analog H
49| C# 2| Side Stick| Side Stick| Side Stick| Side Stick| Side Stick| Side
Stick Analog
50| D 2| Snare| Snare 2| Snare Room L| Snare Rock| Snare Noisy 2| Snare
Analog 1
51| D# 2| Hand Clap| Hand Clap| Hand Clap| Hand Clap| Hand Clap| Hand Clap
52| E 2| Snare Tight| Snare Tight 2| Snare Room H| Snare Rock Rim| Snare
Noisy 3| Snare Analog 2
53| F 2| Floor Tom L| Floor Tom L| Tom Room 1| Tom Rock 1| Tom Electronic 1|
Tom Analog 1
54| F# 2| Hi-Hat Closed| Hi-Hat Closed| Hi-Hat Closed| Hi-Hat Closed| Hi-Hat
Closed| Hi-Hat Close Analog 1
55| G 2| Floor Tom H| Floor Tom H| Tom Room 2| Tom Rock 2| Tom Electronic 2|
Tom Analog 2
56| G# 2| Hi-Hat Pedal| Hi-Hat Pedal| Hi-Hat Pedal| Hi-Hat Pedal| Hi-Hat
Pedal| Hi-Hat Close Analog 2
57| A 2| Low Tom| Low Tom| Tom Room 3| Tom Rock 3| Tom Electronic 3| Tom
Analog 3
58| A# 2| Hi-Hat Open| Hi-Hat Open| Hi-Hat Open| Hi-Hat Open| Hi-Hat Open| Hi-
Hat Open Analog
59| B 2| Mid Tom L| Mid Tom L| Tom Room 4| Tom Rock 4| Tom Electronic 4| Tom
Analog 4
60| C 3| Mid Tom H| Mid Tom H| Tom Room 5| Tom Rock 5| Tom Electronic 5| Tom
Analog 5
61| C# 3| Crash Cymbal 1| Crash Cymbal 1| Crash Cymbal 1| Crash Cymbal 1|
Crash Cymbal 1| Cymbal Analog
62| D 3| High Tom| High Tom| Tom Room 6| Tom Rock 6| Tom Electronic 6| Tom
Analog 6
63| D# 3| Ride Cymbal 1| Ride Cymbal 1| Ride Cymbal 1| Ride Cymbal 1| Ride
Cymbal 1| Ride Cymbal 1
64| E 3| Chinese Cymbal| Chinese Cymbal| Chinese Cymbal| Chinese Cymbal|
Chinese Cymbal| Chinese Cymbal
65| F 3| Ride Cymbal Cup| Ride Cymbal Cup| Ride Cymbal Cup| Ride Cymbal Cup|
Ride Cymbal Cup| Ride Cymbal Cup
66| F# 3| Tambourine| Tambourine| Tambourine| Tambourine| Tambourine|
Tambourine
67| G 3| Splash Cymbal| Splash Cymbal| Splash Cymbal| Splash Cymbal| Splash
Cymbal| Splash Cymbal
68| G# 3| Cowbell| Cowbell| Cowbell| Cowbell| Cowbell| Cowbell Analog
69| A 3| Crash Cymbal 2| Crash Cymbal 2| Crash Cymbal 2| Crash Cymbal 2|
Crash Cymbal 2| Crash Cymbal 2
70| A# 3| Vibraslap| Vibraslap| Vibraslap| Vibraslap| Vibraslap| Vibraslap
71| B 3| Ride Cymbal 2| Ride Cymbal 2| Ride Cymbal 2| Ride Cymbal 2| Ride
Cymbal 2| Ride Cymbal 2
72| C 4| Bongo H| Bongo H| Bongo H| Bongo H| Bongo H| Bongo H
73| C# 4| Bongo L| Bongo L| Bongo L| Bongo L| Bongo L| Bongo L
74| D 4| Conga H Mute| Conga H Mute| Conga H Mute| Conga H Mute| Conga H
Mute| Conga Analog H
75| D# 4| Conga H Open| Conga H Open| Conga H Open| Conga H Open| Conga H
Open| Conga Analog M
76| E 4| Conga L| Conga L| Conga L| Conga L| Conga L| Conga Analog L
77| F 4| Timbale H| Timbale H| Timbale H| Timbale H| Timbale H| Timbale H
78| F# 4| Timbale L| Timbale L| Timbale L| Timbale L| Timbale L| Timbale L
79| G 4| Agogo H| Agogo H| Agogo H| Agogo H| Agogo H| Agogo H
80| G# 4| Agogo L| Agogo L| Agogo L| Agogo L| Agogo L| Agogo L
81| A 4| Cabasa| Cabasa| Cabasa| Cabasa| Cabasa| Cabasa
82| A# 4| Maracas| Maracas| Maracas| Maracas| Maracas| Maracas 2
83| B 4| Samba Whistle H| Samba Whistle H| Samba Whistle H| Samba Whistle H|
Samba Whistle H| Samba Whistle H
84| C 5| Samba Whistle L| Samba Whistle L| Samba Whistle L| Samba Whistle L|
Samba Whistle L| Samba Whistle L
85| C# 5| Guiro Short| Guiro Short| Guiro Short| Guiro Short| Guiro Short|
Guiro Short
86| D 5| Guiro Long| Guiro Long| Guiro Long| Guiro Long| Guiro Long| Guiro
Long
87| D# 5| Claves| Claves| Claves| Claves| Claves| Claves 2
88| E 5| Wood Block H| Wood Block H| Wood Block H| Wood Block H| Wood Block
H| Wood Block H
89| F 5| Wood Block L| Wood Block L| Wood Block L| Wood Block L| Wood Block
L| Wood Block L
90| F# 5| Cuica Mute| Cuica Mute| Cuica Mute| Cuica Mute| Scratch H| Scratch
H
91| G 5| Cuica Open| Cuica Open| Cuica Open| Cuica Open| Scratch L| Scratch L
92| G# 5| Triangle Mute| Triangle Mute| Triangle Mute| Triangle Mute| Triangle
Mute| Triangle Mute
93| A 5| Triangle Open| Triangle Open| Triangle Open| Triangle Open| Triangle
Open| Triangle Open
94| A# 5| Shaker| Shaker| Shaker| Shaker| Shaker| Shaker
95| B 5| Jingle Bells| Jingle Bells| Jingle Bells| Jingle Bells| Jingle
Bells| Jingle Bells
96| C 6| Bell Tree| Bell Tree| Bell Tree| Bell Tree| Bell Tree| Bell Tree
97| C# 6| | | | | |
98| D 6| | | | | |
99| D# 6| | | | | |
100| E 6| | | | | |
101| F 6| | | | | |
102| F# 6| | | | | |
103| G 6| | | | | |
Voice No.| 391| 392| 393| 394| 395
—|—|—|—|—|—
Keyboard| Dance Kit| Jazz Kit| Brush Kit|
Symphony Kit| StdKit1 + Chinese Perc.
Note#| Note
25| C# 0| Surdo Mute| Surdo Mute| Surdo Mute| Surdo Mute| Surdo Mute
26| D 0| Surdo Open| Surdo Open| Surdo Open| Surdo Open| Surdo Open
27| D# 0| Hi Q| Hi Q| Hi Q| Hi Q| Hi Q
28| E 0| Whip Slap| Whip Slap| Whip Slap| Whip Slap| Whip Slap
29| F 0| Scratch H| Scratch H| Scratch H| Scratch H| Scratch H
30| F# 0| Scratch L| Scratch L| Scratch L| Scratch L| Scratch L
31| G 0| Finger Snap| Finger Snap| Finger Snap| Finger Snap| Finger Snap
32| G# 0| Click Noise| Click Noise| Click Noise| Click Noise| Click Noise
33| A 0| Metronome Click| Metronome Click| Metronome Click| Metronome Click|
Metronome Click
34| A# 0| Metronome Bell| Metronome Bell| Metronome Bell| Metronome Bell|
Metronome Bell
35| B 0| Seq Click L| Seq Click L| Seq Click L| Seq Click L| Seq Click L
36| C 1| Seq Click H| Seq Click H| Seq Click H| Seq Click H| Seq Click H
37| C# 1| Brush Tap| Brush Tap| Brush Tap| Brush Tap| Brush Tap
38| D 1| Brush Swirl| Brush Swirl| Brush Swirl| Brush Swirl| Brush Swirl
39| D# 1| Brush Slap| Brush Slap| Brush Slap| Brush Slap| Brush Slap
40| E 1| Reverse Cymbal| Brush Tap Swirl| Brush Tap Swirl| Brush Tap Swirl|
Brush Tap Swirl
41| F 1| Snare Roll| Snare Roll| Snare Roll| Snare Roll| Snare Roll
42| F# 1| Hi Q 2| Castanet| Castanet| Castanet| Castanet
43| G 1| Snare Techno| Snare Soft| Brush Slap 2| Snare Soft| Snare Soft
44| G# 1| Sticks| Sticks| Sticks| Sticks| Sticks
45| A 1| Kick Techno Q| Bass Drum Soft| Bass Drum Soft| Bass Drum Soft L|
Bass Drum Soft
46| A# 1| Rim Gate| Open Rim Shot| Open Rim Shot| Open Rim Shot| Open Rim Shot
47| B 1| Kick Techno L| Bass Drum Hard| Bass Drum Hard| Gran Cassa| Bass Drum
Hard
48| C 2| Kick Techno| Bass Drum Jazz| Bass Drum Jazz| Gran Cassa Mute| Bass
Drum
49| C# 2| Side Stick Analog| Side Stick| Side Stick| Side Stick| Side Stick
50| D 2| Snare Clap| Snare Jazz L| Brush Slap 3| Band Snare 1| Snare
51| D# 2| Hand Clap| Hand Clap| Hand Clap| Hand Clap| Hand Clap
52| E 2| Snare Dry| Snare Jazz M| Brush Tap| Band Snare 2| Snare Tight
53| F 2| Tom Analog 1| Tom Jazz 1| Tom Brush 1| Tom Jazz 1| Floor Tom L
54| F# 2| Hi-Hat Close Analog 3| Hi-Hat Closed| Hi-Hat Closed| Hi-Hat Closed|
Hi-Hat Closed
55| G 2| Tom Analog 2| Tom Jazz 2| Tom Brush 2| Tom Jazz 2| Floor Tom H
56| G# 2| Hi-Hat Close Analog 4| Hi-Hat Pedal| Hi-Hat Pedal| Hi-Hat Pedal| Hi-
Hat Pedal
57| A 2| Tom Analog 3| Tom Jazz 3| Tom Brush 3| Tom Jazz 3| Low Tom
58| A# 2| Hi-Hat Open Analog 2| Hi-Hat Open| Hi-Hat Open| Hi-Hat Open| Hi-Hat
Open
59| B 2| Tom Analog 4| Tom Jazz 4| Tom Brush 4| Tom Jazz 4| Mid Tom L
60| C 3| Tom Analog 5| Tom Jazz 5| Tom Brush 5| Tom Jazz 5| Mid Tom H
61| C# 3| Cymbal Analog| Crash Cymbal 1| Crash Cymbal 1| Hand Cymbal 1| Crash
Cymbal 1
62| D 3| Tom Analog 6| Tom Jazz 6| Tom Brush 6| Tom Jazz 6| High Tom
63| D# 3| Ride Cymbal 1| Ride Cymbal 1| Ride Cymbal 1| Hand Cymbal 1 Short|
Ride Cymbal 1
64| E 3| Chinese Cymbal| Chinese Cymbal| Chinese Cymbal| Chinese Cymbal|
Chinese Cymbal
65| F 3| Ride Cymbal Cup| Ride Cymbal Cup| Ride Cymbal Cup| Ride Cymbal Cup|
Ride Cymbal Cup
66| F# 3| Tambourine| Tambourine| Tambourine| Tambourine| Tambourine
67| G 3| Splash Cymbal| Splash Cymbal| Splash Cymbal| Splash Cymbal| Splash
Cymbal
68| G# 3| Cowbell Analog| Cowbell| Cowbell| Cowbell| Cowbell
69| A 3| Crash Cymbal 2| Crash Cymbal 2| Crash Cymbal 2| Hand Cymbal 2| Crash
Cymbal 2
70| A# 3| Vibraslap| Vibraslap| Vibraslap| Vibraslap| Vibraslap
71| B 3| Ride Cymbal 2| Ride Cymbal 2| Ride Cymbal 2| Hand Cymbal 2 Short|
Ride Cymbal 2
72| C 4| Bongo H| Bongo H| Bongo H| Bongo H| Bongo H
73| C# 4| Bongo L| Bongo L| Bongo L| Bongo L| Bongo L
74| D 4| Conga Analog H| Conga H Mute| Conga H Mute| Conga H Mute| Conga H
Mute
75| D# 4| Conga Analog M| Conga H Open| Conga H Open| Conga H Open| Conga H
Open
76| E 4| Conga Analog L| Conga L| Conga L| Conga L| Conga L
77| F 4| Timbale H| Timbale H| Timbale H| Timbale H| Timbale H
78| F# 4| Timbale L| Timbale L| Timbale L| Timbale L| Timbale L
79| G 4| Agogo H| Agogo H| Agogo H| Agogo H| Dagu Mute
80| G# 4| Agogo L| Agogo L| Agogo L| Agogo L| Zhongcha Mute
81| A 4| Cabasa| Cabasa| Cabasa| Cabasa| Dagu Heavy
82| A# 4| Maracas 2| Maracas| Maracas| Maracas| Zhongcha Open
83| B 4| Samba Whistle H| Samba Whistle H| Samba Whistle H| Samba Whistle H|
Paigu Middle
84| C 5| Samba Whistle L| Samba Whistle L| Samba Whistle L| Samba Whistle L|
Paigu Low
85| C# 5| Guiro Short| Guiro Short| Guiro Short| Guiro Short| Xiaocha Mute
86| D 5| Guiro Long| Guiro Long| Guiro Long| Guiro Long| Bangu
87| D# 5| Claves 2| Claves| Claves| Claves| Xiaocha Open
88| E 5| Wood Block H| Wood Block H| Wood Block H| Wood Block H| Bangzi
89| F 5| Wood Block L| Wood Block L| Wood Block L| Wood Block L| Muyu Low
90| F# 5| Scratch H| Cuica Mute| Cuica Mute| Cuica Mute| Zhongluo Mute
91| G 5| Scratch L| Cuica Open| Cuica Open| Cuica Open| Muyu Mid-Low
92| G# 5| Triangle Mute| Triangle Mute| Triangle Mute| Triangle Mute| Zhongluo
Open
93| A 5| Triangle Open| Triangle Open| Triangle Open| Triangle Open| Muyu
Middle
94| A# 5| Shaker| Shaker| Shaker| Shaker| Xiaoluo Open
95| B 5| Jingle Bells| Jingle Bells| Jingle Bells| Jingle Bells| Triangle
Mute
96| C 6| Bell Tree| Bell Tree| Bell Tree| Bell Tree| Triangle Open
97| C# 6| | | | |
98| D 6| | | | |
99| D# 6| | | | |
100| E 6| | | | |
101| F 6| | | | |
102| F# 6| | | | |
103| G 6| | | | |
Song List
| Song No. | Song Name |
|---|
Top Picks
001| Demo 1
002| Demo 2
003| Demo 3
Favorite
004| Frère Jacques
005| Der Froschgesang
006| Aura Lee
007| London Bridge
008| Sur le pont d’Avignon
009| Nedelka
010| Aloha Oe
011| Sippin’ Cider Through a Straw
012| Old Folks at Home
013| Bury Me Not on the Lone Prairie
014| Old MacDonald Had A Farm
015| Santa Lucia
016| If You’re Happy and You Know It
017| Beautiful Dreamer
018| Greensleeves
019| Kalinka
020| Holdilia Cook
021| Ring de Banjo
022| La Cucaracha
023| Funiculi Funicula
024| Largo (from the New World)
025| Brahms’ Lullaby
026| Liebesträume Nr.3
027| Pomp and Circumstance
028| Chanson du Toreador
029| Jupiter, the Bringer of Jollity
030| The Polovetsian Dances
031| Die Moldau
032| Salut d’Amour op.12
033| Humoresques
034| Symphony No.9 (from the New World – 4th movement)
Instrument Master
035| Sicilienne/Fauré
036| Swan Lake
037| Grand March (Aida)
038| Serenade for Strings in C major, op.48
039| Pizzicato Polka
040| Romance de Amor
041| Menuett BWV. Anh.114
042| Ave Verum Corpus
Duet
043| Ten Little Indians (DUET)
044| The Cuckoo (DUET)
045| Close Your Hands, Open Your Hands (DUET)
046| O du lieber Augustin (DUET)
047| We Wish You A Merry Christmas (DUET)
048| London Bridge (DUET)
049| Scarborough Fair (DUET)
050| Twinkle Twinkle Little Star (DUET)
051| Im Mai (DUET)
052| O Christmas Tree (DUET)
053| Pop Goes The Weasel (DUET)
054| Mary Had a Little Lamb (DUET)
Song No.| Song Name
—|—
055| Row Row Row Your Boat (DUET)
056| On Top of Old Smoky (DUET)
Favorite with Style
057| Amazing Grace
058| Oh! Susanna
059| Joy to the World
060| Little Brown Jug
061| Yankee Doodle
062| My Darling Clementine
063| Auld Lang Syne
064| My Bonnie
065| When the Saints Go Marching In
066| The Danube Waves
067| Battle Hymn of the Republic
068| I’ve Been Working On The Railroad
069| Grandfather’s Clock
070| Bill Bailey (Won’t You Please Come Home)
071| Down by the Riverside
072| Camptown Races
073| When Irish Eyes Are Smiling
074| Ave Maria
075| American Patrol
076| Valse Des Fleurs (From “The Nutcracker”)
077| Frühlingsstimmen
Piano Repertoire
078| Wenn ich ein Vöglein wär
079| Die Lorelei
080| Home Sweet Home
081| Scarborough Fair
082| My Old Kentucky Home
083| Loch Lomond
084| Silent Night
085| Deck the Halls
086| O Christmas Tree
087| Sonata Pathétique 2nd Adagio Cantabile
088| Ave Maria/J. S. Bach – Gounod
089| Jesus bleibet meine Freude
090| Prelude op.28-15 “Raindrop”
091| Nocturne op.9-2
092| Etude op.10-3 “Chanson de L’adieu”
093| Romanze (Serenade K.525)
094| Arabesque
095| La Chevaleresque
096| Für Elise
097| Turkish March
098| 24 Preludes op.28-7
099| Annie Laurie
100| Jeanie with the Light Brown Hair
Style List
| Style No. | Style Name |
|---|
8Beat
1| BritPopRock
2| 8BeatModern
3| Cool8Beat
4| 60sGuitarPop
5| 8BeatAdria
6| 60s8Beat
7| 8Beat
8| OffBeat
9| 60sRock
10| HardRock
11| RockShuffle
12| 8BeatRock
16Beat
13| 16Beat
14| PopShuffle
15| GuitarPop
16| 16BeatUptempo
17| KoolShuffle
18| HipHopLight
Ballad
19| 70sGlamPiano
20| PianoBallad
21| LoveSong
22| 6/8ModernEP
23| 6/8SlowRock
24| OrganBallad
25| PopBallad
26| 16BeatBallad
Dance
27| EuroTrance
28| Ibiza
29| SwingHouse
30| Clubdance
31| ClubLatin
32| Garage 1
33| Garage 2
34| TechnoParty
35| UKPop
36| HipHopGroove
37| HipShuffle
38| HipHopPop
Disco
39| 70sDisco
40| LatinDisco
41| SaturdayNight
42| DiscoHands
Swing &Jazz
43| BigBandFast
44| BigBandBallad
45| JazzClub
46| Swing 1
47| Swing 2
48| Five/Four
Style No.| Style Name
—|—
49| Dixieland
50| Ragtime
R &B
51| Soul
52| DetroitPop
53| 6/8Soul
54| CrocoTwist
55| Rock&Roll
56| ComboBoogie
57| 6/8Blues
Country
58| CountryPop
59| CountrySwing
60| Country2/4
61| Bluegrass
Latin
62| BrazilianSamba
63| BossaNova
64| Forro
65| Sertanejo
66| Joropo
67| Parranda
68| Reggaeton
69| Tijuana
70| PasoDuranguense
71| CumbiaGrupera
72| Mambo
73| Salsa
74| Beguine
75| Reggae
World
76| ScottishReel
77| Saeidy
78| WehdaSaghira
79| IranianElec
80| Emarati
81| IndianPop
82| Bhangra
83| Bhajan
84| BollyMix
85| Tamil
86| Kerala
87| GoanPop
88| Rajasthan
89| Dandiya
90| Qawwali
91| FolkHills
92| ModernDangdut
93| Keroncong
94| XiQingLuoGu
95| YiZuMinGe
96| JingJuJieZou
Ballroom
97| VienneseWaltz
Style No.| Style Name
—|—
98| EnglishWaltz
99| Slowfox
100| Foxtrot
101| Quickstep
102| Tango
103| Pasodoble
104| Samba
105| ChaChaCha
106| Rumba
107| Jive
Traditional
108| US March
109| 6/8March
110| GermanMarch
111| PolkaPop
112| OberkrainerPolka
113| Tarantella
114| Showtune
115| ChristmasSwing
116| ChristmasWaltz
Waltz
117| ItalianWaltz
118| SwingWaltz
119| JazzWaltz
120| CountryWaltz
121| OberkrainerWalzer
122| Musette
Pianist
123| Stride
124| PianoSwing
125| Arpeggio
126| Habanera
127| SlowRock
128| 8BeatPianoBallad
129| 6/8PianoMarch
130| PianoWaltz
Effect Type List
Reverb Types
| No. | Reverb Type | Description |
|---|---|---|
| 01–03 | Hall 1–3 | Concert hall reverb. |
| 04–05 | Room 1–2 | Small room reverb. |
| 06–07 | Stage 1–2 | Reverb for solo instruments. |
| 08–09 | Plate 1–2 | Simulated steel plate reverb. |
| 10 | Off | No effect. |
Chorus Types
| No. | Chorus Type | Description |
|---|---|---|
| 1–3 | Chorus 1–3 | Conventional chorus program with rich, warm chorusing. |
| 4–5 | Flanger 1–2 | This produces a rich, animated wavering effect in the sound. |
| 6 | Off | No effect. |
WARRANTY
Important Notice: Guarantee information for customers in EEA* and Switzerland
For detailed guarantee information about this Yamaha product, and Pan-EEA” and
Switzerland warranty service, please either visit the website address below (A
printable file is available at our website) or contact the Yamaha
representative office for your country.EEA: European Economic Area
Read User Manual Online (PDF format)
Read User Manual Online (PDF format) >>
Download This Manual (PDF format)
Download this manual >>
Yamaha PSR-E263 Keyboard Specification
The Yamaha PSR-E263 is a versatile entry-level keyboard designed for aspiring musicians and beginners. It features a 61-key, full-size, touch-sensitive keyboard that provides a realistic playing experience. The instrument is equipped with 400 high-quality voices, including a variety of pianos, organs, strings, and more, allowing for a wide range of musical expression. The PSR-E263 also includes 130 auto-accompaniment styles, offering users the ability to play along with a full band and explore different genres from pop to jazz.
This keyboard incorporates a range of educational functions, making it ideal for learning and practice. The Yamaha Education Suite provides interactive lessons and exercises that help users develop their musical skills at their own pace. The built-in song library contains 112 preset songs for practice and enjoyment, with an option to download more songs if needed. The instrument features a Duo Mode that splits the keyboard into two identical ranges, allowing for side-by-side practice with a teacher or friend.
Connectivity options include a headphone jack for silent practice and an auxiliary input to connect external audio sources, enabling users to play along with their favorite tracks. The lightweight and portable design makes the Yamaha PSR-E263 easy to transport, suitable for both home and on-the-go use. It operates on both AC power and batteries, offering flexibility for various settings. With its combination of educational features, diverse sound palette, and user-friendly design, the Yamaha PSR-E263 is an excellent choice for beginners seeking a reliable and comprehensive keyboard solution.
Yamaha PSR-E263 Keyboard F.A.Q.
To record a song on the Yamaha PSR-E263, press the ‘Record’ button, select the track you want to record, and start playing. Press ‘Stop’ to finish recording.
You can connect headphones to the PSR-E263 by plugging them into the headphone jack located on the back panel of the keyboard.
Check if the power adapter is properly connected to both the keyboard and the power outlet. Ensure the outlet is functioning and try using batteries as an alternative power source.
To adjust the volume, use the ‘Master Volume’ dial located on the control panel of the keyboard.
Yes, you can use a sustain pedal with the PSR-E263 by connecting it to the sustain pedal jack located on the back panel of the keyboard.
To reset the PSR-E263, turn off the keyboard, hold down the highest white key, and turn the keyboard back on. This will restore the factory settings.
To clean the keyboard, use a soft, dry cloth to wipe the surface. Avoid using solvents or abrasive cleaners. For stubborn dirt, use a damp cloth with mild detergent.
Press the ‘Voice’ button, use the number keys or +/- buttons to select the desired voice number, and press ‘Enter’ to confirm your choice.
First, ensure the keyboard is powered on properly. If the issue persists, try resetting the keyboard to factory settings. If keys still do not respond, consult a professional technician.
To transpose the pitch, press the ‘Function’ button, navigate to the ‘Transpose’ setting using the arrow keys, and adjust the value as needed.
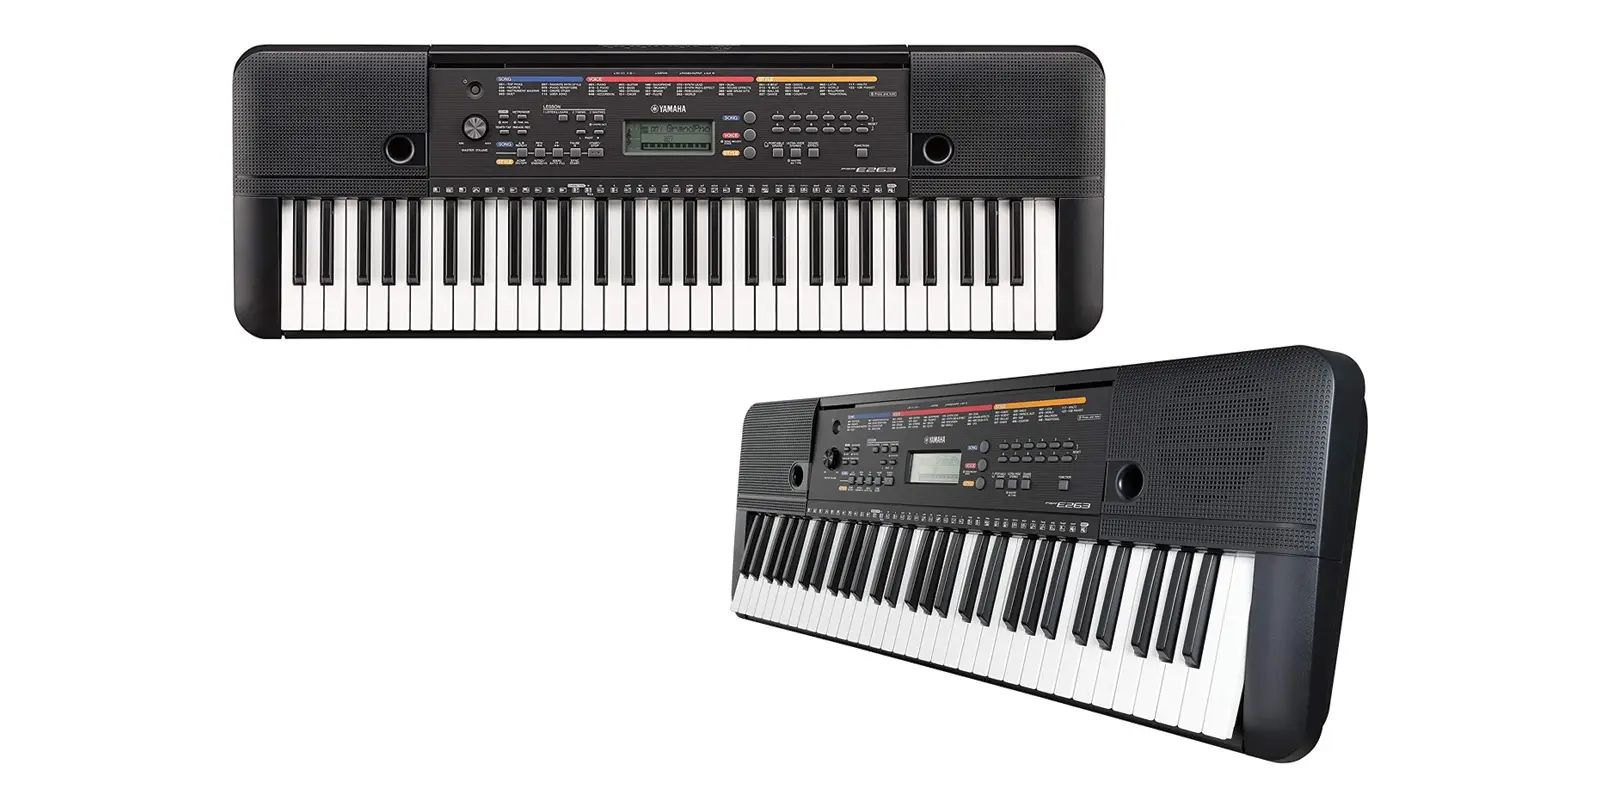
Особенности
Идеально для начинающих музыкантов
PSR-E263 — портативный клавишный инструмент начального уровня с широким разнообразием тембров и функций.
Разнообразие тембров и аккомпанимента
Вы можете выбрать для творчества вариант из 400 высококачественных тембров и 130 стилей автоаккомпанимента. Используйте 112 встроенных композиций и доступное для загрузки учебное пособие Song Book с нотами.
Игра в четыре руки
Режим «дуэт» на Yamaha PSR-E263 позволяет двум исполнителям играть вместе, идеально подходя для совместных музыкальных сессий и обучения.
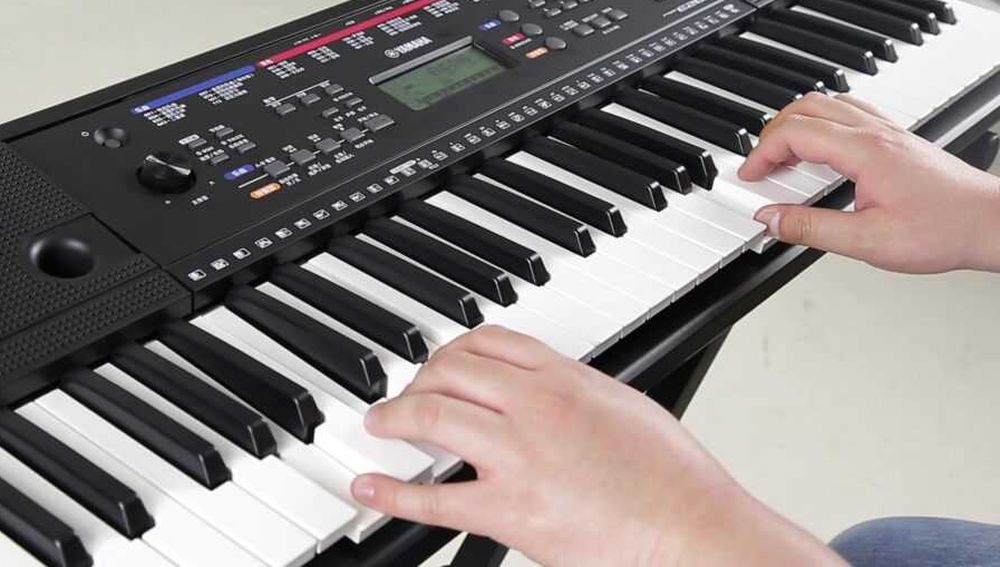
Возможности
-
Функции записи
-
Вход AUX IN для подключения внешнего источника аудиосигнала
-
Функции Master EQ / Ultra Wide Stereo
-
Возможность работы от батарей (6 х АА)
основные особенности
-
130 стилей автоаккомпанемента включают треки, выстраиваемые на основе аккордов, которые вы играете.
-
Компактная, легкая конструкция позволяет вам взять с собой инструмент, куда бы вы ни отправились. Питание от батареи означает, что вы можете настроить и играть в любом месте без необходимости подключать его!
-
3-ступенчатый программа обучения — режим прослушивания, тайминга доступны для каждой руки или обе руки вместе. Уроки используют встроенные песни, чтобы помочь вам освоить навыки игры. Используйте простую функцию записи для прослушивания вашей работы.
-
1) Звучит мелодия / аккорды выбранной вами части. Послушайте внимательно и хорошо запомните.
2) Воспроизведите ноты с правильным темпом. Даже если вы играете неправильно ноты, правильные ноты будут отображены на дисплее и зазвучат.
3) Воспроизведите правильные ноты, показанные на дисплее. Песня приостанавливается до тех пор, пока вы не сыграете правильную ноту. Темп воспроизведения будет изменяться в соответствии с той скоростью, с которой вы играете.
-
Девять новых эффектов реверберации придают ощущение пространства вашей игре — будто вы находитесь в клубе, в концертном зале, в соборе. Хорус придает звуку теплоту и плотность.
Функция Master EQ помогает легко добиться оптимального звучания при игре в наушниках, через встроенные динамики или через внешнюю аудиосистему.
-
Подключите портативный аудиоплеер и включите воспроизведение через динамики инструмента. Начинайте играть под музыку, будто вы играете в составе ансамбля!
Технические характеристики синтезатора Yamaha PSR-E263:
| PSR-E263 | ||
|---|---|---|
| Размер/Вес | ||
| Габариты | Ширина | 940 мм |
| Высота | 106 мм | |
| Глубина | 317 мм | |
| Вес | Вес | 4.0 кг (без аккумуляторов) |
| Интерфейс управления | ||
| Клавиатура | Количество клавиш | 61 |
| Дисплей | Тип | ЖК |
| Язык | Английский | |
| Панель | Язык | Английский |
| Голоса | ||
| Тон-генератор | Технология тон-генератора | AWM Стерео сэмплирование |
| Полифония | Количество одновременно звучащих голосов (макс.) | 32 |
| Предустановленные | Количество тембров | 384 голосов + 16 пресетов ударных/эффектов |
| Эффекты | ||
| Типы | Реверберация | 9 типов |
| Хорус | 5 типов | |
| Общая коррекция | 6 типов | |
| Ultra-Wide Stereo | 3 типа | |
| Функции | Постоянный сустейн | Да |
| Стили аккомпанемента | ||
| Предустановленные | Количество предустановленных стилей | 130 |
| Аппликатура | Мульти | |
| Управление стилем | ACMP ON/OFF, SYNC START, START/STOP, INTRO/ENDING/rit, MAIN/AUTO FILL | |
| Другие особенности | Настройка одним касанием (OTS) | Да |
| Композиции | ||
| Предустановленные | Количество предустановленных композиций | 112 |
| Запись | Количество композиций | 1 |
| Количество треков | 1 | |
| Объем памяти | Примерно 300 нот | |
| Совместимые форматы данных | Запись | Original File Format |
| Функции | ||
| Обучение | Обучение | [1 LISTEN & LEARN], [2 TIMING], [3 WAITING], [A-B REPEAT], [CHORD DICTIONARY] |
| Другие средства управления | Метроном | Да |
| Изменение темпа | 11 — 280 | |
| Транспонирование | -12 до 0, 0 до +12 | |
| Настройка | 427.0 — 440.0 — 453.0 Гц | |
| Функция Duo | Да | |
| Прочее | Кнопка быстрого вызова тембров фортепиано | Да |
| Память и коммутация | ||
| Коммутация | Разъем питания | 12 В |
| Наушники | Стандартный стереоджек (PHONES/OUTPUT) | |
| Гнездо для педали сустейна | Да | |
| Вход AUX IN | Stereo mini jack | |
| Усилители и акустические системы | ||
| Усилители | 2.5 Вт + 2.5 Вт | |
| Акустические системы | 12 см x 2 | |
| Источник питания | ||
| Потребляемая мощность | 6 Вт (При использовании адаптера PA-130) | |
| Функция автоматического выключения | Да | |
| Источник питания | Адаптер | PA-130, PA-3C, или эквивалент рекомендованный Yamaha |
| Батарейки | Шесть 1.5 В батарей размером «AA» (LR6), (R6) или шесть 1.2 V размером «AA» перезаряжаемых батарей (HR6) | |
| Аксессуары | ||
| Опциональные аксессуары | Пюпитр | Да |
Видеообзор синтезатора Yamaha PSR-E263:
Прошивка / ПО
Руководство
Другие загрузки
| Название | Russian | Русский |
|---|---|---|
| Song Book for PSR-E263/YPT-260 | — | [8.9MB] |
-
клавиатура
- Крышка клавиатуры
нет
- Крышка клавиатуры
-
Возможности инструмента
- Автоаккомпанемент
да
- Возможность записи
да
- Наличие дисплея
да
- Встроенные композиции
112
- Метроном
да
- Транспонирование
-12 до 0, 0 до +12
- Внутренняя память инструмента
Примерно 300 нот
- Наличие Bluetooth
нет
- Тип инструмента
синтезатор
- Автоаккомпанемент
-
Габариты
- Ширина
940 см
- Высота
106 см
- Вес
4 см
- Габариты
940х106х317
- Ширина
-
звук
- Количество тембров
384
- Сэмплирование тембров
да
- Эффекты
23 типа
- Количество тембров
-
Эффекты
- Реверберация
да
- Реверберация
-
Комплектация
- Пюпитр
опция
- Блок питания
Адаптер: PA-130, PA-3C, или эквивалент рекомендованный Yamaha / Батарейки: Шесть 1.5 В батарей размером «AA» (LR6), (R6) или шесть 1.2 V размером «AA» перезаряжаемых батарей (HR6)
- Пюпитр
инструкции
доставка
-
по Санкт-петербургу и Ленинградской
области-
При заказе свыше 10 000 ₽
Бесплатная доставкаБесплатная доставка
-
При заказе до 10 000 ₽
Доставка 500 ₽
Доставка товара по Санкт-Петербургу осуществляется в срок 1-2 дня с момента
оформления заказа, в согласованное с покупателем время. Внимание!
Бесплатная доставка действует на Юго-западе СПб до границ ул. Пионерстроя,
на Севере СПб до пересечения КАД с Приморским шоссе. Доставка по
Ленинградской области осуществляется из расчета 30 рублей за каждый
километр от границы Санкт-Петербурга.Специалисты отдела доставки доставят и
поднимут товар к Вам в квартиру и поставят там, где Вы скажете. -
При заказе свыше 10 000 ₽
-
Подъем товара в Санкт-петербурге
-
до 10кг
Бесплатно
-
от 10кг до 30кг (на лифте)
300 ₽
-
от 10кг до 30кг (по лестнице)
300 ₽ (занос) + 100 ₽ этаж
-
свыше 30кг
Рассчитывается индивидуально
-
до 10кг
-
по России
Доставка по России осуществляется до терминала транспортной компании
в Вашем городе при стоимости заказа выше 10 000 рублей. Стоимость доставки
транспортной компанией до терминала в Вашем городе рассчитывается исходя
из тарифов транспортной компании и оплачивается покупателем при получении.
Доставка товара на терминал транспортной компании в Санкт-Петербурге
осуществляется в срок 1-2 дня с момента оплаты заказа (по безналичному
расчету). Сроки доставки до вашего города, Вы можете уточнить у наших
менеджеров. Интернет-магазин Yamaha.ru осуществляет доставку товаров по
всей территории России. Мы уже много лет успешно сотрудничаем с самыми
крупными и надежными в России транспортными компаниями, поэтому все заказы
приходят точно в срок. Заказать звуковое оборудование и музыкальные
иструменты в интернет-магазине Yamaha.ru намного выгоднее, чем покупать
в региональном магазине! Зачем переплачивать посредникам? Мы продаем товар
напрямую от мировых производителей и предлагаем нашим клиентам безупречное
качество по самым низким ценам! -
Рекомендуемые нами ТК
Оплата
-
в Санкт-петербурге
-
1. Оплата наличными при получении
Данный способ оплаты подразумевает, что оплата будет произведена
наличными
деньгами при получении курьеру. -
2. Оплата картой visa, mastercard или maestro при получении
Данный способ оплаты подразумевает, что оплата будет произведена
наличными
деньгами при получении курьеру. -
3. Предоплата по счету на физическое лицо через банк
Данный способ оплаты подразумевает, что оплата будет произведена
безналичным перечислением денежных средств на расчетный cчет компании
(для
юридических лиц). На сегодня данный способ оплаты доступен только при
выборе способов доставки: «Доставка до Транспортной компании (для других
городов)». -
4. Безналичный расчет
Данный способ оплаты подразумевает, что оплата будет произведена
безналичным перечислением денежных средств на расчетный cчет компании
(для
юридических лиц). -
5. Оплата через сайт по карте visa, mastercard или maestro или
Яндекс.Деньги
Данный способ оплаты подразумевает, что вы оставляете заявку (на сайте,
по телефону или по e-mail), после чего наш менеджер высылает по
электронной
почте номер Вашего заказа и ссылку на страницу оплаты:-
Для оплаты банковской картой Вы будете перенаправлены на
защищенную
платежную страницу процессинговой компании PayKeeper . Страница
оплаты
отвечает последним международным требованиям безопасности
платежных
систем
Visa и MasterCard. -
В процессе оплаты банковской картой введите ее номер, срок
действия,
код
CVV, указанный на обороте, а также имя и фамилию владельца и
контактные
данные владельца карты. -
Убедитесь, что Вы ввели корректные данные, а затем нажмите на
кнопку
«Оплатить». -
Если ваша банковская карта поддерживает технологию 3D Secure,
Вы автоматически перейдете на сайт своего банка, где Вас попросят
ввести
секретный код активации, который будет отправлен Вам на телефон. -
Если реквизиты карты введены верно и на счете достаточно денег, Вы
увидите
подтрждение оплаты заказа. После чего Вам будет предложено
вернуться
на страницу магазина.
-
Для оплаты банковской картой Вы будете перенаправлены на
-
рассрочка
-
-
Покупка в рассрочку — нет ничего проще!
*Обращаем Ваше внимание, что при покупке товара в рассрочку, любые акции
или скидки не суммируются с данным предложением.-
Покупайте товары в рассрочку и в кредит прямо на нашем сайте, не
выходя
из дома и не приезжая в банк. - Получение рассрочки или кредита займет не более 20 минут.
- Доступно для всех граждан России, кроме республики Крым.
-
Покупайте товары в рассрочку и в кредит прямо на нашем сайте, не
-
Необходимые документы для оформления рассрочки
- Паспорт гражданина РФ (данные вы предоставляете в банк)
-
После подтверждения рассрочки банком, с Вами свяжется менеджер
магазина и договорится о времени и адресе доставки товара.
-
Покупка в рассрочку — нет ничего проще!
Кредит
-
-
Условия кредитования
- Сумма: от 3 000 до 300 000 руб.
- Срок: от 6 до 36 мес.
- Первоначальный взнос: от 0 до 50% от суммы товара
-
Условия погашения без комиссии: в банкоматах ВТБ и Почта Банка,
через
мобильное приложение или интернет-банк с карт любых банков.
Комиссии
за досрочное погашение отсутствуют.
-
Требования к заемщику
- От 18 лет
- Наличие паспорта РФ
- Наличие постоянной регистрации на территории РФ
- Трудоустройство на текущем месте работы от 3 мес.
-
Процедура оформления
Для получения решения банка необходимо заполнить анкету на сайте. В
случае одобрения вы сможете подписать документы одним из следующих
способов:- В любом отделении Почта Банка по всей России
- Онлайн в приложении (для действующих клиентов)
- Непосредственно в офисе компании (при наличии технической
возможности)
-
Преимущества
- Широкая сеть отделений по всей России,
-
Низкая процентная ставка по кредиту или отсутствие переплаты по
рассрочке, - Минимальный комплект документов и решение в течение 30 минут,
- Выгодные условия и надёжный банк,
- Возможность пользоваться товаром уже сейчас!
-
FAQ: Types of Manuals and Their Contents
Yamaha PSR-E263 Manuals come in various types, each serving a specific purpose to help users effectively operate and maintain their devices. Here are the common types of Yamaha PSR-E263 User Guides and the information they typically include:
- User Manuals: Provide comprehensive instructions on how to use the device, including setup, features, and operation. They often include troubleshooting tips, safety information, and maintenance guidelines.
- Service Instructions: Designed for technicians and repair professionals, these manuals offer detailed information on diagnosing and repairing issues with the device. They include schematics, parts lists, and step-by-step repair procedures.
- Installation Guides: Focus on the installation process of the device, providing detailed instructions and diagrams for proper setup. They are essential for ensuring the device is installed correctly and safely.
- Maintenance Manuals: Provide guidance on routine maintenance tasks to keep the device in optimal condition. They cover cleaning procedures, part replacements, and regular servicing tips.
- Quick Start Guides: Offer a concise overview of the essential steps needed to get the device up and running quickly. They are ideal for users who need immediate assistance with basic setup and operation.
Each type of Yamaha PSR-E263 instruction is designed to address specific needs, ensuring users have the necessary information to use, maintain, and repair their devices effectively.
Related Instructions for Yamaha PSR-E263:
2
EL-100
Owner’s manual Manual: Yamaha EL-100 (KI9GUV, Upd.30/10/2024)
136
1064
235
4
XV
Manual Motorcycle #YD57PX
10
994
239
6
DVD-C940
Service manual Yamaha DVD-C940 Guide (Service manual), @ZNAI37
74
745
164
7
PSS-570
Owner’s manual PSS-570 (Electronic Keyboard ePDF User Manual, #B7W61K)
23
792
159
9
KB-200
Owner’s manual KB-200 (Musical Instrument ePDF User Manual, #NM259A)
20
355
82
Electronic Keyboard Devices by Other Brands:
|
Kurzweil K2600 Manual Kurzweil Synthesizer Manual (File: kurzweil-k2600-manual-4, 16/11/2024) MIDI Note Numbers 16 Nov 2024 | 4 |
|
|
Yamaha Arius YDP-140 Owner’s Manual Yamaha Arius YDP-140 Manual (Owner’s manual), @142L9M YDP-160 02 Nov 2024 | 44 |
|
|
Roland C-330 Manual User Manual: Roland C-330 (68DC6F, Upd.Mon 03.2025) 1. Access the voice palette. 31 Mar 2025 | 2 |
|
|
Roland JD-Xi Supplementary Manual PDF Guide (@L58IMI), Roland JD-Xi Synthesizer (20/03/2025) 1 20 Mar 2025 | 4 |
Categories:
Surround system
Automobile Parts
Snowmobile
Exercise Bike
Acoustic guitar
Av receiver