
| Название | Русский | English |
|---|---|---|
| PSR-350 Owner’s Manual | — |
[5.3MB] |
| PSR-350 Owner’s Manual (Text Version) | — |
[115KB] |
| PSR-350 Owner’s Manual (Text Version) | — |
[115KB] |
| PSR-3500 Owner’s Manual (Image) | — |
[9.6MB] |
Инструкция и руководство для
Yamaha PSR-350
83 страницы подробных инструкций и пользовательских руководств по эксплуатации на русском
YAMAHA
РУКОВОДСТВО
ПОЛЬЗОВАТЕЛЯ

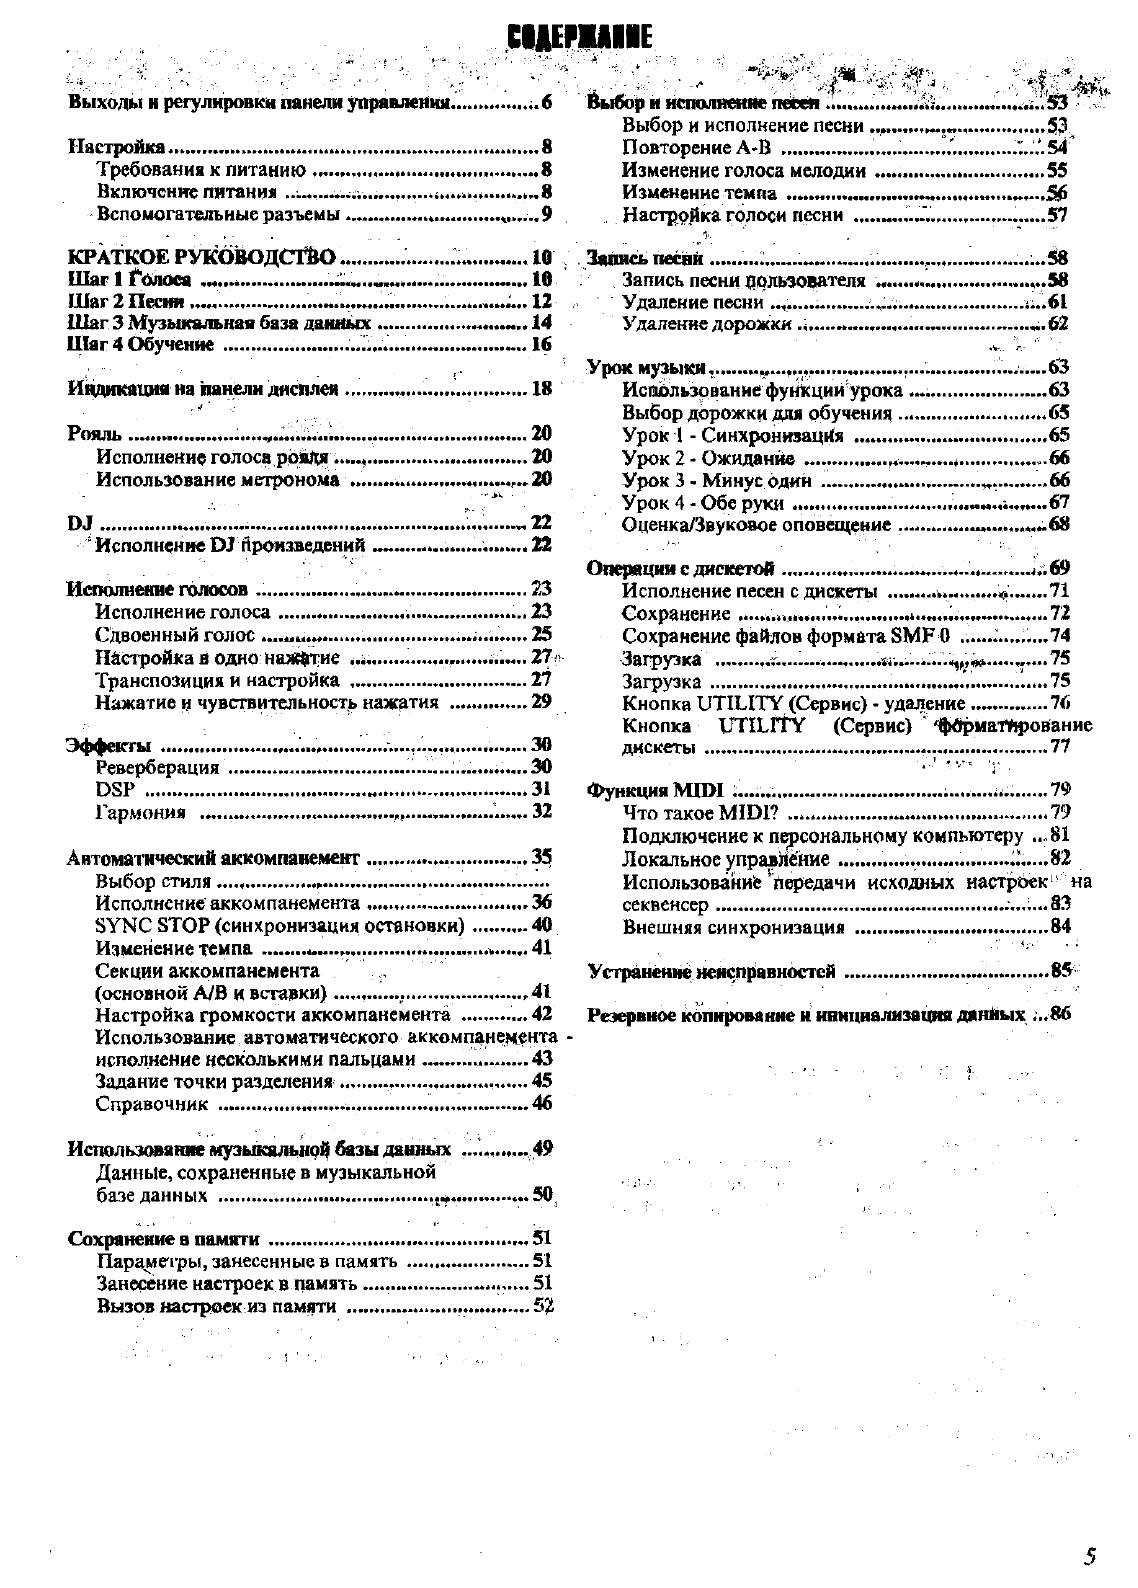
С1ДЕШ11Е
Выходы н регулировки панели управления………… ;.б
Настройка……… …………. ……………………………………….. 8
Требования к литанию …………….. ………. …………… 8
Включение питания
…„8
Вспомогательные разъемы ……………………. М…..9
КРАТКОЕ руководств …………………………………. 10
Шаг 1 Солоса
*•••*«***•«*****« 10
Шаг 2 Песня………………….. ………………………………. 12
Шаг 3 Музьоеальная база данн^
14
Ц1аг
4 Обучение………….
………………………………….. 16
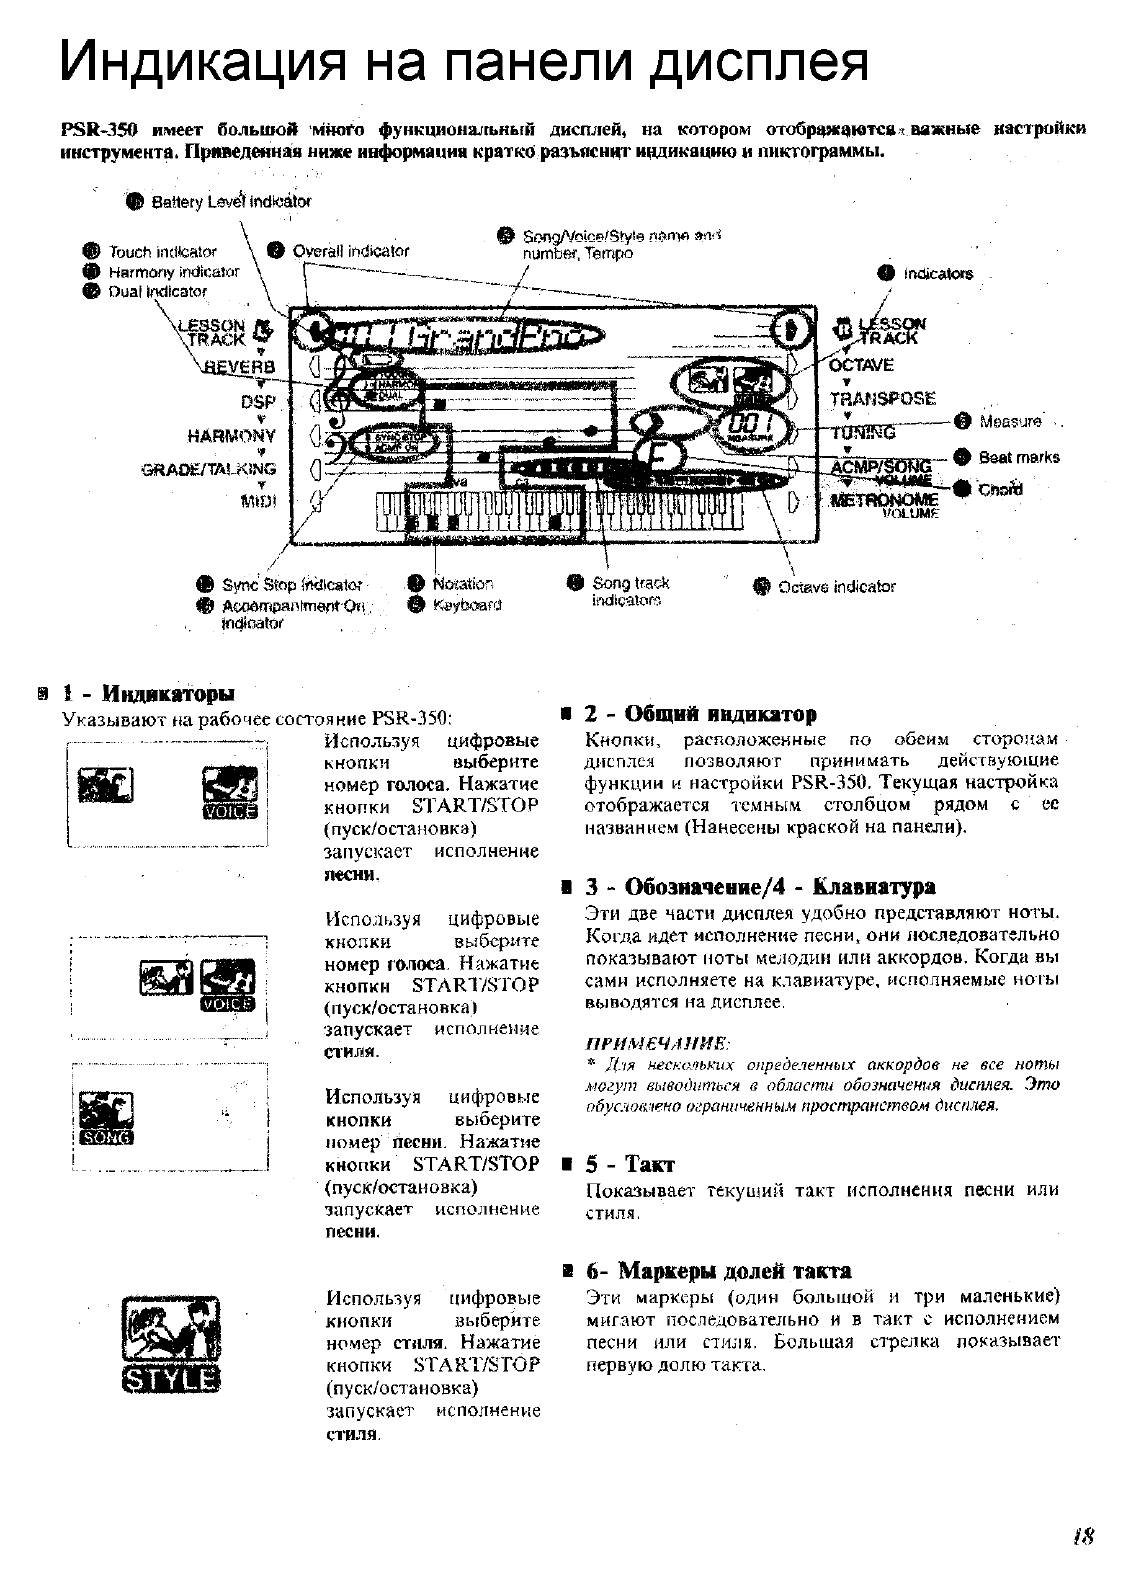
Индикация на панели дисплея ……………………….. 18
. гГ ■:
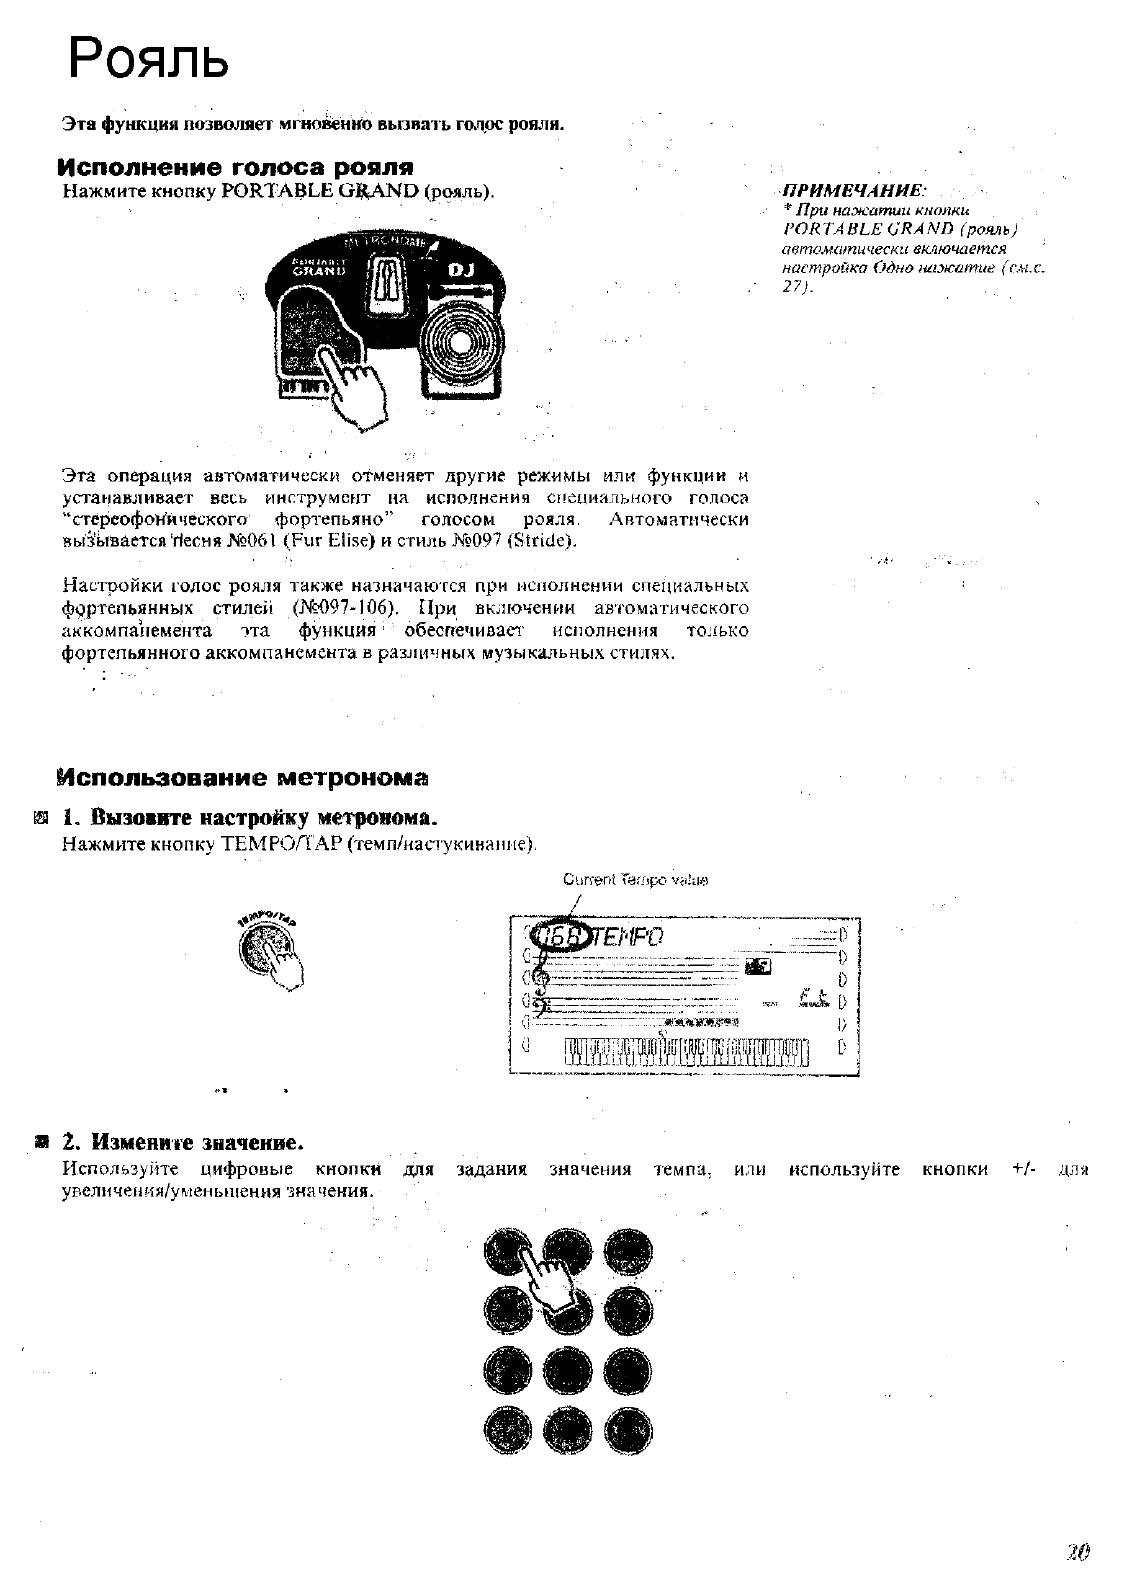
Рояль…………………………………………………………….. 20
Исполнение голоса ррШц………………………….. 20
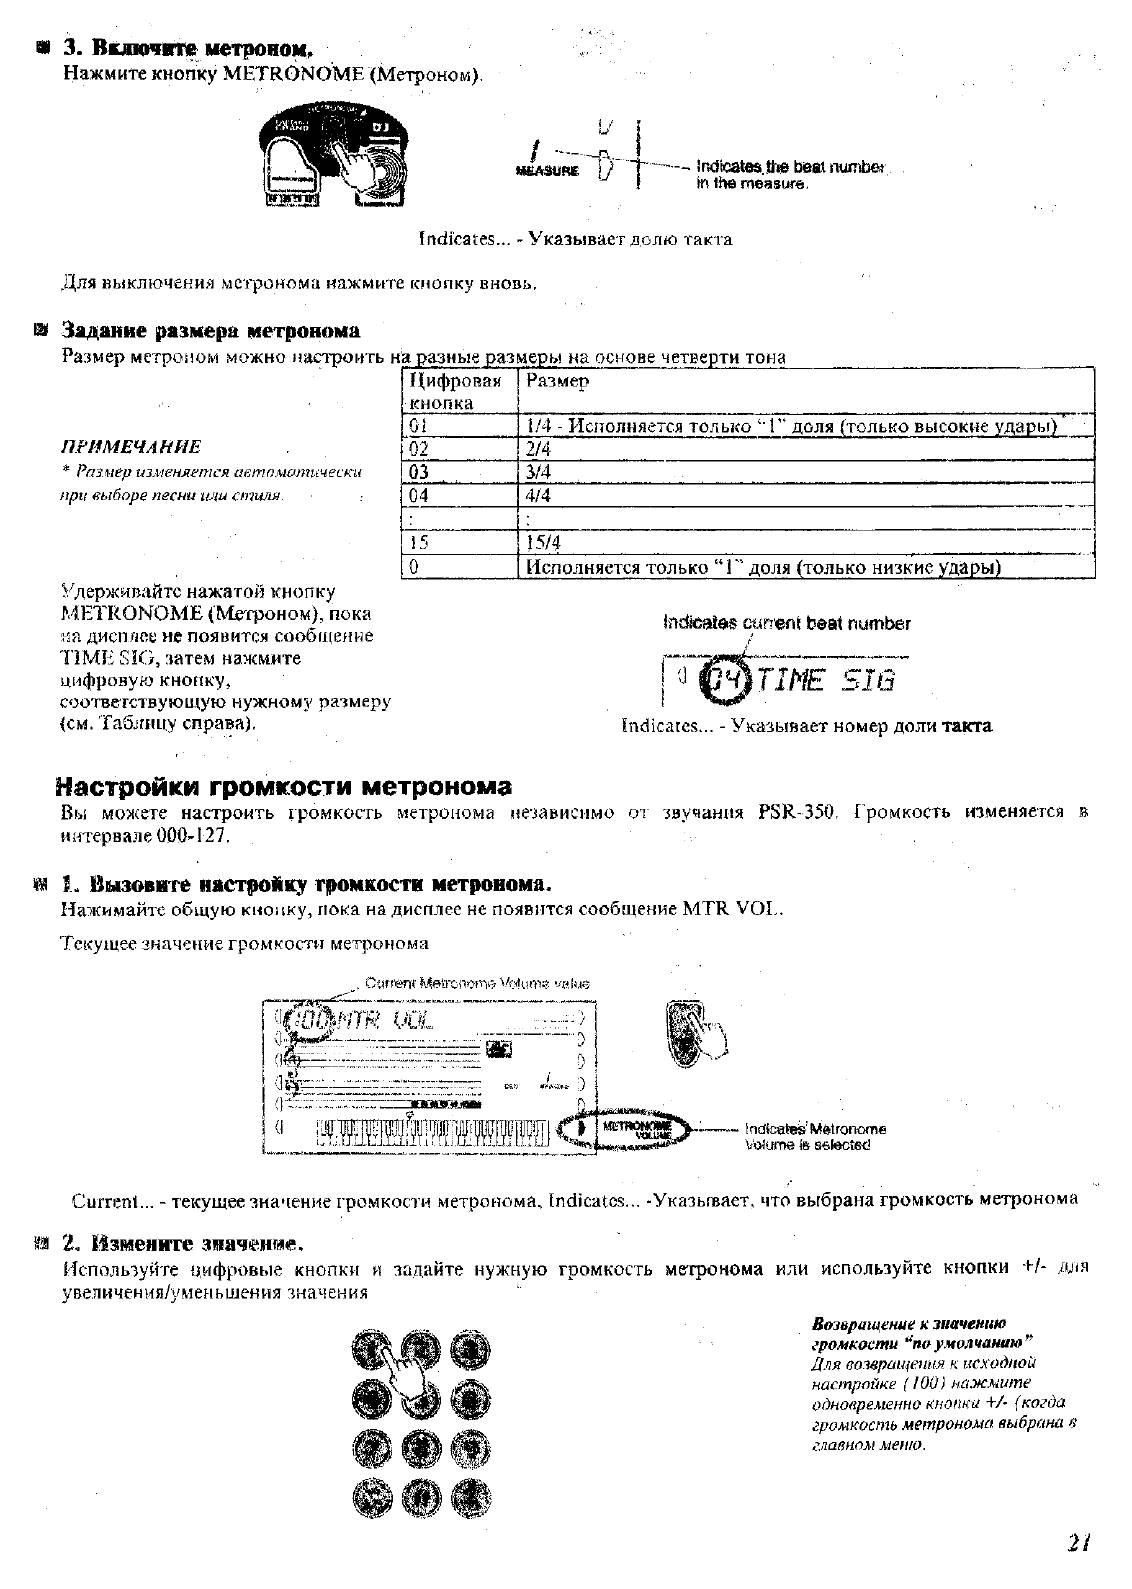
Использование метронома
20
ОТ ………….. ……………………………………………….».1…. «22
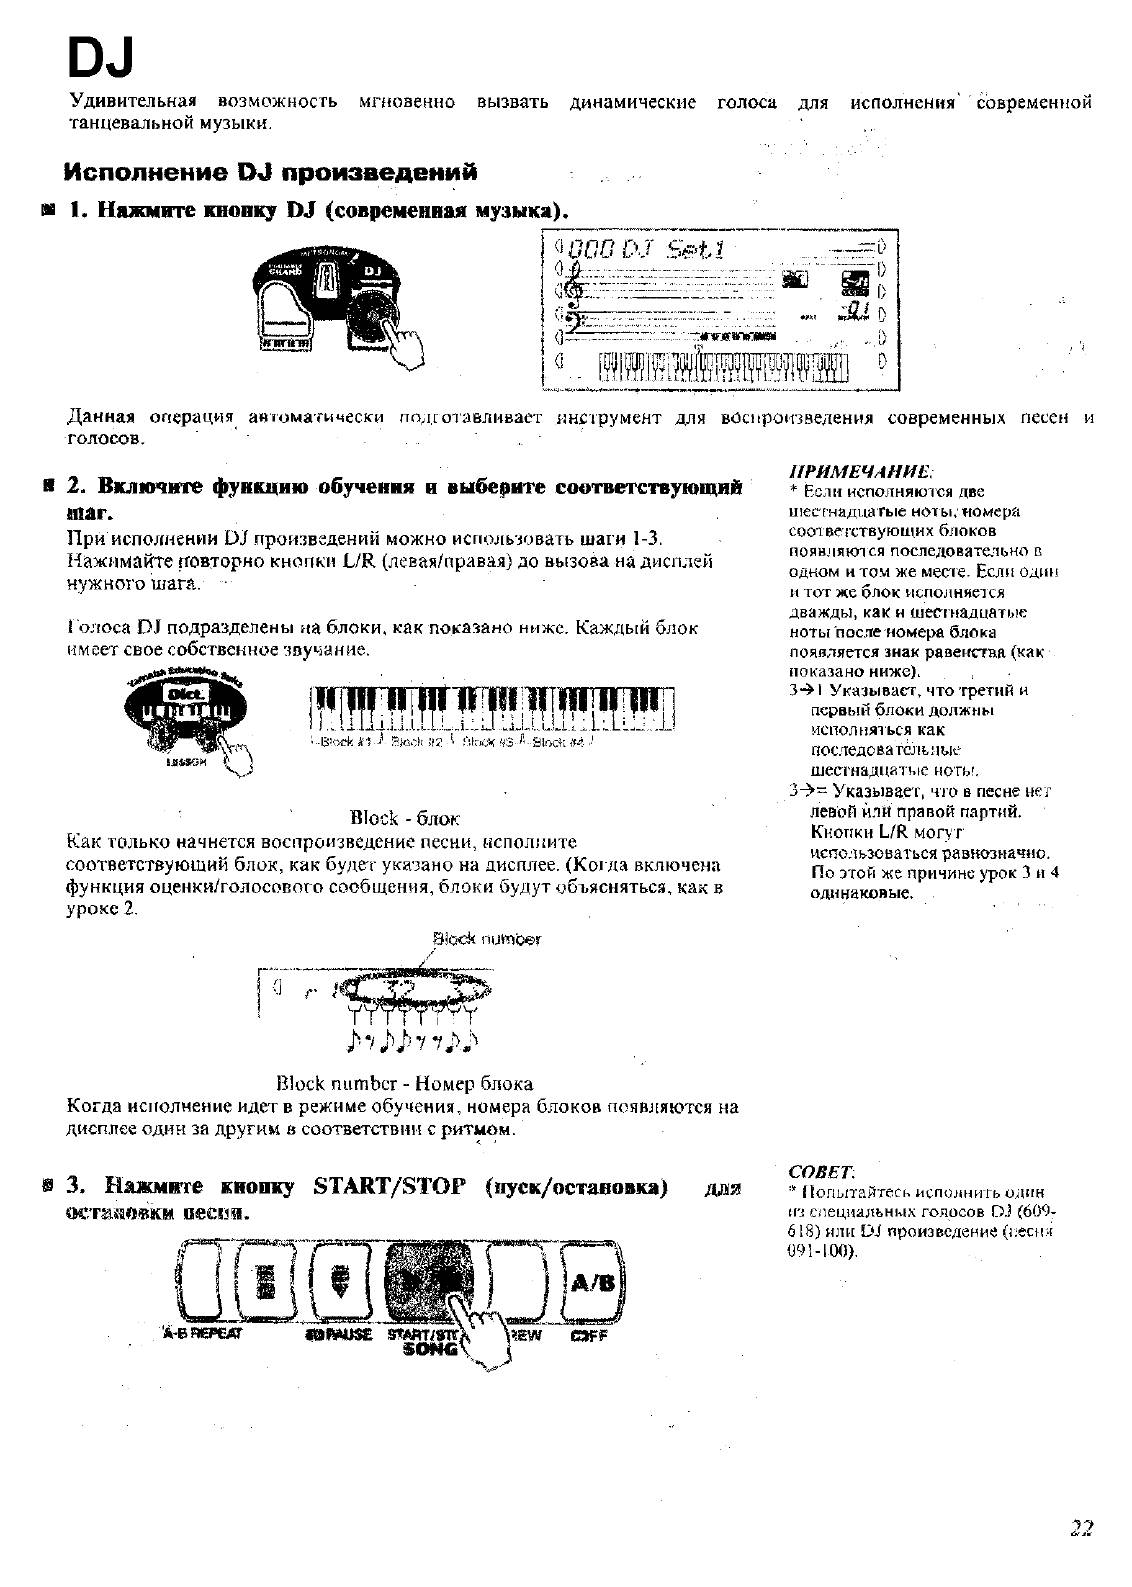
‘ Исполнение ОТ Орсжзведений »»— ……………… 22
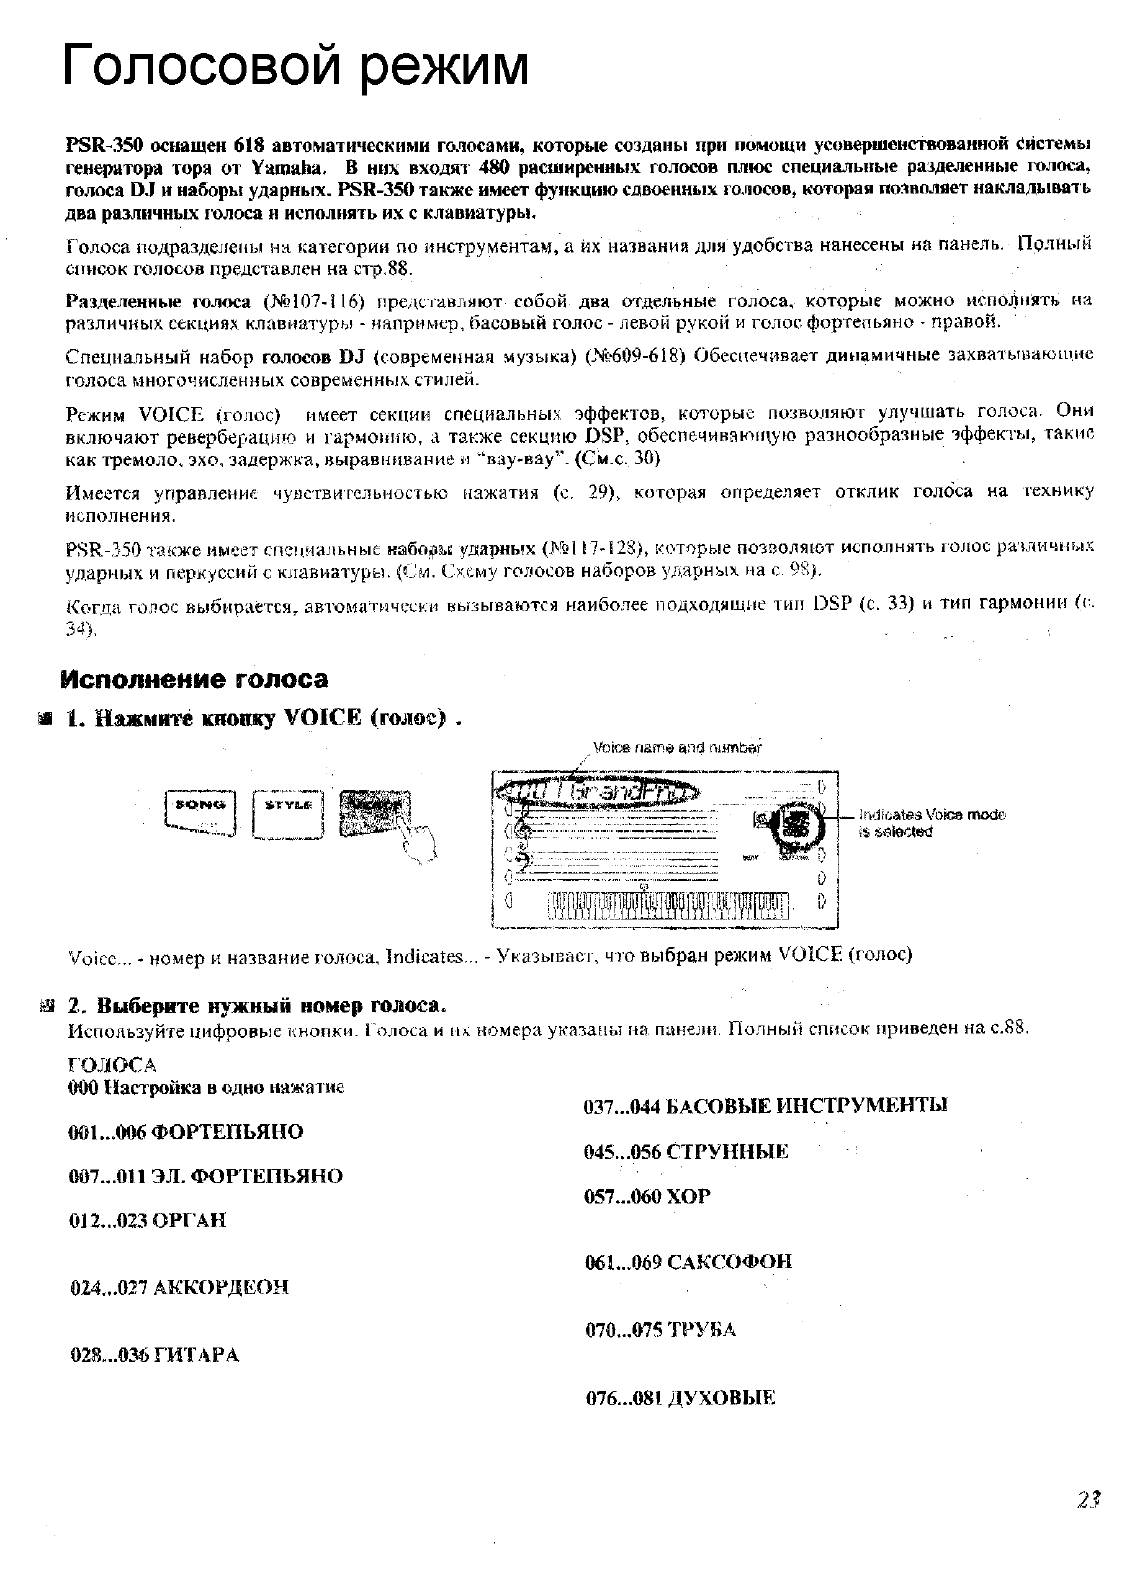
Исполнение голосов ………………………………………. 23
Исполнение голоса …………………………………… 23
Сдвоенный голос
25
Шстройка в одно Нажотие … …….. …………… . 27 v
Транспозиция и настройка ………………………….. 27
Нажатие и чувствительности нажатия ……………29
Эффекты ………………………………………………………. 30
Реверберация……………… …………….
DSP ……………………………………………………………. 31
Гармония .. ……………….. ..—……………………. 32
АнтомазтЕческий аккомпанемент…….. ……………… 35
Выбор стиля…………………………………………… …………
Исполнение аккомпанемента……………………….. 36
SYNC STOP (синхронизация остановки)……….. 40
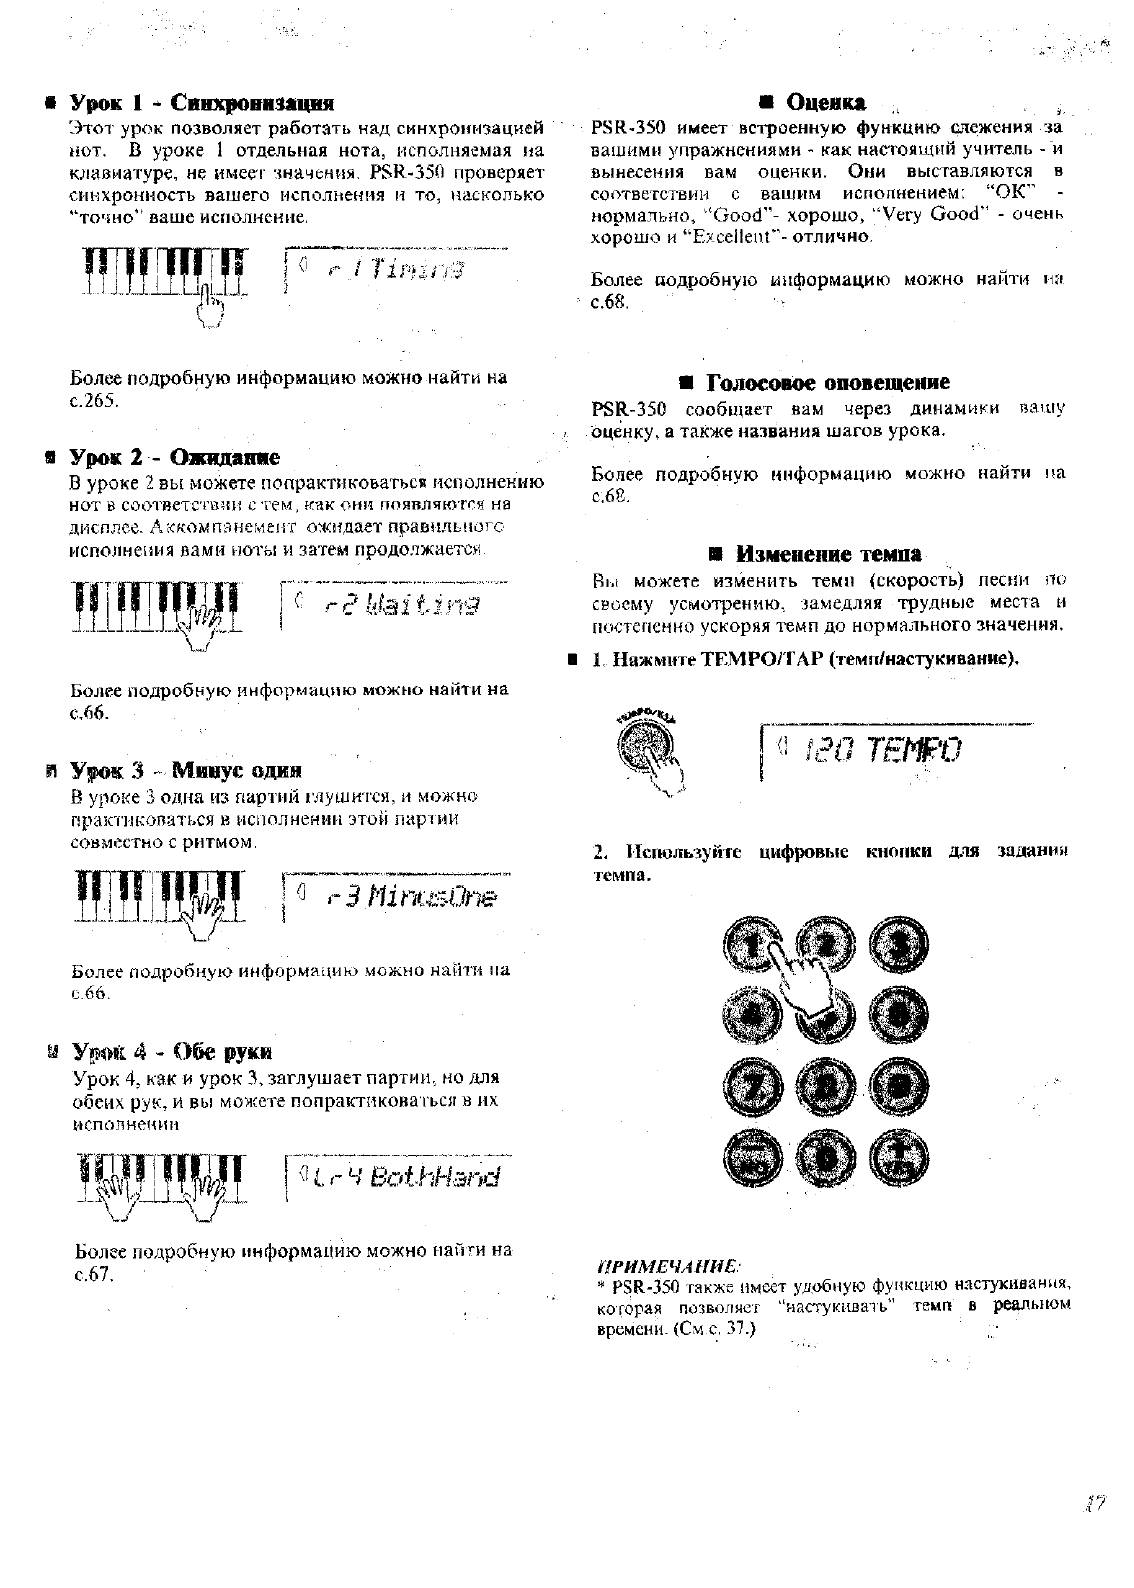
Изменение темпа……….о………………………………. 41
Секции аккомпанемента
(основной А/В и вставки)…… …….,…….. …………. .41
Настройка громкости аккомпанемента………….. 42
Использование автоматического аккомпанемента
исполнение несколькими пальцами …—……… ..43
Задание точки разделения …………………. ………… 45
Справочник …………………………………………… 46
Использ(явя
1а1е мрьдсальнрО базы данных ………… 49
Данные, сохраненные в музыкальной
базе данных …………………………………………………
Сохранение в памяти………………………………………. 51
Параиегры, занесенные в память…………………….51
Занесение настроек в память……………………….. 51
Вызов настроек из памяти ………. ……….. .— 52
и нсполнеияе пееея….. …………………… 53 v
Выбор и исполнение песни
53.
Повторение А-В ………………………………………’…«54
Изменение голоса мелодии …………………………..55
Изменение темпа
…56
Настрр)1ка голоси песни
……57
I.. ‘
Запись песай…………………………………………… ……58
Запись песни пользователя ………………………….58
Удаление песни ……………………………………… vi..6l
Удаление дорожки …………………………………. .«.62
Урок М)^ЫКИ««
……………. «………….. .«.63
Кспгшьзование функций урока……………………..63
Выбор дорожки для обучения…….. ……………… .65
Урок 1 — Синхронизация ………………………….. 65
Урок 2 — Ожидание…………………………………….. 66
Урок 3 — Минус один ………………………………. .66
Урок 4 — Обе руки………………………………………. 67
Оценка/Звуковое оповещение ………….»……..««68
Операции с дискетой……..69
Исполнение песен с дискеты …………………….. «71
Сохранение…… ……………………..i..„..^,,.„…,.«.*…72
Сохранение файлов формата SMF 0 ……«.,.,..,,74
Загрузка … …… ..¡г;«.«…………^¿…«¿«.
75
Загрузка…………………………….. ………… ,1.……. …..75
Кнопка UTILITY (Сервис) — удаление……………76
Кнопка Ш’1СГТУ (Сервис) ‘ ^фврйаГйрованис
дискеты …………………………………………………… 77
Функция MIDI ;«..,«,…………………………………….. ««.79
Что такое MIDI? «…………………………………….. 79
Подключение к персональному компьютеру .«81
Локальное управйёние………………………… «’..«.82
ИспользованиЬ ^Передачи исходных настрбек на
секвенсер …………………………………………………„;«. 83
Внешняя синхронизация ……………………………. 84
Устранение Неисправностей…………………………… 85
Реэ^вное копирование и иннциализв
1
|мя данйых «.^

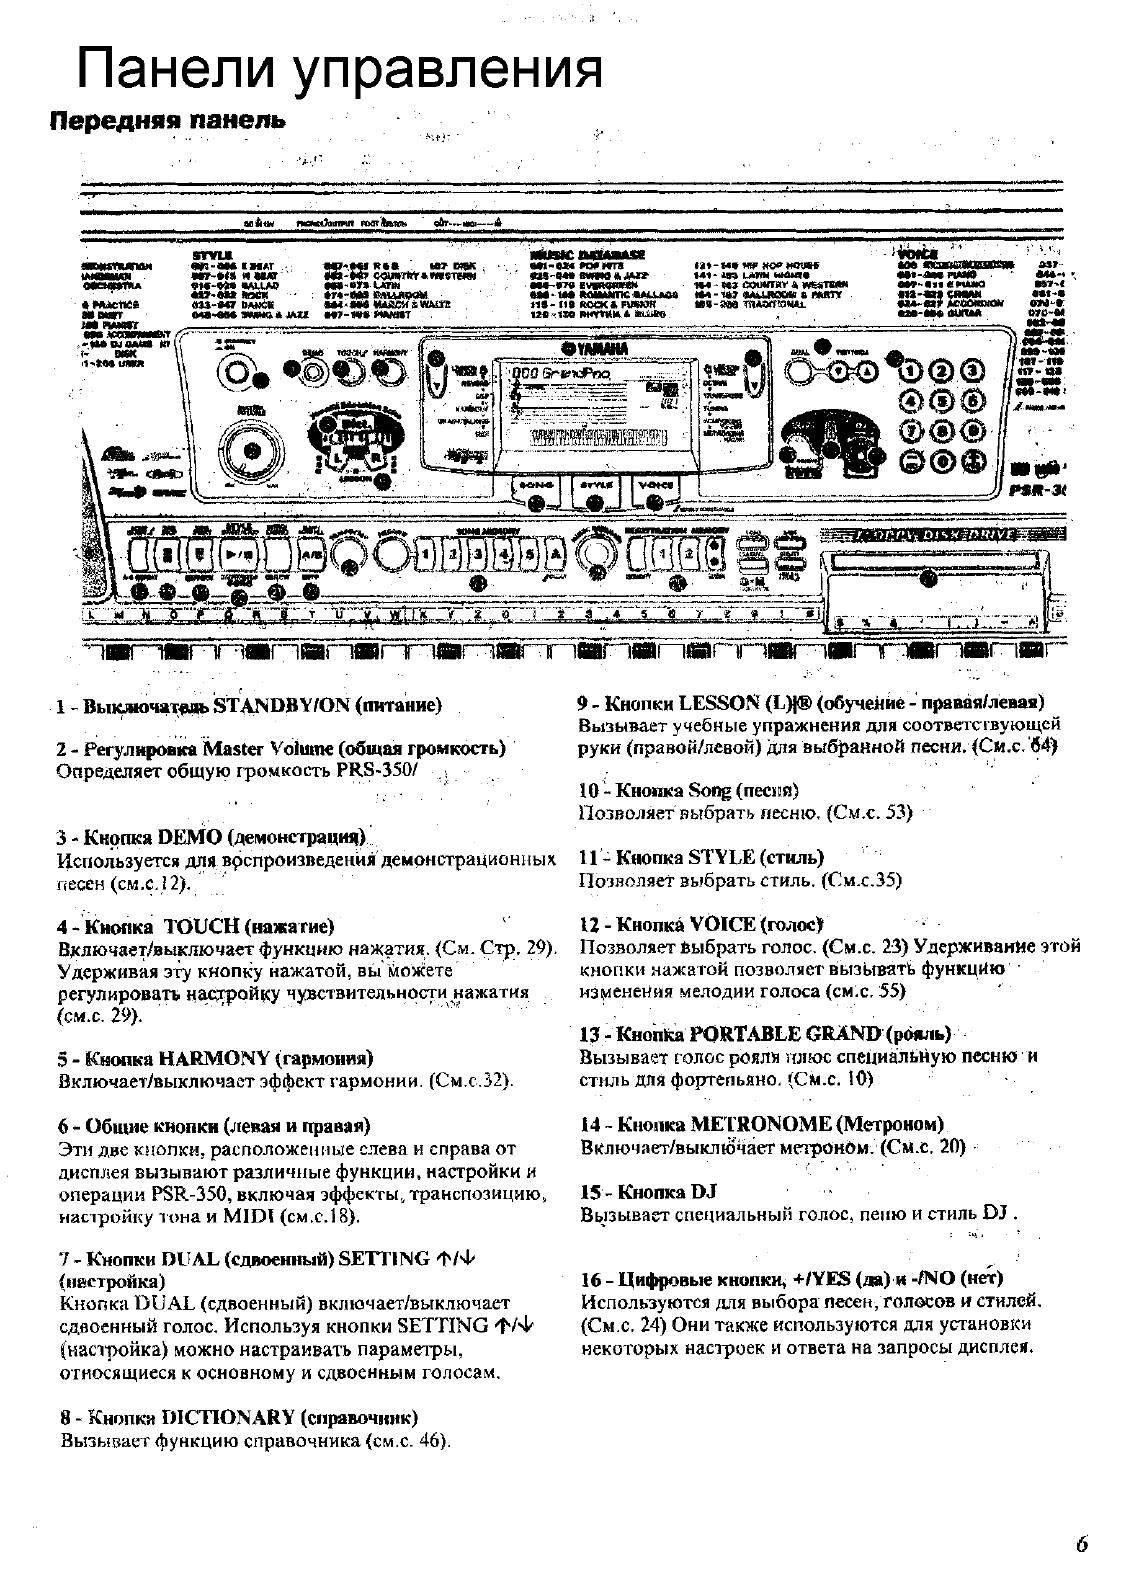
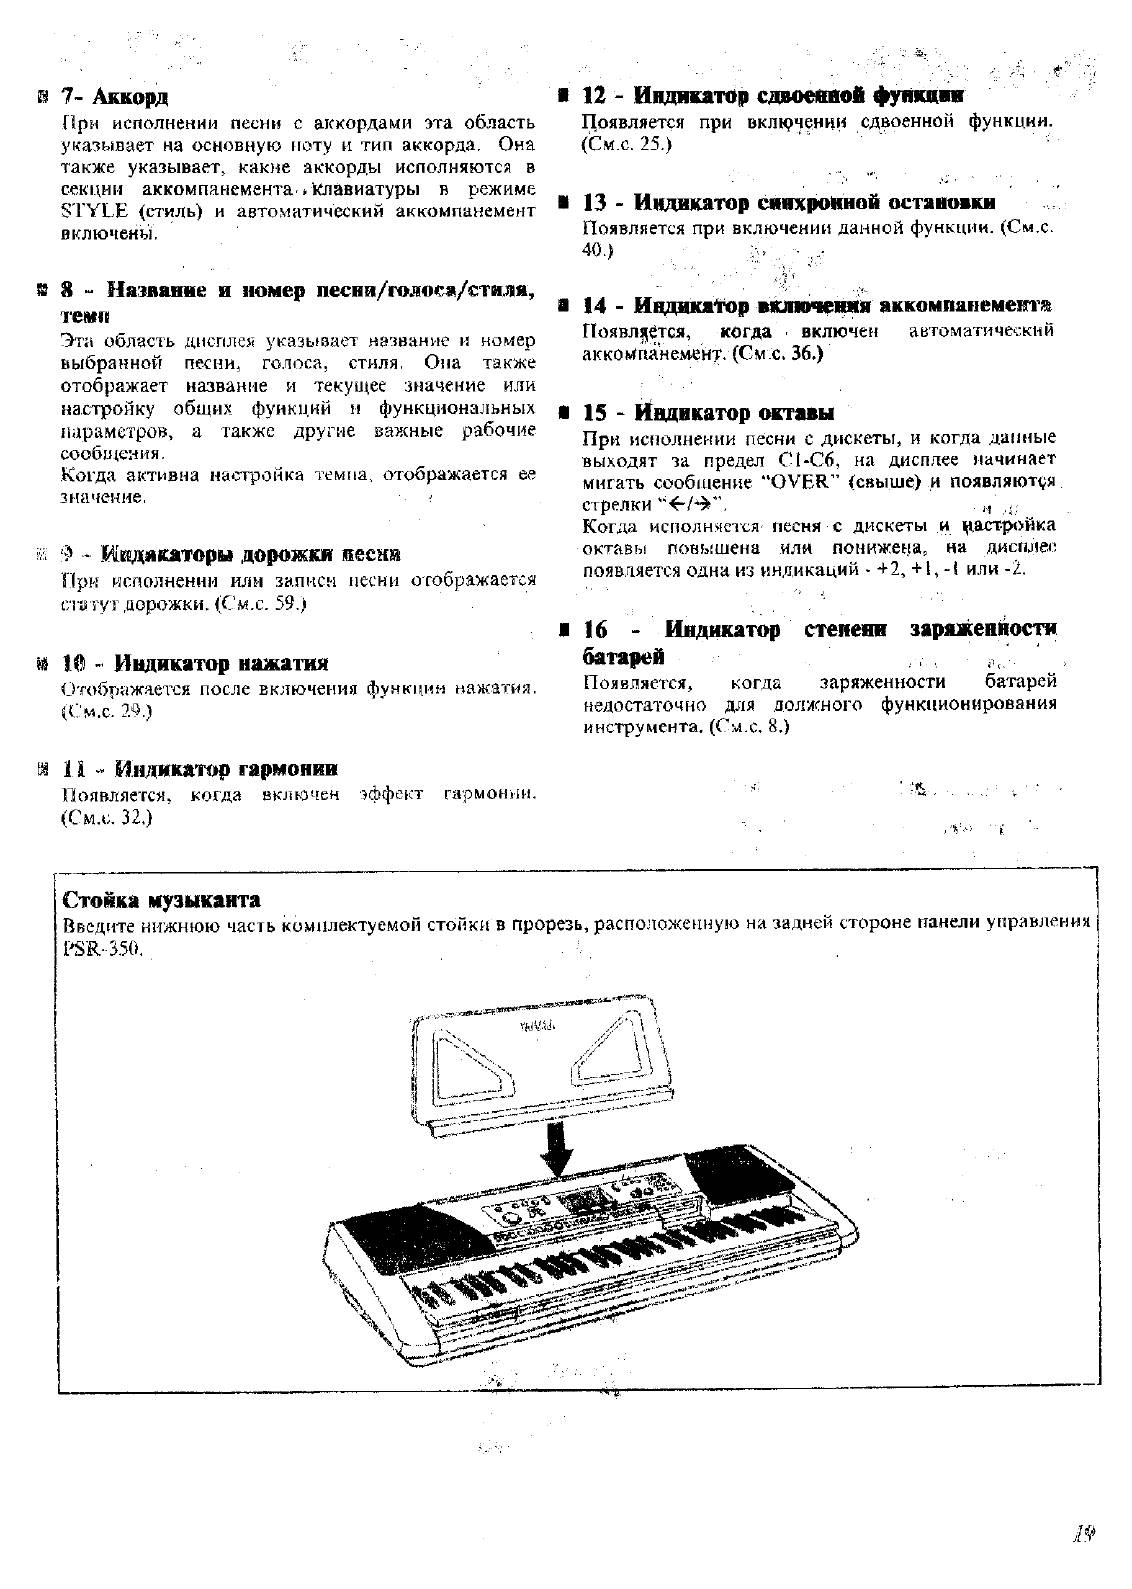
Панели управления
Передняя
панель
aoiktM «ммю^нпмп мюг1мпсн g&r—ию—А
srvu
W-M« 1ИАГ
МГ-М8 КШЫОГ
91С-»М «М.иФ
W*f«f R«« ter ВПК
■— ———
Сфп№»«м«тпт
мя-«1Ч Mtrrn
*Г«’1Мв ВШЛвкМ
0аЗ-М7 DMKK вм^«м миимашшх
она^’ВМ мяно « JMU т~*»« икктт .
а*1’в*« *09 *т
«tS-BM 8WM Я М»
«М‘ If* MilMmc MNULMw
MOCKKFW^m
t£B»«n m«mu>
w HO* MUBff
«41 ‘ w uum M4M*
«М — М3 coomitv « vffisnwM
«94 — M? «AlUICKW 4 l!WtTy
«Bs-авв тпАотоми.
J»7-
MV-««« «nu«a «sY-t
«It’in CIMM «««-•
•Jt4-«x? teeoimoir «М-*
MB-M« випм м«-*
-■^ддр-^’.щИ~Т^«Г^МГП»Г1Г^«Г^Ш-‘ГПМтЯГПвГ1*^)1»^ШГПГ^
1 » Вы
101ючат^(ь STANDS Y/ON (питание)
2 — Регулировка Master Volume (общая громкость)
Определяет общую громкость PRS-350/ ,
9 — Кнопки LESSON (L)|® (обучейие — лрявяя/левая)
Вызывает учебные упражнения для соответсгвующсй
руки (правой/левой) для выбранной песни. (Си.с. 64)
J0 — Кнопка Soi^ (песий)
Позволяет выбрать песню. (См.с. 53)
3 — Кнопка DEMO (демонстрация)
Используется для врспроизведения демонстрационных 11 — Кнопка STYLE (стиль)
песен (см.с. 12).
Позволяет выбрать стиль, (См.с.35)
4 — кнопка TOUCH (нажатие)
‘
П — Кнопка VOICE (голос)
Включает/выключает функцию нажатия. (См. Стр. 29), Позволяет Выбрать голос. (См.с. 23) Удерживание этой
Удерживая эту кнопку нажатой, вь
1
можете
регулировать н^т^ойку чувствительности нажатия
(см.с. 29).
‘
5 — Кнопка HARMONY (гармония)
Включает/выключает эффект гармонии. (См.с.32).
6 — Общие кнопки (левая и правая)
Эти две кнопки, расположенные слева и справа от
дисплея вызывают различные функции, настройки и
операции PSR-350, включая эффекты, транспозицию,
насзройку тона и MIDI (см,с. 18).
7 — Кнопки DUAL (сдвоенный) SETTING ф/Ф
(настройка)
Кнопка DUAL (сдвоенный) включает/выключает
сдвоенный голос. Используя кнопки SETTING ф/Ф
(напройка) можно настраивать параметры,
относящиеся к основному и сдвоенным голосам.
8 — Кнопка DICTIONARY (справочник)
Вызывает функцию справочника (см.с. 46).
кнопки нажатой позволяет вызывать функцию
нз
1
иенеНия мелодии голоса (смх. 55)
13 — Кнопка PORTABLE GRAND (рщмь)
Вызывает голос рояля плюс специальную песню и
стиль для фортепьяно. (См.с. 10)
14 ~ Кнопка METRONOME (Метроном)
Вклгочает/выкл
1
очает метронбм. (См.с. 20) •
15 -Кнопка DJ
Вызывает специальный голос, пеню и стиль DJ .
16 — Цифровые кнопки^ +/¥Е8 (да) и -/N0 (нет)
Используются для выбора песен, голосов и стилей.
(См.с. 24) Они также используются для установки
некоторых настроек и ответа на запросы дисплея.

17 — {Снрпка лес 0^р1Ф<вкл/^^
я
1
?ЕсомпйнементаУА-В REPEAT (повторение А-В)
В режиме STYLE (стиль) эта кнопка
йключает/выключает автоматический аккомпанемент.
(Смх. 36). В режиме Song (песня) она вызывает
функцию повторения А-В.
18 — Кнопка SVNG STOP (остановка синхронизации)
Включает/выключает функцию синхроннзаиии. (См.с,
40).
‘
19″ Кнопка SYNC START (пуск синхронизации)/ П
PAUSE (пауза)
Вюиочает/выключает функцию пуска синкронЕ^зации.
(См.с 3?) В режиме Song (песня) используется для
времепиой остановки воспроизведения песни. (См.с.
55)
.
^
20 — Кнопка START^STOip (пуск/остановка)
При выборе режима STYI.E (стиль) эта кнопка
поочередно запускает/останавливает автоматический
аккомпанемент! (См.с. 36). В режиме Song (песня) ока
поочередно включает/выключает восироизведегчие.
(См.с. 54).
21 — Кнопка INTRO/ENDSNC
(BCTy»neHHc/K
0
HU
0
BKa)/«REW (назад)
При выборе режима STYLE (стиль) эта кнопка
управляет функ
1
|ией вставки/концовки. (См.с. 36) В
режиме Song (песня) она управляет “перемоткой”
назад и.перемещает воспроизведение назад к началу
песни.
22 — Кнопка MAIN/AUTO FILL (основной, авто
BCTaeica)/»FF (вперед)
В режиме STYLE (стиль) эта кнопка используется для
изменения секции автоматического аккомпанемента и
управление функцией автоматической вставки. (См.с.
4!).
В режиме Song (песня) она используется для ^
“перемотки^ воспроизведения вперед по направлению
к концу песни.
23 — Кнопка ТЕМРО/ТАР (темп/настукиваи
11е)
Эта кнопка используется для настройки темпа,
позволяя задавать темп при помощи цифровых кнопок
или кнопок “+/л‘. (См.с. 20). Она также позволяет
настукивать темп а автоматически запускать песню
или стиль при этой скорости настукивания. (См.с.37)
24 — Кнопки SONG MEMORY (песенная память)
Эти кнопки (RECORD (запись), (10…(5)) используются
для записи песен, позволяя вести запись по шести
различным д(^жкам (включая специальную дорожку
аккордов). (См.с. 59) Они также используются .для
удаления записанных данных ср всех или
определенных дорожек для песни пользователя. (См.с.
61,62).
25 — Кнопка MUSIC DATABASE (музьпса;^ь,ная база
данных)
Вызывает оптимальные настройки для выбора
музыкального жанра. (См.с. 49)
26 “ Кнопки REGISIRATION MEMORY (сохранение в
памяти)
Используются для выбора и сохранений заданных
настроек- (См .с, 51)
27 — Дисковод
Используется для введения дискез’Ы, загрузки и
сохранения данных. (См.с. 69)
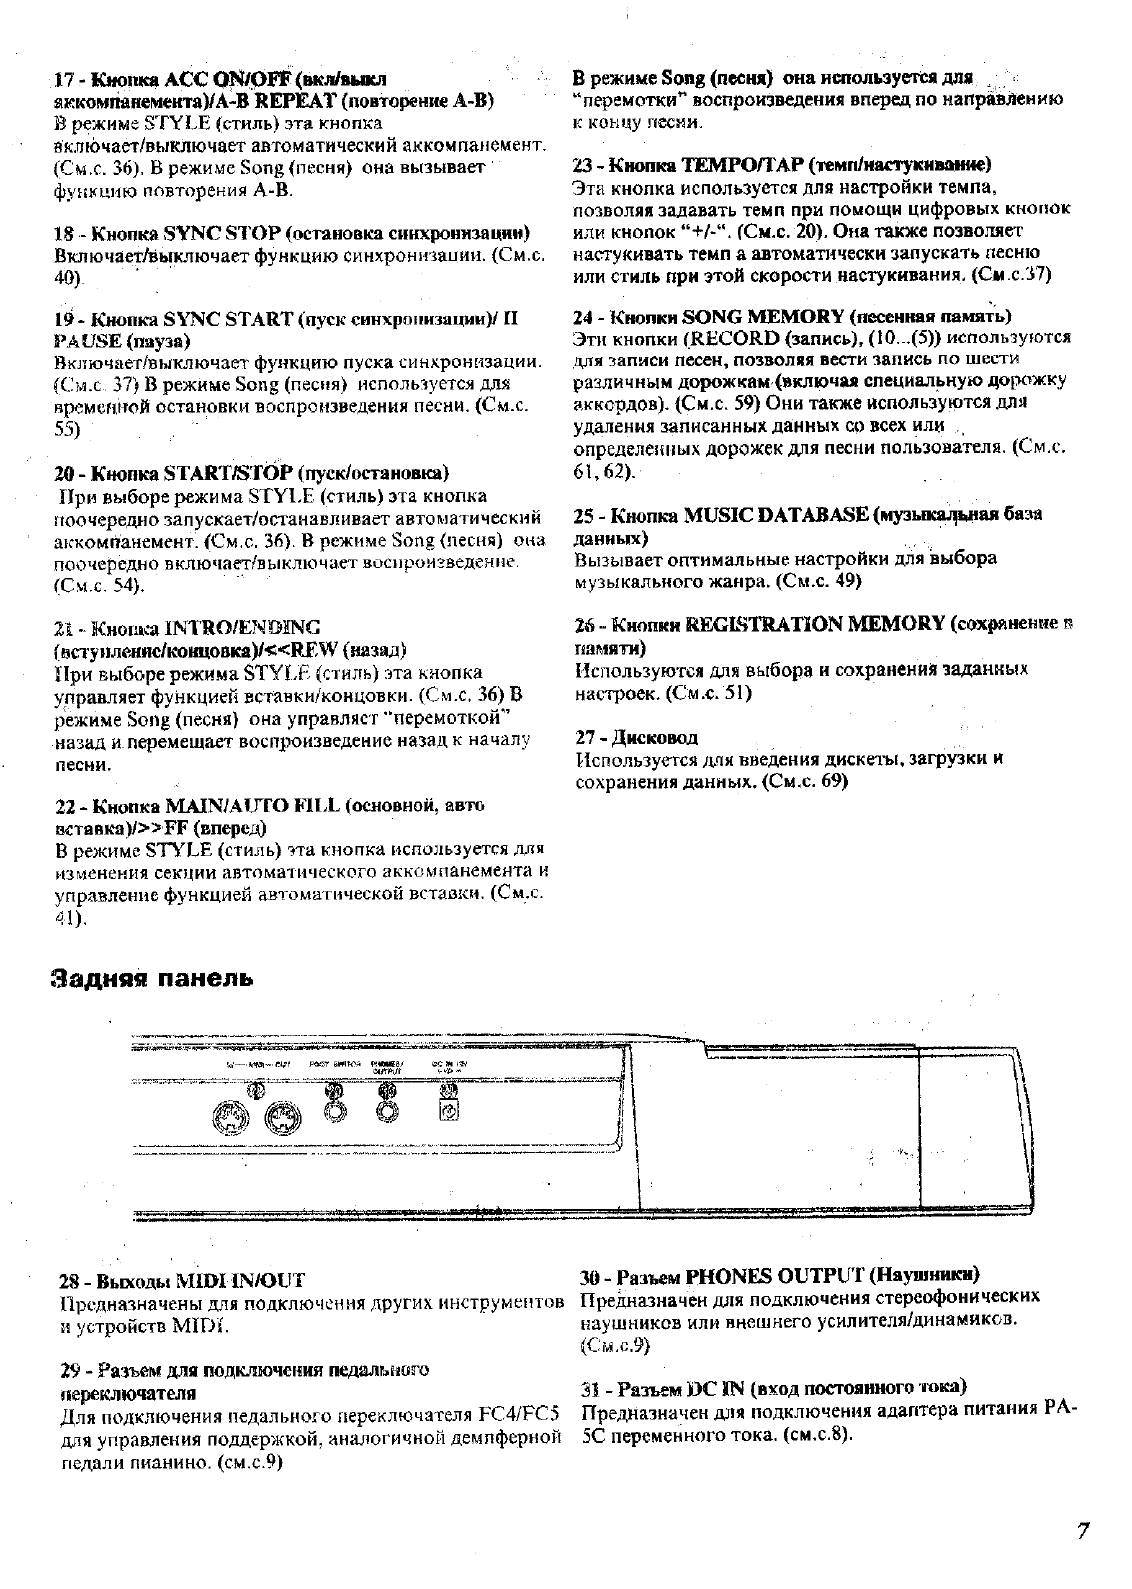
Задмя«! панель
28 — Выходы MЮИN/OUT
Предназначены для подключения других инструмеЕЕтов
и устройств МШ1.
29″ Разъем для подключения педальиого
переключателя
Для подключения Етедального переключателя ЕС4/РС5
для управления поддержкой, аналогичной демпферной
педали пианино, (см.с.9)
30 — Разъем PHONES OUTPUT (Наушники)
Предназначен для подключения стереофонических
наушников или внешнего усилителя/динамиков.
(См.с.9)
31 — Разъем DC IN (вход постоянного в ока)
Предназначен для подключения адаптера питания PA
SC переменного тока, (см.с.8).

Настройка
Этот разщел содержит информацию относительно настройки Р8К-350 для воспроизведения,
оэнапомьтесь с эти№разделом («фед использованием инструмента.
Внимательно
TpitiNm ■ MTUMi
Хотя PSR-350 может работать как от адаптера питания, как и от батарей,
компания Yamaha рекомендует использовать преимущественно адаптер.
ВНИМАНИЕ!
Нтогда не пр^^ытйте подачу
тгтния в процессе записи на PSH-
350 (не вынимайте батареи или не
выключайте адаптер). Это может
привести к утрете данных!
Использование адаптера переменного тока
Для подключения инструмента к стенной розетке вам потребуется адаптер
питания Yamaha ЗА-5С. Использование других адаптеров может привести к
порче инструмента.
Убедитесь, что переключатель STANDBY/ON (питание) установлен в
положение STANDBY. Подключите один конец адаптера к разъема DC IN
(вход постоянного тока), расположен
1
Юму на задней панели PSR-350, а
другой конец — к стенной розетке.
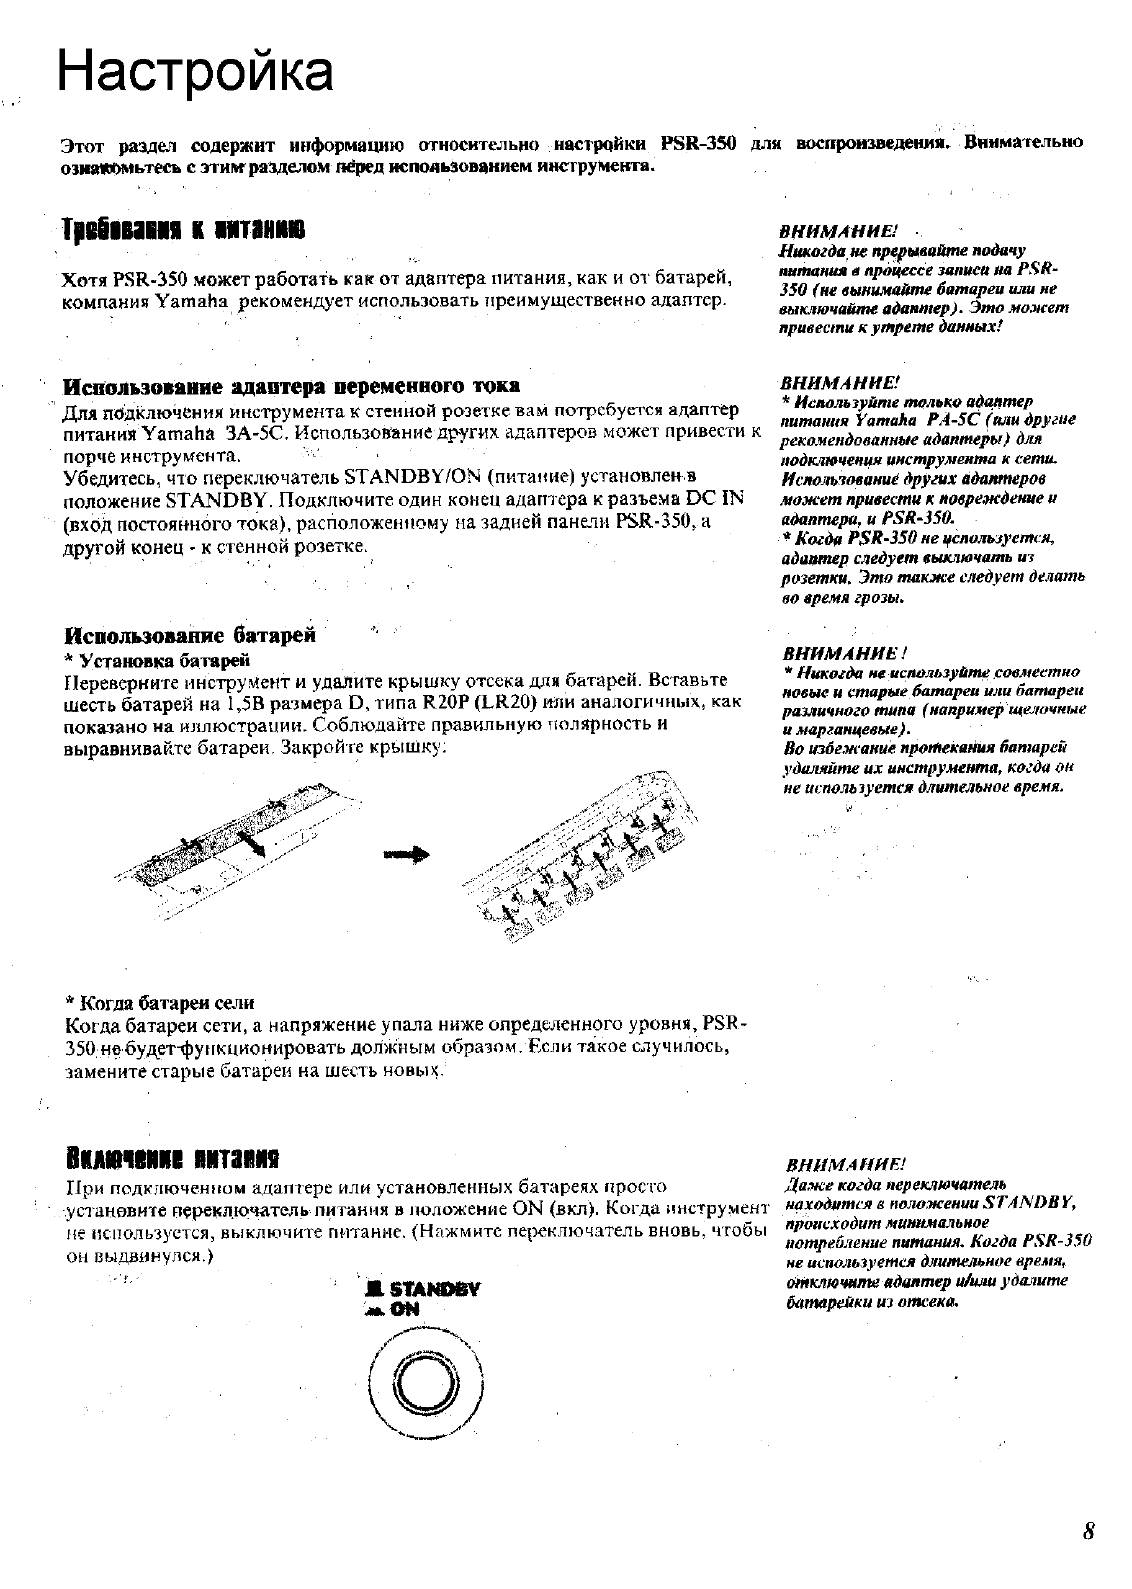
Использование батарей
* Установка батарей
Переверните инструмент и удалите крышку отсека для батарей. Вставьте
шесть батарей на 1,5В размера D, типа R20P (LR20) или аналогичных, как
показано на иллюстрации. Соблюдайте правильную тюлярность и
выравнивайте батареи. Закройте крышку;
‘ да
ВНИМАНИЕ!
* Используйте только а^птер
питания Yamaha РА-5С (или другие
рекомендованные адаптеры) для
подключения инструмента к сети.
Иснолыовамиё других адаптеров
может привести к повреждение и
адаптера, и PSB-350.
* Когда PSR-350 не цспользуется,
адаптер саедует выключать из
розетки. Это также следует делать
во время грозы.
ВНИМАНИЕ!
* Никогда не используйте совместно
новые и старые батареи или батареи
различного типа (например щелочные
и марганцевые).
Во избежание протекания батарей
удаляйте их инструмента, когда он
не используется длительное время.
* Когда батареи сели
Когда батареи сети, а напряжение упала ниже определенного уровня, Р8В —
350 небудет-функционировать должным образом. Если такое случилось,
замените старые батареи на шесть новых.
1ммтп шапм
При подключенном адаптере или установленных батареях просго
у сзан ов ите переключател
ь
п ита н и я в I юл ожен е ON (вкл
)
. К огда I
!
нстру
,>1
енз
находится в положении 8 ТА1^ВВ К,
не используется, выключите питание. (Нажмите переключатель вновь, чтобы
происходит минимальное
он выдвинулся.)
ВНИМАНИЕ!
Даже когда переключатель
stAmm
0Н
потребление питания. Когда Р8В-350
не используется длительное время,
отключите адаптер ийми удалите
батарейки из отсека.
8

es«iifirimyiui
щщш
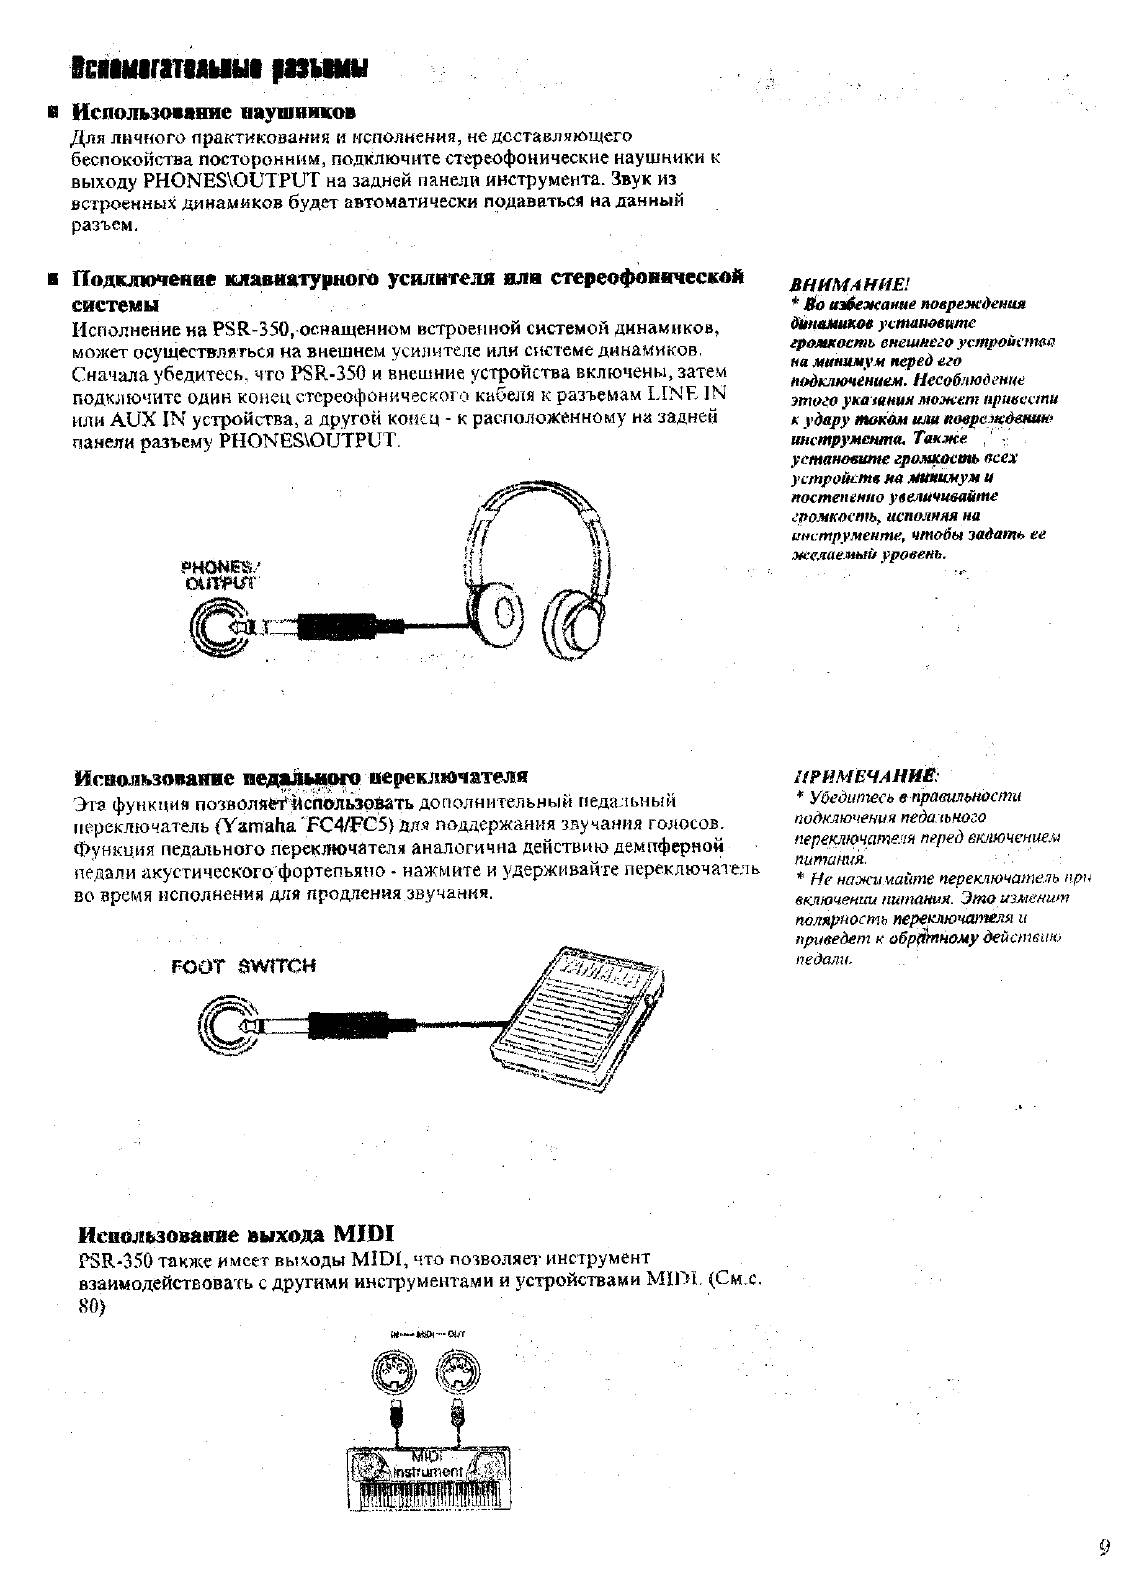
в Иепользомние наушников
Для личного практикования и исполнения, не доставляющего
беспокойства посторонним, подключите стереофонические наушники к
выходу PHONES\OUTPUT на задней панели инструмента. Звук из
встроенных динамиков будет автоматически подаваться на данный
разъем.
Подклтенне клавнатурного усилителя или стереофонической
системы
Исполнение на PSR-350, оснащенном встроенной системой динамиков,
может осуществляться на внешнем усилителе или системе динамиков.
Сначала убедитесь, что PSR-350 и внешние устройства включены, затем
подключите один конец стереофонического кабеля к разъемам LINE IN
или
AUX IN устройства, а другой конец — к расположенному на задней
панели разъему PHONES\OUTPUT.
CXnWî»
внимАнт!
*
1^0 избежание поережЬенш
^блнимииой устаититс
грожиость
енешпего
устроиатв
на минимум перед его
подтиочением. Несоблюдение
этого укаэяния может привести
А удару токам или иоврелкдении*
инструмента. Также , —
установшпе громкость осех
устройств на Минимум и
постепенно увеличивайте
громкость^ неполная на
инструменте, чтобы задать ее
желаемый уровень.
ИсЕшл1ьзо1ваш1е
Эта функций позволяе^^С
110
Льзр]^ть дополнительный педальный
переключатель (Yamaha ‘FC4/FG5) дл.я поддержания звучания голосов.
Функция педального переключателя аналогична действию демпферной
педали акустического фортепьяно • нажмите и удерживайте переключатель
во время исполнения для продления звучания.
FOOT eWÎTCH
аРИМЕЧАННЁ
* Убедитесь в правильности
подключения педального
переключателя перед включением
питания.
* Ие нажимайте переключатель при
еключенюА питания. Это ишенит
полярность переключателя и
приведет к обр1^ыому дейспшпо
педали.
Ис&ол
1
^зова
1
Шс выхода МШ1
P3R-3.‘>0 также имеет выходы MIDI, что позволяет инструмент
взаимодействовать с другими инструментами и устройствами МШЕ (См.с.
80)
— -шг

Краткое руководство шаг1. голоса, Исполнение на фортепьяно, Ш 1. нажмите кнопку portable grand (рояль)
Исполнение с метрономом, Нажмите кноик^ metronome (метроном), 2* начните исполнение на клавиа1тре Чат поддержки
- Изображение
- Текст
Краткое руководство Шаг1. Голоса
■: ©
,
wntinti
•••
ффф
гяяи^тииу
ффф 1
___J
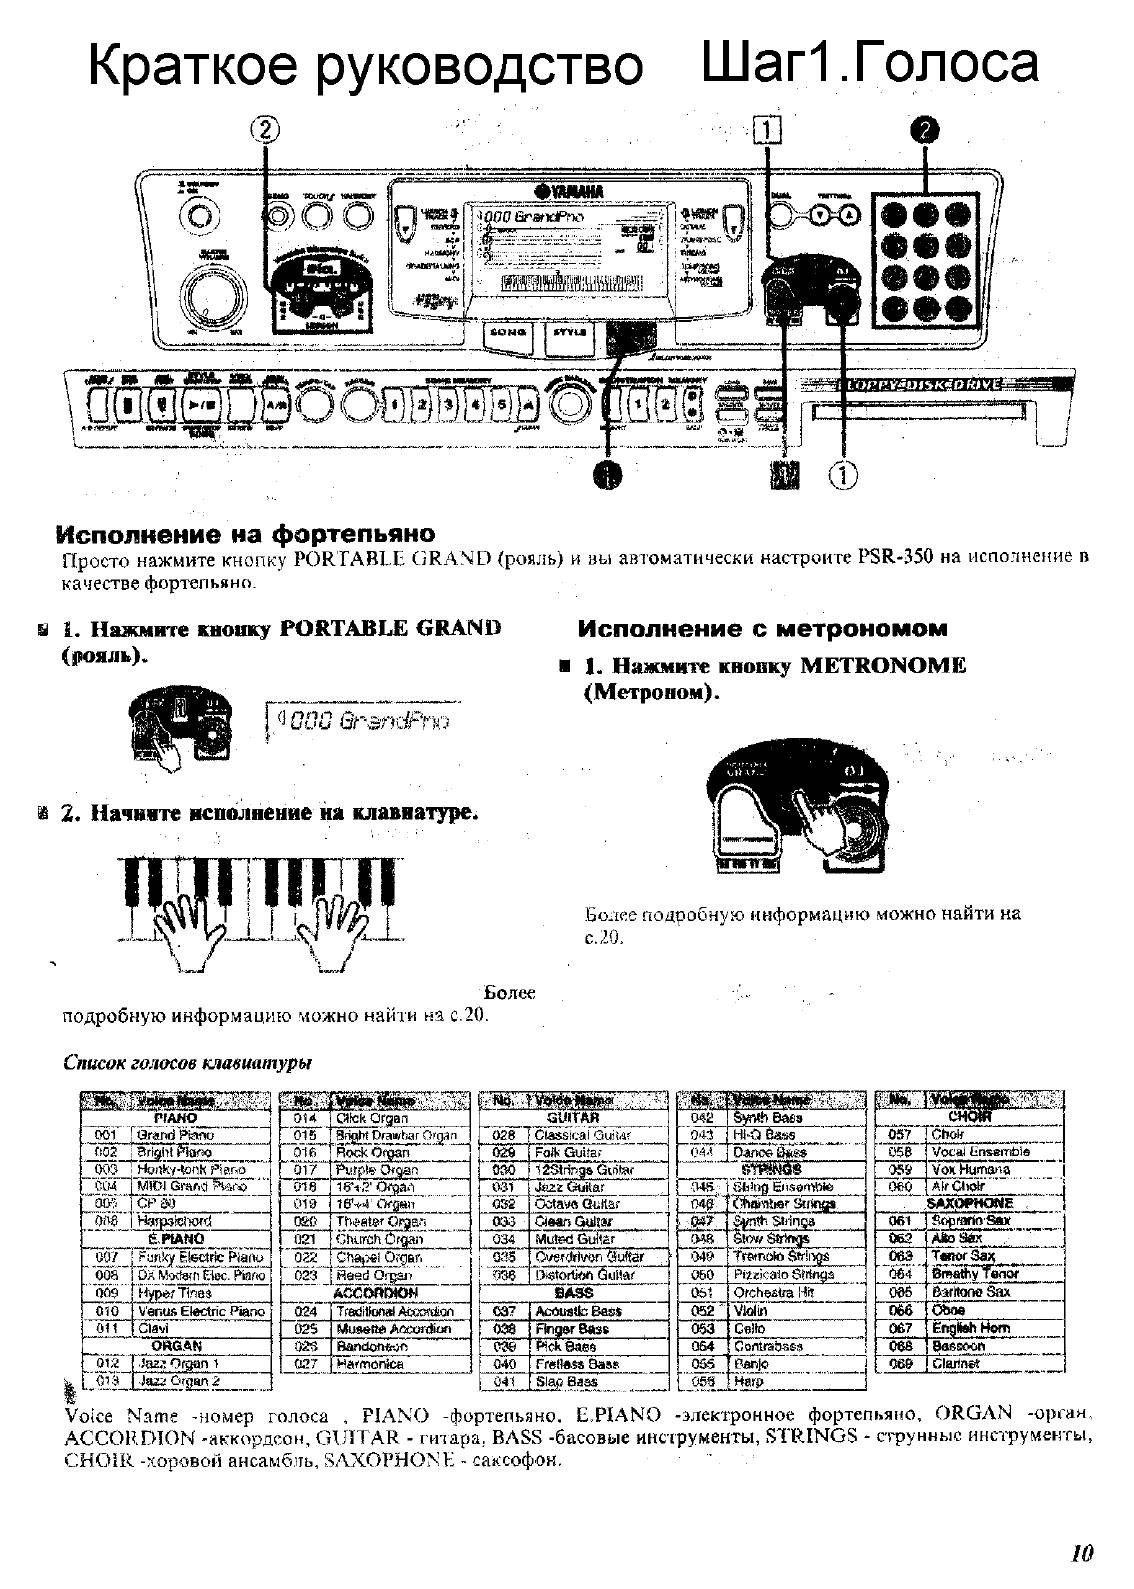
Исполнение на фортепьяно
просто нажмите кнопку PORTABLE GRAND (рояль) и вы автоматически настроите PSR-350 на исполнение в
качестве фортепьяно.
ш 1. Нажмите кнопку PORTABLE GRAND
(рояль).
R’ooo Qrandf’
Исполнение с метрономом
■ 1.
Нажмите кноик^ METRONOME
(Метроном).
по
2* Начните исполнение на клавиа
1
тре.
Более подробную информацию можно найти на
с.
20.
Более
подробную информацию можно найги на с.20.
Список голосов клавиатуры
__ ______ PfÀHO _____
00Ì forarid Ptoiio'»» _______ ^
» if05″iari^^arto
003
HcNìky-tonli Piano
C04
‘»ооГ“
«eoa»“
»*009…
MÌO) Gmrto
CPiKJ
H.nrfi3itì>ord
éJHANQ___ ____J
Fonky El^ctdc Ptaiiu »
DXMKf9fn0ec. PiaM
Hyper Дл8$
сио
V’enus Electric Piano
oil
CÌavi
OHG.4N
01 ;2 Эазл Organ i
Jazi Organ 2
Guim«
028 ‘ Ctassicai Guiiar
ОЙв Folk Guiiaf
Si»
12Si!togs Gifitof ’
031
J&zz GfuHar
032
Octave Qatlar
ОВД dean Gyiiai’
034
Mated Guitar
^“’ойГ^Cverdrivan éuf^r ..
036
Oistortifto Guitar
BASS
037
Acoustb Baas
038
Ftegar Bass
030
Pick Baes
040 [ Frettftss Bass
041 I S]g^ , __________
04Ì!
“043
«(ЯТ’
Baas
Hi-O
Danoé i^ìis
.04В.;
М0;.-
049
050
Ob-j
053
054
055
ШШЖ
sti’jRfl Elisembte
Stnnsff
Stfinga
bowstrings»
Trinato
Pizzicato Stringa
Ofchgstfa Hit
Violin»
Cello
Banjo
^tÌÌ№»
057
1
Choir
058 I Vocai Ensembia
059
Vox Humana
oeo j Air CtioV
SAXPPHONB
001
ОбТ
j Sopmsio’Stet___
TAitoSax
06Э
‘»064
1 _______________
t Br^Shy fen^
086
Baritone Sax
066
Oboe
067
English Horn
oes
Bassoon
060 j Clarinet
Harp
Voice Name -номер голоса , PIANO -фортепьяно, E.PIANO -электронное фортепьяно, ORGAN -орган,
ACCORDION -аккордеон, GUITAR — гитара, BASS -басовые инструменты, STRINGS — струнные инструменты,
CHOIR -хоровой ансамбль, SAXOPHONE — саксофон.
‘ г
10

Выбор г исполнение, 1 3ì( начните исоолиенне на клавиатуре, Нажмите киопку 03 (современная музыка)
I 3. начните исполнение 03 голоса, Выбор и исполнение песни, Т т т, При использовании исполнение Чат поддержки
- Изображение
- Текст
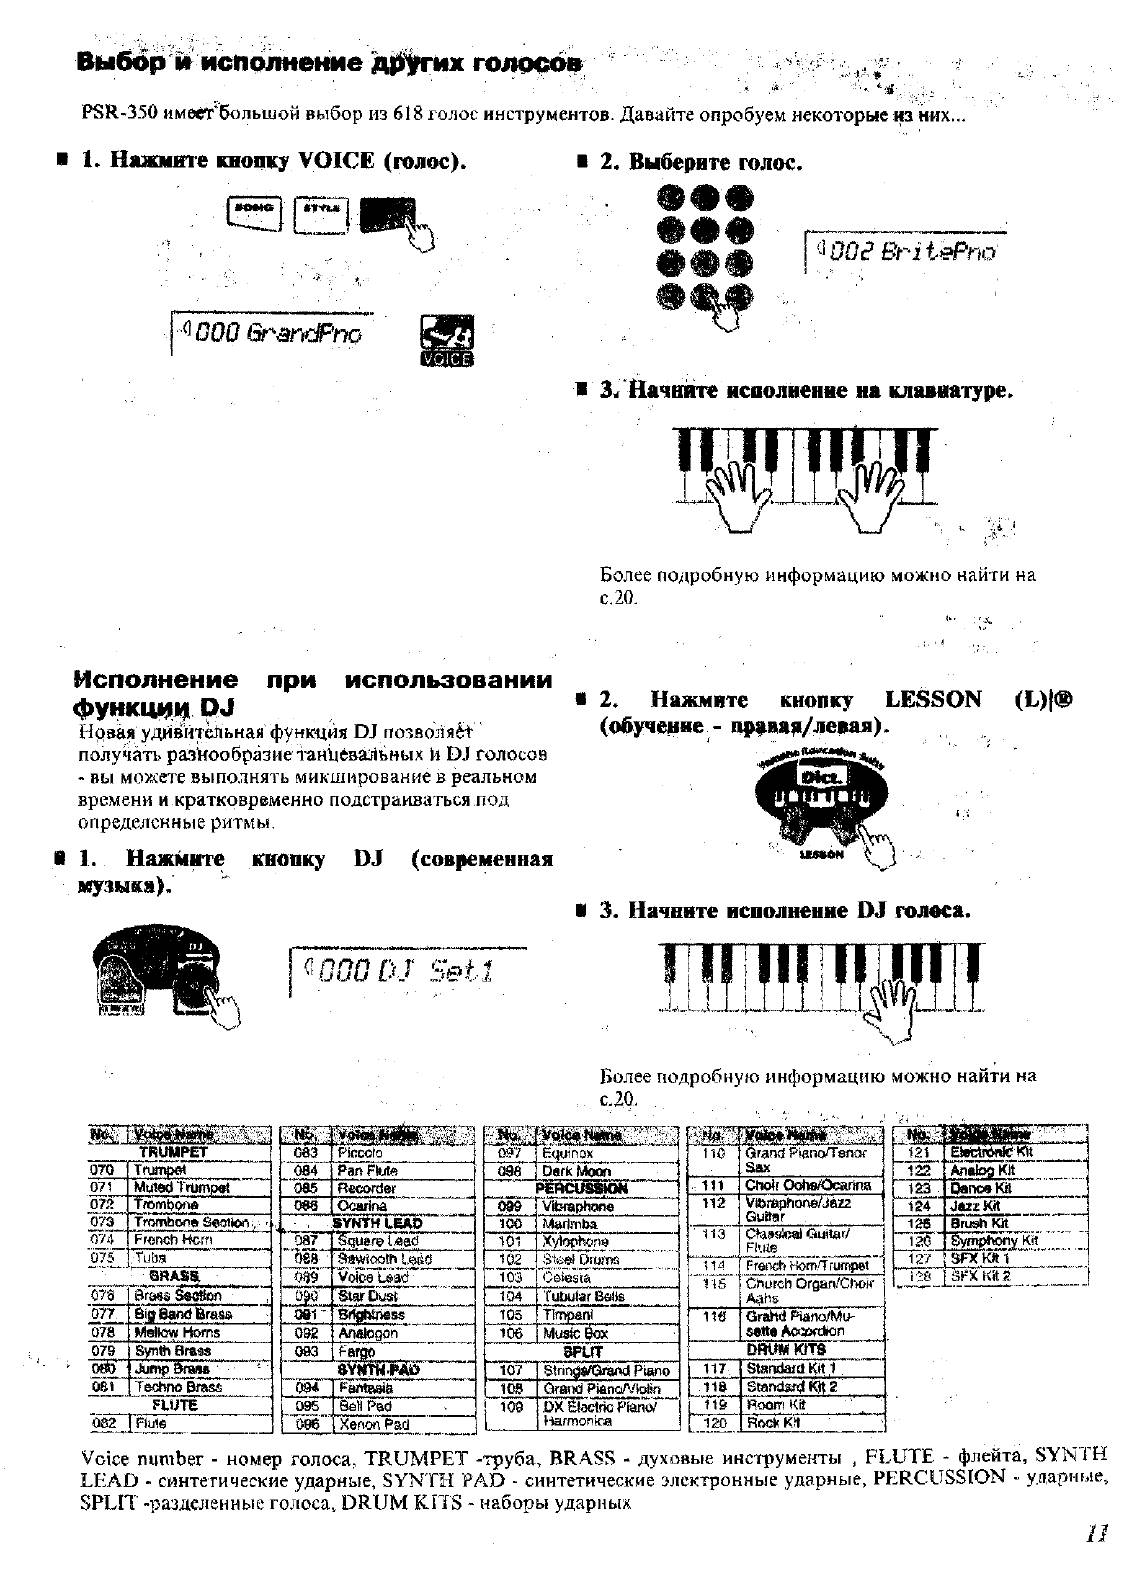
Выбор г исполнение
PSR-350 имеет большой выбор из 618 голос инструментов. Давайте опробуем некоторые ш них…
i 1. Нажмите кнопку VOICE (голос).
i 2. Выберите голос.
. .
т т т
—U_______ *
^йОО Gt-^ancPno
^WO^BHiePnù
1
3ì( Начните исоолиенне на клавиатуре.
шиш
Более подробнувз информацию можно найти на
с. 20.
при использовании
Исполнение
функци!« р><
Нрвая удивительная фунщия О! пoзвoля¿t
получать разнообразие таайеваЛьных И голосов
— вы моУл’ете выполнять микширование в реальном
времени и кратковременно подстраиваться под
определенные ритмы.
1.
Нажмите киопку 03 (современная
музыка).
^^000 DJ Seil
2.
Нажмите
кнопку
LESSON
(Е)|Ф
(обучение — пррваа/левая).
i 3. Начните исполнение 03 голоса.
TRUMPET
070 (Тащхй
071
0^
073″
074
Mpiect Trwìptft
Troìint)ó>^
Trombone Sedton
■.
Fronch Horn
Ü7S .ТиЬз
079
080
QRASa
Brass ^мз^огГ
M^tew Homs
Byntìi Brass
Адтф BrastT
ÜS1 Techno Brass
Recorder
Ocariria
«aywHliAo”
092
‘Pqujtre l^ad
Votee
Star Pest «
AnatoQon
Более подробную информацию можно найти на
С.20.
Шкй
Equinox
096
Dark Moon___ __
т
vbraphono
10Ö
101
Marimba
X’^ophona**
102
103 ‘
■StfeHSi Diu?~m
Ceiegta
104
Tubular Bolls
105
timpani
106
Music ^
SPLIT
107
Btringi/Orànd Piano
109
1 108
QrÉttid Р^апоЛЛЫт
DX Eìacifìc PianoT
1-larmonioa
no
Grand Pisno/Tenof
Sax
111
Choir ОоЬвЮсаг1па
112
yibt^honè/Jazz
Guitar
‘ 113
Guitar/
Flute
rTi4
FroÉTch Кот.’Тгшгфе!
IIS
Church Orsan/Ciwff
Aabs
‘ 11Ö Gr^ld Piano/Mu-
sette Асфгскоп
DRUMKtTS
117
Standard Kil l
lie
Stendarit 2
119
Room Kti
120
Rock KH
’’121″¡ElBSKt 1
122
Analofl kit
123
Dance Kit
124
Jtut Kit
126
Bruah Ю( 1
120
^mphony Kit____
127TWkin 1
Ì2S i S F X K i t Ä i
FLUTE
Q82~7
Voice number — номер голоса, TRUMPET -труба, BRASS — духовые инструменты , FLUTE — флейта, SYN 1Н
LEAD — синтетические ударные, SYNTH FAD — синтетические электронные ударные, PERCUSStON — ударные,
SPLIT -разделенные голоса, DRUM KITS — наборы ударных
и

I. запустите исполнение демонстрационной песни, Нажмите кнопку song (песня), Оставовите исполнение демонстрационной песяв
I 3. начните ее исполнение, Шаг 2. песни 0[3]в, М1соолнение песен, Исполнение демонстрационных песен, 1% исполнение отдельной песни, Рш] р Чат поддержки
- Изображение
- Текст
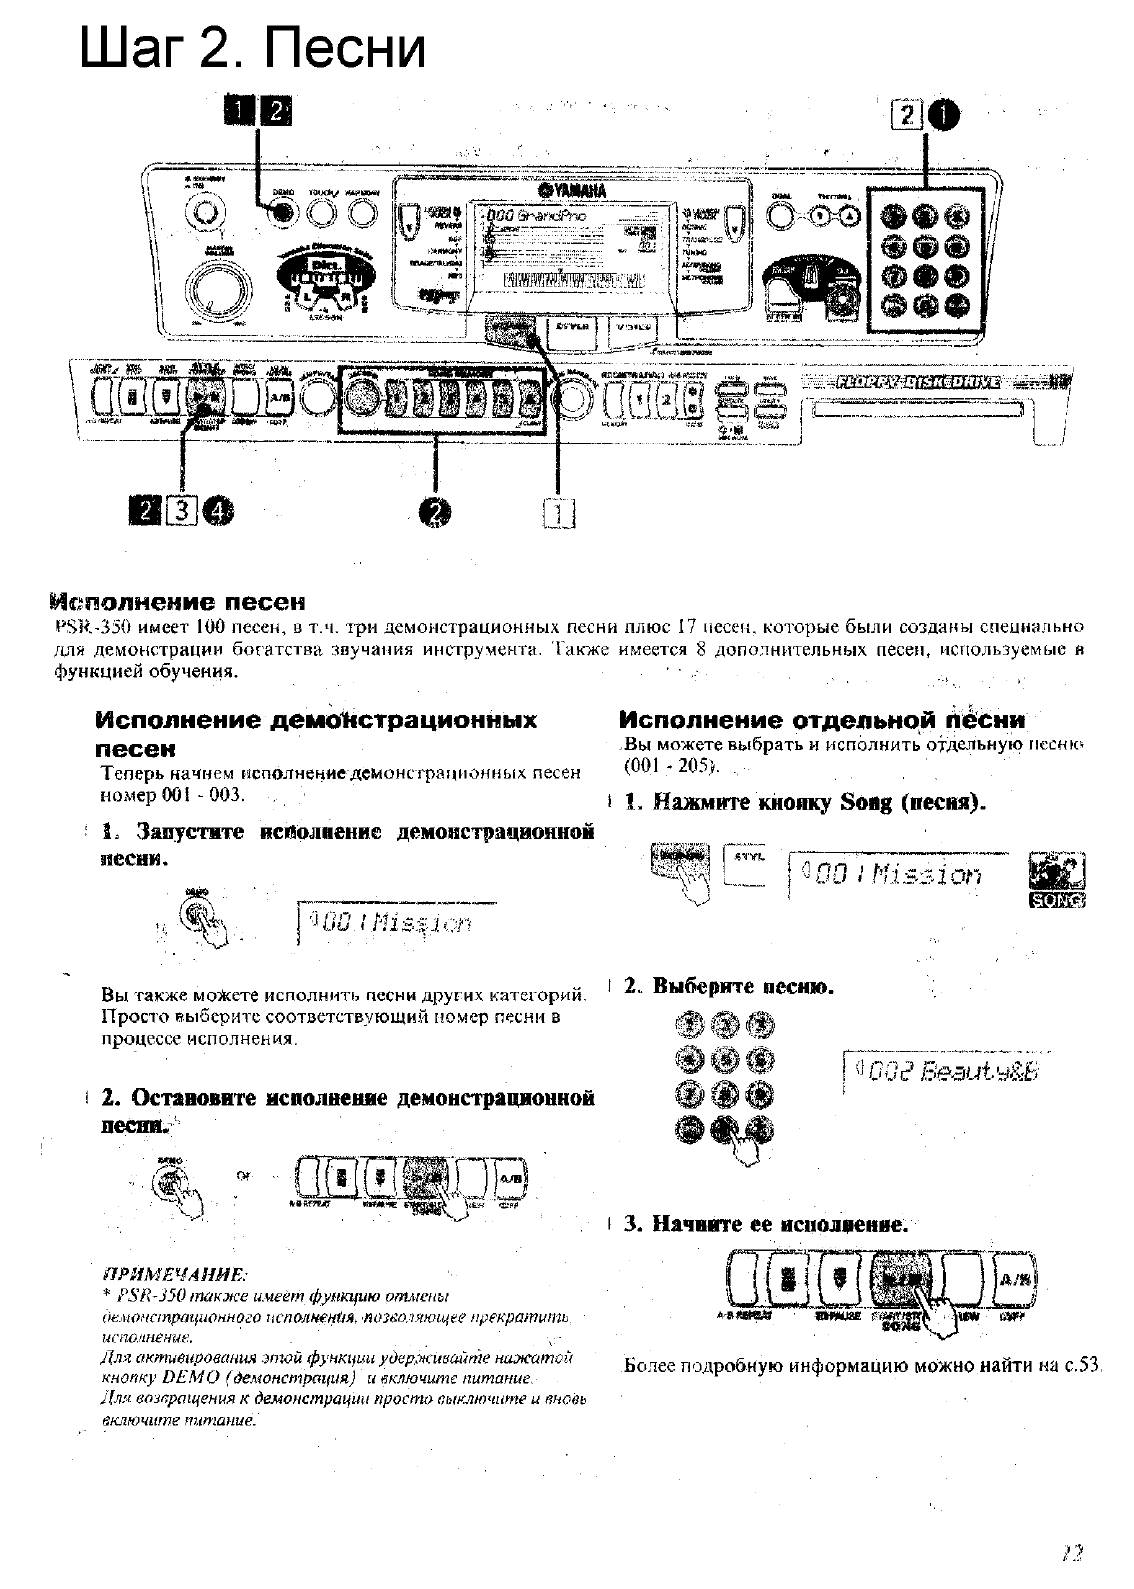
Шаг 2. Песни
0[3]в
М1соолнение песен
IPSR-350 имеет 100 песен, в т.ч. три демонстрационных песни плюс 17 песен, которые были созданы специально
для демонстрации богатства звучания инструмента. Также имеется 8 дополнительных песен, используемые в
функцией обучения.
.
Исполнение демонстрационных
песен
Теперь начнем исполнение демонстрационных песен
номер 001 — 003.
I. Запустите исполнение демонстрационной
песни.
„1%
Исполнение отдельной песни
.Вы можете выбрать и исполнить отдельную
песню
(001 — 205).
1. Нажмите кнопку Song (песня).
РШ] р
^00
! Mission
иО. I .Mission
шш
Вы также можете исполнить песни других категорий, * Выберите песнЮ.
Просто выберите соответствующий номер песни в
процессе исполнения.
2. Оставовите исполнение демонстрационной
песяв«
Of-
! Ьов!
ФвФ
А А А
и
/JOc? Б’еаи1.у-ЙБ
ПРИМЕЧАНИЕ:
FSR-350 также имеет функцию отмены
аемонапртцюниого пспа/шеыия, позеоляющее прекратить
испо.теиие.
,
\-
Для активирования этой функции удер.живайте нажатой
кнопку DEMO (демонстрация) и включите питание.
Для возпращеныя к демонстрации просто выключите и вновь
включите питание.
I 3. Начните ее исполнение.
А’»*«®»
«ШВЕ S
Более подробную информацию можно найти на с.53,

Исполнение песни с дискеты, Нуск/остановка), Выберите нужную несню пользователя для записи
И список песен, Ю i filen3f‘iê и список песен, Более подробную информацию можно найти на, Man’s desi, Greenslü^vya aura, J^gj9_belb___ muss t o^nn, Mov’ «ssrenads» mentisti Чат поддержки
- Изображение
- Текст
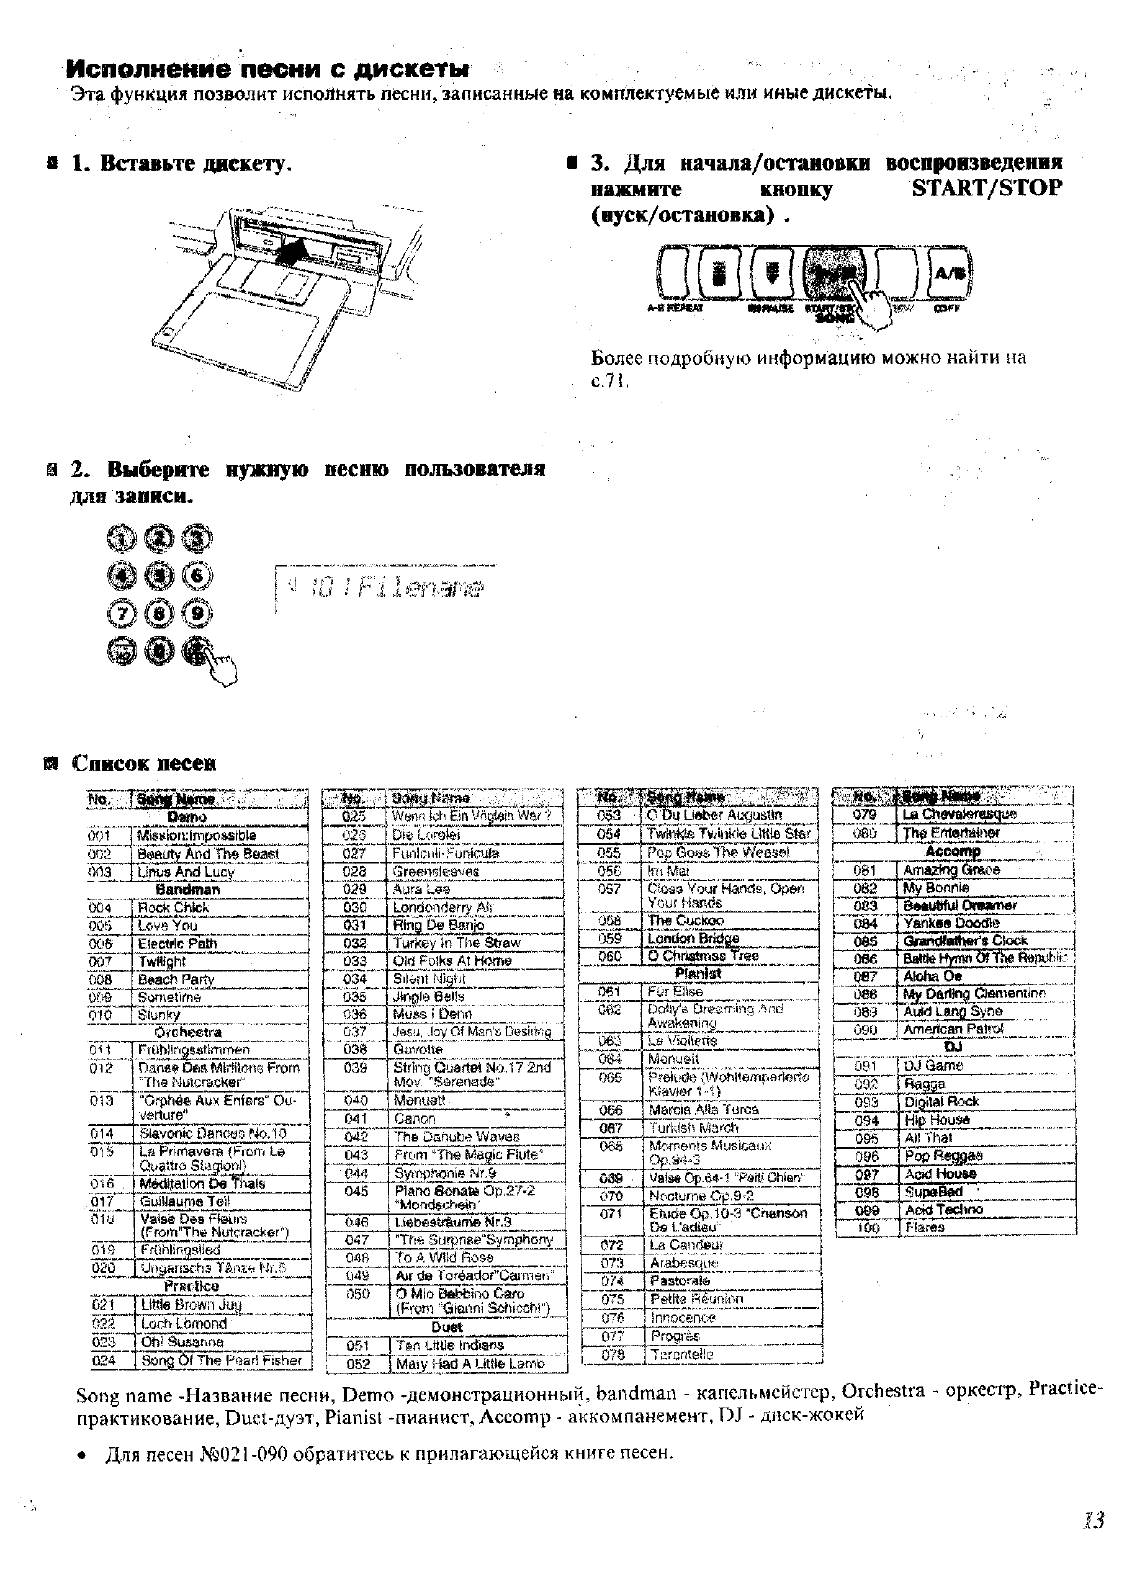
Исполнение песни с дискеты
Эта функция позволит исполнять песни, записанные на комплектуемые или иные дискеты.
В 1. Вставьте дискету.
3. Для начала/остановки воспроизведения
нажмите
кнопку
START/STOP
(нуск/остановка) .
Более подробную информацию можно найти на
С.71,
2. Выберите нужную несню пользователя
для записи.
[ —
Ю I Filen3f‘iê
и Список песен
тВ’
‘
‘ 0wtia
(Ю1
003
‘ооэ.'»
MigsÌQn:lfnp04jiibt8
And Beaef_______
UfUis And Lucy
Bamimart » ……. ………..
0Û4
Ro<^ Chick
005
love You
0С’$
Eiectflc Path
007
Twfiffiht
008
Baach Parly
Ш
Sometime
CHÒ
Siunfry
Orchestra
ОР
rrUhiiriQsstimrnen
Q12
Danse ¿tea Miïiftdne From
«The MLitcra.cKar»
013
“Orphéfi Aux Ënfars“ Ou
verture»
014
Slavonic, bancoG rio.ló
015
La Primavem (FiDfr. Le
Ouattro Siagioni}
016 .
Méctiìalion De thaïs
Ó17
(àuJilaunie Tei!
iìiu
Valsé Des Fteifit-î
(From’The Nutcracker»)
01Э
FrOhlifìgsIied
020
Ungaîisoha Tèniu Wr.5
PrKfìice
031
‘ Liììie Brown Juy
022
Lorh Lòrnond
023
Oh! Susaruìo
024 I ïking Òl The Pear! Fisher
» 025
029
ОЗО’
031
032
‘
Û33
‘034’
«оЗб»
036
й37
‘Ô36’
ч|й5У,
Man’s Desi!
{ч
g
Gtvs/oite
039
040
041
04S
043
044
045
046
047
~049
oso’
W m f i !cS £iri War 7
Uimioi
^
Funliuli-Funicufa
Greenslü^vya
Aura
j^dÔïïÎier^ AS’.’ ___
Ring 5g Sanjo
fyfkey în The Straw»
Pici Folks At Home
Silent Nigi’it_ _ _ _ _ _ _ _ _ _ _ _
j^gj9_Belb___
Muss t O^nn
String
Qijâftei
Î40.17
2nd
Mov’ «Ssrenads»
Mentisti
Canon
TTie Danube Wavôe
Ггот ‘Tne Flute“
Syi’nptaonie Nr. 9
Piaiio esnate Op,27-2
**WDfidec44eìfì»
l.i4b€âîrüum© Мг.Э
«Tbe SurpiiBe“SympbDny
To Д Wiki Ross______
Air de Toréador»Oaimei i
Ô Mìo BftbfeinCi Caro
(From «Gianni Scbicchi“}
Duet
051
052
T
m
Ше Irxlians
Mai у idad A Littte Lamb
053
0S4
Tvnnkìe Lltité’ Ster,
055
«‘»ose ■■
Pc-p (iom The Weeset
(iïî Mai
057
dosa Your Hands, Орел
Your Hands
OÜ8′
The Cuckoo
ЗД9
060
Lpnckifft Bridge__
0 сНг1й(йГ)ЭД Tree
Püffiîïrt
061
FOr Eiiae
Св£
Dolly’s breaming And
Awakening
063
La i
064
Monueii
065
PreitrcSe {Wc^ftempflfiodfii
Kteviof 1-1)
066
Marcia Alia Turca
087
Turkish March
Oëè
Moments MLJSicai.)K
Op.94-3
03S ■
Valae 6p.64-l «Perii Chien’
ОТО
Nocturne Op,9-2
071
FhtdeOp,lO-3 «Chafison
De L.’adicu» i
072
La Canf^ur
073
Ar.abesqu<:i
Ü?«
Pastorate
075
Petite Réunion
076
innocence
077
Progrèç.
07S
T lircnteite
I 9Д
~nW Cfttertajuj&r_____
..J
081
Amazing Grace ‘
082
My Bofthte
[ 083
B«№bfut Orawner |
1
mi
Vankss Ooo(№
\
0ÔS
Clock 1
1 oee
Eattte Hytrm
1 QB7
Atoha Oa
088
My Darling ¿ienientine i
089
Auk) Lano Syne 1
09Ü
American Patroi j
,
tw i
08Ì
OJ Game
I 093
Ragga
t 093
Digital Rock
P 094
Htp Hous*
095′
All Thai
096
P(itRegga«
Ò97
Add
House
C98
Supe^ ‘
№9
Acidtecliw
too
Flares
Song name -Название песни, Demo -демонстрационный, bandman — капельмейстер, Orchestra — оркестр, Practice-
практикование, Duet-дуэт, Pianisi -пианист, Лссошр — аккомпанемент, DJ — диск-жокей
♦ Для песен №021-090 обратитесь к прилагающейся книге песен.
В

13:11
Yamaha PSR-350 keyboard with disk drive
20:32
All Sounds of Yamaha PSR-350 — Jul 12th ’17
02:27
шатунов — медленно уходит осень — yamaha psr 350
14:02
New Yamaha PSR-A350 — All Oriental Styles
21:39
Демоснстрация стилей yamaha PSR 340, игра на синтезаторе ямаха
03:25
V- RUS — TRANCE POP STYLE [YAMAHA PSR 350]
06:57
ХИТЫ 90Х НА YAMAHA PSR 350 от SERGO
Нажмите на кнопку для помощи
Главная >
Синтезаторы/фортепиано >
Yamaha >
PSR-350
Поделиться
Раздел: Бытовая, кухонная техника, электроника и оборудование
Тип: Синтезатор/фортепиано
Инструкция к Синтезатору/фортепиано Yamaha PSR-350

- 1
- 2
- 3
- 4
- 5
Аннотации для Синтезатора/фортепиано Yamaha PSR-350 в формате PDF
Топ 10 инструкций
100.00
MB QUART DSG 213
99.98
Skil 0790 RA
99.98
Bosch KGN39VW21
99.97
Sony CDX-CA750X RU
99.97
Braun 310 Series 3
99.96
Asus P3-PE5
99.96
Siemens MQ 5 N 298
99.96
YUKON EXTEND LRS-1000
99.96
Bosch GWS 22-230 JH Professional
99.96
Philips Lunettes 3D Active
К рейтингу инструкций и мануалов →
Другие инструкции
Yamaha PSR-295
Yamaha PSR-3000
Yamaha PSR-450
Yamaha PSR-50
Vitek VT-1300
Zanussi FJE 904

SPECIAL MESSAGE SECTION
This product utilizes batteries or an external power supply (adapter). DO NO T
connect this product to any power supply or adapter other than one described
in the manual, on the name plate, or specifically recommended by Yamaha.
This product should be used only with the components supplied or; a cart,
rack, or stand that is recommended by Yamaha. If a cart, etc., is used, please
observe all safety markings and instructions that accompany the accessory
product.
SPECIFICATIONS SUBJECT TO CHANGE:
The information contained in this manual is believed to be correct at the time
of printing. However, Yamaha reserves the right to change or modify any of
the specifications without notice or obligation to update existing units.
This product, either alone or in combination with an amplifier and headphones or speaker/s, may be capable of producing sound levels that could
cause permanent hearing loss. DO NOT operate for long periods of time at a
high volume level or at a level that is uncomfortable. If you experience any
hearing loss or ringing in the ears, you should consult an audiologist.
IMPORTANT: The louder the sound, the shorter the time period before damage occurs.
NOTICE:
Service charges incurred due to a lack of knowledge relating to how a function or effect works (when the unit is operating as designed) are not covered
by the manufacturer’s warranty, and are therefore the owners responsibility.
Please study this manual carefully and consult your dealer before requesting
service.
ENVIRONMENTAL ISSUES:
Yamaha strives to produce products that are both user safe and environmentally friendly. We sincerely believe that our products and the production methods used to produce them, meet these goals. In keeping with both the letter
and the spirit of the law, we want you to be aware of the following:
Battery Notice:
This product MAY contain a small non-rechargeable battery which (if applicable) is soldered in place. The average life span of this type of battery is
approximately five years. When replacement becomes necessary, contact a
qualified service representative to perform the replacement.
This product may also use “household” type batteries. Some of these ma y be
rechargeable. Make sure that the battery being charged is a rechargeable
type and that the charger is intended for the battery being charged.
When installing batteries, do not mix batteries with new, or with batteries of a
different type. Batteries MUST be installed correctly. Mismatches or incorrect
installation may result in overheating and battery case rupture.
Warning:
Do not attempt to disassemble, or incinerate any battery. Keep all batteries
away from children. Dispose of used batteries promptly and as regulated by
the laws in your area. Note: Check with any retailer of household type batteries in your area for battery disposal information.
Disposal Notice:
Should this product become damaged beyond repair, or for some reason its
useful life is considered to be at an end, please observe all local, state, and
federal regulations that relate to the disposal of products that contain lead,
batteries, plastics, etc. If your dealer is unable to assist you, please contact
Yamaha directly.
NAME PLATE LOCATION:
The name plate is located on the bottom of the product. The model number,
serial number, power requirements , etc., are located on this plate . You should
record the model number, serial number, and the date of purchase in the
spaces provided below and retain this manual as a permanent record of your
purchase.
Model
Serial No.
Purchase Date
92-BP
(bottom)
PLEASE KEEP THIS MANUAL
FCC INFORMATION (U.S.A.)
1. IMPORTANT NOTICE: DO NOT MODIFY THIS UNIT!
This product, when installed as indicated in the instructions contained in
this manual, meets FCC requirements. Modifications not expressly
approved by Yamaha may void your authority, granted by the FCC, to use
the product.
2. IMPORTANT:
another product use only high quality shielded cables. Cable/s supplied
with this product MUST be used. F ollow all installation instructions . Failure
to follow instructions could void your FCC authorization to use this product
in the USA.
3. NOTE:
requirements listed in FCC Regulations, Part 15 for Class “B” digital
devices. Compliance with these requirements provides a reasonable lev el
of assurance that your use of this product in a residential environment will
not result in harmful interference with other electronic devices. This equipment generates/uses radio frequencies and, if not installed and used
according to the instructions found in the users manual, may cause interference harmful to the operation of other electronic devices. Compliance
* This applies only to products distributed by YAMAHA CORPORATION OF AMERICA.
OBSERVERA!
Apparaten kopplas inte ur växelströmskällan (nätet) sá länge som den ar
ansluten till vägguttaget, även om själva apparaten har stängts av.
ADVARSEL:
netledningen siddr i en stikkontakt, som er t endt — ogsá selvom der or
slukket pá apparatets afbryder.
VAROITUS:
verkosta.
When connecting this product to accessories and/or
This product has been tested and found to comply with the
Netspæendingen til dette apparat er IKKE afbrudt, sálæenge
Laitteen toisiopiiriin kytketty käyttökytkin ei irroita koko laitetta
with FCC regulations does not guarantee that interference will not occur in
all installations. If this product is found to be the source of interference,
which can be determined by turning the unit “OFF” and “ON”, please try to
eliminate the problem by using one of the following measures:
Relocate either this product or the device that is being affected by the
interference.
Utilize power outlets that are on different branch (circuit breaker or fuse)
circuits or install AC line filter/s.
In the case of radio or TV interf erence, relocate/reorient the antenna. If the
antenna lead-in is 300 ohm ribbon lead, change the lead-in to co-axial
type cable.
If these corrective measures do not produce satisfactory results, please
contact the local retailer authorized to distribute this type of product. If you
can not locate the appropriate retailer, please contact Yamaha Corporation of America, Electronic Service Division, 6600 Orangethorpe Ave,
Buena Park, CA90620
The above statements apply ONLY to those products distributed by
Yamaha Corporation of America or its subsidiaries.
(class B)
Entsorgung leerer Batterien (nur innerhalb Deutschlands)
Leisten Sie einen Beitrag zum Umweltschutz. Verbrauchte Batterien oder
Akkumulatoren dürfen nicht in den Hausmüll. Sie können bei einer Sammelstelle für Altbatterien bzw. Sondermüll abgegeben werden. Informieren
Sie sich bei Ihrer Kommune.
(battery)
(standby)
2
Yamaha cannot be held responsible for damage caused by improper
use or modifications to the instrument, or data that is lost or destroyed.
* The illustrations and LCD screens as shown in this owner’s manual
are for instructional purposes only, and may be different from the
ones on your instrument.
PRECAUTIONS
PLEASE READ CAREFULLY BEFORE PROCEEDING
* Please keep these precautions in a safe place for future reference.
WARNING
Always follow the basic precautions listed below to avoid the possibility of serious injury or even death from electrical shock,
short-circuiting, damages, fire or other hazards. These precautions include, but are not limited to, the following:
• Do not open the instrument or attempt to disassemble the internal parts or
modify them in any way. The instrument contains no user-serviceable
parts. If it should appear to be malfunctioning, discontinue use immediately and have it inspected by qualified Yamaha service personnel.
• Do not expose the instrument to rain, use it near water or in damp or wet
conditions, or place containers on it containing liquids which might spill
into any openings.
• If the AC adaptor cord or plug becomes frayed or damaged, or if there is a
sudden loss of sound during use of the instrument, or if any unusual
smells or smoke should appear to be caused by it, immediately turn off the
CAUTION
Always follow the basic precautions listed below to avoid the possibility of physical injury to you or others, or damage to the
instrument or other property. These precautions include, but are not limited to, the following:
• Do not place the AC adaptor cord near heat sources such as heaters or
radiators, and do not excessively bend or otherwise damage the cord,
place heavy objects on it, or place it in a position where anyone could walk
on, trip over, or roll anything over it.
• When removing the electric plug from the instrument or an outlet, always
hold the plug itself and not the cord.
• Do not connect the instrument to an electrical outlet using a multiple-connector. Doing so can result in lower sound quality, or possibly cause overheating in the outlet.
• Unplug the AC power adaptor when not using the instrument, or during
electrical storms.
• Always make sure all batteries are inserted in conformity with the +/polarity markings. Failure to do so might result in overheating, fire, or battery fluid leakage.
• Always replace all batteries at the same time. Do not use new batteries
together with old ones. Also, do not mix battery types, such as alkaline batteries with manganese batteries, or batteries from different makers, or different types of batteries from the same maker, since this can cause
overheating, fire, or battery fluid leakage.
• Do not dispose of batteries in fire.
• Do not attempt to recharge batteries that are not intended to be charged.
• When the batteries run out, or if the instrument is not to be used for a long
time, remove the batteries from the instrument to prevent possible leakage
of the battery fluid.
• Keep batteries away from children.
• If the batteries do leak, avoid contact with the leaked fluid. If the battery
fluid should come in contact with your eyes, mouth, or skin, wash immediately with water and consult a doctor. Battery fluid is corrosive and may
possibly cause loss of sight or chemical burns.
• Before connecting the instrument to other electronic components, turn off
the power for all components. Before turning the power on or off for all
components, set all volume levels to minimum. Also, be sure to set the
volumes of all components at their minimum levels and gradually raise the
volume controls while playing the instrument to set the desired listening
level.
• Do not expose the instrument to excessive dust or vibrations, or extreme
cold or heat (such as in direct sunlight, near a heater, or in a car during the
day) to prevent the possibility of panel disfiguration or damage to the internal components.
(4)-7
power switch, disconnect the adaptor plug from the outlet, and have the
instrument inspected by qualified Yamaha service personnel.
• Use the specified adaptor (PA-5C or an equivalent recommended by
Yamaha) only. Using the wrong adaptor can result in damage to the instrument or overheating.
• Before cleaning the instrument, always remove the electric plug from the
outlet. Never insert or remove an electric plug with wet hands.
• Check the electric plug periodically and remove any dirt or dust which may
have accumulated on it.
• Do not use the instrument near other electrical products such as televisions, radios, or speakers, since this might cause interference which can
affect proper operation of the other products.
• Do not place the instrument in an unstable position where it might accidentally fall over.
• Before moving the instrument, remove all connected adaptor and other
cables.
• When cleaning the instrument, use a soft, dry cloth. Do not use paint thinners, solvents, cleaning fluids, or chemical-impregnated wiping cloths.
Also, do not place vinyl, plastic or rubber objects on the instrument, since
this might discolor the panel or keyboard.
• Do not rest your weight on, or place heavy objects on the instrument, and
do not use excessive force on the buttons, switches or connectors.
• Use only the stand specified for the instrument. When attaching the stand
or rack, use the provided screws only. Failure to do so could cause damage
to the internal components or result in the instrument falling over.
• Do not operate the instrument for a long period of time at a high or uncomfortable volume level, since this can cause permanent hearing loss. If you
experience any hearing loss or ringing in the ears, consult a physician.
■
DATA BACK-UP AND STORAGE
• Yamaha recommends that you regularly save data using a floppy disk and
storing the floppy disks in a safe, cool, dry place. YAMAHA CANNOT BE
HELD RESPONSIBLE FOR THE ACCIDENTAL LOSS OF IMPORTANT
MUSIC DATA! Regarding the data you have created, as long as fresh batteries are inserted in (or an AC power adaptor is connected to) the instrument, the data will be retained, even when the power is turned off. It will
also be retained long enough to exchange an old set of batteries for a new
set. If you have important data in the instrument which you don’t want to
lose, please take care to keep fresh batteries inserted in (or keep an AC
power adaptor connected to) the instrument, and to regularly save data.
Always turn the power off when the instrument is not in use.
Make sure to discard used batteries according to local regulations.
3
■
■
■
Congratulations on your purchase of the Yamaha PSR-350 PortaTone!
You now own a portable keyboard that combines advanced functions, great sound
and exceptional ease-of-use in a highly compact package. Its outstanding features
also make it a remarkably expressive and versatile instrument.
Read this Owner’s Manual carefully while playing your new PSR-350 in order to
take full advantage of its various features.
Main Features
The PSR-350 is a sophisticated yet easy-to-use keyboard with the following features and functions:
MUSIC DATABASE ……………………….. page 49
The PSR-350 has an advanced, easy-to-use Music Database feature that automatically selects the style,
voice, and effect settings for playing in a specific type of music. This can be a big help if you know what
genre of music you want to play , but you don’t know what settings to make. Just select the genre, and the
PSR-350 takes care of the rest!
Disk Drive ……………………….. page 69
The PSR-350 also features a convenient floppy disk drive letting you load and save your own original
User Songs or load the Style Files. The PSR-350 is also compatible with a wide variety of disk formats,
allowing you to play back song data on commercially available GM, DOC, and Clavinova Disklavier
Piano Soft disks.
It also allows you to save and play back Standard MIDI File (SMF) format 0 data,making it possible to use
song data with your favorite sequencer or sequencingsoftware.
Powerful Speaker System
The built-in stereo amplifier/speaker system of the PSR-350 with a special Bass Boost feature — provides
exceptionally powerful, high-quality sound, letting you hear the full dynamic range of the PSR-350’s
authentic voices.
Other powerful features include:
• The advanced Yamaha Education Suite — a special set of
learning tools that make it easy and fun to master the keyboard.
These tools include
parts of a song just as a teacher would,
which evaluates your practice sessions and rates your performance, and
• Instant
• Exciting DJ feature, which puts a wealth of dance/DJ sounds
•
• Special
• 10 different
• High-quality
Portable Grand
ing the PSR-350 for optimum piano play. Includes an authentic Stereo Sampled Piano voice and special pianoaccompaniment Pianist styles.
and rhythms at your fingertips.
618
exceptionally
tal recordings of actual instruments.
Split voices
separate sections of the keyboard.
cussion sounds on each key.
ing the sound of the voices — and your performance.
Lesson
, which guides you through the
Grade & Talking
Dictionary
Drum Kit voices
Reverb, DSP, and Harmony effects
, which teaches you how to play chords.
function, for automatically configur-
realistic and dynamic voices
, with two different voices playable from
, with individual drum and per-
,
, utilizing digi-
for enhanc-
•
106 auto accompaniment styles
B, and Ending sections. An Auto Fill function adds dynamic
fills when switching sections.
• Powerful, easy-to-use
ing and playing back up to five of your original songs.
•
Registration Memory
panel settings to a single button for instant and automatic
recall.
•
One T ouch Setting
appropriate voice to match the style or song you select.
•
Touch Response
narily expressive control over the voices. They automatically
change both the volume and tone according to your playing
strength — just like a real musical instrument!
• Full MIDI and
you easily integrate the PSR-350 into a MIDI music system,
and use the built-in GM voices with all GM software.
song recording
presets for storing all of the PSR-350’s
function for automatically calling up an
and
Dynamic Filter
General MIDI (GM) compatibility
, each with Intro, Main A and
operations, for record-
that give you extraordi-
, letting
4

Contents
Panel Controls and Terminals……………………6
Setting Up…………………………………………………8
• Power Requirements……………………………………8
• Turning On the Power…………………………………..8
• Accessory Jacks………………………………………….9
Quick Guide 10
Step 1 Voices ………………………………………………….. 10
Step 2 Songs…………………………………………………… 12
Step 3 Music Database……………………………………… 14
Step 4 Lesson …………………………………………………. 16
Panel Display Indications ………………………..18
Portable Grand………………………………………..20
• Playing the Portable Grand………………………….20
• Using the Metronome …………………………………20
DJ …………………………………………………………..22
• Playing the DJ……………………………………………22
Playing Voices ………………………………………..23
• Playing a Voice………………………………………….23
• Dual Voice ………………………………………………..25
• One Touch Setting……………………………………..27
• Transpose and Tuning………………………………..27
• Touch and Touch Sensitivity………………………..29
Effects…………………………………………………….30
• Reverb……………………………………………………..30
• DSP …………………………………………………………31
• Harmony…………………………………………………..32
Auto Accompaniment………………………………35
• Selecting a Style………………………………………..35
• Playing the Accompaniment………………………..36
• Sync Stop …………………………………………………40
• Changing the Tempo………………………………….41
• Accompaniment Sections
(Main A/B and Fill-ins)………………………………..41
• Adjusting the Accompaniment Volume………….42
• Using Auto Accompaniment
— Multi Fingering ………………………………………43
• Setting the Split Point …………………………………45
• Dictionary………………………………………………….46
Using the Music Database ……………………….49
• Data stored by the Music Database………………50
Registration Memory……………………………….51
• Registration Memory Presets ………………………51
• Recording a Registration Memory Preset………51
• Recalling a Registration Memory Preset ……….52
Selecting and Playing Songs ………………….. 53
• Selecting and Playing a Song………………………53
• A-B Repeat……………………………………………….54
• Melody Voice Change…………………………………55
• Changing the Tempo………………………………….56
• Adjusting the Song Volume …………………………57
Song Recording……………………………………… 58
• Recording a User Song ………………………………58
• Song Clear……………………………………………….61
• Track Clear……………………………………………….62
Song Lesson………………………………………….. 63
• Using the Lesson Feature……………………………63
• Select the Lesson Track……………………………..65
• Lesson 1 — Timing…………………………………….65
• Lesson 2 — Waiting……………………………………66
• Lesson 3 — Minus One………………………………66
• Lesson 4 — Both Hands……………………………..67
• Grade/Talking……………………………………………68
Disk Operations……………………………………… 69
• Disk Song Playback……………………………………71
• Save…………………………………………………………72
Saving files in SMF Format 0…………………..74
• Load…………………………………………………………75
• Utility – Delete……………………………………………76
• Utility – Formatting an Unformatted Disk……….77
• Utility – Formatting a Previously
Formatted Disk ………………………………………….78
MIDI Functions……………………………………….. 79
• What Is MIDI?……………………………………………79
• Connecting to a Personal Computer……………..81
• Local Control……………………………………………..82
• Using Initial Setup Send with a Sequencer…….83
• External Clock……………………………………………84
Troubleshooting…………………………………….. 85
Data Backup & Initialization ……………………. 86
Voice List ………………………………………………. 87
Style List ……………………………………………….. 94
Music Database List……………………………….. 95
Drum Kit List………………………………………….. 96
MIDI Implementation Chart……………………… 98
Effect map……………………………………………. 100
Specifications………………………………………. 101
Index……………………………………………………. 102
5
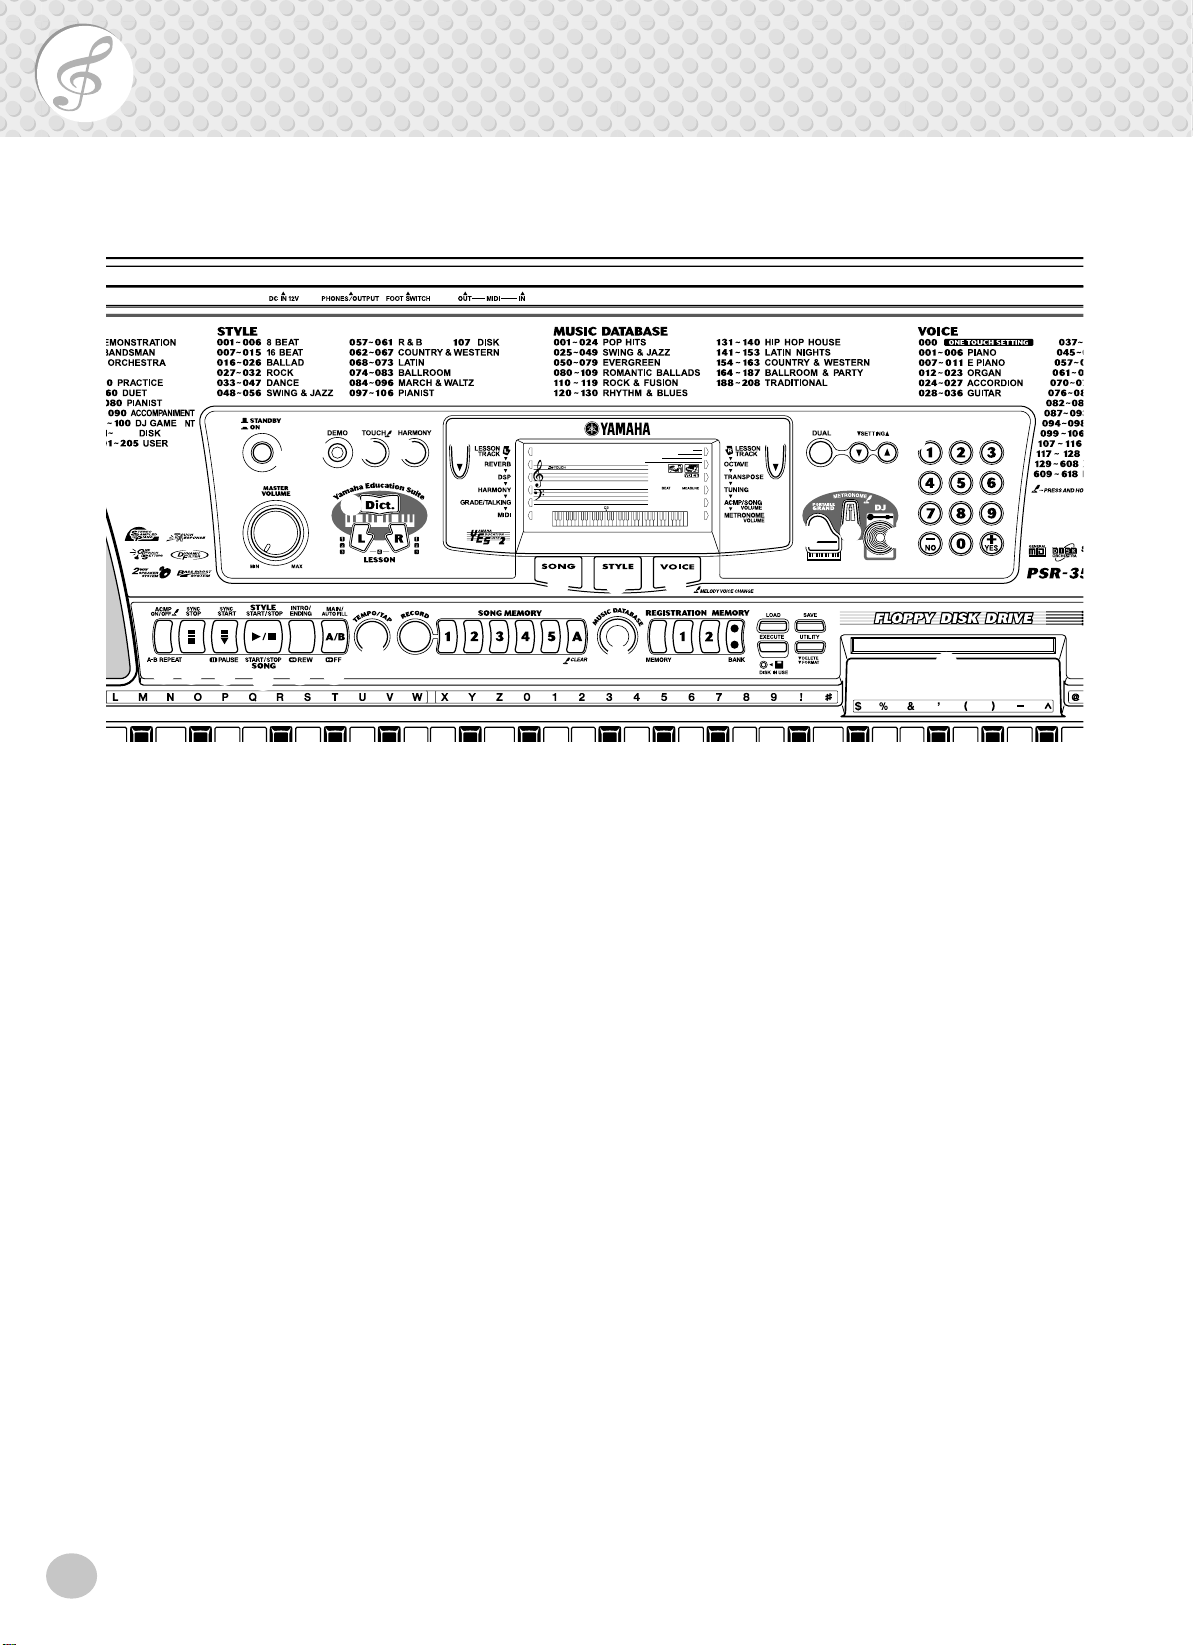
Panel Controls and Terminals
Front Panel
■
y y
i
@3
t
000
o
!0
@4 @6
e r
q
w
!7
!8
!9
@0
Power switch ([STANDBY/ON])
q
[MASTER VOLUME] dial
w
@1
@2
This determines the overall volume of the PSR-350.
[DEMO] button
e
This is used to play the Demo songs. (See page 12.)
[TOUCH] button
r
This turns the Touch function on and off. (See page
29.) Holding down this button allows you to adjust
the Touch Sensitivity setting. (See page 29.)
t
[HARMONY] button
This turns the Harmony effect on and off. (See page
32.)
Overall (left, right) buttons
y
These two buttons on either side of the LCD let you
call up various functions, settings, and operations of
the PSR-350, including effects, transpose, tuning, and
MIDI. (See page 18.)
GrandPno
!1
@5
o
u
001
!4
!3
!2
LESSON [L] (Left) and [R] (Right) buttons
!6
!5
@7
These call up the Lesson exercises for the corresponding hand (left or right) for the selected song. (See
page 64.)
!0
[SONG] button
This is for enabling song selection. (See page 53.)
[STYLE] button
!1
This is for enabling style selection. (See page 35.)
[VOICE] button
!2
This is for enabling voice selection. (See page 23.)
Holding down this button calls up the Melody Voice
Change function. (See page 55.)
!3
[PORTABLE GRAND] button
This instantly calls up the Grand Piano voice, plus a
special piano song and style. (See page 10.)
[METRONOME] button
!4
This turns the metronome on and off. (See page 20.)
[DUAL] and [SETTING ▲ / ▼ ] buttons
u
Use the [DUAL] button to turn the Dual voice on or
off. Use the [SETTING ▲ / ▼ ] buttons to set the
parameters related to the Main and Dual voices.
i
[Dict.] (DICTIONARY) button
This calls up the Dictionary function (page 46).
6
[DJ] button
!5
This instantly calls up a special DJ voice, song and
style.
!6
Numeric keypad, [+/YES] and [-/NO] buttons
These are used for selecting songs, voices, and styles.
(See pages 24.) They are also used for adjusting certain settings and answering certain display prompts.
Panel Controls and Terminals
[ACMP ON/OFF] / [A-B REPEAT] button
!7
When the Style mode is selected, this turns the auto
accompaniment on and off. (See page 36.) In the
Song mode, this calls up the A-B Repeat function.
(See page 54.)
[SYNC STOP] button
!8
This turns the Sync Stop function on and off. (See
page 40.)
!9
[SYNC START] / [ PAUSE] button
This turns the Sync Start function on and off. (See
page 37.) In the Song mode, it is used to temporarily
pause song playback. (See page 55.)
[START/STOP] button
@0
When the Style mode is selected, this alternately starts
and stops the auto accompaniment. (See page 36.) In
the Song mode, this alternately starts and stops song
playback. (See page 54.)
[INTRO/ENDING] / [ REW] button
@1
When the Style mode is selected, this is used to control the Intro and Ending functions. (See page 36.)
When the Song mode is selected, this is used as a
“rewind” control, or move the song playback point
back toward the beginning.
[MAIN/AUTO FILL] / [ FF] button
@2
When the Style mode is selected, these are used to
change auto accompaniment sections and control the
Auto Fill function. (See page 41.) When the Song
mode is selected, this is used as a “fast forward” control, or move the song playback point toward the end.
[TEMPO/TAP] button
@3
This button is used to call up the Tempo setting, letting you set the Tempo with the numeric keypad or
[+]/[-] buttons. (See page 20.) It also allows you to
tap out the tempo and automatically start a selected
song or style at that tapped speed. (See page 37.)
@4
[SONG MEMORY] buttons
These buttons ([RECORD], [1] — [5], [A]) are used for
song recording, letting you record up to six different
tracks of a song (including a special Chord track).
(See page 59.) They are also used for clearing
recorded data of all or specific tracks of a User song.
(See pages 61, 62.)
@5
MUSIC DATABASE button
This calls up the optimum panel settings for selected
music genre. (See page 49.)
REGISTRATION MEMORY buttons
@6
These are used for selecting and recording the Registration Memory presets. (See page 51.)
@7
Disk Drive
This is for insertion of floppy disks, for loading and
saving of data. (See page 69.)
■
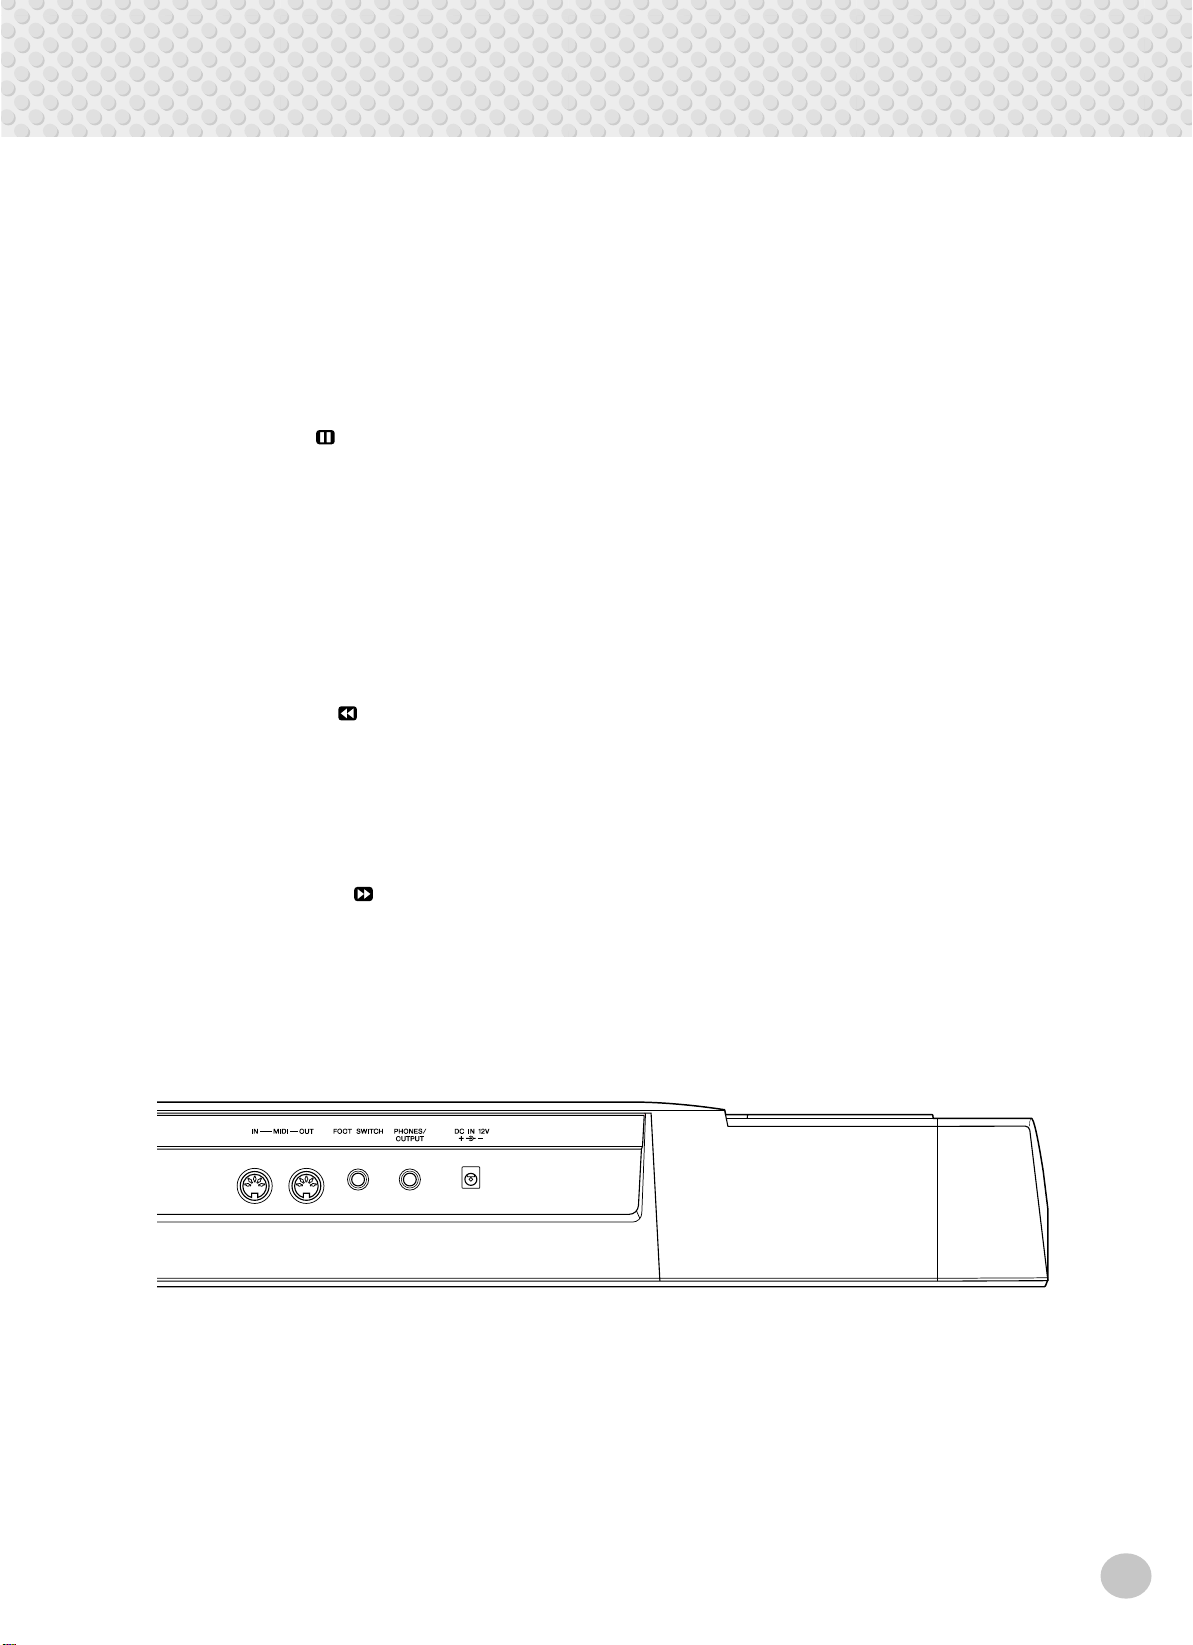
Rear Panel
@8
MIDI IN, OUT terminals
@8
These are for connection to other MIDI instruments
and devices. (See page 80.)
@9
FOOTSWITCH jack
This is for connection to an optional FC4 or FC5
Footswitch for control over sustain, just like the
damper pedal on a piano. (See page 9.)
@9 #0
#1
PHONES/OUTPUT jack
#0
This is for connection to a set of stereo headphones or
to an external amplifier/speaker system. (See page 9.)
#1
DC IN 12V jack
This is for connection to a PA-5C AC power adaptor.
(See page 8.)
7
Setting Up
This section contains information about setting up your PSR-350 for playing. Make sure to
read this section carefully before using the instrument.
Power Requirements
Although the PSR-350 will run either from an optional AC adaptor or batteries,
Yamaha recommends use of an AC adaptor whenever possible. An AC adaptor is
more environmentally friendly than batteries and does not deplete resources.
■ Using an AC Power Adaptor • • • • • • • • • • • • • • • • • • • • • • • • •
To connect your PSR-350 to a wall socket, you will need the optionally available
Yamaha PA-5C Power Adaptor. Use of other AC adaptors could result in damage
to the instrument, so be sure to ask for the right kind.
Make sure that the [STANDBY/ON] switch of the PSR-350 is set to STANDBY.
Connect one end of the adaptor to the DC IN 12V jack on the rear panel of your
PSR-350, and the other end to a suitable electrical outlet.
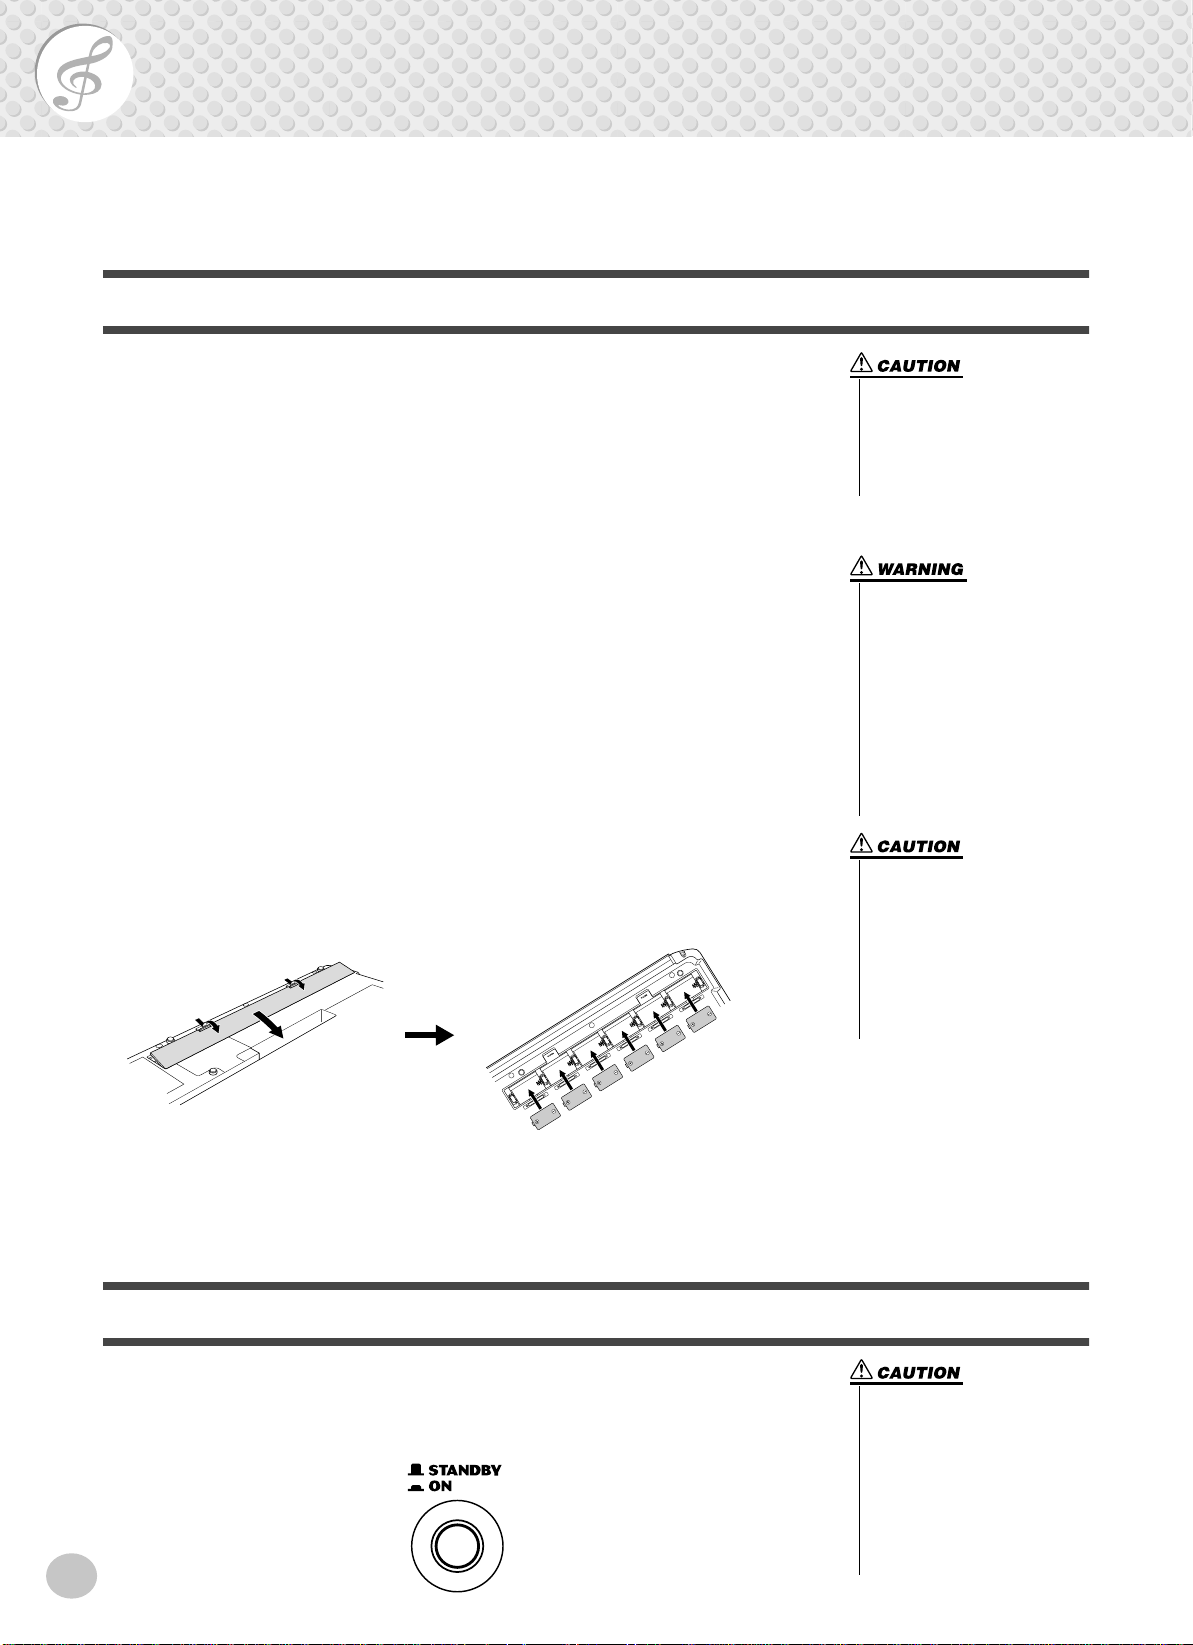
■ Using Batteries • • • • • • • • • • • • • • • • • • • • • • • • • • • • • • • • • •
● Inserting Batteries
Turn the instrument upside-do wn and remove the battery compartment lid. Insert
six 1.5-volt “D” size, R20P (LR20) or equiv alent batteries as sho wn in the illustration, making sure that the positive and negative terminals are properly aligned,
and replace the lid.
• Never interrupt the power supply (e.g. remove the batteries
or unplug the AC adaptor) during any PSR-350 record operation! Doing so can result in a
loss of data.
• Use ONLY a Yamaha PA-5C AC
Power Adaptor (or other adaptor specifically recommended
by Yamaha) to power your
instrument from the AC mains.
The use of other adaptors may
result in irreparable damage to
both the adaptor and the PSR-
350.
• Unplug the AC Power Adaptor
when not using the PSR-350,
or during electrical storms.
• Never mix old and new batteries or different types of batteries (e.g., alkaline and
manganese).
• To prevent possible damage
from battery leakage, remove
the batteries from the instrument if it is not to be used for a
long time.
● When the Batteries Run Down
When the batteries run low and the battery voltage drops belo w a certain le vel, the
PSR-350 may not sound or function properly. As soon as this happens, replace
them with a complete set of six new batteries.
Turning On the Power
With the AC power adaptor connected or with batteries installed, simply press the
power switch until it locks in the ON position. When the instrument is not in use,
be sure to turn the power off. (Press the switch again so that it pops up.)
8
• Even when the switch is in the
“STANDBY” position, electricity is still flowing to the instrument at the minimum level.
When you are not using the
PSR-350 for a long time, make
sure you unplug the AC power
adaptor from the wall AC outlet, and/or remove the batteries
from the instrument.
Accessory Jacks
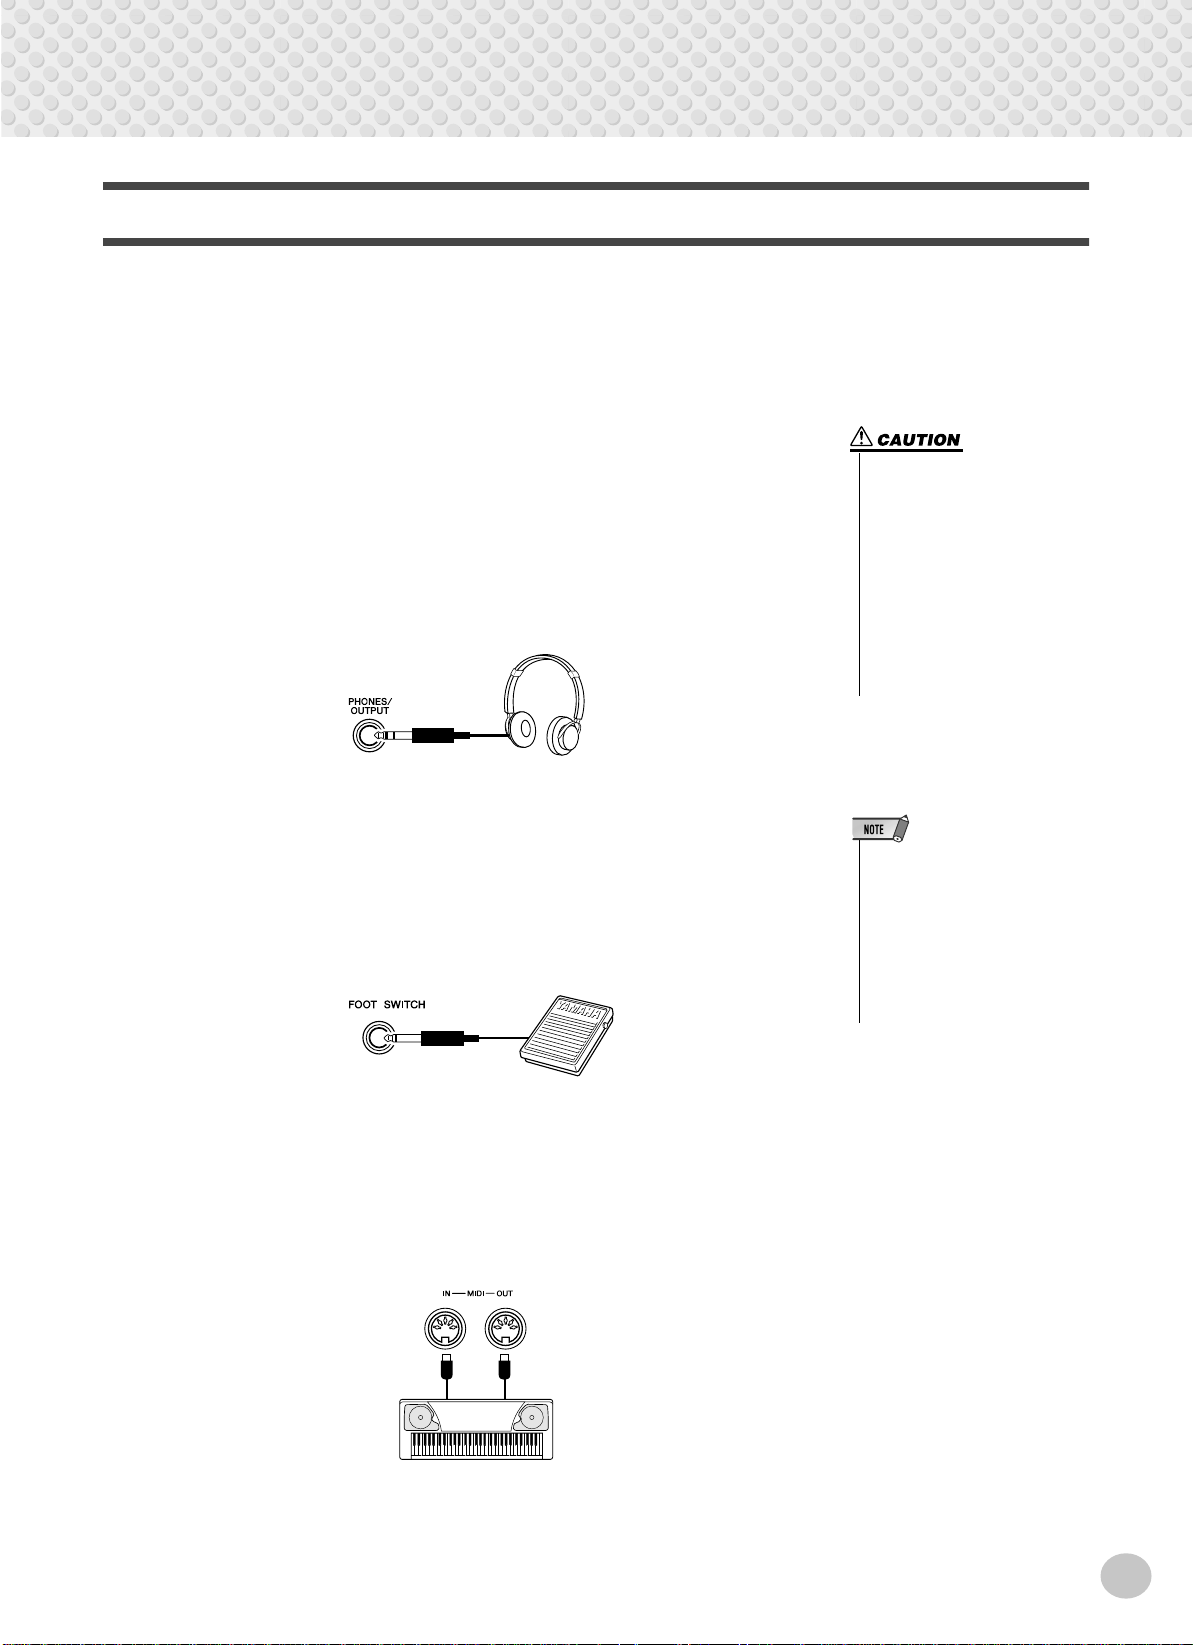
■ Using Headphones• • • • • • • • • • • • • • • • • • • • • • • • • • • • • • • •
For private practicing and playing without disturbing others, connect a set of stereo headphones to the rear panel PHONES/OUTPUT jack. Sound from the builtin speaker system is automatically cut off when you insert a headphone plug into
this jack.
■ Connecting a Keyboard Amplifier or Stereo System • • • • • • •
Though the PSR-350 is equipped with a built-in speaker system, you can also play
it through an external amplifier/speaker system. First, make sure the PSR-350 and
any external devices are turned of f, then connect one end of a stereo audio cable to
the LINE IN or AUX IN jack(s) of the other device and the other end to the rear
panel PHONES/OUTPUT jack on the PSR-350.
Setting Up
• To prevent damage to the
speakers, set the volume of the
external devices at the minimum setting before connecting them. Failure to observe
these cautions may result in
electric shock or equipment
damage. Also, be sure to set
the volumes of all devices at
their minimum levels and grad
ually raise the volume controls
while playing the instrument to
set the desired listening level.
■ Using a Footswitch • • • • • • • • • • • • • • • • • • • • • • • • • • • • • • •
This feature lets you use an optional footswitch (Yamaha FC4 or FC5) to sustain
the sound of the voices. The footswitch functions the same way as a damper pedal
on an acoustic piano — press and hold down the footswitch as you play the keyboard to sustain the sound.
■ Using the MIDI Terminals • • • • • • • • • • • • • • • • • • • • • • • • • • •
The PSR-350 also features MIDI terminals, allowing you to interface the PSR350 with other MIDI instruments and devices. (For more information, see page
80.)
MIDI
instrument
• Make sure that the footswitch
plug is properly connected to the
FOOTSWITCH jack before turning on the power.
• Do not press the footswitch while
turning the power on. Doing this
changes the recognized polarity
of the footswitch, resulting in
reversed footswitch operation.
9
●
Quick
Guide
Step 1
Voices
w
000
GrandPno
001
z
z
w
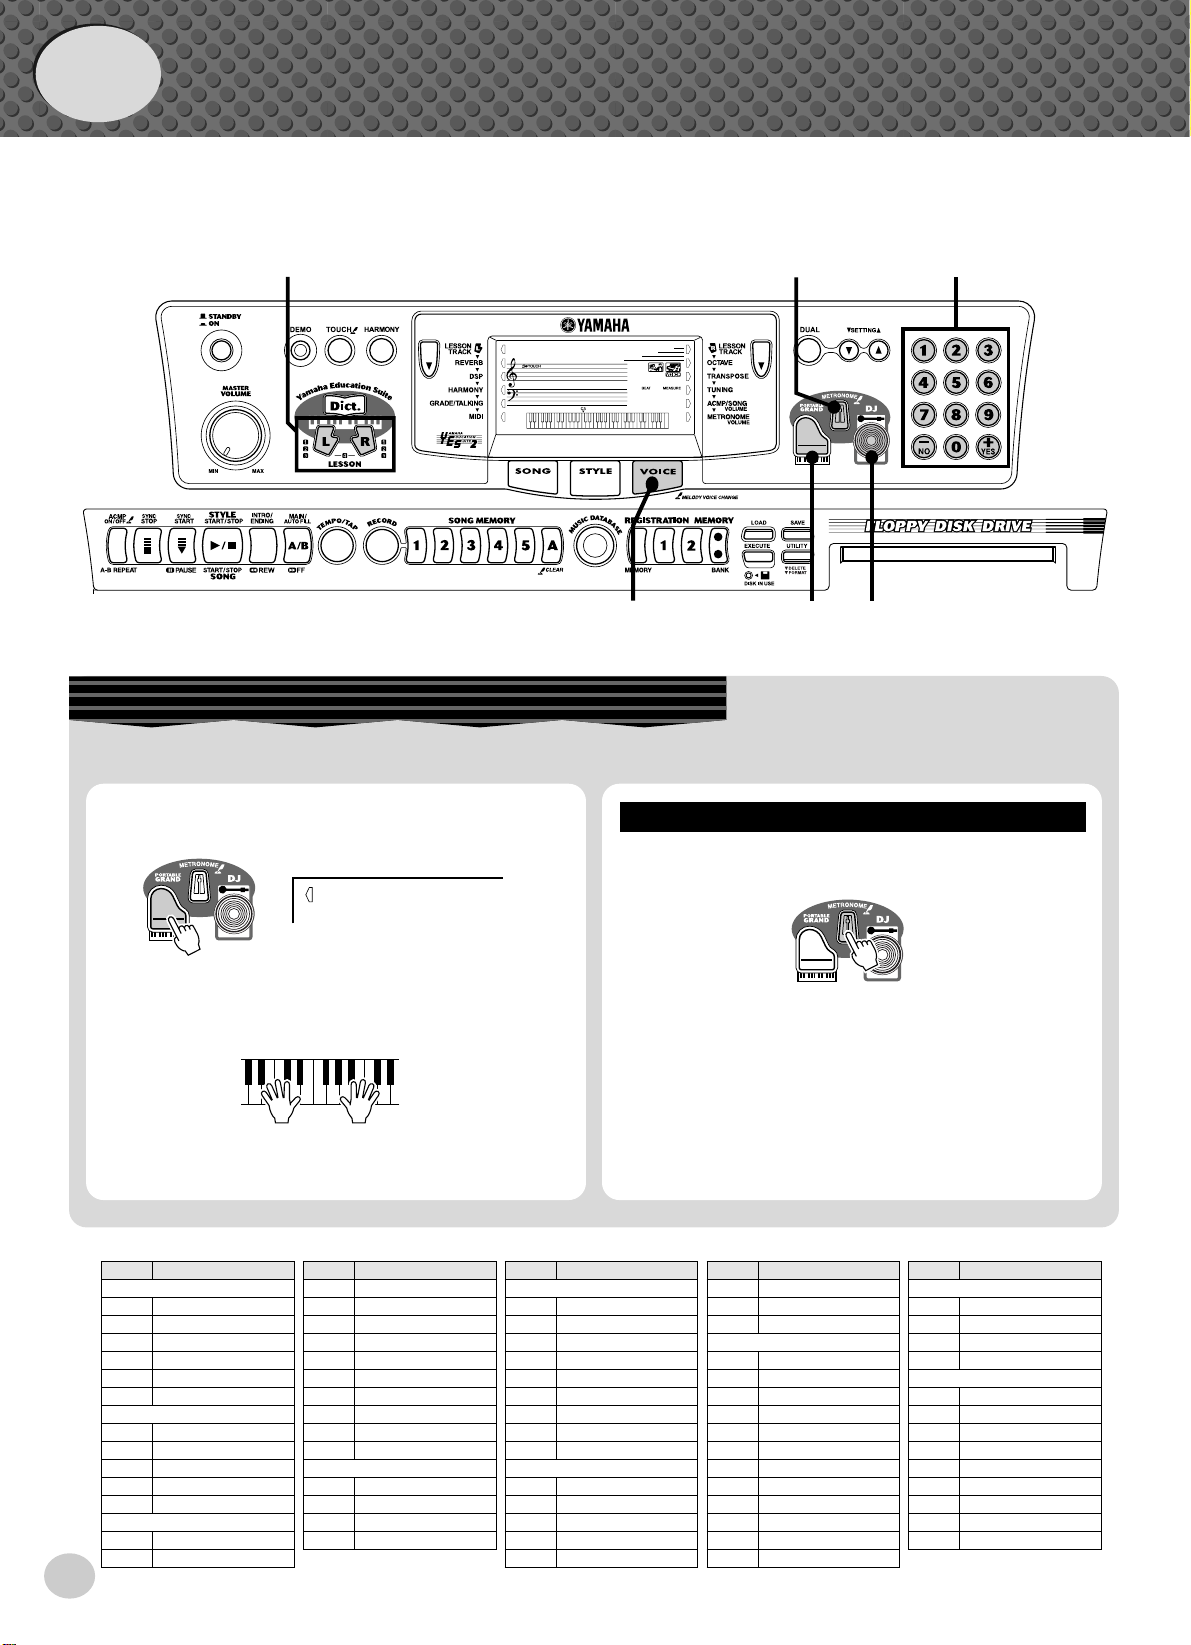
Playing the Piano
Simply by pressing the [PORTABLE GRAND] button, you can automatically reset the entire PSR-350 for piano play.
z
Press the [PORTABLE GRAND] button.
z
Playing along with the Metronome
Press the [METRONOME] button.
10
x
Play the keyboard.
Panel Voice List
Voice Name
No.
PIANO
001 Grand Piano
002 Bright Piano
003 Honky-tonk Piano
004 MIDI Grand Piano
005 CP 80
006 Harpsichord
E.PIANO
007 Funky Electric Piano
008
DX Modern Elec. Piano
009 Hyper Tines
010 Venus Electric Piano
011 Clavi
ORGAN
012 Jazz Organ 1
013 Jazz Organ 2
000
GrandPno
Want to find out more? See page 20.
Voice Name
No.
014 Click Organ
015 Bright Organ
016 Rock Organ
017 Purple Organ
018 16’+2′ Organ
019 16’+4′ Organ
020 Theater Organ
021 Church Organ
022 Chapel Organ
023 Reed Organ
ACCORDION
024
Traditional Accordion
025 Musette Accordion
026 Bandoneon
027 Harmonica
No.
028 Classical Guitar
029 Folk Guitar
030 12Strings Guitar
031 Jazz Guitar
032 Octave Guitar
033 Clean Guitar
034 Muted Guitar
035 Overdriven Guitar
036 Distortion Guitar
037 Acoustic Bass
038 Finger Bass
039 Pick Bass
040 Fretless Bass
041 Slap Bass
Voice Name
GUITAR
BASS
Want to find out more? See page 20.
Voice Name
No.
042 Synth Bass
043 Hi-Q Bass
044 Dance Bass
STRINGS
045 String Ensemble
046 Chamber Strings
047 Synth Strings
048 Slow Strings
049 Tremolo Strings
050 Pizzicato Strings
051 Orchestra Hit
052 Violin
053 Cello
054 Contrabass
055 Banjo
056 Harp
Voice Name
No.
CHOIR
057 Choir
058 Vocal Ensemble
059 Vox Humana
060 Air Choir
SAXOPHONE
061 Soprano Sax
062 Alto Sax
063 Tenor Sax
064 Breathy Tenor
065 Baritone Sax
066 Oboe
067 English Horn
068 Bassoon
069 Clarinet
Step 1 Voices
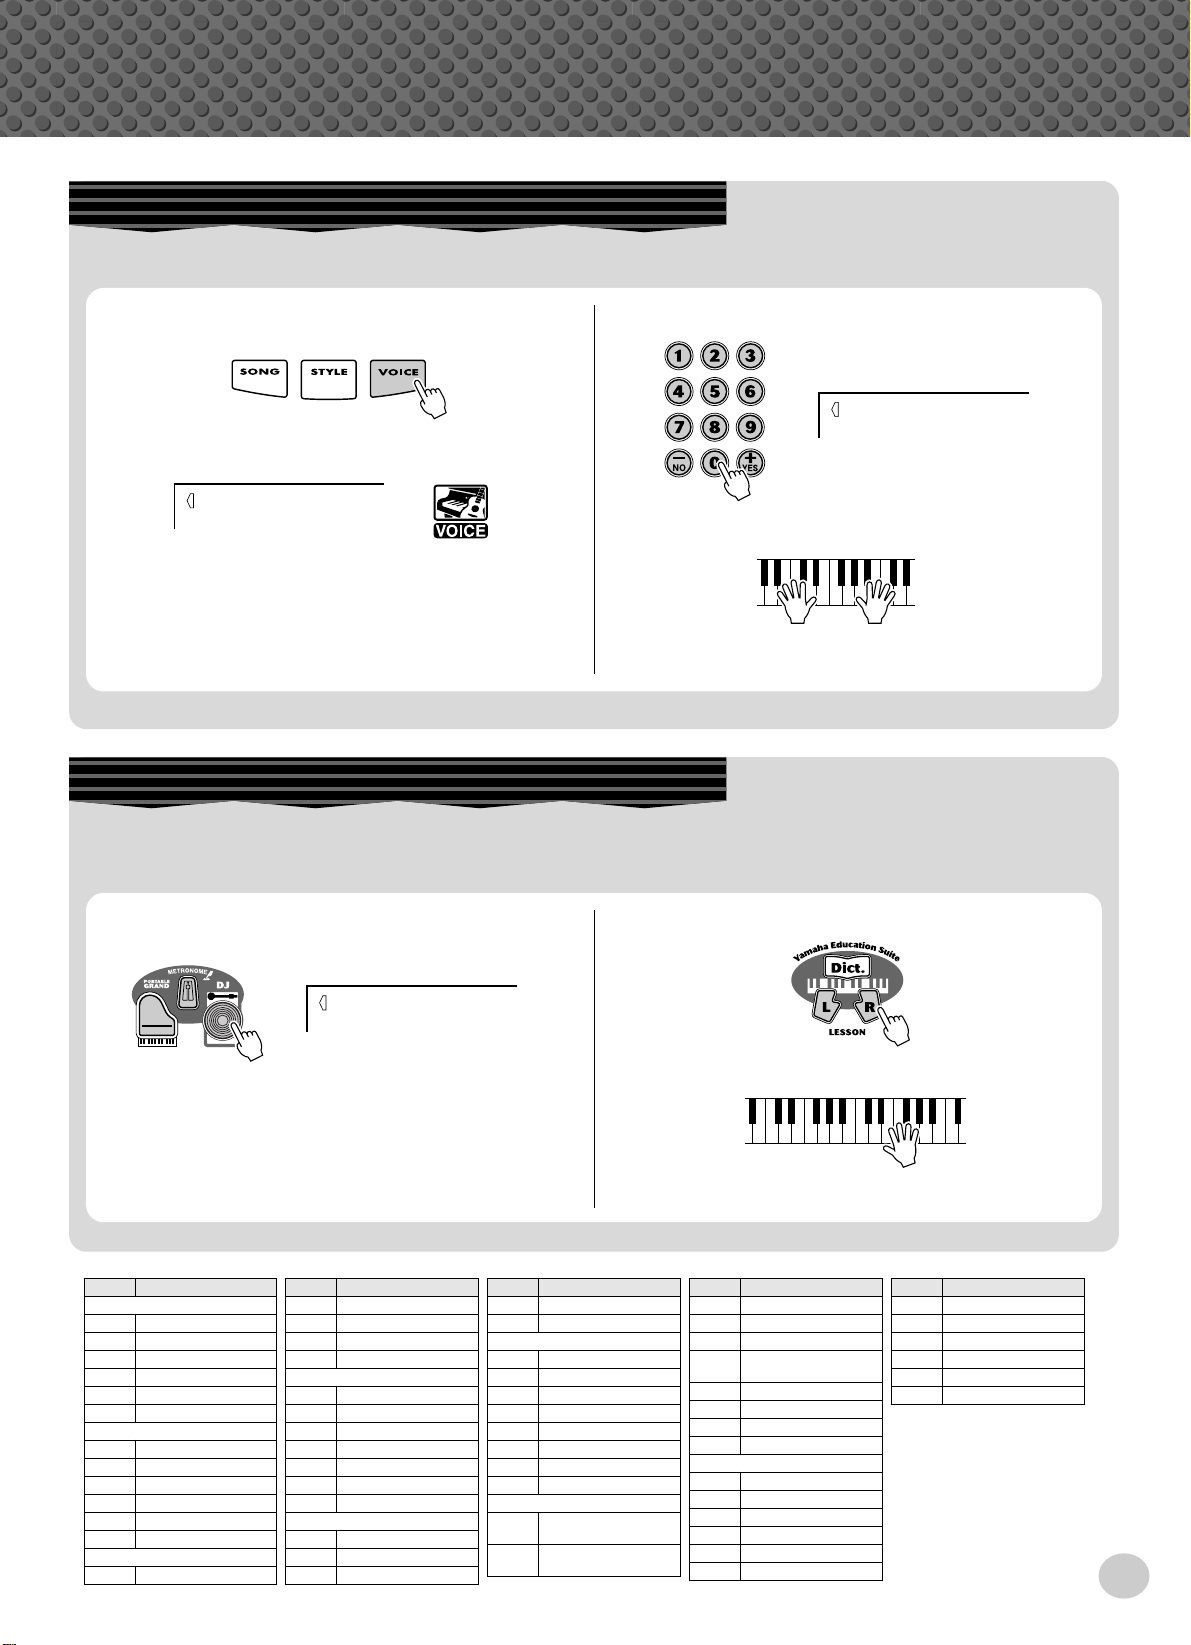
Selecting and Playing Other Voices
The PSR-350 has a huge total of 618 dynamic and realistic instrument voices. Let’s try a few of them out now…
q
Press the [VOICE] button.
000
GrandPno
w
Select a voice.
e
Play the keyboard.
002
BritePno
Want to find out more? See page 23.
Playing with the DJ Feature
The exciting new DJ feature gives you a full variety of dance and DJ sounds — letting you create your own real-time mixes and
groove along with various contemporary rhythms.
q
Press the [DJ] button.
000
DJ Set1
w
Press the Lesson [L] or [R] button.
e
Play the DJ voice.
Want to find out more? See page 22.
Voice Name
No.
TRUMPET
070 Trumpet
071 Muted Trumpet
072 Trombone
073 Trombone Section
074 French Horn
075 Tuba
BRASS
076 Brass Section
077 Big Band Brass
078 Mellow Horns
079 Synth Brass
080 Jump Brass
081 Techno Brass
FLUTE
082 Flute
Voice Name
No.
083 Piccolo
084 Pan Flute
085 Recorder
086 Ocarina
SYNTH LEAD
087 Square Lead
088 Sawtooth Lead
089 Voice Lead
090 Star Dust
091 Brightness
092 Analogon
093 Fargo
SYNTH PAD
094 Fantasia
095 Bell Pad
096 Xenon Pad
Voice Name
No.
097 Equinox
098 Dark Moon
PERCUSSION
099 Vibraphone
100 Marimba
101 Xylophone
102 Steel Drums
103 Celesta
104 Tubular Bells
105 Timpani
106 Music Box
107 Aco.Bass /
108 FngrBass /
SPLIT
GrandPno
GrandPno
Voice Name
No.
109 Fretless / DXModern
110 Aco.Bass / Vibe
111 Fretless / Brass
112 Analogon /
Saw.Lead
113 SlapBass / Clavi
114 ClassGtr / Flute
115 Strings / GrandPno
116 V.Humana / Choir
DRUM KITS
117 Standard Kit 1
118 Standard Kit 2
119 Room Kit
120 Rock Kit
121 Electronic Kit
122 Analog Kit
Voice Name
No.
123 Dance Kit
124 Jazz Kit
125 Brush Kit
126 Symphony Kit
127 SFX Kit 1
128 SFX Kit 2
11
Quick
Guide
Step 2 Songs
000
xqzx
GrandPno
001
zxcr w
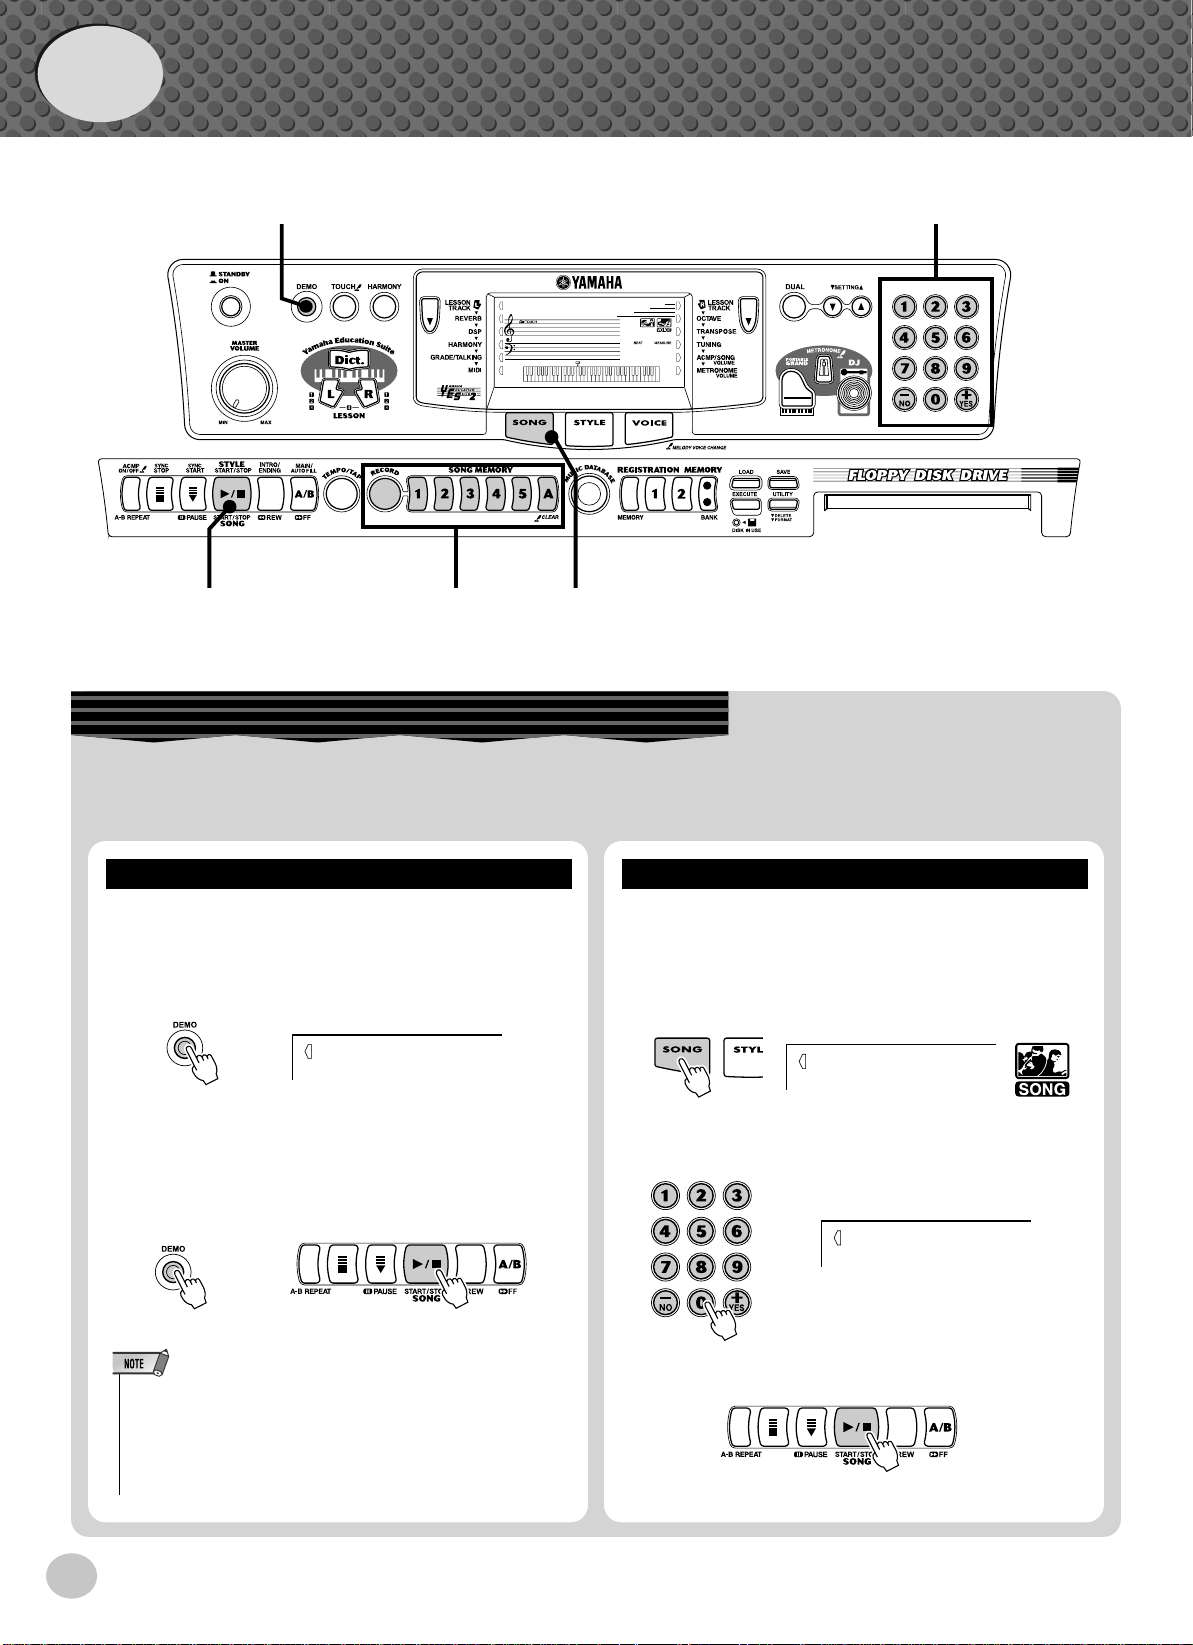
Playing the Songs
The PSR-350 is packed with a total of 100 songs, including three Demo songs, plus seventeen songs that have been specially
created to showcase the rich and dynamic sounds of the instrument. There are also eighty additional songs, designed to be used
with the educational Lesson feature.
Playing
Let’s play the Demo songs now, Repeating with (001 —
003)
z
Start the Demo song.
001
Mission
You can also play back songs of other categories. Simply
select the appropriate number of the desired song during
playback.
x
Stop the Demo song.
or
Naturally, you can also individually select and play back
the PSR-350’s songs (001 — 205).
z
Press the [SONG] button.
x
Select a song.
Playing
001
002
Mission
Beauty&B
12
• The PSR-350 also has a Demo Cancel function that allows you to
disable Demo playback.
To enable Demo Cancel, simultaneously hold down the [DEMO] button and turn on the power.
To restore the Demo capabilities, simply turn the power off and on
again.
c
Start (and stop) the song.
Want to find out more? See page 53.
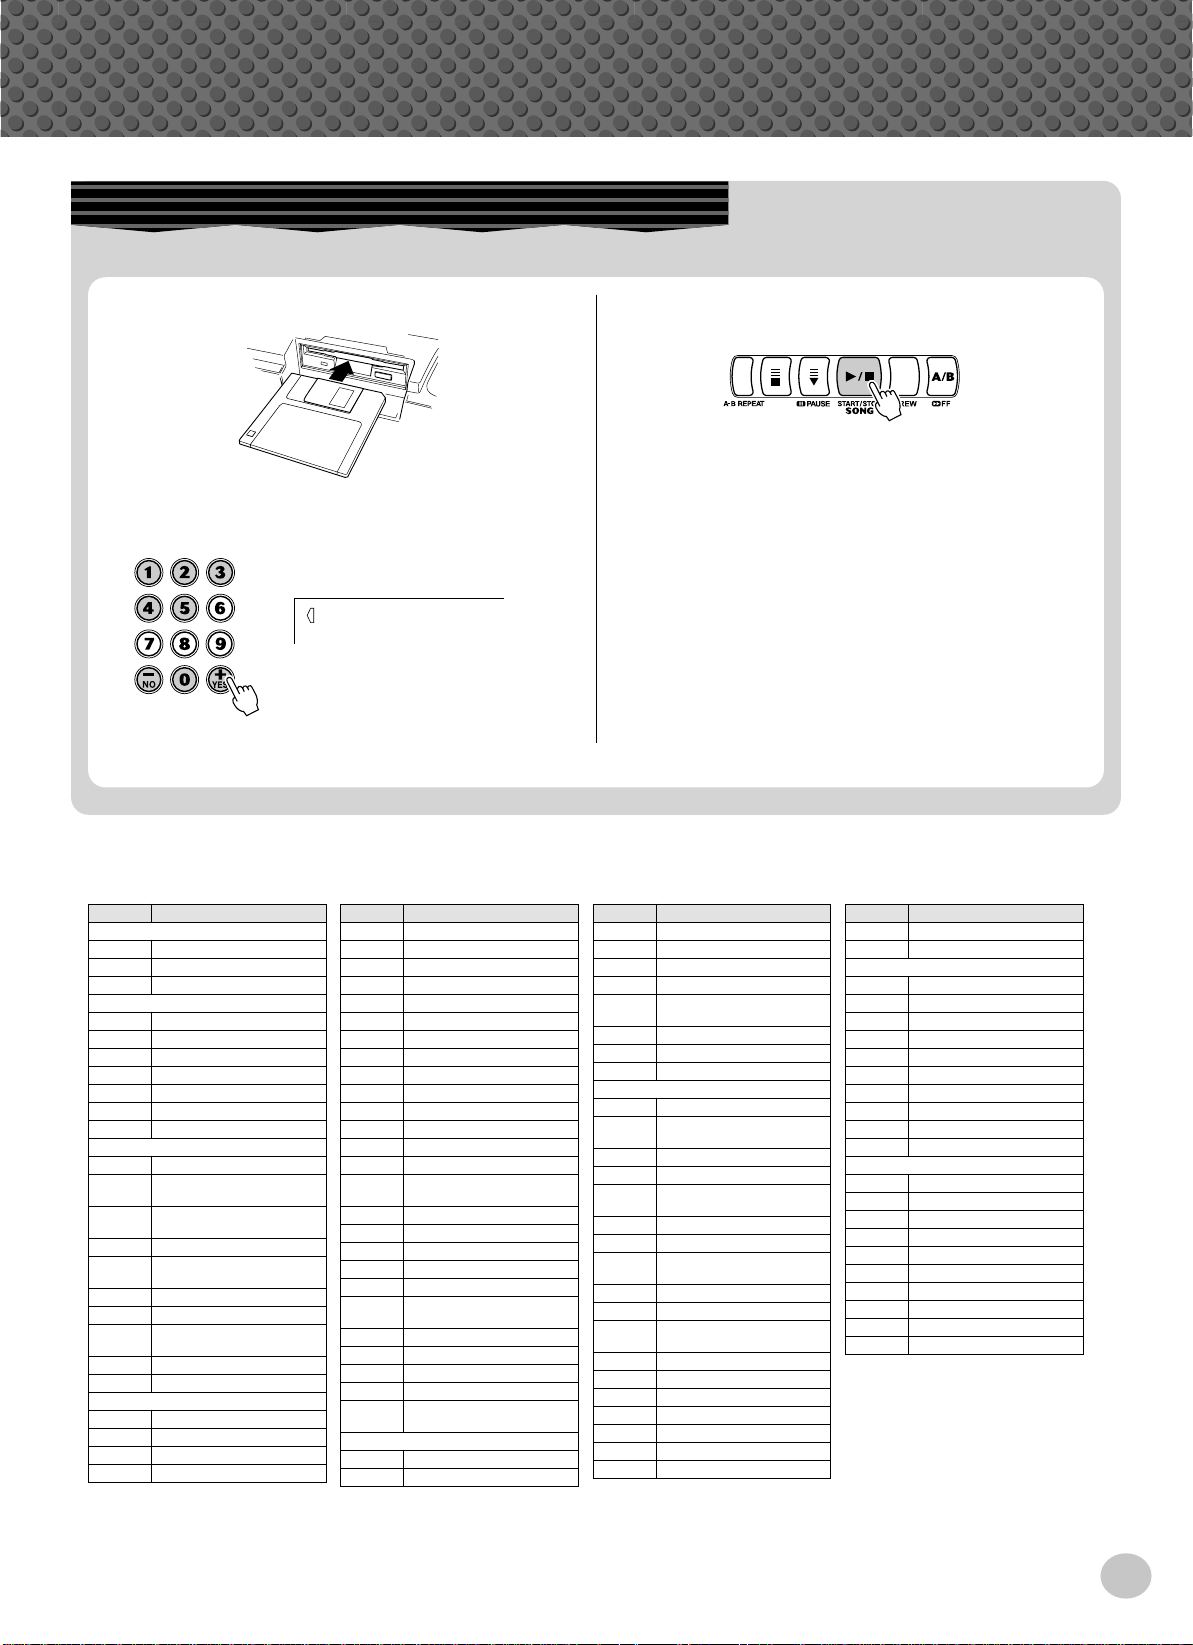
Playing the Disk Song
This function lets you play songs contained on the included disk or on other song data disks.
q
Insert the disk.
w
Select a desired User song for recording.
101
Filename
e
To start or stop playing, press the [START/
STOP] button.
Step 2 Songs
Want to find out more? See page 71.
● Song List
No. Song Name
001 Mission:Impossible
002 Beauty And The Beast
003 Linus And Lucy
004 Rock Chick
005 Love You
006 Electric Path
007 Twilight
008 Beach Party
009 Sometime
010 Slunky
011 Frühlingsstimmen
012 Danse Des Mirlitons From
013 «Orphée Aux Enfers» Ou014 Slavonic Dances No.10
015 La Primavera (From Le
016 Méditation De Thais
017 Guillaume Tell
018 Valse Des Fleurs
019 Frühlingslied
020 Ungarische Tänze Nr.5
021 Little Brown Jug
022 Loch Lomond
023 Oh! Susanna
024 Song Of The Pearl Fisher
Demo
Bandman
Orchestra
«The Nutcracker»
verture»
Quattro Stagioni)
(From»The Nutcracker»)
Practice
No. Song Name
025
Wenn Ich Ein Vöglein War ?
026 Die Lorelei
027 Funiculi-Funicula
028 Greensleeves
029 Aura Lee
030 Londonderry Air
031 Ring De Banjo
032 Turkey In The Straw
033 Old Folks At Home
034 Silent Night
035 Jingle Bells
036 Muss I Denn
037
Jesu, Joy Of Man’s Desiring
038 Gavotte
039 String Quartet No.17 2nd
Mov. «Serenade»
040 Menuett
041 Canon
042 The Danube Waves
043 From «The Magic Flute»
044 Symphonie Nr.9
045 Piano Sonate Op.27-2
«Mondschein»
046 Liebesträume Nr.3
047 «The Surprise»Symphony
048 To A Wild Rose
049 Air de Toréador»Carmen»
050 O Mio Babbino Caro
(From «Gianni Schicchi»)
051 Ten Little Indians
052 Mary Had A Little Lamb
Duet
No. Song Name
053 O Du Lieber Augustin
054 Twinkle Twinkle Little Star
055 Pop Goes The Weasel
056 Im Mai
057 Close Your Hands, Open
Your Hands
058 The Cuckoo
059 London Bridge
060 O Christmas Tree
061 Für Elise
062 Dolly’s Dreaming And
063 La Viollette
064 Menuett
065 Prelude (Wohltemperierte
066 Marcia Alla Turca
067 Turkish March
068 Moments Musicaux
069
070 Nocturne Op.9-2
071 Etude Op.10-3 «Chanson
072 La Candeur
073 Arabesque
074 Pastorale
075 Petite Réunion
076 Innocence
077 Progrès
078 Tarentelle
Pianist
Awakening
Klavier 1-1)
Op.94-3
Valse Op.64-1 «Peiti Chien»
De L
‘
adieu»
No. Song Name
079 La Chevaleresque
080 The Entertainer
081 Amazing Grace
082 My Bonnie
083 Beautiful Dreamer
084 Yankee Doodle
085 Grandfather’s Clock
086
087 Aloha Oe
088 My Darling Clementine
089 Auld Lang Syne
090 American Patrol
091 DJ Game
092 Ragga
093 Digital Rock
094 Hip House
095 All That
096 Pop Reggae
097 Acid House
098 SupaBad
099 Acid Techno
100 Flares
Accomp
Battle Hymn Of The Republic
DJ
*For the songs #021- #090, refer to the included Song Book.
13
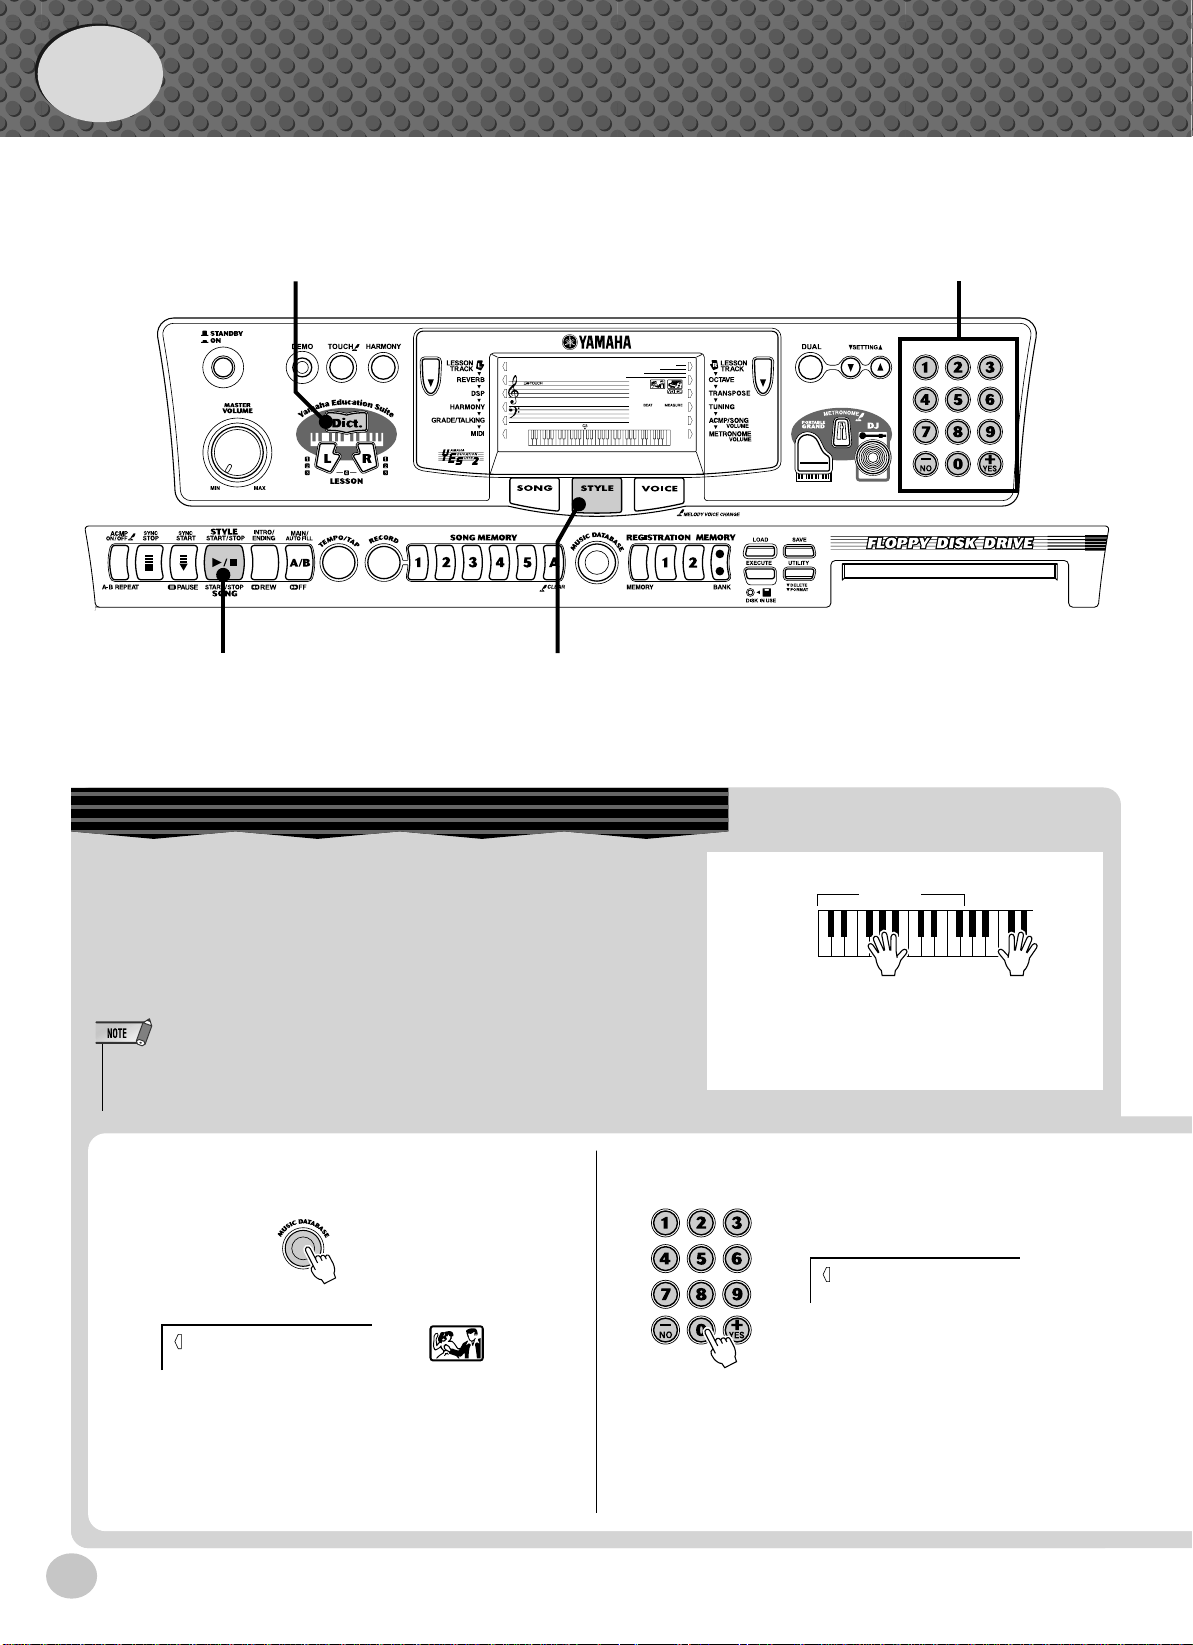
Quick
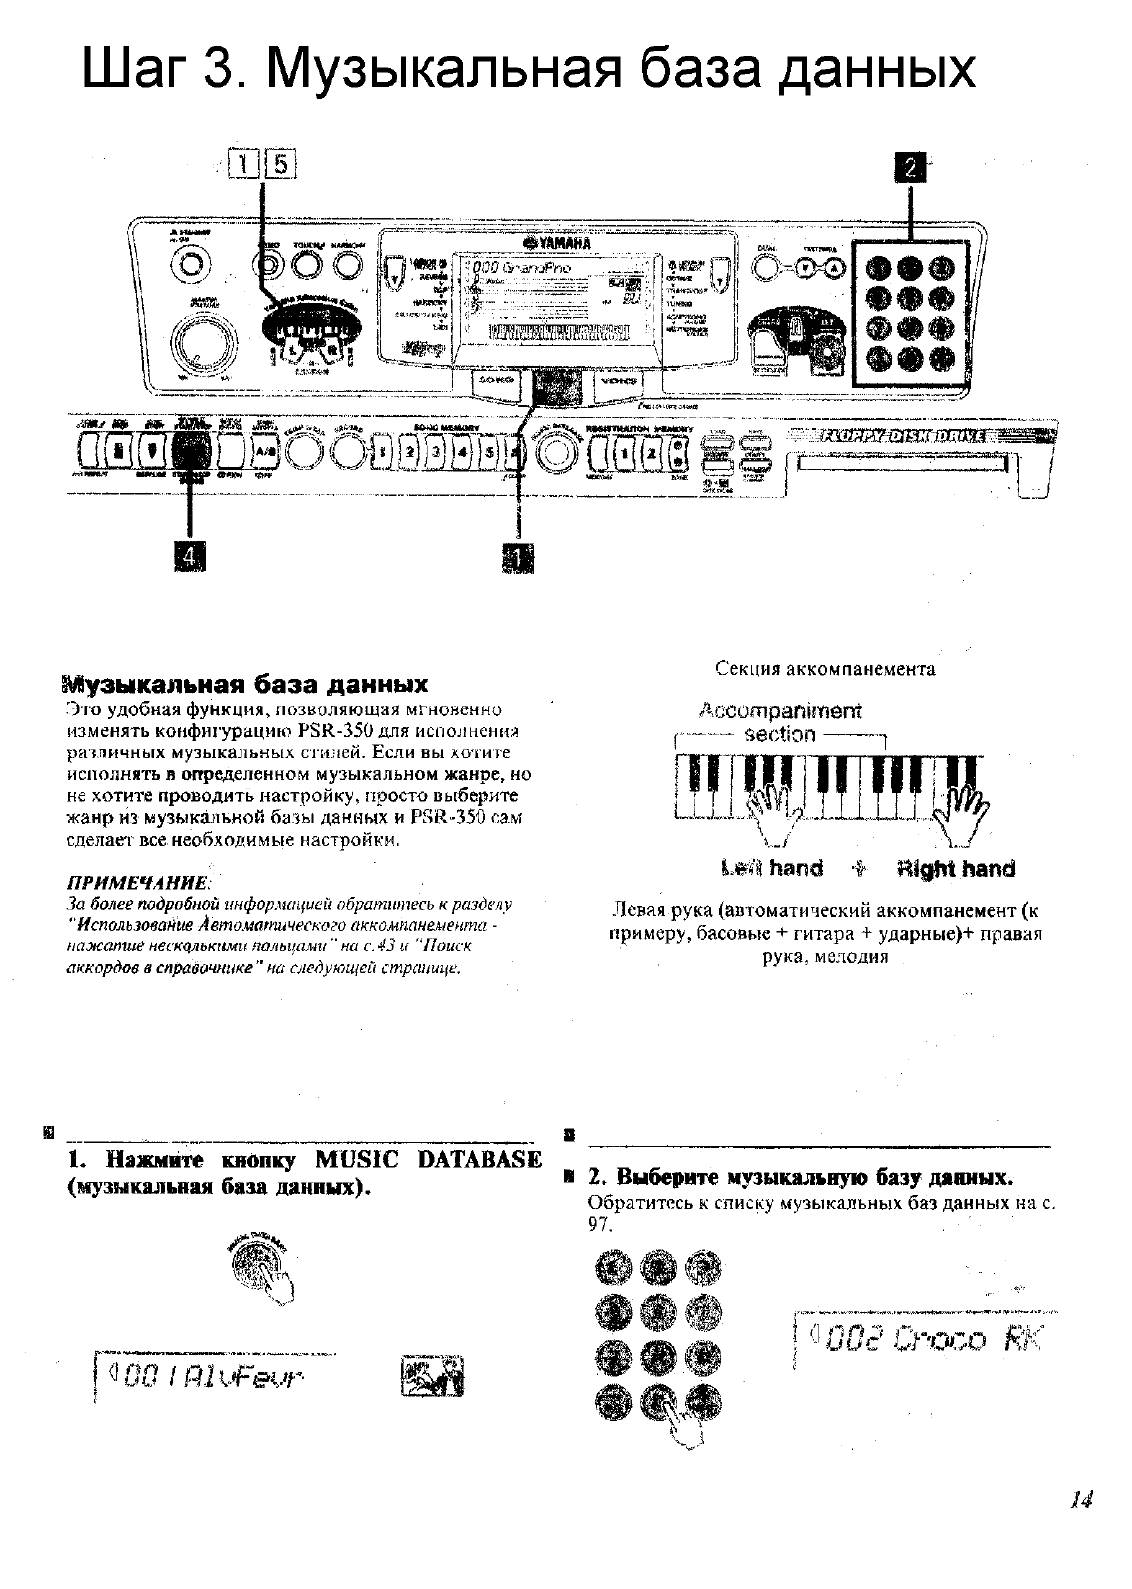
Accompaniment
section
Left hand
Auto accompaniment
(for example,
bass + guitar + drums)
Right hand
Melody
+
Guide
Step 3 Music Database
Music Database
zb
000
x
GrandPno
001
zv
Here’s a convenient feature that lets you instantly reconfigure the
PSR-350 for playing in different music styles. If you want to perform in a certain genre but don’t know what settings to make, simply
select the genre from the Music Database — and the PSR-350
makes all the right settings for you!
• For more infomation on playing proper chords for the auto accompaniment, see “Using Auto Accompaniment — Multi Fingering” on page
43 and “Looking up Chords in the Dictionary” on the next page.
z
Press the [MUSIC DATABASE] button.
001
AlvFevr
x
Select a Music Database.
Refer to the Music Database List on page 95.
002
Croco RK
14
Step 3 Music Database
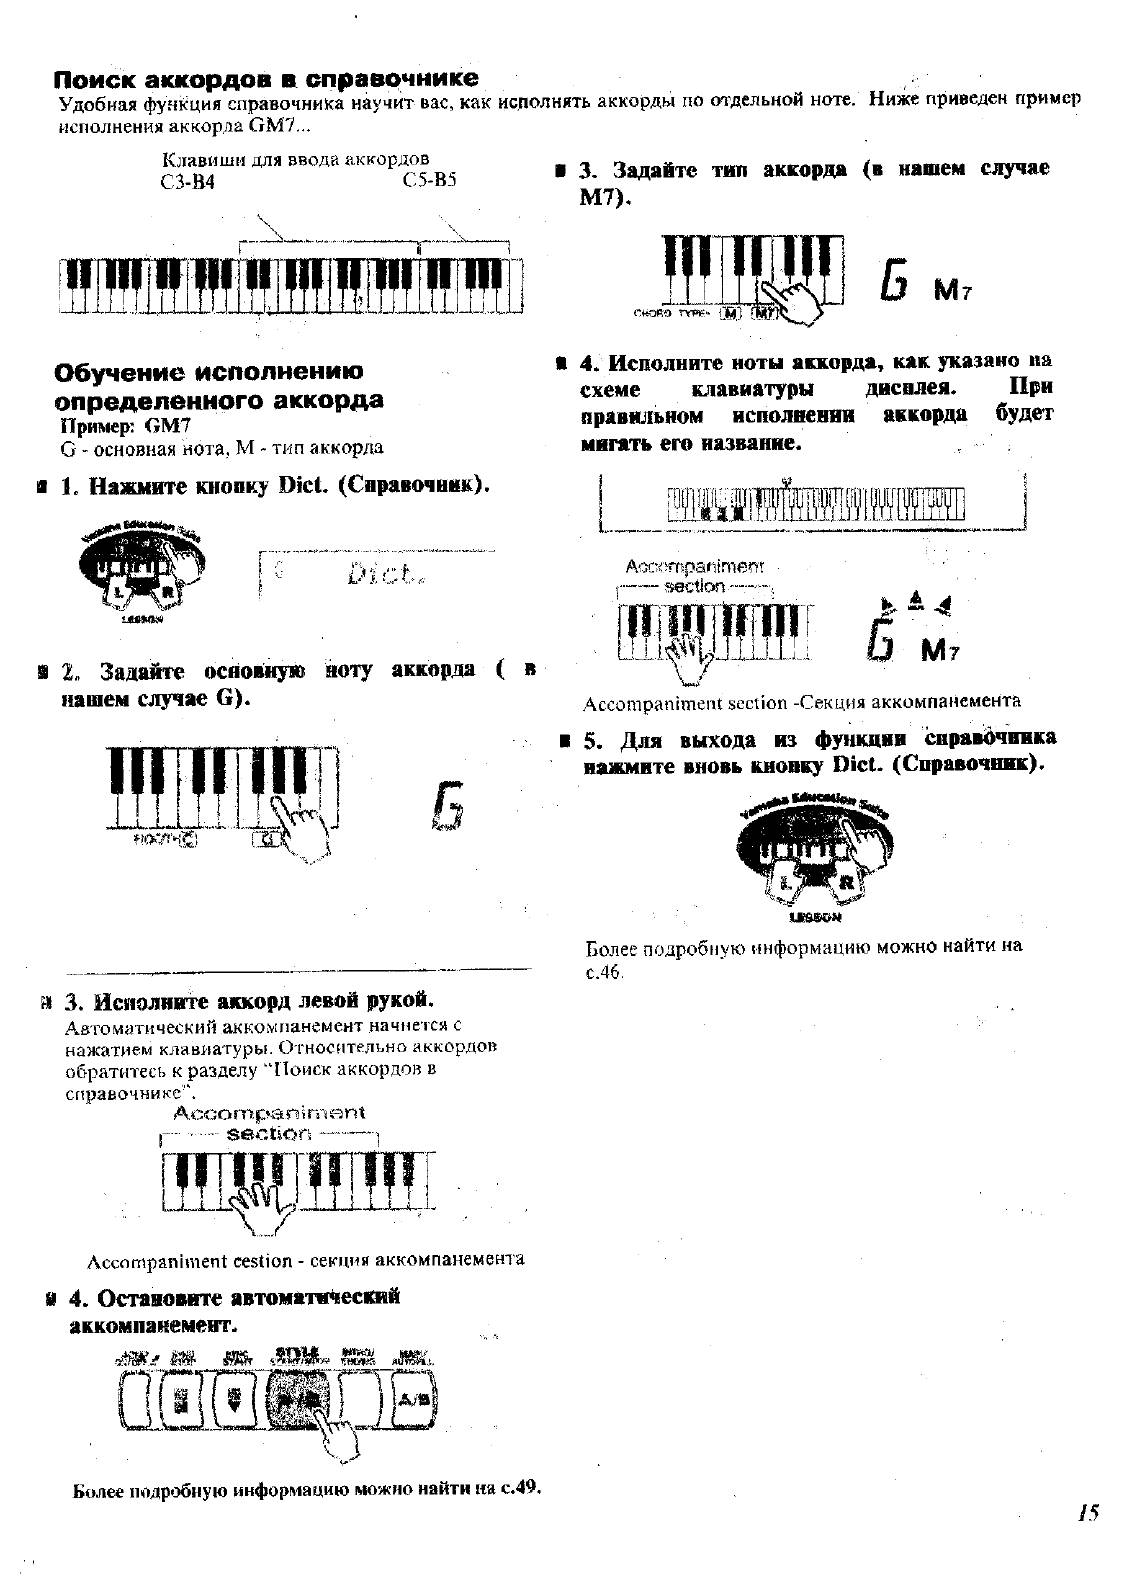
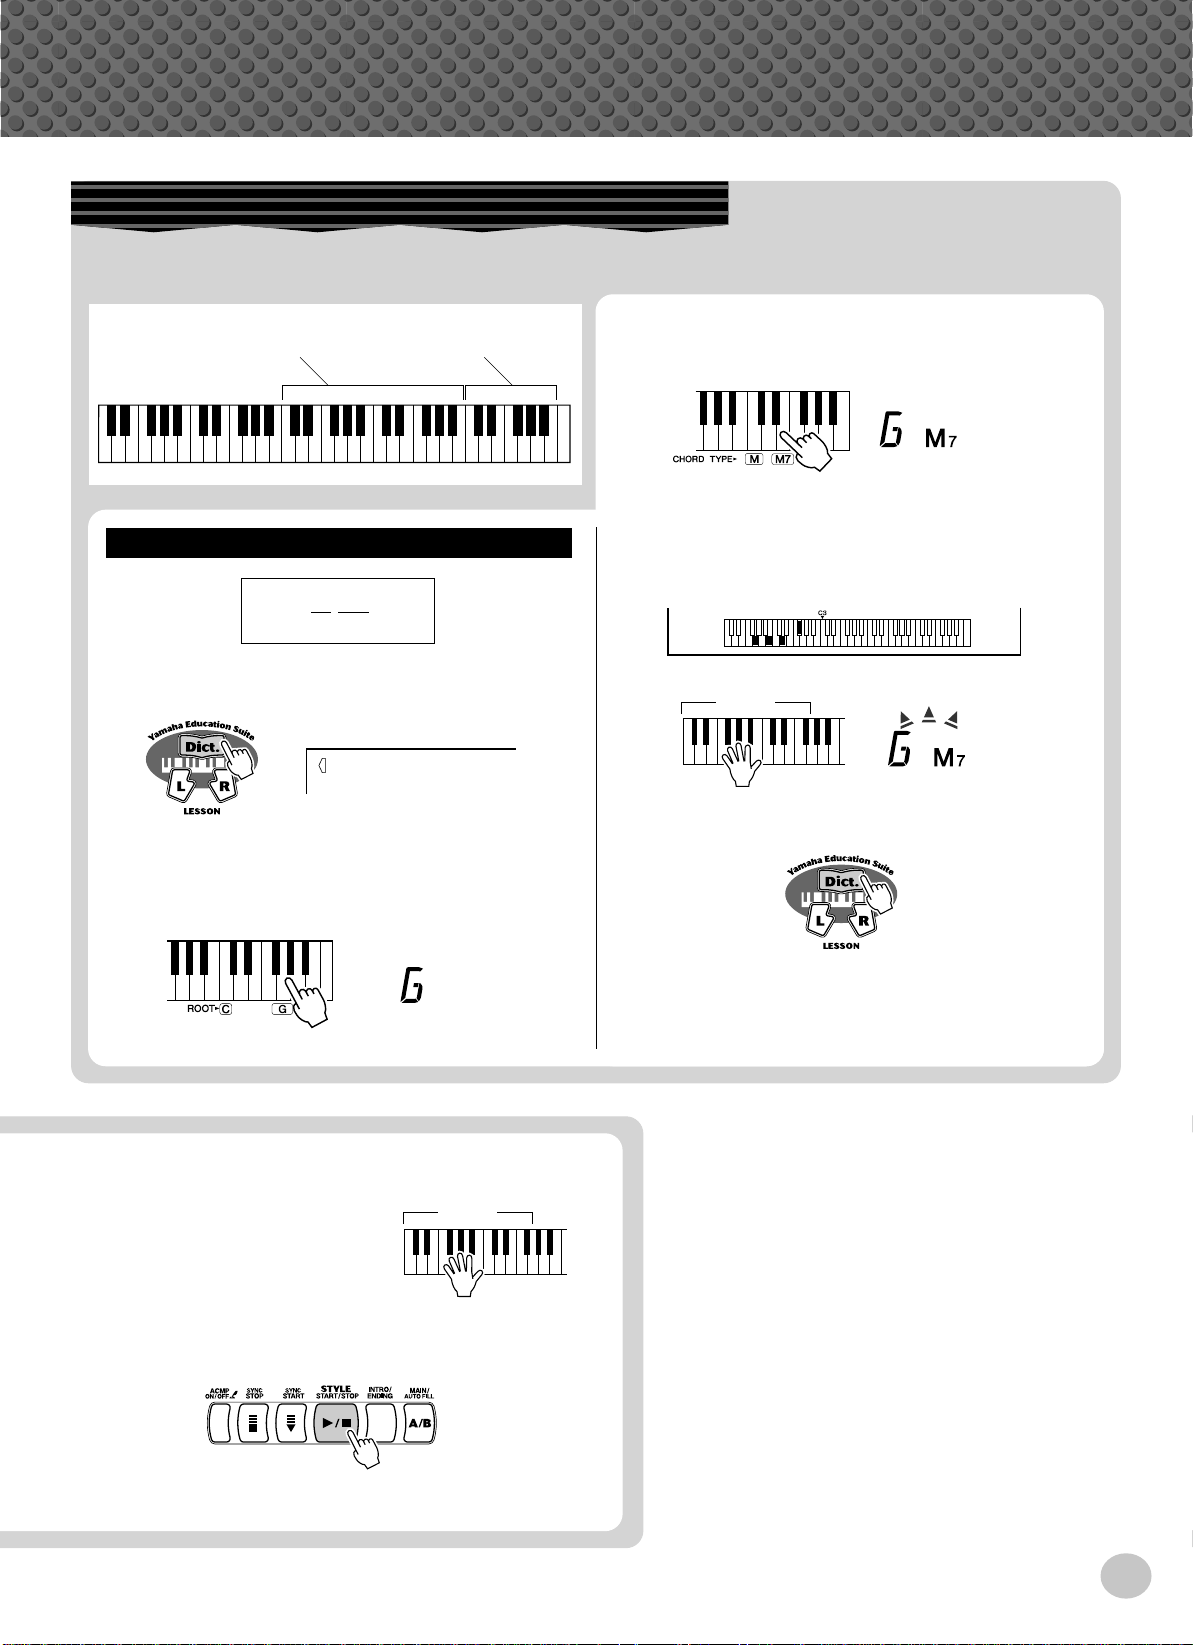
Looking up Chords in the Dictionary
The convenient Dictionary function teaches you how to play chords by showing you the individual notes. In the example
below, we’ll learn how to play a GM7 chord…
c
Keys for entering
the chord type (C3 — B4)
Learning
Example:
GM7
Root note Chord type
Keys for entering
the chord root (C5 — B5)
Specify the chord type of the chord (in this
case, M7).
v
Play the notes of the chord as indicated in the
keyboard diagram in the display. The chord
name flashes when the chord is played properly.
z
Press the [Dict.] button.
Dict.
x
Specify the root note of the chord (in this case,
G).
c
Play a chord with your left hand.
The auto accompaniment
starts as soon as you play the
keyboard. For more on
chords, see “Looking up
Chords in the Dictionary”
above.
Accompaniment
section
Accompaniment
section
b
To leave the Dictionary function, press the
[Dict.] button again
Want to find out more? See page 46.
v
Stop the auto accompaniment.
Want to find out more? See page 49.
15

Quick
Guide
Step 4 Lesson
z zv
000
xx
GrandPno
001
Using the Lesson Feature
Songs 021 to 100 are specially designed for use with the educational Lesson feature. Lesson makes it fun and easy to master
these songs. You can practice the left- and right-hand parts of each song individually: simply press the appropriate button, [L]
(left) or [R] (right). The practice steps below apply to either hand.
Lesson 1 — Timing. . . . . . . . .This lesson step lets you practice just the timing of the notes.
Lesson 2 — Waiting . . . . . . . .In this lesson step, the PSR-350 waits for you to play the correct notes before continuing
playback of the song.
Lesson 3 — Minus One . . . . .This lesson step plays back the song with one part muted — letting you play and master the
missing part yourself.
Lesson 4 — Both Hands. . . . .This lesson step is the same as “Minus One,” except in that both the left- and right-hand
parts are muted — letting you play and master both hands.
z
Select one of the Lesson songs.
For instructions on selecting songs, see page 63.
x
Select the part you wish to work on (left or
right) and the Lesson step.
If you want to work on the right-hand part, press the
[R] button; to work on the left, press the [L] button.
c
Start the Lesson.
v
When you’re finished, stop the Lesson.
16
r1
Timing
• Each press of the corresponding button ([L] or [R]) alternately selects
Lessons 1 — 3. Pressing both buttons simultaneously calls up Lesson
4, Both Hands.
• You can also exit from the Lesson by pressing one the LESSON buttons ([L] or [R]) repeatedly until song name is shown in the display.
Loading…
Перейти к контенту
Синтезаторы, цифровые пианино Yamaha
- Размер инструкции: 3.74 Мб
- Формат файла: pdf
Если вы потеряли инструкцию от синтезатора, цифрового пианино Yamaha PSR-350, можете скачать файл для просмотра на компьютере или печати.
Инструкция для синтезатора, цифрового пианино Yamaha PSR-350 на русском языке. В руководстве описаны возможности и полезные функции, а также правила эксплуатации. Перед использованием внимательно ознакомьтесь с инструкцией.
Чтобы не читать всю инструкцию вы можете выполнить поиск по содержимому внутри инструкции и быстро найти необходимую информацию. Рекомендации по использованию помогут увеличить срок службы синтезатора, цифрового пианино Yamaha PSR-350. Если у вас появилась проблема, то найдите раздел с описанием неисправностей и способами их решения. В нем указаны типичные поломки и способы их решения.