
Вот и перестали цветные дисплеи быть исключительной особенностью мобильных телефонов! Производители радиотелефонов взяли на вооружение идею применения в своих аппаратах полноцветных жидкокристаллических матриц. В коллекции Siemens DECT есть уже несколько моделей радиотелефонов с цветными дисплеями. И сегодня я хочу представить вам одну из них — Gigaset S150 Colour.
Комплектация
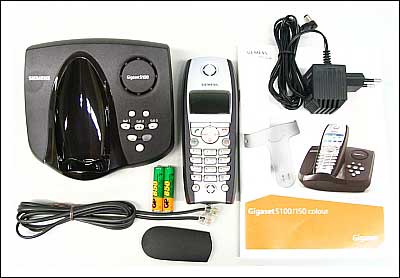
Коробка, в которую упакован аппарат со всеми аксессуарами, не представляет собой ничего выдающегося. Размеры 245 х 180 х 85, выполнена из гофрированного картона не самого высокого качества.

Зато производитель позаботился о том, чтобы упаковка не открылась случайно. Коробка не имеет привычного закрывающегося клапана, а полностью заклеена. Вскрыть ее, не повредив, просто невозможно! Такие меры не позволят «пропасть» каким-нибудь комплектующим. Однако делать нечего, пришлось производить вскрытие!
После проведения этой операции при помощи самого настоящего медицинского скальпеля, из чрева оранжевой коробки были извлечены следующие предметы:
Базовый блок; переносная трубка; два Ni-Mh аккумулятора; крышечка аккумуляторного отсека; клипса для ношения трубки на ремне; блок питания; телефонный шнур; внушительная инструкция на русском языке и гарантийный талон.
Внешний вид
Мистер Siemens S150 Colour облачен в стильный корпус из шероховатой черной пластмассы, на котором только лафет для переносной трубки отполирован до зеркального блеска! При рассмотрении базового блока сбоку, он имеет форму треугольника, острый угол которого является передней частью корпуса, а внушительное утолщение с противоположной стороны — задней частью.
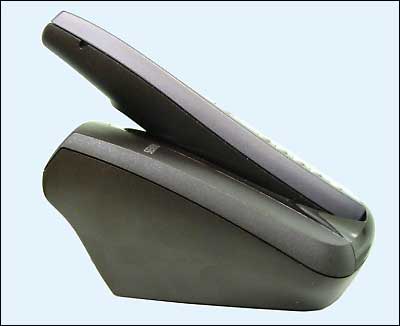
На этом массивном базовом блоке, создающем впечатление весьма устойчивой конструкции, также прочно располагается переносная трубка. Несмотря на кажущуюся, с первого взгляда, ненадежность такого положения, трубка действительно лежит в своем лафете очень прочно. Достичь этого удалось благодаря тому, что контакты зарядного устройства в нижней части трубки не просто прислоняются к пружинным клеммам базового блока, а, как бы, надеваются на них. При этом контакты базового блока довольно глубоко приникают в основание трубки, что и дает гарантию надежного удержания оной на своем месте.

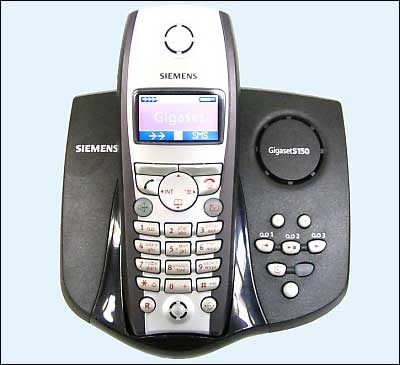
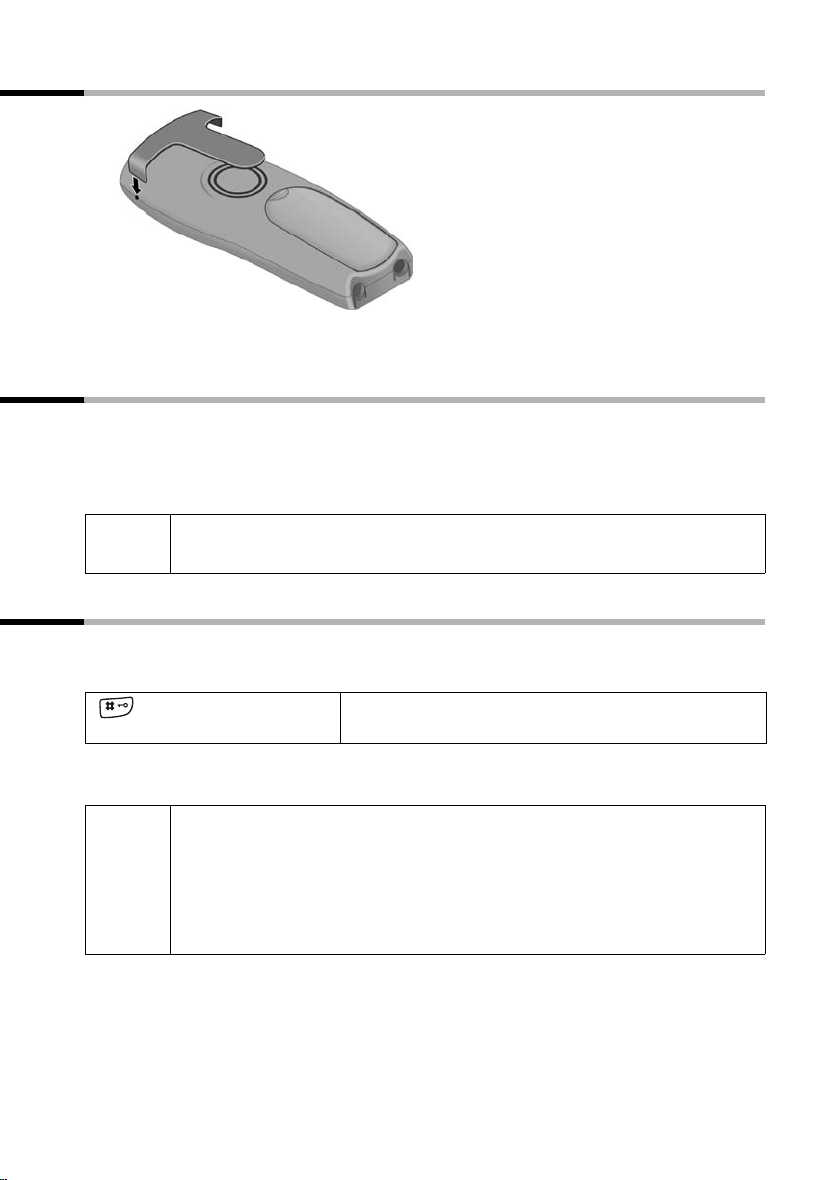
Слева от трубки на базовом блоке красуется логотип производителя, а справа расположены кнопки управления цифровым автоответчиком и отверстие динамика спикерфона, имеющее округлую форму и закрытое декоративной крышечкой с обозначением модели данного аппарата.
Гнезда для подключения телефонного кабеля и шнура питания находятся на днище S150 Colour. Чтобы шнуры не лишали аппарат устойчивости, они заправляются в специальные канальцы и надежно удерживаются там чередующимися выступами по обеим сторонам.
Трубка, как и у большинства радиотелефонов Siemens, выглядит довольно громоздко, на мой взгляд. Да и весит она тоже прилично — 131 грамм. И, хотя значительную часть массы несут в себе аккумуляторные батареи, пользователю от этого мало успокоения. Ведь без аккумуляторов все равно трубкой пользоваться нельзя.
Клавиатура Siemens S150 Colour имеет вполне традиционный вид и похожа на большинство клавиатур современных телефонных аппаратов. Все те же цифровые и экранные клавиши, четырехпозиционный джойстик для перемещения по меню аппарата, кнопка громкой связи, кнопка быстрого входа в сервис SMS, а также кнопки для работы с режимом функций и «Recall» для взаимодействия с городской телефонной станцией.
Отверстия микрофона и динамика выполнены в одинаковом стиле и имеют округлую форму.
Самым выдающимся элементом в конструкции трубки является цветной дисплей с подсветкой, позволяющий пользователю видеть индикатор уровня сигнала, уровень заряда аккумулятора, дату и время, стоимость или продолжительность разговора.
Элементы меню аппарата выглядят на дисплее S150 Colour, также как на последних моделях сотовых телефонов Siemens. Выполнены они в виде небольших красочных пиктограмм, перемещаться по которым можно при помощи навигационной клавиши.
Тыльная сторона трубки имеет слегка выпуклую форму, благодаря которой она удобно лежит в руке. В самом верху разработчики предусмотрительно поместили логотип компании и марку телефона. Эти надписи не перекрываются рукой во время разговора и легко видны всем окружающим, что позволяет лишний раз сделать рекламу телефонам Siemens.
Чуть ниже надписей находится декоративная решетка динамика вызывного сигнала. Как и все остальные элементы этого типа, она сделана в форме круга.
И, наконец, в самом низу расположен отсек для аккумуляторных батарей. Крышечка отсека держится очень прочно. Чтобы ее сдвинуть, нужно приложить некоторое усилие. Также надежно лежат в своих гнездах и сами аккумуляторы. Довольно сильные пружины контактов держат аккумуляторы так сильно, что, вынимая их, я подумал о том, что женщинам сделать это, не сломав ногти, не удастся.
Работа с телефоном
Подключение аппарата не вызвало никаких затруднений. Базовый блок приобрел работоспособность сразу после включения питания. Все функции, возложенные на эту часть Siemens Gigaset S150 Colour, стали доступны. Аппарат звонил при поступлении вызова, можно было активировать автоответчик.
После того, как в переносную трубку были вставлены аккумуляторы, на ее цветном дисплее появилось предложение зарегистрироваться на одной из возможных баз. Аппарат не производит автоматической регистрации в целях избежания несанкционированного доступа к вашей телефонной линии. Функция регистрации трубки на базе доступна из меню трубки. Вся процедура занимает несколько секунд, после чего S150 Colour готов к полноценной эксплуатации.
Аппарат имеет полифонический звонок с возможностью выбора мелодии, и даже загрузки их беспроводным способом с других переносных трубок. Компания Siemens позаботилась о том, чтобы пользователи радиотелефонов могли скачать мелодии прямо с сайта производителя. К сожалению, для внешней загрузки мелодий в телефон телефонный оператор, услугами которого вы пользуетесь, должен поддерживать возможность передачи SMS-сообщений в своих телефонных сетях. В нашей стране я пока не знаю примеров того, чтобы операторы традиционной телефонной связи, предлагали своим абонентам такую услугу.
Аппарат можно использовать для акустического контроля помещения. При включении этой функции осуществляется вызов по сохраненному внутреннему или внешнему номеру, если в помещении произойдет превышение заданного уровня шума. Это позволяет использовать S150 Colour в качестве радионяни для маленького ребенка, или контроля охраняемых объектов. При включенном режиме акустического контроля помещения, при поступлении входящего вызова, звонок телефона не включается, но все вызовы регистрируются в памяти переносной трубки и отображаются на дисплее. При этом световая индикация дисплея тоже не включается.
Поддержка телефоном стандарта GAP (Generic Access Profile) позволяет строить домашние и офисные телефонные сети, применяя в них оборудование различных производителей. Естественно, что устройства других марок тоже должны иметь поддержку протокола GAP.
Siemens Gigaset S150 Colour имеет встроенный цифровой автоответчик, который находится в базовом блоке и позволяет записывать сообщения общей длительностью до 15 минут. В этом пункте я бы хотел обратить особое внимание читателя на русификацию аппарата. В самом деле, эта опция реализована очень хорошо! Сразу видно, что разработчики программного обеспечения постарались на славу. Мягкий женский голос, которым снабжены акустические подсказки автоответчика, звучит ровно, без каких либо пауз и изменений интонации, которые можно было наблюдать у ранних моделей отечественных АОНов. При этом голос не просто записан в память. При произнесении сообщения используется проговаривание различных цифровых комбинаций, и даже в этих случаях фраза звучит цельно, так, как будто ее действительно записали заранее целиком.
Мне, как и многим другим абонентам, была весьма интересна реализация функция определения номера на Gigaset S150 Colour. Как выяснилось, аппарат оснащен функцией CLIP. Причем она включена в телефоне по умолчанию и не требует дополнительных настроек. Режим определения номера выбирается автоматически из двух возможных — DTMF или FSK. Поддержка Российского АОНа в аппарате не предусмотрена. Напомню, что для работы этой функции абонент должен заказать у своего телефонного оператора дополнительную услугу «Определение номера вызывающего абонента».
За то время пока аппарат находился у меня на тестировании, в работе функции CLIP не было обнаружено никаких сбоев. Определялись номера всех звонивших мне абонентов, независимо от того, аналоговая у них АТС или цифровая. Даже номера абонентов сотовых сетей отображались вполне корректно.
Еще одна достаточно важная характеристика, на которую стоит обращать внимание при выборе радиотелефона, это дальность его действия. В инструкции к S150 Colour говорится, что он может обеспечивать устойчивую связь на расстоянии до 300 метров на открытом пространстве и до 50 метров в помещениях. Мне было весьма интересно подтвердится ли это утверждение на практике!
Как выяснилось, в реальных условиях эксплуатации, значения указанные производителем являются скорее нормативными, нежели действительными. Во время теста внутри помещения с множеством кирпичных перегородок и наличием большого количества электронной аппаратуры и токоведущих элементов, оказалось, что аппаратом можно нормально пользоваться лишь в пределах 10 — 15 метров вверх и вниз от базового блока и на 20 — 25 метров при перемещении в пределах одного этажа. На открытом пространстве радиус действия Siemens Gigaset S150 Colour также был далек от значения, указанного производителем. Максимум на что он оказался способен, это расстояние в 150 — 170 метров.
Технические характеристики
Рекомендуемые аккумуляторы
Nickel-Metall-Hydrid (NiMH):
- Sanyo Twicell 700
- Sanyo Twicell 650
- Panasonic 700 мАч
- GP 700 мАч
- YDTAAA SUPER 700
- VARTA PhonePower AAA 700 мАч
- GP 850 мАч
- Sanyo Ni-MH 800
- Yuasa Delta AAA 800
Время работы/зарядки переносного телефона
| Емкость (мАч) |
Режим готовности (часы) |
Время разговора (часы) |
Время зарядки (часы) |
| 700 | около 160 (6 дней) | около 13 | около 7 |
Время работы и зарядки указано для рекомендованных аккумуляторов
Потребляемая мощность
- В режиме готовности (без зарядки): S150 colour — 2,2 Вт.
- В режиме готовности (с зарядкой): S150 colour — 4,6 Вт.
- Во время разговора (без зарядки): S150 colour — 2,5 Вт.
Общие технические характеристики
| Характеристика | Значение |
| Стандарт DECT | поддерживается |
| Стандарт GAP | поддерживается |
| Количество каналов | 60 дуплексных каналов |
| Диапазон частот | 1880-1900 МГц |
| Метод дуплексной передачи | Уплотнение по времени, кадры по 10 мс |
| Сетка каналов | 1728 кГц |
| Скорость передачи | 1152 кбит/с |
| Модуляция | GFSK |
| Кодирование речи | 32 кбит/с |
| Мощность передачи | 10 мВт, средняя мощность на канал |
| Дальность связи | до 300 м на открытом пространстве, до 50 м в зданиях |
| Электропитание/базовый блок | 220/230 В ~/50 Гц; |
| Температура эксплуатации | от +5 °С до +45 °С; |
| Относительная влажность | от 20% до 75% |
| Способ набора номера | тональный/импульсный |
| Время «флэш» | регулируется программно от 80 до 400 мс |
| Размеры/базовый блок | Gigaset S150 colour: 132 х 140 х 65 мм (Д х Ш хВ) |
| Размеры/переносной телефон | 146 х 55 х 27 мм |
| Масса | базовый блок S150 colour: 224 г; переносной телефон с аккумуляторами: 131 г |
Автор благодарит сеть магазинов «КомпАС» за предоставленное на тест оборудование
Если Вы заметили ошибку — выделите ее мышью и нажмите CTRL+ENTER.

EN Dear Customer,
Gigaset Communications GmbH is the legal successor to
Siemens Home and Office Communication Devices GmbH &
Co. KG (SHC), which in turn continued the Gigaset business
of Siemens AG. Any statements made by Siemens AG or
SHC that are found in the user guides should therefore be
understood as statements of Gigaset Communications
.
GmbH
We hope you enjoy your Gigaset.
DE Sehr geehrte Kundin, sehr geehrter Kunde,
FR Chère Cliente, Cher Client,
IT Gentile cliente,
NL Geachte klant,
ES Estimado cliente,
PT SCaros clientes,
die Gigaset Communications GmbH ist Rechtsnachfolgerin
der Siemens Home and Office Communication Devices
GmbH & Co. KG (SHC), die ihrerseits das Gigaset-Geschäft
der Siemens AG fortführte. Etwaige Erklärungen der
Siemens AG oder der SHC in den Bedienungsanleitungen
sind daher als Erklärungen der Gigaset Communications
GmbH zu verstehen.
Wir wünschen Ihnen viel Freude mit Ihrem Gigaset.
la société Gigaset Communications GmbH succède en droit
à Siemens Home and Office Communication Devices GmbH
& Co. KG (SHC) qui poursuivait elle-même les activités Gigaset de Siemens AG. Donc les éventuelles explications de Siemens AG ou de SHC figurant dans les modes d’emploi
doivent être comprises comme des explications de Gigaset
Communications GmbH.
Nous vous souhaitons beaucoup d’agrément avec votre
Gigaset.
la Gigaset Communications GmbH è successore della Siemens Home and Office Communication Devices GmbH &
Co. KG (SHC) che a sua volta ha proseguito l’attività della
Siemens AG. Eventuali dichiarazioni della Siemens AG o
della SHC nei manuali d’istruzione, vanno pertanto intese
come dichiarazioni della Gigaset Communications GmbH.
Le auguriamo tanta soddisfazione con il vostro Gigaset.
Gigaset Communications GmbH is de rechtsopvolger van
Siemens Home and Office Communication Devices GmbH &
Co. KG (SHC), de onderneming die de Gigaset-activiteiten
van Siemens AG heeft overgenomen. Eventuele uitspraken
of mededelingen van Siemens AG of SHC in de gebruiksaanwijzingen dienen daarom als mededelingen van Gigaset
Communications GmbH te worden gezien.
Wij wensen u veel plezier met uw Gigaset
la Gigaset Communications GmbH es derechohabiente de la
Siemens Home and Office Communication Devices GmbH &
Co. KG (SHC) que por su parte continuó el negocio Gigaset
de la Siemens AG. Las posibles declaraciones de la
Siemens AG o de la SHC en las instrucciones de uso se
deben entender por lo tanto como declaraciones de la Gigaset Communications GmbH.
Le deseamos que disfrute con su Gigaset.
Gigaset Communications GmbH é a sucessora legal da Siemens Home and Office Communication Devices GmbH &
Co. KG (SHC), que, por sua vez, deu continuidade ao sector
de negócios Gigaset, da Siemens AG. Quaisquer declarações por parte da Siemens AG ou da SHC encontradas nos
manuais de utilização deverão, portanto, ser consideradas
como declarações da Gigaset Communications GmbH.
Desejamos que tenham bons momentos com o seu Gigaset.
DA Kære Kunde,
FI Arvoisa asiakkaamme,
SV Kära kund,
NO Kjære kunde,
EL Αγ α πητή πελάτισσα, αγαπητέ πελάτη,
HR Poštovani korisnici,
.
SL Spoštovani kupec!
Gigaset Communications GmbH er retlig efterfølger til Siemens Home and Office Communication Devices GmbH &
Co. KG (SHC), som fra deres side videreførte Siemens AGs
Gigaset-forretninger. Siemens AGs eller SHCs eventuelle
forklaringer i betjeningsvejledningerne skal derfor forstås
som Gigaset Communications GmbHs forklaringer.
Vi håber, du får meget glæde af din Gigaset.
Gigaset Communications GmbH on Siemens Home and
Office Communication Devices GmbH & Co. KG (SHC)-yri-
tyksen oikeudenomistaja, joka jatkoi puolestaan Siemens
AG:n Gigaset-liiketoimintaa. Käyttöoppaissa mahdollisesti
esiintyvät Siemens AG:n tai SHC:n selosteet on tämän
vuoksi ymmärrettävä Gigaset Communications GmbH:n
selosteina.
Toivotamme Teille paljon iloa Gigaset-laitteestanne.
Gigaset Communications GmbH övertar rättigheterna från
Siemens Home and Office Communication Devices GmbH &
Co. KG (SHC), som bedrev Gigaset-verksamheten efter Siemens AG. Alla förklaringar från Siemens AG eller SHC i
användarhandboken gäller därför som förklaringar från
Gigaset Communications GmbH.
Vi önskar dig mycket nöje med din Gigaset.
Gigaset Communications GmbH er rettslig etterfølger etter
Siemens Home and Office Communication Devices GmbH &
Co. KG (SHC), som i sin tur videreførte Gigaset-geskjeften i
Siemens AG. Eventuelle meddelelser fra Siemens AG eller
SHC i bruksanvisningene er derfor å forstå som meddelelser
fra Gigaset Communications GmbH.
Vi håper du får stor glede av din Gigaset-enhet.
η Gigaset Communications GmbH είναι η νομική διάδοχος της
Siemens Home and Office Communication Devices GmbH &
Co. KG (SHC), η οποία έχει αναλάβει την εμπορική
δραστηριότητα Gigaset της Siemens AG. Οι δηλώσεις της
Siemens AG ή της SHC στις
επομένως δηλώσεις της Gigaset Communications GmbH.
Σας ευχόμαστε καλή διασκέδαση με τη συσκευή σας Gigaset.
Gigaset Communications GmbH pravni je sljednik tvrtke
Siemens Home and Office Communication Devices GmbH &
Co. KG (SHC), koji je nastavio Gigaset poslovanje tvrtke
Siemens AG. Zato sve izjave tvrtke Siemens AG ili SHC koje
se nalaze u uputama za upotrebu treba tumačiti kao izjave
tvrtke Gigaset Communications GmbH.
Nadamo se da sa zadovoljstvom koristite svoj Gigaset
uređaj.
Podjetje Gigaset Communications GmbH je pravni naslednik
podjetja Siemens Home and Office Communication Devices
GmbH & Co. KG (SHC), ki nadaljuje dejavnost znamke
Gigaset podjetja Siemens AG. Vse izjave podjetja Siemens
AG ali SHC v priročnikih za uporabnike torej veljajo kot izjave
podjetja Gigaset Communications GmbH.
Želimo vam veliko užitkov ob uporabi naprave Gigaset.
οδηγίες χρήσ
ης αποτ
ελούν
Issued by
Gigaset Communications GmbH
Schlavenhorst 66, D-46395 Bocholt
Gigaset Communications GmbH is a trademark
licensee of Siemens AG
© Gigaset Communications GmbH 2008
All rights reserved.
Subject to availability. Rights of modifications
reserved.
www.gigaset.com

CS Vážení zákazníci,
společnost Gigaset Communications GmbH je právním
nástupcem společnosti Siemens Home and Office
Communication Devices GmbH & Co. KG (SHC), která dále
přejala segment produktů Gigaset společnosti Siemens AG.
Jakékoli prohlášení společnosti Siemens AG nebo SHC, které
naleznete v uživatelských příručkách, je třeba považovat za
prohlášení společnosti Gigaset Communications GmbH.
Doufáme, že jste s produkty Gigaset spokojeni.
SK Vážený zákazník,
Spoločnosť Gigaset Communications GmbH je právnym
nástupcom spoločnosti Siemens Home and Office
Communication Devices GmbH & Co. KG (SHC), ktorá zasa
pokračovala v činnosti divízie Gigaset spoločnosti Siemens
AG. Z tohto dôvodu je potrebné všetky vyhlásenia
spoločnosti Siemens AG alebo SHC, ktoré sa nachádzajú v
používateľských príručkách, chápať ako vyhlásenia
spoločnosti Gigaset Communications GmbH.
Veríme, že budete so zariadením Gigaset spokojní.
PL Szanowny Kliencie,
Firma Gigaset Communications GmbH jest spadkobiercą
prawnym firmy Siemens Home and Office Communication
Devices GmbH & Co. KG (SHC), która z kolei przejęła
segment produktów Gigaset od firmy Siemens AG. Wszelkie
oświadczenia firm Siemens AG i SHC, które można znaleźć
w instrukcjach obsługi, należy traktować jako oświadczenia
firmy Gigaset Communications GmbH.
Życzymy wiele przyjemności z korzystania z produktów
Gigaset.
TR Sayın Müşterimiz,
Gigaset Communications GmbH, Siemens AG’nin Gigaset
işletmesini yürüten Siemens Home and Office
Communication Devices GmbH & Co. KG (SHC)’nin yasal
halefidir. Kullanma kılavuzlarında bulunan ve Siemens AG
veya SHC tarafından yapılan bildiriler Gigaset
Communications GmbH tarafından yapılmış bildiriler olarak
algılanmalıdır.
Gigaset’ten memnun kalmanızı ümit ediyoruz.
RO Stimate client,
Gigaset Communications GmbH este succesorul legal al
companiei Siemens Home and Office Communication
Devices GmbH & Co. KG (SHC), care, la rândul său, a
continuat activitatea companiei Gigaset a Siemens AG.
Orice afirmaţii efectuate de Siemens AG sau SHC şi incluse
în ghidurile de utilizare vor fi, prin urmare, considerate a
aparţine Gigaset Communications GmbH.
Sperăm ca produsele Gigaset să fie la înălţimea dorinţelor
dvs.
SR Poštovani potrošaču,
Gigaset Communications GmbH je pravni naslednik
kompanije Siemens Home and Office Communication
Devices GmbH & Co. KG (SHC), kroz koju je nastavljeno
poslovanje kompanije Gigaset kao dela Siemens AG. Stoga
sve izjave od strane Siemens AG ili SHC koje se mogu naći u
korisničkim uputstvima treba tuma
Gigaset Communications GmbH.
Nadamo se da ćete uživati u korišćenju svog Gigaset
uređaja.
BG Уважаеми потребители,
Gigaset Communications GmbH е правоприемникът на
Siemens Home and Office Communication Devices GmbH
& Co. KG (SHC), която на свой ред продължи бизнеса на
подразделението Siemens AG. По тази причина
всякакви изложения, направени от Siemens AG или
SHC, които се намират в ръководствата за
потребителя, следва да се разбират като изложения на
Gigaset Communications GmbH.
Надяваме се да ползвате с удоволствие вашия Gigaset.
izjave kompanije
čiti kao
RU Уважаемыи покупатель!
Компания Gigaset Communications GmbH является
правопреемником компании Siemens Home and Office
Communication Devices GmbH & Co. KG (SHC), которая,
ою очередь, приняла подразделение Gigaset в свое
в св
управление от компании Siemens AG. Поэтому любые
заявления, сделанные от имени компании Siemens AG
или SHC и встречающиеся в руководствах
пользователя, должны восприниматься как заявления
компании Gigaset Communications GmbH.
Мы надеемся, что продукты Gigaset удовлетворяют
вашим требованиям.
HU T
isztelt Vásárló!
A Siemens Home and Communication Devices GmbH & Co.
KG (SHC) törvényes jogutódja a Gigaset Communications
GmbH, amely a Siemens AG Gigaset üzletágának utódja.
Ebből következően a Siemens AG vagy az SHC felhasználói
kézikönyveiben található bármely kijelentést a Gigaset
Communications GmbH kijelentésének kell tekinteni.
Reméljük, megelégedéssel használja Gigaset készülékét.
Issued by
Gigaset Communications GmbH
Schlavenhorst 66, D-46395 Bocholt
Gigaset Communications GmbH is a trademark
licensee of Siemens AG
© Gigaset Communications GmbH 2008
All rights reserved.
Subject to availability. Rights of modifications
reserved.
www.gigaset.com
Telephone with answering
machine
Operating instructions and warranty

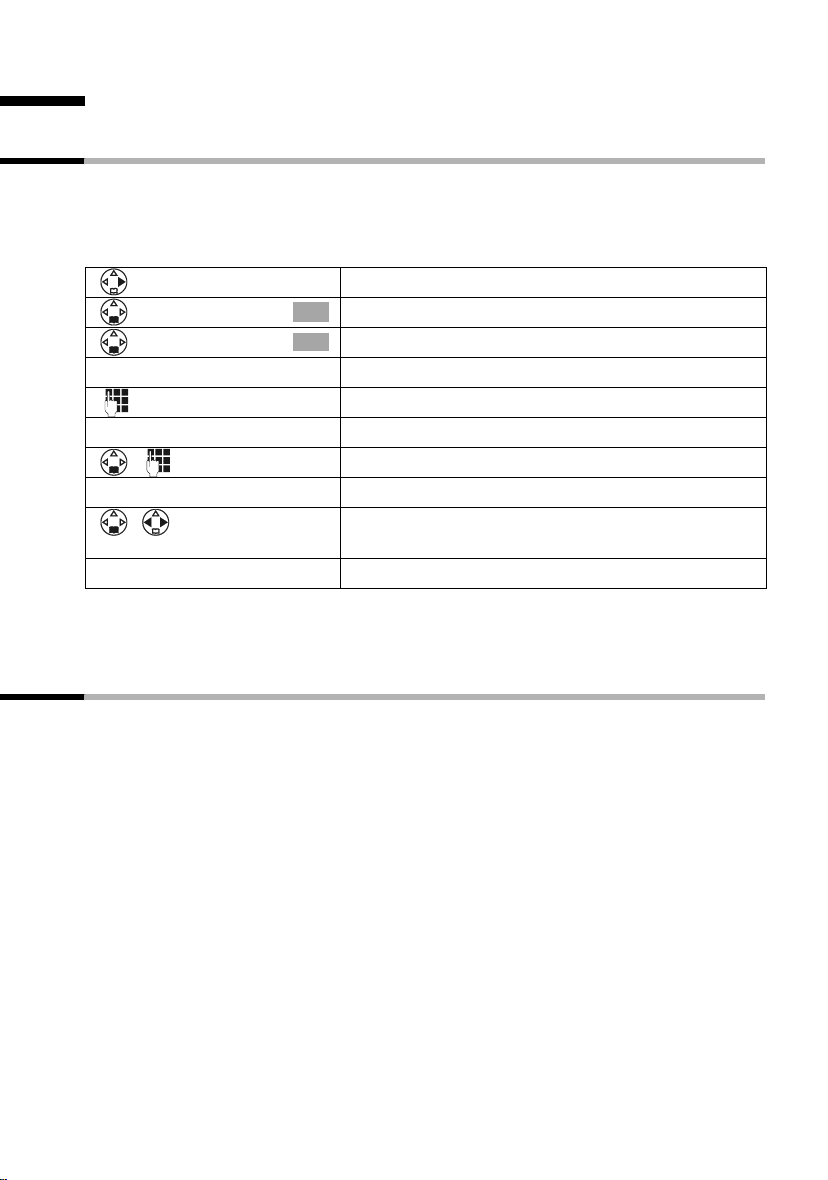
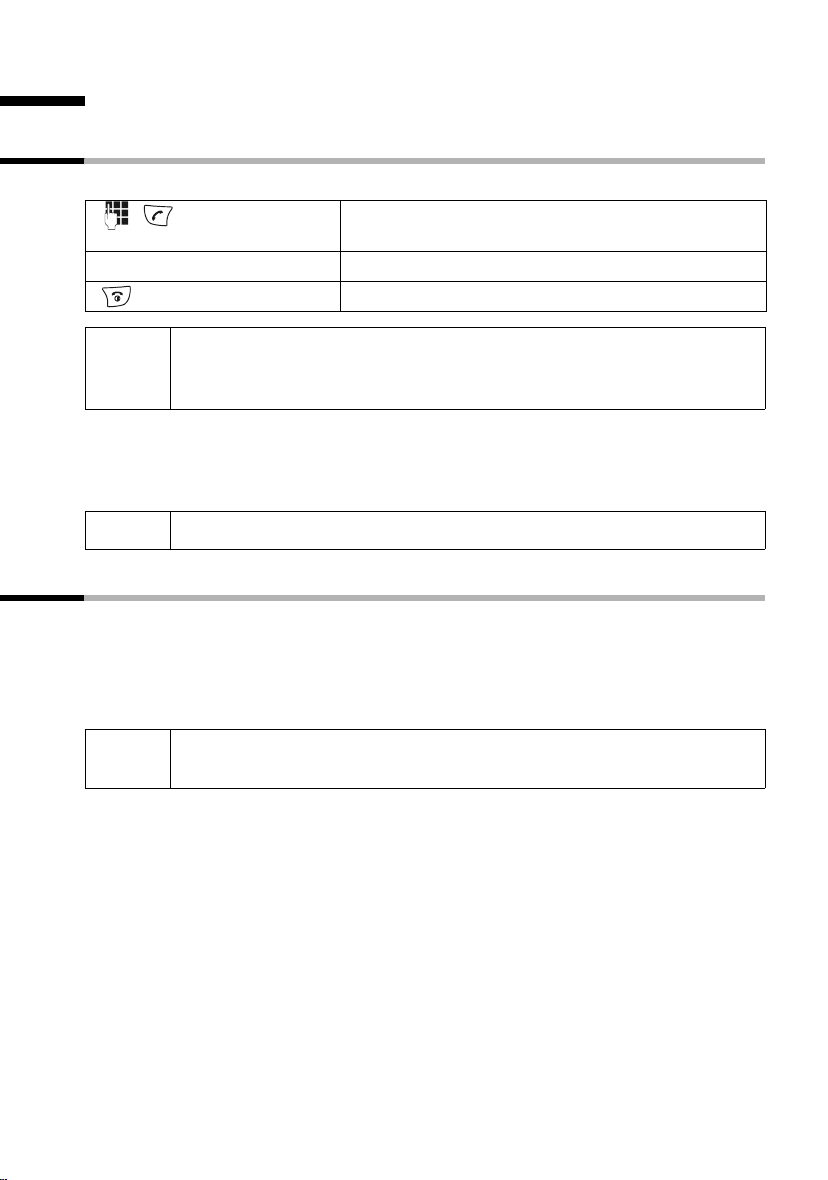
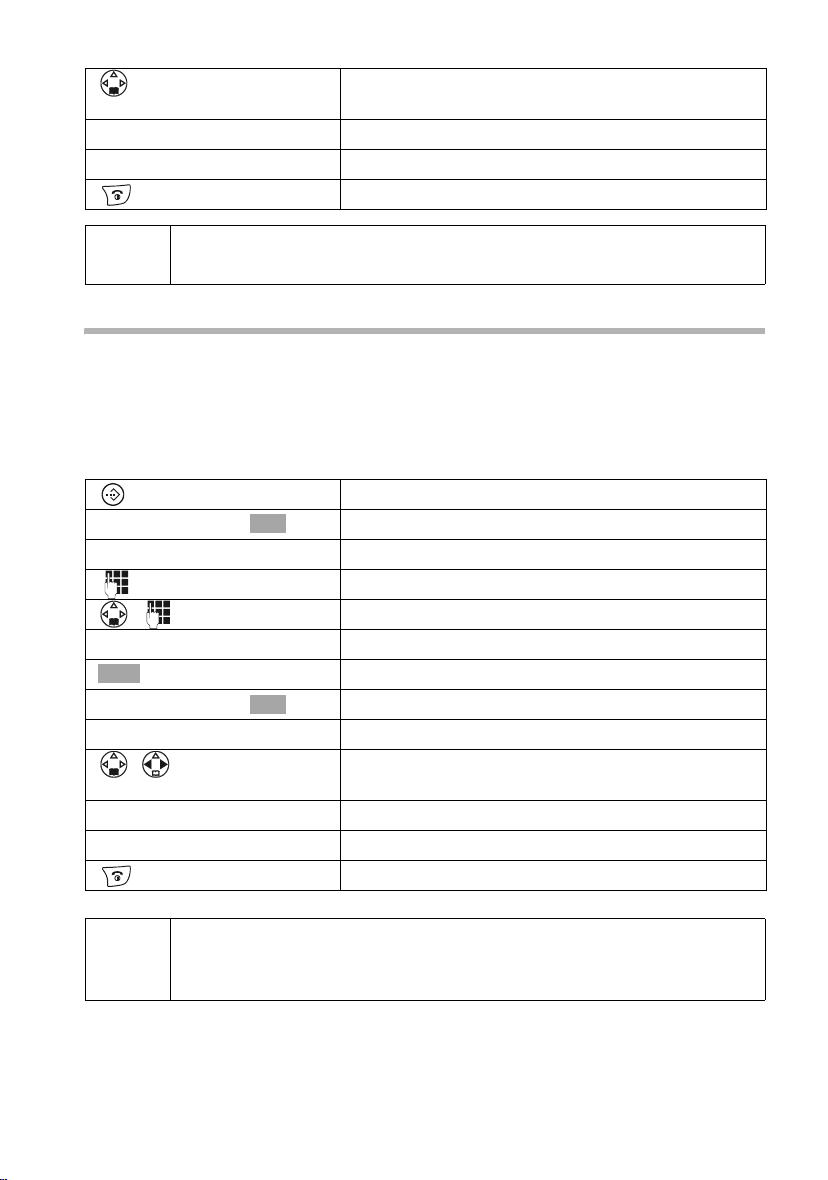
Brief overview of the handset
Brief overview of the handset
Reception strength
Tal k key
◆ Accept a call
◆ Dial number
◆ Switch from handsfree
to «handset»
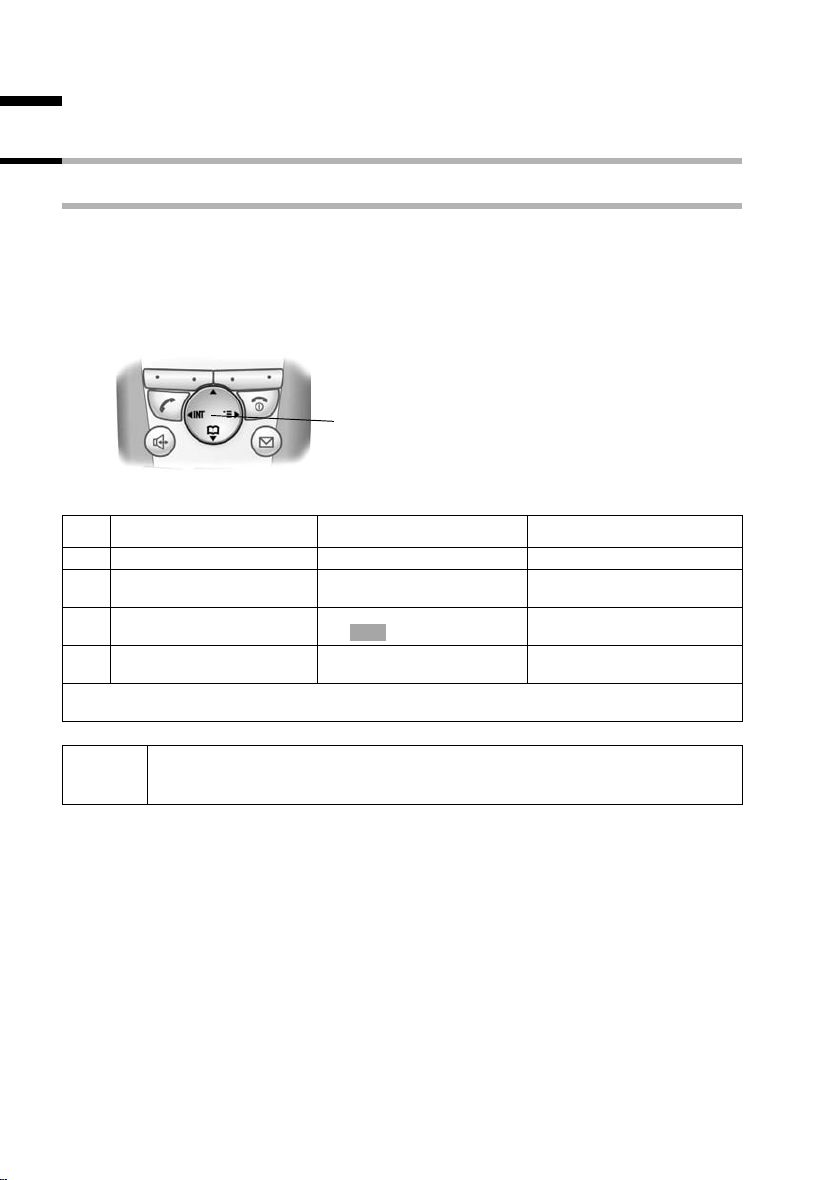
Control key
Opens the menu, directory, Navigation in entry
field
Handsfree key
◆ Switch from «handset»
to handsfree talking
◆ Illuminated: Handsfree
talking is activated
◆ Flashes: incoming call,
automatic redial
Open directory
Key 1
Select answering
machine/network mailbox
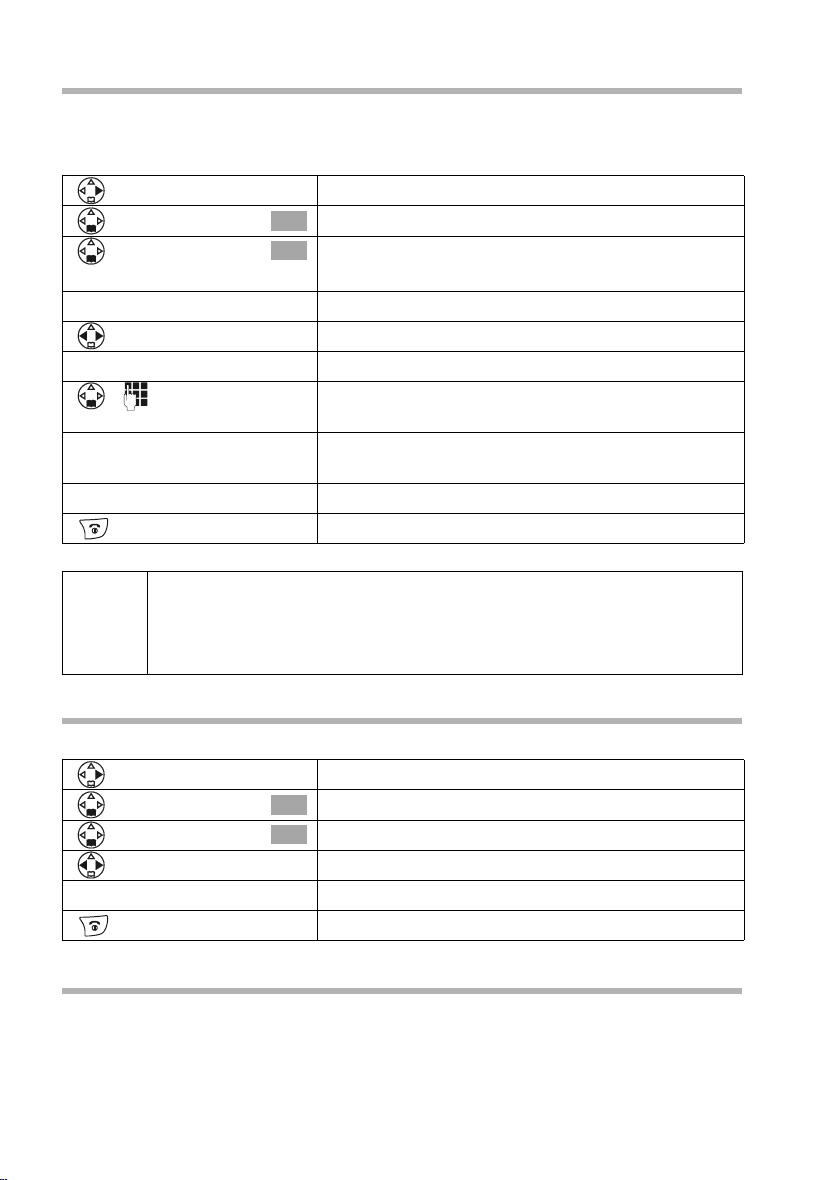
Star key
◆ Ringer tones on/off
(press for about
2seconds)
◆ Switch between upper-
case, lowercase and
number mode
R key
Enter pause (hold key
down)
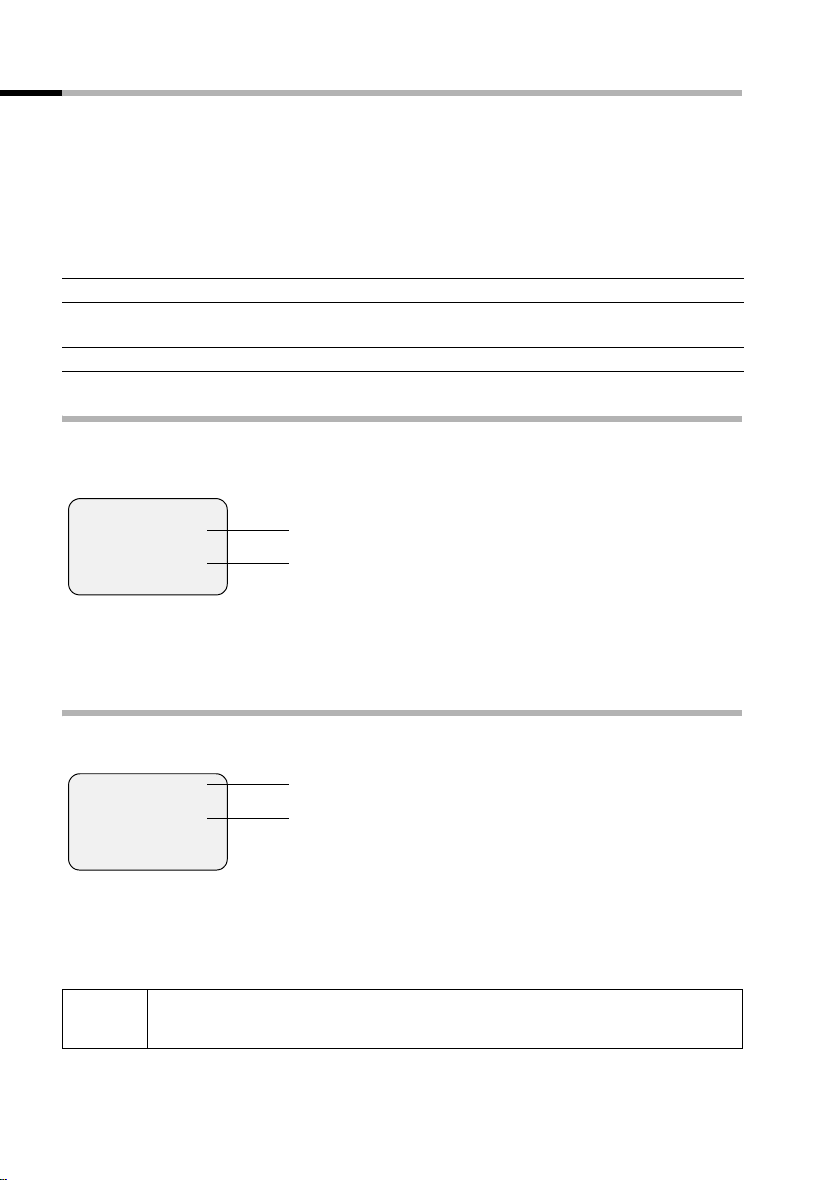
Display (display field)
Charging status
×
×
almost flat or battery
being charged
Current functions and
ÐÙ
INT 1
20.05.04 09:45
• §§§§§§§SMS§§§§§§
display keys
The display keys give you
access to the functions displayed.
End call key and On/Off
key
◆ End call
◆ Cancel function
◆ One menu level back
◆ Return to idle state
◆ Handset on/off (press
Message key
◆ Access to the lists of
◆ Flashes: new SMS,
Microphone
Hash key
Keypad protection on/off
(press for about 1 second)
Speed dial key
Open speed dial list
(press briefly)
Ú
flat
full
flashes: Battery
(press briefly)
(press for about 1
second)
for about 2 seconds)
SMS messages, network mailbox, caller/
answering machine
message, calls
1

Contents
Contents
Brief overview of the handset . . . . . . . . . . . . . . . . . 1
Safety precautions . . . . . . . . . . . . . . . . . . . . . . . . . . 6
Preparing the telephone . . . . . . . . . . . . . . . . . . . . . . 7
Installing the base station . . . . . . . . . . . . . . . . . . . . . . . . . . . . . . . . . . . . . . . . . . . . . . . 7
Connecting the base station . . . . . . . . . . . . . . . . . . . . . . . . . . . . . . . . . . . . . . . . . . . . . 8
Operating the handset . . . . . . . . . . . . . . . . . . . . . . . . . . . . . . . . . . . . . . . . . . . . . . . . . . 9
Attaching the belt clip . . . . . . . . . . . . . . . . . . . . . . . . . . . . . . . . . . . . . . . . . . . . . . . . . 11
Activating/deactivating the handset . . . . . . . . . . . . . . . . . . . . . . . . . . . . . . . . . . . . . . 11
Activating/deactivating keypad protection . . . . . . . . . . . . . . . . . . . . . . . . . . . . . . . . . 11
Using the telephone and menus . . . . . . . . . . . . . . 12
Keys . . . . . . . . . . . . . . . . . . . . . . . . . . . . . . . . . . . . . . . . . . . . . . . . . . . . . . . . . . . . . . . 12
Correcting entries . . . . . . . . . . . . . . . . . . . . . . . . . . . . . . . . . . . . . . . . . . . . . . . . . . . . . 13
Idle state . . . . . . . . . . . . . . . . . . . . . . . . . . . . . . . . . . . . . . . . . . . . . . . . . . . . . . . . . . . . 14
Graphic main menu . . . . . . . . . . . . . . . . . . . . . . . . . . . . . . . . . . . . . . . . . . . . . . . . . . . 14
Example for menu operation: «Set volume for handsfree talking» . . . . . . . . . . . . . . . 14
Date and time functions . . . . . . . . . . . . . . . . . . . . . 15
Setting the date and the time . . . . . . . . . . . . . . . . . . . . . . . . . . . . . . . . . . . . . . . . . . . 15
Setting the alarm clock . . . . . . . . . . . . . . . . . . . . . . . . . . . . . . . . . . . . . . . . . . . . . . . . 15
Setting appointments . . . . . . . . . . . . . . . . . . . . . . . . . . . . . . . . . . . . . . . . . . . . . . . . . 17
Displaying and deleting missed appointments and anniversaries . . . . . . . . . . . . . . . 18
Making calls . . . . . . . . . . . . . . . . . . . . . . . . . . . . . . . 19
Making and ending external calls . . . . . . . . . . . . . . . . . . . . . . . . . . . . . . . . . . . . . . . . 19
Answering a call . . . . . . . . . . . . . . . . . . . . . . . . . . . . . . . . . . . . . . . . . . . . . . . . . . . . . . 19
Calling line identification . . . . . . . . . . . . . . . . . . . . . . . . . . . . . . . . . . . . . . . . . . . . . . . 20
Handsfree talking . . . . . . . . . . . . . . . . . . . . . . . . . . . . . . . . . . . . . . . . . . . . . . . . . . . . . 21
Activating/deactivating listening in (at the base station) . . . . . . . . . . . . . . . . . . . . . . 22
Muting the handset . . . . . . . . . . . . . . . . . . . . . . . . . . . . . . . . . . . . . . . . . . . . . . . . . . . 22
Network mailbox features . . . . . . . . . . . . . . . . . . . 23
Function set for the next call . . . . . . . . . . . . . . . . . . . . . . . . . . . . . . . . . . . . . . . . . . . . 23
Functions set for all following calls . . . . . . . . . . . . . . . . . . . . . . . . . . . . . . . . . . . . . . . 23
Functions during a call . . . . . . . . . . . . . . . . . . . . . . . . . . . . . . . . . . . . . . . . . . . . . . . . . 25
Function set after a call . . . . . . . . . . . . . . . . . . . . . . . . . . . . . . . . . . . . . . . . . . . . . . . . 25
2

Contents
Using the directory and other lists . . . . . . . . . . . . 26
Directory and speed dial list . . . . . . . . . . . . . . . . . . . . . . . . . . . . . . . . . . . . . . . . . . . . 26
Redialling list . . . . . . . . . . . . . . . . . . . . . . . . . . . . . . . . . . . . . . . . . . . . . . . . . . . . . . . . 32
Email directory . . . . . . . . . . . . . . . . . . . . . . . . . . . . . . . . . . . . . . . . . . . . . . . . . . . . . . . 34
Displaying available memory . . . . . . . . . . . . . . . . . . . . . . . . . . . . . . . . . . . . . . . . . . . 36
Displaying lists via the message key . . . . . . . . . . . . . . . . . . . . . . . . . . . . . . . . . . . . . . 36
Caller list and message list . . . . . . . . . . . . . . . . . . . . . . . . . . . . . . . . . . . . . . . . . . . . . 37
Making cost-effective calls . . . . . . . . . . . . . . . . . . 41
Linking a call-by-call number and a telephone number . . . . . . . . . . . . . . . . . . . . . . . 41
Automatic network provider selection (Preselection) . . . . . . . . . . . . . . . . . . . . . . . . . 41
SMS (text messages) . . . . . . . . . . . . . . . . . . . . . . . 44
General . . . . . . . . . . . . . . . . . . . . . . . . . . . . . . . . . . . . . . . . . . . . . . . . . . . . . . . . . . . . 44
Prerequisites for sending and receiving text messages (SMS) . . . . . . . . . . . . . . . . . . 45
Sending and receiving text messages . . . . . . . . . . . . . . . . . . . . . . . . . . . . . . . . . . . . . 45
Sending text messages (SMS) and outgoing list . . . . . . . . . . . . . . . . . . . . . . . . . . . . . 47
Sending text messages (SMS) to an email address . . . . . . . . . . . . . . . . . . . . . . . . . . . 49
Receiving text messages (SMS) and incoming list . . . . . . . . . . . . . . . . . . . . . . . . . . . 53
Using several SMS mailboxes . . . . . . . . . . . . . . . . . . . . . . . . . . . . . . . . . . . . . . . . . . . 57
Using new ring tones for the handset . . . . . . . . . . . . . . . . . . . . . . . . . . . . . . . . . . . . . 61
Text messages (SMS) on PABX systems . . . . . . . . . . . . . . . . . . . . . . . . . . . . . . . . . . . . 62
Errors when sending and receiving text messages (SMS) . . . . . . . . . . . . . . . . . . . . . 62
Using the base station answering machine . . . . 64
Operating the answering machine via the base station . . . . . . . . . . . . . . . . . . . . . . . 64
Operating the answering machine via the handset . . . . . . . . . . . . . . . . . . . . . . . . . . 65
Playing back messages . . . . . . . . . . . . . . . . . . . . . . . . . . . . . . . . . . . . . . . . . . . . . . . . 70
Recording infotexts . . . . . . . . . . . . . . . . . . . . . . . . . . . . . . . . . . . . . . . . . . . . . . . . . . . 72
Operating the answering machine by voice command . . . . . . . . . . . . . . . . . . . . . . . 74
Operating the answering machine away from home (remote operation) . . . . . . . . . 75
Setting the base station answering machine . . . 77
Ring delay and charge saving function for remote operation . . . . . . . . . . . . . . . . . . 77
Setting the message length and recording quality . . . . . . . . . . . . . . . . . . . . . . . . . . . 78
Listening in . . . . . . . . . . . . . . . . . . . . . . . . . . . . . . . . . . . . . . . . . . . . . . . . . . . . . . . . . 78
Resetting the answering machine for fast access . . . . . . . . . . . . . . . . . . . . . . . . . . . . 79
Using the network mailbox . . . . . . . . . . . . . . . . . . 80
Setting the network mailbox for speed dialling . . . . . . . . . . . . . . . . . . . . . . . . . . . . . 80
Checking the network mailbox . . . . . . . . . . . . . . . . . . . . . . . . . . . . . . . . . . . . . . . . . . 80
3

Contents
Registering and de-registering handsets . . . . . . . 81
Automatic registration . . . . . . . . . . . . . . . . . . . . . . . . . . . . . . . . . . . . . . . . . . . . . . . . . 81
Manual registration . . . . . . . . . . . . . . . . . . . . . . . . . . . . . . . . . . . . . . . . . . . . . . . . . . . 81
Manual registration of handsets from other manufacturers . . . . . . . . . . . . . . . . . . . . 82
De-registering handsets . . . . . . . . . . . . . . . . . . . . . . . . . . . . . . . . . . . . . . . . . . . . . . . . 82
Looking for handsets («Paging») . . . . . . . . . . . . . . . . . . . . . . . . . . . . . . . . . . . . . . . . . . 83
Switching base stations . . . . . . . . . . . . . . . . . . . . . . . . . . . . . . . . . . . . . . . . . . . . . . . . 83
Operating several handsets . . . . . . . . . . . . . . . . . . 84
Making internal calls . . . . . . . . . . . . . . . . . . . . . . . . . . . . . . . . . . . . . . . . . . . . . . . . . . 84
Changing the name of the handset . . . . . . . . . . . . . . . . . . . . . . . . . . . . . . . . . . . . . . . 84
Changing a handset’s internal number . . . . . . . . . . . . . . . . . . . . . . . . . . . . . . . . . . . . 85
Internal enquiry calls . . . . . . . . . . . . . . . . . . . . . . . . . . . . . . . . . . . . . . . . . . . . . . . . . . 86
Accepting or rejecting a waiting call . . . . . . . . . . . . . . . . . . . . . . . . . . . . . . . . . . . . . . 86
Listening in on an external call . . . . . . . . . . . . . . . . . . . . . . . . . . . . . . . . . . . . . . . . . . 87
Using direct inward dialling . . . . . . . . . . . . . . . . . . . . . . . . . . . . . . . . . . . . . . . . . . . . 88
Using a handset as a room monitor . . . . . . . . . . . . . . . . . . . . . . . . . . . . . . . . . . . . . . . 89
Setting the Walk and Talk mode . . . . . . . . . . . . . . . . . . . . . . . . . . . . . . . . . . . . . . . . . 92
Setting the handset . . . . . . . . . . . . . . . . . . . . . . . . . 94
Changing the display language . . . . . . . . . . . . . . . . . . . . . . . . . . . . . . . . . . . . . . . . . . 94
Setting the display . . . . . . . . . . . . . . . . . . . . . . . . . . . . . . . . . . . . . . . . . . . . . . . . . . . . 94
Logo display . . . . . . . . . . . . . . . . . . . . . . . . . . . . . . . . . . . . . . . . . . . . . . . . . . . . . . . . . 95
Activating/deactivating Auto talk . . . . . . . . . . . . . . . . . . . . . . . . . . . . . . . . . . . . . . . . . 95
Changing the handsfree speaking volume . . . . . . . . . . . . . . . . . . . . . . . . . . . . . . . . . 95
Changing ringer melodies . . . . . . . . . . . . . . . . . . . . . . . . . . . . . . . . . . . . . . . . . . . . . . 96
Activating/deactivating advisory tones . . . . . . . . . . . . . . . . . . . . . . . . . . . . . . . . . . . . 99
Resetting a handset to the factory setting . . . . . . . . . . . . . . . . . . . . . . . . . . . . . . . . . 100
Setting the base station . . . . . . . . . . . . . . . . . . . . 101
Protecting your telephone from unauthorised access . . . . . . . . . . . . . . . . . . . . . . . . 101
Emergency numbers . . . . . . . . . . . . . . . . . . . . . . . . . . . . . . . . . . . . . . . . . . . . . . . . . 102
Changing the loudspeaker volume of the base station . . . . . . . . . . . . . . . . . . . . . . 103
Changing the base station ringer tones . . . . . . . . . . . . . . . . . . . . . . . . . . . . . . . . . . 104
Activating/deactivating the base station key beep . . . . . . . . . . . . . . . . . . . . . . . . . . 104
Changing the base station name . . . . . . . . . . . . . . . . . . . . . . . . . . . . . . . . . . . . . . . . 105
Repeater support . . . . . . . . . . . . . . . . . . . . . . . . . . . . . . . . . . . . . . . . . . . . . . . . . . . . 105
Resetting the base station to the factory setting . . . . . . . . . . . . . . . . . . . . . . . . . . . . 105
Connecting the base station to a PABX . . . . . . . . 107
Dialling mode and flash time . . . . . . . . . . . . . . . . . . . . . . . . . . . . . . . . . . . . . . . . . . . 107
Saving the prefix (APL) . . . . . . . . . . . . . . . . . . . . . . . . . . . . . . . . . . . . . . . . . . . . . . . . 108
Setting pauses . . . . . . . . . . . . . . . . . . . . . . . . . . . . . . . . . . . . . . . . . . . . . . . . . . . . . . 108
Switching temporarily to tone dialling (DTMF) . . . . . . . . . . . . . . . . . . . . . . . . . . . . . 109
4

Contents
Appendix . . . . . . . . . . . . . . . . . . . . . . . . . . . . . . . . 110
Care . . . . . . . . . . . . . . . . . . . . . . . . . . . . . . . . . . . . . . . . . . . . . . . . . . . . . . . . . . . . . . 110
Contact with liquid . . . . . . . . . . . . . . . . . . . . . . . . . . . . . . . . . . . . . . . . . . . . . . . . . . 110
Questions and answers . . . . . . . . . . . . . . . . . . . . . . . . . . . . . . . . . . . . . . . . . . . . . . . 110
Authorisation . . . . . . . . . . . . . . . . . . . . . . . . . . . . . . . . . . . . . . . . . . . . . . . . . . . . . . . 111
Technical data . . . . . . . . . . . . . . . . . . . . . . . . . . . . . . . . . . . . . . . . . . . . . . . . . . . . . . 113
Answering machine remote operation . . . . . . . . . . . . . . . . . . . . . . . . . . . . . . . . . . . 114
Character map . . . . . . . . . . . . . . . . . . . . . . . . . . . . . . . . . . . . . . . . . . . . . . . . . . . . . . 114
Predictive text entry . . . . . . . . . . . . . . . . . . . . . . . . . . . . . . . . . . . . . . . . . . . . . . . . . 116
Menu table . . . . . . . . . . . . . . . . . . . . . . . . . . . . . . 117
Main menu . . . . . . . . . . . . . . . . . . . . . . . . . . . . . . . . . . . . . . . . . . . . . . . . . . . . . . . . 117
Directory key and speed dialling list key . . . . . . . . . . . . . . . . . . . . . . . . . . . . . . . . . . 119
Caller list/message list . . . . . . . . . . . . . . . . . . . . . . . . . . . . . . . . . . . . . . . . . . . . . . . . 119
Index . . . . . . . . . . . . . . . . . . . . . . . . . . . . . . . . . . . 120
5
Safety precautions
Safety precautions
Only use the power supply unit supplied, as indicated on the underside of the
$
base station.
Only use approved rechargeable batteries (page 113) of the same type!
I. e. no other type of rechargeable batteries or non-rechargeable batteries
because otherwise health risks and personal injuries cannot be excluded.
‹
Insert rechargeable batteries in accordance with the polarity symbols and use
the battery type recommended in these operating instructions (the symbols
Œ
can be found on the handset
Medical equipment can be affected by the use of the telephone. Observe the
conditions of your environment (e. g. doctor’s practice).
The handset can cause an unpleasant humming sound in hearing aids.
Do not install the base station in bathrooms or showers (page 110). The handsets and base station are not splashproof.
Do not use the telephone while driving (Walk and Talk function).
!
battery compartment)
.
6
Telephones must be switched off at all times while in an aircraft (Walk and Talk
function). Prevent accidental activation.
Do not use the telephone in environments where there is a risk of explosions
(e.g.paint shops).
Ensure that the operating instructions are included when passing on your
ƒ
base station and handset to a third party.
Dispose of batteries and telephone in an environmentally friendly manner.
i
Not all functions described in these operating instructions are available in
all countries.
Preparing the telephone
Preparing the telephone
The package contains the following:
◆ one base station,
◆ one handset,
◆ one power supply unit and cable,
◆ one telephone cord,
◆ one belt clip for the handset,
◆ two batteries,
◆ one set of operating instructions.
Installing the base station
Notes on installation
The base station is designed for operation in dry rooms with a temperature range of
+5 °C to +45 °C. Install the base station in a central location in the home, e. g. in the hall.
◆ Never expose the telephone to the following: heat sources, direct
W
Range and reception strength
sunlight, other electrical equipment.
◆ Protect your base station and handset against moisture, dust,
corrosive liquids and vapours.
The base station range is approx. 300 m outdoors and up to 50 m indoors. The receive
strength display shows the quality of the radio contact between the base station and the
handset:
Ð receive strength 100% i receive strength 75%
Ñ receive strength 50% Ò low receive strength
| no reception (flashes)
7

Preparing the telephone
Connecting the base station
Cable duct
1.
Underneath of
base station
(magnified)
Telephone plug
with telephone
cable
1.
◆ Insert the small plug on the telephone cable into the jack (clicks into place),
◆ place cable in the cable duct,
◆ insert telephone jack into the telephone socket.
Cable duct
Tel ep hon e
socket
Socket
Underneath of
base station
(magnified)
2.
◆ Insert the small plug on the mains cable into the jack,
◆ place cable in the cable duct,
◆ insert power supply unit into mains socket.
Tel epho ne ja ck as sign ment:
◆ The power supply unit must be plugged in at all times for the
i
◆ If you buy another telephone cable, ensure that the telephone leads
8
3
2
1
telephone to work.
have 3-4 assignment.
4
1
2
5
3
6
4
5
6
free
free
a
b
free
free
2.
Power sup ply unit
(230V) with
mains cable
Preparing the telephone
Operating the handset
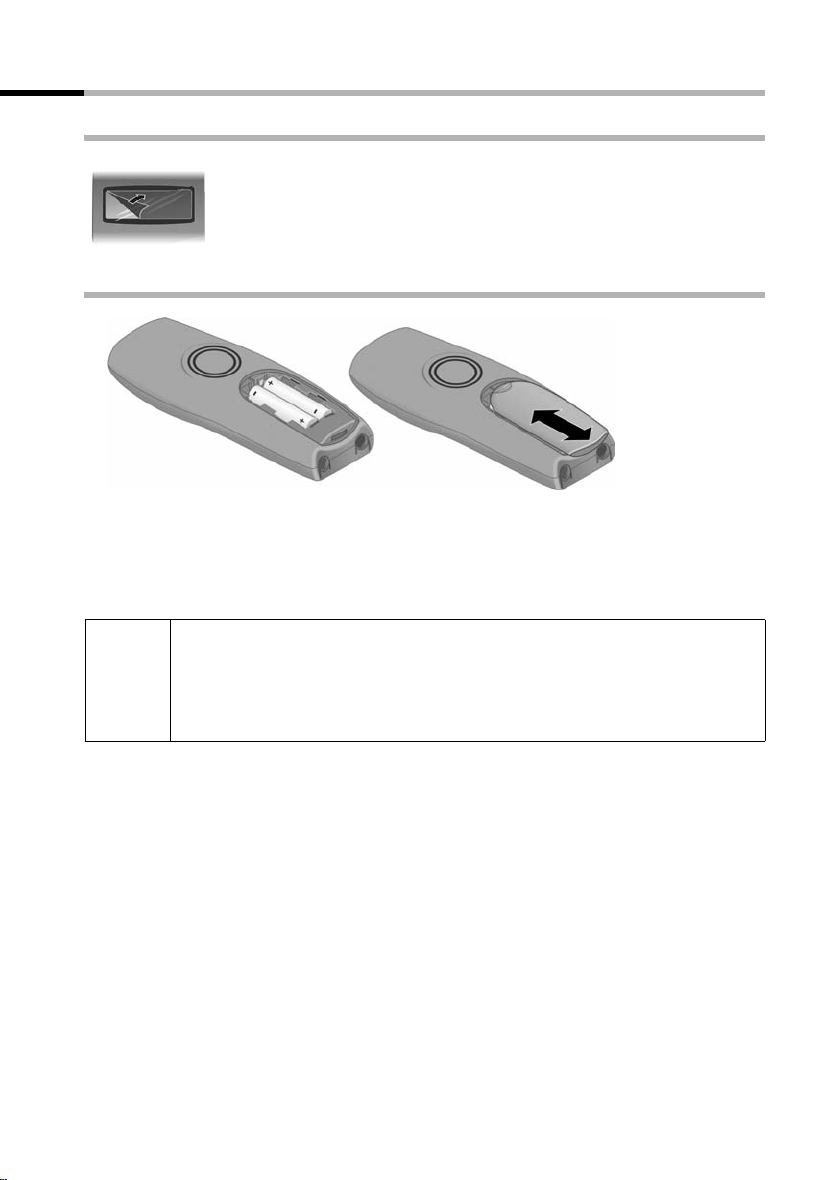
Remove the protective plastic film
The display is protected by a plastic film.
Remove the protective plastic film!
Insert the batteries
◆ Insert the batteries ensuring correct polarity – see figure on left.
◆ Place the cover about 3 mm down lower and then push upwards until it clicks into
place,
◆ To o pen, press the grooved area on the cover and slide back.
Only use the chargeable batteries recommended on page 113! Never use
ordinary (non-rechargeable) batteries or a different type of rechargeable
W
batteries because this may lead to serious health risks or personal injuries.
For example the battery casing may be destroyed (dangerous). The telephone itself may not work properly or be damaged.
9
Preparing the telephone
Placing the handset into the base station and charging the batteries
If you place the handset on the base station, it automatically registers. This can be done
as follows:
1. Place the handset in the base station with the display facing upward.
2. Wait until the handset has automatically registered with the base station (page 81):
This takes about a minute. During registration the display shows Regstr.Proce-
dure and it flashes Base 1. After registration you will see «INT 1» in the display,
which means that the handset has been assigned the first internal number. You can
change the handset name «INT 1» (page 84).
3. Leave the handset in the base station to charge the batteries, because they are not
charged at the factory. The charging is indicated in the upper right of the display
where the charging status Ù flashes:
2
× Batteries flat Ù Batt.
Ø Batteries 1/3 charged Ú Batt. fully charged
If automatic registration is interrupted, you can register the handset manually as
described from page 81. There is a table of the most important questions and answers
to help you (page 110).
/3 charged
i
W
The battery charging status is correctly displayed only after uninterrupted charging/dis-
charging. Therefore you should not remove the batteries unnecessarily or terminate the
charging process early.
i
If you want to register further handsets, please turn to page 81.
For initial charging we recommend a continous, uninterrupted charging
period of seven hours, whatever charge level is indicated! The battery
charge capacity decreases after a few years for technical reasons.
◆ Once the initial charging operation is completed you can replace your
handset in the base station after each call. Charging is controlled
electronically. This ensures optimum charging.
◆ The batteries heat up during charging. This is normal and not
dangerous.
Note:
Your telephone is now ready for operation. The answering machine with the prerecorded announcement has also been switched on. All you have to do is set the date
and time, so the time of incoming calls and messages can be noted correctly (page 15).
10
Preparing the telephone
Push the belt clip onto the back of the handset until the side protrusions click into place.
Activating/deactivating the handset
To activate the handset hold down the end call key a. You will hear a confirmation
beep (rising tone sequence).
To deactivate the handset while in the idle state hold down the end call key a again
(confirmation beep).
i
Placing the handset in the base station or charging unit automatically
activates it.
Activating/deactivating keypad protection
You can disable the handset keys, e. g. when carrying it in your pocket or bag. This protects the keypad against inadvertent activation.
To deactivate hold down the hash key R again (confirmation beep).
◆ The keypad protection is automatically deactivated when you receive
a call. After the call it is automatically activated again.
i
◆ Emergency numbers cannot be dialled if the keypad protection has
been activated.
◆ The keypad protection is still indicated if you have loaded a logo as
display graphic (page 61).
Hold down the hash key (confirmation beep).
The display shows the icon Ø.
11
Using the telephone and menus
Using the telephone and menus
Keys
Control key
The control key with four direction arrows and associated icons is the central operating
element. Pressing the various icons (up, down, right or left) opens a different function.
The side you have to press is shown by a black triangle in the operating instructions,
e.g.: v key for right = open menu. Navigating in the graphic main menu (see page 14)
is always displayed with the down key s.
Example:
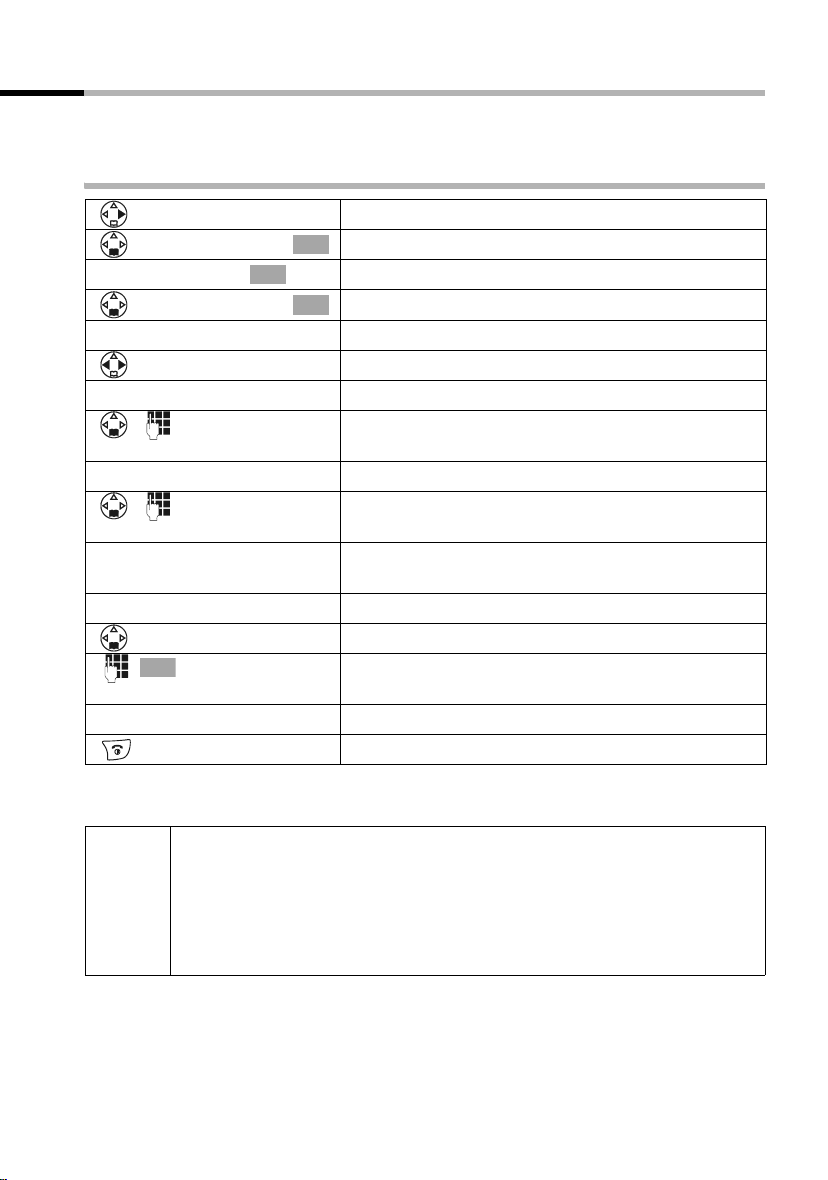
Control key
Functions of the control key.
In idle state In lists and menus In an entry field
t
Scroll up Move the cursor one line up
Open directory Scroll down Move the cursor one line
s
Open graphic main menu Confirm selected entry
v
Open handset list Scroll one menu level back
u
Use the control key to navigate through the icons that appear in the graphic main menu
(page 14).
OK
(as )
(cancel)
down
Move the cursor to the right
Move the cursor to the left
12
i
You can often use the control key to carry out functions assigned to the
right display key.
Using the telephone and menus
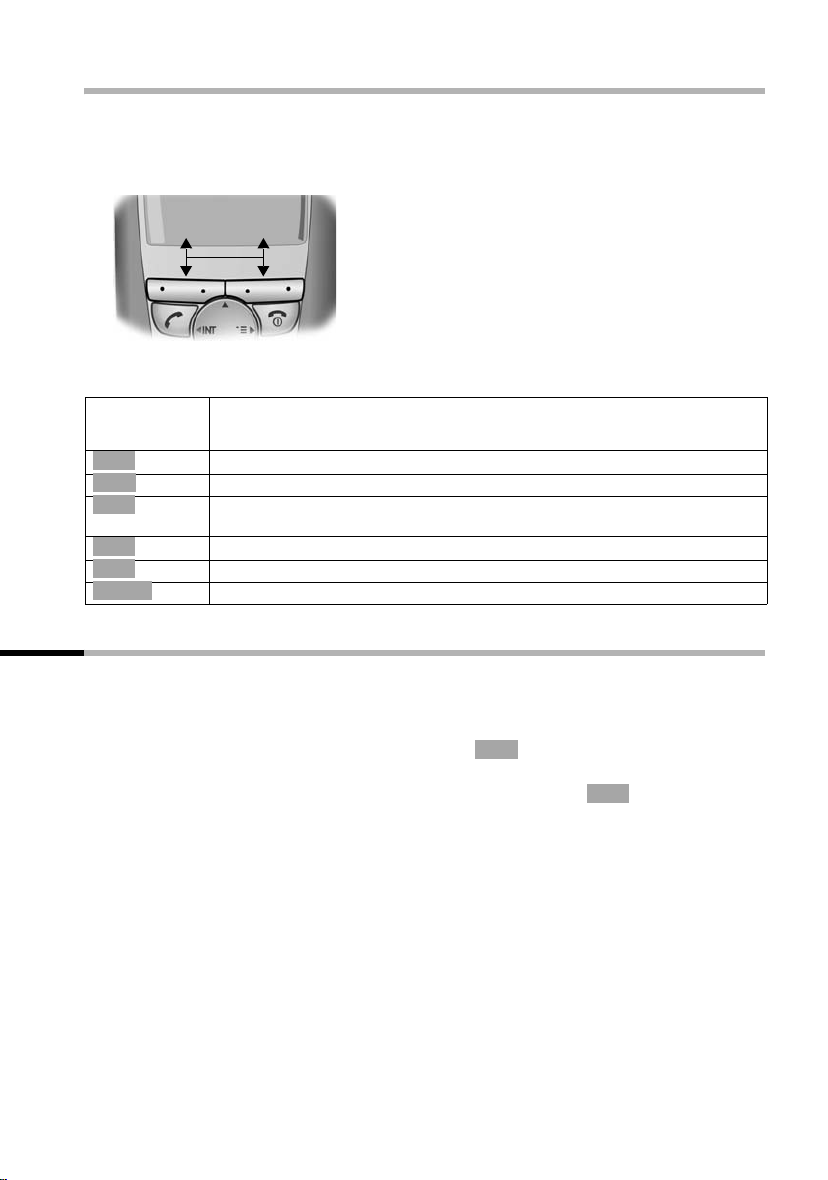
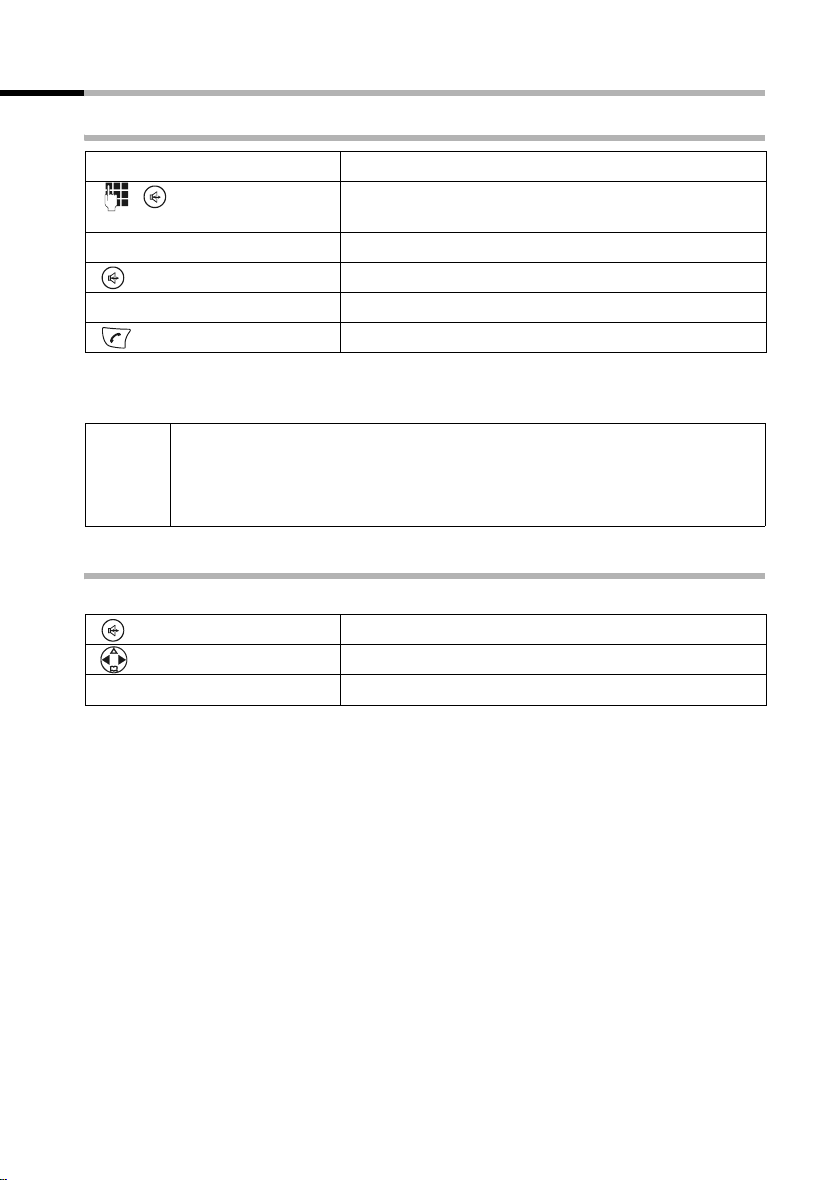
Display keys
The display keys are the horizontal buttons directly below the display. Their functions
depend on the operating situation. The current function is shown directly above the
button in the display.
Example:
• §§§§§§§SMS§§§§§
Display keys
The various displays have the following meaning:
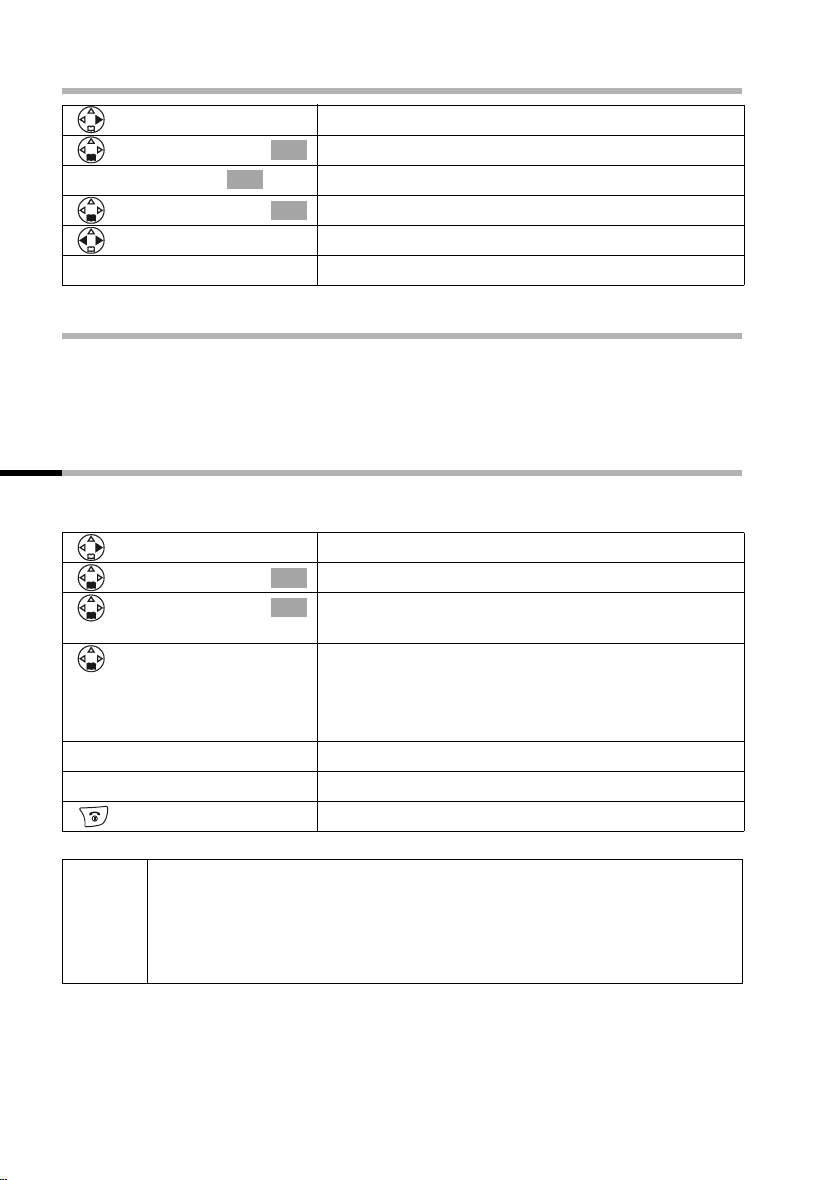
Display
If you press the key
icon
Þ
OK
à
C
Ý
ä
Redial key: Opens the list of the last 10 telephone numbers.
OK key: Confirm menu function or entry.
Menu key: In idle state opens the main menu.
While telephoning, opens context sensitive menu.
Delete key: Deletes input character by character from right to left.
Escape key: One menu level back (cancel).
Open email directory.
Correcting entries
After a correct entry you will hear a confirmation beep (rising tone sequence), after an
incorrect entry an error beep (falling tone sequence). You can repeat the entry.
If you have entered the wrong character in a text, you can correct it as follows:
f
Delete characters to the left of the cursor with
To correct a telephone number or text, move the cursor to the right of the incorrect character or number with the control key. Then press the display key . This deletes the
character. Now enter the correct character.
Inserting characters to the left of the cursor
If you have left out a character, use the control key to move the cursor to where you
want to insert the character and then enter it.
Overwriting characters to the right of the cursor
When entering Cost per Unit: the number of digits is fixed and there is a default entry
in the field. Use the control key to move the cursor to the left of the wrong digit and
then overwrite it.
C
f
C
13
Using the telephone and menus
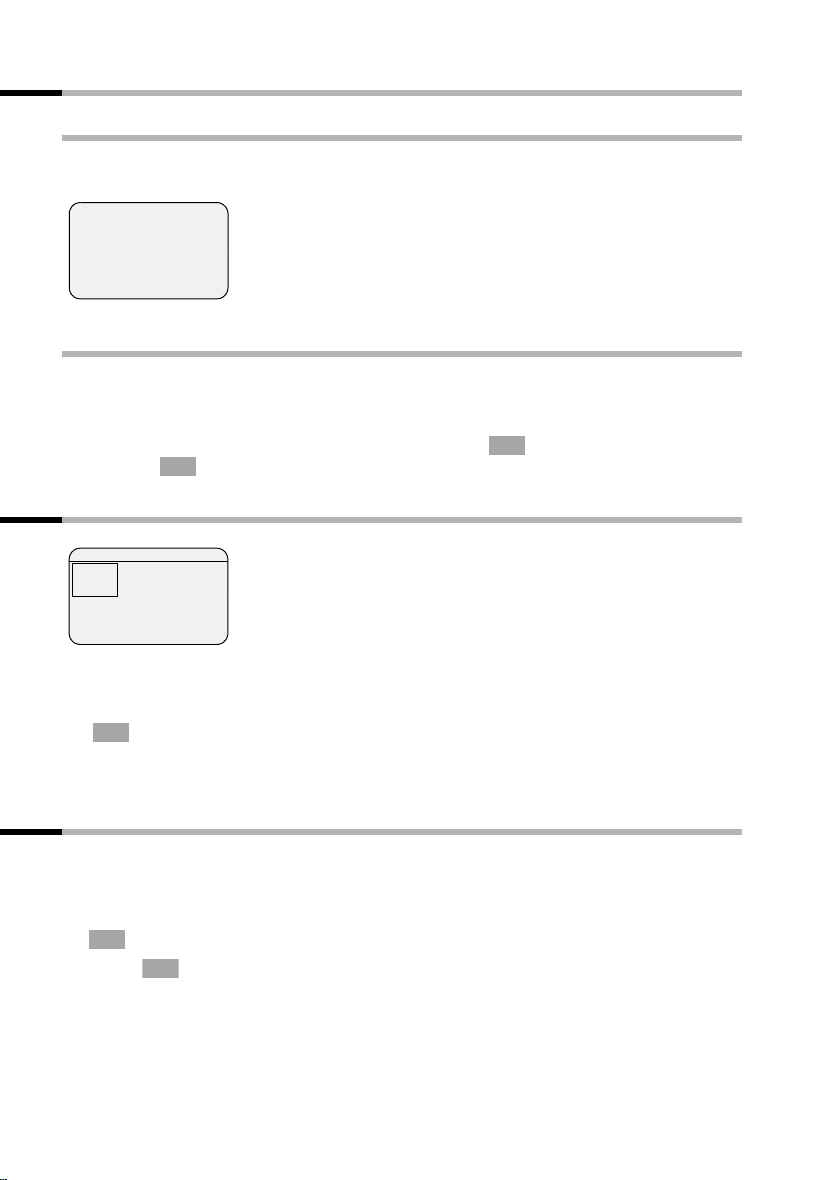
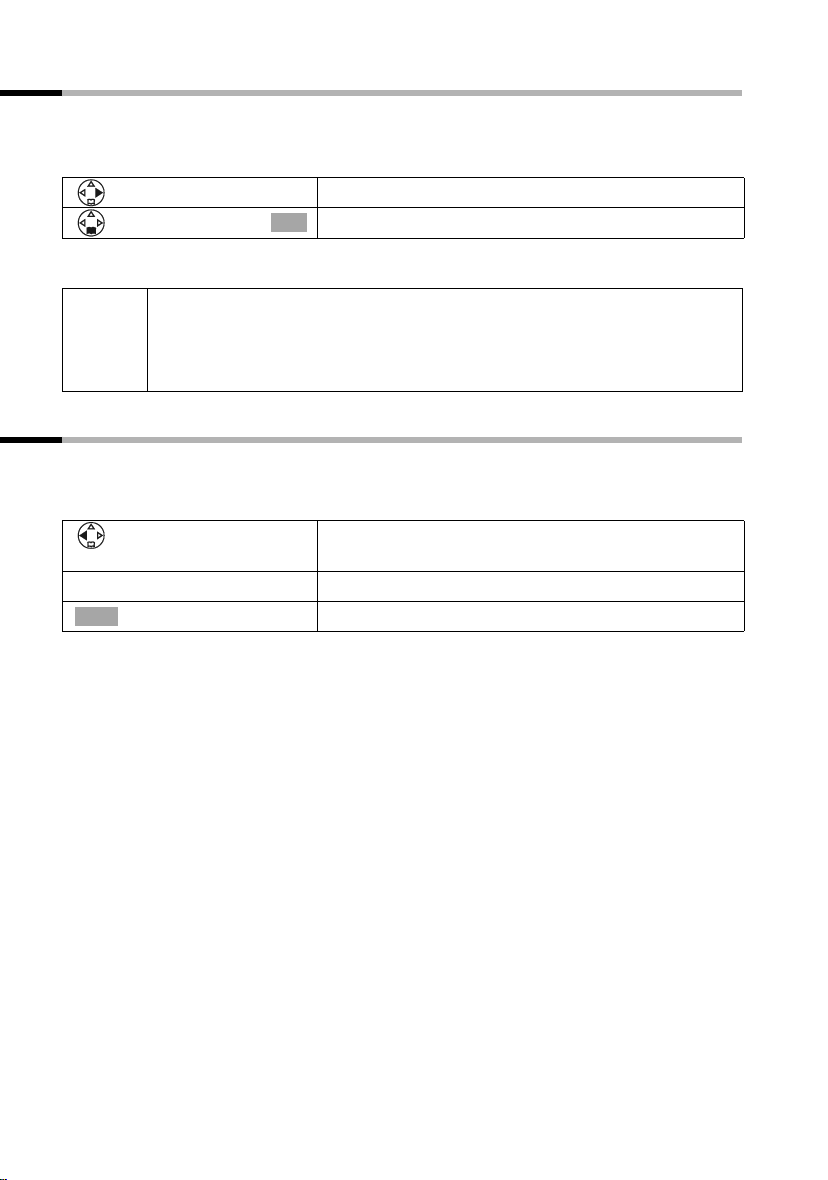
Idle state
Display in idle state (example)
Ð × Ù
INT 1
20.05.04 09:45
The date and time have
already been set
• S M S
Returning to the idle state from anywhere in the menu:
◆ Hold down the end call key a for about 1 second or
◆ do not press any key: After about 2 minutes the display automatically returns to the
idle state.
OK
Changes you have not confirmed or saved by pressing ,
Save Entry will be discarded.
OK
Yes, Save, Send or with
Graphic main menu
SMS 1
è
ç
Î
î
ê
t
§§§§§§§§§OK§§§§§§§§
x
é
ë
The icons actually displayed will
depend on your base.
The display shows all the menu options from the main menu as coloured icons. Use the
control key to select the required icon — this is now highlighted by a border. The name of
the selected menu appears at the top of the screen. To open the menu, press the display
OK
key .
If the main menu has three lines, then either the top two or the bottom two lines will
be displayed.
Example for menu operation: «Set volume for handsfree talking»
1. v Press the right side of the control key. This opens the menu.
2.
ê Navigate with the control key (up, down, right or left) until the icon
s
ê is framed in the display.
OK
3. Confirm with the display key.
4. v or Confirm the first display entry, Handset Volume
5. r Press the left or right side of the control key to set the volume you
6.
7. a Hold the end call key down to return to the idle state.
14
OK
[RRRRRRRRRRRRRRRRRRRRRR ]
Save
, with the right side
of the control key or with the display key.
want (1–5).
Press the display key to save the setting.
Date and time functions
Date and time functions
Setting the date and the time
You need to set the date and time so that they can be displayed correctly when calls /
messages are received.
You can set the clock mode to either 12 hour (factory setting) or 24 hour (am = 1st part
of the day; pm = 2nd part of the day).
Open the menu.
[______________________________________________]
ç
[______________________________________________]
Date/Time
[RRRRRRRRRRRRRRRRRRRRRR]
Save
Select the menu item and confirm.
OK
Select the menu item and confirm.
OK
Enter the date:
In the Date: line, enter day/month/year.
Enter the time:
Scroll to the Time: line and enter the hours/minutes.
Select the display mode:
Scroll to the Time Mode: line if you want to choose
between 12 hour and 24 hour mode.
Press the display key to save the entry.
With 12-hour mode you can scroll to Time: and then use the display key am/pm to switch
between am and pm.
Setting the alarm clock
You can use your handset as an alarm clock.
Prerequisite: You have set the date and time (page 15).
15
Date and time functions
Activating and setting the alarm clock
If you want to use your handset as an alarm clock, you have to set the alarm time,
choose a melody and activate the alarm clock.
Open the menu.
[______________________________________________]
ç
[______________________________________________]
Alarm Clock
[RRRRRRRRRRRRRRRRRRRRRR]
am/pm
[RRRRRRRRRRRRRRRRRRRRRR]
Save
◆ The alarm clock will ring only if the handset is in the idle state. The
i
alarm clock will not ring if the room monitor function is activated, a
call is being made or during automatic redialling.
◆ How to change the volume and melody is explained on page 96.
Select the menu item and confirm.
OK
Select the menu item and confirm.
OK
The current setting is displayed.
Switching the alarm clock on:
In the Room M.: line select On.
Enter the time for alarm call:
Scroll to the Time: line and enter the hours/minutes,
e.g. QM15 for «7.15 am».
When in 12 hour mode, press the display key if you
want to switch between am and pm.
Press the display key to save the entry.
Hold down (return to idle). You will see the icon ¼.
Switching the alarm clock off
The alarm clock is set to a particular time, but you do not want it to ring.
Open the menu.
[______________________________________________]
ç
[______________________________________________]
Alarm Clock
[RRRRRRRRRRRRRRRRRRRRRR]
Save
Select the menu item and confirm.
OK
Select the menu item and confirm.
OK
In the Room M.: line select Off.
Press the display key to save the setting.
Hold down (return to idle).
Deactivating the alarm call
An alarm call with deactivated ringer melody is signalled on the handset and the display
shows Alarm Clock. Press the display key
The alarm call will ring for 30 seconds if it is not answered sooner.
Silence or any key to turn off the alarm call.
16
Date and time functions
Setting appointments
You can have your handset remind you of up to five appointments. To do this you have
to save the times.
Activating and setting appointments
Open the menu.
[______________________________________________]
ç
[______________________________________________]
Set Appoints.
[______________________________________________]
Appoint. 2
[RRRRRRRRRRRRRRRRRRRRRR]
am/pm
[RRRRRRRRRRRRRRRRRRRRRR]
Edit
OK
[RRRRRRRRRRRRRRRRRRRRRR]
Save
OK
Select the menu item and confirm.
OK
Confirm.
Select the appointment (1 — 5) and confirm.
OK
Activating the appointment:
In the Room M.: line select On.
Enter the date:
Scroll to the Date: line and enter the day/month.
Example: For 20.05 enter 2QQ5.
Enter the time:
Scroll to the Time: line and enter the hours/minutes.
Example: For 9:05 am enter QOQ5.
If in 12h mode (page 15): you can switch between
am and pm
Specifying the appointment:
Scroll to the Notes: line and press the display key.
Enter a name (max. 16 characters) (for entering let-
ters and characters see page 114) and confirm.
Press the display key to save the entry.
Hold down (return to idle). You will see the icon ¼.
◆ If you do not enter a name, the display will then show
«Appointment
i
◆ How to change the volume and melody is explained from page 96.
◆ An appointment will be displayed only if the handset is in the idle
…».
state. It will not be displayed if the room monitor function is activated,
a call is being made or during automatic redialling.
17
Date and time functions
Cancelling an appointment
Open the menu.
Select the menu item and confirm.
OK
OK
Confirm.
Select the appointment (1 — 5) and confirm.
OK
Select setting Off.
Press the display key to save the setting.
[______________________________________________]
ç
[______________________________________________]
Set Appoints.
[______________________________________________]
Appoint. 2
[RRRRRRRRRRRRRRRRRRRRRR]
Save
Switching off or answering an appointment alarm
An appointment is signalled with the selected ringer melody (page 97) and in the display you will see for example Appoint. 2. Once it has been signalled you can switch it
off or answer with an SMS. The appointment call will ring for 30 seconds if it is not
answered sooner.
Displaying and deleting missed appointments and anniversaries
If you do not accept an appointment or anniversary alarm when it rings (page 32), it will
be saved in a list.
Open the menu.
[______________________________________________]
ç
[______________________________________________]
Missed Dates
[RRRRRRRRRRRRRRRRRRRRRR]
Delete
… then
Select the menu item and confirm.
OK
Select the menu item and confirm. The list of
OK
appointments/anniversaries will open.
Select appointment/anniversary.
This will display information about the appointment/
anniversary. A missed appointment is marked with
¼, a missed anniversary with ‚.
Press the display key.
Hold down (return to idle).
18
◆ If there is a new appointment/anniversary in the list, the display
Appoint. You can also use this display key to open the list of
shows
i
appointments/anniversaries. Once you have looked at all the new
appointments,
◆ If the list is empty, you can close it with Go Back.
Appoint will disappear from the display.
Making calls
Making calls
Making and ending external calls
External calls are calls into the public telephone network.
Enter the telephone number and press the talk key.
The telephone number is dialled.
Ending a call:
Press the end call key.
◆ You can also first press the talk key c (you will hear the dial tone)
i
Dialling pause
You can insert a pause between the dialling code and the telephone number. Hold down
the key S for about 2 seconds. Then enter the telephone number.
and then enter the telephone number.
◆ You can cancel the dialling operation with the end call key a.
i
How to call another handset is explained on page 84.
Answering a call
Your handset rings, the call is shown in the display and the handsfree key d flashes.
Press the talk key c, the display key
If the handset is in the base station/charging unit and the function Auto Answer is activated (page 95), you only have to take the handset from the base station/charging unit
to answer the call.
i
If the ringer tone disturbs you, press the display key Silence. You can
accept the call as long as it is shown in the display.
Accept or the handsfree key d to accept the call.
19
Making calls
Calling line identification
The caller’s number or name will be shown.
Prerequisites:
1. You have asked your network provider to have the caller’s telephone number (CLIP)
or name (CNIP) shown on your display.
2. The caller has asked his or her network provider to have the telephone number
shown (CLI).
3. Your network provider supports CLIP, CLI and CNIP.
CLI Calling Line Identification = transmission of the caller’s telephone number
CLIP Calling Line Identification Presentation = display of the caller’s telephone
number
CNIP Calling Name Identification Presentation = display of the caller’s name
Display with CLIP/CLI
The caller’s telephone will be shown in the display. If you have saved an entry in your
directory for this number, then the directory entry will be shown instead of the number,
e. g. «Anna».
Å
1234567890
Accept Silence
The display will show External if no telephone number is transmitted.
The display will show Withheld if the caller has suppressed transmission of the number
(page 23) or Unavailable if it has not been ordered.
Bell icon
telephone number
or «Anna»
Display with CNIP
If you have CNIP, you will also see the name (place) registered with your network provider for this telephone number.
Anna Smith, London
1234567890
Accept Silence
The display will show External if no telephone number is transmitted.
The display will show Withheld if the caller has suppressed transmission of the number
(page 23) or Unavailable if it has not been ordered.
i
Calling line identification may be a chargeable function. Please contact
your network provider for more information.
Name and place
Telephone number
20
Making calls
Handsfree talking
Activating/deactivating handsfree talking
Activating while dialling:
Enter the telephone number and press the handsfree
key (instead of the talk key c).
Activating during a call:
Press the handsfree key.
Deactivating handsfree talking:
Press the talk key
As soon as you end handsfree talking, you switch to «handset operation» for the rest of
the call.
◆ If you want to put the handset back in the base station during a call,
i
Changing the volume during handsfree talking
You are making a call and handsfree talking d is activated.
[RRRRRRRRRRRRRRRRRRRRRR]
Save
keep the handsfree key d pressed while you do so.
◆ Before you use the handsfree function, you should inform your caller
about your intention.
Press the handsfree key again.
Raise or lower the volume.
Press the display key to save the setting.
21
Making calls
Activating/deactivating listening in (at the base station)
You can switch on the base station loudspeaker so that other people in the room can
hear what your external caller on the telephone is saying.
Prerequisite: You are making a call (handsfree talking).
Open the menu.
[______________________________________________]
Open Listen. On
Ending the call deactivates the function.
◆ Before you use this function, you should inform your caller about your
i
intention.
◆ You can adjust the volume directly on the base station with the keys
Select the menu item and confirm.
OK
ð and ñ (page 64).
Muting the handset
You can deactivate your microphone during external calls in order to talk confidentially
to another person in the room, for example. The external caller cannot hear your conversation during this time (waiting melody). You cannot hear your caller either.
Open the handset list. The call is «parked» (waiting
melody).
Reactivating the microphone:
Ý
Press the display key.
22
Network mailbox features
Network mailbox features
Network mailbox features are functions made available by your network provider. You
can only use these features if you have ordered them from your network provider.
Please contact the provider to find out which functions can be activated free of charge
and which are chargeable.
i
If you have any problems with these features please contact your
network provider.
Function set for the next call
Before the following procedure press the keys:
v (open menu); s
which you can then see in the handset display.
Suppressing the telephone
number for the next call
(CLIR):
î [. Once the procedure is completed, a code will be sent
Withhold No. [
~ (enter the telephone number); c
Functions set for all following calls
Before each of the following procedures press the keys: v (Open menu);
î [; s All Calls [ Once a procedure is completed, a code will be sent which
s
you can then see in the handset display.
You can quit the current procedure by pressing the end call key a after the confirma-
tion from the telephone network.
Activating/deactivating call
waiting (only during an exter-
nal call):
Activating/deactivating and
setting general call
diversion:
(Menu operation see page 23)
Call Waiting [
s
r (activate/deactivate);
Call Divert
All [
r (select variant
Busy
s
~ (enter the telephone number)
©
sr (activate/deactivate);
[
)
Edit
Save Entry [
Send
All Calls, No Answer or When
Send
23
Network mailbox features
Activating/deactivating and
setting selective call
diversion:
(Menu operation see page 23)
Entering the telephone
number for selective call
diversion:
(Menu operation see page 23)
Call Divert
s
Settings [
r (select variant); s
[
Selective [
Edit
~ (enter the telephone number)
Save Entry [
©
sr (activate/deactivate);
Call Divert
s
s
[
Selective [
Number List [
~ (enter the list position); s
Send
Edit
~ (enter the telephone number)
Save Entry [; Send
©
24
Network mailbox features
Functions during a call
Activating callback: You hear the busy tone: v (open menu)
Ringback [; a
s
Initiating an enquiry call: Ext.Call, ~ (enter the number of the user)
Ending an enquiry call: v (open menu)
s End Active Call [
Tog gli ng: q (Toggling between two callers)
Ending toggling: v (open menu)
s End Active Call [
Accepting a waiting call: Accept
Rejecting a waiting call: v (open menu)
Reject Call Wait [
s
Function set after a call
Before the procedure press the keys: v (open menu); s î [.
Cancelling callback: s Ringback Off [;
25
Using the directory and other lists
Using the directory and other lists
Directory and speed dial list
The directory and speed dial list can store up to 200 telephone numbers depending on
the length of the entries, the number of entries in the speed dial list and the email directory (page 34).
The directory makes dialling numbers much easier. Open the directory with the s key.
For each directory entry you can add an anniversary and mark the entry as «VIP».
The speed dial list is a special directory you can use to store especially important numbers, e.g. private telephone numbers, prefixes of network providers (so-called «call-bycall numbers») etc. Open the speed dial list with the C key.
You can create a directory, email directory and speed dial list individually for your handset. If you want to make the lists or individual entries available to other handsets, you
can send them to the handset(s) (page 31).
Apart from the storing of entries, the operating of speed dial lists is identical to that for
the directory.
◆ Entering names can be made easier with EATONI predictive text entry
(page 116, factory setting deactivated).
◆ Please see the character map (page 114) on how to enter text
i
correctly.
◆ You can enter up to 32 digits for a number and 16 letters for a name.
◆ When entering a number you can use , s Insert Pause or
press the S key for about 2 seconds to add the appropriate pause.
à OK
Saving telephone numbers in the directory
Open the directory.
[______________________________________________]
New Entry
either …
à
[______________________________________________]
Save Entry
or …
OK
OK
Confirm.
Write the entry
Enter the telephone number.
Scroll to the next line and enter the name.
Saving the telephone number:
Press the display key to open the menu.
Confirm. The entry is saved.
Entering an anniversary before saving:
26
RRRRRRRRRRRRRRRRRRRRRRRR
Save
… then
Using the directory and other lists
Scroll to the line Annivers.: if you want to enter an
anniversary, as described on page 32. Then:
Press the display key to save the entry.
Hold down (return to idle).
i
If your telephone is connected to a PABX, you may have to enter the external call prefix (APL) as the first digit of your directory entry (page 108).
Saving numbers in the speed dial list
You can assign up to nine entries in the speed dial list to one of the numbers 0, 2 to 9.
Already assigned numbers will not be offered. If you hold down one of these numbers
in the idle state and press the talk key c you will be immediately connected to the telephone number assigned to that number.
The maximum number of entries in the speed dial list depends on the number of entries
in the directory and the email directory.
Open the speed dial list.
[______________________________________________]
New Entry
either …
à
[______________________________________________]
Save Entry
or …
RRRRRRRRRRRRRRRRRRRRRRRR
Save
… then
OK
OK
Confirm.
Write the entry
Enter the telephone number.
Scroll to the PublicKey: line and enter the name.
Saving the telephone number:
Press the display key to open the menu.
Confirm. The entry is saved.
Saving a speed dial number:
Scroll to the Enter key: line and select a number (0,
2–9) for this telephone number.
Press the display key to save the setting.
Hold down (return to idle).
◆ Already assigned speed dial numbers will not be offered.
i
◆ Sorting sequence: Entries with speed dial numbers will appear at the
head of the list.
27
Loading…
SIEMENS GIGASET S150 RUS
Type: (RAR)
Size
776.0byte
Page
—
Category
TELEPHONE
EPROM
If you get stuck in repairing a defective appliance
download
this repair information for help. See below.
Good luck to the repair!
Please do not offer the downloaded file for sell only
use it for personal usage!
Looking for similar siemens manual?
Document preview [1st page]
No preview item for this file.
Possible causes:
- No preview picture generated yet.
- It is not a pdf file.
Please tick the box below to get download link:
- Also known:
SIEMENS GIGASET S-150 S150 RUS 150
- If you have any question about repairing write your question to the Message board. For this no need registration.
- If the site has helped you and you also want to help others, please Upload a manual, circuit diagram or eeprom that is not yet available on the site.
Have a nice Day! - See related repair forum topics below. May be help you to repair.
Warning!
If you are not familiar with electronics, do not attempt to repair!
You could suffer a fatal electrical shock! Instead, contact your nearest service center!
Note! To open downloaded files you need acrobat reader or similar pdf reader program. In addition,
some files are archived,
so you need WinZip or WinRar to open that files. Also some files are djvu so you need djvu viewer to open them.
These free programs can be found on this page: needed progs
If you use opera you have to disable opera turbo function to download file!
If you cannot download this file, try it with CHROME or FIREFOX browser.
T.Kollégák.A készülék töltésre kapcs.után 5-10 sec.múlva kikapcsolja
a töltést lemerült akku esetén.Csak a készülék szó szerinti meghajlitása után hajlandó ismét töltésre kapcsolni,de ismét kikapcsol.Én alaplap hibára gyanakszom,kérdésem hogy érdemes egyáltalán foglalkozni vele?Előre is köszi a segitséget.
Üdv!
Egy Siemens M55 mobilban használt kijelzőt keresek megvételre. Ha valakinél akad a fiókban, akár bontásból is, megegyezhetnénk. Sajna, nem egy gyakori darab…
köszi!
Jani
Szépnapot Mesterek!
A fent megnevezett telefonnal gyűlt meg a bajom. Konyhai balesetet szenvedett (étolaj fürdő)! Ezen már túljutottam, viszont szétszedéskor levált a kijelzőjéről a fólia. Azt hiszem már sokan írtak hasonló problémákról, ill. megoldásaikról, de jelen pillanatban túl lusta vagyok visszakeresgélni. Tehát hogyan lehet visszailleszteni az LCD-re a levált fóliát. Tekintettel arra, hogy sajátom, nem szívesen dobnám ki. Köszönettel veszek minden építőjellegű tanácsot, megoldást!
Üdvözlettel: Tamás
üdv tanyalakok!
siemens me 45 csepp ,por ,és ütésállo telo sajna beázott./munkás telom/
kitakaritottam minden funkcio megy,kivéve a töltés.
kijelzi a töltést de az akkut nem tölti.
másik akkuval is probáltam,töltöcsati is megtakaritva, de semmi javulás.
akku nélkül az akksi csatin megjelenik 3.2 volt.töltéskor.
tudom egy öskövület de szeretem! mint a pálinkát!
üdv:atis
Similar manuals:
If you want to join us and get
repairing help
please sign in or sign up by completing a simple electrical test
or write your question to the Message board without registration.
You can write in English language into the forum (not only in Hungarian)!
E-Waste Reduce
-
Page 1: Siemens Gigaset 150
Gigaset C150 / IM eng lisch / A31008-C150-J101-1-7619 / cov er_0_V orlage.fm / 24.06.2003 s Be inspir ed[…]
-
Page 2: Siemens Gigaset 150
1 The handset at a glance Gigaset C100 / eng lisch / A31008-C100-J101-1-7619 / cov ers_I-II.fm / 24.06.2003 The handset at a g lance Handsfree key: ◆ Switch from «earpiece» to handsfr ee mode ◆ Lights up: Handsfree is activat ed ◆ Flashes: Incoming call Ta l k / directory key: T op half: ◆ Answer a call ◆ Initiate dialling ◆ S[…]
-
Page 3: Siemens Gigaset 150
2 T able of Contents Gigaset C150 / IM eng lisch / A31008-C150-J101-1-7619 / C_150_AMIVZ.fm / 24.06.2003 T able of Contents The handset at a glance . . . . . . . . . . . . . . . . . . . . . . 1 Safe ty Precautions . . . . . . . . . . . . . . . . . . . . . . . . . . . 5 Preparing to use y o ur phone . . . . . . . . . . . . . . . . . . 6 Installing t[…]
-
Page 4: Siemens Gigaset 150
3 T able of Contents Gigaset C150 / IM eng lisch / A31008-C150-J101-1-7619 / C_150_AMIVZ.fm / 24.06.2003 Using the answering mac hine in the C 150 Base . . . . . . . . . . . . . . . . . . . . . . . . . . . . . . . . 40 Operating the answering machine from the base . . . . . . . . . . . . . . . . . . . . . . . . . . . 40 Operating the answering mach[…]
-
Page 5: Siemens Gigaset 150
4 T able of Contents Gigaset C150 / IM eng lisch / A31008-C150-J101-1-7619 / C_150_AMIVZ.fm / 24.06.2003 Setting the base . . . . . . . . . . . . . . . . . . . . . . . . . . . 63 Pro tecting t he telephone from unaut horized access . . . . . . . . . . . . . . . . . . . . . . . . . . 63 Changing the loudspeaker v olume of the base (C 150 only) . . .[…]
-
Page 6: Siemens Gigaset 150
5 Safety Precautions Gigaset C100 / eng lisch / A31008-C100-J101-1-7619 / star ting.fm / 24.06.2003 Safe ty Precautions ! Only use the pow er supply unit supplied , as indicated on the underside of the device. Fit only the recommended rechargeable batt eries (page 73) of the same type ! Use no other types of batt eries or non-rechargeable batteries[…]
-
Page 7: Siemens Gigaset 150
6 Preparing to use y our phone Gigaset C100 / eng lisch / A31008-C100-J101-1-7619 / star ting.fm / 24.06.2003 Preparing to use y our phone The pack contains: ◆ one Gigaset C 100 or C 150 base ◆ one Gigaset C 1 handse t, ◆ one power supply unit with po wer cord, ◆ one telephone cord, ◆ two batteries, ◆ one set of operating instruc tions.[…]
-
Page 8: Siemens Gigaset 150
7 Preparing to use y our phone Gigaset C100 / eng lisch / A31008-C100-J101-1-7619 / star ting.fm / 24.06.2003 Connecting the base i ◆ K eep the power supply unit plugged in at all times t o ensure y our phone is ready f or use whenever y ou need it. ◆ If ever y ou purchase a phone cor d from a stor e, ensure that the phone conduct ors are corre[…]
-
Page 9: Siemens Gigaset 150
8 Preparing to use y our phone Gigaset C100 / eng lisch / A31008-C100-J101-1-7619 / star ting.fm / 24.06.2003 Preparing to use the handset Removing pro tectiv e film Insert ing the batteries ◆ Insert the batteries ensuring correct polarity – see figure on left. ◆ Position the batt er y cover so that it is open b y around 3 mm , then slide up […]
-
Page 10: Siemens Gigaset 150
9 Preparing to use y our phone Gigaset C100 / eng lisch / A31008-C100-J101-1-7619 / star ting.fm / 24.06.2003 Placing the handset into the base and c harging the batteries When you place the handse t into the base, the handse t will register automatically to the base. Proceed st ep by step as f ollows: 1. Place the handset in the base with the disp[…]
-
Page 11: Siemens Gigaset 150
10 Preparing to use y our phone Gigaset C100 / eng lisch / A31008-C100-J101-1-7619 / star ting.fm / 24.06.2003 Activating/deac tivating the handset T o activat e the handset, pr ess the ‘end call’ k ey a and hold . Y ou will hear a confirma- tion tone (rising tone seq uence). To deactivate the handset, pr ess the ‘end call’ k ey[…]
-
Page 12: Siemens Gigaset 150
11 Operating the telephone, menu guidance Gigaset C100 / eng lisch / A31008-C100-J101-1-7619 / guidance.fm / 24.06.2003 Operating the telephone, menu guidance Key s T alk/directory ke y The talk/direct o r y ke y c is a rock er ke y that has two functions. Y ou pr ess the top half of this ke y to initiat e a call. Y ou press the bo ttom half of the[…]
-
Page 13: Siemens Gigaset 150
12 Operating the telephone, menu guidance Gigaset C100 / eng lisch / A31008-C100-J101-1-7619 / guidance.fm / 24.06.2003 Correcting wrong inputs After a correct in put you will hear a confirmation tone (rising t one sequence), an incor- rec t input is indicated b y an error tone (falling t one sequence). Y ou can repeat the input. If you ha ve enter[…]
-
Page 14: Siemens Gigaset 150
13 Operating the telephone, menu guidance Gigaset C100 / eng lisch / A31008-C100-J101-1-7619 / guidance.fm / 24.06.2003 Menu operation, with «Setting Handsfree V olume» as an example 1. MENU Pres s the display k ey . The menu opens. 2. s Pres s the display k ey repeat edly until Audio Settings appears on the screen. 3. OK Confirm with the[…]
-
Page 15: Siemens Gigaset 150
14 Date and Time Gigaset C100 / eng lisch / A31008-C100-J101-1-7619 / TimeCalendar .fm / 24.06.2003 Date and Time Setting the date and the time Correc t date and time settings ar e essential if you w ant to know ex actly when calls/messages (C 150) w ere receiv ed. Changing the time mode Y ou can choose between the 12 hour and the 24 hour displa y […]
-
Page 16: Siemens Gigaset 150
15 Making calls Gigaset C100 / eng lisch / A31008-C100-J101-1-7619 / telephony .fm / 24.06.2003 Making calls Making external calls and ending a call External calls ar e calls into the public te lephone network. Inserting a dialling pause Y ou can inser t a dialling pause between the pr efix and the actual t elephone number . T o do this, press S f […]
-
Page 17: Siemens Gigaset 150
16 Making calls Gigaset C100 / eng lisch / A31008-C100-J101-1-7619 / telephony .fm / 24.06.2003 Calling Line Identification When you ge t a call, you will see the caller’s number and/or name displa yed on the screen. Preconditions: 1. Y ou hav e asked y our netw ork provider f or the caller’s number (CLIP) or name (CNIP) to be displa yed […]
-
Page 18: Siemens Gigaset 150
17 Making calls Gigaset C100 / eng lisch / A31008-C100-J101-1-7619 / telephony .fm / 24.06.2003 Handsfree Activating/deac tivating handsfree As soon as you t erminate the handsfree mode y ou switch to ‘earpiece mode’ and con- tinue the call on the handset. Adjusting the v olume while in handsfree mode A call is in progr ess and handsfree […]
-
Page 19: Siemens Gigaset 150
18 Making calls Gigaset C100 / eng lisch / A31008-C100-J101-1-7619 / telephony .fm / 24.06.2003 Activating/deac tivating open listening (call screening at the base) (C 150 only) Y ou can activate the built-in base loudspeak er to allow other people in the r oom to hear what your ext ernal caller is saying. Precondition: A call is in pr ogres s. Han[…]
-
Page 20: Siemens Gigaset 150
19 Using the directory and other lists Gigaset C100 / eng lisch / A31008-C100-J101-1-7619 / Direc tories.fm / 24.06.2003 Using the direct or y and ot her lists Directory and speed dial list Y ou can store up t o 50 entries max. in the directory and the speed dial list (depending on the size of individual entries). The director y makes dialling easi[…]
-
Page 21: Siemens Gigaset 150
20 Using the directory and other lists Gigaset C100 / eng lisch / A31008-C100-J101-1-7619 / Direc tories.fm / 24.06.2003 St oring a telephone number in the speed dial list Y ou can assign a digit (0, 2–9) to up t o nine entries on your speed dial list. When you pres s and hold one of these digits, e.g. ‘3’, and pres s the top half of th[…]
-
Page 22: Siemens Gigaset 150
21 Using the directory and other lists Gigaset C100 / eng lisch / A31008-C100-J101-1-7619 / Direc tories.fm / 24.06.2003 Changing an entr y in the directory/speed dial list Deleting a single entry or director y/speed dial list Adding a displa yed telephone number to the direct or y When a telephone number appears in the display (CLIP) y ou can add […]
-
Page 23: Siemens Gigaset 150
22 Using the directory and other lists Gigaset C100 / eng lisch / A31008-C100-J101-1-7619 / Direc tories.fm / 24.06.2003 Picking a phone number from the direct or y/speed dial list If you ar e promp ted to ent er a telephone number while you ar e operating your tele- phone, you can use the dir ect or y to do this. Precondition: The entr y field for[…]
-
Page 24: Siemens Gigaset 150
23 Using the directory and other lists Gigaset C100 / eng lisch / A31008-C100-J101-1-7619 / Direc tories.fm / 24.06.2003 Opening lists with the Message key Y ou can use the Message k ey f to open the f ollowing lists: 1. SMS list, 2. Answering machine list (only C 150), 3. Messages in the ne twork mailbo x (if your netw ork provider supports this f[…]
-
Page 25: Siemens Gigaset 150
24 Using the directory and other lists Gigaset C100 / eng lisch / A31008-C100-J101-1-7619 / Direc tories.fm / 24.06.2003 Opening the caller list/answering machine list (only C 150) New calls (caller list) and new mes sages (answering machine) ar e shown on screen by the letter icon Û , mes sages are indicat ed by an advisor y tone as well. Calling[…]
-
Page 26: Siemens Gigaset 150
25 Using the directory and other lists Gigaset C100 / eng lisch / A31008-C100-J101-1-7619 / Direc tories.fm / 24.06.2003 Viewing an entr y in the caller list/answering machine list (only C 150), adding a number to the directory Y ou can view the time when a call arrived and add t he telephone number to y our direc- tory. Open the caller list/answ e[…]
-
Page 27: Siemens Gigaset 150
26 Using the directory and other lists Gigaset C100 / eng lisch / A31008-C100-J101-1-7619 / Direc tories.fm / 24.06.2003 Deleting the caller list Open the caller list (page 24). Now : Deleting old mes sages from the answering machine list is e xplained on page 45. Deleting a single entry from the caller list Open the caller list and select an entry[…]
-
Page 28: Siemens Gigaset 150
27 SMS (T ext Messages) Gigaset C100 / eng lisch / A31008-C100-J101-1-7619 / SMS_Neutral_so.fm / 24.06.2003 SMS (T ext Messages) Y ou can send and receive SMS t ext messages ( S hort M essage S er vice) with your hand- set. Y ou can write, edit, r ead, delet e or forward te xt messages fr om any regist ered hand- set that has SMS func tionality . W[…]
-
Page 29: Siemens Gigaset 150
28 SMS (T ext Messages) Gigaset C100 / eng lisch / A31008-C100-J101-1-7619 / SMS_Neutral_so.fm / 24.06.2003 Before y ou can send and receive te xt messages ◆ Calling Line Identification (page 16) must be enabled for y our phone line. Check with your telephone ne twork pro vider to mak e sure that this ser vice is activated on your phone line. Y o[…]
-
Page 30: Siemens Gigaset 150
29 SMS (T ext Messages) Gigaset C100 / eng lisch / A31008-C100-J101-1-7619 / SMS_Neutral_so.fm / 24.06.2003 Entering the number of an SMS centre, changing the send centre Y ou can enter and change the call numbers of an SMS centre. A pr eviously st ored SMS centre number is changed b y being overwritten. Y ou should find out about the ser vices and[…]
-
Page 31: Siemens Gigaset 150
30 SMS (T ext Messages) Gigaset C100 / eng lisch / A31008-C100-J101-1-7619 / SMS_Neutral_so.fm / 24.06.2003 T ext mes sage sending and the draft message list If a call arrives while you ar e writing a message, then the message is auto matically saved to th e draft message list . Y ou can take the call and finish writing or send the mes sage later ([…]
-
Page 32: Siemens Gigaset 150
31 SMS (T ext Messages) Gigaset C100 / eng lisch / A31008-C100-J101-1-7619 / SMS_Neutral_so.fm / 24.06.2003 St oring text messag es Precondition: Y ou hav e written a text mes s age (page 30) and the input field is open. The message is st ored in the draf t message list . It can be re trieved and sent at a lat er time (page 33). Sending a text mess[…]
-
Page 33: Siemens Gigaset 150
32 SMS (T ext Messages) Gigaset C100 / eng lisch / A31008-C100-J101-1-7619 / SMS_Neutral_so.fm / 24.06.2003 Sending a text mess age to an email address If your service provider supports the ‘SMS to email’ service, then you can also send your text mes sages to email addr esses. Ask your service provider which se ttings you must make on y o[…]
-
Page 34: Siemens Gigaset 150
33 SMS (T ext Messages) Gigaset C100 / eng lisch / A31008-C100-J101-1-7619 / SMS_Neutral_so.fm / 24.06.2003 Opening the draft message list The draft message list shows you: ◆ T ext messages whic h you sav ed before you sent them (page 31), ◆ T ext messag es you could not send because, f or example, you wer e interrupt ed by an incoming call whi[…]
-
Page 35: Siemens Gigaset 150
34 SMS (T ext Messages) Gigaset C100 / eng lisch / A31008-C100-J101-1-7619 / SMS_Neutral_so.fm / 24.06.2003 Sending or editing text messag es in the draft message list Precondition: Y ou hav e opened a text messag e in the draft message list to rea d (page 33). Y ou can now send the messag e as described on page 31. Receiving text mes sages and the[…]
-
Page 36: Siemens Gigaset 150
35 SMS (T ext Messages) Gigaset C100 / eng lisch / A31008-C100-J101-1-7619 / SMS_Neutral_so.fm / 24.06.2003 The display t ells you if the mes sage memory is full. Pres s OK to confirm and dele te indi- vidual messages y ou no longer req uire from t he incoming and draft message list. Opening with the menu Viewing the date and time of an incoming te[…]
-
Page 37: Siemens Gigaset 150
36 SMS (T ext Messages) Gigaset C100 / eng lisch / A31008-C100-J101-1-7619 / SMS_Neutral_so.fm / 24.06.2003 Deleting the entire incoming messag e list This function dele tes all new and old t ext messages in the incoming mes sage list. Precondition: Y ou hav e opened the incoming message list (page 34). Replying to or forwarding text messag es Whil[…]
-
Page 38: Siemens Gigaset 150
37 SMS (T ext Messages) Gigaset C100 / eng lisch / A31008-C100-J101-1-7619 / SMS_Neutral_so.fm / 24.06.2003 Adding the telephone number of a text mes sage to the directory Y ou can add the telephone number to y our direc tor y . Precondition: Y ou hav e opened the incoming message list and selec ted a messag e Te x t m e s s a g e s to P AB X'[…]
-
Page 39: Siemens Gigaset 150
38 SMS (T ext Messages) Gigaset C100 / eng lisch / A31008-C100-J101-1-7619 / SMS_Neutral_so.fm / 24.06.2003 Errors when sending and receiving a text message Errors when sending a text message The follo wing error codes are displa yed: Errors when receiving a text message Yo u cannot receive t ext messages under the f ollowing conditions: ◆ The CL[…]
-
Page 40: Siemens Gigaset 150
39 SMS (T ext Messages) Gigaset C100 / eng lisch / A31008-C100-J101-1-7619 / SMS_Neutral_so.fm / 24.06.2003 Self-help with error messages Error Message Possible Cause Remedy Y ou cannot send messages. Y ou have no t request ed the CLIP ser vice (Calling Line Iden- tification Presentation). Ask your ne twork pro vider to activat e this ser vice. Mes[…]
-
Page 41: Siemens Gigaset 150
40 Using the answering machine in the C 150 Base Gigaset C150 / IM eng lisch / A31008-C150-J101-1-7619 / answering_m.fm / 24.06.2003 Using the answering mac hine in the C 150 Base The Gigaset C 150 has a built-in answ ering machine that recor ds calls provided it is ac ti- vated (default se tting). It can be operated: ◆ from the base, ◆ from th[…]
-
Page 42: Siemens Gigaset 150
41 Using the answering machine in the C 150 Base Gigaset C150 / IM eng lisch / A31008-C150-J101-1-7619 / answering_m.fm / 24.06.2003 Operating the answering machine from the handse t The handset’s loudspeak er activates automatically if you r eceive an acoustic pr ompt or announcement while operating the answering machine fr om the handset. Pr[…]
-
Page 43: Siemens Gigaset 150
42 Using the answering machine in the C 150 Base Gigaset C150 / IM eng lisch / A31008-C150-J101-1-7619 / answering_m.fm / 24.06.2003 Playing announcements Delete announcements i ◆ Recording ends aut omatically when the max. recording time of 170 seconds is ex ceeded or there was a br eak in speech or more than 2s e c o n d s . ◆ While recording[…]
-
Page 44: Siemens Gigaset 150
43 Using the answering machine in the C 150 Base Gigaset C150 / IM eng lisch / A31008-C150-J101-1-7619 / answering_m.fm / 24.06.2003 Select announcement mode Y ou can choose between the Answer and Record and the Announce Only mode (if you ha ve recor ded the announce only , page 41). For definitions of the terms see page 40. There is one pr e-recor[…]
-
Page 45: Siemens Gigaset 150
44 Using the answering machine in the C 150 Base Gigaset C150 / IM eng lisch / A31008-C150-J101-1-7619 / answering_m.fm / 24.06.2003 Pla ying messages The received dat e and time of each message is logged (pr ovided this func tion is set, page 14). If Calling Line Identification is activated, then the caller’s number or name is display ed. New[…]
-
Page 46: Siemens Gigaset 150
45 Using the answering machine in the C 150 Base Gigaset C150 / IM eng lisch / A31008-C150-J101-1-7619 / answering_m.fm / 24.06.2003 Deleting messag es Y ou can delete old mes sages either all toge ther or individually . Deleting all old messages During playback or pause: Deleting individual old messages While playing back t he message t o be delet[…]
-
Page 47: Siemens Gigaset 150
46 Using the answering machine in the C 150 Base Gigaset C150 / IM eng lisch / A31008-C150-J101-1-7619 / answering_m.fm / 24.06.2003 Activating/deac tivating T wo-W ay Recording Y ou can record an external call with the answering machine. The r ecording time depends on the length of the messages y ou have no t ye t deleted. Precondition: Y ou are c[…]
-
Page 48: Siemens Gigaset 150
47 Using the answering machine in the C 150 Base Gigaset C150 / IM eng lisch / A31008-C150-J101-1-7619 / answering_m.fm / 24.06.2003 The answering machine tells y o u whether ne w messages ha ve been recor ded. The mes- sages are no w played bac k. Y ou can operate the answer ing machine remot ely by k eying cert ain digits: Activating the answ eri[…]
-
Page 49: Siemens Gigaset 150
48 Setting the Answer ing Machine of the C 150 Base Gigaset C150 / IM eng lisch / A31008-C150-J101-1-7619 / answering_m.fm / 24.06.2003 Setting the Answ ering Machine of the C 150 Base The answering machine has already been pr eset at the fact or y . Y ou can howev er make individual settings using the handse t. Ring dela y and charge sa ving funct[…]
-
Page 50: Siemens Gigaset 150
49 Setting the Answering Mac hine of the C 150 Base Gigaset C150 / IM eng lisch / A31008-C150-J101-1-7619 / answering_m.fm / 24.06.2003 Setting the recording time Y ou can set the maximum length of a messag e. The total r ecording time is up to 15 minutes. Activating/deac tivating call screening While a message is re cording, you can monit or the c[…]
-
Page 51: Siemens Gigaset 150
50 Setting the Answer ing Machine of the C 150 Base Gigaset C150 / IM eng lisch / A31008-C150-J101-1-7619 / answering_m.fm / 24.06.2003 Resetting fast access on the answ ering machine The (built-in) answering machine is preconfigur ed for fast access at the fac tory. Ho w- ever if y ou hav e set the netw ork mailbox f or fast access (see page 51) y[…]
-
Page 52: Siemens Gigaset 150
51 Using the network mailbo x Gigaset C100 / eng lisch / A31008-C100-J101-1-7619 / SA G_ T -netbo x.fm / 24.06.2003 Using the netw ork mailbo x The ‘T -NetBo x’ netw ork mailbox is the answering mac hine in the netw ork operated by your pr ovider (‘T -Net’). Y ou canno t use the network mailbo x unless you hav e applied to your […]
-
Page 53: Siemens Gigaset 150
52 Registering and de-registering handsets Gigaset C100 / eng lisch / A31008-C100-J101-1-7619 / registration.fm / 24.06.2003 Registering and de-registe ring handsets Y ou can register up t o six handsets on y our base. A C 1 that is not y et regist ered on a base is r egistered aut omatically . Handsets that belong to the Gigase t 1000, 2000, 3000,[…]
-
Page 54: Siemens Gigaset 150
53 Registering and de-registering handsets Gigaset C100 / eng lisch / A31008-C100-J101-1-7619 / registration.fm / 24.06.2003 Manual registration: Gigaset C 1 on Gigase t C 100 or C 150 Y ou must initiate handset r egistration on the handset and on the base. 1. On the handset Base 1 flashes in the display when the syst em PIN has been entered. 2. On[…]
-
Page 55: Siemens Gigaset 150
54 Registering and de-registering handsets Gigaset C100 / eng lisch / A31008-C100-J101-1-7619 / registration.fm / 24.06.2003 Manual registration: Gigaset 1000 to 4000 and o ther handsets with GAP functionality This section describes how t o connect handse ts belonging to the Gigase t families, hand- sets A 2, C 2, S 1 or handse ts of other de vices[…]
-
Page 56: Siemens Gigaset 150
55 Using sev eral handsets Gigaset C100 / eng lisch / A31008-C100-J101-1-7619 / registration.fm / 24.06.2003 Using sev eral handsets Internal calls, ending a call Internal calls ar e calls with other handse ts that are regist ered on the same base. These calls are fr ee. Calling a specific handset or all handsets simultaneously . Changing the name […]
-
Page 57: Siemens Gigaset 150
56 Using sev eral handsets Gigaset C100 / eng lisch / A31008-C100-J101-1-7619 / registration.fm / 24.06.2003 Changing a handset’s internal number A handset is auto matically assigned the lowe st unassigned number when it is regis- tered (pag e 52). Y ou can change the internal number of all r egister ed handsets (1–6). T ransfer call to ano […]
-
Page 58: Siemens Gigaset 150
57 Using sev eral handsets Gigaset C100 / eng lisch / A31008-C100-J101-1-7619 / registration.fm / 24.06.2003 Internal consultation calls Y ou can call an internal user (e.g. to consult with him) while speaking with an external caller . Y ou are automatically reconnec ted to the external user when y o u end this inter- nal call. Accepting/rejec ting[…]
-
Page 59: Siemens Gigaset 150
58 Handset settings Gigaset C100 / eng lisch / A31008-C100-J101-1-7619 / settings_bs_hs.fm / 24.06.2003 Handset se ttings Y our handset is preconfigur ed, but you can change the se ttings to suit your individual requir ements. Changing the displa y language Y ou can view the displa y texts in different languages. Activat e/deactivate Aut o Answer I[…]
-
Page 60: Siemens Gigaset 150
59 Handset settings Gigaset C100 / eng lisch / A31008-C100-J101-1-7619 / settings_bs_hs.fm / 24.06.2003 Adjusting the loudspeak er volume Y ou can adjust the earpiece volume on thr ee levels (1–3) and the handsfr ee volume on five lev els (1–5) – you can ev en do this while an external call is in pr ogress. Changing the ringer tone Y ou can s[…]
-
Page 61: Siemens Gigaset 150
60 Handset settings Gigaset C100 / eng lisch / A31008-C100-J101-1-7619 / settings_bs_hs.fm / 24.06.2003 Adjusting the ringer v olume Ringer off/on All handsets ring when ther e is an incoming call. Y ou can cancel the ringer on your handset bef ore you answ er a call or when the handset is in idle status; the ring er can be cancelled permanently or[…]
-
Page 62: Siemens Gigaset 150
61 Handset settings Gigaset C100 / eng lisch / A31008-C100-J101-1-7619 / settings_bs_hs.fm / 24.06.2003 Activating/deac tivating advisor y tones Y our handset uses ‘advisory tones’ to tell y ou about different activities and statuses. The following advisory tones can be activat ed and cancelled individually (the default setting is On). ?[…]
-
Page 63: Siemens Gigaset 150
62 Handset settings Gigaset C100 / eng lisch / A31008-C100-J101-1-7619 / settings_bs_hs.fm / 24.06.2003 Restoring the handset f ac to r y s et tin gs Y ou can reset individual se ttings and changes. Entries in the dir ectory , the caller list and the speed dial list and the handset’s r egistration on the base will be re tained. Press a to canc[…]
-
Page 64: Siemens Gigaset 150
63 Setting the base Gigaset C100 / eng lisch / A31008-C100-J101-1-7619 / settings_bs_hs.fm / 24.06.2003 Setting the base All the settings f or the base are made wit h a register ed C 1 handset. Prot ecting the telephone from unauthorized acces s Y ou can pro tect y our telephone fr om unauthorized access by sa ving system settings f or the base wit[…]
-
Page 65: Siemens Gigaset 150
64 Setting the base Gigaset C100 / eng lisch / A31008-C100-J101-1-7619 / settings_bs_hs.fm / 24.06.2003 Changing the ringer volume and the ringer melody (C 150 only) As with the handset, y ou can choose between differ ent ringer volumes and ringer mel- odies for the base (see page 59). Y ou can also cancel the base ringer . Adjusting the ringer vol[…]
-
Page 66: Siemens Gigaset 150
65 Setting the base Gigaset C100 / eng lisch / A31008-C100-J101-1-7619 / settings_bs_hs.fm / 24.06.2003 Repeater support With a repeater y o u can increase the range and r eception strength of y our base; the repeater must be r egistered. T o use the repeat er you must first activate the r epeater mode. This will cancel any calls that ar e in prog […]
-
Page 67: Siemens Gigaset 150
66 Setting the base Gigaset C100 / eng lisch / A31008-C100-J101-1-7619 / settings_bs_hs.fm / 24.06.2003 F actory settings of the base Number of the SMS centres/Email services empty page 37 Send centre empty page 36 SMS incoming and draft messages list empty page 44 and page 38 Dialling pause 3 s page 68 Pause after recall ke y 800 ms page 68 Pause […]
-
Page 68: Siemens Gigaset 150
67 Connecting the base to a P ABX Gigaset C100 / eng lisch / A31008-C100-J101-1-7619 / pabx.fm / 24.06.2003 Connecting the base t o a P ABX The following se ttings are only needed when your P ABX requires them, please ref er to the operating instructions for y our P ABX . Dialling modes and recall The current se tting is indicated by ‰ . St ep 1:[…]
-
Page 69: Siemens Gigaset 150
68 Connecting the base to a P ABX Gigaset C100 / eng lisch / A31008-C100-J101-1-7619 / pabx.fm / 24.06.2003 Setting pauses Changing the pause after line seizure Y ou can set the length of the pause that is inserted between pr essing the top half of the c ke y and the transmission of the t elephone number (the default setting is 3 seconds). Change p[…]
-
Page 70: Siemens Gigaset 150
69 Appendix Gigaset C100 / eng lisch / A31008-C100-J101-1-7619 / appendix.fm / 24.06.2003 Appendix Care Wipe the base and the h a ndset with a damp clo th (use no solvent) or an antistatic clot h. Nev er use a dr y cloth as th is can cause static discharge! Contact with liquid If the handset should come int o contact with liquid, on no account swit[…]
-
Page 71: Siemens Gigaset 150
70 Appendix Gigaset C100 / eng lisch / A31008-C100-J101-1-7619 / appendix.fm / 24.06.2003 … the incoming call number is not displa yed ev en though CLIP is set? Calling line identification is not enabled. The caller should ask his net- work pro vider to enable the identification of his number (CLI). … I hear an error tone (falling tone sequence[…]
-
Page 72: Siemens Gigaset 150
71 Appendix Gigaset C100 / eng lisch / A31008-C100-J101-1-7619 / appendix.fm / 24.06.2003 Ser vice (Customer Care) Y ou can get as sistance easily when you hav e technical questions or q uestions about how to use y our device by using our online support ser vice on the Internet at: www .my-siemens.com/customercare or by ref erring to the section en[…]
-
Page 73: Siemens Gigaset 150
72 Appendix Gigaset C100 / eng lisch / A31008-C100-J101-1-7619 / appendix.fm / 24.06.2003 In some countries repair and replace services are impos sible where the pr oducts are no t sold through our authorised dealers. Y ou r G i g as e t C 10 0 / C 1 5 0 i s d e s i g n e d fo r op e r a t i o n i n yo u r c ou n t r y, a s i nd i c a te d o n t h […]
-
Page 74: Siemens Gigaset 150
73 Appendix Gigaset C100 / eng lisch / A31008-C100-J101-1-7619 / appendix.fm / 24.06.2003 Specifications Recommended batteries Nick el-metal-hydride (NiMH): ◆ Sany o T wicell 700 ◆ Sany o T wicell 650 ◆ Panasonic 700 mAh ◆ GP 700 mAh ◆ YD T AAA SUPER 700 ◆ V ART A PhonePower AAA 700 mAh Handset operating times/charging times These opera[…]
-
Page 75: Siemens Gigaset 150
74 Appendix Gigaset C100 / eng lisch / A31008-C100-J101-1-7619 / appendix.fm / 24.06.2003 Answering machine remo te operation (C 150 only) The functions of the k eys f or operating the answering machine r emotely ar e the same for all t elephones, handsets and t one transmitters. This «credit car d» shows you ho w to remo te operate t he […]
-
Page 76: Siemens Gigaset 150
75 Appendix Gigaset C100 / eng lisch / A31008-C100-J101-1-7619 / appendix.fm / 24.06.2003 Creating and editing text Y ou can create and edit t ext in a number of wa ys: ◆ The cursor is controlled with u v t s . ◆ Charact ers (to the left of the cursor) are delet ed with Û . ◆ Charact ers are added to the left of the cursor (page 12). ◆ T o[…]
-
Page 77: Siemens Gigaset 150
76 Acce ssor ies Gigaset C100 / eng lisch / A31008-C100-J101-1-7619 / Acces sories.fm / 24.06.2003 Acc ess o ri es Gigaset Handset C 1 ◆ Graphic display with dat e and time ◆ Direc tor y for ar ound 50 entries ◆ Handsfree ◆ SMS (CLIP must be enabled) Gigaset Handset S 1 ◆ Large illuminat ed graphic display with dat e and time ◆ Direc to[…]
-
Page 78: Siemens Gigaset 150
77 Accessories Gigaset C100 / eng lisch / A31008-C100-J101-1-7619 / Acces sories.fm / 24.06.2003 All accessories and batt eries are a vailable from your mobile phone r etailer . Or you can order direc t online from the m y-siemens Online Shop: www.m y-siemens.com/shop . The Online Shop also has the latest pr oduct inf ormation. Gigaset Handset C 2 […]
-
Page 79: Siemens Gigaset 150
78 Menu T ree Gigaset C100 / eng lisch / A31008-C100-J101-1-7619 / menuetree.fm / 24.06.2003 Menu T ree Instead of scr olling to locate a menu func tion, you can selec t a menu function faster b y opening the menu and ke ying in the digit combination (‘shor tcut’). Example: MENU 54 1 for ‘Se t ringer melody for e xternal calls’.[…]
-
Page 80: Siemens Gigaset 150
79 Menu T ree Gigaset C100 / eng lisch / A31008-C100-J101-1-7619 / menuetree.fm / 24.06.2003 8B a s e S e t — tings 8-1 Audio Se ttings (C 150 only) 8-1-1 Loudspeaker Vol u m e 8-1-2 Ringer Volume 8-1-3 Ringer Melody 8-1-3-1 Melody 1 8-1-3-… [to] 8-1-3-0 Melody 10 8-1-4 Ke y T ones 8-2 System PIN 8-3 Base Reset 8-4 Additional Fea- tures 8-4-1 Dia[…]
-
Page 81: Siemens Gigaset 150
80 Menu T ree Gigaset C100 / eng lisch / A31008-C100-J101-1-7619 / menuetree.fm / 24.06.2003 Directory ke y and speed dial list ke y Press t he bottom half of the h ke y or the speed dial list k ey C , selec t an entr y with s and pres s MENU to open the requir ed list . The follo wing menu functions are a vail- able: Caller List/Answering Machine […]
-
Page 82: Siemens Gigaset 150
81 Index Gigaset C150 / IM eng lisch / A31008-C150-J101-1-7619 / C_150_AMSIX.fm / 24.06.2003 Index A Access code pause . . . . . . . . . . . . . . . . . . . . . . 68 Access pr ot ection . . . . . . . . . . . . . . . 63 Accessories . . . . . . . . . . . . . . . . . . . . 76 Acknow ledge tones . . . . . . . . . . . . . . 61 Activate answering machine[…]
-
Page 83: Siemens Gigaset 150
82 Index Gigaset C150 / IM eng lisch / A31008-C150-J101-1-7619 / C_150_AMSIX.fm / 24.06.2003 Connect to a P ABX . . . . . . . . . . . . . . . 67 Consultation call (internal) . . . . . . . . . 57 Correc ting wrong inputs . . . . . . . . . . 12 Customer Care (Ser vice) . . . . . . . . . . 71 Customer service . . . . . . . . . . . . . . . . 71 D Date […]
-
Page 84: Siemens Gigaset 150
83 Index Gigaset C150 / IM eng lisch / A31008-C150-J101-1-7619 / C_150_AMSIX.fm / 24.06.2003 I Icon . . . . . . . . . . . . . . . . . . . . . . 11 , 44 Idle status (display) . . . . . . . . . . . . . . 12 Incoming message list (SMS) . 30 , 34 , 36 Internal consultation . . . . . . . . . . . . . . . . . 57 making calls . . . . . . . . . . . . . . . […]
-
Page 85: Siemens Gigaset 150
84 Index Gigaset C150 / IM eng lisch / A31008-C150-J101-1-7619 / C_150_AMSIX.fm / 24.06.2003 P PA B X . . . . . . . . . . . . . . . . . . . . . . . . . 67 pause after access code . . . . . . . . . 68 set dialling mode . . . . . . . . . . . . . . 67 set recall . . . . . . . . . . . . . . . . . . . . 67 swi tch to to ne di al lin g . . . . . . . . . […]
-
Page 86: Siemens Gigaset 150
85 Index Gigaset C150 / IM eng lisch / A31008-C150-J101-1-7619 / C_150_AMSIX.fm / 24.06.2003 SMS activating/deac tivating function . . . 28 an T elefonanlagen . . . . . . . . . . . . . 37 date and time . . . . . . . . . . . . . . . . 35 delete . . . . . . . . . . . . . . . . . . . 34 , 35 delet e draf t message list . . . . . . . . 33 delet e incom[…]
-
Page 87: Siemens Gigaset 150
Gigaset C100 / eng lisch / A31008-C150-J101-1-7619 / cover_back_V orlage.fm / 24.06.2003 Issued by Information and Communication mobile Haidenauplatz 1 D-81667 Munich © Siemens AG 2003 All rights reserved. Subject to a vailability . Right of modification reserved. Printed in Germany (06/2003). Siemens Aktiengesellschaft http://www .my-siemens.com […]
Инструкция и руководство для
Siemens Gigaset 100
12 страниц подробных инструкций и пользовательских руководств по эксплуатации на русском
Gigaset
100
Цифровой беспроводной
телефон DECT
Инструкция по эксплуатации
и требования техники безопасности

Внешний вид
Символ
базового
блока
—
горит:
телефон
готов набору
номера/приему
вызовов
—
мигает:
нет связи
с базовым блоком
Клавиша соединения
прием вызовов/
завершение
соединения
набор абонентского
номера
Сокращенный набор
Сигнальная клавиш а
■ только для офисных
АТС и телефонных
служб
Пауза при наборе I________
— удерживайте
клавишу нажатой!
п
В
Повторный набор
Блокировка клавиш
Для включения/вык-
лючения блокировки
удерживайте эту
клавишу нажатой!
Клавиша памяти
■ для сохранения
■ для настроек
Символы на дисплее
6
Символ базового
блока
С
„Снята трубка“
4
Сохранение
Специальные символы на дисплее
п
Символ *
ии
Блокировка клавиа^ры
_
Символ #
— □ —
Переносной телефон
готов к регистрации
и
Сигнальная
клавиша
Переносной телефон
ищет готовый к регист
рации базовый блок
Пауза
Переносной телефон
нашел готовый к регист
рации базовый блок
Память
свободна

Требования техники безопасности
Используйте только прилагаемый сетевой блок питания,
как это обозначено на задней панели телефона.
Используйте только прилагаемый аккумулятор или
аккумулятор разрешенного типа (см. стр. 6).
Для предотвращения возможности создания взаимных помех
телефон не следует устанавливать в непосредственной
близости от таких устройств, как звуковоспроизводящая
аппаратура, телевизоры, офисная техника или
микроволновые печи.
Телефон может оказывать влияние на работу медицинского
оборудования.
Переносной телефон может вызывать неприятное жужжание
в слуховых аппаратах.
Когда переносной телефон звонит (входящий вызов), его не
следует держать рядом с ухом.
Не устанавливайте базовый блок в ванной или в душе.
Не пользуйтесь телефоном в местах, где существует
опасность взрыва (например, в лакокрасочных цехах).
Утилизация аккумуляторов и телефона должна
осуществляться без ущерба для окружающей среды.
Передавайте ваш телефон 01дазе1100 третьим лицам только
вместе с инструкцией по эксплуатации.
В отделении для аккумулятора переносного телефона
имеются следующие предупредительные надписи:
—
Допускается использование только того типа
аккумуляторов, который указан в настоящей инструкции по
эксплуатации.
— Соблюдайте правильную полярность при подключении
штекера аккумулятора (красный провод — плюс; четный
провод — минус). При несоблюдении этого требования
переносной телефон работать не будет. Также возможно
повреждение телефона.

Подключение телефона
Этап 1: Подключение базового блока
Сначала подключите базовый блок к телефонной розетке
и к сети питания.
220 В/
Телефонный
230 В
штекер *
Вставьте в гнездо круглый штекер
кабеля питания.
Проложите кабель через канавку (до
зажима предохранения от натяжения)
Вставьте блок питания в розетку.
А
Вставьте в гнездо
прямоугольный штекер
телефонного кабеля.
Проложите кабель через канавку.
Вставьте телефонный штекер в телефонную
розетку.
В различных странах используются различные телефонные штекеры!
(В Австрии: подключение рядом с символом телефонной трубки)
Если вместо прилагаемого телефонного кабеля вы хотите
использовать другой кабель, обратите внимание на то, что вы
можете использовать либо простой кабель-удлинитель, либо
телефонный кабель, соединяющий контакты штекера 3 и 4. При
использовании других кабелей ваш телефон 01дазе1100 не
будет работать.
1
не используется
2
не используется
3
линия а
4
линия Ь
5
не используется
6
не используется

Подключение телефона
Этап 2: Установка аккумулятора
Вставьте штекер аккумулятора в гнездо (смотри врезку на
рисунке). Штекер должен быть надежно зафиксирован.
Вставьте аккумулятор в отделение для аккумулятора.
Зафиксируйте кабель аккумулятора в предусмотренном для
этого держателе.
Установите нижнюю сторону крышки отделения для
аккумулятора в паз и надавите на ее верхнюю сторону. Вы
должны услышать щелчок. Для того чтобы открыть отделение
для аккумулятора, приподнимите верхнюю сторону крышки.
Используйте только аккумуляторы разрешенного
типа.
Не используйте зарядные устройства других
изготовителей, так как это может привести к порче
аккумулятора.
Дисплей защищен специальной пленкой.
Снимите защитную пленку!
Этап 3: Регистрация переносного телефона на базовом блоке
Перед тем как вы сможете вести телефонные разговоры, вы
должны зарегистрировать ваш переносной телефон на базовом
блоке.
Выньте блок питания базового блока из
розетки.
Переносной телефон должен стоять в базовом
блоке. На дисплее мигает символ ф.
Теперь снова вставьте блок питания в розетку.
Примерно через 90 секунд символ ф
перестанет мигать. Теперь переносной
телефон зарегистрирован. Если процедура
регистрации не завершилась успешно,
повторите этап 3.

Подключение телефона
Этап 4: Зарядка аккумулятора
Прилагаемый аккумулятор не заряжен.
Для зарядки аккумулятора установите
переносной телефон в базовый блок. После
этого вы можете разговаривать по телефону.
Этап 5: Задание короткого времени размыкания шлейфа
(100 мс) для сигнальной клавиши (только в Австрии и
Швейцарии)
Нажмите одну за другой клавиши:
Рекомендации по использованию аккумулятора
• При первой зарядке мы рекомендуем заряжать
аккумулятор непрерывно не менее 16 часов.
• После первой зарядки вы можете после каждого
телефонного разговора устанавливать переносной телефон
в базовый блок.
• Во время зарядки аккумулятор нагревается. Это
нормальное явление, не представляющее опасности.
Время работы/зарядки переносного телефона
Емкость
Время рабо
ты в режиме
готовности
Время
разговора
Время
зарядки
300 мАч
д о Ю О ч
д о Ю ч
около 16 ч
Потребляемый ток в режиме готовности
Без зарядки
около 1,7 Вт
Во время зарядки
около 2,1 Вт
Разрешенный к использованию тип аккумулятора
Никель-кадмиевый (NiCd)
Обозначение типа 1а (300 мАч) V30145-K1310-X147 NiCd
Вы можете приобрести аккумулятор в специализированных
магазинах, в сервисных центрах фирмы Siemens или заказать
его через Интернет
(https://communication-market.siemens.de/serviceshop/default.asp),
смотри последнюю страницу.

Разговоры по телефону
Исходящие вызовы
Наберите абонентский номер.
7
©
Нажмите клавишу соединения.
Устанавливается соединение. На дисплее
появляется символ с .
Вы набрали неправильный номер? В этом слу
чае дважды нажмите клавишу соединения 0.
Для набора номера вы можете также сначала нажать клавишу
соединения, а затем ввести цифры.
С помощью сигнальной клавиши @ вы можете вводить паузу
при наборе (нажмите клавишу и удерживайте ее нажатой). Это
можете потребоваться при установлении международных
соединений и при вызове служб автоматических объявлений.
Завершение соединения
©
Нажмите клавишу соединения. Символ
с
исчезает с дисплея,
установите переносной телефон в базовый
блок. Соединение завершено.
Прием вызовов
Нажмите клавишу соединения. Вы соединены с
вызывающим абонентом.
Повторный набор
В памяти телефона сохраняется последний набранный
абонентский номер.
©
Нажмите эту клавишу для вызова сохраненного
номера из памяти.
Нажмите клавишу соединения.
Устанавливается соединение.

Разговоры по телефону
Сохранение/изменение абонентских номеров
(сокращенный набор)
Для упрощения набора номера вы можете сохранить до 10
абонентских номеров, а затем набирать их, используя функцию
сокращенного набора.
Нажмите клавишу памяти, затем нажмите
клавишу сокращенного набора.
Нажмите цифровую клавишу (от 0 до 9) для
которой вы хотите ввести абонентский номер.
Наберите абонентский номер.
напр., )
7
Нажмите клавишудля сохранения номера
сокращенного набора. Звучит сигнал
подтверждения.
Использование сокращенного набора
Нажмите клавишу сокращенного набора.
напр., )
©
Нажмите цифровую клавишу (от 0 до 9), для
которой вы сохранили нужный абонентский
номер.
Нажмите клавишу соединения.
Устанавливается соединение.
Цифра сокращенного набора „0“ автоматически активизирует
ся, если нажать клавишу сокращенного набора и удерживать
ее нажатой. Поэтому для цифры „0“ целесообразно сохранить
абонентский номер, который вы набираете чаще всего.
Экономичная телефонная связь
Для сокращения стоимости телефонных соединений вы можете
использовать коды доступа различных операторов сети
(Са11-Ьу-Са11 ); возможность использования этой функции зависит
от предложения телефонных компаний. Коды доступа вы
можете сохранить как номера сокращенного набора (от 0 до 9).
Вместо использования сокращенного набора вы можете
набирать коды доступа и абонентские номера как обычно.
• Функция Са11-Ьу-Са11 с использованием клавиши
сокращенного набора
Нажмите клавишу сокращенного набора и
удерживайте ее нажатой. На дисплей
автоматически выводится код доступа,
сохраненный для цифровой клавиши „0“.
Введите абонентский номер и нажмите клавишу
соединения для набора полного номера.
7 ©
функция доступна не во всех странах

Экономичная телефонная связь
„Объединение“ нескольких цифр сокращенного набора
Если вы сохранили несколько кодов доступа и абонентских
номеров в качестве номеров сокращенного набора, то вы
можете их объединять.
Нажмите клавишу сокращенного набора и
удерживайте ее нажатой. На дисплей
выводится код доступа, сохраненный для
цифры „0“.
Нажмите клавишу сокращенного набора еще
раз.
Нажмите цифровую клавишу (от 0 до 9), для
которой вы сохранили нужный вам абонентский
номер. Код доступа и абонентский номер
объединяются и выводятся на дисплей.
Нажмите клавишу соединения.
Устанавливается соединение.
напр.,
©
Дополнительные коды доступа можно сохранять как номера
сокращенного набора для клавиш от 0 до 9 .
Если вы хотите использовать эти дополнительные коды, то
нажмите и быстро отпустите клавишу @, а затем нажмите
нужную цифру сокращенного набора.
Настройка
Громкость телефонной трубки
Вы можете выбрать один из трех уровней громкости телефонной
трубки.
‘ О
напр.,
К
Вызовите функцию.
Измените громкость (уровень от 1до 3) и
сохраните настройку.
Громкостьзвонка
Вы можете выбрать один из трех уровней громкости.
напр.,
Вызовите функцию — телефон зазвонит.
Измените громкость звонка (уровень от 1 до 3)
и сохраните настройку.

Настройка
Мелодия звонка
Вы можете выбрать одну из двух мелодий звонка.
Вызовите функцию — телефон зазвонит.
напр.,
Выберите мелодию звонка (вариант 1 или 2) и
сохраните настройку.
Блокировка клавиатуры
При включенной блокировке случайные нажатия клавиш
игнорируются. Вы можете принимать вызовы как обычно.
Для включения выключения блокировки
удерживайте клавишу нажатой дольше
1 секунды.
_ _ _ _
Когда блокировка включена, на дисплей
выводятся эти символы.
Подключение телефона к офисной АТС
При подключении телефона 01дазе1 к офисной АТС может
потребоваться изменение способа набора номера (заводская
настройка — многочастотный способ набора номера) и времени
размыкания шлейфа. Нужные значения вы можете узнать из
инструкции по эксплуатации офисной АТС.
С помощью цифровых клавиш от 1до 4 вы можете выбрать
одну из следующих настроек:
1
Многочастотный (тональный) набор, продолжительное
размыкание шлейфа
(250 мс, состояние при поставке — ФРГ)
2
Многочастотный (тональный набор), кратковременное
размыкание шлейфа
(100 мс, состояние при поставке — Австрия и Швейцария)
3
Импульсный набор 1,5/1
4
Импульсный набор 2/1
©
Нажмите клавишу соединения.
) Вызовите функцию.
напр.,
Нажмите цифровую клавишу, соответствующую
нужной настройке (от 1 до 4).
Сохраните настройку.
Вы ошиблись во время настройки» Нажмите клавишу
соединения 1два раза. Или подождите, пока исходная
индикация на дисплее восстановится сама по себе.
10

14:06
ОНЛАЙН ТРЕЙД.РУ — Радиотелефон GIGASET A220 Black; Код товара: 95851
21:05
Gigaset A120 — Обзор ? Диалог о DECT и моем маленьком хобби.
17:09
Как восстановить, починить клавиатуру на телефонах и т.п устройствах. Siemens Gigaset A100
13:48
Gigaset ME — смартфон БОМБА на Snapdragon 810!!!
22:58
GIGASET GS100 Review — Das kann das deutsche Einsteigermodell — Moschuss.de
00:19
Siemens Gigaset 100 zsinórnélküli telefonkészülék 571 001
Нажмите на кнопку для помощи