
4411 Instruction Manual

When using an electrical appliance, basic safety should always be
followed, including the following:
Read all instructions before using this sewing machine.
1. An appliance should never be left unattended when plugged in.
2. Always unplug this appliance from the electric outlet immediately
after using and before cleaning.
3.
. Replace bulb with
same type rated 15 watts
1. Do not allow to be used as a toy. Close attention is necessary
when this appliance is used by or near children.
2. Use this appliance only for its intended use as described in this
manual. Use only attachments recommended by the
manufacturer as contained in this manual.
3. Never operate this appliance if it has a damaged cord or plug, if
it is not working properly, if it has been dropped or damaged, or
dropped into water. Return the appliance to the nearest
authorized dealer or service center for examination, repair,
electrical or mechanical adjustment.
4. Never operate the appliance with any air openings blocked. Keep
ventilation openings of the sewing machine and foot controller
free from accumulation of lint, dust, and loose cloth.
5. Keep fingers away from all moving parts. Special care is required
around the sewing machine needle.
6. Always use the proper needle plate. The wrong plate can cause
the needle to break.
7. Do not use bent needles.
8. Do not pull or push fabric while stitching. It may deflect the
needle causing it to break.
9. Switch the sewing machine off («O») when making any adjustments
in the needle area, such as threading needle, changing needle,
threading bobbin, or changing presser foot, and the like.
10. Always unplug sewing machine from the electrical outlet when
removing covers, lubricating, or when making any other user
servicing adjustments mentioned in the instruction manual.
11. Never drop or insert any object into any opening.
12. Do not use outdoors.
13. Do not operate where aerosol spray products are being used or
where oxygen is being administered.
14. To disconnect, turn all controls to the off («O») position, then
remove plug from outlet.
15. Do not unplug by pulling on cord. To unplug, grasp the plug, not
the cord.
This sewing machine is intended for household use only.
DANGER
SAVE THESE INSTRUCTIONS
—
To reduce the risk of electric shock:
(110-120V area / 220-240V area).
Please turn off the machine or unplug when the machine is not
operating properly.
18. Never place anything on the foot controller.
19. If the supply cord that is fixed with foot controller is damaged, it
must be replaced by the manufacturer or its service agent or a
similar qualified person in order to avoid a hazard.
20. This appliance is not intended for use by persons (including
children) with reduced physical, sensory or mental capabilities, or
lack of experience and knowledge, unless they have been given
supervision or instruction concerning use of the appliance by a
person responsible for their safety.
21. Children should be supervised to ensure that they do not play
with the appliance.
WARNING
—
To reduce the risk of burns, fire,
electric shock, or injury to persons:
Always unplug before changing the light bulb
16. The sound pressure level under normal operating conditions is
75dB(A).
17.
IMPORTANT SAFETY INSTRUCTIONS
As the owner of a new Singer sewing machine, you are about to begin an exciting adventure in
creativity. From the moment you first use your machine, you will know you are sewing on one
of the easiest to use sewing machines ever made.
May we recommend that, before you start to use your sewing machine, you discover the many
features and the ease of operation by going through this instruction book, step by step, seated
at your machine.
To ensure that you are always provided with the most modern sewing capabilities, the
manufacturer reserves the right to change the appearance, design or accessories of this
sewing machine when considered necessary.
SINGER is a registered trademark of The Singer Company Limited or its affiliates.
© 2010 The Singer Company Limited or its affiliates. All rights reserved.
Congratulations

List of Contents
Machine Basics
Sewing
General Information
Maintenance and Troubleshooting
Principle Parts of the Machine…………………………………………………………………………………………………………………………….2/3
Connecting Machine to Power Source ……………………………………………………………………………………………………………………4
Two Step Presser Foot Lifter/
…………………………………………………………………………………5
Accessories ………………………………………………………………………………………………………………………………………………………..6
Winding the Bobbin ……………………………………………………………………………………………………………………………………………..7
Inserting the Bobbin …………………………………………………………………………………………………………………………………………….8
Threading the Upper Thread …………………………………………………………………………………………………………………………………9
Raising the Bobbin Thread ………………………………………………………………………………………………………………………………….10
How to Choose Your Pattern ……………………………………………………………………………………………………………………………….12
Stitch Length Dial …………………………………………………………………………………………………………………..14
Sewing Straight Stitch ………………………………………………………………………………………………………………………………………..15
Reverse Sewing/
………………………………………………………………………………………16
Blind Hem …………………………………………………………………………………………………………………………………………………………17
………………………………………………………………………………………………………………………………………………………18
Sewing on Buttons …………………………………………………………………………………………………………………………………………….20
Installing the Removable Extension Table……………………………………………………………………………………………………………..21
Attaching the Presser Foot Shank………………………………………………………………………………………………………………………..22
Needle/ Fabric/ Thread Chart ………………………………………………………………………………………………………………………………23
………………………………………………………………………………………………………………………………………24
Inserting & Changing Needle ………………………………………………………………………………………………………………………………25
Changing the Bulb ……………………………………………………………………………………………………………………………………………..26
Troubleshooting Guide ……………………………………………………………………………………………………………………………………….27
Adjusting Presser Foot Pressure
Thread Tension ………………………………………………………………………………………………………………………………………………….11
Three Needle Position Dial………………………………………………………………………………………………………………………………….13
Stitch Width Dial &
Removing the Work/ Cutting the Thread
Buttonholes
Left and Right Side Balance for Buttonhole …………………………………………………………………………………………………………..19
How To Drop Feed Dog
Threading the Machine

1. Thread tension dial
2. Presser foot pressure adjustment
3. Thread take-up lever
4. Reverse sewing lever
5. Thread cutter
6. Presser foot
7. Needle plate cover
8. Removable extension table/ accessory storage
9. Three needle position dial
10. Bobbin stopper
11. Stitch width dial
12. Stitch length dial
13. Pattern selector dial
2
1
2
3
5
6
8
7
13
11
12
10
4
9
Principal Parts of the Machine

14. Horizontal spool pin
15. Bobbin winding spindle
16.
uxiliary spool pin
17. Handwheel
18. Buttonhole stitch balance adjustment slot
19. Power and light switch
20. Main plug socket
21. Bobbin thread guide
22. Upper thread guide
23. Face plate
24. Handle
25. Presser foot lifter
26. Drop feed control
27. Foot speed control
28. Power cord
Hole for a
3
28
24
25
27
22
23
26
19
20
21
14
15
16
18
17
Principal Parts of the Machine

Connect the machine to a power source as illustrated. (1)
This appliance is equipped with a polarized plug which must be
used with the appropriate polarized outlet. (2)
Unplug power cord when machine is not in use.
The foot control pedal regulates the sewing speed. (3)
Consult a qualified electrician if in doubt of how to connect
machine to power source.
Unplug power cord when machine is not in use.
The foot control must be used with the appliance by KD-
1902 (110-120V area)/ KD-2902 (220-240V area)
manufactured by ZHEJIANG FOUNDER MOTOR
CORPORATION LTD. (China)
4C-316B (110-120V area)/ 4C-326G (230V area)
manufactured by Wakaho Electric Ind. Co., Ltd. (Vietnam)
Press main switch (A) to » l » for power and light.
For appliance with a polarized plug (one blade is wider than
the other). To reduce the risk of electric shock, this plug is
intended to fit in a polarized outlet only one way. If it does not
fit fully in the outlet, reverse the plug. If it still does not fit,
contact a qualified electrician to install the proper outlet. Do
not modify the plug in any way.
Attention:
Foot control
Attention:
Sewing light
IMPORTANT NOTICE
a. Polarized attachment plug
b. Conductor intended to be grounded
2
3
4
1
a
b
A
Connecting Machine to Power Source

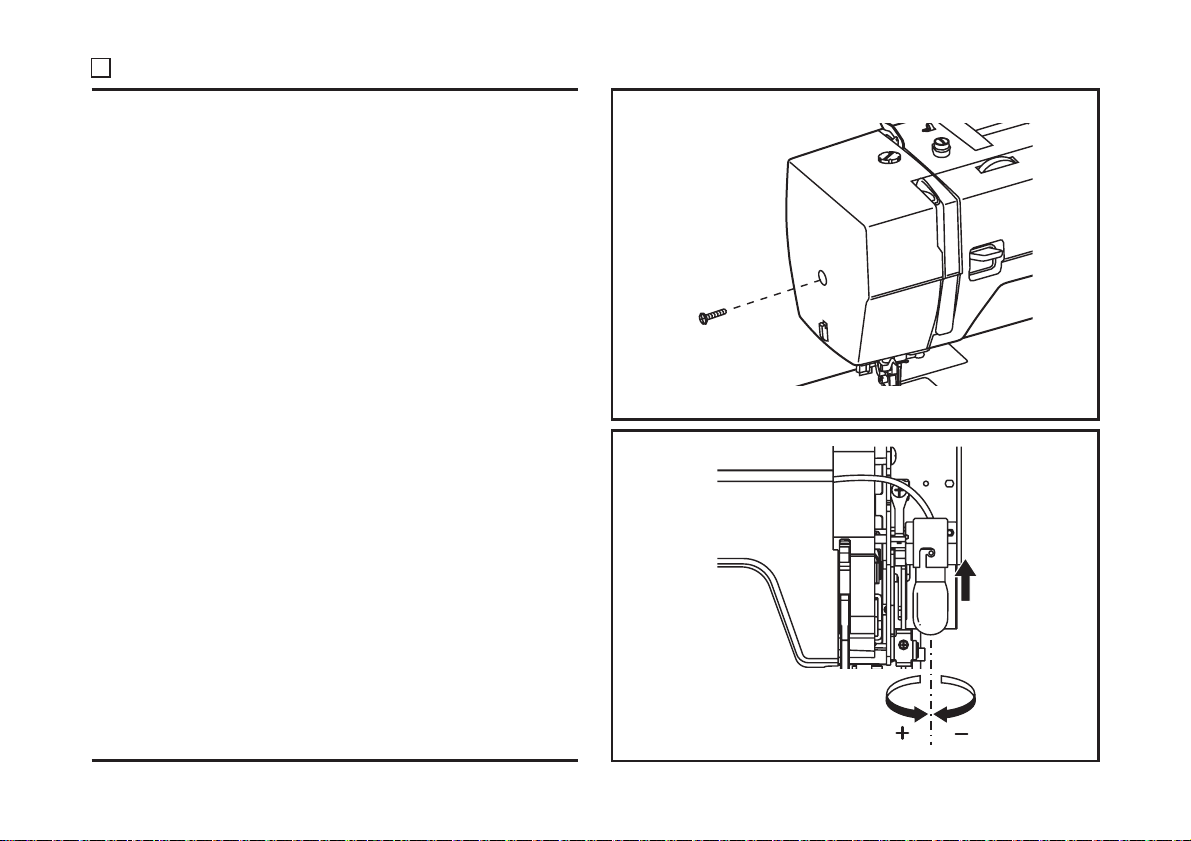
5
When sewing several layers or thick fabrics, the presser foot
can be raised
for easy positioning of the
work. (A)
to a higher position
A
The presser foot pressure of the machine has been pre-set
and requires no particular readjustment according to the type
of fabric (light-or-heavy weight).
However, if you need to adjust the presser foot pressure,
turn the presser adjusting screw with a coin.
For sewing very thin fabric, loosen the pressure by turning
the screw counter clockwise, and for heavy fabric, tighten by
turning it clockwise.
Two Step Presser Foot Lifter
Adjusting Presser Foot Pressure

1 Standard accessories
2 Optional accessories
m
h
g
e
f
i
j
l
k
a
b
c
d
006806008
006905008
006914008
006909008
Standard accessories (1)
Optional accessories (2)
a. All purpose foot
b. Zipper foot
c. Buttonhole foot
d. Button sewing foot
e. Seam ripper/ brush
f. Edge/ quilting guide
g. Pack of needles
h. Spool holders
i. Bobbin (3x)
j. L-screwdriver
k. Auxiliary Spool Pin
l. Spool pin felt
m. Soft cover
(These 10 accessories are not supplied with this machine;
they are, however, available for purchase from your authorized
retailer.)
n. Satin stitch foot
o. Overcasting foot
p. Hemmer foot
q. Cording foot
r. Blind hem foot
s. Quilting/ straight stitch foot
t. Gathering foot
u. Darning/ embroidery foot
v. Even Feed foot
w. Twin needle
o
n
p
q
r
s
t
u
v
w
006916008
006016008
006917008
0061850081
006904008
006172008
006907008
006900008
006813008
Accessories
6

—
corresponding
. (1/2)
— Snap thread into thread guide. (3)
— Wind thread clockwise around bobbin winder tension discs. (4)
— Thread bobbin as illustrated and place on spindle. (5)
— Push bobbin spindle to right. (6)
— Hold thread end. (7)
— Step on foot control pedal. (8)
— Cut thread. (9)
— Push bobbin spindle to left (10) and remove.
When the bobbin winder spindle is in «bobbin winding»
position, the machine will not sew and the
.
To start sewing, push the bobbin winder spindle to the left
(sewing position).
Please Note:
Place thread and
spool holder on to spool
pin
handwheel turn
1
2
4
7
8
9
5
6
3
10
Winding the Bobbin
7

21:25
SINGER 4411 | Heavy Duty Sewing Machine — Play All
12:38
SINGER 4411 | Heavy Duty — Threading
03:57
FREWI testar Singer Heavy Duty 4411 — Skarva konstläder
11:43
Швейная машина Singer Heavy Duty 4411 и 4423
08:03
Singer 4411 Heavy Duty: Unboxing
Нажмите на кнопку для помощи

При подключении этого продукта необходимо внимательно ознакомиться с правилами по технике
безопасности, в соответствии с действующим законодательством в вашей стране. Пожалуйста,
учтите, что по окончании срока службы этот продукт должен быть утилизирован в соответствии с
действующим Национальным законодательством, установленным для электрических приборов.

Неполадки и их устранение
Проблема Причина Устранение
Обрыв верхней
нити
Обрыв нижней
нити
Нечеткий шов
Поломка иглы
Пропуск стежков
Швы стягиваются
или
сморщиваются
Неровные стежки,
неравномерное
продвижение
Машина шумно
работает
Тяжелый ход
машины
1. Нить неправильно заправлена
2. Очень сильное натяжение верхней нити
3. Нить слишком толстая для иглы
4. Игла установлена неверно
5. Нить обмоталась вокруг держателя катушки
6. Повреждена игла
1. Шпулька установлена неправильно
2. Неправильно заправлена нижняя нить
3. Слишком сильное натяжение нижней нити
1. Неправильно установлена игла
2. Игла повреждена
3. Несоответствующий размер иглы
4. Установлена неподходящая лапка
1. Тянете ткань во время шитья
2. Неправильно установлена игла
3. Несоответствующий размер иглы
4. Установлена неподходящая лапка
1. Верхняя нить неправильно заправлена
2. Нижняя нить неправильно заправлена
3. Несоответствующий размер иглы
4. Неправильное натяжение нити
1. Игла слишком толстая для выбранной ткани
2. Длина стежка выбрана неверно
3. Очень сильное натяжение нити
1. Плохое качество ниток
2. Неправильно заправлена нижняя нить
3. Тянете ткань во время шитья
1. В челночном механизме скопилось много ворса и
пыли
2. Повреждена игла
Запутывание нити в челноке
1. Заново заправьте нить
2. Ослабьте натяжение верхней нити
3. Установите иглу большего размера
4. Правильно установите иглу (плоской стороной назад)
5. Размотайте нить
6. Замените иглу на новую
1. Достаньте и снова установите шпульку, заправьте нить
нить должна легко тянуться.
2. Заправьте нижнюю нить
3. Ослабьте натяжение нижней нити
1. Правильно установите иглу плоской стороной назад
2. Установите новую иглу
3. Установите иглу, соответствующую типу ткани и нити
4. Установите подходящую лапку
1. Нельзя тянуть или подталкивать ткань во время шитья
2. Правильно установите иглу плоской стороной назад
3. Установите иглу, соответствующую типу ткани и нити
4. Установите подходящую лапку
1. Правильно заправьте верхнюю нить
2. Правильно заправьте нижнюю нить
3. Установите иглу, соответствующую типу ткани и нити
4. Установите правильное натяжение
1. Установите тонкую иглу
2. Измените длину стежка
3. Ослабьте натяжение нити
1. Используйте нити хорошего качества
2. Вынь те и заново установите шпульку, заправив нижнюю
нить
3. Нельзя тянуть или подталкивать ткань во время шитья,
машина продвигает ткань самостоятельно
1. Прочистите челночный механизм и зубцы транспортера
как описано.
2. Замените иглу
Удалите верхнюю нить и достаньте шпульку. Поверните
вручную маховое колесо на себя и от себя, достаньте
остатки ниток и ворса.
27
Замена лампочки
Отключите машину от сети электропитания, вынув
сетевой шнур из розетки!
Используйте лампочки такого же типа 10W (110-120V)
или 15W (220-240V).
— Выкрутите винт (А) как показано на рисунке (1).
— Снимите крышку корпуса (В).
— Выкрутите лампочку и вставьте новую (С). (2)
— Поставьте крышку корпуса на место и вкрутите винт.
B
A
В случае возникновения проблем, обращайтесь в
местный сервисный центр.
1
C
2
26
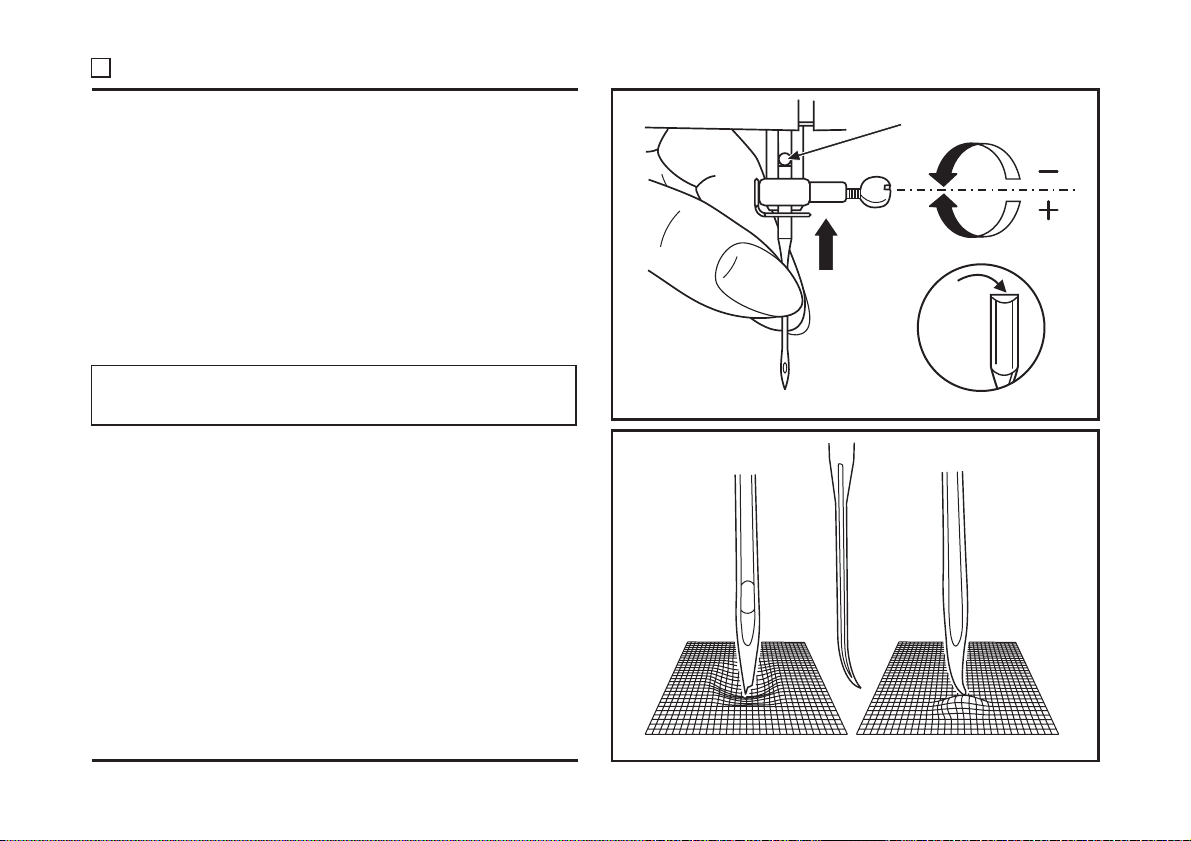
Установка и смена иглы
Меняйте иглы регулярно после шитья каждого проекта
или при возникновении каких-либо проблем.
Используйте иглы SINGER для лучшего качества шитья.
®
Вставьте иглу, как показано на рисунке.
A. Ослабьте винт иглы и затем затяните его снова, после
того, как вставите новую иглу (1).
B. Плоская сторона иглы должна быть направлена от
âàñ.
C/D.Вставляйте иглу вверх до упора.
Внимание:
Всегда выключайте машину «О» перед заменой иглы.
Иглы должны быть в исправном состоянии (2).
Неисправности иглы:
Игла изогнута
A.
Повреждено острие
B.
Игла затупилась
C.
D
A
B
C
1
B
A
C
25
2
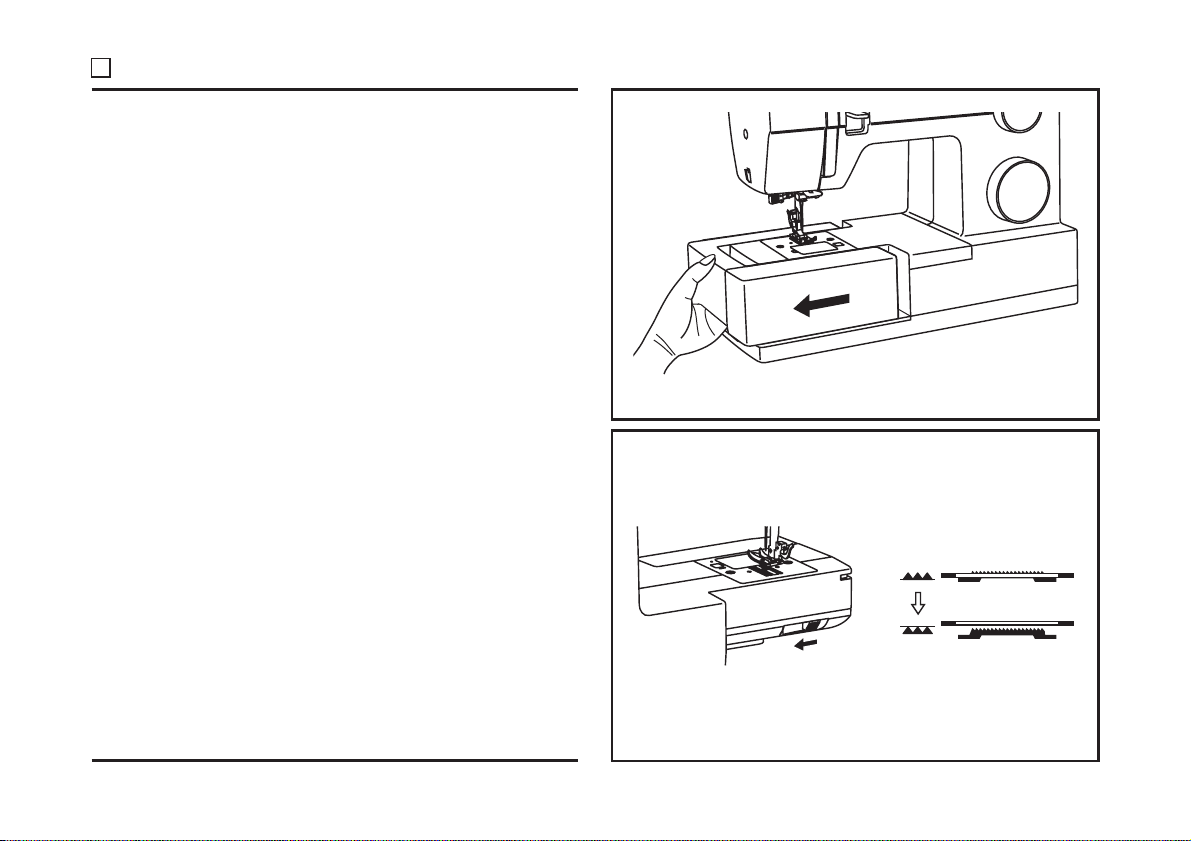
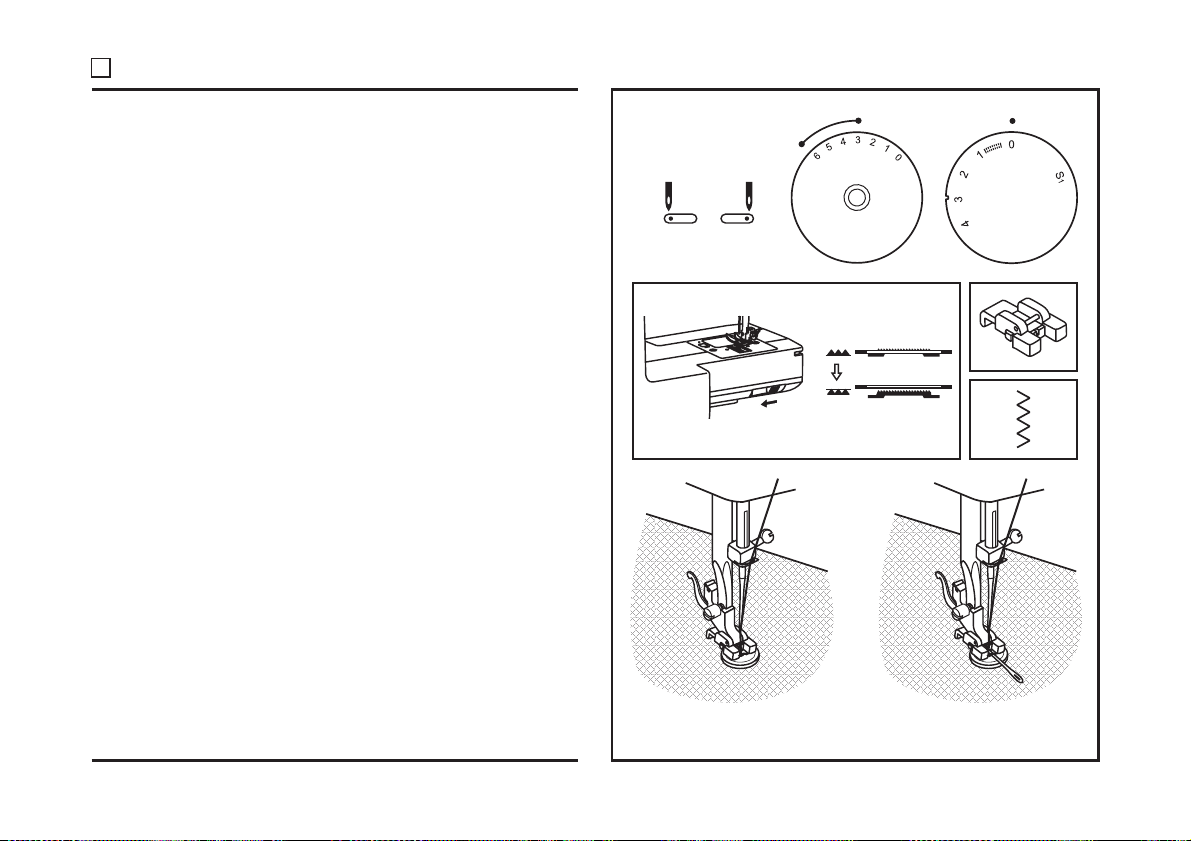
Как опустить зубцы транспортера
Для шитья в обычном режиме, нужно, чтобы зубцы
транспортера были подняты. Для вышивания в технике
«свободного передвижения», пришивания пуговиц или
штопки опустите зубцы.
Чтобы поднять (а) и опустить (b) зубцы транспортера. (2)
1
a
24
a
b
2
b

Таблица соответствия типов Иглы/Ткани/Нитей
Руководство по выбору ткани, нитей, игл
Размер иглы
9-11 (70-80)
Легкие ткани- хлопок, вуаль, саржа, шелк, муслин,
органза, легкий трикотаж, джерси, креп, полиэстр,
блузочные ткани.
11-14 (80-90)
Ткани средней плотности — хлопок, сатин, парусина,
двойной трикотаж, махровая ткань, джинса.
14 (90)
Ткани средней пл отности — хлопковое грубое полотно,
парусина, шерсть, плотная вязаная ткань, махровая
ткань, джинса.
16 (100)
Среднеплотные тк ани — брезент, шерсть, стеганые
изделия, джинса, обивочные ткани (легкие и средние).
18 (110)
Плотная шерсть, ткань для пальто, обивочные ткани,
некоторые виды кожи и винил.
ВАЖНО: Соотношение размера иглы к размеру нити и плотности ткани.
ВЫБОР ТКАНИ И ИГЛЫ
Èãëû
SINGER 2020
SINGER 2045
SINGER 2032
®
®
®
Стандартные острые иглы. Размерный
рядоттонкихктолстым.9(70)до18(110).
Иглы с закругленным острием 9 (70) до
18 (110).
Двойные иглы. Иглы для кожи 12 (80) до
18(110)
Пояснение
Ткани
Натуральные ткани — шерсть, хлопок, шелк и т.д.
Не рекомендуется для трикотажа двойной вязки.
Натуральные и синтетические ткани, полиэстр, одинарные и
двойные трикотажи.
А также лайкра, ткань для купальных костюмов, эластичные
ткани.
Кожа, винил, обивочные ткани. (Следы проколов на ткани
меньше, чем после использования стандартных игл).
Íèòè
Тонкая нить — хлопковая, нейлоновая,
полиэстровая или армированный хлопком
полиэстр.
Большинство продаваемых типов нитей
применимы для этих видов тканей и игл.
Используйте полиэстровые или интетические
нити и нити х/б для тканей натурального
плетения для получения наилучшего
результата.
Всегда используйте верхнюю и нижнюю нити
одного размера и качества.
Плотная нить, штопальная нить.
Вид ткани
Важно:
1. Для получения наилучших результатов всегда используйте подлинные иглы SINGER .
®
2. Часто меняйте иглы (примерно после к аждого сшитого проекта) или при обрыве нитей и пропуске стежков).
23
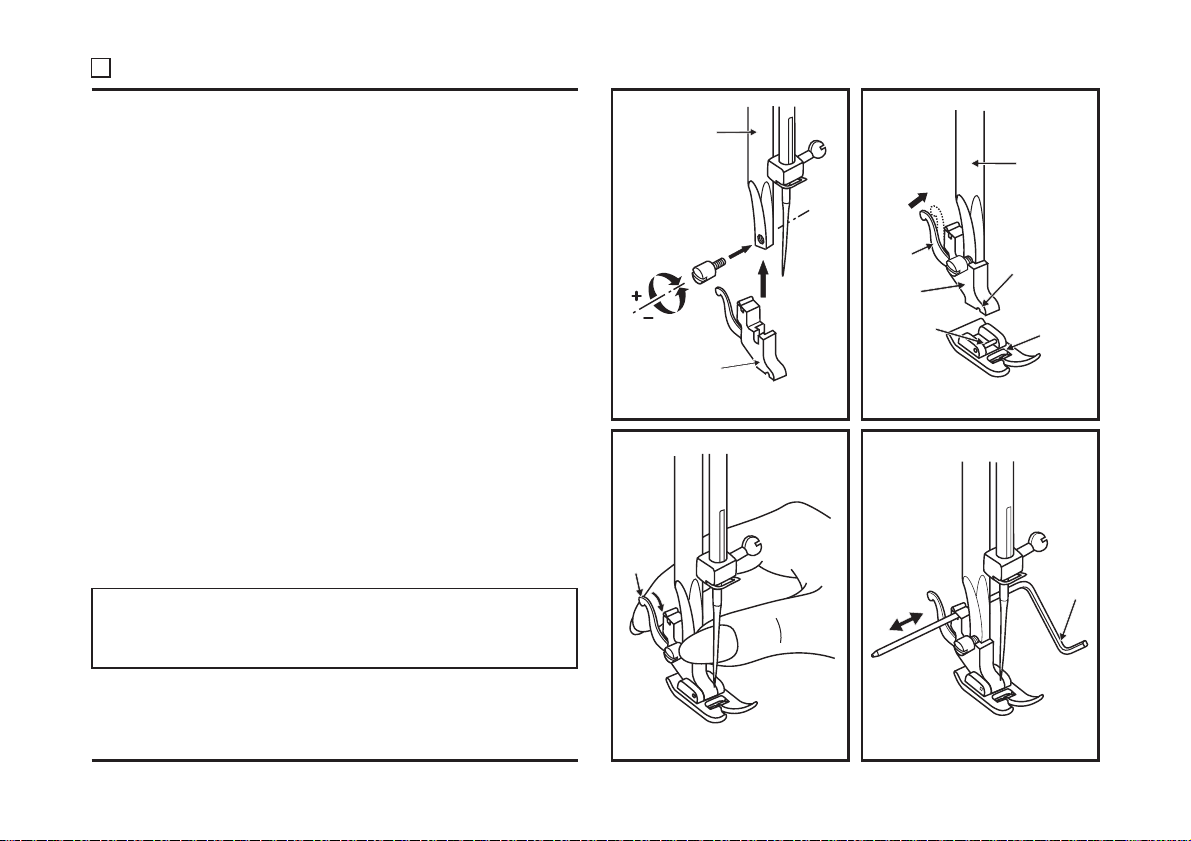
Установка держателя лапки
Поднимите держатель лапки (а).
Надень те держатель прижимной лапки (b), как показано на
рисунке (1).
Установка прижимной лапки
Опустите держатель прижимной лапки (b), пока выемка (с)
не совпадет с осью (d). (2) Опустите держатель
прижимной лапки и лапка (f) автоматически присоединится.
Снятие прижимной лапки
Поднимите прижимную лапку (3).
Поднимите рычаг (е) и лапка отсоединится.
Подсоединение направляющей линейки для
краеобметочног о/стегальног о шва
Введите направляющую линейку для краеобметочного/
стегального шва (g) в отверстие, как показано на рисунке
(4).
Настройте в соответ ствии с кромкой, каймой, складками
или др.
Внимание:
Пожалуйста, выключайте машину («О») во время
выполнения вышеуказанных операций!
a
a
e
b
d
b
12
e
c
f
g
22
3
4
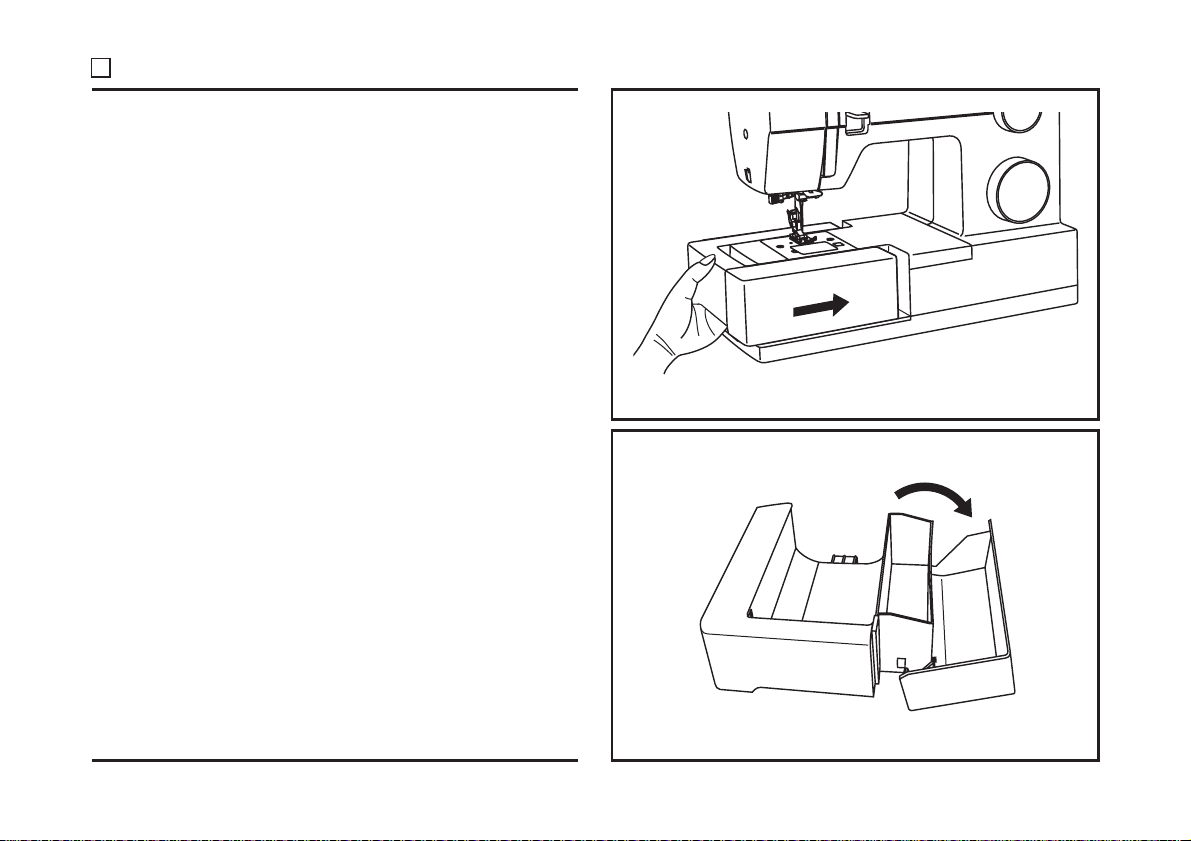
Установка съемной рабочей поверхности
Держите съемную рабочую поверхность
задвиньте ее по направлению стрелок (1).
Внутренняя часть съемной рабочей поверхности может
использоваться для хранения аксессуаров.
Откройте крышку съемного как показано на
рисунке (2).
отсека
горизонтально и
1
21
2
Пришивание пуговицы
Переведите рычаг, регулирующий положение зубцов
транспортера, вправо, чтобы опустить зубцы. (1)
Смените универсальную лапку на лапку для пришивания
пуговицы (2).
Установите длину стежка «0».
Расположите пуговицу и ткань под лапкой для
пришивания пуговиц как показано на рисунке (3).
Переключите машину на строчку зиг-заг, затем
установите ширину строчки «3» — «6». Поверните маховое
колесо на себя, чтобы проверить, насколько точно игла
входит в отверстия на пуговице. Если необходимо,
настройте ширину стежка, ориентируясь на расстояние
между отверстиями на пуговице. Медленно сделайте 10
стежков.
Поднимите иглу, чтобы она вышла из ткани. Переключите
машину на прямую строчку и сделайте несколько стежков
для закрепки.
Если вы хотите сделать пуговицу на «ножке», положите
штопальную толстую иглу поверх пуговицы. Для пуговиц
с четырьмя отверстиями, пришейте сначала пуговицу
через два отверстия, затем сдвиньте изделие и пришейте
через оставшиеся.
1
L R
3
a
b
a
b
2
4
20
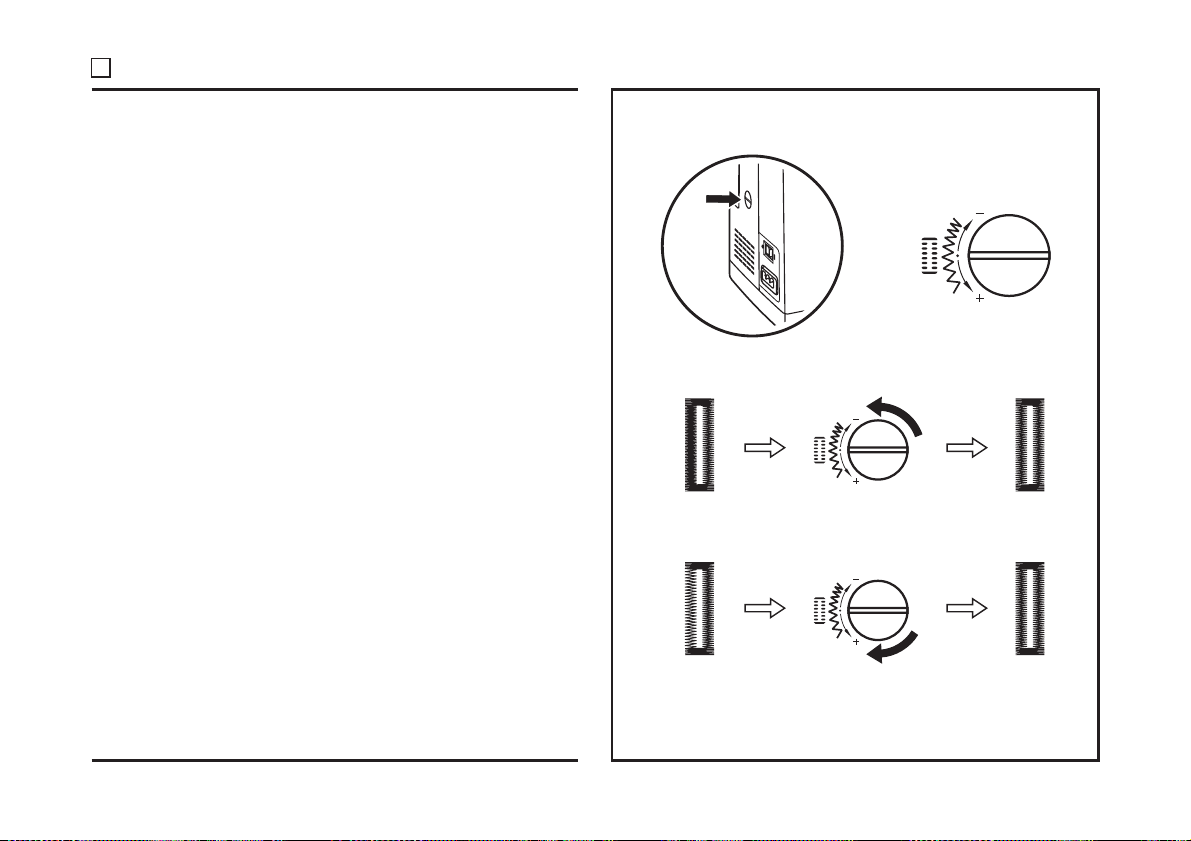
Баланс правой и левой сторон петли
Вы можете сбалансировать плотность застила правой и
левой сторон петли с помощью Регулятора баланса
петли.
Обычно регулятор должен находиться в нейтральном
положении (между «+» и «-«).
Если стежки левой стороны петли наложены слишком
плотно, поверните регулятор влево (+).
* Поворачивая регулятор влево, ослабляете застил левой
стороны.
Если стежки левой стороны петли наложены слишком
редко, поверните регулятор вправо (-).
* Поворачивая регулятор вправо, уплотняете застил
левой стороны.
19
Loading…
View the manual for the Singer Heavy Duty 4411 here, for free. This manual comes under the category sewing machines and has been rated by 13 people with an average of a 8.7. This manual is available in the following languages: English. Do you have a question about the Singer Heavy Duty 4411 or do you need help?
Ask your question here
Singer Heavy Duty 4411 specifications
Below you will find the product specifications and the manual specifications of the Singer Heavy Duty 4411.
The Singer Heavy Duty 4411 sewing machine is an electric device with a rotary control type, specifically designed for sewing. It features a free arm, allowing users to access difficult-to-reach areas when working on their projects. With a total of 10 stitch patterns available, this sewing machine provides versatility and options for various sewing needs.
The Singer Heavy Duty 4411 does not come with a display, allowing users to rely on the rotary control for stitch selection. The machine operates on a power supply type of electric, with an AC input voltage of 220 V. The AC input frequency is set at 60 Hz.
When it comes to its physical specifications, the Singer Heavy Duty 4411 has a width of 170 mm and a height of 300 mm. The package dimensions are 245 mm in width, 380 mm in height, and 480 mm in depth. The sewing machine itself weighs 7600 g, making it a sturdy and reliable option for users.
In conclusion, the Singer Heavy Duty 4411 sewing machine offers a range of stitch patterns and a free arm for convenient sewing. Its compact size and durable build make it a reliable choice for various sewing projects.
Power supply type
Electric
Universal presser foot included
Yes
General
Features
| Product colour | Grey |
| Sewing machine functions | Sewing |
| Free arm | Yes |
| Number of stitch patterns | 10 |
| Display | No |
| Control type | Rotary |
| Adjustable thread tension | Yes |
Power
| Power supply type | Electric |
| AC input voltage | 220 V |
| AC input frequency | 60 Hz |
Packaging data
| Package weight | 7600 g |
| Package width | 245 mm |
| Package height | 380 mm |
| Package depth | 480 mm |
Weight & dimensions
| Width | 170 mm |
| Height | 300 mm |
| Depth | 400 mm |
| Weight | 6300 g |
Packaging content
| Universal presser foot included | Yes |
| Needle set included | Yes |
| Screwdriver included | Yes |
show more
Questions & answers
Can’t find the answer to your question in the manual? You may find the answer to your question in the FAQs about the Singer Heavy Duty 4411 below.
How to Troubleshoot a Stuck Needle on Singer Heavy Duty 4411 Sewing Machine
Why is the fabric gathering or becoming trapped under the presser foot?
Please check the tension settings; both the upper and lower thread tensions should be balanced. Ensure the fabric is properly aligned and guided while sewing. Consider using appropriate stabilizers or adjusting the presser foot pressure for different fabric thicknesses.
Why is the needle not picking up the bobbin thread?
Check if the needle is inserted correctly and is not bent or dull. Make sure the bobbin is placed and threaded correctly. Adjust the tension settings if needed.
Why is the machine making a loud noise while sewing?
Make sure that the needle is properly inserted and not hitting any parts of the machine. Check for any loose screws or parts that may be causing the noise. Lubricate the machine as per the manufacturer’s recommendations.
How do I change the presser foot on the machine? Canadian English translation:How do I change the presser foot on the machine?
Raise the presser foot lever, remove the current presser foot, and align the new presser foot with the holder. Lower the presser foot lever to secure the new foot in place.
How do I adjust the stitch length on the machine?
Find the stitch length dial (usually on the front or side of the machine) and adjust it to the desired stitch length measurement. A larger number means longer stitches, while a smaller number means shorter stitches.
Does the Singer Heavy Duty 4411 have a free arm?
Yes, the Singer Heavy Duty 4411 has a free arm. This means that the user can easily access hard-to-reach areas, such as cuffs and collars, for sewing tasks.
How many stitch patterns does the Singer Heavy Duty 4411 have?
The Singer Heavy Duty 4411 has 10 {dix points de couture}. This offers the user a variety of options for different sewing projects.
Does the Singer Heavy Duty 4411 have a display?
No, the Singer Heavy Duty 4411 does not have a display. This means that the user will not have a visual interface to adjust settings or view stitch information.
What type of control does the Singer Heavy Duty 4411 have?
The Singer Heavy Duty 4411 has a rotary control. This allows the user to easily adjust stitch length and width by simply turning a dial.
Is the Singer Heavy Duty 4411 powered by electricity?
Yes, the Singer Heavy Duty 4411 is powered by electricity. This means that the user will need to plug it into a power outlet to operate the sewing machine.
What is the weight of the Singer Heavy Duty 4411?
The Singer Heavy Duty 4411 has a weight of 6300 g.
What is the height of the Singer Heavy Duty 4411?
The Singer Heavy Duty 4411 has a height of 300 mm.
What is the width of the Singer Heavy Duty 4411?
The Singer Heavy Duty 4411 has a width of 170 mm.
What is the depth of the Singer Heavy Duty 4411?
The Singer Heavy Duty 4411 has a depth of 400 mm.
What size needle should I use?
Which size of needle you can best use depends on the thickness of the fabric you use. With a thick fabric you should use a thick needle. The packaging of your needle states for which substances your needle is suitable.
Why does the needle break while sewing?
There can be several causes for needle breakage:
— Not using the right needle for the right fabric
— The needle is set too low
— The fabric is not properly guided
— The bobbin case is not inserted correctly
How long does a sewing needle last?
Generally, a sewing needle lasts about 7 to 9 hours.
Is the manual of the Singer Heavy Duty 4411 available in English?
Yes, the manual of the Singer Heavy Duty 4411 is available in English .
Is your question not listed? Ask your question here
Перейти к контенту
Русские электронные инструкции по эксплуатации
Постоянно обновляемый большой каталог документации по эксплуатации и использованию современных устройств и оборудования на русском языке. Бесплатное скачивание файлов.
Поиск:
Главная
♥ В закладки
Просмотр инструкции в pdf
Инструкция по эксплуатации швейной машины Singer 4411.
Скачать инструкцию к швейной машине Singer 4411 (1,05 МБ)
Инструкции по эксплуатации швейных машин Singer
« Инструкция к швейной машине Toyota SPA 15R
» Инструкция к швейной машине CHAYKA New Wave 4030
Вам также может быть интересно

Инструкция к швейной машине Singer M3505

Инструкция к швейной машине Singer Heavy Duty 4423

Инструкция к швейной машине Singer Talent 3321

Инструкция к швейной машине Singer M3305

Инструкция к швейной машине Singer Confidence 7470

Инструкция к швейной машине Singer Tradition 2263

Инструкция к швейной машине Singer CONFIDENCE 7463

Инструкция к швейной машине Singer Promise 1409
Добавить комментарий
Имя *
Email *
Сайт
Комментарий
Сохранить моё имя, email и адрес сайта в этом браузере для последующих моих комментариев.
- Добавить инструкцию
- Заказать инструкцию
- Политика конфиденциальности
Описание
Простая и надежная швейная машина Singer Heavy Duty 4411 подойдет и для начинающей мастерицы, и для профессиональной швеи. Модель имеет электромеханический тип конструкции, выполняет 11 операций, адаптирована для шитья тяжелых и сверхтяжелых материалов, включая кожу, драп, фетр. Машина имеет специальный регулятор давления лапки, позволяющий менять нажим с учетом особенностей ткани. Есть в комплектации нитеобрезное устройство ручного типа. Швейная машина Singer Heavy Duty 4411 способна автоматически выметывать бельевые петли, воспроизводить прямую, смещенную, потайную и оверлочную строчку. Длина стежка ограничена диапазоном в 5 мм при ширине до 4 мм. Невысокая скорость – 400 ст/мин удобна при работе с тяжелыми и плотными тканями.
Характеристики:
тяжелые, сверхтяжелые
электромеханическая
11
Максимальная скорость шитья:
400 ст/мин
75 Вт
горизонтальный ротационный
отсутствует
полуавтоматически
3
Максимальная длина стежка:
5 мм
Максимальная ширина стежка:
4 мм
оверлочная, прямая, прямая строчка со смещением влево, потайная подшивка низа
Съемная рукавная платформа:
есть
7 кг
Максимальная высота подъема лапки:
12 мм
Регулировка давления лапки на ткань:
есть
бельевая
Кол-во выполняемых петель:
1
Освещение рабочей поверхности:
лампа накаливания
отсутствует
стандартное
ручное
силиконовая
2019
есть
Регулировка баланса петли:
отсутствует
отсутствует
отсутствует
есть
Автоматическая намотка шпульки
отсутствует
Регулировка скорости на корпусе
отсутствует