
Инструкция по сборке корпуса шкафа ПАКС ИКЕА
Подробная иллюстрированная инструкция с пояснениями, сборки односекционного корпуса шкафа системы хранения серии ПАКС компании ИКЕА.
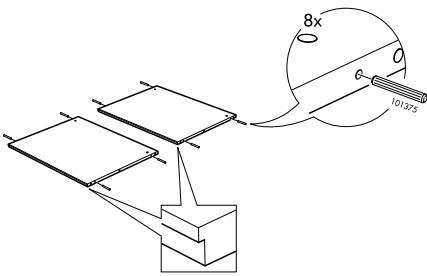
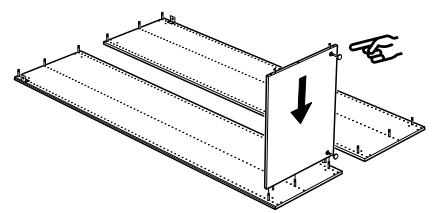
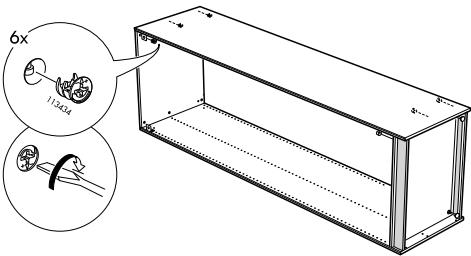
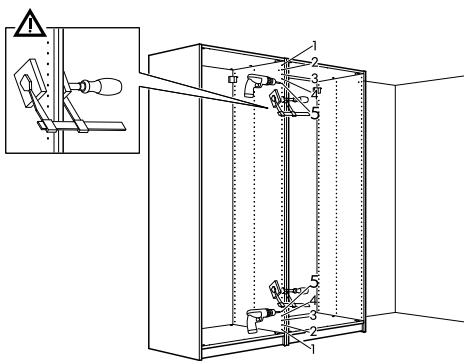
С помощью винтов зафиксируйте уголки на верхней части боковых стенок шкафа
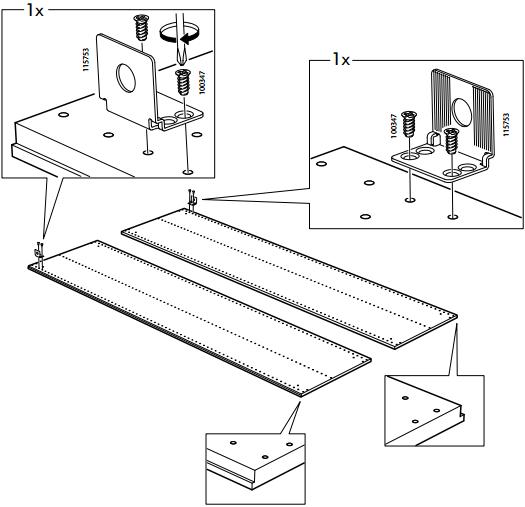
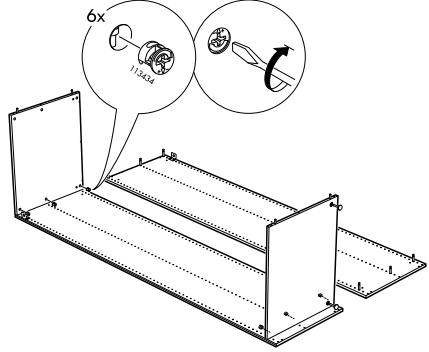
В соответствующие отверстия вкрутите шток эксцентриковых стяжек
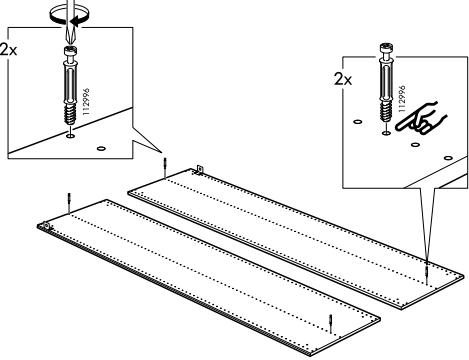
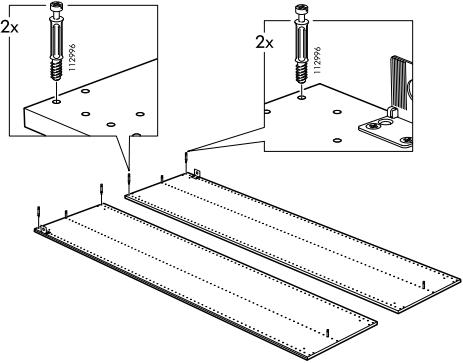
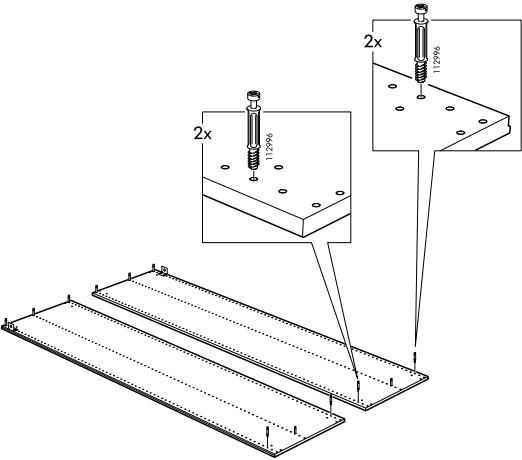
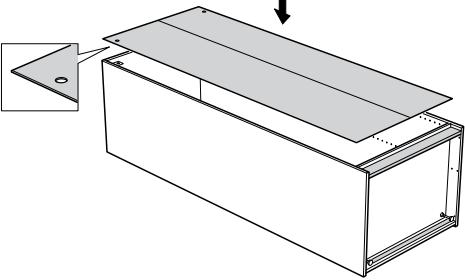
Вставьте деревянные шканты в отверстия низа и верха корпуса шкафа
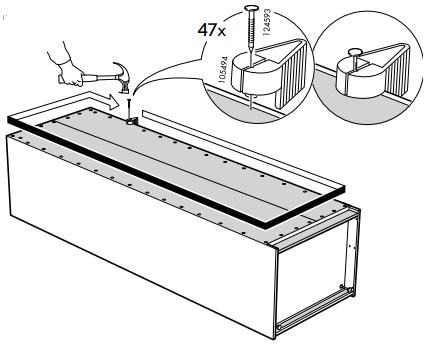
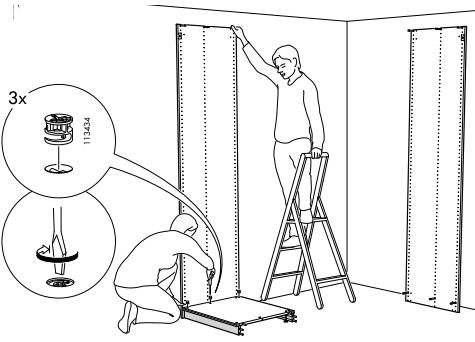
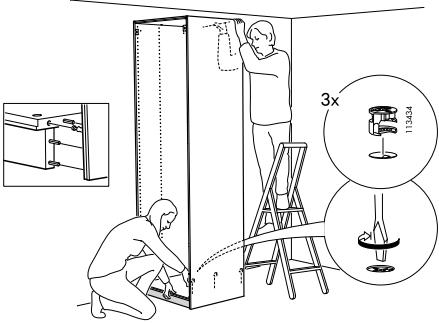
с помощью молотка установите гайку в нижнюю панель
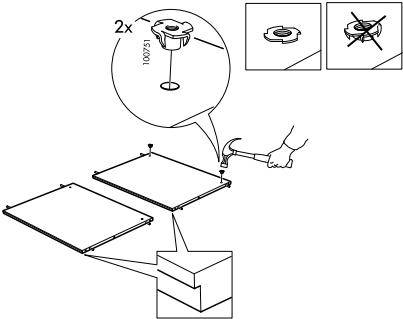
соедините резьбовую и пластиковую части опор до щелчка
и вкрутите в установленную ранее гайку
Вставьте шканты в цокольные планки
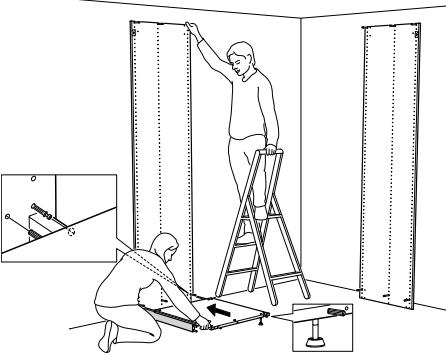
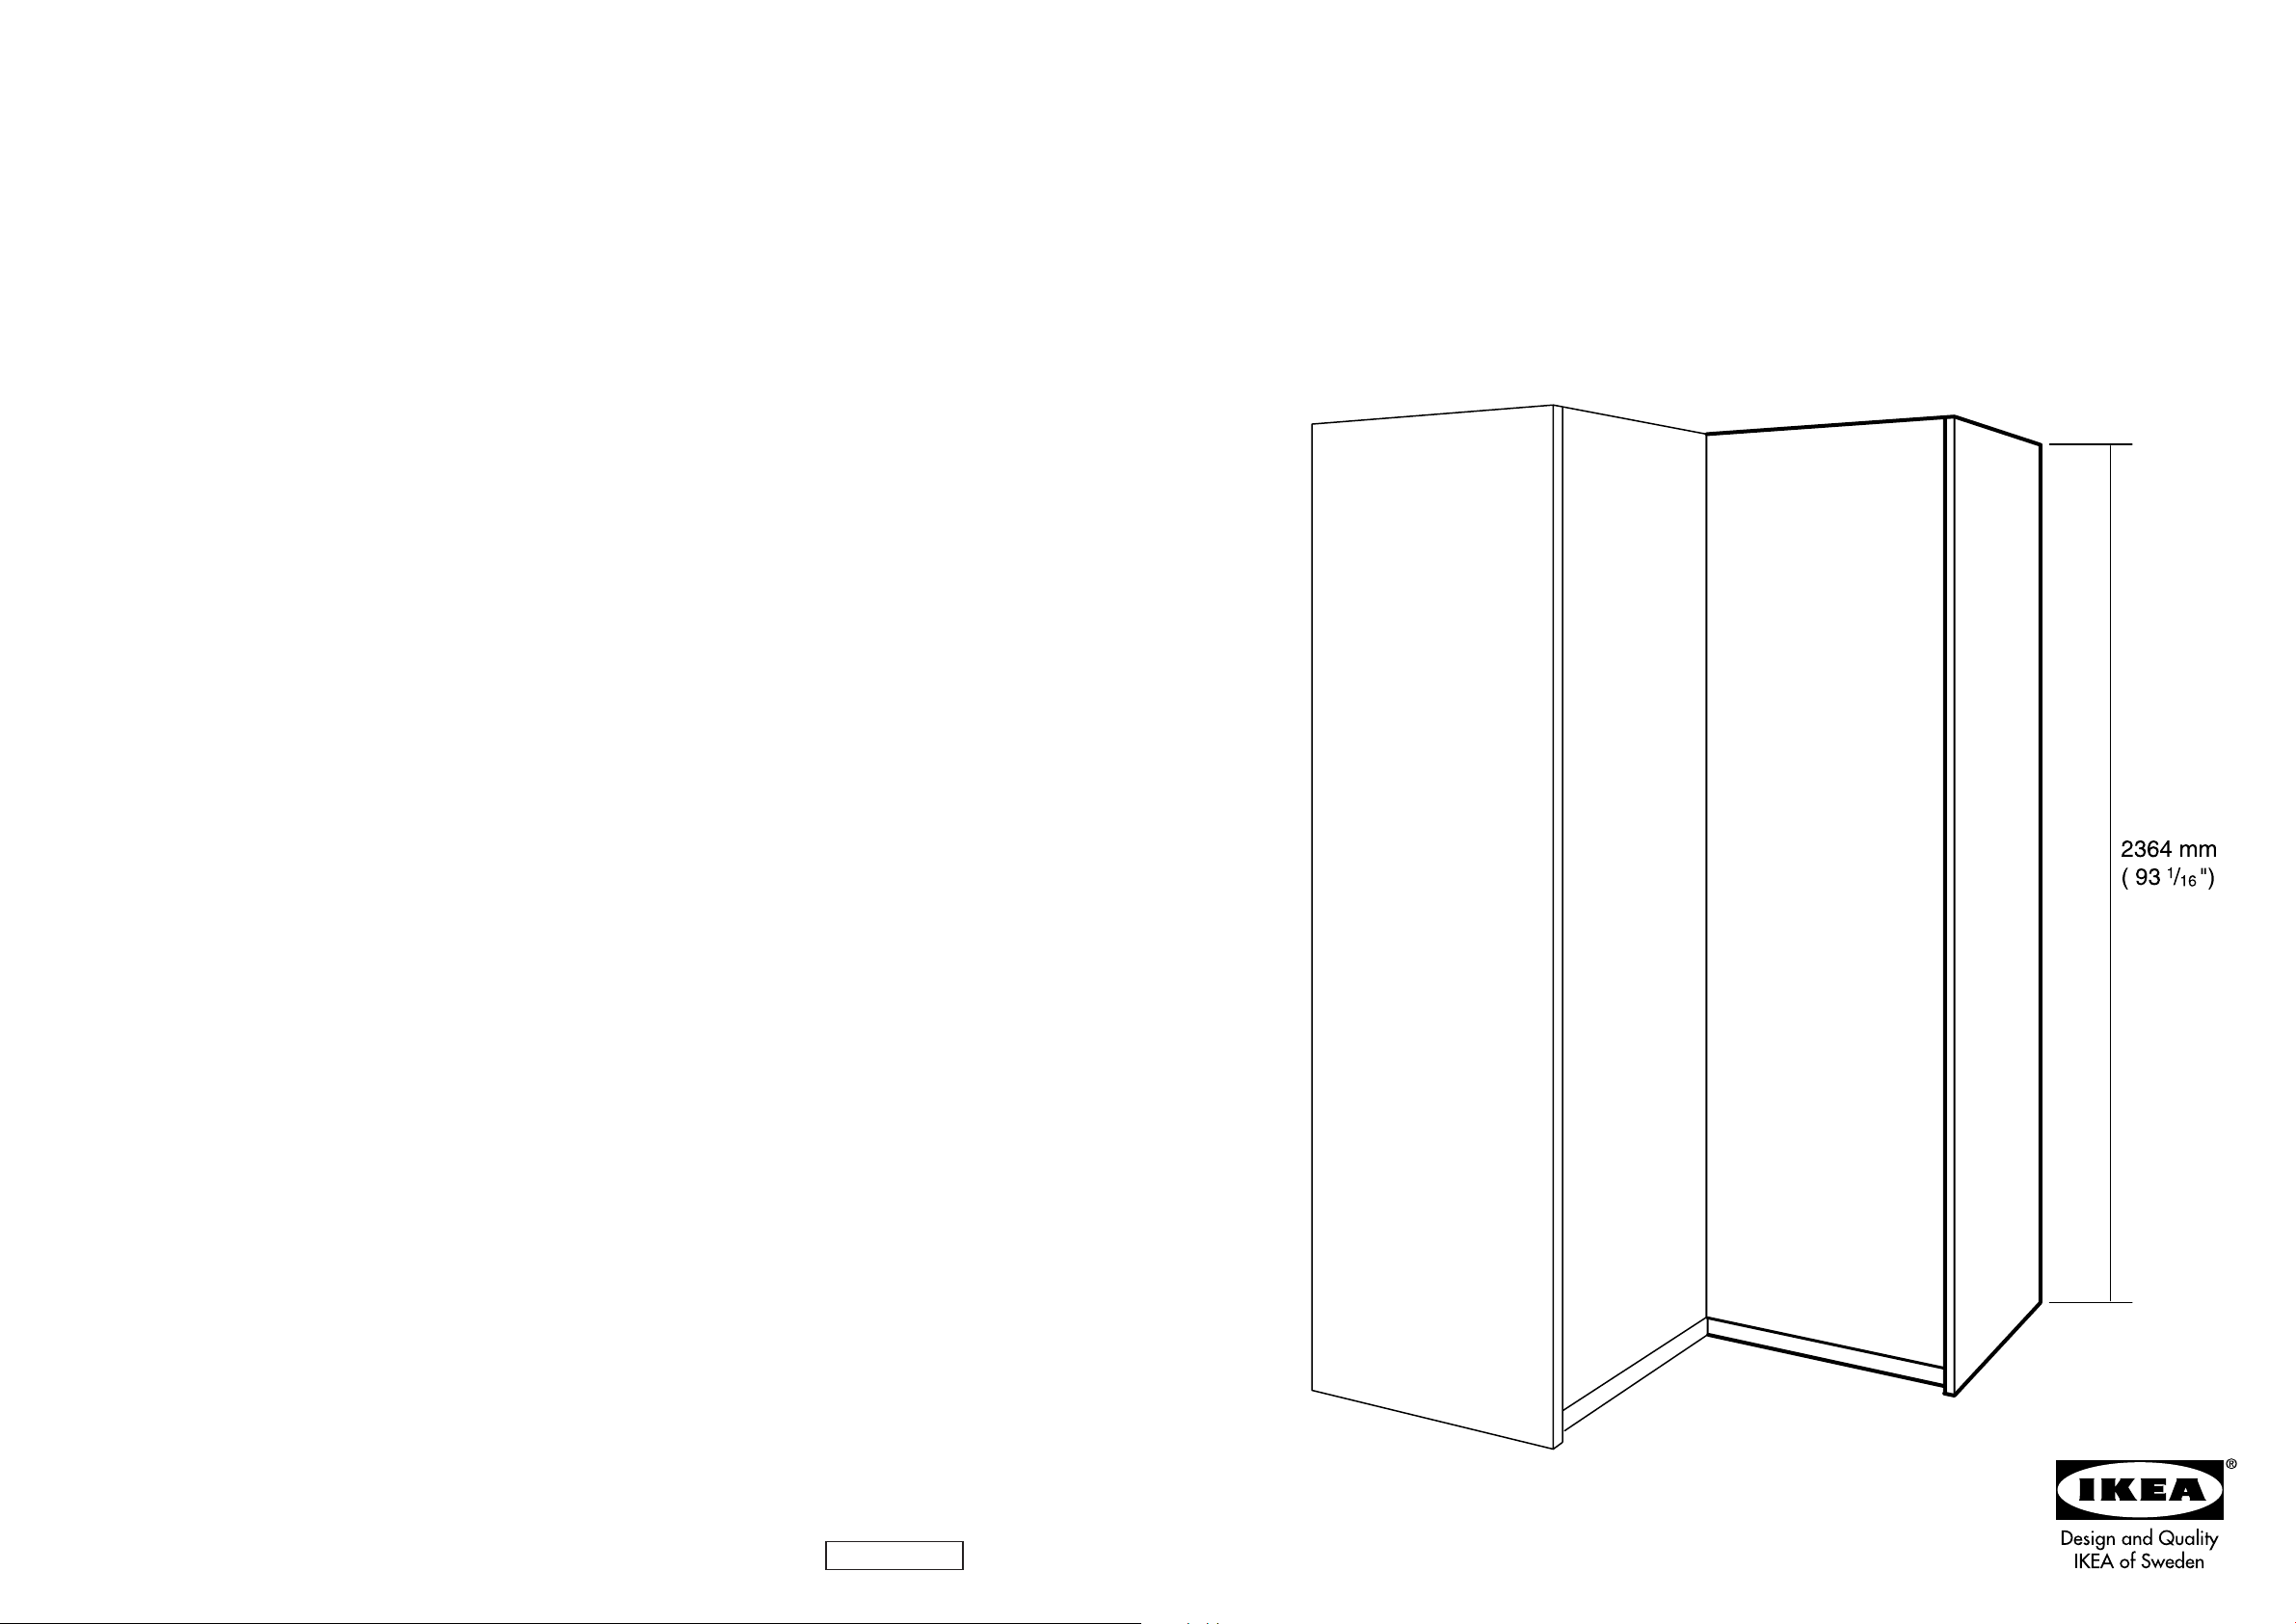
Измерьте с помощью рулетки высоту потолка в месте установки шкафа
Если высота составляет 244 и более сантиметров, шкаф можно собирать в горизонтальном положении.
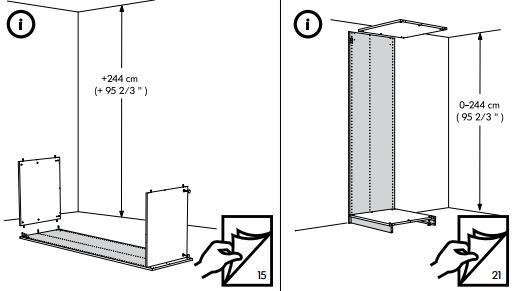
Если высота потолка меньше 244 сантиметров, то шкаф придется собирать в вертикальном положении.
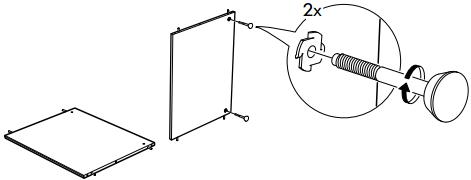
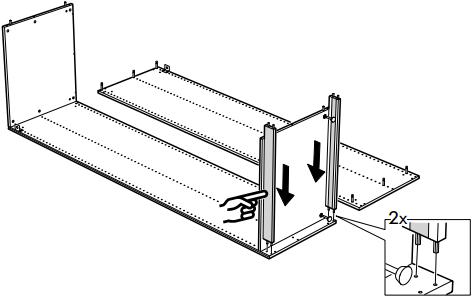
На одну из боковин установите нижнюю
и верхнюю панели шкафа

и зафиксируйте их эксцентриковыми стяжками.
Установите цокольные элементы шкафа
Установите вторую боковину шкафа
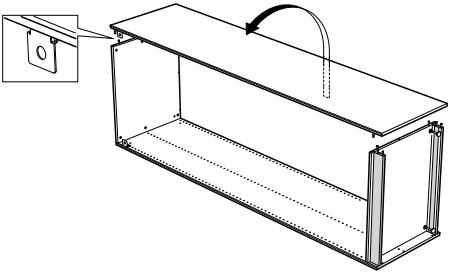
и зафиксируйте ее эксцентриками
переверните каркас лицевой стороной вниз
и установив в специальные углубления заднюю стенку шкафа
зафиксируйте ее гвоздями
Сборка шкафа в вертикальном положении
С помощью напарника придерживая в вертикальном положении боковину шкафа установите цокольные элементы
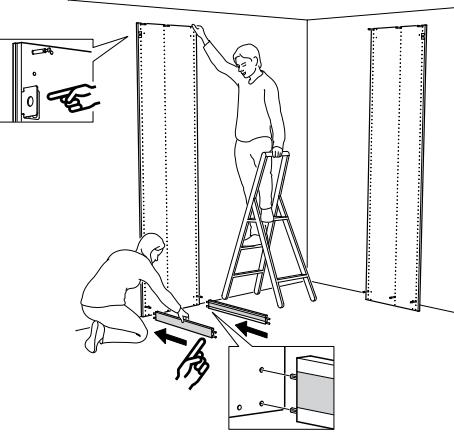
затем установив на них нижнюю панель
зафиксируйте эксцентриками
установите верхнюю панель
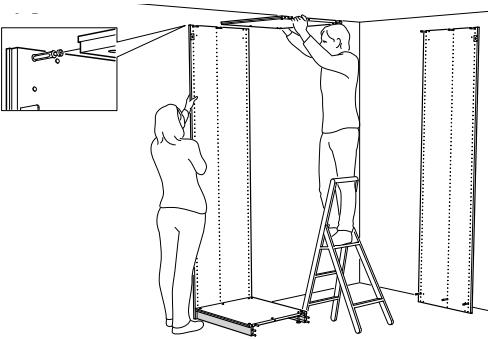
Соединив конструкцию с боковой стенкой
зафиксируйте их эксцентриками сверху
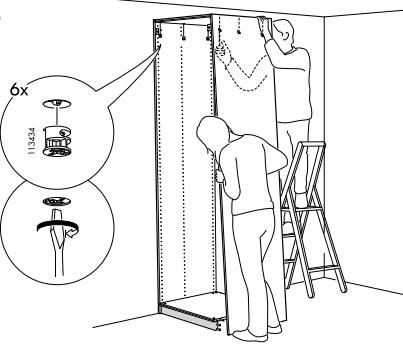
и снизу
Вставите в углубления заднюю стенку
Придерживая заднюю стенку шкафа, зафиксируйте ее гвоздями
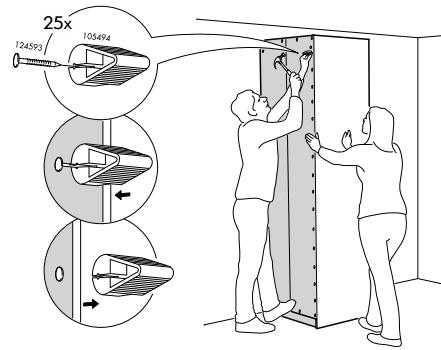
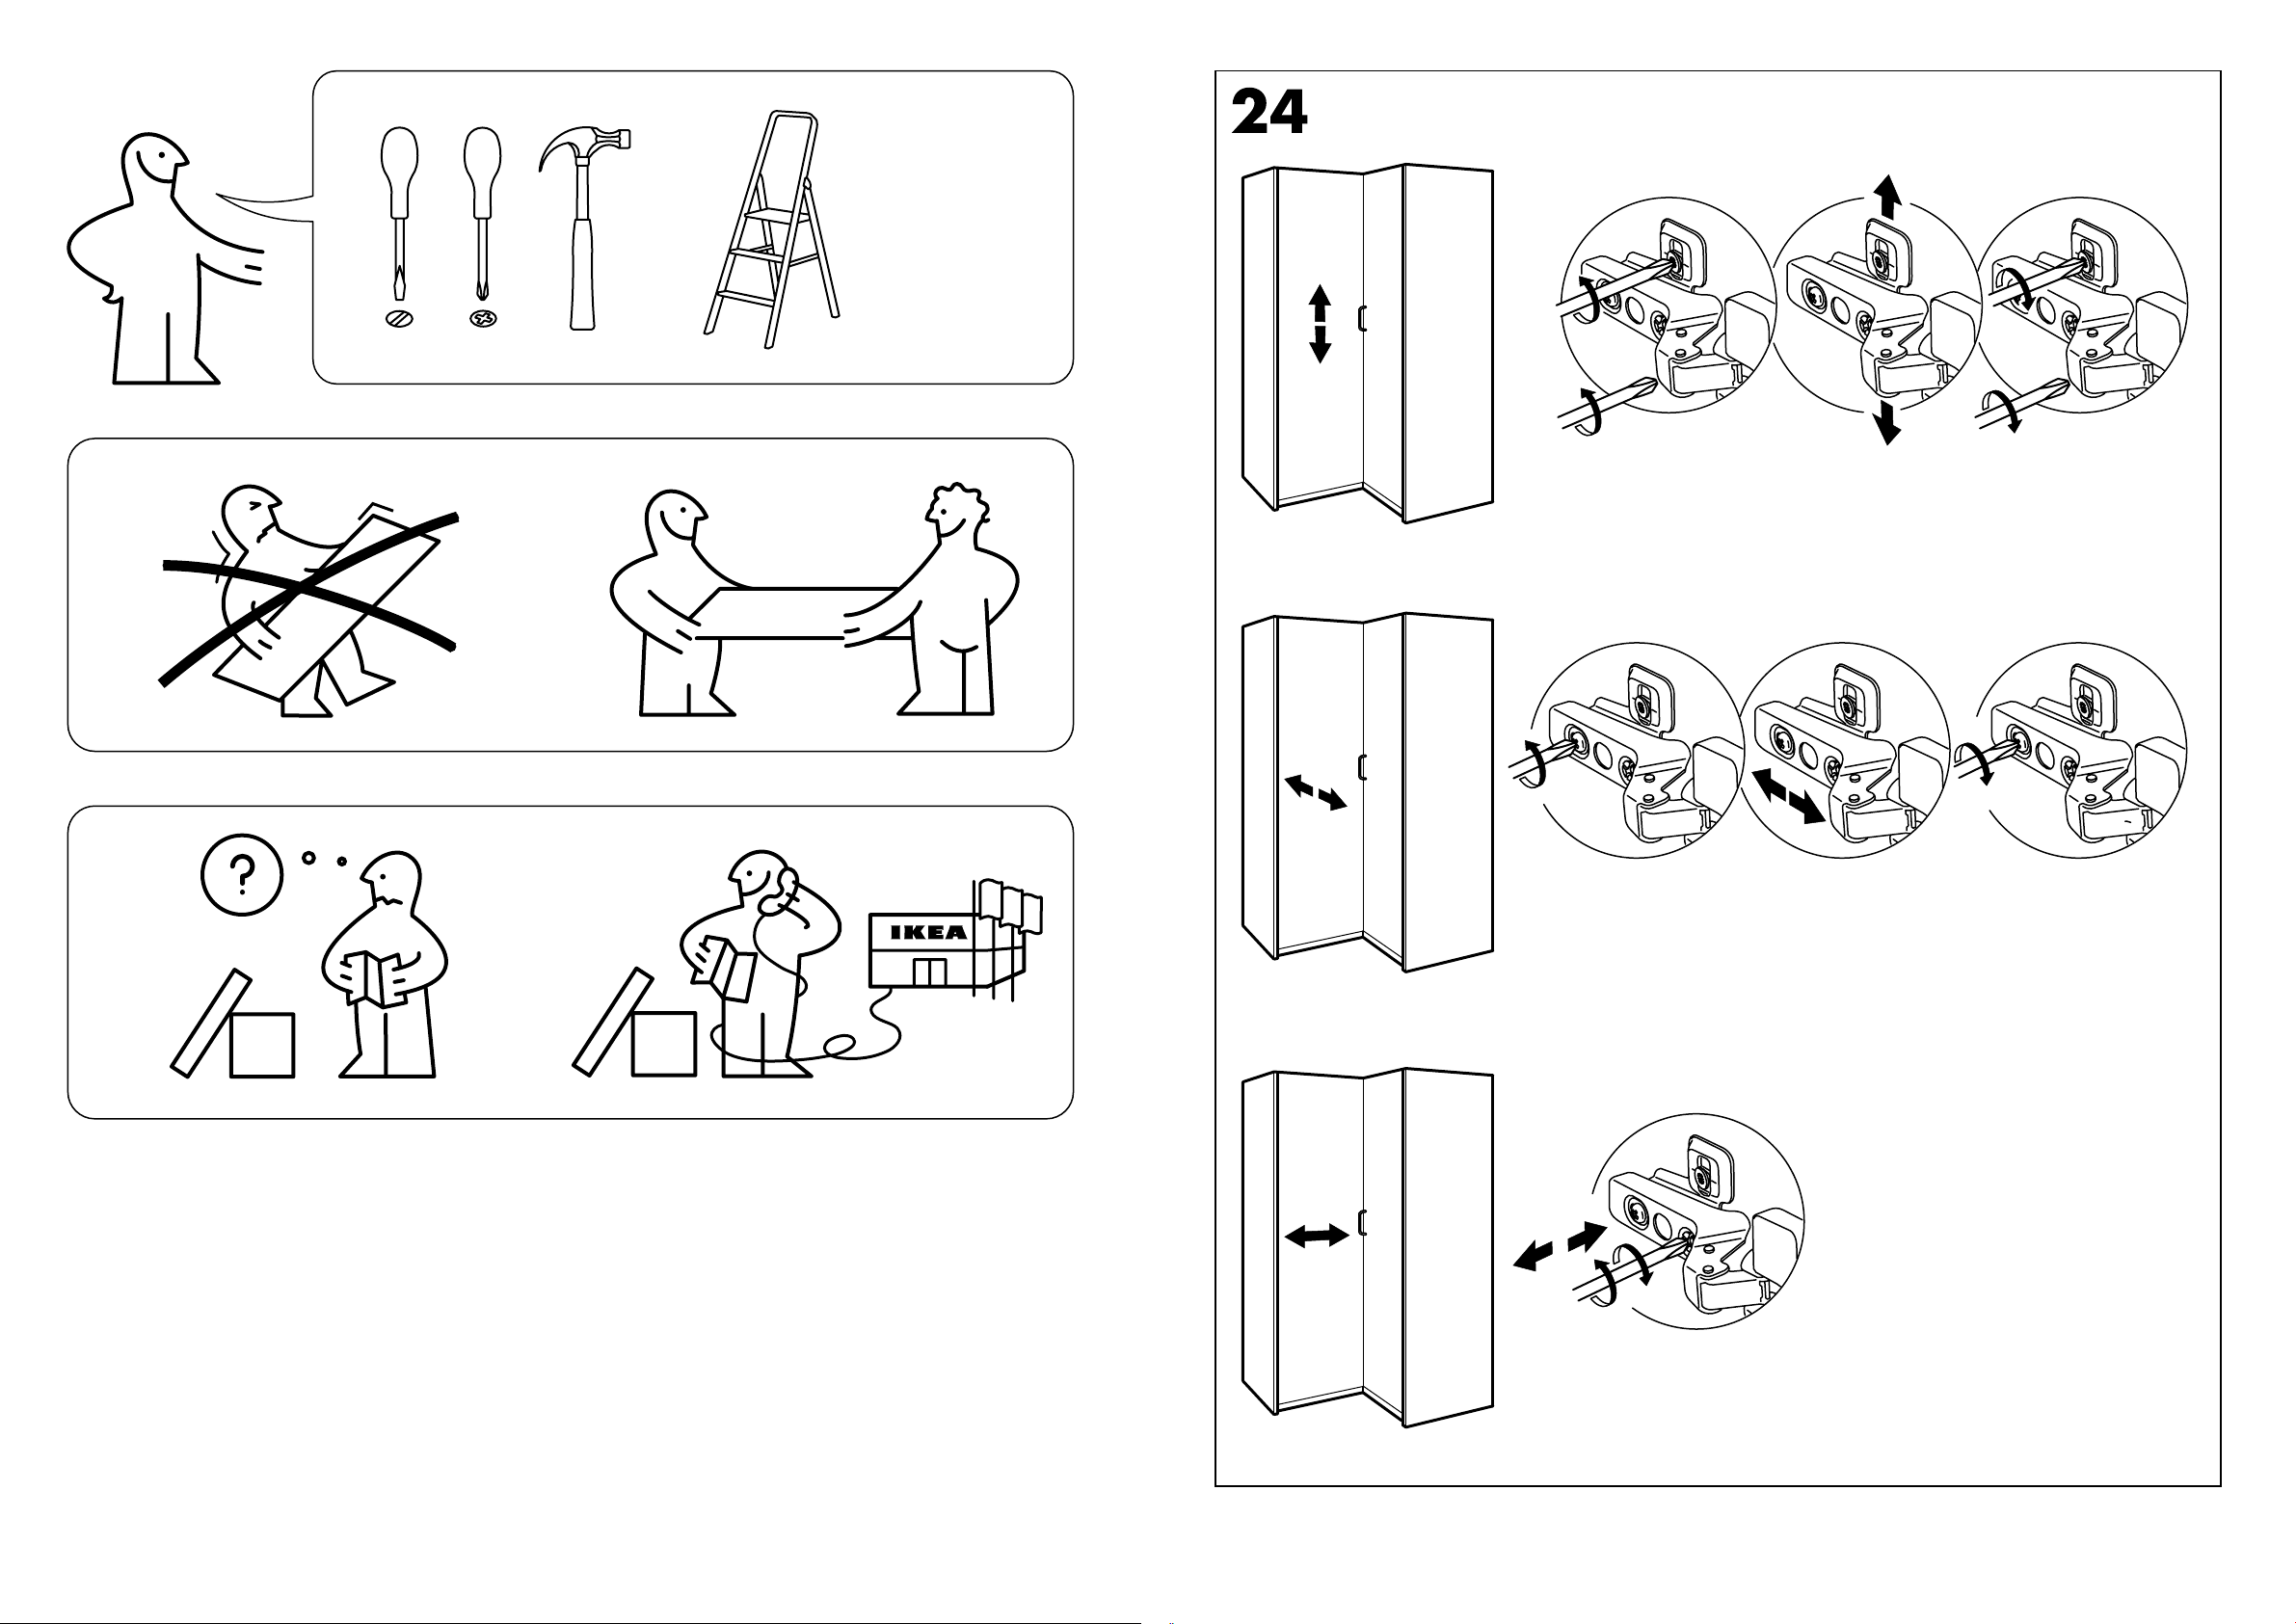
Прикрепите корпус шкафа к стене, не заворачивая крепеж до конца.
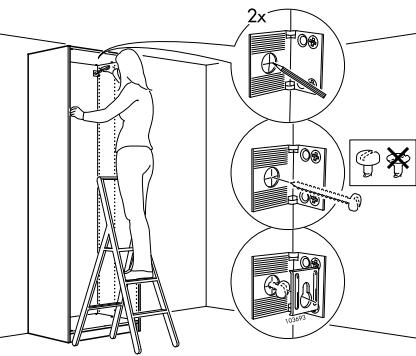
и отрегулируйте опоры до строго вертикального положения.
Заверните до конца крепления к стене и закройте их пластиковыми уголками
отверстия в нижней и верхней панелях закройте заглушками.
Если шкаф состоит из двух или более секций, соедините их стяжками

View the manual for the Ikea PAX here, for free. This manual comes under the category makeup mirrors and has been rated by 46 people with an average of a 8.3.
This manual is available in the following languages: English. Do you have a question about the Ikea PAX or do you need help?
Ask your question here
Ikea PAX specifications
Below you will find the product specifications and the manual specifications of the Ikea PAX.
The Ikea PAX makeup mirror is a product designed to provide a functional and practical solution for individuals in need of a dedicated space for makeup application. This mirror is part of the wider PAX wardrobe system offered by Ikea, and its design is tailored to seamlessly integrate into the overall system for a cohesive look.
The makeup mirror features a sleek and minimalist design, with a frame constructed from durable materials to ensure long-lasting reliability. It is designed to be wall-mounted, allowing for flexibility in placement within a room. The mirror itself is of high quality, providing a clear and accurate reflection for precise makeup application.
The PAX makeup mirror is equipped with light fixtures, providing adjustable illumination to suit different lighting preferences and needs. The lighting is designed to be both functional and flattering, enabling users to achieve optimal results in their makeup routine.
Furthermore, this makeup mirror is designed to be customizable, allowing users to personalize it according to their own preferences and needs. It can be paired with other components of the PAX system, such as drawers, shelves, and organizers, to create a comprehensive and efficient makeup station.
Overall, the Ikea PAX makeup mirror offers a practical and reliable solution for individuals seeking a dedicated space for their makeup routine. Its customizable and integrated design, along with its quality construction, make it a desirable choice for those looking to enhance their makeup experience.
General
| Brand | Ikea |
| Model | PAX |
| Product | makeup mirror |
| Language | English |
| Filetype | User manual (PDF), Visual instructions (PDF) |
Frequently Asked Questions
Can’t find the answer to your question in the manual? You may find the answer to your question in the FAQs about the Ikea PAX below.
How do I properly install the makeup mirror in my Ikea PAX wardrobe?
A proper installation is crucial for the stability and functionality of your makeup mirror. To install it correctly, ensure that the mirror is securely attached to the designated mounting points in your Ikea PAX wardrobe. Make sure to follow the precise instructions provided to ensure a safe and stable installation.
What is the maximum weight capacity that the makeup mirror can hold?
The makeup mirror in the Ikea PAX wardrobe has a maximum weight capacity of <insert weight capacity here>. It is essential to adhere to this limit to prevent any damage to the mirror or the wardrobe.
How can I adjust the brightness of the built-in LED lights in the makeup mirror?
The makeup mirror’s built-in LED lights can typically be adjusted by using the touch controls located on the mirror’s surface. The touch controls offer various brightness settings, allowing you to customize the lighting according to your preference and needs.
Can I replace the LED bulbs in the makeup mirror?
Typically, the LED bulbs in the makeup mirror are not replaceable. They are designed to have a long lifespan and should not require replacement throughout the mirror’s intended usage. If you encounter any issues with the LED lights, it is advisable to consult the manufacturer or refer to the troubleshooting section of the manual.
How do I clean and maintain the makeup mirror for optimal performance?
To ensure optimal performance and longevity of your makeup mirror, it is important to clean and maintain it regularly. Use a soft, lint-free cloth slightly dampened with mild detergent or glass cleaner to gently wipe the mirror’s surface. Avoid using harsh or abrasive cleaners and refrain from spraying liquids directly onto the mirror. Also, make sure to refer to the specific care instructions provided in the manual to keep your mirror in excellent condition.
Is the manual of the Ikea PAX available in English?
Yes, the manual of the Ikea PAX is available in English .
Is your question not listed? Ask your question here
IKEA Pax Indoor Furnishing PDF User Guides and Manuals for Free Download: Found (4) Manuals for IKEA Pax Device Model (Manual , Assembly Manual, Assembly Instructions Manual)
When it comes to maximizing space and organizing your living area, the IKEA Pax system stands out as a versatile and stylish solution. IKEA is synonymous with affordable furniture that combines functionality with aesthetic appeal, and the Pax line is no exception. This customizable wardrobe system allows you to create a unique storage solution tailored to your specific needs, making it a popular choice for homes of all sizes.
One of the standout features of the Pax system is its extensive range of sizes and configurations. Whether you have a small bedroom or a spacious walk-in closet, IKEA offers solutions that can fit into any space. You can choose from different depths, heights, and widths, allowing for a personalized design. Furthermore, the ability to mix and match various components is a significant advantage, enabling you to really make the system your own.
Installation of the Pax wardrobe can be a straightforward process, although it does require some DIY effort. IKEA provides detailed instruction manuals with clear diagrams, making the assembly process manageable, even for those who may not be particularly handy. Nevertheless, it’s useful to have an extra set of hands to help maneuver the larger pieces into place. Depending on your configuration, assembly might take several hours, but the end result is well worth the effort.
The design of the Pax system is not just about looks but also functionality. Here are some of the standout features that enhance its usability:
- Customizable Interiors: The Pax offers various interior accessories such as shelves, drawers, hanging rods, and shoe racks, allowing you to organize your items efficiently.
- Sliding Doors Option: For those with limited space, sliding doors are a great option, as they do not require additional room to swing open, making them a smart choice for tighter areas.
- Quality Materials: While the Pax system is affordable, IKEA doesn’t compromise on quality. The wardrobe is sturdy and built to last, with finishes that can withstand everyday wear and tear.
- Variety of Styles: From sleek modern designs to more traditional looks, the Pax system comes in a broad selection of finishes and colors, allowing it to blend seamlessly with your home decor.
- Eco-Friendly Options: For those who prioritize sustainability, IKEA has incorporated eco-friendly materials into some of its Pax offerings, making it easier to choose greener options.
One of the few downsides of the Pax system is the price of additional accessories. While the base units are reasonably priced, adding multiple interior fittings can add up. Despite this, many users find that the increased organization and customizability justify the initial investment. Additionally, compared to custom-built closets, the Pax remains a cost-effective choice.
In conclusion, the IKEA Pax system is an excellent option for anyone looking to create a tailored storage solution that doesn’t compromise on style or function. Its modular design, variety of configurations, and quality materials make it a popular choice for modern homes. Although initial assembly may require some effort, the versatility and functionality you gain from this product make it a worthwhile addition. If you’re in the market for a wardrobe that can adapt to your needs, the Pax from IKEA is definitely worth considering.
© Inter IKEA Systems B.V. 200336 AA-74363-7
4
ENGLISH
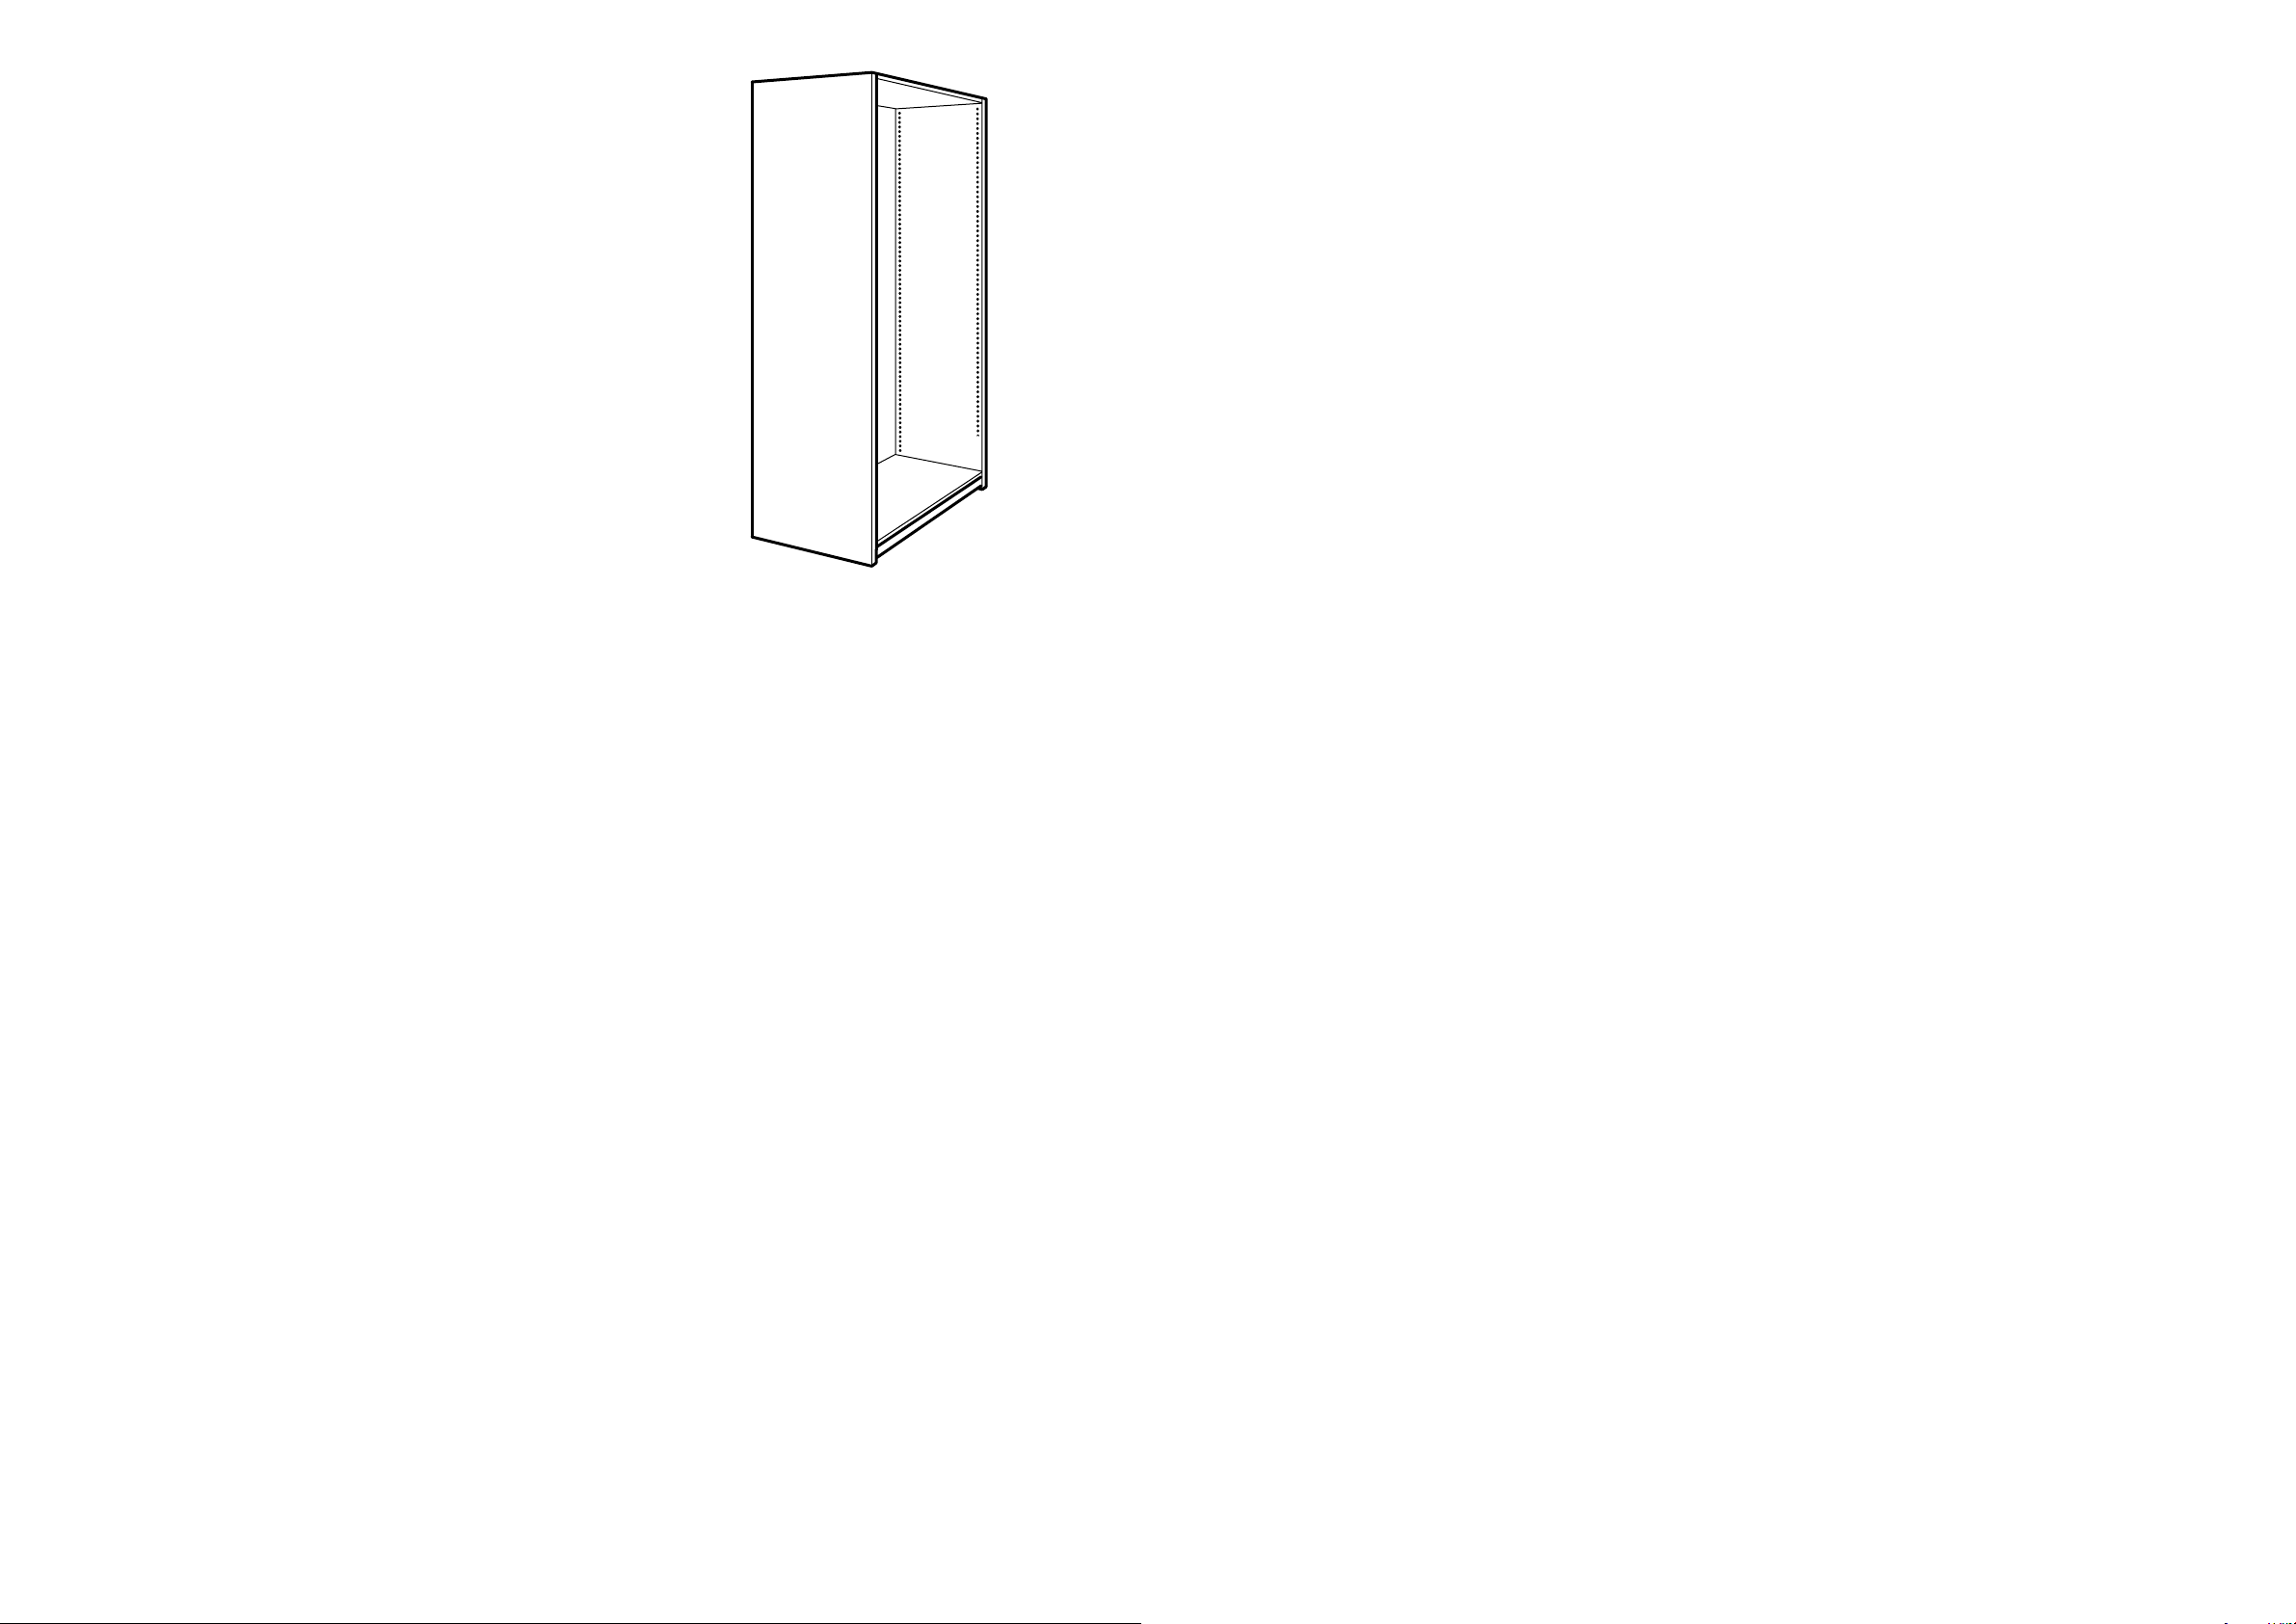
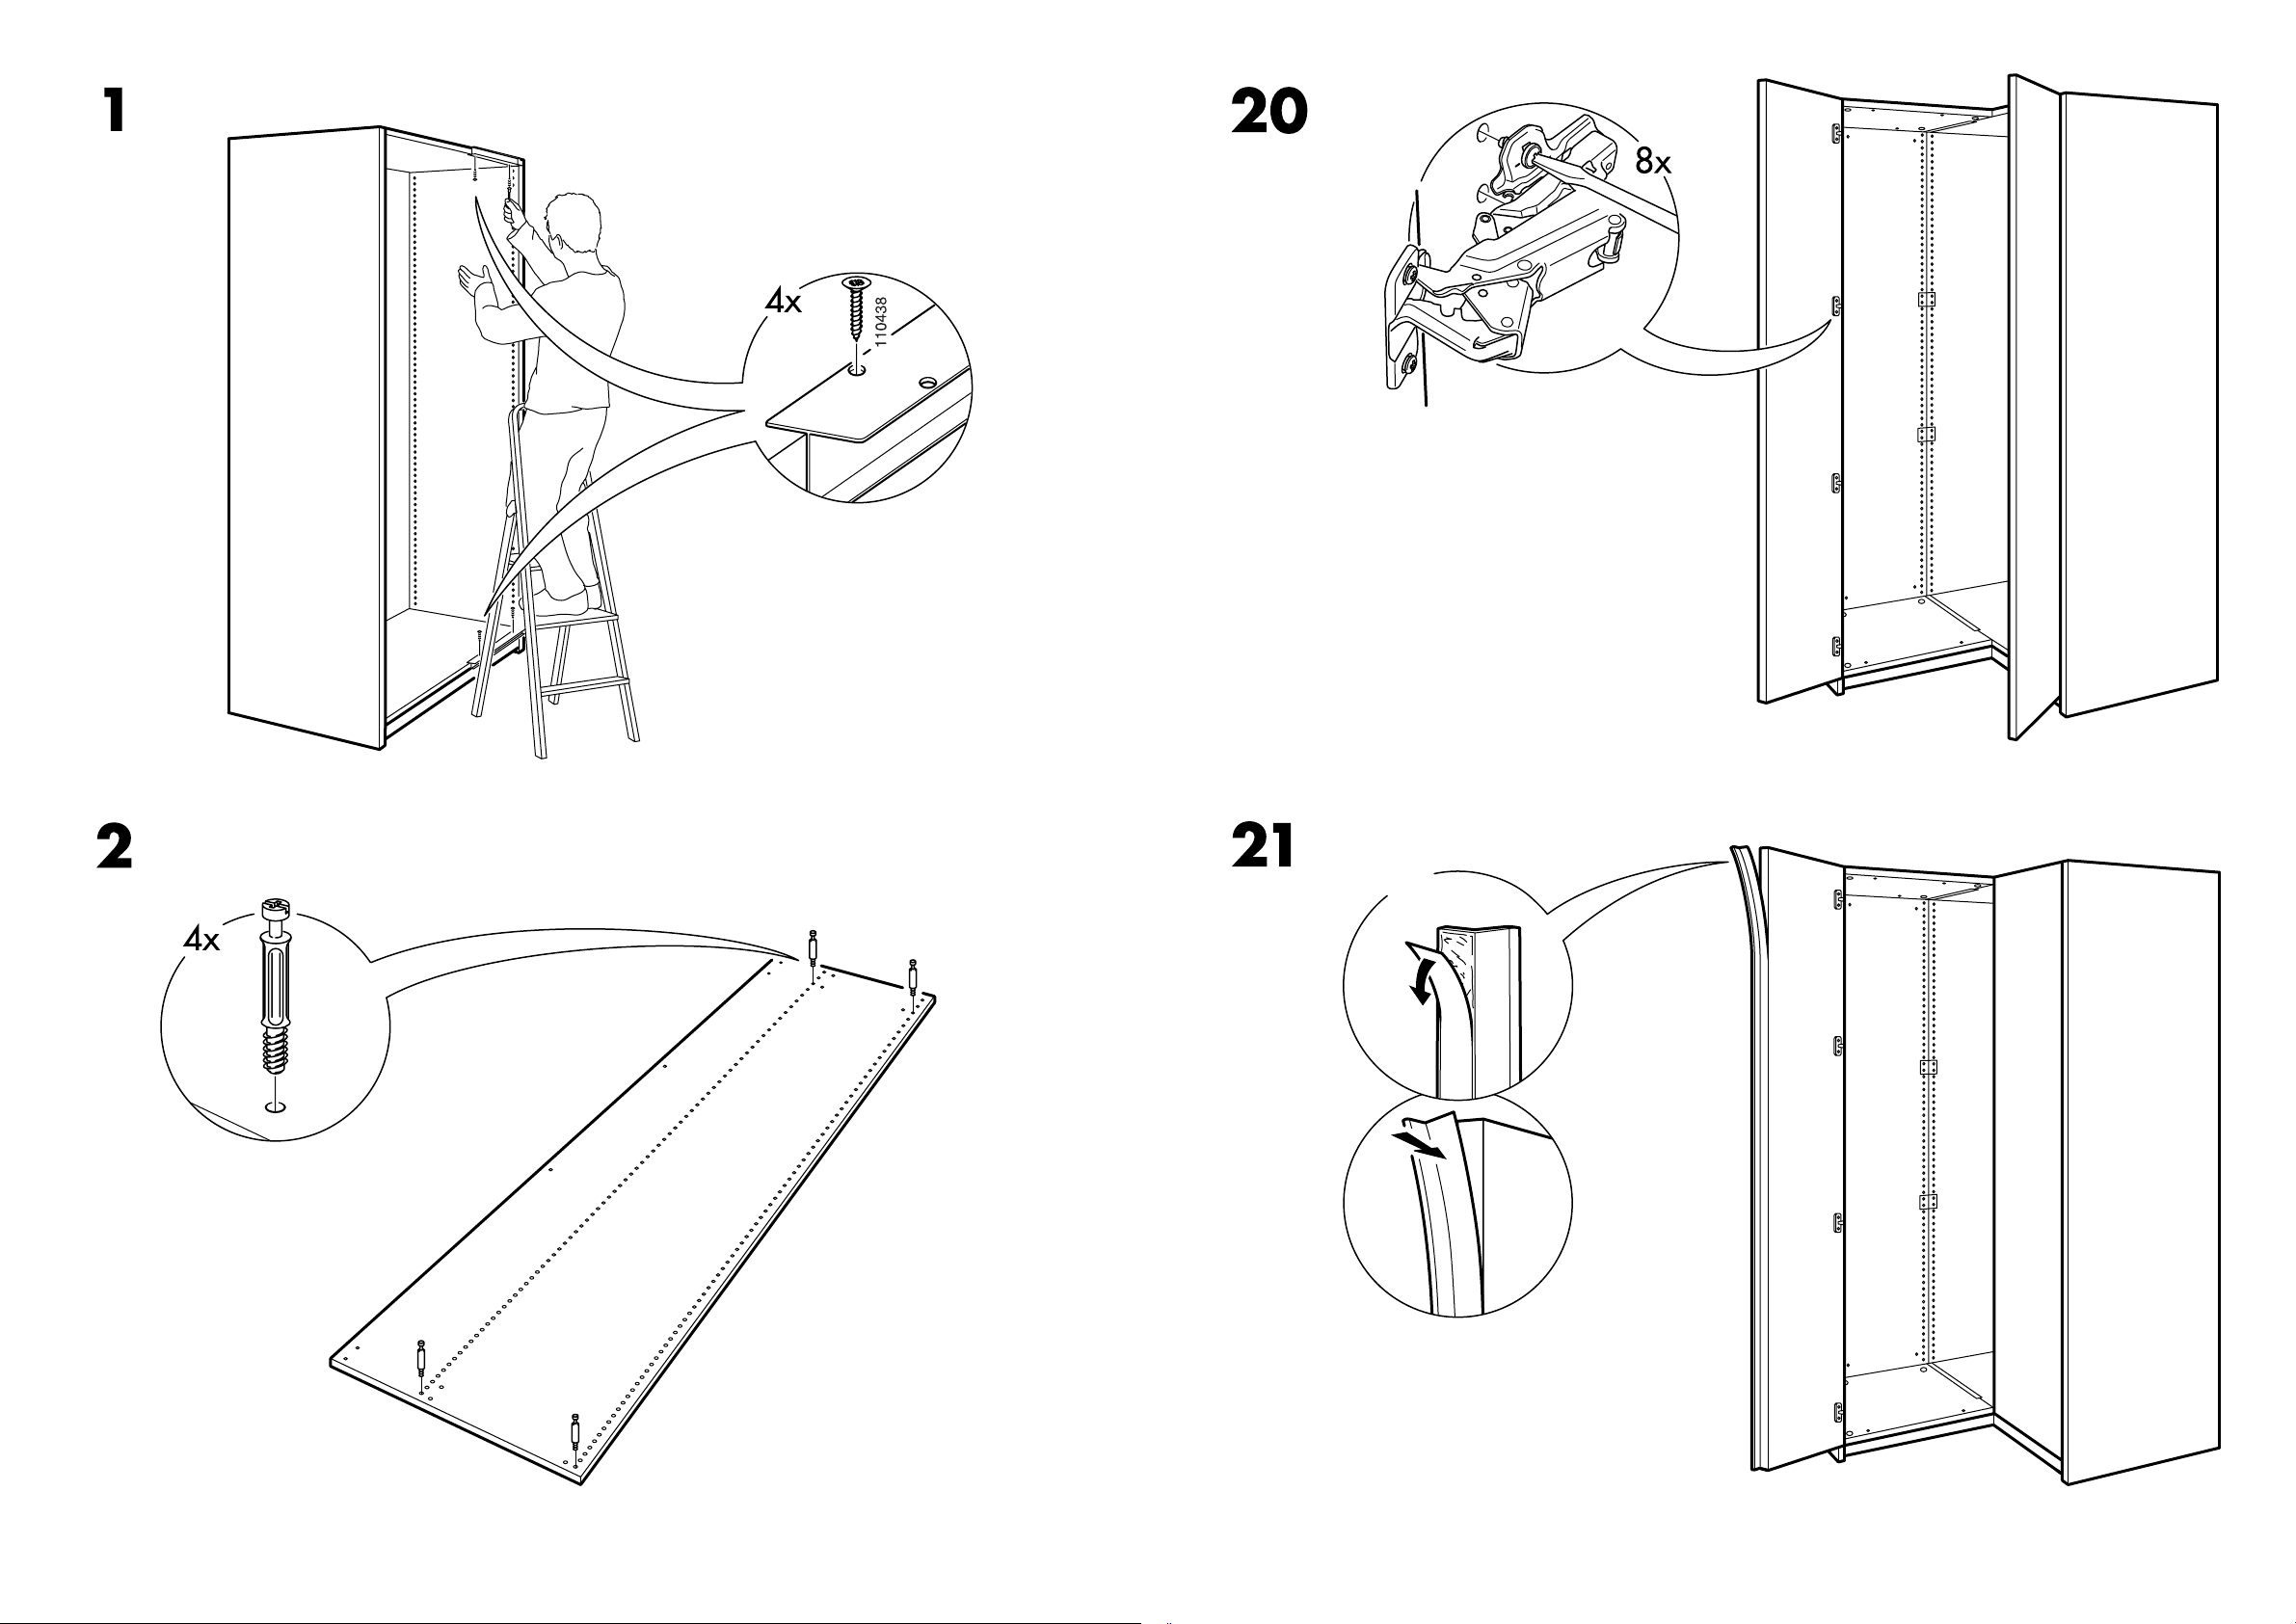
Assemble the frame before mounting the
corner unit.
DEUTSCH
Vor der Montage des Eckelements das
Grundelement zusammenbauen.
FRANÇAIS
Montez la structure avant de monter
l’élément d’angle.
NEDERLANDS
Monteer het basiselement voordat je het
hoekdeel monteert.
ITALIANO
Monta la struttura prima dell’elemento
angolare.
ESPAÑOL
Monta la estructura antes de montar el
módulo de esquina.
PORTUGUES
Instale a estrutura antes de montar o
elemento de canto.
SVENSKA
Montera stommen innan du monterar
hörndelen.
DANSK
Monter stellet inden du monterer
hjørnedelen.
NORSK
Monter stammen før du monterer
hjørnedelen.
SUOMI
Asenna runko ennen kulmaosan asen
—
tamista.
POLSKI
Przed mocowaniem segmentu narożnego
należy złożyć obudowę.
ČESKY
Rám sestrojte před montáží rohového dílu.
SLOVENSKY
Rám zmontujte pred montážou rohového
dielu.
MAGYAR
Mielőtt a sarokelemet felszereled, állítsd
össze a keretet.
РУССКИЙ
Соберите каркас перед тем, как
установить угловую секцию.
中文
安装转角件之前,须首先安装基本
柜件。
日本語
コーナーユニットを設置する前にフレー
ムを組み立ててください。
AA-74363-7
33
ENGLISH
The door bumpers are designed to damp
the bang when closing the doors. In order
to minimise the gap between the two
doors, choose a thick bumper for a thin
door and a thin bumper for a thick door.
DEUTSCH
Türdämpfer minimieren das Geräusch
der Schranktüren beim Schließen. Um
den Spalt zwischen den beiden Türen
möglichst schmal zu halten, empfehlen wir
die Verwendung eines großen Dämpfers
für Türen mit geringer Tiefe und umgeke
—
hrt.
FRANÇAIS
Les amortisseurs servent à amortir le
choc à la fermeture des portes. Pour que
l’interstice entre les deux portes soit le plus
petit possible, il est conseillé de choisir
un amortisseur épais pour une porte ne
et un amortisseur n pour une porte plus
épaisse.
NEDERLANDS
Deurbuffers moeten zorgen dat de deuren
niet te hard dichtslaan. Om de opening
tussen beide deuren zo klein mogelijk
te houden, is het ‘t beste om een dikke
deurbuffer te kiezen voor een dunne deur
en een dunne deurbuffer voor een dikkere
deur.
ITALIANO
I gommini salvaporta attutiscono il rumore
provocato dalla chiusura delle ante. Per
ridurre il più possibile la differenza tra
le due ante, usa un gommino spesso per
l’anta più sottile e un gommino sottile per
l’anta più spessa.
ESPAÑOL
Los topes de las puertas sirven para
amortiguar el golpe al cerrarlas. Para que
la rendija entre las dos puertas sea lo más
pequeña posible, se debe elegir un tope
grueso para puertas de poco grosor y un
tope no para puertas de mayor grosor.
PORTUGUES
Os batentes das portas foram desen
hados para amortecer o golpe das portas
ao fecharem. Para minimizar a distância
entre as duas portas: para uma porta
na, escolha um batente grosso; e para
uma porta de maior grossura, um batente
no.
SVENSKA
Dörrdämparna är till för att dämpa
tillslaget när dörrarna stängs. För att
glipan mellan de båda dörrarna ska bli
så liten som möjligt bör man välja en tjock
dörrdämpare till en tunn dörr samt en tunn
dörrdämpare till en tjockare dörr.
DANSK
Dørdæmperne er til at dæmpe slaget når
døren lukkes. For at åbningen mellem dør
rene er så lille som muligt bør man vælge
et tyk dørdæmper til en tynd dør og en
tynd dørdæmper til en tykkere dør.
NORSK
Dørdemperne er til for å dempe slaget når
dørene stenges. For at glippen mellom de
to dørene skal bli så liten som mulig bør
man velge en tykk dørdemper til en tynn
dør samt en tynn dørdemper til en tykkere
dør.
SUOMI
Ovenvaimentimet pehmentävät iskua,
kun ovet suljetaan. Jotta ovien välinen
rako jäisi mahdollisimman pieneksi, käytä
paksua vaimenninta ohuessa ovessa ja
ohutta vaimenninta paksussa ovessa.
POLSKI
Ochraniacze do drzwi zaprojektow
ano z myślą o stłumieniu hałasu
towarzyszącemu zamykaniu drzwi. Aby
zminimalizować przestrzeń pomiędzy
drzwiami wybierz gruby ochraniacz do
cienkich drzwi i cienki ochraniacz do
grubych drzwi.
ČESKY
Dveřní tlumič tlumí náraz při zavírání dveří.
Aby mezera mezi dveřmi byla co nejmenší,
použijte pro tenké dveře tlustší dveřní
tlumič a pro tlustší dveře tenčí dveřní
tlumič.
SLOVENSKY
Tlmič do dverí tlmí nárazy pri zatváraní
dverí. Aby ste čo najviac minimalizovali
medzeru medzi dverami, použite na tenké
dvere hrubší dverový tlmič a na hrubšie
dvere tenší dverový tlmič.
MAGYAR
Az ajtó zárásakor előforduló esetleges
csattanás elkerülésének érdekében az
ajtókon ütközők vannak. Két ajtó közötti
nyílás minimálisra csökkentése érdekében
a vékony ajtóhoz vastag, a vastag ajtóhoz
vékony ütközőt válassz.
РУССКИЙ
Дверные амортизаторы предназначены
для смягчения удара при закрывании
дверей. Для того, чтобы уменьшить
зазор между дверьми, подберите
толстый амортизатор для тонкой двери и
тонкий амортизатор для толстой двери.
中文
门件缓冲垫用于防止关门时发生撞
击。为了减小两门件之间的缝隙,较薄的
门板可采用厚缓冲垫,较厚的门板可选用
薄缓冲垫。
日本語
ドアバンパーはドアを閉じる際の衝撃を
和らげるためのものです。2つのドアの
すき間を最小限に抑えるため、薄いドア
には厚いバンパーを、厚いドアには薄い
バンパーをご使用ください。
32
ENGLISH
The handle is to be tted on the door that
is mounted on the frame.
DEUTSCH
Den Griff nur an der Tür befestigen, die
am Korpus montiert ist.
FRANÇAIS
Les poignées ne doivent être xées dans
la porte xée à la structure.
NEDERLANDS
Bevestig de handgreep uitsluitend aan de
deur die op het basiselement gemonteerd
is.
ITALIANO
La maniglia va ssata all’anta montata
sulla struttura.
ESPAÑOL
El tirador sólo se colocará en la puerta
jada a la estructura.
PORTUGUES
O puxador é para instalar na porta que
está montada na estrutura.
SVENSKA
Handtag skall endast fästas i dörren som
sitter på stommen.
DANSK
Håndtag skal kun fastspændes på døren
som sidder på stellet.
NORSK
Håndtak skal kun festes i døren som sitter
på stammen.
SUOMI
Vedin voidaan kiinnittää vain rungossa
kiinni olevaan oveen.
POLSKI
Rączkę należy przymocować do wcześniej
zamontowanych na obudowie drzwi.
ČESKY
Úchytka je připevněna na dveřích, které
jsou namontované na rámu.
SLOVENSKY
Uchytka je prichytená na dvere, ktoré sú
montované do rámu.
MAGYAR
A fogantyú a keretre erősített ajtóra
szerelhető.
РУССКИЙ
Ручка должна закрепляться на дверь,
которая установлена на каркас.
中文
门把手应安装于基本柜件的门件上。
日本語
この取っ手はフレームに設置した方のド
アに取り付けてください。
AA-74363-7
5
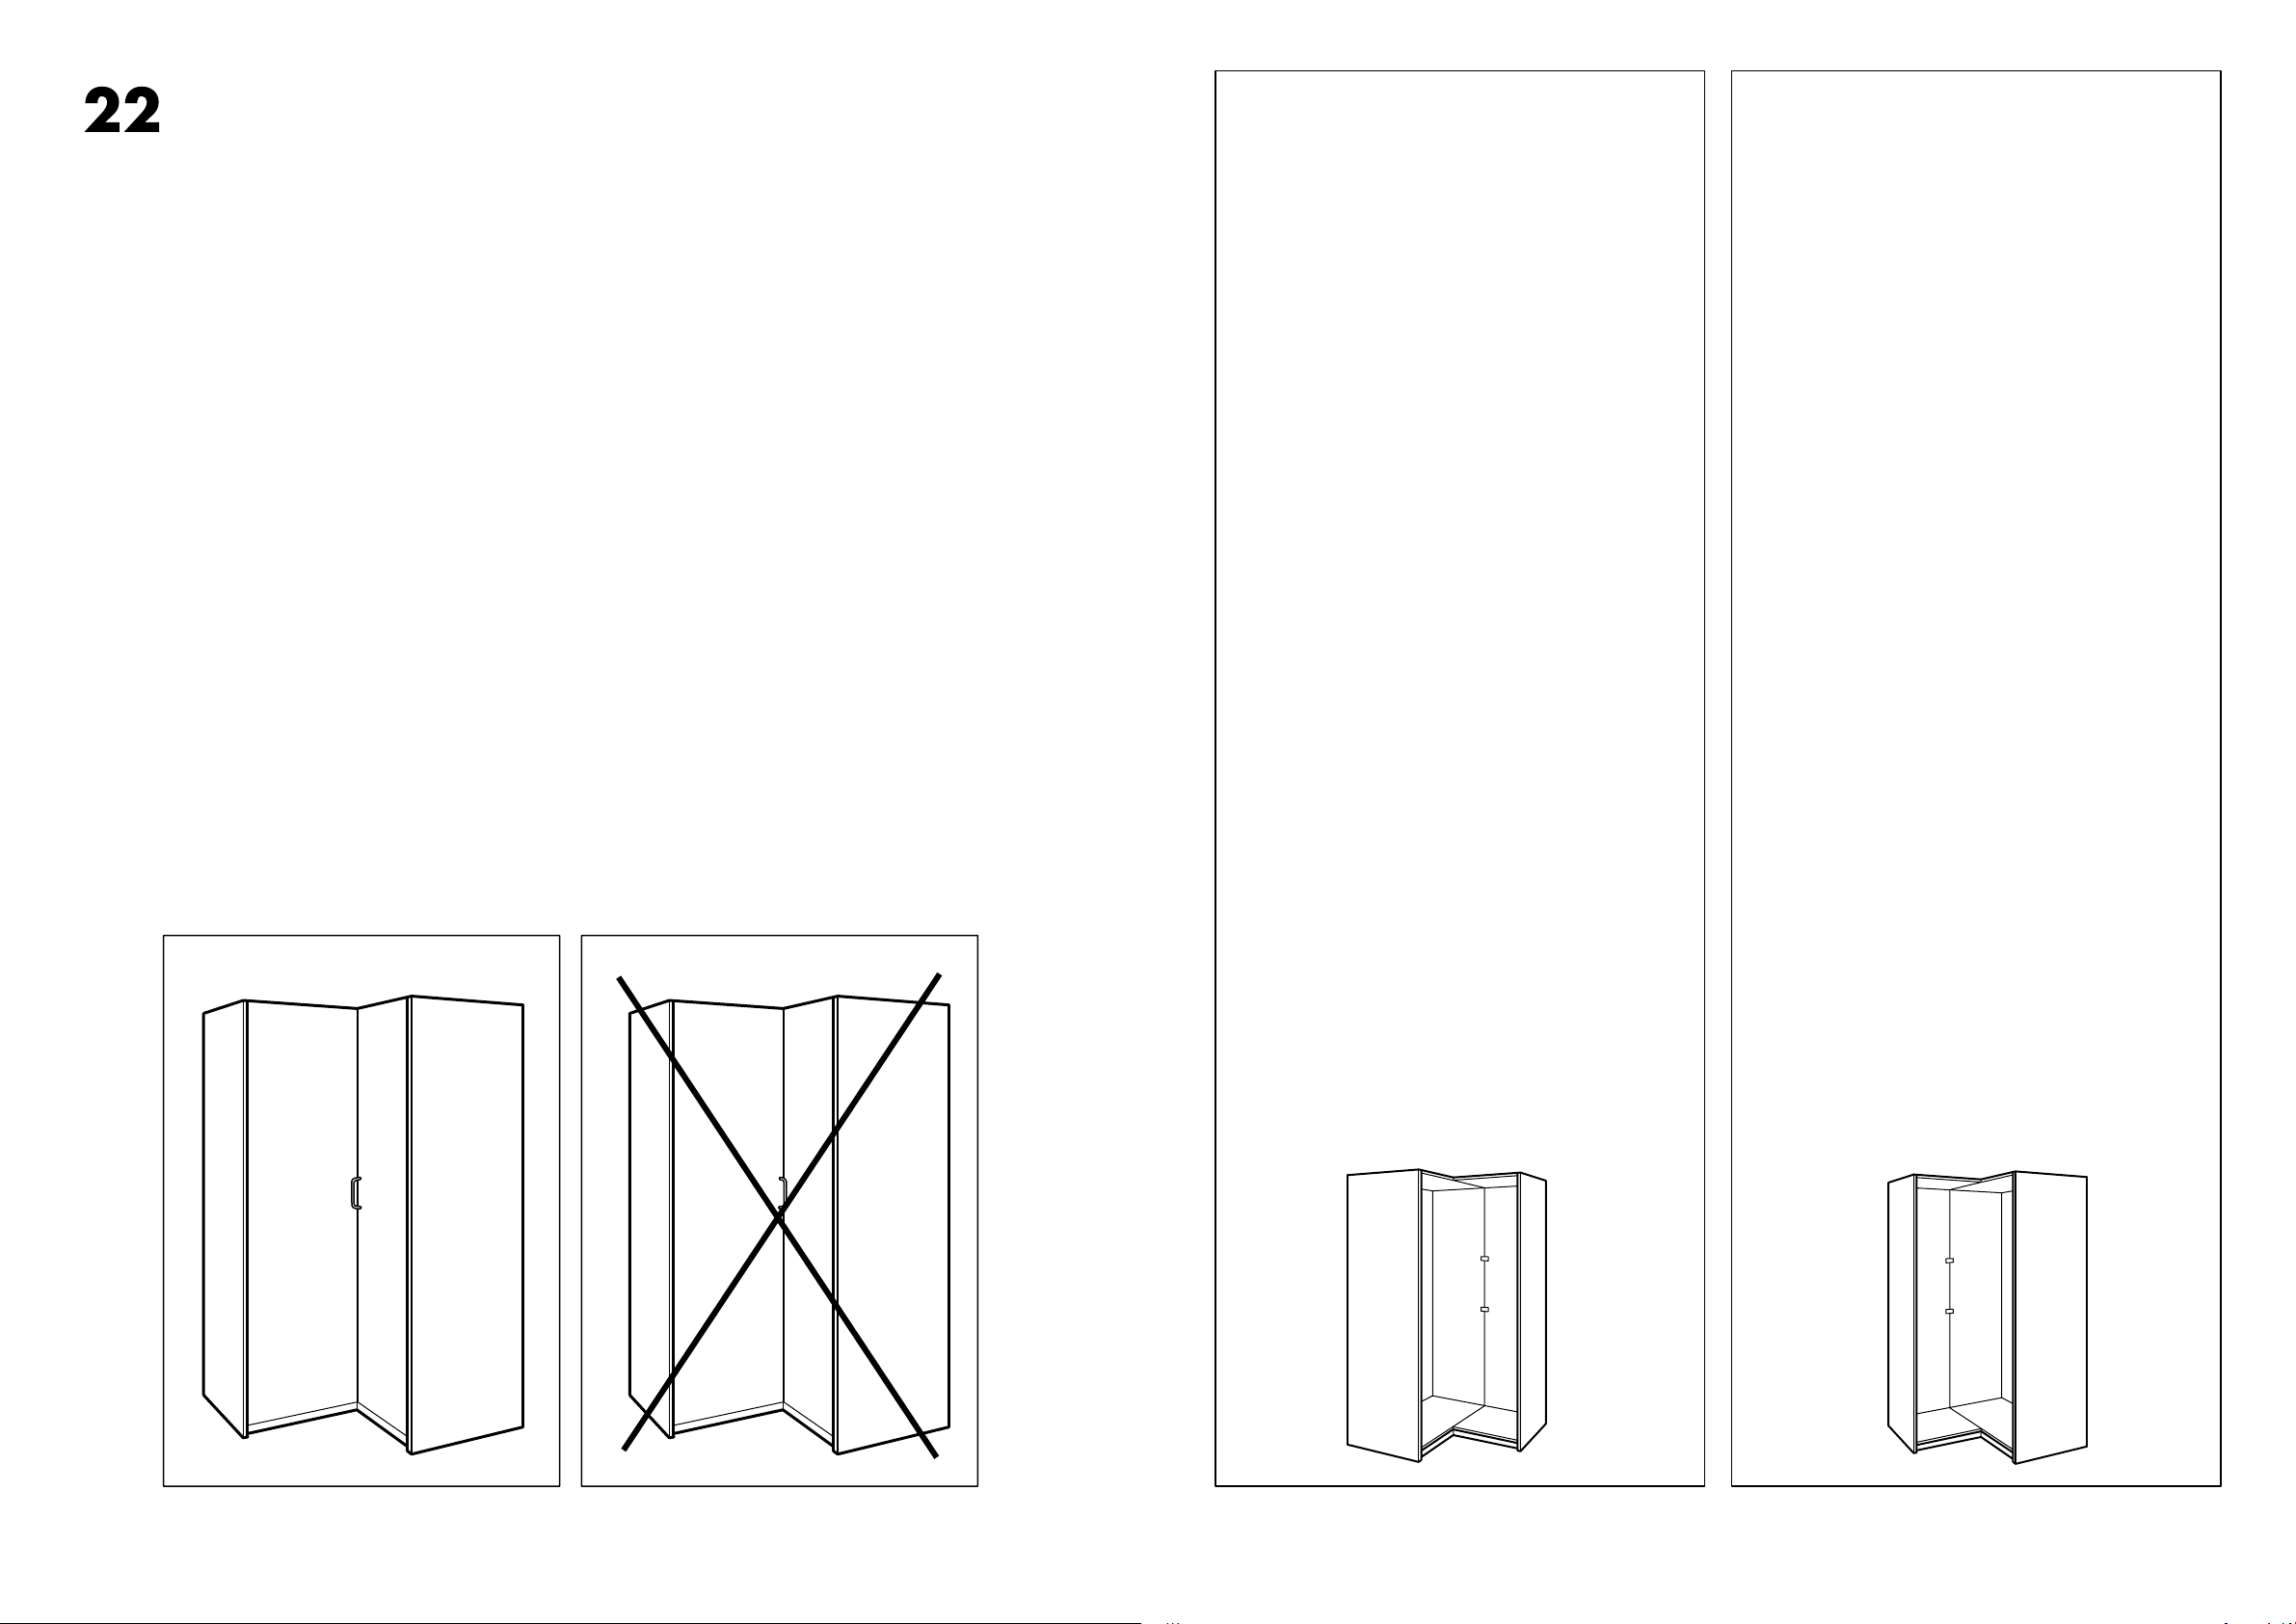
ENGLISH
For left-hand mounting of corner unit, see page 19.
DEUTSCH
Montageanleitung für Eckelement links siehe Seite 19.
FRANÇAIS
Montage de l’élément d’angle à gauche, voir page 19.
NEDERLANDS
Montage van het hoekdeel links — zie blz. 19.
ITALIANO
Per il montaggio dell’elemento angolare sul lato sinistro, vedi
pagina 19.
ESPAÑOL
Montaje del módulo de esquina en el lado izquierdo, ver
página 19.
PORTUGUES
Para a montagem à esquerda do elemento de canto, veja a
página 19.
SVENSKA
Montering av hörndelen på vänster sida — se sida 19.
DANSK
Montering af hjørnedelen på venstre side — se side 19.
NORSK
Montering av hjørnedelen på venstre side — se s 19.
SUOMI
Kulmaosan asentaminen vasemmalle puolelle — katso sivu 19.
POLSKI
Montaż lewostronny segmentu narożnego opisany jest na
stronie 19.
ČESKY
Při montáži levého rohového dílu postupujte podle strany 19.
SLOVENSKY
Pri montáži ľavého rohového dielu postupujte podľa
inštrukcií zo str.19.
MAGYAR
Ha a sarokelemet bal oldali nyitással szeretnéd felszerelni,
lapozz a 19. oldalra.
РУССКИЙ
Для установки угловой секции слева см. страницу 19.
中文
左侧边安装转角件,请参看说明材料第19页。
日本語
コーナーユニットを左側に設置する場合は、19ページをご
参照ください。
ENGLISH
For right-hand mounting of corner unit, see page 5.
DEUTSCH
Montageanleitung für Eckelement rechts siehe Seite 5.
FRANÇAIS
Montage de l’élément d’angle à droite, voir page 5.
NEDERLANDS
Montage van het hoekdeel rechts — zie blz. 5.
ITALIANO
Montaggio dell’elemento angolare sul lato destro: vedi
pagina 5.
ESPAÑOL
Montaje del módulo de esquina en el lado derecho, ver
página 5.
PORTUGUES
Para a montagem à direita do elemento de canto, veja a
página 5.
SVENSKA
Montering av hörndelen på höger sida — se sida 5.
DANSK
Montering af hjørnedelen på højre side — se side 5.
NORSK
Montering av hjørnedelen på høyre side — se s 5.
SUOMI
Kulmaosan asentaminen oikealle puolelle — katso sivu 5.
POLSKI
Montaż prawostronny segmentu narożnego opisany jest na
stronie 5.
ČESKY
Při montáži pravého rohového dílu postupujte podle strany 5.
SLOVENSKY
Pri montáži pravého rohového dielu postupujte podľa
inštrukcií zo str.5.
MAGYAR
Ha a sarokelemet jobb oldali nyitással szeretnéd felszerelni,
lapozz az 5. oldalra.
РУССКИЙ
Для установки угловой секции справа см. страницу 5.
中文
在右侧边安装转角件,请参看说明材料第5页。
日本語
コーナーユニットを右側に設置する場合は、5ページをご
参照ください。
Loading…