
Table of Contents
M365 Pro 2 cooking guide
Detailed parameter description for M365 Pro 2 firmware generator

Download Scooter Hacking utility
This tab links straight to Google Play store. It is suggested to use SH utility for flashing the herein generated firmware.
In case your device does not come with Google Play or Google Service Framework installed, you can download the apk here: https://scooterhack.in/utilityapk
Presets
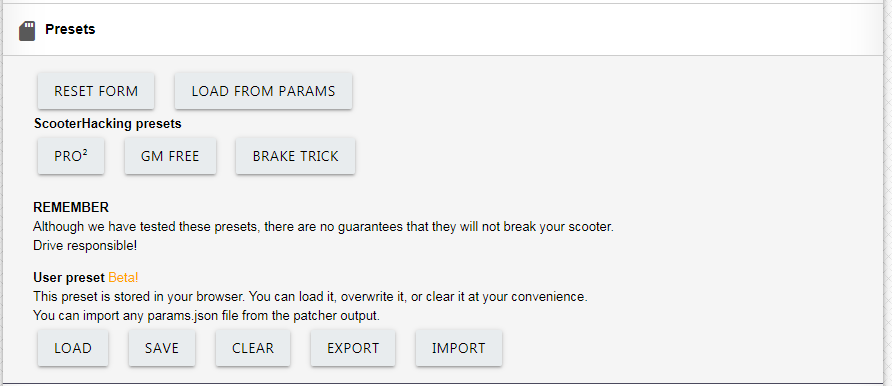
This category contains suggested presets, set up by community. You can base your template on any of them, however it’s suggested to start from vanilla configuration.
You can also save presets in your browser or import/export them into a file
Basics
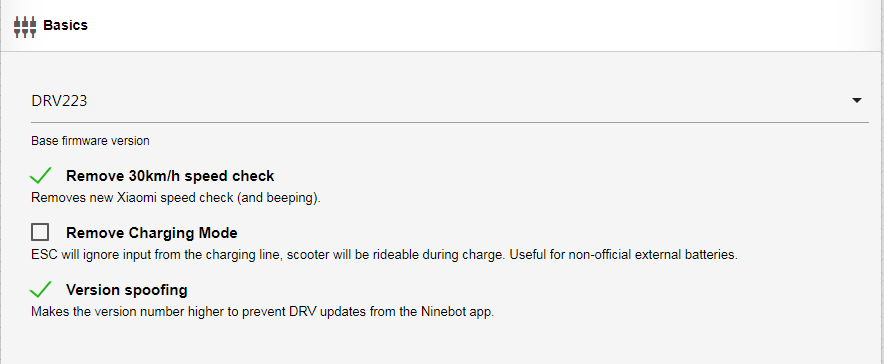
Base firmware version
Use DRV223 if you don’t know what you’re doing.
Remove 30km/h speed check
This will patch out new limitation imposed in 223/224 DRV that beeps when the target speed reaches 30km/h or more.
Remove charging mode
If you intend on using external battery through the charging on, turn this on. For all other uses, keep it off.
Version spoofing
Artificially inflates the firmware version number in order to prevent any official apps from unsolicited upgrading. No side effects are to be expected with sideloading different firmwares. Recommended
Power and Speed
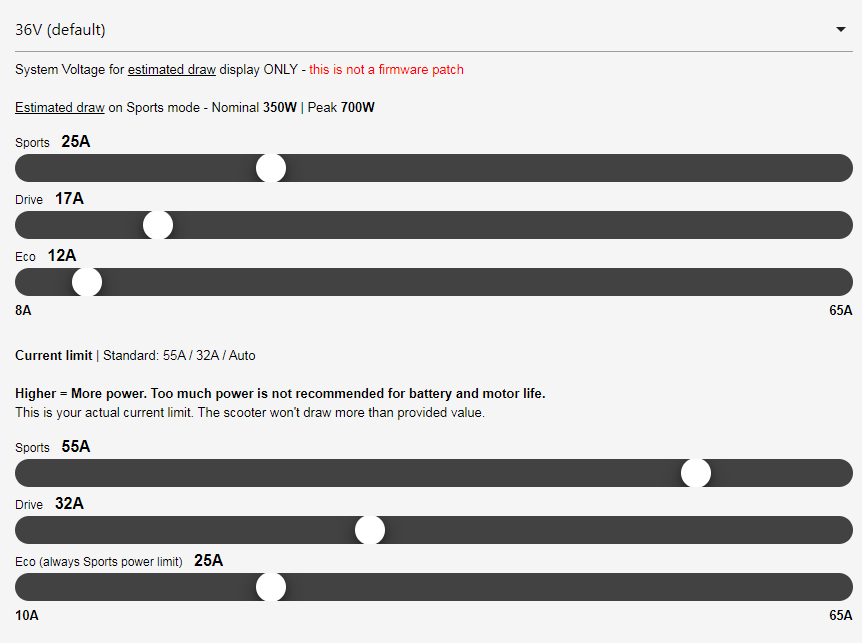
Estimated draw
Current in the following rows should be thought as torque. More amperage means more torque, but also more stress on the components and motor, usually less range on single charge. It is suggested to start from factory values and proceed up only if necessary. 25A on Sport mode is already high enough that the motor cannot exert this level of torque for long without overheating. Bear in mind that the motor case temperature are only a fraction of the heat generated by coils, which are usually 50-60C hotter than the case.
Estimated draw is the ‘older’ setting for current. In practical sense, this would be the target current you’ll reach during operation, with small fluctuations based on the current elevation or speed.
Current limit was previously known as phase current limit . This is the peak envelope power on the ABC phases, measured by the ESC itself. __Treat this as hard limit, and the estimated draw as soft limit.u When unsure, you can set this to 2-3 times of the estimated draw.
Recommended values (if you don’t know what to do)
-
Sport — Estimated 25A, Limit 65A
-
Drive — Estimated 17A, Limit 65A
-
Eco — Estimated 10A
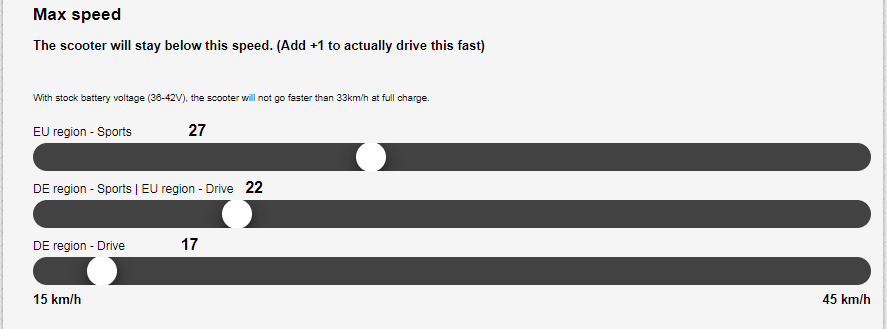
Max speed
Max speed is rather self explanatory, in speed mode, your max speed will be limited by this setting. The scooter never actually reaches this, due to various factors. Generally, 1km/h should be added here to reach the target speed, e.g. for 25km/h, set 26.

Direct power control
Changes the way the throttle reacts:
-
In speed mode, throttle position always corresponds to fractional value of the set max speed. This speed, especially with cruise control enabled, will be kept regardless of terrain or air resistance, also considering maximum current for set mode (eco/drive/sport)
-
In direct power mode, throttle position corresponds to fractional value of the max current/power set for said mode. In contrast, here the power remains constant, but the speed changes with the torque the motor needs to apply to keep you moving. This results in speeding up with low payload, low air drag or downhill, and slowing down with high payload, high air drag or uphill.
-
Direct power mode ignores any speed limits you might have set, including the global set limit.
-
Acceleration tends to be smoother, as the throttle reacts in a similar way to gas/accellerator pedal in combustion vehicles
-
In direct power mode, your scooter will try to reach the maximum speed possible, until set current limits are reached.
-
DPC mode can be disabled entirely, enabled through boot sequence with brake lever pressed (press the brake lever while turning on the scooter, and keep it pressed for 2 seconds until it’s fully on), or always enabled.
-
Since 5th March, there’s also an additional method of activating DPC using shu app, Switchable, register option allows you to enable DPC in the app by activating DPC switch. It can also be automated through the Automation menu.
-
-
There are two response settings for the throttle – flat and quadratic
-
Flat makes the throttle response linear – e.g. throttle at 60% results in 60% of the max current set
-
Quadratic makes the throttle response, well, quadratic (or logarithmic if you prefer) — 60% throttle will result in approx 40% of the max current set
-
-
Current raising coefficient
This setting controls how is the full current applied, relative to your active current. The idea here is not to stress the motor at low rotations per minute, where its efficiency is the lowest. 16000 is the allowable maximum.
If you limit the current limit to conservative values, you can max this out, to get current-accurate DPC.
Motor start speed
Motor will not exert any torque unless this speed is reached. Please note that even when this is set to 0, the scooter won’t accelerate from dead stop. Minimum speed here is >0.01kmh represented by the value “0” on the slider.
Braking & Energy Recovery
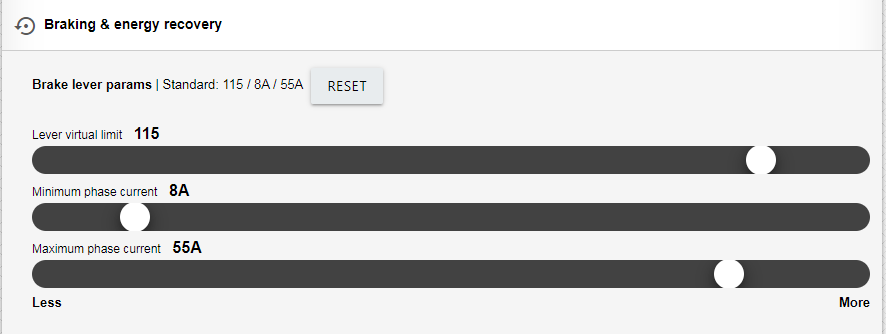
Brake lever parameters
Lever virtual limit – modifies the linear response of the brake lever in such a way, to apply the maximum value sooner based on relative position of the brake lever. 130 results in fully linear response, 0-100%, 85 reaches the maximum braking power at about 70% of the brake lever range.
If you have separate lever or thumb throttle for ebrake, set this to maximum to get the best dynamic range, otherwise keep to 75-100 with combined levers.
Minimum and Maximum phase current
Sets the strength of how your brake will be pulling. It is advisable not to go over 30A, as there are reports of broken controller boards due to regenerative braking. Furthermore, there is a limit to how much braking can be achieved per system voltage. Going over this limit means the scooter will try to brake by applying current instead of regeneration. This can stress the components excessively, and shouldn’t be used in other cases except emergencies. More braking power can be unlocked by raising system voltage to 48V or beyond.
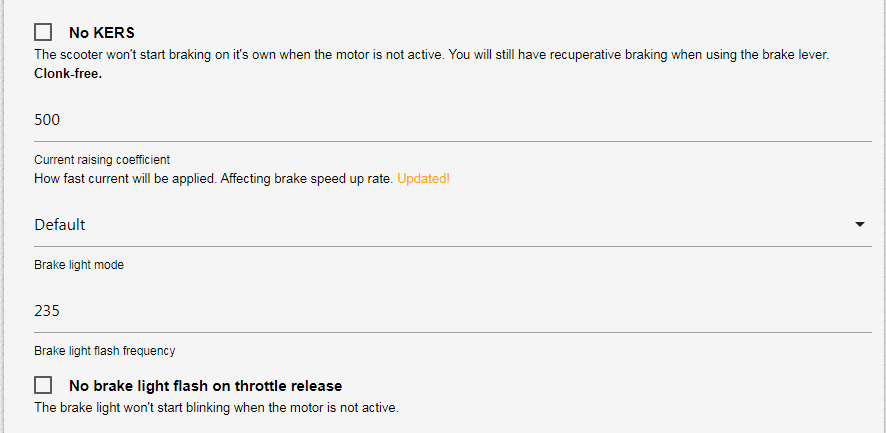
No KERS
Disables automatic braking when no acceleration is applied. Recommended, as the default automatic braking has no significant advantages, and only results in applying throttle more than necessary. Furthermore, small current is applied when the scooter is moving even without any throttle set. This can help with coasting, as the static magnetic forces of the motor are overcome, which would normally cause drag.
Current raising coefficient
Again, same as with adding torque, this controls the relation of the braking current applied to the speed you’re moving. Lower setting might help with finding balance between good downhill speed and regeneration, while higher values will pull more current faster, leading to quicker stop.
Brake light mode
Changes the way the rear light reacts to braking
-
Default — No strobe on drive, strobe on braking
-
Static — ON all the time — no matter lever position
-
Reversed — No strobe on braking, strobe on drive
-
Strobe — Always strobe
Brake light flash frequency
Sets the flashing frequency for rear light in flashes per minute.
No brake light flash on throttle release
By default, the rear red light will blink when the brake lever is pressed. Check this to keep that from happening.
Cruise control

Cruise control delay
Sets the time until cruise control is applied, when the throttle is kept at the same position. After the beep, your speed or power will be kept constant, until you touch the throttle again, or apply brakes.
Advanced
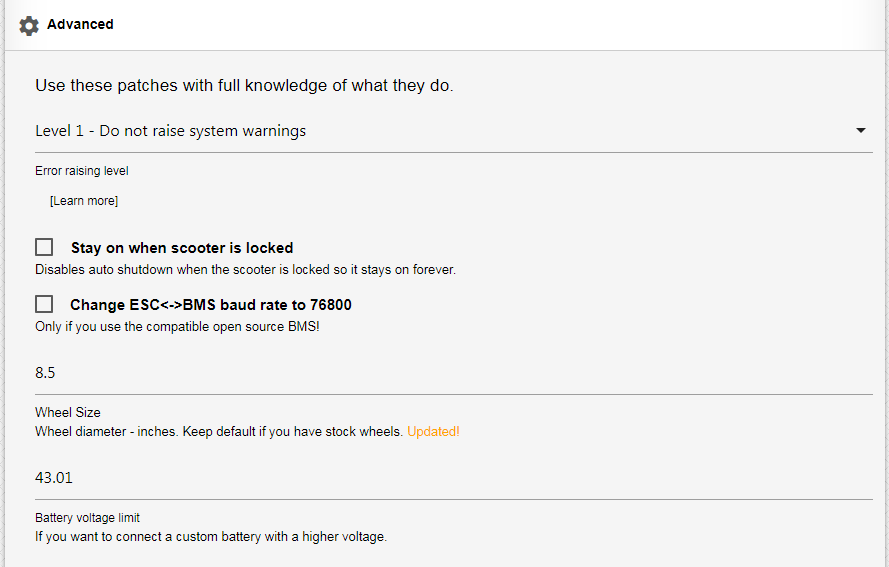
Error raising level
Check this guide for what errors will be raised with the applied settings: https://wiki.scooterhacking.org/doku.php?id=nberrorcodes
Stock, unmodded scooter should have this set to level 0.
If you have higher voltage battery with no “smart” bms, set this to level 2 to prevent ESC from triggering error 21
Level 3, known as stealth level bypasses all errors. Not recommended for general usage
Stay on when scooter is locked
With this enabled, the scooter will be always on in lock mode, with blocked motor to prevent theft.
Change ESC-BMS baud rate to 76800
Enable this only if you used open source BMS, as detailed on BoToX github.
Wheel size diameter
Keep as is, if you use stock 8.5” tires. This directly affects speed limits set earlier, and should be set only in case 10” tires were put on.
Set to:
9.47 for XuanCheng tires
9.0 for Wanda P1237 tires
9.0 for Deli SA-206 tires
Battery voltage limit
Change this only if you increased battery voltage. The threshold should be maximum 4.3V per cell.
So 51.6V for 12s, 55.9 for 13s, 60.2V for 14s and 64.5 for 15s.
Time to cook
Select the output format based on the flashing app you use, and then click Download ZIP
Congratulations, you have successfully cooked your custom, tailored firmware. Now load it in Scooter Hacking utility, DownG or XiaoFlasher (deprecated) and enjoy
SHFW is a custom firmware available for flashing via the Scooterhacking Utility app. Configuring it might be challenging for new users. This guide aims to provide a quick and easy way to apply the important basics. The understanding aspect of all this can be overwhelming, but it will come as a side effect of your own testing and thinking as we can’t do that for you.
Join the discussions on Telegram and Discord.
Installation
To install SHFW, follow these steps:
-
Download our official app Utility, alternatively for wide range device support, including iOS, check out Luna.
-
Supported Scooter Models:
-
Ninebot G30, G30L: You can flash this firmware if the DRV version is at 1.7.3 or below. If your DRV is 1.7.3, you need to select “Attempt Downgrade” before SHFW. For DRV versions above 1.7.3, you’ll need an ST-Link. Refer to this for more information.
-
Ninebot G2, F2, F2 Plus, F2 Pro: Every regional model is compatible, needs to be unlocked via ST-Link.
-
Ninebot ESx: Every version is supported.
-
Exx Series: [Not E2, E2 Plus, E2 Pro. Only the older E22, E45, etc] You can flash SHFW if the DRV version is below 2.7.0. Else you will need to use a ST-Link.
-
Ninebot F-Series: [Older SHFW 0.3.6] You can flash this firmware if the DRV version is below 5.7.0. Else you will need to use a ST-Link. There are online guides available for this process. The app will prompt for updates even if there’s none, be aware. Needs to flash with up to date Utility, then configured with Utility 2.5. Do not enable brake boost.
-
Ninebot D-Series: [Currently not working] There is an experimental support for D-Series using the F-Series firmware. It’s not known at which DRV version you will need a ST-Link. The guides should be identical to the F-Series.
-
Xiaomi Scooters: If the BLE version is at 1.5.5 or above, then you’ll need to ST-Link downgrade the dashboard. ST-Link Downgrade Guide. Flashing on M365 with a 4-dot dashboard requires extra steps detailed in the 4th section of installation. Attempt DRV downgrade via our app if flashing SHFW fails with a supported BLE version.
Reflasher, Webflasher and ScooterFlasher are programs used for ST-Linking, choose either one if it’s needed.
Model Compatible BLE Compatible DRV ST-Link if incompatible ST-Link if incompatible Ninebot G30 All Up to 1.7.3 Ninebot G2 All ST-Link Ninebot F2, F2 Plus, F2 Pro All ST-Link Xiaomi Essential, 1s, Pro 2, 3 Below 1.5.5 All Ninebot EsX All All Ex Series All Below 2.7.0 Ninebot E2, E2D, E2 Pro N/A N/A Ninebot F-Series All Below 5.7.0 Ninebot D-Series All Experimental (F-Series firmware, unknown) -
-
Flash Procedure:
- Open the utility app, connect to the scooter.
- Press “Install/update SHFW” and select the version of the highest number, if there are multiple choices. Then, press flash. If it fails, and the above grid claims a supported version, try the “attempt drv downgrade” flash before SHFW.
- If you have the newer Gen 3 G30 motor then select the new motor option under the motor config tab. This is automatic with original serial. If you don’t know which one you have, compare the motor serial to this:
Motor Serial Number (SN) Generation Models Starts with 6 First Generation Most older models Starts with 9 Second Generation G30Ps, some G30Lx models Includes PCAH Third Generation G30P Includes PAAH Third Generation G30E Includes PADH/PADJ Third Generation G30D
Usage
Please be aware that the information provided below is intended for practical use, but it should be used with caution. Remember, field weakening, by its nature, will not be efficient.
Peak Current Draw Calculator Features
- Torque Amps Calculation: Users can input their torque amps (Iq) to calculate the torque component accurately.
- Field Weakening Calculation: By entering the initial flux in A, variable flux in mAh, current max speed in km/h, and start speed in km/h, the calculator determines the flux component (Id), incorporating field weakening effects.
- Peak Current Draw: With the input parameters, the calculator computes the peak current draw (I_total), providing essential insights into the system’s maximum electrical demand.
To customize these phase limits, check out the Iq and Id sliders under “Field Weakening”.
Try the Peak Current Draw Calculator — A user-friendly tool designed for clarity and efficiency in calculating electrical parameters. Keep in mind, this is peak, not showing actual real life battery draw, but it helps visualize it. Sport, drive and eco curves in Utility, show target battery current, but it is not a limiter, and for low speed compensation, higher current can be temporarily drawn.
Ninebot G30
To achieve the top speed for Ninebot G30, follow these configurations:
- Enable “expert view” on the top right.
- Set sport DPC auto curve to 25A, 0.5 quadratic
- Configure the other modes as desired, lower current than sport for less acceleration.
- Keep the speed limit to off / 0.
- Acceleration boost, 50%.
- Brake boost, 0-50%, try it out.
- Overmodulation on for sport/drive, efficient speed increase by 10%.
You can set eco and drive to lower values, e.g. 10A eco, 25A drive. Drive will use less current since we won’t enable field weakening.
-
Go to the field weakening tab and enable field weakening for sport mode:
Normal use:
- Configure as follows:
- Speed: 20 km/h
- Initial: 0A
- Variable: 1200
Higher efficiency, less field weakening:
- Configure as follows:
- Speed: 20 km/h
- Initial: 0A
- Variable: 600
- Configure as follows:
-
Default tire size for Max models are 10”, but set 9.4” on G30 to get the dash speed to match GPS speed.
-
Under Motor Settings, select 20 or 24khz.
Ninebot G2, F2
To achieve the top speed for G2 and F2, follow these configurations:
- Enable “expert view” on the top right.
- Set sport DPC auto curve to 25A, 0.5 quadratic
- Configure the other modes as desired, lower current than sport for less acceleration.
- Keep the speed limit to off / 0.
- Acceleration boost, 100%. However if it turns off, decrease this percentage.
- Brake overshoot to 45A, reduces risk of overcurrent from brake activation.
You can set eco and drive to lower values, e.g. 10A eco, 25A drive. Drive will use less current since we won’t enable field weakening.
-
Go to the field weakening tab and enable field weakening for sport mode:
Normal use:
- Configure as follows:
- Speed: 20 km/h
- Initial: 0A
- Variable: 1200
Higher efficiency, less field weakening:
- Configure as follows:
- Speed: 20 km/h
- Initial: 0A
- Variable: 600
- Configure as follows:
Xiaomi Pro 2
Configuration for this model depends on the battery serial number and firmware version:
Enable “expert view” on the top right.
Battery serial number starting with 4XFG AND BMS firmware version with 3 numbers (e.g. 1.4.1) instead of 4 numbers:
- Sport mode, DPC, auto curve 30A, half quadratic (0.5):
- Acceleration boost set to 100%.
- Brake boost set to 100%.
- Overmodulation on for sport/drive.
Battery serial number starting with BFFG OR BMS firmware version with 4 numbers (e.g. 1.1.0.2) instead of 3 numbers:
- Sport mode, DPC, auto curve 20A, half quadratic (0.5):
- Acceleration boost set to 80%.
- Brake boost set to 100%.
- Overmodulation on for sport/drive.
You can set eco and drive to lower values, e.g. 10A eco, 20A drive. Drive will use less current since we won’t enable field weakening.
- Go to the field weakening tab and:
- Enable field weakening for sport mode.
- Configure as follows: 20 km/h, 0A, 1500.
- Under Motor Settings, select 20khz.
Xiaomi Mi 3
For this model, use the following configurations:
Enable “expert view” on the top right.
- Sport mode, DPC, auto curve 20A, half quadratic (0.5):
- Acceleration boost set to 90%. If the vehicle turns off, decrease this.
- Brake boost set to 100%.
- Overmodulation on for sport/drive
You can set eco and drive to lower values, e.g. 10A eco, 20A drive. Drive will use less current since we won’t enable field weakening.
- Go to the field weakening tab and:
- Enable field weakening for sport mode.
- Configure as follows: 20 km/h, 0A, 1500.
- Under Motor Settings, select 20khz.
Xiaomi Essential, Lite, 1S
For Xiaomi Essential & 1S, use these configurations:
- Enable “expert view” on the top right.
- Sport mode, DPC, 18A, fully quadratic (1.0).
- Acceleration boost set to 50%.
- Brake set to 30A, flat (0.0), if your brake feels weak, slowly increase the brake boost setting.
- Overmodulation on for sport/drive.
You can set eco and drive to lower values, e.g. 10A eco, 18A drive. Drive will use less current since we won’t enable field weakening.
-
Go to the field weakening tab and:
- Enable field weakening for sport mode.
- Configure as follows: 15 km/h, 0A, 1500.
-
Under Motor Settings, select 20.
Ninebot EsX, Ex
For Ninebot EsX, Ex, use these configurations:
- Enable “expert view” on the top right.
- Sport mode, DPC, 18A, fully quadratic (1.0).
- Acceleration boost, 50%.
- Brake, 55A flat (0.0)
- Overmodulation on for sport/drive
You can set eco and drive to lower values, e.g. 10A eco, 18A drive. Drive will use less current since we won’t enable field weakening.
- Go to the field weakening tab and:
- Enable field weakening for sport mode.
- Configure as follows: 15 km/h, 0A, 1500.
- Under Motor Settings, select 20khz.
Explanation of PI Control and Acceleration Boost
PI Control for Voltage Time Conversion
The PI control system converts amperes into voltage time. This process scales the voltage time from 0 to 31128, where 31128 represents 100%. This scaling is done for both current components. If the total time exceeds 31128, the values are adjusted down to a new value accordingly.
Voltage Measurement and Compensation
The system measures only the voltage time, using a 100% duty cycle at maximum potential speed. This method allows the system to perform consistently at different voltages without requiring firmware adjustments. The PWM (Pulse Width Modulation) cycle is kept high continuously, operating similarly to a DC engine.
Implementation Specifics
- 16-bit Counters: The system uses 16-bit counters to implement PWM. The counters stop 4 loops before the end of the frequency.
- Duty Cycle Limit: The duty cycle is limited to 95%, as achieving 100% is theoretically possible but impractical.
- Voltage Relevance: Voltage is not directly relevant for control. Instead, the control manages the phase duration. For example:
- Phase A might be high for 10 ms
- Phase B might be high for 5 ms
- Phase C might be high for a shorter duration
However, it is important to note that the actual phase times are much shorter than these examples.
Acceleration Boost
The Acceleration Boost feature allows for enhanced motor response by temporarily increasing the target current during acceleration. This is controlled via a 0-100% slider, which adjusts the boost intensity.
When the slider is set, the system requests a higher current for a short duration, effectively doubling the target current when the slider is at 100%. For instance, setting the slider to 50% increases the requested current to 150% of the original target. This temporary boost enables the motor to achieve quicker acceleration without permanently raising the current limit.
However, this technique results in increased electricity consumption as the system draws additional power during the acceleration phase. The necessary energy for this boost is sourced from the battery, leading to a higher overall power usage.
Field Weakening Calculations and Logic
What is Field Weakening?
Field weakening is a technique commonly used with 3-phase electric motors to achieve higher speeds in electric vehicles like scooters. It allows the motor to operate beyond its rated voltage and rpm, which can result in increased top speed. However, implementing field weakening comes with trade-offs, including increased battery usage, higher motor temperatures, and potential additional expenses.
Field Weakening Flux Calculation
The calculation for field weakening flux is as follows:
field weakening flux = initial + (“current speed” — “field weakening start speed”) * (variable / 1000)
initial: The initial value of the field weakening flux."current speed": The current speed of the scooter."field weakening start speed": The speed at which field weakening should start.variable: A parameter that influences the rate of flux increase.
Here’s a graph of the flux current applied at various speeds comparing the following 2 setups:
- 7A initial current, 24km/h start speed, 1500mA/km/h variable current
- 0A initial current, 24km/h start speed, 1500mA/km/h variable current
So as to summarize the graph, initial adds field weakening at field weakening speed, with additional current per km/h as per set variable current. Initial current can be used to get over the needed threshhold to reach higher field weakening current by variable. Too much field weakening will just cause heating and potential harm, while too little will limit your speed. It is however optimal for motor and battery performance to not use field weakening at all.
Custom batteries and BMS emulation
After installing a custom battery in specific scooter models, you might notice that the display no longer shows the battery charge percentage. This occurs because the scooter’s original Battery Management System (BMS) uses a communication cable to provide this information, among other functions. As a workaround, BMS emulation can be employed. This method calculates the battery’s charge level based purely on the system’s voltage, a viable approach due to the linear relationship between voltage and charge state.
For configuration, access the Utility app and navigate to the ‘Config’ tab. Here, you will find the BMS emulation option towards the bottom. In this section, enter the details of your battery, including the number of series groups and the total capacity. It’s crucial to ensure the minimum and maximum cell group voltages are set correctly, ideally matching or being more conservative than those specified by your BMS. The voltage range for a Li-Ion cell typically spans from 3 to 4.2V, but your BMS may have specific cutoff limits for charging and discharging. Adjust these settings according to your BMS’s limits or opt for the default if uncertain.
Note, BMS emulation is necessary only if you’ve completely replaced the original battery. If you’ve added an additional pack in series with matching or higher capacity, or if you have another battery in parallel, BMS emulation is not required. In cases of parallel battery configurations, the primary adjustment needed is to disable the charging mode, which can be found in the system settings. This guide aims to facilitate a seamless transition to custom battery usage, ensuring optimal performance and compatibility.
Given:
V_min= Minimum voltage of the battery pack when fully discharged.V_max= Maximum voltage of the battery pack when fully charged.V_current= Current voltage of the battery pack.
The formula to calculate the battery percentage (Battery_%) is:
Battery_% = ((V_current — V_min) / (V_max — V_min)) * 100
Where:
Battery_%is the state of charge of the battery pack as a percentage.V_minis the total voltage of the pack when all cells are at their minimum voltage.V_maxis the total voltage of the pack when all cells are at their maximum voltage.V_currentis the current total voltage of the battery pack.
Example of what I_total of 42A actually looks on a flat road while requesting 30A torque, 30A flux.
ADC modding info (G30 & ESx)
Special thanks to BXLR for providing valuable information on the R_adc logic.
Open Calculator
Note1: Make sure to adjust R_adc, as it plays a significant role in ADC modding.
Note2: You can also measure your battery voltage and then increase the divider voltage until the system voltage reading matches your previous meassuring.
Note3: You only need to touch this setting once you changed the resistors on the esc.
License
This project is licensed under the MIT License.
Please review the LICENSE file for detailed terms and conditions.
Note: The MIT License is applied to this project. While it allows for wide use and modification, it comes with no warranties or guarantees. The project contributors and maintainers are not responsible for any issues, damages, or liabilities that may arise from the use of this software.
This guide has been written by lekrsu, who can be reached on Discord with the tag lekrsu and on Telegram with the username lekrsu. You’re welcome to send a pull request if you feel like the information needs correction.
This guide can be viewed in a prettier form here.
Posted: 03 june 2022, 18:49
Ответ пользователю
tak1973 : 03 june 2022, 18:38
на это сообщение (развернуть)
@Alex_VG, вот, попробуйте эту ссылку. https://mimod.ru/download/ESMaxFree.apk
Не устанавливается.
Пишет, что была убрана по запросу.
Posted: 03 june 2022, 19:23
@Alex_VG, только что поставил на свой телефон. Скрин в студию.
► Answers: 2
Posted: 03 june 2022, 20:20
Ответ пользователю
tak1973 : 03 june 2022, 19:23
на это сообщение (развернуть)
@Alex_VG, только что поставил на свой телефон. Скрин в студию.
@Alex_VG, только что поставил на свой телефон. Скрин в студию.
Какая у вас версия Андройд?
Я пробую на 9.
Фото на черном фоне — пытался открыть через тотал.
Posted: 03 june 2022, 22:14
@Alex_VG, на моём 7.
Ладно, забейте на ESMax, давайте кастом с ScooterHacking настроим так чтобы работал примерно как ESMaxFree.
Да, забыл спросить, а контроллер усилен?
И так, открываем https://esx.cfw.sh/#.
В Presets: выбираем DEFAULT.
В Basics: выбираем версию стоковой прошивки. У Вас сейчас 1.3.9, ну и оставляем её. ЗЫ: На мой вкус 1.3.9 — самая оптимальная стоковая прошивка.
В Power & Speed: устанавливаем ползунок Motor Power Constan на 50000, если контроллер не подготовлен. Дла опции Stock KERS выбираем значение KERS/12.
В Advanced: устанавливаем галку у опции Current-based Throttle Algorithm.
Сохраняем прошивку для ScooterHacking Utility
Устанавливаем на смартфон ScooterHacking Utility из ГуглаПлея https://apk.support/app/sh.cfw.utility/download?v=Mi4wLjQ=&e=fefc.
Шьемся, пробуем кататься.
С помощью ScooterHacking Utility изменяем настройки курков.
Покажется вялым разгон и торможение, уменьшаем значение Motor Power Constan.
Примерно так.
ЗЫ: Возможно придётся сперва откатить BMS до 1.3.6.
► Answers: 1
Posted: 04 june 2022, 1:19
Ответ пользователю
tak1973 : 03 june 2022, 19:23
на это сообщение (развернуть)
@Alex_VG, только что поставил на свой телефон. Скрин в студию.
@Alex_VG, только что поставил на свой телефон. Скрин в студию.
Встал на третий Андройд.
Самокат видит, крутится и дальше и не идет…
Posted: 04 june 2022, 1:24
Ответ пользователю
tak1973 : 03 june 2022, 22:14
на это сообщение (развернуть)
@Alex_VG, на моём 7.Ладно, забейте на ESMax, давайте кастом с ScooterHacking настроим так чтобы работал примерно как…
@Alex_VG, на моём 7.
Ладно, забейте на ESMax, давайте кастом с ScooterHacking настроим так чтобы работал примерно как ESMaxFree.
Да, забыл спросить, а контроллер усилен?
И так, открываем https://esx.cfw.sh/#.
В Presets: выбираем DEFAULT.
В Basics: выбираем версию стоковой прошивки. У Вас сейчас 1.3.9, ну и оставляем её. ЗЫ: На мой вкус 1.3.9 — самая оптимальная стоковая прошивка.
В Power & Speed: устанавливаем ползунок Motor Power Constan на 50000, если контроллер не подготовлен. Дла опции Stock KERS выбираем значение KERS/12.
В Advanced: устанавливаем галку у опции Current-based Throttle Algorithm.
Сохраняем прошивку для ScooterHacking Utility
Устанавливаем на смартфон ScooterHacking Utility из ГуглаПлея https://apk.support/app/sh.cfw.utility/download?v=Mi4wLjQ=&e=fefc.
Шьемся, пробуем кататься.
С помощью ScooterHacking Utility изменяем настройки курков.
Покажется вялым разгон и торможение, уменьшаем значение Motor Power Constan.
Примерно так.
ЗЫ: Возможно придётся сперва откатить BMS до 1.3.6.
Да, именно это я и делал.
Кроме отката до BMS 1.3.6
Сейчас попробую откат.
А что значит усиленный контроллер?
__________
Откатил до 1.3.6
Ничего не изменилось.
Если я ставлю галку накат, то максимальная скорость 26
Но тогда курок газа работает дискретно. Как кнопка.
Если галку накат убираю, то 22.
Все так и было.
Вопрос:
А если в https://esx.cfw.sh/#. выбрать не Ex а MAX?
Posted: 11 june 2022, 18:18
Я проверял ночью с включенным фонарем.
Днем разгон до 28-30.
Ночью (с фонарем) 18-22(макс)
Уменьшать ток фонаря или менять батареи?
Или уменьшит ток можно программно?
Posted: 12 june 2022, 0:33
Такое впечатление, что «просел» самовосстанавливающийся предохранитель, питающий дисплейную плату, и под нагрузкой от фары убегает диапазон ручки газа.
► Answers: 1
1
Posted: 12 june 2022, 0:40
Еще одна проблема вылезла на втором самокате.
Когда включаю фонарь, вместе с ним включается тормоз.
Начинают мигать стопы.
Драйвер светодиода только что заменил, на всякий случай — ничего не дало.
Posted: 12 june 2022, 0:42
Ответ пользователю
Conejo : 12 june 2022, 0:33
на это сообщение (развернуть)
Такое впечатление, что «просел» самовосстанавливающийся предохранитель, питающий дисплейную плату, и под…
Такое впечатление, что «просел» самовосстанавливающийся предохранитель, питающий дисплейную плату, и под нагрузкой от фары убегает диапазон ручки газа.
А где он стоит?
Что то не нашел.
На контроллере?
Posted: 12 june 2022, 0:46
Ток подсветки R18 насколько я понял менять?
Posted: 12 june 2022, 1:07
А можете ток фонаря померять?
От отдельного БП.
Что то скачет он от 80 мА до 300. На 300 я защиту поставил. Срабатывает она.
С простым светодиодом тормоза не включаются.
Посажен похоже фонарь.
Какой ток должен быть?
Posted: 12 june 2022, 1:27
Я замерил на самокате — 500 мА
Не дофига?
______________________
Снизил ток до 50 мА — все равно срабатывает тормоз.
Не в этом дело…
Posted: 13 june 2022, 23:48
[quote message=280466]Alex_VG написал(а) 04 june 2022, 1:24
Если я ставлю галку накат, то максимальная скорость 26
Но тогда курок газа работает дискретно. Как кнопка.
Если галку накат убираю, то 22.
[/quote]
В ScooterHacking Utility настройте графики работы курков.
Также, в первоначальных настройках прошивки не была выбрана максимальная скорость.
[quote message=282055]Alex_VG написал(а) 12 june 2022, 1:07Что то скачет он от 80 мА до 300. На 300 я защиту поставил.[/quote]
Если ток через светодиод фары изменяется в широких пределах, то либо дроссель сдох, либо CS-резистор в драйвере фары, либо проседает шина +5В. Ток через светодиод фары всегда должен быть постоянен и не должен зависеть от внешних факторов в известных пределах. Для этого драйвер и устанавливается, ну и для повышения КПД.
При включённой фаре замерьте уровень напряжение на шины +5В непосредственно на плате табло. Если F2 сдох на плате контроллера, то и шина +5В просядет после него, особенно при включённой фаре. При этом, при тапке в пол курком газа, самокат не сможет ехать с максимальной скоростью, так как выходной сигнал с курка газа также будет просевшим, а ведь именно уровень выходного сигнала с датчика Холла курка газа контроллер определяет запрашиваемую скорость, если курок газа работает в режиме круиз-контроля, или запрашиваемый уровень тока через МК, если курок газа работает в режиме управления мощностью.
► Answers: 1
1
Posted: 21 june 2022, 17:39
Добрался до него наконец.
Проверил ШИМ U5 L322
сравнением с заведомо исправной. (на схеме)
Между 3 и 4 сопротивление 305 кОм.
На исправной обрыв.
Думаю в нем дело.
Подскажите пожалуйста, что это за элемент.
По какому номеру заказывать?
Posted: 21 june 2022, 17:58
Ответ пользователю
tak1973 : 13 june 2022, 23:48
на это сообщение (развернуть)
[quote message=280466]Если я ставлю галку накат, то максимальная скорость 26Но тогда курок газа работает дискретно. Как…
[quote message=280466]Alex_VG написал(а) 04 june 2022, 1:24
Если я ставлю галку накат, то максимальная скорость 26
Но тогда курок газа работает дискретно. Как кнопка.
Если галку накат убираю, то 22.
[/quote]
В ScooterHacking Utility настройте графики работы курков.
Также, в первоначальных настройках прошивки не была выбрана максимальная скорость.
[quote message=282055]Alex_VG написал(а) 12 june 2022, 1:07Что то скачет он от 80 мА до 300. На 300 я защиту поставил.[/quote]
Если ток через светодиод фары изменяется в широких пределах, то либо дроссель сдох, либо CS-резистор в драйвере фары, либо проседает шина +5В. Ток через светодиод фары всегда должен быть постоянен и не должен зависеть от внешних факторов в известных пределах. Для этого драйвер и устанавливается, ну и для повышения КПД.
При включённой фаре замерьте уровень напряжение на шины +5В непосредственно на плате табло. Если F2 сдох на плате контроллера, то и шина +5В просядет после него, особенно при включённой фаре. При этом, при тапке в пол курком газа, самокат не сможет ехать с максимальной скоростью, так как выходной сигнал с курка газа также будет просевшим, а ведь именно уровень выходного сигнала с датчика Холла курка газа контроллер определяет запрашиваемую скорость, если курок газа работает в режиме круиз-контроля, или запрашиваемый уровень тока через МК, если курок газа работает в режиме управления мощностью.
А что такое F2 на плате контроллера?
Posted: 21 june 2022, 18:01
У меня только такая схема:
1
Posted: 21 june 2022, 19:09
F2 — предохранитель. На фото он ближе всех к красному проводу в разъёме. Вместо F2 надо либо перемчку запаять, либо соплю припоя повесить. Эти F2 деградируют современем, увеличивая внутреннее сопротивленние. Он не нужен совсем.
U5 не ШИМка, а LDO — тупо КРЕНка с фиксированным выходом на 3.3В до 0.5А, например SPX3819M5-L-3-3, MIC5219-3.3 и т.д.
► Answers: 1
1
Posted: 21 june 2022, 20:23
Ответ пользователю
tak1973 : 21 june 2022, 19:09
на это сообщение (развернуть)
F2 — предохранитель. На фото он ближе всех к красному проводу в разъёме. Вместо F2 надо либо перемчку запаять,…
F2 — предохранитель. На фото он ближе всех к красному проводу в разъёме. Вместо F2 надо либо перемчку запаять, либо соплю припоя повесить. Эти F2 деградируют современем, увеличивая внутреннее сопротивленние. Он не нужен совсем.
U5 не ШИМка, а LDO — тупо КРЕНка с фиксированным выходом на 3.3В до 0.5А, например SPX3819M5-L-3-3, MIC5219-3.3 и т.д.
Понял.
Это Fuse.
У меня он 450 Ом!
Очень много!
Скорее и регулятор целый.
Благодарю!
Posted: 23 june 2022, 8:09
[quote message=283850]Alex_VG написал(а) 21 june 2022, 20:23Скорее и регулятор целый.[/quote]
А причём тут регулятор U5 5-3.3? Регулятор в любом случае на выходе должен выдавать 3.3В, ибо висит на шине +5В до предохранителя.
А вот табло точно не стартанёт с таким предохранителем.
► Answers: 1
Описание ScooterHacking Utility
Compatible with
— Xiaomi M365/Pro/Pro 2/1S/Lite/3
— Ninebot ESx/E2x/E4x/Max/T15/F-series
You are responsible for the values and files used.
We are not affiliated with Segway-Ninebot, Xiaomi, or any brand.
Если вам нравится эта игра, вы можете попробовать поиграть в похожие игры ниже:
——Загружено пользователем
Дополнительная информация
Категория: Инструменты
Издатель: ScooterHacking.org
Требования: Andriod 5.0+
Дата публикации:
Sat Nov 19 05:07:05 CST 2022
ScooterHacking Utility 2.1 Обновлять
Обновление Sat Nov 19 05:07:05 CST 2022
Please check the in-app changelog
Показать больше
Теги
Версии истории
Похожий на ScooterHacking Utility
рекомендуемые
Рекомендуемая статья
Отзывы (0)
Написать обзор
Нет контента~
PlayMods
PlayMods, играйте веселее!
Скачать
Скачать моды в PlayMods
Mods Name …
Время создания:
Подробнее об этой игре
Язык :
EN AM AR AS BE BG BN BS CA CS EN AM AR ASs
BE BG BN BS CA CS EN AM AR AS BE BG BN BS
CA CS
Разрешение :
EN AM AR AS BE BG BN BS CA CS EN AM AR ASs
BE BG BN BS CA CS EN AM AR AS BE BG BN BS
CA CS
Подробнее об этой игре
Предоставляйте инструменты Toca для пользователей, которые любят Toca, загружайте и сохраняйте свои собственные архивы в любое время и делитесь своими зданиями с друзьями. Собирайте различные пасхальные яйца, предметы и рецепты еды, чтобы предоставить их пользователям.
Загрузите PlayMods, чтобы написать обзор~~
Скачать
Инструкция по установке
PlayMods безопасен и надежен. Если во время установки вы увидите приглашение Google Play Protect, сначала нажмите «Подробнее», а затем «Все равно установить», чтобы продолжить.
Google Play Protect
PlayMods
Все равно установить