
View the manual for the Samsung Xpress SL-C430W here, for free. This manual comes under the category printers and has been rated by 9 people with an average of a 8.2. This manual is available in the following languages: English. Do you have a question about the Samsung Xpress SL-C430W or do you need help?
Ask your question here
Samsung Xpress SL-C430W specifications
Below you will find the product specifications and the manual specifications of the Samsung Xpress SL-C430W.
The Samsung Xpress SL-C430W printer is a colour laser printer with a maximum resolution of 2400 x 600 DPI. It has a maximum duty cycle of 20000 pages per month, suitable for medium to large office environments. The printer is not equipped with duplex printing capabilities and operates with a print speed of 18 pages per minute for black and white documents on A4/US Letter-sized paper, with a time to first page of 14 seconds.
The Xpress SL-C430W printer has a total input capacity of 150 sheets and an output capacity of 50 sheets, making it suitable for low to medium print volumes. It can handle a maximum ISO A-series paper size of A4. The printer features a manual duplex printing mode and uses laser print technology for high-quality prints.
The printer is compact and easy to use, making it ideal for small office spaces. It comes with wireless connectivity options such as Wi-Fi, NFC, and Wi-Fi Direct, enabling easy printing from your smartphone or tablet. With its simple and intuitive interface, users can easily print from their mobile devices without connecting directly to the printer.
Overall, the Samsung Xpress SL-C430W printer is a reliable and efficient colour laser printer that offers good value for its price. Its compact size and wireless connectivity options make it an ideal choice for small office environments, while its high duty cycle and print quality make it suitable for medium to large office needs. With its simple and user-friendly interface, it is easy to use and maintain, ensuring long-term durability and performance.
Maximum duty cycle
20000 pages per month
Total input capacity
150 sheets
Maximum ISO A-series paper size
A4
Standard interfaces
Ethernet, USB 2.0, Wireless LAN
General
| Brand | Samsung |
| Model | Xpress SL-C430W | SL-C430W |
| Product | printer |
| EAN | 8806086702515, 8806086780131, 5712505795101, 8806086926171, 0779184060079 |
| Language | English |
| Filetype | User manual (PDF) |
Printing
| Colour | Yes |
| Maximum resolution | 2400 x 600 DPI |
| Duplex printing | No |
| Print technology | Laser |
| Print speed (black, normal quality, A4/US Letter) | 18 ppm |
| Print speed (colour, normal quality, A4/US Letter) | 4 ppm |
| Time to first page (black, normal) | 14 s |
| Time to first page (colour, normal) | 26 s |
| Duplex printing mode | Manual |
Features
| Maximum duty cycle | 20000 pages per month |
| Number of print cartridges | — |
| Page description languages | SPL-C |
| Printing colours | Black, Cyan, Magenta, Yellow |
Input & output capacity
| Total input capacity | 150 sheets |
| Total output capacity | 50 sheets |
Paper handling
| Maximum ISO A-series paper size | A4 |
| Paper tray media types | Bond paper, Card stock, Glossy paper, Labels, Plain paper, Pre-Printed, Recycled paper, Thick paper, Thin paper |
| ISO A-series sizes (A0…A9) | A4 |
| Paper tray media weight | 60 — 220 g/m² |
| Custom media width | 76 — 216 mm |
| Custom media length | 152.4 — 355.6 mm |
Network
| Ethernet LAN | Yes |
| Wi-Fi | Yes |
| Network ready | — |
| Wi-Fi standards | 802.11b, 802.11g, Wi-Fi 4 (802.11n) |
| Near Field Communication (NFC) | Yes |
| Mobile printing technologies | Samsung Mobile Print |
Ports & interfaces
| Standard interfaces | Ethernet, USB 2.0, Wireless LAN |
Performance
| Internal memory | 64 MB |
| Maximum internal memory | — MB |
| Sound pressure level (printing) | 48 dB |
| Processor frequency | 400 MHz |
| Built-in processor | Yes |
Design
| Product colour | Black, White |
| Built-in display | — |
Power
| Power consumption (printing) | 290 W |
| Power consumption (standby) | 60 W |
| Power consumption (PowerSave) | 1.3 W |
System requirements
| Windows operating systems supported | Windows 10 Education, Windows 10 Education x64, Windows 10 Enterprise, Windows 10 Enterprise x64, Windows 10 Home, Windows 10 Home x64, Windows 10 Pro, Windows 10 Pro x64, Windows 7 Enterprise, Windows 7 Enterprise x64, Windows 7 Home Basic, Windows 7 Home Basic x64, Windows 7 Home Premium, Windows 7 Home Premium x64, Windows 7 Professional, Windows 7 Professional x64, Windows 7 Starter, Windows 7 Starter x64, Windows 7 Ultimate, Windows 7 Ultimate x64, Windows 8, Windows 8 Enterprise, Windows 8 Enterprise x64, Windows 8 Pro, Windows 8 Pro x64, Windows 8 x64, Windows 8.1, Windows 8.1 Enterprise, Windows 8.1 Enterprise x64, Windows 8.1 Pro, Windows 8.1 Pro x64, Windows 8.1 x64, Windows Vista Business, Windows Vista Business x64, Windows Vista Enterprise, Windows Vista Enterprise x64, Windows Vista Home Basic, Windows XP Home, Windows XP Home x64, Windows XP Professional, Windows XP Professional x64 |
| Mac operating systems supported | Mac OS X 10.0 Cheetah, Mac OS X 10.6 Snow Leopard, Mac OS X 10.7 Lion, Mac OS X 10.8 Mountain Lion, Mac OS X 10.9 Mavericks |
| Linux operating systems supported | Yes |
| Server operating systems supported | Windows Server 2003, Windows Server 2008, Windows Server 2008 R2 |
Weight & dimensions
| Width | 382 mm |
| Depth | 309 mm |
| Height | 211 mm |
| Weight | 9960 g |
show more
Frequently Asked Questions
Can’t find the answer to your question in the manual? You may find the answer to your question in the FAQs about the Samsung Xpress SL-C430W below.
Why is my printer not connecting to the Wi-Fi network?
If your printer is not connecting to the Wi-Fi network, make sure that the printer and your Wi-Fi router are nearby. Double-check the Wi-Fi password you entered during the setup process as it needs to be correct. Also, check that your printer is on the same network as your computer or mobile device.
How do I correctly install the toner cartridges?
To install toner cartridges in your printer, Samsung Xpress SL-C430W, open the front cover, remove the empty cartridge, unpack the new one, gently shake it, and then insert it firmly. Make sure to match the cartridge colours with the corresponding slots and close the front cover securely.
How can I resolve paper jams in my printer?
If you experience a paper jam in your Samsung Xpress SL-C430W printer, begin by switching off the printer and opening the rear cover. Carefully remove the jammed paper, being careful not to rip it. Inspect for any additional paper jams in other parts of the printer and remove them as well. Once finished, close the rear cover and switch on the printer.
How do I adjust the print quality or colour density?
To adjust the print quality or colour density on your printer, access the print settings on your computer or mobile device. Within the print settings, you can choose different print quality options such as draft, normal or best. Additionally, you can adjust the colour intensity settings to achieve the desired print output.
What should I do if the printer is displaying error codes?
If your Samsung Xpress SL-C430W printer is displaying error codes, note down the specific code being shown. Refer to the troubleshooting section in the printer’s manual, where you can find a list of error codes and their corresponding solutions. Follow the provided instructions to resolve the specific error code you encountered.
Does the Samsung Xpress SL-C430W have a maximum resolution of 2400 x 600 DPI?
Yes, the Samsung Xpress SL-C430W has a maximum resolution of 2400 x 600 DPI. This means that it can produce high-quality prints with sharp and clear details.
Can the Samsung Xpress SL-C430W handle a duty cycle of 20000 pages per month?
Yes, the Samsung Xpress SL-C430W can handle a duty cycle of 20000 pages per month. This means that it is suitable for small to medium-sized businesses or individuals who require a printer that can handle high printing volumes.
Does the Samsung Xpress SL-C430W support double-sided printing?
No, the Samsung Xpress SL-C430W does not support double-sided printing. This means that users will need to manually turn the pages if they want to print on both sides of the paper.
Is the print technology of the Samsung Xpress SL-C430W laser?
Yes, the print technology of the Samsung Xpress SL-C430W is laser. This means that it utilises laser technology to produce high-quality prints rapidly and efficiently.
Does the Samsung Xpress SL-C430W have Wi-Fi and NFC capabilities for mobile printing?
Yes, the Samsung Xpress SL-C430W has both Wi-Fi and NFC capabilities for mobile printing. This means that users can easily print from their mobile devices without the need for a wired connection, providing convenience and flexibility.
What is the weight of the Samsung Xpress SL-C430W?
The Samsung Xpress SL-C430W has a weight of 9960 g.
What is the height of the Samsung Xpress SL-C430W?
The Samsung Xpress SL-C430W has a height of 211 mm.
What is the width of the Samsung Xpress SL-C430W?
The Samsung Xpress SL-C430W has a width of 382 mm.
What is the depth of the Samsung Xpress SL-C430W?
The Samsung Xpress SL-C430W has a depth of 309 mm.
What is the best way to remove jammed paper from my printer?
It is best to gently pull the paper out of the printer. Turn the printer off, and make sure that the printhead is not hanging over the paper and that no paper remains in the printer.
How come my prints are of poor quality?
There can be various reasons for poor print quality. Check if the cartridges or toners are full. If so, inkjet printers often require cleaning the printer, the cartridges have dried out, or the print head is broken. With laser printers, calibrating the laser printer is recommended.
How come my printer does not accept original cartridges?
Non-genuine cartridges may not be recognised by the printer. In that case you will receive a message that the cartridge is empty. The manual of the purchased cartridge usually contains the solution, if this does not work, it is advisable to contact the seller.
How many cartridges can be placed in the Samsung Xpress SL-C430W?
— cartridges can be placed in the Samsung Xpress SL-C430W.
How come my inkjet printer has black stripes?
In most cases, the inkjet printer cartridge is broken and the cartridge needs to be replaced.
What is the difference between a laser printer and an inkjet printer?
A laser printer prints with a toner and an inkjet printer prints with ink.
What does DPI stand for?
DPI stands for Dots Per Inch and is the number of ink droplets (per inch) that end up on the paper when printing.
Is the manual of the Samsung Xpress SL-C430W available in English?
Yes, the manual of the Samsung Xpress SL-C430W is available in English .
Is your question not listed? Ask your question here

User’s Guide
User’s Guide
BASIC
BASIC
This guide provides information concerning the installation, basic operation
and troubleshooting on windows.
ADVANCED
This guide provides information about the installation, advanced configuration, operation
and troubleshooting on various OS environments.
Some features may not be available depending on models or countries.

Available maintenance parts 43
1. Introduction
Key benefits 4
Features by model 6
Useful to know 9
About this user’s guide 10
Safety information 11
Machine overview 17
Control panel overview 20
Turning on the machine 22
Installing the driver locally 23
Reinstalling the driver 25
2. Learning the Basic Usage
Storing the toner cartridge 44
Redistributing toner 46
Replacing the toner cartridge 48
Replacing the waste toner container 50
Replacing the imaging unit 52
Cleaning the machine 54
Tips for moving & storing your machine 56
4. Troubleshooting
Tips for avoiding paper jams 58
Clearing paper jams 59
Understanding the status LED 62
Media and tray 27
Basic printing 35
3. Maintenance
Ordering supplies and accessories 41
Available supplies 42
5. Appendix
Specifications 67
Regulatory information 75
Copyright 85
2

1. Introduction
This chapter provides information you need to know before using the machine.
•Key benefits 4
• Features by model 6
• Useful to know 9
• About this user’s guide 10
• Safety information 11
• Machine overview 17
• Control panel overview 20
• Turning on the machine 22
• Installing the driver locally 23
• Reinstalling the driver 25

Key benefits
Environmentally friendly
• To save toner and paper, this machine supports the Eco feature (see «Easy
Eco Driver» on page 154).
• To save paper, you can print multiple pages on a single sheet of paper (see
«Using advanced print features» on page 139).
• To save paper, you can print on both sides of the paper (manual doublesided printing) (see «Using advanced print features» on page 139).
• To save electricity, this machine automatically conserves electricity by
substantially reducing power consumption when not in use.
• We recommend using recycled paper for saving energy.
Fast high resolution printing
• You can print in a full range of colors using cyan, magenta, yellow, and black.
• You can print with a resolution of up to 2,400 x 600 dpi effective output (600
x 600 x 2 bit).
• Fast, on-demand printing.
Convenience
• Simply touch your cell phone on the NFC tag on your printer and get the
print job done (see «Using the NFC feature» on page 124).
• You can print on the go from your smartphone or computer using Samsung
Cloud Print apps (see «Samsung Cloud Print» on page 131).
• You can print on the go from your smartphone or computer using Google
Cloud Print enabled apps (see «Google Cloud Print™» on page 133).
• Easy Capture Manager allows you to easily edit and print whatever you
captured using the Print Screen key on the keyboard (see «Easy Capture
Manager» on page 152).
• Samsung Easy Printer Manager and Samsung Printer Status are a program
that monitors and informs you of the machine’s status and allows you to
customize the machine’s settings (see «Using Samsung Easy Printer
Manager» on page 161 or «Using Samsung Printer Status» on page 163).
• Smart Update allows you to check for the latest software and install the
latest version during the printer driver installation process. This is available
only for Windows OS users.
• If you have Internet access, you can get help, support application, machine
drivers, manuals, and order information from the Samsung website,
www.samsung.com > find your product > Support or Downloads.

Key benefits
Wide range of functionality and application support
• Supports various paper sizes (see «Print media specifications» on page 69).
• Print watermark: You can customize your documents with words, such as
“CONFIDENTIAL” (see «Using advanced print features» on page 139).
• Print posters: The text and pictures of each page of your document are
magnified and printed across the multiple sheets of paper and can then be
taped together to form a poster (see «Using advanced print features» on
page 139).
• You can print in various operating systems (see «System requirements» on
page 72).
• Your machine is equipped with a USB interface and/or a network interface.
Supports various wireless network setting method
• Using the WPS (Wi-Fi Protected Setup™) button
— You can easily connect to a wireless network using the WPS button on
the machine and the access point (a wireless router).
• Using the USB cable or a network cable
— You can connect and set various wireless network settings using a USB
cable or a network cable.
• Using the Wi-Fi Direct
— You can conveniently print from your mobile device using the Wi-Fi or
Wi-Fi Direct feature.
See «Introducing wireless set up methods» on page 106.

Features by model
Some features and optional goods may not be available depending on model or country.
Operating System
(●: Supported)
Operating System C43x series C43xW series
Windows ● ●
Mac ● ●
Linux ● ●
Features by model
Software
You can install the printer driver and software when you insert the software CD into your CD-ROM drive.
For Windows, select the printer driver and software in the Select Software to Install window.
Software C43x series C43xW series
SPL printer driver ● ●
XPS printer driver
a
Samsung Easy Color Manager
a
● ●
● ●
Samsung Easy Printer Manager ● ●
Samsung Printer Center ● ●
Samsung Printer Status ● ●
Eco Driver Pack
b
Samsung Stylish Driver Pack
c
● ●
● ●
SyncThru™ Web Service ●
a. Download the software from the Samsung website and install it: (http://www.samsung.com > find your product > Support or Downloads). Before installing, check whether your
computer’s OS support the software.
b.
To use the
c. The printer driver includes a user interface that is optimized for touchscreens. To use this UI, click Samsung Printer Center > Device Options and then select Stylish User Interface
(see «Using Samsung Printer Center» on page 155).
Easy Eco Driver
features, the
Eco Driver Pack
must be installed.
(●: Supported, Blank: Not supported)

Features by model
Variety feature
(●: Supported, Blank: Not supported)
Features C43x series C43xW series
Hi-Speed USB 2.0 ● ●
Network Interface Ethernet 10/100 Base TX wired LAN ●
Network Interface 802.11b/g/n wireless LAN
a
a. Depending on your country, wireless LAN card may not be available. For some countries, only 802.11 b/g can be applied. Contact your local Samsung dealer or the retailer where you
bought your machine.
●
IPv6 ●
NFC (Near Field Communication) printing ●
Mopria™ ●
AirPrint ●
Samaung Cloud Print ●
Google Cloud Print™ ●
Wi-Fi Protected Setup™ (WPS) ●
Eco printing (Easy Eco Driver)
b
b. Setting the ECO settings is available from the windows driver.
● ●
Manual duplex (2-sided) printing
c
c. Available for Windows OS users only.
● ●
Useful to know
Where can I download the machine’s driver?
• Visit www.samsung.com/printer to download the latest
machine’s driver, and install it on your system.
Where can I purchase accessories or supplies?
• Inquire at a Samsung distributor or your retailer.
• Visit www.samsung.com/supplies. Select your country/region
to view product service information.
The status LED flashes or remains constantly on.
• Turn the product off and on again.
• Check the meanings of LED indications in this manual and
troubleshoot accordingly (see «Understanding the status LED»
on page 62).
Printouts are blurry.
• The toner level might be low or uneven. Shake the toner
cartridge.
• Try a different print quality setting.
• Replace the toner cartridge.
The machine does not print.
• Open the print queue list and remove the document from the
list (see «Canceling a print job» on page 36).
• Remove the driver and install it again (see «Installing the driver
locally» on page 23).
• Select your machine as your default machine in your Windows.
A paper jam has occurred.
• Open and close the cover (see «Front view» on page 18).
• Check the instructions on removing jammed paper in this
manual and troubleshoot accordingly (see «Clearing paper
jams» on page 59).
About this user’s guide
This user’s guide provides information for your basic understanding of the
machine as well as detailed steps to explain machine usage.
• Do not discard this manual, and keep it for future reference.
• Read the safety information before using the machine.
• If you have a problem using the machine, refer to the troubleshooting
chapter.
• Terms used in this user’s guide are explained in the glossary chapter.
• All illustrations in this user’s guide may differ from your machine depending
on its options or model you purchased.
• The screenshots in this user’s guide may differ from your machine
depending on the machine’s firmware/driver version.
• The procedures in this user’s guide are mainly based on Windows 7.
1
2
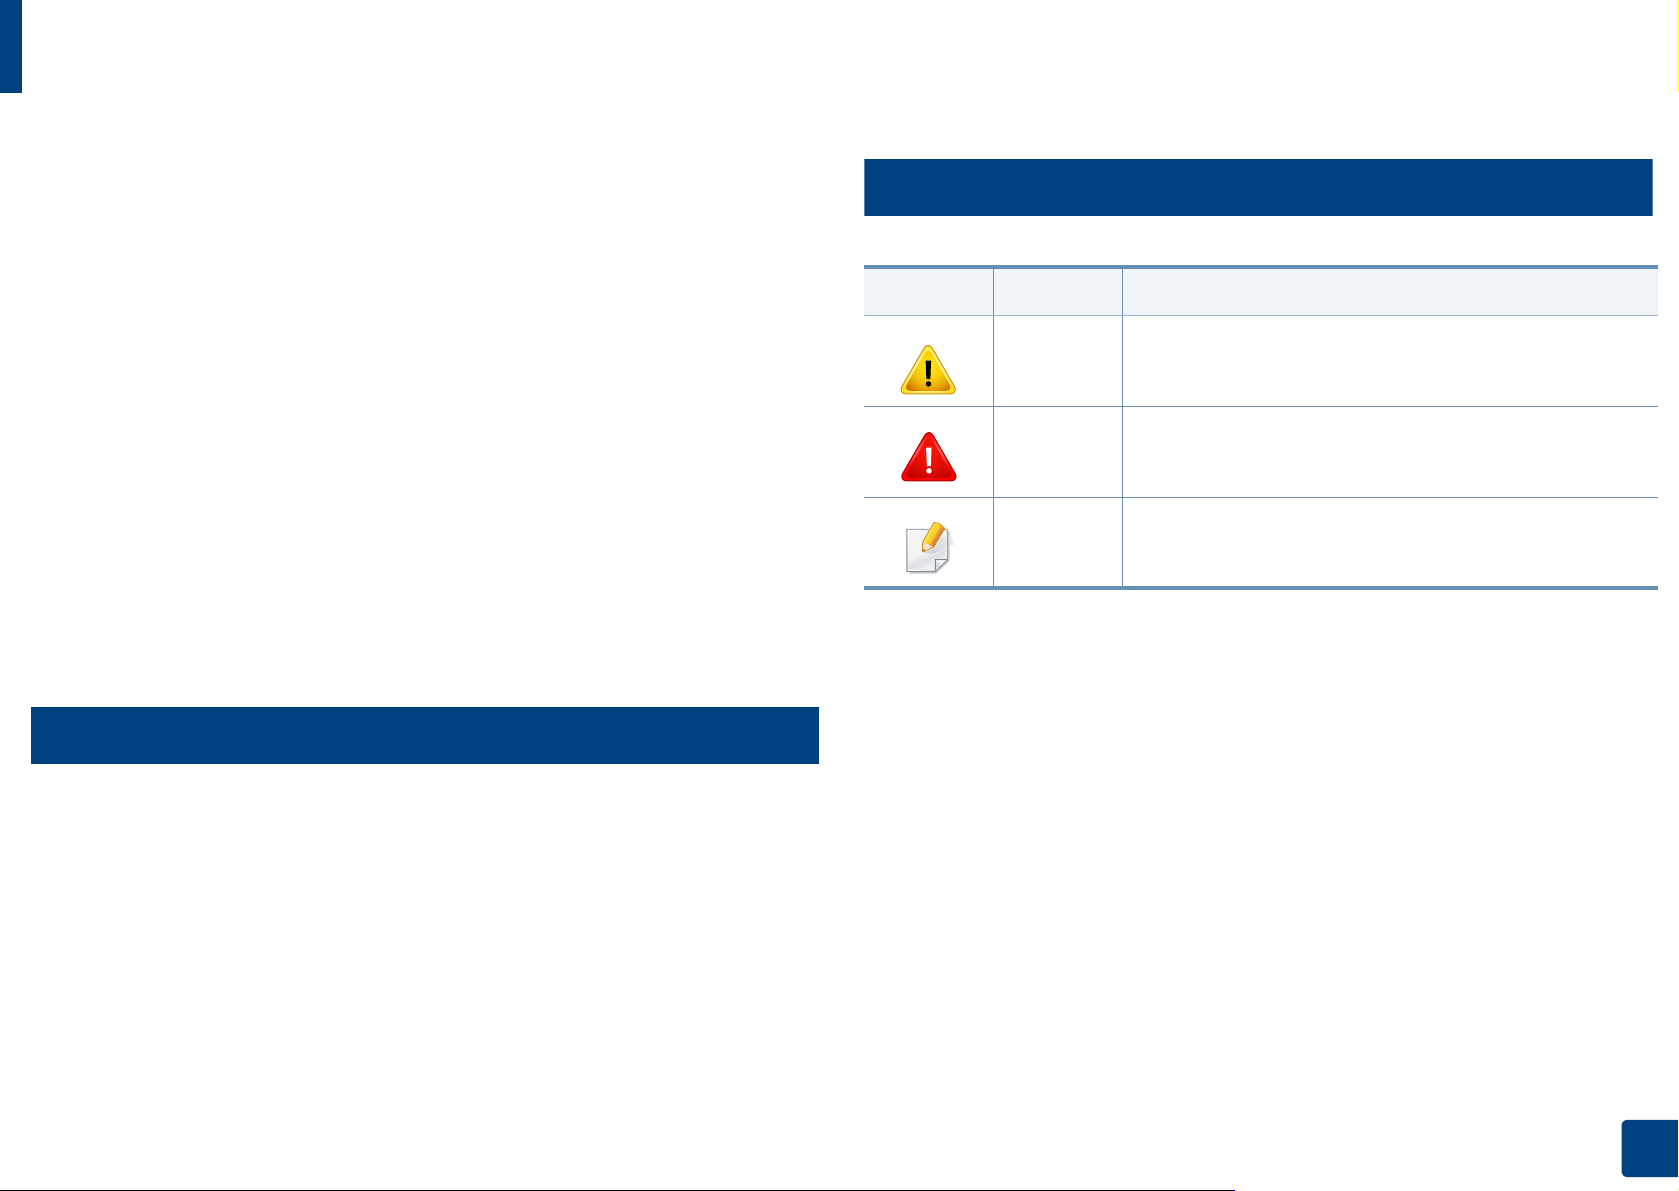
General icons
Icon Text Description
Gives users information to protect the machine from
Caution
Warning
Note
possible mechanical damage or malfunction.
Used to alert users to the possibility of personal injury.
Provides additional information or detailed
specification of the machine function and feature.
Conventions
Some terms in this guide are used interchangeably, as below:
• Document is synonymous with original.
• Paper is synonymous with media, or print media.
• Machine refers to printer or MFP.
1. Introduction
10
Safety information
These warnings and precautions are included to prevent injury to you and
others, and to prevent any potential damage to your machine. Be sure to read
and understand all of these instructions before using the machine. After reading
this section, keep it in a safe place for future reference.
3
Important safety symbols
Explanation of all icons and signs used in this chapter
Warning
Caution
Hazards or unsafe practices that may result in severe
personal injury or death.
Hazards or unsafe practices that may result in minor
personal injury or property damage.
4
Operating environment
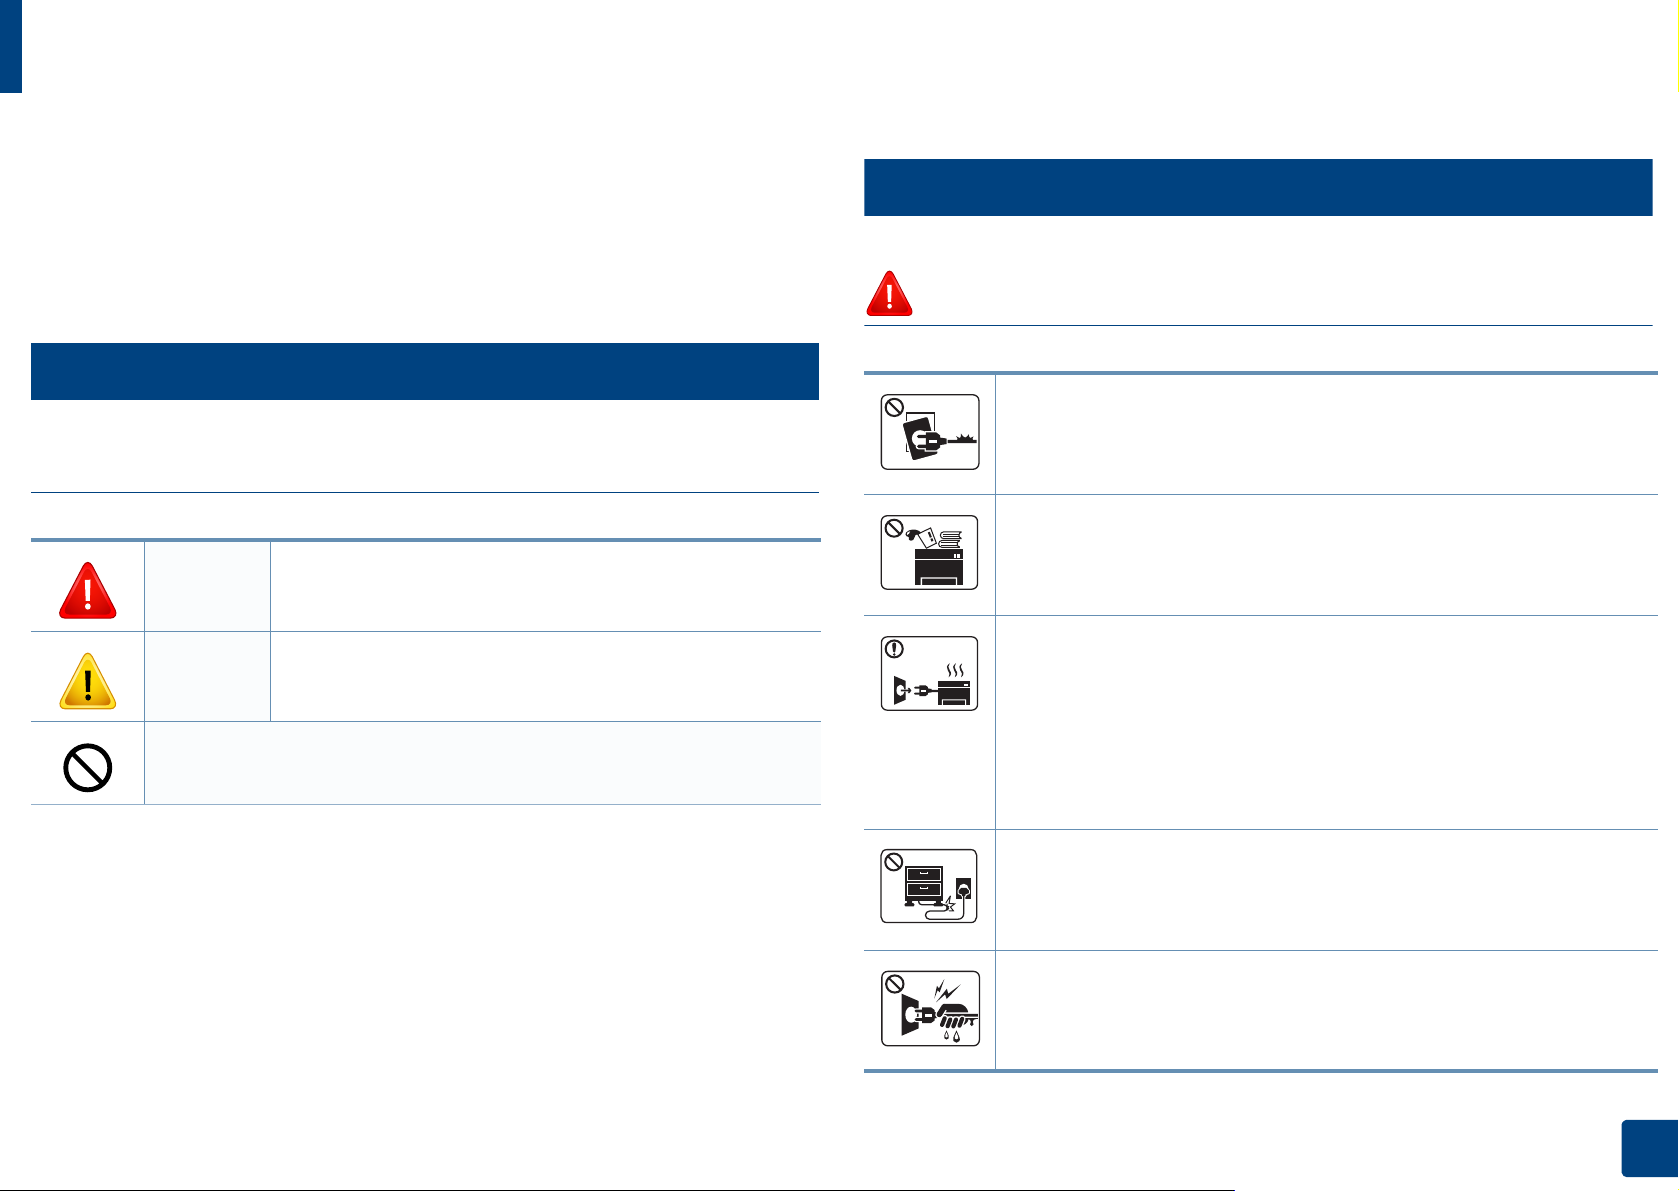
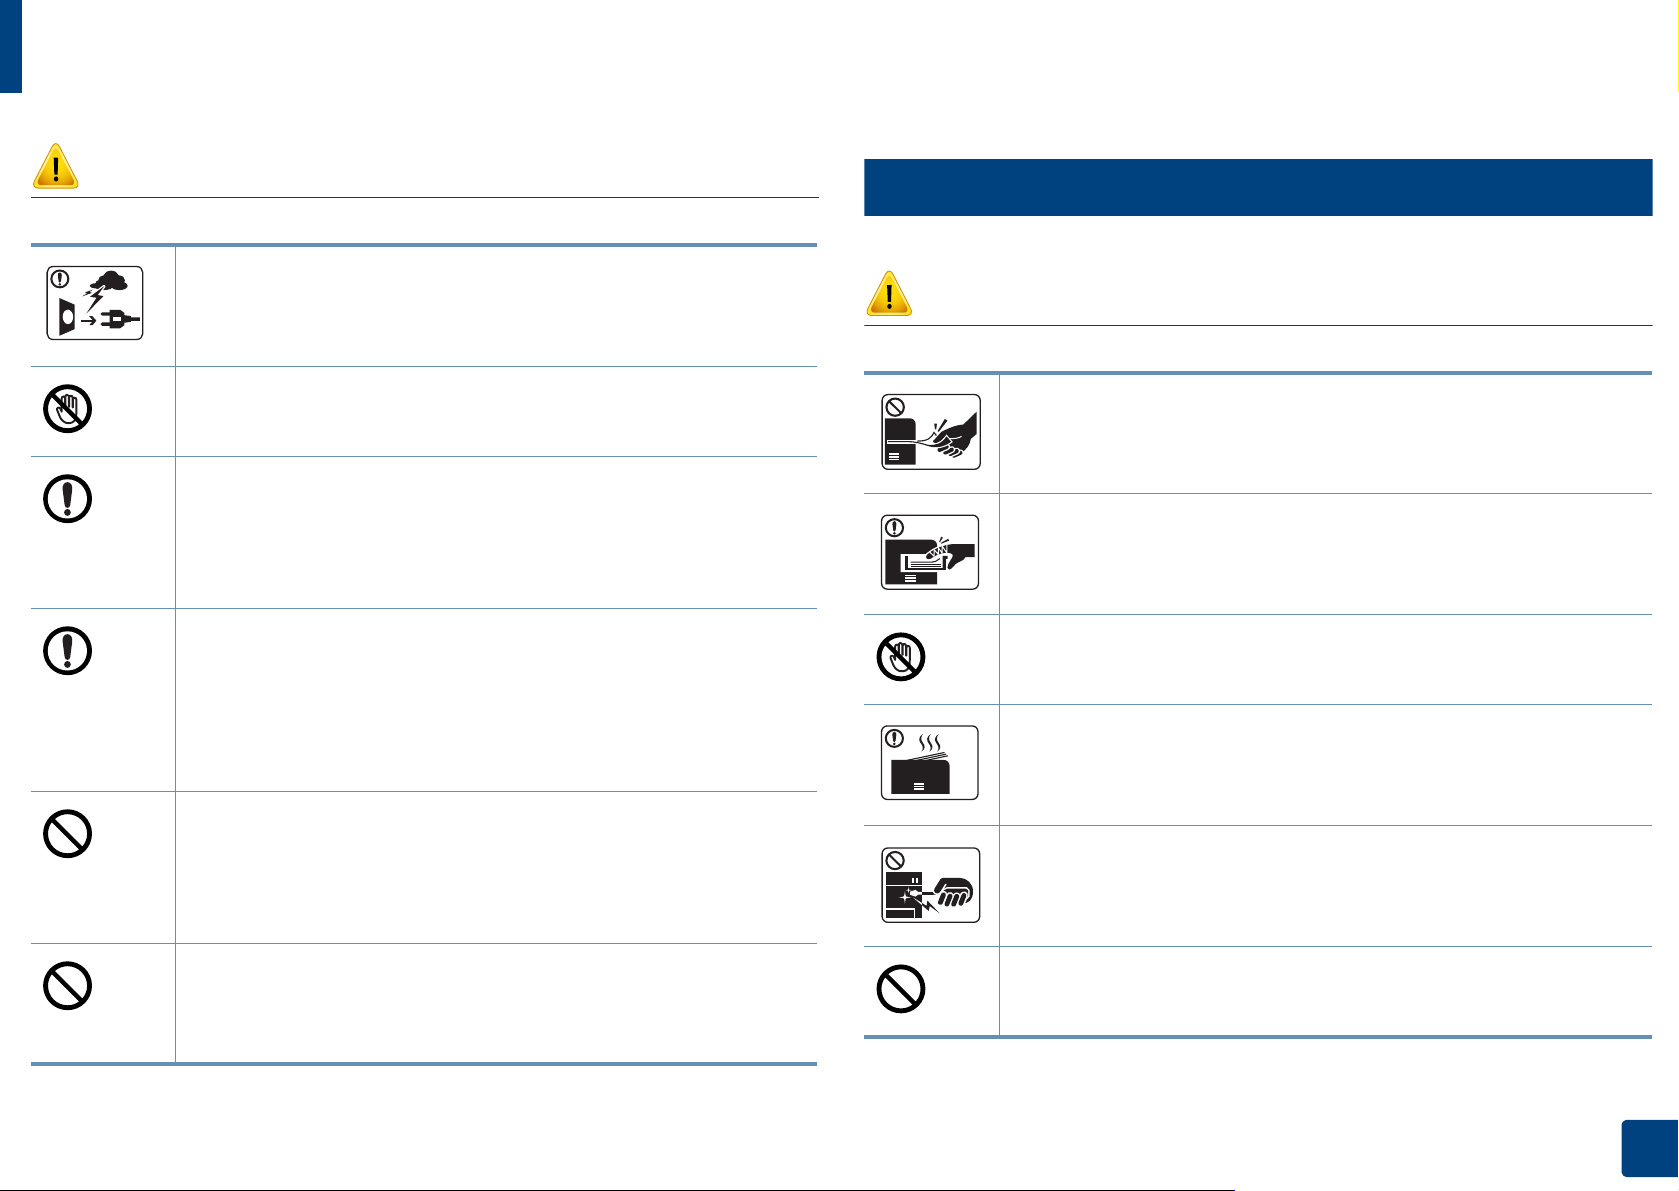
Warning
Do not use if the power cord is damaged or if the electrical outlet is
not grounded.
This could result in electric shock or fire.
Do not place anything on top of the machine (water, small metal or
heavy objects, candles, lit cigarettes, etc.).
This could result in electric shock or fire.
• If the machine gets overheated, it releases smoke, makes strange
noises, or generates an odd odor, immediately turn off the power
switch and unplug the machine.
Do not attempt.
• The user should be able to access the power outlet in case of
emergencies that might require the user to pull the plug out.
This could result in electric shock or fire.
Do not bend, or place heavy objects on the power cord.
Stepping on or allowing the power cord to be crushed by a heavy
object could result in electric shock or fire.
Do not remove the plug by pulling on the cord; do not handle the
plug with wet hands.
This could result in electric shock or fire.
1. Introduction
11
Safety information
5
Caution
During an electrical storm or for a period of non-operation,
remove the power plug from the electrical outlet.
This could result in electric shock or fire.
Be careful, the paper output area is hot.
Burns could occur.
If the machine has been dropped, or if the cabinet appears
damaged, unplug the machine from all interface connections and
request assistance from qualified service personnel.
Otherwise, this could result in electric shock or fire.
If the machine does not operate properly after these instructions
have been followed, unplug the machine from all interface
connections and request assistance from qualified service
personnel.
Otherwise, this could result in electric shock or fire.
Operating method
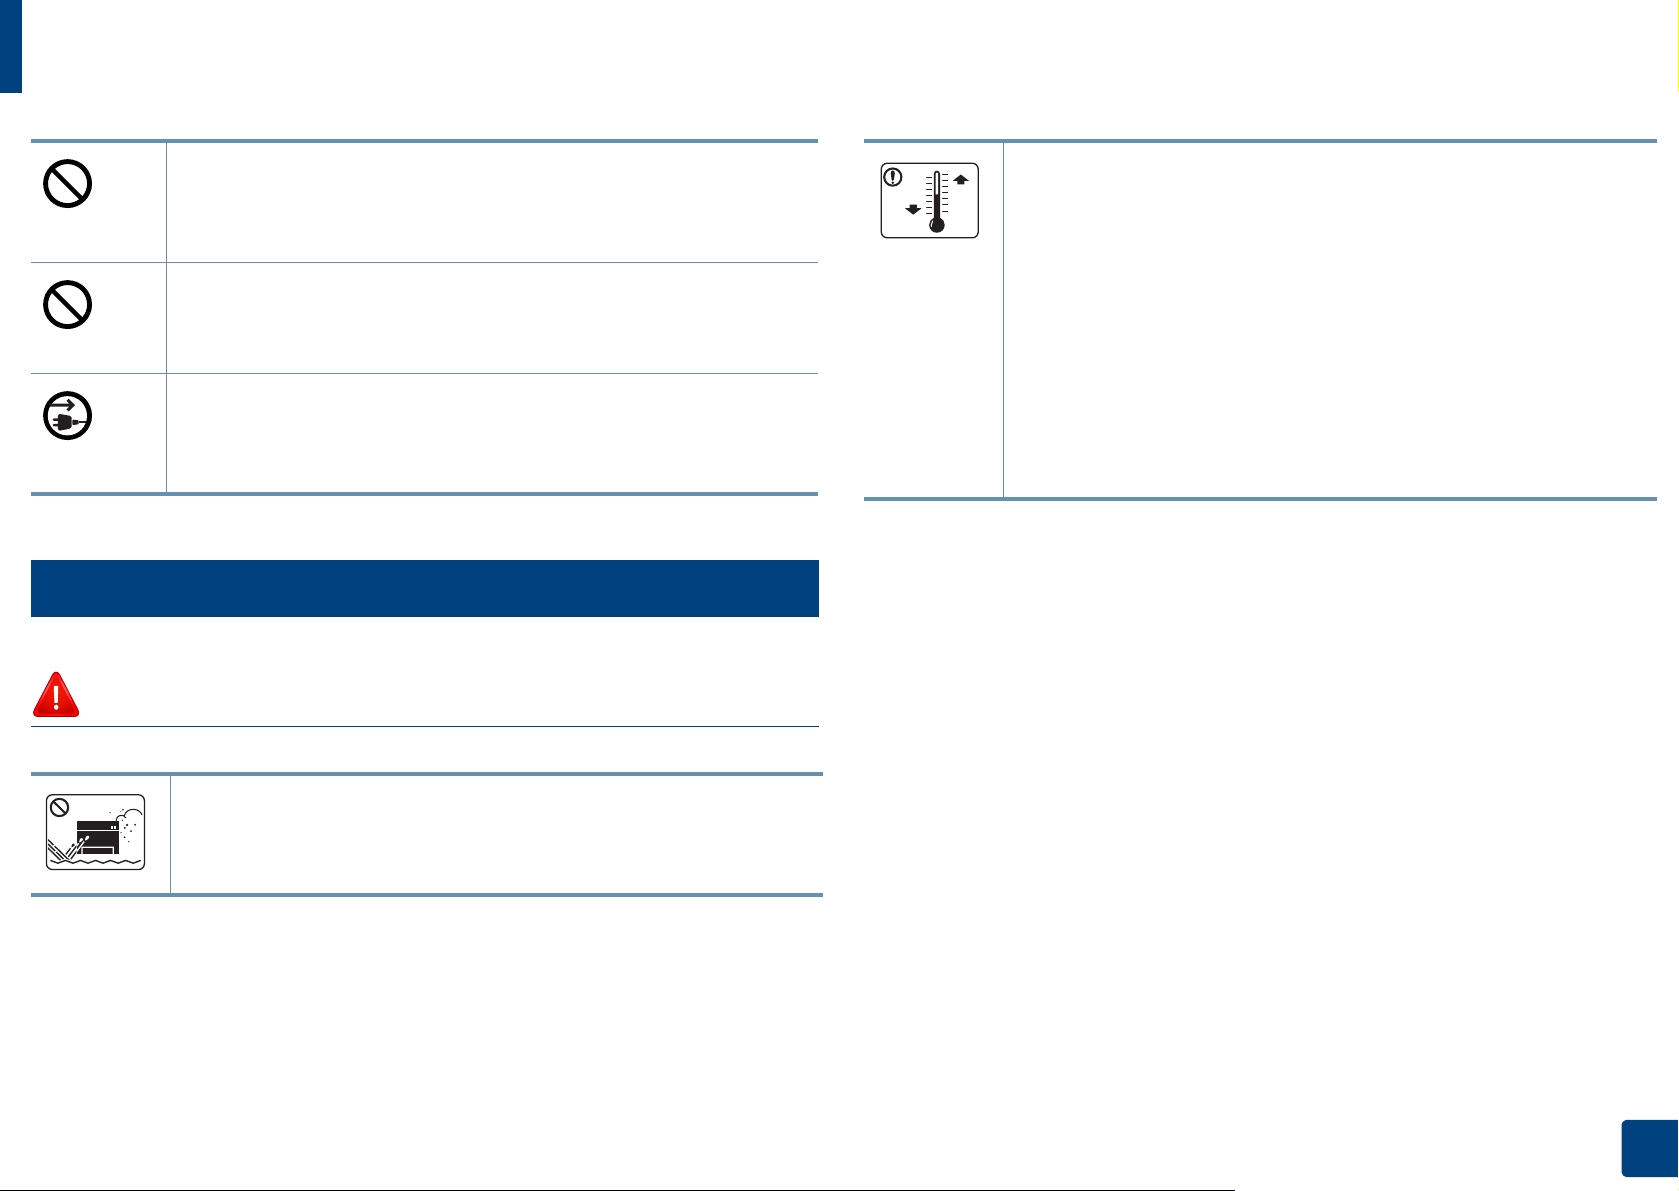
Caution
Do not forcefully pull the paper out during printing.
It can cause damage to the machine.
Be careful not to put your hand between the machine and paper
tray.
You may get injured.
Be careful when replacing paper or removing jammed paper.
New paper has sharp edges and can cause painful cuts.
When printing large quantities, the bottom part of the paper
output area may get hot. Do not allow children to touch.
If the plug does not easily enter the electrical outlet, do not
attempt to force it in.
Call an electrician to change the electrical outlet, or this could
result in electric shock.
Do not allow pets to chew on the AC power, telephone or PC
interface cords.
This could result in electric shock or fire and/or injury to your pet.
Burns can occur.
When removing jammed paper, do not use tweezers or sharp metal
objects.
It can damage the machine.
Do not allow too many papers to stack up in the paper output tray.
It can damage the machine.
1. Introduction
12
Safety information
Do not block or push objects into the ventilation opening.
This could result in elevated component temperatures which can
cause damage or fire.
Use of controls or adjustments or performance of procedures other
than those specified herein may result in hazardous radiation
exposure.
This machine’s power reception device is the power cord.
To switch off the power supply, remove the power cord from the
electrical outlet.
6
Installation / Moving
Warning
Place the machine in the environment where it meets the
operating temperature and humidity specification.
Do not use the machine when it is below freezing temperature or
has recently been moved from a location below freezing
temperature. Doing so may damage the machine. Only operate the
machine when the internal temperature of the machine is within
the operating temperature and humidity specifications.
Otherwise, quality problems can occur and cause damage to the
machine.
See «General specifications» on page 67.
Do not place the machine in an area with dust, humidity, or water
leaks.
This could result in electric shock or fire.
1. Introduction
13
Safety information
Caution
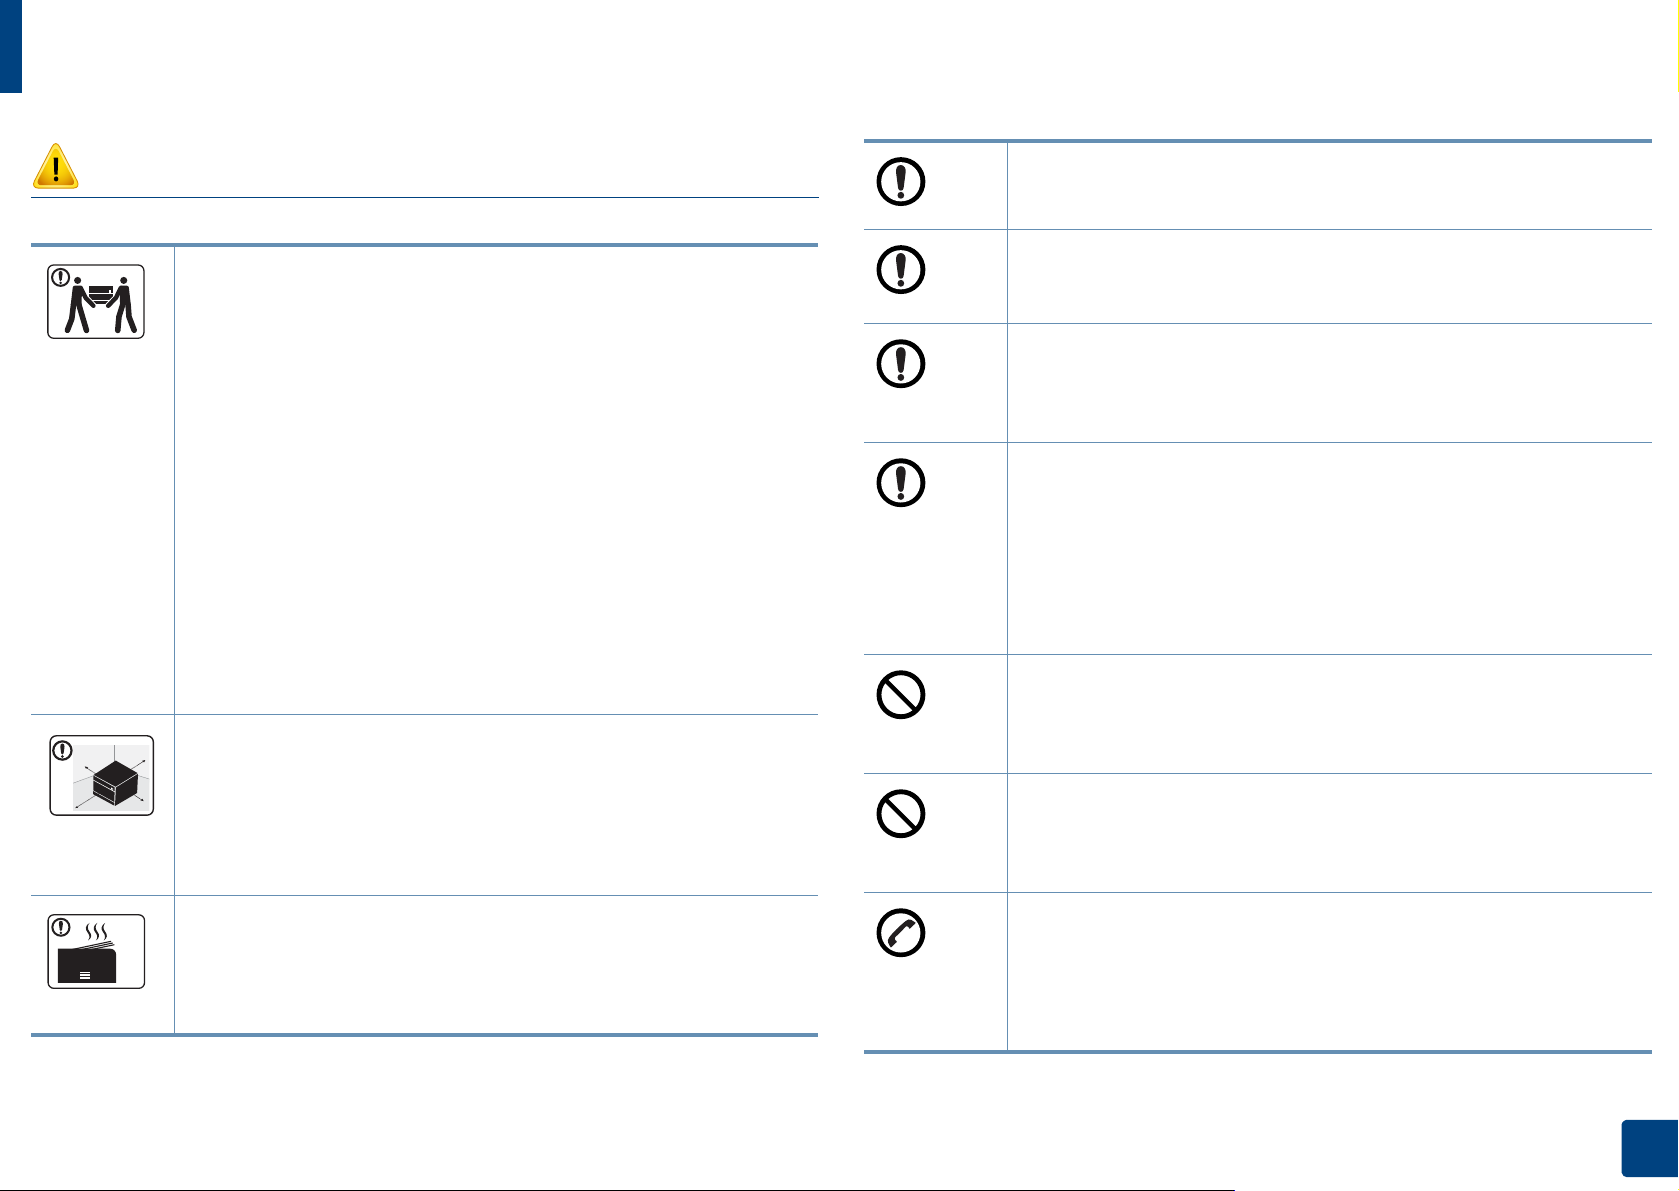
Before moving the machine, turn the power off and disconnect all
cords. The information below are only suggestions based on the
units weight.
If you have a medical condition that prevents you from lifting, do
not lift the machine. Ask for help, and always use the appropriate
amount of people to lift the device safety.
Then lift the machine:
• If the machine weighs under 20 kg (44.09 lbs), lift with 1 person.
• If the machine weighs 20 kg (44.09 lbs) — 40kg (88.18 lbs), lift
• If the machine weighs more than 40 kg (88.18 lbs), lift with 4 or
The machine could fall, causing injury or machine damage.
Choose a flat surface with enough space for ventilation to place
the machine. Also consider the space required to open the cover
and trays.
with 2 people.
more people.
Do not place the machine on an unstable surface.
The machine could fall, causing injury or machine damage.
a
Use only No.26 AWG
Otherwise, it can cause damage to the machine.
Make sure you plug the power cord into a grounded electrical
outlet.
Otherwise, this could result in electric shock or fire.
Use the power cord supplied with your machine for safe
operation. If you are using a cord which is longer than 2 meters (6
feet) with a 110V machine, then the gauge should be 16 AWG or
larger.
Otherwise, it can cause damage to the machine, and could result
in electric shock or fire.
Do not put a cover over the machine or place it in an airtight
location, such as a closet.
If the machine is not well-ventilated, this could result in fire.
Do not overload wall outlets and extension cords.
or larger, telephone line cord, if necessary.
The place should be well-ventilated and be far from direct light,
heat, and humidity.
When using the machine for a long period of time or printing a
large number of pages in a non-ventilated space, it could pollute
the air and be harmful to your health. Place the machine in a wellventilated space or open a window to circulate the air periodically.
This can diminish performance, and could result in electric shock
or fire.
The machine should be connected to
the power level which is specified on the label.
If you are unsure and want to check the power level you are using,
contact the electrical utility company.
a. AWG: American Wire Gauge
1. Introduction
14
Safety information
7
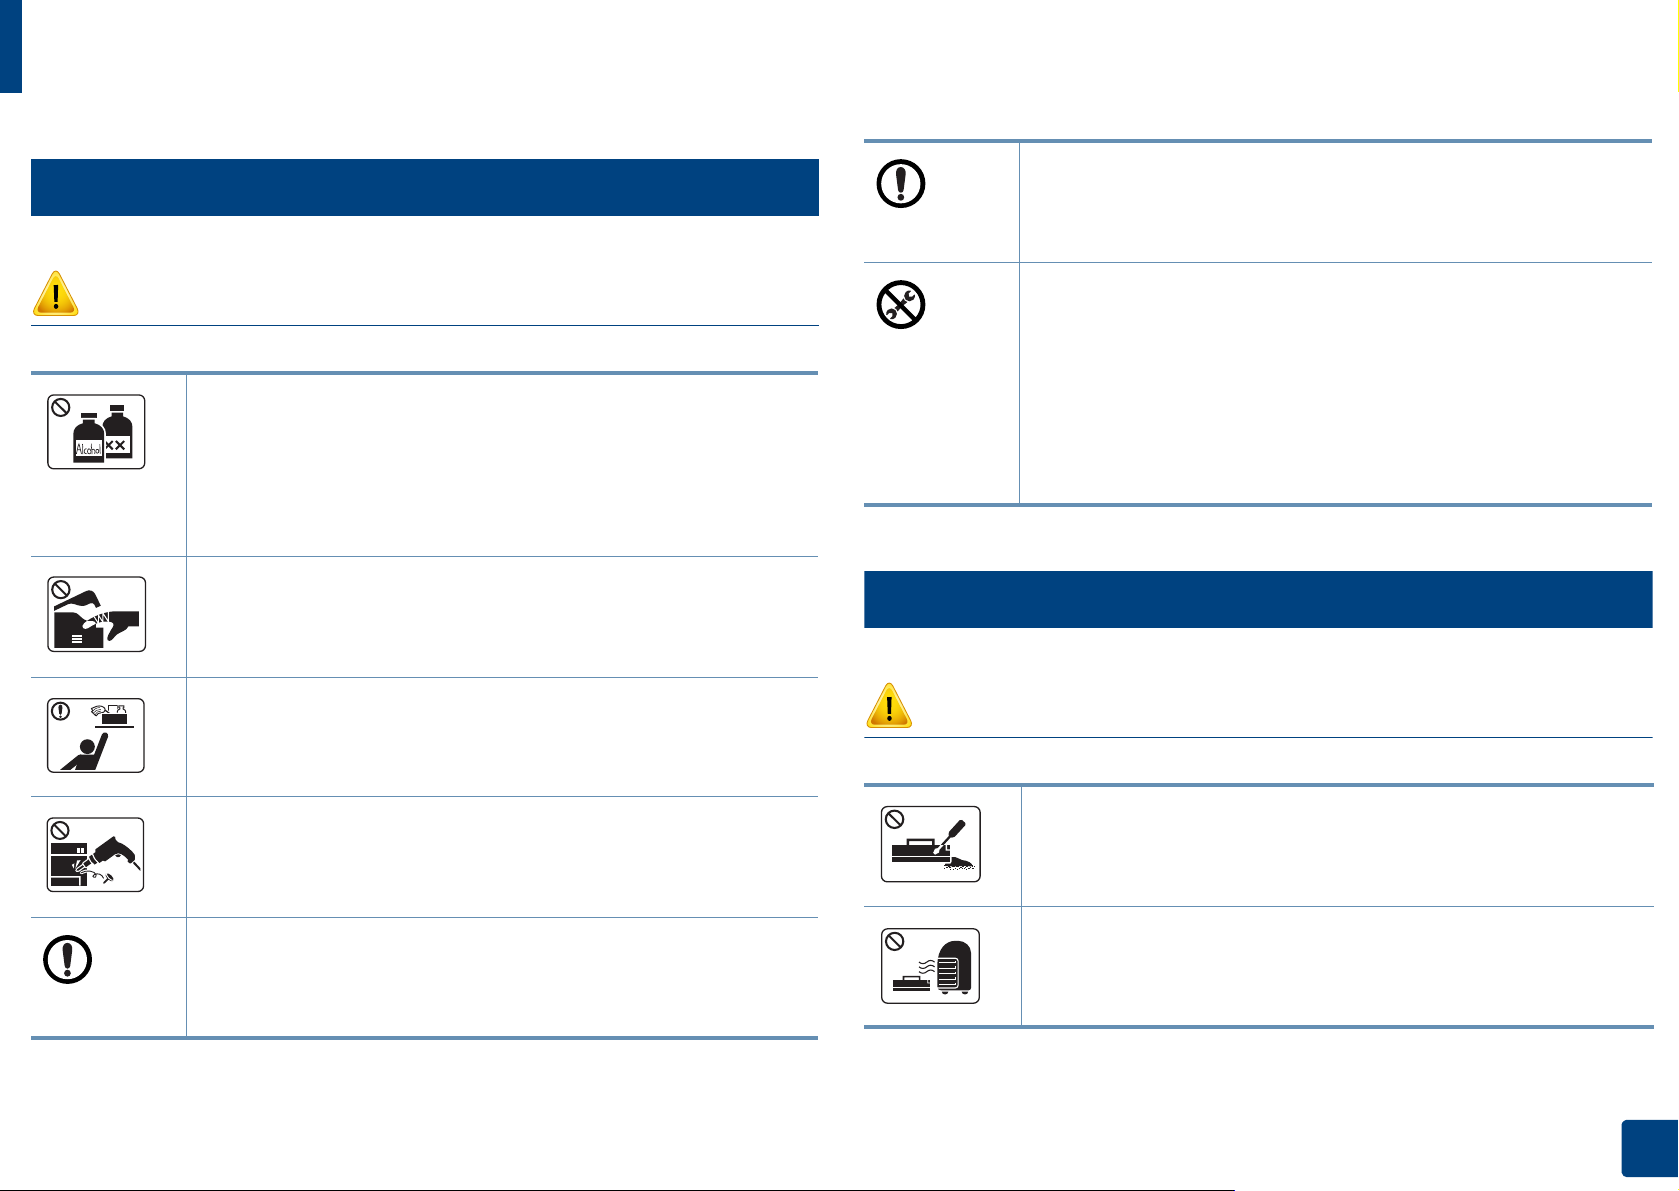
Maintenance / Checking
Keep the power cable and the contact surface of the plug clean
from dust or water.
Otherwise, this could result in electric shock or fire.
Caution
Unplug this product from the wall outlet before cleaning the
inside of the machine. Do not clean the machine with benzene,
paint thinner or alcohol; do not spray water directly into the
machine.
This could result in electric shock or fire.
When you are working inside the machine replacing
consumables or cleaning the inside, do not operate the machine.
You could get injured.
Keep cleaning consumables away from children.
Children could get hurt.
Do not disassemble, repair or rebuild the machine by yourself.
It can damage the machine. Call a certified technician when the
machine needs repairing.
• Do not remove any covers or guards that are fastened with
screws.
• Fuser units should only be repaired by a certified service
technician. Repair by non-certified technicians could result in
fire or electric shock.
• The machine should only be repaired by a Samsung service
technician.
8
Supply usage
Caution
Do not disassemble the toner cartridge.
Toner dust can be dangerous if inhaled or ingested.
To clean and operate the machine, strictly follow the user’s guide
provided with the machine.
Otherwise, you could damage the machine.
Do not burn any of the consumables such as toner cartridge or
fuser unit.
This could cause an explosion or uncontrollable fire.
1. Introduction
15

Safety information
When storing consumables such as toner cartridges, keep them
away from children.
Toner dust can be dangerous if inhaled or ingested.
Using recycled consumables, such as toner, can cause damage to
the machine.
In case of damage due to the use of recycled consumables, a
service fee will be charged.
For consumables that contain toner dust (toner cartridge, waste
toner bottle, imaging unit, etc.) follow the instructions below.
• When disposing of the consumables, follow the instructions
for disposal. Refer to the reseller for disposal instructions.
• Do not wash the consumables.
• For a waste toner bottle, do not reuse it after emptying the
bottle.
If you do not follow the instructions above, it may cause machine
malfunction and environmental pollution. The warranty does
not cover damages caused by a user’s carelessness.
When toner gets on your clothing, do not use hot water to wash
it.
Hot water sets toner into fabric. Use cold water.
When changing the toner cartridge or removing jammed paper,
be careful not to let toner dust touch your body or clothes.
Toner dust can be dangerous if inhaled or ingested.
1. Introduction
16
Machine overview
9
Components
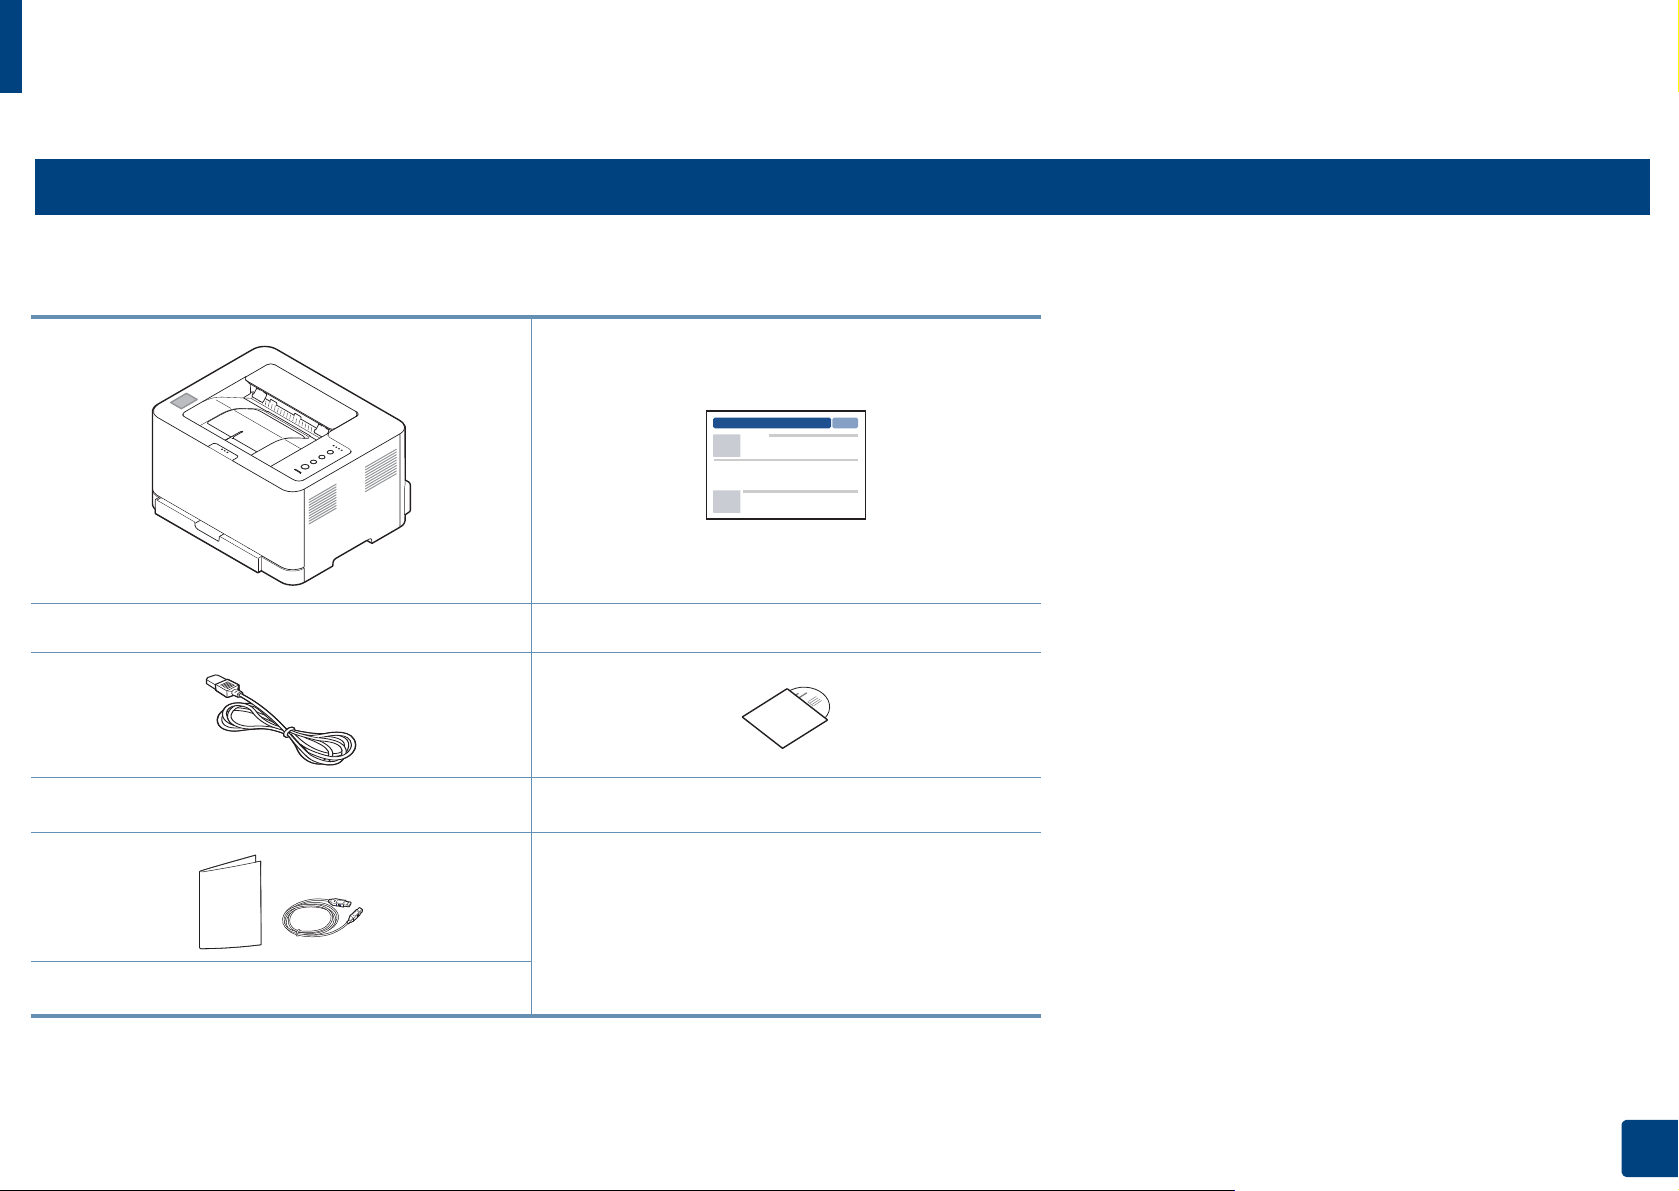
The actual component may differ from the illustration below. Some components may change depending on the configuration.
Machine Quick installation guide
Power cord
Misc. accessories
a. The software CD contains the print drivers, user’s guide, and software applications.
b. Miscellaneous accessories included with your machine may vary by country of purchase and specific model.
b
Software CD
a
1. Introduction
17
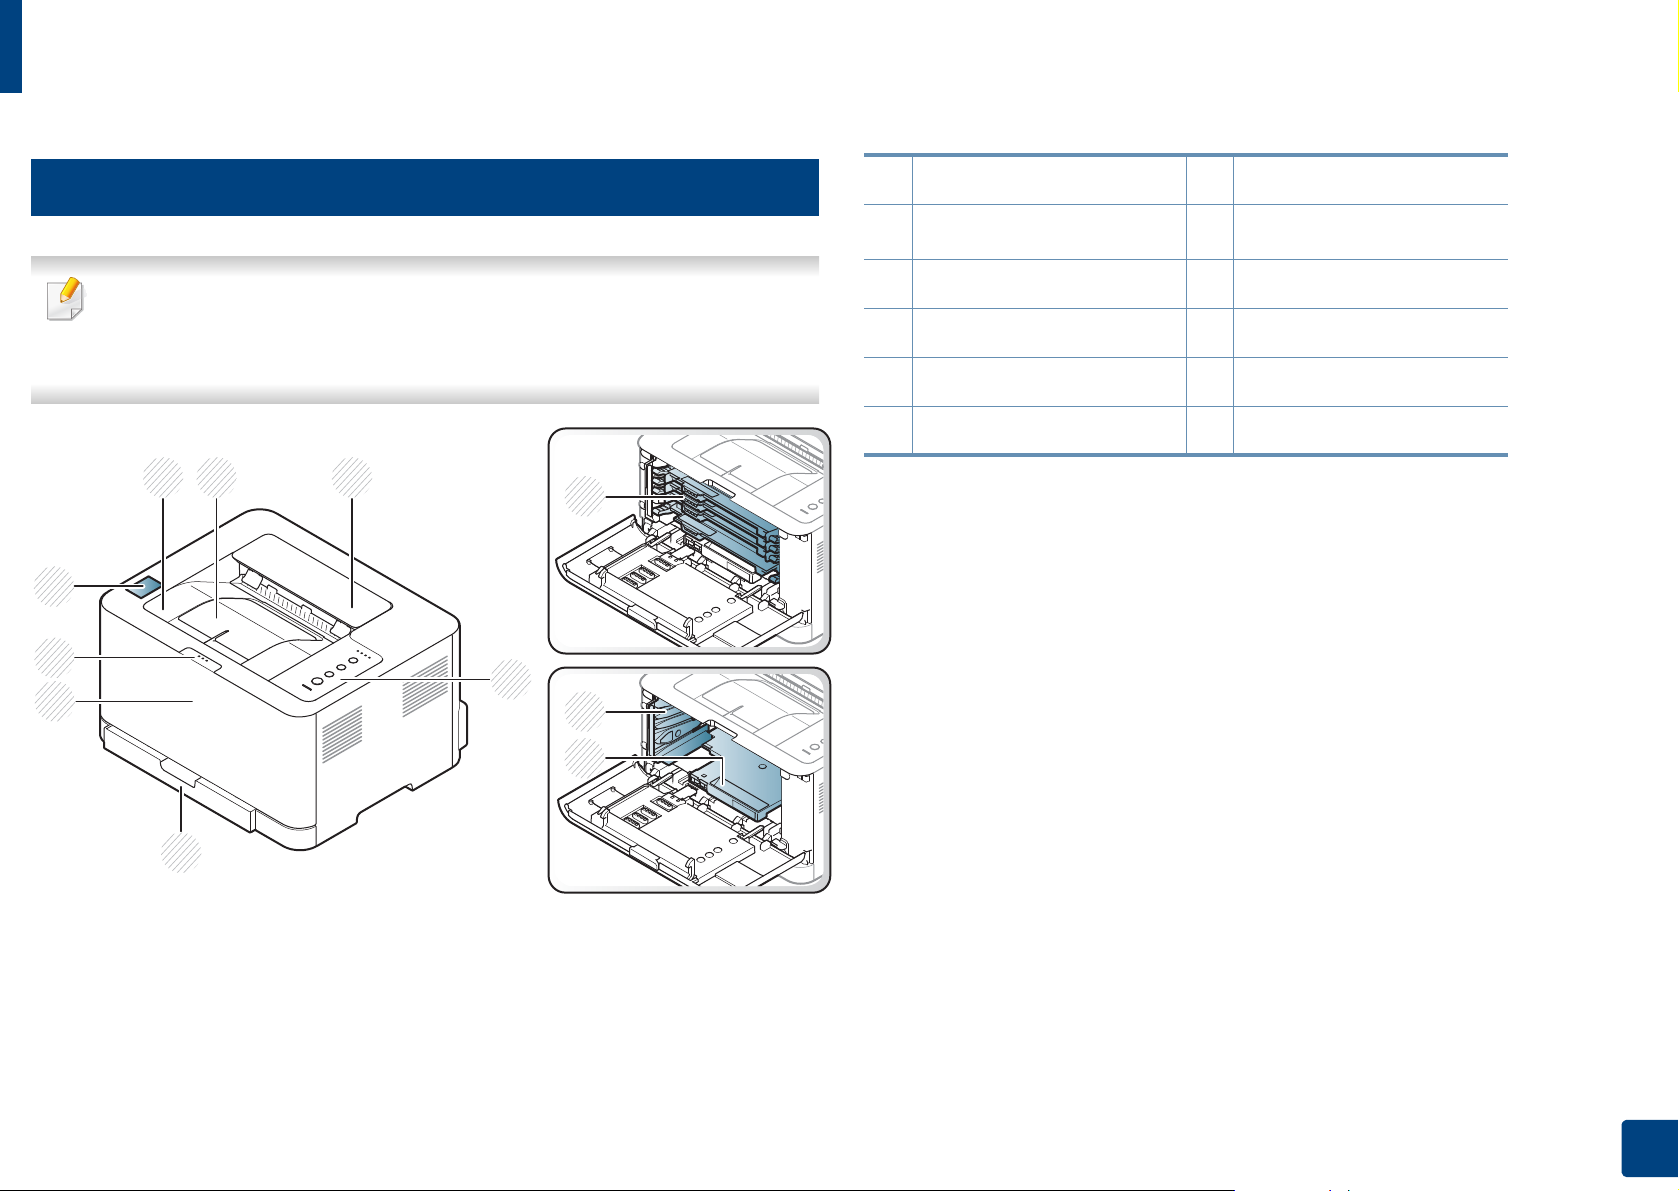
Machine overview
10
Front view
• This illustration may differ from your machine depending on its model.
• Some features and optional goods may not be available depending on
model or country (see «Features by model» on page 6).
8
7
6
2 3
1
4
9
10
1 Output tray 7 Front cover release button
2
Output support
3 Top cover 9 Toner cartridges
4 Control Panel 10 Waster toner container
5Tray 11Imaging unit
6 Front cover
a. C43xW series only.
8
NFC tag
a
5
11
1. Introduction
18
Machine overview
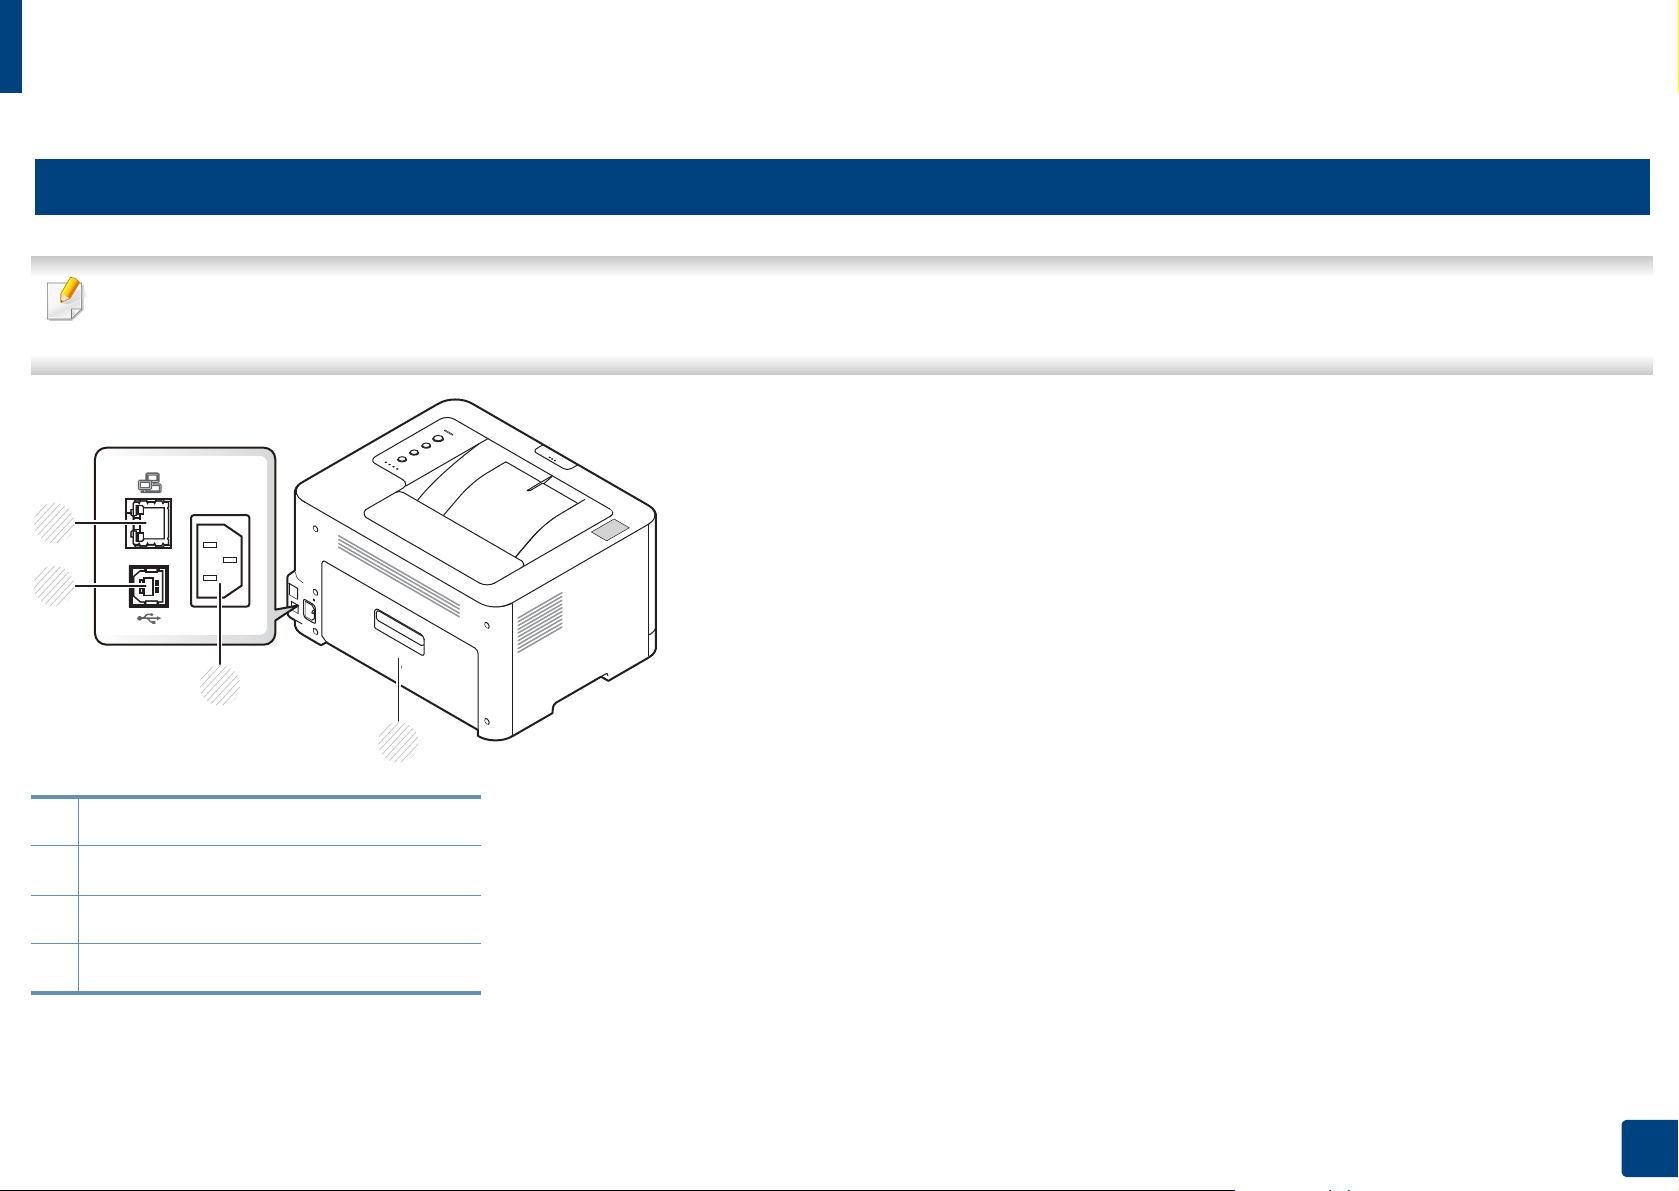
11
Rear view
• This illustration may differ from your machine depending on its model.
• Some features and optional goods may not be available depending on model or country (see «Features by model» on page 6).
1 Rear cover
2Power receptacle
3USB port
4 Network port
1. Introduction
19

Control panel overview
This control panel may differ from your machine depending on its model.
There are various types of control panels.
1
3
(WPS)
Configures the wireless network connection easily without a
computer (see «Wireless network setup» on page 106).
• Manual print
a
— Press this button each time you load a sheet of paper in the
tray if you have selected Manual Feeder for Source in your
printer driver.
1 Toner
LED
2
Eco
2
3
4
5
6
Shows the status of the toner (see «Status LED» on page 63).
Turn into eco mode to reduce toner consumption and paper
usage when pc-printing only (see «Eco printing» on page 38).
screen)
• Prints the screen
— Press this button and the blue LED will start blinking. If you
want to print only the active screen, release the button
b
when the blue LED stops blinking. If you want to print the
whole screen, release the button while it’s blinking.
— Manual print
▪ Press this button each time you load a sheet of paper in
the tray if you have selected Manual Feeder for Source
in your printer driver.
• Print Screen can only be used in the Windows and
• You can only use this function with USB-connected
• When printing the active window/whole monitor
• You can only use this function if the machine’s Easy
Mac operating systems.
machine.
screen using the print screen button, the machine may
use more toner depending on what is being printed.
Printer Manager program is installed if you are a Mac
OS user, you need to enable Screen Print Settings
from the Easy Printer Manager to use the Print Screen
feature.
1. Introduction
20

Control panel overview
4
(Cancel)
5
(Power/
Wake Up)
6
You can stop an operation at any time. You also can do the
following functions.
• Configuration / Network Configuration Report
— Press and hold this button for about 2 seconds until the
blue LED blinks slowly, and release.
• Error Information / Usage Counter
— Press and hold this button for about 4 seconds until the
blue LED blinks quickly, and release.
• Supplies Information
— Press and hold this button for about 6 seconds until the
blue LED on, and release.
You can turn the power off or wake the machine up from the sleep
mode with this button.
Shows the status of your machine (see «Status LED» on page 63).
a
(Status
LED)
a. C43xW series only.
b. C43x series only.
1. Introduction
21
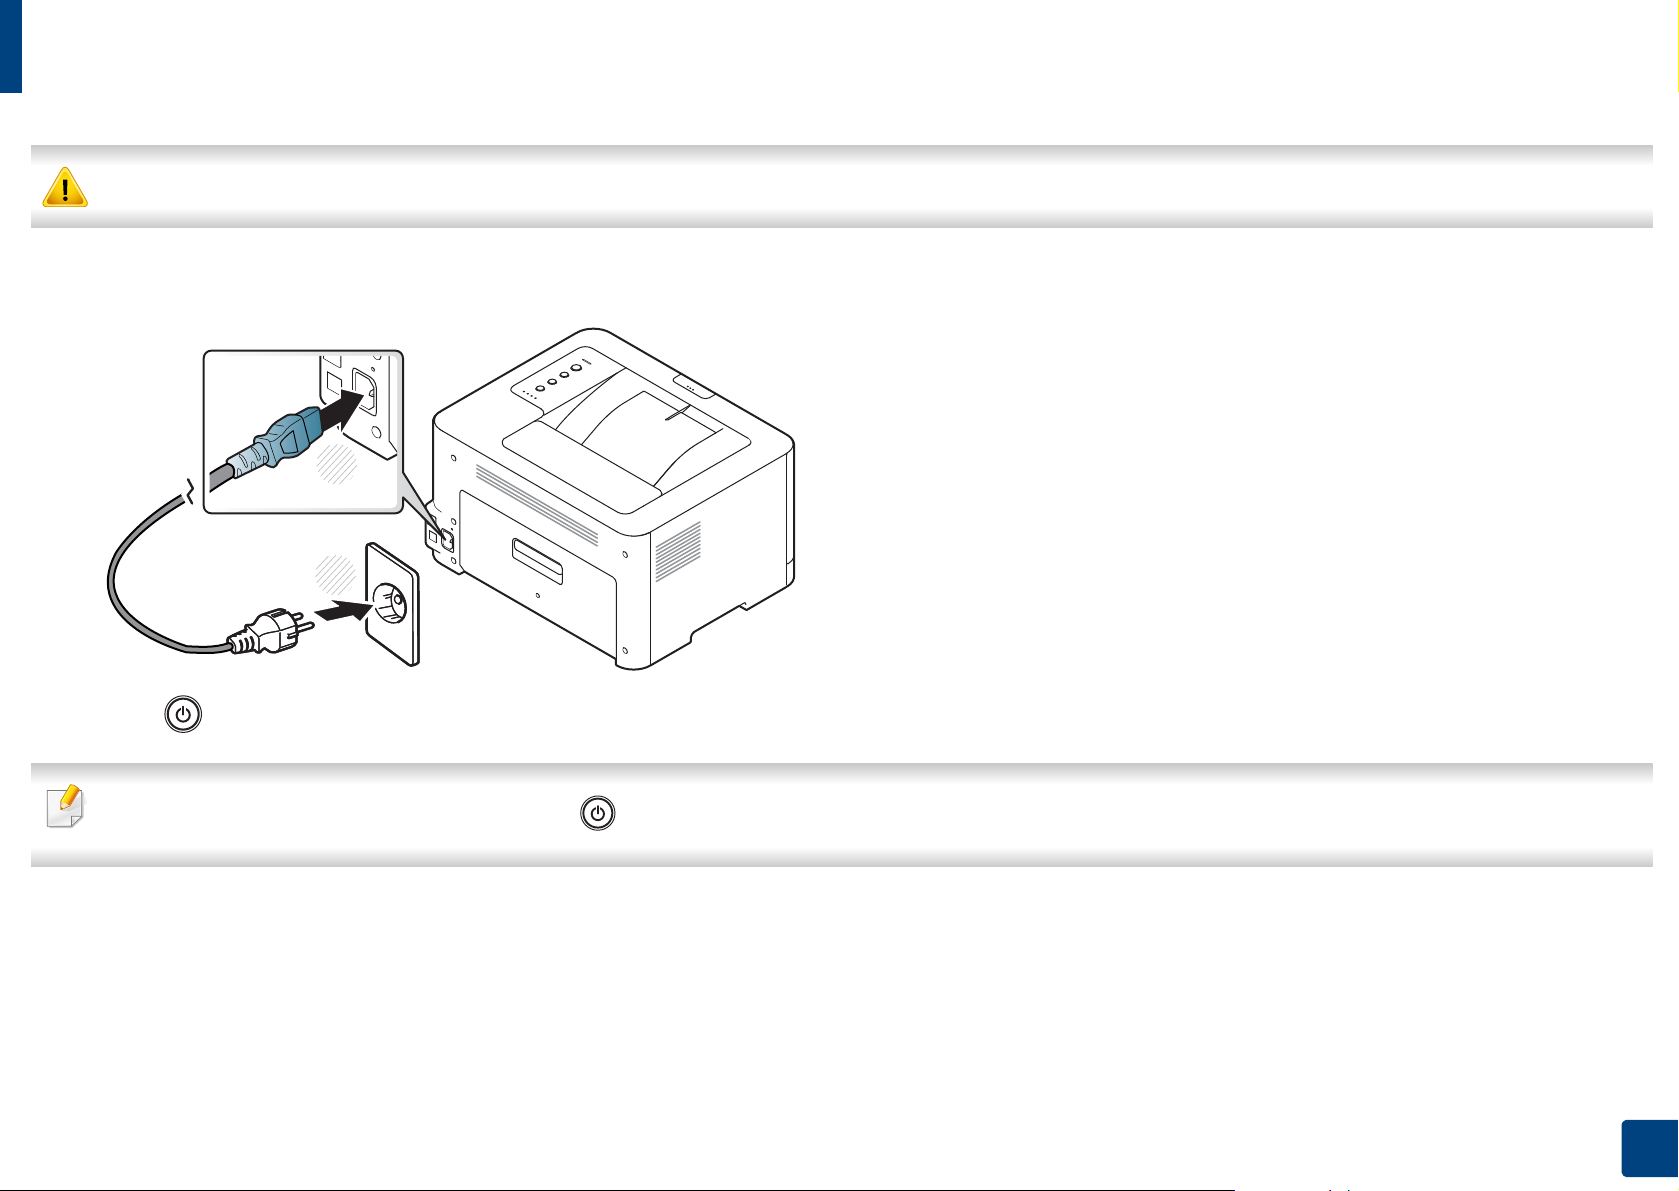
Turning on the machine
Keep in mind that you should use the power cord supplied with the machine. Otherwise, it can cause damage or fire to the machine.
Connect the machine to the electricity supply first.
1
1
2
press (Power/Wake Up) button on the control panel.
2
If you want to turn the power off, press and hold (Power/Wake Up) button for about 3 seconds.
1. Introduction
22

Installing the driver locally
A locally connected machine is a machine directly attached to your computer
using a USB cable. If your machine is attached to a network, skip the following
steps below and go on to installing a network connected machine’s driver (see
«Installing driver over the network» on page 99).
• If you are a Mac or Linux operating systems user, refer to the «Installation
for Mac» on page 90 or «Installation for Linux» on page 92.
• The installation window in this User’s Guide may differ depending on the
machine and interface in use.
• Only use a USB cable no longer than 3 meters (118 inches).
12
Windows
Make sure that the machine is connected to your computer and
1
powered on.
If the installation window does not appear, from Charms, select
Search > Apps and search for Run. Type in X:\Setup.exe, replacing
“X” with the letter that represents your CD-ROM drive and click OK.
If “Tap to choose what happens with this disc.” pop-up window
appears, click the window and select Run Setup.exe.
Review and accept the installation agreements in the installation
3
window. Then, click Next.
Select USB on the Printer Connection Type screen. Then, click Next.
4
Follow the instructions in the installation window.
5
You can select the software applications in the Select Software to Install
window.
Insert the supplied software CD into your CD-ROM drive.
2
If the installation window does not appear, click Start > All programs >
Accessories > Run.
X:\Setup.exe replacing “X” with the letter, which represents your CDROM drive and click OK.
• For Windows 8,
1. Introduction
23

Installing the driver locally
From the Windows 8 Start Screen
• The V4 driver is automatically downloaded from the Windows Update if
your computer is connected to the Internet. If not, you can manually
download the V4 driver from Samsung website, www.samsung.com >
find your product > Support or downloads.
• You can download Samsung Printer Experience app from the Windows
Store. You need have a Microsoft account to use the Windows Store.
1 From Charms, select Search.
2 Click Store.
3 Search and click Samsung Printer Experience.
4 Click Install.
• If you install the driver using the supplied software CD, V4 driver is not
installed. If you want to use the V4 driver in the Desktop screen, you can
download from the Samsung website, www.samsung.com >find your
product > Support or downloads.
• If you want to install Samsung’s printer management tools, you need to
install them using the supplied software CD.
Make sure that your computer is connected to the Internet and powered
1
on.
Make sure that the machine is powered on.
2
Connect the computer and the machine with a USB cable.
3
The driver is automatically installed from the Windows Update.
1. Introduction
24

Reinstalling the driver
If the printer driver does not work properly, follow the steps below to reinstall
the driver.
13
Windows
Make sure that the machine is connected to your computer and
1
powered on.
From the Start menu, select Programs or All Programs > Samsung
2
Printers > Uninstall Samsung Printer Software.
• For Windows 8,
1 From Charms, select Search > Apps.
2 Search and click Control Panel.
3 Click Programs and Features.
4 Right-click the driver you want to uninstall and select Uninstall.
From the Windows 8 Start Screen
Make sure that the machine is connected to your computer and
1
powered on.
Click on the Uninstall Samsung Printer Software in the Start screen.
2
Follow the instructions in the window.
3
• If you cannot find a Samsung Printer Software tile, unintstall from the
desktop screen mode.
• If you want to uninstall Samsung’s printer management tools, from the
Start screen, right-click the app > Uninstall > right-click the program
you want to delete > Uninstall and follow the instruction in the window.
Follow the instructions in the installation window.
3
Insert the software CD into your CD-ROM drive and install the driver
4
again (see «Installing the driver locally» on page 23).
1. Introduction
25

2. Learning the Basic Usage
After installation is complete, you may want to set the machine’s default settings. Refer to the next section if you would
like to set or change values. This chapter provides information about the overall menu structure and the basic setup
options.
• Media and tray 27
• Basic printing 35
Media and tray
This chapter provides information on how to load print media into your
machine.
• Using print media that does not meet these specifications may cause
problems or require repairs. Such repairs are not covered by Samsung’s
warranty or service agreements.
• Make sure not to use the inkjet photo paper with this machine. It could
cause damage to the machine.
• Using inflammable print media can cause a fire.
• Use designated print media (see «Print media specifications» on page
69).
The use of inflammable media or foreign materials left in the printer may
lead to overheating of the unit and, in rare cases may cause a fire.
1
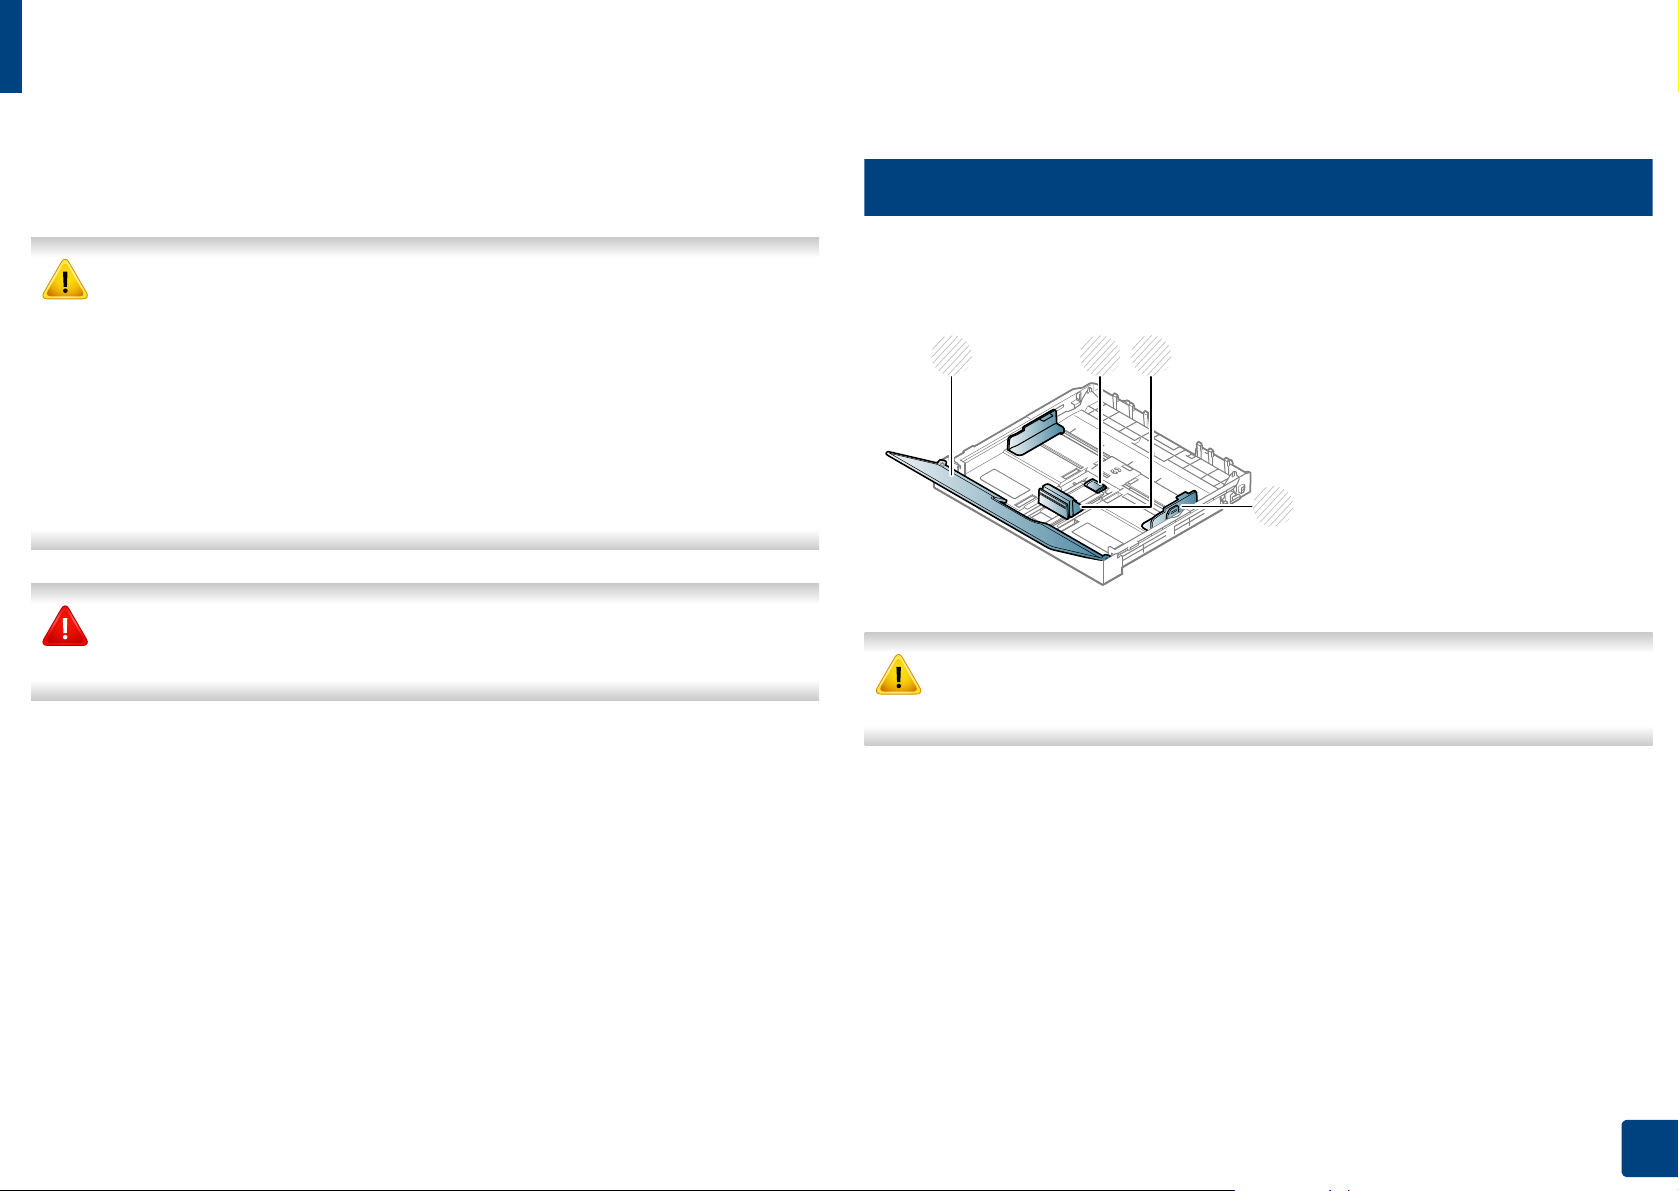
Tray overview
To change the size, you need to adjust the paper guide.
21
3
4
If you do not adjust the guide, it may cause paper registration, image skew,
or jamming of the paper.
1 Paper cover
2 Guide lock
3 Paper length guide
4 Paper width guide
2. Learning the Basic Usage
27
Media and tray
2
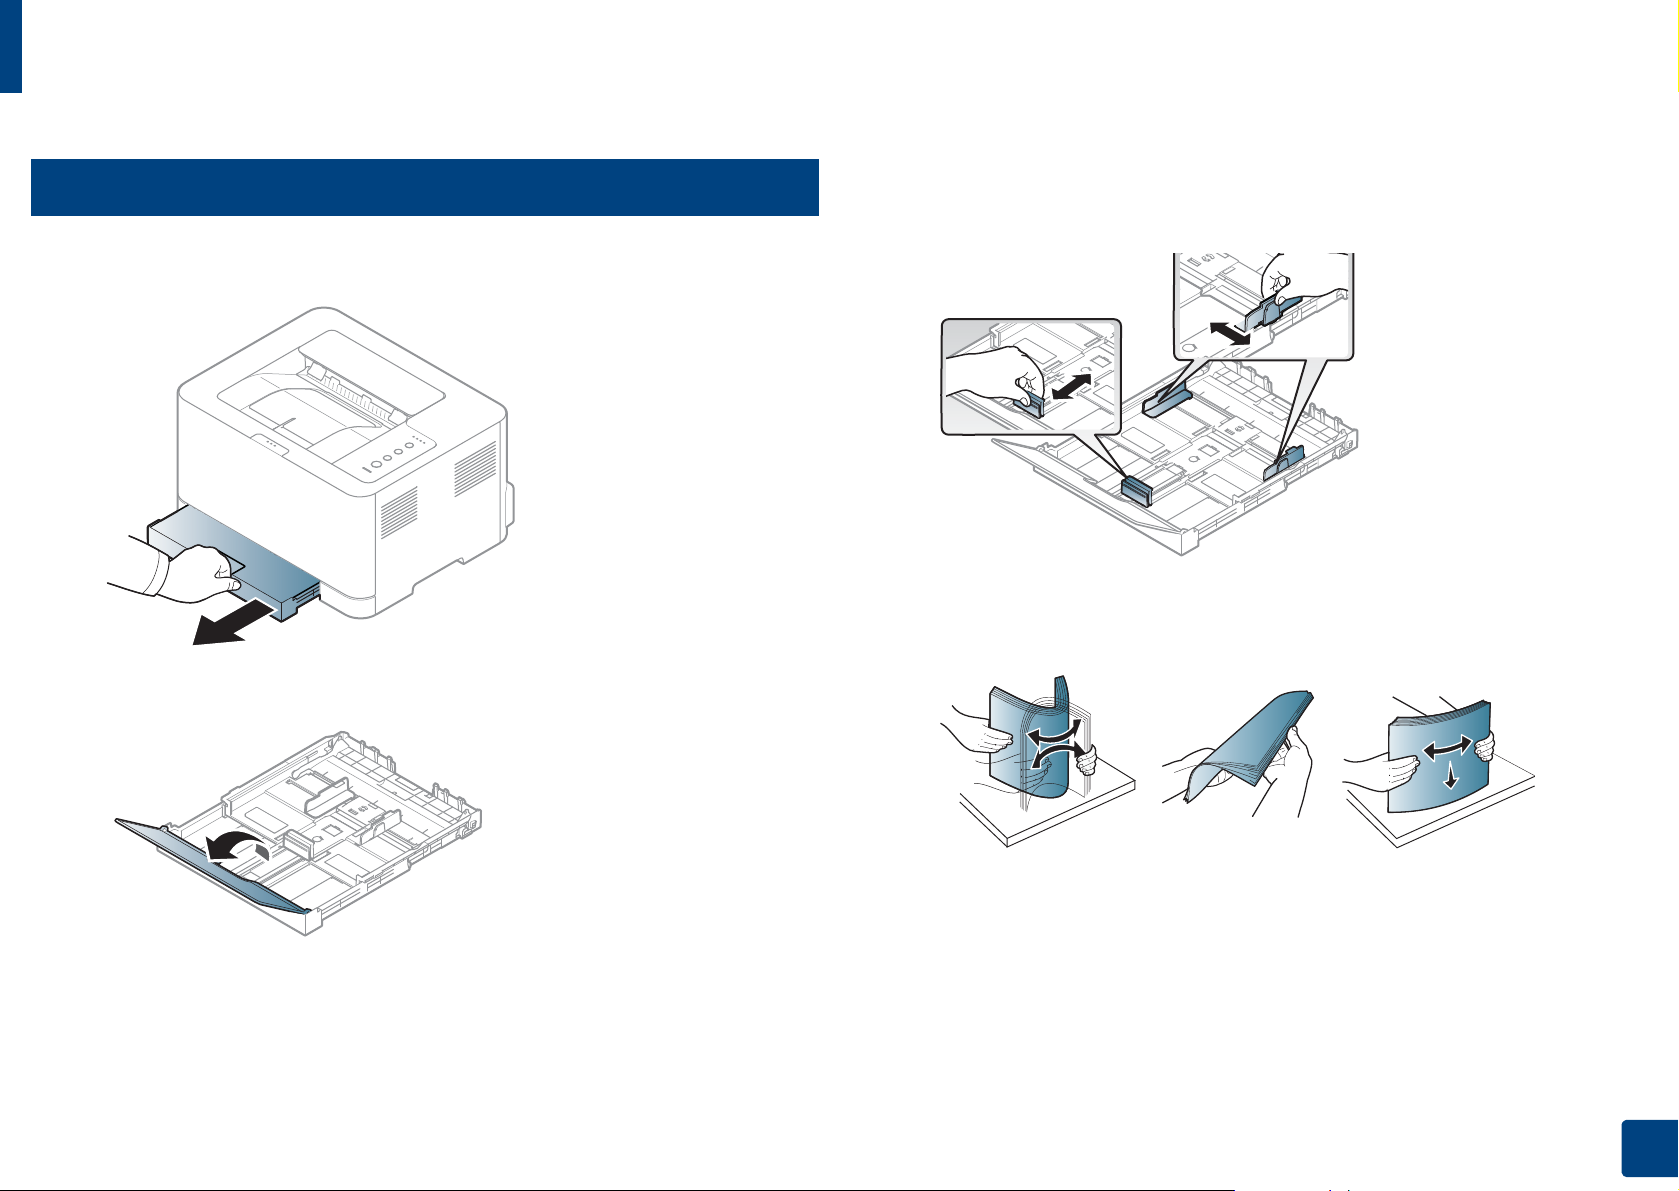
Loading paper in the tray
Pull out the paper tray (see «Tray overview» on page 27).
1
Open the paper cover.
2
Squeeze and the paper width guide and paper length lever to locate
3
them in the correct paper size slot marked at the bottom of the tray to
adjust to the size.
Flex or fan the edge of the paper stack to separate the pages before
4
loading papers.
2. Learning the Basic Usage
28
Media and tray
Place the paper with the side you want to print facing up.
5
For paper smaller than Letter-sized, press and unlatch the guide lock in
the tray, push the tray in manually. Then adjust the paper length guide
and paper width guide.
1
2
For paper longer than A4-sized(like ‘Legal’), press and unlatch the guide
lock in the tray, pull the tray out manually. Then adjust the paper length
guide and paper width guide.
• Do not push the paper width guide too far causing the media to buckle.
• If you do not adjust the paper width guide, it may cause paper jams.
• Do not use a paper with a leading-edge curl, it may cause a paper jam or
the paper can be wrinkled.
2. Learning the Basic Usage
29
Media and tray
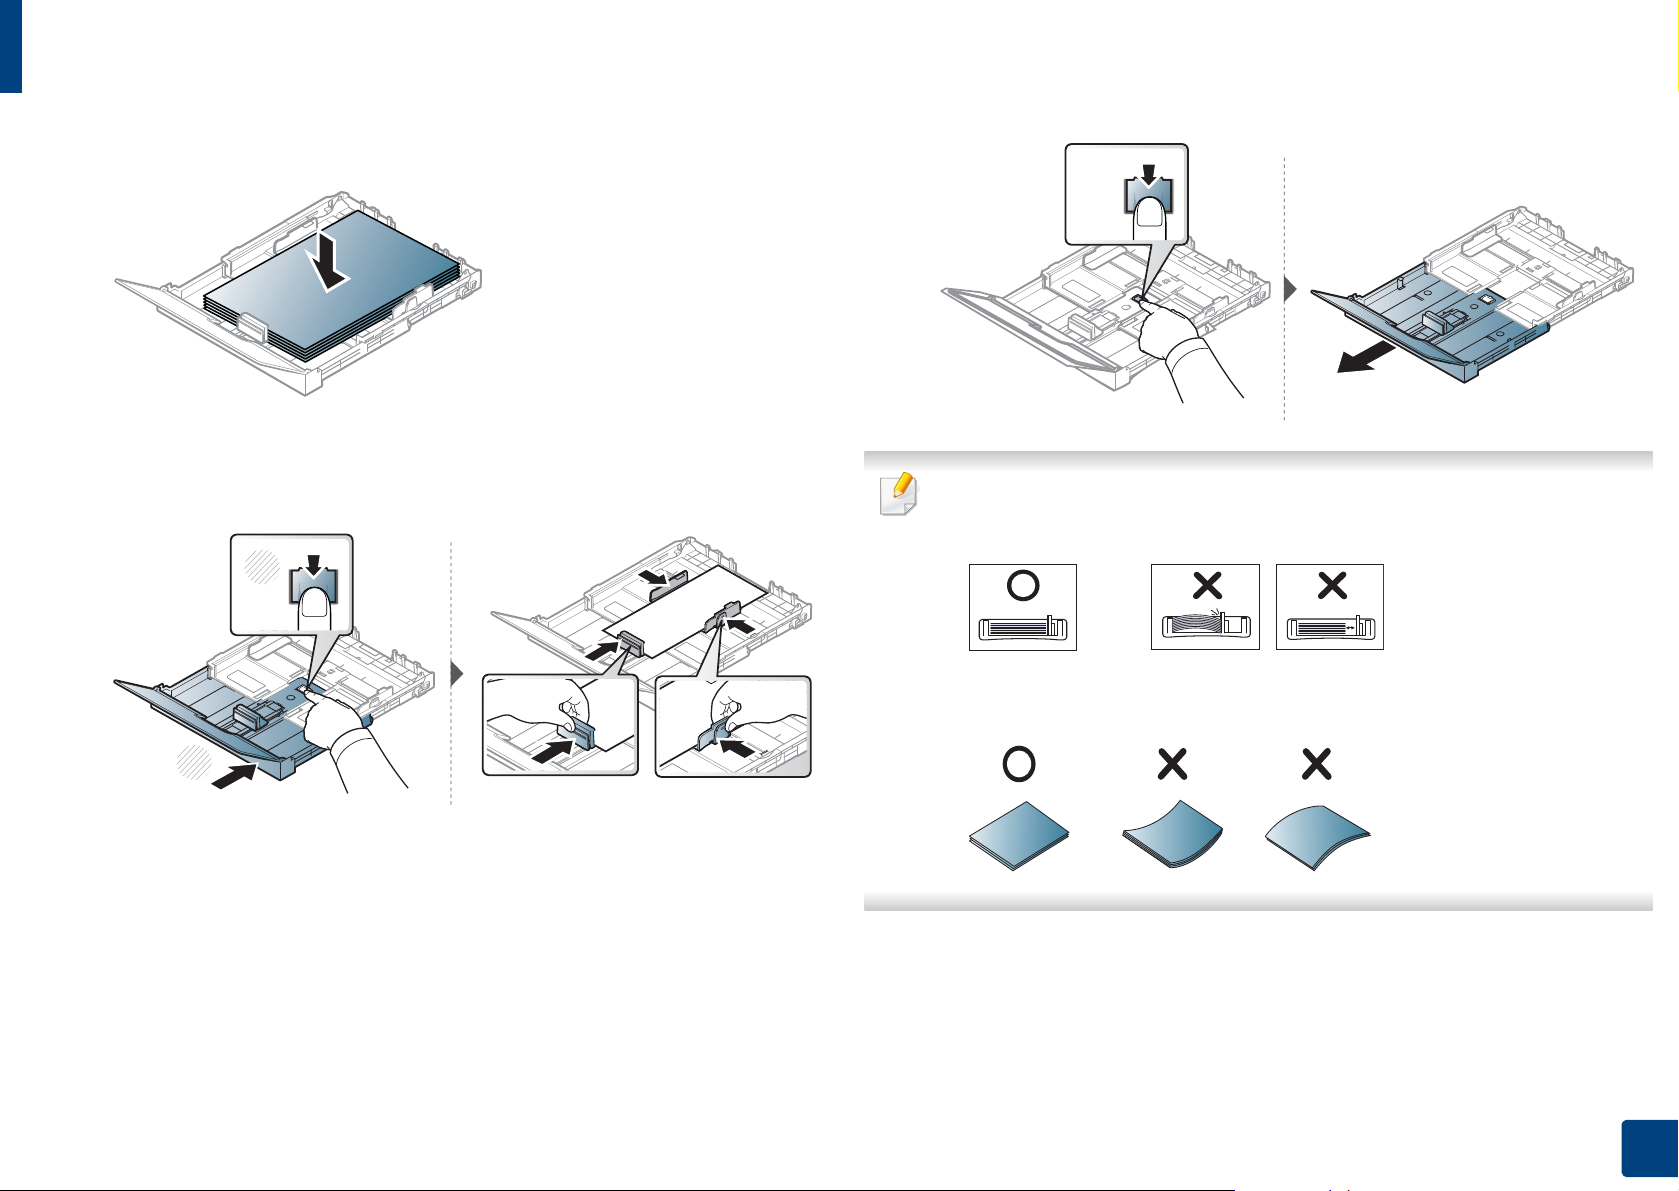
Squeeze the paper width guide and slide it to the edge of the paper stack
6
without causing it to buckle.
Close the paper cover.
7
Insert the paper tray.
8
When you print a document, set the paper type and size for the tray (see
9
«Setting the paper size and type» on page 34).
2. Learning the Basic Usage
30
Loading…
Новости
Самые популярные статьи
- Принтеры и МФУ
-
- Epson с СНПЧ и ПЗК
- Прошитый Samsung
- Принтер и МФУ HP
- Oki принтеры и мфу
- Ручной принтер
- Прошитый МФУ, принтер Pantum
- СНПЧ
-
- СНПЧ Epson
- СНПЧ Canon
- СНПЧ Hp
- СНПЧ Brother
- СНПЧ Конструктор ( комплектующие )
- ПЗК
-
- ПЗК Epson
- ПЗК HP
- ПЗК Canon
- ПЗК Brother
- Чернила
-
- Чернила Epson
- Чернила Canon
- Чернила HP
- Чернила Brother
- Чернила Epson, Canon, HP в канистре
- Фотобумага
-
- Фотобумага глянцевая
- Фотобумага матовая
- Фотобумага фактурная. Дизайнерская
- Рулонная фотобумага
- Фотобумага мелованная (2-х сторонний глянец для струйной печати)
- Оригинальная фотобумага HP, Canon, Epson
- Термобумага для терминалов и банкоматов
- Тонер
-
- Тонер HP
- Тонер Samsung
- Тонер Canon
- Тонер Epson
- Тонер Xerox
- Тонер Brother
- Тонер Panasonic
- Тонер Kyocera
- Тонер OKI
- Тонер Ricoh
- Тонер Toshiba
- Тонер Konica
- Тонер Sharp
- Тонер Handan
- Тонер Lexmark
- Лазерные картриджи
-
- Картридж Epson
- Картридж Canon
- Картридж HP
- Картридж Samsung
- Картридж Xerox
- Картридж Brother
- Картридж Panasonic
- Картридж Kyocera
- Картридж OKI
- Картридж Toshiba, Sharp, Lexmark, Ricoh
- ЗИП для картриджа
-
- ЗИП картриджа Canon
- ЗИП картриджа HP
- ЗИП картриджа Samsung
- ЗИП картриджа Xerox
- ЗИП картриджа Brother
- ЗИП картриджа Panasonic
- ЗИП картриджа Lexmark
- ЗИП картриджа Ricoh, Kyocera, Sharp
- Пакеты для картриджей
- Комплектующие (ЗИП) для принтера
-
- ЗИП Epson
-
- Print Head ( Печатающая головка )
- Pump Assy ( Узел подачи чернил в сборе )
- Board Assy ( Электронная плата )
- DAMPER ( Демпер )
- Cable Assy ( Шлейф в сборе )
- Belt, Scale ( ремень каретки, лента позиционирования )
- Motor Assy ( двигатель )
- Paper feed unit ( узел подачи бумаги )
- Gear ( Шестерня )
- Scaner unit ( блок сканера )
- Power Assy ( блок питания )
- Разное Epson
- ЗИП Canon
-
- Печатающая головка Canon
- Электронная плата Canon
- Узел термозакрепления Canon
- Узел подачи бумаги Canon
- Ремни, ленты позиционирования, диски энкодера Canon
- Шлейфы Canon
- Узел подачи чернил Canon
- Шестеренки Canon
- Блоки питания Canon
- Электродвигатели и соленоиды Canon
- Датчики Canon
- Разное Canon
- ЗИП HP
-
- Печатающая головка HP
- Электронная плата HP
- Узел термозакрепления HP
- Узел подачи бумаги HP
- Ремни, ленты позиционирования, диски энкодера HP
- Шлейфы HP
- Узел подачи чернил HP
- Модули памяти HP
- Шестеренки HP
- Подшипники (бушинги) HP
- Блоки питания HP
- Электродвигатели и соленоиды HP
- Узел сканирования HP
- Датчики HP
- Разное HP
- ЗИП Samsung
-
- Электронная плата Samsung
- Узел термозакрепления Samsung
- Узел подачи бумаги Samsung
- Шлейфы Samsung
- Шестеренки Samsung
- Подшипники (бушинги) Samsung
- Блоки питания Samsung
- Электродвигатели и соленоиды Samsung
- Узел сканирования Samsung
- Блок лазера Samsung
- Датчики Samsung
- Разное Samsung. Товары, не вошедшие в предыдущие категории
- ЗИП Xerox
-
- Печатающая головка Xerox
- Электронная плата Xerox
- Узел термозакрепления Xerox
- Узел подачи бумаги Xerox
- Ремни, ленты позиционирования, диски энкодера Xerox
- Шлейфы Xerox
- Узел подачи чернил Xerox
- Шестеренки Xerox
- Электродвигатели и соленоиды Xerox
- Блоки питания Xerox
- Узел сканирования Xerox
- Датчики Xerox
- Блок лазера Xerox
- Разное Xerox
- ЗИП Brother
-
- Печатающая головка Brother
- Электронная плата Brother
- Узел термозакрепления Brother
- Узел подачи бумаги Brother
- Ремни, ленты позиционирования, диски энкодера Brother
- Шлейфы Brother
- Узел подачи чернил Brother
- Шестеренки Brother
- Блоки питания Brother
- Электродвигатели и соленоиды Brother
- Датчики Brother
- Узел сканирования Brother
- Блок лазера Brother
- Разное Brother
- ЗИП Kyocera
-
- Электронная плата Kyocera
- Узел термозакрепления Kyocera
- Узел подачи бумаги Kyocera
- Шлейфы Kyocera
- Шестеренки Kyocera
- Подшипники (бушинги) Kyocera
- Блоки питания Kyocera
- Электродвигатели и соленоиды Kyocera
- Узел сканирования Kyocera
- Блок лазера Kyocera
- Датчики Kyocera
- Разное Kyocera. Товары, не вошедшие в предыдущие категории
- ЗИП Panasonic, OKI, Ricoh, Pantum
-
- Печатающая головка Panasonic, Oki, Ricoh, Pantum
- Электронная плата Panasonic, Oki, Ricoh, Pantum
- Узел термозакрепления Panasonic, Oki, Ricoh, Pantum
- Узел подачи бумаги Panasonic, Oki, Ricoh, Pantum
- Ремни, ленты позиционирования, диски энкодера Panasonic, Oki, Ricoh, Pantum
- Шлейфы Panasonic, Oki, Ricoh, Pantum
- Узел подачи чернил Panasonic, Oki, Ricoh, Pantum
- Шестеренки Panasonic, Oki, Ricoh, Pantum
- Блоки питания Panasonic, Oki, Ricoh, Pantum
- Электродвигатели и соленоиды Panasonic, Oki, Ricoh, Pantum
- Датчики Panasonic, Oki, Ricoh, Pantum
- Узел сканирования Panasonic, Oki, Ricoh, Pantum
- Блок лазера Panasonic, Oki, Ricoh, Pantum
- Разное Panasonic, Oki, Ricoh, Pantum
- ЗИП Lexmark, Toshiba, Sharp
-
- Печатающая головка Lexmark, Toshiba, Sharp
- Электронная плата Lexmark, Toshiba, Sharp
- Узел термозакрепления Lexmark, Toshiba, Sharp
- Узел подачи бумаги Lexmark, Toshiba, Sharp
- Ремни, ленты позиционирования, диски энкодера Lexmark, Toshiba, Sharp
- Шлейфы Lexmark, Toshiba, Sharp
- Узел подачи чернил Lexmark, Toshiba, Sharp
- Шестеренки Lexmark, Toshiba, Sharp
- Блоки питания Lexmark, Toshiba, Sharp
- Электродвигатели и соленоиды Lexmark, Toshiba, Sharp
- Узел сканирования Lexmark, Toshiba, Sharp
- Блок лазера Lexmark, Toshiba, Sharp
- Датчики Lexmark, Toshiba, Sharp
- Разное Lexmark, Toshiba, Sharp
- ЗИП Термопринтера
- Стекла для МФУ и сканера
- Струйные картриджи
-
- Картриджи Epson
- Картриджи Canon
- Картриджи HP
- Картриджи Brother, Lexmark, Sharp
- Чипы
-
- Чипы Epson
- Чипы Canon
- Чипы HP
- Чипы Samsung
- Чипы Xerox
- Чипы OKI
- Чипы Ricoh
- Чипы Pantum
- Чипы Kyocera
- Чипы Lexmark
- Решение для принтера
-
- Прошивка Epson
- Генераторы, Прошивки Samsung
- Генераторы, Прошивки Xerox
- Прошитая оригиналом память
- Прошивка принтера Pantum
- Прошивки и Сервисные программы Canon
- Химия для техники
-
- Промывочная жидкость
- Смазки и масла для техники
- Восстанавливающие, очищающие средства
- Программаторы
- Радиодетали
-
- Транзисторы
- Микросхемы памяти FLASH
- Микросхемы памяти EEPROM
- Микроконтроллеры
- Конденсаторы
- Блок питания
- Материалы для наружной рекламы
- Сублимация
- 3D печать ABS PLA
- Планшетный принтер, текстильная печать
- Разработка сайтов и программного обеспечения
- Для ноутбука
-
- Зарядные устройства
- Аккумуляторы
- Запчасти для телевизоров и мониторов
-
- Электронные платы для телевизоров
- Матрицы для телевизора
- Блоки питания для телевизоров
- Тюнеры для телевизора
- Светодиодная подсветка
- Шлейфы и кабели для телевизоров и мониторов
- Разное для телевизоров и мониторов
- Запчасти для асиков (asic miner)
- Разное
- Бытовая техника
- Электротовары
Вход
Самое покупаемое

-
Инструкции по эксплуатации
1
Samsung Xpress C430W инструкция по эксплуатации
(228 страниц)
- Языки:Русский
-
Тип:
PDF -
Размер:
11.88 MB -
Описание:
Лазерный принтер
Просмотр
На NoDevice можно скачать инструкцию по эксплуатации для Samsung Xpress C430W. Руководство пользователя необходимо для ознакомления с правилами установки и эксплуатации Samsung Xpress C430W. Инструкции по использованию помогут правильно настроить Samsung Xpress C430W, исправить ошибки и выявить неполадки.
Gain flexibility with the Samsung Xpress SL-C430W laser printer! Print contactless from your smartphone using NFC technology or print remotely via a network connection. Using Rendering Engine for Clean Page (ReCP) technology, this laser printer delivers professional-level print quality, with smooth color images and crisp text. Plus, its fast print speed of up to 18 ppm (4 ppm color) and duplex capability will boost your productivity.
Easily use your printer, even when you’re on the go! The Samsung Xpress C430W printer is compatible with several remote printing applications, from then your network: Samsung Mobile Print, Samsung Cloud Print, Google Cloud Print, and AirPrint. Mobile printing couldn’t be easier, thanks to NFC technology! With this Samsung printer, simply tap the screen of your NFC-enabled smartphone, to install the Samsung mobile printing app (if you haven’t already) and instantly connect your mobile device to the printer. Thanks to its compatibility with a large number of mobile devices, this Samsung printer gives you great freedom of action. This laser printer is compatible with the Mobile Print app on iOS, Android, Windows Phone, and Kindle.
Simply install your Samsung Xpress SL-C430W printer, in just 3 steps, without a USB connection! SPSI (Samsung Printer S / W Installer) technology will automatically select your operating system and install the drivers without the CD!
Samsung SL-C430W driver and manual
Samsung Xpress SL-C430W Printer Features
Samsung Xpress SL-C430W printer supports Google Cloud Print, and mobile printing through AirPrint or via Samsung’s MobilePrint app. check below for technical features of the printer:
- Printer Type: Workgroup printer – laser – color
- Print Speed: Up to 18 ppm – B/W – A4 (8.25 in x 11.7 in) | Up to 19 ppm – B/W – Letter A Size (8.5 in x 11 in) | Up to 4 ppm – color – A4 (8.25 in x 11.7 in) | Up to 4 ppm – color – Letter A Size (8.5 in x 11 in)
- Connectivity Technology: Wireless
- Interface: USB 2.0, LAN, Wi-Fi(n), NFC
- Max Resolution (B&W): 2400 x 600 dpi
- Max Resolution (Color): 2400 x 600 dpi
- First Print Out Time B/W: 14 sec
- First Print Out Time Color: 26 sec
- Language Simulation: SPL (Samsung Printer Language)
- Printer Features: Rendering Engine for Clean Page (ReCP) Technology
- Media Handling: 150-sheet input tray
- Monthly Duty Cycle (max): 20000 pages
- Recommended Monthly Volume: 100 – 500 pages
- Networking: Print server
- Security Protocols & Features: WPS
Read Also: Samsung Xpress SL-C480W Driver and Manual
Download the Samsung Xpress SL-C430W Driver and Manuals
You can download the Samsung Xpress SL-C430W driver, and then read the printer manual to set up your printer properly.
Samsung Xpress SL-C430W Driver:
Windows driver:
Samsung SL-C430W Series Print Driver Download
Filename: C43x_Series_WIN_UPD_V3.00.16.00.01_CDV1.23.exe
File Size: 102.1 MB
macOS driver:
Samsung Universal Print and Scan Driver Download
Filename: Samsung_Mac_10.15_Driver_V3.92.00.dmg
File Size: 20.5 MB
Samsung Xpress SL-C430W Printer Manual:
Samsung Xpress SL-C43x, SL-C43xFW Color Laser Printer series – User Guide Download
File Size: 22.06MB
Samsung Xpress SL-C430, SL-C430W Color Laser – Quick Installation Guide Download
File Size: 1.4MB