

Регистрация устройства поможет вам управлять его гарантией, получать техническую поддержку и отслеживать статус ремонта.
Апгрейд гарантии: здесь.
* Обращаем ваше внимание, что доступность устройств с гарантией Premium Care зависит от региона.
Регистрация продукта
Руководства пользователя
Версия E8145
3.1 MB
2013/04/01
ASUS RT-N10P user’s manual for English
- Продукты, сертифицированные Федеральной комиссией по связи и Министерством промышленности Канады, будут распространяться в США и Канаде. Информацию о них можно получить на соответствующих региональных сайтах ASUS.
- Технические характеристики могут быть изменены без предварительного уведомления. Точную информацию о них вы можете получить у продавца. Доступность продуктов зависит от региона.
- Технические характеристики зависят от конкретной модели продукта – см. страницу спецификаций. Все изображения служат лишь для целей иллюстрации.
- Цвет печатной платы и версии приложенных программ могут быть изменены без предварительного уведомления.
- Упомянутые выше названия продуктов являются торговыми марками соответствующих компаний.
- Термины HDMI и HDMI High-Definition Multimedia Interface, оформление HDMI-изделий и логотипы HDMI – торговые марки или зарегистрированные торговые марки компании HDMI Licensing Administrator, Inc.
RT-N10P
Superspeed Wireless N Router
User Guide

E8145
First Edition
February 2013
Copyright © 2013 ASUSTeK Computer Inc. All Rights Reserved.
No part of this manual, including the products and software described
in it, may be reproduced, transmitted, transcribed, stored in a retrieval
system, or translated into any language in any form or by any means, except
documentation kept by the purchaser for backup purposes, without the express
written permission of ASUSTeK Computer Inc. (“ASUS”).
Product warranty or service will not be extended if: (1) the product is repaired,
modified or altered, unless such repair, modification of alteration is authorized
in writing by ASUS; or (2) the serial number of the product is defaced or missing.
ASUS PROVIDES THIS MANUAL “AS IS” WITHOUT WARRANTY OF ANY KIND,
EITHER EXPRESS OR IMPLIED, INCLUDING BUT NOT LIMITED TO THE IMPLIED
WARRANTIES OR CONDITIONS OF MERCHANTABILITY OR FITNESS FOR A
PARTICULAR PURPOSE. IN NO EVENT SHALL ASUS, ITS DIRECTORS, OFFICERS,
EMPLOYEES OR AGENTS BE LIABLE FOR ANY INDIRECT, SPECIAL, INCIDENTAL,
OR CONSEQUENTIAL DAMAGES (INCLUDING DAMAGES FOR LOSS OF PROFITS,
LOSS OF BUSINESS, LOSS OF USE OR DATA, INTERRUPTION OF BUSINESS
AND THE LIKE), EVEN IF ASUS HAS BEEN ADVISED OF THE POSSIBILITY OF
SUCH DAMAGES ARISING FROM ANY DEFECT OR ERROR IN THIS MANUAL OR
PRODUCT.
SPECIFICATIONS AND INFORMATION CONTAINED IN THIS MANUAL ARE
FURNISHED FOR INFORMATIONAL USE ONLY, AND ARE SUBJECT TO CHANGE
AT ANY TIME WITHOUT NOTICE, AND SHOULD NOT BE CONSTRUED AS A
COMMITMENT BY ASUS. ASUS ASSUMES NO RESPONSIBILITY OR LIABILITY
FOR ANY ERRORS OR INACCURACIES THAT MAY APPEAR IN THIS MANUAL,
INCLUDING THE PRODUCTS AND SOFTWARE DESCRIBED IN IT.
Products and corporate names appearing in this manual may or may not be
registered trademarks or copyrights of their respective companies, and are used
only for identification or explanation and to the owners’ benefit, without intent
to infringe.
2

Table of contents
1 Overview 5
Package contents …………………………………………………………………………….5
Hardware features …………………………………………………………………………… 6
2 Setting up your wireless network 9
Positioning your router……………………………………………………………………9
What you need ……………………………………………………………………………….10
Setting up your wireless router ……………………………………………………10
Wired connection …………………………………………………………………….11
Wireless connection ………………………………………………………………..12
Before you proceed …………………………………………………………………13
A. Disable any congured proxy servers. …………………………
B. Congure TCP/IP settings. ……………………………………………..
C. Disable dial-up networking …………………………………………..
3 NetworkcongurationusingthewebGUI 19
Logging in to the web GUI ……………………………………………………………19
Setting up the Internet connection …………………………………………….20
Quick Internet Setup (QIS) with auto-detection ………………… 21
Setting up wireless security ………………………………………………………….26
Creating your Guest Network ………………………………………………………28
Using the Trac Manager ……………………………………………………………..30
Managing QoS (Quality of Service) Bandwidth ………………….. 30
Monitoring Trac …………………………………………………………………… 32
Conguring Advanced settings……………………………………………………33
Setting up the DHCP Server …………………………………………………..33
Upgrading the rmware …………………………………………………………35
Restoring/Saving/Uploading settings ………………………………….36
13
15
18
3

Table of contents
4 Usingtheutilities 37
Device Discovery ……………………………………………………………………………37
Firmware Restoration …………………………………………………………………….39
5 Troubleshooting 41
Troubleshooting …………………………………………………………………………….41
ASUS DDNS Service ……………………………………………………………………….45
Frequently Asked Questions (FAQs) ……………………………………..45
Appendices 47
Notices ……………………………………………………………………………………………..47
Networks Global Hotline Information …………………………………………61
ASUS Contact information ……………………………………………………………64
4
1 Overview
Package contents
RT-N10P wireless router
Network cable (RJ-45)
Power adapter
Quick Start Guide
Warranty card
• If any of the items is damaged or missing, contact ASUS for
technical inquiries and support. Refer to the ASUS Support
Hotline list at the back of this user manual.
• Keep the original packaging material in case you would need
future warranty services such as repair or replacement.
5
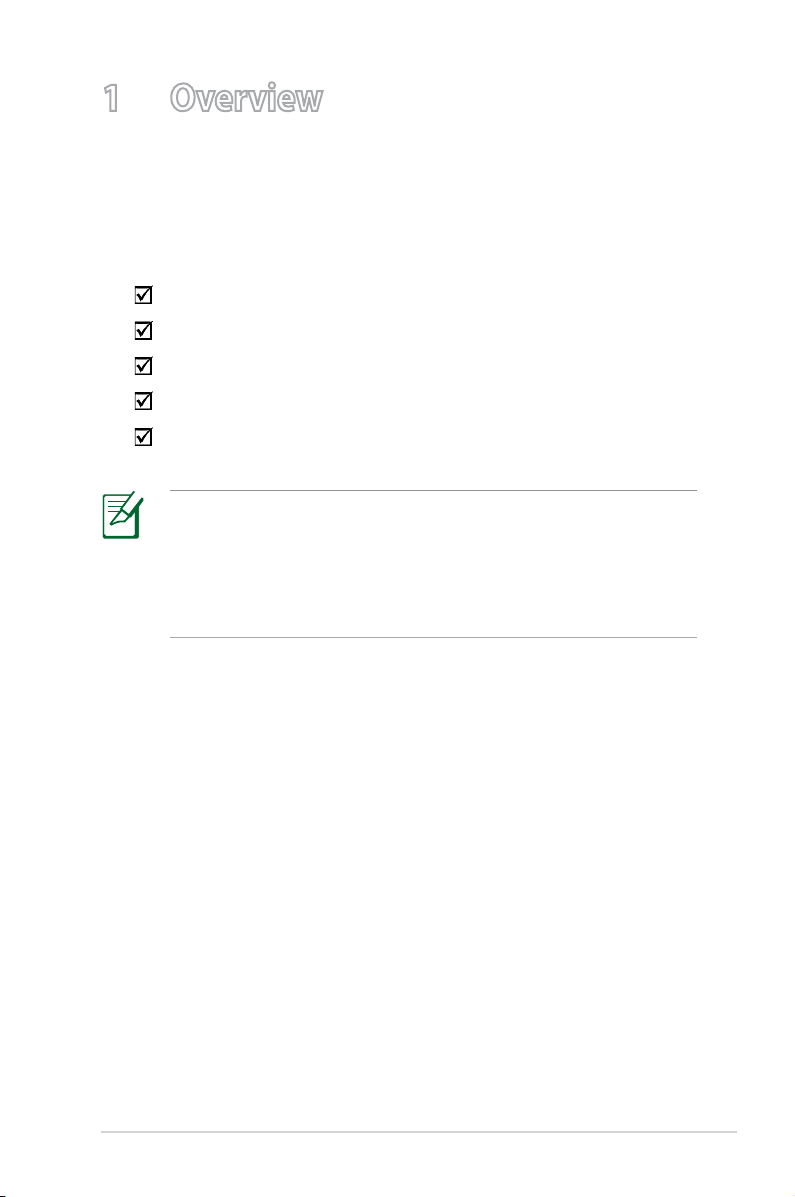
Hardware features
Front
Status indicators
LED Status Indication
Off No power
Power
Wireless
WPS Flashing WPS in progress
WAN
Wide Area
Network
LAN 1-4
Local Area
Network
On System ready
Flashing slowly Rescue mode
Off No power
On Wireless system ready
Flashing Transmitting or receiving data (wireless)
Off No power or no physical connection
On Has physical connection to an Ethernet
network
Flashing Transmitting or receiving data (through
Ethernet cable)
Off No power or no physical connection
On Has physical connection to an Ethernet
network
Flashing Transmitting or receiving data (through
Ethernet cable)
6
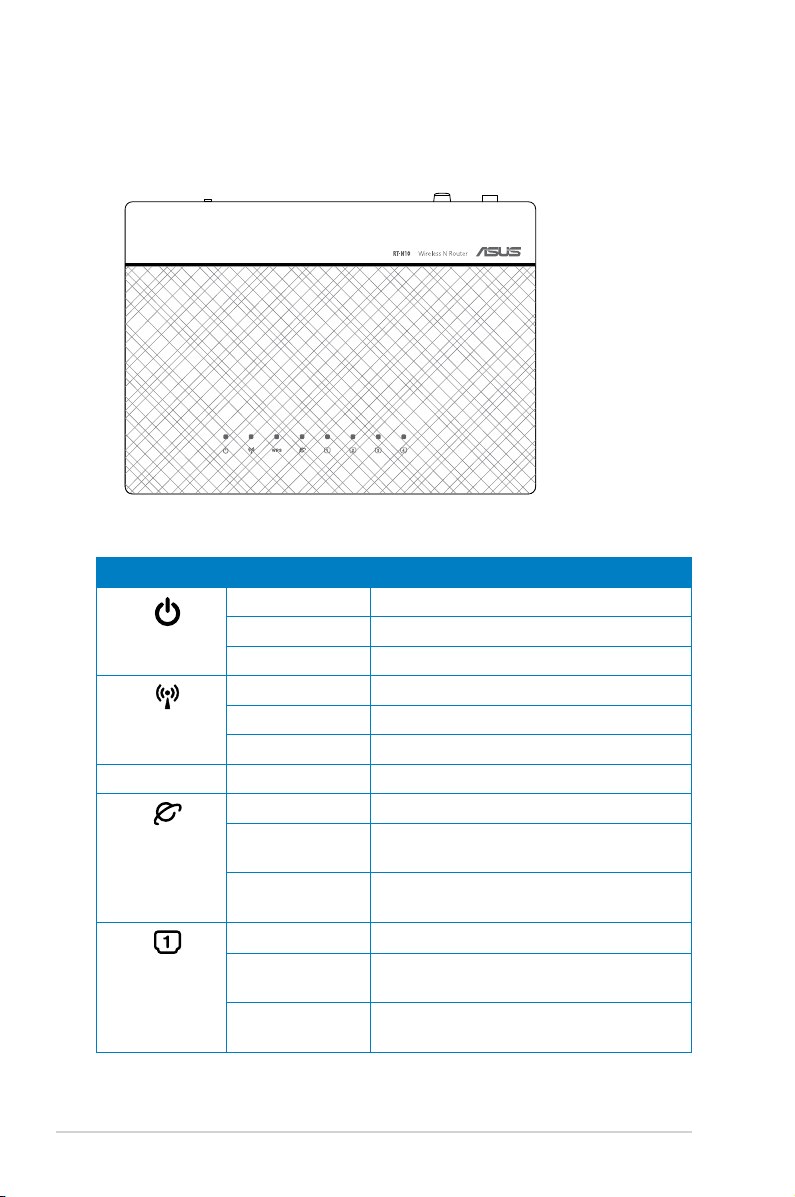
Rear
1
2
3
4
5
6
Label Description
Press this button for more than five seconds to restore the
Reset
system to its factory default settings.
Press this button to power on/off the wireless router.
Power
Insert the AC adapter into this port to connect your router to
a power source.
Connect RJ-45 Ethernet cables to these ports to establish
LAN1-LAN4
LAN connection.
Connect an RJ-45 Ethernet cable to this port to establish
WAN
WAN connection.
WPS Press this button for more than four seconds to establish a
secure wireless connection with a WPS-supported wireless
device.
7
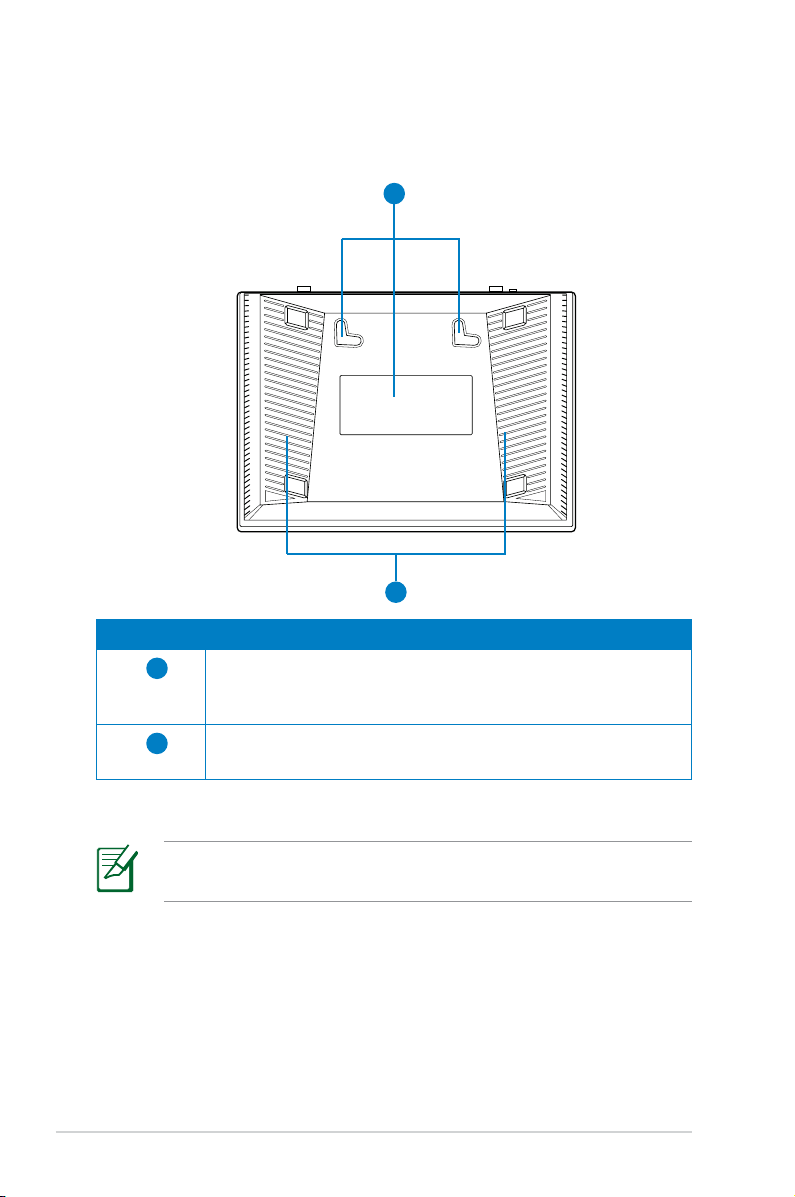
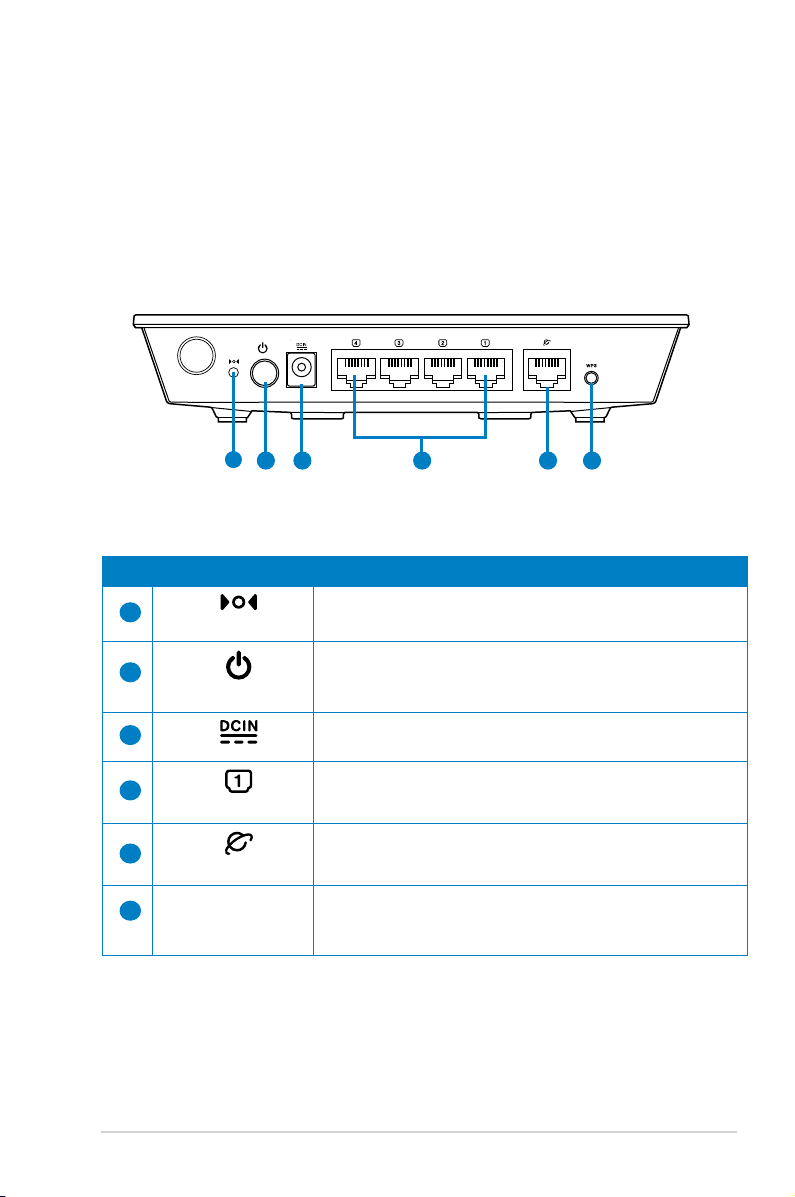
Bottom panel
1
2
Item Description
1
2
Mounting hooks
Use the mounting hooks to mount your router on concrete or
wooden surfaces using two round head screws.
Air vents
These vents provide ventilation to your router.
Mounting the wireless router to a wall is not recommended as it
reduces wireless performance.
8
2 Setting up your wireless
network
Positioning your router
To get the best wireless network performance from your wireless
router, follow the recommendations below:
• Place the wireless router at the center of your network for
maximum wireless coverage.
• Keep the device away from metal obstructions and away from
direct sunlight.
• Keep the device away from 802.11g or 20MHz only Wi-Fi
devices, 2.4GHz computer peripherals, Bluetooth devices,
cordless phones, transformers, heavy-duty motors, fluorescent
lights, microwave ovens, refrigerators, and other industrial
equipment to prevent signal interference or loss.
• For the best front-to-rear wireless coverage, place the wireless
router in an upright position.
• For the best upward and downward wireless coverage, place
the wireless router in an inclined position.
• Always update to the latest firmware. Visit the ASUS website at
http://support.asus.com to get the latest firmware updates.
9
What you need
To set up your network, you need one or two computers that meet
the following system requirements:
• Ethernet RJ-45 (LAN) port (10Base-T/100Base-TX)
• IEEE 802.11b/g/n wireless capability
• An installed TCP/IP service
• Web browser such as Microsoft Internet Explorer, Mozilla
Firefox, Apple Safari, or Google Chrome
• If your computer does not have built-in wireless capabilities,
install an IEEE 802.11b/g/n WLAN adapter to your computer
to connect to the network.
• The Ethernet RJ-45 cables used to connect the network
devices should not exceed 100 meters.
Setting up your wireless router
• Use a wired connection when setting up your wireless router
to avoid possible wireless setup issues.
10
• Before setting up your ASUS wireless router, do the following:
• If you are replacing an existing router, disconnect it from
your network.
• Disconnect the cables/wires from your existing modem. If
your modem has a backup battery, remove it as well.
• Reboot your computer (recommended).
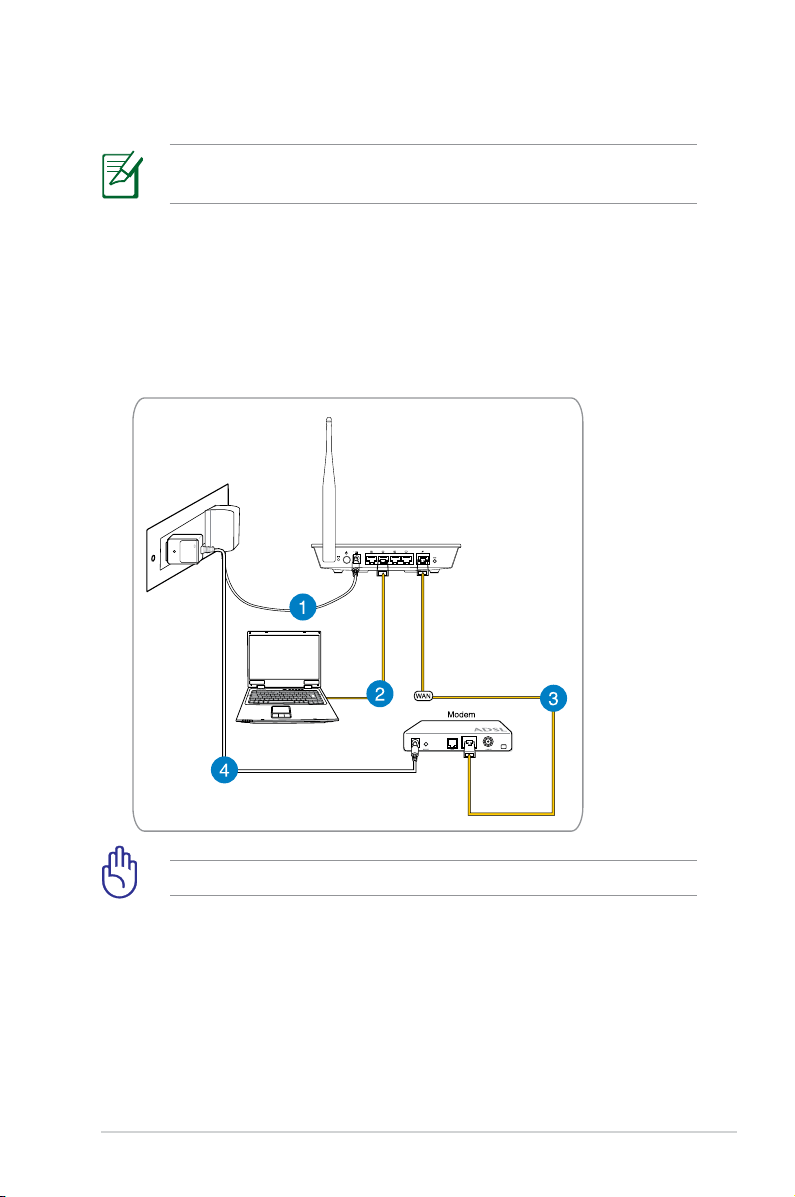
Wired connection
Your wireless router supports both a straight-through or
crossover cable when setting up a wired connection.
To set up a network using a wired connection:
1. Insert your wireless router’s AC adapter to the DC-In port and
plug it to a power outlet.
2. Using the bundled network cable, connect your computer to
your wireless router’s LAN port.
Ensure that the LAN LED is blinking.
3 Using another network cable, connect your modem to your
wireless router’s WAN port.
4. Insert your modem’s AC adapter to the DC-In port and plug it
to a power outlet.
11
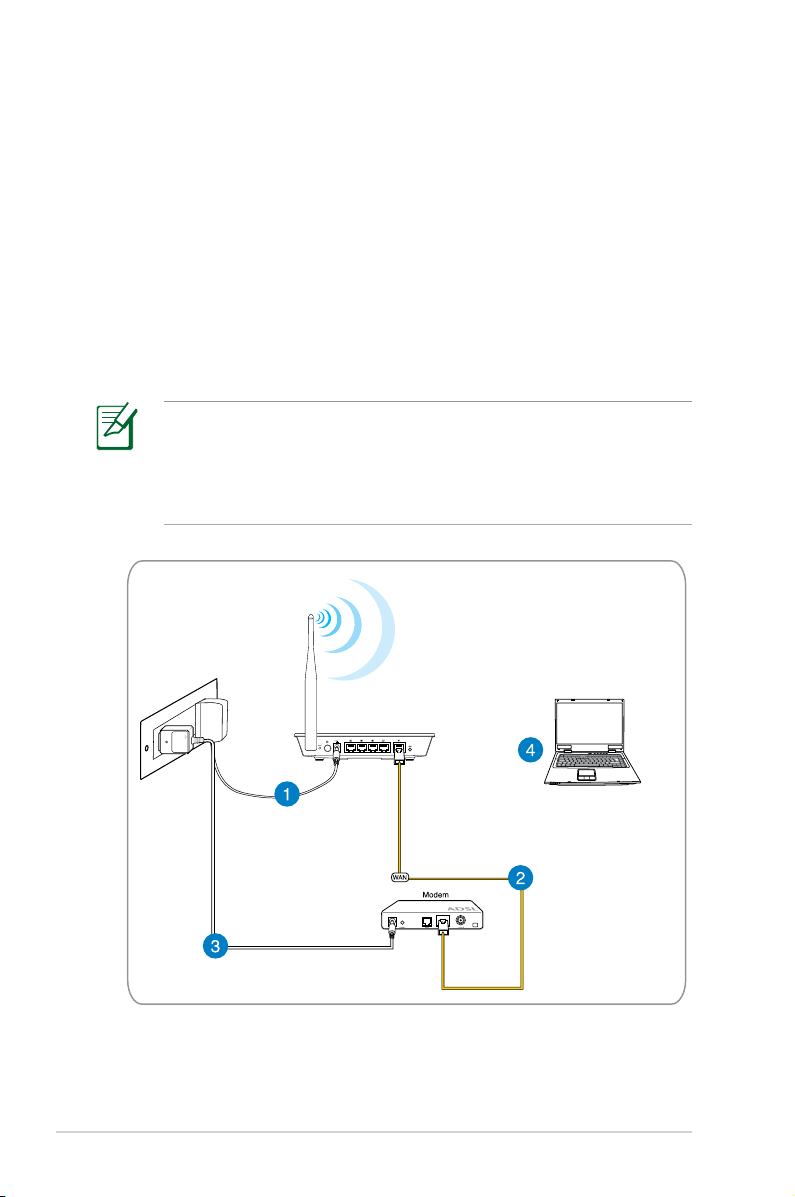
Wireless connection
To set up your wireless network:
1. Insert your wireless router’s AC adapter to the DC-In port and
plug it to a power outlet.
2 Using the bundled network cable, connect your modem to your
wireless router’s WAN port.
3. Insert your modem’s AC adapter to the DC-In port and plug it
to a power outlet.
4. Install an IEEE 802.11b/g/n WLAN adapter on your computer.
• For details on connecting to a wireless network, refer to the
WLAN adapter’s user manual.
• To set up the security settings for your network, refer to the
section Setting up wireless security.
12
Before you proceed
Before configuring your wireless router, apply the steps
described in this section to each computer on the network to
avoid problems connecting to the wireless network.
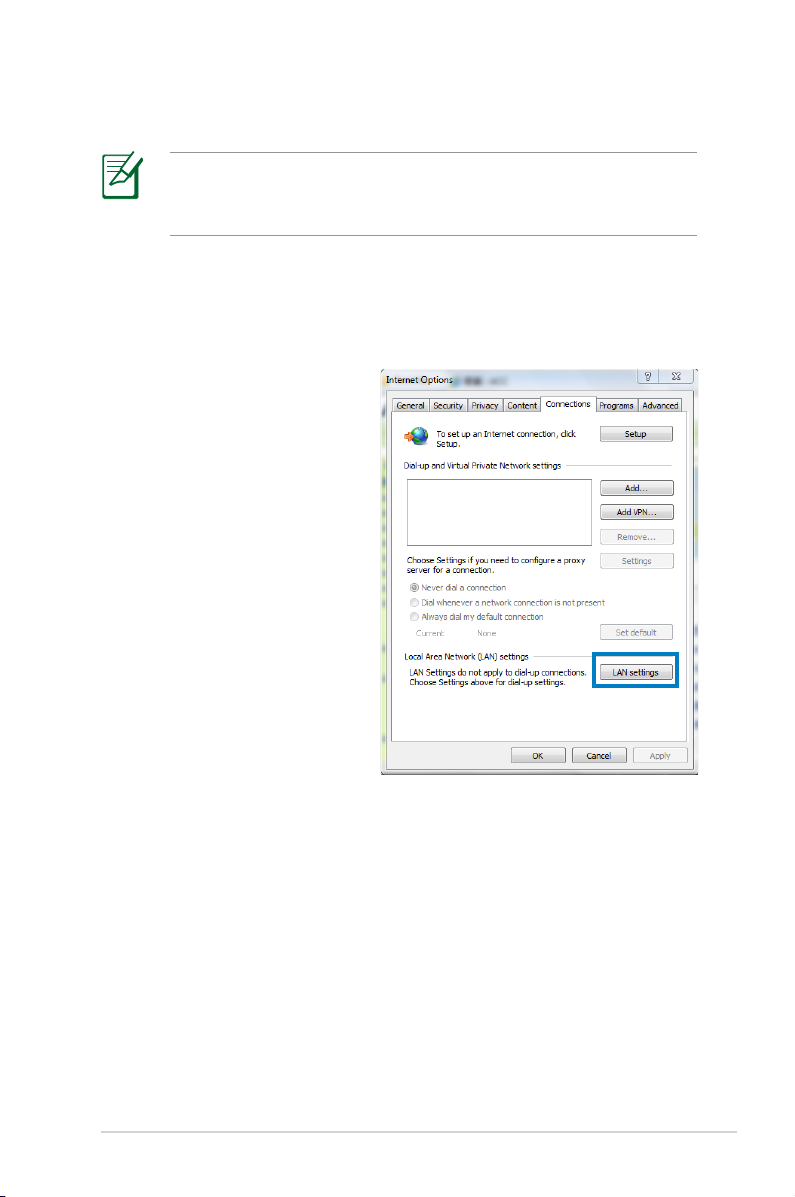
A. Disable any configured proxy servers.
Windows® 7
1. Click Start > Internet
Explorer.
2. Click
Tools >
Internet options >
Connections tab >
LAN settings.
13
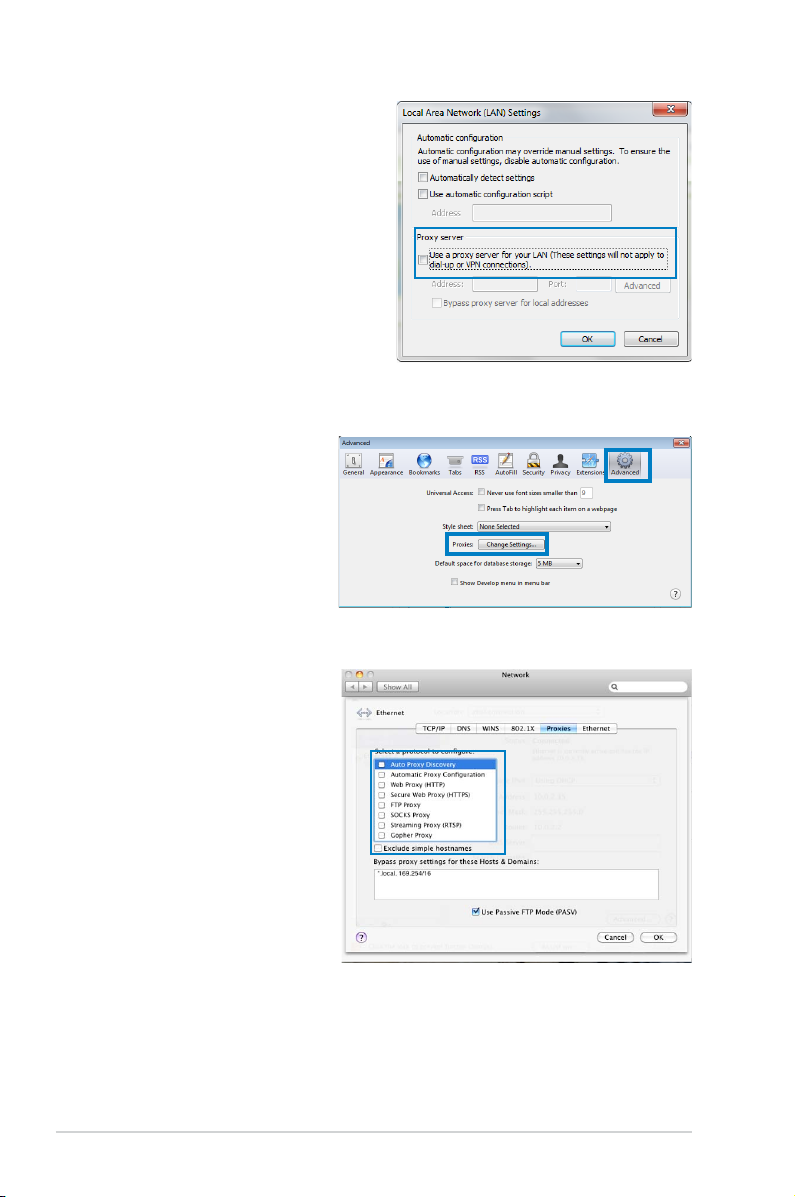
3. From the Local Area
Network (LAN) Settings
window, uncheck Use a
proxy server for your LAN.
4. Click
OK then Apply.
MAC OSX
1. From your Apple
Safari browser, click
Safari > Preferences
> Advanced. On the
Proxies item, click
Change Settings…
2. From the Network
screen, uncheck FTP
Proxy and Web Proxy
(HTTP).
3. Click
OK then Apply.
14

B. Configure TCP/IP settings to automatically obtain an
IP address.
Windows
®
7
1. Click Start > Control Panel
> Network and Internet
> Network and Sharing
Center > Change adapter
settings.
2. On the Network Connections
window, click on Local Area
Connection.
3. On the Local Area Connection
Network Status window, click
Properties.
4. Select Internet Protocol
Version 4 (TCP/IPv4) or
Internet Protocol Version
6 (TCP/IPv6), then click
Properties.
15
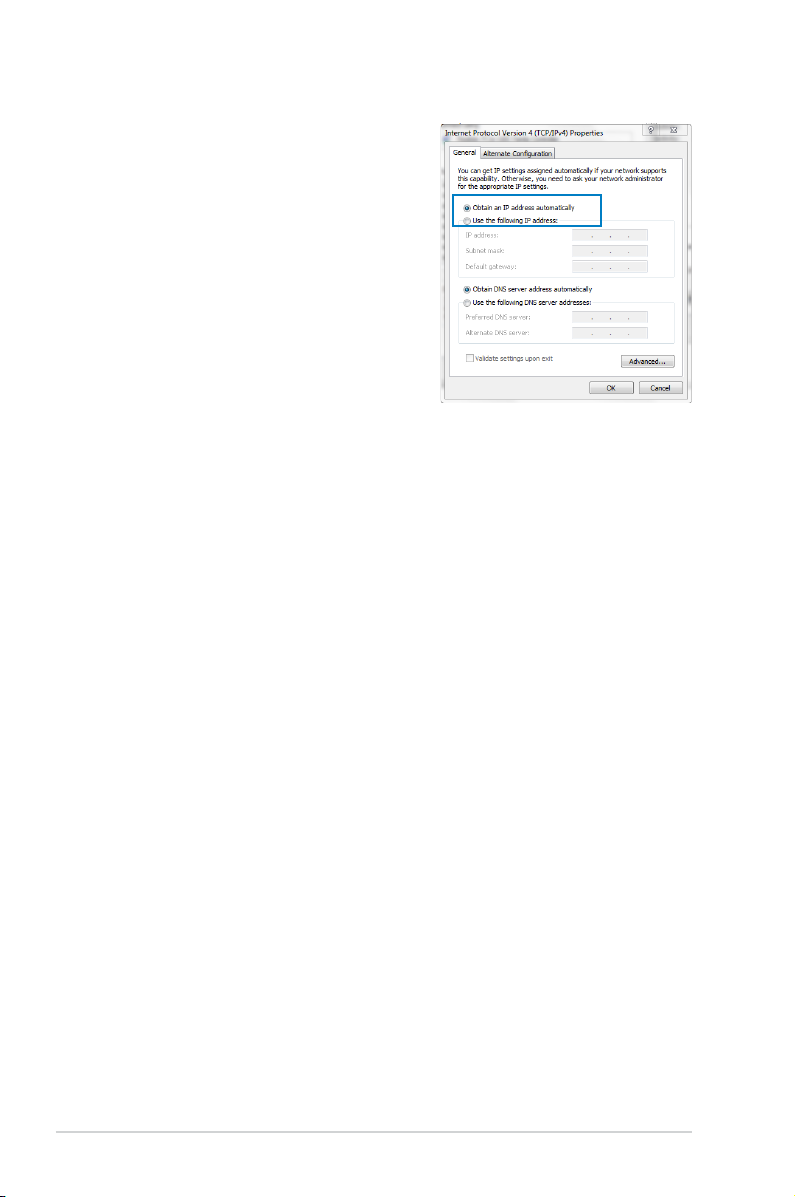
6. Tick Obtain an IP address
automatically.
7. Click
OK.
16
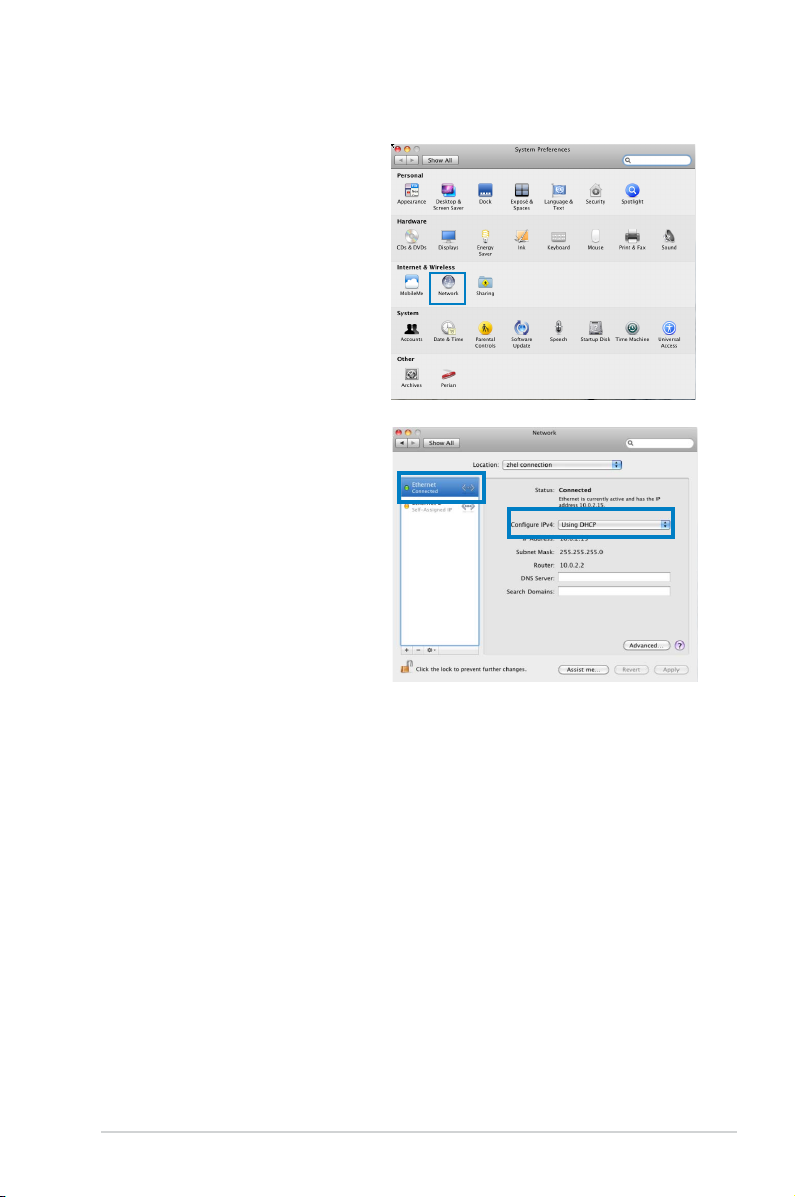
MAC OSX
1. Click Apple Menu
>System Preferences >
Network
2. Click Ethernet on the
left panel.
3. On the Configure IPv4,
item select Using
DHCP.
4. Cllick
Apply.
17
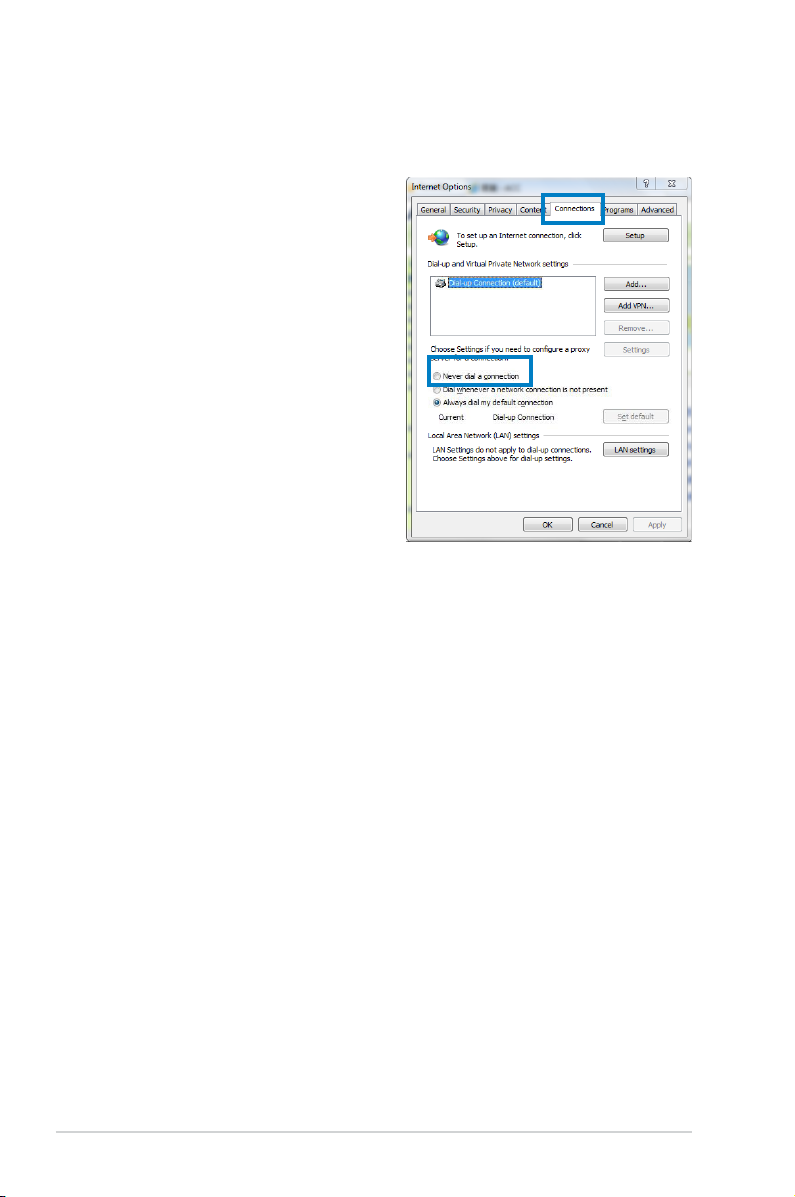
C. Disable dial-up networking
Windows® 7
1. Click Start > Internet
Explorer.
2. Click
Tools > Internet
Options > Connections
tab.
3. Tick
Never dial a
connection.
4. Click
Apply then OK.
18
3 Network configuration using
the web GUI
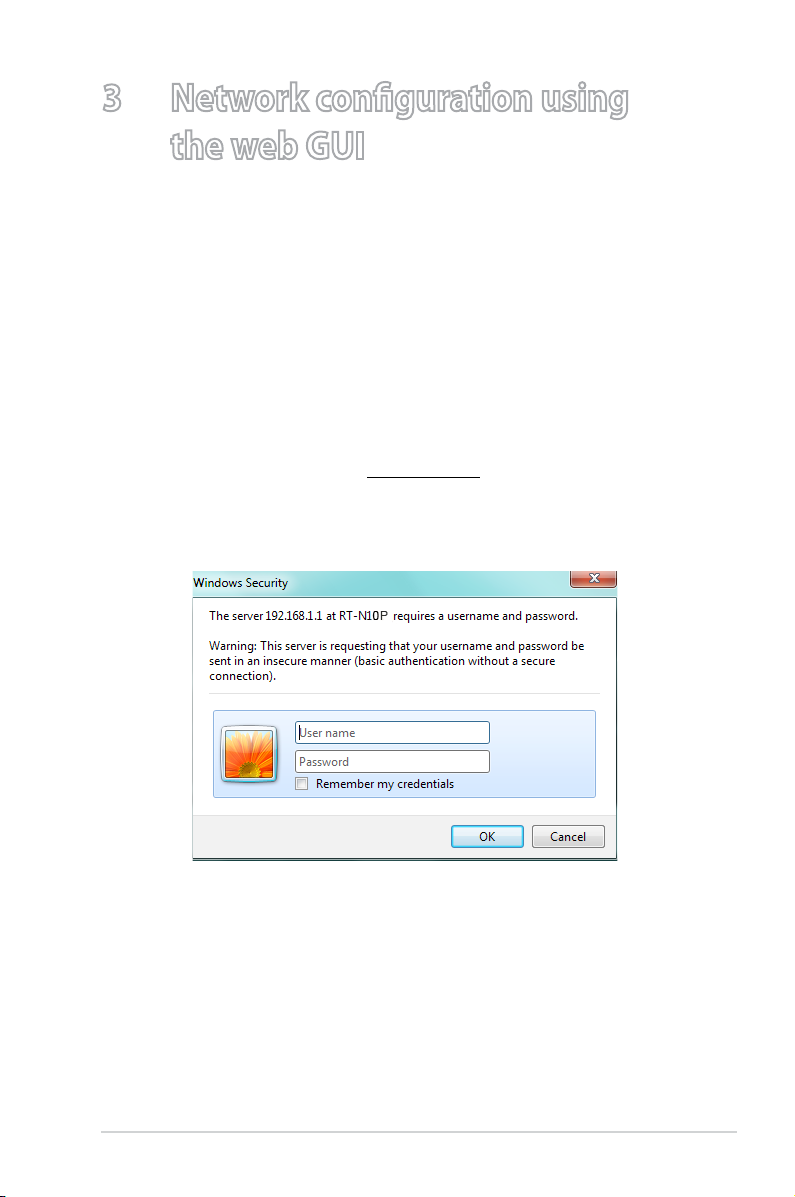
Logging in to the web GUI
Your ASUS Wireless Router uses a web-based user interface that
allows you to configure the router using any web browser such as
Internet Explorer, Mozilla Firefox, Apple Safari, or Google Chrome.
To log in to the web GUI:
1. Launch your web browser and manually key in the wireless
router’s default IP address: 192.168.1.1
2. On the login page, key in the default user name (
password (admin).
admin) and
19
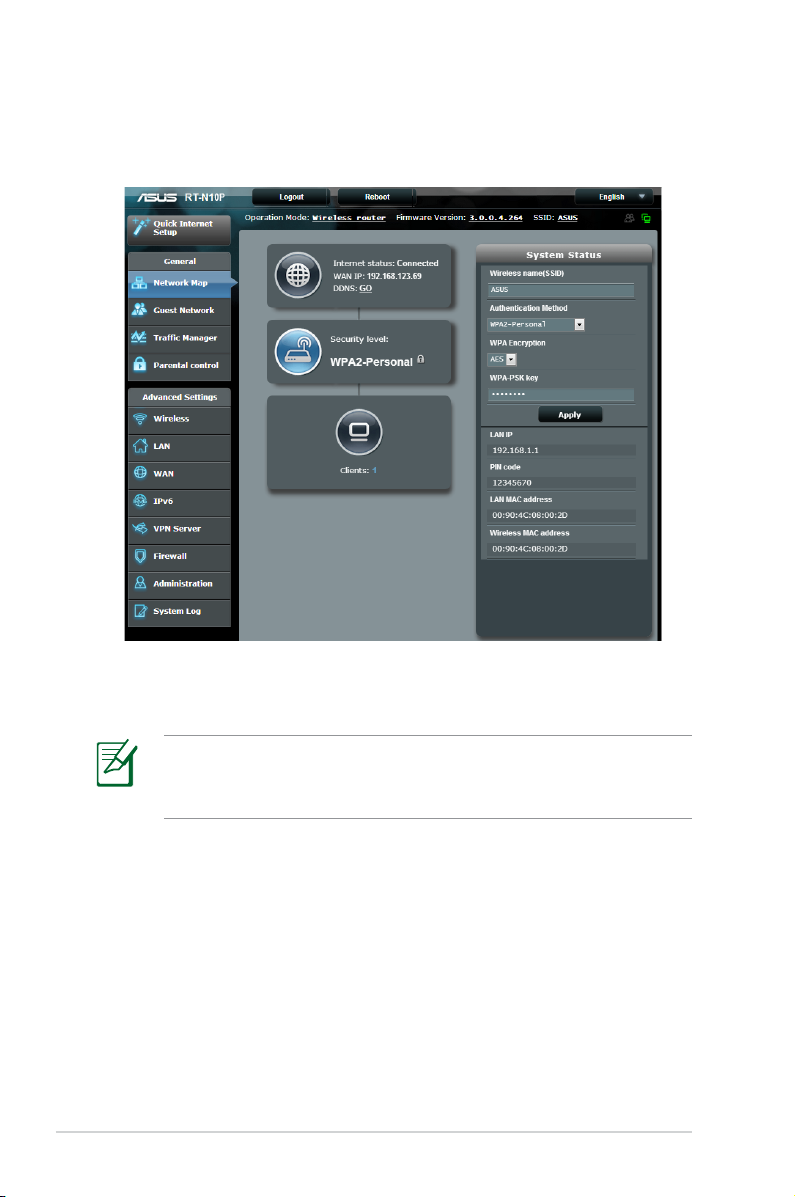
3. The wireless router GUI provides access to various
configuration settings.
Setting up the Internet connection
20
When setting up the Internet connection for the first time, press
the Reset button on your wireless router to reset it to its factory
default settings.
Loading…
Manual
View the manual for the Asus RT-N10P here, for free. This manual comes under the category routers and has been rated by 1 people with an average of a 9.3.
This manual is available in the following languages: English. Do you have a question about the Asus RT-N10P or do you need help?
Ask your question here
Asus RT-N10P specifications
Below you will find the product specifications and the manual specifications of the Asus RT-N10P.
The Asus RT-N10P is a router that offers Ethernet LAN connectivity with data rates of 10 and 100 Mbit/s. It does not have support for Wi-Fi band. The router features five Ethernet LAN (RJ-45) ports and a DC-in jack for power supply. It complies with various networking standards including IEEE 802.11b, IEEE 802.11e, IEEE 802.11g, IEEE 802.11i, IEEE 802.11n, IEEE 802.3, and IEEE 802.3u.
The Asus RT-N10P has an external antenna design with a maximum antenna gain level of 5 dBi. It is equipped with one antenna and operates on the 2.4 GHz frequency band. The router also includes a reset button for easy troubleshooting and resetting of the device.
Please note that no subjective conclusion or evaluation of the product is provided in this description.
Wi-Fi standards
802.11b, 802.11g, Wi-Fi 4 (802.11n)
Ethernet LAN (RJ-45) ports
5
General
| Brand | Asus |
| Model | RT-N10P | RT-N10P |
| Product | router |
| EAN | 0041114913565, 0168141649905, 0886227244843, 0886227449347, 8862274493474 |
| Language | English |
| Filetype | User manual (PDF) |
Network
| Ethernet LAN | Yes |
| Ethernet LAN data rates | 10, 100 Mbit/s |
| Networking standards | IEEE 802.11b, IEEE 802.11e, IEEE 802.11g, IEEE 802.11i, IEEE 802.11n, IEEE 802.3, IEEE 802.3u |
| VPN support | IPSec Pass-Throuth\r\nPPTP Pass-Through\r\nL2TP Pass-Through |
| Ethernet LAN interface type | Fast Ethernet |
Wireless LAN features
| Wi-Fi standards | 802.11b, 802.11g, Wi-Fi 4 (802.11n) |
| Wi-Fi band | No |
| Top Wi-Fi standard | Wi-Fi 4 (802.11n) |
Ports & interfaces
| Ethernet LAN (RJ-45) ports | 5 |
| DC-in jack | Yes |
Protocols
| DHCP client | — |
| DHCP server | — |
| Universal Plug and Play (UPnP) | Yes |
Antenna
| External | |
| Antenna gain level (max) | 5 dBi |
| Antennas quantity | 1 |
Other features
| Frequency band | 2.4 GHz |
| Filtering description | IP, URL |
| Rack mounting | — |
| xDSL connection | No |
Management features
| Web-based management | — |
| Reset button | Yes |
Security
| MAC address filtering | Yes |
| Security algorithms | 128-bit WEP, 64-bit WEP, WPA-PSK, WPA2-PSK, WPS |
| DMZ support | Yes |
| Filtering | Yes |
| Network address translation (NAT) | Yes |
| Stateful Packet Inspection (SPI) | Yes |
Power
| AC input voltage | 110 — 240 V |
| AC input frequency | 50 — 60 Hz |
Weight & dimensions
| Width | 168 mm |
| Depth | 124 mm |
| Height | 30 mm |
| Weight | 210 g |
Packaging content
| AC adapter included | Yes |
| Cables included | LAN (RJ-45) |
| Manual | Yes |
| Quick start guide | Yes |
System requirements
| Windows operating systems supported | Yes |
| Mac operating systems supported | Yes |
| Linux operating systems supported | Yes |
WAN connection
show more
Frequently Asked Questions
Can’t find the answer to your question in the manual? You may find the answer to your question in the FAQs about the Asus RT-N10P below.
Does the Asus RT-N10P have Ethernet LAN capabilities?
Yes, the Asus RT-N10P has Ethernet LAN capabilities. This means that it can be connected to wired devices such as computers, game consoles, and smart TVs using an Ethernet cable for stable and reliable internet access.
What is the maximum data rate for Ethernet LAN on the Asus RT-N10P?
The Asus RT-N10P has a maximum data rate of 10/100 Mbit/s for Ethernet LAN. While this speed may not be as high as some other routers, it is still suitable for everyday internet activities, such as web browsing and streaming.
Does the Asus RT-N10P support Wi-Fi connectivity?
No, the Asus RT-N10P does not support Wi-Fi connectivity. This means that it cannot provide wireless internet access to devices such as smartphones, laptops, and tablets. It can only be used with wired connections.
How many Ethernet LAN ports does the Asus RT-N10P have?
The Asus RT-N10P has 5 Ethernet LAN (RJ-45) ports. This allows users to connect multiple wired devices simultaneously, such as desktop computers, printers, and gaming consoles, without the need for additional network switches.
Does the Asus RT-N10P have MAC address filtering?
Yes, the Asus RT-N10P supports MAC address filtering. This feature allows users to restrict network access to specific devices by filtering their unique MAC addresses. This can enhance network security by preventing unauthorized devices from connecting to the router. Additionally, the Asus RT-N10P also supports IP and URL filtering for further control over network access.
How do I set up the Asus RT-N10P router for wireless connectivity?
To set up the Asus RT-N10P router for wireless connectivity, follow these steps:
1. Connect the router to a power outlet using the AC adapter provided.
2. Use the bundled network cable to connect your modem to the router’s WAN port.
3. Connect the modem to a power outlet using its AC adapter.
4. Install an IEEE 802.11b/g/n WLAN adapter on your computer. Refer to the user manual of your WLAN adapter for detailed instructions on how to connect to a wireless network.
5. To set up the security settings for your network, refer to the section on «Setting up wireless security» in the manual.
Please note that these steps are a general guide and may vary slightly depending on your specific setup. For more detailed instructions and troubleshooting tips, refer to the manual of the Asus RT-N10P router.
Why is my Asus RT-N10P router not connecting to the internet?
If your Asus RT-N10P router is not connecting to the internet, you can try the following steps:
1. Check the physical connections: Ensure that the router is properly connected to the modem using the network cable provided. Make sure both the router and modem are powered on.
2. Restart the router and modem: Turn off the router and modem, wait for a few seconds, and then turn them back on. This can help refresh the network connection.
3. Verify the IP address: Use the Device Discovery utility provided by Asus to find the router’s IP address. This utility can be found in the Start menu under «ASUS Utility» and then «RT-N10P Wireless Router».
4. Check the internet settings: Access the router’s web interface by entering the IP address in a web browser. Ensure that the internet settings, such as the ISP username and password, are correctly configured.
5. Reset the router: If the above steps do not resolve the issue, you can try resetting the router to its factory default settings. This can be done by pressing and holding the reset button on the router for about 10 seconds.
Please note that these steps are general troubleshooting suggestions and may vary depending on your specific setup. For more detailed instructions and troubleshooting tips, refer to the manual of the Asus RT-N10P router.
How can I change the default password for my Asus RT-N10P router?
To change the default password for your Asus RT-N10P router, follow these steps:
1. Connect your computer to the router using a network cable or via a wireless connection.
2. Open a web browser and enter the default IP address of the router in the address bar. The default IP address is usually «192.168.1.1».
3. Enter the default username and password for the router. The default username is usually «admin» and the default password is usually «admin» or left blank. If you have previously changed the login credentials, use the updated username and password.
4. Once logged in, navigate to the «Administration» or «System» section of the router’s web interface.
5. Look for the option to change the password. It may be labeled as «Change Password» or «Administration Password».
6. Enter your desired new password in the provided field. Make sure to choose a strong password that is not easily guessable.
7. Confirm the new password by entering it again in the confirmation field.
8. Click on the «Apply» or «Save» button to save the changes.
Please note that these steps are a general guide and may vary slightly depending on your specific router model. For more detailed instructions and troubleshooting tips, refer to the manual of the Asus RT-N10P router.
What should I do if I forget the password for my Asus RT-N10P router?
If you forget the password for your Asus RT-N10P router, you can follow these steps to restore it to its default settings:
1. Locate the Reset button on the rear panel of the router.
2. Press and hold the Reset button for more than five seconds. This will restore the router to its factory default settings.
3. After the reset, the default username and password will be restored. The default username is usually «admin» and the default password is usually «admin».
4. Access the router’s web interface using a web browser and enter the default username and password.
5. Once logged in, you can change the password to a new one of your choice. It is recommended to choose a strong password that is not easily guessable.
Please note that restoring the router to its default settings will erase any customized settings you have made. Make sure to backup any important configurations before performing the reset. For more detailed instructions and troubleshooting tips, refer to the manual of the Asus RT-N10P router.
How do I update the firmware of my Asus RT-N10P router?
To update the firmware of your Asus RT-N10P router, follow these steps:
1. Download the latest firmware from the ASUS website at http://support.asus.com.
2. Connect your computer to the router using a network cable or via a wireless connection.
3. Open a web browser and enter the default IP address of the router in the address bar. The default IP address is usually «192.168.1.1».
4. Enter the default username and password for the router. The default username is usually «admin» and the default password is usually «admin» or left blank. If you have previously changed the login credentials, use the updated username and password.
5. Once logged in, navigate to the «Administration» or «System» section of the router’s web interface.
6. Look for the «Firmware Upgrade» or similar option. Click on it.
7. In the «New Firmware File» item, click on «Browse» and navigate to the downloaded firmware file.
8. Click on «Upload» to start the firmware upgrade process.
9. Wait for the upgrade process to complete. Do not interrupt the power or disconnect the router during this process.
Please note that these steps are a general guide and may vary slightly depending on your specific router model. For more detailed instructions and troubleshooting tips, refer to the manual of the Asus RT-N10P router.
How do I set up the Asus RT-N10P router for wireless connectivity?
To set up the Asus RT-N10P router for wireless connectivity, follow these steps:
1. Connect the router to a power outlet using the AC adapter provided.
2. Use the bundled network cable to connect your modem to the router’s WAN port.
3. Connect the modem to a power outlet using its AC adapter.
4. Install an IEEE 802.11b/g/n WLAN adapter on your computer. Refer to the user manual of your WLAN adapter for detailed instructions on how to connect to a wireless network.
5. To set up the security settings for your network, refer to the section on setting up wireless security in the manual.
By following these steps, you will be able to set up the Asus RT-N10P router for wireless connectivity.
Why is my Asus RT-N10P router not connecting to the internet?
If your Asus RT-N10P router is not connecting to the internet, you can try the following steps:
1. Check the physical connections: Ensure that the router is properly connected to the modem using the network cable provided. Make sure both the router and modem are powered on.
2. Restart the router and modem: Turn off the router and modem, wait for a few seconds, and then turn them back on. This can help refresh the network connection.
3. Verify the IP address: Use the Device Discovery utility provided by ASUS to find the router’s IP address. This utility can be found in the ASUS Utility section of your computer’s Start menu.
4. Check the internet settings: Access the router’s web interface by entering the router’s IP address in a web browser. Make sure the internet settings, such as the ISP username and password, are correctly configured.
5. Reset the router: If the above steps do not resolve the issue, you can try resetting the router to its factory default settings. Refer to the manual for instructions on how to perform a reset.
By following these steps, you can troubleshoot and resolve the issue of your Asus RT-N10P router not connecting to the internet.
How can I change the default password for my Asus RT-N10P router?
To change the default password for your Asus RT-N10P router, follow these steps:
1. Connect your computer to the router using a network cable or via a wireless connection.
2. Open a web browser and enter the default IP address of the router in the address bar. The default IP address is usually «192.168.1.1».
3. Enter the default username and password for the router. The default username is usually «admin» and the default password is usually «admin» or left blank. If you have previously changed the login credentials, use the updated username and password.
4. Once logged in, navigate to the «Administration» or «System» section of the router’s web interface.
5. Look for the option to change the password. It may be labeled as «Change Password» or «Set Password».
6. Enter your desired new password in the provided field. Make sure to choose a strong password that is not easily guessable.
7. Save the changes and log out of the router’s web interface.
By following these steps, you can change the default password for your Asus RT-N10P router and enhance the security of your network.
Why is the wireless signal strength weak on my Asus RT-N10P router?
If the wireless signal strength is weak on your Asus RT-N10P router, you can try the following steps to improve it:
1. Check the router placement: Ensure that the router is placed in a central location, away from obstructions such as walls, furniture, and electronic devices that may interfere with the signal.
2. Adjust the antenna position: If your router has external antennas, try adjusting their position to optimize the signal coverage. Position them vertically or at a 45-degree angle for better signal propagation.
3. Change the wireless channel: Access the router’s web interface and navigate to the wireless settings. Look for the option to change the wireless channel. Try selecting a different channel to avoid interference from neighboring networks.
4. Update the router firmware: Check for any available firmware updates for your router on the manufacturer’s website. Updating the firmware can improve the router’s performance and signal strength.
5. Consider using a Wi-Fi range extender: If the signal strength is still weak in certain areas of your home or office, you can use a Wi-Fi range extender to extend the coverage of your wireless network.
By following these steps, you can troubleshoot and improve the wireless signal strength on your Asus RT-N10P router.
How do I reset the Asus RT-N10P router to its factory settings?
To reset the Asus RT-N10P router to its factory settings, follow these steps:
1. Locate the reset button on the back of the router. It is usually a small hole labeled «Reset» or «Restore Factory Settings».
2. Using a paperclip or a similar pointed object, press and hold the reset button for about 10 seconds. Make sure to apply steady pressure.
3. Release the reset button after 10 seconds. The router will restart and the factory settings will be restored.
4. Wait for the router to fully reboot. This may take a few minutes.
5. Once the router has restarted, you can access the router’s web interface using the default login credentials. Refer to the manual for the default username and password.
By following these steps, you can reset the Asus RT-N10P router to its factory settings. Please note that this will erase any customized settings and configurations, so make sure to backup any important data before performing the reset.
What is the weight of the Asus RT-N10P?
The Asus RT-N10P has a weight of 210 g.
What is the height of the Asus RT-N10P?
The Asus RT-N10P has a height of 30 mm.
What is the width of the Asus RT-N10P?
The Asus RT-N10P has a width of 168 mm.
What is the depth of the Asus RT-N10P?
The Asus RT-N10P has a depth of 124 mm.
What does the download speed on the internet depend on?
The download speed on the internet depends on the type of connection you have. If you have a 25 Mb/s connection this means that theoretically you should be able to download 25 MB per second.
What is the difference between a router and a modem?
A modem provides the internet connection via the internet provider. A router then distributes the Internet signal to the devices connected to the router.
Is WIFI radiation harmful?
WIFI is a radio frequency signal in the form of non-ionising radiation. This radiation cannot damage cells and tissues and is therefore not harmful to human health.
Is the manual of the Asus RT-N10P available in English?
Yes, the manual of the Asus RT-N10P is available in English .
Is your question not listed? Ask your question here
С появлением в продаже одной из последних модификаций Wi-Fi роутера с новой прошивкой, все чаще приходится отвечать на вопрос о том, как настроить Asus RT-N10P, хотя, казалось бы, никаких особенных отличий в базовой настройке от предыдущих версий, несмотря на новый веб-интерфейс, нет.
Но, возможно, это только мне кажется, что все так просто, а потому напишу подробное руководство по настройке Asus RT-N10P для Интернет провайдера Билайн. См. также Настройка роутера — все инструкции и решение проблем.
Подключение маршрутизатора
Прежде всего, следует правильно подключить роутер, думаю тут проблем не возникнет, но, тем не менее, обращу на это ваше внимание.
- К порту Internet на роутере (синий, отдельный от 4-х других) подключите кабель Билайн.
- Один из оставшихся портов соедините сетевым кабелем с портом сетевой карты вашего компьютера, с которого будет производиться настройка. Настроить Asus RT-N10P можно и без проводного подключения, но лучше все первоначальные действия выполнить по проводам, так будет удобнее.

Также рекомендую зайти в свойства Ethernet подключения на компьютере и посмотреть, установлено ли в свойствах протокола IPv4 автоматическое получение IP адреса и адресов DNS. Если нет, измените параметры соответствующим образом.
Примечание: перед тем, как приступить к последующим шагам по настройке роутера, отключите соединение Билайн L2TP на вашем компьютере и больше не подключайте его (даже после завершения настройки), в противном случае потом вы будете задавать вопрос о том, почему интернет работает на компьютере, а на телефоне и ноутбуке сайты не открываются.
Настройка подключения L2TP Билайн в новом веб-интерфейсе роутера Asus RT-N10P
После того, как все действия, описанные выше, были проделаны, запустите любой Интернет-браузер и в адресной строке введите 192.168.1.1, а на запрос логина и пароля следует ввести стандартные логин и пароль Asus RT-N10P — admin и admin соответственно. Эти адрес и пароль указаны также на наклейке, которая находится на нижней стороне устройства.
После первого входа, вы попадете на страницу быстрой настройки Интернет. Если до этого вы уже безуспешно пробовали настроить роутер, то откроется не мастер, а главная страница настроек роутера (на которой отображается карта сети). Сначала опишу, как настроить Asus RT-N10P для Билайн в первом случае, а затем — во втором.
Использование мастера быстрой настройки Интернет на маршрутизаторе Asus
Нажмите кнопку «Перейти», находящуюся ниже описания вашей модели роутера.

На следующей странице будет предложено задать новый пароль для входа в настройки Asus RT-N10P — задайте свой пароль и запомните его на будущее. Учтите при этом, что это не тот же пароль, который нужен для подключения Wi-Fi. Нажмите «Далее».

Начнется процесс определения типа подключения и, скорее всего, для Билайн оно будет определено как «Динамический IP», что не так. Поэтому нажмите кнопку «Internet Type» (Тип соединения) и выберите тип подключения «L2TP», сохраните сделанный выбор и нажмите «Далее».

На странице «Настройка учетной записи» введите в поле «Имя пользователя» ваш логин «Билайн» (начинается с 089), а в поле пароль — соответствующий пароль от Интернета. После нажатия кнопки «Далее» вновь запустится определение типа подключения (не забудьте, Билайн L2TP на компьютере должно быть отключено) и, если вы все ввели правильно, следующая страница, которую вы увидите — «Параметры беспроводной сети».

Введите имя сети (SSID) — это имя, по которому вы будете отличать свою сеть от всех остальных доступных, используйте латиницу при вводе. В поле «Сетевой ключ» введите пароль на Wi-Fi, который должен состоять не менее чем из 8 символов. Также, как и в предыдущем случае, не используйте кириллицу. Нажмите кнопку «Применить».
После успешного применения настроек отобразится статус беспроводной сети, Интернет-соединения и локальной сети. Если ошибок допущено не было, то все будет работать и уже сейчас на компьютере доступен Интернет, а при подключении ноутбука или смартфона по Wi-Fi, Интернет будет доступен и на них. Нажмите «Далее» и вы окажетесь на главной странице настроек Asus RT-N10P. В дальнейшем, вы всегда будете попадать на этот раздел, минуя мастер (если не сбросите роутер на заводские настройки).
Настройка подключения Билайн вручную

Если вместо мастера быстрой настройки Интернета вы оказались на странице «Карта сети» роутера, то для настройки подключения Билайн, нажмите «Интернет» слева, в разделе «Дополнительные настройки» и укажите следующие параметры подключения:
- Тип WAN-подключения — L2TP
- Получить IP адрес автоматически и подключаться к DNS автоматически — Да
- Имя пользователя и пароль — логин и пароль для Интернета Билайн
- VPN сервер — tp.internet.beeline.ru

Остальные параметры изменять обычно не требуется. Нажмите «Применить».
Настроить имя беспроводной сети SSID и пароль на Wi-Fi можно прямо с главной страницы Asus RT-N10P, справа, под заголовком «Состояние системы». Используйте следующие значения:
- Имя беспроводной сети — удобное вам имя (латиница и цифры)
- Метод проверки подлинности — WPA2-Personal
- Ключ WPA-PSK — желаемый пароль на Wi-Fi (без кириллицы).
Нажмите кнопку «Применить».
На этом, базовая настройка роутера Asus RT-N10P завершена, и вы можете входить в Интернет как по Wi-Fi, так и по проводному подключению.