
Всего 10 инструкций.
Горилла
Змея
Курица
Монстр (крокодил?)
171 деталь
Пасхальный заяц
Петух
Рыбка-ангел
Слон
Собака
Черепаха
Вернуться в каталог (всего 137 инструкций).
2025-04-23 09:40
Инструкции Lego EV3
Скачать инструкцию
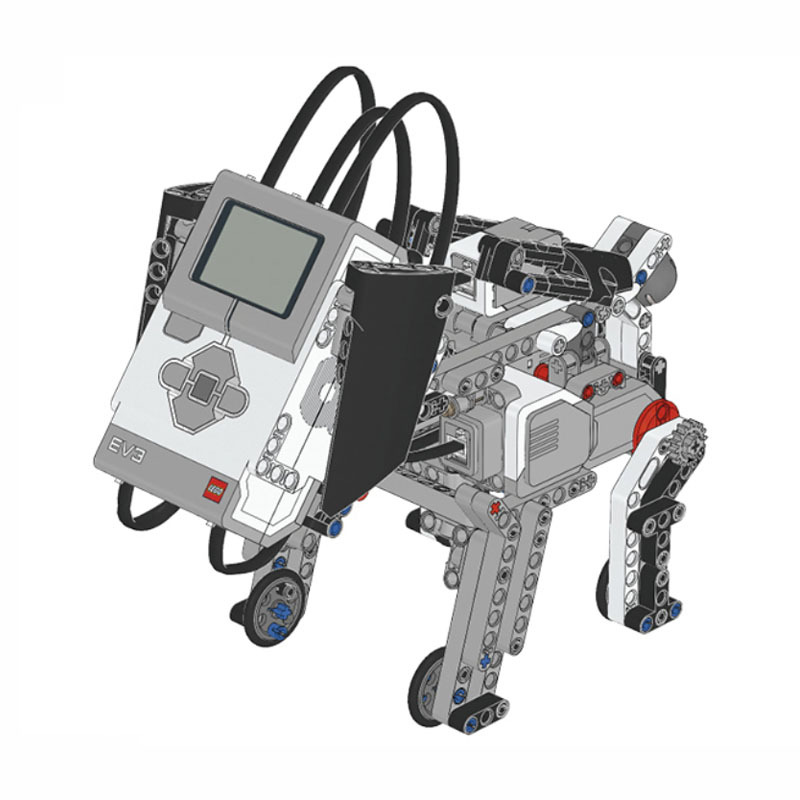
Название проекта: Робот-щенок (Puppy) из LEGO Education Mindstorms EV3
Платформа: LEGO Mindstorms
Робот-щенок — стандартная модель, разработанная специалистами LEGO Education.
Инструкция по сборке.
Использованные компоненты: базовый набор LEGO Mindstorms Education EV3, артикул 45544

Сайт проекта: http://robotsquare.com/2013/10/01/education-ev3-45544-instruction/
Другие проекты на этой платформе:
- Двуногий робот из Arduino, LEGO и деталей 3D печати
- LEGO EV3 робот-художник
- SpinnerBot из LEGO Mindstorms
- LegoGun — двуствольный пистолет из Lego Mindstorms EV3
- Спирограф — рисующий робот из LEGO Mindstorms EV3
- Бесполезная коробка из Lego Mindstoms EV3
- Гексапод из Lego Mindstorms EV3
- Роботизированная рука из Lego Mindstorms EV3
- Подъемные механизмы из LEGO Mindstorms
- Прибор автоматической подачи одноразовых стаканчиков из LEGO Mindstorms
- Робот-кабан-динозавр DINOR3X из LEGO Mindstorms EV3
- Znap — робот из LEGO Mindstorms EV3
- Робот-сортировщик (Color Sorter) из LEGO Mindstorms EV3
- Робот Educator Vehicle из LEGO Mindstorms EV3
- Робот-сигвей (Gyro Boy) из Lego Mindstorms
- Робот-манипулятор Arm H25 из LEGO Mindstorms
- Робот-гексапод NXTAPOD из LEGO Mindstorms. Модель Даниэля Бенедеттелли
- Лимоноид — робот, продающий напитки
- Киноаппарат из Lego Mindstorms
- Принтер из Lego Mindstorms «STALKER ver. 2.0»
- Робот-пожарный из LEGO Mindstorms
- Крестики-нолики — ARBUZIKI-TEAM
- EZ Wilber — говорящий балансирующий робот из Lego Mindstorms
- Ev3 Print3rbot — робот-художник из Lego Mindstorms
- 3D-принтер из Lego печатает шоколадом
- Lego Mindstorms NXT 2.0 играет в шахматы
- Робот-гексапод из Lego Mindstorms NXT 2.0
- Робоноги из Lego Mindstorms
- Lego Mindstorms-экскаватор, управляемый Microsoft Kinect
- Lego-робот DIZZ3
- Крестики-нолики для Lego-робота
- Lego Mindstorms EV3 3D-принтер 2.0
Перейти в каталог DIY-проектов роботов
Как добавить робопроект в каталог?

Теги: Lego Education, Lego Mindstorms, инструкция

100₽
Скачать инструкцию по сборке Lego EV3 Mindstorms «Тузик» в формате PDF
you can join us on patreon and download the instructions there
https://www.patreon.com/dvorik
PATREON
-
Описание
-
Отзывы (0)
Описание
Собака Lego EV3 Инструкция
Облегченный вариант сборки Щенка. Модель прекрасно подходит для изучения программирования звуков и картинок диплея блока EV3
Похожие товары
-

Карусель Lego EV3 Mindstorms инструкция
150₽
В корзину -
Рука Lego EV3 инструкция по сборке
150₽
В корзину -
building instruction Lego EV3 «Dinosaur»
150₽
В корзину -
Инструкция по сборке Lego EV3 Mindstorms Плессиозавр
150₽
В корзину


Today I will analyze another demo project included in LEGO MindStorms software – the Puppy. The model is complex, including 134 steps in total. I will analyze its mechanical structure briefly, and then turn to its code analysis. At the end of the post, I will put forward some areas to improve, in terms of code segment. I will redesign the code to realize the effect mentioned in the below video in the next post, so keep patient and let’s start!
Mechanical Structure
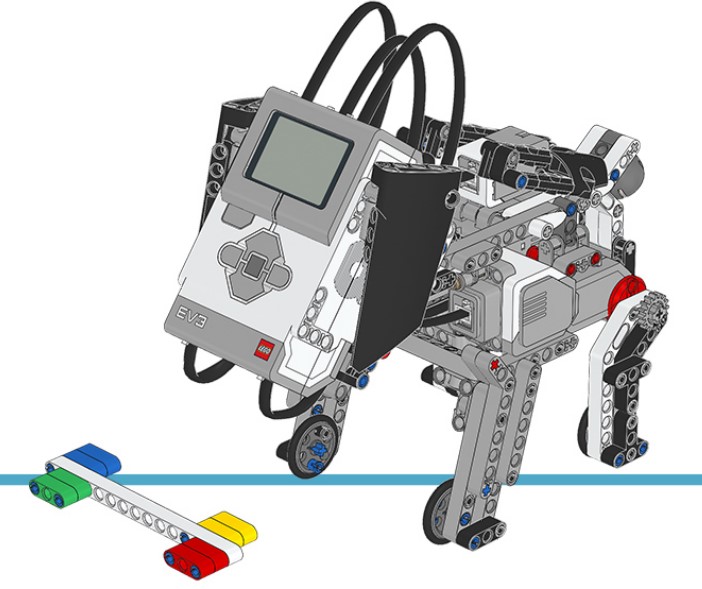
The mechanical structure of the model is not difficult to understand. One highlight is that it looks really like a puppy by using the smart hub as the head and having two ears, designing four legs, and the rear legs being able to sit down and stand up.
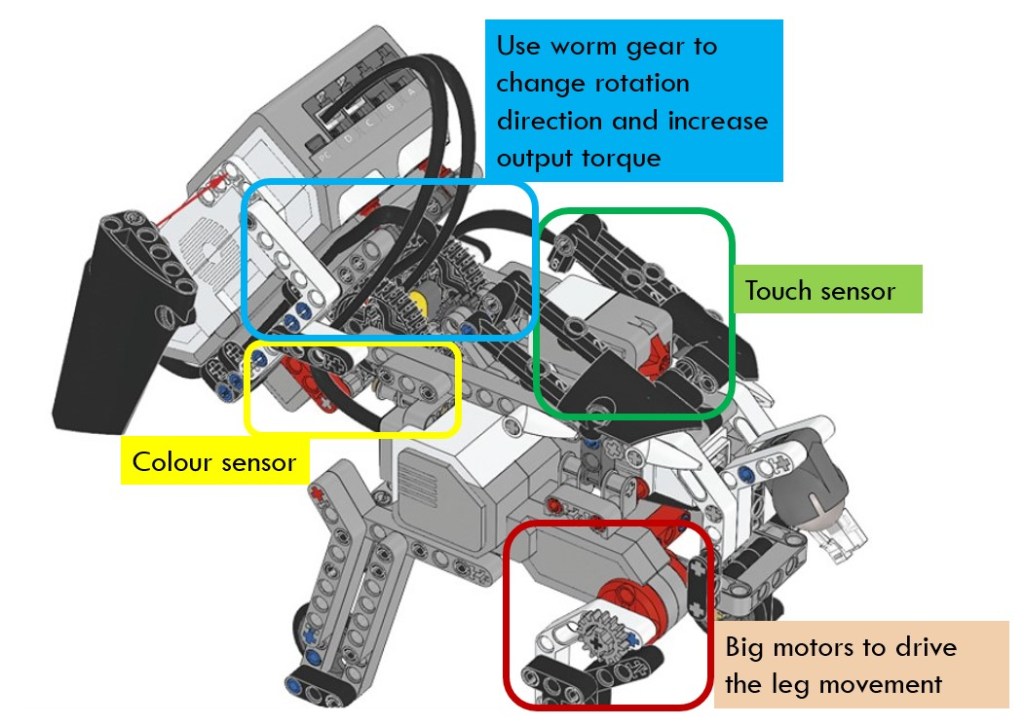
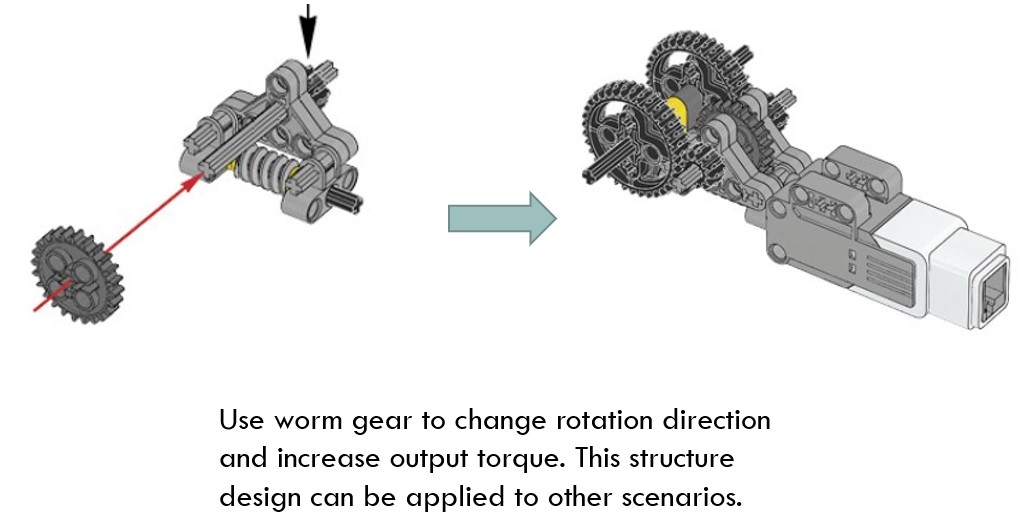
The other highlight is the use of worm wear to change rotation direction and increase output torque. The model is heavy, especially the head which is made of the smart hub. As we know, the advantages of worm gear is that it increases the torque dramatically. Therefore, it is suitable to be used in such a scenario.
Pay attention to the assembly structure of the worm gear and see how it uses various connectors to assembly the worms and gears together. Such a structure could be used in many other scenarios.
Program
Main Code Line
The main code line is shown below. It looks simple because many functions are wrapped in blocks. However, the name of those blocks are not straightforward at all, so even you look inside those blocks carefully, it is not easy to understand their meaning. Here I will give a brief introduction of the code.

The above code section initializes the big motor and medium motor by setting their rotation sensor value to zero in block “DN”. This is to ensure that the puppy sits up as the default gesture. In block “MNRH”, it waits for the player to press down the center button on the brick to start off the program. After that, it displays an image of Sleeping Eyes on the screen in block “IS” and makes the puppy stand up in block “UP”. Finally, it resets all the relevant variables in block “RST”.
Main Code Line (Continue)
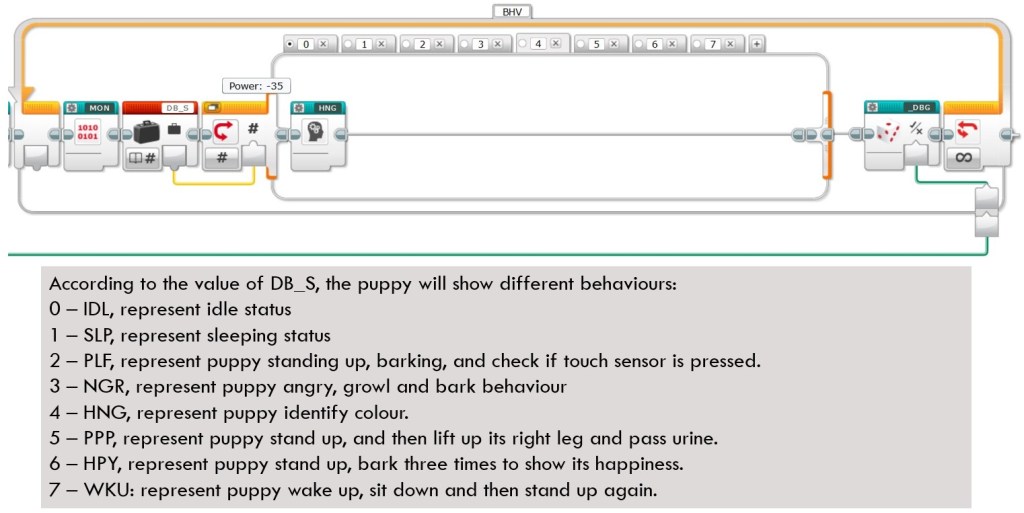
Continue the above main code line. After the above initialization, the program will enter into a forever loop, in which the puppy will have different behaviors. The same as above, it wraps the behavior in different blocks and the block names are nothing short of vague. the functions of each block are listed below as a reference for you.
The execution of block is determined by the value of variable “DB_S”. The value of “DB_S” is not increased or decreased continuously but will be changed in the behavior blocks. Therefore, one behavior of puppy will influence the subsequent behavior. In another word, those behavior blocks are not totally independent, making the analysis especially difficult.
In the following section, I will explore the interior of several blocks. I will not explain in detail since I don’t think many of them good examples for learning. In the next post, I will redefine the whole program and rewrite many blocks.
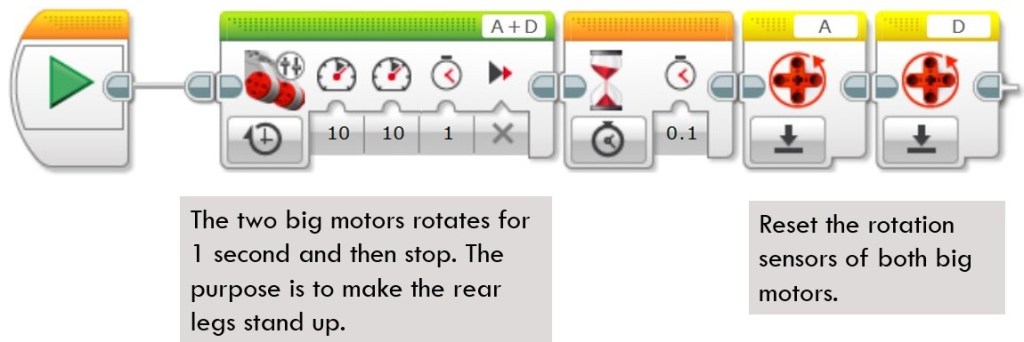
DN Block
This block first uses MoveTank block to rotate two big motors by 1 second, and then resets the rotation sensors of the two big motors to zero. Its purpose is to make the puppy keep a sitting gesture as the initial status.
MNRH Block
This block displays EV3 icon on the screen and lights up the brick button. After that, it waits for players to press Up or Down brick buttons to adjust the angle of puppy head. When center brick button is pressed, it resets the rotation sensor of medium motor and then lights up the brick button in green, indicating that the program is ready for next action.

IS Block
This block is a display block. It depends on a numeric input parameter to display various images on screen.

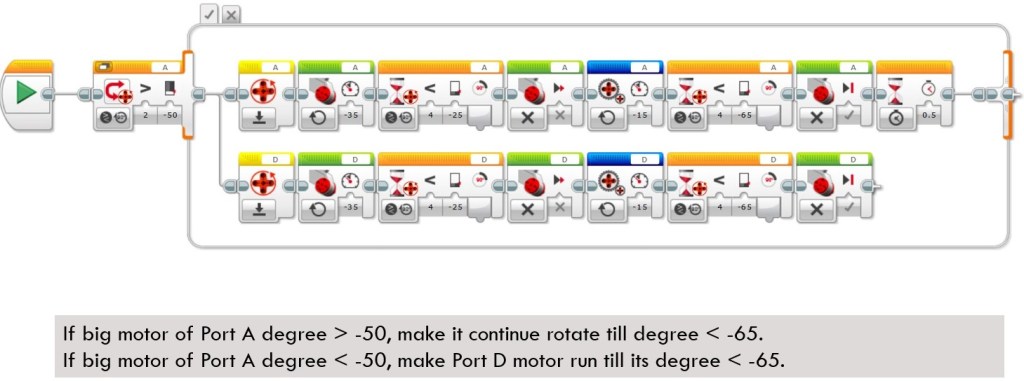
UP Block
This block is supposed to make the rear legs of the puppy stand up. It does not use Move Tank block since in practice, this method could not make the legs stand up successfully each time. The reason might be that the body is too heavy, so sometimes the torque exceeds the load of the motor. To overcome this problem, this block simulates the Move Tank block by using parallel code. Each motor calls Big Motor block to run a small degree of 25 and then switches to use Unregulated Motor block to run another 35 degrees.
The Unregulated Motor block does not include automatic motor control, like the normal Medium Motor block and the Large Motor block. This means that no automatic regulation on motor power will be included. The specified Power Input is what is used to control the motor. Power Control will compensate for any resistance or slippage that the motor encounters. Power control will also try to compensate for battery levels, when possible. Because of the features of Unregulated Motor blocks, the puppy could stand up stably each time.
Areas to Improve

The above points summarize some areas where the program could improve. There are other good points, but I will address those issues first in the next post. Before this post finishes, let me show you what the puppy could do after I update its program. Take a look at the below video and don’t forget to enjoy the coding and have fun!