
Digital Camera
Operating Manual
To ensure the best performance from your camera, please read
the Operating Manual before using the camera.

Thank you for purchasing this RICOH WG-30W Digital Camera.
Please read this manual before using the camera in order to get the most out of
all the features and functions. Keep this manual safe, as it can be a valuable tool
in helping you to understand all the camera’s capabilities.
Regarding copyrights
Images taken with this digital camera that are for anything other than personal
enjoyment cannot be used without permission according to the rights as specified in
the Copyrigh t Act. Please take care, as there are cases where limitations are placed on
taking pictures even for personal enjoyment during demonstrations, performances or
of items on display. Images taken with the purpose of obtaining copyrights also cannot
be used outside the scope of use of the copyright as laid out in the Copyright Act, and
care should be taken here also.
Regarding trademarks
• SDXC logo is a trademark of SD-3C, LLC.
• Microsoft, Windows and Windows Vista are registered trademarks of Microsoft
Corporation in the United States of America and other countries.
• Macintosh, Mac OS, OS X, and Safari are trademarks of Apple Inc., registered
in the U.S. and other countries.
• HDMI, the HDMI logo, and High-Definition Multimedia Interface are trademarks
or registered trademarks of HDMI Licensing, LLC in the United States and/or
other countries.
• Wi-Fi is a trademark of Wi-Fi Alliance.
• Intel, Intel Core, and Pentium are trademarks of Intel Corporation in the U.S.
and/or other countries.
• AMD, AMD Athlon, and ATI Radeon are trademarks or registered trademarks
of Advanced Micro Devices, Inc.
• NVIDIA and GeForce are trademarks and/or registered trademarks of NVIDIA
Corporation in the U .S. and/or other countries.
• Android and Chrome are trademarks or registered trademarks of Google Inc.
• IOS is a trademark or registered trademark of Cisco in the U.S. and other
countries and is used under license.
• This product supports PRINT Image Matching III. PRINT Image Matching
enabled digital still cameras, printers and software help photographers to
produce images more faithful to their intentions. Some functions are not
available on printers that are not PRINT Image Matching III compliant.
Copyright 2001 Seiko Epson Corporation. All Rights Reserved.
PRINT Image Matching is a trademark of Seiko Epson Corporation. The PRINT
Image Matching logo is a trademark of Seiko Epson Corporation.
• This product is licensed under the AVC Patent Portfolio License for the personal
use of a consumer or other uses in which it does not receive remuneration to (i)
encode video in compliance with the AVC standard (“AVC video”) and/or (ii)
decode AVC video that was encoded by a consumer engaged in a personal
activity and/or was obtained from a video provider licensed to provide AVC
video. No license is granted or shall be implied for any other use.
Additional information may be obtained from MPEG LA, LLC.
See http://www.mpegla.com.

• All other trademarks are the property of their respective owners.
To users of this camera
• Do not use or store this camera in the vicinity of equipment that generates strong
electromagnetic radiation or magnetic fie lds.
Strong static charges or the magnetic fields pro duced by equipment such as radio
transmitters could interfere with the display, damage the stored data, or affect the
camera’s internal circuitry and cause camera misoperation.
• The liquid crystal panel used for the display is manufactured using extremely high
precision technology. Although the level of functioning pixels is 99.99% or better, you
should be aware that 0.01% or fewer of the pixels may not illuminate or may
illuminate when they should not. However, this has no effect on the recorded image.
• There is a possibility that the illustrations and the screen display in this manual are
different from the actual ones.
• In this manual, SD Memory Cards, SDHC Memory Cards and SDXC Memory Cards
are referred to as SD Memory Cards.
• In this manual, the generic term “computer(s)” refers to either a Windows PC or a
Macintosh.
• In this manual, the term “battery(ies)” refers to any type of batteries used for this
camera and its accessories.
Using Your Camera Safely
We have paid close attention to the safety of this camera. When using
this camera, we request your special attention regarding items marked
with the following symbols.
Warning
Caution
This symbol indicates that ignoring this item could
cause serious personal injuries.
This symbol indicates that ignoring this item could
cause minor or medium personal injuries, or loss of
property.
1

About the Camera
Warning
• Do not attempt to take the camera apart or modify the camera. High voltages
are present within the camera, and there is a danger of electric shock if the
camera is taken apart.
• If the inside of the camera should become exposed as a result of, for example,
the camera being dropped, please do not under any circumstances touch such
exposed portions, as there is a danger of receiving an electric shock.
• Wrapping the strap around a neck is dangerous. Take care that small children
do not hang the strap around their necks.
• If any irregularities occur during use, such as smoke or a strange odor, stop use
immediately, remove the battery or the AC adapter, and contact your nearest
service center. Continued use can cause a fire or electric shock.
Caution
• Do not place your finger on the flash when it is discharging as there is a risk of
burns.
• Do not discharge the flash while it is touching your clothing as there is a risk of
discoloring.
• Some portions of the camera heat up during use, so please take care, as there
is a risk of low temperature burns if such portions are held for long periods of
time.
• Should the display be damaged, be careful of glass fragments. Also, be careful
not to allow the liquid crystal to get on your skin, in your eyes, or in your mouth.
• Depending on your individual factors or physical condition, the use of the
camera may cause itching, rashes or blisters. In case of any abnormality, stop
using the camera and get medical attention immediately.
2

About the Power Adapter and the AC Adapter
Warning
• Always use the power adapter or AC adapter exclusively developed for this
camera, with the specified power and voltage. Using a power adapter or AC
adapter not exclusive to this camera, or using the exclusive power adapter or
AC adapter with an unspecified power or voltage can cause a fire, electric
shock, or camera breakdown. The specified voltage is 100-240V AC.
• Do not disassemble or modify the product. This can cause a fire or electric
shock.
• If the generation of smoke or strange odor from the product or other abnormality
occurs, immediately discontinue its use and consult your nearest service
center. Continued use can cause a fire or electric shock.
• If water should happen to get inside the product, consult your nearest service
center. Continued use can cause a fire or electric shock.
• If you see a lightning flash or hear thunder during use of the power adapter or
AC adapter, unplug the AC plug and discontinue use. Continued use can cause
damage to the product, fire, or electric shock.
• Wipe off the AC plug if it becomes covered with dust. Accumulated dust may
cause a fire.
Caution
• Do not place or drop heavy objects on or forcefully bend the USB cable or AC
plug cord. Doing so may damage the cord. Should the cord be damaged,
consult your nearest service center.
• Do not touch or short-circuit the terminal area of the USB cable or AC plug cord
while the cord is plugged in.
• Do not handle the AC plug with wet hands. This can cause an electric shock.
• Do not subject the product to strong impacts or allow it to drop onto a hard
surface. This can cause a malfunction.
• Do not use the power adapter to charge a battery other than a rechargeable
lithium-ion battery D-LI92. This can cause overheating, explosion, or power
adapter failure.
•
To reduce the risk of hazards, use only a CSA/UL certified power supply cord set,
cord is Type SPT-2 or heavier, minimum NO.18 AWG copper, one end with a
molded-on male attachment pl ug cap (wit h a specified NEMA configur ation), and
the other is provided with a molded-on female connector body (wi th a specif ied IEC
nonindustrial type configuration) or the equivalent.
3

About the Battery
Warning
• Be sure to store the battery out of the reach of small children. Placing it in their
mouths may cause an electric shock.
• If any leakage from the battery should come in contact with your eyes, it may
cause a loss of sight. Flush your eyes with clean water and get medical
attention immediately. Do not rub them.
Caution
• Only use the specified battery with this camera. Use of other batteries may
cause an explosion or fire.
• Do not disassemble the battery. Disassembling the battery may cause an
explosion or leakage.
• Remove the battery from the camera immediately if it becomes hot or begins to
smoke. Be careful not to burn yourself during removal.
• Keep wires, hairpins, and other metal objects away from the + and — contacts of
the battery.
• Do not short the battery or dispose of the battery in fire. This can cause an
explosion or fire.
•
If any leakage from the battery should come in contact with skin or clothes, it may
cause irritation to the skin. Wash the affected areas thoroughly with water.
• Precautions for D-LI92 Battery Usage:
BATTERY MAY EXPLODE OR FIRE IF MISTREATED.
— DO NOT DISASSEMBLE OR DISPOSE OF IN FIRE.
— DO NOT CHARGE EXCEPT SPECIFIED CHARGING CONDITION.
— DO NOT HEAT ABOVE 140°F / 60°C, OR SHORT CIRCUIT.
— DO NOT CRUSH OR MODIFY.
Keep the Camera and its Accessories out of the Reach of Small
Children
Warning
• Be sure to keep the camera and its accessories out of the reach of small
children.
1. Injuries may result from the product falling or from unexpected movement.
2. Suffocation may result from wrapping the strap around the neck.
3. Small accessories such as battery or an SD Memory Card may be
swallowed. Seek medical attention immediately if an accessory is
accidentally swallowed.
4

Care to be Taken During Handling
Before Using Your Camera
• When the camera has not been used for a long time, confirm that it is still
working properly, particularly prior to taking important pictures (such as at a
wedding or when traveling). Contents of the recording cannot be guaranteed if
recording, playback or transferring your data to a computer, etc. is not possible
due to a malfunction of your camera or recording media (SD Memory Card), etc.
• The lens on this camera is not interchangeable. The lens is not removable.
About the Battery and Power Adapter
• To keep the battery in optimum condition, avoid storing it in a fully charged state
or in high temperatures.
• If the battery is left inserted and the camera is not used for a long time, the
battery will over-discharge and shorten the battery’s life.
•
Charging the battery a day befor e use or on the day of use i s recommended.
• The AC plug adapter D-PL135 is designed for exclusive use with t he Power
Adapter D-PA135. Do not use it with other devices.
Precautions on Carrying and Using Your Camera
Hot and humid places should be avoided. Particular care should be taken
•
regarding vehicles, which can become very hot inside.
• Ensure that the camera is not subjected to substantial vibrat ions, shocks, or
pressure as this may cause damage, malfunction, or a loss in waterproof
performance. Place the camera on a cushion for protection when the camera is
subjected to the vibrations of a motorbike, car, ship, etc. If the camera is
subjected to substantial vibrations, shocks, or pressure, take your camera to
your nearest service center and have it checked.
• The temperature range in which the camera can be used is -10°C to 40°C (14°F
to 104°F).
• The display will become black at high temperatures but will return to normal at
normal temperatures.
• The response speed of the display becomes slow at low temperatures. This is
due to the properties of the liquid crystal and is not a malfunction.
• If the camera is subjected to rapid temperature changes, condensation may
form on the inside and outside of the camera. Therefore put the camera in a bag
or plastic bag and take it out when the difference in temperature has subsided.
5

• Avoid contact with garbage, mud, sand, dust, water, toxic gases, or salt. These
could cause t he camera to breakdown. Wipe the camera to dry off any rain or
water drops.
• Do not press the display with excessive force. This could cause it to break or
malfunction.
• Be careful not to sit down with the camera in your back pocket as this may
damage the exterior of the camera or the display.
• When using a tripod with the camera, be careful not to overtighten the screw in
the tripod socket on the camera.
Cleaning Your Camera
• Do not clean the camera with organic solvents such as thinner, alcohol or
benzine.
• Use a lens brush to remove dust accumulated on the lens. Never use a spray
blower for cleaning as it may damage the lens.
Storing Your Camera
• Avoid storing the camera where pesticides and chemicals are handled. Remove
the camera from its case and store it in a well-ventilated place to prevent the
camera from becoming moldy during storage.
• Avoid using or storing the camera where it may be exposed to static electricity
or electrical interference.
• Avoid using or storing the camera in direct sunlight or in locations where it may
be exposed to rapid changes in temperature or to condensation.
• Periodic inspections are recommended every one to two years to maintain high
performance.
6

Other Precautions
• The SD Memory Card is equipped with a
write-protect switch. Setting the switch to
LOCK prevents new data from being
recorded on the card, the stored data from
being deleted, and the card from being
formatted by the camera or computer.
r appears on the display when the card is
write-protected.
• Care should be taken when removing the SD Memory Card immediately
after using the camera, as the card may be hot.
• Keep the battery/card cover closed and do not remove the SD Memory
Card or turn the camera off while the data is being played back or saved to
the card, or the camera is connected to a computer with the USB cable, as
this may cause the data to be lost or the card to be damaged.
• Do not bend the SD Memory Card or subject it to violent impact. Keep it
away from water and store away from high temperature.
• Do not remove the SD Memory Card during formatting as this may damage
the card and render it unusable.
• The data on the SD Memory Card may be lost in the following
circumstances. We do not accept any liability for data that is deleted
(1) when the SD Memory Card is mishandled by the user.
(2) when the SD Memory Card is exposed to static electricity or electrical
interference.
(3) when the SD Memory Card has not been used for a long time.
(4) when the SD Memory Card is ejected or the batteries are removed
while the card is being accessed.
• If it is not used for a long time, the data on the card may become
unreadable. Be sure to regularly make a backup of important data on a
computer.
• Be sure to format SD Memory Cards that are unused or have been used
on another camera. Refer to “Formatting the Memory” (p.148).
• When using an SD Memory Card with a slow recording speed, recording
may stop while recording a movie even if there is adequate space in the
memory, or image capture or playback may take a long time.
• Please note that deleting data, or formatting the SD Memory Cards or the
built-in memory does not completely erase the original data. Deleted files
can sometimes be recovered using commercially available software. It is
user’s responsibility to ensure the privacy of such data.
7
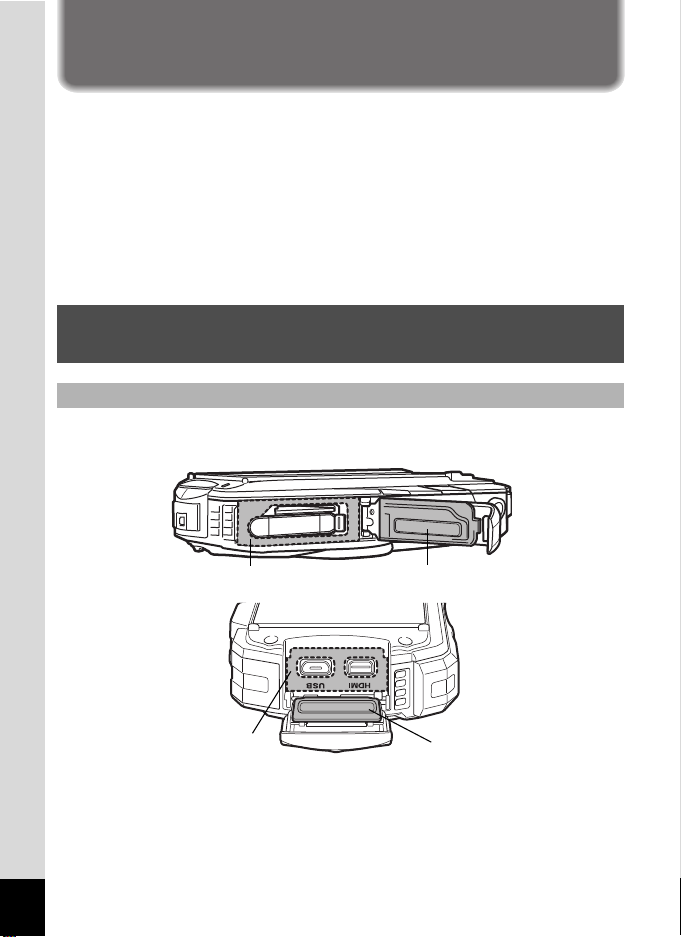
Regarding Waterproof, Dustproof, and
Packing contact surface
Waterproof packing
Packing contact surface
Waterproof packing
Shockproof Design
• This camera is provided with a waterproof/dustproof design complying with JIS
waterproof grade 8 and JIS dustproof grade 6 (equivalent to IP68).
• The camera satisfies our drop test (1.5 m height onto a 5 cm thick plywood
surface) complying with MIL-Standard 810F Method 516.5-Shock testing.
• The camera satisfies our test for the waterproof, dustproof, and shockproof
performance, but this does not guarantee it will remain free of trouble or
damages.
• Waterproof performance is not guaranteed if the camera is exposed to impact
such as being dropped or hit.
Precautions Before Using the Camera in the
Water
Check the Following Before Going Near the Water
• Make sure that there are no cracks or scratches on the rubber seal of the
batter y/card and terminal covers.
• Make sure that there are no foreign objects (dust, sand, hair, lint or liquid) on the
rubber seal or the surface they contact before closing the bat tery/card and
terminal covers. Wipe off any foreign objects with a clean lint-free cloth.
• Close the battery/card and terminal covers properly until they click. Otherwise
water may get in and damage the camera.
8

Be Careful Near the Water
• Avoid opening the battery/card and terminal covers when near the waterside or
with wet hands. When changing the battery or the SD Memory Card, avoid
places where the camera is likely to get wet or dirty, and make sure that the
camera and your hands are completely dry.
• The camera will sink if dropped in water, so be sure to attach the strap to the
camera and wrap it around your wrist when using the camera in or near water.
• To enhance the waterproof performance of the camera, the front of the lens is
protected by glass. The glass should be kept clean at all times, as any dirt or
water on the glass will affect the quality of pictures taken.
Precautions When Using the Camera in the Water
• Do not use the camera deeper than 12 meters underwater. Do not use the
camera underwater for more than 120 minutes consecutively.
• Do not open the battery/card and terminal covers underwater.
• Do not use the camera in hot water or in a hot spring.
• Do not apply excessive force to the camera, for example diving into water with
it. Doing so may compromise the waterproof performance of the camera or
cause the cover to open.
• Do not leave the camera on the sand at the beach, as this may cause the
camera to exceed the upper limit of its operational temperature range, or cause
the speaker or microphone to become blocked with sand.
• Avoid subjecting the camera to substantial vibrations, shocks, or pressure as
this may cause a loss in waterproof performance. If the camera is subjected to
substantial vibrations, shocks or pressure, take your camera to your nearest
service center and have it checked.
• Avoid getting sunscreen or sun oil on the camera as it may cause discoloration
of the surface. If any oil gets on the camera, wash it off immediately with warm
water.
• Sudden and extreme changes in temperature may cause condensation to form
in and on the camera. Keep the camera in a bag or case to reduce the
difference in temperature.
9
Precautions After Using the Camera in the Water
• Do not open the battery/card and terminal covers if the camera is wet. Wipe off
any water with a clean lint-free cloth.
• The inside surface of the covers may get wet when they are opened. Wipe off
any water that is on the cover.
• Wiping off the camera while there is sand or dust on it may scratch the surface
of the camera. Make sure that the battery/card and terminal covers are firmly
closed before washing the camera in tap water. After washing the camera, dry
it with a soft cloth.
• Wipe off any dirt or sand on the waterproof seal or the contact surface. The
camera’s waterproof performance may be compromised by a loose seal, or
cracks or dents on the seal or the contact surface. If there is any such damage,
contact your nearest service center.
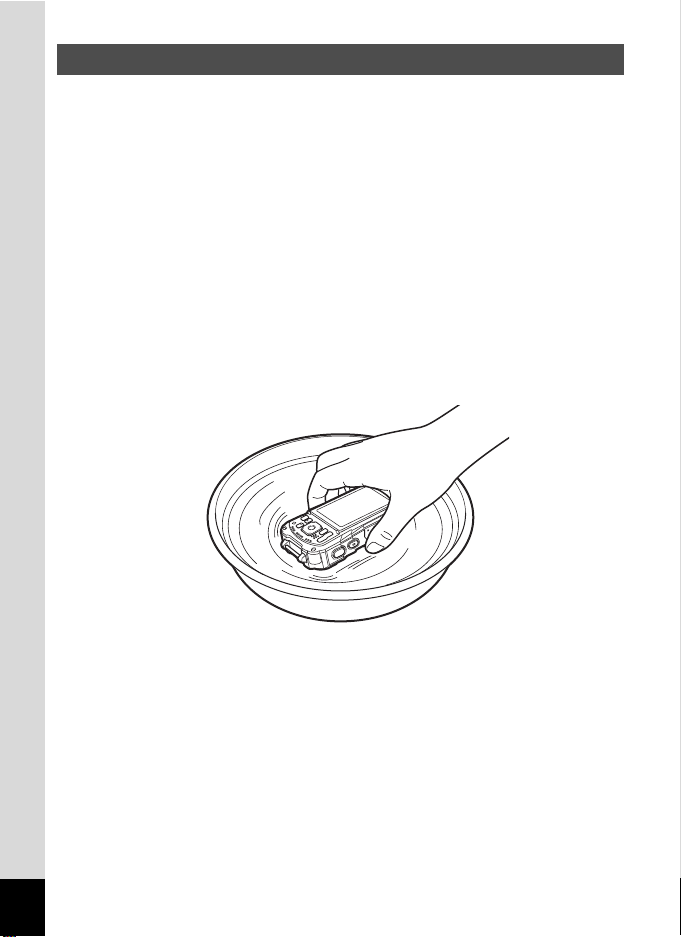
• If the camera becomes very dirty or after it has been used in the sea, make sure
that it is turned off and the battery/card and terminal covers are firmly closed
before rinsing it under running tap water or leaving it in a bowl of clean water for
a short time (2 or 3 minutes).
• Avoid cleaning with agents such as soapy water, mild detergents, or alcohol as
this may compromise the waterproof performance of the camera.
• To maintain the waterproof performance of the camera, you are recommended
to change the waterproof seal once a year. Contact your nearest service center
regarding changing the seal. (A charge will be made.)
• The camera’s accessories are not waterproof.
10

Contents
Using Your Camera Safely……………………………………………………………. 1
Care to be Taken During Handling…………………………………………………. 5
Regarding Waterproof, Dustproof, and Shockproof Design……………….. 8
Precautions Before Using the Camera in the Water………………………….. 8
Precautions When Using the Camera in the Water…………………………… 9
Precautions After Using the Camera in the Water…………………………… 10
Contents…………………………………………………………………………………… 11
Composition of the Operating Manual …………………………………………… 17
Getting Started 18
Checking the Contents of the Package……………………………………………. 18
Names of Parts ………………………………………………………………………………. 19
Names of Operating Parts ………………………………………………………………. 20
Display Indications ………………………………………………………………………… 21
Displa y in A Mode…………………………………………………………………….. 21
Displa y in Q Mode……………………………………………………………………. 24
Guide Display ……………………………………………………………………………. 26
Histogram…………………………………………………………………………………. 27
Attaching the Strap………………………………………………………………………… 28
Attaching the Strap…………………………………………………………………….. 28
Powering the Camera …………………………………………………………………….. 29
Installing the Battery…………………………………………………………………… 29
Charging the Battery ………………………………………………………………….. 31
Using the AC Adapter…………………………………………………………………. 33
Installing an SD Memory Card ………………………………………………………… 35
Turning the Camera On and Off………………………………………………………. 37
Starting-up in Playback Mode ……………………………………………………… 38
Initial Settings………………………………………………………………………………… 39
Setting the Display Language ………………………………………………………39
Setting the Date and Time…………………………………………………………… 42
Common Operations 44
Understanding the Button Functions……………………………………………….44
A Mode …………………………………………………………………………………… 44
Q Mode ………………………………………………………………………………….. 46
Switching Between A Mode and Q Mode…………………………………… 48
Setting the Camera Functions ………………………………………………………… 49
Operating the Menus………………………………………………………………….. 49
Menu List………………………………………………………………………………….. 51
11

Taking Pictures 55
Taking Still Pictures……………………………………………………………………….. 55
Taking Pictures………………………………………………………………………….. 55
Using the Zoom ………………………………………………………………………….58
Setting the Shooting Mode ………………………………………………………….. 61
Using the Face Detection Function ………………………………………………. 64
Taking Pictures in Basic Mode (Green Mode)………………………………… 65
Taking Pictures of Your Pet (Pet Mode)………………………………………… 66
Taking Pictures in Digital Microscope Mode…………………………………… 66
Taking Pictures at a Set Interval (Interval Shot)……………………………… 67
Using the Self-timer……………………………………………………………………. 68
Taking a Series of Pictures (Continuous Shooting/Burst Shooting) …… 70
Taking Pictures Using a Remote Control Unit (Optional) ………………….71
Taking Pictures with Automatic Exposure Adjustment
(Auto Bracketing)…………………………………………………………………. 72
Setting the Shooting Functions ………………………………………………………. 73
Using the Rec. Mode Menu Items ………………………………………………… 73
Selecting the Flash Mode…………………………………………………………….74
Selecting the Focus Mode…………………………………………………………… 75
Setting the Image Tone………………………………………………………………. 79
Selecting the Number of Recorded Pixels……………………………………… 80
Selecting the Quality Level of Still Pictures ……………………………………. 81
Adjusting the White Balance ………………………………………………………..82
Setting the AE Metering ……………………………………………………………… 84
Setting the Sensitivity ………………………………………………………………….85
Setting AUTO ISO Range ……………………………………………………………86
Setting the Exposure (EV Compensation)……………………………………… 86
Correcting the Brightness (D-Range Setting)…………………………………. 87
Setting Pixel Track SR ……………………………………………………………….. 88
Switching the Face Detection Function …………………………………………. 89
Setting the Blink Detection Function …………………………………………….. 91
Setting the Instant Review…………………………………………………………… 91
Setting the Green Button Function………………………………………………..92
Setting the Image Sharpness (Sharpness) ……………………………………. 95
Setting the Saturation/Tone Adjustment………………………………………… 95
Setting the Image Contrast (Contrast)……………………………………………96
Setting the Date Imprint Function…………………………………………………. 96
Setting the IQ Enhancer Processing ……………………………………………..97
Setting the Macro Light ………………………………………………………………. 97
Underwater Shooting ……………………………………………………………………… 98
Underwater Shooting (Underwater Mode/Underwater Movie Mode) ….. 98
12

Recording Movies ………………………………………………………………………… 100
Recording Movies…………………………………………………………………….. 100
Recording a Movie Quickly Using the Movie Button………………………. 101
Selecting the Number of Recorded Pixels and Frame Rate
for Movies…………………………………………………………………………. 102
Setting the Movie SR (Movie Shake Reduction) Function………………. 103
Suppressing Wind Noises during Movie Recording
(Wind Suppression) ……………………………………………………………. 104
Combining Pictures Taken at a Set Interval into a Movie
(Interval Movie)………………………………………………………………….. 104
Using the High Speed Movie Function………………………………………… 107
Saving the Settings (Memory)……………………………………………………….. 108
Playing Back and Deleting Images 110
Playing Back Images ……………………………………………………………………. 110
Playing Back Still Pictures…………………………………………………………. 110
Playing Back a Movie……………………………………………………………….. 111
Multi-Image Display………………………………………………………………….. 112
Using the Playback Functions……………………………………………………. 114
Slideshow……………………………………………………………………………….. 117
Rotating the Image…………………………………………………………………… 119
Zoom Playback…………………………………………………………………………120
Deleting Images……………………………………………………………………………. 121
Deleting a Single Image ……………………………………………………………. 121
Deleting Selected Images …………………………………………………………. 122
Deleting All Images ………………………………………………………………….. 123
Protecting Images from Deletion (Protect) …………………………………… 124
Connecting the Camera to an AV Device……………………………………….. 126
Connecting the Camera to an HDMI Terminal ………………………………126
13

Editing and Printing 128
Editing Images……………………………………………………………………………… 128
Changing the Image Size (Resize)……………………………………………… 128
Cropping Images ……………………………………………………………………… 129
Processing Images to Make Faces Look Smaller …………………………. 130
Using the Digital Filters …………………………………………………………….. 131
Using the HDR Filter ………………………………………………………………… 133
Using the Ink Rubbing Filter………………………………………………………. 133
Creating a Collage Image………………………………………………………….. 134
Red-eye Edit……………………………………………………………………………. 137
Overlaying Your Original Frame on Still Pictures ………………………….. 138
Editing Movies ………………………………………………………………………….142
Copying Images ………………………………………………………………………. 145
Settings 147
Camera Settings…………………………………………………………………………… 147
Using the Setting Menu Items ……………………………………………………. 147
Formatting the Memory …………………………………………………………….. 148
Changing the Sound Settings……………………………………………………..149
Changing the Date and Time ……………………………………………………..150
Setting the Alarm……………………………………………………………………… 151
Setting the World Time………………………………………………………………153
Setting the Text Size on the Menu ……………………………………………… 155
Changing the Display Language ………………………………………………… 155
Changing the Naming System of the Folder…………………………………. 156
Changing the Naming System of the File……………………………………..158
Selecting the HDMI Output Format …………………………………………….. 160
Viewing Communication Information of Wi-Fi Mode………………………. 160
Adjusting the Brightness of the Display……………………………………….. 161
Using the Power Saving Function ……………………………………………….161
Using the Auto Power Off Function…………………………………………….. 162
Setting the Quick Zoom Function……………………………………………….. 162
Setting the Guide Display………………………………………………………….. 163
Perform Pixel Mapping……………………………………………………………… 163
Changing the Start-up Screen……………………………………………………. 164
Resetting to Default Settings (Reset) ………………………………………….. 165
Setting the Startup Shortcut ………………………………………………………. 165
Displaying the Clock Display……………………………………………………… 166
Light up the LED Macro Lights…………………………………………………… 167
14

Connecting to a Computer 168
Connecting to a Computer ……………………………………………………………. 168
Setting the USB Connection Mode……………………………………………… 168
Connecting the Camera and a Computer……………………………………..169
Disconnecting the Camera from the Computer…………………………….. 170
System Requirements………………………………………………………………. 170
Connecting a Smartphone or Other Communication Device
(Wi-Fi Mode) 172
Connecting a Smartphone or Other Communication Device
(Wi-Fi Mode)…………………………………………………………………………………. 172
Connecting the Camera to a Communication Device…………………….. 174
Doing Remote Photography………………………………………………………. 175
Viewing Images on a Communication Device ………………………………. 176
Sending Date and Time Information to the Camera………………………. 177
Checking Informatio n About the Wireless LAN and
Changing Languages …………………………………………………………. 177
Appendix 178
Functions Available for Each Shooting Mode ………………………………… 178
Messages…………………………………………………………………………………….. 182
Troubleshooting …………………………………………………………………………… 184
Default Settings……………………………………………………………………………. 186
List of World Time Cities ………………………………………………………………. 191
Main Specifications………………………………………………………………………. 192
Warranty Policy ……………………………………………………………………………. 197
Index……………………………………………………………………………………………. 202
15
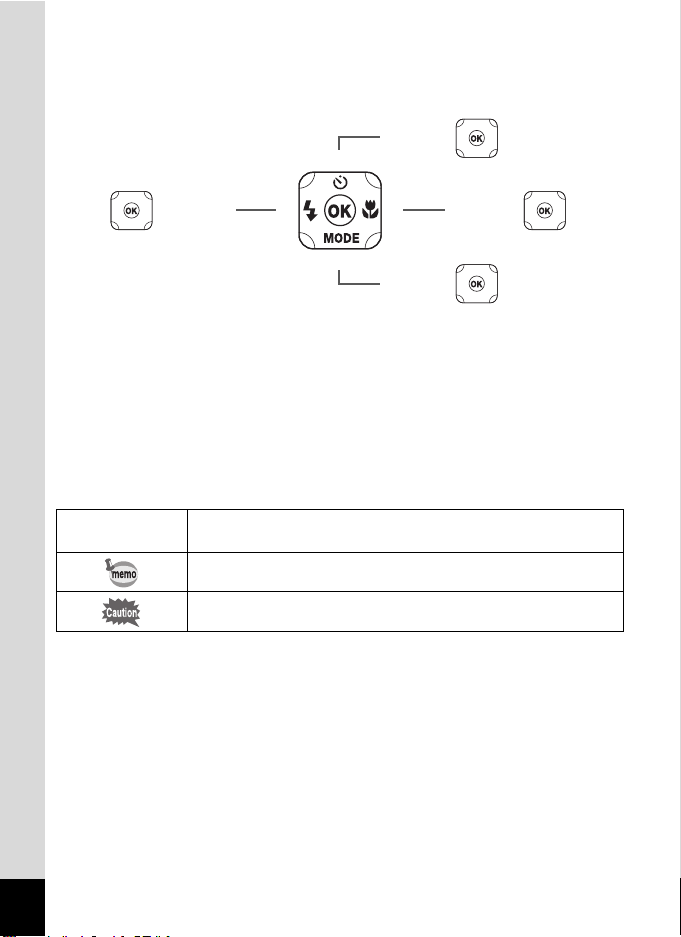
In this manual, the method for operating the four-way controller is shown in
5
or
2 or
3
or
or
4
3
5
2
4
4
2
5
3
illustrations, such as in the ones below.
The meanings of the symbols used in this Operating Manual are explained below.
1
Indicates the reference page number for an explanation of the
related operation.
Indicates information that is useful to know.
Indicates precautions to be taken wh en operatin g the camera.
16

Composition of the Operating Manual
This Operating Manual contains the following chapters.
1 Getting Started ––––––––––––––––––––––––––––––––––––––––––––––––
This chapter explains what you need to do after purchasing the camera before
you start taking pictures. Be sure to read it and follow the instructions.
2 Common Operations –––––––––––––––––––––––––––––––––––––––––––
This chapter explains common operations such as t he functions of the buttons and
how to use the menus. For more details, refer to the respective chapters below.
3 Taking Pictures –––––––––––––––––––––––––––––––––––––––––––––––
This chapter explains the various ways of capturing images and how to set the
relevant functions.
4 Playing Back and Deleting Images ––––––––––––––––––––––––––––––––
This chapter explains how to view still pictures and movies on the camera or on
a TV and how to delete them from the camera.
5 Editing and Printing––––––––––––––––––––––––––––––––––––––––––––
This chapter explains the various ways of printing still pictures and how to edit
them with the camera.
6 Settings ––––––––––––––––––––––––––––––––––––––––––––––––––––––
This chapter explains how to set camera-related functions.
7 Connecting to a Computer ––––––––––––––––––––––––––––––––––––––
This chapter explains how to connect the camera to a computer, and includes
installation instructions and a general overview of the provided software.
8 Connecting a Smartphone or Other Communication Device
(Wi-Fi Mode) ––––––––––––––––––––––––––––––––––––––––––––––––––
This chapter has a general overview and explains how to connect to a
communication device, such as a smartphone or a tablet, via a wireless LAN.
9 Appendix–––––––––––––––––––––––––––––––––––––––––––––––––––––
This chapter provides some basic troubleshooting tips and other useful
informa tion.
1
2
3
4
5
6
7
8
9
17
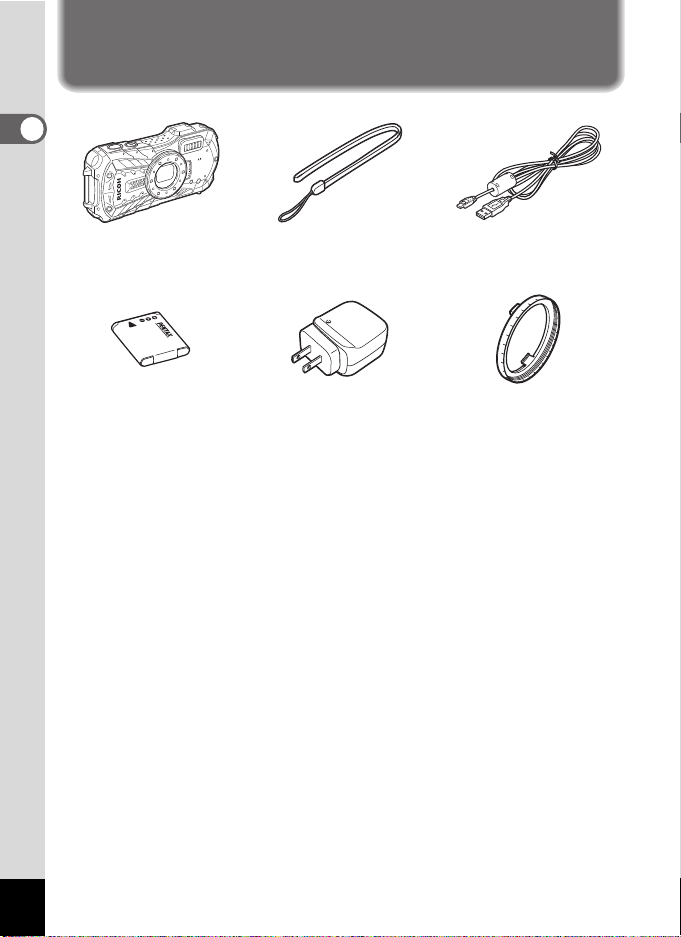
Checking the Contents of the Package
1
Getting Started
Camera
RICOH WG-30W
Rechargeable lithium-ion
battery D-LI92 (*1)
Start Guide
Regarding Waterproof,
Dustproof, and Shockproof
Design
*1 Available as optional accessories.
*2 The AC plug adapter is attached to the power adapter.
Power adapter D-PA135/
AC plug adapter D-PL135 (*2)
Strap
O-ST104 (*
1)
USB cable
I-USB157 (*1)
Macro stand
O-MS1
18
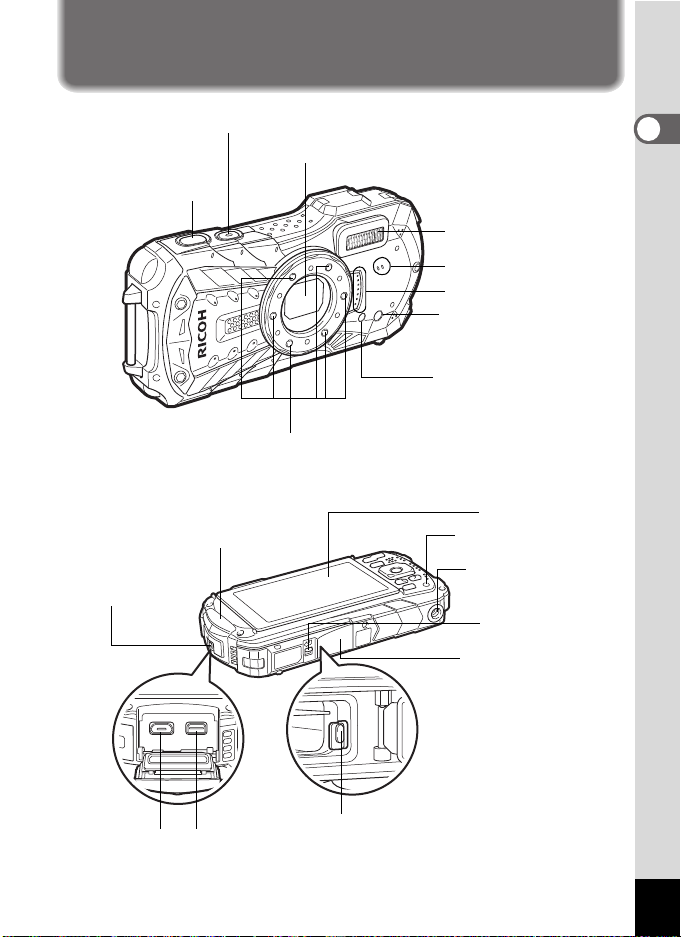
Names of Parts
Shutter
release button
Lens
Power button/Power lamp (green)
Flash
Microphone
Self-timer lamp/
Focus assist light
Remote control receiver
LED Macro Lights
Speaker
Display
Tripod socket
Battery/card cover
USB terminal
Battery lock lever
Terminal cover
lock lever
HDMI terminal
Terminal cover
Battery/card cover
lock lever
Remote control
receiver
Front
Back
1
Getting Started
19
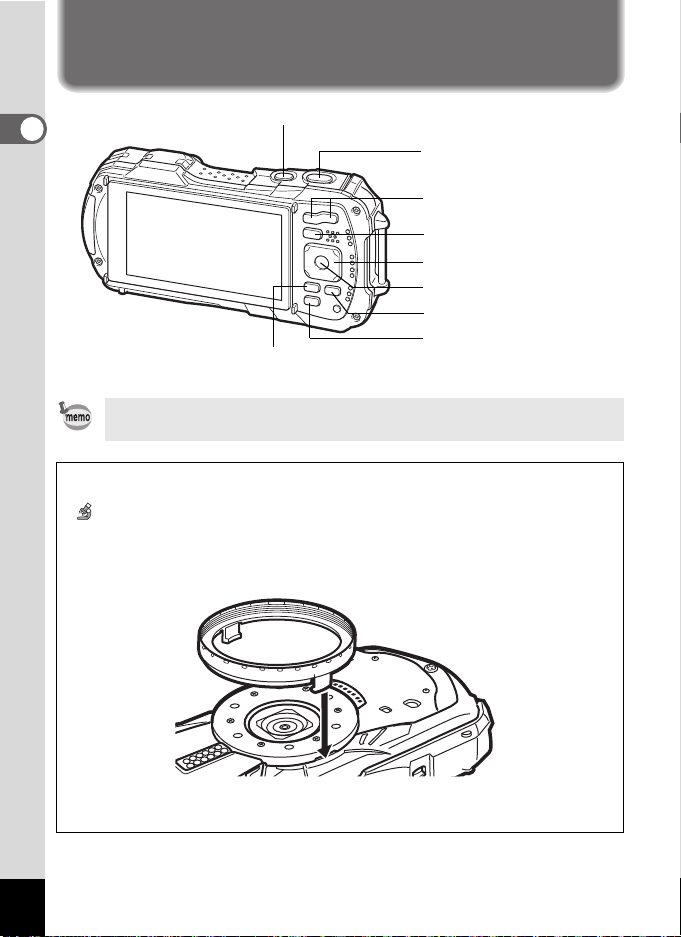
Names of Operating Parts
4/W button
3 button
Four-way controller
Green/i button
Power button
Movie button
Q button
W/T/f/y button
Shutter release button
1
Getting Started
Refer to “Understanding the Button Fu nctions” (p.44 — 47 ) for an explanation
of the function of each button.
Macro stand
Attaching the supplied macro stand (O-MS1) reduces camera shake during shooting
in (Digital Microscope) mode (p.66). Insert two clips into the slits in upper and lower
sides of the LED Macro Lights part. When attaching and detaching the macro stand,
do not hold the clip part.
* When using the macro stand, the camera may not be able to focus if the objects
have uneven surfaces.
20
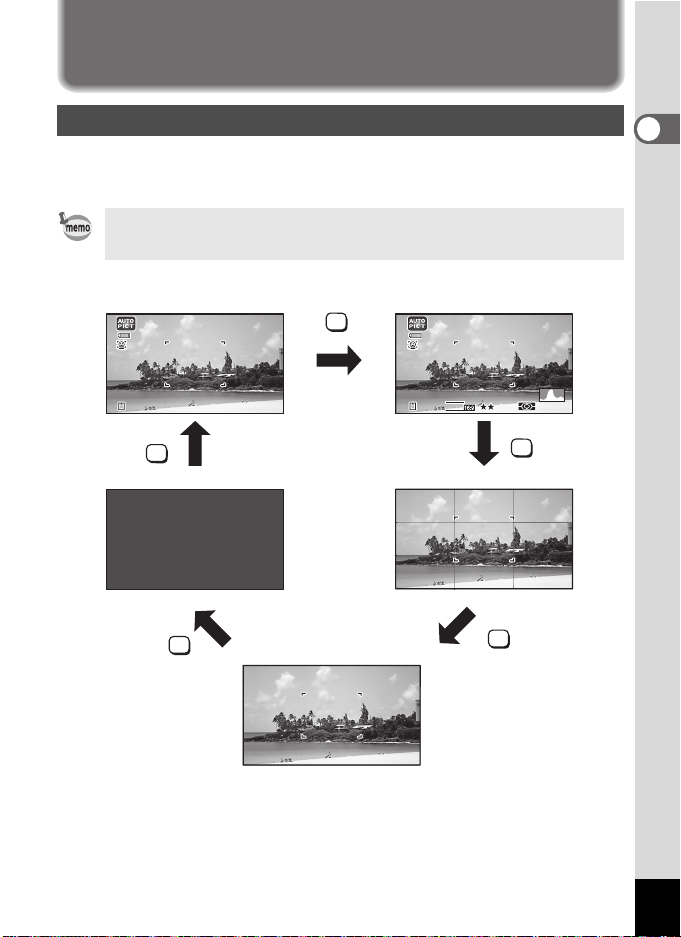
Display Indications
LCD Off
Normal Display Histogram + Info
No Info
Grid Display
Display in A Mode
The display changes in the following sequence each time you press the 4
button: “Normal Display”, “Histogram + Info”, “Grid Display”, “No Info”, “LCD Off”.
• All the camera buttons function as normal even when the LCD is off. Press
the shutter release button to take pictures as normal.
• The display cannot be changed in some shoo ting modes.
OK
12
12
M
383838
OK
383838
OK
OK
AWB
OK
20
200
IS
ISO
1
Getting Started
21
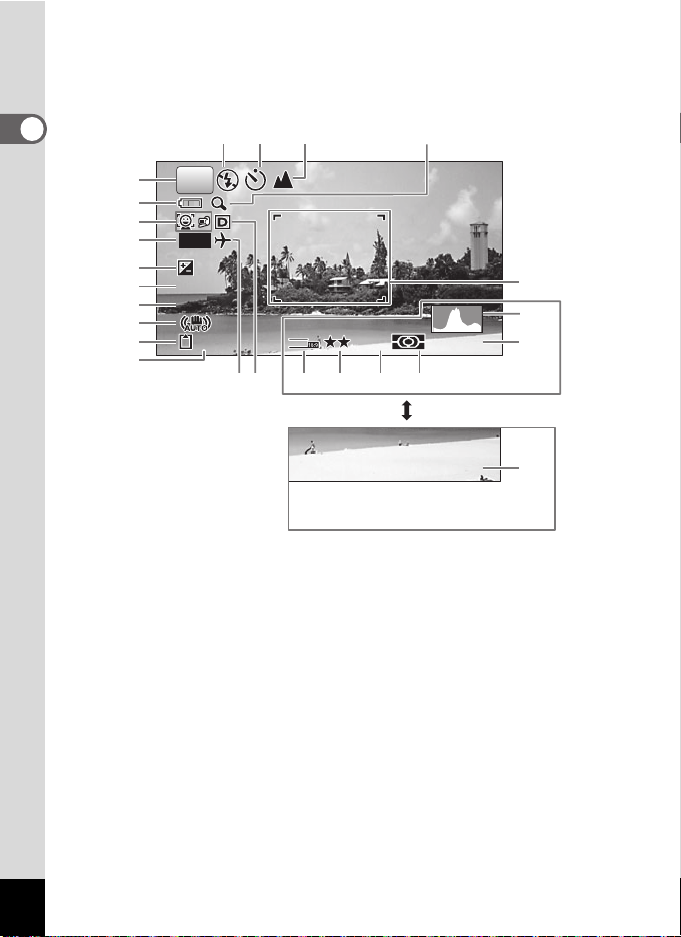
Normal Display/ Histogram + Info/ Grid Display in Still Picture Capture Mode
+ 1 . 0
1 / 2 5 0
F 3 . 5
1 to 17 and A1 appear when “Normal Display” is selected. B1 to B6 appear at the
position of 15 when “Histogram + Info” is selected. Only A1 appears when “Grid
Display” or “No Info” is selected.
1
Getting Started
1
11 12 13 14
P
2
3
DATE
4
+1.0
5
6
7
8
9
+1.
1/25
1/250
F3.5
F3.
38
A1
B5
12
12
M
AWB
IS
ISO
20
200
B6
10
17
16
B1 B2 B3 B4
12/12/2014
12/12/2014
14:2
14:25
15
22
Shooting mode (p.61)
1
Battery level indicator (p.33)
2
Face Detection icon (p.89)
3
Date Imprint setting (p.96)
4
EV Compensation (p.86)
5
Shutter speed
6
Aperture
7
Pixel Track SR icon (p.88)
8
Memory status (p.37)
9
Remaining image storage capacity
10
Flash Mode (p.74)
11
Drive Mode (p.68 — p.72)
12
Focus Mode (p.75)
13
Digital zoom/Intelligent Zoom
14
icon (p.58)
Date and time (p.42)
15
World Time setting (p.153)
16
D-Range Setting (p.87)
17
Focus frame (p.55)
A1
Recorded Pixels (p.80)
B1
Quality Level (p.81)
B2
White Balance (p.82)
B3
AE Metering (p.84)
B4
Histogram (p.27)
B5
Sensitivity (p.85)
B6

* 6 and 7 are only displayed when the shutter release button is pressed halfway.
*For 8, M is displayed when Pixel Track SR is set to O (On) on the [A Rec.
Mode] menu. f is displayed when the shutter release button is pressed
halfway if Pixel Track SR is set to P (Off) and there is a danger of camera
shake.
* For 13, when the focus mode is set to = and the Auto Macro function is
activated, q appears on the display (p.75).
* 15 appears for two seconds after the camera is turned on.
* 17 changes depending on [D-Range Setting] settings in the [A Rec. Mode]
menu. No icon is displayed on the screen when [Highlight Correction] and
[Shadow Correction] are both set to [Off].
* When the shooting mode is b (Auto Picture) and if you press the shutter
release button halfway, the automatically selected shooting mode appears in
A1 even when “No Info” is selected.
* If there are overexposed highlight areas in the image, they will blink red on the
display, and if there are underexposed shadow areas, they will blink yellow.
* Some indications may not appear depending on the shooting mode.
1
Getting Started
23
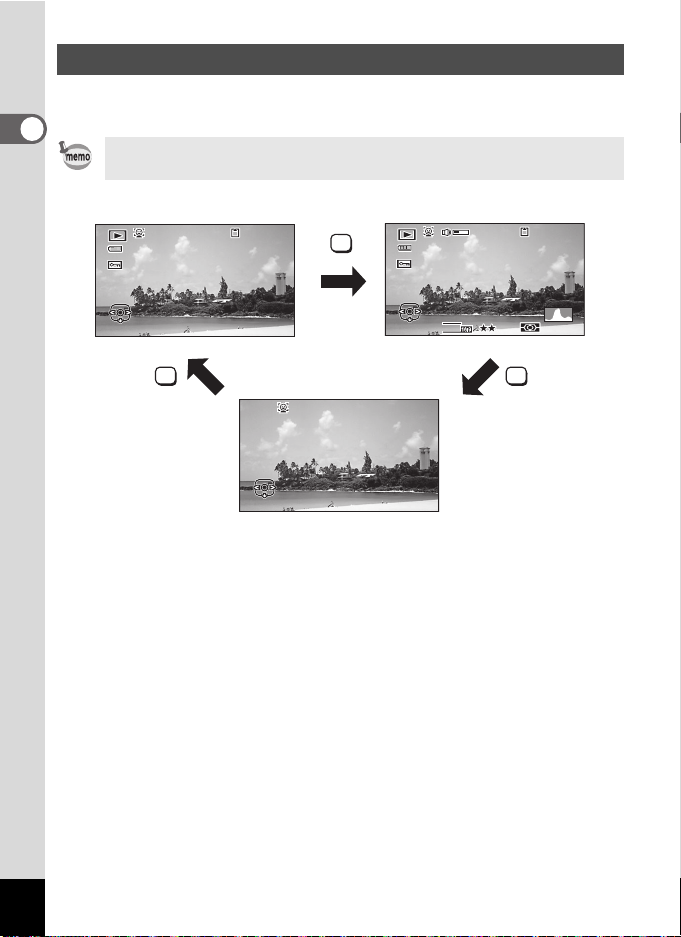
Display in Q Mode
Normal Display Histogram + Info
No Info
The display shows the shooting information of the image in playback mode. The
display changes in the following sequence each time you press the 4 button:
1
Getting Started
The display cannot be changed by pressing the 4 button while playing back
or pausing a movie.
10
10
100-0038
Edit
Edit 12/12/2014
12/12/2014 14:25
003
14:25
OK
1/25
1/250
F3.
F3.5
Edit
Edit
12
M
100-0038
AWB
IS
ISO
003
20
200
OK
Edit
Edit
24
OK
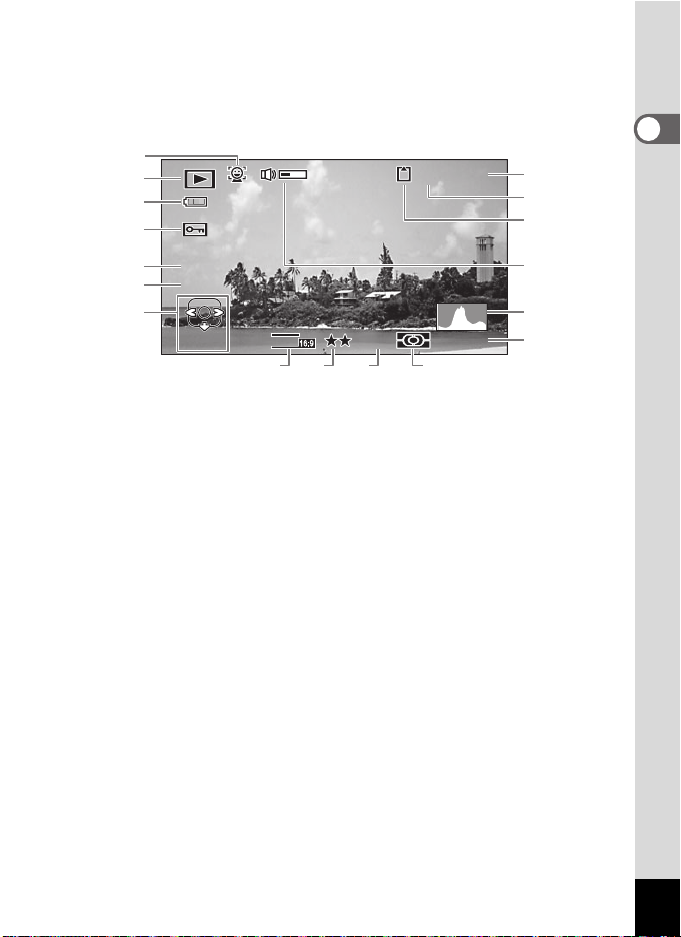
Normal Display/ Histogram + Info in Playback Mode
(All of the display items are displayed here for explanatory purposes.)
The display shows information such as the shooting conditions. In “Normal
Display”, A1 to A9 are displayed. In “Histogram + Info”, B1 to B8 are displayed as
well.
A1
10
003
A2
A3
A4
100-0038
A6
A7
A8
1
Getting Started
B1
B2
1/25
1/250
F3.
F3.5
A5
M
Edit
Edit
Face Detection icon (p.89)
A1
Playback mode
A2
Q : Still pictur e (p.110)
K : Movie (p.111)
Battery level indicator (p.33)
A3
Protect icon (p.124)
A4
Four-way controller guide
A5
File number
A6
Folder number (p.156)
A7
Memory status (p.37)
A8
* A1 appears only if the Face Detection function worked when the image was shot.
* In “Normal Display”, A3 disappears if no operation is performed for two seconds.
* A5 appears even when “No Info” is selected, but disappears if no operation is
performed for two seconds. When no operation is performed for two seconds in
“Normal Display” or “Histogram + Info”, only “Edit” disappears.
* A9 appears only when the volume is being adjusted during playback of movies
(p.111).
* When “Normal Display” is selected, the current date and time appears for two
seconds in the B4 t o B8 positions.
* If there are overexposed highlight areas in the image, they will blink red on the
display, and if there are underexposed shadow areas, they will blink yellow.
12
B5
B6 B7 B8
AWB
A9
B1
B2
B3
B4
B5
B6
B7
B8
IS
20
ISO
200
Volume icon
Shutter speed
Aperture
Histogram (p.27)
Sensitivity (p.85)
Recorded Pixels (p.80)
Quality Level (p.81)
White Balance (p.82)
AE Metering (p.84)
A9
B3
B4
25

Guide Display
A guide indicator for each available button or key operation appears as follows on
the display during operation.
1
Getting Started
2 Four-way controller (2) Zoom button
3 Four-way controller (3) 4 button
4 Four-way controller (4) Shutter release button
5 Four-way controller (5) X (green),
MENU
3 button
OK
SHUTTER
i Green/i button
(red) Movie button
26
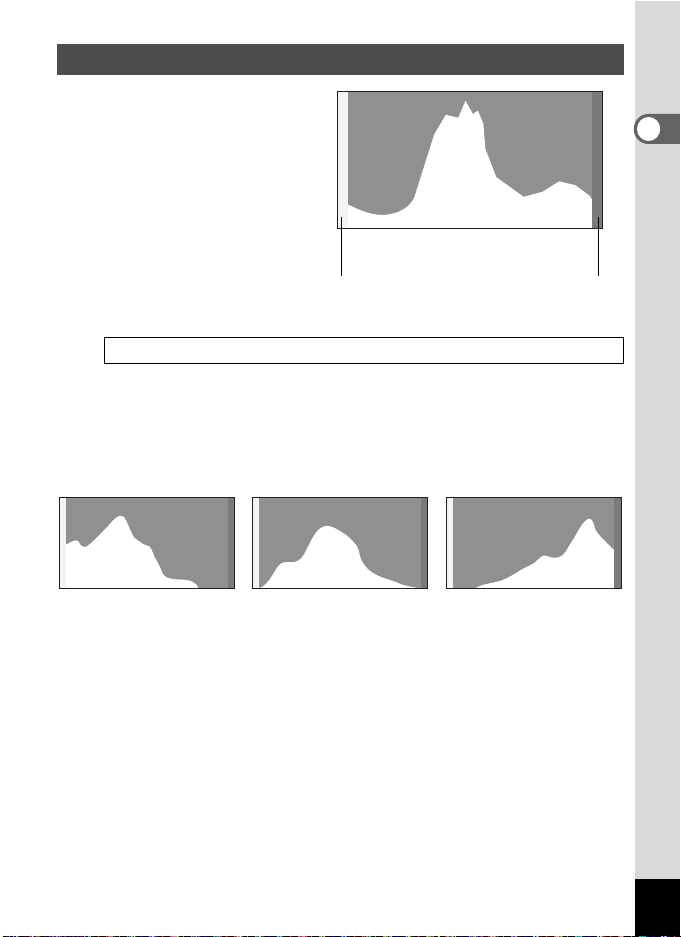
Histogram
Number of pixels→
←Brightness→(Dark) (Bright)
Dark portions Bright portions
Dark image Correct image Bright image
A histog ram shows the bright ness
distribution of an image. The
horizontal axis represents
brightness (dark at the left and
bright at the right) and the vertical
axis represents the number of
pixels.
The shape of the histogram
before a nd after shoo ting tells you
whether the brightness and
contrast are correct or not, and
lets you decide if you need to use EV compensation and take the picture again.
Setting the Exposure (EV Compensation) 1p.86
Understanding Brightness
If the brightness is correct, the graph peaks in the middle. If the image is
underexposed, the peak is on the left side, and if it is overexposed, the peak is on
the right side.
When the image is underexposed, the part to the left is cut off (dark portions) and
when the image is overexposed, the part to the right is cut off (bright portions).
This camera has a function where overexposed areas are indicated as blinking
red and underexposed areas as blinking yellow.
Understanding Contrast
The graph peaks gradually for images in which contrast is balanced. The graph
peaks on both sides but sinks in the middle for images with a large difference in
contrast and low amounts of mid-level brightness.
1
Getting Started
27
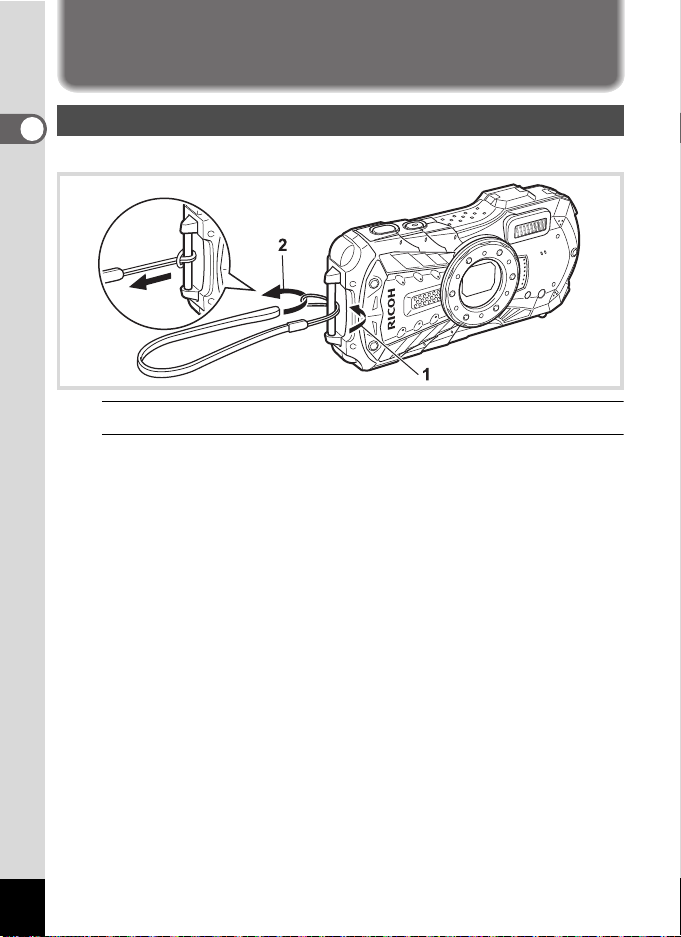
Attaching the Strap
Attaching the Strap
1
Getting Started
Attach the strap (O-ST104) supplied with the camera.
1
Pass the narrow end of the strap through the strap lug.
2
Pass the other end of the strap through the loop and pull tight.
28
Loading…
На этой странице вы можете совершенно бесплатно скачать Руководство по эксплуатации Ricoh WG-30W.
У документа PDF Руководство по эксплуатации 208 страниц, а его размер составляет 7.28 Mb.
Читать онлайн Фото- и видеокамеры Ricoh WG-30W Руководство по эксплуатации
Скачать файл PDF «Ricoh WG-30W Руководство по эксплуатации» (7.28 Mb)
Популярность:
5393 просмотры
Подсчет страниц:
208 страницы
Тип файла:
Размер файла:
7.28 Mb
Прочие инструкции Ricoh WG-30W
Прочие инструкции Ricoh Фото- и видеокамеры
Прочие инструкции Ricoh
Ricoh WG-30W Operating Manual
Ricoh WG-30W Specification
The Ricoh WG-30W is a robust digital compact camera designed for outdoor enthusiasts and adventurers. It features a 16-megapixel back-illuminated CMOS sensor that ensures high-resolution images and excellent performance in low-light conditions. The camera is equipped with a 5x optical zoom lens, offering a focal range equivalent to 28-140mm in 35mm format, which is versatile for capturing wide-angle landscapes and distant subjects.
One of the standout features of the Ricoh WG-30W is its rugged build, capable of withstanding harsh environments. It is waterproof up to 12 meters, shockproof from a height of 1.5 meters, freezeproof down to -10°C, and crushproof up to 100 kgf, making it ideal for extreme outdoor activities. The camera also includes six macro LED lights surrounding the lens, providing shadow-free illumination for close-up shots, enhancing macro photography capabilities.
The WG-30W supports wireless connectivity through built-in Wi-Fi, allowing users to transfer images to smartphones and tablets seamlessly. This feature also enables remote shooting, providing flexibility in capturing images from various angles and positions. The camera records Full HD 1080p video at 30 frames per second, ensuring high-quality video capture.
Its 2.7-inch LCD screen with anti-reflective coating ensures clear visibility in bright sunlight, and the robust design complements its user-friendly interface, making it easy to navigate through settings and modes. The Ricoh WG-30W is powered by a rechargeable lithium-ion battery, supporting extended shooting sessions, which is crucial for outdoor adventures. Overall, the WG-30W combines durability with advanced photographic features, making it a reliable companion for capturing moments in challenging conditions.
Ricoh WG-30W F.A.Q.
To connect your Ricoh WG-30W to a smartphone, ensure that the camera’s Wi-Fi is enabled. Then, download and install the ‘Image Sync’ app on your smartphone. Open the app, select your camera’s SSID, and enter the password if prompted.
If your Ricoh WG-30W does not turn on, check if the battery is properly inserted and charged. If the issue persists, try cleaning the battery contacts and ensure the battery door is securely closed.
To perform a factory reset on the Ricoh WG-30W, go to the camera’s menu, select ‘Settings’, then ‘Reset’, and confirm your selection. This will restore the default settings.
The Ricoh WG-30W is waterproof up to a depth of 12 meters (approximately 40 feet) for up to 2 hours. Ensure all camera doors are securely closed before submerging.
To improve battery life on the Ricoh WG-30W, reduce the LCD screen brightness, turn off Wi-Fi when not in use, and utilize the power-saving mode. Always carry a spare battery for extended sessions.
If your images are blurry, ensure that the lens is clean and free from smudges. Check that the camera is in focus before taking a picture and avoid moving the camera during the shot. Use a tripod for stability.
To transfer videos from the Ricoh WG-30W to your computer, connect the camera using a USB cable, select the appropriate USB mode, and copy the files from the camera to your computer’s hard drive.
For underwater photography, use the ‘Underwater’ shooting mode, ensure white balance is set to ‘Underwater’, and consider using additional lighting for better color and depth.
To update the firmware, download the latest firmware file from the Ricoh website. Copy it to the root directory of a formatted SD card, insert it into the camera, and follow the on-screen instructions to complete the update.
Yes, the Ricoh WG-30W is designed to operate in temperatures as low as -10°C (14°F). However, it’s advisable to keep the camera warm when not in use to prevent battery drain and condensation.
Найди любой мануал:
Например: Sony VGN-FW460J/T
Вы можете бесплатно скачать Руководство по эксплуатации для Ricoh WG-30W.
Также вы сможете прочесть онлайн этот документ без скачивания.
Скачать Руководство по эксплуатации для Ricoh WG-30W
Тип файла
PDF
Размер
7.28 Mb
Кол-во страниц
208
Просмотров
5392
Читать онлайн Руководство по эксплуатации для Ricoh WG-30W (Страница 1)

Другие Фото- и видеокамеры Ricoh WG-30W
Топ Ricoh Фото- и видеокамеры
Ранее вы смотрели
Эта страница полезна для вас? Поделитесь ссылкой:
-
Page 1: Ricoh RICOH WG-30W
30 Digital Camera Operati ng Man ual To ensure t he best perf orm ance from your camer a, please read the Operat ing Ma nual befo re using t he camera. RI COH IM AGIN G COM PA NY, LT D. 2- 35- 7, Maen o- c ho , I t ab as h i- k u, Toky o 17 4- 86 39 , JA PAN (h ttp:/ /ww w.ric oh- imagi ng. co.jp ) RI COH IM AGI NG EURO PE S.A.S 112 Quai de Bez ons[…]
-
Page 2: Ricoh RICOH WG-30W
Me mo Th an k yo u for pu r cha si ng t h is RIC OH WG -3 0W D ig it al C ame r a. Plea se re ad th is man ua l be fore u sing th e ca mera in o rde r to get th e mo st ou t of all t he fe at ures an d fun c tio ns . K ee p t hi s m an ua l s a fe, as i t c a n b e a va lu ab le to ol in h elpin g yo u t o un de rs tan d al l the cam era ’s cap a[…]
-
Page 3: Ricoh RICOH WG-30W
1 • Al l other trad emarks ar e the pr opert y of thei r resp ective owner s. To us ers of this c amer a • D o no t use or stor e th is ca mer a in th e vic init y of equ ipm en t that ge nerat es stron g el ectr omag ne tic r ad iatio n or ma gne tic fie lds. St ro ng sta tic charg es or th e mag net ic fi elds pro du ced by equi p ment such a[…]
-
Page 4: Ricoh RICOH WG-30W
2 W a rnin g • Do n ot at temp t to ta ke t he cam er a a part or m o dify th e ca me ra. Hig h vo lt ages ar e pre s en t wi t hi n the cam e r a, an d the re is a da ng e r of el ec tri c sh oc k if th e ca me r a is ta ke n ap art . • If the insi de of th e camera sho uld beco me expo sed as a res ult of, f o r exa mple , the c amera b eing […]
-
Page 5: Ricoh RICOH WG-30W
3 W a rnin g • A lwa ys u se th e po wer ad ap t er or AC a da pt er ex cl us iv e ly de v el op ed fo r t h is ca me r a, wit h the s pe ci fie d po w er an d vo lta ge . U si ng a po wer ad ap t e r or A C adap ter not excl usive to th is came ra, or us ing t he exc lusi ve powe r ada pter or AC adap ter w ith an un spec ified powe r or vol tag[…]
-
Page 6: Ricoh RICOH WG-30W
4 W a rnin g • B e sur e to sto re t h e ba tte ry ou t of th e rea c h of sm a ll chi ld ren . P la ci ng it in th eir mout hs may ca us e an el ectri c shock . • I f a ny lea ka ge fro m th e batte ry shou ld c ome in con tac t w ith you r e yes , it m ay ca us e a l os s of s igh t. Fl us h y o ur ey es wi th cl ea n w ate r a nd g et me di […]
-
Page 7: Ricoh RICOH WG-30W
5 • W he n the cam e ra ha s no t b ee n us ed for a long ti m e, co nf irm th at it is s til l wo rk in g p ro pe r ly, par t ic ul arl y pri or t o tak in g impo r ta nt pi ct ure s (su c h a s at a we dd in g o r wh en trav e lin g) . C on ten ts of th e rec o rdi ng can no t be gu ara nt ee d if re c ord in g, pla y ba ck or tr an s ferr i ng[…]
-
Page 8: Ricoh RICOH WG-30W
6 • Avoi d con tact wit h gar bage, mud, sa nd, dust, water, toxic gase s, or s alt. T hese co uld c au s e t he c am er a t o b r e ak do wn. W i pe th e ca mer a to d ry off any ra i n or water d rops. • Do no t pr ess the di spla y with exc e ss ive f orce . Thi s coul d cau se it t o br eak or malf unct ion. • B e c a refu l not to s it d[…]
-
Page 9: Ricoh RICOH WG-30W
7 • T he SD Memor y Car d i s eq uipp ed wi th a write-protect sw itch. Setting th e switch t o LOCK p revents new dat a from b ein g reco rde d on t he ca rd, t he st or ed dat a f rom bein g delete d, and t he card from be ing form atte d by the camera or com puter. r appea rs on t he di spla y w hen t he car d i s writ e-protec ted. • C ar e[…]
-
Page 10: Ricoh RICOH WG-30W
8 Reg ardi ng Wate rproof, Dustpr oof, a nd Sh oc kp roo f D esign • This camera is pr ov ide d with a wat e rp r oof /dus tpr oof desi gn co mply ing wi th JIS wat erp roof gr ade 8 and JI S dus tpr oof gr ade 6 (eq uiva lent t o IP68) . • T he c ame ra s atis fi es o ur d ro p t est ( 1.5 m h eight o nto a 5 cm t hick ply woo d su r fac e ) c[…]
-
Page 11: Ricoh RICOH WG-30W
9 • A void ope ni n g t he bat tery /c a r d an d te rmi na l co v ers w he n ne ar th e w at ers id e or wit h we t hand s. When cha ngin g the bat ter y or th e SD Memo ry Card , avoi d pla ces wh ere th e ca me ra is l ik ely t o g et w et o r d irty , and m a ke s ure that th e ca me r a an d yo ur ha nd s are com p let el y dr y. • T he c […]
-
Page 12: Ricoh RICOH WG-30W
10 • D o n ot op en th e b at t ery /c a rd a nd te r m inal co ve r s if the c am e ra i s wet . Wi pe of f any w ater wit h a cl ean li nt-f ree c lot h. • The i nside surf ac e of t he cov ers ma y get we t wh en th ey are op ened . Wip e off any wa te r th at is o n the cov er . • W ipin g off the c am er a w h il e th ere i s sa nd o r d[…]
-
Page 13: Ricoh RICOH WG-30W
11 Usin g You r Ca mera Safe ly ….. …… ……. …… …… ……… ……. …… ……… …… … 1 Car e to be Taken Duri ng Handl ing …… …… …… …… ……. …… ……… …… …… 5 Rega rd in g Wat erpro of, D ustproof , and S hockp roof D e sign…….. …… …… 8 Prec autio ns Bef ore Using the Came ra […]
-
Page 14: Ricoh RICOH WG-30W
12 Taki ng Pic tures 55 Taki n g Still Pic ture s …….. …… …… ………. …… …… ……… ……. …… ……… …… …. 55 Taki ng Pict u res….. …… …… …… …… ……. …… ……… …… ……. ……… …… …… . 55 Usin g the Zoo m ……. …… …… …… ……. …… …… ……… …[…]
-
Page 15: Ricoh RICOH WG-30W
13 Reco rd in g Mov ie s ….. …… …… …… …… ……. …… ……… …… ……. ……… …… ….. 100 Reco rdin g Mo vies …. …… …… …… ……. …… …… …… …… ……. …… …… …… .. 100 Reco rdin g a Movi e Q uickly Usin g th e Mov ie Butto n ….. …… …… …… ….. 1 01 Sele ct ing[…]
-
Page 16: Ricoh RICOH WG-30W
14 Edit ing a nd Print ing 128 Editin g Images …. ……. …… …… …… ………. …… …… ……… ……. …… …… …… ….. 128 Chang ing the Image Size (R esize ) …… …… …… …… ……. …… …… …… ….. 128 Cro ppin g Images …….. …… …… ………. …… …… …… …… ……. ….[…]
-
Page 17: Ricoh RICOH WG-30W
15 Co nnec ti ng t o a Co mput e r 16 8 Conne cting to a Comput er … …… …… ……. …… …… …… ………. …… …… …… .. 168 Settin g the USB C o nn ectio n Mod e …… …… …… …… ……. ……… …… …… .. 168 Conne c ti ng t he Came ra and a Comput e r ….. …… ………. …… …… ……… […]
-
Page 18: Ricoh RICOH WG-30W
16 In th is man ua l, th e me tho d fo r op er ati ng the fou r-w a y co nt roller is s how n in il lust r ati on s, s uc h as in t he on es b el ow. Th e mea ni ng s of the s ym b ols used in t h is Op era ti ng Man ua l ar e ex pl ai ne d be lo w. 1 Indic at es the ref er ence pa ge num be r for an exp lana tio n of the rel ated op era tio n. Ind[…]
-
Page 19: Ricoh RICOH WG-30W
17 Thi s Oper ating Man ual co ntai ns th e follo wing ch apt ers. Compo sition o f the O perating Manual 1 Gett ing S tarte d –––––– ––––– –––– –––––– –––– –––– ––––––– –––– –––– –––– This cha pter ex pl ai ns what yo u ne ed to do af t er p urcha sing […]
-
Page 20: Ricoh RICOH WG-30W
18 Getti ng Started 1 Ch ec king th e Con te nts o f th e Pa cka g e *1 Avai labl e as op tio nal acce ssor ie s. *2 The AC pl ug adap ter i s att ache d to the pow er ad apte r. Cam era R ICOH WG -30 W Strap O- ST 10 4 (* 1 ) USB cable I-U SB 157 ( *1) Rec har gea ble l ithi um- ion bat ter y D-LI 92 (* 1) Powe r adapter D- PA135/ AC p l ug ad apt[…]
-
Page 21: Ricoh RICOH WG-30W
19 1 Getti ng Started Na m es of Par ts Fro nt Back Shut ter re le as e but to n Lens Powe r but ton/Power lamp (gree n) Flas h Mic r opho n e Se lf -tim e r la m p/ Focu s assi st li ght Remote control receiver LED Macr o Ligh ts Speake r Display Tr ipo d socket Batte ry /card cov er USB te rminal Ba t ter y l ock lever Terminal cov er lock l ev e[…]
-
Page 22: Ricoh RICOH WG-30W
20 Getti ng Started 1 Na mes of Oper at ing Pa rt s Ref er t o “Unde rs ta ndin g t he But to n Fu nc tio ns” (p . 44 — 47 ) for an ex plan at ion of th e func tio n of eac h bu tton . Macr o st and At tach ing t he su pp lied m a cro s ta nd ( O- MS1 ) redu ce s c ame ra s ha ke dur i ng shoot ing in (D igi t al M ic rosc ope ) mode (p.6 6). I[…]
-
Page 23: Ricoh RICOH WG-30W
21 1 Getti ng Started Di splay In dicat io ns Th e disp la y c h an ge s in th e f ol lo w in g s eq u en ce e ach t ime yo u pr e ss t he 4 butto n: “Nor ma l Dis p lay” , “Hi st ogr am + I nfo ”, “G ri d Dis p la y”, “N o In fo” , “LCD Off ”. Display in A Mo de • Al l t he c ame ra bu tt ons fu nct io n as no rmal even when […]
-
Page 24: Ricoh RICOH WG-30W
22 1 Getti ng Started Norm al Dis play/ His tog ram + In fo/ Gri d Di sp lay in Sti ll Pic ture Cap tur e M ode 1 to 17 an d A1 ap pear w hen “Nor mal D ispla y” i s se lect ed. B1 to B6 appe ar at the pos iti on of 1 5 w h en “H i st og ram + In fo ” is s el ec te d. O nl y A 1 ap pear s wh en “G ri d Di splay” or “No In fo” is sel[…]
-
Page 25: Ricoh RICOH WG-30W
23 1 Getti ng Started * 6 and 7 are only displa yed w hen the shut ter r elease but t on i s pr esse d hal fway. *F o r 8 , M is di splayed when P ixel T rack S R is set to O (On) on th e [ A Rec. Mode] menu. f is di spla yed whe n the shu tte r rele ase bu tton i s pre sse d hal fwa y if Pixel Tra c k SR is s e t to P ( Off ) an d the re is a dang[…]
-
Page 26: Ricoh RICOH WG-30W
24 1 Getti ng Started Th e d is pl ay s ho w s th e sh oo tin g i nf or m at io n o f th e i ma ge in pl ay ba ck mod e. Th e dis play c hange s in t he foll owing seq uence ea ch ti me you pr ess the 4 bu tton: Display in Q Mo de The dis play c annot be ch ang ed by pre ss ing th e 4 b utt on w hile pl ayi ng b ack or pau sin g a movi e. 10 10 0 -[…]
-
Page 27: Ricoh RICOH WG-30W
25 1 Getti ng Started Norm al Dis pla y/ H ist og ram + Inf o in Pla yb ac k Mo de (A ll o f th e di splay i tems ar e disp layed here f or exp lan ator y pur po ses.) Th e disp la y s h ow s i nf o rm ati on s uc h as t he sh o ot i ng c on di tio ns . I n «N o rm al Displ ay» , A1 to A9 a re disp la yed . In «His to gram + Info &qu[…]
-
Page 28: Ricoh RICOH WG-30W
26 1 Getti ng Started A gu ide i ndica tor for each a vail able butt on or key oper ation app ears as fo llows on the displ ay duri ng op era t ion . Guide Display 2 Fou r-w ay co nt roll e r ( 2 ) Zo om bu tton 3 Fou r-w ay co nt roll e r ( 3 ) 4 but t on 4 Fou r-w ay co nt roll e r ( 4 ) Sh ut ter rel e ase but ton 5 Fou r-w ay co nt roll e r ( 5[…]
-
Page 29: Ricoh RICOH WG-30W
27 1 Getti ng Started A hi st og ram s ho w s th e b rig ht ness dist rib ut ion o f a n im ag e. Th e hor iz o nta l ax is re pre se n ts br ightne ss (d ark a t the lef t and br ight at th e right ) and th e vert ical axis re p r es en ts th e nu mb er of pi xe ls. Th e sh ap e of the his to gr a m bef o re a nd af te r sh oo ti ng tel ls y ou wh[…]
-
Page 30: Ricoh RICOH WG-30W
28 Getti ng Started 1 Attachin g the Strap Attac h the s tra p ( O-ST1 04 ) sup pl ied wi th th e ca mera . 1 Pass the narrow end of the strap through the strap lug. 2 Pass the othe r end of the st rap thro ugh t he loop and pu l l ti ght. Attac hing the S trap[…]
-
Page 31: Ricoh RICOH WG-30W
29 1 Getti ng Started Power ing the Came ra Use th e re charg eabl e lith ium- ion bat tery D-LI 92 t hat is p rov ided w ith t he c amera. 1 Open the batter y/card cover. Press the ba tter y/card cover lock le ver in the d ir ecti on show n 1 , sli de th e co ve r towa rds 2 a nd op en i t t o war ds 3 . 2 Using t he side of the batter y to p ress[…]
-
Page 32: Ricoh RICOH WG-30W
30 1 Getti ng Started 1 Open the batter y/card cover. 2 Push the batte ry lock leve r t owards 4 . The battery will b e ejected. Take care not to drop the b attery when removing it. Remov ing the Battery • Do not u se e xces siv e forc e w hen open ing an d clo sin g th e bat tery / card cover bec au se the water pro of seal may pe el of f. If th[…]
-
Page 33: Ricoh RICOH WG-30W
31 1 Getti ng Started Con ne c t th e su pp li ed p ow e r a da pte r (D — PA 1 35 ) to th e ca me r a an d ch ar ge t h e batte ry before us ing i t for the firs t time or a fter a long pe riod o f no n-us e, o r whe n the [Batt ery dep leted ] mess age ap pear s. 1 Make su re that t he ca mera is t urned off and open the t erminal cover. Mo ve th[…]
-
Page 34: Ricoh RICOH WG-30W
32 1 Getti ng Started 5 Unplug t he power adapter f r om the power outlet when charging i s finish ed. 6 Remove the USB cable from the camera. 7 Close the term inal cover. Cl ose t he t ermin al cove r i n the opp os ite direc t ion ind i cate d by 3 . While lightly pres s ing on the cover , sl ide it awa y from 2 un til it clicks. • I mage S to […]
-
Page 35: Ricoh RICOH WG-30W
33 1 Getti ng Started • Bat tery Leve l Indi cat or You can che ck th e batte ry le vel by th e indi cat or on th e disp lay. Use of the o pti onal AC ad apt er k it (K -AC117 ) is re commen ded i f yo u in t end to u se the c a mera fo r a lo ng ti me o r con ne ct it to a co mpu ter . Note: AC plug cord “Listed, Type SPT-2 or NISPT-2 , 18/2 f[…]
-
Page 36: Ricoh RICOH WG-30W
34 1 Getti ng Started 3 Ins ert t he D C cou pler . Us ing t he s ide of th e DC cou pl er to pu sh th e batt ery loc k lev er , inser t t he DC cou pl er. C onf irm t hat th e DC co uple r is loc ke d in pl ace. The battery/card cover will not close while the DC coupler is inserted. Leave the cov er open whe n usi ng the A C a dapte r and do no t […]
-
Page 37: Ricoh RICOH WG-30W
35 1 Getti ng Started Insta l ling a n SD Memory Card This came ra uses SD Mem ory Cards, SDHC Memo ry Cards or SDXC Mem ory Ca r ds. Capt ured imag es are sa ved on the S D Me mory Ca rd i f a ca rd is inse rted in th e ca mer a. T he y are s aved in t he bu il t-in m e mor y if a ca rd is no t i ns e rted (p.37). • Be su r e to u se th is ca me[…]
-
Page 38: Ricoh RICOH WG-30W
36 1 Getti ng Started 1 Open the batter y/card cover. Press the ba tter y/card cover lock le ver in the d ir ecti on show n 1 , sli de th e co ve r towa rds 2 a nd op en i t t o war ds 3 . 2 Ins ert t he S D Me mory Car d int o the S D Memo ry Card socke t so that the label is facing towar d the front of the camer a (the side wi th the l ens). Pu s[…]
-
Page 39: Ricoh RICOH WG-30W
37 1 Getti ng Started Tur ning the Came ra On an d Off 1 Press the power button. Th e ca mer a tu rns on an d bo th the p ower l amp and di spl a y turn on. If the [Language/ ] screen or [Date Adjustmen t] sc reen appears when you turn the camera on, follow the proc ed ure on p. 39 to set the di splay language and/ or current date and time. 2 Press[…]
-
Page 40: Ricoh RICOH WG-30W
38 1 Getti ng Started Us e th is fun c tio n wh en yo u w a nt to pl ay ba ck im a ge s str a ig hta way w it ho ut t ak in g any pi ct ur e . 1 Press an d hold down the Q button. Th e dis play turns on an d t he cam er a star ts up i n pla yb ack mod e. Starting -up in Pl ayback M o de • To s wit ch fr om p lay bac k mo de t o ca ptur e mod e, p[…]
-
Page 41: Ricoh RICOH WG-30W
39 1 Getti ng Started I nitial Set tin gs Th e [La ng ua ge / ] s cr ee n ap pe ars wh en th e ca m era i s t ur n ed o n f or the fi r s t ti me . Per fo rm the op er a tio n s in “S et tin g the Di sp la y La ng ua ge ” bel ow to se t the lang ua ge , a n d in “ Set tin g the D a te an d Tim e ” (p . 42 ) t o s et th e cu rr en t da te an[…]
-
Page 42: Ricoh RICOH WG-30W
40 1 Getti ng Started 3 Press the fou r-way c ont roll er ( 3 ). The fr ame mov es to [ W Hom e to wn ]. 4 Press t he four -way con troller ( 5 ). The [ W Hom e town ] s creen app ear s. 5 Use the four- way controll er ( 45 ) to choos e a ci ty. 6 Press t he four -way con troller ( 3 ). Th e fram e move s to [D ST ] (Day ligh t S avi ng Tim e) . 7 […]
-
Page 43: Ricoh RICOH WG-30W
41 1 Getti ng Started If you a cc ide nt ally se lec t th e w ron g la ngu age an d g o to t h e ne xt p roc ed ure , per f orm the fol lo wi ng opera tion to set the lan guage ba ck. Wh en the W ro ng La ngu ag e H a s Bee n I n a dve rte n tly Se l ect e d 1 Press the four-way cont roller ( 5 ). 2 Use the four — way control ler ( 234 5 ) to selec[…]
-
Page 44: Ricoh RICOH WG-30W
42 1 Getti ng Started Se t the cu r re nt da te an d tim e and the dis pl ay for mat . 1 Press t he four -way con troller ( 5 ). Th e fram e move s to [mm/ dd /yy ]. 2 Use the four- way controll er ( 23 ) to choos e the date a nd time di spl ay fo r m a t. Choose from [m m/d d/yy ], [dd/mm /yy ] or [ yy/ mm/dd]. 3 Press t he four -way con troller ([…]
-
Page 45: Ricoh RICOH WG-30W
43 1 Getti ng Started When the [Ini tial Sett ing ] or [D ate A djus t ment ] scr een i s dis play ed , you c an canc el t he s ettin g ope rat ion and s witc h to captu re mod e by pre ssi ng the 3 button. In this c ase, the [ I nitial Setting] s creen will ap p ear next time you turn th e camer a on. [La ngu ag e/ ], [Da te] , [T ime] , [Ho met o[…]
-
Page 46: Ricoh RICOH WG-30W
44 2 Common Operat ions Unde rstand ing t he Bu tton Funct ions 1 Power button Tu rn s the c amer a on an d of f (p. 37) . 2 Shutter rele ase button Focuses the camera on t he subject when pressed halfway in S till Picture Cap tu re Mod e (e xc ep t wh en the foc us m ode is set t o 3 , s , a nd ) (p.5 6). Takes a still pict ure when pressed down[…]
-
Page 47: Ricoh RICOH WG-30W
45 2 Common Operat ions 6 4 button Cha nge s t he infor m ati on on the di spl ay (p. 21 ). 7 3 butto n In S ti ll Pict ur e Ca ptur e M ode, [ A Rec . Mod e] me nu a ppe ars . In Mov ie M od e, [ C Mov ie] menu app ear s (p .49). 8 Movie but ton Starts movie recordin g in Still P icture Capture Mo de (p.101). 9 Green button Swit ches to 9 (Gre en […]
-
Page 48: Ricoh RICOH WG-30W
46 2 Common Operat ions 1 Power button Tu rn s the c amer a on an d of f (p. 37) . 2 Shutter rele ase button Swit ches to A mo d e (p.48). 3 f / y button In s ingle -i mag e dis play , press ing f s wit c hes to 6 -imag e di spl ay. Pr es sing f agai n s witc hes to 1 2- i mage d isp lay ( p. 112). P r ess y to r etu rn to t he pr evious dis pla y.[…]
-
Page 49: Ricoh RICOH WG-30W
47 2 Common Operat ions 5 Four-way cont roller ( 2 ) : Pl ays ba ck and pauses a mov ie (p. 11 1) . ( 3 ) : Di splay s the Pl a yback Mode Pa lette ( p.116). St ops a mov ie duri ng p lay bac k ( p. 111). ( 45 ) : D ispla ys the pr ev ious or next ima ge durin g s ingle -im ag e dis play (p.1 10) . Fa st-fo r wa r ds, fast-r e ver ses, fr ame fo r […]
-
Page 50: Ricoh RICOH WG-30W
48 2 Common Operat ions In t his ma nual , the capt ure m ode, suc h as fo r tak ing sti ll pi ctur es an d rec ordin g movi es, i s referr ed to as “ A mo de ” ( c apt u re mo de ) ( “ Stil l P ic tu re C ap t ure M o de ” re fers to t he mo de fo r ta king sti ll pi ctur es and “ Movi e Mode” r efe rs to th e mode for r ecordi ng movi[…]
-
Page 51: Ricoh RICOH WG-30W
49 2 Common Operat ions Se tti ng t he C am e ra Fu n ct ion s To c ha nge the c am era s e tting s, pres s the 3 button t o di spla y t he [ A Rec. Mode ] me nu o r [ W Se tting ] menu . Fun ctio ns for play ing ba ck and ed iting im ages can b e acces sed f rom t h e Pl ayba ck Mode Pa lett e. Th ere are t hre e ty pe s of me nu s : [ A Re c. Mo […]
-
Page 52: Ricoh RICOH WG-30W
50 2 Common Operat ions • Avail abl e bu tton and k ey oper at ions app ea r on the di spl a y duri ng menu operat ion . • The 3 bu t to n func tio n va ries dep end ing on the scree n. Refer to the guid e indic at ions . Exit Ex its th e menu and r et urn s to th e or igi nal s creen . Ret ur ns to the pre vio us scree n wi th th e cu rre nt s[…]
-
Page 53: Ricoh RICOH WG-30W
51 2 Common Operat ions Th e fol lo win g l is t s h ow s th e ite m s t ha t c an b e se t w i th th e m e nu s an d p ro vi de s des cr i pt ion s of ea ch i tem . See th e l is t o f d ef au lt se tti ng s in the A p pe nd ix “ De fa ul t Set tings ” (p .186 ) t o check whet her t he setti ngs are sav ed wh en th e ca mera is turne d o ff, a[…]
-
Page 54: Ricoh RICOH WG-30W
52 2 Common Operat ions * IQ En han cer = Ima ge Qu al it y Enha ncer Memory Fo r ch oosi ng wheth er t o sa ve the set va lues of the shoo tin g fu nc tion s or re tu rn to t he d ef ault s wh en t he came ra is tu rned off p.1 08 Gree n Bu tto n Fo r assi gni ng a funct ion to the Gr een but ton in A mode p.9 2 Sha rpn es s Fo r choos ing s ha rp[…]
-
Page 55: Ricoh RICOH WG-30W
53 2 Common Operat ions [ C Movi e] Men u [ W Setting ] Menu Item Desc rip ti o n Pa g e Reco rded Pi xel s Fo r ch oosi ng the num b er o f reco rd ed pix el s and th e frame ra te for m ovie s p.10 2 Movie SR Fo r c hoo sin g wh ethe r or not to u se th e Mov ie S ha ke Redu ct ion fun ct ion p.10 3 Wi nd Sup pre ss ion For su ppr es sin g wind n[…]
-
Page 56: Ricoh RICOH WG-30W
54 2 Common Operat ions Auto Power O ff For se tting t he ti me un til th e ca mera tu rns o ff automatically p.16 2 Qui ck Zoom F or cho os ing wh et her to u se th e Q uic k Zo om f un cti on (p. 12 0) w hen play ing ba ck image s p.16 2 Gui de Di spl ay F or s ettin g wh et her to displ a y expl a nati on s for sel ect ed ite ms in C ap tu re Mo[…]
-
Page 57: Ricoh RICOH WG-30W
55 3 Taking Pi ctures Tak in g St ill Pictu r es Th is ca m era ha s v ari ou s f u n cti on s and sh oo ti ng mo de s tha t su pp or t a wid e a r ra y of s cene s an d su bj ec ts . T hi s s e ct io n e xp la in s sh oo ti ng wit h th e d ef a ul t s et tin gs whe n sh ip pe d. 1 Press the power button. The camera turns on and is r eady to take s[…]
-
Page 58: Ricoh RICOH WG-30W
56 3 Taking Pi ctures Yo u ca n ch ange th e ca pture d ar ea by pre ssi ng the zoo m butto n (p .58). Rig ht ( T ) E nlar ges t he s ubj ect . Left ( W ) Wi den s the ar ea tha t is cap tu red by t he ca mer a. 3 Press t he shut ter r elease but t on halfway. Th e c am e ra e mi t s fo cu s a ss i st l ig h t in d ark sho ot ing s itu ati ons. Th […]
-
Page 59: Ricoh RICOH WG-30W
57 3 Taking Pi ctures The shu tter rele ase bu tton wor ks in a two -st ep acti on as f ollo ws. Pr ess h alfw ay This ref ers to pre ss ing the shu tte r rel ease butto n ge ntly t o th e firs t p ositi on . This lock s the f ocu s se t ti ng an d ex po sur e . Th e gr e en foc us fra me lig ht s o n th e di sp la y wh en the shut t er rele ase b […]
-
Page 60: Ricoh RICOH WG-30W
58 3 Taking Pi ctures Th e im ag e a pp ea rs on the dis pl ay te mp ora ril y (I ns ta nt R evi ew ) i mm e di ate ly aft er it i s capt ur ed. If the ca mera de tects t hat th e subj ect ’s eye s are cl osed wh ile Fac e De t ect ion (p .89) is acti vated, t he me ssage [Clos ed eye s have bee n detec ted] ap pe ar s f or 3 s e co nd s ( Bli nk[…]
-
Page 61: Ricoh RICOH WG-30W
59 3 Taking Pi ctures Th e zo om ba r is dis play ed as f ollow s. * 1 You ca n zo om in to a max imu m of 5x optic all y . *2 The Intelligent Zoom range v aries depending on the n umber of recorded pixe ls. S ee the f oll owi ng tab le . Re corde d pi xels an d the ma ximum zo om rat io (*) V can b e s e t o n ly when (Re por t) mo d e is set. Re […]
-
Page 62: Ricoh RICOH WG-30W
60 3 Taking Pi ctures The di gital zoom is set t o O (On) in t he d efaul t s ettin gs . To ta ke pic tur es us i ng only th e op ti cal z o om a nd Intel li gent Zo om, s e t th e di gi tal z oo m to P (O f f). 1 Press t he 3 but ton i n A mode. The [ A Re c. M ode ] me nu ap pea rs. 2 Use the four-way c ontroll er ( 23 ) to sele ct [Dig ital Z oo[…]
-
Page 63: Ricoh RICOH WG-30W
61 3 Taking Pi ctures Th is ca mer a ha s a var i et y o f s ho oti ng m od es th at l et you t ak e p ic tu r es o r rec or d movi es in di ffer ent sit uat ions si mply by ch oosin g the ri ght mode fo r the part icular situ ation fr om the Cap tu re Mo de Pa lette . 1 Press t he four -way con troller ( 3 ) in A mode. Th e Ca ptur e M ode Pale tt[…]
-
Page 64: Ricoh RICOH WG-30W
62 3 Taking Pi ctures Th e fol lo win g m o de s ca n be s ele ct ed f rom th e C apt u re M o de Pa le tte . Ite m De sc rip ti o n Page b Auto P ictur e Th e cam er a autom a tical ly sele cts the appr op ri ate s hoo tin g mode fro m th e fol lowin g fift e en m odes * When th e camer a det ects the pet’ s fa ce, th e shu tter is auto mati cal[…]
-
Page 65: Ricoh RICOH WG-30W
63 3 Taking Pi ctures * 9 (G reen) ( p. 65) m ode is ava ilabl e in a ddit ion t o the on es n ot ed abov e. c Port ra it F o r capt ur ing po rt rait s. R epr odu ce s a heal thy and br i gh t skin t one ⎯ Under wa te r For ca ptur i ng imag es unde rw ater p .9 8 U nde rwat er M ov ie Use thi s mo de f or t aki ng un der wate r mov ies p.98 Int[…]
-
Page 66: Ricoh RICOH WG-30W
64 3 Taking Pi ctures W h en the ca mera det ect s a pers on’ s f ac e in th e i mage, the Face De tec ti on fu nct i on d is pl ays a yel l ow f a ce det ect i o n f r ame ar ou nd t he fac e o n t he di spl ay s cre en, set s th e f ocus ( Face Det e cti on A F) and co mpens at es t he ex pos ur e (Fac e D et ect i o n AE). If the s ub ject in […]
-
Page 67: Ricoh RICOH WG-30W
65 3 Taking Pi ctures In 9 ( Gr ee n) mo d e, yo u ca n en joy eas y pic tur e -ta k ing wi th st anda r d se tti ng s, reg a rdl es s of the s et tin gs m a de fro m th e [ A Rec . Mode] me nu. The 9 m o de set t in gs ar e as sh o w n b el ow. 1 Press the Green but t on in A mod e. Th e ca mer a sw itc he s to 9 m o de. Pr es s the Gr een butto n[…]
-
Page 68: Ricoh RICOH WG-30W
66 3 Taking Pi ctures In e (Pet ) mode, t he camer a automat ical ly r el eases t he shut ter when the pet is det e cted. 1 Use the four- way cont rol l er ( 2345 ) to sel ec t e ( Pet ) fr om the Capture Mode Palette. 2 Press t he 4 but ton. The e m ode is sele cted and the came ra re t urn s to ca pt ure mode. When the camera de tects t he pet’[…]
-
Page 69: Ricoh RICOH WG-30W
67 3 Taking Pi ctures In thi s m od e, a se t nu m be r of pi c ture s ca n be tak e n au to ma t i ca ll y at a se t in te r va l from a set tim e. 1 Use the four- way cont rol l er ( 2345 ) to sel ec t (In te r val Shot) f rom th e Capture M ode Pal ette. 2 Press t he 4 but ton. Th e cu rrent int erv al s hot sett ing s ap pea r for ap pro xim a […]
-
Page 70: Ricoh RICOH WG-30W
68 3 Taking Pi ctures 7 Press t he four -way con troller ( 3 ). The fr ame mov e s to [Start Delay] . 8 Set the start del ay. 1 Press t he fou r-way controll er ( 5 ). 2 Use t he f our- way co ntroll er ( 23 ) to s et t he hour s, th en pre ss the f our- way con trol ler ( 5 ). 3 Use t h e f our -wa y cont rol ler ( 23 ) to s et the minu te s, the […]
-
Page 71: Ricoh RICOH WG-30W
69 3 Taking Pi ctures 2 Use the four- way cont rol l er ( 45 ) to sel e ct g and press the four-way controll er ( 3 ). 3 Use the four — way contr ol ler ( 45 ) to select g or Z and press the 4 button . Th e ca mer a is re ady to tak e a pic ture usin g the self-timer. Whe n t he c ame ra det ect s a per son’ s fa ce , the Face Det ect ion f unc t[…]
-
Page 72: Ricoh RICOH WG-30W
70 3 Taking Pi ctures Pi ctures are tak en con tin uousl y as lo ng as t he shu tte r re leas e butto n is pre ssed. * The numb er of ima ges that c an be shot co nt inuo usl y and the int erv al b etwe en sh ots depe nd on sho ot ing situ ations . 1 Press t he four -way con troller ( 2 ) in A mode. Th e [Dri ve M od e] sc ree n ap pea rs . 2 Use t[…]
-
Page 73: Ricoh RICOH WG-30W
71 3 Taking Pi ctures You can us e a re mote con trol unit (op t ion al) to take pict ures w hile yo u are aw ay from th e came ra. 1 Press t he four -way con troller ( 2 ) in A mode. Th e [Dri ve M od e] sc ree n ap pea rs . 2 Use the four- way cont rol l er ( 45 ) to sel e ct i a nd press the four-way controll er ( 3 ). 3 Use the four — way contr[…]
-
Page 74: Ricoh RICOH WG-30W
72 3 Taking Pi ctures Pres s th e s hutt e r rele as e b utt on on ce t o au tom ati cal ly a dju st t he e xp osu r e an d ta ke thr ee pi ctu res in succ essi on. A fter ta kin g th e pic tur es , you can s ele ct the best shot fro m them . The sho oting or der i s as foll ows : t he prop er e xposu re → – 1 .0 EV → +1.0 EV. 1 Press t he fo[…]
-
Page 75: Ricoh RICOH WG-30W
73 3 Taking Pi ctures Se tti ng t he S ho o tin g Fu nc ti on s Se tti ng s f or sh oo ti ng are m o st l y se t f rom t he [ A Rec. M o de] m e nu. R e fer to exp lana tio ns for e ach fu nctio n on how t o ma ke thes e sett in gs . 1 Press t he 3 but ton i n Still Pi cture Capt ure Mode. The [ A Re c. M ode ] me nu ap pea rs. Pr es sing th e 3 bu[…]
-
Page 76: Ricoh RICOH WG-30W
74 3 Taking Pi ctures 1 Press the f our-way cont roll er ( 4 ) in A mode. Th e [F lash Mode ] scr een appe ars . Th e fla sh m o de cha nge s ea ch tim e the but to n is pr esse d. You c an als o cha nge th e set ti ng us ing the four- way cont roll e r ( 23 ). The 3 but ton f unc ti on vari e s depen di ng on the s cr een . Ref er to th e gui de i[…]
-
Page 77: Ricoh RICOH WG-30W
75 3 Taking Pi ctures 2 Press t he 4 but ton. Th e se tting is sa ve d and the came ra ret urn s to ca pt ur e mode . Abo ut th e red- eye phe nomen on Ta kin g pic tu res us ing t he fl as h may cause the sub jec t’s eye s to ap pea r red in the res ult ing pi ctu re . This phen ome non occ ur s when t he li ght fr om th e fla sh is refl ecte d […]
-
Page 78: Ricoh RICOH WG-30W
76 3 Taking Pi ctures 1 Press the four-way contr oller ( 5 ) in A mode. Th e [F ocus Mo de] sc re en ap pea rs. Th e focu s mod e ch an ges eac h t ime th e but ton is pres sed. Y ou c an als o ch ang e t he set ti ng u sing the f our -w ay contr oller ( 23 ). 2 Press t he 4 but ton. Th e se tting is sa ve d and the came ra ret urn s to ca pt ur e […]
-
Page 79: Ricoh RICOH WG-30W
77 3 Taking Pi ctures 5 Press t he 4 but ton. Th e focu s is lock ed and the c am era re tu rns to cap tu re mo de. Af ter t he f ocus is lo cked , y ou can pr es s the fou r-w ay co nt roll e r ( 5 ) a gai n t o dis pla y th e indi cat or a nd r ead ju st t he fo cu s. Yo u c a n ch an ge th e a u tof oc us a rea ( F oc usin g A rea ). 1 Use the[…]
-
Page 80: Ricoh RICOH WG-30W
78 3 Taking Pi ctures When [A uto Mac ro ] is set t o O (O n) , th e focu s is ad ju sted to th e mac ro r an ge (dis tan ce to th e sub je ct is 10 cm to 60 cm ) as nec ess ary , eve n if th e focu s mod e is s et to = (S tandard). When it is off and the f ocus mode is set to = ( Standar d), the A F op erat es onl y in the sta ndard r ange , and f[…]
-
Page 81: Ricoh RICOH WG-30W
79 3 Taking Pi ctures For setti ng the t one of im ages. You c an s e lect fro m [Brigh t], [Nat ura l] , or [M on och rome ]. The de fault se tt ing i s [Bri ght]. 1 Use the four — way contro ller ( 23 ) to select [ Image Tone] i n the [ A Rec. Mode] menu. 2 Press t he four -way con troller ( 5 ). A pu ll- do wn men u ap pea rs . 3 Use the four- w[…]
-
Page 82: Ricoh RICOH WG-30W
80 3 Taking Pi ctures You can ch oose th e numb er o f re cord ed pi xels fo r st ill pic ture s. The larger the number of recorded pixels, the clearer the details will appear when you print y our picture. As the quality o f the printed pictur e also depends on the image quality, exposure control, r esolution of the pr inter, and other f actors, yo[…]
-
Page 83: Ricoh RICOH WG-30W
81 3 Taking Pi ctures 1 Use the four-way con troller ( 23 ) to select [Recorde d Pixel s] in th e [ A Rec. Mode] menu. 2 Press t he four -way con troller ( 5 ). A pu ll- do wn men u ap pea rs . 3 Use the four- way cont rol l er ( 23 ) to c hange the numbe r of recorded pi xels. 4 Press t he 4 but ton. Th e se tt ing is sa ve d. Se le ct th e qu al […]
-
Page 84: Ricoh RICOH WG-30W
82 3 Taking Pi ctures Yo u c an ta ke p ic tur es in na tu ral co lo r s by a dju s tin g t he w hi te ba la nc e a c co rdi ng to th e l ig ht c on dit ions a t th e time of s hooti ng . 1 Use the f our-way c ontroller ( 23 ) to sel ect [Whit e Balance] i n the [ A Rec. Mode ] m enu. 2 Press t he four -way con troller ( 5 ). Th e [Whi te B alan ce[…]
-
Page 85: Ricoh RICOH WG-30W
83 3 Taking Pi ctures 4 Press t he 4 but ton. Th e se tt ing is sa ve d. Refe r to the followin g instr uctions if yo u wan t to se t the w h it e bal ance by sel ect ing t he fl uores c ent l ight type , or a dj ust it manu all y. Sel ect the pr ope r fl uoresc ent l ight ty pe fr om J D (Daylight Co lors Fl uorescen t), J N (D ay ligh t Whi te F […]
-
Page 86: Ricoh RICOH WG-30W
84 3 Taking Pi ctures 4 Press t he 4 but ton. Th e se tting is sa ve d and the sc ree n re turns to the [ A Rec. Mode ] menu. Yo u c a n se t t h e ar e a of the s cr ee n wh er e t he br ightn es s is m et ere d to de ter mi ne th e e x po su re. 1 Use the four- way cont rol l er ( 23 ) to sel e ct [ AE Me t erin g ] in the [ A Rec. Mode ] m enu. […]
-
Page 87: Ricoh RICOH WG-30W
85 3 Taking Pi ctures Yo u c a n se lec t the s en s iti vi ty to s ui t th e bri gh tne s s of the s urr ou nd in gs . 1 Use the fou r-way control l er ( 23 ) to sel ect [Sensit ivity] i n the [ A Rec. Mode] menu. 2 Press t he four -way con troller ( 5 ). A pu ll- do wn men u ap pea rs . 3 Use the four- way cont rol l er ( 23 ) to c hange the sens[…]
-
Page 88: Ricoh RICOH WG-30W
86 3 Taking Pi ctures Set the sen sitiv it y range w hen th e sensit ivit y is set t o AUTO. The sensitivity can b e set to 125 -200, 12 5-400, 125 -800, 12 5-1600, 125- 3200, 125- 6400 . 1 Use the four — way contr ol ler ( 23 ) to select [AUTO ISO Range] in th e [ A Rec. Mode] menu. 2 Press t he four -way con troller ( 5 ). A pu ll- do wn men u ap[…]
-
Page 89: Ricoh RICOH WG-30W
87 3 Taking Pi ctures Ex pa nd s th e d y na mi c r an ge a nd pr ev en ts br igh t an d d ar k ar e as f ro m oc c urri ng . [H ighl igh t Corre ctio n] adju sts the br ight ar eas when the im age is too br igh t and [Sh ad ow C orr ectio n] ad ju s ts th e d ar k a re as wh en th e i m ag e i s to o d ark . 1 Use the four-way contro ller ( 23 ) t[…]
-
Page 90: Ricoh RICOH WG-30W
88 3 Taking Pi ctures You c a n se t th is fu nc tion to corr ect fo r ca me ra shak e w hen ta ki ng s til l sho ts . I f Pi xel Tra ck SR is set to O (On), t he ca mera au tomati cally co rrects for ca mera sha ke in th e im ag es y o u sh ot . Th e de fau lt se tt ing i s P (Off ). 1 Use the four-way contro ller ( 23 ) to select [Pixel Track SR][…]
-
Page 91: Ricoh RICOH WG-30W
89 3 Taking Pi ctures The Fa c e De tecti on func tio n loc ate s fac es in th e fra me an d autom at ical ly ad ju st s the focus an d expo sure fo r th ose face s. You ca n chan ge th e setti ng of th e fun cti on so that the c amer a will autom ati call y relea se th e shutt er whe n one or more o f th e subj ects s m ile. T he d efa ult s et ti[…]
-
Page 92: Ricoh RICOH WG-30W
90 3 Taking Pi ctures The LED Macro Ligh t s ar ound th e lens blink w hen the came ra det ects peo ple’ s faces in (Self-portrait Assist) or J (Self -portrait Assist + Smile Ca pture ) mod e. T he po si ti on of t he bli nk in g L ED M ac ro Li gh t in di ca te s w h er e th e d et e ct e d face is on th e sc ree n. Th e po si tio n (ar e a) of […]
-
Page 93: Ricoh RICOH WG-30W
91 3 Taking Pi ctures Thi s spec ifies w h et her Bl ink Det ectio n work s when yo u use t he Fac e Dete ction fu nct io n. Th e de fa ult s ett in g i s O (On). 1 Use the four — way contr ol ler ( 23 ) to sel ect [Bl ink Detec t ion] in the [ A Rec. Mode ] m enu. 2 Use the four-way c ontroll er ( 45 ) to swit ch b etwe en O (O n) o r P (O ff). O […]
-
Page 94: Ricoh RICOH WG-30W
92 3 Taking Pi ctures 2 Use the four- way cont rol l er ( 45 ) to s w itch b etween O (O n) or P (Off ). O (O n) In st an t R e vie w is di spl a ye d . P (Of f) Ins ta nt Rev iew is not di spl ayed . Th e se tt ing is sa ve d. Yo u c a n a ssi gn o ne of t h e fol lo win g fun c tio ns to t he G ree n bu tt o n: [G re en M od e] (p. 65 ) o r [F n […]
-
Page 95: Ricoh RICOH WG-30W
93 3 Taking Pi ctures Yo u c a n a ssi gn f re qu en tl y u s ed fu nc ti on s on th e f ou r- wa y c o ntro ll er. Us in g t hi s fun cti on, yo u can di rect ly set the f unctio ns by pr essi ng th e four -way c ontr oller wit ho ut di sp la yi ng t h e me nu i n c a ptu re m od e. In [ Fn Set ting] , Sti ll P ictur e Capt ure Mod e and M ovie Mo[…]
-
Page 96: Ricoh RICOH WG-30W
94 3 Taking Pi ctures The de fault se tt ings fo r e ach mode It ems that can be assig ned to each key * The menu it em to be di spla yed ch ange s depe nding on the [ Imag e Tone ] sele cted in t he [ A Re c. M od e] me n u. Wh en you ha ve s elec te d ei ther [B rig ht] or [Nat u ral ], [S a tura ti on ] is disp la ye d, and w he n [M on ochr o m[…]
-
Page 97: Ricoh RICOH WG-30W
95 3 Taking Pi ctures Yo u c a n g ive an im a ge s ha rp or so ft o u tli ne s. 1 Use the four-way cont roller ( 23 ) to s elec t [Shar pness ] in the [ A Rec. Mode] menu. 2 Use the four- way cont rol l er ( 45 ) to c hange the sharpne ss lev el. F Soft G No rmal H Shar p You can set ei the r col or bri ghtne ss (Sat urati on) or the t one of mo n[…]
-
Page 98: Ricoh RICOH WG-30W
96 3 Taking Pi ctures For setti ng the i mage co ntras t lev el. 1 Use the four- way cont rol l er ( 23 ) t o s elect [Con trast] in the [ A Rec. Mode] menu. 2 Use the four- way cont rol l er ( 45 ) to c hange the contr ast lev el. F Low G No rmal H Hig h You can c hoose w h et her to impr int the d ate and/or time w hen t aking still pictu res. 1 […]
-
Page 99: Ricoh RICOH WG-30W
97 3 Taking Pi ctures Yo u c an tak e pict u res wit h c le ar e r de tai ls by us ing i ma ge pr o ces si ng w ith th e IQ En ha nc er te ch ni qu e. 1 Use the four- way cont rol l er ( 23 ) t o s elec t [I Q Enh ancer ] in the [ A Rec. Mode ] m enu. 2 Use the four- way cont rol l er ( 45 ) to sel e ct O (On) / P (Off ). O (On) The IQ Enha nc er f[…]
-
Page 100: Ricoh RICOH WG-30W
98 3 Taking Pi ctures Un d er wa ter Sh oo ti ng Th is cam e r a co mp li es w i th JI S wa ter p ro of gra de 8 an d ca n be u se d t o tak e pic tur es at a de pth of 12 m eters cont inuo usly for 2 hour s . In add itio n, th is ca mera comp lies wit h JIS dus tproo f grad e 6 (IP 68). 1 Use the four- way cont rol l er ( 2345 ) to sel ec t (Under[…]
-
Page 101: Ricoh RICOH WG-30W
99 3 Taking Pi ctures Alth oug h t he c am era i s desi g ned t o b e w ater pr oof a nd dust pro of, av oid us ing the ca mer a und er t he fol low ing con dit ions . It may mom e ntaril y be subj e cted to wat er pre ss ur e beyon d th at cover ed in t he gu ar antee and w at er may enter the i nter ior of th e cam era . • J ump ing i nto the w[…]
-
Page 102: Ricoh RICOH WG-30W
100 3 Taking Pi ctures Re co rdin g Movi es Th is mod e en ab le s yo u t o rec ord m o vi es . S ou n d is r e co rd ed at t h e sa me t ime. 1 Use the four- way cont rol l er ( 2345 ) to sel ec t C (M o vie ) from the Capture Mode Palet te. 2 Press t he 4 but ton. The C (Movie) mode is selec ted and the camer a retur n s to captur e mode. Th e fo[…]
-
Page 103: Ricoh RICOH WG-30W
101 3 Taking Pi ctures If yo u ke ep th e sh ut ter rel ea s e b ut ton p r ess ed fo r m ore t ha n o ne s ec o nd , re cordin g will cont inue as long as you k eep th e but ton pr essed . Sh ooting st ops whe n yo u ta ke y ou r f i ng er off th e s h utt er rel ea se b utt on . Thi s camera start s/stop s movi e rec ordin g simply by pr essing t[…]
-
Page 104: Ricoh RICOH WG-30W
102 3 Taking Pi ctures 2 Press t he Movie button ag ain. Reco rding sto ps. Yo u c an ch oo s e th e n um b er o f r e co rde d pix e ls an d fr a me r a te se tt i ng s f or m o vi es . The more pi xels th ere a re, t he clear er th e detai ls an d the bi gger the file si ze. The more fra m es p er se cond , t he b ett er t he qua lit y of the m o[…]
-
Page 105: Ricoh RICOH WG-30W
103 3 Taking Pi ctures 3 Use the four — way contr ol ler ( 23 ) to change the number of recorded pixel s and f rame ra te. 4 Press t he 4 but ton. Th e se tt ing is sa ve d. In C (M ovie) and ( Un de rw at er M ov ie ) mo de s, you ca n co rrec t c am er a sh ake whi le y ou a re r e co rd in g a m o vi e wi th th e M o vi e S R (M o vi e S hake R […]
-
Page 106: Ricoh RICOH WG-30W
104 3 Taking Pi ctures You can redu ce win d nois es duri ng movi e re cordin g. Th e de fau lt se tt ing i s P (O ff). 1 Use the four- way cont rol l er ( 23 ) to sel e ct [Win d Suppressi on] in the [ C Movi e] menu. 2 Use the four — way contr ol ler ( 45 ) to select O (On)/ P ( O ff). O (O n) Sup pre ss es w i nd n oi s es. P (O ff) D oes not su[…]
-
Page 107: Ricoh RICOH WG-30W
105 3 Taking Pi ctures 4 Set th e int erva l . 1 Press t he four- way con troll er ( 5 ). A pu ll- do wn men u ap pea rs . 2 Use the four -way cont rolle r ( 23 ) to set the interv al, then press the 4 but ton . The fr ame retu rns to [Inter val]. 5 Press t he four -way con troller ( 3 ). The fra me mov es t o [ Tot al Ti me]. 6 Set th e to ta l ti[…]
-
Page 108: Ricoh RICOH WG-30W
106 3 Taking Pi ctures • Conf irm that th e batter y is suffi ciently charg ed befo re start ing inter val movie rec ordi ng . If the ba tter y is not suff icie nt ly char ged , it may be com e depl eted dur i ng int erva l mov ie re co rdin g a nd c ause re cor din g o f the m ovi e to s t op . • For int er val movie rec ord ing, the fo ll ow […]
-
Page 109: Ricoh RICOH WG-30W
107 3 Taking Pi ctures Th e ca me ra re co r ds a h igh s pe ed m o vi e f or s l ow m o tio n pl ay ba ck . 1 Use the four- way cont rol l er ( 2345 ) to sel ec t (H igh Speed Movie) fr om the Capture Mode Pale t te. 2 Press t he 4 but ton. Th e cam er a retur ns to capt ur e mod e. 3 Press the shut t er rel ease button fully. Rec ord in g s ta r […]
-
Page 110: Ricoh RICOH WG-30W
108 3 Taking Pi ctures Sa vin g th e Setti ng s (M em or y ) The M emo ry fu n ction is for sav i ng the cur rent c am er a sett in gs w hen th e cam e ra is tu rn ed of f. For so me ca mera settings, the M em ory fun ct ion is alw ays s et to O ( On) ( t he s e t t i n g s a r e sav ed w he n the cam era is tur ned off) , wh ile f or oth er s yo u[…]
-
Page 111: Ricoh RICOH WG-30W
109 3 Taking Pi ctures 1 Use the four- way cont rol l er ( 23 ) t o s elec t [M emor y] in the [ A Rec. Mode] menu. 2 Press t he four -way con troller ( 5 ). Th e [M emor y] sc re en ap pea rs . 3 Use the four- way controll er ( 23 ) to choos e an i tem. 4 Use the four-w ay controller ( 45 ) to se l ect O (O n) or P (Off). MENU Memory Face Detectio[…]
-
Page 112: Ricoh RICOH WG-30W
110 4 Playin g Back an d Deleting Images Pl ayi ng Ba ck Im ages 1 Press the Q button af ter taki ng a pictur e. The ca mera enters Q mode a nd the image appears on t he display. Displ a ying o ne imag e in full in Q m ode (d efault s etti ng) is calle d single-i mage disp l ay . 2 Press t he four -way con troller ( 45 ). Th e pr evio us or ne xt i[…]
-
Page 113: Ricoh RICOH WG-30W
111 4 Playin g Back an d Deleting Images You can pl ay bac k the mo vies you hav e take n. The so und i s pl ayed bac k at the same time. 1 Enter Q mode and use the four- way controller ( 45 ) to choose the movie you want to play bac k. 2 Press t he four -way con troller ( 2 ). Play ba ck st ar ts. The fol lowing operati ons can be perform ed dur i[…]
-
Page 114: Ricoh RICOH WG-30W
112 4 Playin g Back an d Deleting Images You can di spla y 6 or 1 2 thum bnai ls of c aptu red ima ges at a tim e. 1 Press t he f b ut ton in Q mode. Th e 6- image di spl ay app ear s s ho wing a pag e cons ist ing of 6 thum bnai l im ag es. Pr es sing th e f bu tton a ga in ch ang es i t to a 1 2-im a ge dis pla y. A pa ge c onsi sting of 6 or 12 […]
-
Page 115: Ricoh RICOH WG-30W
113 4 Playin g Back an d Deleting Images Th e ico ns tha t ap pe ar on the ima ges indic at e the f ollow ing : Pr es s the 4 bu tton to swi tch to si ngle -imag e di spl ay of the sele cted ima ge. Pr es s the Q butto n to switc h to A m ode . Pr es s the f bu tton in 12-ima ge di splay to switc h to fol der or c alen dar d ispl ay. Pr es s the Gr[…]
-
Page 116: Ricoh RICOH WG-30W
114 4 Playin g Back an d Deleting Images Ca lenda r d isp lay St or ed imag es are dis pla ye d by dat e in cal e nda r form a t. Th e fir st im age captu re d on a da te is di sp lay ed for t hat dat e on th e cal end ar. Use th e f our-w ay c ont rol ler ( 23 45 ) to mo v e the f ra me. If you se lec t a date a nd p res s the y butt on, the ima g[…]
-
Page 117: Ricoh RICOH WG-30W
115 4 Playin g Back an d Deleting Images • Wh en th e fram e i s pl aced ov er an ic on on the P la ybac k Mo de Pale tt e, the guid e of tha t func t ion ap pea rs . • You c an set t he gu i de of t he func tio n n ot to dis play o n t he Play bac k Mod e P alett e (p.163) . OK MENU 1/2 OK MENU Image Rotation 1/2 Slideshow 10 10 0 — 003 003 8 […]
-
Page 118: Ricoh RICOH WG-30W
116 4 Playin g Back an d Deleting Images Pl ayback Mod e Pal ette P layba ck Mo de De scrip tion Page u Sl id esho w F o r cont inuo us ly play ing bac k im ag es. S creen or soun d ef fect s c an b e se t p.117 s Im ag e Ro tatio n Rot at es cap tu red ima ge s. Us eful when v ie win g vert ic al i mage s on a TV p. 119 k Small Face Filter Redu ce[…]
-
Page 119: Ricoh RICOH WG-30W
117 4 Playin g Back an d Deleting Images Yo u c a n pl ay ba ck re c ord ed s til l p ic tu r es a nd m ov i es on e af ter an ot he r . 1 Enter Q mode and use the four- way controller ( 45 ) to choose the image to start the slide show w ith. 2 Use the four- way cont rol l er ( 2345 ) to sel ec t u (Sli deshow) f rom th e Playba ck Mode Pal ette . […]
-
Page 120: Ricoh RICOH WG-30W
118 4 Playin g Back an d Deleting Images 3 Use the four- way cont rol l er ( 23 ) to c hange [Int erval] an d press t he 4 but ton. Choose from [ 3sec.], [5sec. ], [10s e c.], [20se c .] o r [30sec .]. 4 Use the four- way cont rol l er ( 23 ) to sel e ct [Scr e en Eff ec t]. Af ter s elec t ing [ Scre en Ef fe ct] , pres s the f our -w ay con tr ol[…]
-
Page 121: Ricoh RICOH WG-30W
119 4 Playin g Back an d Deleting Images 1 Press t he Q but ton after taki ng a pi ctur e. Th e image app ear s on the disp lay . 2 Use the four- way cont rol l er ( 2345 ) to sel ec t s (Ima ge Rotation) fr om the Playback Mode Pal et te. 3 Press t he 4 but ton. Th e ro ta tio n sel ecti on scree n (0 °, Righ t 90 °, Lef t 90°, or 180° ) ap pe[…]
-
Page 122: Ricoh RICOH WG-30W
120 4 Playin g Back an d Deleting Images Yo u c a n ma gn ify a n im ag e up to te n t im es . 1 Enter Q mode and use the four- way controller ( 45 ) to choose the image you want to magn i fy. 2 Press t he y button. Th e im a ge is mag nif ied (x 1. 1 to x 10 ). Ho lding dow n t he y b utt on con tin uou sly ma gnif ies the i mage . W ith [ Qu i ck[…]
-
Page 123: Ricoh RICOH WG-30W
121 4 Playin g Back an d Deleting Images Delet in g Imag es Delet e i mag es th at y ou do n ot w ant t o k eep . Yo u c a n del et e a s in gl e i m ag e. 1 Enter Q mode and use the four- way controller ( 45 ) to choose the image you want to delet e . 2 Press t he i but ton. A co nfi rma tio n sc re en ap pea rs. 3 Use the four- way controll er ( […]
-
Page 124: Ricoh RICOH WG-30W
122 4 Playin g Back an d Deleting Images Yo u c a n d el et e m ult i pl e i mag es s el ec te d f rom th e 6- or 1 2 -im ag e dis p la y a t on ce . 1 Press t he f button once or twi ce i n Q mode . 6-i mag e di spl ay or 12 -i mag e dis play app ear s. 2 Press t he i but ton. P appear s o n th e image s. 3 Use the four- way cont rol l er ( 2345 )[…]
-
Page 125: Ricoh RICOH WG-30W
123 4 Playin g Back an d Deleting Images De letes al l the im ages a t once . 1 Press t he 3 but ton i n Q mode. The [ W Set tin g] m enu appe ars. Whe n yo u pre ss the 3 bu tton in A mode, pr ess t he fou r-w ay con trol ler ( 5 ) once or t wic e. 2 Use the four — way contr ol ler ( 23 ) to select [Delete All] . 3 Press t he four -way con troller[…]
-
Page 126: Ricoh RICOH WG-30W
124 4 Playin g Back an d Deleting Images Yo u c a n pr o tec t s to re d i ma g es fro m be in g ac ci de nt al ly de le t ed. 1 Enter Q mode and use the four- way controller ( 45 ) to choose the image you want to prot ect. 2 Use the four- way cont rol l er ( 2345 ) to sel ec t Z (Pr o tec t) from the Playb ack Mode Palette . 3 Press t he 4 but ton[…]
-
Page 127: Ricoh RICOH WG-30W
125 4 Playin g Back an d Deleting Images 1 Select [ All Images] i n step 4 on p.124. 2 Press t he 4 but ton. 3 Use the four- way controll er ( 2 ) to select [ Protect ]. 4 Press t he 4 but ton. All the i mage s ar e pr otec ted and the scree n sh ow n in st ep 1 reappe ars . 5 Use the f our-way control ler ( 23 ) t o select [ Cancel] and press the […]
-
Page 128: Ricoh RICOH WG-30W
126 4 Playin g Back an d Deleting Images Con necting the Camera to a n AV Device Yo u c a n co nn ec t t he c am era to a TV or ot he r de v ic e with a n H DM l te r mina l an d play ba c k im ag es. Us e a c om mer ciall y av ail ab le HD MI ca bl e to co nn ec t th e c am e ra to a de v ic e w it h an HD MI term i nal. • The po we r lam p on t[…]
-
Page 129: Ricoh RICOH WG-30W
127 4 Playin g Back an d Deleting Images 1 Turn the AV device and camer a off. 2 Open the term inal cover . Mo ve the t er mi nal c over l ock l ever i n the di re ction sh own by 1 , sli d e th e cover in the d i rect ion s how n by 2 and open th e co ver in the di re ction sho wn by 3 . 3 Connect the HDMI cable to the HDMI termi nal. 4 Connect t […]
-
Page 130: Ricoh RICOH WG-30W
128 5 Editing and Pri nt ing Ed iti ng Im a ges By ch angi ng the r ecord ed pix els and qu ali ty le vel of a sele cted image , you can mak e the fil e si ze sm alle r tha n the orig inal . You can us e this func tion to co ntinu e taki ng pic tu res w he n the S D Me mo ry Ca rd or th e buil t-in me mory i s full , b y mak in g th e i mag es s ma[…]
-
Page 131: Ricoh RICOH WG-30W
129 5 Editing and Pri nt ing You can de lete t he un want ed p art of a pi ctu re an d save t he c ropp ed im age as a sep ar a te im age. 1 Enter Q mode and use the four- way controller ( 45 ) to choose the image you want to crop. 2 Use the four- w ay controll er ( 23 45 ) to s ele ct o (Cr opping) from the Playb ack Mode Palette . 3 Press t he 4 […]
-
Page 132: Ricoh RICOH WG-30W
130 5 Editing and Pri nt ing Im ag es ar e pr oces s ed to r e du ce th e si ze o f pe op le ’s fac e s d ete c ted w it h th e Fa c e De t ect ion fun cti on (p.8 9) when t akin g pictu res so th at they lo ok smal ler. 1 Enter Q mode and use the four- way controller ( 45 ) to choose the image you want to edit . 2 Use the four- way control l er […]
-
Page 133: Ricoh RICOH WG-30W
131 5 Editing and Pri nt ing Th is mode le t s yo u chan ge th e co lo r tone s and pe rf o rm sp ec ia l pro ce s si ng on a sel ecte d imag e. 1 Enter Q mode and use the four- way controller ( 45 ) to choose the image you want to edit . 2 Use the four- way cont rol l er ( 2345 ) to sel ec t P (Di gital Filter) from the Playback Mode Palette. You […]
-
Page 134: Ricoh RICOH WG-30W
132 5 Editing and Pri nt ing 3 Press t he 4 but ton. Th e digit al f il ter se lec tio n sc re en ap pears . 1 B&W/Se pia 2 Toy Camera 3 Ret ro 4 Col or 5 Extra ct C o lor 6 Col or Emph as is 7 Hi gh Co ntra st 8 Star b urst 9 Soft 10 Fish-eye 11 Brig ht nes s 12 Mi ni atur e 4 Use the four- way cont rol l er ( 23 ) to c hoose the digi tal f il[…]
-
Page 135: Ricoh RICOH WG-30W
133 5 Editing and Pri nt ing 7 Use the four- way cont rol l er ( 23 ) t o s elect [Ove rwrite ] or [Save as ]. 8 Press t he 4 but ton. The ima ge pr oces sed wit h th e filte r is sa ved. Adj ust s part s of the image t hat are to o brigh t or to o dark and pr oce sses im ages to simulate an HDR effe ct. 1 Enter Q mode and use the four- way control[…]
-
Page 136: Ricoh RICOH WG-30W
134 5 Editing and Pri nt ing 2 Use the four- way cont rol l er ( 2345 ) to sel ec t (I n k Rubbing Filter ) from the Pla yback Mode Palett e. 3 Press t he 4 but ton. Th e pr evie w im ag e of the res ult of the filt er eff ec t ap pears . 4 Use the four — way contr ol ler ( 45 ) to choose the effect . Yo u ca n adju st th e effe ct i n five l evel […]
-
Page 137: Ricoh RICOH WG-30W
135 5 Editing and Pri nt ing 2 Press t he 4 but ton. Th e ite m s ele cti on sc ree n app ear s. 3 Use the four- way cont rol l er ( 23 ) to c hoose the [Recor ded Pixels]. 4 Press t he four -way con troller ( 5 ). A pu ll- do wn men u ap pea rs . 5 Use the four — way contr ol ler ( 23 ) to choose the rec or ded pixel s. Yo u ca n choos e f rom h o[…]
-
Page 138: Ricoh RICOH WG-30W
136 5 Editing and Pri nt ing 11 Use the four- way cont rol l er ( 23 ) to c hoose [Ba ckgnd.]. 12 Press t he four -way con troller ( 5 ). A pu ll- do wn men u ap pea rs . 13 Use the four — way contr ol ler ( 23 ) to choose the backg round. Yo u ca n choos e t he w hite backg ro und or the b lac k ba ckgr oun d. 14 Press t he 4 but ton. Ret ur ns to[…]
-
Page 139: Ricoh RICOH WG-30W
137 5 Editing and Pri nt ing 19 Press t he 9 but ton. Ret ur ns to the it em se lec tio n scre en. 20 Use the four — way contr ol ler ( 23 ) to select [Create an image ]. 21 Press t he 4 but ton. A co nfi rma tio n dial og for sa ving th e im age appe ars. 22 Use the four- way cont rol l er ( 2 ) to select [Save]. 23 Press t he 4 but ton. The edi t[…]
-
Page 140: Ricoh RICOH WG-30W
138 5 Editing and Pri nt ing A co nfi rma tio n dial og for ov erw rit ing the ima ge ap pea rs. If the s ele ct ed imag e i s pro t ecte d, the p roc es sed i ma ge is s aved as a n ew image and the conf irm ati on d ial og d oes not appea r. 4 Use the four- way cont rol l er ( 23 ) t o s elect [Ove rwrite ] or [Save as ]. 5 Press t he 4 but ton. […]
-
Page 141: Ricoh RICOH WG-30W
139 5 Editing and Pri nt ing 1 Enter Q mode and use the four- way controller ( 45 ) to choose the image to which you want to add a frame. 2 Use the four- way cont rol l er ( 2345 ) to sel ec t E (Ori ginal Frame) f rom the Playback Mode Palet te. 3 Press t he 4 but ton. Th e or igina l fra me ty pe sele cting s cr een app ear s. 4 Use the four — wa[…]
-
Page 142: Ricoh RICOH WG-30W
140 5 Editing and Pri nt ing 11 Press t he 4 but ton. A co nfi rma tio n dial og for ov erw rit ing the ima ge ap pea rs. If the s ele ct ed imag e i s pro t ecte d, the p roc es sed i ma ge is s aved as a n ew image and the conf irm ati on d ial og d oes not appea r. 12 Use the four- way cont rol l er ( 23 ) t o s elect [Ove rwrite ] or [Save as ][…]
-
Page 143: Ricoh RICOH WG-30W
141 5 Editing and Pri nt ing 1 Use the four- way cont rol l er ( 2345 ) to select a character and press the 4 but t on. Th e se lec ted ch ara cter is i npu t. Up t o 52 c har acte rs can be i npu t. 2 Use the four- way cont rol l er ( 2345 ) t o se le ct [Fini sh] a n d press t he 4 but ton. 3 Use the four — way contr ol ler ( 23 ) to sel ect [Dis[…]
-
Page 144: Ricoh RICOH WG-30W
142 5 Editing and Pri nt ing 1 Press the Green but t on . Th e pr evie w scr een appe ar s. 2 Press t he 3 but ton. Th e scre en ret urn s to th e or iginal s creen . 3 Press t he 4 but ton. Pr oc eed to ste p 11 on p. 140 . Yo u ca n ex tra ct a fra m e from a mo vi e to s av e as a stil l pi ct ure , div id e a mo vi e in to tw o, or add a ti tle[…]
-
Page 145: Ricoh RICOH WG-30W
143 5 Editing and Pri nt ing 6 Use the four- way cont rol l er ( 2345 ) to choose the frame you want to save. 2 Play s ba ck or p aus es the m ovie 3 St ops th e mov ie and ret ur ns to the first frame 4 Rev ers es th e mov i e frame by frame 5 Adv an ces t he mov ie f rame by fram e 7 Press t he 4 but ton. The selected frame is s aved as a still p[…]
-
Page 146: Ricoh RICOH WG-30W
144 5 Editing and Pri nt ing 9 Press t he 4 but ton. Th e mov ie i s di vid ed at the sp eci fied posi ti on, ea ch seg men t is sa ved as a ne w fil e, and the origin al mov ie is de let ed. 4 Select [Ad di ng title pi ct ure] on the edit option sel ection scree n. 5 Press t he 4 but ton. Th e scre en f or sel e cting a t itle p i ctur e ap pea rs[…]
-
Page 147: Ricoh RICOH WG-30W
145 5 Editing and Pri nt ing You c an co py imag es from th e bui lt-in m emo ry to the SD Me mory Card and v ice ver s a. Th is fu nc ti on c an on ly b e se le ct ed w h en an SD Me mor y Ca rd is in s ert e d in th e ca mera . 1 Use the four- way cont rol l er ( 2345 ) to sel ec t p (I ma ge Copy) from the Playback Mode Palette. 2 Press t he 4 b[…]
-
Page 148: Ricoh RICOH WG-30W
146 5 Editing and Pri nt ing The im ag e se le cted fro m th e S D M emory Ca rd is c opie d to the b ui lt-i n mem ory . 3 Use the four- way cont rol l er ( 23 ) to sel e ct [ {} 2 ]. 4 Press t he 4 but ton. 5 Use the four — way contr ol ler ( 45 ) to select the image you want to copy. 6 Press t he 4 but ton. Th e sel ecte d im age is co pied to t[…]
-
Page 149: Ricoh RICOH WG-30W
147 6 Sett i ngs Camera Se ttin gs Setti ng s for the cam era are set fro m the [ W Se tti ng ] me nu . R e fe r t o ex pl an ati on s for e ac h fun ct ion o n how to m ake th ese se tting s. 1 Press t he 3 but ton i n Q mode. The [ W Set tin g] m enu appe ars. Whe n yo u pre ss the 3 bu tton in A mode, pr ess t he fou r-w ay con trol ler ( 5 ) on[…]
-
Page 150: Ricoh RICOH WG-30W
148 6 Sett i ngs Fo rm att in g de le tes all the da t a on th e SD Memo r y Card or in the bu il t-in me mo r y. Be s ure to use th is c ame ra t o f orm at (i nitia li ze) a n S D M em or y Car d th at is unu sed or has be en pr evio usly u sed on othe r came ras o r dig ital de vice s. 1 Use the four- way cont rol l er ( 23 ) to sele ct [Fo rmat[…]
-
Page 151: Ricoh RICOH WG-30W
149 6 Sett i ngs Yo u can adjust the volu me of ope ration soun ds and ch ange th e type of soun d. 1 Use the four- way cont rol l er ( 23 ) to sel e ct [So und ] in the [ W Sett i ng] menu. 2 Press t he four -way con troller ( 5 ). Th e [So und ] scr een app ear s. 3 Use the four- way cont rol l er ( 23 ) to sel e ct [Op e ra tio n Volume]. 4 Use […]
-
Page 152: Ricoh RICOH WG-30W
150 6 Sett i ngs You can ch ange th e initi al da te an d ti me set tings (p . 42) , and t he st yle in w hich th e dat e ap p ea rs on th e d is p lay . 1 Use the f our-way con troller ( 23 ) to sel ect [Date Adj ustment] in th e [ W Set t ing] menu. 2 Press the f our-way contr oller ( 5 ). Th e [Dat e Adj u stm en t] scre en ap pea rs . 3 Press t[…]
-
Page 153: Ricoh RICOH WG-30W
151 6 Sett i ngs 10 Use the four- way cont rol l er ( 23 ) to c hange the month. 11 Press t he four -way con troller ( 5 ). Th e fr am e mov es t o t he da y fie l d. U se the fo ur- wa y co nt rolle r ( 23 ) t o c ha nge the day . Af ter ch ang ing t he d ay, ch an ge t he year in the same ma nn er. 12 Change th e time in t he same wa y as in step[…]
-
Page 154: Ricoh RICOH WG-30W
152 6 Sett i ngs 4 Use the four- way cont rol l er ( 23 ) to se l e ct th e a la r m . Choose from [ Off], [Once ], or [E veryda y]. 5 Press t he 4 but ton. 6 Press t he four -way con troller ( 3 ). Th e fram e move s to th e [Time ] fi eld. 7 Press t he four -way con troller ( 5 ). Th e fram e move s to th e hou r fie ld. 8 Use the four- way cont […]
-
Page 155: Ricoh RICOH WG-30W
153 6 Sett i ngs Th e Cl oc k Dis pl ay ap pe ars a nd th e a lar m r i ng s for o ne min ute wh en th e set t im e is rea che d whi le th e cam era is tur ned of f. Yo u c an sto p the ala r m by pr e s si ng an y b utt on on t h e ca mer a wh ile t he al ar m i s r in gi ng. The dat e and ti me sel ect ed in “Set tin g th e D ate and Tim e” ([…]
-
Page 156: Ricoh RICOH WG-30W
154 6 Sett i ngs 5 Use the four — way contr ol ler ( 45 ) to change the Dest inati on cit y. Th e cu rrent time , loc at ion and t ime di ffer enc e of t he sel ec ted cit y appe ar . 6 Use the four- way cont rol l er ( 23 ) to sel e ct [DS T ]. 7 Use the four- way cont rol l er ( 45 ) to sel e ct O ( On) or P ( Off). Selec t O if the D es tin ati […]
-
Page 157: Ricoh RICOH WG-30W
155 6 Sett i ngs You c a n se t th e tex t size o f the ite m wit h the s elec tio n fr ame o n the m enu to [S t and ard ] (n orma l disp lay) or [La rge] ( magn ifi ed dis play ). 1 Use the four- way cont rol l er ( 23 ) to sel e ct [T ext Size ] in the [ W Se tting ] me nu. 2 Press t he four -way con troller ( 5 ). A pu ll- do wn men u ap pea rs[…]
-
Page 158: Ricoh RICOH WG-30W
156 6 Sett i ngs You can cha nge t he nam ing sy stem of the fold er for st oring image s. When th e nam ing s yst em is s et to th e [Da te] , ima ges are sav e d in se parat e f olde rs by th e date th ey we re tak en. Changin g the Na ming Syst em of the Fo lder Ch oic e Th e name of th e fo lder Dat e (Def ault ) xx x_ mmdd (3 -di g it fol de r[…]
-
Page 159: Ricoh RICOH WG-30W
157 6 Sett i ngs 1 Use the four- way cont rol l er ( 23 ) to sel e ct [F old e r Nam e ] in the [ W Setting] menu. 2 Press t he four -way con troller ( 5 ). A pu ll- do wn men u ap pea rs . 3 Use the four-way cont roller ( 23 ) to sel e c t the rule fo r nam i ng folder s. 4 Press t he 4 but ton. Th e se tt ing is sa ve d. Yo u c a n n ame t h e f […]
-
Page 160: Ricoh RICOH WG-30W
158 6 Sett i ngs 5 Press t he four -way con troller ( 4 ) while “A” is select ed, or press ( 35 ) whil e “_” is sel ected. The fr ame mov es to [Se ttings c o mple te]. 6 Press t he 4 but ton twice. Th e fol de r name is fix ed, an d ret ur ns to t he [ W Set tin g] me nu. Yo u c a n ch an ge th e n a mi ng s yst em of t h e f ile . 1 Use t[…]
-
Page 161: Ricoh RICOH WG-30W
159 6 Sett i ngs Yo u c a n nam e th e fil e o f i mag es th at ar e cap tu r ed . Yo u c a n ent er up to fo ur si ng le -by te al ph an um e ric c ha rac te rs . T he 4- d ig it na m e is disp laye d befor e the 4- digit fil e numbe r. 1 Select [USER] in step 3 in “Select i ng a R ule for Naming Fil es”. 2 Press t he four -way con troller ( 5[…]
-
Page 162: Ricoh RICOH WG-30W
160 6 Sett i ngs When y ou c onne c t th e ca mera to a n A V d evic e with a n HD MI ca bl e, s ele ct a n out put re solu tion for pl aying ba ck imag es. The def ault se ttin g is [Aut o]. 1 Use the four- way cont rol l er ( 23 ) to sel e ct [HD MI O u t] in the [ W Se tting ] me nu. 2 Press t he four -way con troller ( 5 ). A pu ll- do wn men u[…]
-
Page 163: Ricoh RICOH WG-30W
161 6 Sett i ngs Yo u c a n a dj ust the b rig htn es s o f th e di sp la y to 7 l ev e ls . 1 Use the four- way control ler ( 23 ) to select [ Brightness Level ] in th e [ W Set t ing] menu. 2 Use the four- way cont rol l er ( 45 ) to a djust the brightness . F Dark G Norm al H Bright You ca n sav e the ba tter y powe r by settin g th e dis pla y […]
-
Page 164: Ricoh RICOH WG-30W
162 6 Sett i ngs Yo u ca n se t the c a me ra to tu r n o ff a u tom a tic al ly wh en n o op er ati on i s pe r fo rm ed for a fix e d t ime. 1 Use the four- way cont rol l er ( 23 ) to sel e ct [ Au to Po we r Of f] in th e [ W Set t ing] menu. 2 Press t he four -way con troller ( 5 ). A pu ll- do wn men u ap pea rs . 3 Use the four- way cont rol[…]
-
Page 165: Ricoh RICOH WG-30W
163 6 Sett i ngs Set whet her to di spla y mode g uide s for t he Cap t ur e Mode Pal ette an d Playb ack Mod e P alett e. 1 Use the four- way cont rol l er ( 23 ) to se l e ct [ G u id e D i sp l a y] i n the [ W Setting] menu. 2 Use the four-way c ontroll er ( 45 ) to swit ch b etwe en O (O n) o r P (O ff). O (O n) T h e mod e guid es are dis pla[…]
-
Page 166: Ricoh RICOH WG-30W
164 6 Sett i ngs Yo u c a n c h oo se th e st art — up sc re en d is pl ay ed wh en t h e ca me ra is tu rn ed on . Yo u c a n ch oo se a ny o f th e f ol lo win g i m ag es a s t he st ar t-u p s c ree n: • G ui de di sp la y st art -up s cre en s ho win g a gu ide f or t he s ho oti ng mod e s a nd but to ns • Pre-in stalled s creen • O ne […]
-
Page 167: Ricoh RICOH WG-30W
165 6 Sett i ngs You ca n res et the cam era se tti ngs to their defaul ts. Refer to “Def ault Set tin gs” (p.18 6) for th e res et setti ng s. 1 Use the four- way cont rol l er ( 23 ) to sel e ct [Re se t ] in th e [ W Sett i ng] menu. 2 Press t he four -way con troller ( 5 ). Th e [Res et ] sc ree n app ea rs. 3 Use the four- way controll er […]
-
Page 168: Ricoh RICOH WG-30W
166 6 Sett i ngs 3 Use the four- way controll er ( 23 ) to sel ect an i tem. 4 Use the four- way cont rol l er ( 45 ) to s w itch b etween O (On)/ P (Off ). O (O n) T h e star tup s hor tcut is av ailab l e. P (O ff) T h e star t up shor tc ut i s not av ailab l e. Yo u c a n u se t he c am era a s a c l oc k. Wi th t h e ca me r a tur ne d o ff , […]
-
Page 169: Ricoh RICOH WG-30W
167 6 Sett i ngs You can use t he camer a as a l ight . Pr es sing and hold ing dow n th e Gre en but ton ligh t s up th e LE D M acr o Li gh ts whe n the c am e ra is tu rne d off . 1 Press and hold down the Green butt on. Th e LED Ma cro Li gh ts tu rn on. Th e l ight s tur n of f auto mat ica ll y aft er the l ap se of th e tim e s e t i n [Au t[…]
-
Page 170: Ricoh RICOH WG-30W
168 7 Connectin g to a Comput er Co nne c t i n g t o a C o m p u t e r Conn ecti n g to a Comp uter Se t th e de vi ce t o w h ic h th e c am er a is c on ne ct ed wit h t he U SB ca bl e. 1 Turn your camera on. 2 Use the four — way contr oller ( 23 ) t o se l e ct [U S B C onn e c ti o n] in th e [ W Set t ing] menu. 3 Press t he four -way con tr[…]
-
Page 171: Ricoh RICOH WG-30W
169 7 Connectin g to a Comput er Co nnect t he came ra to a co mputer usin g the prov ided USB cabl e. 1 Turn t he computer on. 2 Turn the camera of f . 3 Connect the camer a to the computer usi ng the USB cable. Con nec t the ter minal of th e US B ca ble w ith the B mar k fa cin g the di spl ay si de of t he cam er a. Th e p ow er la mp b lin ks […]
-
Page 172: Ricoh RICOH WG-30W
170 7 Connectin g to a Comput er Wh en the ca me ra is be in g u se d by an ap pli ca ti on , it c an no t be dis c on ne ct ed unt il the appl icatio n is cl osed. 1 Click t he (Safely Remove Hardware) icon in the task bar located at the bottom-r ight cor ner of the deskt op. 2 Clic k [Ejec t (t he de vice connec ted)] . Th e mes sa ge a ppe ars. […]
-
Page 173: Ricoh RICOH WG-30W
171 7 Connectin g to a Comput er Windows ® OS Win dow s Vi sta ® (32 bit /64 bi t), Wind ows ® 7 (32 bit /64 bi t), Windo ws ® 8 (32 bi t/6 4 bit ), Wind ows ® 8.1 ( 32 bit /64 bi t) CPU I ntel ® Penti um ® IV 1. 6 GH z, AMD Athlo n™ X P 1800 +, or equ i valent (Int el ® Cor e™ 2 Du o E 630 0, AMD Athlo n™ 64 X2 5000 +, or high er rec[…]
-
Page 174: Ricoh RICOH WG-30W
172 8 Co nnecting a Sma r tphon e or Othe r Comm u nicat i on Device ( Wi- Fi Mo de) Connecting a Smartphone or Other Com munic ation Device (Wi-F i Mode) Setti ng the c a mera to Wi -Fi mod e a nd c onne c ting with a sma rtp ho ne, t ab let, o r ot he r co mm u nica t io n de vic e vi a a w ire le s s LAN ena bl es you to us e the fo llo w in g r[…]
-
Page 175: Ricoh RICOH WG-30W
173 8 Co nnecting a Sma r tphon e or Othe r Comm u nicat i on Device ( Wi- Fi Mo de) • Do not a ttem p t to us e the ca m era in a loca tio n wh ere the use of wirel e ss LAN de vic es is res tri cte d or pr oh ibi ted, su ch as on airp la nes . • The da ta s ho uld be ma na ged a t y our o wn r isk . • Thi s c am e ra is e quip ped w ith a w[…]
-
Page 176: Ricoh RICOH WG-30W
174 8 Co nnecting a Sma r tphon e or Othe r Comm u nicat i on Device ( Wi- Fi Mo de) 1 Press the Green but t on in A mode t o disp lay the screen o n the right. Th e cam er a enter s Wi- Fi mode . Aft er pres s ing t he 4 butt on, follo w the «S et ting up the Co m munic at ion Dev ice » pro ce dur e belo w to co nnect th e camer a to the[…]
-
Page 177: Ricoh RICOH WG-30W
175 8 Co nnecting a Sma r tphon e or Othe r Comm u nicat i on Device ( Wi- Fi Mo de) 2 Input «ht tp://192. 168.1.1» i n the address bar of your browser. A me nu scre en ap pea rs in you r br owser w he n th e co nne ct i on is co m pl et e. Th e mes sa ge «W i-Fi conne ct ion est ab li shed» appea rs on t he c amer a’s di s[…]
-
Page 178: Ricoh RICOH WG-30W
176 8 Co nnecting a Sma r tphon e or Othe r Comm u nicat i on Device ( Wi- Fi Mo de) To ch eck the p ictu res you hav e take n, you ca n eit her t ap in the sh oot ing scr e en o r s el ec t «V i ew I mag es » in th e me nu s c ree n o f yo ur br o wse r . Tap a th umbn ai l im ag e to vi ew o n e i mag e i n f ull. To uc h an d hold an i[…]
-
Page 179: Ricoh RICOH WG-30W
177 8 Co nnecting a Sma r tphon e or Othe r Comm u nicat i on Device ( Wi- Fi Mo de) Selec t «Uplo ad» i n the m en u scre en or ta p in th e sh oo t in g or vi ewi ng s cre en o f th e bro w ser to di sp la y t h e sc r ee n sh own o n the r i gh t. Y ou can s end da te an d time info rmat ion fro m t he commu nica tio n devi ce t o t he[…]
-
Page 180: Ricoh RICOH WG-30W
178 9 Appendix Functions Available for Each Shooting Mode √ : Can be set. ×: Ca nnot b e se t. ⎯ : Setti ngs an d c han ges are not app lied. Functio n S hoo ti ng M od e b A A C Zoom bu tton Z oom operati on √ *2 √√√√ √ *3 √√ *3 Fl ash Mode , Auto √√ ×××× √ × a Flash O ff √√√√√√√√ b Flash O n √√ […]
-
Page 181: Ricoh RICOH WG-30W
179 9 Appendix a b K c R B c Q e S 9 √√ √ √ *36 √ *3 6 √ *4 √√√√ √ *5 √ *6 √ √ √ × × × √√√ × √ √ √ √ √√√√√√√√√√ √ √ √ × × × √√√ × √ × √√ √ ××× √√ √ × √ × √ √ √ × × × √√√ × √ × √√ ×× √√√ √√√√√ √ √ ?[…]
-
Page 182: Ricoh RICOH WG-30W
180 9 Appendix √ : Can be set. ×: Ca nnot b e se t. ⎯ : Setti ngs an d c han ges are not app lied. Functio n S hoo ti ng M od e b A A C [ A Rec. Mode] menu Image T one × *8 √ × *8 √√ √ × *8 × *8 Recor ded Pixels √√√√√ √ *10 √ √ *1 0 Qual ity Lev el √√√√√ × *16 √ × *16 White Balanc e × *18 √√√√[…]
-
Page 183: Ricoh RICOH WG-30W
181 9 Appendix a b K c R B c Q e S 9 × *8 × *8 √√√√√ × *8 × *8 × *8 √ × *8 √ √ √ × × *3 1 × *11 √ √ √ √ × *1 4 × *15 √√ √ × *1 6 × *1 6 √√√√√√ × *17 × *18 × *18 √√√√√ × *1 8 × *18 × *18 × *1 8 × *18 √√ √ √ *20 √ *2 0 √√√√ × *19 √ × *19 √ √ √ √[…]
-
Page 184: Ricoh RICOH WG-30W
182 9 Appendix Mess ages Mes sa g es s uc h as th e f ol lo win g m a y ap pe ar on th e dis p la y d ur in g c am e ra oper ati on . Mes sage D escri ption Batte ry d eple ted The ba tter y is exh aus ted. Ch arg e the ba tt er y using the batt ery charg er ( p. 31) . Memor y card fu ll The SD Memor y Ca rd is full an d no mor e i mages c an be sa[…]
-
Page 185: Ricoh RICOH WG-30W
183 9 Appendix Dat a be ing re co rde d Di spla yed wh en y o u t r y to swit ch to Q m ode w hi le a n image is still being recorded, or w hen the p rotect setting is bein g c han ged. It di sap pea rs af ter t he im age is recor ded or th e se tt i ng i s c ha ng ed . Dat a be ing pr oc esse d Di spl aye d wh e n t he came ra ta kes mor e than fi[…]
-
Page 186: Ricoh RICOH WG-30W
184 9 Appendix Tr ou bl es ho ot i n g Pr obl em Caus e Rem edy The camera will not turn on Th e batt ery is no t in stal led C heck if a battery is installed. If not, in stall a ba tter y. Th e batt ery is in stal led incorrectly Che ck orie nt ation of th e batt er y. Rei n sert the batt er y acco rdin g to the +- sym bols in the bat t er y com p[…]
-
Page 187: Ricoh RICOH WG-30W
185 9 Appendix Th e subj ect is n ot in fo cus The subject is d iffic u lt to foc us o n wit h autof o cus Loc k t he foc us on an obj ect t he sam e di stan ce a wa y as t he su bjec t (by pres si ng an d holdi n g the sh utte r rel eas e butt on hal fway ), then aim the came ra a t yo ur sub j ect an d pres s the shut ter re le as e butt on ful l[…]
-
Page 188: Ricoh RICOH WG-30W
186 9 Appendix Def ault S ett ings The tab le b elo w l is ts th e facto ry de fa ult s ett in gs. The mean ing of th e in dica t ion s fo r menu items wi th a defau lt settin g is expla ined belo w . Last Me mory Sett ing Yes : Th e cur r ent setti ng (las t memor y) is s aved w hen th e camer a is turn ed o ff. No : The setti ng retu rn s to the […]
-
Page 189: Ricoh RICOH WG-30W
187 9 Appendix [ C Movi e] Menu Items Blink Detection O ( On) Y es Yes p .91 Di git al Zoom O (O n) * Yes p.60 Ins t ant Rev iew O (O n) Y es Yes p.91 Memory Face Detection P (Off ) Ye s Ye s p.1 08 Flas h Mode O ( On) Y es Yes Dri ve Mo de P (O ff) Yes Ye s Fo cus Mod e P (O ff) Yes Ye s Zoom Posit ion P (Off) Yes Ye s MF P o si tion P (O ff) Yes […]
-
Page 190: Ricoh RICOH WG-30W
188 9 Appendix [ W Settin g] Menu Items Item D e faul t Settin g Last Memory Settin g Rese t Settin g Pa ge Sound Op erat io n Vol um e 3 Ye s Yes p. 149 Play b ack Vo lu me 3 Yes Ye s Star tup Sound Off Yes Yes Shu tter Sound 1 Ye s Yes Op erat io n Sou nd 1 Yes Yes Self- timer So und 1 Yes Yes Dat e Adjustment Da te F o rma t (d ate) Accord in g […]
-
Page 191: Ricoh RICOH WG-30W
189 9 Appendix *1 Exce p t th e fo lder n a me t hat yo u cr e ate d Playback Mode Palette Item s Star tup Sh ortc ut Pl ay bac k Mo de O ( On) Yes Yes p. 165 LE D Li ghti ng O (O n) Yes Y es p.16 5 Cl o ck Di splay O (O n) Yes Yes p.16 5 For mat Canc el ⎯⎯ p. 148 Ite m D efaul t Se tting Last Memory Settin g Rese t Settin g Page Sl id esho w I[…]
-
Page 192: Ricoh RICOH WG-30W
190 9 Appendix Button/ Key Opera tion Pr otec t Single Image D epe nd ing on the pic ture t ak en ⎯⎯ p.1 24 All Images Depe nd in g on the pic ture t ak en ⎯⎯ St art- up S creen Defaul t Yes Yes p. 1 64 Ite m Func tion Defau lt Sett ing Last Memory Se t ti ng Rese t Settin g Page Q bu tton Op era tio n Mod e Q Mode ⎯⎯ ⎯ W / T butto n […]
-
Page 193: Ricoh RICOH WG-30W
191 9 Appendix List of Worl d Time C iti es City : i nd ic at es c iti es th at ca n be se t a s ei the r th e Ini t ia l S et tin g ( p. 3 9) or t he W or ld Time (p .153). Region City n am e Region City nam e North Ameri ca Honolulu Africa/West Asi a Istanb ul Anchorage Cai ro Vancouver J erusale m San F rancisco Nairobi Los Ang eles Jedda h Calg[…]
-
Page 194: Ricoh RICOH WG-30W
192 9 Appendix Main Sp ec ifi cat io ns Type Fully autom atic c ompact di gital c ame ra with b uilt-in z oom lens Numb er of Eff ective Pixe ls Appr ox. 16 megapi xels Image Sen sor 1/2 .3 in ch C MOS Numb er of Rec or ded Pixe ls Stil l ( 460 8 x 3456) , (3456 x 3456 ), (4608 x 2592), 6 (3072 x 2304), (3072 x 1728), f (2592 x 1 944), (2592 x 1464[…]
-
Page 195: Ricoh RICOH WG-30W
193 9 Appendix Appr ox imat e Ima ge S tora ge C apa cit y a nd R ec ord ing Ti me Still • The image s torage capacity is for ref erence only. The actual image st orage capacity may vary depending on t he SD Memory Card and t h e subject. • V (1280 x 960) can b e set onl y when (Report) m ode is s et. Movie • Th e ab ov e fig ure s ar e based[…]
-
Page 196: Ricoh RICOH WG-30W
194 9 Appendix White B alance Auto, D aylight, Shad e, Tungs ten L igh t, Fluores cent Li ght (Day light Color s/Dayl ight Whi te/White Lig ht), Manu al Lens Foc al L ength 5.0 — 25.0 m m (approx . 28 — 14 0 mm i n 35 m m format equi valent) Maxi mum Aper ture F3 .5 (W ) — F5 .5 (T) Lens Co nstruc tion 11 ele ments in 9 groups (5 as pheri cal ele m[…]
-
Page 197: Ricoh RICOH WG-30W
195 9 Appendix Pet Detec tion Dete ctable n umber of pets : 1 Shooting Mod e Auto Pictur e, Program, HDR, Hand held Nigh t Snap, Movi e, Und erwater , Underwate r M ovie, Digit al M icrosc ope, L andscap e, Flow er, Portr ait, Inter val S hot, I nterval Mov ie, Hig h Speed Mo vi e, Digita l SR, Surf & Sno w, Kids, Pet, Sport, Ni ght Sce ne, Ni […]
-
Page 198: Ricoh RICOH WG-30W
196 9 Appendix Imp a ct R e si st an ce Rating Our dr op test (1.5 m height on to a 5 cm t hick p lywood s urfac e) compl ying wi th MI L-Stand ard 810F Me thod 5 16.5-Sh ock tes ting. * Wat erpro of perfor mance is not guar ant eed if the c amera i s expose d to impac t such as being dropped or hit. * The c amera i s n ot guaran teed to be free o […]
-
Page 199: Ricoh RICOH WG-30W
197 9 Appendix Wa rra nty Po lic y All our c amer as purcha se d t hro ugh author ize d bo na f ide ph ot ogr aph ic dis tri bu tio n chan nel s are guar ant ee d ag ains t def ec ts of mate rial or wor kma ns hip f or a pe riod of twelv e mon th s from the d at e of you r pur ch ase. Serv ice w ill be ren der ed, and def ec tive parts will be repl[…]
-
Page 200: Ricoh RICOH WG-30W
198 9 Appendix • Th is warr a nty pol i cy does n ot aff ec t the c usto me r ’s stat uto r y rig hts. • Th e local warranty policies available from our distribut ors in some countries can su perse d e t his war r anty poli cy . Th eref ore, we recom m end t hat you rev iew the warrant y card supplied with your product at the time of purchase[…]
-
Page 201: Ricoh RICOH WG-30W
199 9 Appendix Fo r cu st o me rs in US A STATEMENT OF FCC COMPLI ANCE This d evic e com plies wi th Pa rt 1 5 of the FC C R ules . Oper ati on is s u bjec t to the fol lowi ng two con ditio ns: (1) T his devi ce may no t caus e harm ful in terf ere nce, and (2 ) thi s dev ice mus t accep t any in terf ere nce rece ived, incl udin g inter feren ce […]
-
Page 202: Ricoh RICOH WG-30W
200 9 Appendix De claratio n of Con formity According to 47CFR, Parts 2 and 15 for Class B P ersonal Com puters and Peri pherals We: RICOH I MAGING AM ERICAS CORPORATION Located at: 633 17 S treet, Suite 2600, Denve r, Colorado 80202, U.S.A. Phone : 800-877-0155 Fax: 303-790-1131 De clare u nder s ole r esp onsib ility tha t th e prod uct i dent if[…]
-
Page 203: Ricoh RICOH WG-30W
201 9 Appendix Infor mation f or Users on Col lection and D ispos al of Old Equipment and Used Batte ries 1. I n the Eu ropean Unio n These sym bols on th e products , packagi ng and/or accom panying document s mean that used electr i cal and el ectroni c equipment and b at ter i es s hould not be mixed wit h general household waste. Used el ectric[…]
-
Page 204: Ricoh RICOH WG-30W
202 9 Appendix In dex Sym b ols A Mode ….. …. ……. …. …. …. …. … …. . 48 Q Mode …….. …. ……. …. …. …. … …. . 48 Q butt on ……. …. … …. …. …. …. . 44 , 46 [ A Rec. Mode] Menu …. ……. 5 1 , 18 6 [ C Mo vi e] Me nu …. …. …. …. … 5 3 , 18 7 [ W Setti ng] M e nu … …. …. …. … 5[…]
-
Page 205: Ricoh RICOH WG-30W
203 9 Appendix Co nnecti ng t he camer a t o an A V de v ic e .. …. ……. …. …. …. … … 126 Co ntinuo us S hoo ting . …. …. …. … …. . 70 Contrast .. …. …. …. … …. …. …. …. ……. . 96 Copy … …. …. …. …. ……. …. …. …. … … 145 Cr oppi ng ….. …. …. … …. …. …. ……. … 1 29[…]
-
Page 206: Ricoh RICOH WG-30W
204 9 Appendix N Num b er of pi xe ls . … …. …. …. …. … …. . 80 O 4 butt on .. …. ……. …. …. …. …. . 45 , 47 Op era ting th e menu s ….. …. …. … …. . 49 Orig in al Fr a me …. … …. …. …. …. … … 1 38 P Pan Focu s 3 …. … …. …. …. …. … …. . 75 Pet M ode …. …. …. … …. …. ..[…]
-
Page 207: Ricoh RICOH WG-30W
Me mo Th an k yo u for pu r cha si ng t h is RIC OH WG -3 0W D ig it al C ame r a. Plea se re ad th is man ua l be fore u sing th e ca mera in o rde r to get th e mo st ou t of all t he fe at ures an d fun c tio ns . K ee p t hi s m an ua l s a fe, as i t c a n b e a va lu ab le to ol in h elpin g yo u t o un de rs tan d al l the cam era ’s cap a[…]
-
Page 208: Ricoh RICOH WG-30W
30 Digital Camera Operati n g Man u al To ensure t he best perform ance from your camera, please read the Operat ing Manual befo r e using t he camera. RI COH IMAGIN G CO MPA NY, L TD. 2- 35- 7, Maen o- c ho , I t ab as h i- k u, Toky o 17 4- 86 39 , JA PAN (h ttp://ww w.ric oh-imagi ng.co.jp ) RI COH IM AGING EURO PE S.A.S 112 Quai de Bez ons, B .[…]