

AV Receiver
Operating Instructions
Discover the benefits of registering your product online at http://www.pioneer.co.uk (or http://www.pioneer.eu).
VSX-827
-K/-S
VSX-527
-K/-S
IMPORTANT
The lightning flash with arrowhead symbol,
within an equilateral triangle, is intended to
alert the user to the presence of uninsulated
“dangerous voltage” within the product’s
enclosure that may be of sufficient
magnitude to constitute a risk of electric
shock to persons.
WARNING
This equipment is not waterproof. To prevent a fire or
shock hazard, do not place any container filled with
liquid near this equipment (such as a vase or flower
pot) or expose it to dripping, splashing, rain or
moisture.
WARNING
Before plugging in for the first time, read the following
section carefully.
The voltage of the available power supply differs
according to country or region. Be sure that the
power supply voltage of the area where this unit
will be used meets the required voltage (e.g., 230 V
or 120 V) written on the rear panel.
CAUTION
RISK OF ELECTRIC SHOCK
DO NOT OPEN
CAUTION:
TO PREVENT THE RISK OF ELECTRIC
SHOCK, DO NOT REMOVE COVER (OR
BACK). NO USER-SERVICEABLE PARTS
INSIDE. REFER SERVICING TO QUALIFIED
SERVICE PERSONNEL.
WARNING
To prevent a fire hazard, do not place any naked flame
sources (such as a lighted candle) on the equipment.
D3-4-2-1-3_A1_En
D3-4-2-1-4*_A1_En
Operating Environment
Operating environment temperature and humidity:
+5 °C to +35 °C (+41 °F to +95 °F); less than 85 %RH
(cooling vents not blocked)
Do not install this unit in a poorly ventilated area, or in
locations exposed to high humidity or direct sunlight (or
strong artificial light)
The exclamation point within an equilateral
triangle is intended to alert the user to the
presence of important operating and
maintenance (servicing) instructions in the
literature accompanying the appliance.
D3-4-2-1-1_A1_En
D3-4-2-1-7a_A1_En
D3-4-2-1-7c*_A1_En
This product is for general household purposes. Any
failure due to use for other than household purposes
(such as long-term use for business purposes in a
restaurant or use in a car or ship) and which requires
repair will be charged for even during the warranty
period.
K041_A1_En
When installing this unit, make sure to leave space
around the unit for ventilation to improve heat radiation
(at least 40 cm at top, 20 cm at rear, and 20 cm at each
side).
WARNING
Slots and openings in the cabinet are provided for
ventilation to ensure reliable operation of the product,
and to protect it from overheating. To prevent fire
hazard, the openings should never be blocked or
covered with items (such as newspapers, table-cloths,
curtains) or by operating the equipment on thick carpet
or a bed.
D3-4-2-1-7b*_A1_En
.
2
.
Information for users on collection and disposal of old equipment and used batteries
Symbol for
equipment
Symbol examples
for batteries
Pb
These symbols on the products, packaging, and/or accompanying documents mean
that used electrical and electronic products and batteries should not be mixed with
general household waste.
For proper treatment, recovery and recycling of old products and used batteries,
please take them to applicable collection points in accordance with your national
legislation.
By disposing of these products and batteries correctly, you will help to save valuable
resources and prevent any potential negative effects on human health and the
environment which could otherwise arise from inappropriate waste handling.
For more information about collection and recycling of old products and batteries,
please contact your local municipality, your waste disposal service or the point of sale
where you purchased the items.
These symbols are only valid in the European Union.
For countries outside the European Union:
If you wish to discard these items, please contact your local authorities or dealer and
ask for the correct method of disposal.
K058a_A1_En
If the AC plug of this unit does not match the AC
outlet you want to use, the plug must be removed
and appropriate one fitted. Replacement and
mounting of an AC plug on the power supply cord of
this unit should be performed only by qualified
service personnel. If connected to an AC outlet, the
cut-off plug can cause severe electrical shock. Make
sure it is properly disposed of after removal.
The equipment should be disconnected by removing
the mains plug from the wall socket when left unused
for a long period of time (for example, when on
vacation).
D3-4-2-2-1a_A1_En
CAUTION
The STANDBY/ON switch on this unit will not
completely shut off all power from the AC outlet.
Since the power cord serves as the main disconnect
device for the unit, you will need to unplug it from the
AC outlet to shut down all power. Therefore, make
sure the unit has been installed so that the power
cord can be easily unplugged from the AC outlet in
case of an accident. To avoid fire hazard, the power
cord should also be unplugged from the AC outlet
when left unused for a long period of time (for
example, when on vacation).
D3-4-2-2-2a*_A1_En
3

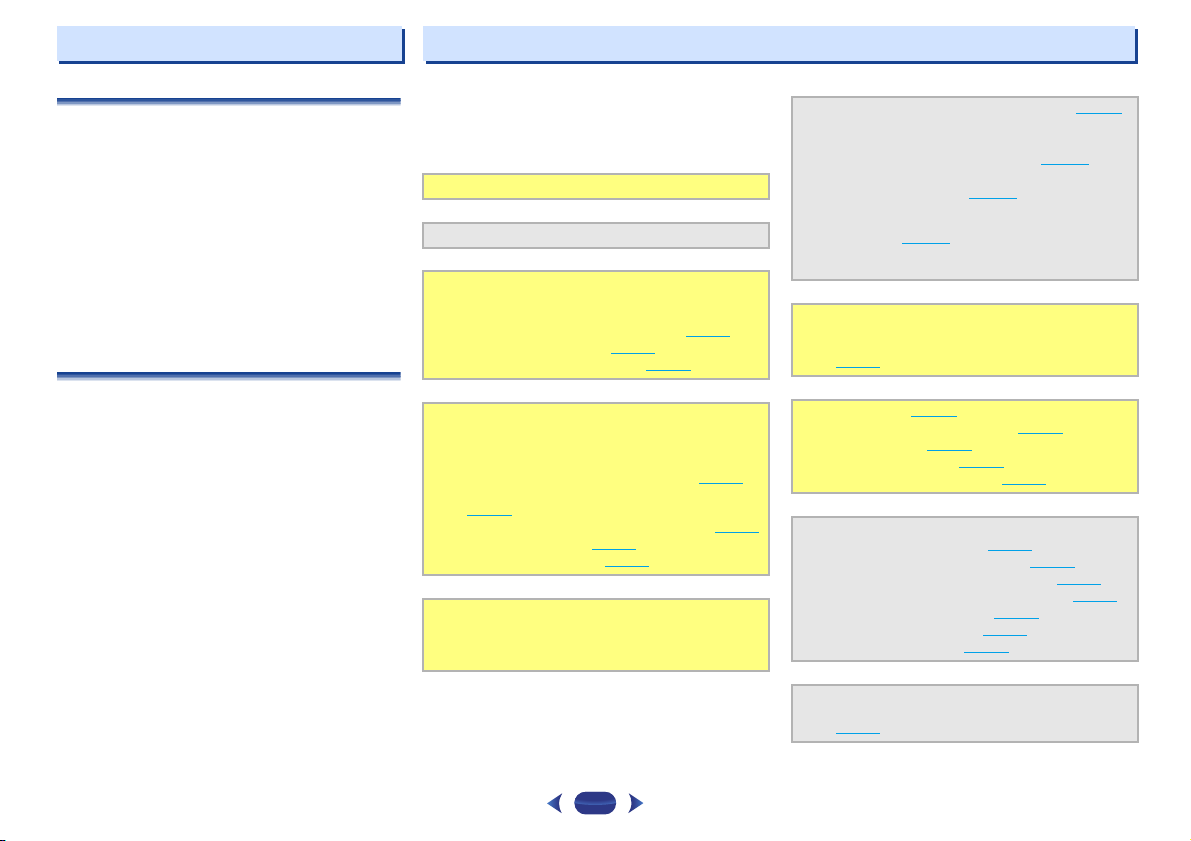
Contents
Thank you for buying this Pioneer product. Please read
through these operating instructions so you will know how to
operate your model properly.
Before you start
Checking what’s in the box. . . . . . . . . . . . . . . . . . . . . . . . . 6
Installing the receiver . . . . . . . . . . . . . . . . . . . . . . . . . . . . . 6
Flow of settings on the receiver
01 Controls and displays
Front panel . . . . . . . . . . . . . . . . . . . . . . . . . . . . . . . . . . . . . 7
Display . . . . . . . . . . . . . . . . . . . . . . . . . . . . . . . . . . . . . . 8
Remote control. . . . . . . . . . . . . . . . . . . . . . . . . . . . . . . . . . 9
Loading the batteries. . . . . . . . . . . . . . . . . . . . . . . . . . . 10
Operating range of remote control . . . . . . . . . . . . . . . . 10
02 Connecting your equipment
Determining the speakers’ application . . . . . . . . . . . . . . . 11
Some tips for improving sound quality . . . . . . . . . . . . . 11
Connecting the speakers . . . . . . . . . . . . . . . . . . . . . . . . . 12
Connect the surround back or front height speakers
(In case of VSX-827). . . . . . . . . . . . . . . . . . . . . . . . . . . . 12
Connect the surround back or front height speakers
(In case of VSX-527). . . . . . . . . . . . . . . . . . . . . . . . . . . . 12
Switching the speaker terminal . . . . . . . . . . . . . . . . . . . 14
Making cable connections . . . . . . . . . . . . . . . . . . . . . . . . 14
HDMI cables . . . . . . . . . . . . . . . . . . . . . . . . . . . . . . . . . 14
About HDMI . . . . . . . . . . . . . . . . . . . . . . . . . . . . . . . . . 14
Analog audio cables . . . . . . . . . . . . . . . . . . . . . . . . . . . 15
Digital audio cables. . . . . . . . . . . . . . . . . . . . . . . . . . . . 15
Video cables . . . . . . . . . . . . . . . . . . . . . . . . . . . . . . . . . 15
About the video converter (VSX-827 only) . . . . . . . . . . . . . 16
About video outputs connection
(VSX-527 only) . . . . . . . . . . . . . . . . . . . . . . . . . . . . . . . . . 16
Connecting a TV and playback components . . . . . . . . . . . 17
Connecting using HDMI . . . . . . . . . . . . . . . . . . . . . . . . 17
Connecting your TV with no HDMI input . . . . . . . . . . . . 18
Connecting your DVD player with no HDMI output
(VSX-827 only) . . . . . . . . . . . . . . . . . . . . . . . . . . . . . . . . 19
Connecting optional Bluetooth
Connecting to the network through LAN interface . . . . . . 20
Connecting antennas . . . . . . . . . . . . . . . . . . . . . . . . . . . . 21
Using external antennas . . . . . . . . . . . . . . . . . . . . . . . . 21
. . . . . . . . . . . . . . . . . . . . . . . . . . . . . 6
. . . . . . . . . . . . . . 6
®
ADAPTER . . . . . . . . . . . 20
Connecting a USB device . . . . . . . . . . . . . . . . . . . . . . . . . 21
Connecting an iPod . . . . . . . . . . . . . . . . . . . . . . . . . . . . . 22
Plugging in the receiver . . . . . . . . . . . . . . . . . . . . . . . . . . 22
03 Basic Setup
Canceling the Auto Power Down . . . . . . . . . . . . . . . . . . . 23
Canceling the demo display . . . . . . . . . . . . . . . . . . . . . . . 23
Automatically setting up for surround sound (MCACC) . . 23
Other problems when using the Auto MCACC setup. . . 24
04 Basic playback
Playing a source . . . . . . . . . . . . . . . . . . . . . . . . . . . . . . . . 25
Selecting the audio input signal . . . . . . . . . . . . . . . . . . 25
Playing an iPod . . . . . . . . . . . . . . . . . . . . . . . . . . . . . . . . . 27
Playing back files stored on an iPod . . . . . . . . . . . . . . . 27
Basic playback controls. . . . . . . . . . . . . . . . . . . . . . . . . 27
Watching photos and video content . . . . . . . . . . . . . . . 27
Playing a USB device . . . . . . . . . . . . . . . . . . . . . . . . . . . . 28
Playing back audio files stored on a USB memory
device . . . . . . . . . . . . . . . . . . . . . . . . . . . . . . . . . . . . . . 28
Playing back photo files stored on a USB memory
device . . . . . . . . . . . . . . . . . . . . . . . . . . . . . . . . . . . . . . 28
About playable file formats . . . . . . . . . . . . . . . . . . . . . . 29
Bluetooth® ADAPTER for Wireless Enjoyment of Music
Wireless music play. . . . . . . . . . . . . . . . . . . . . . . . . . . . 30
Pairing the Bluetooth ADAPTER and Bluetooth wireless
technology device . . . . . . . . . . . . . . . . . . . . . . . . . . . . . 30
Listening to Music Contents of Bluetooth wireless
technology device with Your System . . . . . . . . . . . . . . . 31
AIR JAM . . . . . . . . . . . . . . . . . . . . . . . . . . . . . . . . . . . . 31
Listening to the radio . . . . . . . . . . . . . . . . . . . . . . . . . . . . 32
Improving FM sound . . . . . . . . . . . . . . . . . . . . . . . . . . . 32
Saving station presets . . . . . . . . . . . . . . . . . . . . . . . . . . 32
Listening to station presets . . . . . . . . . . . . . . . . . . . . . . 32
Naming preset stations . . . . . . . . . . . . . . . . . . . . . . . . . 32
An introduction to RDS. . . . . . . . . . . . . . . . . . . . . . . . . . . 33
Searching for RDS programs. . . . . . . . . . . . . . . . . . . . . 33
Displaying RDS information . . . . . . . . . . . . . . . . . . . . . 33
. . . 30
05 Listening to your system
Choosing the listening mode . . . . . . . . . . . . . . . . . . . . . . 34
Auto playback . . . . . . . . . . . . . . . . . . . . . . . . . . . . . . . . 34
Listening in surround sound . . . . . . . . . . . . . . . . . . . . . 34
Using the Advanced surround . . . . . . . . . . . . . . . . . . . 35
Using Stream Direct . . . . . . . . . . . . . . . . . . . . . . . . . . . 35
Using the Sound Retriever . . . . . . . . . . . . . . . . . . . . . . . . 35
Listening with Acoustic Calibration EQ . . . . . . . . . . . . . . . 35
Better sound using Phase Control . . . . . . . . . . . . . . . . . . 36
Using surround back channel processing. . . . . . . . . . . . . 36
Setting the Up Mix function . . . . . . . . . . . . . . . . . . . . . . . 36
Setting the Audio options . . . . . . . . . . . . . . . . . . . . . . . . . 37
06 Playback with NETWORK features
Introduction . . . . . . . . . . . . . . . . . . . . . . . . . . . . . . . . . . . 39
About playable DLNA network devices. . . . . . . . . . . . . . 39
Using AirPlay on iPod touch, iPhone, iPad, and
iTunes . . . . . . . . . . . . . . . . . . . . . . . . . . . . . . . . . . . . . . 39
About the DHCP server function . . . . . . . . . . . . . . . . . . 39
Authorizing this receiver . . . . . . . . . . . . . . . . . . . . . . . . 39
Playback with Network functions . . . . . . . . . . . . . . . . . . . 40
Basic playback controls . . . . . . . . . . . . . . . . . . . . . . . . . 40
Listening to Internet radio stations. . . . . . . . . . . . . . . . . 40
Playing back audio files stored on components on
the network . . . . . . . . . . . . . . . . . . . . . . . . . . . . . . . . . . 41
Playing back your favorite songs . . . . . . . . . . . . . . . . . . 41
The Network Setup menu . . . . . . . . . . . . . . . . . . . . . . . . . 41
Network Configuration . . . . . . . . . . . . . . . . . . . . . . . . . . 42
Language. . . . . . . . . . . . . . . . . . . . . . . . . . . . . . . . . . . . 43
Firmware Update . . . . . . . . . . . . . . . . . . . . . . . . . . . . . . 43
Factory Reset . . . . . . . . . . . . . . . . . . . . . . . . . . . . . . . . . 43
System Information . . . . . . . . . . . . . . . . . . . . . . . . . . . . 43
About network playback . . . . . . . . . . . . . . . . . . . . . . . . . . 44
Content playable over a network . . . . . . . . . . . . . . . . . . 44
About playback behavior over a network . . . . . . . . . . . . 45
Glossary . . . . . . . . . . . . . . . . . . . . . . . . . . . . . . . . . . . . . . 45
About playable file formats . . . . . . . . . . . . . . . . . . . . . . . . 46
4

Contents
07 Home Menu
Using the Home Menu . . . . . . . . . . . . . . . . . . . . . . . . . . . 47
Manual speaker setup . . . . . . . . . . . . . . . . . . . . . . . . . . . 47
Speaker Setting. . . . . . . . . . . . . . . . . . . . . . . . . . . . . . . 47
X.Over . . . . . . . . . . . . . . . . . . . . . . . . . . . . . . . . . . . . . . 48
Channel Level . . . . . . . . . . . . . . . . . . . . . . . . . . . . . . . . 49
Speaker Distance . . . . . . . . . . . . . . . . . . . . . . . . . . . . . 49
The Input Assign menu . . . . . . . . . . . . . . . . . . . . . . . . . . 50
Analog Input . . . . . . . . . . . . . . . . . . . . . . . . . . . . . . . . . 50
Component Input (VSX-827 only) . . . . . . . . . . . . . . . . . . 50
The Speaker System setting (VSX-827 only) . . . . . . . . . . . 50
The Video Parameter setting (VSX-827 only) . . . . . . . . . . . 50
Video Converter. . . . . . . . . . . . . . . . . . . . . . . . . . . . . . . 50
Resolution. . . . . . . . . . . . . . . . . . . . . . . . . . . . . . . . . . . 51
Aspect. . . . . . . . . . . . . . . . . . . . . . . . . . . . . . . . . . . . . . 51
The Pre Out Setting (VSX-527 only) . . . . . . . . . . . . . . . . . . 51
The Auto Power Down menu . . . . . . . . . . . . . . . . . . . . . . 52
The Network Standby menu . . . . . . . . . . . . . . . . . . . . . . . 52
The FL Demo Mode menu . . . . . . . . . . . . . . . . . . . . . . . . 52
08 Control with HDMI function
Making Control with HDMI connections. . . . . . . . . . . . . . 53
HDMI Setup . . . . . . . . . . . . . . . . . . . . . . . . . . . . . . . . . . . 53
Before using synchronization . . . . . . . . . . . . . . . . . . . . . . 54
About synchronized operations . . . . . . . . . . . . . . . . . . . . 54
Cautions on the Control with HDMI function . . . . . . . . . . 54
09 Controlling the rest of your system
Setting the remote to control other components . . . . . . . 55
Selecting preset codes directly. . . . . . . . . . . . . . . . . . . . . 55
Clearing all the remote control settings . . . . . . . . . . . . . . 55
Controls for TVs . . . . . . . . . . . . . . . . . . . . . . . . . . . . . . . . 56
Controls for other components. . . . . . . . . . . . . . . . . . . . . 56
Preset Code List . . . . . . . . . . . . . . . . . . . . . . . . . . . . . . . . 56
10 Additional information
Troubleshooting . . . . . . . . . . . . . . . . . . . . . . . . . . . . . . . . 62
General . . . . . . . . . . . . . . . . . . . . . . . . . . . . . . . . . . . . . 62
NETWORK feature . . . . . . . . . . . . . . . . . . . . . . . . . . . . . 63
HDMI. . . . . . . . . . . . . . . . . . . . . . . . . . . . . . . . . . . . . . . 64
Important information regarding the HDMI
connection . . . . . . . . . . . . . . . . . . . . . . . . . . . . . . . . . . 64
Windows 7 . . . . . . . . . . . . . . . . . . . . . . . . . . . . . . . . . . . . 65
About iPod/iPhone/iPad . . . . . . . . . . . . . . . . . . . . . . . . . . 65
About FLAC . . . . . . . . . . . . . . . . . . . . . . . . . . . . . . . . . . . 65
About messages displayed when using network
functions . . . . . . . . . . . . . . . . . . . . . . . . . . . . . . . . . . . . . 66
Resetting the main unit . . . . . . . . . . . . . . . . . . . . . . . . . . 66
Cleaning the unit . . . . . . . . . . . . . . . . . . . . . . . . . . . . . . . 66
Specifications . . . . . . . . . . . . . . . . . . . . . . . . . . . . . . . . . . 67
5
Before you start
Flow of settings on the receiver
Checking what’s in the box
Please check that you’ve received the following supplied
accessories:
•
Setup microphone
•
Remote control
•
AAA size IEC R03 dry cell batteries (to confirm system
operation) x2
•
AM loop antenna
•
FM wire antenna
•
Power cord
•
iPod cable (VSX-827 only)
•
Warranty card
•
Quick start guide
•
Safety Brochure
•
These operating instructions (CD-ROM)
Installing the receiver
•
When installing this unit, make sure to put it on a level and
stable surface.
Don’t install it on the following places:
– on a color TV (the screen may distort)
– near a cassette deck (or close to a device that gives off a
magnetic field). This may interfere with the sound.
– in direct sunlight
– in damp or wet areas
– in extremely hot or cold areas
– in places where there is vibration or other movement
– in places that are very dusty
– in places that have hot fumes or oils (such as a kitchen)
The unit is a full-fledged AV receiver equipped with an
abundance of functions and terminals. It can be used easily
after following the procedure below to make the connections
and settings.
The colors of the steps indicate the following:
Required setting item
Setting to be made as necessary
— — — — — — — — — — — — — — — — — — — — — — — — — — — — — — — — — — — — — — — — — —
Connecting the speakers
1
Where you place the speakers will have a big effect on
the sound.
•
Determining the speakers’ application (page 11)
•
Connecting the speakers (page 12)
•
Switching the speaker terminal (page 14)
Connecting the components
2
For surround sound, you’ll want to hook up using a
digital connection from the Blu-ray Disc/DVD player to
the receiver.
•
About the video converter (VSX-827 only) (page 16)
•
About video outputs connection (VSX-527 only)
(page 16
)
•
Connecting a TV and playback components (page 17)
•
Connecting antennas (page 21)
•
Plugging in the receiver (page 22)
Power On
3
Make sure you’ve set the video input on your TV to this
receiver. Check the manual that came with the TV if you
don’t know how to do this.
The Speaker System setting (VSX-827 only) (page 50)
4
(Specify either using the surround back or front height
speaker.)
The Pre Out Setting (VSX-527 only) (page 51
(When connecting the front height speakers.)
The Input Assign menu (page 50
(When using connections other than the recommended
connections.)
HDMI Setup (page 53
(When the connected TV supports the HDMI Audio Return
Channel function.)
Use the on-screen automatic MCACC setup to set up
5
your system
•
Automatically setting up for surround sound (MCACC)
(page 23
)
Basic playback (page 25)
6
•
Selecting the audio input signal (page 25)
•
Playing an iPod (page 27)
•
Playing a USB device (page 28)
•
Choosing the listening mode (page 34)
Adjusting the sound as desired
7
•
Using the Sound Retriever (page 35)
•
Better sound using Phase Control (page 36)
•
Listening with Acoustic Calibration EQ (page 35)
•
Using surround back channel processing (page 36)
•
Setting the Up Mix function (page 36)
•
Setting the Audio options (page 37)
•
Manual speaker setup (page 47)
Making maximum use of the remote control
8
•
Setting the remote to control other components
(page 55
)
)
)
)
6
Chapter
Controls and displays
1
1
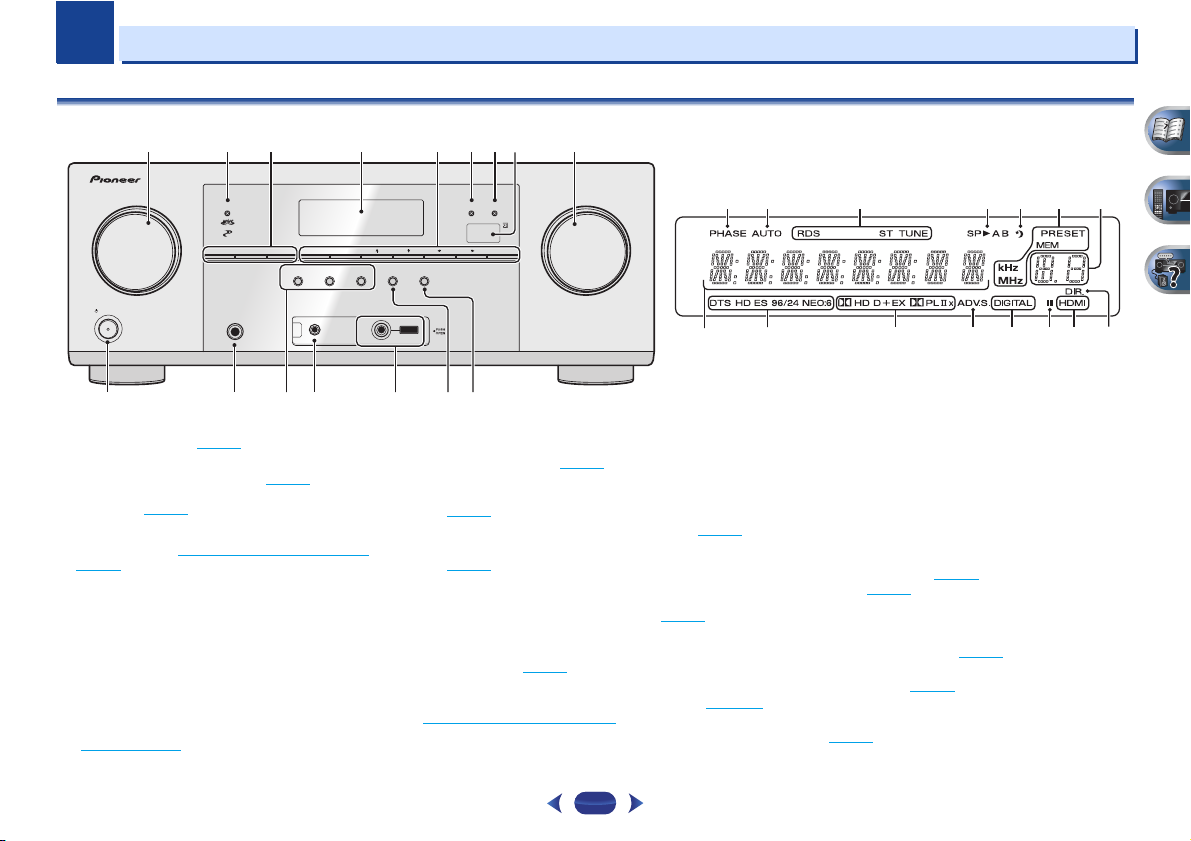
Front panel
1 7 938
2
456
SPEAKERS DIMMER DISPLAY BAND TUNER EDIT TUNE PRESET ENTER
INPUT
SELECTOR
STANDBY/ON
10
1
INPUT SELECTOR
Selects an input source (page 25).
2
MCACC indicator
Lights when Acoustic Calibration EQ (page 35) is on (Acoustic
Calibration EQ is automatically set to on after the Auto
MCACC setup (page 23
3
Receiver control buttons
SPEAKERS
page 14.
DIMMER
can be controlled in four steps.
DISPLAY
mode, sound volume, Speaker System (VSX-827)/Pre Out
(VSX-527) setting or input name can be checked by
selecting an input source.
• The Speaker System/Pre Out setting may or may not be
displayed, depending on the input source you have
selected.
4
Character display
See Display on page 8.
dial
)).
– See Switching the speaker terminal on
– Dims or brightens the display. The brightness
– Switches the display of this unit. The listening
PHONES
11 12
AUTO SURROUND
STREAM DIRECT
/
STANDARD SURR
ADVANCED
ALC/
RETRIEVER AIR
SURROUND
MCACC
VIDEO
SETUP
MIC
HDMIMCACC
iPod iPhone iPad
SOUND
iPod iPhone iPad
DIRECT CONTROL
USB
iPod
iPhone
iPad
MASTER
VOLUME
1513 14 16
5
Tuner control buttons
BAND
– Switches between AM, FM ST (stereo) and FM
MONO radio bands (page 32
TUNER EDIT
ENTER
(page 32
TUNE
PRESET
(page 32
6
HDMI indicator
Blinks when connecting an HDMI-equipped component;
lights when the component is connected (page 17
7
iPod iPhone iPad indicator
Lights when an iPod/iPhone/iPad is connected and
input is selected (page 27
8
Remote sensor
Receives the signals from the remote control (see Operating
range of remote control on page 10).
9
MASTER VOLUME
10
STANDBY/ON
– Use with
to memorize and name stations for recall
).
/
– Used to find radio frequencies (page 32).
/
– Use to select preset radio stations
).
dial
).
).
TUNE
/, PRESET
17 18 19 20 21 19
23
24 25 26 27 27 2928
11
PHONES jack
Use to connect headphones. When the headphones are
connected, there is no sound output from the speakers. The
/
).
iPod/USB
listening mode when the sound is heard from the headphone
and
can be selected only from PHONES SURR, STEREO or
STEREO ALC mode (S.R AIR mode can be also selected with
ADAPTER input).
12
Listening mode buttons
AUTO SURROUND/STREAM DIRECT
Auto surround mode (page 34
playback (page 35
ALC/STANDARD SURR
and to switch between the modes of 2 Pro Logic II, 2
Pro Logic IIx, 2 Pro Logic IIz and NEO:6, and the Auto
level control stereo mode (page 34
ADVANCED SURROUND
surround modes (page 35
13
MCACC SETUP MIC jack
Use to connect a microphone when performing Auto MCACC
setup (page 23
).
).
) and Stream Direct
– Press for standard decoding
).
– Switches between the various
).
22
– Switches between
7
1
1
14
iPod iPhone iPad/USB terminal
Use to connect your Apple iPod or USB mass storage device
as an audio source (page 22
15
SOUND RETRIEVER AIR
When the button is pressed, the input switches to ADAPTER
and the listening mode is automatically set to S.R AIR
(page 31
).
16
iPod iPhone iPad DIRECT CONTROL
Change the receiver’s input to the iPod and enable iPod
operations on the iPod (page 28
).
).
Display
17
PHASE
Lights when the Phase Control is switched on (page 36).
18
AUTO
Lights when the Auto Surround feature is switched on
(page 34
).
19
Tuner indicators
RDS – Lights when an RDS broadcast is received
(page 33
).
ST – Lights when a stereo FM broadcast is being received
in auto stereo mode (page 32
TUNE – Lights when a normal broadcast channel.
PRESET – Shows when a preset radio station is registered
or called.
MEM – Blinks when a radio station is registered.
kHz/MHz – Lights when the character display is showing
the currently received AM/FM broadcast frequency.
20
Speaker indicators
Shows if the speaker system is on or not (page 14).
21
Sleep timer indicator
Lights when the receiver is in sleep mode (page 9).
22
PRESET information or input signal indicator
Shows the preset number of the tuner or the input signal type,
etc.
23
Character display
Displays various system information.
).
24
DTS indicators
DTS – Lights when a source with DTS encoded audio
signals is detected.
HD – Lights when a source with DTS-EXPRESS or DTS-HD
encoded audio signals is detected.
ES – Lights to indicate DTS-ES decoding.
96/24 – Lights when a source with DTS 96/24 encoded
audio signals is detected.
NEO:6 – When one of the NEO:6 modes of the receiver is
on, this lights to indicate NEO:6 processing (page 34
25
Dolby Digital indicators
2 D – Lights when a Dolby Digital encoded signal is
detected.
2 D+ – Lights when a source with Dolby Digital Plus
encoded audio signals is detected.
2HD – Lights when a source with Dolby TrueHD encoded
audio signals is detected.
).
EX – Lights to indicate Dolby Digital EX decoding.
2PLII(x) – Lights to indicate 2 Pro Logic II/2 Pro Logic
IIx decoding. Light will go off during 2 Pro Logic IIz
decoding (see Listening in surround sound
more on this).
26
ADV.S.
Lights when one of the Advanced Surround modes has been
selected (see Using the Advanced surround
more on this).
27
SIGNAL SELECT indicators
DIGITAL – Lights when a digital audio signal is selected.
Blinks when a digital audio signal is selected and selected
audio input is not provided.
HDMI – Lights when an HDMI signal is selected. Blinks
when an HDMI signal is selected and selected HDMI input
is not provided.
28
Up Mix/DIMMER indicator
Lights when the Up Mix function is set to ON (page 36). Also,
lights when DIMMER is set to off.
29
DIR.
Lights when the DIRECT or PURE DIRECT mode is switched
on (page 35
).
on page 34 for
on page 35 for
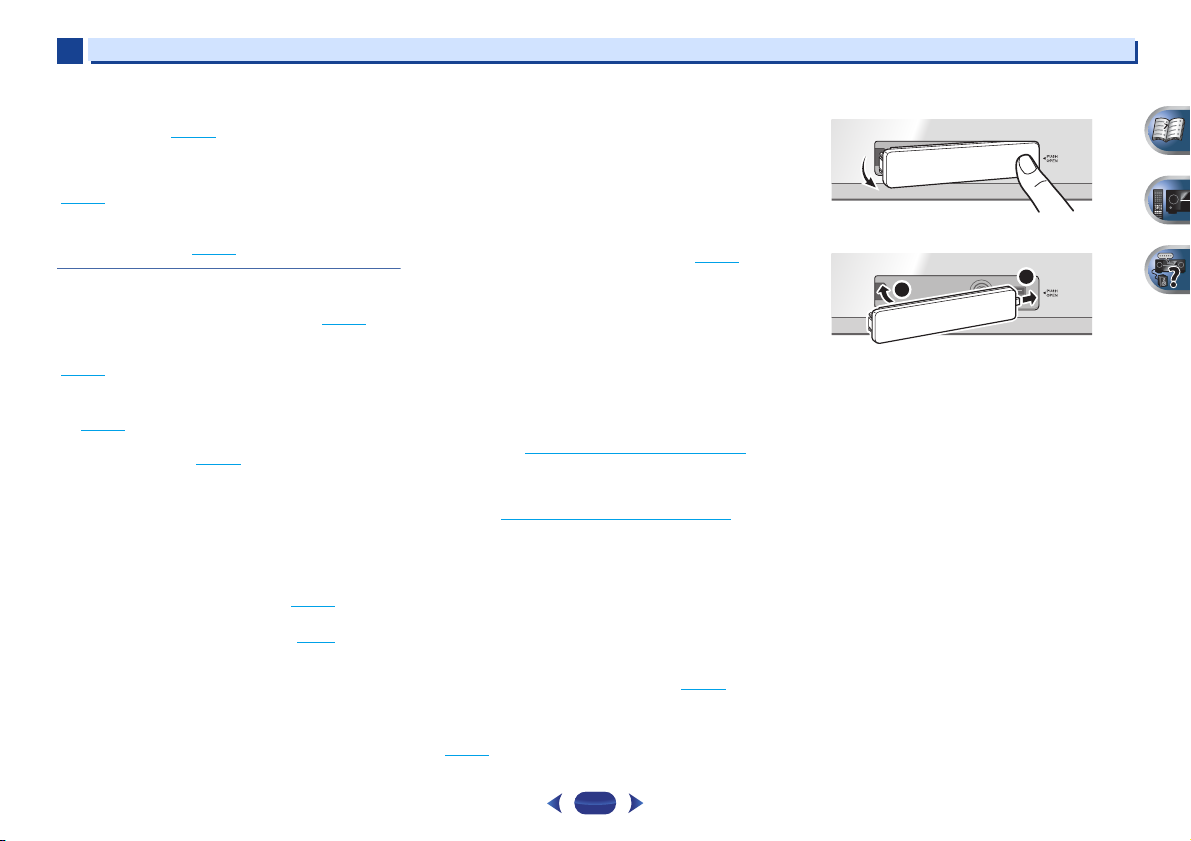
Removing the front cover
MCACC
SETUP
MIC
Attaching the front cover
MCACC
2
SETUP
MIC
Controls and displays
5 V
2.1
VIDEO
VIDEO
A
iPod
iPhone
USB
iPad
1
USB
iPod
iPhone
iPad
8
SLEEP
INPUT
1
4
7
RECEIVER
ENTER
2
5
8
DISP
CLR
3
6
9
0
ENTER
CH
CH
MUTE
RETURN
AUDIO
PARAMETER
MENU
HOME
MENU
RECEIVER
RECEIVER
SOURCE
TOOLS
BAND
iPod CTRL
PTY
TOP
MENU
T
U
N
E
T
U
N
E
P
R
E
S
E
T
P
R
E
S
E
T
SHIFT
1
2
11
12
13
14
15
16
3
4
5
6
7
8
9
10
1
1
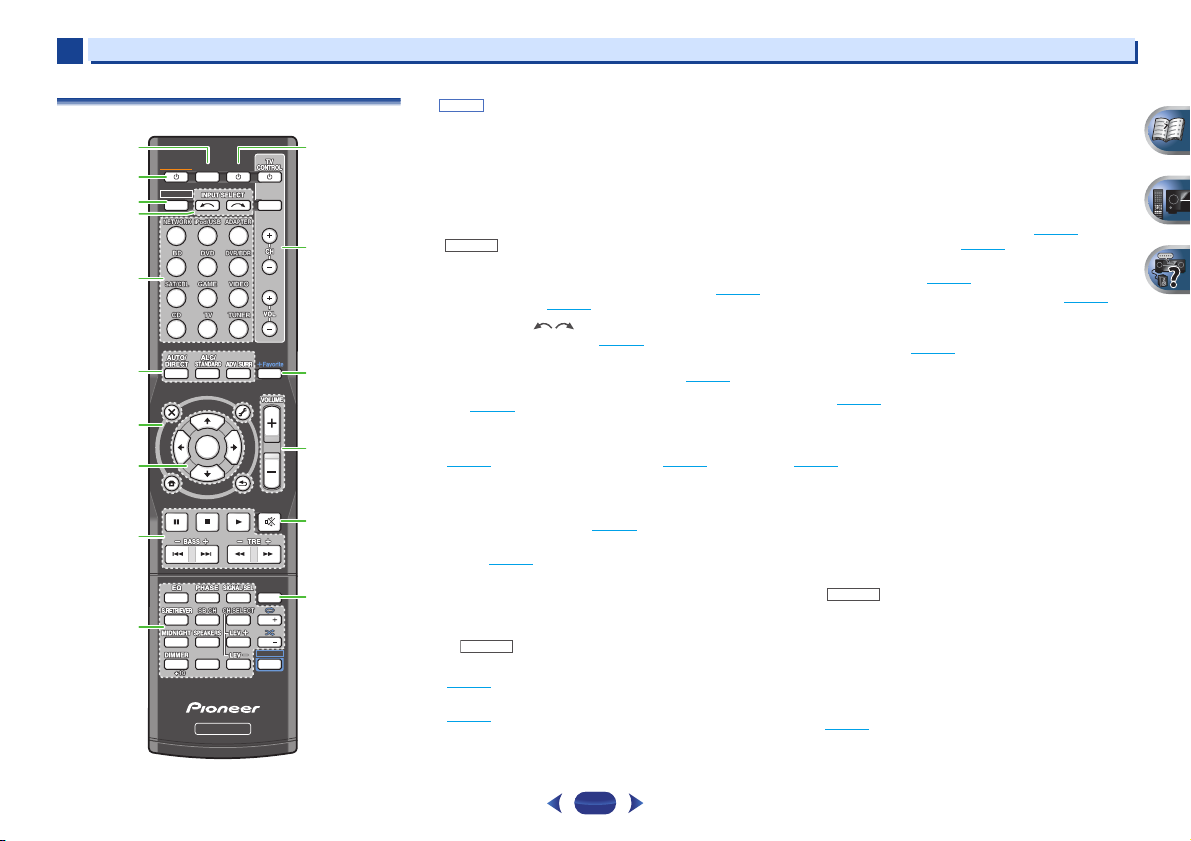
Remote control
•
button is not used with this receiver.
SHIFT
1
SLEEP
Press to change the amount of time before the receiver
switches into standby (30 min – 60 min – 90 min – Off). You
can check the remaining sleep time at any time by pressing
SLEEP
once.
2
RECEIVER
Switches the receiver between standby and on.
3
RECEIVER
Switches the remote to control the receiver (used to select the
white commands above the number buttons (
etc)). Also use this button to set up surround sound (page 47
or Audio parameters (page 37
4
INPUT SELECT
Use to select the input source (page 25).
5
Input function buttons
Use to select the input source to this receiver (page 25). This
will enable you to control other components with the remote
control (page 55
6
Listening mode buttons
AUTO/DIRECT
(page 34
ALC/STANDARD SURR
and to switch between the modes of 2 Pro Logic II, 2
Pro Logic IIx, 2 Pro Logic IIz and NEO:6, and the Auto
level control stereo mode (page 34
ADV SURR
modes (page 35
7
Receiver and component control buttons
The following button controls can be accessed after you have
selected the corresponding input function button (
etc.).
).
– Switches between Auto surround mode
) and Stream Direct playback (page 35).
– Switches between the various surround
).
– Press for standard decoding
).
).
MIDNIGHT
BD, DVD
,
Press first to access:
AUDIO PARAMETER
(page 37
).
HOME MENU
(page 47
).
RETURN
– Confirm and exit the current menu screen.
– Use to access the Audio options
– Press to access the Home Menu
Controls and displays
BD, DVD
or
DVR/BDR
Press
TOP MENU
Disc/DVD.
HOME MENU
RETURN
MENU
Press
TOOLS
used to change the name (page 32
BAND
MONO radio bands (page 32
)
PTY
Press
iPod CTRL
receiver controls (page 27
8
/// (TUNE
Use the arrow buttons when setting up your surround sound
system (page 47
menus/options.
Use
TUNE
PRESET
(page 32
9
Component control buttons
The main buttons (, , etc.) are used to control a component
after you have selected it using the input function buttons.
The controls above these buttons can be accessed after you
have selected the corresponding input function button (
DVD
below.
Press first to access:
,
BASS +/–, TRE +/–
• These controls are disabled when the listening mode is
• When the front speaker is set at SMALL in the Speaker
– Displays the disc ‘top’ menu of a Blu-ray
– Displays the HOME MENU screen.
– Confirm and exit the current menu screen.
– Display s the TOOLS menu of Blu-ray Disc player.
TUNER
first to access:
– Memorizes stations for recall (page 32), also
– Switches between AM, FM ST (stereo) and FM
– Use to search for RDS program types (page 33).
iPod/USB
first to access:
– Switches between the iPod controls and the
). Also used to control Blu-ray Disc/DVD
/
can be used to find radio frequencies and
/
can be used to select preset radio stations
).
and CD). These buttons also function as described
RECEIVER
set to DIRECT or PURE DIRECT.
Setting (or automatically via the Auto MCACC setup)
and the X.Over is set above 150 Hz, the subwoofer
channel level will be adjusted by pressing
(page 48
).
first to access:
).
).
).
/, PRESET
/
),
ENTER
– Use to adjust Bass or Treble.
BASS +/–
BD
,
9
1
1
10
Number buttons and other component controls
Use the number buttons to directly select a radio frequency
(page 32
) or the tracks on a CD, etc. There are other buttons
that can be accessed after is pressed. (For example
MIDNIGHT
11
Press to turn on/off other components connected to the
receiver (page 55
12
These buttons are dedicated to control the TV assigned to the
TV
system assign it to the
13
Press while a song is being played back or stopped. The
selected song is then registered in the Favorites folder
(page 41
14
Use to set the listening volume.
, etc.)
EQ
– Press to switch on/off Acoustic Calibration EQ
setting (page 35
PHASE
– Press to switch on/off Phase Control (page 36).
SIGNAL SEL
component to play back (page 25
S.RETRIEVER
compressed audio sources (page 35
SB CH
back channel (page 36
CH SELECT
use
LEV +/–
MIDNIGHT
(page 37
SPEAKERS
page 14.
DIMMER
can be controlled in four steps.
SOURCE
TV CONTROL buttons
button. Thus if you only have one TV to hook up to this
– Use to turn on/off the power of the TV.
INPUT
CH +/–
VOL +/–
+Favorite
VOLUME +/–
– Press to select the audio input signal of the
– Press to select ON, AUTO or OFF the surround
– Press repeatedly to select a channel, then
LEV +/–
to adjust the level (page 49).
– Use to adjust the channel level.
– Switches to Midnight or Loudness listening
).
– See Switching the speaker terminal on
– Dims or brightens the display. The brightness
– Use to select the TV input signal.
– Use to select channels.
– Use to adjust the volume on your TV.
).
RECEIVER
).
– Press to restore CD quality sound to
).
TV
button (page 56).
).
).
).
15
MUTE
Mutes/unmutes the sound.
16
DISP
Switches the display of this unit. The listening mode, sound
volume, Speaker System (VSX-827)/Pre Out (VSX-527) setting or
input name can be checked by selecting an input source.
•
The Speaker System/Pre Out setting may or may not be
displayed, depending on the input source you have
selected.
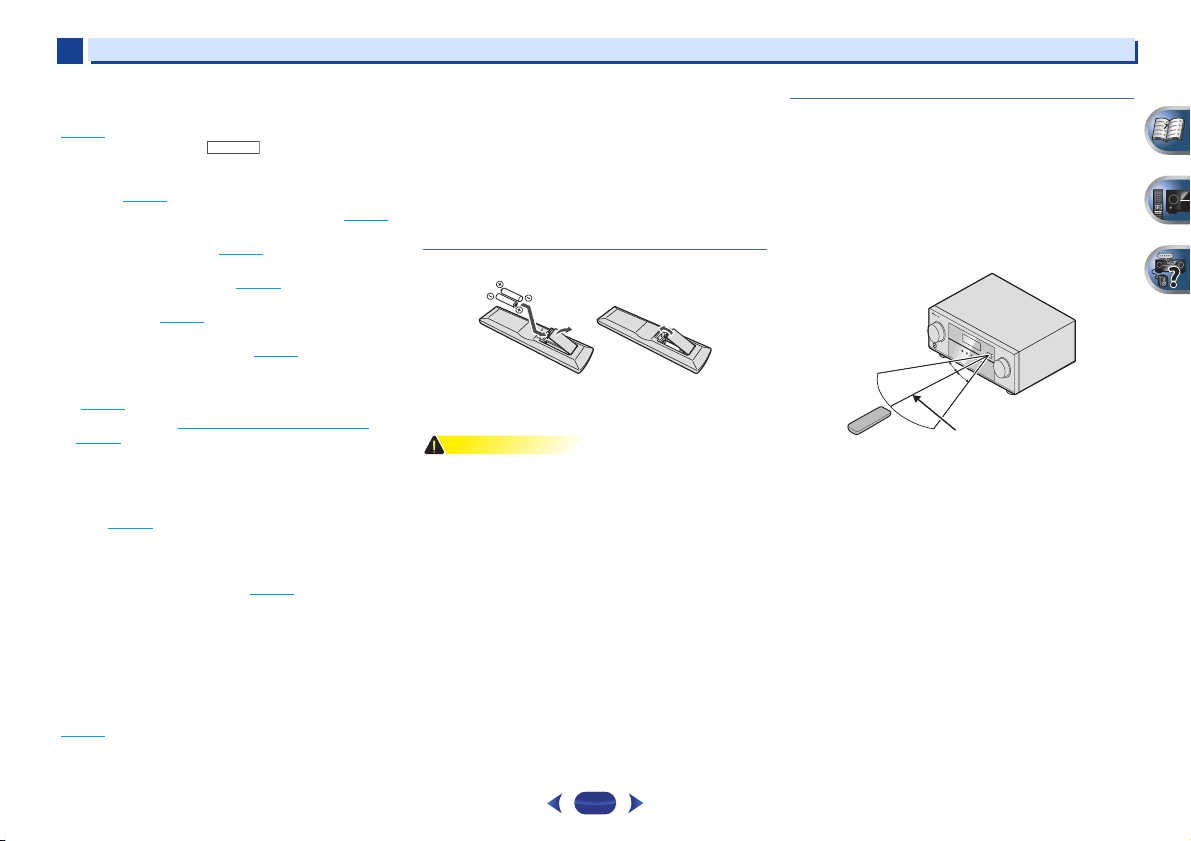
Loading the batteries
The batteries included with the unit are to check initial
operations; they may not last over a long period. We
recommend using alkaline batteries that have a longer life.
•
Incorrect use of batteries may result in such hazards as
leakage and bursting. Observe the following precautions:
—
Never use new and old batteries together.
—
Insert the plus and minus sides of the batteries properly
according to the marks in the battery case.
—
Batteries with the same shape may have different
voltages. Do not use different batteries together.
—
When disposing of used batteries, please comply with
governmental regulations or environmental public
instruction’s rules that apply in your country or area.
—
Do not use or store batteries in direct sunlight or other
excessively hot place, such as inside a car or near a
heater. This can cause batteries to leak, overheat,
explode or catch fire. It can also reduce the life or
performance of batteries.
Controls and displays
Operating range of remote control
The remote control may not work properly if:
•
There are obstacles between the remote control and the
receiver’s remote sensor.
•
Direct sunlight or fluorescent light is shining onto the
remote sensor.
•
The receiver is located near a device that is emitting
infrared rays.
•
The receiver is operated simultaneously with another
infrared remote control unit.
10
Chapter
5.1 channel surround
system:
6.1 channel surround
(Surround back) system:
7.1 channel surround
(Surround back) system:
7.1 channel surround
(Front height) system:
2
2
Connecting your equipment
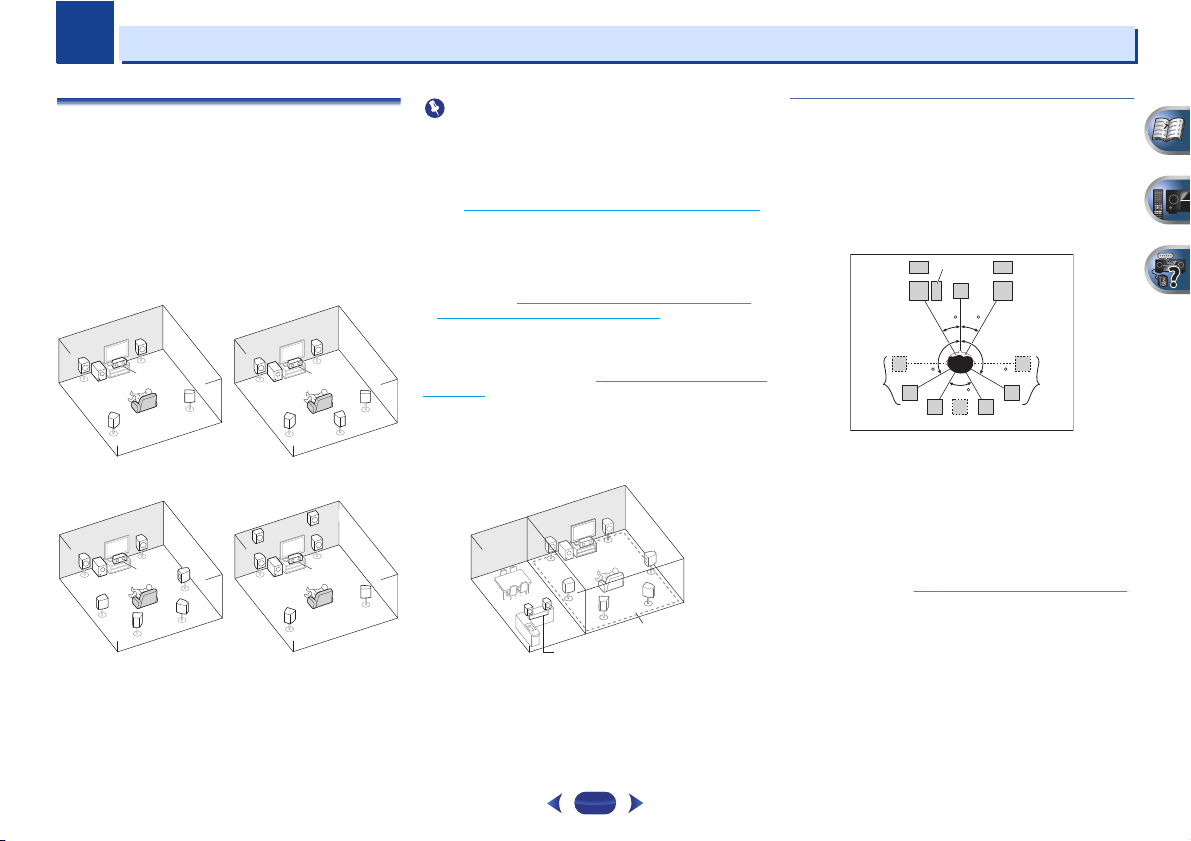
Determining the speakers’ application
By connecting the left and right front speakers (L/R), the
center speaker (C), the left and right surround speakers (SL/
SR), the left and right surround back speakers (SBL/SBR) (or
the left and right front height speakers (FHL/FHR)), and the
subwoofer (SW), a surround sound system up to 7.1 channel
can be enjoyed.
The 5.1 channel surround system is the most commonly-used
in home theaters. To achieve the best possible surround
sound, install your speakers as shown below.
RR
L
SW
SL
L
SW
SL
SBL
C
SR
R
C
SR
SBR
L
SW
FHL
L
SW
Some tips for improving sound quality
•
VSX-827 only: Both the surround back speakers and the
front height speakers can be connected at the same time.
In this case, sound will be output from either the front
height speaker or the surround back speaker depending on
which one was selected in the Speaker System setting
(see The Speaker System setting (VSX-827 only)
•
VSX-527 only: To connect the surround back or front
height speakers, an additional amplifier is required.
Connect the additional amplifier to the PRE OUT SURR
BACK/FRONT HEIGHT outputs of this unit and connect the
surround back or front height speakers to the additional
amplifier (see Connect the surround back or front height
speakers (In case of VSX-527) on page 12).
VSX-827 only: Another way, you can use the speakers
C
SR
SB
SL
FHR
R
C
SL
SR
connected to the B speaker terminals to listen to stereo
playback in another room. See Switching the speaker terminal
on page 14 for the listening options with this setup.
•
You will not be able to connect the B speakers if you
connect the front height speakers in the main zone.
Further, if you use the B speakers, a 5.1 ch playback will be
the maximum in the main zone. (No sound is output from
the surround back speaker.)
R
L
on page 50).
Where you put your speakers in the room has a big effect on
the quality of the sound. The following guidelines should help
you to get the best sound from your system.
•
It is best to angle the speakers towards the listening
position. The angle depends on the size of the room. Use
less of an angle for bigger rooms.
•
Refer to the chart below for placement of speakers you
intend to connect.
SW
FHL
L
30 30
—
Place the surround speakers at 120º from the center. If
you, (1) use the surround back speaker, and, (2) don’t use
the front height speakers, we recommend placing the
surround speaker right beside you.
—
If you intend to connect only one surround back
speakers, place it directly behind you.
—
If the surround speakers cannot be set directly to the side
of the listening position with a 7.1-channel system, the
surround effect can be enhanced by turning off the Up
Mix function (see Setting the Up Mix function
•
For the best stereo effect, place the front speakers 2 m to
3 m apart, at equal distance from the TV.
•
If you’re using a center speaker, place the front speakers at
a wider angle. If not, place them at a narrower angle.
•
Place the center speaker above or below the TV so that the
sound of the center channel is localized at the TV screen.
Also, make sure the center speaker does not cross the line
formed by the leading edge of the front left and right
speakers.
SL
120 120
60
SBL
SB
FHR
C
R
SR
SBR
on page 36).
11
2
2
•
Surround and surround back speakers should be
positioned 60 cm to 90 cm higher than your ears and titled
slight downward. Make sure the speakers don’t face each
other. For DVD-Audio, the speakers should be more directly
behind the listener than for home theater playback.
•
Try not to place the surround speakers farther away from
the listening position than the front and center speakers.
Doing so can weaken the surround sound effect.
•
Place the left and right front height speakers at least one
meter directly above the left and right front speakers.
•
If you’re going to place speakers around your CRT TV, use
shielded speakers or place the speakers at a sufficient
distance from your CRT TV.
•
The subwoofer can be placed on the floor. Ideally, the other
speakers should be at about ear-level when you’re listening
to them. Putting the speakers on the floor (except the
subwoofer), or mounting them very high on a wall is not
recommended.
•
When not connecting a subwoofer, connect speakers with
low frequency reproduction capabilities to the front
channel. (The subwoofer’s low frequency component is
played from the front speakers, so the speakers could be
damaged.)
•
After connecting, be sure to conduct the Auto MCACC
(speaker environment setting) procedure.
See Automatically setting up for surround sound (MCACC)
on page 23.
•
Make sure that all speakers are securely installed. This not
only improves sound quality, but also reduces the risk of
damage or injury resulting from speakers being knocked
over or falling in the event of external shocks such as
earthquakes.
Connecting the speakers
The receiver will work with just two stereo speakers (the front
speakers in the diagram) but using at least three speakers is
recommended, and a complete setup is best for surround
sound.
Make sure you connect the speaker on the right to the right (R)
terminal and the speaker on the left to the left (L) terminal.
Also make sure the positive and negative (+/–) terminals on
the receiver match those on the speakers.
You can use speakers with a nominal impedance between 6 Ω
and 16 Ω.
Be sure to complete all connections before connecting this unit
to the AC power source.
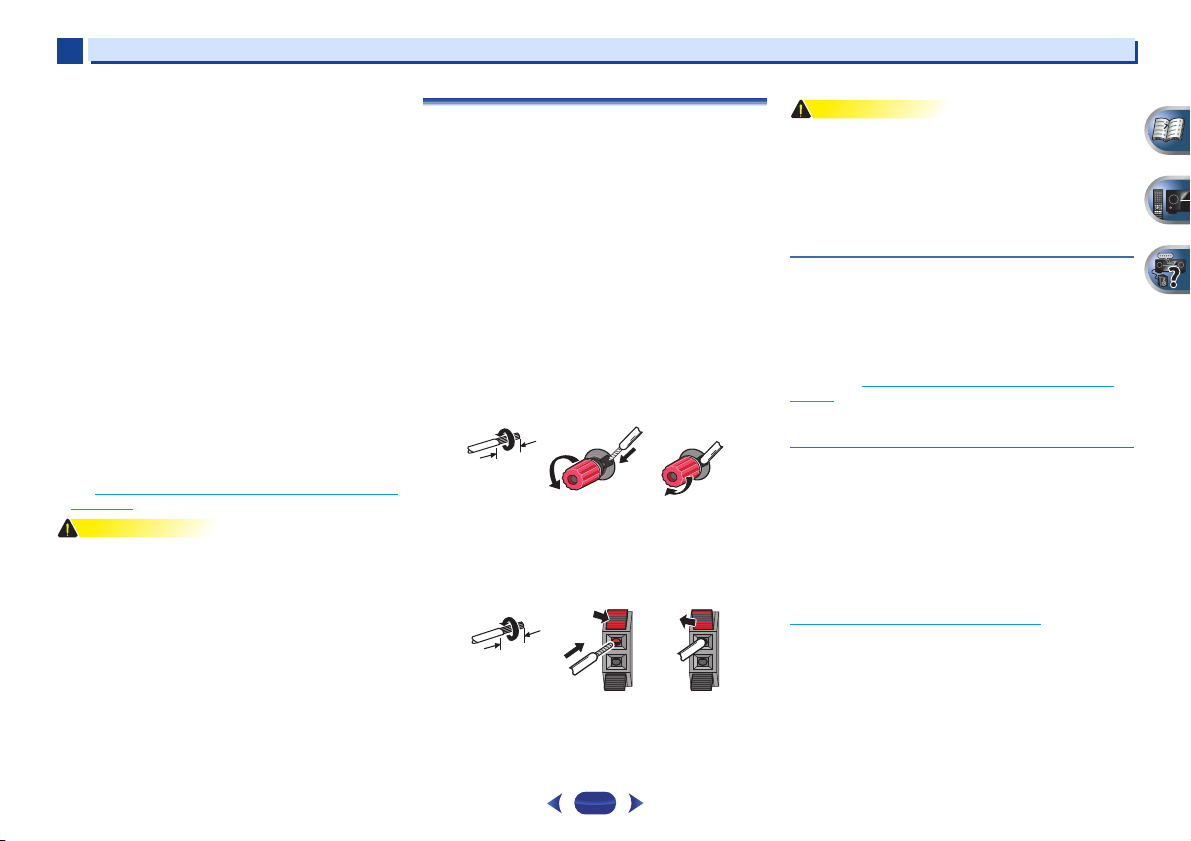
Bare wire connections
1
Twist exposed wire strands together.
2
Loosen terminal and insert exposed wire.
3
Tighten terminal.
12 3
Connect the wires to the B-Speakers terminals of the VSX-827 as
shown below:
1
Twist exposed wire strands together.
2
Push open the tabs and insert exposed wire.
3
Release the tabs.
12 3
Connecting your equipment
•
These speaker terminals carry HAZARDOUS LIVE voltage.
To prevent the risk of electric shock when connecting or
disconnecting the speaker cables, disconnect the power
cord before touching any uninsulated parts.
•
Make sure that all the bare speaker wire is twisted together
and inserted fully into the speaker terminal. If any of the
bare speaker wire touches the back panel it may cause the
power to cut off as a safety measure.
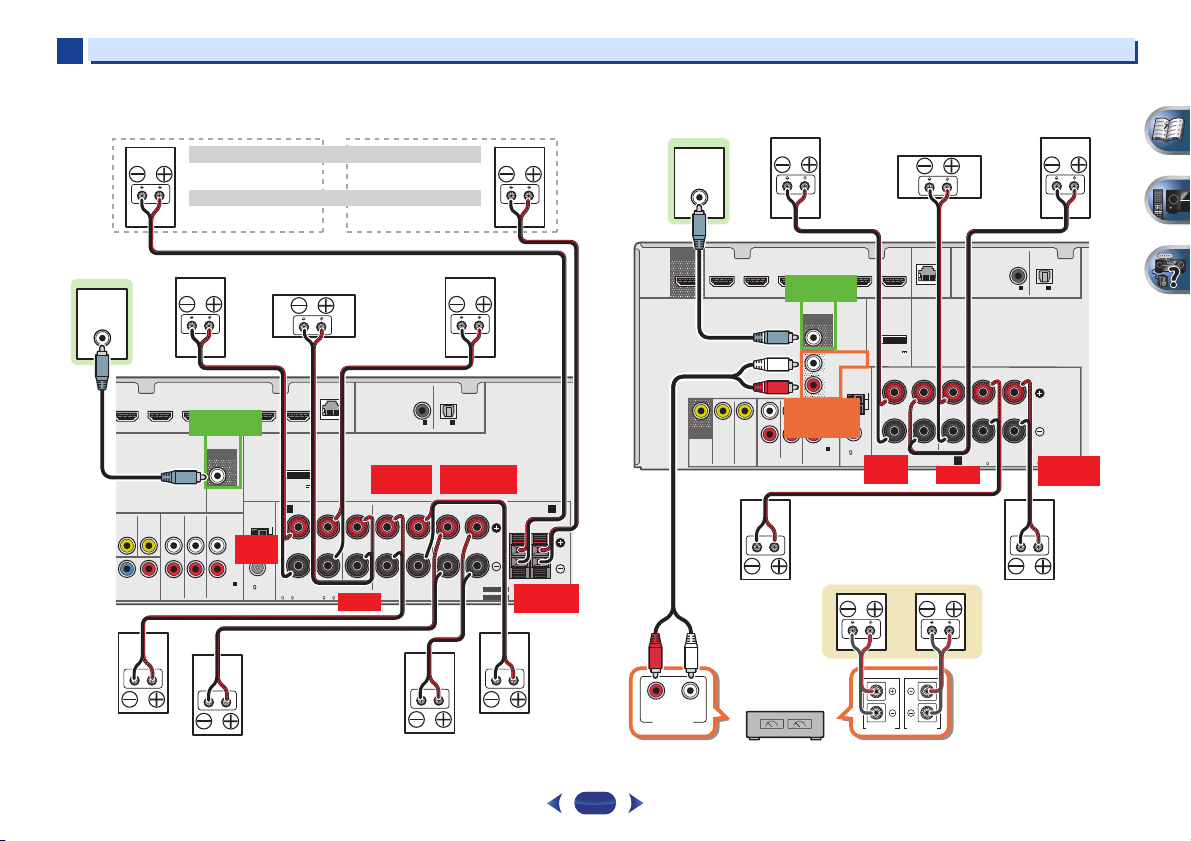
Connect the surround back or front height
speakers (In case of VSX-827)
The Speaker System setting must be set if the above
connections are performed. Select Surr.Back if the surround
back speaker is connected and Height if the front height
speaker is connected (If neither the surround back speaker
nor the front height speaker is connected, either setting will
suffice) (see The Speaker System setting (VSX-827 only)
page 50).
•
When using only one surround back speaker, connect it to
the SURROUND BACK L (Single) terminals.
on
Connect the surround back or front height
speakers (In case of VSX-527)
Connect the PRE OUT SURR BACK/FRONT HEIGHT outputs
of the unit and additional amplifier to add a surround back or
front height speaker.
The Pre Out setting must be set if the above connections are
performed. Select Surr.Back if the surround back speaker is
connected and Height if the front height speaker is
connected (If neither the surround back speaker nor the front
height speaker is connected, either setting will suffice) (see
The Pre Out Setting (VSX-527 only)
•
You can use the additional amplifier on the surround back
channel pre-outs for a single speaker as well. In this case
plug the amplifier into the left (L (Single)) terminal only.
on page 51).
12
2
Front height setting
Speaker B setting
Front right
Subwoofer
Center
Front left
Surround right
Surround left
Surround
back right
Surround
back left
Front height right
Speaker B — right
Front height left
Speaker B — left
The front height terminals can also be used for Speaker B.
When using only one surround back speaker, connect it
to the SURROUND BACK L (Single) terminals.
Center
Surround right
Front right
Front left
Subwoofer
Surround left
Right
Surround back or
front height speakers
Surround back or front height
channel amplifier
Left
2
VSX-827 connection diagram VSX-527 connection diagram
LINE LEVEL
HDMI
OUT
INPUT
MONITOR
OUT
ADAPTER PORT
(
OUTPUT 5 V
0.1 A MAX
A
RL
CAUTION:
SPEAKER IMPEDANCE
6 -16 .
LAN
)
FRONT
ATTENTION:
ENCEINTE D’IMPEDANCE DE
6 -16 .
LINE LEVEL
INPUT
DVD GAME VIDEOBD
IN
PB PR
NENT VIDEO
PREOUT
SAT/CBL DVR/BDR
SUBWOOFER
AUDIO
DVD INSAT/CBL
DVD
SAT/CBL
IN
PRE OUT
SUB WOOFER
ANTENNA
AM LOOP
FRONT
L
IN
R L
R
FM UNBAL
1
1
ANALOG IN
75
(CD)
ASSIGNABLE
(10/100
CENTER
CENTER
)
COAXIAL
ASSIGNABLE
IN1IN
(CD)
SURROUND
R L
SURROUND
RL
SPEAKERS
OPTICAL
ASSIGNABLE
1
(TV)
SURROUND BACK
R L
SURROUND BACK FRONT HEIGHT /
(
)
Single
RL
SELECTABLE
SEE INSTRUCTION MANUAL
FRONT HEIGHT
VOIR LE MODE D’EMPLOI
SELECTABLE
RL
B
R L
DVD GAME VIDEOBD
IN
PREOUT
SAT/CBL DVR/BDR
SUBWOOFER
PREOUT
SURR BACK/
DVD INSAT/CBL
FRONT HEIGHT
DVD
SAT/CBL
VIDEO
IN
PRE OUT
SUB WOOFER
PRE OUT
ANALOG IN
ASSIGNABLE
AUDIO
SURR BACK/
FRONT HEIGHT
L
(
)
Single
R
L
IN
R
(CD)
1
1
ANTENNA
AM LOOP
FM UNBAL
75
Connecting your equipment
(
)
CENTER
A
CENTER
COAXIAL
ASSIGNABLE
SURROUND
RL
CAUTION:
SPEAKER IMPEDANCE
6 -16 .
ADAPTER PORT
(
OUTPUT 5 V
0.1 A MAX
Class 2 Wiring
FRONT
R L
LAN
10/100
)
FRONT
RL
SPEAKERS
IN1IN
(TV)
(CD)
ATTENTION:
ENCEINTE D’IMPEDANCE DE
6 —16 .
OPTICAL
ASSIGNABLE
1
SURROUND
R L
13
RL
ANALOG
AUDIO IN
SPEAKER R SPEAKER L
2
2
Switching the speaker terminal
Use
SPEAKERS
off. When the SP OFF is selected, no sound is output from the
speakers connected to this receiver.
VSX-827 only: If you selected Surr.Back in The Speaker System
setting (VSX-827 only) on page 50, you can switch between
speakers using the
the button will simply switch your main speaker terminal on or
off. The options below are for the Surr.Back setting only.
Use the
speaker terminal setting.
Press repeatedly to choose a speaker terminal option:
•
SPA – Sound is output from the speakers connected to
the A-speaker terminals and PRE OUT SURR BACK/FRONT
HEIGHT (VSX-527 only) (multichannel playback is possible).
•
SPB (VSX-827 only) – Sound is output from the two
speakers connected to the B-speaker terminals (only stereo
playback is possible).
•
SPAB (VSX-827 only) – Sound is output from the Aspeaker terminals, the two speakers in the B-speaker
terminals, and the subwoofer. Multichannel sources are
downmixed only when the STEREO or STEREO ALC mode
is selected for stereo output from A- and B-speaker
terminals.
•
SP – No sound is output from the speakers.
•
VSX-827 only: The subwoofer output depends on the
settings you made in Speaker Setting
if SPB is selected above, no sound is heard from the
subwoofer (the LFE channel is not downmixed).
•
All speaker terminals are switched off (SP) when
headphones are connected. SPB can be selected even
when headphones are connected for VSX-827.
button to change the speaker system on or
SPEAKERS
SPEAKERS
SPEAKERS DIMMER DISPLAY
button. If you selected Height,
button on the front panel to select a
on page 47. However,
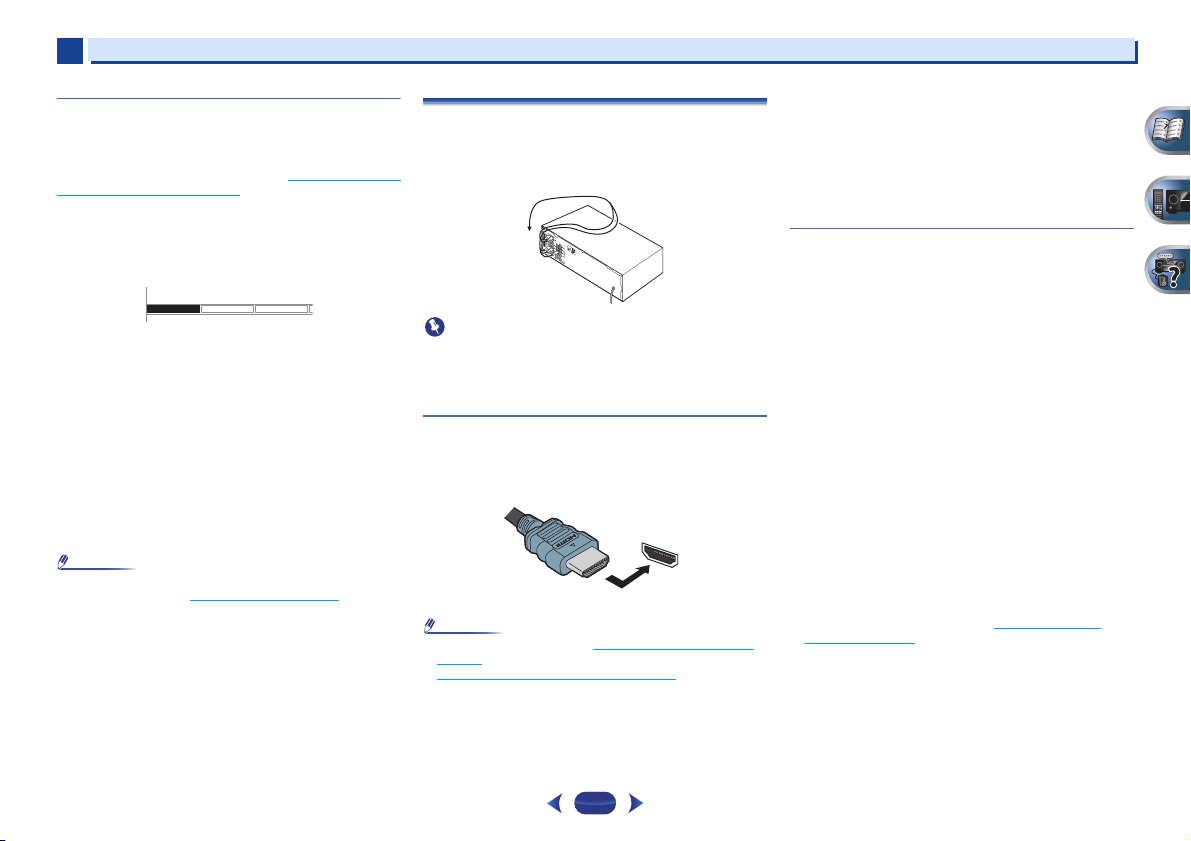
Making cable connections
Make sure not to bend the cables over the top of this unit (as
shown in the illustration). If this happens, the magnetic field
produced by the transformers in this unit may cause a
humming noise from the speakers.
•
Before making or changing connections, switch off the
power and disconnect the power cord from the AC outlet.
•
Before unplugging the power cord, switch the power into
standby.
HDMI cables
Both video and sound signals can be transmitted
simultaneously with one cable. If connecting the player and
the TV via this receiver, for both connections, use HDMI
cables.
HDMI
Be careful to connect the terminal in the proper direction.
•
Set the HDMI parameter in Setting the Audio options on
page 37 to THRU (THROUGH) and set the input signal in
Selecting the audio input signal
want to hear HDMI audio output from your TV (no sound
will be heard from this receiver).
on page 25 to HDMI, if you
Connecting your equipment
•
If the video signal does not appear on your TV, try adjusting
the r esolution s ettings on y our comp onent or display. Note
that some components (such as video game units) have
resolutions that may not be displayed. In this case, use a
(analog) composite connection.
•
When the video signal from the HDMI is 480i, 480p, 576i or
576p, Multi Ch PCM sound and HD sound cannot be
received.
About HDMI
The HDMI connection transfers uncompressed digital video,
as well as almost every kind of digital audio that the
connected component is compatible with, including DVDVideo, DVD-Audio, SACD, Dolby Digital Plus, Dolby TrueHD,
DTS-HD Master Audio (see below for limitations), Video CD/
Super VCD and CD.
This receiver incorporates High-Definition Multimedia
Interface (HDMI
This receiver supports the functions described below through
HDMI connections.
•
Digital transfer of uncompressed video (contents protected
by HDCP (1080p/24, 1080p/60, etc.))
•
3D signal transfer
•
Deep Color signal transfer
•
x.v.Color signal transfer
•
Audio Return Channel
•
Input of multi-channel linear PCM digital audio signals
(192 kHz or less) for up to 8 channels
•
Input of the following digital audio formats:
– Dolby Digital, Dolby Digital Plus, DTS, High bitrate audio
(Dolby TrueHD, DTS-HD Master Audio), DVD-Audio, CD,
SACD (DSD 2 ch only), Video CD, Super VCD
•
Synchronized operation with components using the
Control with HDMI function (see Control with HDMI
function on page 53)
®
) technology.
14

2
Coaxial digital
audio cable
Optical cable
Green (Y)
Red (PR)
Blue (PB)
2
Connecting your equipment
•
Use a High Speed HDMI® cable. If HDMI cable other than
a High Speed HDMI
properly.
•
When an HDMI cable with a built-in equalizer is connected,
it may not operate properly.
•
3D, Deep Color, x.v.Color signal transfer and Audio Return
Channel are only possible when connected to a compatible
component.
•
HDMI format digital audio transmissions require a longer
time to be recognized. Due to this, interruption in the audio
may occur when switching between audio formats or
beginning playback.
•
Turning on/off the device connected to this unit’s HDMI
OUT terminal during playback, or disconnecting/
connecting the HDMI cable during playback, may cause
noise or interrupted audio.
The terms HDMI and HDMI High-Definition Multimedia
Interface, and the HDMI Logo are trademarks or registered
trademarks of HDMI Licensing LLC in the United States and
other countries.
®
cable is used, it may not work
“x.v.Color” and are trademarks of Sony
Corporation.
Analog audio cables
Use stereo RCA phono cables to connect analog audio
components. These cables are typically red and white, and
you should connect the red plugs to R (right) terminals and
white plugs to L (left) terminals.
L
AUDIO
R
Digital audio cables
Commercially available coaxial digital audio cables or optical
cables should be used to connect digital components to this
receiver.
COAXIAL
IN
•
When connecting optical cables, be careful when inserting
the plug not to damage the shutter protecting the optical
socket.
•
When storing optical cable, coil loosely. The cable may be
damaged if bent around sharp corners.
•
You can also use a standard RCA video cable for coaxial
digital connections.
OPTICAL
IN
Video cables
Standard RCA video cables
These cables are the most common type of video connection
and are used to connect to the composite video terminals. The
yellow plugs distinguish them from cables for audio.
VIDEO
Component video cables (VSX-827 only)
Use component video cables to get the best possible color
reproduction of your video source. The color signal of the TV is
divided into the luminance (Y) signal and the color (P
signals and then output. In this way, interference between the
signals is avoided.
COMPONENT VIDEO
Y
P
B
P
B and PR)
R
15
2
VIDEO
IN
IN
HDMI
VIDEO
MONITOR
OUT
HDMI
OUT
IN
COMPONENT VIDEO
YPBP
R
Terminal for connection with source device
Terminal for connection with TV monitor
Playback component
TV
Video signals can be output.
The OSD will
not appear.
This item incorporates copy protection technology that is
protected by U.S. patents and other intellectual property
rights of Rovi Corporation. Reverse engineering and
disassembly are prohibited.
Terminal for connection with
source device
Terminal for connection
with TV monitor
Playback component
TV
The OSD will
not appear.
Video signals can be output.
2
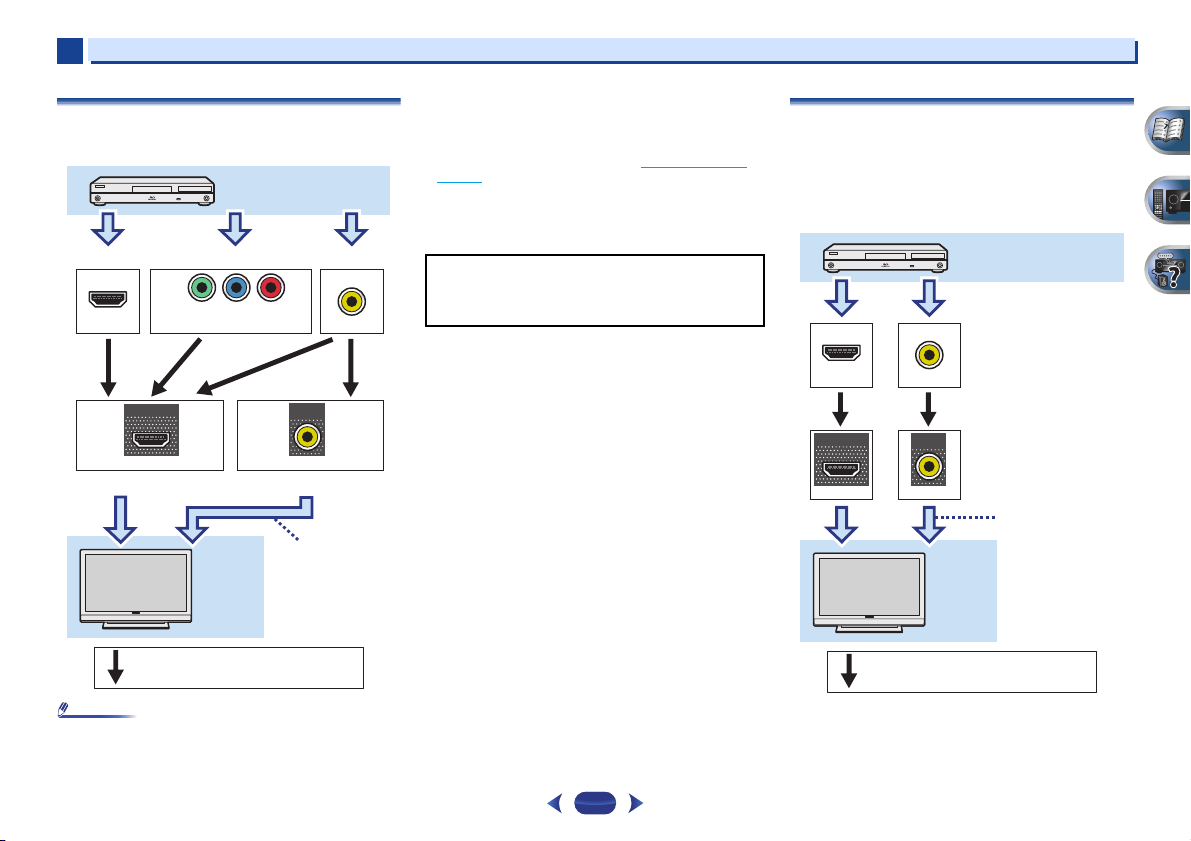
About the video converter (VSX-827 only)
The video converter ensures that all video sources are output
from the HDMI OUT terminal.
•
If the video signal does not appear on your TV, try adjusting
the resolution settings on your component or display. Note
that some components (such as video game units) have
resolutions that may not be converted. In this case, try
switching Video Converter OFF (see Video Converter
page 50).
•
The signal input resolutions that can be converted from the
component video input for the HDMI output are 480i/576i,
480p/576p, 720p and 1080i. 1080p signal cannot be
converted.
on
Connecting your equipment
About video outputs connection
(VSX-527 only)
This receiver is not loaded with a video converter. When you
use HDMI cables for connecting to the input device, the same
cables should be used for connecting to the TV.
The signals input from the analog (composite) video inputs of
this unit will not be output from the HDMI OUT terminal.
•
If several video components are assigned to the same input
function, the converter gives priority to HDMI, component,
then composite (in that order).
16
IN
HDMI
OUT
HDMI
IN
VIDEO
MONITOR
OUT
VIDEO
2
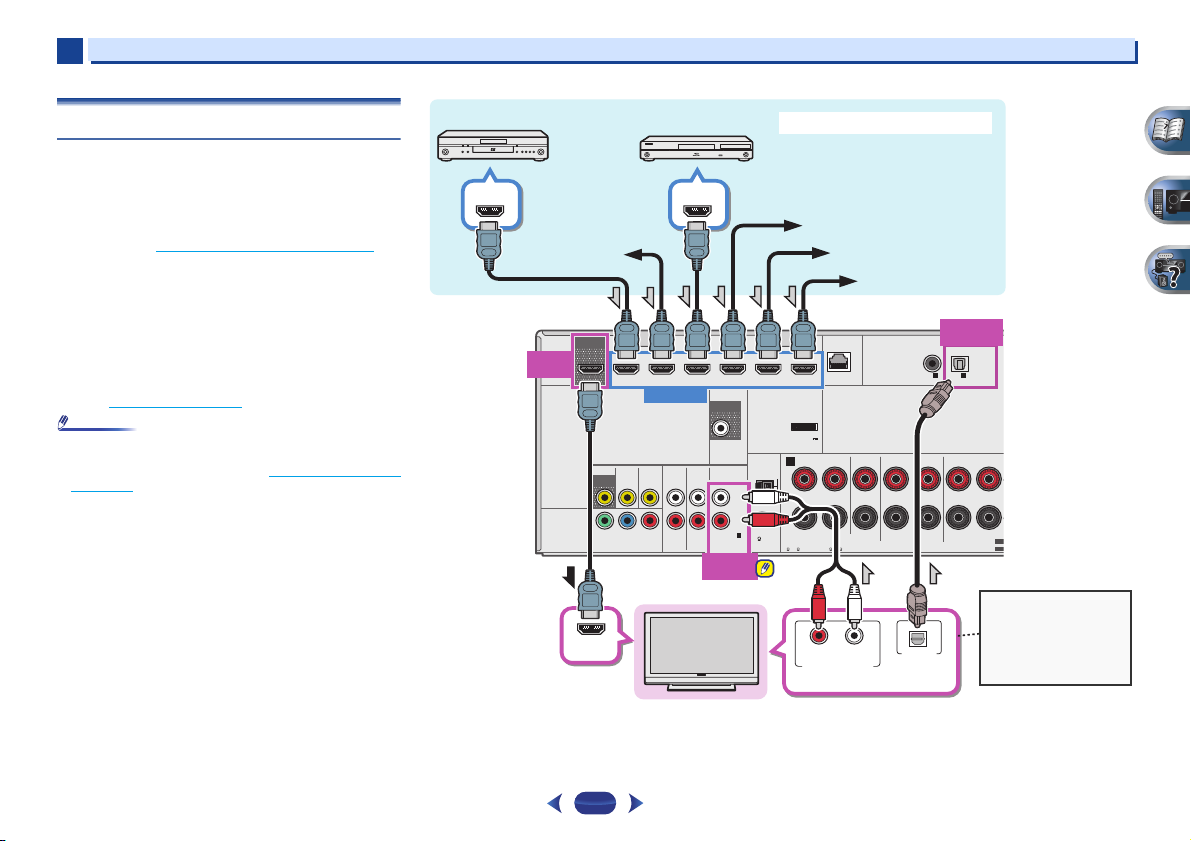
Select one
HDMI/DVI-compatible TV
Set-top box
DVD player
Blu-ray Disc player
Game console
HDMI/DVI-compatible components
If the TV does not support
the HDMI Audio Return
Channel function, this
connection is required to
listen to the TV sound over
the receiver.
DVD recorder,
Blu-ray Disc recorder
Video component
VSX-827
2
Connecting a TV and playback components
Connecting using HDMI
If you have an HDMI or DVI (with HDCP) equipped component
(Blu-ray Disc player, etc.), you can connect it to this receiver
using a commercially available HDMI cable.
If the TV and playback components support the Control with
HDMI feature, the convenient Control with HDMI functions
can be used (see Control with HDMI function
•
The following connection/setting is required to listen to the
sound of the TV over this receiver.
—
If the TV does not support the HDMI Audio Return
Channel function, connect the receiver and TV with audio
cables (as shown).
—
If the TV supports the HDMI Audio Return Channel
function, the sound of the TV can be input to the receiver
via the HDMI terminal, so there is no need to connect an
audio cable. In this case, set ARC at HDMI Setup to ON
(see HDMI Setup
•
In or der to liste n to the audi o from the TV tha t is connect ed
to this receiver using an analog audio cables, set-up for
analog audio input is required (see The Input Assign menu
on page 50).
on page 53).
on page 53).
HDMI OUT
HDMI
HDMI
OUT
IN
(
DVD
ASSIGNABLE
OUT
DVD GAME VIDEOBD
VIDEO
MONITOR
OUT
IN
1
1
)
YPBP
COMPONENT VIDEO
HDMI OUT
IN
SAT/CBL DVR/BDR
HDMI IN
PRE OUT
SUB WOOFER
L
IN
R
1
1
ANALOG IN
(CD)
ASSIGNABLE
ANALOG
IN1 (CD)
ANTENNA
AM LOOP
FM UNBAL
75
AUDIO
DVD INSAT/CBL
DVD
SAT/CBL
R
ADAPTER PORT
(
OUTPUT 5 V
0.1 A MAX
A
RL
CAUTION:
SPEAKER IMPEDANCE
6 -16 .
LAN
)
FRONT
ATTENTION:
ENCEINTE D’IMPEDANCE DE
6 -16 .
(10/100
)
CENTER
Connecting your equipment
OPTICAL
IN1 (TV)
COAXIAL
ASSIGNABLE
SURROUND
RLRL
SPEAKERS
IN1IN
(CD)
OPTICAL
ASSIGNABLE
1
(TV)
SURROUND BACK
(
)
Single
SEL
SEL
HDMI IN
17
RL
ANALOG AUDIO OUT
OPTICAL
DIGITAL AUDIO OUT
2
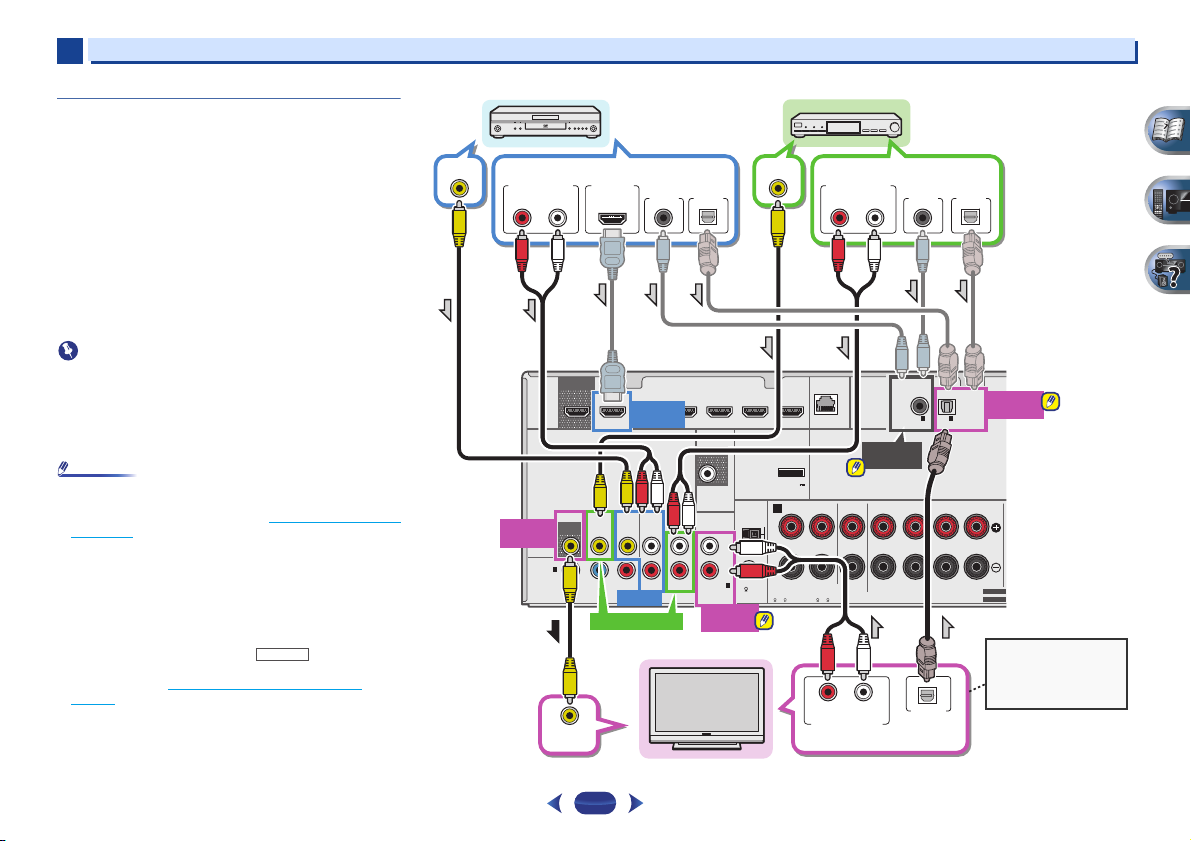
Select one Select one
Select one
TV
DVD player
Set-top box
This connection is
required in order to listen
to the sound of the TV
over the receiver.
VSX-827
2
Connecting your TV with no HDMI input
This diagram shows connections of a TV (with no HDMI input)
and DVD player (or other playback component) to the receiver.
•
With these connections, the picture is not output to the TV
even if the DVD player is connected with an HDMI cable.
Connect the DVD player’s video signals using a composite
cable.
•
In order to listening to HD audio with this receiver, connect
an HDMI cable, and use analog video cable for video signal
input.
Depending on the player, it may not be possible to output
video signals to both HDMI and other video output
(composite, etc.) simultaneously, and it may be necessary
to make video output settings. Please refer to the operating
instructions supplied with your player for more information.
•
When the receiver and TV are connected by composite
cable, the OSD function allowing display of the receiver’s
settings, operations, etc., on the TV’s screen cannot be
used. In this case, watch the receiver’s front panel display
while performing the various operations and making
settings.
•
In or der to liste n to the audi o from the TV tha t is connect ed
to this receiver using a analog audio cables, set-up for
analog audio input is required (see The Input Assign menu
on page 50).
•
Only one component can be connected to both the optical
input terminal and coaxial input terminal. If connecting
other devices, please use a different method to connect the
audio.
In order to listen to the audio from the source component
that is connected to this receiver using an optical cable or
a coaxial cable, first, switch to the DVD (DVD player) or
SAT/CBL (set-top box), then use and
SEL
to choose the audio signal O1 (OPTICAL1) or C1
(COAXIAL1) (see Selecting the audio input signal
page 25).
RECEIVER
SIGNAL
on
Connecting your equipment
L
IN
R
1
1
(CD)
ASSIGNABLE
ANALOG
IN1 (CD)
ANTENNA
AM LOOP
FM UNBAL
75
VIDEO OUT
ADAPTER PORT
(
OUTPUT 5 V
0.1 A MAX
A
CAUTION:
SPEAKER IMPEDANCE
6 -16 .
ANALOG AUDIO OUT
(10/100
LAN
)
FRONT
RL
ATTENTION:
ENCEINTE D’IMPEDANCE DE
6 -16 .
RL
ANALOG AUDIO OUT
RL
)
COAXIAL
ASSIGNABLE
COAXIAL
IN1 (CD)
CENTER
SURROUND
RLRL
SPEAKERS
DIGITAL AUDIO OUT
DIGITAL AUDIO OUT
OPTICALCOAXIAL
OPTICAL
ASSIGNABLE
1
IN1IN
(TV)
(CD)
SURROUND BACK
OPTICAL
(
Single
)
SELECTABLE
SELECTABLE
OPTICAL
IN1 (TV)
VIDEO OUT
ANALOG AUDIO OUT
RL
MONITOR
OUT
HDMI
IN
(
DVD
ASSIGNABLE
OUT
VIDEO
MONITOR
OUT
1
1
)
YPB PR
COMPONENT VIDEO
HDMI OUT
SAT/CBL
DIGITAL AUDIO OUT
HDMI
DVD IN
DVD GAME VIDEOBD
SAT/CBL DVR/BDR
AUDIO
DVD
IN
IN
DVD
SAT/CBL
DVD IN
OPTICALCOAXIAL
IN
PRE OUT
SUB WOOFER
ANALOG IN
SAT/CBL IN
VIDEO IN
18
2
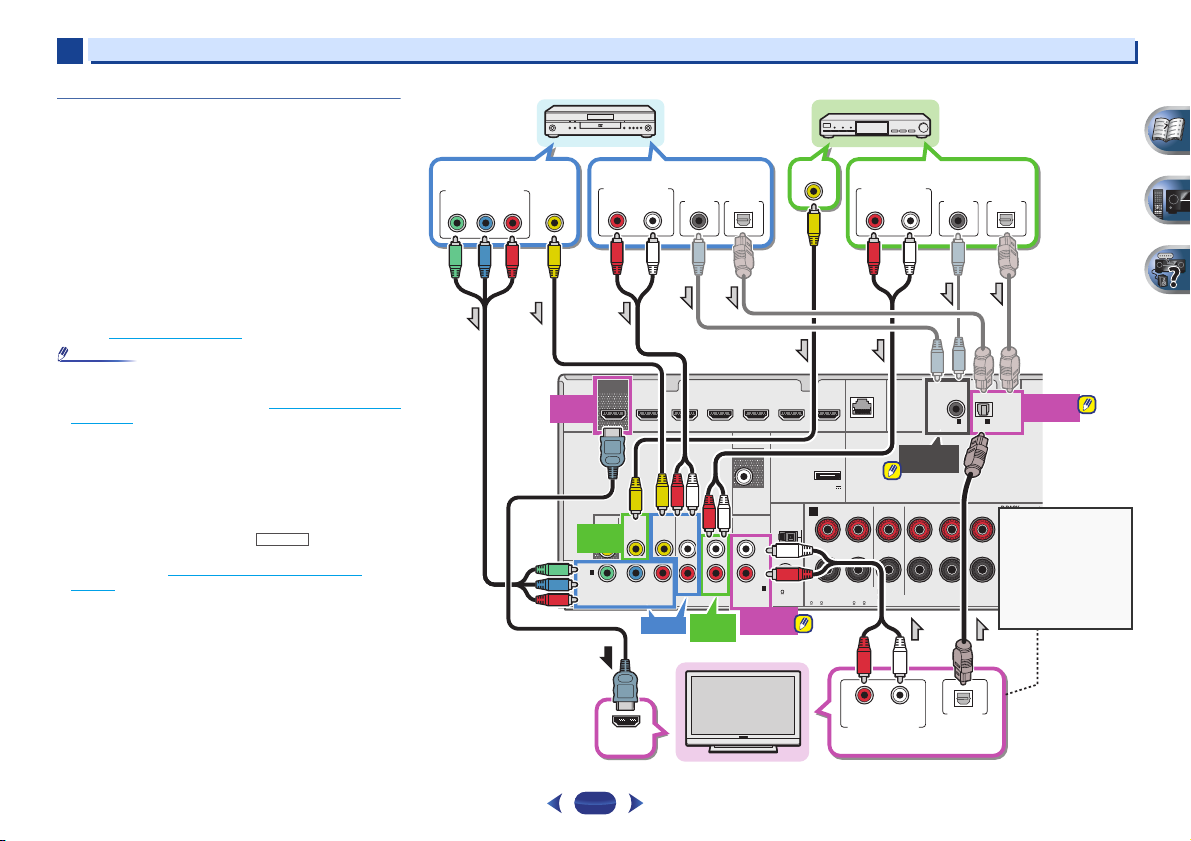
Select one
DVD player
Select one
Select one
Set-top box
If the TV does not
support the HDMI
Audio Return Channel
function, this
connection is required
to listen to the TV
sound over the
receiver.
Select one
HDMI/DVI-compatible TV
2
Connecting your DVD player with no HDMI
output (VSX-827 only)
This diagram shows connections of a TV (with HDMI input)
and DVD player (or other playback component with no HDMI
output) to the receiver.
•
The following connection/setting is required to listen to the
sound of the TV over this receiver.
—
If the TV does not support the HDMI Audio Return
Channel function, connect the receiver and TV with audio
cables (as shown).
—
If the TV supports the HDMI Audio Return Channel
function, the sound of the TV can be input to the receiver
via the HDMI terminal, so there is no need to connect an
audio cable. In this case, set ARC at HDMI Setup to ON
(see HDMI Setup
•
In or der to liste n to the audi o from the TV tha t is connect ed
to this receiver using a analog audio cables, set-up for
analog audio input is required (see The Input Assign menu
on page 50).
•
Only one component can be connected to both the optical
input terminal and coaxial input terminal. If connecting
other devices, please use a different method to connect the
audio.
In order to listen to the audio from the source component
that is connected to this receiver using an optical cable or
a coaxial cable, first, switch to the DVD (DVD player) or
SAT/CBL (set-top box), then use and
SEL
to choose the audio signal O1 (OPTICAL1) or C1
(COAXIAL1) (see Selecting the audio input signal
page 25).
on page 53).
RECEIVER
SIGNAL
on
COMPONENT VIDEO OUT
YPBP
VIDEO OUT
R
ANALOG AUDIO OUT
RL
OUT
HDMI
HDMI
OUT
VIDEO
MONITOR
SAT/CBL
SAT/CBL
OUT
IN
IN
1
1
IN
(
)
DVD
ASSIGNABLE
YPB PR
COMPONENT VIDEO
DIGITAL AUDIO OUT
OPTICALCOAXIAL
DVD GAME VIDEOBD
SAT/CBL DVR/BDR
AUDIO
DVD
IN
DVD
SAT/CBL
SAT/CBL
DVD IN
IN
IN
PRE OUT
SUB WOOFER
IN
ANALOG IN
(CD)
ASSIGNABLE
ANALOG
IN1 (CD)
L
R
1
1
ANTENNA
AM LOOP
FM UNBAL
75
VIDEO OUT
ADAPTER PORT
(
OUTPUT 5 V
0.1 A MAX
A
CAUTION:
SPEAKER IMPEDANCE
6 -16 .
ANALOG AUDIO OUT
(10/100
LAN
)
FRONT
RL
ATTENTION:
ENCEINTE D’IMPEDANCE DE
6 -16 .
Connecting your equipment
RL
)
CENTER
DIGITAL AUDIO OUT
OPTICALCOAXIAL
COAXIAL
ASSIGNABLE
COAXIAL
IN1 (CD)
SURROUND
RLRL
SPEAKERS
IN1IN
(CD)
OPTICAL
ASSIGNABLE
1
(TV)
SURROUND BACK
(
Single
OPTICAL
IN1 (TV)
)
SELECTABLE
SELECTABLE
19
HDMI IN
RL
ANALOG AUDIO OUT
OPTICAL
DIGITAL AUDIO OUT
2
Bluetooth® ADAPTER
VSX-527
to LAN port
LAN cable
(sold separately)
Router
Modem
Internet
VSX-527
PC
2
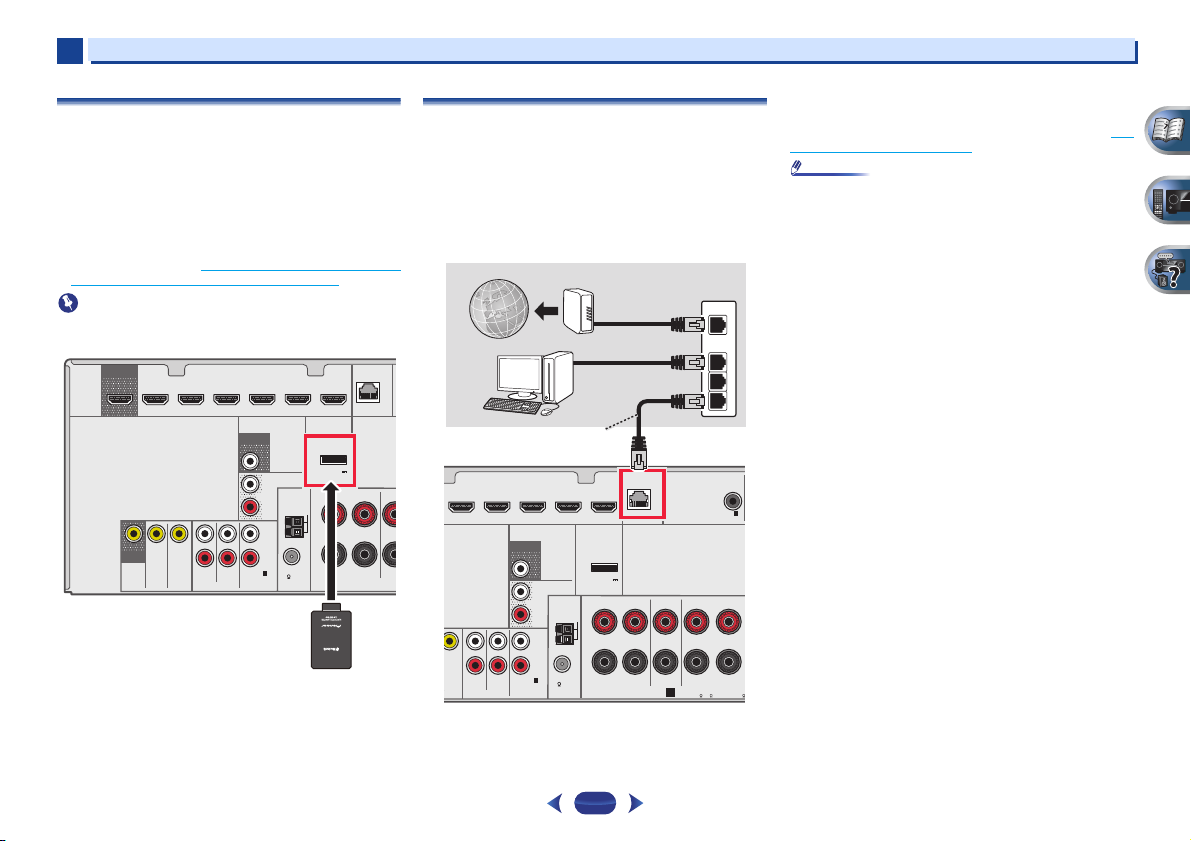
Connecting your equipment
Connecting optional
When the Bluetooth ADAPTER (Pioneer Model No. AS-BT100
or AS-BT200) is connected to this unit, a product equipped
with Bluetooth wireless technology (portable cell phone,
digital music player, etc.) can be used to listen to music
wirelessly.
Connect a
terminal on the rear panel.
•
For instructions on playing the Bluetooth wireless
technology device, see Pairing the
Bluetooth wireless technology device on page 30.
•
Do not move the receiver with the Bluetooth ADAPTER
connected. Doing so could cause damage or faulty contact.
HDMI
Bluetooth
OUT
DVD GAME VIDEOBD
SAT/CBL
MONITOR
OUT
IN
Bluetooth
ADAPTER to the ADAPTER PORT
SAT/CBL DVR/BDR
DVD
IN
DVD
SAT/CBL
VIDEO
®
Bluetooth ADAPTER and
IN
PRE OUT
SUB WOOFER
SURR BACK/
FRONT HEIGHT
L
(
)
Single
ANTENNA
PRE OUT
R
AM LOOP
L
IN
R
FM UNBAL
(CD)
1
1
ANALOG IN
75
ASSIGNABLE
AUDIO
ADAPTER
ADAPTER PORT
(
OUTPUT 5 V
)
0.1 A MAX
FRONT
RL
(
LAN
10/100
SPEAKERS
Connecting to the network through LAN
interface
By connecting this receiver to the network via the LAN
terminal, you can listen to Internet radio stations. To listen to
Internet radio stations, you must sign a contract with an ISP
(Internet Service Provider) beforehand.
When connected in this way, you can play audio files stored
on the components on the local network, including your
computer.
)
)
(10/100
ADAPTER PORT
(
OUTPUT 5 V
0.1 A MAX
RL
)
FRONT
LAN
SPEAKERS
CENTER
A
CE
SAT/CBL DVR/BDR
DVD
IN
IDEO
Connect the LAN terminal on this receiver to the LAN terminal
on your router (with or without the built-in DHCP server
function) with a straight LAN cable (CAT 5 or higher).
IN
GAME VIDEOBD
PRE OUT
SUB WOOFER
SURR BACK/
FRONT HEIGHT
L
(
)
Single
ANTENNA
PRE OUT
R
AM LOOP
L
IN
R
FM UNBAL
(CD)
1
1
SAT/CBL
ANALOG IN
DVD
ASSIGNABLE
AUDIO
75
20
WAN
LAN
1
2
3
COAXIAL
ASSIGNABLE
1
IN
(CD)
SURROUND
RL
A
CAUTION:
EN
SPEAKER IMPEDANCE
6
6 -16 .
Turn on the DHCP server f unction of your router. In case you r
router does not have the built-in DHCP server function, it is
necessary to set up the network manually. For details, see The
Network Setup menu on page 41.
•
Refer to the operation manual of the equipment you have as
the connected equipment and connection method may
differ depending on your Internet environment.
•
When using a broadband Internet connection, a contract
with an Internet service provider is required. For more
details, contact your nearest Internet service provider.
2
75 Ω coaxial cable
One-touch PAL
connector
Outdoor
antenna
5 m to 6 m
Indoor antenna
(vinyl-coated wire)
2
Connecting your equipment
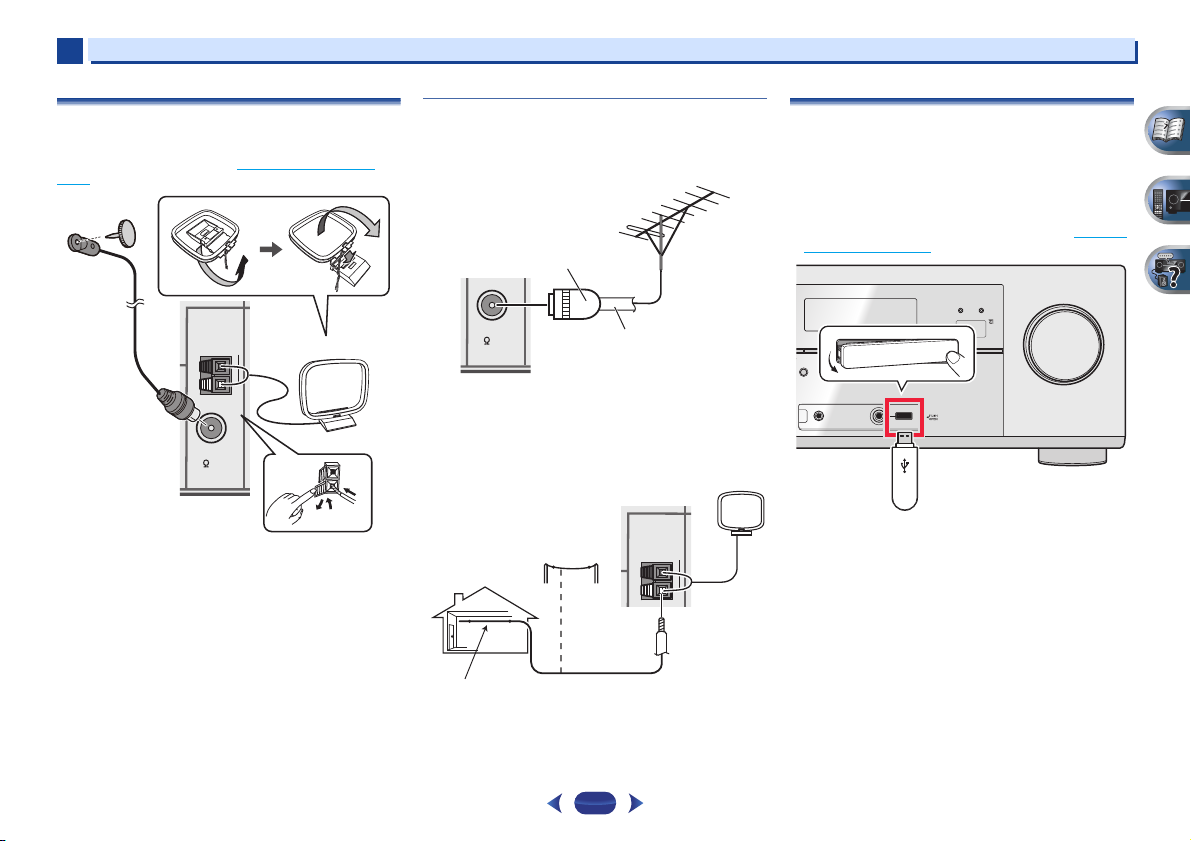
Connecting antennas
Connect the AM loop antenna and the FM wire antenna as
shown below. To improve reception and sound quality,
connect external antennas (see Using external antennas
below).
ANTENNA
AM LOOP
FM UNBAL
75
1
Push open the tabs, then insert one wire fully into each
terminal, then release the tabs to secure the AM antenna
wires.
2
Fix the AM loop antenna to the attached stand.
To fix the stand to the antenna, bend in the direction indicated
by the arrow then clip the loop onto the stand.
3
Place the AM antenna on a flat surface and in a direction
giving the best reception.
4
socket.
For best results, extend the FM antenna fully and fix to a wall
or door frame. Don’t drape loosely or leave coiled up.
Connect the FM wire antenna into the FM antenna
Using external antennas
To improve FM reception
Use a PAL connector (not supplied) to connect an external FM
antenna.
FM UNBAL
75
To improve AM reception
Connect a 5 m to 6 m length of vinyl-coated wire to the AM
antenna terminal without disconnecting the supplied AM
loop antenna.
For the best possible reception, suspend horizontally
outdoors.
ANTENNA
AM LOOP
21
Connecting a USB device
It is possible to play audio and photo files by connecting USB
devices to this receiver.
Switch the receiver into standby then connect your USB
device to the USB terminal on the front panel of this
receiver.
•
This receiver does not support a USB hub.
•
For instructions on playing the USB device, see Playing a
USB device on page 28.
iPod iPhone iPad
HDMI
CONTROL ON / OFF
BAND TUNER EDIT TUNE PRESET ENTER
O SURROUND
/
STANDARD SURR
EAM DIRECT
SOUND
ADVANCED
SURROUND
iPod iPhone iPad
RETRIEVER AIR
DIRECT CONTROL
USB
VIDEO
iPod
iPhone
iPad
MASTER
VOLUME
ALC/
MCACC
SETUP
MIC
Loading…

VSX-827-K/-S
AV-ресивер
VSX-527-K/-S
Зарегистрируйте Baшe изделие на http://www.pioneer-rus.ru (или http://www.pioneer.eu).
Oзнакомьтесь с преимуществами регистрации в Интернет

Содержание
Благодарим за покупку данного изделия компании Pioneer.
Подключение антенн . . . . . . . . . . . . . . . . . . . . . . . . . . . . 21
05 Прослушивание аудиозаписей
Пожалуйста, прочтите данные инструкции по эксплуатации
Использование внешних антенн. . . . . . . . . . . . . . . . . . . 21
Выбор режима прослушивания . . . . . . . . . . . . . . . . . . . . . 34
для надлежащего использования данной модели.
Подключение устройства USB . . . . . . . . . . . . . . . . . . . . . 21
Автоматическое воспроизведение . . . . . . . . . . . . . . . . . 34
Подключение iPod . . . . . . . . . . . . . . . . . . . . . . . . . . . . . . 22
Прослушивание материала с использованием объемного
Перед началом работы
. . . . . . . . . . . . . . . . . . . . . . . 6
Подключение ресивера к электророзетке . . . . . . . . . . . . . 22
звучания . . . . . . . . . . . . . . . . . . . . . . . . . . . . . . . . . . . . 34
Проверка комплекта поставки . . . . . . . . . . . . . . . . . . . . . . 6
Использование дополнительного объемного звучания . . 35
Установка ресивера . . . . . . . . . . . . . . . . . . . . . . . . . . . . . . 6
03 Основная настройка
Использование функции Stream Direct
Отмена функции Auto Power Down (автоматическое
(Прямое воспроизведение) . . . . . . . . . . . . . . . . . . . . . . 35
Порядок выполнения настроек на ресивере
. . . . 6
отключение питания) . . . . . . . . . . . . . . . . . . . . . . . . . . . . 23
Использование функции Sound Retriever
Отмена режима демонстрации дисплея . . . . . . . . . . . . . . . 23
(Восстановление звучания) . . . . . . . . . . . . . . . . . . . . . . . . 35
01 Органы управления и индикаторы
Автоматическая настройка объемного звучания (MCACC)
. 23
Прослушивание с использованием эквалайзера
Передняя панель. . . . . . . . . . . . . . . . . . . . . . . . . . . . . . . . . 7
Проблемы при использовании автоматической настройки
акустической калибровки . . . . . . . . . . . . . . . . . . . . . . . . . 35
Дисплей . . . . . . . . . . . . . . . . . . . . . . . . . . . . . . . . . . . . . 8
MCACC . . . . . . . . . . . . . . . . . . . . . . . . . . . . . . . . . . . . . 24
Улучшение качества звучания с помощью функции Phase
Пульт ДУ . . . . . . . . . . . . . . . . . . . . . . . . . . . . . . . . . . . . . . 9
04 Основные операции воспроизведения
Control (Корректировка фазы) . . . . . . . . . . . . . . . . . . . . . . 36
Установка батареек . . . . . . . . . . . . . . . . . . . . . . . . . . . . 10
Воспроизведение источника . . . . . . . . . . . . . . . . . . . . . . . 25
Использование обработки заднего тылового канала . . . . . 36
Дальность действия пульта дистанционного
управления . . . . . . . . . . . . . . . . . . . . . . . . . . . . . . . . . . 10
Выбор входного аудиосигнала. . . . . . . . . . . . . . . . . . . . 25
Настройка функции Up Mix. . . . . . . . . . . . . . . . . . . . . . . . 36
Воспроизведение iPod. . . . . . . . . . . . . . . . . . . . . . . . . . . . 27
Настройка параметров звука . . . . . . . . . . .
. . . . . . . . . . . . 37
02 Подключение оборудования
Воспроизведение файлов, сохраненных на iPod . . . . . . . 27
Выбор количества громкоговорителей . . . . . . . . . . . . . . . 11
06 Воспроизведение с функцией NETWORK
Основные органы управления воспроизведением. . . . . . 27
Введение. . . . . . . . . . . . . . . . . . . . . . . . . . . . . . . . . . . . . . 39
Некоторые советы по улучшению качества звучания. . . 11
Просмотр фотографий и видеоконтента . . . . . . . . . . . . . 27
О воспроизводимых сетевых устройствах с поддержкой
Подключение громкоговорителей. . . . . . . . . . . . . . . . . . . 12
Воспроизведение устройства USB. . . . . . . . . . . . . . . . . . . 28
DLNA . . . . . . . . . . . . . . . . . . . . . . . . . . . . . . . . . . . . . . 39
Подключение задних громкоговорителей объемного
Воспроизведение аудиофайлов, сохраненных на
Использование AirPlay на iPod touch, iPhone, iPad и
звучания или передних верхних громкоговорителей
устройстве памяти USB . . . . . . . . . . . . . . . . . . . . . . . . . 28
iTunes . . . . . . . . . . . . . . . . . . . . . . . . . . . . . . . . . . . . . . 39
(Для VSX-827). . . . . . . . . . . . . . . . . . . . . . . . . . . . . . . . 12
Воспроизведение файлов фотографий, сохраненных на
О функции DHCP сервера . . . . . . . . . . . . . . . . . . . . . . . 39
Подключение задних громкоговорителей объемного
устройстве памяти USB . . . . . . . . . . . . . . . . . . . . . . . . . 28
Авторизация данного ресивера. . . . . . . . . . . . . . . . . . . . 39
звучания или передних верхних громкоговорителей
О воспроизводимых форматах файлов . . . . . . . . . . . . . . 29
Воспроизведение с функциями Network . . . . . . . . . . . . . . 40
(Для VSX-527). . . . . . . . . . . . . . . . . . . . . . . . . . . . . . . . 12
АДАПТЕР Bluetooth
®
для прослушивания музыки без
Основные органы управления воспроизведением. . . . . . 40
Переключение терминалов громкоговорителей . . . . . . . 14
проводов. . . . . . . . . . . . . . . . . . . . . . . . . . . . . . . . . . . . . . 30
Прослушивание Интернет—радиостанций . . . . . . . . . . . . 40
Подсоединение кабелей . . . . . . . . . . . . . . . . . . . . . . . . . . 14
Воспроизведение музыки по беспроводной связи . . . . . 30
Воспроизведение аудиофайлов, сохраненных на
Кабели HDMI . . . . . . . . . . . . . . . . . . . . . . . . . . . . . . . . 14
Соединение («спаривание«) АДАПТЕРА Bluetooth и
компонентах в сети . . . . . . . . . . . . . . . . . . . . . . . . . . . . 41
О HDMI. . . . . . . . . . . . . . . . . . . . . . . . . . . . . . . . . . . . . 14
устройства с беспроводным интерфейсом Bluetooth
. . . . . 30
Воспроизведение любимых песен . . . . . . . . . . . . . . . . . 41
Аналоговые аудиокабели. . . . . . . . . . . . . . . . . . . . . . . . 15
Прослушивание музыки c устройства, оборудованного
Меню Network Setup . . . . . . . . . . . . . . . . . . . . . . . . . . . . . 41
Цифровые аудиокабели . . . . . . . . . . . . . . . . . . . . . . . . . 15
беспроводной технологией Bluetooth, на данной
Конфигурация сети . . . . . . . . . . . . . . . . . . . . . . . . . . . . 42
Видеокабели . . . . . . . . . . . . . . . . . . . . . . . . . . . . . . . . . 15
системе . . . . . . . . . . . . . . . . . . . . . . . . . . . . . . . . . . . . . 31
Language (язык) . . . . . . . . . . . . . . . . . . . . . . . . . . . . . . . 43
О преобразователе видеосигнала (только VSX-827) . . . . . 16
AIR JAM . . . . . . . . . . . . . . . . . . . . . . . . . . . . . . . . . . . . 31
Обновление встроенного программного обеспечения. . . 43
Подключение ви
деовыходов (то
лько VSX-527) . . . . . . . . 16
Прослушивание радиопередач . . . . . . . . . . . . . . . . . . . . . 32
Возврат к заводским уст
ановкам . . . . . . . . . . . . . . . . . .
43
Подключение телевизора и компонентов
Улучшение звучания в диапазоне FM . . . . . . . . . . . . . . 32
Информация о системе. . . . . . . . . . . . . . . . . . . . . . . . . . 43
воспроизведения. . . . . . . . . . . . . . . . . . . . . . . . . . . . . . . . 17
Сохранение запрограммированных радиостанций . . . . . 32
О воспроизведении через сеть . . . . . . . . . . . . . . . . . . . . . . 44
Подключение с помощью HDMI . . . . . . . . . . . . . . . . . . 17
Прослушивание запрограммированных
Материал, воспроизводимый через сеть . . . . . . . . . . . . . 44
Подключение телевизора без входа HDMI. . . . . . . . . . . 18
радиостанций. . . . . . . . . . . . . . . . . . . . . . . . . . . . . . . . . 32
О характере воспроизведения через сеть . . . . . . . . . . . . 45
Подключение проигрывателя DVD без выхода HDMI
Присваивание названий запрограммированным
Справочник. . . . . . . . . . . . . . . . . . . . . . . . . . . . . . . . . . . . 45
(только VSX-827) . . . . . . . . . . . . . . . . . . . . . . . . . . . . . 19
радиостанциям. . . . . . . . . . . . . . . . . . . . . . . . . . . . . . . . 32
О воспроизводимых форматах файлов. . . . . . . . . . . . . . . . 46
Подключение дополнительного АДАПТЕРА
Введение в систему радиоданных RDS . . . . . . . . . . . . . . . 33
Bluetooth
®
. . . . . . . . . . . . . . . . . . . . . . . . . . . . . . . . . . . . . 20
Поиск программ RDS. . . . . . . . . . . . . . . . . . . . . . . . . . . 33
Подключение к сети через интерфейс LAN. . . . . . . . . . . . 20
Отображение информации RDS . . . . . . . . . . . . . . . . . . . 33
4

Содержание
07 Home Menu
10 Дополнительная информация
Использование «Home Menu» (главного меню). . . . . . . . . 47
Устранение неполадок . . . . . . . . . . . . . . . . . . . . . . . . . . . 62
Ручная настройка громкоговорителей. . . . . . . . . . . . . . . . 47
Общие сведения. . . . . . . . . . . . . . . . . . . . . . . . . . . . . . . 62
Настройка громкоговорителей. . . . . . . . . . . . . . . . . . . . 48
Функция NETWORK . . . . . . . . . . . . . . . . . . . . . . . . . . . 63
X.Over . . . . . . . . . . . . . . . . . . . . . . . . . . . . . . . . . . . . . . 48
HDMI . . . . . . . . . . . . . . . . . . . . . . . . . . . . . . . . . . . . . . 64
Уровень канала . . . . . . . . . . . . . . . . . . . . . . . . . . . . . . . 49
Важная информаци по подключению HDMI . . . . . . . . . 64
Расстояние до громкоговорителей . . . . . . . . . . . . . . . . . 49
Windows 7. . . . . . . . . . . . . . . . . . . . . . . . . . . . . . . . . . . . . 65
Меню назначения входов . . . . . . . . . . . . . . . . . . . . . . . . . 50
iPod/iPhone/iPad . . . . . . . . . . . . . . . . . . . . . . . . . . . . . . . . 65
Аналоговый вход. . . . . . . . . . . . . . . . . . . . . . . . . . . . . . 50
О FLAC . . . . . . . . . . . . . . . . . . . . . . . . . . . . . . . . . . . . . . 65
Компонентный вход (только VSX-827) . . . . . . . . . . . . . 50
О сообщениях, отображаемых при использовании функций
Настройка системы громкоговорителей (Speaker System)
сети . . . . . . . . . . . . . . . . . . . . . . . . . . . . . . . . . . . . . . . . . 66
(только VSX-827) . . . . . . . . . . . . . . . . . . . . . . . . . . . . . . . 50
Сброс параметров ресивера (перезагрузка) . . . . . . . . . . . . 66
Настройка параметров видеосигнала (Video Parameter)
Чистка устройства . . . . . . . . . . . . . . . . . . . . . . . . . . . . . . 66
(только VSX-827) . . . . . . . . . . . . . . . . . . . . . . . . . . . . . . . 50
Технические характеристики . . . . . . . . . . . . . . . . . . . . . . 67
Преобразователь видеосигнала . . . . . . . . . . . . . . . . . . . 50
Разрешение . . . . . . . . . . . . . . . . . . . . . . . . . . . . . . . . . . 51
Аспект. . . . . . . . . . . . . . . . . . . . . . . . . . . . . . . . . . . . . . 51
Настройка выхода предварительного усилителя
(только VSX-527) . . . . . . . . . . . . . . . . . . . . . . . . . . . . . . . 51
Меню Auto Power Down (автоматическое отключение
питания) . . . . . . . . . . . . . . . . . . . . . . . . . . . . . . . . . . . . . . 52
Меню Network Standby (Ожидание сети) . . . . . . . . . . . . . 52
Меню FL Demo Mode (режим демонстрации) . . . . . . .
. . . 52
08 Функция Control with HDMI (Управление по HDMI)
Подключение функции Управление по HDMI. . . . . . . . . . 53
HDMI Setup . . . . . . . . . . . . . . . . . . . . . . . . . . . . . . . . . . . 53
Перед использованием синхронизации . . . . . . . . . . . . . . . 54
О синхронизированных операциях . . . . . . . . . . . . . . . . . . 54
Меры предосторожности по функции Управление по
HDMI . . . . . . . . . . . . . . . . . . . . . . . . . . . . . . . . . . . . . . . . 54
09 Управление остальными частями системы
Настройка пульта дистанционного управления для
работы с другими компонентами . . . . . . . . . . . . . . . . . . . 55
Непосредственный ввод кодов компонентов. . . . . . . . . . . 55
Сброс параметров пульта дистанционного управления . . . 55
Органы управления телевизорами . . . . . . . . . . . . . . . . . . 56
Органы управления другими компонентами . . . . . . . . . . . 56
Список предварительно заданных кодов. . . . . . . . . . . . . . 56
5
04:13
Как выбрать ресивер Pioneer? Купить аудио ресивер Pioneer (Пионер).
05:26
Av receiver Pioneer vsx 527-k
14:25
Ресивер в качестве стереоусилителя: обзор на примере Pioneer VSX-416
04:25
Как правильно настроить аудио ресивер PIONEER для кристально чистого,мощного,глубокого звука дома.
01:06
Pioneer VSX527 VSX-527
08:25
Pioneer VSX-527 Распаковка, запуск, тест !
Нажмите на кнопку для помощи
В инструкции по применению, прилагавшейся к подстилке для кошки, было написано:
— Можно стирать в стиральной машине.
Затем было добавлено:
— Не забудьте убрать с подстилки кошку.
-
Страница 1
AV Receiver Operating Instructions Discov er the benefits of registering your product online at http://www .pioneer .co.uk (or http://www .pioneer .eu ). VSX-827 -K /-S VSX-527 -K /-S[…]
-
Страница 2
2 . The exclamation point within an equilateral triangle is intended to alert the user to the presence of important operating and maintenance (servicing) instructions in the literature accompanying the appliance. The lightning flash with arrowhead symbol, within an equilateral triangle, is intended to alert the user to the presence of uninsulated ?[…]
-
Страница 3
3 If the AC plug of this unit does not match the AC outlet you want to use, the plug must be removed and appropriate one fitted. Replacement and mounting of an AC plug on the power supply cord of this unit should be performed only by qualified ser vice personnel. If connected to an AC outlet, the cut-off plug can cause severe electrical shock. Make[…]
-
Страница 4
4 Thank you for buying this Pioneer product. Please read through these operating instructions so you will know how to operate your model properly. Before you start . . . . . . . . . . . . . . . . . . . . . . . . . . . . . 6 Checking what’s in the box . . . . . . . . . . . . . . . . . . . . . . . . . 6 Installing the receiver . . . . . . . . . . .[…]
-
Страница 5
Contents 5 07 Home Menu Using the Home Menu . . . . . . . . . . . . . . . . . . . . . . . . . . . 47 Manual speaker setup . . . . . . . . . . . . . . . . . . . . . . . . . . . 47 Speaker Setting . . . . . . . . . . . . . . . . . . . . . . . . . . . . . . . 47 X.Over . . . . . . . . . . . . . . . . . . . . . . . . . . . . . . . . . . . . . . 48 Chan[…]
-
Страница 6
6 Before you start Checking what’s in the box Please check that you’ve received the following supplied accessories: • Setup microphone • Remote control • AAA size IEC R03 dry cell batteries (to conf irm system operation) x2 • AM loop antenna • FM wire antenna • Power cord • iPod cable (VSX-827 only) • Warrant y card • Quick st[…]
-
Страница 7
1 1 Chapter 7 Controls and displays Front panel 1 INPUT SEL ECTOR dial Selects an input source ( page 25 ). 2 MCACC indicator Lights when Acoustic Calibration EQ ( page 35 ) is on (Acoustic Calibration EQ is automatically set to on after the Auto MCACC setup ( page 23 )). 3 Receiver control buttons SPEAKERS – See Switching the speaker terminal on[…]
-
Страница 8
Controls and displays 1 1 8 14 iPod iPhone iPad/USB terminal Use to connect your Apple iPod or USB mass stor age device as an audio source ( page 22 ). 15 SOUND RETRIEVER AIR When the button is pressed, the input switches to ADAPTER and the listening mode is automatically set to S.R AIR ( page 31 ). 16 iPod iPhone iPad DIRECT CO NTROL Change the re[…]
-
Страница 9
Controls and displays 1 1 9 Remote control • button is not used with this receiver. 1 SLEEP Press to change the amount of time before the receiver switches into standby ( 30 min – 60 min – 90 min – Off ). You can check the remaining sleep time at any time by pressing SLEEP once. 2 RECEIVER Switches the receiver between standby and on. 3[…]
-
Страница 10
Controls and displays 1 1 10 10 Number buttons and other component cont rols Use the number buttons to directly select a radio frequency ( page 32 ) or the tracks on a CD, etc. There are other buttons that can be accessed after is pressed. (For exam ple MIDNIGHT , etc.) EQ – Press to switch on/o ff Acoustic Calibration EQ setting ( page 35 ). PHA[…]
-
Страница 11
2 2 11 Chapter Connecting your equipment Determining the speakers’ application By connecting the left and right front speakers ( L / R ), the center speaker ( C ), the left and right surround speakers ( SL / SR ), the left and right surround back speakers ( SBL / SBR ) (or the left and right front height speakers ( FHL / FHR )), and the subwoofer[…]
-
Страница 12
Connecting your equipment 2 2 12 • Surround and surround back speakers should be positioned 60 cm to 90 cm higher than your ears and titled slight downward. Make sure the speakers don’t face each other. For DVD-Audio, the spea kers should be more directly behind the listener than for home theater playback. • Try not to place the surround spea[…]
-
Страница 13
Connecting your equipment 2 2 13 VSX-827 connection diagram VSX-527 connection diagram R L AUD I O O NENT VIDEO PRE OUT SPEAKERS ANTENNA OPTICAL COAXIAL LAN ( 10/100 ) DVD IN SA T/CBL IN DVD P B P R SA T/C BL ANALOG IN IN IN DVD GAME VIDEO BD SA T /CBL DVR/ BDR ( CD ) ( TV ) IN 1 IN 1 ( CD ) ASSIGNABLE ASSIGNABLE ASSIGNABLE 1 FM UNBAL 75 CAUTION: A[…]
-
Страница 14
Connecting your equipment 2 2 14 Switching the speaker term inal Use SPEAKERS button to change the speaker system on or off. When the SP OFF is selected, no sound is output from the speakers connected to this receiver. VSX-827 onl y: If you selected Su rr.Back in The Speaker Syste m setting (VSX-827 only) on page 50 , you can switch between speaker[…]
-
Страница 15
Connecting your equipment 2 2 15 Note • Use a High Speed HDMI ® cable. If HDMI cable other than a High Speed HDMI ® cable is used, it may not work properly. • When an HDMI cable with a built-in equalizer is connected, it may not operate properly. • 3D, Deep Color, x.v.Color signal transfer and Audio Return Channel are only possible when con[…]
-
Страница 16
Connecting your equipment 2 2 16 About the video converter (VSX-827 only) The video converter ensures that all video sources are output from the HDMI OUT terminal. Note • If several video components are assigned to the same input function, the converter gives priorit y to HDMI, component, then composite (in that order). • If the video signal do[…]
-
Страница 17
Connecting your equipment 2 2 17 Connecting a TV and playback components Connecting using HDMI If you have an HDMI or DVI (with HDCP) equipped component (Blu-ray Disc play er, etc.), you can connect it to this re ceiver using a commercially av ailable HDMI cable. If the TV and playback components support the Control with HDMI feature, the convenien[…]
-
Страница 18
Connecting your equipment 2 2 18 Connecting your TV with no HDMI input This diagram shows connections of a TV (with no HDMI input) and DVD player (or other playback component) to the receiv er. • With these connections, the picture is not output to the TV even if the DVD player is connected with an HDMI cable. Connect the DVD player’s video sig[…]
-
Страница 19
Connecting your equipment 2 2 19 Connecting your DVD player with no HDMI output (VSX-827 only) This diagram shows connections of a TV (with HD MI input) and DVD player (or other playback component with no HDMI output) to the receiver. • The following connection/setting is required to listen to the sound of the TV over this receiver. — If the TV d[…]
-
Страница 20
Connecting your equipment 2 2 20 Connecting optional Bluetooth ® ADAPTER When the Bluetoo th ADAPTER (Pioneer Model No. AS-BT100 or AS-BT200) is connected to this unit, a product equipped with Bluetooth wireless technology ( portable cell phone, digital music player, etc.) can be used to listen to music wirelessly. Connec t a Bluetooth ADAPTER[…]
-
Страница 21
Connecting your equipment 2 2 21 Connecting antennas Connect the AM loop antenna and the FM wire antenna as shown below. To improve re ception and sound quality, connect external antennas (see Using external antennas below ). 1 Push open the tabs, then insert on e wire fully into each terminal, then releas e the tabs to secure the AM antenna wires.[…]
-
Страница 22
Connecting your equipment 2 2 22 Connecting an iPod This receiver has a dedicated iPod terminal that will allow you to control playback of audi o content from your iPod using the controls of this receiver. Switch the receiver into standby, and then use the iPod cable to connect your iPod to the iPod iPho ne iPad USB terminal on th e front panel[…]
-
Страница 23
3 Chapter 3 23 Basic Setup Canceling the Auto Power Down When this receiver is not used over a period of seve ral hours, it will power down automatica lly. The automatic power-off timer is set to six hours under factory settings, and the timing can be changed or the power- off function switched of f altogether. For details, see The Auto Power Down […]
-
Страница 24
Basic Setup 3 3 24 5 Select ‘Auto MCACC’ fro m the Home Menu, then press ENTER . • Mic In! blinks when the microphone is not connected to MCACC SETU P MIC jack . Try to be as quiet as possible after pressing ENTER . The system outputs a se ries of test tones to establish the ambient noise level. 6 Follow the instructio ns on-screen. • Make […]
-
Страница 25
4 Chapter 4 25 Basic playback Playing a s ource Here are the basic instructions for playing a source (such as a DVD disc) with your home theater system. 1 Switch on your system components and receiver. Start by switching on the playback component (for example a DVD player), your TV and subwoofer (if you have one), then the receiver (press RECEI[…]
-
Страница 26
Basic playback 4 4 26 • When digital input (optical or coaxial) is selected, this receiver can only play back Dolby Digital, PCM (32 kHz t o 96 kHz) and DTS (including DTS 96 kHz/24 bit) digital signal formats. The compatible signals via the HDMI terminals are: Dolby Digital, DTS, SA CD ( DSD 2 ch only), PCM (32 kHz to 192 kHz sampling frequencie[…]
-
Страница 27
Basic playback 4 4 27 Playing an iPod This receiver has the iPod iPhone iPad USB terminal that will allow you to control playback of audio content from your i Pod using the controls of this receiver. Important • Pioneer cannot under any circumstances accept responsibility for any direct or indirect loss arising from any inconvenience or loss of r[…]
-
Страница 28
Basic playback 4 4 28 2 Press iPod CTRL again to s witch back to the receiver controls when you’re done. Tip • Change the receiver’s input to the iPod in one action by pressing iPod iPhone iP ad DIRECT CON TROL on the front panel to enable iPod operations on the iPod. Playing a USB device It is possible to play files using the USB interface o[…]
-
Страница 29
Basic playback 4 4 29 About playable file formats The USB function of this receiv er supports the following file format s. Note that some file formats ar e not availa ble for playback although they are listed as playable file formats. Music files a. MPEG Layer-3 audio decoding tech nology licensed from Fraunhofer IIS an d Thomson multimedia. b. Fil[…]
-
Страница 30
Basic playback 4 4 30 Bluetooth ® ADAPTER for Wireless Enjoyment of Music Wireless music play When the Bluetoo th ADAPTER (Pioneer Model No. AS-BT100 or AS-BT200) is connected to this unit, a product equipped with Bluetooth wireless technology ( portable cell phone, digital music player, etc.) can be used to listen to music wirelessly. Also, by us[…]
-
Страница 31
Basic playback 4 4 31 When Bluetooth wir eless technology device is not connected: WAITING appears in the receiver display. In this case, perform the connection operation from the side of the Bluetooth wireless technology device. 7 From the Bluetooth wireless tech nology device list, select Bluetooth ADAPTER and enter the PIN code selected in the s[…]
-
Страница 32
Basic playback 4 4 32 Listening to the radio The following steps show yo u ho w to tune in to FM and AM radio broadcasts using the au tomatic (search) and manual (step) tuning functions. Once you are tuned to a station you can memorize the frequency for r ecall later—see Saving station presets below for more on how to do this. 1 Press TUNER to se[…]
-
Страница 33
Basic playback 4 4 33 An introduction to RDS Radio Data System (RDS) is a sy stem used by most FM radio stations to provide listeners with various kinds of information—the name of the station and the kind of show they’re broadcasting, for example. One feature of RDS is that you ca n s e a r c h b y t y p e o f p r o g r a m . For example, you c[…]
-
Страница 34
5 Chapter 5 34 Listening to your system Choosing the listening mode This receiver off ers a vari ety of listening modes to accommodate playback of variou s audio formats. C hoose one according to your speaker environment or the source. While listening to a sourc e, press the listening mode button repeatedly to select a listening mode you want. […]
-
Страница 35
Listening to your system 5 5 35 b. You can also adjust t he C.WIDTH , DIMEN. , and PNRM. effect (see Setting the Audi o options on page 37 ). c. You can also adj ust the H.GAIN effect (see Setting the Audio options on pa ge 37 ). d. You can also adjust t he C.IMG effect (see Setting the Audio options on pa ge 37 ). e. • In case of VS X-827: Canno[…]
-
Страница 36
Listening to your system 5 5 36 Better sound using Phase Control This receiver’s Phase Control feature uses phase correction measures to make sure your sound source arrives at the listening position in phase, preventing unwanted distortion and/or coloring of the sound. Phase Control technology provides coherent sound reproduction through the use […]
-
Страница 37
Listening to your system 5 5 37 Setting the Audio options There are a number of additional sound sett ings you can make using the AUDIO PARAMETER menu. The defaults, if not stated, are listed in bold. Important • Note that if a set ting doesn’t appear in the AUDIO PARAMETER menu, it is unavailable due to the current source, settings and status […]
-
Страница 38
Listening to your system 5 5 38 a. You can ch ange the MIDNIGHT/LOUDNESS options at any time by using MIDNIGHT button. b. You can change the Sound Retriever feature at any time by using S.RETRIEVER button. c. The default se tting when the iPod/USB , ADAPTER , NETRADIO , M.S ERVER or FAVORITE input is selected is ON . d. This setting works only with[…]
-
Страница 39
6 Chapter 6 39 Playback with NETWORK features Introduction This receiver is equipped with the LAN terminal and you can enjoy the following features by connecting your components to these terminals. Listening to Internet radio stations You can select and listen to your favorite Inter net radio sta tion from the list of Internet radio stations create[…]
-
Страница 40
Playback with NETWORK features 6 6 40 Playback with Network functions Important • In case a domain is configured in a Windows network environment, you cannot access a PC on the network while you are logged onto the domain. Instead of logging onto the domain, log onto the local machine. • There are cases where the time elapsed may not be correct[…]
-
Страница 41
Playback with NETWORK features 6 6 41 Registering broadcast stations not on the vTuner list from the special Pioneer site With the receiver, broadcast stations not included on the list of station distributed by vTuner can be registered and played. Check the access code required for registration on the receiver, use this access code to access the sp[…]
-
Страница 42
Playback with NETWORK features 6 6 42 Network Configuration IP address/Proxy setting In case the router connected to the LAN terminal on this receiver is a broadband router (with a built-in DHCP server function), simply turn on the DHCP server function, and you will not need to set up the network manually. You must set up the network as described b[…]
-
Страница 43
Playback with NETWORK features 6 6 43 Language Language can be set on the NETWORK function OSD screen. 1 Select ‘Language’ from the Network Setup menu. 2 Select the language you want. 3 When you’re finished, press RETURN . You return to the Network Setup menu. Firmware Update Use this procedure to update the receiver’s software. Updating vi[…]
-
Страница 44
Playback with NETWORK features 6 6 44 About network playback The network playback function of this unit uses the following technologies: Windows Media Player See Windows Media Playe r 11/ Windows Media Player 12 on page 45 for more on this. Windows Media DRM Microsoft Windows Media Digital Rights Management (WMDRM) is a platfor m to protect and sec[…]
-
Страница 45
Playback with NETWORK features 6 6 45 About playback behavi or over a network • Playback may stall when the PC is switched off or any media files stored on it are deleted while playing content. • If there are problems within the net work environment (heavy network traffic, etc.) co ntent may not be displayed or played properly (playback may be […]
-
Страница 46
Playback with NETWORK features 6 6 46 About playable file formats The NETWORK feature of this receiver supports the following file formats. Note that some file formats ar e not available for playback although they are listed as playable file formats. Also, the compatibility of file fo rmats varies depending on the type of server. Check with your se[…]
-
Страница 47
7 Chapter 7 47 Home Menu Using the Home Menu The following section show s you how to make detailed settings to specify how you’re using th e receiver, and also explains how to fine-tune individual speaker sy stem settings to your liking. Important • The OSD will not appear if yo u have connected using the composite output to your TV. Use HDMI c[…]
-
Страница 48
Home Menu 7 7 48 1 Select ‘Manual SP Setup’ from the Home Menu . 2 Select ‘Speaker Setting’ from the Manual SP Setup menu. 3 Choose the set of speakers that you want to set then select a speaker size. Use / to select the size (and number) of each of the following speakers: • Front – Select LARGE if your front speakers reproduce ba[…]
-
Страница 49
Home Menu 7 7 49 Channel Level Using the channel level settings, you c an adjust the overall balance of your speaker system , an important factor when setting up a home theater system. CAUTION • The test ton es used in the Channel Lev el settings are ou tput at high volume. 1 Select ‘Manual SP Setup’ from the Home Menu . 2 Select ‘Channel L[…]
-
Страница 50
Home Menu 7 7 50 The Input Assign menu Assigns input function for anal og audio input terminal and component video input terminal (component video inpu t terminal for VSX-827 only). • For the assignment of the digital signal inputs, see Selecting the au dio input signal on page 25 . Analog Input ANALOG IN1 audio input terminal is assigned to CD u[…]
-
Страница 51
Home Menu 7 7 51 Resolution Specifies the output resoluti on of the video signal (when video input signals are output at the HDMI OUT terminal, selec t this according to the resolution of your monitor and the images you wish to watch). • This setting is not applicable for video signals input via HDMI. 1 Select ‘Video Parameter’ from the Home […]
-
Страница 52
Home Menu 7 7 52 The Auto Power Down menu Set to automatically turn off the rece iver after a specified time has passed (when the power has been on with n o operation for several hou rs). • Default setting: 6H 1 Select ‘Auto Power Down’ from the Home Menu. 2 Specify the amount of time to allow before th e power is turned off (when there has b[…]
-
Страница 53
8 Chapter 8 53 Control with HDMI function Synchronized operations below with a Control with HDMI- compatible Pioneer TV or Blu- ray Disc player are possible when the component is connected to the receiver using an HDMI cab le. • Synchronized amp mode The receiver’s volume can be set and the sound can be muted using the TV’s remote control. ?[…]
-
Страница 54
Control with HDMI function 8 8 54 Before using synchronization Once you have finished all connections and settings, you must: 1 Put all compon ents into standby mode. 2 Turn the power on for all components, with the pow er for the TV being turned on last. 3 Choose the HDMI inpu t to which the TV is conn ected to this receiver, and see if video outp[…]
-
Страница 55
9 Chapter 9 55 Controlling the rest of your system Setting the remote to control other components Most components can be assi gned to one of the input function buttons using the component’s manufacturer preset code stored in the remote. However, please note that there are cases wher e only certain functions may be controllable after assigning the[…]
-
Страница 56
Controlling the rest of your system 9 9 56 Controls for TVs This remote control can cont rol components (TV, DTV, Satellite TV or Cable TV) after entering the proper codes or teaching the receiver the commands (see Controlling the rest of your system on page 55 for more on this). Use the input function buttons to select the component. • The TV CO[…]
-
Страница 57
Controlling the rest of your system 9 9 57 TV Pioneer 0113, 0233, 0252, 0275, 0291, 0295, 0296, 0305 A.R. Systems 0155 Acme 0141 Acura 0142, 0154 ADC 0140 Admiral 0138, 0139, 0140, 01 45, 0146 Adyson 0141, 0228, 0229 Agashi 0228, 0229 Agazi 0140 Aiko 0141, 0142, 0154, 0155, 0228, 0229 Aim 0155 Aiwa 0199 Akai 0142, 0143, 0149, 0152, 0154, 0155, 0228[…]
-
Страница 58
Controlling the rest of your system 9 9 58 Panama 0140, 0141, 0142 , 0154, 0155, 0228, 0229 Panasonic 0123, 0146, 0155, 0158, 0164, 0214, 0217 Panavision 0155 Pathe Cinema 0125, 0133, 0141, 0156, 0228 Pausa 0142, 0154 Perdio 0155, 0228 Perfekt 0155 Philco 0125, 0132, 0138, 0155 Philharmonic 0141, 0229 Philips 0115, 0117, 0138, 0141, 0149, 0152, 015[…]
-
Страница 59
Controlling the rest of your system 9 9 59 TCM 2097 Teac 2162, 2177, 2181 Tec 2186 Technika 2188 Telefunken 2183 Tensai 2188 Tevion 2097, 2181, 2187 Thomson 2098, 2112, 2155, 2159 Tokai 2178, 2186 Toshiba 2102, 2156, 2168, 2169, 2172 TRANScontinents 2189 Trio 2188 TruVision 2185 Wharfedale 2180, 2181 Xbox 2098 Xlogic 2181, 2188 XMS 2188 Yamada 2189[…]
-
Страница 60
Controlling the rest of your system 9 9 60 Boshmann 6244, 6247 Boston 6227 Brainwave 6232, 6231 British Sky Broadcasting 6210 Broco 6180 BskyB 6210 BT 6195 Bubu Sat 6180 Bush 6254, 6217, 6264, 6228, 6190, 6232, 6268, 6201, 6265, 6182 Cambridge 6236 Canal Digital 6220 Canal Satellite 6220, 6219, 6278, 6277 Canal+ 6220, 6277 CGV 6244, 6183 Cherokee 6[…]
-
Страница 61
Controlling the rest of your system 9 9 61 Systec 6238 Tantec 6176 Targa 6191 Tatung 6176 TBoston 6227, 6245 Tecatel 6233 Technical 6228 Technika 6217, 6232, 621 8 TechniSat 6213, 6261, 6176, 623 6, 6215, 6222, 6216, 6223 Technomate 6250 Technosat 6193 Technosonic 6254, 6232 Technotrend 6232 Technowelt 6256, 6255 Techwood 6213, 6217, 622 8, 6218 Te[…]
-
Страница 62
10 Chapter 10 62 Additional information Troubleshooting Incorrect operations are often mistaken for trouble and malfunctions. If you think that there is something wrong with this component, check the points below. Take a look at the other components and electrical appliances being used, because sometimes the problem may lie there. If the trouble is[…]
-
Страница 63
Additional information 10 10 63 After using the Auto MCACC setup, the speaker size setting (LARGE or SMALL) is inco rrect. Low-frequency noise could have been caused by an air conditioner or motor . Switch off all appliances in the room an d rerun the Au to MCACC setup. Can’t operate the remote control. Replace the batt eries ( pa[…]
-
Страница 64
Additional information 10 10 64 Network connections could be restricted due to the computer ’s network settings, security set tings, etc. Check the computer ’s network settings, security set tings, etc. Supported file formats vary by ser ver . As su ch, files not supported by your server are no t displayed on this unit. F or more inform[…]
-
Страница 65
Additional information 10 10 65 • If you want to switch the input source, you’ll have to switch functions on both the receiver and your display unit. • Since the sound is muted on the display when using the HDMI connection, you must adjust the volume on the display every time you switch input sources. Configuration B (VSX-827 only) Use compon[…]
-
Страница 66
Additional information 10 10 66 About messages displayed when using network functions Refer to the following informat ion when you com e up with a status message while operating the Network functions. Resetting the main unit Use this procedure to reset all the receiver’s settings to the factory default. Use the front panel controls to do this. ?[…]
-
Страница 67
Additional information 10 10 67 Specifications Audio section Rated power outp ut Front, Center, Surround . . . . . . . . . . . . . . . . . . . 130 W per channel (1 kHz, 6 Ω , 1 %) 100 W per channel (20 Hz to 20 kH z, 8 Ω , 0.09 %) Total Harmonic Distortion . . . . . . . . . . . . . . . . . 0.06 % (20 Hz to 20 kHz, 8 Ω , 50 W/ch) Frequency respon[…]
-
Страница 68
<ARB7471-A> © 2012 PIONEER CORPORA TION. All rights reser ved. http://www .pioneer .co.uk http://www .pioneer .eu PIONEER CORPORA TION 1-1, Shin-ogura, Saiwai-ku, Ka wasaki-shi, Kanagaw a 212-0031, Japan PIONEER ELECTRONICS (USA) INC. P .O . BOX 1540, Long Beach, Calif ornia 90801-1540, U.S .A. TEL: (800) 421-1404 PIONEER ELECTRONICS OF CANA[…]
Report abuse
Libble takes abuse of its services very seriously. We’re committed to dealing with such abuse according to the laws in your country of residence. When you submit a report, we’ll investigate it and take the appropriate action. We’ll get back to you only if we require additional details or have more information to share.
Product:
Get your user manual by e-mail
Enter your email address to receive the manual of Pioneer VSX-527 in the language / languages: English as an attachment in your email.
The manual is 10,61 mb in size.
You will receive the manual in your email within minutes. If you have not received an email, then probably have entered the wrong email address or your mailbox is too full. In addition, it may be that your ISP may have a maximum size for emails to receive.
The manual is sent by email. Check your email
If you have not received an email with the manual within fifteen minutes, it may be that you have a entered a wrong email address or that your ISP has set a maximum size to receive email that is smaller than the size of the manual.