
Для работы проектов iXBT.com нужны файлы cookie и сервисы аналитики.
Продолжая посещать сайты проектов вы соглашаетесь с нашей
Политикой в отношении файлов cookie
Здравствуйте друзья
Это обзор посвящен очередной IP камере от китайского бренда Reolink, для меня она четвертая по счету и думаю что не последняя. Для тех кто не читал моих предыдущих обзоров по продукции Reolink — ссылки будут чуть далее.
Содержание
- Где купить ?
- Параметры
- Ссылки на обзоры других моделей
- Поставка
- Комплектация
- Конструкция
- Приложение Reolink для Android
- Программа
- Номе Assistant
- Установка камеры
- Видео версия обзора
- Вывод
Где купить ?
- Reolink RLC-410W на Aliexpress — цена на момент публикации $56.99
- Reolink RLC-410W на сайте производителя — цена на момент публикации $ 62.99
Параметры
- Модель RLC-410W
- Максимальное разрешение — 4 МП, 2560×1440
- Видео поток — до 30 кадров / сек, битрейт до 6144 кбит
- Имеет встроенный микрофон, что редкость для наружных камер
- Поддержка карт памяти micro SD до 64 ГБ
- Сеть — Ethernet, wi-fi 2,4 / 5 ГГц, POE — нет
- Максимальная мощность — до 8 Вт
- Класс защиты — IP66, уличная установка
- Рабочие температуры — -10 ℃ ~ + 55 ℃, но имейте в виду когда камера работает она греется, поэтому температура окружающей среды может быть значительно ниже.
- Размер — φ67×186 мм
- Вес — 425 г
Ссылки на обзоры других моделей
- Reolink RLC-411WS
- Reolink C2 Pro
- Reolink Argus 2
Поставка
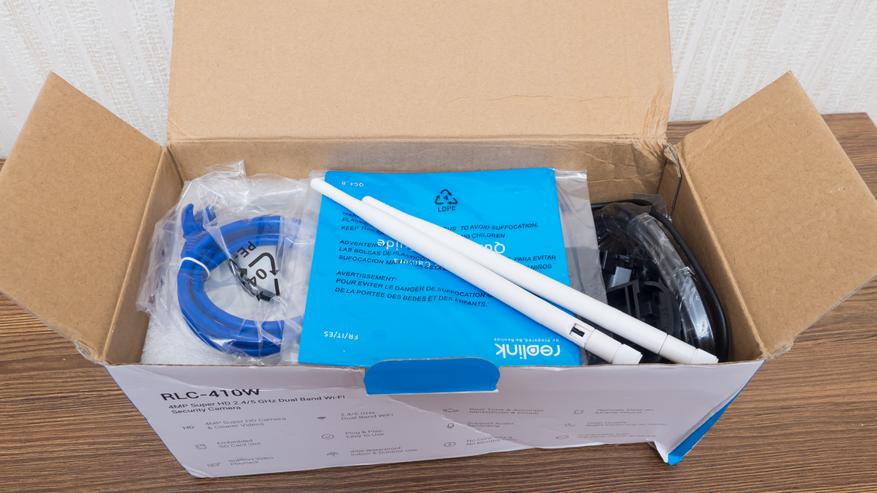
Поставляется камера в бело-голубой картонной коробке, характерной для продукции бренда Reolink. На ней изображена модель и фотография камеры. С другой стороны коробки перечислены параметры камеры
Приступим к разборке содержимого коробки. Первыми в глаза бросаются две съемные антенны.
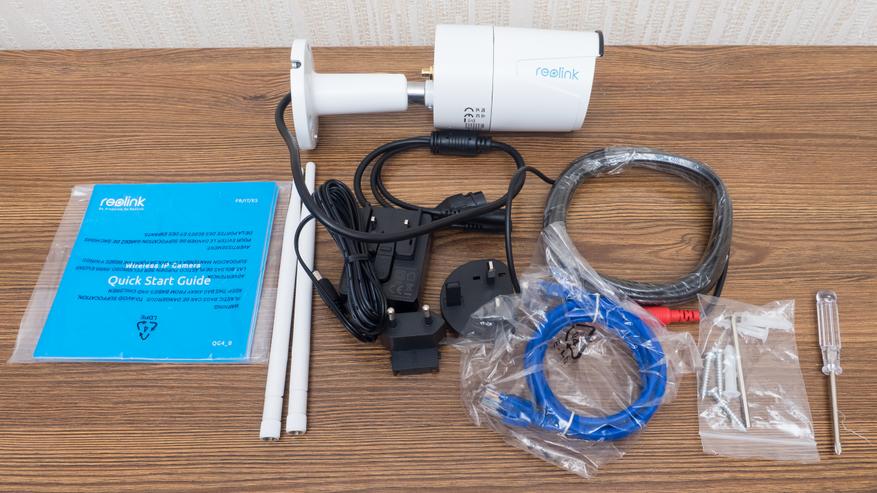
А вот так выглядит весь комплект поставки. Давайте быстро пробежимся по всем составляющим.
Комплектация
Блок питания с съемной вилкой — в комплекте была европейская и британская. Выходное напряжение 12 Вольт, ток до 1 А, полуторный запас от заявленной мощности камеры. Удлинитель для питания, если розетка находится далеко от камеры, и кабель Ethernet
Инструкции на 5 языках, из которых самый понятный для меня — английский. Наклейка на стену для сверления отверстий, гарантия и еще одна наклейка, предупреждающая о видеонаблюдении. Крестовая отвертка, шестигранник и комплект крепежа. Мелочь к деталям — это приятно, не часто к камерам кладут отвертки
Конструкция
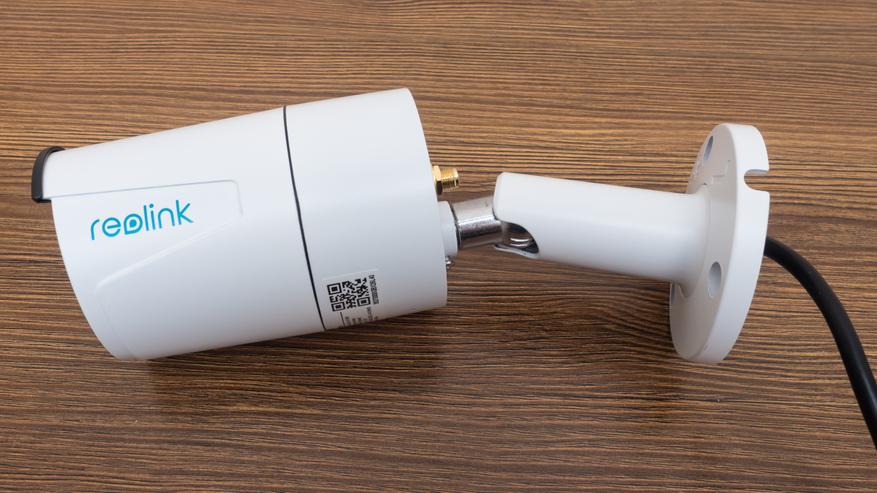
410W — представитель классических цилиндрических наружных камер видеонаблюдения. В основании камеры — настенное крепление и настраиваемая ножка-держатель.
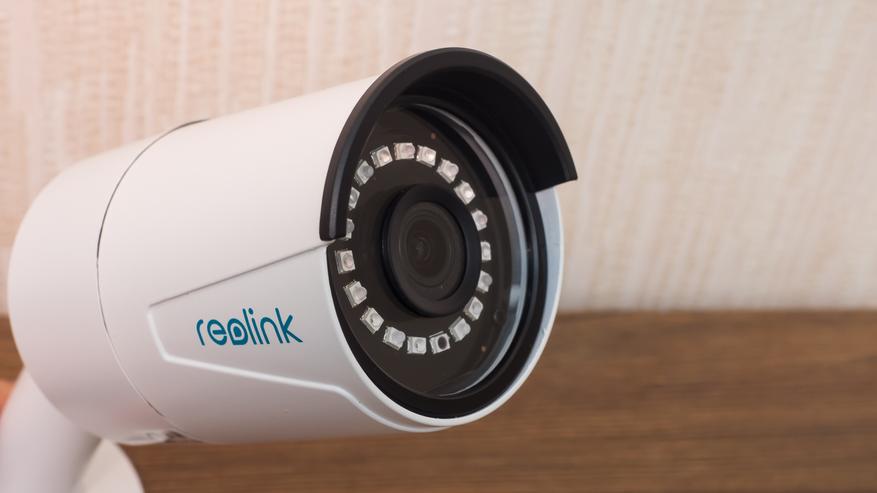
По окружности объектива располагаются инфракрасные светодиоды ночной подсветки и датчик освещенности. Мощности 18-ти диодов, по заявлению производителя, должно хватать на расстояние до 10 метров
В верхней части, корпус камеры образовывает что-то вроде козырька, для защиты от капель по время дождя.
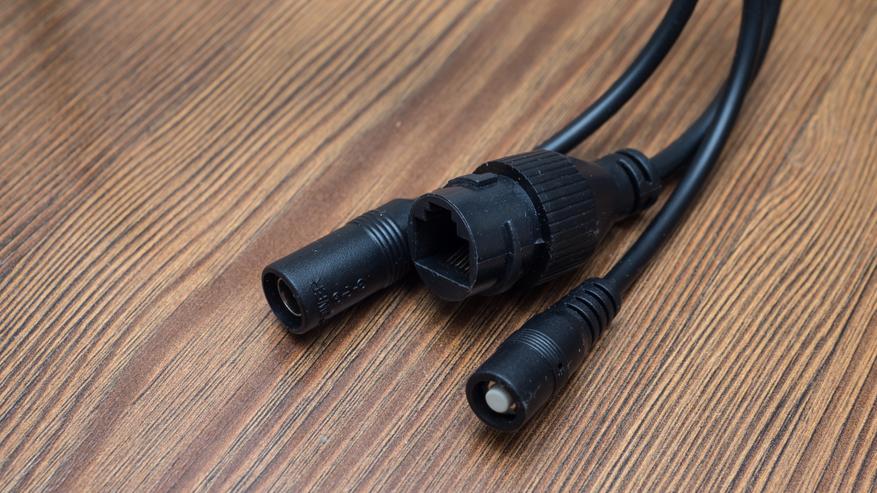
Кабель подключенный к камере имеет три разветвления — питание, кнопка сброса и разъем для подключения Ethernet
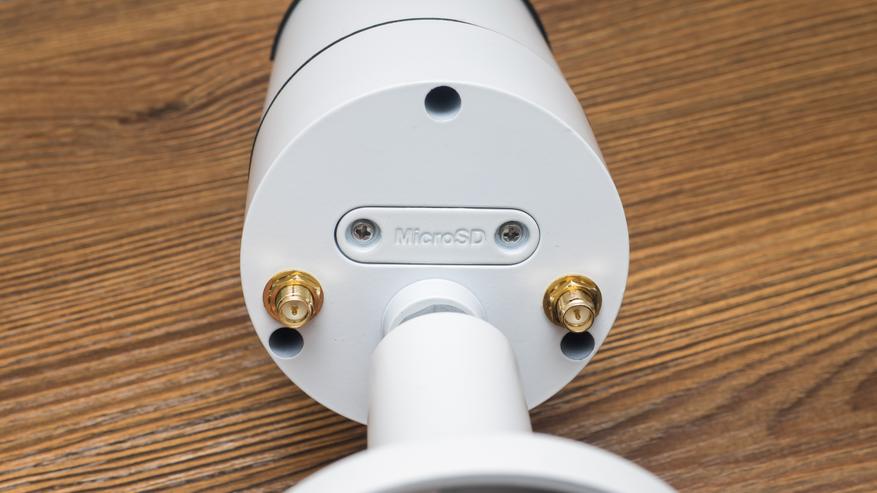
Сзади находятся разъемы для подключения внешних антенн, посередине — герметичное закрытое гнездо для карты памяти.
Антенны довольно большие, по длине они превосходят корпус самой камеры. Обе антенне — рабочие, камера двухдиапазонная с поддержкой технологии 2T2R MIMO
Вернемся к карте памяти — для доступа к ней, нужно отвинтить крышку. По периметру разъем имеет резиновую прокладку. Крышка металлическая, крепится очень плотно. Уверен что осадки камере и карте памяти не страшны.
Приложение Reolink для Android
Для подключения к приложению удобнее всего использовать кабельное подключение, даже если камера в дальнейшем планируется использовать в wi-fi — как у меня
Для работы с камерой используется приложение Reolink. Камера подключенная кабелем — обнаруживается сразу, ее необходимо инициализировать — первым шагом нужно дважды указать пароль — учетная запись по умолчанию — admin
Далее называем камеру и выбираем wi-fi сеть, причем доступны оба диапазона, 2.4 и 5 ГГц
Еще немного времени, камера подключится к роутеру, инициализация завершится и камера будет готова к работе. Ethernet кабель можно теперь отключить.
Основное окно плагина камеры в верхней части отображает видео в реальном времени, если в зоне видимости камеры обнаруживается движение — об этом сигнализирует символ красного человечка. Изображение может транслироваться с одной или с четырех камер — у меня как раз 4. Посмотрим на настройки устройства. Как я и говорил, необычным для наружной камеры — является наличие микрофона. Запись аудио включается в настройках.
В настройках изображения можно его перевернуть, в нижней части имеется ряд продвинутых опций, например яркость инфракрасной подсветки — зависит от нужной дальности, баланс белого,
Режимы день/ночь, управления подсветкой, 3D DNR — цифровое шумоподавление. Тут можно добавить ватермарк на видео, изменить положение или отключить название камеры, даты и времени
Настроить каждый из двух видеопотоков — основной и быстрый. Максимальное разрешение — 2560×1440, но мне достаточно 1920*1080, частоту кадров я выбрал максимальную — 30, и битрейт 2058 кбит/сек. Для быстрого потока доступно только одно разрешение — 640х360
Для записи по движению настраивается уровень чувствительности, или общий, или зависящий от времени суток. При необходимости можно задать область на кадре, на которую камера будет реагировать, а остальную часть — игнорировать.
Можно настроить отправку уведомлений, фото и видео фрагментов, снятых при обнаружении движения на электронную почту. Дополнительно можно задать временной интервал для рассылок
Отснятый материал можно хранить на карте памяти и синхронизировать на внешний ftp сервер
Полезной является функция предзаписи, благодаря которой ролик записывается за некоторое время — в моем случае за 15 секунд до обнаружения движения. В режиме воспроизведения камера отображает и таймлайн и записанные ролики в виде блоков, на которых отображается время и длительность каждого. Из приложения можно скачать ролик длительностью не более 30 секунд
Приложение можно полноценно использовать как монитор видеонаблюдения в горизонтальном режиме. Добавлю еще что работает оно как в локальной сети с камерами, так и удаленно используя собственное облако.

Программа
Кроме приложения, имеется еще программа Reolink, для тех кто предпочитает использовать компьютер. Нажимаем добавить устройство и выбираем камеру из списка
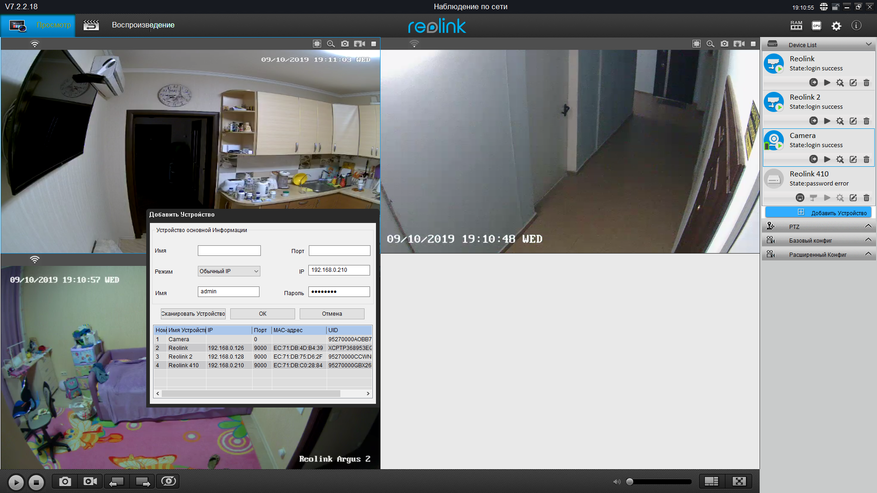
Большая часть настроек — аналогична приложению, просто в программе делать это удобнее и быстрее.
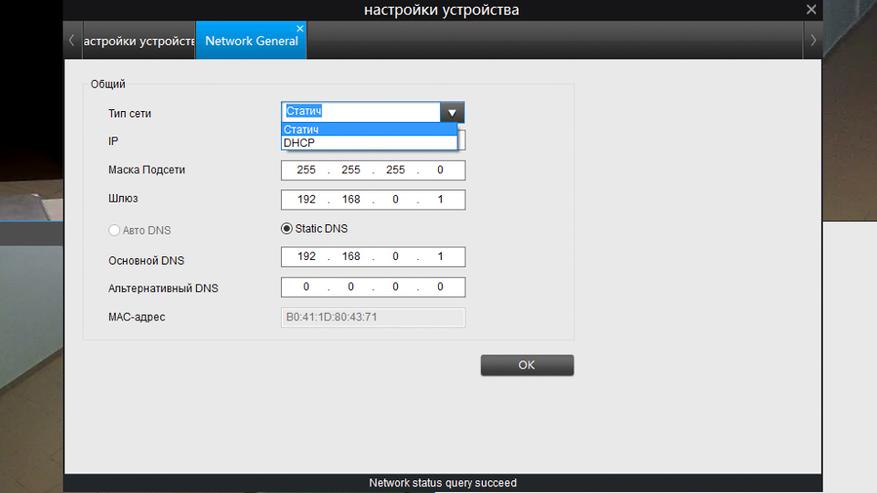
Здесь можно настроить статический IP адрес, что пригодится для интеграции в альтернативные системы
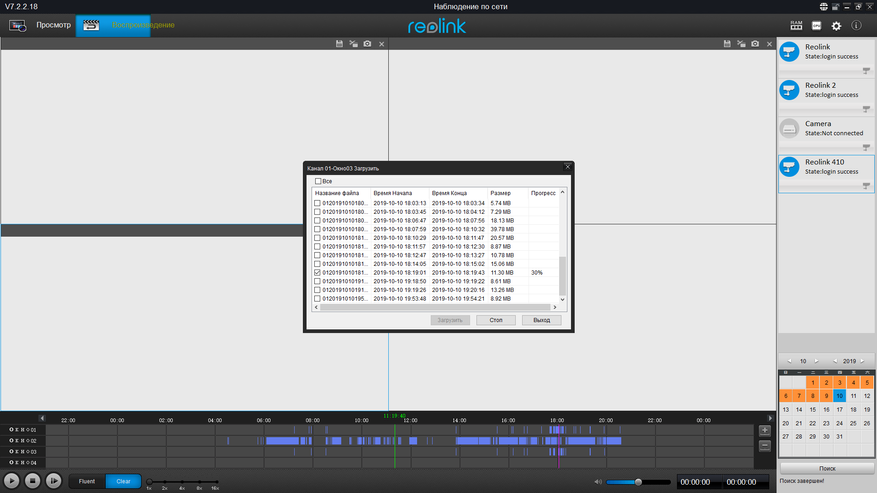
Главной фишкой использование программы — является загрузка записанных видеофрагментов — для этого нужно перейти в меню воспроизведение, выбрать нужную камеру, отметить в списке нужный фрагмент и скачать. В отличии от приложения — тут нет никаких ограничений на длительность.
Кроме этого у камеры есть веб сервер, с воспроизведением видео через flash плеер, так что подключиться к ней можно и без установки дополнительного ПО. Ограничение только в том, что через браузер нельзя одновременно смотреть несколько камер, к каждой надо подключаться отдельно. В остальном это практически аналог программы.
Номе Assistant
Так как камера транслирует видео в стандартных видеопотоках — интеграция в Home Assistant сводится к прописанию адресов статической картинки и rtsp потока. Я делаю из одной физической камеры — две логических, на основном и дополнительном видеопотоке.
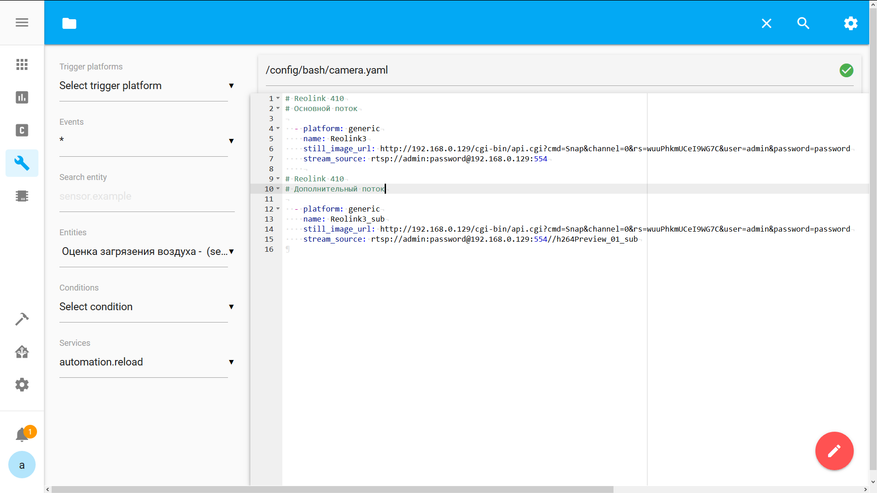
Основной используется для съемки фото — я отправляю их в телеграмм при открытии двери, а дополнительный — легкий поток, для онлайн просмотра в ловлейс, чтобы не грузить систему
Установка камеры
Эта камеру я взял, для замены IP камеры Alfawise — на нее я тоже делал обзор. Хотя она отлично работает, интегрируется в Home Assistant и не отваливается, мне хотелось чтобы все мои ip камеры были в одном приложении. Для Alfawise — очевидно приходилось держать отдельное.
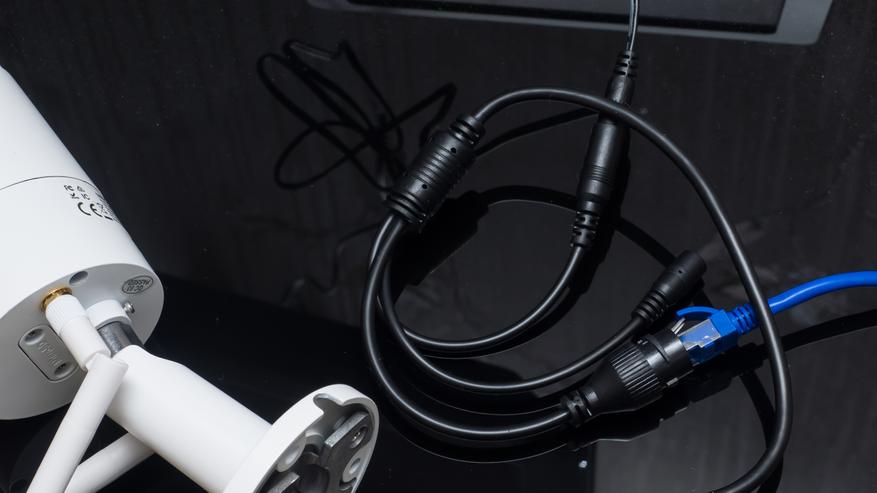
Поэтому установка получилась очень быстрой и легкой — мало того что подошли все три просверленные под Alfawise отверстия. Так еще я использовал ее же питания — разъем тоже подошел и блок питания имеет аналогичные параметры 12 В 1 А.
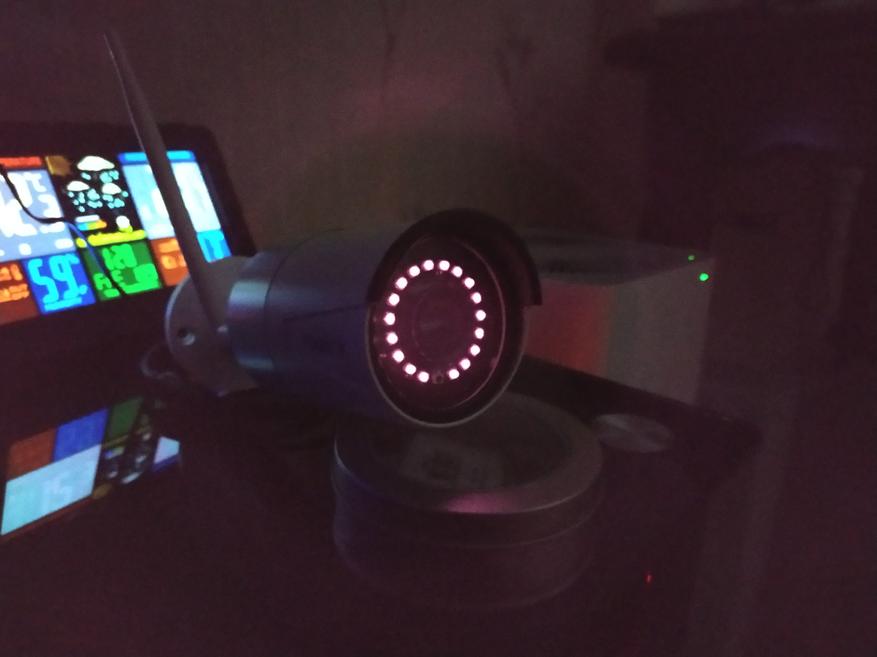
Да, еще добавлю что ИК подстветка в ярком режиме — хорошо видна в темноте, даже невооруженным глазом.
Видео версия обзора
Примеры съемки при различном освещении, съемка со звуком, и другая дополнительная информация — в видео версии обзора
Вывод
Четвертый Reolink меня тоже не разочаровал, качественная камера, с хорошим разрешением и частотой кадров. В штатном функционале имеет и приложение с удаленным подключением, причем гораздо более быстрое и стабильное чем mihome, и программу для компьютера и веб интерфейс и стандартные потоки для альтернативного ПО.
Считаю что по соотношению цена качество — это отличный вариант.
PDF manual · 16 pages English
Reolink RLC-410W
Wireless IP Camera
Quick Start Guide
QG4_B
For Windows Client & Mac Client, please download the PC software:
https://reolink.com/software-and-manual/
For advanced setup, please download the user manual:
https://reolink.com/software-and-manual/
For more troubleshooting, please go to FAQs on our website:
https://reolink.com/faqs/
For other technical support, please contact us at
support@reolink.com
Technical Support
EN/DE
Manual
View the manual for the Reolink RLC-410W here, for free. This user manual comes under the category security cameras and has been rated by 1 people with an average of a 7.5. This manual is available in the following languages: English. Do you have a question about the Reolink RLC-410W?
Ask your question here
Product Images (3)

Reolink RLC-410W specifications
Below you will find the product specifications and the manual specifications of the Reolink RLC-410W.
Ethernet LAN (RJ-45) ports
1
General
| Brand | Reolink |
| Model | RLC-410W | RLC-410W |
| Product | security camera |
| EAN | 0725423890020, 6972489770696 |
| Language | English |
| Filetype | User manual (PDF) |
Performance
| Type | IP security camera |
| Placement supported | Outdoor |
| Connectivity technology | Wired & Wireless |
| Antennas quantity | 2 |
| Antenna type | External |
| Day/night mode | Yes |
| Remote viewing | Yes |
Network
| Ethernet LAN | Yes |
| Wi-Fi | Yes |
| Bluetooth | No |
| Ethernet interface type | Fast Ethernet |
| Supported network protocols | HTTPS, SSL, TCP/IP, UDP, UPNP, RTSP, SMTP, NTP, DHCP, DNS, DDNS, FTP, P2P |
| Number of users | 20 user(s) |
| Networking standards | IEEE 802.11a, IEEE 802.11b, IEEE 802.11g, IEEE 802.11n |
| Wi-Fi standards | 802.11a, 802.11b, 802.11g, Wi-Fi 4 (802.11n) |
Storage
| Built-in HDD | No |
| Card reader integrated | Yes |
| Compatible memory cards | MicroSD (TransFlash) |
Ports & interfaces
| Ethernet LAN (RJ-45) ports | 1 |
Design
| Form factor | Bullet |
| Mounting type | Ceiling/wall |
| Product colour | White |
| International Protection (IP) code | IP66 |
| Protection features | Waterproof |
Packaging content
| Number of cameras | 1 |
| Cables included | LAN (RJ-45) |
| Manual | Yes |
| Screws included | Yes |
| Mounting kit | Yes |
Management features
| Web-based management | Yes |
| Reset button | Yes |
| Web browser | Yes |
Image sensor
| Sensor type | CMOS |
| Number of sensors | 1 |
| Optical sensor size | 1/2.7 « |
Lens system
| Number of lenses | 1 |
| Fixed focal length | 4 mm |
| Maximum aperture number | 2 |
Video
| Total megapixels | 4 MP |
| Maximum resolution | 2560 x 1440 pixels |
| Back Light Compensation (BLC) | Yes |
| Noise reduction | Yes |
| Noise reduction technology | 3D noise reduction |
| Video compression formats | H.264 |
| Supported graphics resolutions | 640 x 480 (VGA),2048 x 1536 (QXGA),2304 x 1296,2560 x 1440 |
| Bit rate | 1024-8192 Kbps; 64-512 Kbps |
| Frame rate | 25 fps |
| Video streaming | Yes |
Camera
| Lens viewing angle, vertical | 42 ° |
| Lens viewing angle, horizontal | 80 ° |
| Minimum illumination | 0 lx |
| Camera pan control | No |
| Camera tilt control | No |
Night vision
| Night vision | Yes |
| Night vision distance | 30 m |
| LED type | IR |
| Number of illumination LEDs | 18 |
| Infra-red wavelength | 850 nm |
Audio
System requirements
| Windows operating systems supported | Yes |
| Mac operating systems supported | Yes |
| Mobile operating systems supported | Android, iOS |
Security
| Video motion detection | Yes |
| Security algorithms | WPA-PSK, WPA2-PSK |
Power
| Power source type | DC |
| DC output voltage | 12 |
| Power consumption (max) | 8 W |
Operational conditions
| Operating temperature (T-T) | -10 — 55 °C |
| Operating relative humidity (H-H) | 10 — 90 % |
Weight & dimensions
| Diameter | 67 mm |
| Length | 186 mm |
| Weight | 425 g |
show more
Frequently asked questions
Can’t find the answer to your question in the manual? You may find the answer to your question in the FAQs about the Reolink RLC-410W below.
What is the weight of the Reolink RLC-410W?
The Reolink RLC-410W has a weight of 425 g.
What does the abbreviation ‘MP’ stand for?
MP stands for MegaPixels.
What is a megapixel?
The number of megapixels denotes how many pixels there are in the sensor. 1 megapixel equals 1 million pixels. The more pixels, the higher the potential image quality.
Is the manual of the Reolink RLC-410W available in English?
Yes, the manual of the Reolink RLC-410W is available in English .
Is your question not listed? Ask your question here
Related user manuals
View all Reolink manuals View all Reolink security camera manuals

Wireless IP Camera
EN/DE
Technical Support
For Windows Client & Mac Client, please download the PC software:
https://reolink.com/software-and-manual/
For advanced setup, please download the user manual:
https://reolink.com/software-and-manual/
For more troubleshooting, please go to FAQs on our website:
https://reolink.com/faqs/
For other technical support, please contact us at
support@reolink.com
Quick Start Guide
QG4_B
General Introduction
English 3
Deutsch 17
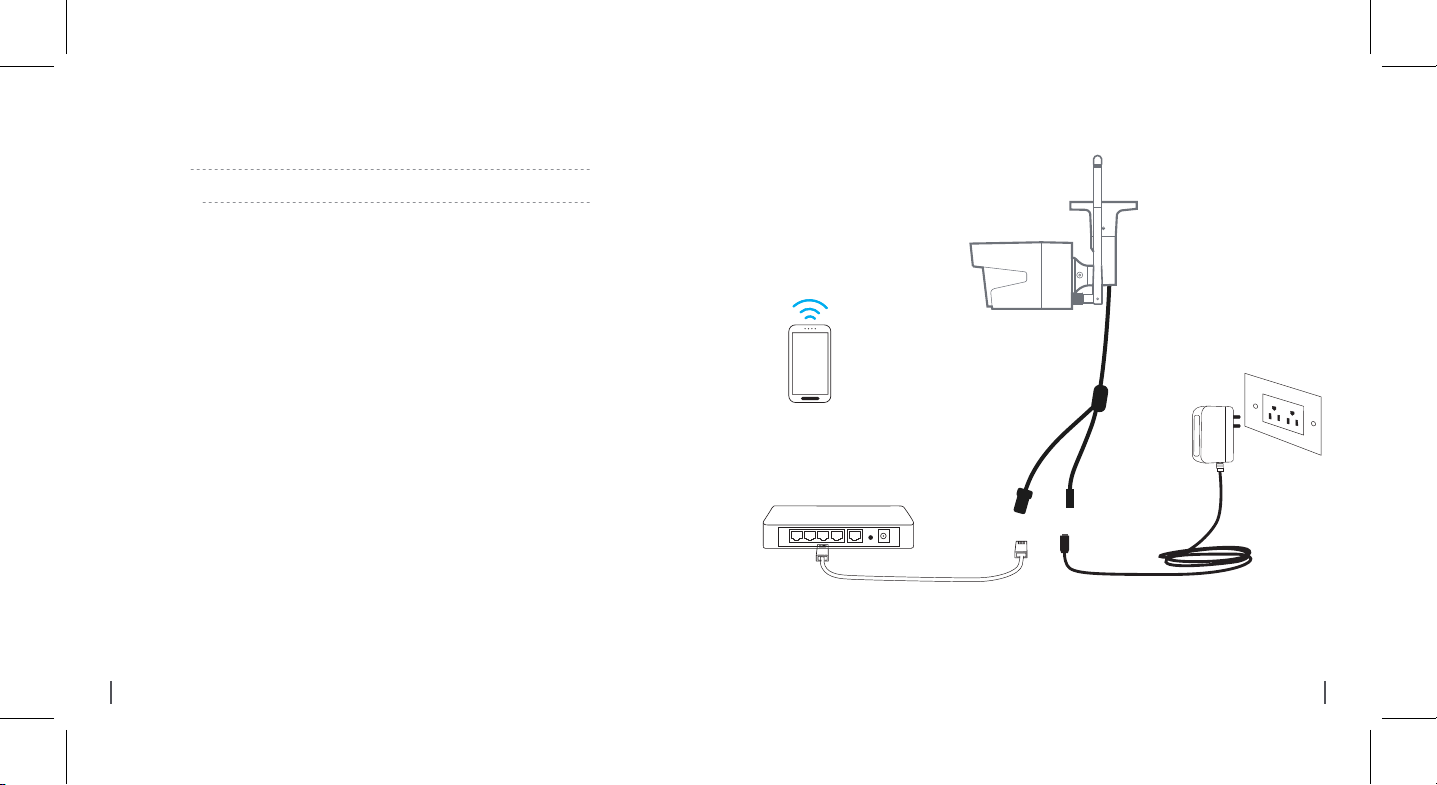
Camera Connection Diagram
Wireless IP Camera
Your Smart
Device
2 English
Router
For initial setup, please connect the camera to your router LAN port with an Ethernet
cable, and then follow the steps below to set up your camera. Make sure that your camera
and your smart devices are in the same network.
Power CableNetwork Cable
Power Adapter
3English

01.
Access the
Install Reolink App
There are two ways to get the Reolink App:
1. Search “Reolink” in App Store (for iOS), or Google Play (for Android), download and
install the app.
2. Scan the QR code below to download and install the app.
Available on the
Camera by
Smartphones
4 English
Add the Device
When in LAN
1
(Local Area Network)
The camera will be automatically added. You need to add the camera either by
When in WAN
2
(Wide Area Network)
scanning the QR code on the camera or
by entering the UID number manually.
5English

1
In LAN
Front Door
Reolink-5G
1. Connect your smartphone to
the WiFi network of your router.
6 English
Front Door
3. Tap screen to sync the time
and create your password.
4. Start live view or go to “Device
Settings” for more configurations.
2. Launch Reolink App. The camera
will automatically display in the
camera list in LAN.
7English
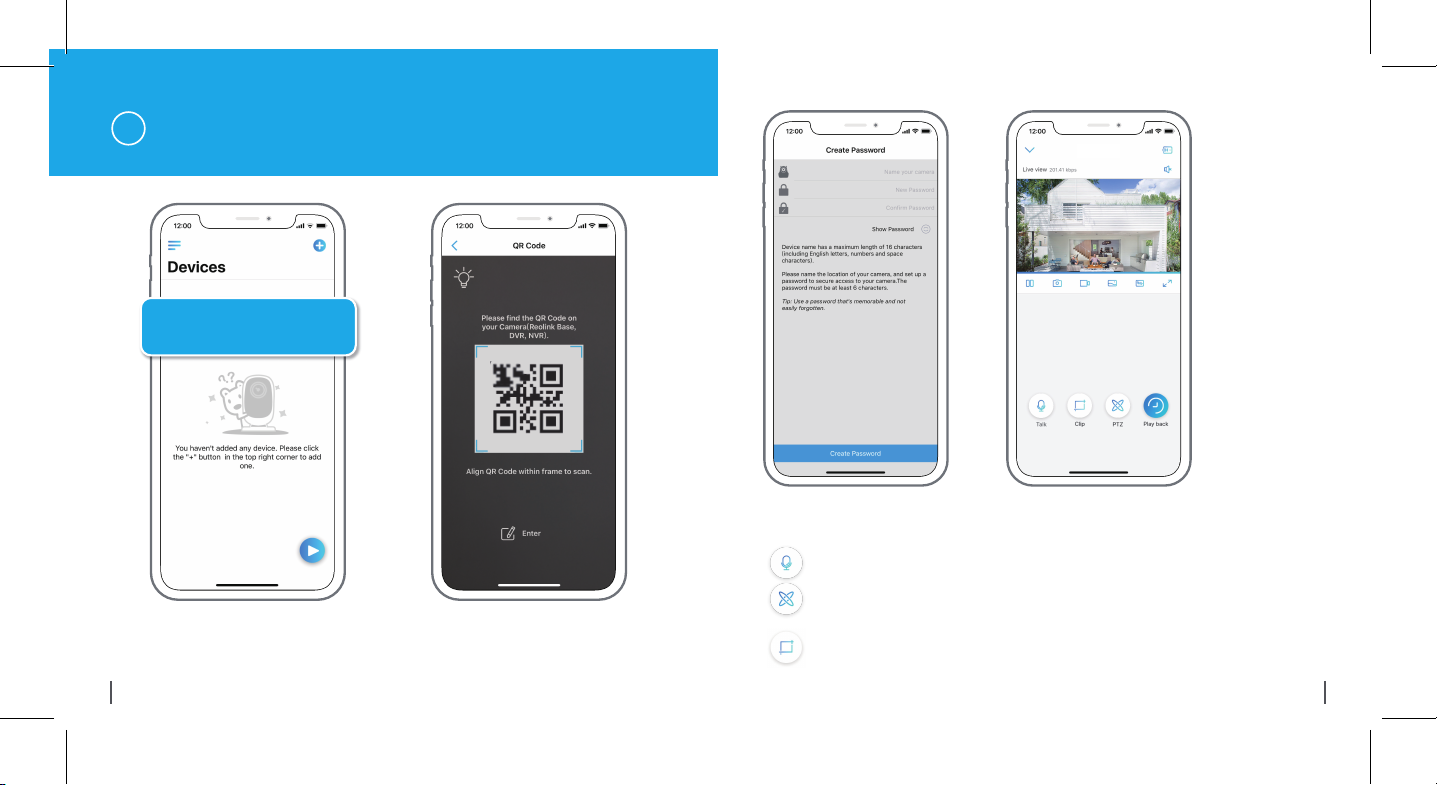
In WAN
2
Add New Device
1. Click “Add New Device” on the app. 2. Scan the QR code on the camera, and
8 English
then tap “Login”. (There is no password at
the factory default status.)
Front Door
3. Name your camera, create a password, and then start live view.
This icon only displays if the camera supports 2-way audio.
This icon only displays if the camera supports pan & tilt (zoom).
This icon only displays if the camera (4MP or above) supports Clip
function, which means you will see more detailed image in the selected
area and get clearer image quality under fluent mode/ substream video.
9English
Loading…
Table of Contents
- What’s in the Box
- Camera Introduction
- Connection Diagram
- Set up the Camera
- Install the Camera
- Troubleshooting
- Specifications
- Notification of Compliance
- References
- Read User Manual Online (PDF format)
- Download This Manual (PDF format)
RLC-410W
Quick Start Guide
What’s in the Box

NOTE: Camera and accessories vary with different camera models that you
purchase.
Camera Introduction

Connection Diagram
Before initial setup, follow the steps below to connect your camera.
- Connect the camera to a LAN port on your router with an Ethernet cable.
- Power on the camera with a power adapter.

Set up the Camera
Download and Launch the Reolink App or Client software, and follow the
onscreen instructions to finish initial setup.
-
On Smartphone
Scan to download the Reolink App.
https://reolink.com/wp-json/reo-v2/app/download
-
On PC
Download path of the Reolink Client: Go to
https://reolink.com>Support>App&Client.

Install the Camera
Installation Tips
- Do not face the camera towards any light sources.
- Do not point the camera towards a glass window. Or, it may result in poor image performance because of the window glare by infrared LEDs, ambient lights or status lights.
- Do not place the camera in a shaded area and point it towards a well-lit area. Or, it may result in poor image performance. For better image quality, please make sure that the lighting condition for both the camera and the capture object is the same.
- For better image quality, it’s recommended to clean the lens with a soft cloth from time to time.
- Make sure the power ports are not exposed to water or moisture or blocked by dirt or other elements.
- Do not install the camera at places where rain and snow may hit the lens directly.
- The camera may work in extreme cold conditions as low as -25°C.
Because when it is powered on, the camera will produce heat. You may power on
the camera indoors for a few minutes before installing it outdoors.
NOTE: There are two different types of mounts for bullet cameras. Please
check out the mount included in the package and follow the corresponding
instruction to install the camera properly.
Mount the Camera

| Drill holes in accordance with
the mounting hole template.
NOTE: Use the drywall anchors included in the package if needed.
—|—

| Install the mount base with the
mounting screws included in the package.
NOTE: Run the cable through the cable notch on the mount base.

| To get the best field of view,
loosen the adjustment knob on security mount and turn the camera.

| Stiffen the adjustment knob to
lock the camera.
NOTE: If your camera has another mount without the adjusting knob, please
loosen the adjusting screw with the provided hex key and turn the camera as
shown below to adjust the angle.

Twist the screws with the wrench to unlock the camera and adjust its
direction.
After adjustment, twist the screws back to lock the camera.
Troubleshooting
IP Camera Is Not Powering on
If you find your camera is not powering on, try the following solutions:
- Please check whether the outlet is working properly or not. Try to plug the camera into a different outlet and see if it works.
- Please check whether the DC adapter is working or not. If you have another 12V DC power adapter which is working, please use another power adapter and see if it works.
If these won’t work, please contact Reolink Support
https://support.reolink.com
**IR LEDs Stop Working**
If you find the IR LEDs of your camera stop working, try the following
solutions:
- Go to Device Settings and check whether you have enabled Infrared LEDs. If the LEDs are disabled, please enable them.
- Please go to Live View and check the Day/Night mode. Set the mode to Auto to activate the IR lights.
- Upgrade your camera’s firmware to the latest version.
- Restore the camera to the factory settings and check the IR light settings again.
If these won’t work, please contact Reolink Support
https://support.reolink.com
Specifications
Hardware Features
IR Distance: 30 meters (100ft)
Day/Night Mode: Auto switchover
General
Operating Temperature: -10°C to 55°C (14°F to 131°F)
Operating Humidity: 10%-90%
Weather Resistance: IP66 certified weatherproof
Notification of Compliance
FCC Compliance Statement
This device complies with Part 15 of the FCC Rules. Operation is subject to
the following two conditions:
- this device may not cause harmful interference, and
- this device must accept any interference received, including interference that may cause undesired operation.
NOTE: This equipment has been tested and found to comply with the limits
for a Class B digital device, pursuant to part 15 of the FCC Rules. These
limits are designed to provide reasonable protection against harmful
interference in aresidential installation. This equipment generates uses and
can radiate radio frequency energy and, if not installed and used in
accordance with the instructions, may cause harmful interference to radio
communications. However, there is no guarantee that interference will not
occur in a particular installation. If this equipment does cause harmful
interference to radio or television reception, which can be determined by
turning the equipment off and on, the user is encouraged to try to correct the
interference by one or more of the following measures:
- Reorient or relocate the receiving antenna.
- Increase the separation between the equipment and receiver.
- Connect the equipment into an outlet on a circuit different from that to which the receiver is connected.
- Consult the dealer or an experienced radio/TV technician for help.
Changes or modifications not expressly approved by the party responsible for
compliance could void the user’s authority to operate the equipment.
FCC RF Exposure Warning Statements
This equipment complies with FCC radiation exposure limits set forth for an
uncontrolled environment. This equipment shall be installed and operated with
minimum distance 20cm between the radiator & body.
Simplified EU Declaration of Conformity
Reolink declares that this device is in compliance with the essential
requirements and other relevant provisions of Directive 2014/53/EU.
Correct Disposal of This Product
This marking indicates that this product should not be disposed with other
household wastes throughout the EU. To prevent possible harm to the
environment or human health from uncontrolled waste disposal, recycle it
responsibly to promote the sustainable reuse of material resources. To return
your used device, please use the return and collection systems or contact the
retailer where the product was purchased. They can take this product for
environmentally safe recycling.
Limited Warranty
This product comes with a 2-year limited warranty that is valid only if
purchased from Reolink official stores or Reolink authorized resellers. Learn
more: https://reolink.com/warranty-and-return/.
NOTE: We hope that you enjoy the new purchase. But if you are not
satisfied with the product and plan to return, we strongly suggest that you
reset the camera to factory default settings and take out the inserted SD card
before returning.
Terms and Privacy
Use of the product is subject to your agreement to the Terms of Service and
Privacy Policy at reolink.com. Keep out of the reach
of children. End User License Agreement By using the Product Software that is
embedded on the Reolink product, you agree to the terms of this End User
License Agreement (“EULA”) between you and Reolink. Learn more:
https://reolink.com/eula/.
ISED Statements
This device contains licence-exempt transmitter(s)/receiver(s) that comply
with Innovation, Science and Economic Development Canada’s licence-exempt
RSS(s). Operation is subject to the following two conditions:
- This device may not cause interference.
- This device must accept any interference, including interference that may cause undesired operation of the device.
Radio Frequency Exposure Statement for IC
The device has been evaluated to meet general RF exposure requirements. The
device can be used in mobile exposure conditions. The min separation distance
is 20cm.
Operation of this device is restricted to indoor use only. (5180-5240MHz)
Technical Support
If you need any technical help, please visit our official support site and
contact our support team before returning the products,
https://support.reolink.com
This radio transmitter [IC: 26839-2201D] has been approved by Innovation,
Science and Economic Development Canada to operate with the antenna types
listed below, with the maximum permissible gain indicated. Antenna types not
included in this list that have a gain greater than the maximum gain indicated
for any type listed are strictly prohibited for use with this device.
Antennas
| Antenna Type | Manufacturer | Model/Part No. | Gain (dBi) | Frequency Range (MHz) |
|---|---|---|---|---|
| omnidirectional antenna | Shenzhen Yingjiachuang | |||
| Electronic Technology Co.. Ltd | YJC-60302-W27 | 2.89 | 2400-2500 | |
| omnidirectional antenna | Shenzhen Yingjiachuang | |||
| Electronic Technology Co.. Ltd | YJC-60302-W27 | 2.55 | 5150-5850 |
December 2020
QSG1_B_EN
58.03.001.0158
@ReolinkTechhttps://reolink.com
References
- Reolink Official: Security Cameras and Systems for Home & Business
- Reolink Official: Security Cameras and Systems for Home & Business
- Warranty & Return – Reolink
- Reolink Support — Official Reolink Help Center
Read User Manual Online (PDF format)
Read User Manual Online (PDF format) >>
Download This Manual (PDF format)
Download this manual >>