
Спасибо, что остановили свой выбор на продукции Recaro.
На протяжении уже более чем 100 лет, используя свой уникальный опыт компания Recaro занимается разработкой и модернизацией автомобильных кресел, авиационных кресел и кресел для гоночных видов спорта. Эти научно-технические знания применяются при разработке каждой системы детской безопасности. Мы стремимся предлагать изделия, дизайн, функциональность, комфорт и безопасность которых, устанавливали бы новые стандарты.
Лучшие материалы, высочайшая точность при изготовлении и эффективные методы тестирования гарантируют максимальное качество и безопасность. Используя новые идеи и инновационные решения, мы продолжаем работать над тем, чтобы иметь возможность предложить Вам наилучшие изделия для мобильной жизни вместе с детьми.
Мы желаем Вам испытать удовольствие от безопасных поездок.
Ваш коллектив Recaro child safety.
Содержание:
1 Инструкция по безопасности
2 Использование кресла (9 — 18 кг)
3 Использование кресла (15 — 36 кг)
4 Чистка и обслуживание детского автокресла
5 Указания
1. Инструкция по безопасности
Перед применением автокресла RECARO Young Sport HERO внимательно прочитайте инструкцию.
Инструкция для автокресла Recaro Young Sport Hero
- Независимо от использования для группы 1 или 2 — 3 следите за правильным пролеганием ремней в точках, несущих нагрузку. Замок ремня должен всегда находится ниже направляющей ремня
- Кресло Recaro Young Sport Hero может использоваться только в автомобилях, оборудованных автоматическими трехточечными ремнями безопасности, применение которых разрешено распоряжением № 16 UN — ЕСЕ или другими аналогичными нормами
- Кресло Recaro Young Sport Hero необходимо всегда закреплять согласно инструкции по монтажу, даже если оно не используется. При экстренном торможении незакрепленное кресло может нанести травмы пассажирам автомобиля
- Кресло допущено к эксплуатации для весовой группы 1-3 (9 — 36 кг). Установку кресла производить только по ходу движения автомобиля
- В весовой группе 1 (9 −18 кг) кресло разрешается использовать только вместе с интегрированной системой ремней
- Recaro Young Sport Hero необходимо закрепить так, чтобы оно не могло быть зажато передним сиденьем или дверями автомобиля
- Не разрешается вносить изменения в конструкцию детского автокресла, следует строго соблюдать инструкцию по монтажу и уходу за креслом, поскольку в противном случае нельзя исключить вероятность травмирования ребенка при его перевозке
- Не разрешается перекручивать или пережимать ремни, они должны быть всегда натянуты
- После аварии кресло Recaro Young Sport Hero необходимо проверить на заводе и при необходимости заменить
- Перед пристегиванием ремней необходимо снять слишком толстые детали одежды
- Следите, чтобы багаж и другие предметы были надлежащим образом зафиксированы, особенно на задней полке, поскольку в случае столкновения они могут нанести травмы
- Покажите хороший пример и пристегнитесь сами. Взрослый человек, не пристегнутый ремнями безопасности, может представлять опасность для ребенка
- Примечание: Разрешается использовать только оригинальные аксессуары и запасные детали
- Не оставляйте ребенка без присмотра
- Всегда пристегивайте ребенка ремнем
- Предохраняйте кресло от воздействия прямых солнечных лучей для недопущения того, чтобы ребенок получил из-за этого ожоги, или чтобы не допустить выгорания обивки
- Не разрешается использование детского автокресла без обивки. Не разрешается менять обивку кресла на другую, которая не рекомендована производителем, т.к. оригинальная обивка является частью системы безопасности
2. Использование кресла для маленьких детей (9 — 18 кг)
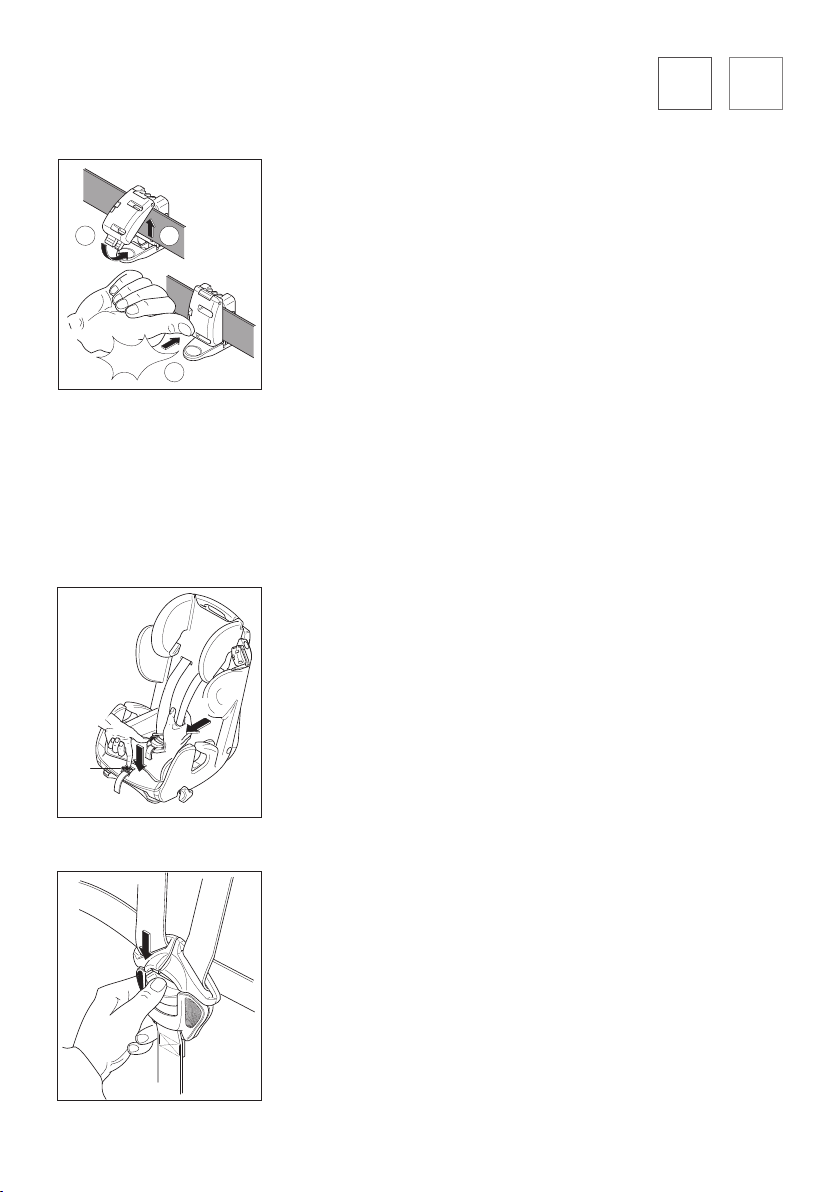
2.1 Крепление кресла при помощи трехточечного ремня
- Раскройте зажим ремня. Нажмите для этого на выступающий наружу рычаг 1. Зажим ремня откроется автоматически 2
- Вытяните трехточечный ремень, приподнимите чехол подголовника и протяните ремень за чехлом
- Защелкните замок ремня и вставьте поясной ремень трехточечного ремня безопасности в задние направляющие, пропустив его через красные натяжители ремня безопасности
- Натяните сначала поясной 1, а затем диагональный плечевой ремень 2
- Вложите диагональный плечевой ремень в зажим 3, и закройте зажим 4 со слышимым щелчком 5
- После этого еще раз натяните ремень, чтобы обеспечить оптимальную фиксацию детского кресла. Для этого просто потяните ремень от зажима в сторону механизма втягивания ремня безопасности Вашего автомобиля, при этом дополнительно натяните поясной и диагональный плечевой ремень безопасности
2.2 Пристегивание ребенка ремнями
- Для удлинения ремней нажмите центральный регулятор 1 вниз, держите его нажатым и потяните внизу за плечевые ремни 2
- Откройте замок, нажав на красную кнопку в направлении стрелки
- Выложите ремни наружу
- Усадите ребенка в кресло и проведите руки ребенка через плечевые ремни
- Закройте замок, соединив оба язычка 1 и вставив их в замок со слышимым щелчком 2
- Натяните ремни, потянув центральный ремень по направлению стрелки. Ремни должны плотно прилегать
2.3 Регулировка ремней по высоте
- Ослабьте систему ремней
- Потяните за желтую кнопку фиксатора и переставьте подголовник в следующее положение
Внимание! Перед тем как впервые регулировать высоту подголовника необходимо удалить уменьшитель, и затем проверить, нужна ли еще регулировка по высоте
- Чтобы удалить уменьшитель откройте нажимные кнопки на задней стороне уменьшителя и вытяните его из пахового ремня и из замка ремня
- Плечевые ремни должны проходить так, как показано на рисунке рядом. Направляющая ремней не должна находиться ниже плеча ребенка
2.4 Регулировка положения для отдыха
- Детское сиденье можно переставить в положение для отдыха, повернув ручку регулировки по направлению стрелки
Внимание! После того как демонтирована внутренняя система пристегивания ремнями безопасности (при использовании для группы 2 и выше), положение для отдыха больше нельзя использовать
3. Использование детского кресла для детей старшего возраста
И хотя согласно норме допуска для детских автокресел использование кресла Recaro Young Sport Hero начиная с массы тела ребенка 15 кг разрешается вместе с ремнями безопасности автомобиля, мы рекомендуем использовать внутреннюю систему ремней кресла пока Ваш ребенок не достигнет веса 18 кг.
3.1 Перед установкой:
- Бережно сохраняйте извлеченные детали для дальнейшего использования! Ослабьте лямки ремней и отцепите петли плечевых ремней от металлического соединителя. Вытяните плечевые ремни вперед
- Ослабьте лямки ремней и отцепите петли плечевых ремней от металлического соединителя
ВНИМАНИЕ: Центральный ремень, следовательно часть ремня с металлическим соединителем, должен остаться на кресле
- Вытяните плечевые ремни вперед
- Переставьте подголовник в самое верхнее положение и ослабьте винт с грибковой ручкой. Передвиньте обводную трубку немного вниз и снимите ремни крепления плечевой подушки. Затем снимите обводную трубку
- Чтобы снять плечевую подушку надо снять чехол подголовника и протолкнуть плечевую подушку через прорези для ремней. После этого можно убрать модуль плечевой подушки.
- По частям снимите чехол сиденья и вытяните поясные ремни из корпуса поддона
- Отсоедините от зажимов напольную пластину и поверните ее в сторону
- Высуньте металлическую пластину из пахового ремня, а затем вытяните ремень за замок по направлению от поверхности сиденья
- Разверните обратно напольную пластину и вдавите ее обратно в зажимы
- Установите металлический соединитель в его крепление, расположенное на нижней стороне напольной пластины
ВНИМАНИЕ: Часть ремня с металлическим соединителем должна остаться на кресле.
3.2 Пристегивание кресла и ребенка трехточечными ремнями безопасности
- Начиная с группы 2 использовать положение для отдыха не разрешается! Усадите ребенка на сиденье и вставьте поясной ремень трехточечного ремня безопасности в переднюю направляющую ремня. Закройте замок ремня со слышимым щелчком
- Диагональный ремень вставьте в направляющую на подголовнике
- Отрегулируйте подголовник в зависимости от роста ребенка. Оптимально ремень должен проходить посередине ключицы и не слишком близко к шее ребенка
4. Чистка и обслуживание детского автокресла
Замок ремня должен всегда застегиваться со слышимым щелчком. Если этого не происходит, то это может быть вызвано засорением замка. В качестве контрмеры замок ремня можно после демонтажа помыть в теплой воде (глава 3.1). Перед обратной установкой замок ремня надо хорошо просушить. Смазывать замок ремня не разрешается.
Чехол сидения Recaro Young Sport Hero можно стирать в стиральной машине. Чтобы не оказывать воздействия на окружающую среду мы рекомендуем стирать чехол при 30 °С в деликатном режиме стирки. При более высоких температурах может выцветать краска. Не отжимать в центрифуге и не сушить в сушильной машине, поскольку ткань
4.1 Снятие чехла сидения
- Сначала отстегните чехол от мягких пуговиц в верхней, задней и нижней частях сиденья. Затем можно просто снять чехол
- Снятие чехла возможно только при демонтированной системе пристегивания ремнями безопасности (см. главу 3.1)
4.2. Обратная установка лямок ремней
- Установку производить легче, когда язычки замка защелкнуты в замке ремней
- Сначала отсоедините от зажимов напольную пластину и поверните ее в сторону. После этого снимите подушку сидения и положите ее в сторону
- Проденьте поясные ремни внутренней системы ремней сверху вниз сквозь наружное продолговатое отверстие и проведите их сквозь внутренние продолговатые отверстия снова наверх 1. Проденьте стопорные пряжки сквозь петли 2
Важно: Должны быть видны все 4 носика
- Уложите подушку сидения обратно на поверхность для сидения и пропустите паховый ремень сквозь отверстие вниз. Зафиксируйте петлю в пряжке крепления
Важно: Все 4 крюка должны находиться снаружи петли
- Разверните обратно напольную пластину и вдавите ее обратно в зажимы. Следите при этом, чтобы Т-образная деталь регулировочного ремня была свободно доступна
- Прикрепите чехол к нижней и к задней части сиденья
- Установите подголовник во 2-е положение снизу и протяните ремни крепления блока плечевой подушки сквозь прорези назад. Вставьте, как показано на рисунке обводную трубку и протяните ремни крепления поверх трубки
- Поднимите подголовник в 3-е положение и закрепите при помощи винта с грибковой ручкой
- Протяните плечевую подушку сквозь прорези с чехле подголовника и наденьте чехол на подголовник. Откройте плечевую подушку, проложите плечевые ремни, как показано на рисунке, и протяните их сквозь подголовник назад. Проследите, чтобы ремни проходили поверх обводной трубки
- Зацепите плечевые ремни за Т-образную деталь
Важно: Не перекручивать ремни
- По окончании замкните плечевые ремни, и сильно потянув за них убедитесь, что все крепления надежно зафиксированы
5. Указания
5.1 Общие указания
- Инструкция по эксплуатации находится в кармане под обивкой на спинке. После использования ее необходимо всегда класть в это же место
- Весовая группа 1, 2 +3 (9 — 36 кг. Установку производить по ходу движения автомобиля
- Кресло и ремень можно чистить теплой водой с мылом. Снятую обивку можно стирать согласно этикетки по уходу за изделием
- Некоторые автомобильные подголовники мешают монтажу детского автокресла, поэтому их необходимо заранее демонтировать. Необходимо учитывать, чтобы из- за автомобильного подголовника не образовывалось нежелательно пространство между спинкой детского автокресла и спинкой сидения автомобиля. Из-за наличия автомобильного подголовника вероятна ограниченная регулировка по высоте подголовника детского автокресла
5.2 Гарантийные условия
- Срок гарантии составляет два года от даты продажи, и распространяется на заводской брак или дефекты материала. Рекламации принимаются только при подтвержденной дате покупки. Гарантия распространяется только на детские автокресла, с которыми обращались надлежащим образом, и которые были присланы в чистом надлежащем виде
- Гарантия не распространяется на явления, связанные с естественным износом, повреждения, вызванные чрезмерными нагрузками или повреждения, вызванные несвойственным либо ненадлежащим использованием
- Текстильные материалы: все наши материалы соответствуют высоким требованиям, касающимся стойкости цвета. Тем не менее, под УФ излучением материалы выцветают. В данном случае речь не идет о браке материала, а об обычных явлениях износа, на которые гарантия не предоставляется
5.3 Защита Вашего автомобиля
- Мы указываем на то, что при использовании детских автокресел не исключается повреждение сидений автомобиля. Согласно директиве по безопасности ЕСЕ R44 необходим жесткий монтаж. Пожалуйста, предпринимайте в отношении сидений Вашего автомобиля надлежащие защитные меры (напр. защитный коврик Recaro). Фирма Recaro child safety GmbH & Co. KG или ее дилеры не несут ответственности за возможное повреждение сидений Вашего автомобиля.

PL SEDE EN FR NL SL
NO DK FI LT LV IT HR

RECARO Child Safety GmbH & Co. KG
Guttenbergstrasse 2, D-95352 Marktleugast
Phone: +49 9255 77-0
info@recaro-cs.com, www.recaro-cs.com

ENDE
MONTAGE — UND GEBRAUCHSANLEITUNG
INSTRUCTIONS FOR INSTALLATION AND USE
7898-00/1
Kinderautositz Young Sport Her∞ der Altersgruppe I-III, 9-36 kg Körpergewicht
zur Befestigung mit dem Dreipunktgurt
im Fahrzeug, mit separatem FünfpunktGurtsystem zur Sicherung des Kindes für
die Gruppe I (9-18kg Körpergewicht)
Der Kindersitz kann auf allen vorwärtsgerichteten Plätzen im Fahrzeug verwendet
werden, die mit einem Dreipunktgurt ausgestattet sind, der nach der ECE-Regelung
Nr. 16 oder nach einem anderen vergleichbaren Standard genehmigt wurde.
Geprüft und zugelassen nach ECE 44/04
bei einem Frontaufprall bei 50 km/h.
ACHTUNG: Diese Montage- und Gebrauchsanleitung unbedingt für späteres Nachlesen aufbewahren.
Druckfehler, Irrtümer und technische Änderungen vorbehalten.
The Young Sport Her∞ child car seat is
suitable for ECE groups I-III, weight 9-36 kg
to be installed using the vehicle three-point
seatbelt, with a separate ve-point harness
system for securing children in age group I
(weight 9-18kg)
The child seat can be used in all forward
facing seats in the vehicle which are tted
with a three-point seatbelt approved under
ECE Regulation No. 16 or another equivalent
standard.
Tested and approved in accordance with
ECE 44/04 for frontal impact at 50 km/h.
NOTICE: These instructions for installation
and use must be retained for future
reference.
Subject to printing errors, mistakes and
technical changes.
3
ENDE
SICHERHEIT IST
VERTRAUENSSACHE.
Vielen Dank, dass Sie sich für RECARO
entschieden haben.
Dank einzigartiger Erfahrung revolutioniert
RECARO seit über 100 Jahren das Sitzen
im Auto, im Flugzeug und im Rennsport.
Dieses konkurrenzlose Know-how fließt in
die Entwicklung jedes unserer Kindersicherheitssysteme ein. Unser Ziel ist es, Ihnen
Produkte zu bieten, die in puncto Design,
Funktionalität, Komfort und Sicherheit neue
Maßstäbe setzen.
Ausgewählte Materialien, höchste Präzision
bei der Fertigung und ausgiebige Testverfahren garantieren maximale Qualität und
Sicherheit. Mit neuen Ideen und innovativen Lösungen arbeiten wir fortwährend
daran, Ihnen die besten Produkte für ein
mobiles Leben mit Ihren Kindern zu bieten.
Wir wünschen Ihnen viel Spaß und allzeit
sichere Fahrt.
SAFETY IS A MATTER OF
TRUST.
Thank you for choosing RECARO.
Thanks to our unique experience RECARO
has been revolutionizing car, airplane and
racing car seating for over 100 years. This
unrivaled expertise feeds into the development of all of our child safety systems. Our
aim is to offer you products which set new
standards in terms of design, functionality,
comfort and safety.
Selected materials, maximum precision
in manufacturing and extensive test
procedures ensure the highest quality and
safety. With new ideas and innovative
solutions we constantly strive to offer you
the best products for life on the move with
your children.
We wish you lots of fun and a safe journey
every time.
Your RECARO Child Safety Team
Ihr RECARO Child Safety Team
4

ENDE
CONTENT Page
INHALT · Seite ·
1. Sicherheitshinweise
1. Safety notice
06
2. Verwenden des Kindersitzes für Kleinkinder (von 9 — 18kg)
2. Use of the child seat for infants (from 9 — 18kg)
2.1 Befestigen des Sitzes mit Dreipunktgurt
2.1 Installation of the child seat using the three-point seatbelt
2.2 Anschnallen des Kindes
2.2 Securing the child in
2.3 Höheneinstellung der Gurte
2.3 Adjusting the harness height
2.4 Einstellen der Ruheposition
2.4 Adjusting the recline position
3. Verwenden des Kindersitzes für größere Kinder (ab 15 kg)
3. Use of the child seat for older children (from 15kg)
3.1 Vor dem Einbau
3.1 Before installation
3.2 Anschnallen des Sitzes und des Kindes mit dem Dreipunktgurt
3.2 Securing the seat and child in using the three-point seatbelt
4. Reinigen des Sitzbezuges
4. Cleaning the seat cover
5. Hinweise
5. Notice
5.1 Allgemeine Hinweise
5.1 General information
5.2 Gewährleistung
5.2 Warranty
5.3 Schutz Ihres Fahrzeuges
5.3 Protecting your vehicle
08
08
09
11
12
13
13
15
16
19
19
20
20
5
1. SICHERHEITSHINWEISE
7915-00 / 1
Achten Sie, unabhängig von der Ver wendung
in der Gruppe I oder II+III, auf die richtige
Gurtführung an den lasttragenden Punkten.
Das Gurtschloss muss immer unterhalb der
Gurtführung liegen.
• Der RECARO Young Sport Her∞ ist nur
zur Benutzung in Fahrzeugen geeignet,
wenn das genehmigte Fahrzeug mit
Dreipunktautomatikgurten ausgerüstet
ist, die nach UN-ECE-Regelung Nr. 16
oder anderen vergleichbaren Normen
genehmigt sind.
• Der RECARO Young Sport Her∞ ist immer
gemäß Einbauanleitung zu befestigen,
auch wenn er nicht benutzt wird. Ein
nicht befestigter Sitz kann bereits bei
einer Notbremsung andere Autoinsassen
verletzen.
• Der Kindersitz ist für die Gewichtsklasse
I-III (9-36 kg) zugelassen. Einbau des
Sitzes nur in Fahrtrichtung.
• In der Gewichtsklasse I (9 -18 kg) darf
der Kindersitz nur mit dem integrierten
Gurtsystem verwendet werden
• Den RECARO Young Sport Her∞ im
Auto so befestigen, dass er nicht durch
die Vordersitze oder die Fahrzeugtüren
eingeklemmt wird.
• Der Kindersitz darf nicht verändert
werden und die Montage- und
Bedienungsanleitung ist sorgfältig zu
befolgen, da sonst entsprechende
6
DE
Gefährdungen beim Transport Ihres
Kindes nicht ausgeschlossen werden
können.
• Die Gurte dürfen nicht verdreht oder
eingeklemmt sein und müssen gestrafft
werden.
• Nach einem Unfall muss der RECARO
Young Sport Her∞ im Werk überprüft und
gegebenenfalls ausgetauscht werden.
• Stark auftragende Kleidungsstücke
müssen vor dem Anschnallen ausgezogen
werden.
• Achten Sie darauf, dass Gepäckstücke
und andere Gegenstände ausreichend
gesichert sind, besonders auf der
Hutablage, da diese im Fall eines
Zusammenstoßes Verletzungen verur-
sachen könnten.
• Gehen Sie mit gutem Beispiel voran und
schnallen Sie sich an. Auch ein nicht
angegurteter Erwachsener kann eine
Gefahr für Ihr Kind sein.
• Hinweis: Es darf nur Originalzubehör bzw.
-ersatzteile verwendet werden.
• Lassen Sie Ihr Kind nie unbeaufsichtigt.
• Legen Sie Ihrem Kind immer den Gurt an.
• Den Kindersitz vor direkter Sonnen-
einstrahlung schützen, um zu verhindern,
dass sich Ihr Kind daran verbrennt oder
die Farbe des Bezuges leidet.
• Der Kindersitz darf nie ohne Bezug
verwendet werden. Der Sitzbezug darf
nie gegen einen nicht vom Hersteller
empfohlenen Bezug ausgetauscht
werden, da dieser Bezug Bestandteil der
Sicherheitswirkung des Systems ist.

1. SAFETY NOTICE
7915-00 / 1
Regardless of whether it is being used
for age group I or II+III, ensure that the
belt position is correct at the load-bearing
points. The buckle must always be below
the belt guide.
• The RECARO Young Sport Her∞ is only
suitable for use in vehicles if the vehicle
is authorised and tted with three-point
seatbelts approved under UN — ECE
Regulation No. 16 or other comparable
standards.
• The RECARO Young Sport Her∞ should
always be tted in accordance with the
instructions, even when not in use. In the
event that the driver has to brake hard in
an emergency, an unattached seat may
cause injury to other occupants in the
vehicle.
• The child seat is only approved for use
for weight classes I-IIII (9 — 36kg). The
seat should only be installed facing in the
direction of travel.
• For weight class I (9 — 18 kg), the child seat
must only be used with the integrated
restraint system.
• Install the RECARO Young Sport Her∞
in the vehicle in such a way that it is not
clamped by the front seats of vehicle
door.
• The child seat must not be modied in any
way, and the instructions for installation
and use must be followed carefully,
EN
otherwise your child could be put at risk
while travelling.
• The harness should not be twisted or
jammed and it must be tightened fully.
• Always have the child car seat replaced
following an accident and, if necessary,
checked by the manufacturer.
• Very bulky items of clothing must be
removed prior to securing the child in.
• Always ensure that items of luggage and
other objects are adequately secured,
particularly those on the parcel shelf, as
these could cause injury in the event of
a collision.
• Always set a good example and always
use your seat belt. An adult who is not
wearing a seatbelt can also endanger
your child.
• Notice: Only original accessories or
replacement parts may be used.
• Never leave your child unattended.
• Always secure your child.
• Protect the child seat from direct sunlight
in order to avoid your child being burnt by
it and to prevent the color of the cover
fading.
• The child seat must not be used without
the cover. The cover should never be
replaced with a cover which has not been
recommended by the manufacturer,
since this cover comprises an integral
part of the seat safety system.
7

2. Verwenden des Kindersitzes für Kleinkinder (von 9 — 18kg)
2. Use of the child seat for ECE group I (from 9 — 18kg)
2.1 Befestigung des Sitzes mit Dreipunktgurt
1
2.1 Installation of the child seat using the three-point seatbelt
ENDE
Klick
2
7023-4-02/1
7899-00 / 1
Öffnen Sie die Gurtklemme. Betätigen Sie dazu den
Hebel an der Außenseite (1). Die Gurtklemme öffnet daraufhin selbsttätig (2).
Open the belt clamp. To do this operate the lever on
the outside (1). The belt clamp will then open of its own
accord. (2).
Ziehen Sie den Dreipunktgurt heraus, heben Sie den
Kopfstützenbezug an und führen Sie den Gurt hinter dem
Bezug durch.
Extend the three-point belt, lift the head rest cover and
feed the belt through behind the cover.
Schließen Sie das Gurtschloss mit einem hörbaren Klick
und legen Sie den Beckengurt des Dreipunktgurtes, an
den roten Gurtstraffern vorbei, in die hinteren Führungen
ein.
Fasten the buckle so that you hear an audible click, and
feed the lap section of the three-point seatbelt past the
red belt tensioners into the rear guide.
7900-00 /1
2
Straffen Sie erst den Becken- (1) und dann den Diagonalgurt (2).
First tighten the lap belt (1) and then the diagonal belt (2).
1
7901-00 /1
8

ENDE
Legen Sie den Diagonalgurt in die Gurtklemme ein (3)
und schließen Sie die Klemme (4) mit einem hörbaren
Klick (5).
4
3
Spannen Sie den Gurt daraufhin noch einmal nach um
den optimalen Halt des Kindersitzes zu gewährleisten.
Ziehen Sie dazu einfach den Gurt von der Gurtklemme
weg in Richtung des Gurtaufrollers Ihres Fahrzeugs und
straffen dabei den Becken- und Diagonalgurt nach.
Klick
5
7024-4-01/1
Place the diagonal belt in the belt clamp (3) and close the
clamp (4) with an audible click. (5).
Next tighten the belt once more in order to ensure that
the child seat is held as rmly as possible. For this, simply
pull the belt away from the belt clamp towards the vehicle
seatbelt tensioner, and then tighten the lap and diagonal
belts accordingly.
2.2 Anschnallen des Kindes
2.2 Securing the child
Zum Verlängern der Gurte drücken Sie den Zentralversteller (1) nach unten, halten ihn gedrückt und ziehen
2
unten an den Schultergurten (2).
1
7902-00 / 1
ment button (1), keep it pressed down and pull downwards on the shoulder straps (2).
Öffnen Sie das Schloss durch Betätigen der roten Taste
in Pfeilrichtung.
Open the buckle by pressing the red button in the
To lengthen the straps press down on the central adjust-
direction indicated by the arrow.
7729-4-00/1
9
7903-00 / 1
7904-00 / 1
ENDE
Legen Sie die Gurte außen ab.
Place the straps to the sides.
Setzen Sie Ihr Kind in den Sitz und führen Sie die Arme
des Kindes durch die Schultergurte.
Place your child in the seat and put the child’s arms
through the shoulder straps.
Schließen Sie das Schloss, in dem Sie die beiden Zungen
ineinander schieben (1) und mit einem hörbaren Klick ins
Schloss einrasten (2).
2
Fasten the buckle by pushing the two tongues into one
another (1) and inserting them into the buckle until it
closes with an audible click (2).
Klick
7730-4-00/1
Straffen Sie die Gurte durch Ziehen des Zentralgurtes in
Pfeilrichtung. Die Gurte sollten eng anliegen.
Tighten the straps by pulling the central belt in the
direction indicated by the arrow. The straps should t
tightly to your child.
7905-00 / 1
10

7906-00 / 1
ENDE
2.3 Höheneinstellung der Gurte:
2.3 Adjusting the harness height:
Lockern Sie das Gurtsystem.
Ziehen Sie am gelben Rastknopf und bringen Sie die
Kopfstütze in die nächste Position.
Achtung!
Bitte entfernen Sie zuerst den Verkleinerer bevor Sie
die Höhe der Kopfstütze zum ersten Mal anpassen und
prüfen Sie, ob eine Höhenverstellung immer noch notwendig ist.
Um den Verkleinerer zu entfernen, öffnen Sie dazu die
Druckknöpfe am hinteren Ende des Verkleinerers und
ziehen ihn von Schrittgurt und Gurtschloss ab.
Loosen the harness system.
Pull on the yellow ratchet stop button and raise the
headrest to the next position.
Warning!
Before adjusting the headrest, check if the insert cushion
needs to be removed for the child rst. In the event of
the insert cushion being removed, take care when feeding the buckle and crotch pad through.
1643-4-00/1
Die Schultergurte sollten wie im nebenstehenden Bild
dargestellt verlaufen. Die Führung der Gurte darf nie unterhalb der Schulter des Kindes liegen.
The shoulder straps should always be positioned as
shown in the adjacent illustration. The straps should
never follow a course below the child’s shoulders.
11
7908-00 / 1
ENDE
2.4 Einstellen der Ruheposition
2.4 Adjusting the recline position
Der Kindersitz kann durch Drehen des Verstellgriffes in
Pfeilrichtung in eine Ruheposition gebracht werden.
Achtung!
Sobald das interne Gurtsystem des Kindersitzes ausgebaut ist (ab Verwendung für Gruppe II) darf die Ruheposition nicht mehr verwendet werden.
The child seat can be placed in a rest position by turning
the adjuster handle in the direction indicated by the
arrow.
Warning!
Once the internal harness system has been removed (for
use for group II and up), the recline position should no
longer be used.
12

3. Verwenden des Kindersitzes für größere Kinder (ab 15 kg)
3. Use of the child seat for older children (from 15 kg)
ENDE
Auch wenn es nach der Zulassungsnorm für Kindersitze zulässig ist, den RECARO Young
Sport Her∞ ab einem Körpergewicht Ihres Kindes von 15 kg zusammen mit dem Fahrzeug-
gurt zu benutzen, empfehlen wir die Verwendung mit dem integrierten Gurtsystem solange
bis Ihr Kind das Gewicht von 18 kg erreicht hat.
Although the approvals standard for child car seats permits use of the RECARO Young Sport
Her∞ with the vehicle seatbelt for children weighing over 15 kg, we recommend continuing
to use the integrated harness system until your child has reached a weight of 18 kg.
3.1 Vor dem Einbau:
3.1 Before installation:
Bitte bewahren Sie entnommene Teile für den späteren
Gebrauch sorgfältig auf!
Lockern Sie das Gurtzeug und hängen Sie die Schultergurtschlaufe aus dem metallenen Verbindungsstück aus.
Ziehen Sie die Schultergurte nach vorne heraus.
7909-00 / 1
7916-00 / 1
Please keep any parts removed in a safe place for later
use!
Loosen the harness and detach the shoulder strap loops
from the metal connector.
Remove the shoulder straps by pulling them to the
front.
Bringen Sie die Kopfstütze in die oberste Position und
lösen Sie die Sterngriffschraube. Ziehen Sie das Umlenkrohr etwas nach unten heraus und ziehen Sie die
Befestigungsgurte der Schulterpolster ab. Entfernen Sie
anschließend das Umlenkrohr.
Place the headrest in the highest position and loosen
the star shaped knob. Pull the guide rail out and slightly
downwards, and remove the shoulder pad retaining belt.
Next remove the guide rail.
13

ENDE
Zum Abnehmen der Schulterpolster nehmen Sie den
1
3
Kopfstützenbezug ab und schieben die Schulterpolster
durch die Gurtschlitze. Danach können Sie die Schulterpolstereinheit entfernen.
Nehmen Sie den Sitzbezug teilweise ab und schlaufen
Sie die Beckengurte aus dem Schalenkörper aus.
2
In order to remove the shoulder pads remove the headrest cover and push the shoulder pads through the har-
1647-4-07/1
ness slot. You can then remove the shoulder pads.
Partially remove the seat cover and unhook the lap belt
from the body shell.
Klipsen Sie die Bodenplatte aus und drehen Sie sie seitlich weg.
Unclip the base plate and turn it away to the side.
1645-4-05/1
Schlaufen Sie die Metallplatte aus dem Schrittgurt aus
und ziehen Sie den Gurt am Schloss, von der Sitzfläche
weg, heraus.
Unhook the metal plate from the crotch strap and pull the
strap out by the buckle by pulling away from the seat.
1666-4-00/1
Drehen Sie die Bodenplatte zurück und drücken Sie sie
wieder in die Aufnahmen.
Turn the base plate back to its original position and push
it back into place.
1646-4-02/1
14

Klick
7912-00 / 1
ENDE
3.2 Anschnallen des Sitzes und des Kindes mit
dem Dreipunktgurt:
3.2 Securing the seat and child in using the
three-point seatbelt:
Die Ruheposition darf ab Gruppe 2 nicht mehr verwendet werden!
Lassen Sie Ihr Kind im Sitz Platz nehmen und legen Sie
den Beckengurt des Dreipunktgurtes in die vorderen
Gurtführungen ein. Schließen Sie das Gurtschloss mit
einem hörbaren Klick.
The recline position must not be used for group II or
above!
Allow your child to sit in the seat and insert the lap belt of
the three-point seatbelt into the front belt guides. Fasten
the seatbelt buckle so that it closes with an audible click.
Legen Sie den Diagonalgurt in die Führung an der Kopfstütze ein.
1652-4-01/1
7913-00 /1
Insert the diagonal belt into the guide on the headrest.
Stellen Sie die Kopfstütze auf die Größe Ihres Kindes ein,
Bedienung wie in Bild 2.7 beschrieben. Der Gurt verläuft
optimal über die Mitte des Schlüsselbeins und nicht zu
nah am Hals des Kindes entlang.
Adjust the headrest for your child’s height, operation as
described in illustration 2.7. The belt is in an optimal position when it runs over the middle of the collarbone and
not too close to the child’s neck.
15

4. Reinigung und Wartung des Kindersitzes
4. Cleaning and maintenance of the child seat
ENDE
Das Gurtschloss muss immer mit einem hörbaren Klick einrasten. Falls dies nicht der Fall
ist, kann dies durch Verunreinigungen im Schloss verursacht sein. Als Gegenmaßnahme
kann das Gurtschloss nach dem Ausbau (Kapitel 3.1) in warmem Wasser gereinigt werden.
Vor dem Wiedereinbau lassen Sie das Gurtschloss gründlich trocknen. Das Gurtschloss
darf nicht geölt oder geschmiert werden.
Der Sitzbezug des RECARO Young Sport Her∞ kann in der Maschine gewaschen werden.
Wir empfehlen den Bezug bei 30 °C im Schonwaschgang zu waschen um die Umwelt zu
schonen. Bei höheren Temperaturen können die Farben ausbleichen. Nicht schleudern und
nie im Wäschetrockner trocknen, da sich Stoff und Polsterung von einander lösen können.
The buckle must always lock into place with an audible click. If it does not, this may be
caused by dirt in the buckle. As a counter measure, the buckle can be removed (chapter 3.1)
and cleaned with warm water. Before reinstalling, allow the buckle to dry thoroughly. The
buckle must not be lubricated with oil or grease.
The cover of the RECARO Young Sport Her∞ can be washed in the washing machine. We
recommend washing the cover at 30 °C on a gentle wash setting in order to protect the
environment. If washed at higher temperatures the colors may fade. Do not spin and never
dry in a tumble drier, as the material and wadding could separate from one another.
4.1 Abnehmen des Sitzbezugs:
4.1 Removing the seat cover:
Lösen Sie zunächst den Bezug von den Posterknöpfen
an Kopf, Rücken- und Sitzteil. Anschließend können Sie
den Bezug ganz einfach abnehmen.
Das Abnehmen des Bezugs ist nur bei ausgebautem
Gurtsystem (siehe Kapitel 3.1) möglich.
7914-00 /1
First release the cover from the buttons on the head,
back and seat sections. You can then simply remove the
cover.
Removing the seat cover is only possible if the harness
system has previously been removed (see chapter 3.1).
1616

ENDE
1
1
2
7917-00 / 1
4.2. Wiedereinbau des Gurtzeuges
4.2. Replacing the harness
Der Einbau wird erleichtert, wenn die Schlosszungen im
Gurtschloss eingerastet sind.
Klipsen Sie zunächst die Bodenplatte ab und drehen Sie
diese zur Seite. Danach nehmen Sie das Sitzpolster ab
und legen es zur Seite.
Stecken Sie nun die Beckengurte des internen Gurtzeugs
von oben durch das äußere Langloch nach unten durch
und führen Sie diese durch die inneren Langlöcher wieder nach oben (1). Stecken Sie nun die Sicherungsbleche
durch die Schlaufen (2)
Wichtig: Alle 4 Nasen müssen sichtbar sein.
Legen Sie das Sitzpolster wieder auf die Sitzfläche und
führen Sie den Schrittgurt durch die Öffnung nach unten.
Schlaufe mit Befestigungsblech sichern. Wichtig: Alle 4
Haken müssen außerhalb der Schlaufe liegen
Drehen Sie die Bodenplatte wieder zurück und klipsen
Sie sie wieder ein. Dabei darauf achten, dass das T-Stück
des Verstellgurts danach frei zugänglich ist.
Befestigen Sie den Bezug am Sitzteil und Rückenteil.
Installation is made easier if the buckle tongues are
locked in place in the buckle.
First unclip the base plate and turn it away to the side.
Then remove the seat cushion and place it to one side.
Now insert the lap belt of the integral harness system
from the top through the outer long slit and downwards,
then thread it through the inner slits back towards the
top (1). Now insert the locking plate into the loops (2).
Important: All 4 lugs must be visible.
Replace the seat cushion on the seat and insert the
crotch strap through the opening from above. Secure
the loops with the mounting plate. Important: All 4 hooks
must lie outside the loops.
Turn the base plate back to its original position and clip
it in. Ensure that the T-section of the adjuster strap remains readily accessible.
Attach the cover to the seat and backrest.
17

7918-00 / 1
ENDE
Bringen Sie die Kopfstütze in die 2. Position von unten
und führen Sie die Befestigungsgurte der Schulterpolstereinheit durch die Schlitze nach hinten. Das Umlenkrohr
wie gezeigt einführen und die Befestigungsgurte über
das Rohr führen.
Kopfstütze in die 3. Position nach oben stellen und mit
der Sternschraube befestigen.
Führen Sie nun die Schulterpolster durch die Schlitze
im Kopfstützenbezug und bringen Sie den Bezug an der
Kopfstütze an. Öffnen Sie die Schulterpolster, legen Sie
die Schultergurte wie gezeigt ein und führen Sie diese
durch die Kopfstütze nach hinten. Achten Sie darauf die
Gurte über das Umlenkrohr zu führen.
Hängen Sie die Schultergurte im T-Stück ein. Wichtig:
Gurte nicht verdrehen
Schließen Sie zum Abschluss die Schulterpolster und
stellen Sie durch kräftiges Ziehen an den Gurten sicher,
dass alle Befestigungen sicher sind.
Place the headrest in the 2nd position from the bottom
and insert the retaining belt for the shoulder pads through the slits from front to back. Insert the guide rail
as shown and pass the retaining belt over the guide rail.
Move the headrest up into the 3rd position and secure
with the star shaped knob.
Now push the shoulder pads through the slits in the
headrest cover and place the cover on the headrest.
Open the shoulder pads, insert the shoulder straps as
shown and insert these through the headrest from front
to back. Ensure that you pass the straps over the guide
rail.
Attach the shoulder straps to the T section. Important:
Do not twist the straps.
Finally, close the shoulder pads and ensure, by pulling
rmly on the straps, that all the connections are secure.
18
18

5. HINWEISE
5. NOTICE
ENDE
5.1 Allgemeine Hinweise
• Die Gebrauchsanleitung bendet sich in
einer Einstecktasche unter dem Polster
am Rücken. Sie sollte nach Gebrauch immer wieder an ihren Platz zurück.
• Gewichtsklasse I, II, III (9-36 kg). Einbau
nur in Fahrtrichtung.
• Sitz und Gurt können mit lauwarmem
Wasser und Seife gereinigt werden. Der
abgenommene Bezug kann laut Pflege-
etikett gewaschen werden.
• Manche PKW-Kopfstützen stören die
Montage Ihres Kindersitzes und müssen deshalb vorher ausgebaut werden.
Dabei ist darauf zu achten, dass durch
die PKW-Kopfstütze kein ungewollter
Abstand zwischen der Rückenlehne des
Kindersitzes und der Rückenlehne des
Fahrzeugs entsteht. Eventuell wird die
Höheneinstellung der Kopfstütze des Kindersitzes durch das Vorhandensein einer
PKW-Kopfstütze eingeschränkt.
5.1 General information
• The instructions for use are located in a
pocket under the upholstery on the back
of the seat. They should always be replaced after use.
• Weight classes I, II, III (9 – 36 kg). Always
install facing in the direction of travel.
• The seat and harness can be cleaned with
lukewarm water and soap. Once removed
the cover can be washed according to the
instructions on the care label.
• Some vehicle headrests interfere with
the tting of your child seat. In this case,
please remove the vehicle headrest prior
to tting. Please ensure that the vehicle
headrest does not create an undesirable
gap between the child seat backrest and
the vehicle seat backrest. It is also possible that the ability to adjust the child
seat headrest height may be impaired by
the presence of a headrest on the vehicle
seat.
19

ENDE
5.2 Gewährleistung
• Sie beträgt 2 Jahre ab Kaufdatum und
bezieht sich auf Fabrikations- oder
Materialfehler. Reklamationsansprüche
können nur bei Nachweis des Kaufdatums geltend gemacht werden. Die
Gewährleistung beschränkt sich auf
Kindersitze, die sachgemäß behandelt
wurden und die in sauberem und
ordentlichem Zustand zurückgesandt
werden.
• Die Gewährleistung erstreckt sich nicht
auf natürliche Abnutzungserscheinungen
und Schäden durch übermäßige Beanspruchung oder Schäden durch ungeeig-
nete oder unsachgemäße Verwendung
• Textilien: Alle unsere Stoffe erfüllen hohe
Anforderungen in Bezug auf Farbbeständigkeit. Dennoch bleichen Stoffe durch
UV-Strahlung aus. Hierbei handelt es sich
nicht um einen Materialfehler, sondern
um normale Verschleißerscheinungen,
für die keine Gewährleistung übernommen werden kann.
5.3 Schutz Ihres Fahrzeuges
• Wir weisen darauf hin, dass bei Benutzung
von Kinderautositzen Beschädigungen
der Fahrzeugsitze nicht auszuschließen
sind. Die Sicherheitsrichtlinie ECE R44
fordert eine feste Montage. Bitte treffen
Sie für die Sitze Ihres Fahrzeugs geeignete Schutzmaßnahmen (z.B. eine Autositzunterlage wie der RECARO Car Seat
Protector).Die Firma RECARO Child Safety GmbH & Co. KG oder deren Händler
haften nicht für mögliche Schäden an den
Fahrzeugsitzen.
5.2 Warranty
• There is a two-year warranty from the
date of purchase for manufacturing or
material defects. Claims may only be asserted upon proof of the date of purchase. The warranty is limited to child seats
which have been used correctly and
which are returned in a clean and proper
condition.
• The warranty does not cover natural wear
and damage resulting from excessive
strain or unsuitable or improper use.
• Textiles: All our fabrics meet high standards with regard to colorfastness. However, UV radiation may cause colors
to fade. This is not a material fault, but
simply normal wear and tear, for which no
warranty can be given.
5.3 Protecting your vehicle
• We would like to point out that the use
of child car seats may cause damage to
the seats in your vehicle. Safety Directive
ECE R44 requires secure installation of
the child seat. Please take appropriate
measures to protect your vehicle seats
(e.g. a RECARO Car Seat Protector). RECARO Child Safety GmbH & Co. KG and
its dealers accept no liability for damage
to vehicle seats.
20
20

ENDE
Sollten Sie noch Fragen haben, rufen Sie
uns an, oder schreiben Sie uns eine E-Mail:
RECARO Child Safety GmbH & Co. KG
Guttenbergstrasse 2,
D-95352 Marktleugast
Phone: +49 9255 77-0
info@recaro-cs.com, www.recaro-cs.com
If you have any questions , please call us or
send us an e-mail:
RECARO Child Safety GmbH & Co. KG
Guttenbergstrasse 2,
D-95352 Marktleugast
Phone: +49 9255 77-0
info@recaro-cs.com, www.recaro-cs.com
21

NLFR
NOTICE DE MONTAGE ET D’UTILISATION
MONTAGE- EN GEBRUIKSAANWIJZING
7898-00/1
Young sport Her∞: Le siège auto, pour les
groupes I-II-III de 9 à 36kg. Fixation par la
ceinture trois points du véhicule plus le
Système de harnais cinq points du siège
auto pour assurer une sécurité maximum
en groupe I (9-18kg).
Toujours face à la route, ce siège auto
peut-être placé à l’avant ou à l’arrière du
véhicule équipé de la ceinture trois points
homologuée conformément à la norme
ECE n°16 ou à une autre norme équivalente.
Le siège est contrôlé et est conformément
homologué à la norme ECE 44/04 pour un
choc frontal à 50km/h.
ATTENTION: Cette notice doit être
impérativement conservée pour un usage
ultérieur.
Sous réserve d’erreurs, d’erreurs
d’impression et ou de modications
techniques.
Kinderzitje Young Sport Her∞ Leeftijdsgroep
I-III, 9 — 36 kg lichaamsgewicht voor
bevestiging met de driepuntsgordel
in het voertuig, met afzonderlijk
vijfpuntsgordelsysteem voor de veiligheid
van het kind uit de groep I (9-18 kg
lichaamsgewicht).
Het kinderzitje kan worden gebruikt op alle
voorwaarts gerichte plaatsen in het voertuig,
die met een driepuntsgordel uitgerust
zijn, die werd goedgekeurd volgens de
ECE-regeling nr. 16 of volgens een andere
vergelijkbare standaard.
Gecontroleerd en goedgekeurd conform
ECE 44/04 bij een frontale botsing aan 50
km/u.
OPGELET: Deze montage- en
gebruiksaanwijzing absoluut bewaren voor
later gebruik.
Drukfouten, vergissingen en technische
wijzigingen voorbehouden.
22

NLFR
LA SÉCURITÉ EST UNE AFFAIRE DE CONFIANCE.
Nous vous remercions d’avoir acheté un
produit RECARO.
Grâce à notre expérience unique, RECARO
révolutionne l’assise au sein des véhicules
et des avions ainsi que dans le sport depuis
plus de 100 ans. Ce savoir-faire inégalé se
reflète jusque dans les moindres détails
de nos systèmes de sécurité enfant. Notre
objectif est de vous offrir des produits
innovants, que ce soit en matière de design,
de fonctionnalité, de confort et de sécurité.
Des matériaux sélectionnés, la plus haute
précision lors de la fabrication et une
procédure d’essai minutieuse garantissent
la qualité et la sécurité maximales. Grâce
à des nouvelles idées et des solutions
innovantes, nous travaillons en permanence
an de vous garantir une vie mobile avec
vos enfants.
Nous vous souhaitons beaucoup de plaisir
et une conduite sûre en tout temps.
Votre équipe RECARO Child Safety
VEILIGHEID IS EEN ZAAK VAN
VERTROUWEN.
Hartelijk dank dat u voor RECARO hebt
gekozen.
Met onze unieke ervaring revolutioneert
RECARO al meer dan 100 jaar het zitten in
de auto, het vliegtuig en in de racesport.
Deze ongeëvenaarde kennis weerspiegelt
zich in de ontwikkeling van al onze
veiligheidssystemen voor kinderen. Onze
doelstelling is om producten aan te bieden
die op vlak van design, functionaliteit,
comfort en veiligheid nieuwe normen
stellen.
Uitgekozen materialen, uiterste
nauwkeurigheid bij de vervaardiging en
uitvoerige tests garanderen de maximale
kwaliteit en veiligheid. Met nieuwe ideeën
en innovatieve oplossingen werken we er
voortdurend aan om u de beste producten
voor een mobiel leven te bieden met uw
kinderen.
We wensen u veel plezier en een behouden
rit.
Het RECARO Child Safety Team
23
NLFR
INHOUD PAGINA
SOMMAIRE · PAGE ·
1. Consignes de sécurité
1. Veiligheidsinstructies
25
2. Utilisation du siège auto en groupe I pour les enfants en bas âge (9 à 18 kg)
2. Gebruiken van het kinderzitje voor kleine kinderen (van 9-18kg)
2.1 Fixation du siège avec une ceinture trois points
2.1 Bevestigen van het zitje met driepuntsgordel
2.2 Attacher votre enfant
2.2 Vastsnoeren van het kind
2.3 Réglage de la hauteur du harnais
2.3 Hoogte-instelling van de gordel
2.4 Réglage de la position de repos
2.4 Instellen van de rustpositie
3. Utilisation du siège auto en groupe II-III pour les enfants plus âgés (9 à 18 kg)
3. Gebruiken van het kinderzitje voor grotere kinderen (vanaf 15 kg)
3.1 Avant le montage
3.1 Voor de montage
3.2 Attacher le siège et l’enfant à l’aide de la ceinture trois points
3.2 Vastsnoeren van het zitje en het kind met de driepuntsgordel
4. Nettoyage de la housse du siège
4. Reinigen van de bekleding van het zitje
5. Remarques
5. Aanwijzingen
5.1 Consignes générales
5.1 Algemene aanwijzingen
5.2 Garantie
5.2 Garantie
5.3 Protection de votre véhicule
5.3 Bescherming van uw voertuig
27
27
28
30
31
32
32
34
35
38
38
39
39
24

1. CONSIGNES DE SÉCURITÉ
7915-00 / 1
Indépendamment de l’utilisation du siège
pour les classes d’âge I ou II+III, veillez au
passage correct de la ceinture au niveau
des points prévus à cet effet. La boucle de
la ceinture doit se trouver au-dessous du
point de passage de la ceinture.
• Le siège pour enfant RECARO Young
Sport Her∞ convient uniquement
aux véhicules équipés de ceintures
automatiques trois points homologuées
conformément au à la norme ECE n°16
ou à toutes autres normes équivalentes.
• Le siège auto RECARO Young Sport Her∞
doit toujours être xé conformément à la
notice de montage même s’il n’est pas
utilisé. Un siège non xé peut blesser les
autres passagers du véhicule en cas de
freinage brusque.
• Le siège est homologué pour les groupes
I à III (9 à 36 kg). Montage du siège dans
le sens de la marche.
• Pour le groupe I (9-18kg), le siège auto
doit obligatoirement être utilisé avec le
système de harnais intégré.
• Fixer le siège auto RECARO Young Sport
Her∞ de sorte à ce qu’il ne soit pas
bloqué par les sièges avant ou les portes
du véhicule.
• Ne pas modier le siège auto et respecter
la notice de montage et d’utilisation. Dans
le cas contraire, des risques ne peuvent
pas être exclus lors du transport de votre
enfant.
FR
• Les ceintures ne doivent pas être tournées
ou bloquées et doivent être tendues.
• Après un accident, le siège pour enfant
RECARO Young Sport Her∞ doit être
contrôlé en usine et, le cas échéant, être
remplacé.
• Les vêtements épais doivent être enlevés
avant la xation de la ceinture.
• Veuillez à ce que les bagages et autres
objets soient sufsamment sécurisés,
notamment sur la plage arrière car ils
peuvent provoquer des blessures en cas
de collision.
• Donnez l’exemple et attachez votre
ceinture. Un adulte non attaché peut être
un danger pour l’enfant.
• Remarque: n’utilisez que des pièces et
accessoires originaux.
• Ne laissez jamais votre enfant sans
surveillance.
• Attachez toujours votre enfant.
• Protégez le siège auto des rayons directs
du soleil an d’éviter toute brûlure de
votre enfant et d’une décoloration des
couleurs de la housse.
• Ne pas utiliser le siège auto sans housse.
Ne jamais remplacer la housse du siège
auto par une housse non recommandée
par le fabricant car celle-ci contribue à la
sécurité du système.
25

1. VEILIGHEIDSINSTRUCTIES
7915-00 / 1
Let onafhankelijk van het gebruik in de groep
I of II+III op de juiste gordelgeleiding aan de
lastdragende punten. Het gordelslot moet
steeds onder de gordelgeleiding liggen.
• De RECARO Young Sport Her∞ is enkel
geschikt voor gebruik in goedgekeurde
voertuigen, als het voertuig is uitgerust
met automatische driepuntsgordels,
die volgens UN — ECE — regeling nr.
16 of andere vergelijkbare normen
goedgekeurd zijn.
• De RECARO Young Sport Her∞ moet
steeds volgens de montagehandleiding
worden bevestigd, ook als deze niet
wordt gebruikt. Een niet bevestigd zitje
kan zelfs bij een noodremming andere
passagiers verwonden.
• Het kinderzitje is voor de gewichtsklasse
I-III (9-36 kg) toegestaan. Montage van
het zitje enkel in rijrichting.
• In de gewichtsklasse I (9 — 18 kg) mag het
kinderzitje enkel met het geïntegreerde
gordelsysteem worden gebruikt
• De RECARO Young Sport Her∞ in de
auto zo bevestigen dat het niet door de
voorstoel of de voertuigdeuren wordt
ingeklemd.
• Het kinderzitje mag niet worden veranderd
en de montage- en gebruiksaanwijzing
moet zorgvuldig worden gerespecteerd
omdat anders gevaren tijdens het
transport van uw kind niet kunnen worden
uitgesloten.
26
NL
• De gordels mogen niet worden verdraaid
of klem zitten en moeten strak worden
aangetrokken.
• Na een ongeval moet de RECARO
Young Sport Her∞ in de fabriek worden
gecontroleerd en eventueel worden
vervangen.
• Sterk dik makende kledingstukken
moeten voor het vastsnoeren worden
uitgetrokken.
• Let erop dat bagage en andere
voorwerpen voldoende beveiligd zijn,
vooral op de hoedenplank, omdat deze
bij een botsing verwondingen zouden
kunnen veroorzaken.
• Geef altijd het goede voorbeeld en doe uw
gordel om. Ook een niet vastgesnoerde
volwassene kan een gevaar zijn voor uw
kind.
• Instructie: Er mag enkel origineel
toebehoren resp. -reserveonderdelen
worden gebruikt.
• Laat uw kind nooit zonder toezicht.
• Snoer bij uw kind steeds de gordel vast.
• Het kinderzitje beschermen tegen
directe zonnestralen om te verhinderen
dat het kind er zich aan verbrandt of
om de kleurechtheid van de overtrek te
behouden.
• Het kinderzitje mag nooit zonder overtrek
worden gebruikt. De overtrek van het
zitje mag nooit worden vervangen door
een niet door de fabrikant aanbevolen
overtrek omdat deze overtrek onderdeel
is van de veiligheidswerking van het
systeem.

2. Utilisation du siège auto en groupe I pour les enfants en
bas âge (de 9 à 18kg)
2. Gebruiken van het kinderzitje voor kleine kinderen
(van 9-18kg)
2.1 Fixation du siège avec une ceinture trois points
1
2.1 Bevestigen van het zitje met driepuntsgordel
Ouvrez la pince de ceinture. Pour cela, actionnez le
2
levier situé du côté extérieur (1). La pince s’ouvre
automatiquement (2).
Open de gordelklem. Bedien daarvoor de hendel aan
de buitenkant (1). De gordelklem opent vervolgens
zelfstandig (2).
7023-4-02/1
Tirez la ceinture trois points, soulevez la housse de
l’appui-tête et passez la ceinture derrière la housse.
Trek de driepuntsgordel eruit, til de overtrek van de
hoofdsteun op en steek de gordel er achteraan de
overtrek door.
7899-00 / 1
FR
NL
Klick
1
2
Fermez la boucle de la ceinture (celle-ci doit faire «clic») et
placez la partie du bassin de la ceinture trois points dans
les guides-ceinture arrière via les tendeurs de ceinture.
Sluit het gordelslot met een hoorbare klik en plaats de
bekkengordel van de driepuntsgordel, langs de rode
gordelspanner, in de achterste geleidingen.
7900-00 /1
Tendez tout d’abord la partie du bassin (1) puis la partie
diagonale (2).
Span eerst de bekken- (1) en dan de diagonale gordel (2).
7901-00 /1
27
NLFR
Placez la ceinture diagonale dans la pince de ceinture (3)
et fermez la pince (4) (celle-ci doit faire «clic»).
Tendez à nouveau la ceinture an de garantir le maintien
4
3
optimal du siège enfant. Pour cela, tendez la ceinture de
la pince de ceinture en direction de l’enrouleur et tendez
la ceinture de bassin et diagonale.
Plaats de diagonale gordel in de gordelklem (3) en sluit de
Klick
5
7024-4-01/1
klem (4) met een hoorbare klik (5).
Span de gordel vervolgens nog eenmaal na om de
optimale grip van het kinderzitje te garanderen. Trek
gewoon de gordel van de gordelklem weg in de richting
van de gordeloproller van uw voertuig en span daarbij de
bekken- en diagonale gordel aan.
2.2 Attacher votre enfant
2.2 Vastsnoeren van het kind
Pour allonger le harnais, appuyez sur le réglage central (1)
vers le bas, maintenez-le enfoncé et tirez sur les bretelles
2
du harnais (2).
Om de gordel te verlengen, drukt u de centrale versteller
1
(1) naar beneden, houd deze ingedrukt en trek onderaan
aan de schoudergordels (2).
7902-00 / 1
Ouvrez la boucle en actionnant le bouton rouge dans le
sens de la flèche.
Open het slot door te drukken op de rode knop in de
richting van de pijl.
7729-4-00/1
28

7903-00 / 1
7904-00 / 1
NLFR
Placez les bretelles vers l’extérieur du siège.
Plaats de gordels naar buiten.
Asseyez votre enfant dans le siège et placez les bras de
ce dernier à travers les bretelles du harnais.
Plaats uw kind in het zitje en steek de armen van het kind
doorheen de schoudergordels.
Fermez la boucle en assemblant les deux languettes (1)
et en les encliquetant dans la boucle (celles-ci doivent
faire «clic») (2).
2
Klick
7730-4-00/1
Sluit het slot,door de beide tongen in elkaar te schuiven
(1) en met een hoorbare klik in het slot vast te klikken (2).
Tendez les bretelles en tirant sur la sangle de réglage
dans le sens de la flèche. Les bretelles doivent être
serrées.
Span de gordel aan door te trekken aan de centrale
gordel in de richting van de pijl. De gordels moeten goed
aansluiten.
7905-00 / 1
29

7906-00 / 1
NLFR
2.3 Réglage de la hauteur la tétière:
2.3 Hoogte-instelling van de riemen:
Détendez le harnais.
Tirez sur le bouton jaune situé à l’arrière sur siège et
positionnez l’appui-tête à la hauteur adéquate.
Attention !
Veuillez retirer tout d’abord le coussin réducteur avant de
régler la hauteur de l’appui-tête pour la première fois et
vériez que le réglage soit toujours nécessaire.
Pour retirer le réducteur, ouvrez les boutons situés sur
le bord arrière du réducteur et retirez-le de la sangle
d’entrejambe et de la boucle du harnais.
Losmaken van het gordelsysteem.
Trek aan de gele ratelknop en breng de hoofdsteun in de
volgende positie.
Opgelet!
Verwijder eerst de verkleiner alvorens u de hoogte van de
hoofdsteun voor de eerste maal aanpast en controleer of
een hoogteverstelling nog steeds noodzakelijk is.
Om de verkleiner te verwijderen, opent u de drukknoppen
aan het achterste uiteinde van de verkleiner en trekt u
hem van de schoudergordel en het gordelslot.
Les bretelles doivent être positionnées comme sur
l’illustration ci-contre. Les bretelles ne doivent jamais
passer en-dessous des épaules de l’enfant.
De schoudergordels moeten zoals op de afbeelding
hiernaast lopen. De geleiding van de gordels mag nooit
onder de schouder van het kind liggen.
1643-4-00/1
30
Loading…
YOUNG SPORT YOUNG SPORT HERO UN-Group I-III 9 to 36 kg approx. 9 months to 12 years
EN
CN
TW
Instructions for installation and use
KO
2 3
YOUNG SPORT YOUNG SPORT HERO ECE-Group I-III 9 to 36 kg approx. 9 months to 12 years
Instructions for installation and use The Young Sport, Young Sport HERO child car seat is suitable for ECE groups I-III, weight 9-36 kg to be installed using the vehicle three-point seatbelt, with a separate five-point harness system for securing children in age group I (weight 9-18kg). The child seat can be used in all forward facing seats in the vehicle which are fitted with a three- point seatbelt approved under ECE Regulation No. 16 or another equivalent standard. Tested and approved in accordance with ECE 44/04 for frontal impact at 50 km/h.
NOTICE: These instructions for installation and use must be retained for future reference.
Subject to printing errors, mistakes and technical changes.
Safety is a matter of trust. Thank you for choosing RECARO.
Thanks to our unique experience RECARO has been revolutionizing car, airplane and racing car seating for over 100 years. This unrivaled expertise feeds into the development of all of our child safety systems. Our aim is to offer you products which set new standards in terms of design, functionality, comfort and safety.
Selected materials, maximum precision in manufacturing and extensive test procedures ensure the highest quality and safety. With new ideas and innovative solutions we constantly strive to offer you the best products for life on the move with your children.
We wish you lots of fun and a safe journey every time.
Your RECARO Child Safety Team
Content
1. Safety notice 4
2. Use of the child seat for infants (from 9 — 18kg ECE-Group I) 4-5 2.1 Installation of the child seat using the three-point seatbelt 4 2.2 Securing the child in 5 2.3 Adjusting the harness height 5 2.4 Adjusting the recline position 5
3. Use of the child seat for older children 5-6 (from 15 — 36kg ECE-Group II-III) 3.1 Before installation 5 3.2 Securing the seat and child in using the three-point seatbelt 6
4. Cleaning and maintenance of the child seat 6 4.1 Removing the seat cover 6 4.2 Replacing the harness (see also chapter 3.1) 6
5. Notice 7 5.1 General information 7 5.2 Warranty 7 5.3 Protecting your vehicle 7
EN
4 5
1. Safety Notice Before using the RECARO Young Sport, Young Sport HERO, please read the instructions carefully. Regardless of whether it is being used for age group I or II+III, ensure that the belt position is correct at the load-bearing points. The buckle must always be below the belt guide (fig. 1). The child seat is only suitable for use in vehicles if the vehicle is authorised and fitted with three-point seatbelts approved under UN — ECE Regulation No. 16 or other comparable standards. The child seat should always be fitted in accordance with the instructions, even when not in use. In the event that the driver has to brake hard in an emergency, an unattached seat may cause injury to other occupants in the vehicle. The child seat is only approved for use for weight classes I-IIII (9 — 36kg). The seat should only be installed facing in the direction of travel. For weight class I (9 — 18 kg), the child seat must only be used with the integrated restraint system. Install the child seat in the vehicle in such a way that it is not clamped by the front seats or the vehicle door. The child seat must not be modified in any way, and the instructions for installation and use must be followed carefully, otherwise your child could be put at risk while travelling. The belts must not be twisted or trapped and must be completely tightened. IMPORTANT: Ensure that the lap belts in particular are tight and fitted as low as possible across the childs pelvis. After an accident, the child seat must be removed and tested in the factory and, if necessary, replaced. Very bulky items of clothing must be removed prior to securing the child in. Always ensure that items of luggage and other objects are adequately secured, particularly those on the parcel shelf, as these could cause injury in the event of a collision. Always set a good example and always use your seat belt. An adult who is not wearing a seatbelt can also endanger your child. Notice: Only original accessories or replacement parts may be used. Never leave your child unattended. Always strap your child in. Protect the child seat from direct sunlight in order to avoid your child being burnt by it and to preserve the color of the cover. The child seat must not be used without the cover. The cover must never be replaced with a cover which has not been recommended by the manufacturer, since this cover comprises an integral part of the seat safety system.
2. Use of the child seat for infants (from 9 — 18kg ECE-Group I)
2.1 Installation of the child seat using the three-point seatbelt Open the belt clamp. To do this operate the lever on the outside (1). The belt clamp will then open of its own accord (2) (fig. 2). Extend the three-point belt, lift the head rest cover and feed the belt through behind the cover (fig. 3). Fasten the buckle so that you hear an audible click, and feed the lap section of the three- point seatbelt past the red belt tensioners into the rear guides (fig. 4). First tighten the lap belt (1) and then the diagonal belt (2) (fig. 5). Place the diagonal belt in the belt clamp (3) and close the clamp (4) with an audible click. (5) (fig. 6). Next tighten the belt once more in order to ensure that the child seat is held as firmly as possible. For this, simply pull the belt away from the belt clamp towards the vehicle seatbelt tensioner, and then tighten the lap and diagonal belts accordingly.
2.2 Securing the child in To lengthen the straps press down on the central adjustment button (1), keep it pressed down and pull downwards on the shoulder straps (2) (fig. 7). Open the buckle by pressing the red button in the direction indicated by the arrow (fig. 8). Place the straps to the sides (fig. 9). Place your child in the seat and put the childs arms through the shoulder straps (fig. 10). Fasten the buckle by pushing the two tongues into one another (1) and inserting them into the buckle until it closes with an audible click (2) (fig. 11). Tighten the straps by pulling the central belt in the direction indicated by the arrow. The straps should fit tightly to your child (fig. 12).
2.3 Adjusting the harness height Loosen the harness system. Pull on the ratchet stop button and raise the headrest to the next position (fig. 13). NOTICE: Before adjusting the headrest, check if the insert cushion needs to be removed for the child first. In the event of the insert cushion being removed, take care when feeding the buckle and crotch pad through. The shoulder straps should always be positioned as shown (fig. 14). The straps should never follow a course below the childs shoulders.
2.4 Adjusting the recline position The child seat can be placed in a recline position by turning the adjuster handle in the direction indicated by the arrow (fig. 15). NOTICE: Once the internal harness system has been removed (for use for group II and up), the recline position should no longer be used.
3. Use of the child seat for older children (from 15 — 36kg ECE-Group II-III) Although the approvals standard for child car seats permits use of the RECARO Young Sport, Young Sport HERO with the vehicle seatbelt for children weighing over 15 kg, we recommend continuing to use the integrated harness system until your child has reached a weight of 18 kg.
3.1 Before installation Please keep any parts removed in a safe place for later use! Loosen the harness and detach the shoulder strap loops from the metal connector (fig. 16,17). NOTICE: The central belt, that means the belt-part with the metal connector (fig. 17), has to remain on the child seat. Remove the shoulder straps by pulling them to the front. Place the headrest in the highest position and loosen the screw. Pull the guide rail out and slightly downwards, and remove the shoulder pad retaining belt. Next remove the guide rail (fig. 18). In order to remove the shoulder pads remove the headrest cover and push the shoulder pads through the harness slot. You can then remove the shoulder pads. Partially remove the seat cover and unhook the lap belt from the body shell (fig. 19). Unclip the base plate and turn it away to the side (fig. 20). Unhook the metal plate from the crotch strap and pull the strap out by the buckle by pulling away from the seat (fig. 21). Turn the base plate back to its original position and push it back into place (fig. 22). Put the metal connector in the pocket on bottom of the base plate (fig. 23). NOTICE: The belt-part with the metal connector has to remain on the child seat.
EN
6 7
3.2 Securing the seat and child in using the three-point seatbelt The recline position must not be used for group II or above! Allow your child to sit in the seat and insert the lap belt of the three-point seatbelt into the front belt guides. Fasten the seatbelt buckle so that it closes with an audible click (fig. 24). Insert the diagonal belt into the guide on the headrest (fig. 25). Adjust the headrest for your childs height. The belt is in an optimal position when it runs over the middle of the collarbone and not too close to the childs neck (fig. 26).
4. Cleaning and maintenance of the child seat The buckle must always lock into place with an audible click. If it does not, this may be caused by dirt in the buckle. As a counter measure, the buckle can be removed (chapter 3.1) and cleaned with warm water. Before reinstalling, allow the buckle to dry thoroughly. The buckle must not be lubricated with oil or grease. The cover of the RECARO Young Sport, Young Sport HERO can be washed in the washing machine. Please remove all removable foam pads from and out of the covers before washing. These pads must not be washed. We recommend washing the cover at 30 C on a gentle wash setting in order to protect the environment. If washed at higher temperatures the colors may fade. Do not spin and never dry in a tumble drier, as the material and wadding could separate from one another.
4.1 Removing the seat cover First release the cover from the buttons on the head, back and seat sections. You can then simply remove the cover (fig. 27). Removing the seat cover is only possible if the harness system has previously been removed (see chapter 3.1).
4.2 Replacing the harness (see also chapter 3.1) Installation is made easier if the buckle tongues are locked in place in the buckle (fig. 11). First unclip the base plate and turn it away to the side. Then remove the seat cushion and place it to one side. Now insert the lap belt of the integral harness system from the top through the outer long slit and downwards, then thread it through the inner slits back towards the top (1). Now insert the locking plate into the loops (2) (fig. 28,29). Important: All 4 lugs must be visible. Replace the seat cushion on the seat and insert the crotch strap through the opening from above. Secure the loops with the mounting plate (fig. 30). Important: All 4 hooks must lie outside the loops. Turn the base plate back to its original position and clip it in. Ensure that the T-section of the adjuster strap remains readily accessible. Attach the cover to the seat and backrest. Place the headrest in the 2nd position from the bottom and insert the retaining belt for the shoulder pads through the slits from front to back. Insert the guide rail as shown and pass the retaining belt over the guide rail (fig. 31,32,33). Move the headrest up into the 3rd position and secure with the screw (fig. 34). Now push the shoulder pads from back side through the slits in the headrest cover and place the cover on the headrest. Open the shoulder pads, insert the shoulder straps as shown and insert these through the headrest from front to back. Ensure that you pass the straps over the guide rail. Attach the shoulder straps to the T section. Important: Do not twist the straps (fig. 32,35). Finally, close the shoulder pads and ensure, by pulling firmly on the straps, that all the connections are secure.
5. Notice
5.1 General information The instructions for use are located in a pocket in the base plate of the child seat. They should always be replaced after use. Weight classes I, II, III (9 36 kg). Always install facing in the direction of travel. The seat and harness can be cleaned with lukewarm water and soap. Once removed the cover can be washed according to the instructions on the care label. Some vehicle headrests interfere with the fitting of your child seat. In this case, please remove the vehicle headrest prior to fitting. Please ensure that the vehicle headrest does not create an undesirable gap between the child seat backrest and the vehicle seat backrest. It is also possible that the ability to adjust the child seat headrest height may be impaired by the presence of a headrest on the vehicle seat.
5.2 Warranty There is a two year warranty from the date of purchase for manufacturing or material faults. Claims may only be asserted upon proof of the date of purchase. The warranty is limited to child seats which have been used correctly and which are returned in a clean and proper condition. The warranty does not cover natural wear and damage resulting from excessive strain or inappropriate or improper use. Material: All our fabrics meet high standards with regard to colorfastness. However, UV radiation may cause colors to fade. This is not a material fault, but simply normal wear and tear, for which no warranty can be given. Buckle: Improper functioning of the buckle is usually the result of soiling, for which, likewise, no warranty can be given.
5.3 Protecting your vehicle We would like to point out that the use of child car seats may cause damage to the vehicle seats. Safety Directive ECE R44 requires secure installation of the seat. Please take appropriate measures to protect your vehicle seats (e.g. use a RECARO Car Seat Protector). RECARO Kids s.r.l. or its dealers will not be liable for any damage to vehicle seats.
If you have any other queries, please call us or send us an e-mail:
RECARO Kids s.r.l. Via Niccol Tommaseo, 68 35131 PADOVA (PD) ITALY Phone: +39 02 4546 7740 Mail: info@recaro-kids.com Web: www.recaro-kids.com
EN
8 9
YOUNG SPORT YOUNG SPORT HERO ECE I-III 9 36 9 12
GB27887-2011
I-III Young SportYoung Sport HERO 9 36 I 9 18
GB14166ECE R163
ECE 44/04GB27887 50 /
1. GB27887-2011
2.
3.
RECARO
100 RECARO
RECARO
1. 10
2. 9-18ECEI 10-11 2.1 10 2.2 11 2.3 11 2.4 11
3. 15-36ECEII+III 11 3.1 11 3.2 11
4. 12 4.1 12 4.2 3.1 12
5. 12-13 5.1 12 5.2 12 5.3 13
CN
10 11
1. RECARO Young SportYoung Sport HERO I II+III 1 I-III9 — 36 I9 — 18 GB14166ECE R16 .
2. 9-18ECEI
2.1 12 2 3 4 12 5 345 6
2.2 12 7 8 9 10 12 11 12.
2.3 13 14.
2.4 15 II
3. 15-36ECEII+III RECARO Young SportYoung Sport HERO 15 18
3.1 16,17 17 18 19 20 21 22 23
3.2 2 24 25 26
CN
12 13
4. 3.1 RECARO Young SportYoung Sport HERO 30C
4.1 27 3.1
4.23.1 11 12 2829 4 30 4 T 2 313233 3 34 T 3235
5.
5.1 IIIIII9 36
5.2
5.3 ECE R44 RECARO Car Seat Protector RECARO Kids s.r.l.
RECARO Kids s.r.l. Via Niccol Tommaseo, 68 35131 PADOVA (PD) ITALY Phone: +39 02 4546 7740 Mail: info@recaro-kids.com Web: www.recaro-kids.com
Shanghai ForU Sleep Technology Co., Ltd. 5085 3F 3rd Floor, #5 building, No. 508, Chundong Rd., Minghang Dist., Shanghai Tel:021-33592233 Fax: 021-33586620 Email: service@for-u.cn
CN
14 15
YOUNG SPORT YOUNG SPORT HERO ECE I-III 9 36 9 12
I-III Young SportYoung Sport HERO 9 36 I 9 18 ECE16 ECE 44/04 50 /
RECARO
100 RECARO
RECARO
1. 16
2. 9-18ECEI 16-17 2.1 16 2.2 16-17 2.3 17 2.4 17
3. 15-36ECEII+III 17-18 3.1 17 3.2 17-18
4. 18 4.1 18 4.2 3.1 18
5. 18-19 5.1 18-19 5.2 19 5.3 19
TW
16 17
1. RECARO Young SportYoung Sport HERO I II+III 1 UN — ECE16 I-III9 — 36 I9 — 18
2. 9-18ECEI
2.1 12 2 3 4 12 5 345 6
2.2 12 7 8
9 10 12 11
2.3 13 14
2.4 15 II
3. 15-36ECEII+III RECARO Young SportYoung Sport HERO 15 18
3.1 16,17 17 18 19 20 21 22 23
3.2 2 24
TW
18 19
25 26
4. 3.1 RECARO Young SportYoung Sport HERO
30C
4.1 27 3.1
4.23.1 11 12 2829 4 30 4 T 2 313233 3 34 T 3235
5.
5.1 IIIIII9 36
5.2
5.3 ECE R44 RECARO Car Seat Protector RECARO Kids s.r.l.
RECARO Kids s.r.l.
Via Niccol Tommaseo, 68
35131 PADOVA (PD)
ITALY
Phone: +39 02 4546 7740
Mail: info@recaro-kids.com
Web: www.recaro-kids.com
TW
20 21
YOUNG SPORT YOUNG SPORT HERO ECE Group I-III 9~36kg 9~12
Young Sport, Young Sport HERO ECE Group I-III . 3 9~36kg I(9~18kg ) . ECE Regulation No. 16 3 . ECE 44/04 50 km/h .
: .
.
. Thank you for choosing RECARO.
RECARO .
RECARO 100 , , . RECARO . RECARO , , , .
, , . .
.
RECARO
1. 22
2. (9~18kg ECE Group I) 22-23 2.1 3 22 2.2 22-23 2.3 23 2.4 23
3. (15~36kg ECE Group II+III) 23 3.1 23 3.2 3 23
4. 24 4.1 24 4.2 (3.1 ) 24
5. 24-25 5.1 24 5.2 25 5.3 25
KO
22 23
1. RECARO Young Sport, Young Sport HERO . I II+III . ( 1). UN — ECE Regulation No. 16 3 . . . I-IIII(9~36kg) . . I(9~18kg) . . , . . . : . . . . . . : . . . . . .
2. (9~18kg ECE Group I)
2.1 3 . (1) . (2) ( 2). 3 ( 3). 3 ( 4). (1) (2) ( 5). (3) (5) (4) ( 6). . .
2.2 (1) (2) ( 7). ( 8). ( 9). ( 10).
(1) (2) ( 11). . ( 12).
2.3 . ( 13). : . . ( 14). .
2.4 ( 15). : (Group II ) .
3. (15~36kg ECE Group II+III) 15kg RECARO Young Sport, Young Spot HERO 18kg .
3.1 ! ( 16,17). : , ( 17) . . . . ( 18). . . ( 19). ( 20). ( 21). ( 22). ( 23). : .
3.2 3 Group II ! 3 . ( 24). ( 25). . ( 26).
KO
24 25
4. . . (3.1) . . . RECARO Young Sport, Young Sport HERO . . . 30C . . , .
4.1 , . ( 27). (3.1 ).
4.2 (3.1 ) ( 11). . . (1) . (2) ( 28, 29). : 4 . . ( 30). : 4 .. . T . . . ( 31, 32, 33). ( 34). . . . T . : ( 32, 35). .
5.
5.1 . . I, II, III(9~36kg). . . . . . . .
5.2 2 A/S . A/S . , . . : RECARO . , . . : .
5.3 . ECE R44 . (: RECARO Car Seat Protector ). RECARO Kids s.r.l. .
:
RECARO Kids s.r.l. Via Niccol Tommaseo, 68 35131 PADOVA (PD) ITALY Phone: +39 02 4546 7740 Mail: info@recaro-kids.com Web: www.recaro-kids.com
KO
Subject to printing errors, mistakes and technical changes.
RECARO Kids s.r.l. Via Niccol Tommaseo, 68 35131 PADOVA (PD) ITALY Phone: +39 02 4546 7740 Mail: info@recaro-kids.com Web:
RECARO Young Sport Hero Car Seat PDF User Guides and Manuals for Free Download: Found (3) Manuals for RECARO Young Sport Hero Device Model (Instructions For Installation And Use Manual)
When it comes to child safety in vehicles, finding the right car seat is of utmost importance for parents. The RECARO Young Sport Hero is a versatile option that promises comfort, safety, and usability as your child grows. Combining the features of a baby seat and a high-back booster, this car seat is designed for children weighing between 9 and 36 kilograms, roughly aged from 9 months to around 12 years. With its unique design and considerable capabilities, the Young Sport Hero stands out in the crowded marketplace of child safety seats.
One of the most impressive aspects of the RECARO Young Sport Hero is its ergonomic design. The seat is equipped with a well-cushioned headrest and backrest, which ensures that your child remains comfortable even on long journeys. Thanks to its adjustable features, parents can modify the seat to suit their child’s height as they grow. Additionally, the pad of the seat is removable and washable, making it easy to maintain hygiene, which is often a concern with children.
Safety is undoubtedly the primary concern when selecting any car seat. The RECARO Young Sport Hero boasts a robust safety structure that includes:
- Integrated Side Impact Protection (ISP) that absorbs collision forces.
- A 5-point harness system for younger children, providing extra security.
- Easy installation in the vehicle with the use of the car’s seatbelt or ISOFIX connectors.
In addition to its superior safety features, the Young Sport Hero also excels in user-friendliness. The adjustable headrest can be modified with one hand, allowing parents to adjust the seat effortlessly without causing any disturbance to the child. Furthermore, the reclining feature offers additional comfort, as it allows the car seat to adapt during naps or when the child is resting.
One notable aspect parents appreciate about the RECARO Young Sport Hero is its aesthetic appeal. Available in a variety of colors, the design is sleek and modern, making it not just a practical choice but also an attractive one. The quality of materials used is evident; it feels durable and well-constructed, adding to the longevity of the product, which is a significant consideration for most parents investing in a car seat.
However, while the Young Sport Hero has numerous strengths, there are a few areas that could be improved. Some parents have noted that the seat can be a bit bulky, which might pose a challenge in smaller vehicles or for parents who need to frequently switch the seat between cars. Additionally, although the installation process is straightforward, some users recommend watching installation videos online for the best fitting.
In conclusion, the RECARO Young Sport Hero effectively balances safety, comfort, and style, making it a solid choice for parents looking for a long-lasting car seat solution. Its ability to adapt as children grow, combined with its user-friendly features and robust safety standards, make it a worthy investment for families. As with any product, it’s essential to weigh the benefits against any drawbacks, but overall, it stands out positively in the market of child car seats.
Спасибо, что остановили свой выбор на продукции Recaro.
На протяжении уже более чем 100 лет, используя свой уникальный опыт компания Recaro занимается разработкой и модернизацией автомобильных кресел, авиационных кресел и кресел для гоночных видов спорта. Эти научно-технические знания применяются при разработке каждой системы детской безопасности. Мы стремимся предлагать изделия, дизайн, функциональность, комфорт и безопасность которых, устанавливали бы новые стандарты.
Лучшие материалы, высочайшая точность при изготовлении и эффективные методы тестирования гарантируют максимальное качество и безопасность. Используя новые идеи и инновационные решения, мы продолжаем работать над тем, чтобы иметь возможность предложить Вам наилучшие изделия для мобильной жизни вместе с детьми.
Мы желаем Вам испытать удовольствие от безопасных поездок.
Ваш коллектив Recaro child safety.
Содержание:
1 Инструкция по безопасности
2 Использование кресла (9 — 18 кг)
3 Использование кресла (15 — 36 кг)
4 Чистка и обслуживание детского автокресла
5 Указания
1. Инструкция по безопасности
Перед применением автокресла RECARO Young Sport HERO внимательно прочитайте инструкцию.
Инструкция для автокресла Recaro Young Sport Hero
- Независимо от использования для группы 1 или 2 — 3 следите за правильным пролеганием ремней в точках, несущих нагрузку. Замок ремня должен всегда находится ниже направляющей ремня
- Кресло Recaro Young Sport Hero может использоваться только в автомобилях, оборудованных автоматическими трехточечными ремнями безопасности, применение которых разрешено распоряжением № 16 UN — ЕСЕ или другими аналогичными нормами
- Кресло Recaro Young Sport Hero необходимо всегда закреплять согласно инструкции по монтажу, даже если оно не используется. При экстренном торможении незакрепленное кресло может нанести травмы пассажирам автомобиля
- Кресло допущено к эксплуатации для весовой группы 1-3 (9 — 36 кг). Установку кресла производить только по ходу движения автомобиля
- В весовой группе 1 (9 −18 кг) кресло разрешается использовать только вместе с интегрированной системой ремней
- Recaro Young Sport Hero необходимо закрепить так, чтобы оно не могло быть зажато передним сиденьем или дверями автомобиля
- Не разрешается вносить изменения в конструкцию детского автокресла, следует строго соблюдать инструкцию по монтажу и уходу за креслом, поскольку в противном случае нельзя исключить вероятность травмирования ребенка при его перевозке
- Не разрешается перекручивать или пережимать ремни, они должны быть всегда натянуты
- После аварии кресло Recaro Young Sport Hero необходимо проверить на заводе и при необходимости заменить
- Перед пристегиванием ремней необходимо снять слишком толстые детали одежды
- Следите, чтобы багаж и другие предметы были надлежащим образом зафиксированы, особенно на задней полке, поскольку в случае столкновения они могут нанести травмы
- Покажите хороший пример и пристегнитесь сами. Взрослый человек, не пристегнутый ремнями безопасности, может представлять опасность для ребенка
- Примечание: Разрешается использовать только оригинальные аксессуары и запасные детали
- Не оставляйте ребенка без присмотра
- Всегда пристегивайте ребенка ремнем
- Предохраняйте кресло от воздействия прямых солнечных лучей для недопущения того, чтобы ребенок получил из-за этого ожоги, или чтобы не допустить выгорания обивки
- Не разрешается использование детского автокресла без обивки. Не разрешается менять обивку кресла на другую, которая не рекомендована производителем, т.к. оригинальная обивка является частью системы безопасности
2. Использование кресла для маленьких детей (9 — 18 кг)
2.1 Крепление кресла при помощи трехточечного ремня
- Раскройте зажим ремня. Нажмите для этого на выступающий наружу рычаг 1. Зажим ремня откроется автоматически 2
- Вытяните трехточечный ремень, приподнимите чехол подголовника и протяните ремень за чехлом
- Защелкните замок ремня и вставьте поясной ремень трехточечного ремня безопасности в задние направляющие, пропустив его через красные натяжители ремня безопасности
- Натяните сначала поясной 1, а затем диагональный плечевой ремень 2
- Вложите диагональный плечевой ремень в зажим 3, и закройте зажим 4 со слышимым щелчком 5
- После этого еще раз натяните ремень, чтобы обеспечить оптимальную фиксацию детского кресла. Для этого просто потяните ремень от зажима в сторону механизма втягивания ремня безопасности Вашего автомобиля, при этом дополнительно натяните поясной и диагональный плечевой ремень безопасности
2.2 Пристегивание ребенка ремнями
- Для удлинения ремней нажмите центральный регулятор 1 вниз, держите его нажатым и потяните внизу за плечевые ремни 2
- Откройте замок, нажав на красную кнопку в направлении стрелки
- Выложите ремни наружу
- Усадите ребенка в кресло и проведите руки ребенка через плечевые ремни
- Закройте замок, соединив оба язычка 1 и вставив их в замок со слышимым щелчком 2
- Натяните ремни, потянув центральный ремень по направлению стрелки. Ремни должны плотно прилегать
2.3 Регулировка ремней по высоте
- Ослабьте систему ремней
- Потяните за желтую кнопку фиксатора и переставьте подголовник в следующее положение
Внимание! Перед тем как впервые регулировать высоту подголовника необходимо удалить уменьшитель, и затем проверить, нужна ли еще регулировка по высоте
- Чтобы удалить уменьшитель откройте нажимные кнопки на задней стороне уменьшителя и вытяните его из пахового ремня и из замка ремня
- Плечевые ремни должны проходить так, как показано на рисунке рядом. Направляющая ремней не должна находиться ниже плеча ребенка
2.4 Регулировка положения для отдыха
- Детское сиденье можно переставить в положение для отдыха, повернув ручку регулировки по направлению стрелки
Внимание! После того как демонтирована внутренняя система пристегивания ремнями безопасности (при использовании для группы 2 и выше), положение для отдыха больше нельзя использовать
3. Использование детского кресла для детей старшего возраста
И хотя согласно норме допуска для детских автокресел использование кресла Recaro Young Sport Hero начиная с массы тела ребенка 15 кг разрешается вместе с ремнями безопасности автомобиля, мы рекомендуем использовать внутреннюю систему ремней кресла пока Ваш ребенок не достигнет веса 18 кг.
3.1 Перед установкой:
- Бережно сохраняйте извлеченные детали для дальнейшего использования! Ослабьте лямки ремней и отцепите петли плечевых ремней от металлического соединителя. Вытяните плечевые ремни вперед
- Ослабьте лямки ремней и отцепите петли плечевых ремней от металлического соединителя
ВНИМАНИЕ: Центральный ремень, следовательно часть ремня с металлическим соединителем, должен остаться на кресле
- Вытяните плечевые ремни вперед
- Переставьте подголовник в самое верхнее положение и ослабьте винт с грибковой ручкой. Передвиньте обводную трубку немного вниз и снимите ремни крепления плечевой подушки. Затем снимите обводную трубку
- Чтобы снять плечевую подушку надо снять чехол подголовника и протолкнуть плечевую подушку через прорези для ремней. После этого можно убрать модуль плечевой подушки.
- По частям снимите чехол сиденья и вытяните поясные ремни из корпуса поддона
- Отсоедините от зажимов напольную пластину и поверните ее в сторону
- Высуньте металлическую пластину из пахового ремня, а затем вытяните ремень за замок по направлению от поверхности сиденья
- Разверните обратно напольную пластину и вдавите ее обратно в зажимы
- Установите металлический соединитель в его крепление, расположенное на нижней стороне напольной пластины
ВНИМАНИЕ: Часть ремня с металлическим соединителем должна остаться на кресле.
3.2 Пристегивание кресла и ребенка трехточечными ремнями безопасности
- Начиная с группы 2 использовать положение для отдыха не разрешается! Усадите ребенка на сиденье и вставьте поясной ремень трехточечного ремня безопасности в переднюю направляющую ремня. Закройте замок ремня со слышимым щелчком
- Диагональный ремень вставьте в направляющую на подголовнике
- Отрегулируйте подголовник в зависимости от роста ребенка. Оптимально ремень должен проходить посередине ключицы и не слишком близко к шее ребенка
4. Чистка и обслуживание детского автокресла
Замок ремня должен всегда застегиваться со слышимым щелчком. Если этого не происходит, то это может быть вызвано засорением замка. В качестве контрмеры замок ремня можно после демонтажа помыть в теплой воде (глава 3.1). Перед обратной установкой замок ремня надо хорошо просушить. Смазывать замок ремня не разрешается.
Чехол сидения Recaro Young Sport Hero можно стирать в стиральной машине. Чтобы не оказывать воздействия на окружающую среду мы рекомендуем стирать чехол при 30 °С в деликатном режиме стирки. При более высоких температурах может выцветать краска. Не отжимать в центрифуге и не сушить в сушильной машине, поскольку ткань
4.1 Снятие чехла сидения
- Сначала отстегните чехол от мягких пуговиц в верхней, задней и нижней частях сиденья. Затем можно просто снять чехол
- Снятие чехла возможно только при демонтированной системе пристегивания ремнями безопасности (см. главу 3.1)
4.2. Обратная установка лямок ремней
- Установку производить легче, когда язычки замка защелкнуты в замке ремней
- Сначала отсоедините от зажимов напольную пластину и поверните ее в сторону. После этого снимите подушку сидения и положите ее в сторону
- Проденьте поясные ремни внутренней системы ремней сверху вниз сквозь наружное продолговатое отверстие и проведите их сквозь внутренние продолговатые отверстия снова наверх 1. Проденьте стопорные пряжки сквозь петли 2
Важно: Должны быть видны все 4 носика
- Уложите подушку сидения обратно на поверхность для сидения и пропустите паховый ремень сквозь отверстие вниз. Зафиксируйте петлю в пряжке крепления
Важно: Все 4 крюка должны находиться снаружи петли
- Разверните обратно напольную пластину и вдавите ее обратно в зажимы. Следите при этом, чтобы Т-образная деталь регулировочного ремня была свободно доступна
- Прикрепите чехол к нижней и к задней части сиденья
- Установите подголовник во 2-е положение снизу и протяните ремни крепления блока плечевой подушки сквозь прорези назад. Вставьте, как показано на рисунке обводную трубку и протяните ремни крепления поверх трубки
- Поднимите подголовник в 3-е положение и закрепите при помощи винта с грибковой ручкой
- Протяните плечевую подушку сквозь прорези с чехле подголовника и наденьте чехол на подголовник. Откройте плечевую подушку, проложите плечевые ремни, как показано на рисунке, и протяните их сквозь подголовник назад. Проследите, чтобы ремни проходили поверх обводной трубки
- Зацепите плечевые ремни за Т-образную деталь
Важно: Не перекручивать ремни
- По окончании замкните плечевые ремни, и сильно потянув за них убедитесь, что все крепления надежно зафиксированы
5. Указания
5.1 Общие указания
- Инструкция по эксплуатации находится в кармане под обивкой на спинке. После использования ее необходимо всегда класть в это же место
- Весовая группа 1, 2 +3 (9 — 36 кг. Установку производить по ходу движения автомобиля
- Кресло и ремень можно чистить теплой водой с мылом. Снятую обивку можно стирать согласно этикетки по уходу за изделием
- Некоторые автомобильные подголовники мешают монтажу детского автокресла, поэтому их необходимо заранее демонтировать. Необходимо учитывать, чтобы из- за автомобильного подголовника не образовывалось нежелательно пространство между спинкой детского автокресла и спинкой сидения автомобиля. Из-за наличия автомобильного подголовника вероятна ограниченная регулировка по высоте подголовника детского автокресла
5.2 Гарантийные условия
- Срок гарантии составляет два года от даты продажи, и распространяется на заводской брак или дефекты материала. Рекламации принимаются только при подтвержденной дате покупки. Гарантия распространяется только на детские автокресла, с которыми обращались надлежащим образом, и которые были присланы в чистом надлежащем виде
- Гарантия не распространяется на явления, связанные с естественным износом, повреждения, вызванные чрезмерными нагрузками или повреждения, вызванные несвойственным либо ненадлежащим использованием
- Текстильные материалы: все наши материалы соответствуют высоким требованиям, касающимся стойкости цвета. Тем не менее, под УФ излучением материалы выцветают. В данном случае речь не идет о браке материала, а об обычных явлениях износа, на которые гарантия не предоставляется
5.3 Защита Вашего автомобиля
- Мы указываем на то, что при использовании детских автокресел не исключается повреждение сидений автомобиля. Согласно директиве по безопасности ЕСЕ R44 необходим жесткий монтаж. Пожалуйста, предпринимайте в отношении сидений Вашего автомобиля надлежащие защитные меры (напр. защитный коврик Recaro). Фирма Recaro child safety GmbH & Co. KG или ее дилеры не несут ответственности за возможное повреждение сидений Вашего автомобиля.

universal 9 – 36 kg
04301171
E
1
Nr. ……………..
ECE 44/04
sto2221-4-25/1 disk storchenmühle Young Sport
Titelseite erst. 03.05.05 ps / geänd. am 14.06.05 tk / 08.07.05 ps / 14.09.05 tk / 22.09.05 tk / 28.09.05 tk / 06.03.07 ps / 10.10.07 ps /
22.01.08 ps / 03.03.08 ps / 04.03.08 ps / 20.01.10 ps / 21.01.10 ps / 19.02.10 ps / 02.07.10 ps / 16.07.10 ps / 16.07.10 ps / 20.07.10 ps
/ 23.07.10 ps / 30.07.10 ps / 04.08.10 ps / 24.03.11 ps / 01.04.11 ps / 12.09.11 ps / 14.09.11 ps / 20.09.11 ps
2221-4-25/1 — Version 200911
RECARO Child Safety GmbH & Co. KG, Guttenbergstr. 2, 95352 Marktleugast-Mannsflur
Telefon +49/(0)9255/77-66, Fax +49/(0)9255/77-13, E-Mail: info@recaro-cs.com, www.recaro-cs.com
GB
Installation Instructions
Child Restraint System, Group I,II,III (9-36 kg)
F
Instructions de montage
Système de retenue d’enfant, Groupes I,II,III (9-36 kg)
NL
Montage- en gebruiksaanwijzing
Bevestigingssysteem voor kinderen Groep I,II,III (9-36 kg)
N
Montasjeanvisning
Barnesikring for bil, Gruppe I,II,III (9 — 36 kg)
SLO
Navodilo za montažo
Otroški varnostni sistem za skupine I,II,III (9-36 kg)
I
Istruzioni di montaggio
Sistema di sicurezza per bambini, gruppo I,II,III (9-36 kg)
CZ
Návod na montáž
Dětský zádržný systém, Skupina I,II,III (9-36 kg)
E
Montaje – Instrucciones
Sistema de seguridad para niños, Grupo I,II,III (9-36 kg)
DK
Montage-vejledning
Børne-sikkerhedssystem, Gruppe I, II, III (9-36 kg)
PL
Instrukcja montażu
System zabezpieczenia dziecka, Grupa I, II, III (9-36 kg)
RUS
Руководство по монтажу Специальное удерживающее устройство для детейГруппы I,II, III (9-36 кг)
D
Montage — Anleitung
Kinder-Rückhaltesystem, Gruppe I,II,III (9-36 kg)
-
Contents
-
Table of Contents
-
Bookmarks
Quick Links
ECE 44/04
universal 9 – 36 kg
E
1
04301171
Nr. ……………..
Installation Instructions
GB
These instructions must always be handed to the customer. Errors and omissions reserved. Subject to amendment.
WARNING – Keep for future reference.
TW
CN
J
KO
RECARO Child Safety GmbH & Co. KG, Guttenbergstr. 2, D-95352 Marktleugast-Mannsflur
Telefon +49/(0)9255/77-66, Fax +49/(0)9255/77-13, E-Mail: info@recaro-cs.com, www.recaro-cs.com
Young Sport
Child Restraint System, Group I,II,III (9-36 kg)
Summary of Contents for RECARO Young Sport
Русский
- Bedienungsanleitung Recaro Young Sport HERO
- Recaro Young Sport HERO User Manual
- Manual Usuario Recaro Young Sport HERO
- Mode d’emploi Recaro Young Sport HERO
- Istruzioni Recaro Young Sport HERO
- инструкция Recaro Young Sport HERO
- Recaro Young Sport HEROの取扱説明書
- Handleiding Recaro Young Sport HERO
- Manual de uso Recaro Young Sport HERO
Вам нужна инструкция? Мы поможем Вам ее найти и сэкономить Ваше время.
- 22 stron
- 0 mb
Изделие Recaro Young Sport HERO, а также другие, которыми Вы пользуетесь ежедневно, наверняка вы получили в комплекте с инструкцией обслуживания. Из опыта наших пользователей мы знаем, что большинство из Вас не уделили этому особого внимания. Большая часть инструкций, сразу же после покупки попадает в корзину для мусора вместе с коробкой — это ошибка. Ознакомьтесь с информацией, касающейся инструкции Recaro Young Sport HERO, которая поможет Вам в будущем сэкономить нервы и избежать головной боли.
Важная подсказка — не забывайте хотя бы раз прочитать инструкцию Recaro Young Sport HERO
Если вы не хотите каждый раз читать информационные брошюры, касающиеся, тех или Recaro Young Sport HERO иных изделий, достаточно, прочитать их раз — сразу же после покупки устройства. Вы получите основное знания, касающиеся поддержания изделия Recaro Young Sport HERO в хорошем эксплуатационном состоянии, так, чтобы без проблем достигнуть его планируемого цикла работы. Затем инструкцию можно отложить на полку и вернуться к ней только в случае, если вы не уверены, правильно ли проводится техобслуживание изделия. Правильный уход является необходимым элементом Вашего удовольствия Recaro Young Sport HERO.
Раз в году пересмотрите шкафчик, в котором держите инструкции для всех устройств, — выбросите те, которыми вы уже не пользуетесься. Это поможет Вам сохранять порядок в своей домашней базе инструкций обслуживания.
Summary of Contents for Recaro Young Sport HERO
Что находится в инструкции Recaro Young Sport HERO? Почему стоит ее прочитать?
- Гарантия и подробности, касающиеся техобслуживания изделия
Хорошей идеей будет прикрепить чек к странице инструкции. Если что-то плохое случится во время использования Recaro Young Sport HERO, у вас будет комплект документов, необходимый для гарантийного ремонта. В этой части инструкции вы найдете информацию об авторизованных сервисных центрахRecaro Young Sport HERO а также, как самостоятельно правильно ухаживать за оборудованием — так, чтобы не потерять гарантийных прав. - Указания по монтажу и Setup
Не терять нервов и времени на самостоятельную попытку установки и первого запуска изделия. Воспользуйтесь рекомендациями производителя Recaro Young Sport HERO чтобы правильно запустить изделие, без лишнего риска повреждения оборудования. - Информация, касающаяся дополнительных запчастей (входящих в комплект а также являющихся опцией)
Пересматривая эту часть документа вы сможете проверить, доставлен ли ваш Recaro Young Sport HERO с полним комплектом аксессуаров. Вы также сможете узнать, какие дополнительные запчасти или аксессуары для Recaro Young Sport HERO Вы сможете найти и докупить к своему устройству. - Troubleshooting
Самые частые проблемы, касающиеся Recaro Young Sport HERO и методы их решения. Это очень полезная часть руководства по обслуживанию — она позволит Вам сэкономить много времени на поиск решений. 90% проблем с Recaro Young Sport HERO повторяется у многих пользователей. - Требования, касающиеся питания и энергетический класс
Информация, касающаяся количества потребляемой энергии, а также рекомендации, касающиеся установки и питания Recaro Young Sport HERO. Прочитайте, чтобы оптимально пользоваться Recaro Young Sport HERO и не использовать большего количества ресурсов, нежели это необходимо для правильной работы изделия. - Специальные функции Recaro Young Sport HERO
Здесь вы можешь узнать, как персонализировать изделие Recaro Young Sport HERO. Вы узнаете, какие дополнительные функции могут помочь Вам удобно использовать продукт Recaro Young Sport HERO а также, какие функции Вашего устройства оптимальны для выполнения конкретной деятельности.
Как видите в инструкции вы найдете информацию, которая реально поможет Вам в использовании Вашего изделия. Стоит с ней ознакомиться, чтобы избежать разочарований, возникающих из более короткого, нежели предусматривалось, периода исправности изделия Recaro Young Sport HERO. Если все же вы не хотите копить инструкции в своем доме, наш сайт поможет Вам в этом — вы должны найти у нас руководство по обслуживанию большинства из своих устройств, а также Recaro Young Sport HERO.
Комментарии (0)
Требуется руководство для вашей Recaro Young Sport Автомобильное кресло? Ниже вы можете просмотреть и загрузить бесплатно руководство в формате PDF. Кроме того, приведены часто задаваемые вопросы, рейтинг изделия и отзывы пользователей, что позволит оптимально использовать ваше изделие. Если это не то руководство, которое вы искали, – свяжитесь с нами.
Ваше устройство неисправно, и в руководстве отсутствует решение? Перейдите в Repair Café для получения бесплатных ремонтных услуг.
Руководство
Рейтинг
Сообщите нам, что вы думаете о Recaro Young Sport Автомобильное кресло, оставив оценку продукта. Хотите поделиться вашими впечатлениями от данного изделия или задать вопрос? Вы можете оставить комментарий в нижней части страницы.
Довольны ли вы данным изделием Recaro?
Да Нет
29 голоса
Часто задаваемые вопросы
Наша служба поддержки выполняет поиск полезной информации по изделиям и отвечает на часто задаваемые вопросы. Если вы заметили неточность в наших часто задаваемых вопросах, сообщите нам об этом с помощью нашей контактной формы.
Можно ли размещать автокресла Isofix в автомобилях без Isofix? Проверенный
Большинство доступных автокресел Isofix имеют универсальное разрешение на использование ремней безопасности в дополнение к разрешению для конкретного автомобиля. Это позволяет закрепить сиденье ремнями безопасности. Подробности читайте в руководстве по эксплуатации автокресла. Есть автокресла Isofix, которые нельзя закрепить ремнями безопасности.
Это было полезно (659)
Где безопаснее всего размещать детское автокресло? Проверенный
Частично это зависит от модели автомобиля, но теоретически центр заднего сидения является самым безопасным местом. Сидя в центре, ребенок находится дальше всего от боков машины, что обеспечивает его безопасность в случае ДТП. Однако это правило действует только при наличии 3-точечного ремня безопасности. Если имеется только поясной ремень, то безопаснее будет разместить кресло на заднем сидении возле окна.
Это было полезно (613)
Могу ли я использовать автомобильный шептал в самолете? Проверенный
Нет международных правил использования автокресел в самолетах. В зависимости от модели, возможно, автокресло подходит для этого. Разрешено это или нет, зависит от авиакомпании. Всегда обращайтесь в авиакомпанию заранее, чтобы убедиться в этом.
Это было полезно (189)
Можно ли установить все автокресла Isofix во всех автомобилях с Isofix? Проверенный
Нет, есть универсальные и неуниверсальные автокресла Isofix. Неуниверсальное автокресло Isofix можно использовать только в определенных автомобилях. К сиденью прилагается список моделей автомобилей, которые подходят для этого сиденья. Универсальное автокресло Isofix можно использовать только в автомобилях, оборудованных Isofix и точкой крепления Top Tether.
Это было полезно (137)
Как долго мой ребенок может находиться в автокресле? Проверенный
Не позволяйте ребенку сидеть в автокресле дольше 1,5–2 часов в день. Многие современные коляски предлагают возможность прикрепить автокресло сверху, что позволяет быстро перевозить ребенка. Также в этом случае не превышайте 1,5–2 часа в день.
Это было полезно (131)
Что такое Изофикс? Проверенный
Isofix — это международно стандартизованная система для установки автокресел в автомобилях. В машине есть монтажные кронштейны Isofix. Эти кронштейны расположены между спинкой и сиденьем заднего сиденья и соединяются с кузовом автомобиля. Автокресло Isofix оснащено крючками, которые легко прикрепляются к монтажным кронштейнам.
Это было полезно (130)