
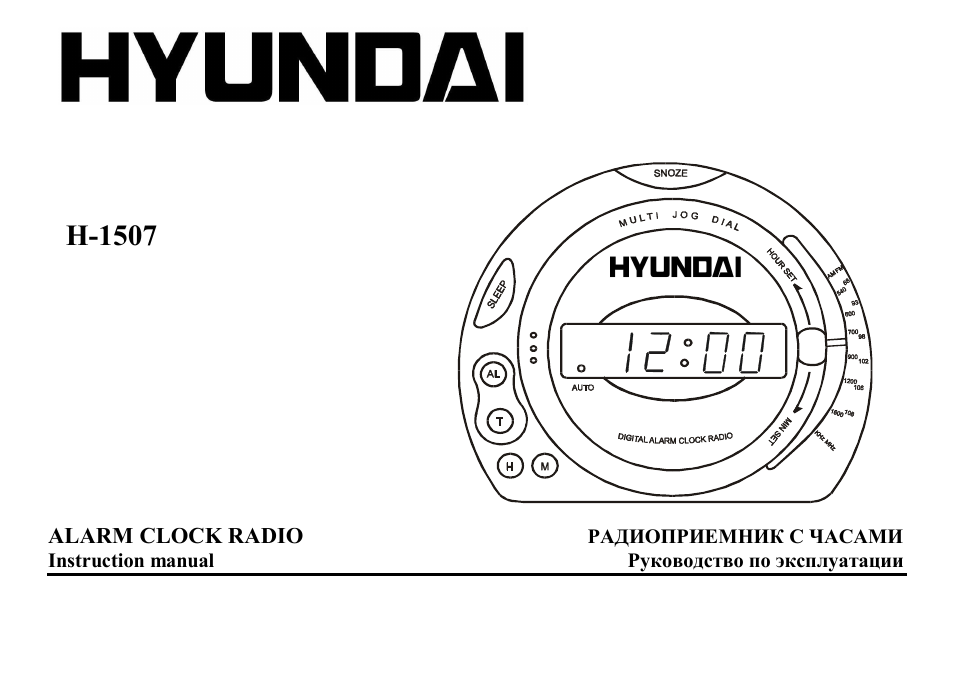
HYUNDAI
H-1507
ALARM
CLOCK
RADIO
Instruction manual
РАДИОПРИЕМНИК C ЧАСАМИ
Руководство по эксплуатации
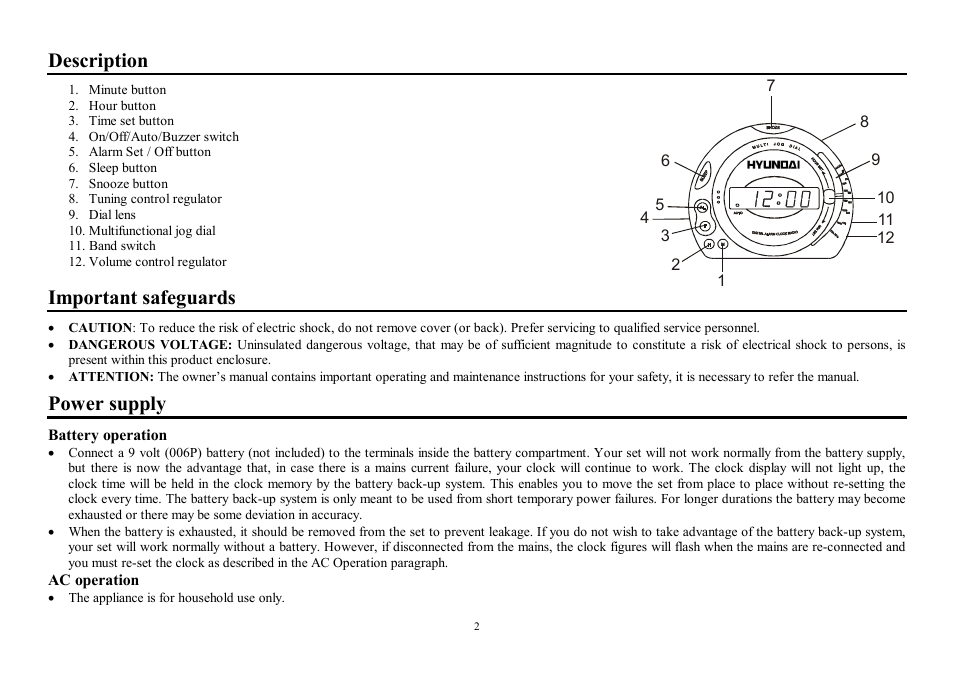
Description
1. Minute button
2. Hour button
3. Time set button
4. On/Off/Auto/Buzzer switch
5. Alarm Set / Off button
6. Sleep button
7. Snooze button
8. Tuning control regulator
9. Dial l ens
10. Multifunctional jog dial
11. Band switch
12. Volume control regulator
Important safeguards
7
10
■11
-12
•
CAUTION: To reduce the risk of electric shock, do not remove cover (or back). Prefer servicing to qualified service personnel.
•
DANGEROUS VOLTAGE: Uninsulated dangerous voltage, that may be of sufficient magnitude to constitute a risk of electrical shock to persons, is
present within this product enclosure.
•
ATTENTION: The owner’s manual contains important operating and maintenance instructions for your safety, it is necessary to refer the manual.
Power supply
Battery operation
• Connect a 9 volt (006P) battery (not included) to the terminals inside the battery compartment. Your set will not work normally from the battery supply,
but there is now the advantage that, in case there is a mains current failure, your clock will continue to work. The clock display will not light up, the
clock time will be held in the clock memory by the battery back-up system. This enables you to move the set from place to place without re-setting the
clock every time. The battery back-up system is only meant to be used from short temporary power failures. For longer durations the battery may become
exhausted or there may be some deviation in accuracy.
•
When the battery is exhausted, it should be removed from the set to prevent leakage. If you do not wish to take advantage of the battery back-up system,
your set will work normally without a battery. However, if disconnected from the mains, the clock figures will flash when the mains are re-connected and
you must re-set the clock as described in the AC Operation paragraph.
AC operation
•
The appliance is for household use only.
2
•
Before the first connecting of the appliance check that voltage indicated on the rating label corresponds the mains voltage in your home.
•
Insert the plug into the power supply.
•
The set is now working as an electronic clock and it will flash the clock figures to show you it is not set correctly.
Setting the correct time
•
To set the correct time, press the Time set button and Hour button simultaneously, release the buttons approximately before the correct time is reached.
Now press the Minute button and Time set buttons simultaneously to set the readout to the correct time precisely.
Radio operation
Operation
•
Slide the On/Off/Auto/Buzzer switch to “ON” position.
•
Select your desired broadcasting band with Band switch.
•
Rotate the Tuning control knob to receive the desired broadcast.
•
Adjust the level of sound with Volume control knob.
Antenna
•
For FM reception, this set is specially equipped with the FM antenna, which is placed near the power line cord.
Wake to radio
Having selected your station and set the volume at the desired level, proceed as follows:
•
Slide the On/Off/Auto/Buzzer switch to “AUTO” position.
•
Press the Alarm set button and whilst this button is pressed, press the Hour button on the panel or on the multi jog dial and then the Minute button on the
panel or on the multi jog dial until the time, when you would like to wake up, is reached. The wake up time is now entered into the timer memory, thus
the light indicator “AUTO” will light up. To check the wake up time, simply press the Alarm set button and the clock will show the preset time. The
preset wake up time will continue to be registered in the timer memory and the radio will switch on by itself at the same time the next day. To switch the
radio off, simply press the Alarm off button.
Wake to buzzer
• Set the controls as for “WAKE TO RADIO”, but Volume control knob/Buzzer to “BUZZ” position. The buzzer can then be switched off by pressing the
Alarm off button or it can be converted to the radio by selecting the On/Off/Auto/Buzzer switch to “ON” position.
Sleep to music
•
The radio can be set to play and to switch off automatically for a length of time from 1 minute to 1 hour 59 minute by following this procedure — with all
the controls preset in the “WAKE TO RADIO” positions, depress the Sleep button and press the Minute button to count down to the desired sleep time.
To switch off the radio before the end of the registered sleep time period, simply press the Snooze button.
Snooze control
•
The Snooze button allows the user an extra sleep time of about 9 minutes after the radio alarm is switched on at the preset wake up time. This can be
repeated up to 5 times.
3
Maintenance and care
•
Switch off the appliance, unplug from the power supply.
•
The outside of the appliance can be cleaned with a slightly damp cloth.
• Avoid leaving the clock radio in direct sunlight or in hot, humid, dusty places. Keep the set away from heating appliances and appliances that generate
noise, such as fluorescent lamps and motors.
Specification
Power supply
220 V, 50 Hz
Net / Gross weight
0.43 kg / 0.50 kg
Gift box dimension (L x W x H)
145 mm x 125 mm x 120 mm
4
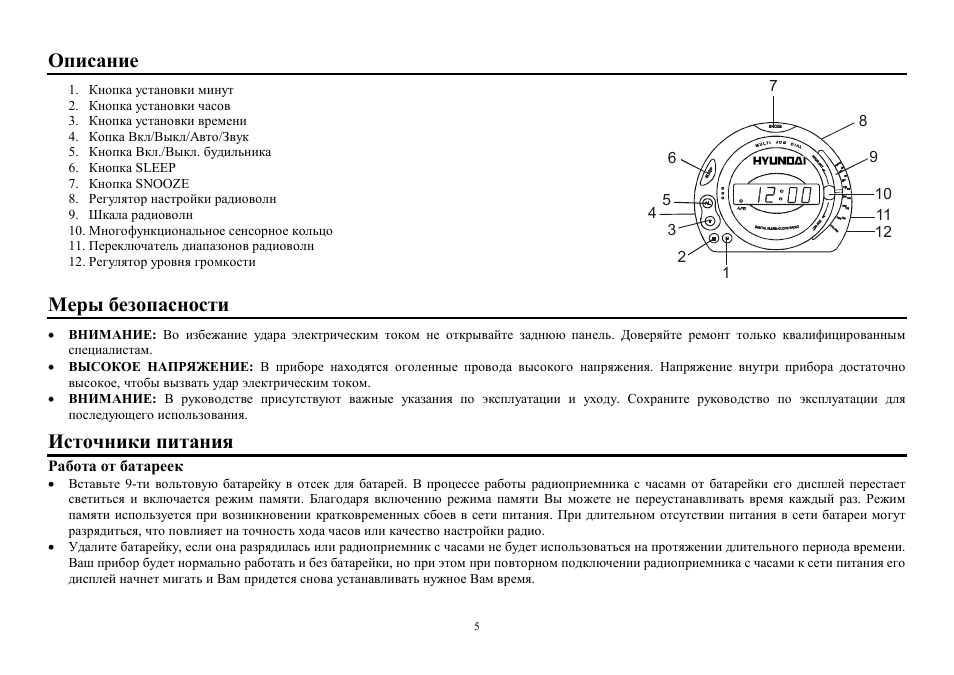
Описание
1. Кнопка установки минут
2. Кнопка установки часов
3. Кнопка установки времени
4. Копка Вкл/Выкл/Авто/Звук
5. Кнопка Вкл./Выкл. будильника
6. Кнопка SLEEP
7. Кнопка SNOOZE
8. Регулятор настройки радиоволн
9. Шкала радиоволн
10. Многофункциональное сенсорное кольцо
11. Переключатель диапазонов радиоволн
12. Регулятор уровня громкости
7
■10
-11
-12
Меры безопасности
•
ВНИМАНИЕ: Во избежание удара электрическим током не открывайте заднюю панель. Доверяйте ремонт только квалифицированным
специалистам.
•
ВЫСОКОЕ НАПРЯЖЕНИЕ: В приборе находятся оголенные провода высокого напряжения. Напряжение внутри прибора достаточно
высокое, чтобы вызвать удар электрическим током.
• ВНИМАНИЕ: В руководстве присутствуют важные указания по эксплуатации и уходу. Сохраните руководство по эксплуатации для
последующего использования.
Источники питания
Работа от батареек
•
Вставьте 9-ти вольтовую батарейку в отсек для батарей. В процессе работы радиоприемника с часами от батарейки его дисплей перестает
светиться и включается режим памяти. Благодаря включению режима памяти Вы можете не переустанавливать время каждый раз. Режим
памяти используется при возникновении кратковременных сбоев в сети питания. При длительном отсутствии питания в сети батареи могут
разрядиться, что повлияет на точность хода часов или качество настройки радио.
•
Удалите батарейку, если она разрядилась или радиоприемник с часами не будет использоваться на протяжении длительного периода времени.
Ваш прибор будет нормально работать и без батарейки, но при этом при повторном подключении радиоприемника с часами к сети питания его
дисплей начнет мигать и Вам придется снова устанавливать нужное Вам время.
5
Использование радиоприемника, Установка времени, Установка будильника в режиме радио
Установка будильника в режиме звонка Чат поддержки
- Изображение
- Текст
Питание от сети переменного тока
•
Прибор предназначен только для домашнего использования.
• Перед первым использованием прибора проверьте, соответствует ли электропитание Вашего прибора, указанное в таблице с техническими
характеристиками, электропитанию в Вашей локальной сети.
•
Подключите радиоприемник с часами к сети питания.
• Теперь доступны все функции устройства. Дисплей часов начнет мигать, сообщая о необходимости установки времени.
Установка времени
•
Для установки правильного времени нажмите одновременно кнопку установки часов и кнопку установки времени, отпустите их
приблизительно перед тем, как корректировка времени выполнена, т.е. когда будет выставлен точный час. Далее нажмите кнопку установки
минут и кнопку установки времени одновременно и выставите точное время.
Использование радиоприемника
•
Установите переключатель Вкл./Выкл./Авто/Звонок в положение “ON”.
•
Используя переключатель диапазонов радиоволн, выберите диапазон радиовещания.
•
Вращая регулятор настройки радиоволн, настройтесь на волну выбранной Вами радиостанции.
•
С помощью регулятора громкости установите желаемый уровень громкости.
Антенна
•
Для приема FM сигнала имеется антенна, находящаяся рядом с электрошнуром.
Установка будильника в режиме радио
После настройки на волну выбранной Вами радиостанции и установки желаемого уровня звука, Вам необходимо действовать следующим образом
для установки автоматического включения радио:
•
Установите переключатель Вкл./Выкл./Авто/Звонок в положение “AUTO”.
• Нажмите кнопку Вкл./Выкл. будильника и, удерживая ее нажатой, нажмите кнопку установки часов, а затем кнопку установки минут для
установки точного времени будильника. Как только Вы установите время будильника, оно будет занесено в память часов, при этом загорится
световой индикатор “AUTO”. Для просмотра времени будильника нажмите кнопку Вкл./Выкл. будильника. Заданное время будильника будет
занесено в память, и радио включится автоматически на следующий день. Для выключения радио нажмите кнопку Вкл./Выкл. будильника.
Установка будильника в режиме звонка
• Для установки времени звонка Вам необходимо действовать следующим образом: повторите операции, указанные в предыдущем пункте,
установив
переключатель
Вкл./Выкл./Авто/Звонок
в
положение
“ALARM”.
Вы
можете
отключить
звонок,
установив
переключатель
Вкл./Выкл./Авто/Звонок в положение “ON” для включения радио или нажав на кнопку Вкл./Выкл. будильника.
6
Автоматическое выключение радио
•
Вы можете установить режим автоматического выключения радио с интервалом от 1 минуты до 1 часа 59 минут. Для установки режима
автоматического отключения радио Вам необходимо действовать следующим образом:
нажав кнопки, указанные в пункте
“АВТОМАТИЧЕСКОЕ ВКЛЮЧЕНИЕ РАДИО”, нажмите кнопку SLEEP и кнопку установки минут для установки обратного отсчета времени.
Если Вы хотите отключить радио до истечения времени его автоматического отключения, нажмите кнопку SNOOZE.
Кнопка snooze
•
Используя кнопку SNOOZE, Вы можете добавить около 9 минут ко времени сна после автоматического включения радио. Данную операцию
Вы можете повторять до 5 раз.
Чистка и уход
•
Перед чисткой убедитесь, что прибор отключен от сети питания.
•
Протрите корпус прибора при помощи влажной тряпочки.
•
Предохраняйте прибор от попадания влаги, а также чрезвычайно высокой температуры от отопительного оборудования или прямых
солнечных лучей.
Технические характеристики
Электропитание
220 Вольт, 50 Еерц
Вес нетто / брутто
0,43 кг / 0,50 кг
Размеры коробки (Д x В x Ш)
145 мм x 125 мм x 120 мм
7
08:12
Harper HCLK-2044 — обзор электронных часов с радиоприёмником
12:36
Hyundai H-1/Максимальная комплектация Business
24:11
Hyundai H1 2018. Качественнее Citroen Spacetourer.
17:10
Часы будильник HYUNDAI H-1506
09:50
Кондиционер HYUNDAI Seoul H-AR19-07H. Компрессор кондиционера Хендай. Обзор сплит-систем
22:04
Hyundai H1 2018 2.5D (170 л.с.) AT Business — видеообзор
01:51
Слабое место в приводе ГРМ HYUNDAI H-1 2.5 Diesel
Нажмите на кнопку для помощи
Hyundai H-1507 Clock Radio PDF User Guides and Manuals for Free Download: Found (2) Manuals for Hyundai H-1507 Device Model (Instruction Manual)
The Hyundai H-1507 stands out in a competitive market of compact vans, showcasing a blend of reliability, performance, and utility that both businesses and individuals can appreciate. Designed with versatility in mind, it caters to a range of needs, making it a preferred choice for small businesses and families alike. The sturdy build and efficient engineering speak volumes about Hyundai’s commitment to quality.
One of the most notable features of the H-1507 is its robust engine performance. Powered by a modern diesel engine, it delivers a commendable balance of power and fuel efficiency. The torque it offers ensures that the vehicle performs admirably even under heavy loads, making it a practical choice for transporting goods or larger families on the go.
In terms of design, the Hyundai H-1507 doesn’t skimp on style or functionality. Its aerodynamic shape aids in fuel efficiency while giving it a modern appearance on the road. Furthermore, the spacious interior is designed with convenience in mind. Key interior features include:
- Ample cargo space suitable for various transporting needs.
- Comfortable seating arrangements for up to five passengers.
- User-friendly dashboard layout with intuitive controls.
- Advanced sound insulation for a quieter ride.
Safety is another area where the Hyundai H-1507 excels. It is equipped with a range of safety features designed to protect both the driver and passengers. Important safety elements include:
- Multiple airbags throughout the cabin for enhanced protection.
- Anti-lock braking system (ABS) for improved control.
- Electronic stability control (ESC) to assist in maintaining traction.
- Rear-view camera for better visibility while reversing.
The H-1507 also shines in terms of technology, offering various modern amenities to ensure a comfortable driving experience. Features such as Bluetooth connectivity, USB ports, and a well-integrated audio system are included, allowing drivers and passengers to enjoy their journeys without feeling disconnected from their digital lives.
When it comes to maintenance, the Hyundai H-1507 is designed for longevity and ease. Routine servicing is straightforward, thanks to Hyundai’s widespread service network. Additionally, the availability of spare parts reinforces the vehicle’s long-term viability, allowing owners peace of mind regarding maintenance costs.
In conclusion, the Hyundai H-1507 emerges as a commendable option in the compact van category. Its solid performance, great safety features, and comfortable design create a vehicle that meets various needs without compromise. Whether you are a business owner in search of a reliable delivery vehicle or a family looking for a spacious and comfortable ride, the H-1507 is a choice that won’t disappoint.
FAQ: Types of Manuals and Their Contents
Hyundai H-1507 Manuals come in various types, each serving a specific purpose to help users effectively operate and maintain their devices. Here are the common types of Hyundai H-1507 User Guides and the information they typically include:
- User Manuals: Provide comprehensive instructions on how to use the device, including setup, features, and operation. They often include troubleshooting tips, safety information, and maintenance guidelines.
- Service Instructions: Designed for technicians and repair professionals, these manuals offer detailed information on diagnosing and repairing issues with the device. They include schematics, parts lists, and step-by-step repair procedures.
- Installation Guides: Focus on the installation process of the device, providing detailed instructions and diagrams for proper setup. They are essential for ensuring the device is installed correctly and safely.
- Maintenance Manuals: Provide guidance on routine maintenance tasks to keep the device in optimal condition. They cover cleaning procedures, part replacements, and regular servicing tips.
- Quick Start Guides: Offer a concise overview of the essential steps needed to get the device up and running quickly. They are ideal for users who need immediate assistance with basic setup and operation.
Each type of Hyundai H-1507 instruction is designed to address specific needs, ensuring users have the necessary information to use, maintain, and repair their devices effectively.
Related Instructions for Hyundai H-1507:
1
C2017 ADU01
Manual PDF User Guide (@6L8Q3L), Hyundai C2017 ADU01 Automobile Accessories (07th Jan 2025)
7
655
145
4
H-DVR17HD
Instruction manual Hyundai Dash Cameras Instruction manual (File: hyundai-h-dvr17hd-dash-cameras-13, Mon 03.2025)
13
983
158
7
RTCC 636 SURIP
Instruction manual PDF Manual (@LINOU5), Hyundai RTCC 636 SURIP Stereo System (12.01.2025)
88
955
182
8
2006 Azera
Quick reference manual Hyundai Automobile Quick reference manual (File: hyundai-2006-azera-quick-reference-manual-9, Mon 10.2024)
9
761
176
9
HY-RBC1562-001
36
885
204
Clock Radio Devices by Other Brands:
|
Konig KN-WS200 Manual Konig Clock Radio Manual (File: konig-kn-ws200-manual-56, 17/11/2024) KN-WS200 17 Nov 2024 | 56 |
|
|
RCA RC107 Operation & User’s Manual RCA Clock Radio Operation & user’s manual (File: rca-rc107-clock-radio-2, 09/01/2025) user manual 09 Jan 2025 | 2 |
|
|
Kaito KA1102 Manual KA1102 Manual — 97DV1W INDEX 16 Mar 2025 | 19 |
|
|
Brandt BCR160P Instruction Manual #54L9J3: BCR160P Clock Radio Instruction manual EN INSTRUCTION MANUAL 18 Nov 2024 | 56 |
Categories:
Cooling boxes
Power Screwdriver
Indoor Furnishing
Cutter
Active speakers
Compact Loader
Просмотр
Доступно к просмотру 7 страниц. Рекомендуем вам скачать файл инструкции, поскольку онлайн просмотр документа может сильно отличаться от оригинала.
-
H-1507
SOUNDMAX
ALARM CLOCK RADIO                                                       ????????????? ? ??????
Instruction manual                                                                                ??????????? ?? ????????????
-
Description
1. Minute button                                                                                                           7
2. Hour button
3. Time set button                                                                                                                          8
4. On/Off/Auto/Buzzer switch
5.  Alarm Set / Off button                                                                               6                                    9
6. Sleep button                                                                                                          SOUNDMAX
7. Snooze button
8. Tuning control regulator                                                                             5                                      10
9. Dial lens                                                                                         4                                         11
10. Multifunctional jog dial                                                                             3                                     12
11. Band switch
12. Volume control regulator                                                                               2
1
Important safeguards
·   CAUTION: To reduce the risk of electric shock, do not remove cover (or back). Prefer servicing to qualified service personnel.
·   DANGEROUS VOLTAGE:            Uninsulated dangerous voltage, that may be of sufficient magnitude to constitute a risk of electrical shock to persons, is
present within this product enclosure.
·   ATTENTION: The owner¶s manual contains important operating and maintenance instructions for your safety, it is necessary to refer the manual.
Power supply
Battery operation
·   Connect a 9 volt (006P) battery (not included) to the terminals inside the battery compartment. Your set will not work normally from the battery supply,
but there is now the advantage that, in case there is a mains current failure, your clock will continue to work. The clock display will not light up, the
clock time will be held in the clock memory by the battery back-up system. This enables you to move the set from place to place without re-setting the
clock every time. The battery back-up system is only meant to be used from short temporary power failures. For longer durations the battery may become
exhausted or there may be some deviation in accuracy.
·   When the battery is exhausted, it should be removed from the set to prevent leakage. If you do not wish to take advantage of the battery back-up system,
your set will work normally without a battery. However, if disconnected from the mains, the clock figures will flash when the mains are re-connected and
you must re-set the clock as described in the AC Operation paragraph.
$? operation
·   The appliance is for household use only.
2
-
·   Before the first connecting of the appliance check that voltage indicated on the rating label corresponds the mains voltage in your home.
·   Insert the plug into the power supply.
·   The set is now working as an electronic clock and it will flash the clock figures to show you it is not set correctly.
Setting the correct time
·   To set the correct time, press the Time set button and Hour button simultaneously, release the buttons approximately before the correct time is reached.
Now press the Minute button and Time set buttons simultaneously to set the readout to the correct time precisely.
Radio operation
Operation
·   Slide the On/Off/Auto/Buzzer switch to ?ON? position.
·   Select your desired broadcasting band with Band switch.
·   Rotate the Tuning control knob to receive the desired broadcast.
·   Adjust the level of sound with Volume control knob.
Antenna
·   For FM reception, this set is specially equipped with the FM antenna, which is placed near the power line cord.
Wake to radio
Having selected your station and set the volume at the desired level, proceed as follows:
·   Slide the On/Off/Auto/Buzzer switch to ?AUTO? position.
·   Press the Alarm set button and whilst this button is pressed, press the Hour button on the panel or on the multi jog dial and then the Minute button on the
panel or on the multi jog dial until the time, when you would like to wake up, is reached. The wake up time is now entered into the timer memory, thus
the light indicator ?AUTO?  will light up. To check the wake up time, simply press the Alarm set button and the clock will show the preset time. The
preset wake up time will continue to be registered in the timer memory and the radio will switch on by itself at the same time the next day. To switch the
radio off, simply press the Alarm off button.
Wake to buzzer
·   Set the controls as for ?WAKE TO RADIO?, but Volume control knob/Buzzer to ?BUZZ? position. The buzzer can then be switched off by pressing the
Alarm off button or it can be converted to the radio by selecting the On/Off/Auto/Buzzer switch to ?ON? position.
Sleep to music
·   The radio can be set to play and to switch off automatically for a length of time from 1 minute to 1 hour 59 minute by following this procedure ± with all
the controls preset in the ?WAKE TO RADIO? positions, depress the Sleep button and press the Minute button to count down to the desired sleep time.
To switch off the radio before the end of the registered sleep time period, simply press the Snooze button.
Snooze control
·   The Snooze button allows the user an extra sleep time of about 9 minutes after the radio alarm is switched on at the preset wake up time. This can be
repeated up to 5 times.
3
- 1
- 2
- 3
- 4
- 7