
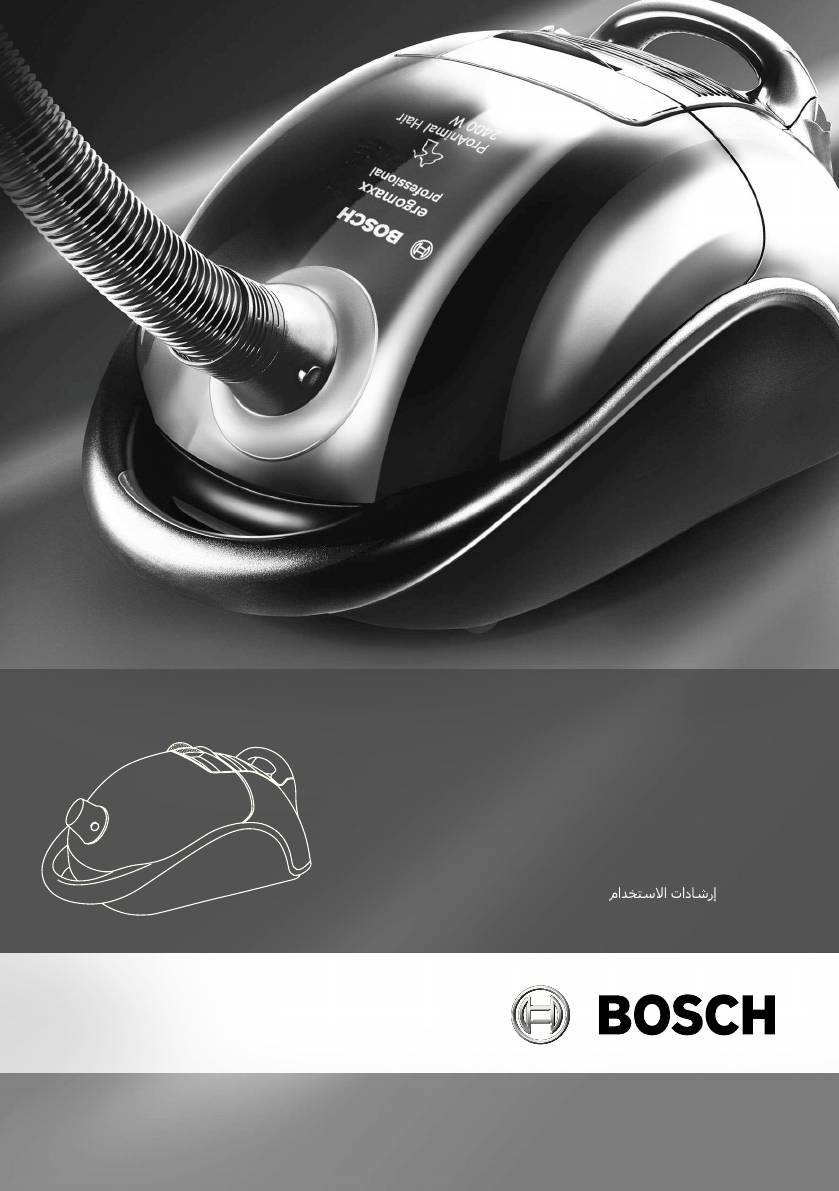
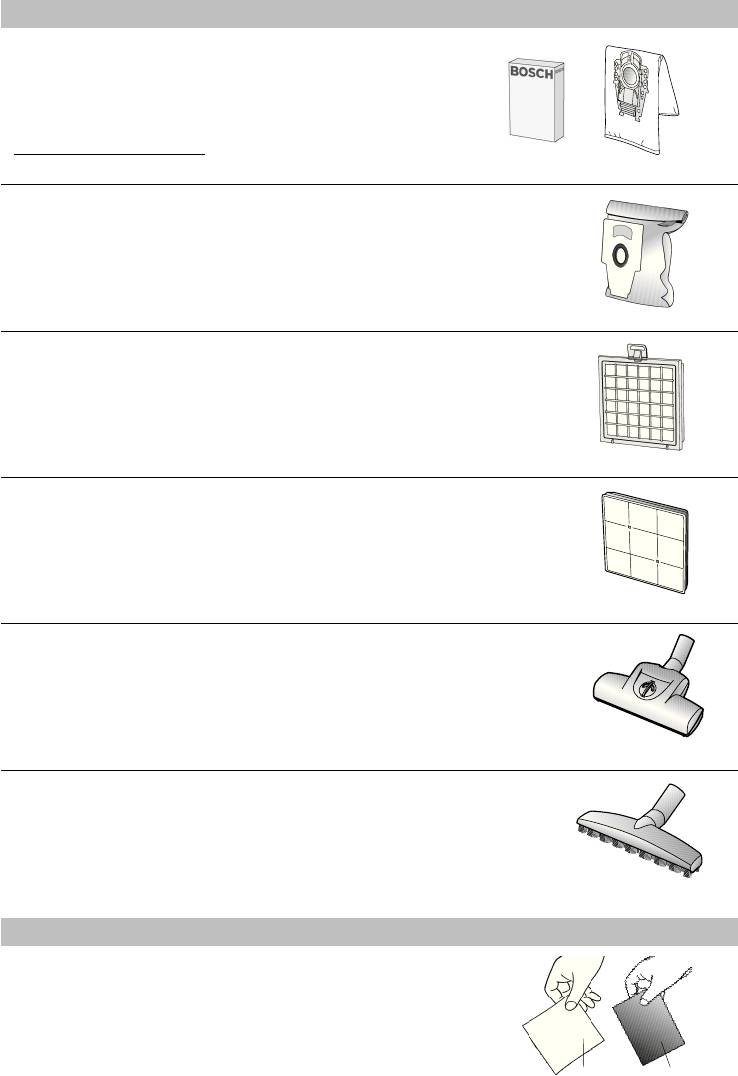
Ключевые особенности
Пылесос серии Bosch Sportline с мощным мотором в 2400 Вт эффективнее справляется с загрязнениями, что экономит время уборки.
Описание модели BGL35MOV27
Пылесос серии Bosch Sportline с мощным мотором в 2400 Вт эффективнее справляется с загрязнениями, что экономит время уборки. Высокую маневренность и удобство обеспечивает система EasyFollow:сверхпрочный вращающийся шланг и большие колеса. Система гигиеничной фильтрации HEPA делает воздух на выходе из прибора чище, чем в помещении, поэтому прибор подходит людям с аллергией. В комплекте 2 незаменимых аксессуара: щелевая насадка и насадка для мягкой мебели.
Ключевые преимущества:
- Мощный мотор в 2400 Вт
- Система EasyFollow: 360°
- Система гигиеничной фильтрации HEPA
Характеристики Bosch BGL 35 MOV 27
ОБЩИЕ ХАРАКТЕРИСТИКИ
Серия основная
Дизайн-линия MoveOn
Тип пылесоса напольный
Вид пылесоса мешковый
Тип уборки сухая
Источник питания сеть
Цвет голубой
УПРАВЛЕНИЕ
Электронная регулировка мощности с поворотным регулятором есть
Регулятор мощности на корпусе
ФИЛЬТРАЦИЯ
Система гигиенической фильтрации мешковой
Объем пылесборника, л 4
Индикатор заполнения пылесборника есть
КОМПЛЕКТАЦИЯ
Труба всасывания телескопическая
Щелевая насадка есть
Насадка для мягкой мебели есть
ОСОБЕННОСТИ
Подвижные ролики, шт 1
Количество обычных колес, шт 2
Автосматывание сетевого шнура есть
Отсек для хранения насадок не встроенный
ДОПОЛНИТЕЛЬНЫЕ ХАРАКТЕРИСТИКИ
Радиус действия, м 10
Мотор надежный и долговечный
Потребляемая мощность, Вт 2400
ТЕХНИЧЕСКИЕ ХАРАКТЕРИСТИКИ
Габариты, В х Ш х Г (высота без рабочей поверхности), см 27 х 31.8 х 39.5
Уровень шума, дБ 80
Напряжение сети, В 220-240
Частота, Гц 50-60
Длина сетевого кабеля, м 7
Вес нетто, кг 6
* Страна производства указана на основании данных последних продаж. На сегодняшний день на территорию РФ легальный ввоз товаров разрешен с разных официальных заводов, поэтому в некоторых случаях у заказанного товара данные о стране производства могут отличаться.
** Все информационные материалы, представленные на Сайте, носят справочный характер и не могут в полной мере передавать достоверную информацию о свойствах, комплектации и характеристиках товара, включая цвета, размеры и формы. Фирма-производитель оставляет за собой право на внесение изменений в конструкцию, дизайн и комплектацию товара без предварительного уведомления. Перед оформлением Заказа Покупатель должен обратиться к Продавцу для уточнения свойств и характеристик Товара. Подробная информация о товаре указывается в инструкции и на упаковке товара. Используемое название в России: Бош BGL35MOV27
Отзывы о модели Bosch BGL35MOV27
Отзывов пока нет, Ваш отзыв может стать первым.
Почему стоит выбрать пылесосы Bosch
Мешковый
Мешковый
Традиционная конструкция пылесосов подразумевает наличие мешка-пылесборника из плотной ткани, который надо вытряхивать, выбивать и очищать щеткой, как коврик. Чуть позже появились пылесосы с бумажными одноразовыми мешками-пакетами, которые по мере заполнения не очищаются, а заменяются. Это самая простая, надежная и недорогая конструкция.
Перейти в глоссарий

О бренде Bosch
Bosch — это один из ведущих мировых брендов в области бытовой и промышленной техники. Его продукция сочетает в себе высокое качество, надежность, практичность и современный дизайн, а широкий ассортимент позволяет подобрать вариант, который удовлетворит любые запрос. Основной страной производства с 1886 года является Германия, но на данный момент заводы компании находятся во многих странах как в Европе, так и в Азии. С каталогом техники можно ознакомиться на сайте официального дилера — bosch-centre.ru. На все товары, купленные в магазине, распространяется гарантия от производителя на срок до 24 месяцев. Миссия Bosch заключается в предоставлении клиентам инновационных технологий и решений, которые улучшают их качество жизни.
Вопросы и ответы на пылесос Bosch BGL35MOV27
Добрый день! Пылесос Bosch BGS41POW1 мотор с щетками?
Специалист интернет-магазина 27.01.2025
Здравствуйте, мотор бесщеточный с технологией Bosch Motor Technology производства Германии.
Если вы сейчас не указываете мощность всасывания пылесоса, как тогда потребителю отличить более мощный пылесос от менее мощного?
Специалист интернет-магазина 25.01.2025
Здравствуйте, понятие мощность всасывания существует только в странах СНГ, так как бренд европейский, то такой параметр не рассчитывается и в документах не указывается. Скорость воздушного потока во всех пылесосах достаточна, выбирайте модель исходя из необходимых насадок и энергоэффективности двигателя.
Здравствуйте
Пылесос
Bosch BCS711PET, какая ёмкость у аккумулятора? Мощность всасывания?
Специалист интернет-магазина 16.11.2024
Здравствуйте, емкость аккумулятора 3000 мА*ч, мощность всасывания производитель сейчас не указывает.
Показать ещё вопросы
-
Бесплатная доставка
Товары с специальным лейблом доставляются бесплатно по Москве и в пределах МКАД, и отдельная доставка аксессуаров не предусмотрена. При заказе бытовой техники от Bosch, рекомендуем обсудить с менеджером удобное время доставки и способ оплаты. Товары со статусом «В наличии» могут быть отправлены покупателю в течение трех дней. Если вам интересен товар «Под заказ», обсудите возможность его приобретения с менеджером сайта. Товары с специальным лейблом доставляются бесплатно по Москве в пределах МКАД, и отдельная доставка аксессуаров не предусмотрена.
В оговоренный день служба доставки доставит упакованный прибор до двери или прихожей. Если необходимо переместить прибор до места установки, пожалуйста, предварительно уточните это с менеджером. За данную услугу взимается дополнительная плата. Важно учитывать, что если размеры прибора не позволяют ему пройти через дверной проем, сотрудники транспортной службы не могут демонтировать дверцы, ручки или другие выступающие элементы, так как это может привести к отказу в гарантийном ремонте в будущем. Перед заказом удостоверьтесь, что сможете переместить прибор в нужное место, учитывая размеры упаковки или без нее.
-
Подключение техники
Приборы с особым лейблом подключаются к готовым коммуникациям бесплатно в Москве, при этом выезд мастера за МКАД оплачивается отдельно. Специалисты сервисного центра-партнера занимаются подключением бытовой техники Bosch. Установка профессиональной техники осуществляется за отдельную плату, и дополнительные услуги по монтажу оплачиваются согласно прайсу. Сервис предоставляет гарантию 1 год на выполненные работы и использованные материалы. Профессиональное установление, подключение и регулярное обслуживание обеспечивают продолжительную и эффективную эксплуатацию техники, предотвращая возможные ошибки и преждевременные сбои.
Готовые коммуникации предполагают, в зависимости от категории, наличие установленной розетки, доступ к воде, крана и готовой точки слива. Стандартная установка включает в себя: снятие транспортировочных креплений, разблокировку при необходимости, соединение отдельных частей, монтаж техники в готовую нишу или на место с проверкой по уровню, подключение к существующим коммуникациям, первый запуск и консультацию по эксплуатации. В стандартную установку не включаются: прокладка коммуникаций, расходные материалы, навешивание фасадов и перевешивание дверей.
-
Ремонт и обслуживание
В нашем интернет-магазине предоставляется официальная гарантия на всю бытовую технику Bosch в течение 1 года с момента покупки. Этот гарантийный срок, распространяется на все приборы, предоставляя вам долгий период защиты и уверенности в качестве вашей техники. Однако важно отметить, что гарантия действует исключительно на те приборы, которые были использованы в домашних условиях.
Гарантийный срок для комплектующих компонентов ограничен 3 месяцами. Комплектующими считаются те детали, которые могут быть демонтированы без применения инструментов, такие как полки, корзины, ящики, решетки, насадки и шланги.
В случае выявления неисправности в период гарантии, она будет бесплатно устранена в авторизированном сервисном центре. После истечения гарантийного срока вы по-прежнему можете рассчитывать на ремонт и обслуживание вашей техники у наших партнеров. Работы по ремонту и техническому обслуживанию приборов Bosch осуществляются в высококвалифицированных сервисных центрах.
-
Премиальные сервисные продукты
Сеть сервисных центров Бош охватывает все крупные города России. Адреса сервисных центров можно найти на нашем сайте в разделе «Гарантия» или на официальном сайте Bosch. В этих центрах можно получить ремонт бытовой и профессиональной техники, а также приобрести аксессуары. Важно отметить, что бытовые приборы не предназначены для использования на промышленных предприятиях, и избыточная нагрузка может вызвать преждевременный выход из строя. Производитель выполняет гарантийное обслуживание техники только в случае соблюдения инструкции по эксплуатации и использования в предназначенных целях.
В нашем онлайн-магазине предоставляется гарантия от производителя на всю технику. Гарантийный период составляет 12 месяца для бытовых приборов. Однако следует отметить, что аксессуары и запасные части, приобретаемые отдельно и не включенные в комплектацию прибора, не покрываются гарантией. В течение гарантийного срока любые неисправности производственного характера устраняются бесплатно.
GA 9000 345 356 A
30
33*
32
29
31
28
25
27
26
24
23
CLICK!
CLICK!
24
BSG 8…. dual filtration technology
de Gebrauchsanweisung
en Instructions for use
fr
Notice d’utilisation
it
Istruzioni per l’uso
nl
Gebruiksaanwijzing
da Brugsanvisning
no Bruksanvisning
sv Bruksanvisning
fi
Käyttöohje
es Instrucciones de uso
pt Instruções de utilização
el
Οδηγίες χρήσης
tr
Kullanma Kılavuzu
pl Instrukcja obsługi
hu Használati utasítás
bg аМТЪÛ͈Ëfl Б‡ ФУОБ‚‡МВ
ru Руководство по
эксплуатации
ro Instrucţiuni de utilizare
uk Інструкція з експлуатації
ar
A
Ⅲ
Bitte Bildseiten ausklappen!
Ⅲ
Please fold out the picture page!
Ⅲ
Prière d’ouvrir les pages portant les illustrations!
Ⅲ
Spiegare i fogli doppi con le illustrazioni!
Ⅲ
Klap de bladzijden met illustraties open!
Ⅲ
Fold venligst billedsiderne ud!
Ⅲ
Vennligst klaff ut billedsidene!
Ⅲ
Fäll ut bladen med bildbeskrivningen!
Ⅲ
Käännä kuvasivut esiin!
Ⅲ
¡Por favor, desplegar la página de la figura!
Ⅲ
É favor abrir as páginas das figuras!
Ⅲ
αρακαλείσθε να εδιπλώσετε τις σελίδες απεικ νισης!
Ⅲ
Lütfen șekil içeren saıfaları açın!
Ⅲ
Proszę rozłożyć strony z rysunkami!
Ⅲ
Kérjük kihajtani a képeket tartalmazó oldalakat!
Ⅲ
åÓÎfl, ‡Б„˙МВЪВ ЛО˛ТЪУ‚‡МЛЪВ ТЪ‡ÌˈË!
Ⅲ
PoΩalujsta, raskrojte list s illüstraciämi.
Ⅲ
Deschideţi vă rugăm pliantul cu fotografiile
Ⅲ
кУБ„УМ¥Ъ¸ ТЪУ¥МНЛ Б ЛТЫМН‡ПЛ!
Ⅲ
Ⅲ
Gedruckt auf Recyclingpapier
Ⅲ
Printed on recycled paper
Ⅲ
Imprimé sur papier recyclé
Ⅲ
Stampato su carta riciclata
Ⅲ
Gedrukt op recyclingpapier
Ⅲ
Trykt på genbrugspapir
Ⅲ
Trykket på resirkulert papir
Ⅲ
Tryckt på återvunnet papper
Ⅲ
Painettu uusiopaperille
Ⅲ
Impreso sobre papel reciclable
Ⅲ
Imprimido em papel reciclado
Ⅲ
Εκτυπωµ ν σε ανακυκλ σιµ αρτ
Ⅲ
Geri kazanılmıș ka ˘gıda basılmıștır.
Ⅲ
Wydrukowano na papierze z recyklingu
Ⅲ
Újrahasznosított papírra nyomtatva
Ⅲ
з‡ФВ˜‡Ъ‡МУ М‡ ˆËÍΡ̇ ı‡ЪЛfl.
Ⅲ
з‡ФВ˜‡Ъ‡МУ М‡ ·ЫП‡„В, ЛБ„УЪУ‚ОВММУИ
ЛБ П‡НЫО‡ЪЫ˚.
Ⅲ
Tip ˘arit pe hîrtie din materiale reciclabile.
Ⅲ
燉ЫНУ‚‡МУ М‡ Ф‡ФВ¥ Б ‚ЪУËÌÌÓª ТЛУ‚ЛМЛ.
Ⅲ

12
13
11*
c
10
CLICK!
CLICK!
a
b
15
14
17
16
a)
b)
2*
9*
3*
CLICK!
CLICK!
a)
8*
b)
6
7
a)
b)
1
5
a)
b)
4*
18
22
21
23
19
20
CLICK!
CLICK!
20
Ⅲ
Das Design dieses Produkts ist umweltfreundlich.
Alle Kunststoffteile sind zur Wiederverwertung
gekennzeichnet.
Ⅲ
The design of this product is environment-friendly.
All plastic parts are identified for recycling purposes
Ⅲ
Le design de ce produit est écologique.
Toutes les pièces en matière plastique peuvent être
recyclées.
Ⅲ
Questo prodotto è stato ideato per essere in
armonia con l’ambiente.
Tutte le parti in plastica sono contrassegnate per il loro
riciclaggio.
Ⅲ
Het design van dit product is milieuvriendelijk.
Alle kunststof delen zijn gemarkeerd voor hernieuwd
gebruik.
Ⅲ
Dette produkts design er miljøvenlig.
Alle dele af plast er markeret til genanvendelse.
Ⅲ
Dette produktet har en miljøvennlig utforming.
Alle plastdelene er merket for resirkulering.
Ⅲ
Denna produkt är miljövänlig.
Alla delar av plast är märkta för återvinning
Ⅲ
Tämä tuote on ympäristöystävällinen.
Kaikki muoviosat on merkitty uudelleenkäyttöä varten.
Ⅲ
El diseño de este producto es ecológico.
Todas las piezas de plástico se han marcado para el
posterior reciclaje.
Ⅲ
O design deste produto é sem efeito nocivo
sobre o ambiente.
Todas as peças de material plástico foram caracterizadas
para a reciclagem
Ⅲ
Τ ντισ ιν αυτ
τ υ πρ ϊ ντ ς ε ναι ιλικ
πρ ς τ περι
λλ ν.
λα τα µ ρη π υ απ τελ
νται απ συνθετικ λη
ρ υν διακριτικ ανακ κλωσης.
Ⅲ
Bu ürün, çevre korumasına dikkat edilerek dizayn
edilmiștir.
Tüm plastik parçalar geri kazanma ișlemi için
ișaretlenmiștir.
Ⅲ
Konstrukcja tego produktu jest przyjazna dla
środowiska.
Wszystkie elementy z tworzyw sztucznych przeznaczone
są do recyklingu.
Ⅲ
A termék formatervezése környezetbarát.
A műanyag részek meg vannak jelölve az
újraértékesítéshez.
Ⅲ
СЛБ‡ИМ˙Ъ М‡ ЪУБЛ ФУ‰ЫНЪ В ВНУОУ„Л˜ВМ.
ЗТЛ˜НЛ ФО‡ТЪП‡ТУ‚Л ˜‡ТЪЛ Т‡ У·УБМ‡˜ВМЛ Б‡ ˆËÍΡМВ.
Ⅲ
С‡ММ˚И ФУ‰ЫНЪ ЛПВВЪ ˝НУОУ„Л˜ВТНЛ
‡БЫПМ˚И ‰ЛБ‡ИМ.
ЗТВ ФО‡ТЪП‡ТТУ‚˚В ‰ВЪ‡ОЛ ЛПВ˛Ъ П‡НЛУ‚НЫ,
ЫН‡Б˚‚‡˛˘Ы˛ М‡ ‚УБПУКМУТЪ¸ ЫЪЛОЛБ‡ˆЛЛ.
Ⅲ
Designul acestui produs este simpatich mediului
ambiant
Ⅲ
сВИ ‚Л¥· ‚¥‰ФУ‚¥‰‡π ‚ЛПУ„‡П ¥Б Б‡ıËÒÚÛ М‡‚НУОЛ¯М¸У„У
ТВВ‰У‚Л˘‡.
мТ¥ ФО‡ТЪП‡ТУ‚¥ ‰ВЪ‡О¥ ПУКЫЪ¸ ·ЫЪЛ ‚ЛНУЛТЪ‡М¥, flН
‚ЪУЛММ‡ ТЛУ‚ЛМ‡.
Ⅲ

1
de
Gebrauchsanweisung . . . . . . . . . . . . . . . . . . . . . . . . . . . . . . . . . . . . . . . . .2
en
Instructions for use . . . . . . . . . . . . . . . . . . . . . . . . . . . . . . . . . . . . . . . . . . .8
fr
Notice d’utilisation . . . . . . . . . . . . . . . . . . . . . . . . . . . . . . . . . . . . . . . . . .14
it
Instruzioni per l´uso . . . . . . . . . . . . . . . . . . . . . . . . . . . . . . . . . . . . . . . . .20
nl
Gebruiksaanwijzing . . . . . . . . . . . . . . . . . . . . . . . . . . . . . . . . . . . . . . . . . .26
da
Brugsanvisning . . . . . . . . . . . . . . . . . . . . . . . . . . . . . . . . . . . . . . . . . . . . .32
no
Bruksanvisning . . . . . . . . . . . . . . . . . . . . . . . . . . . . . . . . . . . . . . . . . . . . .38
sv
Bruksanvisning . . . . . . . . . . . . . . . . . . . . . . . . . . . . . . . . . . . . . . . . . . . . .44
fi
Käyttöohje . . . . . . . . . . . . . . . . . . . . . . . . . . . . . . . . . . . . . . . . . . . . . . . . .50
es
Instrucciones de uso . . . . . . . . . . . . . . . . . . . . . . . . . . . . . . . . . . . . . . . . .56
pt
Instruções de utilização . . . . . . . . . . . . . . . . . . . . . . . . . . . . . . . . . . . . . .62
el
δηγίες ρήσης . . . . . . . . . . . . . . . . . . . . . . . . . . . . . . . . . . . . . . . . . . . . . . . .68
tr
Kullanma k lavuzu . . . . . . . . . . . . . . . . . . . . . . . . . . . . . . . . . . . . . . . . . . .74
pl
Instrukcja obsługi
. . . . . . . . . . . . . . . . . . . . . . . . . . . . . . . . . . . . . . . . . . . . . . . . .80
hu
Használati utasitás . . . . . . . . . . . . . . . . . . . . . . . . . . . . . . . . . . . . . . . . . .86
bg
аМТЪÛ͈Ëfl Б‡ ФУОБ‚‡МВ . . . . . . . . . . . . . . . . . . . . . . . . . . . . . . . . . . . . . . . . . .92
ru
кЫНУ‚У‰ТЪ‚У ФУ ˝НТФОЫ‡Ъ‡ˆЛЛ . . . . . . . . . . . . . . . . . . . . . . . . . . . . . . . . . . . . .98
ro
Instrucţiuni de utilizare . . . . . . . . . . . . . . . . . . . . . . . . . . . . . . . . . . . . . . . . . . .104
uk
ЯМТЪЫНˆ¥fl Б ВНТФОЫ‡Ъ‡ˆ¥ª . . . . . . . . . . . . . . . . . . . . . . . . . . . . . . . . . . . . .110
122 . . . . . . . . . . . . . . . . . . . . . . . . . . . . . . . . .
ar

114
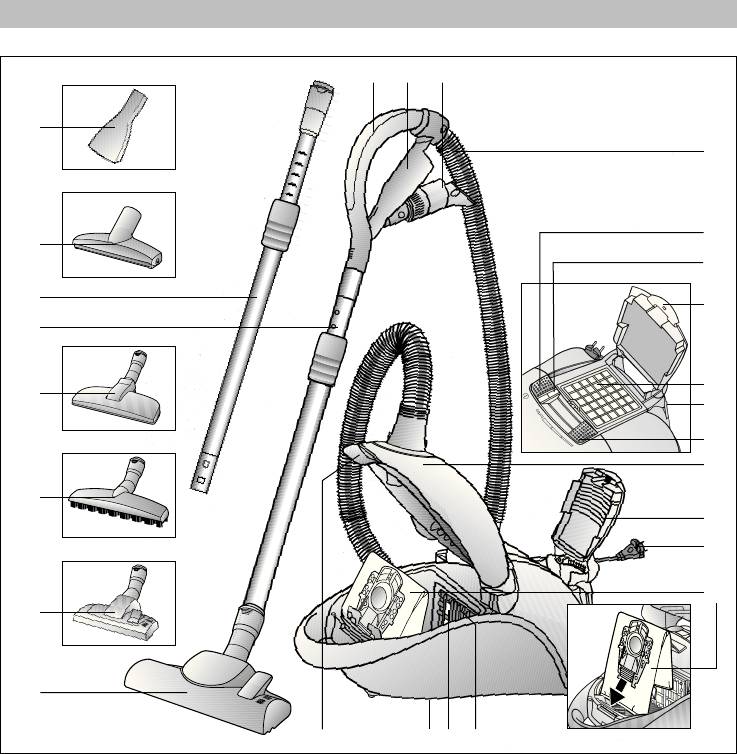
Описание пылесоса
ru
1
Ручка шланга
2
Держатель для принадлежностей
3
Комби-насадка
4
Всасывающий шланг
5
Выключатель
6Индикатор фильтра «filter status»
7
Защелка
8
Выпускной фильтр*
9
Парковка трубки
10
Регулятор мощности всасывания
11
Многоразовый фильтр для контейнера для сбора
пыли
12
Фильтр Microsan для контейнера для сбора пыли
13
Крышка пылесборного отсека
14
Решетка вентилятора
15
Сетевой кабель
16Контейнер для сбора пыли или альтернативный вариант
17
Мешок для сбора пыли MEGAfilt
®
SuperTEX
18
Моторный фильтр
19
Парковочные защелки (с нижней стороны пылесоса)
20
Зажимной рычаг
21
Переключаемая насадка для чистки пола/ковра*
22
Насадка для пола/ковра с разблокировочной муфтой*
23
Подъемник для ковра*
24
Насадка для удаления пыли при сверлении*
25
Телескопическая трубка с муфтой-ползунком*
26Телескопическая трубка с муфтой-ползунком и
разблокировочной муфтой*
*в зависимости от комплектации
3 4
1
2
18
19
7
21*
9
10
15
14
16
5
8*
17
13
6
22*
24*
23*
26*
25*
20
11
12

115
ru
Сохраните инструкцию по эксплуатации. При
передаче пылесоса новому владельцу не забудьте
передать также инструкцию по эксплуатации.
Указания по использованию
Данный пылесос предназначен для уборки бытовых
помещений, он не предназначен для промышленного
использования.
Используйте пылесос только согласно инструкции по
эксплуатации.
Изготовитель не несет ответственности за
повреждения, полученные в результате
использования пылесоса не по назначению или
неправильного обращения с ним.
Поэтому обязательно соблюдайте указания,
приведенные ниже!
Для пылесоса необходимо использовать:
Ⅲ оригинальный мешок для сбора пыли
MEGAfilt
®
SuperTEX
Ⅲ оригинальные запчасти, принадлежности или
специальные принадлежности
Запрещается использовать пылесос для:
Ⅲ чистки людей и животных;
Ⅲ всасывания:
– насекомых;
– вредных для здоровья веществ, острых, горячих
или раскаленных предметов;
– мокрых предметов или жидкостей;
– легковоспламеняющихся или взрывчатых
веществ и газов,
– пепла, сажи из кафельных печей и установок
центрального отопления.
Правила техники безопасности
Данный пылесос соответствует общепризнанным
техническим требованиям и специальным правилам
техники безопасности.
Мы подтверждаем соответствие следующим
европейским нормам: 89/336/EWG (заменено
на RL 91/263/EWG, 92/31/EWG и 93/68/EWG).
73/23/EWG (заменено на RL 93/68/EWG).
Ⅲ Подсоединение к электросети и включение
пылесоса должно производиться только с учетом
данных заводской таблички.
Ⅲ Не используйте пылесос без контейнера или мешка
для сбора пыли MEGAfilt
®
SuperTEX.
=> Пылесос может быть поврежден!
Ⅲ Разрешайте детям пользоваться пылесосом только
в присутствии взрослых.
Ⅲ Не подносите всасывающую насадку и трубку
к голове.
=> Это может привести к травме!
Ⅲ Не используйте сетевой кабель для
переноски/транспортировки пылесоса.
Ⅲ Для многочасовой работы в непрерывном режиме
сетевой кабель следует вытянуть полностью.
Ⅲ При отсоединении пылесоса от электросети всегда
беритесь рукой за вилку, а не за сетевой кабель.
Ⅲ Следите за тем, чтобы сетевой кабель не был зажат
и не попадал на острые края предметов.
Ⅲ Перед проведением любых работ по ремонту и
техническому обслуживанию пылесоса
отсоединяйте его от электросети.
Ⅲ Не пользуйтесь неисправным пылесосом. При
возникновении неисправности вынимайте вилку из
розетки.
Ⅲ Во избежание опасности все работы по ремонту и
замене деталей пылесоса следует выполнять только
в авторизованной Сервисной службе.
Ⅲ Защищайте пылесос от воздействия влаги и
источников тепла.
Ⅲ Выключайте пылесос даже при небольших паузах в
уборке.
Ⅲ Отслужившие приборы сделайте непригодными для
дальнейшего использования, а затем утилизируйте
в соответствии с действующими правилами.
Ⅲ Из соображений безопасности пылесос оснащен
защитой от перегрева. Если пылесос засорился и
слишком нагрелся, он автоматически выключится.
Отсоедините пылесос от электросети и проверьте,
возможно, забились насадка, всасывающая трубка
или шланг, или же необходимо заменить фильтр.
После устранения неисправности необходимо дать
пылесосу остыть в течение как минимум 1 часа.
После этого пылесос снова будет готов к работе.
Инструкции по утилизации
Ⅲ Упаковка
Упаковка служит для защиты пылесоса от
повреждений при транспортировке.
Она изготовлена из экологически чистых материалов,
поэтому ее можно использовать для вторичной
переработки. Использованные упаковочные
материалы относите в пункты приема вторсырья.
Ⅲ Отслужившие приборы
Отслужившие приборы содержат материалы,
пригодные для дальнейшего использования.
Поэтому Вы можете отнести отслуживший прибор
Вашему дилеру или в пункт приема вторсырья для
дальнейшей утилизации.
Информация о возможности утилизации находится
у Вашего дилера или в местной администрации.
!
Внимание
Пылесос следует подключать к розетке, которая
защищена предохранителем минимум на 16 А!
При включении прибора предохранитель может
сразу сработать, если одновременно в данную
электрическую цепь включены другие приборы с
большой общей потребляемой мощностью.
Срабатывание предохранителя можно
предотвратить, если перед включением прибора
установить минимальную мощность, а затем
постепенно увеличить ее.

Разверните страницы с рисунками!
Подготовка к работе
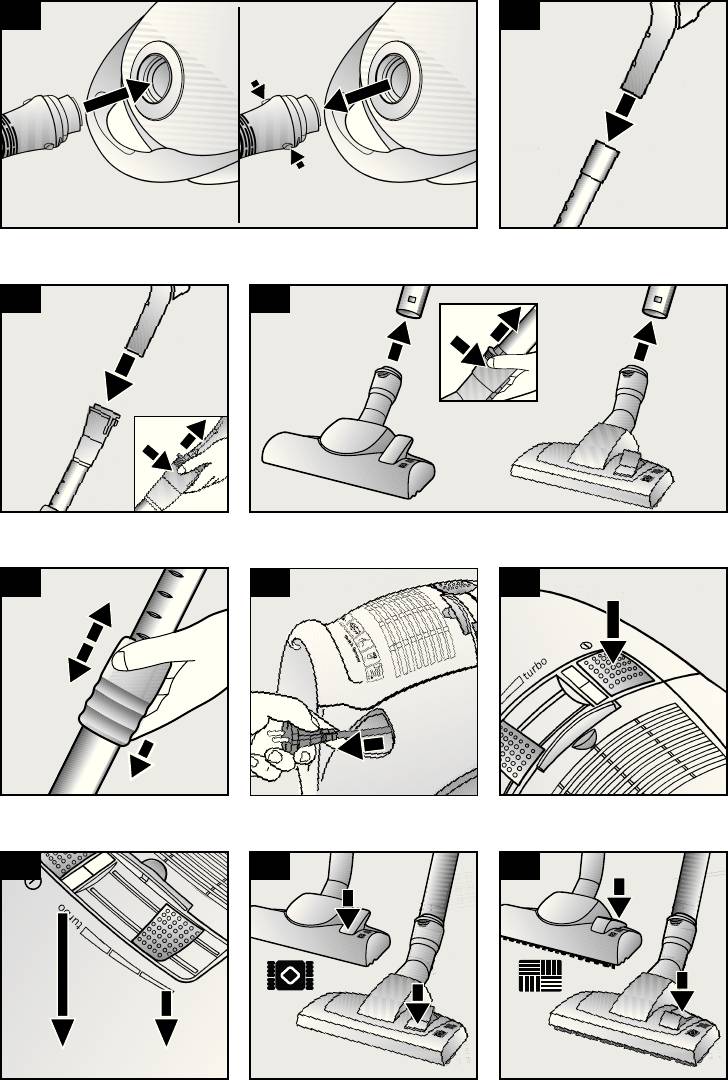
Рис.
a)Подсоедините патрубок всасывающего шланга к
всасывающему отверстию и зафиксируйте его.
b)Чтобы отсоединить шланг, нажмите на оба
фиксатора и выньте шланг из отверстия.
Рис.
a) Насадите телескопическую трубку на ручку.
b)Задвиньте ручку в телескопическую трубку до
надежной фиксации.
Чтобы отсоединить телескопическую трубку,
нажмите на разблокировочную муфту и вытащите
ручку.
Рис.
Ⅲ Установите подъемник для ковра на насадку.
Ⅲ Зафиксируйте подъемник для ковра нажатием
сбоку.
Рис.
a)Насадите на телескопическую трубку насадку для
пола/ковра.
b)Задвиньте телескопическую трубку в патрубок
насадки для пола/ковра до надежной фиксации.
Для отсоединения нажмите на разблокировочную
муфту и извлеките телескопическую трубку.
Рис.
Нажатием на муфту-ползунок в направлении,
указанном стрелкой, разблокируйте и сдвиньте
телескопическую трубку.
Рис.
Возьмитесь за вилку сетевого кабеля, вытяните
кабель на нужную длину и вставьте вилку в розетку.
Рис.
Ⅲ Пылесос включается и выключается нажатием на
выключатель.
Ⅲ Синий индикатор фильтра «filter status» указывает
на готовность прибора к работе.
7
6
5*
4*
3*
2*
1
116
ru
Уборка
Вы приобрели очень мощный и надежный прибор.
Работа на максимальной мощности рекомендуется
только для чистки сильно загрязненных ковровых
напольных покрытий с коротким ворсом или твердых
покрытий.
Рис.
Используйте насадку для пола/ковра:
a)для чистки ковров
и ковровых покрытий
=>
b)для чистки твердых покрытий
=>
Насадка для пола/ковра с подъемником для ковра*
Рис.
При обратном ходе насадка для пола/ковра
приподнимает ковер и делает возможной уборку
под краем ковра.
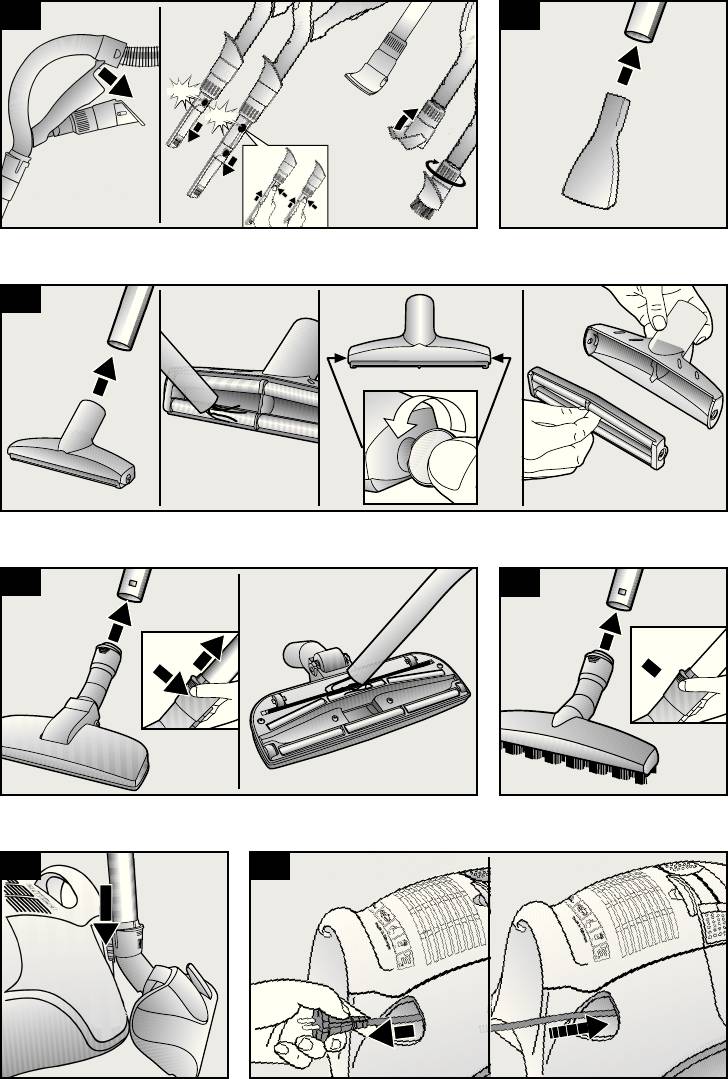
Использование принадлежностей
Рис.
Чтобы вынуть комби-насадку из держателя, потяните
за нее в направлении стрелки.
a) Щелевая насадка
Для чистки щелей и углов.
Для уборки в труднодоступных местах комби-
насадка оснащена двухступенчатыми
телескопическими вставками, с помощью которых
можно удлинить щелевую насадку.
Ⅲ Вытягивайте щелевую насадку на обе ступени
так, чтобы было слышно, как она фиксируется.
Ⅲ Освободив фиксаторы телескопических вставок
(нажатием в направлении стрелки) можно снова
уменьшить длину щелевой насадки.
b)Насадка для мягкой мебели
Для чистки мягкой мебели, занавесок и т. п.
c) мягкая щетка для корпусной мебели
Для чистки оконных рам, шкафов, профилей и т. п.
Ⅲ Откиньте насадку для мягкой мебели в
направлении стрелки.
Ⅲ Чтобы выдвинуть щетину, поверните насадку в
направлении стрелки.
Перед установкой комби-насадки в держатель для
принадлежностей щетинный венец нужно убрать и
сложить насадку для мягкой мебели.
10
9*
8
*в зависимости от комплектации

117
Мы рекомендуем использовать:
– контейнеры для сбора пыли – прежде всего для
уборки Вашей домашней мастерской, например,
для удаления опилок и т. д.
– мешок для сбора пыли MEGAfilt
®
SuperTEX —
преимущественно для обычной уборки в доме.
Использование контейнера для сбора
пыли
Рис.
Для уборки с контейнером для сбора пыли
установите регулятор мощности в позицию
«bagless».
Рис.
Ⅲ В случае переполнения контейнера для сбора пыли
загорается красный индикатор фильтра «filter
status», синий индикатор гаснет.
Ⅲ Если прибор не будет выключен, а контейнер
опорожнен, через некоторое время индикатор
снова загорится красным, а прибор автоматически
переключится на самую низкую ступень мощности.
Ⅲ Регулировка мощности пылесоса возможна только
после выключения и повторного включения
прибора.
Опорожнение контейнера для сбора пыли
Рис.
Ⅲ Контейнер для сбора пыли желательно опорожнять
после каждой уборки; самое позднее в случае, если
при поднятой насадке мигает красный индикатор
фильтра «filter status».
Ⅲ Откройте крышку пылесборного отсека, нажав
зажимной рычаг в направлении стрелки.
Рис.
Извлеките контейнер для сбора пыли из пылесоса.
Рис.
Ⅲ Для опорожнения откройте донный клапан в
направлении стрелки.
Ⅲ При закрывании донного клапана проследите,
чтобы его край не был загрязнен, в случае
необходимости очистите его.
Ⅲ Защелкните донный клапан.
Рис.
Снова установите контейнер для сбора пыли в
прибор и закройте крышку пылесборного отсека.
!
Внимание: после многократного использования
внутренняя поверхность контейнера может
покрыться царапинами и потускнеть. Тем не
менее, это не оказывает никакого влияния на
функционирование пылесоса, т.е. он остается
полностью работоспособным.
21
20
19
18
17
16
Рис.
Ⅲ Закрепите насадку для удаления пыли при
сверлении на рукоятке и расположите ее таким
образом по отношению к стене, чтобы отверстие
насадки находилась непосредственно над
просверливаемым отверстием.
Ⅲ Установите пылесос на низкий уровень мощности и
затем включите его.
Ⅲ Насадка для удаления пыли при сверлении будет
удерживаться в требуемом положении за счет
мощности всасывания.
Возможно, в дальнейшем окажется необходимым
увеличить мощность в зависимости от материала
стены, в которой просверливается отверстие,
чтобы обеспечить надежное удаление пыли при
помощи насадки.
При сверлении тонкая пыль будет удаляться
автоматически.
!
Внимание: насадка для удаления пыли при
сверлении должна использоваться только вместе
с контейнером, так как тонкая пыль от сверления
может повредить мешок для сбора пыли.
Рис.
Во время коротких перерывов в процессе уборки
используйте парковку трубки на задней стороне
прибора. Пластмассовые выступы на патрубке
насадки для пола/ковра вставьте в прорези на
задней стороне пылесоса.
После уборки
Рис.
Ⅲ Выключите пылесос и выньте вилку из розетки.
Ⅲ Слегка потяните за сетевой кабель и отпустите его
(кабель автоматически смотается).
Ⅲ Если снова потянуть за сетевой кабель, он снова
фиксируется, а если еще раз немного потянуть за
кабель — он освобождается.
Рис.
Нажатием на муфту-ползунок в направлении,
указанном стрелкой, разблокируйте и сдвиньте
телескопическую трубку.
Рис.
Для хранения/транспортировки прибора можно
использовать парковочные фиксаторы,
расположенные снизу. Поставьте пылесос
вертикально. Пластмассовые выступы на патрубке
насадки для пола/ковра вставьте в прорези на
нижней стороне пылесоса.
Данный бытовой пылесос предназначен для
различных вариантов сухой уборки с использованием
либо контейнера, либо мешка для сбора пыли
MEGAfilt
®
SuperTEX.
15
14
13
12
11*
ru

118
*в зависимости от комплектации
Рис.
Подходящая мощность всасывания плавно
устанавливается регулятором мощности всасывания.
Ⅲ Небольшая
мощность:
для чистки деликатных тканей, например
занавесок.
Ⅲ Средняя
мощность:
для ежедневной уборки при слабом загрязнении.
Ⅲ Максимальная
мощность:
для чистки грубых и твердых покрытий и при
сильном загрязнении.
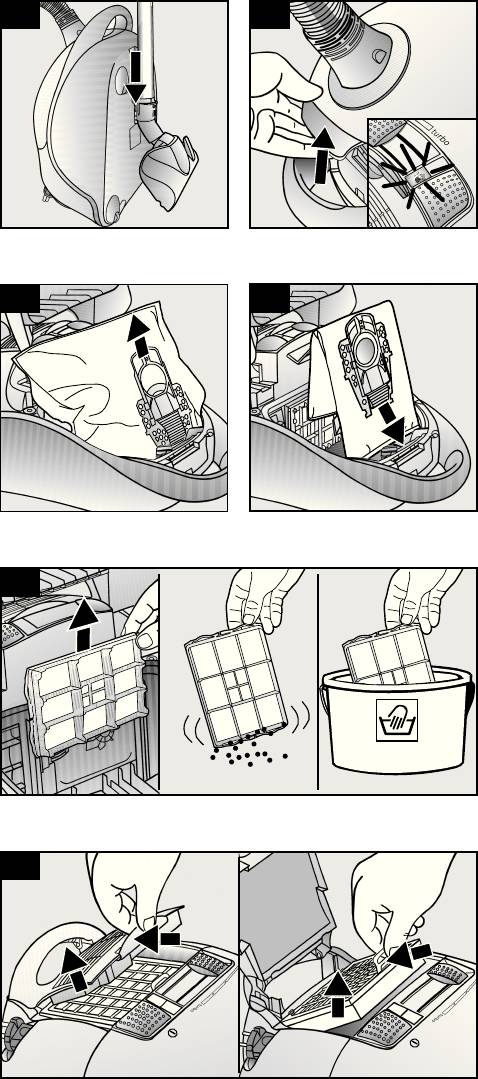
Замена мешка для сбора пыли MEGAfilt
®
SuperTEX
Рис.
Ⅲ Если насадка не касается пола при самой высокой
мощности всасывания, а мигающий красный
индикатор фильтра «filter status», погаснув, через
некоторое время загорается снова постоянным
светом, необходимо заменить мешок для сбора
пыли, даже если он еще не наполнен. В этом случае
необходимость замены определяется видом
содержащегося в мешке мусора.
Как только красный индикатор загорается
постоянным светом, пылесос переключается на
самую низкую ступень мощности.
Регулировка мощности пылесоса возможна только
после выключения и повторного включения
прибора.
Ⅲ Откройте крышку пылесборного отсека, нажав
зажимной рычаг в направлении стрелки.
Рис.
Потянув за защелку, закройте мешок для сбора
пыли MEGAfilt
®
SuperTEX и выньте его.
Рис.
Вставьте новый мешок для сбора пыли Filterbeutel
MEGAfilt
®
SuperTEX в держатель и закройте крышку
пылесборного отсека.
!
Внимание: крышка пылесборного отсека
закрывается только при вставленном мешке для
сбора пыли MEGAfilt
®
SuperTEX, текстильном
фильтре или контейнере для сбора пыли.
Если после замены мешка для сбора пыли
продолжает мигать красный индикатор фильтра
«filter status», то следует проверить и прочистить
насадку, трубку или шланг.
29
28
27
26
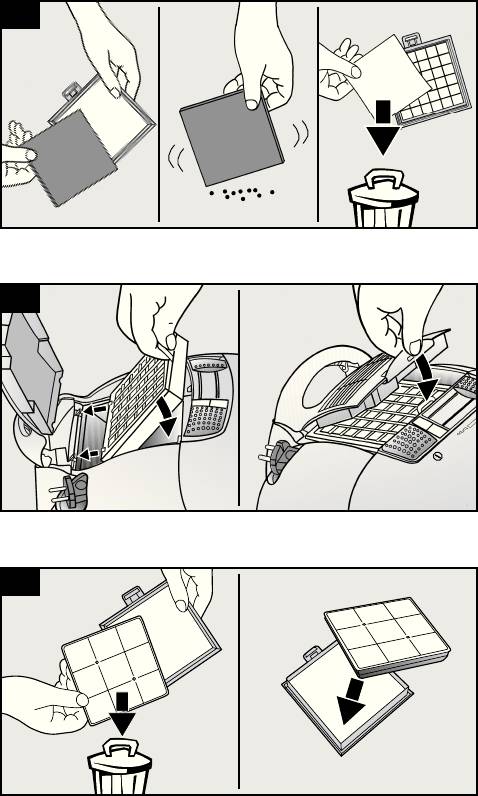
Очистка многоразового фильтра и фильтра
Microsan
Когда требуется очистка:
Ⅲ если вспыхнул индикатор фильтра «filter status».
Ⅲ каждый раз после устранения неисправностей,
например, засорения;
Ⅲ минимум каждые полгода.
Рис.
Ⅲ Разблокируйте держатель фильтра, нажав на оба
фиксатора в направлении стрелок, и откиньте его.
Рис.
Ⅲ Выньте фильтр Microsan и многоразовый фильтр и
очистите их путем выколачивания.
!
Внимание: каждые полгода или при сильном
загрязнении фильтр Microsan необходимо
вручную стирать; снова устанавливать фильтр
можно только после просушивания в течение
прим. 24 часов.
Устранение неисправностей
Устранение засорения контейнера для сбора пыли.
Рис.
Ⅲ Опорожните контейнер (см. рис. 20)
Ⅲ Удалите засорение, например, с помощью
отвертки, и вытряхните мусор из контейнера или
очистите его пылесосом.
Ⅲ Защелкните донный клапан.
Обращение с мешком для сбора
пыли MEGAfilt
®
SuperTEX
При необходимости вместо контейнера можно
использовать мешок для сбора пыли
MEGAfilt
®
SuperTEX.
Рис.
Ⅲ Откройте крышку пылесборного отсека (см. рис. 18)
Ⅲ Извлеките контейнер для сбора пыли (см. рис. 19)
и установите мешок для сбора пыли
MEGAfilt
®
SuperTEX.
Ⅲ Закройте крышку пылесборного отсека.
25
24
23
22
ru

119
Уход
Перед каждой чисткой пылесоса выключайте его и
вынимайте вилку сетевого кабеля из розетки.
Пылесос и пластмассовые принадлежности можно
чистить обычными средствами для чистки пластмассы.
!
Не используйте абразивные чистящие средства,
средства для мытья стекол или универсальные
моющие средства.
Не погружайте пылесос в воду.
При необходимости пылесборный отсек можно очистить
с помощью другого пылесоса, протереть сухой
тряпочкой или почистить кисточкой для пыли.
Оставляем за собой право на внесение технических
изменений.
Замена моторного/выпускного
фильтра
Чистка моторного фильтра
Моторный фильтр рекомендуется регулярно
выколачивать или промывать!
Рис.
Ⅲ Откройте крышку пылесборного отсека (см. рис. 18).
Ⅲ Выньте моторный фильтр в направлении стрелки.
Ⅲ Очистите моторный фильтр путем выколачивания.
Ⅲ В случае сильного загрязнения фильтра промойте
его.
Дайте фильтру обсохнуть в течение минимум
24 часов.
Ⅲ После очистки вставьте моторный фильтр на место
и закройте крышку пылесборного отсека.
Новый моторный фильтр в качестве запасной детали
вы можете получить, обратившись в сервисную
службу (см. «Список запасных деталей» на с. 8).
Замена фильтра Hepa*
Фильтр Hepa необходимо менять один раз в год.
Рис.
Ⅲ Нажав на защелку в направлении стрелки,
освободите решетку вентилятора и откройте ее.
Ⅲ Нажав на защелку в направлении стрелки,
разблокируйте фильтр Hepa, выньте и утилизируйте
его.
Рис.
Ⅲ Задвиньте новый фильтр Hepa под оба
удерживающих выступа и отклоните в направлении
стрелки до фиксации.
Ⅲ Закройте решетку вентилятора.
Замена угольного фильтра*
Если Ваш пылесос оснащен угольным фильтром, то раз
в год его необходимо менять.
Рис.
Ⅲ Выньте фильтр и утилизируйте его вместе с
бытовым мусором.
Ⅲ Установите новый угольный фильтр.
После уборки мелкой пыли (напр., гипсовой,
цементной и т. п.) очистите моторный фильтр путем
выколачивания, возможно, моторный и выпускной
фильтры следует заменить.
33*
32*
31*
30
ru
*в зависимости от комплектации

120
Специальные принадлежности
ru
Упаковка сменных фильтров BBZ52AFP2
В комплект входят:
5 сменных мешков для сбора пыли MEGAfilt
®
SuperTEX с застежкой
1 выпускной фильтр Microsan
http://www.dust-bag-bosch.com
Текстильный фильтр (многоразовый) BBZ10TFP
Многоразовый фильтр с застежкой-липучкой.
!
Внимание: следует избегать комбинации текстильного фильтра и фильтра
HEPA, так как при этом значительно сокращается срок службы фильтра
HEPA.
Угольный фильтр BBZ190AF
Угольный фильтр большой толщины. Предотвращает появление неприятных
запахов при хранении. Заменять один раз в год. Использовать только совместно
с фильтром Hepa (BBZ151HF) или гигиеническим микрофильтром. При
использовании с гигиеническим микрофильтром выньте поролоновую
прокладку из рамки фильтра (рис. 22) и вставьте угольный фильтр.
Щетка TURBO-UNIVERSAL
®
BBZ102TBB
Одновременно чистит щеткой и всасывает пыль из ковров и напольных ковровых
покрытий с коротким ворсом или любых напольных покрытий. Особенно
эффективна для удаления шерсти животных. Валик щетки приводится в движение
потоком всасываемого пылесосом воздуха.
Дополнительный источник электроэнергии не требуется.
Щетка TURBO-UNIVERSAL
®
BBZ102TBB
Одновременно чистит щеткой и всасывает пыль из ковров и напольных ковровых
покрытий с коротким ворсом или любых напольных покрытий. Особенно
эффективна для удаления шерсти животных. Валик щетки приводится в движение
потоком всасываемого пылесосом воздуха. Дополнительный источник
электроэнергии не требуется.
Тип P /
номер для заказа 462588
Запасные части
(в случае необходимости можно заказать в сервисной службе.)
Щеточка для ниток (1/2)
Щеточка для ниток (1): номер для заказа 188565
Щеточка для ниток (2): номер для заказа 184773
Многоразовый фильтр (3) и фильтр Microsan (4) к контейнеру для сбора пыли.
Многоразовый фильтр к контейнеру для сбора пыли (3): номер для заказа
Фильтр Microsan к контейнеру для сбора пыли (4): номер для заказа
Моторный фильтр (5)
Моторный фильтр (5): номер для заказа 187622
Фильтр HEPA (класс H12) BBZ151HF
Рекомендуется для аллергиков. Обеспечивает исключительную чистоту выдуваемого
воздуха. Заменять один раз в год.
!
Внимание: следует избегать комбинации текстильного фильтра и фильтра HEPA,
так как при этом значительно сокращается срок службы фильтра HEPA.
2
1
3 4
5

13:30
Пылесос Bosch. Разборка, диагностика
04:07
Пылесос BOSCH BSG 82480.mp4
01:08
Пылесос BOSCH BSG82480
03:56
Пылесос BOSCH BSG 82480.mp4
04:19
Маленький, да удаленький пылесос Bosch BSN2100RU
05:20
Пылесос BOSCH BSGL 32383
04:21
Пылесос BOSCH BSG 82480.mp4
06:05
Пылесос BOSCH BSGL 32383
Нажмите на кнопку для помощи
Код: 111269
Извините, товара сейчас нет в наличии
Бесплатная доставка
по Красноярску
Извините, товара сейчас нет в наличии
Новости интернет-магазина «Лаукар»:
Дополнительная информация в категории Пылесос:
В интернет-магазине бытовой техники «Лаукар» Вы можете скачать инструкцию к товару Пылесос Bosch GL-20 совершенно бесплатно.
Все инструкции, представленные на сайте интернет-магазина бытовой техники «Лаукар», предоставляются производителем товара.
Перед началом использования товара рекомендуем Вам ознакомиться с инструкцией по применению.
Для того чтобы скачать инструкцию, Вам необходимо нажать на ссылку «скачать инструкцию», расположенную ниже, а в случае, если ссылки нет,
Вы можете попробовать обратиться к данной странице позднее,
возможно специалисты интернет-магазина бытовой техники «Лаукар» еще не успели загрузить для скачивания инструкцию к товару:
Пылесос Bosch GL-20.

Фирма-производитель оставляет за собой право на внесение изменений в конструкцию, дизайн и комплектацию товара: Пылесос Bosch GL-20. Пожалуйста, сверяйте информацию о товаре с информацией на
официальном сайте компании производителя.
Характеристики, спецификации
Потребляемая мощность:
2400 Вт
Пылесборник:
мешок, емкостью 6 л
Регулятор мощности:
на корпусе
Фильтр тонкой очистки:
есть
Функции и возможности:
индикатор заполнения пылесборника,автосматывание сетевого шнура,вертикальная парковка трубы всасывания на корпусе пылесоса
Труба всасывания:
телескопическая
Дополнительные насадки в комплекте:
щетка для пола ProAnimal Hair. щетка для мягкой мебели. роликовая щетка ковер/пол 280 мм. интегрированная 4 в 1(для мягкой мебели, для корпусной мебели, раздвижная щелевая)
Инструкция к Пылесосу Bosch BSG 82425
BSG8….
de Gebrauchsanweisung
el Οδηγίες χρήσης
en Instructions for use
tr Kullanma Kılavuzu
fr Notice d’utilisation
pl Instrukcja obsługi
it Istruzioni per l’uso
hu Használati utasítás
nl Gebruiksaanwijzing
bg àÌÒÚÛ͈Ëfl Á‡ ÔÓÎÁ‚‡ÌÂ
da Brugsanvisning
ru Руководство по
no Bruksanvisning
эксплуатации
sv Bruksanvisning
ro Instrucţiuni de utilizare
fi Käyttöohje
uk Інструкція з експлуатації
es Instrucciones de uso
ar
pt Instruções de utilização
max min
1
a)
b)
2
a)
3*
4
5
6
7
8*
a)
9
10*
a
CLICK!
CLICK!
11*
12*
13*
14
15

de Gebrauchsanweisung . . . . . . . . . . . . . . . . . . . . . . . . . . . . . . . . . . . . . . . . . . . . .2
en Instructions for use . . . . . . . . . . . . . . . . . . . . . . . . . . . . . . . . . . . . . . . . . . . . . . .8
fr Notice d’utilisation . . . . . . . . . . . . . . . . . . . . . . . . . . . . . . . . . . . . . . . . . . . . . . .14
it Instruzioni per l´uso . . . . . . . . . . . . . . . . . . . . . . . . . . . . . . . . . . . . . . . . . . . . . .20
nl Gebruiksaanwijzing . . . . . . . . . . . . . . . . . . . . . . . . . . . . . . . . . . . . . . . . . . . . . .26
da Brugsanvisning . . . . . . . . . . . . . . . . . . . . . . . . . . . . . . . . . . . . . . . . . . . . . . . . .32
no Bruksanvisning . . . . . . . . . . . . . . . . . . . . . . . . . . . . . . . . . . . . . . . . . . . . . . . . .38
sv Bruksanvisning . . . . . . . . . . . . . . . . . . . . . . . . . . . . . . . . . . . . . . . . . . . . . . . . .44
fi Käyttöohje . . . . . . . . . . . . . . . . . . . . . . . . . . . . . . . . . . . . . . . . . . . . . . . . . . . . .50
es Instrucciones de uso . . . . . . . . . . . . . . . . . . . . . . . . . . . . . . . . . . . . . . . . . . . . . .56
pt Instruções de utilização . . . . . . . . . . . . . . . . . . . . . . . . . . . . . . . . . . . . . . . . . . .62
el Οδηγίεσ χρήσησ . . . . . . . . . . . . . . . . . . . . . . . . . . . . . . . . . . . . . . . . . . . . . . . .68
tr Kullanma klavuzu . . . . . . . . . . . . . . . . . . . . . . . . . . . . . . . . . . . . . . . . . . . . . . .74
pl Instrukcja obsługi . . . . . . . . . . . . . . . . . . . . . . . . . . . . . . . . . . . . . . . . . . . . . . . . .80
hu Használati utasitás . . . . . . . . . . . . . . . . . . . . . . . . . . . . . . . . . . . . . . . . . . . . . . .86
bg àÌÒÚÛ͈Ëfl Á‡ ÔÓÎÁ‚‡Ì . . . . . . . . . . . . . . . . . . . . . . . . . . . . . . . . . . . . . . . . . .92
ru êÛÍÓ‚Ó‰ÒÚ‚Ó ÔÓ ˝ÍÒÔÎÛ‡Ú‡ˆËË . . . . . . . . . . . . . . . . . . . . . . . . . . . . . . . . . . . . .98
ro Instrucţiuni de utilizare . . . . . . . . . . . . . . . . . . . . . . . . . . . . . . . . . . . . . . . . . . .104
uk ßÌÒÚÛ͈¥fl Á ÂÍÒÔÎÛ‡Ú‡ˆ¥ª . . . . . . . . . . . . . . . . . . . . . . . . . . . . . . . . . . . . . . . .110
122 . . . . . . . . . . . . . . . . . . . . . . . . . . . . . . . . . . . . ar
1
de
Gerätebeschreibung de
de
31 2
25*
4
5
24*
6
23*
7
22*
8*
21*
9
10
11
20*
12
13
14
19*
19*
1718
16 15
1 Schlauchhandgriff
16 Motorschutzfilter
2 Zubehörhalter
17 Abstellhilfe (an der Geräteunterseite)
3 Kombi-Zubehör
18 Verschlusshebel
4 Saugschlauch
19 umschaltbare Bodendüse mit
5 Ein- bzw. Austaste
Entriegelungshülse*
6 Filterwechselanzeige
20 Hartbodendüse mit Entriegelungshülse*
7 Verschlusslasche
21 Tierhaardüse mit Entriegelungshülse*
8 Ausblasfilter*
22 Teleskoprohr mit Schiebemanschette*
9 Parkhilfe
23 Teleskoprohr mit Schiebemanschette
10 Saugkraftregler
und Entriegelungshülse*
11 Staubraumdeckel
24 Tierhaar-Polsterdüse*
12 Ausblasgitter
25 Matratzendüse*
13 Netzanschlusskabel
®
14 Filterbeutel MEGAfilt
Super TEX
*je nach Ausstattung
15 Filterhalterung
2

de
Die Gebrauchsanweisung bitte aufbewahren.
䡲
Beschädigten Staubsauger nicht in Betrieb nehmen.
Bei Weitergabe des Staubsaugers an Dritte bitte
Beim Vorliegen einer Störung Netzstecker ziehen.
Gebrauchsanweisung mitgeben.
䡲
Um Gefährdungen zu vermeiden, dürfen Reparaturen
und Ersatzteileaustausch am Staubsauger nur vom
autorisierten Kundendienst durchgeführt werden.
Bestimmungsgemäße Verwendung
䡲
Staubsauger vor Feuchtigkeit und Hitzequellen schützen.
䡲
Gerät ausschalten, wenn nicht gesaugt wird.
Dieser Staubsauger ist nur für den Gebrauch im Haushalt
䡲
Ausgediente Geräte sofort unbrauchbar machen, danach
und nicht für gewerbliche Zwecke bestimmt.
das Gerät einer ordnungsgemäßen Entsorgung zuführen.
Den Staubsauger ausschließlich gemäß den Angaben in
䡲
Aus Sicherheitsgründen sind Staubsauger, die eine
dieser Gebrauchsanweisung verwenden.
Leistung von 2300 W und mehr haben, mit einem
Der Hersteller haftet nicht für eventuelle Schäden, die durch
Überhitzungsschutz ausgestattet.
nicht bestimmungsgemäßen Gebrauch oder falsche
Sollte eine Blockierung auftreten und das Gerät zu heiß
Bedienung verursacht werden.
werden, schaltet es sich automatisch ab.
Deshalb beachten Sie bitte unbedingt die nachfolgenden
Ziehen Sie den Netzstecker und stellen Sie sicher, dass
Hinweise!
Düse Saugrohr oder Schlauch nicht verstopft sind, bzw.
Der Staubsauger darf nur bedient werden mit:
der Filter gewechselt werden muß.
®
䡲
Original-Filterbeutel MEGAfilt
SuperTEX
Nach Beseitigung der Störung lassen Sie das Gerät
䡲
Original-Ersatzteilen, -Zubehör oder -Sonderzubehör
mindestens 1 Stunde abkühlen. Danach ist das Gerät
wieder einsatzbereit.
Der Staubsauger ist nicht geeignet für:
䡲
das Absaugen von Menschen oder Tieren
䡲
das Aufsaugen von:
Hinweise zur Entsorgung
– Kleinlebewesen
– gesundheitsschädlichen, scharfkantigen, heißen oder
䡲
Verpackung
glühenden Substanzen
Die Verpackung schützt den Staubsauger vor
– feuchten oder flüssigen Substanzen
Beschädigung auf dem Transport.
– leicht entflammbaren oder explosiven Stoffen und
Sie besteht aus umweltfreundlichen Materialien und ist
Gasen.
deshalb recycelbar.
– Asche, Ruß aus Kachelöfen und Zentral-Heizungs-
Entsorgen Sie nicht mehr benötigte Verpackungs-
anlagen
materialien an den Sammelstellen für das
Verwertungssystem »Grüner Punkt«.
Sicherheitshinweise
䡲
Altgerät
Altgeräte enthalten vielfach noch wertvolle Materialien.
Dieser Staubsauger entspricht den anerkannten Regeln der
Geben Sie deshalb Ihr ausgedientes Gerät bei Ihrem
Technik und den einschlägigen Sicherheitsbestimmungen.
Händler bzw. einem Recyclingcenter zur
Wir bestätigen die Übereinstimmung mit den folgenden
Wiederverwertung ab.
europäischen Richtlinien: 89/336/EWG (geändert durch RL
Aktuelle Entsorgungswege erfragen Sie bitte bei Ihrem
91/263/EWG, 92/31/EWG und 93/68/EWG). 73/23/EWG
Händler oder Ihrer Gemein-deverwaltung.
(geändert durch RL 93/68/EWG).
䡲
Staubsauger nur gemäß Typenschild anschließen und in
Bitte beachten
!
Betrieb nehmen.
Das Gerät nur an eine Steckdose anschließen, die mit
®
䡲
Niemals ohne Filterbeutel MEGAfilt
SuperTEX saugen
einer Sicherung von mindestens 16 A abgesichert ist!
=> Gerät kann beschädigt werden!
Sollte die Sicherung beim Einschalten des Gerätes
䡲
Kindern die Benutzung des Staubsaugers nur unter
einmal ausgelöst werden, so kann dies daran liegen,
Aufsicht gestatten.
dass gleichzeitig andere Elektrogeräte mit hohem
䡲
Vermeiden Sie das Saugen mit Düse und Rohr in
Anschlusswert am gleichen Stromkreis angeschlossen
Kopfnähe.
sind.
=> Es besteht Verletzungsgefahr!
Das Auslösen der Sicherung ist vermeidbar, in dem Sie
䡲
Das Netzanschlusskabel nicht zum Tragen / Transpor-
vor dem Einschalten des Gerätes die niedrigste
tieren des Staubsaugers benutzen.
Leistungsstufe einstellen und erst danach eine höhere
䡲
Bei mehrstündigem Dauerbetrieb Netzanschlusskabel
Leistungsstufe wählen.
vollständig ausziehen.
䡲
Nicht am Netzanschlusskabel, sondern am Stecker
ziehen, um das Gerät vom Netz zu trennen.
䡲
Das Netzanschlusskabel nicht über scharfe Kanten
ziehen und nicht einquetschen.
䡲
Vor allen Arbeiten am Staubsauger oder Zubehör
Netzstecker ziehen.
3
de
Bitte Bildseiten ausklappen!
Saugen
Sie haben ein sehr leistungs- und saugstarkes Gerät
erworben. Die max. Leistungsstellung empfiehlt sich
deshalb nur bei stark verschmutzten Niedrigflor—
Teppichböden oder Hartböden.
7
Bild
Durch Betätigen des Saugkraftreglers kann die gewünschte
Saugkraft stufenlos eingestellt werden.
䡲
Niedriger
Inbetriebnahme
Leistungsbereich:
Für das Absaugen empfindlicher Stoffe, z. B. Gardinen.
1
Bild
䡲
Mittlerer
a) Saugschlauchstutzen in die Saugöffnung einführen und
Leistungsbereich:
einrasten lassen.
Für die tägliche Reinigung bei geringer Verschmutzung.
b) Beim Entfernen des Saugschlauches beide Rastnasen
䡲
Hoher
zusammendrücken und Schlauch herausziehen.
Leistungsbereich:
Zur Reinigung robuster Bodenbeläge, Hartböden und bei
2*
Bild
starker Verschmutzung.
a) Handgriff und Teleskoprohr bündig zusammenstecken.
䡲
Turbobereich:
b) Handgriff bis zum Einrasten bündig in das Teleskoprohr
schieben.
Zum Reinigen von hartnäckigen und sehr starken
Zum Lösen der Verbindung Entriegelungshülse drücken
Verschmutzungen.
und Handgriff herausziehen.
8
Bild
3*
Bild
Bodendüse einstellen:
Teleskoprohr bis zum Einrasten bündig in den Stutzen
a) Zum Saugen von Teppichen
der Bodendüse schieben.
und Teppichböden =>
Zum Lösen der Verbindung Entriegelungshülse drücken
und Teleskoprohr herausziehen
b) Zum Saugen von Hartböden =>
4*
Bild
Saugen mit Zubehör
Durch Drücken der Schiebemanschette in Pfeilrichtung
Teleskoprohr entriegeln und gewünschte Länge
9
Bild
einstellen.
Kombi-Zubehör durch Ziehen in Pfeilrichtung aus dem
Zubehörhalter lösen.
5
Bild
a) Fugendüse
Netzanschlusskabel am Stecker greifen, auf die
Zum Absaugen von Fugen und Ecken.
gewünschte Länge herausziehen und Netzstecker
Für schwer zugängliche Stellen kann das Kombi-Zubehör
einstecken.
durch teleskopartiges Ausziehen der Fugendüse in
2 Stufen verlängert werden.
6
Bild
䡲
Fugendüse in beiden Stufen soweit ausziehen bis sie
Staubsauger durch Betätigen der Ein- bzw. Austaste in
hörbar einrastet.
Pfeilrichtung ein- bzw. ausschalten.
䡲
Durch Lösen der Teleskopverriegelungen (Drücken in
Pfeilrichtung) kann die Fugendüse wieder
zusammengeschoben werden.
b) Polsterdüse
Zum Absaugen von Polstermöbeln, Vorhängen usw.
c) Möbelpinsel
Zum Absaugen von Fensterrahmen, Schränken, Profilen
usw.
䡲
Polsterdüse in Pfeilrichtung umklappen.
䡲
Durch Drehen in Pfeilrichtung wird der Borstenkranz
ausgefahren.
Vor dem Einsetzen des Kombi-Zubehörs in den
Zubehörhalter muss der Borstenkranz eingedreht und
die Polsterdüse zurückgeklappt werden.
*
je nach Ausstattung
4
de
10*
Nach der Arbeit
Bild
Matratzendüse
15
Bild
Zum Absaugen von Matratzen, Polstern usw. ( je nach
䡲
Gerät ausschalten, Netzstecker aus der Steckdose
Bedarf auf Handgriff bzw. Saugrohr stecken )
ziehen.
11*
䡲
Kurz am Netzanschlusskabel ziehen und loslassen (Kabel
Bild
rollt sich automatisch auf).
Tierhaar-Polsterdüse
䡲
Durch erneutes Ziehen am Netzanschlusskabel wird die
䡲
Zum leichten und gründlichen Entfernen von Tierhaaren
Kabelbremse wieder aktiv, durch kurzes Ziehen am Kabel
(je nach Bedarf auf Handgriff bzw. Saugrohr stecken).
deaktiviert.
䡲
Zur Reinigung die Tierhaar-Polsterdüse einfach mit dem
Handgriff absaugen.
16
Bild
䡲
Bei stärkerer Verschmutzung kann die Tierhaar—
Zum Abstellen/Transportieren des Gerätes können Sie die
Polsterdüse auch geöffnet werden.
Abstellhilfe an der Geräteunterseite benutzen. Gerät
Dazu die beiden Schrauben an den Düsenseiten (z.B. mit
aufrecht hinstellen. Kunststoffrippe an der Boden-
einem Geldstück) aufdrehen und den Innenteil aus der
düse in die Aussparung an der Geräteunterseite schieben.
Düse entnehmen.
䡲
Nach der Reinigung Innenteil wieder einsetzen (auf
richtigen Sitz achten) und mit dem Gehäuse
Filterwechsel
verschrauben.
®
12*
Filterbeutel MEGAfilt
SuperTEX austauschen
Bild
Tierhaardüse
17
Bild
Bodendüse zum leichten und gründlichen Entfernen von
䡲
Leuchtet bei vom Teppich abgehobener Düse und
Tierhaaren.
höchster Saugleistungseinstellung die Filterwechsel-
Teleskoprohr bis zum Einrasten in den Stutzen der
anzeige intensiv und gleichmäßig auf, muss der
Tierhaardüse schieben.
Filterbeutel gewechselt werden, auch wenn er noch
Zum Lösen der Verbindung Entriegelungshülse drücken
nicht voll sein sollte. In diesem Fall macht die Art des
und Teleskoprohr herausziehen.
Füllgutes den Wechsel erforderlich.
Zur Reinigung die Düse einfach mit dem Teleskoprohr /
䡲
Staubraumdeckel durch Betätigung des Verschluss-
Handgriff absaugen.
hebels in Pfeilrichtung öffnen.
13*
Bild
18
Bild
Hartbodendüse
®
Filterbeutel MEGAfilt
SuperTEX durch Ziehen an der
Zum Saugen von harten Bodenbelägen
Verschlusslasche verschließen und herausnehmen.
(Fliesen, Parkett usw.)
Teleskoprohr bis zum Einrasten in den Stutzen der
19
Bild
Hartbodendüse schieben.
®
Neuen Filterbeutel MEGAfilt
SuperTEX in die Halterung
Zum Lösen der Verbindung Entriegelungshülse drücken
einlegen und Staubraum-deckel schließen.
und Teleskoprohr herausziehen.
14
Achtung: Staubraumdeckel schließt nur mit
Bild
!
®
eingelegtem Filterbeutel MEGAfilt
SuperTEX bzw.
Bei kurzen Saugpausen können Sie die Parkhilfe an der
Textilfilter.
Geräterückseite benutzen.
Sollte nach Austausch des Filterbeutels die
Kunststoffrippe am Düsenstutzen in die Aussparung an
Filterwechselanzeige weiterhin leuchten, bitte über—
der Geräterückseite schieben.
prüfen, ob Düse, Rohr oder Saugschlauch
verstopft sind.
*
je nach Ausstattung
5

de
Motorschutzfilter reinigen
Hepa-Filter austauschen*
Der Motorschutzfilter sollte in regelmäßigen Abständen
Ist Ihr Gerät mit einem Hepa-Filter ausgestattet, muss dieser
durch Ausklopfen bzw. Auswaschen gereinigt werden!
jährlich ausgewechselt werden.
(Filterwechsel siehe Bilder 21 und 23)
20
Bild
䡲
Staubraumdeckel öffnen (siehe Bild 17).
䡲
Motorschutzfilter in Pfeilrichtung herausziehen.
Aktivkohlekassette austauschen*
䡲
Motorschutzfilter durch Ausklopfen reinigen.
䡲
Bei starker Verschmutzung sollte der Motorschutzfilter
Ist Ihr Gerät mit einer Aktivkohlekassette ausgestattet, muss
ausgewaschen werden.
diese jährlich ausgewechselt werden.
Den Filter anschließend mindestens 24 Stunden
24*
trocknen lassen.
Bild
䡲
Nach der Reinigung Motorschutzfilter in das Gerät bis
䡲
Aktivkohlekassette herausnehmen und im Hausmüll
zum Anschlag einschieben und Staubraumdeckel
entsorgen.
schließen.
䡲
Neue Aktivkohlekassette einlegen.
(Filterwechsel siehe Bilder 21, 22, 23)
Einen neuen Motorschutzfilter erhalten Sie auf Wunsch als
Ersatzteil vom Kundendienst. (siehe Ersatzteile S. 7)
Pflege
Micro-Hygienefilter austauschen*
Vor jeder Reinigung des Staubsaugers, muss dieser
ausgeschaltet und der Netzstecker gezogen werden.
Der Micro-Hygienefilter sollte bei jeder neuen
Staubsauger und Zubehörteile aus Kunststoff können mit
Austauschfilterpackung (nach 5 Filterbeuteln), spätestens
einem handelsüblichen Kunststoffreiniger gepflegt werden.
nach Ablauf eines Jahres ausge-tauscht werden.
Keine Scheuermittel, Glas- oder Allzweckreiniger
21
Bild
!
verwenden. Staubsauger niemals in Wasser tauchen.
䡲
Durch Drücken der Verschlusslasche in Pfeilrichtung
Ausblasgitter entriegeln und öffnen.
Der Staubraum kann bei Bedarf mit einem zweiten
䡲
Filterrahmen durch Drücken des Verschlusses in
Staubsauger ausgesaugt oder einfach mit einem trockenen
Pfeilrichtung entriegeln und herausnehmen.
Staubtuch / Staubpinsel gereinigt werden.
22*
Bild
䡲
Schaumstoff und Micro-Hygienefilter entnehmen.
䡲
Micro-Hygienefilter entsorgen und neuen
Micro-Hygienefilter einlegen.
䡲
Schaumstoff säubern und ebenfalls wieder in den
Filterrahmen einlegen.
Nach dem Aufsaugen feiner Staubpartikel
(wie z. B. Gips, Zement, usw.) Motorschutzfilter durch
Ausklopfen reinigen, evtl. Motorschutzfilter und Micro-
Hygienefilter aus-tauschen.
23
Bild
䡲
Filterrahmen unter die beiden Halterippen schieben und in
Pfeilrichtung schwenken bis er einrastet.
䡲
Ausblasgitter schließen.
*
je nach Ausstattung
Technische Änderungen vorbehalten.
6
Sonderzubehör
Austauschfilterpackung BBZ52AFP2
Inhalt:
®
5 Austauschfilter
MEGAfilt
Super TEX
mit Verschluss
1 Micro-Hygienefilter
http://
www.dust-bag-bosch.com
Typ P / Ident-Nr. 462588
Textilfilter (Dauerfilter) BBZ10TFP
Wiederverwendbarer Filter mit Klettverschluss.
Achtung: Die Kombination Textilfilter und HEPA-Filter
!
sollte vermieden werden, da sich dabei die Lebensdauer
des HEPA-Filters erheblich verkürzt.
HEPA-Filter (Klasse H12) BBZ151HF
Für Allergiker empfohlen. Für extrem saubere Ausblasluft.
Jährlich auswechseln (siehe Bilder 19 und 21)
Achtung: Die Kombination Textilfilter und HEPA-Filter
!
sollte vermieden werden, da sich dabei die Lebensdauer
des HEPA-Filters erheblich verkürzt.
Aktivkohlekassette BBZ190AF
Extra dicke Aktivkohlekassette. Verhindert für lange Zeit störende Gerüche. Jährlich aus-
wechseln. Nur in Verbindung mit HEPA-Filter (BBZ151HF) oder Micro-Hygienefilter ver-
wendbar. Bei Verwenden mit Micro-Hygienefilter Schaumstoff aus Filterrahmen entfernen
(Bild 20) und Aktivkohlekassette
einlegen.
®
TURBO-UNIVERSAL
-Bürste BBZ102TBB
Bürsten und Saugen in einem Arbeitsgang von kurzflorigen Teppichen und Teppichböden
bzw. für alle Beläge. Besonders geeignet zum Aufsaugen von Tierhaaren. Antrieb der
Bürstenwalze erfolgt über Saugstrom des Staubsaugers. Kein Elektroanschluss erforder-
lich.
Hartboden-Düse BBZ123HD
Zum Saugen glatter Böden (Parkett, Fliesen, Terracotta,…)
Ersatzteile
Microsan-Ausblasfilter (1) und Motorschutzfilter (2)
Microsan-Ausblasfilter (1): Ident-Nr. 483332
Motorschutzfilter (2): Ident-Nr. 187622
12
7

Your vacuum cleaner en
31 2
25*
4
5
24*
6
23*
7
22*
8*
21*
9
10
11
20*
12
13
14
19*
19*
1718
16 15
1 Handle
15 Filter bracket
2 Accessories holder
16 Motor protection filter
3 4 in 1 tool
17 Storage aid (on underside of unit)
4 Hose
18 Locking lever
5 ON/OFF button
19 Adjustable floor tool with locking collar
*
6 Dust bag change indicator
20 Hard-floor brush with
locking collar
*
7 Locking tab
21 Pet hair tool with locking collar*
8 Exhaust filter*
22 Telescopic tube with adjusting sleeve
*
9 Parking aid
23 Telescopic tube with adjusting sleeve and locking collar*
10 Suction regulation button
24 Pet hair upholstery nozzle*
11 Dust bag compartment lid
25 Mattress nozzle*
12 Exhaust grille
13 Power cord
®
14
MEGAfilt
Super TEX dust bag
*
Dependent on model
8

en
Please keep this instruction manual When passing the vac-
䡲
For safety reasons, only authorised after-sales service
uum cleaner on to a third party, please also pass on this
personnel are permitted to carry out repairs and fit
instruction manual.
replacement parts to the vacuum cleaner.
䡲
The vacuum cleaner should be protected from moisture
and sources of heat.
Intended use
䡲
Switch off the vacuum cleaner when it is not in use.
䡲
At the end of its life, the vacuum cleaner should be dis-
This vacuum cleaner is intended for domestic use only, not
posed of in an appropriate manner.
for commercial use.
䡲
For safety reasons, vacuum cleaners with a power rating
Only use this vacuum cleaner in accordance with the
of more than 2300 W are fitted with a temperature safety
instructions in this instruction manual.
switch.
The manufacturer will not accept any responsibility for
This automatically switches off the vacuum cleaner if it is
damage caused by improper use or incorrect operation.
blocked and overheating.
Therefore, please note the following points.
Unplug the power cord from the mains and make sure
The vacuum cleaner must only be operated with:
that the nozzle, suction pipe and hose are not blocked.
®
䡲
Manufacturer’s original MEGAfilt
SuperTEX dust bags
Also check whether the filter needs changing.
䡲
Manufacturer’s original replacement parts, accessories
Having cleared the blockage, leave the vacuum cleaner
and optional accessories
to cool down for at least one hour. It can then be
switched back on again.
The vacuum cleaner is not to be used for:
䡲
vacuuming persons or animals
䡲
vacuuming up:
Disposal information
– Insects and spiders
– Hazardous, sharp-edged, hot or burning substances.
䡲
Packaging
– Damp or liquid substances
The packaging is designed to protect the vacuum clean-
– Highly flammable or explosive substances and gases
er from being damaged during transport.
– Ash, soot from tiled stoves and central heating sys-
It is made of environmentally-friendly materials and can
tems
be recycled.
Dispose of packaging that is no longer required at an
appropriate recycling point.
Safety information
䡲
Used vacuum cleaners
This vacuum cleaner complies with the recognised rules of
Used vacuum cleaners still contain many recyclable
technology and the relevant safety regulations.
materials.
We confirm that it complies with the following European
Therefore, please take used vacuum cleaners to your
directives: 89/336/EEC (amended by Directives
retailer or recycling centre so that they can be recycled.
91/263/EEC, 92/31/EEC and 93/68/EEC). 73/23/EEC
For current disposal methods, please enquire at your
(amended by Directive 93/68/EEC).
appliance dealership or local council.
䡲
Always observe the information on the rating plate when
using the vacuum cleaner and connecting to the power
Please note
!
supply.
Only connect the appliance to a socket rated for at least
®
䡲
Never use the vacuum cleaner without a MEGAfilt
16 amps.
SuperTEX dust bag fitted.
If a fuse is tripped when you switch on the vacuum
=> This can damage the vacuum cleaner.
cleaner, this may be because other electrical appliances
䡲
Only allow children to use the vacuum cleaner under
which have a high current draw are connected to the
supervision.
same power circuit.
䡲
Keep the vacuum cleaner away from the face when
To prevent the fuse from tripping, select the lowest
using nozzles and tubes.
power setting before switching the vacuum cleaner on,
=> There is a risk of injury.
and increase the power only once it is running.
䡲
Never carry the vacuum cleaner by the power cord.
䡲
Fully extend the power cord when using the vacuum
cleaner continuously for a long period of time.
䡲
When disconnecting the appliance from the mains, pull
the plug, not the power cord.
䡲
Do not pull the power cord around sharp corners or
allow it to become trapped.
䡲
Unplug the power cord from the mains before carrying
out any work on the vacuum cleaner or its accessories.
䡲
Do not use the vacuum cleaner if it is damaged. Unplug
the power cord from the mains if a fault is detected.
9
en
Fold out picture pages.
Vacuuming
You have bought an extremely powerful device. The high-
est suction setting is therefore only recommended for
heavily soiled, short-pile carpets and hard floors.
7
Figure
The required suction power can be selected by adjusting the
suction regulator.
䡲
Low
Setting up
suction range:
For vacuuming delicate fabrics, e.g. curtains.
1
Figure
䡲
Moderate
a) Insert the flexible hose adapter into the air intake open-
suction range:
ing and allow it to engage.
For daily vacuuming of lightly soiled floors.
b) To remove the flexible hose, press the two lugs together
and pull the tube out.
䡲
High
suction range:
2*
Figure
For vacuuming durable floor coverings, hard floors and
a) Align and connect the handle and the telescopic tube.
for heavily soiled surfaces.
b) Push the handle straight into the telescopic tube until it
䡲
Turbo range:
engages.
To release the connection, squeeze the collar sleeve and
For vacuuming stubborn dirt and very heavily soiled sur-
pull the handle out.
faces.
3*
Figure
8
Figure
Push the telescopic tube straight into the
Adjusting the floor tool:
connecting piece of the floor tool until it engages.
a) For vacuuming rugs and carpets =>
To release the connection, squeeze the locking collar
and pull the telescopic tube out.
b) For vacuuming hard floors =>
4*
Figure
Press the adjusting sleeve in the direction of the arrow
Vacuuming with accessories
and adjust the telescopic tube to the length required.
9
Figure
5
Figure
Pull the 4 in 1 tool in the direction of the arrow to remove it
Holding the power cord by the plug, pull out the required
from the tool holder.
length and plug the plug into the mains socket.
a) Crevice nozzle
For vacuuming in crevices and corners.
6
Figure
For difficult to reach places, the 4 in 1 tool can be
To switch your vacuum cleaner on and off, press the On/Off
extended to two different lengths by pulling out the
button in the direction of the arrow.
crevice nozzle.
䡲
For either length extension, pull the crevice nozzle out
until you hear it engage.
䡲
The crevice nozzle can be pushed back in again by
releasing the telescopic locking mechanism (pressing it
in the direction of the arrow).
b) Upholstery nozzle
For cleaning upholstered furniture,
curtains, etc.
c) Hard furnishings brush
For window frames, cabinets, profiles etc.
䡲
Fold the upholstery nozzle over in the direction of the
arrow.
䡲
To extend the brush ring, turn in the direction of the
arrow.
Before replacing the 4 in 1 tool in the tool holder,
retract the brush ring and fold the upholstery nozzle
back.
10
en
10*
When the work is done
Figure
Mattress nozzle
15
Figure
For vacuuming mattresses, upholstery etc.
䡲
Switch the vacuum cleaner off and unplug the power
(attach to handle or suction pipe as required).
cord from the mains.
11*
䡲
Tug the power cord and let go. The cable then rewinds
Figure
automatically.
Pet hair upholstery nozzle
䡲
To reactivate or deactivate the cable brake, quickly tug
䡲
For easy and thorough removal of pet hair (attach to
the power cord.
handle or suction pipe as required).
䡲
To clean the pet hair upholstery nozzle, simply vacuum
16
Figure
using the handle.
To store or transport the vacuum cleaner, use the storage
䡲
If it is very dirty, the pet hair upholstery nozzle can also
aid on the underside of the vacuum cleaner. Stand the
be opened.
vacuum cleaner up on its end. Slide the plastic lug on the
To do this, turn the two screws on the sides of the nozzle
floor tool into the groove on the underside of the unit.
(e.g. using a coin) and remove the inner part from the
nozzle.
䡲
After cleaning, replace the inner part (make sure it is
Changing the dust bag and filters
correctly seated) and screw to the housing.
®
12*
Replacing the MEGAfilt
SuperTEX dust bag
Figure
Pet hair tool
17
Figure
Floor tool for easy and thorough vacuuming of pet hair.
䡲
If the dust bag change indicator lights up brightly and
Push the telescopic tube into the connecting piece of the
evenly when the floor tool is lifted from the carpet and
pet hair tool until it engages.
the highest suction power is selected, the dust bag must
Press on the locking collar and pull out the telescopic
be changed, even though it may not yet be full. In this
tube to disconnect.
case it is essential to change the dust bag due to the
To clean, simply vacuum the tool using the suction
type of material it contains.
pipe/handle.
䡲
Open the dust bag compartment lid by moving the dust
13*
compartment locking lever in the direction of the arrow.
Figure
Hard-floor brush
18
Figure
For vacuuming hard floor coverings (tiles, parquet floor-
®
Seal the MEGAfilt
SuperTEX dust bag by pulling the self-
ing, etc.)
seal tap and then remove it.
Push the telescopic tube into the connecting piece of
the hard-floor brush until it engages.
19
Figure
Press on the unlatching sleeve and pull out the telescop-
®
Insert a new MEGAfilt
SuperTEX dust bag into the holder
ic tube to disconnect.
and close the dust bag compartment lid.
14
Figure
Caution: the dust bag compartment lid will
only close
You can use the parking aid on the back of the vacuum
!
®
when the MEGAfilt
SuperTEX disposable or textile
cleaner if you wish to stop vacuuming for a short time.
filter are inserted.
Slide the plastic lug on the tool connector into the
groove at the back of the vacuum cleaner.
If the dust bag change indicator is still lit after the
dust bag has been changed, please check whether
the nozzle, tube or flexible hose are blocked.
*
Dependent on model
11

en
Cleaning the motor protection filter
Replacing the active carbon filter*
The motor protection filter should be cleaned regularly by
If your vacuum cleaner is fitted with an active carbon filter, this
knocking out the dirt and rinsing.
must be replaced once a year.
20
24*
Figure
Figure
䡲
Open the dust bag compartment lid (see Figure 17).
䡲
Remove the active carbon filter and dispose of it with
䡲
Pull out the motor protection filter in the direction of the
the household rubbish.
arrow.
䡲
Insert a new active carbon filter.
(See Figures 21, 22, 23
䡲
Clean the motor protection filter by tapping it.
for changing the filters)
䡲
If it is very dirty, the motor protection filter should be
rinsed.
The filter must then be left to dry for at least 24 hours.
Care
䡲
After cleaning, insert the motor protection filter into the
appliance as far as it will go and close the dust bag
Always switch off the vacuum cleaner and disconnect the
compartment lid.
power cord from the mains before cleaning the appliance.
The vacuum cleaner and plastic accessories can be cleaned
You can obtain a new motor protection filter on request as
with a commercial plastic cleaner.
a spare part from the after-sales service. (see Spare parts,
page 13 )
Do not use a scourer, glass-cleaning agent or all-pur-
!
pose cleaning product.
Never immerse the vacuum cleaner in water.
Changing the micro-hygiene filter*
The dust compartment can, if necessary, be cleaned with a
The micro-hygiene filter should be replaced with every new
second vacuum cleaner or simply wiped with a dry cloth or
replacement filter pack (after 5 dust bags) and at least
dusting brush.
once a year.
21
Figure
䡲
Press the locking tab in the direction of the arrow to
unlatch the exhaust grille and open it.
䡲
Unlatch and remove the filter frame by pressing the tab
in the direction of the arrow.
22*
Figure
䡲
Remove the foam and micro-hygiene filter.
䡲
Dispose of the micro-hygiene filter and fit a new micro-
hygiene filter.
䡲
Clean the foam and replace in the filter frame.
If you have used the vacuum cleaner for fine dust particles
(such as plaster or cement), clean the motor protection fil-
ter by tapping it and, if necessary, replace the motor protec-
tion filter and the micro-hygiene filter.
23
Figure
䡲
Slide the filter frame under the two retaining ribs and push
in the direction of the arrow until it engages.
䡲
Close the exhaust grille.
Replacing the Hepa filter*
If your vacuum cleaner is fitted with a HEPA filter,
this must be replaced once a year. (See figures 21 and 23 for
changing the filter)
Subject to technical modifications.
12

Optional accessories
Replacement filter pack BBZ52AFP2
Contains:
®
5
MEGAfilt
Super TEX
replacement filters with lock
1 micro-hygiene filter
http://
www.dust-bag-bosch.com
Type P/product code 462588
Textile dust bag (permanent dust bag) BBZ10TFP
Reusable bag with Velcro (R) fastener.
Caution: avoid a combination of textile dust bag and HEPA filter
!
because this considerably reduces the service life of the HEPA filter.
HEPA filter (class H12) BBZ151HF
Recommended for allergy sufferers. Ensures very clean exhaust air.
Replace once a year (see figures 19 and 21 )
Caution: avoid a combination of cloth filter and HEPA filter because this
!
considerably reduces the service life of the HEPA filter.
Active carbon filter BBZ190AF
Extra-thick active carbon filter. Combats unpleasant odours. Replace once a year. Can be
used only in combination with HEPA filter (BBZ151HF) or micro-hygiene filter. If used with a
micro-hygiene filter, remove the foam from the filter frame (figure 20) and replace with the
active carbon filter.
®
TURBO-UNIVERSAL
brush BBZ102TBB
All in one brushing and vacuuming of short-pile pile rugs and carpets and all hard floor
coverings. Especially suitable for picking up pet hair. The brush roller is driven by the air
flow through the vacuum cleaner. No separate electrical connection is needed.
Hard-floor brush BBZ123HD
For vacuuming hard floors (parquet flooring, tiles, laminate, etc.)
Replacement parts
Microsan exhaust filter (1) and motor protection filter (2)
Microsan exhaust filter (1): product code 483332
Motor protection filter (2): product code 187622
12
13

Description de l’appareil fr
31 2
25*
4
5
24*
6
23*
7
22*
8*
21*
9
10
11
20*
12
13
14
19*
19*
1718
16 15
1 Poignée de flexible
15 Support de filtre
2 Porte-accessoire
16 Filtre de protection du moteur
3 Accessoire combiné
17 Position de rangement (sur le dessous de l’appareil)
4 Flexible d’aspiration
18 Levier de fermeture
5 Bouton marche/arrêt
19 Brosse commutable pour sols avec manchon de
6 Indicateur pour le changement du sac aspirateur
déverrouillage
*
7 Attache de fermeture
20 Brosse pour sols durs avec
manchon de déverrouillage
*
8 Filtre de sortie d’air*
21 Brosse pour poils d’animaux avec manchon de déverrouil-
9 Position parking
lage*
10 Variateur de la puissance d’aspiration
22 Tube télescopique avec manchette coulissante
*
11 Couvercle du compartiment de poussière
23 Tube télescopique avec manchette coulissante et manchon
12 Grille de sortie d’air
de déverrouillage*
13 Cordon électrique
24 Brosse pour poils d’animaux et coussins*
®
14 Sac aspirateur
MEGAfilt
Super TEX
25 Suceur pour matelas*
*
selon l’équipement
14

fr
Conservez cette notice d’utilisation. Si vous remettez l’as-
䡲
Ne pas tirer le cordon électrique par-dessus d’arêtes
pirateur à un tiers, veuillez-y joindre sa notice d’utilisation.
vives et ne pas le coincer.
䡲
Avant tous les travaux sur l’aspirateur ou les acces-
soires, retirer la fiche de la prise.
Utilisation conforme aux prescriptions et
䡲
Ne pas mettre l’aspirateur en service s’il est défectueux.
à l’emploi prévu
En cas de panne, retirer la fiche de la prise.
䡲
Pour éviter des dangers, seul le service après-vente
Cet aspirateur est destiné exclusivement à l’emploi domes-
agréé est autorisé à effectuer des réparations et le rem-
tique et non pas à l’usage industriel.
placement de pièces de rechange sur l’aspirateur.
Utilisez l’aspirateur exclusivement selon les indications
䡲
Ne pas exposer l’aspirateur à l’humidité ni aux sources
figurant dans cette notice d’utilisation.
de chaleur.
Le fabricant n’est pas responsable d’éventuels dommages
䡲
Eteignez l’appareil si vous n’aspirez pas.
résultant d’un emploi non conforme ou d’un maniement
䡲
Rendre immédiatement inutilisables les appareils hors
incorrect.
d’usage, ensuite mettre l’appareil au rebut de manière
Veuillez donc respecter impérativement les consignes sui-
réglementaire.
vantes!
䡲
Pour des raisons de sécurité, les aspirateurs d’une
L’aspirateur doit être utilisé uniquement avec:
puissance de 2300 W et plus sont équipés d’une
®
䡲
un sac aspirateur MEGAfilt
SuperTEX d’origine
protection de surchauffe.
䡲
des pièces de rechange, accessoires ou accessoires
En cas de blocage et de surchauffe de l’appareil, il
optionnels d’origine
s’arrête automatiquement.
Retirez la fiche de la prise et vérifiez que la brosse, le
L’aspirateur n’est pas approprié à:
tube d’aspiration ou le flexible ne sont pas obstrués ou si
䡲
aspirer sur des personnes ou des animaux
le filtre (sac) doit être changé.
䡲
aspirer des:
Après l’élimination du dérangement, laissez refroidir
– petits organismes vivants
l’appareil au moins 1 heure. Ensuite l’appareil est de
– substances nocives, à arêtes vives, chaudes ou incan-
nouveau opérationnel.
descentes
– substances humides ou liquides
– substances et gaz facilement inflammables ou explo-
Indication pour la mise au rebut
sifs.
– cendres, suie des poêles et d’installations de chauffa-
䡲
Emballage
ge central
L’emballage protège l’aspirateur contre un endommage-
ment pendant le transport.
Il est constitué de matériaux écologiques et est donc
Consignes de sécurité
recyclable.
Les matériaux d’emballage qui ne sont plus utilisés doi-
Cet aspirateur répond aux règles techniques reconnues et
vent être mis au rebut aux points collecteurs du système
aux prescriptions de sécurité applicables.
de recyclage «Point vert».
Nous déclarons la conformité de l’appareil avec les direc-
tives européennes suivantes: 89/336/CEE (modifiée par la
䡲
Appareil usagé
directive 91/263/CEE, 92/31/CEE et 93/68/CEE).
Les appareils usagés contiennent souvent des matériaux
73/23/CEE (modifiée par la directive 93/68/CEE).
précieux.
Remettez donc votre appareil usagé à votre revendeur
䡲
Raccorder et mettre l’aspirateur en service uniquement
ou à un centre de recyclage pour la revalorisation.
selon les indications figurant sur la plaque signalétique.
Pour connaître les possibilités d’élimination actuelles,
®
䡲
Ne jamais aspirer sans sac aspirateur MEGAfilt
demandez à votre revendeur ou à votre mairie.
SuperTEX
=> L’appareil peut être endommagé!
Important
!
䡲
Permettre aux enfants d’utiliser l’aspirateur uniquement
Brancher l’appareil uniquement sur une prise qui est
sous surveillance.
protégée par un fusible d’au moins 16 A.
䡲
Eviter d’aspirer avec le suceur et le tube à proximité de
Si le disjoncteur se déclenche lors de la mise en marche
la tête.
de l’appareil, ceci peut être dû au fait que d’autres appa-
=> Il y a risque de blessures!
reils électriques d’une puissance connectée élevée sont
䡲
Ne pas utiliser le cordon électrique pour porter/ trans-
branchés en même temps sur le même circuit électrique.
porter l’aspirateur.
Le déclenchement du disjoncteur peut être évité en
䡲
En cas de fonctionnement continu de plusieurs heures,
réglant l’appareil sur la plus faible puissance avant de le
dérouler complètement le cordon électrique.
mettre en marche et en le réglant ensuite sur une puis-
䡲
Ne pas tirer sur le cordon électrique, mais sur la fiche
sance supérieure.
pour déconnecter l’appareil du secteur.
15