
Пульсотахограф
Инструкция по
применению
german
|engineering
PM 26
RUS
Данный пульсотахограф обладает водонепроницаемыми
свойствами , таким образом, допускается его использование при
плавании. Однако ЗАПРЕЩАЕТСЯ нажимать кнопки под водой ,
будет нарушена герметичность прибора. Измерения под водой
производиться не будут ввиду невозможности передачи сигнала.

1
О
ГЛАВЛЕНИЕ
Объем поставки …………………………………………………………………..2
Важные указания …………………………………………………………………3
Общая информация о тренировках …………………………………….5
Функции пульсотахографа ………………………………………………….7
Передача сигнала и принципы измерения, выполняемого
устройствами ………………………………………………………………………8
Ввод в эксплуатацию…………………………………………………………..8
Надевание пульсотахографа ………………………………………………..8
Активирование пульсотахографа из режима транспортировки..8
Надевание нагрудного ремня ……………………………………………….9
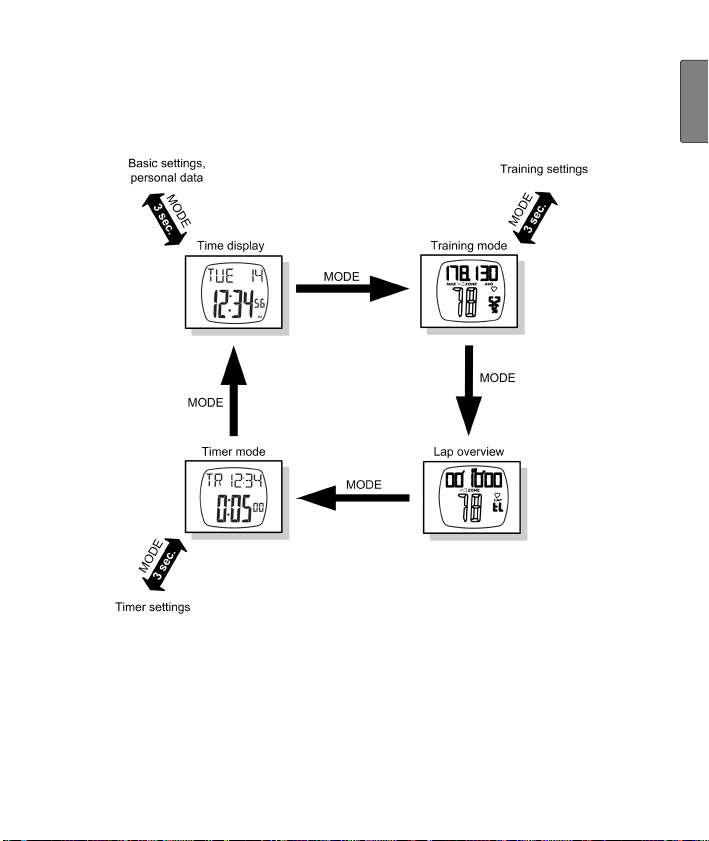
Пульсотахограф: общее управление…………………………………10
Кнопки пульсотахографа …………………………………………………….10
Дисплей …………………………………………………………………………….11
Меню …………………………………………………………………………………12
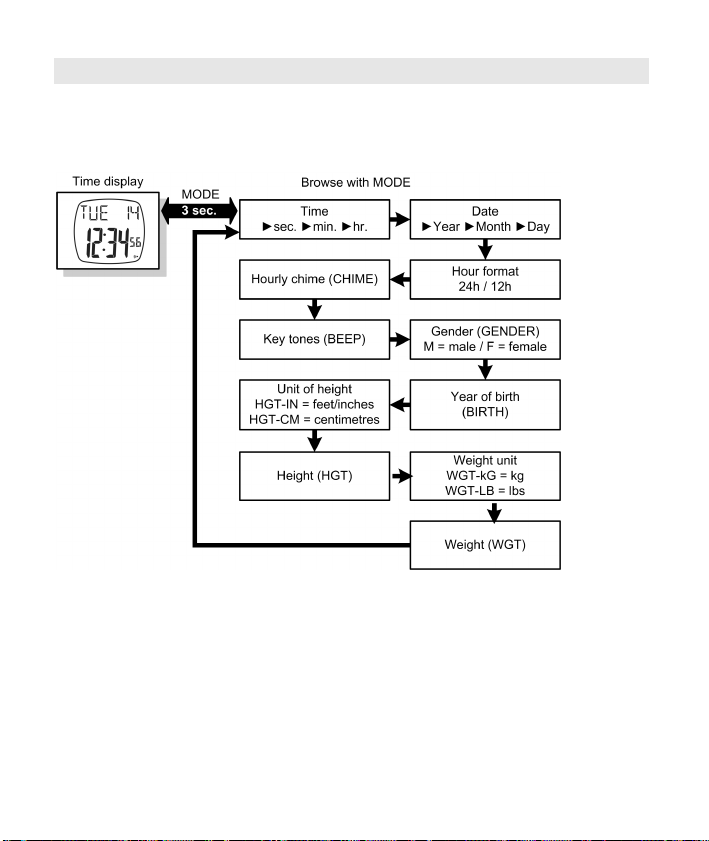
Основные настройки………………………………………………………….13
Настройка основных функций и личных данных …………………..13
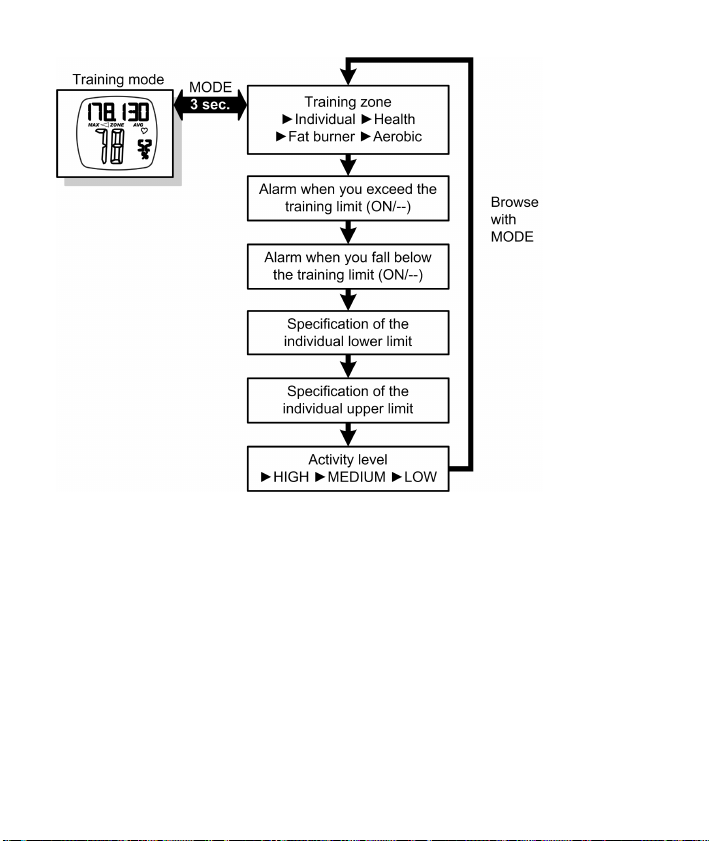
Установка данных о тренировках ………………………………………..14
Тренировка…………………………………………………………………………16
Остановка рабочего времени………………………………………………16
Отображение этапов тренировки…………………………………………17
Удаление всех записей ………………………………………………………17
Отображение данных о тренировках……………………………………17
Отображение обзора этапов тренировки ……………………………..18
Будильник ………………………………………………………………………….19
Таймер ……………………………………………………………………………….20
Технические характеристики, батарейки и гарантия …………21
Список сокращений……………………………………………………………25

2
О
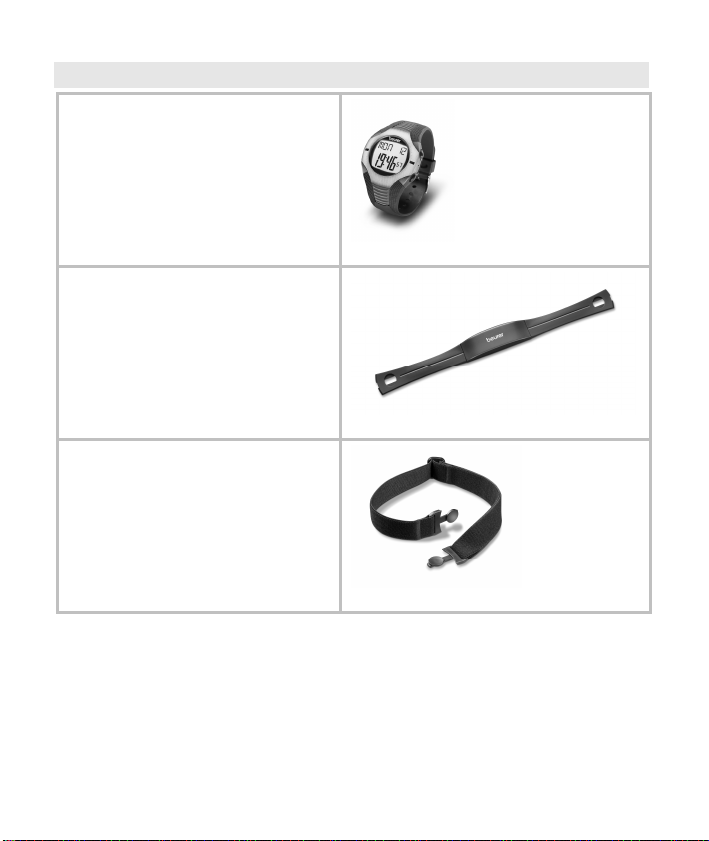
БЪЕМ ПОСТАВКИ
Пульсотахограф с ремеш-
ком
Нагрудный ремень
Эластичная лента (регули-
руемая)
Дополнительно:
данная инструкция

3
В
АЖНЫЕ УКАЗАНИЯ
Внимательно прочтите данную инструкцию по эксплуатации,
сохраните ее и ознакомьте с ней и других лиц. Соблюдайте все
указания, приведенные в данной инструкции по применению!
Тренировка
Данное изделие не является медицинским прибором. Оно
представляет собой прибор для тренировок, который был раз-
работан с целью измерения и показа значений частоты пульса
человека.
При занятиях видами спорта с повышенным риском учтите, что
использование пульсотахографа может представлять собой
дополнительный источник возможных травм.
В случае сомнений или во время болезни выясняйте у лечаще-
го врача Ваши персональные верхнюю и нижнюю величины
пульса при тренировках, а также длительность и частоту тре-
нировок. Благодаря этому Вы можете достигнуть оптимальных
результатов на тренировках.
ВНИМАНИЕ! Лицам с заболеваниями сердечно-сосудистой
системы и лицам, использующим кардиостимулятор, рекомен-
дуется пользоваться этим пульсотахографом только после
консультации с врачом.
Назначение
Пульсотахограф предназначен только для личного пользования.
Пульсотахограф разрешается использовать только таким об-
разом, как указано в инструкции по использованию. Изготови-
тель не несет ответственности за ущерб, вызванный неквали-
фицированным или неправильным использованием.
Данный пульсотахограф обладает водонепроницаемыми свой-
ствами (глубина 50 м), таким образом, допускается его исполь-

4
зование при плавании. Однако под водой измерения произво-
диться не будут ввиду невозможности передачи сигнала.
Могут возникать электромагнитные помехи. (см. главу «Техни-
ческие данные», стр. 21)
Очистка и уход
Регулярно очищайте мыльным раствором нагрудный ремень,
эластичную нагрудную ленту и пульсотахограф. Затем все дета-
ли промойте чистой водой. Тщательно вытрите их насухо мягкой
тряпкой. Эластичную нагрудную ленту можно стирать в стираль-
ной машине при 30° без умягчающего средства. Нагрудную ленту
запрещается сушить в сушилке для белья!
Храните нагрудный ремень в сухом и чистом месте. Грязь отри-
цательно сказывается на эластичности и на работоспособности
передатчика. Пот и влага могут приводить к тому, что из-за влаж-
ности электродов передатчик остается активным, что ведет к со-
кращению срока службы батарейки.
Производите замену батареек исключительно в специализиро-
ванном магазине.
Ремонт, принадлежности и утилизация
Перед использованием убедиться в том, что прибор и при-
надлежности не имеют видимых повреждений. В случае со-
мнений не используйте его и обратитесь в торговую органи-
зацию, продавшую прибор, либо по указанному адресу сер-
висной службы.
Ремонт разрешается выполнять только сервисной службе
или авторизированным торговым организациям. Ни в коем
случае не пытайтесь самостоятельно отремонтировать пуль-
сотахограф!
Используйте пульсотахограф только совместно с оригиналь-
ными принадлежностями Beurer!

5
Избегайте контакта прибора с кремом для загара или подоб-
ными продуктами, т. к. они могут повредить надписи или пла-
стмассовые части.
Не подвергайте прибор действию прямых солнечных лучей.
Утилизируйте прибор согласно требованиям Положе-
ния об утилизации электрического и электронного
оборудования 2002/96/EC – WEEE („Waste Electrical
and Electronic Equipment“). По всем вопросам по ути-
лизации обращатесь в соответствующую коммуналь-
ную службу.
О
БЩАЯ ИНФОРМАЦИЯ О ТРЕНИРОВКАХ
Данный пульсотахограф служит для измерения частоты сердеч-
ных сокращений. Благодаря различным вариантам настройки Вы
можете использовать Вашу индивидуальную программу трени-
ровок и контролировать пульс. Рекомендуется контролировать
пульс во время тренировок, так как, с одной стороны, Вы должны
защищать сердце от перегрузок, а с другой стороны, достигать
оптимальных результатов тренировок. В таблице приведены
некоторые указания по выбору зоны тренировок. Максимально
допустимая частота сердечных сокращений уменьшается с уве-
личением возраста. Поэтому данные о частоте пульса во время
тренировки всегда должны зависеть от максимально допустимой
частоты сердечных сокращений.
Определение максимально допустимой частоты сердечных со-
кращений производится по следующей эмпирической формуле:
максимально допустимая частота сердечных сокращений =
220 минус возраст
.
Пример для 40-летнего человека: 220-40=180

6
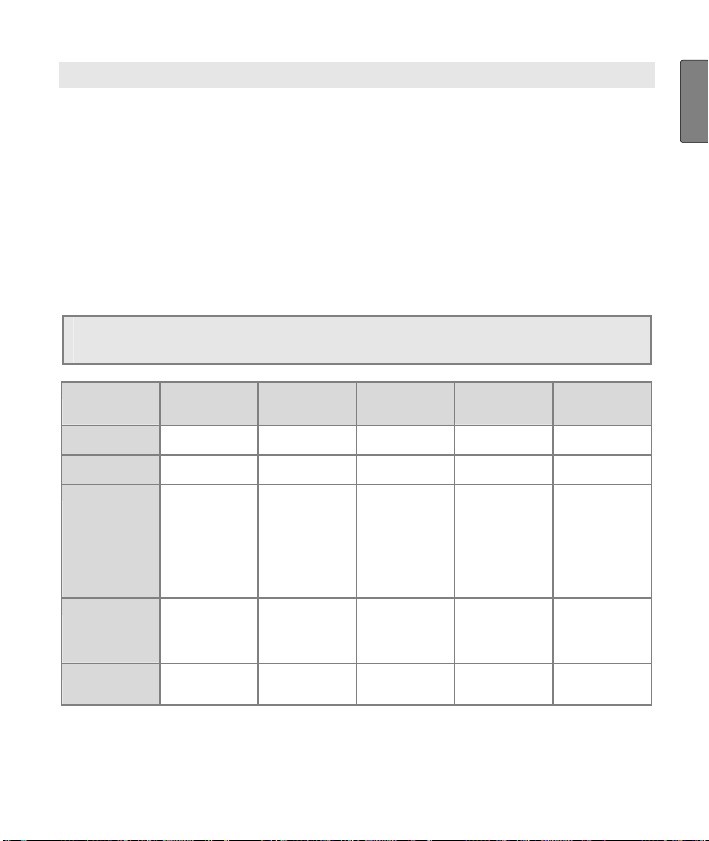
Зона здоро-
вья
Зона сжигания
жира
Зона фит-
неса
Зона сило-
вой вы-
носливо-
сти
Анаэробная
тренировка
Процент от
макс. ЧСС
50-60% 60-70% 70-80% 80-90% 90-100%
Показ Дис-
плей
HEALTH FAT-B
AROBIC
—
—
Действие
Укрепление
сердечно-
сосудистой
системы.
Организм сжига-
ет в процентном
отношении
наибольшее
количество
калорий из
жировой ткани.
Укрепляется
сердечно-
сосудистая
система, улуч-
шается физиче-
ское состояние.
Улучшается
дыхание и
кровообра-
щение.
Оптимально
для повы-
шения
базовой
выносливо-
сти.
Улучшается
скоростная
выносли-
вость и
повышает-
ся базовая
скорость.
Целенаправлен-
но создаются
перегрузки для
мускулатуры.
Высокий риск
травм у спорт-
сменов-
любителей, при
болезнях: опас-
ность для серд-
ца
Для кого
подходит?
Идеально для
начинающих
Контроль и
уменьшение веса
Спортсме-
ны-
любители
Подготов-
ленные
спортсме-
ны-
любители,
спортсме-
ны-
профессио-
налы
Только
спортсме-
ны-
профессионалы
Тренировка Восстановите-
льная трени-
ровка
Фитнес-
тренировка
Тренировка
силовой
выносливо-
сти
Развивающая
тренировка со
специализацией
В пульсотахографе сохранены три предустановленных диапазо-
на частоты пульса как предложения для зон тренировок
(HEALTH / FAT-B / AROBIC). Для выбора границ пульса см. раз-
дел «Установка данных о тренировках», стр.14.

7
Ф
УНКЦИИ ПУЛЬСОТАХОГРАФА
Функции измерения пульса
Измерение частоты сердечных со-
кращений, соответствующее по точ-
ности ЭКГ
Передача: аналоговая
3 предложения для зон тренировок
Можно настроить индивидуальную
зону тренировок
Акустический сигнал при выходе из
зоны тренировок
Средняя частота сердечных сокраще-
ний (Average)
Максимальный пульс при тренировках
Расход энергии в ккал
Сжигание жиров в граммах
Функции времени
Время
Календарь (до 2099 года) и день не-
дели
Дата
Акустическая сигнализация/будильник
Секундомер
25 значений времени прохождения
кругов, до 10 часов для каждого круга,
вызов всех вместе или каждого в от-
дельности. Индикация времени про-
хождения кругов и средней частоты
пульса
Таймер обратного отсчета
Настройки
Пол
вес
Единица измерения
веса кг/фунты
рост
Единицы измере-
ния роста: см, футы
и дюймы
Год рождения
Сигнал каждый час
Звук при нажатии
кнопок
12-/24-часовой
формат
Уровень активности
(3 ступени)

8
П
ЕРЕДАЧА СИГНАЛА И ПРИНЦИПЫ ИЗМЕРЕНИЯ
,
ВЫПОЛНЯЕМОГО УСТРОЙСТВАМИ
Зона приема пульсотахографа
Пульсотахограф принимает сигналы пульса от находящегося на
нагрудном ремне передатчика в радиусе 70 сантиметров.
Сенсоры нагрудного ремня
Нагрудный ремень состоит из двух частей: собственно нагрудно-
го ремня и эластичной ленты. В середине прилегающей к телу
внутренней стороны нагрудного ремня находятся два ребристых
датчика. Оба сенсора измеряют частоту сердечных сокращений,
по точности соответствующую ЭКГ, и передают эту информацию
в пульсотахометр.
Нагрудный ремень не совместим с аналоговыми устройствами,
например, эргометрами.
В
ВОД В ЭКСПЛУАТАЦИЮ
Надевание пульсотахографа
Пульсотахограф Вы можете носить как наручные часы.
Активирование пульсотахографа из режима транс-
портировки
Во время транспортировки показания на дисплее отсутствуют.
Для выхода из режима транспортировки нажмите любую кнопку.

9
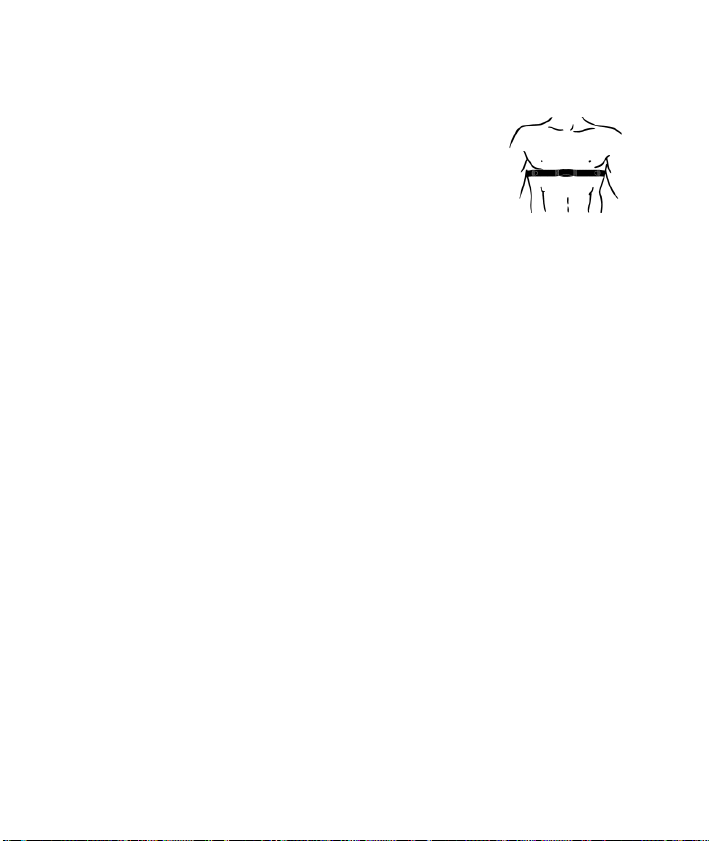
Надевание нагрудного ремня
Закрепите нагрудный ремень на эластичной
ленте. Длину ленты отрегулируйте таким об-
разом, чтобы ремень надежно прилегал, но не
слишком свободно или слишком тесно. Ре-
мень наденьте вокруг груди так, чтобы лого-
тип был обращен наружу и в правильном по-
ложении прилегал прямо к грудине. У мужчин
ремень должен находиться прямо под грудной
мышцей, у женщин – прямо под основанием
молочных желез.
В связи с тем, что не сразу может установиться оптимальный
контакт между кожей и датчиками пульса, может пройти опре-
деленное время, прежде чем начнется измерения и индикация
частоты пульса. При необходимости измените положение пе-
редатчика, чтобы обеспечить оптимальный контакт. Благодаря
потоотделению под ремнем, как правило, достигается доста-
точно хороший контакт. При необходимости Вы можете смо-
чить точки контакта на внутренней стороне ремня. Для этого
слегка приподнимите нагрудный ремень и слегка смочите дат-
чики пульса слюной, водой или гелем для ЭКГ (продается в
аптеках). Контакт между кожей и нагрудным ремнем не должен
прерываться даже при значительных движениях грудной клет-
ки, например, при глубоких вдохах. Сильное оволосение груди
может нарушать или вообще препятствовать контакту.
Наденьте ремень за несколько минут до начала тренировки,
чтобы нагреть его до температуры тела и установить опти-
мальный контакт.

Данное руководство также подходит к другим моделям:
- Beurer PM26
03:49
Спортивный пульсометр BEURER PM 25: распаковка, применение и тестирование
07:06
Beurer PM26 настройки
01:00
Обзор наручных часов-пульсометров Beurer PM26
04:14
Пульсометр Beurer pm26 таймер обратного отсчета
01:49
Beurer PM 26 sporthorloge videoreview en unboxing (NL/BE)
Нажмите на кнопку для помощи
Manual
View the manual for the Beurer PM 26 here, for free. This user manual comes under the category sport watches and has been rated by 11 people with an average of a 9. This manual is available in the following languages: English. Do you have a question about the Beurer PM 26?
Ask your question here
Frequently asked questions
Can’t find the answer to your question in the manual? You may find the answer to your question in the FAQs about the Beurer PM 26 below.
What is bluetooth?
Bluetooth is a way of exchanging data wirelessly between electronic devices via radio waves. The distance between the two devices that exchange data can in most cases be no more than ten metres.
Do I need to switch off my sport watch at night?
It is sensible for you to switch off your sport watch at night, this ensures longer battery life.
Do I need internet for GPS?
No, no internet is required to receive GPS.
What is GPS?
GPS is a system that can be used all over the globe to determine your location by means of satellites.
What does the abbreviation GPS stand for?
The abbreviation GPS stands for ‘Global Positioning System’.
What is an adult’s maximum heart rate?
As a rule of thumb for your maximum heart rate, you can use 220 minus your age.
How much should I exercise as an adult per week?
As an adult, it is recommended to do moderately intensive exercise for at least 2.5 hours per week. Preferably spread over several days.
How high is an adult’s heart rate at rest?
An adult’s resting heart rate is between 60 and 100 beats per minute.
Is the manual of the Beurer PM 26 available in English?
Yes, the manual of the Beurer PM 26 is available in English .
Is your question not listed? Ask your question here
heart rate monitor
herzfrequenz pulsuhr
german|engineering
PM 26
Operating Instructions
Gebrauchsanleitung


TABLE OF CONTENTS
Scope of delivery…………………………………………………………………..2
Important Notes ……………………………………………………………………. 3
General Information for Training…………………………………………….5
Functions of the HR monitor …………………………………………………. 6
Transmission of signal and methods of Devices Measurement.7
Getting started ……………………………………………………………………… 7
Putting on the heart rate monitor…………………………………………7
Activating the HR watch from transport mode……………………….7
Putting on the chest strap………………………………………………….. 8
General operation of the heart rate monitor ……………………………9
Buttons on the heart rate monitor………………………………………..9
Display………………………………………………………………………….. 10
Menus…………………………………………………………………………… 10
Basic settings ……………………………………………………………………..12
Setting basic functions and personal data………………………….. 12
Setting the training data …………………………………………………..13
Training……………………………………………………………………………….15
Stopping running times……………………………………………………. 15
Recording laps ……………………………………………………………….16
Deleting all records…………………………………………………………. 16
Displaying training data …………………………………………………… 16
Displaying the lap overview………………………………………………17
Alarm clock …………………………………………………………………………18
Timer…………………………………………………………………………………..19
Technical details and batteries …………………………………………….20
Abbreviation list ………………………………………………………………….23
1
G
B
SCOPE OF DELIVERY
Heart rate monitor with wrist
band
Chest strap
Elastic tension strap (adjustable)
In addition:
These operating instructions
2
IMPORTANT NOTES
Please read these operating instructions carefully, keep them for
future reference and also make them available to others. Pay attention to all information in these operating instructions!
Training
This HR monitor is not a therapeutic device. It is a training instru-
ment which was developed for the measurement and representation of the human heart rate.
With high-risk sports, please note that the use of the HR monitor
can represent an additional source of injury.
If in doubt or in the case of illnesses, please consult your doctor
about your ideal upper and lower training heart rate, as well as
the recommended duration and frequency of the training. In such
a way, you can achieve optimal results when training.
WARNING: People suffering from cardiovascular diseases or
those with pacemakers should only use this heart rate monitor after having consulted their doctor.
Application
The heart rate monitor is only intended for private use.
The heart rate monitor may only be used in the manner outlined in
the operating instructions. The manufacturer is not liable for damages that are caused by improper or incorrect use.
This heart rate monitor is waterproof (50 m) and therefore suitable
for swimming. No signal transmission is possible underwater,
however, which means you cannot carry out a reading.
Electromagnetic disturbances may occur. (see chapter «Technical
Specifications», page 20)
G
B
3
Cleaning and care
From time to time, carefully clean your chest strap, elastic chest
strap and heart rate monitor with a soap and water solution. Then
rinse off all components with clean water. Carefully dry them with
a soft towel. You can wash the elastic chest strap in the washing
machine at 30° without fabric softener. The chest strap is not made for the dryer!
Store the chest strap in a clean and dry place. Dirt impairs the
elasticity and functioning of the transmitter. Sweat and moisture
can keep the electrodes wet and consequently activate the
transmitter, which shortens battery life.
Only change the batteries at a specialist dealer.
Repair, Accessories and Disposal
Prior to use, you have to ensure that the HR monitor is free of
damage. If in doubt, do not use the HR monitor and consult your
sales representative or the customer service address provided.
Repairs may only be conducted by customer service or author-
ized dealers. Please do not in any case attempt to repair the HR
monitor!
Use the HR monitor only in combination with Beurer original ac-
cessories.
Avoid contact with suntan lotions or the like, since these can cau-
se damage to the imprint or plastic components.
Do not expose the device to direct sunlight.
Please dispose of the HR monitor and used batteries
only in accordance with the Waste Electric and Electronic Equipment Directive 2002/96/EC – WEEE. For
inquiries, please contact the municipal authority responsible for disposal in your area.
4
GENERAL INFORMATION FOR TRAINING
This heart rate monitor serves to measure the human pulse. By
means of various settings, you can support your individual training
program and monitor your pulse. You should monitor your pulse
during exercise because you should prevent your heart from excessive strain on the one hand and on the other in order to achieve the
optimal training results. The table provides you with some information on the selection of your training zone. The maximum heart rate
reduces with advancing age. Information on the training heart rate
must therefore always be in relation to the maximum heart rate. The
following rule of thumb helps to identify the maximum heart rate:
220 — age = maximum heart rate
The following example applies to a 40-year-old person: 220-40 = 180
Heart/health
Max. heart rate
range
Display on
monitor
Effect Strengthens the
Suitable for Ideal for
Training Regenerative
programme
50-65% 55-75% 65-80% 80-90% 90-100%
HEALTH FAT-B AROBIC – –
heart and the
circulatory system
beginners
training
Fat burning
zone
The body burns
the highest
percentage of
calories from fat.
Strengthens the
heart and the
circulatory
system,
enhances fitness
Weight control
and loss
Fitness training Endurance
Fitness programme
Improves the
respiratory and
circulatory
system. Ideal to
promote the basic
endurance
Athletes at
amateur level
Three preset pulse ranges are saved in the heart rate monitor as
training zone suggestions (HEALTH/FAT-B/AROBIC). For selecting
pulse limits, see chapter «Setting the training data», page 13.
Endurance
training programme
Improves speed
maintenance and
increases basic
speed.
Ambitious
athletes at
amateur level,
professional
athletes
training
Anaerobic
training
Overloads
specific muscles.
High injury risk for
athletes at
amateur level,
risk to the heart in
case of disease.
Only professional
athletes
Fitness training
addressing
specific zones
G
B
5

FUNCTIONS OF THE HR MONITOR
Pulse functions
Exact ECG heart rate meas-
urement
Transmission: analogue
3 training zone suggestions
Individual training zone ad-
justable
Acoustic alarm upon leaving
training zone
Average heart rate (average)
Maximum training heart rate
Calorie consumption in kcal
Fat burn in grams
Time functions
Time of day
Calendar (up to 2099) and
weekday
Date
Alarm/alarm clock
Stop watch
25 laps for each training,
recall of all of them or each
one. Display of lap time and
average heart rate
Countdown timer
Settings
Gender
Weight
Unit of weight kg/lb
Height
Unit of height in cm or ft/in
Year of birth
Hourly chime
Key tones
12 and 24-hour format
Activity level (3 levels)
6

TRANSMISSION OF SIGNAL AND METHODS OF DEVICES MEAS-
UREMENT
Receiving range of the heart rate monitor
Your heart rate monitor picks up the heart rate signals sent by the
chest strap transmitter within a range of 70 centimeters.
Sensors on the chest strap
The entire chest strap consists of two components: the actual chest
strap and an elastic tension belt. There are two ribbed sensors in the
middle on the inside of the chest strap that fits close to the body.
Both sensors determine your heart rate ECG exactly and transmit
this to the heart rate monitor.
The chest strap is compatible with other analogue devices, such as
e.g. ergometers.
GETTING STARTED
Putting on the heart rate monitor
You can wear your heart rate monitor like a wrist watch.
Activating the HR watch from transport mode
During transport, nothing is shown on the display. You can activate
your heart rate monitor from the transport mode by pressing any
button for 5 seconds.
G
B
7
Putting on the chest strap
Tighten the chest strap with the elastic tension
belt. Adjust the length of the belt such that the
belt is snug, but neither too loose nor too tight.
Position the belt around the chest such that the
logo is facing outwards and in the correct position directly over the breast bone. For men, the
chest belt should be located directly below the
pectoral muscles, for women, directly below the
breast.
Since optimal contact between the skin and the heart rate sensors
can not be created immediately, it may take some time until the
heart rate is measured and displayed. If necessary, alter the position of the transmitter in order to achieve optimal contact. Most of
the time, sufficient contact is achieved through the accumulation
of sweat beneath the chest strap. You can, however, also wet the
contact points on the inside of the chest strap. For this, lift the
chest strap up from the skin slightly and wet the two sensors with
saliva, water or ECG gel (available at the chemistry). The contact
between the skin and chest strap may not be interrupted also with
greater movements of the thorax such as during deep breathing.
Significant chest hair can interfere with and even prevent contact.
Put on the chest strap a few minutes before starting in order to
warm it up to body temperature and establish optimal contact.
8
GENERAL OPERATION OF THE HEART RATE MONITOR
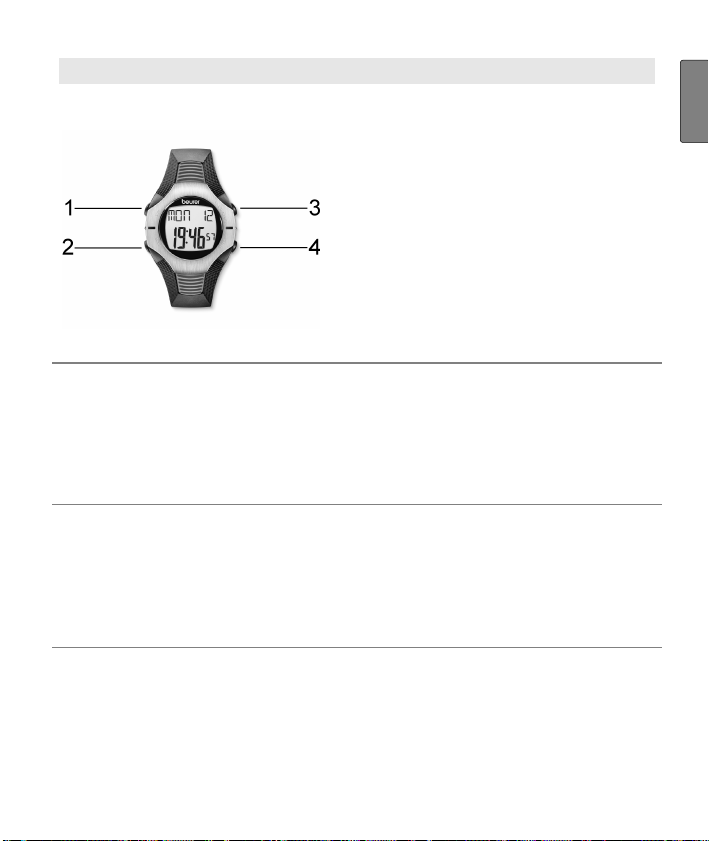
Buttons on the heart rate monitor
1
LAP Stops individual training laps.
2
MODE Switches between the main menus. If you
keep the MODE button pressed for at least
3 seconds, you get into the setting mode for
a menu. Exit the setting mode also by keeping the MODE button pressed for 3 seconds.
3
ST/STP/RESET
4
LIGHT
Start/stops functions, sets values. Keep
pressed to accelerate input.
Counts values forwards.
Starts and stops the stop watch.
When held down, resets the stopwatch
function and the results data (kcal etc.).
When held down for 3 seconds, the dis-
play will light up for 3 seconds. Note: does
not apply in the setup menu for basic settings and personal data.
Counts down set values.
G
B
9
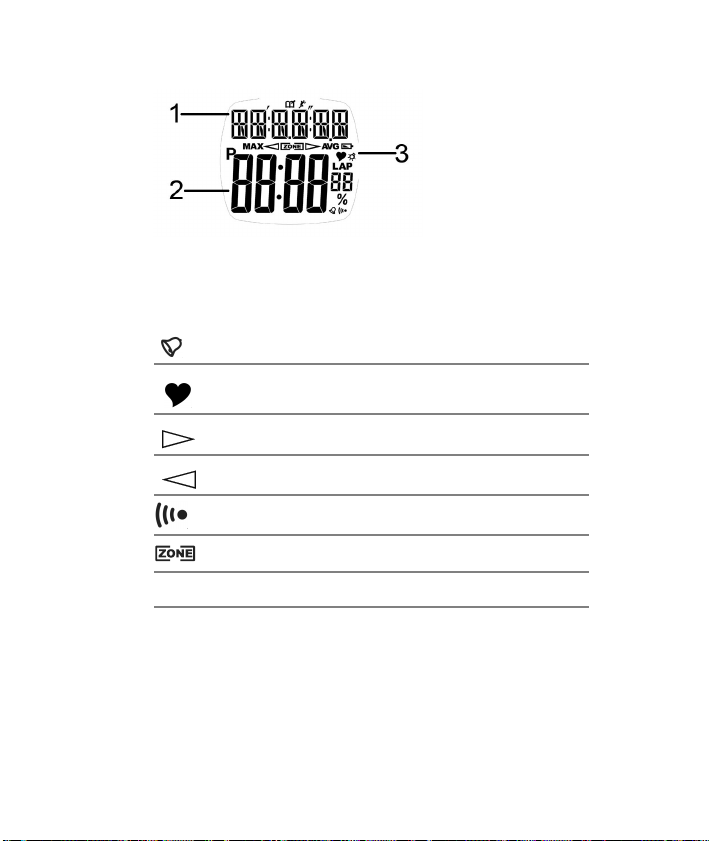
Display
1
2
3
An explanation of the display abbreviations can be found in the list of
abbreviations at the end of the operating instructions.
Top line
Bottom line
Symbols
Hour signal is activated
Heart rate is being received
Training zone has been exceeded
Training zone has been underrun
Alarm clock is activated
Heart rate is inside the preset pulse limits
MAX
Maximum heart rate
AVG
Average heart rate
Menus
Operation of the heart rate monitor is based on main menus. From
the main menus (except lap overview), you can switch to the rele-
10
vant settings menu. You can switch between the main menus with
the MODE button. You can reach the settings menus by holding the
MODE button down for around 3 sec. You can leave the settings
menus in the same way and return to the relevant main menu.
G
B
Power-saving mode
In the time display main menu, press the LAP button for approx.
5 sec to turn on power-saving mode. The display is turned off in this
mode, so that the battery can last longer. Please note that the functions (e.g. Time) are still working and the display is just turned off.
Press any button to reactivate the display again.
11
BASIC SETTINGS
Setting basic functions and personal data
In the time display main menu, you can set the time, set basic functions of the heart rate monitor and specify personal settings.
In the time display main menu, hold down the MODE button for
approx. 3 sec. You get into the setting menu with a number of settings; move on to the next setting by pressing the MODE button. The
default settings flash if you can change them. Change these settings
with the START/STOP/RESET and LIGHT buttons.
Exit the setting menu by keeping the MODE button pressed for approx. 3 seconds.
TIP: If you hold down the buttons ST/STP/RESET or LIGHT for more
than 2 sec, the relevant setting automatically counts up or down until
you release the button.
12

Setting the training data
In the training mode main menu, you can set the individual upper
and lower limits of your heart rate by selecting your optimal training
workload. To do this, you can choose from three default values:
optimal health [HEALTH] (50-65 % of the max. heart rate)
fat burner [FAT-B] (55-75 % of the max. heart rate)
fitness [AROBIC] (65-80 % of the max. heart rate)
Or you can specify your own limits for the heart rate [USR].
In addition, you can also set the acoustic alarm, if your heart rate is
outside your pulse limits during training.
You can also specify your activity level at one of 3 levels. Calorie
consumption and fat burn will be recalculated according to your
selected activity level:
High activity level [HIGH]: You regularly play sport and train very
intensely at least three times a week.
Medium activity level [MEDIUM]: You regularly play sport recrea-
tionally.
Low activity level [LOW]: You only play sport occasionally and
without high sporting demands.
G
B
13
Press the MODE button in the training mode main menu for
approx. 3 sec to reach the settings menu. Browse through the respective settings with the MODE button. Settings that you can
change will flash. Change the settings with the ST/STP/RESET and
LIGHT buttons. Confirm with the MODE button.
Leave the settings menu once again by holding down the MODE
button for approx. 3 sec.
TIP: If you hold down the buttons ST/STP/RESET or LIGHT for more
than 2 sec, the relevant setting automatically counts up or down.
14
Loading…
- Инструкции и руководства
- Бренды
- Beurer
- PM26
- Руководство По Работе
heart rate monitor
herzfrequenz pulsuhr
Operating Instructions
Gebrauchsanleitung
german
|engineering
PM 26
-
Страница 1
heart rate monitor herzfr equenz pulsuhr Operating Instructions Gebrauchsanleitung german |engineering PM 62[…]
-
Страница 2
[…]
-
Страница 3
1 G B T ABL E O F C ONTENTS Scope of deliv ery ………………………………………………………………………… 3 Important Notes ………………………………………………………………………….. 4 General Inform ation for Training …………………………………………………. 6 Functions of the[…]
-
Страница 4
2 Stop and store rec ording ………………………………………………………. 25 Delete all recordings …………………………………………………………….. 26 Analyzing memory messages ……………………………………………….. 27 Results……………………………………………………….[…]
-
Страница 5
3 G B S COPE OF DELIVERY Heart rate monitor wi th wrist band Chest strap Elastic tension strap (adjusta ble) Bike mount Storage box In addition: Operating instructions a nd separate short instru ctions[…]
-
Страница 6
4 I MPOR TANT N OTES Please carefully re ad through these operat ing instructions, keep it for future referenc e and also make it available t o others. Training This product is not a therapeutic device. It is a training instrument, which was developed for the measurement and representation of the human heart rate. With high-risk sports, ple[…]
-
Страница 7
5 G B Cleaning and care From time to time, c arefully clean your chest strap, elastic chest strap and heart rate monitor with a soap and water sol ution. Then rinse off all components w ith clean water. Carefully dr y them with a soft towel. You can wash the elast ic chest strap in the washing mac hine at 30° without fabric softe ner. The ches[…]
-
Страница 8
6 G ENERA L I NFOR MATION FOR T RAINING This hear t rate monitor serves to meas ure the human pu lse. By means of various settings, y ou can support your ind ividual training program and monitor your pulse. You should monitor your pulse during ex ercise because you should prevent your heart from excessive strain on the one hand and on the other in […]
-
Страница 9
7 G B Analysis of t he Training You can transfer your t raining data to a PC via the PC interface of your HR monitor (3 pins on the back of your monitor) an d evaluate it there. The required access ories consisting of a CD w ith the PC software EasyFit and a communicatio n cable are available at specialist shop s under order nu mber 671.10. The PC […]
-
Страница 10
8 F UNCTION S OF THE HR MONI TOR HR functions Exact ECG heart rate meas- urement Transmission: analogue Individual training zone ad — justable Acoustic and visual alarm as well as colour change of LED for exit from th e training zone Average heart rate (ave rage) Maximum tr aining hear t rate Calorie consumption in Kc al[…]
-
Страница 11
9 G B T RA NSMISSION OF SIGNAL A ND METHODS OF D EVICES M EAS — UREMENT Receiving range of the heart rate monitor Your heart rate monit or picks up the heart rate signals sent by the chest strap transmitt er within a range of 70 centimeters. Sensors on the c hest strap The entire chest strap co nsists of two components: the actual ch est strap and […]
-
Страница 12
10 Activating the heart rate monitor from power saving mode You can activate your heart rate monitor by pressing any button. I f the heart rate monitor has not received any signal for app rox. five minutes, it switches to the power savin g mode. At that point, only the current time and the date w ill be displayed. Press any butt on in order to reac[…]
-
Страница 13
11 G B G ENERA L OPERATION OF THE HR MONITOR Buttons on the HR watch 1 START/STOP Starts and stops functio ns and adjusts values. Press and holding ac celerates the entry. 2 OPTION/SET Switches between the func tions within one menu and confirms settings. 3 MENU Switches between the different menus. 4 / Pressing quickly illuminates the display for […]
-
Страница 14
12 Display 1 Top line 2 Middle line 3 Bottom line 4 Symbols Alarm clock is activated . Heart rate is being rec eived. Training zone has been exceeded. Training zone has been underrun. Acoustic alarm for exit from the training zone is ac tivated. The sound when press ing the buttons is activate d. 5 Two LEDs: Blink in time with heart rate. Colour ch[…]
-
Страница 15
13 G B Menus You can switch menus w ith the MENU Button. Time Training Result LAP Result Setting FitTest MENU Power saving mode If your heart rate monito r has not received any signal for approx. five minutes, i t switches to the power saving mode. In that case, o nly the current time and the date will be shown. Press any button t o reactivate the […]
-
Страница 16
14 Main displa y When changing menus, the name of the menu is first shown, then your HR monitor will automatical ly switch to the main displa y of the active menu. From there, you hav e to first choose a sub menu or you can directl y access functions. Menu Main display automatically Overvie w of the menus Menu Meaning Description: see chapter… Ti[…]
-
Страница 17
15 G B B A SIC SETTINGS Overview In the menu Setting y ou can: Enter your personal dat a (user). Based on this data, your HR monito r determines your calorie consumption and your f at burning during train- ing! Set your training zone (limits). See chapter «General Information on Training» for ex plana- tions on how to set the trai[…]
-
Страница 18
16 START/STOP Gender is displayed. START/STOP Select M , if y ou are male. START/STOP Select F , if you are female. OPTION/SET AG E is displayed. START/STOP Set your age (10-99). OPTION/SET MaxHR is displayed. The H R monitor automatically calcula tes the maximum heart rate according to t he formula: 220 — age = MaxHR Please note that the HR monito[…]
-
Страница 19
17 G B Set training zo ne You can set your individ ual upper and lower heart rate limit as described below. Please note that both limits are automatically set as a training zone suggestion after e very fitness test and that the old data are conse- quently overwritten . For this, the lower li mit of the suggested training zone totals 65%, the upper […]
-
Страница 20
18 Set units MENU Switch to the menu Set ting . OPTION/SET Limits is displ ayed. OPTION/SET Units is displayed. START/STOP kg/lb is displayed. The weight unit blinks. START/STOP Switch between the units. OPTION/SET cm/inch is displayed. The unit of measurement for heig ht blinks. START/STOP Switch the units. OPTION/SET Return to the d isplay Units […]
-
Страница 21
19 G B W A TCH SETTINGS Overview In the Time menu you can: Set the time and th e date. Set the alarm clock. When you are in the Ti me menu th e heart rate monitor automaticall y activates the main display. In this mode both the weekday and the current date are displayed. On th e display: Fri 12.04 (Friday 12th April). Set time of day and da[…]
-
Страница 22
20 OPTION/SET Year is displayed. Th e year setting blinks. START/STOP Set the year. Th e calendar goes up to 2099. OPTION/SET Month is displ ayed. The monthly set- ting blinks. START/STOP Set the month (1-12). OPTION/SET Day is displayed. The da y setting blinks. START/STOP Set the day (1-31). OPTION/SET Back to the main display.[…]
-
Страница 23
21 G B Set alarm clock You can turn off the alarm clock by pressing any button. On the follow- ing day, we will be woken up at the same ti me. MENU Switch to the menu Time . OPTION/SET Al ar m is displayed. START/STOP 5 sec Set Time is shown brie fly. On A larm is displayed. START/STOP Turns the alarm clock off (Off) and on (On). OPTION/SET Hour is[…]
-
Страница 24
22 R ECORD ING OF TRAINING Overview In the menu Tr aining you can: Stop your run times and thereby record your training sessio n. Record individual laps. Stop and save your recordin g. Delete all recordings. Analyze memory messages. Once you are in the menu Training , y our HR moni- tor automatically switches to the main display[…]
-
Страница 25
23 G B section “Delete all recordings” in this chapter to find out how to delete the recordings. You can let your training da ta be displayed. The last recording save d, can be recalled in the me nu Result . In the menu Lap Res ult you can see the laps fo r this recording. As soon as you have transferred the recordings into the EasyFit […]
-
Страница 26
24 Record laps While the recording of yo ur entire training is in progress, you can record individual laps. The time con tinues to run as the laps are recorded. You are in the menu Training and you r training is currently bei ng recorded. Run is displayed. OPTION/SET Time a new lap. The displ ay shows the time and number of the last lap time d for […]
-
Страница 27
25 G B Stop and store reco rding Please note that a fter finishing and saving , you can no longer have the data displayed in th e Result and Lap Result menus. You are in the menu Training . You have just recorded a t raining. Stop is displayed. START/STOP 5 sec Save the recording. Hold Save is displayed. The display automatically switches back to t[…]
-
Страница 28
26 Delete all record ings Your HR watch informs y ou automatically when the me mory is almost full. Before you then del ete the memory, we recommend analyzing the training recordi ng or transmit to the PC! The memory o n the HR watch will be deleted automatically every time y ou successfully transfer data to the PC. Alternatively you can delete the[…]
-
Страница 29
27 G B Analyzing memory messages In the menu Training your HR watch automatically informs you if th e memory is almost full or if almost all the laps are occupied. Message Meaning When switching to the menu Training the HR watch signals MEM LOW , if less than 10% of the memory or less tha n 10 laps are free. During training, th e HR watch signals e[…]
-
Страница 30
28 R ESULTS Overview In the menu Result you can display your training data of the last recordin g stopped: mean and maxi- mum heart rate, times withi n and outside of the training zone as w ell as calorie consumption and fat burning. Once you are in t he menu Result , your HR monitor automatically sw itches to the main display. This displays bPM A […]
-
Страница 31
29 G B OPTION/SET Lo [min] (t ime below the training zo ne) is displayed. OPTION/SET Hi [min] (time above the t raining zone) is displayed. OPTION/SET [kcal] (the total calori e consumption during the re cording of the training session) is displayed. The c alculation is conducted based on moderately fast jogging. The basis for the display o f the c[…]
-
Страница 32
30 L A P RESULTS Overview In the menu LAP Result you can have t he time and average heart rate as well as the last stopped train- ing recording a nd the individual laps di splayed. Once you are in the me nu LAP Result , your HR monitor automatically sw itches to the main display. The top line shows the average hea rt rate, the middle line the train[…]
-
Страница 33
31 G B F ITNESS TEST Overview In the menu FitTest you can: Test your personal fitness in a 1600m ru n (1 mile). Have your fitness evaluate d: Fitness index (1-5), maximum oxygen-breath volume (VO 2 max), basal metaboli c rate (BMR) and active met abolic rate (AMR). Have your individual upp er and lower limit calcu- lated automatically a[…]
-
Страница 34
32 4 = Good 5 = Elite On the middle line, the date of you r last fitness test is displayed. If you ha ve not yet completed a fitness test, then the p reset date is displayed. Conduct fitness test The units displayed «m» o r «mile» result from the basic settings. I n the chapter «Basic Settings», se ction «[…]
-
Страница 35
33 G B The scrolling display Press STOP after 1600 m reminds you to press the but- ton START/STOP after 1600m. The scrolling display Test Fi nished appears and the time req uired is dis- played. START/STOP Back to the main disp lay. It displays your fitness index (1-5) with evaluation and the current date. Display fitness values The display of the […]
-
Страница 36
34 OPTION/SET BMR (Basal Metabolic R ate) is dis- played. The basal metabolic rat e is calculated based on the values of age, gender, body size and w eight. The BMR specifies the calories needed t o maintain your vital functions — in the absence of movement. OPTION/SET AMR (Active Metabolic Rate) is dis- played. The active metabol ic rate is calcul[…]
-
Страница 37
35 G B E ASY F IT SOFTWARE You can analyse your training data optimally with the Accesso ry Set 671.10, consisting of a CD w ith the PC software EasyFit an d a commu- nication cable, w hich can be bought optionally. In addition to th at, you will find many other functions for weight management and for worko ut planning. Calendar functions T[…]
-
Страница 38
36 T ECHNICA L SPECIFICATIONS A ND BATTERIES HR monitor Waterproof to 30 m (suitable for swim- ming) The impermeability of the moni- tor to moisture cannot be guar- anteed if you jump into w ater (high pressure load) and also if the buttons ar e pressed in the rain. Chest strap Waterproof (suitable for swimming ) Transmission frequency 5.3 KHz Batt[…]
-
Страница 39
37 G B Replacing the batteries The battery of the HR monitor may on ly be replaced by a specialized dealer (any loc k-maker’s shop) and at the service a ddress provided. You can replace the battery in the chest strap on your own. The battery compartment is loca ted on the inner side. U se a coin or the battery to be used to open the compartme […]
-
Страница 40
38 Distortion and interference In the HR monitor, a receivor for sig nals from the chest strap transmi tter is integrated. During use, it may arise that the HR monitor receives signals other th an those transmitted by the c hest strap. How can I recognize inte rference? Interference ca n be recognized in that the val ues displayed are unrealis- tic[…]
-
Страница 41
39 G B L IS T OF ABBREVIA TIONS Abbreviations on t he display in alphabetical orde r: Abbrev iation English AGE Age Alarm Alarm AMR Calories needed f or the activity AVG Average heart rate during training AVG Run Average heart rate during train ing BMR Basal Metabolis m BPM Heart beats per minute bPM AVG Average heart rate during train ing, beats p[…]
-
Страница 42
40 Abbrev iation English Limits Training limits Lo Time below the training zone Lo limit Lowest training limit m male MaxHR Maximum Heart Rate (formula: 220 — age) MEM Memory MEM Delete Memory Delete Minute Minute [min] Minute Mon Monday Month Month Result Result Run Run time is measured Sat Saturday Setting Settings (Menu) SEt Setting Start Start […]
-
Страница 43
41 G B I NDEX A Accessories 5 Alarm Clock 12 Application 4 B Basic settings 1 5 Buttons 11 C Care 5 Cleaning 5 Conduct fitness t est 32 D Delete all re cordings 26 Displ ay 12 Display fitness values 33 Display lap results 30 Display training data 28 Dispos al 5 Distortion and i nterfence 38 F Fitness index 31 Fitness test 31 FitTest (Menu) 14 G Get[…]
-
Страница 44
42[…]
-
Страница 45
43 D I NHALTSVERZEICHNIS Lieferumfang …………………………………………………………………………………. 45 Wichtige Hinweise …………………………………………………………………………. 46 Allgemeines zum Training …………………………………………………………….. 48 Funktio[…]
-
Страница 46
44 Aufzeichnung beenden und speichern ………………………………………. 67 Alle Aufzeichnungen löschen …………………………………………………….. 68 Speichermeldungen beurteilen ………………………………………………….. 69 Ergebnisse ……………………………………………………….[…]
-
Страница 47
45 D L IEFERUMF ANG Herzfrequenz-Pulsuhr mit Armband Brustgurt Elastischer Spanngurt (verstellbar) Fahrradhalterung Aufbewahrungsbox Zusätzlich: Gebrauchsanleitung und separate Kurzanleitung[…]
-
Страница 48
46 W ICHTIGE H INWEISE Lesen Sie diese Gebrauchsanleitung sorgfältig durch, bewahren Sie sie auf und machen Sie diese auch anderen Personen zugänglich. Training Dieses Produkt ist kein medizinisches Gerät. Es ist ein Trainingsin- strument, welches für die Messung und Darstellung der menschlichen Herzfrequenz entwickelt wurde. Beachten S[…]
-
Страница 49
47 D Reinigung und Pflege Reinigen Sie Brustgurt, elastisches Brustband und Pu lsuhr von Zeit zu Zeit sorgfältig mit einer Seifenwasserlösung. Spülen Sie alle Teile dan n mit klarem Wasser ab. Trocknen Sie sie sorgfältig mit einem weichen Tuch ab. Das elastische Brustband können Sie in der Waschmaschine bei 30° ohne Weichspüler waschen. […]
-
Страница 50
48 A LLGEMEINES ZUM T RAINING Diese Pulsuhr dient zur Erfassung des Pulses beim Menschen. Durch die verschiedenen Einstellmöglichkeiten könne n Sie Ihr individuelles Trai- ningsprogramm unterstützen und den Puls überwachen. Sie sollten Ihren Puls beim Training überwachen, weil Sie zu m einen Ihr Herz vor Überlas- tung schützen sollten und zu[…]
-
Страница 51
49 D Auswertung des Trainings Über die PC-Schnittstelle Ihrer Pulsuhr (3 Pins auf der Rück seite der Uhr) können Sie Ihre Trainingsdaten an einen PC übertragen und dort aus wer- ten. Das dafür notwendige Zubehör, bestehend aus einer CD mit der PC- Software Eas yFit und einem Übertragungskabel, erhalten Sie im Fach- handel unter der Bestellnu[…]
-
Страница 52
50 F UNKTIONEN DER H ERZFREQUENZ -P ULSUHR Puls-Funktionen EKG-genaue Herzfrequenz- Messung Übertragung: analog Individuelle Trainingszone einstellbar Akustischer und visueller Alarm sowie Farbwechsel der Leucht- dioden beim Verlassen der Trainingszone Durchschnittliche Herzfrequenz (Average) Maximale Trainingsherzfre- quen[…]
-
Страница 53
51 D S IGNALÜBERTRAGUNG UND M ESSPRINZIPIEN DER G ERÄTE Empfangsbereich der Pulsuhr Ihre Pulsuhr empfängt die Pulssignale des Brustgurt-Senders innerhalb von 70 Zentimetern. Sensoren des Brustgurtes Der gesamte Brustgurt besteht aus zwei Teilen: dem eigentlichen Brust- gurt und einem elastischen Spanngurt. Auf der am Körper anliegenden Innensei[…]
-
Страница 54
52 tum angezeigt. Drücken Sie einen beliebigen Knopf, um die Uhr wieder zu aktivieren. Anlegen des Brustgurtes Befestigen Sie den Brustgurt am elastischen Spanngurt. Stellen Sie die Gurtlänge so ein, dass der Gurt gut, jedoch nicht zu locker oder zu eng an- liegt. Legen Sie den Gurt so um die Brust, dass das Logo nach außen zeigt und in der […]
-
Страница 55
53 D A LLGEMEINE B EDIENUNG DER P ULSUHR Knöpfe der Pulsuhr 1 START/STOP Startet und stoppt Funktionen und stellt Werte ein. Gedrückt Halten beschleunigt die Eingabe. 2 OPTION/SET Wechselt zwischen Funktionen innerhalb eines Me- nüs und bestätigt Einstellungen. 3 MENU Wechselt zwischen den verschiedenen Menüs. 4 / Kurzes Drücken beleuchtet da[…]
-
Страница 56
54 Display 1 Obere Zeile 2 Mittlere Zeile 3 Untere Zeile 4 Symbole Weckalarm ist aktiviert. Herzfrequenz wird empfangen. Trainingszone ist überschritten. Trainingszone ist unterschritten. Akustischer Alarm bei Verlassen der Trainingszone ist aktivi ert. Ton bei Betätigen der Knöpfe ist aktiviert. 5 Zwei Leuchtdioden: Blinken in der Herzfrequenz.[…]
-
Страница 57
55 D Menüs Zwischen den Menüs wechseln Sie mit dem Knopf MENU . Time Training Result LAP Result Setting FitTest MENU Stromsparmodus Wenn Ihre Pulsuhr ca. 5 Minuten lang kein Signal empfängt, schaltet die Uhr in den Stromsparmodus. Es werden dann nur die aktuelle Uhrzeit und das Datum angezeigt. Drücken Sie einen beliebigen Kno pf, um die Pulsuh[…]
-
Страница 58
56 Hauptanzeige Bei jedem Menüwechsel wird zunächst der Name des Menüs angezeigt, dann wechselt Ihre Pulsuhr automa- tisch in die Hauptanzeige des aktiven Menüs. Von hier aus müssen Sie entweder erst ein Untermenü wählen oder können direkt Funktionen starten. Menü Haup t- anzeige Automatisch Übersicht der Menüs Menü Bedeutung Beschreibu[…]
-
Страница 59
57 D G RUNDEINSTELLUNGEN Übersicht Im Menü Setting können Sie: Ihre persönlichen Daten (User) eingeben. Ihre Pulsuhr errechnet aus diesen Daten Ihren Kalo- rienverbrauch und Ihre Fettverbrennung während des Trainings! Ihre Trainingszone (Limits) einstellen. Erklärun- gen zur Einstellung der Trainingszonen finden Sie im Kapitel „Allg[…]
-
Страница 60
58 START/STOP Gender wird angezeigt. START/STOP Wählen Sie M , wenn Sie ein Mann sind. Wählen Sie F , wenn Sie eine Frau sind. OPTION/SET AGE wird angezeigt. START/STOP Stellen Sie Ihr Lebensalter ein (10-99). OPTION/SET MaxHR wird angezeigt. Die Pulsuhr errechnet die maximale Herzfrequenz automatisch gemäß der Formel: 220 – Lebensalter = Max[…]
-
Страница 61
59 D Trainingszone einstellen Sie können Ihre individuelle Ober- und Unt ergrenze Ihres Pulses wie im Folgenden beschrieben einstellen. Beachten Sie, dass nach jedem Fitnesstest b eide Grenzen als Trainings- zonenvorschlag automatisch eingestellt und dadurch die alten Angaben überschrieben werden. Die untere Grenze des Trainingszonenvorschlags be[…]
-
Страница 62
60 Einheiten einstellen MENU Wechseln Sie in das Menü Setting . OPTION/SET Limits wird angezeigt. OPTION/SET Units wird angezeigt. START/STOP kg/lb wird angezeigt. Die Gewichtsein- heit blinkt. START/STOP Wechseln Sie zwischen den Einheiten. OPTION/SET cm/inch wird angezeigt. Die Maßeinheit für die Körpergröße blinkt. START/STOP Wechseln Sie […]
-
Страница 63
61 D U HR -E INSTELLUNGEN Übersicht Im Menü Time können Sie: Die Uhrzeit und das Datum einstellen. Den Weckalarm einstellen. Sobald Sie im Menü Time sind, wechselt Ihre Puls- uhr automatisch in die Hauptanzeige. Diese zeigt den Wochentag und das Datum an. Auf dem Bild: Fri 12.04 (Freitag, den 12. April). Uhrzeit und Datum einstellen MEN[…]
-
Страница 64
62 OPTION/SET Year wird angezeigt. Die Jahres- Einstellung blinkt. START/STOP Stellen Sie das Jahr ein. Der Kalender geht bis in das Jahr 2099. OPTION/SET Month wird angezeigt. Die Monats- Einstellung blinkt. START/STOP Stellen Sie den Monat (1-12) ein. OPTION/SET Day wird angezeigt. Die Tages- Einstellung blinkt. START/STOP Stellen Sie den Tag (1-[…]
-
Страница 65
63 D Weckalarm einstellen Den Weckalarm können Sie durch das Drücken eines beliebigen Knopf s ausschalten. Am nächsten Tag werden Sie wieder zur gleichen Zeit ge- weckt. MENU Wechseln Sie in das Menü Time . OPTION/SET Ala rm wird angezeigt. START/STOP 5 sec Set Alarm wird kurz angezeigt. On Alarm wird angezeigt. START/STOP Schaltet den Weckalar[…]
-
Страница 66
64 T RAININGSAUFZEICHNUNG Übersicht Im Menü Training können Sie: Ihre Laufzeiten stoppen und damit Ihr Training aufzeichnen. Einzelne Runden aufzeichnen. Aufzeichnung beenden und speichern. Alle Aufzeichnungen löschen. Speichermeldungen beurteilen. Sobald Sie im Menü Training sind, wechselt Ihre Pulsuhr automatisch in die H[…]
-
Страница 67
65 D manuell löschen. Wie Sie diese löschen kö nnen, lesen Sie im Ab- schnitt „Alle Aufzeichnungen löschen“ in diese m Kapitel. Ihre Trainingsdaten können Sie sich anzeigen lassen. Im Menü Result ist die letzte gespeicherte Aufzeichnung abrufbar. Im Menü Lap Result sehen Sie die Runden dieser Aufzeichnung. Sobald Sie Ihre Aufzeic[…]
-
Страница 68
66 Runden aufzeichnen Während die Aufzeichnung Ihres Gesamttrainings läuft, können Sie ein- zelne Runden aufzeichnen. Die Zeit läuft, während Sie die Runden auf- zeichnen, stets weiter. Sie sind im Menü Training und Ihr Training wird gerade aufgezeichnet. Run wird angezeigt. OPTION/SET Stoppen Sie eine neue Runde ab. Die Anzeige zeigt für 5 […]
-
Страница 69
67 D Aufzeichnung beenden und speichern Beachten Sie, dass Sie die Daten nach dem Beenden und Speichern nicht mehr in den Menüs Result und Lap Result anzeigen lassen können. Sie sind im Menü Training . Sie haben gerade ein Training aufgezeichnet. Stop wird angezeigt. START/STOP 5 sec Speichern Sie die Aufzeichnung. Hold Save wird angezeigt. Die […]
-
Страница 70
68 Alle Aufzeichnungen löschen Ihre Pulsuhr informiert Sie automatisch, wenn der Speicher fast voll ist. Bevor Sie dann den Speicher löschen, emp fehlen wir, die Trainingsauf- zeichnung auszuwerten oder auf den PC zu übertragen! Mit jeder erfolg- reichen Datenübertragung auf den PC wird der Speicher auf der Pulsuhr automatisch gelöscht. Altern[…]
-
Страница 71
69 D Speichermeldungen beurteilen Im Menü Training informiert Sie Ihre Pulsuhr automatisch, wenn der Speicher fast voll ist oder fast alle Runden belegt sind. Meldung Bedeutung Bei Wechsel in das Menü Training meldet die Pulsuhr MEM LOW , wenn weniger als 10% des Speichers oder weniger als 10 Runden frei sind. Während des Trainings meldet die Pu[…]
-
Страница 72
70 E RGEBNISSE Übersicht Im Menü Result können Sie Ihre Trainingsdaten der zuletzt gestoppten Aufzeichnung anzeigen: mittlere und maximale Herzfrequenz, Zeiten inner- und au- ßerhalb der Trainingszone sowie Kalorienverbrauch und Fettverbrennung. Sobald Sie im Menü Result sind, wechselt Ihre Pulsuhr automatisch in die Hauptanzeige. Diese zeigt […]
-
Страница 73
71 D OPTION/SET Lo [min] (Zeit unterhalb der Trainings- zone) wird angezeigt. OPTION/SET Hi [min] (Zeit oberhalb der Trainingszo- ne) wird angezeigt. OPTION/SET [kcal] (gesamter Kalorienverbrauch während des Trainings) wird ange- zeigt. Die Berechnung erfolgt auf Basis mittelschnellen Joggens. Grund- lage für den Kalorienverbrauch und die Fettver[…]
-
Страница 74
72 R UNDEN -E RGEBNISSE Übersicht Im Menü LAP Result können Sie Zeit und durch- schnittliche Herzfrequenz anzeigen lassen. Diese Anzeigen sind sowohl für die gesamte zuletzt ge- stoppte Trainingsaufzeichnung als auch für jede einzelne Runde abrufbar. Sobald Sie im Menü LA P Re sult sind, wechselt Ihre Pulsuhr automatisch in die Hauptanzeige. […]
-
Страница 75
73 D F ITNESSTEST Übersicht Im Menü FitTest können Sie: Ihre persönliche Fitness bei einem 1600m Lauf testen (1 Meile). Ihre Fitness bewerten lassen: Fitnessindex (1-5), maximales Sauerstoff-Atemvolumen (VO2max), Grundumsatz (BMR) und Aktivitätskalorienbedarf (AMR). Ihre individuelle Ober- und Untergrenze als Trai- ningszonenvorsch[…]
-
Страница 76
74 In der mittleren Zeile wird das Datum Ihres letzten Fitnesstests angezeigt. Wenn Sie noch kein en Fit- nesstest durchgeführt haben, wird das voreingestell- te Datum angezeigt. Fitnesstest durchführen Die angezeigten Einheiten „m“ oder „mile“ stammen aus den Grundein- stellungen. Wie Sie diese wechseln können, lesen Sie im Ka pitel „[…]
-
Страница 77
75 D Die durchlauf ende Anzeige Press STOP after 1600 m erinnert Sie daran, nach 1600m den Knopf START/STOP zu drücken. Es erscheint d ie durchlaufende Anzeige Test Finish ed und die benötigte Zeit wird angezeigt. START/STOP Zurück in die Hauptanzeige. Sie zeigt Ihren Fitnessindex (1-5) mit Bewertung und das aktuelle Datum an. Fitnesswerte anzei[…]
-
Страница 78
76 OPTION/SET BMR (Basal Metabolic Rate) wird ange- zeigt. Der Grundumsatz errechnet sich aus den Werten Alter, Geschlecht, Körpergröße und Gewicht. Der BMR gibt den Kalorienbedarf an, den Sie für die Aufrechterhaltung Ihrer Lebensfunk- tionen – ohne Bewegung – benötigen. OPTION/SET AMR (Active Metabolic Rate) wird an- gezeigt. Der Aktivit[…]
-
Страница 79
77 D E ASY F IT S OFTWARE Mit dem zukaufbaren Zubehör Set 671.10, bestehend aus einer CD mit der PC-Software EasyFit und einem Übertragungskabel, können Sie Ihre Trainingsdaten optimal auswerten. Darüber hinaus bietet EasyFit zahlrei- che Funktionen zum Gewichtsmanagement und zur Trainingsplanung. Kalenderfunktionen Übertragen der Trai[…]
-
Страница 80
78 T ECHNISCHE D AT E N , B ATTERIEN UND G AR AN TI E Pulsuhr Wasserdicht bis 30 m (zum Schwimmen ge- eignet) Die Dichtigkeit der Uhr gegenüber Nässe kann bei Sprüngen ins Wasser (hohe Druckbelastungen) sowie beim Drücken der Knöpfe im Regen nicht gewährleistet werden. Brustgurt Wasserdicht (zum Schwimmen geeignet) Übertragungsfrequenz 5,3 K[…]
-
Страница 81
79 D Austausch der Batterien Die Batterie der Pulsuhr darf nur ein Fachgeschäft (jede Uhrmacherwerk- stätte) oder die angegebene Serviceadresse austauschen. Ansonsten erlöschen Garantieansprüche. Die Batterie des Brustgurtes können Sie selb ständig wechseln. Das Bat- teriefach befindet sich auf der Innenseite. Verwenden Sie zum Öffnen des Fa[…]
-
Страница 82
80 Störungen und Überlagerungen In der Pulsuhr ist ein Empfänger für die Signale des Senders des Brust- gurtes eingebaut. Bei der Benutzung kann es vorkommen, d ass die Puls- uhr zusätzlich andere Signale empfängt als die des Brustgurtes. Wie können Sie Störungen erkennen? Störungen erkennen Sie daran, dass unrealistische Werte angezeigt w[…]
-
Страница 83
81 D Garantie Wir leisten drei Jahre Garantie ab Kaufdatum für Material- und Fabrikati- onsfehler des Produktes. Die Garantie gilt nicht: im Falle von Schäden auf Grund unsachgemäßer Bedienung für Verschleißteile, wie zum Beispiel Batterien oder das Armband für Mängel, die dem Kunden bereits bei Kauf bekannt waren bei Eigenv[…]
-
Страница 84
82 A BKÜRZUNG SVERZEICHNIS Abkürzungen auf dem Display in alphabetischer Reihenfolge: Abk ür zu ng Deutsch AGE Alter Alarm Alarm AMR Aktivitätskalorienbedarf AVG Durchschnittliche Trai nings-Herzfrequenz AVG-Run Durchschnittliche Trai nings-Herzfrequenz BMR Grundumsatz BPM Herzschläge pro Minute bPM AVG Durchschnittliche Trainings -Herzfrequen[…]
-
Страница 85
83 D Abk ür zu ng Deutsch LED Leuchtdiode Limits Trainingsgrenzen Lo Zeit unterhalb der Trainingszone Lo limit Untere Trainingsgrenze m männlich MaxHR Maximale Herzfrequenz (Formel: 220 — Lebensalter) MEM Speicher Minute Minute [min] Minute Mon Montag Month Monat Result Ergebnis Run Laufzeit wird gem essen Sat Samstag Setting Einstellungen (Menü[…]
-
Страница 86
84 S TICHWORTVERZEICHNIS A Abkürzun gsverzeich nis 83 Aufzeich nung 65 Aufzeichnun gen löschen 69 B Batterien 80 D Datum einstellen 62 Display 54 E Einheiten einst ellen 61 Entsorgu ng 47 Ergebniss e 71 F Fitnessind ex 74 Fitnesstest 74 Fitness test durchfüh ren 75 Fitnesswerte anzeigen 76 FitTest (Menü) 57 G Garantie 82 Grundeinstel lungen 58 […]
-
Страница 87
[…]
-
Страница 88
heart rate monitor herzfr equenz pulsuhr 753.247-0908 Irrtum und Änderungen vorbehalten Beurer GmbH, Söflinger Str . 218, 89077 Ulm, Germany www .beurer .de, T el: (0049) 0731-3989144, Fax: (0049) 0731-3989255, kd@beurer .de[…]