

Digital Graphic
Printer
2-345-260-11 (4)
Instructions for Use
UP-D897
© 2005 Sony Corporation

Owner’s Record
The model and serial numbers are located at the rear.
Record these numbers in the space provided below.
Refer to these numbers whenever you call upon your
Sony dealer regarding this product.
Model No. ____________________
Serial No. ____________________
For the customers in Canada
This unit has been certified according to Standard CSA
C22.2 No.601.1.
For the customers in the U.S.A. and
Canada
Model UP-D897 is Non-Patient Equipment.
This unit can not be used in the vicinity of patients.
WARNING
To reduce the risk of fire or electric shock, do
not expose this apparatus to rain or moisture.
To avoid electrical shock, do not open the
cabinet. Refer servicing to qualified personnel
only.
THIS APPARATUS MUST BE EARTHED.
To disconnect the main power, unplug the AC
IN connector.
This symbol indicates the equipotential
terminal which brings the various parts of a
system to the same potential.
For the customers in the U.S.A.
This equipment has been tested and found to comply
with the limits for a Class A digital device, pursuant to
Part 15 of the FCC Rules. These limits are designed to
provide reasonable protection against harmful
interference when the equipment is operated in a
commercial environment. This equipment generates,
uses, and can radiate radio frequency energy and, if not
installed and used in accordance with the instruction
manual, may cause harmful interference to radio
communications. Operation of this equipment in a
residential area is likely to cause harmful interference in
which case the user will be required to correct the
interference at his own expense.
You are cautioned that any changes or modifications not
expressly approved in this manual could void your
authority to operate this equipment.
All interface cables used to connect peripherals must be
shielded in order to comply with the limits for a digital
device pursuant to Subpart B of Part 15 of FCC Rules.
* Patient Vicinity
R1.83m
(6 feet)
Important safeguards/notices for use in
the medical environments
1. All the equipments connected to this unit shall be
certified according to Standard IEC60601-1,
IEC60950-1, IEC60065 or other IEC/ISO Standards
applicable to the equipments.
2. When this unit is used together with other equipment
in the patient area*, the equipment shall be either
powered by an isolation transformer or connected via
an additional protective earth terminal to system
ground unless it is certified according to Standard
IEC60601-1.
* Patient Area
R1.5m
3. The leakage current could increase when connected
to other equipment.
4. This equipment generates, uses, and can radiate radio
frequency energy. If it is not installed and used in
accordance with the instruction manual, it may cause
interference to other equipment. If this unit causes
interference (which can be determined by
unplugging the power cord from the unit), try these
measures: Relocate the unit with respect to the
susceptible equipment. Plug this unit and the
susceptible equipment into different branch circuit.
2

Consult your dealer. (According to standard
EN60601-1-2 and CISPR11, Class B, Group 1)
Caution
When you dispose of the unit or accessories, you must
obey the law in the relative area or country and the
regulation in the relative hospital.
Warning on power connection
Use a proper power cord for your local power supply.
1. Use the approved Power Cord (3-core mains lead) /
Appliance Connector / Plug with earthing-contacts
that conforms to the safety regulations of each
country if applicable.
2. Use the Power Cord (3-core mains lead) / Appliance
Connector /Plug conforming to the proper ratings
(Voltage, Ampere).
If you have questions on the use of the above Power
Cord/Appliance Connector/Plug, please consult a
qualified service personnel.
Warning on power connection for
medical use
Please use the following power supply cord.
With connectors (plug or female) and cord types other
than those indicated in this table, use the power supply
cord that is approved for use in your area.
United States Canada
Plug Type HOSPITAL GRADE* HOSPITAL GRADE*
Female end E62405, E35708 LR53182, LL022442,
Cord type E159216, E35496
Minimum cord set
rating
Safety approval UL Listed CSA
*Note: Grounding reliability can only be achieved when the equipment is connected to an equivalent receptacle marked ‘Hospital Only’
or ‘Hospital Grade’.
Min.Type SJT
Min.18 AWG
10A/125V 10A/125V
LL088408
LL112007-1, LL20262,
LL32121, LL84494
Min.Type SJT
Min.18AWG
3

Table of Contents
Getting Started
Overview ………………………………………………………. 5
Location and Function of Parts and Controls …. 5
Front Panel ………………………………………………… 5
Rear Panel …………………………………………………. 6
Connections …………………………………………………… 6
Connecting to the USB Connector ………………… 6
Installing the Printer Driver ………………………….. 6
Paper …………………………………………………………….. 7
Paper You Can Use ……………………………………… 7
Loading Paper in the Unit ……………………………… 7
Loading Paper ……………………………………………. 7
Operation
Adjustments and Settings Using the Menu ……… 9
Menu Flow ………………………………………………… 9
Menu List ………………………………………………… 10
Basic Menu Operations ……………………………… 11
Registering Menu Settings …………………………. 13
Printing the Menu List ………………………………. 13
Printing ……………………………………………………….. 14
Starting a Print Job ……………………………………. 14
Cancelling a Print Job ……………………………….. 14
Making Copies of the Last Printout …………….. 14
Feeding Paper …………………………………………… 14
Adjusting the Contrast and Brightness …………. 15
Others
Precautions ………………………………………………….. 16
On Safety …………………………………………………. 16
On the Printer Carriage ……………………………… 16
On Installation ………………………………………….. 16
Maintenance ………………………………………………… 17
Cleaning the Cabinet …………………………………. 17
Cleaning the Thermal Head ……………………….. 17
Cleaning the Platen Roller …………………………. 17
Specifications ………………………………………………. 18
Troubleshooting …………………………………………… 19
Error Messages ……………………………………………. 20
Index …………………………………………………………… 21
4
Getting Started
Location and Function
of Parts and Controls
Overview
Quiet, High Quality, Fast Printing
• Employs a thin thermal head with a built-in high speed
drive IC, capable of high resolution images of 12.8
dots/mm.
• Print speeds of approximately 1 high quality image
(960 × 1280 dots) every 2 seconds when printing at
high speed.
• Standard image memory capable of handling and
printing images up to 4096 × 1280 dots (approx. 320
× 100mm).
• Monochrome printing with up to 256 shades of
gradation.
• Built-in temperature correction circuits prevent
temperature changes which could cause blurred prints.
USB interface
The unit is equipped with a USB connector which
complies with the Hi-Speed USB (USB 2.0).
Easy printer settings using a menu
You can make up the settings to meet your requirements
using a menu. You can store up to three settings as a set
of user settings.
Easy Paper Loading
Free access to the door panel allows you to drop paper
into the unit for easy loading.
For more details, see the referenced page numbers
enclosed in parentheses ( ).
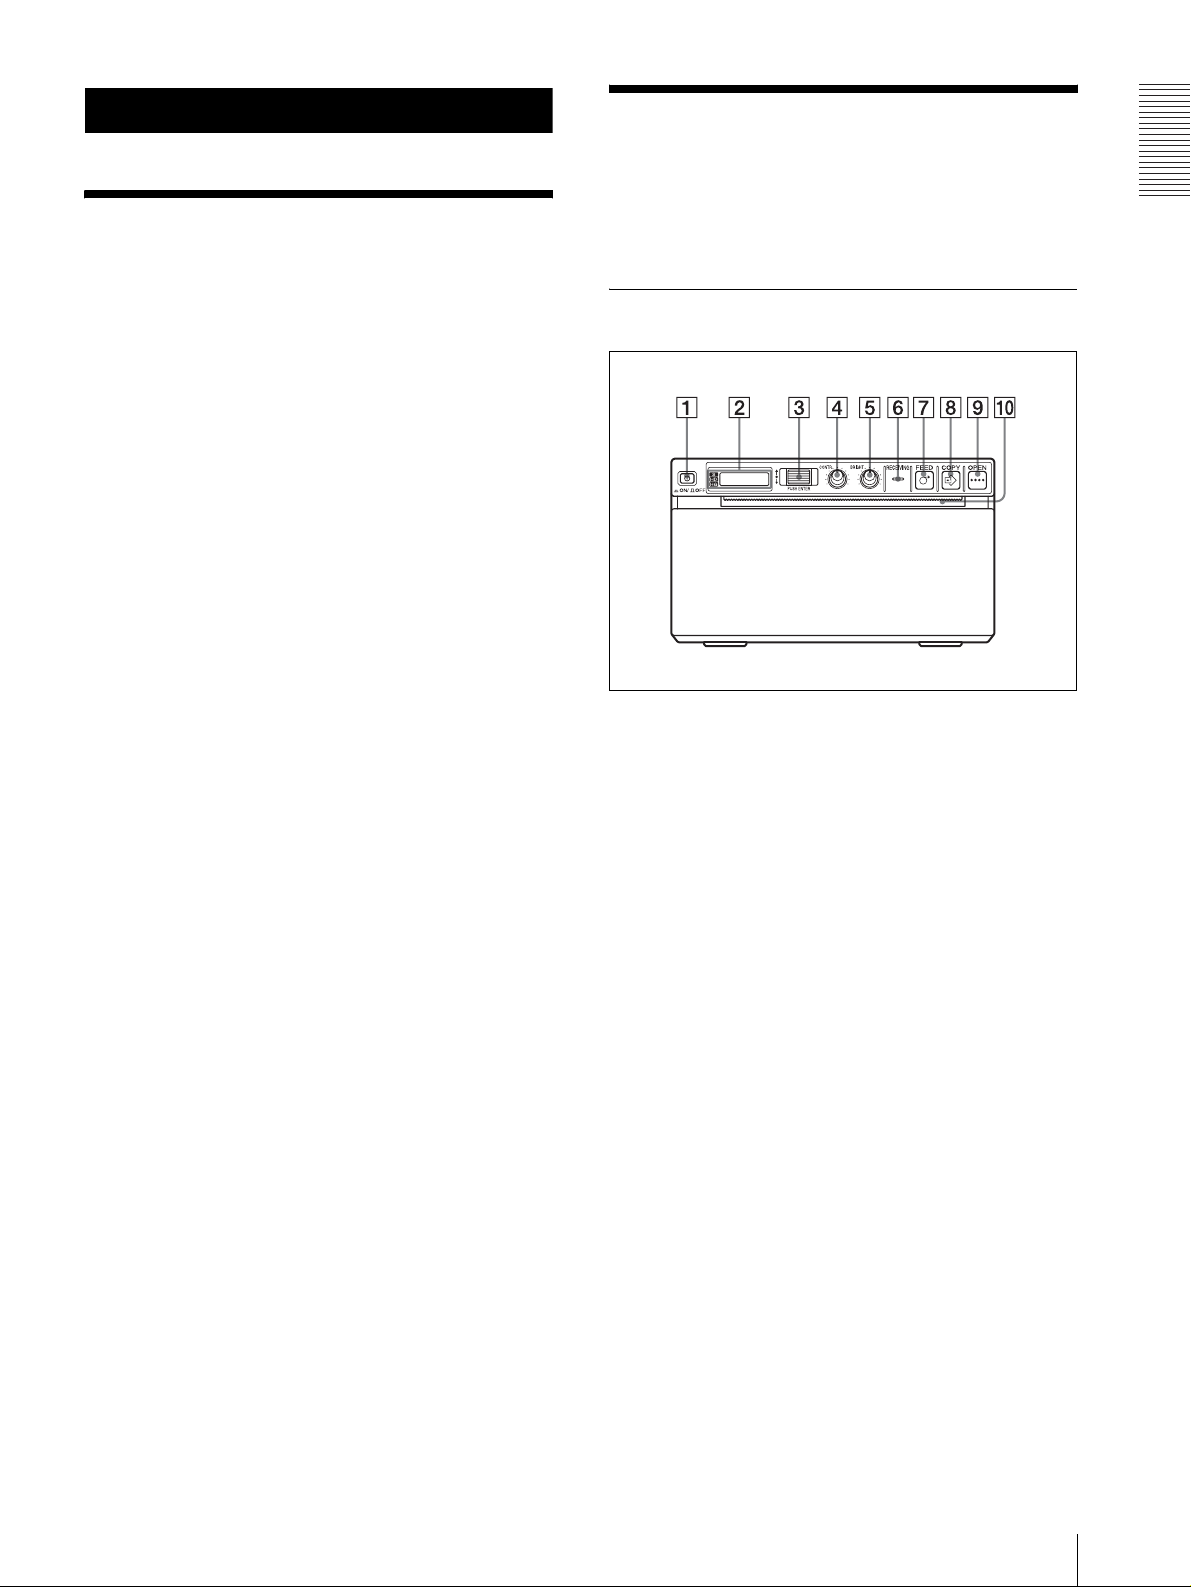
Front Panel
A !Power ON/OFF Switch (7, 11, 14, 17)
Press to switch to ON to turn the power on. The
back light on the LCD lights in green.
B Printer window display (LCD: liquid crystal
display) (9, 14)
The back light lights in green when the unit
operates normally. Also, in normal operation, the
paper currently selected is indicated by the pointer
on the LCD.
For detailed information on the paper, see “Paper”
on page 7 and “Paper currently selected” on page
14.
If an error occurs, a corresponding alarm message
is displayed.
During menu operations, menu items and settings
are displayed
Getting Started
C Jog dial (11, 17)
Used to make menu operations.
D CONTR (contrast) control (15)
Adjusts the contrast of the printouts.
E BRIGHT (brightness) control (15)
Adjusts the brightness of the printouts.
F RECEIVING indicator
Lights while the unit is receiving print data from the
computer.
Overview / Location and Function of Parts and Controls
5

G FEED button (8, 14)
Hold down to feed paper. While a print job is in
progress, press to cancel the print job.
H COPY button (14)
Getting Started
Prints another copy of the previous printout.
You can make only one copy each time you press
this button regardless of the print quantity set using
the menu.
Connections
After connecting the USB connecting cable (supplied)
to the unit and the computer, connect the power cord.
For details about the unit connection, refer to the
manuals for the computer or other peripheral devices.
Notes
I OPEN button (8, 14)
Press to open the paper door. While a print job is in
progress, press to cancel the print job.
J Paper cutter
Cuts the paper as each image is printed.
Rear Panel
• Before connecting the unit to the computer, turn off
the unit, computer, monitor, and all peripheral devices
connected to the computer.
• Before connecting the unit to the computer, disconnect
the power cord from the unit. Connect the power cord
to the unit only after connecting the unit and the
computer.
• Follow the connection procedures described in the
computer manual.
• Make sure that the cables are connected securely at
both ends.
• The unit drive software provided with the unit is not
suitable for using the unit connected to a network.
• Printer operation is not guaranteed when connecting
to the computer using the USB cable via a hub.
Connecting to the USB Connector
UP-D897
A USB connector (6)
Connects to a computer equipped with the USB
interface (which conforms to USB 2.0), using the
supplied USB cable.
B Equipotential ground terminal connector
Used to connect to the equipotential plug to bring
the various parts of a system to the same potential.
Refer to “Important safeguards/notices for use in
the medical environments” on page 2.
C — AC IN connector
Use a proper power cord for your local power
supply (not supplied).
Refer to “Warning on power connection” on page 3
and “Warning on power connection for medical
use” on page 3.
to (USB) connector
USB connecting
cable (supplied)
Installing the Printer Driver
Install the printer driver provided with the printer. For
detailed instructions about how to install the unit driver,
refer to the Readme.txt file included on the supplied CDROM disc.
6
Connections

Paper
Loading Paper in the
Use only Sony UPP-110S/110HD/110HG paper
designed for use with this unit. High print quality cannot
be guaranteed if any other paper is used with this unit,
and such paper could damage the unit.
You cannot use the UPP-110HA as specified for the
UP-D890/890 series printer.
Paper You Can Use
Print paper characteristics are as follows.
Print Characteristics Paper Type
TYPE I (Normal) UPP-110S
TYPE II (High Density) UPP-110HD
TYPE V (High Glossy) UPP-110HG
Notes on storing and handling paper
Storing unused paper
• Store unused paper at a temperature below 30°C
(86°F) in a dry location that is not exposed to direct
sunlight.
• Do not store unused paper near volatile liquids or
allow the paper to contact any organic volatile liquid,
cellophane tape, or any compound of vinyl chloride.
Unit
Getting Started
Notes
• Before loading paper in the unit, see “Notes on storing
and handling paper” (page 7).
• Always handle paper carefully when loading to avoid
adversely affecting the quality of the printouts. Never
bend or crease the paper and never touch the printing
surface with your fingers. Fingerprints perspiration
can blur printing.
• Do not use any paper other than UPP-110S/110HD/
110HG paper. (page 7)
• Be sure to set the “MEDIA” of the menu to the paper
to be used. (page 10) You can confirm the media
currently selected on the LCD.
For detailed information on how to confirm, see
“Paper currently selected” on page 14.
Loading Paper
Caution
A paper cutter is mounted with the unit. When loading
paper, be careful not to touch the paper cutter. Touching
the paper cutter may cause injury.
Loading paper
• Handle the paper carefully when loading to avoid
touching the printing surface with your fingers.
Perspiration or oil from you hands could cause
pictures to blur.
• After removing the label from the leading edge of the
paper, pull the paper out 15~20 cm (about 6~8 in.)
before printing. Label adhesive remaining on the
paper could spoil a picture.
Storing printouts
• To prevent printouts from fading or changing color,
store them in a cool, dry location where the
temperature is not higher than 30°C (86°F).
• Store printouts in a polypropylene pouch or between
sheets of paper that contain no plastic.
• Do not store printouts where they will be exposed to
direct sunlight or high humidity.
• Do not store printouts near volatile liquids or allow the
prints to contact any organic volatile liquid,
cellophane tape, or any compound of vinyl chloride.
• To prevent fading, do not stack printouts on or under a
diazo copy sheet.
• To mount printouts on another sheet of paper, use
double-sides tape or a water base adhesive.
• Do not incinerate waste printer paper.
1
Press the power ON/OFF switch to turn the unit on.
When paper is not loaded yet, the back light on the
LCD lights in umber and the message “EMPTY” is
displayed.
Paper / Loading Paper in the Unit
7
Loading…
- Инструкции и руководства
- Бренды
- Sony
- UP-D897
- Справочник Пользователя
2-345-260-11 (4)
Digital Graphic
Printer
© 2005 Sony Corporation
UP-D897
Instructions for Use
Document Download |
‹
›
Sony UP-D897 Manual Online:
4.35,
737
votes
Sony UP-D897 User Manual
Sony UP-D897 User Guide
Sony UP-D897 Online Manual
Text of Sony UP-D897 User Guide:
More Instructions:
|
Sony UP-D897 Specifications
|
DOWNLOAD | |
|
Sony UP-D897 User manual manual
|
DOWNLOAD |
Related Products and Documents (All in One Printer):
-
Sony DPP-M55 — Digital Color Photo Printer All in One Printer Operating instructions manual
DPP-M55 — Digital Color Photo Printer
sony/dpp-m55-digital-color-photo-printer.pdf, 32 -
Sony UP-51MD All in One Printer Specifications
UP-51MD
sony/up-51md.pdf, 4 -
Sony HDR-CX360E All in One Printer Handbook
HDR-CX360E
sony/hdr-cx360e.pdf, 130 -
Sony UP-DR150 All in One Printer Specifications
UP-DR150
sony/up-dr150.pdf, 5 -
Sony DPP-EX7 All in One Printer Operating instructions manual
DPP-EX7
sony/dpp-ex7.pdf, 296 -
Sony UP-980 All in One Printer Operation & user’s manual
UP-980
sony/up-980.pdf, 204 -
Sony DPP-EX5 All in One Printer Operating instructions manual
DPP-EX5
sony/dpp-ex5.pdf, 87 -
Sony UP-D21MD All in One Printer Instruciton for use
UP-D21MD
sony/up-d21md.pdf, 19
Comparable Devices:
| # | Manufacturer | Model | Document Type | File | Updated | Pages | Size |
|---|---|---|---|---|---|---|---|
| 1 | SIIG | ExpressCard/54 CF R/W | Quick installation manual | siig/expresscard-54-cf-r-w-Q44.pdf | 03 Nov 2024 | 8 | 0.04 Mb |
| 2 | Sennheiser | MM 50 IP | Product sheet | sennheiser/mm-50-ip-L3H.pdf | 24 Dec 2024 | 1 | 0.6 Mb |
| 3 | AAMP of America | iSimple | Owner’s manual | aamp-of-america/isimple-496.pdf | 23 Nov 2023 | 16 | 1.71 Mb |
| 4 | Hyundai | HLCD-A32W4 | Service manual | hyundai/hlcd-a32w4-OSN.pdf | 20 Apr 2024 | 83 | |
| 5 | Sony | ICD-UX512BLK | Specifications | sony/icd-ux512blk-L67.pdf | 28 Apr 2025 | 4 | 0.18 Mb |
| 6 | Black & Decker | 905180165 | Instruction manual | black-decker/905180165-1I8.pdf | 29 Apr 2025 | 16 | 1.42 Mb |
Similar Resources:
All in One Printer Instructions:
-
Supermicro Motherboard X5DL8-GG
X5DL8-GG (Motherboard ePDF Manual, #3L65Z6)
X5DL8-GG, 90
-
RedMax Blower GK-280
RedMax Product Manual: GK-280 PDF Owner’s/operator’s manual — 799DQ3
GK-280, 7
-
Thermador Ranges Pro Harmony Series
Thermador Pro Harmony Series Manual (Doc Type: Ranges Quick reference manual)
Pro Harmony Series, 4
-
Parrot Digital Photo Frame PHOTO VIEWER 7″
Operation & user’s manual for Parrot PHOTO VIEWER 7″ Digital Photo Frame
PHOTO VIEWER 7″, 136
-
DigitaLinx Media Converter DL-HDCAT
#9DXRYQ DL-HDCAT: DigitaLinx Media Converter Owner Documentation
DL-HDCAT, 12
-
RoadPilot Automobile Accessories microGo
#1FI6K4: microGo Automobile Accessories Operation & user’s manual
microGo, 4
-
Panasonic Controller MGSDB2 Series
Controller #SN2CH1
MGSDB2 Series, 25
-
Philips TV Receiver 24RF50S
#1NFND3: 24RF50S TV Receiver Specification sheet
24RF50S, 2
-
Polycom Monitor HDX 9000 Series
Polycom Monitor HDX 9000 Series Features and benefits
HDX 9000 Series, 5
-
Denon Stereo Receiver AVR-87
Denon Product User Guide: AVR-87 PDF Datasheet — 5634T2
AVR-87, 2
-
Razer Mouse Salmosa
Razer Salmosa User Manual (Operation & user’s manual), @AH4H2X
Salmosa, 12
-
Leightronix Recording Equipment Incodex Vier
Recording Equipment Manual (Leightronix Incodex Vier)
Incodex Vier, 5
Comments, Questions and Opinions:
Sony UP-D897 Printer PDF User Guides and Manuals for Free Download: Found (3) Manuals for Sony UP-D897 Device Model (Specifications, User Manual Manual)
The Sony UP-D897 is a compact and efficient digital printer that has proven itself in various professional environments, particularly in medical imaging and digital photography. It brings together reliability, print quality, and user-friendliness, making it a favorite among professionals who require on-demand printing solutions without compromising on quality.
One of the most notable features of the Sony UP-D897 is its exceptional print quality. Utilizing dye-sublimation technology, this printer produces vibrant colors and sharp details, making it ideal for applications that demand high-resolution prints. Whether it’s for printing patient records in a hospital or photographs for an event, the output from the UP-D897 consistently meets the high standards expected by professionals.
Another impressive aspect of the UP-D897 is its compact size. This printer is designed to fit comfortably in tight spaces, which is beneficial for both studio settings and portable applications. Its lightweight and compact form factor, along with its easy connection options, allow for seamless integration into existing workflows. Many users appreciate that they can set it up quickly without requiring extensive technical knowledge.
In terms of performance, the Sony UP-D897 stands out with its rapid printing speed. It can produce a 4×6 inch print in approximately 7 seconds, making it a great option for environments where time is of the essence. This speed is particularly valuable in high-pressure scenarios like events or medical imaging, where prompt delivery of prints is crucial.
The ease of use is another key selling point. With intuitive controls and an LCD screen, users can navigate the printing process effortlessly. The printer supports a variety of input formats, compatible with numerous cameras and imaging devices, further enhancing its versatility. For users who value convenience, the UP-D897 offers excellent usability right out of the box.
Here are some additional notable specifications and features of the Sony UP-D897:
- Dye-sublimation printing technology for vibrant colors and sharp images.
- Compact and lightweight design for easy portability.
- Fast print speed of approximately 7 seconds for a 4×6 print.
- Supports multiple media sizes, including 4×6, 5×7, and 6×8 inches.
- User-friendly interface with an LCD screen for easy operation.
- Various connectivity options, including USB, for versatile use.
However, it is essential to consider that the Sony UP-D897 is designed primarily for specific markets. While the exceptional print quality and speed are undeniable, the cost of consumables such as ink and paper may add up, especially for users who print in high volumes. Budget-conscious users should take this into account and evaluate their specific printing needs.
In conclusion, the Sony UP-D897 is a remarkable printer tailored for professionals who prioritize quality, speed, and convenience in their printing tasks. Its compact design, impressive output quality, and user-friendly features make it a formidable tool for those in need of reliable printing solutions. While initial costs may be a consideration, the performance and output justify the investment for many users who rely on high-quality prints daily.