

MX310dn
Руководство пользователя
Май 2013 г. www.lexmark.com
Тип(ы) машины:
7015
Модель(и):
270

Содержание 2
Содержание
Сведения по технике безопасности………………………………………..6
Знакомство с принтером…………………………………………………………8
Поиск сведений о принтере……………………………………………………………………………………….8
Выбор места для установки принтера………………………………………………………………………..9
Конфигурации принтера…………………………………………………………………………………………..10
Основные функции сканера……………………………………………………………………………………..11
Общие сведения о УАПД и стекле экспонирования сканера……………………………………..12
Использование панели управления принтера……………………………………………………………13
Знакомство c цветами света кнопки перехода в спящий режим и цветами
индикатора…………………………………………………………………………………………………………..13
Дополнительная настройка принтера…………………………………..15
Установка внутренних дополнительных устройств……………………………………………………15
Установка дополнительных аппаратных модулей…………………………………………………….19
Подключение кабелей……………………………………………………………………………………………..22
Установка ПО принтера…………………………………………………………………………………………..23
Работа в сети…………………………………………………………………………………………………………..25
Проверка установки принтера………………………………………………………………………………….31
Загрузка обычной и специальной бумаги……………………………..33
Задание формата и типа бумаги………………………………………………………………………………33
Настройка параметров для бумаги формата Universal………………………………………………33
Загрузка бумаги в лотки…………………………………………………………………………………………..34
Загрузка многоцелевого устройства подачи……………………………………………………………..38
Связывание лотков и исключение лотков из цепочки связи……………………………………..42
Инструкции по работе с обычной и специальной бумагой…..46
Инструкции по использованию бумаги………………………………………………………………………46
Поддерживаемые форматы, типы и плотность бумаги………………………………………………51
Использование специальной бумаги…………………………………………………………………………53
Хранение бумаги……………………………………………………………………………………………………..56
Выполняется печать………………………………………………………………57
Печать документа……………………………………………………………………………………………………57

Содержание 3
Печать с мобильного устройства………………………………………………………………………………58
Печать конфиденциальных и других отложенных заданий………………………………………..58
Печать информационных страниц…………………………………………………………………………….61
Отмена задания на печать……………………………………………………………………………………….61
Копирование………………………………………………………………………….63
Получение копий……………………………………………………………………………………………………..63
Копирование фотографий………………………………………………………………………………………..64
Копирование на специальные материалы для печати……………………………………………….65
Настройка параметров копирования………………………………………………………………………..66
Размещение информации на копиях…………………………………………………………………………72
Отмена задания на копирование……………………………………………………………………………..73
Сведения о параметрах копирования……………………………………………………………………….73
Передача по электронной почте……………………………………………77
Настройка принтера для отправки электронной почты…………………………………………….77
Создание кода быстрого доступа для электронной почты………………………………………..78
Отправка документа по электронной почте……………………………………………………………..78
Отмена передачи сообщения электронной почты……………………………………………………..79
Работа с факсом…………………………………………………………………….80
Настройка принтера для отправки факса…………………………………………………………………80
Передача факса………………………………………………………………………………………………………95
Создание кода быстрого доступа для назначения факса с использованием
встроенного веб-сервера………………………………………………………………………………………97
Настройка параметров факса………………………………………………………………………………….98
Отмена исходящего факса……………………………………………………………………………………….99
Откладывание и пересылка факсов……………………………………………………………………….100
Сведения о параметрах факсимильной передачи…………………………………………………..101
Сканирование………………………………………………………………………103
Сканирование с передачей по адресу FTP……………………………………………………………..103
Сканирование на компьютер………………………………………………………………………………….105
Структура меню……………………………………………………………………107
Список меню………………………………………………………………………………………………………….107
Меню «Бумага»………………………………………………………………………………………………………108
Меню «Отчеты»……………………………………………………………………………………………………..118

Содержание 4
Меню «Сеть/порты»……………………………………………………………………………………………….119
Меню «Безопасность»……………………………………………………………………………………………126
Меню «Параметры»……………………………………………………………………………………………….128
меню «Справка»…………………………………………………………………………………………………….163
Экономия денег с заботой об окружающей среде………………165
Экономия бумаги и тонера……………………………………………………………………………………..165
Экономия энергии………………………………………………………………………………………………….166
Утилизация……………………………………………………………………………………………………………170
Закрепление принтера…………………………………………………………172
Заявление об энергозависимости…………………………………………………………………………..172
Очистка энергозависимой памяти…………………………………………………………………………..172
Очистка энергонезависимой памяти……………………………………………………………………….172
Поиск сведений о безопасности принтера………………………………………………………………173
Обслуживание принтера………………………………………………………174
Чистка деталей принтера……………………………………………………………………………………….174
Проверка состояния компонентов и расходных материалов……………………………………176
Предполагаемое количество оставшихся страниц…………………………………………………..176
Заказ расходных материалов…………………………………………………………………………………177
Хранение расходных материалов……………………………………………………………………………179
Замена расходных материалов………………………………………………………………………………179
Перемещение принтера………………………………………………………………………………………….183
Управление принтером………………………………………………………..185
Поиск расширенной информации о сети и данных для администратора…………………..185
Доступ к удаленной панели управления………………………………………………………………….185
Настройка электронных уведомлений…………………………………………………………………….185
Просмотр отчетов………………………………………………………………………………………………….186
Настройка уведомлений о расходных материалах из встроенного веб-сервера……….186
Восстановление заводских настроек по умолчанию……………………………………………….187
Устранение замятий……………………………………………………………..188
Предотвращение замятия материалов для печати………………………………………………….188
Значение сообщений о замятиях бумаги и их местоположение………………………………..189
Замятие страницы [x], откройте переднюю дверцу. [20y.xx]…………………………………….191
Замятие страницы [x], откройте заднюю дверцу. [20y.xx]………………………………………..195

Содержание 5
Замятие страницы [x], очистите стандартный выходной лоток. [20y.xx]……………………196
Замятие страницы [x], снимите лоток 1 для очистки устройства двусторонней
печати. [23y.xx]……………………………………………………………………………………………………197
Замятие страницы [x], откройте лоток [x]. [24y.xx]…………………………………………………..198
Замятие страницы [x], очистите устройство ручной подачи. [25y.xx]………………………..199
Замятие страниц ([x]), откройте верхнюю крышку автоподатчика. [28y.xx]………………201
Поиск и устранение неисправностей…………………………………..202
Значение сообщений принтера……………………………………………………………………………….202
Устранение неполадок принтера……………………………………………………………………………218
Устранение проблем печати…………………………………………………………………………………..225
Устранение неполадок копирования………………………………………………………………………251
Устранение неполадок передачи факса…………………………………………………………………254
Устранение неполадок сканера……………………………………………………………………………..261
Встроенный веб-сервер не открывается…………………………………………………………………265
Обращение в службу технической поддержки………………………………………………………..267
Примечания………………………………………………………………………….268
Сведения о продукте……………………………………………………………………………………………..268
Замечание к выпуску……………………………………………………………………………………………..268
Потребляемая мощность………………………………………………………………………………………..272
Указатель……………………………………………………………………………..279
Сведения по технике безопасности 6
Сведения по технике безопасности
Подключайте кабель питания к легкодоступной и надежно заземленной сетевой розетке,
расположенной рядом с изделием.
Запрещается устанавливать и использовать данное устройство рядом с водой или в местах с высокой
влажностью.
ВНИМАНИЕ-ОПАСНОСТЬ ПОРАЖЕНИЯ ТОКОМ: Во время грозы запрещается использование
факсимильной связи. Запрещается устанавливать и использовать данное устройство или
выполнять электрические/кабельные подключения, например подключение факса, кабеля
питания или телефонного кабеля, во время грозы.
ВНИМАНИЕ-ВОЗМОЖНОСТЬ ТРАВМЫ: Для уменьшения риска нестабильной работы
оборудования загружайте каждый лоток отдельно. Остальные устройства подачи или лотки
держите закрытыми.
Обслуживание и ремонт, не описанные в документации пользователя, должны производиться
опытным специалистом по поддержке.
Это устройство разработано, проверено и признано соответствующим строгим международным
стандартам при использовании определенных компонентов данного изготовителя. Обеспечивающие
безопасность конструктивные особенности некоторых деталей не всегда являются очевидными.
Изготовитель не несет ответственности за последствия применения других запасных частей.
ВНИМАНИЕ-ОПАСНОСТЬ ПОРАЖЕНИЯ ТОКОМ: Убедитесь в том, что все внешние
подключения (например подключение сети Ethernet или телефона) установлены правильно с
использованием соответствующих портов.
ВНИМАНИЕ-ВОЗМОЖНОСТЬ ТРАВМЫ: В изделии используется лазерное излучение.
Использование органов управления, выполнение регулировок или любых других действий, не
описанных в настоящем руководстве, может привести к опасному облучению.
Процесс печати в данном изделии связан с нагреванием материала для печати, что может привести
к выделению из материала вредных веществ. Во избежание опасных последствий изучите раздел
руководства, содержащий рекомендации по выбору материалов для печати.
ВНИМАНИЕ-ГОРЯЧАЯ ПОВЕРХНОСТЬ: Возможен нагрев внутри принтера. Для уменьшения
опасности получения травмы из-за горячего компонента дождитесь остывания поверхности
перед тем, как до неё дотронуться.
ВНИМАНИЕ-ВОЗМОЖНОСТЬ ТРАВМЫ: Литиевая батарейка в данном устройстве не
подлежит замене. При неправильном выполнении замены существует опасность взрыва
литиевой батарейки. Не перезаряжайте, не разбирайте и не сжигайте литиевую батарейку.
Утилизируйте использованные литиевые батарейки в соответствии с указаниями изготовителя
батарейки или местными предписаниями.
При подключении данного устройства к телефонной сети общего пользования используйте только
телекоммуникационный кабель (RJ-11), прилагаемый к данному устройству или кабель 26 AWG или
большего сечения.

Сведения по технике безопасности 7
ВНИМАНИЕ-ВОЗМОЖНОСТЬ ТРАВМЫ: Не скручивайте, не сгибайте, не ударяйте и не
ставьте тяжелые предметы на кабель питания. Не подвергайте кабель питания нагрузке и не
допускайте его перетирания. Не защемляйте кабель питания между предметами мебели и
стенами. В противном случае возможно возгорание или поражение электрическим током.
Регулярно проверяйте кабель питания на наличие признаков подобных проблем. Перед
осмотром отключайте кабель питания от электрической розетки.
ВНИМАНИЕ-ОПАСНОСТЬ ПОРАЖЕНИЯ ТОКОМ: Во избежание поражения электрическим
током при чистке корпуса принтера, прежде чем продолжить, отсоедините кабель питания от
электророзетки и отсоедините все кабели принтера.
Используйте кабель питания, входящий в комплект поставки данного продукта или одобренный
изготовителем.
ВНИМАНИЕ-ОПАСНОСТЬ ОПРОКИДЫВАНИЯ: Конфигурации для напольной установки
требуют установки дополнительных устройств. При использовании нескольких
дополнительных устройств подачи необходимо устанавливать принтер на подставку или
основание. Если вы приобрели многофункциональный принтер (МФП) с функциями
сканирования, копирования и факсимильной передачи, вам могут потребоваться
дополнительные приспособления. Дополнительные сведения см. на веб-сайте по адресу:
www.lexmark.com/multifunctionprinters.
ВНИМАНИЕ-ОПАСНОСТЬ ПОРАЖЕНИЯ ТОКОМ: При доступе к плате контроллера или
установке дополнительного оборудования или устройств памяти после настройки принтера,
прежде чем продолжить, выключите принтер и отсоедините кабель питания от электрической
розетки. Если к принтеру подключены другие устройства, отключите их, а затем отсоедините
подключенные к принтеру кабели.
ВНИМАНИЕ-ВОЗМОЖНОСТЬ ТРАВМЫ: Принтер весит более 18 кг, поэтому для его
безопасного перемещения требуется не менее двух человек.
ВНИМАНИЕ-ВОЗМОЖНОСТЬ ТРАВМЫ: Прежде чем перемещать принтер, во избежание
травм и повреждений принтера выполняйте следующие указания.
• Выключите принтер с помощью выключателя и отсоедините кабель питания от электрической
розетки.
• Перед перемещением принтера отсоедините от него все кабели.
• Если установлен дополнительный лоток, сначала извлеките его из принтера. Чтобы удалить
дополнительный лоток, сдвиньте фиксатор с правой стороны лотка по направлению к передней
части лотка, пока не услышите щелчок.
• Поднимайте принтер за выемки для рук с обеих сторон принтера.
• Следите за тем, чтобы при опускании принтера ваши пальцы не оказались под принтером.
• Перед настройкой принтера убедитесь в наличии вокруг него достаточного свободного
пространства.
СОХРАНИТЕ ЭТИ ИНСТРУКЦИИ.
Знакомство с принтером 8
Знакомство с принтером
Поиск сведений о принтере
Какую информацию требуется
найти?
Указания по первоначальной
установке.
• Подключение принтера
• Установка программного
обеспечения принтера
Дополнительные инструкции по
установке и указания по использованию принтера:
• Выбор и хранение бумаги и
специальной бумаги
• Загрузка бумаги
• Настройка параметров
принтера
• Просмотр и печать
документов и фотографий
• Установка и использование
программного обеспечения
принтера
• Настройка принтера в сети
• Уход и обслуживание
принтера
• Поиск и устранение неполадок
Рекомендации по поиску
Документация по установке. Документация по установке включена в
комплект поставки принтера, а также ее можно найти на веб-сайте по
адресу
Руководство пользователя и Краткое справочное руководство доступны
на компакт-диске с программным обеспечением и документацией.
Для получения дополнительных сведений см. веб-сайт
http://support.lexmark.com.
http://support.lexmark.com.
Инструкции:
• Подключение принтера к сети
Ethernet
• Устранение проблем подклю-
чения принтера
Справка по использованию
программного обеспечения
принтера
Руководство по работе в сети. Откройте компакт-диск с программным
обеспечением и документацией и перейдите к:
Документация >Руководство пользователя и другие публикации >Руководство по работе в сети
Справка Windows или Mac – откройте программу принтера, а затем
выберите Справка.
?
Нажмите кнопку
Примечания.
для просмотра информации контекстной справки.
• Справка по программе устанавливается автоматически вместе с
программным обеспечением принтера.
• Программное обеспечение принтера находится в программной папке
принтера или на рабочем столе, в зависимости от операционной
системы.
Знакомство с принтером 9
Какую информацию требуется
найти?
Самая последняя вспомогательная информация, обновления
и поддержка клиентов.
• Документация
• Файлы драйверов для
загрузки
• Поддержка путем общения
через Интернет
• Поддержка по электронной
почте
• поддержка голосовой связи
Рекомендации по поиску
Веб-узел службы поддержки Lexmark –
Примечание. Выберите страну или регион, а затем выберите продукт для
просмотра соответствующего веб-узла поддержки.
Номера телефонов поддержки и часы работы в вашей стране или регионе
можно найти на веб-узле поддержки или на печатной гарантии, прилагаемой к принтеру.
Укажите следующие сведения (которые имеются в чеке продавца и на
задней панели принтера) и будьте готовы предоставить их при обращении
в службу поддержки. Эти сведения помогут быстрее ответить на вопрос:
http://support.lexmark.com
• Код типа механизма
• Серийный номер
• Дата покупки
• Магазин, где был приобретен принтер
Сведения о гарантии Сведения о гарантии отличаются в зависимости от страны или региона:
• На территории США— см. Заявление об ограниченной гарантии в
комплекте поставки данного принтера или на веб-
http://support.lexmark.com.
сайте
• В других странах и регионах — см. печатную документацию по гаран-
тийным обязательствам из комплекта поставки принтера.
Выбор места для установки принтера
ВНИМАНИЕ-ВОЗМОЖНОСТЬ ТРАВМЫ: Принтер весит более 18 кг (40 фунтов), поэтому для
его безопасного перемещения требуется не менее двух человек.
При выборе места для принтера, оставьте достаточное пространство для открывания лотков,
крышек и дверец. Если планируется установить дополнительные устройства, предусмотрите также
место и для них. Важно обеспечить выполнение следующих условий.
• Установите принтер рядом с надежно заземленной и легкодоступной розеткой.
• Убедитесь, что циркуляция воздуха отвечает требованиям стандарта ASHRAE в последней
редакции или стандарту 156 технического комитета по стандартизации.
• Необходимо подготовить горизонтальную, прочную и устойчивую поверхность.
• Принтер следует содержать в следующих условиях:
– в чистом состоянии, сухом и незапыленном месте;
– в принтере не должно оставаться скрепок;
– вдали от непосредственного воздействия воздушных потоков кондиционеров, нагревателей
или вентиляторов;
– не допуская воздействия прямого солнечного света, резких перепадов влажности или
температуры;
• Соблюдайте рекомендуемый температурный режим и избегайте колебаний.
Окружающая температура от 15,6 до 32,2°C (от 60 до 90°F)
Температура хранения от -40 до 60°C (от -40 до 140°F)
• Обеспечьте наличие рекомендованного свободного пространства вокруг принтера для
надлежащей вентиляции:
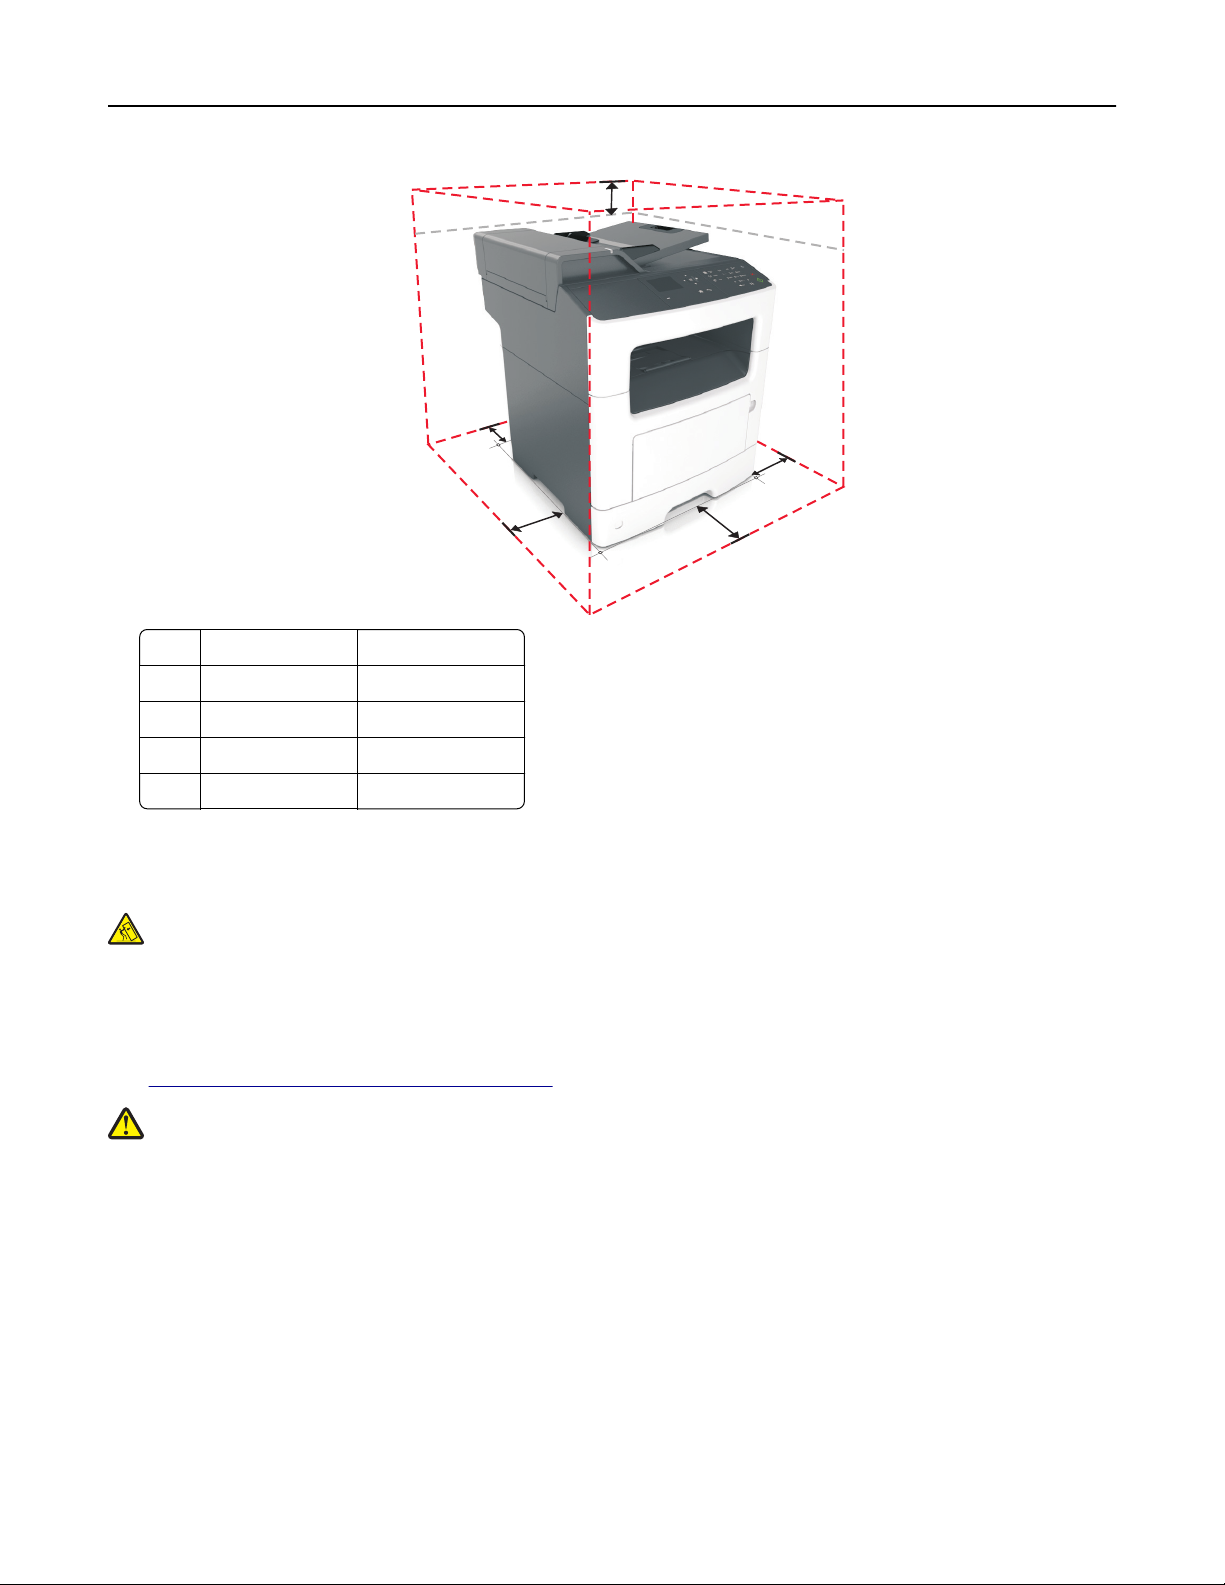
Знакомство с принтером 10
5
4
1
3
Правая сторона 30 см (12″)
1
2 Спереди 51 см (20″)
Левая сторона 20 см (8 дюймов)
3
4 Сзади 20 см (8 дюймов)
Верхний 54 см (21 дюйм)
5
1
2
Конфигурации принтера
ВНИМАНИЕ-ОПАСНОСТЬ ОПРОКИДЫВАНИЯ: Конфигурации для напольной установки
требуют установки дополнительных устройств для устойчивости. При использовании
нескольких дополнительных устройств подачи необходимо устанавливать принтер на
подставку или основание. Если вы приобрели многофункциональный принтер (МФП) с
функциями сканирования, копирования и факсимильной передачи, вам могут потребоваться
дополнительные приспособления. Дополнительные сведения см. на веб-сайте по адресу:
www.lexmark.com/multifunctionprinters.
ВНИМАНИЕ-ВОЗМОЖНОСТЬ ТРАВМЫ: Для уменьшения риска нестабильной работы
оборудования загружайте каждый лоток отдельно. Остальные устройства подачи или лотки
держите закрытыми.
Можно изменить конфигурацию принтера, установив один дополнительный лоток на 250 или 50
листов. Инструкции по установке дополнительного лотка см. в разделе «Установка дополнительных
лотков» на стр. 19.
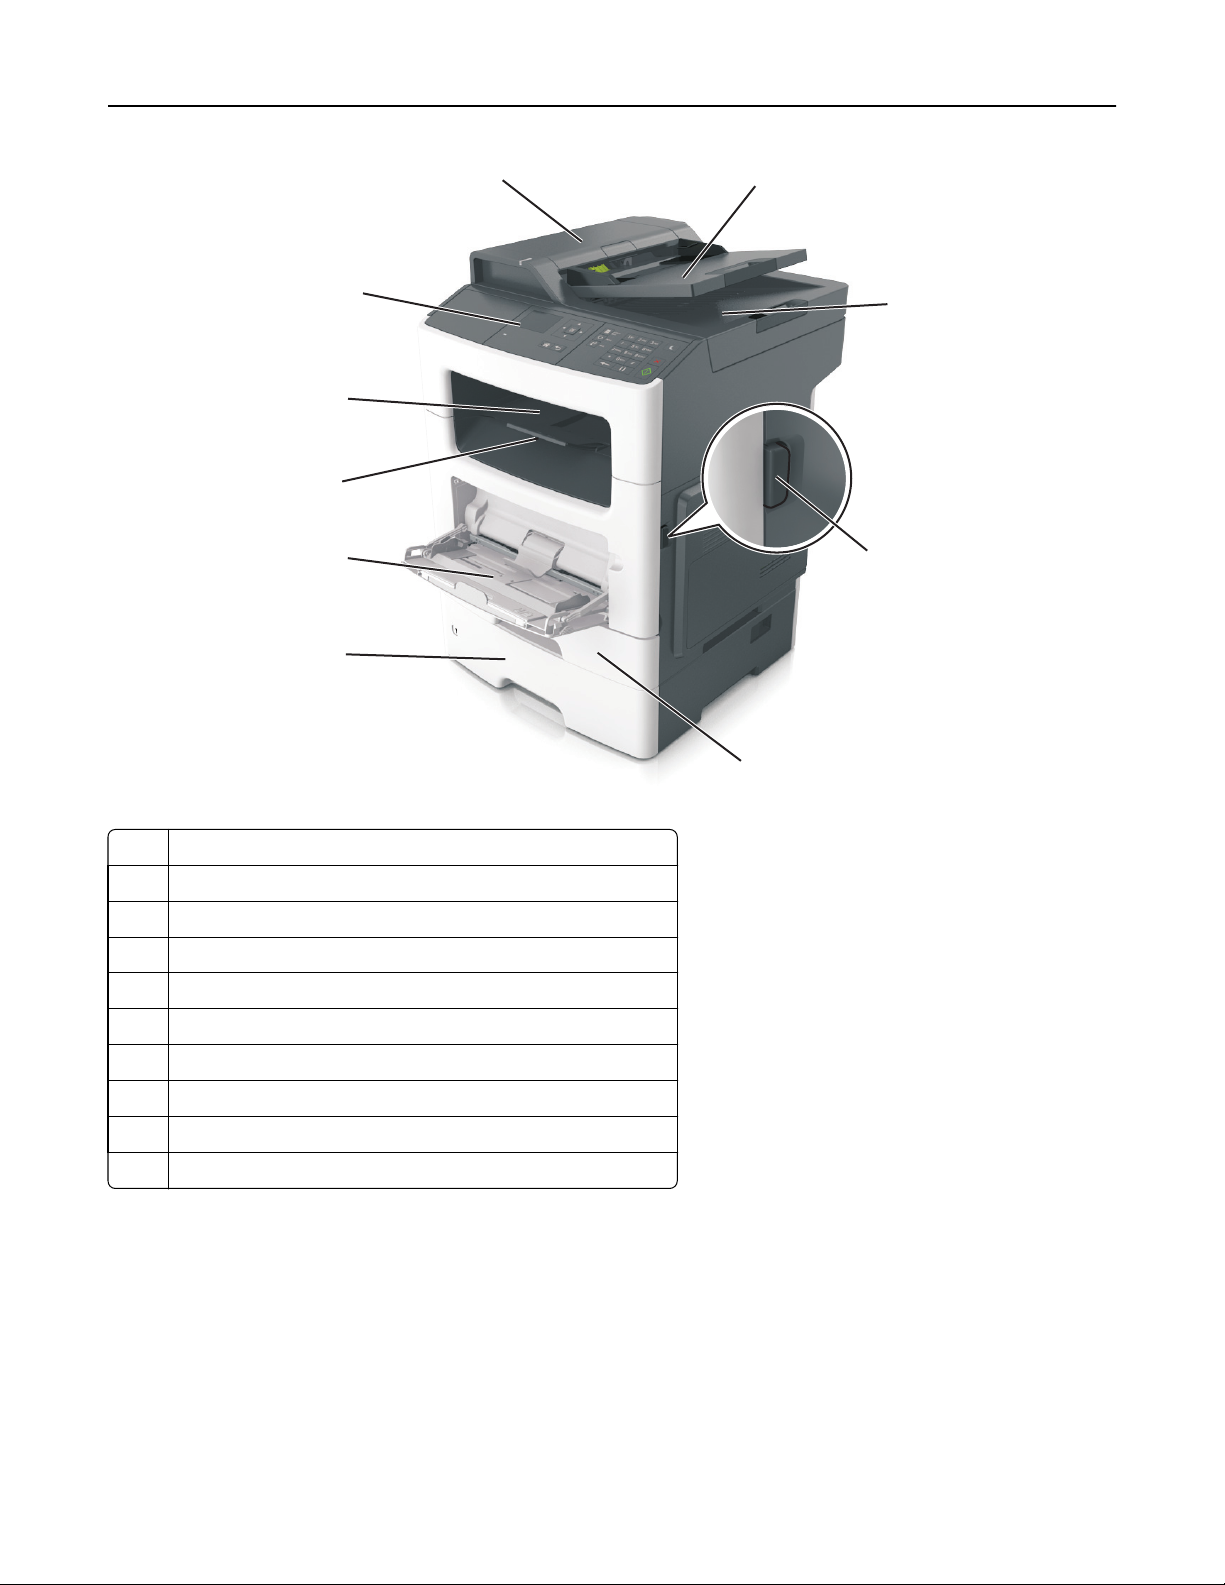
Знакомство с принтером 11
10
9
2
1
8
7
3
4
5
6
Панель управления принтера
1
2 Устройство автоматической подачи документов (УАП)
Лоток устройства автоматической подачи
3
Лоток УАП
4
5 Кнопка освобождения передней дверцы
Стандартный лоток на 250 листов
6
7 Дополнительный лоток на 250 или 550 листов
Многоцелевое устройство подачи на 50 листов
8
9 Фиксатор бумаги
Стандартный лоток
10
Основные функции сканера
• Быстрое копирование или настройка принтера для выполнения специальных заданий на
копирование.
• Отправка факса с помощью панели управления принтера.
• Одновременная передача факса нескольким получателям.
• Сканирование документов и передача их на компьютер, по адресу электронной почты или по
адресу FTP.
• Сканирование документов и передача их на другой принтер (PDF через FTP).
Знакомство с принтером 12
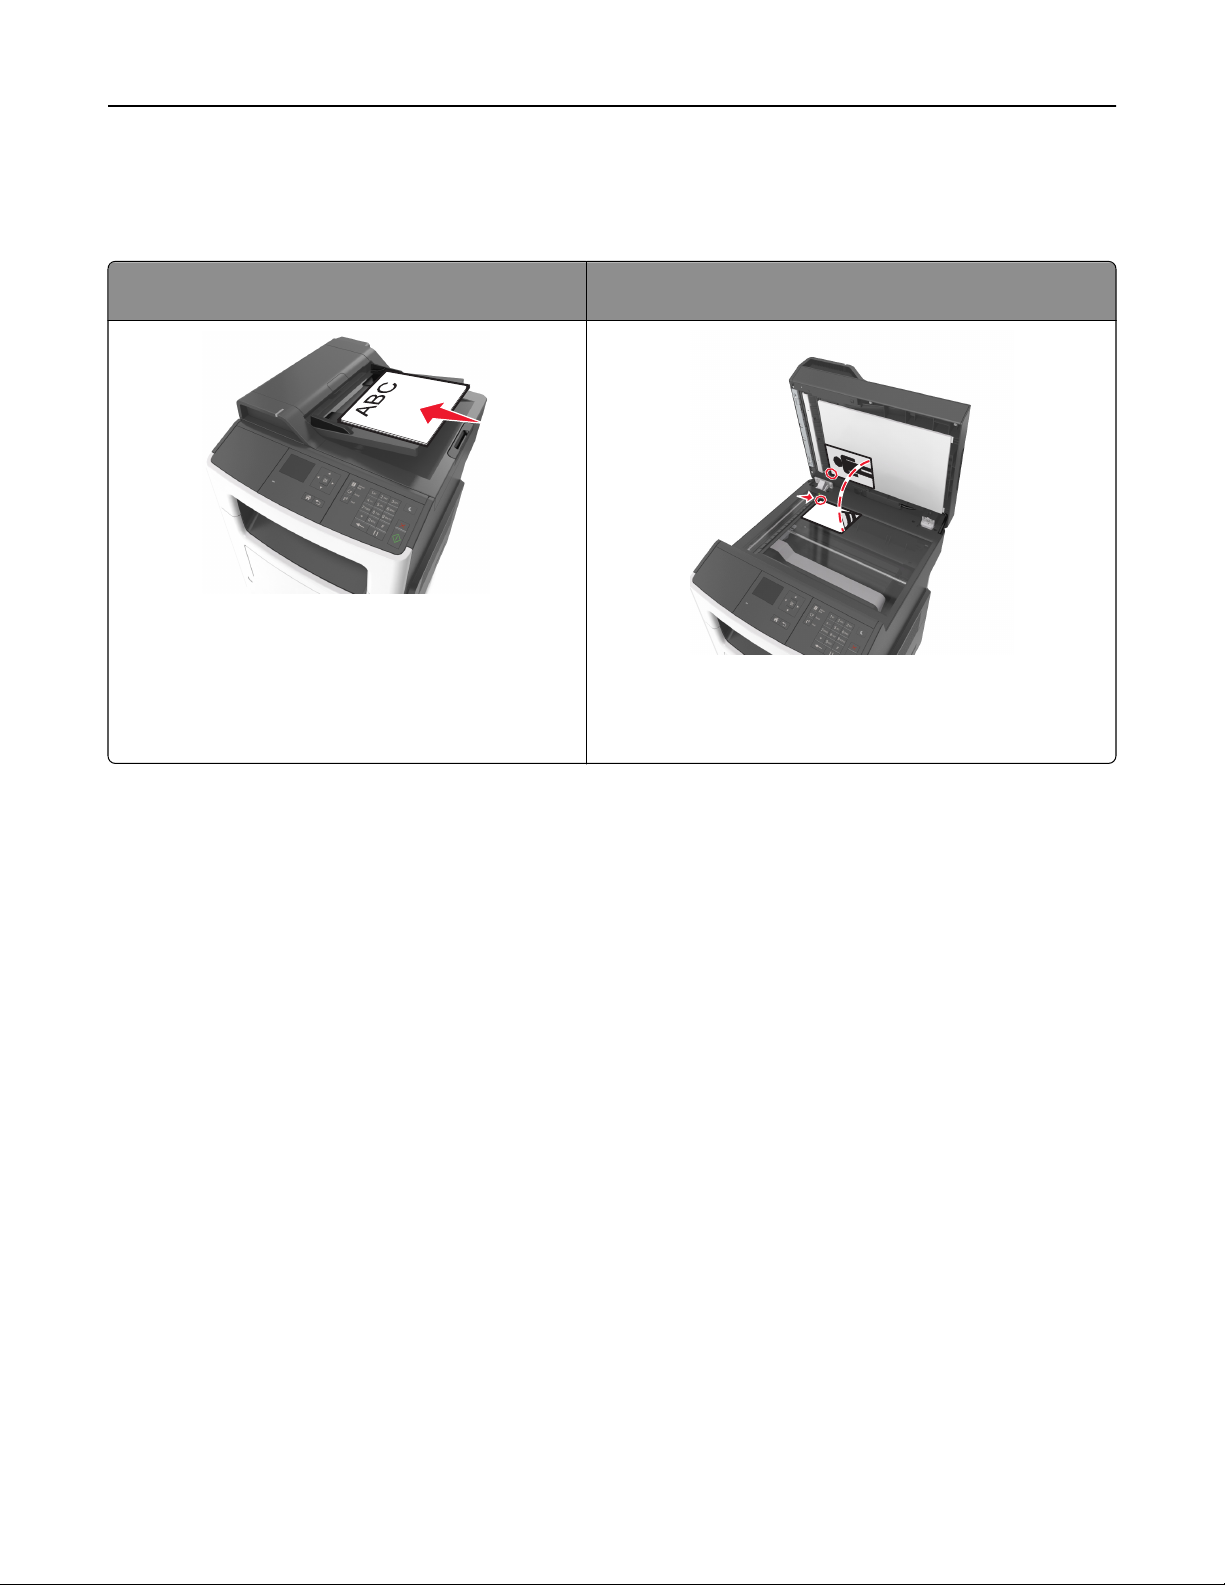
Общие сведения о УАПД и стекле экспонирования
сканера
Устройство автоматической подачи документов
(УАП)
При работе с многостраничными документами
рекомендуется использовать УАПД.
Примечание. В УАПД сканируется только одна
сторона листа.
Стекло экспонирования сканера
Стекло сканера используется для отдельных страниц,
небольших документов (например, открыток или
фотографий), прозрачных пленок, фотобумаги или
тонких листов (например, вырезок из журналов).
Использование УАПД
• Загрузите исходный документ в УАПД лицевой стороной вверх, короткой стороной вперед.
• В устройство автоматической подачи можно загружать не более 50 листов обычной бумаги.
• Размеры сканируемых изображений шириной от 105 x 148 мм (4,1 x 5,8 «) до 216 x 368 мм
(8,5 x 14,5 «).
• Плотность сканируемых документов от 52 до 120 г/м
• Не загружайте в лоток УАПД почтовые открытки, фотокарточки, документы небольшого
формата, прозрачные пленки, фотобумагу и документы на тонкой бумаге (например, вырезки из
журналов). Помещайте такие документы на стекло экспонирования сканера.
2
(от 14 до 32 фунтов).
Использование стекла экспонирования сканера
Использование стекла экспонирования сканера.
• Поместите документ на стекло сканера лицевой стороной вниз в угол, помеченный зеленой
стрелкой.
• Сканирование и копирование документов форматом до 216 x 296,9 мм (8,5 x 11,69″).
• Можно копировать книги толщиной до 12,7 мм (0,5 «).
Знакомство с принтером 13
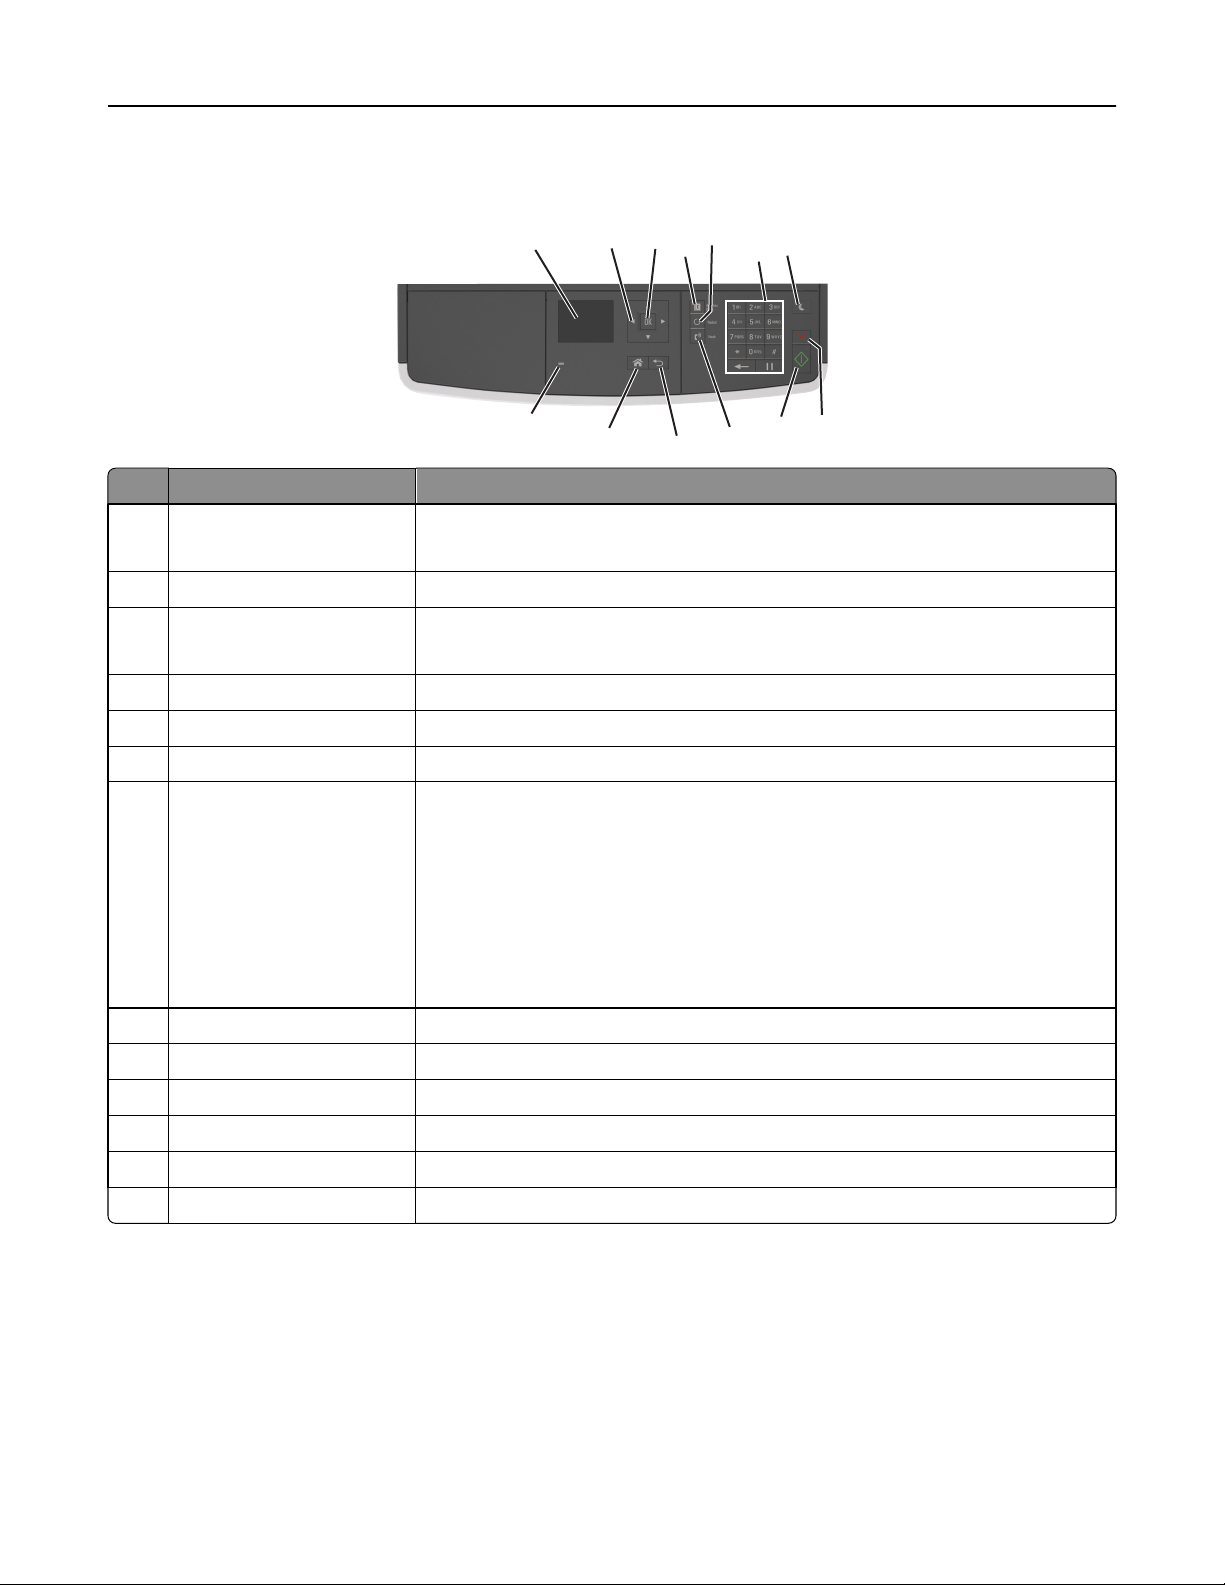
Использование панели управления принтера
5
3
4
11
10
7
6
8
9
Элемент Назначение
1 Отобразить
• Просмотр состояния принтера и сообщений.
13
1
2
12
• Настройка и работа с принтером.
2 кнопки со стрелками Прокрутка списка меню вверх и вниз или влево и вправо.
кнопка «Выбрать»
3
• Выбор параметров меню.
• Сохранение настроек.
Кнопка «Адресная книга» Просмотр всех сохраненных адресов.
4
5 Кнопка «Повтор» Просмотр последнего набранного номера.
Клавиатура Введите числа, буквы или символы.
6
7 Кнопка «Сон» Переход в спящий режим или режим гибернации.
Выполните следующие действия для выведения принтера из спящего
режима.
• Нажмите любую кнопку.
• Откройте крышку или дверцу.
• Передайте задание на печать с компьютера.
• Выполнение сброса настроек по включению питания с помощью выклю-
чателя питания.
кнопка «Отмена» Отмена всех операций, выполняемых на принтере.
8
9 Кнопка «Пуск» Запуск задания в зависимости от выбранного режима.
кнопка «Факс» Отправка факсов.
10
11 кнопка «Назад» Возврат к предыдущему экрану.
Кнопка «Домашняя» Возвращение к начальному экрану.
12
Световой индикатор Проверка состояния принтера.
13
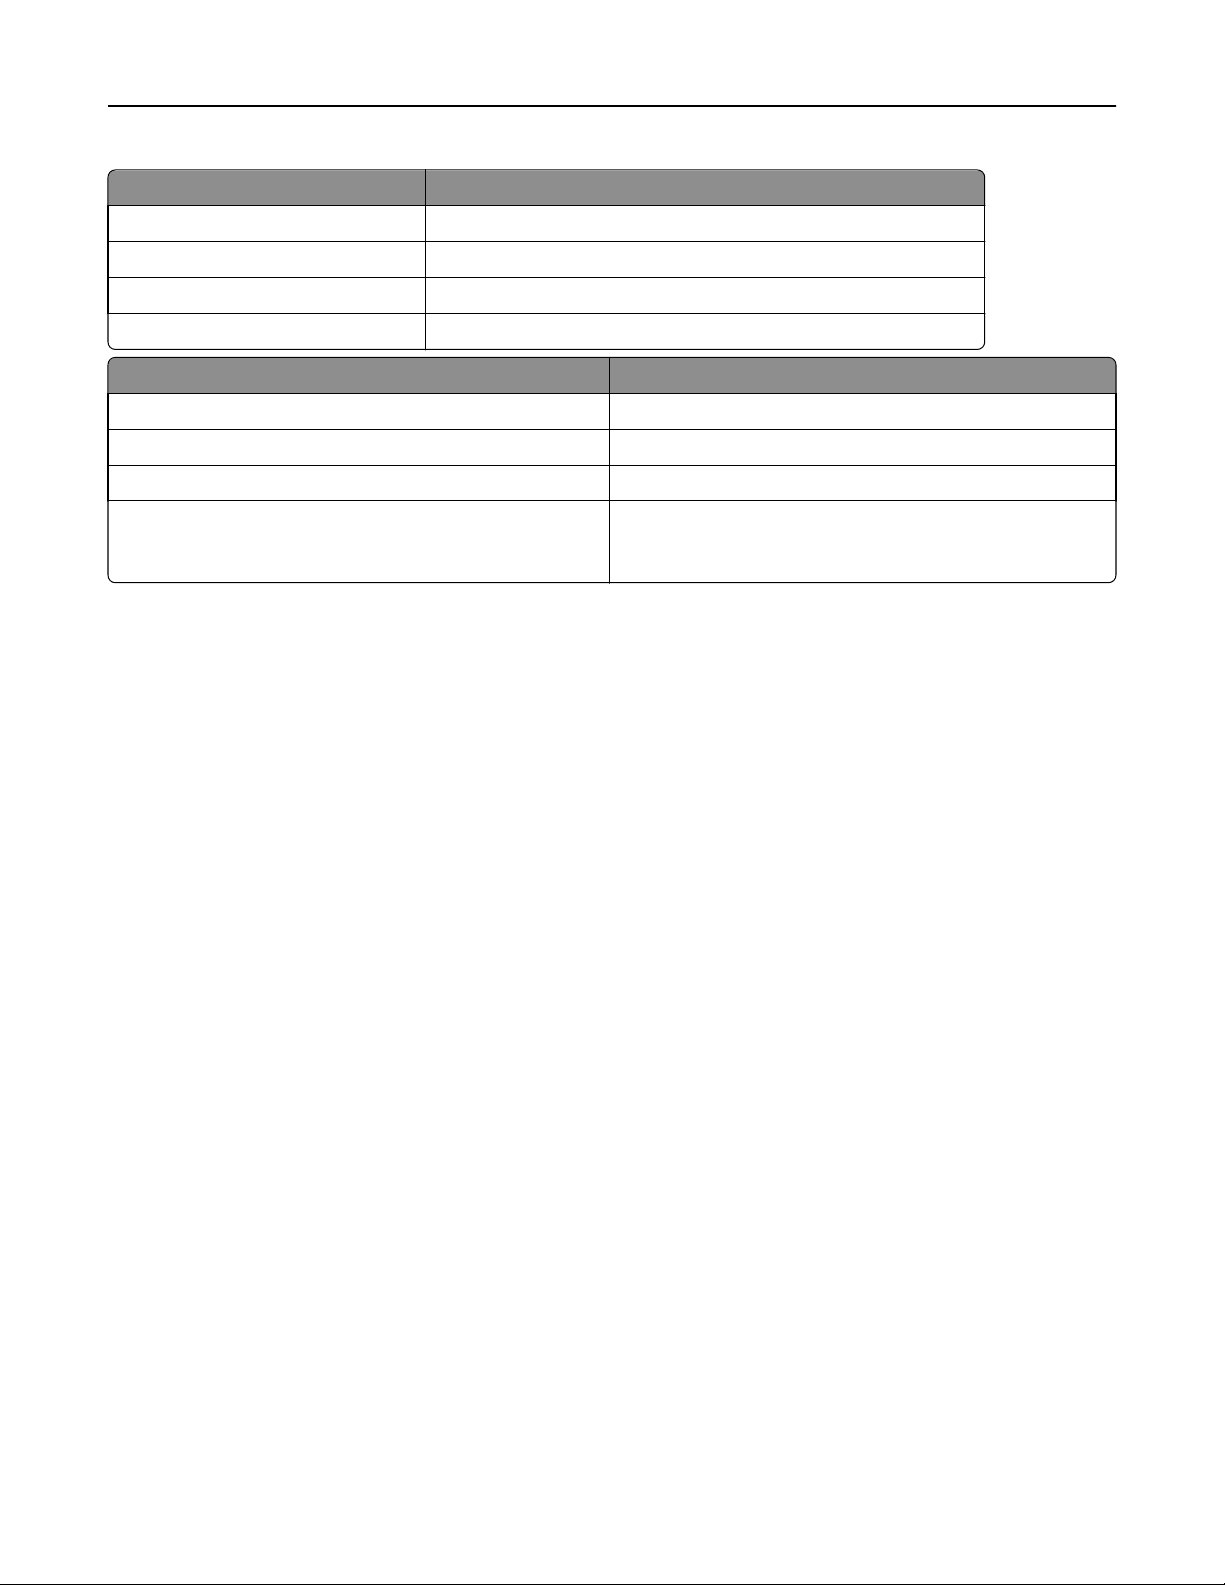
Знакомство c цветами света кнопки перехода в
спящий режим и цветами индикатора
Цвета света кнопки перехода в спящий режим и цвета индикатора на панели управления принтера
обозначают состояние принтера.
Знакомство с принтером 14
Световой индикатор Состояние принтера
Выкл. Принтер отключен или находится в режиме гибернации.
Мигает зеленым цветом Принтер прогревается, обрабатывает данные или печатает.
Постоянно горит зеленым цветом Принтер включен, но простаивает.
Мигает красным цветом Требуется вмешательство пользователя.
Свет кнопки перехода в спящий режим Состояние принтера
Выкл. Принтер выключен или в состоянии готовности.
Постоянно горит желтым цветом Принтер находится в режиме сна.
Мигает желтым Принтер входит в или выходит из режима гибернации.
Мигает желтым 0,1 секунды, затем полностью
перестает гореть в течение 1,9 секунды, и так попеременно.
Принтер находится в режиме гибернации.
Дополнительная настройка принтера 15
Дополнительная настройка принтера
Установка внутренних дополнительных устройств
ВНИМАНИЕ-ОПАСНОСТЬ ПОРАЖЕНИЯ ТОКОМ: При доступе к плате контроллера или
установке дополнительного оборудования или устройств памяти после настройки принтера,
прежде чем продолжить, выключите принтер и отсоедините кабель питания от электрической
розетки. Если к принтеру подключены другие устройства, отключите их, а затем отсоедините
подключенные к принтеру кабели.
Имеющиеся внутренние дополнительные устройства
Карты памяти
•
Флэш-память
• Шрифты
Доступ к плате контроллера
ВНИМАНИЕ-ОПАСНОСТЬ ПОРАЖЕНИЯ ТОКОМ: При доступе к плате контроллера или
установке дополнительного оборудования или устройств памяти после настройки принтера,
прежде чем продолжить, выключите принтер и отсоедините кабель питания от электрической
розетки. Если к принтеру подключены другие устройства, отключите их, а затем отсоедините
подключенные к принтеру кабели.
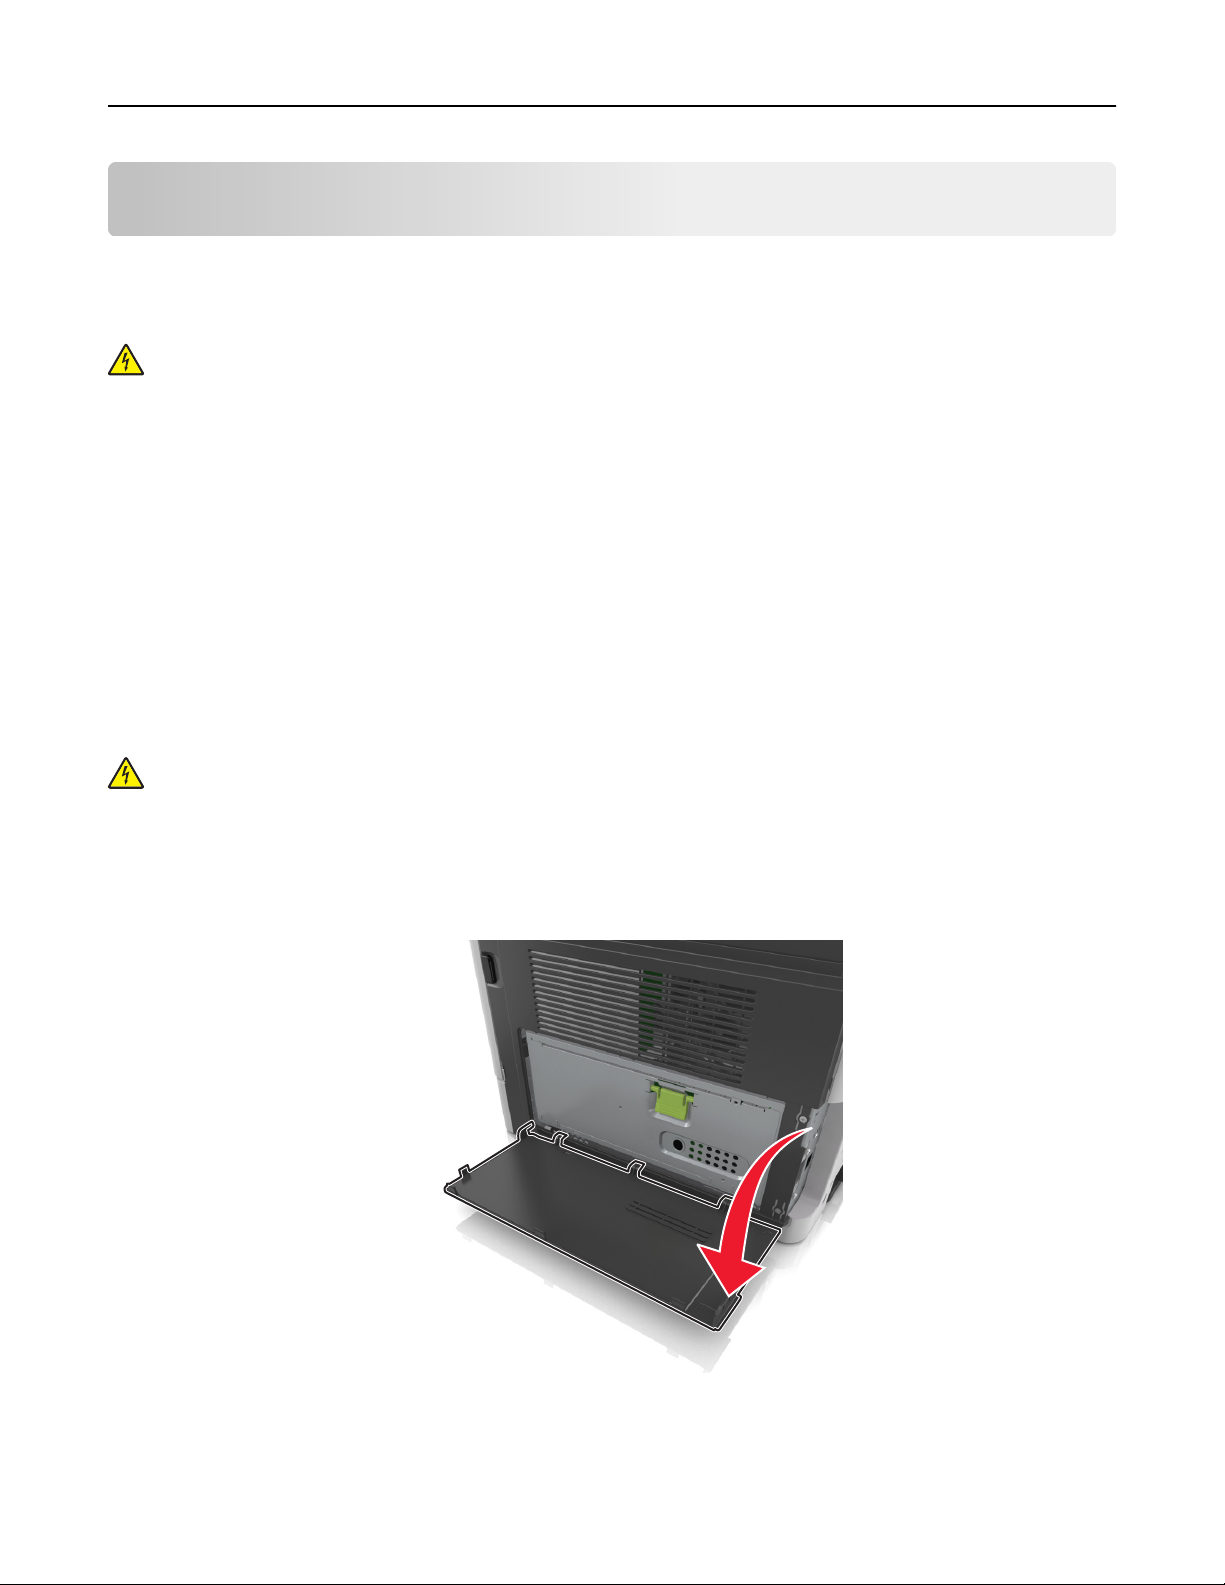
1 Откройте дверцу доступа к плате контроллера.
Дополнительная настройка принтера 16
2 Откройте защитный чехол платы контроллера, воспользовавшись зеленой рукояткой.
1
2
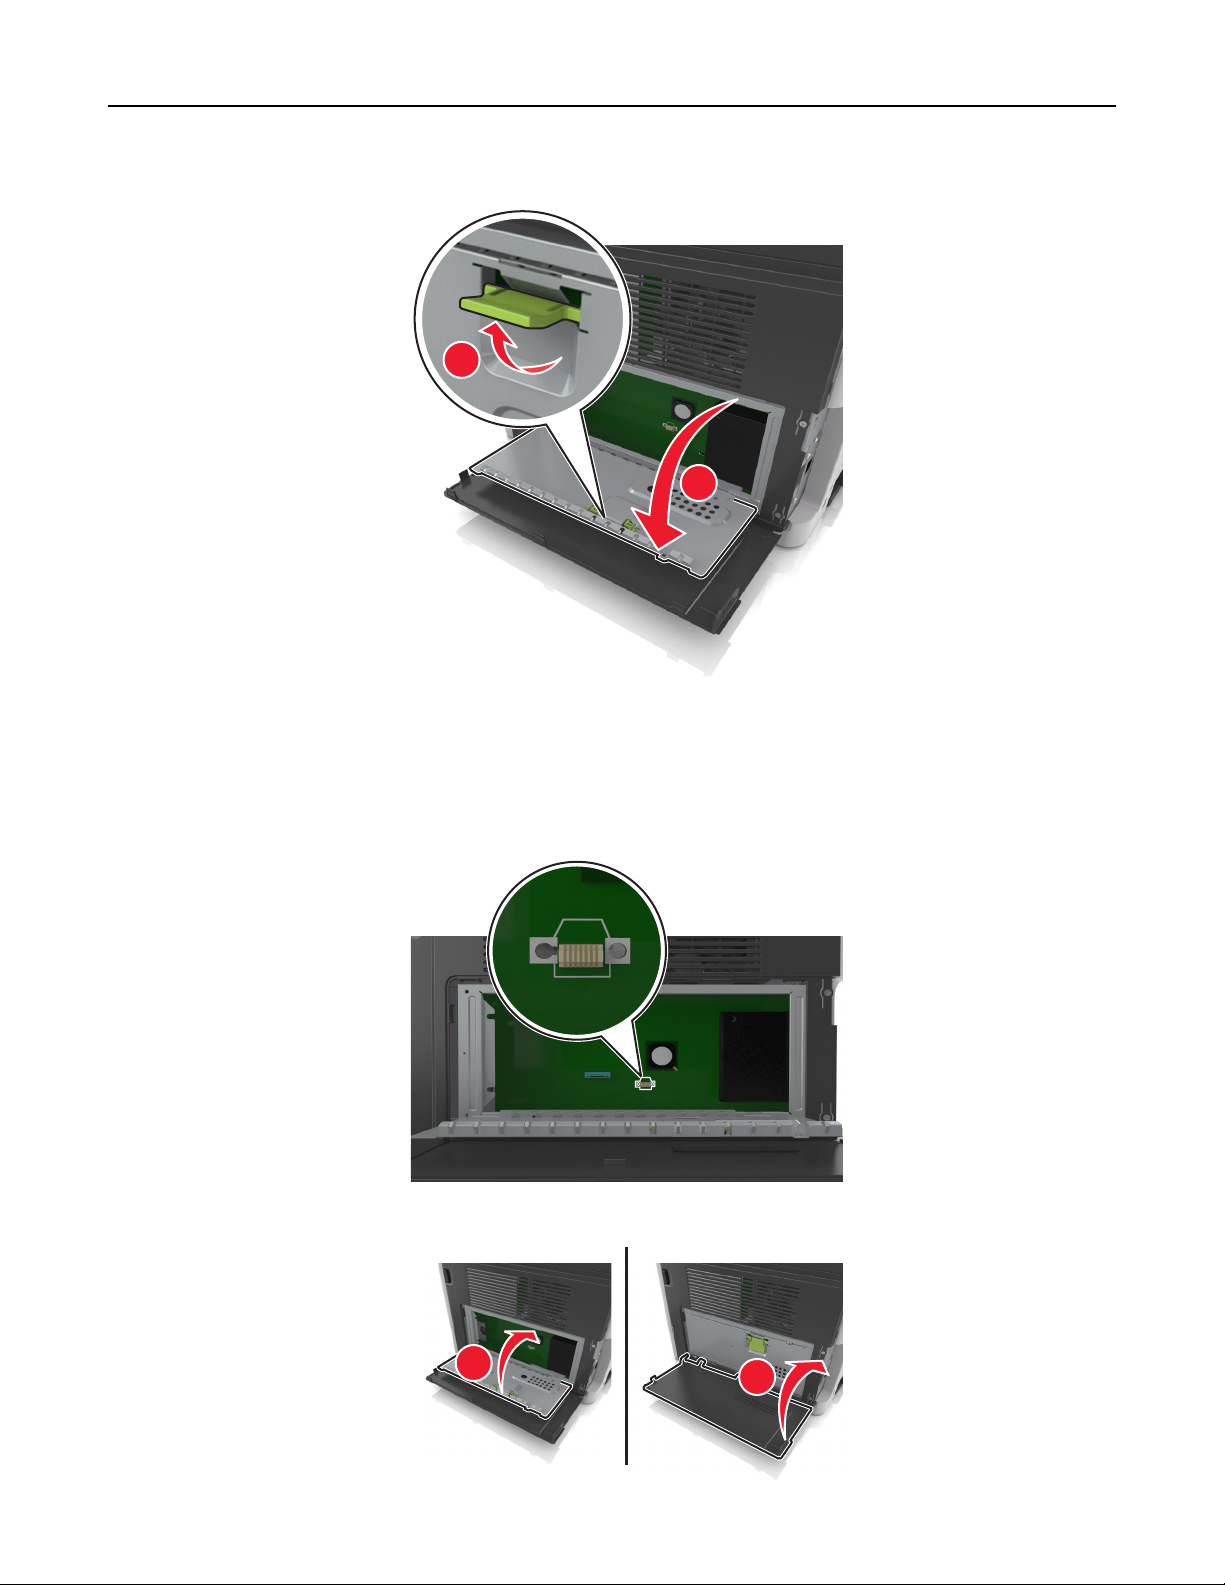
3 Для поиска разъёма дополнительной платы обратитесь к приведенному далее рисунку.
ПРЕДУПРЕЖДЕНИЕ. Возможность повреждения: Электронные компоненты системной
платы могут выйти из строя под действием статического электричества. Перед тем как
прикоснуться к какому-либо электронному компоненту платы контроллера или разъему,
дотроньтесь рукой до какой-нибудь металлической детали принтера.
4 Закройте чехол, а затем закройте дверцу доступа.
1
2
Дополнительная настройка принтера 17
Установка дополнительной платы
ВНИМАНИЕ-ОПАСНОСТЬ ПОРАЖЕНИЯ ТОКОМ: При доступе к плате контроллера или
установке дополнительного оборудования или устройств памяти после настройки принтера,
прежде чем продолжить, выключите принтер и отсоедините кабель питания от электрической
розетки. Если к принтеру подключены другие устройства, отключите их, а также отсоедините
подключенные к принтеру кабели.
ПРЕДУПРЕЖДЕНИЕ. Возможность повреждения: Электронные компоненты платы контроллера
быстро выходят из строя под воздействием статического электричества. Перед тем, как
прикоснуться к какому-либо электронному компоненту системной платы или разъему, дотроньтесь
рукой до какой-нибудь металлической детали принтера.
1 Обеспечьте доступ к системной плате.
Для получения дополнительных сведений, см. «Доступ к плате контроллера» на стр. 15.
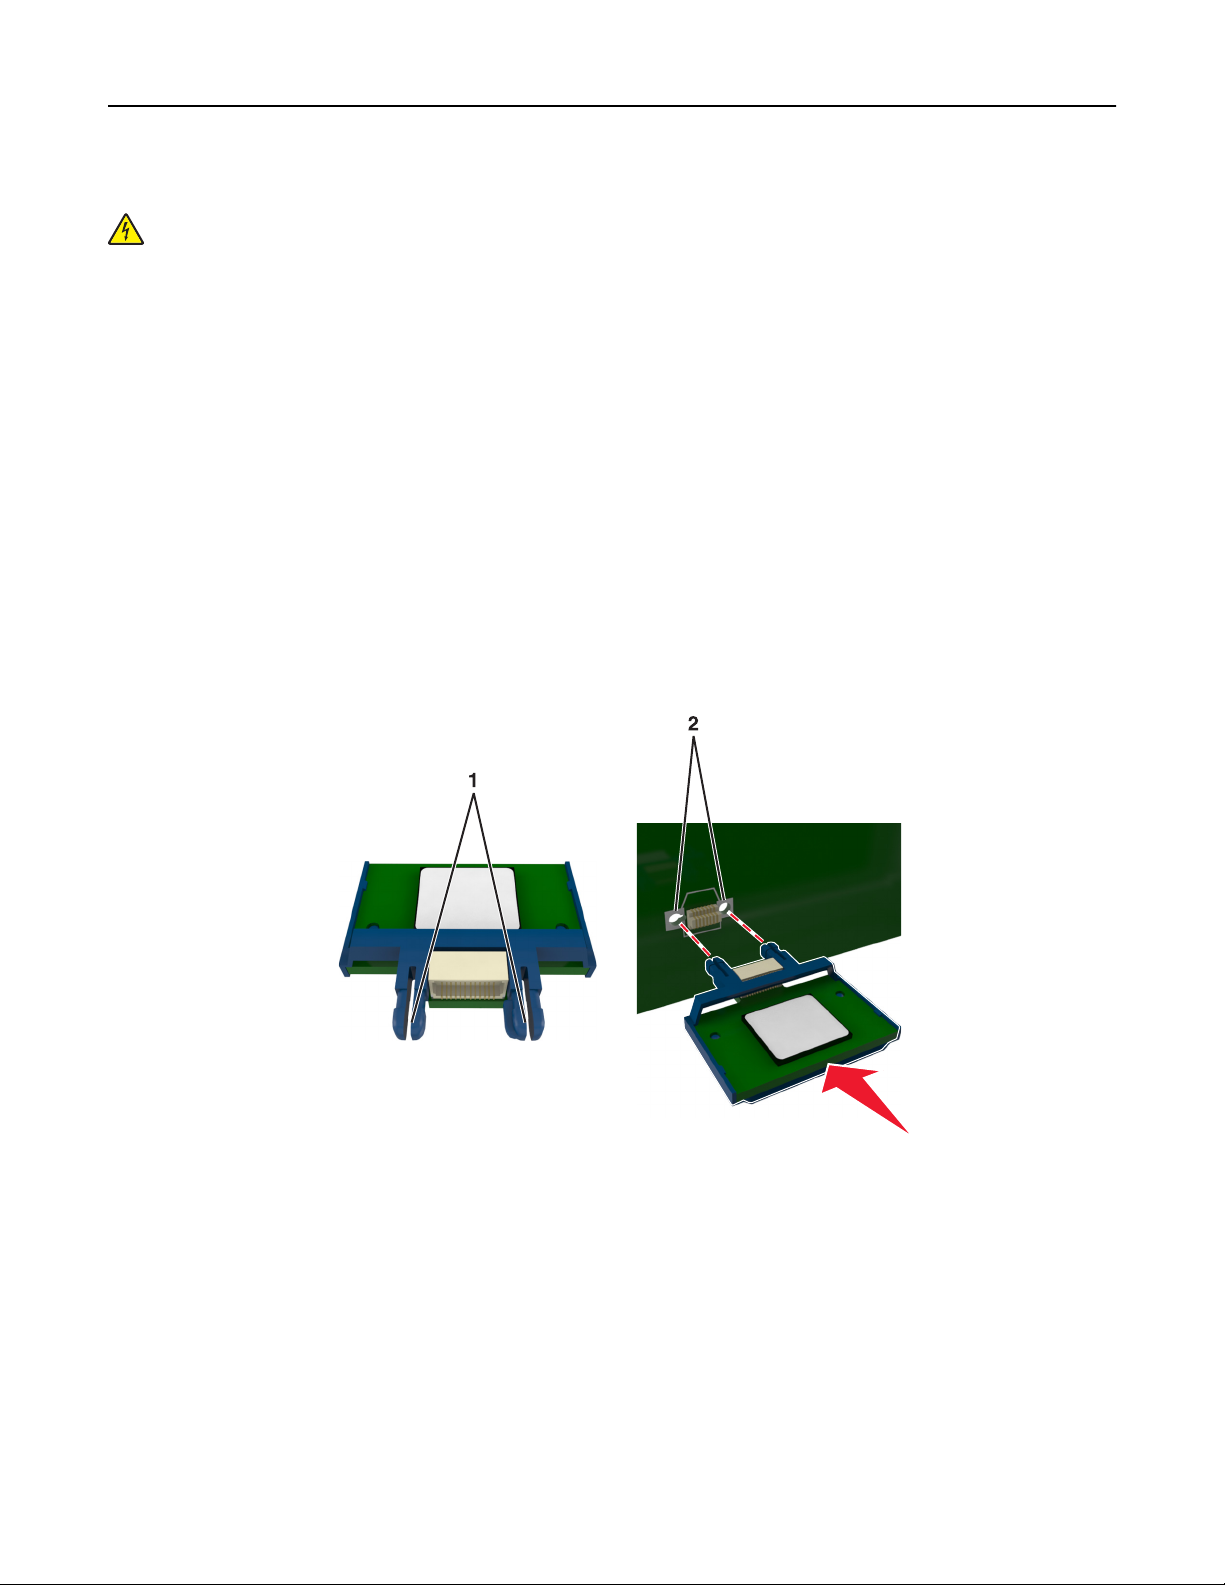
2 Распакуйте дополнительную плату.
ПРЕДУПРЕЖДЕНИЕ. Возможность повреждения: Не прикасайтесь к контактам разъема,
расположенным вдоль края модуля.
3 Возьмите плату за края и совместите пластмассовые штыри (1) на плате с отверстиями (2) на
плате контроллера.
Дополнительная настройка принтера 18
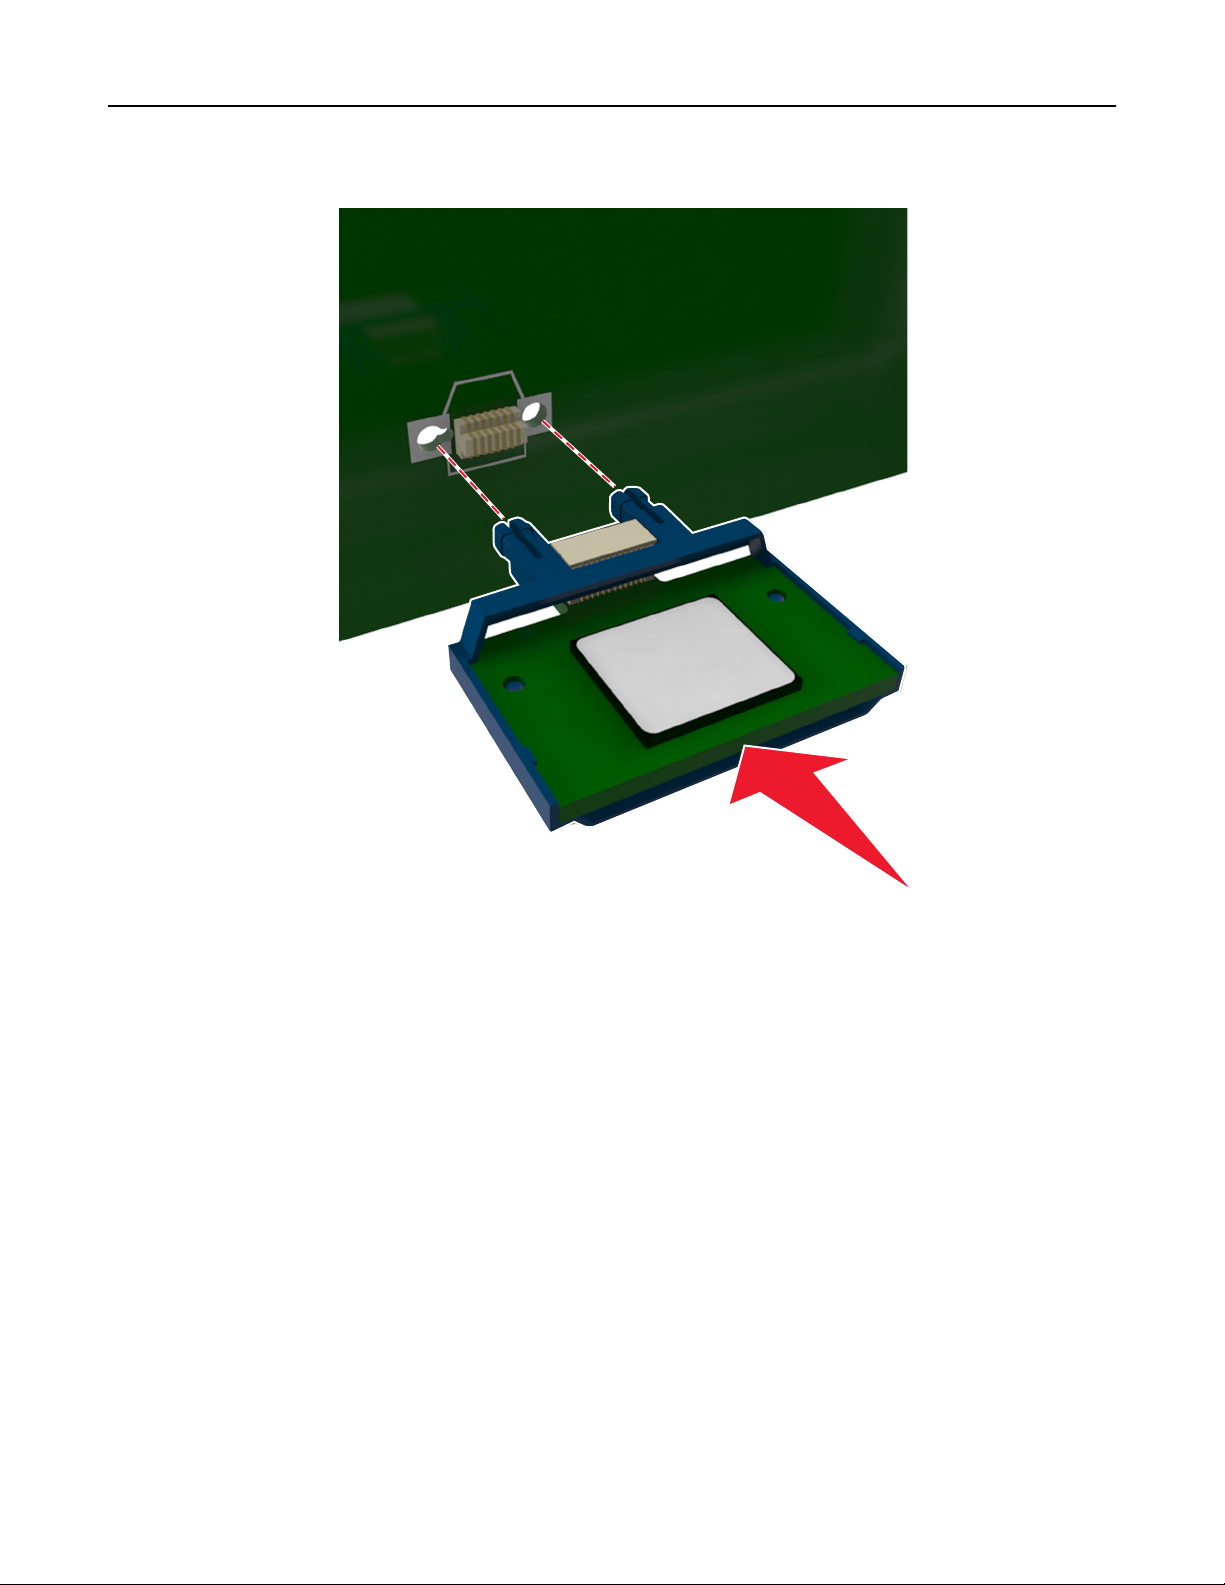
4 С усилием вставьте плату в разъем, как показано на рисунке.
ПРЕДУПРЕЖДЕНИЕ. Возможность повреждения: Неправильная установка платы может
привести к повреждению платы и платы контроллера.
Примечание. Разъем платы микропрограммного обеспечения должен соприкасаться с
системной платой по всей длине и располагаться в одной плоскости с ней.
5 Закройте защитный чехол платы контроллера и дверцу доступа к плате контроллера.
Примечание. После установки программного обеспечения принтера и всех дополнительных
устройств, возможно, потребуется вручную добавить дополнительные устройства в драйвере
принтера, чтобы сделать их доступными для заданий печати. Для получения дополнительных
сведений см. раздел «Обновление списка дополнительных устройств в драйвере принтера» на
стр. 24.
Дополнительная настройка принтера 19
Установка дополнительных аппаратных модулей
Порядок установки
ВНИМАНИЕ-ВОЗМОЖНОСТЬ ТРАВМЫ: Принтер весит более 18 кг (40 фунтов), поэтому для
его безопасного перемещения требуется не менее двух человек.
ВНИМАНИЕ-ОПАСНОСТЬ ПОРАЖЕНИЯ ТОКОМ: При доступе к плате контроллера или
установке дополнительного оборудования или устройств памяти после настройки принтера,
прежде чем продолжить, выключите принтер и отсоедините кабель питания от электрической
розетки. Если к принтеру подключены другие устройства, отключите их, а затем отсоедините
подключенные к принтеру кабели.
ВНИМАНИЕ-ОПАСНОСТЬ ОПРОКИДЫВАНИЯ: Для устанавливаемых на полу конфигураций
требуются дополнительные принадлежности в целях обеспечения устойчивости. При
использовании нескольких дополнительных устройств подачи необходимо устанавливать
принтер на подставку или основание. Если вы приобрели многофункциональный принтер
(МФП) с функциями сканирования, копирования и факсимильной передачи, вам могут
потребоваться дополнительные приспособления. Дополнительные сведения см. на веб-сайте
по адресу:
www.lexmark.com/multifunctionprinters.
Установка принтера и дополнительных устройств производится в следующем порядке.
• Напольная подставка принтера
• Дополнительный лоток на 250 или 550 листов
• Принтер
Более подробная информация по установке подставки принтера, дополнительного лотка на 250 или
550 листов, или шайбы находится в инструкции по установке, поставляемой с конкретным
устройством.
Установка дополнительных лотков
ВНИМАНИЕ-ВОЗМОЖНОСТЬ ТРАВМЫ: Принтер весит более 18 кг (40 фунтов), поэтому для
его безопасного перемещения требуется не менее двух человек.
ВНИМАНИЕ-ОПАСНОСТЬ ПОРАЖЕНИЯ ТОКОМ: При доступе к плате контроллера или
установке дополнительного оборудования или устройств памяти после настройки принтера,
прежде чем продолжить, выключите принтер и отсоедините кабель питания от электрической
розетки. Если к принтеру подключены другие устройства, отключите их, а затем отсоедините
подключенные к принтеру кабели.
ВНИМАНИЕ-ОПАСНОСТЬ ОПРОКИДЫВАНИЯ: Для устанавливаемых на полу конфигураций
требуются дополнительные принадлежности в целях обеспечения устойчивости. При
использовании нескольких дополнительных устройств подачи необходимо устанавливать
принтер на подставку или основание. Если вы приобрели многофункциональный принтер
(МФП) с функциями сканирования, копирования и факсимильной передачи, вам могут
потребоваться дополнительные приспособления. Дополнительные сведения см. на веб-сайте
по адресу:
www.lexmark.com/multifunctionprinters.
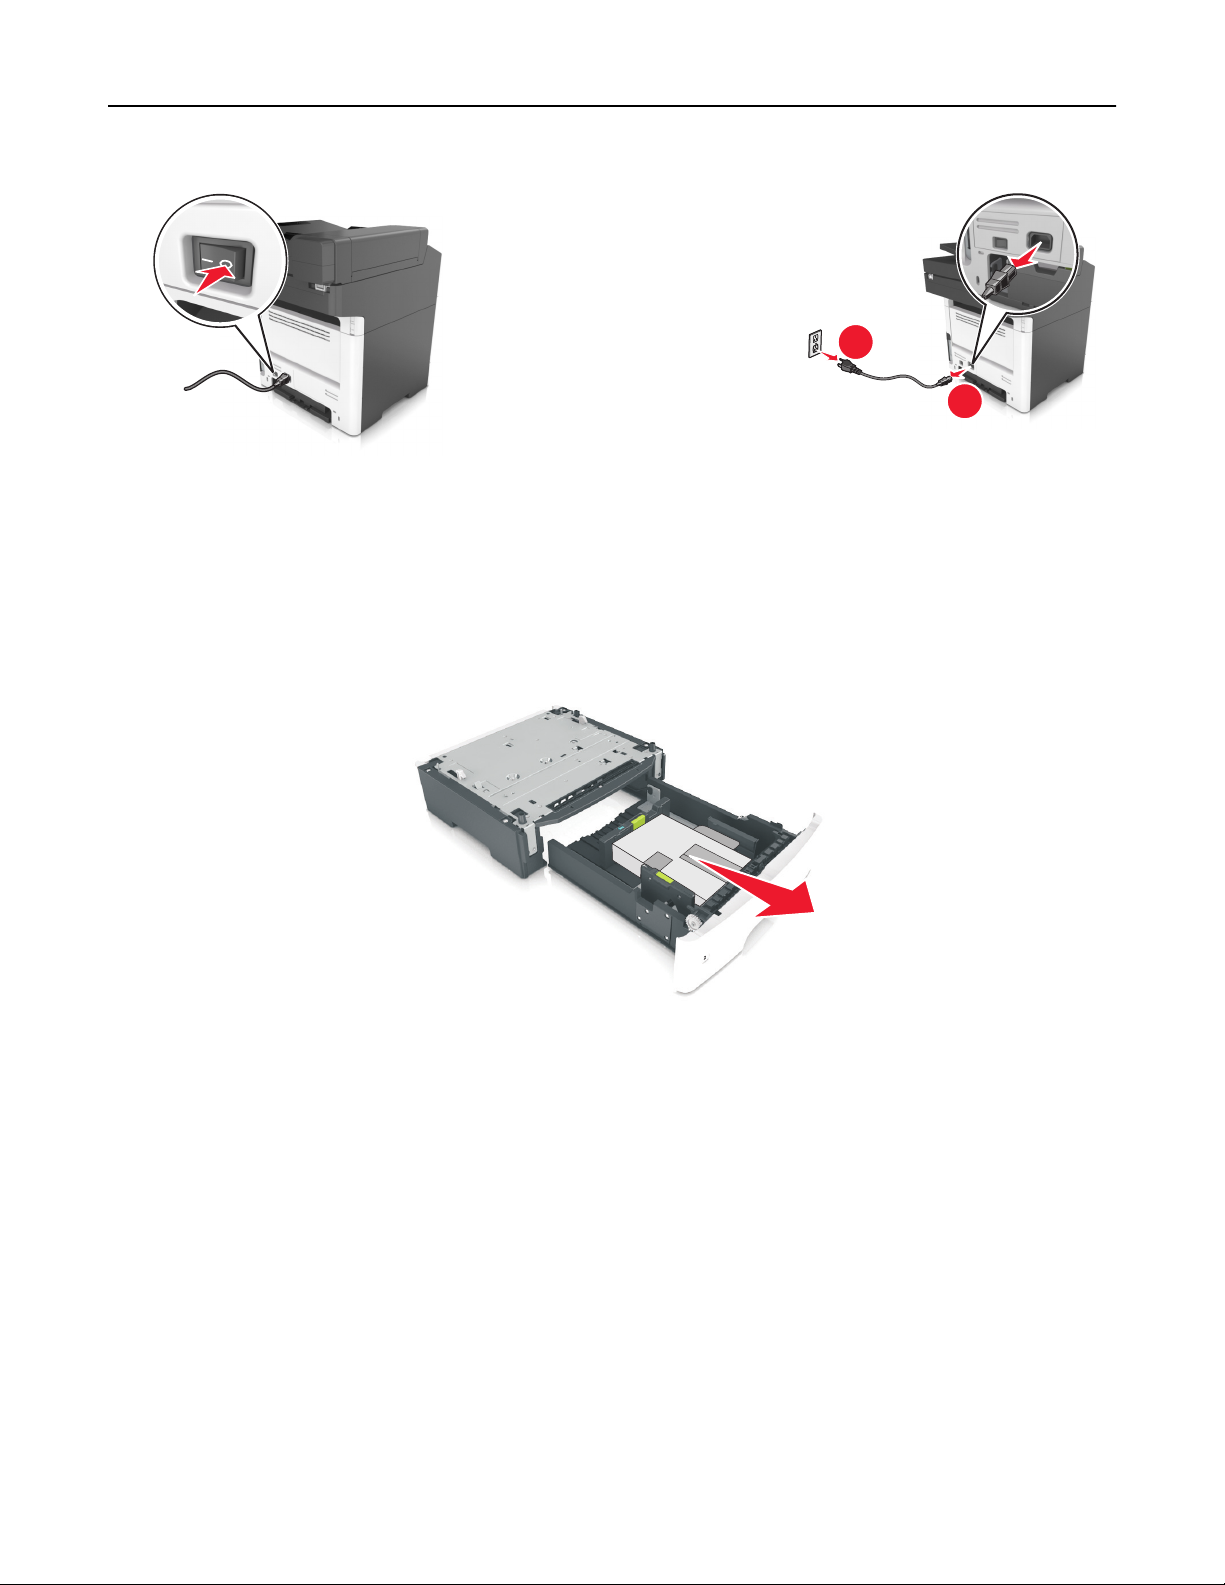
1 Выключите принтер с помощью выключателем питания и отсоедините кабель питания от розетки
электросети.
Дополнительная настройка принтера 20
1
2
2 Извлеките лоток и удалите все упаковочные материалы.
3 Извлеките лоток с основания.
4 Удалите упаковочный материал и ленту из лотка.
5 Вставьте лоток в основание.
6 Поместите лоток около принтера.
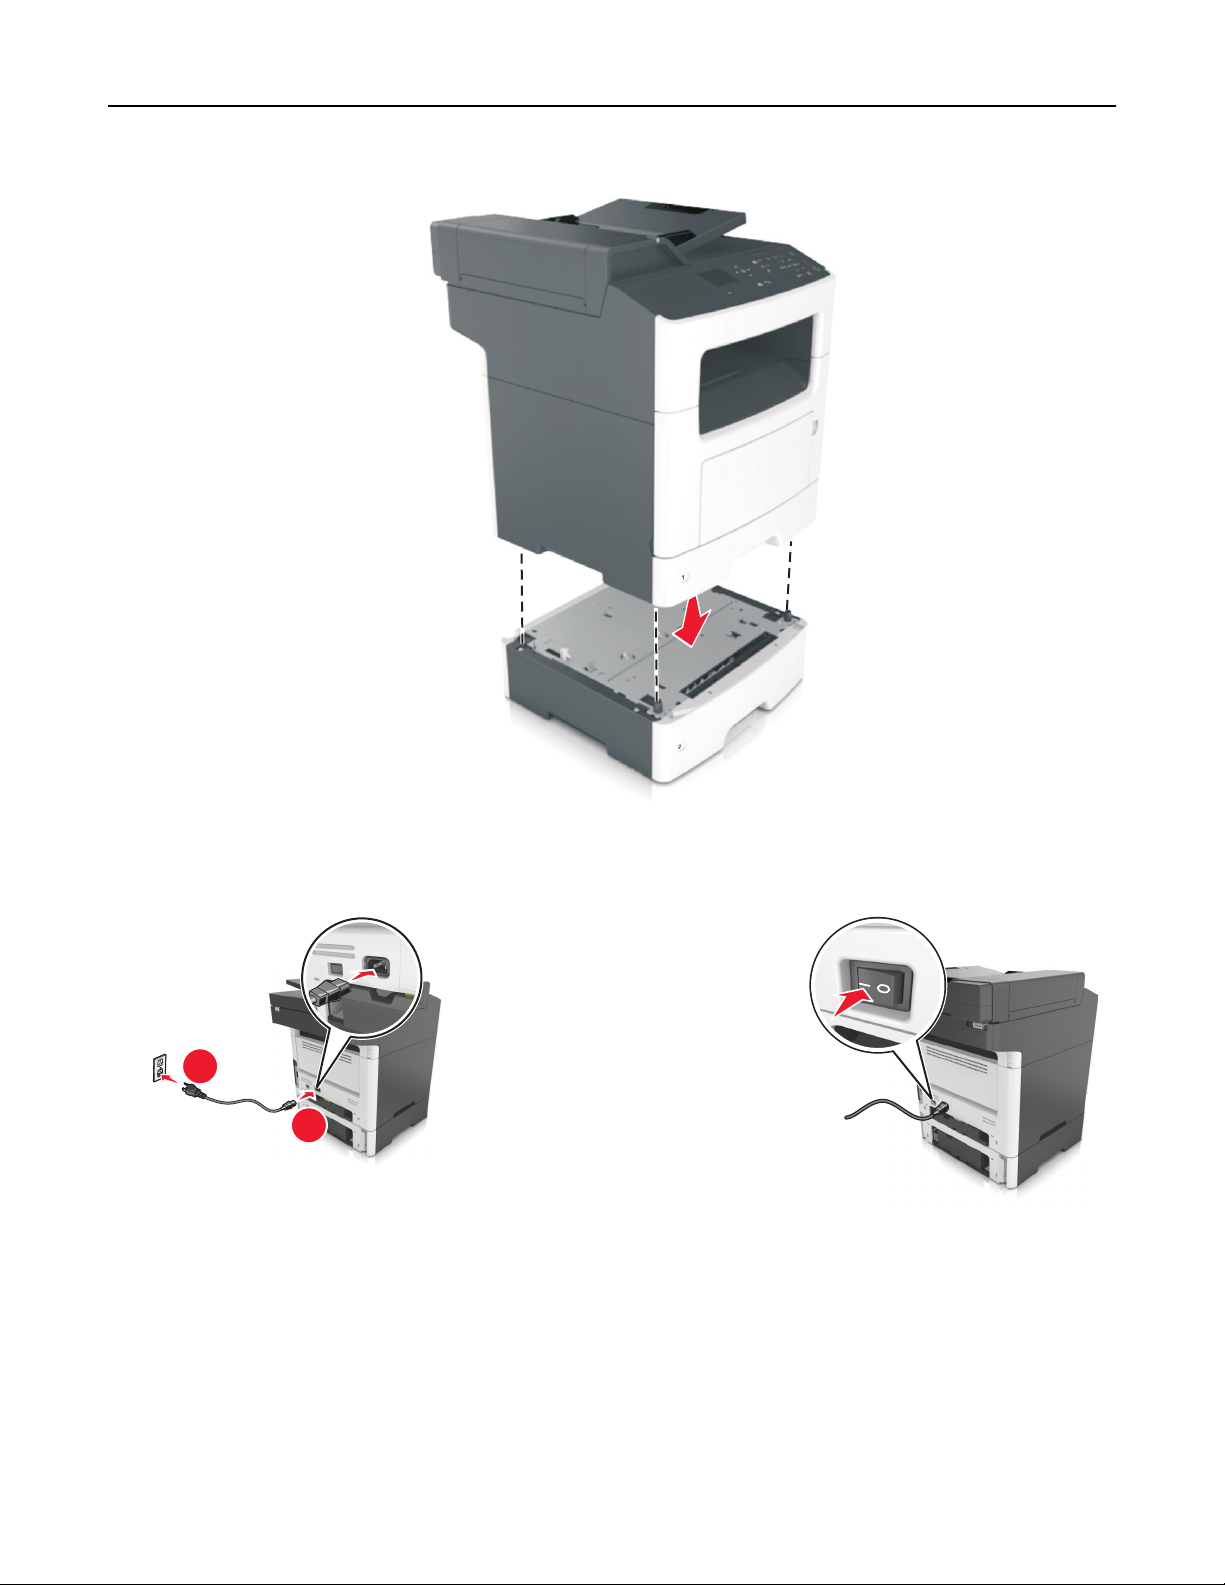
7 Совместите принтер и лоток и медленно опустите принтер на свое место.
Примечание. При установке друг на друга дополнительные лотки защелкиваются.
Дополнительная настройка принтера 21
8 Подсоедините кабель питания к принтеру, затем к электрической розетке с правильным
заземлением и включите принтер.
2
1
Примечания.
• После установки программного обеспечения принтера и всех дополнительных аппаратных
устройств, возможно, потребуется вручную добавить дополнительные устройства в
драйвере принтера, чтобы сделать их доступными для заданий печати. Для получения
дополнительных сведений см. раздел «Обновление списка дополнительных устройств в
драйвере принтера» на стр. 24.
• Чтобы удалить дополнительные лотки, сдвиньте фиксатор с правой стороны принтера в
направлении передней панели принтера, пока не услышите щелчок, а затем снимайте
установленные друг на друге лотки по одному сверху вниз.
Дополнительная настройка принтера 22
Подключение кабелей
ВНИМАНИЕ-ОПАСНОСТЬ ПОРАЖЕНИЯ ТОКОМ: Не пользуйтесь факсом во время грозы. Не
настраивайте устройство, не работайте с факсом и не подсоединяйте никакие электрические
провода или кабели (питания или телефонной линии) во время грозы.
Подключите принтер к компьютеру с помощью кабеля USB или к сети с помощью кабеля Ethernet.
Убедитесь в совпадении следующего.
• Символа USB на кабеле с символом USB на принтере
• Соответствующий кабель Ethernet с портом Ethernet
ПРЕДУПРЕЖДЕНИЕ. Возможность повреждения: Не прикасайтесь к кабелю USB, сетевому
адаптеру, а также к указанным участкам на принтере, когда выполняется печать или
сканирование. Может произойти потеря данных или возникнуть неисправность.
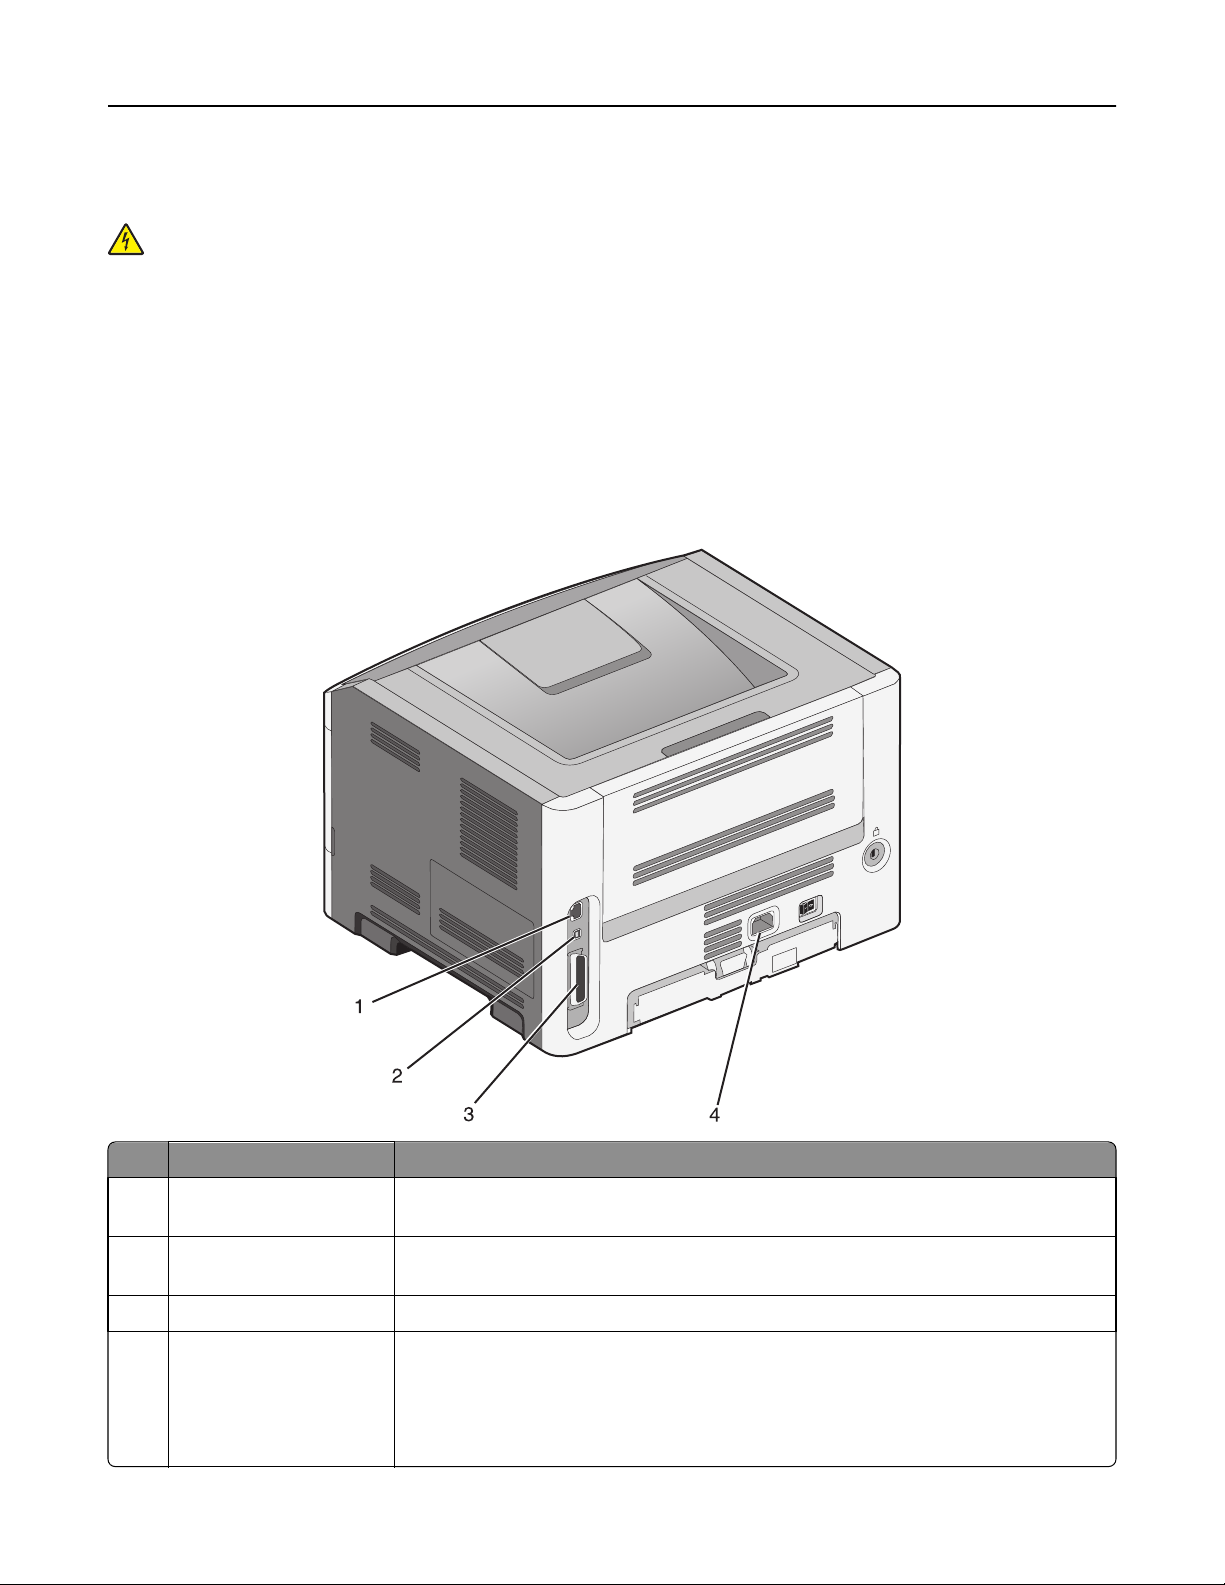
Использовать Чтобы
Разъем кабеля питания
1
принтера
Переключатель
2
питания
Порт Ethernet Подключение принтера к сети Ethernet.
3
4 Порт EXT Подключение дополнительных устройств (телефона или автоответчика) к
Подсоедините принтер к правильно заземленной электрической розетке.
Включение или отключение принтера.
принтеру и телефонной линии. Этот порт используется при отсутствии
выделенной линии факса для принтера и только в том случае, если этот способ
подключения поддерживается в вашей стране или регионе.
Примечание. Для доступа к адаптеру снимите заглушку.

Дополнительная настройка принтера 23
Использовать Чтобы
5 Порт LINE Подключите принтер к рабочей телефонной линии через стандартную розетку
(RJ-11), DSL фильтр, VoIP адаптер или любой другой адаптер, который
позволяет получить доступ к телефонной линии для передачи и приема
факсов.
Порт USB принтера Подключите принтер к компьютеру.
6
7 Гнездо замка безопас-
ности
Прикрепите замок, который будет закреплять принтер на месте.
Установка ПО принтера
Установка программного обеспечения принтера
Примечания.
• Если ранее на этом компьютере уже было установлено программное обеспечение принтера, но
требуется переустановить его, удалите сначала текущую версию программного обеспечения.
• Перед установкой программного обеспечения принтера закройте все открытые программы.
1 Получите копию установочного пакета программы.
• С компакт-диска с программным обеспечением и документацией, поставляющегося в
комплекте с принтером.
• С веб-узла компании:
перейдите на веб-узел
ПОДДЕРЖКА & ЗАГРУЗКИ > выберите принтер > выберите операционную систему >
загрузите установочный пакет программы.
www.lexmark.com, а потом выберите следующее.
2 Выполните одно из следующий действий.
• При использовании компакт-диска с программным обеспечением и документацией вставьте
компакт-диск и подождите, пока не появится диалоговое окно установки.
Если диалоговое окно установки не появится, выполните одно из следующих действий.
В системе Windows 8
В окне поиска введите run, а затем выполните команду:
список приложений >Run > введите D:\setup.exe >OK.
В системе Windows 7 или более ранних версий
а
Щелкните или нажмите кнопку Пуск и выберите пункт Выполнить.
б В диалоговом окне «Начать поиск» или «Выполнить» введите D:\setup.exe.
в Нажмите Enter или ОК.
Примечание. D соответствует букве имени дисковода компакт-дисков или дисков DVD.
В системе Macintosh:
Нажмите на значок компакт-диска на рабочем столе.

Дополнительная настройка принтера 24
• Если используется программа установки программного обеспечения, загруженная с
Интернета, дважды нажмите эту программу, сохраненную на компьютере. Подождите, пока
не появится диалоговое окно с возможностью выбора типа установки, а потом нажмите
Установить.
Примечание. При появлении запроса о запуску установочного пакета программы нажмите
Запустить.
3 Нажмите Установить и следуйте указаниям на экране компьютера.
Обновление списка дополнительных устройств в драйвере
принтера
После установки аппаратных устройств, возможно, потребуется вручную добавить дополнительные
устройства в драйвере принтера, чтобы сделать их доступными для использования.
Для пользователей Windows
1 Откройте папку «Принтеры».
В системе Windows 8
Нажмите чудо-кнопку «Поиск», введите выполнить и выберите:
Список приложений >Выполнить >, введите управлять принтерами >, нажмите OK
В системе Windows 7 или более ранних версиях
а Щелкните или нажмите кнопку Пуск, а затем нажмите Выполнить.
б В диалоговом окне «Начать поиск» или «Выполнить» введите управлять принтерами.
в Нажмите ВВОД или нажмите ОК.
2 В зависимости от устройства выполните одно из следующих действий:
• Нажмите и удерживайте принтер, который необходимо обновить.
• Щелкните правой кнопкой принтер, который нужно обновить.
3 В появившемся меню выполните одно из следующих действий:
• В системе Windows 7 или более поздних версиях выберите Свойства принтера.
• В более ранних версиях выберите Свойства.
4 Откройте вкладку Настройка.
5 Выполните одно из следующий действий.
• Щелкните Обновить сейчас ‑ Опрос принтера.
• В разделе параметров конфигурации добавьте все установленные дополнительные
устройства.
6 Нажмите Применить.

Дополнительная настройка принтера 25
Для пользователей Macintosh
1 В меню Apple найдите один из таких пунктов:
• Настройки системы >Печать и сканирование > выберите принтер >Опции и расходные
материалы >Драйвер
• Настройки системы >Печать и факс > выберите принтер >Опции и расходные
материалы >Драйвер
2 Добавьте все установленные дополнительные устройства и нажмите кнопку ОК.
Работа в сети
Примечания.
• Перед настройкой принтера в беспроводной сети приобретите адаптер беспроводной сети
TM
MarkNet
беспроводной сети см. прилагаемые к нему инструкции по установке.
N8352. Для получения дополнительных сведений об установке адаптера
• Имя SSID (Идентификатор беспроводной сети) — это имя, назначаемое для беспроводной
сети. Wireless Encryption Protocol (WEP), Wi-Fi Protected Access (WPA) и WPA2 – это типы
защиты, которые используются в сети.
Подготовка к настройке принтера в сети Ethernet
Чтобы настроить принтер для использования в сети Ethernet, соберите следующие сведения перед
началом настройки:
Примечание. Если IP-адреса назначаются в сети компьютерам и принтерам автоматически,
продолжите установку принтера.
• Допустимый уникальный IP-адрес, который должен использовать принтер в сети
• Сетевой шлюз
• Маска сети
• Псевдоним для принтера (необязательный)
Примечание. Псевдоним принтера упрощает идентификацию принтера в сети. Можно
использовать псевдоним принтера по умолчанию или назначить легко запоминающееся имя.
Кроме того, потребуется кабель Ethernet для подключения принтера к сети и свободный порт, с
помощью которого принтер можно физически подключить к сети. По возможности используйте
новый сетевой кабель, чтобы предотвратить возможные проблемы, связанные с поврежденным
кабелем.

Дополнительная настройка принтера 26
Установка принтера в сети Ethernet
Для пользователей ОС Windows
1
Получите копию установочного пакета программы.
• С компакт-диска с программным обеспечением и документацией, поставляющегося в
комплекте с принтером.
• С веб-узла компании:
перейдите на веб-узел
ПОДДЕРЖКА & ЗАГРУЗКИ > выберите принтер > выберите операционную систему >
загрузите установочный пакет программы.
2 Выполните одно из следующий действий.
• При использовании компакт-диска с программным обеспечением и документацией вставьте
компакт-диск и подождите, пока не появится диалоговое окно установки.
Если диалоговое окно установки не появится, выполните одно из следующих действий.
В системе Windows 8
В окне поиска введите run, а затем выполните команду:
Список приложений >Run > введите D:\setup.exe >OK
www.lexmark.com, а потом выберите следующее.
В ОС Windows 7 или более ранних версиях
а Щелкните или нажмите кнопку Пуск и выберите пункт Выполнить.
б В диалоговом окне «Начать поиск» или «Выполнить» введите D:\setup.exe.
в Нажмите Enter или ОК.
Примечание. D соответствует букве имени дисковода компакт-дисков или дисков DVD.
• Если используется программа установки программного обеспечения, загруженная с
Интернета, дважды нажмите эту программу, сохраненную на компьютере. Подождите, пока
не появится диалоговое окно с возможностью выбора типа установки, а потом нажмите
Установить.
Примечание. При появлении запроса о запуску установочного пакета программы нажмите
Запустить.
3 Нажмите Установить и следуйте указаниям на экране компьютера.
4 Выберите подключение Ethernet, затем нажмите Продолжить.
5 Подключите соответствующий кабель Ethernet, если это требуется инструкцией.
6 Выберите принтер в списке, а затем нажмите кнопку Продолжить.
Примечание. Если настроенный принтер не отображается в списке, нажмите Изменить поиск.
7 Следуйте указаниям на экране компьютера.
Для пользователей Macintosh
1
Разрешите настройку IP-адреса принтера сетевым сервером DHCP.
2 Получение IP-адреса принтера:
• С панели управления принтера
• В разделе «TCP/IP» меню «Сеть/порты»

Дополнительная настройка принтера 27
• Путем печати страницы настройки сети или параметров меню и поиска раздела «TCP/IP»
Примечание. Если выполняется настройка доступа для компьютеров, находящихся в другой
подсети, нежели принтер, то потребуется IP-адрес.
3 Установка драйвера принтера на компьютер.
а Вставьте компакт-диск с программным обеспечением и документацией, а затем дважды
щелкните пакет установки для принтера.
б Следуйте указаниям на экране компьютера.
в Выберите место установки и нажмите кнопку Продолжить.
г На экране «Простая установка» нажмите кнопку Установить.
д Введите пароль пользователя, а затем нажмите кнопку OK.
На компьютер устанавливаются все необходимые приложения.
е После завершения установки нажмите кнопку Close (Закрыть).
4 Добавьте принтер.
• Для печати по протоколу IP:
а В меню Apple найдите один из таких пунктов:
– System Preferences >Print & Scan
– System Preferences >Print & Fax
б Щелкните знак +.
в При необходимости нажмите Добавить принтер или сканер или Добавить другой
принтер или сканер.
г Откройте вкладку IP.
д Введите IP-адрес принтера в поле адреса, а затем нажмите кнопку Добавить.
• Для печати по протоколу AppleTalk:
Примечания.
– Убедитесь в том, что на принтере активирован протокол AppleTalk.
– Эта функция поддерживается только в Mac OS X версии 10.5.
а В меню Apple выберите:
System Preferences >Print & Fax
б Щелкните знак +, а затем выберите:
AppleTalk > выберите принтер >Добавить
Подготовка к настройке принтера в беспроводной сети
Примечания.
• Убедитесь в том, что адаптер беспроводной сети установлен в принтер и работает нормально.
Для получения дополнительных сведений см. инструкции, прилагаемые к адаптеру
беспроводной сети.
• Убедитесь в том, что точка доступа (беспроводной маршрутизатор) включена и работает.

Дополнительная настройка принтера 28
Перед настройкой принтера в беспроводной сети убедитесь в наличии следующих данных.
• SSID. SSID также называют именем сети.
• Беспроводной режим (или режим сети) — это может быть либо одноранговый режим, либо
режим инфраструктуры.
• Канал (для одноранговых сетей). Для сетей в режиме инфраструктуры по умолчанию канал
выбирается автоматически.
В некоторых одноранговых сетях также необходимо использовать параметр автоматического
выбора. Если вы сомневаетесь, какой канал следует выбрать, обратитесь к специалисту службы
поддержки.
• Способ защиты—Существует четыре базовых варианта «Способа защиты»:
– ключ WEP
Если в беспроводной сети используется несколько ключей WEP, введите до четырех ключей
в имеющихся полях. Выберите ключ, который в настоящее время используется в сети. Для
этого выберите параметр «Ключ передачи WEP по умолчанию».
– Предварительный ключ или фраза доступа WPA или WPA2
В WPA используется шифрование в качестве дополнительного уровня безопасности.
Возможные варианты: AES и TKIP. Необходимо выбрать один и тот же тип шифрования на
маршрутизаторе и принтер. В противном случае обмен данными по сети будет невозможен для
принтера.
– 802.1X–RADIUS
В случае установки принтера в сети 802.1X может потребоваться следующая информация:
• Тип проверки подлинности
• Тип внутренней проверки подлинности
• Имя пользователя и пароль 802.1X
• Сертификаты
– Защита отсутствует
Если в беспроводной сети не используется никакой тип защиты, никакие данные безопасности
не потребуются.
Примечание. Не рекомендуется использовать беспроводные сети без защиты.
Примечания.
– Если имя SSID сети, к которой подключен компьютер, неизвестно, запустите программу
настройки беспроводного соединения сетевого адаптера компьютера, чтобы узнать имя сети.
Если не удается найти имя SSID или сведения по безопасности для сети, обратитесь к
документации, прилагаемой к беспроводной точке доступа, или к специалисту по поддержке
системы.
– Чтобы найти предварительный ключ/фразу доступа WPA/WPA2 или фразу доступа для
беспроводной сети, обратитесь к документации, прилагаемой к беспроводной точке доступа
(беспроводному маршрутизатору), перейдите на встроенный cервер Embedded Web Server
соответствующей точки доступа, или обратитесь к представителю службы поддержки.
Дополнительная настройка принтера 29
Подключение принтера с помощью мастера настройки
беспроводной сети
Прежде чем начать, убедитесь в следующем.
• Адаптер беспроводной сети установлен в принтере, правильно подключен и работает. Для
получения дополнительных сведений см. инструкции, прилагаемые к адаптеру беспроводной
сети.
• Кабель Ethernet отсоединен от принтера.
• Для параметра «Активная сетевая плата» установлено значение «Авто». Для настройки значения
«Авто» выполните следующие команды:
>Параметры > >Сеть/порты > >Активная сетевая плата > >Авто >
Примечание. Убедитесь, что принтер выключен и приблизительно через 5 секунд снова включите
его.
1 На панели управления принтера выберите:
>Параметры > >Сеть/порты > >Сеть [x] > >Сеть [x] Установка >
>Беспроводная связь > >Настройка беспроводных сетей >
2 Выберите «Настройка беспроводных сетей».
Параметр Чтобы
Найти сети
Введите имя сети
Настройка защищенной WiFi
Показать доступные беспроводные соединения.
Примечание. Этот элемент меню показывает передаваемые защищенные
или незащищенные имена SSID.
Выберите имя сети SSID вручную.
Примечание. Убедитесь в правильности ввода имени SSID.
Подключите принтер к беспроводной сети с помощью функции настройки
защищенной Wi-Fi.
3 Нажмите кнопку и следуйте указаниям на дисплее принтера.
Подключение принтера к беспроводной сети с помощью
защищенной установки Wi-Fi (Wi-Fi Protected Setup)
Прежде чем начать, убедитесь в следующем.
• Убедитесь в том, что точка доступа (беспроводной маршрутизатор) совместима со стандартом
настройки защищенной Wi-Fi (WPS). Подробнее см. прилагаемую к точке доступа документацию.
• Адаптер беспроводной сети установлен в принтере, правильно подключен и работает. Для
получения дополнительных сведений см. инструкции, прилагаемые к адаптеру беспроводной
сети.

Дополнительная настройка принтера 30
Использование метода настройки кнопки (PBC)
1
На панели управления принтера выберите:
>Параметры > >Сеть/Порты > >Сеть [x] > >Сеть [x] Настройка >
>Беспроводная > >Настpойка беспроводного соединения > >Настройки
защищенной Wi-Fi >
>Параметр «Настройка нажатием кнопки» >
2 Следуйте указаниям на дисплее принтера.
Воспользуйтесь методом личного идентификационного номера (PIN-кода)
1
На панели управления принтера выберите:
>Параметры > >Сеть/Порты > >Сеть [x] > >Сеть [x] Настройка >
>Беспроводная > >Настpойка беспроводного соединения > >Настройки
защищенной Wi-Fi >
>Запуск метода с PIN-кодом >
2 Скопируйте PIN-код WPS, состоящий из 8 символов.
3 Откройте обозреватель и в поле адреса введите IP-адрес точки доступа.
Примечания.
• IP-адрес отображается в виде четырех наборов цифр, разделенных точками, например
123.123.123.123.
• Если используется прокси-сервер, временно отключите его, чтобы обеспечить правильную
загрузку веб-страницы.
4 Откройте параметры WPS: Подробнее см. прилагаемую к точке доступа документацию.
5 Введите PIN‑код из восьми цифр, и сохраните настройки.
Подключение принтера к беспроводной сети с использованием
встроенного веб-сервера
Прежде чем начать, убедитесь в следующем.
• Принтер временно подключен к сети Ethernet.
• Адаптер беспроводной сети установлен в принтер и работает нормально. Для получения
дополнительных сведений см. инструкции, прилагаемые к адаптеру беспроводной сети.
1 Откройте веб-браузер и в поле адреса введите IP-адрес принтера.
Примечания.
• IP-адрес принтера указан на панели управления принтера. IP-адрес отображается в виде
четырех наборов цифр, разделенных точками, например 123.123.123.123.
• Если используется прокси-сервер, временно отключите его, чтобы обеспечить правильную
загрузку веб-страницы.
2 Нажмите Параметры >Сети/Порты >Беспроводная.
Loading…
View the manual for the Lexmark MX310dn here, for free. This user manual comes under the category printers and has been rated by 4 people with an average of a 7.8. This manual is available in the following languages: English. Do you have a question about the Lexmark MX310dn?
Ask your question here
Index
- Contents
- Safety information
- Learning about the printer
- Additional printer setup
- Loading paper and specialty media
- Paper and specialty media guide
- Printing
- Copying
- E-mailing
- Faxing
- Scanning
- Understanding printer menus
- Saving money and the environment
- Securing the printer
- Maintaining the printer
- Managing the printer
- Clearing jams
- Troubleshooting
- Notices
- Index
Product Images (6)

Lexmark MX310dn specifications
Below you will find the product specifications and the manual specifications of the Lexmark MX310dn.
All-in-one functions
Copy, Fax, Print, Scan
Maximum duty cycle
50000 pages per month
Maximum copy resolution
1200 x 1200 DPI
Optical scanning resolution
600 x 1200 DPI
Fax transmission speed
3 sec/page
General
| Brand | Lexmark |
| Model | MX310dn | 35S5700 |
| Product | printer |
| EAN | 734646452625, 734646452670, 0071040204956, 0798694886542, 0734646351584, 0830917029135, 0806298137660, 0809302028787, 0779184001423, 0640206698306, 0809099028052, 0804993508518, 0163121323721, 0804891041230, 0806792046826, 0800187806255, 0642125169516, 0805095895001, 0823887424246, 0801593245515, 0641438725280, 0799666156397 |
| Language | English |
| Filetype | User manual (PDF) |
Printing
| Print technology | Laser |
| Maximum resolution | 1200 x 1200 DPI |
| Print speed (black, normal quality, A4/US Letter) | 33 ppm |
| Duplex print speed (black, normal quality, A4/US Letter) | 14 ppm |
| Time to first page (black, normal) | 6.5 s |
| Printing | Mono printing |
| Duplex printing | Yes |
Other features
| All-in-one functions | Copy, Fax, Print, Scan |
| Colour all-in-one functions | Scan |
| Network ready | Yes |
| Finishing option | No |
| Package dimensions (W x D x H) | 19.09 x 21.65 x 22.48 « |
| Supported media weight(s) | 60 — 90 g/m² |
| Supported media weight (imperial) | 24 lbs |
Features
| Maximum duty cycle | 50000 pages per month |
| Page description languages | Microsoft XPS, PCL 5e, PCL 6, PDF 1.7, PostScript 3, PPDS |
| Country of origin | China |
| Recommended duty cycle | 250 — 6000 pages per month |
| Digital sender | No |
Copying
| Maximum copy resolution | 1200 x 1200 DPI |
| Copy speed (black, normal quality, A4) | 33 cpm |
| Copier resize | 25 — 400 % |
| Time to first copy (black, normal) | 6.5 s |
| Copying | Mono copying |
| Duplex copying | Yes |
Scanning
| Optical scanning resolution | 600 x 1200 DPI |
| Maximum scan area | 216 x 356 mm |
| Scanner type | Flatbed & ADF scanner |
| Duplex scan speed (colour) | 20 ppm |
| Duplex scan speed (black) | 43 ppm |
| Scan technology | CIS |
| Scanning | Colour scanning |
Fax
| Fax transmission speed | 3 sec/page |
| Modem speed | 33.6 Kbit/s |
| Faxing | Mono faxing |
| Duplex faxing | Yes |
Input & output capacity
| Total input capacity | 300 sheets |
| Maximum input capacity | 850 sheets |
| Auto document feeder (ADF) input capacity | 50 sheets |
| Total number of input trays | 2 |
| Maximum number of input trays | 3 |
| Total output capacity | 150 sheets |
| Maximum output capacity | 150 sheets |
| Auto document feeder (ADF) output capacity | 50 sheets |
| Auto document feeder (ADF) | Yes |
Paper handling
| ISO A-series sizes (A0…A9) | A4, A5, A6 |
| Maximum print size | — |
| Paper tray media types | Card stock, Envelopes, Labels, Plain paper, Transparencies |
| Non-ISO print media sizes | Executive (184 x 267mm), Folio (media size), Legal (media size), Letter (media size), Oficio (media size), Statement (140 x 216mm) |
| JIS B-series sizes (B0…B9) | B5 |
| Envelopes sizes | 7 3/4, 9,10, DL |
| Maximum ISO A-series paper size | A4 |
Design
| Display | LCD |
| Display diagonal | 2.4 « |
| Touchscreen | No |
| Built-in display | Yes |
| Market positioning | Business |
Ports & interfaces
| Direct printing | No |
| Standard interfaces | Ethernet, USB 2.0 |
| Optional connectivity | Wireless LAN |
| USB 2.0 ports quantity | 1 |
| USB port | Yes |
Network
| Ethernet LAN | Yes |
| Wi-Fi | No |
| Network printing methods | LPR/LPD Direct IP (Port 9100) Enhanced IP (Port 9400) FTP, TFTP Telnet IPP 1.0, 1.1, 2.0 |
| Supported network protocols (IPv4) | TCP/IP, AppleTalk, TCP, UDP |
| Supported network protocols (IPv6) | TCP/IP |
| Management protocols | HTTP, HTTPs (SSL*/TLS), SNMPv1, SNMPv2c, SNMPv3, WINS, IGMP, APIPA (AutoIP), DHCP, ICMP, DNS, Bonjour, DDNS, mDNS, ARP, NTP, Telnet, Finger |
Performance
| Internal memory | 256 MB |
| Maximum internal memory | 256 MB |
| Card reader integrated | No |
| Processor frequency | 800 MHz |
| Sound pressure level (copying) | 54 dB |
| Sound pressure level (printing) | 53 dB |
| Sound pressure level (scanning) | 55 dB |
| Sound pressure level (duplex printing) | 52 dB |
Power
| Power consumption (average operating) | — W |
Weight & dimensions
| Width | 399 mm |
| Depth | 472 mm |
| Height | 468 mm |
| Weight | 20000 g |
Packaging data
| Package width | 485 mm |
| Package depth | 550 mm |
| Package height | 571 mm |
| Package weight | 22500 g |
Operational conditions
| Operating temperature (T-T) | 16 — 32 °C |
| Operating relative humidity (H-H) | 8 — 80 % |
| Operating temperature (T-T) | 60 — 90 °F |
| Operating altitude | 0 — 2896 m |
System requirements
| Mac operating systems supported | Mac OS X 10.5 Leopard, Mac OS X 10.6 Snow Leopard, Mac OS X 10.7 Lion, Mac OS X 10.8 Mountain Lion |
| Server operating systems supported | Windows Server 2003, Windows Server 2003 x64, Windows Server 2008, Windows Server 2008 R2, Windows Server 2008 x64 |
| Other operating systems supported | Novell NetWare 5.x, Novell NetWare 6.x, Novell Open Enterprise Server |
Sustainability
| Sustainability certificates | ENERGY STAR |
Certificates
| Certification | Blue Angel (RAL-UZ-122), CAN/CSA-C22.2 60950-1, CSA E60825-1, ICES-003 B, BSMI B, CNS 13438, VCCI B, US FDA, FCC B, UL 60950-1, IEC 320-1, EN/IEC 60320-1, CE B, CB IEC 60950-1, EN 62311, EN 60950-1, EN/IEC 61000-3, EN 55022 B, EN 55024, EN/IEC 60825-1, GS (TÜV), SEMKO, UL AR, CS, TÜV Rh, SMA C-tick B, CCC B, CISPIR 22 B, EK Mark, N Mark, ECMA-370, TED |
show more
Frequently asked questions
Can’t find the answer to your question in the manual? You may find the answer to your question in the FAQs about the Lexmark MX310dn below.
What is the weight of the Lexmark MX310dn?
The Lexmark MX310dn has a weight of 20000 g.
What is the height of the Lexmark MX310dn?
The Lexmark MX310dn has a height of 468 mm.
What is the width of the Lexmark MX310dn?
The Lexmark MX310dn has a width of 399 mm.
What is the depth of the Lexmark MX310dn?
The Lexmark MX310dn has a depth of 472 mm.
What is the screen size of the Lexmark MX310dn?
The screen size of the Lexmark MX310dn is 2.4 «.
What is the best way to remove jammed paper from my printer?
It is best to gently pull the paper out of the printer. Turn the printer off, and make sure that the printhead is not hanging over the paper and that no paper remains in the printer.
How come my prints are of poor quality?
There can be various reasons for poor print quality. Check if the cartridges or toners are full. If so, inkjet printers often require cleaning the printer, the cartridges have dried out, or the print head is broken. With laser printers, calibrating the laser printer is recommended.
How come my printer does not accept original cartridges?
Non-genuine cartridges may not be recognised by the printer. In that case you will receive a message that the cartridge is empty. The manual of the purchased cartridge usually contains the solution, if this does not work, it is advisable to contact the seller.
What certifications does the Lexmark MX310dn have?
The Lexmark MX310dn has the following certifications: Blue Angel (RAL-UZ-122), CAN/CSA-C22.2 60950-1, CSA E60825-1, ICES-003 B, BSMI B, CNS 13438, VCCI B, US FDA, FCC B, UL 60950-1, IEC 320-1, EN/IEC 60320-1, CE B, CB IEC 60950-1, EN 62311, EN 60950-1, EN/IEC 61000-3, EN 55022 B, EN 55024, EN/IEC 60825-1, GS (TÜV), SEMKO, UL AR, CS, TÜV Rh, SMA C-tick B, CCC B, CISPIR 22 B, EK Mark, N Mark, ECMA-370, TED.
How come my inkjet printer has black stripes?
In most cases, the inkjet printer cartridge is broken and the cartridge needs to be replaced.
What is the difference between a laser printer and an inkjet printer?
A laser printer prints with a toner and an inkjet printer prints with ink.
What does DPI stand for?
DPI stands for Dots Per Inch and is the number of ink droplets (per inch) that end up on the paper when printing.
Is the manual of the Lexmark MX310dn available in English?
Yes, the manual of the Lexmark MX310dn is available in English .
Is your question not listed? Ask your question here
-
Page 1: Lexmark MX310DN
MX310dn User’s Guide May 2013 www.le xmark.c om Machine type(s): 7015 Model(s): 270[…]
-
Page 2: Lexmark MX310DN
Conten ts Safe ty infor matio n…. …… ….. …….. …… …….. ….. …… …….. ….. …… ……. …… …… .6 Learn ing a bout t he pr inte r….. ……….. …….. …….. ……….. …….. …….. ……….. …..8 Findi ng in formati on abo ut the p rint er….. ……… …… ……. …… ………. …… .[…]
-
Page 3: Lexmark MX310DN
Prin ting co nfid entia l and o ther he ld jo bs.. …….. …. …… ……. ….. ….. ….. ……. ….. ….. ….. ……. ….. …… …. ….. …..53 Prin ting i nformati on p ages…. …. ……. ….. ….. …. ……. ….. …. ……. ….. ….. ……. ….. …. ….. ……. …. ….. .. ……. ….. …..55 Cancel ing a […]
-
Page 4: Lexmark MX310DN
Settin gs me nu. ……. …. …. ….. …… ….. …. …. ……. …. ….. …. …… ….. …. ….. …… …. ….. …. …… ….. …. …. …. ….. …… …1 17 Help menu.. ….. ….. …….. ….. ….. ….. …….. ….. ….. ….. …….. ….. ….. …… ……. ….. ….. …… ……. ….. . ………. ….. […]
-
Page 5: Lexmark MX310DN
[x] ‑ page j am, op en tra y [x]. [2 4y.xx ]…… ………… …….. ……… ………… ……… ……….. ……… …….. ………. …….1 80 [x] ‑ page j am, cl ear m anual f eeder . [ 25y.x x]….. ….. ….. ……. …… …. …….. ….. ….. ….. ……. ….. ….. ….. …….. … ..181 [x] ‑ page j am, op en[…]
-
Page 6: Lexmark MX310DN
Safety information Connect t he power co rd to a pr operly gro unded elec trical o utlet th at is near the prod uct and ea sily acces sible. Do not p lace or use this product near wate r or we t locati ons. CAUTION —SHOCK HA ZARD: Do not use the fax feature during a lig htning s torm. Do not set up this prod uct or make any ele ctrical o r cablin[…]
-
Page 7: Lexmark MX310DN
CAUTION —SHOCK HA ZARD: If you are acce ssing the c ontroller bo ard or instal ling optio nal hardware or memo ry devices somet ime after setting up the pr inter, th en turn t he pri nter off , and unplu g the powe r cord from th e electric al outl et befo re conti nuing. If you have an y other devi ces att ached to the print er, then turn them o[…]
-
Page 8: Lexmark MX310DN
Learni ng about the prin ter Finding informa tion about the printer What are you looking for? Find it here Initia l setup in structions: • Connecting the printer • Installin g the p rinter sof tware Setup documentation—The setu p documentation came with the printer and is al so available at http://support.le xmark.com . Additional setup and i[…]
-
Page 9: Lexmark MX310DN
What are you looking for? Find it here The latest supplemental information, upda tes, and customer support: • Docu mentati on • Driver d ownload s • Live chat support • E ‑ mail support • Voice support Lexmark support Web site— http://support.le xmark.com Note: Select your country or regi on, and then select your product to view the a[…]
-
Page 10: Lexmark MX310DN
1 2 3 4 5 1 1 Right s ide 30 cm (1 2 in.) 2 Front 51 cm (20 in.) 3 Left side 20 cm (8 in.) 4 Rear 20 cm (8 in.) 5 Top 54 cm (21 in.) Printer configurations CAUTION—TIPPI NG HAZARD: Fl oor-mount ed config urations require addit ional furni ture for st ability. You m ust use eith er a printe r stand o r printer base if yo u are using m ultiple in p[…]
-
Page 11: Lexmark MX310DN
1 2 3 4 8 9 10 7 6 5 1 Printer control panel 2 Automatic document f eeder (ADF) 3 ADF tr ay 4 ADF bi n 5 Front door release button 6 Standard 2 50 ‑ sheet tray 7 Optio nal 2 50 ‑ or 550 ‑ sheet tray 8 50 ‑ sheet multipurpose f eeder 9 Paper s top 10 Standard b in Understanding th e basic fun ctions of the scan ner • Make q uick copies or […]
-
Page 12: Lexmark MX310DN
Using the ADF and scanner glass Automatic d ocument feed er (ADF) Scanner glass Use the ADF for m ulti ple ‑ page documents. Note: The ADF scans only one side of the page. Use the scanner g lass for single ‑ page documents, book pages, sma ll items (such as postcards or photos), transparenci es, photo paper, or thin media (such as magazine cl i[…]
-
Page 13: Lexmark MX310DN
Using the printer control panel 1 2 3 4 5 6 7 8 9 11 12 13 10 Use the To 1 Display • View the printer status and me ssages. • Set up and operate the printer. 2 Arrow buttons Scroll up and down or l eft and right. 3 Select butto n • Select menu options. • Save settings. 4 Address book button View all the stored addresses. 5 Redial button Vie[…]
-
Page 14: Lexmark MX310DN
Indicator light Printer st atus Off The print er is off or in Hibernate mo de. Blinking green The printer is warming up, proc essing data, or printi ng. Solid gree n The print er is on, but idle. Blinking red The print er requires user inte rvention. Sleep button light Printer status Off The printer is off, idle or in Ready state. Solid amber Th e […]
-
Page 15: Lexmark MX310DN
Additional printer setup Installing internal options CAUTION —SHOCK HA ZARD: If you are acce ssing the c ontroller bo ard or instal ling optio nal hardware or memo ry devices somet ime after setting up the pr inter, th en turn t he pri nter off , and unplu g the powe r cord from th e electirca l outlet b efore co ntinui ng. If you ha ve any ot he[…]
-
Page 16: Lexmark MX310DN
2 Open th e controller board shield usi ng the green handl e. 1 2 3 Use the followi ng illustra tion to locate the option card connect or. Warning—Pote ntial Da mage: Controller b oard electronic co mponents ar e easily damaged by static elect ricity. Touch so methin g metal o n the prin ter befo re touc hing any c ontrolle r board ele ctron ic c[…]
-
Page 17: Lexmark MX310DN
Installing an op tional card CAUTION —SHOCK HA ZARD: If you are acce ssing the c ontroller bo ard or instal ling optio nal hardware or memo ry devices somet ime after setting up the pr inter, th en turn t he pri nter off , and unplu g the powe r cord from the electr ical ou tlet befo re conti nuing . If you have o ther de vices at tached to the p[…]
-
Page 18: Lexmark MX310DN
4 Push the c ard firmly into place as shown in the ill ustration . Warning—Pote ntial Da mage: Imprope r inst allation of the card m ay cause damag e to th e card a nd the contr oll er boar d. Note: The entire l ength o f the co nnector on the card must to uch and be flushe d agains t the con troller board. 5 Close th e controller board sh ield, […]
-
Page 19: Lexmark MX310DN
CAUTION —SHOCK HA ZARD: If you are acce ssing the c ontroller bo ard or instal ling optio nal hardware or memo ry devices somet ime after setting up the pr inter, th en turn t he pri nter off , and unplu g the powe r cord from th e electric al outl et befo re conti nuing. If you have an y other devi ces att ached to the print er, then turn them o[…]
-
Page 20: Lexmark MX310DN
3 Pul l out the tray fr om the base. 4 Remove any p acking material from in side th e tray. 5 Insert th e tra y into th e bas e. 6 Pla ce the tray near th e printe r. 7 Align th e printer with the t ray, and the n slowly l ower the prin ter into place. Note: O ption al trays l ock tog ether when s tacked. Additi onal print er set up 20[…]
-
Page 21: Lexmark MX310DN
8 Connect the p ower c ord to the pr inter , then to a p roperl y grounded electrical outlet, and th en turn on the print er. 1 2 Notes: • When th e printer software and any har dware opt ions are install ed, you may nee d to manual ly add the options in the p rinter d river to make them availa bl e for print jobs. For more infor mation, see “U[…]
-
Page 22: Lexmark MX310DN
Attaching cables CAUTION —SHOCK HA ZARD: Do not use the fax feature during a lig htning s torm. Do not set up this prod uct or make any ele ctrical o r cabling c onnection s, such a s the fax feature, power cord, or telepho ne, during a light ning storm . Connect t he printer to the c omputer using a USB ca ble or to the network u sing an Etherne[…]
-
Page 23: Lexmark MX310DN
Use the To 5 LINE port Connect the printer to an acti ve tele phone line thr ough a standard wall jack (RJ ‑ 11), DSL filter, or VoIP adapter , or any other adapter that allo ws you to access the tele phone line to send and rece ive faxes. 6 USB printer port Connect the p rinter to a compu ter. 7 Security slot Attach a lock that wi ll secure the […]
-
Page 24: Lexmark MX310DN
3 Click Install , and then follow the instru ctions on the compu ter screen. Updat ing availa ble optio ns in the printer driver When any har dware o ptions a re instal led, you may nee d to manu ally add the optio ns in the p rinter driver to make them availabl e for use. For Windows users 1 Open the printers folder. In Wind ows 8 From th e Search[…]
-
Page 25: Lexmark MX310DN
Networking Notes: • Purchase a Ma rkNet TM N8352 wireless networ k adapter first b efore setting up the printer on a wireless netwo rk. For infor mation on installing t he wireless net work adapter , see the setu p sheet that came with the a dapter. • A Servic e Set Id entifier (SSID) i s a nam e assigned to a wirel ess netw ork. Wi red Equi va[…]
-
Page 26: Lexmark MX310DN
In Wind ows 7 or earlier a Click , or cl ick Sta rt and then cli ck Run . b In th e Start Search o r Run di alog, typ e D:s e tu p.e xe . c Press Enter , or clic k OK . Note: D is the le tter of y o ur CD or DVD drive. • If you are u sing the downloaded software installer f rom the We b, then double ‑ click the in staller tha t you have saved […]
-
Page 27: Lexmark MX310DN
d Click the IP ta b. e Type the printer IP address in the address field, and then click Add . • For Appl eTalk print ing: Notes: – Make su re Appl eTa lk is ac tivated on you r print er. – This feature is supported only in Mac OS X version 10.5. a From the Apple menu, nav igate to: System Prefer ences > Pr int & Fax b Click + , and the[…]
-
Page 28: Lexmark MX310DN
Notes: – If you do no t know th e SSID of the networ k that your co mputer is connecte d to, the n launch the wireless u tility of the c omputer net work adap ter, and t hen look f or the network name . If you can not fi nd the SSID o r the securit y informa tion for you r network, t hen see th e document ation t hat came wi th the a ccess poi nt[…]
-
Page 29: Lexmark MX310DN
Using the Push Button C onfiguration (PBC) method 1 From the print er cont rol pan el, naviga te to: > Sett ings > > Networ k/Port s > > Network [ x] > > Net work [x] S etup > > Wireless > > Wireless Connection Se tup > > Wi ‑ Fi Prote cted S etup > > Start Pus h Button M ethod > 2 Follow th e instr[…]
-
Page 30: Lexmark MX310DN
5 Turn of f the print er, and the n discon nect the Eth ernet ca ble. Then wai t for at leas t five seco nds, and t hen turn the prin ter back on. 6 To veri fy if your printer is connected to the net work, print a network setup pag e. Then in the Network Car d [x] section, see if the status is Connected. Verifying printer setup When all ha rdware a[…]
-
Page 31: Lexmark MX310DN
Loading paper and specialty media The sele ction and h andling o f paper and spe cialty med ia can affe ct how reliably do cuments print. F or more inf ormation , see “Avoid ing jams” on page 171 a nd “Sto ring pap er” on page 5 1. Setting the pap er size and type 1 From the print er cont rol pan el, naviga te to: > Settings > > Pa[…]
-
Page 32: Lexmark MX310DN
2 Squeeze and then slide the widt h guide tab to the correct positio n for the size of th e paper you are loading. A 4 LT R E X E C B 5 A 5 2 1 Loading pape r and specialty media 32[…]
-
Page 33: Lexmark MX310DN
3 Squeeze and then slide the length guide tab to the correct position for th e size of the paper you are loading. A 4 LT R E XE C B 5 A 5 2 1 Notes: • For some pap er sizes like lett er, legal, and A4, s queeze and slid e the length gu ide tab backwar d to accommodate their length . • When loadi ng legal ‑ si ze paper, t he lengt h guide ext […]
-
Page 34: Lexmark MX310DN
A 4 LT R E X E C B5 A 5 4 Flex the sheets ba ck and forth to loosen the m, and then fan them. Do not fold or crease t he paper. Straighten the edges on a level su rface. 5 Load th e paper stack. Notes: • Load with the printable side facedown when using recycled or preprinted paper. • Load prepunched paper with the holes on the to p edge toward […]
-
Page 35: Lexmark MX310DN
• Load le tterhea d facedown , with the top edge of the sheet t oward the front of th e tray. Fo r two ‑ sid ed printing, load letterhead faceup with th e bottom edge of th e sheet toward the fro nt of the tray. • Make sure the paper is belo w the maxim um paper fi ll indic ator loc ated on the side of the width guide. 6 Ins ert the tra y. 7 […]
-
Page 36: Lexmark MX310DN
Loading the multipurpose feeder Use the multipurpose feed er when printing on different paper sizes and types or specialty media, such as card stock, transpar encies, paper label s, and env elopes. You can also u se it for sin gle ‑ pag e prin t jo bs on let terhe ad . 1 Open the multipurpos e feeder. a Pull the multipurpose feeder extender . Loa[…]
-
Page 37: Lexmark MX310DN
b Pull the extender gently so th at the multipurpose feeder is fu lly extended and open. 2 Squeeze the tab on the left width gu ide, and then move the gu ides for the paper you are loading. 1 2 3 Prepare the paper or specialty media for loading. • Flex sheets of pap er back and forth to loos en them, and then fan them. Do n ot fold or crease th e[…]
-
Page 38: Lexmark MX310DN
• Flex the stack of envelopes back and forth to loo sen them, and then fan them. Straighten the ed ges on a level surf ace. 4 Load the paper or spe cialty media. Notes: • Do not for ce paper o r special ty medi a into the m ultipurpo se feed er. • Make sure the paper or specia lty med ia is below t he max imum paper fill ind icator located o […]
-
Page 39: Lexmark MX310DN
Note: When loadi ng A6 ‑ s ize paper, make sure the m ultipurpose feeder extend er rests lightly against the edge of the pap er so that the last few sh eets of paper remain in place. • Load let terhea d faceu p with th e top edg e entering the pr inter first. For two ‑ sided (duplex ) printing , load letterhead facedown with the bott om edge […]
-
Page 40: Lexmark MX310DN
• Load envelopes with the flap on the left side facedown. Warn ing— Potent ial D amag e: Never us e envelopes with stamps , clasps, snaps, wind ows, coate d linings, o r self ‑ stick adhe sives. T hese env elopes ma y severel y damage th e printer. 5 From the printe r contro l panel, s et the pape r siz e and paper type in the P aper menu to […]
-
Page 41: Lexmark MX310DN
Creat ing a cu stom na me fo r a pape r type Using the Embedded Web Server 1 Open a Web browser, and then type the print er IP address in the ad dress field. Notes: • View the printer IP address in the TCP/IP sect ion in t he Network/Por ts men u. The IP addres s appea rs as four sets of numbers separated by periods, su ch as 123. 123.123.123. ?[…]
-
Page 42: Lexmark MX310DN
Using the printer c ontrol panel 1 From the print er cont rol pan el, naviga te to: > Settings > > Pape r Menu > > Custom Names 2 Type a na me for the p aper type , and then press . Assigning a custom paper type Using the Embedded Web Server 1 Open a Web browser, and then type the print er IP address in the ad dress field. Notes: •[…]
-
Page 43: Lexmark MX310DN
Paper and specialty media guide Additi onal info rmation f or print ing on s peciali ty media ma y be found in the Ca rd Stock an d Label Gu ide availabl e at http: //suppo rt.lexma rk.com . Paper guidelines Select ing the cor rect pap er or sp ecialty me dia reduces printin g problem s. For th e best print quality, t ry a sampl e of the paper or s[…]
-
Page 44: Lexmark MX310DN
Grain direction Grain ref ers to the a lignment of the pape r fibers in a sheet o f paper. Grain is eit her gra in lon g , running the leng th of the paper , or grain short , running the width of the paper . For 60–90 ‑ g/m 2 (16–24 ‑ lb) bond paper, grain l ong paper is recom mended. Fiber content Most h igh ‑ qua lity xerogra phic pap e[…]
-
Page 45: Lexmark MX310DN
• Avoid papers wit h rough o r heavily te xtured surfaces. Use papers pr inted with heat ‑ resis tant inks desi gned for use in xerograp hic copie rs. The ink must be a ble to withst and tempera tures up to 230°C (446°F) wi thout melti ng or relea sing ha zardous emiss ions. Use i nks that are n ot affect ed by the re sin in to ner. I nks th […]
-
Page 46: Lexmark MX310DN
Lexmark does not endor se specific suppliers, although a converter’s produ ct list fo r special ap plication s is main tained. However, the follo wing paper choi ce guidelines will help alleviat e the environmental impact of pr inting: 1 Minimi ze paper consumpt ion. 2 Be selective ab out the orig in of wood fiber. Buy fr om suppliers who carry c[…]
-
Page 47: Lexmark MX310DN
Paper size and dimension Standard 250 ‑ sheet tray Optional 250 ‑ or 550 ‑ sheet tray Multipurpose feeder ADF Scanner glas s Duplex mode A4 210 x 2 97 mm (8.27 x 11.7 in.) A5 148 x 2 10 mm (5.83 x 8.27 in.) X A6 105 x 1 48 mm (4.13 x 5.83 in.) X X JIS B5 182 x 2 57 mm (7.17 x 10.1 in.) X Letter 215. 9 x 279.4 mm (8.5 x 11 in .) Legal 215. 9 x[…]
-
Page 48: Lexmark MX310DN
Paper size and dimension Standard 250 ‑ sheet tray Optional 250 ‑ or 550 ‑ sheet tray Multipurpose feeder ADF Scanner glas s Duplex mode 9 Enve lope 98.4 x 226.1 mm (3.875 x 8.9 in.) XX XX X 10 Envelo pe 104. 8 x 241.3 mm (4.12 x 9.5 in.) XX XX X DL Envelope 110 x 2 20 mm (4.33 x 8.66 in.) XX XX X C5 Enve lope 162 x 2 29 mm (6.38 x 9.01 in.) […]
-
Page 49: Lexmark MX310DN
Paper type 250 ‑ or 550 ‑ sheet tray Multip urpose feede r Duplex mode ADF Scanner glass Envelope 2 X XX Rough envelope X XX Letterhead Preprint ed Colored paper Light paper Heavy paper Rough/Cotton X Custom Ty pe [x] 1 One ‑ sided paper label s designed for laser pr inters ar e support ed for occasion al us e. We recommend printing only up t[…]
-
Page 50: Lexmark MX310DN
Tips on us ing en velopes Print sample s on the envelop es being considered for us e before buying large quantit ies. • Use envelopes designed specifically for laser printers. Check with the manufactu rer or vendor to ensure that the envel opes can wi thstand temperat ures up to 230°C ( 446°F) without se aling, wri nkling, curling excess ively,[…]
-
Page 51: Lexmark MX310DN
• If zo ne coating o f the adhes ive is not po ssible, t hen remov e a 2 ‑ mm ( 0.06 ‑ inc h) strip on the leading and driver edge, and the n use a no n ‑ oozing a dhesive . • Portra it ori entation is reco mmended, e speciall y when pri nting b ar codes. Tips on us ing card sto ck Card st ock is hea vy, single ‑ ply specialty medi a. M[…]
-
Page 52: Lexmark MX310DN
Printing Printing a docume nt Printing a documen t 1 From the Pape r menu o n the prin ter contr ol panel, s et the pa per type and size to matc h the pape r loaded . 2 Send the print jo b: For Windows users a With a do cument o pen, click File > Print . b Click Properties , Pref erenc es , Op tions , or Setup . c Adju st the sett ings , if nece[…]
-
Page 53: Lexmark MX310DN
Using the printer c ontrol panel 1 From the print er cont rol pan el, naviga te to: > Settings > > Print Se ttings > > Quality Menu > > Toner Da rkness 2 Adjust the toner darkness, and then press . Print ing fr om a mo bile device To downloa d a compat ible mobil e printing applicat ion, visi t www.lexmark .com/mobil e . Note: […]
-
Page 54: Lexmark MX310DN
Printing confidential an d other he ld jobs Note: Confidentia l and Verify print jobs are automatic ally deleted from m emory afte r printin g. Repeat an d Reserve jobs are held in the printer u ntil you ch oose to delete th em. For Windo ws user s 1 With a d ocu ment o pen, c lick F ile > Print . 2 Click Properties , Pre feren ces , Options , o[…]
-
Page 55: Lexmark MX310DN
• If you are using a proxy se rver, then tempo rarily disable it to load the Web page correctly. 2 Click Setti ngs tab > Security > Confid ential Pr int Setu p . 3 Modify th e settin gs: • Set a maximum number of PIN entry attempts. When a user exceeds a sp ecific number of PIN entry attempts, all of the jobs for t hat user are deleted. ?[…]
-
Page 56: Lexmark MX310DN
In Wind ows 7 or ea rlier a Click o r click Start , and then click Run . b In the Sta rt Searc h or Run di alog, typ e control printer s . c Pres s Enter , or cli ck OK . 2 Doub le ‑ click the pri nter icon. 3 Select the print jo b you want to cancel . 4 Click Delet e . For Macintosh users 1 From the Appl e menu, navig ate to e ither of the fo ll[…]
-
Page 57: Lexmark MX310DN
Copying Automatic d ocument feed er (ADF) Scanner glass Use the ADF for m ulti ple ‑ page documents includin g two-sided (duplex) pages. Use the scanner g lass for single-page documents, book pages , small items (such as postcar ds or photos), transparenc ies, photo paper, or thin media (such as m agazine clippin gs). Making copies Making a qu ic[…]
-
Page 58: Lexmark MX310DN
• The ADF indica tor lig ht comes on when th e paper is l oaded pro perly. 2 Adjust the paper guides. 3 From the printe r contro l panel , use the keypad to ent er the number of copies, and then pres s . Copyin g using the scanner gl ass 1 Place an origina l docume nt facedo wn on the s canner g lass in th e upper lef t corner. 2 From the printe […]
-
Page 59: Lexmark MX310DN
3 From the print er cont rol pan el, naviga te to: > Copy > > Copy from > sele ct the si ze of t he origi nal doc ument 4 Navigate to: Copy to > > select the tray containing the transparencies > > select the number of copies or enter a number on the keypad > 5 If there are no trays th at contain transparencies, then do th[…]
-
Page 60: Lexmark MX310DN
Note: If you want to copy anot her docume nt, then place it on the sca nner gla ss, press th e left or right arro w button to sc roll to Scan the Next Page , an d then pre ss . 6 Pre ss the le ft or ri ght arrow bu tton to scroll to Finish the Job , and t hen press . Customizing copy setting s Copyin g to a differen t size 1 Load an o riginal do cu[…]
-
Page 61: Lexmark MX310DN
4 Navigate to: Copy to > > select t he tray co ntaining th e paper size and t ype you want to use > > s elect the number of copies or enter a number on the keypad > 5 If ther e are no t rays that c ontain the paper si ze and type you want t o use, then d o the follo wing: a Navigate to: Copy to > > Ma nual Feed er > > s e[…]
-
Page 62: Lexmark MX310DN
Notes: • Do not lo ad postcar ds, photos , small it ems, tran sparencies , photo paper, o r thin me dia (such as magaz ine clippings) into the ADF tray. Place these items on the scanner glass. • The ADF indica tor lig ht comes on when th e paper is l oaded pro perly. 2 If you are loading a document into the ADF tray, then adjust the paper guide[…]
-
Page 63: Lexmark MX310DN
3 From the print er cont rol pan el, naviga te to: > Copy > > Cont ent Ty pe > se lect the conte nt type of the o rigin al docum ent 4 Press the le ft or ri ght ar row butt on to s croll to one o f the foll owing: • Text —The content of th e original d ocument is mostly tex t or line art. • Text/Pho to —The original document is […]
-
Page 64: Lexmark MX310DN
• The ADF indica tor lig ht comes on when th e paper is l oaded pro perly. 2 If you are loading a document into the ADF tray, then adjust the paper guides. 3 From the print er cont rol pan el, naviga te to: > Copy > > Col late > select the collate set ting you want > select the number of c opies or ente r a number on the keypa d &g[…]
-
Page 65: Lexmark MX310DN
Notes: • Do not lo ad postcar ds, photos , small it ems, tran sparencies , photo paper, o r thin me dia (such as magaz ine clippings) into the ADF tray. Place these items on the scanner glass. • The ADF indica tor lig ht comes on when th e paper is l oaded pro perly. 2 If you are loading a document into the ADF tray, then adjust the paper guide[…]
-
Page 66: Lexmark MX310DN
Cancelin g a copy job Canceli ng a copy job from the printer control panel 1 From the print er cont rol pan el, press . 2 When a li st of copy jo bs appears, select t he job to cancel, and t hen press . 3 Press to go back to the home scr een. Understanding th e copy options Copies This op tion l ets you set the numb er of co pies to be prin ted. Co[…]
-
Page 67: Lexmark MX310DN
Scale This op tion l ets you sc ale th e docume nt from 25% to 400% of the ori gina l documen t size. Yo u can a lso set au tomati c scal ing. • When copying to a dif ferent paper s ize, such as fro m legal ‑ size to let ter ‑ size paper, set the “Copy f rom” and “C opy to” paper siz es autom atica lly to sca le the scan ima ge to fit[…]
-
Page 68: Lexmark MX310DN
Advanced Duplex This option lets you specify the docum ent orien tation, whethe r document s are one-sided or two-sided, and how docume nts are bound. Overlay This op tion l ets you cr eate a watermar k (or mes sage) th at overla ys the co ntent of yo ur copy. You can choose from Conf ide ntial , Co py, Dra ft, Urg ent , an d Cu stom . Yo u ca n t […]
-
Page 69: Lexmark MX310DN
E-mailing Automatic d ocument feed er (ADF) Scanner glass Use the ADF for m ulti ple ‑ page documents includin g two-sided (duplex) pages. Use the scanner g lass for single-page documents, book pages , small items (such as postcar ds or photos), transparenc ies, photo paper, or thin media (such as m agazine clippin gs). You can us e the prin ter […]
-
Page 70: Lexmark MX310DN
• If you are using a proxy se rver, then tempo rarily disable it to load the Web page correctly. 2 Click Setti ngs > E-mail/FTP Settings > E-mail Setti ngs . 3 Enter t he appropriate informa tion, and th en click Submit . Creating an e-mail shortcut Creati ng an e-mail shortcut using the Em bedded Web Server 1 Open a Web browser, and then t[…]
-
Page 71: Lexmark MX310DN
Notes: • Do not lo ad postcar ds, photos , small it ems, tran sparencies , photo paper, o r thin me dia (such as magaz ine clippings) into the ADF tray. Place these items on the scanner glass. • The ADF indicator light comes on when the pap er is properly loaded. 2 If you are loading a document into the ADF tray, then adjust the paper guides. 3[…]
-
Page 72: Lexmark MX310DN
Faxing Automatic d ocument feed er (ADF) Scanner glass Use the ADF for m ulti ple ‑ page documents includin g two-sided (duplex) pages. Use the scanner g lass for single-page documents, book pages , small items (such as postcar ds or photos), transparenc ies, photo paper, or thin media (such as m agazine clippin gs). Setting up the printer to fax[…]
-
Page 73: Lexmark MX310DN
Initial f ax setup Many coun tries and regi ons requ ire ou tgoing faxes to contai n the fol lowing in formati on in a margin at the to p or bot tom of each transm itted page, or on the first page of the transm ission: fax na me (i dentific ation o f the bu siness , other entit y, or indi vidual se nding the message ) and fax number (tel ephone nu […]
-
Page 74: Lexmark MX310DN
Choos ing a fax conn ecti on Scenario 1: Standard telephone line Setup 1: Printer is connected to a dedicated fax l ine To conn ect: 1 Connec t one end o f the tel ephone cabl e that c ame with the printer t o the port of the printer. 2 Connect the other end of the telephone cable to an active analog wall jack. Tips fo r this se tup: • You c an s[…]
-
Page 75: Lexmark MX310DN
Setup 2: Printer is sharing the li ne with an answering machine Connect ed to th e sa me telep hone wall j ack P H O N E L IN E To conn ect: 1 Connec t one end o f the tel ephone cabl e that c ame with the printer t o the port of the printer. 2 Connect the other end of the telephone cable to an active analog wall jack. 3 Connect the answering machi[…]
-
Page 76: Lexmark MX310DN
Connec ted to differ ent wall j acks P H O N E L IN E To conn ect: 1 Connec t one end o f the tel ephone cabl e that c ame with the printer t o the port of the printer. 2 Connect the other end of the telephone cable to an active analog wall jack. Tips fo r this se tup: • If yo u have only one telep hone n umber on your l ine, the n you n eed to s[…]
-
Page 77: Lexmark MX310DN
Setup 3: Printer is sharing the li ne with a telephone subscribed to voice mail s ervice 02 To conn ect: 1 Connec t one end o f the tel ephone cabl e that c ame with the printer t o the port of the printer. 2 Connect the other end of the telephone cable to an active analog wall jack. 3 Connect the telephon e to the port of th e printer. Tips fo r t[…]
-
Page 78: Lexmark MX310DN
Scenario 2: Digital Subscriber Line (DSL) A Digital Subscri ber Line sp lits your regular t elephone line into t wo channels : voice an d Interne t. Telepho ne and fa x signals travel through t he voice c hannel, and Interne t signals p ass throug h the ot her chann el. This way, yo u can use the sa me line for analog v oice cal ls (inclu ding faxe[…]
-
Page 79: Lexmark MX310DN
Scenario 3: VoIP telephone service To conn ect: 1 Connec t one end o f the tel ephone cabl e that c ame with the printer t o the port of the printer. 2 Connect the other end o f the cable to the po rt labeled Phone Line 1 or Phone Port on the VoIP adapter. Note: The port labele d Phone Line 2 or Fax Po rt is not always ac tive. VoIP p roviders ma y[…]
-
Page 80: Lexmark MX310DN
Scenario 4: Digital telephone service through a cable provider Setup 1: Printer is connected directly to a cable modem 1 Connec t one end o f the tel ephone c able that c ame with you r printer to the por t of the pri nter. 2 Connect the other end o f the cable to the po rt labeled Phone Line 1 or Phone Port on the cable mod em. Note: The port labe[…]
-
Page 81: Lexmark MX310DN
Setup 2: Printer is connected to a wall jac k; cable modem is installe d elsewhere in the facility 1 Connec t one end o f the tel ephone c able that c ame with you r printer to the por t of the pri nter. 2 Connec t the other end of the t elephone cable to an activ e analog telepho ne wall jac k. 3 Connec t your anal og tele phone to the port of the[…]
-
Page 82: Lexmark MX310DN
If the wall jack or equipment in your facility is not compat ible with t his typ e of conn ecti on, the n you n eed to us e a telepho ne adapte r. An adapt er for yo ur countr y or regi on may not come with you r printe r, and you ma y need to purchas e it sep aratel y. There may be an adapter plug inst alled in th e port of the printer . If you ar[…]
-
Page 83: Lexmark MX310DN
Connecting the printer to a non ‑ RJ ‑ 11 wall ja ck LINE EXT 1 Connec t one end o f the tel ephone c able that c ame with prin ter to t he port of the printer. 2 Connect the other en d of the cable to the RJ ‑ 11 adapte r, and then connect the adap ter to the wall ja ck. 3 If you want to co nnect ano ther dev ice (te lephone or answerin g ma[…]
-
Page 84: Lexmark MX310DN
Connecting the pri nter to a wall jack in Germany The G erman w all jack h as two kind s of ports. The N port s are for fax machines, modems, and answering machines. The F port is for tele phones. NF N Connect t he printer to any of th e N ports. P H O N E LIN E NFN Faxing 84[…]
-
Page 85: Lexmark MX310DN
1 Connec t one e nd of the te lephone cable that cam e the print er to the port of the p rinter. 2 Connec t the other e nd of the teleph one cabl e to th e RJ ‑ 11 adapter, a nd then co nnect th e adapter to an N port. 3 If you want to conne ct a tel ephone and answeri ng machine t o the same wall jack, then connect t he device s as shown . Note:[…]
-
Page 86: Lexmark MX310DN
Setting the da te and time You can s et the da te and tim e so that they are printed on every fax you se nd. If the re is a powe r fail ure, then yo u may have to rese t the d ate and time. 1 Open a Web browser, and then type the print er IP address in the ad dress field. Notes: • View the printer IP address in the TCP/IP sect ion in t he Network[…]
-
Page 87: Lexmark MX310DN
3 From the print er cont rol pan el, naviga te to: > Fax > > enter a fax or shor tcut number on th e keypad > > Original S ize > Note: If you want to fax anot her docume nt, then place it on the sc anner gla ss, press t he left or right ar row button to sc roll to Scan the Nex t Page , and then press . 4 Pre ss the le ft or ri ght[…]
-
Page 88: Lexmark MX310DN
• The ADF indica tor lig ht comes on when th e paper is l oaded pro perly. 2 If you are loading a document into the ADF tray, then adjust the paper guides. 3 Press # , and then enter th e shor tcut nu mber on the ke ypad. 4 Press . Sending a fax using th e address boo k The addre ss book f eature let s you search f or bookm arks and ne twork dire[…]
-
Page 89: Lexmark MX310DN
Notes: • View the printer IP address in the TCP/IP sect ion in t he Network/Por ts men u. The IP addres s appea rs as four sets of numbers separated by periods, su ch as 123. 123.123.123. • If you are using a proxy se rver, then tempo rarily disable it to load the Web page correctly. 2 Click Setti ngs > Man age Shortcuts > Fax Shortc ut S[…]
-
Page 90: Lexmark MX310DN
• The ADF indica tor lig ht comes on when th e paper is l oaded pro perly. 2 If you are loading a document into the ADF tray, then adjust the paper guides. 3 From the print er cont rol pan el, naviga te to: Fax > > enter the f ax number > > Dar kness > adjust the dark ness of th e fax > Viewin g a f ax log 1 Open a Web browser, […]
-
Page 91: Lexmark MX310DN
Cance ling a fax job afte r scan ning the orig ina l docu ment s 1 From the print er cont rol pan el, press . 2 Press the le ft or ri ght ar row butt on to s croll to the jo b you wan t to can cel. 3 Press > Delete Se lected Jo bs . Holding and forwarding faxes Hold ing faxe s This option lets you hold received faxes from printing unti l they ar[…]
-
Page 92: Lexmark MX310DN
5 In the “Forward to Shortc ut” fie ld, ente r the sho rtcut num ber where yo u want th e fax fo rwarded. Note: The shortcut number must be valid for t he setting selected in the “Forward to” menu. 6 Click Submit . Understanding the fax options Original Size This opt ion lets you c hoose the size o f the docum ents you a re going to fax. 1 […]
-
Page 93: Lexmark MX310DN
Conten t Source This opt ion lets you s et the or iginal do cument sour ce. Select f rom th e followi ng cont ent so urces : • Color Laser —The origina l document was pri nted using a color la ser printer. • Black/Wh ite Las er —The original docume nt was prin ted using a mono lase r printer . • Inkjet —Th e o rigi nal doc ument was pr […]
-
Page 94: Lexmark MX310DN
Scanning Scanning t o an FTP ad dress Automatic d ocument feed er (ADF) Scanner glass Use the ADF for m ulti ple ‑ page documents includin g two-sided (duplex) pages. Use the scanner glass fo r single-pag e documents, book pages, small items (such as postcards or ph otos), transpare ncies, photo p aper, or thin media (such as mag azine clipping s[…]
-
Page 95: Lexmark MX310DN
4 Enter a shor tcut num ber. If you enter a num ber that is already in u se, then you are prompt ed to select another nu mber. 5 Click Add . Scanning to an FTP addre ss Scanning to an FTP address using a shortcut number 1 Load an o riginal do cument f aceup, sho rt edge first i nto the AD F tray or fac edown o n the scan ner glas s. Notes: • Do n[…]
-
Page 96: Lexmark MX310DN
Scanning t o a compu ter Automatic d ocument feed er (ADF) Scanne r glass Use the ADF for m ulti ple ‑ page documents. Use the sc anner glass for sing le pages, small items (such as postcard s or photos), transp arencies, photo paper, or thin media (such as magazine clippings) . The scan ner let s you scan d ocuments directl y to a co mputer. The[…]
-
Page 97: Lexmark MX310DN
Notes: • Do not l oad postcar ds, pho tos, small items, tr ansparenc ies, phot o paper, or thin m edia (such a s magazine clippings) into the ADF tray. Place these items on the scanner glass. • The ADF indicator light turns on when t he paper is loaded prop erly. b If you are load ing a documen t into the AD F tray, then ad just the p aper guid[…]
-
Page 98: Lexmark MX310DN
Understandin g the printer menus Menus list Paper Menu Reports Network/Ports Security Settings Default Source Paper Siz e/Type Configure M P Substitute Size Paper Texture Paper Weight Paper Loadi ng Custom Types Custom Scan Sizes Universal Setup Menu Settings Page Device S tatistics Network Setup Page 1 Shortcu t List Fax Jo b Log Fax Cal l Log Cop[…]
-
Page 99: Lexmark MX310DN
Paper menu Default Sourc e menu Use To Default Source Tray [x] MP Feeder Manual Paper Manual Envelope Set a default pap er source for all print jobs. Note s: • Tray 1 (standard tray) is the factory default setting. • From the Paper menu, set Configure MP to “Cassette” for MP Feeder to appear as a menu settin g. • If the same size and type[…]
-
Page 100: Lexmark MX310DN
Use To MP Feeder Siz e A4 A5 A6 JIS B 5 Letter Legal Executive Oficio ( Mexico) Folio Stat emen t Universal 7 3/4 E nvelo pe 9 Envelo pe 10 Env elope DL Envelo pe C5 En vel ope B5 Env elope Oth er En velo pe Specify the si ze of the paper loaded in the multipurpose feeder. Notes: • Lett er i s th e U.S . fa ctor y defa ul t set ting . A4 is th e […]
-
Page 101: Lexmark MX310DN
Use To Manual Paper Size A4 A5 A6 JIS B 5 Letter Legal Executive Oficio ( Mexico) Folio Stat emen t Universal Specify the size of the paper being manually lo aded. Note: Letter is the U.S. factory default setting. A4 is the internati onal factory default setting. Manual Paper Type Plain Pape r Card Sto ck Transparency Recy cled Labels Bond Letterhe[…]
-
Page 102: Lexmark MX310DN
Configu re MP menu Use To Conf igur e MP Cassette Manual First Determine when the printer s elects paper from the multipurpose fe eder. Note s: • Cassette is the factory default setting. Cassette configures the multipurpo se feeder as the automatic paper source. • Manual sets the multipurpo se feeder only for manual ‑ feed print jobs. • Fir[…]
-
Page 103: Lexmark MX310DN
Use To Labels Texture Smoo th Normal Rough Specify the relati ve texture of the la bels loaded. Note: Normal is the factor y default setting. Bond Texture Smoo th Normal Rough Specify the relative texture of th e bond paper loaded. Note: Rough i s the factory default setting. Envelope Texture Smoo th Normal Rough Specify the relative text ure of th[…]
-
Page 104: Lexmark MX310DN
Paper Weig ht menu Use To Plain Weight Light Normal Heavy Specify the relative weight of the plain paper loaded. Note: Normal is the factory defa ult setting. Card S tock Weigh t Light Normal Heavy Specify the relative weight of the car d stock loaded. Note: Normal is the factory defa ult setting. Trans pare ncy We igh t Light Normal Heavy Specify […]
-
Page 105: Lexmark MX310DN
Use To Colo red We ight Light Normal Heavy Specify the relative weight of the colored paper loaded. Note: Normal is the factory defa ult setting. Light W eight Light Specify that the relative weight of the paper loaded is light. Heavy Weight Heavy Specify the relati ve weight of the paper loaded is heavy. Rough/Cotton Weight Light Normal Heavy Spec[…]
-
Page 106: Lexmark MX310DN
Use To Light Lo ading Duplex Off Determine and set two ‑ sided printing for all print jobs that speci fy Light as the paper type. Heav y Loadi ng Duplex Off Determine and set two ‑ sided printing for all print jobs that speci fy Heavy as the paper type. Custom [x ] Loadi ng Duplex Off Determine and set two ‑ sided printing for all print jobs […]
-
Page 107: Lexmark MX310DN
Custom Sc an Sizes m enu Use To Cust om Sc an Siz e [x ] Scan Size Name Widt h Height Orient ation Portrai t Landscape 2 scans per side Off On Specify a custom scan size name and page ori entation. Notes: • The custom scan size name replaces Custom Scan Size [x] in the printer menus. • ADF Media Type is the factory default setting f or custom s[…]
-
Page 108: Lexmark MX310DN
Use To Feed Direction Short Edge Long Edge Specify the feed direction if the paper can be loaded in either direction. Note s: • Short Edge is the factory defaul t setting. • Long Edge appears onl y when the longest edge is shorter than the maximum width suppor ted in the tray. Reports menu Reports me nu Use To Menu Settings Page Print a repor t[…]
-
Page 109: Lexmark MX310DN
Networ k/P orts m enu Active NIC menu Use To Active NIC Auto [list of available ne twork cards] Note s: • Auto is t he fac tory d efault setting . • This menu item appe ars only when an optional ne twork card is instal led. Standard Network o r Networ k [x] menu Note: Only active p orts appear i n this menu. All inactive p orts are omitte d. Us[…]
-
Page 110: Lexmark MX310DN
Use To Network Buffer Auto 3KB to [maximum size allowed] Set the size of the network inp ut buffer. Note s: • Auto is t he fac tory d efault setting . • The value can be changed in 1KB increments. • The maximum size allowed depends on th e amount of memory in the pri nter, the size of the other link buffers, and whether Resource Save is set t[…]
-
Page 111: Lexmark MX310DN
Use To View C ard Status Connected Discon nected View the connection status of the wirel ess network adapter. View Card Sp eed View the speed of an acti ve wireless network adapter. Network Address UAA LAA View the network addresses. Job Timeout 0, 10 –225 second s Set the amount of time it takes for a networ k print job to be canceled. Note s: ?[…]
-
Page 112: Lexmark MX310DN
Use To Enable BOOTP On Off Specify the BOOTP address assignment setting. Note: On is the factory default setting. Enable AutoIP Yes No Specify the Zero Configurati on Networking setting. Note: Yes is the fa ctory d efault setting . Enable FTP/TFTP Yes No Enable the b uilt-in FTP server, which lets you s end files to the printe r using Fi le Transfe[…]
-
Page 113: Lexmark MX310DN
Use To Auto Configuration On Off Specify whether or not the wireless network adapter accepts the automatic IP v6 address configuration entries pro vided by a router. Note: On i s the fact ory default setti ng. View Ho stname Se t the h os t name . Note: These settings can be chang ed only from the Embedded Web Serv er. View Address View R oute r A […]
-
Page 114: Lexmark MX310DN
Use To View Se curity Mode View the encryption method for the wireless network. AppleT alk menu Note: This menu is available only in prin ter mode ls connect ed to a wire d networ k or when an o ptional network ca rd is installed. To acces s the m enu, navi gate to any of the fo llowing: • Networ k/Po rts > Standa rd Ne twork > Standard Net[…]
-
Page 115: Lexmark MX310DN
Use To Use SSL Disabled Negotiate Requ ired Set the printer to use SSL for inc reased security when connecting to the SMTP serv er. Note s: • Disabled is the fact ory default setti ng. • When the Negotiate setting is used, the SMTP s erver determines if SSL will be used. SMTP Server Authentication No authentication required Login/Plai n CRA M ?[…]
-
Page 116: Lexmark MX310DN
Use To Configure Log Enable Audit Yes No Enable Remote Syslog No Yes Remot e Syslog Facility 0–23 Severity of events to log 0–7 Specify how and whether or not aud it logs are created . Notes: • Enable Audit determines if events are recor ded in the secure audit log and remote syslog. No is the factory default setting. • Enable Remote Syslog[…]
-
Page 117: Lexmark MX310DN
Settings menu General Settin gs menu Use To Display L anguage English Francai s Deuts ch Italiano Espanol Dansk Norsk Nederlands Svens ka Portugu ese Suom i Russ ian Polski Greek Magyar Turkce Cesk y Simpli fied Chine se Traditional Chi nese Korean Japanese Set the language of the text appear ing on the printer display. Note: Not a ll languages are[…]
-
Page 118: Lexmark MX310DN
Use To Run Initia l setup Yes No Run the setup wizard. Notes: • Yes is the factory default setting. • After completing the setup wiza rd by selecting Done at the country or regi on selection screen, the default becomes No. Paper Si zes US Metric Specify the unit of measurement for paper si zes. Notes: • U.S. is the factory default setting. ?[…]
-
Page 119: Lexmark MX310DN
Use To Alarms Alarm C ontrol Cartridge A larm Set an alarm to sound when the printer requi res user intervention. When activated, Alarm Co ntrol lets you set the number of times that the alarm sounds, while Cartridge Alarm lets you stop printing when a cartri dge ‑ low conditio n occurs. For each alarm type, select from t he followin g options: O[…]
-
Page 120: Lexmark MX310DN
Use To Timeou ts Screen Timeout 15–30 0 sec Set the amount of time in seconds the prin ter waits before returning the display to th e Ready state. Note: “30 sec” i s the factory default settin g. Timeou ts Print Timeout Dis abled 1–255 se c Set the amount of time in seco nds the printer waits to receive an end ‑ of ‑ job message bef ore[…]
-
Page 121: Lexmark MX310DN
Use To Print Reco very Jam Assi st On Off Set the printer to automati cally check for jammed pap er. Note: On i s the fact ory default setti ng. Print Reco very Page Prot ect Off On Let the printer successfully print a page that may not have printed otherwise. Notes: • Off is the factory default setti ng. This prints a partial page when there is […]
-
Page 122: Lexmark MX310DN
Copy Settin gs menu Use To Content Type Text Graphics Text/Photo Photo Specify the content of the origi nal document. Note: Text/P hoto is the factory default setting. Content Source Black/ White Laser Colo r Lase r Inkjet Photo/Film Magazine Newspaper Press Other Specify how the original documen t was produced. Note: Black/White Laser i s the fact[…]
-
Page 123: Lexmark MX310DN
Use To Orig inal Size Letter Legal Executive Folio Stat emen t Oficio ( Mexico) Universal Auto Si ze Sens e A4 A5 A6 JIS B 5 Custom Scan Size [x] Book Orig inal Busi ness C ard 3 x 5 in . 4 x 6 in . ID Card Specify the p aper size of the original document . Notes: • Letter is the U.S. factory default setting . • A4 is the intern ational fact or[…]
-
Page 124: Lexmark MX310DN
Use To Overla y Con fide ntial Cop y Draf t Urgent Cust om Off Specify the overlay text printed on each page of the copy job. Note: Off is the facto ry defaul t setti ng. Custo m Overlay Specify the custom overlay text. Note: A maximum of 64 charac ters is allowed. Allow pr iority copies On Off Allow interrupt ion of a print job to copy a pag e or […]
-
Page 125: Lexmark MX310DN
Use To Adjust ADF Skew Auto Off On Correct slight skew in the scanned image. Note: Auto is the factory default setting. Scan edge to edge Off On Specify if the origi nal document is scanned edge ‑ to ‑ edge. Note: Off is the facto ry defaul t setti ng. Sharpness 1–5 Adjust the amount of sharpness of a copy. Note: 3 is the factory default sett[…]
-
Page 126: Lexmark MX310DN
Use To Cal ler ID Off Primary Altern ate Specify the typ e of caller ID being used . Fax number ma sking Off From lef t From ri ght Specify the direction fr om where digits are masked in an outgoing fax number. Notes: • Off is the fac tory def ault set ting. • The number of characters mask ed is determined by the “Digits to mask” setting. D[…]
-
Page 127: Lexmark MX310DN
Use To Orig inal Size Letter Legal Executive Folio Stat emen t Oficio ( Mexico) Universal Auto Si ze Sens e Mixed Sizes A4 A5 A6 JIS B 5 Custom Scan Size [x] Book Orig inal Busi ness C ard 3 x 5 in . 4 x 6 in . Specify the p aper size of the original document . Note: Mixed Sizes is the US facto ry def ault sett ing . A4 is the in ter nati ona l fac[…]
-
Page 128: Lexmark MX310DN
Use To Behind a PABX Yes No Enable or disable switchboar d blind dialing without a di al tone. Note: No is the factory default setting. Enable ECM Yes No Enable or disabl e Error Correction Mode for fax jobs . Note: Yes is the fa ctory d efault s etting . Enab le Fax Sc ans On Off Fax files that are scanned at the pri nter. Note: On is the factory […]
-
Page 129: Lexmark MX310DN
Use To Mirror I mage Off On Create a mirror image of the original document. Note: Off is the facto ry defaul t setti ng. Negative Image Off On Create a negative image o f the original document. Note: Off is the facto ry defaul t setti ng. Shadow Deta il ‑ 4 to 4 Adjust the amount of shadow detail visible. Note: 0 is the factory default setting . […]
-
Page 130: Lexmark MX310DN
Use To Paper Source Auto Tray [x] MP Feeder Specify the paper source for pri nting incoming fax jobs. Note : Auto is the factory default setting. Sides (Duplex) Off On Enable two ‑ sided ( duplex) prin ting for incoming fax jobs. Note : Off is the fa ctory defau lt set ting. Separator Sh eets Off Before Job After J ob Enable the printer to inc lu[…]
-
Page 131: Lexmark MX310DN
Use To Transm ission Log Print log Do not print log Print only for error Enable prin ting of a transmission log af ter each fax job. Note : Pr in t log is the fa ct ory d efaul t se tti ng. Receive Error Log Print Never Print on Error Enable prin ting of a receive error log foll owing a receive error . Note : Print Never is the factory de fault set[…]
-
Page 132: Lexmark MX310DN
Use To All Ri ngs Single Ring Onl y Double Ring Only Tri ple Ri ng Only Single or Double Rings On ly Sing le or Tri ple Ring s Onl y Double or Triple Rings Only Specify ring pat terns when the printer is answering c alls. Note : All Rings is the f actory default settin g. E ‑ mail Sett ings menu Use To E ‑ mail Serve r Setup Send me a copy Neve[…]
-
Page 133: Lexmark MX310DN
Use To Resoluti on 75 dpi 150 d pi 200 d pi 300 d pi 400 d pi 600 d pi Specify the resolution of the scan in dots p er inch. Note: 150 dp i is the fac tory defaul t setting. Darkness 1–9 Lighten or darken the outpu t. Note: 5 is the fa ctory d efault setting. Orientation Portrai t Landscape Specify th e orientation of the scanned image. Note: Por[…]
-
Page 134: Lexmark MX310DN
Use To JPEG Quality Best f or conte nt 5–90 Set the q uality of a JPEG p hoto image i n relation to file size and q uality of the image. Notes: • “Best for content” is the factory default setting. • 5 reduces the file size and quality of the image. • 90 p ro vides t he b est i mag e qu ali ty, bu t th e f ile s ize is v ery la rge. • […]
-
Page 135: Lexmark MX310DN
Use To Color Dropout Color Dropout None Red Green Blue Default R ed Thresho ld 0–255 Defau lt Gree n Thre shold 0–255 Default B lue Thresh old 0–255 Specify which c olor to drop and to adjust the dr opout setting for each color threshol d. Notes: • None is the factory default setting for Color Dropout. • 128 is t he factory default settin[…]
-
Page 136: Lexmark MX310DN
FTP Settings menu Use To Forma t PDF (.pdf) Secure PDF (.p df) TIFF (.tif) JPEG (.jpg) XPS ( .xps) Specify the format of the file for FTP sending. Note: PDF (.pdf) i s the factory default setting. PDF Vers ion 1.2–1. 7 A–1a Set the version level of th e PDF file for FTP sending. Note: 1.5 is the factory defaul t setting . Content Type Text Grap[…]
-
Page 137: Lexmark MX310DN
Use To Orig inal Size Letter Legal Executive Folio Stat emen t Oficio ( Mexico) Universal Auto Si ze Sens e Mixed Sizes A4 A5 A6 JIS B 5 Custom Scan Size [x] Book Orig inal Busi ness C ard 3 x 5 in . 4 x 6 in . Specify th e paper size of the original docum ent. Notes: • Letter is the U.S. factory default setting . • A4 is the inter national fac[…]
-
Page 138: Lexmark MX310DN
Use To Use Multi ‑ Page TIFF On Off Choose between si ngle-page TIFF fi les and multiple ‑ page TIFF file s. For a m ultiple-p age scan ‑ to ‑ FTP j ob, eit her on e TI FF file i s c re ate d co ntai ni ng a ll t he pages, or multiple TIFF file s are created with one file for each page of the job. Notes: • On is the factory default settin[…]
-
Page 139: Lexmark MX310DN
Use To Negative Image Off On Create a negative imag e of the original document. Note: Off i s the factory d efaul t settin g. Shadow Deta il ‑ 4 to 4 Adjust the amount of shadow detail visible on a scanned image. Note: 0 is the factor y defaul t setti ng. Adjust ADF Skew Auto Off On Correct slight skew in the scanned image. Note: Auto is the fact[…]
-
Page 140: Lexmark MX310DN
Finishing menu Use To Sides (Duplex) 1 sid ed 2 sid ed Spec ify whet her two ‑ sided (duplex) printing is set as the user default setting for all print jobs. Notes: • “1 sided” is the factory default setting. • You can set two ‑ sided printin g from the software program. For Windows users: Clic k Fi le > Print , and then click Proper[…]
-
Page 141: Lexmark MX310DN
Use To Paper Save r Off 2 ‑ Up 3 ‑ Up 4 ‑ Up 6 ‑ Up 9 ‑ Up 12 ‑ Up 16 ‑ Up Print multiple pages on one shee t of paper. Notes: • Off is the fact ory defau lt setti ng. • When the number of pages per shee t is selected, each page is sca led so that the number of pages you want can be displa yed on the sheet. Paper Saver Or dering H[…]
-
Page 142: Lexmark MX310DN
Use To Enhance Fine Lines On Off Enable a prin t mode preferable for files such as archit ectural drawings, maps , electrical circuit diag rams, and flow charts. Notes: • Off is the fact ory defau lt setti ng. • You can set this option fr om the printer software. For Windows users, click File > Prin t , and then click Properti es , Pr efe re[…]
-
Page 143: Lexmark MX310DN
XPS menu Use To Print Error Pages Off On Print a page c ontaining info rmation on erro rs, including XM L markup errors . Note : Of f is th e facto ry default se tting. PDF menu Use To Scale t o Fit Yes No Scale page content to fit the sel ected paper size. Note : No is the factory default setting. Annotations Do Not Print Print Print annotati ons […]
-
Page 144: Lexmark MX310DN
Use To PCL Emulation Settings Pitch 0.08–100 .00 Specify the font pitch fo r scalable monospaced f onts. Note s: • 10 is t he factory def ault setting. • Pitch refe rs to the number of f ixed ‑ space characters pe r inch (cpi). This can be increased or decr eased in 0.01 ‑ cp i inc reme nts. • For no n ‑ scalable monospaced fonts, the[…]
-
Page 145: Lexmark MX310DN
Use To Tray Renumber Assign Multipurpose F eeder Off None 0–199 Assign Tray [x] Off None 0–199 Assign Manual Paper Off None 0–199 Assign Manual Envelope Off None 0–199 Configure the printer to work with pr inter software or pr ograms that use different source ass ignments for trays and feeders. Note s: • “Off” is the fa ctory de fault[…]
-
Page 146: Lexmark MX310DN
HTML menu Use To Font Name Albertus MT Antiq ue Oliv e Appl e Chan cery Arial MT Avant Garde Bodoni Bookma n Chi cago Clarendon Coop er B lack Copperplate Coro net Cou rier Eurostile Garamond Geneva Gill Sans Goudy Helvetica Hoefler Text Intl CG Times Intl Courier Intl Univers Joanna MT Lett er G ot hic Lubalin Graph Marigold MonaLisa Rec ut Monaco[…]
-
Page 147: Lexmark MX310DN
Use To Margin S ize 8–25 5 mm Set the page margi n for HTML documents. Note s: • 19 mm is the factory default setting. • Margin size can be increased in 1 ‑ mm increments. Backgrounds Do Not Print Print Specify whether to print backgrounds on HTML docu ments. Note : Print is the factory default setting. Image m enu Use To Auto Fit On Off Se[…]
-
Page 148: Lexmark MX310DN
Menu item Description E ‑ mail Guide Provides information abou t sending e ‑ mail s using addresses, shortcut numbers, or the address book, and about changing settings Fax Guide Provides information about sending faxes using fax numbers, shortcut numbers, or the address book, and abo ut changing settings FTP Guide Pr ovides information about sc[…]
-
Page 149: Lexmark MX310DN
Saving money and the environment Lexmark is co mmitted to environmental sustainabi lity and is continuall y improv ing its printer s to reduc e their impac t on the environment. We design with the environment in mind, engineer ou r packaging to redu ce materials, and provide coll ection and re cycli ng progra ms. For mor e inform ation, see : • T[…]
-
Page 150: Lexmark MX310DN
Avoid paper jams Correct ly set the p aper typ e and size to avoid p aper jams . For mor e informatio n, see “ Avoiding jams” on pag e 171. Saving energy Using Eco ‑ mo de Use Eco ‑ Mode to quickly s elect on e or more ways to reduc e your print er’s env ironmenta l impact . 1 From the print er cont rol pan el, naviga te to: > Setti[…]
-
Page 151: Lexmark MX310DN
Use To On Reduce printer noise. Note s: • Print jobs process at a re duced speed. • Printer engine motors do not start until a document is ready to print. There is a short del ay before the first page is printed. • The alarm control and cartridge alar m sounds are turned off. • The printer ignores the Advance Sta rt command. Off Use fac tor[…]
-
Page 152: Lexmark MX310DN
Using Hi bernate mode Hibernate is an ultra ‑ low ‑ power opera ting mode . When operatin g in Hiber nate mode, a ll othe r system s and dev ices are powe red down saf ely. Notes: • Make su re to wake t he printe r from Hib ernate mode befo re sending a print jo b. A hard reset or a long pre ss of the Sl eep butt on wakes the prin ter from Hi[…]
-
Page 153: Lexmark MX310DN
Notes: • View the printer IP address in the TCP/IP sect ion in t he Network/Por ts men u. The IP addres s appea rs as four sets of numbers separated by periods, su ch as 123. 123.123.123. • If you are using a proxy se rver, then tempo rarily disable it to load the Web page correctly. 2 Click Setti ngs > Ge neral S etti ngs . 3 In the Screen […]
-
Page 154: Lexmark MX310DN
Recycling Lexmark packaging Lexmark cont inually str ives to minim ize packaging. Less packag ing helps t o ensure th at Lexmark p rinters are tr ansported in the most efficient and environmentally sensitiv e manner and that there is less packaging to dispose of. These efficiencies result in fewer greenhouse emissions, energy sav ings, and natural […]
-
Page 155: Lexmark MX310DN
Securin g the prin ter Statement of Volatility Your print er co ntains va rious t ypes of m emory tha t can stor e devic e and netw ork sett ings, and us er data. Type of memory Description Volatile memory Your printer uses stand ard random access mem ory (R AM) to temporarily buffer user data du ring simple print jobs. Non-volatile memory Your pri[…]
-
Page 156: Lexmark MX310DN
The printer w ill perform a po wer ‑ on rese t, and then retu rn to no rmal opera ting mode. Finding printer secu rity in formation In high-sec urity e nvironme nts, it may be necessary to take addi tional st eps to ma ke sure that confidenti al data s tored in the pri nter cannot be a ccess ed by un auth orized pers ons. For more info rmatio n, […]
-
Page 157: Lexmark MX310DN
Maintaining the printer Cleaning the printer pa rts Cleaning th e printer Note: You ma y need to perf orm th is task af ter every f ew mon ths. Warn ing— Potent ial D amag e: Dam age to the p rinter caused by im proper handling is not co vered by t he printer warranty. 1 Make sure that the printer is turned off and unplu gged from the electrical […]
-
Page 158: Lexmark MX310DN
Cleaning th e scanner glass Clean th e scanner glass if you encounte r print quality pro blems, such a s streaks on copied or scanned images. 1 Slight ly dampen a soft, li nt-free c loth or pa per towel wi th wate r. 2 Open t he sc anner cover. 3 Clean all the areas shown, and then let them d ry. 1 White underside of the scanner cover 2 Scann er g […]
-
Page 159: Lexmark MX310DN
Checking the stat us of parts an d supplies A message app ears on the display whe n a replacement supply item is neede d or when maintenance is required . Checki ng the status of parts and supplies on the printe r control pan el From the printer contro l panel, nav igate to : > Status/S uppli es > > Vi ew Suppl ies > Checki ng the statu[…]
-
Page 160: Lexmark MX310DN
Ordering su pplies To order part s and su pplies i n the U.S. , contact Lexmark at 1-8 00-539-6275 for informa tion about Lexmar k authori zed supplie s deal ers in your a rea. In o ther cou ntrie s or regi ons, vi sit the L exmark Web site at www.lexmark .com or cont act the place where you purchased the printer. The Lexmar k Return Prog ram lets […]
-
Page 161: Lexmark MX310DN
Item Regul ar ca rtri dg e Worldwide High Yiel d Toner Cartridge 600HA Ordering a maintenance kit Notes: • Using c ertai n types o f paper may req uire more frequen t rep lacement of the mai ntenanc e kit. • The separator roller, fuser , pick rollers, t ransfer roller, a nd redrive ass embly are all inc luded in th e maintenan ce kit and ca n b[…]
-
Page 162: Lexmark MX310DN
• High hum idity abo ve 80% • Salty a ir • Corros ive gases • Heavy dust Replacing supplies Replacing the toner cartridge 1 Pre ss the but ton on the ri ght si de of th e printe r, and t hen ope n the f ront do or. 2 Pull the tone r cartr idge out using t he handle. 3 Unpack the tone r cartri dge, an d then rem ove all pac king mat erials. […]
-
Page 163: Lexmark MX310DN
4 Sha ke the ne w cartr idge to r edist ribute the ton er. 5 Insert th e ton er cartri dge into the prin ter by al igning the side rails of the cart ridg e with the ar rows on the side r ails insi de the prin ter. Warning—Pote ntial Da mage: Do not expo se the i maging u nit to di rect light for m ore than 10 minut es. Extended exposure to light […]
-
Page 164: Lexmark MX310DN
Replacing the imagin g unit 1 Pre ss the but ton on the ri ght si de of th e printe r, and t hen ope n the f ront do or. 2 Pull the tone r cartr idge out using t he handle. 3 Lift the green handle, and then pull the imaging unit out of the p rinter. Maintai ning the prin ter 164[…]
-
Page 165: Lexmark MX310DN
4 Unpack the new imagin g unit, and then shake it. 5 Remove all pa cking ma terials from the imaging un it. Warning—Pote ntial Da mage: Do not expo se the i maging u nit to di rect light for m ore than 10 minut es. Extended exposure to light m ay cause pri nt qualit y problems. Warning—Pote ntial Da mage: Do not to uch the ph otocon ductor dr u[…]
-
Page 166: Lexmark MX310DN
7 Insert th e ton er cartri dge into the prin ter by al igning the side rails of the cart ridg e with the ar rows on the side r ails insi de the prin ter. 8 Clos e the front do or. Moving the printer CAUTION—PO TENTIAL IN JURY: The pr inter we ight is greater than 18 kg (40 lb) and requi res tw o or mor e trained p ersonnel to lift it safel y. Be[…]
-
Page 167: Lexmark MX310DN
• Use the hand holds l ocated on both s ides o f the printer to lift it. • Make s ure your fing ers are n ot under the print er when you set it down. • Before setting up the print er, make sure there is adequate clearanc e around it. Use only the power cord provided with this p roduct or t he manufacture r’s authorized repl acement. Warn[…]
-
Page 168: Lexmark MX310DN
Managing the printer Finding adva nced networking an d administra tor information This chapt er cove rs basi c adminis trative s upport ta sks using the Embe dded Web S erver. F or more ad vanced s ystem suppor t tasks , see the Network ing Guide on th e Software and Documentat ion CD or the Embe dded Web Se rv er Administr ator’s Guide on the[…]
-
Page 169: Lexmark MX310DN
Viewing reports You can view some repo rts from the Emb edded Web Server . These reports are usefu l for assessing the status of the printer , networ k, and su pplies. 1 Open a Web browser, and then type the print er IP address in the ad dress field. Notes: • View the printer IP address in the TCP/IP sect ion in t he Network/Por ts men u. The IP […]
-
Page 170: Lexmark MX310DN
Notification Description Non Continuable Stop 1,2 The printer stops pro cessing jobs when the supp ly conditi on is reached. The supply must be replaced to continue pri nting. 1 The printer generates an e-mail about the status of the supply when supply notifica tion is enabled. 2 The printer stops when some supplie s become empty to prevent damage.[…]
-
Page 171: Lexmark MX310DN
Clearin g jams By carefully select ing paper and speci alty media and loa ding it properly , you sh ould be able to avoid most j ams. If j ams occur, then follow t he step s outl ined i n this cha pter. Warn ing— Potent ial D amag e: Never us e any tool to remove a jam. Doing so could per manently damage th e fuser. Avoiding jam s Load paper prop[…]
-
Page 172: Lexmark MX310DN
• Make sure the guides in t he tray or the multipurpose feeder are prop erly positioned and are not press ing tightly agains t the p aper or en velope s. • Push th e tray firm ly into the prin ter aft er loadi ng pape r. Use recommended paper • Use onl y recommen ded paper or specialty med ia. • Do not lo ad wrinkled , creased, da mp, bent,[…]
-
Page 173: Lexmark MX310DN
1 2 3 4 5 6 7 Jam ac cess ar ea Printer control panel message What to do 1 Automatic document feeder (ADF) [x] ‑ page jam, open automatic feeder top co ver. [28y.x x] Remove all paper f rom the ADF tray, and then remove the jammed paper. 2 Standard b in [x] ‑ page jam, c lear standard bin. [2 0y. xx] Remove the jammed paper. 3 Front door [x] ?[…]
-
Page 174: Lexmark MX310DN
[x] ‑ page jam, op en front do or. [ 20y.xx] CAUTION —HOT SURFA CE: The inside of the prin ter might be hot. To r educe the risk of i njury from a hot component, allow the s urface to cool before touching it. 1 Pre ss the but ton on the ri ght si de of th e printe r, and t hen ope n the f ront do or. 2 Pull the tone r cartr idge out using t he […]
-
Page 175: Lexmark MX310DN
3 Lift the green handle, and then pull the imaging unit out of the p rinter. Warning—Pote ntial Da mage: Do not touch the shin y blue photocondu ctor drum und er the imag ing unit. Doing so may aff ect the qua lity of future pr int jobs. 4 Place th e imaging uni t aside on a flat, smooth surface. Warning—Pote ntial Da mage: Do not expo se the i[…]
-
Page 176: Lexmark MX310DN
Note: M ake sure all paper fragments ar e removed. 7 Inser t the im aging uni t by ali gning th e arrows on the si de rail s of the unit with the ar rows on the side rails in side the p rinter, a nd then insert the ima ging unit into th e prin ter. 8 Insert the to ner cartridge by aligning the side r ails of the ca rtridg e with the ar rows on t he[…]
-
Page 177: Lexmark MX310DN
9 Clos e the front do or. 10 From the pri nter contro l pane l, touc h to clear the me ssage a nd cont inue p rinting . For non ‑ touch ‑ screen p rinter model s, s elect Ne xt > > Cle ar the j am, p ress OK > . [x] ‑ page jam, open rear door. [ 20y.xx] 1 Open the front d oor to loosen t he jammed paper in t he rear door. 2 Gently p […]
-
Page 178: Lexmark MX310DN
4 Close the rear door, and then the front door. 5 From the pri nter contro l pane l, touc h to clear the me ssage a nd cont inue p rinting . For non ‑ touch ‑ screen p rinter model s, s elect Ne xt > > Cle ar the j am, p ress OK > . [x] ‑ page jam, clear s tandard bin . [20y.xx] 1 Firmly gr asp the ja mmed pape r on eac h side, and t[…]
-
Page 179: Lexmark MX310DN
[x] ‑ page jam, remove tray 1 to clear duplex. [23y.xx] CAUTION —HOT SURFA CE: The inside of the prin ter might be hot. To r educe the risk of i njury from a hot component, allow the s urface to cool before touching it. 1 Pul l the tray compl etely o ut of the print er. 2 Locate t he blue l ever, and the n pull it do wn to relea se the jam. 3 F[…]
-
Page 180: Lexmark MX310DN
4 Ins ert the tra y. 5 From the pri nter contro l pane l, touc h to clear the me ssage a nd cont inue p rinting . For non ‑ touch ‑ screen p rinter model s, s elect Ne xt > > Cle ar the j am, p ress OK > . [x] ‑ page jam, open tray [x]. [24y.xx] 1 Pul l the tray compl etely o ut of the print er. Note: The message on the printer displ[…]
-
Page 181: Lexmark MX310DN
3 Ins ert the tra y. 4 From the pri nter contro l pane l, touc h to clear the me ssage a nd cont inue p rinting . For non ‑ touch ‑ screen p rinter model s, s elect Ne xt > > Cle ar the j am, p ress OK > . [x] ‑ page jam, clear ma nual feeder. [25y.xx] 1 From th e multi purpose feeder, fir mly grasp the jamm ed paper o n each side, a[…]
-
Page 182: Lexmark MX310DN
3 Reload paper into the mul tipurpo se feeder. Note: M ake sure the p aper guid e ligh tly rest s again st the edge of the pa per. 4 From the pri nter contro l pane l, touc h to clear the me ssage a nd cont inue p rinting . For non ‑ touch ‑ screen p rinter model s, s elect Ne xt > > Cle ar the j am, p ress OK > . [x] ‑ page jam, ope[…]
-
Page 183: Lexmark MX310DN
5 Strai ghten the edges of the or iginal doc uments, then loa d the origin al document s into the AD F, and then adjust the paper gu ide. 6 From the pri nter contro l pane l, touc h to clear the me ssage a nd cont inue p rinting . For non ‑ touch ‑ screen p rinter model s, s elect Ne xt > > Cle ar the j am, p ress OK > . Clearing jams […]
-
Page 184: Lexmark MX310DN
Troubleshooting Understanding printer m essages Cartridge low [88.xy] You m ay nee d to o rder a ton er car tridge . If nece ssary , sele ct C ontin ue on the printer control panel t o clear t he mes sage and cont inue print ing. For non ‑ touch ‑ screen p rinter mo dels, pr ess to confirm . Cartridge nearly low [88.xy] If nec essary, select Co[…]
-
Page 185: Lexmark MX310DN
Change [paper so urce] to [paper size] l oad [orientation] Try on e or m ore of t he follo wing: • Load th e correct paper si ze and type in the t ray, veri fy the pape r size an d type s ettings are specif ied in the P aper menu on the printer control pa nel, and the n select Fi nished changing p aper . Fo r non ‑ touch ‑ screen printe r mod[…]
-
Page 186: Lexmark MX310DN
Defect ive f lash dete cted [5 1] Try on e or m ore of t he follo wing: • Replace the defective flash memory card. • From th e printer con trol panel, s elect Co ntinu e to igno re the m essage a nd contin ue printi ng. F or non ‑ to uch ‑ screen printer models, press to co nfirm. • Cancel the curr ent prin t job. Error reading USB driv e[…]
-
Page 187: Lexmark MX310DN
Fax Station Nu mber not set up. Contact system admi nistrator. Try either of the following: • From the print er cont rol pan el, sel ect Cont inu e to clear the mess age. For non ‑ touc h ‑ screen print er models, press to con fir m. • Complet e the Analo g Fax Setu p. If the m essage a ppears ag ain after co mpleti ng the setu p, then cont[…]
-
Page 188: Lexmark MX310DN
Insuffic ient memory for Flash Me mory Defrag ment operation [37] Try on e or m ore of t he follo wing: • From the print er cont rol pan el, sel ect Cont inu e to stop t he defrag mentatio n and con tinue pr inting. For non ‑ touch ‑ scre en printer mo dels, pres s to co nfirm. • Dele te font s, mac ros, and other data f rom the p rinter me[…]
-
Page 189: Lexmark MX310DN
Load manual feeder with [custom type n ame] [paper orientation] Try on e or m ore of t he follo wing: • Load th e multi purpose feeder wit h the corr ect si ze and type o f paper. • Dependi ng on your printer m odel, touch Cont inue or press to cle ar the m essage and continue print ing. Note: If n o paper is loaded in the feede r when Continue[…]
-
Page 190: Lexmark MX310DN
Load [paper so urce] with [custom type name] [paper orien tation] Try on e or m ore of t he follo wing: • Load the tray or feeder with the corr ect size and type of pap er. • To use the tray that has the correct size or type of paper, sele ct Fini shed lo ading pape r on the printer co ntrol p anel. For no n ‑ touch ‑ screen pr inter mode l[…]
-
Page 191: Lexmark MX310DN
Mainte nance kit nea rly low [80. xy] For mor e informa tion , visit t he Lexmark suppo rt Web si te at ht tp://s uppo rt.le xmark .com or contact cus tomer s upport, and then report the mes sage. If nec essary, select Conti nue to clear th e mes sage and co ntinue printin g. For non ‑ tou ch ‑ screen pr inter mo dels, press to confirm . Mainte[…]
-
Page 192: Lexmark MX310DN
• Update the network f irmwar e in the p rinte r or prin t ser ver. Fo r more informat ion, vi sit th e Lexmar k suppor t Web site at htt p:/ /sup port. lexma rk.co m . No analog phone li ne connected to modem , fax is disable d. Connect t he printer to an analo g phone l ine. Non ‑ Lexmark [supply type], s ee User’s Guid e [33.xy] Note: The […]
-
Page 193: Lexmark MX310DN
For more in formation , visit http:/ /support .lexma rk.com or cont act cust omer su pport. Reinstall missing or un responsiv e cartridge [31.xy ] Try on e or m ore of t he follo wing: • Check if the ton er cartr idge is mi ssing. If missing , install th e toner ca rtrid ge. For i nformat ion on in stalling the car tridg e, see the “Repl acing […]
-
Page 194: Lexmark MX310DN
Note: If you do not have a replacement cartridge, then see t he “Ordering supplies” section o f the User’s Guid e or visit www.le xmark. com . Replace cartridge, printer region mismatch [42.xy] Install a toner c artridg e that m atches the reg ion num ber of the printer . x indicates the value of t he printer reg ion. y indica tes the value o[…]
-
Page 195: Lexmark MX310DN
Replace jammed ori ginals if restarting job. From the printe r con trol pane l, try on e or m ore of the followin g: • Select Canc el job to clear the message and cancel the scan job. For non ‑ touch ‑ screen printer mod els, press to confi rm. • Select Scan fr om automatic feeder to conti nue sca nning fro m the ADF i mmediate ly after t h[…]
-
Page 196: Lexmark MX310DN
Scan ner dis abled. Cont act sy stem admin istrat or if pro ble m persi sts. [ 840 .02] From the printe r con trol pane l, try on e or m ore of the followin g: • Select Contin ue with s canne r disable d to ret urn to the home screen, and then contact yo ur system sup port person . • Select Re boot an d aut omatically enab le sc anner t o cance[…]
-
Page 197: Lexmark MX310DN
Standard USB port disabled [56] From the printer contro l panel, select C ontin ue to clear the mess age. For non ‑ touch ‑ screen pr inter mode ls, press to con firm. Notes: • The pri nter dis cards any dat a recei ved thro ugh th e USB port . • Make su re the U SB Buf fer men u is not s et to Dis abled . Supp ly nee ded to complete jo b D[…]
-
Page 198: Lexmark MX310DN
Weblink se rver not set up. Contact sy stem administrator. Select Continu e to clear the message. Fo r non ‑ touch ‑ screen print er models, pres s to confirm . Note: If the me ssage appea rs agai n, then con tact your system s upport p erson . Solving printer problems • “Basic print er problems” on page 198 • “Hardw are and in tern a[…]
-
Page 199: Lexmark MX310DN
Action Yes No Step 5 Check if the cables connecting the printer and the computer are inserted in the correc t ports. Are the cables ins erted in the co rrect ports? Go to step 6. Make sure to match the following : • The USB sym bol on the cable with the USB symbol on the printer • The appropriate Ethernet cable with the Ethernet port Step 6 Mak[…]
-
Page 200: Lexmark MX310DN
Printer display is blank Action Yes No Step 1 Press the Sleep button on the printer co ntrol panel. Does Ready appear on the printer displ ay? The p rob lem is s olve d. Go to st ep 2. Step 2 Turn off the printer, then wait for about 10 seconds, and then turn the printer back on. Do Please wait and Ready appear on the printer display ? The pr ob le[…]
-
Page 201: Lexmark MX310DN
Action Yes No Step 4 a Check if the internal opti on is selected. It may be necessary to manuall y add the internal option in the pri nter driver to make it avai lable for print job s. For more informa tion, see “Updating availabl e options in the printer driver” on page 24. b Resend the print job. Does the i nternal option operate cor rectly? […]
-
Page 202: Lexmark MX310DN
Paper feed problems Jammed pages are not reprinted Action Yes No a Turn on jam recovery. 1 From the printer control pan el, navigate to: Settings > General Settings > Print R ecovery > Ja m Recovery 2 Selec t On or Auto . 3 Depending on your printer model, press or touch Su bmi t . b Resend the pages that did not prin t. Were the ja mmed p[…]
-
Page 203: Lexmark MX310DN
Paper jam m essage rema ins after ja m is cle ared Action Yes No a Do either of the following: • For touc h ‑ screen printer models, touch or Done . • For non ‑ to uc h ‑ screen printer models, select Next > > Clear the jam, press OK > . b Follow the instructions on the pr inter display. Does the paper jam message remain? Contact[…]
-
Page 204: Lexmark MX310DN
Action Yes No Step 2 a From the Paper menu on the prin ter control panel, set the paper size and type to match the paper loaded i n the tray. b Resend the print job. Did the job print from the correc t tray or on the correct paper? The p rob lem is s olve d. Go to st ep 3. Step 3 a Depending o n your operating system, open Pri nting Preference s or[…]
-
Page 205: Lexmark MX310DN
Multiple ‑ language PDF files do not print Action Yes No Step 1 a Check if the print options for the PDF output are set to embed all fonts. For more information , see the docum entation that c ame with Adobe Acrob at. b Generate a new PDF file, and then resend the print job. Do the fi les print? The p rob lem is s olve d. Go to st ep 2. Step 2 a […]
-
Page 206: Lexmark MX310DN
Action Yes No Step 4 a Check if the ports (USB, ser ial, or Ethernet) are working and if the cables are securel y connected to the computer and the printer. Note: For more inform ation, see the setup documentation that came with the printer. b Resend the print job. Do the jobs print? The p rob lem is s olve d. Go to st ep 5. Step 5 a Turn off the p[…]
-
Page 207: Lexmark MX310DN
Action Yes No Step 3 a Remove held jobs stored in the printer memory. b Resend the print job. Did the job print? The p rob lem is s olve d. Go to st ep 4. Step 4 a Disable the Pa ge Prot ect feature. From the printer control pa nel, navigate to: Settings > Gen eral S ett ings > Print Recove ry > Page Protect > Off b Resend the print job[…]
-
Page 208: Lexmark MX310DN
Tray linking does not work Notes: • The trays can detec t paper l ength. • The multipurpose feeder does not automat ically detect the paper size. You must s et the size from the Paper Size/Type m enu. Action Yes No Step 1 a Open the trays, and then check if they contain p aper of the same size and type. • Check if the paper g uides are in the[…]
-
Page 209: Lexmark MX310DN
Print qual ity probl ems Char acter s ha ve jag g ed or uneven edges Action Yes No Step 1 a Print a font sample list to check if the fonts you are using are supported by the printer. 1 From the printer control pan el, navigate to: Menus > Reports > Print Fonts 2 Selec t PCL Fonts or PostScri pt Fonts . b Resend the print job. Are you using fo[…]
-
Page 210: Lexmark MX310DN
Action Yes No Step 2 From the printer cont rol panel, set th e paper size and type in th e Paper menu to match the paper loaded in the tray. Do the paper size and type match th e paper loaded in the tray? Go to step 3. Do one or more of the following : • Specify the paper size from the tray settings to match the paper loaded in the tray. • Chan[…]
-
Page 211: Lexmark MX310DN
Action Yes No Step 2 a Replace the fuser. For more information on installin g the fuser, see the instruction sheet that came with t he part. b Resend the print job. Do compressed images still appear? The pr oble m is so lve d. Con tact custome r support . Gray background o n prints ABCDE ABCDE ABCDE Leading edge Trailing edge Action Yes No Step 1 a[…]
-
Page 212: Lexmark MX310DN
Horizontal voids appear on prints Leading edge Trailing edge Action Yes No Step 1 a Make sure your sof tware program is using a correct fill pattern. b Resend the print job. Do horizontal voids app ear on prints? Go t o st ep 2. The p rob lem is s olve d. Step 2 a Load the specifie d tray or feeder with a rec ommended type of paper. b Resend the pr[…]
-
Page 213: Lexmark MX310DN
Incorrect margins on prints ABCD ABCD ABCD Action Yes No Step 1 a Move the width and lengt h guides in the tray to the correct positi ons for the paper size loaded. b Resend the print job. Are the margins co rrect? The p rob lem is s olve d. Go to st ep 2. Step 2 From the printer cont rol panel, set the paper size in the Pap er menu to match the pa[…]
-
Page 214: Lexmark MX310DN
Paper curl Action Yes No Step 1 Move the width and length guides in the tray to the correct position s for the size of the paper loaded. Are the width and length guides positi oned correctly? Go to step 2. Adjust the width and length guide s. Step 2 From the printer control panel, set th e paper type and weight in the Paper menu to match the paper […]
-
Page 215: Lexmark MX310DN
Action Yes No Step 1 a Move the width and lengt h guides in the tray to the correct positi ons for the size of the paper loaded in the tray. b Resend the print job. Do print irr egularitie s still appear? Go t o st ep 2. The p rob lem is s olve d. Step 2 From the printer cont rol panel, set th e paper size and type in th e Paper menu to match the p[…]
-
Page 216: Lexmark MX310DN
Print is too dark Action Yes No Step 1 a From the Quality menu o n the printer con trol panel, r educe the toner darkness. Note: 8 is th e factory default setting. b Resend the print job. Is the print still too dar k? Go t o st ep 2. The p rob lem is s olve d. Step 2 a From the p rinter control p anel, se t the pap er type, texture and weight in th[…]
-
Page 217: Lexmark MX310DN
Action Yes No Step 5 a Load paper from a fresh pac kage. Note: Paper absorbs moisture due to high humidity. Store p aper in its original wrap per until you use it. b Resend the print job. Is the print still too dar k? Go t o st ep 6. The p rob lem is s olve d. Step 6 Replace the imaging unit , and then resend the print job. Is the print still too d[…]
-
Page 218: Lexmark MX310DN
Action Yes No Step 4 Make sure that the paper has no texture or roug h finishes. Are you printing on textur ed or rough paper? From the printer control panel, cha nge the texture settings in the Paper Text ure menu to match the paper you are printing on. Go to step 5. Step 5 a Load paper from a fresh pac kage. Note: Paper absorbs moisture due to hi[…]
-
Page 219: Lexmark MX310DN
Action Yes No Step 1 a Check if there is packing materia l left on the imaging unit. 1 Remove the toner car tridge, and then the imaging unit. 2 Check if the packi ng material is prope rly removed from th e imaging unit. Warn ing—P oten tia l Damag e: Do n ot expose the imaging unit to direct light for mor e than 10 minutes. Extended exposure to […]
-
Page 220: Lexmark MX310DN
Action Yes No Step 1 a Rein sta ll the imag ing un it. 1 Remove the toner car tridge, and then the imaging unit. Warn ing—P oten tia l Damag e: Do n ot expose the imaging unit to direct light for mor e than 10 minutes. Extended exposure to light may cause print quali ty problems. 2 Install the imag ing unit, and then the cartri dge. b Resend the […]
-
Page 221: Lexmark MX310DN
Shadow images appear on prin ts ABCD ABCD ABCD ABCD Leading edge Trailing edge Action Yes No Step 1 Load paper with the corr ect paper type and weight in the tray. Is paper with the correct pap er type and weight loaded in the tray? Go to step 2. Load paper with the correct paper type and weight in the tray. Step 2 From the printer control panel, s[…]
-
Page 222: Lexmark MX310DN
Action Yes No Step 1 a Move the width and lengt h guides in the tray to the correct positi ons for the size of the paper loaded. b Resend the print job. Is the print still skewed? Go t o st ep 2. The p rob lem is s olve d. Step 2 a Check if you are print ing on a paper that is supported by the tray. b Resend the print job. Is the print still skewed[…]
-
Page 223: Lexmark MX310DN
Action Yes No Step 4 a Rein sta ll the imag ing un it. 1 Remove the toner car tridge, and then the imaging unit. Warn ing—P oten tia l Damag e: Do n ot expose the imaging unit to direct light for mor e than 10 minutes. Extended exposure to light may cause print quali ty problems. 2 Install the imag ing unit, and then the cartri dge. b Resend the […]
-
Page 224: Lexmark MX310DN
Action Yes No Step 3 a Load paper from a fresh pac kage. Note: Paper absorbs moisture due to high humidity. Store p aper in its original wrap per until you use it. b Resend the print job. Do streaked vertical li nes appear on prints? Go t o st ep 4. The p rob lem is s olve d. Step 4 a Rein sta ll the imag ing un it. 1 Remove the toner car tridge, a[…]
-
Page 225: Lexmark MX310DN
Toner rubs off Leading edge Trailing edge ABC DEF Action Yes No Step 1 From the Paper menu on the pri nter control panel, check th e paper type and weight. Do the paper type and texture match the paper load ed in the tray? Go to step 2. Specify the paper type and weight from the tray settings to ma tch the paper loaded in the tray. Step 2 Check if […]
-
Page 226: Lexmark MX310DN
Uneven print density Action Yes No Replace the imaging unit , and then resend the print job. Is the print density uneven? Contact customer support . The pr ob lem is s olve d. Vertical voids appear on prints Leading edge Trailing edge Action Yes No Step 1 a Make sure your sof tware program is using a correct fill pattern. b Resend the print job. Do[…]
-
Page 227: Lexmark MX310DN
Action Yes No Step 4 a Redistribute the toner in the imaging unit. 1 Remove the toner car tridge, and then the imaging unit. 2 Firmly shake the imaging uni t. Warn ing—P oten tia l Damag e: Do n ot expose the imaging unit to direct light for mor e than 10 minutes. Extended exposure to light may cause print quali ty problems. 3 Reinstall the imagi[…]
-
Page 228: Lexmark MX310DN
Scanner un it does not close Action Yes No Check if there are no obstructi ons between the scanner unit and the printer. a Lift the scanner unit. b Remove any obstruction tha t keeps the scanner unit open. c Lower the scanner unit. Did the scanner unit cl ose properly? The pr oble m is so lve d. Con tact custome r support . Poor copy quality Action[…]
-
Page 229: Lexmark MX310DN
Action Yes No Step 6 Check the copy settin gs. From the Copy screen, check if the Content Type and Content Source settings are correct for the doc ument being scanned. Are the Content Type and Content Source settin gs correct for the document being scanned? Go to step 7. Change the Content Type and Content Source settings to match the document bein[…]
-
Page 230: Lexmark MX310DN
Action Yes No Step 2 Check if the paper size setting matches the size of the paper loaded in the tray. From the Paper menu on the prin ter control panel, check th e Paper Size se tting . Does the paper size setting match the size of the paper loaded in the tray. Go to step 3. Change the paper size setting to match the paper loaded in the tray, or l[…]
-
Page 231: Lexmark MX310DN
Action Yes No a From the printer control pa nel, navigate to: > Settings > > General Settings > > Run initial setup > > b Tur n o ff the pri nte r, and t hen tu rn it ba c k on. The “Select your language” screen a ppears on the printer display. c Select a language, and then press . d Select a country or region, and then pre[…]
-
Page 232: Lexmark MX310DN
Cann ot se nd or receive a fax Action Yes No Step 1 Check if an error or status message appears on the display. Is there an error or sta tus message on the display? Clear the erro r or status message. Go to step 2. Step 2 Check if the power cord is plugg ed into the printer and a proper ly grounded electrical outlet. Is the power cord plugge d into[…]
-
Page 233: Lexmark MX310DN
Action Yes No Step 6 Check if the print er is connected to an anal og phone service or the correc t digital connec tor. The fax modem is an analog device . Certain devices can be connected to the printer so that digi tal telephone services can be used. • If you are using an ISDN t elephone service, then connect the printer to an analog telephone […]
-
Page 234: Lexmark MX310DN
Action Yes No Step 10 a Temporarily disable voice mail servi ce. For more i nformation, contact your telephone company. Note: If you want to u se both voice mail and the printer, then consider addi ng a second te lephone line for the printer. b Try sending or rec eiving a fax. Can you send or receive a fax? The p rob lem is s olve d. Go to st ep 11[…]
-
Page 235: Lexmark MX310DN
Action Yes No Step 3 Replace the toner c artridge. For mo re information, se e the instruction sheet that came with the supply. Can you receive faxes? The pr oble m is so lve d. Con tact custome r support . Can rece ive but no t send faxes Action Yes No Step 1 Check if the pri nter is in Fax mod e. From the printer control pa nel, press Fa x to put[…]
-
Page 236: Lexmark MX310DN
Recei ved fax has po or print quali ty Action Yes No Step 1 Ask the person who sen t you the fax to: a Check if the quality of the orig inal document is satisfactor y. b Increase the fax scan resolution, if possible. c Resend the fax. There ma y have been a problem with the quality of the telephone line connection. Is the fax print quality satisfa […]
-
Page 237: Lexmark MX310DN
• “Scanning takes too long or freeze s the computer” on page 238 • “Poor s canne d im age q uali ty” on page 239 • “Parti al docum ent or photo sc ans” on page 240 The scanner do es not respond Action Yes No Step 1 Check if the printer is turn ed on. Is the printer turned on? Go to step 2. Turn on the printer. Step 2 Check if the […]
-
Page 238: Lexmark MX310DN
Scan job was n ot successfu l Action Yes No Step 1 Check the cable connections. Make sure the Ethe rnet or USB cable i s securely connec ted to the computer and the pr inter. Are the cables securely connected? Go to step 2. Connect the cables properly. Step 2 Check if the file name is already in use. Is the file name already in use? Change the fi l[…]
-
Page 239: Lexmark MX310DN
Action Yes No Step 2 Select a lower scan resolution. Does scanning still take too long o r freeze the computer? Contact customer support . The pr ob lem is s olve d. Poor scanne d image quali ty Action Yes No Step 1 Check if an error message appears on the display. Is there an error message o n the printer display? Clear the erro r message. Go to s[…]
-
Page 240: Lexmark MX310DN
Action Yes No Step 7 Increase the scan resolution settings for a higher ‑ quality output. Did the increased resolution produ ce a higher ‑ quality output? Problem solved. Contact customer support . Partial document or ph oto scans Action Yes No Check the placement of the document or photo. Make sure the document or ph oto is loaded facedown on […]
-
Page 241: Lexmark MX310DN
Action Yes No Step 3 Check if the network is working. a Print a network setu p page. b Check the first section of the n etwork setup page and confirm that the status is Connected. Note: If the status is Not Connected, then the connection may be intermittent, or the network cabl e may be defective. Contact your system support person for a soluti on,[…]
-
Page 242: Lexmark MX310DN
Live c hat You can chat directly with a service representative. Th ey can work with you to solve your printer probl em or provide assistance through Assisted Service where the service representative ca n remotely connect to your computer through the Internet to trou bleshoot proble ms, install updat es, or complete other tasks to help you successfu[…]
-
Page 243: Lexmark MX310DN
Notices Prod uct i nfor mat ion Produc t name: Lexmark MX310dn Machin e type: 7015 Mode l(s): 270 Edition notice May 2013 The foll owing p aragraph does not ap ply to any coun try whe re su ch provisio ns are incon sistent with l ocal law : LEXMARK INTERNATIONAL, INC., PROVIDES THIS PUBLICATION “AS IS” WITHOUT WARRANTY OF ANY KIND, EITHE R EXPR[…]
-
Page 244: Lexmark MX310DN
Licensing noti ces All li cens ing noti ces ass ociat ed with th is prod uct can be viewed from the ro ot directo ry of the in stall ation so ftware CD. Trademarks Lexmark, Lexmar k with diam ond design , and Ma rkVision ar e trademarks of Lexmark Int ernational, Inc., regist ered in the United St ates and/or other countries. Mac and the Mac logo a[…]
-
Page 245: Lexmark MX310DN
Noise emission levels The following measuremen ts were made in acc ordance with ISO 7779 and reported in conform ance with ISO 9296. Note: Some modes may not ap ply to your p roduct. 1-meter average sound pressure, dBA Printing 5 2 dBA Scanning 45 dBA Copying 54 dBA Read y N/A Values are subject t o change. See www .lexmark .com for curren t values[…]
-
Page 246: Lexmark MX310DN
Static sensitivity notice This s ymbol i dentifi es stat ic-sens itive parts. Do not touch in the area s near these symbols without firs t touchin g the metal frame o f the pr inter. ENERGY STAR Any Lex mark pr oduct bea ring the ENER GY STAR e mblem o n the prod uct or on a star t-up scr een is c ertifi ed to c omply with Env ironmental Protec tio[…]
-
Page 247: Lexmark MX310DN
DANGER — Invisible l aser radiation wh en cartridges are r emoved and interlock defeated. Avoid e xposure to laser b eam. PERIGO — Radi ação a laser invisível se rá liberada se os cartuch os forem removidos e o lacre rompido. Evite a exposição aos feix es de laser. Opasnost — Ne vidljivo lasersko zr a č enje kada su kasete uklonjene i poniš[…]
-
Page 248: Lexmark MX310DN
Sleep Mode This product is design ed with an energy-saving mode called Sleep Mo de . The Sleep Mode saves energy by lo wering power co nsumpti on duri ng exte nded per iods of inact ivity. Th e Sleep M ode is aut omatic ally eng aged af ter this product is not used for a sp ecified period of time, called the Sleep Mode Timeout . Factory default Sle[…]
-
Page 249: Lexmark MX310DN
日本の VCCI 規定 製品にこのマーク が表示されている場合、次の要件を満たし ています。 この装置は、クラス B 情報技術装置です。この装置は 、家庭環境で使用することを目的としていま すが、この 装置がラジオやテレビジョン受信機に近接して使用される?[…]
-
Page 250: Lexmark MX310DN
after July 23, 2001, the REN for this product is part of the product i dentifier that has the format US:AAAEQ##TXXXX. The digits re presented b y ## are th e REN without a decimal poin t (for example, 03 is a REN of 0.3). For earl ier products , the REN is shown separately on the label. If this e quipment cau ses harm to the tel ephone network, t h[…]
-
Page 251: Lexmark MX310DN
the countr y/region of use. Th is is to av oid dama ge to the equipmen t caused by lo cal light ning strike s and ot her elect rical surges. This equipment uses CA11A telephon e jacks. Avis réservé aux utilis ateurs du r éseau téléphonique du Canada Ce produi t est confo rme aux spéc ificati ons techn iques d’I ndustrie Canada. Le nu méro […]
-
Page 252: Lexmark MX310DN
Lexmark Intern ational, Inc. LEX-M0 3-002 A11- 0160001 JP Using this p roduct in Switzerland This pro duct requir es a Swis s billin g tone filt er (Lexmark pa rt number 80D1877) t o be installed on any lin e which rece ives meter ing pulses in Switzer land. The filter mu st be used, as meter ing pul ses are pr esent on al l analog telephon e lines[…]
-
Page 253: Lexmark MX310DN
Complian ce is indicated by the CE marking. The manufa cturer of t his prod uct is: Lexmark Inter national, I nc., 740 W est Ne w Circle Road , Lexington, K Y, 40550 USA. The authorized representat ive is: Lexmark International Te chnolo gy Hu ngá ria Kf t., 8 L ech ner Ödö n f asor , Mill enni um Tower III, 1095 Budapest HUNGARY, A declar ation[…]
-
Page 254: Lexmark MX310DN
To prevent radio in terference to th e licensed service, this device is intend ed to be operated indoo rs and away from windows t o provide m aximum shieldi ng. Equip ment (or its transmit antenna ) that is installed ou tdoors is subject to licensing . The inst aller of thi s radio equi pment must ensure that the a ntenna is lo cated or point ed su[…]
-
Page 255: Lexmark MX310DN
Complian ce is indicated by the CE marking. The manufa cturer of t his prod uct is: Lexmark Inter national, I nc., 740 W est Ne w Circle Road , Lexington, K Y, 40550 USA. The authorized representat ive is: Lexmark International Te chnolo gy Hu ngá ria Kf t., 8 L ech ner Ödö n f asor , Mill enni um Tower III, 1095 Budapest HUNGARY, A declar ation[…]
-
Page 256: Lexmark MX310DN
Español Por medio de la presente, Lexmark International , Inc. dec lara que e ste produ c to cumple con los requ isitos esenciales y cuales quiera ot ras disposicio nes aplica bles o exig ibles de la D irectiva 1999/5 /CE. Eesti Käe solevaga kinnit ab Lexmark International, Inc., et seade see toode vastab direktiivi 1999/5/ EÜ põhinõuet ele j […]
-
Page 257: Lexmark MX310DN
The use of th is product or ser vice is subject to th e reason able, non-di scrimin atory t erms in the Intelle ctual Pro perty Rights (IPR) Di sclosur e of Ce rticom Co rp. at th e IETF fo r TL S Suite B Profile for Tr anspor t Laye r Securi ty (T LS) im plement ed in th e product or serv ice. The use of th is product or ser vice is subject to th […]
-
Page 258: Lexmark MX310DN
Limited warranty service The warrant y period s tarts on t he date o f origina l purchase as show n on the pur chase re ceipt and ends 12 months la ter provided that t he warranty period for any s upplies and for any maintenan ce items included with the printer s hall end earlier if it, or its original contents, are substant ially used up, depleted[…]
-
Page 259: Lexmark MX310DN
MERCHAN TABILITY , FITNE SS FOR A PARTIC ULAR PURP OSE, AN D SATISFA CTORY Q UALITY. ANY WARR ANTIES THAT MAY NOT BE D ISCLAIMED UNDE R APPLICABLE L AW ARE LIMITED IN DU RATION T O THE WARRANTY PERI OD. NO WARRANTI ES, EX PRESS OR IMPLIED, W ILL APP LY AFTER T HIS PER IOD. ALL INFO RMATION, SP ECIFI CATIONS, PRICES , AND SERV ICES ARE SUBJEC T TO C[…]
-
Page 260: Lexmark MX310DN
Index Numerics 250 ‑ sheet tray installi ng 19 550 ‑ sheet tray installi ng 19 Symbol s [x] ‑ page jam, clear manual feeder. [25y.xx] 181 [x] ‑ page ja m, clear s tandard bin . [20y.xx] 178 [x] ‑ page jam , open au tomatic feeder top cover. [28y.xx] 182 [x] ‑ page jam , open fron t door. [20y.xx] 174 [x] ‑ page jam, open rea r door. [[…]
-
Page 261: Lexmark MX310DN
Eco ‑ Mode 150 Hibernate mode 15 2 Quiet mode 150 Schedu le Power M odes 153 Sleep mode 151 conse rving suppli es 149 contact ing custo mer suppor t 241 contro l panel, printer indicato r light 1 3 Slee p button ligh t 13 contro ller boa rd access ing 15 copies copy opt ions 66 copy from copy opt ions 66 copy job canceling 6 6 copy opt ions advan[…]
-
Page 262: Lexmark MX310DN
Error reading USB drive. Remove USB. 186 Error reading USB hub. Remove hub. 186 Ethernet ne twork preparin g to set up for Et hernet printin g 25 Etherne t network setu p using M acintos h 25 using W indows 25 Ethernet ne tworking Maci ntosh 25 Windows 2 5 Ethernet port 22 Etherne t setup preparing for an 25 EXT ports 22 ext erior of the p rint er […]
-
Page 263: Lexmark MX310DN
Imaging unit ve ry low, [ x] esti mated pages re main [84.xy] 187 Incorrect paper size, open [paper source] [34] 187 indica tor light printer control panel 13 initial fax setup 73 using t he Embedded W eb Server 73 install ing an opt ional card 17 install ing op tions order o f inst allation 18 install ing printe r on a netwo rk Ethernet netwo rkin[…]
-
Page 264: Lexmark MX310DN
N Network [x] menu 109 Network [x] softwa re error [54] 191 Network Card menu 110 Network Repo rts menu 1 10 netwo rk s etting s Embedded Web Serv er 168 networ k setup page printin g 30 Networking Guide where to find 168 No analog phone line connected t o modem, fax is dis abled. 192 noise emi ssion levels 245 noise , printer reduc ing 150 Non ‑[…]
-
Page 265: Lexmark MX310DN
print t rouble shooti ng incorrect characte rs print 2 03 incorrect margins o n prints 21 3 jammed pages are not reprint ed 202 job prin ts from wrong t ray 20 3 job prin ts on wr ong pape r 203 jobs do no t pri nt 205 Large jobs do not collate 204 multipl e ‑ languag e PDF f iles do not print 205 paper cur l 214 paper frequently ja ms 202 print […]
-
Page 266: Lexmark MX310DN
Replace all o riginals if re starting job. 193 Replace cartridge, 0 estimated pages re main [88.xy] 193 Replace car tridge, print er region mismatch [42.xy] 194 Replace defective imagi ng unit [31.xy] 194 Replace imag ing unit, 0 estimated pages re main [84.xy] 194 Replace jamm ed originals if resta rting job. 195 Replace m aintenance kit, 0 estima[…]
-
Page 267: Lexmark MX310DN
functi ons 11 scann er glass 12 Scanner auto matic feeder c over open 195 Scanner disabled by admin [840.01] 195 Scanne r disabl ed. Contac t syste m administ rato r if prob lem persist s. [840.02] 196 scanne r glass cleaning 158 copyin g using 58 Scanner jam , remove all origi nals from the scanne r [2yy. xx] 196 Scanner j am, remove jammed origin[…]
-
Page 268: Lexmark MX310DN
trans paren cies copying o n 58 loading, mu ltipurpose feeder 36 tips 49 tray s linking 40 loading 31 unlink ing 40 troubl eshootin g cannot open Emb edde d Web Server 240 checking an unres ponsiv e printer 198 contact ing cus tomer supp ort 241 fax funct ion is no t set up 230 solving b asic pri nter proble ms 198 the scanne r does not res pond 23[…]
-
Page 269: Lexmark MX310DN
wireless setup wizard using 28 X XPS me nu 143 Index 269[…]
- Инструкции и руководства
- Бренды
- Lexmark
- MX310dn
- Справочник Пользователя
MX310dn
User’s Guide
May 2013
Machine type(s):
7015
Model(s):
270