

GB
DE
LAGAN
DW60
FR
IT


ENGLISH 4
DEUTSCH 22
FRANÇAIS 42
ITALIANO 67

ENGLISH 4
Contents
Safety information 4
Product description 5
Control panel 6
Washing programmes 7
Use of the appliance 7
Setting the water softener 8
Use of dishwasher salt 9
Use of rinse aid 10
Loading cutlery and dishes 10
Use of detergent 12
Subject to change without notice
Setting and starting a washing programme
13
Care and cleaning 14
What to do if… 15
Technical data 16
Installation 17
Water connection 17
Electrical connection 18
Environment concerns 18
IKEA GUARANTEE 19
Safety information
For your safety and correct operation of
the appliance, read this manual carefully
before installation and use. Always keep these
instructions with the appliance even if you
move or sell it. Users must fully know the operation and safety features of the appliance.
Correct use
• The appliance is designed exclusively for
domestic use.
• Only use the appliance to clean household
utensils that are applicable for dishwashers.
• Do not put solvents in the appliance. Risk of
explosion.
• Put the knives and all items with sharp points
in the cutlery basket with their points down.
If not, put in a horizontal position in the upper basket.
• Use only branded products for dishwashers
(detergent, salt, rinse aid).
• If you open the door while the appliance is
in operation, hot steam can escape. Risk of
skin burns.
• Do not remove dishes from the dishwasher
before the end of the washing programme.
• When the washing programme is comple-
ted, disconnect the mains plug from the
mains socket and close the water tap.
• Only an authorised service engineer can re-
pair this appliance. Use only original spare
parts.
• Do not do repairs yourself to prevent injury
and damage to the appliance. Always contact your local After Sales Service.
General safety
• Persons (including children) with reduced
physical sensory, mental capabilities or lack
of experience and knowledge must not use
the appliance. They must have supervision
or instruction for the operation of the appliance by a person responsible for their safety.
• Obey the safety instructions from the manufacturer of the dishwasher detergent to
prevent burns to eyes, mouth and throat.
• Do not drink the water from the dishwasher.
Detergent residues can stay in your appliance.
• Always close the door when you do not use
the appliance to prevent injury and not to
stumble over the open door.
• Do not sit or stand on the open door.
Child safety
• Only adults can use this appliance. Children
must get supervision to make sure that they
do not play with the appliance.
• Keep all the packaging away from children.
There is a risk of suffocation.
• Keep all detergents in a safe area. Do not
let children touch the detergents.
• Keep children away from the appliance
when the door is open.
ENGLISH 5
Installation
• Make sure that the appliance is not damaged because of transport. Do not connect
a damaged appliance. If necessary, contact
the supplier.
• Remove all packaging before first use.
• A qualified and competent person must do
the electrical installation.
• A qualified and competent person must do
the plumbing installation.
• Do not change the specifications or modify
this product. Risk of injury and damage to
the appliance.
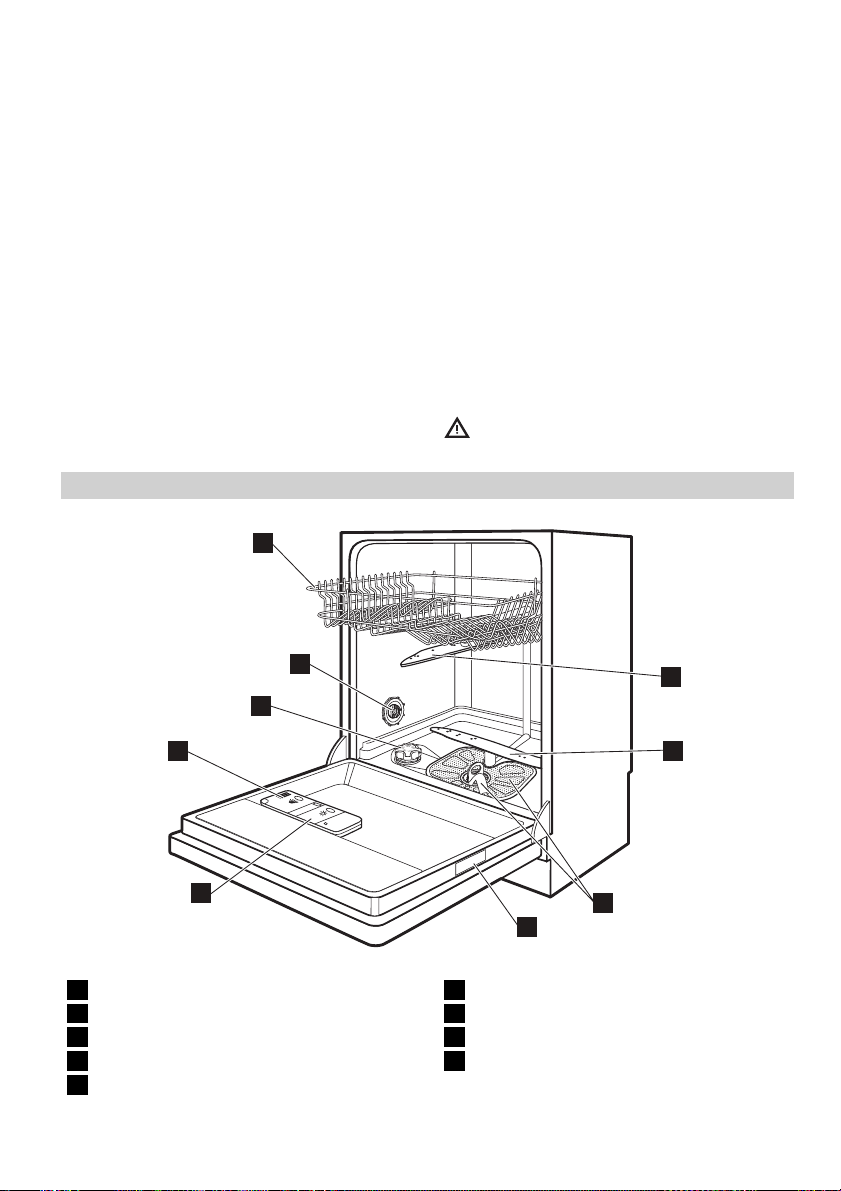
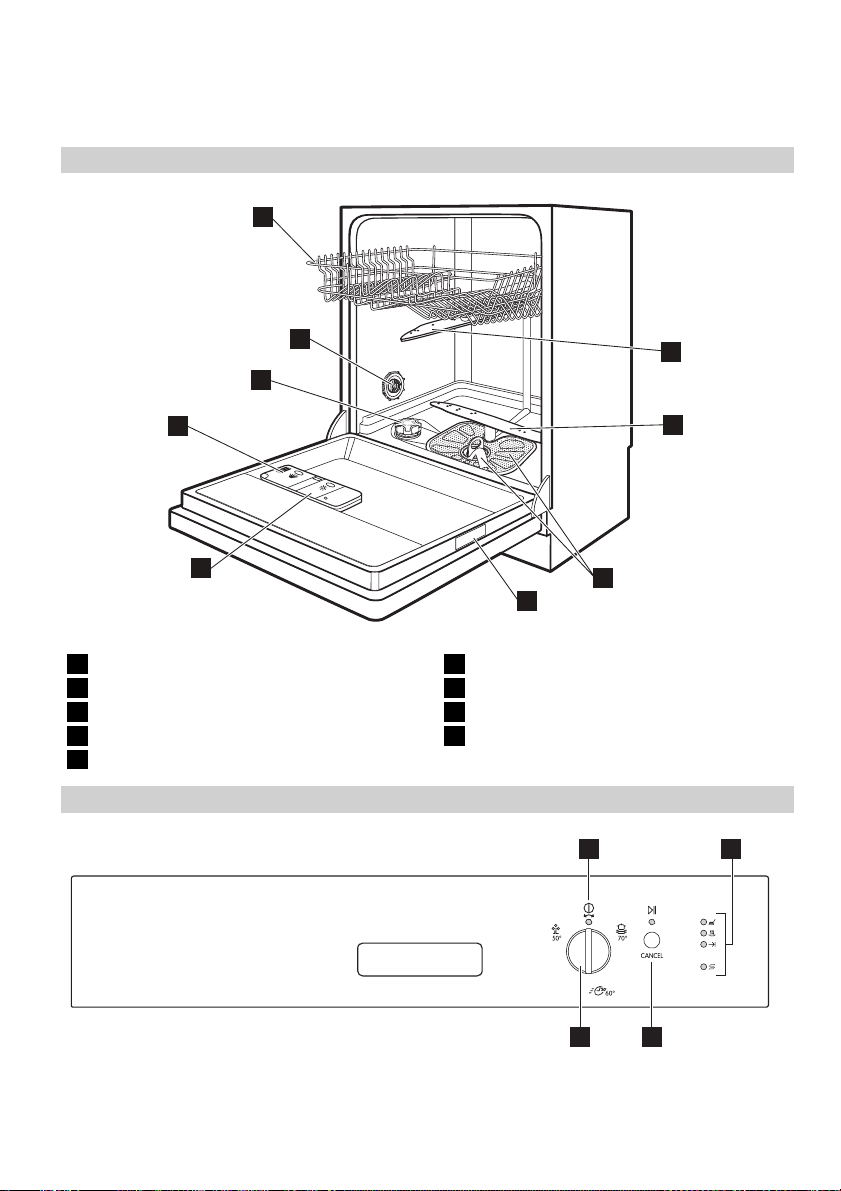
Product description
1
2
3
• Do not use the appliance:
– if the mains cable or water hoses are
damaged,
– if the control panel, worktop or plinth area
are damaged, that you can get access to
the inner side of the appliance.
If you have any doubts, please contact your
After Sales Service. Refer to the list of the
After Sales Services at the end of user manual.
• Do not drill into the sides of the appliance to
prevent damage to hydraulic and electrical
components.
Warning! Carefully obey the instructions
for electrical and water connections.
9
4
5
1 Upper basket
2 Water hardness dial
3 Salt container
4 Detergent dispenser
5 Rinse aid dispenser
8
7
6
6 Rating plate
7 Filters
8 Lower spray arm
9 Upper spray arm
ENGLISH 6
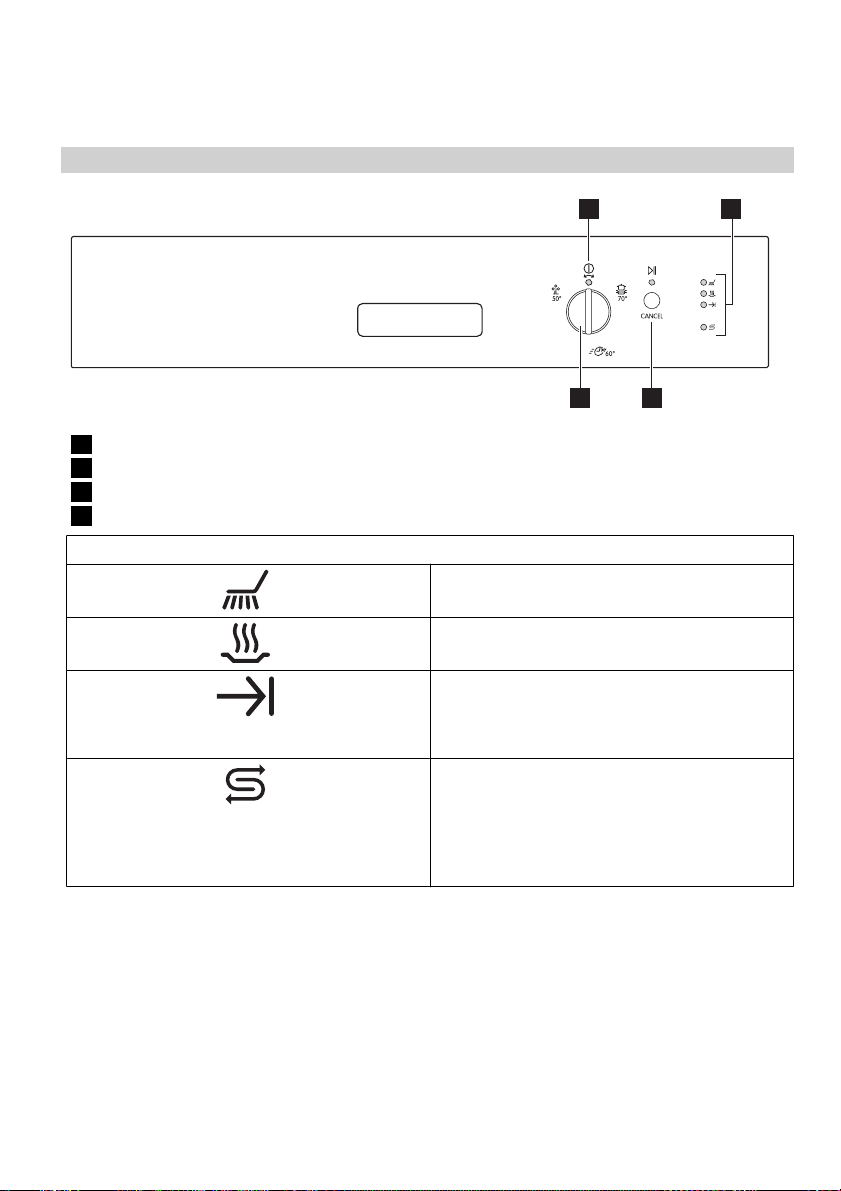
Control panel
1 Programme knob
2 Start/cancel button
3 Indicator lights
4 On/off indicator light
Indicator lights
The indicator light comes on when the washing
phase or the rinsing phase operates.
The indicator light comes on when the drying
phase operates.
The indicator light comes on when the washing
programme is completed. Auxiliary functions:
• Level of the water softener.
• An alarm if the appliance has a malfunction.
The indicator light comes on when it is neces-
sary to fill the salt container. Refer to the chap-
1)
ter ‘Use of dishwasher salt’.
The salt indicator light can stay on for some
hours, but it does not have an unwanted effect
on the operation of the appliance.
1) The indicator light is off while a washing programme operates.
Programme knob and on/off indicator light
• To set a washing programme, turn the programme knob clockwise or anticlockwise.
The programme marker on the programme
knob must agree with one of the washing
programmes on the control panel.
• To set the appliance to the off position, turn
the programme knob until the programme
marker agrees with the on/off indicator
light.
– The on/off indicator light goes off (posi-
tion OFF).
– The on/off indicator light comes on (posi-
tion ON).
4
1
2
3
ENGLISH 7
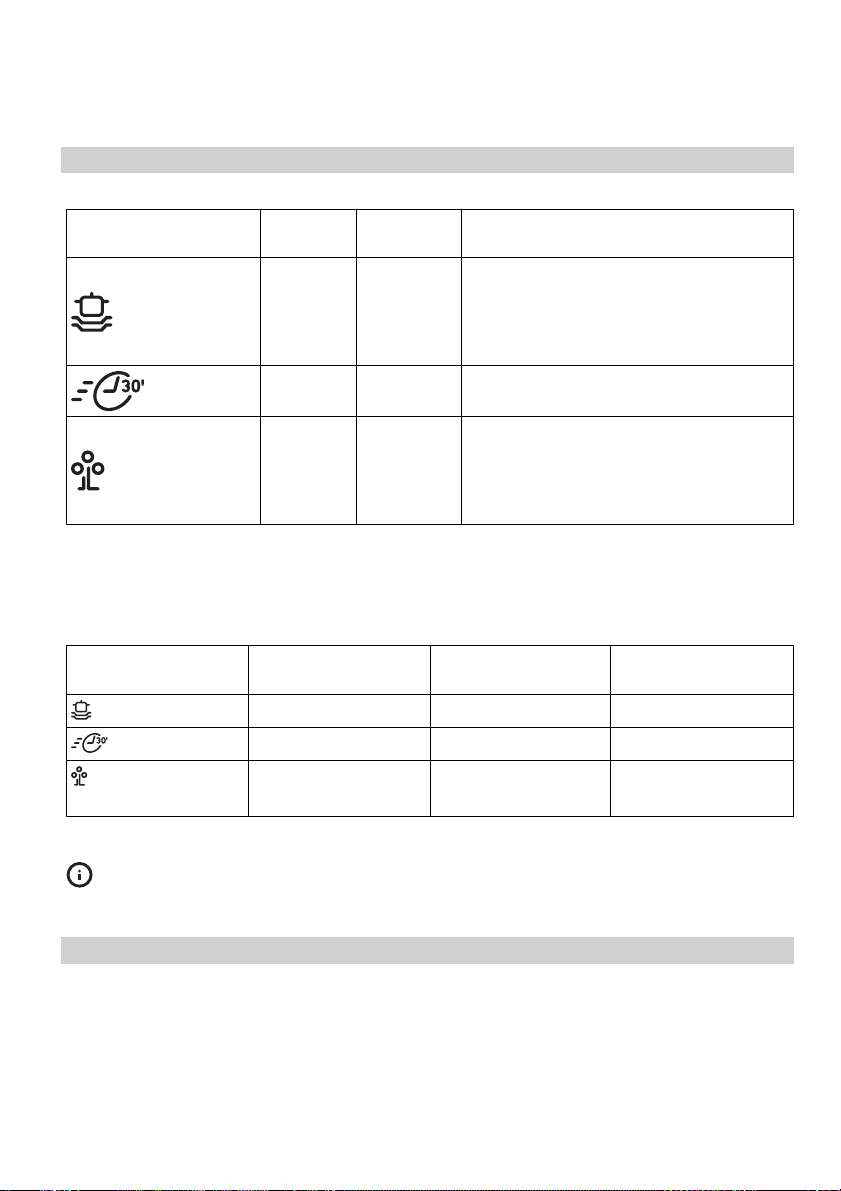
Washing programmes
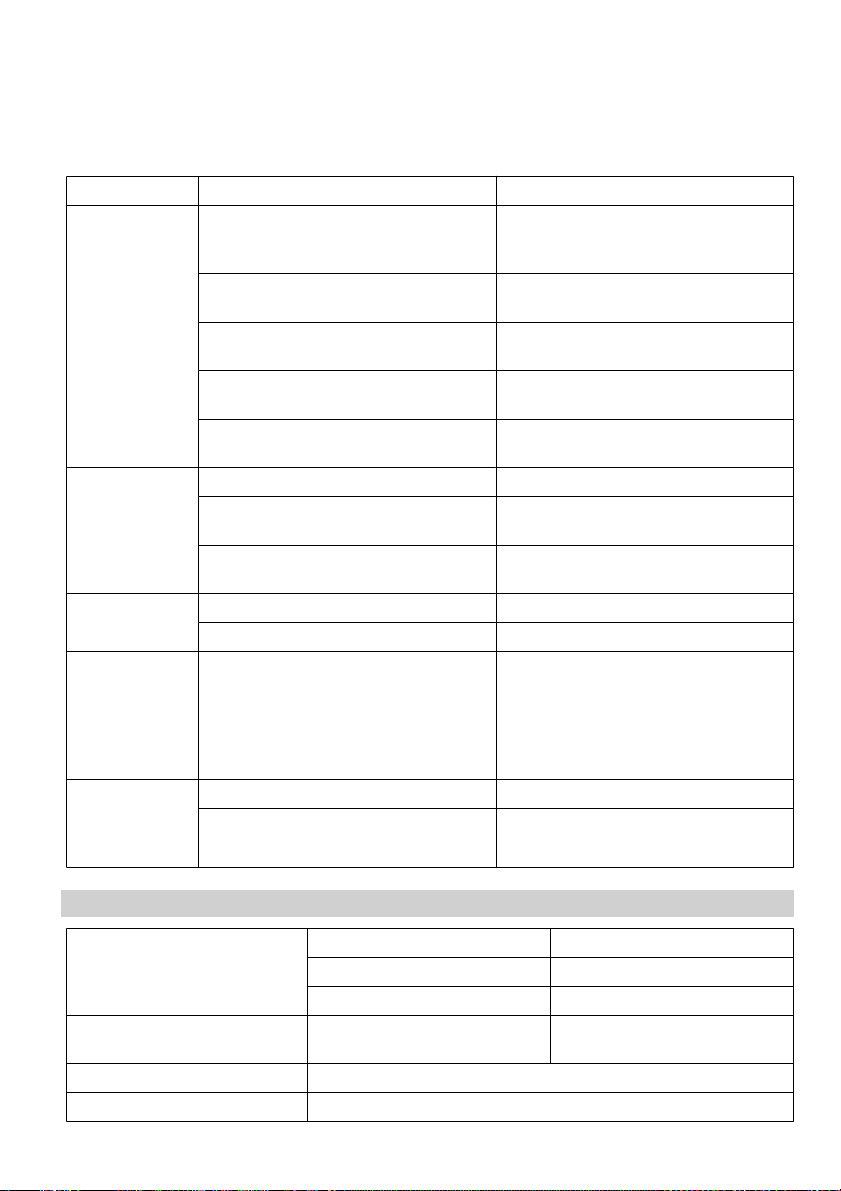
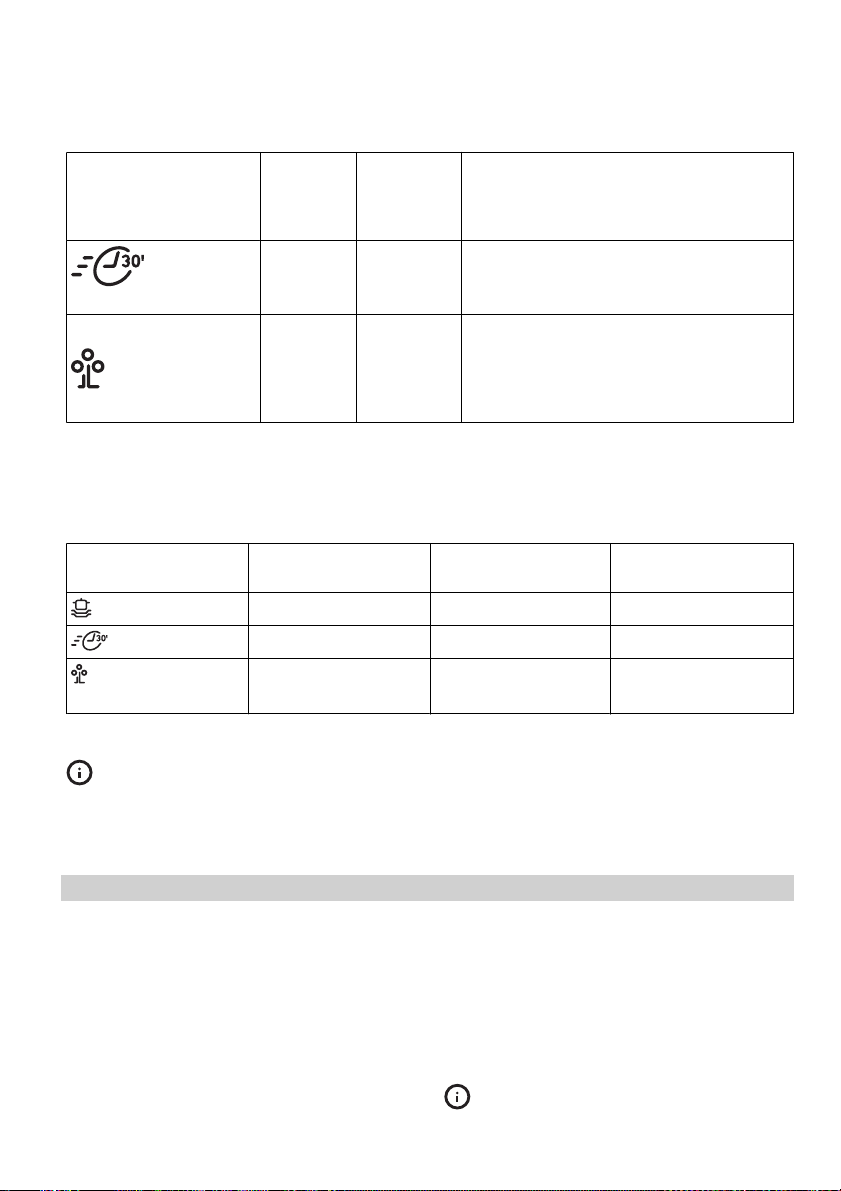
Washing programmes
Programme
Intensive
1)
Quick
2)
Eco
1) This is the perfect daily programme to clean a not fully load. Ideal for a family of 4 persons who only want
to load breakfast and dinner crockery and cutlery.
2) Test programme for test institutes. This is the economy washing programme. Please refer to separate leaflet
supplied, for test data. Available only in 3 languages (English, French, German) just for test institutes
purpose.
Degree of
soil
Heavy soil
Normal or
light soil
Normal
soil
Consumption values (for full washing cycle)
Programme Programme duration
(minutes)
85-95 1,8-2,0 22-25
30 0,9 9
Type of
load
Crockery,
cutlery,
pots and
pans
Crockery
and cutlery
Crockery
and cutlery
Programme description
Prewash
Main wash up to 70°C
2 intermediate rinses
Final rinse
Drying
Main wash up to 60°C
Final rinse
Prewash
Main wash up to 50°C
1 intermediate rinse
Final rinse
Drying
Energy consumption
(kWh)
Water consumption
(litres)
1)
1) The duration of this washing programme is prefixed (longer) than the others due to a prolonged drying
and washing phases.
130-140 1,0-1,2 14-16
The pressure and temperature of the water, the variations of power supply and
the quantity of dishes can change these values.
Use of the appliance
Refer to the following instructions for each step
of procedure:
1. Make a check if the water softener level is
correct for the water hardne ss in yo ur a rea .
If necessary set the water softener.
2. Fill the salt container with dishwasher salt.
3. Fill the rinse aid dispenser with rinse aid.
4. Load cutlery and dishes into the dishwasher.
5. Set the correct washing programme for the
type of load and soil.
6. Fill the detergent dispenser with the correct
quantity of detergent.
7. Start the washing programme.
ENGLISH 8
If you use detergent tablets, refer to the
chapter ‘Use of detergent’.
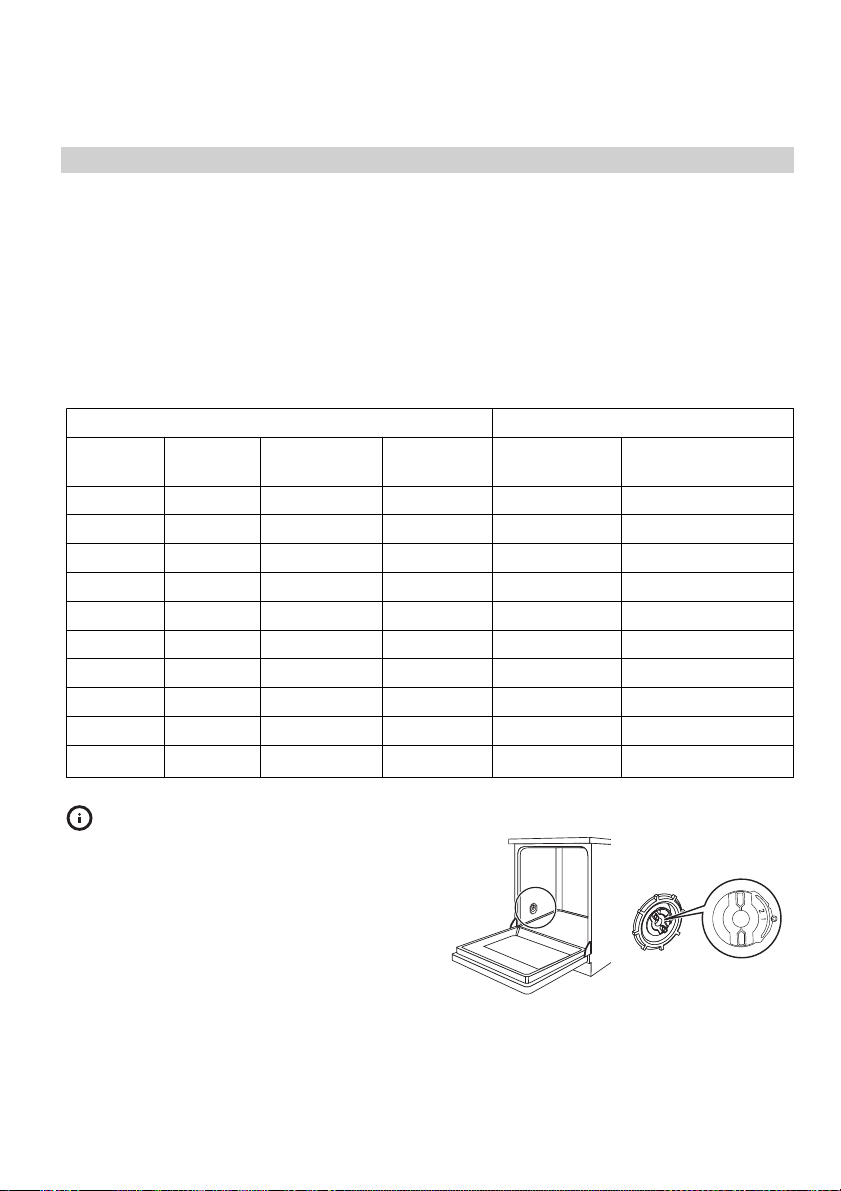
Setting the water softener
The water softener removes minerals and salts
from the water supply. Minerals and salts can
have bad effect on the operation of the appliance.
Water hardness is measured in equivalent
scales:
• German degrees (dH°).
• French degrees (°TH).
• mmol/l (millimol per litre — international unit
for the hardness of water).
•Clarke.
Water hardness Water hardness setting
°dH °TH mmol/l Clarke manually electronically
51 — 70 91 — 125 9,1 — 12,5 64 — 88 2 10
43 — 50 76 — 90 7,6 — 9,0 53 — 63 2 9
37 — 42 65 — 75 6,5 — 7,5 46 — 52 2 8
29 — 36 51 — 64 5,1 — 6,4 36 — 45 2 7
23 — 28 40 — 50 4,0 — 5,0 28 — 35 2 6
19 — 22 33 — 39 3,3 — 3,9 23 — 27 2 5
15 — 18 26 — 32 2,6 — 3,2 18 — 22 1 4
11 — 14 19 — 25 1,9 — 2,5 13 — 17 1 3
4 — 10 7 — 18 0,7 — 1,8 5 — 12 1 2
< 4 < 7 < 0,7 < 5
1) No use of salt required.
You must set the water softener manually
and electronically.
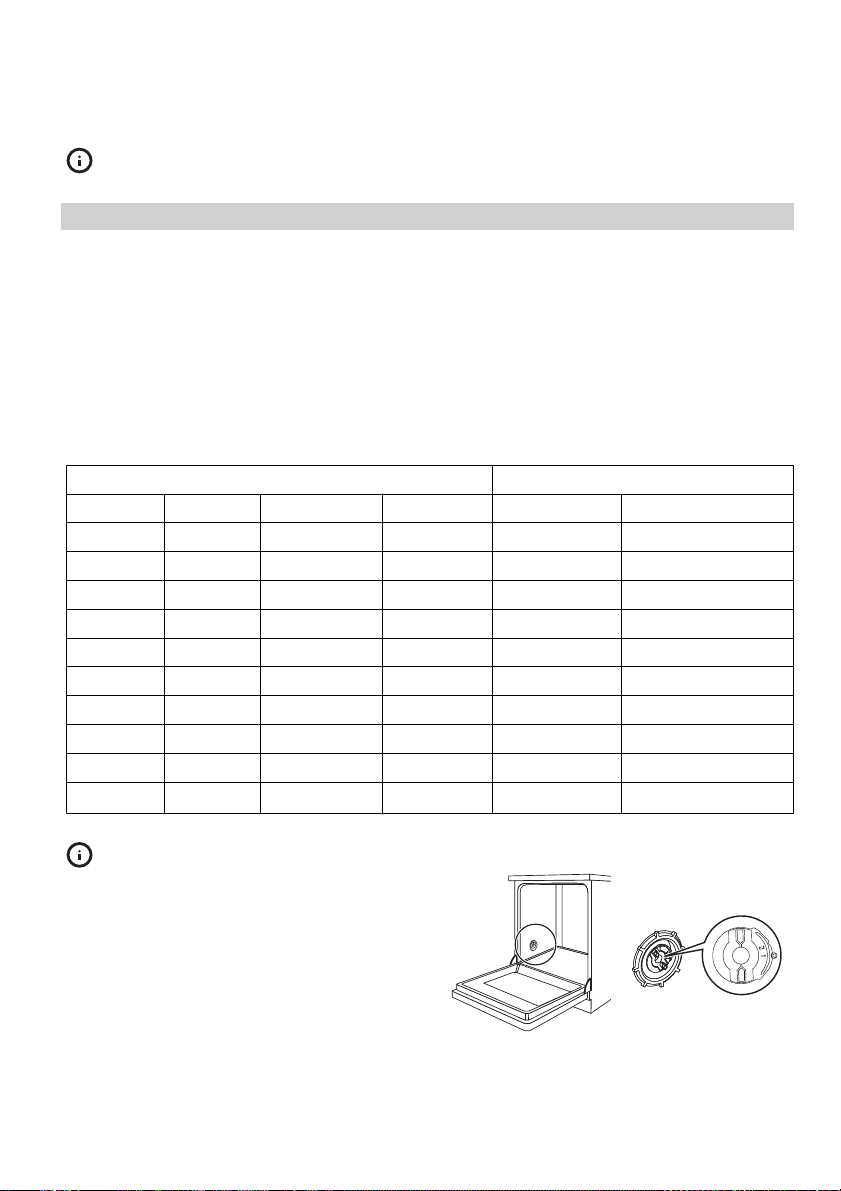
Manual adjustment
The appliance is set at the factory at position
2.
Adjust the water softener to the water hardness in your area. If necessary, contact your
local water authority.
1)
1
1 2
1)
1
Set switch to position
1 or 2.

ENGLISH 9
Electronic adjustment
The water softener is set at the factory at
level 5.
1. Press and hold the start/cancel button.
Turn the programme knob clockwise until
the programme marker agrees with the
first washing programme on the control
panel.
2. Release the start/cancel button when the
on/off indicator light and the start/cancel
indicator light start to flash.
– At the same time, the end indicator light
flashes to show the level of the water
softener.
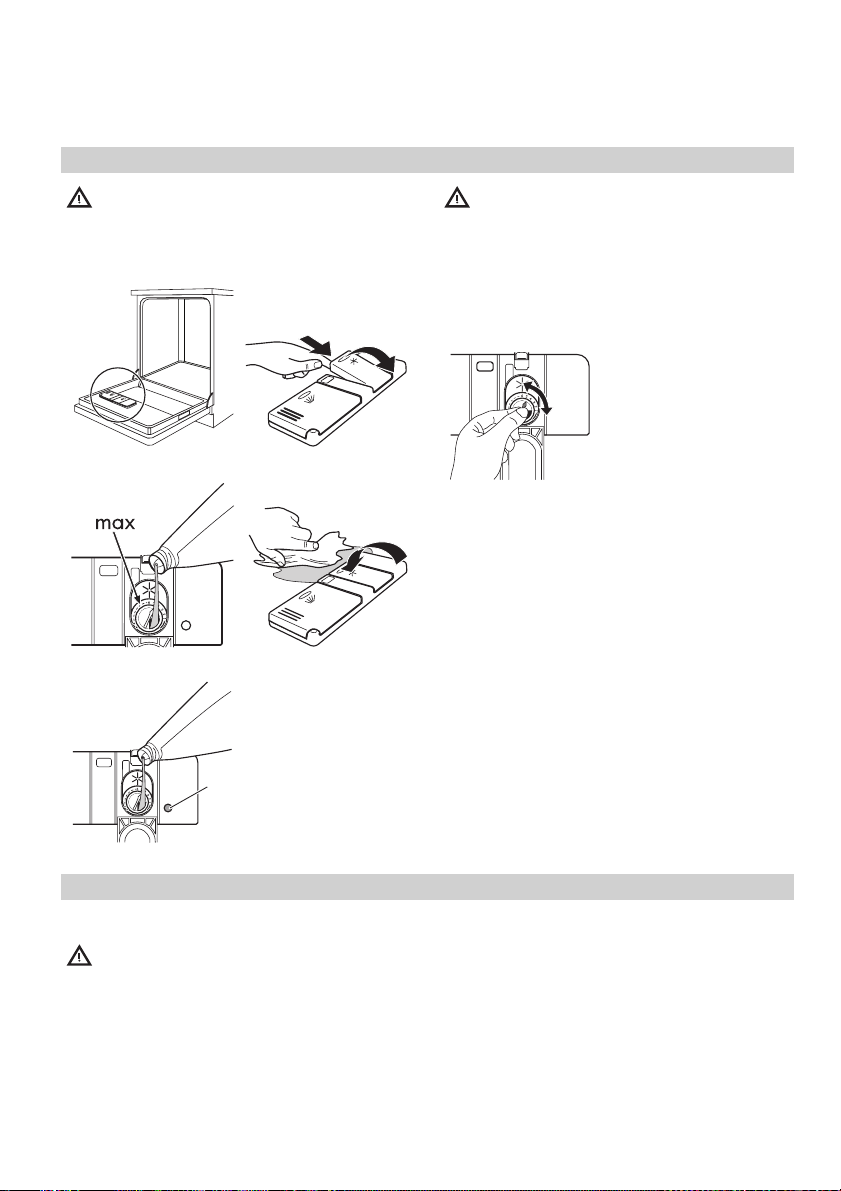
Use of dishwasher salt
Caution! Only use dishwashers salt.
Types of salt that are not applicable for
dishwashers cause damage to the water
softener.
1
3
2
4
Example:
5 flashes, pause, 5 flashes, pause, etc…
= level 5
3. Press the start/cancel button one time to
increase the water softener level by one
step.
The end indicator light shows the new level.
4. Turn the programme knob to the off position to save the operation.
5
Make sure that there
is no grain of salt outer of the salt compartment.
It is normal that water overflows from the
salt container when you fill it with salt.
6
Fill the salt container
with 1 litre of water
(only the first operation).
Fill the salt container
with 1,5-2,0 kg of
salt. Use the salt funnel supplied.
ENGLISH 10
Use of rinse aid
Caution! Only use branded rinse aid for
dishwashers.
Do these steps to fill the rinse aid dispenser:
1
3 4
2
Caution! Do not fill the rinse aid
dispenser with other products (e.g.
dishwasher cleaning agent, liquid detergent).
This can cause damage to the appliance.
Adjusting the dosage of rinse aid
The rinse aid dial is
set at the factory at
position 4.
To increase or decrease the dosage
refer to ‘What to do
if…’
5
Fill when the rinse aid
indicator ( A ) becomes clear.
A
Loading cutlery and dishes
Helpful hints and tips
Caution! Only use the appliance for
household utensils that are applicable for
dishwashers.
Do not use the appliance to clean objects that
can absorb water (sponges, household cloths,
etc.).
• Before you load cutlery and dishes, do these
steps:
– Remove all food remainings and debris.
– Make burnt, remaining food in pans soft.
ENGLISH 11
• While you load cutlery and dishes, do these
steps:
– Load hollow items (e.g. cups, glasses and
pans) with the opening down.
– Make sure that water does not collect in
the container or in a deep base.
– Make sure that cutlery and dishes do not
lie inside one another.
– Make sure that cutlery and dishes do not
cover other cutlery and dishes.
– Make sure that glasses do not touch other
glasses.
– Put small objects in the cutlery basket.
• Plastic items and pans with non-stick coatings can keep water droplets. Plastic items
do not dry as well as porcelain and steel
items.
• Put light items in the upper basket. Make
sure that the items do not move.
Caution! Make sure that the spray arms
can move freely before you start a
washing programme.
Warning! Always close the door after
you load or unload the appliance. An
open door can be dangerous.
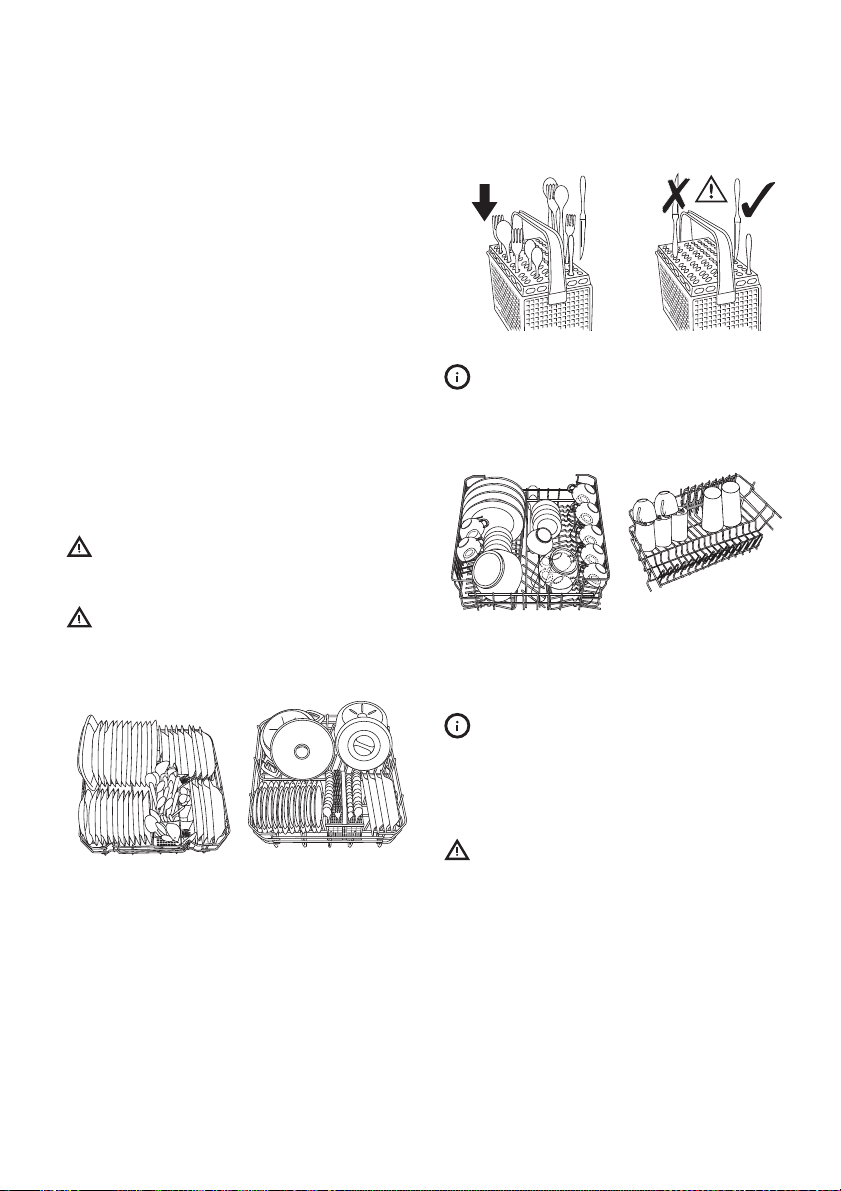
Use the cutlery grid. If the dimensions of
the cutlery prevent use of the cutlery grid,
remove it.
Arrange the items to let water touch all surfaces (left). For longer items fold the cup
racks up (right).
Arrange service
dishes and large lids
around the edge of
the lower basket.
Put plates in the rear part of the upper
basket. Tilt them forward.
Adjustment of the height of the upper basket
If you put large plates in the lower basket, first
move the upper basket to a upper position.
Warning! Adjust the height before you
load the upper basket.
Maximum height of the dishes in :
• Upper basket.
– Upper position: 20 cm.
– Lower position: 24 cm.
•Lower basket.
– Upper position: 31 cm.
– Lower position: 27 cm.

ENGLISH 12
Do these steps to move the upper basket to the
A
A
upper or lower position:
1. Move the front runner stops (A) out.
2. Pull the basket out.
3. Put the basket in the upper or lower posi-
tion.
4. Replace the front runner stops (A) in their
initial position.
Caution! If the basket is in the upper
position, do not put cups on the cup racks.
Use of detergent
Only use detergents (powder, liquid or
tablet) that are applicable for dishwashers.
Follow the data on the packaging:
• Dosage recommended by the manufactur-
er.
• Storage recommendations.
Do not use more than the correct quantity of
detergent to save an environment.
1
2
3
A
Fill the detergent dispenser (A) with detergent.
5
4
B
If you use a washing
programme with
prewash phase, put
more detergent in
the prewash detergent compartment
(B).
6
A
Use of detergent tablets
Put the detergent tablet in the detergent dispenser (A).
Detergent tablets contain:
•detergent
•rinse aid
• other cleaning agents.
Do these steps to use detergent tablets:

ENGLISH 13
1. Make sure that the detergent tablets are
applicable for your water hardness. Refer
to the instructions from the manufacturer.
2. Set the lowest levels of water hardness and
rinse aid dosage.
It is not necessary to fill the salt container
and the rinse aid dispenser.
Do these steps when the drying results are
not satisfactory:
1. Fill the rinse aid dispenser with rinse aid.
2. Set the rinse aid dosage to position 2.
Do these steps to use the detergent powder
again:
1. Fill the salt container and the rinse aid dis-
penser.
2. Set the water softener to the highest level.
3. Do a washing programme without dishes.
4. Adjust the water softener. Refer to the
chapter ‘Setting the water softener’.
5. Adjust the rinse aid dosage.
Different brands of detergent dissolve in
different times. Some detergent tablets
do not have the best cleaning results during
short washing programmes. Use long washing
programmes when you use detergent tablets
to fully remove the detergent.
Setting and starting a washing programme
Do these steps to set and start a washing programme:
1. Close the door.
2. Turn the programme knob to set the washing programme. Refer to the chapter
‘Washing programmes’.
– The on/off indicator light comes on.
– The phase indicator light for the washing
programme starts to flash.
3. Press the start/cancel button.
– The washing programme starts auto-
matically.
– The start/cancel indicator light comes
on.
– When the programme starts, only the
phase in progress indicator light stays
on.
When the washing programme operates,
you cannot change the programme. Can-
cel the washing programme.
Warning! Only interrupt or cancel a
washing programme if necessary.
Caution! Open the door carefully. Hot
steam can come free.
Cancelling a washing programme
•Press and hold the start/cancel button for
approximately 5 seconds.
– The start/cancel indicator light goes off.
– The phase indicator lights starts to flash.
The washing programme is cancelled.
At this time you can do these steps:
1. Switch off the appliance.
2. Set a new washing programme.
Fill the detergent dispenser with detergent
before you set a new washing programme.
Interrupting a washing programme
Open the door.
• The programme stops.
Close the door.
• The programme continues from the point of
interruption.
End of the washing programme
Switch off the appliance in these conditions:
• The appliance stops automatically.
• The end indicator light comes on.
For better drying results, keep the door ajar for
some minutes before you remove the dishes.
Let the dishes cool down before you remove
them from the appliance. Hot dishes are easily
damaged.
Removing the load
• First remove items from the lower basket,
then from the upper basket.
ENGLISH 14
• There can be water on the sides and door
of the appliance. Stainless steel becomes
cool more quickly than the dishes.
Care and cleaning
Warning! Switch the appliance off before
you clean the filters.
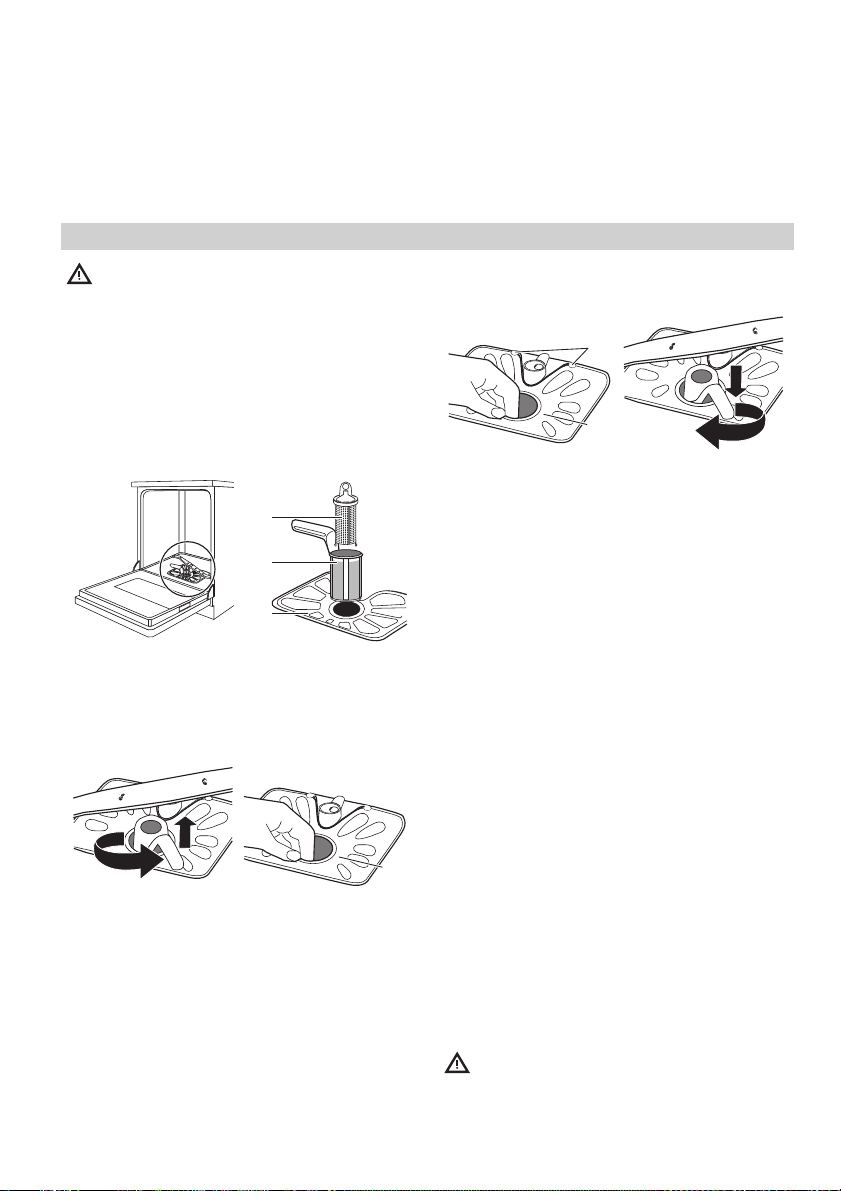
Cleaning the filters
Important! Do not use the appliance without
the filters. Make sure that the installation of the
filters is correct. Incorrect installation will cause
unsatisfactory washing results and damage to
the appliance.
5
6
D
1
A
2
1
3
2
1
To remove filters B
and C, turn the handle approximately
1/4 anticlockwise.
2
C
B
A
Fully clean the filters
A, B and C below running water.
4
A
Remove the flat filter
A from the bottom of
the appliance.
Put the flat filter A in
the bottom of the appliance. Install the
flat filter correctly under the two guides D.
Important! Do not remove the spray arms.
If the holes in the spray arms become clogged,
remove remaining parts of soil with a cocktail
stick.
Long periods of non-operation
Do these steps when you do not use the appliance for a long period:
1. Disconnect the mains plug from the mains
socket.
2. Close the water tap.
3. Keep the door open to prevent unpleasant
smells.
4. Keep the inner side of the appliance clean
(filters especially).
External cleaning
Clean the external surfaces of the appliance
and control panel with a damp soft cloth. Only
use neutral detergents. Do not use abrasive
products, scouring pads or solvents (acetone,
trichloroethylene etc…).
Frost precautions
Caution! Do not install the appliance
where the temperature is below 0 °C. The
manufacturer is not responsible for damage
because of frost.
Put the filter system in
position. To lock the
filter system, turn the
handle clockwise until it locks in position.
ENGLISH 15
If not possible, empty the appliance and close
the door. Disconnect the water inlet hose and
remove water from the water inlet hose.
What to do if…
The appliance does not start or stops during operation.
If there is a fault, first try to find a solution to the problem yourself. If you cannot find a solution
to the problem yourself, contact your dealer or the After Sales Service.
Problem Possible cause Solution
• Continuous flash
of the start/cancel indicator light.
• 1 flash of the end
indicator light.
Malfunction:
The dishwasher
does not fill with water.
• Continuous flash
of the start/cancel indicator light.
• 2 flashes of the
end indicator
light.
Malfunction:
The dishwasher will
not drain.
• Continuous flash
of the start/cancel indicator light.
• 3 flashes of the
end indicator
light.
Malfunction:
The anti-flood device operates.
Malfunction:
The programme
does not start.
After the check, switch on the appliance. The programme continues from the point of interruption. If the malfunction shows again, contact your After Sales Service.
The water tap is blocked or furred
with limescale.
The water tap is closed. Open the water tap.
The filter in the water inlet hose is
blocked.
The connection of the water inlet
hose is not correct. The hose can be
kinked or squashed.
There is a blockage in the sink spigot.
The connection of the water drain
hose is not correct. The hose can be
kinked or squashed.
Close the water tap and contact your local After Sales Service.
The appliance door is not closed. Close the door.
Mains plug is not connected in. Put in the mains.
The fuse has blown out in the
household fuse box.
Clean the water tap.
Clean the filter.
Make sure that the connection is
correct.
Clean the sink spigot.
Make sure that the connection is
correct.
Replace the fuse.
ENGLISH 16
When the cleaning results are not satisfactory:
Problem Possible cause Solution
The dishes are
not clean
Limescales
particles on the
dishes
The dishes are
wet and dull
There are
streaks, milky
spots or a bluish coating on
glasses and
dishes
Dry water drop
signs on
glasses and
dishes
The selected washing programme is
not applicable for the type of load
and soil.
The baskets are loaded incorrectly so
that water cannot reach all surfaces.
Spray arms do not turn freely because
of incorrect arrangement of the load.
The filters are dirty or not correctly installed.
The quantity of detergent is too little
or missing.
The salt container is empty. Fill the salt container with salt.
The water softener is adjusted on a
wrong level.
The salt container cap is not closed
correctly.
No rinse aid has been used. Set the rinse aid dosage.
The rinse aid dispenser is empty. Fill the rinse aid dispenser.
Wrong dosage of rinse aid. Decrease the rinse aid dosage.
Wrong dosage of rinse aid. Increase rinse aid dosage.
The detergent can be the cause. Use different type of detergent.
Set different washing programme.
Load the baskets correctly.
Make sure that the cutlery and dishes
do not block the spray arms.
Make sure that the filters are clean
and installed correctly.
Make sure that the quantity of detergent in detergent dispenser is correct.
Set the water softener.
Make sure that the salt container is
closed correctly.
Technical data
Dimensions Width (cm) 59,6
Height (cm) 81,8-87,8
Depth (cm) 57,5
Water supply pressure
Capacity (place settings) 12
Energy class A
1)
Minimum
Maximum
0,5 bar (0,05 MPa)
8 bar (0,8 MPa)
ENGLISH 17
Washing class A
Drying class A
Noise (dB(A)) 52
Average annual energy con-
sumption (kWh)
Average annual water con-
sumption (litres)
1) If the pressure in your area is lower or higher, please contact your After Sales Service.
2) The data is based on the washing programme for test institutes assuming 220 cycles per a year.
Information on the electrical connection, voltage and overall power is given on the rating
plate on the inner edge of the dishwasher door.
2)
2)
231
3520
Installation
Caution! Refer to the assembly
instructions, in order to proceed with the
installation.
Warning! Make sure that mains plug is
disconnected from the mains socket
during installation.
Place the appliance on the floor and install it
under a counter (kitchen worktop or sink).
If a repair is necessary, the appliance must be
easily accessible for the engineer.
Put the appliance adjacent to a water tap and
a drain.
For the venting of the dishwasher only water
fill, water drain and power supply cable openings are necessary.
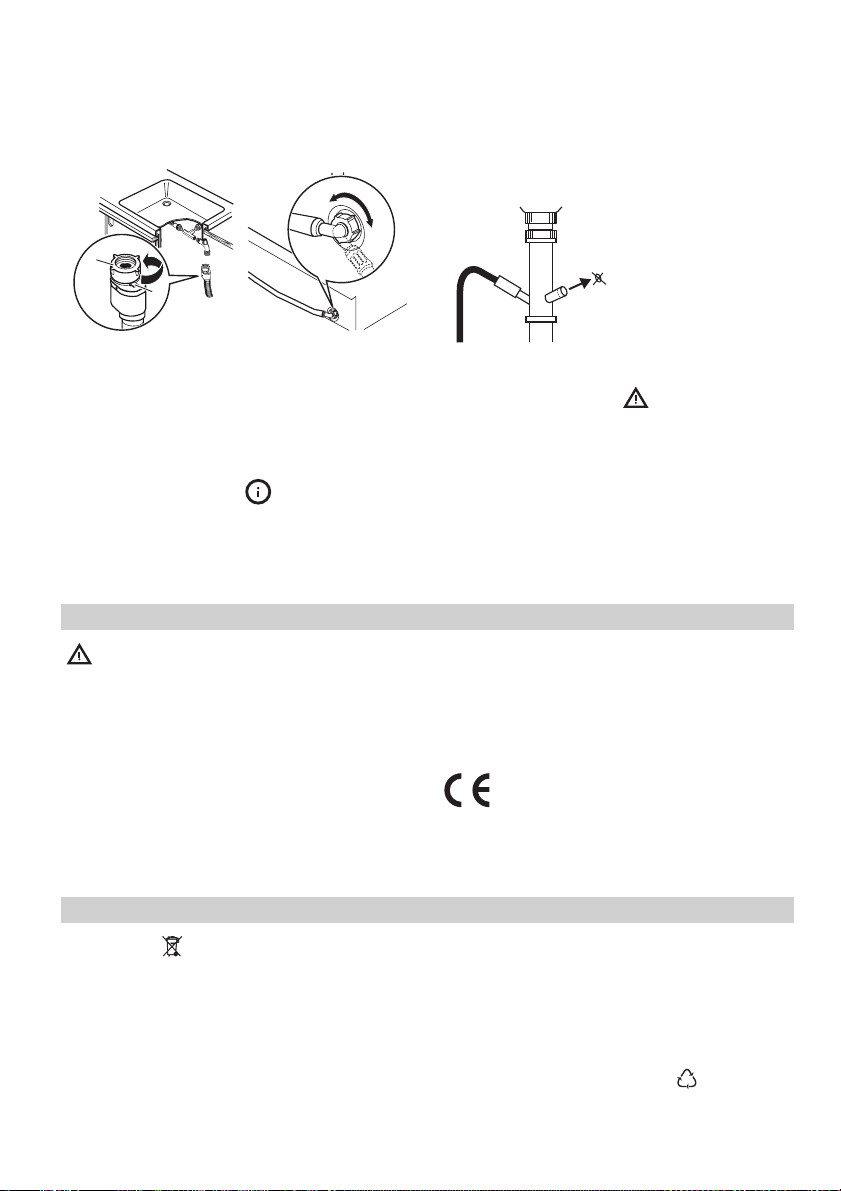
Water connection
This appliance has a special inlet hose for
water stop later defined as aqualock.
Water inlet hose
Connected the appliance to a hot (max. 60°)
or cold water supply.
If the hot water comes from alternative sources
of energy that are more environmentally
friendly (e.g. solar or photovoltaic panels and
aeolian), use a hot water supply to decrease
energy consumption.
Connect the inlet hose to a water tap with an
external thread of 3/4″.
Caution! Do not use connection hoses
from an old appliance.
Caution! If you connect the appliance to
new pipes or pipes that are not used for
a long time, we recommend to run the water
for some minutes before you connect the inlet
hose.
Aqualock inlet hose
The inlet hose is a high pressure resistant. It can
hold pressure at maximum 6 MPa. From external the inlet hose has a sheathing against
eventual damages. If the inner hose breaks,
the water that is in the hose will became dark.
You can see it across the special transparent
sheathing. Turn off the water tap immediately
and contact the After Sales Service.
ENGLISH 18
Drain hose
If you connect the
water drain hose to a
water trap under the
A
B
The aqualock inlet
hose is installed with
a safety device to
prevent accidental
loosening. To disconnect the hose:
• Press the lever ( B ).
• Turn the retaining
ring ( A ) anticlockwise.
Turn the inlet hose to
the left or the right to
suit the installation.
Tight the locknut correctly to prevent water leaks.
If you use a inlet
hose extension
the total reached
length must be no
longer than 4 metres.
sink, remove the
A
plastic membrane
(A). If you do not remove the membrane,
remaining food can
cause a blockage in
the drain hose spigot.
Caution! Make
sure that the
water couplings are
tight to prevent water leakage.
Electrical connection
Warning! The manufacturer is not
responsible if you do not follow these
safety precautions.
Ground the appliance according to safety precautions.
Make sure that the rated voltage and type of
power on the rating plate agree with the voltage and the power of the local power supply.
Always use a correctly installed shockproof
socket.
Do not use multi-way plugs, connectors and
extension cables. There is a risk of fire.
Do not replace the mains cable yourself. Contact the After Sales Service.
Make sure that the mains plug is accessible
after installation.
Do not pull the mains cable to disconnect the
appliance. Always pull the mains plug.
This appliance complies with the E.E.C. Directives.
Environment concerns
The symbol on the product or on its
packaging indicates that this product may not
be treated as household waste. Instead it
should be taken to the appropriate collection
point for the recycling of electrical and
electronic equipment. By ensuring this product
is disposed of correctly, you will help prevent
potential negative consequences for the
environment and human health, which could
otherwise be caused by inappropriate waste
handling of this product. For more detailed
information about recycling of this product,
please contact your local council, your
household waste disposal service or the shop
where you purchased the product.
Packaging materials
The materials with the symbol
ble. Dispose the packaging in a suitable collection containers to recycle it.
are recycla-

ENGLISH 19
Before disposal of appliance
Warning! Do these steps to dispose the
appliance:
• Pull the mains plug out of the mains socket.
IKEA GUARANTEE
How long is the IKEA guarantee valid?
This guarantee is valid for five (5) years from
the original date of purchase of Your appliance at IKEA, unless the appliance is named
LAGAN in which case two (2) years of guarantee apply. The original sales receipt is required as proof of purchase. If service work is
carried out under guarantee, this will not extend the guarantee period for the appliance,
Which appliances are not covered by the
IKEA five (5) years guarantee?
The range of appliances named LAGAN and
all appliances purchased in IKEA before 1st of
August 2007
Who will execute the service?
IKEA service provider will provide the service
through its own service operations or authorized service partner network.
What does this guarantee cover?
The guarantee covers faults of the appliance,
which have been caused by faulty construction
or material faults from the date of purchase
from IKEA. This guarantee applies to domestic
use only. The exceptions are specified under
the headline “What is not covered under this
guarantee?” Within the guarantee period, the
costs to remedy the fault e.g. repairs, parts, labour and travel will be covered, provided that
the appliance is accessible for repair without
special expenditure. On these conditions the
EU guidelines (Nr. 99/44/EG) and the respective local regulations are applicable. Replaced
parts become the property of IKEA.
• Cut off the mains cable and discard it.
• Discard the door catch. This prevents the
children to close themselves inside the appliance. Risk of suffocation.
What will IKEA do to correct the problem?
IKEA appointed service provider will examine
the product and decide, at its sole discretion,
if it is covered under this guarantee. If considered covered, IKEA service provider or its authorized service partner through its own service operations, will then, at its sole discretion,
either repair the defective product or replace
it with the same or a comparable product.
What is not covered under this guarantee?
• Normal wear and tear.
• Deliberate or negligent damage, damage
caused by failure to observe operating instructions, incorrect installation or by connection to the wrong voltage, damage
caused by chemical or electro-chemical reaction, rust, corrosion or water damage including but not limited to damage caused by
excessive lime in the water supply, damage
caused by abnormal environmental conditions.
• Consumable parts including batteries and
lamps.
• Non-functional and decorative parts which
do not affect normal use of the appliance,
including any scratches and possible color
differences.
• Accidental damage caused by foreign objects or substances and cleaning or unblocking of filters, drainage systems or soap
drawers.
• Damage to the following parts: ceramic
glass, accessories, crockery and cutlery baskets, feed and drainage pipes, seals, lamps
and lamp covers, screens, knobs, casings
and parts of casings. Unless such damages
can be proved to have been caused by production faults.
• Cases where no fault could be found during
a technician’s visit.

ENGLISH 20
• Repairs not carried out by our appointed
service providers and/or an authorized
service contractual partner or where nonoriginal parts have been used.
• Repairs caused by installation which is faulty
or not according to specification.
• The use of the appliance in a non-domestic
environment i.e. professional use.
• Transportation damages. If a customer
transports the product to their home or other
address, IKEA is not liable for any damage
that may occur during transport. However,
if IKEA delivers the product to the customer’s
delivery address, then damage to the product that occurs during this delivery will be
covered by this guarantee.
• Cost for carrying out the initial installation of
the IKEA appliance. However, if an IKEA
service provider or its authorized service
partner repairs or replaces the appliance
under the terms of this guarantee, the service provider or its authorized service partner
will re-install the repaired appliance or install the replacement, if necessary.
This restriction do not apply to fault-free work
carried out by a qualified specialist using our
original parts in order to adapt the appliance
to the technical safety specifications of another
EU country.
How country law applies
The IKEA guarantee gives You specific legal
rights, which covers or exceed local demands.
However these conditions do not limit in any
way consumer rights described in the local
legislation
Area of validity
For appliances which are purchased in one EU
country and taken to another EU country, the
services will be provided in the framework of
the guarantee conditions normal in the new
country. An obligation to carry out services in
the framework of the guarantee exists only if
the appliance complies and is installed in accordance with:
• the technical specifications of the country in
which the guarantee claim is made;
• the Assembly Instructions and User Manual
Safety Information;
The dedicated After Sales Service for IKEA
appliances:
Please do not hesitate to contact IKEA After
Sales Service to:
1. make a service request under this guarantee;
2. ask for clarification on installation of the
IKEA appliance in the dedicated IKEA
kitchen furniture. The service won’t provide
clarifications related to:
– the overall IKEA kitchen installation;
– connections to electricity (if machine
comes without plug and cable), to water
and to gas since they have to be executed by an authorized service engineer.
3. ask for clarification on user manual contents and specifications of the IKEA appliance.
To ensure that we provide you with the best
assistance, please read carefully the Assembly
Instructions and/or the User Manual section of
this booklet before contacting us.
How to reach us if You need our service
Please refer to the last page of this manual for
the full list of IKEA appointed contacts and relative national phone numbers.
Important! In order to provide You with a
quicker service, we recommend that You use
the specific phone numbers listed at the end of
this manual. Always refer to the numbers listed
in the booklet of the specific appliance You
need an assistance for. Before calling us,
assure that You have to hand the IKEA article
number (8 digit code) for the appliance of
which you need our assistance.
Important! SAVE THE SALES RECEIPT! It is
Your proof of purchase and required for the
guarantee to apply. Note that the receipt
reports also the IKEA article name and number
(8 digit code) for each of the appliances you
have purchased.

ENGLISH 21
Do You need extra help?
For any additional questions not related to After Sales of your appliances, please contact
our nearest IKEA store call centre. We recommend you read the appliance documentation
carefully before contacting us.

DEUTSCH 22
Inhalt
Sicherheitshinweise 22
Gerätebeschreibung 24
Bedienblende 24
Spülprogramme 25
Verwendung des Geräts 26
Einstellen des Wasserenthärters 27
Gebrauch von Salz für Geschirrspüler 28
Gebrauch von Klarspülmittel 28
Laden von Besteck und Geschirr 29
Gebrauch von Spülmittel 31
Änderungen vorbehalten
Auswählen und Starten eines Spülprogramms
32
Reinigung und Pflege 33
Was tun, wenn … 34
Technische Daten 36
Gerät aufstellen 37
Wasseranschluss 37
Elektrischer Anschluss 38
Umwelttipps 38
IKEA GARANTIE 39
Sicherheitshinweise
Lesen Sie diese Bedienungsanleitung bit-
te sorgfältig durch, bevor Sie das Gerät
anschließen und benutzen, um Gefahren zu
vermeiden und einen korrekten Betrieb des
Geräts zu gewährleisten. Bewahren Sie diese
Bedienungsanleitung in der Nähe des Geräts
auf, auch wenn Sie dieses anderswo aufstellen.
Wenn Sie das Gerät verkaufen, geben Sie dem
Käufer die Bedienungsanleitung mit. Jeder,
der dieses Gerät benutzt, sollte mit der Bedienung und den Sicherheitsmerkmalen vertraut
sein.
Bestimmungsgemäßer Gebrauch
• Dieses Gerät ist ausschließlich zur Verwen-
dung im Haushalt bestimmt.
• Spülen Sie in diesem Gerät ausschließlich
spülmaschinengeeignete Haushaltsutensilien.
• Geben Sie keine Lösungsmittel in das Gerät.
Andernfalls besteht Explosionsgefahr.
• Ordnen Sie Messer und andere spitze Ge-
genstände mit der Spitze nach unten in den
Besteckkorb ein. Oder legen Sie sie horizontal in den Oberkorb.
• Verwenden Sie ausschließlich Markenreini-
gungsprodukte für Geschirrspüler (Spülmittel, Salz, Klarspüler).
• Wenn Sie die Tür öffnen, während das Ge-
rät in Betrieb ist, kann heißer Dampf austreten. In diesem Fall besteht die Gefahr von
Hautverbrennungen.
• Nehmen Sie vor dem Ende des Spülpro-
gramms nichts aus dem Geschirrspüler.
• Wenn das Spülprogramm beendet ist, ziehen Sie den Netzstecker aus der Netzsteckdose und schließen Sie den Wasserhahn.
• Das Gerät darf nur von einem Servicetechniker einer autorisierten Kundendienststelle
repariert werden. Dabei dürfen ausschließlich Originalersatzteile verwendet werden.
• Versuchen Sie nicht, selbst Reparaturen auszuführen. Andernfalls besteht Unfallgefahr
und das Gerät könnte beschädigt werden.
Wenden Sie sich stets an Ihren lokalen Kundendienst.
Allgemeine Sicherheitshinweise
• Das Gerät darf von Erwachsenen oder Kindern mit eingeschränkten physischen, sensorischen oder geistigen Fähigkeiten oder
einem Mangel an Wissen und Erfahrung
nicht benutzt werden. Solche Personen müssen von einer Person beaufsichtigt oder bei
der Bedienung des Geräts angeleitet werden, die für ihre Sicherheit verantwortlich ist.
• Beachten Sie die Sicherheitsanweisungen
des Reinigungsmittelherstellers, um Verätzungen an Augen, Mund oder Kehlkopf zu
vermeiden.
• Trinken Sie kein Wasser aus dem Geschirrspüler. Es können Spülmittelrückstände darin zurückbleiben.
• Wenn Sie das Gerät nicht benutzen, halten
Sie die Tür geschlossen, damit es nicht zu
Unfällen kommt, weil jemand darüber stolpert.

DEUTSCH 23
• Setzen oder stellen Sie sich nie auf die offene
Tür.
Kindersicherheit
• Nur Erwachsene dürfen dieses Gerät bedienen. Kinder müssen beaufsichtigt werden, so
dass sie nicht mit dem Gerät spielen können.
• Halten Sie das Verpackungsmaterial von
Kindern fern. Andernfalls besteht Erstickungsgefahr.
• Bewahren Sie alle Reinigungsmittel an einem sicheren Ort auf. Achten Sie darauf,
dass Reinigungsmittel nicht in die Hände
von Kindern gelangen.
• Halten Sie Kinder vom geöffneten Geschirrspüler fern.
Aufstellung
• Vergewissern Sie sich, dass das Gerät beim
Transport nicht beschädigt wurde. Schließen
Sie ein beschädigtes Gerät nicht an. Wenden Sie sich bei Bedarf an den Hersteller.
• Entfernen Sie vor dem ersten Gebrauch alle
Verpackungsmaterialien.
• Der elektrische Anschluss muss von einer
qualifizierten Fachkraft vorgenommen werden.
• Die Wasseranschlüsse müssen von einer
qualifizierten Fachkraft vorgenommen werden.
• Nehmen Sie weder technische noch anderweitige Modifikationen am Gerät vor. Andernfalls besteht Unfallgefahr und das Gerät könnte beschädigt werden.
• Benutzen Sie das Gerät nicht:
– wenn das Netzkabel oder die Wasser-
schläuche beschädigt sind,
– wenn die Bedienblende, die Abdeckung
oben oder der Sockel beschädigt sind, so
dass das Innere des Geräts freiliegt.
Bei weiteren Fragen wenden Sie sich bitte
an unseren Kundenservice. Eine Liste der
Kundendienststellen finden Sie am Ende des
Benutzerhandbuchs.
• Bohren Sie keine Löcher ins Gehäuse des
Geräts. Andernfalls könnten hydraulische
oder elektrische Bauteile beschädigt werden.
Warnung! Beachten Sie genau sämtliche
Anweisungen zu den elektrischen und
den Wasseranschlüssen.
DEUTSCH 24
Gerätebeschreibung
1
2
3
4
5
1 Oberkorb
2 Anzeige der Wasserhärtestufe
3 Salzbehälter
4 Behälter für Reinigungsmittel
5 Dosiergerät für Klarspüler
Bedienblende
6
6 Typenschild
7 Filter
8 Unterer Sprüharm
9 Oberer Sprüharm
4
9
8
7
3
1
2

DEUTSCH 25
1 Programmwähler
2 Start-/Abbruch-Taste
3 Kontrolllampen
4 Ein/Aus-Betriebsanzeige
Kontrolllampen
Die Kontrolllampe leuchtet während der Reinigungsphase oder der Klarspülphase.
Die Kontrolllampe leuchtet während der Trockenphase.
Diese Kontrolllampe leuchtet auf, wenn das
Spülprogramm zu Ende ist. Zusatzfunktionen:
• Einstellung des Wasserenthärters.
• Alarm bei einer Störung des Geräts.
Die Kontrolllampe leuchtet auf, wenn der Salz-
behälter aufgefüllt werden muss. Siehe Kapitel
1)
1) Die Kontrolllampe ist aus, während ein Spülprogramm läuft.
Programmwähler und Ein/AusBetriebsanzeige
• Drehen Sie den Programmwähler zum Einstellen eines Spülprogramms im Uhrzeigersinn oder gegen den Uhrzeigersinn. Die Referenzmarkierung am Programmwähler
muss auf eins der Spülprogramme auf der
Bedienblende zeigen.
«Verwendung von Geschirrspülsalz».
Die Salzkontrolllampe kann nach dem Nachfüllen von Salz noch einige Stunden leuchten.
Dies hat jedoch keine unerwünschte Auswirkung auf den Gerätebetrieb.
– Die Ein/Aus-Betriebsanzeige leuchtet auf
(Position EIN).
• Um das Gerät auszuschalten, drehen Sie
den Programmwähler, bis die Referenzmarkierung auf die Ein/Aus-Betriebsanzeige
zeigt.
– Die Ein/Aus-Betriebsanzeige erlischt (Po-
sition AUS).
Spülprogramme
Spülprogramme
Programm
Intensiv
Grad der
Ver-
schmut-
zung
Stark ver-
schmutzt
Spülgut Programmbeschreibung
Geschirr,
Besteck,
Töpfe,
Pfannen
Vorspülgang
Hauptspülgang bis zu 70 °C
2 Zwischenspülgänge
Klarspülgang
trocknen
DEUTSCH 26
Grad der
Programm
Schnellspül-
1)
gang
2)
Öko
1) Dies ist das ideale tägliche Spülprogramm für eine 4-köpfige Familie. die lediglich das Frühstücks- und
Abendessensgeschirr samt Besteck spülen möchte.
2) Testprogramm für Testinstitute. Dies ist das Öko-Spülprogramm. Die Testdaten finden Sie auf dem
mitgelieferten separaten Infoblatt. Nur in drei Sprachen erhältlich (Englisch, Französisch, Deutsch) nur für
Testzwecke an Prüfinstituten.
Verbrauchswerte (für ungekürzte Spülgänge)
Programm Programmdauer (in
Ver-
schmut-
Spülgut Programmbeschreibung
zung
Normal/
leicht ver-
schmutzt
Geschirr
und Besteck
Hauptspülgang bis zu 60 °C
Klarspülgang
Vorspülgang
Normal
ver-
schmutzt
Geschirr
und Besteck
Hauptspülgang bis zu 50 °C
1 Zwischenspülgang
Klarspülgang
trocknen
Minuten)
Energieverbrauch
(kWh)
Wasserverbrauch (in
Liter)
85-95 1,8-2,0 22-25
30 0,9 9
1)
1) Die Dauer dieses Spülprogramms ist fest vorgegeben (länger) und aufgrund der verlängerten Spül- und
Trockenphasen länger als andere Programme.
130-140 1,0-1,2 14-16
Die Verbrauchswerte sind Richtwerte, die
je nach dem Druck und der Temperatur
des Wassers, den Schwankungen in der Stromversorgung und der Geschirrmenge variieren
können.
Verwendung des Geräts
Bitte halten Sie sich für die folgenden Schritte
genau an die Anweisung:
1. Überprüfen Sie, ob der Wasserenthärter
(Weichwasserbereiter) korrekt auf den
Härtegrad des Wassers in Ihrer Region
eingestellt ist. Stellen Sie den Wasserenthärter bei Bedarf auf die richtige Stufe ein.
2. Füllen Sie den Salzbehälter mit Geschirr-
spülsalz.
3. Füllen Sie den Klarspüldosierer mit Klar-
spüler.
4. Ordnen Sie Geschirr und Besteck in den
Geschirrspüler ein.
5. Stellen Sie je nach Spülgut und Verschmutzungsgrad das passende Spülprogramm
ein.
6. Füllen Sie den Spülmittelbehälter mit der
passenden Menge an Spülmittel.
7. Starten Sie das Spülprogramm.
Wenn Sie Reinigertabletten verwenden,
siehe das Kapitel «Gebrauch von Spül-
mitteln».
DEUTSCH 27
Einstellen des Wasserenthärters
Der Wasserenthärter entfernt Mineralien und
Salze aus dem Spülwasser. Andernfalls könnten sich die Mineralien und Salze nachteilig auf
die Funktion des Geräts auswirken.
Die Wasserhärte wird in unterschiedlichen,
aber gleichwertigen Einheiten gemessen:
• Deutsche Wasserhärtegrade (dH°).
• Französische Wasserhärtegrade (°TH).
• mmol/l (Millimol pro Liter — internationale
Einheit für Wasserhärtegrade).
• Clarke-Werte.
Wasserhärte Einstellung des Wasserenthärters
°dH °TH mmol/l Clarke-
51 — 70 91 — 125 9,1 — 12,5 64 — 88 2 10
43 — 50 76 — 90 7,6 — 9,0 53 — 63 2 9
37 — 42 65 — 75 6,5 — 7,5 46 — 52 2 8
29 — 36 51 — 64 5,1 — 6,4 36 — 45 2 7
23 — 28 40 — 50 4,0 — 5,0 28 — 35 2 6
19 — 22 33 — 39 3,3 — 3,9 23 — 27 2 5
15 — 18 26 — 32 2,6 — 3,2 18 — 22 1 4
11 — 14 19 — 25 1,9 — 2,5 13 — 17 1 3
4 — 10 7 — 18 0,7 — 1,8 5 — 12 1 2
< 4 < 7 < 0,7 < 5
1) Kein Salz erforderlich.
Sie müssen den Wasserenthärter manuell
und elektronisch einstellen.
Manuelle Einstellung
Werkseitig ist das Gerät auf Stufe 2 eingestellt.
Stellen Sie den Wasserenthärter auf den Wasserhärtegrad in Ihrer Region ein. Bei Bedarf
erfahren Sie den Härtegrad bei Ihrem Wasserversorger.
Werte
1 2
Manuell Elektronisch
1)
1
1)
1
Stellen Sie den Schalter auf Stufe 1 oder 2.
Elektronische Einstellung
Werkseitig ist der Wasserenthärter auf Stufe
5 eingestellt.
Loading…
Report abuse
Libble takes abuse of its services very seriously. We’re committed to dealing with such abuse according to the laws in your country of residence. When you submit a report, we’ll investigate it and take the appropriate action. We’ll get back to you only if we require additional details or have more information to share.
Product:
Get your user manual by e-mail
Enter your email address to receive the manual of Ikea LAGAN DW60 in the language / languages: All languages as an attachment in your email.
The manual is 1,69 mb in size.
You will receive the manual in your email within minutes. If you have not received an email, then probably have entered the wrong email address or your mailbox is too full. In addition, it may be that your ISP may have a maximum size for emails to receive.
The manual is sent by email. Check your email
If you have not received an email with the manual within fifteen minutes, it may be that you have a entered a wrong email address or that your ISP has set a maximum size to receive email that is smaller than the size of the manual.
- June 17, 2024
- Ikea
Table of Contents
- Safety Information
- Product description
- Control panel
- First Use
- Loading the racks
- Daily Use
- Programs table
- Cleaning and maintenance
- What to do if …
- After-Sales Service
- Technical Data
- Environmental concerns
- Installation
- IKEA GUARANTEE
- Documents / Resources
- References
- Read User Manual Online (PDF format)
- Download This Manual (PDF format)
LAGAN Integrated
Dishwasher 60 cm
Instruction Manual
Safety Information
Before using the appliance, read these safety instructions. Keep them nearby
for future reference.
These instructions and the appliance itself provide important safety warnings,
to be observed at all times. The manufacturer declines any liability for
failure to observe these safety instructions, for inappropriate use of the
appliance or incorrect setting of controls.
****Very young children (0-3 years) should be kept away from the appliance.
Young children (3-8 years) should be kept away from the appliance unless
continuously supervised. Children from 8 years old and above and persons with
reduced physical, sensory or mental capabilities or lack of experience and
knowledge can use this appliance only if they are supervised or have been
given instructions on safe use and understand the hazards involved.
Children must not play with the appliance.
Cleaning and user maintenance must not be carried out by children without
supervision.
PERMITTED USE
CAUTION: the appliance is not intended to be operated by means of an external
switching device, such as a timer, or separate remote controlled system.
This appliance is intended to be used in household and similar applications
such as: staff kitchen areas in shops, offices and other working environments;
farm houses; by clients in hotels, motels, bed & breakfast and other
residential environments.
This appliance is not for professional use. Do not use the appliance
outdoors.
The maximum number of place settings is shown in the product sheet.
The door should not be left in the open position – risk of tripping. The
open appliance door can only support the weight of the loaded rack when pulled
out.
Do not rest objects on the door or sit or stand on it.
WARNING: Dishwasher detergents are strongly alkaline. They can be
extremely dangerous if swallowed. Avoid contact with the skin and eyes and
keep children away from the dishwasher when the door is open. Check that the
detergent receptacle is empty after completion of the wash cycle.
WARNING: Knives and other utensils with sharp points must be loaded in
the basket with their points down or placed in a horizontal position – risk of
cuts.
Do not store explosive or flammable substances (e.g. gasoline or aerosol
cans) inside or near the appliance – risk of fire.
The appliance must be used only to wash domestic dishes in accordance with the
instructions in this manual. The water in the appliance is not potable. Use
only detergent and rinse additives designed for an automatic dishwasher. When
adding a water softener (salt), run one cycle immediately with the machine
empty, to avoid corrosion damage to internal parts.
Store the detergent, rinse aid and salt out of reach of children. Shut off the
water supply and unplug or disconnect the power before servicing and
maintenance.
Disconnect the water and electricity supply in the event of any malfunction.
INSTALLATION
The appliance must be handled and installed by two or more persons – risk
of injury. Use protective gloves to unpack and install – risk of cuts.
Installation, including water supply (if any), electrical connections and
repairs must be carried out by a qualified technician. Do not repair or
replace any part of the appliance unless specifically stated in the user
manual. Keep children away from the installation site. After unpacking the
appliance, make sure that it has not been damaged during transport.
In the event of problems, contact the dealer or your nearest After-sales
Service.
Once installed, packaging waste (plastic, styrofoam parts etc.) must be stored
out of reach of children – risk of suffocation.
The appliance must be disconnected from the power supply before any
installation operation – risk of electrical shock. During installation, make
sure the appliance does not damage the power cable – risk of fire or
electrical shock. Only activate the appliance when the installation has been
completed.
Connect the dishwasher to the water mains using only new hose sets. The old
hose sets should not be reused. All hoses must be securely clamped to prevent
them coming loose during operation.
All local waterboard regulations must be complied with.
Water supply pressure 0.05 – 1.0 MPa.
The appliance must be placed against the wall or built into furniture to limit
the access to its rearside.
For dishwashers having ventilation openings in the base, the openings must 6
not be obstructed by a carpet.
If installing the dishwasher at the end of a row of units making the side
panel accessible, the hinge area must be covered to avoid risk of injury.
The inlet water temperature depends on the dishwasher model. If the installed
inlet hose is marked “25°C Max”, the maximum allowed water temperature is
25°C. For all other models the maximum allowed watertemperature is 60°C. Do
not cut hoses and, in the case of appliances fitted with a waterstop system,
do not immerse the plastic casing containing the inlet hose in water. If hoses
are not long enough, contact your local dealer. Make sure the inlet and drain
hoses are kink-free and are not crushed. Before using the applinace for the
first time, check the water inlet and drain hose for leaks. Make sure that the
four feet are stable and resting on the floor, adjusting them as required, and
check that the dishwasher is perfectly levelled using a spirit level.
****Use the appliance only when the covers shown on diagram 19 in the
Assembly instruction are correctly assembled – risk of injury.
ELECTRICAL WARNINGS
The rating plate is on the edge of the dishwasher door (visible when the door
is open).
It must be possible to disconnect the appliance from the power supply by
unplugging it if plug is accessible, or by a multi-pole switch installed
upstream of the socket in accordance with the wiring rules and the appliance
must be earthed in conformity with national electrical safety standards.
Do not use extension leads, multiple sockets or adapters. The electrical
components must not be accessible to the user after installation. Do not use
the appliance when you are wet or barefoot.
Do not operate this appliance if it has a damaged power cable or plug, if
it is not working properly, or if it has been damaged or dropped.
If the supply cord is damaged, it must be replaced with an identical one by
the manufacturer, its service agent or similarly qualified persons in order to
avoid a hazard – risk of electrical shock.
**If the fitted plug is not suitable for your socket outlet, contact a
qualified technician.
Do not pull the power supply cable. Do not immerse the mains cord or plug in
water.
Keep the cord away from hot surfaces.
ELECTRICAL CONNECTION FOR GREAT BRITAIN AND IRELAND ONLY**
Fuse replacement.
If the mains lead of this appliance is fitted with a BS 1363A 13amp fused
plug, to change a fuse in this type of plug use an A.S.T.A. approved fuse to
BS1362 type and proceed as follows:
- Remove the fuse cover (A) and fuse (B).
- Fit replacement 13A fuse into fuse cover.
- Refit both into plug.
Important:
The fuse cover must be refitted when changing a fuse and if the fuse cover is
lost the plug must not be used until a correct replacement is fitted.
Correct replacement are identified by the colour insert or the colour embossed
in words on the base of the plug.
Replacement fuse covers are available from your local electrical store.
For the Republic of Ireland only
The information given in respect of Great Britain will frequently apply, but a
third type of plug and socket is also used, the 2-pin, side earth type.
Socket outlet / plug (valid for both countries)
If the fitted plug is not suitable for your socket outlet, please contact
After-sales Service for further instruction. Please do not attempt to change
plug yourself. This procedure needs to be carried out by a qualified
technician in compliance with the manufactures instructions and current
standard safety regulations.
CLEANING AND MAINTENANCE
WARNING : Ensure that the appliance is switched off and disconnected from
the power supply before performing any maintenance operation. To avoid risk of
personal injury use protective gloves (risk of laceration) and safety shoes
(risk of contusion); be sure to handle by two persons (reduce load); never use
steam cleaning equipment (risk of electric shock).
Non-professional repairs not authorized by the manufacturer could result in a
risk to health and safety, for which the manufacturer cannot be held liable.
Any defect or damage caused from nonprofessional repairs or maintenance will
not be covered by the guarantee, the terms of which are outlined in the
document delivered with the unit.
Product description

- Upper rack
- Foldable flaps
- Upper rack height adjuster
- Upper sprayer arm
- Lower rack
- Cutlery basket
- Lower sprayer arm
- Filter Assembly
- Salt reservoir
- Detergent and Rinse Aid dispensers
- Control panel
Control panel

- On-Off/Reset button with indicator light
- Program selection button
- Salt refill indicator light
- Program indicator lights
- START/Pause button with indicator light
First Use
Advice regarding the first time use
Before installation and first usage of the appliance please read carefully „
SAFETY INSTRUCTION” and „ASSEMBLY INSTRUCTION” available in the product
literature bag. Please remember to remove all transport protection parts from
the dishwasher.
Filling the salt reservoir
The use of salt prevents the formation of LIMESCALE on the dishes andon the
machine’s functional components.
- It is mandatory that THE SALT RESERVOIR BE NEVER EMPTY
- It is important to set the water hardness.
The salt reservoir is located in the lower part of the dishwasher (see PRODUCT
DESCRIPTION) and should be filled when the SALT REFILL indicator light in the
control panel is lit.
- Remove the lower rack and unscrew the reservoir cap (anticlockwise).
- Position the funnel (see figure) and fill the salt reservoir right up to its edge (approximately 1 kg); it is not unusual for a little water to leak out.
- Only the first time you do this: fill the salt reservoir with water.
- Remove the funnel and wipe any salt residue away from the opening.
Make sure the cap is screwed on tightly, so that no detergent can get into the
container during the wash program (this could damage the water softener beyond
repair).
As soon as this procedure is complete, run a program without loading. The
“Pre-Wash” program alone is NOT sufficient.
Residual saline solution or grains of salt can lead to corrosion, irreparably
damaging the stainless steel components.
The guarantee is not applicable if faults are caused by such circumstances.
Only use salt that has been specifically designed for dishwashers. If the salt
container is not filled, the water softener and the heating element may be
damaged as a result of limescale accumulation. Using of Salt is recommended
with any type of dishwasher detergent.
Whenever you need to add salt, it is mandatory to complete the procedure
before the beginning of the washing cycle to avoid corrosion.
Setting the water hardness
To allow the water softener to work in a perfect way, it is essential that the
water hardness setting is based on the actual water hardness in your house.
This information can be obtained from your local water supplier. The factory
sets the default value for the water hardness.
- Switch on the appliance by pressing the ON/OFF button.
- Switch off the appliance by pressing the ON/OFF button.
- Hold down button for 5 seconds, until you hear a beep.
- Switch on the appliance by pressing quickly the ON/OFF button.
- The program indicator light of the current set level flashes.
- Press button to select the desired hardness level (see WATER HARDNESS TABLE).
- Switch off the appliance by pressing the ON/OFF button.
Setting is complete!
Water Hardness Table
Level| °dH German degrees| °fH French degrees| °Clark English degrees
1 Soft| 0 – 6| 0-10| 0 – 7
2 Medium| 7 -11| 11 – 20| 8 -14
3 Average| 12 -16| 21 – 29| 15 – 20
4 Hard| 17 – 34| 30 – 60| 21 – 42
5 Very hard| 35 – 50| 61 – 90| 43 – 62
Water Softening System
Water softener automatically reduces water hardness, consequently preventing
scale buildup on heater, contributing also to better cleaning efficiency. This
system regenerates itself with salt, therefore it is required to refill salt
container when empty.
Frequency of regeneration depends on water hardness level setting –
regeneration takes place once per 6 Eco cycles with water hardness level set
to 3.
Regeneration process starts in final rinse and finishes in drying phase,
before cycle ends.
- Single regeneration consumes: ~3.5 L of water;
- Takes up to 5 additional minutes for the cycle;
- Consumes below 0.005 kWh of energy.
Filling the rinse aid dispenser
Rinse aid makes dish DRYING easier. The rinse aid dispenser A should be filled
when when the dark optical indicator on the dispenser door C becomes
transparent.

- Open the dispenser B by pressing and pulling up the tab on the lid.
- Carefully introduce the rinse aid as far as the maximum (110 ml) reference notch of the filling space – avoid spilling it. If this happens, clean the spill immediately with a dry cloth.
- Press the lid down until you hear a click to close it.
NEVER pour the rinse aid directly into the tub.
Adjusting the dosage of rinse aid
If you are not completely satisfied with the drying results, you can adjust
the quantity of rinse aid used.
- Switch the dishwasher on using the ON/OFF button.
- Switch it off using the ON/OFF button.
- Press button three times – a beep will be heard.
- Switch it on using the ON/OFF button.
- The program indicator light of the current set level flashes.
- Press button to select the level of rinse aid quantity to be supplied.
- Switch it off using the ON/OFF button.
Setting is complete!
If the rinse aid level is set to 1 (ECO), no rinse aid will be supplied. The
LOW RINSE AID indicator light will not be lit if you run out of rinse aid. A
maximum of 5 levels can be set according to the dishwasher model. The factory
setting is specific to the model, please follow instruction above to check
this for your machine.
- If you see bluish streaks on the dishes, set a low number (2-3).
- If there are drops of water or limescale marks on the dishes, set a high number (4-5).
Filling the detergent dispenser
Usage of detergent not designed for dishwashers may cause malfunction or
damage to the appliance.
To achieve the best washing and drying results, the combined use of detergent,
rinse aid liquid and refined salt is required.
We recommend using detergents that do not contain phosphates or chlorine, as
these products are harmful to the environment.
Good washing results also depend on the correct amount of detergent being
used.
Exceeding the stated amount does not result in a more effective wash and
increases environmental pollution.
The amount can be adjusted to the soil level. In the case of normally soiled
items, use approximately either 35g (powder detergent) or 35ml (liquid
detergent) and additional tea spoon of detergent directly inside the tub. If
tablets are used, one tablet will be enough.
If the crockery is only lightly soiled or if it has been rinsed with water
before being placed in the dishwasher, reduce the amount of detergent used
accordingly (minimum 25 g/ml) e.g. skip the powder/gel putted inside the tub.
To open the detergent dispenser press button D .
Introduce the detergent into the dry dispenser E only.
Place the amount of detergent for pre-washing directly inside the tub.

- When measuring out the detergent refer to the mentioned earlier information to add the proper quantity. Inside the dispenser E there are indications to help the detergent dosing.
- Remove detergent residues from the edges of the dispenser and close the cover until it clicks.
- Close the lid of the detergent dispenser by pulling it up until the closing device is secured in place.
The detergent dispenser automatically opens up at the right time according to
the program.
Loading the racks
TIPS
Before loading the baskets, remove all food residues from the crockery and
empty the glasses. You do not need to rinse beforehand under running water.
Arrange the crockery so that it is held in place firmly and does not tip over;
and arrange the containers with the openings facing downwards and the
concave/convex parts placed obliquely, thus allowing the water to reach every
surface and flow freely.
Warning: lids, handles, trays and frying pans do not prevent the sprayer arms
from rotating.
Place any small items in the cutlery basket. Very soiled dishes and pans
should be placed in the lower basket because in this sector the water sprays
are stronger and allow a higher washing performance.
After loading the appliance, make sure that the sprayer arms can rotate
freely.
Upper rack
Load delicate and light dishes: glasses, cups, saucers, low salad bowls.
Foldable flaps with adjustable position
The side foldable flaps can be fold or unfold to optimize the arrangement of
crockery inside the rack.
Wine glasses can be placed safely in the foldable flaps by inserting the stem
of each glass into the corresponding slots.
Depending on the model:
- to unfold the flaps there is needed to slide it up and rotate or release it from the snaps and pull it down.
- to fold the flaps there is needed to rotate it and slide flaps down or pull it up and attach flaps to the snaps.
Adjusting the height of the upper rack
The height of the upper rack can be adjusted: high position to place bulky
crockery in the lower basket and low position to make the most of the tipup
supports by creating more space upwards and avoid collision with the items
loaded into lower rack. The upper rack is equipped with aUpper Rack height
adjuster (see figure), without pressing the levers, lift it up by simply
holding the rack sides, as soon as the rack is stable in its upper position.
To restore to the lower position, press the levers A at the sides of the rack
and move the basket downwards.
We strongly recommend that you do not adjust the height of the rack when it is
loaded.
NEVER raise or lower the basket on one side only. Lower rack
For pots, lids, plates, salad bowls, cutlery etc. Large plates and lids should
ideally be placed at the sides to avoid interferences with the spray arm.
Cutlery basket
The basket is equipped with top grilles for improved cutlery arrangement. The
cutlery basket should be positioned only at the front of the lower rack.
Knives and other utensils with sharp edges must be placed in the cutlery
basket with the points facing downwards or they must be positioned
horizontally in the tip-up compartments on the upper rack.
Unsuitable crockery
- Wooden crockery and cutlery.
- Delicate decorated glasses, artistic handicraft and antique crockery. Their decorations are not resistant.
- Parts in synthetic material which do not withstand high temperatures.
- Copper and tin crockery.
- Crockery soiled with ash, wax, lubricating grease or ink.
The colours of glass decorations and aluminium/silver pieces can change and
fade during the washing process. Some types of glass (e.g. crystal objects)
can become opaque after a number of wash cycles too.
Damage to glass and crockery
- Only use glasses and porcelain guaranteed by the manufacturer as dishwasher safe.
- Use a delicate detergent suitable for crockery
- Collect glasses and cutlery from the dishwasher as soon as the wash cycle is over.
Hygiene
To avoid odour and sediment which can be accumulated in the dishwasher please
run a high temperature program at least once a month. Use a tea spoon of
detergent and run it without the loading to clean your appliance.
TIPS ON ENERGY SAVING
-
When the household dishwasher is used according to the manufacturer’s instructions, washing tableware in a dishwasher usually consumes less energy and water than hand dishwashing.
-
In order to maximize dishwasher efficiency it is recommended to initiate the wash cycle once dishwasher is fully loaded.
Loading the household dishwasher up to the capacity indicated by the
manufacturer will contribute to energy and water savings.
Information on correct loading of tableware can be found in Loading chapter.
Incorrect loading or overloading the dishwasher may increase resources usage
(such as water, energy and time, as well as increase noise level), reducing
cleaning and drying performance. -
Manual pre-rinsing of tableware items leads to increased water and energy consumption and is not recommended.
Daily Use
-
CHECK WATER CONNECTION
Check that the dishwasher is connected to the water supply and that the tap is
open. -
SWITCH ON THE DISHWASHER
Open the door and press the ON/OFF button. -
LOAD THE RACKS (see LOADING THE RACKS)
-
FILLING THE DETERGENT DISPENSER (see FILLING THE DETERGENT DISPENSER).
-
CHOOSE THE PROGRAM AND CUSTOMISE THE CYCLE Select the most appropriate program in accordance with the type of crockery and its soiling level (see PROGRAMS DESCRIPTION) by pressing the button.
-
START
Start the wash cycle by pressing START/Pause button (led is lit) and closing
the door within 4 sec. When the program starts you hear a single beep. If the
door was not closed within 4sec., the alarm sound will be played. In this
case, open the door, press START/Pause button and close the door again within
4 sec. -
END OF WASH CYCLE
The end of the wash cycle is indicated by beeps and by the flashing of the
indicator light of the selected program. Open the door and switch off the
appliance by pressing the ON/OFF button.
Wait for a few minutes before removing the crockery – to avoid burns. Unload
the racks, beginning with the lower one. The machine will switch off
automatically during certain extended periods of inactivity, in order to
minimise electricity consumption. If the crockery is only lightly soiled or if
it has been rinsed with water before being placed in the dishwasher, reduce
the amount of detergent used accordingly.
Modifying a running program
If a wrong program was selected, it is possible to change it, provided that it
has only just begun: open the door, press and hold the ON/ OFF button, the
machine will switch off. Switch the machine back on using the ON/OFF button
and select the new wash cycle; Start the wash cycle by pressing START/Pause
button and closing the door within 4 sec.
If it takes more than 4 seconds the appliance automatically pauses and you
must restart the appliance again by repeating the last operation.
Adding extra crockery
Without switching off the machine, open the door (START/Pause led starts
blinking) (be aware of HOT steam!) and place the crockery inside the
dishwasher. Press the START/Pause button and close the door within 4 sec., the
cycle will resume from the point at which it was interrupted.
Accidental interruptions
If the door is opened during the wash cycle, or if there is a power cut, the
cycle pauses. Press the START/Pause button and close the door within 4 sec.,
the cycle will resume from the point at which it was interrupted.
Programs table
Program| Drying
phase| Duration of wash program (h:min)*)| Water consumption
(litres/cycle)| Energy consumption
(kWh/cycle)
—|—|—|—|—
1 Eco ECO 50°| | 3:35| 10.| 0.95
2 Fast Wash 40′ 45°| –| 0:40| 9.0| 0.50
3 Intensive 65°| | 2:40| 18.0| 1.60
4 Mixed 55º| | 2:15| 16.0| 1.40
5 Glass 45°| | 1:40| 12.| 1.20
ECO program data is measured under laboratory conditions according to European
Standard EN 60436:2020.
Note for Test Laboratories: For information on comparative EN testing
conditions, please send an email to the following address:
dw_test_support@whirlpool.com
Pre-treatment of the dishes is not needed before any of the programs.
*) Values given for programs other than the eco program are indicative only. The actual time may vary depending on many factors such as temperature and pressure of the incoming water, room temperature, amount of detergent, quantity and type of load, load balancing, additional selected options and sensor calibration
- ECO – Eco program is suitable to clean normally soiled tableware, that for this use, it is the most efficient program in terms of its combined energy and water consumption, and that it is used to assess compliance with the EU Ecodesign legislation.
- FAST WASH 40’ – Program for limited quantity of normally soiled crockery. Ensures optimal cleaning performance in shorter time.
- INTENSIVE – Program recommended for heavily soiled crockery, especially suitable for pans and saucepans (not to be used for delicate items).
- MIXED – Mixed soil. For normally soiled dishes with dried food residues.
- GLASS – Program for delicate items, which are more sensitive to high temperatures, for example glasses and cups.
Cleaning and maintenance
ATTENTION: Always unplug the appliance when cleaning it and when performing
maintenance work. Do not use flammable liquids to clean the machine.
Cleaning the dishwasher
Any marks on the inside of the appliance may be removed using a cloth dampened
with water anda little vinegar.
The external surfaces of the machine and the control panel can be cleaned
using a nonabrasive cloth which has been dampened with water. Do not use
solvents or abrasive products.
Preventing unpleasant odours
Always keep the door of the appliance ajar in order to avoid moisture from
forming and being trapped inside the machine.
Clean the seals around the door and detergent dispensers regularly using a
damp sponge. This will avoid food becoming trapped in the seals, which is the
main cause behind the
formation of unpleasant odours.
Cheking the water supply hose Check the inlet hose regularly for brittleness
and cracks. If damaged, replace it by a new hose available through our
AfterSales Service or your specialist dealer. Depending on the hose type:

If the inlet hose has a transparent coating, periodically check if the colour
intensifies locally. If yes, the hose may have a leak and should be replaced.
For water stop hoses: check the small safety valve inspection window (see
arrow). If it is red, the water stop function was triggered, and the hose must
be replaced by a new one.
For unscrewing this hose, press the release button while unscrewing the hose.
Cleaning the water inlet hose
If the water hoses are new or have not been used for an extended period of
time, let the water run to make sure it is clear and free of impurities before
performing the necessary connections. If this precaution is not taken, the
water inlet could become blocked and damage the dishwasher.
Cleaning the filter assembly
Regularly clean the filter assembly so that the filters do not clog and that
the waste water flows away correctly.
Using dishwasher with clogged filters or foreign objects inside filtration
system or sprayarms may cause unit malfunction resulting in lose of
performance, noisy work or higher resources usage.
The filter assembly consists of three filters which remove food residues from
the washing water and then recirculate the waterThe dishwasher must not be
used without filters or if the filter is loose.
At least once per month or after each 30 cycles, check the filter assembly and
if necessary clean it thoroughly under running water, using a non-metallic
brush and following the instructions below:
- Turn the cylindrical filter A in an anti-clockwise direction and pull it out (Fig 1).
- Remove the cup filter B by exerting a slight pressure on the side flaps (Fig 2).
- Slide out the stainless-steel plate filter C (Fig 3).
- In case you find foreign objects (such as broken glass, porcelain, bones, fruit seeds etc.) please remove them carefully.
- Inspect the trap and remove any food residues. NEVER REMOVE the wash-cycle pump protection (black detail) (Fig 4).


After cleaning the filters, replace the filter assembly and fix it in
position correctly; this is essential for maintaining the efficientoperation
of the dishwasher.
Cleaning the spray arms
On occasions, food residue may become encrusted onto the spray arms and block
the holes used to spray the water. It is therefore recommended that you check
the arms from time to time and clean them with a small non-metallic brush.
To remove the upper spray arm, turn the plastic locking ring in a clockwise
direction. The upper spray arm should be replaced so that the side with the
greater number of holes is facing upwards.
The lower spray arm may be removed by pulling it upwards and rotating it anti-
clockwise.
What to do if …
****In case your dishwasher doesn’t work properly, check if the problem can
be solved by going through the following list. For other errors or issues
please contact authorized After-sales Service which contact details can be
found in the guarantee booklet. Spare parts will be available for a period of
either up to 7 or up to 10 years, according to the specific Regulation
requirements.
The spare parts can be found: https://parts-
selfservice.whirlpool.com/en/landing
| Problems… | Possible causes… | Solutions… |
|---|---|---|
| Salt indicator Is lit | Salt reservoir is empty. (After refill the salt | |
| indicator may remain lit for several wash cycles). | Refill reservoir with salt |
(for more information – see page 8). Adjust water hardness – see table. page
8.
The dishwasher won’t start or does not respond to commands.| The appliance has
not been plugged in properly.| Insert the plug into the socket.
Power outage.| For safety reasons, dishwasher will not re-start automatically
when power returns. Open dishwasher door, press START/Pause button and close
the door within 4 seconds.
The dishwasher door is not closed.| Vigorously push the door until you hear
the “click”.
Cycle is interupted by door opening for more than 4 seconds.| Press
START/Pause and close the door within 4 seconds.
It does not respond to commands.| Switch off the appliance by pressing the
ON/OFF button, switch it back on after approximately one minute and restart
the program. If problem persists, unplug the appliance for 1 minute, then plug
it back in.
The dishwasher won’t drain.| The wash cycle has not finished yet.| Wait until
the wash cycle finishes.
The drain hose is bent.| Check that the drain hose is not bent (see
INSTALLATION).
The sink drain pipe is blocked.| Clean the sink drain pipe.
The filter is clogged up with food residues.| Clean the filter (see CLEANING
THE FILTER ASSEMBLY).
The dishwasher makes excessive noise.| The dishes are rattling against each|
Position the crockery correctly (see LOADING THE RACKS).
An excessive amount of foam has been produced.| The detergent has not been
measured out correctly or it is not suitable for use in dishwashers (see
FILLING THE DETERGENT DISPENSER). Restart the current cycle by switching OFF
the dishwasher, then switch it on again, select a new program. press
START/Pause and close the door within 4 seconds. Please do not add any
detergent.
The dishes are not clean.| The crockery has not been arranged properly.|
Arrange the crockery correctly (see LOADING THE RACKS).
The spray arms cannot rotate freely, being hindered by the dishes.| Arrange
the crockery correctly (see LOADING THE RACKS).
The wash cycle is too gentle and/or detergent efficiency is low.| Select an
appropriate wash cycle (see PROGRAMS TABLE).
An excessive amount of foam has been produced.| The detergent has not been
measured out correctly or it is not suitable for use in dishwashers (see
FILLING THE DETERGENT DISPENSER).
The cap on the rinse aid compartment has not been shut correctly.| Make sure
the cap of the rinse aid dispenser is closed.
The filter is soiled or clogged.| Clean the filter assembly (see CLEANING AND
MAINTENANCE).
There is no salt| Fill the salt reservoir (see FILLING THE SALT RESERVOIR).
Dishwasher finishes the cycle prematurely.| Drain hose positioned too low or
siphoning into home sewage system.| Check if end of drain hose is placed at
correct height (see INSTALLATION). Check for siphoning into home sewage
system, install air admittance valve if necessary.
Air in water supply.| Check water supply for leaks or other issues letting air
inside.
The dishwasher does not fill the water.
All LEDs are blinking rapidly| No water in the water supply or the tap is
closed.| Make sure there is water in the water supply or the tap running.
The inlet hose is bent| Make sure the inlet hose is not bent (see
INSTALLATION) reprogram the dishwasher and reboot.
The sieve in the water inlet hose is clogged: it is necessary to clean it|
After having carried out the verification and cleaning, turn off and turn on
the dishwasher and restart a new program.
Dishes have not been dried.| Selected program has no drying phase.| Verify in
the programs table if the selected program has drying phase.
—|—|—
Rinse aid has run out or the dosage is not adequate.| Add the rinse aid or
adjust the dosage levels higher (see FILLING THE RINSE AID DISPENSER).
Dishes are made of non-stick or plastic.| The presence of drops of water it is
normal (see TIPS).
Dishes and glasses show limescale or a whitish film.| Salt level is too low.|
Fill the salt reservoir (see FILLING THE SALT RESERVOIR).
Adjustment of the water hardness is not adequate.| Increase the values (see
WATER HARDNESS TABLE).
Cap of the salt reservoir is not properly closed.| Check the salt reservoir
cap.
Rinse aid has run out or the dosage is insufficient.| Add the rinse aid or
adjust the dosage levels higher.
Dishes and glasses have a bluish tinge or blue streakes.| Rinse aid dosage is
excessive.| Adjust the dosage rates to lower values.
After-Sales Service
If, after carrying out the above checks, the fault persists, disconnect the
mains plug and turn off the water tap. Contact the After-sales Service (see
guarantee).
Before contacting our After-Sales Service, take note of the following:
- the description of the fault,
- the appliance type and model,
- the service code (the number indicated on the adhesive rating plate) inside the door on the right-hand side:

Technical Data
| Product dimensions (mm) | Height | mm | 820 |
|---|---|---|---|
| Width | mm | 598 | |
| Depth | mm | 555 | |
| Performances | Voltage | V | 220/240 |
| Frequency | Hz | 50 | |
| Energy efficiency class | E | ||
| Cleaning performance index | 1. | ||
| Drying performance index | 1. | ||
| Water supply pressure, max | Bar | 10 | |
| Water supply pressure, min | Bar | 0.5 | |
| Energy consumption | kWh/100 cycles | 95 | |
| Water supply, max inlet water temp. | °C | 60 | |
| Number of place settings | 14 | ||
| Power consumption in delay start | W | 4 | |
| Power consumption in standby mode | W | 0.5 | |
| Water consumption | I/cycle | 10. | |
| Noise level | dB(A) re 1 pW | 46 | |
| Noise class | C |
Environmental concerns
Disposal of packaging materials
The packaging material is 100% recyclable and is marked with the recycle
symbol **. The various parts of the packaging must therefore be disposed of
responsibly and in full compliance with local authority regulations governing
waste disposal.
Disposal of household appliances
This appliance is manufactured with recyclable or reusable materials. Dispose
of it in accordance with local waste disposal regulations. For further
information on the treatment, recovery and recycling of household electrical
appliances, contact your local authority, the collection service for household
waste or the store where you purchased the appliance. This appliance is marked
in compliance with European Directive 2012/19/EU, Waste Electrical and
Electronic Equipment (WEEE) and with the Waste Electrical and Electronic
Equipment regulations 2013 (as amended). By ensuring this product is disposed
of correctly, you will help prevent negative consequences for the environment
and human health.
The symbol **on the product or on the accompanying documentation indicates
that it should not be treated as domestic waste but must be taken to an
appropriate collection center for the recycling of electrical and electronic
equipment.
Energy saving tips
ECO programme is suitable to clean normally soiled tableware, that for this
use, it is the most efficient programme in terms of its combined energy and
water consumption, and that it is used to assess compliance with the EU
Ecodesign legislation.
Loading the household dishwasher up to the capacity indicated by the
manufacturer will contribute to energy and water savings. The manual pre-
rinsing of tableware items leads to increased water and energy consumption and
is not recommended. Washing tableware in a household dishwasher usually
consumes less energy and water in the use phase than hand dishwashing when the
household dishwasher is used according to the manufacturer’s instructions.
Installation
ATTENTION : If the appliance must be moved at any time, keep it in an
upright position; if absolutely necessary, it may be tilted onto its back.
Connecting the water supply
Adaptation of the water supply for installation should only be performed by a
qualified technician.
The water inlet and outlet hoses may be positioned towards the right or the
left in order to achieve the best possible installation.
Make sure the dishwasher does not bend or squash the hoses.
Connecting the water inlet hose
- Run the water until it is perfectly clear.
- Screw the inlet hose tightly into position and turn on the tap.
If the inlet hose is not long enough, contact a specialist store or an
authorised technician.
The water pressure must be within the values indicated in the Technical Data
table – otherwise the dishwasher may be function properly.
Make sure the hose is not bent or compressed.
Specifications for the connection of the water supply hose:
| Water supply | cold or hot (max. 60°C) |
|---|---|
| Water intake | 3/4” |
| Power of water pressure | 0.05 ÷ 1 MPa (0.5 ÷ 10 bar) 7.25 – 145 psi |
Connecting the water outlet hose
Connect the outlet hose to a drain duct with a minimum diameter of 2 cm A.

The outlet hose connection must be at a height ranging from 40 to 80 cm from
the floor or surface where the dishwasher rests.
Before connecting the water outlet hose to the sink drain, remove the plastic
plug B.
Electrical connection
WARNING: Under no circumstances should the water inlet hose be cut as it
contains live electrical parts.
Before inserting the plug into the electrical socket, make sure that:
- The socket is earth and complies with current regulations;
- The socket can withstand the maximum load of the appliance as shown on the data plate located on the inside of the door (see PRODUCT DESCRIPTION).
- The power supply voltage falls within the values indicated on the data plate on the inside of the door.
- The socket is compatible with the plug of the appliance.
If this is not the case, ask an authorised service only to replace the
certified power cord with a correct plug dedicated for this appliance (see
AFTER-SALES SERVICE). Do not use extension cablesor multiple sockets or not
authorized power cords with plugs.
Once the appliance has been installed, the power supply cable and the
electrical socket should be easily accessible.
The cable should not be bent or compressed.
If the power supply cable is damaged, have it replaced by the manufacturer or
its authorised Technical Assistance Service in order to prevent all potential
hazards.
The Company shall not be held responsible for any incidents, if these
regulations are not observed.
Positioning and levelling
- Position the dishwasher on a level sturdy floor. If the floor is uneven, the front feet of the appliance may be adjusted until it reaches a horizontal position. If the appliance is levelled correctly, it will be more stable and much less likely to move or cause vibrations and noise while it is operating.
- Before recessing the dishwasher, stick the adhesive transparent strip under the wooden shelf in order to protect it from any condensation which may form.
- Place the dishwasher so that its sides or back panel are in contact with the adjacent cabinets or the wall. This appliance can also be recessed under a single worktop.
- To adjust the height of the rear foot, turn the red hexagonal bushing on the lower central part at the front of the dishwasher using a hexagonal spanner with an opening of 8 mm. Turn the spanner in a clockwise direction to increase the height and in an anticlockwise direction to decrease it.
DIMENSIONS AND CAPACITY:
| Width | 598 mm |
|---|---|
| Height | 820 mm |
| Depth | 555 mm |
| Capacity | 14 standard place-settings |
IKEA GUARANTEE
How long is the IKEA guarantee valid?
The guarantee is valid 2 years from purchase date unless otherwise specified
in national legislation. In Norway, Portugal and Spain the guarantee is valid
for 3 years from delivery date to the customer unless otherwise specified in
national
legislation. The original sales receipt, is required as proof of purchase. If
service work is carried out under guarantee, this will not extend the
guarantee period for the appliance.
Who will execute the service?
IKEA Service Provider will provide the service through its own service
operations or authorized service partner network.
What does this guarantee cover?
The guarantee covers faults of the appliance, which have been caused by faulty
construction or material faults from the date of purchase from IKEA. This
guarantee applies to domestic use only. The exceptions are specified under the
headline “What is not covered under this guarantee?” Within the guarantee
period, the costs to remedy the fault e.g. repairs, parts, labour and travel
will be covered, provided that the appliance is accessible for repair without
special expenditure. On these conditions the EU guidelines (Nr. 99/44/EG) and
the respective local regulations are applicable. Replaced parts become the
property of IKEA.
What will IKEA do to correct the problem?
IKEA appointed Service Provider will examine the product and decide, at its
sole discretion, if it is covered under this guarantee. If considered covered,
IKEA Service Provider or its authorized service partner through its own
service operations, will then, at its sole discretion, either repair the
defective product or replace it with the same or a comparable product.
What is not covered under this guarantee?
-
Normal wear and tear.
-
Deliberate or negligent damage, damage caused by failure to observe operating instructions, incorrect installation or by connection to the wrong voltage, damage caused by chemical or electrochemical reaction, rust, corrosion or water damage including but not limited to damage caused by excessive lime in the water supply, damage caused by abnormal environmental conditions.
-
Consumable parts including batteries and lamps.
-
Non-functional and decorative parts which do not affect normal use of the appliance, including any scratches and possible color differences.
-
Accidental damage caused by foreign objects or substances and cleaning or unblocking of filters, drainage systems or soap drawers.
-
Damage to the following parts: ceramic glass, accessories, crockery and cutlery baskets, feed and drainage pipes, seals, lamps and lamp covers, screens, knobs, casings and parts of casings. Unless such damages can be proved to have been caused by production faults.
-
Cases where no fault could be found during a technician’s visit.
-
Repairs not carried out by our appointed service providers and/or an authorized service contractual partner or where non-original parts have been used.
-
Repairs caused by installation which is faulty or not according to specification.
-
The use of the appliance in a non-domestic environment i.e. professional use.
-
Transportation damages. If a customer transports the product to his home or another address, IKEA is not liable for any damage that may occur during transport. However, if IKEA delivers the product to the customer’s delivery address, then damage to the product that occurs during this delivery will be covered by IKEA.
-
Cost for carrying out the initial installation of the IKEA appliance.
-
However, if an IKEA appointed Service Provider or its authorized service partner repairs or replaces the appliance under the terms of this guarantee, the appointed Service Provider or its authorized service partner will reinstall the
repaired appliance or install the replacement, if necessary. -
This does not apply within Ireland, customer should contact the local IKEA dedicated after sales line or the appointed Service Provider for further information.
(just for GB)
These restrictions do not apply to fault-free work carried out by a qualified
specialist using our original parts in order to adapt the appliance to the
technical safety specifications of another EU country.
How country law applies
The IKEA guarantee gives you specific legal rights, which cover or exceed all
the local legal demands. However these conditions do not limit in any way
consumer rights described in the local legislation.
Area of validity
For appliances which are purchased in one EU country and taken to another EU
country, the services will be provided in the framework of the guarantee
conditions normal in the new country.
An obligation to carry out services in the framework of the guarantee exists
only if the appliance complies and is installed in accordance with: -
the technical specifications of the country in which the guarantee claim is made;
-
the Assembly Instructions and User Manual Safety Information.
The dedicated AFTER SALES for IKEA appliances
Please don’t hesitate to contact IKEA appointed Authorized Service Centre to:
- make a service request under this guarantee;
- ask for clarifications on installation of the IKEA appliance in the dedicated IKEA kitchen furniture;
- ask for clarification on functions of IKEA appliances.
To ensure that we provide you with the best assistance, please read carefully
the Assembly Instructions and/or the User Manual before contacting us.
How to reach us if you need our service
Please refer to the last page of this manual for the full list of IKEA
appointed After Sales Service Provider and relative national phone numbers.
In order to provide you a quicker service, we recommend to use the
specific phone numbers listed on this manual.
Always refer to the numbers listed in the booklet of the specific appliance
you need an assistance for. Please also always refer to the IKEA article
number (8 digit code) and 12 digit service number placed on the rating plate
of your appliance.
SAVE THE SALES RECEIPT!
It is your proof of purchase and required for the guarantee to apply. The
sales receipt also reports the IKEA name and article number (8 digit code) for
each of the appliances you have purchased.
Do you need extra help?
For any additional questions not related to After Sales of your appliances
please contact your nearest IKEA store call centre.
We recommend you read the appliance documentation carefully before contacting
us.
Spare parts will be available for a period of either up to 7 or up to 10
years, according to the specific regulation requirements.
The spare parts can be found: https://parts-
selfservice.whirlpool.com/en/landing
UNITED KINGDOM – IRELAND
Phone number: 02076601517
Rate: Local rate
Opening hours: Monday – Friday Saturday Sunday
8.00am – 6.00pm
8.30am – 4.30pm
9.30am – 3.30pm
400011682791
© Inter IKEA Systems B.V. 2023
23256
AA-2412043-1
Documents / Resources
| IKEA
LAGAN Integrated Dishwasher 60
cm
[pdf] Instruction Manual
LAGAN Integrated Dishwasher 60 cm, LAGAN, Integrated Dishwasher 60 cm,
Dishwasher 60 cm
—|—
| IKEA
LAGAN Integrated Dishwasher 60
cm
[pdf] Instruction Manual
LAGAN Integrated Dishwasher 60 cm, LAGAN, Integrated Dishwasher 60 cm,
Dishwasher 60 cm
References
- Møbler, boligtilbehør og inspiration til hjemmet — IKEA
- Hej! Welcome to IKEA Global
- Mobilier et décorations — Intérieur et extérieur — IKEA
- Official Service
Read User Manual Online (PDF format)
Read User Manual Online (PDF format) >>
Download This Manual (PDF format)
Download this manual >>
Всем привэт! Меня зовут Вера и я лентяй и просто ужасная хозяйка. Тем не менее, проблем с мытьём посуды у меня совсем не возникало и я никогда не задумывалась о покупке посудомойки.
Приобрести эту чудо-технику меня уговорил муж! Убедил, что будем экономить воду, свои силы и время. Посмотрели пару видео-обзоров от довольных хозяек и я сдалась…
При покупке кухни в магазине IKEA решили укомплектовать её встроенной посудомоечной машиной LAGAN, производитель: Electrolux. В силу отсутствия какого-либо опыта в пользовании данной техникой, решили взять недорогую (среди представленных в магазине), стоимостью 19.999 р., вместительную и, по заверению продавца, экономичную в плане энергопотребления, но тут есть нестыковочка: на сайте указан класс энергопотребления: А+, а в инструкции — А.
И вот данная техника у меня дома. Душераздирающий процесс установки кухни от IKEA позади:

сборка кухни. Как видите, посудомоечная машина — справа от раковины))
она же, скрытая дверцей
Перед первым использованием для избавления от загрязнений, которые могли остаться в приборе после его производства, производитель рекомендует залить 1 литр воды в ёмкость для соли и запустить программу, что и было сделано.
В ближайшем магазине купили таблетки для посудомоечных машин (Econta, 30 шт. за 204 р.), соль (Filtero, 1000 гр. за 150р.):
аксессуары))
А потом выяснили, что соль нам не нужна, как и большинству жителей СПб.
Подробнее об этом в цитате:
Для использования посудомоечной машины необходимо было выставить уровень смягчителя для воды, а для этого надо было знать уровень жёсткости воды из крана. Покопавшись в интернете, получила следующую информацию — 98% поступающей в город Санкт-Петербург питьевой воды берётся из Невы, а в ней вода мягкая, жёсткость составляет 0,67-0,77 мг-экв/л. При такой жёсткости производитель рекомендует не использовать соль, кроме того, соль ещё может содержаться в моющем средстве. Таким образом, появление известкового налета в посудомоечной машине жителям Санкт-Петербурга не грозит.
Когда у меня начался стресс и я реально пожалела о сделанной покупке:
Мы стали «копить» посуду для полной загрузки машины (экономия, мать её, мы ж для этого её взяли!). Я считаю, что для семьи из 2ух человек посуды у нас предостаточно, тем не менее, в какой-то момент закончились кастрюли и вилки с ложками, пришлось доставать их и мыть вручную. Примерно неделя ушла у нас на заполнение машины (в инструкции указана вместимость на 13 персон). Как принять тот факт, что грязная посуда стоит столько времени в ожидании помывки? А вдруг там уже сверчки-паучки-тараканы и крысы?? Жуткая плесень и болезнетворные бактерии?? Зачем, ну зачем мы её купили?! Я каждый день несколько раз заглядывала в машину, чтобы убедиться, что там нет плесени и тараканов… Всё было ОК. Вот тогда я поняла, зачем нужна функция частичной загрузки. В нашей посудомоечной машине она отсутствует.

И вот настал тот день, посуда разложена в корзинах посудомоечной машины согласно рекомендациям производителя…

примеры загрузки
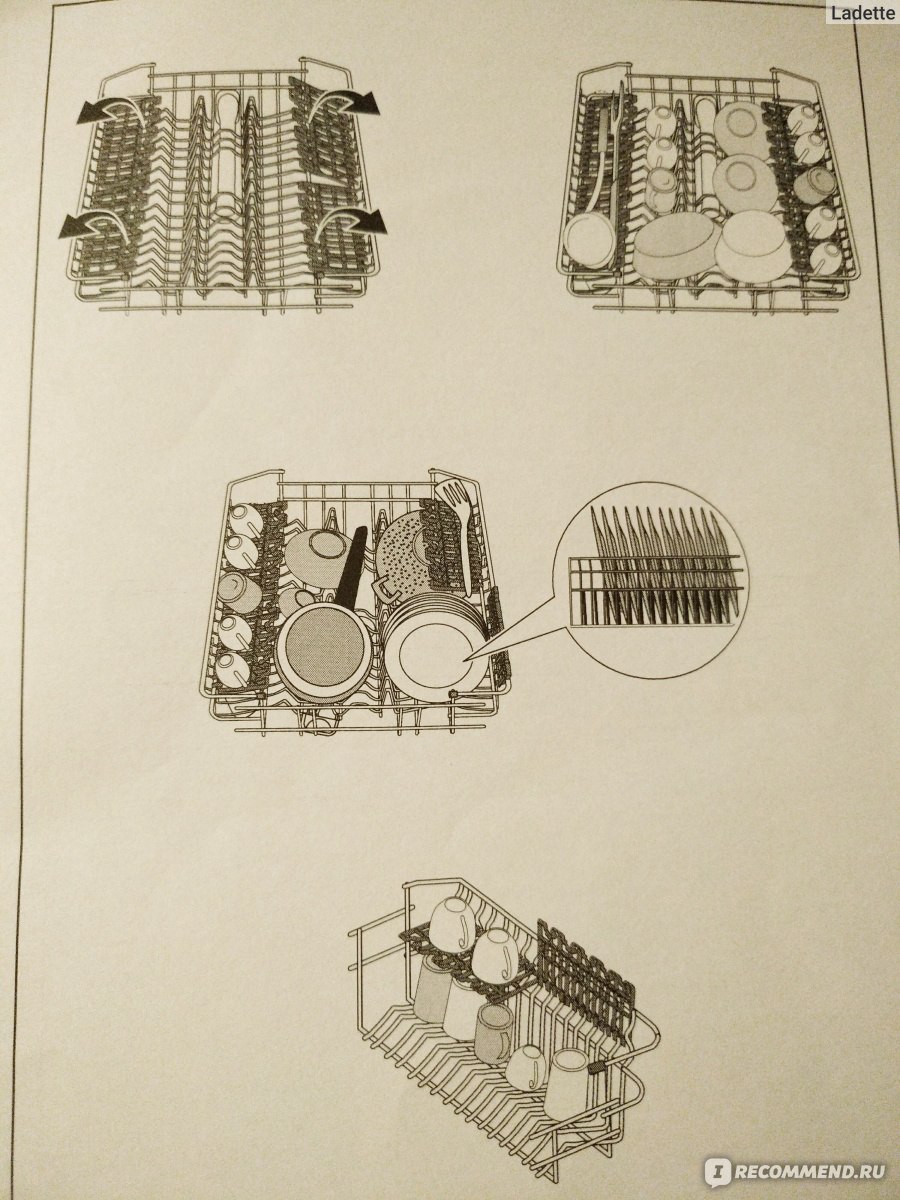
специально для экспертов по посудомойкам))
Сухие цифры из инструкции про уровень шума в 52 дБ ни о чём не говорят обычному покупателю. Звуки, издаваемые посудомоечной машиной, напоминают звук стиральной машины, только намного громче. Шум текущей воды пугает, кажется, что затапливаешь соседей, даже сейчас, спустя 2 месяца после начала использования нашей посудомойки, я периодически проверяю, нет ли где протёка.
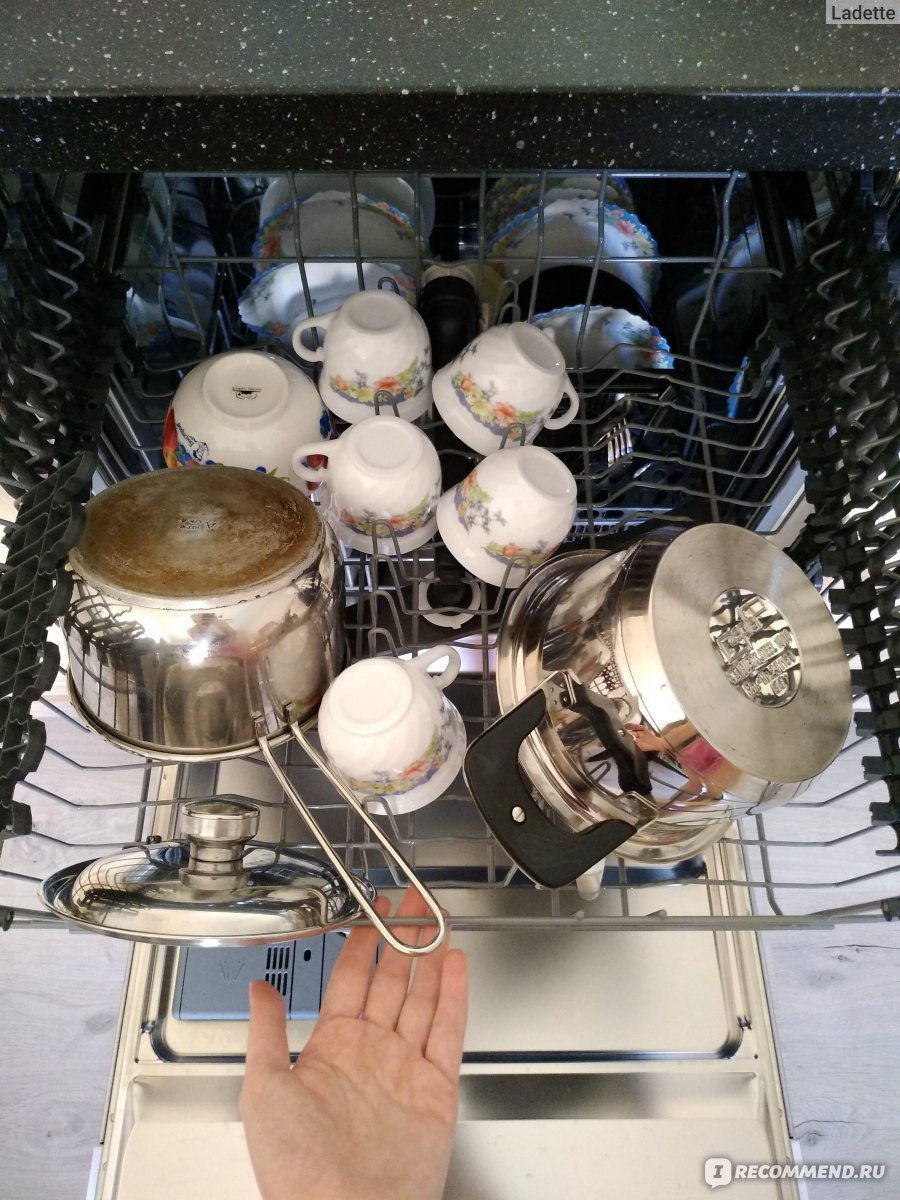
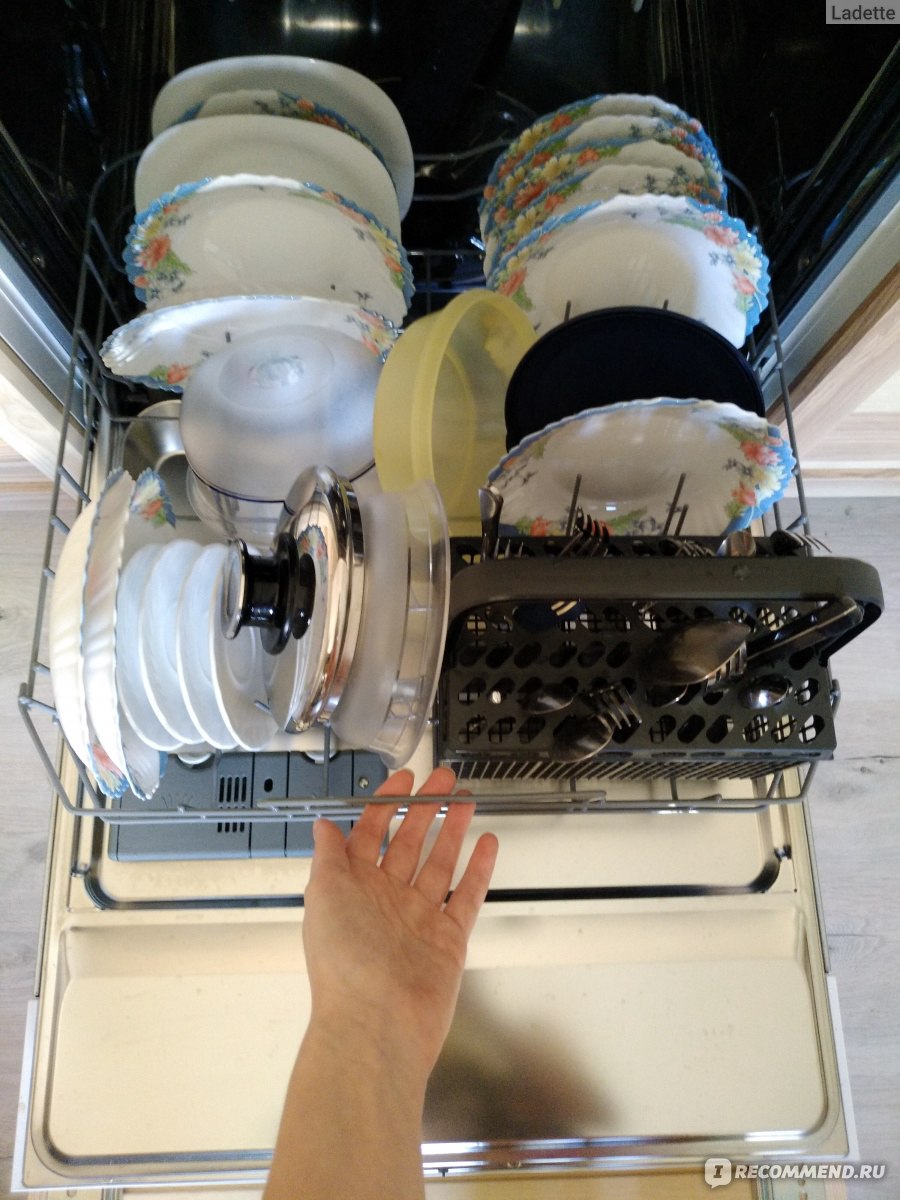
Результат мытья:
По окончанию мойки раздается звуковой сигнал и приоткрывается дверца, посуда в это время горячая после сушки. Впечатление после первой мойки – WOW! Посуда действительно суперчистая и издает характерный скрип. Позже окажется, что не всё так гладко: чашки, кастрюли, снаружи отмываются хорошо а вот внутри иногда имеются замечания. Хотела привести вам для примера фото «ДО/ПОСЛЕ» старенькой поварёшки, на которой были остатки жира многолетней давности, но вот незадача: после помывки жир остался на месте, но размягчился и я смогла легко убрать его с помощью губки и воды:
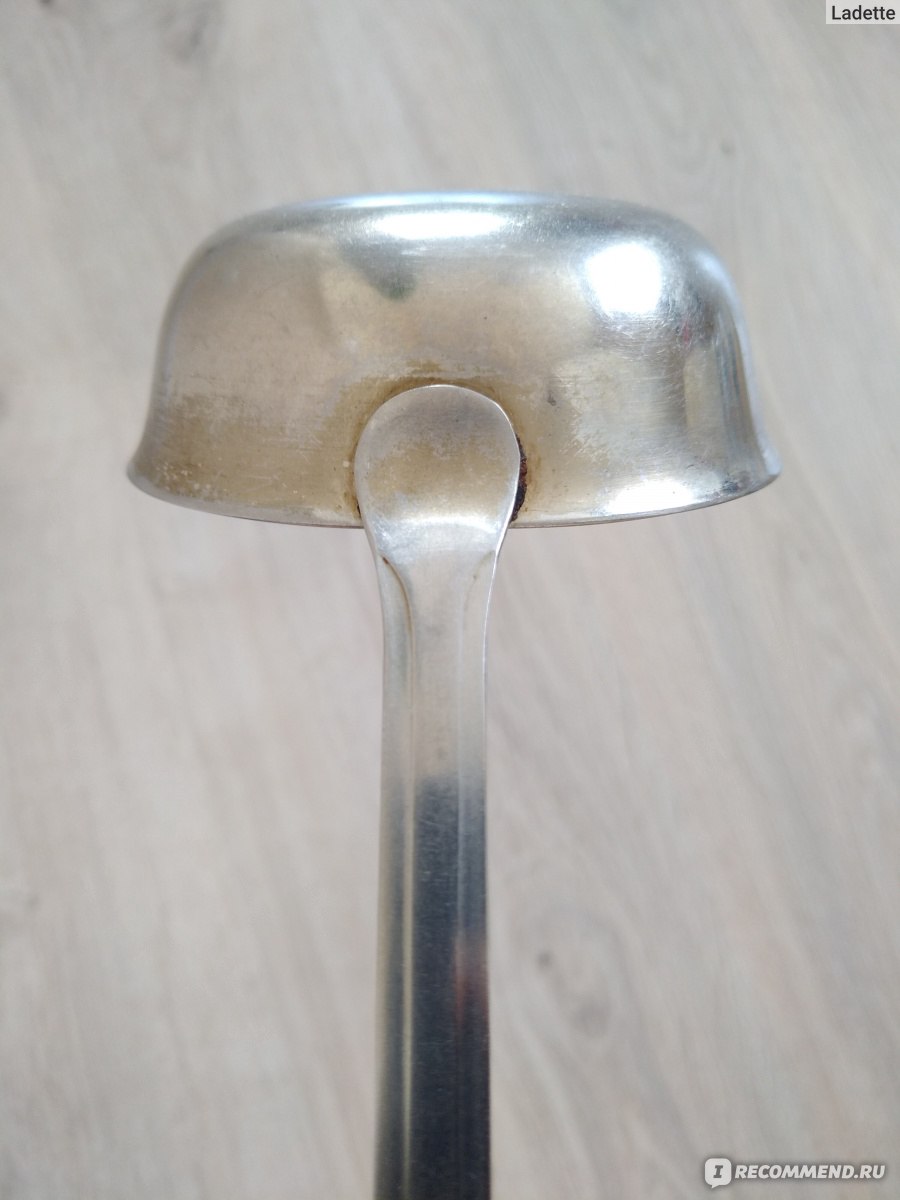
до мытья

после мытья
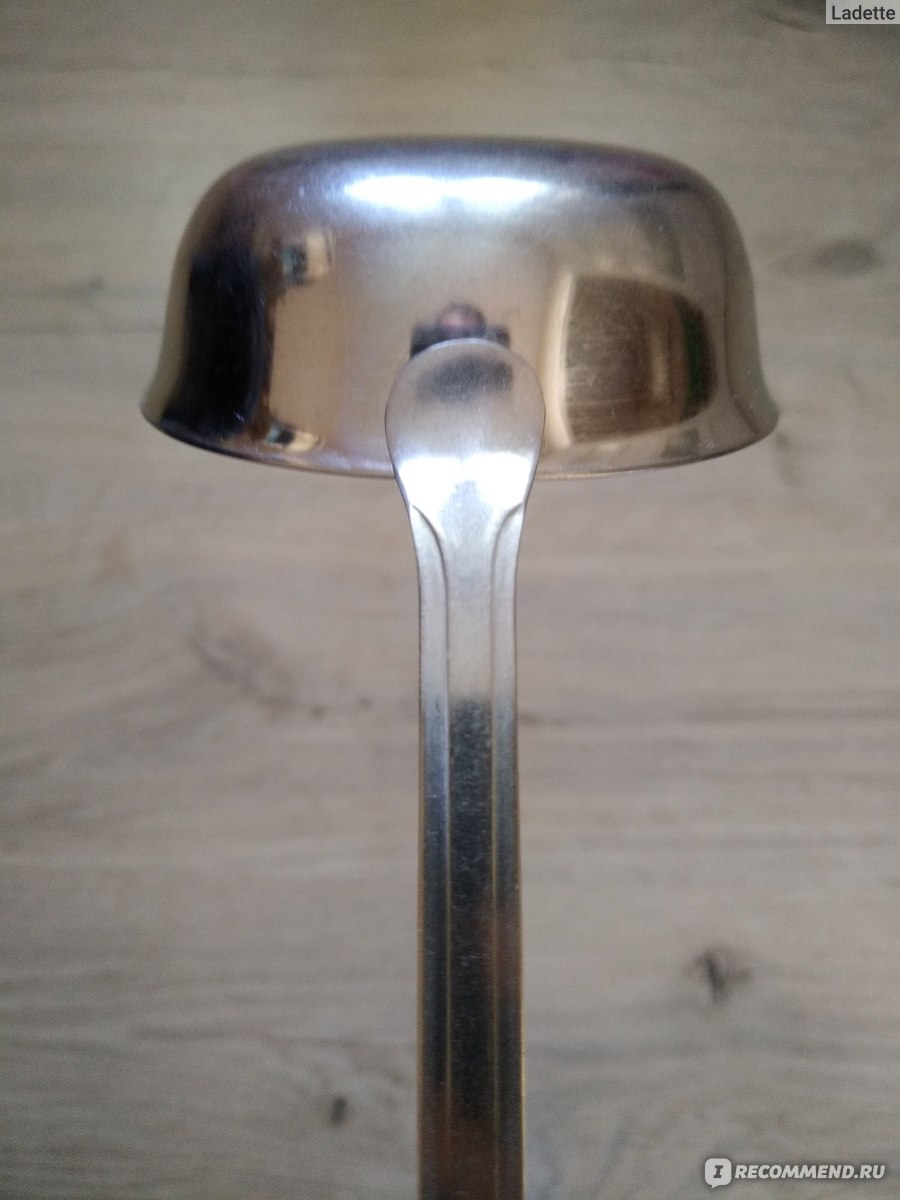
после «доработки» вручную
Подобное было и с дном кастрюльки, на котором был застарелый пригоревший жир: он размягчился и легко отчистился, но уже вручную:

обратите внимание на дно кастрюльки
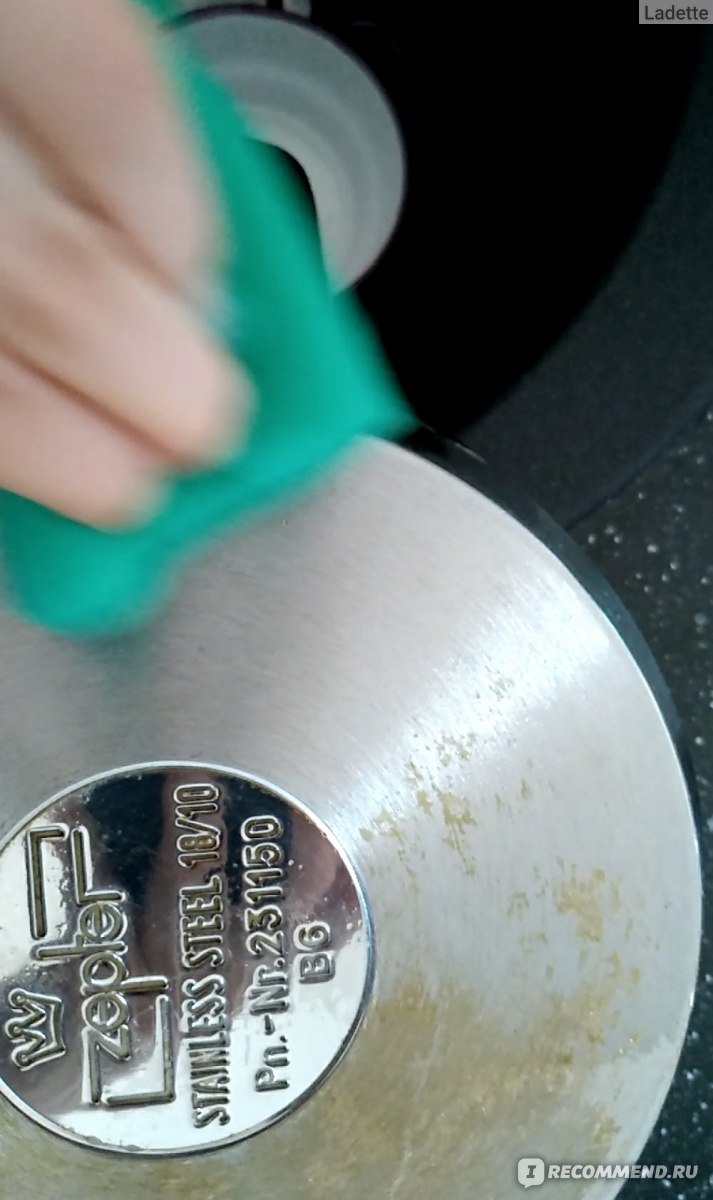
дочищаю вручную. Очищается легко губкой с Fairy
А вот последнее мытьё оставило следы пищи и странные разводы на одной из тарелок:
остатки пищи

остатки пищи#2
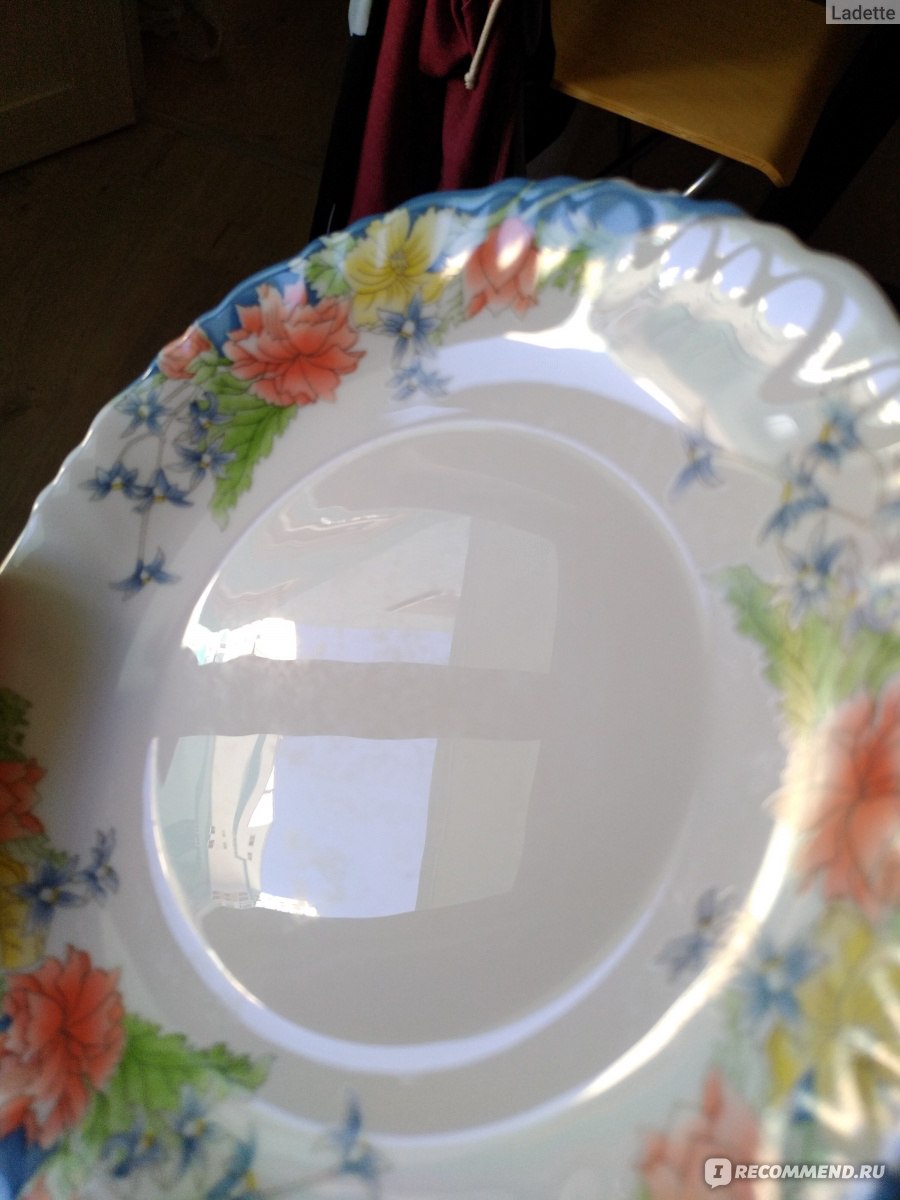
разводы
Посудомоечная машина имеет 3 программы мойки: 65ºC, Эко 50ºC и 70ºC. Обычно выставляем мойку при 65ºC. Расход воды в среднем 15 литров и это несомненный плюс, так как при мытье руками уходит на одну вилку порядка 1 литра. Ещё бы функцию отложенный старт для включения мойки в ночное время и, соответственно, экономии ещё и на электроэнергии, но данная функция отсутствует в нашей модели.
Продолжительность программ около 2 часов и это довольно долго, за это время успеешь всё руками отмыть, но зачем тратить свои силы, когда можно присесть и почитать отзывы на любимом сайте под тарахтение этой чудо — техники))
А иногда отмывает даже слишком хорошо: изображение на кружке после мойки скукожилось и облезло:
кружку привезли из Кипра. Там был милый ослик(( сами виноваты, знаю
Подводя итог, скажу, что, если весь первый месяц использования посудомойки я считала её бесполезной тратой денег и моих нервов (повторюсь, что больше всего я психовала из-за долгого её заполнения и отсутствия чистой посуды), то сейчас я уже привыкла и совсем не хочу мыть тарелки в раковине (мой внутренний лентяй ликует!). Но это получился вывод про моё отношение к посудомоечным машинам в целом. Касаемо данной модели LAGAN снова повторюсь, что среди плюсов: экономия воды, электричества, своего личного времени и сил. Минусы: шумная, не всегда хорошо отмывает посуду. Решайте сами, нужна ли вам эта модель или данная техника в принципе, всё индивидуально и зависит от количества человек и посуды в вашей семье))
Спасибо за внимание!
Другие мои отзывы об обустройстве дома методом «проб и ошибок» можно посмотреть здесь:
Брак, снова брак, КОМПЕНСАЦИЯ МОРАЛЬНОГО ВРЕДА и развод! История моих непростых отношений с IKEA в целом и шкафом PAX в частности))
Не так страшен Hoff, как его малюют?..
Наш самолёт приступил к снижению! или TOTAL NO FROST за 20.000
Яркий дизайн по доступной цене!!! Красотка Daewoo KOR-6LBRRB в ретро стиле станет «изюминкой» вашей кухни))