
* Plasmacluster is a trademark
of Sharp Corporation.
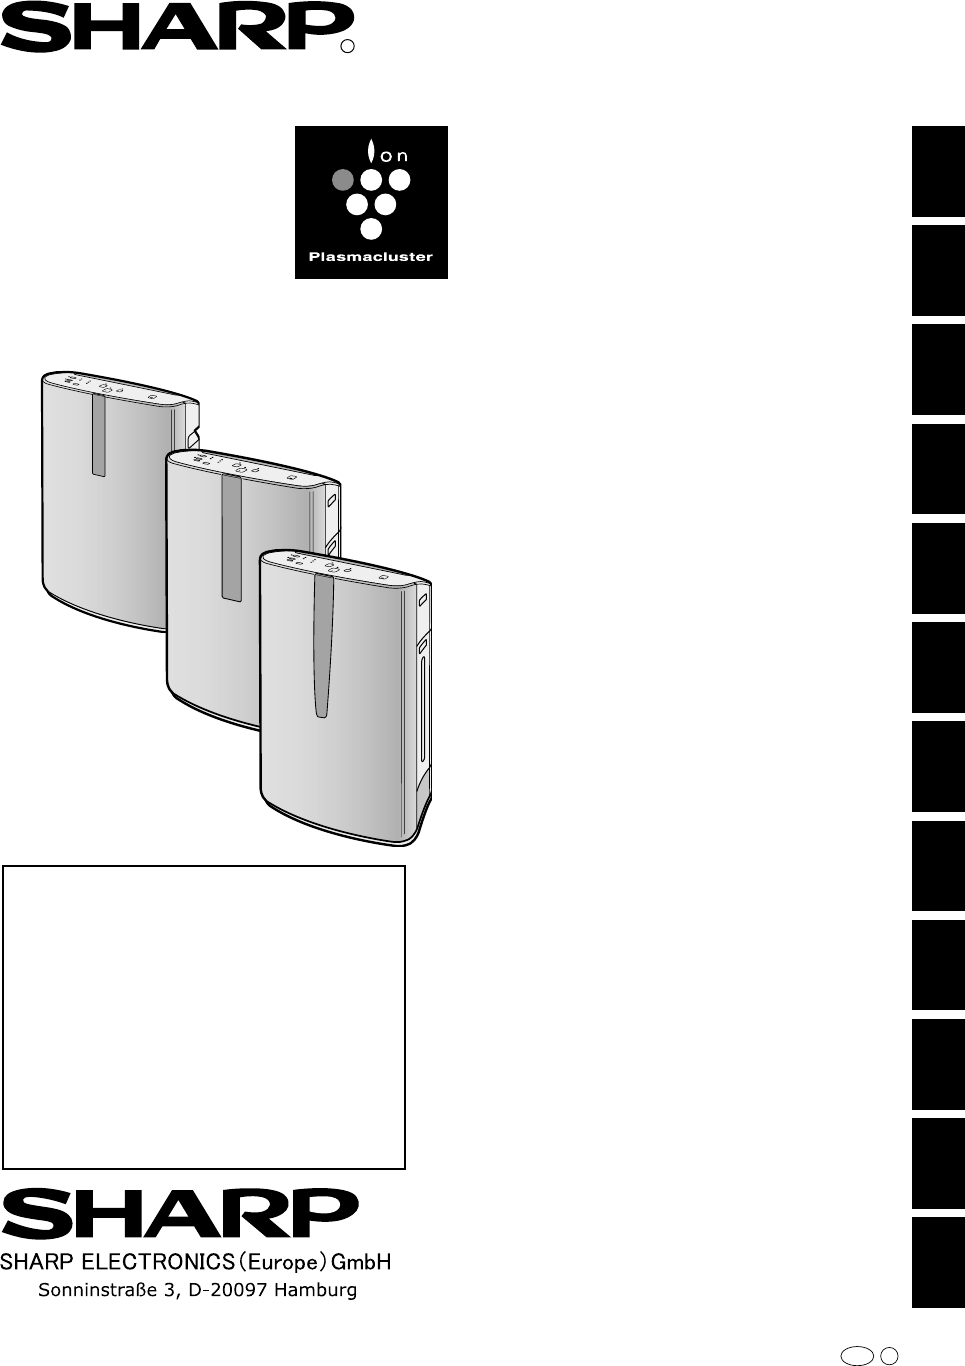
AIR PURIFIER
with Humidifying Function
KC-840E
KC-850E
KC-860E
OPERATION MANUAL
ČISTIČKA VZDUCHU
s funkcí zvlhčování
NÁVOD K OBSLUZE
ČISTIČKA VZDUCHU
s funkciou zvlhčovania
NÁVOD NA POUŽITIE
LÉGTISZTÍTÓ
párásító funkcióval
HASZNÁLATI ÚTMUTATÓ
ОЧИСНИК ПОВІТРЯ
з Функцією Зволожування
ENGLISH
ČESKY
SLOVENSKYMAGYAR
KC-840E
KC-850E
KC-860E
ПОСІБНИК З ЕКСПЛУАТАЦІЇ
УКРАЇНСЬКА

Please read before operating your new Air Purifi er
The air purifi er draws in room air from the air intake, passes the air through a Pre-Fil-
ter, a Washable Deodorizing Filter and a HEPA Filter inside of the unit, then discharges the air through the air outlet. The HEPA Filter can remove 99.97% of dust particles
as small as 0.3 microns that pass through the fi lter and also helps absorb odours. The
Washable Deodorizing Filter gradually absorbs odours as they pass through the fi lter.
Some odours absorbed by the fi lters may break down over time, resulting in additional
odour. Depending on the usage environment, especially when the product is used in
extreme environments (significantly more severe than normal household use), this
odour may become strong in a shorter period than expected. If the odour persists, the
fi lters should be replaced.
NOTE
• The air purifi er is designed to remove air-suspended dust and odour, but not harmful gases (for
example, carbon monoxide contained in cigarette smoke). If the source of the odour still exists, the
air purifi er may not completely remove the odour.
HEPA Filter
Washable Deodorizing Filter
Pre-Filter
(Common illustration has used “KC-850E”.)
ENGLISH
FEATURES
Unique Combination of Air Treatment
Technologies
Triple Filtration System + Plasmacluster
+ Humidifi cation
TRAPS DUST*
Washable pre-filter traps dust and other
large airborne particles.
DECREASES ODOURS
Washable deodorizing fi lter absorbs many
common household odours.
REDUCES POLLEN & MOLD*
HEPA filter traps 99.97% of particles as
small as 0.3 microns.
FRESHENS
Plasmacluster treats the air similar to the
way nature cleans the environment by
emitting a balance of positive and negative
ions.
HUMIDIFIES
Runs up to 10 hours per fi lling.**
*When air is drawn through the filter sys-
tem.
**Room size:
up to 48 m
up to 38 m
up to 26 m2 (KC-840E)
Sensor Technology continuously monitors
air quality, and automatically adjusting operation based on detected air purity and
humidity.
2
(KC-860E)
2
(KC-850E)
CONTENTS
……
…
E-10
E-10
E-10
E-10
E-12
E-12
E-13
E-14
E-15
E-16
E-18
..
E-19
IMPORTANT SAFETY INSTRUCTIONS
• WARNING …………………………………………..
• CAUTIONS CONCERNING OPERATION .
• INSTALLATION GUIDELINES ………………..
• FILTER GUIDELINES …………………………..
PART NAMES
• ILLUSTRATIVE DIAGRAM …………………….
• BACK ………………………………………………….
• FRONT MONITOR ……………………………….
PREPARATION FOR USE ……………………….
• FILTER INSTALLATION ………………………..
• REFILLING WATER TANK …………………….
OPERATION
• MAIN UNIT DISPLAY ……………………………
• CLEAN AIR & HUMIDIFY MODE ……………
• CLEAN AIR MODE ……………………………….
• CLEAN ION SHOWER MODE ……………….
• FAN SPEED BUTTON …………………………..
• Plasmacluster ON/OFF BUTTON ………….
• LIGHTS CONTROL BUTTON ………………
• WATER SUPPLY INDICATOR LIGHT ……
• ADJUSTMENT OF SENSOR
DETECTION SENSITIVITY ………………….
CARE AND MAINTENANCE
• FILTER INDICATOR LIGHT …………………
• BACK PANEL AND SENSORS …………….
• UNIT ………………………………………………..
• WATER TANK …………………………………….
• WASHABLE DEODORIZING
FILTER CARE ……………………………………
• HUMIDIFYING TRAY ………………………….
• HUMIDIFYING FILTER ………………………..
•
FILTER REPLACEMENT GUIDELINES
TROUBLESHOOTING
SPECIFICATIONS
………………………………………
………………………………………..
……………..
……………………….
………………………………
INFORMATION ON PROPER DISPOSAL
E-2
E-2
E-3
E-3
E-3
E-4
E-4
E-4
E-5
E-6
E-6
E-7
E-8
E-8
E-8
E-9
E-9
E-9
E-11
E-11
E-11
E-11
ENGLISH
Thank you for purchasing this SHARP Air
Purifier. Please read this manual carefully
before using the air purifi er.
After reading, keep the manual in a convenient location for future reference.
E-1

IMPORTANT SAFETY INSTRUCTIONS
When using electrical appliances, basic safety precautions should be followed, including the
following:
WARNING
• Read all instructions before using the unit.
• Use only a 220~240 volt outlet.
• Do not use the unit if the power cord or plug is damaged or the connection to the wall outlet
is loosened.
• Periodically remove dust from the plug.
• Do not insert fi ngers or foreign objects into the air intake or air outlet.
• When removing the power plug, always hold the plug and never pull on the cord.
Electrical shock and/or fi re from a short circuit may result.
• Do not remove the plug when your hands are wet.
• Do not use this unit near gas appliances or fi replaces.
• When refi lling the Water Tank, cleaning the unit, or when the unit is not in use, be sure to unplug
the unit. Electrical shock and/or fi re from a short circuit may result
• If the power cord is damaged, it must be replaced by the manufacturer, its service agent, a
Sharp authorized Service Centre or similarly qualifi ed person in order to avoid a hazard.
• Do not operate when using aerosol insecticides or in rooms where there is oily residue, incense,
sparks from lit cigarettes, chemical fumes in the air, or in locations where the unit may get wet,
such as a bathroom.
• Be cautious when cleaning the unit. Strong corrosive cleansers may damage the exterior.
• Only a Sharp Authorized Service Centre should service this air purifi er. Contact the nearest Service
Centre for any problems, adjustments, or repairs.
• When carrying the unit, remove the Water Tank and Humidifying Tray fi rst and hold the unit by han-
dles on both sides.
• Do not drink the water in the Humidifying Tray or Water Tank.
• Change the water in the Water Tank daily with fresh tap water and regularly clean the Water Tank
and Humidifying Tray. (See E-12 and E-13). When unit is not in use, dispose of the water in the
Water Tank and Humidifying Tray. Leaving water in the Water Tank and/or Humidifying Tray may
result in mold, bacteria, and bad odours.
In rare cases, this bacteria may cause harmful physical effects.
• This appliance is not intended for use by persons (including children) with reduced physical, sensory or mental capabilities, or lack of experience and knowledge, unless they have been given supervision or instruction concerning use of the appliance by a person responsible for their safety.
Children should be supervised to ensure they do not play with the appliance.
– To reduce the risk of electrical shock, fi re or injury to persons:
NOTE
If this air purifi er should cause interference to radio or television reception, try to correct the interfer-
ence by one or more of the following measures:
• Reorient or relocate the receiving antenna.
• Increase the separation distance between the unit and radio/TV receiver.
• Connect the equipment into an outlet on a circuit different from that to which the receiver is connected.
• Consult the dealer or an experienced radio/TV technician for help.
– Radio or TV Interference
E-2

CAUTIONS CONCERNING OPERATION
• Do not block the intake and/or air outlet.
• Do not use the unit near or on hot objects, such as stoves or heaters, or where it may come into
contact with steam.
• Always operate the unit in an upright position.
• Hold the unit by using the handles on both sides when moving.
Do not move when the unit is in operation.
• Do not operate the unit without the fi lters, Water Tank, and Humidifying Tray properly in-
stalled.
• Do not wash and reuse the HEPA fi lter.
Not only does it not improve fi lter performance, it may cause electric shock or malfunction.
• Clean the exterior with a soft cloth only.
Do not use volatile fl uids and/or detergents.
The unit surface may be damaged or cracked.
In addition, the sensors may malfunction as a result.
• Frequency of maintenance required (descaling) will depend on the hardness or the impurities of the water that you use; the harder the water the more often descaling will be necessary.
• Keep the unit away from water.
INSTALLATION GUIDELINES
• When using the unit, place at least 2m away from equipment utilizing electric waves such
as televisions or radios to avoid electrical interference.
• Avoid a location where the sensor is exposed to direct wind.
The unit may not operate properly.
• Avoid use in locations where furniture, fabrics or other items may come in contact with and
restrict the air intake and/or air outlet.
• Avoid use in locations where the unit is exposed to condensation or drastic temperature
changes. Appropriate conditions are when room temperature is between 5 – 35 ºC.
• Place on a stable surface with suffi cient air circulation.
When placing the unit on a heavily carpeted area, the unit may vibrate slightly.
Place the unit on an even surface to avoid water leakage from the Water Tank and/or Humidifying
Tray.
• Avoid locations where grease or oily smoke is generated.
The unit surface may crack or the sensor may malfunction as a result.
• Place the unit about 30 cm~60 cm(1~2 ft) away from the wall in order to ensure proper airfl ow.
The wall directly behind the air outlet may become dirty over time. When using the unit for an ex-
tended period of time in the same location, periodically clean the wall and protect the wall with a
vinyl sheet, etc. to prevent the wall from becoming dirty.
ENGLISH
FILTER GUIDELINES
• Follow the instructions in this manual for correct care and maintenance of the fi lters.
E-3

PART NAMES
ILLUSTRATIVE DIAGRAM – FRONT
Air Outlet
Main Unit Display
Front Monitor
Main Unit
KC-860E
BACK
Handle (2 locations left and right)
Sensors
• Dust Sensor
•
Temperature / Humidity Sensor
•
Odour Sensor(KC860E•KC850E)
Tank Handle
KC-850E
Air Outlet
Main Unit Display
Front Monitor
Main Unit
KC-840E
Air Outlet
HEPA Filter (white)
Washable Deodorizing
Filter (black)
Tabs
Water Tank
(For humidifying)
Humidifying Filter
Filter Frame
Tank Cap
Float
Humidifying Tray
Power Cord
Plug
(Shape of plug depends on country.)
E-4
Air Inlet
Date Label
(Rating Label)
Back Panel (Pre-Filter)
FRONT MONITOR
Indicates condition and humidity of room air.
KC-850E KC-860E
Indicates the room condition of odour, dust, and humidity.
DUST MONITOR
The dust sensor continuously monitors
the air and changes colour depending on
air purity.KC-860E has 5 levels of dust
detector.
Sensor Reading
Clean
All green
Clean
All green
Green
Flashing
Yellow
Green
Flashing
Yellow
Very lmpure
Flashing
All red
Very lmpure
Flashing
All red
When the dust sensor detects dust,
the fl ashing light moves depending on
dustiness.
Plasmacluster Indicator Light (blue)
Blue: Plasmacluster ON
Light off: Plasmacluster OFF
ODOUR MONITOR
The odour sensor continuously
monitors the air and changes colour
depending on odour intensity.
Odour in the room
Faint
Green Yellow Red
Dust and odor are detected by different
sensors.The colours may not change
simultaneously.
Strong
Water Supply Indicator Light (red)
This light will illuminate when the water
tank needs to be refi lled.
Humidity Indicator Light (green)
Displays the approximate humidity level
in the room. Humidity setting cannot be
adjusted.
(Ex.) At 60 % humidily
80 % or more
Less than 30 %
ENGLISH
KC-840E
DUST MONITOR
The dust sensor continuously
monitors the air and changes colour
depending on air purity.
Sensor Reading
Clean
All green
Clean
All green
Green
Flashing
Yellow
Green
Flashing
Yellow
When the dust sensor detects dust,
the fl ashing light moves depending on
dustiness.
Very lmpure
Flashing
All red
Very lmpure
Flashing
All red
Humidity Indicator Light (green)
Displays the approximate humidity level
in the room. Humidity setting cannot be
adjusted.
High – 65 % or more
Med – 65 % or less of 40 % or more
Low – 40 % or less
Water Supply Indicator Light(red)
This light will illuminate when the water
tank needs to be refi lled.
Plasmacluster Indicator Light (blue)
Blue: Plasmacluster ON
Light off: Plasmacluster OFF
E-5

Unplug the unit before installing
PREPARATION FOR
USE
or adjusting the fi lters.
FILTER INSTALLATION
To maintain the quality of the fi lters, they are packed in plastic bags and placed in the
unit. Be sure to remove the fi lters from the plastic bags and replace the fi lters in the
unit before initial use.
1
1
Back Panel
2
Remove the fi lters
Remove the Back Panel.
Gently push down on the tabs,
then tilt and remove the back
panel.
Tabs on the top
Remove the Wash-
able Deodorizing Filter
(black) and HEPA Filter
(white) from the plastic
bags.
2
1
2
Install the fi lters
Install the HEPA Filter.
Please make sure that the HEPA Filter is
placed in proper orientation.
Installing the filter backwards
will affect the performance of
the unit.
Ta b
Insert the Back Panel’s 2 bottom tabs
(left and right) into the small holes in the
unit, and slide the Washable Deodorizing Filter between the HEPA Filter and
the Back Panel.
Washable Deodorizing Filter
HEPA Filter
Back Panel
Bottom tabs
HEPA Filter
Washable
Deodorizing
Filter
Gently push in the up-
3
per tabs (left and right)
to lock in place.
Upper tabs
Fill in the usage start
4
date on the Date Label.
Use the usage start date as
a guide for when the fi lters
should be replaced.
Date Label
E-6

REFILLING THE WATER TANK
The unit can be used in the Clean Air Mode without
putting water in the Water Tank. When using the Clean
Air & Humidify Mode, or the CLEAN ION SHOWER
Mode, the Water Tank should be fi lled with water.
Remove the Water Tank by unlatching the
1
top.
Remove the Water Tank Cap and carefully
2
fi ll the Water Tank with tap water.
• Change the water in the Water Tank every day with
fresh tap water.
After fi lling, securely tighten the Tank Cap.
3
• Check to see that there is no water leaking.
• Be sure to wipe off any excess water on the outside of
the Water Tank.
• When carrying the Water Tank, hold it with both hands
so that the Water Tank opening is facing up.
Tank Handle
Water Tank
Humidifying
Tray
ENGLISH
Water Tank
Tank Cap
tighten
Replace the Water Tank in the unit.
4
• The top latch will “click” in place when the Water Tank
is properly installed.
CAUTION
• Do not expose the unit to water. Short circuit and/or electrical shock may occur as a result.
• Do not use hot water (40 ºC), chemical agents, aromatic substances, dirty water, or other
damaging substances, deformation and/or malfunction may occur.
• Use only fresh tap water. Use of other water sources may promote the growth of mold, fungus and/or bacteria.
E-7
OPERATION
MAIN UNIT DISPLAY
Filter Reset Button/
Indicator Light (red)
Light Control
Button
Fan Speed Button/
Indicator Light (green)
Plasmacluster ON/OFF Button/
Indicator Light (green)
Power ON Button
Press any of the buttons to select mode and start the unit.
Clean Air & Humidify MODE Button/
Indicator Light (green)
Clean Air MODE Button/
Indicator Light (green)
Power OFF Button
CLEAN ION SHOWER MODE Button/
Indicator Light (blue)
CLEAN AIR & HUMIDIFY MODE
Use the Clean Air & Humidify Mode to quickly clean the air, reduce odours and to humidify.
Fill Water Tank. (See E-7)
1
Press the CLEAN AIR & HUMIDIFY MODE Button.
2
• If the power cord was not unplugged between uses, the unit
will automatically re-start at the previously selected settings.
Press the FAN SPEED Button to select the de-
3
sired fan speed.
• Indicator lights will show the fan speed
currently selected.
Press the Power OFF Button to turn the unit off.
About Automatic Humidify Mode
The Temperature/Humidity sensors automatically detect and
adjust humidity according to changes in room temperature.
Depending on the size and humidity of the room, humidity
may not reach 55~65 %. In such cases, it is recommended
that CLEAN AIR & HUMIDIFY/MAX MODE be used.
Temperature Humidity
~18 ºC 65 %
18 ºC~24 ºC 60 %
24 ºC~ 55 %
E-8
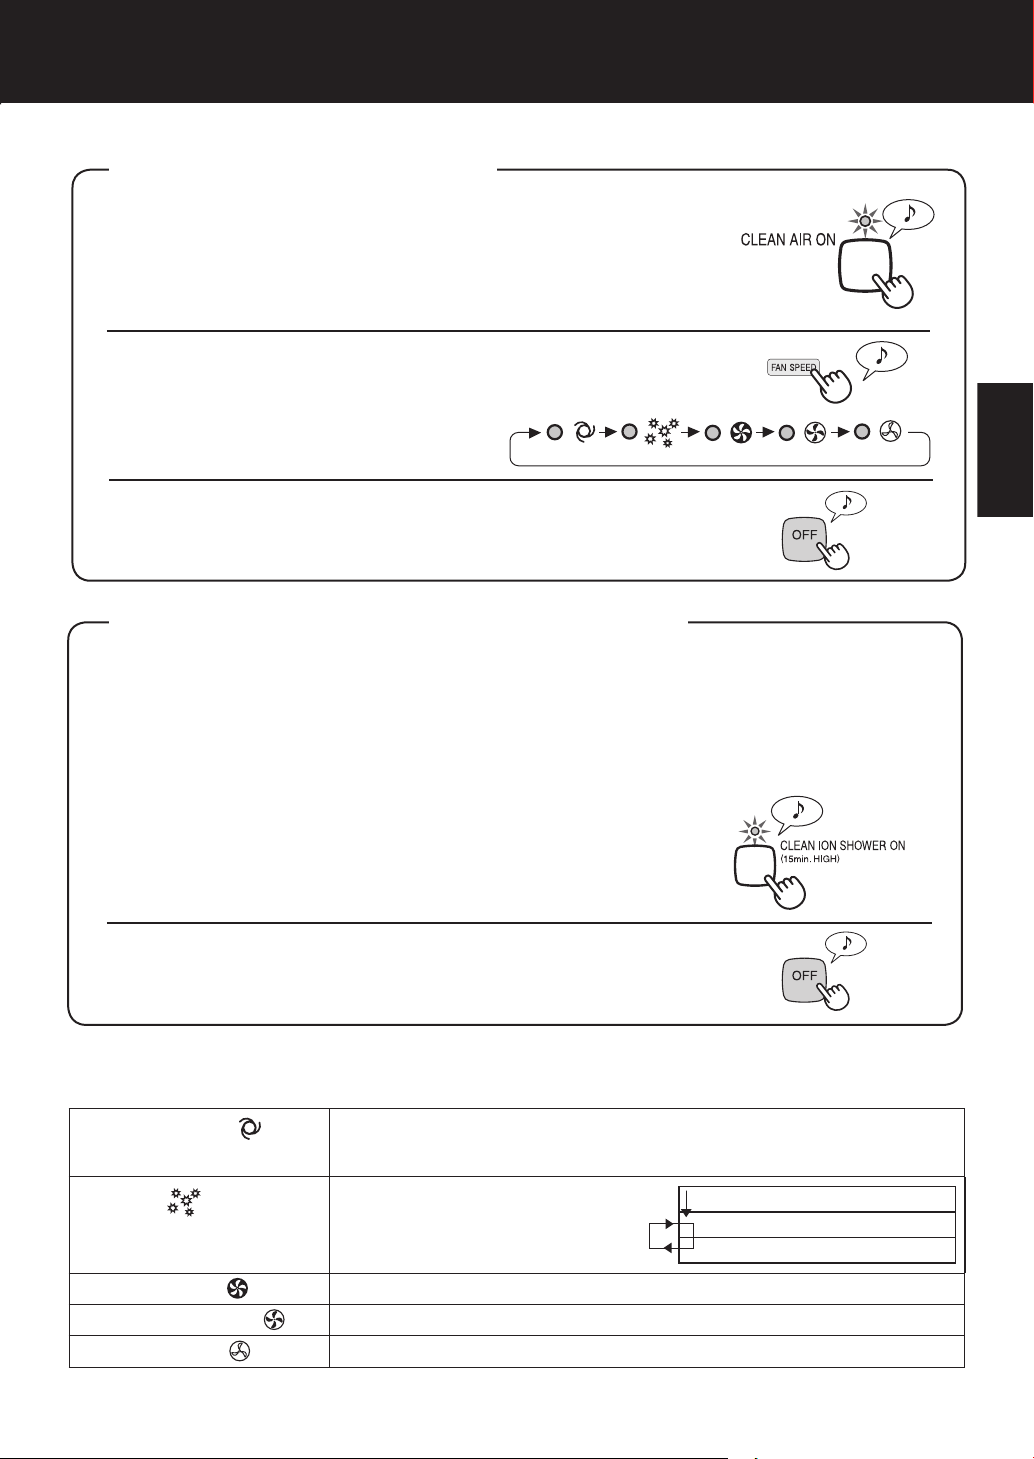
CLEAN AIR MODE
Use the Clean Air Mode when additional humidity is not required.
Press the CLEAN AIR MODE Button on the display.
1
• If the power cord was not unplugged between uses, the unit will
automatically re-start at the previously selected settings.
Press the FAN SPEED BUTTON to select the de-
2
sired fan speed.
• Indicator lights will show the fan
speed currently selected.
Press the Power OFF Button to turn the unit off.
CLEAN ION SHOWER MODE
CLEAN ION SHOWER Mode with humidifi cation releases high-density Plasmacluster ions.
By continuously discharging strong airfl ow for 15 minitues, the unit effectively removes air-
borne dust, pollen, mold and allergens from the air as they are drawn through the fi lter system.
Water must be in the Water Tank when this mode is selected.
The unit humidifi es when there’s water in the Water Tank, and it operates without humidifying
when there’s no water in it.
Press the CLEAN ION SHOWER MODE Button
1
on the display to select this mode.
When the operation fi nishes, the unit will return to the prior
operation.
Press the Power OFF Button to turn the unit off.
Fan Speed Button
Please note the fan speed cannot be adjusted during the CLEAN ION SHOWER MODE.
AUTO operation
POLLEN mode
operation
The fan speed is automatically switched (between HIGH and LOW) depending on the amount of impurities in the air. The sensors detect impurities for
effi cient air purfi cation.
The unit will operate at High Level for
10 minutes, then will atternate between MEDIUM and HIGH.
10 minutes: High fan level
20 minutes: Medium fan level
20 minutes: High fan level
ENGLISH
MAX operation
MEDIUM operation
LOW operation
The unit will operate at maximum fan speed.
The unit will operate at medium fan speed.
The unit will operate quietly using minimal air intake.
*HiGH fan speed is an intermediate speed between MEDIUM and MAX.
E-9
OPERATION
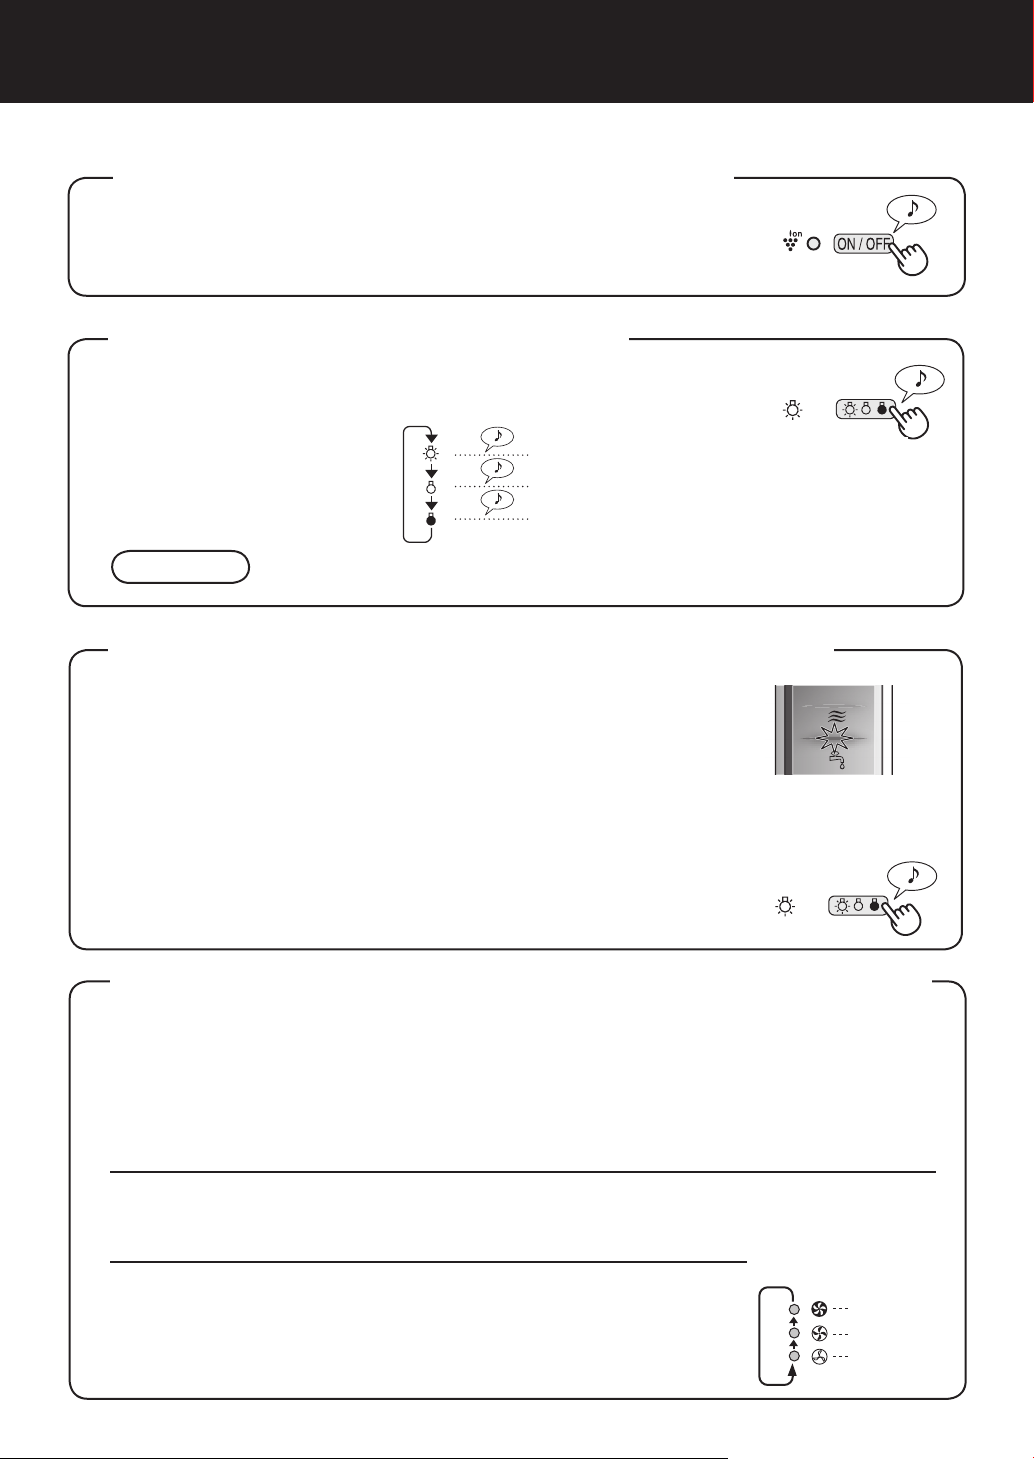
Plasmacluster ON/OFF Button
Press the Plasmacluster ON/OFF Button to turn Plasmacluster Ion Mode ON and OFF.
When Plasmacluster is ON, both the Indicator Light and
Plasmacluster Indicator Light turn on.
LIGHTS CONTROL Button
Use when the light on the
front panel is too bright.
CAUTION
The lights on the front monitor are always brighter when starting.
Refer to the diagram on the right to select the
desired brightness on the front panel.
The lights on the front panel are brighter.
「 」
「 」
「 」
The lights on the front panel are brighter.
The lights on the front panel are darker.
The lights on the front panel are darker.
The lights on the front monitor turn off
The lights on the front monitor turn off.
WATER SUPPLY INDICATOR LIGHT
When the Water Tank is empty, the Water Supply Indicator Light will fl ash
to indicate that the Water Tank should be refi lled. Please note the light
will not fl ash even when the Water Tank is empty during the Clean
Air Mode and the Clean ION SHOWER Mode.
Sound indicator setting for water supply.
In addition to the Indicator Light, the unit can be set to signal with an audible beep when the
Water Tank is empty. With the unit OFF, press the Lights Control button for 3 seconds to turn
the audible signal ON.
Cancellation
To cancel the audible signal, with the unit OFF, press the Lights
Control button again more than 3 seconds.
Flashing
ADJUSTMENT OF SENSOR DETECTION SENSITIVITY
Set to “low” if the DUST MONITOR and ODOUR MONITOR is constantly red to reduce
sensitivity, and set to “high’ if the DUST MONITOR and ODOUR MONITOR is constantly
green to increase sensitivity.
With the unit OFF, press the Fan Speed Button for 3 seconds.
1
The Fan Speed Indicator Lights will display the currently set sensor sensitivity level. The
factory setting is Standard, indicated by the MED light.
Press the Fan Speed Button to set the desired sensor sensitivity.
2
Refer to the diagram on the right to select the desired sensor sensitivity level.
Press the Power OFF Button.
3
Note that if the Power OFF Button is not pushed within 8 seconds
of adjusting sensor sensitivity, the setting will be saved automatically. The sensor sensitivity setting will be saved even if the unit is
unplugged.
E-10
Fan Speed
Indicator
Light
Sensor
Detection
sensitivity
High
Standard
Low
CARE AND MAINTENANCE
To maintain optimum performance of this air purifi er, please clean the unit including
the sensor and fi lters periodically.
When cleaning the unit, be sure to fi rst unplug the power cord, and never handle the
plug with wet hands. Electrical shock and/or bodily injury may occur as a result.
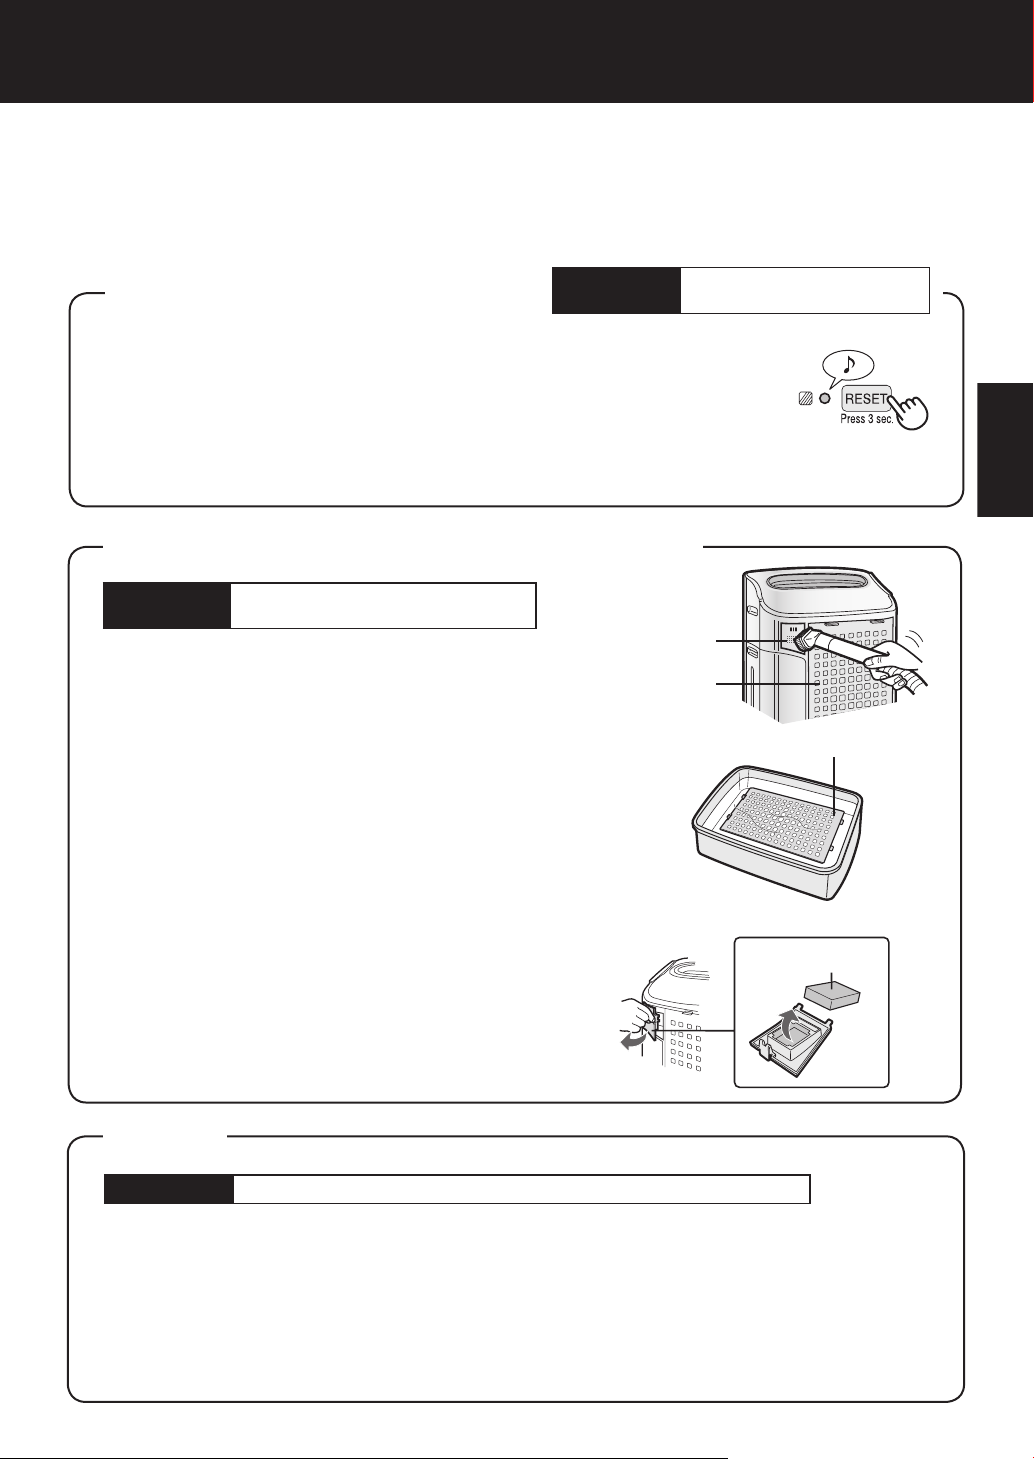
FILTER INDICATOR LIGHT
The Filter Indicator Light will illuminate as a reminder to perform maintenance
of the Back Panel, Sensors, and Humidifying Filter. The Indicator Light will turn
on after approximately 720 hours of use.
After performing maintenance, reset the Filter Indicator. Plug the unit in, turn
power ON, and press the RESET button for 3 seconds. The Filter Indicator
Light will go off. Even if the Filter Indicator Light is already off, the RESET but-
ton should be pressed to reset the maintenance timer.
Care Cycle
After 720 hours of use
30days × 24hours = 720)
(
BACK PANEL and SENSORS
Care Cycle
Gently remove dust from the sensor opening and the
back panel, using a vacuum cleaner attachment or
similar tool.
When the back panel has stubborn dirt
In case of oily dirt, soak the back panel in water with
kitchen detergent.
1
Avoid scrubbing the back panel hard when washing.
Rinse the back panel repeatedly with clean water to re-
move the solution residue.
2
Drip dry fi lter to remove excess water.
Whenever dust accumulates
on the unit or every 2 months
Sensor
Back Panel
Back Panel
3
ENGLISH
SENSOR FILTER CARE
Remove the sensor filter and tap it lightly over a sink
or bin to dislodge dust. If it is very dirty, wash it gently
with lukewarm water. Do not use any detergents or
chemicals of any kind to clean the fi lter. Dry the fi lter
completely before replacing in the unit. Do not operate
unit without all fi lters properly installed.
Sensor Filter
UNIT
Care Cycle
To prevent dirt or stains on the unit, clean regularly. If stains are allowed to remain, they may
become diffi cult to remove.
Wipe with a dry, soft cloth
For stubborn stains or dirt, use a soft cloth dampened with warm water.
Do not use volatile fl uids
Benzene, paint thinner, polishing powder, may damage the surface.
Do not use detergents
Detergent ingredients may damage the unit.
Whenever dust accumulates on the unit or every 2 months
E-11
CARE AND MAINTENANCE
WATER TANK
Care Cycle
Rinse the inside of the tank by leaving a small amount of lukewarm water inside, closing the tank cap firmly, and shaking
the tank. Mild household detergents may be used to clean the
inside of the tank, but detergent should be diluted and the tank
should be thoroughly rinsed to remove all detergent residue.
(Note the Water Tank is not dishwasher safe.)
TANK CAP CARE
The small cap back of the tank cap is removable.
When the tank cap and small cap are dirty and slimy,
cleaning is necessary.
Use a cotton swab or a toothbrush.
Every day when Humidifying
care cycle… once a month
Tank Cap
Tank Cap
Water Tank
Toothbrush
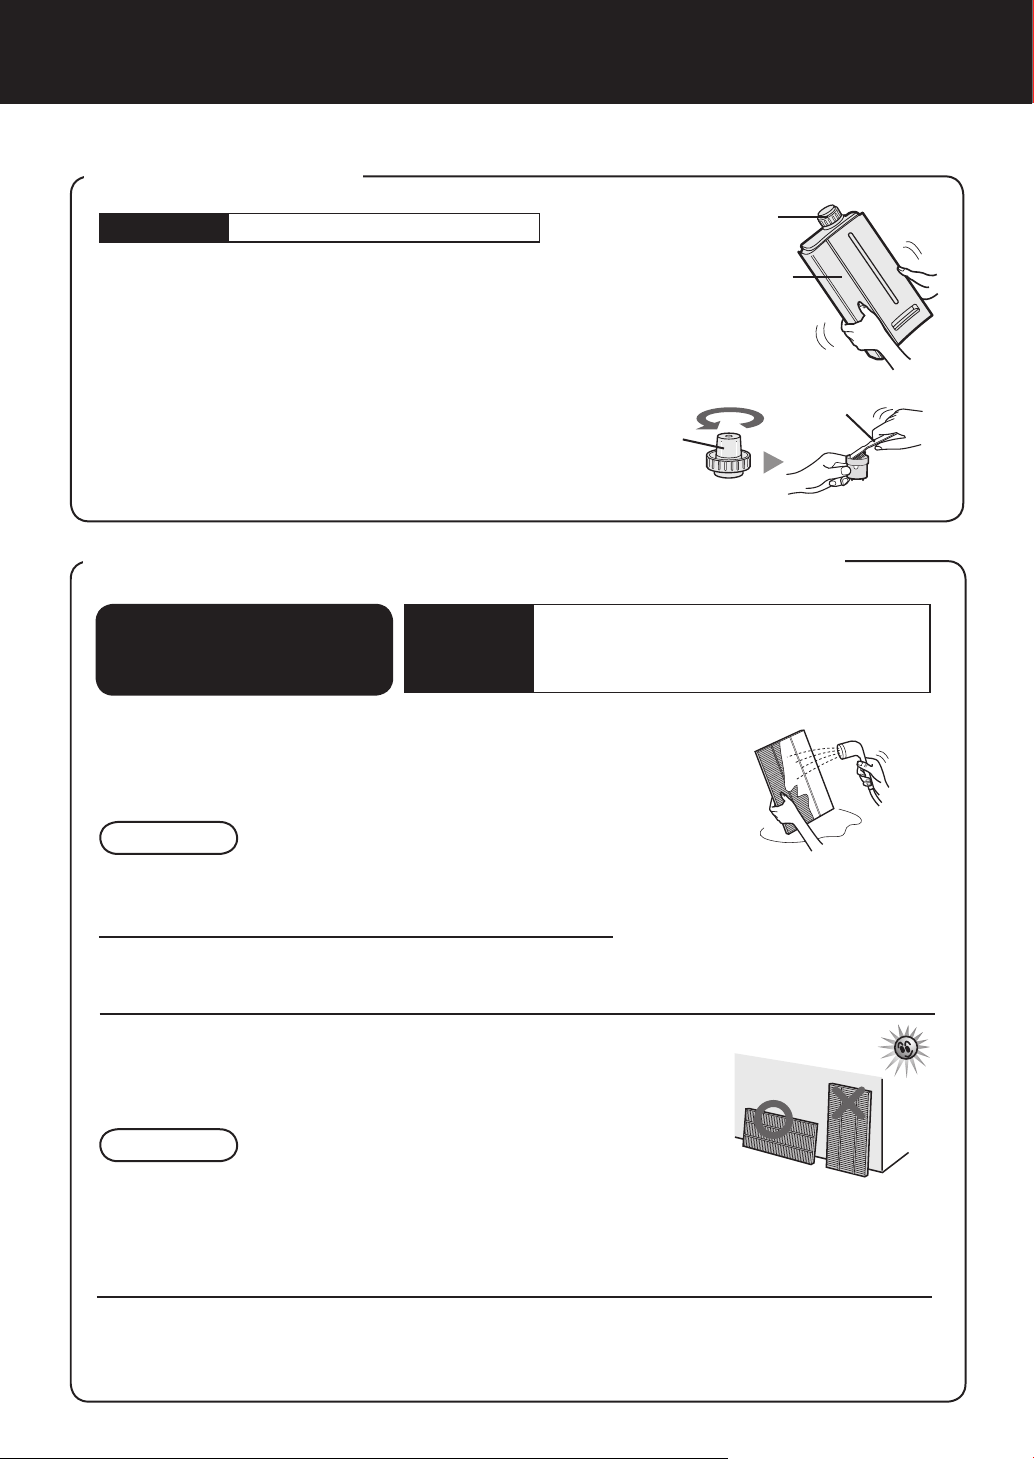
WASHABLE DEODORIZING FILTER CARE
HAND WASH ONLY!
DO NOT DRY IN CLOTHES
DRYER!
Care Cycle
Rinse dirt from the WASHABLE DEODORIZING
1
FILTER under lukewarm water.
Remove dust on the washable deodorizing fi lter before washing.
When an unpleasant odour is noticed
from the air outlet.
When performance of fi lter seems to be
reduced and odours persist.
CAUTION
• When washing the fi lter for the fi rst time, the rinse water may
be brown. This does not affect deodorization performance.
• Avoid bending or folding the fi lter when washing.
Drip dry fi lter to remove excess water.
2
Dry filter completely in a well ventilated area. If
3
possible, dry outdoors.
Dry fi lter in a sideways position to avoid warping of the fi lter.
The fi lter takes about 6 hours to dry out.
CAUTION
• Avoid drying fi lter outdoors during inclement weather (e.g. rain or cold
temperatures).
Do not allow fi lter to freeze.
• If fi lter is dried indoors, take precautions, such as placing towels, etc
under the fi lter to prevent water damage to the fl oor.
Replace the fi lter in unit. (See E-6).
4
Dry fi lter completely before replacing to prevent odours.
Do not operate unit without all fi lters properly installed.
E-12
HUMIDIFYING TRAY
Care Cycle
Remove the Water Tank and Humidifying
1
Tray.
Unlatch the Water
Tank first, then remove the tray. Use
both hands when
pulling out the Humidifying Tray to
avoid spilling water.
Remove the Humidifying Filter from the
Humidifying Tray. Drain accumulated wa-
2
ter by tilting the Humidifying Tray slowly.
Humidifying Filter
1 month
Frequency of maintenance cycle will depend on the hardness
of the water. Avoid spilling water when removing or cleaning
the tray.
Tank Handle
Water Tank
Do not hold
this part.
Humidifying
Tray
Rinse the inside of the Humidifying
3
Tray with lukewarm water to remove
impurities.
• Do not remove the
Styrofoam fl oat.
• Clean diffi cult-to-
reach parts with a
cotton-tipped swab
or tooth brush.
Float
Replace the Humidifying Filter and re-
4
place the Humidifying Tray in the unit.
The Humidifying Filter will not
fi t if placed in backwards. Be
sure there is no gap between
the Humidifying tray and the
unit when the Humidifying Tray
is replaced in the unit. The unit
may not operate properly if the
Humidifying Tray is not properly replaced in the unit.
Colour: Gray
When Water Deposits are Diffi cult to Remove
Fill Humidifying Tray halfway with lukewarm water,
1
add a small amount of mild
kitchen detergent, and leave
to soak for about 30 minutes.
Dilute detergent according to
instructions on the container.
Clean diffi cult-to-reach parts
with a cotton
swab or tooth
brush.
Rinse the Humidifying
2
Tray with lukewarm water.
• Rinse until all detergent residue
is removed.
• Inadequate rinsing may
cause the detergent odour
or changes
in the shape/
colour of the
main unit.
CAUTION
• Use only mild kitchen detergents to
clean the Humidifying Tray. Use of
non-designated chemicals or detergents can cause deformation, tarnishing, cracking (water leakage).
ENGLISH
If the Styrofoam fl oat comes off,
replace by inserting the tabs of
the Float into the holes in the
Humidifying Tray as shown in the
diagram.
Insert the tab of the
fl oat into the hole.
Insert the fl oat below
this tab.
Insert the tab on
the other side of the
fl oat into the hole.
E-13
CARE AND MAINTENANCECARE AND MAINTENANCE
HUMIDIFYING FILTER
Care Cycle
Frequency of maintenance cycle will depend on the hardness or the impuri
you use; the harder the water the more often descaling will be necessary.
Pay attention not to spill water when cleaning the fi lter.
Remove the Water Tank and
1
Humidifying Tray.
Once a month or when the Filter Indicator Light is on.
ties of the water that
Rinse the Humidifying Filter re-
5
peatedly with lukewarm water
to remove all the solution resi-
Humidifying fi lter
Humidifying
Tray
Water Tank
Humidifying
Tray
due.
Inadequate rinsing may cause odour and
affect the performance and/or appearance of the unit.
* Do not scrub the Humidi-
fying Filter, rinse gently
under lukewarm water
only.
Attach the Humidifying Filter
Remove the Humidifying Filter
2
from the Humidifying Tray.
Avoid spilling water from the Humidifying
Tray.
Preparing the descaling solu-
3
tion.
Citric acid, available at some drugstores,
or 100 % bottled lemon juice are used for
descaling. Choose either one to use, and
prepare the descaling solution.
<For using citric acid>
Dissolve 3 teaspoons of citric acid and 2
1/2 cups of lukewarm water in a suitable
container, and stir well.
<For using lemon juice>
100 % bottled lemon juice can be used
for descaling. Use only 100 % bottled
lemon juice with no pulp (strain juice if
necessary). Combine 1/4 cup lemon juice
and 3 cups of lukewarm water in a container large enough to hold the Humidifying Filter and stir well.
P
re-soak the Humidifying Filter
4
in the solution for 30 minutes
before cleaning.
When using lemon juice,
it is recommended to presoak longer than citric
acid.
6
to the Humidifying Tray, and
replace the Humidifying Tray in
the unit.
•The Humidifying Filter will not fit if
placed in backwards. Be sure there is
no gap between the Humidifying Tray
and the unit when the Humidifying Tray
is replaced in the unit. The unit may not
operate properly if the Humidifying Tray
is not properly replaced in the unit.
•When not using the
unit for a long periods of time, dry the
Humidifying Filter
completely before
replacing.
Plug in the unit, turn power
7
ON, and press the Filter Reset
Button on the display for more
than 3 seconds to reset.
You may notice reddish-brown or white
deposits forming on the surface of the
Humidifying Filter. These impurities (calcium, etc.) are due to the impurities contained in tap water; this is not a defect.
Replace the Humidifying Filter when it is
covered completely
in white deposits.
E-14
FILTER REPLACEMENT GUIDELINES
Filter life will vary depending on the room environment, usage, and location of the unit. If dust
or odours persist, replace the fi lters.
(Refer to “Please read before operating your new Air Purifi er”)
Guide for fi lter replacement timing
HEPA Filter
Filter life can be greatly reduced depending on the room environment. Cigarette smoke, pet dander,
and other airborne particles can reduce fi lter life. Check fi lters regularly and replace as necessary.
Up to 5 years after opening
Washable Deodorizing Filter
The fi lter can be repeatedly used after washing, or it can be replaced.
Humidifying Filter
Filter life can be greatly reduced depending on the room environment. Even if 2 years have not
passed, replace the Humidifying Filter if you notice the following:
• Mineral deposits (white, black, or red masses) which are not removed after cleaning or the Humidifying Filter is still dirty.
• Filter is severely damaged or warped.
Up to 2 years after opening
Replacement Filters
• HEPA Filter: 1unit
Model FZ-C150HFE (for KC-860E)
FZ-C100HFE (for KC-850E)
FZ-C70HFE (for KC-840E)
• Washable Deodorizing Filter: 1unit
Model FZ-C150DFE (for KC-860E)
FZ-C100DFE (for KC-850E)
FZ-C70DFE (for KC-840E)
• Humidifying Filter: 1unit
Model FZ-C100MFE
(Gray)
Humidifying fi lter
ENGLISH
Replacing the Filters
1. Replace fi lters according to the instructions provided with the replacement fi lters.
2. Use the date labels as a reminder for when the fi lters should be replaced.
Filter Frame (Gray)
Filter Frame (white)
Disposal of Filters
Please dispose of used fi lters according to any local laws and regulations.
HEPA Filter materials:
• Filter: Polypropylene • Frame: Polyester
Washable Deodorizing Filter materials:
• Polyester, Rayon, Activated charcoal
Humidifying Filter materials:
• Rayon, Polyester
E-15
(white)

TROUBLESHOOTING
Before calling for service, please review the Troubleshooting chart below, since the problem may not
be a unit malfunction.
SYMPTOM REMEDY (not a malfunction)
Odours and smoke are not
removed.
The Front Monitor illuminates
green even when the air is
impure.
The Front Monitor illuminates
orange or red even when the
air is clean.
A clicking or ticking sound is
heard from the unit.
The discharged air has an
odour.
The unit does not operate
when cigarette smoke is in the
air.
Filter Indicator Light is
illuminated.
• Clean or replace the fi lters if they appear to be heavily soiled.
(See E-11,E-12,E-14)
• The air could be impure at the time the unit was plugged in.
Unplug the unit, wait one minute, and plug the unit in again.
• Sensor operation is affected if the dust sensor openings are
dirty or clogged. Gently clean the dust sensors (See E-11).
• Clicking or ticking sounds may be audible when the unit is
generating ions.
• Check to see if the fi lters are heavily soiled.
• Clean or replace the fi lters.
• Plasmacluster Air Purifi ers emit small traces of ozone which
may produce an odour.
• Is the unit installed in a location that is diffi cult for the sensor
to detect cigarette smoke?
• Are the dust sensor openings blocked or clogged?
(In this case, clean the openings.) (See E-11)
• After replacing fi lters, connect the power cord to an outlet and
press the Filter Reset Button. (See E-11)
The Front Monitor are turned
off.
The Water Supply Indicator
Light does not illuminate when
the tank is empty.
Water lever in the tank does
not decrease or decreases
slowly.
The Front Monitor lights
change colour frequently.
• Check to see if the Lights OFF Mode selected. If so, then
press the Lights Control Button to activate the indicator lights.
(See E-10)
• Check Styrofoam fl oat for impurities. Clean the Humidifying-
Tray. Ensure unit is located on a level surface.
• Check to see if the Humidifying Tray and Water Tank are correctly installed. Check the Humidifying Filter.
• Clean or replace the filter when it is heavily soiled
(See E-14 and E-15).
• The Front Monitor lights automatically change colours as impurities are detected by the dust sensor and odour sensor.
E-16
ERROR DISPLAY
KC-850E•KC-860E
If error occurs again, contact the Sharp Service Centre.
DIGITAL
INDICATION
LAMP INDICATION ERROR DETAILS REMEDY
Flashing of the Clean Air &
Humidify Indicator Light.
Flashing of the Fan Speed
Indicator Light ‘
Flashing of the Clean Ion
Shower Indicator Light.
Flashing of the Clean Air Indicator Light.
Flashing of the Fan Speed Indicator Light ‘ ‘.
Flashing of the Fan Speed Indicator Light ‘ ‘.
‘.
Abnormal humidity fi lter Verify if the Humidifying Filter,
Abnormal fan motor
Abnormal temperaturehumidity sensor
Problem in circuit board
Humidifying Tray and Water
Tank are properly installed and
then turn power ON again.
Turn power OFF to cancel the
error display, wait one minute,
and then turn power ON.
Unplug the unit, wait one
minute, and plug the unit in
again.
ENGLISH
KC-840E
LAMP INDICATION ERROR DETAILS REMEDY
Flashing of the Clean Air &
Humidify Indicator Light.
Flashing of the Fan Speed
Indicator Light ‘
Flashing of the Humidity Indicator Light ‘High’ or ‘Low’.
Flashing of the Clean Ion
Shower Indicator Light.
Flashing of the Clean Air Indicator Light.
Flashing of the Fan Speed Indicator Light ‘
Flashing of the Fan Speed Indicator Light ‘
‘.
‘.
‘.
Abnormal humidity fi lter Verify if the Humidifying Filter,
Abnormal fan motor
Abnormal temperaturehumidity sensor
Problem in circuit board
Humidifying Tray and Water
Tank are properly installed and
then turn power ON again.
Turn power OFF to cancel the
error display, wait one minute,
and then turn power ON.
Unplug the unit, wait one
minute, and plug the unit in
again.
E-17
SPECIFICATIONS
Model KC-860E KC-850E KC-840E
Power supply 220 ~ 240 V 50/60 Hz
56 19 5.5 (4.9) 41 11.6 3.8 (3.3) 26 9.5 3.7 (3.4)
396 240 84 306 168 60 210 132 48
/hour)
3
Fan Speed (m
Rated Power (W)
Fan Speed Adjustment MAX MED LOW MAX MED LOW MAX MED LOW
CLEAN AIR
51 39 17 47 35 15 45 34 15
56 21 8.8 (8.2) 40 13.5 6.8 (6.3) 21 11.5 6.1 (5.8)
50 39 25 47 35 22 42 34 20
396 240 120 288 168 84 186 132 54
/hour)
3
Noise Level (dBA)
Fan Speed (m
730 500 300 600 400 230 450 330 170
Rated Power (W)
Noise Level (dBA)
Humidifi cation (mL/hour)*2
CLEAN AIR
& HUMIDIFY
Dust/odour/Temperature & Humidity Dust/Temperature & Humidity
)*1 ~48 ~38 ~26
2
Dust collection HEPA with Microbial control *3
Deodorization Washable Deodorizing
Water Tank Capacity (L) 4.3 4.0 3.0
Sensors
Filter type
Cord Lenght (m) 2.0
Dimensions (mm) 398 (W) × 288 (D) × 627 (H) 378 (W) × 265 (D) × 586 (H) 360 (W) × 233 (D) × 550 (H)
Recommended Room Size (m
Weight (kg) 11.0 9.0 8.0
The class of the HEPA fi lter by EN1822 is H10.
*1 • The Recommended Room Size is appropriate for operating the unit of maximum fan speed.
• The Recommended Room Size area indicates the space where a certain amount of dust particles can be removed in 30 minutes.
*2 • Humidifi cation Amount changes in accordance with indoor and outdoor temperature and humidity.
*3 •
Humidifi cation Amount increases as temperatures rise or humidity decreases.
Humidifi cation Amount decreases as temperatures decrease or humidity rises.
• Measurement Condition: 20 ºC, 30 % humidity (JEM1426)
Standby Power
In order to operate the electrical circuits while the power plug is inserted in the wall outlet, this
product consumes about 0.7 W of standby power.
For energy conservation, unplug the power cord when the unit is not in use.
E-18

Attention: Your product is
marked with this symbol. It
means that used electrical
and electronic products
should not be mixed with
general household waste.
There is a separate
collection system for these
products.
A. Information on Disposal for Users (private households)
1. In the European Union
Attention: If you want to dispose of this equipment, please do not use the ordinary dust
bin!
Used electrical and electronic equipment must be treated separately and in
accordance with legislation that requires proper treatment, recovery and recycling of
used electrical and electronic equipment.
Following the implementation by member states, private households within the EU
states may return their used electrical and electronic equipment to designated
collection facilities free of charge*. In some countries* your local retailer may also
take back your old product free of charge if you purchase a similar new one.
*) Please contact your local authority for further details.
If your used electrical or electronic equipment has batteries or accumulators, please
dispose of these separately beforehand according to local requirements.
By disposing of this product correctly you will help ensure that the waste undergoes
the necessary treatment, recovery and recycling and thus prevent potential negative
effects on the environment and human health which could otherwise arise due to
inappropriate waste handling.
2. In other Countries outside the EU
If you wish to discard this product, please contact your local authorities and ask for the
correct method of disposal.
ENGLISH
For Switzerland: Used electrical or electronic equipment can be returned free of
charge to the dealer, even if you don’t purchase a new product. Further collection
facilities are listed on the homepage of
B
. Information on Disposal for Business Users.
www.swico.ch or www.sens.ch.
1. In the European Union
If the product is used for business purposes and you want to discard it:
Please contact your SHARP dealer who will inform you about the take-back of the
product. You might be charged for the costs arising from take-back and recycling.
Small products (and small amounts) might be taken back by your local collection
facilities.
For Spain: Please contact the established collection system or your local authority for
take-back of your used products.
2. In other Countries outside the EU
If you wish to discard of this product, please contact your local authorities and ask for
the correct method of disposal.
E-19
EN

Memo

Pročtěte si tuto příručku před zahájením obsluhy své nové čističky vzduchu
Čistička vzduchu nasává vzduch z místnosti z přívodu vzduchu, nechá vzduch projít přes předfi ltr (umývatelný dezodorizační fi ltr a HEPA fi ltr vevnitř přístroje), a pak
vypustí vzduch přes odvod vzduchu. HEPA filtr dokáže odstranit 99,97 % prachových částic velkosti 0,3 mikronů, které procházejí přes fi ltr a taky pomáhá absorbovat
pachy. Umývatelný dezodorizační fi ltr postupně absorbuje pachy během jejich prochá-
zení fi ltrem.
Některé pachy absorbované fi ltry se můžou časem rozložit a způsobit další pachy.
V závislosti na prostředí, ve kterém se přístroj používá, především, když se výrobek
používá v extrémních prostředích (podstatně horších než je běžné používání v domácnosti), tyto pachy můžou být v krátkém čase intenzivnější než se očekává. Jestli pachy
přetrvávají, měli byste vyměnit fi ltry.
POZNÁMKA
• Čistička vzduchu je navržena tak, aby odstraňovala prach a pachy rozptýlené ve vzduchu, ale ne
škodlivé plyny (například oxid uhelnatý obsažený v cigaretovém kouři). Nachází-li se v místnosti
stále zdroj zápachu, čistička vzduchu nemůže pach odstranit úplně.
HEPA fi ltr
Umývatelný dezodorizační fi ltr
Předfi ltr
(Obvykle je na ilustracích zařízení „KC-850E“.)

ČESKY
FUNKCE
Unikátní kombinace technologií úpravy
vzduchu
Trojitý fi ltrační systém + Plasmacluster
+ Zvlhčení
ZACHYTÁVÁ PRACH*
Umývatelný předfi ltr zachytává prach a jiné
velké částice ve vzduchu.
POTLAČUJE PACHY
Umývatelný dezodorizační filtr absorbuje
mnoho běžných pachů v domácnosti.
ZMENŠUJE MNOŽSTVÍ PYLU A PLÍSNÍ*
HEPA fi ltr zachytává 99,97 % částic s vel-
kostí 0,3 mikronů.
OSVĚŽUJE
Plasmacluster upravuje vzduch podobně
jako se v přírodě čistí životní prostředí emitováním rovnováhy pozitivních a negativních ionů.
ZVLHČUJE
Pracuje až 10 hodin na jedno naplnění.**
*
Když je vzduch nasáván fi ltračním systémem.
**Velkost pokoje:
max. 48 m2 (KC-860E)
max. 38 m
max. 26 m
Technologie senzorů neustále monitoruje
kvalitu vzduchu a automaticky upravuje
provoz na základě zjištěné čistoty a vlhkosti vzduchu.
2
(KC-850E)
2
(KC-840E)
OBSAH
DŮLEŽITÉ BEZPEČNOSTNÍ POKYNY
• VÝSTRAHA ………………………………………
•
UPOZORNĚNÍ VZTAHUJÍCÍ SE K PROVOZU
• POKYNY K INSTALACI ……………………..
• SMĚRNICE TÝKAJÍCÍ SE FILTRU ……..
NÁZVY ČÁSTÍ
• ILUSTRAČNÍ DIAGRAM …………………….
• ZADNÍ ČÁST …………………………………….
• PŘEDNÍ MONITOR ……………………………
PŘÍPRAVA NA POUŽITÍ
• INSTALACE FILTRU ………………………….
• DOPLNĚNÍ VODNÍ NÁDRŽE ………………
PROVOZ
• DISPLEJ HLAVNÍ JEDNOTKY …………….
•
REŽIM ČISTÉHO VZDUCHU A ZVLHČENÍ
• REŽIM ČISTÉHO VZDUCHU ………………
• REŽIM ČISTÉ IONOVÉ SPRCHY ………..
•
TLAČÍTKO RYCHLOSTI VENTILÁTORU
• TLAČÍTKO ZAP./VYP. Plasmacluster …
• TLAČÍTKO OVLÁDÁNÍ KONTROLEK …
• KONTROLKA INDIKÁTORU
DODÁVÁNÍ VODY …………………………..
• NASTAVENÍ CITLIVOSTI DETEKCE
SENZORU ………………………………………
PÉČE A ÚDRŽBA
• KONTROLKA INDIKÁTORU FILTRU …
• ZADNÍ PANEL A SENZORY ……………..
• JEDNOTKA ……………………………………
• VODNÍ NÁDRŽ ………………………………..
• PÉČE O UMÝVATELNÝ
DEZODORIZAČNÍ FILTR ………………….
• ZVLHČOVACÍ MISKA ………………………
• ZVLHČOVACÍ FILTR ……………………….
•
POKYNY K VÝMĚNĚ FILTRU
ŘEŠENÍ PROBLÉMŮ
TECHNICKÉ ÚDAJE
…………………………………..
……………………
……………………………………………
……………………………
……………..
………………………
……………………….
INFORMACE O SPRÁVNÉ LIKVIDACI
..
…
…
…
CZ-10
CZ-10
CZ-10
CZ-10
CZ-11
CZ-11
CZ-11
CZ-11
CZ-12
CZ-12
CZ-13
CZ-14
CZ-15
CZ-16
CZ-18
…
CZ-19
CZ-2
CZ-2
CZ-3
CZ-3
CZ-3
CZ-4
CZ-4
CZ-4
CZ-5
CZ-6
CZ-6
CZ-7
CZ-8
CZ-8
CZ-8
CZ-9
CZ-9
CZ-9
ČESKY
Děkujeme vám za zakoupení této čističky
vzduchu od společnosti SHARP. Přečtěte si,
prosím, pozorně tento návod k obsluze dřív,
než budete používat čističku vzduchu.
Po přečtení tento návod uschovejte na
dostupném místě, abyste do něj mohli
nahlédnout i v budoucnosti.
CZ-1

DŮLEŽITÉ BEZPEČNOSTNÍ POKYNY
Při používaní elektrických zařízení byste měli dodržovat základní bezpečnostní opatření, mimo jiné:
VÝSTRAHA
• Před použitím přístroje si přečtěte všechny pokyny.
• Používejte jen zásuvku s napětím 220 – 240 voltů.
• Přístroj nepoužívejte, jsou-li napájecí kabel nebo zástrčka poškozené, nebo je-li připojení k
elektrické zásuvce uvolněné.
• Ze zástrčky odstraňujte pravidelně prach.
• Do přívodu ani vývodu vzduchu ventilace nedávejte prsty ani jiné cizí předměty.
• Při vytahování zástrčky vždy uchopte zástrčku a nikdy netahejte za kabel.
Mohlo by to způsobit elektrický výboj a/nebo požár vlivem zkratu.
• Nevytahujte zástrčku mokrýma rukama.
• Nepoužívejte přístroj v blízkosti plynových zařízení ani ohnišť.
• Při doplňování vodní nádrže, čištění přístroje, nebo když přístroj nepoužíváte, nezapomeňte ho
odpojit z elektrické zásuvky. Jinak může dojít k elektrickému výboji a/nebo požáru vlivem zkratu
• Je-li napájecí kabel poškozen, může ho vyměnit pouze výrobce, jeho servisní technik, autorizované servisní středisko společnosti Sharp nebo kvalifi kovaná osoba, aby se zabránilo
nebezpečí.
• Přístroj nepoužívejte, když používáte aerosolové insekticidy, ani v místnostech, kde jsou ve vzduchu zbytky oleje, kadidla, jiskry od zapálených cigaret, chemické výpary, ani na místech, ve kterých
se může př
• Při čištění přístroje si dávejte pozor. Silné korosivní čistící prostředky můžou poškodit zevnějšek
přístroje.
• Servis této čističky vzduchu může vykonávat jen autorizované servisní středisko společnosti Sharp.
Při výskytu problémů, potřebě nastavení nebo opravy kontaktujte nejbližší servisní středisko.
• Při přenášení přístroje odstraňte nejdříve vodní nádrž a zvlhčovací misku a držte přístroj pomocí
držadel nacházejících se na obou stranách.
• Nepijte vodu ze zvlhčovací misky nebo vodní nádrže.
• Vyměňte každý den vodu ve vodní nádrži čerstvou vodou z vodovodního kohoutku a pravidelně
čistěte vodní nádrž a zvlhčovací misku. (Viz CZ-12 a CZ-13). Když přístroj nepoužíváte, vylijte
vodu z vodní nádrže a zvlhčovací misky. Necháte-li ve vodní nádrži a/nebo zvlhčovací misce vodu,
může to způsobit plesnivění, množení bakterií a zápachy.
V ojedinělých případech můžou tyto bakterie nepř
• Tento přístroj není určen k používání osobami (včetně dětí) se sníženými fyzickými, smyslovými nebo
mentálními schopnostmi, nebo nedostatkem zkušeností a znalostí, pokud na ně nedohlíží osoba
zodpovědná za jejich bezpečnost, nebo pokud jim tato osoba nedala pokyny ohledně používání.
Na děti je potřeba dohlížet, aby se zaručilo, že si se zařízením nebudou hrát.
– pro snížení nebezpečí zkratu, požáru, nebo poranění:
ístroj namočit, jako například v koupelnách.
íznivě působit na zdraví.
POZNÁMKA
Pokud tato čistička vzduchu způsobí rušení příjmu radia nebo televize, pokuste se opravit rušení jedním nebo více následujícími opatřeními:
• Přeorientujte nebo přemístěte příjmovou anténu.
• Zvyšte vzdálenost mezi přístrojem a radiovým/televizním přijímačem.
• Připojte zařízení do zásuvky v jiném okruhu než je ten, do kterého je zapojený přijímač.
• Vyhledejte pomoc u prodejce nebo zkušeného radiového/televizního technika.
– rušení rádia nebo televizoru
CZ-2

UPOZORNĚNÍ VZTAHUJÍCÍ SE K PROVOZU
• Neblokujte vstupní a/nebo výstupní otvory ventilace.
• Nepoužívejte přístroj u ani na horkých předmětech, jako jsou například sporáky nebo ohřívače, ani
tam, kde můžou přijít do kontaktu s párou.
• Přístroj obsluhujte vždy ve svislé poloze.
• Při přesouvání přístroje ho držte pomocí držadel nacházejících se na obou stranách.
Když je přístroj v provozu, nepřesouvejte jej.
• Nespouštějte přístroj bez správné instalace fi ltrů, vodní nádrže a zvlhčovací misky.
• Neumývejte ani opětovně nepoužívejte HEPA fi ltr.
Nejenom, že tím nezlepšíte výkon fi ltru, ale můžete tak způsobit úraz elektrickým proudem nebo
poruchu.
• Zevnějšek čistěte jen jemným hadříkem.
Nepoužívejte prchavé látky ani čistící prostředky.
Mohli byste jimi poškodit povrch přístroje nebo by mohl prasknout.
Taky by vlivem toho nemusely senzory pracovat správně.
• To, jak často je třeba vykonávat údržbu (odstraňování vodního kamene), závisí na tvrdos-
ti vody a množství nečistot v používané vodě; čím je voda tvrdší, tím častěji musíte vodní
kámen odstraňovat.
• Udržujte přístroj z dosahu vody.
POKYNY K INSTALACI
• Přístroj umístěte nejmíň 2 m od zařízení využívající elektrické vlny, jako jsou například televizory nebo rádia, abyste při používaní přístroje zabránili elektrickému rušení.
• Vyhněte se místem, kde bude senzor vystaven přímému větru.
Přístroj nemusí fungovat správně.
• Vyhněte se používání na místech, kde se může přístroj dostat do kontaktu s nábytkem, látkami, nebo jinými předměty, které by mohly zabránit vstupu/výstupu vzduchu ventilace.
• Přístroj nepoužívejte na místech, kde bude vystaven kondenzaci nebo velkým teplotním
změnám. Vhodná teplota místnosti je mezi 5 – 35 °C.
• Umístěte na stabilní povrch s dostatečnou cirkulací vzduchu.
Když přístroj umístíte na oblast s hrubou kobercovou plochou, může mírně vibrovat.
Přístroj umístěte na rovný povrch, abyste zabránili unikání vody z vodní nádrže a/nebo zvlhčovací
misky.
• Přístroj nepoužívejte na místech, kde se tvoří mastnota nebo olejový kouř.
Mohl by vlivem toho prasknout povrch, nebo by senzor nemusel pracovat správně.
• Přístroj umístěte asi 30 cm – 60 cm (1 – 2 ft) od zdi, abyste zajistili správné proudění vzduchu.
Časem se může zeď nacházející se přímo za výfukem ventilace zašpinit. Používáte-li tento přístroj
delší dobu na stejném místě, pravidelně čistěte zeď a chraňte zeď vinylovou pokrývkou nebo ně-
čím podobným, aby se nezašpinila.
ČESKY
SMĚRNICE TÝKAJÍCÍ SE FILTRU
•
Postupujte podle pokynů v tomto návodu, abyste se správně starali o fi ltry a abyste je dobře udržovali.
CZ-3
NÁZVY ČÁSTÍ
ILUSTRAČNÍ DIAGRAM – PŘEDNÍ ČÁST
Odvod
vzduchu
Displej hlavní
jednotky
Přední
monitor
Hlavní
jednotka
KC-860E
ZADNÍ ČÁST
Držadlo (2 umístění vlevo a vpravo)
Senzory
• Prachový senzor
•
Senzor teploty / vlhkosti
•
Pachový senzor (KC860E•KC850E)
Držadlo nádrže
KC-850E
Odvod vzduchu
Displej hlavní
jednotky
Přední
monitor
Hlavní
jednotka
KC-840E
Odvod vzduchu
HEPA fi ltr (bílý)
Umývatelný dezodorizační fi ltr (černý)
Ouška
Vodní nádrž
(na zvlhčení)
Zvlhčovací fi ltr
Rám fi ltru
Víko nádrže
Plovák
Zvlhčovací miska
Napájecí kabel
Zástrčka
(Tvar zástrčky závisí na zemi.)
CZ-4
Přívod vzduchu
Štítek s datem
(Jmenovitý štítek)
Zadní panel (předfi ltr)
PŘEDNÍ MONITOR
Označuje čistotu a vlhkost vzduchu v místnosti.
KC-850E KC-860E
Označuje množství pachů, prachu a vlhkosti v místnosti.
MONITOR PRACHU
Prachový senzor neustále monitoruje
vzduch a v závislosti na čistotě vzduchu
mění barvu. Přístroj KC-860E má 5 úrovní detektoru prachu.
Výklad senzoru
Žlutá
Žlutá
Velmi špinavé
Blikání
Všechno
červené
Velmi špinavé
Blikání
Všechno
červené
Čisté
Všechno
zelené
Čisté
Všechno
zelené
Zelená
Blikání
Zelená
Blikání
Zachytí-li prachový senzor prach, bude
se v závislosti na zaprášení pohybovat
blikající kontrolka.
Kontrolka indikátoru Plasmacluster (modrá)
Modrá: Plasmacluster ZAP.
Vypnutá kontrolka: Plasmacluster VYP.
MONITOR PACHŮ
Pachový senzor neustále monitoruje vzduch a v závislosti na intenzitě
pachu mění barvu.
Pach v místnosti
Slabé
Zelená Žlutá Červená
Prach a pachy se zjišťují různými senzory. Barvy se nemusí měnit současně.
Silné
Kontrolka indikátoru dodávání
vody (červená)
Tato kontrolka se rozsvítí, je-li potřeba
doplnit vodní nádrž.
Kontrolka indikátoru vlhkosti (zelená)
Zobrazuje přibližnou úroveň vlhkosti v
místnosti. Nastavení vlhkosti se nedá
upravit.
(Př.) při 60 % vlhkosti
80 % nebo víc
Méně než 30 %
ČESKY
KC-840E
MONITOR PRACHU
Pachový senzor neustále monitoruje vzduch a v závislosti na čistotě
vzduchu mění barvu.
Výklad senzoru
Žlutá
Žlutá
Velmi špinavé
Blikání
Všechno
červené
Velmi špinavé
Blikání
Všechno
červené
Čisté
Všechno
zelené
Čisté
Všechno
Zelená
Blikání
Zelená
Blikání
Zachytí-li prachový senzor prach, bude
se v závislosti na zaprášení pohybovat
blikající kontrolka.
Kontrolka indikátoru vlhkosti
(zelená)
Zobrazuje přibližnou úroveň vlhkosti v
místnosti. Nastavení vlhkosti se nedá
upravit.
Vysoká – 65 % nebo víc
Střední – mezi 40 % a 65 %
Nízká – 40 % nebo méně
Kontrolka indikátoru dodávání
vody (červená)
Tato kontrolka se rozsvítí, je-li potřeba
doplnit vodní nádrž.
Kontrolka indikátoru Plasmacluster
(modrá)
Modrá: Plasmacluster ZAP.
Vypnutá kontrolka: Plasmacluster VYP.
CZ-5

Před instalací nebo úpravou fi ltrů
PŘÍPRAVA NA
POUŽITÍ
odpojte přístroj z elektrické sítě.
INSTALACE FILTRU
K udržení kvality fi ltrů jsou zabaleny v umělohmotných sáčcích a umístěny v přístroji.
Nezapomeňte vyndat fi ltry z umělohmotných sáčků a před prvním použitím dejte fi ltry
opět do přístroje.
1
1
Zadní panel
2
Vyndejte fi ltry
Odstraňte zadní panel.
Jemně zatlačte na ouška a pak
nakloňte a odstraňte zadní panel.
Ouška na vrchu
Vyberte umývatelný
dezodorizační filtr (černý) a HEPA filtr (bílý) z
umělohmotných sáčků.
2
1
2
Instalujte fi ltry
Instalujte HEPA fi ltr.
Ujistěte se, je-li HEPA fi ltr umístěn se správ-
nou orientací.
Instalováním filtru v opačném
směru ovlivníte výkon přístroje.
HEPA fi ltr
Ouško
Vložte 2 dolní ouška zadního panelu (levé
a pravé) do malých otvorů v přístroji a
zasuňte umývatelný dezodorizační filtr
mezi HEPA fi ltr a zadní panel.
Umývatelný dezodorizační fi ltr
Zadní panel
Dolní ouška
HEPA fi ltr
Umývatelný
dezodorizační
fi ltr
Jemně zatlačte na horní
3
ouška (levé a pravé), aby
zapadli na své místo.
Horní ouška
Vyplňte na štítku s datem
4
počáteční datum používání.
Počáteční datum používání
použijte jako pomůcku na zjiště-
ní, kdy byste měli vyměnit fi ltry.
Štítek s datem
CZ-6
Loading…
OSAKA, JAPAN
SHARP CORPORATION
R
* Plasmacluster is a
trademark of Sharp
Corporation.
KC-840E
KC-850E
KC-860E
ČISTIČKA VZDUCHU
s funkcí zvlhčování
NÁVOD K OBSLUZE
ČISTIČKA VZDUCHU
s funkciou zvlhčovania
NÁVOD NA POUŽITIE
LÉGTISZTÍTÓ
párásító funkcióval
HASZNÁLATI ÚTMUTATÓ
ОЧИСНИК ПОВІТРЯ
з Функцією Зволожування
ПОСІБНИК З ЕКСПЛУАТАЦІЇ
Free standing type
Freistehendes Modell
Type mobile
Vrijstaand type
Modello strutturalmente indipendente
Tipo vertical sin soporte
Тип установки: отдельностоящий
Volně stojící
Voľne stojaca
Különálló típus
Вільностоячий тип
床置き・卓上兼用型
AIR PURIFIER
with Humidifying Function
OPERATION MANUAL
LUFTREINIGER
mit Befeuchtungsfunktion
BEDIENUNGSANLEITUNG
Purifi cateur d’air avec fonction
d’humidifi cation
MANUEL D’UTILISATION
LUCHTREINIGER
met luchtbevochtiger
GEBRUIKSAANWIJZING
PURIFICATORE D’ARIA
con funzione di umidifi cazione
MANUALE D’USO
PURIFICADOR DE AIRE
con Función de humidifi cación
MANUAL DE USO
DUTITASPA
RUS
Воздухоочиститель с
функцией увлажнения
РУКОВОДСТВО ПО ЭКСПЛУАТАЦИИ
FRE
SLK
UKR
JPN
加湿空気清浄機
取扱説明書
Printed in China
TINS-A384KKRZ 09J-
CN 1
HUN CZE
GER ENG
KC-840E
KC-850E
KC-860E
KC-840E_cover.indd 1KC-840E_cover.indd 1 2009/10/08 10:58:222009/10/08 10:58:22
-
Инструкции по эксплуатации
1
Sharp KC-850E инструкция по эксплуатации
(128 страниц)
- Языки:Русский
-
Тип:
PDF -
Размер:
15.35 MB -
Описание:
Очиститель воздуха
Просмотр
На NoDevice можно скачать инструкцию по эксплуатации для Sharp KC-850E. Руководство пользователя необходимо для ознакомления с правилами установки и эксплуатации Sharp KC-850E. Инструкции по использованию помогут правильно настроить Sharp KC-850E, исправить ошибки и выявить неполадки.
-
Страница 1
Р УССКИЙ NEDERLANDS DEUTSCH ENGLISH AIR PURIFIER with Humidifying Function OPERA TION MANUAL KC-840E KC-850E KC-860E KC-840E KC-850E KC-860E LUCHTREINIGER met luchtbevochtiger GEBRUIKSAANWIJZING LUFTREINIGER mit Befeuchtungsfunktion BEDIENUNGSANLEITUNG Printed in China TINS-A279KKRZ 08H- OSAKA, J AP AN SHARP CORPOR A TION Puricateur d’a[…]
-
Страница 2
NOTE HEP A Filter W ashable Deodorizing Filter Pre-Filter The air purier draws in room air from the air intake, passes the air through a Pre-Fil — ter , a W ashable Deodorizing Filter and a HEP A Filter inside of the unit, then discharg — es the air through the air outlet. The HEP A Filter can remove 99.97% of dust particles as small as 0.3 micr[…]
-
Страница 3
ENGLISH DEUTSCH NEDERLANDS Р УССКИЙ FRANÇAIS E-1 (Common illustration has used “KC-850E”.) ENGLISH Thank you for purchasing thi s SHARP A i r Pu r i f ie r. P l ea s e re a d thi s ma n u al ca r e f ul l y before using the air purier . Af te r r ea di ng , keep the man ua l in a co nv en — ie nt l oc at io n fo r fu tu re r ef er en[…]
-
Страница 4
E-2 IMPORT ANT SAFETY INSTRUCTIONS When using electrical appliances, basic safety precautions should be followed, including the following: W ARNING – T o reduce the risk of electrical shock, re or injury to persons: • Read all instructions before using the unit. • Use only a 220~240 volt outlet. • Do not use the unit if the power cord or[…]
-
Страница 5
ENGLISH DEUTSCH NEDERLANDS Р УССКИЙ FRANÇAIS E-3 CAUTIONS CONCERNING OPERATION • Do not block the intake and/or air outlet. • Do not use the unit near or on hot objects, such as stoves or heaters, or where it may come into contact with steam. • Always operate the unit in an upright position. • Hold the unit by using the handles on b[…]
-
Страница 6
E-4 Front Monitor P ART NAMES ILLUSTRA TIVE DIAGRAM – FRONT Air Outlet Main Unit BACK Handle (2 locations left and right) Sensors • Dust Sensor • T emperature / Humidity Sensor • Odour Sensor(KC860E • KC850E) T ank Handle W ater T ank (For humidifying) Humidifying Filter T ank Cap Float Humidifying T ray Power Cord Plug Air Outlet HEP A F[…]
-
Страница 7
ENGLISH DEUTSCH NEDERLANDS Р УССКИЙ FRANÇAIS E-5 W ater Supply Indicator Light (red) This light will illuminate when the water tank needs to be re lled. Sensor Reading Sensor Reading Sensor Reading Sensor Reading Sensor Reading Sensor Reading Sensor Reading Sensor Reading Sensor Reading Flashing Clean All green Green Y ellow V ery lmpure[…]
-
Страница 8
E-6 Date Label Unplug the unit before installing or adjusting the lters. PREP ARA TION FOR USE 1 Remove the Back Panel. Gently push down on the tabs, then tilt and remove the back panel. Install the lters 1 Install the HEP A Filter . Please make sure that the HEP A Filter is placed in proper orientation. T o maintain the quality of the lte[…]
-
Страница 9
ENGLISH DEUTSCH NEDERLANDS Р УССКИЙ FRANÇAIS E-7 REFILLING THE W A TER T ANK CAUTION T ank Handle W ater T ank T ank Cap W ater T ank Humidifying T ray tighten • Do not expose the unit to water . Short circuit and/or electrical shock may occur as a result. • Do not use hot water (40 ºC), chemical agents, aromatic substances, dirty wate[…]
-
Страница 10
E-8 CLEAN AIR & HUMIDIFY MODE OPERA TION Use the Clean Air & Humidify Mode to quickly clean the air , reduce odours and to humidify . About Automatic Humidify Mode The T emperature/Humidity sensors automatically detect and adjust humidity according to changes in room temperature. Depending on the size and humidity of the room, humidity may […]
-
Страница 11
ENGLISH DEUTSCH NEDERLANDS Р УССКИЙ FRANÇAIS E-9 Use the Clean Air Mode when additional humidity is not required. CLEAN AIR MODE CLEAN ION SHOWER Mode with humidication releases high-density Plasmacluster ions. By continuously discharging strong airow for 15 minitues, the unit effectively removes air — borne dust, pollen, mold a nd al[…]
-
Страница 12
E-10 OPERA TION W A TER SUPPL Y INDICA TOR LIGHT When the W ater T ank is empty , the Water Supply Indicator Light will ash to indicate that the W ater T ank should be re lled. Please note the light will not ash even when the Water T ank is empty during the Clean Air Mode and the Clean ION SHOWER Mode. Sound indicator setting for water s[…]
-
Страница 13
ENGLISH DEUTSCH NEDERLANDS Р УССКИЙ FRANÇAIS E-1 1 CARE AND MAINTENANCE UNIT FIL TER INDICA T OR LIGHT The Filter Indicator Light will illuminate as a reminder to perform maintenance of the Back Panel, Sensors, and Humidifying Filter . The Indicator Light will turn on after approximately 720 hours of use. After performing maintenance, reset[…]
-
Страница 14
E-12 CARE AND MAINTENANCE W A TER T ANK HAND W ASH ONL Y! DO NOT DR Y IN CLOTHES DR YER! Rinse the inside of the tank by leaving a small amount of luke — wa r m w at e r i ns i d e, c l o si n g t he t a n k ca p f i rm l y , a n d s ha k i n g the tank. Mild household detergents may be used to clean the inside of the tank, but detergent should be […]
-
Страница 15
ENGLISH DEUTSCH NEDERLANDS Р УССКИЙ FRANÇAIS E-13 Frequency of maintenance cycle will depend on the hardness of the water . A void spilling water when removing or cleaning the tray . 1 Remove the W ater T ank and Humidifying T ray . U n l a t c h t h e W a t e r T ank first, then re — m o v e t h e t r a y . U s e both hands when pulling ou[…]
-
Страница 16
E-14 CARE AND MAINTENANCE CARE AND MAINTENANCE Frequency of maintenance cycle will depend on the hardness or the impuri ties of the water that you use; the harder the water the more often descaling will be necessary . Pay attention not to spill water when cleaning the lter . 1 R e m o v e t h e W a t e r Ta n k a n d Humidifying T ray . 2 Rem ov[…]
-
Страница 17
ENGLISH DEUTSCH NEDERLANDS Р УССКИЙ FRANÇAIS E-15 Humidifying lter (Gray) Filter Frame (Gray) (white) Filter Frame (white) FIL TER REPLACEMENT GUIDELINES Filter life will vary depending on the room environment, usage, and location of the unit. If dust or odours persist, replace the lters. (Refer to “Please read before operating your[…]
-
Страница 18
E-16 TROUBLESHOOTING Before calling for ser vice, ple ase r eview the T roublesho oting c har t below , sinc e the problem may not be a unit malfuncti on. SYMPTOM R EME D Y (not a mal func t ion) Odo urs a nd smo ke are no t rem oved. • Clean o r replac e the lter s if they appe ar to be heavily s oile d. (See E- 1 1,E- 12,E- 14 ) The Front M[…]
-
Страница 19
ENGLISH DEUTSCH NEDERLANDS Р УССКИЙ FRANÇAIS E-17 ERROR DISP L A Y K C- 850E• K C- 860 E If error o cc urs again, contac t the Sharp S er vic e Centre. DIGIT AL INDICA TION LAMP INDICA TION ERROR DET AILS REMEDY F l a sh in g o f t h e C l e a n A i r & Humidify Indicator Light. Abnormal hum idity lter Veri f y if th e Hu m id i fy[…]
-
Страница 20
E-18 SPECIFICA TIONS Model KC-860E KC-850E KC-840E Power supply 220 ~ 240 V 50/60 Hz Fan Speed Adjustment MAX MED LOW MAX MED LOW MAX MED LOW CLEAN AIR Fan Speed (m 3 /hour) 396 240 84 306 168 60 210 132 48 Rated Power (W) 56 19 5.5 (4.9) 41 1 1.6 3.8 (3.3) 26 9.5 3.7 (3.4) Noise Level (dBA) 51 39 17 47 35 15 45 34 15 CLEAN AIR & HUMIDIFY Fan S[…]
-
Страница 21
ENGLISH DEUTSCH NEDERLANDS Р УССКИЙ FRANÇAIS E-19 A. Information on Dispos al for Users (private households) 1. In the European Union Attention: If you w ant to dispose of this equipment, please do no t use the ordinary dust bin! Used electrical and elec tronic equipment must be treated separ ately and in accordance w ith legislation that r[…]
-
Страница 22
E-20 Printed in China TINS-A248KKRZ 07K- OSAKA, J AP AN SHARP CORPORA TION Memo KC-840E_Eng2.indd 20 08.10.10 9:23:36 AM[…]
-
Страница 23
ENGLISH DEUTSCH NEDERLANDS Р УССКИЙ FRANÇAIS KC-840E_Eng2.indd 21 08.10.10 9:23:36 AM[…]
-
Страница 24
HINWEIS Bitte lesen Sie sich diese Bedienungsanleitung vor der ersten Inbetriebnahme Ihres neuen Luftreinigers sorgfältig durch. HEP A-Filter Auswaschbarer Desodorierungslter V orlter Der Luftreiniger saugt die Raumluft durch seinen Lufteinlass ein, führt diese Luft durch einen V orfilter , einen auswaschbaren Desodorierungsfilter sowie ein[…]
-
Страница 25
ENGLISH DEUTSCH NEDERLANDS Р УССКИЙ POLSK FRANÇAIS D-1 DEUTSCH Wir danken Ihnen herzlich für den Kauf eines Luftreinigers von SHARP . Bitte lesen Sie sich diese Bedienungsanleitung sorgfältig durch, bevor Sie den Luftreiniger in Betrieb nehmen. Bewahren Sie die Bedienungsanleitung nach dem Lesen an einem sicheren Ort auf, damit Sie bei Be[…]
-
Страница 26
D-2 WICHTIGE SICHERHEITSHINWEISE Bei der V erwen dung elek trisc her Ger äte müss en eine Rei he gru ndle gende r Siche rheit shin weise einschließlich der folgenden beachtet werden: W ARNUNG — Bitte halten Sie sich an die folgenden Anweisungen, um das Risiko von Strom — schlägen, Bränden oder V erletzungen bei Personen zu vermeiden: HINWEIS -[…]
-
Страница 27
ENGLISH DEUTSCH NEDERLANDS Р УССКИЙ POLSK FRANÇAIS D-3 RICHTLINIEN ZUM UMGANG MIT FIL TERN • Befolgen Sie für eine ordnungsgemäße Pege und Wartung der Filter alle in dieser Bedienungsan — leitung aufgeführten Anweisungen. SICHEITHEITSHINWEISE FÜR DEN BETRIEB • Blockieren Sie niemals den Lufteinlass bzw . -auslass. • V erwenden[…]
-
Страница 28
BEZEICHNUNG DER EINZELNEN KOMPONENTEN D-4 EXPLOSIONSZEICHUNG — VORDERSEITE RÜCKSEITE Griff (2, links und rechts) Sensoren T ankgriff W asserbehälter (zur Luftbefeuchtung) Luf tbef eucht ungs lter T ankdeckel Schwimmer Luftbefeuchtungswanne Netzkabel Stecker Luftauslass HEP A-Filter (weiß) Auswaschbarer Desodo- rierungslter (schwarz) Lasche[…]
-
Страница 29
ENGLISH DEUTSCH NEDERLANDS Р УССКИЙ POLSK FRANÇAIS D-5 W asserversorgungs-Leuchtanzeige (rot) Diese Anzeige leuchtet, wenn der W as- serbehälter aufgefüllt werden muss. ANZEIGENFELD AN DER VORDERSEITE Hier werden die Umgebungsbedingungen sowie die Feuchtigkeit der Raumluft angezeigt. Plasmacluster-Le uchtanzeige (blau) Blau: Plasmacluster[…]
-
Страница 30
D-6 4 3 T ragen S ie das Datu m der Inbetriebnahme auf dem Datumsaufkleber ein. V erwenden Sie das Datum der Inbetriebnahme als Richt- linie für den künftigen Aus- tausch der Filter . Datumsaufkleber T rennen Sie das Gerät von der Stromversorgung, bevor Sie die Filter installieren oder einstellen VORBEREITUNG DER INBETRIEBNAHME 2 1 Nehmen Sie di[…]
-
Страница 31
ENGLISH DEUTSCH NEDERLANDS Р УССКИЙ POLSK FRANÇAIS AUFFÜLLEN DES W ASSERBEHÄL TERS Im Luftreinigungsmodus kann das Gerät betrieben werden, ohne dass zuerst der W asserbehälter aufge- füllt werden muss. Wenn Sie das Gerät allerdings im Luftreinigungs- und Luftbefeuchtungs- oder Ionen- dusche-Reinigungsmodus verwenden, sollten Sie den W[…]
-
Страница 32
D-8 L U F T R E I N I G U N G S — U N D L U F T B E F E U C H T U N G S M O D U S BETRIEB V erwenden Sie den Luftreinigungs- und Luftbefeuchtungsmodus, um die Raumluft schnell und effektiv zu reinigen, unerwünschte Gerüche zu beseitigen und die Luft zu befeuchten. Füllen Sie den W asserbehälter auf. (Siehe dazu Seite D-7.) Wissenswertes über d[…]
-
Страница 33
ENGLISH DEUTSCH NEDERLANDS Р УССКИЙ POLSK FRANÇAIS Dr ü ck en S ie d i e LU FT RE IN I GU NG SM OD US — T as te a uf de r A nz ei ge . D-9 V erwe nden Sie den Luftr eini gung smodu s, w enn S ie k eine zusä tzli che L uftf euch tigke it w ünsch en. 1 2 • Falls Sie das Netzkabel zwischen den einzelnen V erwendungen nicht vom Stromnetz g[…]
-
Страница 34
D-10 BETRIEB Blinkend W ASSER VORRA TS-ANZEIGELEUCHTE Sobald der W asserbehälter leer ist, blinkt die W asservorrats-Anzeige- leuchte, um darauf hinzuweisen, dass der W asserbehälter wieder aufge- füllt werden muss. Beachten Sie jedoch, dass diese Anzeige auch bei leerem W asserbehälter nicht blinkt, wenn sich das Gerät im Luftrei- nigungs- od[…]
-
Страница 35
ENGLISH DEUTSCH NEDERLANDS Р УССКИЙ POLSK FRANÇAIS D-1 1 PFLEGE UND W ARTUNG GERÄT FIL TER-ANZEIGELEUCHTE RÜCKW AND UND SENSOREN Sensor Rückwand Sensorlter Bitte reinigen Sie das Gerät einschließlich sämtlicher Sensoren und Filter regelmäßig, damit die optimale Leistung dieses Luftreinigers erhalten bleibt. Stellen Sie bei der Re[…]
-
Страница 36
D-12 PFLEGE UND W ARTUNG W ASSERBEHÄL TER Spü len Sie das Inn ere des T anks aus , in dem Sie ein e kleine Me nge lauwarmen W assers in den W asserbehälter füllen, den T ankdeckel fes t und sich er schl ießen u nd den W ass erbeh älter s chüt teln. Z ur Rei — nig ung der W ass erbe hält er-I nne nsei te k ann herk ömml iche r Ha ush alts -[…]
-
Страница 37
ENGLISH DEUTSCH NEDERLANDS Р УССКИЙ POLSK FRANÇAIS D-13 Die Häufigkeit der erforderlichen W artung variiert je nach W asserhärte. V ermeiden Sie Wasserspritzer , wenn Sie die W anne herausnehmen oder reinigen. Herausnehmen des W asserbehälters und der Luftbefeuchtungswanne. 1 2 3 Spülen Sie das Innere der Luftbefeuchtungs- wanne mit lau[…]
-
Страница 38
D-14 PFLEGE UND W ARTUNG Luftbefeuchtungslter Die Häugkeit der erforderlichen W artung variiert je nach W asserhärte oder Reinheit des von Ihnen verwendeten W assers; je härter das W asser ist, desto häuger ist eine Entkalkung erforderlich. 1 6 * Schrubben Sie den Luftbe- feuchtungsfilter auf keinen Fall, sondern spülen Sie i h n n u […]
-
Страница 39
ENGLISH DEUTSCH NEDERLANDS Р УССКИЙ POLSK FRANÇAIS D-15 Die Lebensdauer der Filter variiert je nach Betriebsumgebung des Geräts, V erwendungshäu — gkeit sowie Aufstellungsort. Falls das Gerät die Raumluft nicht mehr von Staub oder Gerü — chen reinigt, müssen die Filter ausgetauscht werden. (Lesen Sie dazu den Abschnitt „Bitte lese[…]
-
Страница 40
D-16 STÖRUNGSBESEITIGUNG Sehen Sie sich bei Problemen mit dem Gerät bitte zuerst die unten aufgeführte T abelle zur Störungs- beseitigung an, bevor Sie den Kundendienst konsultieren, da es sich bei einigen Problemen u. U. nicht um eine Fehlfunktion des Geräts handelt. PROBLEM ABHILFE (keine Fehlfunktion) Gerüche und Rauch werden nicht beseiti[…]
-
Страница 41
ENGLISH DEUTSCH NEDERLANDS Р УССКИЙ POLSK FRANÇAIS D-17 FE HLERMELDUN G K C- 850E• K C- 860 E Falls der Fehler erneut auftritt, konsultieren Sie bitte eine Sharp Service-Niederlassung. DIGIT ALAN- ZEIGE LEUCHT ANZEIGE FEHLERDET AILS ABHILFEMASSNAHME Die Luftreinigungs- und Befeuchtungs-Leuchtanzeige blinkt. Fehlfunktion des Be- feuchtungs[…]
-
Страница 42
TECHNISCHE DA TEN Standby-Betrieb Damit die elektrischen Schaltkreise bei an die Stromversorgung angeschlossenem, aber ausgeschaltetem Gerät weiter — hin betrieben werden können, verbraucht dieses Gerät 0,7 W Standby-Strom. Wenn Sie das Gerät nicht verwenden, können Sie den Netzstecker vom Stromnetz trennen, um Strom zu sparen. *1 •Die empfo[…]
-
Страница 43
ENGLISH DEUTSCH NEDERLANDS Р УССКИЙ POLSK FRANÇAIS D-19 A. Entsorgungsinformationen für Benutzer aus Pri vathaushalten 1. In der Europäischen Union Achtung: Werfen Sie dieses Gerät zur En tsorgung bitte nicht in den normalen Hausmüll ! Gemäß einer neuen EU-Richtlinie, die die ordnungsgemäße Rücknahme, Behandlung und Verwertung von […]
-
Страница 44
D-20 KC-C100E_Ger_11.08.indd 22 07.11.13 10:59:12 AM SER VICE PROCEDURE / SERVICE VORGEHENSWEISE SER VICE PROCEDURE — ONL Y EFFECTIVE IN GERMANY Dear SHARP customer , SHARP machines are proprietary articles which are produced with precision and care according to most modern production methods. In case of proper handling and with considering of the […]
-
Страница 45
ENGLISH DEUTSCH NEDERLANDS Р УССКИЙ POLSK FRANÇAIS KC-850E_Ger_08.09.indd 23 08.9.19 11:57:53 AM[…]
-
Страница 46
NOTE V euillez lire ces instructions avant de faire fonctionner votre nouveau puricateur d’air Filtre HEP A Filtre désodorisant lavable Pré-ltre Le puricateur d’air achemine l’air de la pièce par l’entrée d’air , le fait passer à l’inté — rieur de l’appareil par un pré-ltre, un ltre désodorisan[…]
-
Страница 47
ENGLISH DEUTSCH NEDERLANDS Р УССКИЙ POLSK FRANÇAIS F-1 FRANÇAIS Merci de vous être porté acquéreur d’un puricateur d’air SHARP . V euillez lire attenti — vement le présent manuel avant d’utiliser le puricateur d’air . Après avoir lu le manuel, gardez-le à portée de main pour future référence. CARACTÉRISTIQUES T ABLE[…]
-
Страница 48
F-2 INSTRUCTIONS DE SÉCURITÉ IMPORT ANTES Lors de l’utilisation d’appareils électriques, les précautions de sécurité de base doivent être suivies, notamment les suivantes : A VERTISSEMENT — Pour réduire le risque d’électrocution, d’incendie ou de blessures corporelles : NOTE — Brouillage de la radio ou de la télévision Si ce puri[…]
-
Страница 49
ENGLISH DEUTSCH NEDERLANDS Р УССКИЙ POLSK FRANÇAIS F-3 GUIDE D’UTILISA TION DES FIL TRES • Suivez les instructions de ce manuel pour bien assurer le soin et l’entretien des ltres. PRÉCAUTIONS CONCERNANT LE FONCTIONNEMENT • N’obturez ni l’ouïe d’entrée, ni l’ouïe d’évacuation. • N’utilisez pas l’appareil sur d[…]
-
Страница 50
DÉSIGNA TION DES PIÈCES F-4 SCHÉMA ILLUSTRA TIF — A V ANT DOS DE L ’APP AREIL Poignée (2 emplacements, gauche et droit) Capteurs Poignée du réservoir Réservoir d’eau (pour l’humidication) Filtre d’humidication Bouchon du réservoir Flotteur Bac d’humidication Câble d’alimentation Fiche Sortie d’air Filtre HEP A (blanc[…]
-
Страница 51
ENGLISH DEUTSCH NEDERLANDS Р УССКИЙ POLSK FRANÇAIS F-5 V oyant indicateur de l’alimenta- tion en eau (rouge) Ce voyant s’allume quand le réservoir d’eau a besoin d’être rempli. MONITEUR A V ANT Indique l’état et l’humidité de l’air de la pièce. V oy ant i ndic ateu r du Plas macl uster (bl eu) Bleu : Plasmacluster activé[…]
-
Страница 52
F-6 4 3 Inscrivez la date de début d’utilisation sur l’étiquette de date. Utilisez la date de début d’ utilisation pour savoir quand les filtres doivent être rem — placés. Étiquette de date Débranchez l’appareil avant d’installer ou d’ajuster les ltres. PRÉP ARA TIFS A V ANT L ’EMPLOI 2 1 Retirez le panneau arrière. Instal[…]
-
Страница 53
ENGLISH DEUTSCH NEDERLANDS Р УССКИЙ POLSK FRANÇAIS REMPLISSAGE DU RÉSER VOIR D’EAU On peut utiliser l’appareil en mode d’épuration de l’air sans remplir le réservoir d’eau. Lorsque vous utilisez le mode d’épuration d’air et d’humidication ou le mode d’épuration par pluie d’ions, le réservoir d&apo[…]
-
Страница 54
F-8 MODE D’ÉPURA TION DE L ’AIR ET D’HUMIDIFICA TION FONCTIONNEMENT Utilisez le mode d’épuration de l’air et d’humidication pour rapidement épurer l’air , ré — duire les odeurs et humidier . Remplissez le réservoir d’eau. (V oir page F-7) À propos du mode d’humidication automatique 1 2 3 Appuyez sur la touche de vit[…]
-
Страница 55
ENGLISH DEUTSCH NEDERLANDS Р УССКИЙ POLSK FRANÇAIS Appuyez sur la touche de mode d’épuration de l’air sur l’afchage. F-9 Utilisez le mode d’épuration de l’air lorsqu’il n’est pas nécessaire d’accroître l’humidité. 1 2 • Si le câble d’alimentation n’a pas été débranché entre deux utilisations, l&apo[…]
-
Страница 56
F-10 FONCTIONNEMENT VOY ANT D’ALIMENT A TION EN EAU Lorsque le réservoir d’eau est vide, le voyant d’alimentation en eau clignote pour indiquer que le réservoir a besoin d’être rempli. V euillez noter que le voyant ne clignote pas, même si le réservoir d’eau est vide lorsque l’appareil est en mode d’épuration d’air[…]
-
Страница 57
ENGLISH DEUTSCH NEDERLANDS Р УССКИЙ POLSK FRANÇAIS F-1 1 SOIN ET ENTRETIEN APP AREIL Le voyant de ltre s’allume pour rappeler qu’il est temps d’effectuer l’entretien du panneau arrière, des capteurs et du ltre d’humidication. Le voyant indicateur s’allume au bout d’ environ 720 heures d’utilisation. Après avoir[…]
-
Страница 58
F-12 L AV A G E À L A M A I N U N I — QUEMENT ! P A S D E S É C H A G E E N M A — CHINE ! SOIN ET ENTRETIEN A TTENTION Lorsque vous remarquez une odeur désa- gréable en provenance de la sortie d’air . Lorsque le rendement du ltre semble baisser et que les odeurs persistent. Cycle d’ en — tretien RÉSER VOIR D’EAU Rincez l’intérie[…]
-
Страница 59
ENGLISH DEUTSCH NEDERLANDS Р УССКИЙ POLSK FRANÇAIS F-13 La fréquence de l’entretien dépend de la dureté de l’eau. Evi — tez de renverser l’eau lorsque vous retirez ou nettoyez le bac. Retirez le réservoir d’eau et le bac d’humi — dication. 1 2 3 Rincez l’intérieur du bac d’humidi — cation à l’eau tiède […]
-
Страница 60
F-14 SOIN ET ENTRETIEN FIL TRE D’HUMIDIFICA TION La fréquence du cycle d’entretien dépend de la dureté ou des impure tés de l’eau que vous utilisez ; plus l’eau est dure, plus le détartrage doit être fréquent. 1 6 * Ne frottez pas le ltre d’ humidication ; limitez- vous à le rincer délicate — ment sous l’eau tiède. 5 Ret[…]
-
Страница 61
ENGLISH DEUTSCH NEDERLANDS Р УССКИЙ POLSK FRANÇAIS F-15 La durée de vie des ltres varie selon les conditions ambiantes, l’emploi et l’emplacement de l’ap — pareil. Si la poussière ou les odeurs persistent, remplacez les ltres. (Reportez-vous à « V euillez lire ces instructions avant de faire fonctionner votre nouveau puri[…]
-
Страница 62
F-16 RÉSOLUTION DES PROBLÈMES Avant de faire appel au SA V , veuillez lire le tableau de résolution de problèmes ci-dessous, car le problème n’est peut être pas un dysfonctionnement de l’appareil. SYMPTÔME SOLUTION (pas un dysfonctionnement) Les odeurs et la fumée ne sont pas éliminées. • Nettoyez ou remplacez les ltres s’ils s[…]
-
Страница 63
ENGLISH DEUTSCH NEDERLANDS Р УССКИЙ POLSK FRANÇAIS F-17 AFF ICHA GE D’ERRE UR K C- 850E• K C- 860 E Si l’erreur de reproduit, contactez le centre de service Sharp. AFFICHAGE NUMERIQUE AFFICHAGE LUMINEUX ORIGINE DE L ’ERREUR SOLUTION Clignotement du voyant indi — cateur d’épuration de l’air et d’humidication. Anomalie du[…]
-
Страница 64
CARACTÉRISTIQUES Consommation en veille Pour être capable de faire fonctionner les circuits électriques lorsque le câble d’alimentation est raccordé au secteur , cet appareil consomme environ 0,7 W en mode veille. Pour économiser l’énergie, débranchez le câble d’alimentation lorsque l’appareil n’est pas utilisé. *1 •La taille […]
-
Страница 65
ENGLISH DEUTSCH NEDERLANDS Р УССКИЙ POLSK FRANÇAIS F-19 A. Informations sur la mise au rebut à l’intention des utilisateurs privés (ménages) 1. Au sein de l’Union europ éenne Attention : si vous souh aitez mettre cet appareil au rebut, ne le jetez pas dans une poubelle ordinaire ! Les appareils élec triques et électroniques […]
-
Страница 66
Memo KC-850E_Fre_08.9.indd 22 08.9.19 0:06:22 PM[…]
-
Страница 67
ENGLISH DEUTSCH NEDERLANDS Р УССКИЙ POLSK FRANÇAIS KC-850E_Fre_08.9.indd 23 08.9.19 0:06:22 PM[…]
-
Страница 68
OPMERKING Lees het onderstaande aandachtig door voordat u uw nieuwe luchtreiniger in gebruik neemt HEP A-lter Afwasbaar geurlter V oorlter De luchtreiniger neemt via de luchtinlaat de kamerlucht op, voert de lucht achtereen- volgens door een voorlter , een afwasbaar geurlter en een HEP A-lter en blaast de lucht via de luchtuitlaat[…]
-
Страница 69
ENGLISH DEUTSCH NEDERLANDS Р УССКИЙ POLSK FRANÇAIS Unieke combinatie van 3 luchtbehande- lingstechnologieën Drievoudig filtratiesysteem + Luchtzui- vende Plasmacluster ionen + Luchtbe- vochtiger N-1 NEDERLANDS D an k u v oo r h et ve rt r ou w en d at u i n d e de z e lu c ht r ei ni g er va n SH A RP he ef t g es te ld .L e es d ez e ge b[…]
-
Страница 70
N-2 BELANGRIJKE VEILIGHEIDSVOORSCHRIFTEN Bij het gebruik van elektrische apparaten dient u altijd enkele fundamentele veiligheidsvoor- schriften in acht te nemen, waaronder: W AARSCHUWING — Om het gevaar voor een elektrische schok, brand of lichamelijk letsel te voorkomen: OPMERKING — V erstoring van de radio- of televisieontvangst Als deze luchtre[…]
-
Страница 71
ENGLISH DEUTSCH NEDERLANDS Р УССКИЙ POLSK FRANÇAIS N-3 RICHTLIJNEN VOOR GEBRUIK V AN DE FIL TERS • V olg de in deze gebruiksaanwijzing vermelde instructies voor het op de juiste wijze behandelen en reinigen van de lters. VOORZORGSMAA TREGELEN VOOR GEBRUIK • Blokkeer de luchtinlaat en/of luchtuitlaat niet. • Gebruik de luchtreiniger[…]
-
Страница 72
BENAMING V AN DE ONDERDELEN N-4 OVERZICHT — VOORZIJDE ACHTERZIJDE Handgrepen (aan weerszijden) Sensoren Handgreep van het waterreservoir W aterreservoir (voor luchtbevochtiging) Luchtbevochti- gingslter Dop van het waterreservoir Vlotter Luchtbevochtigingsbak Netsnoer Stekker Luchtuitlaat HEP A-lter (wit) Afwasbaar geurlter (zwart) Lipjes […]
-
Страница 73
ENGLISH DEUTSCH NEDERLANDS Р УССКИЙ POLSK FRANÇAIS N-5 W ater bijvul-indicator (rood) Deze indicator licht op om aan te geven dat het waterreservoir moeten worden bijgevuld. DISPLA Y Het display laat de toestand van de lucht in de kamer zien. Plasmacluster-indicator (blauw) Blauw: Plasmacluster AAN Indicator uit: Plasmacluster UIT Luchtvoch[…]
-
Страница 74
N-6 4 3 Noteer de datum van de ingebruikname van het lter op het dat umetiket. Ge bru ik de z e d at um o m u t e h el pe n her inn ere n aan d e datum waaro p de f il ter s mo ete n word en ver van — ge n. Datumetiket T rek de stekker uit het stopcontact voordat u de luchtreiniger instal- leert of de lters plaatst. VOORBEREIDINGEN VOOR GEBRU[…]
-
Страница 75
ENGLISH DEUTSCH NEDERLANDS Р УССКИЙ POLSK FRANÇAIS VULLEN V AN HET W A TERRESERVOIR Met het programma LUCHTREINGEN kan de lucht- reiniger worden gebruikt zonder dat er water in het waterreservoir zit. V oor de programma’s LUCHT — REINGEN & LUCHTBEVOCHTIGEN en CLEAN ION SHOWER moet het waterreservoir met water zijn gevuld. 2 1 3 Maa[…]
-
Страница 76
N-8 HET PROGRAMMA LUCHTREINIGEN & LUCHTBEVOCHTIGEN BEDIENING Gebruik het programma Luchtreinigen & Luchtbevochtigen om de lucht te reinigen, te bevoch- tigen en om geuren te verminderen. V ul het waterreservoir . (Zie pagina N-7) Over het programma Automatisch luchtbevochtigen 1 2 3 Druk op de VENTILA TORSNELHEIDKNOP om de gewenste ventilat[…]
-
Страница 77
ENGLISH DEUTSCH NEDERLANDS Р УССКИЙ POLSK FRANÇAIS Dr u k op d e pr o gr am ma kn op LU CH TR EI NI G EN o p de d i sp la y . N-9 Gebruik het programma Luchtreinigen wanneer de lucht niet bevochtigd hoeft te worden. 1 2 • De luchtreiniger start met hetzelfde programma als toen het apparaat werd uitgeschakeld, tenzij u tussentijds de stekk[…]
-
Страница 78
N-10 BEDIENING W A TER BIJVUL-INDICA TOR Wannee r he t wa te rr es er vo ir l eeg is, beg in t de wat er bij vu l-i nd ic at or te knipperen om aan te geven dat het waterreservoir moet worden bijge- vuld. De indicator gaat niet knipperen wanneer het waterreservoir leeg is en het programma Luchtreinigen of het programma Clean ION SHOWER is geselecte[…]
-
Страница 79
ENGLISH DEUTSCH NEDERLANDS Р УССКИЙ POLSK FRANÇAIS N-1 1 ZORG EN ONDERHOUD FIL TERINDICA T OR De lterindicator licht op om u eraan te herinneren dat het achterpaneel, de sen — soren en het luchtbevochtigingslter moeten worden schoongemaakt. De indica — tor licht op na 720 gebruiksuren. Na het schoonmaken moet de lterindicator worde[…]
-
Страница 80
Onderhoudscyclus Dagelijks als de lucht wordt bevochtigd N-12 ZORG EN ONDERHOUD W A TERRESER VOIR Maak de binnenkant van het waterreservoir schoon door er een kleine hoeveelheid handwarm water in te doen, de dop goed dicht te draaien en het waterreservoir goed te schudden. Hierbij mag een mild schoon — maakmiddel worden gebruikt, dat echter wel moe[…]
-
Страница 81
ENGLISH DEUTSCH NEDERLANDS Р УССКИЙ POLSK FRANÇAIS N-13 De onderhoudscyclus is mede afhankelijk van de hardheid van het water . Probeer bij het verwijderen en schoonmaken van de luchtbevochtigingsbak geen water te morsen. V erwijder het waterreservoir en de luchtbevochtigingsbak. 1 2 3 Spoel de binnenkant van de lucht- bevochtigingsbak uit […]
-
Страница 82
Mogelijk ziet u een roodbruine of witte neer — slag op het oppervlak van het luchtbevoch — tigingslter . Deze onzuiverheden (calcium, e.d.) zijn afkomstig van het kraanwater; dit duidt niet op een defect. V ervang het luchtbevochtigings — lter wanneer het helemaal met witte neerslag is bedekt. N-14 ZORG EN ONDERHOUD LUCHTBEVOCHTIGINGSFIL TER […]
-
Страница 83
ENGLISH DEUTSCH NEDERLANDS Р УССКИЙ POLSK FRANÇAIS N-15 De levensduur van de lters is afhankelijk van de omstandigheden, het gebruik en de locatie van de luchtreiniger . V ervang de lters wanneer stof of nare geuren niet meer worden verwijderd. (Lees ook “Lees het onderstaande aandachtig door voordat u uw nieuwe luchtreiniger in geb[…]
-
Страница 84
N-16 PROBLEMEN OPLOSSEN Lees de onderstaande tabel voordat u contact opneemt met een reparateur . Een probleem duidt niet altijd op een defect. PROBLEEM OPLOSSING (geen defect) Geuren en rook worden niet verwijderd. • Reinig of vervang de lters als ze erg vuil lijken. (Zie pagi — na’s N-1 1, N-12, N-14) D e s t o f o f g e u r m o n i t o[…]
-
Страница 85
ENGLISH DEUTSCH NEDERLANDS Р УССКИЙ POLSK FRANÇAIS N-17 F OUT A ANDUIDINGEN K C- 850E• K C- 860 E N eem cont act op met het Sharp ser vicecenter wanneer dezelfde fout nogmaals optreedt. DIGIT ALE INDICA TIE INDICA TIE DET AILS V AN DE FOUT OPLOSSING Kni pp e ren van de Luc ht re in i- ge n & Luch tb evoch ti ge n ind i- ca tor. Proble[…]
-
Страница 86
TECHNISCHE GEGEVENS Stand-by stroomverbruik V oor het voeden van de elektrische circuits terwijl de stekker in het stopcontact zit, verbruikt deze lucht — reiniger in de stand-by ongeveer 0,7 W . T rek de stekker uit het stopcontact om energie te besparen wanneer u de luchtreiniger niet gebruikt. *1 •De aanbevolen vloeroppervakte geldt voor een l[…]
-
Страница 87
ENGLISH DEUTSCH NEDERLANDS Р УССКИЙ POLSK FRANÇAIS N-19 A. Informatie over afvalverw ijdering voor gebruikers (particuliere huishoudens) 1. In de Europese Unie Let op: Deze appara tuur niet samen met het normale huisafval w eggooien! Afgedankte elektrische en elektronisc he apparatuur moet gescheiden w orden ingezameld conform d e wetgeving[…]
-
Страница 88
(»dõæªdG ΩGóîà°SÉdG) RÉ¡édG øe ᪫∏°ùdG ¢ü∏îàdG á≤jôW ∫ƒM äÉeƒ∏©e.CG »HhQhC’G OÉ–’G ∫hO ‘ . 1 !…OÉ©dG äÉjÉØædG Öμe ‘ ¬«eQ ΩóY AÉLôdG ,RÉ¡÷G Gòg øe ¢ü∏îàdG äOQC G GP EG :¬«ÑæJ á÷É©ŸG øª°†J »àdG ÚfGƒ≤dG Ö°ùM π°üØæe πμ°ûH πeÉ©J ¿CG Ö[…]
-
Страница 89
396 56 51 396 56 50 730 240 19 39 240 21 39 500 84 5.5(4.9) 17 120 8.8(8.2) 25 300 306 41 47 288 40 47 600 168 11.6 35 168 13.5 35 400 60 3.8(3.3) 15 84 6.8(6.3) 22 230 210 26 45 186 21 42 450 132 9.5 34 132 11.5 34 330 48 3.7(3.4) 15 54 6.1(5.8) 20 170 ~48 4.3 ~38 4.0 3.0 KC-860E KC-850E KC-840E 220 ~ 240 50/60 ~26 RGô£dG Qɶàf’G ™°Vh ?[…]
-
Страница 90
Î∏ØdG ∫GóÑà°SG äɪ«∏©J .ÜQÉ°T áeóN õcôà π°üJG ,iôNCG Iôe CÉ£ÿG ô¡X GPEG KC-850 • KC-860E KC-840 »ªbôdG ô°TDƒŸG IAÉ°VE’G ô°TDƒe Ö«WôJ h ∞«¶æJ ô°TDƒe Aƒ°V ¢†«eh .AGƒ¡dG πμ°ûH πª©j ’ Ö«WÎdG Î∏a »©«ÑW ,Ö«WÎdG á«æ«°U h ,Ö«WÎdG Î∏a ¿CG øe ócCÉJ í«[…]
-
Страница 91
.¬°ùØf RÉ¡÷G ‘ k Ó£Y ¿ƒμJ ’ ób áKOÉ◊G á∏μ°ûŸG ¿C G å«M ,√ÉfO CG áëFÓdG á©LGôe AÉLôdG ,áfÉ«°üdG áeóîH ∫É°üJ’G πÑb ¢VGôYC ’G ( k Ó£Y ¢ù«d) í«ë°üàdG .¿’hõj ’ ¿ÉNódG h á¡jôμdG íFGhôdG ô°†NC’G ¿ƒ∏dÉH á«eÉeC’G á°TÉ°ûdG A»°†J .»≤f ÒZ AGƒ?[…]
-
Страница 92
Î∏ØdG ∫GóÑà°SG äɪ«∏©J hCG QÉѨdG OƒLh ôªà°SG GPEG .RÉ¡÷G ™bƒe h ΩGóîà°S’G h áaô¨dG ƒ÷ k É©ÑJ Î∏Ø∏d »°VGÎa’G ôª©dG Ò¨àj .äGÎ∏ØdG ∫óÑà°SG ,á¡jôμdG íFGhôdG ( “ ójó÷G AGƒ¡dG »≤æe ΩGóîà°SÉH AóÑdG πÑb ‹ÉàdG IAGôb AÉLôdG ” ¤EG ™LQG) Î∏ØdG […]
-
Страница 93
Ö«WÎdG Î∏a 1 2 3 4 6 5 7 ájÉæ©dG IQhO .Î∏ØdG ô°TDƒe A»°†j ÚM hCG k Éjô¡°T IóMGh Iôe âfÉc ɪ∏c ,É¡eóîà°ùJ »àdG AÉŸG ‘ ÖFGƒ°ûdG áHÓ°U ≈∏Y áfÉ«°üdG ájQhO óªà©à°S .ÌcCG …QhO πμ°ûH áfÉ«°ü∏d âéàMG ɪ∏c Ö∏°UCG .Ö«WÎdG á«æ«°U h AÉŸG ¿GõN êôNCG AÉŸ[…]
-
Страница 94
1 2 Ö«WÎdG á«æ«°U 1 2 3 4 ájÉæ©dG IQhO óMGh ô¡°T óæY AÉŸG Öμ°S ÖæŒ .√É«ŸG áHÓ°U ≈∏Y ájÉæ©dG IQhO QGôμJ óªà©j .á«æ«°üdG ∞«¶æJ hC G ´õf .Ö«WÎdG á«æ«°U h AÉŸG ¿GõN ´õfEG ¿GõÿG ¢†Ñ≤e ºK k ’hCG AÉŸG ¿GõN êôNCG Ωóîà°SG .Ö«WÎdG á«æ«°U á«æ«°U Öë[…]
-
Страница 95
AÉŸG ¿GõN (¿ƒë°üdG ádÉ°ùZ ‘ ¿GõÿG π°ùZ øμÁ ’) :á¶MÓe ájÉæ©dG IQhO Ö«WÎdG óæY Ωƒj πc ºK ¬bÓZEG h ¿GõÿG πNGO AÉŸG øe á∏«∏b ᫪c ∑ÎH ôJÉØdG AÉŸÉH ¿GõÿG πNGO ∞£°TG AÉŸG ‘ ¬àHGPE’ ó©H øμd h πNGódG øe ¬Ø«¶æàd ∞«ØN ‹õæe ∞¶æe ΩGóîà°SG øμÁ .[…]
-
Страница 96
.äGÎ∏ØdG h äÉ°ùéŸG ∂dP ‘ Éà k ÉjQhO ¬Ø«¶æJ AÉLôdG ,RÉ¡÷G Gò¡d ‹ÉãŸG AGOC’G ≈∏Y ®ÉØë∏d k GóHCG ¢ùÑ≤ŸG ∂°ù“ ’ h ,AÉHô¡μdG Qó°üe øe ¢ùÑ≤ŸG ´õæH »FÉHô¡μdG QÉ«àdG øe ¬∏°üa øe ócCÉJ ,RÉ¡÷G ∞«¶æJ óæY .ájó°ùL áHÉ°UEG h/hCG á«FÉHô¡c áeó°?[…]
-
Страница 97
AÉŸG ójhõJ ô°TDƒe Aƒ°V 1 2 3 ìƒ∏dG Aƒ°V ¿ƒμj ÚM ¬eóîà°SG .¥Gô°TE’G ó°S ó°T »eÉeC’G áLQO QÉ«àN’ QÉ°ù«dG ≈∏Y »ë«°VƒàdG º°SôdG ¤EG ™LQEG .»eÉeC’G ìƒ∏d áHƒ∏£ŸG ¥Gô°TE’G .RÉ¡÷G ΩGóîà°SÉH AóÑdG óæY k ÉbGô°TE G Ìc CG á«eÉeC’G á°TÉ°ûdG AGƒ°VCG ¿?[…]
-
Страница 98
1 2 AGƒ¡dG ∞«¶æJ §‰ 1 .AGƒ¡dG ¤EG áHƒWôdG øe ójõŸG AÉØ°VEG Ωõ∏j ’ ÚM AGƒ¡dG ∞«¶æJ §‰ Ωóîà°SG .á°TÉ°ûdG ≈∏Y AGƒ¡dG ∞«¶æJ §‰ QR §¨°VEG RÉ¡édG 𪩫°S ,∫ɪ©à°SG πc ø«H kÉYhõæe »FÉHô¡μdG ¢ùÑ≤ªdG øμj ºd GPEG • .≥HÉ°ùdG ∫ɪ©à°S’G óæY É?[…]
-
Страница 99
AGƒ¡dG Ö«WôJ h ∞«¶æJ §‰ 65% 60% 55% ~ 18 18 ~ 24 ~ 24 á«°ù«FôdG ¢Vô©dG á°TÉ°T / ΰù∏cÉeRÓH ±É≤jEG/𫨰ûJ QR (ô°†NCG) ô°TDƒŸG Aƒ°V ±É≤jE’G QR 𫨰ûàdG QR §ªædG QÉ«àN’ QGQRC’G øe ÉjCG §¨°VEG .RÉ¡÷G 𫨰ûàH AóÑdG h /áMhôŸG áYô°S QR (ô°†NCG) ô°TDƒŸG […]
-
Страница 100
AÉŸG ¿GõN áÄÑ©J ¿hO AGƒ¡dG ∞«¶æJ §‰ ‘ RÉ¡÷G ΩGóîà°SG øμÁ óæY AÉŸÉH ¿GõÿG Aπe »¨Ñæj .AÉŸÉH ¿GõÿG Aπe §‰ h äÉfƒjC’G ≥aO §‰ ‘ RÉ¡÷G ΩGóîà°SG .AGƒ¡dG Ö«WôJ h ∞«¶æJ .≈∏YC’G øe ¬Ñë°ùH AÉŸG ¿GõN êôNCG RÉ¡÷G πNGO AÉŸG ¿GõN â«ÑãJ IOÉYEG ¿Gõ?[…]
-
Страница 101
…CG AGôLEG hCG Ö«côJ πÑb AÉHô¡μdG øe RÉ¡÷G ¢ùÑ≤e ´õfEG .äGÎ∏ØdG ≈∏Y äÓjó©J øe äGÎ∏ØdG ádGREG øe ócCÉJ .RÉ¡÷G πNGO â©°Vh h á«μ«à°SÓH ¢SÉ«cCG ‘ É¡¶ØM ” ,äGÎ∏ØdG IOƒL ≈∏Y á¶aÉëª∏d .Iôe ∫hC’ ¬eGóîà°SG πÑb RÉ¡÷G πNGO í«ë°üdG É¡fÉμe ‘ É¡©[…]
-
Страница 102
á«eÉeC ’G á°TÉ°ûdG QÉѨdG ô°TDƒe á°TÉ°T QÉѨdG ô°TDƒe á°TÉ°T (¥QRCG) ΰù∏cÉeRÓH äÉfƒjCG ô°TDƒe Aƒ°V á¡jôμdG íFGhôdG ô°TDƒe á°TÉ°T (ô°†NCG) áHƒWôdG ô°TDƒe Aƒ°V (ôªMCG) AÉŸG ójhõJ ô°TDƒe Aƒ°V ΰù∏cÉeRÓH äÉfƒjCG ô°TDƒe Aƒ°V (¥QRCG) ( ôªM CG ) AÉŸG ój[…]
-
Страница 103
KC-840E KC-850E KC-860E á«°ù«FôdG IóMƒdG á« ° ù « F ô d G I ó Mƒ d G á« e É e C ’G á °TÉ °ûdG á « °ù « F ôdG ¢ V ô©dG á °TÉ °T AG ƒ¡ dG ê ô fl á«eÉ e C ’G á ¡ ÷ G – »ë « °V ƒJ §£ fl á«Ø ∏ ÿG á¡÷G AGƒ¡dG êôfl á«°ù«FôdG ¢Vô©dG á°TÉ°T á«eÉeC ’G á°TÉ°ûdG […]
-
Страница 104
𫨰ûàdÉH á°UÉN äÉWÉ«àMG .AGƒ¡dG êôfl hCG/h πNóe ó°ùH º≤J ’ • QÉîÑ∏d ¢Vô©àJ ¿C G ø μ Á å « M h CG ,äÉfÉî°ùdG hC G ¿Gôa C’G πãe ,IQGô◊G QOÉ°üe ¥ƒa hCG øe Üô≤dÉH RÉ¡÷G Ωóîà°ùJ ’ • .ºFÉb ™°Vh ‘ ƒg h kÉehO RÉ¡÷G 𫨰ûàH ºb • .á«ÑfÉ÷G ¢†HÉ[…]
-
Страница 105
:‹ÉàdG øª°†àJ »àdG h á«°SÉ°SC’G áeÓ°ùdG äÉWÉ«àMG ´ÉÑJG Ú©àj ,á«FÉHô¡μdG Iõ¡LC’G ΩGóîà°SG óæY :äÉHÉ°UEG ´ƒbh hCG ≥jôM ܃°ûf hCG á«FÉHô¡c áeó°üH áHÉ°UE’G ô£N …OÉØàd – ôjò– .RÉ¡÷G ΩGóîà°SG πÑb äɪ«∏©àdG ™«ªL CGôbEG • .âdƒa 240 ~ 220 ?[…]
-
Страница 106
………………… …………………………. ………………… …………………………….. …………………. …………………………… á«Ø∏îdG á¡édG ………………………………………………… ………………………………………. • • • • • • • • • • ………….[…]
-
Страница 107
äGRɨdG ádGREÉd ºª°üe ô«Z ¬æμd h ,¬d áÑMÉ°üªdG á¡jôμdG íFGhôdG h AGƒ¡dÉH ≥dÉ©dG QÉѨdG ádGREÉd AGƒ¡dG »≤æe º«ª°üJ ºJ • å©ÑæJ …òdG Qó°üªdG óLGƒJ ôªà°SG GPEG .(ôFÉé°ùdG ¿ÉNO »a óLGƒàªdG ¿ƒHôμdG ó«°ùcC G ∫h CG ,∫ÉãªdG π«Ñ°S ≈∏Y) IQÉ°†dG .ΩÉJ […]
-
Страница 108
»HôY KC-840E KC-850E KC-860E KC-840E KC-850E KC-860E AP operation manual-new.indd 1 AP operation manual-new.indd 1 10/5/08 12:47:14 PM 10/5/08 12:47:14 PM[…]
Р
УССКИЙ
NEDERLANDS
DEUTSCH
ENGLISH
AIR PURIFIER
with Humidifying Function
OPERATION MANUAL
KC-840E
KC-850E
KC-860E
KC-840E
KC-850E
KC-860E
LUCHTREINIGER
met luchtbevochtiger
GEBRUIKSAANWIJZING
LUFTREINIGER
mit Befeuchtungsfunktion
BEDIENUNGSANLEITUNG
Printed in China
TINS-A279KKRZ 08H-
OSAKA, JAPAN
SHARP CORPORATION
Purificateur d’air avec
fonction d’humidification
MANUEL D’UTILISATION
Воздухоочиститель с
функцией увлажнения
РУКОВОДСТВО ПО
ЭКСПЛУАТАЦИИ
FR
AN
Ç
AI
S
*Plasmacluster is a trademark
of Sharp Corporation.
KC-840E_Eng2.indd 1
08.10.10 9:23:04 AM