
i 2023 Scrambler 850 Owner’s Manual

|
| 2023 Owner’s Manual Scrambler 850 |
Trademarks
NGK® is a registered trademark of NGK Spark Plug Co., Ltd.
FOX® is a registered trademark of Fox Factory Inc. Loctite®
is a registered trademark of Henkel Corporation. MACPHERSON RIDE®
is a registered trademark of Aftermarket Auto Parts Alliance, Inc.
NYOGEL® is a registered trademark of Nye Lubricants, Inc. Bluetooth®
is a registered trademark of Bluetooth Sig, Inc. QR Code® is
a registered trademark of DENSO WAVE INCORPORATED. BatteryMinder®
is a registered trademark of VDC Electronics, Inc. Phillips®
is a registered trademark of the Phillips Screw Company. Tread LightlySM is a service mark of the United States Department of Agriculture.
Google Play® is a registered trademark of Google LLC. APPLE®
and APP STORE® are registered trademarks of Apple Inc. MIKUNI®
is a registered Trademark of MIKUNI CORPORATION. Silicon Labs®
is a registered trademark of Silicon Laboratories Inc. iOS® is
a registered trademark of Cisco Technology, Inc. Android® is
a registered trademark of Google LLC. Duro® is a registered trademark
of HWA Fong Rubber (USA) Inc. DBA Duro Tire & Wheel Corp. AUTOLITE®
is a registered trademark of BMO HARRIS BANK N.A. RiderCourse℠
is a service trademark of Specialty Vehicle Institute of America.
Unless noted, trademarks are the property of Polaris Industries
Inc.
Copyright Information
Copyright 2022 Polaris Industries Inc. All information contained
within this publication is based on the latest product information
at the time of publication. Due to constant improvements in the design
and quality of production components, some minor discrepancies may
result between the actual vehicle and the information presented in
this publication. Depictions and/or procedures in this publication
are intended for reference use only. No liability can be accepted
for omissions or inaccuracies. Any reprinting or reuse of the depictions
and/or procedures contained within, whether whole or in part, is expressly
prohibited.
The original instructions for this vehicle are in English. Other
languages are provided as translations of the original instructions.
Printing
Printed in U.S.A.
ii Welcome

Thank you for purchasing a POLARIS vehicle, and welcome to our
world-wide family of POLARIS enthusiasts. Be sure to visit us online
at www.polaris.com for the latest news, new product introductions,
upcoming events, career opportunities and more.
Here at POLARIS we proudly produce an exciting line of utility
and recreational products. We believe POLARIS sets a standard of excellence
for all utility and recreational vehicles manufactured in the world
today. Many years of experience have gone into the engineering, design,
and development of your POLARIS vehicle, making it the finest machine
we’ve ever produced.
For safe and enjoyable operation of your vehicle, be sure to follow
the instructions and recommendations in this owner’s manual.
Your manual contains instructions for minor maintenance, but information
about major repairs is outlined in the POLARIS Service Manual and
can be performed by a factory certified Master Service Dealer (MSD)
technician.
Your POLARIS dealer knows your vehicle best and is interested in
your total satisfaction. Your POLARIS dealership can perform all of
your service needs during and after the warranty period.
For the most up-to-date owner’s manual visit
https://www.polaris.com/en-us/owners-manuals.
iii Safety Symbols and Signal Words
The following signal words and symbols appear throughout this manual
and on your vehicle. Your safety is involved when these words and
symbols are used. Become familiar with their meanings before reading
the manual.
DANGER
DANGER indicates a hazardous situation which,
if not avoided, WILL result in death or serious injury.
WARNING
WARNING indicates a hazardous situation which,
if not avoided, COULD result in death or serious injury.
CAUTION
CAUTION indicates a hazardous
situation which, if not avoided, COULD result in minor to moderate
injury.
NOTICE
NOTICE provides key information by clarifying
instructions.
IMPORTANT
IMPORTANT provides key reminders during
disassembly, assembly, and inspection of components.
The Prohibition Safety Sign indicates
an action NOT to take in order to avoid a hazard.

The Mandatory Action Sign indicates
an action that NEEDS to be taken to avoid a hazard.

Chapter 1: Introduction
1.1.1: Important Warning About This Manual
WARNING
Failure to heed the warnings and safety precautions
contained in this manual can result in severe injury or death. A POLARIS
ATV is not a toy and can be hazardous to operate. This vehicle handles
differently than other vehicles, such as motorcycles and cars. A collision
or rollover can occur quickly, even during routine maneuvers like
turning, or driving on hills or over obstacles, if you fail to take
proper precautions.
-
Read this owner’s manual. Understand all safety warnings,
precautions and operating procedures before operating a POLARIS ATV.
Keep this manual with the ATV. -
Never operate an ATV without proper instruction. Take a certified
ATV safety training course. In the United States, certified training
can be found at www.atvsafety.org. -
This vehicle is an ADULT VEHICLE ONLY. Operation is prohibited
for anyone under 16 years of age. -
Never permit a guest to operate the ATV unless the guest has
read this manual and all product labels and has completed a certified
safety training course. In the United States, certified training can
be found at www.atvsafety.org.
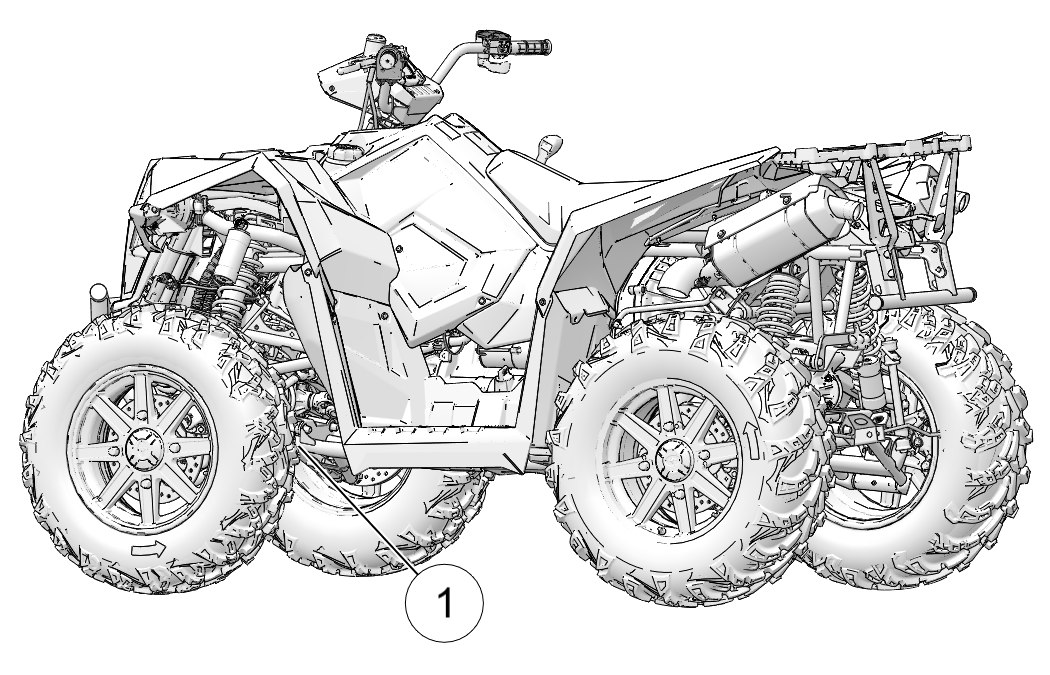
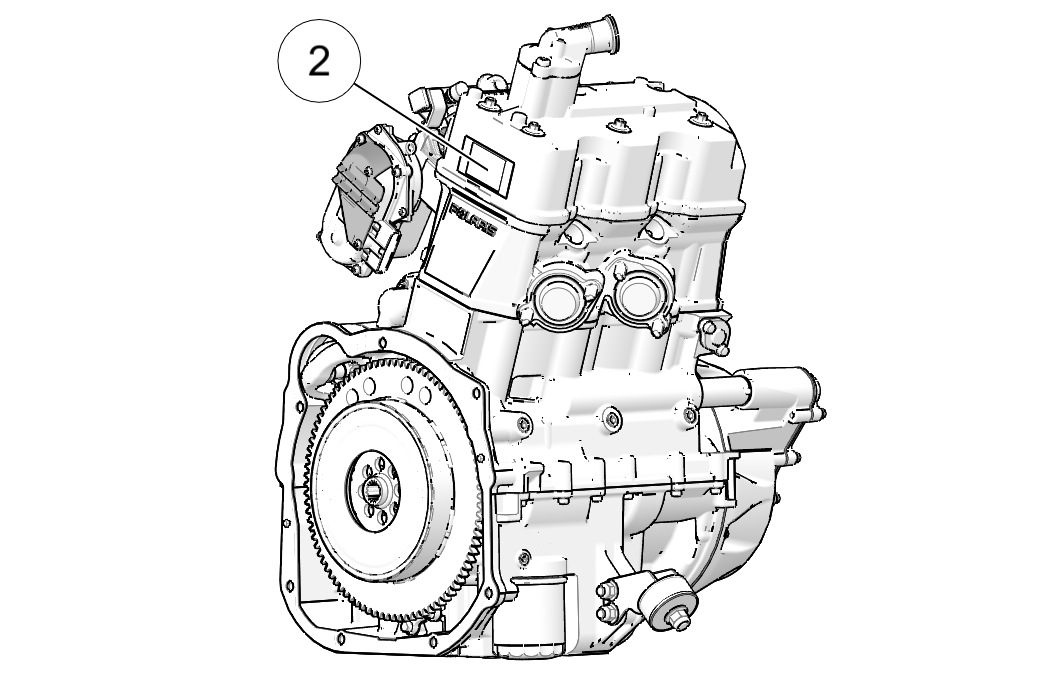
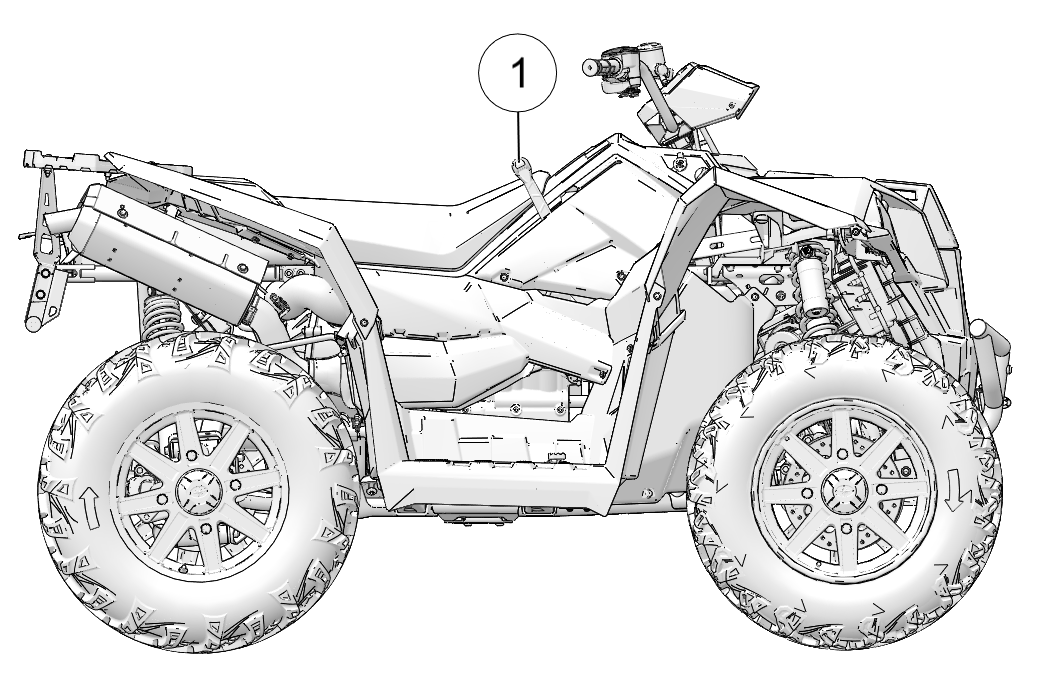
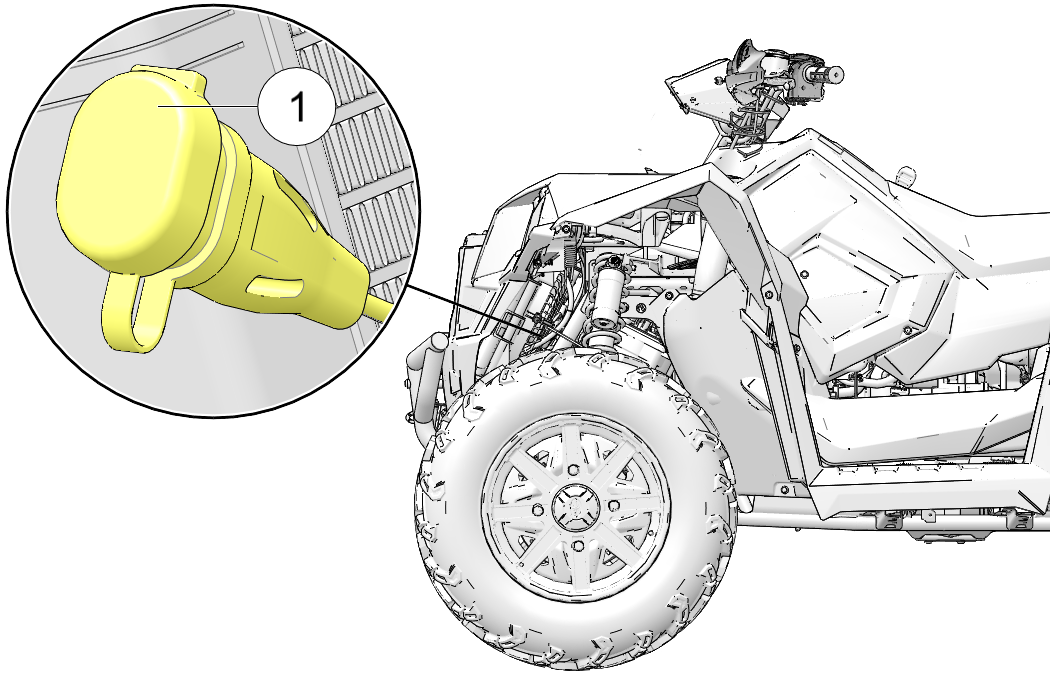
1.1.2: Vehicle Identification Numbers
The vehicle identification number (VIN) is stamped on the left
front frame tube 1.
Record your vehicle’s identification numbers and key number in
the spaces provided. Remove the spare key and store it in a safe place.
An ignition key can be duplicated only by ordering a POLARIS key blank
(using your key number) and mating it with one of your existing keys.
The ignition switch must be replaced if all keys are lost.
| Vehicle Model Number | |
| Frame VIN 1 |
|
| Engine Serial Number 2 |
|
| Key Number |
1.1.3: Reporting Safety Defects (Canada)
To report a safety defect to Transport Canada, you may either fill
out an online defect complaint form at their website (English: http://www.tc.gc.ca/recalls, French: http://www.tc.gc.ca/rappels) or contact their Defect Investigations and Recalls Division by
calling toll-free 1-800-333-0510 (Canada) or 819-994-3328 (Ottawa-Gatineau
area / International).
Chapter 2: Safety
2.2.1: Safety Training
ATV safety training is a top priority for POLARIS. POLARIS strongly
encourages you and any family members who will be riding the ATV to
take a training course.
A POLARIS ATV is an off-road vehicle. Familiarize yourself with
all laws and regulations concerning the operation of this vehicle
in your area. We strongly advise you to strictly follow the recommended
maintenance program outlined in your vehicle manual. This preventive
maintenance program is designed to ensure that all critical components
on your vehicle are thoroughly inspected at specific intervals.
Safety Training in the United States
If
you purchased a new POLARIS ATV in the United States, your dealer
provided information about the authorized ATV RiderCourse℠
that is available to you and your eligible family members. This training
is included in the purchase price of your ATV. You were also provided
with printed materials that explain safe operating procedures. You
should review this information on a regular basis.
If you purchased
a used POLARIS ATV in the United States, you can enroll in the ATV RiderCourse℠ for a fee. Call ATV Enrollment Express at
1-800-887-2887 or visit www.atvsafety.org. If you purchased
a POLARIS ATV outside the United States, please contact your dealer
or local law enforcement agencies, or visit www.polaris.com for information about safety training.
FOR MORE INFORMATION
ABOUT ATV SAFETY in the United States, call the Consumer Product Safety
Commission at 1-800-638-2772, or visit www.cpsc.gov, visit www.atvsafety.org, or call POLARIS at 1-800-342-3764.
2.2.2: Safe Riding Gear
Always wear helmet, eye protection,
gloves, long-sleeve shirt, long pants, and over-the-ankle boots at
all times. Protective gear reduces the chance of injury.
-
1 Helmet
-
2 Eye Protection
-
3 Long Sleeves
-
4 Gloves
-
5 Long Pants
-
6 Over-the-Ankle Boots
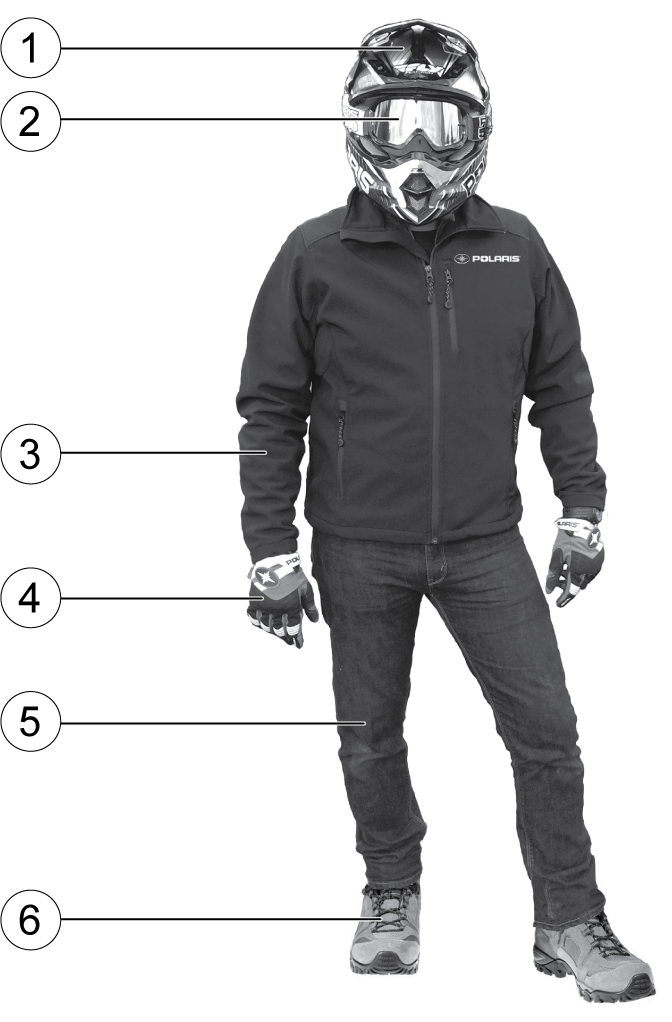
2.2.2.1: Helmet
Wearing a helmet can prevent a severe head injury. Whenever riding
this POLARIS vehicle, always wear a helmet that meets or exceeds established
safety standards. Clasp the buckle and pull each strap tight to ensure
the helmet is properly secured to the head.
Approved helmets in the USA and Canada
bear a U.S. Department of Transportation (DOT) label.

Approved helmets in Europe, Asia
and Oceania bear the ECE 22.05 label. The ECE mark consists of a circle
surrounding the letter E, followed by the distinguishing number of
the country which has granted approval. The approval number and serial
number will also be displayed on the label.

2.2.2.2: Eye Protection
Do not depend on eyeglasses or sunglasses for eye protection. Whenever
riding this POLARIS vehicle, always wear shatterproof goggles or use
a shatterproof helmet face shield. POLARIS recommends wearing approved
Personal Protective Equipment (PPE) bearing markings such as VESC
8, V-8, Z87.1, or CE. Make sure protective eye wear is kept clean.
2.2.2.3: Gloves
Wear gloves for comfort and for protection from sun, cold weather
and other elements.
2.2.2.4: Boots
Wear sturdy over-the-ankle boots for support and protection. Never
ride a POLARIS vehicle with bare feet or sandals.
2.2.2.5: Clothing
Wear long sleeves and long pants to protect arms and legs.
2.2.3: Safety Warnings
WARNING
Failure to operate this vehicle properly can
result in a collision, loss of control, accident or rollover, which
may result in serious injury or death. Heed all safety warnings outlined
in this section of the owner’s manual. See the operation section
of this owner’s manual for proper operating procedures.
2.2.3.1: Operating Without Instruction
Operating this ATV without proper
instruction increases the risk of an accident. The operator must understand
how to operate the ATV properly in different situations and on different
types of terrain.
Beginning and inexperienced
operators should complete the recommended safety training before operating
this vehicle.
Never permit a guest
to operate the ATV unless the guest has read this manual and all product
labels and has completed a certified safety training course.

2.2.3.2: Age Restrictions
This vehicle is an ADULT VEHICLE
ONLY. Operation is prohibited for anyone under 16 years of age.
Never allow anyone under 12 years of age to ride
as a passenger on a 2-up ATV.
Even
though a child may be within the recommended age group for operating
some ATVs, they may not have the skills, abilities, or judgment needed
to operate or ride on this ATV safely and could be susceptible to
accident or injury.

2.2.3.3: Using Alcohol or Drugs
Never consume alcohol or drugs before
or while operating this vehicle.
Operating
this vehicle after consuming alcohol or drugs could adversely affect
operator judgment, reaction time, balance and perception.

2.2.3.4: Failure to Inspect Before Operating
WARNING
Failure to inspect and verify that the vehicle
is in safe operating condition before operating increases the risk
of an accident.
Always perform the pre-ride inspection before
each use of your vehicle to make sure it’s in safe operating condition.
Always follow the inspection and maintenance procedures and schedules
described in this owner’s manual.
2.2.3.5: Handling Gasoline
Gasoline is highly flammable and explosive under certain conditions.
-
Always exercise extreme caution whenever handling gasoline.
-
Always refuel with the engine stopped, and outdoors or in a
well ventilated area. -
Never carry fuel or other flammable liquids on this vehicle.
Failure to follow this instruction could lead to serious burn injuries
or death. -
Do not smoke or allow open flames or sparks in or near the
area where refueling is performed or where gasoline is stored. -
Do not overfill the tank. Do not fill the tank neck.
-
If gasoline spills on your skin or clothing, immediately wash
it off with soap and water and change clothing.
2.2.3.6: Exposure to Exhaust
CAUTION
Engine exhaust fumes are
poisonous and can cause loss of consciousness or death in a short
time. Never start the engine or let it run in an enclosed area. Operate
this vehicle only outdoors or in well-ventilated areas.
2.2.3.7: Protective Apparel
Riding in this vehicle without wearing
an approved helmet and protective eye wear increases the risk of a
serious injuries in the event of an accident.
Always wear a helmet, eye protection, gloves, long-sleeve shirt,
long pants and over-the-ankle boots.

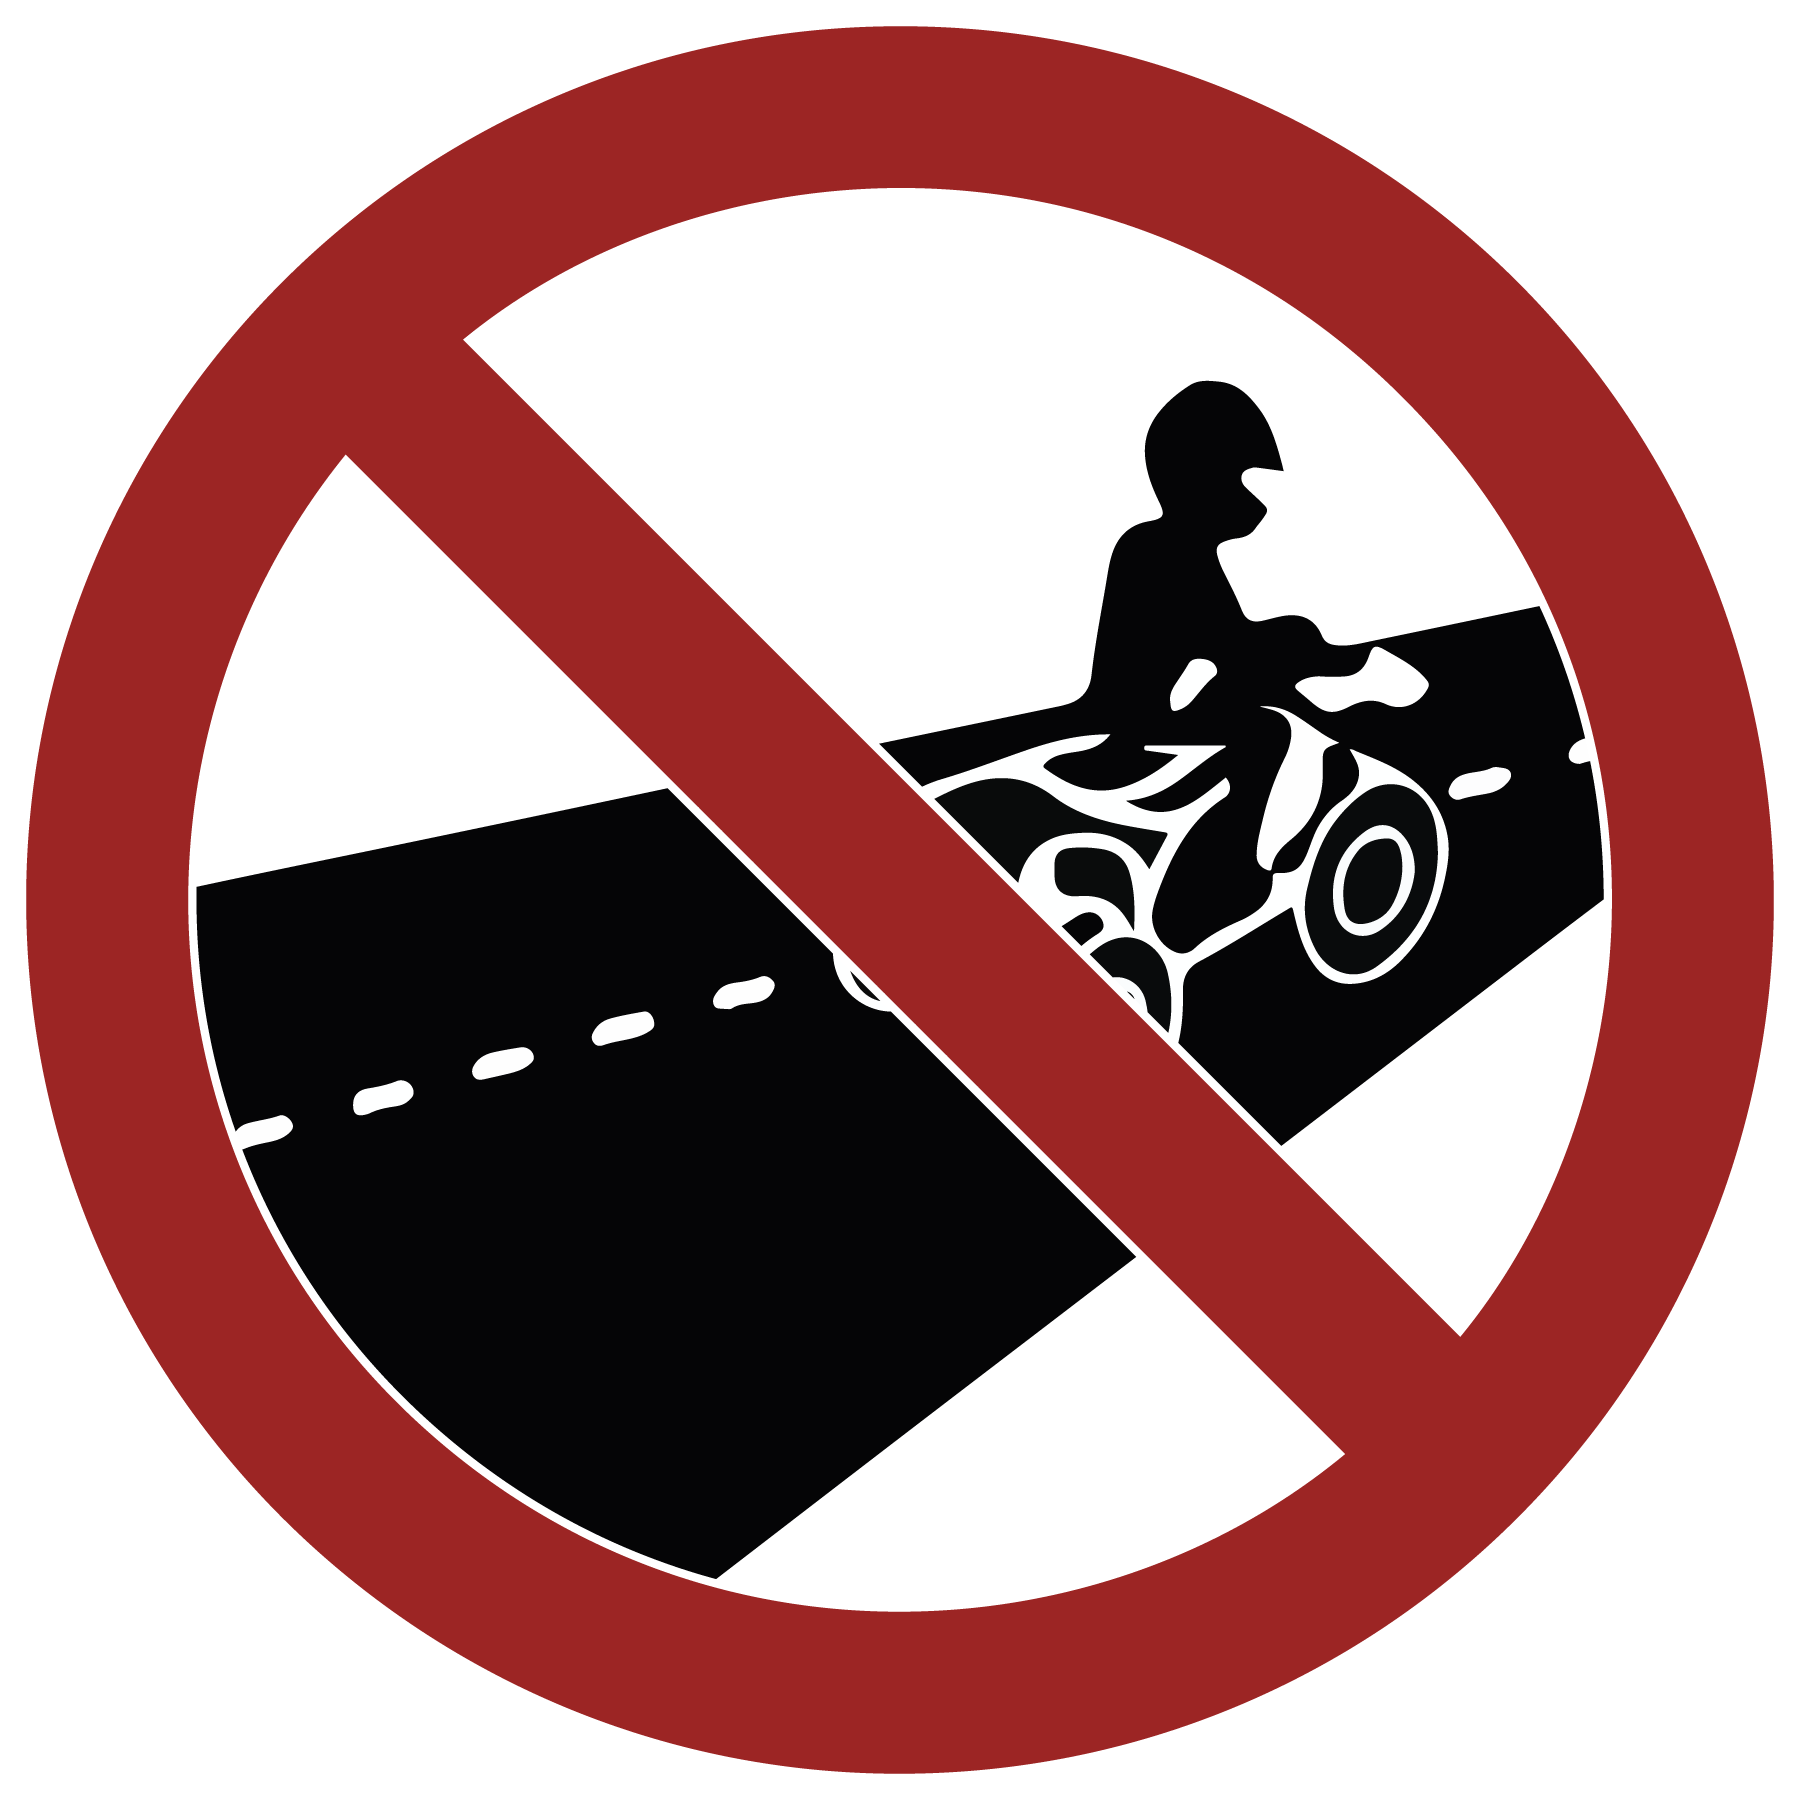
2.2.3.8: Operating on Pavement
This vehicle’s tires are designed for off-road use only, not for
use on pavement. Operating this vehicle on paved surfaces (including
sidewalks, paths, parking lots and driveways) may adversely affect
the handling of the vehicle and may increase the risk of loss of control
and accident or rollover. Avoid operating the vehicle on pavement.
If it’s unavoidable, travel slowly, travel short distances and avoid
sudden turns or stops.
2.2.3.9: Operating on Public Roads
Operating this vehicle on public
streets, roads or highways could result in a collision with another
vehicle. Never operate this vehicle on any public street, road or
highway, including dirt and gravel roads (unless designated for off-highway
use).
2.2.3.10: Operating at Excessive Speeds
Operating this vehicle at excessive
speeds increases the operator’s risk of losing control. Always operate
at a speed that’s appropriate for the terrain, the visibility and
operating conditions and your skills and experience.
2.2.3.11: Physical Control of the Vehicle
Removing even one hand or foot can reduce ability to control the
vehicle or could cause loss of balance and ejection from the ATV.
If a person’s feet are not firmly planted on the footrests, they
could come into contact with the wheels or other moving parts and
lead to accident or injury.
Always keep both hands on the handlebars and both feet on the footrests
of the ATV during operation.
2.2.3.12: Turning Improperly
CAUTION
Turning improperly could
cause loss of traction, loss of control, accident or rollover. Always
follow proper procedures for turning as described in this owner’s
manual.
Avoid sharp turns. Never turn while applying heavy throttle. Never
make abrupt steering maneuvers. Practice turning at slow speeds before
attempting to turn at faster speeds.
2.2.3.13: Jumps and Stunts
Exhibition driving increases the
risk of an accident or rollover. DO NOT do power slides, “donuts”,
jumps or other driving stunts. Avoid exhibition driving.

2.2.3.14: Improper Hill Climbing
Improper hill climbing could cause loss of control or rollover.
Use extreme caution when operating on hills. Always follow proper
procedures for hill climbing as described in this owner’s manual.
See the New Operator Driving Procedures section for details.
2.2.3.15: Descending Hills Improperly
Improperly descending a hill could cause loss of control or rollover.
Always follow proper procedures for traveling down hills as described
in this owner’s manual. See the New Operator Driving Procedures
section for details.
2.2.3.16: Crossing Hillsides
Driving on a sidehill is not recommended. Improper procedure could
cause loss of control or rollover. Avoid crossing the side of any
hill unless absolutely necessary.
If crossing a hillside is unavoidable, always follow proper procedures
as described in this owner’s manual. See the New Operator Driving
Procedures section for details.
2.2.3.17: Stalling While Climbing a Hill
Stalling, rolling backwards or improperly
dismounting while climbing a hill could cause a rollover.
-
Always maintain a steady speed when climbing a hill.
-
Always engage ADC mode (if equipped) before ascending or descending
a hill. If ADC mode is not equipped, apply AWD mode before ascending
or descending a hill.
If all forward speed is lost:
-
Lean forward to keep body weight uphill. A passenger should
also lean uphill. -
Apply the brakes.
-
Lock the parking brake when fully stopped.
-
Dismount on the uphill side of the vehicle, or on the left
if the vehicle is pointing straight uphill. Have a passenger dismount
first, then the operator may dismount. -
Turn the ATV around and remount, following the procedure described
in the owner’s manual.
If the ATV begins rolling downhill:
-
Keep operator and passenger body weight uphill.
-
Never apply engine power.
-
Apply the brake lever gradually.
-
When fully stopped, apply the auxiliary brake as well, and
then lock the parking brake. -
Dismount on the uphill side of the vehicle, or on the left
if the vehicle is pointing straight uphill. Have a passenger dismount
first, then the operator may dismount. -
Turn the ATV around and remount, following the procedure described
in the owner’s manual.
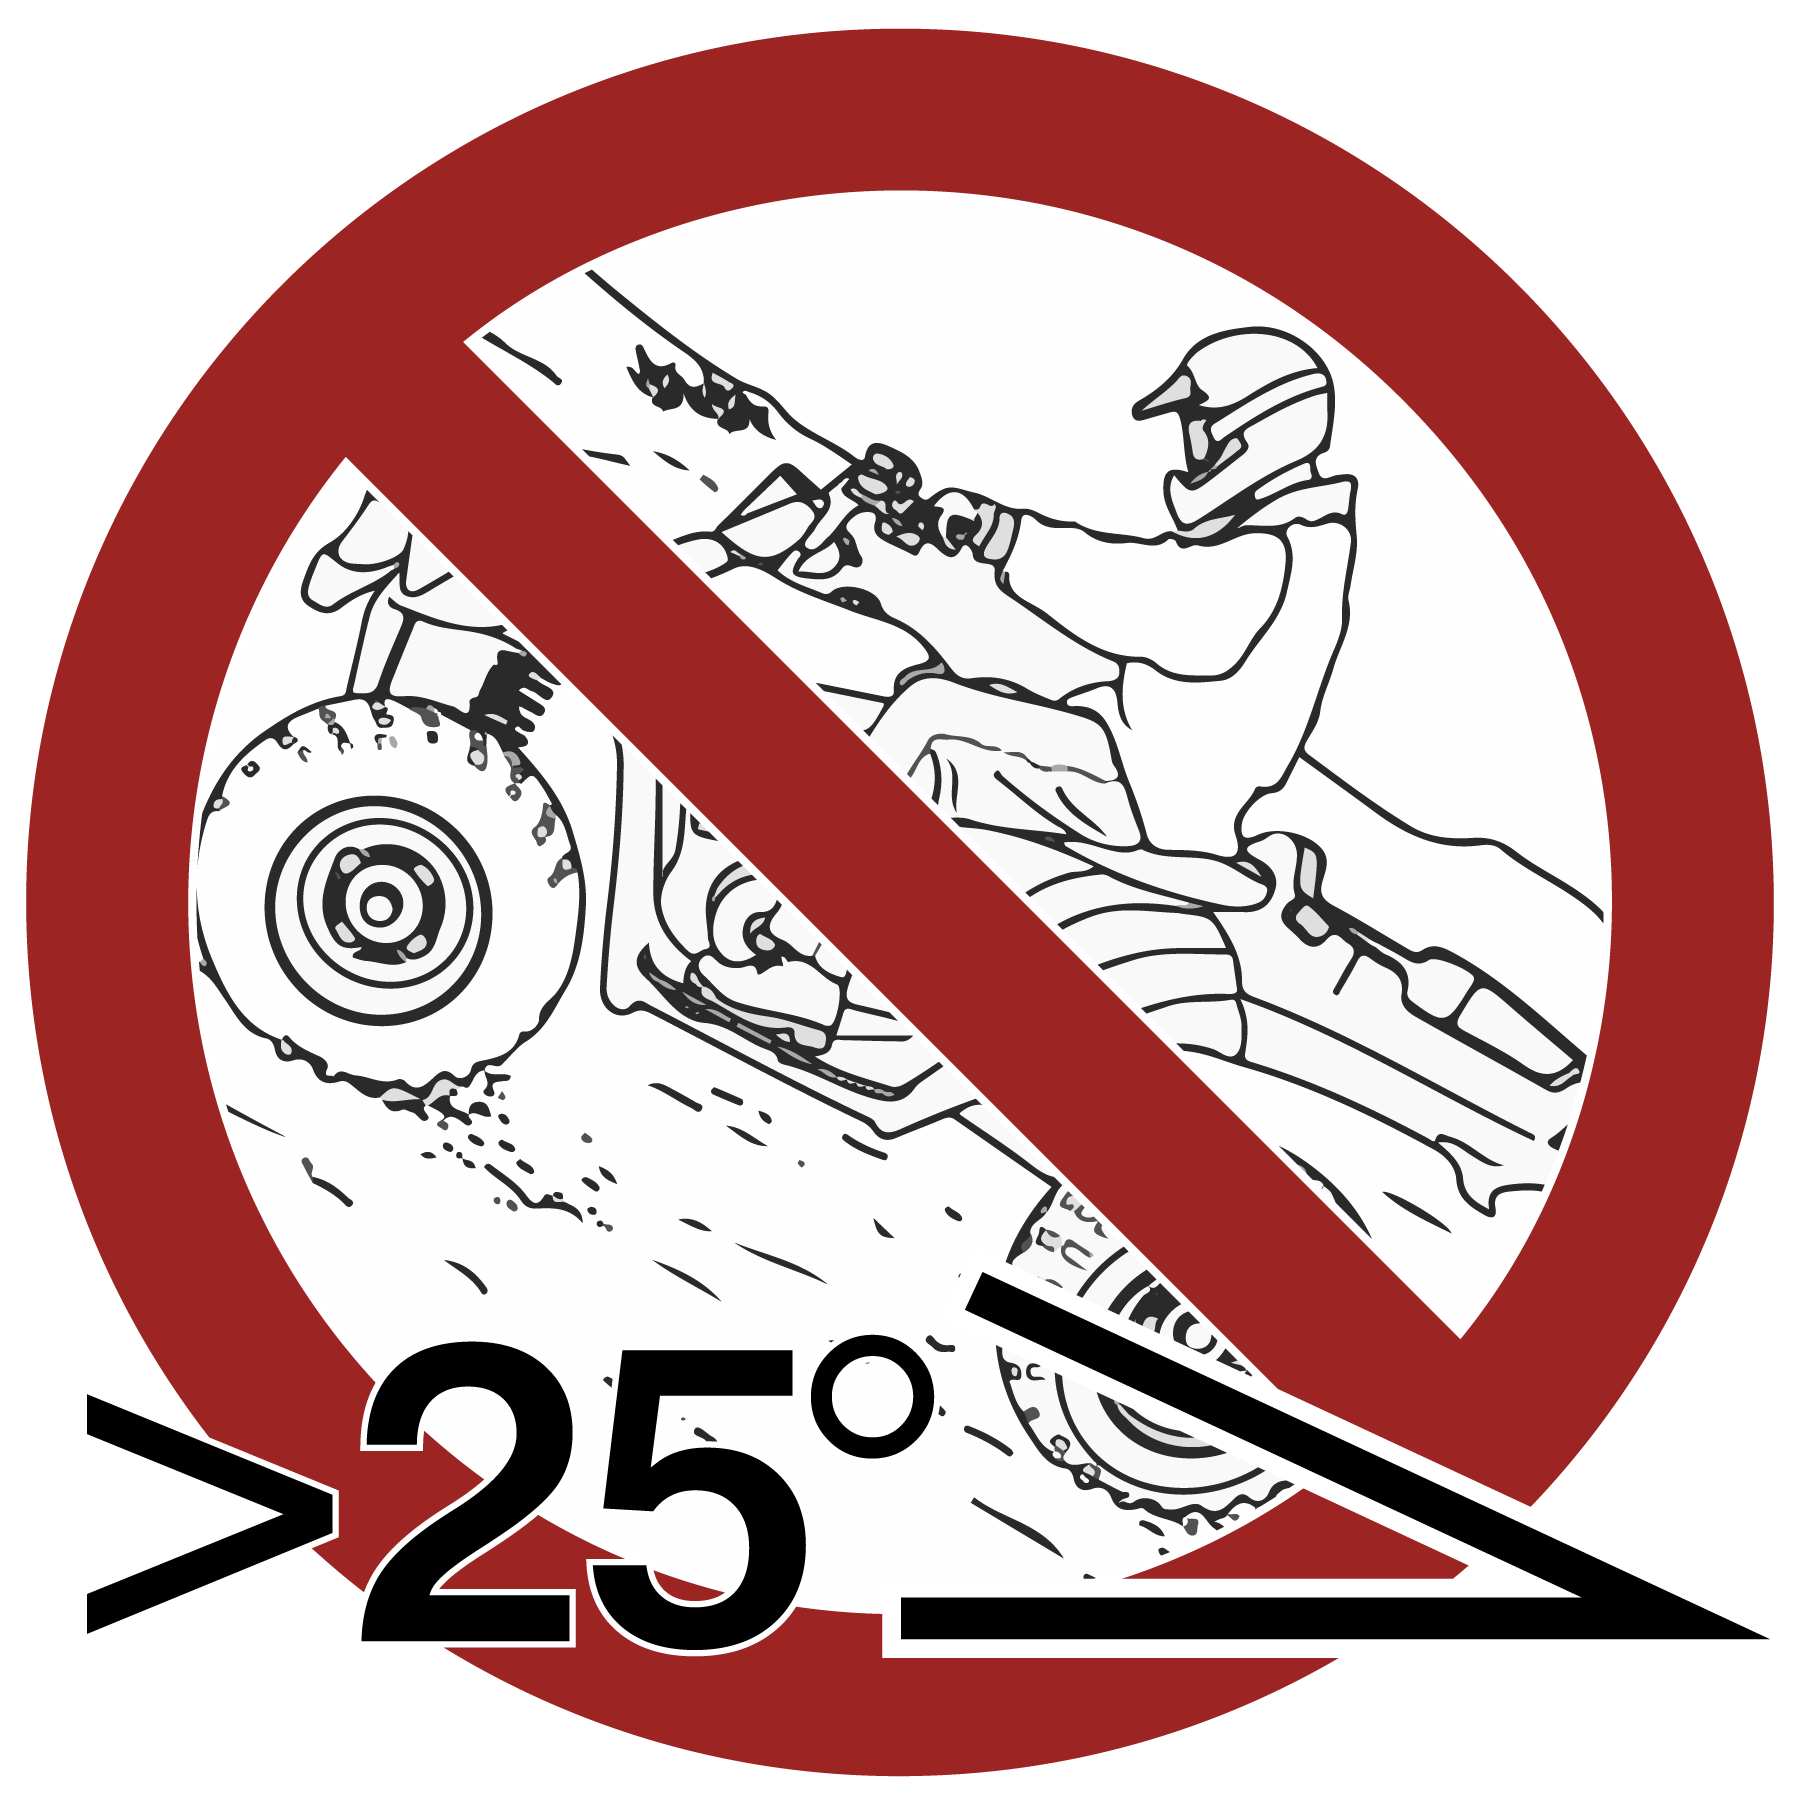
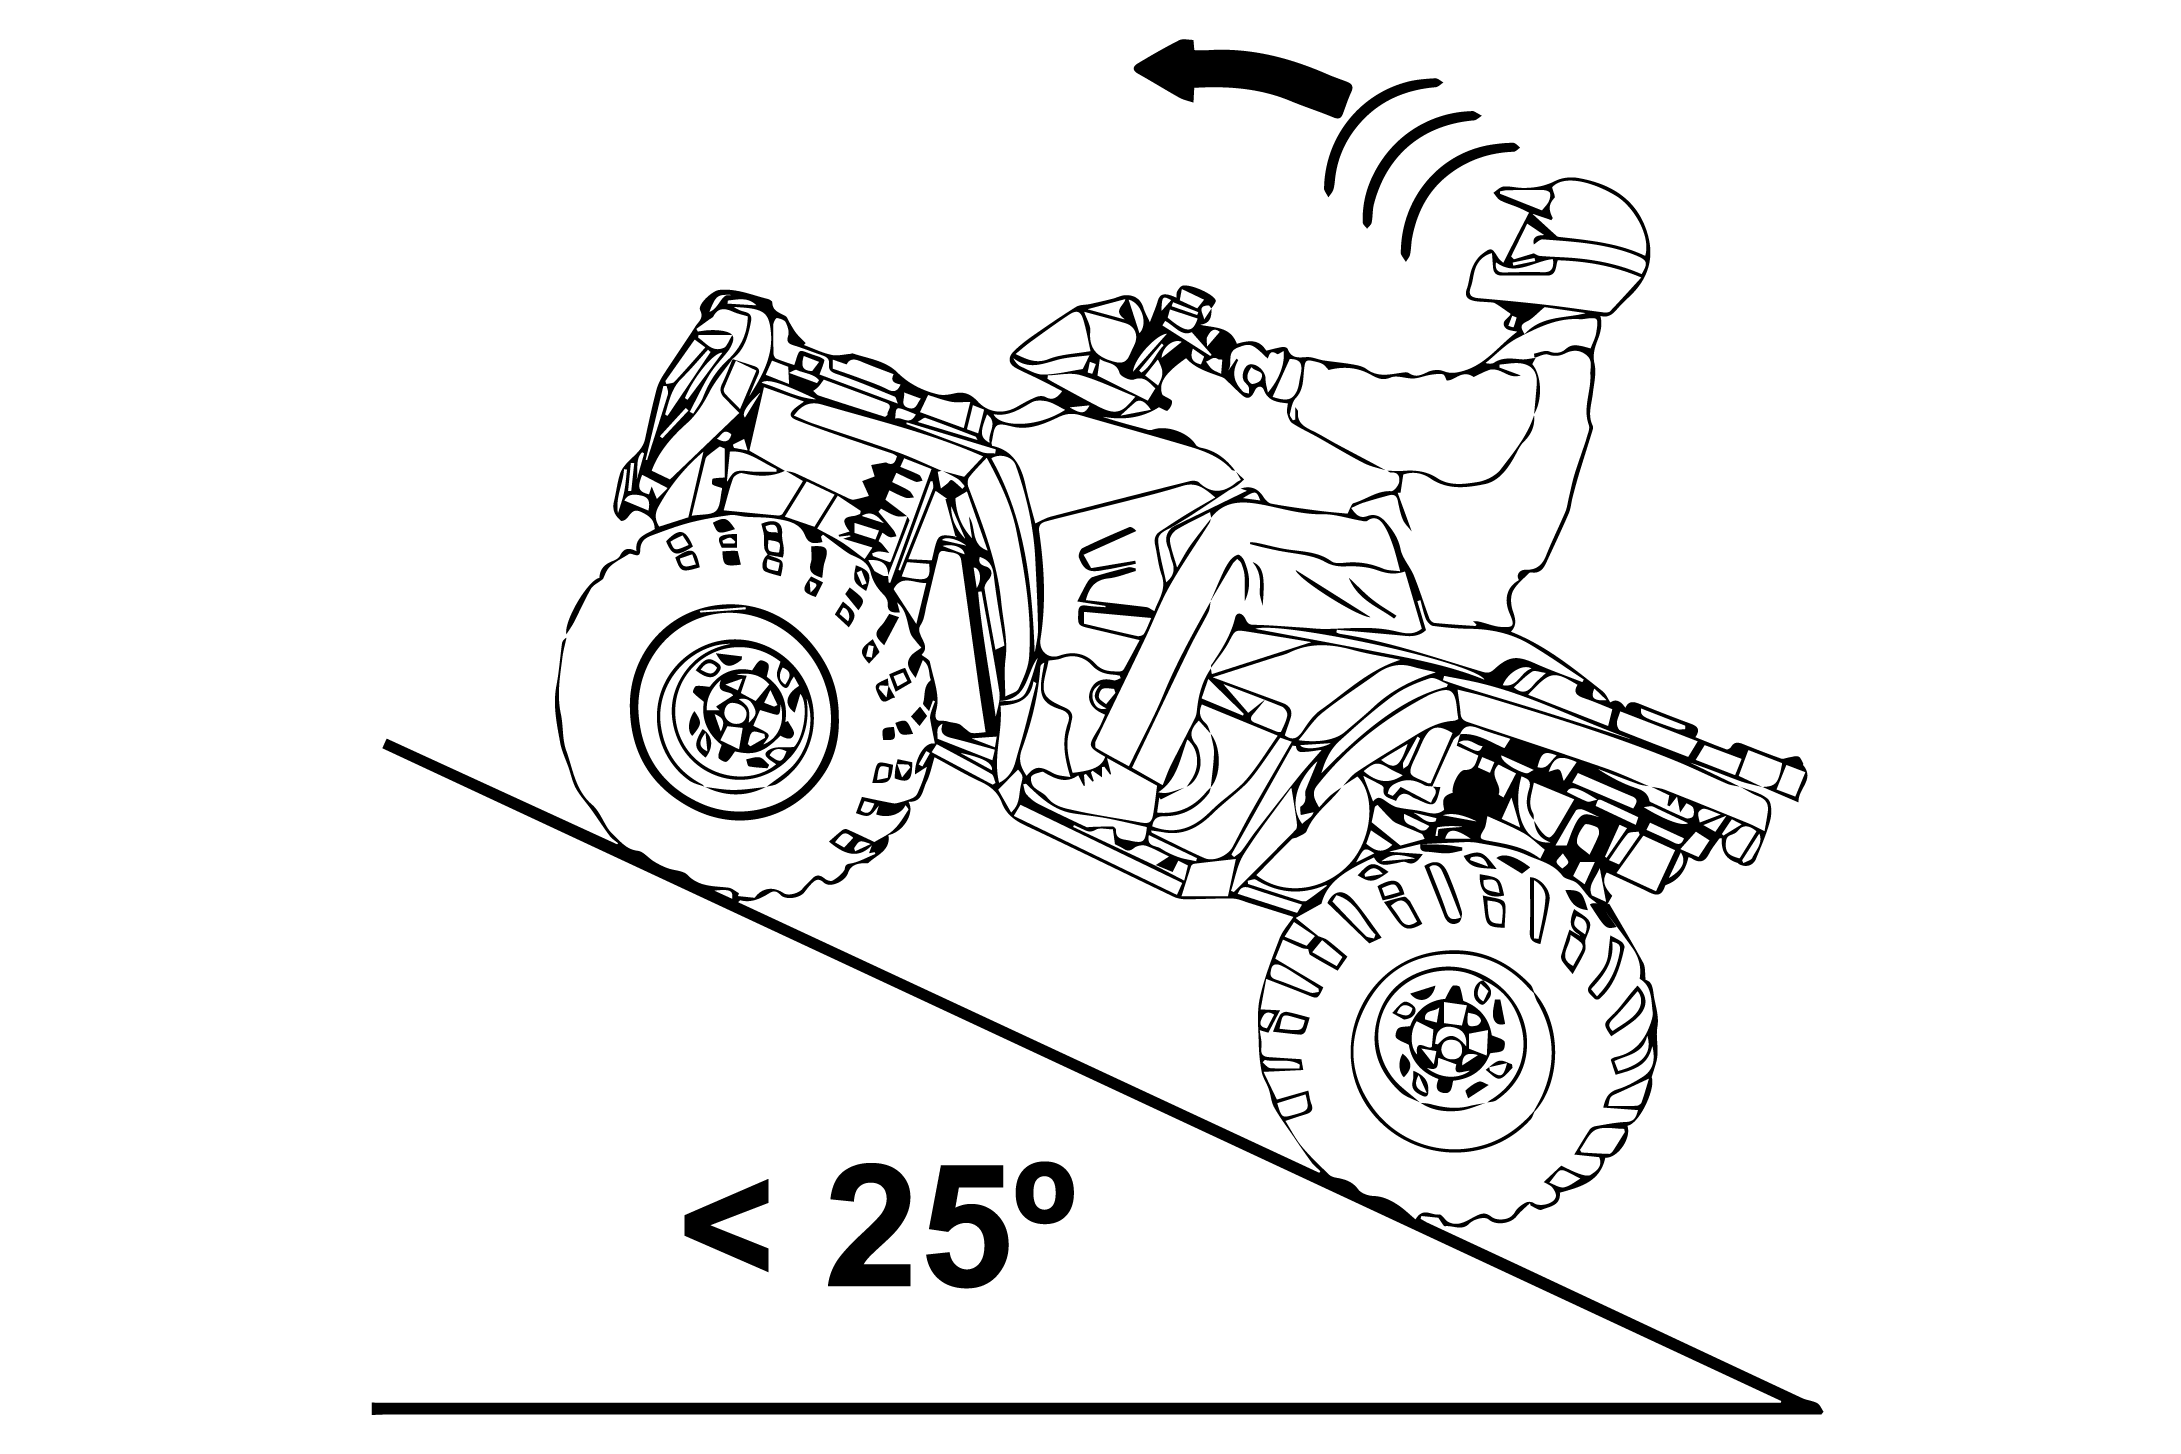
2.2.3.18: Operating on Steep Hills
Operating on excessively steep hills
could cause an overturn.
Never operate
on hills too steep for the ATV or for your abilities.
Never operate this ATV on hills steeper than 25
degrees.
2.2.3.19: Operating on Slippery Terrain
Failure to use extra caution when
operating on excessively rough, slippery or loose terrain could cause
loss of traction, loss of control, accident or overturn.
-
Do not operate on excessively rough, slippery or loose terrain
until you’ve learned and practiced the skills necessary to control
the vehicle on such terrain. -
Always use extra caution on rough, slippery or loose terrain.
2.2.3.20: Operating in Unfamiliar Terrain
Failure to use extra caution when operating on unfamiliar terrain
could result in an accident or rollover.
Unfamiliar terrain may contain hidden rocks, bumps, or holes that
could cause loss of control or rollover.
Travel slowly and use extra caution when operating on unfamiliar
terrain. Always be alert to changing terrain conditions.
2.2.3.21: Improper Tire Maintenance
-
Operating this vehicle with improper tires or with improper
or uneven tire pressure could cause loss of control or accident. -
Always use the size and type of tires specified for your vehicle.
-
Always maintain proper tire pressure as described in the owner’s
manual and on safety labels.
2.2.3.22: Operating Improperly in Reverse
Improperly operating in reverse could result in a collision with
an obstacle or person. Always follow proper operating procedures as
outlined in this manual. See the New Operator Driving Procedures section
for details.
Before shifting into reverse gear, always check for obstacles or
people behind the vehicle. When it’s safe to proceed, back slowly.
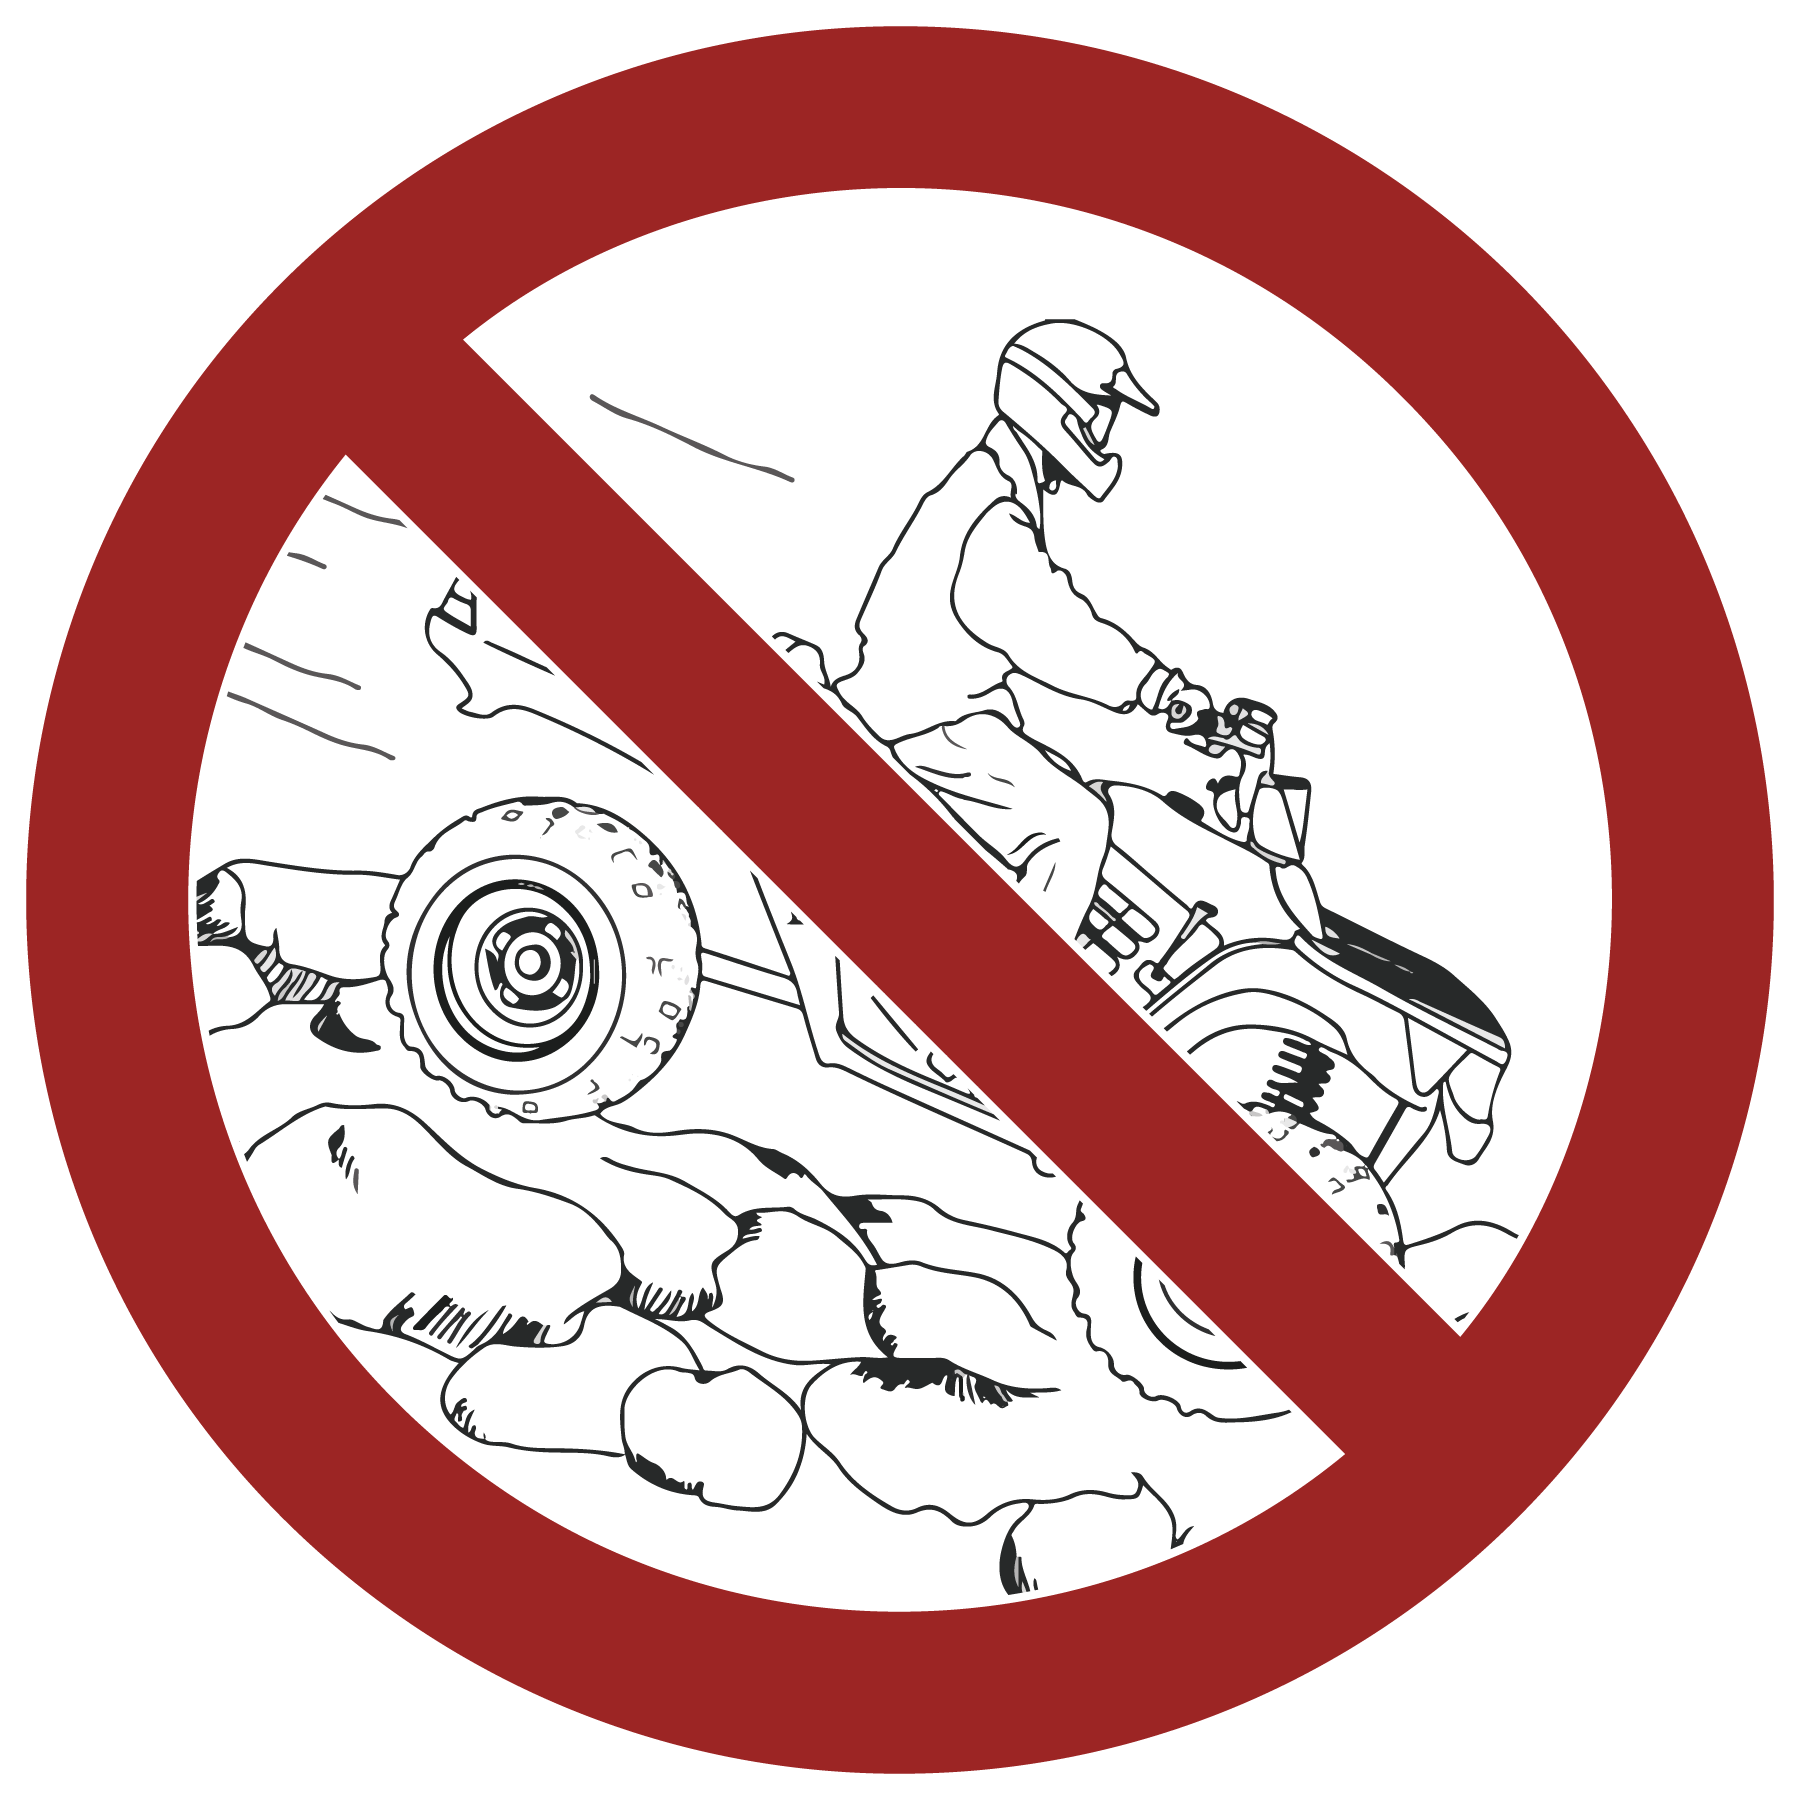
2.2.3.23: Operating Over Obstacles
Improperly operating over obstacles
could cause loss of control or rollover.
Before operating in a new area, check for obstacles. Avoid operating
over large obstacles such as large rocks and fallen trees. Always
follow the proper procedures outlined in this manual when operating
over obstacles. See the New Operator Driving Procedures section for
details.
2.2.3.24: Skidding or Sliding
Failure to use extra caution when
operating on excessively rough, slippery or loose terrain could cause
loss of traction, loss of control, accident or rollover. Do not operate
on excessively slippery surfaces. Always slow down and use additional
caution when operating on slippery surfaces.
Skidding or sliding due to loss of traction can cause loss of control
or rollover (if tires regain traction unexpectedly). Always follow
proper procedures for operating on slippery surfaces as described
in this owner’s manual. See the New Operator Driving Procedures section
for details.
2.2.3.25: Operating a Damaged Vehicle
CAUTION
Operating a damaged vehicle
can result in an accident. After any rollover or other accident, have
a qualified service dealer inspect the entire machine for possible
damage, including (but not limited to) brakes, throttle, and steering
systems.
2.2.3.26: Operating Through Water
Operating through deep or fast-flowing water can cause loss of
traction, loss of control, rollover or accident. Never operate in
fast-flowing water or in water that exceeds the floor level of the
vehicle.
Always follow proper procedures for operating in water as described
in this owner’s manual.
Wet brakes may have reduced stopping ability. After leaving water,
test the brakes. Apply them lightly several times while driving slowly.
The friction will help dry out the pads.
2.2.3.27: Improper Cargo Loading
Overloading the vehicle or carrying cargo improperly may cause
changes in stability and handling, which could cause loss of control
or an accident.
-
Always follow the instructions in this owner’s manual
for carrying cargo. -
Never exceed the stated load capacity for this vehicle.
-
Cargo should be properly distributed and securely attached.
-
Reduce speed when carrying cargo or pulling a trailer. Allow
a greater distance for braking.
2.2.3.28: Operating on Frozen Bodies of Water
Severe injury or death can result if the vehicle and/or the operator
fall through the ice. Never operate the vehicle on a frozen body of
water unless you have first verified that the ice is sufficiently
thick to support the weight and moving force of the vehicle, you and
your cargo, together with any other vehicles in your party.
Always check with local authorities and residents to confirm ice
conditions and thickness over your entire route. Vehicle operators
assume all risk associated with ice conditions on frozen bodies of
water.
2.2.3.29: Poor Visibility
CAUTION
Operating this vehicle in
darkness or inclement weather could result in a collision or accident,
especially if operating on a road or street. This vehicle is not equipped
with highway-approved lights. Operate this vehicle off-road only.
Use caution and drive at reduced speeds in conditions of reduced visibility
such as fog, rain and darkness. Clean headlights frequently and replace
burned out headlamps promptly.
2.2.3.30: Physical Skills
Safe operation of this rider-active vehicle requires good judgment
and physical skills. Persons with cognitive or physical disabilities
who operate this vehicle have an increased risk of overturn and loss
of control.
2.2.3.31: Hot Exhaust Systems
WARNING
Exhaust system components are very hot during
and after use of the vehicle. Hot components can cause burns and fire.
Do not touch hot exhaust system components. Always keep combustible
materials away from the exhaust system.
Use caution when traveling
through tall grass, especially dry grass and when traveling through
muddy conditions. Always inspect the underside of the vehicle and
areas near the exhaust system after driving through tall grass, weeds,
brush, other tall ground cover, and muddy conditions. Promptly remove
any grass, debris or foreign matter clinging to the vehicle and pay
particular attention to the exhaust system area.
2.2.3.32: Trailer Hitch Warning (if equipped)
If using a hitch, ensure the receiver does not exceed a two inch
drop or raise.
WARNING
When trailering with your ATV, be aware that
the exhaust is located above the hitch ball receiver and the trailer
hitch. During operation of the ATV, the exhaust will produce hot
exhaust gas that should not be inhaled and that may elevate the surface
temperature of surrounding surfaces, including trailer surfaces (e.g.,
trailer hitch, trailer tongue, trailer walls, . . . etc.). To reduce
the risk of inhaling exhaust gases and to avoid risk of burn or injury,
shut off your engine and allow time for the exhaust gases to dissipate
and for the surfaces surrounding the exhaust to cool, including the
trailer surfaces, before connecting or disconnecting a trailer. To
reduce the potential for the trailer hitch or trailer tongue from
getting too hot, do not use a receiver hitch with a rise of more than
two inches.
2.2.3.33: Unauthorized Use of the Vehicle
Leaving the keys in the ignition can lead to unauthorized use of
the vehicle by someone under the age of 16, without a drivers license,
or without proper training. This could result in an accident or rollover.
Always remove the ignition key when the vehicle is not in use.
2.2.3.34: Equipment Modifications
Your POLARIS vehicle is designed to provide safe operation when
used as directed. Modifications to your vehicle may negatively impact
vehicle stability. Failure of critical machine components may result
from operation with any modifications, especially those that increase
speed or power. This vehicle may become less stable at speeds higher
than those for which it is designed. Loss of control may occur at
higher speeds.
Do not install any non-POLARIS-approved accessory or modify the
vehicle for the purpose of increasing speed or power. Any modifications
or installation of non-POLARIS-approved accessories could create a
substantial safety hazard and increase the risk of bodily injury.
The POLARIS limited warranty on your POLARIS vehicle will be terminated
if any non-POLARIS approved equipment and/or modifications have been
added to the vehicle that increase speed or power.
The addition of certain accessories, including (but not limited
to) mowers, blades, tires, sprayers, or large racks, may change the
handling characteristics of the vehicle. Use only POLARIS-approved
accessories, and familiarize yourself with their function and effect
on the vehicle.
For more information about ATV safety, see the Safety Training
section.
2.2.3.35: Reporting Safety Defects (Canada)
To report a safety defect to Transport Canada, you may either fill
out an online defect complaint form at their website (English: http://www.tc.gc.ca/recalls, French: http://www.tc.gc.ca/rappels) or contact their Defect Investigations and Recalls Division by
calling toll-free 1-800-333-0510 (Canada) or 819-994-3328 (Ottawa-Gatineau
area / International).
2.2.4: Safety Labels and Locations
Warning labels have been placed on the vehicle for your protection.
Read and follow the instructions on each label carefully. If any of
the labels shown in this manual differ from the labels on your vehicle,
always read and follow the instructions of the labels on the vehicle.
If an informational or graphic label becomes illegible or comes
off, contact your POLARIS dealer to purchase a replacement. Replacement
safety labels are provided by POLARIS at no charge. The part number
is printed on the label.
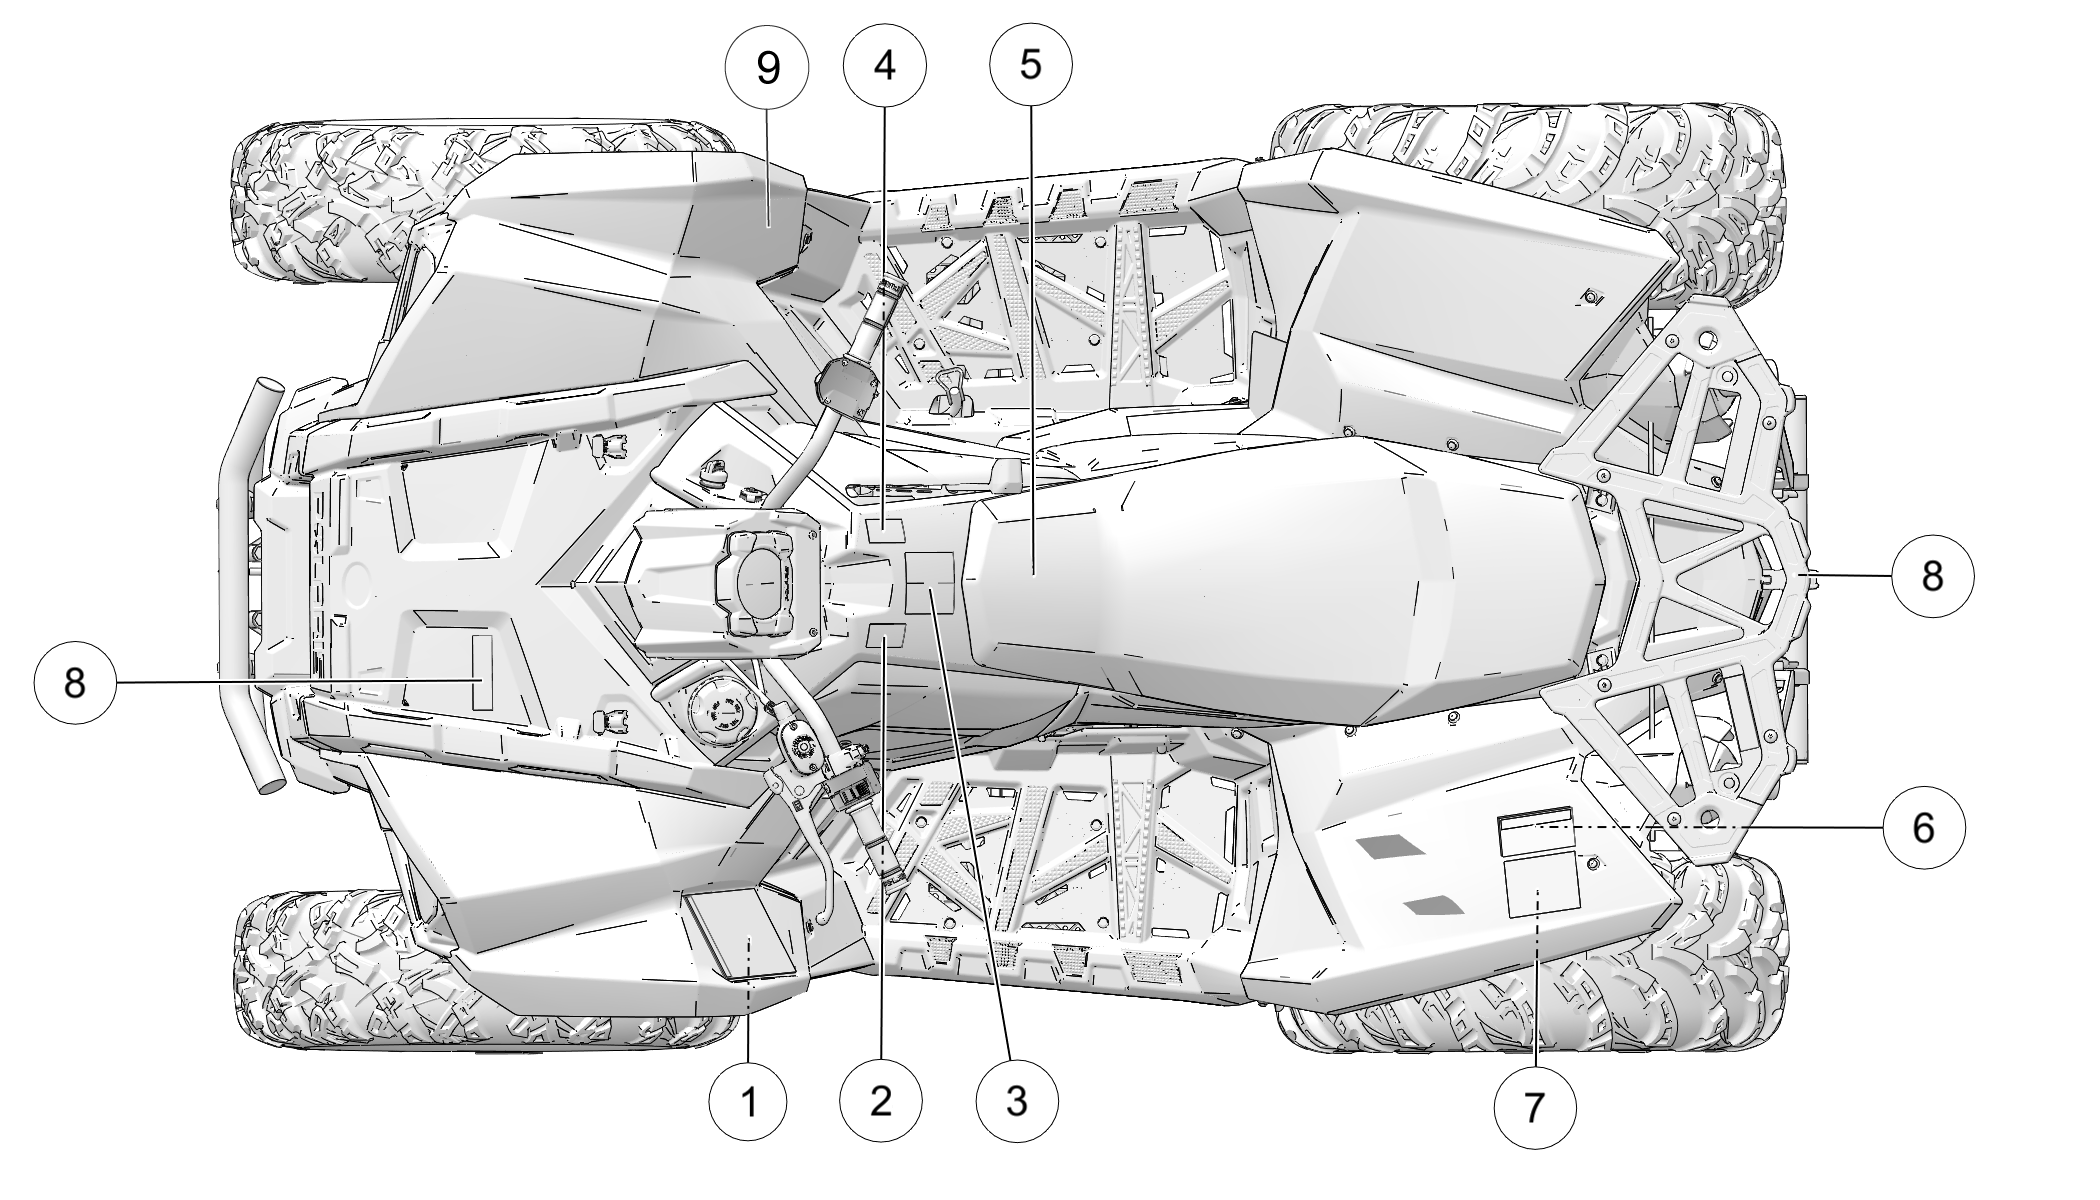
-
1 General Warning
-
2 Reverse Override Warning
-
3 Age Warning
-
4 4×4 (AWD) Caution
-
5 Clutch Warning (Under Seat)
-
6 “No Passenger” Warning
-
7 Tire Pressure/Load Warning
-
8 Rack Warning
-
9 Discretionary Warning
2.2.4.1: General Warning
WARNING
Improper use can result in SEVERE INJURY or DEATH
-
ALWAYS USE AN APPROVED HELMET AND PROTECTIVE GEAR
-
NEVER USE ON PUBLIC ROADS
-
NEVER CARRY PASSENGERS
-
NEVER USE WITH DRUGS OR ALCOHOL
NEVER operate:
-
without proper training or instruction
-
at speeds too fast for your skills or the conditions
-
on public roads — a collision can occur with another vehicle
-
with a passenger — passengers affect balance and steering and
increase risk of losing control
ALWAYS:
-
use proper riding techniques to avoid vehicle overturns on
hills and rough terrain and in turns -
avoid paved surfaces — pavement may seriously affect handling
and control
Locate and Read Owner’s Manual. Follow All Instructions And Warnings.
Part Number: 7186136
2.2.4.2: Age 16 Warning
WARNING
-
Operating this ATV if you are under the age of 16 increases
your chance of severe injury or death. -
NEVER operate this ATV if you are under age 16.
2.2.4.3: Reverse Override Warning
WARNING
Improper use of override button can lead to loss of control resulting
in severe injury or death. Do not activate override while throttle
is engaged. Always apply throttle gradually while in reverse.
2.2.4.4: Clutch Cover Warning
WARNING
-
Moving parts hazard under belt-clutch guard. To prevent serious
injury, do not operate vehicle with guard removed. -
Do not modify engine or clutch. Doing so can cause part failure,
possible imbalance, and excessive engine RPM, which can result in
serious injury or death.
Part Number: 7175488
2.2.4.5: Tire Pressure/Load Warning
WARNING
Improper tire pressure or overloading can cause loss of control.
Loss of control can result in severe injury or death.
-
Cold tire pressure:
-
Front: 7.0 psi (48.3 kPa)
-
Rear: 7.0 psi (48.3 kPa)
-
-
Maximum weight capacity: 290 lbs. (131 kg)
-
Lug nut torque values: Reference Owner’s Manual
2.2.4.6: No Passenger Warning
WARNING
NEVER ride as a passenger. Passengers can cause a loss of control,
resulting in SEVERE INJURY or DEATH.
Part Number: 7186125
2.2.4.7: Rack/Box Warning
WARNING
-
DO NOT TOW FROM RACK OR BUMPER. Vehicle damage or tipover may
result causing severe injury or death. Tow only from tow hooks or
hitch. -
Maximum Rack Loads: Front 25 lbs. (11 kg) Rear 50 lbs. (23
kg)
2.2.4.8: 4X4 (AWD) Caution
CAUTION
Do not push switch to engage 4X4 (AWD) if the rear wheels are spinning.
This may cause severe drive shaft and clutch damage.
2.2.4.9: Discretionary Warning
WARNING
-
Never operate this ATV on hills steeper than 25 degrees. To
prevent overturn on hilly terrain, use throttle and brakes gradually,
and shift weight uphill. -
REVERSE operation can be dangerous even at low speeds. Steering
becomes difficult. To prevent loss of control, avoid sudden braking
or sharp turns.
Part Number: 7186138
Chapter 3: Features and Controls
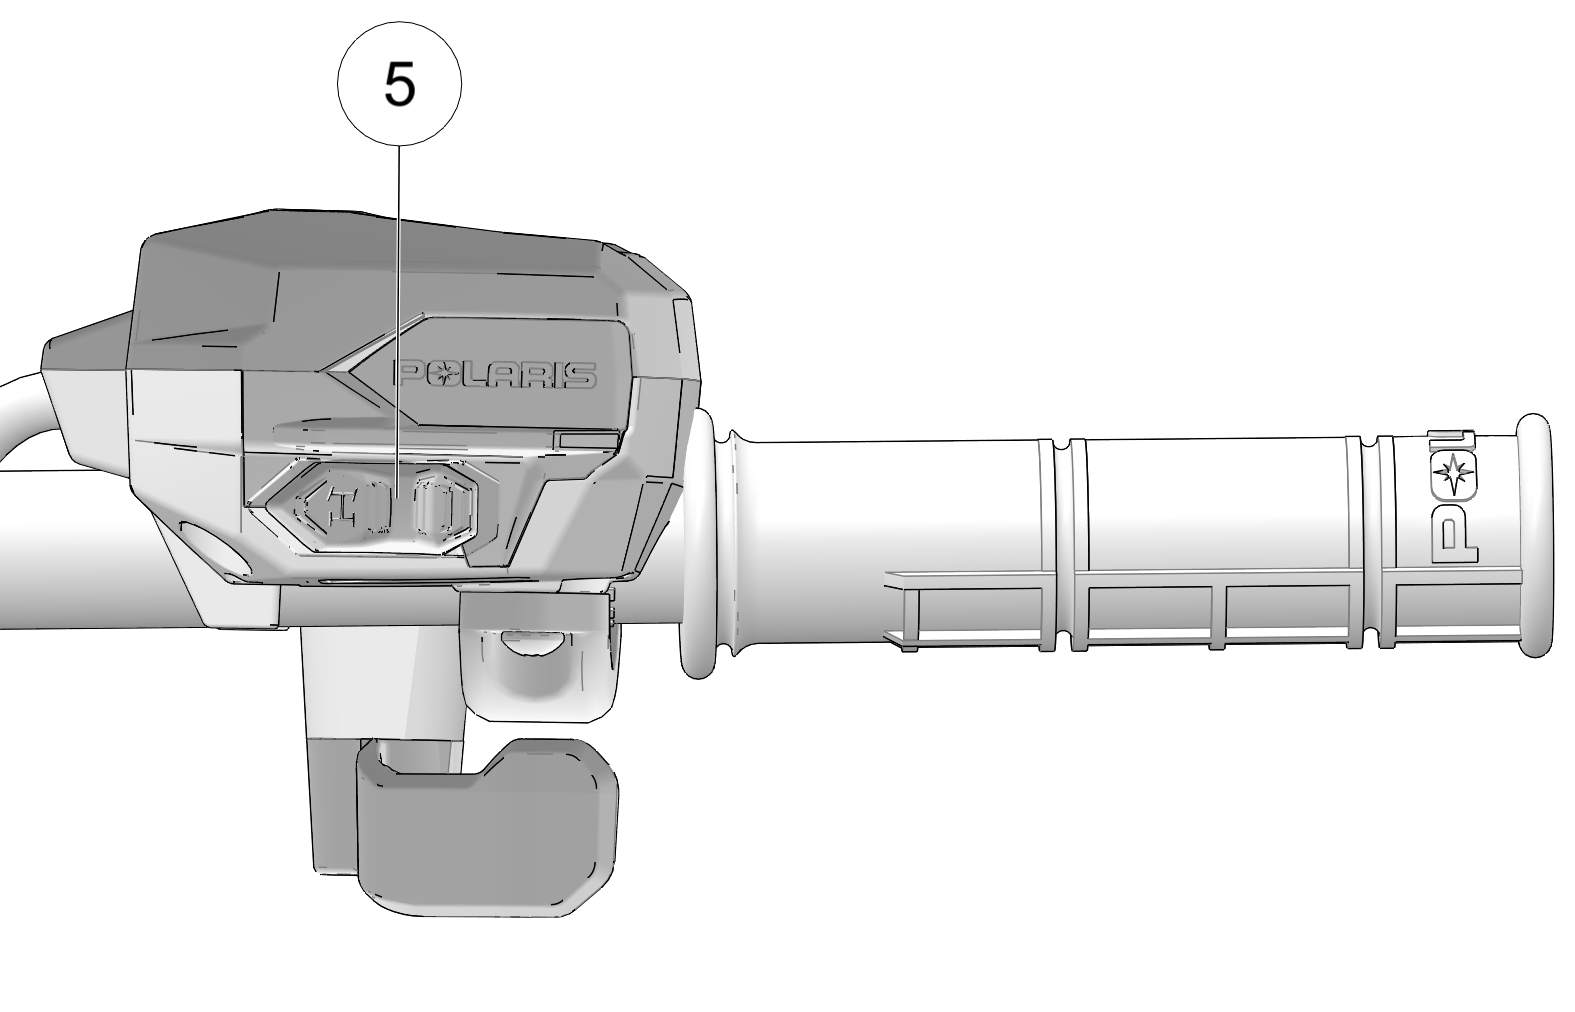
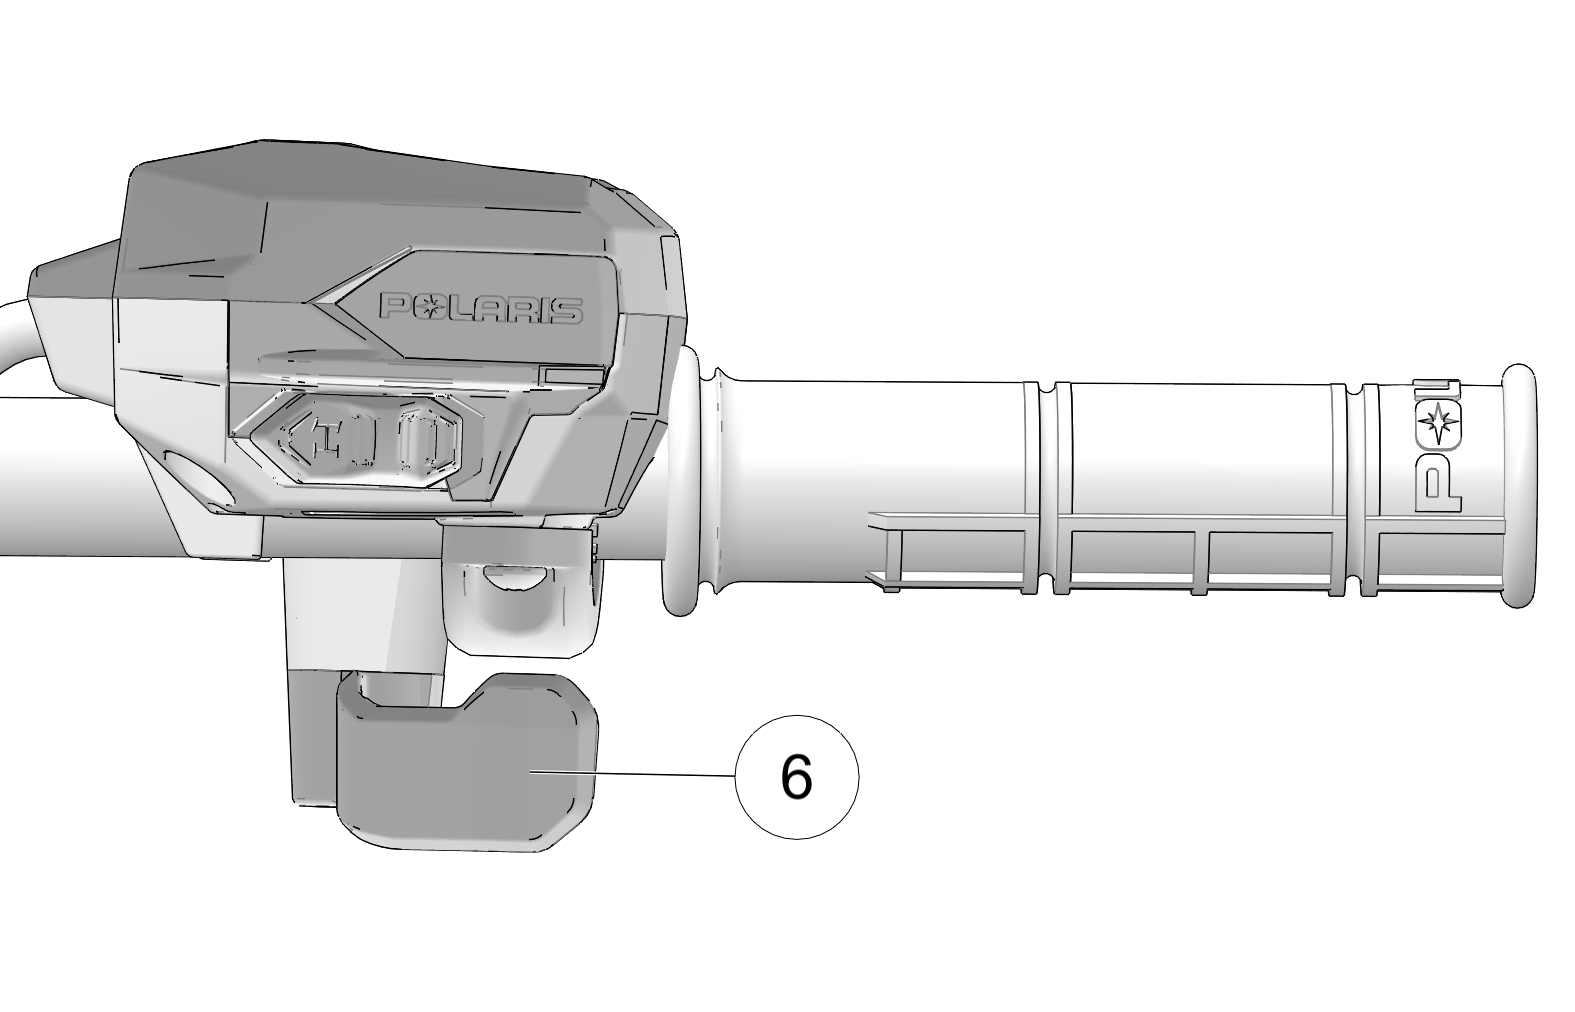
3.3.1: Controls
-
1 Key Ignition Switch
-
2 Engine Stop Switch
-
3 Mode/Reverse Override Switch
-
4 Headlight Switch
-
5 4×4 Switch
-
6 Throttle Lever
-
7 Throttle Performance Switch
-
8 LED Light Switch
3.3.1.1: Ignition Switch/Light Switch
Use the ignition switch to start the engine. The key can be removed
from the switch when it is in the OFF position.
| OFF | Turn the key to the OFF position to stop the engine. Electrical circuits are off. |
| RUN | Turn the key the RUN position to activate electrical components. Electrical circuits are on. Electrical equipment can be used. |
| START | Turn the key to the START position to engage the electric starter. See the Starting the Engine section for starting procedures. |
3.3.1.2: Engine Stop Switch
Move the stop switch 2 either
left or right to the OFF position to stop the engine quickly.
Move the stop switch to the RUN position before attempting to start
the engine. The engine will not start or run when the switch is off.
Both the main switch and the engine stop switch will shut off all
electrical power to the vehicle, including lights.
3.3.1.3: Mode/Reverse Override Switch
WARNING
Pressing the override button while the throttle
is open can cause loss of control, which may result in serious injury
or death. Always release the throttle before pressing the override
button.
This vehicle is equipped with a reverse
speed limiter system. To gain additional wheel speed while backing,
release the throttle and depress the override button 3. The
reverse override button also acts as a MODE button when held down
for approximately one half second. The override button will not function
as a MODE button if the transmission is in reverse.
3.3.1.4: Headlight Switch
Use the headlight switch to turn
the lights on and off and to change the lights from high beam to low
beam. The key must be in the ON position and the engine stop switch
must be in the RUN position.
3.3.1.5: 4×4 Switch (if equipped)
The drive mode switch 5 controls
the All Wheel Drive (AWD/4X4) system. Use this switch to engage AWD
(4X4) or 2X4. The vehicle automatically engages 4X4 when operating
in reverse if the drive mode is set to AWD (4X4). See All Wheel Drive System for drive mode
(AWD) operating instructions.
3.3.1.6: Throttle Lever
WARNING
Operating an ATV with sticking or improperly
operating throttle controls could cause an accident. Never start or
operate an ATV that has a sticking or improperly operating throttle.
Immediately contact your POLARIS dealer or other qualified person
for service if throttle problems arise.
Failure to check or maintain
proper operation of the throttle system can result in an accident
if the throttle lever sticks during operation. Always check the lever
for free movement and return before starting the engine. Also check
occasionally during operation.
Modifications to the electronic
throttle control could result in failure to perform as designed, which
could result in an accident. Do not attempt to modify the throttle
control system or replace it with any after market throttle mechanisms.
Engine speed and vehicle movement
are controlled by pressing the throttle lever 6. The throttle
lever is spring loaded. Engine speed returns to idle when the lever
is released. This ATV is equipped with a throttle release switch,
which is designed to reduce the risk of a frozen or stuck throttle.
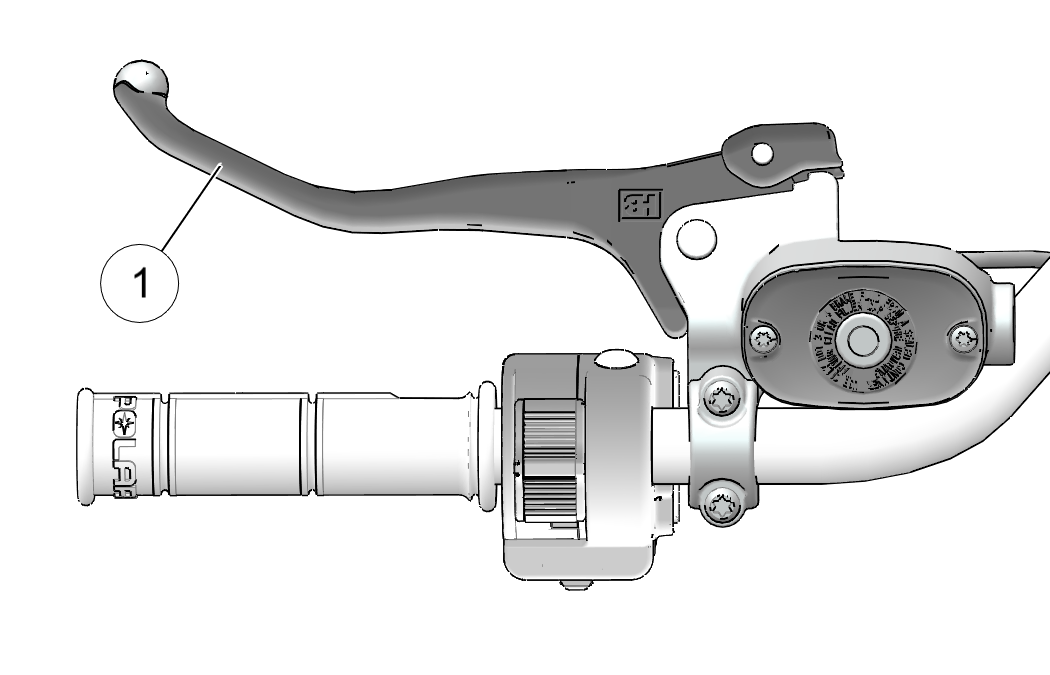
3.3.2: Brake Lever
WARNING
Operating the ATV with a spongy brake lever can
result in loss of braking, which could cause an accident. Never operate
the ATV with a spongy-feeling brake lever. Always contact your dealer
for service before operating the vehicle.
Squeeze the brake lever 1 toward the handlebar to apply the front and rear brakes. These brakes
are hydraulically activated disc type brakes that are activated by
only one lever. Always test brake lever travel and master cylinder
fluid level before riding. When squeezed, the lever should feel firm.
Any sponginess would indicate a possible fluid leak or low master
cylinder fluid level, which must be corrected before riding. Contact
your POLARIS dealer or other qualified service facility for proper
diagnosis and repairs.
3.3.3: Parking Brake
Locking the Parking Brake
WARNING
Operating the ATV while the parking brake is engaged could result
in an accident or fire. Always check to be sure the parking brake
is disengaged before operating.
-
Place the transmission in PARK.
-
Squeeze and release the brake lever 1 two or three
times, then squeeze and hold. -
Push the parking brake lock 2 forward to engage the
lock. -
Release the brake lever.
-
To release the parking brake lock, squeeze and release the
brake lever. It will return to its unlocked position.

WARNING
The parking brake may relax if left on for a long period of time.
Always block the wheels to prevent rolling. Always block the wheels
on the downhill side of the ATV if leaving it parked on a hill. Another
option is to park the ATV in a sidehill position. Never depend on
the parking brake alone if the ATV is parked on a hill.
3.3.4: Master Cylinder/Brake Fluid
WARNING
An over-full master cylinder may cause brake
drag or brake lock-up, which could result in an accident. Maintain
brake fluid at the recommended level. Do not overfill.
Never store
or use a partial bottle of brake fluid. Brake fluid is hygroscopic,
meaning it rapidly absorbs moisture from the air. The moisture causes
the boiling temperature of the brake fluid to drop, which can lead
to early brake fade and the possibility of brake failure, which could
result in an accident. After opening a bottle of brake fluid, always
discard any unused portion.
Check the brake fluid in the master cylinder before each ride.
-
Position the ATV on a level surface.
-
Position the handlebars so the master cylinder 1 is
level.
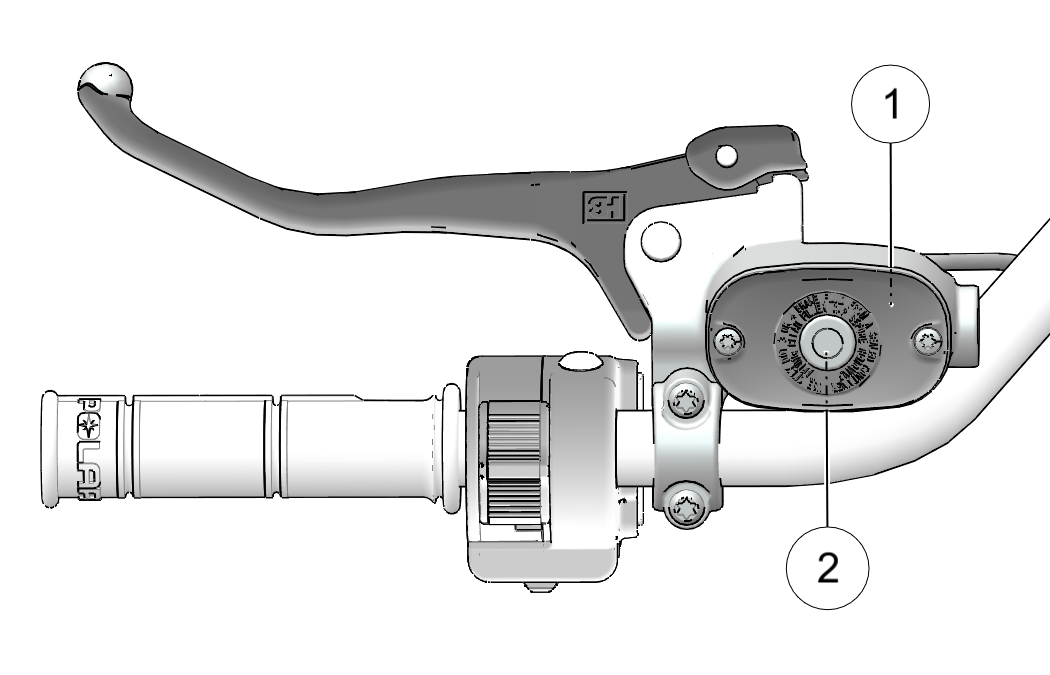
-
View the brake fluid level through the indicator
window 2 on the top of the master cylinder. The eye will
appear dark when the fluid level is full. When fluid is low, the eye
will be clear. -
If the fluid level is low, remove the cover screws and add
fluid to the fill line. Do not overfill. Use DOT 4 brake fluid
only. -
Reinstall the cover. Torque screws to specification.
TORQUE
Brake Fluid Reservoir
Cover Screws
7 in-lbs
(1 N·m)
3.3.5: Auxiliary Foot Brake
WARNING
Never back down a hill. Applying the auxiliary
brake when backing down a hill may cause rear tipover, which could
result in serious injury or death.
Use caution when applying the
auxiliary brake. Do not aggressively apply the auxiliary brake when
going forward. The rear wheels may skid and slide sideways, causing
loss of control and serious injury or death.
|
The auxiliary brake system is intended to be The auxiliary If the rear wheels slide while |
|
3.3.5.1: Brake Fluid Level
Check the brake fluid level frequently for the auxiliary brake
system. The reservoir is located under the front storage box.
Maintain the fluid level between the maximum and minimum marks.
Use DOT 4 brake fluid only.
3.3.6: Automatic Transmission Gear Selector
|
The transmission gear selector 1 is H: High Gear L: Low Gear N: Neutral R: Reverse P: Park To shift gears, brake to a complete stop. |
|
NOTICE
Shifting gears with the engine speed above idle
or while the vehicle is moving could cause transmission damage.
Whenever the ATV is left unattended, always place the transmission
in PARK and lock the parking brake.
3.3.6.1: Belt Life
To extend belt life, use low forward gear when pulling a heavy
load at less than 7 mph
(11 kph) for extended periods and when operating
uphill at a slow speed.
3.3.7: Fuel Cap
NOTICE
Never use fuel blends with more than 10% ethanol.
Engine damage could occur.
|
Always refuel Remove the fuel tank cap 1 and add fuel. Use unleaded gasoline with a minimum pump octane number The fuel tank is designed to |
|
3.3.8: Front Compartment
|
To gain access to the front compartment, release |
|
Access the following components in the front compartment:
-
Radiator cap
-
Brake fluid reservoir
-
Battery
-
Coolant recovery bottle cap
-
Electrical/fuse/relay components
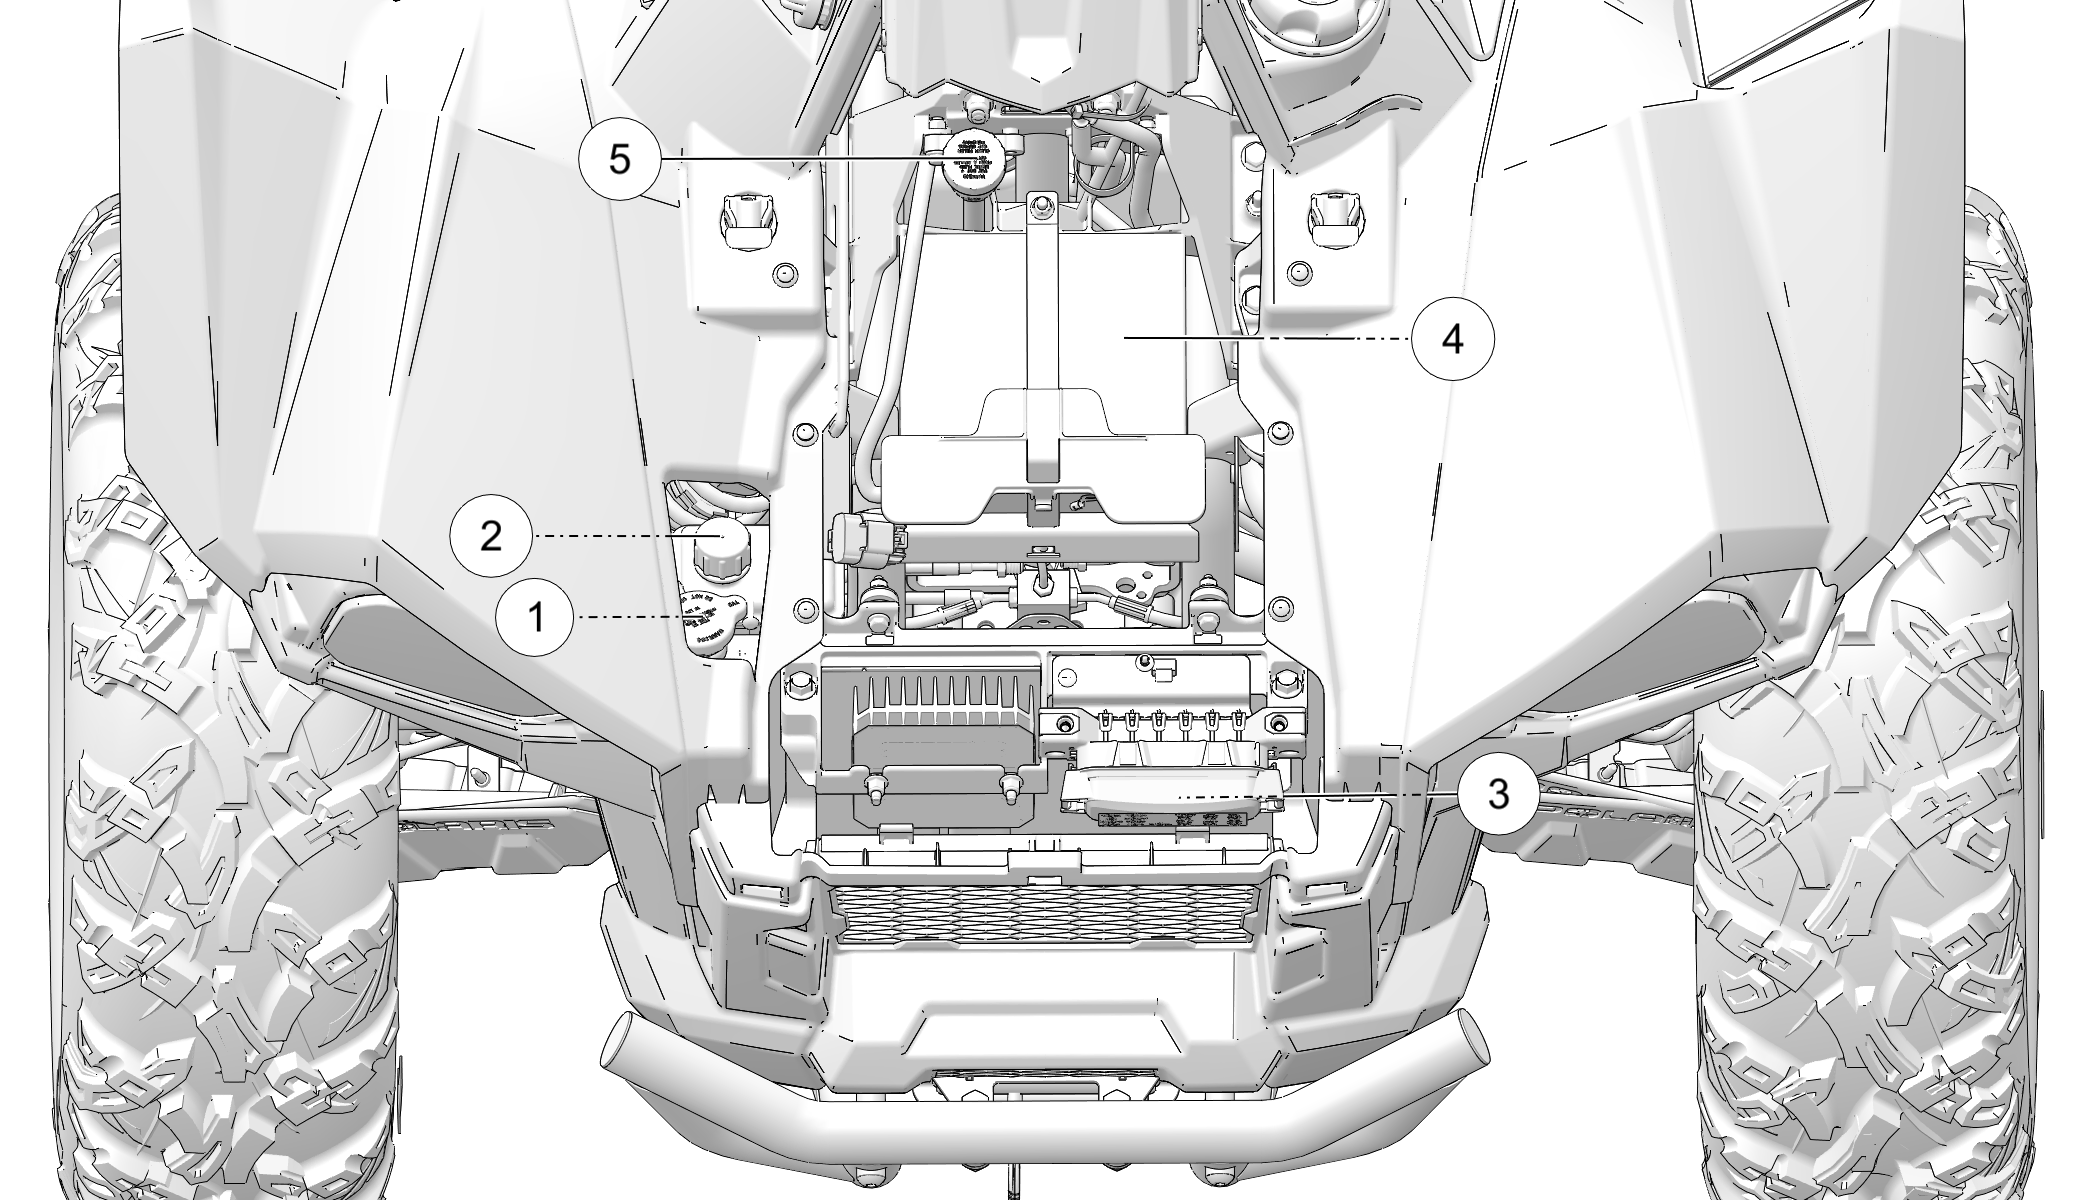
-
1 Radiator Cap
-
2 Coolant Bottle Cap
-
3 Electrical/Fuse/Relay
-
4 Battery
-
5 Brake Fluid Reservoir
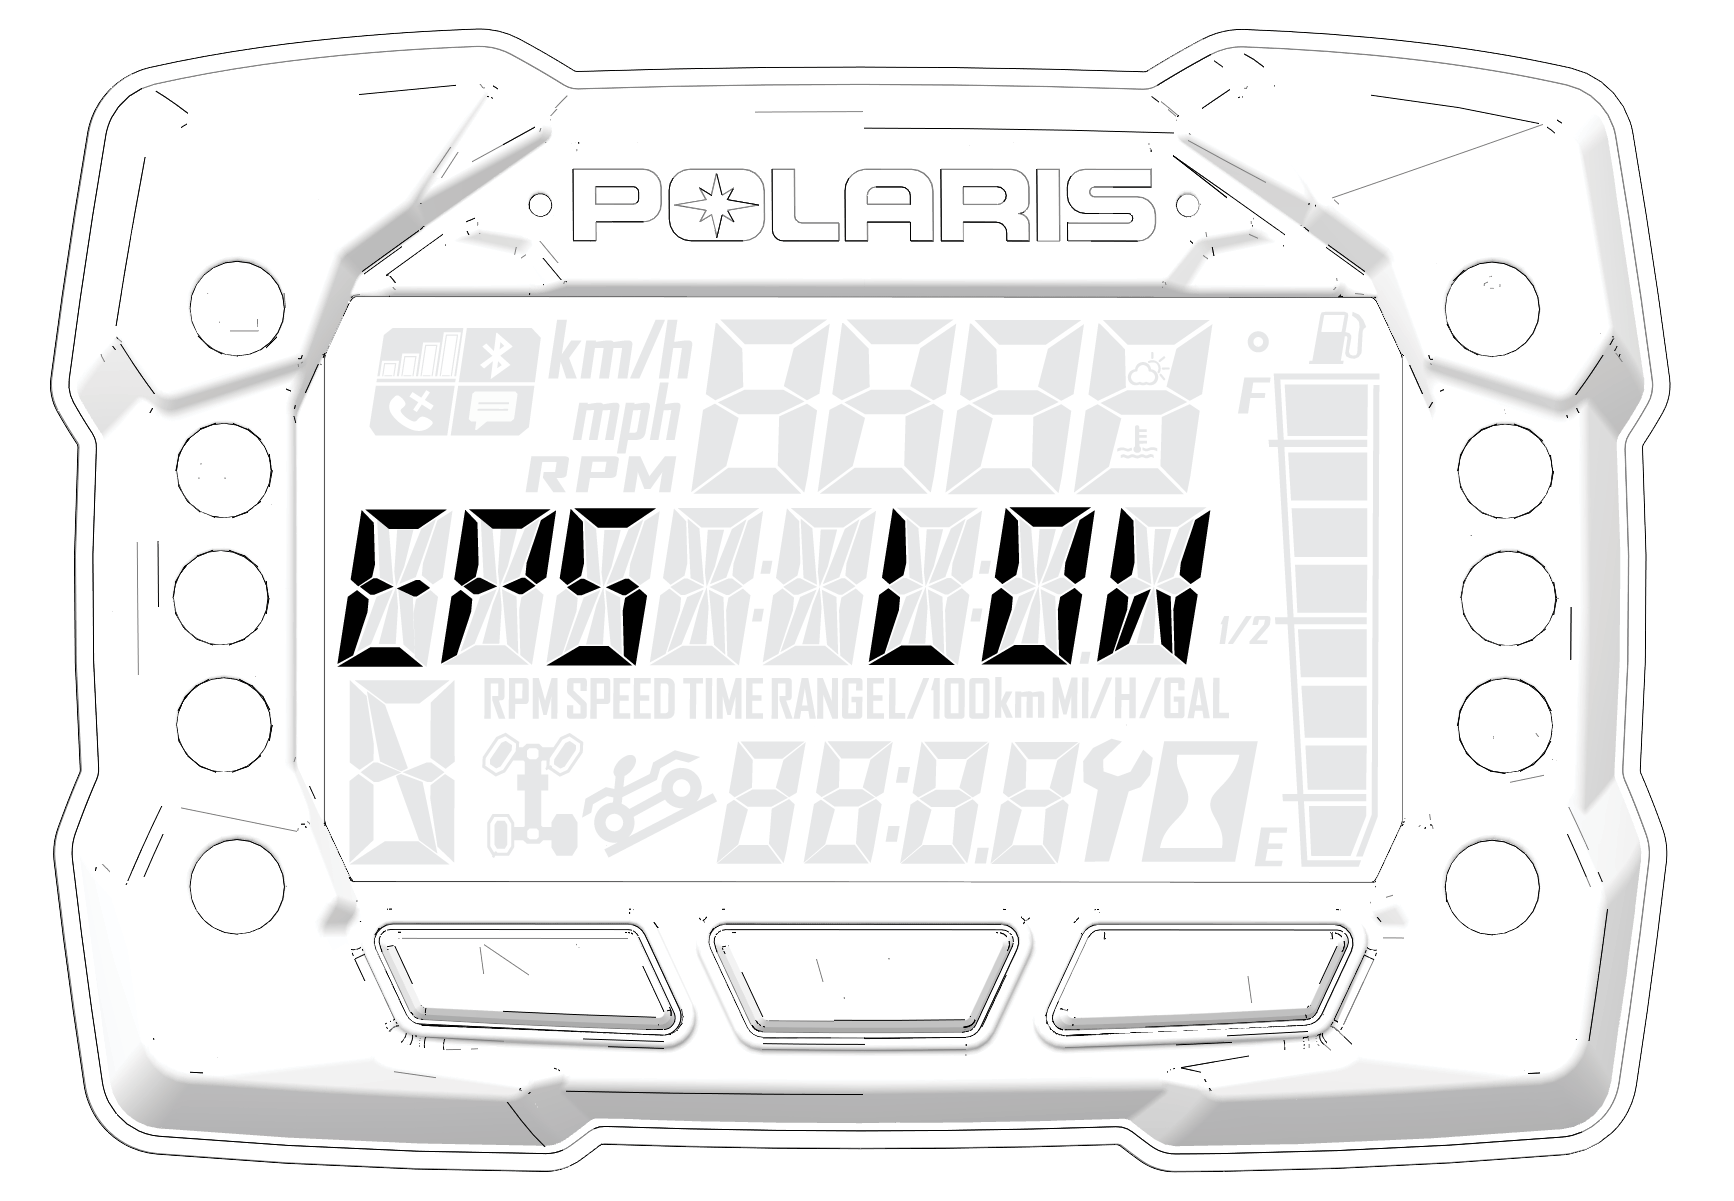
3.3.9: Electronic Power Steering (EPS)
Electronic power steering (EPS), if equipped, engages when the
ignition key is turned to the ON position. EPS remains engaged whether
the vehicle is moving or idle. See the Instrument Cluster section
for EPS Warning Indicator information.
3.3.10: Battery Charge Port
Your vehicle is equipped with a battery
charge port 1. The battery charge port allows you to quickly
and easily connect a battery charger to your vehicle’s battery.
For more information see Battery Charging.
3.3.11: All Wheel Drive System
The All Wheel Drive system is controlled by the Drive Line switch.
3.3.11.1: 4X4 Mode
When the switch is on 4X4, the ATV is four-wheel drive, and the
4X4 indicator icon in the instrument cluster display will be visible.
When in 4X4, the demand drive unit will automatically engage any
time the rear wheels lose traction. When the rear wheels regain traction,
the demand drive unit will automatically disengage.
There is no limit to the length of time the vehicle may remain
in 4X4. The vehicle automatically engages 4X4 when operating in reverse
if the switch is set to either 4X4 position.
3.3.11.2: 2X4 Mode
When the switch is on 2X4, the ATV is in two-wheel drive at all
times.
3.3.11.3: Engaging 4X4
The 4X4 switch may be turned on or off while the vehicle is moving.
Initially, the vehicle’s electronic system will not enable 4X4 until
the engine RPM is below 3000. Once enabled, 4X4 remains enabled until
the 4X4 switch is turned off. If the switch is turned off while the
demand drive unit is moving, it will not disengage until the rear
wheels regain traction.
Engage the 4X4 switch before getting into conditions where front
wheel drive may be needed. If the rear wheels are spinning, release
the throttle before switching to 4X4.
NOTICE
Switching to 4X4 or ADC 4X4 while the rear wheels
are spinning may cause severe drive shaft and gearcase damage. Always
switch to 4X4 or ADC 4X4 while the rear wheels have traction or are
at rest.
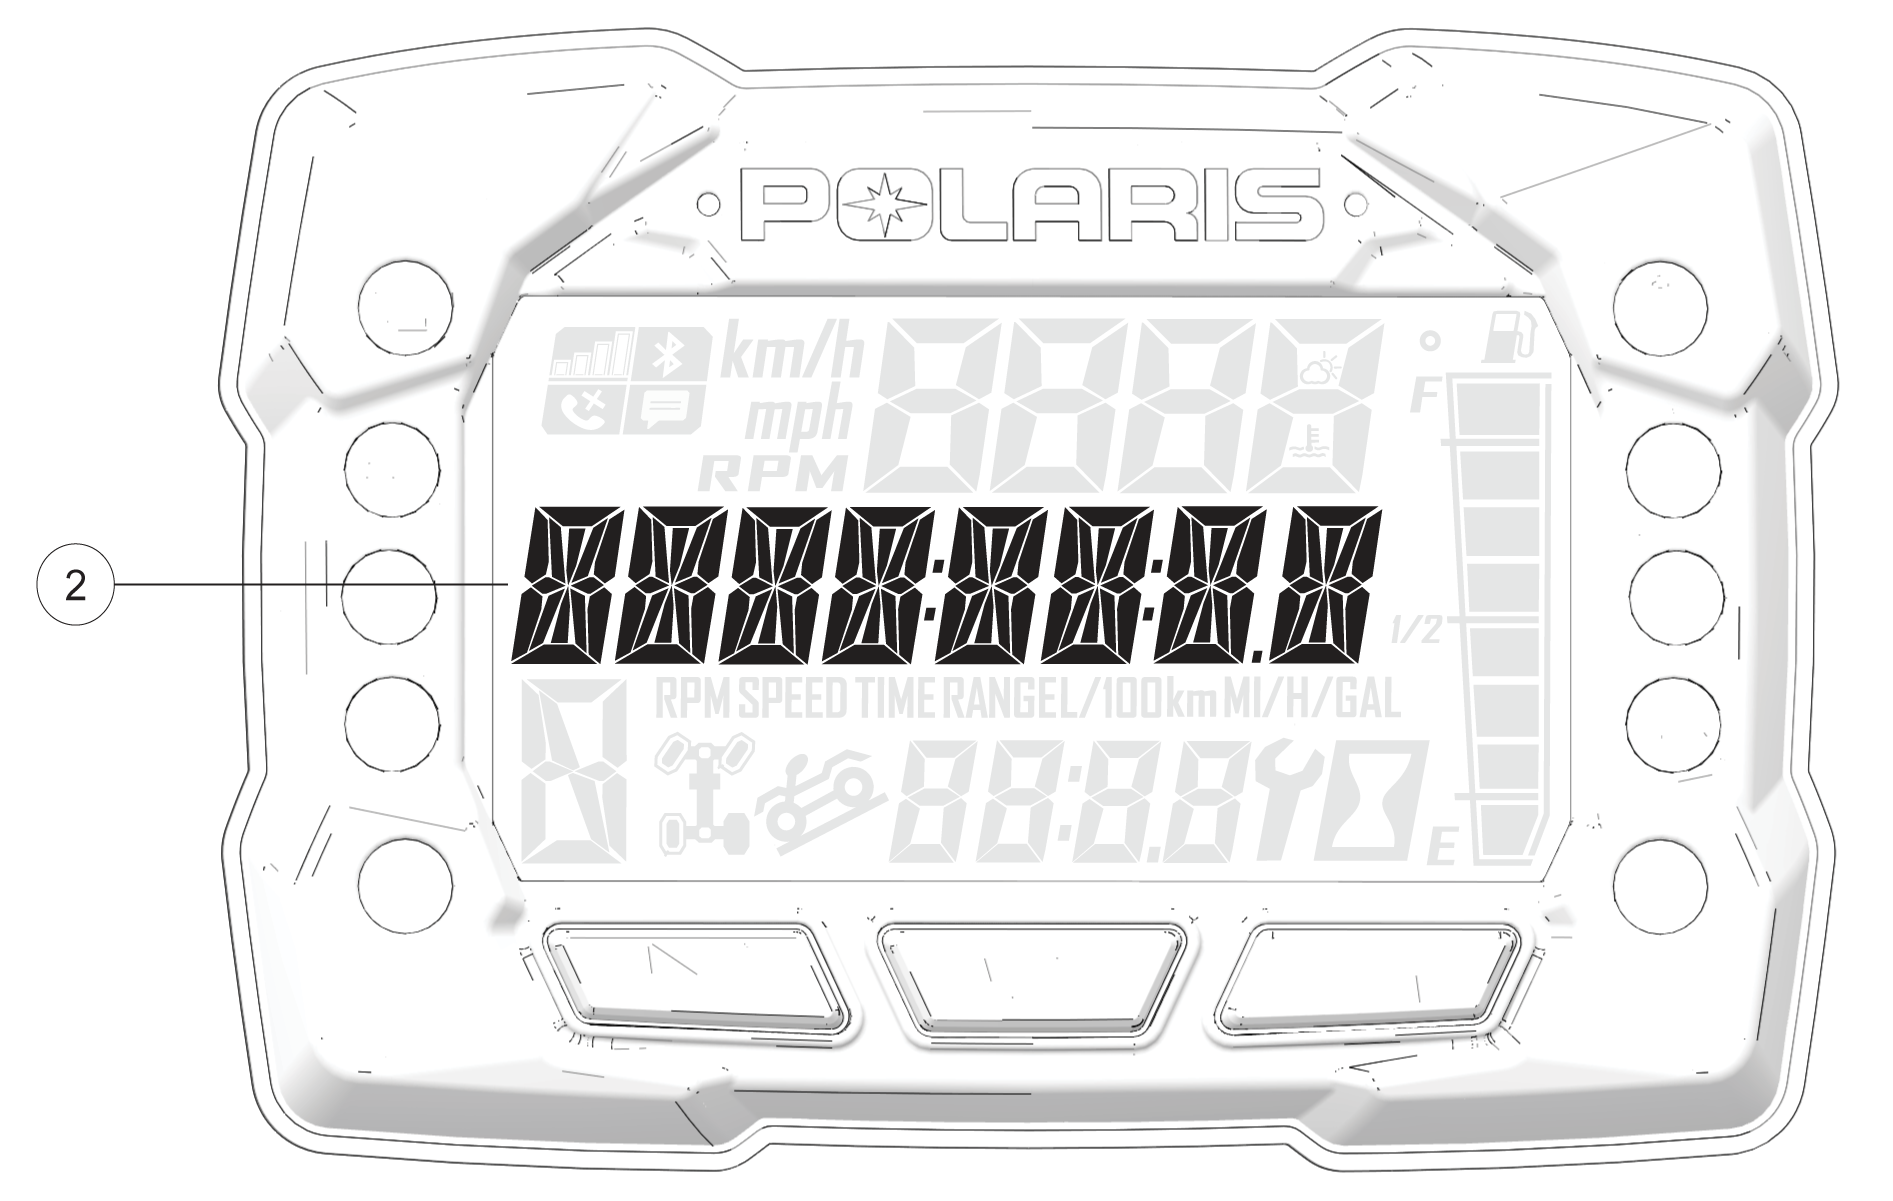
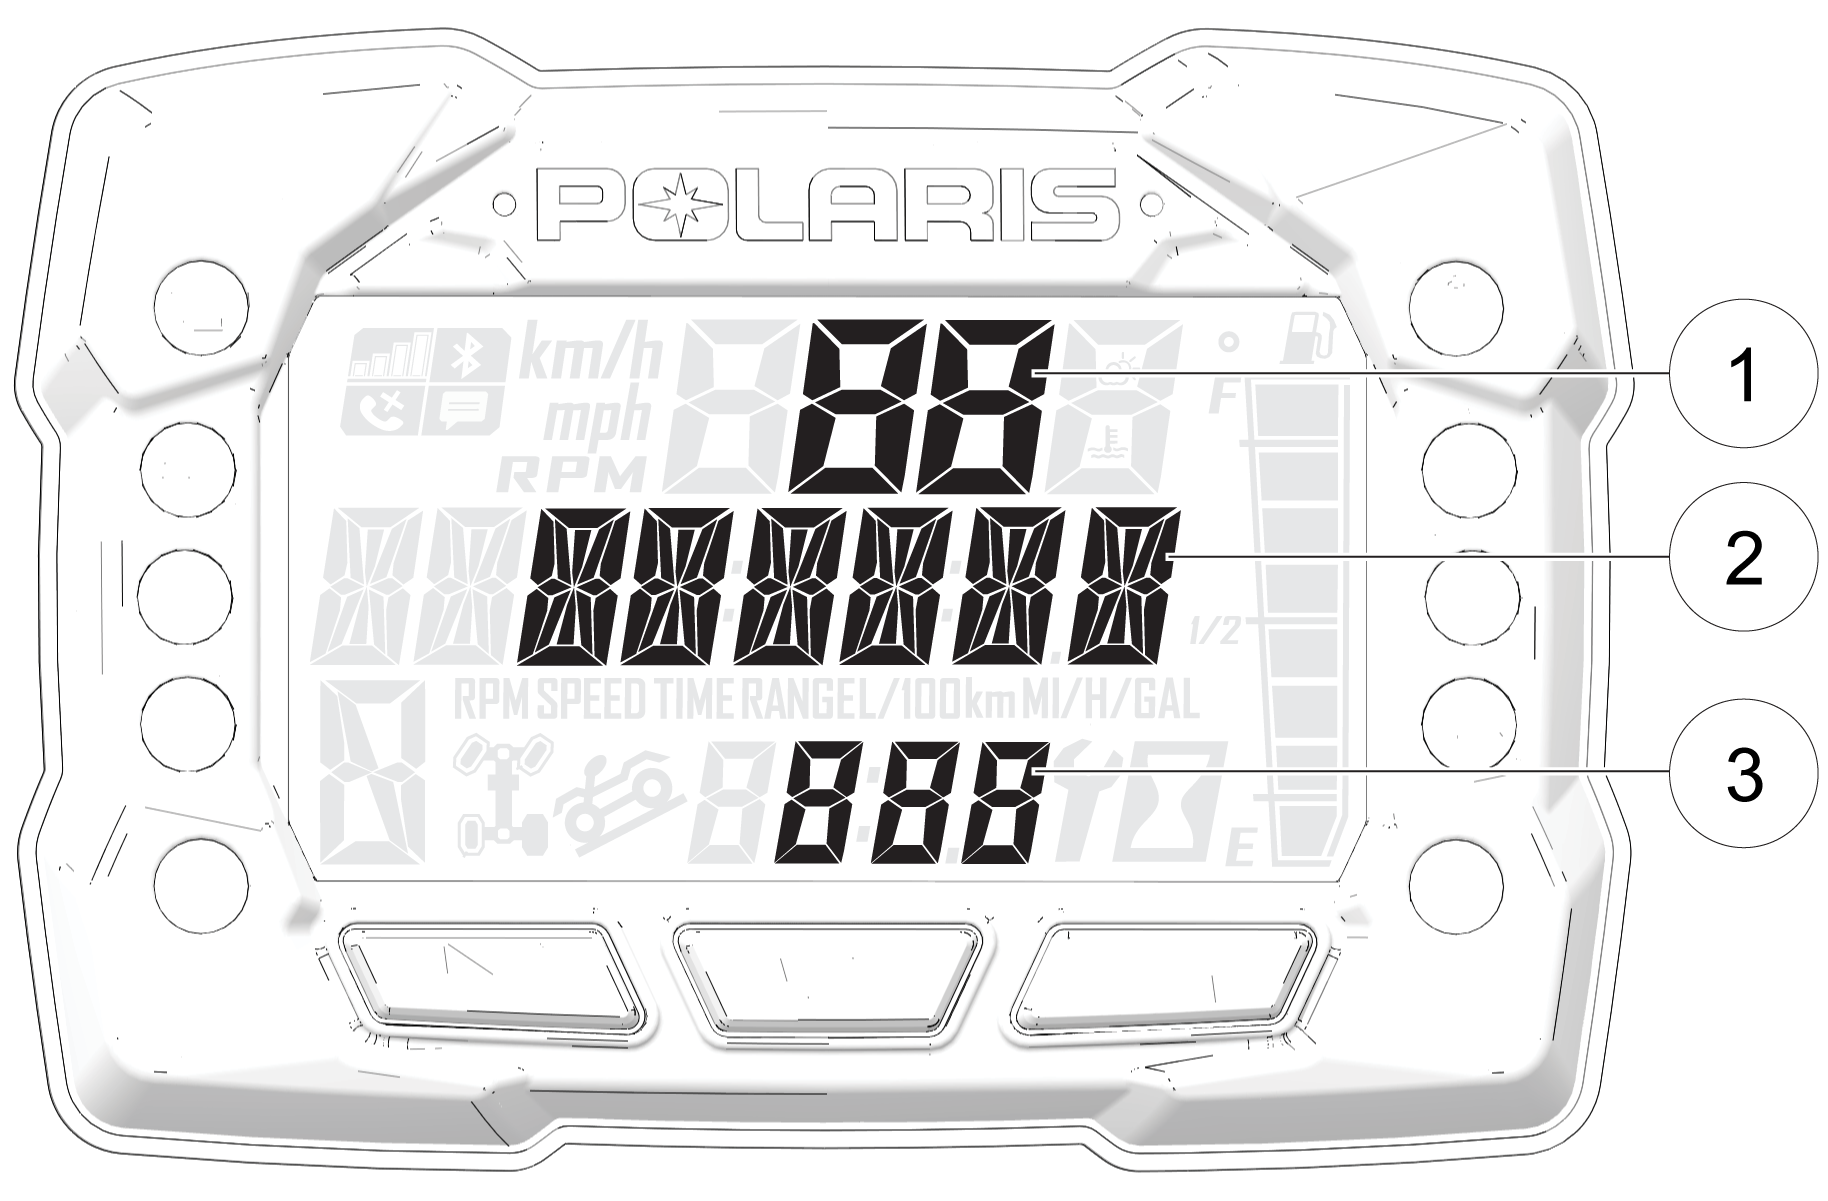
3.3.12: Instrument Cluster
3.3.12.1: Overview

NOTICE
The use of a high pressure washer may damage
the instrument cluster. Wash the vehicle by hand or with a garden
hose using mild soap. Do not use alcohol to clean the instrument cluster.
Do not allow insect sprays to contact the lens. Immediately clean
off any gasoline that splashes on the instrument cluster.
|
1 Gear Indicator |
H = High Gear L = Low Gear N = Neutral R = Reverse Gear P = Park — = Gear Signal Error (or |
|
2 Display Area 2 |
This area displays odometer, trip meter, trip meter 2, voltage, engine temperature, engine hour meter, programmable service hour interval, ground speed, or engine RPM. |
|
3 Display Area 1 |
This area displays engine RPM, ground speed, or coolant temperature. |
|
4 Fuel Gauge |
The segments of the fuel gauge show the level of fuel in the fuel tank. When the last segment clears, a low fuel warning is activated. All segments including the fuel icon will flash. Refuel immediately. |
|
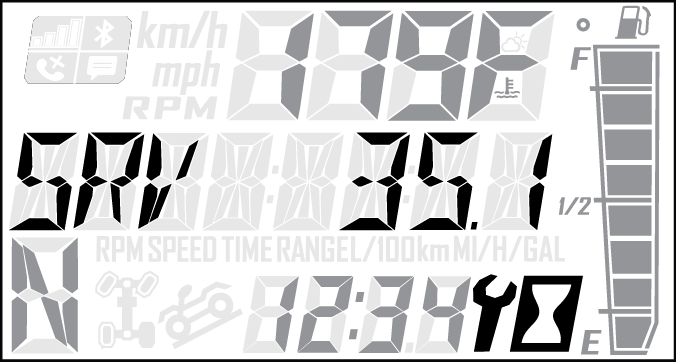
5 Service Indicator |
A flashing wrench symbol alerts the operator that the preset service interval has been reached. Your POLARIS dealer can provide scheduled maintenance. See Service Hours for more information. |
|
6 Clock |
The clock displays time in a 12-hour or 24-hour format. |
|
7 AWD Indicator |
Segments of the indicator illuminate based on drive mode engaged. |
3.3.12.2: Indicator Lamps
3.3.12.3: Digital Gauge
The instrument cluster displays critical vehicle information to
the user.
NOTE
Some features are not applicable to all models. The use of a
high pressure washer may damage the instrument cluster. Wash the vehicle
by hand or with a garden hose using mild soap. Certain products, including
insect repellents and chemicals, will damage the instrument cluster
lens. Do not use alcohol to clean the instrument cluster. Do not allow
insect sprays to contact the lens. Immediately clean off any gasoline
that splashes on the instrument cluster.
-
Gear Display — This area displays gear shifter position:
H:
High Gear
L:
Low Gear
N:
Neutral
R:
Reverse Gear
P:
Park
—:
Gear Signal Error (or shifter between gears)
-
Display Area 1 — This area displays engine RPM, ground
speed, or coolant temperature. -
Display Area 2 —This area displays odometer, trip meter,
trip meter 2, voltage, engine temperature, engine hour meter, programmable
service hour interval, ground speed, or engine RPM. -
Fuel Gauge —The segments of the fuel gauge show the
level of fuel in the fuel tank. When the last segment clears, a low
fuel warning is activated. All segments including the fuel icon will
flash. Refuel immediately. -
Service Indicator — A flashing wrench symbol alerts
the operator that the preset service interval has been reached. Your
POLARIS dealer can provide scheduled maintenance. See the Periodic
Maintenance Chart section for more information. -
Clock — The clock displays time in a 12-hour or 24-hour
format. -
AWD Indicator— Segments of the indicator illuminate
based on drive mode engaged.
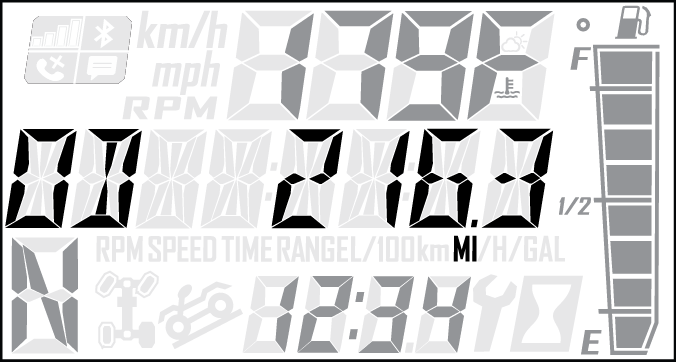
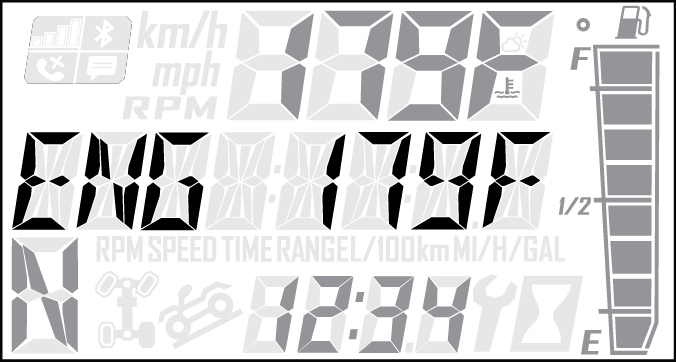
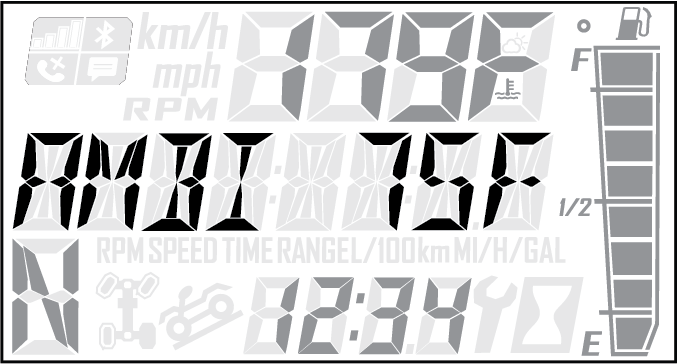
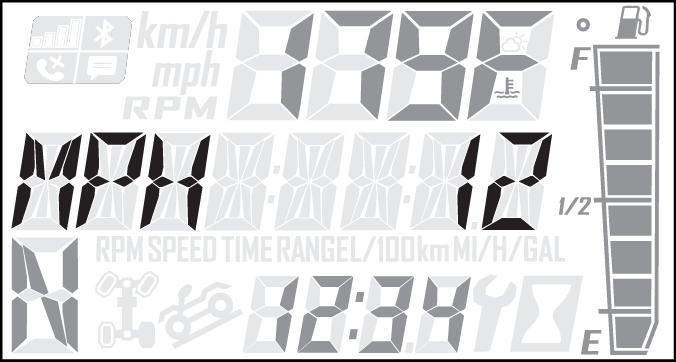
3.3.12.4: Display Area 1
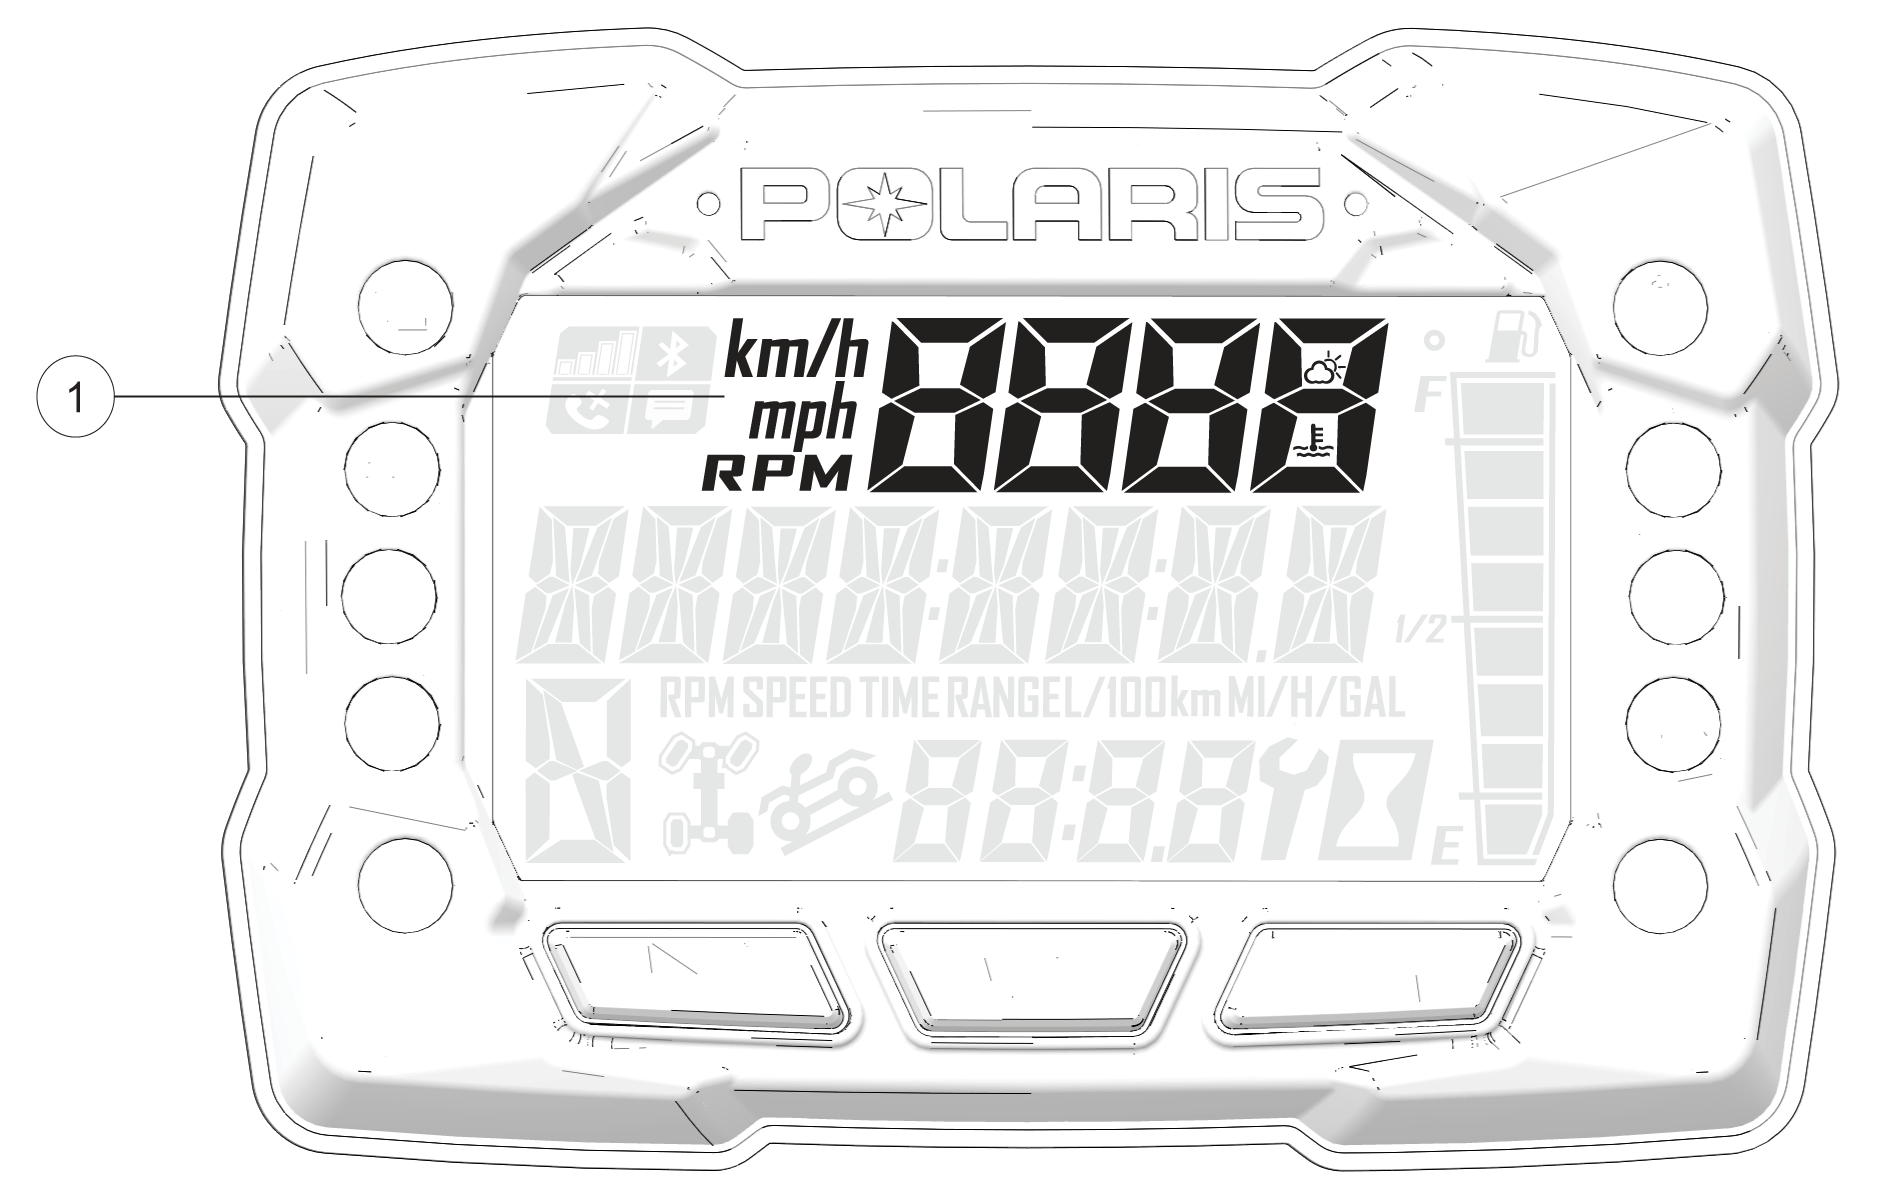
Pressing the MODE button will change the information displayed
in Area 1 1.
Speed
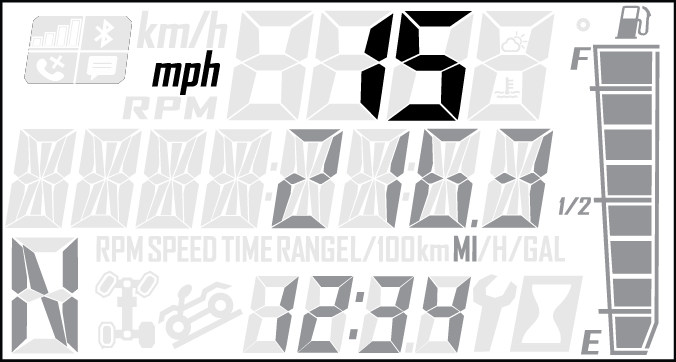
Engine Temperature
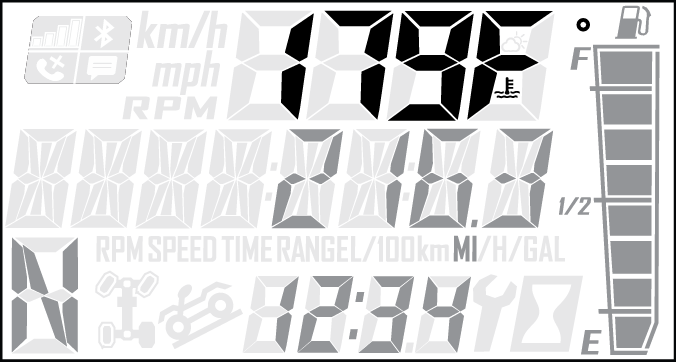
RPM
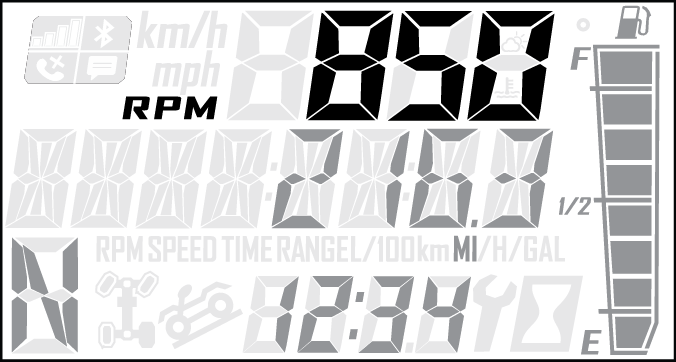
Ambient Temperature (Optional)
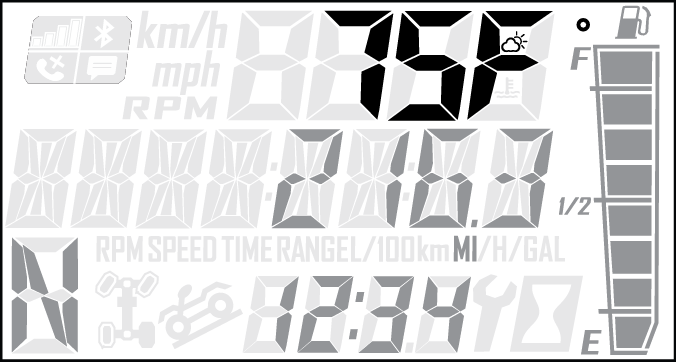
3.3.12.5: Display Area 2
Toggle the Up/Down buttons to change the information displayed
in Area 2 2.
Odometer
Engine Temperature
Trip 1
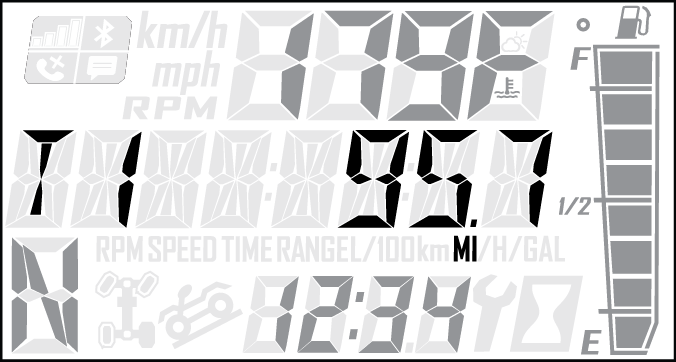
Ambient Temperature (Optional)
Trip 2
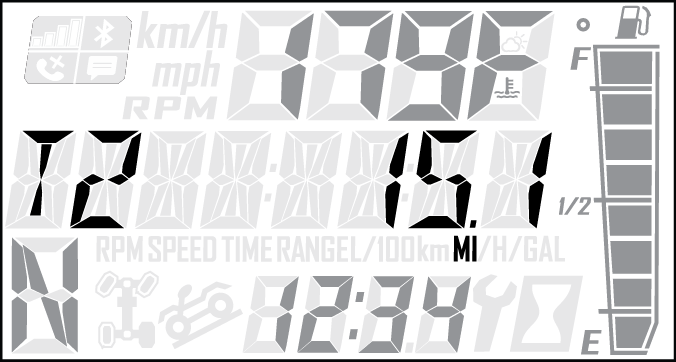
RPM
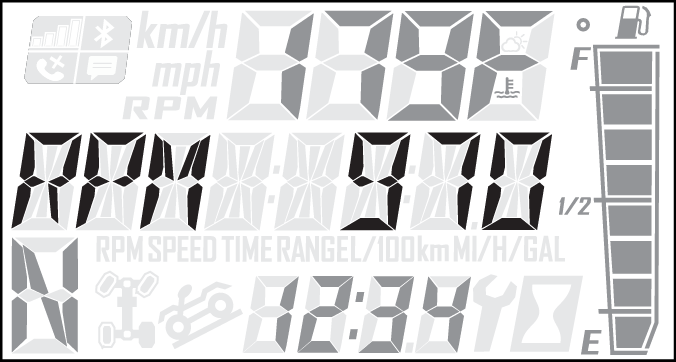
Voltage
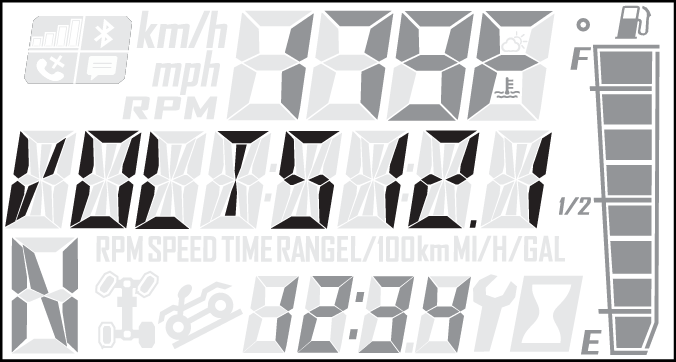
Speed
Engine Hours
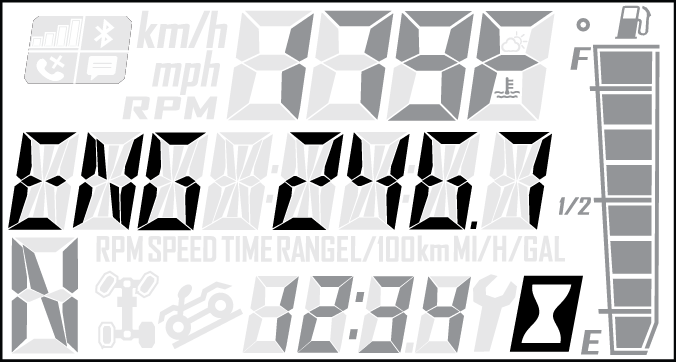
Service Hours
3.3.12.6: Options Menu

Press and hold the MODE button to enter the Options Menu.
| Options Menu | Notes |
|---|---|
| Diagnostic Codes |
Only displays if fault codes are present or stored |
| Units — Distance |
Select MPH or KPH |
| Units — Temp |
Select between °F and °C |
| Clock |
Select between 12H or 24H, and set time |
| Backlight Color |
Select between Blue or Red |
| Backlight Level |
Set backlight brightness level |
| Service Hours |
View/Set Service hours |
| Bluetooth® Pairing (if equipped) |
Pair Bluetooth® device |
| Exit Menu |
Exit |
3.3.12.6.1: Diagnostic Code
Diagnostic Code Screen will show available MIL that has come on
during that ignition cycle.
To access the Diagnostic Code Screen,
do the following:
-
Press and hold the MODE button to enter the Options Menu. “OPTIONS”
will display on the screen for 3 seconds before showing first menu
item.
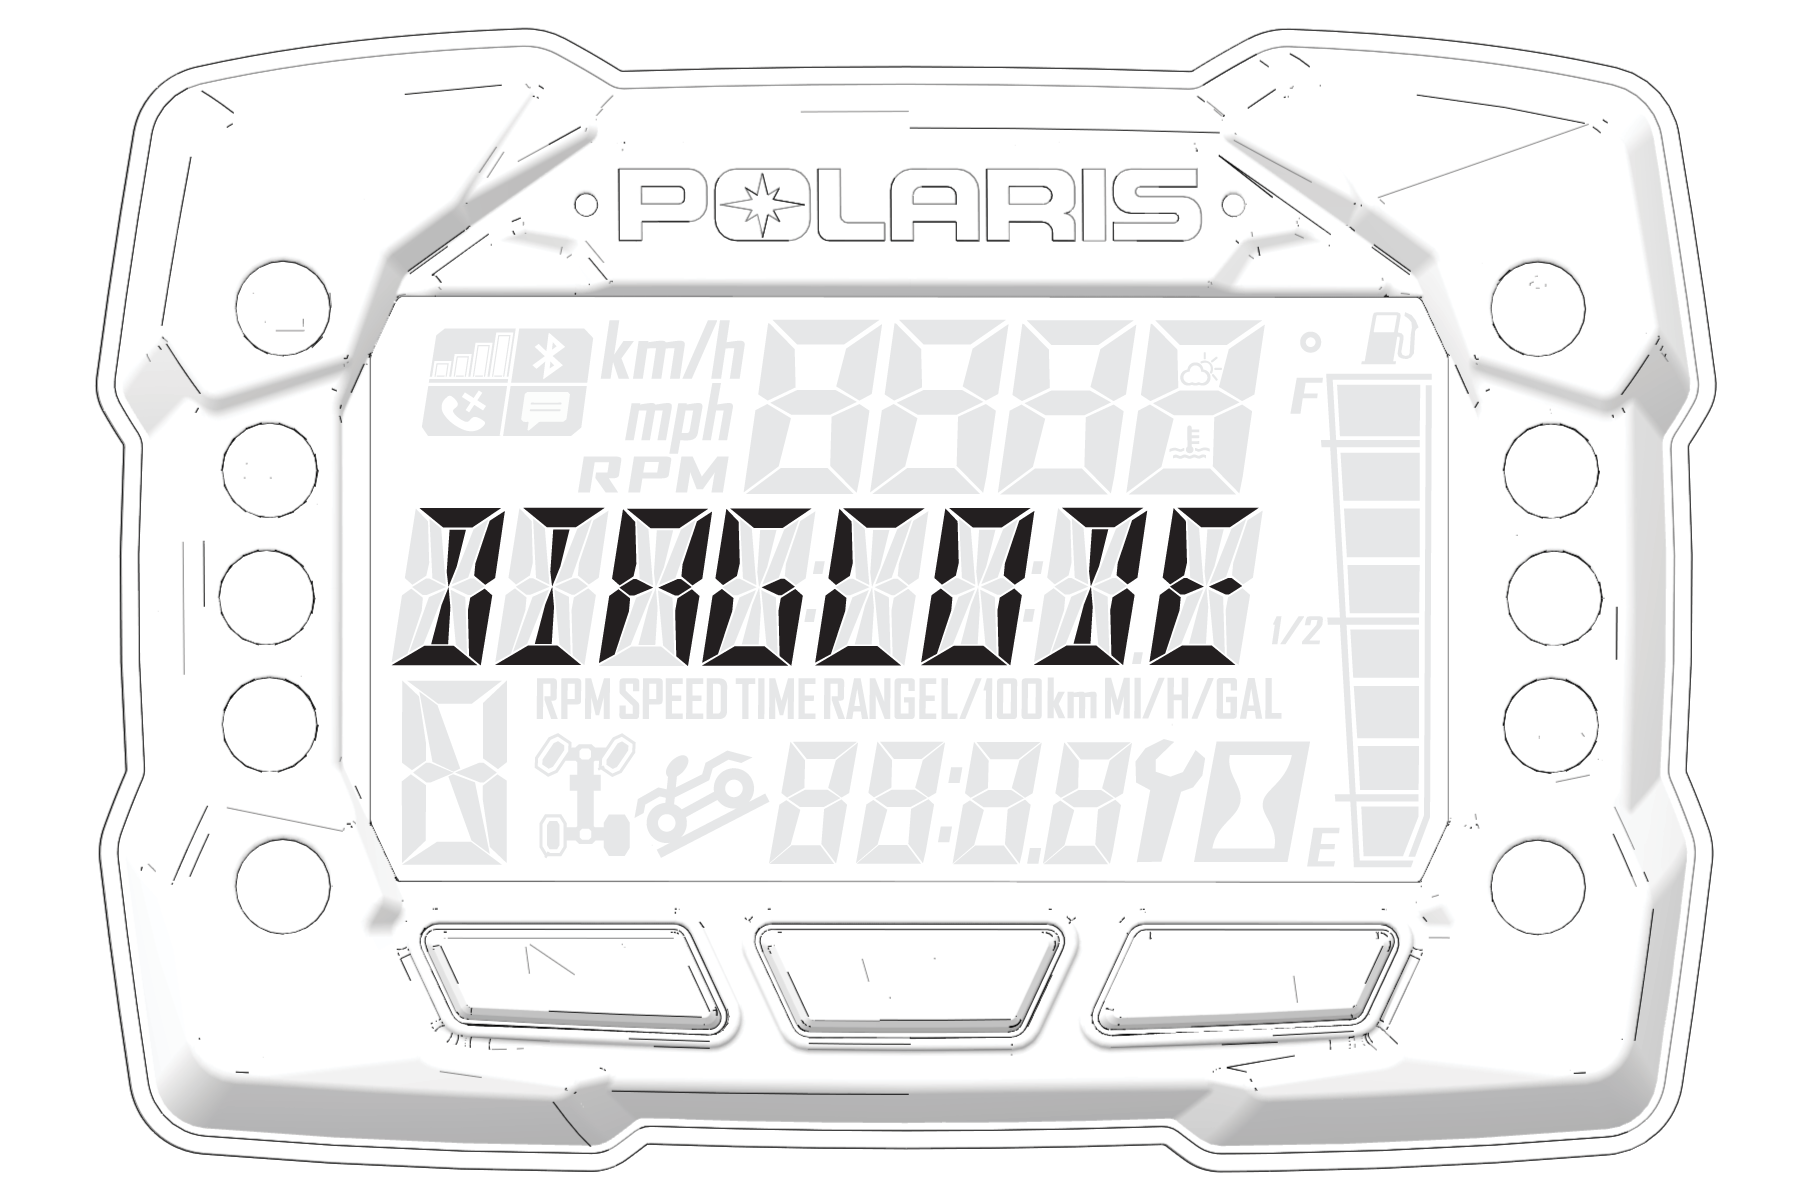
-
Select “Diagnostic Codes” from
the Options Menu by pressing the MODE button.Toggle the Up/Down
Buttons to cycle through Code(s).NOTICE
This option
will only be available if a fault code was set or is active during
the current ignition key ‘on’ cycle. Turning off the ignition will
clear any save fault codes from the gauge.-
1 Display area 1 will show FMI
-
2 Display area 2 will show SPN
-
3 Clock Area will show Count.

NOTICE
When the gauge is displaying a fault code,
the warning telltale (check engine or EPS) will blink to indicate
which controller set the fault code. -
-
To exit the Options Menu the user can select Exit Menu function
from Options Menu, can hold Mode Button and exit out of Options Menu,
or not press any button for 10 seconds, which will exit out of the
Options Menu.
3.3.12.6.2: Unit Selection Distance
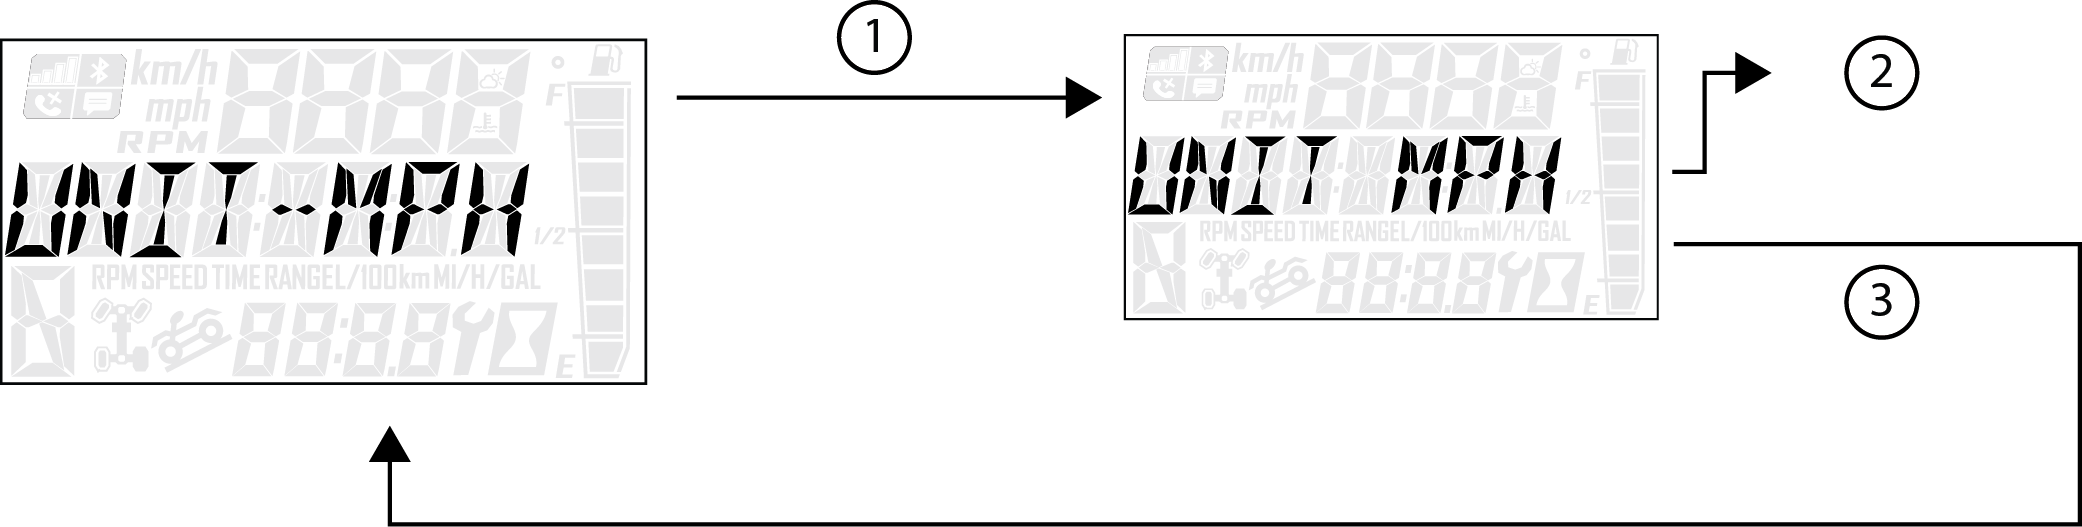
-
Press and hold the MODE button to enter the Options Menu.
NOTICE
“OPTIONS” will display on the
screen for 3 seconds before showing first menu item. -
Select “Units-Distance” from the Options Menu
by pressing the MODE button.Reference the image shown above:
1 Press the MODE button.
2 Toggle
the Up/Down Buttons to change the units (MPH or KPH)3 With the correct unit displayed, Press the mode button which will
set the unit and return to the Options Menu. -
To exit the Options Menu the user can select Exit Menu function
from Options Menu, can hold Mode Button and exit out of Options Menu,
or not press any button for 10 seconds, which will exit out of the
Options Menu.
3.3.12.6.3: Unit Selection Temperature
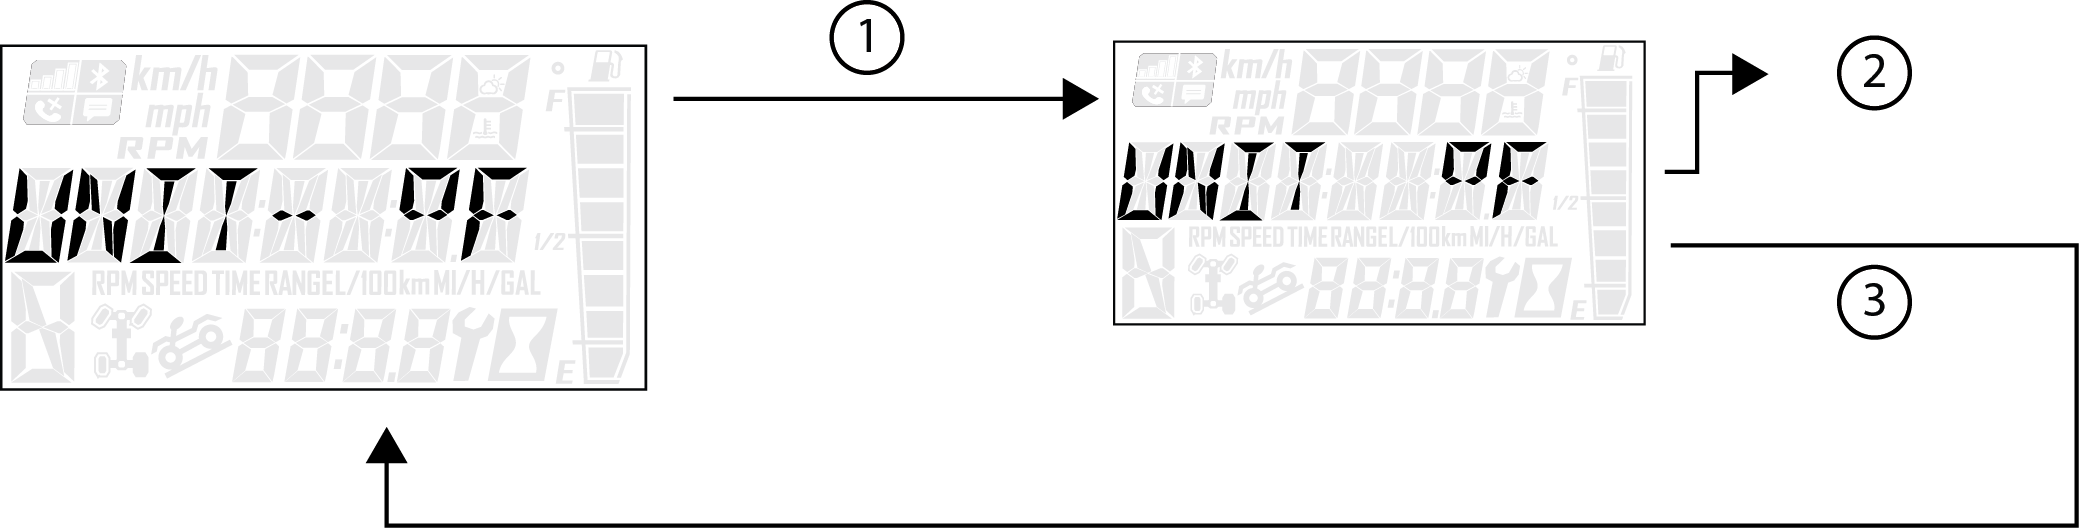
-
Press and hold the MODE button to enter the Options Menu.
NOTICE
“OPTIONS” will display on the
screen for 3 seconds before showing first menu item. -
Select “Units — Temp” from the Options Menu by
pressing the MODE button.Reference the image shown above:
1 Press the MODE button.
2 Toggle
the Up/Down Buttons to change the units (°F or °C)3 With the correct unit displayed, Press the mode button
which will set the unit and return to the Options Menu. -
To exit the Options Menu the user can select Exit Menu function
from Options Menu, can hold Mode Button and exit out of Options Menu,
or not press any button for 10 seconds, which will exit out of the
Options Menu.
3.3.12.6.4: Clock (if Equipped)
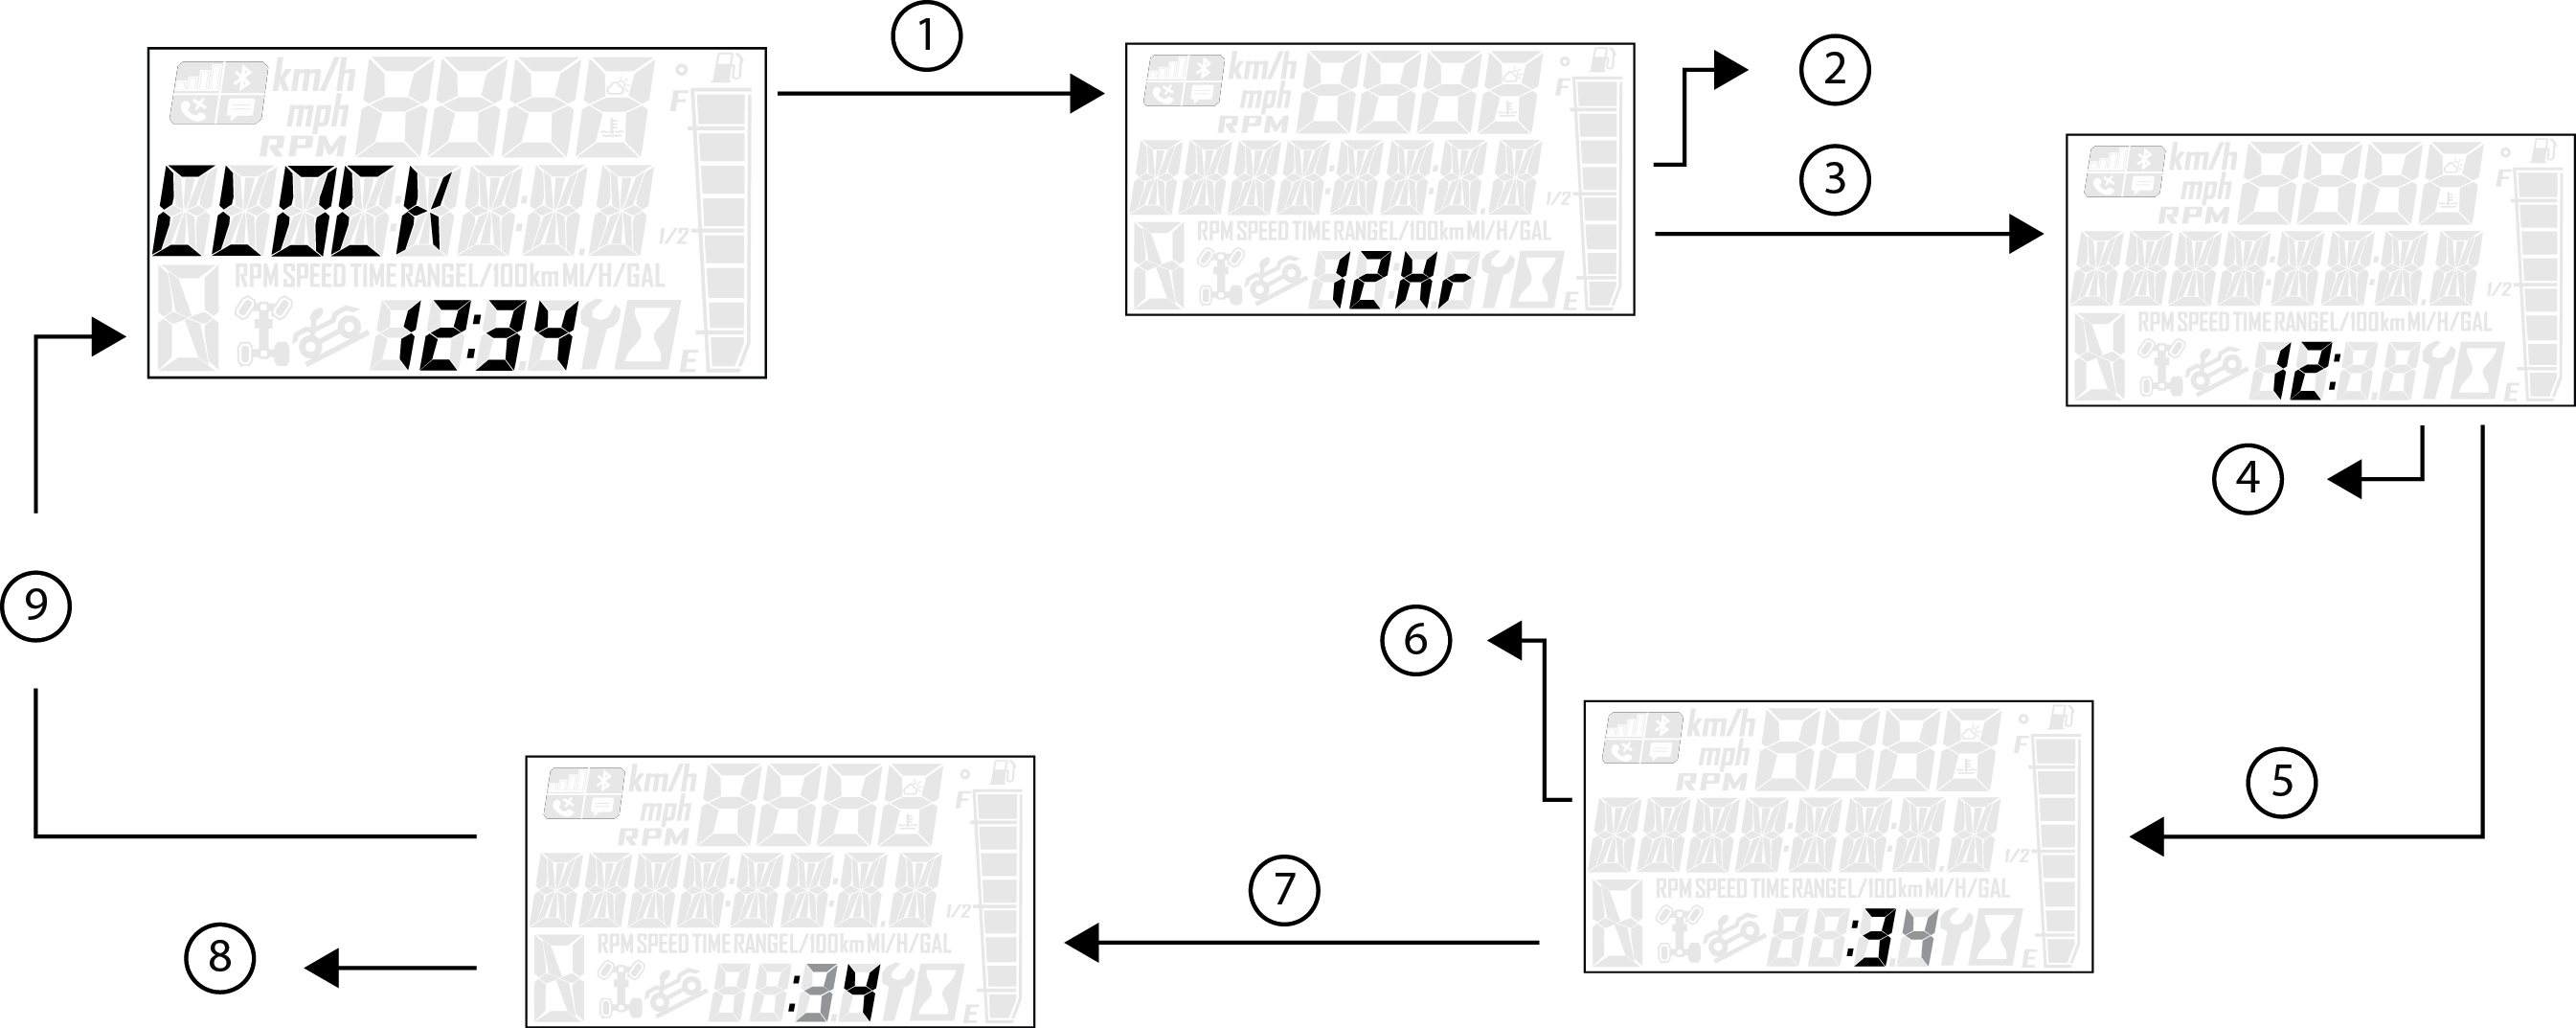
-
Press and hold the MODE button to enter the Options Menu.
NOTICE
“OPTIONS” will display on the
screen for 3 seconds before showing first menu item. -
Select “Clock” from the Options Menu by pressing
the MODE button.Reference the image shown above:
-
1 Press the MODE button.
-
2 Toggle the Up/Down Buttons to change the units (12H
or 24H) -
3 With the correct unit displayed, Press the mode
button which will set the unit. -
4 Toggle the Up/Down Buttons to change the units (Cycles
Hours) -
5 With the correct unit displayed, Press the mode
button which will set the unit. -
6 Toggle the Up/Down Buttons to change the units (Cycles
10s of Minutes) -
7 With the correct unit displayed, Press the mode
button which will set the unit. -
8 Toggle the Up/Down Buttons to change the units (Cycles
1s of Minutes) -
9 With the correct unit displayed. Press the mode
button which will set the unit and return to the Options menu.
-
-
To exit the Options Menu the user can select Exit Menu function
from Options Menu, can hold Mode Button and exit out of Options Menu,
or not press any button for 10 seconds, which will exit out of the
Options Menu.
3.3.12.6.5: Back Light Color
-
Press and hold the MODE button to enter the Options Menu.
NOTICE
“OPTIONS” will display on the
screen for 3 seconds before showing first menu item. -
Select “Backlight Color” from the Options Menu
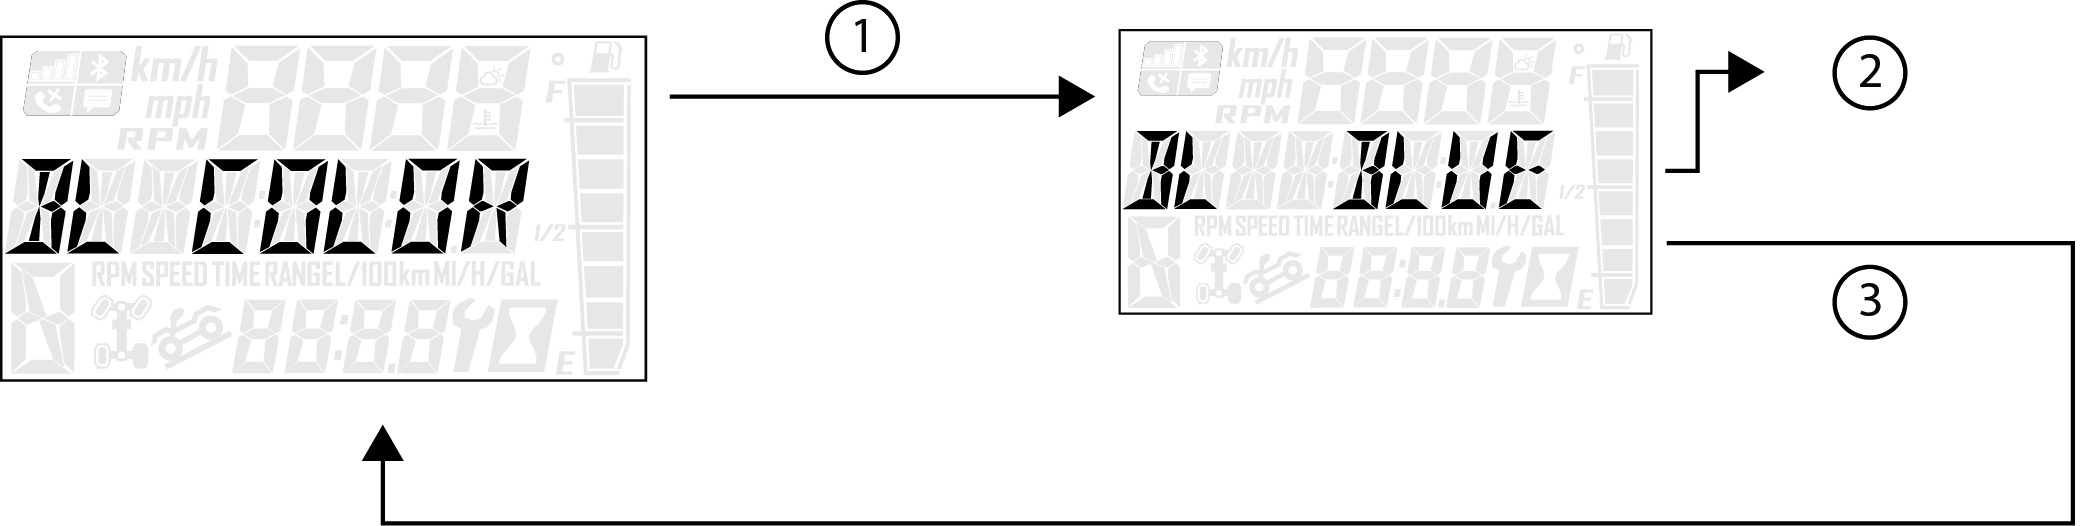
by pressing the MODE button.Reference the image shown above:
1 Press the MODE button.
2 Toggle
the Up/Down Buttons to change the units (Blue or Red)3 With the correct unit displayed, Press the MODE button which will
set the unit and return to the Options Menu. -
To exit the Options Menu the user can select Exit Menu function
from Options Menu, can hold MODE Button and exit out of Options Menu,
or not press any button for 10 seconds, which will exit out of the
Options Menu.
3.3.12.6.6: Back Light Level
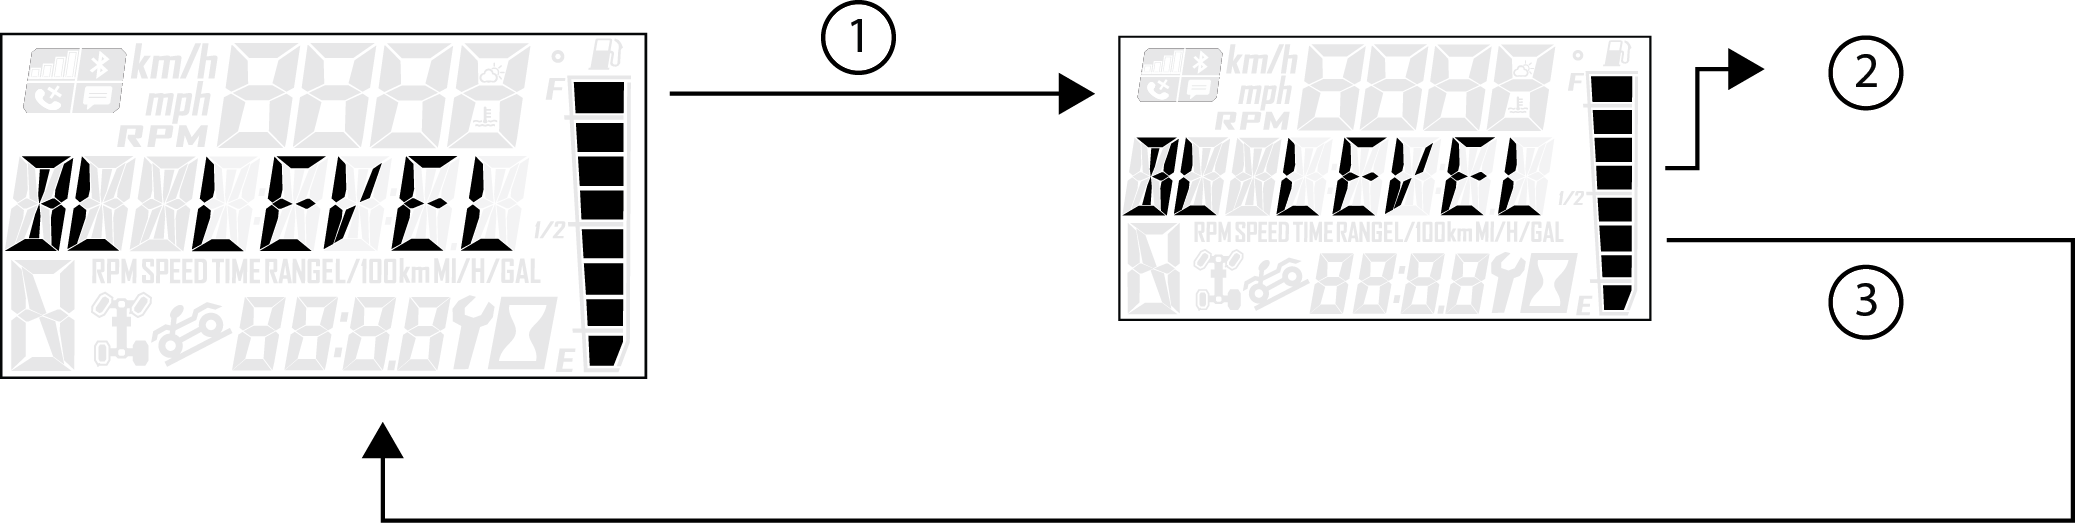
-
Press and hold the MODE button to enter the Options Menu.
NOTICE
“OPTIONS” will display on the
screen for 3 seconds before showing first menu item. -
Select “Backlight Level” from the Options Menu
by pressing the MODE button.Reference the image shown above:
1 Press the MODE button.
2 Toggle
the Up/Down Buttons to change the units (Increase or Decrease Level)3 With the correct unit displayed, Press the MODE button
which will set the unit and return to the Options Menu. -
To exit the Options Menu the user can select Exit Menu function
from Options Menu, can hold MODE Button and exit out of Options Menu,
or not press any button for 10 seconds, which will exit out of the
Options Menu.
3.3.12.6.7: Service Hours
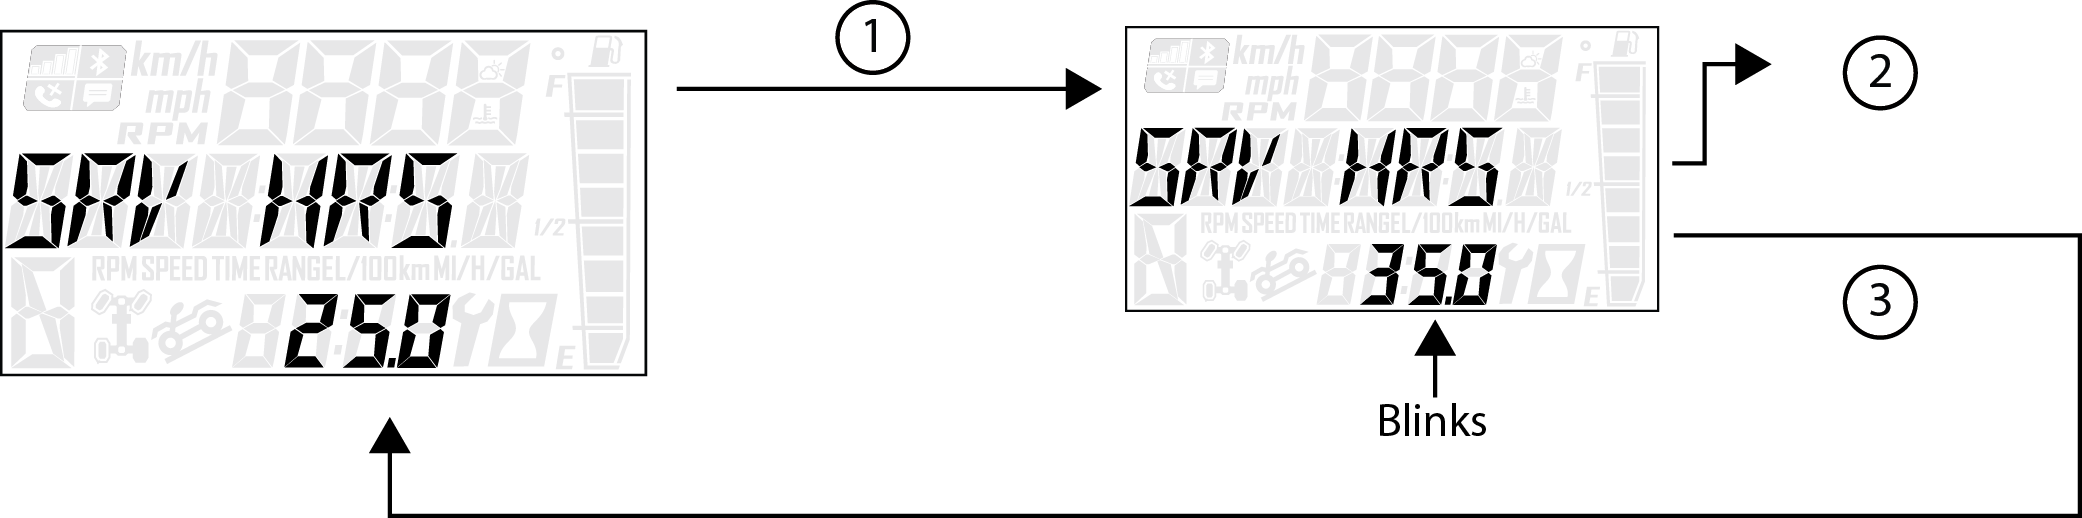
-
Press and hold the MODE button to enter the Options Menu.
NOTICE
“OPTIONS” will display on the
screen for 3 seconds before showing first menu item. -
Select “Service Hours” from the Options Menu
by pressing the MODE button.Reference the image shown above:
1 Press the MODE button.
2 Toggle
the Up/Down Buttons to change the units (0, 5, 10 — 95, 100)3 With the correct unit displayed, press the MODE button,
which will set the unit and return you to the Options Menu.NOTICE
To reset service hours after they have counted
down to «0.0», reselect the existing setpoint or select a new service
hour value. -
To exit the Options Menu the user can select Exit Menu function
from Options Menu, can hold MODE Button and exit out of Options Menu,
or not press any button for 10 seconds, which will exit out of the
Options Menu.
3.3.12.6.8: Bluetooth® (if equipped)
The Bluetooth® functionality
allows users to pair their phones with the vehicle’s digital
gauge. This function allows users to receive call and text alerts
while operating the vehicle.
If a text
message is received while the vehicle is moving faster than 2 KPH,
only the sender’s name is shown onscreen.
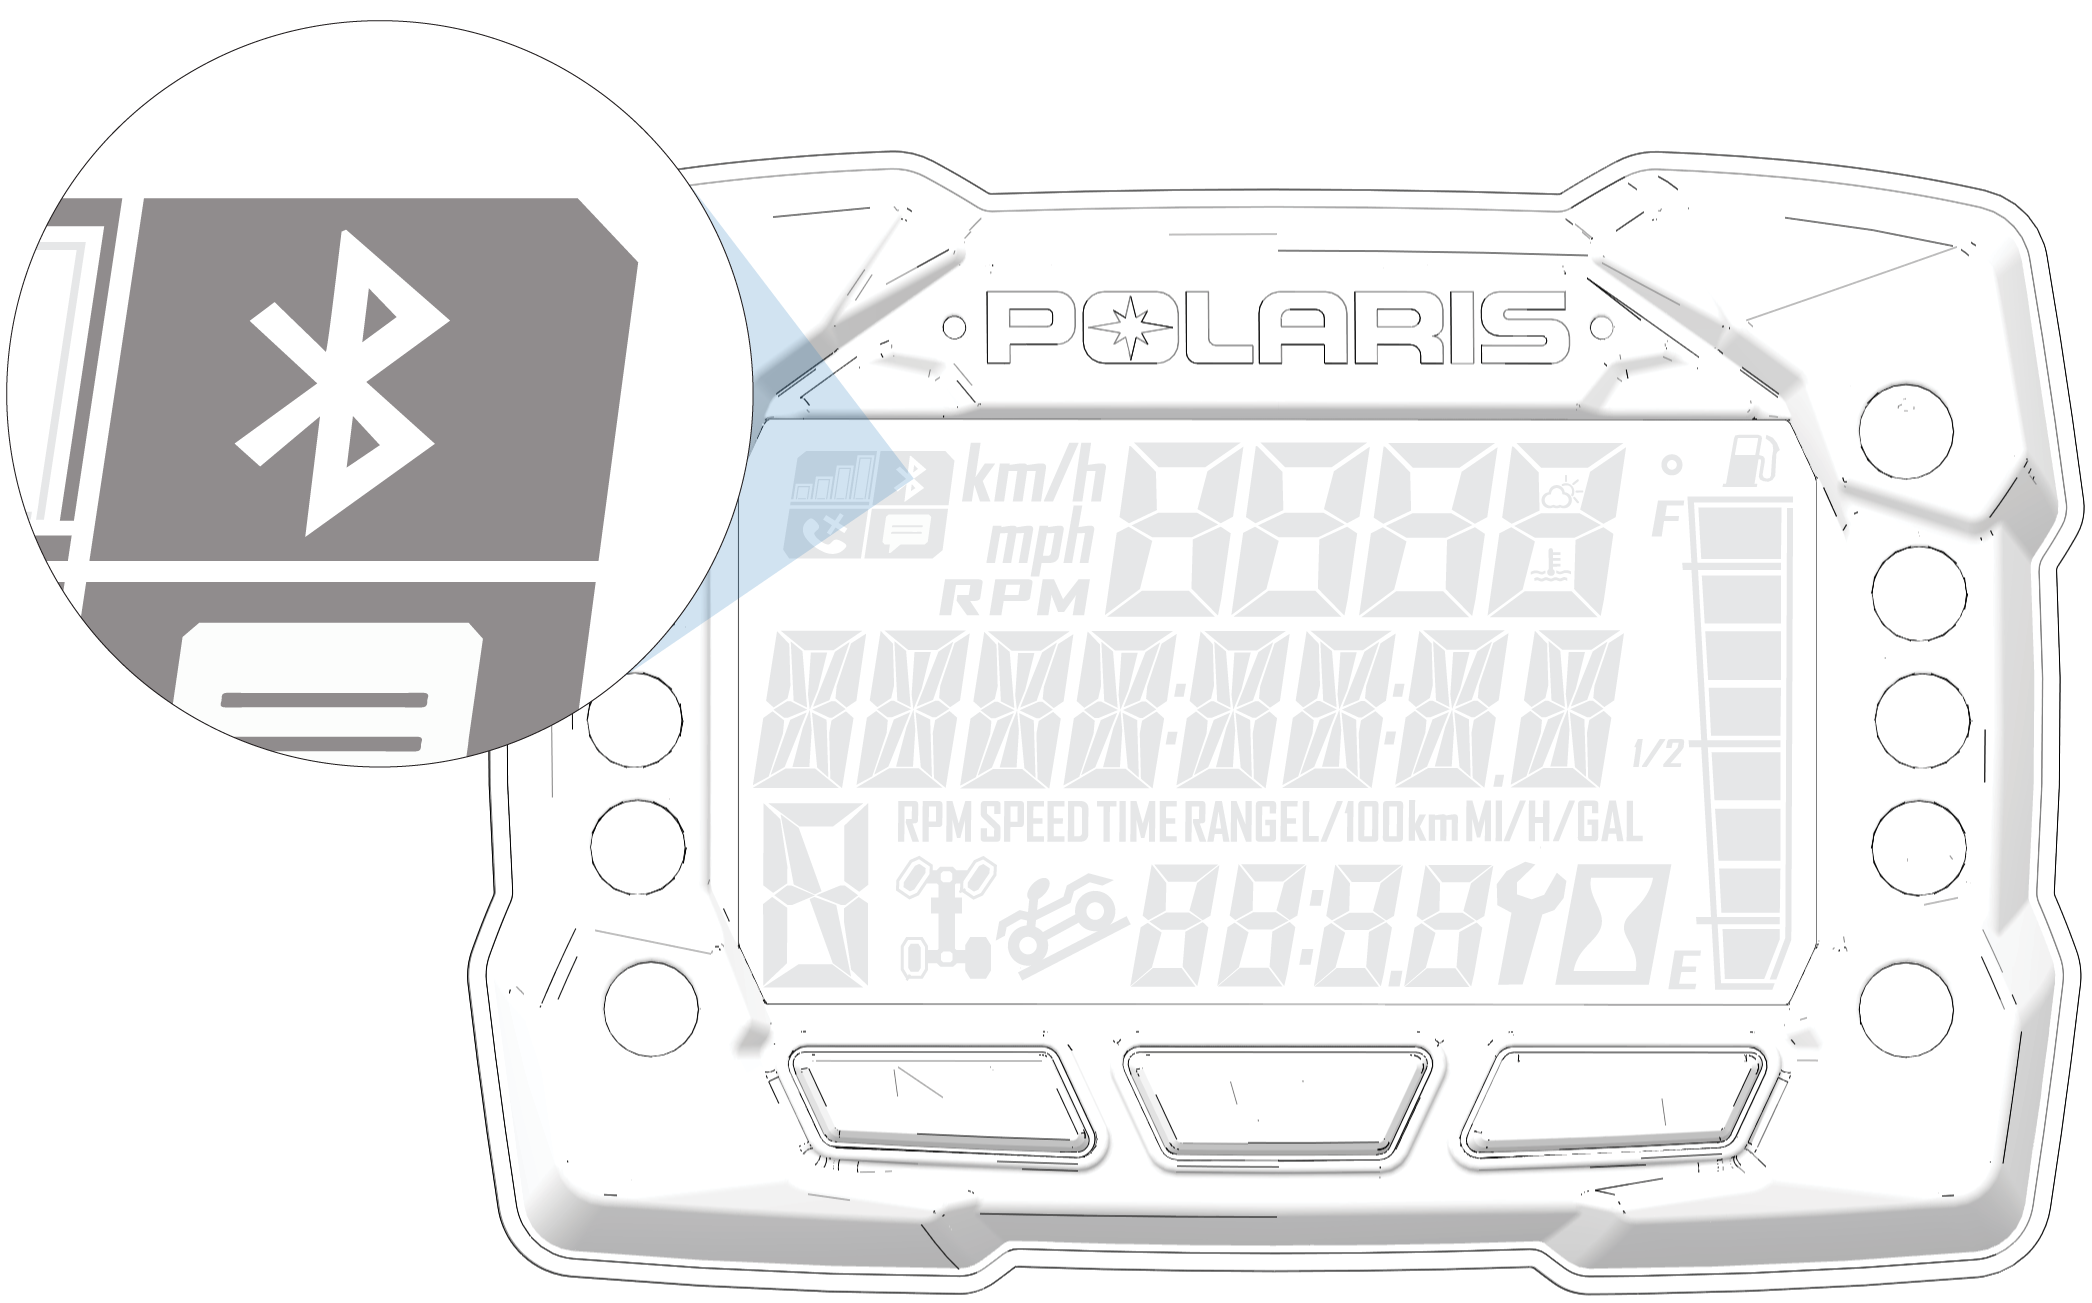
If you are browsing any of the Bluetooth® menus and the vehicle
starts to move faster than 2 KPH, the menu will automatically display VEHICLE MOVING. If you attempt to access Bluetooth® menus
while the vehicle is moving faster than 2 KPH, the screen will display VEHICLE MOVING momentarily, and then it will redirect to the
options menu.
3.3.12.6.8.1: Pairing Your Phone to the Gauge
Use the following procedure to pair your phone with the vehicle’s
digital gauge.
NOTICE
Bluetooth® functionality is compatible with
both iOS® and Android® phones. For iOS® phones, you
must go to the Settings option and enable notifications. Most Android®
phones will prompt the user automatically to enable notifications
as part of the pairing process.
-
Make sure Bluetooth® is enabled on your phone.
-
Access the options menu on the vehicle’s digital gauge
and select BT PAIR. The Bluetooth® icon will begin to
blink. -
Find and select Polaris Gauge on your phone’s
Bluetooth® menu or prompt. Pairing should occur momentarily.
Pairing mode will continue for up to 90 seconds or if you exit the BT PAIR menu.
After successfully pairing the phone, the vehicle’s digital
gauge will automatically reconnect with the phone each time it is
powered on and within range. No further action is required by the
user at this point.
3.3.12.6.9: Electronic Power Steering (EPS) (if equipped)
Electronic power steering (EPS), if equipped, engages when the
ignition key is turned to the ON position. EPS remains engaged whether
the vehicle is moving or idle. See the Instrument Cluster section
for EPS Warning Indicator information.
NOTICE
Never switch EPS modes while the vehicle is in
motion. Ensure the vehicle is fully stopped and no force is applied
to the steering system before switching EPS modes.
EPS has three modes: high, medium,
low. To set the EPS mode, do the following.
-
Stop the ATV and put it in PARK.
-
Press and hold the MODE button to enter the Options Menu. “OPTIONS”
will display on the screen for 3 seconds before showing the first
menu item. -
Select “EPS” from the Options Menu by pressing
the MODE button.
-
Toggle the Up/Down Buttons to choose between
the high, medium, and low modes. -
Press the MODE button to lock in the EPS setting.
Chapter 4: Operation
4.4.1: Important Information
WARNING
Failure to operate the vehicle properly can
result in a collision, loss of control, accident or rollover, which
may result in serious injury or death. Read and understand all safety
warnings outlined in the safety section of this owner’s manual.
4.4.2: Safe Operation Practices
-
Complete the recommended safety training before operating this
vehicle. Visit www.atvsafety.org for safety courses and riding tips.
See Safety Training for
details. -
Do not allow anyone under 16 years of age to operate this vehicle.
Do not allow anyone with cognitive or physical disabilities to operate
this vehicle. -
Never carry a passenger on a 1-up ATV. Never carry more than
one passenger on a 2-up ATV. -
Engine exhaust fumes are poisonous. Never start the engine
or let it run in an enclosed area. -
Before operating, learn how to use the auxiliary brake for
emergency situations (if service brakes become inoperable). -
Operate this vehicle off-road only. Never operate the vehicle
on pavement or on any public street, road or highway, including dirt
and gravel roads. -
Use caution and drive at reduced speeds in conditions of reduced
visibility such as fog, rain and darkness. Clean headlights frequently
and replace burned out headlamps promptly. -
Drive in a manner appropriate for your skills, your passenger’s
skills and operating conditions. Never operate at excessive speeds.
Never attempt wheelies, jumps, or other stunts. Never remove your
hands from the handlebars while operating, and always keep both feet
on the footrests. -
Never consume alcohol or drugs before or while operating an
ATV. -
Always use the size and type of tires specified for your vehicle.
Always maintain proper tire pressure. -
Never operate a damaged ATV. After any overturn or accident,
have a qualified service dealer inspect the entire machine for possible
damage. -
Never operate the ATV on a frozen body of water unless you
have independently verified that the ice is sufficiently thick to
support the weight and moving force of the ATV, you and your cargo,
together with any other vehicles in your party. -
Do not touch hot exhaust system components. Always keep combustible
materials away from the exhaust system. -
Always remove the ignition key when the vehicle is not in use
to prevent unauthorized use.
4.4.3: Trail Etiquette
Always practice good etiquette when riding. Allow a safe distance
between your vehicle and other vehicles operating in the same area.
Communicate to oncoming operators by signaling the number of vehicles
in your group. When stopping, move your vehicle to the edge of the
trail as far as possible to allow others to pass safely.
4.4.4: Know Your Riding Area/Tread LightlySM
Familiarize yourself with all laws and regulations concerning the
operation of this vehicle in your area. Respect the environment in
which you ride your vehicle. Find out where the designated riding
areas are by contacting your POLARIS dealer, a local riding club,
or local officials.
Help keep our trails open for recreational vehicle use. As an off-road
enthusiast, you represent the sport and can set a good example (or
a poor example) for others to follow. Tread LightlySM.
Operate with respect for the terrain, avoid littering, and always
stay on the designated trails.
4.4.5: Vehicle Break-in Period
The break-in period for your new POLARIS vehicle is the first 25
hours of operation, or the time it takes to use the first two tanks
full of gasoline. No single action on your part is as important as
a proper break-in period. Careful treatment of a new engine and drive
components will result in more efficient performance and longer life
for these components. Perform the following procedures carefully.
NOTICE
Excessive heat build-up during the first three
hours of operation will damage close-fitted engine parts and drive
components. Do not operate at full throttle or high speeds during
the first three hours of use.
Use of any improper oils
may cause serious engine damage. POLARIS PS-4 Full Synthetic 5W-50
4-Cycle Oil is specifically formulated for your 4-cycle engine.
4.4.5.1: Engine and Drivetrain Break-in
-
Fill the fuel tank with gasoline. See the Fuel Tank section
for details. Always exercise extreme caution whenever handling gasoline. -
Check the oil level. See the Oil Check section for reference.
Add the recommended oil as needed to maintain the oil level in the
safe operating range. -
Drive slowly at first. Select an open area that allows room
to familiarize yourself with vehicle operation and handling. -
Avoid aggressive use of the brakes.
-
Vary throttle positions. Do not operate at sustained idle.
-
Pull only light loads.
-
Perform regular checks on fluid levels, controls and areas
outlined on the daily pre-ride inspection checklist. -
During the break-in period, change both the oil and the filter
at 25 hours or 250 miles. -
Check fluid levels of transmission and all gearcases after
the first 25 hours of operation and every 100 hours thereafter.
4.4.5.2: Brake System Break-in
Apply only moderate braking force for the first 50 stops. Aggressive
or overly forceful braking when the brake system is new could damage
brake pads and rotors.
4.4.5.3: PVT Break-in (Clutches/Belt)
Always break in the clutches and drive belt of new vehicles, as
well as after a belt replacement.
A proper break-in of the clutches and drive belt will ensure a
longer life and better performance. Break in the clutches and belt
by operating at slower speeds during the break-in period as recommended.
Pull only light loads. Avoid aggressive acceleration and high speed
operation during the break-in period.
If a belt fails and you need to replace it, always clean all debris
from the PVT intake and outlet duct, the clutch, and the engine components.
4.4.6: Pre-Ride Checklist
Failure to inspect and verify that the ATV is in safe operating
condition before operating increases the risk of an accident. Always
inspect the ATV before each use to make sure it’s in safe operating
condition.
|
Item |
Remarks |
Page |
|---|---|---|
|
Brake system/lever travel |
Ensure proper operation |
Brake Lever Brakes |
|
Brake fluid |
Ensure proper level |
Brake Fluid Level |
|
Auxiliary brake |
Ensure proper operation |
Auxiliary Foot Brake |
|
Front suspension |
Inspect, lubricate if necessary |
— |
|
Rear suspension |
Inspect, lubricate if necessary |
— |
|
Steering |
Ensure free operation |
— |
|
Tires |
Inspect condition and pressure |
Tires |
|
Wheels/fasteners |
Inspect, ensure fastener tightness |
— |
|
Frame nuts, bolts, fasteners |
Inspect, ensure tightness |
— |
|
Fuel and oil |
Ensure proper levels |
Lubricants / Service Products |
|
Coolant level |
Ensure proper level |
Cooling System |
|
Coolant hoses |
Inspect for leaks |
— |
|
Throttle |
Ensure proper operation |
Throttle Lever |
|
Indicator lights/switches |
Ensure operation |
Indicator Lamps |
|
Engine stop switch |
Ensure proper operation |
Engine Stop Switch |
|
Air filter, pre-filter |
Inspect, clean |
Air Filter Installation |
|
Headlamp |
Check operation |
Controls |
|
Brake light/taillight |
Check operation |
— |
|
Riding gear |
Wear approved helmet, goggles, and protective clothing |
Safe Riding Gear |
|
Winch (if equipped) |
Inspect cable and switch |
Winch Safety |
|
Grass and Leaves |
Remove grass, leaves, foreign matter, and |
— |
4.4.7: New Operator Driving Procedures
-
Complete a certified safety training course. See the Safety
Training section. -
Wear protective riding gear. See the Safe Riding Gear section.
-
Perform the pre-ride inspection.
-
Place the transmission in PARK.
-
Lock the parking brake.
-
Mount the vehicle from the left side.
-
Sit upright with both feet on the footrests and both hands
on the handlebars. -
Start the engine and allow it to warm up.
-
Shift the transmission into gear.
-
Check your surroundings and determine your path of travel.
-
Release the parking brake.
-
Slowly depress the throttle with your right thumb and begin
driving. -
Drive slowly. Practice maneuvering and using the throttle and
brakes on level surfaces.
4.4.7.1: Turning the Vehicle
Both rear wheels drive equally at all times. This means that the
outside wheel must travel a greater distance than the inside wheel
when turning, and the inside tire must slip traction slightly.
-
Slow down.
-
Never turn quickly when carrying cargo.
-
Steer in the direction of the turn.
-
Keep both feet on the footrests.
-
Lean your upper body to the inside of the turn while supporting
your weight on the outer footrest. This technique alters the balance
of traction between the rear wheels, allowing the turn to be made
smoothly. The same leaning technique should be used for turning in
reverse. - Practice making turns at slow speeds before attempting to turn
at faster speeds.
WARNING
Turning improperly can result in vehicle overturn.
Never turn abruptly or at sharp angles. Never turn at high speeds.
4.4.7.2: Driving on Slippery Surfaces
Whenever riding on slippery surfaces such as wet trails or loose
gravel, or during freezing weather, follow these precautions:
-
Do not operate on excessively rough, slippery or loose terrain.
-
Slow down when entering slippery areas.
-
Engage 4X4 before wheels begin to lose traction.
NOTICE
Severe damage to drive train may occur if the 4X4 is
engaged while the wheels are spinning. Allow the rear wheels to stop
spinning before engaging 4X4, or engage 4X4 before wheels begin to
lose traction. -
Maintain a high level of alertness, reading the trail and avoiding
quick, sharp turns, which can cause skids. -
Never apply the brakes during a skid. Correct a skid by turning
the handlebars in the direction of the skid and shifting your body
weight forward.
4.4.7.3: Driving Uphill
Braking and handling are greatly
affected when operating in hilly terrain. Improper procedure could
cause loss of control or overturn. Whenever traveling uphill, follow
these precautions:
-
Always move the 4X4 switch to ADC 4X4 before ascending or descending
a hill. -
Drive straight uphill.
-
Avoid steep hills. Maximum incline is 25°
-
Always check the terrain carefully before ascending any hill.
-
Never climb hills with excessively slippery or loose surfaces.
-
Keep both feet on the footrests.
-
Shift body weight uphill.
-
Proceed at a steady rate of speed and throttle opening. Opening
the throttle suddenly could cause the ATV to flip over backwards. -
Never go over the top of any hill at high speed. An obstacle,
a sharp drop, or another vehicle or person could be on the other side
of the hill. -
Remain alert and be prepared to take emergency action. This
may include quick dismounting of the vehicle.
4.4.7.4: Driving Downhill
When driving downhill, follow these precautions:
-
Always check the terrain carefully before descending a hill.
-
Always move the 4X4 switch to ADC 4X4 before ascending or descending
a hill. -
Avoid steep hills. Maximum incline is 25°
-
Always descend a hill with the transmission in forward gear.
Do not descend a hill with the transmission in neutral. -
Slow down. Never travel down a hill at high speed.
-
Drive straight downhill. Avoid traveling down a hill at an
angle, which would cause the vehicle to lean sharply to one side. -
Shift body weight uphill.
-
Apply the brakes slightly
to aid in slowing.
Applying the brakes too firmly may cause the rear wheels to lock,
which could result in loss of control.
4.4.7.5: Driving on a Sidehill (Sidehilling)
Driving on a sidehill is not recommended.
Improper procedure could cause loss of control or overturn. Avoid
crossing the side of any hill unless absolutely necessary.
If crossing a sidehill is unavoidable, follow these precautions:
-
Slow down.
-
Avoid crossing the side of a steep hill.
-
Lean into the hill, transferring your upper body weight toward
the hill while keeping your feet on the footrests. -
If the vehicle begins to tip, quickly turn the front wheel
downhill, if possible, or dismount on the uphill side immediately!
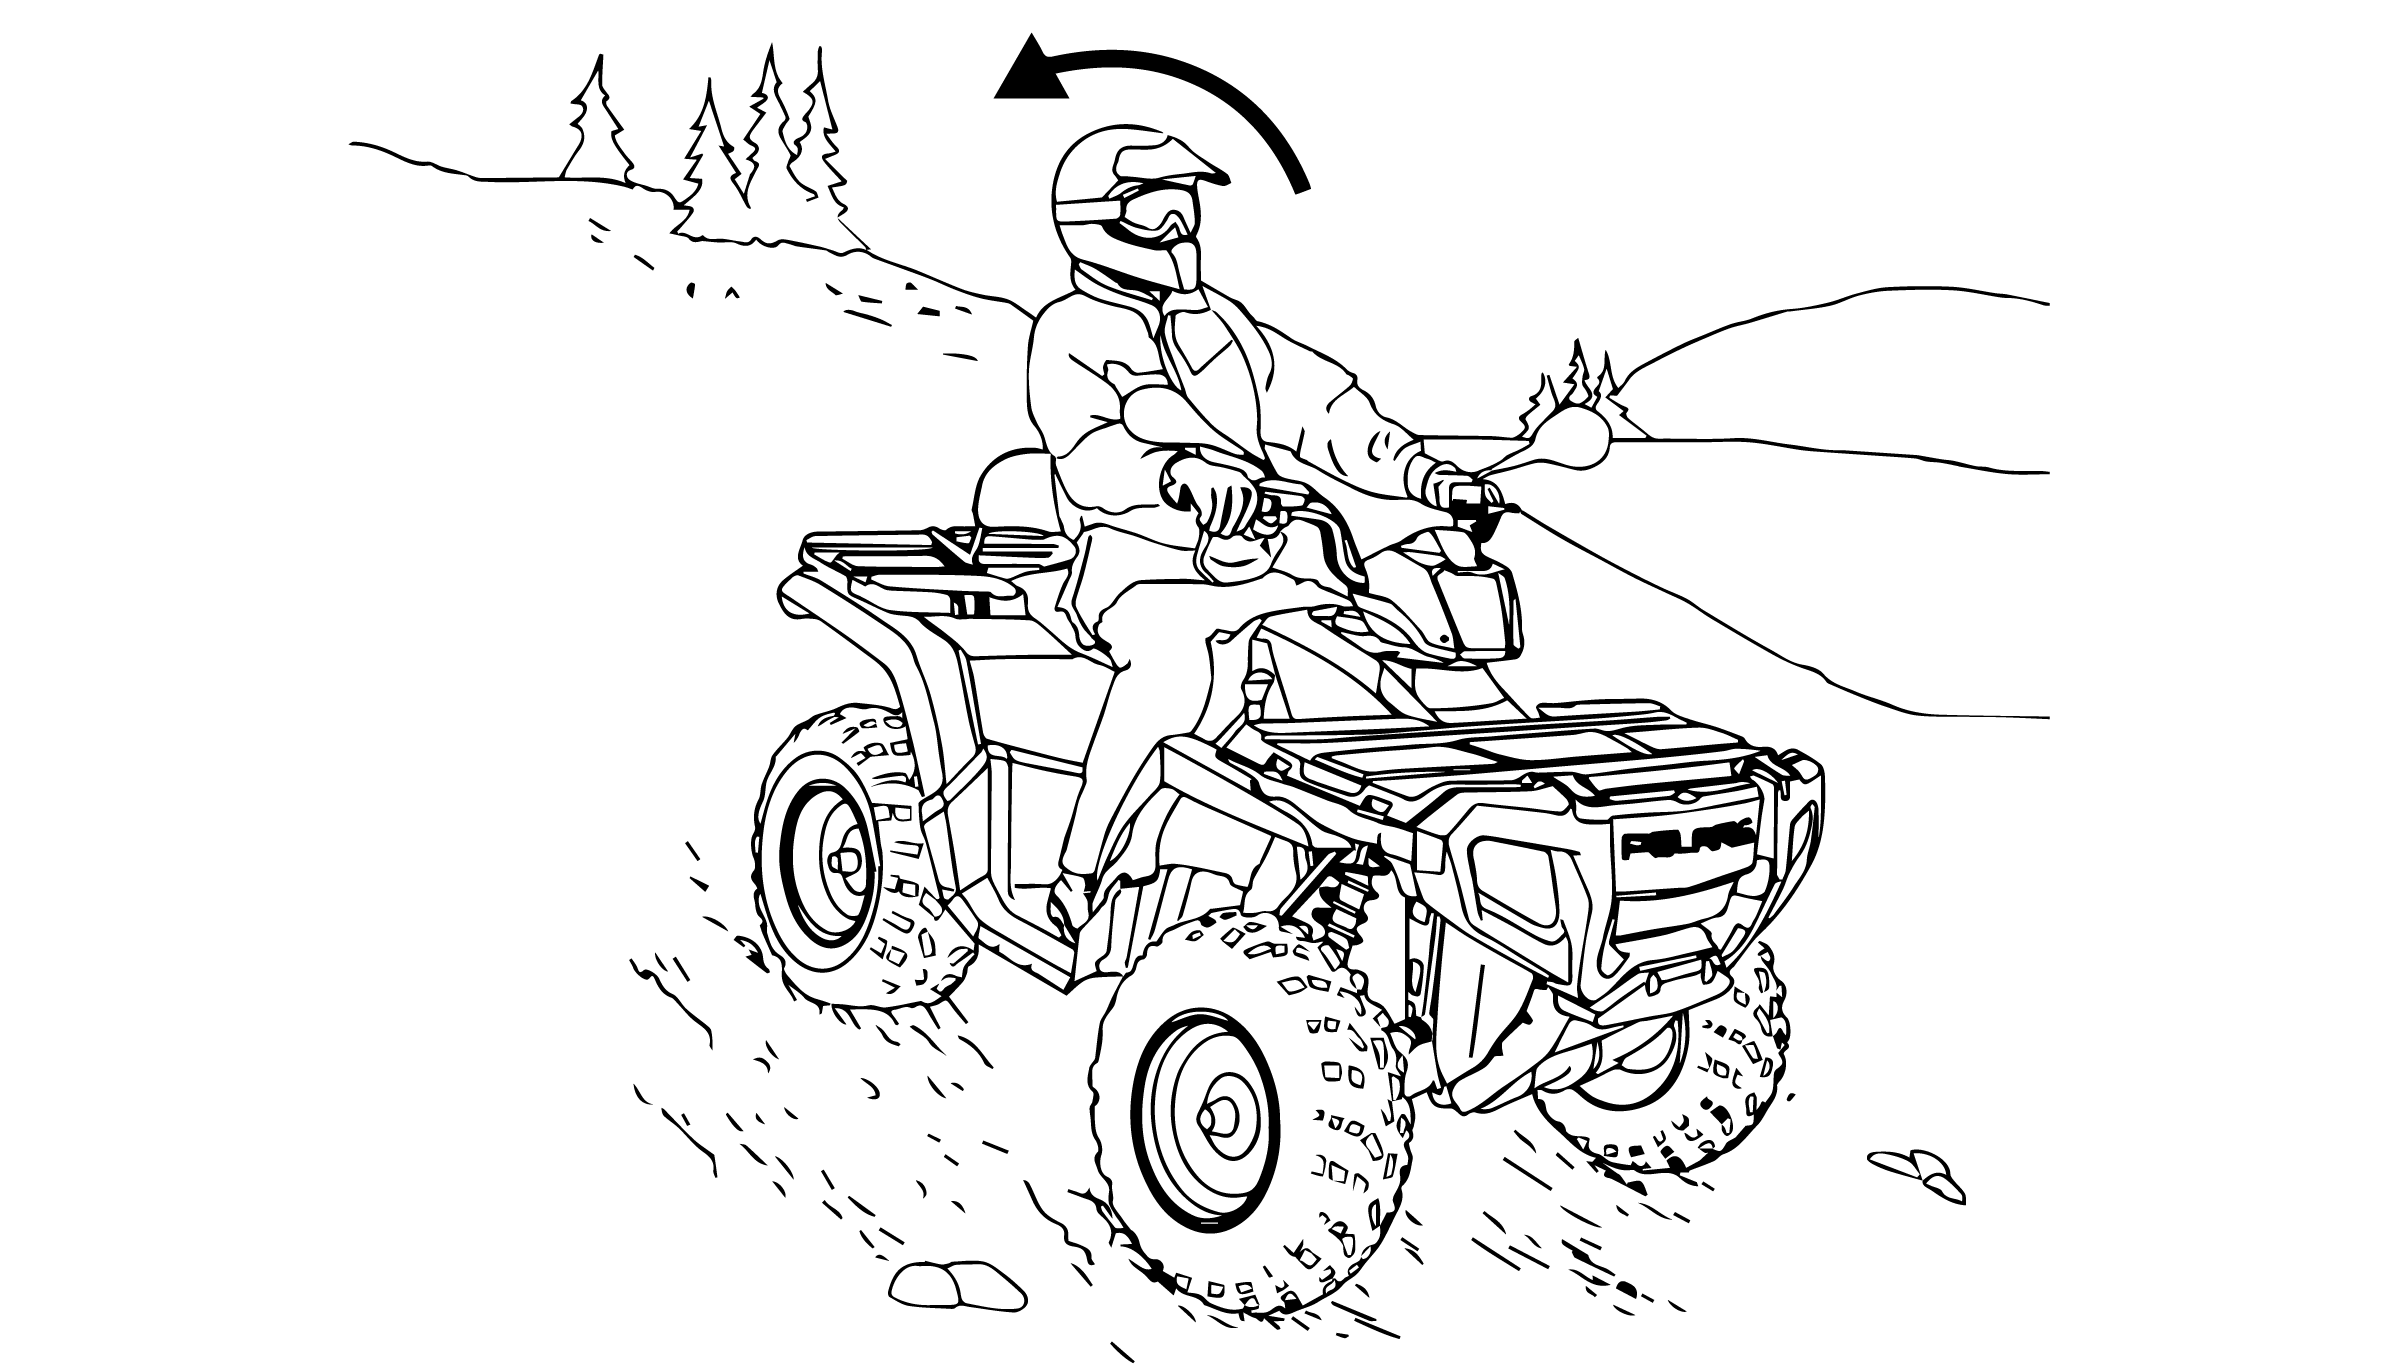
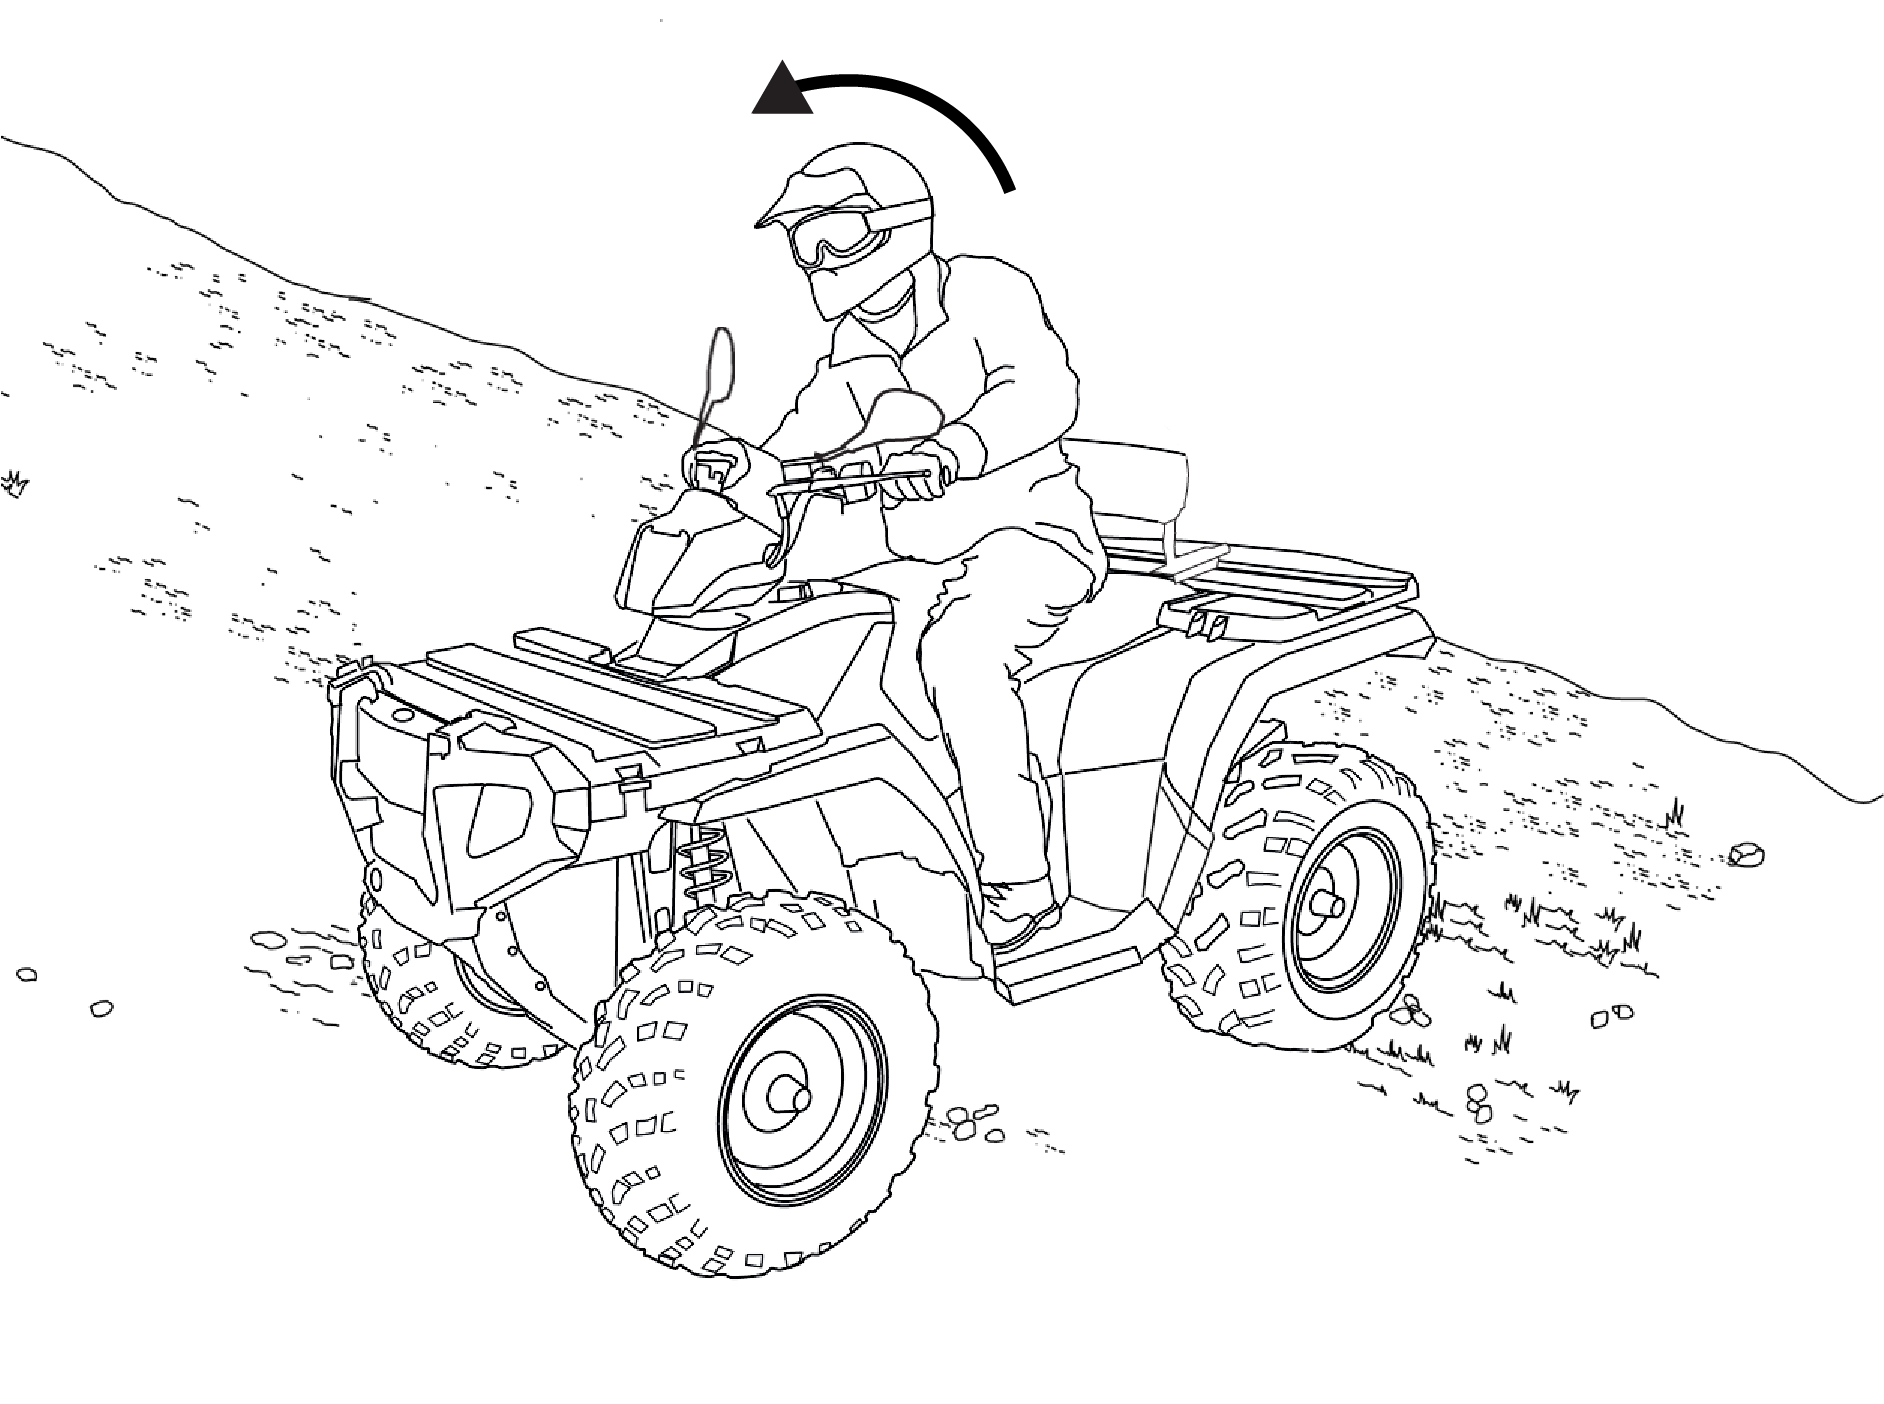
4.4.7.6: Turning Around on a Hill (K-Turn)
If the vehicle stalls while climbing a hill, never back it down
the hill! Use the K-turn to turn around.
-
Stop and lock the parking brake while keeping body weight uphill.
-
Always move the 4X4 switch to ADC 4X4 before ascending or descending
a hill. See the Switch Location section for details. -
Leave the transmission in forward and shut off the engine.
-
Dismount on the uphill side of the vehicle, or on the left
if the vehicle is pointing straight uphill. -
Staying uphill of the vehicle, turn the handlebars full left.
-
While holding the brake lever, release the parking brake lock
and slowly allow the vehicle to roll around to your right until it’s
pointing across the hill or slightly downward. -
Lock the parking brake. Remount the vehicle from the uphill
side, keeping body weight uphill. Start the engine with the transmission
still in forward. -
Release the parking brake and proceed slowly, controlling
speed with the brake lever, until the vehicle is on more level ground.
4.4.7.7: Driving Through Water
|
|
|
Your ATV can operate through water with a maximum recommended
|
If it’s unavoidable to enter water deeper than the footrest
level:
-
Proceed slowly. Avoid rocks and obstacles.
-
Balance your weight carefully. Avoid sudden movements.
-
Maintain a steady rate of speed. Do not make sudden turns or
stops. Do not make sudden throttle changes.
4.4.7.8: Driving Over Obstacles
Follow these precautions when operating over obstacles:
-
Always check for obstacles before operating in a new area.
-
Look ahead and learn to read the terrain. Be constantly alert
for hazards such as logs, rocks and low hanging branches. -
Travel slowly and use extra caution when operating on unfamiliar
terrain. Not all obstacles are immediately visible. -
Never attempt to operate over large obstacles, such as rocks
or fallen trees. -
If you are operating a 2-up ATV, always have the passenger
dismount before you operate over an obstacle that could cause a fall
from the vehicle or vehicle tipover.
4.4.7.9: Driving in Reverse
Follow these precautions when operating in reverse:
-
Always check for obstacles or people behind the vehicle.
-
Always avoid backing downhill.
-
Back slowly.
-
Apply the brakes lightly for stopping.
-
Avoid turning at sharp angles.
-
Never open the throttle suddenly.
-
Do not use the override switch unless additional wheel speed
is required for vehicle movement. Use the override with caution as
rearward vehicle speed is greatly increased. Do not operate at wide
open throttle. Operate the throttle just enough to maintain a desired
speed.
NOTICE
Excessive throttle operation while in the
speed limit mode may cause fuel to build in the exhaust, resulting
in engine popping and/or engine damage.
4.4.8: Starting the Engine
-
Position the vehicle on a level surface outdoors or in a well-
ventilated area. -
Place the transmission in PARK.
-
Lock the parking brake.
TIP
The starter interlock
will prevent the engine from starting if the brake is not engaged. -
Sit on the vehicle and move the engine stop switch to RUN.
TIP
Do not press the throttle while starting the engine.
-
Turn the ignition key past the ON position to engage the starter.
Activate the starter for a maximum of five seconds, releasing the
key when the engine starts. -
If the engine does not start, return the key to the OFF position
and wait five seconds before attempting to start again. Activate the
starter for another five seconds if necessary. Repeat this procedure
until the engine starts.
NOTICE
Operating the vehicle immediately after starting
could cause engine damage. Allow the engine to warm up for several
minutes before operating the vehicle.
4.4.8.1: Cold Weather Operation
If the vehicle is used year-round, check the oil level frequently.
A rising oil level could indicate the accumulation of contaminates
such as water or excess fuel in the bottom of the crankcase. Water
in the bottom of the crankcase can lead to engine damage and must
be drained. Water accumulation increases as outside temperature decreases.
4.4.9: Stopping the Engine
-
Release the throttle pedal completely and brake to a complete
stop. -
Place the transmission in PARK.
-
Turn the key to the OFF position.
-
Slowly release the brake pedal and make sure the transmission
is in PARK before exiting the vehicle.
WARNING
A rolling vehicle can cause serious injury. Always
place the transmission in PARK before stopping the engine.
4.4.10: Parking the Vehicle
-
Stop the vehicle on a level surface. When parking inside a
garage or other structure, be sure that the structure is well ventilated
and that the vehicle is not close to any source of flame or sparks,
including any appliance with pilot lights. -
Place the transmission in PARK.
-
Turn the engine off.
-
Engage the parking brake (if equipped).
-
Slowly release the brake pedal and make sure the transmission
is in PARK before exiting the vehicle. -
Remove the ignition key to prevent unauthorized use.
4.4.10.1: Parking on an Incline
Avoid parking on an incline if possible. If it’s unavoidable, follow
these precautions:

-
Stop the engine.
-
Place the transmission in PARK.
-
Lock the parking brake.
-
Always block the rear wheels on the downhill side.
4.4.11: Cargo Warning
WARNING
Overloading the vehicle or carrying or towing
cargo improperly can alter vehicle handling and may cause loss of
control or brake instability, which can result in serious injury or
death. Always follow these precautions when hauling cargo:
REDUCE
SPEED AND ALLOW GREATER DISTANCES FOR BRAKING WHEN HAULING CARGO.
NEVER EXCEED THE MAXIMUM WEIGHT CAPACITY of the vehicle. When
determining the weight you are adding to the vehicle, include the
weight of the operator, passenger (if you are operating a 2-up ATV),
accessories, loads in the rack or box and the load on the trailer
tongue. The combined weight of these items must not exceed the maximum
weight capacity.
CARGO WEIGHT DISTRIBUTION should be 1/3 on
the front rack and 2/3 on the rear rack. When operating over rough
or hilly terrain, reduce speed and cargo to maintain stable driving
conditions. Carrying loads on only one rack increases the possibility
of vehicle overturn.
CARRY LOADS AS LOW ON THE RACKS AS POSSIBLE.
Carrying loads high on the racks raises the center of gravity of the
vehicle and creates a less stable operating condition.
SECURE
ALL LOADS BEFORE OPERATING. Unsecured loads can create unstable operating
conditions, which could result in loss of control of the vehicle.
WARNING
OPERATE ONLY WITH STABLE AND SAFELY ARRANGED
LOADS. When handling off-centered loads that cannot be centered, securely
fasten the load and operate with extra caution. Always attach the
tow load to the hitch point designated for your vehicle.
HEAVY
LOADS CAN CAUSE BRAKING AND CONTROL PROBLEMS. Use extreme caution
when applying brakes with a loaded vehicle. Avoid terrain or situations
that may require backing downhill.
USE EXTREME CAUTION when
operating with loads that extend over the rack sides. Stability and
maneuverability may be adversely affected, causing the vehicle to
overturn.
DO NOT BLOCK THE FRONT HEADLIGHT BEAM when carrying
loads on the front rack.
DO NOT TRAVEL FASTER THAN THE RECOMMENDED
SPEEDS.
The vehicle should never exceed 10 mph
(16 kph) while towing a load
on a level surface. Vehicle speed should never exceed 5 mph
(8 kph) when
towing loads in rough terrain, while cornering, or while ascending
or descending a hill.
4.4.12: Hauling Cargo Guidelines
When hauling cargo, adhere to the following:
-
Never exceed the weight capacities specified for your ATV on
warning labels and in the specifications section of this manual. -
Cargo weight should be evenly distributed (1/3 on the front
rack and 2/3 on the rear rack) and mounted as low as possible. -
When operating over rough or hilly terrain, reduce speed and
cargo weight to maintain stable driving conditions. -
Do not obstruct the headlight beam with cargo.
-
Slow down.
-
Use low forward gear when hauling or towing heavy cargo to
extend belt life. -
Always operate the vehicle with extreme caution whenever hauling
or towing loads. Balance, handling and control may be affected.
4.4.13: Towing Loads
Always attach a towed load to the hitch point. Remove the hitch
from the ATV when not towing a trailer. If towing a load, reduce rear
rack cargo weight by the amount of tongue weight.
-
The combination of rear rack cargo weight and tongue weight
must not exceed the rear rack capacity. -
The total load (operator, accessories, cargo and weight on
hitch) must not exceed the maximum weight capacity of the vehicle.
NOTICE
Using an improper hitch or exceeding the
maximum tongue weight capacity can result in serious damage to the
vehicle. Never install a hitch longer than 4″ (10 cm). Never install
automotive accessories on your POLARIS ATV. Always install POLARIS-approved
(or equivalent) accessories designed for ATV use.
Maximum Towing Capacities
Do not exceed
maximum towing capacities. Avoid towing on inclines.
|
Maximum Towed Load (Level Ground) |
1500 lbs. (680 kg) |
|
Maximum Vertical Hitch Weight |
150 lbs. (68 kg) |
Chapter 5: Winch Guide
5.5.1: Winch Safety
These safety warnings and instructions apply if your vehicle came
equipped with a winch or if you choose to add an accessory winch to
your vehicle.
WARNING
Improper winch use can result in SEVERE INJURY
or DEATH. Always follow all winch instructions and warnings in this
manual.
Your winch may have a cable made of either wire rope or specially
designed synthetic rope. The term “winch cable” will
be used for either unless noted otherwise.
5.5.2: Winch Safety Precautions
-
Read all sections of this manual.
-
Never use alcohol or drugs before or while operating the winch.
-
Never allow children under 16 years of age to operate the winch.
-
Always wear eye protection and heavy gloves when operating
the winch. -
Always keep body, hair, clothing and jewelry clear of the winch
cable, fairlead and hook when operating winch. -
Never attempt to “jerk” a load attached to the
winch with a moving vehicle. See the Shock Loading section
on Shock Loading. -
Always keep the area around the vehicle, winch, winch cable,
and load clear of people (especially children) and distractions while
operating the winch. -
Always turn the vehicle ignition power OFF when it and the
winch are not being used. -
Always be sure that at least five (5) full turns of winch cable
are wrapped around the winch drum at all times. The friction provided
by this wrapped cable allows the drum to pull on the winch cable and
move the load. -
Always apply your vehicle’s park brake and/or park mechanism
to hold the vehicle in place during winching. Use wheel chocks if
needed. -
Always align the vehicle and winch with the load directly in
front of the vehicle as much as possible. Avoid winching with the
winch cable at an angle to the winching vehicle’s centerline
whenever possible. -
If winching at an angle is unavoidable, follow these precautions:
-
Look at the winch drum occasionally. Never let the winch cable
“stack” or accumulate at one end of the winch drum.
Too much winch cable at one end of the winch drum can damage the winch
and the winch cable. -
If stacking occurs, stop winching. Follow step 15 of Winch
Operation to feed and rewind the cable evenly before continuing the
winch operation.
-
-
Never winch up or down at sharp angles. This can destabilize
the winching vehicle and possibly cause it to move without warning. -
Never attempt to winch loads that weigh more than the winch’s
rated capacity. -
The winch motor may become hot during winch use. If you winch
for more than 45 seconds, or if the winch stalls during operation,
stop winching and permit the winch to cool down for 10 minutes before
using it again.
-
Never touch, push, pull or straddle the winch
cable while winching a load. -
Never let the winch cable run through your hands, even if wearing
heavy gloves. -
Never release the clutch on the winch when the winch cable
is under load. -
Never use the winch for lifting or transporting people.
-
Never use the winch to hoist or suspend a vertical load.
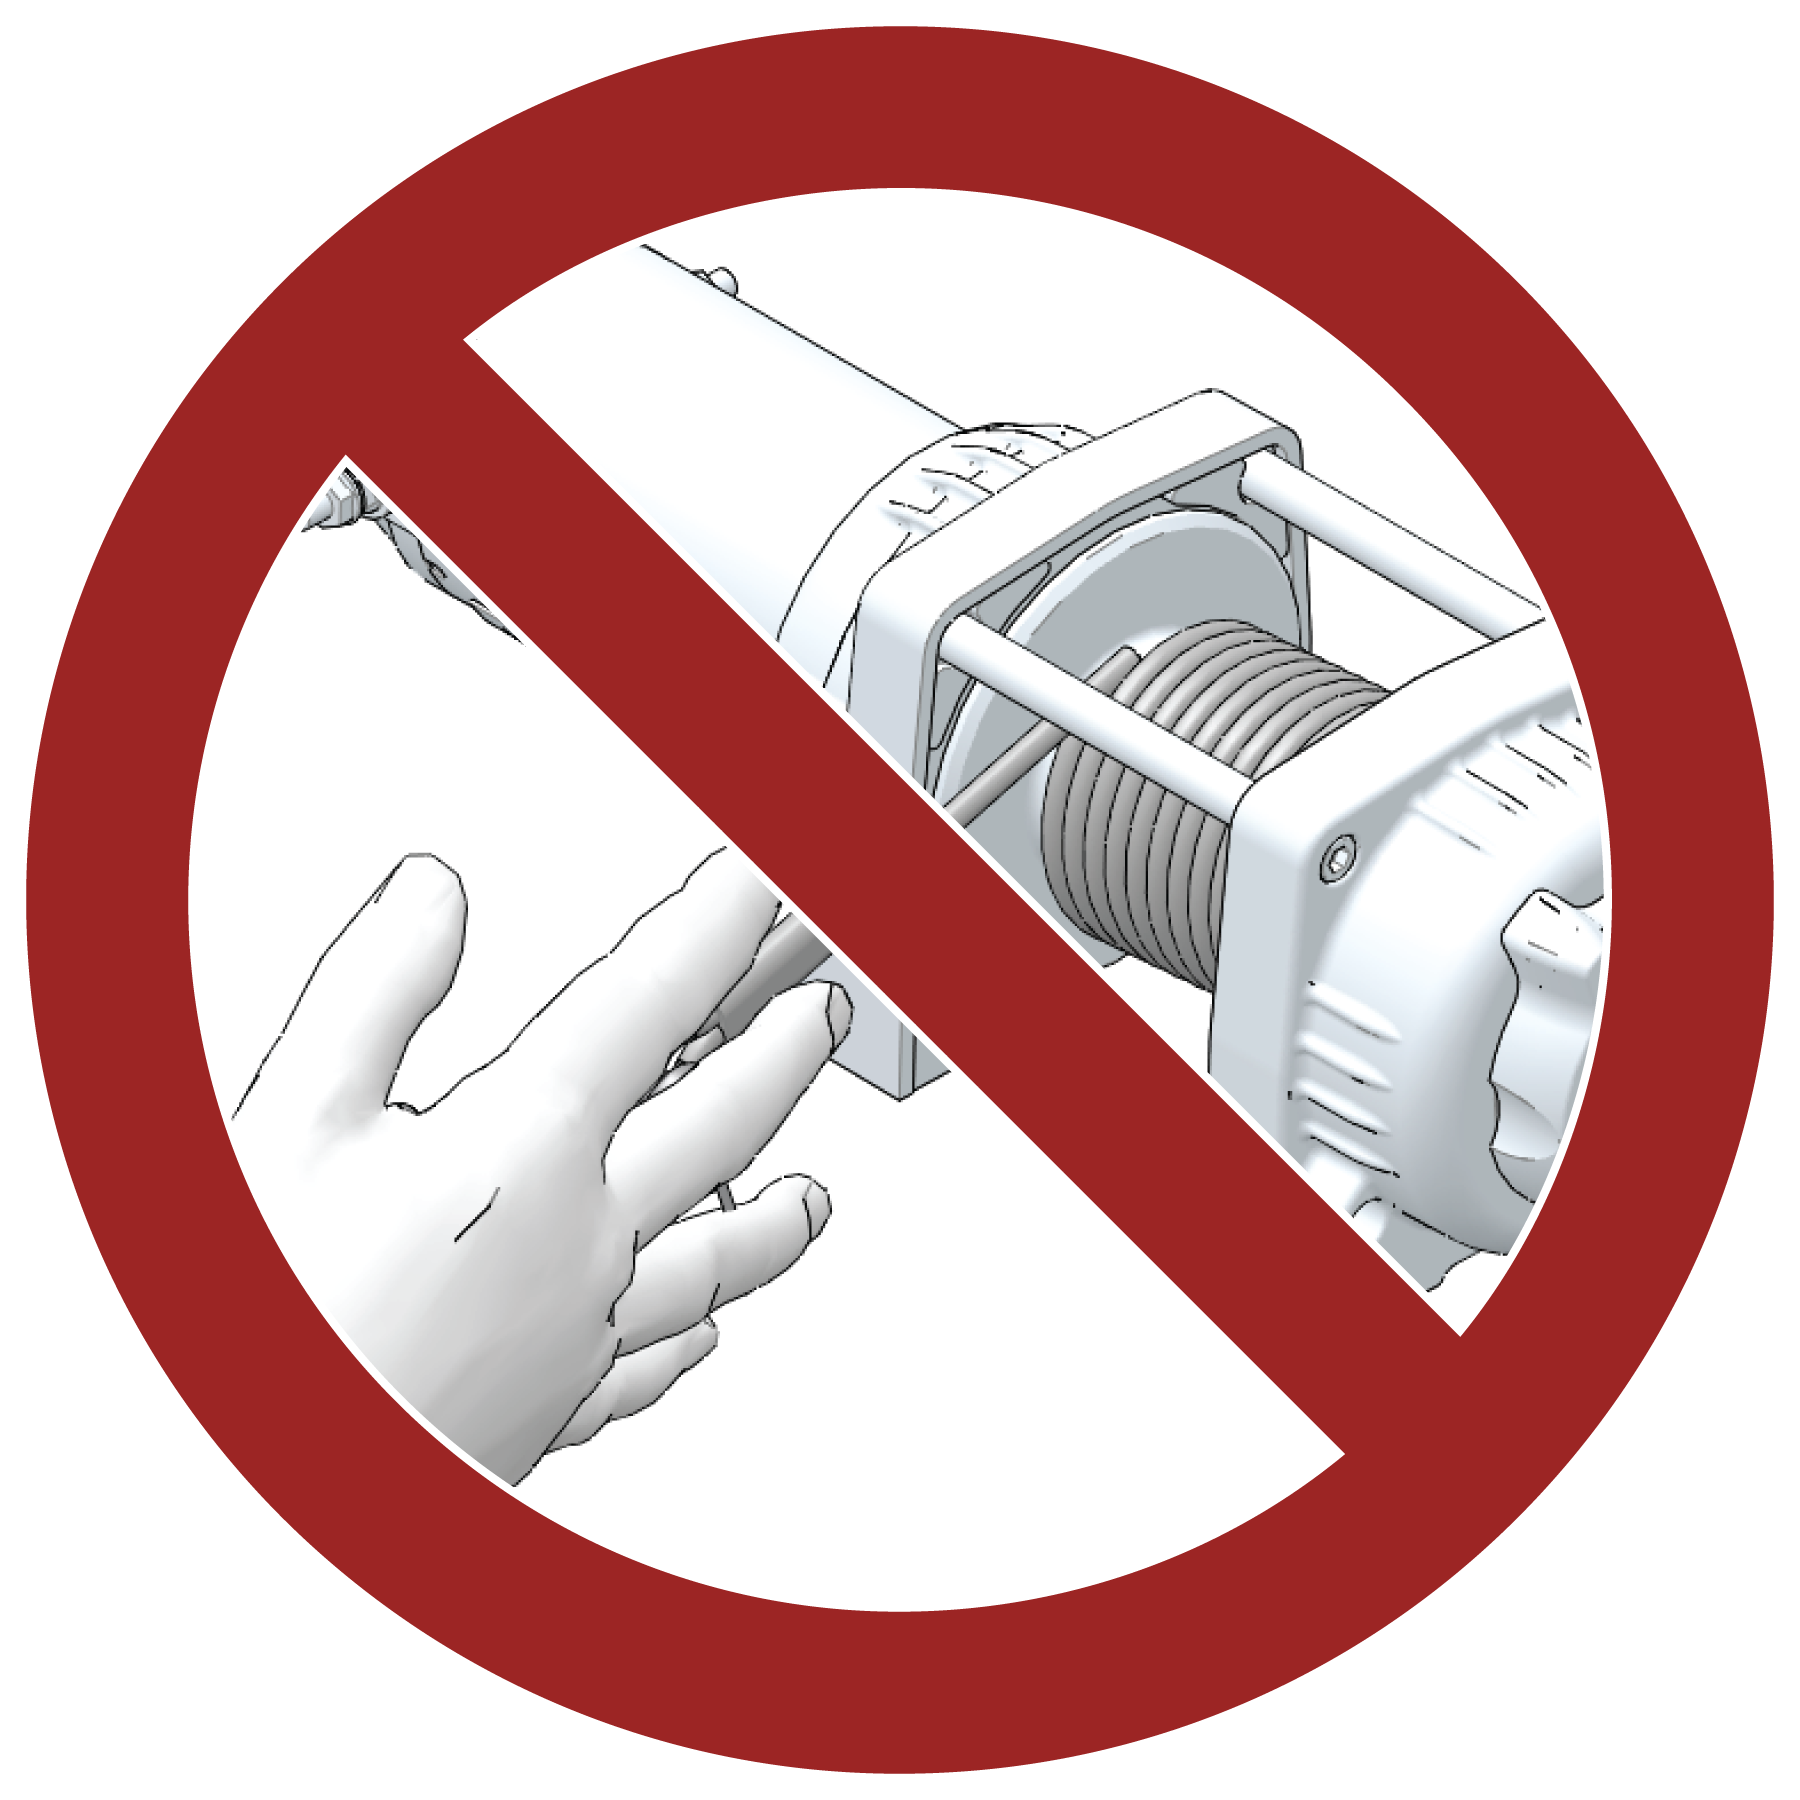
-
Always inspect your winch and winch cable
before each use. -
Never winch the hook fully into the winch. This can cause damage
to winch components. -
Unplug the remote control from the vehicle when the winch is
not in use to prevent inadvertent activation and use by unauthorized
persons. -
Never grease or oil the winch cable. This will cause the winch
cable to collect debris that will shorten the life of the cable.
5.5.3: Winch Operation
Read the Winch Safety Precautions in the preceding pages before
using your winch.
TIP
Consider practicing the operation and use of your
winch before you actually need to use it in the field.
WARNING
Improper winch use can result in SEVERE INJURY
or DEATH. Always follow all winch instructions and warnings in this
manual.
Each winching situation is unique.
-
Take your time to think through the winching you are about
to do. -
Proceed slowly and deliberately.
-
Never hurry or rush during winching.
-
Always pay attention to your surroundings.
-
You may need to change your winching strategy if it is not
working. -
Always remember that your winch is very powerful.
-
There are simply some situations that you and your winch will
not be able to deal with. Do not be afraid to ask others to help when
this happens.
-
Always inspect the vehicle, winch, winch cable and winch controls
for any signs of damage or parts in need of repair or replacement
before each use. Pay particular attention to the first 3 feet (1
meter) of winch cable if the winch is being used (or has been used)
for lifting an accessory plow assembly. Promptly replace any worn
or damaged cable.
-
Never operate a winch or a vehicle in need
of repair or service. -
Always apply your vehicle’s park brake and/ or park
mechanism to hold the vehicle in place during winching. Use wheel
chocks if needed. -
Always use the hook strap when handling the hook.
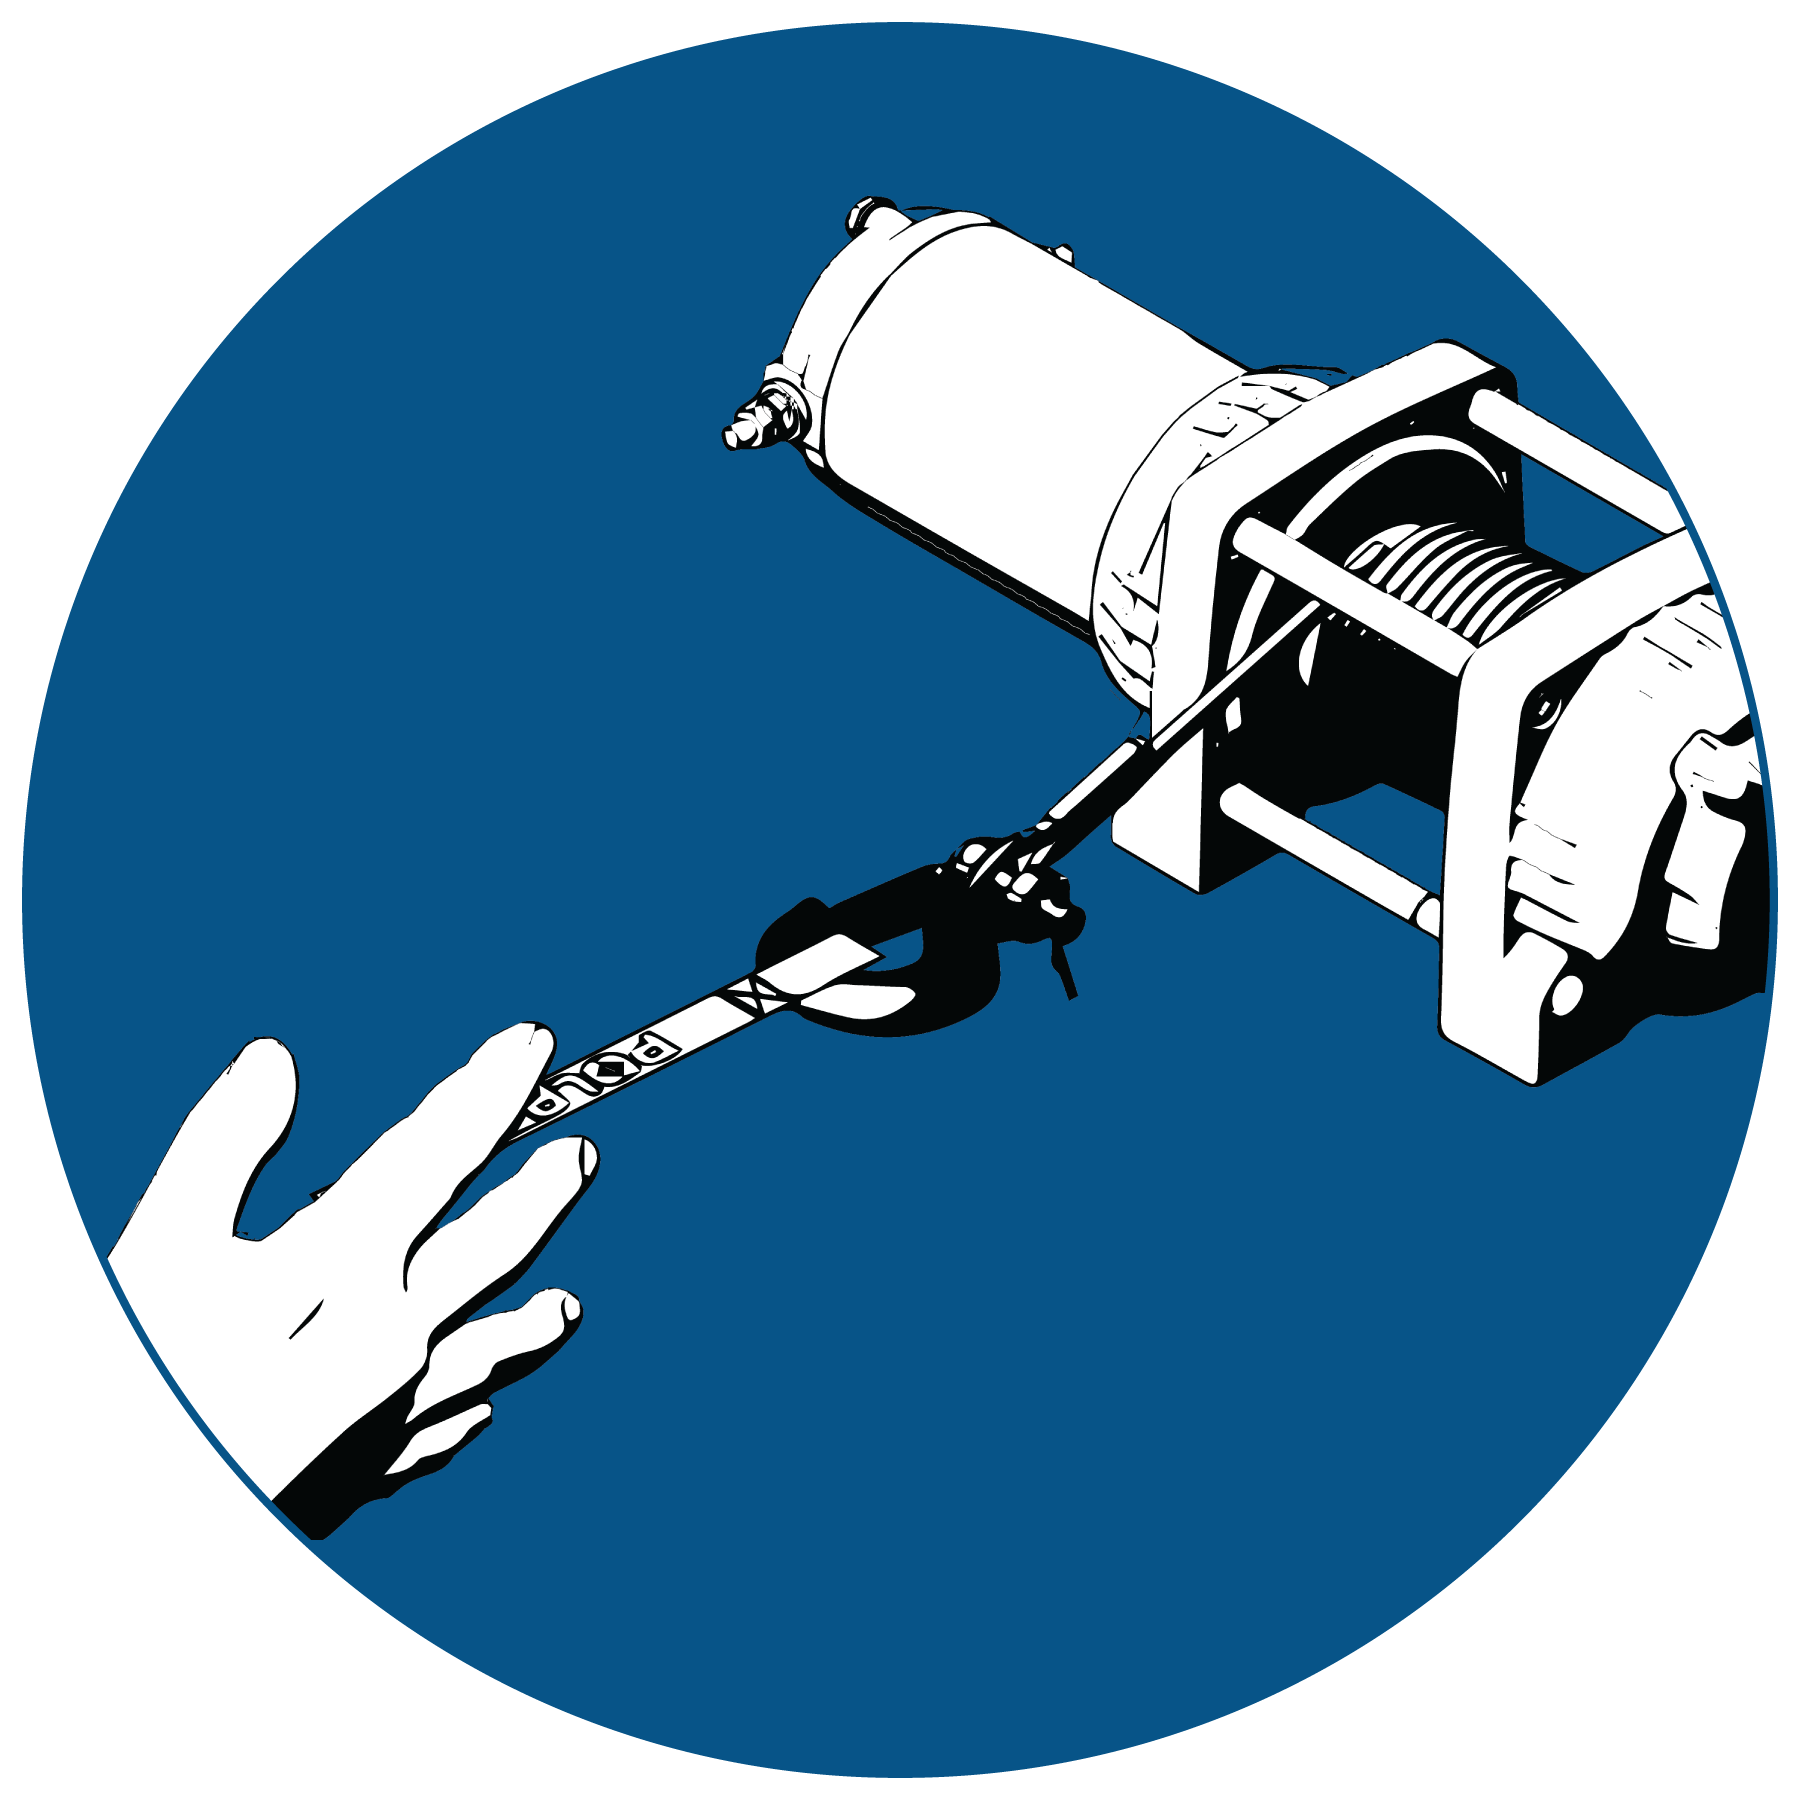
WARNING
Never put your fingers into the hook. This
could lead to SEVERE INJURY.
-
Attach the hook itself onto the load or use a tow strap or
chain to secure the load to the winch cable.

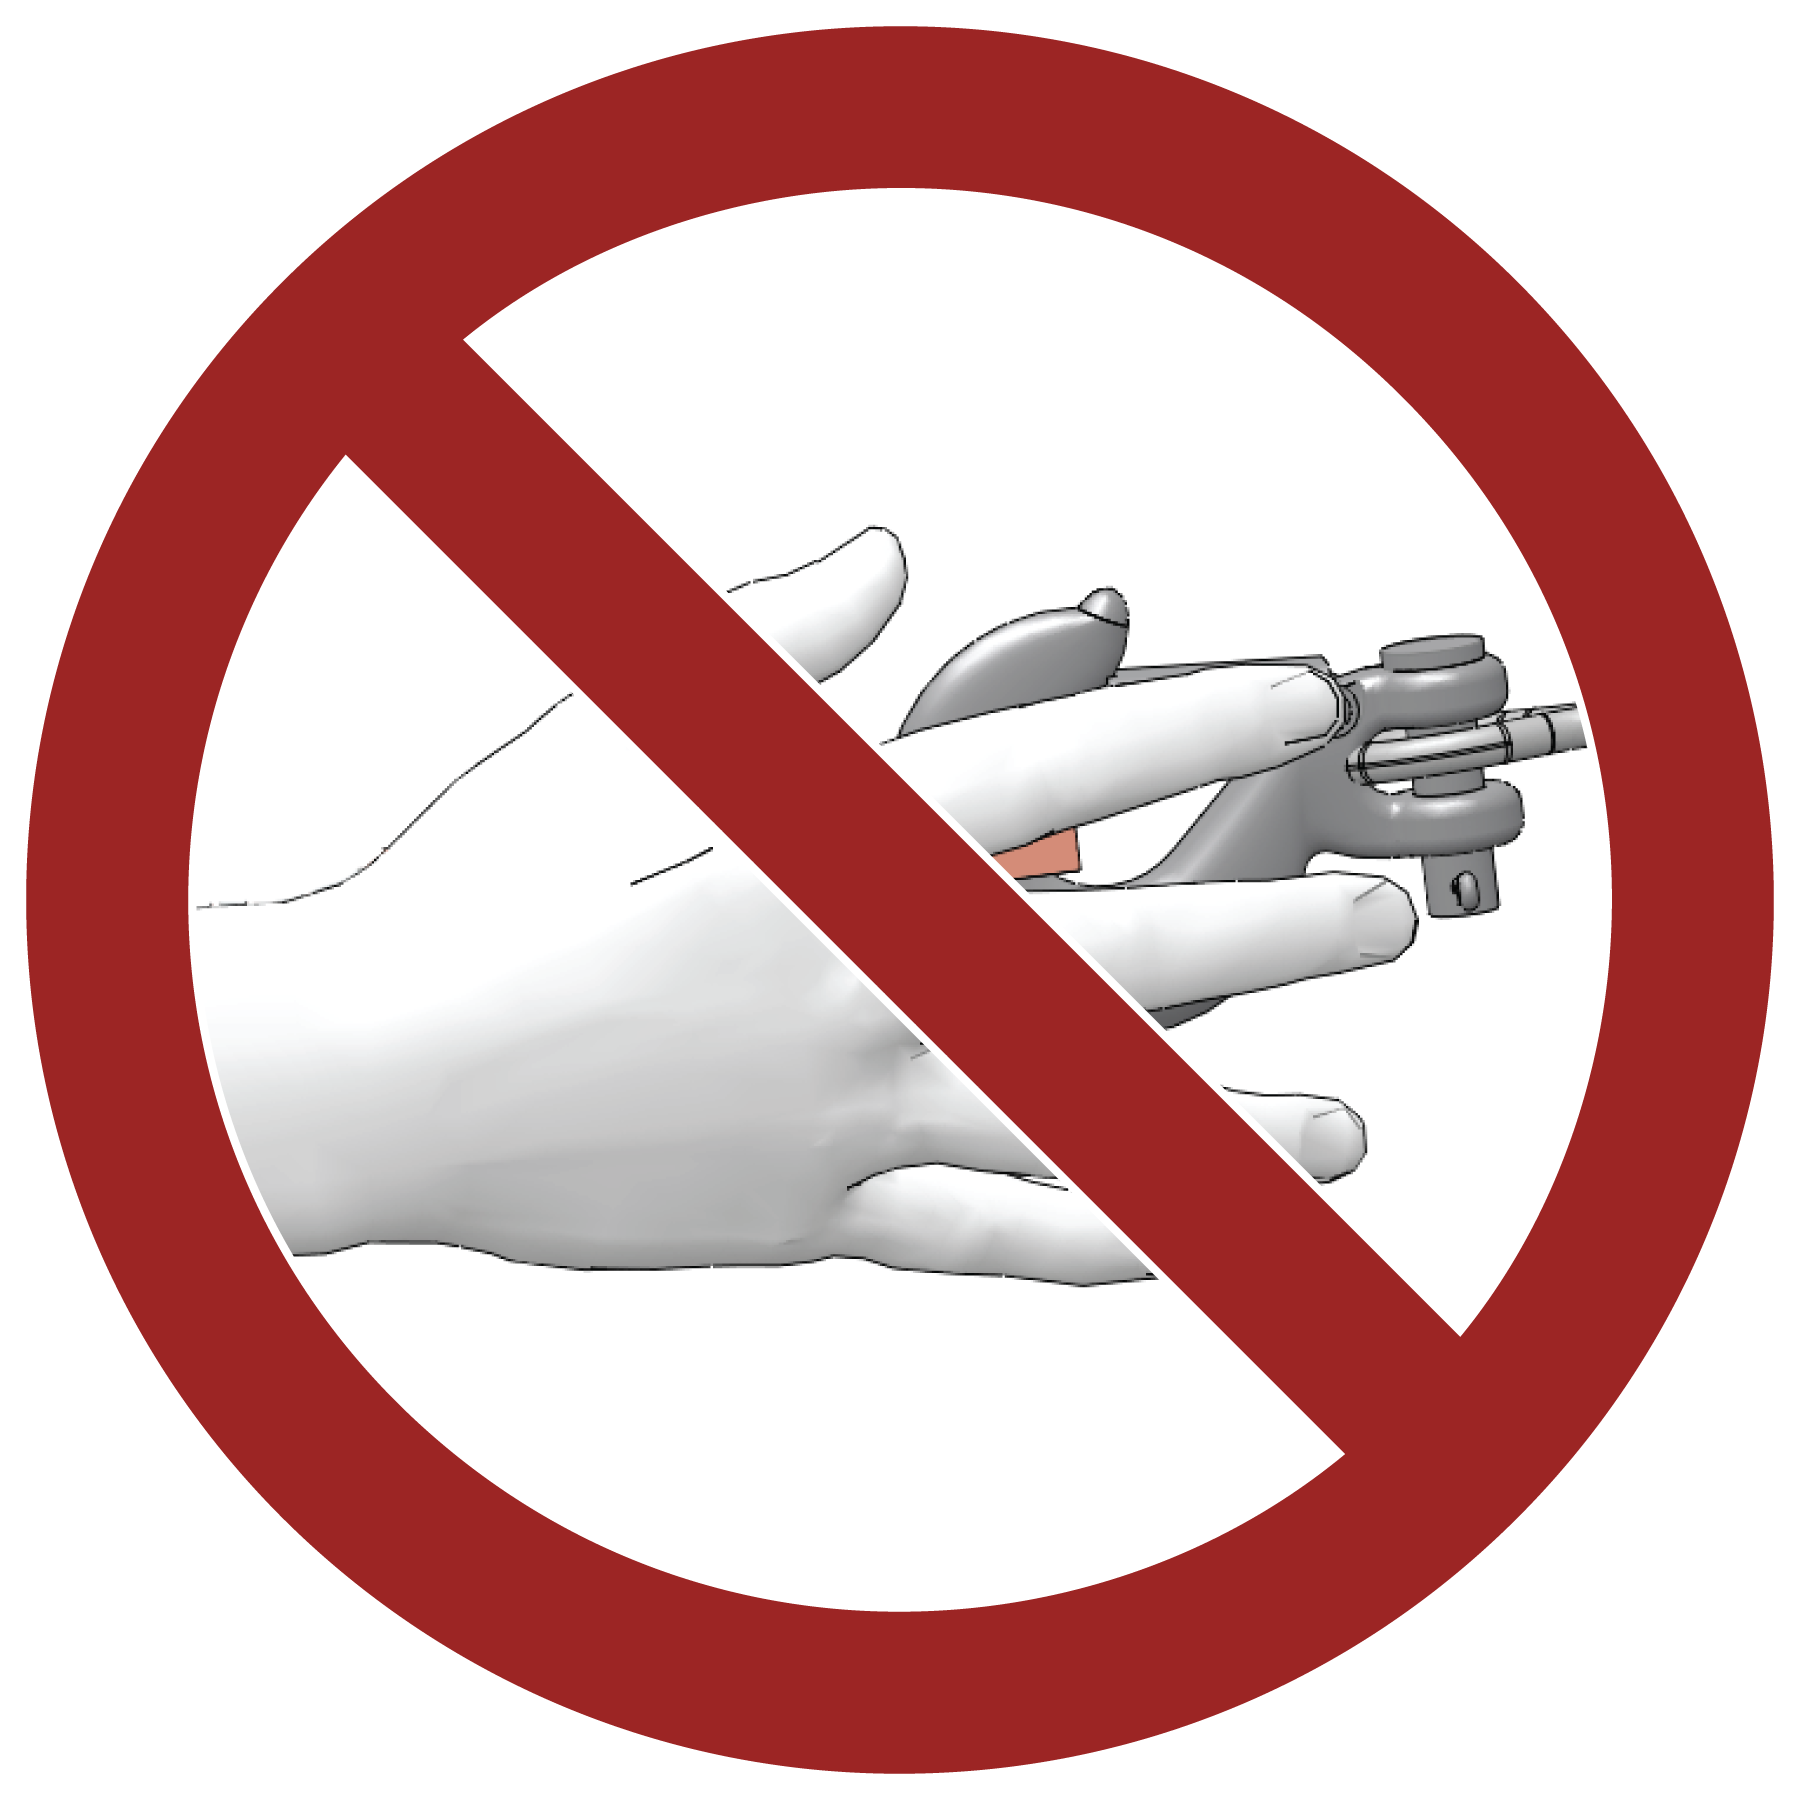
TIP
A “tow strap” is NOT intended to
stretch. A “recovery strap” is designed to stretch.
WARNING
Never use a recovery strap when winching due
to the excessive energy that can be released if the winch cable breaks.
This can result in SEVERE INJURY or DEATH. See the Shock Loading section on Shock Loading.
-
Never hook the winch cable back onto itself. This will damage
the winch cable and may result in winch cable failure.
WARNING
Replace the winch cable at the first sign of
damage to prevent SEVERE INJURY or DEATH in the event of failure.
For your safety, always replace POLARIS winch parts (including the
cable) with genuine POLARIS replacement parts available at your authorized
POLARIS dealer, or other qualified dealer.
-
If possible, keep the winch cable aligned with the centerline
of the winching vehicle. This will help the spooling of the winch
cable and reduce the load on the fairlead. -
If freeing a stuck vehicle by attaching to a tree, use an item
such as a tow strap to avoid damaging the tree during winch operation.
Sharp cables and chains can damage and even kill trees. Please remember
to Tread Lightly℠ (treadlightly.org). -
Before operating the winch, be sure that the safety latch on
the winch cable hook is fully seated when the load is attached. -
Never operate your winch with a damaged hook or latch. Always
replace damaged parts before using the winch.
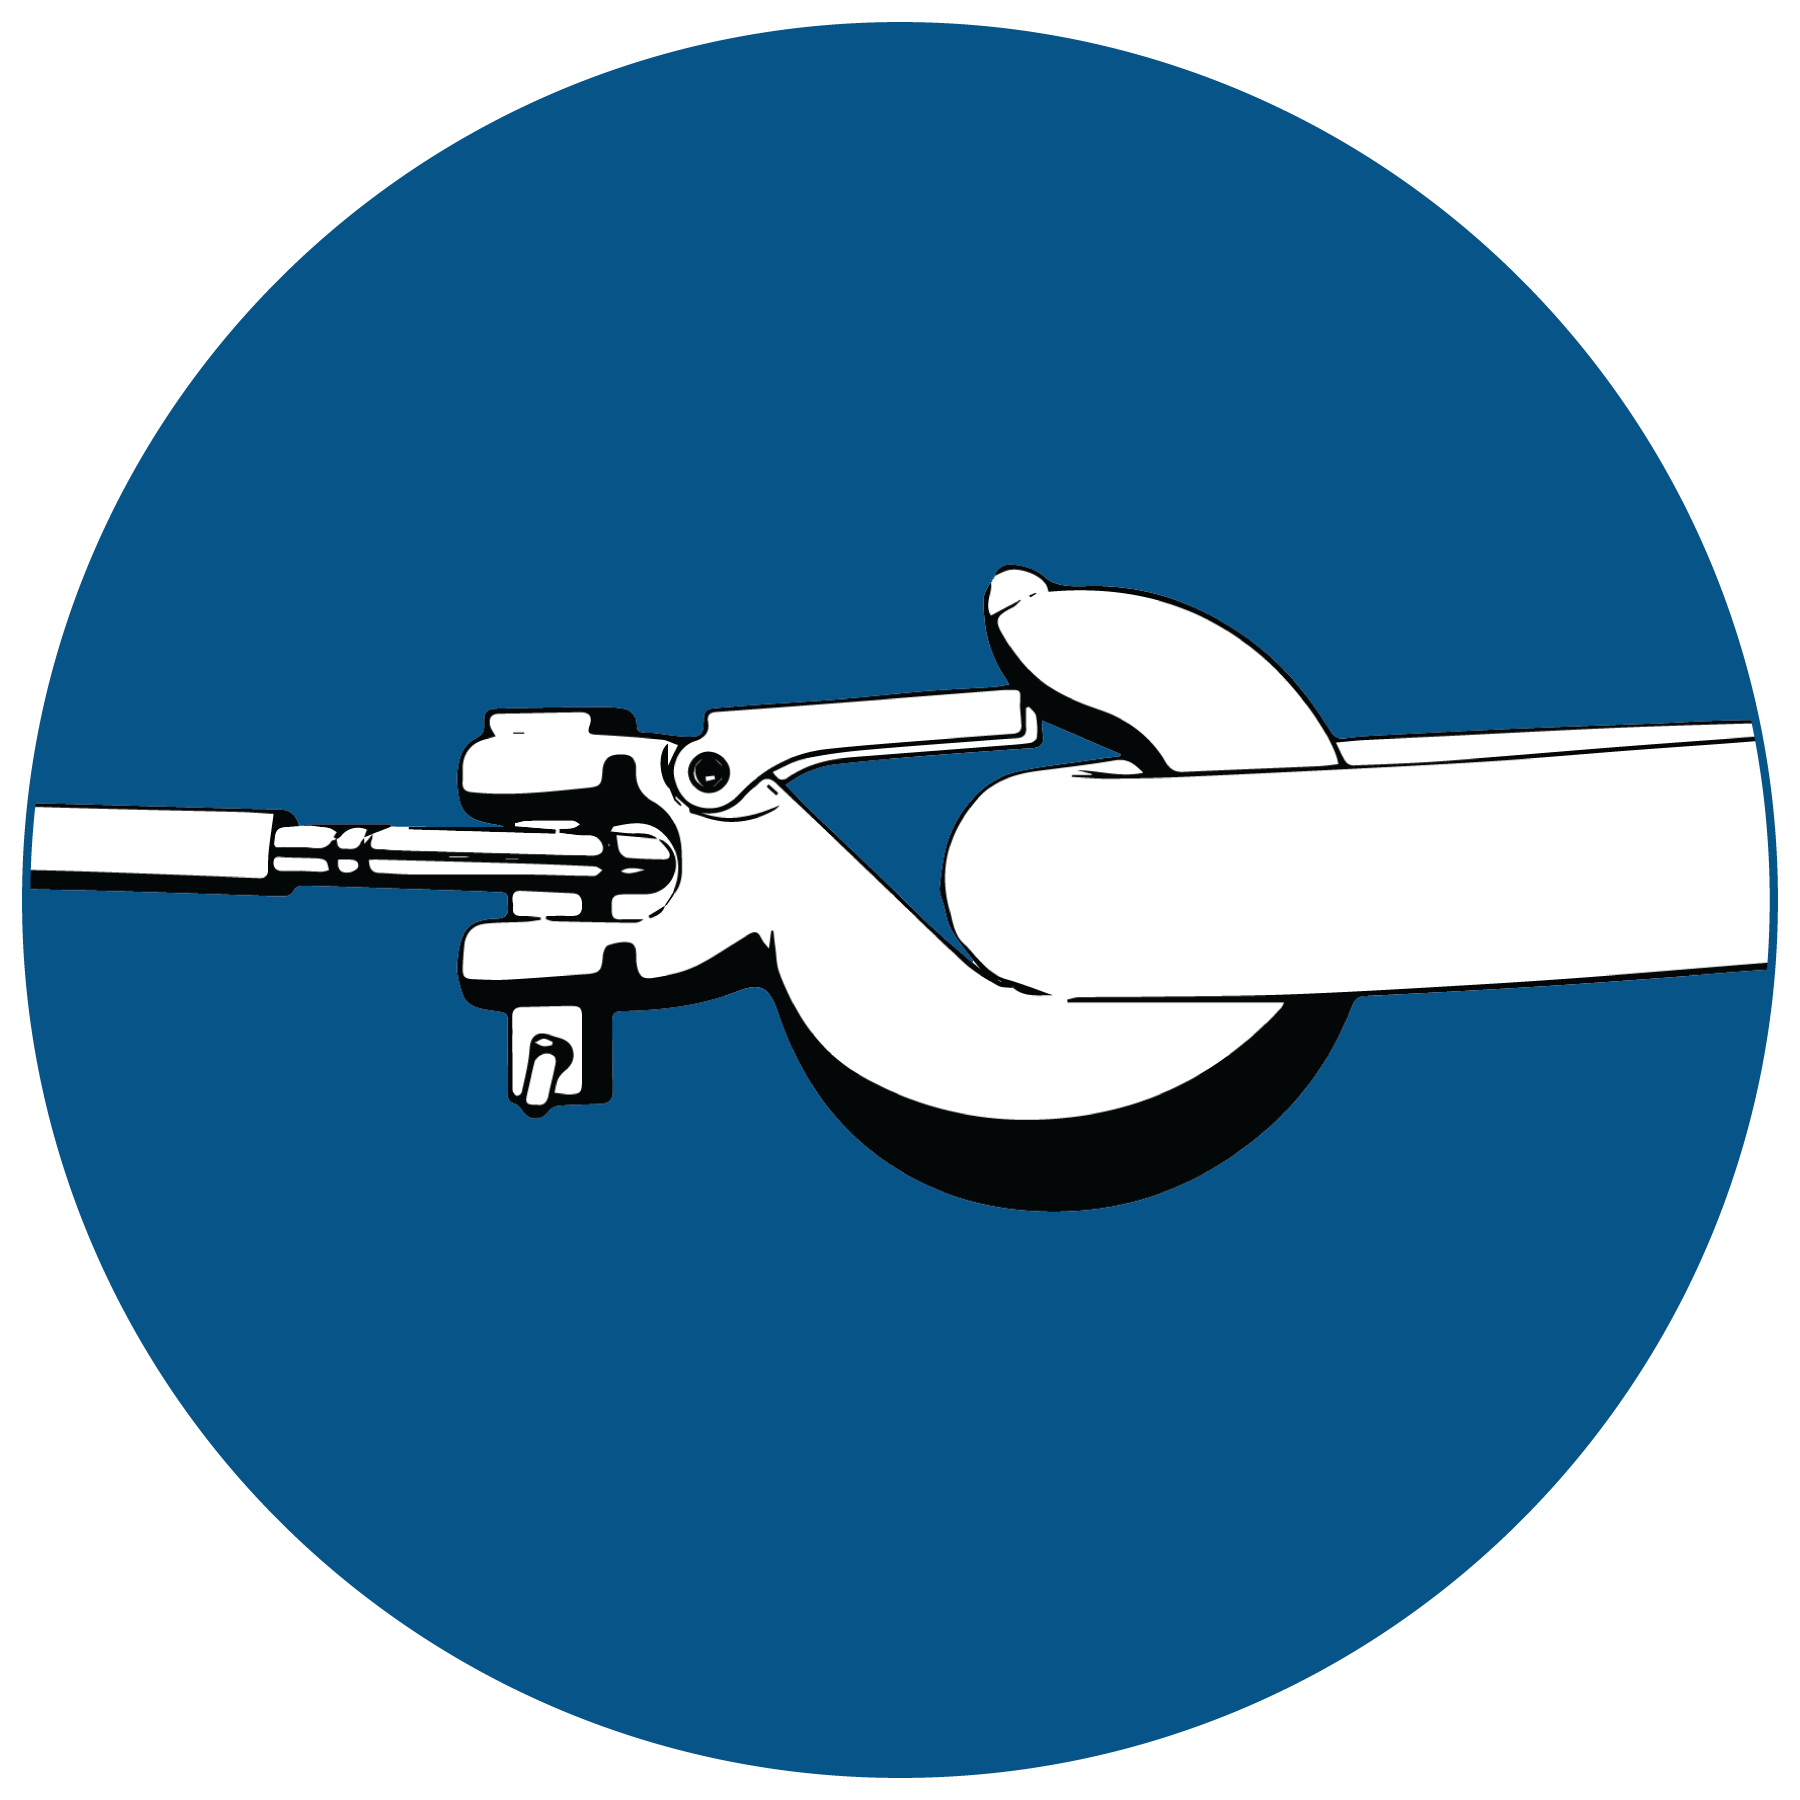
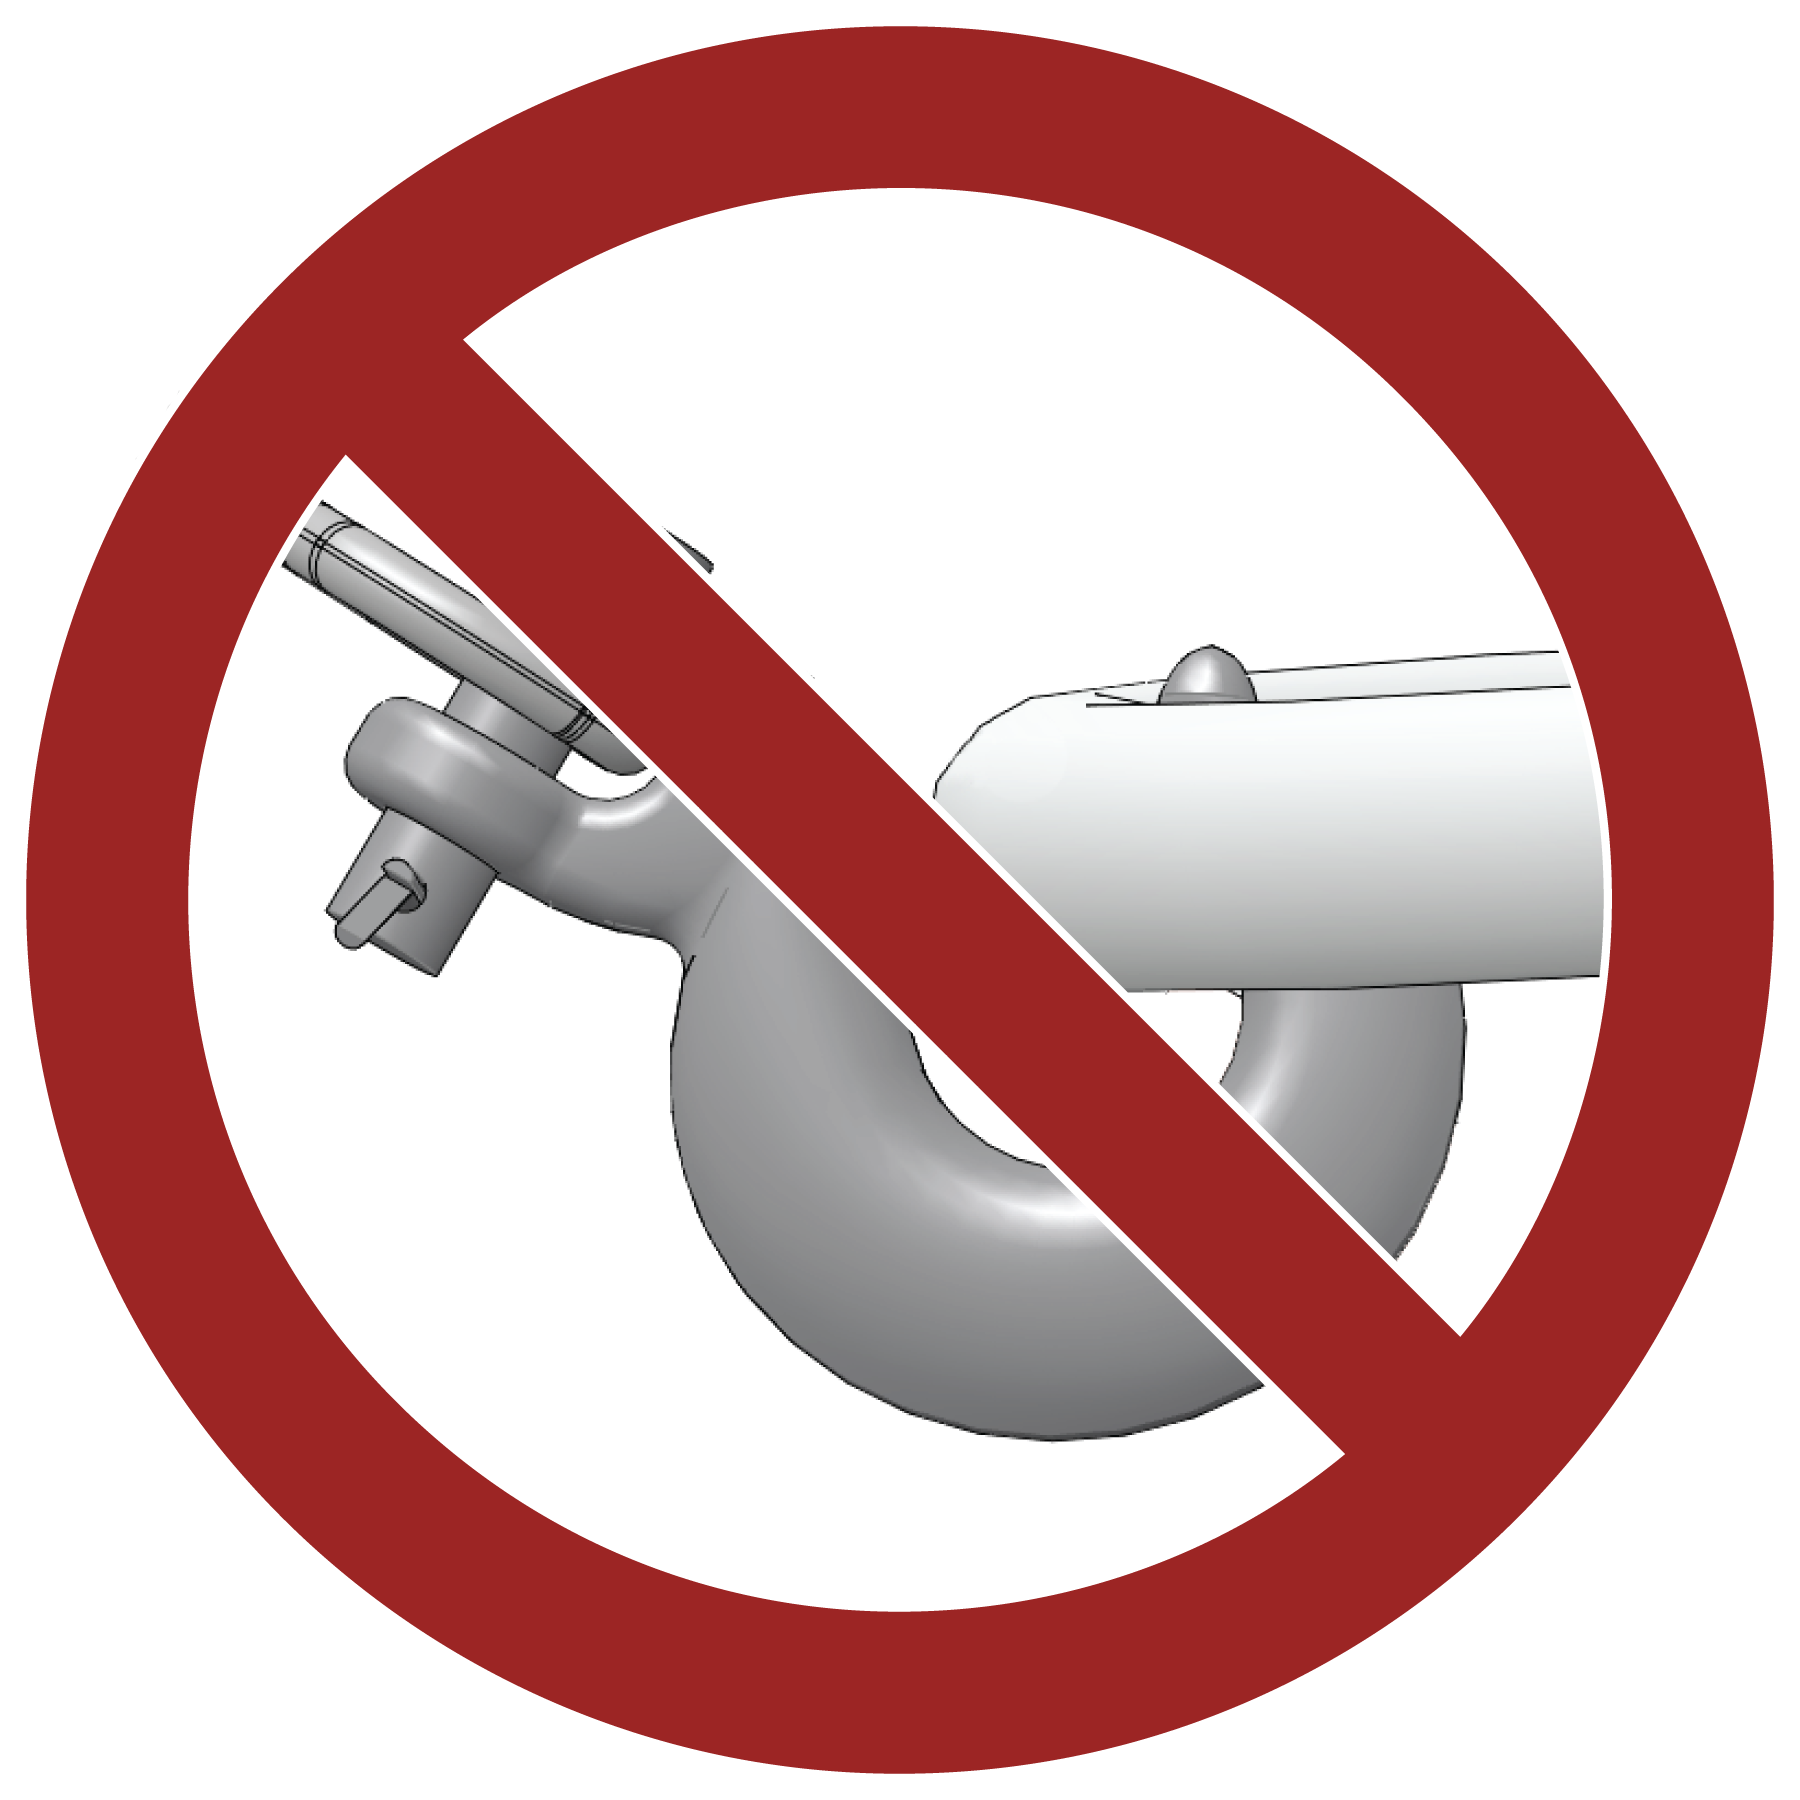
-
Never remove the hook strap from the hook.
-
Release the winch clutch and pull out the winch cable.
-
Pulling out as much cable as possible maximizes the winch’s
pulling capacity. Always be sure that at least five (5) full turns
of winch cable are wrapped around the winch drum at all times. The
friction provided by this wrapped cable allows the drum to pull on
the winch cable and move the load. -
Read and adhere to the following information for winch damping
to ensure safe winch use.-
In order to absorb energy that could be released by a winch
cable failure, always place a “damper” on the winch
cable. A damper can be heavy jacket, tarp, or other soft, dense object.
A damper can absorb much of the energy released if a winch cable breaks
when winching. Even a tree limb can help as a damper if no other items
are available to you. -
Lay the damper on top of the mid-point of the winch cable length
that is spooled out. -
On a long pull, it may be necessary to stop winching so that
the damper can be repositioned to the new mid-point of the winch cable.
Always release the tension on the winch cable before repositioning
the damper. -
Avoid being directly in line with the winch cable whenever
possible. Also, never permit others to stand near or in line with
the winch cable during winch operation.
-
-
Never hook the winch cable back onto itself. This will damage
the winch cable and may result in winch cable failure. -
Never use straps, chains or other rigging items that are damaged
or worn. -
The ONLY time a winch-equipped vehicle should be moving when
using the winch is when that vehicle itself is stuck. The winch equipped
vehicle should NEVER be in motion to “shock” load the
winch cable in an attempt to move a second stuck vehicle. See the
Shock Loading section on Shock Loading. For your safety, always follow these guidelines when winching
a vehicle free:-
Release the winch clutch and spool out the necessary length
of winch cable. -
Align the winch cable as close as possible to the winching
vehicle’s centerline. -
Attach the winch cable hook to the anchor point or the stuck
vehicle’s frame following instructions in this manual. -
Re-engage the clutch on the winch.
-
Slowly winch in the slack in the winch cable.
-
Select the proper vehicle gear to propel the stuck vehicle
in the direction of winching. -
Shift to the lowest gear available on the stuck vehicle.
-
Slowly and carefully apply vehicle throttle and winch together
to free the vehicle. -
Stop winching as soon as the stuck vehicle is able to propel
itself without the help of the winch. -
Detach the winch cable hook.
-
Rewind the winch cable evenly back onto the winch drum following
the instructions in this manual.
-
-
Never attempt to winch another stuck vehicle by attaching the
winch cable to a suspension component, brush guard, bumper or cargo
rack. Vehicle damage may result. Instead, attach the winch to a strong
portion of the vehicle frame or hitch. -
Extensive winching will run down the battery on the winching
vehicle. Let the winching vehicle’s engine run while operating
the winch to prevent the battery from running low if winching for
long periods. -
The winch motor may become hot during winch use. If you winch
for more than 45 seconds, or if the winch stalls during operation,
stop winching and permit the winch to cool down for 10 minutes before
using it again. -
After winching is complete, especially if winching at an angle,
it may be necessary to re-distribute the winch cable across the winch
drum. You will need an assistant to perform this task.-
Release the clutch on the winch.
-
Feed out the winch cable that is unevenly bunched up in one
area. -
Re-engage the winch clutch.
-
Have an assistant pull the winch cable tightly with about 100
lbs. (45 kg) of tension using the hook strap. -
Slowly winch the cable in while your assistant moves the end
of the winch cable back and forth horizontally to evenly distribute
the winch cable on the drum. -
Doing this reduces the chances of the winch cable “wedging”
itself between lower layers of winch cable.
-
5.5.4: Winch Cable Care
WARNING
Use of worn or damaged cable could lead to
sudden failure and SEVERE INJURY.
For your safety, always replace POLARIS winch parts (including
the cable) with genuine POLARIS replacement parts available at your
authorized POLARIS dealer, or other qualified person.
-
Always inspect your winch before each use. Inspect for worn
or loose parts including mounting hardware. Never use the winch if
any part needs repair or replacement. -
Always inspect your winch cable before each use. Inspect for
worn or kinked winch cable.A
kinked winch cable made of wire rope is shown at right. Even after
being “straightened out,” this cable has already been
permanently and severely damaged. Promptly discontinue use of a winch
cable in this condition.A kinked winch
cable made of wire rope that has been “straightened out”
is shown at right. Even though it may look usable, the cable has been
permanently and severely damaged. It can no longer transmit the load
that it could prior to kinking. Promptly discontinue use of a winch
cable in this condition.A winch cable made of synthetic rope should be inspected for signs
of fraying. Replace the cable if fraying is observed (shown below).
Promptly discontinue use of a winch cable in this condition. Also
replace the winch cable if there are fused or melted fibers. Such
an area of the synthetic rope will be stiff and appear smooth or glazed.
Promptly discontinue use of a winch cable in this condition.
5.5.5: Shock Loading
WARNING
Your winch cable is very strong but it is
NOT designed for dynamic, or “shock” loading. Shock
loading may tension a winch cable beyond its strength and cause the
cable to break. The end of a broken winch cable under such high loading
can cause SEVERE INJURY or DEATH to you and other bystanders.
Winch cables are designed to NOT absorb energy. This is true
of both wire-rope and synthetic-rope winch cables.
-
Never attempt to “jerk” a load with the winch.
For example, never take up slack in the winch cable by moving the
winching vehicle in an attempt to move an object. This is a dangerous
practice. It generates high winch cable loads that may exceed the
strength of the cable. Even a slowly moving vehicle can create large
shock loads in a winch cable.
WARNINGSEVERE INJURY
or DEATH can result from a broken winch cable. -
Never quickly turn the winch ON and OFF repeatedly (“jogging”).
This puts extra load on the winch, winch cable, and generates excessive
heat from the motor. This is a form of shock loading. -
Never tow a vehicle or other object with your winch. Towing
an object with a winch produces shock loading of the cable even when
towing at slow speeds. Towing from a winch also positions the towing
force high on the vehicle. This can cause instability of the vehicle
and possibly lead to an accident. -
Never use recovery straps with your winch. Recovery straps
are designed to stretch and can store energy. This stored energy in
the recovery strap is released if a winch cable fails making the event
even more hazardous. Similarly, never use elastic “bungie”
cords for winching. -
Never use the winch to tie down a vehicle to a trailer or other
transportation vehicle. This type of use also causes shock loading
that can cause damage to the winch, winch cable, or vehicles used.
Your winch cable is designed and tested to withstand the loads
produced by the winch motor when operated from a stationary vehicle.
Always remember that the winch and winch cable are NOT designed for
shock loading.
5.5.6: Winch Maintenance and Service Safety
WARNING
Improper or lack of winch maintenance and service
could lead to SEVERE INJURY or DEATH. Always follow all winch instructions
and warnings in this manual.
-
Always inspect your winch before each use. Inspect for worn
or kinked winch cable. Also inspect for worn or loose parts including
mounting hardware. -
Permit your winch motor to cool down prior to servicing your
winch. -
Never work on your winch without first disconnecting the battery
connections to prevent accidental activation of the winch. -
For your safety, always replace POLARIS winch parts (including
the cable) with genuine POLARIS replacement parts available at your
authorized POLARIS dealer, or other qualified person. -
Some winch models use wire rope as the winch cable. Other winches
use a specially designed synthetic rope as the winch cable. -
Never replace a synthetic-rope winch cable with a consumer-grade
polymer rope such as can be purchased in a hardware store. Although
they may look similar, they are NOT alike. A polymer rope not designed
for winch use will stretch and store excessive energy when winching.
WARNING
Failure of a stretched rope under winching conditions
will release all of the stored energy. This will increase the chances
of SEVERE INJURY or DEATH.
Chapter 6: Emission Control Systems
6.6.1: Noise Emission Control System
Do not modify the engine, intake or exhaust components, as doing
so may affect compliance with U.S.A. EPA noise control requirements
(40 CFR 205) and local noise level requirements.
6.6.2: Operation on Public Lands in the U.S.A.
Your vehicle has a spark arrester that was tested and qualified
to be in accordance with the USFS standard 5100-1a. Federal law requires
that this spark arrester be installed and functional when the vehicle
is operated on public lands.
Operation of off-road vehicles on public lands in the U.S.A. is
regulated by 43 CFR 420. Violations are subject to monetary penalties.
Federal regulations can be viewed online at https://ecfr.federalregister.gov/current/title-43/subtitle-B/chapter-I/part-420.
6.6.3: Crankcase Emission Control System
This engine is equipped with a closed crankcase system. Blow-by
gases are forced back to the combustion chamber by the intake system.
All exhaust gases exit through the exhaust system.
6.6.4: Exhaust Emission Control System
Exhaust emissions are controlled by engine design. An electronic
fuel injection (EFI) system controls fuel delivery. The engine and
EFI components are set at the factory for optimal performance and
are not adjustable.
The emissions label is located on the right front frame of the
vehicle.
6.6.5: Electromagnetic Interference
This spark ignition system complies with Canadian ICES-002.
This vehicle complies with the EMC requirements of UN ECE Regulation
10.
Non-ionizing Radiation: This vehicle emits some electromagnetic
energy. People with active or non-active implantable medical devices
(such as heart monitoring or controlling devices) should review the
limitations of their device and the applicable electromagnetic standards
and directives that apply to this vehicle.
Chapter 7: Maintenance
7.7.1: Periodic Maintenance Chart
Any qualified repair shop or person may maintain, replace or repair
the emission control devices or systems on your vehicle. An authorized
dealer can perform any service that may be necessary for your vehicle.
POLARIS also recommends POLARIS parts for emissions-related service,
however equivalent parts can be used.
It is a potential violation of the Clean Air Act if a part supplied
by an aftermarket parts manufacturer reduces the effectiveness of
the vehicle’s emission controls. Tampering with emission controls
is prohibited by federal law.
Owners are responsible for performing the scheduled maintenance
identified in this owner’s manual.
Careful periodic maintenance will help keep your vehicle in the
safest, most reliable condition. Inspection, adjustment and lubrication
of important components are explained in the periodic maintenance
chart.
Inspect, clean, lubricate, adjust and replace parts as necessary.
When inspection reveals the need for replacement parts, genuine POLARIS
parts are available from your POLARIS dealer, or other qualified person.
Equivalent parts may be used for emissions-related service.
Service and adjustments are important for proper vehicle operation.
If you’re not familiar with safe service and adjustment procedures,
a qualified dealer can perform these operations.
Vehicles subjected to heavy or severe use patterns must be inspected
and serviced more frequently.
SEVERE USE DEFINITION
-
Frequent immersion in mud, water or sand
-
Frequent or prolonged operation in dusty environments
-
Short trip cold weather operation
-
Racing or race-style high RPM use
-
Prolonged low speed, heavy load operation
-
Extended idle
Pay special attention to the oil level. A rise in oil level
during cold weather can indicate contaminants collecting in the oil
sump or crankcase. Change oil immediately if the oil level begins
to rise. Monitor the oil level, and if it continues to rise, discontinue
use and determine the cause. Your authorized dealer can assist.
7.7.2: Maintenance Interval Chart
WARNING
Improperly performing the procedures marked with
a D could result in component failure and lead to serious injury
or death. Have an authorized POLARIS dealer or other qualified person
perform these services.
| Symbol | Description |
|---|---|
| XU |
Perform these procedures more often for vehicles subjected |
| D |
Have an authorized Polaris dealer or other qualified person |
Perform all services at whichever maintenance interval is reached
first. Record maintenance and service in the Maintenance Log.
| Item | Maintenance Interval (whichever comes first) |
Remarks | |||
|---|---|---|---|---|---|
| Hours | Calendar | Miles (KM) |
|||
| Steering | Pre-Ride | Inspect and make adjustments as needed. |
|||
| Front Suspension | |||||
| Rear Suspension | |||||
| Tires | |||||
| Brake Fluid Level | |||||
| Brake Lever Travel | |||||
| Brake System | |||||
| Wheels / Fasteners | |||||
| CV Boot | |||||
| Frame Fasteners | |||||
| Engine Oil Level | |||||
| Winch (if equipped) | |||||
| XU | Air Filter (Pre-Filter) | — | Daily | — | Inspect; clean often; replace as needed |
| Air Box Sediment Tube | — | Daily | — | Drain deposits when visible | |
| Coolant | — | Daily | — | Check level daily, change coolant every two years | |
| Head Lights / Tail Lights | — | Daily | — | Check operation; apply dielectric grease if replacing | |
| Power Steering unit (If equipped) |
— | Daily | Inspect daily, clean often | ||
| XU | Air Filter (main element) | — | Weekly | — | Inspect; replace as needed |
|
XU D |
Brake Pad Wear | 10 H | Monthly | 100 (160) | Inspect periodically |
| Battery | 20 H | Monthly | 200 (320) | Check terminals; clean; test | |
| Fuel System | 20 H | Monthly | — | Turn key on to pressurize fuel pump, check lines/fittings for leaks and abrasion. |
|
|
XU |
Engine Oil Change | 25 H | 1 M | — | Break-in oil and filter change |
| XU | Demand Drive Fluid | 25 H | 1 M | 250 (400) | Break-in fluid change |
| XU | Rear Gearcase Oil | 25 H | 1 M | 250 (400) | Break-in fluid change |
| XU | Transmission Fluid | 25 H | 1 M | 250 (400) | Break-in fluid change |
| XU | General Lubrication | 50 H | 3 M | 500 (800) | Lubricate all fittings, pivots, cables, etc. |
| Shift Linkage | 50 H | 3 M | 500 (800) | Inspect | |
| D | Steering | 50 H | 6 M | 500 (800) | Lubricate |
| XU | Front/Rear Suspension | 50 H | 6 M | 500 (800) | Lubricate |
| XU | Throttle Release Switch | 50 H | 6 M | 500 (800) | Inspect; adjust; lubricate; replace if necessary |
| Throttle Body Intake Duct | 50 H | 6 M | 500 (800) | Inspect ducts for proper sealing / air leaks | |
| Drive Belt | 50 H | 6 M | 500 (800) | Inspect ducts for proper sealing / air leaks. Inspect belt and replace as needed. |
|
| Cooling System | 50 H | 6 M | 1000 (1600) | Inspect coolant strength seasonally; pressure test system yearly |
|
| XU | Radiator | 50 H | 6 M | 1000 (1600) | Inspect; clean external surfaces |
| XU | Cooling Hoses | 50 H | 6 M | 1000 (1600) | Inspect for leaks |
| XU | Shocks | 50 H | — | 500 (800) | Inspect for leaks, loose joints, and wear |
| XU | Oil lines and fasteners | 100 H | 6 M | 1000 (1600) | Inspect for leaks and loose fittings |
| XU | Engine oil change | 100 H | 6 M | 1000 (1600) | Change the oil and filter |
| D | Fuel System | 100 H | 12 M | 600 (1000) | Cycle key to pressurize fuel pump; check for leaks at fill cap, fuel lines/rail and fuel pump |
| XU | Engine Mounts | 100 H | 12 M | 1000 (1600) | Inspect |
| Exhaust Pipe / Silencer | 100 H | 12 M | 1000 (1600) | Inspect | |
| XU | Spark Plug | 100 H | 12 M | 600 (1000) | Inspect; replace as needed |
| XU | Wiring | 100 H | 12 M | 1000 (1600) | Inspect for wear, routing, security; apply dielectric grease to connectors subjected to water, mud, etc. |
| D | Clutches (Drive/Driven) | 100 H | 12 M | 1000 (1600) | Inspect; clean; replace worn parts |
| D | Wheel Bearings | 100 H | 12 M | 1000 (1600) | Inspect; replace as needed |
| D | Brake Fluid | 200 H | 24 M | 2000 (3200) | Change every two years |
| XU | Demand drive fluid (normal use) | 200 H | 24 M | 2000 (3200) | Change fluid |
| XU | Rear gearcase oil | 200 H | 24 M | 2000 (3200) | Change fluid |
| XU | Transmission oil | 200 H | 24 M | 2000 (3200) | Change fluid |
|
XU D |
Shocks | 250 H | — | 2500 (4000) | Replace shocks |
| Spark Arrestor | 300 H | 36 M | 3000 (4800) | Clean out; or remove clean out plug | |
| XU | Coolant | — | 60 M | — | Replace coolant (50/50 Extended Life Coolant) |
| XU | Valve Clearance | 500 H | — | 5000 (8000) | Inspect; adjust as needed |
| D | Toe Adjustment | — | Inspect periodically; adjust as needed | ||
| Headlight Aim | — | Adjust as needed |
7.7.3: Lubrication Guide
Check and lubricate all components at the intervals outlined in
the Periodic Maintenance Chart. Items not listed in the chart should
be lubricated at the General Lubrication interval.
The a-arms and upper control arms are lubricated at the factory,
and no additional lubrication will be needed. However, if these components
are subjected to severe use, grease zerks have been provided for additional
lubrication at the user’s discretion.
|
Item |
Recommended Lubricant |
Capacity at Fluid Change |
Fill Plug Torque |
Drain Plug Torque |
See Page |
|---|---|---|---|---|---|
|
Engine Oil |
PS-4 5W-50 4-Cycle Oil |
2 qt. (1.9 l) |
— |
12 ft-lbs (16 Nm) |
Engine Oil |
|
Transmission Oil |
AGL Gearcase Lubricant & Transmission |
37 oz. (1100 ml) |
10-14 ft-lbs (14-19 Nm) |
10-14 ft-lbs (14-19 Nm) |
Transmission Oil |
|
Demand Drive Fluid (Front Gearcase) |
Demand Drive Fluid |
9.3 oz. (275 ml) |
8-10 ft-lbs (11-14 Nm) |
11 ft-lbs (15 Nm) |
Front Gearcase (Demand Drive) Fluid |
|
Rear Gearcase Oil |
ATV Angle Drive Fluid (or GL5 80- 90 weight |
7.1 oz. (210 ml) |
10-14 ft-lbs (14-19 Nm) |
10-14 ft-lbs (14-19 Nm) |
Rear Gearcase Oil |
|
Brake Fluid |
DOT 4 Brake Fluid |
— |
— |
— |
Brake Fluid Level |
|
Front Prop Shaft Yoke |
U-Joint Grease |
Grease fittings |
|||
|
A-Arms, Front and Rear |
POLARIS All-Season Grease |
Grease fittings |
7.7.4: Engine Oil
Always check and change the oil at the intervals outlined in the
Periodic Maintenance Chart. Always use the recommended engine oil.
Always change the oil filter whenever changing oil.
Pay special attention to the oil level. A rise in oil level during
cold weather can indicate contaminants collecting in the oil sump
or crankcase. Change oil immediately if the oil level begins to rise.
Monitor the oil level, and if it continues to rise, discontinue use
and determine the cause. Your dealer can assist.
WARNING
Vehicle operation with insufficient, deteriorated,
or contaminated engine oil will cause accelerated wear and may result
in engine seizure, accident and injury. Always perform the maintenance
procedures as outlined in the Periodic Maintenance Chart.
7.7.4.1: Oil Recommendations
IMPORTANT
Always change the oil filter when you change
the engine oil.
POLARIS recommends the use of POLARIS PS-4 Full Synthetic 5W-50
4-cycle oil or a similar oil for this engine. Oil may need to be changed
more frequently if POLARIS oil is not used. Always use 5W-50 oil.
Follow the manufacturer’s recommendations for ambient temperature
operation.
See the Lubrication Guide section for fluid recommendations, capacities,
and plug torques.
IMPORTANT
Mixing brands or using a non-recommended oil
may cause serious engine damage. Always use the recommended oil. Never
substitute or mix oil brands.
7.7.4.2: Oil Level Check
IMPORTANT
Check the oil level when the engine is cold.
Never check the oil with the engine running or damage to the dipstick
and / or engine could occur.
To check the oil level, do the following:
-
Position the vehicle on a level surface.
-
Access the oil dipstick and fill tube from the left side of
the ATV 1. Remove the dipstick. Wipe it dry with a clean
cloth. -
Reinstall and tighten the dipstick.
-
Remove the dipstick and check the oil level.
-
Add the recommended fluid as needed. Maintain the oil level
in the safe range between the FULL and ADD marks. Do NOT overfill. -
Reinstall and tighten the dipstick.
7.7.4.3: Oil and Filter Change
See the fluid recommendation table for capacities and plug torques.
Always change the oil and filter at the intervals outlined in the
Periodic Maintenance Chart. Always change the oil filter when you
change the engine oil.
-
Position the vehicle on a level surface.
-
Start the engine. Allow it to warm up at idle for two to three
minutes. -
Stop the engine.
-
Clean the area around the drain plug 1.
-
Place a drain pan under the crankcase.
-
Remove the drain plug 1. Allow the oil to drain completely.
CAUTIONHot oil can cause burns to skin. Do not allow hot oil
to contact skin. -
Install a new sealing washer on the drain plug. The sealing
surfaces on drain plug and crankcase should be clean and free of burrs,
nicks or scratches. -
Reinstall the drain plug. Torque to specification.
-
Remove the oil filter cover plate 2 by loosening the
three screws holding into place. -
Place shop towels beneath the oil filter 3. Using
an oil filter wrench (available from your POLARIS dealer), turn the
filter counter- clockwise to remove it. -
Using a clean dry cloth, clean the filter sealing surface on
the crankcase. -
Lubricate the o-ring on the new filter with a film of fresh
engine oil. Check to make sure the o-ring is in good condition. -
Install the new filter and rotate it clockwise by hand until
the filter gasket contacts the sealing surface, then turn it an additional
3/4 turn. -
Remove the dipstick. Add the proper amount of the recommended
oil. Do not overfill. -
Reinstall the dipstick.
-
Place the transmission in PARK.
-
Lock the parking brake.
-
Start the engine. Allow it to idle for one to two minutes.
-
Stop the engine.
-
Check for leaks.
-
Check the oil level. Add oil as needed to bring the level to
the upper mark on the dipstick. -
Dispose of used filter and oil properly.
7.7.5: Transmission Oil
Always check and change the transmission
oil at the intervals outlined in the Maintenance Interval Chart. See
the Lubrication Guide section for fluid recommendations, capacities,
and plug torques. Maintain the oil level at the bottom of the fill
plug hole 1.
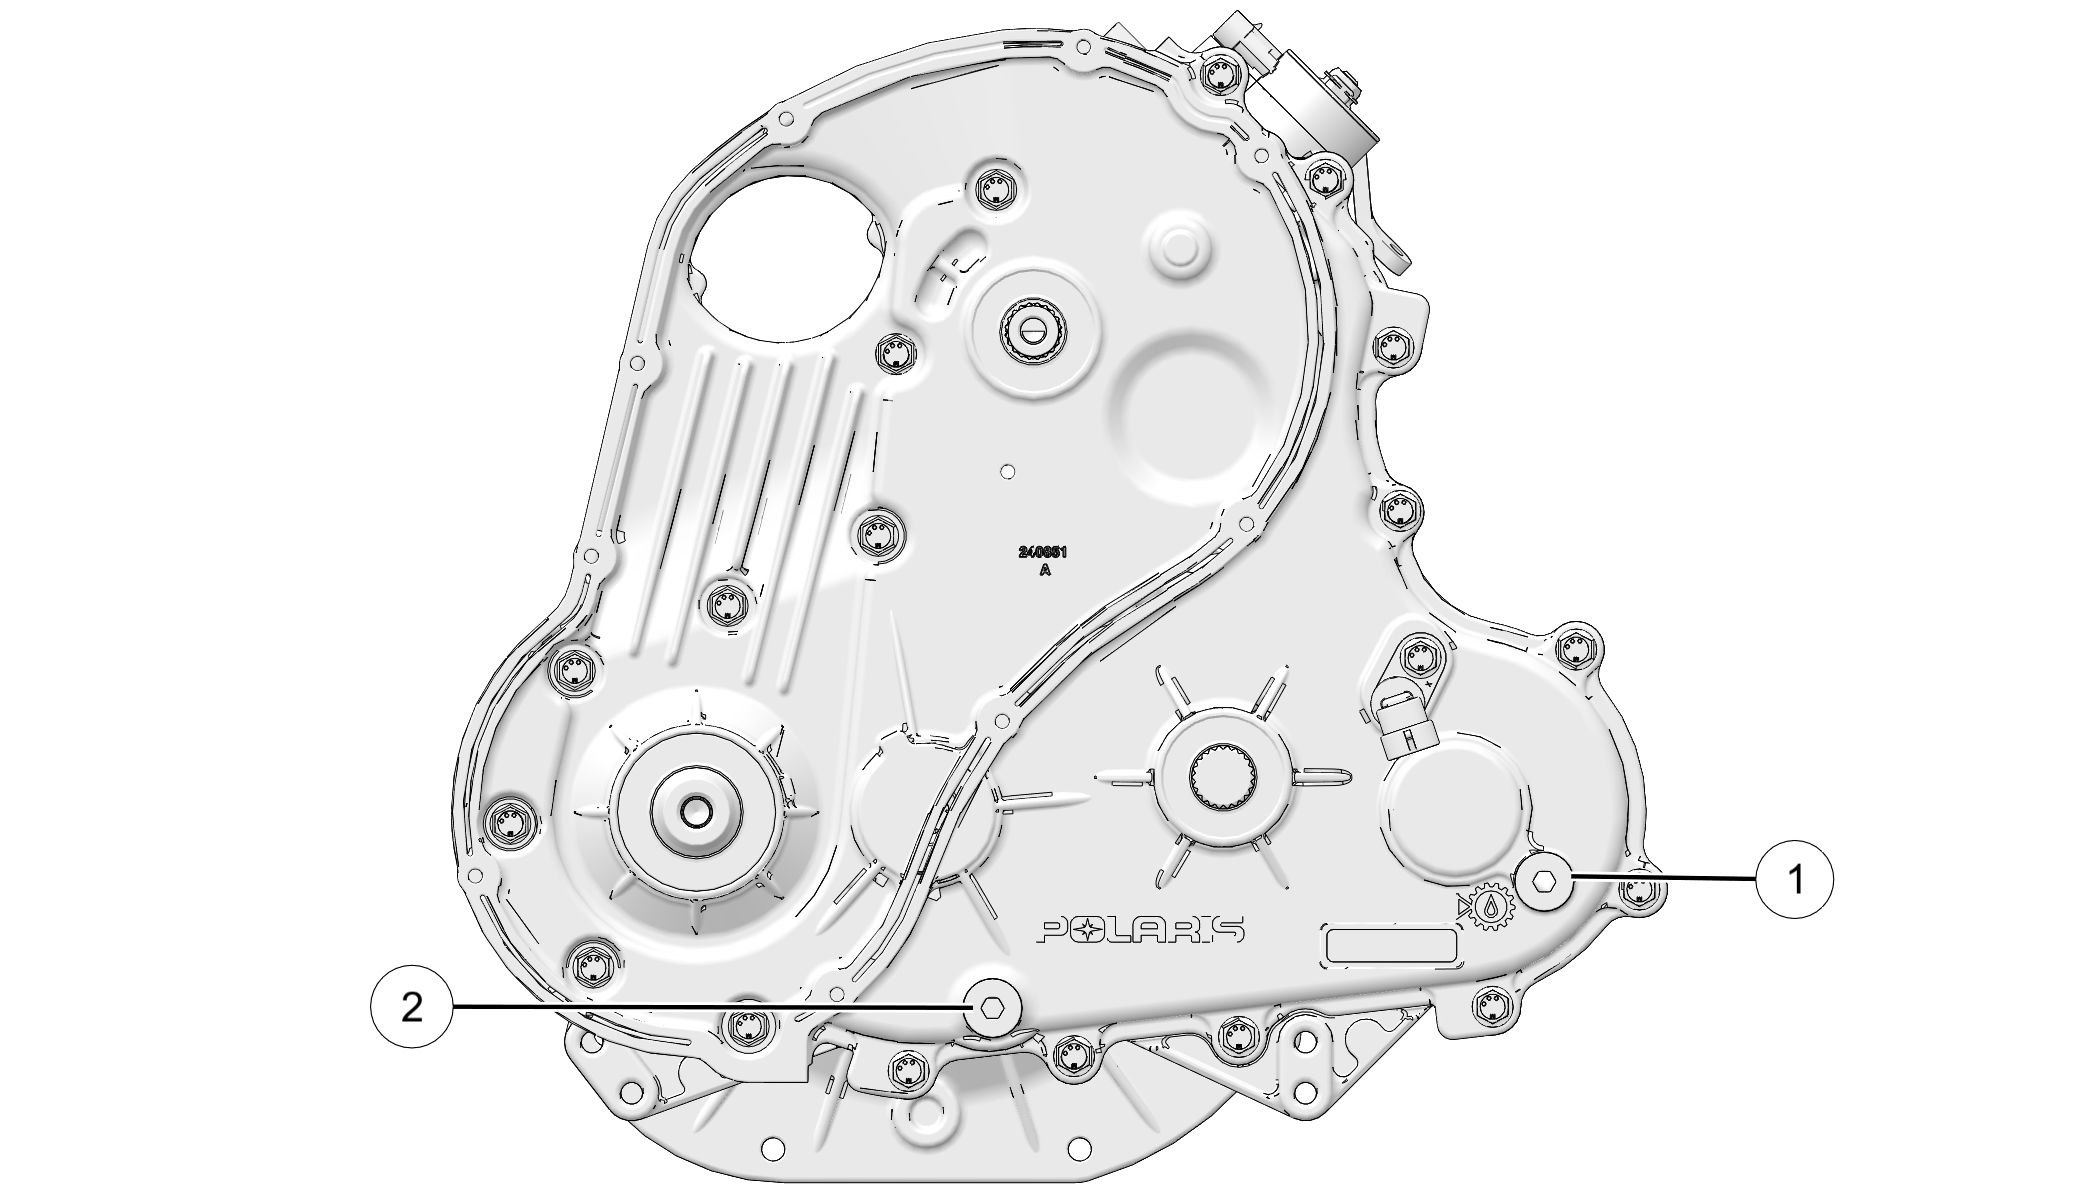
The fill plug is located on the right side of the ATV behind the
footwell. The drain plug 2 is located on the bottom rear
side of the gearcase.
OIL CHECK
-
Remove the footwell.
-
Remove the fill plug. Check the oil level.
-
Add the recommended fluid as needed to bring the level to the
bottom of the fill hole threads. -
Reinstall the fill plug. Torque to specification.
TORQUE
Fill Plug:
12 ft-lbs
(16 N·m)
-
Reinstall the footwell.
OIL CHANGE
-
Remove the footwell.
-
Place a drain pan under the gearcase. Remove the drain plug.
Allow the oil to drain completely. -
Clean and reinstall the drain plug. Torque to specification.
TORQUE
Drain Plug:
12 ft-lbs
(16 N·m)
-
Remove the fill plug. Add the proper amount of the recommended
oil. -
Reinstall the fill plug. Torque to specification.
TORQUE
Fill Plug:
12 ft-lbs
(16 N·m)
-
Check for leaks.
-
Reinstall the footwell.
-
Dispose of used oil properly.
7.7.6: Front Gearcase (Demand Drive) Fluid
Always check and change the demand drive fluid at the intervals
outlined in the Periodic Maintenance Chart.
Change the front gearcase fluid every 25 hours if the ADC unit
is exposed to extreme use. Extreme use includes any of the following:
-
Operation in ADC mode for prolonged periods.
-
Constant ADC operation on hilly or mountainous terrain.
-
ADC is the primary mode of all-wheel-drive operation.
TIP
If the front gearcase is making excessive noise
during ADC operation, change the demand drive fluid. If the noise
continues, please see your POLARIS dealer or other qualified service
facility for service.
Use the recommended fluid. Use of other fluids may result in improper
operation of components. Maintain the fluid level at the bottom of
the fill hole threads. The fill plug is located on the right side
of the demand drive unit. The drain plug is located on the bottom
right side of the unit.
Fluid Check
-
Position the vehicle on a level surface. Remove the fill plug 1. Check the fluid level.
-
Add the recommended fluid as needed to bring the level to the
bottom of the fill hole threads. -
Reinstall the fill plug. Torque to specification.
TORQUE
Fill Plug
19 ft-lbs
(26 N·m)
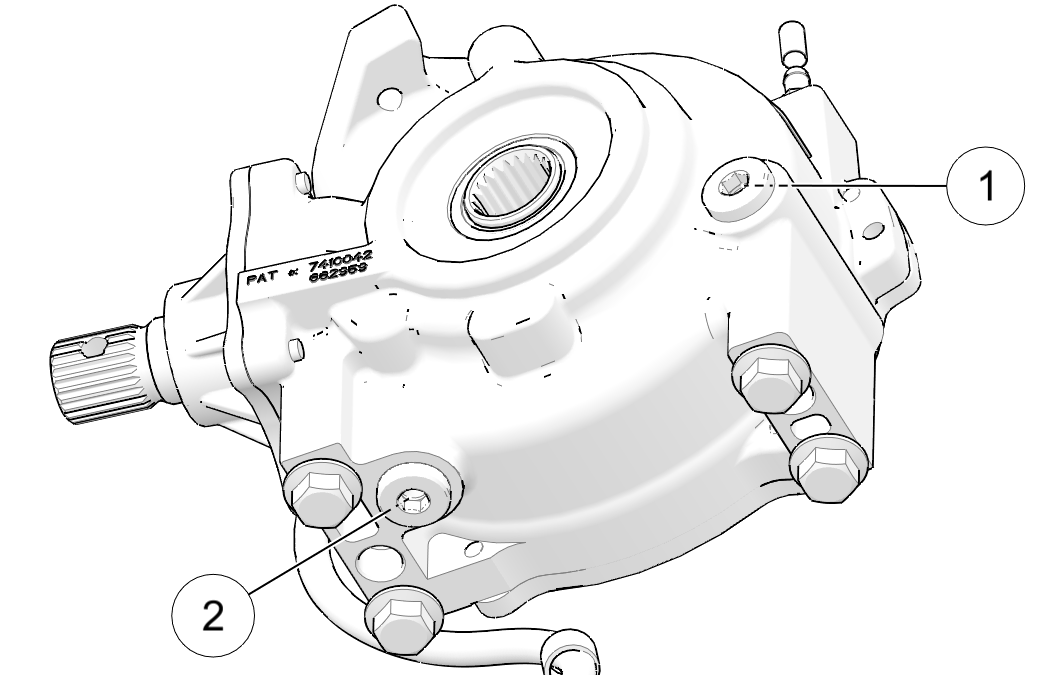
Fluid Change
-
Position the vehicle on a level surface. Remove the drain plug 1.
-
Place a drain pan under the demand drive unit. Remove the drain
plug 2. Allow the fluid to drain completely. -
Clean and reinstall the drain plug. Torque to specification.
TORQUE
Drain Plug
19 ft-lbs
(26 N·m)
-
Add the proper amount of the recommended fluid.
-
Reinstall the fill plug. Torque to specification.
TORQUE
Fill Plug
19 ft-lbs
(26 N·m)
-
Check for leaks. Dispose of used fluid properly.
7.7.7: Rear Gearcase Oil
Always check and change the rear gearcase oil at the intervals
outlined in the Periodic Maintenance Chart. See Lubricants / Service Products for the part numbers
of POLARIS products.
The fill plug is located on the rear of the gearcase. The drain
plug is located on the bottom of the gearcase.
Maintain the fluid level at the bottom of the fill hole threads.
Do not overfill.
Oil Check
-
Position the vehicle on a level surface.
-
Remove the fill plug 1. Check the oil level.
-
Add the recommended oil as needed to bring the level to the
bottom of the fill hole threads. Do not overfill. -
Reinstall the fill plug. Torque to specification.
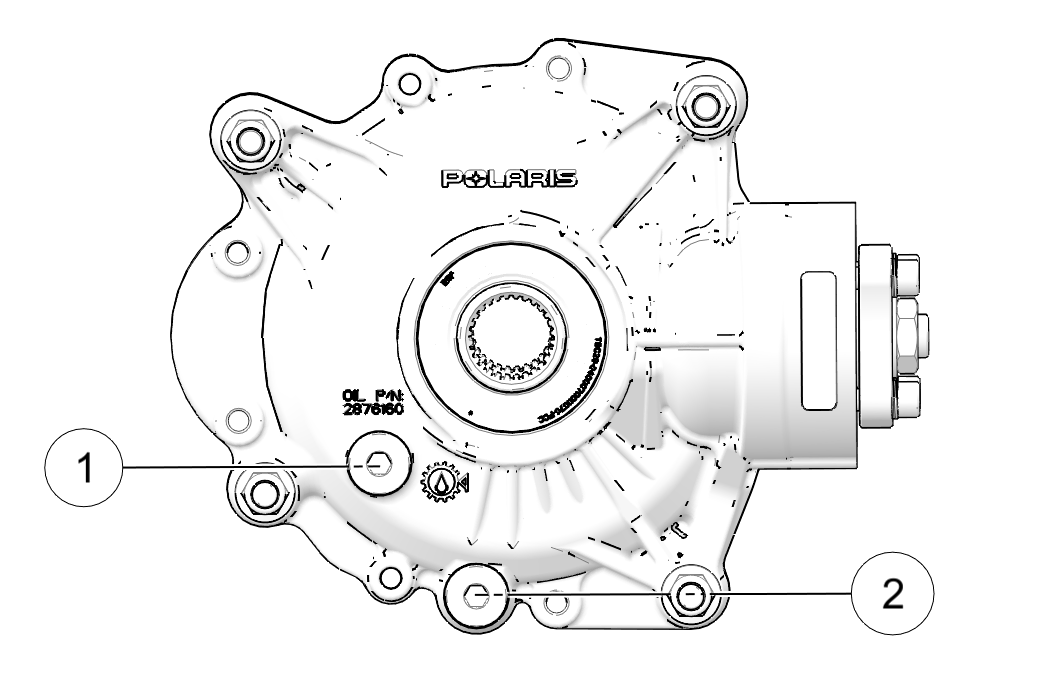
TORQUE
Fill Plug
12 ft-lbs
(16 N·m)
Oil Change
-
Position the vehicle on a level surface.
-
Place a drain pan under the drain hole2.
-
Remove the drain plug. Allow the oil to drain completely.
-
Clean and reinstall the drain plug with a new sealing washer.
Torque to specification.TORQUE
Drain Plug
12 ft-lbs
(16 N·m)
-
Remove the fill plug. Add the proper amount of the recommended
oil. Do not
overfill. -
Reinstall the fill plug. Torque to specification.
TORQUE
Fill Plug
12 ft-lbs
(16 N·m)
-
Check for leaks.
-
Dispose of used oil properly.
7.7.8: Power Steering Unit (if equipped)
If your model is equipped with power
steering, frequently clean the areas around and on the power steering
unit to allow proper cooling. Clean these areas 1 thoroughly.
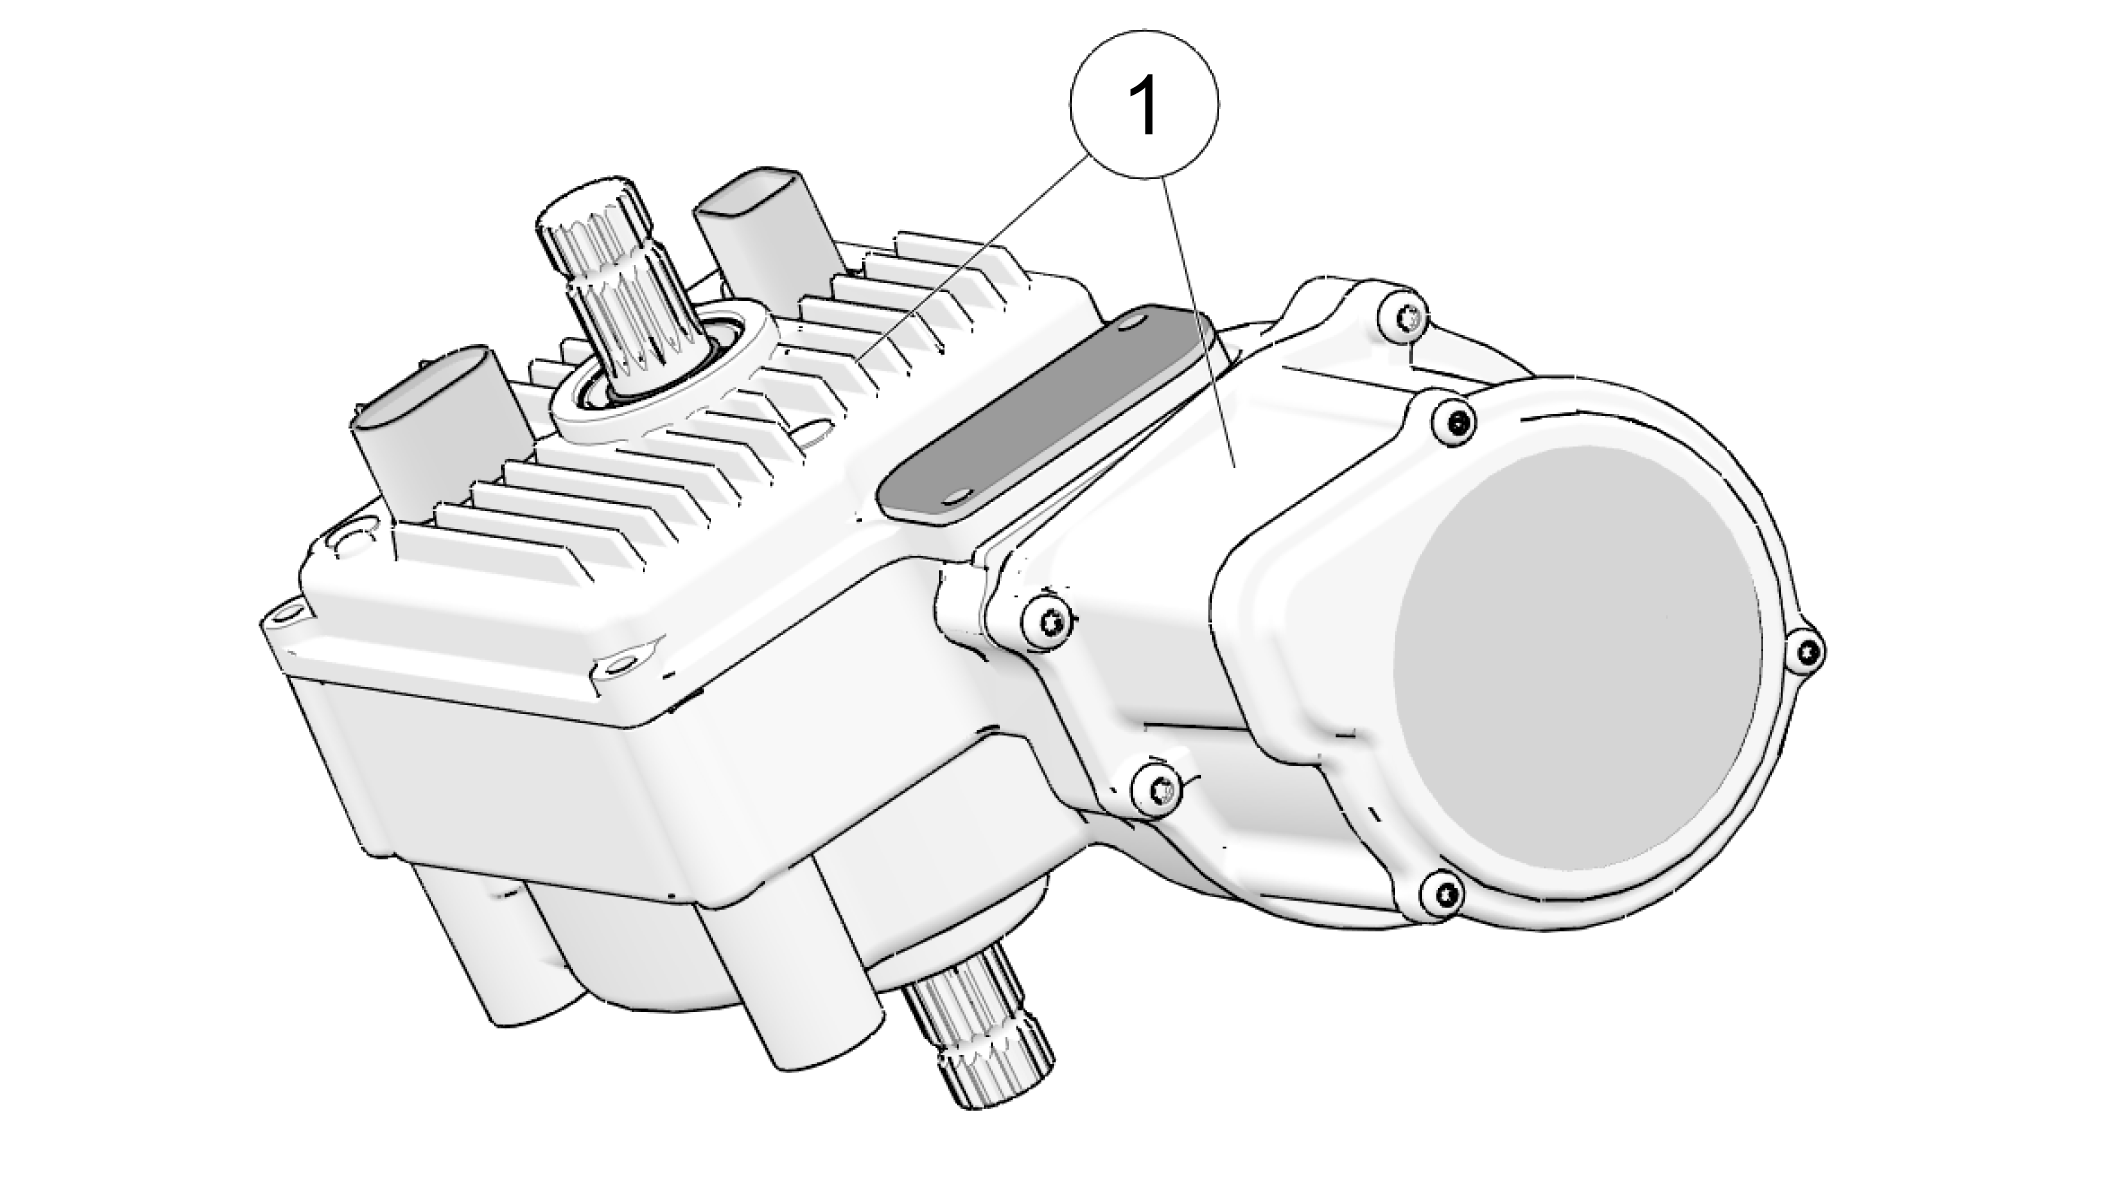
7.7.9: Steering Assembly
The steering assembly of the ATV should be checked periodically
for loose nuts and bolts. If loose nuts and bolts are found, see your
authorized dealer or other qualified service facility before operating
the vehicle.
7.7.10: Cooling System
The engine coolant level is controlled, or maintained, by the recovery
system. The recovery system components are the recovery bottle, the
radiator filler neck, the radiator pressure cap and the connecting
hose.
As coolant operating temperature increases, the expanding (heated)
excess coolant is forced out of the engine, past the pressure cap,
and into the recovery bottle. As engine coolant temperature decreases
the contracting (cooled) coolant is drawn back up from the bottle,
past the pressure cap, and into the radiator.
Some coolant level drop on new vehicles is normal as the system
is purging itself of trapped air. Check the coolant level and maintain
as recommended by adding coolant to the recovery bottle.
POLARIS recommends the use of POLARIS Antifreeze 50/50 Premix.
This antifreeze is already premixed and ready to use. Do not dilute
with water. See the Polaris Products section for the part numbers.
7.7.10.1: Recovery Bottle Coolant
The recovery bottle fluid level can be viewed from inside the front
right wheel well. Access the recovery bottle cap under the front box.
-
View the fluid level in the bottle.
-
If the level is low, remove the bottle cap and add coolant
as needed. Maintain the coolant level between the minimum and maximum
marks on the bottle (when the fluid is cool). -
Reinstall the cap.
-
Close and secure the front box and cover.
7.7.10.2: Radiator Coolant
To ensure that the coolant maintains its ability to protect the
engine, we recommend that the system be completely drained every five
(5) years and fresh Antifreeze 50/50 Premix added.
Any time the cooling system has been drained for maintenance or
repair, replace the coolant with fresh Antifreeze 50/50 Premix. If
the recovery bottle has run dry, check the level in the radiator.
Add coolant as needed.
CAUTION
Escaping steam can cause burns. Never remove
the pressure cap while the engine is warm or hot. Always allow the
engine to cool before removing the pressure cap.
-
Access the pressure cap under the front box. See the Front
Compartment section for details. -
Remove the pressure cap.
-
Using a funnel, slowly add coolant through the radiator filler
neck. -
Reinstall the pressure cap. Use of a non-standard pressure
cap will not allow the recovery system to function properly. Your
POLARIS dealer can provide the correct replacement part. -
Close and secure the front box and cover.
7.7.11: Brakes
7.7.11.1: Hand Brake
CAUTION
Brake discs can become extremely hot after operation.
Allow the discs to cool before performing maintenance to prevent risk
of burns.
The front and rear brakes are hydraulic disc brakes, activated
by moving the single brake lever toward the handlebar. These brakes
are self- adjusting.
Under normal operation, the diaphragm extends into the reservoir
as fluid level drops. If the fluid level is low and the diaphragm
is not extended, a leak is likely and the diaphragm should be replaced.
To ensure proper diaphragm operation, always fill the reservoir as
needed whenever the cover is loosened or removed. Do not overfill.
WARNING
An over-full master cylinder may cause brake
drag or brake lock- up, which could result in serious injury or death.
Maintain brake fluid at the recommended level. Do not overfill.
The following checks are recommended to keep the brake system in
good operating condition. Check more often if brakes are used heavily
under normal operation.
-
Always keep brake fluid at an adequate level. See the Master
Cylinder/Brake Fluid section for details. -
Check the brake system for fluid leaks.
-
Check the brakes for excessive travel or spongy feel.
-
Check the friction pads for wear, damage and looseness. Replace
brake pads when they are worn to .030” (0.762 mm). -
Check the security and surface condition of the disc. Clean
any grease using a recommended brake cleaner or alcohol. Do not use
spray lubricants or other petroleum-based products. If you discover
any damage (cracks, excessive corrosion, warping) see your dealer
for service before operating.
7.7.11.2: Auxiliary Foot Brake
The hydraulic auxiliary brake system requires no adjustment. Check
the brake fluid level frequently for the auxiliary brake system.
7.7.12: Seat Removal
-
Grasp one side of the seat near the rear edge.
-
Pull upward abruptly to disengage the under-seat fasteners.
-
Remove the seat.
7.7.13: Side Panel/Footwell Removal
Remove the seat before removing a side panel. To remove a side
panel or footwell, remove the fasteners securing it to the frame.
Lift the right side panel upward while removing it to clear the shifter
knob.
7.7.14: Tires
WARNING
Operating your ATV with worn tires, improperly
inflated tires, non-standard tires or improperly installed tires will
affect vehicle handling and could cause an accident resulting in serious
injury or death. Always follow all tire maintenance procedures as
outlined in this manual and on the labels on the vehicle. Always use
original equipment size and type when replacing tires.
Refer to the specifications section for recommended tire type,
size and pressure.
7.7.14.1: Tire Tread Depth
Always replace tires when tread depth
is worn to 3 mm (1/8”) or less.
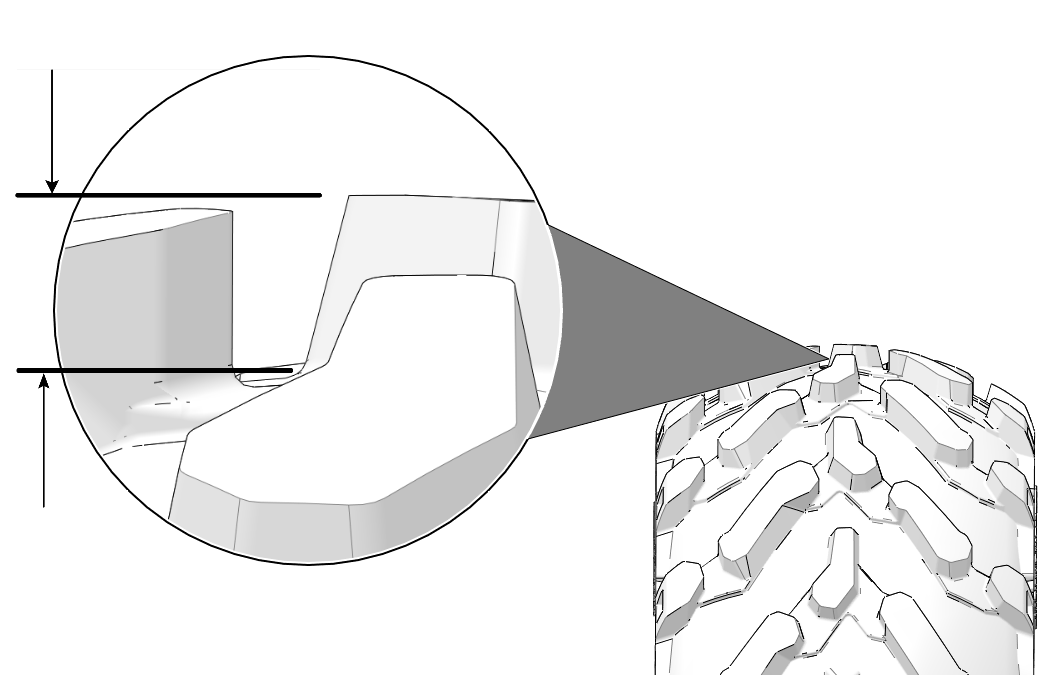
7.7.14.2: Front Wheel Hub Tightening
Front wheel bearing tightness and spindle nut retention are critical
component operations. All service must be performed by your authorized
dealer or other qualified service facility.
7.7.14.3: Wheel Nut Torque Specifications
Check the wheel nut torques occasionally and when they’ve been
loosened for service.
|
Wheel Type |
Nut Torque |
|---|---|
|
Aluminum Wheel Lug Nuts |
75 ft-lbs |
|
Steel Wheel Lug Nuts |
45 ft-lbs |
7.7.14.4: Wheel Removal
-
Stop the engine.
-
Place the transmission in PARK.
-
Lock the parking brake.
-
Loosen the wheel nuts slightly.
WARNINGDo not
service axle nuts that have a cotter pin installed. Your authorized
dealer can assist. -
Elevate the side of the vehicle by placing a suitable stand
under the foot rest frame. -
Remove the wheel nuts.
-
Remove the wheel.
7.7.14.5: Wheel Installation
-
Place the transmission in PARK.
-
Lock the parking brake.
-
Place the wheel on the hub with the valve stem toward the outside
and rotation arrows on the tire pointing toward forward rotation (if
equipped). -
Install the wheel nuts and finger-tighten them.
-
Lower the vehicle to the ground.
-
Torque the wheel nuts to specification.
WARNING
Loose nuts could cause a tire to come off during
operation, which could result in an accident or overturn. Always ensure
that all nuts are torqued to specification.
7.7.15: Toe Alignment
WARNING
Severe injury or death can result from improper
toe alignment and adjustment. Do not attempt to adjust tie rod alignment.
All tie rod adjustments should be performed by an authorized POLARIS
dealer or other qualified service facility.
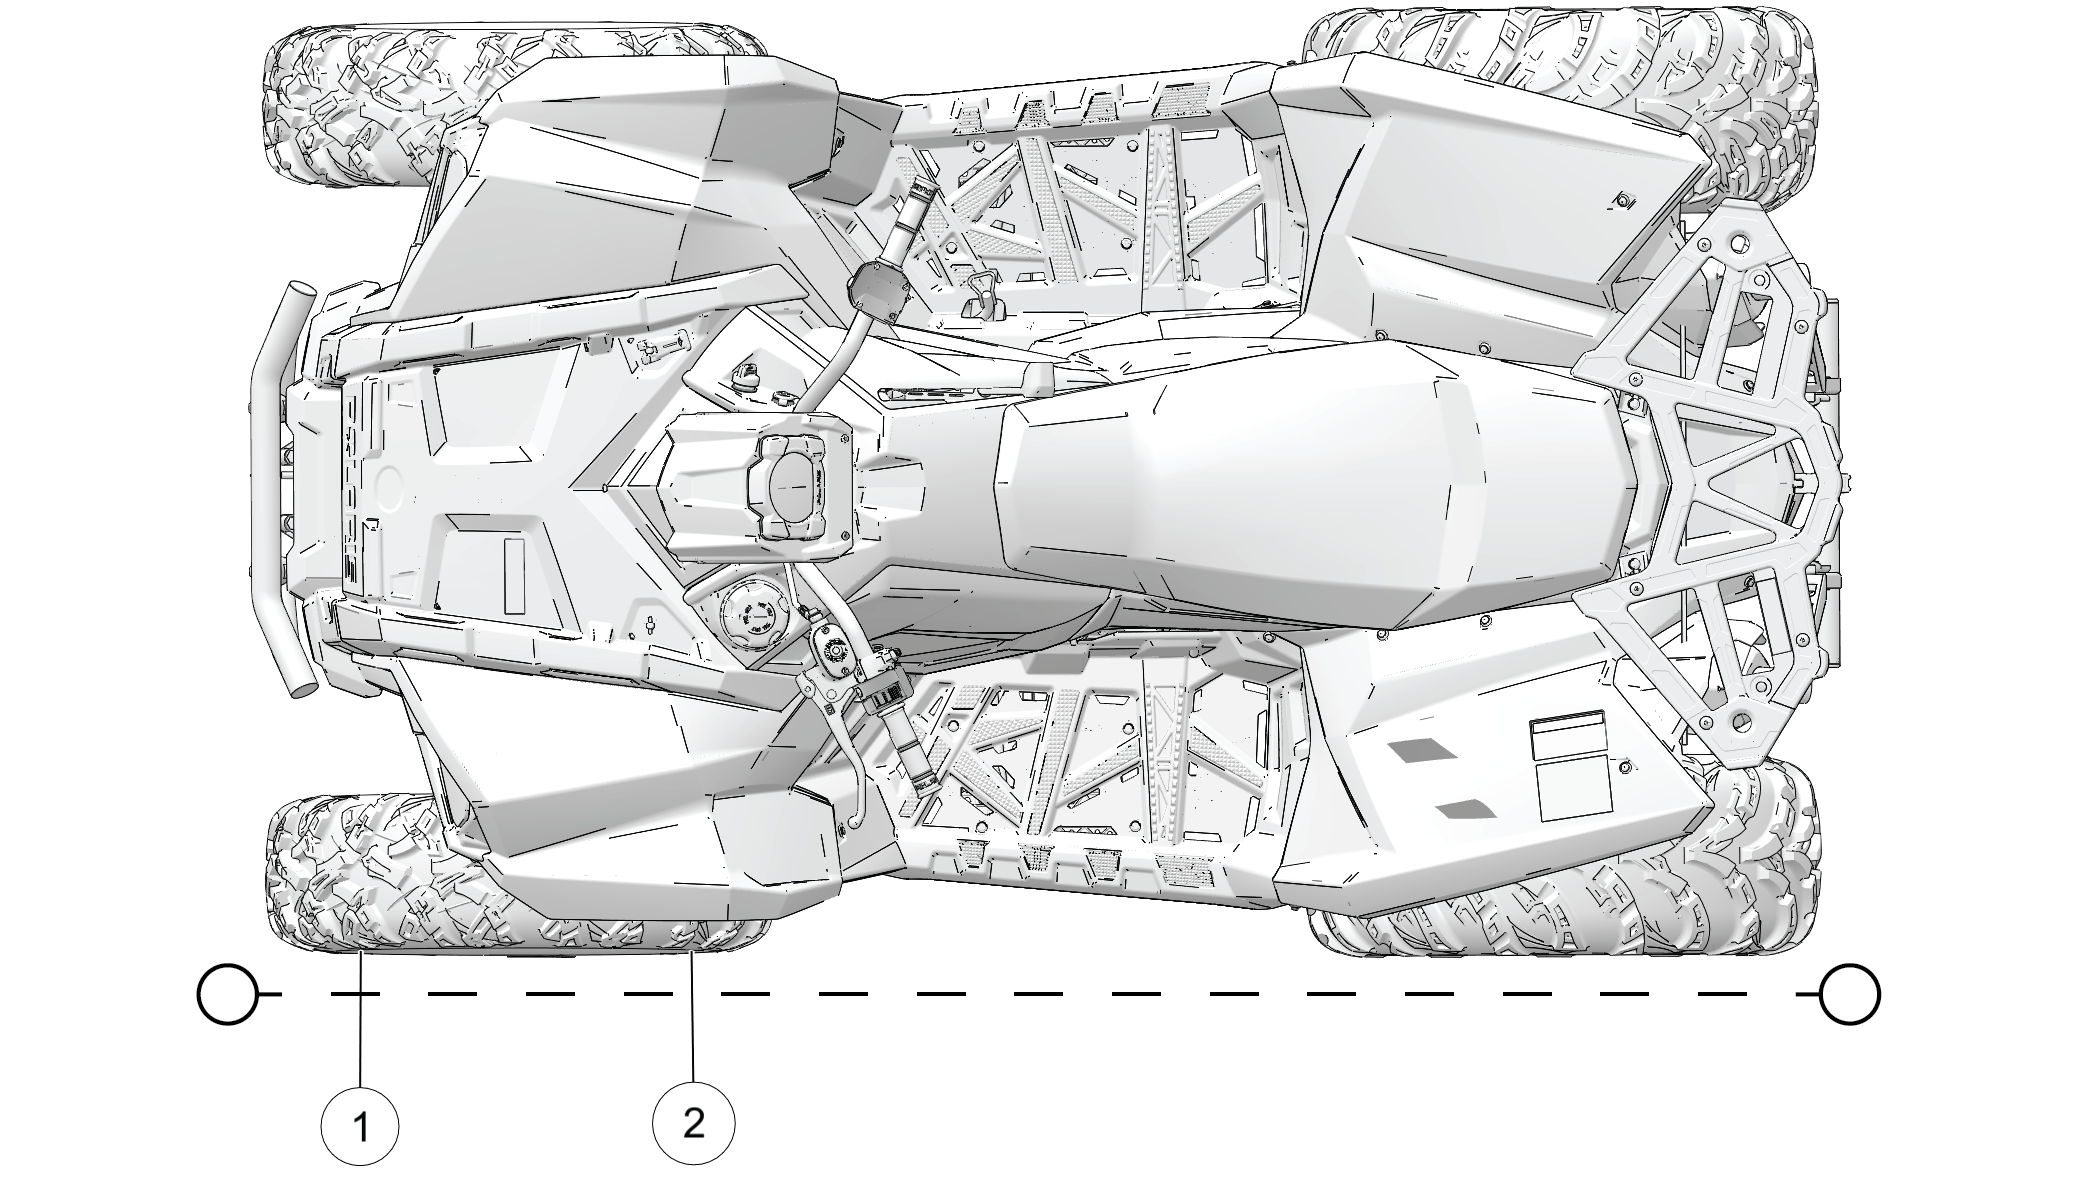
Use the following procedure to check the toe alignment of the vehicle.
The recommended toe alignment is 1/4-1/2 inch (6-12 mm).
-
Position the vehicle on a level surface.
-
Place the handlebars in a straight-ahead position.
-
Tie a length of string between two stands as shown in the illustration.
Position the stands so that the string is flush with the side of the
rear tire. If available, you may use a long straight-edge instead
of string. -
Measure the distance from the string to the rim at the front 1 and rear 2 of the front rim. The rear measurement
should be 1/8–1/4 inch (3–6 mm) more than the front
measurement on each side of the vehicle to obtain the recommended
1/4–1/2 inch (6–12 mm) toe out alignment. -
Repeat the measurement procedure on the other side of the vehicle.
-
If you discover improper alignment, see your POLARIS dealer
for service.
7.7.16: Air Filter Installation
-
Remove the seat, the air box cover strap 2, and remove
the air box cover 1.
-
Remove the filter 3.
-
Remove the fabric type pre- filter 4 from the main
filter 5. Wash the pre-filter in soapy water, then rinse
and let dry.
-
Reinstall the pre-filter over the main filter. Install a new
main filter if needed. -
Reinstall the filter into the air box.
-
Reinstall the air box cover and the seat.
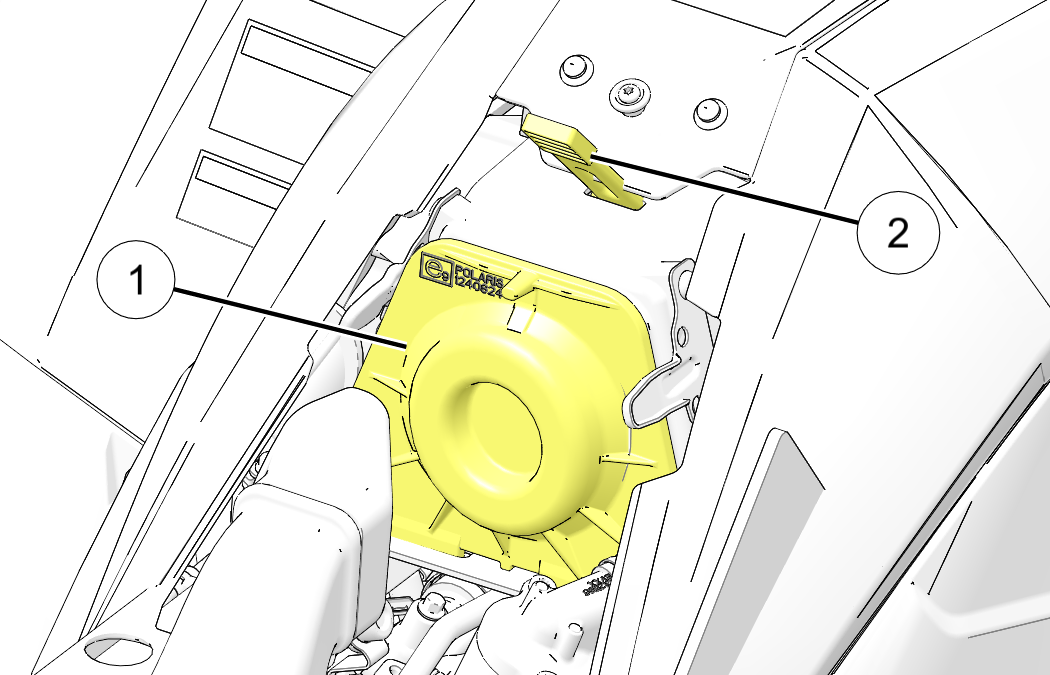
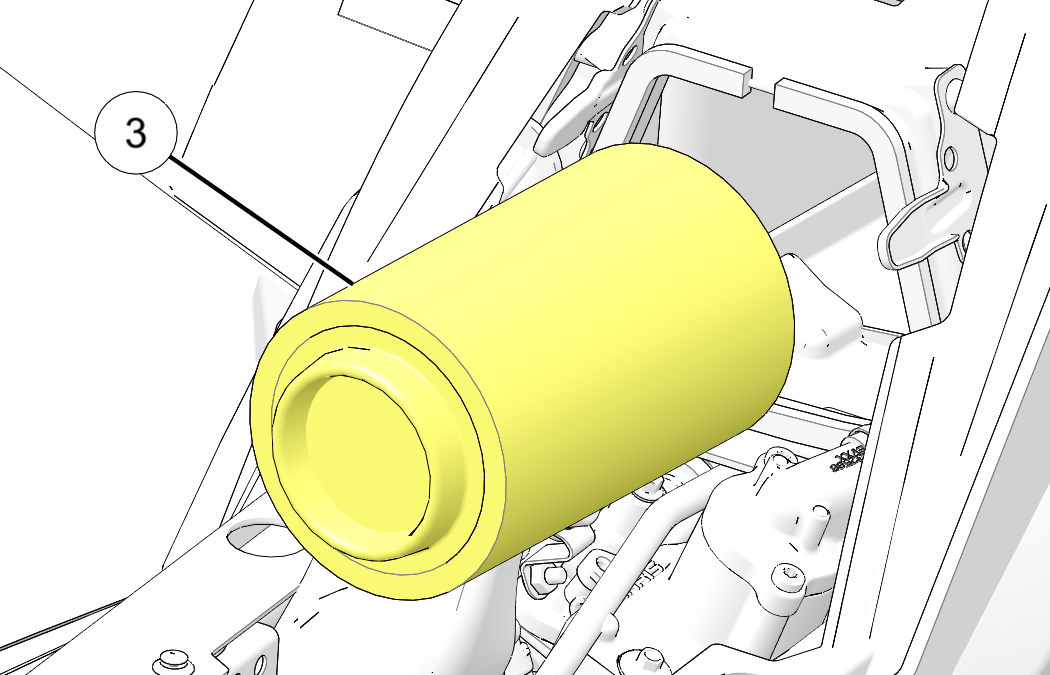

7.7.17: Fuse Replacement
If the engine stops or will not start, or if you experience other
electrical failures, a fuse may need replacement. Locate and correct
any short circuits that may have caused the blown fuse, then replace
the fuse.
Spare fuses are provided in the fuse box.
-
Access the fuses under the front box.
-
Remove the fuse box cover.
-
Remove the suspect fuse from the fuse panel. If the fuse is
blown, install a new fuse with the same amperage rating. -
Reinstall the fuse box cover.
-
Close and secure the front box and cover.
SCRAMBLER 850
| SPARE 20A |
FAN CKT BKR 20A |
UNSWITCH 10A |
EFI 10A |
FUEL PUMP 10A |
CHASSIS RELAY |
| SPARE 10A |
START/ BRAKES 7.5A |
ACCESSORY 20A |
DRIVE 20A |
LIGHTS 20A |
|
| START RELAY |
HIGH BEAM RELAY |
LOW BEAM RELAY |
FUEL PUMP RELAY |
FAN RELAY |
EFI RELAY |
| TOP OF VEHICLE ↑ |
7.7.18: Lights
7.7.18.1: Headlight Beam Inspection
Poor lighting can result in reduced visibility when driving. Headlight
and taillight lenses become dirty during normal operation. Clean lights
frequently and replace burned out lamps promptly. Always make sure
lights are adjusted properly for best visibility.
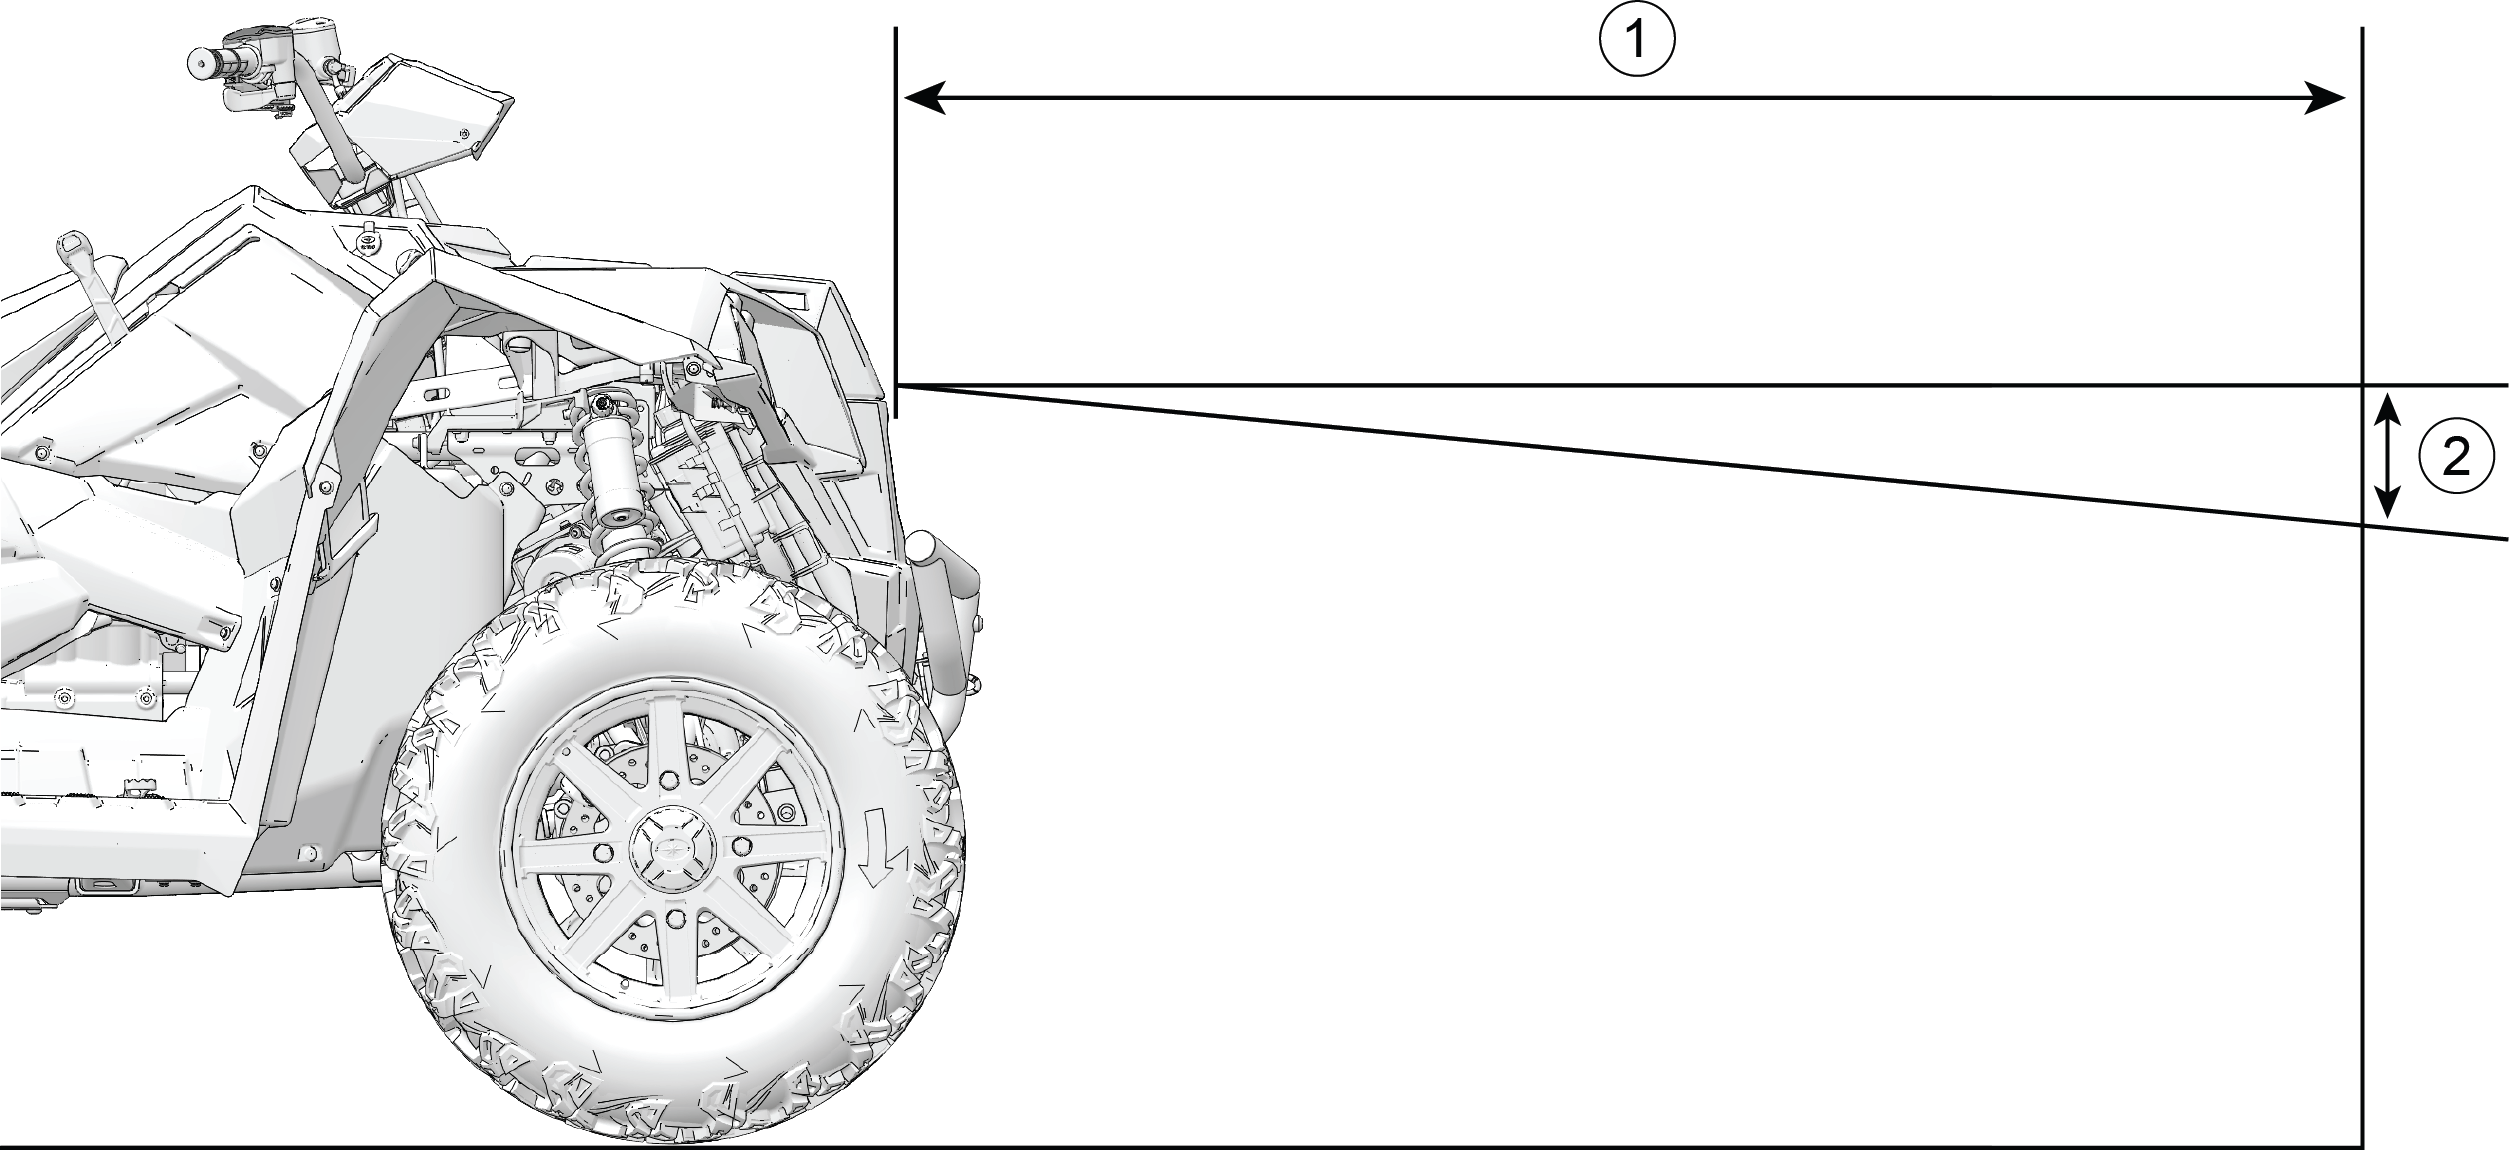
The headlight beam can be adjusted slightly upward or downward.
Use the following procedure to make the adjustment.
-
Position the vehicle on a level surface with the headlight
approximately 25 ft. (7.6 m) from a wall 1. Place the transmission
in PARK. -
Measure the distance from the floor to the center of the headlight
and make a mark on the wall at the same height. -
Start the engine. Turn the headlight switch to high beam.
-
Observe the headlight aim on the wall. The most intense part
of the headlight beam should be 2 in. (5 cm) below the mark on the
wall2. Include rider weight on the seat when measuring. -
The adjustment screw is located on the left side of the headlight
pod. To adjust the beam, loosen the screw. Adjust the headlamp to
the desired position, then tighten the screw.
7.7.18.2: Headlight Beam Adjustment
|
The headlight beam can be adjusted horizontally Tighten or loosen one or more of the three headlight |
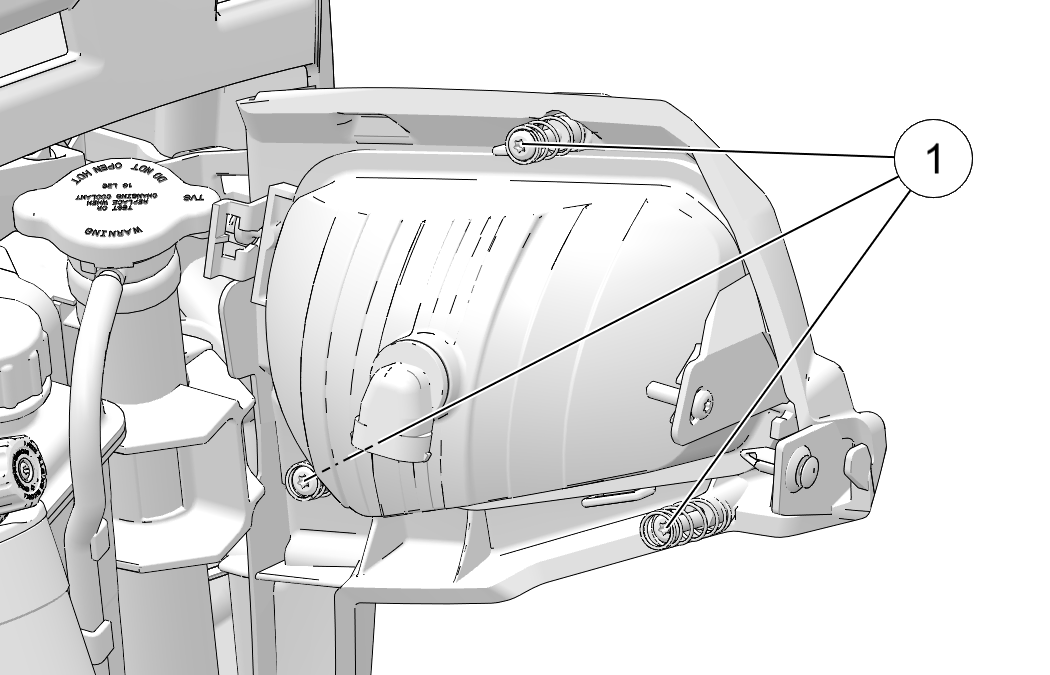
|
7.7.18.3: Headlamp Replacement
If a headlight becomes damaged or inoperable, the entire headlight
assembly must be replaced. An authorized dealer can assist.
7.7.18.4: Taillight/Brake Light Lamp Replacement
The taillight assembly is not serviceable. If the light fails to
operate properly, replace the entire taillight assembly.
7.7.19: Spark Plugs
7.7.19.1: Spark Plug Recommendations
Refer to the specifications section for the recommended spark plug
type and gap for your vehicle. Torque spark plugs to specification.
NOTICE
Using non-recommended spark plugs can result in
serious engine damage. Always use POLARIS-recommended spark plugs
or their equivalent.
|
Plug Condition |
Torque Specification |
|---|---|
|
New Spark Plug |
18 ft-lbs (25 N·m) |
|
Previously Installed Spark Plug |
18 ft-lbs (25 N·m) |
7.7.19.2: Spark Plug Inspection
Spark plug condition is indicative of engine operation. Check the
spark plug for the correct color.
CAUTION
A hot exhaust system and engine can cause burns.
Wear protective gloves when removing a spark plug for inspection.
Allow engine to cool before removing spark plug wire.
-
Rotate the spark plug cap 1/4 turn and pull it off the spark
plug. -
Rotate the spark plug counter-clockwise to remove it.
-
Reverse the procedure for spark plug installation. Torque to
specification.
7.7.19.2.1: Normal Plug
The normal insulator tip is gray, tan or light brown. There will
be few combustion deposits. The electrodes are not burned or eroded.
This indicates the proper type and heat range for the engine and the
service.
The tip should not be white. A white insulator tip indicates overheating,
caused by use of an improper spark plug or incorrect throttle body
adjustments.
7.7.19.2.2: Wet Fouled Plug
The wet fouled insulator tip is black. A damp oil film covers the
firing end. There may be a carbon layer over the entire nose. Generally,
the electrodes are not worn. General causes of fouling are excessive
oil consumption, use of non-recommended oil, or poor fuel quality.
7.7.20: Vehicle Immersion
If your vehicle becomes immersed, major engine damage can result
if the machine is not thoroughly inspected. Take the vehicle in for
service before starting the engine. Your POLARIS dealer can provide
this service.
If it’s impossible to take your ATV to a dealer before starting
it, follow the steps outlined below.
-
Move the ATV to dry land or at the very least, to water below
the footrests. -
Check the air box. If water is present, dry the air box and
replace the filter with a new filter. If equipped, remove the air
box drain plug to drain water. Reinstall the drain plug. Make sure
the E-ring is on the drain plug and reinstall the drain plug.NOTICE
Serious damage could occur if the air box drain plug
is not reinstalled and tightened properly. -
Remove the spark plugs.
-
Turn the engine over several times using the electric start.
-
Dry the spark plugs. Reinstall the plugs or install new plugs.
-
Attempt to start the engine. If necessary, repeat the drying
procedure.NOTICE
Serious damage can occur after immersion
if fluids are not changed promptly. Your POLARIS dealer can assist. -
Take the vehicle in for service as soon as possible, whether
you succeed in starting it or not. Your POLARIS dealer can provide
the required service. -
If water has been ingested into the PVT, follow the procedure
on PVT Drying for drying
out the PVT.
7.7.21: Spark Arrestor
WARNING
Failure to heed the following warnings while
servicing the spark arrestor could result in serious injury or death.
-
Never run the engine in an enclosed area. Exhaust contains
poisonous carbon monoxide gas that can cause loss of consciousness
or death in a very short time. -
Wear eye protection and leather work gloves.
-
Do not perform clean-out immediately after the engine has been
run, as the exhaust system becomes very hot. Serious burns could result
from contact with the exhaust components. Allow components to cool
sufficiently before proceeding.
Never operate without the spark arrestor
Periodically clean the spark arrestor to remove accumulated carbon.
-
Place the transmission in PARK.
-
Remove the arrestor retaining bolt and nut.
-
Remove the arrestor from the end of the muffler.
-
Use non-synthetic brush to clean the arrestor screen. A synthetic
brush may melt if the components are warm. If necessary, blow debris
from the screen with compressed air. -
Inspect the screen for wear and damage. Replace a worn or damaged
screen. -
Reinstall the arrestor.
-
Torque the bolt to specification.
TORQUE
Spark Arrestor Fastener:
8 ft-lbs
(11 N·m)
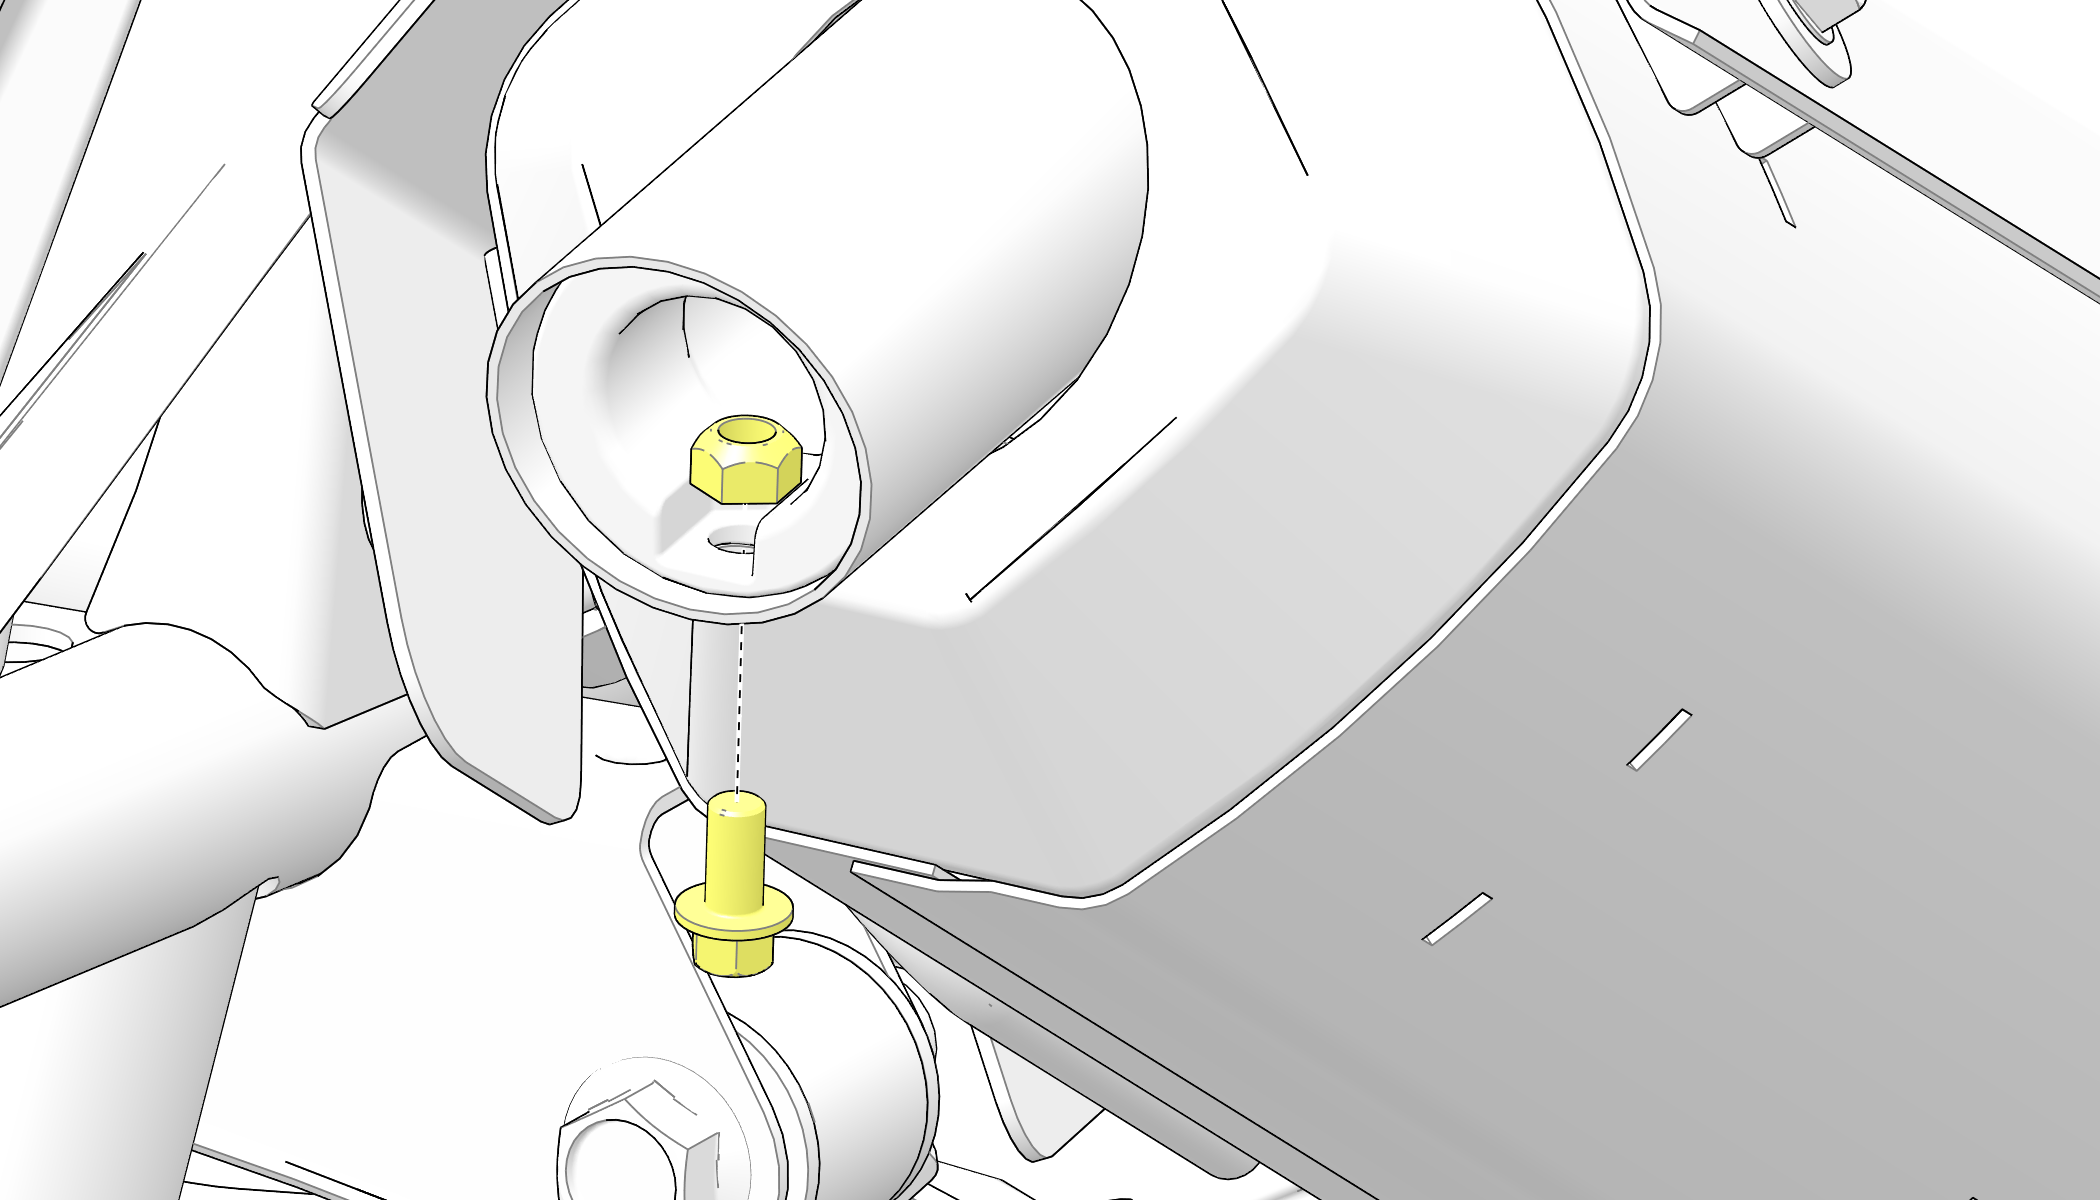
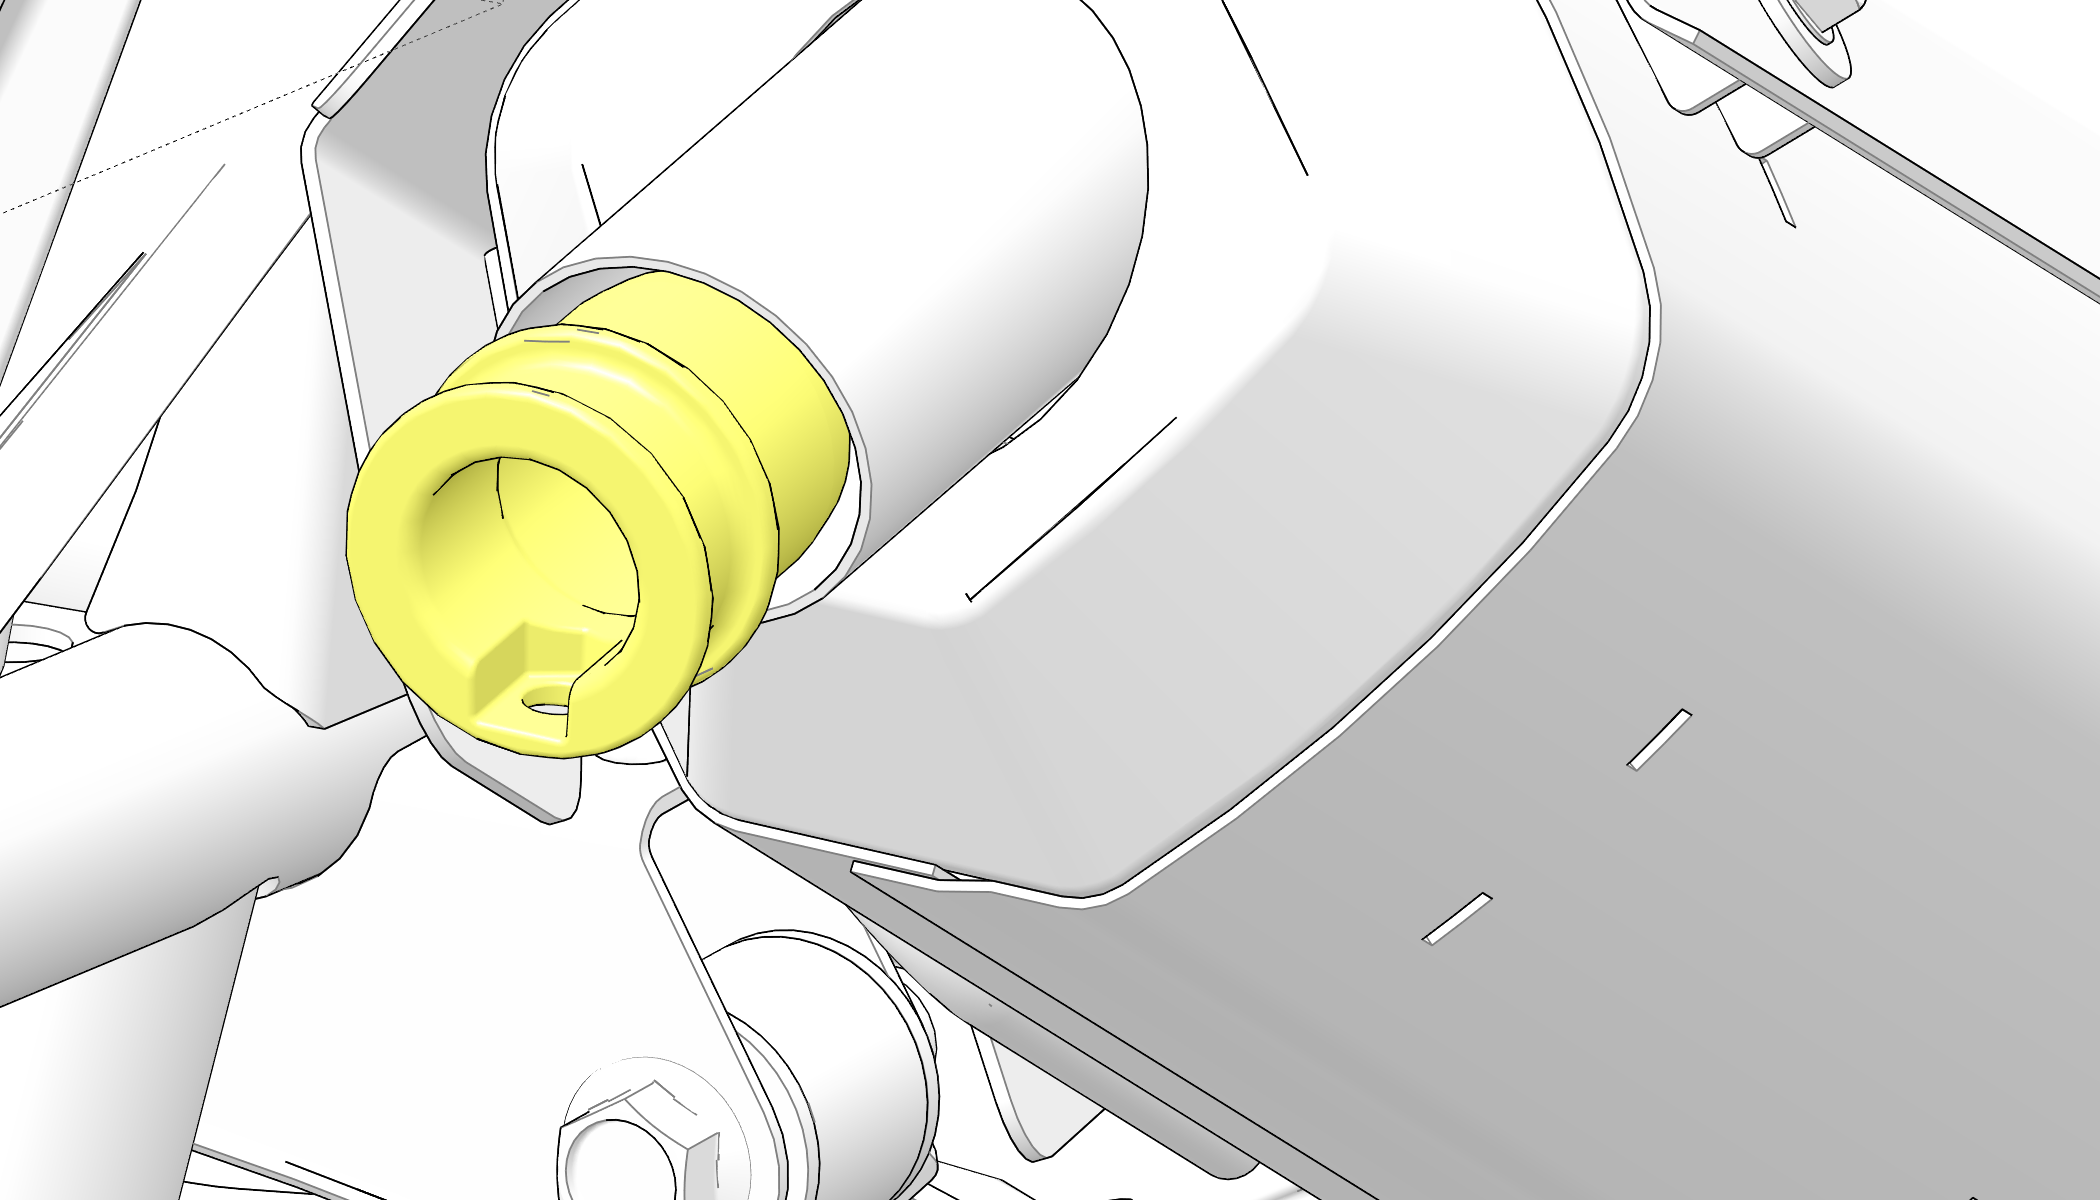
7.7.22: PVT System
WARNING
Failure to comply with the instructions in
this warning can result in severe injury or death.
Do not modify
any component of the PVT system. Doing so may reduce its strength
so that a failure may occur at a high speed. The PVT system has been
precision balanced. Any modification will cause the system to be out
of balance, creating vibration and additional loads on components.
The PVT system rotates at high speeds, creating large amounts
of force on clutch components. Extensive engineering and testing has
been conducted to ensure the safety of this product. However, as the
owner, you have the following responsibilities to make sure this system
remains safe:
-
Always follow all recommended maintenance procedures. Always
look for and remove debris inside and around the clutch and vent system
when replacing the belt. -
See your POLARIS dealer, or other qualified person, for service
and repair assistance. -
This PVT system is intended for use on POLARIS products only.
Do not install it in any other product. -
Always make sure the PVT housing is securely in place during
operation.
The basic operation of the POLARIS PVT system is dependent on engine
speed and vehicle torque requirements. As engine speed increases,
the force exerted on the movable drive sheave by the flyweights also
increases. This, in turn, increases the amount of pinch applied to
the drive belt. Similarly, if the engine speed decreases, the amount
of centrifugal force decreases, reducing the amount of belt pinch.
On POLARIS ATVs, the approximate gear ratio difference between
high and low range is 1:2.25. This difference in gearing affects the
operation of the PVT, especially at speeds less than 7 MPH (11 km/h),
due to the system’s dependence on engine speed.
For example, when operating at a ground speed of 3 MPH (5 km/h)
in low range, the engine speed would be around 3000 RPM. This is well
above the engagement speed of 1600 — 1800 RPM. However, in high range
at 3 MPH (5 km/h), the engine would be running at only 1500 RPM. Whenever
operating this close to the engagement speed, the engine may be running
at a speed too low to provide the pinch needed to prevent belt slip.
Belt slip is responsible for creating the excessive heat that destroys
belts, wears clutch components and causes outer clutch covers to fail.
The air temperature in the clutch cover is substantially reduced
by using low range while operating at low ground speeds. Reducing
the temperature inside the clutch cover greatly extends the life of
the PVT components (belt, cover, etc.).
7.7.22.1: When to Use Low Range and High Range
|
Condition |
Range to Use |
|---|---|
|
Operating at speeds less than 7 MPH (11 km/h) |
Low |
|
Towing heavy loads |
Low |
|
Operating in rough terrain (swamps, mountains, etc.) |
Low |
|
Operating at speeds greater than 7 MPH (11 km/h) |
High |
7.7.22.2: PVT Drying
There may be some instances when water is accidently ingested into
the PVT system. Use the following instructions to dry it out before
operating.
-
Position the vehicle on a level surface.
-
Remove the drain plug. Allow the water to drain completely.
Reinstall the drain plug. -
Start the engine. Place the transmission in PARK.
-
Apply varying throttle for 10-15 seconds to expel the moisture
and air-dry the belt and clutches. Do not hold the throttle wide open
for more than 5 seconds. -
Allow the engine RPM to settle to idle speed, then shift the
transmission to low range. -
Test for belt slippage. If the belt slips, repeat the process.
Your vehicle requires service as soon as possible, which your authorized
dealer can provide.
7.7.23: Battery
WARNING
Improperly connecting or disconnecting battery
cables can result in an explosion and cause serious injury or death.
When removing the battery, always disconnect the negative (black)
cable first. When reinstalling the battery, always connect the negative
(black) cable last.
Your ATV is equipped with a sealed battery, which requires little
maintenance. POLARIS does not recommend using a conventional battery
in this vehicle. The orientation of the battery could result in electrolyte
leakage, which would shorten the life of the battery considerably.
Always keep battery terminals and connections free of corrosion.
If cleaning is necessary, remove corrosion with a stiff wire brush.
Wash with a solution of one tablespoon baking soda and one cup water.
Rinse well with tap water and dry off with clean shop towels. Coat
the terminals with dielectric grease or petroleum jelly.
7.7.23.1: Battery Removal
-
Access the battery under the front box.
-
Disconnect the black (negative) battery cable first.
-
Disconnect the red (positive) battery cable last.
-
Disconnect the battery hold-down strap.
-
Lift the battery out of the ATV.
7.7.23.2: Battery Installation
Using a new battery that has not been fully charged can damage
the battery and result in a shorter life. It can also hinder vehicle
performance. Follow the instructions in the Battery Charging section
before installing the battery.
An optional extreme use battery may be available for your model.
If the performance of the factory-installed battery is inadequate
due to operation in extreme cold or due to extended use of multiple
electrical accessories, your authorized dealer can assist. Your dealer
can provide any installation procedures that may differ for an extreme
use battery.
-
Ensure that the battery is fully charged.
-
Place the battery in the battery holder.
-
Coat the terminals with dielectric grease or petroleum jelly.
-
Secure the battery hold-down strap.
-
Connect and tighten the red (positive) cable first.
-
Connect and tighten the black (negative) cable last.
-
Verify that cables are properly routed. Cables should be safely
tucked away at the front and rear of the battery. -
Close and secure the front box and cover.
7.7.23.3: Battery Storage
Whenever the vehicle is not used for a period of three months or
more, remove the battery from the vehicle, ensure that it’s fully
charged, and store it out of the sun in a cool, dry place. Check battery
voltage each month during storage and recharge as needed to maintain
a full charge.
POLARIS recommends maintaining battery charge by using a POLARIS
Battery Tender charger or by charging about once a month to make up
for normal self-discharge. Battery Tender can be left connected during
the storage period, and will automatically charge the battery if the
voltage drops below a pre-determined point. See the Polaris Products
section for the part numbers.
7.7.23.4: Battery Charging
The following battery charging instructions apply only to the installation
of a sealed battery. Read all instructions before proceeding with
the installation of this battery.
The sealed battery is already filled with electrolyte and has been
sealed and fully charged at the factory. Never pry the
sealing strip off or add any other fluid to this battery.
The single most important thing about maintaining a sealed battery
is to keep it fully charged. Since the battery is sealed and the sealing
strip cannot be removed, you must use a voltmeter or multimeter to
measure DC voltage.
WARNING
An overheated battery may explode, causing severe
injury or death. Always watch charging times carefully. Stop charging
if the battery becomes very warm to the touch. Allow it to cool before
resuming charging.
For a refresh charge, follow all instructions carefully.
-
The battery should be disconnected from a load or charger for
at least two hours before checking voltage. Check the battery voltage
with a voltmeter or multimeter. A fully charged battery will register
12.6 V or higher. -
If the voltage is less than 12.6 volts, recharge the battery
at 1.2 amps or less until battery voltage is 12.6 or greater. -
When using an automatic charger, refer to the charger manufacturer’s
instructions for recharging. When using a constant current charger,
use the following guidelines via the table below.
Battery Charging (Sealed Battery)
Always
verify battery condition before and 1-2 hours after the end of charging.
|
State of Charge |
Voltage |
Action |
Charge Time (Using constant current |
|---|---|---|---|
|
100% |
12.6-12.8 volts |
Conventional/Low Maintenance Battery: check after 60 days AGM Battery: check after 30 days |
None required |
|
50%-75% |
12.0-12.5 volts |
Needs charge |
5-11 hours |
|
25%-50% |
11.5-12.0 volts |
Needs charge |
At least 13 hours, verify state of charge |
|
0%-25% |
11.5 volts or less |
AGM ONLY: needs charge with desulfating charger |
At least 20 hours |
7.7.23.5: Battery Identification
IMPORTANT
It is important to identify the type of
battery installed in the vehicle. Different types of batteries require
different service procedures. Proper servicing and upkeep of the battery
is very important for maintaining long battery life. All Polaris ORV
models include either a Conventional battery or a Low Maintenance
battery.
Conventional Battery
-
The battery is NOT activated when packaged
-
Distilled water and electrolyte added as required
-
Removable cap plugs located on top of battery
-
Vent tube located on side of battery
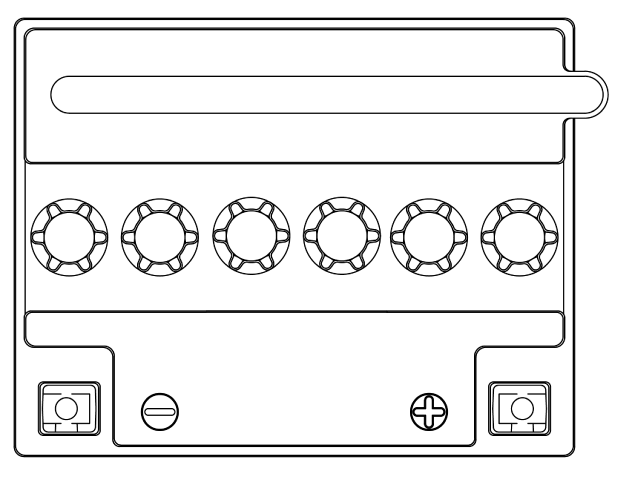
Low Maintenance Battery
-
Battery activated when packaged
-
Distilled water and electrolyte NEVER added
-
Non removable cap(s) located on top of battery
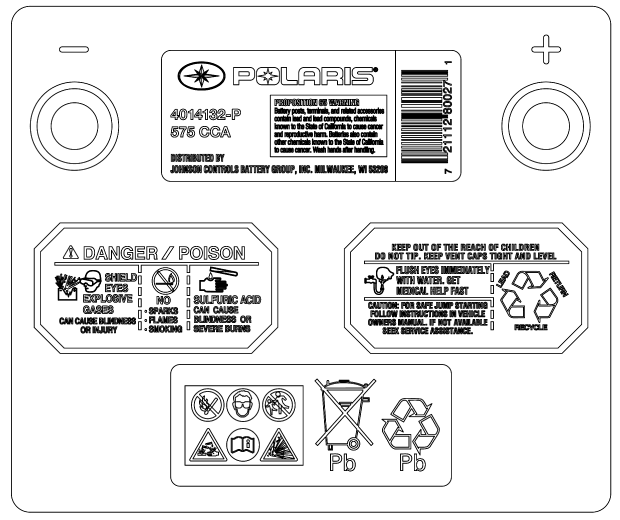
7.7.23.6: LEAD ACID CONVENTIONAL / DRY SHIPPED AGM BATTERY BEST PRACTICES
Some Polaris ORV models include either a Lead
Acid Conventional battery or a Dry Shipped Absorbed Glass Mat (AGM)
battery. See the Service Manual for procedures on how to activate,
charge, maintain, and test a Lead Acid Conventional or Dry Shipped
AGM battery.
NOTICE
Using a new battery that
has not been fully charged can damage the battery and result in a
shorter life. It can also hinder vehicle performance.
7.7.23.6.1: LEAD ACID CONVENTIONAL BATTERIES
ACTIVATION
NOTE
A Polaris battery purchased
from a Polaris dealership should be activated at time of purchase
by the dealer.
-
Do NOT activate the battery unless it will be put into regular
service within 30 days. Bulk acid should be used to activate the battery. -
Always remove the sealing cap from the vent elbow before activating
the battery. Never put the sealing cap back onto the battery. The
gas pressure can cause the battery to rupture. -
Let the battery sit for 30 minutes after you add the initial
electrolyte. Once absorbed, fill the battery with additional electrolyte
to the upper line of the electrolyte level indicator. This is the
only time that electrolyte should be added to the battery. -
Once the battery is fully charged, replace cap plugs by hand.
Do NOT use a tool to install the cap plugs.
CHARGING
-
The battery must be fully charged before use or battery life
will be significantly reduced by 10-30% of the battery’s full potential. -
Nominal voltage is 12.6 to 12.8 Volts when fully charged. If
the voltage falls below 12.5V, charge it immediately, or the battery
service life and vehicle performance may be affected. -
Polaris recommends using a BatteryMINDer® 1510 1.5 Amp
12V charger (or a similar charger), which can be ordered through your
normal parts channel. -
Charge the battery with a charging output no larger than 10%
of the battery’s amp-hour rating.
MAINTENANCE
-
Recharge the battery to its full capacity every 30 to 60 days.
-
If the battery is stored or used in a partially charged condition,
battery service life and vehicle performance may be adversely affected. -
Never add any electrolyte to the battery once the battery is
in service. After the battery is initially activated, only distilled
water should be added to maintain electrolyte levels. -
Store the battery in the vehicle with the cables disconnected,
or store the battery in a cool / dry location. Batteries will self
discharge more rapidly when stored in extreme temperatures.
TESTING
-
If the test fails, fully charge the battery.
-
Proper load testing of the battery requires special equipment
and can be performed by your dealer.
7.7.23.6.2: DRY SHIPPED AGM BATTERIES
ACTIVATION
-
Do NOT activate the battery unless it will be put into regular
service within 30 days. Only use the electrolyte container supplied
with the battery to activate the battery. -
Keep the electrolyte container in place for 20 minutes or longer
until the container is completely empty. If necessary, gently tap
the container to empty it. -
Once the battery is fully charged, replace the strip of caps
by hand. Do NOT use a tool to install the strip.
CHARGING
-
Polaris recommends using a BatteryMINDer® 2012 AGM — 12V
/ 2.0 Amp charger, which can be ordered through your normal parts
channel. -
Nominal voltage is 12.8 Volts when fully charged. If the voltage
falls below 12.5V, charge it immediately, or the battery runs the
risk of sulfation.
MAINTENANCE
-
Never add any electrolyte or distilled water to the battery
once the battery is in service. -
If you do not drive the vehicle for more than TWO weeks, maintain
the battery with the BatteryMINDer® 2012 AGM — 12V / 2.0 Amp
charger. -
If you plan to store the vehicle for ONE month or longer, remove
the battery from the vehicle and store the battery in a cool / dry
location. Continue to maintain the battery with the BatteryMINDer®
2012 AGM — 12V / 2.0 Amp charger and inspect the battery every 60
days.
TESTING
-
If the test fails, fully charge the battery.
-
If the battery is too low to accept a charge, see the AGM Battery
Charging — Deeply Discharged (Below 3 Volts) procedure in the Service
Manual. -
Proper load testing of the battery requires special equipment
and can be performed by your dealer.
7.7.23.7: LOW MAINTENANCE BATTERY BEST PRACTICES
Some Polaris ORV models include either a Lead
Acid or Absorbed Glass Mat (AGM) Low Maintenance battery. See the
Service Manual for procedures on how to charge, maintain, and test
a Lead Acid or AGM Low Maintenance battery.
NOTICE
Using a new battery that
has not been fully charged can damage the battery and result in a
shorter life. It can also hinder vehicle performance.
7.7.23.7.1: LEAD ACID LOW MAINTENANCE BATTERY
CHARGING
-
The battery must be fully charged before use or battery life
will be significantly reduced by 10-30% of the battery’s full potential. -
Nominal voltage is 12.6 to 12.8 Volts when fully charged. If
the voltage falls below 12.5V, charge it immediately, or the battery
service life and vehicle performance may be affected. -
Polaris recommends using a BatteryMINDer® 1510 1.5 Amp
12V charger (or a similar charger), which can be ordered through your
normal parts channel. -
Charge the battery with a charging output no larger than 10%
of the battery’s amp-hour rating.
MAINTENANCE
-
Recharge the battery to its full capacity every 30 to 60 days.
-
If the battery is stored or used in a partially charged condition,
hard crystal sulfation will form on the plates, reducing the efficiency
and service life of the battery. -
Never add electrolyte or distilled water to the battery. Doing
so will damage the case and shorten the life of the battery. -
Store the battery in the vehicle with the cables disconnected,
or store the battery in a cool / dry location. Batteries will self
discharge more rapidly when stored in extreme temperatures.
TESTING
-
Test the battery using the PU-50296 battery tester.
-
Proper load testing of the battery requires special equipment
and can be performed by your dealer.
7.7.23.7.2: AGM LOW MAINTENANCE BATTERIES
CHARGING
-
Polaris recommends using a BatteryMINDer® 2012 AGM — 12V
/ 2.0 Amp charger, which can be ordered through your normal parts
channel. -
Nominal voltage is 12.6–12.8 Volts when fully charged.
If the voltage falls below 12.5V, charge it immediately, or the battery
runs the risk of sulfation.
MAINTENANCE
-
Never add electrolyte or distilled water to the battery. Doing
so will damage the case and shorten the life of the battery. -
If you do not drive the vehicle for more than TWO weeks, maintain
the battery with the BatteryMINDer® 2012 AGM — 12V / 2.0 Amp
charger. -
If you plan to store the vehicle for ONE month or longer, remove
the battery from the vehicle and store the battery in a cool / dry
location. Continue to maintain the battery with the BatteryMINDer®
2012 AGM — 12V / 2.0 Amp charger and inspect the battery every 60
days.
TESTING
-
If the test fails, fully charge the battery.
-
If the battery is too low to accept a charge, see the AGM Battery
Charging — Deeply Discharged (Below 3 Volts) procedure in the Service
Manual. -
Proper load testing of the battery requires special equipment
and can be performed by your dealer.
7.7.24: Camber and Caster
The camber and caster are non-adjustable.
7.7.25: Front/Rear Shock Compression
The compression damping clicker knob is located on the top of the
front shock reservoir and on the bottom of the rear shock reservoir.
When the knob is turned clockwise until it stops, the damping is in
the fully closed position.
|
FOX® Shocks |
|
|---|---|
|
Setting |
Compression Damping |
|
Softest |
20 clicks from closed |
|
Factory |
10 clicks from closed |
|
Firmest |
2 clicks from closed |
-
Turn the clicker clockwise to increase compression damping.
-
Turn the clicker counter-clockwise to decrease compression
damping.
7.7.26: Throttle Body/Idle RPM
Idle RPM is preset by the manufacturer. If the engine idle speed
is not satisfactory, please see your POLARIS dealer or other qualified
service facility for adjustment.
7.7.27: Handlebars
The handlebars can be adjusted for rider preference.
WARNING
Improper adjustment of the handlebars or incorrect
torquing of the adjuster block tightening bolts can cause limited
steering or loosening of the handlebars, resulting in loss of control
and serious injury or death. Follow the adjustment procedures exactly,
or see your POLARIS dealer for service.
-
Remove the upper headlight pod.
-
Loosen the four handlebar bolts.
-
Adjust the handlebar to the desired height. Be sure the handlebars
do not contact the gas tank or any other part of the machine when
turned fully to the left or right. -
Torque the front two bolts to specification, then torque the
rear two bolts. A gap of up to 1/8″ (3 mm) will remain at the rear
of the clamp blocks.TORQUE
Handlebar
Bolts:
14 ft-lbs
(19 N·m)
-
Reinstall the headlight pod.
7.7.28: Cleaning and Storage
7.7.28.1: Washing the Vehicle
NOTICE
The use of a high pressure washer may damage
the instrument cluster. Wash the vehicle by hand or with a garden
hose using mild soap. Do not use alcohol to clean the instrument cluster.
Do not allow insect sprays to contact the lens. Immediately clean
off any gasoline that splashes on the instrument cluster.
If a high pressure water system is used for cleaning (not recommended),
exercise extreme caution. The water may damage components and could
remove paint and decals. Avoid directing the water stream at the following
items:
-
Wheel bearings
-
Radiator
-
Transmission seals
-
Cab and body panels
-
Electrical components
-
Switches and controls
-
Fuel system components
-
Labels and decals
If an informational or graphic label becomes illegible or comes
off, contact your POLARIS dealer to purchase a replacement. Replacement safety labels are provided by POLARIS at no charge.
Grease all zerk fittings immediately after washing. Allow the engine
to run for a while to evaporate any water that may have entered the
engine or exhaust system.
Washing Tips
-
Avoid the use of harsh cleaners, which can scratch the finish.
-
Do not use a power washer to clean the vehicle.
-
Do not use medium to heavy duty compounds on the finish.
-
Always use clean cloths and pads for cleaning and polishing.
Old or reused cloths and pads may contain dirt particles that will
scratch the finish.
7.7.28.2: Polishing the Vehicle
POLARIS recommends the use of common household aerosol furniture
polish for polishing the finish on your POLARIS vehicle. Follow the
instructions on the container.
7.7.28.2.1: Polishing Tips
-
Avoid the use of automotive products, some of which can scratch
the finish of your vehicle. -
Always use clean cloths and pads for cleaning and polishing.
Old or reused cloths and pads may contain dirt particles that will
scratch the finish.
7.7.29: Cleaning and Storage
7.7.29.1: Storage Tips
NOTICE
Starting the engine during the storage period
will disturb the protective film created by fogging and damage could
occur. Never start the engine during the storage period.
7.7.29.1.1: Clean the Exterior
Make any necessary repairs and clean the vehicle as recommended.
See the Washing the Vehicle section.
7.7.29.1.2: Stabilize the Fuel
-
Fill the fuel tank.
-
Add POLARIS Carbon Clean Fuel Treatment or POLARIS Fuel Stabilizer
or equivalent fuel treatments or stabilizers. Follow the instructions
on the container for the recommended amount. Carbon Clean removes
water from fuel systems, stabilizes fuel and removes carbon deposits
from pistons, rings, valves and exhaust systems. -
Allow the engine to run for 15-20 minutes to allow the stabilizer
to disperse through the entire fuel delivery system.
7.7.29.1.3: Oil and Filter
Change the oil and filter. See the Engine Oil section.
7.7.29.1.4: Air Filter / Air Box
Replace the air filter. See Maintenance Chapter. Clean the air
box.
7.7.29.1.5: Fluid Levels
Inspect the fluid levels. Add or change fluids as recommended in
the Periodic Maintenance Chart.
-
Demand drive fluid (front gearcase)
-
Rear gearcase fluid (if equipped)
-
Transmission fluid
-
Brake fluid (change every two years and any time the fluid
looks dark or contaminated) -
Coolant (test strength/fill)
7.7.29.1.6: Inspect and Lubricate
Inspect all cables and lubricate all areas of the vehicle as recommended
in the Periodic Maintenance Chart.
7.7.29.1.7: Fog the Engine
-
Treat the fuel system with POLARIS Carbon Clean or other equivalent
fuel treatment. Follow the instructions on the container. Start the
engine. Allow it to idle for several minutes so the Carbon Clean reaches
the injectors. Stop the engine. -
Remove the spark plugs and add 1–1.5 oz. (29.5–44
cc.) of engine oil. To access the plug holes, use a section of clear
6 mm (1/4”) hose and a small plastic squeeze bottle filled
with the pre-measured amount of oil. Do this carefully! If you
miss the plug holes, oil will drain from the spark plug cavities into
the hole at the front of the cylinder head, and appear to be an oil
leak. -
Reinstall the spark plugs. Torque to specification.
-
Apply dielectric grease to the inside of each spark plug cap. Do not reinstall the cap onto the plug at this step.
-
Turn the engine over several times. Oil will be forced in and
around the piston rings and ring lands, coating the cylinder with
a protective film of fresh oil. -
Reinstall the spark plug caps.
-
If POLARIS fuel system additive is not used, fuel tank, fuel
lines, and injectors should be completely drained of gasoline.
7.7.29.1.8: Battery Maintenance
See the Battery Storage and Battery Charging sections for
storage and charging procedures.
7.7.29.1.9: Storage Area / Covers
Be sure the storage area is well ventilated. Cover the vehicle
with a genuine POLARIS cover. Do not use plastic or coated materials.
They do not allow enough ventilation to prevent condensation, and
may promote corrosion and oxidation.
7.7.30: Transporting the ATV
Follow these procedures when transporting the vehicle.
-
Stop the engine.
-
Place the transmission in PARK.
-
Lock the parking brake.
-
Secure the fuel cap, oil cap and seats.
-
Always tie the frame of the ATV to the transporting unit securely
with suitable straps or rope. Do not attach tie straps to the front
A- arm bolt pockets, racks or handlebars. -
Remove the key to prevent loss during transporting.
8.1 SCRAMBLER 850
|
SCRAMBLER
|
|
|---|---|
|
Maximum Weight Capacity |
290 lb |
|
Dry Weight |
740 lb
750 lb |
|
Fuel Capacity |
5.25 gal |
|
Engine Oil Capacity |
2 qt |
|
Coolant Capacity |
2 qt |
|
Rear Gearcase Oil Capacity |
7.1 floz |
|
Demand Drive Fluid Capacity |
9.3 floz |
|
Transmission Oil Capacity |
37 floz |
|
Front Rack/Storage Box Capacity |
25 lb |
|
Rear Rack Capacity |
50 lb |
|
Receiver Hitch Tongue Capacity |
150 lb |
|
Hitch Towing Rating |
1500 lb |
|
Unbraked Trailer Towing Capacity* |
1914 lb |
|
Overall Length |
82.5 in |
|
Overall Width |
48 in |
|
Overall Height |
49.5 in |
|
Wheelbase |
53 in |
|
Ground Clearance |
10.6 in |
|
Minimum Turning Radius |
84 in |
|
Engine |
EHO850LE |
|
Displacement |
850 cc |
|
Bore x Stroke |
87 x 71.5 |
|
Alternator Output |
475w @1200 RPM/Peak 630w |
|
Compression Ratio |
11:1 |
|
Starting System |
Electric |
|
Ignition System |
Electronic Fuel Injection |
|
Ignition Timing |
6° +/- 5° BTDC @ 1200 RPM, Engine warm |
|
Idle RPM |
1200 +/- 50 |
|
Throttle Body/Size |
Mikuni® Dual Bore/42 mm |
|
Spark Plug Type / Gap |
REA6MC / .035 in |
|
Lubrication System |
Wet Sump |
|
Driving System Type |
Automatic PVT (POLARIS Variable Transmission) |
|
Front Suspension |
Dual a-arm travel: 9.2 in |
|
Rear Suspension |
Progressive rate travel: 10.2 in |
|
Transmission |
H/L/N/R/P |
|
Gear Reduction, Low |
5.034:1 |
|
Gear Reduction, Reverse |
4.508:1 |
|
Gear Reduction, High |
2.367:1 |
|
Drive Ratio, Front |
3.818:1 |
|
Drive Ratio, Rear |
3.7:1 |
|
Tires/Pressure, Front |
26×8-14 / 7 psi |
|
Tires/Pressure, Rear |
26×10-14 / 7 psi |
|
Brakes, Front/Rear |
Single-Control Hydraulic Disc, All Wheel |
|
Brakes, Auxiliary |
Foot-Activated Hydraulic Disc, Rear Wheel |
|
Brake, Parking |
Hydraulic lock, all wheel |
|
Headlight |
Hi/Lo Beam on Bumper (50 watt) |
|
Taillights |
LED |
|
Instrument Cluster |
Digital/Analog |
Clutching
|
Altitude |
Shift Weight |
Drive Clutch Spring |
Driven Clutch Spring |
Helix |
|---|---|---|---|---|
|
0-6000 ft (0-1800 m) |
23-60 PN 5142260 |
Purple PN 7043805 |
140-240 PN 7045111 |
62SR PT PN 3236444 |
|
6000-12000 ft (1800-3700 m) |
23-50 PN 5632395 |
Purple PN 7043805 |
140-240 PN 7045111 |
62SR PT PN 3236444 |
Chapter 8: POLARIS Products
8.8.1: Lubricants / Service Products
|
Product
|
Size (quantity)
|
Quantity
|
Part Number
|
|---|---|---|---|
|
Fogging Oil |
12 floz |
12 |
2870791 |
|
1 qt |
12 |
2871517 |
|
|
PS-4
|
1 qt
|
12
|
2876244
|
|
2 qt
|
8
|
2877490
|
|
|
1 gal
|
4
|
2876245
|
|
|
PS-4 Extreme Duty |
1 qt |
12 |
2878920 |
|
2 qt |
8 |
2878922 |
|
|
1 gal |
4 |
2878919 |
|
|
1 qt |
12 |
2889395 |
|
|
1 gal |
4 |
2889396 |
|
|
AGL
|
1 qt
|
12
|
2878068
|
|
1 gal
|
4
|
2878069
|
|
|
Pump for Gallon Jug |
— |
1 |
2870465 |
|
Demand Drive
|
1 qt
|
12
|
2877922
|
|
2.5 gal
|
2
|
2877923
|
|
|
Antifreeze / Coolant |
1 qt |
12 |
2880514 |
|
1 gal |
6 |
2880513 |
|
|
Grease Gun Kit, Premium
|
—
|
1
|
2871312
|
|
All Season Grease |
Four 3 floz |
6 |
2871322 |
|
14 floz |
1 |
2871423 |
|
|
Premium Starter Grease
|
—
|
1
|
2871460
|
|
U-Joint Grease |
3 floz |
24 |
2871515 |
|
14 floz |
1 |
2871551 |
|
|
Dielectric Grease (Nyogel®)
|
—
|
1
|
2871329
|
|
Carbon Clean |
12 floz |
12 |
2871326 |
|
Fuel Stabilizer
|
16 floz
|
12
|
2870652
|
|
2.5 gal
|
2
|
2872280
|
|
|
DOT 4 Brake Fluid |
— |
1 |
2872189 |
|
Loctite® 565 Thread
|
—
|
1
|
2871956
|
|
BatteryMINDer® 2012 AGM — 2 AMP Charger |
— |
1 |
2830438 |
Chapter 9: Troubleshooting
9.9.1: Drive Belt Wear/Burn
|
Possible Cause |
Solution |
|---|---|
|
Driving onto a pickup or tall trailer in high range |
Use low range during loading. |
|
Starting out going up a steep incline |
Use low range. |
|
Driving at low RPM or ground speed – 3–7 mph |
Drive at a higher speed or use low range more frequently. |
|
Insufficient warm-up at low ambient temperatures |
Warm the engine at least 5 minutes. With the transmission |
|
Slow/easy clutch engagement |
Use the throttle quickly and effectively. |
|
Towing/pushing at low RPM/low ground speed |
Use low range only. |
|
Utility use/plowing |
Use low range only. |
|
Stuck in mud or snow |
Shift the transmission to low range and carefully use fast,
WARNING: Excessive throttle may cause loss of control and |
|
Climbing over large objects from a stopped position |
Shift the transmission to low range and carefully use fast,
WARNING: Excessive throttle may cause loss of control and |
|
Belt slippage from water or snow ingestion into the PVT |
Dry out the PVT. Prevent water from entering the PVT intake |
|
Clutch malfunction |
An authorized dealer can assist. |
|
Poor engine performance |
Check for clogged air filter, clogged fuel filter, water |
|
Slippage from failure to warm up belt |
Always warm up the belt by operating below 30 mph |
|
Wrong or missing belt |
Install the recommended belt. |
|
Improper break-in |
Always break in a new belt and/or clutch. |
9.9.2: Engine Doesn’t Turn Over
| Possible Cause | Solution |
|---|---|
| Low battery voltage | Recharge the battery. |
| Loose battery connections | Check all connections and tighten. |
| Loose solenoid connections | Check all connections and tighten. |
| Loose electronic control box connections | Inspect, clean, reinstall connectors. |
9.9.3: Engine Turns Over, Fails to Start
| Possible Cause | Solution |
|---|---|
| Out of fuel | Refuel. |
| Water is present in fuel | Drain the fuel system and refuel. |
| Old or non-recommended fuel | Replace with fresh recommended fuel. |
| Fouled or defective spark plug | Inspect plug and replace if necessary. |
| No spark to spark plug | Inspect plug and replace if necessary. |
| Water or fuel in crankcase | Your authorized dealer can assist. |
| Low battery voltage | Recharge the battery to 12.8 VDC. |
| Mechanical failure | Your authorized dealer can assist. |
9.9.4: Engine Backfires
| Possible Cause | Solution |
|---|---|
| Weak spark from spark plug | Inspect, clean and/or replace spark plug |
| Incorrect spark plug gap or heat range | Set gap to specs or replace plug |
| Old or non-recommended fuel | Replace with fresh recommended fuel |
| Incorrectly installed spark plug wires | Your authorized dealer can assist |
| Mechanical failure | Your authorized dealer can assist |
| Loose ignition connections | Check all connections and tighten |
| Water present in fuel | Replace with fresh recommended fuel |
9.9.5: Engine Pings or Knocks
| Possible Cause | Solution |
|---|---|
| Poor quality or low octane fuel | Replace with recommended fuel |
| Incorrect spark plug gap or heat range | Set gap to specs or replace plug |
9.9.6: Engine Runs Irregularly, Stalls or Misfires
| Possible Cause | Solution |
|---|---|
| Fouled or defective spark plug | Inspect, clean and/or replace spark plug |
| Worn or defective spark plug wires | Your authorized dealer can assist |
| Incorrect spark plug gap or heat range | Set gap to specs or replace plug |
| Loose ignition connections | Check all connections and tighten |
| Water present in fuel | Replace with new fuel |
| Low battery voltage | Recharge battery to 12.8 VDC |
| Incorrect fuel | Replace with recommended fuel |
| Clogged air filter | Inspect and clean or replace |
| Clogged intake pre-filter | Inspect and clean (with soapy water) or replace |
| Other mechanical failure | Your authorized dealer can assist |
9.9.7: Engine Stops or Loses Power
| Possible Cause | Solution |
|---|---|
| Out of fuel | Refuel |
| Kinked or plugged fuel vent line | Inspect and replace |
| Water is present in fuel | Replace with new fuel |
| Fouled or defective spark plug | Inspect, clean and/or replace spark plug |
| Worn or defective spark plug wires | Your authorized dealer can assist |
| Incorrect spark plug gap or heat range | Set gap to specs or replace plug |
| Loose ignition connections | Check all connections and tighten |
| Low battery voltage | Recharge the battery |
| Incorrect fuel | Replace with fresh recommended fuel |
| Clogged air filter | Inspect and clean or replace |
| Clogged intake pre-filter | Inspect and clean (with soapy water) or replace |
| Other mechanical failure | Your authorized dealer can assist |
| Overheated engine | Clean radiator screen and core, clean engine exterior, and check coolant level. Your dealer can assist. |
9.9.8: Diagnostic Display Code Definitions
Open Load:
There is a break in the wires that lead
to the item listed in the chart (injector, fuel pump, etc.), or the
item has failed.
Short-to-Ground:
The wire is shorted to ground between
the electronic control unit and the item listed in the chart.
Shorted Load:
The wires leading to the item listed
in the chart are shorted together, or the item has shorted internally.
Short-to-Battery:
The wire leading from the item listed
in the chart to the electronic control unit is shorted to a wire at
battery voltage.
|
Diagnostic Codes |
|||
|---|---|---|---|
|
Component |
Condition |
SPN |
FMI |
|
Throttle Position Sensor |
Voltage Too High |
51 |
3 |
|
Voltage Too Low |
51 |
4 |
|
|
Engine Temperature Sensor |
Voltage Too High |
110 |
3 |
|
Voltage Too Low |
110 |
4 |
|
|
Temperature Too High |
110 |
16 |
|
|
Engine Overheat Shutdown |
110 |
0 |
|
|
Intake Air Temperature Sensor |
Voltage Too High |
105 |
3 |
|
Voltage Too Low |
105 |
4 |
|
|
Manifold Absolute Pressure Sensor |
Voltage Too High |
102 |
3 |
|
Voltage Too Low |
102 |
4 |
|
|
Signal Out of Range |
102 |
2 |
|
|
Crankshaft Position Sensor |
Circuit Fault |
636 |
8 |
|
Plausibility Fault |
636 |
2 |
|
|
Vehicle Speed Signal |
Speed Too High |
84 |
8 |
|
Plausibility Fault |
84 |
2 |
|
|
Gear Sensor Signal |
Voltage Too Low |
523 |
4 |
|
Voltage Too High |
523 |
3 |
|
|
Signal Fault |
523 |
2 |
|
|
Injector 1 (MAG) (SDI Part Load) |
Driver Circuit Open/Grounded |
651 |
5 |
|
Driver Circuit Short to B+ |
651 |
3 |
|
|
Driver Circuit Grounded |
651 |
4 |
|
|
Injector 2 (PTO) (SDI Part Load) |
Driver Circuit Open/Grounded |
652 |
5 |
|
Driver Circuit Short to B+ |
652 |
3 |
|
|
Driver Circuit Grounded |
652 |
4 |
|
|
Ignition Coil Primary Driver 1 (MAG) |
Driver Circuit Short to B+ |
1268 |
3 |
|
Ignition Coil Primary Driver 2 (PTO) |
Driver Circuit Short to B+ |
1269 |
3 |
|
Fuel Pump Driver Circuit |
Driver Circuit Open/Grounded |
1347 |
5 |
|
Driver Circuit Short to B+ |
1347 |
3 |
|
|
Driver Circuit Grounded |
1347 |
4 |
|
|
Fan Relay Driver Circuit |
Driver Circuit Open/Grounded |
1071 |
5 |
|
Driver Circuit Short to B+ |
1071 |
3 |
|
|
Driver Circuit Grounded |
1071 |
4 |
|
|
Idle Air Control |
Driver Circuit Open/Grounded |
634 |
5 |
|
Driver Circuit Short to B+ |
634 |
3 |
|
|
Driver Circuit Grounded |
634 |
4 |
|
|
Position Out of Range |
634 |
7 |
|
|
Starter Enable Circuit |
Driver Circuit Open/Grounded |
1321 |
5 |
|
Driver Circuit Short to B+ |
1321 |
3 |
|
|
Driver Circuit Grounded |
1321 |
4 |
|
|
Chassis Relay |
Driver Circuit Open/Grounded |
520208 |
5 |
|
Driver Circuit Short to B+ |
520208 |
3 |
|
|
Driver Circuit Grounded |
520208 |
4 |
|
|
All Wheel Drive Control |
Driver Circuit Open/Grounded |
520207 |
5 |
|
Driver Circuit Short to B+ |
520207 |
3 |
|
|
Driver Circuit Grounded |
520207 |
4 |
|
|
System Power |
Voltage Too High |
168 |
3 |
|
Voltage Too Low |
168 |
4 |
|
|
Throttle Safety Signal |
Voltage Too High |
520194 |
3 |
|
Voltage Too Low |
520194 |
4 |
|
|
Signal Out of Range |
520194 |
2 |
|
|
Throttle Stuck |
520194 |
7 |
|
|
Active Descent Control System |
Driver Circuit Open/Grounded |
520203 |
5 |
|
Driver Circuit Short to B+ |
520203 |
3 |
|
|
Driver Circuit Grounded |
520203 |
4 |
|
|
Idle Speed |
Speed Too High |
520211 |
3 |
|
Speed Too Low |
520211 |
4 |
|
|
Right Hand Control |
Momentary Driveline Mode Switch Press |
520468 |
31 |
|
Diagnostic Codes |
|||
|---|---|---|---|
|
Component |
Condition |
SPN |
FMI |
|
EPS Models Only |
|||
|
Vehicle Speed Sensor |
Data Valid But Above Normal Operational Range — Most Severe |
84 |
0 |
|
Data Erratic, Intermittent Or Incorrect |
84 |
2 |
|
|
Abnormal Rate Of Change |
84 |
10 |
|
|
Received Network Data In Error |
84 |
19 |
|
|
System Power |
Data Valid But Above Normal Operational Range — Most Severe |
168 |
0 |
|
Voltage Above Normal, Or Shorted To High Source |
168 |
3 |
|
|
Voltage Below Normal, Or Shorted To Low Source |
168 |
4 |
|
|
Engine Speed |
Data Valid But Above Normal Operational Range — Most Severe |
190 |
0 |
|
Data Erratic, Intermittent Or Incorrect |
190 |
2 |
|
|
Received Network Data In Error |
190 |
19 |
|
|
ECU Memory |
Bad Intelligent Device Or Component |
628 |
12 |
|
Out Of Calibration |
628 |
13 |
|
|
Calibration |
Out Of Calibration |
630 |
13 |
|
Steering Over Current Shut Down |
Current Above Normal Or Grounded Circuit |
520221 |
6 |
|
Steering Excessive Current Error |
Current Above Normal Or Grounded Circuit |
520222 |
6 |
|
Steering Torque Partial Failure |
Condition Exists |
520223 |
31 |
|
Steering Torque Full Failure |
Condition Exists |
520224 |
31 |
|
EPAS Inverter Temperature |
Data Valid But Above Normal Operational Range — Most Severe |
520225 |
0 |
|
Data Valid But Above Normal Operating Range — Moderately |
520225 |
16 |
|
|
EPAS Communications Receive Data Error |
Data Erratic, Intermittent Or Incorrect |
520226 |
2 |
|
Condition Exists |
520226 |
31 |
|
|
Position Encoder Error |
Root Cause Not Known |
520228 |
11 |
|
Bad Intelligent Device Or Component |
520228 |
12 |
|
|
Condition Exists |
520228 |
31 |
|
|
EPAS Software Error |
Bad Intelligent Device Or Component |
520229 |
12 |
|
Condition Exists |
520229 |
31 |
|
|
EPAS Power Save Condition |
Condition Exists |
520231 |
31 |
|
EPS SEPIC Voltage Error |
Voltage Above Normal, Or Shorted To High Source |
524086 |
3 |
|
Voltage Below Normal, Or Shorted To Low Source |
524086 |
4 |
Chapter 10: Warranty
10.10.1: Limited Warranty
POLARIS Industries Inc., 2100 Highway 55, Medina, MN 55340 (POLARIS)
gives a SIX MONTH LIMITED WARRANTY on all components of your POLARIS
vehicle against defects in material or workmanship. Laws and regulations
in your jurisdiction may give extra protection. POLARIS further warrants
that the spark arrester in this product will meet the efficiency requirements
of USFS standard 5100-1C for at least 1000 hours when subjected to
normal use and when maintenance and installation are in accordance
with POLARIS recommendations.
This warranty covers parts and labor charges for repair or replacement
of defective parts and begins on the date of purchase by the original
retail purchaser. This warranty is transferable to another owner during
the warranty period through a POLARIS dealer, or other qualified person,
but any such transfer will not extend the original term of the warranty.
The duration of this warranty may vary by international region based
upon local laws and regulations.
10.10.2: Registration
At the time of sale, the Warranty Registration Form must be completed
by your dealer and submitted to POLARIS within ten days of purchase.
Upon receipt of this registration, POLARIS will record the registration
for warranty. No verification of registration will be sent to the
purchaser as the copy of the Warranty Registration Form will be your
proof of warranty coverage. If you have not signed the original registration
and received the customer copy, please contact your dealer immediately.
NO WARRANTY COVERAGE WILL BE ALLOWED UNLESS YOUR VEHICLE IS REGISTERED
WITH POLARIS. Initial dealer preparation and set-up of your vehicle
is very important in ensuring trouble-free operation. Purchasing a
machine in the crate or without proper dealer set-up will void your
warranty coverage.
10.10.3: Warranty Coverage And Exclusions
10.10.3.1: Limitations Of Warranties And Remedies
This POLARIS limited warranty excludes any failures that are not
caused by a defect in material or workmanship. THIS WARRANTY DOES
NOT COVER CLAIMS OF DEFECTIVE DESIGN. This warranty also does not
cover acts of God, accidental damage, normal wear and tear, abuse
or improper handling. This warranty also does not cover any vehicle,
component, or part that has been altered structurally, modified, neglected,
improperly maintained or used for racing, competition or purposes
other than for which it was designed.
This warranty excludes damages or failures resulting from improper
lubrication; improper engine timing; improper fuel; surface imperfections
caused by external stress, heat, cold or contamination; operator error
or abuse; improper component alignment, tension, adjustment or altitude
compensation; snow, water, dirt or other foreign substance ingestion/contamination;
improper maintenance; modified components; use of aftermarket or unapproved
components, accessories, or attachments; use of unapproved software
or calibration; unauthorized repairs; or repairs made after the warranty
period expires or by an unauthorized repair center.
This warranty excludes damages or failures caused by abuse, accident,
fire, or any other cause other than a defect in materials or workmanship
and provides no coverage for consumable components, general wear items,
or any parts exposed to friction surfaces, stresses, environmental
conditions and/or contamination for which they were not designed or
not intended, including but not limited to the following items:
-
Wheels and tires
-
Suspension components
-
Brake components
-
Seat components
-
Clutches and components
-
Steering components
-
Batteries
-
Light bulbs/Sealed beam lamps
-
Filters
-
Lubricants
-
Bushings
-
Finished and unfinished surfaces
-
Carburetor/Throttle body components
-
Engine components
-
Drive belts
-
Hydraulic components and fluids
-
Circuit breakers/Fuses
-
Electronic components
-
Spark plugs
-
Sealants
-
Coolants
-
Bearings
10.10.3.2: Lubricants and Fluids
-
Mixing oil brands or using non-recommended oil may cause engine
damage. We recommend the use of POLARIS engine oil. -
Damage or failure resulting from the use of non-recommended
lubricants or fluids is not covered by this warranty.
This warranty provides no coverage for personal loss or expense,
including mileage, transportation costs, hotels, meals, shipping or
handling fees, product pick-up or delivery, replacement rentals, loss
of product use, loss of profits, or loss of vacation or personal time.
THE EXCLUSIVE REMEDY FOR BREACH OF THIS WARRANTY SHALL BE, AT POLARIS’
OPTION, REPAIR OR REPLACEMENT OF ANY DEFECTIVE MATERIALS, COMPONENTS,
OR PRODUCTS. THE REMEDIES SET FORTH IN THIS WARRANTY ARE THE ONLY
REMEDIES AVAILABLE TO ANY PERSON FOR BREACH OF THIS WARRANTY. POLARIS
SHALL HAVE NO LIABILITY TO ANY PERSON FOR INCIDENTAL, CONSEQUENTIAL
OR SPECIAL DAMAGES OF ANY DESCRIPTION, WHETHER ARISING OUT OF EXPRESS
OR IMPLIED WARRANTY OR ANY OTHER CONTRACT, NEGLIGENCE, OR OTHER TORT
OR OTHERWISE. THIS EXCLUSION OF CONSEQUENTIAL, INCIDENTAL, AND SPECIAL
DAMAGES IS INDEPENDENT FROM AND SHALL SURVIVE ANY FINDING THAT THE
EXCLUSIVE REMEDY FAILED OF ITS ESSENTIAL PURPOSE.
THE IMPLIED WARRANTY OF FITNESS FOR A PARTICULAR PURPOSE IS EXCLUDED
FROM THIS LIMITED WARRANTY. ALL OTHER IMPLIED WARRANTIES (INCLUDING
BUT NOT LIMITED TO THE IMPLIED WARRANTY OF MERCHANTABILITY) ARE LIMITED
IN DURATION TO THE ABOVE SIX MONTH WARRANTY PERIOD. POLARIS DISCLAIMS
ALL EXPRESS WARRANTIES NOT STATED IN THIS WARRANTY. SOME STATES DO
NOT PERMIT THE EXCLUSION OR LIMITATION OF INCIDENTAL OR CONSEQUENTIAL
DAMAGES OR ALLOW LIMITATIONS ON THE DURATION OF IMPLIED WARRANTIES,
SO THE ABOVE LIMITATIONS MAY NOT APPLY TO YOU IF INCONSISTENT WITH
CONTROLLING STATE LAW.
10.10.4: How To Obtain Warranty Service
If your vehicle requires warranty service, you must take it to
a POLARIS Servicing Dealer. When requesting warranty service you must
present your copy of the Warranty Registration Form to the dealer.
(THE COST OF TRANSPORTATION TO AND FROM THE DEALER IS YOUR RESPONSIBILITY.)
POLARIS suggests that you use your original selling dealer; however,
you may use any POLARIS Servicing Dealer to perform warranty service.
10.10.4.1: In the Country where your product was purchased:
Warranty or Service Bulletin repairs must be done by an authorized
POLARIS dealer, or other qualified person. If you move or are traveling
within the country where your product was purchased, Warranty and
Service Bulletin repairs may be requested from any authorized POLARIS
dealer, or other qualified person, that sells the same line as your
product.
10.10.4.2: Outside the Country where your product was purchased:
If you are traveling temporarily outside the country where your
product was purchased, you should take your product to an authorized
POLARIS dealer, or other qualified person. You must show the dealer
photo identification from the country of the selling dealer’s authorized
location as proof of residence. Upon residence verification, the servicing
dealer will be authorized to perform the warranty repair.
10.10.4.3: If you move:
If you move to another country, be sure to contact POLARIS Customer
Assistance and the customs department of the destination country before
you move. Product importation rules vary considerably from country
to country. You may be required to present documentation of your move
to POLARIS in order to continue your warranty coverage. You may also
be required to obtain documentation from POLARIS in order to register
your product in your new country. You should warranty register your
product at a local POLARIS dealer in your new country immediately
after you move to continue your warranty coverage and to ensure that
you receive information and notices regarding your product.
10.10.4.4: If you purchase from a private party:
If you purchase a POLARIS product from a private party, to be kept
and used outside of the country in which the product was originally
purchased, all warranty coverage will be denied. You must nonetheless
register your product under your name and address with a local POLARIS
dealer in your country to ensure that you receive safety information
and notices regarding your product.
10.10.5: Exported Products
EXCEPT WHERE SPECIFICALLY REQUIRED BY LAW, THERE IS NO WARRANTY
OR SERVICE BULLETIN COVERAGE ON THIS PRODUCT IF IT IS SOLD OUTSIDE
THE COUNTRY OF THE SELLING DEALER’S AUTHORIZED LOCATION. This policy
does not apply to products that have received authorization for export
from POLARIS. Dealers may not give authorization for export. You should
consult an authorized dealer to determine this product’s warranty
or service coverage if you have any questions. This policy does not
apply to products registered to government officials or military personnel
on assignment outside the country of the selling dealer’s authorized
location. This policy does not apply to Safety Bulletins.
10.10.6: Notice
If your product is registered outside of the country where it was
purchased and you have not followed the procedure set above, your
product will no longer be eligible for warranty or service bulletin
coverage of any kind, other than safety bulletins. Products registered
to government officials or military personnel on assignment outside
of the country where the product was purchased will continue to be
covered by the Limited Warranty.
Please work with your dealer to resolve any warranty issues. Dealership
contacts can be found via this website, if needed:
www.polaris.com/en-us/contact
Should your dealer require any additional assistance, they will
contact the appropriate person at POLARIS.
This warranty gives you specific legal rights, and you may also
have other rights which vary from state to state or in different countries.
If any of the above terms are void because of federal, state, local
law, all other warranty terms will remain in effect.
For questions call POLARIS Customer Assistance:
United States & Canada: 1-800-POLARIS (1-800-765-2747)
French: 1-800-268-6334
10.10.7: U.S.A. EPA Emissions Limited Warranty
This emissions limited warranty is in addition to the POLARIS standard
limited warranty for your vehicle. POLARIS Industries Inc. warrants
that at the time it is first purchased, this emissions-certified vehicle
is designed, built and equipped so it conforms with applicable U.S.
Environmental Protection Agency emission regulations. POLARIS warrants
that the vehicle is free from defects in materials and workmanship
that would cause it to fail to meet these regulations.
The warranty period for off road vehicles 100cc or greater emissions-certified
vehicles starts on the date of purchase by original retail purchaser
and continues for a period of 500 hours of engine operation, 3100 mi
(5000 km) of
vehicle travel, or 30 calendar months from the date of purchase, whichever
comes first. The warranty period for ATVs less than 100cc emissions-certified
vehicles starts on the date of purchase by original retail purchaser
and continues for a period of 250 hours of engine operation, 1550 mi
(2500 km) of
vehicle travel, or 30 calendar months from the date of purchase, whichever
comes first. This EPA emissions warranty period is extended for at
least as long as the standard factory warranty that POLARIS provides
on the vehicle as a whole. The EPA emissions warranty period does
not further extend if you purchase additional warranty coverage in
the form of a service contract or other paid warranty extension, but
emission-related parts may be covered subject to the terms of any
such paid service contract or paid warranty extension.
This emissions limited warranty covers components whose failure
increases the vehicle’s regulated emissions, and it covers components
of systems whose only purpose is to control emissions. Repairing or
replacing other components not covered by this warranty is the responsibility
of the vehicle owner. This emissions limited warranty does not cover
components whose failure does not increase the vehicle’s regulated
emissions.
For exhaust emissions, emission-related components include any
engine parts related to the following systems:
-
Air-induction system
-
Fuel system
-
Ignition system
-
Exhaust gas recirculation systems
The following parts are also considered emission-related components
for exhaust emissions:
-
After treatment devices
-
Crankcase ventilation valves
-
Sensors
-
Electronic control units
The following parts are considered emission-related components
for evaporative emissions:
-
Fuel Tank
-
Fuel Cap
-
Fuel Line
-
Fuel Line Fittings
-
Clamps*
-
Pressure Relief Valves*
-
Control Valves*
-
Control Solenoids*
-
Electronic Controls*
-
Vacuum Control Diaphragms*
-
Control Cables*
-
Control Linkages*
-
Purge Valves
-
Vapor Hoses
-
Liquid/Vapor Separator
-
Carbon Canister
-
Canister Mounting Brackets
-
Carburetor Purge Port Connector
*As related to the evaporative emission control system.
Emission-related components also include any other part whose only
purpose is to reduce emissions or whose failure will increase emissions
without significantly degrading engine/equipment performance. The
exclusive remedy for breach of this limited warranty shall be, at
the exclusive option of POLARIS, repair or replacement of any defective
materials, components or products. THE REMEDIES SET FORTH IN THIS
LIMITED WARRANTY ARE THE ONLY REMEDIES AVAILABLE TO ANY PERSON FOR
BREACH OF THIS WARRANTY. POLARIS SHALL HAVE NO LIABILITY TO ANY PERSON
FOR INCIDENTAL, CONSEQUENTIAL OR SPECIAL DAMAGES OF ANY DESCRIPTION,
WHETHER ARISING OUT OF EXPRESS OR IMPLIED WARRANTY OR ANY OTHER CONTRACT,
NEGLIGENCE OR OTHER TORT OR OTHERWISE. THIS EXCLUSION OF CONSEQUENTIAL,
INCIDENTAL, AND SPECIAL DAMAGES IS INDEPENDENT FROM AND SHALL SURVIVE
ANY FINDING THAT THE EXCLUSIVE REMEDY FAILED OF ITS ESSENTIAL PURPOSE.
ALL IMPLIED WARRANTIES (INCLUDING BUT NOT LIMITED TO ANY IMPLIED
WARRANTIES OF MERCHANTABILITY AND FITNESS FOR A PARTICULAR PURPOSE)
ARE LIMITED IN DURATION TO THE WARRANTY PERIOD DESCRIBED HEREIN. POLARIS
DISCLAIMS ALL EXPRESS WARRANTIES NOT STATED IN THIS WARRANTY. Some
states do not allow limitations on how long an implied warranty lasts,
so the above limitation may not apply if it is inconsistent with the
controlling state law.
This limited warranty excludes failures not caused by a defect
in material or workmanship. This limited warranty does not cover damage
due to accidents, abuse or improper handling, maintenance or use.
This limited warranty also does not cover damage to any engine as
a result of being structurally altered, or when the vehicle has been
used in racing competition. This limited warranty also does not cover
physical damage, corrosion or defects caused by fire, explosions or
other similar causes beyond the control of POLARIS.
Owners are responsible for performing the scheduled maintenance
identified in the owner’s manual. POLARIS may deny warranty claims
for failures that have been caused by the owner’s or operator’s improper
maintenance or use, by accidents for which POLARIS has no responsibility,
or by acts of God.
Any qualified repair shop or person may maintain, replace, or repair
the emission control devices or systems on your vehicle. An authorized
POLARIS dealer can perform any service that may be necessary for your
vehicle.
POLARIS also recommends POLARIS parts, however equivalent parts
may be used for such service. It is a potential violation of the Clean
Air Act if a part supplied by an aftermarket parts manufacturer reduces
the effectiveness of the vehicle’s emission controls. Tampering with
emission controls is prohibited by federal law.
10.10.8: California Residents
Certain POLARIS Off-Road Vehicles are available in 49-state and
50-state versions. Only the 50-state models are certified for sale
in California. The 50-state models available for sale in California
are identified by the letter “B” in the ninth position
of the model number (e.g., R16RTE87B). The POLARIS 50-state models
are designed and built with features such as a reduced cargo box capacity.
Any modifications to these features may be a violation of the applicable
California regulations and may void this limited emissions warranty
offered by the manufacturer.
If you have any questions regarding your warranty rights and responsibilities,
please contact POLARIS Customer Assistance:
United States & Canada: 1-800-POLARIS (1-800-765-2747)
French: 1-800-268-6334
Chapter 11: Maintenance Log
11.11.1: Maintenance Log
Use the following chart to record periodic maintenance.
| DATE | MILES (KM) or HOURS |
TECHNICIAN | SERVICE PERFORMED / COMMENTS |
|---|---|---|---|
Polaris Scrambler 850 (2024)
2024
WARNING
Read this manual carefully. It contains important safety information. This is an adult vehicle only.Operation is prohibited for those under 16 years of age.
OWNER’S
For Maintenance and Safety
Scrambler 850
Manual
View the manual for the Polaris Scrambler 850 (2024) here, for free. This user manual comes under the category not categorized and has been rated by 1 people with an average of a 9. This manual is available in the following languages: English. Do you have a question about the Polaris Scrambler 850 (2024)?
Ask your question here
Product Images (2)

Polaris Scrambler 850 (2024) specifications
Below you will find the product specifications and the manual specifications of the Polaris Scrambler 850 (2024).
The Polaris Scrambler 850 (2024) is an off-road vehicle that belongs to the Polaris Scrambler lineup. Specifically designed for demanding terrain, this ATV offers powerful performance and sturdy construction.
Equipped with a high-output 850cc engine, the Scrambler 850 delivers impressive power for conquering tough off-road challenges. Its advanced suspension system, featuring front dual A-arms and rear dual A-arm with a stabilizer bar, ensures enhanced stability and control over rough surfaces.
The Polaris Scrambler 850 (2024) features an automatic transmission system that allows for seamless shifting, enabling riders to smoothly navigate various terrains. Its 4-wheel drive system provides excellent traction, ensuring maximum performance in challenging conditions.
This ATV comes with a spacious seating design that accommodates a rider and passenger comfortably. Additionally, its ergonomic handlebars and footwells are designed to provide optimum control and comfort during long rides.
With a durable and rugged exterior, the Scrambler 850 can withstand the rigors of off-road exploration. It features durable bodywork and protective accessories, such as front and rear bumpers, skid plates, and hand guards, which offer added defense against obstacles.
Furthermore, this ATV is equipped with high-performance brakes for reliable stopping power and responsive handling. It also incorporates advanced safety features, including LED headlights and taillights, to ensure visibility in low-light conditions.
Overall, the Polaris Scrambler 850 (2024) is a robust and reliable off-road vehicle designed to tackle demanding terrains with power and precision while offering comfort and durability to riders.
General
Frequently asked questions
Can’t find the answer to your question in the manual? You may find the answer to your question in the FAQs about the Polaris Scrambler 850 (2024) below.
Is the manual of the Polaris Scrambler 850 (2024) available in English?
Yes, the manual of the Polaris Scrambler 850 (2024) is available in English .
Is your question not listed? Ask your question here
User manual
View the manual for the Polaris Scrambler 850 (2023) here, for free. This manual comes under the category quads and has been rated by 1 people with an average of a 7.1. This manual is available in the following languages: English. Do you have a question about the Polaris Scrambler 850 (2023) or do you need help?
Ask your question here
Frequently Asked Questions
Can’t find the answer to your question in the manual? You may find the answer to your question in the FAQs about the Polaris Scrambler 850 (2023) below.
Is the manual of the Polaris Scrambler 850 (2023) available in English?
Yes, the manual of the Polaris Scrambler 850 (2023) is available in English .
Is your question not listed? Ask your question here
Polaris Scrambler 850 Specification
The Polaris Scrambler 850 is a high-performance all-terrain vehicle (ATV) designed for both recreational and competitive use. Powered by a robust 4-stroke, SOHC, twin-cylinder engine with a displacement of 850cc, the Scrambler 850 delivers an impressive 78 horsepower, offering a dynamic and responsive ride. Its automatic PVT transmission, featuring high and low gear options, ensures smooth and adaptable power delivery across various terrains.
The Scrambler 850 boasts a durable ProStar engine, equipped with electronic fuel injection (EFI) for optimized fuel efficiency and consistent performance in diverse environmental conditions. The ATV’s suspension system includes dual A-arm front suspension with 9 inches of travel and a rear suspension with 10.25 inches of travel, providing superior shock absorption and stability over rough terrain. The vehicle’s ground clearance stands at 11.5 inches, allowing it to navigate obstacles with ease.
Ergonomically designed, the Polaris Scrambler 850 features a comfortable, contoured seat and intuitive handlebar controls, enhancing rider comfort and control. The ATV is fitted with 26-inch aggressive CST tires on 14-inch cast aluminum wheels, offering excellent traction and durability. For added convenience, it includes a digital gauge that provides real-time information on speed, fuel level, and maintenance alerts.
The Scrambler 850 incorporates advanced safety features such as an integrated front bumper, LED lighting for improved visibility, and a standard electronic power steering (EPS) system that reduces rider fatigue and improves handling precision. Additionally, it offers a payload capacity of 120 lbs and a towing capacity of up to 1,500 lbs, making it versatile for utility tasks.
Overall, the Polaris Scrambler 850 combines power, agility, and advanced technology, making it an ideal choice for ATV enthusiasts seeking both performance and reliability.
Polaris Scrambler 850 F.A.Q.
To break in a new Polaris Scrambler 850 engine, start by varying the throttle and avoiding full throttle use for the first 10 hours. It’s crucial to allow the engine to cool after every hour of use. Perform the initial oil change at 25 hours or one month, whichever comes first.
If your Scrambler 850 won’t start, check the battery connections and ensure the battery is fully charged. Inspect the fuel level and quality, and make sure the engine kill switch is in the ‘RUN’ position. If the issue persists, check the spark plug and fuel pump functionality.
Change the oil on your Polaris Scrambler 850 every 50 hours of operation or every six months, whichever comes first. More frequent oil changes may be necessary if the ATV is used in severe conditions.
Use a high-quality, ethylene glycol-based antifreeze that is specifically designed for use in aluminum engines. Ensure it is pre-mixed to the appropriate water-to-antifreeze ratio recommended by Polaris.
To adjust the suspension, locate the preload adjuster on the shock absorbers. Use a spanner wrench to increase or decrease the spring preload according to your riding preference and load conditions. Always adjust both sides equally to maintain balance.
Common causes of overheating include low coolant levels, a clogged radiator, a malfunctioning thermostat, or a failing water pump. Ensure the cooling fan is operational and inspect the radiator fins for debris or damage.
To improve fuel efficiency, maintain proper tire pressure, use high-quality fuel, and keep the air filter clean. Avoid aggressive acceleration and maintain a steady speed when possible. Regular maintenance of the engine and drivetrain also helps.
Remove the air filter cover and take out the air filter. Clean it with a mild soap and water solution. Rinse thoroughly and allow it to dry completely. Lightly oil the filter before reinstalling, ensuring it’s free of any dirt or debris.
If the check engine light illuminates, check for any obvious issues such as loose connections or fluid levels. Use an OBD-II scanner to read the diagnostic trouble codes. Address the specific issues indicated by the codes or consult a professional mechanic.
For winter storage, clean your ATV thoroughly and change the oil and filter. Stabilize the fuel, disconnect the battery, and inflate the tires to the recommended pressure. Cover the Scrambler 850 to protect it from dust and moisture.
ДОБРО ПОЖАЛОВАТЬ Мы признательны вам за приобретение продукции нашей компании и рады приветствовать во всемирном клубе любителей техники Polaris. Обязательно посетите наш веб-сайт www.brandtpolaris.ru, чтобы узнать о последних новостях, новых продуктах, предстоящих событиях, возможности карьерного
POLARIS® и SCRAMBLER® являются зарегистрированными товарными знаками компании POLARIS Industries Inc. Copyright 2013 POLARIS Sales Inc. Весь материал в этом издании основывается на самой последней информации доступной на момент издания. Поскольку конструкция и качество выпускаемых нами компонентов
СОДЕРЖАНИЕ Введение . . . . . . . . . . . . . . . . . . . . . . . . . . . . . . 4 Безопасность . . . . . . . . . . . . . . . . . . . . . . . . . . 7 Органы управления, узлы и механизмы . . 24 Эксплуатация . . . . . . . . . . . . . . . . . . . . . . . . . 52 Лебедка . . . . . . . . . . . . . . . . .
ВВЕДЕНИЕ SCRAMBLER XP 850 H.O. / 850 H.O EPS НЕ предназначен для движения по дорогам общего пользования. Мотовездеход SCRAMBLER XP 850 H.O. / 850 H.O EPS подлежит регистрации в органах Гостехнадзора. На протяжении всего руководства пользователя появляются следующие сигнальные слова и символы. Когда
ВВЕДЕНИЕ ВНИМАНИЕ Пренебрежение указаниями в данном Руководстве пользователя может привести к серьезным повреждениям квадроцикла, личным травмам и даже смерти. Квадроцикл Polaris не игрушка и при неправильной эксплуатации может представлять серьезную опасность. Специфика управления данным
ВВЕДЕНИЕ Идентификационные номера Запишите идентификационные номера вашего мотовездехода и номер ключа. Храните запасной ключ в надежном месте. Дубликат ключа зажигания выдается по заказу с использованием бланка для ключа Polaris (используйте номер вашего ключа) и предъявления действующего ключа.
Обучение по безопасности БЕЗОПАСНОСТЬ Прохождение обучения по безопасному вождению квадроцикла это приоритетное требование Polaris. Polaris настоятельно рекомендует всем пользователям квадроциклов пройти специальное обучение. При покупке квадроцикла в США, ваш дилер предоставит Вам информацию о
БЕЗОПАСНОСТЬ Экипировка водителя Соображения безопасности требуют, чтобы водитель транспортного средства был экипирован надлежащим образом. Надевайте защитную одежду для комфорта и снижения опасности получения травмы. Шлем Защита глаз Длинные рукава Перчатки Длинные брюки Ботинки Шлем Ношение шлема
Экипировка водителя БЕЗОПАСНОСТЬ Защита глаз Не пользуйтесь обычными или солнцезащитными очками для защиты глаз. При движении на квадроцикле Polaris всегда носите защитные очки или шлем с защитным стеклом. Polaris рекомендует использовать защитную экипировку с маркировкой персональных средств
БЕЗОПАСНОСТЬ Предупредительные таблички ВНИМАНИЕ Пренебрежение предостережениями может привести к потере управления, повреждениям техники, личным травмам или смерти. Соблюдайте все правила безопасности, изложенные в данном разделе Руководства пользователя. Для правильной эксплуатации Вашего
Предупредительные таблички Бензин БЕЗОПАСНОСТЬ Бензин является легко воспламеняемой жидкостью и может быть взрывоопасным в определенных условиях. • Соблюдайте следующие правила предосторожности при заправке топливом. • Заправляйте транспортное средство топливом всегда в хорошо проветриваемом
БЕЗОПАСНОСТЬ Предупредительные таблички Перевозка пассажира Перевозка пассажира нарушает конструктивный баланс квадроцикла и значительно повышает риск переворота и потери контроля над квадроциклом. Запрещается перевозка пассажира на одноместном квадроцикле. Движение по дороге с асфальтовым
Предупредительные таблички Отпускание руля, езда без надежного контакта ног с подножками БЕЗОПАСНОСТЬ Снятие даже одной руки с рукоятки руля или снятие ноги с подножки уменьшает вашу способность контролировать мотовездеход, приводит к потере равновесия и падению с мотовездехода. Если нога водителя
БЕЗОПАСНОСТЬ Предупредительные таблички Неправильная техника движения при езде вниз по склону Неправильная техника движения при езде вниз по склону может привести к потере управления и опрокидыванию мотовездехода. • При движении вниз по склону действуйте так, как рекомендовано в настоящем +25°
Предупредительные таблички Вынужденная остановка на склоне. Скатывание по склону БЕЗОПАСНОСТЬ Остановка скатывание, неверное начало движение на склоне могут привести к перевороту квадроцикла. • Всегда поддерживайте постоянную скорость при движении вверх по склону. При полной потере скорости: •
БЕЗОПАСНОСТЬ Предупредительные таблички Движение по незнакомой местности Будьте предельно осторожны во время езды по незнакомой местности, двигайтесь медленно. На вашем пути могут встретиться валуны, выбоины, ямы, все это повышает вероятность потери управления мотовездеходом, возникновения
БЕЗОПАСНОСТЬ Предупредительные таблички Неправильная техника преодоления препятствий Неправильная техника преодоления препятствий может привести к потере управления и опрокидыванию мотовездехода. На незнакомой местности, прежде всего проверьте наличие препятствий. Не пытайтесь переехать через
БЕЗОПАСНОСТЬ Предупредительные таблички Перегрузка транспортного средства Перегрузка мотовездехода, нарушение правил перевозки или буксировки груза приводит к ухудшению управляемости, возникновению аварии или несчастного случая. • Не перевозите груз с массой, превышающей допустимый предел для
БЕЗОПАСНОСТЬ Предупредительные таблички Эксплуатация неисправного мотовездехода Эксплуатация неисправного мотовездехода приводит к авариям, несчастным случаям, травмам и гибели людей. Если вы попали в ДТП, покажите мотовездеход дилеру, так как машине могут быть нанесены серьезные повреждения.
БЕЗОПАСНОСТЬ Предупредительные таблички и их расположение На корпусе транспортного средства прикреплены таблички с важной информацией, касающейся вашей безопасности. Внимательно прочитайте таблички и следуйте содержащимся в них инструкциям. Если содержание табличек на вашем мотовездеходе отличается
БЕЗОПАСНОСТЬ Предупредительные таблички и их расположение Предупредительные таблички общего характера Предупреждение о возрастном цензе Предупредительная табличка реверса Предупреждение по режиму 4X4 Предупреждение о ЗАПРЕТЕ перевозки пассажиров Предупреждение о давлении в шинах/ Нагрузке
БЕЗОПАСНОСТЬ Предупредительные таблички и их расположение Предупредительная табличка общего характера Предупреждение о нагрузке на фаркоп Предупреждения общего характера ВНИМАНИЕ • Не выезжайте на склоны с крутизной более 25°. Для предотвращения опрокидывания на холмах или пересеченной местности,
БЕЗОПАСНОСТЬ Предупредительные таблички и их расположение Предупреждение по багажной площадке Предупреждение по крышке вариатора (на кожухе вариатора) Предупреждение по багажной площадке Предупреждение на крышке вариатора ВНИМАНИЕ • Движущиеся детали, которые находятся под кожухом ремня вариатора,
ОРГАНЫ УПРАВЛЕНИЯ, УЗЛЫ И МЕХАНИЗМЫ Переключатели Переключатель ближнего/ дальнего света Кнопка переключения режимов Mode/ Reverse Override Выключатель двигателя Выключатель режима 4X4 Замок зажигания Кнопка Mode/Кнопка Оverride Ваше транспортное средство оборудовано системой ограничения скорости
ОРГАНЫ УПРАВЛЕНИЯ, УЗЛЫ И МЕХАНИЗМЫ Переключатели Экстренный выключатель двигателя Чтобы быстро остановить работу двигателя, переведите выключатель вправо или влево в положение OFF RUN OFF ВЫКЛ (OFF). Перед запуском двигателя переведите выключатель в положение RUN (ВКЛ.). Запуск и работа двигателя
ОРГАНЫ УПРАВЛЕНИЯ, УЗЛЫ И МЕХАНИЗМЫ Рычаг акселератора ВНИМАНИЕ Эксплуатация мотовездехода с неисправным приводом дроссельной заслонки может привести к несчастному случаю, травмам или гибели. Эксплуатация мотовездехода с неисправным приводом дроссельной заслонки ЗАПРЕЩЕНА. В случае неисправности
ОРГАНЫ УПРАВЛЕНИЯ, УЗЛЫ И МЕХАНИЗМЫ Рычаг тормоза ВНИМАНИЕ Эксплуатация мотовездехода с «проваливающимся» рычагом тормоза ЗАПРЕЩЕНА. Никогда не управляйте мотовездеходом с излишне «мягким» рычагом тормоза. В случае неисправности обратитесь к дилеру для проведения ремонта. Передние и задние тормоза
ОРГАНЫ УПРАВЛЕНИЯ, УЗЛЫ И МЕХАНИЗМЫ Главный тормозной цилиндр/Тормозная жидкость ВНИМАНИЕ Переполнение главного цилиндра может стать причиной подклинивания или полной блокировки колес, что может привести к травмам или несчастному случаю. Поддерживайте необходимый уровень тормозной жидкости. Не
ОРГАНЫ УПРАВЛЕНИЯ, УЗЛЫ И МЕХАНИЗМЫ Стояночный тормоз Включение стояночного тормоза 1. Включите парковочную передачу. 2. Два или три раза надавите на тормозной рычаг и удерживайте его. 3. Сдвиньте замок стояночного тормоза вперед. 4. Отпустите рычаг тормоза. 5. Чтобы снять машину со стояночного
ОРГАНЫ УПРАВЛЕНИЯ, УЗЛЫ И МЕХАНИЗМЫ Дополнительный ножной тормоз ВНИМАНИЕ Не спускайтесь с холма задним ходом. Резкое включение дополнительного тормоза при спуске с холма может привести к опрокидыванию мотовездехода, причинить травмы водителю или стать причиной его гибели. Будьте осторожны при
ОРГАНЫ УПРАВЛЕНИЯ, УЗЛЫ И МЕХАНИЗМЫ Топливный бак Заправляйте транспортное средКрышка топливного бака ство топливом всегда в хорошо проветриваемом помещении, двигатель должен быть выключен. Заправляйте транспортное средство на ровной поверхности. Снимите крышку топливного бака и залейте топливо.
ОРГАНЫ УПРАВЛЕНИЯ, УЗЛЫ И МЕХАНИЗМЫ Система полного привода Система полного привода управляется переключателем 4X4 switch. Режим 4X4 Когда переключатель находится в положении 4X4, у мотовездехода задействована система полного привода, и загорается индикатор 4X4. Переключатель Находясь в этом режиме
ОРГАНЫ УПРАВЛЕНИЯ, УЗЛЫ И МЕХАНИЗМЫ Система полного привода Включение режима 4X4 Во время движения транспортного средства переключатель 4X4 можно включать и выключать. Электронная система управления блокирует включение полного привода до тех пор, пока обороты двигателя не превысят 3100 об/мин.
ОРГАНЫ УПРАВЛЕНИЯ, УЗЛЫ И МЕХАНИЗМЫ Цифровой прибор ПРИМЕЧАНИЕ: Высокое давление воды может повредить элементы транспортного средства. Мойте транспортное средство вручную с использованием слабого мыльного раствора. Некоторые химические составы при попадании на цифровой прибор, пластик или фары
ОРГАНЫ УПРАВЛЕНИЯ, УЗЛЫ И МЕХАНИЗМЫ Цифровой прибор Комбинированный Цифровой/Аналоговый прибор Контрольные лампы Лампа Индикатор Скорость Условие При выборе стандартного режима, скорость будет показана в милях в час. При выборе метрического режима, скорость будет показана в км/ч. Перегрев Эта лампа
ОРГАНЫ УПРАВЛЕНИЯ, УЗЛЫ И МЕХАНИЗМЫ Цифровой прибор Комбинированный Цифровой/Аналоговый прибор Информационный центр Информационный дисплей расположен в центральной части цифрового прибора. Все сегменты информационного центра включаться на несколько секунд при включении зажигания. В случае, если
ОРГАНЫ УПРАВЛЕНИЯ, УЗЛЫ И МЕХАНИЗМЫ Цифровой прибор Комбинированный Цифровой/Аналоговый прибор Информационный центр 1. Индикатор передачи — Указывает текущий режим трансмиссии. H = Повышающая L = Понижающая N = Нейтраль R = Задний ход P = Парковочная — = Ошибка переключения 2. Уровень топлива —
ОРГАНЫ УПРАВЛЕНИЯ, УЗЛЫ И МЕХАНИЗМЫ Цифровой прибор Комбинированный Цифровой/Аналоговый прибор Информационный центр Кнопка Override при кратковременных дискретных нажатиях функционирует как кнопка MODE. Для использования переключателя Override, как MODE, рычаг КПП не должен находится в режиме
ОРГАНЫ УПРАВЛЕНИЯ, УЗЛЫ И МЕХАНИЗМЫ Цифровой прибор Комбинированный Цифровой/Аналоговый прибор Информационный центр Часы Подсказка: Часы сохраняют настройки до тех пор, пока аккумулятор не будет отсоединен или разряжен. 1. Переведите ключ в положение «ON». Используйте кнопку MODE для переключения
ОРГАНЫ УПРАВЛЕНИЯ, УЗЛЫ И МЕХАНИЗМЫ Цифровой прибор Комбинированный Цифровой/Аналоговый прибор Информационный центр Программируемые сервисные интервалы Как только наработка двигателя сравняется со значением запрограммированного межсервисного интервала, начнет мигать индикатор в виде гаечного ключа
ОРГАНЫ УПРАВЛЕНИЯ, УЗЛЫ И МЕХАНИЗМЫ Цифровой прибор Комбинированный Цифровой/Аналоговый прибор Информационный центр Коды ошибок Предполагаемый номер Номер кода Индикация ошибок возпараметра (SPN) неисправности можна только когда активен индикатор CHECK ENGINE или он включается-выключается в течение
ОРГАНЫ УПРАВЛЕНИЯ, УЗЛЫ И МЕХАНИЗМЫ Цифровой прибор Цифровой прибор (МФД) (модели EPS) Информационный дисплей расположен в центральной части цифрового прибора. Все сегменты информационного центра включаться на несколько секунд при включении зажигания. В случае, если сегменты не включаются при
ОРГАНЫ УПРАВЛЕНИЯ, УЗЛЫ И МЕХАНИЗМЫ Цифровой прибор Цифровой прибор (МФД) (модели EPS) 4. Уровень топлива — Сегменты указывают уровень топлива в баке. Когда последний сегмент очистится, включится индикатор низкого уровня топлива Все элементы дисплея будут мигать. Немедленно заправьтесь топливом.
ОРГАНЫ УПРАВЛЕНИЯ, УЗЛЫ И МЕХАНИЗМЫ Цифровой прибор Цифровой прибор (МФД) (модели EPS) Используйте кнопку MODE для переключения между режимами дисплея. Используйте кнопку SELECT (SEL) для переключения между режимами дисплея. Кнопки MODE и SELECT (SEL) функционируют на скоростях не более 25 км/ч.
ОРГАНЫ УПРАВЛЕНИЯ, УЗЛЫ И МЕХАНИЗМЫ Цифровой прибор Цифровой прибор (МФД) (модели EPS) Единицы измерения (Стандарт США/Метрические) Дисплей может выводить данные в любых из указанных выше единицах измерения. Для переключения: 1. Нажмите и удерживайте кнопку MODE пока на приборе не будет выводится
ОРГАНЫ УПРАВЛЕНИЯ, УЗЛЫ И МЕХАНИЗМЫ Цифровой прибор Цифровой прибор (МФД) (модели EPS) Программируемые сервисные интервалы Как только наработка двигателя сравняется со значением запрограммированного межсервисного интервала, начнет мигать индикатор в виде гаечного ключа в течение 5 секунд при
ОРГАНЫ УПРАВЛЕНИЯ, УЗЛЫ И МЕХАНИЗМЫ Цифровой прибор Цифровой прибор (МФД) (модели EPS) Диагностический режим Диагностический режим существует лишь для информационных целей. За ремонтом обращайтесь к вашему дилеру Polaris. Войти в диагностический режим можно только при активном индикаторе Check
ОРГАНЫ УПРАВЛЕНИЯ, УЗЛЫ И МЕХАНИЗМЫ Цифровой прибор Расшифровка диагностических кодов ошибок Размыкание цепи: Имеет место обрыв в цепи. Замыкание на “массу”: Имеет место замыкание на массу между ECU и элементом нагрузки. Межпроводное замыкание цепи: Имеет место замыкание между двумя проводами цепи.
ОРГАНЫ УПРАВЛЕНИЯ, УЗЛЫ И МЕХАНИЗМЫ Цифровой прибор Расшифровка диагностических кодов ошибок Диагностические коды SCRAMBLER XP 850 H.O. / 850 H.O. EPS Элемент Состояние SPN FMI Цепь разомкнута/замкнута на “массу” 652 5 Цепь замкнута на питание 652 3 Цепь разомкнута/замкнута на “массу” 652 4
ОРГАНЫ УПРАВЛЕНИЯ, УЗЛЫ И МЕХАНИЗМЫ Цифровой прибор Расшифровка диагностических кодов ошибок Диагностические коды SCRAMBLER XP 850 H.O. EPS Модели с EPS Система отключена высокий ток Повышенный ток/замыкание Повышенный ток в системе Повышенный ток/замыкание Частичный выход из строя дат- T1
ОРГАНЫ УПРАВЛЕНИЯ, УЗЛЫ И МЕХАНИЗМЫ Передняя багажная площадка/багажное отделение Снимите фиксаторы переФиксаторы дней площадки и снимите ее для того, чтобы получить доступ к отделению под площадкой. Для того, чтобы установить площадку, удерживая ее как указано на рисунке. Разместите ее на
ЭКСПЛУАТАЦИЯ ВНИМАНИЕ Пренебрежение предостережениями может привести к потере управления, повреждениям техники, личным травмам или смерти. Соблюдайте все правила безопасности, изложенные в данном разделе Руководства пользователя. Обкатка Периодом обкатки нового транспортного средства Polaris
ЭКСПЛУАТАЦИЯ Обкатка Обкатка двигателя и ходовой части 1. Залейте топливо в бак. См. стр. 31. Соблюдайте следующие правила предосторожности при заправке топливом. 2. Проверьте уровень масла при помощи щупа. См. стр. 89. При необходимости долейте масло до требуемого уровня. 3. Первое время
ЭКСПЛУАТАЦИЯ Перечень предварительных проверок Пренебрежение проверкой состояния мотовездехода перед эксплуатацией и нарушение технологии обслуживания мотовездехода повышает вероятность возникновения аварий и несчастных случаев. Обязательно проверяйте состояние вашего мотовездехода перед каждой
ЭКСПЛУАТАЦИЯ Практика безопасной эксплуатации 1. Перед началом эксплуатации пройдите курс по безопасному управлению транспортным средством. См. стр. 7. 2. Не позволяйте детям младше 16 лет использовать данное транспортное средство. Не позволяйте людям с ограниченными физическими и умственными
ЭКСПЛУАТАЦИЯ Изучите местность Перед началом эксплуатации транспортного средства изучите все местные правила и законы, регламентирующие движение на подобного рода технике. Относитесь ответственно к природе. Выясните где находятся самые безопасные места для катания. Помогите сохранить трассы,
Запуск двигателя ЭКСПЛУАТАЦИЯ 1. Установите транспортное средство на ровной площадке. 2. Включите парковочную передачу. 3. Заблокируйте стояночный тормоз. Подсказка: Система блокировки запуска двигателя сработает при попытке запустить двигатель в режиме движения или отпущенном рычаге тормоза. 4.
ЭКСПЛУАТАЦИЯ Вождение 1. Наденьте шлем и защиту для глаз. 2. Сядьте на квадроцикл, обе ноги должны быть н подножках, а обе руки должны быть на рукоятках. 3. Запустите двигатель и дайте ему прогреться в течение нескольких минут. 4. Включите передачу. 5. Осмотрите окружающую местность и спланируйте
Поворот ЭКСПЛУАТАЦИЯ Оба задних колеса вращаются с одинаковой скоростью за исключение случаев вождения в режиме разблокировки заднего дифференциала. Это означает, что при повороте наружное колесо проходит большее расстояние по сравнению с внутренним при повороте и внутренняя шина слегка
ЭКСПЛУАТАЦИЯ Движение по скользким поверхностям Боковое скольжение Поворот в сторону заноса Если Вы двигаетесь по скользким грунтам (грязь, песок, снег и т.д.) следуйте указаниям: 1. Старайтесь избегать движения по такому типу покрытия. 2. Снизьте скорость при подъезде к скользкому участку. 3.
Движение вверх по склону ЭКСПЛУАТАЦИЯ 25° максимум Тормозной эффект и управляемость сильно изменяются при движении по склону. Неправильное движение по склону может привести к потере управления. При движении по склону следуйте инструкциям: 1. Поднимайтесь по склону прямо вверх. 2. Избегайте крутых
ЭКСПЛУАТАЦИЯ Движение поперек склона Не рекомендуется двигаться вдоль склона. Неправильное движение по склону может привести к потере управления. Старайтесь не двигаться вдоль склона. В случае, если вам необходимо проехать поперек склона: 1. Двигайтесь на малой скорости! 2. Перенесите центр тяжести
Спуск со склона ЭКСПЛУАТАЦИЯ Двигаясь вниз по склону, соблюдайте следующие правила: 1. Избегайте крутых склонов (максимальный уклон 25°). 2. Перенесите центр тяжести в сторону вершины склона. 3. Двигайтесь прямо вниз. 4. Двигайтесь на малой скорости. Слишком высокая 25° максимум скорость может
ЭКСПЛУАТАЦИЯ Разворот на склоне (K-образный разворот) Если двигатель транспортного средства заглох при движении вверх по склону, не спускайтесь на нем задним ходом! Развернитесь, используя K-образный разворот. 2.4 м 1. Остановитесь и включите стояночный тормоз, перенеся центр тяжести тела в
Преодоление водных преград Мотовездеход Polaris может двигаться по водоему с максимальной глубиной, при которой подножки находятся выше уровня воды. При пересечении водной преграды соблюдайте следующие правила: 1. Определите глубину и направление потока. 2. Выберите место с пологими берегами. 3. Не
ЭКСПЛУАТАЦИЯ Преодоление препятствий Следуйте инструкциям при преодолении препятствий: 1. Изучите все препятствия на местности перед началом эксплуатации транспортного средства. 2. Научитесь «читать» характер местности. Постоянно будьте готовы к появлению препятствий в виде бревен, камней,
Движение задним ходом ЭКСПЛУАТАЦИЯ При движении задним ходом соблюдайте следующие правила: 1. Всегда проверяйте наличие препятствий или людей позади транспортного средства. 2. Всегда старайтесь избегать движения задним ходом вниз по склону. 3. Двигайтесь задним ходом на малой скорости. 4. Для
ЭКСПЛУАТАЦИЯ Перевозка грузов ВНИМАНИЕ Нарушение правил перевозки груза приводит к потере контроля над машиной и ухудшению эффективности торможения, что, как правило, заканчивается серьезными травмами, увечьями или гибелью людей. Соблюдайте правила техники безопасности при транспортировке грузов:
Перевозка грузов ЭКСПЛУАТАЦИЯ 1. Никогда не превышайте грузоподъемность вашего мотовездехода, указанную на предупреждающих 2:3 табличках и в специфика1:3 циях в руководстве пользователя. 2. Груз должен быть равномерно распределен (1/3 веса на передней багажной площадке и 2/3 веса на задней багажной
ЭКСПЛУАТАЦИЯ Перевозка грузов Буксировка грузов Цепляйте прицеп только за специальное прицепное устройство. Снимайте фаркоп, если не планируете ездить с прицепом. При буксировке прицепа с грузом, уменьшите вес груза на задней багажной площадке на величину нагрузки на фаркоп. • Общий вес веса груза
РУКОВОДСТВО ПО ИСПОЛЬЗОВАНИЮ ЛЕБЕДКИ Данные правила безопасности и инструкции применимы при условии, если на вашем транспортном средстве установлена лебедка, или если вы хотите установить лебедку самостоятельно. ВНИМАНИЕ Неправильная эксплуатация лебедки может привести к СЕРЬЕЗНЫМ ТРАВМАМ или
РУКОВОДСТВО ПО ИСПОЛЬЗОВАНИЮ ЛЕБЕДКИ Меры предосторожности 11. Транспортное средство и лебедка должны находиться на одной линии с грузом. По возможности не используйте лебедку, если трос находится под углом к транспортному средству, к которому присоединена лебедка. 12. Если применение лебедки под
РУКОВОДСТВО ПО ИСПОЛЬЗОВАНИЮ ЛЕБЕДКИ Меры предосторожности 20. Использовать лебедку для подъема и подвешивания груза в вертикальном положении запрещается. 21. Погружать лебедку в воду запрещается. Если это произойдет, обратитесь к дилеру POLARIS для проверки лебедки. 22. Перед каждым использованием
РУКОВОДСТВО ПО ИСПОЛЬЗОВАНИЮ ЛЕБЕДКИ Эксплуатация лебедки Перед началом использования лебедки ознакомьтесь с разделом «Меры предосторожности» на предыдущих страницах Руководства. Подсказка: Изучите теоретические правила использования лебедки перед ее практическим применением. ВНИМАНИЕ Неправильная
РУКОВОДСТВО ПО ИСПОЛЬЗОВАНИЮ ЛЕБЕДКИ Эксплуатация лебедки 4. Используйте крюк только вместе со стропой. ВНИМАНИЕ! Никогда не прикасайтесь к крюку лебедки. Это может привести к серьезным травмам. A. Закрепите груз с помощью крюка или используйте буксиНЕТ ДА ровочный трос или цепь для прикрепления
РУКОВОДСТВО ПО ИСПОЛЬЗОВАНИЮ ЛЕБЕДКИ Эксплуатация лебедки 5. Никогда не снимайте стропу с крюка. 6. Отпустите стопор лебедки и размотайте трос. 7. Всегда отматывайте трос на возможно большее расстояние. Помните, что наибольшее тяговое усилие получается на первых витках (слоях) троса, уменьшаясь с
РУКОВОДСТВО ПО ИСПОЛЬЗОВАНИЮ ЛЕБЕДКИ Эксплуатация лебедки 11. Одновременное движение транспортного средства и работа лебедки возможно только в случае вытягивания самого себя. Для избежания ударной нагрузки на трос запрещается буксировка рывками. См. раздел «Ударная нагрузка» на стр. 80. Для вашей
РУКОВОДСТВО ПО ИСПОЛЬЗОВАНИЮ ЛЕБЕДКИ Эксплуатация лебедки 13. Активная работа лебедки приведет к разрядке аккумулятора транспортного средства. Если планируется долгая работа с лебедкой, заведите двигатель транспортного средства с установленной лебедкой, чтобы не допустить разрядки аккумулятора. 14.
РУКОВОДСТВО ПО ИСПОЛЬЗОВАНИЮ ЛЕБЕДКИ Уход за тросом лебедки В целях вашей безопасности разрешается производить замену деталей лебедки POLARIS (в т.ч. троса) только оригинальными запчастями POLARIS, доступными у официального дилера POLARIS. ВНИМАНИЕ! Использование порванного или поврежденного троса
РУКОВОДСТВО ПО ИСПОЛЬЗОВАНИЮ ЛЕБЕДКИ Ударная нагрузка ВНИМАНИЕ! Трос вашей лебедке достаточно сильный, но он НЕ предназначен для динамической или «ударной» нагрузки. Ударная нагрузка может привести к перегрузке троса с последующим обрывом. Обрыв троса под высокой нагрузкой может привести к
РУКОВОДСТВО ПО ИСПОЛЬЗОВАНИЮ ЛЕБЕДКИ Ударная нагрузка 4. Никогда не используйте растягивающийся трос в качестве троса лебедки. Растягивающиеся тросы могут сохранять энергию. Эта сохраненная энергия высвобождается в случае, если трос лебедки выходит из строя, что усугубляет ситуацию и делает ее
РУКОВОДСТВО ПО ИСПОЛЬЗОВАНИЮ ЛЕБЕДКИ Правила безопасности и техническое обслуживание лебедки ВНИМАНИЕ! Ненадлежащее обслуживание лебедки может привести к СЕРЬЕЗНЫМ ТРАВМАМ или СМЕРТИ. Соблюдайте все правила безопасности и инструкции по эксплуатации лебедки, указанные в данном разделе. 1. Перед
ЗАЩИТА ОКРУЖАЮЩЕЙ СРЕДЫ Система шумоподавления Самостоятельное изменение конструкции двигателя, системы впуска и системы выпуска выхлопных газов ЗАПРЕЩЕНО! Уровень шума соответствует требованиям 40 CFR 205, а также местным нормам. Система контроля вредных выбросов Картер двигателя выполнен по
ТЕХНИЧЕСКОЕ ОБСЛУЖИВАНИЕ Регламент технического обслуживания Надлежащий уход и обслуживание сохранят ваше транспортное средство в наилучшем состоянии. Проверка, затяжка, очистка, замена при необходимости. При необходимости замены деталей используйте только подлинные компоненты POLARIS, поставляемые
ТЕХНИЧЕСКОЕ ОБСЛУЖИВАНИЕ Регламент технического обслуживания Расшифровка символов Символ Описание ► Выполняйте эти операции более часто для транспортных средств, которые эксплуатируются в тяжелых условиях. E Обслуживание компонентов влияющих на чистоту отработавших газов. D Обращайтесь
ТЕХНИЧЕСКОЕ ОБСЛУЖИВАНИЕ Регламент технического обслуживания Элемент Периодичность (что наступит ранее) Примечание Часы Период Мили (KM) — Еженедельно — 10 ч Ежемесячно 100 (160) Периодически проверяйте 20 ч Ежемесячно 200 (320) Проверьте контакты, очистите, протестируйте ► Замена моторного 25 ч 1
ТЕХНИЧЕСКОЕ ОБСЛУЖИВАНИЕ Регламент технического обслуживания Элемент Периодичность (что наступит ранее) Примечание Часы Период Мили (KM) Топливная система 100 ч 12 Месяцев 1000 (1600) Проверьте герметичность крышки бака, шлангов, фильтр, топливный насос. Заменяйте шланги раз в 2 года ► Подушки
ТЕХНИЧЕСКОЕ ОБСЛУЖИВАНИЕ Рекомендации по смазке Проверяйте и смазывайте все компоненты через интервалы, указанные в регламенте ТО, стр. 85. Позиции, не перечисленные в регламенте, — через общий интервалы смазки аналогичных узлов. А-образные рычаги смазываются на заводе при установке и не нуждаются
ТЕХНИЧЕСКОЕ ОБСЛУЖИВАНИЕ Масло двигателя Требования к моторному маслу Polaris рекомендует использовать масло Polaris PS-4 Full Synthetic 5W-50 4-cycle. При использовании масел других производителей гарантия POLARIS теряет силу. Используйте только оригинальное масло Polaris. Следуйте рекомендациям
ТЕХНИЧЕСКОЕ ОБСЛУЖИВАНИЕ Масло двигателя Замена масла и фильтра См таблицу на стр 88. Меняйте масло в соответствии с интервалами, указываемыми в таблице регламента технического обслуживания, начинающейся на стр. 85. При замене масла необходимо заменять масляный фильтр. Масляный фильтр Вид сверху
ТЕХНИЧЕСКОЕ ОБСЛУЖИВАНИЕ Масло двигателя Замена масла и фильтра 10. Расположите ветошь под масляным фильтром. С помощью специального ключа открутите фильтр. Вращайте фильтр против часовой стрелки для того,чтобы его снять. 11. Используя чистую ткань, очистите посадочное место фильтра. 12. Смажьте
ТЕХНИЧЕСКОЕ ОБСЛУЖИВАНИЕ Трансмиссионное Масло Выполняйте периодическое техническое обслуживание в соответствии с интервалами, указанными в таблице регламента технического обслуживания, начинающейся на стр. 85. См таблицу на стр 88. На стр. 133 указаны каталожные номера продуктов POLARIS.
ТЕХНИЧЕСКОЕ ОБСЛУЖИВАНИЕ Передний редуктор (Жидкость Demand Drive) Выполняйте периодическое техническое обслуживание в соответствии с интервалами, указанными в таблице регламента технического обслуживания, начинающейся на стр. 85. См таблицу на стр 88. На стр. 133 указаны каталожные номера
ТЕХНИЧЕСКОЕ ОБСЛУЖИВАНИЕ Масло заднего редуктора Выполняйте периодическое техническое обслуживание в соответствии с интервалами, указываемыми в таблице регламента технического обслуживания, начинающейся на стр. 85. См таблицу на стр 88. На стр. 133 указаны каталожные номера продуктов POLARIS.
ТЕХНИЧЕСКОЕ ОБСЛУЖИВАНИЕ Масло заднего редуктора Замена масла 1. Расположите технику на ровной поверхности. 2. Расположите емкость для использованного масла под сливной пробкой. 3. Снимите сливную пробку. Полностью слейте масло. 4. Установите сливную пробку с новой прокладкой. Затяните в
ТЕХНИЧЕСКОЕ ОБСЛУЖИВАНИЕ Электроусилитель руля Если ваш квадроцикл оснаЧасто очищайте щен электроусилителем рулевого управления производите очистку указанных областей как можно чаще для обеспечения охлаждения устройства. Тщательно очищайте. Рулевое управление Необходимо периодически проверять
ТЕХНИЧЕСКОЕ ОБСЛУЖИВАНИЕ Система охлаждения Расширительный бачок Уровень охлаждающей жидкости в расширительном бачке можно видеть из-под крыла переднего правого колеса. Заливная горловина расширительного бачка находится под передней багажной площадкой. 1. Проверьте уровень жидкости в бачке. 2. Если
ТЕХНИЧЕСКОЕ ОБСЛУЖИВАНИЕ Система охлаждения Радиатор Чтобы система охлаждения сохраняла способность эффективного охлаждения двигателя, охлаждающую жидкость необходимо менять раз в два года. Заменяйте охлаждающую жидкость всегда, когда система охлаждения сливается для проведения технического
ТЕХНИЧЕСКОЕ ОБСЛУЖИВАНИЕ Тормозная система Ручной тормоз Передние и задние тормоза — дисковые, с гидравлическим приводом, управляются одним рычагом на рукоятке руля. Тормоза— саморегулирующиеся. При нормальном функционировании диафрагма втягивается в бачок при понижении уровня жидкости. Если
ТЕХНИЧЕСКОЕ ОБСЛУЖИВАНИЕ Схождение Используйте процедуру для проверки схождения передних колес. Рекомендуемое схождение: — 6-12 мм (расхождение). ВНИМАНИЕ! Неверная регулировка схождения может привести к повреждениям или смерти. Не производите регулировку самостоятельно. Регулировку должен
Снятие сиденья ТЕХНИЧЕСКОЕ ОБСЛУЖИВАНИЕ 1. Возьмитесь за заднюю часть сиденья. 2. Потяните сиденье вверх. 3. Снимите сиденье. Снятие боковой панели/ подножки Снимите сиденье. Снимите винты и заклепки, фиксирующие боковую панель и подножку. Поднимите правую панель вверх при этом снимая ее с рукоятки
ТЕХНИЧЕСКОЕ ОБСЛУЖИВАНИЕ Шины ВНИМАНИЕ Эксплуатация мотовездехода с изношенными шинами, неправильно накачанными шинами, нестандартными шинами или неправильно установленными шинами, приводит к ухудшению управляемости машины, что,в свою очередь, может закончиться аварией или несчастным случаем.
ТЕХНИЧЕСКОЕ ОБСЛУЖИВАНИЕ Шины Установка колеса 1. Включите парковочную передачу. 2. Заблокируйте стояночный тормоз. 3. Поставьте колесо так, чтобы ниппель располагался снаружи, а вращение колеса происходило в направлении, указанном стрелкой на шине. 4. Установите колесные гайки и затяните их от
ТЕХНИЧЕСКОЕ ОБСЛУЖИВАНИЕ Воздушный фильтр 1. Снимите сиденье. Фиксаторный 2. Снимите крышку воздушремень ного фильтра открутив винты и сняв фиксаторный ремень. 3. Снимите фильтр. 4. Снимите тканевый префильтр с воздушного фильтра, промойте его в мыльной воде и высушите. Промойте его в мыльной
ТЕХНИЧЕСКОЕ ОБСЛУЖИВАНИЕ Замена предохранителя Невозможность запуска двигателя, а также иные неполадки в электрической системе, могут указывать на выход из строя плавкого предохранителя. Выявите и устраните короткое замыкание цепей, которое привело к выходу из строя предохранителя. 1. Снимите
ТЕХНИЧЕСКОЕ ОБСЛУЖИВАНИЕ Фары Плохая работа приборов освещения может привести к недостаточной видимости при движении. Стекла задних фонарей и фары обычно быстро загрязняются. Регулярно мойте стекла приборов освещения. Убедитесь, что фары правильно отрегулированы. Проверка направления света фар
ТЕХНИЧЕСКОЕ ОБСЛУЖИВАНИЕ Фары Регулировка верхней фары (XP) Винт Philips Фары можно отрегулировать в вертикальной плоскости в небольшом диапазоне. 1. Ослабьте винт расположенный сзади на фаре. 2. Переместите фару в необходимое положение. 3. Затяните винт. Замена фары (XP) 1. Отверните против
ТЕХНИЧЕСКОЕ ОБСЛУЖИВАНИЕ Свечи зажигания Рекомендации по свечам зажигания Информация по выбору свечей зажигания и размерам межэлектродного зазора приведена на стр. 133. Затягивайте свечи зажигания в соответствии со спецификацией. ПРИМЕЧАНИЕ: Использование не рекомендованных типов свечей зажигания
ТЕХНИЧЕСКОЕ ОБСЛУЖИВАНИЕ Свечи зажигания Проверка свечей зажигания Нормальные свечи зажигания У нормальной свечи изолятор головки серого, желто-коричневого или светло-коричневого цвета. Возможно присутствие небольшого количества нагара. На электродах нет прогаров или эрозии. Такое состояние свечи
ТЕХНИЧЕСКОЕ ОБСЛУЖИВАНИЕ Затопление мотовездехода Если вовремя не принять необходимые меры, то транспортное средство после пребывания в воде может очень сильно пострадать. Немедленно доставьте транспортное средство дилеру. Не запускайте двигатель. При попытке запуска двигателя побывавшего в воде,
Пламегаситель ТЕХНИЧЕСКОЕ ОБСЛУЖИВАНИЕ ВНИМАНИЕ Пренебрежение рекомендациями в данном разделе может привести к серьезной травме или гибели. Не запускайте двигатель в закрытом помещении. Удалите все горючие материалы с места обслуживания пламегасителя. Наденьте защитные очки и кожаные рабочие
ТЕХНИЧЕСКОЕ ОБСЛУЖИВАНИЕ Система PVT (Вариатор) ВНИМАНИЕ Несоблюдение инструкций, приведенных ниже, может привести к серьезным травмам или смерти. Не вносите изменений в конструкцию вариатора. Это может уменьшить его прочность и привести к повреждению. Компоненты этой системы точно отбалансированы.
ТЕХНИЧЕСКОЕ ОБСЛУЖИВАНИЕ Система PVT (Вариатор) Режим эксплуатации системы вариатора Polaris зависит от частоты вращения коленчатого вала двигателя и требуемого крутящего момента. При увеличении оборотов вала сила, действующая на центробежные грузики,также начинает увеличиваться. Это, в свою
ТЕХНИЧЕСКОЕ ОБСЛУЖИВАНИЕ Система PVT (Вариатор) Рекомендации по использованию повышающей ипонижающей передач Условие Передача Движение со скоростью меньше 11 км/час Понижающая Буксировка тяжелых грузов Понижающая Движение по тяжелой местности (болота,горы и т.п.) Понижающая Движение со скоростью
Руль ТЕХНИЧЕСКОЕ ОБСЛУЖИВАНИЕ Руль имеет возможность регулировки. ВНИМАНИЕ! Неверная регулировка или затяжка болтов регулировочного блока не соответствующим моментом могут привести к ограничению управляемости или ослаблению крепления руля, что в свою очередь приведет к потере управления и возможной
ТЕХНИЧЕСКОЕ ОБСЛУЖИВАНИЕ Регулировка развала и угла наклона поворотной оси Не регулируется Передние/Задние пружины (XP) Передние и задние пружины регулируются вращением регулятора. По часовой стрелке для увеличения или против часовой стрелке для уменьшения жесткости. Дополнительные пружины для
ТЕХНИЧЕСКОЕ ОБСЛУЖИВАНИЕ Передние/Задние Амортизаторы (XP EPS) Регулятор жесткости амортизатора расположен на корпусе амортизатора сверху на переднем амортизаторе, снизу — на заднем. Поворот ручки по часовой стрелки до упора соответствует самой жесткой настройке. Амортизаторы Fox Настройка
ТЕХНИЧЕСКОЕ ОБСЛУЖИВАНИЕ Корпус дросселя/Холостой ход Холостые обороты выставляются производителем. При ухудшении качества холостого хода, обратитесь к дилеру Polaris. Свободный ход тросика привода дросселя 1. Вывинтите 4 винта с крышки на правой рукоятке руля и снимите крышку. 2. Руль должен
ТЕХНИЧЕСКОЕ ОБСЛУЖИВАНИЕ Свободный ход тросика привода дросселя 4. Включите парковочную передачу. Заблокируйте стояночный тормоз. 5. Запустите двигатель и дайте ему поработать на холостых оборотах. Нажмите и отпустите рукоятку привода дросселя, чтобы стабилизировать холостой ход. 6. Если обороты
ТЕХНИЧЕСКОЕ ОБСЛУЖИВАНИЕ Батарея ВНИМАНИЕ Неправильное подключение кабелей батареи или их ненадежное подключение может привести к взрыву, что приведет к травмам или смерти. При снятии батареи всегда отсоединяйте черный кабель первым. При установке батареи всегда подсоединяйте черный (отрицательный)
ТЕХНИЧЕСКОЕ ОБСЛУЖИВАНИЕ Батарея Установка батареи Использование нового, не полностью заряженного аккумулятора может повредить аккумулятор и сократить срок его службы. Это также может нарушить работу машины. Перед установкой аккумулятора, зарядите его в соответствии с указаниями на стр. 122. В
ТЕХНИЧЕСКОЕ ОБСЛУЖИВАНИЕ Батарея Зарядка батареи Приведенные ниже рекомендации по зарядке справедливы только для необслуживаемых аккумуляторов. Перед тем, как приступить к зарядке аккумулятора, внимательно прочитайте все инструкции. Необслуживаемые аккумуляторы уже заполнены электролитом и выходят
Батарея Зарядка батареи ТЕХНИЧЕСКОЕ ОБСЛУЖИВАНИЕ Проверьте состояние аккумулятора до и через 1-2 часа после окончания зарядки. Время заряда (Используя зарядное устройство постоянного тока @ нормальный зарядный ток указан на батарее) Состояние зарядки Напряжение Действие 100% 12.8-13.0 В Нет,
ТЕХНИЧЕСКОЕ ОБСЛУЖИВАНИЕ Очистка и хранение Мойка Чистка не только придает транспортному средству опрятный, привлекательный внешний вид, но и продлевает срок его эксплуатации. ПРИМЕЧАНИЕ: Струя воды под высоким давлением может повредить некоторые детали мотовездехода. Рекомендуем мыть транспортное
ТЕХНИЧЕСКОЕ ОБСЛУЖИВАНИЕ Очистка и хранение Мойка При использовании мойки автомобильного типа с водой, подаваемой под высоким давлением, будьте особенно осторожны. Возможно повреждение окрашенных кузовных панелей, и предупредительных табличек. Не направляйте струю на следующие элементы: •
ТЕХНИЧЕСКОЕ ОБСЛУЖИВАНИЕ Очистка и хранение Рекомендации по хранению ПРИМЕЧАНИЕ: Не запускайте двигатель во время хранения, чтобы не разрушить защитную пленку, созданную при обработке двигателя защитным составом. Не запускайте двигатель, находящийся на консервации. Наружная очистка После проведения
ТЕХНИЧЕСКОЕ ОБСЛУЖИВАНИЕ Очистка и хранение Рекомендации по хранению Обработка двигателя защитным составом 1. Выверните свечи зажигания и залейте в цилиндры 2-3 столовые ложки моторного масла. Чтобы проделать эту операцию, используйте шланг диаметром 6 мм и маленькую пластиковую бутылку с
ТЕХНИЧЕСКОЕ ОБСЛУЖИВАНИЕ Транспортировка 1. 2. 3. 4. Выключите двигатель. Включите парковочную передачу. Заблокируйте стояночный тормоз. Проверьте надежность фиксации крышки топливного бака, масляного резервуара и сиденья. 5. Надежно привязывайте квадроцикл за раму, используя подходящую веревку. Не
ПОИСК И УСТРАНЕНИЕ НЕИСПРАВНОСТЕЙ Износ приводного ремня Возможная причина Погрузка транспортного средства в кузов пикапа или на прицеп на повышающей передаче Решение Во избежание нагрева ремня включите пониженную передачу при погрузке транспортного средства. Троганье с места на склоне Пользуйтесь
ПОИСК И УСТРАНЕНИЕ НЕИСПРАВНОСТЕЙ Двигатель не проворачивается Возможная причина Решение Низкий заряд батареи Подзарядите аккумулятор до напряжения 12.8 В пост. тока Плохой контакт аккумулятора Проверьте и подтяните все соединения Плохой контакт реле Проверьте и подтяните все соединения Коленвал
ПОИСК И УСТРАНЕНИЕ НЕИСПРАВНОСТЕЙ Детонация в двигателе Возможная причина Решение Низкое качество или низкое октановое число топлива Замените рекомендованным топливом Неверное опережение зажигания Обратитесь к дилеру Неверный зазор или температурный диапазон свечи Установите зазор согласно
ПОИСК И УСТРАНЕНИЕ НЕИСПРАВНОСТЕЙ Двигатель глохнет или не выдает мощность Возможная причина Решение Нет топлива Заправьтесь топливом. Три раза (каждый по 5 с) переведите ключ в положение ON, после чего запустите двигатель Проверьте, замените Пережата или заблокирована магистраль вентиляции
ПРОДУКЦИЯ POLARIS Артикул 2870791 2876244 2876245 2878068 2878069 2877922 2877923 2870465 2871323 2871534 2871312 2871322 2871423 2876160 2872276 2871460 2871515 2871551 2871329 2871326 2870652 2872189 2871956 2859044 Описание Масло двигателя Fogging Oil (12 унций Aerosol) PS-4 Full Synthetic 5W-50
СПЕЦИФИКАЦИИ SCRAMBLER XP 850 H.O. / 850 H.O. EPS Максимальная грузоподъемность 131 кг (включая вес водителя, груза и аксессуаров) Сухой вес 335.7 кг (XP) 340.2 кг (XP EPS) Запас топлива 20 л Объем масла 1.9 л Заправочный объем системы 1.9 л охлаждения Объем масла в заднем редукторе 210 мл Объем
СПЕЦИФИКАЦИИ SCRAMBLER XP 850 H.O. / 850 H.O. EPS Передняя подвеска Задняя подвеска Трансмиссия Передаточное отношение (L) Передаточное отношение (R) Передаточное отношение (H) Главная передача (перед) Главная передача (зад) Передние шины/ давление Задние шины/ давление Тормозная система
ГАРАНТИЯ Ограниченная гарантия POLARIS обеспечивает ОГРАНИЧЕННУЮ ГАРАНТИЮ сроком 1 год на все узлы транспортного средства POLARIS в отношении дефектов материала и изготовления. Polaris гарантирует соответствие пламегасителя требованиям USFS 5100-1c в течение как минимум 1000 моточасов наработки при
ГАРАНТИЯ Ограничения гарантийных обязательств и возмещений Данная гарантия не покрывает повреждения или неполадки, вызванные нарушением правил эксплуатации, авариями, пожаром или любыми другими причинами, за исключением производственных дефектов, дефектов материалов, а также не распространяется на
ГАРАНТИЯ Ограничения гарантийных обязательств и возмещений ЕДИНСТВЕННЫМ ВОЗМЕЩЕНИЕМ ПРИ СОБЛЮДЕНИИ УСЛОВИЙ ПОДДЕРЖАНИЯ ГАРАНТИИ МОГУТ БЫТЬ, ИСКЛЮЧИТЕЛЬНО ПО ВЫБОРУ POLARIS, РЕМОНТ ИЛИ ЗАМЕНА ДЕФЕКТНОГО МАТЕРИАЛА, ДЕТАЛИ ИЛИ УЗЛА. ПРЕДУСМОТРЕННЫЕ НАСТОЯЩЕЙ ГАРАНТИЕЙ ВОЗМЕЩЕНИЯ ЯВЛЯЮТСЯ ЕДИНСТВЕННЫМИ
ГАРАНТИЯ Порядок получения гарантийного обслуживания Если ваш мотовездеход требует гарантийного обслуживания, Вы должны обратиться к дилеру Polaris, имеющему право на ремонт транспортных средств Polaris. Чтобы запросить гарантийное обслуживание, необходимо представить дилеру вашу копию гарантийной
ГАРАНТИЯ ВЫВОЗИМАЯ ТЕХНИКА ПРИ ОТСУТСТВИИ СПЕЦИАЛЬНЫХ ТРЕБОВАНИЙ ЗАКОНА ГАРАНТИЯ НЕ РАСПРОСТРАНЯЕТСЯ НА ТЕХНИКУ, ЭКСПЛУАТИРУЮЩУЮСЯ В СТРАНАХ, ОТЛИЧНЫХ ОТ СТРАНЫ ПРИОБРЕТЕНИЯ У ОФИЦИАЛЬНОГО ДИЛЕРА POLARIS. Эта политика не распространяется на технику поставляемую через официальную Дилерскую сеть
ГАРАНТИЯ США Ограниченная гарантия по отсутствию превышению уровня вредных выбросов EPA Эта гарантия устанавливается в дополнение к стандартной гарантии Polaris. Polaris Industries Inc. гарантирует, что на момент изначальной покупки это сертифицированное транспортное средство разработано, построено
ГАРАНТИЯ США Ограниченная гарантия по отсутствию превышению уровня вредных выбросов EPA Данные устройства оказывают влияние на вредные выбросы вследствие испарения топлива: • • • • • • • • • Топливный бак Крышка топливного бака Топливные магистрали Коннекторы топливной магистрали Хомуты Клапаны
ГАРАНТИЯ США Ограниченная гарантия по отсутствию превышению уровня вредных выбросов EPA Владельцы несут ответственность за своевременное прохождение технического обслуживания в соответствие с регламентом приведенным в Руководстве Пользователя и замену расходных элементов по мере необходимости
ЖУРНАЛ ТЕХНИЧЕСКОГО ОБСЛУЖИВАНИЯ Предоставляйте этот раздел инструкции вашему дилер каждый раз, при обслуживании мотовездехода. Для получения гарантийного ремонта, необходимо предъявить дилеру данную страницу руководства пользователя с данными о своевременно выполненном техническом обслуживании.
Дата Миль / Км или Моточасов ТЕХНИК КОММЕНТАРИИ 145
146
ЖУРНАЛ ТЕХНИЧЕСКОГО ОБСЛУЖИВАНИЯ Дата Миль / Км или Моточасов ТЕХНИК КОММЕНТАРИИ 147