
X-HM76D
XC-HM86D
X-HM76
X-HM86D
Language select / Sélection de la langue / Selección de idioma / Selezione lingua /
Sprachauswahl / Taal selecteren / Выбор языка
English
Italiano Deutsch Nederlands
Русский
Français
Español

> Before Start > Part Names > Install > Initial Setup > Playback
Supplementary information | Advanced Setup | Others
NETWORK CD RECEIVER SYSTEM
X-HM76D
X-HM76
X-HM86D
NETWORK CD RECEIVER
XC-HM86D
Instruction
Manual
Before Start
What’s in the box ………………………………………………………………..2
Part Names
Front Panel ………………………………………………………………………..4
Rear Panel (X-HM76D, X-HM86D, XC-HM86D) …………………….. 5
Rear Panel (X-HM76) ………………………………………………………….6
Remote Controller ………………………………………………………………. 7
Display ……………………………………………………………………………… 8
Speakers System (X-HM76D, X-HM76) ………………………………… 9
Speakers System (X-HM86D) ……………………………………………. 10
Install
Connect the Speakers ………………………………………………………. 11
Connecting the antennas and power cord, etc. …………………….. 12
Initial Setup
Power On & Initial Setup ……………………………………………………. 13
Time settings ……………………………………………………………………16
Playback
Playing CDs ……………………………………………………………………..17
USB Storage Device/HDD …………………………………………………. 19
Internet Radio ………………………………………………………………….. 21
Spotify …………………………………………………………………………….. 22
Listening to the FM Radio ………………………………………………….. 23
Listening to DAB Digital Radio (X-HM76D, X-HM86D, XC-HM86D) …… 26
BLUETOOTH® …………………………………………………………………. 27
®
AirPlay
Playing audio from an external device …………………………………. 30
Music Server ……………………………………………………………………. 31
Using the alarm to start play ………………………………………………. 33
Entering text, adjusting sound quality, etc. ……………………………34
Supplementary information
Supplementary information for player functions ……………………..35
Advanced Setup
Advanced Settings…………………………………………………………….. 36
Firmware Update ……………………………………………………………… 40
Others
Troubleshooting ………………………………………………………………..42
General Specifications ………………………………………………………. 45
License and Trademark Information …………………………………….47
………………………………………………………………………….. 29
> Before Start
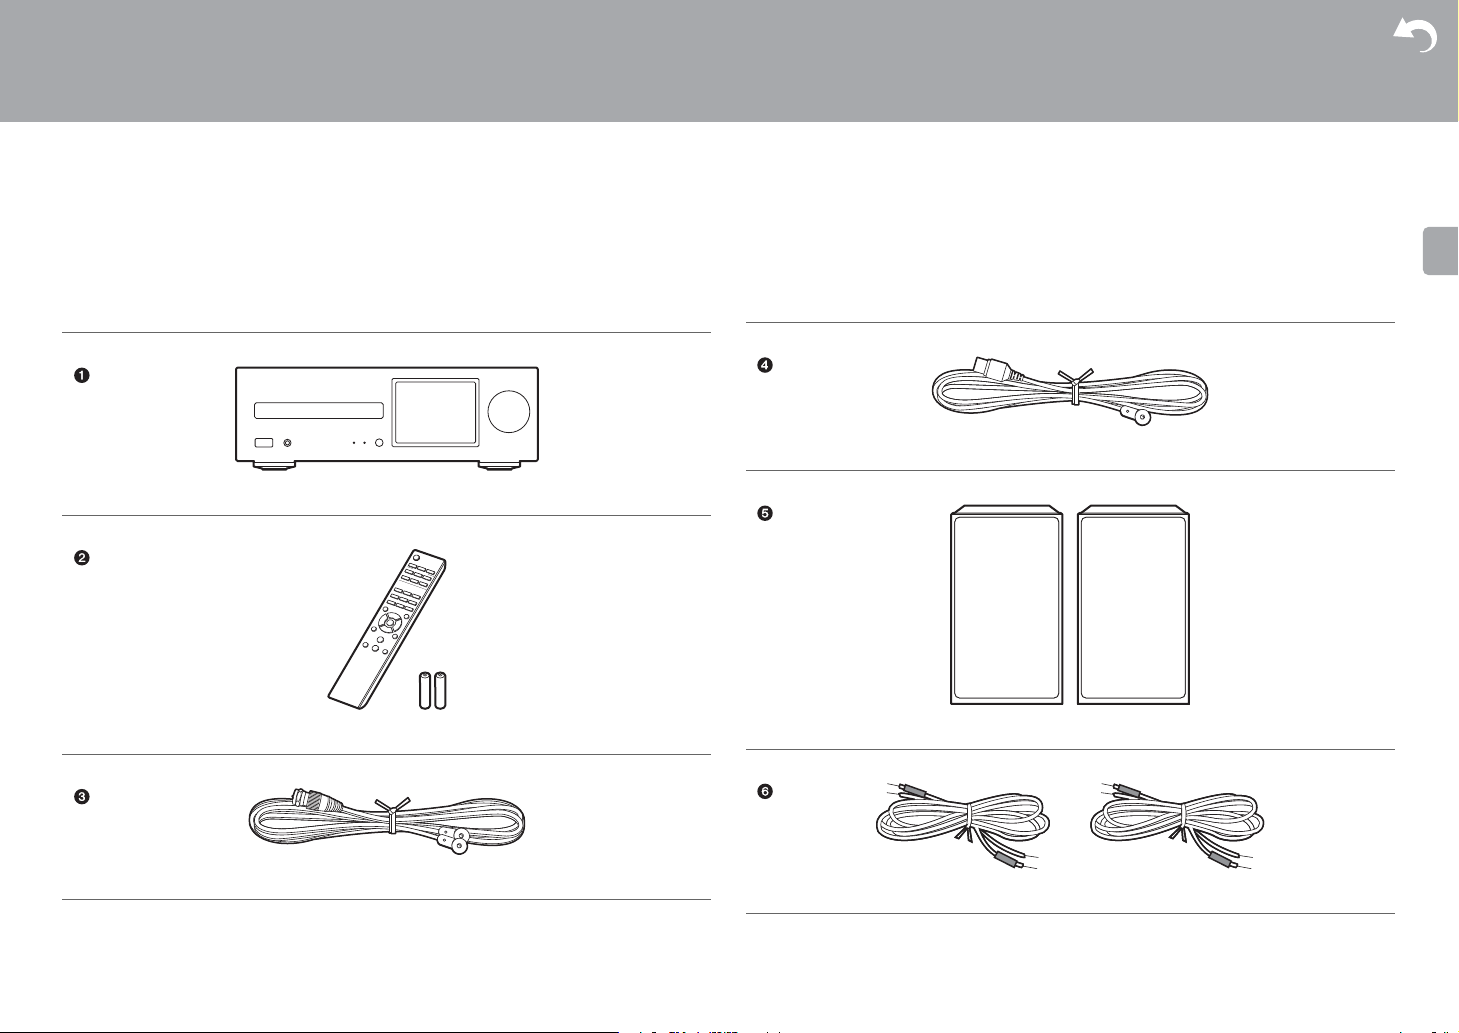
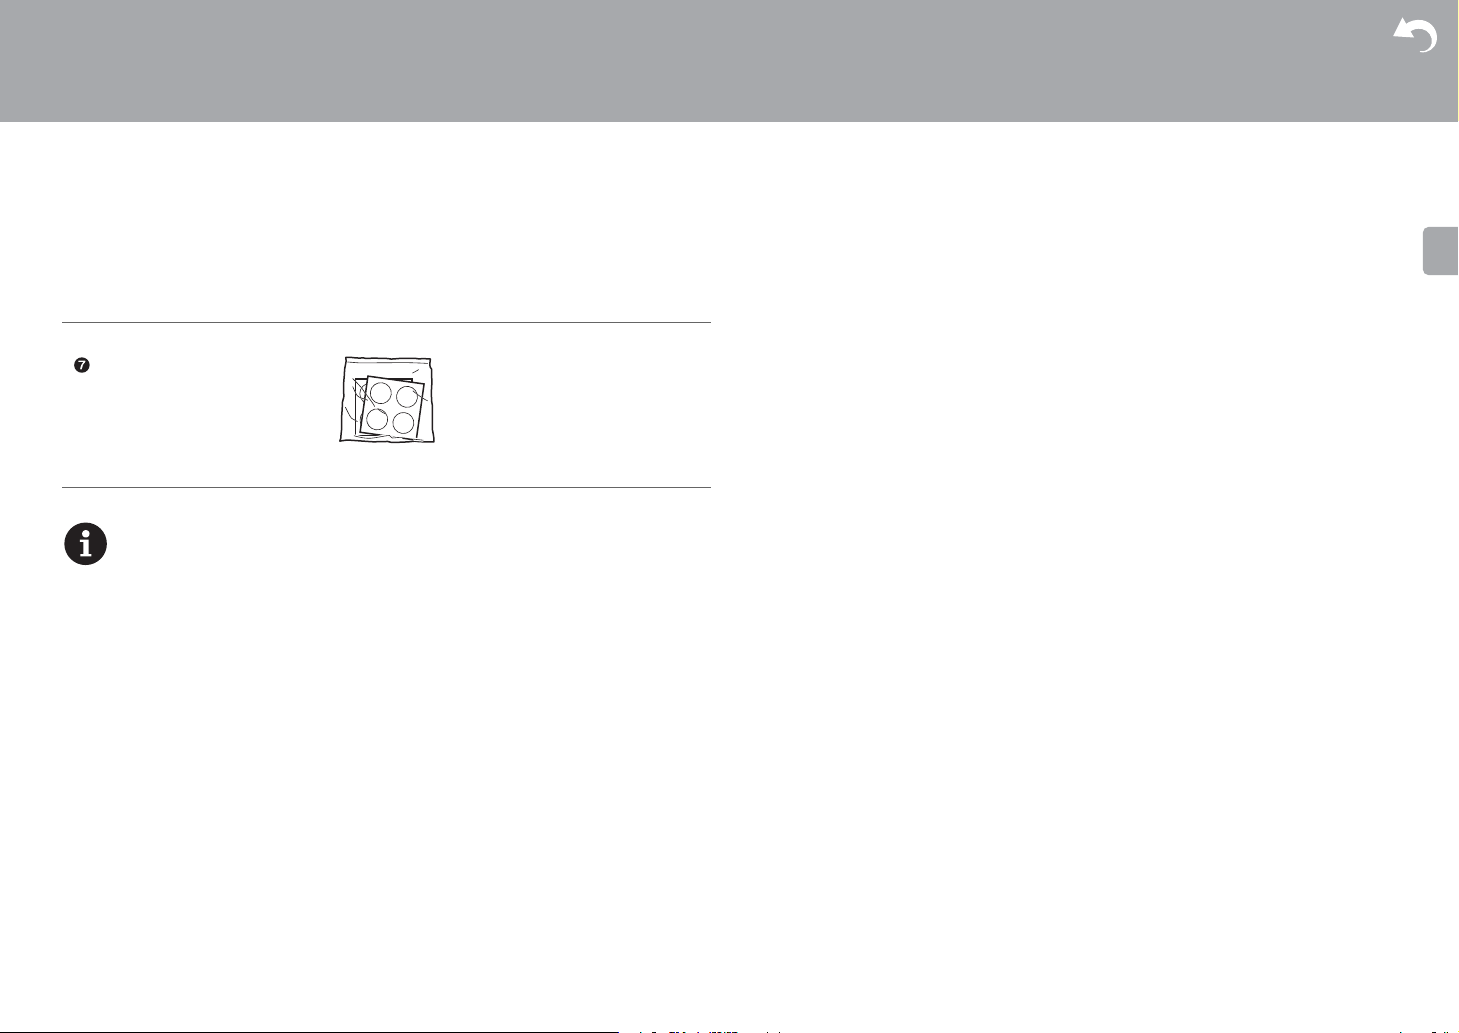
What’s in the box
Before Start
X-HM76D : 12356
X-HM76 : 12456
X-HM86D : 123567
XC-HM86D : 123
Main unit (1)
> Part Names > Install > Initial Setup > Playback
Supplementary information | Advanced Setup | Others
Indoor FM antenna (1)
Remote controller (RC-945S) (1), Batteries (AAA/R03) (2)
DAB/FM wire antenna (1)
2
Speaker system (2)
Speaker cable (1.5 m) (2)
> Before Start
Non-skid pads (8)
0 The power cord must be connected only after all other cable connections are completed.
0 Connect speakers with 4 Ω to 16 Ω impedance.
0 We will not accept responsibility for damage arising from the connection of equipment
manufactured by other companies.
0 Functionality may be introduced by firmware updates and service providers may cease
services, meaning that some network services and content may become unavailable in
the future.
0 Specifications and appearance are subject to change without prior notice.
> Part Names > Install > Initial Setup > Playback
Supplementary information | Advanced Setup | Others
3
> Before Start >Part Names > Install > Initial Setup > Playback
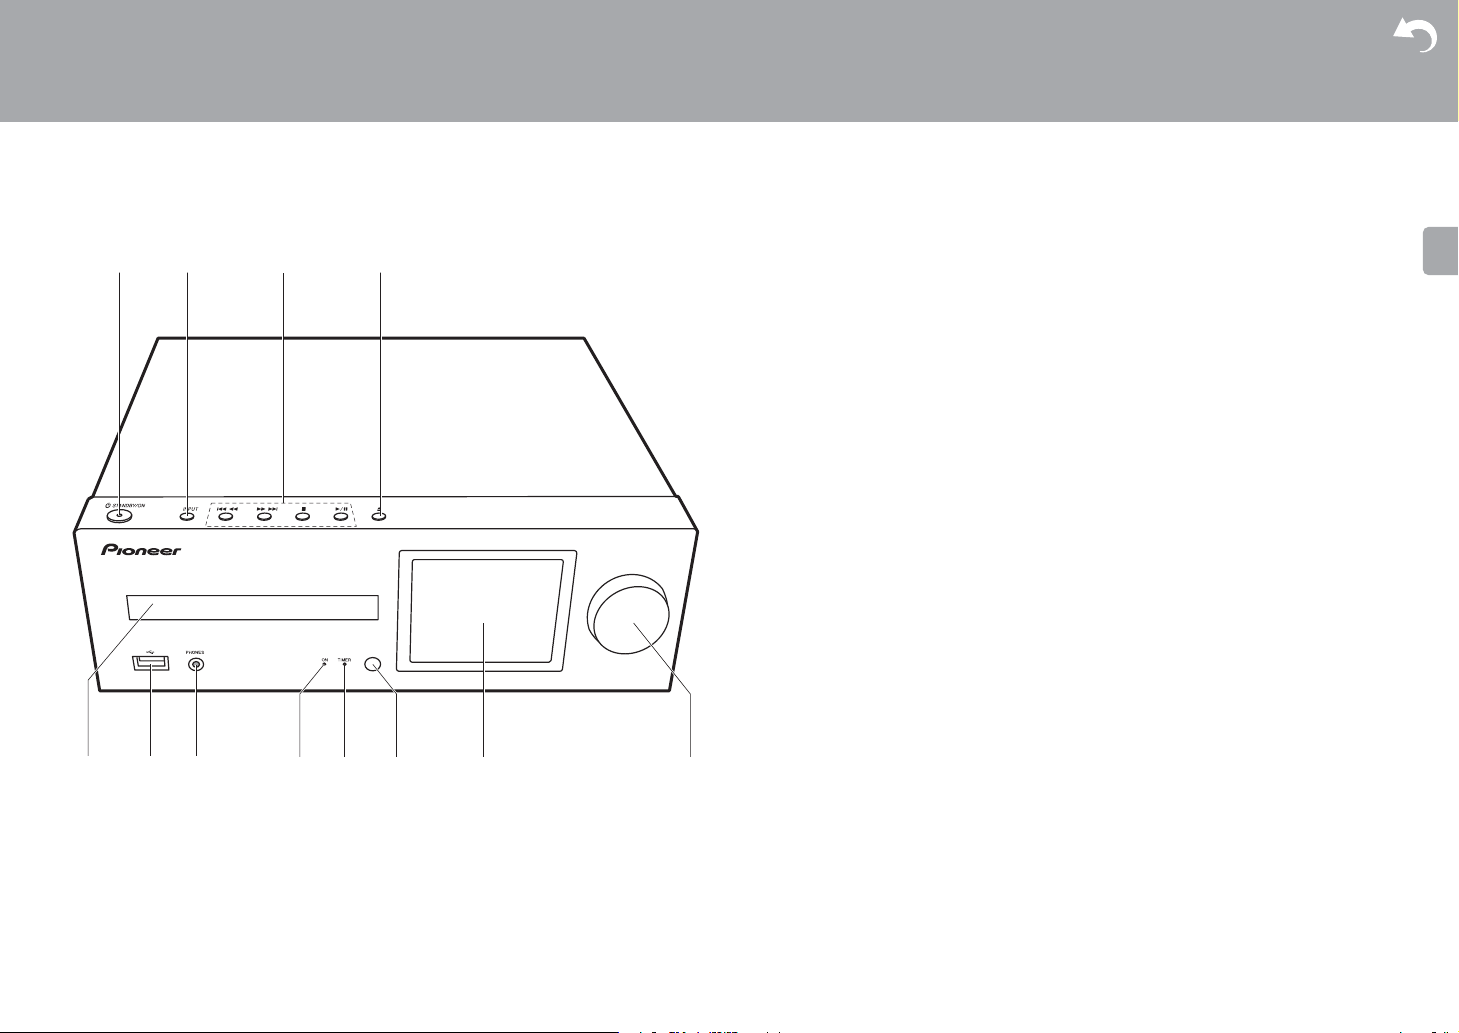
Front Panel
Part Names
1. Í STANDBY/ON button: Turns the unit on or to standby mode.
2. INPUT button: Switches the input to be played.
3. Play button:
:6
: Return to the beginning of the track being played. Press and hold to rewind the
track quickly. (CD)
Move to the previous track. (USB, Music Server)
: Move to the next track. Press and hold to fast-forward through the track. (CD)
Move to the next track. (USB, Music Server)
: This button stops playback.
/; : This button pauses the playback.
port: Connect a USB storage device or HDD (hard disk drive) to play music files. You can
(maximum 5 V/1 A) on the rear of the unit.
59
∫
1
0 Depending on the input, the operation may not start.
4. < button: Open or close the disc tray.
5. Disc tray: Place discs here. 8-cm discs can also be used.
6. USB
also supply power (maximum 5 V/0.5 A) to USB devices with a USB cable.
0 When connecting a HDD that requires more than 5 V/0.5 A, connect to the USB port
7. PHONES jack: Connect stereo headphones with a mini plug.
8. Power indicator: This lights blue when the unit is on.
9. TIMER indicator: This lights when the alarm is set.
10.
Remote control sensor
11.
Display (ÄP8)
12.
VOLUME dial: Adjust the volume. Adjust between 0 and 50.
Supplementary information | Advanced Setup | Others
4
> Before Start >Part Names > Install > Initial Setup > Playback
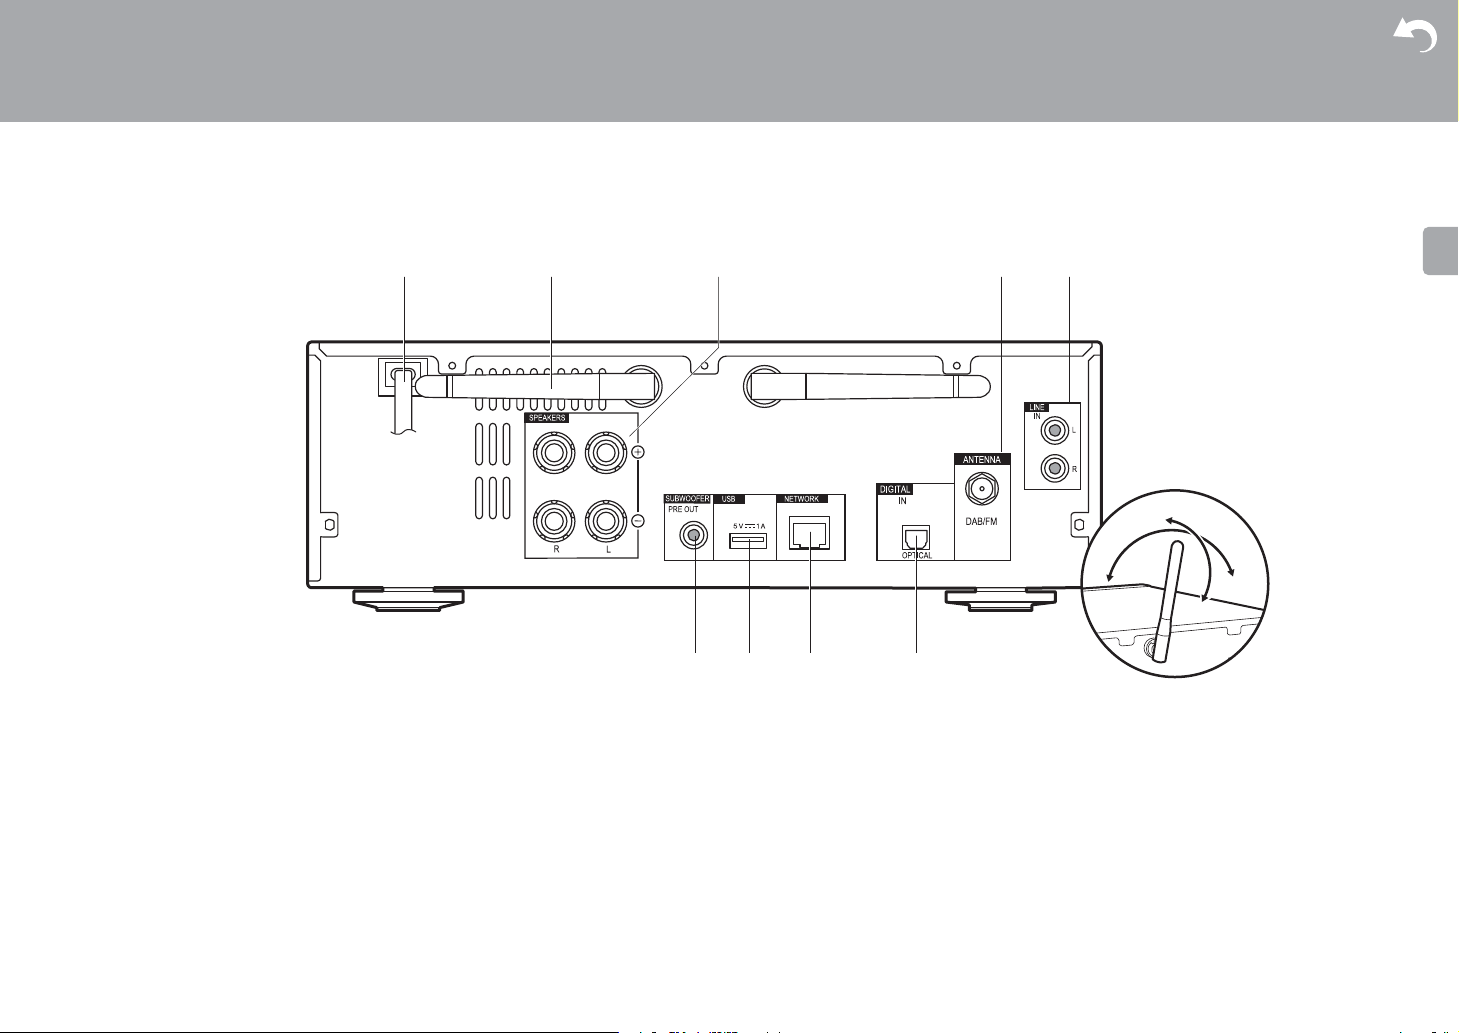
Rear Panel (X-HM76D, X-HM86D, XC-HM86D)
Supplementary information | Advanced Setup | Others
1. Power cord
2. Wireless antenna: Used for Wi-Fi connection or when using a BLUETOOTH enabled
device. Adjust their angles according to the connection status.
3. Speaker terminals: Connect speakers with speaker cables.
4. DAB/FM ANTENNA jack: Connect the supplied DAB/FM wire antenna.
5. LINE IN jack: You can play the audio from an external device such as a television
connected with an analogue audio cable.
6. SUBWOOFER PRE OUT jacks: Connect a subwoofer with built-in amplifier.
7. USB port: Connect a USB storage device or HDD (hard disk drive) to play music files. You
8. NETWORK jack: Connect to the network with an ethernet cable.
9. DIGITAL IN OPTICAL jack: You can play the digital audio from an external device such as
can also supply power (maximum 5 V/1 A) to USB devices with a USB cable.
a television connected with a digital optical cable.
5

> Before Start >Part Names > Install > Initial Setup > Playback
Rear Panel (X-HM76)
Supplementary information | Advanced Setup | Others
1. Power cord
2. Wireless antenna: Used for Wi-Fi connection or when using a BLUETOOTH enabled
device. Adjust their angles according to the connection status.
3. Speaker terminals: Connect speakers with speaker cables.
4. FM ANTENNA jack: Connect the supplied indoor FM antenna.
5. LINE IN jack: You can play the audio from an external device such as a television
connected with an analogue audio cable.
6. SUBWOOFER PRE OUT jacks: Connect a subwoofer with built-in amplifier.
7. USB port: Connect a USB storage device or HDD (hard disk drive) to play music files. You
8. NETWORK jack: Connect to the network with an ethernet cable.
9. DIGITAL IN OPTICAL jack: You can play the digital audio from an external device such as
can also supply power (maximum 5 V/1 A) to USB devices with a USB cable.
6
a television connected with a digital optical cable.
> Before Start >Part Names > Install > Initial Setup > Playback
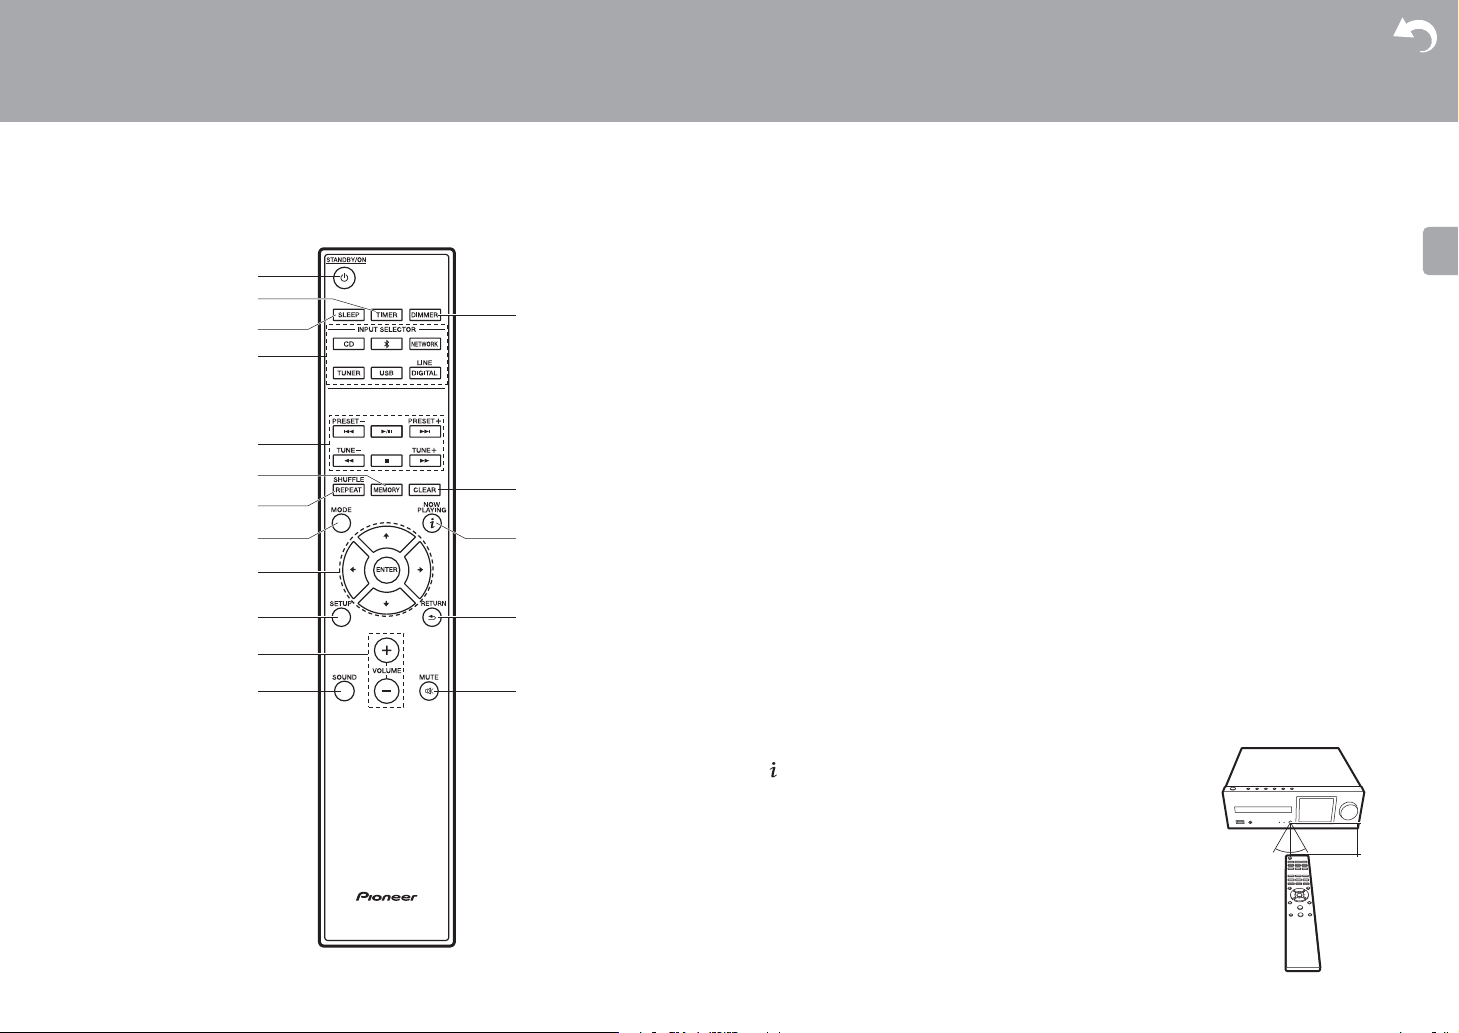
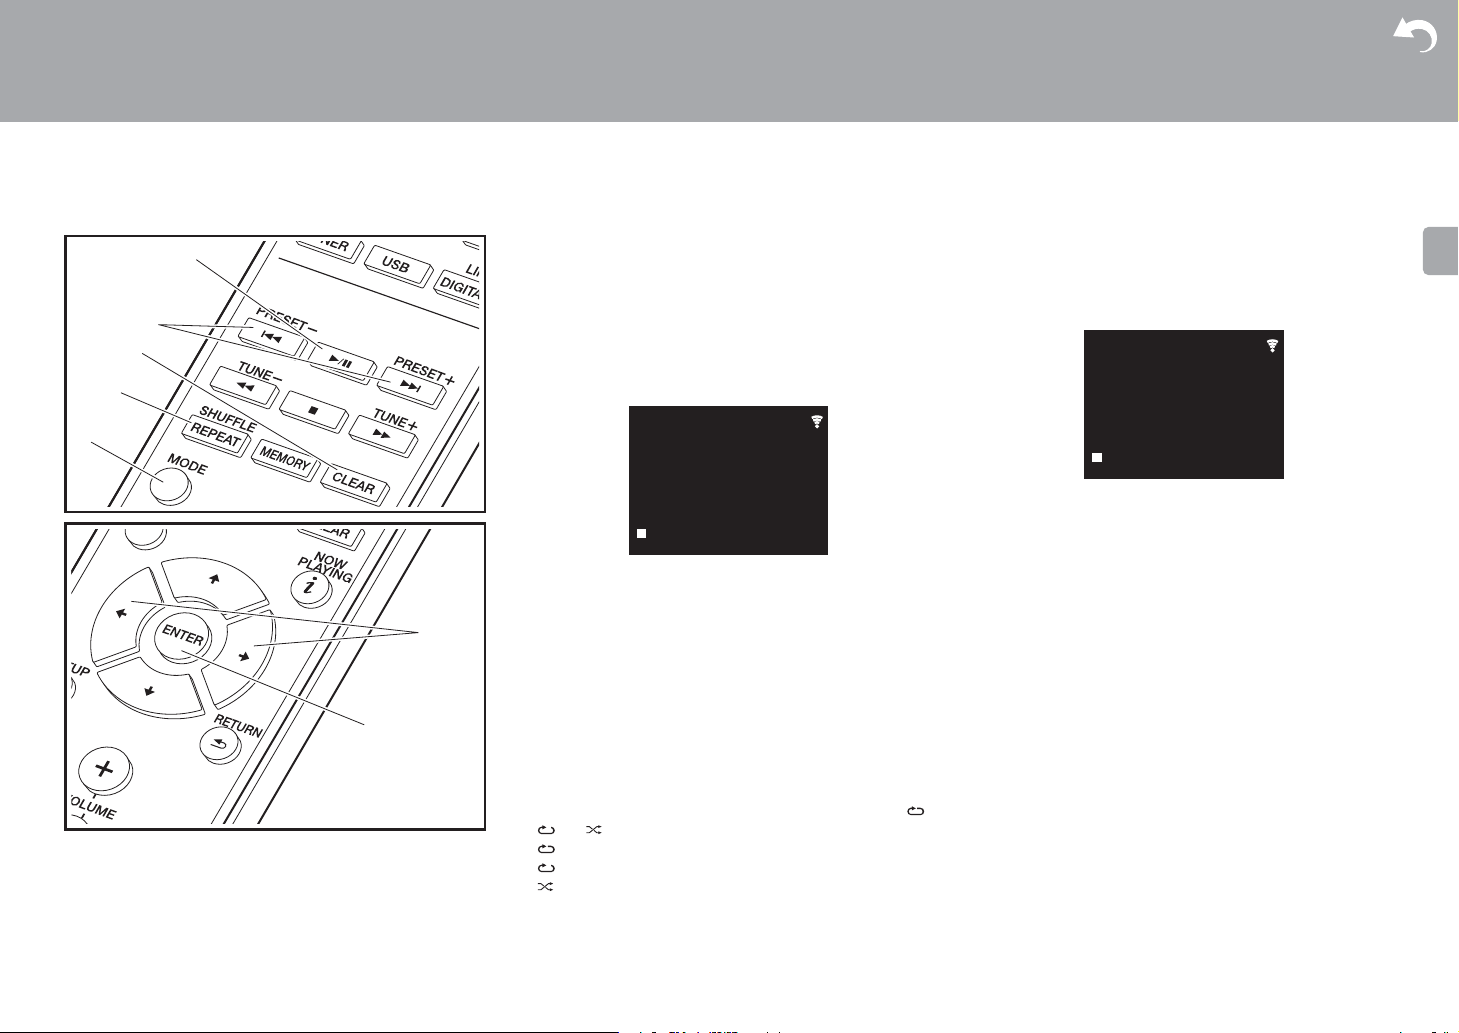
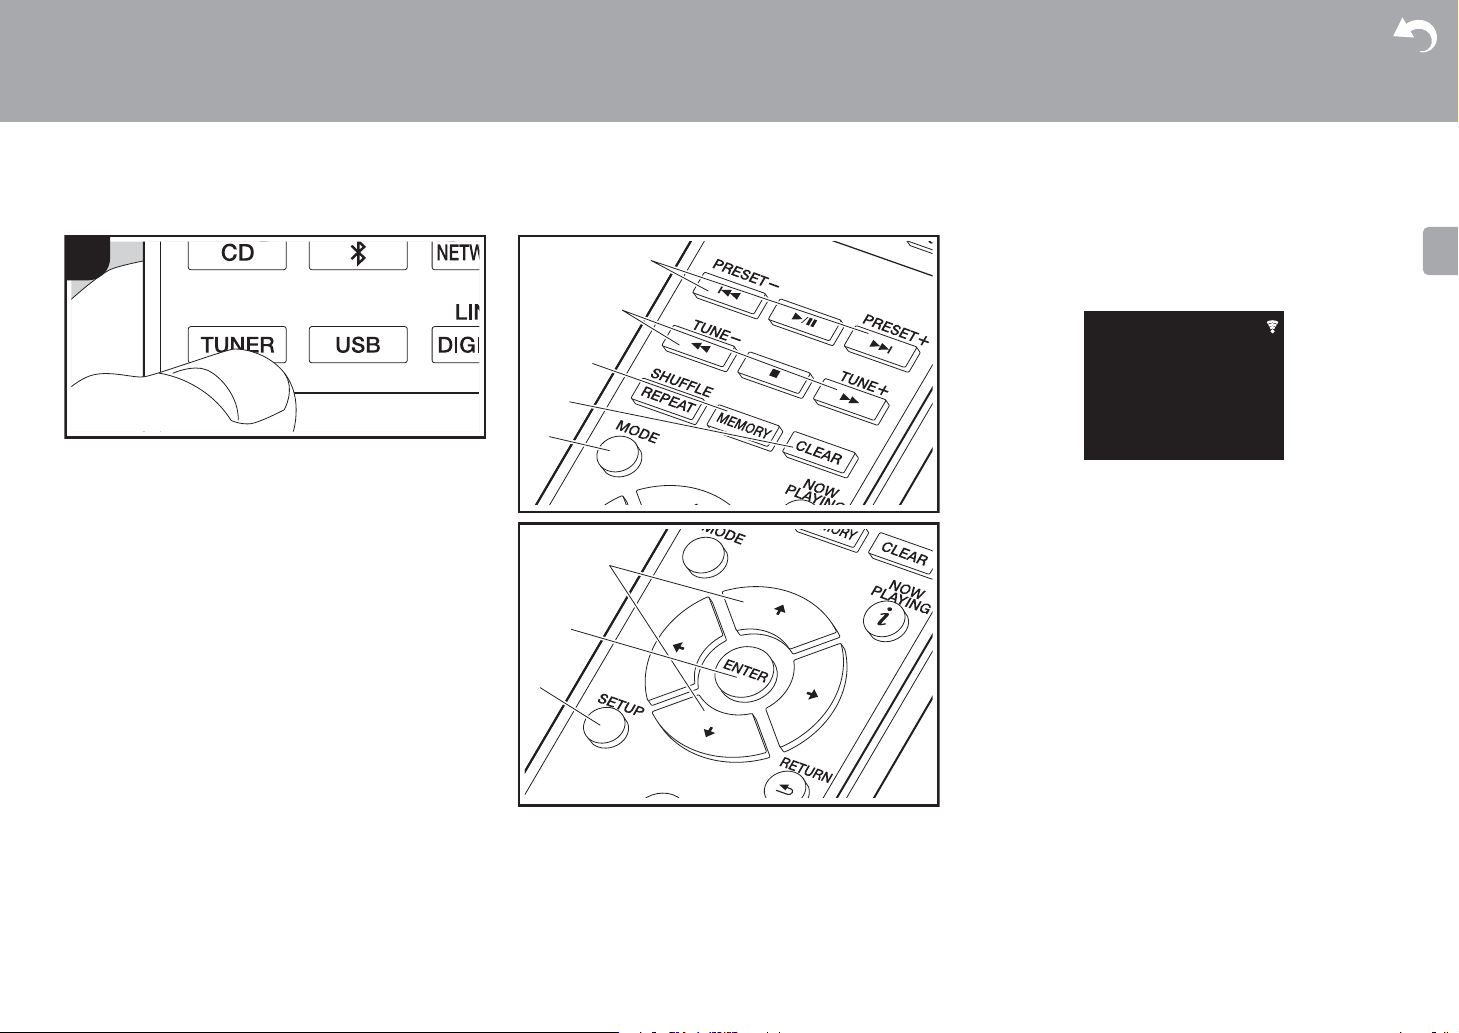
Remote Controller
1. Í STANDBY/ON button: Turns the unit on or into standby mode.
2. TIMER button: Used to set the time and set the alarm.
3. SLEEP button: Set the sleep timer. When the time set (30, 60, or 90 minutes) has
elapsed, the unit switches to standby. If SLEEP button is pressed after setting, the time
remaining until sleep is displayed.
4. INPUT SELECTOR buttons: Switches the input to be played.
5. Play buttons:
:: Return to the beginning of the track being played. (CD)
Move to the track before the one being played. (USB, Music Server)
X/;: Play or pause play.
9: Move to the next track.
22: Rewind the track quickly. (CD only)
∫: Stop playback.
11: Fast-forward the track. (CD only)
0 Depending on the input, the operation may not start.
PRESET i/j buttons: Used to select stations that have been registered or to give names
to stations.
TUNE i/j buttons: Used to select radio stations.
6. MEMORY button: Used to register favorite radio stations.
7. SHUFFLE/REPEAT button: Set repeat play and shuffle play.
8. MODE button: Used for program play of CDs.
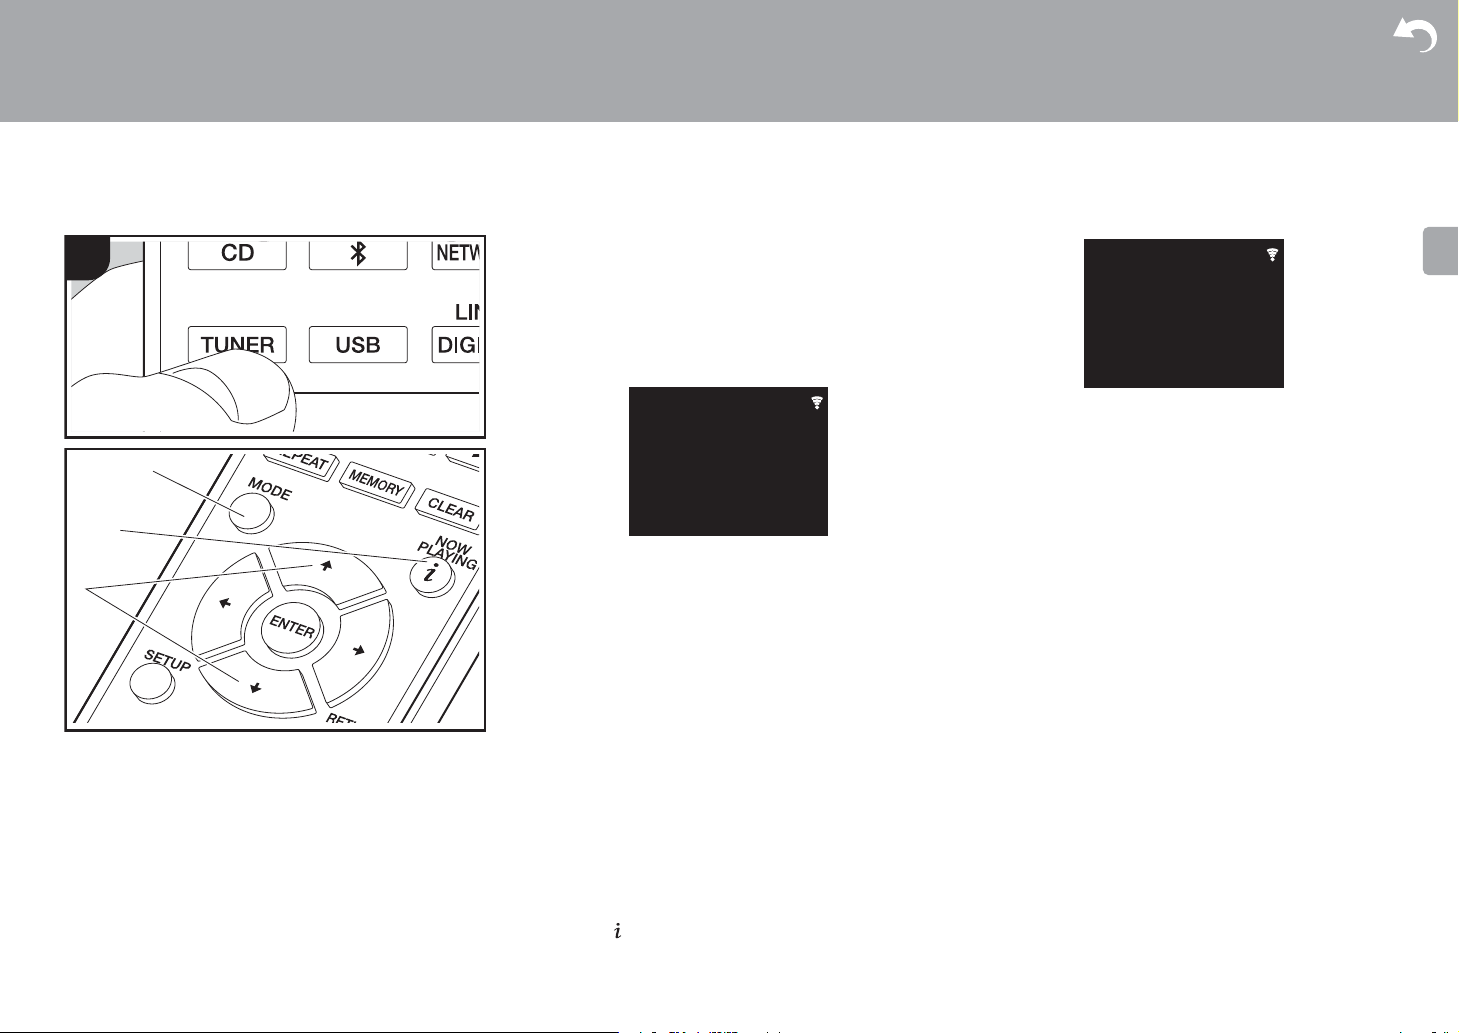
9. Cursors, ENTER button: Select the item with the cursors and press ENTER to confirm.
10.
SETUP button: Displays the Setup menu.
11.
VOLUME i/j buttons: Adjust the volume. Adjust between 0 and 50.
12.
SOUND button: Adjust the sound quality.
13.
DIMMER button: Switch the display off or adjust the brightness of the display in three
steps.
14.
CLEAR button: Used when entering text, etc.
15.
(NOW PLAYING) button: Switches the information on the
display.
16.
RETURN button: Returns the display to the previous state.
17.
MUTE button: Temporarily mutes audio. Press again to cancel
muting.
Supplementary information | Advanced Setup | Others
7
> Before Start >Part Names > Install > Initial Setup > Playback
00:01:45 / 00:03:23
FLAC
44.1
kHz/24bit
USB Front
Song
Artist
Album
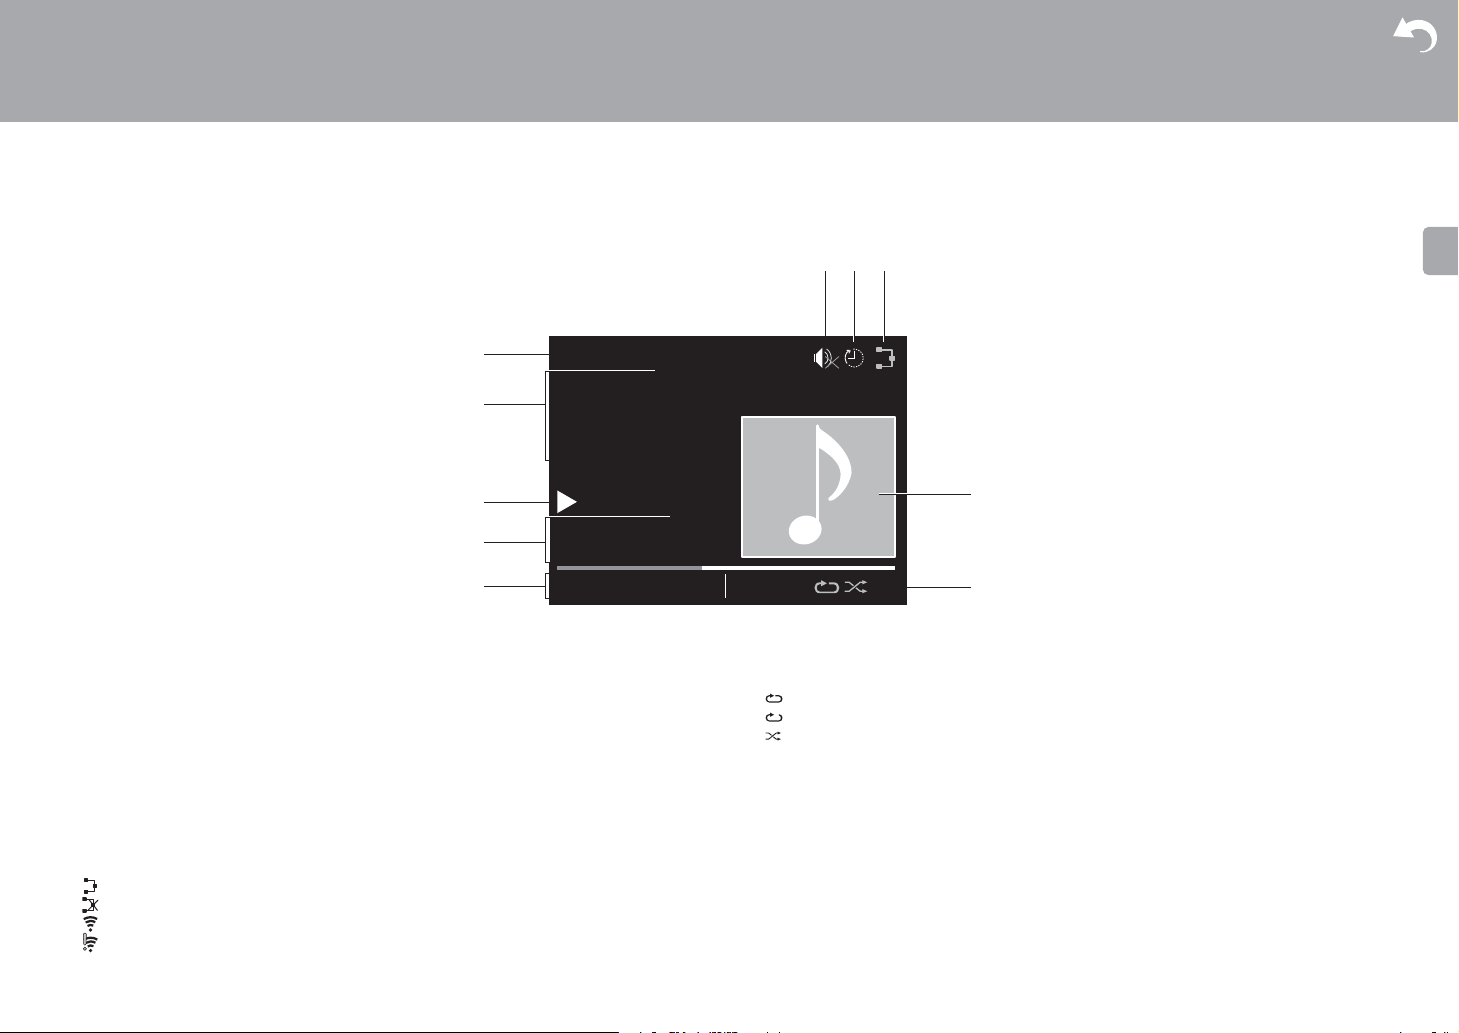
Display
Supplementary information | Advanced Setup | Others
1. The input mode is displayed.
(USB Front / USB Rear / CD / Bluetooth / Network / Digital In / Line / Tuner DAB
FM)
*X-HM76D, X-HM86D, XC-HM86D
2. The name of the file, artist, album, station, etc., is displayed.
3. Displays the play status.
4. Displays file format, sampling frequency, and quantization bit information.
5. The file play status is displayed. This may not be displayed depending on the input or file.
6. This is displayed when muting is on.
7. Displayed when the sleep timer is set.
8. Lights in the following conditions.
:
When the connection setting on the unit is «Wired» and the unit is connected to the network.
:
When the connection setting on the unit is «Wired» and the unit is not connected to the network.
:
When the connection setting on the unit is «Wi-Fi» and the unit is connected to the network.
:
When the connection setting on the unit is «Wi-Fi» and the unit is not connected to the network.
9. If an album jacket is recorded for the file being played, it is displayed here.
8
*
/ Tuner
10.
Lights in the following conditions.
: When all track repeat play is on
: When one track repeat play is on
: When shuffle play is on
0 When DIMMER is pressed to turn off the display, the unit may appear the same as if you
had unplugged the unit from the power outlet, but electricity is still being supplied to the
unit. To completely cut the unit off from the power supply, you need to unplug the power
plug (shutoff device) unit from the power outlet.
> Before Start >Part Names > Install > Initial Setup > Playback
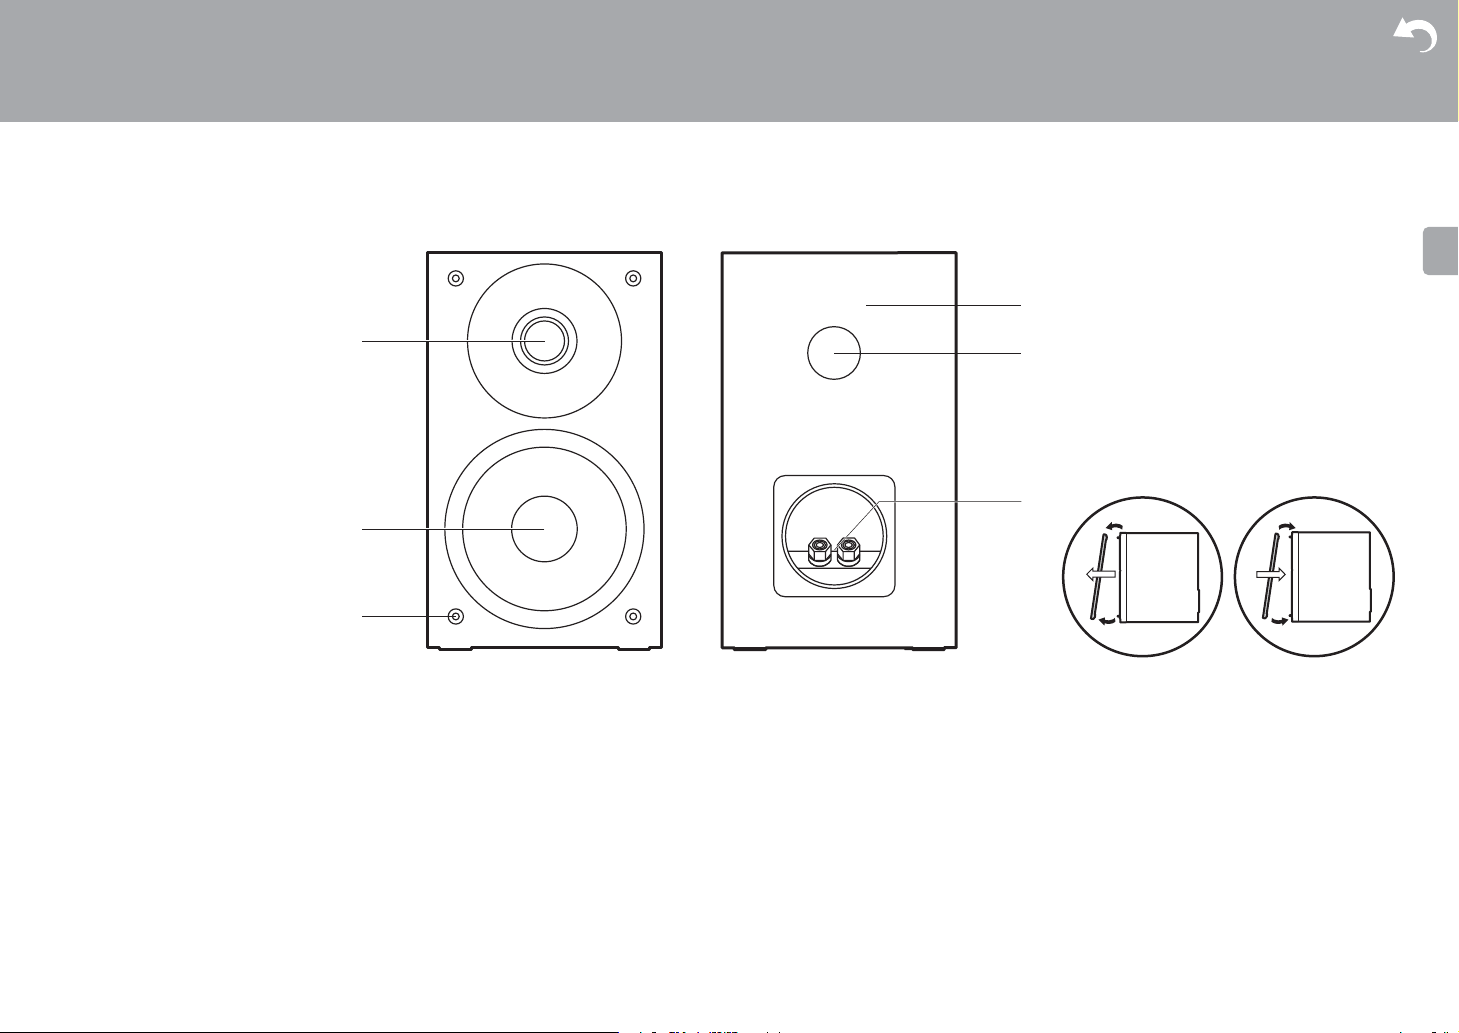
Speakers System (X-HM76D, X-HM76)
Supplementary information | Advanced Setup | Others
There is no distinction between left and right with the included speaker system. There will be
no difference in sound quality whichever side you choose to put each speaker.
1. Tweeter: Plays the mid range and treble.
2. Woofer: Plays the bass.
3. Grill net fittings: Used to attach the grill nets. When removing the grill net, hold the bottom
of the grill net with both hands and pull gently forward, then gently pull the top of the grill
out to remove. To attach again, attach the top first, then the bottom.
4. Speaker cabinet
5. Bass ref duct: This releases the reverberations that occur within the cabinet to enhance
the reproductive capabilities of the bass range. Do not block the ducts.
6. Speaker terminals: Connect speakers to the main unit with speaker cables.
9

> Before Start >Part Names > Install > Initial Setup > Playback
Speakers System (X-HM86D)
Supplementary information | Advanced Setup | Others
There is no distinction between left and right with the included speaker system. There will be
no difference in sound quality whichever side you choose to put each speaker.
1. Tweeter: Plays the mid range and treble.
2. Woofer: Plays the bass.
3. Grill net fittings: Used to attach the grill nets. When removing the grill net, hold the bottom
of the grill net with both hands and pull gently forward, then gently pull the top of the grill
out to remove. To attach again, attach the top first, then the bottom.
4. Speaker cabinet
5. Bass ref duct: This releases the reverberations that occur within the cabinet to enhance
the reproductive capabilities of the bass range. Do not block the ducts.
10
6. Speaker terminals: Connect speakers to the main unit with speaker cables.
> Before Start > Part Names >Install > Initial Setup > Playback
1
RED
RED
3
2
4
RED
RED
b
b
a
a
a
a
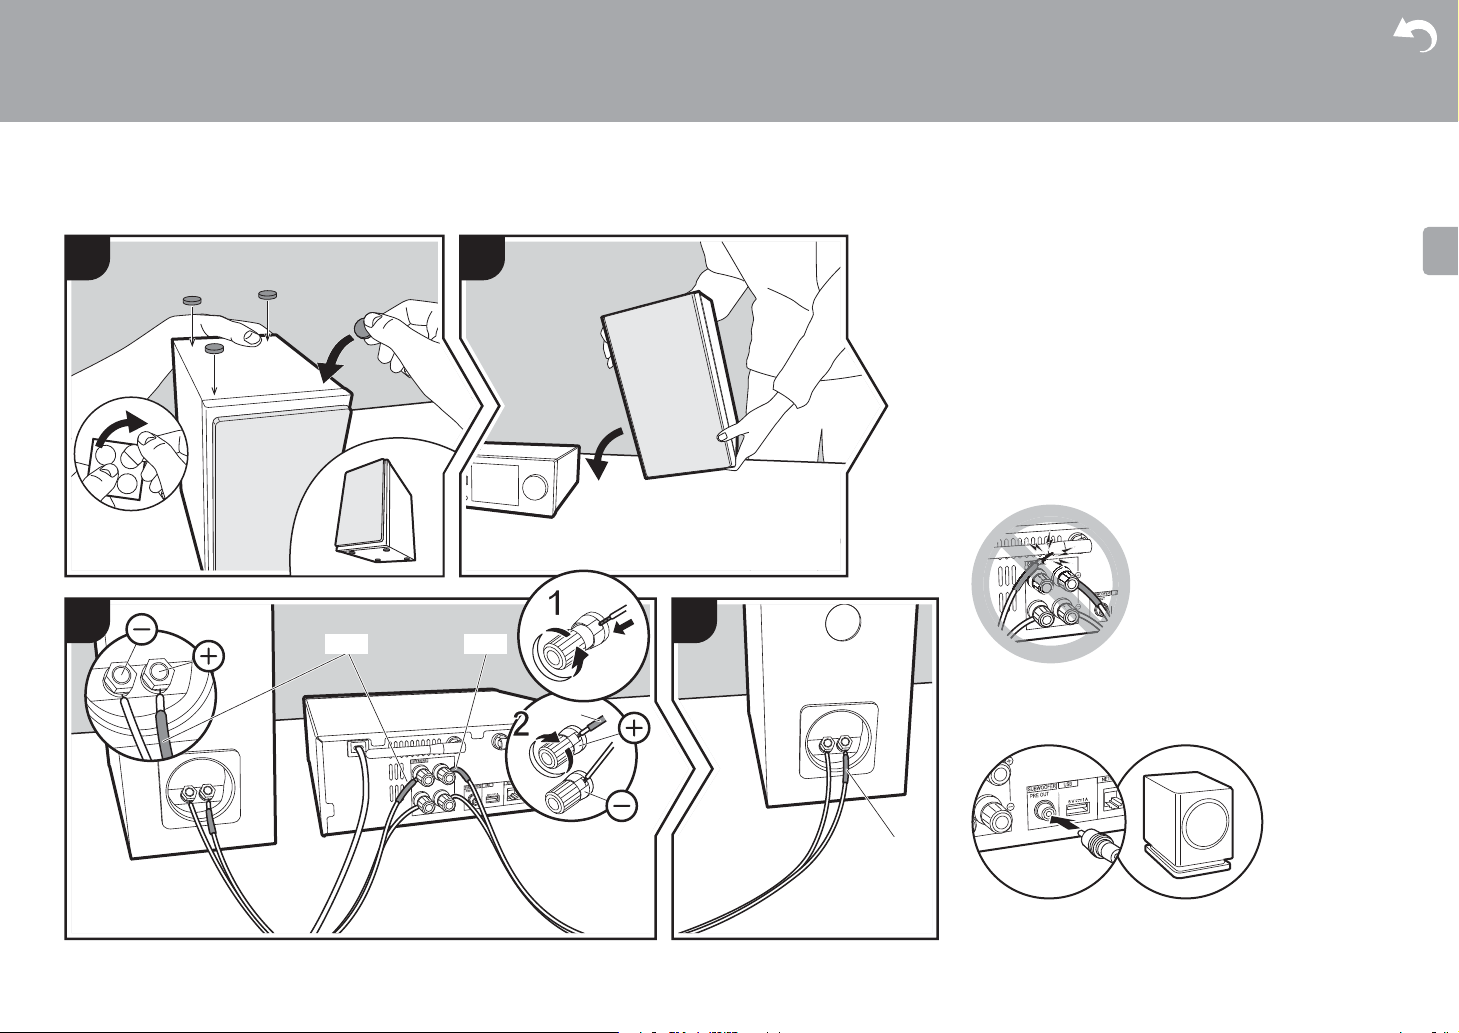
Connect the Speakers
Supplementary information | Advanced Setup | Others
When connecting the speaker system for X-HM76D, XHM76 or X-HM86D, connect the included speaker cables
with ends with the red tubing attached to the i jacks on the
main unit and the speaker. If connection is wrong, the phase
reverses and this makes it harder to output bass.
For XC-HM86D, use the illustration as a reference to
connect your own speakers.
After inserting the speaker cables, tighten the terminals
firmly by turning to the right. Also make sure the exposed
wires of the speakers do not stick out of the speaker
terminals when connecting. If the exposed wires of the
speakers touch the rear panel or the i and s wires touch
each other, the protection circuit may be activated and the
power may turn off.
You can also connect a subwoofer with a built-in amplifier to
Install
a Non-Skid pads, b Speaker cable
boost bass playback even more. Use a subwoofer cable for
connection.
11
> Before Start > Part Names >Install > Initial Setup > Playback
X-HM76D, X-HM86D, XC-HM86D X-HM76
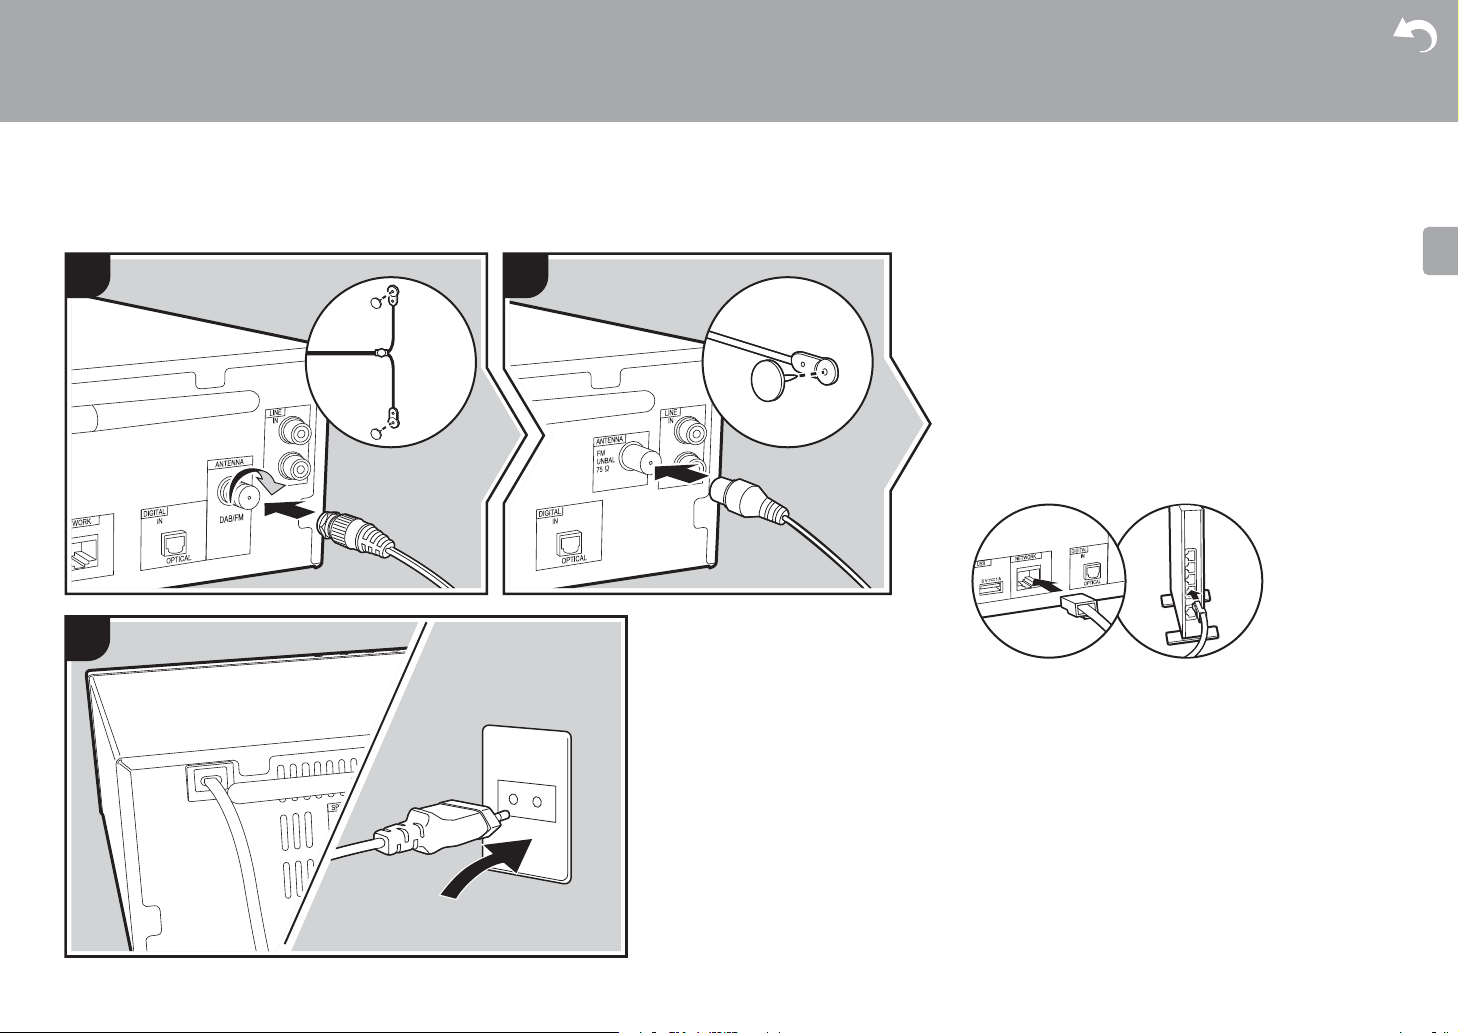
Connecting the antennas and power cord, etc.
Supplementary information | Advanced Setup | Others
Antenna Hookup
Move the antenna around while playing the radio to find the
position with the best reception.
Power Cord Hookup
Connect the power cord to the power outlet after completing
all other connections.
To connect to the network with an ethernet cable, use the
NETWORK jack. When using Wi-Fi connection, make
settings in initial settings (ÄP13). You can enjoy features
such as internet radio and AirPlay by connecting to the
network.
a DAB/FM wire antenna, b Indoor FM antenna, c Power cord
12

> Before Start > Part Names > Install > Initial Setup >Playback
Initial Setup
Wired (Exit)
Wi-Fi
Selects the method of network
connection
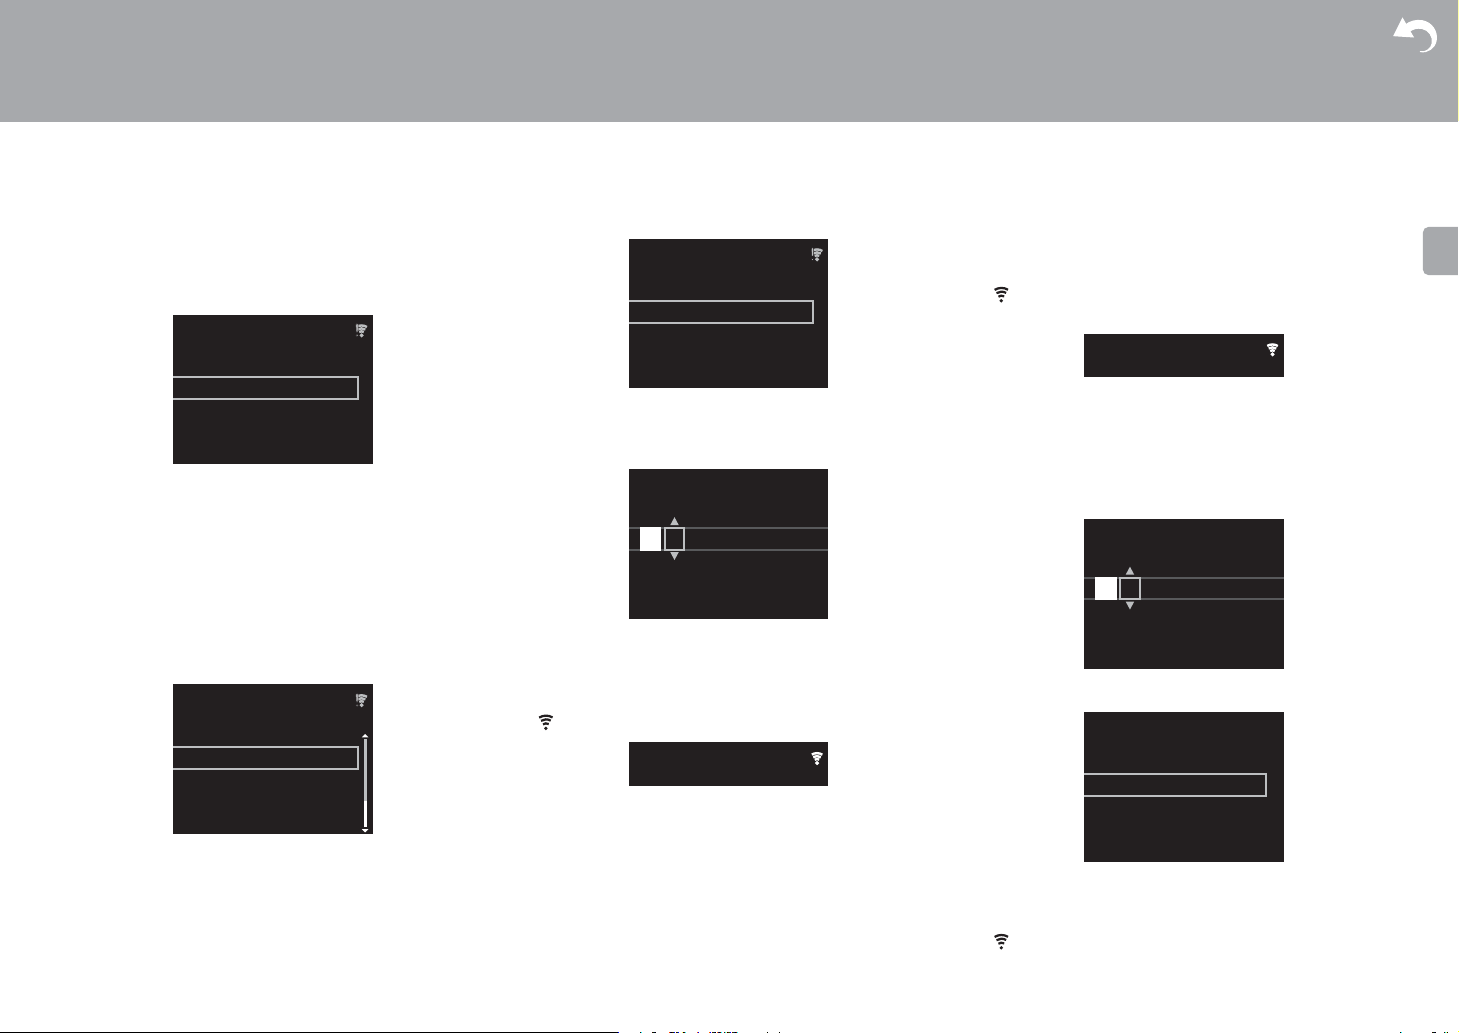
Power On & Initial Setup
Initial Setup
1
2
Supplementary information | Advanced Setup | Others
Starting up: When you press Í STANDBY/ON, the power
indicator on the main unit slowly blinks blue, then «Hello» is
displayed on the display about 20 seconds later. After this,
the display goes blank, then after the Pioneer logo is
displayed, you can start operating the unit.
3
BLUEBLINKING
Wi-Fi connection settings
When you first turn the power on, the initial setup screen is
displayed automatically, allowing you to easily make Wi-Fi
connection settings.
To set, select the item with the cursors on the remote
controller and press ENTER to confirm. To return to the
previous display, press RETURN.
13
> Before Start > Part Names > Install > Initial Setup >Playback
Wireless
Input SSID
Use iOS Device
Wireless
ddddddddddddddddd
ccccccccccccccccccc
bbbbbbbbbbbbbbbbb
Password
A
Delete One Character[CLEAR]
Change Text[REPEAT]
Supplementary information | Advanced Setup | Others
To make Wi-Fi settings, select «Wi-Fi». If you have
connected with an ethernet cable, select «Wired(Exit)» and
confirm. If you select «Wi-Fi», select the method for setting
in the next screen (for example «Scan Networks»).
Scan Networks
0 To redo the initial settings, press SETUP on the remote
controller, select «Wi-Fi» in «Network Setting» »Connection», then select «Wi-Fi Setup».
■Scan Networks
From the list of SSID for access points such as wireless
LAN routers, select the required SSID and make the
settings.
1. Select the SSID of the access point you want to connect
and then confirm.
2. Select either «Enter Password» or «Push Button» and
confirm. If the access point has an automatic setting
button, by selecting «Push Button» you can connect
without entering a password.
aaaaaaaaaaaaaaaa
14
Enter Password
3. If you select «Enter Password», enter the password of the
access point and press ENTER. For details on how to
enter text, refer to «Entering text» (ÄP34).
If you select «Push Button», then after pressing and
holding the automatic setting button on the access point
for the required amount of time, press ENTER on the
remote controller.
4. is displayed when the settings are complete.
■Use iOS Device
Set by sharing the iOS device’s Wi-Fi settings with this unit.
1. Connect the iOS device by Wi-Fi.
2. Select this device in the «SET UP NEW AIRPLAY
SPEAKER…» item on the screen of the iOS device and
select «Next».
0 This unit is displayed as «Pioneer HM76D (76 or 86D)
XXXXXX».
3. After establishing the connection, select «Done» on the
screen of the iOS device.
4. is displayed on the display of the unit when the
settings are complete.
■Enter SSID of the access point
Set by entering the SSID of the access point you want to
connect.
1. Enter the SSID. For details on how to enter text, refer to
«Entering text» (ÄP34).
SSID
A
Change Text[REPEAT]
Delete One Character[CLEAR]
2. Select and confirm the authentication method.
Security Method
None
WEP
WPA
WPA2
0 If you select «None», proceed to step 3. If you select
«WEP», «WPA», or «WPA2», enter the password and
confirm.
3. is displayed when the settings are complete.

> Before Start > Part Names > Install > Initial Setup >Playback
Supplementary information | Advanced Setup | Others
15
> Before Start > Part Names > Install > Initial Setup >Playback
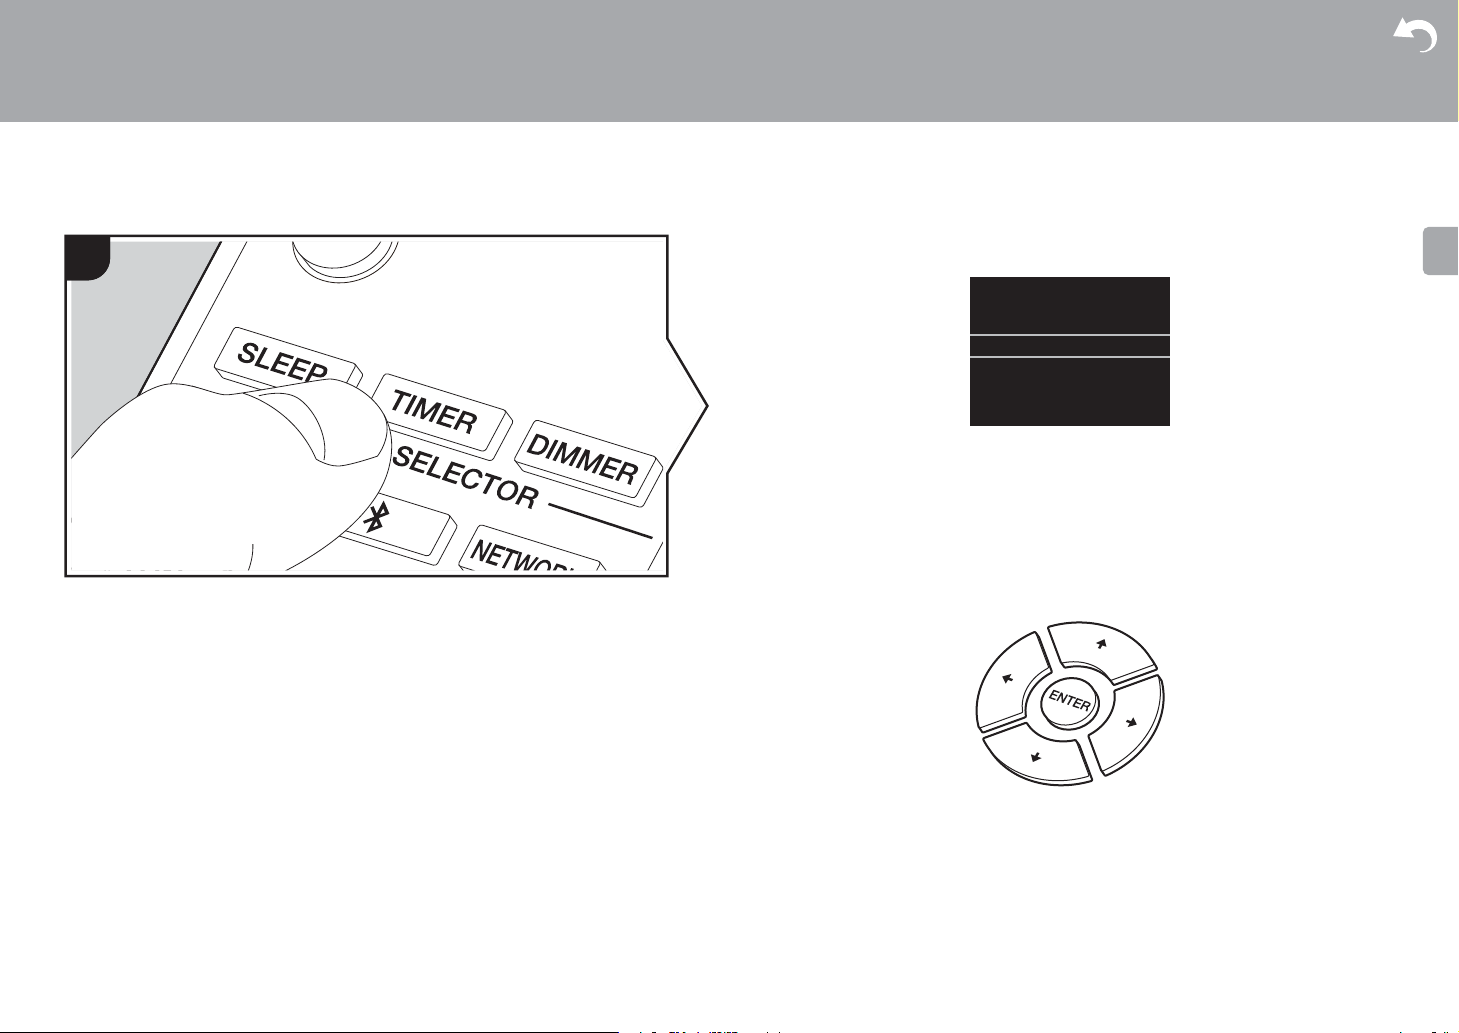
Time settings
By setting the time, you can use the alarm to start play (ÄP33).
1. Press TIMER.
2. Press ENTER.
3. Set the day of the week with w/x, then press ENTER.
4. In the next screen, use w/x to select either «24H» (24-hour display) or «12H» (12-hour
display) and press ENTER.
5. In the next screen, set the time with w/x, then press ENTER.
6. In the next screen, set the minutes with w/x, then press ENTER. Setting ends
automatically after a short time.
0 Once you have completed the setting, the set time can be displayed for about 10 seconds
by pressing TIMER.
Supplementary information | Advanced Setup | Others
16

> Before Start > Part Names > Install > Initial Setup >Playback
Playing CDs
Playback
1
a
b
2
c
Supplementary information | Advanced Setup | Others
This unit can also play CD-R recorded with MP3 or WMA
format files, along with commercially available music CDs.
0 The supported sampling rates for MP3 files are 8 kHz to
48 kHz, and supported bitrates are between 64 kbps and
384 kbps.
0 The supported sampling rates for WMA files are 32 kHz,
44.1 kHz, and 48 kHz, and supported bitrates are
between 64 kbps and 320 kbps.
0 Play of CDs not conforming to the CD standards, such as
copy control CDs, is not guaranteed.
Playing music CDs
1. Turn the unit on.
2. Press CD to change input to CD.
3. Press < on the main unit to open the disc tray.
4. Put the disc on the tray, then press < to close the tray.
5. Press
X/; (a) on the remote controller to start play. Use
other play buttons (b) to stop play or choose tracks to
play. If you press (NOW PLAYING) (c), you can
switch the display to show the elapsed time or remaining
time of the track.
17
> Before Start > Part Names > Install > Initial Setup >Playback
Supplementary information | Advanced Setup | Others
Playing MP3/WMA discs
1. Turn the unit on.
2. Press CD to change input to CD.
3. Press < on the main unit to open the disc tray.
4. Put the disc on the tray, then press < to close the tray.
5. When reading of the disc is complete, the numbers of
folders containing MP3/WMA files and track numbers are
displayed.
0 If MP3/WMA files are stored in two or more folders,
each folder is automatically allocated a number.
6. To start play, press X/; (a) on the remote controller. To
select a folder to play, press w/x (f) to select the folder.
Play starts automatically when you select a folder.
0 Folders that do not contain music files this unit can
play are skipped.
0 A maximum of 255 folders can be read. This includes
folders that contain files this unit cannot play.
Program play (Music CDs)
You can program up to 32 tracks to play.
1. Press MODE (e).
2. The track number (T—) flashes on the display.
CD
PROGRAM
P-01<T—
3. Press
4. Press
:/9 (b) to select the track to register and
press ENTER (g). Repeat this step to register other
tracks. The last track in the program is deleted if you
press CLEAR (c).
X/; (a) to start play.
0 If you press MODE (e) again while play is stopped, the
entire program is cleared.
0 Shuffle play and 1 track repeat play cannot be used
while playing a program.
Repeat play/Shuffle play
1. Repeatedly press SHUFFLE/REPEAT (d) to display ,
, or on the display.
: Repeat play of all tracks.
: Repeat play of the selected individual track.
: Play tracks randomly.
To cancel repeat or shuffle play, press SHUFFLE/
REPEAT (d) several times until the icons disappear.
18
> Before Start > Part Names > Install > Initial Setup >Playback
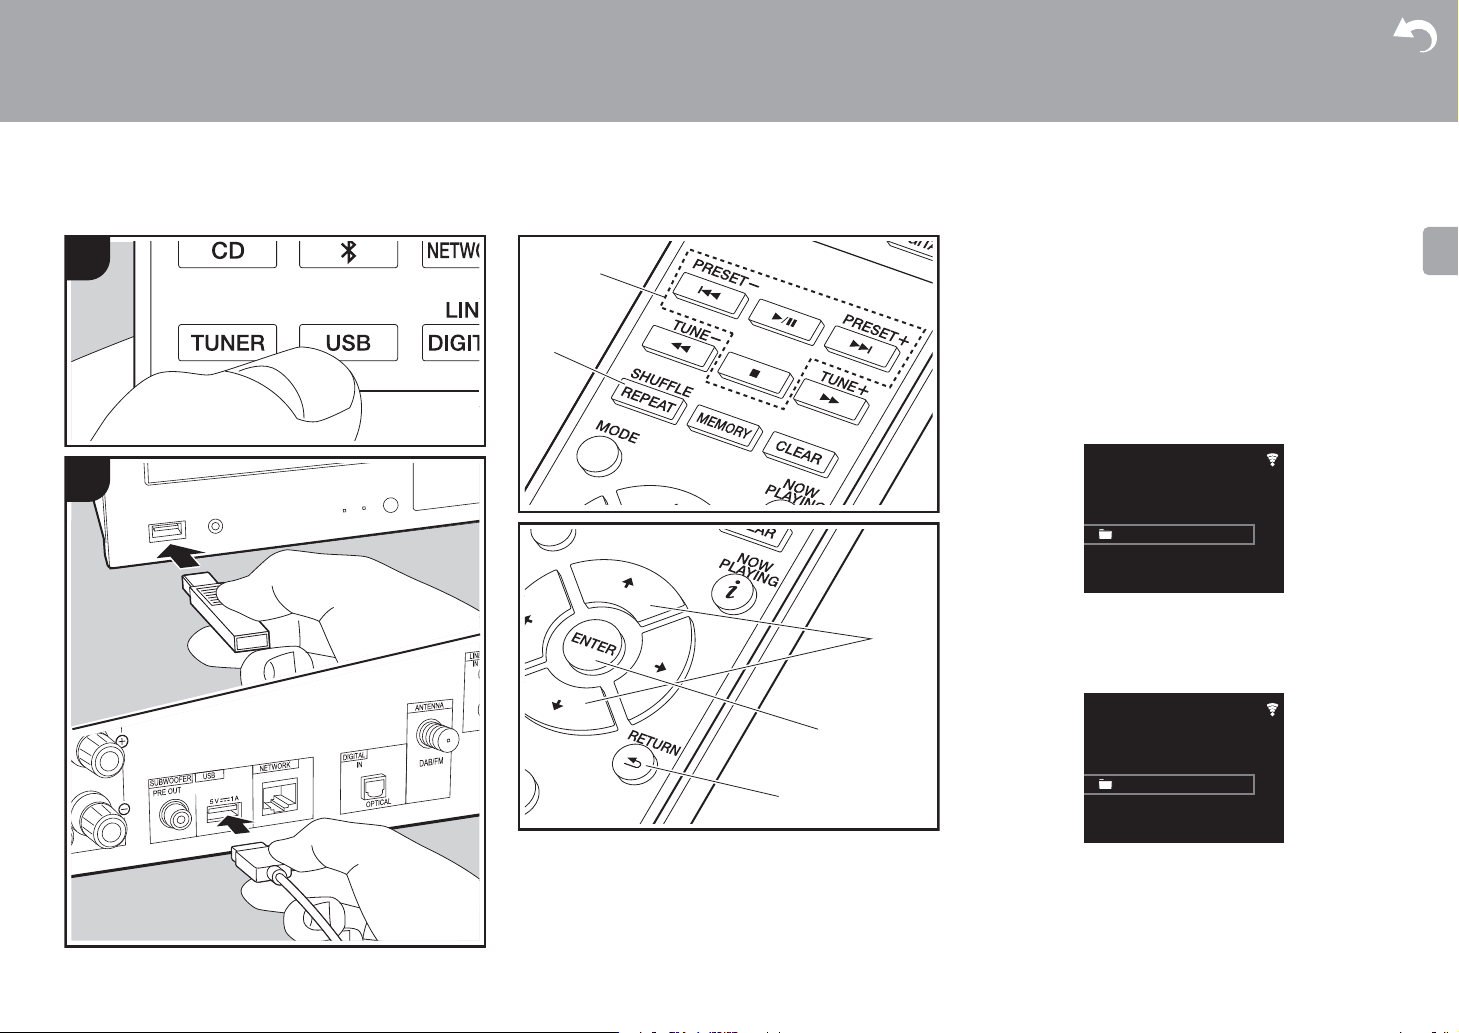
USB Storage Device/HDD
Supplementary information | Advanced Setup | Others
Basic operations
You can play music files by connecting a USB storage
device or HDD (hard disk drive) to the USB port on the front
or rear of the unit.
0 The USB port on the front supports a maximum 5 V/0.5 A
power supply. If the HDD requires more than this,
connect to the USB port (maximum 5 V/1 A) on the rear
of the unit.
1. Turn the unit on.
2. Press USB to select either «USB Front» or «USB Rear».
USB Front
USB
No Storage
3. Plug your USB storage device or HDD into the USB port
on the front or rear.
4. Folders and music files are displayed on the display
when loading is complete.
USB Front
USB
USB Storage
5. Select the folder or music file with the cursors (c) of the
remote controller and press ENTER (d) to confirm. To
return to the previous display, press RETURN (e).
6. Use play buttons (a) to stop play or choose tracks to play.
0 The display of album name, artist name, and album art is
supported with MP3/WMA/Apple Lossless/FLAC/AAC/
19

> Before Start > Part Names > Install > Initial Setup >Playback
Supplementary information | Advanced Setup | Others
DSD (DSF only) format music files. The formats for
embedded images are JPEG and PNG.
0 Characters that cannot be displayed by this unit appear
as «
¢
«.
0 The USB port of this unit conforms with the USB 2.0
standard. The transfer speed may be insufficient for
some content you play, which may cause some
interruption in sound.
Repeat/Shuffle
1. Repeatedly press SHUFFLE/REPEAT (b) during play to
display , or on the display.
: Repeat play of all tracks.
1
: Repeat play of the selected individual track.
: Play tracks in a folder randomly.
To cancel repeat or shuffle play, press SHUFFLE/
REPEAT (b) several times until the icons disappear.
USB Storage / HDD Device Requirements
0 Note that operation is not guaranteed with all USB
storage devices or HDD.
0 This unit can use USB storage devices that comply with
the USB mass storage device class standard. (However,
there are still devices that cannot be played by this unit
even if they comply with the USB mass storage class
standard.)
0 The unit is also compatible with USB storage devices
using the FAT16 or FAT32 file system formats. Other
formats such as exFAT, NTFS, and HFS cannot be
played by this unit.
0 If the USB storage device has been partitioned, each
section will be treated as an independent device.
0 Up to 20,000 tracks per folder can be displayed, and
folders may be nested up to 16 levels deep.
0 USB hubs and USB storage devices with hub functions
are not supported. Do not connect these devices to the
unit.
0 USB storage devices with security function are not
supported on this unit.
0 If the USB storage device or HDD comes with an AC
adapter, we recommend that you use its AC adapter to
power it.
0 Media inserted to the USB card reader may not be
available in this function. Furthermore, depending on the
USB storage device, proper reading of the contents may
not be possible.
0 We accept no responsibility whatsoever for the loss or
damage to data stored on a USB storage device when
that device is used with this unit. We recommend that you
back up your important music files beforehand.
Supported Audio Formats
For server playback and playback from a USB storage
device, this unit supports the following music file formats.
Note that sound files that are protected by copyright cannot
be played on this unit.
MP3 (.mp3/.MP3):
0 Supported formats: MPEG-1/MPEG-2 Audio Layer 3
0 Supported sampling rates: 44.1 kHz, 48 kHz
0 Supported bitrates: Between 8 kbps and 320 kbps and
VBR.
WMA (.wma/.WMA):
0 Supported sampling rates: 44.1 kHz, 48 kHz
0 Supported bitrates: Between 5 kbps and 320 kbps and
VBR.
0 WMA Pro/Voice/WMA Lossless formats are not
supported
WAV (.wav/.WAV):
WAV files include uncompressed PCM digital audio.
0 Supported sampling rates: 44.1 kHz, 48 kHz, 88.2 kHz,
96 kHz, 176.4 kHz, 192 kHz
0 Quantization bit: 8 bit, 16 bit, 24 bit
AIFF (.aiff/.aif/.aifc/.afc/.AIFF/.AIF/.AIFC/.AFC):
AIFF files include uncompressed PCM digital audio.
0 Supported sampling rates: 44.1 kHz, 48 kHz, 88.2 kHz,
96 kHz, 176.4 kHz, 192 kHz
0 Quantization bit: 8 bit, 16 bit, 24 bit
AAC (.aac/.m4a/.mp4/.3gp/.3g2/.AAC/.M4A/.MP4/.3GP/
.3G2):
0 Supported formats: MPEG-2/MPEG-4 Audio
0 Supported sampling rates: 44.1 kHz, 48 kHz, 88.2 kHz,
96 kHz
0 Supported bitrates: Between 8 kbps and 320 kbps and
VBR.
FLAC (.flac/.FLAC):
0 Supported sampling rates: 44.1 kHz, 48 kHz, 88.2 kHz,
96 kHz, 176.4 kHz, 192 kHz
0 Quantization bit: 8 bit, 16 bit, 24 bit
Apple Lossless (.m4a/.mp4/.M4A/.MP4):
0 Supported sampling rates: 44.1 kHz, 48 kHz, 88.2 kHz,
96 kHz, 176.4 kHz, 192 kHz
0 Quantization bit: 16 bit, 24 bit
DSD (.dsf/.dff/.DSF/.DFF):
0 Supported formats: DSF/DSDIFF
0 Supported sampling rates: 2.8 MHz, 5.6 MHz, 11.2 MHz
20
> Before Start > Part Names > Install > Initial Setup >Playback
Network
TIDAL
Deezer
Spotify
TuneIn Radio
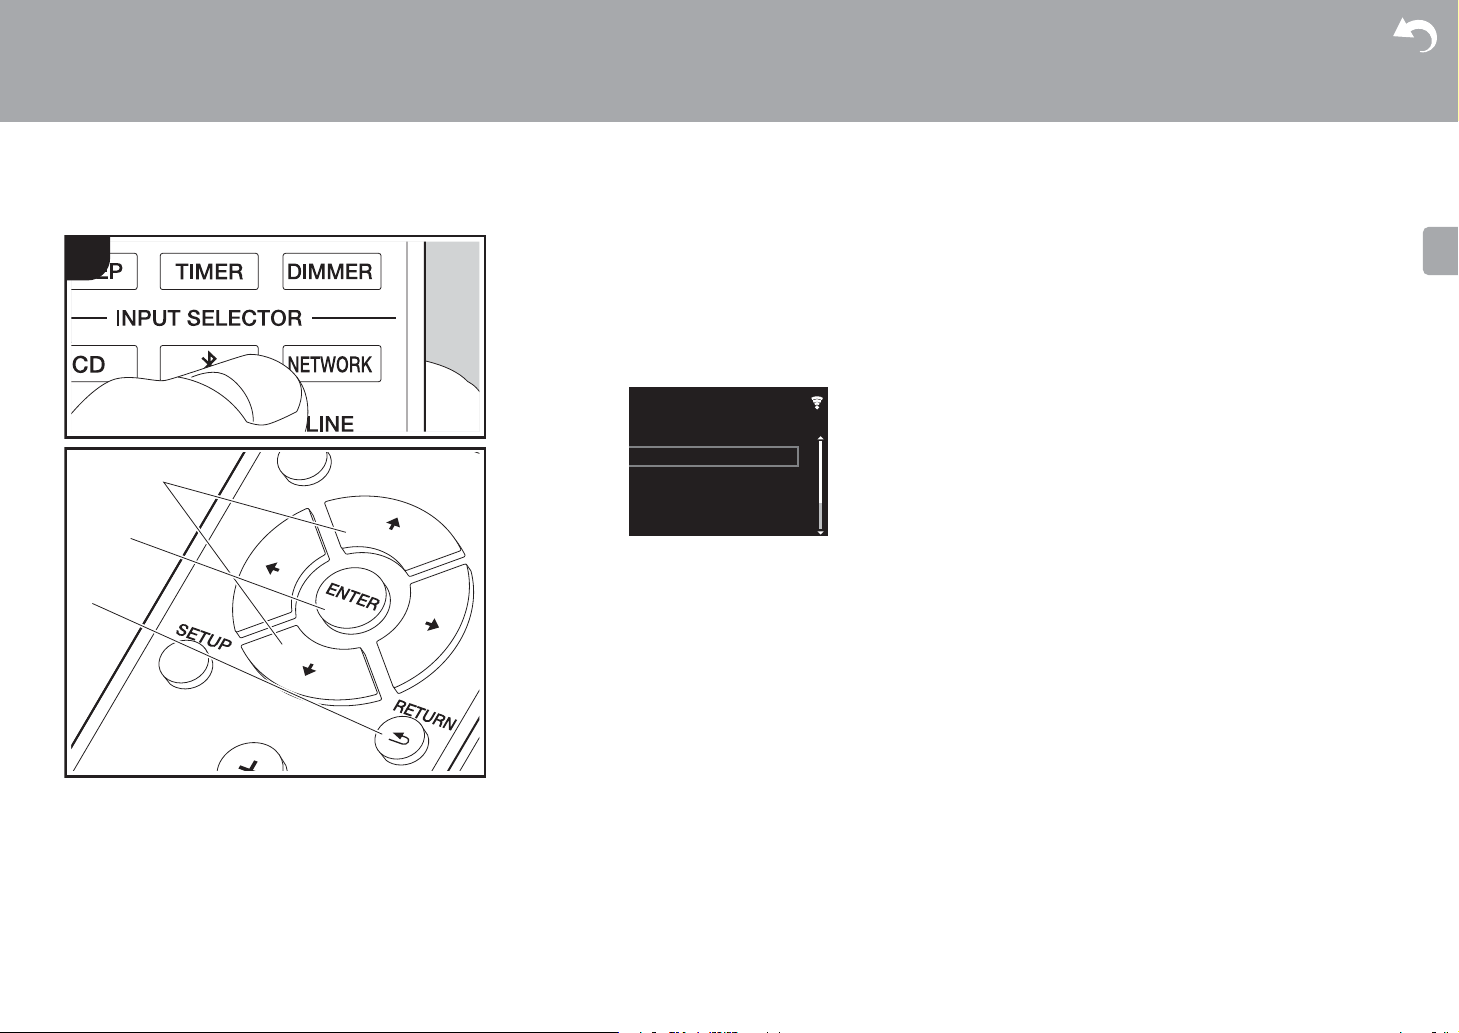
Internet Radio
Basic operations
When this unit is connected to a network, you can listen to
TuneIn or other preregistered Internet radio services.
Depending on the internet radio service, the user may need
to register from their computer first.
1. Turn the unit on.
2. Press NETWORK.
3. Select «TuneIn Radio» with the cursors (a) of the remote
controller and press ENTER (b) to confirm. After
switching the display to the internet radio service, you
can select stations with the cursors (a) on the remote
controller and press ENTER (b) to confirm. To return to
the previous display, press RETURN (c).
Supplementary information | Advanced Setup | Others
TuneIn
You can register a station you have played as a favorite.
1. Press ENTER (b) while playing TuneIn.
2. Select «Add to My Presets» on the display and confirm.
3. To play a favorite, in the top screen of TuneIn, select the
registered station in «My Presets» and confirm. To delete
favorites, press ENTER (b) during play, select «Remove
from My Presets» and confirm.
21
> Before Start > Part Names > Install > Initial Setup >Playback
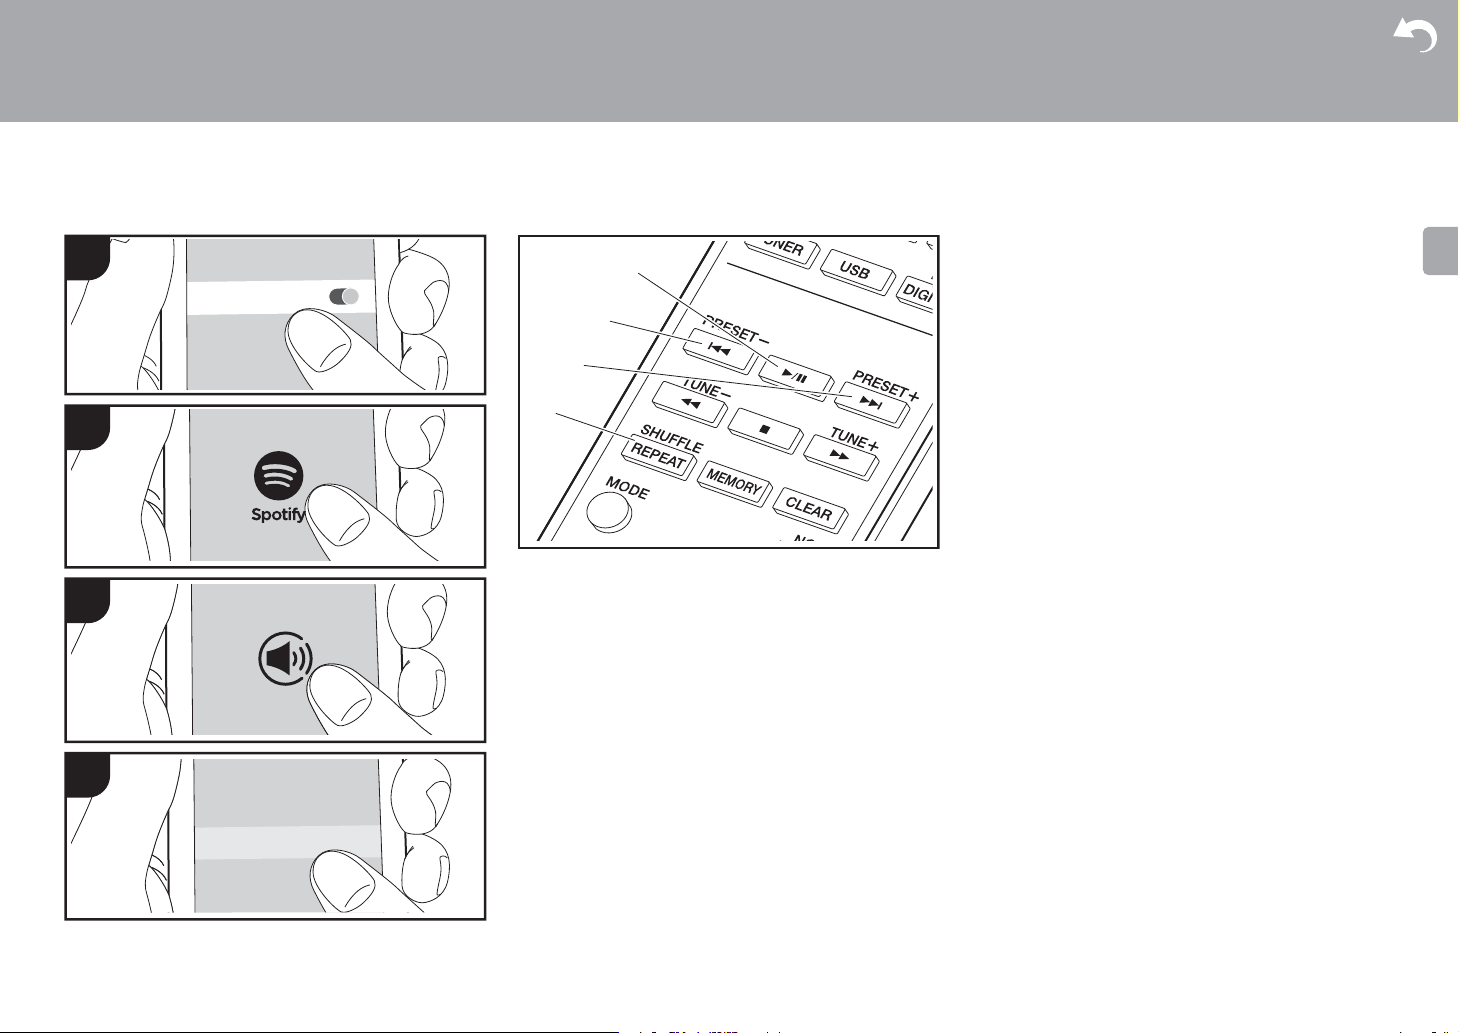
Spotify
Supplementary information | Advanced Setup | Others
Basic Operation
Spotify Connect play is possible by connecting this unit to
the same network as a smart phone or tablet. To enable
Spotify Connect, install the Spotify application on your
smartphone or tablet and create a Spotify premium
account.
1. Connect the smartphone to the network that this unit is
connected to.
2. Click the Connect icon in the track play screen of the
Spotify app.
3. Select this unit.
0 This unit is displayed as «Pioneer HM76D (76 or 86D)
XXXXXX»
4. This unit turns on automatically and the input selector
changes to NETWORK and streaming of Spotify starts.
0 If «Option Setting» — «Power Off Setting» — «Network
Standby» is set to «Off» in the Setup menu, manually
turn the unit on and then press NETWORK on the
remote controller.
0 Refer to the following for Spotify settings:
www.spotify.com/connect/
0 The Spotify software is subject to third party licenses
found here:
www.spotify.com/connect/third-party-licenses
The following remote controller operations are also
possible.
(a) Pressed during play this button pauses playback.
Pressed while paused, and it restarts play.
(b) This button plays the previous track.
(c) This button plays the next track.
(d) Start Repeat or Shuffle play. Pressing this button
repeatedly cycles through the repeat/shuffle modes.
22
> Before Start > Part Names > Install > Initial Setup >Playback
Listening to the FM Radio
Supplementary information | Advanced Setup | Others
Tuning Automatically
1. Turn the unit on.
2. Repeatedly press TUNER to switch input to Tuner FM.
3. When you press TUNE i/j (b) on the remote controller,
automatic tuning starts, and searching stops when a
station is found. «Tuned Stereo» or «Tuned Mono» is
displayed when FM stations are being received.
When FM broadcasts are difficult to receive: Perform the
procedure for «Tuning Manually». If the «Tuning Mode» is set
to «Manual», the reception for FM broadcasts will be
monaural rather than stereo, irrespective of the sensitivity of
the reception.
Tuning Manually
You will need to change the initial settings. Press SETUP
(h) on the remote controller and select «Option Setting» »Tuner Setting» — «Tuning Mode» — «Manual» on the display
and confirm. Press SETUP (h) to finish the settings.
1. Turn the unit on.
2. Repeatedly press TUNER to switch input to Tuner FM.
23

> Before Start > Part Names > Install > Initial Setup >Playback
Supplementary information | Advanced Setup | Others
3. Select the station you want to listen to while pressing
TUNE i/j (b) on the remote controller.
0 The frequency changes by 1 step each time you press
the button. The frequency changes continuously if the
button is held down and stops when the button is
released. Tune by looking at the display.
Registering a station
You can register a maximum of 40 stations.
1. Tune into the radio station you want to register.
2. Press MEMORY (c) on the remote controller so that the
preset number on the display flashes.
3. While the preset number is flashing (about 8 seconds),
repeatedly press PRESET i/j (a) on the remote
controller to select a number between 1 and 40.
4. Press MEMORY (c) on the remote controller again to
register the station. When registered, the preset number
stops flashing.
24
Selecting registered stations
1. Repeatedly press TUNER to switch input to Tuner FM.
2. Press PRESET i/j (a) on the remote controller to select
a preset number.
To delete a registered station
1. Repeatedly press TUNER to switch input to Tuner FM.
2. Press PRESET i/j (a) on the remote controller to select
the preset number you want to delete.
3. Press CLEAR (d) on the remote controller to delete the
preset number.
To give a name to a registered station
1. Repeatedly press TUNER to switch input to Tuner FM.
2. Press PRESET i/j (a) on the remote controller to select
a preset number.
3. Press SETUP (h) on the remote controller.
4. Press y/z (f) on the remote controller to select «Option
Setting» — «Tuner Setting» — «Preset Name» and press
ENTER (g).
5. Enter a name for the station. For details on how to enter
text, refer to » Entering text» (ÄP34).
Using RDS
RDS stands for Radio Data System and is a method of
transmitting data in FM radio signals. In regions using RDS,
the radio station name is displayed when you tune into a
radio station broadcasting program information. When you
press MODE (e) on the remote controller in this state, you
can use the following functions.
Displaying text information (Radio Text)
1. While the name of the station is being displayed on the
display, press MODE (e) on the remote controller once.
Radio Text (RT) broadcast by the station is displayed
scrolling across the display. «Not RDS» is displayed when
no text information is available.
0 Unusual characters may be displayed when the unit
receives unsupported characters. However, this is not a
malfunction. Also, if the signal from a station is weak,
information may not be displayed.
Search for stations by Program Type
1. While the name of the station is being displayed on the
display, press MODE (e) on the remote controller twice.
2. Press the PRESET i/j (a) on the remote controller to
select the Program Type you want to find, then press
ENTER (g) to start the search.
The Program Types displayed are as follows:
None
News (News reports)
Current affair
Information
Sport
Education
Drama
Cultures
Science (Science and technology)
Varied speech
Pop music
Rock music
Easy listening
Light classics
Serious classi (Serious classics)
Other music
Weather & metr
Finance
Children’s pro (Children’s programmes)
Social affairs
Religion
Phone in
Travel & touri
Leisure & hobb
Jazz music
Country music
Nation music
Oldies music

> Before Start > Part Names > Install > Initial Setup >Playback
Folk music
Documentary
0 The information displayed may sometimes not match
the content being broadcast by the station.
3. «FINISH» is displayed when a station is found and the
frequency display flashes. Press ENTER (g) while this is
happening to start receiving that station. If you don’t
press ENTER (g), the unit continues to search for
another station.
0 If no stations are found, the message «Not Found» is
displayed.
0 Unusual characters may be displayed when the unit
receives unsupported characters. However, this is not a
malfunction. Also, if the signal from a station is weak,
information may not be displayed.
Supplementary information | Advanced Setup | Others
25
> Before Start > Part Names > Install > Initial Setup >Playback
News
ABCD-Station
Tuner DAB
Listening to DAB Digital Radio (X-HM76D, X-HM86D, XC-HM86D)
Tuning
1. Turn the unit on.
2. Repeatedly press TUNER to switch input to Tuner DAB.
0 The very first time you select Tuner DAB, the Auto
Tuning function automatically scans the DAB Band 3
for the multiplexes (i.e., stations) available in your
area.
0 Once the scanning process is complete, the first
station that was detected is selected.
0 If a new DAB station is introduced, or you move to a
new area, press SETUP on the remote controller, then
use «DAB Scan» in «Option Setting» — «Tuner Setting».
3. Select the desired radio station with the cursors (c) on
the remote controller.
Supplementary information | Advanced Setup | Others
DLS (Dynamic Label Segment) : When tuned to a
station that’s broadcasting DLS text data, the text will
scroll across the display.
Program Type : Displays the type of program.
Bit Rate and Audio Mode : Displays the station’s bit rate
and audio mode (Stereo, Mono).
Quality : Displays the signal quality.
0 — 59: Poor reception
60 — 79: Good reception
80 — 100: Excellent reception
Multiplex Name : Displays the name of the current
multiplex.
Multiplex Number and Frequency : Displays the
number and frequency of the current multiplex.
26
Changing the order stations are displayed
You can sort the abailable stations alphabetically or by
multiplex.
1. Press MODE (a) repeatedly to set the method for sorting
the display order from the following.
Alphabet (default setting) : Sort stations alphabetically.
Multiplex : Sort stations by multiplex.
Displaying DAB Radio Information
1. Press the (NOW PLAYING) button (b) repeatedly to
display more information about the selected DAB station.
> Before Start > Part Names > Install > Initial Setup >Playback
Supplementary information | Advanced Setup | Others
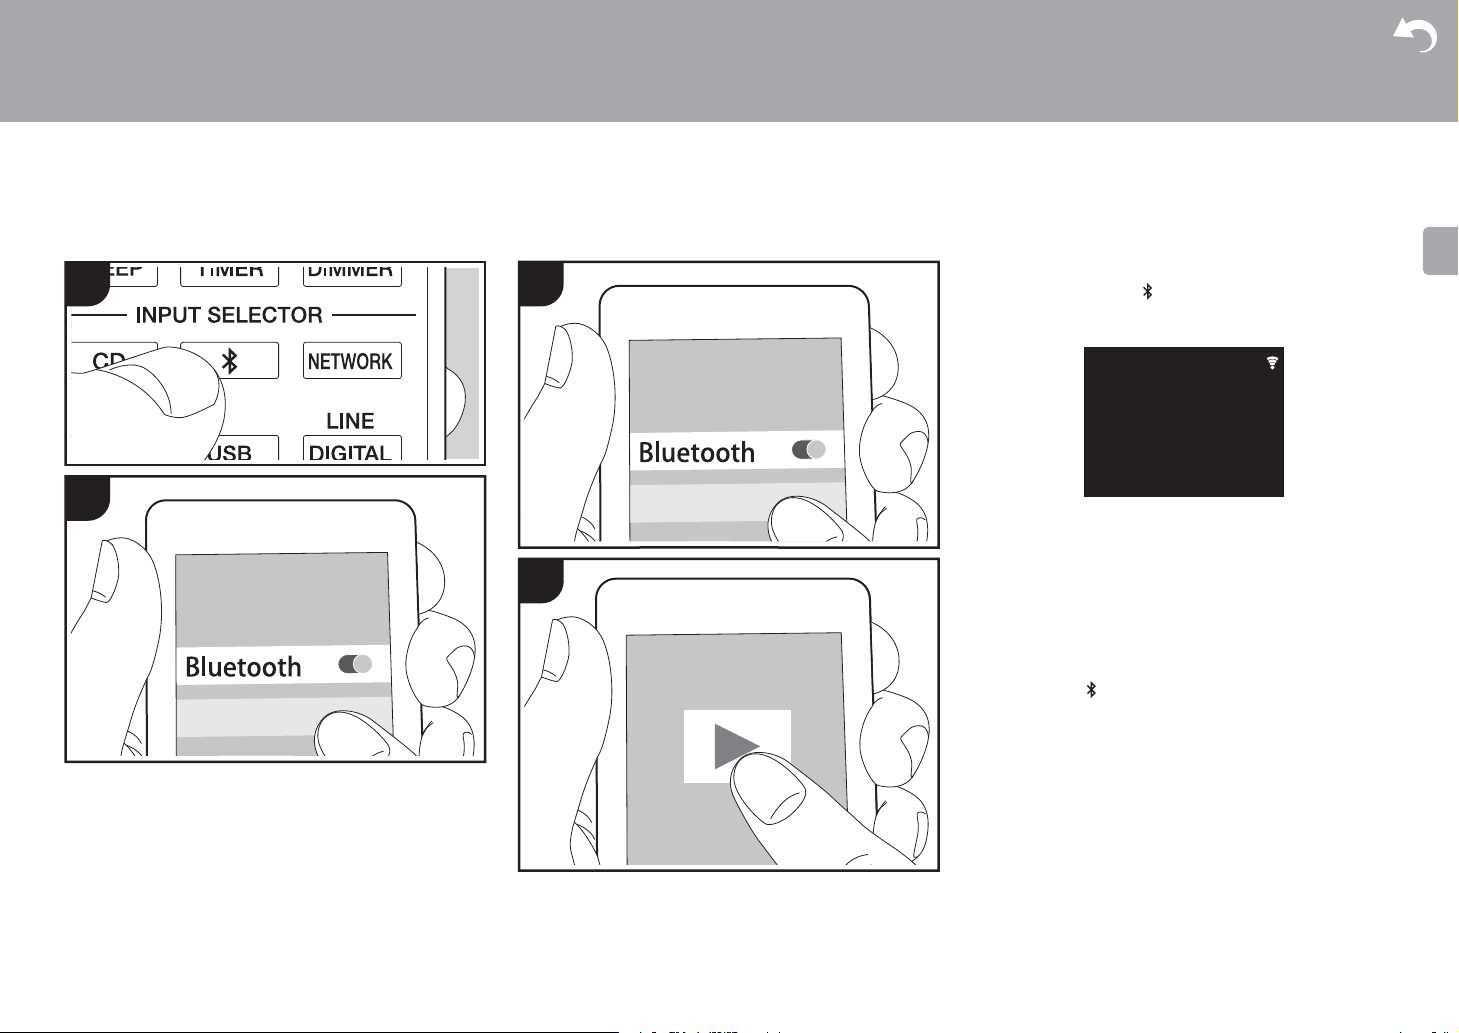
BLUETOOTH
1
2
®
Pairing
Turn the unit on
1
2
1.
2. When you press the button on the remote controller,
«Now Pairing… » is displayed on the display, and the
pairing mode is enabled.
3.
Enable (turn on) the BLUETOOTH function of the
BLUETOOTH enabled device, then select this unit from
amongst the devices displayed. If a password is
requested, enter «0000».
0 This unit is displayed as «Pioneer HM76D (76 or 86D)
XXXXXX».
4. «Now Pairing… » on the display changes to the name of
the BLUETOOTH enabled device.
0 To connect another BLUETOOTH enabled device, press
and hold the button until «Now Pairing… » is displayed,
then perform step 3 above. This unit can store the data of
up to eight paired devices.
0 The coverage area is 10 meters. Note that connection is
not always guaranteed with all BLUETOOTH enabled
devices.
.
Bluetooth
Now Pairing…
—:—:—/—:—:—
Playing Back
1.
Turn the unit on
2. Perform the connection procedure on the BLUETOOTH
enabled device.
3. The input selector on this unit automatically switches to
«Bluetooth».
.
27

> Before Start > Part Names > Install > Initial Setup >Playback
4. Play the music files. Increase the volume of the
BLUETOOTH enabled device to an appropriate level.
0 Due to the characteristics of BLUETOOTH wireless
technology, the sound produced on this unit may slightly
be behind the sound played on the BLUETOOTH
enabled device.
Supplementary information | Advanced Setup | Others
28
> Before Start > Part Names > Install > Initial Setup >Playback
Supplementary information | Advanced Setup | Others
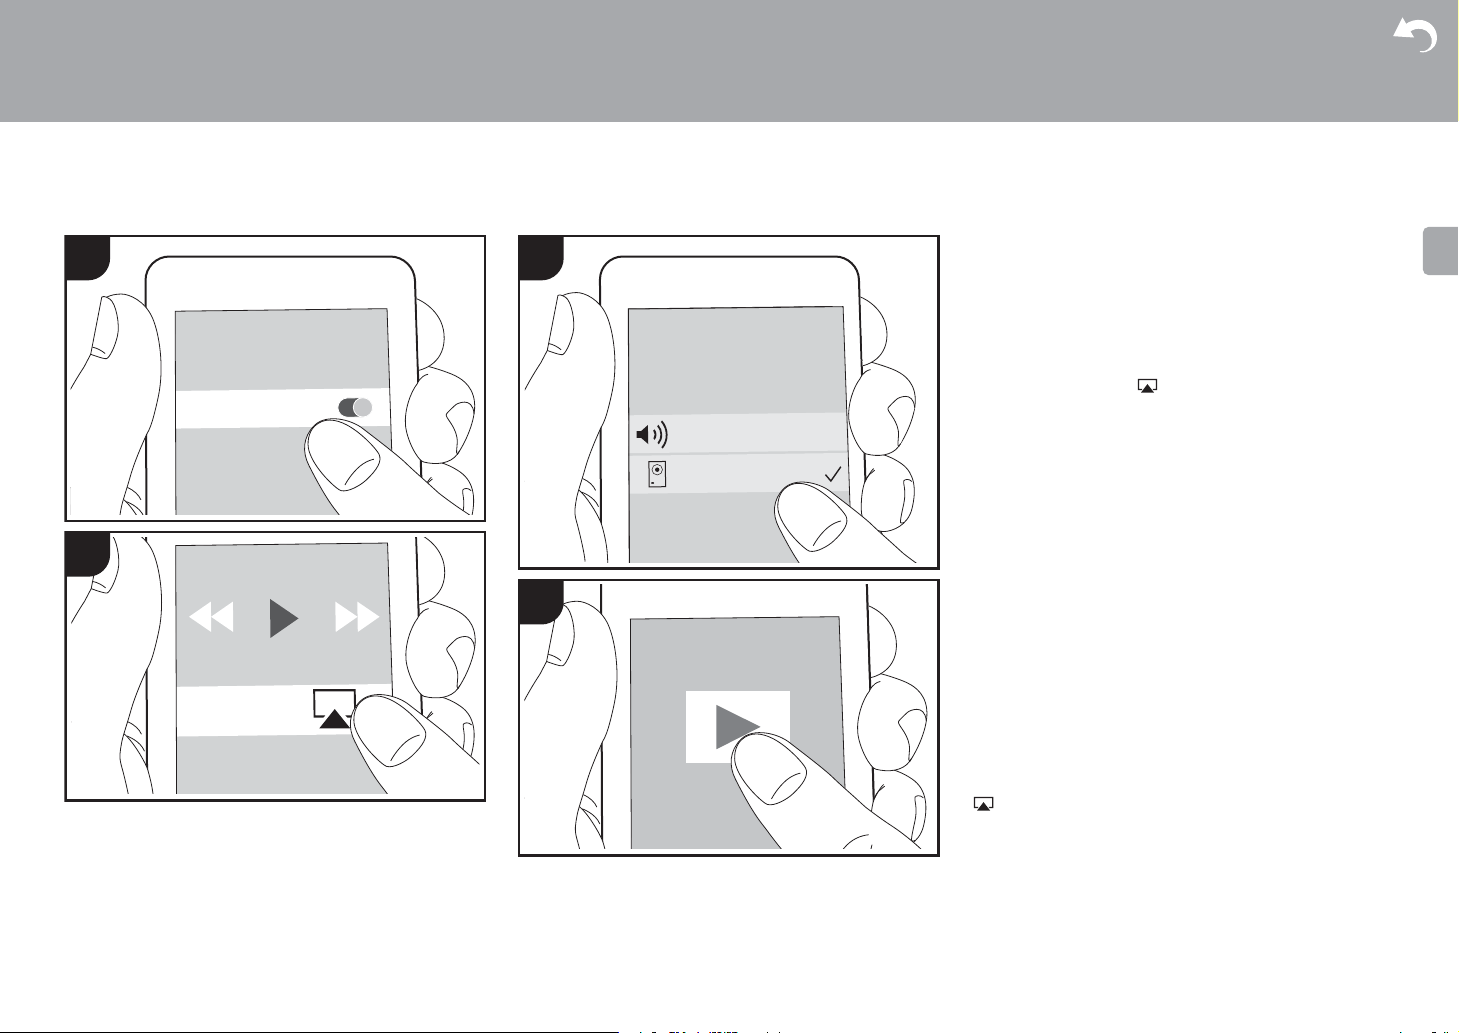
AirPlay
1
2
®
Wi-Fi
3
4
Basic Operation
You can wirelessly enjoy the music files on an iPhone®,
iPod touch
as this unit. Update the OS version on your iOS device to
the latest version.
1. Turn the unit on.
2. Connect the iOS device to the same network as this unit.
3. Tap the AirPlay icon in the control center of the iOS
4. Play the music files on the iOS device.
0 In the Setup menu displayed by pressing SETUP on the
0 Due to the characteristics of AirPlay wireless technology,
0 SHUFFLE/REPEAT on the remote controller does not
You can also play the music files on a computer with iTunes
(Ver. 10.2.2 or later). Make sure this unit and the computer
are connected to the same network, click the AirPlay icon
displayed, and start play of a music file.
®
, or iPad® connected to the same access point
device and select this unit from the list of devices
displayed, and tap «Done».
0 This unit is displayed as «Pioneer HM76D (76 or 86D)
XXXXXX».
0 If an «AirPlay Password» has been set on this unit,
enter the password you set.
remote controller, when «Option Setting»
Setting» — «Network Standby» is set to «On», when play of
AirPlay starts, this unit turns on automatically and play
starts.
the sound produced on this unit may slightly be behind
the sound played on the AirPlay-enabled device.
work. Operate from the iOS device.
in iTunes, select this unit from the list of devices
— «Power Off
29
Loading…
Pioneer X-HM76 Specification
The Pioneer X-HM76 is a compact and versatile micro Hi-Fi system designed to deliver high-quality audio performance with a range of modern features. It supports an array of audio formats, including MP3, AAC, FLAC, WAV, and Apple Lossless, ensuring compatibility with a wide variety of music files. The system integrates a Class D amplifier capable of delivering robust sound output, paired with two-way bass-reflex speakers that enhance audio clarity and depth. For connectivity, the X-HM76 includes Wi-Fi, Bluetooth, and Ethernet options, allowing seamless access to streaming services such as Spotify, TIDAL, and Deezer. It also features Chromecast built-in and is compatible with AirPlay, providing flexible streaming capabilities. The system supports high-resolution audio playback up to 192 kHz/24-bit, ensuring detailed sound reproduction. The built-in FM/DAB+ tuner provides access to a broad spectrum of radio stations. The device is equipped with a 3.5-inch color LCD display for intuitive navigation and control, displaying album art and metadata. Additional inputs include USB, AUX, and optical, offering versatile connectivity with external devices. The Pioneer Remote App enhances user interaction by enabling control via smartphones or tablets. The compact design of the X-HM76 makes it suitable for various spaces, while its elegant finish complements modern interiors. This Hi-Fi system is tailored for audiophiles seeking a blend of classic sound quality with contemporary features.
Pioneer X-HM76 F.A.Q.
To connect your Pioneer X-HM76 to Wi-Fi, press the ‘Home’ button on the remote control, navigate to ‘Network Settings’, select ‘Wi-Fi’, and follow the on-screen instructions to select your network and enter the password.
Ensure the power cable is securely connected to both the unit and the power outlet. Check if the outlet is working by testing another device. If the problem persists, try a different power cable or contact Pioneer support.
To update the firmware, connect the device to the internet, navigate to ‘Settings’, select ‘Firmware Update’, and follow the instructions. Ensure the device remains powered on during the update process.
To reset the device, press and hold the ‘Power’ button until the unit turns off. Press and hold ‘Function’ and ‘Volume Down’ simultaneously until ‘Reset’ appears on the display. Release the buttons to complete the reset.
Check the speaker connections, ensure the correct input source is selected, and verify that the volume is not muted. Make sure the speakers are functioning by testing them with another device.
Yes, you can stream music via Bluetooth. Enable Bluetooth on your smartphone, search for ‘Pioneer X-HM76’ in the list of available devices, and connect. Ensure the unit is set to the Bluetooth input.
To set presets, select the desired radio frequency, press and hold the ‘Memory’ button on the remote until the preset number flashes, then use the ‘Up/Down’ buttons to choose a preset number and press ‘Enter’.
The Pioneer X-HM76 supports a variety of audio formats including MP3, WMA, AAC, FLAC, WAV, and DSD. Ensure your files are in these formats for optimal playback.
Adjust the EQ settings to match your preference, try repositioning the speakers for better acoustics, and ensure you’re using high-quality audio files. Consider using the built-in sound enhancement features.
External devices can be connected via the available inputs such as USB, AUX, and optical. Select the corresponding input source on the unit to begin playback from the external device.

R
U
Перед началом
Содержимое упаковки ……………………………………………………….2
Названия частей
Передняя панель ………………………………………………………………4
Задняя панель (X-HM76D, X-HM86D, XC-HM86D) ……………….5
Задняя панель (X-HM76) ……………………………………………………6
Пульт дистанционного управления ……………………………………..7
Дисплей ……………………………………………………………………………8
Акустическая система (X-HM76D, X-HM76) …………………………9
Акустическая система (X-HM86D) …………………………………….10
Установка
Подключение АС …………………………………………………………….. 11
Подключение антенн, шнура питания и т. п. ………………………12
Начальная настройка
Включение питания и начальная настройка ………………………13
Настройки времени ………………………………………………………….16
Воспроизведение
Воспроизведение компакт-дисков …………………………………….17
Устройство памяти USB/HDD ……………………………………………19
Интернет-радио ……………………………………………………………….21
Spotify ……………………………………………………………………………..22
Прослушивание радио FM ……………………………………………….23
Прослушивание цифрового радио DAB (X-HM76D, X-HM86D, XC-HM86D) …26
BLUETOOTH
®
………………………………………………………………….27
AirPlay
®
…………………………………………………………………………..29
Воспроизведение звука с внешнего источника ………………….30
Music Server …………………………………………………………………….31
Использование будильника для запуска воспроизведения …………..33
Ввод текста, регулировка качества звука и т. п. …………………34
Расширенная настройка
Расширенные настройки …………………………………………………..35
Обновление встроенного программного обеспечения
Обновление встроенного программного обеспечения …………. 39
Другие функции
Поиск и устранение неисправностей ………………………………..41
Общие характеристики …………………………………………………….44
Лицензии и товарные знаки ……………………………………………..46
> Перед началом
> Названия частей
> Установка
> Начальная настройка
> Воспроизведение
Расширенная настройка
| Обновление встроенного программного обеспечения | Другие функции
СИСТЕМА СЕТЕВОГО CD-РЕСИВЕРА
X-HM76D
X-HM76
X-HM86D
СЕТЕВОЙ CD-РЕСИВЕР
XC-HM86D
Руководство по эксплуатации
FAQ: Types of Manuals and Their Contents
Pioneer X-HM76 Manuals come in various types, each serving a specific purpose to help users effectively operate and maintain their devices. Here are the common types of Pioneer X-HM76 User Guides and the information they typically include:
- User Manuals: Provide comprehensive instructions on how to use the device, including setup, features, and operation. They often include troubleshooting tips, safety information, and maintenance guidelines.
- Service Instructions: Designed for technicians and repair professionals, these manuals offer detailed information on diagnosing and repairing issues with the device. They include schematics, parts lists, and step-by-step repair procedures.
- Installation Guides: Focus on the installation process of the device, providing detailed instructions and diagrams for proper setup. They are essential for ensuring the device is installed correctly and safely.
- Maintenance Manuals: Provide guidance on routine maintenance tasks to keep the device in optimal condition. They cover cleaning procedures, part replacements, and regular servicing tips.
- Quick Start Guides: Offer a concise overview of the essential steps needed to get the device up and running quickly. They are ideal for users who need immediate assistance with basic setup and operation.
Each type of Pioneer X-HM76 instruction is designed to address specific needs, ensuring users have the necessary information to use, maintain, and repair their devices effectively.
Related Instructions for Pioneer X-HM76:
1
CLD-900
Operating instructions manual Pioneer CD Player Operating instructions manual (File: pioneer-cld-900-operating-instructions-manual-36, Sunday 23-03-2025)
36
213
41
4
DEH-P3500MP
Installation manual PDF User Manual (@2U4HE2), Pioneer DEH-P3500MP Car Stereo System (Sunday 23-03-2025)
8
49
12
6
HTZ-BD91HW
Owner’s manual Guide: Pioneer HTZ-BD91HW (1B5EAV, Upd.08.03.2025)
220
1141
217
7
YN-M Series
Owner’s manual Pioneer Air Conditioner Owner’s manual (File: pioneer-yn-m-series-owner-s-manual-13, 22.11.2024)
13
230
44
8
DEH-P460MP/XM/UC
Service manual PDF Manual (@13H6PM), Pioneer DEH-P460MP/XM/UC Car Stereo System (Sat 02.2025)
77
869
209
9
F-91
Operating instructions manual Pioneer Tuner Operating instructions manual (File: pioneer-f-91-operating-instructions-manual-12, Sun 02.2025)
12
876
193
10
MVH-S100UI
Owner’s manual Pioneer Receiver Owner’s manual (File: pioneer-mvh-s100ui-owner-s-manual-160, 01st Nov 2024)
160
244
57
Media Player Devices by Other Brands:
|
Sony NWZ-A815 Specifications MP3 Player #9K5S6O NWZ-A815WHI 18 Jan 2025 | 2 |
|
|
Velleman MMPL1 Operation & User’s Manual MMPL1 (Media Player ePDF User Guide, #81WS18) MMPL1 10 Oct 2024 | 18 |
|
|
BOBPERRY AUDIO Ducker 2 Manual User Manual: BOBPERRY AUDIO Ducker 2 (4535ZJ, Upd.Sunday 02-02-2025) Bob Perry Ducker 2 – Manual – Page 1/12 02 Feb 2025 | 12 |
|
|
Emtec K120 Movie Cube Brochure & Specs User Manual: Emtec K120 Movie Cube (462I85, Upd.19/04/2025) K120 19 Apr 2025 | 2 |
Categories:
Home cinema system
Audio & Video Accessories
Surround system
Air Handlers
Smart TV
Navigation system
Хорошее руководство по эксплуатации
Законодательство обязывает продавца передать покупателю, вместе с товаром, руководство по эксплуатации Pioneer X-HM76. Отсутствие инструкции либо неправильная информация, переданная потребителю, составляют основание для рекламации в связи с несоответствием устройства с договором. В законодательстве допускается предоставлении руководства в другой, чем бумажная форме, что, в последнее время, часто используется, предоставляя графическую или электронную форму инструкции Pioneer X-HM76 или обучающее видео для пользователей. Условием остается четкая и понятная форма.
Что такое руководство?
Слово происходит от латинского «instructio», тоесть привести в порядок. Следовательно в инструкции Pioneer X-HM76 можно найти описание этапов поведения. Цель инструкции заключается в облегчении запуска, использования оборудования либо выполнения определенной деятельности. Инструкция является набором информации о предмете/услуге, подсказкой.
К сожалению немного пользователей находит время для чтения инструкций Pioneer X-HM76, и хорошая инструкция позволяет не только узнать ряд дополнительных функций приобретенного устройства, но и позволяет избежать возникновения большинства поломок.
Из чего должно состоять идеальное руководство по эксплуатации?
Прежде всего в инструкции Pioneer X-HM76 должна находится:
— информация относительно технических данных устройства Pioneer X-HM76
— название производителя и год производства оборудования Pioneer X-HM76
— правила обслуживания, настройки и ухода за оборудованием Pioneer X-HM76
— знаки безопасности и сертификаты, подтверждающие соответствие стандартам
Почему мы не читаем инструкций?
Как правило из-за нехватки времени и уверенности в отдельных функциональностях приобретенных устройств. К сожалению само подсоединение и запуск Pioneer X-HM76 это слишком мало. Инструкция заключает ряд отдельных указаний, касающихся функциональности, принципов безопасности, способов ухода (даже то, какие средства стоит использовать), возможных поломок Pioneer X-HM76 и способов решения проблем, возникающих во время использования. И наконец то, в инструкции можно найти адресные данные сайта Pioneer, в случае отсутствия эффективности предлагаемых решений. Сейчас очень большой популярностью пользуются инструкции в форме интересных анимаций или видео материалов, которое лучше, чем брошюра воспринимаются пользователем. Такой вид инструкции позволяет пользователю просмотреть весь фильм, не пропуская спецификацию и сложные технические описания Pioneer X-HM76, как это часто бывает в случае бумажной версии.
Почему стоит читать инструкции?
Прежде всего здесь мы найдем ответы касательно конструкции, возможностей устройства Pioneer X-HM76, использования отдельных аксессуаров и ряд информации, позволяющей вполне использовать все функции и упрощения.
После удачной покупки оборудования/устройства стоит посвятить несколько минут для ознакомления с каждой частью инструкции Pioneer X-HM76. Сейчас их старательно готовят или переводят, чтобы они были не только понятными для пользователя, но и чтобы выполняли свою основную информационно-поддерживающую функцию.