

ВЕНТИЛЯЦИЯ.
При установке устройства
обеспечьте достаточное пространство для
вентиляции и предотвращения теплоизлучения
(не менее 10 см сверху, 10 см сзади и по 10 см
слева и справа).
ВНИМАНИЕ.
Прорезь и отверстия в корпусе
предназначены для обеспечения вентиляции и
надлежащей работы устройства, а также для
предотвращения перегрева или возгорания.
Поэтому их ни в коем случае нельзя
перекрывать или накрывать посторонними
предметами, например газетами, скатертями,
занавесками и т.д. Не устанавливайте также
данное устройство на толстый ковер, кровать,
диван или ворсистую ткань.
МЕРЫ ПРЕДОСТОРОЖНОСТИ ПРИ
ОБРАЩЕНИИ С КАБЕЛЕМ ПИТАНИЯ
Держите кабель питания за вилку. Вынимая вилку из
электророзетки, никогда не тяните за сам кабель,
никогда не дотрагивайтесь до кабеля питания
влажными руками, так как это может стать причиной
короткого замыкания и поражения электрическим
током. Не допускайте установки на кабель питания
самого проигрывателя, предметов мебели и т.п. или
защемления кабеля. Не допускайте связывания
кабеля в узел или его спутывания с другими
кабелями. Кабели питания следует прокладывать в
таких местах, где возможность наступить на них
будет маловероятной. Поврежденный кабель
питания может стать причиной возгорания или
поражения электрическим током. Периодически
проверяйте кабель питания. Если обнаружится его
повреждение, обратитесь в ближайший сервисный
центр, уполномоченный компанией Pioneer, или к
своему дилеру по поводу его замены.
Это изделие содержит систему защиты авторских
прав, защищенную методами, перечисленными в
ряде патентов и в другой интеллектуальной
собственности, принадлежащей Macrovision
Corporation и другим правообладателям. Разрешение
на использование этой системы защиты авторских
прав должно быть выдано Macrovision Corporation и
она предназначена для использования в домашних
условиях или при других ограниченных
обстоятельствах, если другие обстоятельства
использования не разрешены Macrovision Corporation.
Запрещается разборка изделия с целью
несанкционированного доступа к данной технологии.
Это изделие снабжено FontAvenue
®
комплектом шрифта, который лицезируется
NEC Corporation. FontAvenue — это
зарегистрированный торговый знак NEC
Corporation.


08 редактирование, 09 disc history (журнал дисков), 10 photoviewer (просмотр фотографий)
11 меню disc setup (настройка диска), 13 меню initial setup (начальная настройка), 14 дополнительная информация Чат поддержки
- Изображение
- Текст

Перед началом работы
01
6
Ru
Глава 1
Перед началом работы
Особенности
•
Запись на HDD
На внутренний жесткий диск модели DVR- 520H с объемом
памяти 80 Гб (гигабайт) можно записать до 102 часов
видеоматериалов (в режиме ЕР (расширенного
воспроизведения)) или до 204 часов на диск с объемом памяти
160 Гб модели DVR-720H.
Наличие в одном рекордере записываемого DVD и мощного
накопителя на жестком диске позволяет хранить записи на
HDD и получать быстрый доступ к ним в любое время или
осуществлять запись на DVD с целью архивирования или
воспроизведения с других DVD-плейеров.
•
Копирование с HDD на DVD и обратно
Вы можете копировать записи с HDD на записываемый DVD
или с DVD на HDD. В большинстве случаев вы можете
воспользоваться функцией ускоренного копирования, которая
позволяет менее чем за две минуты скопировать видеозапись
продолжительностью в один час (если запись выполнена в
режиме EP с использованием диска DVD-R версия 2.0 / 8x).
Также имеется возможность копирования видеоматериалов с
оригинальной записи с различным качеством. Например, вы
можете скопировать с HDD запись в режиме FINE (самое
высокое качество записи) на DVD с качеством SP
(стандартное воспроизведение), чтобы вместить другие
записи на один и тот же диск.
•
One Touch Copy (Моментальное копирование)
Функция моментального копирования дает возможность
скопировать воспроизводимую с HDD главу на DVD или с DVD
на HDD одним нажатием кнопки.
•
Воспроизведение части записываемого материала
Используя эту функцию, можно просматривать уже
записанный материал, не дожидаясь завершения его записи.
Например, если установлена запись по таймеру для
программы, первые 15 минут который вы не сможете
посмотреть, то по истечении этого времени можно начать
просмотр записанного материала, не прерывая запись.
•
Одновременное воспроизведение и запись
материала
Функции воспроизведения и записи как для DVD, так и для
встроенного HDD абсолютно независимы друг от друга.
Например, можно записать телепередачу как на
записываемый DVD, так и на HDD во время просмотра другой
записи, сделанной ранее на тот же DVD-диск или HDD.
•
Disc Navigator (Навигатор дисков)
Экранный Навигатор дисков обеспечивает простой просмотр
содержания диска или HDD. Для удобства работы с
содержимым записываемых DVD и HDD на экране
отображаются движущиеся миниатюры. Можно также
редактировать содержимое HDD и записываемых DVD,
используя Навигатор дисков.
•
Disc History (Журнал дисков)
На экране Disc History (Журнал дисков) отображается
информация о последних 30 записываемых дисках, которые
были установлены в DVD-рекордер, включая информацию об
оставшемся свободном месте. Информация на экране Disc
History (Журнал дисков) автоматически обновляется каждый
раз, когда устанавливается записываемый диск.
•
Home Menu (Основное меню)
С помощью экрана Home Menu (Основное меню) возможен
доступ ко всем функциям рекордера — от настройки рекордера
до программирования записи по таймеру и редактирования
записанного материала.
•
Объемное звучание домашнего кинотеатра
Подключите рекордер к усилителю/ресиверу,
поддерживающему систему Dolby Digital и/или DTS, для
обеспечения насыщенного объемного звучания при
воспроизведении дисков DVD в системе Dolby Digital и DTS.
•
Easy Timer Recording (Простая запись по таймеру)
Самым простым способом установки рекордера для записи
программы является использование экрана Easy Timer
Recording (Простая запись по таймеру). Установите канал для
записи и качество записи, затем отметьте на графике время
начала и окончания записи. Готово!
•
Программирование до 32 записей по таймеру
Можно запрограммировать рекордер на запись до 32
программ (не более чем на месяц вперед), используя при
необходимости систему ShowView™
*
для более простого
программирования. Кроме разовых программ, можно
запрограммировать рекордер на ежедневные или
еженедельные записи по таймеру.
Данный рекордер также поддерживает систему VPS/PDC, что
обеспечивает выполнение записи программы, даже если
трансляция началась не по расписанию.
*
является торговой маркой компании
Gemstar Development Corporation.
Система ShowView произведена по лицензии Gemstar
Development Corporation.
•
Запись путем однократного нажатия на кнопку
С помощью функции записи путем однократного нажатия на
кнопку запись начинается незамедлительно и выполняется
интервалами по 30 минут. При каждом нажатии кнопки
ì REC время записи увеличивается на 30 минут.
•
Оптимизированная запись
С помощью этой функции можно выполнить автоматическую
настройку качества записи, если при выполненных настройках
не удастся осуществить запись по таймеру на диск.
•
Автоматическое начало записи со спутникового
ресивера или другой приставки
Если спутниковый ресивер или другая приставка подключена
к входам AV2/AUTO START REC (INPUT 1/DECODER) на
рекордере, то в зависимости от настроек таймера приставки
начало и окончание записи можно будет выполнять
автоматически.
HDD
Режим VR
HDD
Режим VR
HDD
TM

Перед началом работы
01
7
Ru
•
Высококачественный 16-битный звук в формате
Linear PCM
Во время записи с использованием одного из параметров
высокого качества (FINE или MN32) звук не сжимается и
записывается в 16-битном формате Linear PCM. При этом
достигается великолепное качество звука и изображения.
•
Функции настройки качества изображения
Во время воспроизведения можно выполнять настройку
различных параметров для улучшения качества изображения.
Можно также выполнить настройку качества записываемого
изображения. Например, прежде чем перезаписать материал
со старой видеокассеты на диск DVD, сначала можно
улучшить качество изображения, а затем выполнить запись
материала на диск.
•
Быстрый и простой поиск нужного для просмотра
материала
В отличие от видеопленки, которую необходимо
перематывать на нужный участок, можно перейти прямо к той
части DVD или HDD, которую необходимо просмотреть. Поиск
необходимого места на диске осуществляется по названию
главы, раздела или по времени.
•
Запись вручную
Кроме четырех предварительно установленных режимов
качества записи (FINE, SP, LP и EP), можно включить режим
записи вручную, который позволяет использовать 32
различных параметра качества/времени записи, благодаря
которым обеспечивается точное управление процессом
записи.
•
Запись с видеокамеры DV на рекордер и с
рекордера на видеокамеру DV
Данный рекордер оснащен встроенным входным/выходным
разъемом DV (цифрового видео) для подключения к
видеокамере DV. Это делает его идеальным для копирования
отснятого видеокамерой материала на DVD или HDD и
дальнейшего редактирования. При необходимости можно
также скопировать содержимое DVD или HDD обратно на
камеру.
•
Редактирование без изменения оригинала
При редактировании материала, сохраненного на диске DVD-
RW, реальное содержимое диска (содержимое оригинала
(Original)) остается неизменным. В измененном варианте
(содержимое списка воспроизведения (Play List)) имеются
ссылки на различные части оригинала (Original).
•
Добавление маркеров разделов
Для упрощения процесса редактирования можно добавить
маркеры разделов в любом месте записанного материала.
•
Воспроизведение материала, записанного в
режиме Video, с помощью обычного проигрывателя
DVD
Диски, записанные в режиме Video, можно воспроизводить,
используя обычные проигрыватели DVD, в том числе
компьютерные дисководы DVD, поддерживающие режим
воспроизведения DVD-Video
*
.
*
Запись в “формате DVD-Video”: запись материала на
диски DVD-R и DVD-RW в формате DVD-Video означает
запись в режиме Video с помощью DVD-рекордеров марки
Pioneer. Некоторые устройства для воспроизведения
дисков DVD, возможно, не будут поддерживать
воспроизведение дисков DVD-R/DVD-RW, в том числе тех,
что записаны в формате DVD-Video.
Примечание. Требуется закрытие сессий диска.
•
Воспроизведение файлов WMA, MP3 и JPEG
С помощью этого рекордера можно воспроизводить
аудиофайлы в формате WMA и MP3 и файлы изображений в
формате JPEG с дисков CD-R, CD-RW или CD-ROM.
•
Создание резервной копии диска
Функция создания резервной копии диска позволяет
скопировать важный материал с одного DVD на другой
записываемый DVD. Сначала материал копируется на HDD, а
затем – на второй DVD-диск.
•
Запись с возвратом в исходный режим
Если запись по таймеру настроена для использования DVD, но
диск, загруженный в момент записи, незаписываемый,
программа автоматически записывается на HDD.
•
Запись с автоматической заменой
Эту функцию удобно использовать при регулярной записи
телепрограммы, которую не нужно хранить после просмотра.
Каждый раз, когда программа записывается, она заменяет
предыдущую запись, которая находится на HDD.
Необходимость удалять материал вручную отсутствует.
Режим VR
Режим VR
HDD
Режим Video
Особенности копирования:
Записывающее оборудование должно использоваться для законного
копирования. Рекомендуется выяснить, что является законным
копированием, а что – нет, в стране, где вы копируете видеоматериалы.
Копирование материала, защищенного авторскими правами, такого как
кинофильмы или музыкальные клипы, является незаконным, если не
разрешено в исключительных случаях или не одобрено владельцами
прав.
HDD
HDD

Перед началом работы
01
8
Ru
Комплект поставки
После открытия упаковки убедитесь в наличии перечисленных
ниже принадлежностей.
• Пульт дистанционного управления
• Сухие батарейки AA/R6P x2
• Кабель аудио/видео (красный/белый/желтый)
• Кабель телевизионной антенны
• Кабель питания
• Инструкции по эксплуатации
• Гарантийный сертификат
Установка батареек в пульт
дистанционного управления
1
Откройте крышку батарейного отсека,
расположенную на обратной стороне пульта
дистанционного управления.
2
Вставьте две батарейки AA/R6P в батарейный
отсек, соблюдая полярность ( , ) в соответствии с
метками внутри отсека.
3
Закройте крышку.
Примечание
Неправильная установка может стать причиной
возникновения опасной ситуации, например утечки
внутреннего вещества или взрыва. Соблюдайте указания,
перечисленные ниже.
• Не устанавливайте вместе старые и новые батарейки.
• Не используйте вместе батарейки разных типов: разные
батарейки могут выглядеть одинаково, но обеспечивать
разное напряжение.
• Следите за тем, чтобы при установке батареек их
положительные и отрицательные полюса располагались в
соответствии с обозначениями внутри батарейного
отсека.
• Извлекайте батарейки из оборудования, которое не
планируется использовать в течение месяца или более.
• Производите утилизацию использованных батареек в
соответствии с действующими в стране или регионе
государственными постановлениями или правилами по
охране окружающей среды.
Использование пульта
дистанционного управления
При использовании пульта дистанционного управления
необходимо помнить перечисленные ниже правила.
• Убедитесь в отсутствии препятствий между пультом
дистанционного управления и дистанционным датчиком
устройства.
• Эффективность работы пульта дистанционного
управления может снизиться при попадании на
дистанционный датчик устройства ярких солнечных лучей
или сильного света флуоресцентной лампы.
• Пульты дистанционного управления различных приборов
могут создавать помехи друг для друга. Старайтесь не
пользоваться пультами дистанционного управления
другого оборудования, расположенного рядом с этим
устройством.
• Замените батарейки, если заметите, что дальность
действия пульта дистанционного управления
сократилась.
• При разрядке или замене батареек автоматически
выполняется сброс режима пульта дистанционного
управления и предварительно заданных кодов
телевизора. Сведения по их восстановлению см. в
разделах Remote Control Set (Настройка пульта
дистанционного управления)
на стр. 99 и Настройка
пульта дистанционного управления для управления
телевизором
на стр. 112.
• При использовании учитывайте дальность действия и
максимальный угол отклонения от сенсора, как показано
ниже.
30
30
7м

Перед началом работы
01
9
Ru
• Этим рекордером можно управлять через датчик
дистанционного управления другого компонента марки
Pioneer. Для этого необходимо подключить компонент к
гнезду CONTROL IN на задней панели рекордера.
Дополнительные сведения см. в разделе Разъемы на
задней панели
на стр. 12.
Поддержка форматов дисков/
содержимого при воспроизведении
Поддержка основных типов дисков
Этот рекордер поддерживает диски (носители) разных типов и
форматов. Диски для воспроизведения обычно имеют один из
следующих логотипов на диске и/или упаковке диска. Но
следует помнить, что некоторые типы дисков, например
записываемые диски CD и DVD, могут содержать данные в
формате, который невозможно воспроизвести. Ниже
приведена информация о совместимости.
• Поддерживаются также диски KODAK Picture CD
•
является торговой маркой формата DVD/Logo
Licensing Corporation.
•
является торговой маркой Fuji Photo Film Co. Ltd.
Этот рекордер также поддерживает стандарт Super VCD,
установленный Международной электротехнической
комиссией (IEC). Стандарт Super VCD обеспечивает более
высокое (по сравнению с Video CD) качество изображения и
позволяет записывать две звуковые дорожки. Кроме того,
Super VCD поддерживает широкоэкранное изображение.
Поддержка дисков DVD-R/RW
С помощью этого рекордера можно воспроизводить и
записывать диски DVD-R/RW.
Поддерживаемые носители:
• диски DVD-RW версий 1.1, 1.1/2x и 1.2/4x
• диски DVD-R версий 2.0 и 2.0/4x/8x
Форматы записи:
• диски DVD-R: формат DVD-Video (режим Video)
• диски DVD-RW: форматы Video Recording (VR) и DVD-
Video (режим Video)
Обратите внимание на то, что более старые модели
рекордеров DVD и устройств для записи DVD могут не
воспринимать диски DVD-RW версии 1.2 / 4x. Для
использования одних и тех же дисков DVD-RW в данном
рекордере и более старых рекордерах/записывающих
устройствах, рекомендуется использовать диски версии 1.1.
Ниже приведена таблица совместимости старых моделей
DVD-рекордеров Pioneer с дисками DVD-RW версии 1.2 / 4x.
1
Перед воспроизведением в данном рекордере необходимо закрыть
сессии на дисках. Диски с незакрытыми сессиями с поддержкой режимов
VR и Video могут не воспроизводиться.
2
При загрузке диска на экране появится надпись
Cannot read the CPRM
information, однако это не влияет на воспроизведение.
3
Главы дисков, предусматривающих однократное копирование, не
воспроизводятся.
Поддержка дисков CD-R/RW
Этот рекордер нельзя использовать для записи дисков CD-R
или CD-RW.
• Поддерживаемые форматы: диски CD-Audio, Video CD/
Super VCD, ISO 9660 CD-ROM*, содержащие файлы MP3,
WMA или JPEG
* Удовлетворяют требованиям стандарта ISO 9660 Level 1
или 2. Физический формат компакт-диска: Mode1, Mode2
XA Form1. Этот рекордер поддерживает файловую
систему Romeo & Joliet.
• Воспроизведение мультисессионных дисков:
поддерживает (кроме дисков CD-Audio и Video CD/Super
VCD)
• Воспроизведение дисков с незакрытыми сессиями:
только диски CD-Audio
Поддержка сжатых аудиосигналов
• Поддерживаемые носители: CD-ROM, CD-R, CD-RW
• Поддерживаемые форматы: MPEG-1 Audio Layer 3 (MP3),
Windows Media Audio (WMA)
• Частоты дискретизации: 44,1 или 48 кГц
• Скорость передачи данных: любая (рекомендуется 128
Кбит/с или выше)
• Воспроизведение в формате MP3 с изменяющейся
скоростью передачи данных (VBR): Да
• Воспроизведение файлов VBR WMA: не поддерживает
• Поддержка кодирования WMA: Windows Media Codec 8
(файлы, закодированные с помощью Windows Media
Codec 9, могут воспроизводиться, но некоторые части
спецификации не поддерживаются, в частности Pro,
Lossless, Voice и VBR)
• Воспроизведение файлов, записанных с использованием
функции DRM (технология управления цифровыми
правами): не поддерживает (о функции DRM см. также в
Глоссарий
на стр. 122)
DVD-Video
DVD-R
DVD-RW
Video CD
Fujicolor CD
Audio CD
CD-R
CD-RW
VIDEO
CD
Super Video CD (Super VCD)
Модель
Воспроизводимый Записываемый
DVR-7000
Да
1,2,3
Нет
DVR-3100/ DVR-5100H
Да
1
Нет

Перед началом работы
01
10
Ru
• Расширения файлов: .mp3, .wma (должны использоваться
для того, чтобы рекордер распознал файлы MP3 и WMA;
не используйте эти расширения для файлов других типов)
• Файловая структура: до 99 папок/999 файлов (при
превышении этих значений воспроизводятся только
файлы и папки, находящиеся в этих пределах)
Поддержка WMA (Windows Media Audio)
Логотип Windows Media
®
, нанесенный на упаковку, означает,
что этот рекордер может воспроизводить данные Windows
Media Audio.
WMA является аббревиатурой от Windows Media Audio и
означает технологию сжатия звука, разработанную
корпорацией Майкрософт. Данные WMA могут кодироваться с
помощью проигрывателя Windows Media
®
версии 7, 7.1,
проигрывателя Windows Media
®
для Windows
®
XP или
проигрывателя Windows Media
®
9 Series.
Microsoft, Windows Media и логотип Windows являются
торговыми марками или зарегистрированными торговыми
марками корпорации Microsoft в США и/или других странах.
Поддержка файлов JPEG
• Поддерживаемые форматы: поддерживаются файлы
неподвижных изображений основных форматов JPEG и
EXIF 2.2*
*Формат файлов, используемый для цифровых
фотоаппаратов
• Коэффициент частоты дискретизации: 4:4:4, 4:4:2, 4:2:0
• Разрешение по горизонтали: 160 – 5120 пиксел
• Разрешение по вертикали: 120 – 3840 пиксел
• Поддержка прогрессивных изображений JPEG: нет
• Расширения файлов: .jpg, jpeg, jif, jfif (должны
использоваться для того, чтобы рекордер распознал
файлы JPEG; не используйте эти расширения для файлов
других типов)
• Файловая структура: в память рекордера можно
одновременно загрузить не более 99 папок/999 файлов
(при наличии на диске большего числа файлов/папок,
файлы/папки, не входящие в этот предел, можно
загрузить позднее)
Поддержка дисков, созданных на ПК
Диск, записанный на персональном компьютере, возможно,
не будет воспроизводиться с помощью этого устройства из-за
настроек прикладной программы, которая использовалась
для создания диска. В таких случаях для получения более
подробной информации следует обратиться к производителю
этого программного обеспечения.
Этот рекордер не поддерживает диски, записанные в режиме
пакетной записи (формат UDF).
Дополнительную информацию о поддержке дисков DVD-R/RW
или CD-R/RW см. на их упаковке.
Часто задаваемые вопросы
• В чем отличие между дисками DVD-R и DVD-RW?
Главное отличие между дисками DVD-R и DVD-RW
заключается в том, что на диск DVD-R материал можно
записать только один раз, а при использовании диска
DVD-RW можно выполнять многократную запись и
удаление данных.
Диск DVD-RW можно перезаписывать приблизительно
1000 раз.
Дополнительные сведения см. в разделе Подробнее о
записи дисков DVD
на стр. 45.
• Что такое режим VR?
Режим VR (Video Recording) специально предназначен для
выполнения записи дисков DVD в домашних условиях.
Этот режим предоставляет более широкие возможности
редактирования записанного материала, чем “‘режим
Video”. С другой стороны, диски, записанные в режиме
Video, в большинстве случаев поддерживаются другими
проигрывателями DVD.
• Можно ли воспроизводить записываемые диски на
обычном проигрывателе DVD?
В большинстве случаев диски DVD-R и DVD-RW,
записанные в режиме Video
*
, можно воспроизвести с
помощью обычного проигрывателя DVD, но сначала
необходимо закрыть сессии этих дисков. При выполнении
этого процесса содержимое на диске фиксируется, что
позволяет проигрывателю DVD прочесть эти данные, как
и в случае с дисками DVD-Video.
Некоторые проигрыватели поддерживают
воспроизведение дисков DVD-RW, записанных в режиме
VR.
Этот значок обозначает совместимость
воспроизведения с дисками DVD-RW, записанными в
режиме VR (формат видеозаписи). Однако диски,
записанные при помощи шифрованной программы
одноразовой записи, можно воспроизвести только
используя устройство, совместимое с CPRM.
Однако нет гарантии, что диски, записанные с помощью
рекордера марки Pioneer, будут воспроизводиться
другими проигрывателями.
*
Запись в “формате DVD-Video”: запись материала на
диски DVD-R и DVD-RW в формате DVD-Video означает
запись в режиме Video с помощью DVD-рекордеров марки
Pioneer. Некоторые устройства для воспроизведения
дисков DVD, возможно, не будут поддерживать
воспроизведение дисков DVD-R/DVD-RW, в том числе тех,
что записаны в формате DVD-Video.
Примечание. Требуется закрытие сессий диска.
Этот рекордер поддерживает запись транслируемых
программ с возможностью копирования только один раз,
защищенных системой защиты от копирования CPRM (см.
раздел CPRM на стр. 46), в режиме VR на диски DVD-RW,
поддерживающие систему CPRM. Материал, записанный
с использованием системы CPRM, можно воспроизводить
только с помощью проигрывателей, поддерживающих
систему CPRM.

09:21
Pioneer DVR-225 DVD Recorder Repair
14:20
PIONEER HDD/DVD RECORDER DVR-650H เครื่องเล่นดีวีดีอัดบันทึกไพโอเนียร์ ขายเครื่องเล่น DVD Recorder
15:59
Pioneer DVR-RT502 DVD recorder VCR combo
11:44
DVD recorder PIONEER DVR-520H-S
04:51
Pioneer DVR-520 extracting Recordings with IsoBuster 4.3.3
10:51
( Đã bán) Test DVD Trên Đầu Pioneer DVR-2000
10:50
Test Pioneer DVR — 77H — Lh A Mẫn 0913897096
Нажмите на кнопку для помощи
DVD Recorder
DVR-420H
DVR-520H
DVR-720H
Operating Instructions
®
IMPORTANT
CAUTION
RISK OF ELECTRIC SHOCK
DO NOT OPEN
The lightning flash with arrowhead symbol,
within an equilateral triangle, is intended to
alert the user to the presence of uninsulated
«dangerous voltage» within the product’s
enclosure that may be of sufficient
magnitude to constitute a risk of electric
shock to persons.
CAUTION:
TO PREVENT THE RISK OF ELECTRIC
SHOCK, DO NOT REMOVE COVER (OR
BACK). NO USER-SERVICEABLE PARTS
INSIDE. REFER SERVICING TO QUALIFIED
SERVICE PERSONNEL.
WARNING: The apparatus is not waterproofs, to
prevent fire or shocks hazard, do not expose this
apparatus to rain or moisture and do not put any
water source near this apparatus, such as vase,
flower pot, cosmetics container and medicine
bottle etc.
CAUTION
This product contains a laser diode of higher class
than 1. To ensure continued safety, do not remove any
covers or attempt to gain access to the inside of the
product.
Refer all servicing to qualified personnel.
The following caution label appears on your unit.
D3-4-2-1-3_En
The exclamation point within an equilateral
triangle is intended to alert the user to the
presence of important operating and
maintenance (servicing) instructions in the
literature accompanying the appliance.
D3-4-2-1-1_En-A
WARNING:
BEFORE PLUGGING IN THE UNIT FOR THE FIRST
TIME, READ THE FOLLOWING SECTION CAREFULLY.
The voltage of the available power supply differs
according to country or region. Be sure that the
power supply voltage of the area where this unit
will be used meets the required voltage (e.g., 230V
or 120V) written on the rear panel.
D3-4-2-1-4_En
CLASS 1
LASER PRODUCT
D3-4-2-1-8_En
This product complies with the Low Voltage Directive
(73/23/EEC, amended by 93/68/EEC), EMC Directives
(89/336/EEC, amended by 92/31/EEC and
93/68/EEC).
D3-4-2-1-9a_En
The STANDBY/ON switch is secondary connected
and therefore, does not separate the unit from mains
power in STANDBY position. Therefore install the
unit suitable places easy to disconnect the MAINS
plug in case of the accident. The MAINS plug of unit
should be unplugged from the wall socket when left
unused for a long period of time.
D3-4-2-2-2a_En

WARNING:
No naked flame sources, such as
lighted candle, should be placed on the apparatus.
If naked flame sources accidentally fall down, fire
spread over the apparatus then may cause fire.
D3-4-2-1-7a_En
Operating Environment
Operating environment temperature and humidity:
+5 ºC – +35 ºC (+41 ºF – +95 ºF); less than 85 %RH
(cooling vents not blocked)
Do not install in the following locations
• Location exposed to direct sunlight or strong artificial
light
• Location exposed to high humidity, or poorly
ventilated location
D3-4-2-1-7c_En
This product incorporates copyright protection technology
that is protected by method claims of certain U.S. patents
and other intellectual property rights owned by
Macrovision Corporation and other rights owners. Use of
this copyright protection technology must be authorized
by Macrovision Corporation, and is intended for home and
other limited viewing uses only unless otherwise
authorized by Macrovision Corporation. Reverse
engineering or disassembly is prohibited.
This product is for general household purposes. Any failure
due to use for other than household purposes (such as longterm use for business purposes in a restaurant or use in a
car or ship) and which requires repair will be charged for
even during the warranty period. K041_En
VENTILATION:
sure to leave space around the unit for ventilation
to improve heat radiation (at least 10 cm at top, 10
cm at rear, and 10 cm at each side).
WARNING:
When installing this unit, make
Slots and openings in the cabinet are
This product includes FontAvenue® fonts licenced by NEC
corporation. FontAvenue is a registered trademark of NEC
Corporation.
provided for ventilation and to ensure reliable
operation of the product and to protect it from
overheating, to prevent fire hazard, the openings
should never be blocked and covered with items,
such as newspapers, table-cloths, curtains, etc. Also
do not put the apparatus on the thick carpet, bed,
sofa, or fabric having a thick pile.
D3-4-2-1-7b_En
POWER-CORD CAUTION
Handle the power cord by the plug. Do not pull out the
plug by tugging the cord and never touch the power
cord when your hands are wet as this could cause a
short circuit or electric shock. Do not place the unit, a
piece of furniture, etc., on the power cord, or pinch the
cord. Never make a knot in the cord or tie it with other
cords. The power cords should be routed such that they
are not likely to be stepped on. A damaged power cord
can cause a fire or give you an electrical shock. Check
the power cord once in a while. When you find it
damaged, ask your nearest PIONEER authorized
service center or your dealer for a replacement.
S002_En
Replacement and mounting of an AC plug on the power supply cord of this unit should be performed only by qualified
service personnel.
Do not connect either wire to the earth terminal of a
three pin plug.
NOTE
After replacing or changing a fuse, the fuse cover in
the plug must be replaced with a fuse cover which
corresponds to the colour of the insert in the base
of the plug or the word that is embossed on the
base of the plug, and the appliance must not be
used without a fuse cover. If lost replacement fuse
covers can be obtained from your dealer.
Only 5 A fuses approved by B.S.I or A.S.T.A to
B.S.1362 should be used.
D3-4-2-1-2-2_En
IMPORTANT
FOR USE IN THE UNITED
KINGDOM
The wires in this mains lead are coloured in
accordance with the following code:
Blue : Neutral
Brown : Live
If the plug provided is unsuitable for your socket
outlets, the plug must be cut off and a suitable plug
fitted.
The cut-off plug should be disposed of and must
not be inserted into any 13 amp socket as this can
result in electric shock. The plug or adaptor or the
distribution panel should be provided with 5 A fuse.
As the colours of the wires in the mains lead of this
appliance may not correspond with coloured
markings identifying the terminals in your plug,
proceed as follows ;
The wire which is coloured blue must be connected
to the terminal which is marked with the letter N or
coloured black.
The wire which is coloured brown must be
connected to the terminal which is marked with the
letter L or coloured red.

Contents
01 Before you start
Features
What’s in the box
Putting the batteries in the remote control
Using the remote control
Disc / content format playback compatibility
About the internal hard disk drive
. . . . . . . . . . . . . . . . . . . . . . . . . . . . . . . . . . . 6
. . . . . . . . . . . . . . . . . . . . . . . . . . . . 8
. . . . . . . . . 8
. . . . . . . . . . . . . . . . . . . . . . 8
. . . . . . . 9
. . . . . . . . . . . . . . . 11
02 Connecting up
Rear panel connections
Front panel connections
Extra features for use with compatible TVs
Easy connections
Using other types of audio/video output
Connecting to a cable box or satellite receiver
Connecting an external decoder box (1)
Connecting an external decoder box (2)
Connecting to an AV amplifier/receiver
Connecting other AV sources
Plugging in
. . . . . . . . . . . . . . . . . . . . . . . . . . . . . . . . 20
. . . . . . . . . . . . . . . . . . . . . . 12
. . . . . . . . . . . . . . . . . . . . . . 12
. . . . . . . . 13
. . . . . . . . . . . . . . . . . . . . . . . . . . . 14
. . . . . . . . . . 15
. . . . . 16
. . . . . . . . . . 17
. . . . . . . . . . 18
. . . . . . . . . . 19
. . . . . . . . . . . . . . . . . . 20
03 Controls and displays
Front panel
Display
Remote control
. . . . . . . . . . . . . . . . . . . . . . . . . . . . . . . . 21
. . . . . . . . . . . . . . . . . . . . . . . . . . . . . . . . . . . 22
. . . . . . . . . . . . . . . . . . . . . . . . . . . . . 23
04 Getting started
Switching on and setting up
Selecting the hard disk or DVD for playback and
recording
Making your first recording
Using the built-in TV tuner
Basic playback
Using the Home Menu
Displaying disc information on-screen
. . . . . . . . . . . . . . . . . . . . . . . . . . . . . . . . . 28
. . . . . . . . . . . . . . . . . . . . . . . . . . . . . 30
. . . . . . . . . . . . . . . . . . . 25
. . . . . . . . . . . . . . . . . . . . 28
. . . . . . . . . . . . . . . . . . . . 29
. . . . . . . . . . . . . . . . . . . . . . . 33
. . . . . . . . . . . 33
Switching DVD soundtracks
Switching audio channels
Switching camera angles
. . . . . . . . . . . . . . . . . . . 43
. . . . . . . . . . . . . . . . . . . . 44
. . . . . . . . . . . . . . . . . . . . . 44
06 Recording
About DVD recording
About HDD recording
Recording time and picture quality
Restrictions on video recording
Setting the picture quality/recording time
Basic recording from the TV . . . . . . . . . . . . . . . . . . . 47
Setting a timer recording . . . . . . . . . . . . . . . . . . . . . 49
Timer recording FAQ . . . . . . . . . . . . . . . . . . . . . . . . 55
Simultaneous recording and playback . . . . . . . . . . . 55
Recording from an external component . . . . . . . . . . 56
Automatic recording from a satellite tuner . . . . . . . . 56
Recording from a DV camcorder
(DVR-520H/720H only) . . . . . . . . . . . . . . . . . . . . . . . 57
Recording from the DV output
(DVR-520H/720H only) . . . . . . . . . . . . . . . . . . . . . . . 59
Playing your recordings on other DVD players . . . . . 59
Initializing a DVD-RW disc . . . . . . . . . . . . . . . . . . . . 60
. . . . . . . . . . . . . . . . . . . . . . . . 45
. . . . . . . . . . . . . . . . . . . . . . . . 45
. . . . . . . . . . . . . . 46
. . . . . . . . . . . . . . . . 46
. . . . . . . . 47
07 Copying and back-up
Introduction . . . . . . . . . . . . . . . . . . . . . . . . . . . . . . . 61
One Touch Copy (HDD to DVD) . . . . . . . . . . . . . . . . 62
One Touch Copy (DVD to HDD) . . . . . . . . . . . . . . . . 62
Copying from HDD to DVD . . . . . . . . . . . . . . . . . . . . 63
HDD to DVD Copy List menu options . . . . . . . . . . . . 64
Recording the Copy List . . . . . . . . . . . . . . . . . . . . . . 65
HDD to DVD Copy List commands . . . . . . . . . . . . . . 65
Copying from DVD to HDD . . . . . . . . . . . . . . . . . . . . 71
DVD to HDD Copy List menu options . . . . . . . . . . . . 72
Recording the Copy List . . . . . . . . . . . . . . . . . . . . . . 72
DVD to HDD Copy List commands . . . . . . . . . . . . . . 73
Using disc back-up . . . . . . . . . . . . . . . . . . . . . . . . . 74
4
En
05 Playback
Introduction
Using the Disc Navigator to browse the contents
of a disc.
Navigating discs and the HDD
Scanning discs
Playing in slow motion
Frame advance/frame reverse
The Play Mode menu
Displaying and switching subtitles
. . . . . . . . . . . . . . . . . . . . . . . . . . . . . . . 36
. . . . . . . . . . . . . . . . . . . . . . . . . . . . . . . . . . 36
. . . . . . . . . . . . . . . . . 38
. . . . . . . . . . . . . . . . . . . . . . . . . . . . . 38
. . . . . . . . . . . . . . . . . . . . . . . 39
. . . . . . . . . . . . . . . . . 39
. . . . . . . . . . . . . . . . . . . . . . . . 40
. . . . . . . . . . . . . . 43
08 Editing
The Disc Navigator screen . . . . . . . . . . . . . . . . . . . . 76
Disc Navigator menu options . . . . . . . . . . . . . . . . . . 78
Editing VR mode Original, Video mode and HDD
content. . . . . . . . . . . . . . . . . . . . . . . . . . . . . . . . . . . 79
Editing HDD groups . . . . . . . . . . . . . . . . . . . . . . . . . 84
Creating and editing a VR mode Play List . . . . . . . . . 84

09 Disc History
Using the Disc History
. . . . . . . . . . . . . . . . . . . . . . . 89
10 The PhotoViewer
Playing a slideshow
. . . . . . . . . . . . . . . . . . . . . . . . . 90
11 The Disc Setup menu
Basic settings
Initialize settings
HDD Initialize
Finalize settings
. . . . . . . . . . . . . . . . . . . . . . . . . . . . . 92
. . . . . . . . . . . . . . . . . . . . . . . . . . . 93
. . . . . . . . . . . . . . . . . . . . . . . . . . . . . 93
. . . . . . . . . . . . . . . . . . . . . . . . . . . . 93
12 The Video/Audio Adjust menu
Setting the picture quality for TV and external
. . . . . . . . . . . . . . . . . . . . . . . . . . . . . . . . . . . 94
inputs
Setting the picture quality for disc playback
Audio DRC
. . . . . . . . . . . . . . . . . . . . . . . . . . . . . . . . 96
13 The Initial Setup menu
Using the Initial Setup menu
Basic settings
Tuner settings
Video In / Out settings
Audio In settings
Audio Out settings
Language settings
Recording settings
Playback settings
. . . . . . . . . . . . . . . . . . . . . . . . . . . . . 97
. . . . . . . . . . . . . . . . . . . . . . . . . . . . . 99
. . . . . . . . . . . . . . . . . . . . . . . . . . 103
. . . . . . . . . . . . . . . . . . . . . . . . . 104
. . . . . . . . . . . . . . . . . . . . . . . . . 105
. . . . . . . . . . . . . . . . . . . . . . . . . 107
. . . . . . . . . . . . . . . . . . . . . . . . . . 109
. . . . . . . . . . . . . . . . . . 97
. . . . . . . . . . . . . . . . . . . . . . 102
15 Index
. . . . . . 95
14 Additional information
Resetting the recorder
Setting up the remote to control your TV
Screen sizes and disc formats
Troubleshooting
Frequently asked questions
About DV (DVR-520H/720H only)
Manual recording modes
Language code list
Country code list
On-screen displays and recorder displays
Handling discs
Storing discs
Damaged discs
Cleaning the pickup lens
Condensation
Hints on installation
Moving the recorder
Glossary
Specifications
. . . . . . . . . . . . . . . . . . . . . . . . . . . . . 121
. . . . . . . . . . . . . . . . . . . . . . . . . . . . 122
. . . . . . . . . . . . . . . . . . . . . . . . . . . . . . . . . 122
. . . . . . . . . . . . . . . . . . . . . . . . . . . . 125
. . . . . . . . . . . . . . . . . . . . . . 112
. . . . . . . . . . . . . . . . 113
. . . . . . . . . . . . . . . . . . . . . . . . . . . 114
. . . . . . . . . . . . . . . . . . 116
. . . . . . . . . . . . . . 117
. . . . . . . . . . . . . . . . . . . . 118
. . . . . . . . . . . . . . . . . . . . . . . . . 119
. . . . . . . . . . . . . . . . . . . . . . . . . . 119
. . . . . . . . . . . . . . . . . . . . . . . . . . . . 121
. . . . . . . . . . . . . . . . . . . . . . . . . . . 121
. . . . . . . . . . . . . . . . . . . . 122
. . . . . . . . . . . . . . . . . . . . . . . . 122
. . . . . . . . . . . . . . . . . . . . . . . . 122
. . . . . . . . 112
. . . . . . . 120
5
En

01
Before you start
Chapter 1
Before you start
Features
• HDD recording
You can record up to 102 hours of video (in EP mode) on
the internal 80GB (gigabyte) hard disk (HDD) on the DVR420H/520H, or up to 204 hours on the 160GB DVR-720H.
With both recordable DVD and a high-capacity HDD in
the same recorder, you have the flexibility to keep
recordings on the HDD for quick access anytime, or
record to DVD for archiving or playing on other DVD
players.
• Copy between HDD and DVD
You can copy recordings from the HDD to recordable
DVD, or from DVD to the HDD. Usually you can use the
high-speed copy feature, which can copy an hour of video
in under two minutes (when recorded in EP mode using
a DVD-R Ver. 2.0 / 8x disc).
You can also choose to copy material at a different
recording quality from the original. For example, you
might want to copy a FINE mode (highest quality)
recording on the HDD to SP (standard play) quality on a
DVD so that you can fit other recordings on the same
disc.
• One Touch Copy
One Touch Copy makes copying the currently playing title
from HDD to DVD, or DVD to HDD as simple as pressing
a button.
• Chase play
Using chase play you can start watching a recording
before the recording has finished. For example, you could
set a timer recording for a program that you’re going to
miss the first 15 minutes of, then start watching while the
recorder is still recording the program 15 minutes ahead
of you.
• Simultaneous recording and playback
VR mode HDD
Playback and recording for both DVDs and the built-in
hard disk drive (HDD) are completely independent. For
example you can record a broadcast program to either a
recordable DVD or the HDD, while watching another
recording you already made on the same DVD or on the
HDD.
HDD
VR mode HDD
• Disc Navigator
The on-screen Disc Navigator makes finding your way
around the contents of a disc or the HDD easy. For
recordable DVD and HDD content, moving thumbnail
images are displayed for ease of use. The Disc Navigator
is also where you can edit HDD and recordable DVD
content.
• Disc History
The Disc History screen shows disc information,
including how much free space remains for recording,
for the last 30 recordable discs loaded in the recorder.
Every time you load a recordable disc, the Disc History is
automatically updated with the latest information.
• Home Menu
The Home Menu gives you on-screen access to all the
recorder’s features in one convenient place, from setting
up the recorder, to programming a timer recording and
editing a recording.
• Cinema surround sound in your home
Connect this recorder to a Dolby Digital and/or DTScompatible AV amp/receiver to enjoy full surround sound
effects from Dolby Digital and DTS DVD discs.
• Easy Timer Recording
Setting the recorder to record a program is simple from
the Easy Timer Recording screen. Set the channel to
record and the recording quality, then graphically set the
start and end times of the recording. That’s it!
• Program up to 32 timer recordings
You can program the recorder to record up to 32
programs, up to a month in advance, using the
VIDEO Plus+
want. As well as single programs, you can specify daily or
weekly recordings, too.
This recorder is also compatible with VPS/PDC systems,
which ensure you don’t miss a timer recording, even if
the broadcast is not running to schedule.
*1
Development Corporation.
The VIDEO Plus+ system is manufactured under
license from Gemstar Development Corporation.
• One Touch Recording
Use One Touch Recording to start recording immediately
in 30 minute blocks. Each time you press the
button, the recording time is extended by another 30
minutes.
®
system* for easy programming if you
is a registered trademark of Gemstar
®
REC
6
En

Before you start
01
• Optimized recording
Optimized recording adjusts the recording quality
automatically if a timer recording will not fit onto a disc
with the settings that you made.
• Auto Start Recording from satellite receiver or
other set top box
With a satellite receiver or other set top box connected to
the
AV2/AUTO START REC (INPUT 1/DECODER)
inputs
of this recorder, you can start and stop recording
automatically according to the timer settings of the set
top box.
• High quality 16-bit Linear PCM audio
When recording using one of the high quality record
settings (
FINE
or
MN32
), the audio is recorded in
uncompressed 16-bit Linear PCM format. This delivers
great sounding audio to accompany the high picture
quality.
• Picture quality adjustment features
During playback, you can adjust various picture quality
settings to improve the picture. You can also adjust the
recording picture quality. For example, if you want to
make a DVD copy of an old video tape, you can optimize
the picture quality before transferring it to disc.
• Find what you want to watch quickly and easily
Unlike video tape that needs to be wound to the correct
place, you can jump right to the part of a DVD disc or the
HDD that you want to watch. Search for a point on a disc
by title, chapter or time.
• Manual recording
In addition to the four preset recording quality modes
(
FINE, SP, LP
and EP), the manual recording mode allows
you to access 32 different recording quality/time settings,
giving you precise control over the recording.
• Record to and from a DV camcorder (DVR-520H/
720H only)
This recorder has a built-in DV (Digital Video) input/
output jack for connection to a DV camcorder. This
makes it ideal for transferring camcorder footage to DVD
or HDD for editing. You can also transfer DVD or HDD
content back to the camcorder if you need to.
• Play Video mode recordings on a regular DVD
Video mode
player
Discs recorded using the Video mode can be played back
on regular DVD players, including computer DVD drives
*
compatible with DVD-Video playback
*
‘DVD-Video format’ recording: The use of the DVD-
.
Video format for recording on DVD-R and DVD-RW discs
is referred to as recording in ‘Video mode’ on Pioneer’s
DVD recorders. Supporting playback of DVD-R / DVDRW discs is optional for manufacturers of DVD
playback equipment, and there is DVD playback
equipment that does not play DVD-R or DVD-RW discs
recorded in the DVD-Video format.
Note: ‘Finalization’ is required.
• WMA, MP3 and JPEG file playback
This recorder can play WMA and MP3 audio files and
JPEG picture files on CD-R, CD-RW or CD-ROM discs.
• Disc Back-up
The disc back-up feature gives you a convenient way to
back-up important material on DVD to another
recordable DVD disc. The material is first copied to the
HDD, then on to a second DVD disc.
• Recovery Recording
HDD
When a timer recording is set to use DVD but the disc
loaded at the time of the recording is unrecordable, the
program will automatically be recorded to the HDD.
• Auto Replace Recording
HDD
This feature is useful for regular timer recordings of a TV
program which you don’t want to keep after watching.
Each time the program is recorded, it replaces the one
currently on the HDD. There’s no need to manually delete
it later.
Note on copying:
Recording equipment should be used only for lawful copying and you
are advised to check carefully what is lawful copying in the country in
which you are making a copy. Copying of copyright material such as
films or music is unlawful unless permitted by a legal exception or
consented to by the rightowners.
• Safe, non-destructive editing
VR mode
When you edit a DVD-RW, the actual content of the disc
(the Original content) is not touched. The edited version
(the Play List content) just points to various parts of the
Original content.
• Chapter marking
VR mode HDD
You can easily add chapter markers anywhere in your
recordings for easy editing.
7
En
01
Before you start
What’s in the box
Please confirm that the following accessories are in the
box when you open it.
• Remote control
• AA/R6P dry cell batteries x2
• Audio/video cable (red/white/yellow)
• RF antenna cable
• Power cable
• These operating instructions
• Warranty card
Putting the batteries in the remote
control
1 Open the battery compartment cover on the
back of the remote control.
2 Insert two AA/R6P batteries into the battery
compartment following the indications (
the compartment.
3 Close the cover.
,
) inside
Note
Incorrect use of batteries can result in hazards such as
leakage and bursting. Please observe the following:
• Don’t mix new and old batteries together.
• Don’t use different kinds of batteries together—
although they may look similar, different batteries
may have different voltages.
• Make sure that the plus and minus ends of each
battery match the indications in the battery
compartment.
• Remove batteries from equipment that isn’t going to
be used for a month or more.
• When disposing of used batteries, please comply
with governmental regulations or environmental
public instruction’s rules that apply in your country or
area.
Using the remote control
Please keep in mind the following when using the remote
control:
• Make sure that there are no obstacles between the
remote and the remote sensor on the unit.
• Remote operation may become unreliable if strong
sunlight or fluorescent light is shining on the unit’s
remote sensor.
• Remote controllers for different devices can interfere
with each other. Avoid using remotes for other
equipment located close to this unit.
• Replace the batteries when you notice a fall off in the
operating range of the remote.
• When the batteries run down or you change the
batteries, the remote control mode and TV preset
codes are automatically reset. See
Set
on page 99 and
your TV
on page 112 to reset them.
• Use within the operating range and angle, as shown.
Setting up the remote to control
Remote Control
8
En
30
30
7m
• You can control this recorder using the remote
sensor of another Pioneer component using the
CONTROL IN
connections
jack on the rear panel. See
on page 12 for more information.
Rear panel
Before you start
Disc / content format playback
compatibility
General disc compatibility
This recorder is compatible with a wide range of disc
types (media) and formats. Playable discs will generally
feature one of the following logos on the disc and/or disc
packaging. Note however that some disc types, such as
recordable CD and DVD, may be in an unplayable
format—see below for further compatibility information.
DVD-Video DVD-R DVD-RW
Note that older models of DVD recorders and DVD
writers may reject DVD-RW Ver. 1.2 / 4x discs. If you want
to share DVD-RW discs between this recorder and an
older recorder/writer, we recommend using Ver. 1.1
discs.
The following table shows older Pioneer DVD recorder
compatibility with DVD-RW Ver. 1.2 / 4x discs.
Model
DVR-7000
DVR-3100/ DVR-5100H
1
Discs should be finalized in this recorder before playing. Unfinalized
VR mode and Video mode discs may not play.
2
Cannot read the CPRM information
you load a disc. However, this will not affect playback.
3
Copy-once protected disc titles will not play.
Playable Recordable
1,2,3
Yes
1
Yes
will show in the display when
No
No
01
Audio CD CD-R
Video CD
CD-RW
Fujicolor CD
• Also compatible with KODAK Picture CD
•
is a trademark of DVD Format/Logo Licensing
Corporation.
•
is a trademark of Fuji Photo Film Co. Ltd.
This recorder also supports the IEC’s Super VCD
standard. Compared to the Video CD standard, Super
VCD offers superior picture quality, and allows two
soundtracks to be recorded. Super VCD also supports the
widescreen size.
VIDEO
CD
Super Video CD (Super VCD)
DVD-R/RW compatibility
This recorder will play and record DVD-R/RW discs.
Compatible media:
• DVD-RW Ver. 1.1, Ver. 1.1 / 2x and Ver. 1.2 / 4x
• DVD-R Ver. 2.0 and Ver. 2.0 / 4x / 8x
Recording formats:
• DVD-R: DVD-Video format (Video mode)
• DVD-RW: Video Recording (VR) format and DVDVideo format (Video mode)
CD-R/RW compatibility
This recorder cannot record CD-R or CD-RW discs.
• Compatible formats: CD-Audio, Video CD/Super
VCD, ISO 9660 CD-ROM* containing MP3, WMA or
JPEG files
*
ISO 9660 Level 1 or 2 compliant. CD physical format:
Mode1, Mode2 XA Form1. Romeo and Joliet file
systems are both compatible with this recorder.
• Multi-session playback: Yes (except CD-Audio and
Video CD/Super VCD)
• Unfinalized disc playback: CD-Audio only
Compressed audio compatibility
• Compatible media: CD-ROM, CD-R, CD-RW
• Compatible formats: MPEG-1 Audio Layer 3 (MP3),
Windows Media Audio (WMA)
• Sampling rates: 44.1 or 48kHz
• Bit-rates: Any (128Kbps or higher recommended)
• Variable bit-rate (VBR) MP3 playback: Yes
• VBR WMA playback: No
• WMA encoder compatibility: Windows Media Codec
8
(files encoded using Windows Media Codec 9 may be
playable but some parts of the specification are not
supported; specifically, Pro, Lossless, Voice and VBR)
• DRM (Digital Rights Management) file playback: No
(see also DRM in the
• File extensions: .mp3, .wma (these must be used for
the recorder to recognize MP3 and WMA files – do
not use for other file types)
• File structure: Up to 99 folders / 999 files (if these
limits are exceeded, only files and folders up to these
limits are playable)
Glossary
on page 122)
En
9

01
Before you start
WMA (Windows Media Audio) compatibility
The Windows Media® logo printed on the box indicates
that this recorder can playback Windows Media Audio
content.
WMA is an acronym for Windows Media Audio and refers
to an audio compression technology developed by
Microsoft Corporation. WMA content can be encoded by
using Windows Media
®
Media
Player for Windows® XP, or Windows Media®
Player 9 Series.
Microsoft, Windows Media, and the Windows logo are
trademarks, or registered trademarks of Microsoft
Corporation in the United States and/or other countries.
®
Player version 7, 7.1, Windows
JPEG file compatibility
• Compatible formats: Baseline JPEG and EXIF 2.2*
still image files
*
File format used by digital still cameras
• Sampling ratio: 4:4:4, 4:4:2, 4:2:0
• Horizontal resolution: 160 – 5120 pixels
• Vertical resolution: 120 – 3840 pixels
• Progressive JPEG compatible: No
• File extensions: .jpg, jpeg, jif, jfif (must be used for the
recorder to recognize JPEG files – do not use for other
file types)
• File structure: The recorder can load up to 99 folders
/ 999 files at one time
that this on the disc then more can be reloaded)
PC-created disc compatibility
Discs recorded using a personal computer may not be
playable in this unit due to the setting of the application
software used to create the disc. In these particular
instances, check with the software publisher for more
detailed information.
Discs recorded in packet write mode (UDF format) are
not compatible with this recorder.
Check the DVD-R/RW or CD-R/RW software disc boxes
for additional compatibility information.
(if there are more files/folders
Frequently asked questions
• What’s the difference between DVD-R and DVD-RW?
The most important difference between DVD-R and
DVD-RW is that DVD-R is a record-once medium,
while DVD-RW is a re-recordable/erasable medium.
You can re-record/erase a DVD-RW disc
approximately 1,000 times.
For more information, see
page 45.
• What’s VR mode?
VR (Video Recording) mode is a special mode
designed for home DVD recording. It allows flexible
editing of recorded material compared to ‘Video
mode’. On the other hand, Video mode discs are
more compatible with other DVD players.
• Can I play my recordable discs in a regular DVD player?
Generally, DVD-R discs and DVD-RW discs recorded
in Video mode
but they must be ‘finalized’ first. This process fixes
the contents of the disc to make them readable to
other DVD players as DVD-Video discs.
DVD-RW discs recorded in VR mode are playable in
some players.
This label indicates playback compatibility with
DVD-RW discs recorded in VR mode (Video
Recording format). However, for discs recorded with
a record-only-once encrypted program, playback can
only be achieved using the CPRM compatible device.
Note that Pioneer cannot guarantee that discs
recorded using this recorder will play on other players.
*
‘DVD-Video format’ recording: The use of the DVDVideo format for recording on DVD-R and DVD-RW discs
is referred to as recording in ‘Video mode’ on Pioneer’s
DVD recorders. Supporting playback of DVD-R / DVDRW discs is optional for manufacturers of DVD
playback equipment, and there is DVD playback
equipment that does not play DVD-R or DVD-RW discs
recorded in the DVD-Video format.
Note: ‘Finalization’ is required.
This recorder supports the recording of ‘copy-once’
broadcast programs using the CPRM copy protection
system (see CPRM on page 46) on CPRM-compliant
DVD-RW discs in VR mode. CPRM recordings can only
be played on players that are specifically compatible
with CPRM.
*
are playable in a regular DVD player,
About DVD recording
on
10
En
Before you start
• Do I need two DVD recorders for editing? What kind of
editing can I do?
Unlike editing video tape, you only need one DVD
recorder to edit discs. With DVD, you edit by making
a ‘Play List’ of what to play and when to play it. On
playback, the recorder plays the disc according to the
Play List.
Original
Title 1
Chapter 1
Title 2Title 1
Chapter 1
Play List
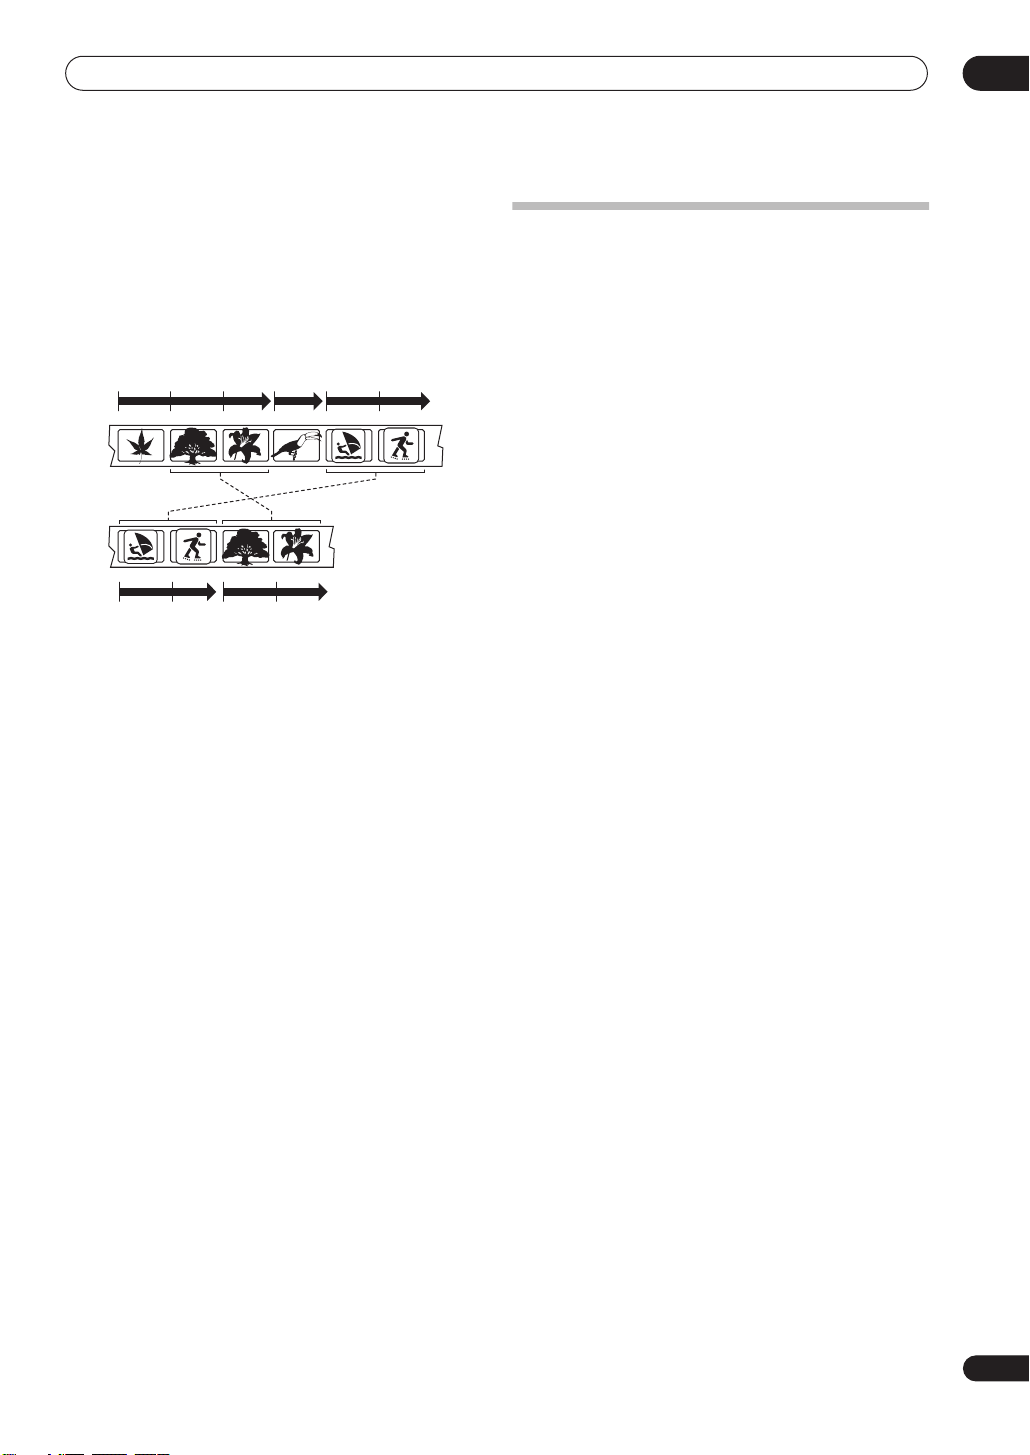
Throughout this manual, you will often see the words
Original and Play List to refer to the actual content
and the edited version.
•
Original
content refers to what’s actually recorded
on the disc.
•
Play List
content refers to the edited version of the
disc—how the Original content is to be played.
Title 3Title 2
Chapter 1 Chapter 1 C hapter 2Chapter 3Chapter 2
Chapter 2Chapter 1Chapter 2
About the internal hard disk drive
The internal hard disk drive (HDD) is a fragile piece of
equipment. Please use the recorder following the
guidelines below to protect against possible HDD failure.
We recommend that you back up your important
recordings onto DVD-R/RW discs in order to protect against
accidental loss.
• Do not move the recorder while it is on.
• Install and use the recorder on a stable, level surface.
• Do not block the rear vent/cooling fan.
• Do not use the recorder in excessively hot or humid
places, or in places that may be subject to sudden
changes in temperature. Sudden changes in
temperature can cause condensation to form inside
the recorder. This can be a cause of HDD failure.
• While the recorder is switched on, do not unplug
from the wall socket or switch the electricity off from
the breaker switch.
• Do not move the recorder immediately after
switching it off. If you need to move the recorder,
please follow the steps below:
1
After the message
display, wait at least two minutes.
2
Unplug from the wall socket.
3
Move the recorder.
• If there’s a power failure while the recorder is on
there is a chance that some data on the HDD will be
lost.
• The HDD is very delicate. If used improperly or in an
unsuitable environment, it is possible that the HDD
will fail after a few years of use. Signs of problems
include playback unexpectedly freezing and
noticeable block noise (mosaic) in the picture.
However, sometimes there will be no warning signs
of HDD failure.
If the HDD fails, no playback of recorded material will
be possible. In this case it will be necessary to
replace the HDD unit.
POWER OFF
is shown in the
01
11
En
02
Connecting up
Chapter 2
Connecting up
Rear panel connections
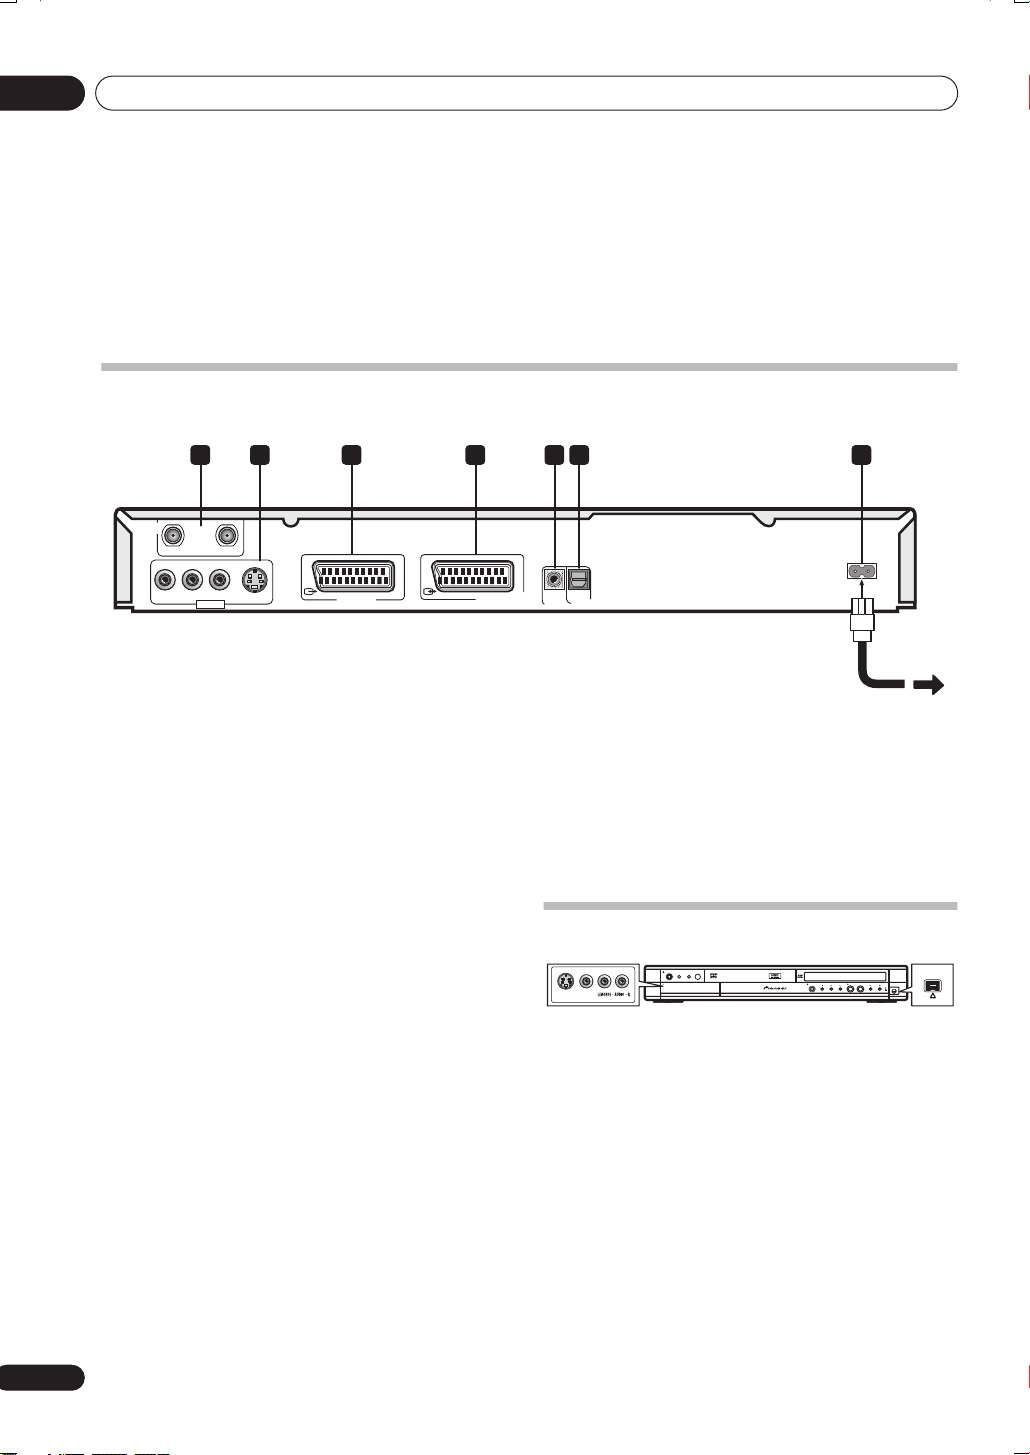
1 32 4 5 6 7
ANTENNA
RL
INOUT
AUDIO
VIDEO
S-VIDEO
OUTPUT
AV 1 (RGB) — TV
AV 2/AUTO START REC
(INPUT 1/DECODER)
IN
CONTROL
OPTICAL
DIGITAL OUT
AC IN
1 ANTENNA IN/OUT
Connect your TV antenna to the
signal is passed through to the
ANTENNA IN
ANTENNA OUT
jack. The
jack for
connection to your TV.
2 OUTPUT jacks
Stereo analog audio, video and S-video outputs for
connection to a TV or AV amplifier/receiver.
3 AV1(RGB)-TV AV connector
Audio/video output SCART-type AV connector for
connecting to a TV or other equipment with a SCART
connector. The video output is switchable between video,
S-video and RGB. See page
AV1 Out
on page 102 for how
to set this up.
4 AV2/AUTO START REC (INPUT 1/DECODER) AV
connector
Audio/video input/output SCART-type AV connector for
connecting to a VCR, or other equipment with a SCART
connector. The input accepts video, S-video and RGB.
See
AV2/L1 In
on page 102 for how to set this up.
5 CONTROL IN
Use to control this recorder from the remote sensor of
another Pioneer component with a
terminal and bearing the Pioneer
CONTROL OUT
CONTROL IN
of the other component to the
of this recorder using a mini-plug cord.
CONTROL OUT
mark. Connect the
6 DIGITAL OUT OPTICAL
For connecting to an AV amplifier/receiver, Dolby Digital/
DTS/MPEG decoder or other equipment with optical
digital input.
7 AC IN – Power inlet
Front panel connections
STANDBY/ON
DVDHDD
VIDEOS-VIDEO
PULL-OPEN
OPEN/CLOSE REC
ONE TOUCH COPY
On the left side of the front panel a flip-down cover hides
a second audio/video input, consisting of an S-video and
standard (composite) video jack, and stereo analog
audio jacks.
DV-520H/720H only:
On the right side is the DV input/
output i.LINK connector. This is for connection to a DV
camcorder.
DV IN/OUT
DV IN/OUT
12
En

Connecting up
Extra features for use with
compatible TVs
When this recorder is connected to a TV that features T-V
Link, EasyLink, MegaLogic, SMARTLINK, Q-Link, DATA
LOGIC or NexTView Link using a fully-wired 21-pin SCART
cable (not supplied), the following functions are
available:
• Direct TV recording
• Channel preset download
• Electronic Program Guide (EPG) download
• TV auto power on
• System configuration
EPG download
EPG download allows you to program a timer recording
directly from the electronic program guide displayed on
your TV.
See the manual that came with your TV for more
information on how to use this feature. Note that the
and
LP
options displayed on your TV correspond to the SP
and
LP
recording modes on this recorder.
SP
TV auto power on
When you play a disc in this recorder, the TV
automatically turns on and switches to the correct video
input. See the manual that came with your TV for how to
use this feature.
02
Direct TV recording
Direct TV recording allows you to record the TV program
that you’re watching, without having to worry about
whether this recorder is set to the same channel. See
Direct recording from TV
feature.
on page 48 for more on this
Channel preset download
This feature allows you to set up the channel presets of
this recorder very simply using the channel presets and
preset names already in your TV. See
setting up
Download from TV
on page 25 and
on page 100 for more on this feature.
Auto Channel Setting :
Switching on and
System configuration
Basic settings, including language, country and TV
screen size (aspect ratio), can be downloaded from your
TV to help set up this recorder for use.
Note
• For further details and compatibility information, see
also the manual that came with your TV.
13
En
02
Connecting up
Easy connections
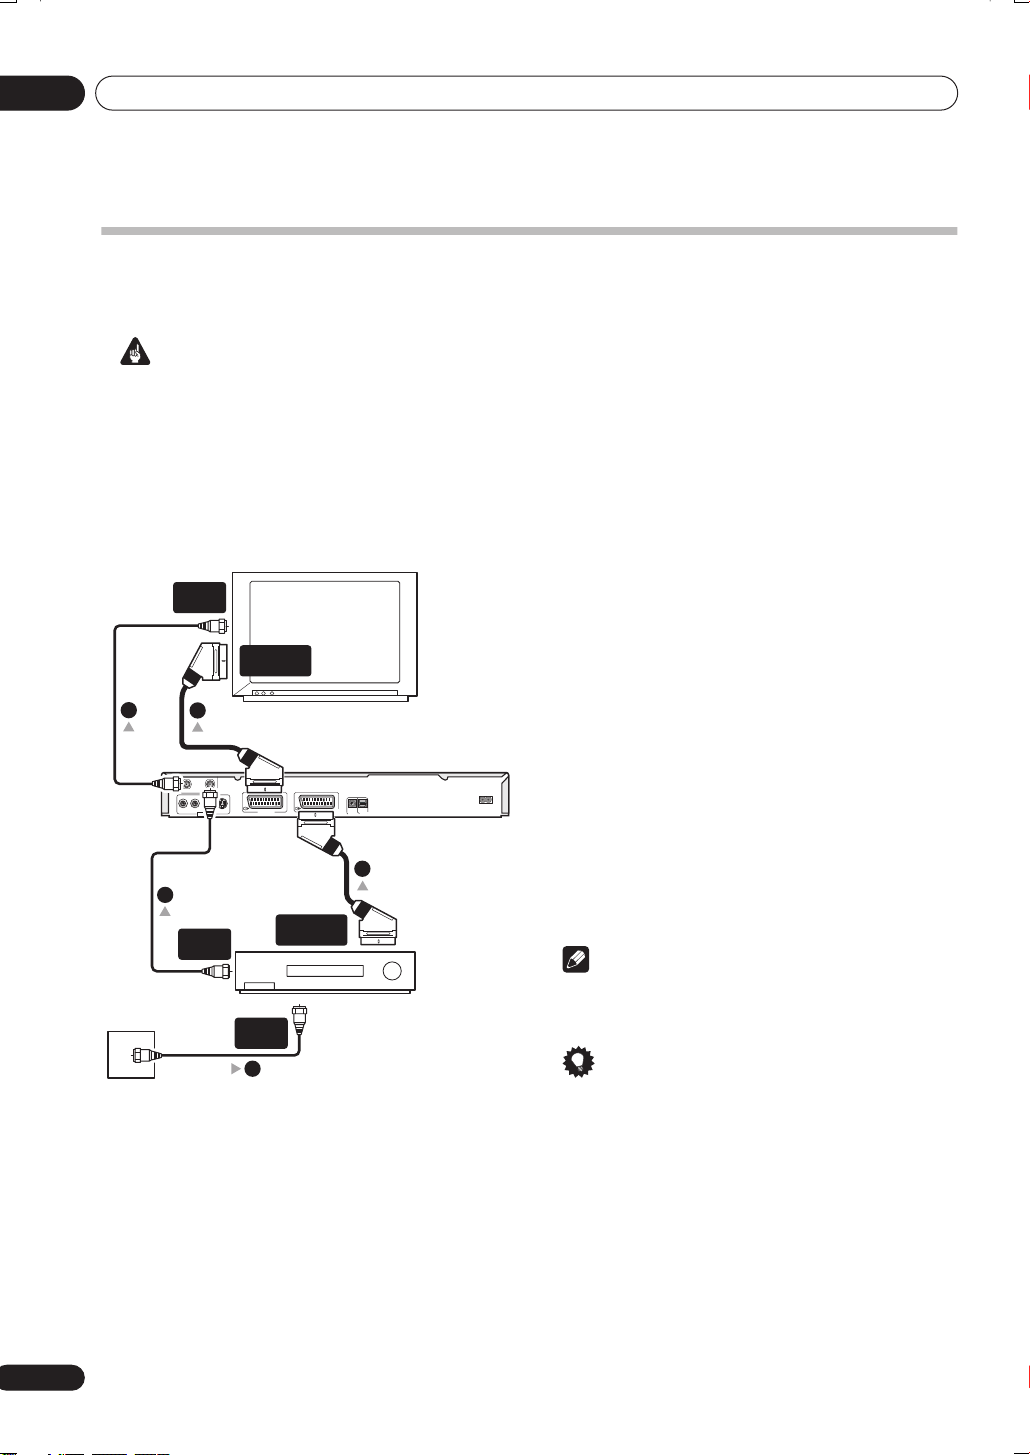
The setup described below is a basic setup that allows you to watch and record TV programs, and play discs. Other
types of connections are explained starting on the following page.
Important
• These connections use SCART cables (not supplied). If your TV (or VCR) does not have a SCART connection, see
the following page for connecting up using the supplied audio/video cable.
• The
AV1(RGB)-TV
The
AV2/AUTO START REC (INPUT 1/DECODER)
well as stereo analog audio. See
• Before making or changing any rear panel connections, make sure that all components are switched off and
unplugged from the wall outlet.
ANTENNA
IN
3
Antenna/cable TV
wall outlet
ANTENNA
2
4
RL
AUDIO
OUTPUT
ANTENNA
OUT
AV connector can output ordinary (composite), S-video or RGB video, plus stereo analog audio.
connector accepts ordinary, S-video and RGB video input, as
AV1 Out
on page 102 and
AV2/L1 In
on page 102 for how to set them up.
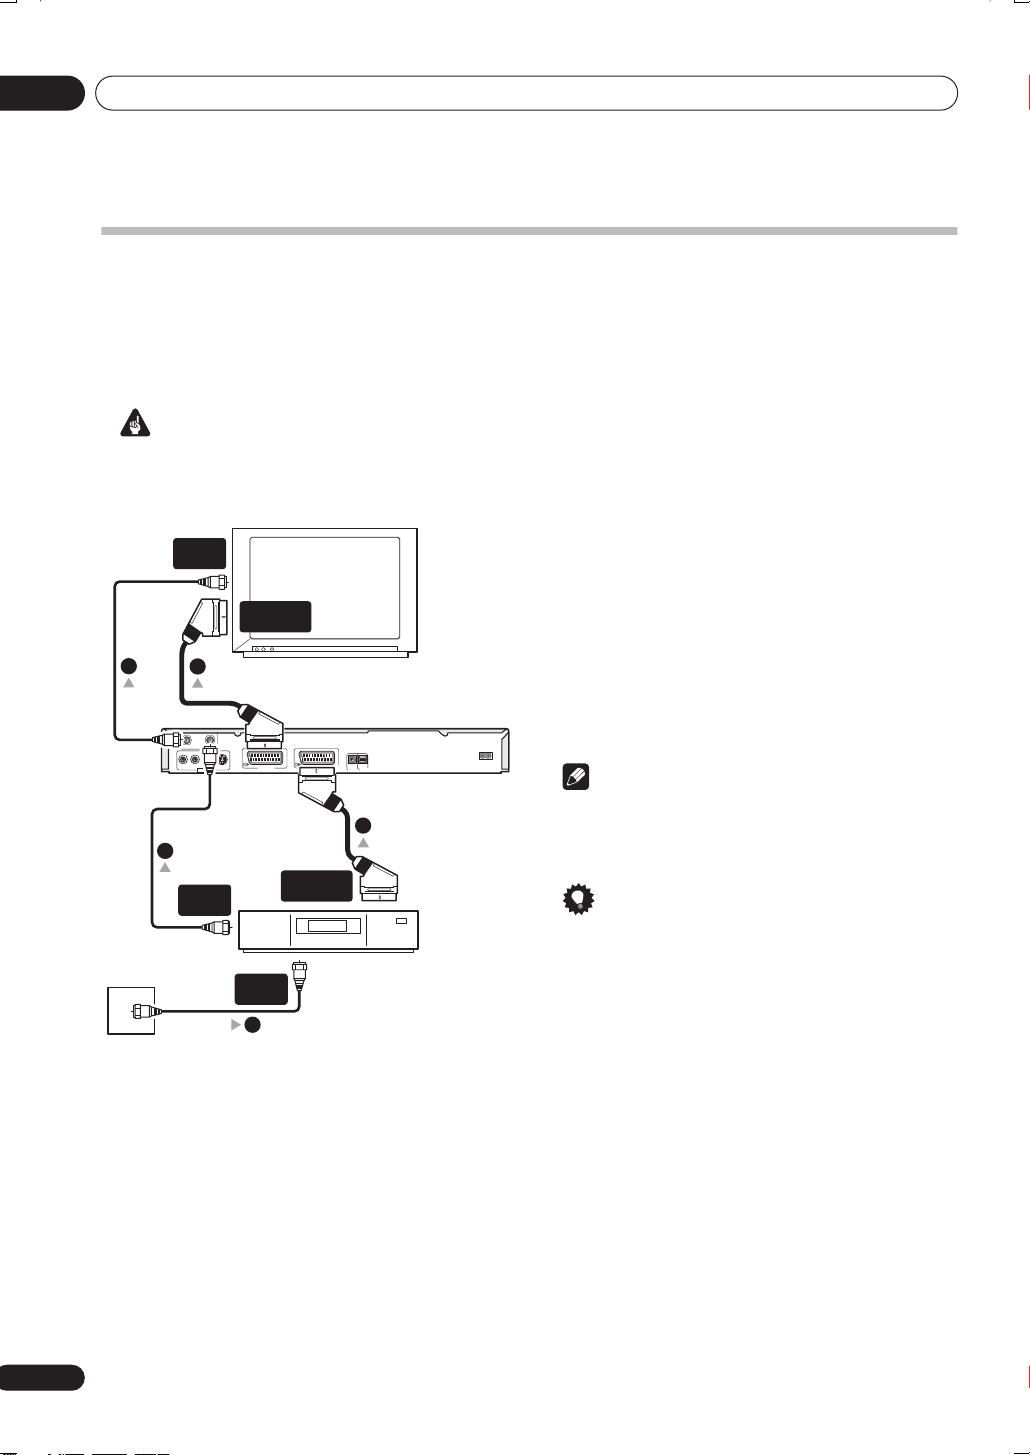
1 Connect the cable from the antenna/cable TV
outlet to the antenna input on your VCR.
• If you are not connecting a VCR in the chain, connect
it to the
ANTENNA IN
jack on this recorder and skip
the next step.
SCART AV
CONNECTOR
2 Use an RF antenna cable (one is supplied) to
connect the antenna output of your VCR to the
ANTENNA IN of this recorder.
TV
3 Use another RF antenna cable to connect the
ANTENNA OUT of this recorder to the antenna input
on your TV.
INOUT
VIDEO
S-VIDEO
AV 1 (RGB) — TV
AV 2/AUTO START REC
(INPUT 1/DECODER)
OPTICAL
IN
DIGITAL OUT
CONTROL
AC IN
4 Use a SCART cable (not supplied) to connect the
AV1(RGB)-TV AV connector on this recorder to the
SCART AV connector on your TV.
5
5 Use another SCART cable to connect the AV2/
AUTO START REC (INPUT 1/DECODER) AV connector
SCART AV
CONNECTOR
to a SCART AV connector on your VCR.
Note
VCR
ANTENNA
1
IN
• See the following page if you want to use one of the
other kinds of audio/video connection.
Tip
• This recorder has a ‘through’ function which allows
you to record a TV program from the built-in TV tuner
in this recorder while watching a video playing on
your VCR. (To use this feature when the recorder is in
standby,
Save
Power Save
on page 98).
must be set to
Off
—see
Power
14
En
Connecting up
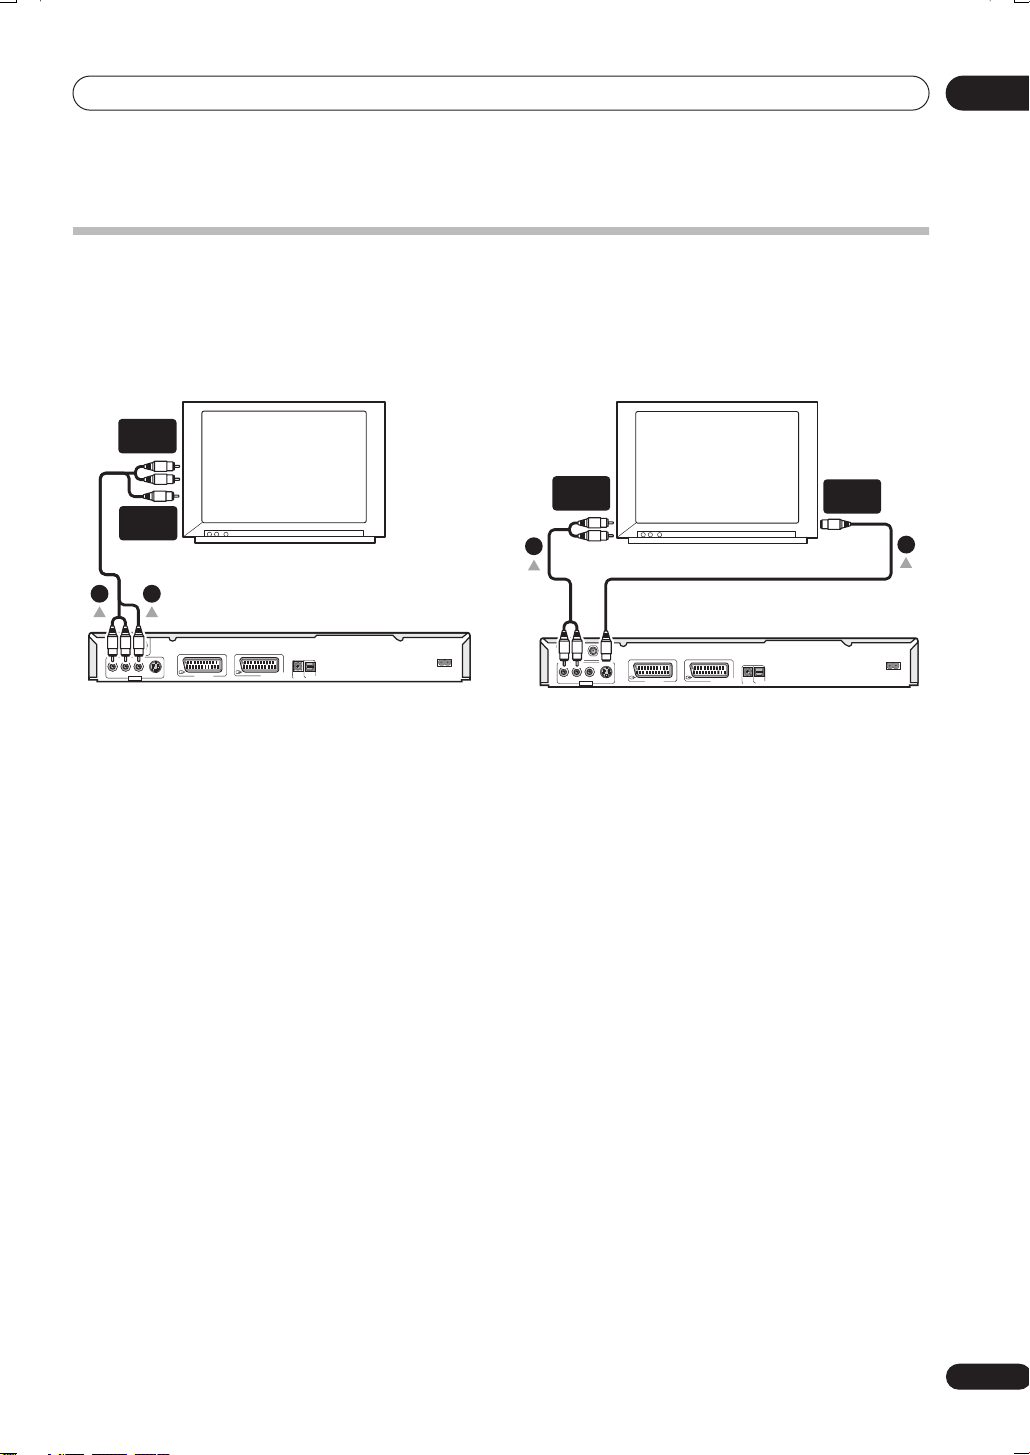
Using other types of audio/video output
If you can’t use the SCART AV connector to connect your TV to this recorder, there are standard audio/video output
jacks, as well as an S-video output.
02
Using the supplied audio/video cable
AUDIO
INPUT
VIDEO
INPUT
TV
12
ANTENNA
INOUT
RL
AUDIO
VIDEO
S-VIDEO
OUTPUT
AV 1 (RGB) — TV
AV 2/AUTO START REC
(INPUT 1/DECODER)
OPTICAL
IN
DIGITAL OUT
CONTROL
1 Connect the VIDEO OUTPUT jack to a video input
on your TV.
Use the yellow jack of the supplied audio/video cable for
the video connection.
2 Connect the AUDIO OUTPUT jacks to the
corresponding audio inputs on your TV.
Use the red and white jacks of the supplied audio/video
cable for the audio connection. Make sure you match up
the left and right outputs with their corresponding inputs
for correct stereo sound.
AC IN
Using the S-video output
AUDIO
INPUT
2
ANTENNA
RL
AUDIO
TV
INOUT
OPTICAL
VIDEO
S-VIDEO
OUTPUT
AV 1 (RGB) — TV
AV 2/AUTO START REC
(INPUT 1/DECODER)
IN
DIGITAL OUT
CONTROL
1 Use an S-video cable (not supplied) to connect
the S-VIDEO OUTPUT to an S-video input on your TV,
monitor (or other equipment).
2 Connect the AUDIO OUTPUT jacks to the
corresponding audio inputs on your TV.
You can use the supplied audio/video cable, leaving the
yellow video plug disconnected. Make sure you match up
the left and right outputs with their corresponding inputs
for correct stereo sound.
S-VIDEO
INPUT
1
AC IN
15
En
02
Connecting up
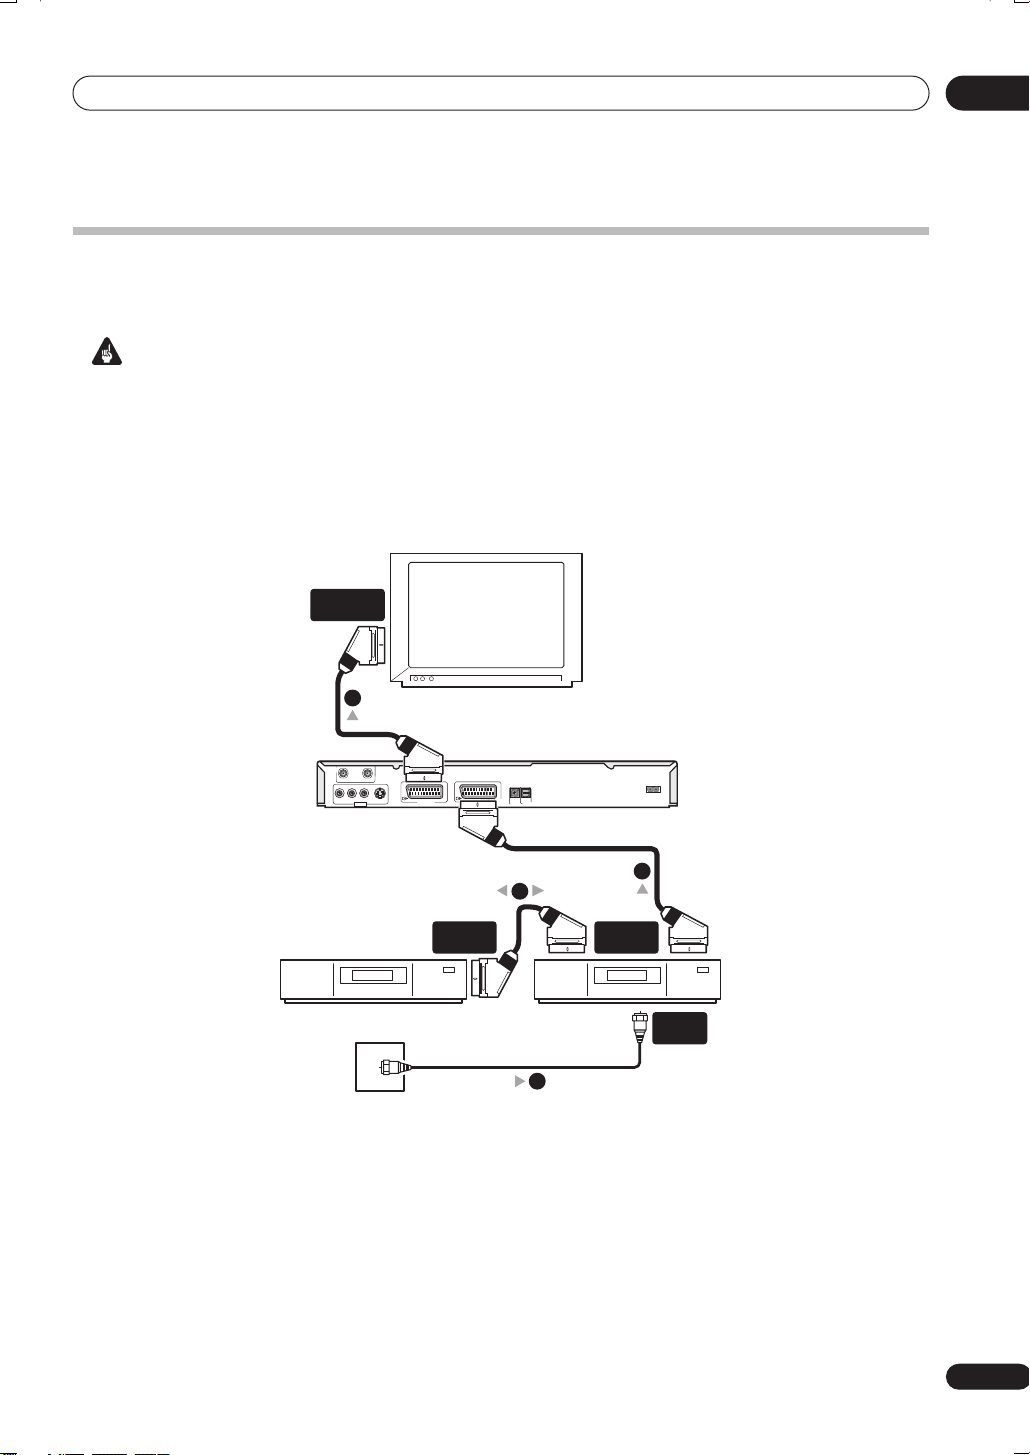
Connecting to a cable box or satellite receiver
If you have a cable or satellite receiver with a built-in decoder, connect it to this recorder and your TV as shown on this
page. If you are using a separate decoder box for your cable/satellite TV, set up following the instructions on the next
page.
Using the setup on this page you can:
• Record any channel by selecting it on the cable box/satellite tuner.
Important
• Do not connect this recorder ‘through’ your VCR, satellite receiver or cable box. Always connect each component
directly to your TV or AV amplifier/receiver.
1 Connect RF antenna cables as shown.
This enables you to watch and record TV channels.
1
Antenna/cable TV
wall outlet
ANTENNA
1
ANTENNA
IN
2
RL
AUDIO
VIDEO
OUTPUT
ANTENNA
OUT
SCART AV
CONNECTOR
TV
INOUT
S-VIDEO
AV 1 (RGB) — TV
AV 2/AUTO START REC
(INPUT 1/DECODER)
OPTICAL
IN
DIGITAL OUT
CONTROL
AC IN
3
SCART AV
CONNECTOR
ANTENNA
IN
Cable/Satellite box
1
2 Use a SCART cable (not supplied) to connect the
AV1(RGB)-TV AV connector to a SCART AV connector
on your TV.
This enables you to watch discs.
3 Use another SCART cable to connect the AV2/
AUTO START REC (INPUT 1/DECODER) AV connector
to a SCART AV connector on your satellite/cable
box.
This enables you to record scrambled TV channels.
Note
• The diagram shows SCART video connections, but
you can alternatively use any of the other audio/video
connections.
Tip
• This recorder has a ‘through’ function which allows
you to record a TV program from the built-in TV tuner
in this recorder while watching a video playing on
your VCR. (To use this feature when the recorder is in
standby,
Save
Power Save
on page 98).
must be set to
Off
—see
Power
16
En
Connecting up
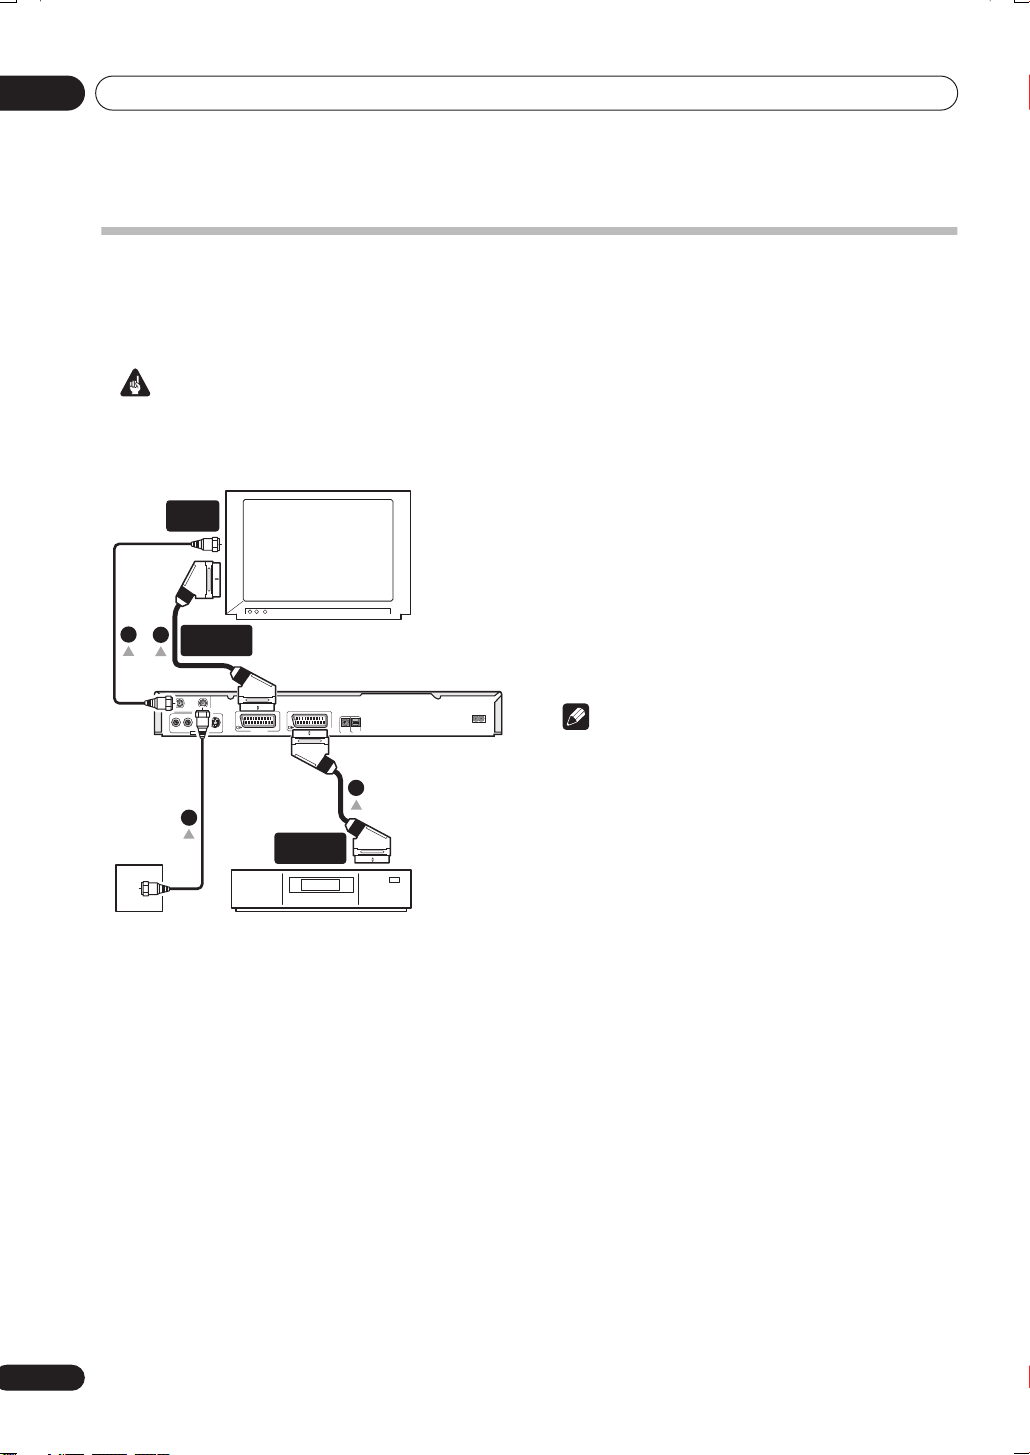
Connecting an external decoder box (1)
If you have an external, dedicated decoder box for your satellite or cable TV system, use the setup described on this
page.
Important
• Do not connect your decoder box directly to this recorder.
• Information from the decoder (for example, relating to pay TV services), is only viewable when this recorder is off
(in standby).
• For timer recording to work properly on this recorder, the VCR/satellite receiver/cable box must also be switched
on during recording.
• It is not possible to watch one TV program and record another using this setup.
SCART AV
CONNECTOR
02
4
TV
ANTENNA
INOUT
RL
AUDIO
VIDEO
S-VIDEO
OUTPUT
AV 1 (RGB) — TV
CONNECTOR
SCART AV
Decoder
Antenna/cable TV
wall outlet
1 Connect the cable from the antenna/cable TV
outlet to the antenna input on your VCR/satellite
receiver/cable box.
2 Use a SCART cable (not supplied) to connect your
decoder to your VCR/satellite receiver/cable box.
See the manual for your decoder box for more detailed
instructions.
AC IN
AV 2/AUTO START REC
(INPUT 1/DECODER)
OPTICAL
IN
DIGITAL OUT
CONTROL
3
2
SCART AV
CONNECTOR
VCR/Satellite receiver
/Cable box
ANTENNA
IN
1
3 Use a SCART cable to connect your VCR/satellite
receiver/cable box to the AV2/AUTO START REC
(INPUT 1/DECODER) AV connector on this recorder.
4 Use a SCART cable to connect the AV1(RGB)-TV
AV connector to your TV.
17
En
02
Connecting up
Connecting an external decoder box (2)
If you only have a decoder, connect it to this recorder and your TV as shown on this page.
Using the setup on this page you can:
• Record scrambled channels received using the recorder’s built-in TV tuner.
Important
• Do not connect this recorder ‘through’ your VCR, satellite receiver or cable box. Always connect each component
directly to your TV or AV amplifier/receiver.
1 Connect RF antenna cables as shown.
This enables you to watch and record TV channels.
ANTENNA
IN
2
ANTENNA
SCART AV
CONNECTOR
RL
AUDIO
VIDEO
OUTPUT
INOUT
S-VIDEO
AV 1 (RGB) — TV
AV 2/AUTO START REC
(INPUT 1/DECODER)
1
TV
OPTICAL
IN
DIGITAL OUT
CONTROL
AC IN
3
1
SCART AV
CONNECTOR
2 Use a SCART cable (not supplied) to connect the
AV1(RGB)-TV AV connector to a SCART AV connector
on your TV.
This enables you to watch discs.
3 Use another SCART cable to connect the AV2/
AUTO START REC (INPUT 1/DECODER) AV connector
to a SCART AV connector on your decoder box.
This enables you to record scrambled TV channels.
Note
• In order to use this setup, you will need to make the
following settings from the Initial Setup menu:
– Set the
Initial Setup menu (see
– From the
Decoder
(see
Manual CH Setting
AV2/L1 In
Manual CH Setting
setting to
AV2/L1 In
Decoder
from the
on page 102).
screen, set the
setting for the scrambled channels to On
on page 100).
18
En
Antenna/cable TV
wall outlet
Decoder
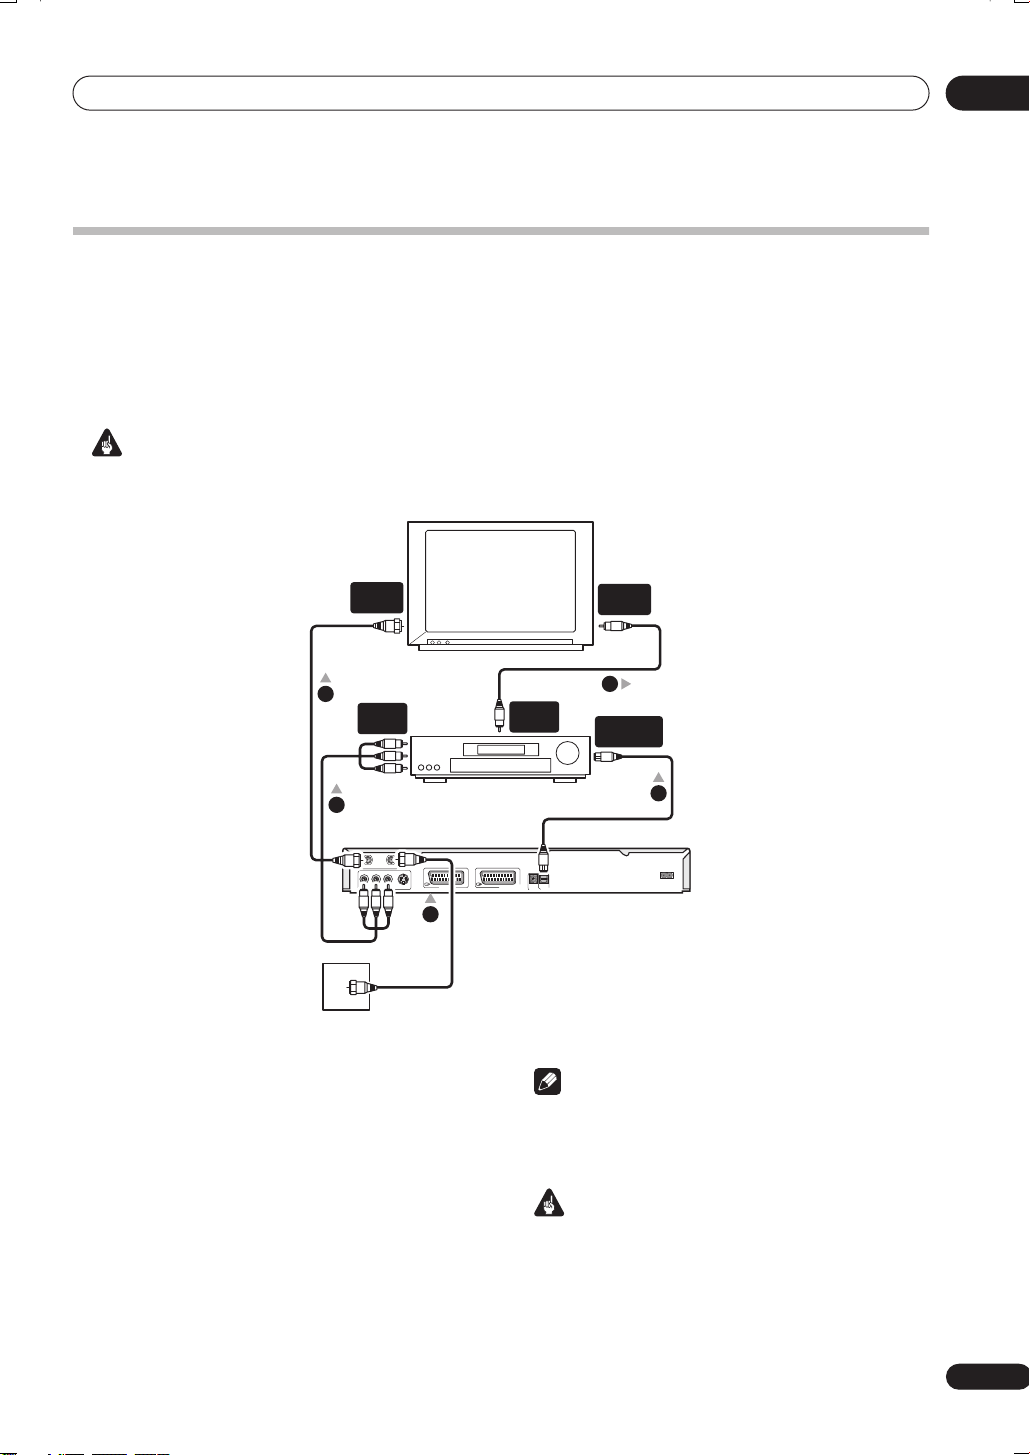
Connecting up
Connecting to an AV amplifier/receiver
To enjoy multichannel surround sound you need to connect this recorder to an AV amplifier/receiver using the digital
optical output.
In addition to a digital connection, we recommend also connecting using the stereo analog connection for
compatibility with all discs and sources.
You’ll probably also want to connect a video output to your AV amplifier/receiver. Use the ordinary video output (as
shown here), or the S-video output.
Important
• Noise may be output from your speakers if the recorder is not set up to work with your AV amplifier/receiver
properly (see
Audio Out settings
on page 104).
02
ANTENNA
IN
TV
1
A/V
IN 1
RL
AUDIO
AV amp/
receiver
INOUT
VIDEO
S-VIDEO
AV 1 (RGB) — TV
OUTPUT
3
ANTENNA
1
Antenna/cable TV
wall outlet
1 Connect RF antenna cables as shown.
This enables you to watch and record TV channels.
2 Connect one of the DIGITAL OUT OPTICAL jack
on this recorder to an optical digital input on your
AV amplifier/receiver.
This enables you to listen to multichannel surround
sound.
3 Connect the analog AUDIO OUTPUT and VIDEO
OUTPUT jacks on this recorder to an analog audio
and video input on your AV amplifier/receiver.
4 Connect the AV amplifier/receiver’s video
output to a video input on your TV.
VIDEO
IN
4
VIDEO
OUT
DIGITAL IN
OPTICAL
2
AC IN
AV 2/AUTO START REC
(INPUT 1/DECODER)
OPTICAL
IN
DIGITAL OUT
CONTROL
Note
• The diagram shows ordinary video connections,
but you can alternatively use an AV connector or
S-video connections, if they’re available.
Important
• Do not connect this recorder to your TV ‘through’
your VCR using A/V cables. Always connect it
directly to your TV.
19
En
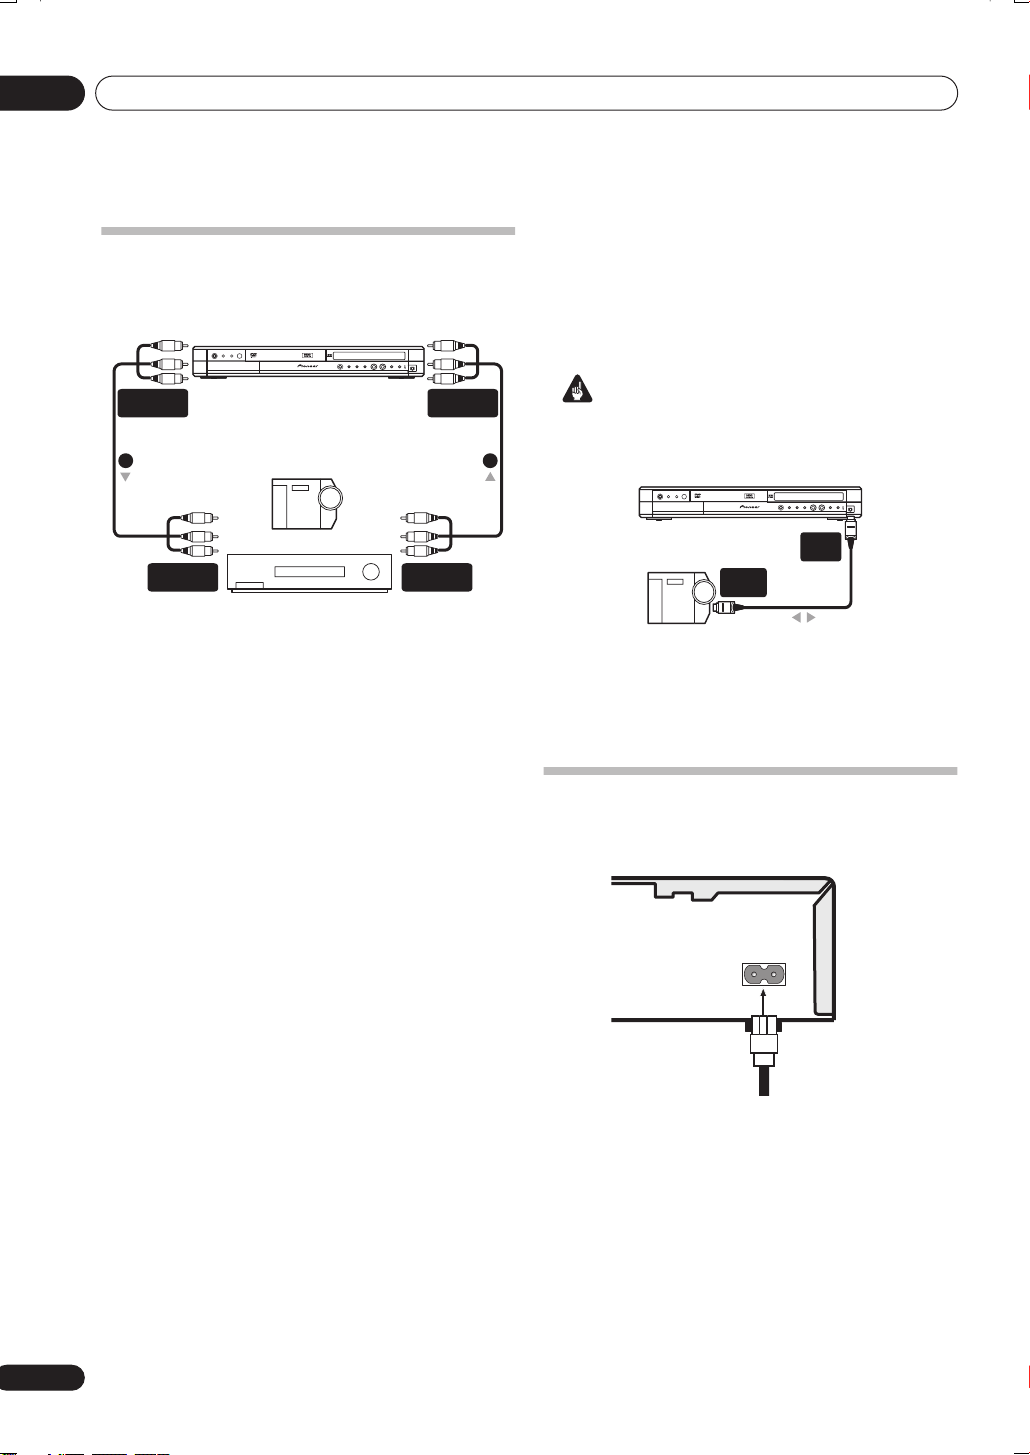
02
Connecting up
Connecting other AV sources
Connecting a VCR or analog camcorder
AUDIO/VIDEO
OUTPUT
1 2
Analog camcorder
AUDIO/VIDEO
INPUT
VCR
1 Connect a set of audio and video outputs on
your VCR or camcorder to a set of inputs on this
recorder.
This enables you to record tapes from your VCR or
camcorder.
• You can use ordinary video or S-video cables for the
video connection.
• The front panel connections make convenient
connections for a camcorder.
2 Connect a set of audio and video inputs on your
VCR or camcorder to a set of outputs on this
recorder.
This enables you to record from this recorder to your VCR
or camcorder.
• You can use ordinary video or S-video cables for the
video connection.
• Alternatively, you can use the
REC (INPUT 1/DECODER)
audio/video input and output with just one SCART
cable.
AV2/AUTO START
SCART connector for
DV IN/OUT
AUDIO/VIDEO
INPUT
AUDIO/VIDEO
OUTPUT
Connecting a DV camcorder
(DVR-520H/720H only)
Using the front panel
connect a DV camcorder or video deck, or DVD-R/RW
recorder and digitally transfer DV tapes or DVD-R/RW
discs to DVD-R/RW.
Important
• This jack is for connection to DV equipment only. It is
not compatible with digital satellite tuners or D-VHS
video decks.
1 Use a DV cable (not supplied) to connect the DV
in/out jack on your DV camcorder/deck to the front
panel DV IN/OUT jack of this recorder.
DV camcorder
DV IN/OUT
DV
IN/OUT
jack, it is possible to
DV IN/OUT
DV
IN/OUT
Plugging in
Before plugging in for the first time, make sure that
everything is connected properly.
AC IN
20
En
1 Plug the supplied AC power cable into the AC IN
inlet and the other end into a standard household
power outlet.
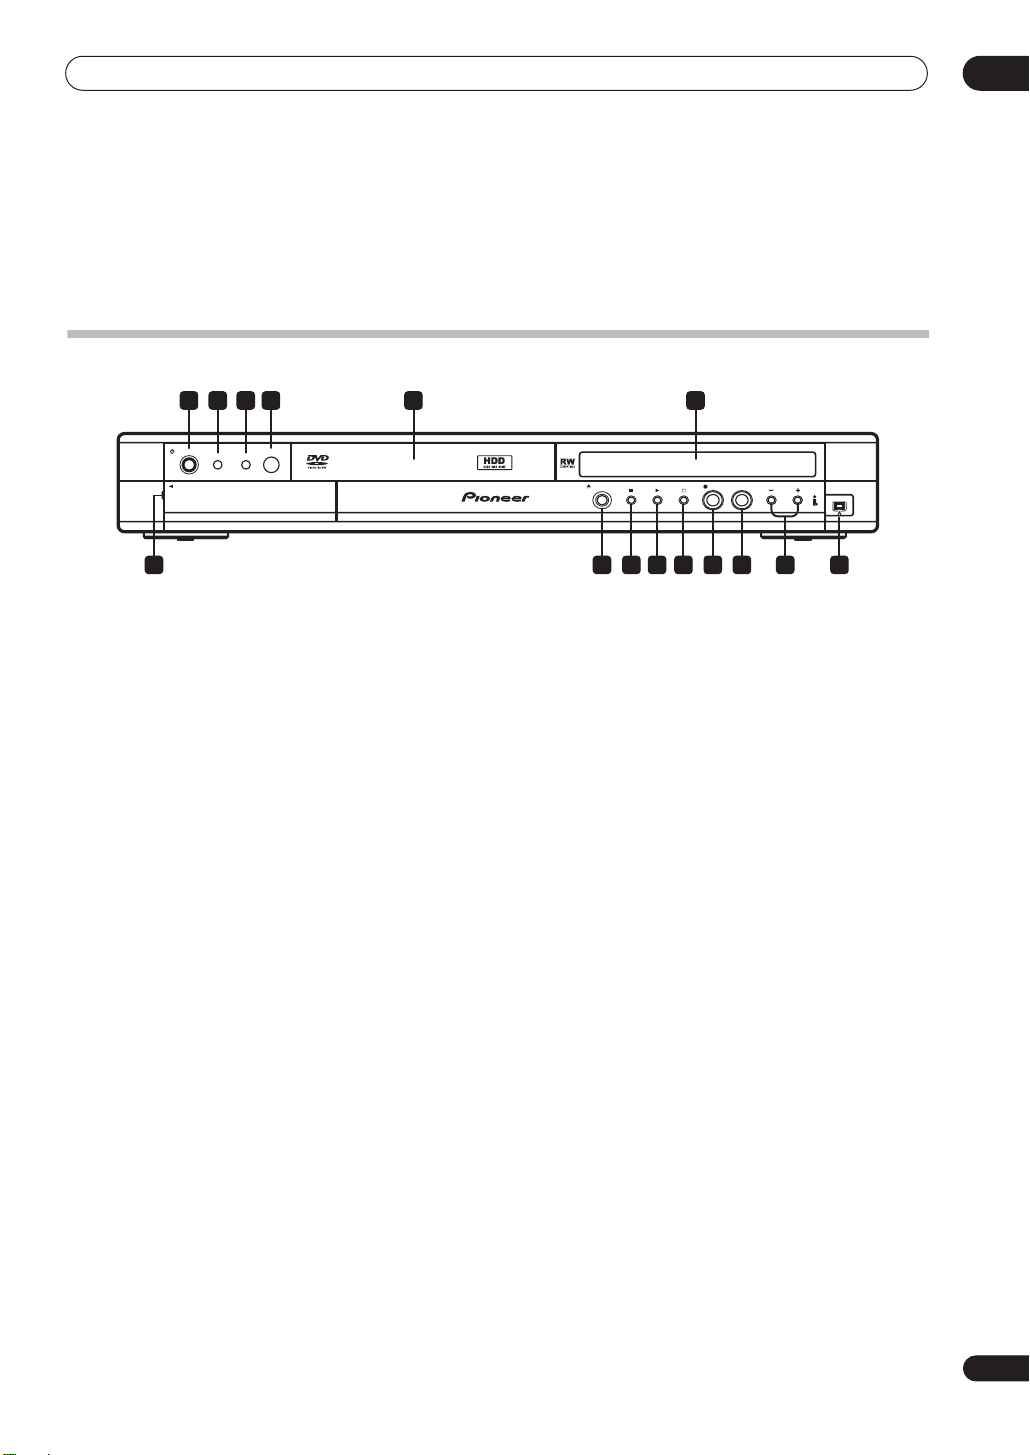
Controls and displays
Chapter 3
Controls and displays
Front panel
1 2 3 4 65
03
STANDBY/ON
PULL-OPEN
Illustration shows DVR-520H
DVDHDD
1 STANDBY/ON
Press to switch the recorder on/into standby.
2 HDD
Press to switch to the hard disk drive (HDD) for recording
and playback. The button lights when HDD is selected.
3 DVD
Press to switch to DVD for recording and playback. The
button lights when DVD is selected.
4 IR remote sensor
(page 
5 Disc tray
6 Front panel display
See
Display
on page 22 for details.
7 DV IN/OUT jack (DVR-520H/720H only)
(page 12,
20, 56, 57, 59, 104, 117)
Digital input/output jack for use with a DV camcorder.
8 +/–
(page 29, 31, 48)
Use to change TV channels, skip chapters/tracks, etc.
OPEN/CLOSE REC
ONE TOUCH COPY
DV IN/OUT
781112131415 910
9 ONE TOUCH COPY
(page 62)
Press to start One Touch Copy of the currently playing
title to DVD or the HDD.
10 REC
Press to start recording.
11
Press to stop recording.
12
Press to start or restart playback.
13
Press to stop playback.
14 OPEN/CLOSE
Press to open/close the disc tray.
15 Front panel inputs
(page 12)
Pull the cover down where indicated to access the front
panel input jacks. Especially convenient for connecting
camcorders and other portable equipment.
21
En
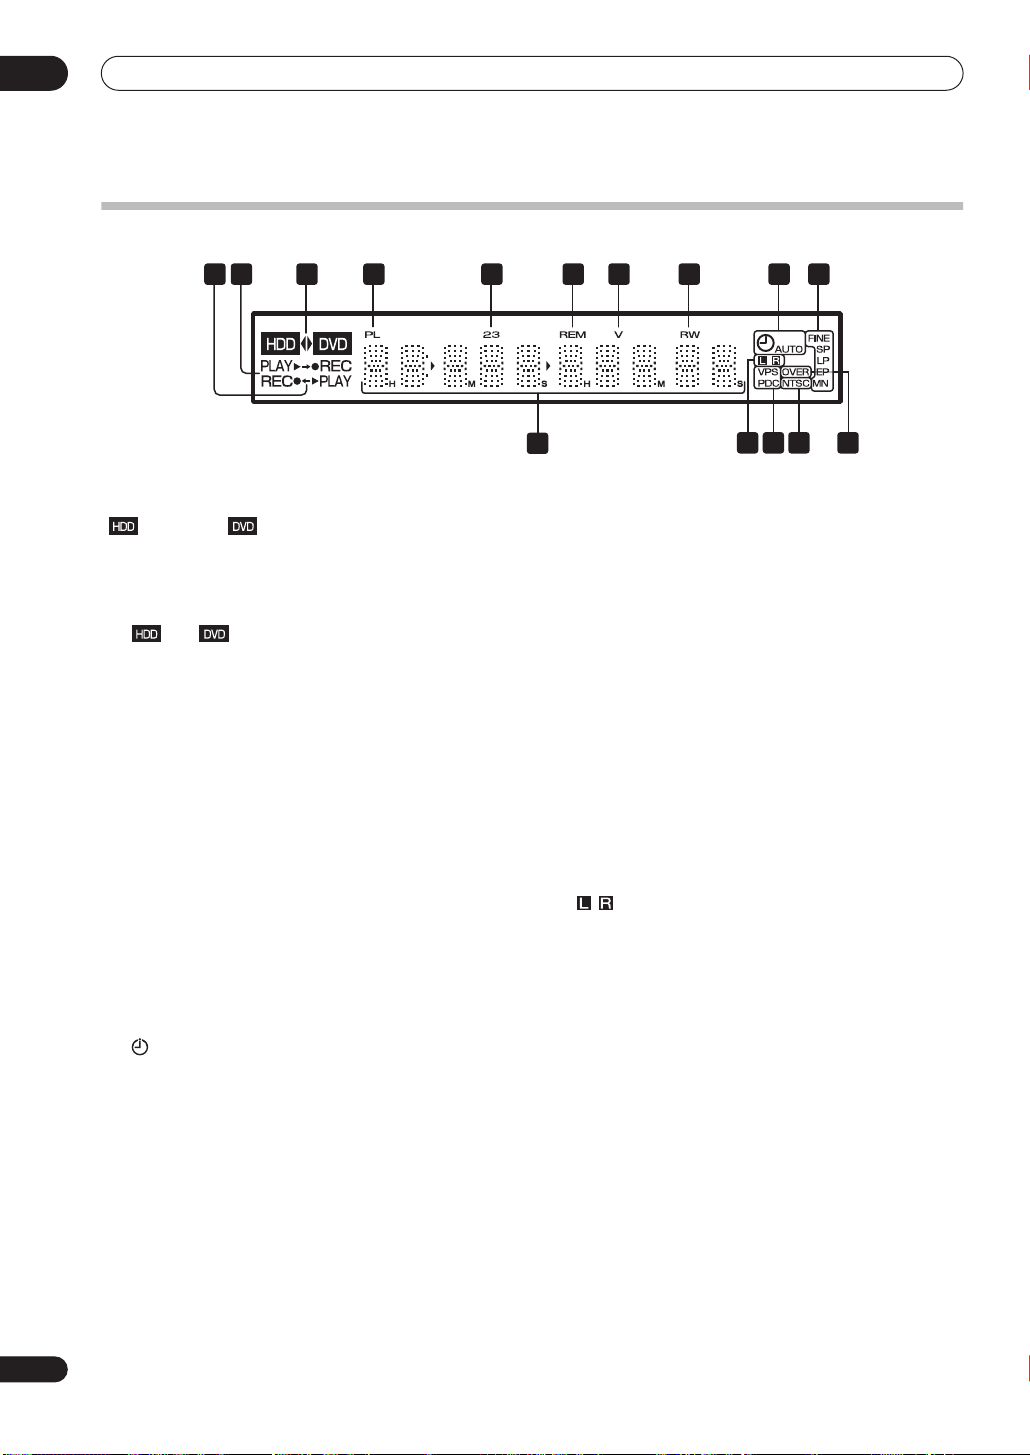
03
Controls and displays
Display
321
1
/
Arrows indicate the copy direction between the HDD
() and DVD ( ).
2 PLAY / REC indicators
Lights during playback / recording; blinks when playback
/ recording is paused.
3
The ‘
or DVD is selected for recording/playback.
4 PL
Lights when a VR mode disc is loaded and the recorder is
in Play List mode.
52 3
Shows the remote control mode (if nothing is displayed,
the remote control mode is 1).
6 REM
Lights when the character display is showing the
remaining available recording time.
7V
Lights when an unfinalized Video mode disc is loaded.
8R / RW
Indicates the type of recordable DVD loaded: DVD-R or
DVD-RW.
9
’ and ‘’ indicators light to indicate that the HDD
(page 78, 84)
(page 99)
(page 49)
Lights when a timer recording has been set.
(Indicator blinks if the timer has been set to DVD but
there isn’t a recordable disc loaded, or the timer has
been set to HDD but the HDD is not recordable.)
AUTO
Lights when Auto Start Recording has been set, and
during Auto Start Recording.
(page 28)
(page 56)
4
5 6 7 8
9 10
11
10 Recording quality indicators
FINE
Lights when the recording mode is set to
quality).
SP
Lights when the recording mode is set to SP
(standard play).
LP
Lights when the recording mode is set to LP (long
play).
EP
Lights when the recording mode is set to EP
(extended play).
MN
Lights when the recording mode is set to MN
(manual recording level) mode.
11 Character display
12
13 VPS / PDC
14 NTSC
15 OVER
(page 104)
Indicates which channels of a bilingual broadcast
are recorded.
(page 49)
Lights when receiving a VPS/PDC broadcast during a
VPS/PDC-enabled timer recording.
Lights when playing NTSC format video.
(page 104)
Lights when the analog audio input level is too high.
1312 14 15
(page 46)
FINE
(best
22
En
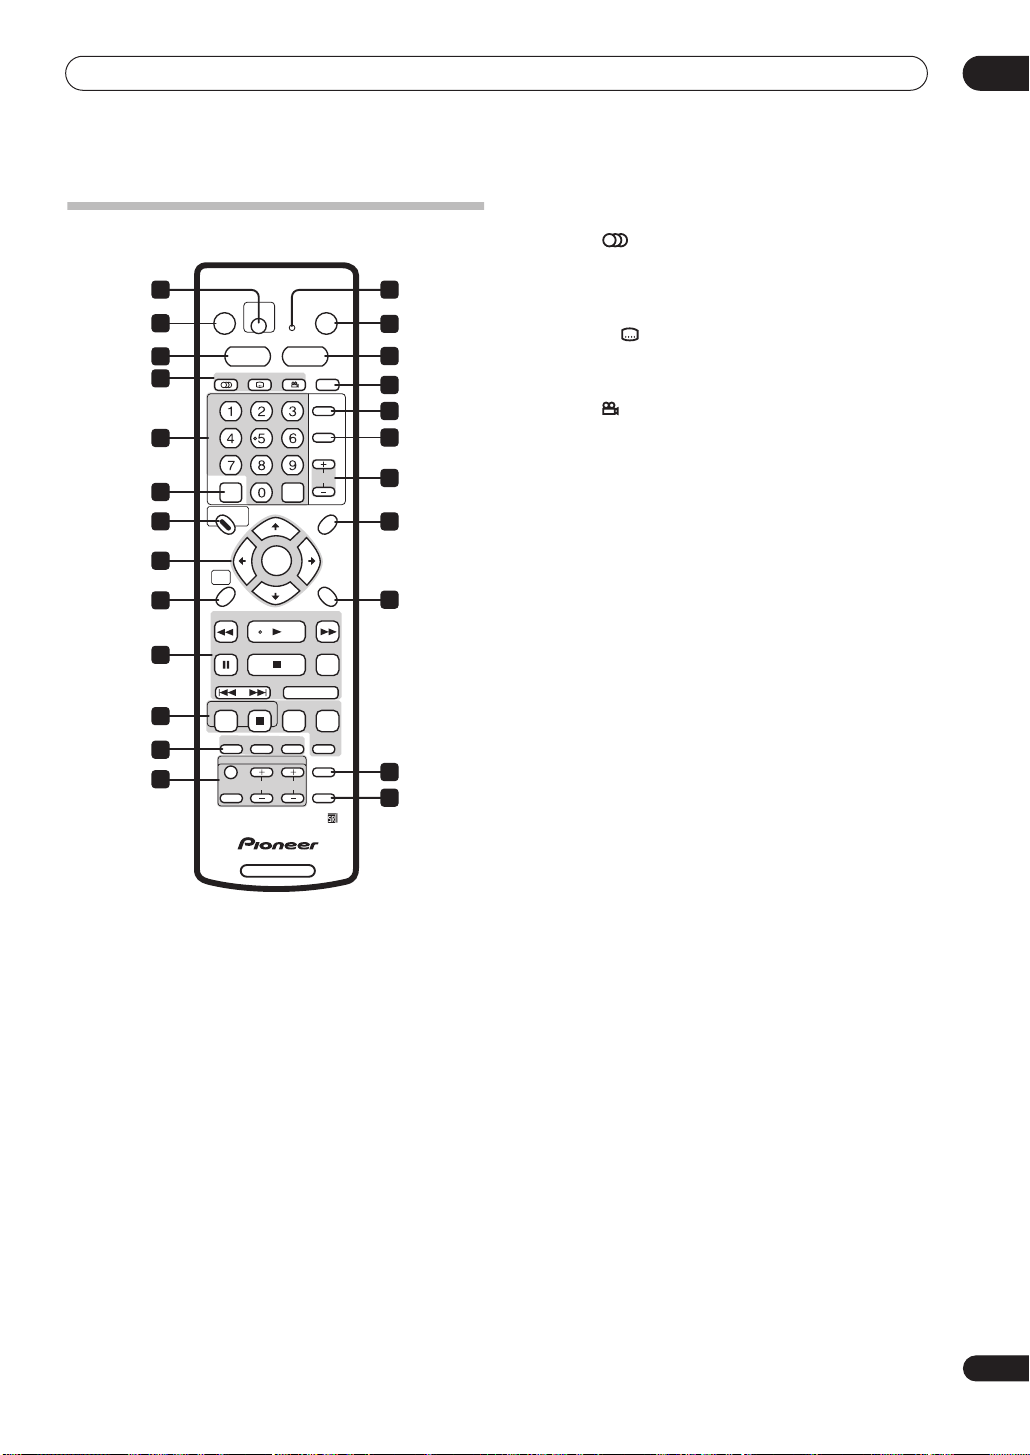
Controls and displays
Remote control
1 2
STANDBY/ON ONE TOUCH
3
5
7
10
13
14
16
17
19
20
21
23
1 ONE TOUCH COPY
HDD DVD
SUBTITLE ANGLE PLAY MODE
AUDIO
GHI JKL MNO
PQRS TUV WXYZ
VIDEO Plus+
+
DISC NAVIGATOR PLAY LIST
TOP MENU MENU
HOME
MENU
REV SCAN PLAY FWD SCAN
PAUSE STOP
CASE
PREV
SELECTION
REC
STOP REC
DISC
HISTORY
TV CONTROL
INPUT
CHANNEL
SELECT
(page 62)
Press to start One Touch Copy of the currently playing
title to DVD or the HDD.
2 Remote control indicator
Lights when setting up the remote control for use with a
TV (page 112) and when setting the remote control mode
(page 99).
3 STANDBY/ON
Press to switch the recorder on/into standby.
4 OPEN/CLOSE
Press to open/close the disc tray.
5 HDD
(page 28)
Press to select the hard disk (HDD) for recording or
playback.
6 DVD
(page 28)
Press to select the DVD for recording or playback.
COPY
DEF
ABC
CLEAR
CLEAR
ENTER
OK CM SKIP
NEXT STEP/SLOW
REC MODE TIMER REC
NAVI
CHP
MARK
MARK
VOLUME
DVD RECORDER
OPEN/CLOSE
TV/DVD
INPUT
SELECT
CHANNEL
RETURN
EASY
TIMER
DISPLAY
TV DIRECT
REC
4
6
8
9
11
12
15
18
22
24
7 DVD playback functions
AUDIO
(page 29, 43, 44)
Changes the audio language or channel. (When the
recorder is stopped, press to change the tuner
audio.)
SUBTITLE
(page 43)
Displays/changes the subtitles included in
multilingual DVD-Video discs.
ANGLE
(page 44)
Switches camera angles on discs with multi-angle
scenes.
8 PLAY MODE
(page 40)
Press to display the Play Mode menu (for features such
as search, repeat and program play).
9 TV/DVD
(page 29)
Press to switch between ‘TV mode’, in which you get the
picture and sound from the TV’s tuner, and ‘DVD mode’,
in which you get picture and sound from the recorder’s
tuner (or an external input).
10 Alphanumeric buttons and CLEAR
Use the number buttons for track/chapter/title selection;
channel selection, and so on. The same buttons can also
be used to enter names for titles, discs and so on.
Use
CLEAR
to clear an entry and start again.
11 INPUT SELECT
(page 56)
Press to change the input to use for recording.
12 CHANNEL +/–
(page 29)
Press to change the channel of the built-in TV tuner.
13 VIDEO Plus+
(page 52)
Press, then use the number buttons to enter a
®
PlusCode
14 DISC NAVIGATOR
programming number for timer recording.
(page 36, 76)
/ TOP MENU
(page 31)
Press to display the Disc Navigator screen, or the top
menu if a DVD-Video disc is loaded.
15 PLAY LIST
(page 78, 84)
/ MENU
(page 31)
Press to switch between Original and Play List content on
VR mode discs, or display the disc menu if a DVD-Video
disc is loaded.
16
///
Used to navigate all on-screen displays. Press
(cursor buttons) and ENTER
ENTER
to
select the currently highlighted option.
17 HOME MENU
(page 33)
Press to display the Home Menu, from which you can
navigate all the functions of the recorder.
18 RETURN
Press to go back one level in the on-screen menu or
display.
03
23
En

03
Controls and displays
19 Playback controls
REV SCAN / FWD SCAN (page 38)
Press to start reverse or forward scanning. Press
again to change the speed.
PLAY
Press to start playback.
PAUSE
Press to pause playback or recording.
STOP
Press to stop playback.
CM BACK (commercial back)
Press repeatedly to skip progressively backward
through the audio or video playing.
CM SKIP (commercial skip)
Press repeatedly to skip progressively forward
through the audio or video playing.
PREV / NEXT
Press to skip to the previous or next title/chapter/
track/folder; or to display the previous or next menu
page.
STEP/SLOW (page 39)
During playback, press to start slow-motion
playback; while paused, press to show the previous
or next video frame.
20 Recording controls
REC
Press to start recording. Press repeatedly to set the
recording time in blocks of 30 mins.
STOP REC
Press to stop recording.
REC MODE
Press repeatedly to change the recording mode
(picture quality).
TIMER REC
Press to set a timer recording from the standard
Timer Recording screen.
EASY TIMER
Press to set a timer recording from the Easy Timer
Recording screen.
(page 30)
(page 28)
(page 47)
(page 51)
(page 50)
21 DISC HISTORY
Press to display summary information (disc name,
recording time left, etc.) from the last 30 recordable
discs loaded.
NAVI MARK
Press to select a thumbnail picture for the current
title for use in the Disc Navigator screen.
CHP MARK
Press to insert a chapter marker when playing/
recording a VR mode DVD-RW disc or the HDD.
22 DISPLAY
Displays/changes the on-screen information displays.
23 TV CONTROL
After setting up, use these controls to control your TV.
24 TV DIRECT REC
Press to start recording whatever channel your TV is set
to.
(page 89)
(page 37)
(page 81)
(page 33)
(page 112)
(page 48)
24
En
Getting started
Chapter 4
Getting started
Switching on and setting up
When you switch the recorder on for the first time, you
can make several basic settings using the Setup
Navigator feature. This takes you through setting the
clock, the internal TV tuner and the video and audio
output settings.
If you’re using the recorder for the first time, we strongly
recommend you use the Setup Navigator before starting
to use the recorder.
STANDBY/ON
1 Switch on your TV and set the video input to this
recorder.
2 Press the
STANDBY/ON button on the remote
control or the front panel to switch on.
When you switch on for the first time, your TV should
display the Setup Navigator screen. (If the Setup
Navigator doesn’t appear, you can also access it from the
Initial Setup menu; see page 99).
• If this recorder is connected to a compatible TV using
a fully-wired 21-pin SCART cable, the recorder will
take a few seconds to download country, TV screen
size and language information. (Check the manual
that came with your TV for compatibility information.)
3 Use the
/
(cursor up/down) buttons to choose
a language, then press ENTER.
04
ENTER
DVD RECORDER
Initial Setup
Basic
Tuner
Video In/Out
Audio In
Audio Out
Language
Recording
Playback
Language
Clock Set
Input Line System
On Screen Display
Front Panel Display
Power Save
Remote Control Set
Setup NavigatorSetup Navigator
English
français
Deutsch
Italiano
Español
4 Press ENTER to start setting up using the Setup
Navigator.
Initial Setup
Basic
Tuner
Video In/Out
Audio In
Audio Out
Language
Recording
Playback
Clock Set
Complete this setup before you
Input Line System
start using your recorder.
On Screen Display
Front Panel Display
Power Save
Remote Control Set
Setup NavigatorSetup Navigator
Start
Cancel
Please use the Initial Setup if you
want to make more detailed settings.
• If you don’t want to use the Setup Navigator, press
(cursor down) to select
Cancel
, then press
ENTER
to
exit the Setup Navigator.
5 Select the Auto Channel Setting (‘Auto Scan’ or
‘Download from TV’), or ‘Do not set’, then press
ENTER.
Initial Setup
Basic
Tuner
Video In/Out
Audio In
Audio Out
Language
Recording
Playback
Auto Channel Setting
Clock Set
Input Line System
On Screen Display
Front Panel Display
Power Save
Remote Control Set
Setup NavigatorSetup Navigator
Auto Scan
Download from TV
Do not set
25
En
04
Getting started
• Select
Do not set
if you want to skip setting up the
channels (because they have already been set up, for
example).
• You can only use the
Download from TV
feature if
you connected this recorder to your TV using a
fully-wired 21-pin SCART cable connected to the
AV1(RGB)-TV
connector, and if your TV supports this
function (check your TV’s instruction manual for
more details).
• Use the
/
(cursor left/right) buttons to
choose your country, then press ENTER.
Initial Setup
Basic
Tuner
Video In/Out
Audio In
Audio Out
Language
Recording
Playback
Country Selection
Clock Set
Input Line System
Country
On Screen Display
Front Panel Display
Power Save
Remote Control Set
Setup NavigatorSetup Navigator
UK
• Auto-tuning channels
The
Auto Scan
option automatically scans and sets the
channel presets.
Tuning
11/107
Cancel
• Downloading channels from your TV
Use the
Download from TV
option to download all the
channels that your TV is tuned to.
Downloading
Cancel
Pr 5
6 Select ‘Auto’ for automatic time setting, or
‘Manual’ to set the clock manually, then press
ENTER.
Initial Setup
Basic
Tuner
Video In/Out
Audio In
Audio Out
Language
Recording
Playback
Clock Setting
Clock Set
Input Line System
On Screen Display
Front Panel Display
Power Save
Remote Control Set
Setup NavigatorSetup Navigator
Auto
Manual
Set ‘Clock Set CH‘ to the channel preset number
that broadcasts a time signal, then move the
cursor down to ‘Start’ and press ENTER.
Initial Setup
Auto Clock Setting
Basic
Tuner
Video In/Out
Audio In
Audio Out
Language
Recording
Playback
Clock Set
Input Line System
Date
On Screen Display
Time
Front Panel Display
Power Save
Clock Set CH
Remote Control Set
Setup NavigatorSetup Navigator
Pr 1
Start
The recorder takes a short while to set the time. After
you see that the time has been set, select
Next
proceed.
Initial Setup
Auto Clock Setting
Basic
Tuner
Video In/Out
Audio In
Audio Out
Language
Recording
Playback
Clock Set
Input Line System
Date
On Screen Display
Time
Front Panel Display
Power Save
Clock Set CH
Remote Control Set
Setup NavigatorSetup Navigator
THU
11 20
0101 2004
Pr 1
Start
Next
If the time could not be set automatically, press
RETURN
Manual
to go back to the previous screen and select
.
• Manual clock setting
If no stations in your area are broadcasting time
signals, you can set the clock manually.
Use the
/
(cursor left/right) buttons to set
your time zone.
You can set this by selecting a city or a time relative
to GMT.
Initial Setup
Basic
Tuner
Video In/Out
Audio In
Audio Out
Language
Recording
Playback
Clock Set
Manual Clock Setting
Input Line System
On Screen Display
Time Zone
Front Panel Display
Power Save
Summer Time
Remote Control Set
Setup NavigatorSetup Navigator
Off
England
London
Press (cursor down) then use the
1/2
/
left/right) buttons to select ‘On’ or ‘Off’ for
summer time, then press ENTER.
Select On if you are currently using summer time.
to
(cursor
26
En
• Auto clock setting
Some TV channels broadcast time signals together
with the program. This recorder can use these
signals to set the clock automatically.
Initial Setup
Basic
Tuner
Video In/Out
Audio In
Audio Out
Language
Recording
Playback
Manual Clock Setting
Clock Set
Input Line System
On Screen Display
Time Zone
Front Panel Display
Power Save
Summer Time
Remote Control Set
Setup Navigator
Setup Navigator
On
England
London
1/2

Getting started
04
Set the date (day/month/year) and time, then
press ENTER to make all the settings.
Initial Setup
Basic
Tuner
Video In/Out
Audio In
Audio Out
Language
Recording
Playback
Use the
/
Manual Clock Setting
Clock Set
Input Line System
On Screen Display
Front Panel Display
Power Save
Remote Control Set
Setup NavigatorSetup Navigator
Date
Time
Time Zone
Summer Time
THU
01 01 2004
00 00
England
London
On
2/2
(cursor up/down) buttons to change
the value in the highlighted field.
Use the
/
(cursor left/right) buttons to move
from one field to another.
• You can go back to the previous screen at anytime in
the Setup Navigator by pressing
RETURN
.
7 Select the TV screen type, ‘Standard (4:3)’ or
‘Wide (16:9)’.
Initial Setup
TV Screen Size
Clock Set
Input Line System
On Screen Display
Front Panel Display
Power Save
Remote Control SetSetup Navigator
Setup Navigator
Wide (16:9)
Standard (4:3)
(cursor up/down) buttons to select, then
.
Use the
press
Basic
Tuner
Video In/Out
Audio In
Audio Out
Language
Recording
Playback
/
ENTER
8 Is this recorder connected to an AV amplifier/
receiver for digital audio?
Use the
Digital
ENTER
/
(cursor up/down) buttons to select
,
Dolby Digital, DTS
or
PCM only
.
Dolby
, then press
• Check the operating instructions that came with your
AV amplifier/receiver if you’re not sure what it’s
compatible with.
9 Is your AV amplifier/receiver compatible with 96
kHz PCM digital audio?
Initial Setup
Basic
Tuner
Video In/Out
Audio In
Audio Out
Language
Recording
Playback
Use the
/
(cursor up/down) buttons to select
Compatible, Not Compatible
press
ENTER
.
96kHz PCM Compatible
Clock Set
Input Line System
On Screen Display
Front Panel Display
Power Save
Remote Control Set
Setup NavigatorSetup Navigator
Compatible
Not Compatible
Don’t Know
, or
Don’t Know
, then
• Check the operating instructions that came with your
AV amplifier/receiver if you’re not sure.
10 Press ENTER to exit the Setup Navigator, or select
‘Go Back’ if you want to start again.
Initial Setup
Basic
Tuner
Video In/Out
Audio In
Audio Out
Language
Recording
Playback
Clock Set
Input Line System
Setup is complete!
On Screen Display
Enjoy using your DVD recorder!
Front Panel Display
Power Save
Remote Control Set
Setup NavigatorSetup Navigator
Finish Setup
Go Back
Initial Setup
AV Amp Digital Connect
Basic
Tuner
Video In/Out
Audio In
Audio Out
Language
Recording
Playback
Use the
/
Connected
• If you select
setup. Press
select
Go Back
Clock Set
Input Line System
On Screen Display
Front Panel Display
Power Save
Remote Control Set
Setup NavigatorSetup Navigator
Connected
Not Connected
(cursor up/down) buttons to select
, or
Not Connected
Not Connected
ENTER
, then press
, that completes the
to exit the Setup Navigator, or
if you want to go back and start again.
ENTER
• Select the digital audio formats your AV amplifier/
receiver is compatible with.
Initial Setup
Basic
Tuner
Video In/Out
Audio In
Audio Out
Language
Recording
Playback
AV Amp Compatibility
Clock Set
Input Line System
On Screen Display
Front Panel Display
Power Save
Remote Control Set
Setup NavigatorSetup Navigator
Dolby Digital
Dolby Digital, DTS
PCM only
That completes basic setup using the Setup Navigator.
Other settings you can make
After setting up using the Setup Navigator, you should be
ready to start enjoying your DVD recorder. It’s possible,
however, that you may want to make a couple of
additional settings, depending on how the recorder is set
up for terrestrial TV broadcasts.
.
• Manual channel setting – This setting lets you skip
channels where there is no station, as well as
manually tune to stations. See
Manual CH Setting
on
page 100.
• VIDEO Plus+ channel setting – This setting lets you
assign guide channels to ensure that the VIDEO
Plus+ programming system works correctly. See
VIDEO Plus+ CH
on page 101.
Set
• Setting up the remote to control your TV – You can set
up the supplied remote control to control many
brands of TV. See
TV
on page 112.
Setting up the remote to control your
27
En
04
Getting started
Selecting the hard disk or DVD for
playback and recording
The
HDD
and
DVD
buttons (remote control and front
panel) are used to select the hard disk (HDD) or DVD for
playback and recording. The indicator in the front panel
display shows which is currently selected.
HDD DVD
Making your first recording
This quick guide shows you how to make a basic
recording of a TV program on either the HDD, or to a
recordable DVD.
Recording is covered in much more detail in chapter 6
(
Recording
).
STANDBY/ON
HDD DVD
OPEN/CLOSE
CHANNEL
1 If they aren’t already on, switch on your TV and
this recorder.
Press STANDBY/ON
to switch on.
• Make sure that the video input on your TV is set to this
recorder.
2 Press HDD to record to the HDD, or DVD to record
to a recordable DVD.
If you choose to record to the HDD, skip to step 5 now.
3 Press OPEN/CLOSE to open the disc tray.
4 Load a blank DVD-R or DVD-RW disc with the
label side face-up, using the disc guide to align the
disc.
• When you load a new, blank DVD-RW disc, the
recorder will take a moment to initialize it for
recording.
5 Use the CHANNEL +/– buttons to select the TV
channel you want to record from.
• You can also use the
+/–
buttons on the front panel if
the recorder is stopped.
• Channel presets are numbered 1–99.
• If the recorder is connected to your TV using a SCART
cable and your TV supports Direct Recording, it’s
possible to quickly start recording whatever channel
your TV is tuned to. See
Direct recording from TV
on
page 48 for detailed instructions.
6 Press REC to start recording.
• By default, the recording will be in SP (standard play)
mode, which will give you around two hours of
recording from a blank DVD disc.
• You can pause recording by pressing
Press
REC
or PAUSE
again to restart recording.
PAUSE
.
7 When you want to stop recording, press
STOP REC.
28
En
REC
PLAY
STOP
STOP REC
DVD RECORDER
Playing back your recording
The TV program you just recorded should be on the HDD
or DVD disc as a single title with one or more chapters.
• Press PLAY to start playback.
If you want to stop playback before the end of the
recording, press
STOP
.
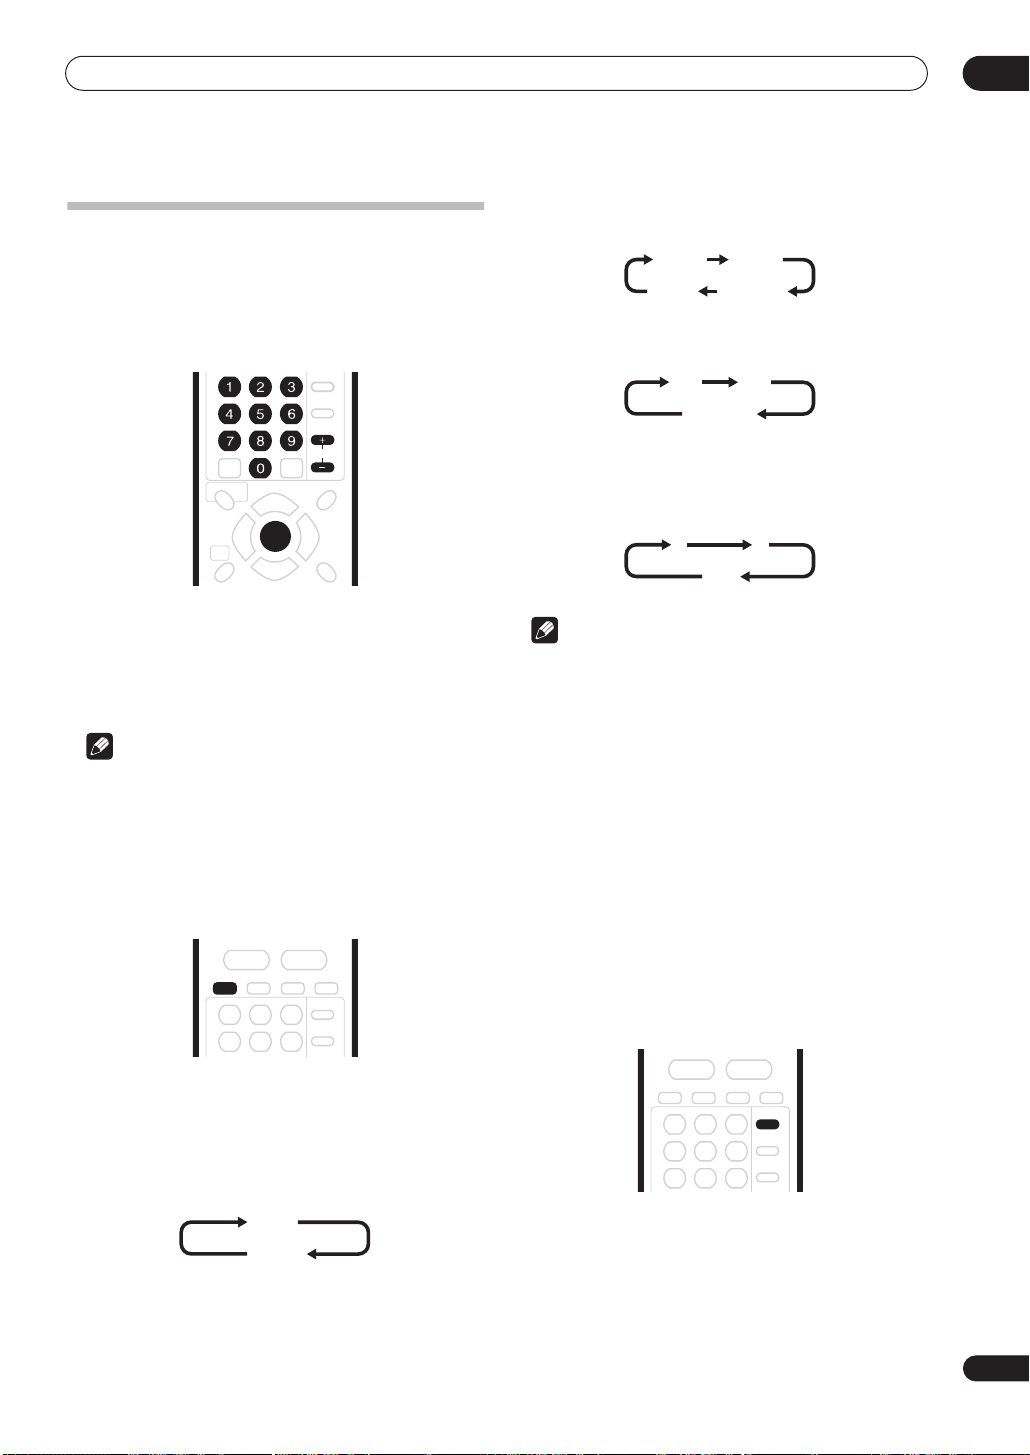
Getting started
Using the built-in TV tuner
Changing TV channels
There are three different ways to select TV channels. Note
that you can’t change the TV channel during playback,
recording or during recording standby.
• If the NICAM broadcast is bilingual, you can also
select the language.
NICAM A NICAM B
Regular
NICAM A+B
• You can also select the language for a non-NICAM
bilingual broadcast.
A (L) B (R)
A + B (L+R)
04
CHANNEL
ENTER
•
CHANNEL +/–
Number buttons
•
select channel 4, press
press
3, 4, ENTER
•
+/–
buttons on the front panel
buttons on the remote
on the remote – For example, to
4
then
ENTER
; for channel 34,
.
Note
• Channel presets are numbered 1–99.
• You can’t change TV channels during playback or
recording, or while in recording standby.
Changing audio channels
You can change the audio channel of the broadcast or
external input signal.
AUDIO
• When watching a recording made from an external
input with
Audio
channel between left (
Bilingual
recording selected (see
on page 103), you can switch the audio
L
), right (R) or both (
LR
L+R
L+R
External
).
Note
• When recording to the HDD, or in Video mode, or in
VR mode using the
FINE/MN32
setting, only one
channel of a bilingual broadcast is recorded. In this
case, decide which language you want to record
before recording by setting the Bilingual Recording
setting (see
Bilingual Recording
on page 104).
Switching between TV and DVD
When the recorder is stopped or recording you can
choose whether to have the audio/video from the built-in
TV tuner (or external input) play on your TV (‘DVD mode’),
or watch the channel that the TV is currently set to (‘TV
mode’).
During playback or when a menu is being displayed onscreen, the sound and video is always routed to your TV
and is unaffected by the
Note that the recorder must be connected to your TV
using a SCART cable to be able to use this feature.
TV/DVD
mode setting.
• Press AUDIO to change the audio.
The current audio channel is displayed on-screen.
• If the NICAM audio setting (see
page 103) is set to
NICAM
NICAM Select
and you are watching a
NICAM broadcast, you can switch between
and
Regular
(non-NICAM) audio.
NICAM
Regular
on
NICAM
• Press TV/DVD to switch between TV mode and
DVD mode.
29
En
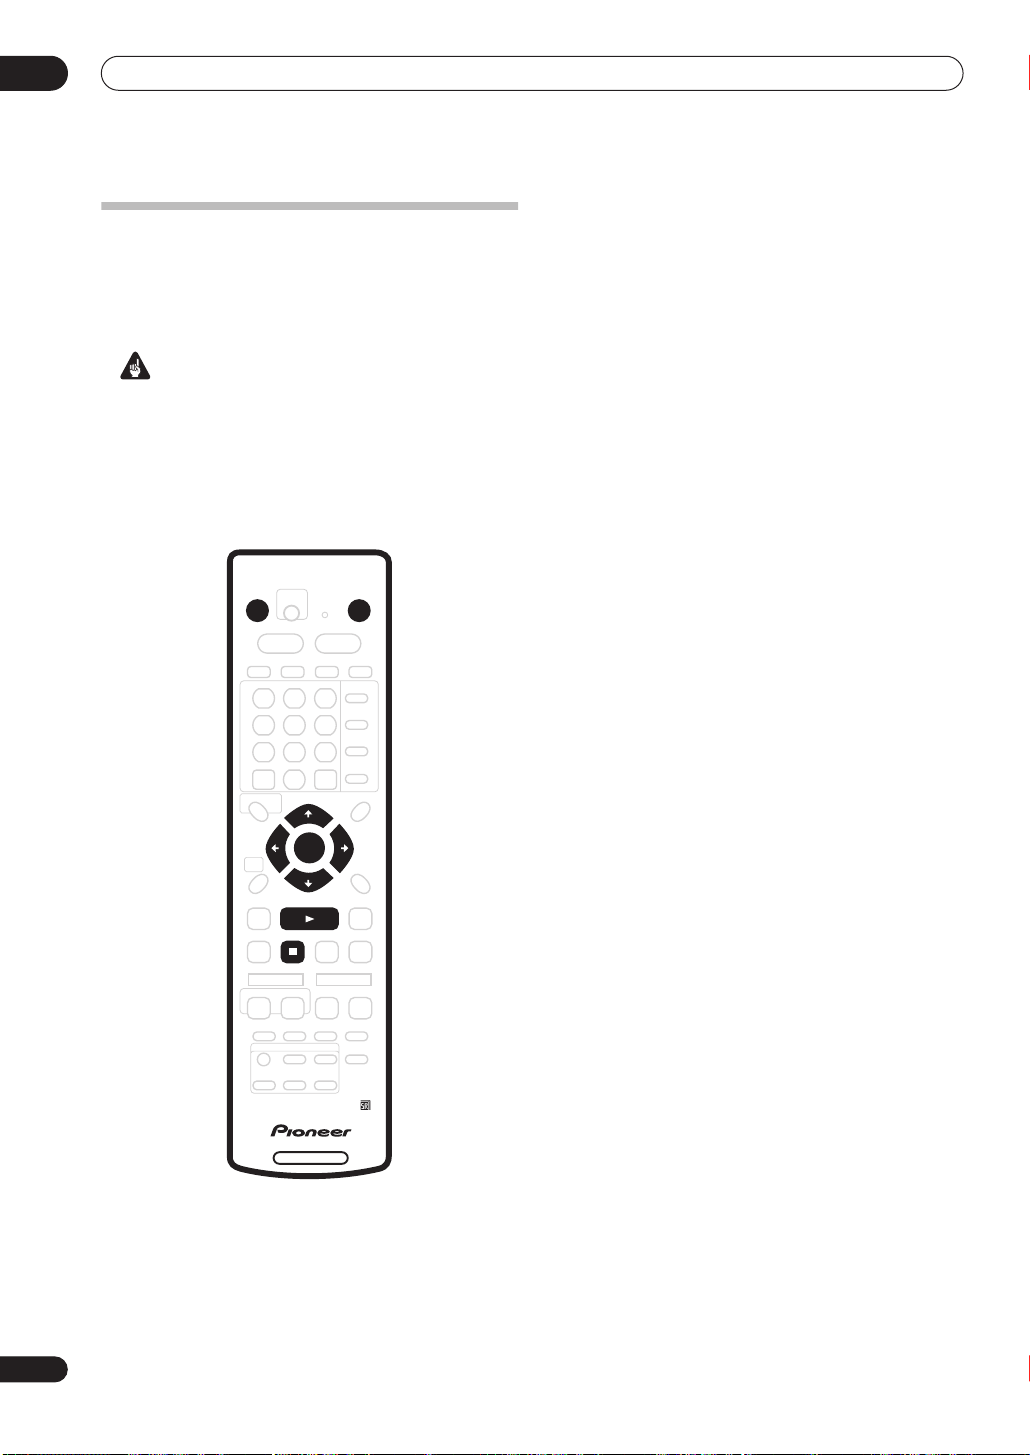
04
Getting started
Basic playback
This section shows you how to use your recorder for
playback of discs (DVD, CD, etc.), and for playback of
video from the HDD. More playback features, such as
repeat and program play, are covered in the next chapter.
Important
• Throughout this manual, the term ‘DVD’ means
playback-only DVD-Video discs and DVD-R/RW. If a
function is specific to a particular kind of DVD disc, it
is specified.
• Some DVD-Video discs don’t allow certain playback
controls to operate at certain points in the disc. This
is not a malfunction.
STANDBY/ON
OPEN/CLOSE
3 Press OPEN/CLOSE to open the disc tray.
4 Load a disc.
Load a disc with the label side facing up, using the disc
tray guide to align the disc (if you’re loading a doublesided DVD-Video disc, load it with the side you want to
play face down).
• If you want to play a DTS audio CD, please first read
the note on page 32.
5 Press PLAY to start playback.
• If you’re playing a DVD-Video or Video CD, a disc
menu may appear when you start playback. Use the
///
(cursor) buttons and
ENTER
to navigate
DVD disc menus, and the number buttons and
ENTER
for Video CD menus.
• When playing video from the HDD, playback will
automatically stop after the end of a title is reached.
• See the following sections for more details on playing
specific kinds of discs.
6 To stop playback, press STOP.
7 When you’ve finished using the recorder, eject
the disc and switch the recorder back into standby.
• To open/close the disc tray, press OPEN/CLOSE
Remove the disc before putting the recorder into
standby.
• Press
STANDBY/ON
to switch the recorder into
standby.
.
30
En
ENTER
PLAY
STOP
DVD RECORDER
1 Press STANDBY/ON to switch on.
Also turn on your TV and make sure that it is set to the
correct video input.
2 Press HDD to playback from the HDD, or DVD to
play a DVD.
If playing video from the HDD, skip to step 5 below.
Loading…
Manual
View the manual for the Pioneer DVR-520H here, for free. This user manual comes under the category DVD players and has been rated by 1 people with an average of a 7.5. This manual is available in the following languages: English. Do you have a question about the Pioneer DVR-520H?
Ask your question here
Frequently asked questions
Can’t find the answer to your question in the manual? You may find the answer to your question in the FAQs about the Pioneer DVR-520H below.
How can I best clean my DVD player?
A slightly damp cleaning cloth or soft, dust-free cloth works best to remove fingerprints. Dust in hard-to-reach places is best removed with compressed air.
Is the manual of the Pioneer DVR-520H available in English?
Yes, the manual of the Pioneer DVR-520H is available in English .
Is your question not listed? Ask your question here
Pioneer DVR-520H user guide recommended for: DVR-225, XV-DV505, DVR-533H-S, DVR-450H-S, DVR-510H.
The Pioneer DVR-520H DVD Recorder manual (Pioneer Operating instructions manual, 128 pages) is completely safe to download (last scan date: 25/10/2024). You can rest assured of your safety when interacting with Pioneer DVR-520H document.
2
R100
Operation & user’s manual Samsung Cell Phone Operation & user’s manual (File: samsung-r100-cell-phone-127, Mon 12.2024)
127
252
58
7
DVD-SR150M
Instruction manual PDF Manual (@46166O), Samsung DVD-SR150M DVD Player (Sunday 16-03-2025)
94
347
73
8
RH589H
Owner’s manual PDF Manual (@GT8M6I), LG RH589H DVD Recorder (Tuesday 22-10-2024)
37
325
52
9
DVDR3380
Specifications Philips DVDR3380 User Manual (Specifications), @51FR63
2
700
105
10
RD-XS35SU
Quick reference Toshiba RD-XS35SU User Manual (Quick reference), @UU955L
16
950
219
Manual: DVR520H OM PIONEER
- Addeddate
- 2021-07-25 12:24:58
- Identifier
- manual_DVR520H_OM_PIONEER
- Identifier-ark
- ark:/13960/t0ps9t77s
- Ocr
- tesseract 5.0.0-alpha-20201231-10-g1236
- Ocr_detected_lang
- en
- Ocr_detected_lang_conf
- 1.0000
- Ocr_detected_script
- Latin
- Ocr_detected_script_conf
- 1.0000
- Ocr_module_version
- 0.0.13
- Ocr_parameters
- -l eng
- Ppi
- 600
- Scanner
- Internet Archive Python library 2.0.3
comment
Reviews
There are no reviews yet. Be the first one to
write a review.
48
Views
DOWNLOAD OPTIONS
Temporarily Unavailable
DAISY
For users with print-disabilities
Temporarily Unavailable
EPUB
Uploaded by
Sketch the Cow
on