

Operation Manual
CD Receiver
DEH-P6950IB
English
Español
Português (B)

Contents
Thank you for buying this Pioneer product.
Please read through these operating instructions so you will know how to operate
your model properly. After you have finished reading the instructions, keep this man-
ual in a safe place for future reference.
Before You Start
About this unit 5
Visit our website 5
Protecting your unit from theft 6
– Removing the front panel 6
– Attaching the front panel 6
About the demo mode 6
Use and care of the remote control 7
– Installing the battery 7
– Using the remote control 7
Operating this unit
What’s What 8
– Head unit 8
– Remote control 8
Basic Operations 9
– Power ON/OFF 9
– Selecting a source 9
– Adjusting the volume 10
Tuner 10
– Basic Operations 10
– Storing and recalling broadcast
frequencies 11
– Introduction of advanced
operations 11
– Storing the strongest broadcast
frequencies 11
– Tuning in strong signals 12
Built-in CD Player 12
– Basic Operations 12
– Selecting a track directly 13
– Introduction of advanced
operations 14
– Selecting a repeat play range 14
– Playing tracks in random order 14
– Scanning folders and tracks 14
– Pausing disc playback 15
– Using compression and BMX 15
– Searching every 10 tracks in the current
disc or folder 15
– Using disc title functions 15
– Displaying text information on disc 16
– Selecting tracks from the track title
list 16
– Selecting tracks from the file name
list 16
Playing songs on iPod 17
– Basic Operations 17
– Browsing for a song 18
– Displaying text information on
iPod 18
– Introduction of advanced
operations 18
– Repeating play 19
– Playing songs in a random order
(shuffle) 19
– Playing all songs in a random order
(shuffle all) 19
– Pausing a song 19
Audio Adjustments 20
– Introduction of audio adjustments 20
– Using balance adjustment 20
– Using the equalizer 20
– Adjusting loudness 22
– Using subwoofer output 22
– Boosting the bass 22
– Using the high pass filter 23
– Adjusting source levels 23
Initial Settings 24
– Adjusting initial settings 24
– Selecting the display language 24
– Setting the clock 24
– Setting the FM tuning step 25
– Setting the AM tuning step 25
– Switching the warning tone 25
– Switching the auxiliary setting 25
– Switching the dimmer setting 25
2
En

Contents
English
– Adjusting the brightness 25
– Setting the rear output and subwoofer
controller 26
– Switching the sound muting/
attenuation 26
– Switching the feature demo 26
– Switching the reverse mode 26
– Switching the Ever Scroll 27
– Activating the BT Audio source 27
– Entering PIN code for Bluetooth
wireless connection 27
Other Functions 28
– Using the AUX source 28
– Turning the clock display on or off 28
– Using different entertainment
displays 28
– Using the PGM button 29
Available accessories
Playing songs on USB portable audio player/
USB memory 30
– Basic Operations 30
– Selecting an audio file directly in the
current folder 30
– Introduction of advanced
operations 30
– Displaying text information of an audio
file 31
– Selecting files from the file name
list 31
Bluetooth Audio 32
– Basic Operations 32
– Introduction of advanced
operations 33
– Connecting a Bluetooth audio
player 33
– Playing songs on Bluetooth audio
player 33
– Pausing a song 33
– Stopping playback 33
– Disconnecting a Bluetooth audio
player 34
– Displaying BD (Bluetooth Device)
address 34
– Displaying system version for
repair 34
Bluetooth Telephone 34
– Basic Operations 34
– Setting up for hands-free phoning 35
– Making a phone call 35
– Taking a phone call 36
– Introduction of advanced
operations 36
– Connecting a cellular phone 37
– Disconnecting a cellular phone 37
– Registering connected cellular
phone 38
– Deleting a registered phone 38
– Connecting to a registered cellular
phone 38
– Using the Phone Book 38
– Using the Call History 41
– Using preset numbers 41
– Making a call by entering phone
number 41
– Clearing memory 42
– Setting the automatic rejecting 42
– Setting the automatic answering 42
– Switching the ring tone 42
– Echo canceling and noise
reduction 43
– Displaying BD (Bluetooth Device)
address 43
– Displaying system version for
repair 43
Multi-CD Player 43
– Basic Operations 43
– Selecting a track directly 44
En
3

Contents
– Introduction of advanced
operations 44
– Using ITS playlists 45
– Using disc title functions 46
– Using CD TEXT functions 46
DVD Player 47
– Basic Operations 47
– Selecting a disc 48
– Selecting a folder 48
– Introduction of advanced
operations 48
TV tuner 49
– Basic Operations 49
– Storing and recalling broadcast
stations 50
– Storing the strongest broadcast
stations sequentially 50
Additional Information
Troubleshooting 51
Understanding error messages 51
Handling guideline of discs and player 51
Dual Discs 52
Compressed audio files 52
– Example of a hierarchy 53
– Compressed audio compatibility 53
About handling the iPod 53
– About iPod settings 53
Specifications 54
4
En
Before You Start
Section
01
About this unit
CAUTION
! Do not allow this unit to come into contact
with liquids. Electrical shock could result.
Also, this unit damage, smoke, and overheat
could result from contact with liquids.
! Keep this manual handy as a reference for op-
erating procedures and precautions.
! Always keep the volume low enough so that
you can hear sounds from outside the vehicle.
! Protect this unit from moisture.
! If the battery is disconnected or discharged,
the preset memory will be erased and must be
reprogrammed.
! If this unit does not operate properly, contact
your dealer or nearest authorized Pioneer Service Station.
About WMA
The Windows Media™ logo printed on the box
indicates that this unit can play back WMA
data.
WMA is short for Windows Media Audio and
refers to an audio compression technology
that is developed by Microsoft Corporation.
WMA data can be encoded by using Windows
Media Player version 7 or later.
Windows Media and the Windows logo are trademarks or registered trademarks of Microsoft
Corporation in the United States and/or other
countries.
! This unit may not operate correctly depend-
ing on the application used to encode
WMA files.
About MP3
Supply of this product only conveys a license
for private, non-commercial use and does not
convey a license nor imply any right to use
this product in any commercial (i.e. revenuegenerating) real time broadcasting (terrestrial,
satellite, cable and/or any other media), broadcasting/streaming via internet, intranets and/
or other networks or in other electronic content distribution systems, such as pay-audio or
audio-on-demand applications. An independent license for such use is required. For details, please visit
http://www.mp3licensing.com.
About AAC
AAC is short for Advanced Audio Coding and
refers to an audio compression technology
standard used with MPEG 2 and MPEG 4.
Several applications can be used to encode
AAC files, but file formats and extensions differ depending on the application which is
used to encode.
This unit plays back AAC files encoded by
®
version 6.0.5 and earlier.
iTunes
iTunes is a trademark of Apple Computer, Inc.,
registered in the U.S. and other countries.
®
compatibility
iPod
This unit can control and listen to songs on an
iPod.
! iPod is a trademark of Apple Computer,
Inc., registered in the U.S. and other countries.
! This unit supports only an iPod with Dock
Connector.
! This unit does not support software ver-
sions prior to iPod update 2004-10-20. For
supported versions, consult your nearest
Pioneer dealer.
! Operations may vary depending on the soft-
ware version of iPod.
Visit our website
Visit us at the following site:
! We offer the latest information about
Pioneer Corporation on our website.
English
En
5
Section
01
Before You Start
Protecting your unit from
theft
The front panel can be detached to deter theft.
! If the front panel is not detached from the
head unit within five seconds of turning off
the ignition, a warning tone will sound.
! You can turn off the warning tone. See
Switching the warning tone on page 25.
Important
! Handle gently when removing or attaching
the front panel.
! Avoid subjecting the front panel to excessive
shocks.
! Keep the front panel out of direct sunlight and
high temperatures.
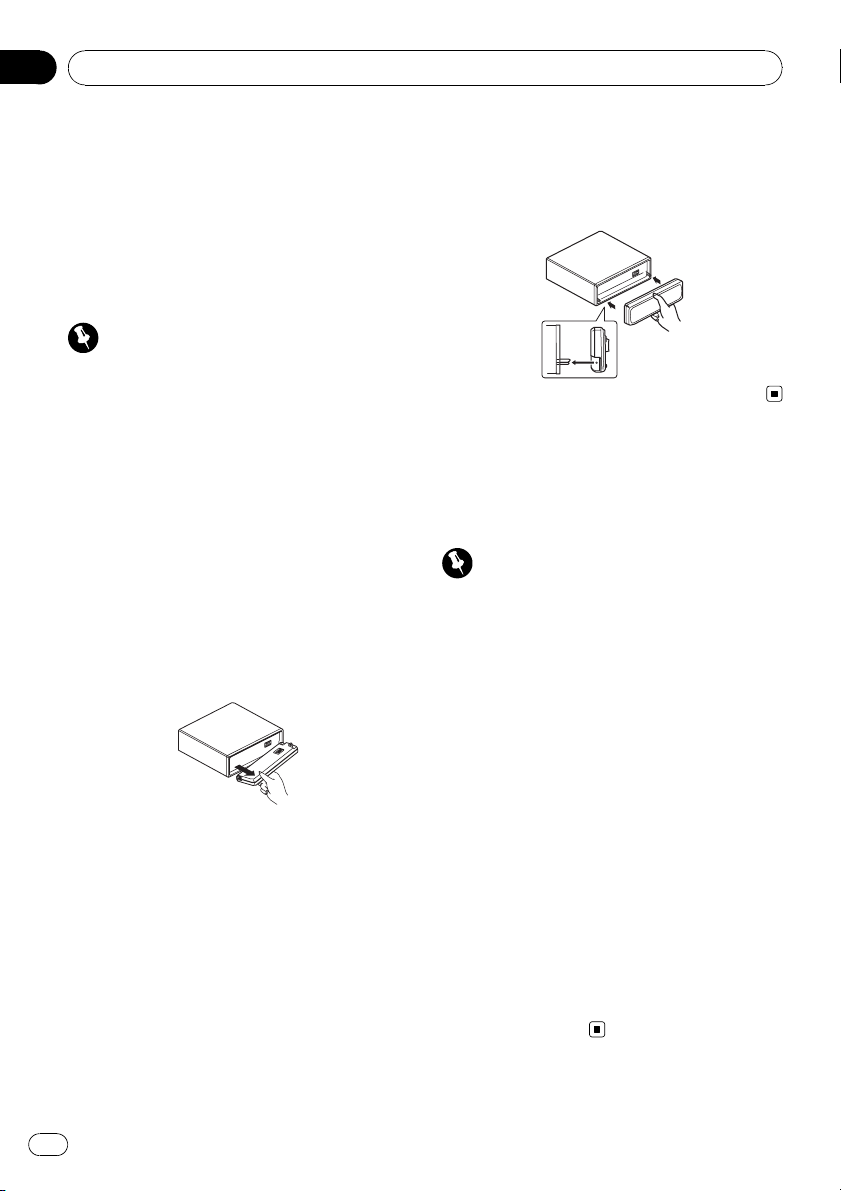
Removing the front panel
1 Press OPEN to open the front panel.
2 Grip the left side of the front panel and
pull it gently outward.
Take care not to grip it too tightly or to drop
the front panel and protect it from contact
with water or other fluids to prevent permanent damage.
3 Put the front panel into provided protective case for safe keeping.
Attaching the front panel
% Replace the front panel by holding it
upright to the unit and clipping it securely
into the mounting hooks.
About the demo mode
This unit features two demonstration modes.
One is the reverse mode, the other is the feature demo mode.
Important
The red lead (ACC) of this unit should be connected to a terminal coupled with ignition switch
on/off operations. If this is not done, the vehicle
battery may be drained.
Reverse mode
If you do not perform an operation within
about 30 seconds, screen indications start to
reverse, and then continue reversing every 10
seconds. Pressing BAND when power to this
unit is turned off while the ignition switch is
set to ACC or ON cancels the reverse mode.
Press BAND again to start the reverse mode.
Feature demo mode
The feature demo automatically starts when
power to this unit is turned off while the ignition switch is set to ACC or ON. Pressing
DISPLAY during feature demo operation cancels the feature demo mode. Press DISPLAY
again to start the feature demo mode. Remember that if the feature demo continues operating when the car engine is turned off, it may
drain battery power.
6
En
Before You Start
Use and care of the remote
control
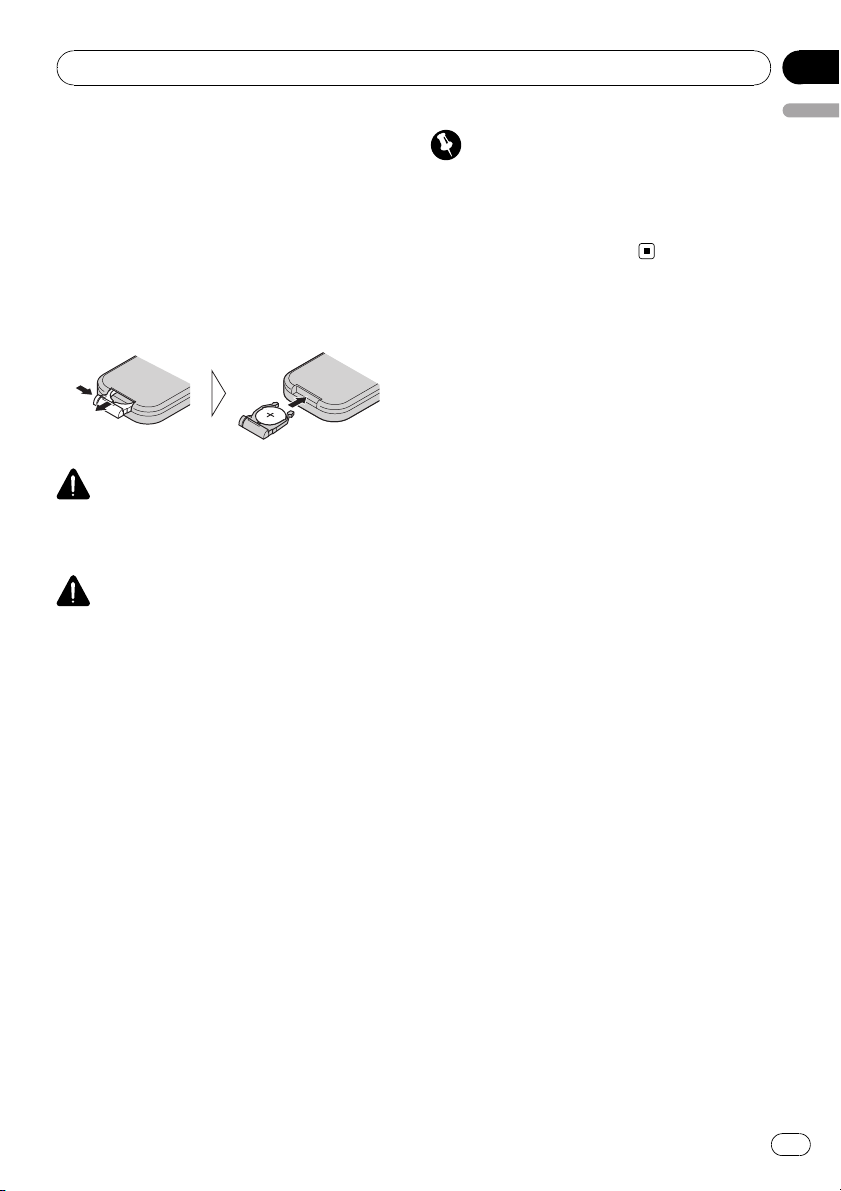
Installing the battery
Slide the tray out on the back of the remote
control and insert the battery with the plus (+)
and minus (–) poles pointing in the proper direction.
! When using for the first time, pull out the
film protruding from the tray.
WARNING
Keep the battery out of the reach of children.
Should the battery be swallowed, immediately
consult a doctor.
CAUTION
! Use only one CR2025 (3 V) lithium battery.
! Remove the battery if the remote control is not
used for a month or longer.
! Danger of explosion if battery is incorrectly re-
placed. Replace only with the same or equivalent type.
! Do not handle the battery with metallic tools.
! Do not store the battery with metallic materi-
als.
! In the event of battery leakage, wipe the re-
mote control completely clean and install a
new battery.
! When disposing of used batteries, please
comply with governmental regulations or environmental public institutions’ rules that
apply in your country/area.
Section
01
English
Important
! Do not store the remote control in high tem-
peratures or direct sunlight.
! Do not let the remote control fall onto the
floor, where it may become jammed under the
brake or accelerator pedal.
Using the remote control
Point the remote control in the direction of the
front panel to operate.
! The remote control may not function prop-
erly in direct sunlight.
En
7

Section
02
Operating this unit
What’s What
Head unit
1 SOURCE button
This unit is turned on by selecting a source.
Press to cycle through all the available
sources.
2 MULTI-CONTROL
Move to perform manual seek tuning, fast
forward, reverse and track search controls.
Also used for controlling functions.
Turn to increase or decrease the volume.
3 OPEN button
Press to open the front panel.
4 CLOCK button
Press to change to the clock display.
5 DISPLAY button
Press to select different displays.
6 SW button
Press to select the subwoofer setting menu.
Press and hold to select the bass boost setting menu.
7 EQ button
Press to select various equalizer curves.
8 LIST button
Press to display the disc title list, track title
list, folder list, file list or preset channel list
depending on the source.
9 BAND button
Press to select among three FM bands and
one AM band and to cancel the control
mode of functions.
Remote control
Operation is the same as when using the buttons on the head unit.
a VOLUME buttons
Press to increase or decrease the volume.
b FUNCTION button
Press to select functions.
c Joystick
Move to perform manual seek tuning, fast
forward, reverse and track search controls.
Also used for controlling functions.
Functions are the same as
MULTI-CONTROL except for volume control.
d DIRECT button
Press to directly select the desired track.
8
En
Operating this unit
Section
02
e CLEAR button
Press to cancel the input number when 0 to
9 are used.
f 0 to 9 buttons
Press to directly select the desired track,
preset tuning or disc. Buttons 1 to 6 can operate the preset tuning for the tuner or disc
number search for the multi-CD player.
g PGM button
Press to operate the preprogrammed functions for each source. (Refer to Using the
PGM button on page 29.)
h ATT button
Press to quickly lower the volume level, by
about 90%. Press once more to return to the
original volume level.
i ENTERTAINMENT button
Press to change to the entertainment display.
j AUDIO button
Press to select various sound quality controls.
English
Basic Operations
Power ON/OFF
Turning the unit on
% Press SOURCE to turn the unit on.
Turning the unit off
% Press SOURCE and hold until the unit
turns off.
Selecting a source
You can select a source you want to listen to.
To switch to the built-in CD player, load a disc
in the unit (refer to page 12).
% Press SOURCE to select a source.
Press SOURCE repeatedly to switch between
the following sources:
Tuner—Television—DVD player/MultiDVD player—Built-in CD player—MultiCD player—iPod—USB—External unit 1—
External unit 2—AUX1—AUX2—BT Audio
—BT Telephone
Notes
! In the following cases, the sound source will
not change:
— When there is no unit corresponding to the
selected source connected to this unit.
— When there is no disc or magazine in the
player.
— When the AUX (auxiliary input) is set to off
(refer to page 25).
— When the BT Audio source is set to off
(refer to Activating the BT Audio source on
page 27).
! AUX1 is set to on by default. Turn off the AUX1
when not in use (refer to Switching the auxili-
ary setting on page 25).
En
9
Section
02
Operating this unit
! External unit refers to a Pioneer product (such
as one available in the future) that, although
incompatible as a source, enables control of
basic functions by this unit. Two external units
can be controlled by this unit. When two external units are connected, the allocation of
them to external unit 1 or external unit 2 is
automatically set by this unit.
! When this unit’s blue/white lead is connected
to the vehicle’s auto-antenna relay control
terminal, the vehicle’s antenna extends when
this unit’s source is turned on. To retract the
antenna, turn the source off.
Adjusting the volume
% Use MULTI-CONTROL to adjust the
sound level.
Tuner
Basic Operations
Important
If you are using this unit in North, Central or
South America, reset the AM tuning step (see
Setting the AM tuning step on page 25).
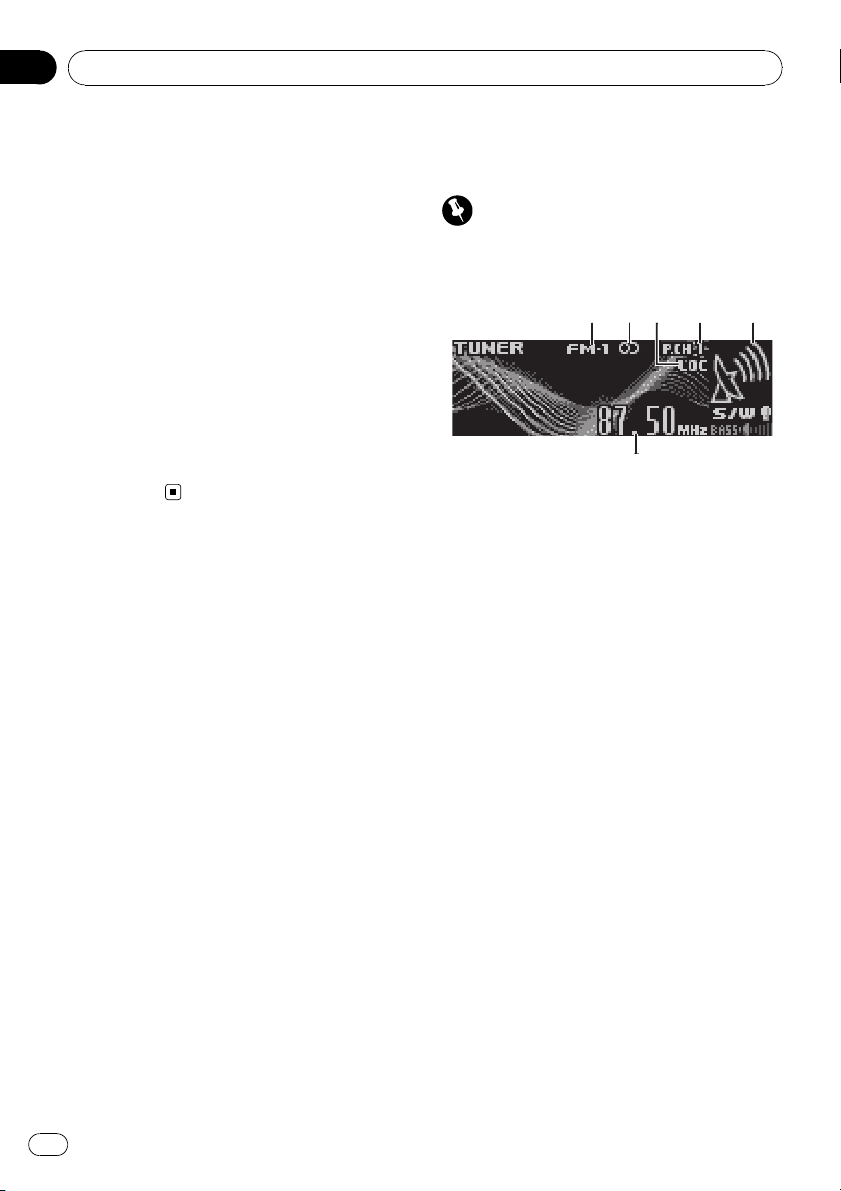
1 Band indicator
2 Stereo (5) indicator
Shows when the selected frequency is being
broadcast in stereo.
3 LOC indicator
Shows when local seek tuning is on.
4 Preset number indicator
5 Signal level indicator
Shows the radio wave strength.
6 Frequency indicator
10
1 Press SOURCE to select the tuner.
2 Press BAND to select a band.
Press BAND until the desired band is displayed, FM-1, FM-2, FM-3 for FM or AM.
3 To perform manual tuning, push
MULTI-CONTROL left or right.
4 To perform seek tuning, push and hold
MULTI-CONTROL left or right for about one
second and release.
The tuner will scan the frequencies until a
broadcast strong enough for good reception is
found.
# You can cancel seek tuning by pushing
MULTI-CONTROL left or right.
En

Operating this unit
Section
02
# If you push and hold MULTI-CONTROL left or
right you can skip stations. Seek tuning starts as
soon as you release MULTI-CONTROL.
Note
Listening AM radio while connecting iPod to this
unit may generate noise. In this case, disconnect
iPod from this unit and noise is disappeared.
Storing and recalling broadcast
frequencies
You can easily store up to six broadcast frequencies for later recall.
! Up to 18 FM stations, six for each of the
three FM bands, and six AM stations can
be stored in memory.
1 When you find a frequency that you
want to store in memory press LIST.
2 Use MULTI-CONTROL to store the selected frequency in memory.
Turn to change the preset number; press and
hold to store.
The preset number you have selected will
flash and then remain lit. The selected radio
station frequency has been stored in memory.
3 Use MULTI-CONTROL to select the desired station.
Turn to change the station; press to select.
# You can also change the station by pushing
MULTI-CONTROL up or down.
# If you do not operate the list within about 30
seconds, the display is automatically returned to
the ordinary display.
The selected radio station frequency has been
English
stored in memory.
The next time you press the same preset tuning button the radio station frequency is recalled from memory.
# You can also recall radio station frequencies
assigned to preset tuning numbers by pushing
MULTI-CONTROL up or down during the frequency display.
Introduction of advanced
operations
1 Press MULTI-CONTROL to display the
main menu.
FUNCTION, AUDIO and ENTERTAINMENT
appear on the display.
2 Use MULTI-CONTROL to select
FUNCTION.
Turn to change the menu option; press to select.
The function name appears on the display.
3 Turn MULTI-CONTROL to select the
function.
Turn MULTI-CONTROL to switch between the
functions in the following order:
BSM (best stations memory)—Local (local
seek tuning)
# You can also select the function by pressing
FUNCTION on the remote control.
# To return to the frequency display, press
BAND.
# If you do not operate functions within about
30 seconds, the display is automatically returned
to the ordinary display.
Using the remote control
% When you find a frequency that you
want to store in memory, press one of preset tuning buttons 1 to 6 and hold until the
preset number stops flashing.
The number you have pressed will flash in the
preset number indicator and then remain lit.
Storing the strongest broadcast
frequencies
BSM (best stations memory) lets you automatically store the six strongest broadcast frequencies under 1 to 6 on the remote control
and once stored there you can tune in to those
frequencies with the touch of a button.
En
11
Section
02
Operating this unit
! Storing broadcast frequencies with BSM
may replace broadcast frequencies you
have saved using 1 to 6 on the remote control.
1 Use MULTI-CONTROL to select BSM in
the function menu.
2 Press MULTI-CONTROL to turn BSM on.
Six strongest broadcast frequencies will be
stored in the order of their signal strength.
# To cancel the storage process, press
MULTI-CONTROL again.
3 Use MULTI-CONTROL to select the desired station.
Turn to change the station; press to select.
# You can also change the station by pushing
MULTI-CONTROL up or down.
Tuning in strong signals
Local seek tuning lets you tune in only those
radio stations with sufficiently strong signals
for good reception.
1 Use MULTI-CONTROL to select Local in
the function menu.
2 Press MULTI-CONTROL to turn local
seek tuning on.
# To turn local seek tuning off, press
MULTI-CONTROL again.
3 Push MULTI-CONTROL left or right to
set the sensitivity.
There are four levels of sensitivity for FM and
two levels for AM:
FM: Level 1—Level 2—Level 3—Level 4
AM: Level 1—Level 2
The Level 4 setting allows reception of only
the strongest stations, while lower settings let
you receive progressively weaker stations.
Built-in CD Player
Basic Operations
The built-in CD player can play back audio CD
(CD-DA) and compressed audio (WMA/MP3/
AAC/WAV) recorded on CD-ROM. (Refer to
page 52 for files that can be played back.)
Read the precautions with discs and player on
page 51.
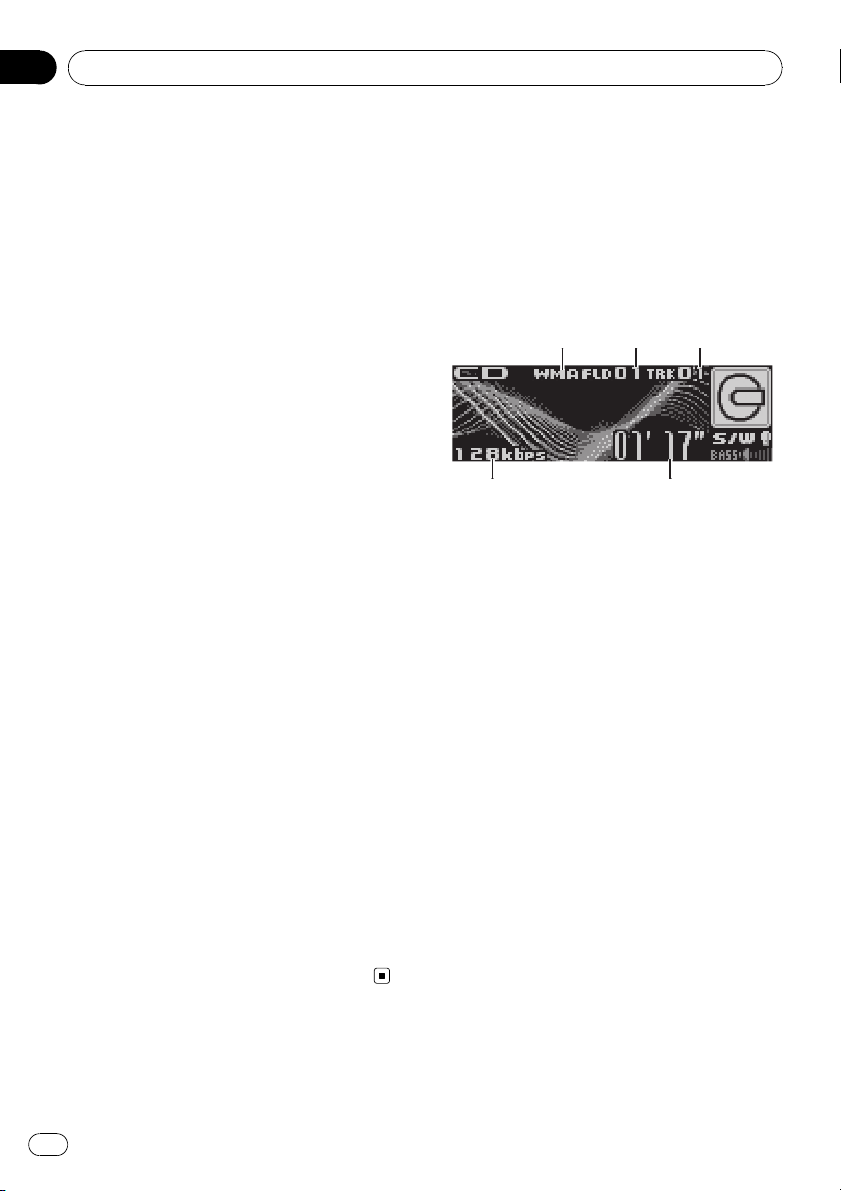
1 WMA/MP3/AAC/WAV indicator
Shows the type of audio file currently playing
when the compressed audio is playing.
2 Folder number indicator
Shows the folder number currently playing
when the compressed audio is playing.
3 Track number indicator
4 Play time indicator
5 Bit rate/sampling frequency indicator
Shows the bit rate or sampling frequency of
the current track (file) when the compressed
audio is playing.
! When playing back VBR (variable bit
rate)-recorded WMA files, the average
bit rate value is displayed.
! When playing back VBR (variable bit
rate)-recorded MP3 files, VBR is displayed instead of bit rate value.
1 Press OPEN to open the front panel.
Disc loading slot appears.
12
En

Operating this unit
Section
02
Disc loading slot
EJECT button
# To avoid a malfunction, make sure that no
metal object comes into contact with the terminals when the front panel is open.
2 Insert a CD (CD-ROM) into the disc loading slot.
Playback will automatically start.
# Be sure to turn up the label side of a disc.
# After a CD (CD-ROM) has been inserted, press
SOURCE to select the built-in CD player.
# You can eject a CD (CD-ROM) by pressing
EJECT.
3 Close the front panel.
4 Push MULTI-CONTROL up or down to
select a folder when playing a compressed
audio.
# You cannot select a folder that does not have
a compressed audio file recorded in it.
# To return to folder 01 (ROOT), press and hold
BAND. However, if folder 01 (ROOT) contains no
files, playback commences with folder 02.
5 To perform fast forward or reverse,
push and hold MULTI-CONTROL left or
right.
# If you select Rough search, pushing and hold-
ing MULTI-CONTROL left or right enables you to
search every 10 tracks in the current disc (folder).
(Refer to Searching every 10 tracks in the current
disc or folder on page 15.)
6 To skip back or forward to another
track, push MULTI-CONTROL left or right.
English
Notes
! There is sometimes a delay between starting
up disc playback and the sound being issued.
When being read, Format read is displayed.
! If an error message such as ERROR-11 is dis-
played, refer to Understanding error messages
on page 51.
! When playing CD-EXTRA or MIXED-MODE
CDs, compressed audio and CD-DA can be
switched by pressing BAND.
! If you have switched between compressed
audio and CD-DA, playback starts at the first
track on the disc.
! When playing back VBR (variable bit rate) re-
corded files, elapsed play time may not be displayed correctly.
! When playing compressed audio, there is no
sound on fast forward or reverse.
! Playback is carried out in order of file number.
Folders are skipped if they contain no files. (If
folder 01 (ROOT) contains no files, playback
commences with folder 02.)
Selecting a track directly
When using the remote control, you can select
a track directly by entering the desired track
number.
! When audio files are being played back,
you can select track in the current folder.
1 Press DIRECT.
Track number input display appears.
2 Press 0 to 9 buttons to enter the desired
track number.
# You can cancel the input number by pressing
CLEAR.
3 Press DIRECT.
The track of entered number will play.
# After entering the number input mode, if you
do not perform an operation within about eight
seconds, the mode is automatically canceled.
En
13

Section
02
Operating this unit
Introduction of advanced
operations
1 Press MULTI-CONTROL to display the
main menu.
FUNCTION, AUDIO and ENTERTAINMENT
appear on the display.
2 Use MULTI-CONTROL to select
FUNCTION.
Turn to change the menu option; press to select.
The function name appears on the display.
3 Turn MULTI-CONTROL to select the
function.
Turn MULTI-CONTROL to switch between the
functions in the following order:
Play mode (repeat play)—Random mode
(random play)—Scan mode (scan play)—
Pause (pause)—Compression (compression
and BMX)—Search mode (search method)—
TitleInput «A» (disc title input)
# You can also select the function by pressing
FUNCTION on the remote control.
# When playing a CD TEXT disc, you cannot
switch to disc title input display. The disc title will
have already been recorded on a CD TEXT disc.
# When playing compressed audio disc, you
cannot switch to disc title input display.
# To return to the ordinary display, press BAND.
# If you do not operate functions except for
TitleInput «A» within about 30 seconds, the display is automatically returned to the ordinary display.
Selecting a repeat play range
Repeat play plays the same track/folder within
the selected repeat play range.
Also, the repeat range determines the range of
random play and scan play.
1 Use MULTI-CONTROL to select
Play mode in the function menu.
2 Press MULTI-CONTROL to select the repeat range.
! Disc repeat – Repeat all tracks
! Track repeat – Repeat just the current
track
! Folder repeat – Repeat the current folder
# If you select another folder during repeat play,
the repeat play range changes to disc repeat.
# When playing CD, performing track search or
fast forward/reverse cancels the repeat play automatically.
# When playing compressed audio, performing
track search or fast forward/reverse during
Track repeat (track repeat) changes the repeat
play range to folder repeat.
# When Folder repeat (folder repeat) is se-
lected, it is not possible to play back a subfolder
of that folder.
Playing tracks in random order
Random play plays tracks in a random order
within the selected repeat range.
Refer to Selecting a repeat play range on this
page.
1 Use MULTI-CONTROL to select
Random mode in the function menu.
2 Press MULTI-CONTROL to turn random
play on.
Tracks will play in a random order.
# To turn random play off, press
MULTI-CONTROL again.
Scanning folders and tracks
Scan play searches the song within the selected repeat range.
Refer to Selecting a repeat play range on this
page.
1 Use MULTI-CONTROL to select
Scan mode in the function menu.
2 Press MULTI-CONTROL to turn scan play
on.
The first 10 seconds of each track is played.
14
En

Operating this unit
Section
02
3 When you find the desired track press
MULTI-CONTROL to turn scan play off.
# If the display has automatically returned to
the playback display, select Scan mode again by
using MULTI-CONTROL.
# After scanning of a disc (folder) is finished,
normal playback of the tracks will begin again.
Pausing disc playback
1 Use MULTI-CONTROL to select Pause in
the function menu.
2 Press MULTI-CONTROL to turn pause
on.
Playback of the current track pauses.
# To turn pause off, press MULTI-CONTROL
again.
Using compression and BMX
Using the COMP (compression) and BMX
functions let you adjust the sound playback
quality of this unit.
1 Use MULTI-CONTROL to select
Compression in the function menu.
2 Press MULTI-CONTROL to select your favorite setting.
COMP/BMX OFF—COMP 1—COMP 2—
COMP/BMX OFF—BMX 1—BMX 2
Searching every 10 tracks in the
current disc or folder
You can switch the search method between
fast forward/reverse and searching every 10
tracks. Selecting Rough search enables you
to search every 10 tracks.
1 Use MULTI-CONTROL to select
Search mode in the function menu.
2 Press MULTI-CONTROL to select
Rough search.
! FF/REV – Fast forward and reverse
! Rough search – Searching every 10 tracks
# To select FF/REV, press MULTI-CONTROL
English
again.
3 Press BAND to return to the playback
display.
4 Push and hold MULTI-CONTROL left or
right to search every 10 tracks on a disc
(folder).
# If the rest of track number is less than 10,
pushing and holding MULTI-CONTROL recalls
the first (last) one.
Using disc title functions
You can input CD titles and display the title.
The next time you insert a CD for which you
have entered a title, the title of that CD will be
displayed.
Entering disc titles
Use the disc title input feature to store up to
48 CD titles in the unit. Each title can be up to
10 characters long.
1 Play the CD that you want to enter a
title for.
2 Use MULTI-CONTROL to select
TitleInput «A» in the function menu.
3 Press DISPLAY to select the desired
character type.
Press DISPLAY repeatedly to switch between
the following character types:
Alphabet (upper case), numbers and symbols
—Alphabet (lower case)—European letters,
such as those with accents (e.g. á, à, ä, ç)—
Numbers and symbols
4 Push MULTI-CONTROL up or down to
select a letter of the alphabet.
5 Push MULTI-CONTROL left or right to
move the cursor to the previous or next
character position.
En
15
Section
02
Operating this unit
6 Move the cursor to the last position by
pushing MULTI-CONTROL right after entering the title.
When you push MULTI-CONTROL right one
more time, the entered title is stored in memory.
7 Press BAND to return to the playback
display.
Notes
! Titles remain in memory, even after the disc
has been removed from the unit, and are recalled when the disc is reinserted.
! After data for 48 discs has been stored in
memory, data for a new disc will overwrite the
oldest one.
! If you connect a multi-CD player, you can
input disc titles for up to 100 discs.
! When a multi-CD player that does not support
disc title functions is connected, you cannot
enter disc titles in this unit.
Displaying text information on
disc
% Press DISPLAY to select the desired text
information.
For title entered CD
Play time—
For CD TEXT discs
Play time—
title—
: disc title and : track title— : track
—
artist name and
and play time
For WMA/MP3/AAC discs
Play time—
: artist name and : track title— :ar-
—
tist name and
and
time—
For WAV discs
Play time—
: disc title and play time
: disc artist name and : track
: disc artist name and : disc title
: track title— : track title
: folder name and : file name
: album title— : album title
: track title— : track title and play
: comment and play time
: folder name and : file name
Notes
! You can scroll to the left of the title by pressing
and holding DISPLAY.
! Audio CD that contains certain information
such as text and/or number is CD TEXT.
! If specific information has not been recorded
on a disc, title or name is not displayed.
! Depending on the version of iTunes
write MP3 files onto a disc, comment information may not be correctly displayed.
! Depending on the version of Windows Media
Player used to encode WMA files, album
names and other text information may not be
correctly displayed.
! The sampling frequency shown in the display
may be abbreviated.
! When Ever Scroll is set to ON at the initial set-
ting, text information scrolls continuously in
the display. Refer to Switching the Ever Scroll
on page 27.
®
used to
Selecting tracks from the track
title list
Track title list lets you see the list of track titles
on a CD TEXT disc and select one of them to
play back.
1 Press LIST to switch to the track title list
mode.
2 Use MULTI-CONTROL to select the desired track title.
Turn to change the track title; press to play.
# You can also change the track title by pushing
MULTI-CONTROL up or down.
# If you do not operate the list within about 30
seconds, the display is automatically returned to
the ordinary display.
Selecting tracks from the file
name list
File name list lets you see the list of file names
(or folder names) and select one of them to
playback.
16
En
Operating this unit
Section
02
1 Press LIST to switch to the file name list
mode.
Names of files and folders appear in the display.
2 Use MULTI-CONTROL to select the desired file name (or folder name).
Turn to change the name of file or folder;
press to play; push right to see a list of the
files (or folders) in the selected folder.
# You can also change the name of file or folder
by pushing MULTI-CONTROL up or down.
# To return to the previous list (the folder one
level higher), push MULTI-CONTROL left.
# If the folder/file number is more than 100, last
2-digit of the folder/file number is displayed.
# Number of the folders/files in the currently selected folder will be indicated on the right side of
the display.
# If you do not operate the list within about 30
seconds, the display is automatically returned to
the ordinary display.
Playing songs on iPod
Basic Operations
You can use this unit to control an iPod by
using a cable (e.g., CD-I200), which is sold separately.
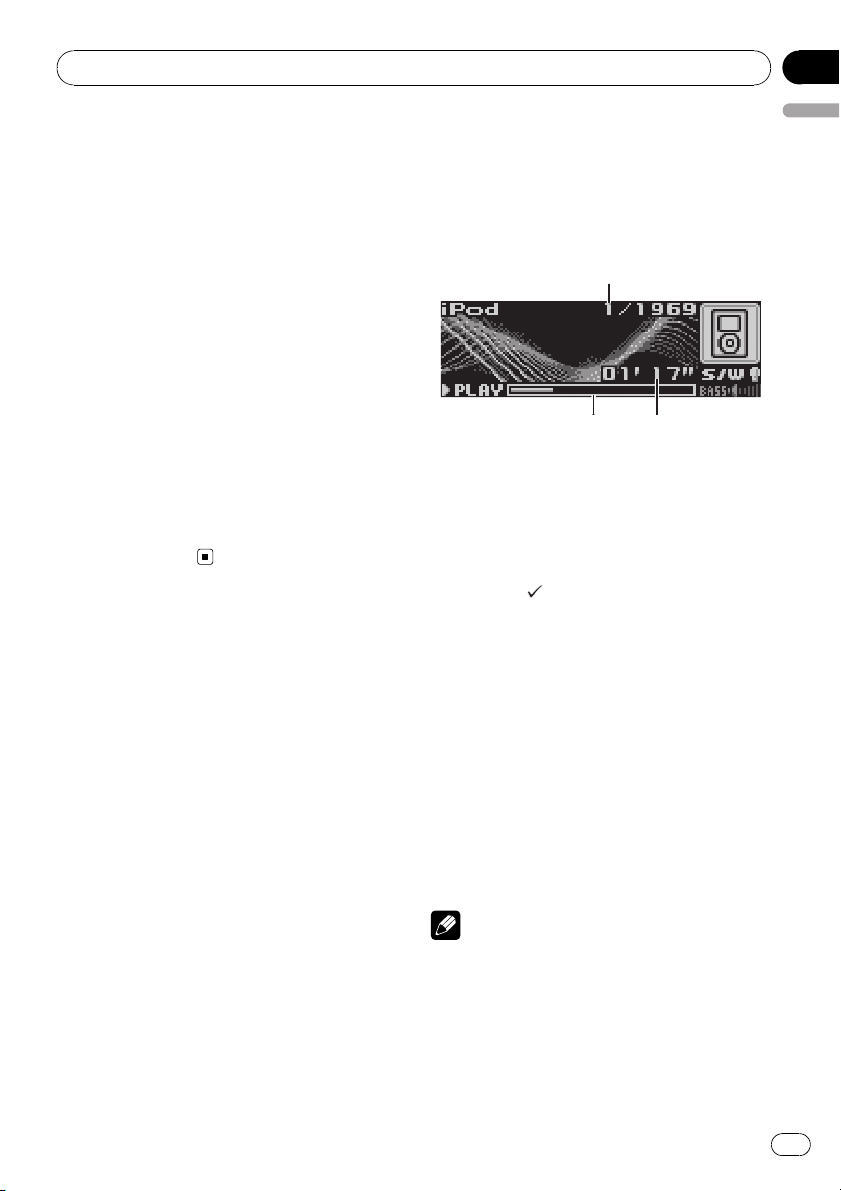
1 Song number indicator
2 Play time indicator
3 Song time (progress bar)
1 Connect the iPod to this unit.
Playback will automatically start.
While the iPod is connected to this unit,
PIONEER (or
the iPod.
# Before connecting the dock connector of this
unit to the iPod, disconnect the headphones from
the iPod.
# After the iPod has been connected to this
unit, press SOURCE to select the iPod.
# When removing the iPod from this unit, this
unit is turned off.
2 To perform fast forward or reverse,
push and hold MULTI-CONTROL left or
right.
3 To skip back or forward to another
song, push MULTI-CONTROL left or right.
(check mark)) is displayed on
English
Notes
! Read the precautions with iPod on page 53.
! If an error message such as ERROR-11 is dis-
played, refer to Understanding error messages
on page 51.
! Connect directly the dock connector of this
unit to the iPod so that this unit works properly.
En
17
Section
02
Operating this unit
! When the ignition switch is set to ACC or ON,
the iPod’s battery is charged while the iPod is
connected to this unit.
! While the iPod is connected to this unit, the
iPod itself cannot be turned on or off.
! The iPod connected to this unit is turned off
about two minutes after the ignition switch is
set to OFF.
Browsing for a song
The operation of this unit to control an iPod is
designed to be as close to the operation of the
iPod as possible for easy operation and song
search.
! If playlist has been selected, first, this unit
shows playlist of your iPod’s name. This
playlist plays all songs in your iPod.
! If the characters recorded on the iPod are
not compatible with this unit, those characters will not be displayed.
1 Press LIST to switch to the top menu of
the list search.
2 Use MULTI-CONTROL to select a category.
Turn to change the category; press to select.
Playlists (playlists)—Artists (artists)—
Albums (albums)—Songs (songs)— Genres
(genres)
List from the selected category is displayed.
# You can start playback throughout the selected category by pressing and holding
MULTI-CONTROL.
# You can also change the category by pushing
MULTI-CONTROL up or down.
# You can also select the category by pushing
MULTI-CONTROL right.
# To return to the previous list, push
MULTI-CONTROL left.
# To go to the top menu of the list search, push
and hold MULTI-CONTROL left.
# If you do not operate the list within about 30
seconds, the list search is cancelled automatically.
3 Repeat step 2 to find a song you want
to listen to.
Displaying text information on
iPod
% Press DISPLAY to select the desired text
information.
Play time—
: artist name and : album name— :
—
album name and
: artist name and : song title
: song title— : song title
and play time
# If the characters recorded on the iPod are not
compatible with this unit, those characters will
not be displayed.
Notes
! You can scroll to the left the text information
by pressing and holding DISPLAY.
! When Ever Scroll is set to ON at the initial set-
ting, text information scrolls continuously in
the display. Refer to Switching the Ever Scroll
on page 27.
Introduction of advanced
operations
1 Press MULTI-CONTROL to display the
main menu.
FUNCTION, AUDIO and ENTERTAINMENT
appear on the display.
2 Use MULTI-CONTROL to select
FUNCTION.
Turn to change the menu option; press to select.
The function name appears on the display.
3 Turn MULTI-CONTROL to select the
function.
Turn MULTI-CONTROL to switch between the
functions in the following order:
Play mode (repeat play)—Shuffle mode
(shuffle)—Shuffle all (shuffle all)—Pause
(pause)
# You can also select the function by pressing
FUNCTION on the remote control.
# To return to the playback display, press BAND.
# If you do not operate functions within about
30 seconds, the display is automatically returned
to the ordinary display.
18
En

Operating this unit
Repeating play
For playback of the songs on the iPod, there
are two repeat play ranges: Repeat One (repeat one song) and Repeat All (repeat all
songs in the list).
! While Play mode is set to Repeat One,
you cannot select the other songs.
1 Use MULTI-CONTROL to select
Play mode in the function menu.
2 Press MULTI-CONTROL to select the repeat range.
! Repeat One – Repeat just the current song
! Repeat All – Repeat all songs in the se-
lected list
Playing songs in a random
order (shuffle)
For playback of the songs on the iPod, there
are two random play methods: Shuffle Songs
(play back songs in a random order) and
Shuffle Albums (play back albums in a random order).
1 Use MULTI-CONTROL to select
Shuffle mode in the function menu.
2 Press MULTI-CONTROL to select your favorite setting.
! Shuffle Songs – Play back songs in a ran-
dom order within the selected list
! Shuffle Albums – Select an album ran-
domly, and then play back all the songs in it
in order
! Shuffle OFF – Cancel the random play
Section
02
English
Note
You can also turn shuffle all on in the menu that
appears by using MULTI-CONTROL.
Pausing a song
1 Use MULTI-CONTROL to select Pause in
the function menu.
2 Press MULTI-CONTROL to turn pause
on.
Playback of the current song pauses.
# To turn pause off, press MULTI-CONTROL
again.
Playing all songs in a random
order (shuffle all)
This method plays all songs on the iPod randomly.
% Press and hold MULTI-CONTROL to turn
shuffle all on during the playback display.
Shuffle All is displayed briefly and all songs
on the iPod will play randomly.
En
19
Section
02
Operating this unit
Audio Adjustments
Introduction of audio adjustments
1 Audio display
Shows the audio adjustment status.
1 Press MULTI-CONTROL to display the
main menu.
FUNCTION, AUDIO and ENTERTAINMENT
appear on the display.
2 Use MULTI-CONTROL to select AUDIO.
Turn to change the menu option; press to select.
The audio function name appears on the display.
3 Turn MULTI-CONTROL to select the
audio function.
Turn MULTI-CONTROL to switch between the
audio functions in the following order:
Fader (balance adjustment)—Powerful (graphic equalizer adjustment)—50Hz (7-band
graphic equalizer adjustment)—LOUD (loudness)—Sub W.1 (subwoofer on/off setting)—
Sub W.2 (subwoofer setting)—Bass (bass
boost)—HPF (high pass filter)—SLA (source
level adjustment)
# You can also select the audio function by
pressing AUDIO on the remote control.
# You can select the Sub W.2 only when sub-
woofer output is turned on in Sub W.1.
# When selecting the FM tuner as the source,
you cannot switch to SLA.
# To return to the display of each source, press
BAND.
# If you do not operate functions except for
50Hz within about 30 seconds, the display is
automatically returned to the ordinary display.
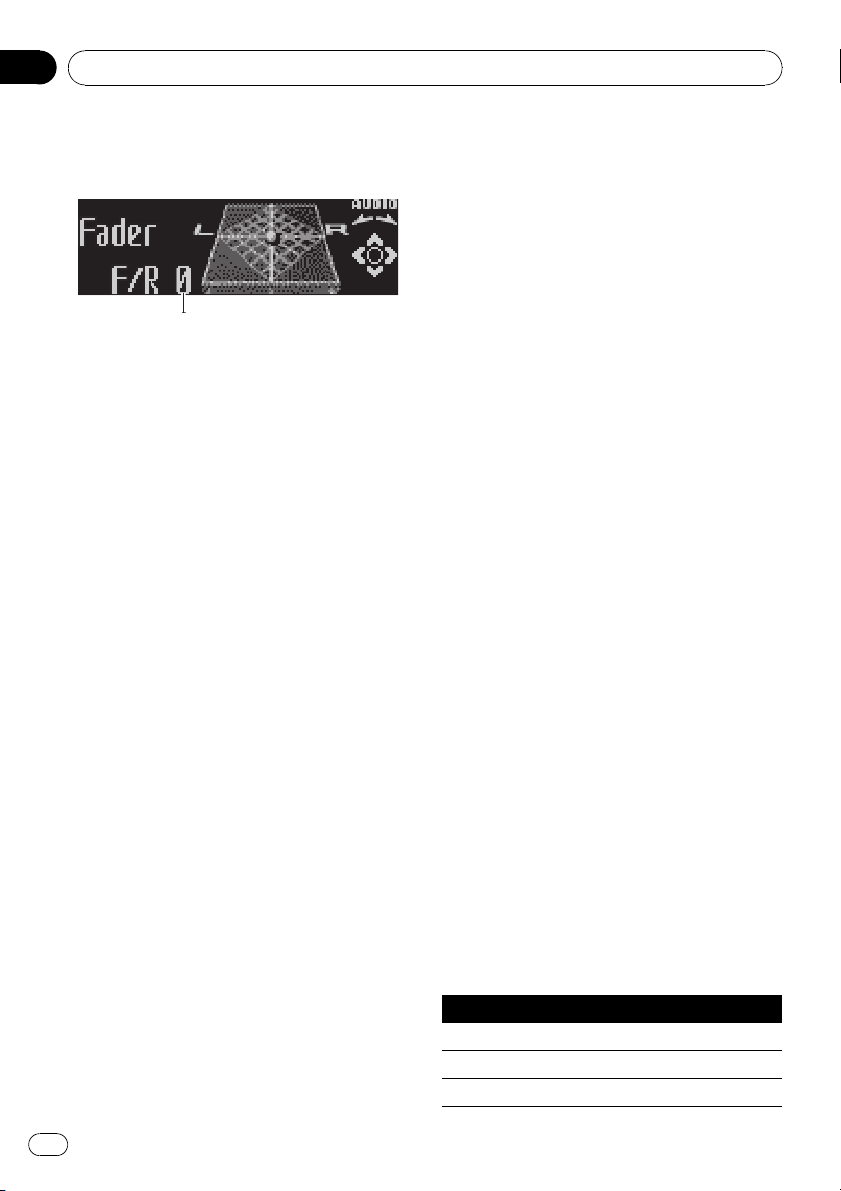
Using balance adjustment
You can change the fader/balance setting so
that it can provide you an ideal listening environment in all occupied seats.
1 Use MULTI-CONTROL to select Fader.
# If the balance setting has been previously adjusted, Balance will be displayed.
2 Push MULTI-CONTROL up or down to
adjust front/rear speaker balance.
Each time MULTI-CONTROL is pushed up or
down, the front/rear speaker balance moves
towards the front or rear.
F15to R15is displayed as the front/rear
speaker balance moves from front to rear.
# F/R 0 is the proper setting when only two
speakers are used.
# When the rear output setting is Rear SP :S/W,
you cannot adjust front/rear speaker balance.
Refer to Setting the rear output and subwoofer
controller on page 26.
3 Push MULTI-CONTROL left or right to
adjust left/right speaker balance.
Each time MULTI-CONTROL is pushed left or
right, the left/right speaker balance moves towards the left or right.
L15to R15is displayed as the left/right
speaker balance moves from left to right.
Using the equalizer
The equalizer lets you adjust the equalization
to match car interior acoustic characteristics
as desired.
Recalling equalizer curves
There are seven stored equalizer curves which
you can easily recall at any time. Here is a list
of the equalizer curves:
Display Equalizer curve
Powerful Powerful
Natural Natural
Vocal Vocal
20
En

Operating this unit
Section
02
Custom 1 Custom 1
Custom 2 Custom 2
Flat Flat
Super Bass (S.Bass) Super bass
! Custom 1 and Custom 2 are adjusted
equalizer curves that you create. Adjustments can be made with a 7-band graphic
equalizer.
! When Flat is selected no supplement or
correction is made to the sound. This is
useful to check the effect of the equalizer
curves by switching alternatively between
Flat and a set equalizer curve.
% Press EQ to select the equalizer.
Press EQ repeatedly to switch between the following equalizers:
Powerful—Natural—Vocal—Custom 1—
Custom 2—Flat—Super Bass (S.Bass)
Adjusting equalizer curves
The factory supplied equalizer curves, with the
exception of Flat, can be adjusted to a fine degree (nuance control).
1 Use MULTI-CONTROL to select the graphic equalizer adjustment.
Powerful appears in the display.
If the equalizer curve has been previously selected, the curve of that previously selected
will be displayed instead of Powerful.
2 Push MULTI-CONTROL left or right to
select an equalizer curve.
Each time MULTI-CONTROL is pushed left or
right, equalizer curves are selected in the following order:
Powerful—Natural—Vocal—Custom 1—
Custom 2—Flat—Super Bass (S.Bass)
3 Push MULTI-CONTROL up or down to
adjust the equalizer curve.
Each time MULTI-CONTROL is pushed up or
down, the equalizer curve increases or decreases respectively.
+6 to –4 (or –6) is displayed as the equalizer
English
curve is increased or decreased.
# The actual range of the adjustments are different depending on which equalizer curve is selected.
# The equalizer curve with all frequencies set to
0 cannot be adjusted.
Adjusting 7-band graphic equalizer
For Custom 1 and Custom 2 equalizer curves,
you can adjust the level of each band.
! A separate Custom 1 curve can be created
for each source. (The built-in CD player and
the multi-CD player are set to the same
equalizer adjustment setting automatically.) If you make adjustments when a
curve other than Custom 2 is selected, the
equalizer curve settings will be memorized
in Custom 1.
! A Custom 2 curve can be created common
to all sources. If you make adjustments
when the Custom 2 curve is selected, the
Custom 2 curve will be updated.
1 Recall the equalizer curve you want to
adjust.
See Recalling equalizer curves on the previous
page.
2 Use MULTI-CONTROL to select 7-band
graphic equalizer adjustment.
Frequency and the level (e.g., 50Hz +4) appears in the display.
3 Push MULTI-CONTROL left or right to
select the equalizer band to adjust.
Each time MULTI-CONTROL is pushed left or
right, equalizer bands are selected in the following order:
50Hz—125Hz—315Hz—800Hz—2kHz—
5kHz—12.5kHz
4 Push MULTI-CONTROL up or down to
adjust the level of the equalizer band.
Each time MULTI-CONTROL is pushed up or
down, the level of the equalization band increases or decreases.
En
21

Section
02
Operating this unit
+6 to –6 is displayed as the level is increased
or decreased.
# You can then select another band and adjust
the level.
5 Press BAND to cancel the 7-band graphic equalizer adjustment.
Adjusting loudness
Loudness compensates for deficiencies in the
low- and high-sound ranges at low volume.
1 Use MULTI-CONTROL to select LOUD.
2 Press MULTI-CONTROL to turn loudness
on.
Loudness level (e.g., Mid) appears in the display.
# To turn loudness off, press MULTI-CONTROL
again.
3 Push MULTI-CONTROL left or right to
select a desired level.
Each time MULTI-CONTROL is pushed left or
right, level is selected in the following order:
Low (low)—Mid (mid)—High (high)
Using subwoofer output
This unit is equipped with a subwoofer output
which can be turned on or off.
Push MULTI-CONTROL right to select normal
phase and Normal appears in the display.
Adjusting subwoofer settings
When the subwoofer output is on, you can adjust the cut-off frequency and the output level
of the subwoofer.
1 Use MULTI-CONTROL to select Sub W.2.
# You can also select the subwoofer setting
menu by pressing SW on the unit.
# When the subwoofer output is on, you can select Sub W.2.
2 Push MULTI-CONTROL left or right to
select cut-off frequency.
Each time MULTI-CONTROL is pushed left or
right, cut-off frequencies are selected in the
following order:
50Hz—63Hz—80Hz—100Hz—125Hz
Only frequencies lower than those in the selected range are outputted from the subwoofer.
3 Push MULTI-CONTROL up or down to
adjust the output level of the subwoofer.
Each time MULTI-CONTROL is pushed up or
down, subwoofer level increases or decreases.
+6 to –24 is displayed as the level is increased
or decreased.
1 Use MULTI-CONTROL to select Sub W.1.
# You can also select the subwoofer setting
menu by pressing SW on the unit.
2 Press MULTI-CONTROL to turn subwoofer output on.
Normal appears in the display. Subwoofer out-
put is now on.
# To turn subwoofer output off, press
MULTI-CONTROL again.
3 Push MULTI-CONTROL left or right to
select the phase of subwoofer output.
Push MULTI-CONTROL left to select reverse
phase and Reverse appears in the display.
22
En
Boosting the bass
Bass boost function boosts the bass level of
sound lower than 100 Hz. The more the bass
level is increased, the more the bass sound is
emphasized and the entire sound becomes
powerful. When using this function with the
subwoofer, the sound under the cut-off frequency is boosted.
1 Use MULTI-CONTROL to select Bass.
# You can also select the bass boost setting by
pressing and holding SW.

Operating this unit
Section
02
2 Push MULTI-CONTROL up or down to
select a desired level.
0 to +6 is displayed as the level is increased or
decreased.
Using the high pass filter
When you do not want low sounds from the
subwoofer output frequency range to play
from the front or rear speakers, turn on the
HPF (high pass filter). Only frequencies higher
than those in the selected range are outputted
from the front or rear speakers.
1 Use MULTI-CONTROL to select HPF.
2 Press MULTI-CONTROL to turn high
pass filter on.
80Hz appears in the display. High pass filter is
now on.
# If the high pass filter has been previously adjusted, the frequency of that previously selected
will be displayed instead of 80Hz.
# To turn high pass filter off, press
MULTI-CONTROL again.
3 Push MULTI-CONTROL left or right to
select cut-off frequency.
Each time MULTI-CONTROL is pushed left or
right, cut-off frequencies are selected in the
following order:
50Hz—63Hz—80Hz—100Hz—125Hz
Only frequencies higher than those in the selected range are outputted from the front or
rear speakers.
2 Use MULTI-CONTROL to select SLA.
English
3 Push MULTI-CONTROL up or down to
adjust the source volume.
Each time MULTI-CONTROL is pushed up or
down, source volume increases or decreases.
SLA +4 to SLA –4 is displayed as the source
volume is increased or decreased.
Notes
! The AM tuner volume level can also be ad-
justed with source level adjustments.
! The built-in CD player and the multi-CD player
are set to the same source level adjustment
volume automatically.
! External unit 1 and external unit 2 are set to
the same source level adjustment volume
automatically.
Adjusting source levels
SLA (source level adjustment) lets you adjust
the volume level of each source to prevent radical changes in volume when switching between sources.
! Settings are based on the FM tuner volume
level, which remains unchanged.
1 Compare the FM tuner volume level
with the level of the source you wish to adjust.
En
23
Section
02
Operating this unit
Initial Settings
Adjusting initial settings
Using the initial settings, you can customize
various system settings to achieve optimal performance from this unit.
1 Function display
Shows the function status.
1 Press SOURCE and hold until the unit
turns off.
2 Press MULTI-CONTROL and hold until
Language select appears in the display.
# You can also perform this operation by pressing and holding FUNCTION on the remote control.
3 Turn MULTI-CONTROL to select one of
the initial settings.
Turn MULTI-CONTROL to switch between the
functions in the following order:
Language select (language selection)—Clock
(clock)—FM step (FM tuning step)—AM step
(AM tuning step)—Warning tone (warning
tone)—AUX1 (auxiliary input 1)—AUX2 (auxiliary input 2)—Dimmer (dimmer)—
Brightness (brightness)—S/W control (rear
output and subwoofer controller)—Mute
(sound muting/attenuation)—Demonstration
(feature demo)—Reverse mode (reverse
mode)—Ever-scroll (ever scroll)—BT AUDIO
(Bluetooth audio)—Pin code input (pin code
input)
Use the following instructions to operate each
particular setting.
# You can also select the function by pressing
FUNCTION on the remote control.
# BT AUDIO and Pin code input can be se-
lected only when Bluetooth adapter (e.g., CDBTB100) is connected to this unit.
# To cancel initial settings, press BAND.
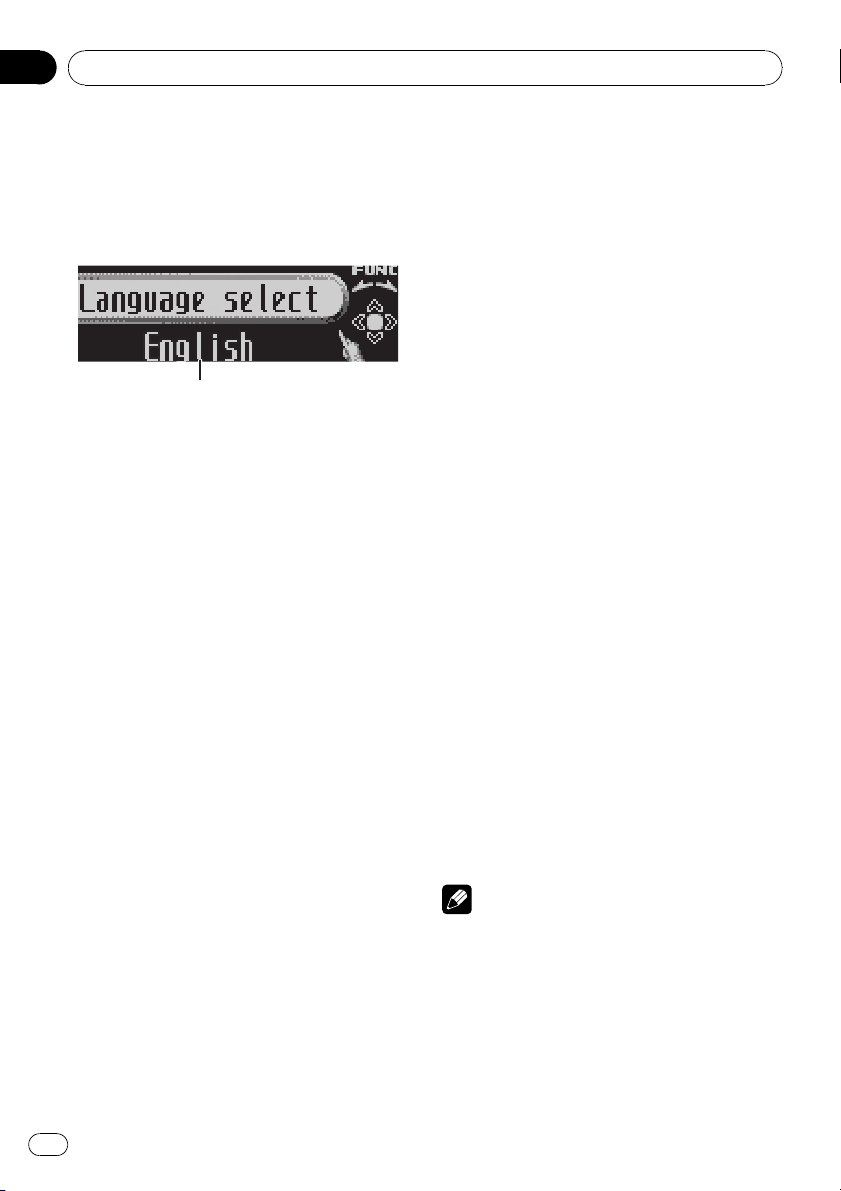
Selecting the display language
For your convenience, this unit equips multiple language display. You can select the language best suited to your first language.
1 Use MULTI-CONTROL to select
Language select.
2 Press MULTI-CONTROL to select the language.
Each press of MULTI-CONTROL selects languages in the following order:
English—Español—Português
Setting the clock
Use these instructions to set the clock.
1 Use MULTI-CONTROL to select Clock.
2 Push MULTI-CONTROL left or right to
select the segment of the clock display you
wish to set.
Pushing MULTI-CONTROL left or right will select one segment of the clock display:
Hour—Minute
As you select segments of the clock display
the segment selected will blink.
3 Push MULTI-CONTROL up or down to
put a clock right.
Note
You can match the clock to a time signal by
pressing MULTI-CONTROL.
! If the minute is 00 to 29, the minutes are
rounded down. (e.g., 10:18 becomes 10:00.)
! If the minute is 30 to 59, the minutes are
rounded up. (e.g., 10:36 becomes 11:00.)
24
En

Operating this unit
Section
02
Setting the FM tuning step
The FM tuning step employed by seek tuning
can be switched between 100 kHz, the preset
step, and 50 kHz.
! If seek tuning is performed in 50 kHz steps,
stations may be tuned in imprecisely. Tune
in the stations with manual tuning or use
seek tuning again.
1 Use MULTI-CONTROL to select FM step.
2 Press MULTI-CONTROL to select the FM
tuning step.
Pressing MULTI-CONTROL repeatedly will
switch the FM tuning step between 50 kHz
and 100 kHz. The selected FM tuning step will
appear in the display.
Setting the AM tuning step
The AM tuning step can be switched between
9 kHz, the preset step, and 10 kHz. When
using the tuner in North, Central or South
America, reset the tuning step from 9 kHz (531
kHz to 1 602 kHz allowable) to 10 kHz (530 kHz
to 1 640 kHz allowable).
1 Use MULTI-CONTROL to select AM step.
2 Press MULTI-CONTROL to select the AM
tuning step.
Pressing MULTI-CONTROL repeatedly will
switch the AM tuning step between 9 kHz and
10 kHz. The selected AM tuning step will appear in the display.
Switching the warning tone
If the front panel is not detached from the
head unit within four seconds of turning off
the ignition, a warning tone will sound. You
can turn off the warning tone.
1 Use MULTI-CONTROL to select
Warning tone.
2 Press MULTI-CONTROL to turn warning
English
tone on.
# To turn warning tone off, press
MULTI-CONTROL again.
Switching the auxiliary setting
Auxiliary equipments connected to this unit
can be activated individually. Set each AUX
source to ON when using. About connecting
or using auxiliary equipments, refer to Using
the AUX source on page 28.
1 Use MULTI-CONTROL to select AUX1/
AUX2.
2 Press MULTI-CONTROL to turn AUX1/
AUX2 on.
# To turn AUX off, press MULTI-CONTROL
again.
Switching the dimmer setting
To prevent the display from being too bright at
night, the display is automatically dimmed
when the car’s headlights are turned on. You
can turn the dimmer on or off.
1 Use MULTI-CONTROL to select Dimmer.
2 Press MULTI-CONTROL to turn dimmer
on.
# To turn dimmer off, press MULTI-CONTROL
again.
Adjusting the brightness
You can adjust the display brightness. Initially
this mode is set to 12.
1 Use MULTI-CONTROL to select
Brightness.
2 Push MULTI-CONTROL left or right to
adjust the brightness level.
0 to 15 is displayed as the level is increased or
decreased.
# When dimmer is functioning, the brightness
level can be adjusted 0 to 10.
En
25
Section
02
Operating this unit
Setting the rear output and
subwoofer controller
This unit’s rear output (rear speaker leads output and RCA rear output) can be used for fullrange speaker (Rear SP :F.Range) or subwoo-
fer (Rear SP :S/W) connection. If you switch
the rear output setting to Rear SP :S/W, you
can connect a rear speaker lead directly to a
subwoofer without using an auxiliary amp.
Initially, the unit is set for rear full-range speaker connection (Rear SP :F.Range).
1 Use MULTI-CONTROL to select
S/W control.
2 Press MULTI-CONTROL to switch the
rear output setting.
Pressing MULTI-CONTROL will switch between Rear SP :F.Range (full-range speaker)
and Rear SP :S/W (subwoofer) and that status
will be displayed.
# When no subwoofer is connected to the rear
output, select Rear SP :F.Range.
# When a subwoofer is connected to the rear
output, set for subwoofer Rear SP :S/W.
Notes
! Even if you change this setting, there is no
output unless you turn the subwoofer output
on (refer to Using subwoofer output on page
22).
! If you change this setting, subwoofer output
in the audio menu return to the factory settings.
! Both rear speaker leads outputs and RCA rear
output are switched simultaneously in this
setting.
Switching the sound muting/
attenuation
Sound from this system is muted or attenuated automatically when the signal from the
equipment with mute function is received.
! The sound is muted or attenuated, MUTE
or ATT are displayed and no audio adjustment is possible.
! Sound from this system returns to normal
when the muting or attenuation is canceled.
1 Use MULTI-CONTROL to select Mute.
2 Press MULTI-CONTROL to switch the telephone muting/attenuation.
Pressing MULTI-CONTROL will switch between TEL ATT (attenuation) and TEL mute
(muting) and that status will be displayed.
Switching the feature demo
The feature demo automatically starts when
power to this unit is turned off while the ignition switch is set to ACC or ON.
1 Use MULTI-CONTROL to select
Demonstration.
2 Press MULTI-CONTROL to turn the feature demo on.
# To turn the feature demo off, press
MULTI-CONTROL again.
Notes
! Remember that if the feature demo continues
operating when the car engine is turned off, it
may drain battery power.
! You can also turn on or off feature demo by
pressing DISPLAY while this unit is turned off.
For more details, see Feature demo mode on
page 6.
Switching the reverse mode
If you do not perform an operation within
about 30 seconds, screen indications start to
reverse, and then continue reversing every 10
seconds.
1 Use MULTI-CONTROL to select
Reverse mode.
26
En

Operating this unit
Section
02
2 Press MULTI-CONTROL to turn the reverse mode on.
# To turn the reverse mode off, press
MULTI-CONTROL again.
Note
You can also turn on or off reverse mode by pressing BAND while this unit is turned off. For more
details, see Reverse mode on page 6.
Switching the Ever Scroll
When Ever Scroll is set to ON, text information
recorded on CD or iPod scrolls continuously in
the display. Set to OFF if you prefer the information to scroll just once.
1 Use MULTI-CONTROL to select
Ever-scroll.
2 Press MULTI-CONTROL to turn the Ever
Scroll on.
# To turn the Ever Scroll off, press
MULTI-CONTROL again.
Activating the BT Audio source
You need to activate the BT Audio source in
order to use a Bluetooth audio player.
! Only when Bluetooth adapter (e.g. CD-
BTB100) is connected to this unit, you can
operate this function.
connection. The default code is 0000, but you
English
can change this in this function.
! With some Bluetooth audio players, you
may be required to enter to this unit in advance PIN code of your Bluetooth audio
player, in order to set this unit ready for a
connection from your Bluetooth audio
player.
! Only when Bluetooth adapter (e.g. CD-
BTB100) is connected to this unit, you can
operate this function.
1 Use MULTI-CONTROL to select
Pin code input.
2 Push MULTI-CONTROL up or down to
select a number.
3 Push MULTI-CONTROL left or right to
move the cursor to the previous or next position.
4 After inputting PIN code (up to 16 digits), press MULTI-CONTROL.
PIN code you entered is now standby to be
stored in memory.
When you press MULTI-CONTROL again on
the same display, the PIN code you entered is
stored in this unit.
# Pushing MULTI-CONTROL right in the confir-
mation display returns you to the PIN code input
display, and you can change the PIN code.
1 Use MULTI-CONTROL to select
BT AUDIO.
2 Press MULTI-CONTROL to turn the
BT Audio source on.
# To turn the BT Audio source off, press
MULTI-CONTROL again.
Entering PIN code for Bluetooth
wireless connection
To connect your cellular phone to this unit via
Bluetooth wireless technology, you need to
enter PIN code on your phone to verify the
En
27

Section
02
Operating this unit
Other Functions
Using the AUX source
This unit can control up to two auxiliary equipments such as VCR or portable devices (sold
separately). When connected, auxiliary equipments are automatically read in as AUX
sources and assigned to AUX1 or AUX2. The
relationship between AUX1 and AUX2
sources is explained below.
About AUX1 and AUX2
You have two methods to connect auxiliary
equipments to this unit.
AUX1 source:
When connecting auxiliar y equipment using a
stereo mini plug cable
% Insert the stereo mini plug into the
input jack on this unit.
For more details, refer to the installation manual.
The allocation of this auxiliary equipment is
automatically set to AUX1.
AUX2 source:
When connecting auxiliar y equipment using an
IP-BUS-RCA Interconnector (sold separately)
% Use an IP-BUS-RCA Interconnector such
as the CD-RB20/CD-RB10 (sold separetely)
to connect this unit to auxiliary equipment
featuring RCA output.
For more details, refer to the IP-BUS-RCA Interconnector owner’s manual.
The allocation of this auxiliary equipment is
automatically set to AUX2.
# You can only make this type of connection if
the auxiliary equipment has RCA outputs.
Selecting AUX as the source
% Press SOURCE to select AUX as the
source.
# If the auxiliary setting is not turned on, AUX
cannot be selected. For more details, see Switch-
ing the auxiliary setting on page 25.
Setting the AUX title
The title displayed for each AUX1 or AUX2
source can be changed.
1 After you have selected AUX as the
source, use MULTI-CONTROL and select
FUNCTION to display TitleInput «A».
2 Enter a title in the same way as the
built-in CD player.
For details concerning operation, refer to Entering disc titles on page 15.
Turning the clock display on or off
You can turn the clock display on or off.
! Even when the sources and the feature
demo are off, the clock display appears on
the display.
% Press CLOCK to turn the clock display
on or off.
Each press of CLOCK turns the clock display
on or off.
# The clock display disappears temporarily
when you perform other operations, but the clock
display appears again after 4 seconds.
Using different entertainment
displays
You can enjoy entertainment displays while listening to each sound source.
1 Press MULTI-CONTROL to display the
main menu.
FUNCTION, AUDIO and ENTERTAINMENT
appear on the display.
28
En

Operating this unit
Section
02
2 Use MULTI-CONTROL to select
ENTERTAINMENT.
Turn to change the menu option; press to select.
3 Use MULTI-CONTROL to change the display.
Turn to change the menu option; press to select.
BGV-1 (background visual 1)—BGV-2 (background visual 2)—BGP-1 (background picture
1)—BGP-2 (background picture 2)—BGP-3
(background picture 3)—BGP-4 (background
picture 4)—SIMPLE-1 (simple display 1)—
SIMPLE-2 (simple display 2)—LEVEL METER
(level meter)—VISUALIZER1 (visualizer 1)—
VISUALIZER2 (visualizer 2)—VISUALIZER3 (visualizer 3)—SPECTRUM ANALYZER 1 (spectrum analyzer 1)—SPECTRUM ANALYZER 2
(spectrum analyzer 2)—MOVIE (movie)—
ENT CLOCK (entertainment clock)
# You can also switch between the display by
pressing ENTERTAINMENT on the remote control.
# To return to the playback display, press BAND.
Using the PGM button
You can operate the preprogrammed functions
for each source by using PGM on the remote
control.
# To cancel the storage process, press PGM
English
again.
% Press PGM and hold to turn BSSM on
when selecting television as the source.
Press PGM and hold until the BSSM turns on.
# To cancel the storage process, press PGM
again.
% Press PGM to turn pause on when selecting the following sources:
! CD – Built-in CD player
! iPod – iPod
! Multi CD – Multi-CD player
! USB – USB portable audio player/USB
memory
! BT Audio – Bluetooth audio player
! DVD – DVD player/multi-DVD player
# To turn pause off, press PGM again.
% Press PGM and hold to turn BSM on
when selecting tuner as the source.
Press PGM and hold until the BSM turns on.
En
29
Section
03
Available accessories
Playing songs on USB portable
audio player/USB memory
Basic Operations
You can use this unit to control a USB adapter,
which is sold separately.
For details concerning operation, refer to the
USB adapter’s operation manual. This section
provides information on USB portable audio
player/USB memory operations with this unit
which differs from that described in the USB
adapter’s operation manual.
! Optimum performance of this unit may not
be obtained depending on the connected
USB portable audio player/USB memory.
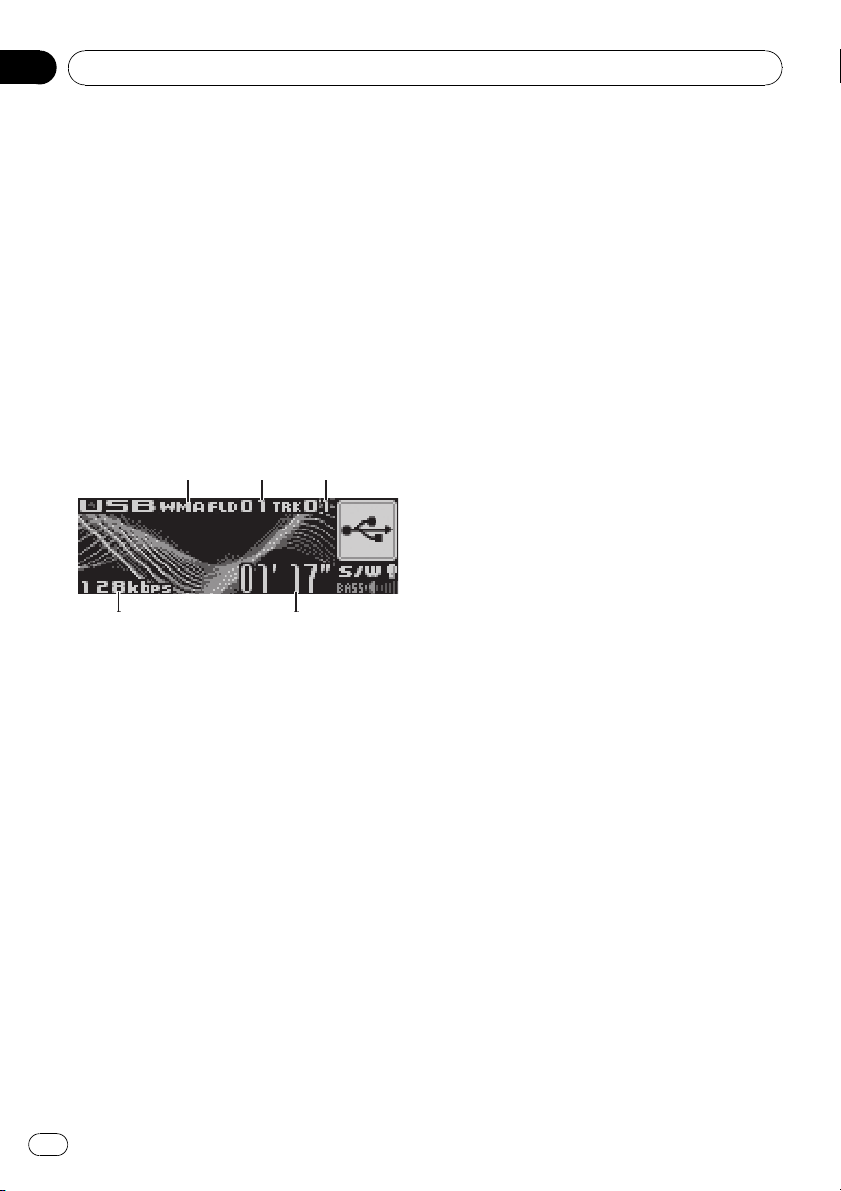
1 WMA/MP3/AAC indicator
Shows the type of file currently playing.
2 Folder number indicator
3 Track number indicator
4 Play time indicator
5 Bit rate indicator
1 Press SOURCE to select USB.
2 Push MULTI-CONTROL up or down to
select a folder.
# You cannot select a folder that does not have
a compressed audio file recorded in it.
# To return to folder 01 (ROOT), press and hold
BAND. However, if folder 01 (ROOT) contains no
files, playback commences with folder 02.
3 To perform fast forward or reverse,
push and hold MULTI-CONTROL left or
right.
4 To skip back or forward to another
compressed audio file, push
MULTI-CONTROL left or right.
Selecting an audio file directly
in the current folder
The operation is basically the same as that of
the built-in CD player.
For details concerning operation, refer to Se-
lecting a track directly on page 13.
Introduction of advanced
operations
1 Press MULTI-CONTROL to display the
main menu.
FUNCTION, AUDIO and ENTERTAINMENT
appear on the display.
2 Use MULTI-CONTROL to select
FUNCTION.
Turn to change the menu option; press to select.
The function name appears on the display.
3 Turn MULTI-CONTROL to select the
function.
Turn MULTI-CONTROL to switch between the
functions in the following order:
Play mode (repeat play)—Random mode
(random play)—Scan mode (scan play)—
Pause (pause)
# You can also select the function by pressing
FUNCTION on the remote control.
# To return to the playback display, press BAND.
# If you do not operate functions within about
30 seconds, the display is automatically returned
to the ordinary display.
Function and operation
Play mode, Random mode, Scan mode and
Pause operations are basically the same as
that of the built-in CD player.
30
En
Loading…
Pioneer DEH-P6950IB/XN/ES Car Receiver PDF User Guides and Manuals for Free Download: Found (1) Manuals for Pioneer DEH-P6950IB/XN/ES Device Model (Service Manual)
Pioneer DEH-P6950IB/XN/ES Service Manual
Details:
- Manufacturer: Pioneer
- Product Name/ID: Pioneer DEH-P6950IB/XN/ES / #2408829
- Category: Car Receiver
- File Path: pioneer/deh-p6950ibxnes_2408829.pdf
- Last Updated: 19 May 2025
- Description: Navigate the features of your Pioneer DEH-P6950IB/XN/ES with ease using this manual, which offers detailed setup instructions, operational tips, and solutions for common problems to enhance your user experience.
- Document Type: User Manual
- Pages: 70
Download PDF
Read Online
The Pioneer DEH-P6950IB/XN/ES is a standout product in the realm of car audio systems, delivering exceptional performance and versatile features for audio enthusiasts. With an impressive design that complements any vehicle’s interior, this head unit combines functionality with aesthetic appeal. This review delves into the various aspects of the DEH-P6950IB/XN/ES, highlighting its strengths and pointing out some minor drawbacks.
One of the most notable features of the Pioneer DEH-P6950IB/XN/ES is its excellent sound quality. The built-in amplifier provides clear and powerful audio output, while the advanced digital signal processing ensures that the sound remains true to its original form. Users can benefit from a range of tuning options, including a 13-band graphic equalizer, allowing for personalized sound adjustments to suit individual preferences.
The connectivity options available on the DEH-P6950IB/XN/ES are another selling point. It is equipped with USB and AUX inputs, catering to various devices for seamless integration. Moreover, it supports iPod and iPhone connectivity, enabling users to access their favorite tracks directly from their devices. The capability to play multiple formats, including MP3, WMA, and WAV, adds to its versatility.
In terms of usability, the Pioneer DEH-P6950IB/XN/ES is designed with user-friendliness in mind. The clear LCD screen displays essential information, such as song titles and artist names, making navigation straightforward. The interface is intuitive, allowing users to switch between different functionalities with ease. It also includes a remote control, which enhances convenience while driving.
Another impressive aspect of the DEH-P6950IB/XN/ES is its customizable options. Users can tailor the display to their preferences and choose from various color combinations to match their vehicle’s interior. Additionally, the detachable faceplate provides a layer of security, as it can be easily removed when the vehicle is parked, deterring theft.
However, like any product, the Pioneer DEH-P6950IB/XN/ES is not without its flaws. Some users have reported that the installation process can be somewhat complicated, particularly for those who are not tech-savvy. The need for specific installation kits might also be a drawback for some potential buyers. Furthermore, while the equalizer offers a range of adjustments, achieving the perfect sound can require some time and experimentation.
Here is a summary of the Pioneer DEH-P6950IB/XN/ES’s key features:
- Sound Quality: Exceptional clarity and powerful audio output.
- Connectivity: USB, AUX, iPod, and iPhone support.
- Usability: Intuitive interface and clear LCD screen.
- Customization: Various color options for display and detachable faceplate for security.
- Audio Tuning: 13-band graphic equalizer for personalized sound.
Overall, the Pioneer DEH-P6950IB/XN/ES is a robust choice for anyone seeking to upgrade their car audio experience. Its combination of sound quality, connectivity, and user-friendly design makes it a contender among competitors in the market. While the installation process may require some additional effort, the benefits that come with this head unit make it a worthwhile investment. Whether you are a casual listener or a hardcore audiophile, the DEH-P6950IB/XN/ES is designed to enhance your driving experience through exceptional sound performance.
DEH-P6950IB
Scanning folders and tracks Pausing disc playback
ContentsBefore You Start About this unit
Playing tracks in random order English
Dual Discs Compressed audio files
Understanding error messages Visit our website
Before You Start About this unit Before You Start Protecting your unit from
About the demo modeTheft
Attaching the front panel Installing the battery
Before You Start Use and care of the remote controlUsing the remote control
Operating this unit What’s What
Remote controlHead unit
Operating this unit
Power ON/OFFBasic Operations
Selecting a source Tuner
Adjusting the volumeBasic Operations
Storing and recalling broadcast frequencies
Using the remote controlIntroduction of advanced operations
Storing the strongest broadcast frequencies Built-in CD Player
Tuning in strong signals Press Direct Track of entered number will play
Selecting a track directly Playing tracks in random order
Selecting a repeat play rangeScanning folders and tracks
Using compression and BMX
Pausing disc playbackUsing disc title functions
Searching every 10 tracks in the current disc or folder Selecting tracks from the track title list
Displaying text information on discSelecting tracks from the file name list
Playing songs on iPod
Displaying text information on iPod
Browsing for a songTo listen to To the ordinary display
Repeating play
Pausing a songPlaying songs in a random order shuffle
Playing all songs in a random order shuffle all Using balance adjustment
Operating this unit Audio AdjustmentsIntroduction of audio adjustments
Using the equalizer Adjusting 7-band graphic equalizer
Adjusting equalizer curves Using subwoofer output
Adjusting loudnessAdjusting subwoofer settings
Boosting the bass Adjusting source levels
Using the high pass filter Adjusting initial settings
Operating this unit Initial SettingsSetting the clock
Selecting the display language Setting the AM tuning step
Setting the FM tuning stepSwitching the auxiliary setting
Switching the dimmer setting Switching the feature demo
Setting the rear output and subwoofer controllerSwitching the sound muting/ attenuation
Switching the reverse mode Entering PIN code for Bluetooth wireless connection
Switching the Ever ScrollActivating the BT Audio source
Using different entertainment displays
Using the AUX sourceOperating this unit Other Functions
Turning the clock display on or off Entertainment
Using the PGM button Audio player/USB memory
Available accessories Playing songs on USB portableSelecting an audio file directly in the current folder
Function and operation Selecting files from the file name list
Available accessoriesDisplaying text information of an audio file
Available accessories Bluetooth Audio
Playing songs on Bluetooth audio player
Connecting a Bluetooth audio playerStopping playback
Disconnecting a Bluetooth
Bluetooth TelephoneDisplaying BD Bluetooth Device address
Audio player Basic Operations Making a phone call
Setting up for hands-free phoningVoice recognition
Pronounce the name of your contact Answering an incoming call
Taking a phone callRejecting an incoming call
Answering a call waiting Disconnecting a cellular phone
Connecting a cellular phoneUsing a cellular phone to initiate a connection
Searching for available cellular phones Using the Phone Book
Connecting to a registered cellular phoneRegistering connected cellular phone
Deleting a registered phone Calling a number in the Phone Book
Changing the Phone Book display orderEditing the name of a Phone Book entry
Clearing a Phone Book entry
Editing phone numbers Using preset numbers
Using the Call HistoryMaking a call by entering phone number
Setting the automatic answering
Setting the automatic rejectingSwitching the ring tone
Clearing memory Displaying BD Bluetooth
Echo canceling and noise reductionMulti-CD Player
Device address Random play-Scan mode scan play
Play mode repeat play-Random modeDBE-ITS play mode ITS play
Turn to change the menu option press to se Creating a playlist with ITS programming
Using ITS playlistsPlayback from your ITS playlist
Erasing a track from your ITS playlist Erasing a CD from your ITS playlist
Using CD Text functionsDisplaying disc titles
Selecting discs from the disc title list DVD Player
Selecting a folder
Selecting a disc Tuning starts as soon as you release
Available accessories TV tunerIf you select other discs during repeat play
50 En
Understanding error messages
Additional Information TroubleshootingiPodHandling guideline of discs and player
Dual Discs
Additional InformationCompressed audio files
About handling the iPod
About iPod settingsExample of a hierarchy
Compressed audio compatibility Infrared remote control
Additional Information SpecificationsGeneral
FM tuner Contenido
Accesorios disponibles Reproducción de canciones en el
Selección de una carpeta
Antes de comenzar Acerca de esta unidad
Protección del producto contra robo
Antes de comenzar Visite nuestro sitio WebAcerca del modo demo
Colocación de la carátula Uso y cuidado del mando a distancia
Antes de comenzarUso del mando a distancia
Instalación de la batería Unidad principal
Utilización de esta unidad Qué es cada cosaMando a distancia
Funciones básicas
Utilización de esta unidadEncendido y apagado
Selección de una fuente Sintonizador
Ajuste del volumenFunciones básicas
Utilice MULTI-CONTROL para ajustar el nivel de sonido Introducción a las funciones avanzadas
Almacenamiento y recuperación de frecuenciasUso del mando a distancia
Derecha Sintonización de señales fuertes
Almacenamiento de las frecuencias de radio más fuertesDad de las señales
Incorporado
Utilización de esta unidad Reproductor de CDPresione Open para abrir la carátula
Aparece la ranura de carga de discos Selección directa de una pista
Reproducción de las pistas en orden aleatorio
Selección de una gama de repetición de reproducciónExploración de carpetas y pistas
Uso de la compresión y BMX
Pausa de la reproducción de un discoBúsqueda cada 10 pistas en el disco o carpeta actual
Uso de las funciones de títulos de discos Selección de pistas de la lista de títulos de las pistas
Visualización de información de texto en el disco Selección de pistas de la lista de nombres de ficheros
Para reproducir canciones en el iPodQuierda
Dicho número Visualización de información de texto en el iPod
Para buscar una canción Reproducción de las canciones en un orden aleatorio shuffle
Repetición de reproducciónPara poner en pausa una canción
Introducción a los ajustes de audio
Ajustes de audioLa pausa
Uso del ajuste del balance
Uso del ecualizadorRecuperación de las curvas de ecualización
Ajuste de las curvas de ecualización
Ajuste de la sonoridadAjuste del ecualizador gráfico de 7 bandas
Uso de la salida de subgraves
Configuración de los ajustes de subgravesIntensificación de los graves
Utilice MULTI-CONTROL para seleccio Nar Sub W.1 Ajuste de los niveles de la fuente
Uso del filtro de paso alto # Para cancelar los ajustes iniciales, presione Band
Configuración de los ajustes inicialesUtilización de esta unidad Ajustes iniciales
Selección del idioma de visualización Ajuste del paso de sintonía de AM
Ajuste del paso de sintonía de FMCambio del tono de advertencia
Cambio del ajuste de un equipo auxiliar Ajuste del brillo
Cambio del ajuste del atenuador de luzCambio del silenciamiento/ atenuación del sonido
Cambio del modo inverso
Cambio de la demostración de característicasCambio del desplazamiento continuo
Activación de la fuente BT Audio Otras funciones
Conexión inalámbrica Bluetooth Uso de la fuente AUXIngreso del código PIN para la
Uso de diferentes visualizaciones de entretenimiento
Activación y desactivación de la visualización del relojUso del botón PGM
Selección de AUX como la fuente Utilización de esta unidad
En el reproductor de audio
Accesorios disponibles Reproducción de cancionesPortátil USB/memoria USB
Selección de ficheros de la lista de nombres de ficheros
Accesorios disponiblesFunción y operación
Accesorios disponibles Audio Bluetooth
Conexión de un reproductor de audio Bluetooth
Visualización de la dirección BD Bluetooth Device
Desconexión de un reproductor de audio BluetoothPara detener la reproducción
Regresa a la versión del sistema de esta unidad Accesorios disponibles Teléfono Bluetooth
Realización de una llamada telefónica
Configuración de la función manos libresAceptación de una llamada telefónica
Rechazo de una llamada en espera
Desconexión de un teléfono móvil
Conexión de un teléfono móvilRegistro del teléfono móvil conectado
Búsqueda de los teléfonos móviles disponibles Conexión a un teléfono móvil registrado
Eliminación de un teléfono registradoUso del Directorio de teléfonos
Display
Llamada a un número del Directorio de teléfonos Borrado de una entrada del Directorio de teléfonos
Edición de números de teléfono Uso de números prefijados
Uso del Historial de llamadas Borrado de la memoria
Realización de una llamada ingresando el número de teléfonoSeleccione All clear
Ajuste del rechazo automático
Cancelación del eco y reducción de ruidoAjuste de la respuesta automática
Cambio del tono de llamada Accesorios disponibles Reproductor de CD múltiple
Que las del reproductor de CD incorporado
102 Es Borrado de una pista de la lista de reproducción ITS
Uso de listas de reproducción ITS Visualización de los títulos de discos
Borrado de un CD de la lista de reproducción ITSSelección de discos de la lista de títulos de los discos
104 Es Uso de las funciones CD Text
Reproductor de DVD Selección de una carpeta
Selección de un disco106 Es
Nombre de la función Operación
Uso de listas de reproducción ITS en la página Almacenamiento y
Accesorios disponibles Sintonizador de TVRecuperación de emisoras
108 Es Accesorios disponibles
Mensajes de error
Información adicional Solución de problemasPara comprender los
Pautas para el manejo de discos y del reproductor Discos dobles
Información adicionalArchivos de audio comprimidos
Estándar CD general, es posible que no se Compatibilidad con audio comprimido
Acerca del manejo del iPodEjemplo de una jerarquía
112 Es Acerca de los ajustes del iPod
114 Es
Información adicional Especificaciones Conteúdo
Desconexão de um áudio player Bluetooth
Especificações Português B
171 Cuidado
Antes de utilizar este produto Sobre esta unidade Proteção da sua unidade contra roubo
Antes de utilizar este produto Visite o nosso websiteSobre o modo de demonstração
Extração do painel frontal Utilização e cuidados do controle remoto
Antes de utilizar este produtoInstalação da bateria
Utilização do controle remoto Unidade principal
Funcionamento desta unidade Introdução aos botõesControle remoto
121 Operações básicas
Funcionamento desta unidadeLigar e desligar
Seleção de uma fonte Operações básicas
Ajuste do volumeUtilize MULTI-CONTROL para ajustar o nível do som
Utilização do controle remoto
Introdução às operações avançadas Sintonia em sinais fortes
Armazenamento das freqüências mais fortes de transmissão Funcionamento desta unidade CD player incorporado
Seleção direta de uma faixa
Reprodução de faixas em ordem aleatória
Seleção de uma série de reprodução com repetiçãoProcura de pastas e faixas
Pausa na reprodução de disco Busca a cada 10 faixas no disco ou na pasta atual
Utilização de compressão e BMXUtilização das funções Título de disco
Introdução de títulos de disco Seleção de faixas na lista de títulos de faixa
Visualização de informações de texto no disco Seleção de faixas da lista de nomes de arquivo
Reprodução de músicas no iPod Visualização de informações de texto no iPod
Procura de uma música Reprodução de músicas em uma ordem aleatória shuffle
Repetição da reproduçãoPausa de uma música
Introdução aos ajustes de áudio
Ajustes de áudio Utilização do equalizador
Utilização do ajuste do balançoChamada das curvas do equalizador da memória
Ajuste das curvas do equalizador Ajuste do equalizador gráfico de 7 bandas
Ajuste da sonoridade Intensificação de graves
Utilização da saída do alto Falante de graves secundárioAjuste do alto-falante de graves secundário
Querda ou para a direita para selecionar a Utilização do filtro de alta freqüência
Ajuste de níveis de fonte Definição dos ajustes iniciais
Funcionamento desta unidade Ajustes iniciaisSeleção do idioma do display
Ajuste da hora Ajuste do passo de sintonia AM
Ajuste do passo de sintonia FMAtivação do som de advertência
Ativação do ajuste auxiliar Ativação do modo de demonstração de recursos
Ajuste do brilhoRio, e esse status será visualizado
Rear SP F.Range Ativação do modo de demonstração de retrocesso
Introdução do código PIN para conexão sem fio BluetoothAtivação da rolagem contínua
Ativação da fonte BT Audio Utilização da fonte AUX
Outras funçõesSobre AUX1 e AUX2
Fonte AUX1 Utilização de diferentes visualizações de entretenimento
Ativação ou desativação da visualização de horaUtilização do botão PGM
Seleção de AUX como a fonte Funcionamento desta unidade
Áudio player portátil USB
Acessórios disponíveis Reprodução de músicas noMemória USB
Seleção de um arquivo de áudio Exibição de informações de texto de um arquivo de áudio
Acessórios disponíveisSeleção de arquivos na lista de nomes de arquivo
Função e operação Acessórios disponíveis Áudio Bluetooth
Reprodução de músicas no seu áudio player Bluetooth
Conexão de um áudio player BluetoothComo parar a reprodução
Ção Visualização de endereços BD Dispositivo Bluetooth
Desconexão de um áudio player BluetoothVisualização da versão do sistema para reparos
151
Acessórios disponíveis Telefone Bluetooth Como fazer uma chamada
Configuração de chamadas viva-vozComo receber uma chamada
Como recusar uma chamada em espera
Desconexão de um telefone celular
Conexão de um telefone celularRegistro de um telefone celular conectado
Busca por telefones celulares disponíveis Conexão a um telefone celular registrado
Exclusão de um telefone registradoConexão manual a um telefone celular registrado
Conexão automática a um telefone celular registrado Transferência de registros para a Agenda de telefones
Utilização da Agenda de telefonesAlteração da ordem de visualização da agenda de telefones
Como chamar um número na Agenda de telefones Edição de números de telefone
Edição do nome de um registro na Agenda de telefones Como apagar um registro da Agenda de telefones
Utilização do histórico de chamadas Como apagar a memória
Utilização de números programadosProgramados, selecione All clear
Ajuste da recusa automática
Cancelamento de eco e redução de ruídoAjuste do atendimento automático
Ativação do toque Acessórios disponíveis Multi-CD player
Random mode Reprodução aleatória
Play mode Reprodução com repetiçãoScan mode Reprodução resumida-Pause
ITS play mode Reprodução ITS Criação de uma lista de reprodução com a programação ITS
Utilização de listas de reprodução ITSReprodução da sua lista ITS
Exclusão de uma faixa da sua lista de reprodução ITS Visualização de títulos de disco
Exclusão de um CD da sua lista de reprodução ITSSeleção de discos da lista de títulos de disco
# No Disc é visualizado ao lado do número do
Utilização das funções CD TextDisco quando não há discos na disqueteira
Seleção de uma pasta
Seleção de um disco ITS play mode, ITS memo e Introdução de tí- tulos de disco
Armazenamento e chamada
Acessórios disponíveis Sintonizador de TVDas emissoras da memória
Pressione MULTI-CONTROL para ativar a Bssm
Armazenamento seqüencial das emissoras mais fortesMados é visualizada
Compreensão das
Informações adicionais Solução de problemasMensagens de erro
Tratamento das diretrizes dos discos e do player Discos duais
Informações adicionaisArquivos de áudio compactados
Compatibilidade com compressão de áudio
Exemplo de uma hierarquiaPasta Arquivo de áudio compactado
Formato compatível PCM linear Lpcm Sobre os ajustes do iPod
Informações adicionais Sobre como manusear o iPod Geral
Informações adicionais Especificações Kmmzx 06K00000 XRD7144-B/N ES
Pioneer Corporation
Pioneer DEH-P6950IB user guide recommended for: FX-MG8006ZT-91/UC, S-DV515, XC-P01-S-K, DEH-1800, ELITE PRO-620HD.
The Pioneer DEH-P6950IB Receiver manual (Pioneer Operation manual, 176 pages) is completely safe to download (last scan date: 31/12/2024). You can rest assured of your safety when interacting with Pioneer DEH-P6950IB document.
3
DVD 27
Service manual PDF Manual (@S2717B), Harman Kardon DVD 27 DVD Player (11th Nov 2024)
110
82
21
4
eXtreme HD mini
46
911
164
5
HCD-DZ770W
Service manual Manual: Sony HCD-DZ770W (11PZ8G, Upd.Tue 10.2024)
90
65
12
7
QuickMedia QM-RX
Operation manual Crestron Receiver Operation manual (File: crestron-quickmedia-qm-rx-receiver-48, 18/03/2025)
48
684
171
10
U-WAVE Series
Manual Mitutoyo Conference System Manual (File: mitutoyo-u-wave-series-manual-8, Tue 10.2024)
8
683
137
Can You Chip In?
Dear Patron: Please don’t scroll past this. The Internet Archive is a nonprofit fighting for universal access to quality information. We build and maintain all our own systems, but we don’t charge for access, sell user information, or run ads. We’d be deeply grateful if you’d join the one in a thousand users that support us financially.
We understand that not everyone can donate right now, but if you can afford to contribute this Friday, we promise it will be put to good use. Our resources are crucial for knowledge lovers everywhere—so if you find all these bits and bytes useful, please pitch in.
Can You Chip In? Dear Patron: Please don’t scroll past this. The Internet Archive is working to keep the record straight by recording government websites, news publications, historical documents, and more. If you find our work useful, please pitch in.