
Раздел: Авто, мото оборудование и транспорт
Тип: Автомагнитола
Характеристики, спецификации
Проигрыватель:
CD, USB флеш
Встроенный усилитель:
есть
Поддерживаемые аудиоформаты:
MP3, WAV, WMA
Поддержка носителей:
CD, CD-R, CD-RW
Мощность:
4×50 Вт (пиковая)
Всего предустановок тюнера:
24
Поддержка технологии «RDS»:
есть
Поддерживаемые сервисы RDS:
EON, PTY
Возможность подключения устройств:
плеер iPod
Разъемы:
ISO-разъем, аудиовход, выход на сабвуфер, линейный выход
Безопасность:
съемная панель
Размеры (ШxВxГ):
178x50x160 мм
Инструкция к Автомагнитоле Pioneer DEH-2400UB

CD RDS RECEIVER
AUTORADIO CD RDS
SINTOLETTORE CD RDS
English NederlandsDeutschEspañolItalianoFrançais Русский
REPRODUCTOR DE CD CON RECEPTOR RDS
CD RDS-EMPFÄNGER
CD RDS-ONTVANGER
CD RDS ПРИЕМНИК
Owner’s Manual
Mode d’emploi
DEH-3400UB
Manuale d’istruzioni
Manual de instrucciones
DEH-2400UB
Bedienungsanleitung
Handleiding
Руководство пользователя
Section
01
Before you start
Before you start
Thank you for purchasing this PIONEER
About this unit
Note
product
Function setting operations are completed even
To ensure proper use, please read through this
The tuner frequencies on this unit are allocated
if the menu is cancelled before the operations
manual before using this product. It is especially
for use in Western Europe, Asia, the Middle
are confirmed.
important that you read and observe WARN-
East, Africa and Oceania. Use in other areas
INGs and CAUTIONs in this manual. Please
may result in poor reception. The RDS (radio
keep the manual in a safe and accessible place for
data system) function only operates in areas
About this manual
future reference.
with broadcasting RDS signals for FM stations.
! In the following instructions, USB memories
and USB audio players are collectively re-
CAUTION
ferred to as “USB storage device”.
! In this manual, iPod and iPhone will be re-
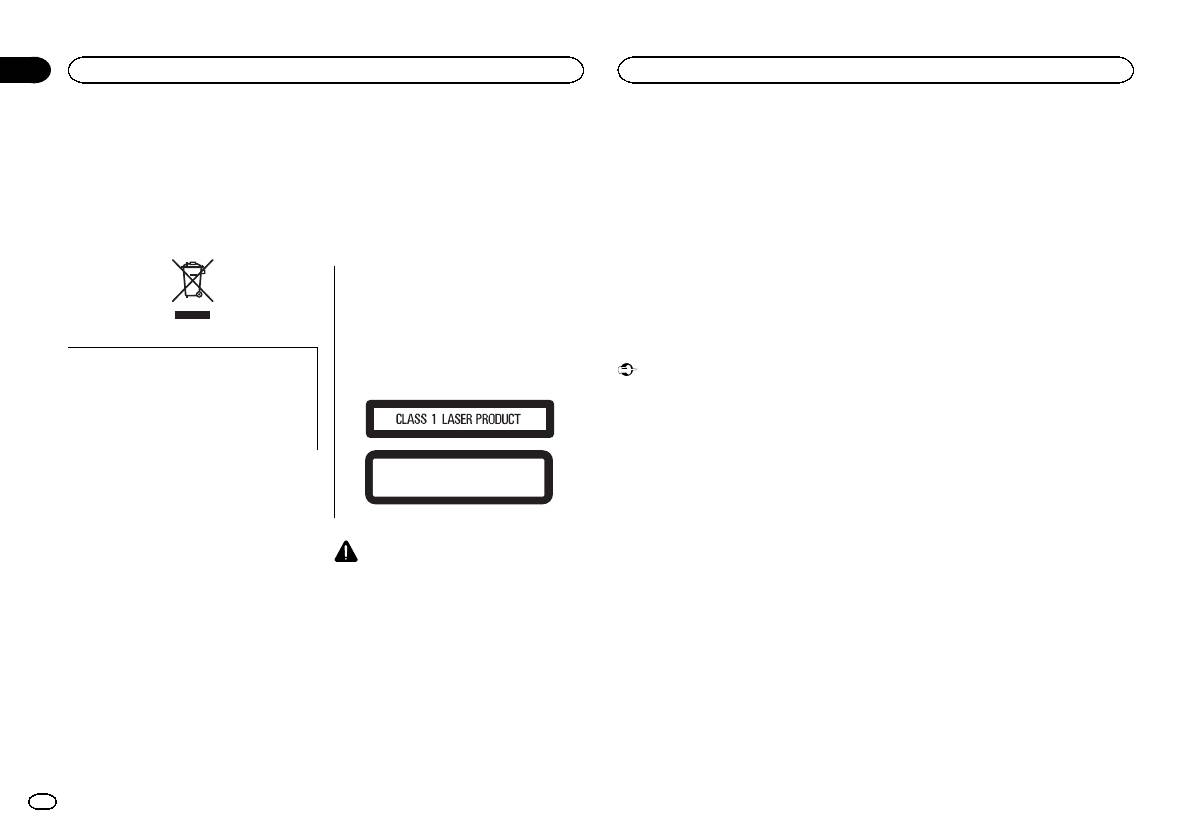
This product is a class 1 laser product classi-
ferred to as “iPod”.
fied under the Safety of laser products, IEC
60825-1:2007, and contains a class 1M laser
module. To ensure continued safety, do not re-
Demo mode
If you want to dispose this product, do not
move any covers or attempt to gain access to
the inside of the product. Refer all servicing to
Important
mix it with general household waste. There is
a separate collection system for used elec-
qualified personnel.
! Failure to connect the red lead (ACC) of this
tronic products in accordance with legislation
unit to a terminal coupled with ignition
that requires proper treatment, recovery and
switch on/off operations may lead to battery
recycling.
drain.
! Remember that if the feature demo contin-
CAUTION—CLASS 1M INVISIBLE LASER
ues operating when the car engine is turned
Private households in the member states of the
RADIATION WHEN OPEN, DO NOT VIEW
off, it may drain battery power.
DIRECTLY WITH OPTICAL INSTRUMENTS.
EU, in Switzerland and Norway may return their
used electronic products free of charge to desig-
The demo starts automatically if you do not oper-
nated collection facilities or to a retailer (if you
ate this unit within about 30 seconds since the
purchase a similar new one).
unit was last operated or if the ignition switch is
For countries not mentioned above, please con-
set to ACC or ON while the unit is turned off. To
CAUTION
tact your local authorities for the correct method
cancel the demo mode, you need to display the
! Do not allow this unit to come into contact
of disposal.
initial settings. Select DEMO (demo display set-
with liquids. Electrical shock could result.
By doing so you will ensure that your disposed
ting) and turn off the demo display. For details,
Also, damage to this unit, smoke, and over-
product undergoes the necessary treatment, re-
refer to Initial settings on page 9.
heating could result from contact with
covery and recycling and thus prevent potential
liquids.
negative effects on the environment and human
! The Pioneer CarStereo-Pass is for use only in
In case of trouble
health.
Germany.
! Always keep the volume low enough to hear
Should this unit fail to operate properly, please
outside sounds.
contact your dealer or nearest authorized
! Avoid exposure to moisture.
PIONEER Service Station.
! If the battery is disconnected or discharged,
any preset memory will be erased.
2
En
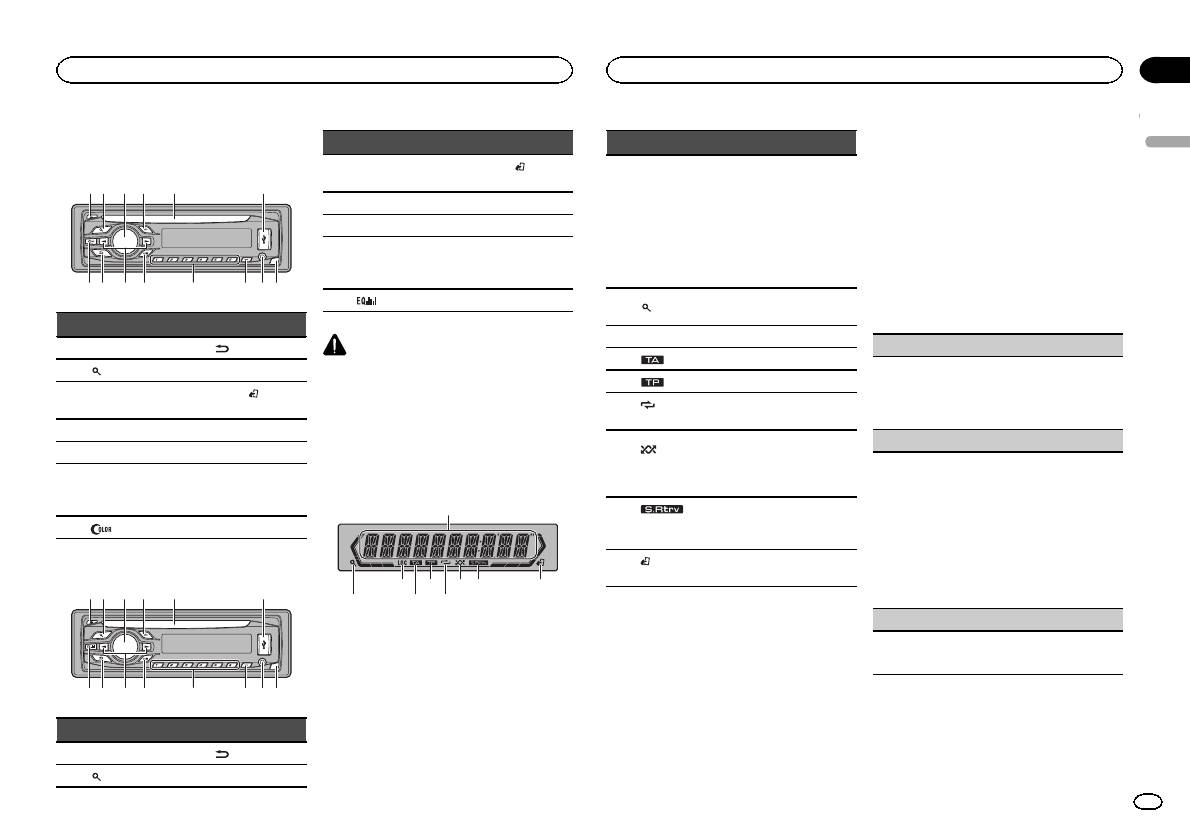
Head unit
DEH-3400UB
b c dea87
12 3 4 5 6
9
Part Part
1 h (eject) 8
(back/display)
2
(list) 9 c/d
MULTI-CONTROL
BAND/
(iPod
3
a
(M.C.)
control)
4 SRC/OFF b 1 to 6
5 Disc loading slot c PTY
AUX input jack
6 USB port d
(3.5 mm stereo
jack)
7
(color) e Detach button
DEH-2400UB
b c dea87
12 3 4 5 6
9
Part Part
MULTI-CONTROL
BAND/
(iPod
3
a
(M.C.)
control)
4 SRC/OFF b 1 to 6
5 Disc loading slot c PTY
AUX input jack
6 USB port d
(3.5 mm stereo
jack)
7
e Detach button
CAUTION
! Use an optional Pioneer USB cable (CD-
U50E) to connect the USB audio player/USB
memory as any device connected directly to
the unit will protrude out from the unit and
may be dangerous.
! Do not use unauthorized products.
Display indication
1
87 93 5
Part Part
1 h (eject) 8
(back/display)
2
(list) 9 c/d
2 4 6
Section
Operating this unit
Operating this unit
02
2 Turn M.C. to switch to YES. Press M.C. to
Indicator State
select.
English
# If you do not operate for 30 seconds, the set up
! Tuner: band and frequency
menu will not be displayed.
! RDS: program service
# If you prefer not to set up at this time, turn M.C.
Main dis-
name, PTY information and
to switch to NO. Press to select.
1
play sec-
other literal information
If you select NO, you cannot set up in the set up
tion
! Built-in CD, USB storage
menu.
device and iPod: elapsed
playback time and text in-
3 Perform the following procedures to set
formation
the menu.
The list function is being oper-
To proceed to the next menu option, you need to
2
(list)
ated.
confirm your selection.
3 LOC Local seek tuning is on.
CLOCK SET (setting the clock)
4
(TA) TA function is on.
1 Turn M.C. to adjust hour.
5
(TP) A TP station is tuned in.
2 Press M.C. to select minute.
(re-
3 Turn M.C. to adjust minute.
6
Track or folder repeat is on.
peat)
4 Press M.C. to confirm the selection.
Random play is on.
FM STEP (FM tuning step)
(ran-
The iPod source is selected
7
dom/shuf-
Normally, the FM tuning step employed by seek
and the shuffle or shuffle all
fle)
tuning is 50 kHz. When AF or TA is on, the tuning
function is on.
step automatically changes to 100 kHz. It may be
preferable to set the tuning step to 50 kHz when
The sound retriever function is
8
(sound re-
AF is on.
on.
triever)
! The tuning step remains at 50 kHz during man-
ual tuning.
(iPod
This unit’s iPod function is op-
9
1 Turn M.C. to select the FM tuning step.
control)
erated from your iPod.
50 (50 kHz)—100 (100 kHz)
2 Press M.C. to confirm the selection.
DEMO (demo display setting)
Set up menu
When you turn the ignition switch to ON after in-
1 Turn M.C. to set the demo display to on or off.
stallation, set up menu appears on the display.
2 Press M.C. to confirm the selection.
You can set up the menu options below.
1 After installation of this unit, turn the
ignition switch to ON.
SET UP appears.
En
3

Section
02
Operating this unit
Operating this unit
TITLE (multi-language)
Removing the front panel to protect your unit from
Selecting a source
Tuner
theft
1 Press SRC/OFF to cycle between:
This unit can display the text information of a com-
Basic operations
1 Press the detach button to release the front
TUNER (tuner)—CD (built-in CD player)—USB
pressed audio file even if they are embedded in a
panel.
(USB)/iPod (iPod)—AUX (AUX)
Western European or Russian language.
2 Push the front panel upward (M) and then pull
Selecting a band
! If the embedded language and the selected
Adjusting the volume
it toward (N) you.
1 Press BAND/
until the desired band (F1, F2,
language setting are not the same, text infor-
1 Turn M.C. to adjust the volume.
F3 for FM or MW/LW) is displayed.
mation may not display properly.
! Some characters may not be displayed prop-
Recalling preset stations
erly.
1 Press c or d.
CAUTION
1 Turn M.C. to select the desired setting.
! If MAN (manual tuning) is selected in SEEK,
For safety reasons, park your vehicle when re-
EUR (European)—RUS (Russian)
you cannot recall preset stations. You need to
moving the front panel.
2 Press M.C. to confirm the selection.
select PCH (preset channel) in SEEK. For de-
QUIT appears.
3 Always keep the detached front panel in a pro-
Note
tails about the settings, refer to SEEK (left/right
tection device such as a protection case.
key setting) on page 6.
When this unit’s blue/white lead is connected to
the vehicle’s auto-antenna relay control termi-
Manual tuning (step by step)
4 To finish your settings, turn M.C. to select
Re-attaching the front panel
1 Slide the front panel to the left.
nal, the vehicle’s antenna extends when this
1 Press c or d.
YES. Press to select.
unit’s source is turned on. To retract the anten-
! If PCH (preset channel) is selected in SEEK,
# If you prefer to change your setting again, turn
Make sure to insert the tabs on the left side of
the head unit into the slots on the front panel.
na, turn the source off.
you cannot tune up or down manually. You
M.C. to switch to NO. Press to select.
need to select MAN (manual tuning) in SEEK.
Notes
For details about the settings, refer to SEEK
Menu operations identical
! You can set up the menu options in the initial
(left/right key setting) on page 6.
settings. For details about the settings, refer
for set up menu/function
Seeking
to Initial settings on page 9.
settings/audio adjustments/
1 Press and hold c or d, and then release.
! You can cancel set up menu by pressing
initial settings/lists
You can cancel seek tuning by briefly pressing
SRC/OFF.
2 Press the right side of the front panel until it is
c or d.
firmly seated.
Returning to the previous display
While pressing and holding c or d, you can
Basic operations
If you cannot attach the front panel to the
Returning to the previous list (the folder one level
skip stations. Seek tuning starts as soon as
head unit successfully, make sure that you are
higher)
you release c or d.
Important
placing the front panel onto the head unit cor-
1 Press
.
! Handle gently when removing or attaching
Note
rectly. Forcing the front panel into place may
the front panel.
Returning to the ordinary display
This unit’s AF (alternative frequencies search)
result in damage to the front panel or head
! Avoid subjecting the front panel to excessive
Canceling the initial setting menu/set up menu
function can be turned on and off. AF should be
unit.
shock.
1 Press BAND/
.
off for normal tuning operation (refer to AF (al-
! Keep the front panel out of direct sunlight
Turning the unit on
ternative frequencies search) on the next page).
Returning to the ordinary display from the list
and high temperatures.
1 Press SRC/OFF to turn the unit on.
1 Press BAND/
.
! To avoid damaging the device or vehicle inte-
Turning the unit off
rior, remove any cables and devices attached
1 Press and hold SRC/OFF until the unit turns
to the front panel before detaching it.
off.
4
En
Section
Operating this unit
Operating this unit
02
Storing and recalling stations
Searching for an RDS station by PTY information
OTHERS
Local seek tuning lets you tune in to only those
English
for each band
You can search for general types of broadcasting
radio stations with sufficiently strong signals for
EDUCATE (Education), DRAMA (Drama), CUL-
programs, such as those listed in the following
good reception.
Using preset tuning buttons
TURE (Culture), SCIENCE (Science), VARIED (Var-
section. Refer to this page.
1 Press M.C. to select the desired setting.
ied), CHILDREN (Children’s), SOCIAL (Social
1 When you find a station that you want
1 Press PTY.
FM: OFF—LV1—LV2—LV3—LV4
affairs), RELIGION (Religion), PHONE IN (Phone
to store in memory, press one of the preset
2 Turn M.C. to select a program type.
MW/LW: OFF—LV1 —LV2
in), TOURING (Travel), LEISURE (Leisure), DOCU-
tuning buttons (1 to 6) and hold until the
NEWS/INFO—POPULAR—CLASSICS—
The highest level setting allows reception of
MENT (Documentaries)
preset number stops flashing.
OTHERS
only the strongest stations, while lower levels
3 Press M.C. to begin the search.
allow the reception of weaker stations.
2 Press one of the preset tuning buttons (1
The unit searches for a station broadcasting
Function settings
PTY SEARCH (program type selection)
to 6) to select the desired station.
that type of program. When a station is found,
its program service name is displayed.
1 Press M.C. to display the main menu.
You can tune in to a station using PTY (program
Switching the RDS display
PTY (program type ID code) information is
type) information.
listed in the following section. Refer to this
2 Turn M.C. to change the menu option
1 Press M.C. to display the setting mode.
% Press
.
page.
and press to select FUNCTION.
2 Turn M.C. to select the desired setting.
Program ser vice name—PTY information—En-
! To cancel the search, press M.C. again.
NEWS/INFO—POPULAR—CLASSICS—
tertainment—Frequency
! The program of some stations may differ
3 Turn M.C. to select the function.
OTHERS
# PTY information and the frequency appear on the
from that indicated by the transmitted PTY.
After selecting, perform the following proce-
3 Press M.C. to begin the search.
display for eight seconds.
! If no station is broadcasting the type of
dures to set the function.
The unit searches for a station broadcasting
# Depending on the band, text information can be
program you searched for, NOT FOUND is
# If MW/LW band is selected, only BSM, LOCAL
that type of program. When a station is found,
changed.
displayed for about two seconds and then
and SEEK are available.
its program service name is displayed.
the tuner returns to the original station.
For PTY (program type ID code) information,
Using PTY functions
BSM (best stations memory)
refer to this page.
You can tune in to a station using PTY (program
BSM (best stations memory) automatically stores
The program of some stations may differ from
type) information.
PTY list
that indicated by the transmitted PTY.
the six strongest stations in the order of their sig-
nal strength.
If no station is broadcasting the type of pro-
NEWS/INFO
1 Press M.C. to turn BSM on.
gram you searched for, NOT FOUND is dis-
played for about two seconds and then the
NEWS (News), AFFAIRS (Current affairs), INFO
To cancel, press M.C. again.
tuner returns to the original station.
(Information), SPORT (Sports), WEATHER (Weath-
REGION (regional)
er), FINANCE (Finance)
TA (traffic announcement standby)
When AF is used, the regional function limits the
POPULAR
selection of stations to those broadcasting region-
1 Press M.C. to turn traffic announcement
POP MUS (Popular music), ROCK MUS (Rock
al programs.
standby on or off.
music), EASY MUS (Easy listening), OTH MUS
1 Press M.C. to turn the regional function on or
AF (alternative frequencies search)
(Other music), JAZZ (Jazz), COUNTRY (Country
off.
music), NAT MUS (National music), OLDIES
LOCAL (local seek tuning)
1 Press M.C. to turn AF on or off.
(Oldies music), FOLK MUS (Folk music)
NEWS (news program interruption)
CLASSICS
1 Press M.C. to turn the NEWS function on or
L. CLASS (Light classical), CLASSIC (Classical)
off.
En
5

Section
02
Operating this unit
Operating this unit
2 Turn M.C. to change the menu option
SEEK (left/right key setting)
Switching between compressed audio and CD-DA
Viewing a list of the files (or folders) in the se-
and press to select FUNCTION.
1 Press BAND/
.
lected folder
You can assign a function to the left and right keys
1 When a folder is selected, press M.C.
of the unit.
Switching between playback memory devices
3 Turn M.C. to select the function.
Select MAN (manual tuning) to tune up or down
You can switch between playback memory devices
Playing a song in the selected folder
After selecting, perform the following proce-
manually or select PCH (preset channel) to switch
on USB storage devices with more than one Mass
1 When a folder is selected, press and hold M.C.
dures to set the function.
between preset channels.
Storage Device-compatible memory device.
1 Press M.C. to select MAN or PCH.
1 Press BAND/
.
REPEAT (repeat play)
! You can switch between up to 32 different
Advanced operations using
memory devices.
special buttons
1 Press M.C. to select a repeat play range.
CD/CD-R/CD-RW and USB
For details, refer to Selecting a repeat play range
Note
Selecting a repeat play range
on this page.
storage devices
Disconnect USB storage devices from the unit
1 Press 6/
to cycle between the following:
RANDOM (random play)
when not in use.
CD/CD-R/CD-RW
Basic operations
! ALL – Repeat all tracks
1 Press M.C. to turn random play on or off.
Displaying text information
! ONE – Repeat the current track
Playing a CD/CD-R/CD-RW
! FLD – Repeat the current folder
PAUSE (pause)
1 Insert the disc into the disc loading slot with
Selecting the desired text information
USB audio player/USB memory
the label side up.
1 Press
.
! ALL – Repeat all files
1 Press M.C. to pause or resume.
Ejecting a CD/CD-R/CD-RW
! Depending on the version of iTunes used to
! ONE – Repeat the current file
S.RTRV (sound retriever)
1 Press h.
write MP3 files to a disc or media file types, in-
! FLD – Repeat the current folder
compatible text stored within an audio file may
Automatically enhances compressed audio and
Playing songs on a USB storage device
Playing tracks in random order
be displayed incorrectly.
restores rich sound.
1 Open the USB port cover.
1 Press 5/
to turn random play on or off.
! Text information items that can be changed
1 Press M.C. to select the desired setting.
2 Plug in the USB storage device using a USB
Tracks in a selected repeat range are played in
depend on the media.
For details, refer to Enhancing compressed
cable.
random order.
audio and restoring rich sound (sound retriever)
A song will be played automatically.
! To change songs during random play, press d
on this page.
Selecting and playing files/
to switch to the next track. Pressing c restarts
Stopping playback of files on a USB storage de-
playback of the current track from the begin-
vice
tracks from the name list
ning of the song.
1 You may disconnect the USB storage device at
iPod
1 Press
to switch to the file/track name
any time.
Pausing playback
list mode.
The unit stops playback.
1 Press 4/PAUSE to pause or resume.
Basic operations
Selecting a folder
2 Use M.C. to select the desired file name
Enhancing compressed audio and restoring rich
Playing songs on an iPod
1 Press 1/
or 2/ .
(or folder name).
sound (sound retriever)
1 Open the USB port cover.
1 Press 3/S.Rtrv to cycle between:
Selecting a track
2 Connect an iPod to the USB cable using an
Changing the file or folder name
1—2—OFF (off)
1 Press c or d.
iPod Dock Connector.
1 Turn M.C.
1 is effective for low compression rates, and 2
A song will be played automatically.
Fast forwarding or reversing
is effective for high compression rates.
Playing
1 Press and hold c or d.
Selecting a song (chapter)
1 When a file or track is selected, press M.C.
! When playing compressed audio, there is no
1 Press c or d.
Function settings
sound during fast forward or reverse.
Returning to root folder
1 Press M.C. to display the main menu.
1 Press and hold BAND/
.
6
En

Section
Operating this unit
Operating this unit
02
Selecting an album
Playing a song in the selected category
Pausing playback
Operating this unit’s iPod
English
1 Press 1/
or 2/ .
1 When a category is selected, press and hold
1 Press 4/PAUSE to pause or resume.
function from your iPod
! The album may not be selected correctly if the
M.C.
You can listen to the sound from your iPod appli-
Enhancing compressed audio and restoring rich
iPod has more than one album with the same
cations using your car’s speakers, when
Searching the list by alphabet
sound (sound retriever)
title on it. Select the album you want to listen
CTRL APP is selected.
1 When a list for the selected category is dis-
1 Press 3/S.Rtrv to cycle between:
to using list search. For details, refer to Brows-
! This function is not compatible with iPod
played, press
to switch to alphabet search
1—2—OFF (off)
ing for a song on this page.
nano 1st generation.
mode.
1 is effective for low compression rates, and 2
APP Mode is compatible with the following iPod
Fast forwarding or reversing
! You also can switch to alphabet search
is effective for high compression rates.
models.
1 Press and hold c or d.
mode by turning M.C. twice.
! iPhone 4 (software version 4.1 or later)
2 Turn M.C. to select a letter.
Notes
! iPhone 3GS (soft ware version 3.0 or later)
3 Press M.C. to display the alphabetical list.
Playing songs related to the
! The iPod cannot be turned on or off when the
! To cancel searching, press
.
currently playing song
! iPhone 3G (software version 3.0 or later)
control mode is set to CTRL AUDIO.
! iPhone (software version 3.0 or later)
You can play songs from the following lists.
! Disconnect headphones from the iPod be-
! iPod touch 4th generation (software version
Notes
• Album list of the currently playing artist
fore connecting it to this unit.
4.1 or later)
! You can play playlists created with the PC ap-
• Song list of the currently playing album
! The iPod will turn off about two minutes after
! iPod touch 3rd generation (software version
plication (MusicSphere). The application will
• Album list of the currently playing genre
the ignition switch is set to OFF.
3.0 or later)
be available on our website.
! iPod touch 2nd generation (software version
! Playlists that you created with the PC appli-
1 Press and hold M.C. to switch to link play
3.0 or later)
Displaying text information
cation (MusicSphere) are displayed in abbre-
mode.
! iPod touch 1st generation (software version
viated form.
3.0 or later)
Selecting the desired text information
2 Turn M.C. to change the mode; press to
1 Press
.
Advanced operations using
select.
% Press BAND/
to switch the control
! ARTIST – Plays an album of the artist cur-
special buttons
mode.
rently being played.
Browsing for a song
! CTRL iPod – This unit’s iPod function can be
! ALBUM – Plays a song from the album cur-
Selecting a repeat play range
operated from the connected iPod.
1 Press
to switch to the top menu of list
rently being played.
1 Press 6/
to cycle between the following:
! CTRL APP – Play back the sound from your
search.
! GENRE – Plays an album from the genre cur-
! OFF – Repeat off
iPod applications.
rently being played.
! ONE – Repeat the current song
! CTRL AUDIO – This unit’s iPod function can
2 Use M.C. to select a category/song.
The selected song/album will be played after the
! ALL – Repeat all songs in the selected list
be operated from this unit.
currently playing song.
! You cannot select OFF when CTRL AUDIO is
Changing the name of the song or category
Notes
selected. Refer to Operating this unit’siPod
Notes
1 Turn M.C.
! Switching the control mode to CTRL iPod/
function from your iPod on this page.
! The selected song/album may be canceled if
Playlists—artists—albums—songs—podcasts
CTRL APP pauses song playback. Operate
you operate functions other than link search
—genres—composers—audiobooks
Playing all songs in random order (shuffle all)
the iPod to resume playback.
(e.g. fast forward and reverse).
1 Press 5/
to turn shuffle all on.
! The following functions are still accessible
Playing
! Depending on the song selected to play, the
! When the control mode is set to CTRL iPod/
from the unit even if the control mode is set
1 When a song is selected, press M.C.
end of the currently playing song and the be-
CTRL APP, shuffle play is on.
to CTRL iPod/CTRL APP.
ginning of the selected song/album may be
Viewing a list of songs in the selected category
— Pausing
cut off.
1 When a category is selected, press M.C.
— Fast forward/reverse
— Song up/down
! When the control mode is set to CTRL iPod,
operations are limited as follows:
En
7
Section
02
Operating this unit
Operating this unit
— The function settings are not available.
PAUSE (pause)
FAD/BAL (fader/balance adjustment)
This unit is equipped with a subwoofer output
— The browse function cannot be operated from
which can be turned on or off.
this unit.
1 Press M.C. to pause or resume.
1 Press M.C. to display the setting mode.
1 Press M.C. to select the desired setting.
2 Press M.C. to cycle between fader (front/rear)
NOR (normal phase)—REV (reverse phase)—
Function settings
AUDIO BOOK (audiobook speed)
and balance (left/right).
OFF (subwoofer off)
1 Press M.C. to display the main menu.
3 Turn M.C. to adjust speaker balance.
1 Press M.C. to display the setting mode.
SUB.W CTRL (subwoofer adjustment)
! When the rear output and RCA output setting
2 Turn M.C. to select your favorite setting.
2 Turn M.C. to change the menu option
are SW, you cannot adjust front/rear speaker
! FASTER – Playback at a speed faster than
The cut-off frequency and output level can be ad-
and press to select FUNCTION.
balance. Refer to REAR-SP (rear output setting)
normal
justed when the subwoofer output is on.
on the next page. Refer to PREOUT (preout set-
! NORMAL – Playback at normal speed
Only frequencies lower than those in the selected
3 Turn M.C. to select the function.
ting) on the next page.
! SLOWER – Playback at a speed slower
range are outputted from the subwoofer.
After selecting, perform the following proce-
than normal
! When you select OFF in SUB.W, you cannot se-
PRESET EQ (equalizer recall)
dures to set the function.
3 Press M.C. to confirm the selection.
lect this function. For details, refer to SUB.W
! When the control mode is set to CTRL iPod/
1 Press M.C. to display the setting mode.
(subwoofer on/off setting) on this page.
CTRL APP, only PAUSE or S.RTRV is avail-
S.RTRV (sound retriever)
2 Turn M.C. to select the equalizer.
1 Press M.C. to display the setting mode.
able.
Automatically enhances compressed audio and
DYNAMIC—VOCAL—NATURAL—CUSTOM
2 Press M.C. to cycle between the cut-off fre-
restores rich sound.
—FLAT—POWERFUL
quency and output level of the subwoofer.
REPEAT (repeat play)
1 Press M.C. to select the desired setting.
3 Press M.C. to confirm the selection.
Cut-off frequency (Cut-off frequency display
For details, refer to Enhancing compressed
! You can also switch the equalizer by pressing
flashes.)—Output level (Output level display
1 Press M.C. to select a repeat play range.
audio and restoring rich sound (sound retriever)
repeatedly (DEH-2400UB).
flashes.)
For details, refer to Selecting a repeat play range
on the previous page.
3 Turn M.C. to select the desired setting.
on the previous page.
TONE CTRL (equalizer adjustment)
Cut-off frequency: 50HZ—63HZ—80HZ—
100HZ—125HZ
SHUFFLE (shuffle)
! Adjusted equalizer curve settings are stored in
Output level: –24 to +6
Audio adjustments
CUSTOM.
1 Press M.C. to select your favorite setting.
1 Press M.C. to display the setting mode.
SLA (source level adjustment)
! SNG – Play back songs in the selected list
1 Press M.C. to display the main menu.
2 Press M.C. to select BASS (bass)/MID (mid)/
SLA (Source level adjustment) lets you adjust the
in random order.
TREBLE (treble).
volume level of each source to prevent radical
! ALB – Play back songs from a randomly se-
2 Turn M.C. to change the menu option
3 Turn M.C. to adjust the level.
changes in volume when switching between sour-
lected album in order.
and press to select AUDIO.
Adjustment range: +6 to –6
ces.
! OFF – Cancel random play.
3 Turn M.C. to select the audio function.
LOUD (loudness)
! Settings are based on the FM volume level,
SHUFFLE ALL (shuffle all)
After selecting, perform the following proce-
which remains unchanged.
Loudness compensates for deficiencies in the low-
dures to set the audio function.
! The MW/LW volume level can also be adjusted
1 Press M.C. to turn shuffle all on.
frequency and high-frequency ranges at low vol-
with this function.
To turn off, set SHUFFLE in the FUNCTION
ume.
! When selecting FM as the source, you cannot
menu to off.
1 Press M.C. to select the desired setting.
switch to SLA.
OFF (off)—LOW(low)—HI (high)
1 Press M.C. to display the setting mode.
LINK PLAY (link play)
SUB.W (subwoofer on/off setting)
2 Turn M.C. to adjust the source volume.
1 Press M.C. to display the setting mode.
Adjustment range: +4 to –4
2 Turn M.C. to change the mode; press to select.
3 Press M.C. to confirm the selection.
For details about the settings, refer to Playing
songs related to the currently playing song on
the previous page.
8
En

Section
Operating this unit
Operating this unit
02
Initial settings
Normally, the FM tuning step employed by seek
The rear speaker leads output can be used for full-
When ever scroll is set to ON, recorded text infor-
English
Important
tuning is 50 kHz. When AF or TA is on, the tuning
range speaker or subwoofer connection.
mation scrolls continuously in the display. Set to
step automatically changes to 100 kHz. It may be
If you switch to SW, you can connect a rear speak-
OFF if you prefer the information to scroll just
PW SAVE (power saving) is cancelled if the ve-
preferable to set the tuning step to 50 kHz when
er lead directly to a subwoofer without using an
once.
hicle battery is disconnected and will need to be
AF is on.
auxiliary amp.
1 Press M.C. to turn the ever scroll on or off.
turned back on once the battery is reconnected.
! The tuning step remains at 50 kHz during man-
Initially, REAR-SP is set for rear full-range speaker
When PW SAVE (power saving) is off, depend-
TITLE (multi-language)
ual tuning.
connection (FUL).
ing on connection methods, the unit may con-
1 Press M.C. to select the FM tuning step.
1 Press M.C. to select the desired setting.
This unit can display the text information of a com-
tinue to draw power from the battery if your
50 (50 kHz)—100 (100 kHz)
FUL—SW
pressed audio file even if they are embedded in a
vehicle’s ignition doesn’t have an ACC (acces-
! Even if you change this setting, there will
Western European or Russian language.
sory) position.
AUTO-PI (auto PI seek)
be no output if you select OFF in SUB.W
! If the embedded language and the selected
The unit can automatically search for a different
(Refer to SUB.W (subwoofer on/off setting)
language setting are not the same, text infor-
1 Press and hold SRC/OFF until the unit
station with the same programming, even during
on the previous page).
mation may not display properly.
turns off.
preset recall.
! If you change this setting, subwoofer out-
! Some characters may not be displayed prop-
1 Press M.C. to turn Auto PI seek on or off.
put in the audio menu will return to the fac-
erly.
2 Press SRC/OFF and hold until function
tory settings.
1 Press M.C. to select the desired setting.
name appears in the display.
AUX (auxiliary input)
EUR (European)—RUS (Russian)
PREOUT (preout setting)
Activate this setting when using an auxiliary de-
3 Turn M.C. to select the initial setting.
PW SAVE (power saving)
vice connected to this unit.
The RCA outputs can be used for rear speaker or
After selecting, perform the following proce-
1 Press M.C. to turn AUX on or off.
subwoofer connection.
Switching this function on enables you to reduce
dures to set the initial setting.
If you switch to SW, you can connect a rear speak-
the consumption of battery power.
USB PNP (plug and play)
er lead directly to a subwoofer without using an
! Turning on the source is the only operation al-
CLOCK SET (setting the clock)
This setting allows you to switch your source to
auxiliary amp.
lowed when this function is on.
USB/iPod automatically.
Initially, PREOUT is set for rear full-range speaker
1 Press M.C. to turn the power save on or off.
1 Press M.C. to display the setting mode.
1 Press M.C. to turn the plug and play function
connection (SW).
2 Press M.C. to select the segment of the clock
on or off.
1 Press M.C. to select the desired setting.
display you wish to set.
ON – When a USB storage device/iPod is con-
SW—REA
Hour—Minute
Selecting the illumination color
nected, depending on the type of device, the
! Even if you change this setting, there will
3 Turn M.C. to adjust the clock.
source is automatically switched to USB/iPod
be no output if you select OFF in SUB.W
Only for DEH-3400UB
CLOCK (clock display)
when you turn on the engine. If you disconnect
(Refer to SUB.W (subwoofer on/off setting)
This unit is equipped with multiple-color illumi-
your USB storage device/iPod, this unit’s
on the previous page).
nation. You can select desired colors for the keys
You can turn the clock display on or off.
source is turned off.
! If you change this setting, subwoofer out-
and display of this unit. You also can customize
The clock display disappears temporarily when
OFF – When a USB storage device/iPod is con-
put in the audio menu will return to the fac-
the colors you want to use.
you perform other operations, but the clock dis-
nected, the source is not switched to USB/
tory settings.
play appears again after 25 seconds.
iPod automatically. Please change the source
Selecting the key color from the
1 Press M.C. to turn the clock display on or off.
DEMO (demo display setting)
to USB/iPod manually.
illumination color list
FM STEP (FM tuning step)
REAR-SP (rear output setting)
1 Press M.C. to turn the demo display on or off.
Only for DEH-3400UB
! If PW SAVE is on, DEMO cannot be selected.
You can select desired colors for the keys of this
unit.
SCROLL (scroll mode setting)
1 Press
.
En
9

Section
02
Operating this unit
Operating this unit
2 Turn M.C. to display KEY COLOR and
! CUSTOM (customized illumination color)
2 Turn M.C. to display KEY COLOR or
Sound muting
press to select.
DISP COLOR. Press to select.
4 Press M.C. to confirm the selection.
Sound is muted automatically when:
3 Turn M.C. to select the illumination color.
3 Press M.C. and hold until the customizing
! A call is made or received using a cell phone
Note
You can select one option from the following list.
illumination color setting appears in the dis-
connected to this unit.
! 30 preset colors (WHITE to ROSE)
For details about colors on the list, refer to Se-
play.
! Voice guidance is output from a connected
! SCAN (cycle through all colors)
lecting the key color from the illumination color
Pioneer navigation unit.
! 3 sets of colors (WARM, AMBIENT, CALM)
list on the previous page.
4 Press M.C. to select the primary color.
The sound is turned off, MUTE is displayed and
! CUSTOM (customized illumination color)
R (red)—G (green)—B (blue)
no audio adjustments, except volume control,
Selecting key and display color
are possible. Operation returns to normal when
4 Press M.C. to confirm the selection.
from the illumination color list
5 Turn M.C. to adjust the brightness level.
the phone connection or the voice guidance is
ended.
Only for DEH-3400UB
Adjustment range: 0 to 60
Notes
You can select the desired colors for the keys
# You cannot select a level below 10 for all three of
! When SCAN is selected, the system auto-
and display of this unit.
R (red), G (green), and B (blue) at the same time.
matically cycles through the 30 preset colors.
# You can also perform the same operation on
! When WARM is selected, the system auto-
1 Press
.
other colors.
matically cycles through the warm colors.
! When AMBIENT is selected, the system au-
Notes
2 Turn M.C. to display BOTH COLOR and
tomatically cycles through the ambient col-
! You cannot create a custom illumination
press to select.
ors.
color when SCAN or a set of colors (WARM,
! When CALM is selected, the system auto-
AMBIENT,orCALM) is selected.
3 Turn M.C. to select the illumination color.
matically cycles through the calm colors.
! You can create custom illumination colors
You can select one option from the following list.
! When CUSTOM is selected, the customized
for both KEY COLOR and DISP COLOR.
! 30 preset colors (WHITE to ROSE)
color saved is selected.
! SCAN (cycle through all colors)
! To cancel selecting the illumination color,
press
.
Switching the dimmer setting
4 Press M.C. to confirm the selection.
You can adjust the brightness of illumination.
Selecting the display color from
Notes
the illumination color list
! You cannot select 3 sets of preset colors and
% Press and hold
.
Only for DEH-3400UB
CUSTOM in this function.
You can select the desired colors for the display
! Once you select a color in this function, col-
ors on the keys and display of this unit auto-
Using an AUX source
of this unit.
matically switch to the color you selected.
1 Insert the stereo mini plug into the AUX
1 Press
.
! For details about colors on the list, refer to
input jack.
Selecting the key color from the illumination
2 Turn M.C. to display DISP COLOR and
color list on the previous page.
2 Press SRC/OFF to select AUX as the
press to select.
source.
Customizing the illumination color
3 Turn M.C. to select the illumination color.
Only for DEH-3400UB
Note
You can select one option from the following list.
AUX cannot be selected unless the auxiliary set-
! 30 preset colors (WHITE to ROSE)
1 Press
.
ting is turned on. For more details, refer to AUX
! SCAN (cycle through all colors)
(auxiliary input) on the previous page.
! 3 sets of colors (WARM, AMBIENT, CALM)
10
En

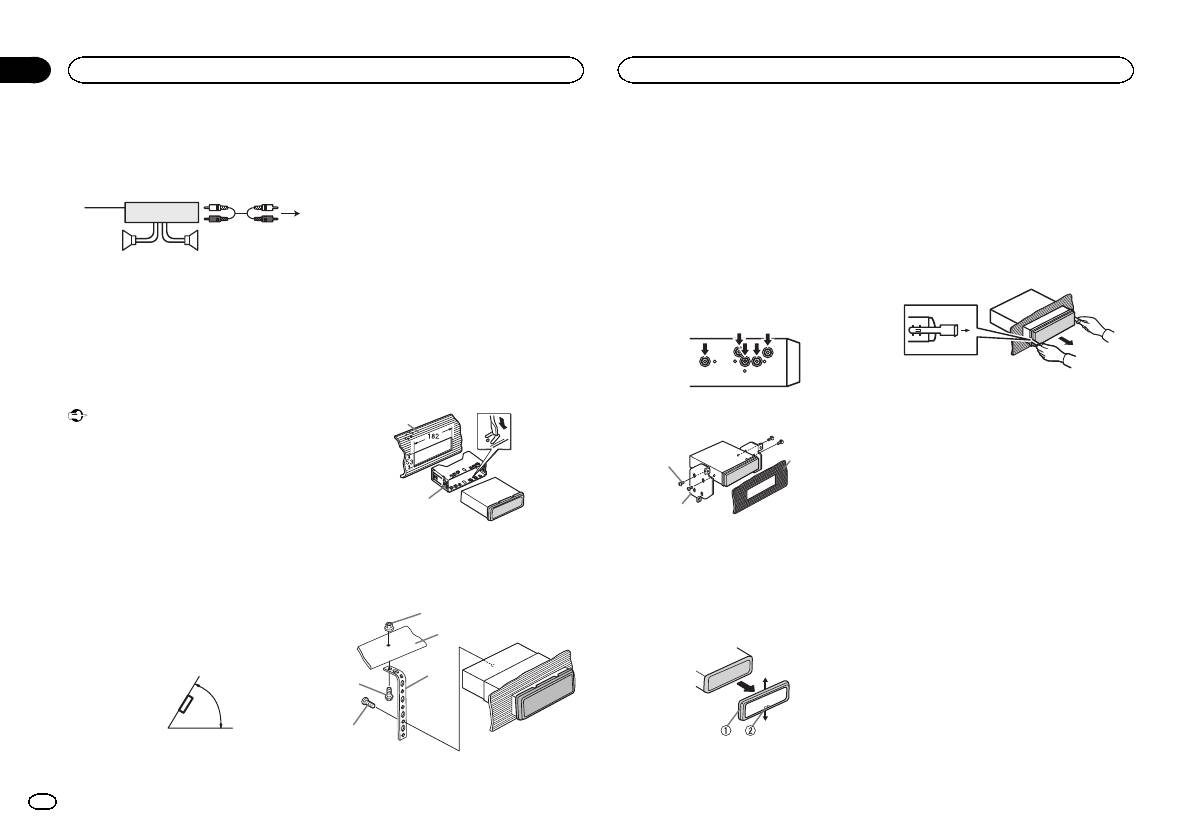
Connections
— Never wire the negative speaker cable directly
to ground.
Important
— Never band together negative cables of multi-
! When installing this unit in a vehicle without
ple speakers.
an ACC (accessory) position on the ignition
! When this unit is on, control signals are sent
switch, failure to connect the red cable to the
through the blue/white cable. Connect this
terminal that detects operation of the ignition
cable to the system remote control of an ex-
key may result in battery drain.
ternal power amp or the vehicle’s auto-anten-
na relay control terminal (max. 300 mA
F
F
O
N
12 V DC). If the vehicle is equipped with a
O
S
A
T
glass antenna, connect it to the antenna
T
R
booster power supply terminal.
! Never connect the blue/white cable to the
ACC position No ACC position
power terminal of an external power amp.
! Use of this unit in conditions other than the
Also, never connect it to the power terminal
following could result in fire or malfunction.
of the auto antenna. Doing so may result in
— Vehicles with a 12-volt battery and negative
battery drain or a malfunction.
grounding.
! The black cable is ground. Ground cables for
— Speakers with 50 W (output value) and 4 ohm
this unit and other equipment (especially,
to 8 ohm (impedance value).
high-current products such as power amps)
! To prevent a short-circuit, overheating or mal-
must be wired separately. If they are not, an
function, be sure to follow the directions
accidental detachment may result in a fire or
below.
malfunction.
— Disconnect the negative terminal of the bat-
tery before installation.
This unit
— Secure the wiring with cable clamps or adhe-
sive tape. Wrap adhesive tape around wiring
1
that comes into contact with metal parts to
protect the wiring.
— Place all cables away from moving parts,
such as the shift lever and seat rails.
— Place all cables away from hot places, such
as near the heater outlet.
— Do not connect the yellow cable to the battery
by passing it through the hole to the engine
compartment.
— Cover any disconnected cable connectors
with insulating tape.
— Do not shorten any cables.
— Never cut the insulation of the power cable of
this unit in order to share the power with
other devices. The current capacity of the
cable is limited.
— Use a fuse of the rating prescribed.
3 45
Power cord
3
4
2
5
6
1
3
4
7
5
6
8
a
9
b
e
2
1 Power cord input
2 Rear output or subwoofer output
3 Antenna input
4 Fuse (10 A)
5 Wired remote input
Hard-wired remote control adaptor can be
connected (sold separately).
d
Section
Installation
Installation
03
9 Blue/white
The pin position of the ISO connector will dif-
English
fer depending on the type of vehicle. Connect
9 and b when Pin 5 is an antenna control
type. In another type of vehicle, never con-
nect 9 and b.
a Blue/white
Connect to system control terminal of the
power amp (max. 300 mA 12 V DC).
b Blue/white
Connect to auto-antenna relay control termi-
nal (max. 300 mA 12 V DC).
c Yellow/black
If you use an equipment with Mute function,
wire this lead to the Audio Mute lead on that
equipment. If not, keep the Audio Mute lead
free of any connections.
c
d Speaker leads
White: Front left +
White/black: Front left *
Gray: Front right +
1 To power cord input
Gray/black: Front right *
2 Depending on the kind of vehicle, the func-
Green: Rear left + or subwoofer +
tion of 3 and 5 may be different. In this
Green/black: Rear left * or subwoofer *
case, be sure to connect 4 to 5 and 6 to
Violet: Rear right + or subwoofer +
3.
Violet/black: Rear right * or subwoofer *
3 Yellow
e ISO connector
Back-up (or accessory)
In some vehicles, the ISO connector may be
4 Yellow
divided into two. In this case, be sure to con-
Connect to the constant 12 V supply termi-
nect to both connectors.
nal.
Notes
5 Red
Accessory (or back-up)
! Change the initial setting of this unit. Refer
6 Red
to REAR-SP (rear output setting) on page 9.
Connect to terminal controlled by ignition
Refer to PREOUT (preout setting) on page 9.
switch (12 V DC).
The subwoofer output of this unit is monau-
7 Connect leads of the same color to each
ral.
other.
! When using a subwoofer of 70 W (2 Ω), be
8 Black (chassis ground)
sure to connect the subwoofer to the violet
and violet/black leads of this unit. Do not
connect anything to the green and green/
black leads.
En
11
Section
03
Installation
Installation
Power amp (sold separately)
DIN front/rear mount
2 Firewall or metal support
! Releasing the front panel allows easier ac-
3 Metal strap
cess to the trim ring.
Perform these connections when using the op-
This unit can be properly installed using either
4 Screw
! When reattaching the trim ring, point the
tional amplifier.
front-mount or rear-mount installation.
5 Screw (M4 × 
side with the notched tab down.
Use commercially available parts when instal-
1
3
# Make sure that the unit is installed securely in
ling.
2
place. An unstable installation may cause skipping
2 Insert the supplied extraction keys into
or other malfunctions.
both sides of the unit until they click into
4
55
DIN Front-mount
place.
1 Insert the mounting sleeve into the dash-
DIN Rear-mount
3 Pull the unit out of the dashboard.
1 System remote control
board.
1 Determine the appropriate position
Connect to Blue/white cable.
For installation in shallow spaces, use the sup-
where the holes on the bracket and the side
2 Power amp (sold separately)
plied mounting sleeve. If there is enough space,
of the unit match.
3 Connect with RCA cables (sold separately)
use the mounting sleeve that came with the ve-
4 To Rear output or subwoofer output
hicle.
5 Rear speaker or subwoofer
2 Secure the mounting sleeve by using a
screwdriver to bend the metal tabs (90°) into
Installation
place.
Removing and re-attaching the front
Important
2 Tighten two screws on each side.
1
panel
! Check all connections and systems before
You can remove the front panel to protect your
final installation.
unit from theft.
! Do not use unauthorized parts as this may
1
3
Press the detach button and push the front
cause malfunctions.
panel upward and pull it toward you.
! Consult your dealer if installation requires
For details, refer to Removing the front panel to
2
drilling of holes or other modifications to the
2
protect your unit from theft and Re-attaching the
vehicle.
front panel on page 4.
! Do not install this unit where:
1 Dashboard
1 Tapping screw (5 mm × 8 mm)
— it may interfere with operation of the vehicle.
2 Mounting sleeve
2 Mounting bracket
— it may cause injury to a passenger as a result
3 Dashboard or console
of a sudden stop.
3 Install the unit as illustrated.
! The semiconductor laser will be damaged if
Removing the unit
it overheats. Install this unit away from hot
1
places such as near the heater outlet.
1 Remove the trim ring.
2
! Optimum performance is obtained when the
unit is installed at an angle of less than 60°.
3
4
60°
5
1 Trim ring
1 Nut
2 Notched tab
12
En
Appendix
Additional information
Additional information
Troubleshooting
Symptom Cause Action
Message Cause Action
Message Cause Action
English
The unit is
You are using a
Move electrical
NO AUDIO The inserted
Replace the disc.
SKIPPED The connected
Play an audio file
Symptom Cause Action
malfunction-
device, such as
devices that may
disc does not
USB storage de-
not embedded
The display il-
Demo mode is
Turn off the demo
ing.
a cellular
be causing the in-
contain any
vice contains
with Windows
lumination
on.
display setting.
There is inter-
phone, that
terference away
playable files.
files embedded
Media DRM 9/10.
turns on and
ference.
transmits elec-
from the unit.
SKIPPED The inserted
Replace the disc.
with Windows
off at random.
tric waves near
disc contains
Mediaä DRM 9/
the unit.
10.
The display
You did not per-
Perform operation
DRM protected
automatically
form any opera-
again.
files.
PROTECT All the files in
Transfer audio
returns to the
tion within
PROTECT All the files on
Replace the disc.
the USB storage
files not em-
Error messages
ordinary dis-
about 30 sec-
the inserted
device are em-
bedded with
play.
onds.
When you contact your dealer or your nearest
disc are em-
bedded with
Windows Media
Pioneer Service Center, be sure to note the error
DRM 9/10 to the
The repeat
Depending on
bedded with
Windows Media
Select the repeat
message.
USB storage de-
play range
the repeat play
play range again.
DRM.
DRM 9/10.
vice and connect.
changes un-
range, the se-
expectedly.
lected range
Built-in CD Player
N/A USB The USB device
! Connect a USB
USB storage device/iPod
may change
connected to is
Mass Storage
when another
Message Cause Action
not supported
Class compliant
Message Cause Action
folder or track is
by this unit.
device.
ERROR-07,
The disc is dirty. Clean the disc.
NO DEVICE When plug and
! Turn the plug
being selected
! Disconnect
11, 12, 17, 30
The disc is
Replace the disc.
play is off, no
and play on.
or during fast
your device and
scratched.
USB storage de-
! Connect a com-
forwarding/re-
replace it with a
versing.
ERROR-07,
There is an elec-
Turn the ignition
vice or iPod is
patible USB stor-
compatible USB
10, 11, 12,
trical or me-
switch OFF and
connected.
age device/iPod.
storage device.
A subfolder is
Subfolders can-
Select another re-
15, 17, 30,
chanical error.
back ON, or
FRMT READ Sometimes
Wait until the
not played
not be played
peat play range.
A0
switch to a differ-
there is a delay
message disap-
back.
when FLD (fold-
ent source, then
between the
pears and you
er repeat) is se-
back to the CD
start of playback
hear sound.
lected.
player.
and when you
NO XXXX ap-
There is no em-
Switch the display
ERROR-15 The inserted
Replace the disc.
start to hear any
pears when a
bedded text in-
or play another
disc is blank.
sound.
display is
formation.
track/file.
changed (NO
ERROR-23 Unsupported
Replace the disc.
NO AUDIO There are no
Transfer the audio
TITLE, for ex-
CD format.
songs.
files to the USB
storage device
ample).
FRMT READ Sometimes
Wait until the
and connect.
there is a delay
message disap-
between the
pears and you
The connected
Follow the USB
start of playback
hear sound.
USB storage de-
storage device in-
and when you
vice has secur-
structions to dis-
start to hear any
ity enabled.
able the security.
sound.
En
13
Appendix
Additional information
Additional information
Message Cause Action
Message Cause Action
Message Cause Action
To clean a CD, wipe the disc with a soft cloth out-
ward from the center.
CHECK USB The USB con-
Check that the
ERROR-19 Communication
Perform one of
NOT FOUND No related
Transfer songs to
nector or USB
USB connector or
failed.
the following op-
songs.
the iPod.
Condensation may temporarily impair the player’s
cable has short-
USB cable is not
erations.
performance. Let it rest for about one hour to ad-
circuited.
caught in some-
–Turn the ignition
just to a warmer temperature. Also, wipe any
thing or dam-
switch OFF and
damp discs off with a soft cloth.
Handling guidelines
aged.
back ON.
Playback of discs may not be possible because of
Discs and player
The connected
Disconnect the
–Disconnect the
disc characteristics, disc format, recorded applica-
USB storage de-
USB storage de-
USB storage de-
tion, playback environment, storage conditions,
vice consumes
vice and do not
vice.
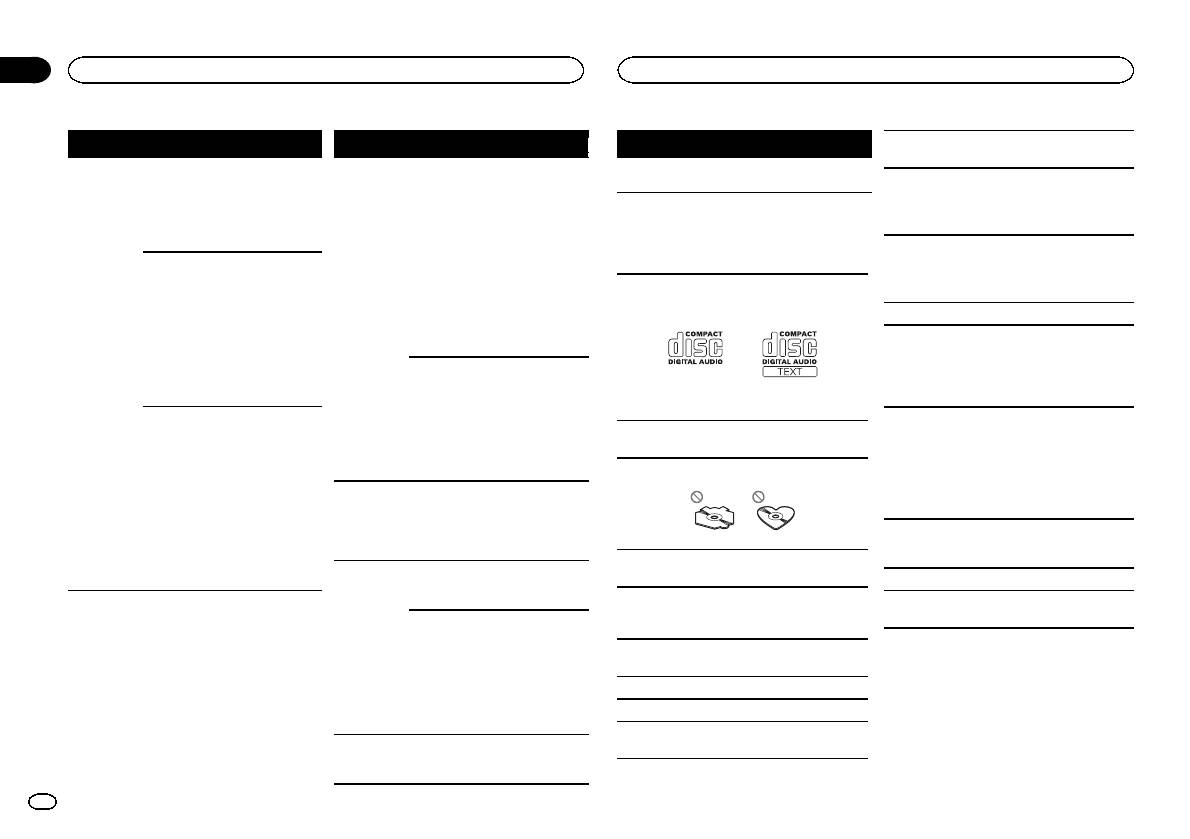
Use only discs that feature either of the following
and so on.
–Change to a dif-
two logos.
more than
use it. Turn the
ignition switch to
ferent source.
Road shocks may interrupt disc playback.
500 mA (maxi-
mum allowable
OFF, then to ACC
Then, return to
When using discs that can be printed on label sur-
current).
or ON and then
the USB source.
faces, check the instructions and the warnings of
connect only
iPod failure. Disconnect the
the discs. Depending on the discs, inserting and
compliant USB
cable from the
ejecting may not be possible. Using such discs
storage devices.
iPod. Once the
may result in damage to this equipment.
The iPod oper-
Make sure the
iPod’s main
Do not attach commercially available labels or
ates correctly
connection cable
menu is dis-
Use 12-cm discs. Do not use 8-cm discs or an
other materials to the discs.
but does not
for the iPod has
played, reconnect
adapter for 8-cm discs.
! The discs may warp making the disc unplay-
charge.
not shorted out
the iPod and reset
able.
it.
Use only conventional, fully circular discs. Do not
(e.g., not caught
! The labels may come off during playback and
use shaped discs.
in metal objects).
ERROR-23 USB storage de-
USB storage de-
prevent ejection of the discs, which may result
After checking,
vice was not for-
vice should be for-
in damage to the equipment.
turn the ignition
matted with
matted with
switch OFF and
FAT12, FAT16 or
FAT12, FAT16 or
back ON, or dis-
FAT32.
FAT32.
USB storage device
Do not insert anything other than a CD into the
connect the iPod
ERROR-16 The iPod firm-
Update the iPod
CD loading slot.
and reconnect.
Connections via USB hub are not supported.
ware version is
version.
old.
Do not use cracked, chipped, warped, or other-
Do not connect anything other than a USB stor-
wise damaged discs as they may damage the play-
iPod failure. Disconnect the
age device.
er.
cable from the
iPod. Once the
Unfinalized CD-R/RW discs cannot be played
iPod’s main
back.
menu is dis-
Do not touch the recorded surface of the discs.
played, reconnect
the iPod and reset
Store discs in their cases when not in use.
it.
Do not attach labels, write on or apply chemicals
STOP There are no
Select a list that
to the surface of the discs.
songs in the
contains songs.
current list.
14
En
Appendix
Additional information
Additional information
Firmly secure the USB storage device when driv-
DualDiscs
Compatible ID3 tag version: 1.0, 1.1, 2.2, 2.3, 2.4
Playable files: up to 999
English
ing. Do not let the USB storage device fall onto the
(ID3 tag Version 2.x is given priority over Version
DualDiscs are two-sided discs that have a record-
File system: ISO 9660 Level 1 and 2, Romeo, Joliet
floor, where it may become jammed under the
1.x.)
able CD for audio on one side and a recordable
brake or accelerator pedal.
Multi-session playback: Compatible
DVD for video on the other.
M3u playlist: Not compatible
Depending on the USB storage device, the follow-
Since the CD side of DualDiscs is not physically
Packet write data transfer: Not compatible
MP3i (MP3 interactive), mp3 PRO: Not compatible
ing problems may occur.
compatible with the general CD standard, it may
Regardless of the length of blank sections be-
! Operations may vary.
not be possible to play the CD side with this unit.
tween the songs from the original recording, com-
! The storage device may not be recognized.
Frequent loading and ejecting of a DualDisc may
WAV
pressed audio discs play with a short pause
! Files may not be played back properly.
result in scratches on the disc. Serious scratches
between songs.
! The device may generate noise in the radio.
can lead to playback problems on this unit. In
File extension: .wav
some cases, a DualDisc may become stuck in the
disc loading slot and will not eject. To prevent this,
Quantization bits: 8 and 16 (LPCM), 4 (MS
USB storage device
iPod
we recommend you refrain from using DualDisc
ADPCM)
with this unit.
Sampling frequency: 16 kHz to 48 kHz (LPCM),
Playable folder hierarchy: up to eight tiers (A prac-
Do not leave the iPod in places with high tempera-
Please refer to the information from the disc man-
22.05 kHz and 44.1 kHz (MS ADPCM)
tical hierarchy is less than two tiers).
tures.
ufacturer for more detailed information about
To ensure proper operation, connect the dock con-
DualDiscs.
Playable folders: up to 500
nector cable from the iPod directly to this unit.
Supplemental information
Playable files: up to 15 000
Firmly secure the iPod when driving. Do not let the
Compressed audio
Only the first 32 characters can be displayed as a
Playback of copyright-protected files: Not compati-
iPod fall onto the floor, where it may become
file name (including the file extension) or a folder
ble
jammed under the brake or accelerator pedal.
compatibility (disc, USB)
name.
Partitioned USB storage device: Only the first par-
About iPod settings
WMA
Russian text to be displayed on this unit should be
tition can be played.
! When an iPod is connected, this unit changes
encoded in one of the following character sets:
There may be a slight delay when starting play-
the EQ (equalizer) setting of the iPod to off in
File extension: .wma
! Unicode (UTF-8, UTF-16)
back of audio files on a USB storage device with
order to optimize the acoustics. When you dis-
Bit rate: 48 kbps to 320 kbps (CBR), 48 kbps to
! A character set other than Unicode that is
numerous folder hierarchies.
connect the iPod, the EQ returns to the original
384 kbps (VBR)
used in a Windows environment and is set to
setting.
Russian in the multi-language setting
! You cannot set Repeat to off on the iPod when
Sampling frequency: 32 kHz, 44.1 kHz, 48 kHz
using this unit. Repeat is automatically
This unit may not operate correctly depending on
CAUTION
Windows Media Audio Professional, Lossless,
changed to All when the iPod is connected to
the application used to encode WMA files.
! Pioneer cannot guarantee compatibility with
Voice/DRM Stream/Stream with video: Not com-
this unit.
all USB mass storage devices and assumes
patible
There may be a slight delay at the start of playback
no responsibility for any loss of data on
Incompatible text saved on the iPod will not be dis-
of audio files embedded with image data or audio
media players, smart phones, or other devi-
played by the unit.
files stored on a USB storage device that has nu-
ces while using this product.
MP3
merous folder hierarchies.
! Do not leave discs or a USB storage device
in any place that is subject to high tempera-
File extension: .mp3
Disc
tures.
Bit rate: 8 kbps to 320 kbps (CBR), VBR
Sampling frequency: 8 kHz to 48 kHz (32 kHz,
Playable folder hierarchy: up to eight tiers (A prac-
44.1 kHz, 48 kHz for emphasis)
tical hierarchy is less than two tiers).
Playable folders: up to 99
En
15
Appendix
Additional information
Additional information
iPod compatibility
3 Save the folder containing files on the USB
streaming via internet, intranets and/or other
About the file/format compatibility, refer to the
storage device.
networks or in other electronic content distribu-
iPod manuals.
This unit supports only the following iPod models.
However, depending on the system environment,
tion systems, such as pay-audio or audio-on-de-
Audiobook, Podcast: Compatible
Supported iPod software versions are shown
you may not be able to specify the playback se-
mand applications. An independent license for
below. Older versions may not be supported.
quence.
such use is required. For details, please visit
Made for
For USB portable audio players, the sequence is
http://www.mp3licensing.com.
CAUTION
! iPhone 4 (software version 4.1)
different and depends on the player.
Pioneer accepts no responsibility for data lost
! iPhone 3GS (software version 3.0.1)
WMA
on the iPod, even if that data is lost while this
! iPhone 3G (software version 2.0)
Windows Media is either a registered trademark
unit is used.
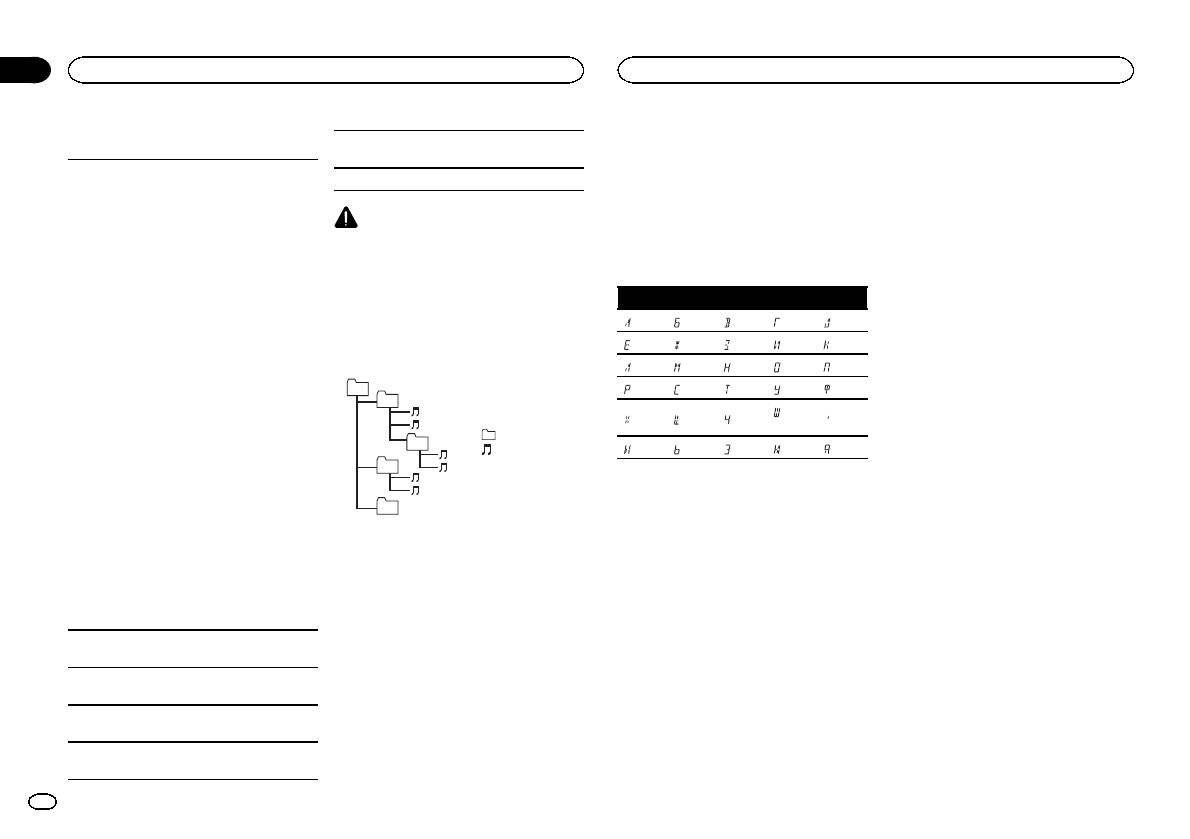
Russian character chart
! iPhone (software version 1.1.1)
or trademark of Microsoft Corporation in the
! iPod nano 6th generation (software version
United States and/or other countries.
D: C D: C D: C D: C D: C
1.0)
This product includes technology owned by
Sequence of audio files
! iPod nano 5th generation (software version
: А : Б : В : Г : Д
Microsoft Corporation and cannot be used or
1.0.1)
The user cannot assign folder numbers and
distributed without a license from Microsoft
! iPod nano 4th generation (software version
specify playback sequences with this unit.
: Е, Ё : Ж : З : И, Й : К
Licensing, Inc.
1.0)
Example of a hierarchy
: Л : М : Н : О : П
! iPod nano 3rd generation (software version
iPod & iPhone
01
: Р : С : Т : У : Ф
1.0)
iPhone, iPod, iPod classic, iPod nano, and iPod
02
! iPod nano 2nd generation (software version
: Ш,
touch are trademarks of Apple Inc., registered in
: Х : Ц : Ч
: Ъ
1.1.2)
Щ
the U.S. and other countries.
: Folder
! iPod nano 1st generation (software version
03
“Made for iPod” and “Made for iPhone” mean
: Compressed
: Ы : Ь : Э : Ю : Я
1.2.0)
that an electronic accessory has been designed
! iPod touch 4th generation (software version
04
audio file
to connect specifically to iPod or iPhone, respec-
01 to 05: Folder
D: Display C: Character
4.1)
tively, and has been certified by the developer to
number
! iPod touch 3rd generation (software version
meet Apple performance standards. Apple is
05
1 to 6: Playback
3.1.1)
not responsible for the operation of this device
Level 1 Level 2 Level 3 Level 4
sequence
Copyright and trademark
! iPod touch 2nd generation (software version
or its compliance with safety and regulator y
2.1.1)
standards. Please note that the use of this ac-
iTunes
! iPod touch 1st generation (software version
Disc
cessory with iPod or iPhone may affect wireless
Apple and iTunes are trademarks of Apple Inc.,
1.1)
Folder selection sequence or other operation
performance.
registered in the U.S. and other countries.
! iPod classic 160GB (software version 2.0.2)
may differ depending on the encoding or writing
! iPod classic 120GB (software version 2.0)
software.
MP3
! iPod classic (software version 1.0)
Supply of this product only conveys a license for
USB storage device
Depending on the generation or version of the
private, non-commercial use and does not con-
Playback sequence is the same as recorded se-
iPod, some functions may not be available.
vey a license nor imply any right to use this prod-
quence in the USB storage device.
uct in any commercial (i.e. revenue-generating)
Operations may vary depending on the software
To specify the playback sequence, the following
real time broadcasting (terrestrial, satellite,
version of iPod.
method is recommended.
cable and/or any other media), broadcasting/
1 Create a file name that includes numbers
When using an iPod, an iPod Dock Connector to
that specify the playback sequence (e.g.,
USB Cable is required.
001xxx.mp3 and 099yyy.mp3).
A Pioneer CD-IU51 interface cable is also avail-
2 Put those files into a folder.
able. For details, consult your dealer.
16
En

Appendix
Additional information
Specifications
CD player
System ………………………. Compact disc audio system
English
General
Usable discs ……………….. Compact disc
Power so urce ………………. 14.4 V DC (10.8 V to 15.1 V al-
Signal-to-noise ratio ……… 94dB (1kHz) (IEC-A network)
lowable)
Number of channels …….. 2 (stereo)
Grounding system ………… Negative type
MP3 decoding format …… MPEG-1 & 2 Audio Layer 3
Maximum current consumption
WMA decoding format ….. Ver. 7, 7.1, 8, 9, 10, 11, 12 (2ch
…………………………….. 10.0 A
audio)
Dimensions (W × H × D):
(Windows Media Player)
DIN
WAV signal format ……….. Linear PCM & MS ADPCM
Chassis ………….. 178mm × 50mm ×
(Non-compressed)
165 mm
Nose ……………… 188 mm × 58mm ×
USB
16 mm
D
USB standard specification
Chassis ………….. 178mm × 50mm ×
…………………………….. USB 2.0 full speed
165 mm
Maximum current supply
Nose ……………… 170 mm × 46mm ×
…………………………….. 500mA
16 mm
USB Class ………………….. MSC (Mass Storage Class)
Weight ……………………….. 1.1 kg
File system ………………….. FAT12, FAT16, FAT32
MP3 decoding format …… MPEG-1 & 2 Audio Layer 3
WMA decoding format ….. Ver. 7, 7.1, 8, 9, 10, 11, 12 (2ch
Audio
audio)
Maximum power output ... 50 W × 4
(Windows Media Player)
70 W × 1/2 W (for subwoofer)
WAV signal format ……….. Linear PCM & MS ADPCM
Continuous power output
(Non-compressed)
…………………………….. 22W × 4 (50 Hz to 15000Hz,
5 % THD, 4 W load, both chan-
FM tuner
nels driven)
Load impedance ………….. 4W (4 W to 8 W allowable)
Frequency range ………….. 87.5 MHz to 108.0 MHz
Preout maximum output level
Usable sensitivity …………. 9 dBf (0.8 µV/75 W, mono, S/N:
…………………………….. 2.0V
30 dB)
Tone controls:
Signal-to-noise ratio ……… 72dB (IEC-A network)
Bass
Frequency ………. 100Hz
MW tuner
Gain ……………… ±12dB
Frequency range ………….. 531 kHz to 1 602kHz
Mid
Usable sensitivity …………. 25µV (S/N: 20 dB)
Frequency ………. 1 kHz
Signal-to-noise ratio ……… 62dB (IEC-A network)
Gain ……………… ±12dB
Treble
Frequency ………. 10kHz
LW tuner
Gain ……………… ±12dB
Frequency range ………….. 153 kHz to 281 kHz
Subwoofer (mono):
Usable sensitivity …………. 28 µV (S/N: 20 dB)
Frequency …………….. 50Hz/63 Hz/80 Hz/100 Hz/
Signal-to-noise ratio ……… 62dB (IEC-A network)
125 Hz
Slope …………………… –18 dB/oct
Note
Gain ……………………. +6dB to –24 dB
Specifications and the design are subject to
Phase ………………….. Normal/Reverse
modifications without notice.
En
17
Section
01
Avant de commencer
Avant de commencer
Nous vous remercions d’avoir acheté cet ap-
Quelques mots sur cet appareil
! Évitez tout contact avec l’humidité.
En cas d’anomalie
pareil PIONEER
! Si la batterie est débranchée ou déchargée,
Pour garantir une utilisation correcte, lisez bien
Les fréquences du syntoniseur de cet appareil
le contenu de la mémoire sera effacé.
En cas d’anomalie, veuillez contacter votre re-
ce mode d’emploi avant d’utiliser cet appareil. Il
sont attribuées pour une utilisation en Europe
vendeur ou le centre d’entretien agréé par
Remarque
est particulièrement important que vous lisiez et
de l’Ouest, Asie, Moyen Orient, Afrique et Océ-
PIONEER le plus proche.
respectiez les indications ATTENTION et PRÉ-
anie. Son utilisation dans d’autres régions peut
Les opérations de réglage des fonctions sont va-
CAUTION de ce mode d’emploi. Conservez-le
se traduire par une réception de mauvaise qua-
lidées même si le menu est annulé avant la
dans un endroit sûr et facilement accessible pour
lité. La fonction RDS (radio data system) n’est
confirmation des opérations.
toute consultation ultérieure.
opérationnelle que dans les régions où des si-
gnaux RDS sont diffusés pour les stations FM.
Quelques mots sur ce mode
d’emploi
PRÉCAUTION
! Dans les instructions suivantes, les mémoi-
Ce produit est classifié comme produit laser
res USB et les lecteurs audio USB sont col-
de classe 1 selon la norme IEC 60825-1:2007
lectivement appelés “périphériques de
“Sécurité des appareils à laser” et contient un
stockage USB”.
Si vous souhaitez vous débarrasser de cet ap-
module laser de classe 1M. Pour assurer une
! Dans ce manuel, iPod et iPhone sont dési-
pareil, ne le mettez pas à la poubelle avec vos
sécurité permanente, n’enlevez aucun couver-
gnés par le terme “iPod”.
ordures ménagères. Il existe un système de
cle et n’essayez pas d’accéder à l’intérieur du
collecte séparé pour les appareils électroni-
produit. Faites effectuer l’entretien par du per-
ques usagés, qui doivent être récupérés, trai-
sonnel qualifié.
Mode de démonstration
tés et recyclés conformément à la législation.
Important
APPAREIL À LASER DE CLASSE 1
! La non-connexion du fil rouge (ACC) de cet
Dans les états membres de l’UE, en Suisse et en
appareil à une borne couplée avec les opéra-
Norvège, les foyers domestiques peuvent rap-
tions de mise en/hors service du contact d’al-
ATTENTION—ÉMISSIONS DE RADIATIONS LASER
porter leurs produits électroniques usagés gra-
INVISIBLES DE CLASSE 1M SI OUVERT. NE PAS OBSERVER
lumage peut conduire au déchargement de
DIRECTEMENT AVEC DES INSTRUMENTS OPTIQUES.
tuitement à des points de collecte spécifiés ou à
la batterie.
un revendeur (sous réserve d’achat d’un produit
! Rappelez-vous que si la démonstration des
similaire).
fonctions continue à fonctionner quand le
Dans les pays qui ne sont pas mentionnés ci-
moteur est coupé, cela peut décharger la
dessus, veuillez contacter les autorités locales
batterie.
PRÉCAUTION
pour vous informer de la méthode correcte de
! Ne laissez pas cet appareil entrer en contact
mise au rebut.
La démonstration démarre automatiquement si
avec des liquides. Cela pourrait provoquer
En agissant ainsi vous assurerez que le produit
vous n’utilisez pas cet appareil dans les 30 se-
une électrocution. Tout contact avec des li-
que vous mettez au rebut est soumis au proces-
condes environ depuis la dernière opération ou
quides pourrait aussi provoquer des domma-
sus de traitement, de récupération et de recy-
si le contact est réglé sur ACC ou ON alors que
ges, de la fumée et une surchauffe de
clage nécessaire et éviterez ainsi les effets
l’appareil est hors service. Pour annuler le mode
l’appareil.
négatifs potentiels sur l’environnement et la
de démonstration, vous devez afficher les régla-
! Le Pioneer CarStereo-Pass est utilisable seu-
santé publique.
ges initiaux. Sélectionnez DEMO (réglage de l’af-
lement en Allemagne.
fichage de démonstration) et désactivez
! Maintenez le niveau d’écoute à une valeur
l’affichage de démonstration. Pour les détails,
telle que vous puissiez entendre les sons pro-
reportez-vous à la page 26, Réglages initiaux.
venant de l’extérieur.
18
Fr
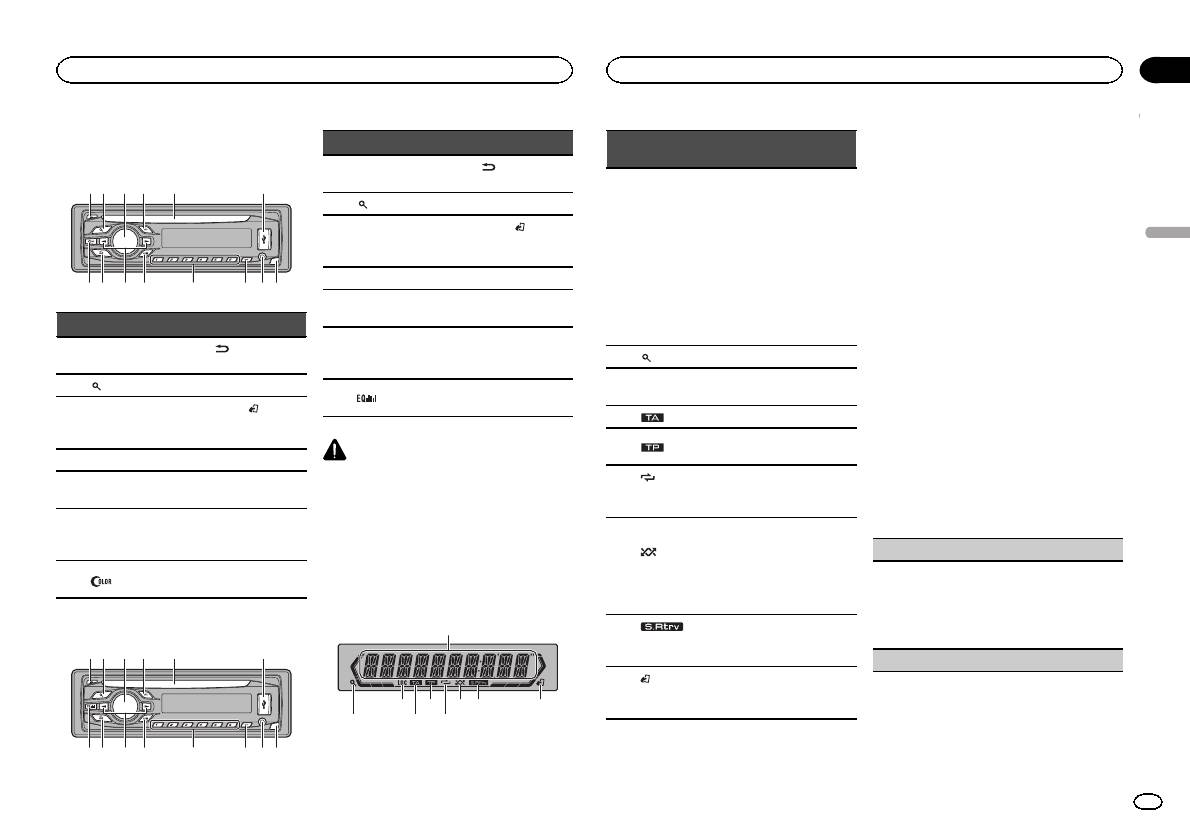
Appareil central
DEH-3400UB
b c dea87
12 3 4 5 6
9
Partie Partie
(retour/affi-
1 h (éjection) 8
chage)
2
(liste) 9 c/d
BAND/
MULTI-CONTROL
3
a
(contrôle de
(M.C.)
l’iPod)
4 SRC/OFF b 1 à 6
Fente de charge-
5
c PTY
ment des disques
Jack d’entrée
6 Port USB d
AUX (jack stéréo
3,5 mm)
Touche de retrait
7
(couleur) e
de la face avant
DEH-2400UB
b c dea87
12 3 4 5 6
9
Partie Partie
(retour/affi-
1 h (éjection) 8
chage)
2
(liste) 9 c/d
BAND/
MULTI-CONTROL
3
a
(contrôle de
(M.C.)
l’iPod)
4 SRC/OFF b 1 à 6
Fente de charge-
5
c PTY
ment des disques
Jack d’entrée
6 Port USB d
AUX (jack stéréo
3,5 mm)
Touche de retrait
7
e
de la face avant
PRÉCAUTION
! Utilisez un câble USB Pioneer optionnel (CD-
U50E) pour connecter le lecteur audio USB/
la mémoire USB, étant donné que n’importe
quel périphérique relié directement à l’appa-
reil dépassera de l’appareil et peut s’avérer
dangereux.
! N’utilisez pas de produits non autorisés.
Indications affichées
1
87 93 5
2 4 6
Section
Utilisation de l’appareil
Utilisation de l’appareil
02
Indica-
Menu de configuration
État
teur
Lorsque vous mettez le contact d’allumage sur
ON après l’installation, le menu de configura-
! Syntoniseur : gamme et fré-
tion s’affiche sur l’écran.
quence
Vous pouvez configurer les options de menu ci-
! RDS : nom du ser vice de
dessous.
Section
programme, informations
Français
d’afficha-
PTY et autres informations
1 Après avoir installé l’appareil, mettez le
1
ge princi-
textuelles
contact d’allumage sur ON.
pal
! Lecteur de CD intégré, péri-
SET UP s’affiche.
phérique de stockage USB
et iPod: temps de lecture
2 Tournez M.C. pour passer à YES. Appuyez
écoulé et informations tex-
sur M.C. pour sélectionner.
tuelles
# Si vous n’effectuez aucune opération dans les
2
(liste) La fonction liste est utilisée.
30 secondes environ, le menu de configuration ne
s’affichera pas.
L’accord automatique sur une
3 LOC
# Si vous préférez ne pas effectuer la configuration
station locale est en service.
pour l’instant, tournez M.C. pour passer à NO. Ap-
4
(TA) La fonction TA est en service.
puyez pour sélectionner.
Si vous sélectionnez NO, vous ne pouvez pas effec-
L’appareil est accordé sur une
5
(TP)
tuer de réglage dans le menu de configuration.
station TP.
(répéti-
La fonction de répétition d’une
3 Effectuez les procédures suivantes pour
6
tion de la
plage ou d’un dossier est acti-
configurer le menu.
lecture)
vée.
Pour passer à la prochaine option de menu,
vous devez confirmer votre sélection.
La lecture aléatoire est activée.
La source iPod est sélection-
(lec-
CLOCK SET (réglage de l’horloge)
née et la fonction de lecture
7
ture aléa-
aléatoire ou lecture aléatoire
toire)
1 Tournez M.C. pour régler l’heure.
de toutes les plages est acti-
2 Appuyez sur M.C. pour sélectionner les minu-
vée.
tes.
3 Tournez M.C. pour régler les minutes.
La fonction Sound Retriever est
8
(sound re-
4 Appuyez sur M.C. pour confirmer la sélection.
activée.
triever)
FM STEP (incrément d’accord FM)
La fonction iPod de cet appa-
9
(contrôle
reil est utilisée à partir de votre
de l’iPod)
iPod.
Fr
19

Section
02
Utilisation de l’appareil
Utilisation de l’appareil
Remarques
Normalement, l’incrément d’accord FM employé
Retrait de la face avant pour protéger l’appareil
Choix d’une source
! Vous pouvez configurer les options de menu
par l’accord automatique est 50 kHz. Quand la
contre le vol
1 Appuyez sur SRC/OFF pour parcourir les op-
dans les réglages initiaux. Pour des détails
fonction AF ou TA est en service, l’incrément d’ac-
1 Appuyez sur la touche de retrait pour libérer la
tions disponibles :
sur les réglages, reportez-vous à la page 26,
cord passe automatiquement à 100 kHz. Il peut
face avant.
TUNER (syntoniseur)—CD (lecteur de CD inté-
Réglages initiaux .
être préférable de régler l’incrément d’accord à
2 Poussez la face avant vers le haut (M), puis
gré)—USB (USB)/iPod (iPod)—AUX (AUX)
! Vous pouvez annuler le menu de configura-
50 kHz quand la fonction AF est en service.
tirez-la vers vous (N).
tion en appuyant sur SRC/OFF.
Réglage du volume
! Pendant l’accord manuel, l’incrément d’ac-
1 Tournez M.C. pour régler le volume.
cord est maintenu à 50 kHz.
1 Tournez M.C. pour choisir l’incrément d’accord
Opérations de base
FM.
50 (50 kHz)—100 (100 kHz)
Important
PRÉCAUTION
2 Appuyez sur M.C. pour confirmer la sélection.
! Lorsque vous enlevez ou remontez la face
Pour des raisons de sécurité, garez votre véhi-
avant, manipulez-la doucement.
cule pour retirer la face avant.
DEMO (réglage de l’affichage de démonstration)
3 Conservez toujours la face avant dans un boî-
! Évitez de heurter la face avant.
tier de protection lorsqu’elle est détachée.
Remarque
! Conservez la face avant à l’abri des tempéra-
1 Appuyez sur M.C. pour activer ou désactiver
Remontage de la face avant
Si le fil bleu/blanc de l’appareil est relié à la
tures élevées et de la lumière directe du so-
l’affichage de démonstration.
leil.
1 Faites glisser la face avant vers la gauche.
prise de commande du relais de l’antenne moto-
2 Appuyez sur M.C. pour confirmer la sélection.
risée du véhicule, celle-ci se déploie lorsque la
! Pour éviter d’endommager le périphérique
Assurez-vous d’insérer les encoches sur le
source est mise en service. Pour rétracter l’an-
TITLE (multilingue)
ou l’intérieur du véhicule, retirez tous les câ-
côté gauche de l’appareil central dans les fen-
tes du panneau de commande.
tenne, mettez la source hors service.
bles et périphériques connectés à la face
Cet appareil peut afficher les informations textuel-
avant, avant d’enlever cette dernière.
les d’un fichier audio compressé même si elles
sont incorporées dans une langue d’Europe de
Opérations communes des
l’Ouest ou russe.
menus pour le(s) menu de
! Si la langue incorporée et la langue sélection-
configuration/réglages des
née sont différentes, les informations textuel-
les peuvent ne pas s’afficher correctement.
fonctions/réglages audio/
! Certains caractères peuvent ne pas s’afficher
2 Appuyez sur le côté droit de la face avant jus-
réglages initiaux/listes
correctement.
qu’àcequ’elle soit bien en place.
1 Tournez M.C. pour choisir le réglage désiré.
Si vous ne pouvez pas monter la face avant
Retour à l’affichage précédent
EUR (Langue européenne)—RUS (Russe)
sur l’appareil central, vérifiez que la face avant
Retour à la liste précédente (le dossier de niveau
2 Appuyez sur M.C. pour confirmer la sélection.
est correctement placée sur l’appareil central.
immédiatement supérieur)
QUIT s’affiche.
Forcer la face avant en position risque de l’en-
1 Appuyez sur
.
dommager ou d’endommager l’appareil cen-
tral.
Retour à l’affichage ordinaire
4 Pour terminer la configuration, tournez
Annulation du menu des réglages initiaux/menu
M.C. pour sélectionner YES. Appuyez pour
Mise en service de l’appareil
de configuration
sélectionner.
1 Appuyez sur SRC/OFF pour mettre en service
1 Appuyez sur BAND/
.
# Si vous souhaitez modifier à nouveau vos régla-
l’appareil.
ges, tournez M.C. pour passer à NO. Appuyez pour
Retour à l’affichage ordinaire à partir de la liste
Mise hors service de l’appareil
sélectionner.
1 Appuyez sur BAND/
.
1 Maintenez la pression sur SRC/OFF jusqu’àce
que l’appareil soit mis hors tension.
20
Fr
Аннотации для Автомагнитолы Pioneer DEH-2400UB в формате PDF
Топ 10 инструкций
Другие инструкции

FAD/BAL (
регулировка уровня сигнала/балан-
са)
1 Для вызова меню настройки нажмите M.C.
2 Нажимайте M.C. для переключения между
настройками уровня сигнала (передние/за-
дние) и баланса (правые/левые).
3 Для регулировки баланса громкоговорите-
лей вращайте M.C.
! Если настройка выхода заднего канала и
выхода RCA находится в режиме SW, то ре-
гулировать баланс передних и задних гром-
коговорителей невозможно. См. раздел
REAR-SP (
настройка выхода заднего кана-
ла) на стр. 121. См. раздел PREOUT (на-
стройка предварительного усилителя) на
стр. 121.
PRESET EQ (
вызов настроек эквалайзера)
1 Для вызова меню настройки нажмите M.C.
2 Нажмите кнопку M.C., чтобы выбрать эква-
лайзер.
DYNAMIC
—VOCAL—NATURAL—CUSTOM
—FLAT—POWERFUL
3 Нажмите M.C., чтобы подтвердить выбор.
! Для переключения режимов эквалайзера
можно нажимать кнопку
(
модель DEH-
2400UB).
TONE CTRL (
регулировка эквалайзера)
! Отрегулированные настройки кривой эква-
лайзера сохраняются в CUSTOM.
1 Для вызова меню настройки нажмите M.C.
2 Нажмите M.C. для выбора BASS (низкие ча-
стоты)/MID (средние частоты)/TREBLE (вы-
сокие частоты).
3 Вращайте M.C., чтобы отрегулировать уро-
вень.
Диапазон настройки: от +6 до –6
LOUD (
тонкомпенсация)
Тонкомпенсация компенсирует недостаточное
звуковое давление в нижнем и верхнем диапа-
зонах частот на низкой громкости.
1 Нажмите M.C. для выбора нужной настрой-
ки.
OFF (
выкл)—LOW (низкий)—HI (высокий)
SUB.W (
включение/выключение сабвуфера)
Это устройство имеет выход канала сабвуфе-
ра, который можно включать и выключать.
1 Нажмите M.C. для выбора нужной настрой-
ки.
NOR (
нормальная фаза)—REV (обратная
фаза)—OFF (сабвуфер выключен)
SUB.W CTRL (
настройка сабвуфер)
Если включён выход канала сабвуфера,
можно настроить частоту среза и уровень
громкости звучания сабвуфера.
На выходе сабвуфера будут воспроизводиться
только те частоты, которые ниже указанных ча-
стот среза.
! Если для параметра SUB.W выбрано зна-
чение OFF, эту функцию выбрать нельзя.
Более подробную информацию см. в раз-
деле SUB.W (
включение/выключение саб-
вуфера) на стр. 120.
1 Для вызова меню настройки нажмите M.C.
2 Нажимайте M.C. для переключения между
частотой среза и уровнем громкости сабву-
фера.
Частота среза (мигает значок частоты
среза)—Уровень громкости (мигает значок
уровня громкости)
3 Для выбора настройки вращайте M.C.
Частота среза: 50HZ—63HZ—80HZ—100HZ
—125HZ
Уровень громкости: от –24 до +6
SLA (
регулировка уровня входного сигнала)
SLA (
функция настройки уровня входного сиг-
нала) позволяет регулировать уровень громко-
сти каждого источника сигнала, чтобы
предотвратить резкие изменения громкости
при переключении источников сигнала.
! Настройки основываются на уровне гром-
кости FM-тюнера, который остается неиз-
менным.
! Регулировку уровня громкости в диапазоне
MW/LW
также можно производить с по-
мощью данной функции.
! При выборе FM-тюнера в качестве источ-
ника сигнала функция SLA недоступна.
1 Для вызова меню настройки нажмите M.C.
2 Вращая M.C., отрегулируйте уровень гром-
кости источника сигнала.
Диапазон настройки: от +4 до –4
3 Нажмите M.C., чтобы подтвердить выбор.
Начальные настройки
Важно
PW SAVE (
режим энергосбережения) выклю-
чается при отключении аккумуляторной ба-
тареи автомобиля; при подключении
батареи его нужно будет включить заново.
При выключенном режиме PW SAVE (режим
энергосбережения) в зависимости от метода
подключения устройство может потреблять
энергию аккумулятора, если зажигание авто-
мобиля не имеет положения АСС.
1
Нажмите и удерживайте кнопку SRC/
OFF, пока устройство не выключится.
2
Нажмите и удерживайте кнопку SRC/
OFF, пока на дисплее не появится назва-
ние функции.
3
Поворачивайте M.C. для выбора на-
чальной настройки.
Затем выполните следующие действия,
чтобы подтвердить выбор начальной на-
стройки.
CLOCK SET (
установка часов)
1 Для вызова меню настройки нажмите M.C.
2 Нажимайте M.C., чтобы выбрать сегмент
дисплея часов, который нужно установить.
Часы—Минуты
3 Вращайте M.C., чтобы отрегулировать
время.
CLOCK (
дисплей часов)
Дисплей часов можно включить или выклю-
чить.
Дисплей часов временно исчезает при выпол-
нении других операций и появляется вновь
через 25 секунд.
1 Нажмите M.C., чтобы включить или выклю-
чить дисплей часов.
FM STEP (
шаг настройки в FM-диапазоне)
Обычно шаг настройки в FM-диапазоне, ис-
пользуемый при настройке с поиском, соста-
вляет 50 кГц. При включении функции AF или
TA
шаг настройки автоматически меняется на
100
кГц. При включенной функции AF предпо-
чтительно установить шаг настройки 50 кГц.
! Во время ручной настройки шаг настройки
составляет 50 кГц.
1 Нажмите M.C., чтобы выбрать шаг настрой-
ки в FM-диапазоне.
50 (50
кГц)—100 (100 кГц)
AUTO-PI (
автоматический поиск по идентифи-
катору программы)
Управление устройством
120
Раздел
Управление устройством
Ru
02

CD RDS RECEIVER
AUTORADIO CD RDS
SINTOLETTORE CD RDS
REPRODUCTOR DE CD CON RECEPTOR RDS
CD RDS-EMPFÄNGER
CD RDS-ONTVANGER
CD RDS ПРИЕМНИК
DEH-3400UB
DEH-2400UB
English NederlandsDeutschEspañolItalianoFrançais Русский
Owner’s Manual
Mode d’emploi
Manuale d’istruzioni
Manual de instrucciones
Bedienungsanleitung
Handleiding
Руководство пользователя

Section
Before you start
01
Before you start
Thank you for purchasing this PIONEER
product
To ensureproperuse,please read through this
manual before using this product. It is especially
important that you read and obser ve WARN-
INGs and CAUTIONs in this manual. Please
keep the manual in a safe and accessible place for
future reference.
If you want to dispose this product, do not
mix it with general household waste. There is
a separate collection system for used electronic products in accordance with legislation
that requires proper treatment, recovery and
recycling.
Private households in the member states of the
EU, in Switzerland and Norway may return their
used electronic products free of charge to designated collection facilities or to a retailer (if you
purchase a similar new one).
For countries not mentioned above, please contact your local authorities for the correct method
of disposal.
By doing so you will ensure that your disposed
product undergoes the necessary treatment, recovery and recycling and thus prevent potential
negative effects on the environment and human
health.
About this unit
The tuner frequencies on this unit are allocated
for use in Western Europe, Asia, the Middle
East, Africa and Oceania. Use in other areas
may result in poor reception. The RDS (radio
data system) function only operates in areas
with broadcasting RDS signals for FM stations.
CAUTION
This product is a class 1 laser product classified under the Safety of laser products, IEC
60825-1:2007, and contains a class 1M laser
module. To ensure continued safety, do not remove any covers or attempt to gain access to
the inside of the product. Refer all servicing to
qualified personnel.
CAUTION—CLASS 1M INVISIBLE LASER
RADIATION WHEN OPEN, DO NOT VIEW
DIRECTLY WITH OPTICAL INSTRUMENTS.
CAUTION
! Do not allow this unit to come into contact
with liquids. Electrical shock could result.
Also, damage to this unit, smoke, and overheating could result from contact with
liquids.
! The Pioneer CarStereo-Pass is for use only in
Germany.
! Always keep the volume low enough to hear
outside sounds.
! Avoid exposure to moisture.
! If the battery is disconnected or discharged,
any preset memory will be erased.
Note
Function setting operations are completed even
if the menu is cancelled before the operations
are confirmed.
About this manual
! In the following instructions, USB memories
and USB audio players are collectively referred to as “USB storage device”.
! In this manual, iPod and iPhone will be re-
ferred to as “iPod”.
Demo mode
Important
! Failure to connect the red lead (ACC) of this
unit to a terminal coupled with ignition
switch on/off operations may lead to battery
drain.
! Remember that if the feature demo contin-
ues operating when the car engine is turned
off, it may drain battery power.
The demo starts automatically if you do not operate this unit within about 30 seconds since the
unit was last operated or if the ignition switch is
set to ACC or ON while the unit is turned off. To
cancel the demo mode, you need to display the
initial settings. Select DEMO (demo display set-
ting) and turn off the demo display. For details,
refer to Initial settings on page 9.
In case of trouble
Should this unit fail to operate properly, please
contact your dealer or nearest authorized
PIONEER Service Station.
2
En
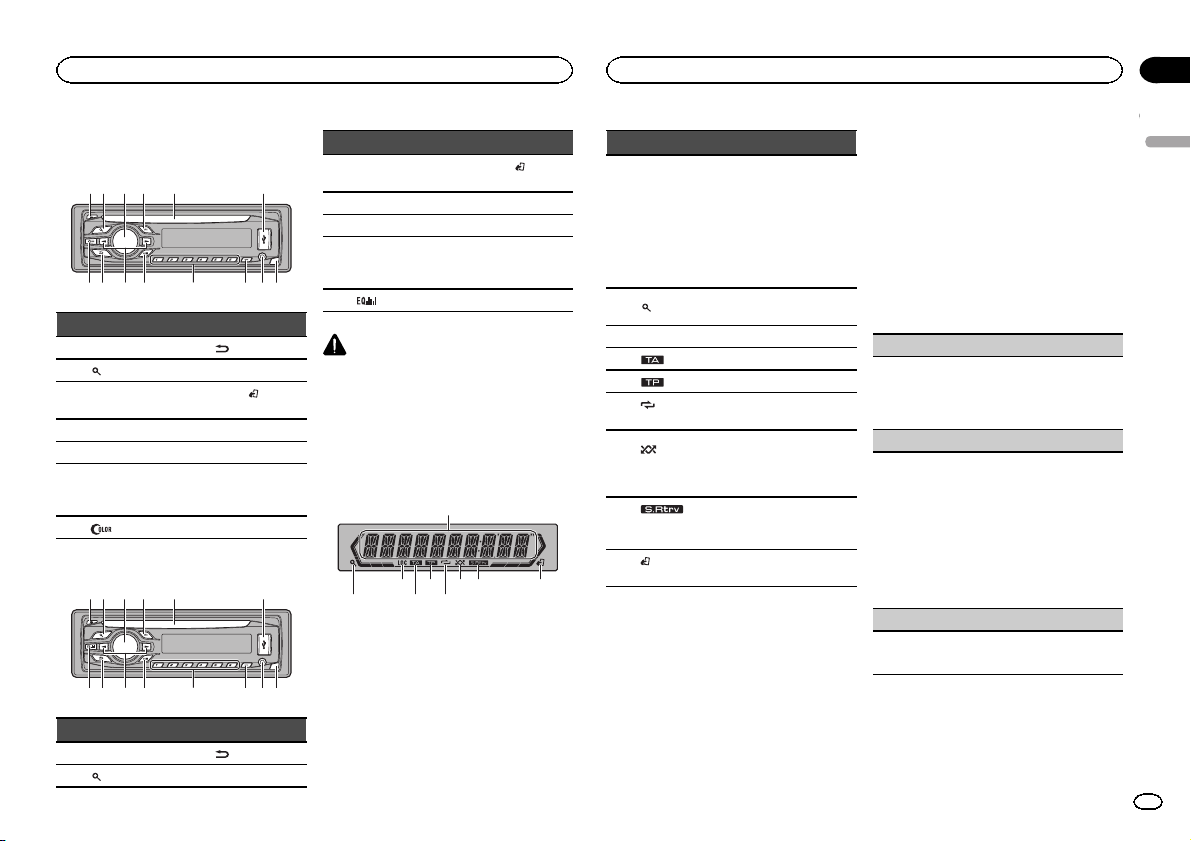
Operating this unit
Operating this unit
Section
02
Head unit
DEH-3400UB
12 3 4 5 6
Part Part
1 h (eject) 8
2
(list) 9 c/d
MULTI-CONTROL
3
(M.C.)
4 SRC/OFF b 1 to 6
5 Disc loading slot c PTY
6 USB port d
(color) e Detach button
7
DEH-2400UB
12 3 4 5 6
Part Part
1 h (eject) 8
2
(list) 9 c/d
a
(back/display)
(iPod
BAND/
control)
AUX input jack
(3.5 mm stereo
jack)
(back/display)
Part Part
MULTI-CONTROL
3
(M.C.)
4 SRC/OFF b 1 to 6
5 Disc loading slot c PTY
6 USB port d
7
CAUTION
! Use an optional Pioneer USB cable (CD-
U50E) to connect the USB audio player/USB
memory as any device connected directly to
the unit will protrude out from the unit and
may be dangerous.
! Do not use unauthorized products.
BAND/
a
e Detach button
(iPod
control)
AUX input jack
(3.5 mm stereo
jack)
Display indication
1
87 93 5
Indicator State
! Tuner: band and frequency
! RDS: program service
Main dis-
1
play section
(list)
2
3 LOC Local seek tuning is on.
4
5
(re-
6
peat)
(ran-
dom/shuf-
7
fle)
(sound re-
8
triever)
(iPod
9
control)
name, PTY information and
other literal information
! Built-in CD, USB storage
device and iPod: elapsed
playback time and text information
The list function is being operated.
(TA) TA function is on.
(TP) A TP station is tuned in.
Track or folder repeat is on.
Random play is on.
The iPod source is selected
and the shuffle or shuffle all
function is on.
The sound retriever function is
on.
This unit’s iPod function is operated from your iPod.
Set up menu
When you turn the ignition switch to ON after installation, set up menu appears on the display.
You can set up the menu options below.
1 After installation of this unit, turn the
ignition switch to ON.
SET UP appears.
2 Turn M.C. to switch to YES. Press M.C. to
select.
# If you do not operate for 30 seconds, the set up
menu will not be displayed.
# If you prefer not to set up at this time, turn M.C.
to switch to NO. Press to select.
If you select NO, you cannot set up in the set up
menu.
3 Perform the following procedures to set
the menu.
To proceed to the next menu option, you need to
confirm your selection.
CLOCK SET (setting the clock)
1 Turn M.C. to adjust hour.
2 Press M.C. to select minute.
3 Turn M.C. to adjust minute.
4 Press M.C. to confirm the selection.
FM STEP (FM tuning step)
Normally, the FM tuning step employed by seek
tuning is 50 kHz. When AF or TA is on, the tuning
step automatically changes to 100 kHz. It may be
preferable to set the tuning step to 50 kHz when
AF is on.
! The tuning step remains at 50 kHz during man-
ual tuning.
1 Turn M.C. to select the FM tuning step.
50 (50 kHz)—100 (100 kHz)
2 Press M.C. to confirm the selection.
DEMO (demo display setting)
1 Turn M.C. to set the demo display to on or off.
2 Press M.C. to confirm the selection.
English
3
En
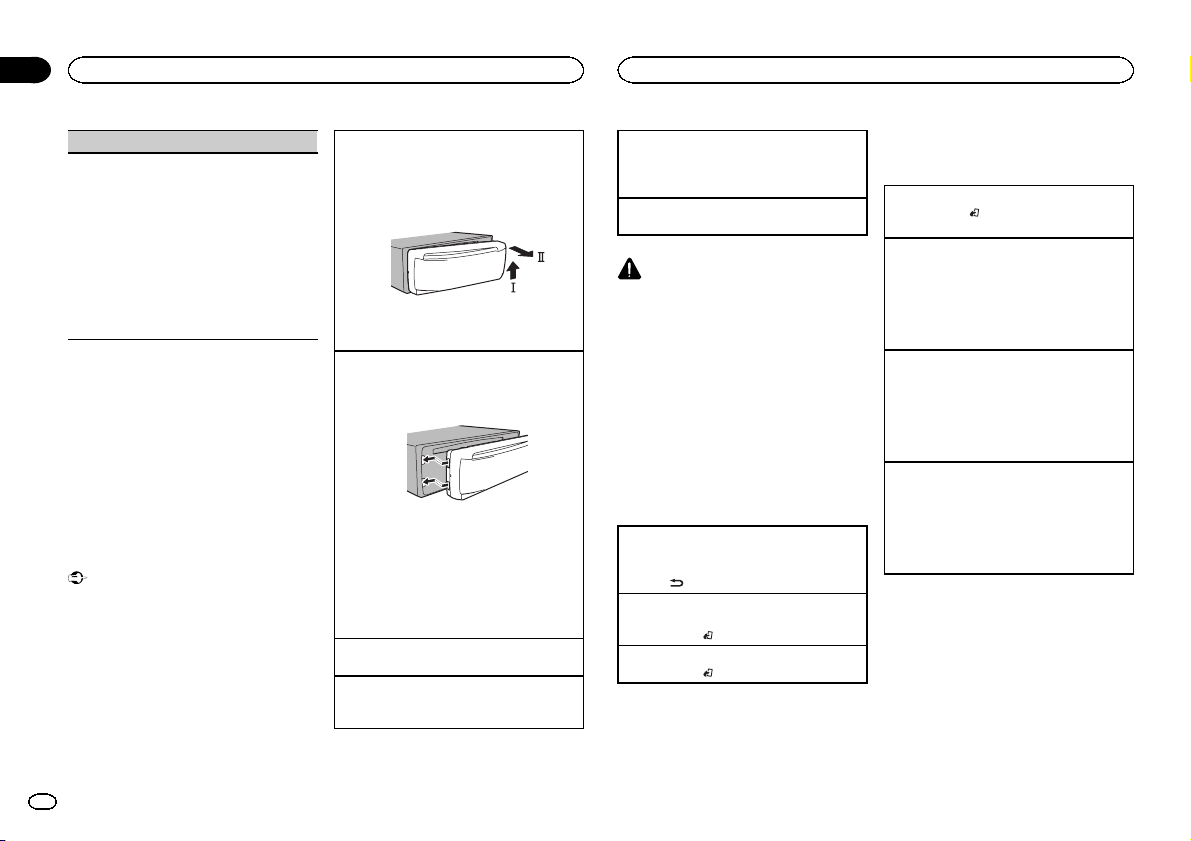
Section
Operating this unit
02
Operating this unit
TITLE (multi-language)
This unit can display the text information of a compressed audio file even if they are embedded in a
Western European or Russian language.
! If the embedded language and the selected
language setting are not the same, text information may not display properly.
! Some characters may not be displayed prop-
erly.
1 Turn M.C. to select the desired setting.
EUR (European)—RUS (Russian)
2 Press M.C. to confirm the selection.
QUIT appears.
4 To finish your settings, turn M.C. to select
YES. Press to select.
# If you prefer to change your setting again, turn
M.C. to switch to NO. Press to select.
Notes
! You can set up the menu options in the initial
settings. For details about the settings, refer
to Initial settings on page 9.
! You can cancel set up menu by pressing
SRC/OFF.
Basic operations
Important
! Handle gently when removing or attaching
the front panel.
! Avoid subjecting the front panel to excessive
shock.
! Keep the front panel out of direct sunlight
and high temperatures.
! To avoid damaging the device or vehicle inte-
rior, remove any cables and devices attached
to the front panel before detaching it.
Removing the front panel to protect your unit from
theft
1 Press the detach button to release the front
panel.
2 Push the front panel upward (M) and then pull
it toward (N) you.
3 Always keep the detached front panel in a pro-
tection device such as a protection case.
Re-attaching the front panel
1 Slide the front panel to the left.
Make sure to insert the tabs on the left side of
the head unit into the slots on the front panel.
2 Press the right side of the front panel until it is
firmly seated.
If you cannot attach the front panel to the
head unit successfully, make sure that you are
placing the front panel onto the head unit correctly. Forcing the front panel into place may
result in damage to the front panel or head
unit.
Turning the unit on
1 Press SRC/OFF to turn the unit on.
Turning the unit off
1 Press and hold SRC/OFF until the unit turns
off.
Selecting a source
1 Press SRC/OFF to cycle between:
TUNER (tuner)—CD (built-in CD player)—USB
(USB)/iPod (iPod)—AUX (AUX)
Adjusting the volume
1 Turn M.C. to adjust the volume.
CAUTION
For safety reasons, park your vehicle when removing the front panel.
Note
When this unit’s blue/white lead is connected to
the vehicle’s auto-antenna relay control terminal, the vehicle’s antenna extends when this
unit’s source is turned on. To retract the antenna, turn the source off.
Menu operations identical
for set up menu/function
settings/audio adjustments/
initial settings/lists
Returning to the previous display
Returning to the previous list (the folder one level
higher)
.
1 Press
Returning to the ordinary display
Canceling the initial setting menu/set up menu
1 Press BAND/
Returning to the ordinary display from the list
1 Press BAND/
.
.
Tuner
Basic operations
Selecting a band
1 Press BAND/
F3 for FM or MW/LW) is displayed.
Recalling preset stations
1 Press c or d.
! If MAN (manual tuning) is selected in SEEK,
you cannot recall preset stations. You need to
select PCH (preset channel) in SEEK. For details about the settings, refer to SEEK (left/right
key setting) on page 6.
Manual tuning (step by step)
1 Press c or d.
! If PCH (preset channel) is selected in SEEK,
you cannot tune up or down manually. You
need to select MAN (manual tuning) in SEEK.
For details about the settings, refer to SEEK
(left/right key setting) on page 6.
Seeking
1 Press and hold c or d, and then release.
You can cancel seek tuning by briefly pressing
c or d.
While pressing and holding c or d, you can
skip stations. Seek tuning starts as soon as
you release c or d.
Note
This unit’s AF (alternative frequencies search)
function can be turned on and off. AF should be
off for normal tuning operation (refer to AF (al-
ternative fre quencies search) on the next page).
until the desired band (F1, F2,
4
En

Operating this unit
Operating this unit
Section
02
Storing and recalling stations
for each band
Using preset tuning buttons
1 When you find a station that you want
to store in memory, press one of the preset
tuning buttons (1 to 6) and hold until the
preset number stops flashing.
2 Press one of the preset tuning buttons (1
to 6) to select the desired station.
Switching the RDS display
% Press .
Program service name—PTY information—Entertainment—Frequency
# PTY information and the frequency appear on the
display for eight seconds.
# Depending on the band, text information can be
changed.
Using PTY functions
You can tune in to a station using PTY (program
type) information.
Searching for an RDS station by PTY information
You can search for general types of broadcasting
programs, such as those listed in the following
section. Refer to this page.
1 Press PTY.
2 Turn M.C. to select a program type.
NEWS/INFO—POPULAR—CLASSICS—
OTHERS
3 Press M.C. to begin the search.
The unit searches for a station broadcasting
that type of program. When a station is found,
its program service name is displayed.
PTY (program type ID code) information is
listed in the following section. Refer to this
page.
! To cancel the search, press M.C. again.
! The program of some stations may differ
from that indicated by the transmitted PTY.
! If no station is broadcasting the type of
program you searched for, NOT FOUND is
displayed for about two seconds and then
the tuner returns to the original station.
PTY list
NEWS/INFO
NEWS (News), AFFAIRS (Current affairs), INFO
(Information), SPORT (Sports), WEATHER (Weather), FINANCE (Finance)
POPULAR
POP MUS (Popular music), ROCK MUS (Rock
music), EASY MUS (Easy listening), OTH MUS
(Other music), JAZZ (Jazz), COUNTRY (Country
music), NAT MUS (National music), OLDIES
(Oldies music), FOLK MUS (Folk music)
CLASSICS
L. CLASS (Light classical), CLASSIC (Classical)
OTHERS
EDUCATE (Education), DRAMA (Drama), CULTURE (Culture), SCIENCE (Science), VARIED (Var-
ied), CHILDREN (Children’s), SOCIAL (Social
affairs), RELIGION (Religion), PHONE IN (Phone
in), TOURING (Travel), LEISURE (Leisure), DOCU-
MENT (Documentaries)
Function settings
1 Press M.C. to display the main menu.
2 Turn M.C. to change the menu option
and press to select FUNCTION.
3 Turn M.C. to select the function.
After selecting, perform the following procedures to set the function.
# If MW/LW band is selected, only BSM, LOCAL
and SEEK are available.
BSM (best stations memory)
BSM (best stations memory) automatically stores
the six strongest stations in the order of their signal strength.
1 Press M.C. to turn BSM on.
To cancel, press M.C. again.
REGION (regional)
When AF is used, the regional function limits the
selection of stations to those broadcasting regional programs.
1 Press M.C. to turn the regional function on or
off.
LOCAL (local seek tuning)
Local seek tuning lets you tune in to only those
radio stations with sufficiently strong signals for
good reception.
1 Press M.C. to select the desired setting.
FM: OFF—LV 1 —LV2 —LV3 —LV4
MW/LW: OFF—LV 1—LV 2
The highest level setting allows reception of
only the strongest stations, while lower levels
allow the reception of weaker stations.
PTY SEARCH (program type selection)
You can tune in to a station using PTY (program
type) information.
1 Press M.C. to display the setting mode.
2 Turn M.C. to select the desired setting.
NEWS/INFO—POPULAR—CLASSICS—
OTHERS
3 Press M.C. to begin the search.
The unit searches for a station broadcasting
that type of program. When a station is found,
its program service name is displayed.
For PTY (program type ID code) information,
refer to this page.
The program of some stations may differ from
that indicated by the transmitted PTY.
If no station is broadcasting the type of program you searched for, NOT FOUND is displayed for about two seconds and then the
tuner returns to the original station.
TA (traffic announcement standby)
1 Press M.C. to turn traffic announcement
standby on or off.
AF (alternative frequencies search)
1 Press M.C. to turn AF on or off.
NEWS (news program interruption)
1 Press M.C. to turn the NEWS function on or
off.
English
5
En
Section
Operating this unit
02
Operating this unit
SEEK (left/right key setting)
You can assign a function to the left and right keys
of the unit.
Select MAN (manual tuning) to tune up or down
manually or select PCH (preset channel) to switch
between preset channels.
1 Press M.C. to select MAN or PCH.
CD/CD-R/CD-RW and USB
storage devices
Basic operations
Playing a CD/CD-R/CD-RW
1 Insert the disc into the disc loading slot with
the label side up.
Ejecting a CD/CD-R/CD-RW
1 Press h.
Playing songs on a USB storage device
1 Open the USB port cover.
2 Plug in the USB storage device using a USB
cable.
A song will be played automatically.
Stopping playback of files on a USB storage device
1 You may disconnect the USB storage device at
any time.
The unit stops playback.
Selecting a folder
1 Press 1/
Selecting a track
1 Press c or d.
Fast forwarding or reversing
1 Press and hold c or d.
! When playing compressed audio, there is no
Returning to root folder
1 Press and hold BAND/
6
En
or 2/ .
sound during fast forward or reverse.
.
Switching between compressed audio and CD-DA
1 Press BAND/
Switching between playback memory devices
You can switch between playback memory devices
on USB storage devices with more than one Mass
Storage Device-compatible memory device.
1 Press BAND/
! You can switch between up to 32 different
memory devices.
.
.
Note
Disconnect USB storage devices from the unit
when not in use.
Displaying text information
Selecting the desired text information
1 Press
.
! Depending on the version of iTunes used to
write MP3 files to a disc or media file types, incompatible text stored within an audio file may
be displayed incorrectly.
! Text information items that can be changed
depend on the media.
Selecting and playing files/
tracks from the name list
1 Press to switch to the file/track name
list mode.
2 Use M.C. to select the desired file name
(or folder name).
Changing the file or folder name
1 Turn M.C.
Playing
1 When a file or track is selected, press M.C.
Viewing a list of the files (or folders) in the selected folder
1 When a folder is selected, press M.C.
Playing a song in the selected folder
1 When a folder is selected, press and hold M.C.
Advanced operations using
special buttons
Selecting a repeat play range
1 Press 6/
Playing tracks in random order
1 Press 5/
! To change songs during random play, press d
Pausing playback
1 Press 4/PAUSE to pause or resume.
Enhancing compressed audio and restoring rich
sound (sound retriever)
1 Press 3/S.Rtrv to cycle between:
to cycle between the following:
CD/CD-R/CD-RW
! ALL – Repeat all tracks
! ONE – Repeat the current track
! FLD – Repeat the current folder
USB audio player/USB memory
! ALL – Repeat all files
! ONE – Repeat the current file
! FLD – Repeat the current folder
to turn random play on or off.
Tracks in a selected repeat range are played in
random order.
to switch to the next track. Pressing c restarts
playback of the current track from the beginning of the song.
1—2—OFF (off)
1 is effective for low compression rates, and 2
is effective for high compression rates.
Function settings
1 Press M.C. to display the main menu.
2 Turn M.C. to change the menu option
and press to select FUNCTION.
3 Turn M.C. to select the function.
After selecting, perform the following procedures to set the function.
REPEAT (repeat play)
1 Press M.C. to select a repeat play range.
For details, refer to Selecting a repeat play range
on this page.
RANDOM (random play)
1 Press M.C. to turn random play on or off.
PAUSE (pause)
1 Press M.C. to pause or resume.
S.RTRV (sound retriever)
Automatically enhances compressed audio and
restores rich sound.
1 Press M.C. to select the desired setting.
For details, refer to Enhancing compressed
audio and restoring rich sound (sound retriever)
on this page.
iPod
Basic operations
Playing songs on an iPod
1 Open the USB port cover.
2 Connect an iPod to the USB cable using an
iPod Dock Connector.
A song will be played automatically.
Selecting a song (chapter)
1 Press c or d.

Operating this unit
Operating this unit
Section
02
Selecting an album
1 Press 1/
! The album may not be selected correctly if the
Fast forwarding or reversing
1 Press and hold c or d.
or 2/ .
iPod has more than one album with the same
title on it. Select the album you want to listen
to using list search. For details, refer to Brows-
ing for a song on this page.
Notes
! The iPod cannot be turned on or off when the
control mode is set to CTRL AUDIO.
! Disconnect headphones from the iPod be-
fore connecting it to this unit.
! The iPod will turn off about two minutes after
the ignition switch is set to OFF.
Displaying text information
Selecting the desired text information
.
1 Press
Browsing for a song
1 Press to switch to the top menu of list
search.
2 Use M.C. to select a category/song.
Changing the name of the song or category
1 Turn M.C.
Playlists—artists—albums—songs—podcasts
—genres—composers—audiobooks
Playing
1 When a song is selected, press M.C.
Viewing a list of songs in the selected category
1 When a category is selected, press M.C.
Playing a song in the selected category
1 When a category is selected, press and hold
M.C.
Searching the list by alphabet
1 When a list for the selected category is dis-
played, press
mode.
! You also can switch to alphabet search
mode by turning M.C. twice.
2 Turn M.C. to select a letter.
3 Press M.C. to display the alphabetical list.
! To cancel searching, press
to switch to alphabet search
.
Notes
! You can play playlists created with the PC ap-
plication (MusicSphere). The application will
be available on our website.
! Playlists that you created with the PC appli-
cation (MusicSphere) are displayed in abbreviated form.
Advanced operations using
special buttons
Selecting a repeat play range
1 Press 6/
! You cannot select OFF when CTRL AUDIO is
Playing all songs in random order (shuffle all)
1 Press 5/
! When the control mode is set to CTRL iPod/
to cycle between the following:
! OFF – Repeat off
! ONE – Repeat the current song
! ALL – Repeat all songs in the selected list
selected. Refer to Operating this unit’siPod
function from your iPod on this page.
to turn shuffle all on.
CTRL APP,shuffle play is on.
Pausing playback
1 Press 4/PAUSE to pause or resume.
Enhancing compressed audio and restoring rich
sound (sound retriever)
1 Press 3/S.Rtrv to cycle between:
1—2—OFF (off)
1 is effective for low compression rates, and 2
is effective for high compression rates.
Playing songs related to the
currently playing song
You can play songs from the following lists.
• Album list of the currently playing artist
• Song list of the currently playing album
• Album list of the currently playing genre
1 Press and hold M.C. to switch to link play
mode.
2 Turn M.C. to change the mode; press to
select.
! ARTIST – Plays an album of the artist cur-
rently being played.
! ALBUM – Plays a song from the album cur-
rently being played.
! GENRE – Plays an album from the genre cur-
rently being played.
The selected song/album will be played after the
currently playing song.
Notes
! The selected song/album may be canceled if
you operate functions other than link search
(e.g. fast forward and reverse).
! Depending on the song selected to play, the
end of the currently playing song and the beginning of the selected song/album may be
cut off.
Operating this unit’s iPod
function from your iPod
You can listen to the sound from your iPod applications using your car ’s speakers, when
CTRL APP is selected.
! This function is not compatible with iPod
nano 1st generation.
APP Mode is compatible with the following iPod
models.
! iPhone 4 (software version 4.1 or later)
! iPhone 3GS (software version 3.0 or later)
! iPhone 3G (software version 3.0 or later)
! iPhone (software version 3.0 or later)
! iPod touch 4th generation (software version
4.1 or later)
! iPod touch 3rd generation (software version
3.0 or later)
! iPod touch 2nd generation (software version
3.0 or later)
! iPod touch 1st generation (software version
3.0 or later)
% Press BAND/
mode.
! CTRL iPod – This unit’s iPod function can be
operated from the connected iPod.
! CTRL APP – Play back the sound from your
iPod applications.
! CTRL AUDIO – This unit’s iPod function can
be operated from this unit.
Notes
! Switching the control mode to CTRL iPod/
CTRL APP pauses song playback. Operate
the iPod to resume playback.
! The following functions are still accessible
from the unit even if the control mode is set
to CTRL iPod/CTRL APP.
— Pausing
— Fast forward/reverse
— Song up/down
! When the control mode is set to CTRL iPod,
operations are limited as follows:
to switch the control
English
7
En

Section
Operating this unit
02
Operating this unit
— The function settings are not available.
— The browse function cannot be operated from
this unit.
Function settings
1 Press M.C. to display the main menu.
2 Turn M.C. to change the menu option
and press to select FUNCTION.
3 Turn M.C. to select the function.
After selecting, perform the following procedures to set the function.
! When the control mode is set to CTRL iPod/
CTRL APP, only PAUSE or S.RTRV is avail-
able.
REPEAT (repeat play)
1 Press M.C. to select a repeat play range.
For details, refer to Selecting a repeat play range
on the previous page.
SHUFFLE (shuffle)
1 Press M.C. to select your favorite setting.
! SNG – Play back songs in the selected list
in random order.
! ALB – Play back songs from a randomly se-
lected album in order.
! OFF – Cancel random play.
SHUFFLE ALL (shuffle all)
1 Press M.C. to turn shuffle all on.
To turn off, set SHUFFLE in the FUNCTION
menu to off.
LINK PLAY (link play)
1 Press M.C. to display the setting mode.
2 Turn M.C. to change the mode; press to select.
For details about the settings, refer to Playing
songs related to the currently playing song on
the previous page.
8
En
PAUSE (pause)
1 Press M.C. to pause or resume.
AUDIO BOOK (audiobook speed)
1 Press M.C. to display the setting mode.
2 Turn M.C. to select your favorite setting.
! FASTER – Playback at a speed faster than
normal
! NORMAL – Playback at normal speed
! SLOWER – Playback at a speed slower
than normal
3 Press M.C. to confirm the selection.
S.RTRV (sound retriever)
Automatically enhances compressed audio and
restores rich sound.
1 Press M.C. to select the desired setting.
For details, refer to Enhancing compressed
audio and restoring rich sound (sound retriever)
on the previous page.
Audio adjustments
1 Press M.C. to display the main menu.
2 Turn M.C. to change the menu option
and press to select AUDIO.
3 Turn M.C. to select the audio function.
After selecting, perform the following procedures to set the audio function.
FAD/BAL (fader/balance adjustment)
1 Press M.C. to display the setting mode.
2 Press M.C. to cycle between fader (front/rear)
and balance (left/right).
3 Turn M.C. to adjust speaker balance.
! When the rear output and RCA output setting
are SW, you cannot adjust front/rear speaker
balance. Refer to REAR-SP (rear output setting)
on the next page. Refer to PREOUT (preout set-
ting) on the next page.
PRESET EQ (equalizer recall)
1 Press M.C. to display the setting mode.
2 Turn M.C. to select the equalizer.
DYNAMIC—VOCAL—NATURAL—CUSTOM
—FLAT—POWERFUL
3 Press M.C. to confirm the selection.
! You can also switch the equalizer by pressing
repeatedly (DEH-2400UB).
TONE CTRL (equalizer adjustment)
! Adjusted equalizer curve settings are stored in
CUSTOM.
1 Press M.C. to display the setting mode.
2 Press M.C. to select BASS (bass)/MID (mid)/
TREBLE (treble).
3 Turn M.C. to adjust the level.
Adjustment range: +6 to –6
LOUD (loudness)
Loudness compensates for deficiencies in the lowfrequency and high-frequency ranges at low volume.
1 Press M.C. to select the desired setting.
OFF (off)—LOW(low)—HI (high)
SUB.W (subwoofer on/off setting)
This unit is equipped with a subwoofer output
which can be turned on or off.
1 Press M.C. to select the desired setting.
NOR (normal phase)—REV (reverse phase)—
OFF (subwoofer off)
SUB.W CTRL (subwoofer adjustment)
The cut-off frequency and output level can be adjusted when the subwoofer output is on.
Only frequencies lower than those in the selected
range are outputted from the subwoofer.
! When you select OFF in SUB.W,you cannot se-
lect this function. For details, refer to SUB.W
(subwoofer on/off setting) on this page.
1 Press M.C. to display the setting mode.
2 Press M.C. to cycle between the cut-off fre-
quency and output level of the subwoofer.
Cut-off frequency (Cut-off frequency display
flashes.)—Output level (Output level display
flashes.)
3 Turn M.C. to select the desired setting.
Cut-off frequency: 50HZ—63HZ—80HZ—
100HZ—125HZ
Output level: –24 to +6
SLA (source level adjustment)
SLA (Source level adjustment) lets you adjust the
volume level of each source to prevent radical
changes in volume when switching between sources.
! Settings are based on the FM volume level,
which remains unchanged.
! The MW/LW volume level can also be adjusted
with this function.
! When selecting FM as the source, you cannot
switch to SLA.
1 Press M.C. to display the setting mode.
2 Turn M.C. to adjust the source volume.
Adjustment range: +4 to –4
3 Press M.C. to confirm the selection.
Operating this unit
Operating this unit
Section
02
Initial settings
Important
PW SAVE (power saving) is cancelled if the vehicle battery is disconnected and will need to be
turned back on once the battery is reconnected.
When PW SAVE (power saving) is off, depending on connection methods, the unit may continue to draw power from the battery if your
vehicle’s ignition doesn’t have an ACC (accessory) position.
1 Press and hold SRC/OFF until the unit
turns off.
2 Press SRC/OFF and hold until function
name appears in the display.
3 Turn M.C. to select the initial setting.
After selecting, perform the following procedures to set the initial setting.
CLOCK SET (setting the clock)
1 Press M.C. to display the setting mode.
2 Press M.C. to select the segment of the clock
display you wish to set.
Hour—Minute
3 Turn M.C. to adjust the clock.
CLOCK (clock display)
You can turn the clock display on or off.
The clock display disappears temporarily when
you perform other operations, but the clock display appears again after 25 seconds.
1 Press M.C. to turn the clock display on or off.
FM STEP (FM tuning step)
Normally, the FM tuning step employed by seek
tuning is 50 kHz. When AF or TA is on, the tuning
step automatically changes to 100 kHz. It may be
preferable to set the tuning step to 50 kHz when
AF is on.
! The tuning step remains at 50 kHz during man-
ual tuning.
1 Press M.C. to select the FM tuning step.
50 (50 kHz)—100 (100 kHz)
AUTO-PI (auto PI seek)
The unit can automatically search for a different
station with the same programming, even during
preset recall.
1 Press M.C. to turn Auto PI seek on or off.
AUX (auxiliary input)
Activate this setting when using an auxiliary device connected to this unit.
1 Press M.C. to turn AUX on or off.
USB PNP (plug and play)
This setting allows you to switch your source to
USB/iPod automatically.
1 Press M.C. to turn the plug and play function
on or off.
ON – When a USB storage device/iPod is con-
nected, depending on the type of device, the
source is automatically switched to USB/iPod
when you turn on the engine. If you disconnect
your USB storage device/iPod, this unit’s
source is turned off.
OFF – When a USB storage device/iPod is con-
nected, the source is not switched to USB/
iPod automatically. Please change the source
to USB/iPod manually.
REAR-SP (rear output setting)
The rear speaker leads output can be used for fullrange speaker or subwoofer connection.
If you switch to SW, you can connect a rear speaker lead directly to a subwoofer without using an
auxiliary amp.
Initially, REAR-SP is set for rear full-range speaker
connection (FUL).
1 Press M.C. to select the desired setting.
FUL—SW
! Even if you change this setting, there will
be no output if you select OFF in SUB.W
(Refer to SUB.W (subwoofer on/off setting)
on the previous page).
! If you change this setting, subwoofer out-
put in the audio menu will return to the factory settings.
PREOUT (preout setting)
The RCA outputs can be used for rear speaker or
subwoofer connection.
If you switch to SW, you can connect a rear speaker lead directly to a subwoofer without using an
auxiliary amp.
Initially, PREOUT is set for rear full-range speaker
connection (SW).
1 Press M.C. to select the desired setting.
SW—REA
! Even if you change this setting, there will
be no output if you select OFF in SUB.W
(Refer to SUB.W (subwoofer on/off setting)
on the previous page).
! If you change this setting, subwoofer out-
put in the audio menu will return to the factory settings.
DEMO (demo display setting)
1 Press M.C. to turn the demo display on or off.
! If PW SAVE is on, DEMO cannot be selected.
SCROLL (scroll mode setting)
When ever scroll is set to ON, recorded text information scrolls continuously in the display. Set to
OFF if you prefer the information to scroll just
once.
1 Press M.C. to turn the ever scroll on or off.
TITLE (multi-language)
This unit can display the text information of a compressed audio file even if they are embedded in a
Western European or Russian language.
! If the embedded language and the selected
language setting are not the same, text information may not display properly.
! Some characters may not be displayed prop-
erly.
1 Press M.C. to select the desired setting.
EUR (European)—RUS (Russian)
PW SAVE (power saving)
Switching this function on enables you to reduce
the consumption of battery power.
! Turning on the source is the only operation al-
lowed when this function is on.
1 Press M.C. to turn the power save on or off.
Selecting the illumination color
Only for DEH-3400UB
This unit is equipped with multiple-color illumination. You can select desired colors for the keys
and display of this unit. You also can customize
the colors you want to use.
Selecting the key color from the
illumination color list
Only for DEH-3400UB
You can select desired colors for the keys of this
unit.
1 Press
.
English
9
En
Section
Operating this unit
02
Operating this unit
2 Turn M.C. to display KEY COLOR and
press to select.
3 Turn M.C. to select the illumination color.
You can select one option from the following list.
! 30 preset colors (WHITE to ROSE)
! SCAN (cycle through all colors)
! 3 sets of colors (WARM, AMBIENT, CALM)
! CUSTOM (customized illumination color)
4 Press M.C. to confirm the selection.
Notes
! When SCAN is selected, the system auto-
matically cycles through the 30 preset colors.
! When WARM is selected, the system auto-
matically cycles through the warm colors.
! When AMBIENT is selected, the system au-
tomatically cycles through the ambient colors.
! When CALM is selected, the system auto-
matically cycles through the calm colors.
! When CUSTOM is selected, the customized
color saved is selected.
! To cancel selecting the illumination color,
press
.
Selecting the display color from
the illumination color list
Only for DEH-3400UB
You can select the desired colors for the display
of this unit.
1 Press
2 Turn M.C. to display DISP COLOR and
press to select.
3 Turn M.C. to select the illumination color.
You can select one option from the following list.
.
! 30 preset colors (WHITE to ROSE)
! SCAN (cycle through all colors)
! 3 sets of colors (WARM, AMBIENT, CALM)
! CUSTOM (customized illumination color)
4 Press M.C. to confirm the selection.
Note
For details about colors on the list, refer to Selecting the k ey color from the illumination color
list on the previous page.
Selecting key and display color
from the illumination color list
Only for DEH-3400UB
You can select the desired colors for the keys
and display of this unit.
1 Press
2 Turn M.C. to display BOTH COLOR and
press to select.
3 Turn M.C. to select the illumination color.
You can select one option from the following list.
4 Press M.C. to confirm the selection.
Notes
! You cannot select 3 sets of preset colors and
! Once you select a color in this function, col-
! For details about colors on the list, refer to
.
! 30 preset colors (WHITE to ROSE)
! SCAN (cycle through all colors)
CUSTOM in this function.
ors on the keys and display of this unit automatically switch to the color you selected.
Selecting the key color from the illumination
color list on the previous page.
Customizing the illumination color
Only for DEH-3400UB
1 Press
.
2 Turn M.C. to display KEY COLOR or
DISP COLOR. Press to select.
3 Press M.C. and hold until the customizing
illumination color setting appears in the display.
4 Press M.C. to select the primary color.
R (red)—G (green)—B (blue)
5 Turn M.C. to adjust the brightness level.
Adjustment range: 0 to 60
# You cannot select a level below 10 for all three of
R (red), G (green), and B (blue) at the same time.
# You can also perform the same operation on
other colors.
Notes
! You cannot create a custom illumination
color when SCAN or a set of colors (WARM,
AMBIENT,orCALM) is selected.
! You can create custom illumination colors
for both KEY COLOR and DISP COLOR.
Switching the dimmer setting
You can adjust the brightness of illumination.
% Press and hold
.
Using an AUX source
1 Insert the stereo mini plug into the AUX
input jack.
2 Press SRC/OFF to select AUX as the
source.
Note
AUX cannot be selected unless the auxiliary setting is turned on. For more details, refer to AUX
(auxiliary input) on the previous page.
Sound muting
Sound is muted automatically when:
! A call is made or received using a cell phone
connected to this unit.
! Voice guidance is output from a connected
Pioneer navigation unit.
The sound is turned off, MUTE is displayed and
no audio adjustments, except volume control,
are possible. Operation returns to normal when
the phone connection or the voice guidance is
ended.
10
En
Installation
Installation
Section
03
Connections
Important
! When installing this unit in a vehicle without
an ACC (accessory) position on the ignition
switch, failure to connect the red cable to the
terminal that detects operation of the ignition
key may result in battery drain.
ACC position No ACC position
! Use of this unit in conditions other than the
following could result in fire or malfunction.
— Vehicles with a 12-volt battery and negative
grounding.
— Speakers with 50 W (output value) and 4 ohm
to 8 ohm (impedance value).
! To prevent a short-circuit, overheating or mal-
function, be sure to follow the directions
below.
— Disconnect the negative terminal of the bat-
tery before installation.
— Secure the wiring with cable clamps or adhe-
sive tape. Wrap adhesive tape around wiring
that comes into contact with metal parts to
protect the wiring.
— Place all cables away from moving parts,
such as the shift lever and seat rails.
— Place all cables away from hot places, such
as near the heater outlet.
— Do not connect the yellow cable to the battery
by passing it through the hole to the engine
compartment.
— Cover any disconnected cable connectors
with insulating tape.
— Do not shorten any cables.
— Never cut the insulation of the power cable of
this unit in order to share the power with
other devices. The current capacity of the
cable is limited.
— Use a fuse of the rating prescribed.
— Never wire the negative speaker cable directly
to ground.
— Never band together negative cables of multi-
ple speakers.
! When this unit is on, control signals are sent
through the blue/white cable. Connect this
cable to the system remote control of an external power amp or the vehicle’s auto-anten-
O
F
N
F
O
S
T
A
R
T
na relay control terminal (max. 300 mA
12 V DC). If the vehicle is equipped with a
glass antenna, connect it to the antenna
booster power supply terminal.
! Never connect the blue/white cable to the
power terminal of an external power amp.
Also, never connect it to the power terminal
of the auto antenna. Doing so may result in
battery drain or a malfunction.
! The black cable is ground. Ground cables for
this unit and other equipment (especially,
high-current products such as power amps)
must be wired separately. If they are not, an
accidental detachment may result in a fire or
malfunction.
This unit
1
1 Power cord input
2 Rear output or subwoofer output
3 Antenna input
4 Fuse (10 A)
5 Wired remote input
Hard-wired remote control adaptor can be
connected (sold separately).
2
Power cord
3
4
1
c
3
556
6
4
a
b89
2
7
e
1 To power cord input
2 Depending on the kind of vehicle, the func-
tion of 3 and 5 may be different. In this
case, be sure to connect 4 to 5 and 6 to
3.
3 Yellow
Back-up (or accessory)
4 Yellow
Connect to the constant 12 V supply terminal.
5 Red
Accessory (or back-up)
6 Red
Connect to terminal controlled by ignition
switch (12 V DC).
7 Connect leads of the same color to each
other.
8 Black (chassis ground)
9 Blue/white
The pin position of the ISO connector will differ depending on the type of vehicle. Connect
9 and b when Pin 5 is an antenna control
type. In another type of vehicle, never connect 9 and b.
a Blue/white
Connect to system control terminal of the
power amp (max. 300 mA 12 V DC).
b Blue/white
Connect to auto-antenna relay control terminal (max. 300 mA 12 V DC).
c Yellow/black
If you use an equipment with Mute function,
wire this lead to the Audio Mute lead on that
equipment. If not, keep the Audio Mute lead
free of any connections.
d Speaker leads
White: Front left +
White/black: Front left *
Gray: Front right +
Gray/black: Front right *
Green: Rear left + or subwoofer +
Green/black: Rear left * or subwoofer *
Violet: Rear right + or subwoofer +
Violet/black: Rear right * or subwoofer *
e ISO connector
In some vehicles, the ISO connector may be
divided into two. In this case, be sure to connect to both connectors.
Notes
! Change the initial setting of this unit. Refer
to REAR-SP (rear output setting) on page 9.
Refer to PREOUT (preout setting) on page 9.
The subwoofer output of this unit is monaural.
! When using a subwoofer of 70 W (2 Ω), be
sure to connect the subwoofer to the violet
and violet/black leads of this unit. Do not
connect anything to the green and green/
black leads.
English
11
En

Section
03
Installation
Installation
Power amp (sold separately)
Perform these connections when using the optional amplifier.
1
1 System remote control
Connect to Blue/white cable.
2 Power amp (sold separately)
3 Connect with RCA cables (sold separately)
4 To Rear output or subwoofer output
5 Rear speaker or subwoofer
3
2
55
4
Installation
Important
! Check all connections and systems before
final installation.
! Do not use unauthorized parts as this may
cause malfunctions.
! Consult your dealer if installation requires
drilling of holes or other modifications to the
vehicle.
! Do not install this unit where:
— it may interfere with operation of the vehicle.
— it may cause injury to a passenger as a result
of a sudden stop.
! The semiconductor laser will be damaged if
it overheats. Install this unit away from hot
places such as near the heater outlet.
! Optimum performance is obtained when the
unit is installed at an angle of less than 60°.
60°
DIN front/rear mount
This unit can be properly installed using either
front-mount or rear-mount installation.
Use commercially available parts when installing.
DIN Front-mount
1 Insert the mounting sleeve into the dashboard.
For installation in shallow spaces, use the supplied mounting sleeve. If there is enough space,
use the mounting sleeve that came with the vehicle.
2 Secure the mounting sleeve by using a
screwdriver to bend the metal tabs (90°) into
place.
1
2
1 Dashboard
2 Mounting sleeve
3 Install the unit as illustrated.
1
2
4
3
2 Firewall or metal support
3 Metal strap
4 Screw
5 Screw (M4 ×
# Make sure that the unit is installed securely in
place. An unstable installation may cause skipping
or other malfunctions.
DIN Rear-mount
1 Determine the appropriate position
where the holes on the bracket and the side
of the unit match.
2 Tighten two screws on each side.
1
2
1 Tapping screw (5 mm × 8 mm)
2 Mounting bracket
3 Dashboard or console
3
Removing the unit
1 Remove the trim ring.
! Releasing the front panel allows easier ac-
cess to the trim ring.
! When reattaching the trim ring, point the
side with the notched tab down.
2 Insert the supplied extraction keys into
both sides of the unit until they click into
place.
3 Pull the unit out of the dashboard.
Removing and re-attaching the front
panel
You can remove the front panel to protect your
unit from theft.
Press the detach button and push the front
panel upward and pull it toward you.
For details, refer to Removing the front panel to
protect your unit from theft and Re-attaching the
front panel on page 4.
5
1 Trim ring
1 Nut
12
En
2 Notched tab

Additional information
Appendix
Additional information
Troubleshooting
Symptom Cause Action
The display illumination
turns on and
off at random.
The display
automatically
returns to the
ordinary display.
The repeat
play range
changes unexpectedly.
A subfolder is
not played
back.
NO XXXX appears when a
display is
changed (NO
TITLE, for example).
Demo mode is
on.
You did not perform any operation within
about 30 seconds.
Depending on
the repeat play
range, the selected range
may change
when another
folder or track is
being selected
or during fast
forwarding/reversing.
Subfolders cannot be played
when FLD (folder repeat) is selected.
There is no embedded text information.
Turn off the demo
display setting.
Perform operation
again.
Select the repeat
play range again.
Select another repeat play range.
Switch the display
or play another
track/file.
Symptom Cause Action
The unit is
malfunctioning.
There is interference.
You are using a
device, such as
a cellular
phone, that
transmits electric waves near
the unit.
Move electrical
devices that may
be causing the interference away
from the unit.
Error messages
When you contact your dealer or your nearest
Pioneer Service Center, be sure to note the error
message.
Built-in CD Player
Message Cause Action
ERROR-07,
11, 12, 17, 30
ERROR-07,
10, 11, 12,
15, 17, 30,
A0
ERROR-15 Theinserted
ERROR-23 Unsupported
FRMT READ Sometimes
The disc is dirty. Clean the disc.
The disc is
scratched.
There is an elec-
trical or mechanical error.
disc is blank.
CD format.
there is a delay
between the
start of playback
and when you
start to hear any
sound.
Replace the disc.
Turn the ignition
switch OFF and
back ON, or
switch to a different source, then
back to the CD
player.
Replace the disc.
Replace the disc.
Wait until the
message disappears and you
hear sound.
Message Cause Action
NO AUDIO The inserted
SKIPPED The inserted
PROTECT All the files on
USB storage device/iPod
Message Cause Action
NO DEVICE When plug and
FRMT READ Sometimes
NO AUDIO There are no
disc does not
contain any
playable files.
disc contains
DRM protected
files.
the inserted
disc are embedded with
DRM.
play is off, no
USB storage device or iPod is
connected.
there is a delay
between the
start of playback
and when you
start to hear any
sound.
songs.
The connected
USB storage device has security enabled.
Replace the disc.
Replace the disc.
Replace the disc.
! Turn the plug
and play on.
! Connect a compatible USB storage device/iPod.
Wait until the
message disappears and you
hear sound.
Transfer the audio
files to the USB
storage device
and connect.
Follow the USB
storage device instructions to disable the security.
Message Cause Action
SKIPPED The connected
PROTECT All the files in
N/A USB The USB device
USB storage device contains
files embedded
with Windows
Mediaä DRM 9/
10.
the USB storage
device are embedded with
Windows Media
DRM 9/10.
connected to is
not supported
by this unit.
Play an audio file
not embedded
with Windows
Media DRM 9/10.
Transfer audio
files not embedded with
Windows Media
DRM 9/10 to the
USB storage device and connect.
! Connect a USB
Mass Storage
Class compliant
device.
! Disconnect
your device and
replace it with a
compatible USB
storage device.
English
13
En
Appendix
Additional information
Additional information
Message Cause Action
CHECK USB The USB con-
14
En
nector or USB
cable has shortcircuited.
The connected
USB storage device consumes
more than
500 mA (maximum allowable
current).
The iPod operates correctly
but does not
charge.
Check that the
USB connector or
USB cable is not
caught in something or damaged.
Disconnect the
USB storage device and do not
use it. Turn the
ignition switch to
OFF, then to ACC
or ON and then
connect only
compliant USB
storage devices.
Make sure the
connection cable
for the iPod has
not shorted out
(e.g., not caught
in metal objects).
After checking,
turn the ignition
switch OFF and
back ON, or disconnect the iPod
and reconnect.
Message Cause Action
ERROR-19 Communication
ERROR-23 USB storage de-
ERROR-16 TheiPod firm-
STOP There are no
failed.
iPod failure. Disconnect the
vice was not formatted with
FAT12, FAT16 or
FAT32.
ware version is
old.
iPod failure. Disconnect the
songs in the
current list.
Perform one of
the following operations.
–Turn the ignition
switch OFF and
back ON.
–Disconnect the
USB storage device.
–Change to a different source.
Then, return to
the USB source.
cable from the
iPod. Once the
iPod’s main
menu is displayed, reconnect
the iPod and reset
it.
USB storage device should be formatted with
FAT12, FAT16 or
FAT32.
Update the iPod
version.
cable from the
iPod. Once the
iPod’s main
menu is displayed, reconnect
the iPod and reset
it.
Select a list that
contains songs.
Message Cause Action
NOT FOUND No related
songs.
Transfer songs to
the iPod.
Handling guidelines
Discs and player
Use only discs that feature either of the following
two logos.
Use 12-cm discs. Do not use 8-cm discs or an
adapter for 8-cm discs.
Use only conventional, fully circular discs. Do not
use shaped discs.
Do not insert anything other than a CD into the
CD loading slot.
Do not use cracked, chipped, warped, or otherwise damaged discs as they may damage the player.
Unfinalized CD-R/RW discs cannot be played
back.
Do not touch the recorded surface of the discs.
Store discs in their cases when not in use.
Do not attach labels, write on or apply chemicals
to the surface of the discs.
To clean a CD, wipe the disc with a soft cloth outward from the center.
Condensation may temporarily impair the player ’s
performance. Let it rest for about one hour to adjust to a warmer temperature. Also, wipe any
damp discs off with a soft cloth.
Playback of discs may not be possible because of
disc characteristics, disc format, recorded application, playback environment, storage conditions,
and so on.
Road shocks may interrupt disc playback.
When using discs that can be printed on label surfaces, check the instructions and the warnings of
the discs. Depending on the discs, inserting and
ejecting may not be possible. Using such discs
may result in damage to this equipment.
Do not attach commercially available labels or
other materials to the discs.
! The discs may warp making the disc unplay-
able.
! The labels may come off during playback and
prevent ejection of the discs, which may result
in damage to the equipment.
USB storage device
Connections via USB hub are not supported.
Do not connect anything other than a USB storage device.
Additional information
Appendix
Additional information
Firmly secure the USB storage device when driving. Do not let the USB storage device fall onto the
floor, where it may become jammed under the
brake or accelerator pedal.
Depending on the USB storage device, the following problems may occur.
! Operations may vary.
! The storage device may not be recognized.
! Files may not be played back properly.
! The device may generate noise in the radio.
iPod
Do not leave the iPod in places with high temperatures.
To ensure proper operation, connect the dock connector cable from the iPod directly to this unit.
Firmly secure the iPod when driving. Do not let the
iPod fall onto the floor, where it may become
jammed under the brake or accelerator pedal.
About iPod settings
! When an iPod is connected, this unit changes
the EQ (equalizer) setting of the iPod to off in
order to optimize the acoustics. When you disconnect the iPod, the EQ returns to the original
setting.
! You cannot set Repeat to off on the iPod when
using this unit. Repeat is automatically
changed to All when the iPod is connected to
this unit.
Incompatible text saved on the iPod will not be displayed by the unit.
DualDiscs
DualDiscs are two-sided discs that have a recordable CD for audio on one side and a recordable
DVD for video on the other.
Since the CD side of DualDiscs is not physically
compatible with the general CD standard, it may
not be possible to play the CD side with this unit.
Frequent loading and ejecting of a DualDisc may
result in scratches on the disc. Serious scratches
can lead to playback problems on this unit. In
some cases, a DualDisc may become stuck in the
disc loading slot and will not eject. To prevent this,
we recommend you refrain from using DualDisc
with this unit.
Please refer to the information from the disc manufacturer for more detailed information about
DualDiscs.
Compressed audio
compatibility (disc, USB)
WMA
File extension: .wma
Bit rate: 48 kbps to 320 kbps (CBR), 48 kbps to
384 kbps (VBR)
Sampling frequency: 32 kHz, 44.1 kHz, 48 kHz
Windows Media Audio Professional, Lossless,
Voice/DRM Stream/Stream with video: Not compatible
MP3
File extension: .mp3
Bit rate: 8 kbps to 320 kbps (CBR), VBR
Sampling frequency: 8 kHz to 48 kHz (32 kHz,
44.1 kHz, 48 kHz for emphasis)
Compatible ID3 tag version: 1.0, 1.1, 2.2, 2.3, 2.4
(ID3 tag Version 2.x is given priority over Version
1.x.)
M3u playlist: Not compatible
MP3i (MP3 interactive), mp3 PRO: Not compatible
WAV
File extension: .wav
Quantization bits: 8 and 16 (LPCM), 4 (MS
ADPCM)
Sampling frequency: 16 kHz to 48 kHz (LPCM),
22.05 kHz and 44.1 kHz (MS ADPCM)
Supplemental information
Only the first 32 characters can be displayed as a
file name (including the file extension) or a folder
name.
Russian text to be displayed on this unit should be
encoded in one of the following character sets:
! Unicode (UTF-8, UTF-16)
! A character set other than Unicode that is
used in a Windows environment and is set to
Russian in the multi-language setting
This unit may not operate correctly depending on
the application used to encode WMA files.
There may be a slight delay at the start of playback
of audio files embedded with image data or audio
files stored on a USB storage device that has numerous folder hierarchies.
Disc
Playable folder hierarchy: up to eight tiers (A practical hierarchy is less than two tiers).
Playable folders: up to 99
Playable files: up to 999
File system: ISO 9660 Level 1 and 2, Romeo, Joliet
Multi-session playback: Compatible
Packet write data transfer: Not compatible
Regardless of the length of blank sections between the songs from the original recording, compressed audio discs play with a short pause
between songs.
USB storage device
Playable folder hierarchy: up to eight tiers (A practical hierarchy is less than two tiers).
Playable folders: up to 500
Playable files: up to 15 000
Playback of copyright-protected files: Not compatible
Partitioned USB storage device: Only the first partition can be played.
There may be a slight delay when starting playback of audio files on a USB storage device with
numerous folder hierarchies.
CAUTION
! Pioneer cannot guarantee compatibility with
all USB mass storage devices and assumes
no responsibility for any loss of data on
media players, smart phones, or other devices while using this product.
! Do not leave discs or a USB storage device
in any place that is subject to high temperatures.
English
15
En

Appendix
Additional information
Additional information
iPod compatibility
This unit supports only the following iPod models.
Supported iPod software versions are shown
below. Older versions may not be supported.
Made for
! iPhone 4 (software version 4.1)
! iPhone 3GS (software version 3.0.1)
! iPhone 3G (software version 2.0)
! iPhone (software version 1.1.1)
! iPod nano 6th generation (software version
1.0)
! iPod nano 5th generation (software version
1.0.1)
! iPod nano 4th generation (software version
1.0)
! iPod nano 3rd generation (software version
1.0)
! iPod nano 2nd generation (software version
1.1.2)
! iPod nano 1st generation (software version
1.2.0)
! iPod touch 4th generation (software version
4.1)
! iPod touch 3rd generation (software version
3.1.1)
! iPod touch 2nd generation (software version
2.1.1)
! iPod touch 1st generation (software version
1.1)
! iPod classic 160GB (software version 2.0.2)
! iPod classic 120GB (software version 2.0)
! iPod classic (software version 1.0)
Depending on the generation or version of the
iPod, some functions may not be available.
Operations may vary depending on the software
version of iPod.
When using an iPod, an iPod Dock Connector to
USB Cable is required.
A Pioneer CD-IU51 interface cable is also available. For details, consult your dealer.
About the file/format compatibility, refer to the
iPod manuals.
Audiobook, Podcast: Compatible
CAUTION
Pioneer accepts no responsibility for data lost
on the iPod, even if that data is lost while this
unit is used.
Sequence of audio files
The user cannot assign folder numbers and
specify playback sequences with this unit.
Example of a hierarchy
01
02
03
04
05
Level 1 Level 2 Level 3 Level 4
Disc
Folder selection sequence or other operation
may differ depending on the encoding or writing
software.
USB storage device
Playback sequence is the same as recorded sequence in the USB storage device.
To specify the playback sequence, the following
method is recommended.
1 Create a file name that includes numbers
that specify the playback sequence (e.g.,
001xxx.mp3 and 099yyy.mp3).
2 Put those files into a folder.
audio file
01 to 05: Folder
number
1 to 6: Playback
sequence
: Folder
: Compressed
3 Save the folder containing files on the USB
storage device.
However,depending on the system environment,
you may not be able to specify the playback sequence.
For USB portable audio players, the sequence is
different and depends on the player.
Russian character chart
D: C D: C D: C D: C D: C
: А : Б : В : Г : Д
: Е, Ё : Ж : З : И, Й : К
: Л : М : Н : О : П
: Р : С : Т : У : Ф
: Х : Ц : Ч
: Ы : Ь : Э : Ю : Я
: Ш,
: Ъ
Щ
D: Display C: Character
Copyright and trademark
iTunes
Apple and iTunes are trademarks of Apple Inc.,
registered in the U.S. and other countries.
MP3
Supply of this product only conveys a license for
private, non-commercial use and does not convey a license nor imply any right to use this product in any commercial (i.e. revenue-generating)
real time broadcasting (terrestrial, satellite,
cable and/or any other media), broadcasting/
streaming via internet, intranets and/or other
networks or in other electronic content distribution systems, such as pay-audio or audio-on-demand applications. An independent license for
such use is required. For details, please visit
http://www.mp3licensing.com.
WMA
Windows Media is either a registered trademark
or trademark of Microsoft Corporation in the
United States and/or other countries.
This product includes technology owned by
Microsoft Corporation and cannot be used or
distributed without a license from Microsoft
Licensing, Inc.
iPod & iPhone
iPhone, iPod, iPod classic, iPod nano, and iPod
touch are trademarks of Apple Inc., registered in
the U.S. and other countries.
“Made for iPod” and “Made for iPhone” mean
that an electronic accessory has been designed
to connect specifically to iPod or iPhone, respectively, and has been certified by the developer to
meet Apple performance standards. Apple is
not responsible for the operation of this device
or its compliance with safety and regulatory
standards. Please note that the use of this accessory with iPod or iPhone may affect wireless
performance.
16
En

Additional information
Appendix
Specifications
General
Power source ………………. 14.4 V DC (10.8 V to 15.1 V al-
Grounding system ………… Negative type
Maximum current consumption
…………………………….. 10.0 A
Dimensions (W × H × D):
DIN
Chassis ………….. 178 mm × 50 mm ×
Nose ……………… 188mm × 58mm ×
D
Chassis ………….. 178 mm × 50 mm ×
Nose ……………… 170mm × 46mm ×
Weight ……………………….. 1.1kg
Audio
Maximum power output … 50 W × 4
Continuous power output
…………………………….. 22 W × 4 (50 Hz to 15000 Hz,
Load impedance ………….. 4 W (4 W to 8 W allowable)
Preout maximum output level
…………………………….. 2.0 V
Tone controls:
Bass
Frequency ………. 100Hz
Gain ……………… ±12dB
Mid
Frequency ………. 1 kHz
Gain ……………… ±12dB
Treble
Frequency ………. 10 kHz
Gain ……………… ±12dB
Subwoofer (mono):
Frequency …………….. 50 Hz/63 Hz/80 Hz/100 Hz/
Slope …………………… –18 dB/oct
Gain ……………………. +6dB to –24 dB
Phase ………………….. Normal/Reverse
lowable)
165 mm
16 mm
165 mm
16 mm
70 W × 1/2 W (for subwoofer)
5 % THD, 4 W load, both channels driven)
125 Hz
CD player
System ………………………. Compact disc audio sys tem
Usable discs ……………….. Compact disc
Signal-to-noise ratio ……… 94 dB (1 kHz) (IEC-A network)
Number of channels …….. 2 (stereo)
MP3 decoding format …… MPEG-1 & 2 Audio Layer 3
WMA decoding format ….. Ver. 7, 7.1, 8, 9, 10, 11, 12 (2 ch
WAV signal format ……….. Linear PCM & MS ADPCM
USB
USB standard specification
…………………………….. USB 2.0 full speed
Maximum current supply
…………………………….. 500 mA
USB Class ………………….. MSC (Mass Storage Class)
File system ………………….. FAT12, FAT16, FAT32
MP3 decoding format …… MPEG-1 & 2 Audio Layer 3
WMA decoding format ….. Ver. 7, 7.1, 8, 9, 10, 11, 12 (2 ch
WAV signal format ……….. Linear PCM & MS ADPCM
FM tuner
Frequency range ………….. 87.5 MHz to 108.0 MHz
Usable sensitivity …………. 9 dBf (0.8 µV/75 W, mono, S/N:
Signal-to-noise ratio ……… 72 dB (IEC-A network)
MW tuner
Frequency range ………….. 531kHz to 1 602kHz
Usable sensitivity …………. 25 µV (S/N: 20 dB)
Signal-to-noise ratio ……… 62 dB (IEC-A network)
LW tuner
Frequency range ………….. 153 kHz to 281 kHz
Usable sensitivity …………. 28 µV (S/N: 20 dB)
Signal-to-noise ratio ……… 62 dB (IEC-A network)
audio)
(Windows Media Player)
(Non-compressed)
audio)
(Windows Media Player)
(Non-compressed)
30 dB)
Note
Specifications and the design are subject to
modifications without notice.
English
17
En

Section
Avant de commencer
01
Avant de commencer
Nous vous remer cions d’avoir acheté cet ap-
pareil PIONEER
Pour garantir une utilisation correcte, lisez bien
ce mode d’emploi avant d’utiliser cet appareil. Il
est particulièrement important que vous lisiez et
respectiez les indications ATTENTION et PRÉ-
CAUTION de ce mode d’emploi. Conser vez-le
dans un endroit sûr et facilement accessible pour
toute consultation ultérieure.
Si vous souhaitez vous débarrasser de cet appareil, ne le mettez pas à la poubelle avec vos
ordures ménagères. Il existe un système de
collecte séparé pour les appareils électroniques usagés, qui doivent être récupérés, traités et recyclés conformément à la législation.
Dans les états membres de l’UE, en Suisse et en
Norvège, les foyers domestiques peuvent rapporter leurs produits électroniques usagés gratuitement à des points de collecte spécifiés ou à
un revendeur (sous réserve d’achat d’un produit
similaire).
Dans les pays qui ne sont pas mentionnés cidessus, veuillez contacter les autorités locales
pour vous informer de la méthode correcte de
mise au rebut.
En agissant ainsi vous assurerez que le produit
que vous mettez au rebut est soumis au processus de traitement, de récupération et de recyclage nécessaire et éviterez ainsi les effets
négatifs potentiels sur l’environnement et la
santé publique.
Quelques mots sur cet appareil
Les fréquences du syntoniseur de cet appareil
sont attribuées pour une utilisation en Europe
de l’ Ouest, Asie, Moyen Orient, Afrique et Océanie. Son utilisation dans d’autres régions peut
se traduire par une réception de mauvaise qualité. La fonction RDS (radio data system) n’est
opérationnelle que dans les régions où des signaux RDS sont diffusés pour les stations FM.
PRÉCAUTION
Ce produit est classifié comme produit laser
de classe 1 selon la norme IEC 60825-1:2007
“Sécurité des appareils à laser ” et contient un
module laser de classe 1M. Pour assurer une
sécurité permanente, n’enlevez aucun couver-
cle et n’essayez pas d’accéder à l’intérieur du
produit. Faites effectuer l’entretien par du per-
sonnel qualifié.
APPAREIL À LASER DE CLASSE 1
ATTENTION—ÉMISSIONS DE RADIATIONS LASER
INVISIBLES DE CLASSE 1M SI OUVERT. NE PAS OBSERVER
DIRECTEMENT AVEC DES INSTRUMENTS OPTIQUES.
PRÉCAUTION
! Ne laissez pas cet appareil entrer en contact
avec des liquides. Cela pourrait provoquer
une électrocution. Tout contact avec des liquides pourrait aussi provoquer des dommages, de la fumée et une surchauffe de
l’appareil.
! Le Pioneer CarStereo-Pass est utilisable seu-
lement en Allemagne.
! Maintenez le niveau d’écoute à une valeur
telle que vous puissiez entendre les sons provenant de l’extérieur.
! Évitez tout contact avec l’humidité.
! Si la batterie est débranchée ou déchargée,
le contenu de la mémoire sera effacé.
Remarque
Les opérations de réglage des fonctions sont validées même si le menu est annulé avant la
confirmation des opérations.
Quelques mots sur ce mode
d’emploi
! Dans les instructions suivantes, les mémoi-
res USB et les lecteurs audio USB sont collectivement appelés “périphériques de
stockage USB”.
! Dans ce manuel, iPod et iPhone sont dési-
gnés par le terme “iPod”.
Mode de démonstration
Important
! La non-connexion du fil rouge (ACC) de cet
appareil à une borne couplée avec les opérations de mise en/hors service du contact d’allumage peut conduire au déchargement de
la batterie.
! Rappelez-vous que si la démonstration des
fonctions continue à fonctionner quand le
moteur est coupé, cela peut décharger la
batterie.
La démonstration démarre automatiquement si
vous n’utilisez pas cet appareil dans les 30 secondes environ depuis la dernière opération ou
si le contact est réglé sur ACC ou ON alors que
l’appareil est hors service. Pour annuler le mode
de démonstration, vous devez afficher les réglages initiaux. Sélectionnez DEMO (réglage de l’af-
fichage de démonstration) et désactivez
l’affichage de démonstration. Pour les détails,
reportez-vous à la page 26, Réglages initiaux.
En cas d’anomalie
En cas d’anomalie, veuillez contacter votre revendeur ou le centre d’entretien agréé par
PIONEER le plus proche.
18
Fr
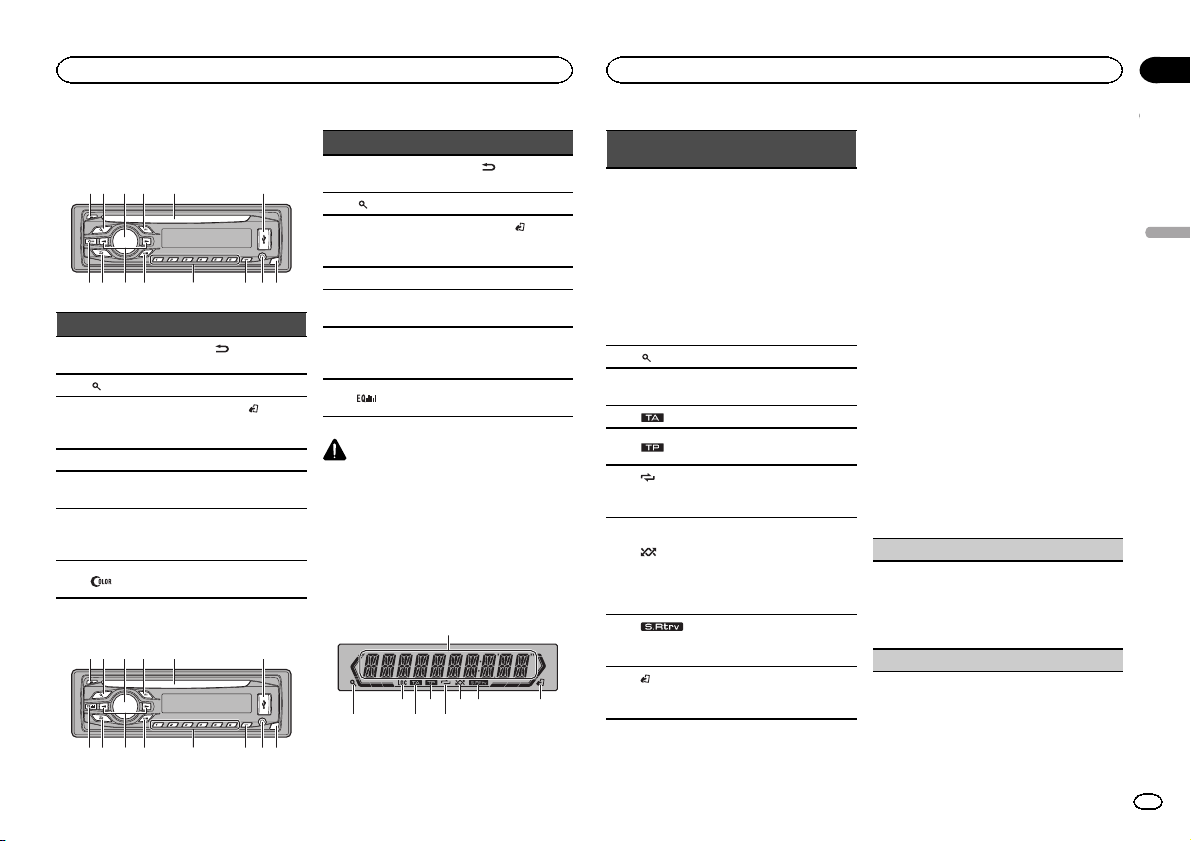
Utilisation de l’appareil
Utilisation de l’appareil
Section
02
Appareil central
DEH-3400UB
12 3 4 5 6
Partie Partie
1 h (éjection) 8
2
(liste) 9 c/d
MULTI-CONTROL
3
(M.C.)
4 SRC/OFF b 1 à 6
Fente de charge-
5
ment des disques
6 Port USB d
(couleur) e
7
DEH-2400UB
12 3 4 5 6
a
c PTY
(retour/affi-
chage)
BAND/
(contrôle de
l’iPod)
Jack d’entrée
AUX (jack stéréo
3,5 mm)
Touche de retrait
de la face avant
Partie Partie
1 h (éjection) 8
(liste) 9 c/d
2
MULTI-CONTROL
3
(M.C.)
4 SRC/OFF b 1 à 6
Fente de charge-
5
ment des disques
6 Port USB d
7
PRÉCAUTION
! Utilisez un câble USB Pioneer optionnel (CD-
U50E) pour connecter le lecteur audio USB/
la mémoire USB, étant donné que n’importe
quel périphérique relié directement à l’appa-
reil dépassera de l’appareil et peut s’avérer
dangereux.
! N’utilisez pas de produits non autorisés.
chage)
BAND/
a
(contrôle de
l’iPod)
c PTY
Jack d’entrée
AUX (jack stéréo
3,5 mm)
Touche de retrait
e
de la face avant
(retour/affi-
Indications affichées
1
87 93 5
Indicateur
Section
d’afficha-
1
ge principal
2
3 LOC
4
5
6
tion de la
lecture)
7
ture aléatoire)
(sound re-
8
triever)
(contrôle
9
de l’iPod)
État
! Syntoniseur : gamme et fré-
quence
! RDS : nom du service de
programme, informations
PTY et autres informations
textuelles
! Lecteur de CD intégré, péri-
phérique de stockage USB
et iPod : temps de lecture
écoulé et informations textuelles
(liste) La fonction liste est utilisée.
L’accord automatique sur une
station locale est en service.
(TA) La fonction TA est en service.
L’appareil est accordé sur une
(TP)
station TP.
(répéti-
La fonction de répétition d’une
plage ou d’un dossier est activée.
La lecture aléatoire est activée.
La source iPod est sélection-
(lec-
née et la fonction de lecture
aléatoire ou lecture aléatoire
de toutes les plages est activée.
La fonction Sound Retriever est
activée.
La fonction iPod de cet appareil est utilisée à partir de votre
iPod.
Menu de configuration
Lorsque vous mettez le contact d’allumage sur
ON après l’installation, le menu de configuration s’affiche sur l’écran.
Vous pouvez configurer les options de menu cidessous.
1 Après avoir installé l’appareil, mettez le
contact d’allumage sur ON.
SET UP s’affiche.
2 Tournez M.C. pour passer à YES. Appuyez
sur M.C. pour sélectionner.
# Si vous n’effectuez aucune opération dans les
30 secondes environ, le menu de configuration ne
s’affichera pas.
# Si vous préférez ne pas effectuer la configuration
pour l’instant, tournez M.C. pour passer à NO. Appuyez pour sélectionner.
Si vous sélectionnez NO, vous ne pouvez pas effectuer de réglage dans le menu de configuration.
3 Effectuez les procédures suivantes pour
configurer le menu.
Pour passer à la prochaine option de menu,
vous devez confirmer votre sélection.
CLOCK SET (réglage de l’horloge)
1 Tournez M.C. pour régler l’heure.
2 Appuyez sur M.C. pour sélectionner les minu-
tes.
3 Tournez M.C. pour régler les minutes.
4 Appuyez sur M.C. pour confirmer la sélection.
FM STEP (incrément d’accord FM)
Français
19
Fr
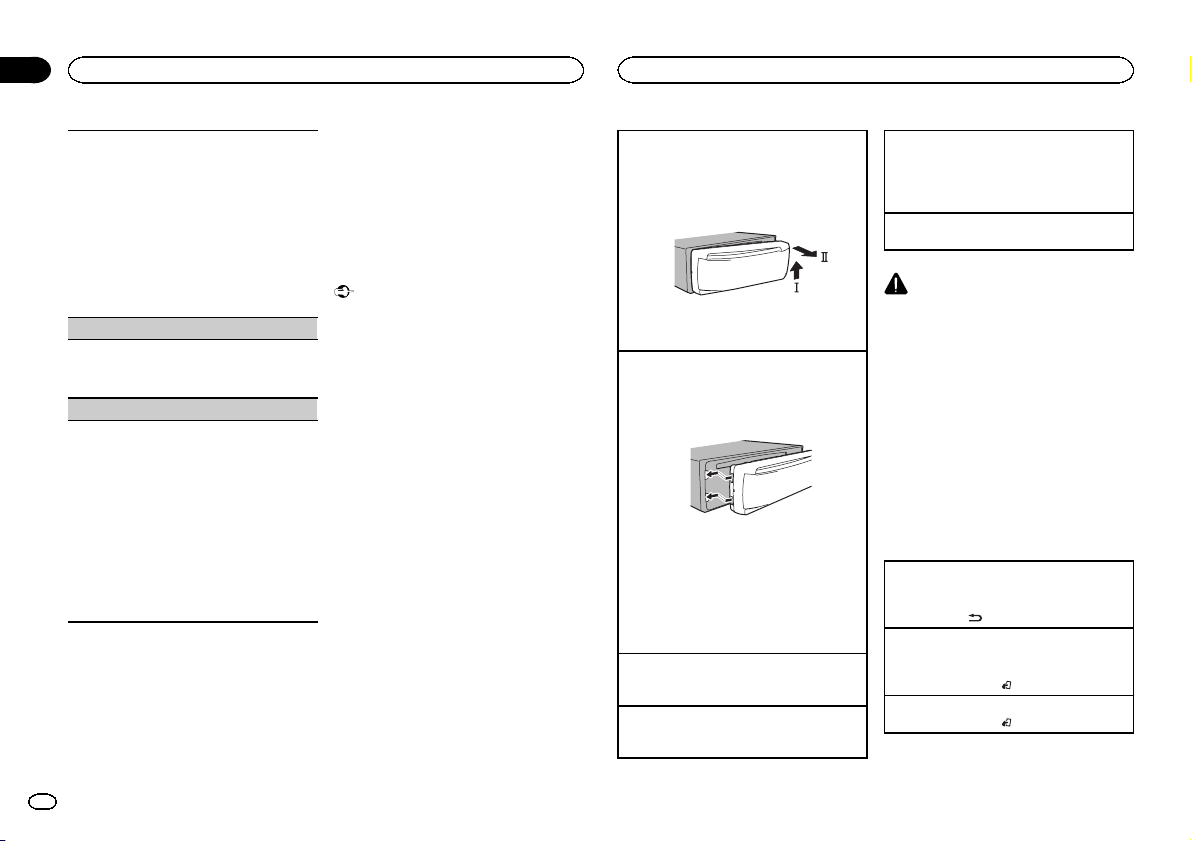
Section
Utilisation de l’appareil
02
Utilisation de l’appareil
Normalement, l’incrément d’accord FM employé
par l’accord automatique est 50 kHz. Quand la
fonction AF ou TA est en service, l’incrément d’accord passe automatiquement à 100 kHz. Il peut
être préférable de régler l’incrément d’accord à
50 kHz quand la fonction AF est en service.
! Pendant l’ accord manuel, l’incrément d’ac-
cord est maintenu à 50 kHz.
1 Tournez M.C. pour choisir l’incrément d’accord
FM.
50 (50 kHz)—100 (100 kHz)
2 Appuyez sur M.C. pour confirmer la sélection.
DEMO (réglage de l’affichage de démonstration)
1 Appuyez sur M.C. pour activer ou désactiver
l’affichage de démonstration.
2 Appuyez sur M.C. pour confirmer la sélection.
TITLE (multilingue)
Cet appareil peut afficher les informations textuelles d’un fichier audio compressé même si elles
sont incorporées dans une langue d’Europe de
l’Ouest ou russe.
! Si la langue incorporée et la langue sélection-
née sont différentes, les informations textuelles peuvent ne pas s’afficher correctement.
! Certains caractères peuvent ne pas s’afficher
correctement.
1 Tournez M.C. pour choisir le réglage désiré.
EUR (Langue européenne)—RUS (Russe)
2 Appuyez sur M.C. pour confirmer la sélection.
QUIT s’affiche.
4 Pour terminer la configuration, tournez
M.C. pour sélectionner YES. Appuyez pour
sélectionner.
# Si vous souhaitez modifier à nouveau vos réglages, tournez M.C. pour passer à NO. Appuyez pour
sélectionner.
Remarques
! Vous pouvez configurer les options de menu
dans les réglages initiaux. Pour des détails
sur les réglages, reportez-vous à la page 26,
Réglages initiaux.
! Vous pouvez annuler le menu de configura-
tion en appuyant sur SRC/OFF.
Opérations de base
Important
! Lorsque vous enlevez ou remontez la face
avant, manipulez-la doucement.
! Évitez de heurter la face avant.
! Conservez la face avant à l’abri des tempéra-
tures élevées et de la lumière directe du soleil.
! Pour éviter d’endommager le périphérique
ou l’intérieur du véhicule, retirez tous les câbles et périphériques connectés à la face
avant, avant d’enlever cette dernière.
Retrait de la face avant pour protéger l’appareil
contre le vol
1 Appuyez sur la touche de retrait pour libérer la
face avant.
2 Poussez la face avant vers le haut (M), puis
tirez-la vers vous (N).
3 Conservez toujours la face avant dans un boî-
tier de protection lorsqu’elle est détachée.
Remontage de la face avant
1 Faites glisser la face avant vers la gauche.
Assurez-vous d’insérer les encoches sur le
côté gauche de l’appareil central dans les fentes du panneau de commande.
2 Appuyez sur le côté droit de la face avant jus-
qu’àcequ’elle soit bien en place.
Si vous ne pouvez pas monter la face avant
sur l’appareil central, vérifiez que la face avant
est correctement placée sur l’appareil central.
Forcer la face avant en position risque de l’ endommager ou d’endommager l’appareil central.
Mise en service de l’appareil
1 Appuyez sur SRC/OFF pour mettre en service
l’appareil.
Mise hors service de l’appareil
1 Maintenez la pression sur SRC/OFF jusqu’àce
que l’appareil soit mis hors tension.
Choix d’une source
1 Appuyez sur SRC/OFF pour parcourir les op-
tions disponibles :
TUNER (syntoniseur)—CD (lecteur de CD intégré)—USB (USB)/iPod (iPod)—AUX (AUX)
Réglage du volume
1 Tournez M.C. pour régler le volume.
PRÉCAUTION
Pour des raisons de sécurité, garez votre véhicule pour retirer la face avant.
Remarque
Si le fil bleu/blanc de l’appareil est relié à la
prise de commande du relais de l’antenne motorisée du véhicule, celle-ci se déploie lorsque la
source est mise en service. Pour rétracter l’antenne, mettez la source hors service.
Opérations communes des
menus pour le(s) menu de
configuration/réglages des
fonctions/réglages audio/
réglages initiaux/listes
Retour à l’affichage précédent
Retour à la liste précédente (le dossier de niveau
immédiatement supérieur)
1 Appuyez sur
Retour à l’affichage ordinaire
Annulation du menu des réglages initiaux/menu
de configuration
1 Appuyez sur BAND/
Retour à l’affichage ordinaire à partir de la liste
1 Appuyez sur BAND/
.
.
.
20
Fr
Utilisation de l’appareil
Utilisation de l’appareil
Section
02
Syntoniseur
Opérations de base
Sélection d’une gamme
1 Appuyez sur BAND/
gamme désirée (F1, F2, F3 en FM ou MW/LW
(PO/GO)) s’affiche.
Rappel des fréquences en mémoire
1 Appuyez sur c ou d.
! Si MAN (accord manuel) est sélectionné dans
le réglage SEEK, vous ne pouvez pas rappeler
les fréquences en mémoire. Vous devez sélectionner PCH (canaux présélectionnés) dans
SEEK. Pour des détails sur les réglages, reportez-vous à la page suivante, SEEK (réglage de la
touche droite/gauche).
Accord manuel (pas à pas)
1 Appuyez sur c ou d.
! Si PCH (canaux présélectionnés) est sélec-
tionné dans le réglage SEEK, vous ne pouvez
pas effectuer un accord de fréquence manuellement. Vous devez sélectionner MAN (accord
manuel) dans SEEK. Pour des détails sur les
réglages, reportez-vous à la page suivante,
SEEK (réglage de la touche droite/gauche) .
Recherche
1 Appuyez de façon continue sur c ou d, puis
relâchez.
Vous pouvez annuler l’accord automatique en
appuyant brièvement sur c ou d.
Lorsque vous appuyez sur c ou d de façon
prolongée, vous pouvez sauter des stations.
L’accord automatique démarre dès que vous
relâchez c ou d.
jusqu’à ce que la
Remarque
La fonction AF (recherche des autres fréquences
possibles) de cet appareil peut être mise en service ou hors service. La fonction AF doit être
hors service pendant une opération d’accord
normal (reportez-vous à la page suivante, AF (re-
cherche des autres fréquences possibles)).
Enregistrement et rappel des
stations pour chaque gamme
Utilisation des touches de présélection
1 Lorsque se présente une station que vous
désirez mettre en mémoire, maintenez la
pression sur une des touches de présélection
(1 à 6) jusqu’à ce que le numéro de la présélection cesse de clignoter.
2 Appuyez sur une des touches de présélection (1 à 6) pour sélectionner la station désirée.
Changement de l’affichage RDS
% Appuyez sur .
Nom du service de programme—Informations
PTY—Divertissement—Fréquence
# Les informations PTY et la fréquence s’affichent
pendant huit secondes.
# En fonction de la gamme sélectionnée, les informations textuelles peuvent être différentes.
Utilisation des fonctions PTY
Vous pouvez rechercher une station à l’aide de
son code PTY (type de programme).
Recherche d’une station RDS en utilisant le code
PTY
Vous pouvez rechercher une station qui diffuse un
type général de programme mentionné dans la
liste de la section suivante. Reportez-vous à cette
page.
1 Appuyez sur PTY.
2 Tournez M.C. pour choisir le type de pro-
gramme.
NEWS/INFO—POPULAR—CLASSICS—
OTHERS
3 Appuyez sur M.C. pour lancer la recherche.
Cet appareil recherche une station qui diffuse
ce type de programme. Quand une station est
trouvée, son nom de service de programme
est affiché.
La liste des types d’émissions (code d’identification du type de programme) est présentée
dans la section suivante. Reportez-vous à cette
page.
! Appuyez à nouveau sur M.C. pour aban-
donner la recherche.
! Le type de l’émission captée peut différer
de celui indiqué par le code PTY transmis.
! Si aucune station ne diffuse d’émission du
type choisi, l’indication NOT FOUND s’affiche pendant environ deux secondes puis
le syntoniseur s’accorde sur la fréquence
d’origine.
Liste des codes PTY
NEWS/INFO
NEWS (Bulletin d’informations), AFFAIRS (Actuali-
tés), INFO (Informations), SPORT (Sports), WEATHER (Météo), FINANCE (Finance)
POPULAR
POP MUS (Musique populaire), ROCK MUS
(Rock), EASY MUS (Musique légère), OTH MUS
(Autre musique), JAZZ (Jazz), COUNTRY (Country), NAT MUS (Musique nationale), OLDIES (Musique du bon vieux temps), FOLK MUS (Folk)
CLASSICS
L. CLASS (Musique classique légère), CLASSIC
(Musique classique)
OTHERS
EDUCATE (Éducation), DRAMA (Drame),
CULTURE (Culture), SCIENCE (Science), VARIED
(Programmes variés), CHILDREN (Émissions destinées aux enfants), SOCIAL (Sujets de société), RE-
LIGION (Religion), PHONE IN (Programmes à
ligne ouverte), TOURING (Voyages), LEISURE (Loisirs), DOCUMENT (Documentaires)
Réglages des fonctions
1 Appuyez sur M.C. pour afficher le menu
principal.
2 Tournez M.C. pour changer l’option de
menu et appuyez pour sélectionner
FUNCTION.
3 Tournez M.C. pour sélectionner la fonction.
Après avoir sélectionné la fonction, effectuez les
procédures de paramétrage suivantes.
# Si la gamme MW/LW (PO/GO) est sélectionnée,
seul BSM, LOCAL et SEEK sont disponibles.
BSM (mémoire des meilleures stations)
La fonction BSM (mémoire des meilleures stations) mémorise automatiquement les six stations
les plus fortes dans l’ordre de la force du signal.
1 Appuyez sur M.C. pour mettre la fonction BSM
en service.
Pour annuler, appuyez de nouveau sur M.C.
Français
21
Fr
Section
Utilisation de l’appareil
02
Utilisation de l’appareil
REGION (stations régionales)
Quand la fonction AF est utilisée, la fonction de recherche des stations régionales limite la sélection
aux stations qui diffusent des programmes régionaux.
1 Appuyez sur M.C. pour mettre la fonction de
recherche des stations régionales en ser vice
ou hors service.
LOCAL (accord automatique sur une station locale)
L’accord automatique sur une station locale ne
s’intéresse qu’aux stations de radio dont le signal
reçu est suffisamment puissant pour garantir une
réception de bonne qualité.
1 Appuyez sur M.C. pour choisir le mode désiré.
FM : OFF—LV 1 —LV2 —LV3 —LV4
MW/LW (PO/GO) : OFF—LV1 —LV 2
La valeur la plus élevée permet la réception
des seules stations très puissantes ; les autres
valeurs autorisent la réception de stations
moins puissantes.
PTY SEARCH (sélection du type de programme)
Vous pouvez rechercher une station à l’aide de
son code PTY (type de programme).
1 Appuyez sur M.C. pour afficher le mode de pa-
ramétrage.
2 Tournez M.C. pour choisir le réglage désiré.
NEWS/INFO—POPULAR—CLASSICS—
OTHERS
3 Appuyez sur M.C. pour lancer la recherche.
Cet appareil recherche une station qui diffuse
ce type de programme. Quand une station est
trouvée, son nom de service de programme est
affiché.
Pour des informations PTY (code d’identification du type de programme), reportez-vous à la
page précédente.
Le type de l’émission captée peut différer de
celui indiqué par le code PTY transmis.
Si aucune station ne diffuse d’émission du
type choisi, l’indication NOT FOUND s’affiche
pendant environ deux secondes puis le syntoniseur s’accorde sur la fréquence d’origine.
TA (attente de bulletins d’informations routières)
1 Appuyez sur M.C. pour mettre en service ou
hors service l’attente d’un bulletin d’ informations routières.
AF (recherche des autres fréquences possibles)
1 Appuyez sur M.C. pour mettre la fonction AF
en service ou hors service.
NEWS (interruption pour réception d’un bulletin
d’informations)
1 Appuyez sur M.C. pour mettre la fonction
NEWS (bulletin d’informations) en service ou
hors service.
SEEK (réglage de la touche droite/gauche)
Vous pouvez assigner une fonction aux touches
droite et gauche de l’appareil.
Sélectionnez MAN (accord manuel) pour effectuer
un accord de fréquence manuellement ou sélectionnez PCH (canaux présélectionnés) pour changer de canal présélectionné.
1 Appuyez sur M.C. pour sélectionner MAN ou
PCH.
CD/CD-R/CD-RW et
périphériques de stockage USB
Opérations de base
Lecture d’un CD/CD-R/CD-RW
1 Introduisez un disque, l’étiquette vers le haut,
dans le logement de chargement des disques.
Éjection d’un CD/CD-R/CD-RW
1 Appuyez sur h.
Lecture de plages musicales sur un périphérique
de stockage USB
1 Ouvrez le capot du port USB.
2 Branchez le périphérique de stockage USB en
utilisant un câble USB.
Une plage musicale sera lue automatiquement.
Arrêt de la lecture de fichiers sur un périphérique
de stockage USB
1 Vous pouvez débrancher le périphérique de
stockage USB à tout moment.
L’appareil arrête la lecture.
Sélection d’un dossier
1 Appuyez sur 1/
Sélection d’une plage
1 Appuyez sur c ou d.
ou 2/ .
Avance ou retour rapide
1 Appuyez de façon continue sur c ou d.
! Lors de la lecture d’un disque d’audio
compressé, aucun son n’est émis pendant l’avance ou le retour rapide.
Retour au dossier racine
1 Appuyez sur BAND/
Commutation entre les modes audio compressé
et CD-DA
1 Appuyez sur BAND/
Commutation entre les périphériques de mémoire
de lecture
Vous pouvez basculer entre les périphériques de
mémoire sur les périphériques de stockage USB
ayant plus d’un périphérique de mémoire compatible avec la norme Mass Storage Class pour effectuer la lecture.
1 Appuyez sur BAND/
! Vous pouvez basculer entre 32 différents péri-
phériques de mémoire maximum.
de façon prolongée.
.
.
Remarque
Débranchez les périphériques de stockage USB
de l’ appareil lorsque vous ne l’utilisez pas.
Affichage des informations
textuelles
Sélection des informations textuelles désirées
1 Appuyez sur
! Selon la version de iTunes utilisée pour enre-
gistrer les fichiers MP3 sur un disque ou les
types de fichiers média, des informations textuelles incompatibles enregistrées dans le fichier audio peuvent ne pas s’afficher
correctement.
! Les informations textuelles pouvant être modi-
fiées dépendent du média.
.
22
Fr
Utilisation de l’appareil
Utilisation de l’appareil
Section
02
Sélection et lecture des fichiers/
plages à partir de la liste des noms
1 Appuyez sur pour passer en mode
liste des noms de fichiers/plages.
2 Utilisez M.C. pour sélectionner le nom de
fichier (ou nom de dossier) désiré.
Modification du nom de fichier ou de dossier
1 Tournez M.C.
Lecture
1 Lorsqu’un fichier ou une plage est sélection-
né(e), appuyez sur M.C.
Affichage d’une liste des fichiers (ou des dossiers)
dans le dossier sélectionné
1 Quand un dossier est sélectionné, appuyez sur
M.C.
Lecture d’une plage musicale dans le dossier sélectionné
1 Quand un dossier est sélectionné, appuyez sur
M.C. de façon prolongée.
Utilisation avancée à l’aide de
touches spéciales
Sélection d’une étendue de répétition de lecture
1 Appuyez sur 6/
disponibles :
CD/CD-R/CD-RW
! ALL – Répétition de toutes les plages
! ONE – Répétition de la plage en cours de
lecture
! FLD – Répétition du dossier en cours de
lecture
Lecteur audio USB/mémoire USB
! ALL – Répétition de tous les fichiers
! ONE – Répétition du fichier en cours de
lecture
! FLD – Répétition du dossier en cours de
lecture
Lecture des plages dans un ordre aléatoire
1 Appuyez sur 5/
la lecture aléatoire.
Les plages d’une étendue de répétition sélectionnée sont lues dans un ordre aléatoire.
! Pour changer de plage musicale pendant la
lecture aléatoire, appuyez sur d pour passer à
la plage suivante. Appuyer sur c permet de recommencer la lecture de la plage musicale en
cours à partir du début.
Pause de la lecture
1 Appuyez sur 4/PAUSE pour mettre en pause
ou reprendre la lecture.
Amélioration de l’audio compressé et restauration
d’un son riche (sound retriever (correcteur de son
compressé))
1 Appuyez sur 3/S.Rtrv pour parcourir les op-
tions disponibles :
1—2—OFF (désactivé)
1 est efficace pour les faibles taux de compres-
sion et 2 est efficace pour les taux de compression élevés.
pour parcourir les options
pour activer ou désactiver
Réglages des fonctions
1 Appuyez sur M.C. pour afficher le menu
principal.
2 Tournez M.C. pour changer l’option de
menu et appuyez pour sélectionner
FUNCTION.
3 Tournez M.C. pour sélectionner la fonction.
Après avoir sélectionné la fonction, effectuez les
procédures de paramétrage suivantes.
REPEAT (répétition de la lecture)
1 Appuyez sur M.C. pour sélectionner une éten-
due de répétition de lecture.
Pour les détails, reportez-vous à cette page, Sé-
lection d’une étendue de répétition de lecture.
RANDOM (lecture aléatoire)
1 Appuyez sur M.C. pour mettre en service ou
hors service la lecture aléatoire.
PAUSE (pause)
1 Appuyez sur M.C. pour mettre en pause ou re-
prendre la lecture.
S.RTRV (sound retriever)
Améliore automatiquement l’audio compressé et
restaure un son riche.
1 Appuyez sur M.C. pour choisir le mode désiré.
Pour les détails, reportez-vous à cette page,
Amélioration de l’audio compressé et restauration d’un son riche (sound re triever (correcteur
de son compressé)).
iPod
Opérations de base
Lecture de plages musicales sur un iPod
1 Ouvrez le capot du port USB.
2 Connecter un iPod au câble USB à l’aide d’un
connecteur Dock iPod.
Une plage musicale sera lue automatiquement.
Sélection d’une plage musicale (d’un chapitre)
1 Appuyez sur c ou d.
Sélection d’un album
1 Appuyez sur 1/
! L’album peut ne pas être sélectionné correcte-
ment s’il y a plus d’un album avec le même
titre sur l’iPod. Sélectionnez l’album que vous
souhaitez écouter à l’aide de la recherche par
liste. Pour les détails, reportez-vous à la page
suivante, Recherche d’une plage musicale.
Avance ou retour rapide
1 Appuyez de façon continue sur c ou d.
Remarques
! L’iPod ne peut pas être mis en service ou
hors service lorsque le mode de commande
est réglé sur CTRL AUDIO.
! Débranchez les écouteurs de l’iPod avant de
le connecter à cet appareil.
! L’iPod sera mis hors service environ deux mi-
nutes après que le contact d’allumage est
mis en position OFF (coupé).
Affichage des informations
textuelles
Sélection des informations textuelles désirées
1 Appuyez sur
ou 2/ .
.
Français
23
Fr
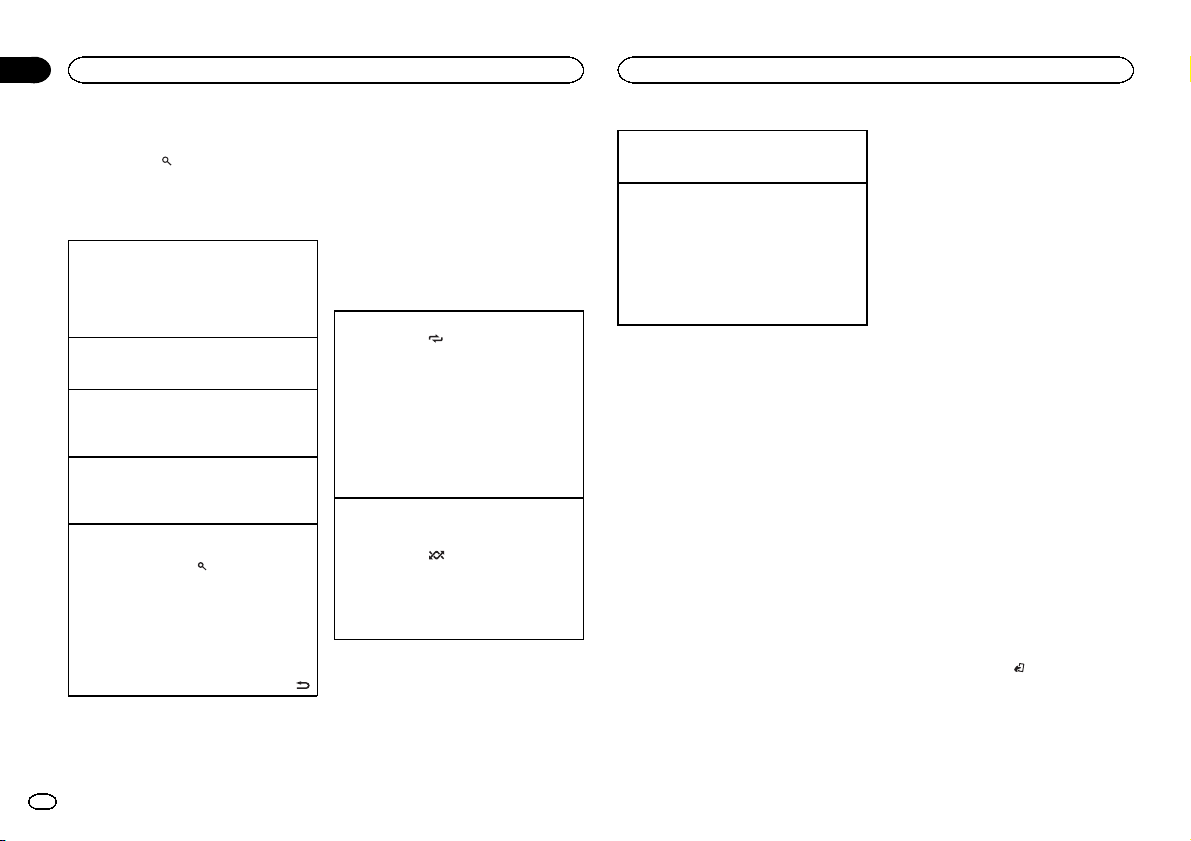
Section
Utilisation de l’appareil
02
Utilisation de l’appareil
Recherche d’une plage musicale
1 Appuyez sur pour passer au menu
principal de la recherche par liste.
2 Utilisez M.C. pour sélectionner une catégorie/plage musicale.
Modification du nom d’une plage musicale/catégorie
1 Tournez M.C.
Listes de lecture—interprètes—albums—plages musicales—podcasts—genres—compositeurs—livres audio
Lecture
1 Quand une plage musicale est sélectionnée,
appuyez sur M.C.
Affichage d’une liste des plages musicales dans
la catégorie sélectionnée
1 Quand une catégorie est sélectionnée, ap-
puyez sur M.C.
Lecture d’une plage musicale dans la catégorie
sélectionnée
1 Quand une catégorie est sélectionnée, ap-
puyez sur M.C. de façon prolongée.
Recherche par ordre alphabétique dans la liste
1 Lorsque la liste de la catégorie sélectionnée
s’affiche, appuyez sur
de recherche par ordre alphabétique.
! Vous pouvez également passer en mode
de recherche par ordre alphabétique en
tournant M.C. deux fois.
2 Tournez M.C. pour sélectionner une lettre.
3 Appuyez sur M.C. pour afficher la liste alpha-
bétique.
! Pour annuler la recherche, appuyez sur
24
Fr
pour activer le mode
Remarques
! Vous pouvez lire les listes de lecture crées à
l’aide de l’application PC (MusicSphere).
L’application sera disponible sur notre site
web.
! Les listes de lecture créées à l’aide de l’appli-
cation PC (MusicSphere) sont affichées sous
forme abrégée.
Utilisation avancée à l’aide de
touches spéciales
Sélection d’une étendue de répétition de lecture
1 Appuyez sur 6/
disponibles :
! OFF – Répétition désactivée
! ONE – Répétition de la plage musicale en
cours de lecture
! ALL – Répétition de toutes les plages musi-
cales de la liste sélectionnée
! Vous ne pouvez pas sélectionner OFF quand
CTRL AUDIO est sélectionné. Reportez-vous à
cette page, Utilisation de la fonction iPod de cet
appareil à partir de votre iPod.
Lecture de toutes les plages musicales dans un
ordre aléatoire (lecture aléatoire de toutes les pla-
ges)
1 Appuyez sur 5/
fonction de lecture aléatoire de toutes les plages.
! Lorsque le mode de commande est réglé sur
CTRL iPod/CTRL APP, la lecture aléatoire est
activée.
.
pour parcourir les options
pour mettre en service la
Pause de la lecture
1 Appuyez sur 4/PAUSE pour mettre en pause
ou reprendre la lecture.
Amélioration de l’audio compressé et restauration
d’un son riche (sound retriever (correcteur de son
compressé))
1 Appuyez sur 3/S.Rtrv pour parcourir les op-
tions disponibles :
1—2—OFF (désactivé)
1 est efficace pour les faibles taux de compres-
sion et 2 est efficace pour les taux de compression élevés.
Lecture de plages musicales
liées à la plage musicale en
cours de lecture
Vous pouvez lire des plages musicales dans les
listes suivantes.
• Liste d’albums de l’interprète en cours de lecture
• Liste de plages musicales de l’album en cours
de lecture
• Liste d’albums du genre en cours de lecture
1 Appuyez de façon prolongée sur M.C.
pour activer le mode de lecture en liaison.
2 Tournez M.C. pour changer le mode, appuyez pour sélectionner.
! ARTIST – Lit un album de l’interprète en
cours de lecture.
! ALBUM – Lit une plage musicale de l’album
en cours de lecture.
! GENRE – Lit un album du genre en cours de
lecture.
La plage musicale/l’album sélectionné sera lu
après la lecture de la plage musicale en cours.
Remarques
! La plage musicale/l’album sélectionné peut
être annulé si vous utilisez d’autres fonctions
que la fonction de recherche de liaison (retour rapide et avance rapide, par exemple).
! En fonction de la plage musicale sélection-
née pour la lecture, la fin de la plage en
cours de lecture et le début de la plage musicale/de l’album sélectionné peuvent être
tronqués.
Utilisation de la fonction iPod de
cet appareil à partir de votre iPod
Vous pouvez écouter l’audio des applications de
votre iPod depuis les haut-parleurs de votre véhicule lorsque CTRL APP est sélectionné.
! Cette fonction n’est pas compatible avec les
iPod nano 1ère génération.
Le mode APP est compatible avec les modèles
d’iPod suivants.
! iPhone 4 (version logicielle 4.1 ou ultérieure)
! iPhone 3GS (version logicielle 3.0 ou ulté-
rieure)
! iPhone 3G (version logicielle 3.0 ou ulté-
rieure)
! iPhone (version logicielle 3.0 ou ultérieure)
! iPod touch 4ème génération (version logi-
cielle 4.1 ou ultérieure)
! iPod touch 3ème génération (version logi-
cielle 3.0 ou ultérieure)
! iPod touch 2ème génération (version logi-
cielle 3.0 ou ultérieure)
! iPod touch 1ère génération (version logicielle
3.0 ou ultérieure)
% Appuyez sur BAND/
mode de commande.
! CTRL iPod – La fonction iPod de cet appareil
peut être utilisée à partir de l’iPod connecté.
! CTRL APP – Lecture de l’audio des applica-
tions de votre iPod.
! CTRL AUDIO – La fonction iPod de cet appa-
reil peut être utilisée à partir de cet appareil.
pour changer le
Utilisation de l’appareil
Utilisation de l’appareil
Section
02
Remarques
! Régler le mode de commande sur
CTRL iPod/CTRL APP met en pause la lecture d’ une plage musicale. Utilisez l’iPod
pour reprendre la lecture.
! Les fonctions suivantes sont toujours acces-
sibles à partir de l’appareil même si le mode
de commande est réglé sur CTRL iPod/
CTRL APP.
— Pause
— Avance/retour rapide
— Avance/retour d’une plage musicale
! Lorsque le mode de commande est réglé sur
CTRL iPod, les opérations sont limitées
comme suit :
— Les réglages des fonctions ne sont pas dispo-
nibles.
— La fonction de recherche ne peut pas être uti-
lisée à partir de cet appareil.
Réglages des fonctions
1 Appuyez sur M.C. pour afficher le menu
principal.
2 Tournez M.C. pour changer l’option de
menu et appuyez pour sélectionner
FUNCTION.
3 Tournez M.C. pour sélectionner la fonction.
Après avoir sélectionné la fonction, effectuez les
procédures de paramétrage suivantes.
! Lorsque le mode de commande est réglé sur
CTRL iPod/CTRL APP, uniquement PAUSE ou
S.RTRV est disponible.
REPEAT (répétition de la lecture)
1 Appuyez sur M.C. pour sélectionner une éten-
due de répétition de lecture.
Pour les détails, reportez-vous à la page précédente, Sélection d’une étendue de répétition de
lecture.
SHUFFLE (lecture aléatoire)
1 Appuyez sur M.C. pour choisir votre réglage fa-
vori.
! SNG – Lecture des plages musicales dans
un ordre aléatoire à l’intérieur de la liste sélectionnée.
! ALB – Lecture dans l’ordre de plages musi-
cales à partir d’un album sélectionné au
hasard.
! OFF – Annulation de la lecture aléatoire.
SHUFFLE ALL (lecture aléatoire de toutes les pla-
ges)
1 Appuyez sur M.C. pour mettre en service la
lecture aléatoire de toutes les plages.
Pour mettre hors service, mettez SHUFFLE
hors service dans le menu FUNCTION.
LINK PLAY (lecture en liaison)
1 Appuyez sur M.C. pour afficher le mode de pa-
ramétrage.
2 Tournez M.C. pour changer le mode, appuyez
pour sélectionner.
Pour des détails sur les réglages, reportez-vous
à la page précédente, Lecture de plages musi-
cales liées à la plage musicale en cours de lecture.
PAUSE (pause)
1 Appuyez sur M.C. pour mettre en pause ou re-
prendre la lecture.
AUDIO BOOK (vitesse du livre audio)
1 Appuyez sur M.C. pour afficher le mode de pa-
ramétrage.
2 Tournez M.C. pour choisir le réglage désiré.
! FASTER – Lecture plus rapide que la vi-
tesse normale
! NORMAL – Lecture à la vitesse normale
! SLOWER – Lecture plus lente que la vitesse
normale
3 Appuyez sur M.C. pour confirmer la sélection.
S.RTRV (sound retriever)
Améliore automatiquement l’audio compressé et
restaure un son riche.
1 Appuyez sur M.C. pour choisir le mode désiré.
Pour les détails, reportez-vous à la page précédente, Amélioration de l’audio compressé et res-
tauration d’un son riche (sound r etriever
(correcteur de son compressé)).
Réglages sonores
1 Appuyez sur M.C. pour afficher le menu
principal.
2 Tournez M.C. pour changer l’option de
menu et appuyez pour sélectionner AUDIO.
3 Tournez M.C. pour sélectionner la fonction audio.
Après avoir sélectionné la fonction audio, effectuez les procédures de paramétrage suivantes.
FAD/BAL (réglage de l’équilibre avant-arrière/
droite-gauche)
1 Appuyez sur M.C. pour afficher le mode de pa-
ramétrage.
2 Appuyez sur M.C. pour basculer entre l’équili-
bre avant-arrière/droite-gauche.
3 Tournez M.C. pour régler l’équilibre sonore
entre les haut-parleurs.
! Si les réglages de la sortie arrière et de la sortie
RCA sont SW, vous ne pouvez pas régler l’équilibre des haut-parleurs avant-arrière. Reportezvous à la page suivante, REAR-SP (réglage de la
sortie arrière). Reportez-vous à la page 27,
PREOUT (réglage du préamp).
PRESET EQ (rappel de l’égaliseur)
1 Appuyez sur M.C. pour afficher le mode de pa-
ramétrage.
2 Tournez M.C. pour sélectionner l’égaliseur.
DYNAMIC—VOCAL—NATURAL—CUSTOM
—FLAT—POWERFUL
3 Appuyez sur M.C. pour confirmer la sélection.
! Vous pouvez aussi changer l’égaliseur en ap-
puyant répétitivement sur
TONE CTRL (réglage de l’égaliseur)
! Les réglages de la courbe d’égalisation ajustée
sont mémorisés dans CUSTOM.
1 Appuyez sur M.C. pour afficher le mode de pa-
ramétrage.
2 Appuyez sur M.C. pour sélectionner BASS
(graves)/MID (médiums)/TREBLE (aigus).
3 Tournez M.C. pour régler le niveau.
Plage de réglage : +6 à –6
LOUD (correction physiologique)
La correction physiologique a pour objet d’accentuer les hautes et les basses fréquences à bas niveaux d’écoute.
1 Appuyez sur M.C. pour choisir le mode désiré.
OFF (désactivé)—LOW (faible)—HI (élevé)
(DEH-2400UB).
Français
25
Fr

Section
Utilisation de l’appareil
02
Utilisation de l’appareil
SUB.W (réglage en service/hors service du hautparleur d’extrêmes graves)
Cet appareil est équipé d’une sortie haut-parleur
d’extrêmes graves qui peut être mise en service
ou hors service.
1 Appuyez sur M.C. pour choisir le mode désiré.
NOR (phase normale)—REV (phase inversée)
—OFF (haut-parleur d’extrêmes graves désactivé)
SUB.W CTRL (réglage du haut-parleur d’extrêmes
graves)
La fréquence de coupure et le niveau de sortie
peuvent être réglés lorsque la sortie haut-parleur
d’extrêmes graves est activée.
Seules les fréquences inférieures à celles de la
plage sélectionnée sont produites par le haut-parleur d’extrêmes graves.
! Quand vous sélectionnez OFF dans SUB.W,
vous ne pouvez pas sélectionner cette fonction. Pour les détails, reportez-vous à cette
page, SUB.W (réglage en service/hors service
du haut-parleur d’extrêmes graves).
1 Appuyez sur M.C. pour afficher le mode de pa-
ramétrage.
2 Appuyez sur M.C. pour basculer entre la fré-
quence de coupure et le niveau de sortie du
haut-parleur d’extrêmes graves.
Fréquence de coupure (L’affichage de la fré-
quence de coupure clignote.)—Niveau de sortie (L’affichage du niveau de sortie clignote.)
3 Tournez M.C. pour choisir le réglage désiré.
Fréquence de coupure : 50HZ—63HZ—80HZ
—100HZ—125HZ
Niveau de sortie : –24 à +6
26
Fr
SLA (réglage du niveau de la source)
La fonction SLA (réglage du niveau de la source)
permet d’ajuster les niveaux sonores de chaque
source afin d’éviter que ne se produisent de fortes
variations d’amplitude sonore lorsque vous passez
d’une source à l’autre.
! Les réglages sont basés sur le niveau du vo-
lume FM qui lui, demeure inchangé.
! Le niveau du volume MW/LW (PO/GO) peut
également être réglé avec cette fonction.
! Si FM a été choisie comme source, vous ne
pouvez pas afficher la fonction SLA.
1 Appuyez sur M.C. pour afficher le mode de pa-
ramétrage.
2 Tournez M.C. pour régler le volume de la
source.
Plage de réglage : +4 à –4
3 Appuyez sur M.C. pour confirmer la sélection.
Réglages initiaux
Important
La fonction PW SAVE (économie d’énergie) est
annulée si la batterie du véhicule est déconnectée et devra être réactivée une fois la batterie reconnectée. Quand PW SAVE est hors service, il
est possible que selon la méthode de connexion
utilisée l’appareil continue à consommer du
courant de la batterie si le commutateur de
contact de votre véhicule ne possède pas de position ACC (accessoire).
1 Maintenez la pression sur SRC/OFF jusqu’à ce que l’appareil soit mis hors tension.
2 Appuyez de façon prolongée sur SRC/
OFF jusqu’à ce que le nom de la fonction apparaisse sur l’affichage.
3 Tournez M.C. pour sélectionner le réglage
initial.
Après avoir sélectionné le réglage initial, effectuez les procédures de paramétrage suivantes.
CLOCK SET (réglage de l’horloge)
1 Appuyez sur M.C. pour afficher le mode de pa-
ramétrage.
2 Appuyez sur M.C. pour sélectionner le seg-
ment de l’affichage de l’horloge que vous voulez régler.
Heure—Minute
3 Tournez M.C. pour régler l’horloge.
CLOCK (affichage de l’horloge)
Vous pouvez mettre l’affichage de l’horloge en service ou hors service.
L’affichage de l’horloge disparaît momentanément
quand une autre opération est réalisée ; il apparaît
à nouveau 25 secondes plus tard.
1 Appuyez sur M.C. pour mettre l’affichage de
l’horloge en service ou hors service.
FM STEP (incrément d’accord FM)
Normalement, l’incrément d’accord FM employé
par l’accord automatique est 50 kHz. Quand la
fonction AF ou TA est en service, l’incrément d’accord passe automatiquement à 100 kHz. Il peut
être préférable de régler l’incrément d’accord à
50 kHz quand la fonction AF est en service.
! Pendant l’ accord manuel, l’incrément d’ac-
cord est maintenu à 50 kHz.
1 Appuyez sur M.C. pour choisir l’incrément
d’accord FM.
50 (50 kHz)—100 (100 kHz)
AUTO-PI (recherche automatique PI)
L’appareil peut rechercher automatiquement une
autre station avec le même type de programme, y
compris si l’accord a été obtenu par le rappel
d’une fréquence en mémoire.
1 Appuyez sur M.C. pour mettre en service ou
hors service la recherche automatique PI.
AUX (entrée auxiliaire)
Activez ce réglage lorsque vous utilisez un appareil auxiliaire connecté à cet appareil.
1 Appuyez sur M.C. pour mettre AUX en service
ou hors service.
USB PNP (Plug-and-Play)
Ce réglage vous permet de commuter votre source
sur USB/iPod automatiquement.
1 Appuyez sur M.C. pour activer ou désactiver la
fonction Plug-and-Play.
ON – Lorsqu’un périphérique de stockage
USB ou un iPod est connecté, la source peut,
selon le type de périphérique, basculer automatiquement sur USB/iPod lorsque vous mettez le moteur en marche. Si vous déconnectez
le périphérique de stockage USB/l’iPod, la
source de cet appareil est mise hors tension.
OFF – Lorsqu’un périphérique de stockage
USB ou un iPod est connecté, la source n’est
pas automatiquement commutée sur USB/
iPod. Basculez la source manuellement sur
USB/iPod.
REAR-SP (réglage de la sortie arrière)
Utilisation de l’appareil
Utilisation de l’appareil
Section
02
La sortie de connexion des haut-parleurs arrière
peut être utilisée pour la connexion d’un haut-parleur pleine gamme ou d’un haut-parleur d’extrêmes graves.
Si vous basculez sur SW, vous pouvez connecter
une borne de haut-parleur arrière à un haut-parleur d’extrêmes graves directement, sans utiliser
un amplificateur auxiliaire.
Initialement, REAR-SP est réglé pour la connexion
d’un haut-parleur arrière pleine gamme (FUL).
1 Appuyez sur M.C. pour choisir le mode désiré.
FUL—SW
! Même si vous changez ce réglage, la sortie
ne fonctionnera pas si OFF est sélectionné
dans SUB.W. (Reportez-vous à la page précédente, SUB.W (réglage en service/hors
service du haut-parleur d’extrêmes graves).)
! Si vous modifiez ce réglage, la sortie haut-
parleur d’extrêmes graves est repositionnée sur les réglages d’usine dans le menu
audio.
PREOUT (réglage du préamp)
Les sorties RCA peuvent être utilisées pour la
connexion d’un haut-parleur arrière ou d’un hautparleur d’extrêmes graves..
Si vous basculez sur SW, vous pouvez connecter
une borne de haut-parleur arrière à un haut-parleur d’extrêmes graves directement, sans utiliser
un amplificateur auxiliaire.
Initialement, PREOUT est réglé pour la connexion
d’un haut-parleur arrière pleine gamme (SW).
1 Appuyez sur M.C. pour choisir le mode désiré.
SW—REA
! Même si vous changez ce réglage, la sortie
ne fonctionnera pas si OFF est sélectionné
dans SUB.W. (Reportez-vous à la page précédente, SUB.W (réglage en service/hors
service du haut-parleur d’extrêmes graves).)
! Si vous modifiez ce réglage, la sortie haut-
parleur d’extrêmes graves est repositionnée sur les réglages d’usine dans le menu
audio.
DEMO (réglage de l’affichage de démonstration)
1 Appuyez sur M.C. pour mettre l’affichage de
démonstration en service ou hors service.
! Si PW SAVE est activé, DEMO ne peut pas
être sélectionné.
SCROLL (réglage du mode de défilement)
Quand la fonction Ever Scroll est réglée sur ON,
les informations textuelles enregistrées défilent en
permanence. Réglez-la sur OFF si vous préférez
que l’information défile une fois seulement.
1 Appuyez sur M.C. pour mettre la fonction de
défilement permanent en service ou hors service.
TITLE (multilingue)
Cet appareil peut afficher les informations textuelles d’un fichier audio compressé même si elles
sont incorporées dans une langue d’Europe de
l’Ouest ou russe.
! Si la langue incorporée et la langue sélection-
née sont différentes, les informations textuelles peuvent ne pas s’afficher correctement.
! Certains caractères peuvent ne pas s’afficher
correctement.
1 Appuyez sur M.C. pour choisir le mode désiré.
EUR (Langue européenne)—RUS (Russe)
PW SAVE (économie d’énergie)
Activer cette fonction vous permet de réduire la
consommation de la batterie.
! La mise en service de la source est la seule
opération permise quand cette fonction est en
service.
1 Appuyez sur M.C. pour mettre l’économie d’é-
nergie en service ou hors service.
Choix de la couleur de
l’éclairage
Seulement pour le DEH-3400UB
Cet appareil dispose d’un éclairage multicolore.
Vous pouvez sélectionner les couleurs désirées
pour les touches et l’écran de cet appareil. Il est
également possible de personnaliser les couleurs que vous voulez utiliser.
Sélection de la couleur des
touches dans la liste des
couleurs d’éclairage
Seulement pour le DEH-3400UB
Vous pouvez sélectionner les couleurs désirées
pour les touches de cet appareil.
1 Appuyez sur
2 Tournez M.C. pour afficher KEY COLOR,
puis appuyez pour sélectionner.
3 Tournez M.C. pour choisir la couleur d’éclairage.
Vous pouvez sélectionner une option dans la
liste suivante.
! 30 couleurs présélectionnées (WHITE à
ROSE)
! SCAN (parcourir les différentes couleurs)
! 3 catégories de couleurs (WARM, AMBIENT,
CALM)
! CUSTOM (couleur d’éclairage personnalisée)
4 Appuyez sur M.C. pour confirmer la sélection.
Remarques
! Quand SCAN est sélectionné, les 30 couleurs
présélectionnées défilent automatiquement.
! Quand WARM est sélectionné, les couleurs
chaudes défilent automatiquement.
! Quand AMBIENT est sélectionné, les cou-
leurs ambiantes défilent automatiquement.
! Quand CALM est sélectionné, les couleurs
calmes défilent automatiquement.
! Quand CUSTOM est sélectionné, la couleur
personnalisée enregistrée est sélectionnée.
.
! Pour annuler la sélection de la couleur d’é-
clairage, appuyez sur
.
Sélection de la couleur d’éclairage
de l’afficheur à partir de la liste
des couleurs d’éclairage
Seulement pour le DEH-3400UB
Vous pouvez sélectionner les couleurs souhaitées pour l’afficheur de cet appareil.
1 Appuyez sur
2 Tournez M.C. pour afficher DISP COLOR,
puis appuyez pour sélectionner.
3 Tournez M.C. pour choisir la couleur d’éclairage.
Vous pouvez sélectionner une option dans la
liste suivante.
! 30 couleurs présélectionnées (WHITE à
ROSE)
! SCAN (parcourir les différentes couleurs)
! 3 catégories de couleurs (WARM, AMBIENT,
CALM)
! CUSTOM (couleur d’éclairage personnalisée)
4 Appuyez sur M.C. pour confirmer la sélection.
.
Remarque
Pour des détails sur les couleurs de la liste, reportez-vous à cette page, Sélection de la couleur
des touches dans la liste des couleurs d’éclairage.
Sélection de la couleur d’éclairage
des touches et de l’afficheur à partir
de la liste des couleurs d’éclairage
Seulement pour le DEH-3400UB
Vous pouvez sélectionner les couleurs souhaitées pour les touches et l’afficheur de cet appareil.
Français
27
Fr

Section
Utilisation de l’appareil
02
Utilisation de l’appareil
1 Appuyez sur .
2 Tournez M.C. pour afficher BOTH COLOR,
puis appuyez pour sélectionner.
3 Tournez M.C. pour choisir la couleur d’éclairage.
Vous pouvez sélectionner une option dans la
liste suivante.
! 30 couleurs présélectionnées (WHITE à
ROSE)
! SCAN (parcourir les différentes couleurs)
4 Appuyez sur M.C. pour confirmer la sélection.
Remarques
! Vous ne pouvez pas sélectionner 3 catégories
de couleurs présélectionnées et CUSTOM
dans cette fonction.
! Une fois que vous avez sélectionné une cou-
leur dans cette fonction, les couleurs des
touches et de l’écran de l’appareil passent
automatiquement à la couleur que vous avez
sélectionnée.
! Pour des détails sur les couleurs de la liste,
reportez-vous à la page précédente, Sélection
de la couleur des touches dans la liste des
couleurs d’éclairage.
Personnalisation de la couleur
d’éclairage
Seulement pour le DEH-3400UB
1 Appuyez sur
2 Tournez M.C. pour afficher KEY COLOR
ou DISP COLOR. Appuyez pour sélectionner.
3 Appuyez sur M.C. jusqu’à ce que le réglage de la couleur d’éclairage personnalisée
apparaisse sur l’afficheur.
.
4 Appuyez sur M.C. pour sélectionner la
couleur primaire.
R (rouge)—G (vert)—B (bleu)
5 Tournez M.C. pour régler le niveau de la
luminosité.
Plage de réglage: 0 à 60
# Vous ne pouvez pas sélectionner un niveau endessous de 10 pour les trois couleurs R (rouge), G
(vert) et B (bleu) en même temps.
# Vous pouvez aussi effectuer la même opération
sur d’autres couleurs.
Remarques
! Vous ne pouvez pas créer de couleur d’éclai-
rage personnalisée si l’option SCAN ou une
catégorie de couleurs (WARM, AMBIENT ou
CALM) est sélectionnée.
! Vous pouvez créer des couleurs d’éclairage
personnalisées pour KEY COLOR et
DISP COLOR.
Mise en service ou hors service
de l’atténuateur de luminosité
Vous pouvez ajuster la luminosité de l’éclairage.
% Appuyez sur
de façon prolongée.
Utilisation d’ une source AUX
1 Insérez la mini prise stéréo dans le jack
d’entrée AUX.
2 Appuyez sur SRC/OFF pour choisir AUX
comme source.
Remarque
Vous ne pouvez pas sélectionner AUX à moins
que le réglage auxiliaire soit activé. Pour plus de
détails, reportez-vous à la page 26, AUX (entrée
auxiliaire).
Coupure du son
Le son est coupé automatiquement quand :
! Un appel est effectué ou reçu sur un télé-
phone cellulaire connecté à cet appareil.
! Un guidage vocal est émis par un appareil
de navigation Pioneer connecté.
Le son est coupé, MUTE est affiché et aucun réglage audio n’est possible sauf le contrôle du volume. Le fonctionnement retourne à la normale
quand la connexion téléphonique ou le guidage
vocal est terminé.
28
Fr
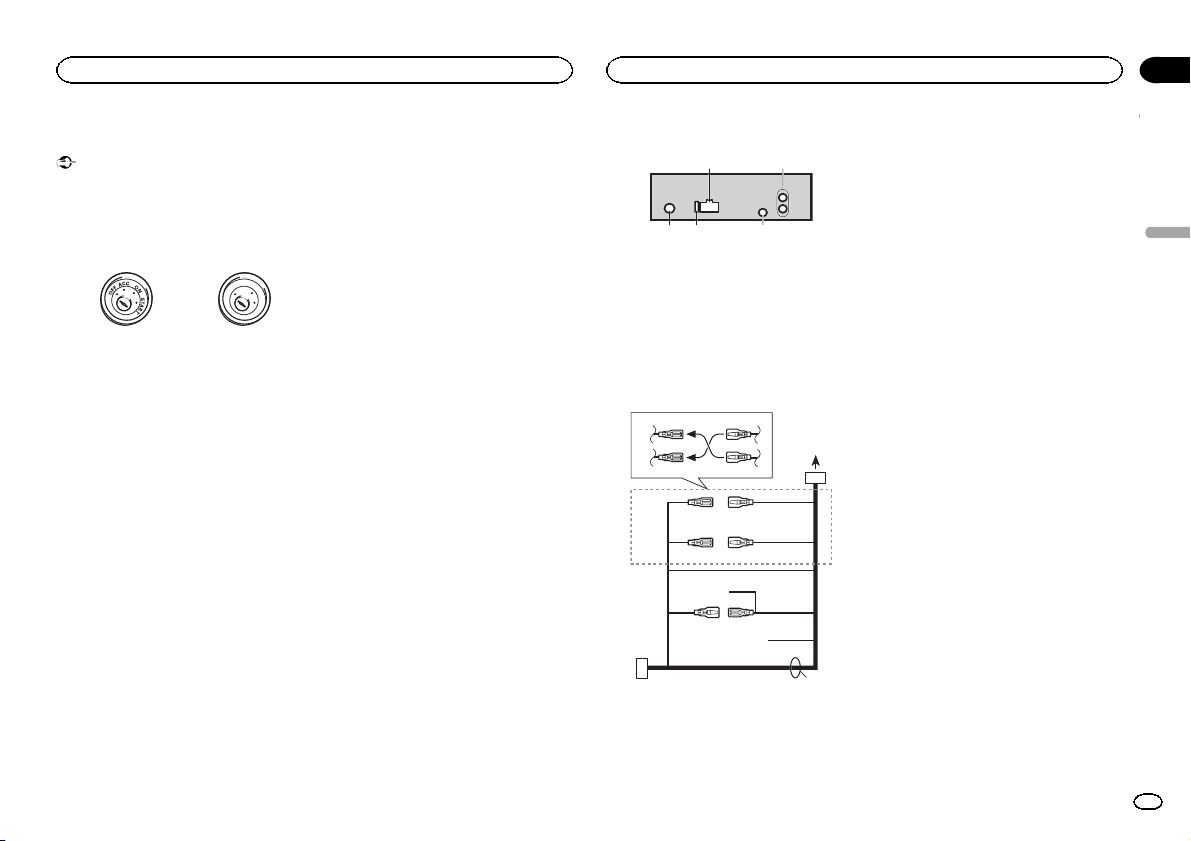
Installation
Installation
Section
03
Connexions
Important
! Lors de l’installation de cet appareil dans un
véhicule sans position ACC (accessoire) sur
le contacteur d’allumage, ne pas connecter
le câble rouge à la borne qui détecte l’utilisation de la clé de contact peut entraîner le déchargement de la batterie.
Avec position ACC Sans position ACC
! L’utilisation de cet appareil dans des condi-
tions autres que les conditions suivantes
pourrait provoquer un incendie ou un mauvais fonctionnement.
— Véhicules avec une batterie 12 volts et mise à
la masse du négatif.
— Haut-parleurs avec une puissance de sortie
de 50 W et une impédance de 4 ohms à
8 ohms.
! Pour éviter un court-circuit, une surchauffe
ou un dysfonctionnement, assurez-vous de
respecter les instructions suivantes.
— Déconnectez la borne négative de la batterie
avant l’installation.
— Fixez le câblage avec des serre-fils ou de la
bande adhésive. Pour protéger le câblage, enroulez dans du ruban adhésif les parties du
câblage en contact avec des pièces en métal.
— Placez les câbles à l’écart de toutes les par-
ties mobiles, telles que le levier de vitesse et
les rails des sièges.
— Placez les câbles à l’écart de tous les endroits
chauds, par exemple les sorties de chauffage.
— Ne reliez pas le câble jaune à la batterie à tra-
vers le trou dans le compartiment moteur.
— Recouvrez tous les connecteurs de câbles qui
ne sont pas connectés avec du ruban adhésif
isolant.
— Ne raccourcissez pas les câbles.
— Ne coupez jamais l’isolation du câble d’ali-
mentation de cet appareil pour partager l’alimentation avec d’autres appareils. La
capacité en courant du câble est limitée.
— Utilisez un fusible correspondant aux caracté-
ristiques spécifiées.
— Ne câblez jamais le câble négatif du haut-par-
leur directement à la masse.
O
F
N
F
O
S
T
A
R
T
— Ne réunissez jamais ensemble les câbles né-
gatifs de plusieurs haut-parleurs.
! Lorsque cet appareil est sous tension, les si-
gnaux de commande sont transmis via le
câble bleu/blanc. Connectez ce câble à la télécommande du système d’un amplificateur
de puissance externe ou à la borne de
commande du relais de l’antenne motorisée
du véhicule (max. 300 mA 12 V CC). Si le véhicule est équipé d’une antenne intégrée à la
lunette arrière, connectez-le à la borne d’alimentation de l’amplificateur d’antenne.
! Ne reliez jamais le câble bleu/blanc à la
borne d’alimentation d’un amplificateur de
puissance externe. De même, ne le reliez pas
à la borne d’alimentation de l’antenne motorisée. Dans le cas contraire, il peut en résulter un déchargement de la batterie ou un
dysfonctionnement.
! Le câble noir est la masse. Les câbles de
terre de cet appareil et d’autres produits (particulièrement les produits avec des courants
élevés tels que l’amplificateur de puissance)
doivent être câblés séparément. Dans le cas
contraire, ils peuvent se détacher accidentellement et provoquer un incendie ou un dysfonctionnement.
Cet appareil
1
1 Entrée cordon d’alimentation
2 Sortie arrière ou haut-parleur d’extrêmes gra-
ves
3 Entrée antenne
4 Fusible (10 A)
5 Entrée télécommande câblée
Un adaptateur de télécommande câblée
(vendu séparément) peut être connecté.
2
Cordon d’alimentation
3
4
1
c
3
556
6
4
a
b89
2
7
e
1 Vers l ’entrée cordon d’alimentation
2 Selon le type de véhicule, 3 et 5 peuvent
avoir une fonction différente. Dans ce cas,
assurez-vous de connecter 4 à 5 et 6 à 3.
3 Jaune
Alimentation de secours (ou accessoire)
4 Jaune
Connectez à la borne d’alimentation 12 V permanente.
5 Rouge
Accessoire (ou alimentation de secours)
6 Rouge
Connectez à la borne contrôlée par le
contact d’allumage (12 V CC).
7 Connectez les fils de même couleur en-
semble.
8 Noir (masse du châssis)
9 Bleu/blanc
La position des broches du connecteur ISO
est différente selon le type de véhicule.
Connectez 9 et b lorsque la broche 5 est de
type commande de l’antenne. Dans un type
différent de véhicule, ne connectez jamais 9
et b.
a Bleu/blanc
Connectez à la prise de commande du système de l’amplificateur de puissance (max.
300 mA 12 V CC).
b Bleu/blanc
Connectez à la borne de commande du relais
de l’ antenne motorisée (max. 300 mA 12 V
CC).
c Jaune/noir
Si vous utilisez un équipement avec la fonction Coupure du son, câblez ce fil au fil Coupure Audio de cet équipement. Sinon, ne
connectez rien au fil Coupure Audio.
d Fils du haut-parleur
Blanc : Avant gauche +
Blanc/noir : Avant gauche *
Gris : Avant droite +
Gris/noir : Avant droite *
Vert: Arrière gauche + ou haut-parleur d’extrêmes graves +
Français
29
Fr
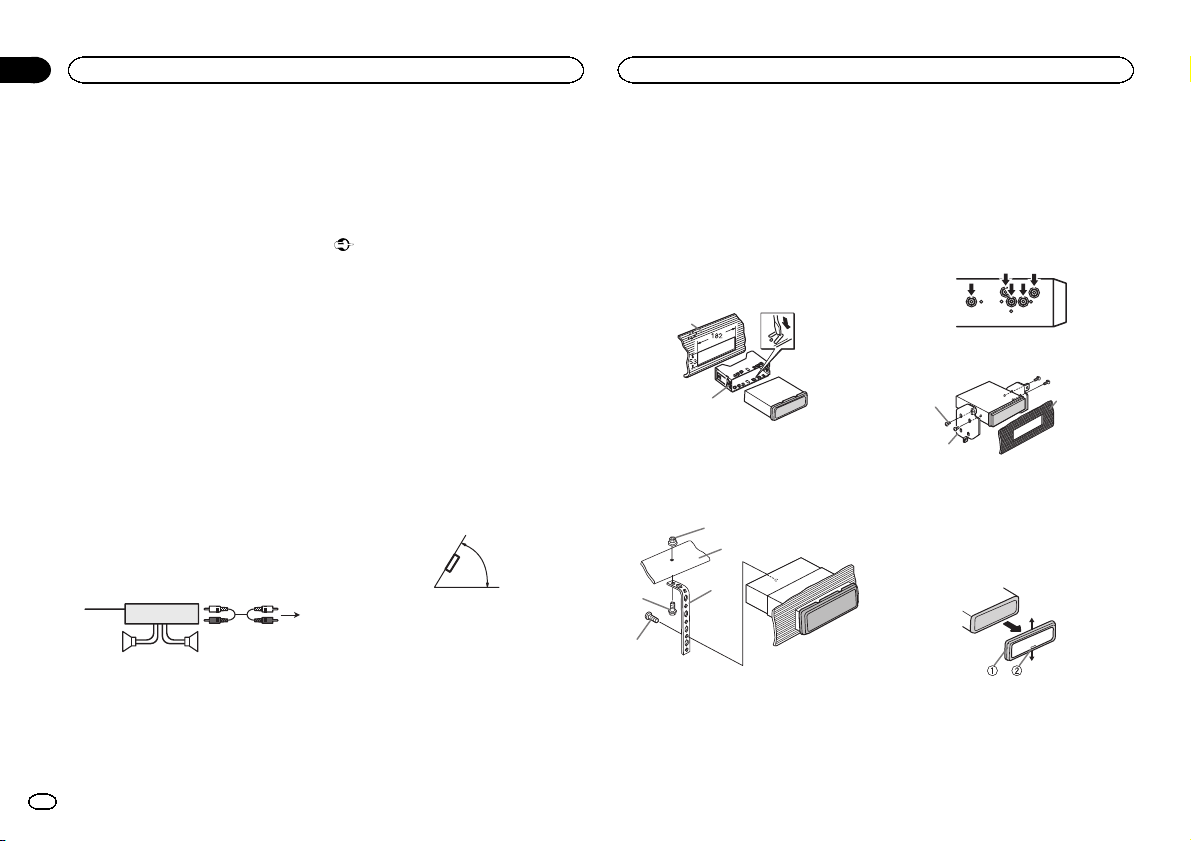
Section
03
Installation
Installation
Vert/noir: Arrière gauche * ou haut-parleur
d’extrêmes graves *
Violet : Arrière droite + ou haut-parleur d’extrêmes graves +
Violet/noir: Arrière droite * ou haut-parleur
d’extrêmes graves *
e Connecteur ISO
Dans certains véhicules, il est possible que
le connecteur ISO soit divisé en deux. Dans
ce cas, assurez-vous de connecter les deux
connecteurs.
Remarques
! Changez les réglages initiaux de cet appareil.
Reportez-vous à la page 26, REAR-SP (réglage
de la sortie arrière). Reportez-vous à la page
27, PREOUT (réglage du préamp).
La sortie haut-parleur d’extrêmes graves de
cet appareil est monaurale.
! Lors de l’utilisation d’un haut-parleur d’extrê-
mes graves de 70 W (2 Ω), assurez-vous de
connecter le haut-parleur d’extrêmes graves
aux fils violet et violet/noir de cet appareil. Ne
connectez aucun périphérique aux fils vert et
vert/noir.
Amplificateur de puissance
(vendu séparément)
Réalisez ces connexions lors de l’utilisation d’un
amplificateur optionnel.
1
1 Télécommande du système
Connectez au câble bleu/blanc.
2 Amplificateur de puissance (vendu séparé-
ment)
3 Connectez avec des câbles RCA (vendus sé-
parément)
30
Fr
3
2
55
4 Sortie arrière ou haut-parleur d’extrêmes gra-
ves
5 Haut-parleur arrière ou haut-parleur d’extrê-
mes graves
Installation
Important
! Vérifiez toutes les connexions et tous les sys-
tèmes avant l’installation finale.
! N’utilisez pas de pièces non autorisées car il
peut en résulter des dysfonctionnements.
! Consultez votre revendeur si l’installation né-
cessite le perçage de trous ou d’autres modifications du véhicule.
! N’installez pas cet appareil là où :
— il peut interférer avec l’utilisation du véhicule.
— il peut blesser un passager en cas d’arrêt
soudain du véhicule.
! Le laser à semi-conducteur sera endommagé
s’il devient trop chaud. Installez cet appareil
àl’écart de tous les endroits chauds, par
exemple les sorties de chauffage.
! Des performances optimales sont obtenues
quand l’ appareil est installé à un angle inférieur à 60°.
Montage avant/arrière DIN
4
Cet appareil peut être installé correctement soit
en montage frontal ou en montage arrière.
Utilisez des pièces disponibles dans le
commerce lors de l’installation.
60°
Montage frontal DIN
1 Insérez le manchon de montage dans le
tableau de bord.
Lors de l’installation de cet appareil dans un espace peu profond, utilisez le manchon de montage fourni. Si l’espace est insuffisant, utilisez le
manchon de montage fourni avec le véhicule.
2 Fixez le manchon de montage en utilisant
un tournevis pour courber les pattes métalliques (90°) en place.
1
2
1 Tableau de bord
2 Manchon de montage
3 Installez l’appareil comme indiqué sur la
figure.
1
2
4
5
1 Écrou
2 Pare-feu ou support métallique
3 Attache en métal
4 Vis
5 Vis (M4 ×
3
# Assurez-vous que l’appareil est correctement mis
en place. Toute installation instable peut entraîner
des sauts ou autres dysfonctionnements.
Montage arrière DIN
1 Déterminez la position appropriée où les
trous sur le support et sur le côté de l’appareil se correspondent.
2 Serrez deux vis de chaque côté.
1
2
1 Vis taraudeuse (5 mm × 8 mm)
2 Support de montage
3 Tableau de bord ou console
3
Retrait de l’appareil
1 Retirez l’anneau de garniture.
1 Anneau de garniture
2 Encoche
! Relâcher la face avant permet d’accéder plus
facilement à l’anneau de garniture.
! Quand vous remontez l’anneau de garniture,
pointez le côté avec l’encoche vers le bas.
Loading…
-
Page 1
Owner ’ s Manual Mode d ’ emploi Manual de instrucciones CD RDS RECEIVER A UT ORADIO CD RDS REPRODUCT OR DE CD CON RECEPT OR RDS DEH-3400UB DEH-2400UB DEH-34UB DEH-24UB English Español Français[…]
-
Page 2
Thank you for purchasing this PIONEER product T o ensure proper use, please read through this manual before using this product. It is especially important that you read and obser ve WARN- ING s and CAUTION s in this manual. Please keep the manual in a safe and accessible place for future reference. This device complies with P art 15 of the FCC Rule[…]
-
Page 3
After -sales service for Pioneer products Please contact the dealer or distributor from where you purchased this unit for after-sales service (including warranty conditions) or any other information. In case the necessary infor- mation is not available, please contact the com- panies listed below: Please do not ship your unit to the companies at th[…]
-
Page 4
Part Operation h a / b Press to recall preset stations. Press to select the next/pre- vious folder . i AUDIO Press to select an audio func- tion. j DISP / SCRL Press to select different dis- plays. Press and hold to turn dimmer on or off . k e Press to pause or resume play- back. l FUNC- TION Press to select functions. m LIST / ENTER Press to displ[…]
-
Page 5
Selecting a source 1 Press SRC / OFF to cycle between: TUNER (tuner) — CD (built-in CD player) — USB (USB)/ iPod (iP od) — AUX (AUX) Adjusting the volume 1 T urn M.C. to adjust the volume. CAUTION For safety reasons, park your vehicle when re- moving the front panel. Note When this unit ’ s blue/white lead is connected to the vehicle ’ s […]
-
Page 6
2 T ur n M.C. to change the menu option and press to select FUNCTION. 3 T ur n M.C. to select the function. After selecting, perform the following proce- dures to set the function. BSM (best stations memory) BSM (best stations memory) automatically stores the six strongest stations in the order of their sig- nal strength. 1 Press M.C. to turn BSM o[…]
-
Page 7
REPEA T (repeat play) 1 Press M.C. to select a repeat play range. For details, refer to Selecting a repeat play range on the previous page. RANDOM (random play) 1 Press M.C. to turn random play on or off. P AUSE (pause) 1 Press M.C. to pause or resume. S.RTRV (sound retriever) Automatically enhances compressed audio and restores rich sound. 1 Press[…]
-
Page 8
! iPod touch 1st generation (software version 3.0 or later) % Press BAND/ to switch the control mode. ! CTRL iPod – This unit ’ s iPod function can be operated from the connected iPod . ! CTRL APP – Play back the sound from your iP od applications. ! CTRL AUDIO – This unit ’ s iPod function can be operated from this unit. Notes ! Switchin[…]
-
Page 9
The cut-off frequency and output level can be ad- justed when the subwoofer output is on. Only frequencies lower than those in the selected range are outputted from the subwoofer . ! This function is not available for DEH-2400UB and DEH-24UB. ! When you select OFF in SUB.W , you cannot se- lect this function. For details, refer to SUB.W (subwoofer […]
-
Page 10
! When AMBIENT is selected, the system au- tomatically cycles through the ambient col- ors. ! When CALM is selected, the system auto- matically cycles through the calm colors. ! When CUSTOM is selected, the customized color saved is selected. ! T o cancel selecting the illumination color , press . Selecting the display color from the illumination c[…]
-
Page 11
Connections WARNING ! Use speakers over 50 W (output value) and between 4 W to 8 W (impedance value). Do not use 1 W to 3 W speakers for this unit. ! The black cable is ground. When installing this unit or power amp (sold separately), make sure to connect the ground wire first. Ensure that the ground wire is properly con- nected to metal parts of t[…]
-
Page 12
j When using a subwoofer of 70 W (2 Ω ), be sure to connect the subwoofer to the violet and violet/black leads of this unit. Do not connect anything to the green and green/ black leads. k Not used. l Subwoofer (4 Ω )× 2 Notes ! With a 2 speaker system, do not connect any- thing to the speaker leads that are not con- nected to speakers. ! Change […]
-
Page 13
2 Insert the supplied extraction keys into both sides of the unit until they click into place. 3 Pull the unit out of the dashboard. Removing and re-attaching the front panel Y ou can remove the front panel to protect your unit from theft. Press the detach button and push the front panel upward and pull it toward you. For details, refer to Removing[…]
-
Page 14
Message Cause Action NO AUDIO The inserted disc does not contain any playable files. Replace the disc. SKIPPED The inserted disc contains DRM protected files. Replace the disc. PROTECT All the files on the inserted disc are em- bedded with DRM. Replace the disc. USB storage device/iPod Message Cause Action NO DEVICE When plug and play is off, no US[…]
-
Page 15
Message Cause Action NOT FOUND No related songs. T ransfer songs to the iPod . Handling guidelines Discs and player Use only discs that feature either of the following two logos. Use 12-cm discs. Do not use 8-cm discs or an adapter for 8-cm discs. Use only conventional, fully circular discs. Do not use shaped discs. Do not insert anything other tha[…]
-
Page 16
Compatible ID3 tag version: 1.0, 1.1, 2.2, 2.3, 2.4 (ID3 tag Version 2.x is given priority over Version 1. x.) M3u playlist: Not compatible MP3i (MP3 interactive), mp3 PRO: Not compatible WA V File extension: .wav Quantization bits: 8 and 16 (LPCM), 4 (MS ADPCM) Sampling frequency: 16 kHz to 48 kHz (LPCM), 22.05 kHz and 44.1 kHz (MS ADPCM) Suppleme[…]
-
Page 17
3 Save the folder containing files on the USB storage device. However , depending on the system environment, you may not be able to specify the playback se- quence. For USB portable audio players, the sequence is different and depends on the player . Copyright and trademark iT unes Apple and iT unes are trademarks of Apple Inc., registered in the U[…]
-
Page 18
Nous vous remercions d ’ avoir acheté cet ap- pareil PIONEER P our garantir une utilisation correcte, lisez bien ce mode d ’ emploi avant d ’ utiliser cet appareil. Il est particulièrement important que vous lisiez et respectiez les indications A TTENTION et PRÉ- CAUTION de ce mode d ’ emploi. Conser vez-le dans un endroit sûr et facile[…]
-
Page 19
Visitez notre site Web http://www.pioneerelectr onics.com au Canada http://www.pioneerelectr onics.ca ! Informez-vous sur les mises à jour disponi- bles pour votre produit (telles que les mises à jour du firmware). ! Enregistrez votre produit afin de recevoir des notifications concernant les mises à jour du produit, ainsi que pour sauvegarder le[…]
-
Page 20
Télécommande f j i g h k a m l 9 4 Partie Utilisation f VOLUME Appuyez sur ces touches pour augmenter ou diminuer le ni- veau sonore. g MUTE Appuyez sur cette touche pour couper le son. Appuyez à nou- veau pour réactiver le son. h a / b Appuyez sur cette touche pour rappeler des stations. Appuyez sur cette touche pour choisir le dossier suivant[…]
-
Page 21
! Conservez la face avant à l ’ abri des tempéra- tures élevées et de la lumière directe du so- leil. ! P our éviter d ’ endommager le périphérique ou l ’ intérieur du véhicule, retirez tous les câ- bles et périphériques connectés à la face avant, avant d ’ enlever cette dernière. Retrait de la face avant pour protéger l ?[…]
-
Page 22
Syntoniseur Opérations de base Sélection d ’ une gamme 1 Appuyez sur BAND / jusqu ’ à ce que la gamme désirée ( F1 , F2 , F3 en FM ou AM )s ’ af- fiche. Rappel des fréquences en mémoire 1 Appuyez sur c ou d . ! Si MAN (accord manuel) est sélectionné dans le réglage SEEK , vous ne pouvez pas rappeler les fréquences en mémoire. Vous[…]
-
Page 23
Commutation entre les modes audio compressé et CD-DA 1 Appuyez sur BAND / . Commutation entre les périphériques de mémoire de lecture Vous pouvez basculer entre les périphériques de mémoire sur les périphériques de stockage USB ayant plus d ’ un périphérique de mémoire compa- tible avec la norme Mass Storage Class pour ef- fectuer la […]
-
Page 24
iPod Opérations de base Lecture de plages musicales sur un iP od 1 Ouvrez le capot du port USB. 2 Connecter un iP od au câble USB à l ’ aide d ’ un connecteur Dock iPod . Une plage musicale sera lue automatique- ment. Sélection d ’ une plage musicale (d ’ un chapitre) 1 Appuyez sur c ou d . Sélection d ’ un album 1 Appuyez sur 1 / ou[…]
-
Page 25
Remarques ! La plage musicale/l ’ album sélectionné peut être annulé si vous utilisez d ’ autres fonctions que la fonction de recherche de liaison (re- tour rapide et avance rapide, par exemple). ! En fonction de la plage musicale sélection- née pour la lecture, la fin de la plage en cours de lecture et le début de la plage musi- cale/de[…]
-
Page 26
FAD/BAL (réglage de l ’ équilibre avant-arrière/ droite-gauche) 1 Appuyez sur M.C. pour afficher le mode de pa- ramétrage. 2 Appuyez sur M.C. pour basculer entre l ’ équili- bre avant-arrière/droite-gauche. 3 T ournez M.C. pour régler l ’ équilibre sonore entre les haut-parleurs. ! Si les réglages de la sortie arrière et de la sorti[…]
-
Page 27
AUX (entrée auxiliaire) Activez ce réglage lorsque vous utilisez un appa- reil auxiliaire connecté à cet appareil. 1 Appuyez sur M.C. pour mettre AUX en ser vice ou hors service. USB PNP (Plug-and-Play) Ce réglage vous permet de commuter votre source sur USB / iPod automatiquement. 1 Appuyez sur M.C. pour activer ou désactiver la fonction Plu[…]
-
Page 28
! 3 catégories de couleurs ( W ARM , AMBIENT , CALM ) ! CUSTOM (couleur d ’ éclairage personnalisée) 4 Appuyez sur M.C. pour confirmer la sélec- tion. Remarque P our des détails sur les couleurs de la liste, re- portez-vous à la page précédente, Sélection de la couleur des touches dans la liste des couleurs d ’ éclairage . Sélection […]
-
Page 29
Connexions A TTENTION ! Utilisez des haut-parleurs avec une puis- sance de sortie de 50 W et une impédance de 4 W à8 W .N ’ utilisez pas des haut-parleurs d ’ impédance 1 W à3 W avec cet appareil. ! Le câble noir est la masse. Lorsque vous in- stallez cet appareil ou un amplificateur de puissance (vendu séparément), assurez-vous de conne[…]
-
Page 30
1 Vers l ’ entrée cordon d ’ alimentation 2 Gauche 3 Droite 4 Haut-parleur avant 5 Haut-parleur arrière 6 Blanc 7 Blanc/noir 8 Gris 9 Gris/noir a Vert b Vert/noir c Violet d Violet/noir e Noir (masse du châssis) Connectez sur un endroit métallique propre, non recouvert de peinture. f Jaune Connectez à la borne d ’ alimentation 12 V per- […]
-
Page 31
Montage arrière DIN 1 Déterminez la position appropriée où les trous sur le support et sur le côté de l ’ appa- reil se correspondent. 2 Serrez deux vis de chaque côté. 1 2 3 1 Vis 2 Support de montage 3 T ableau de bord ou console ! Utilisez des vis à tête bombée (5 mm × 8 mm) ou des vis en affleurement (5 mm × 9 mm), selon la forme[…]
-
Page 32
Message Causes possi- bles Action correc- tive FRMT READ Le début de la lecture et le début de l ’ émis- sion des sons sont parfois dé- calés. Attendez que le message dispa- raisse pour enten- dre les sons. NO AUDIO Le disque inséré ne contient pas de fichiers pou- vant être lus. Utilisez un autre disque. SKIPPED Le disque inséré contie[…]
-
Page 33
Message Causes possi- bles Action correc- tive ERROR-19 P anne de communica- tion. Effectuez une des opérations sui- vantes. – Coupez et remet- tez le contact d ’ al- lumage. – Déconnectez le périphérique de stockage USB. – Choisissez une autre source. Revenez ensuite à la source USB. P anne iPod. Déconnectez le câble de l ’ iPod .[…]
-
Page 34
Quelques mots sur les réglages de l ’ iP od ! Lorsqu ’ un iPod est connecté, cet appareil dés- active le réglage EQ (égaliseur) de l ’ iP od afin d ’ optimiser l ’ acoustique. Le réglage EQ origi- nal est rétabli lorsque l ’ iP od est déconnecté. ! Vous ne pouvez pas mettre la fonction de répé- tition hors service sur l ’ i[…]
-
Page 35
Compatibilité iPod Cet appareil prend en charge uniquement les mo- dèles d ’ iP od suivants. Les versions du logiciel iPod prises en charge sont indiquées ci-dessous. Les versions antérieures ne sont pas prises en charge. Conçu pour ! iPhone 4 (version logicielle 4.1) ! iPhone 3GS (version logicielle 3.0.1) ! iPhone 3G (version logicielle 2.[…]
-
Page 36
Caractéristiques techniques Généralités T ension d ’ alimentatio n ….. 14,4 V CC (10,8 V à 15,1 V ac- ceptable) Mise à la masse …………… Pôle nég atif Consommation maximale …………………………….. 10,0 A Dimensions (L × H × P) : DIN Châssis ………….. 178 m m × 50 mm × 165 mm Panneau avant .. . 188 mm × 58 m[…]
-
Page 37
Français 37 Fr[…]
-
Page 38
Gracias por haber adquirido este producto PIONEER Lea con detenimiento este manual antes de utili- zar el producto por primera vez para que pueda darle el mejor uso posible. Es muy importante que lea y cumpla con la información que apare- ce bajo los mensajes de ADVERTENCIA y PRECAUCIÓN en este manual. Una vez leído, guarde el manual en un lugar[…]
-
Page 39
Unidad principal DEH-3400UB y DEH-34UB b c d e a 8 7 12 3 4 5 6 9 Parte Parte 1 h (expulsar) 8 (parte poste- rior/display) 2 (lista) 9 c / d 3 MUL TI-CONTROL ( M.C. ) a BAND / (control de iP od) 4 SRC / OFF b 1 a 6 5 Ranura de carga de discos c (reloj) 6 Puerto USB d Conector de en- trada AUX (co- nector estéreo de 3,5 mm) 7 (color) e Botón de so[…]
-
Page 40
Menú de configuración Una vez instalada la unidad, al poner en ON la llave de encendido del automóvil aparecerá el menú de configuración. Se pueden configurar las opciones del menú que se describen a continuación. 1 Una vez instalada la unidad, gire la llave de encendido hasta la posición ON. Aparece SET UP . 2 Gire M.C. para cambiar a YES[…]
-
Page 41
ADVERTENCIA ! Mantenga la pila fuera del alcance de los niños. En caso de ingestión accidental de ésta, consulte a un médico de inmediato. ! Las pilas o baterías no deben exponerse a altas temperaturas ni fuentes de calor como el sol, el fuego, etc. PRECAUCIÓN ! Utilice una sola pila de litio CR2025 (3 V) . ! Extraiga la pila si no piensa uti[…]
-
Page 42
SEEK (ajuste tecla izquierda/derecha) Es posible asignar funciones a las teclas derecha e izquierda de la unidad. Seleccione MAN (sintonización manual) para subir o bajar la frecuencia de forma manual o se- leccione PCH (canal presintonizado) para cambiar entre los canales presintonizados. 1 Pulse M.C. para seleccionar MAN o PCH . CD/CD-R/CD-RW y […]
-
Page 43
3 Gire M.C. para seleccionar la función. Una vez seleccionada, siga los siguientes pasos para ajustar la función: REPEA T (repetición de reproducción) 1 Pulse M.C. para seleccionar la gama de repeti- ción de reproducción. P ara obtener más información, consulte Selec- ción de una gama de repetición de reproducción en la página anterior […]
-
Page 44
Reproducción de canciones relacionadas con la canción que se está reproduciendo Se pueden reproducir canciones de las siguien- tes listas: • Lista de álbumes del artista que se está repro — duciendo • Lista de canciones del álbum que se está re- produciendo • Lista de álbumes del género que se está repro- duciendo 1 Mantenga pulsado[…]
-
Page 45
Ajustes de audio 1 Pulse M.C. para acceder al menú princi- pal. 2 Gire M.C. para cambiar la opción de menú y pulse para seleccionar AUDIO. 3 Gire M.C. para seleccionar la función de audio. Una vez seleccionada, siga los siguientes pasos para ajustar la función de audio: FAD/BAL (ajuste del fader/balance) 1 Pulse M.C. para mostrar el modo de aj[…]
-
Page 46
REAR-SP (ajuste de la salida posterior) La salida de cables de altavoces traseros se puede usar para la conexión de altavoces de toda la gama o de subgraves. Si cambia a SW , podrá conectar un cable de alta- voz trasero directamente a un altavoz de subgra- ves sin tener que usar un amplificador auxiliar . En principio, REAR-SP está ajustado para[…]
-
Page 47
Personalización de la iluminación en color Sólo para DEH-3400UB y DEH-34UB . 1 Pulse . 2 Gire M.C. para visualizar KEY COLOR o DISP COLOR. Púlselo para realizar la selec- ción. 3 Mantenga pulsado M.C. hasta que el ajuste de la iluminación personalizada apa- rezca en la pantalla. 4 Pulse M.C. para seleccionar el color pri- mario. R (rojo) — […]
-
Page 48
— Utilice un fusible con la intensidad nominal indicada. — Nunca conecte el cable negativo de los alta- voces directamente a tierra. — Nunca empalme los cables negativos de va- rios altavoces. ! Cuando se enciende esta unidad, se emite una señal de control a través del cable azul/ blanco. Conecte este cable al mando a dis- tancia del sistem[…]
-
Page 49
Instalación Importante ! Compruebe todas las conexiones y sistemas antes de la instalación final. ! No utilice piezas no autorizadas, ya que pue- den causar fallos de funcionamiento. ! Consulte a su distribuidor si para la instala- ción es necesario taladrar orificios o hacer otras modificaciones al vehículo. ! No instale esta unidad en un luga[…]
-
Page 50
Solución de problemas Síntoma Causa Resolución La luz se apaga y en- ciende aleato- riamente. Activado el modo de de- mostración. Desactive el ajus- te de la visualiza- ción de la demostración. La pantalla vuelve auto- máticamente a la visualiza- ción normal. No ha realizado ninguna opera- ción en aproxi- madamente 30 segundos. Realice la […]
-
Page 51
Mensaje Causa Resolución CHECK USB El conector USB o el cable USB está corto- circuitado. Compruebe que el conector USB o el cable USB no esté enganchado en algo ni daña- do. El dispositivo de almacenamien- to USB conec- tado consume más de 500 mA (corriente máxi- ma permitida). Desconecte el dispositivo de al- macenamiento USB y no lo utili-[…]
-
Page 52
Al usar discos de super ficie imprimible para eti- quetas, lea primero las instrucciones y las adver- tencias de los discos. Es posible que algunos discos no puedan insertarse ni expulsarse. La utili- zación de este tipo de discos puede dañar el equi- po. No pegue etiquetas compradas por separado ni otro tipo de material a los discos. ! Los disco[…]
-
Page 53
T ransferencia de datos en formato P acket Write: no compatible Independientemente de la longitud de la seccio- nes en blanco que haya entre las canciones de la grabación original, los discos de audio comprimi- dos se reproducirán con una breve pausa entre cada canción. Dispositivo de almacenamiento USB Jerarquía de carpetas reproducibles: hast[…]
-
Page 54
WMA Windows Media es una marca registrada o una marca de fábrica de Microsoft Corporation en los Estados Unidos y/u otros países. Este producto incluye tecnología propiedad de Microsoft Corporation, y no se puede usar ni dis- tribuir sin una licencia de Microsoft Licensing , Inc. iPod y iPhone iPhone, iP od, iP od classic, iPod nano y iP od son […]
-
Page 55
Español 55 Es[…]
-
Page 56
PIONEER CORPORA TION 1-1, Shin-ogura, Saiwai-ku, Kawasaki-shi, Kanagawa 212-0031, JAP AN PIONEER ELECTRONICS (USA) INC. P .O. Box 1540, Long Beach, California 90801-1540, U.S.A. TEL: (800) 421-1404 PIONEER EUROPE NV Haven 1087, K eetberglaan 1, B-9120 Melsele, Belgium/Belgique TEL: (0) 3/570.05.11 PIONEER ELECTRONICS ASIACENTRE PTE. L TD. 253 Alexa[…]