
HP
Loading…
P
- PHOTOSMART A444 CAMERA AND DOCK
- PhotoSmart A5103
- Photosmart A5123
- PHOTOSMART A51626
- PHOTOSMART A52032
- PHOTOSMART A52618
- PHOTOSMART A53032
- PHOTOSMART A53218
- Photosmart A536
- PhotoSmart A6102
- PHOTOSMART A61222
- Photosmart A6163
- Photosmart A617
- PHOTOSMART A61823
- PHOTOSMART A6202
- Photosmart A62619
- Photosmart A627
- Photosmart A6284
- Photosmart A6303
- Photosmart A63619
- Photosmart A637
- PHOTOSMART A64614
- PHOTOSMART A710
- Photosmart A712
- PhotoSmart A7162
- PHOTOSMART A71720
- Photosmart A82030
- PHOTOSMART A82619
- Photosmart B010a
- Photosmart B010b
- PHOTOSMART B109
- PHOTOSMART B109A16
- PHOTOSMART B109F11
- PHOTOSMART B109N10
- Photosmart B110a2
- PHOTOSMART B110C17
- PHOTOSMART B209
- PHOTOSMART B209A9
- PHOTOSMART B209C10
- Photosmart B8500
- PHOTOSMART B855012
- PHOTOSMART C203
- PhotoSmart C2003
- Photosmart c200cL
- Photosmart c200x
- PHOTOSMART C20/C305
- PHOTOSMART C303
- PhotoSmart C309a
- PhotoSmart C309g
- PHOTOSMART C310
- PHOTOSMART C310017
- PHOTOSMART C312511
- Photosmart C31352
- Photosmart C31402
- Photosmart C31502
- Photosmart C3170
- PHOTOSMART C318015
- Photosmart C31832
- PHOTOSMART C319012
- PhotoSmart C410
- PHOTOSMART C410019
- Photosmart C41403
- Photosmart C41503
- Photosmart C4175
- PHOTOSMART C418016
- Photosmart C4183
- PHOTOSMART C420015
- PHOTOSMART C42056
- Photosmart C42102
- Photosmart C42402
- Photosmart C42502
- PHOTOSMART C427010
- PHOTOSMART C427210
- Photosmart C42732
- Photosmart C42754
- PHOTOSMART C428012
- PhotoSmart C42833
- Photosmart C4288
- PHOTOSMART C434010
- Photosmart C43422
- Photosmart C43443
- PHOTOSMART C438040
- PHOTOSMART C4380 ALL-IN-ONE
- Photosmart C43852
- Photosmart C439029
- PHOTOSMART C4390 ALL-IN-ONE
- PHOTOSMART C440018
- Photosmart C44243
- Photosmart C44354
- Photosmart C44404
- PHOTOSMART C447215
- Photosmart C44732
- PHOTOSMART C448014
- Photosmart C4483
- Photosmart C448517
- Photosmart C45004
- PHOTOSMART C4500 ALL-IN-ONE
- Photosmart C45809
- Photosmart C45833
- PHOTOSMART C45857
Loading…
Loading…
Nothing found
PHOTOSMART C3100
SETUP GUIDE [cz]
12 pgs1.79 Mb0
SETUP GUIDE [cz]
99 pgs4.5 Mb0
SETUP GUIDE [de]
36 pgs1.76 Mb0
SETUP GUIDE [el]
101 pgs4.61 Mb0
SETUP GUIDE [es]
36 pgs2.04 Mb0
SETUP GUIDE [it]
12 pgs22.36 Mb0
SETUP GUIDE [ko]
34 pgs2.74 Mb0
SETUP GUIDE [no]
12 pgs3.13 Mb0
SETUP GUIDE [pt]
12 pgs1.67 Mb0
SETUP GUIDE [pt]
36 pgs1.98 Mb0
SETUP GUIDE [sv]
137 pgs5.19 Mb0
SETUP GUIDE [tr]
12 pgs4.65 Mb0
User Manual
43 pgs11.55 Mb0
User Manual
12 pgs3.4 Mb0
User Manual
12 pgs3.41 Mb0
User Manual [el]
161 pgs6.54 Mb0
User Manual [ja]
40 pgs3.39 Mb0
Table of contents
Loading…
…
HP User Manual
Download
Specifications and Main Features
Frequently Asked Questions
User Manual


Loading…
+ 30 hidden pages
You need points to download manuals.
1 point = 1 manual.
You can buy points or you can get point for every manual you upload.
Buy points
Upload your manuals
Узнать какие картриджи подходят для HP Photosmart C3100 series, скачать драйвера для HP Photosmart C3100 series, скачать инструкцию для HP Photosmart C3100 series и получить дополнительную информацию по товарам и услугам для HP Photosmart C3100 series. На этой странице Вы найдете все требуемые расходные материалы для HP Photosmart C3100 series, получите информацию по драйверам и инструкциям, узнаете об услугах Mr.Image ITO для HP Photosmart C3100 series, а также сможете приобрести все, что требуется, из представленного списка. Вашему вниманию полный список товаров из большого каталога сайта MRIMAGE.RU подходящих для HP Photosmart C3100 series: оригинальные картриджи, совместимые картриджи, запчасти и принадлежности, основные услуги и наборы товаров, которые можно приобрести на более выгодных условиях. Купить картриджи для HP Photosmart C3100 series стало еще проще с MRIMAGE.RU, все подходящие товары и услуги на одной странице. Разнообразные способы оплаты и доставки. Приобретайте картриджи для HP Photosmart C3100 series с MRIMAGE.RU в Москве и всей России.
Внимание! Мы стараемся тщательно проверять все ссылки, программы и драйвера, но не гарантируем абсолютную безопасность скачиваемых файлов. Администрация сайта MRIMAGE.RU не несет ответственности за: содержание файлов; ссылки на другие сайты и ресурсы; программы; драйвера и возможный вред от их использования. Характеристики товара могут отличаться от указанных на сайте. Информация на сайте о товарах носит справочно-информационный характер и не является публичной офертой в соответствии с п. 2 ст. 437 ГК РФ.
Доставка картриджей для HP Photosmart C3100 series
Оплата картриджей для HP Photosmart C3100 series
HP Photosmart C3100 series
Tout-en-un HP Photosmart série C3100
3
2
1
*Q8150-90170*
Q8150-90170
*Q8150-90170*
C3100 -XXXXX R ev. X7
Start Scan/
Reprints
Start Copy
Quality
Copies
Borderless
Resiz e to Fit
Actual Size
Photo Pa per
Plain Pap er
Copy
Settings
Check paper
Check print ca rtridge
Printer Scanner Copier
• •
Cancel
—
I
m
p
o
r
t
a
n
t
—
R
e
m
o
ve
t
h
e
e
n
t
i
r
e
s
t
ic
k
e
r
a
n
d
a
p
p
ly
t
o
c
o
n
t
ro
l p
a
n
e
l
o
n
p
r
od
u
c
t
Par amè tre s de co pie
Qualité
Copier
Numériser/
Réimpressions
Copies
Vérifier papier
Vérifier cartouche d’impr ession
Imprimante Scanner Copieur
• •
Pap ier o rdin air e
Pap ier p hoto
Taille réelle
Redimens ionne r
Sans bordures
Annuler
—
I
m
p
o
r
t
a
n
t
—
R
e
m
o
ve
t
h
e
e
n
t
i
r
e
s
t
ic
k
e
r
a
n
d
a
p
p
ly
t
o
c
o
n
t
ro
l p
a
n
e
l
o
n
p
r
od
u
c
t
Kopiereinstellungen
Qualität
Start Kopieren
Drucker Scanner Kopierer
• •
Start Scannen/
Exemplare
Papier prüfen
Druckpatrone prüfen
Abbrechen
Normalpapier
Fotopa pier
Originalgröße
Format anpassen
ohne Rand
—
I
m
p
o
r
t
a
n
t
—
R
e
m
o
ve
t
h
e
e
n
t
i
r
e
s
t
ic
k
e
r
a
n
d
a
p
p
ly
t
o
c
o
n
t
ro
l p
a
n
e
l
o
n
p
r
od
u
c
t
Configuración copia
Calidad
Iniciar cop ia
Iniciar escaneo /
Reimprimir
Copias
Comprobar papel
Comproba r cartucho
Cancelar
Impresora Escá ner Copiadora
• •
Papel normal
Papel fotográfico
Tamaño real
Ajustar tamaño
Sin bordes
—
Im
p
o
rta
n
t
—
R
e
m
o
ve
t
h
e
e
n
t
ir
e
s
t
i
c
k
e
r
a
n
d
a
p
p
ly
t
o
c
o
n
t
ro
l
p
a
n
e
l
o
n
p
r
od
u
c
t
**Sur CD-ROM.
**
**Auf CD
**Su CD.
**Op cd.
*
* Acheté séparément.
* Nicht im Lieferumfang enthalten
* Da acquistare separatamente.
* Moet apart worden aangeschaft.
NL
NL
NL
NL
FR
FR
FR
FR
DE
IT
IT
DE
IT
DE
IT
DE
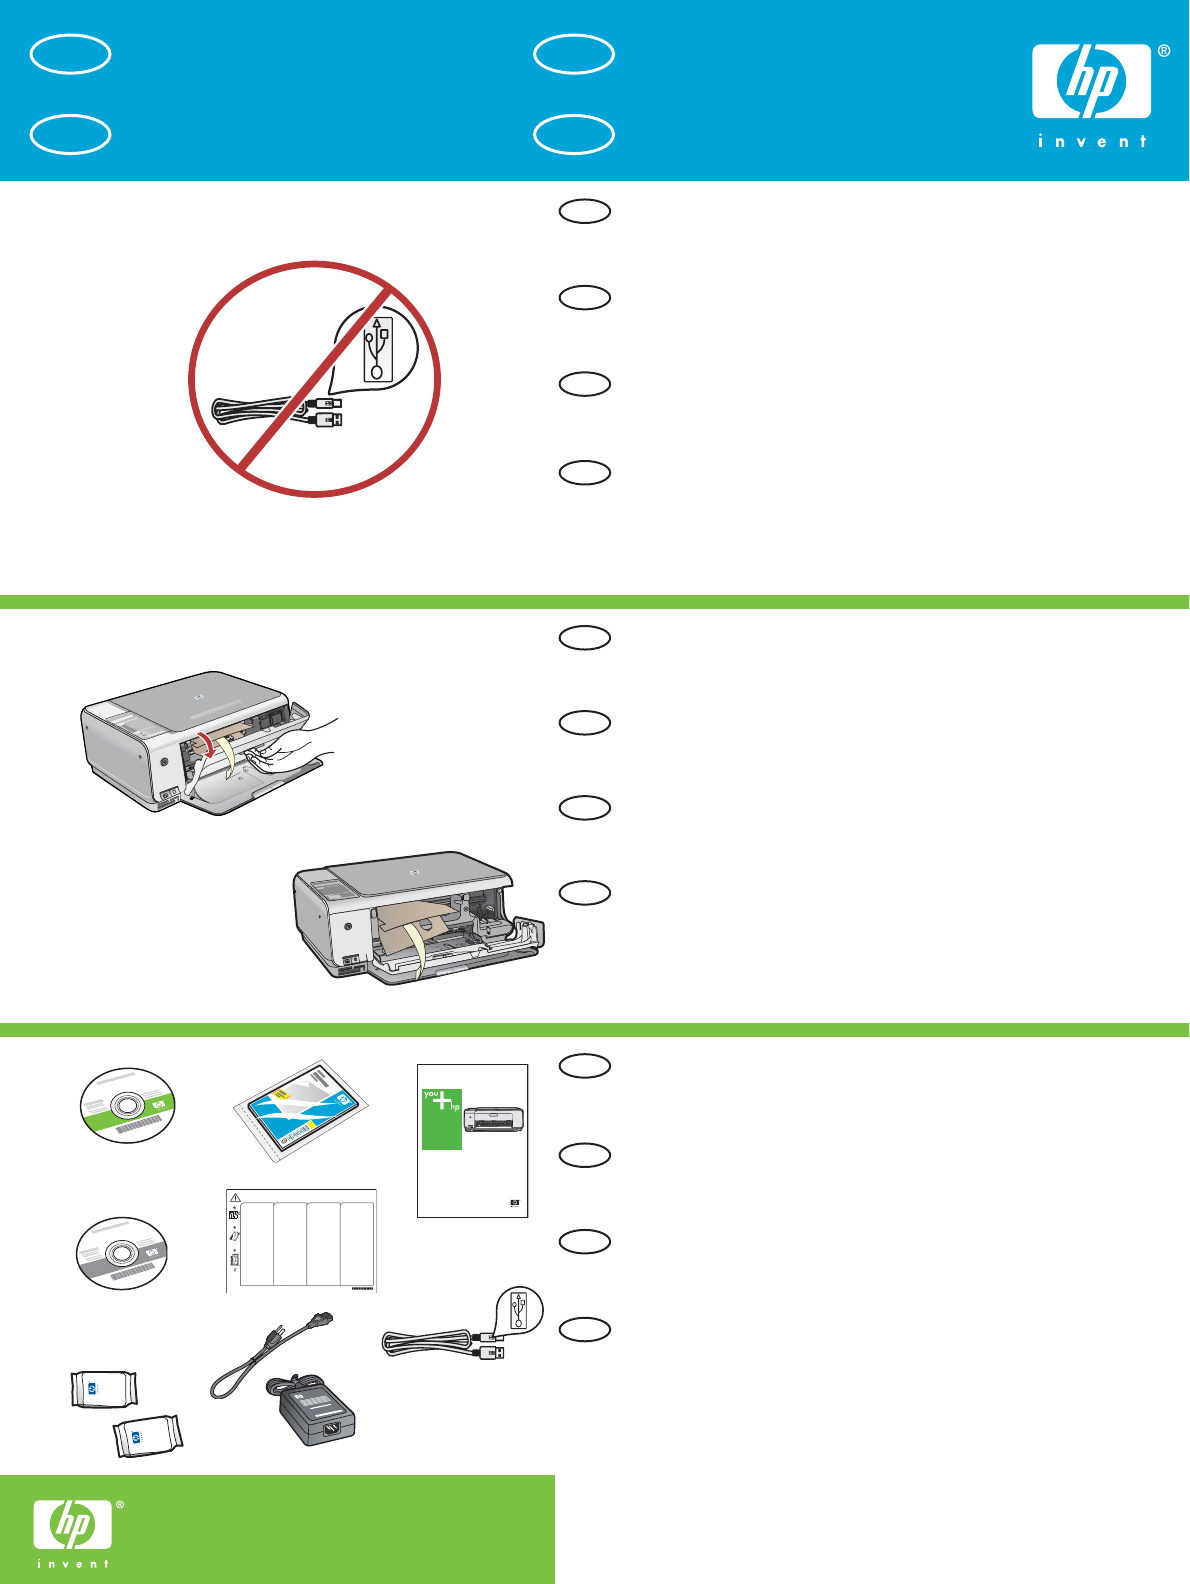
WAARSCHUWING: Sluit de USB-kabel niet aan vóór stap 12.
De software kan dan mogelijk niet goed worden geïnstalleerd.
Laat de papierlade en de toegangsklep voor de printcartridge
zakken.
BELANGRIJK: Verwijder al het verpakkingsmateriaal uit het apparaat.
Controleer de inhoud van de doos.
De inhoud kan per doos verschillend zijn.
Begin hier
AVVERTENZA: per assicurare l’installazione corretta del software,
non collegare il cavo USB fino al punto 12.
Abbassare il vassoio della carta e lo sportello delle cartucce di
stampa. IMPORTANTE: rimuovere tutto il materiale di imballaggio
dalla periferica.
Verificare il contenuto della confezione.
Il contenuto della confezione potrebbe essere diverso.
Iniziare da qui
Erste Schritte
WARNUNG: Schließen Sie das USB-Kabel erst in Schritt 12 an,
damit die Software richtig installiert wird.
Öffnen Sie das Papierfach und anschließend die Patronenklappe.
WICHTIG: Entfernen Sie sämtliches Verpackungsmaterial vom Gerät.
Überprüfen Sie den Packungsinhalt.
Der Lieferumfang ist nicht bei allen Modellen identisch.
Commencez ici
Abaissez le bac d’alimentation du papier et ouvrez la porte
d’accès aux cartouches d’impression.
IMPORTANT : Retirez tout matériel d’emballage du périphérique.
Vérifiez le contenu du coffret.
Le contenu du coffret peut varier.
AVERTISSEMENT : Pour garantir une installation correcte du
logiciel, ne connectez pas le câble USB avant l’étape 12.
USB
a.
b.
Windows
Macintosh
Basics Guide
HP Photosmart C3100 All-in-One series
HP Photosmart C3100 All-in-One series
Basics Guide
Basics Guide
HP Photosmart C3100 All-in-One series
2006 Hewlett-Packard Development Company, L.P.
Adobe and the Acrobat logo are trademarks of Adobe Systems Incorporated. Windows, Windows NT, Windows ME, Windows XP, and Windows 2000 are U.S. registered trademarks of Microsoft Corporation. Intel and Pentium are trademarks or registered trademarks of Intel Corporation or its subsidiaries in the United States and other countries. Energy Star and Energy Star logo are US registered marks of the United States Environmental Protection Agency.
Hewlett-Packard Company notices The information contained in this document is subject to change without notice. All rights reserved. Reproduction, adaptation, or translation of this material is prohibited without prior written permission of Hewlett- Packard, except as allowed under copyright laws. The only warranties for HP products and services are set forth in the express warranty statements accompanying such products and services. Nothing herein should be construed as constituting an additional warranty. HP shall not be liable for technical or editorial errors or omissions contained herein.
Publication number: Q8150-90181
Contents
1 HP All-in-One overview…………………………………………………………………………….2 The HP All-in-One at a glance……………………………………………………………………..3 Control panel buttons…………………………………………………………………………………4 Status light overview…………………………………………………………………………………..5 Use the HP Photosmart software…………………………………………………………………7 Find more information…………………………………………………………………………………8 Access the onscreen Help…………………………………………………………………………..8 Load originals and load paper……………………………………………………………………..8 Avoid paper jams……………………………………………………………………………………..10 Make a copy……………………………………………………………………………………………10 Scan an image…………………………………………………………………………………………10 Print photos using a proof sheet…………………………………………………………………11 Print from a software application………………………………………………………………..13 Replace the print cartridges……………………………………………………………………….14 Clean the HP All-in-One……………………………………………………………………………16
2 Troubleshooting and support………………………………………………………………….18 Uninstall and reinstall the software……………………………………………………………..18 Hardware setup troubleshooting…………………………………………………………………19 Error conditions……………………………………………………………………………………….21 Clear paper jams……………………………………………………………………………………..21 Print cartridge troubleshooting……………………………………………………………………22 Before you call HP customer support………………………………………………………….23
3 Technical information…………………………………………………………………………….24 System requirements………………………………………………………………………………..24 Paper specifications…………………………………………………………………………………24 Print specifications……………………………………………………………………………………24 Copy specifications…………………………………………………………………………………..25 Scan specifications…………………………………………………………………………………..25 Physical specifications………………………………………………………………………………25 Power specifications…………………………………………………………………………………25 Environmental specifications……………………………………………………………………..25 Acoustic information…………………………………………………………………………………25 Environmental product stewardship program……………………………………………….25 Regulatory notices……………………………………………………………………………………26 Warranty…………………………………………………………………………………………………27
Index……………………………………………………………………………………………………………28
Basics Guide 1
1 HP All-in-One overview Use the HP All-in-One to quickly and easily accomplish tasks such as making a copy, scanning documents, or printing photos from a memory card. You can access many HP All-in-One functions directly from the control panel, without turning on your computer.
Note This guide introduces basic operations and troubleshooting, as well as providing information for contacting HP support and ordering supplies. The onscreen Help details the full range of features and functions, including use of the HP Photosmart software that came with the HP All-in-One. For more information, see Access the onscreen Help on page 8.
Copy The HP All-in-One allows you to produce high-quality color and black-and-white copies on a variety of paper types. You can enlarge or reduce the size of an original to fit a specific paper size, adjust the copy quality, and make high-quality copies of photos, including borderless copies. Scan Scanning is the process of converting text and pictures into an electronic format for your computer. You can scan almost anything (photos, magazine articles and text documents) on the HP All-in-One. Print photos The HP All-in-One is equipped with memory card slots which enable you to insert a memory card and begin printing photos from your digital camera without uploading your photos to a computer first. Additionally, if the HP All-in-One is connected to a computer with a USB cable, you can also transfer your photos to the computer to print, edit, or share.
Warning Do not insert more than one memory card at a time. If more than one memory card is inserted, unrecoverable data loss might occur.
Print from your computer The HP All-in-One can be used with any software application that allows printing. You can print a range of projects, such as borderless images, newsletters, greeting cards, iron-on transfers, and posters.
2 HP Photosmart C3100 All-in-One series
H P
A ll-
in -O
ne o
ve rv
ie w
The HP All-in-One at a glance
Label Description
1 Control panel
2 On button
3 Photosmart Express button (left) and Proof Sheet button (right)
4 Memory card slots
5 Input tray
6 Paper tray extender
7 Paper-width guide
8 Print cartridge door
9 Glass
10 Lid backing
Basics Guide 3
H P A
ll-in-O ne overview
Label Description
1 Rear door
2 Rear USB port
3 Power connection*
* Use only with the power adapter supplied by HP.
Control panel buttons
Label Icon Name and Description
1 Check Paper/Check Print Cartridge: Indicates the need to load paper, remove a paper jam, reinsert the print cartridge, replace the print cartridge, or close the print cartridge door.
2 Cancel button: Stops a task or resets settings.
3 Paper Type button: Changes the paper type setting to match the type of paper loaded in the paper tray (plain or photo paper). The default setting is plain paper.
4 Quality button: Changes the copy quality. The default quality for plain paper is one star. The default quality for photo paper is two stars.
Chapter 1
4 HP Photosmart C3100 All-in-One series
H P
A ll-
in -O
ne o
ve rv
ie w
Label Icon Name and Description
5 Size button: Changes the image size to 100% (Actual Size), fits it to the page (Resize to Fit), or prints borderless images (Borderless). The default setting is 100% for plain paper and borderless for photo paper.
6 Copies button: Specifies the desired number of copies. If there is an error, the letter E appears on the display.
7 Start Copy Black button: Makes a black-and-white copy. In certain situations (for example, after clearing a paper jam), this button resumes printing.
8 Start Copy Color button: Starts a color copy. In certain situations (for example, after clearing a paper jam), this button resumes printing.
9 Start Scan/Reprints button: Starts a scan.
10 On: Turns the HP All-in-One on or off. When the HP All-in-One is off, a minimal amount of power is still supplied to the device. To completely remove power, turn the HP All-in-One off, and then unplug the power cord.
11 Photosmart Express button: Launches the HP Photosmart Express software application on your computer for printing, editing, and sharing photos.
12 Proof Sheet button: Prints a proof sheet when a memory has been inserted in the HP All-in-One. A proof sheet shows thumbnail views of all the photos on the memory card. You can select photos on the proof sheet, then print those photos by scanning the proof sheet. You do not need to connect the HP All- in-One to a computer to print a proof sheet from a memory card.
Status light overview Several indicator lights inform you of the status of the HP All-in-One.
(continued)
Basics Guide 5
H P A
ll-in-O ne overview
Label Description
1 Check Paper light
2 Check Print Cartridge light
3 Copy button lights (for the Start Copy Black and Start Copy Color buttons)
4 On button
The following table describes common situations and explains what the lights mean.
Light status What it means
All lights are off. The HP All-in-One is turned off. Press the On button to turn on the device.
The On light and one of the copy button lights are on.
The HP All-in-One is ready for printing, scanning, or copying.
The On light is blinking. The HP All-in-One is busy with a print, scan, copy, or maintenance task such as aligning the print cartridges.
The On light blinks quickly for 3 seconds and then is on steady.
You pressed a button while the HP All-in-One is already busy with a print, scan, copy, or maintenance task such as aligning the print cartridges.
The On light blinks for 20 seconds and then is on steady.
You pressed the Start Scan/Reprints button and there was no response from the computer.
Chapter 1
6 HP Photosmart C3100 All-in-One series
H P
A ll-
in -O
ne o
ve rv
ie w
Light status What it means
The Check Paper light is blinking. The HP All-in-One is out of paper. The HP All-in-One has a paper jam. The paper size setting does not match
the paper size detected in the input tray. For more information, check the computer screen for an error message.
The Check Print Cartridge light is blinking. The print cartridge door is open. The print cartridges are missing or not
seated correctly. The tape was not removed from the print
cartridge. The print cartridge is not intended for use
in this HP All-in-One. The print cartridge might be defective.
The Check Paper and Check Print Cartridge lights are blinking.
The print carriage has stalled. Turn the HP All-in-One off, remove any objects that are blocking the print carriage (including any packing materials), and then turn the HP All-in-One on again.
The Check Paper, and Check Print Cartridge, and copy button lights are blinking.
The control panel overlay is not attached, or not attached properly. For information on attaching the control panel overlay, see the Setup Guide.
The On, Check Paper, and Check Print Cartridge lights are blinking.
Scanner failure. Turn off the HP All-in-One, then on again. If the problem persists, contact HP Support.
All lights are blinking. The HP All-in-One has a fatal error. 1. Turn the HP All-in-One off. 2. Unplug the power cord. 3. Wait a minute, then plug the power cord
back in. 4. Turn the HP All-in-One back on. If the problem persists, contact HP Support.
Use the HP Photosmart software You can use the HP Photosmart software to access many features not available from the control panel. The HP Photosmart software provides a fast and easy way to make prints of your photos or to purchase prints online. It also provides access to other basic HP Photosmart software features, such as saving, viewing, and sharing your photos. For more information on using the HP Photosmart software, see the HP Photosmart Software Help.
(continued)
Basics Guide 7
H P A
ll-in-O ne overview
Find more information A variety of resources, both printed and onscreen, provide information about setting up and using the HP All-in-One. Setup Guide
The Setup Guide provides instructions for setting up your HP All-in-One and installing software. Make sure you follow the steps in the Setup Guide in order. If you have problems during setup, see Troubleshooting in the last section of the Setup Guide, or see Troubleshooting and support on page 18 in this guide.
HP Photosmart Software Tour (Windows) The HP Photosmart Software Tour is a fun, interactive way to get a brief overview of the software included with your HP All-in-One. You’ll learn how the software you installed with your HP All-in-One can help you edit, organize, and print your photos.
Onscreen Help The onscreen Help provides detailed instructions on features of your HP All-in- One that are not described in this User Guide, including features that are only available using the software you installed with your HP All-in-One. For more information, see Access the onscreen Help on page 8.
Readme The Readme file contains the most recent information which might be not be found in other publications. Install the software to access the Readme file.
www.hp.com/support If you have Internet access, you can get help and support from the HP website. This website offers technical support, drivers, supplies, and ordering information.
Access the onscreen Help This guide describes a sampling of the features available, so you can get started using the HP All-in-One. Explore the onscreen Help that came with your device for information on all the features that the HP All-in-One supports.
To access the HP Photosmart Software Help on a Windows computer 1. In the HP Solution Center, click the tab for the HP All-in-One. 2. In the Device Support area, click Onscreen Guide or Troubleshooting.
If you click Onscreen Guide, a pop-up menu appears. You can choose to open the welcome page for the entire Help system or to go specifically to the Help for the HP All-in-One.
If you click Troubleshooting, the Troubleshooting and support page opens.
To access the HP Photosmart Mac Help On the Help menu in the HP Photosmart Studio, choose HP Photosmart Mac
Help. The HP Photosmart Mac Help appears.
Load originals and load paper You can copy or scan up to letter- or A4-size originals by loading them on the glass.
Chapter 1
8 HP Photosmart C3100 All-in-One series
H P
A ll-
in -O
ne o
ve rv
ie w
To load an original on the glass 1. Lift the lid on the HP All-in-One. 2. Load your original print side down in the right front corner of the glass.
Tip For more help on loading an original, refer to the engraved guides along the edge of the glass.
3. Close the lid.
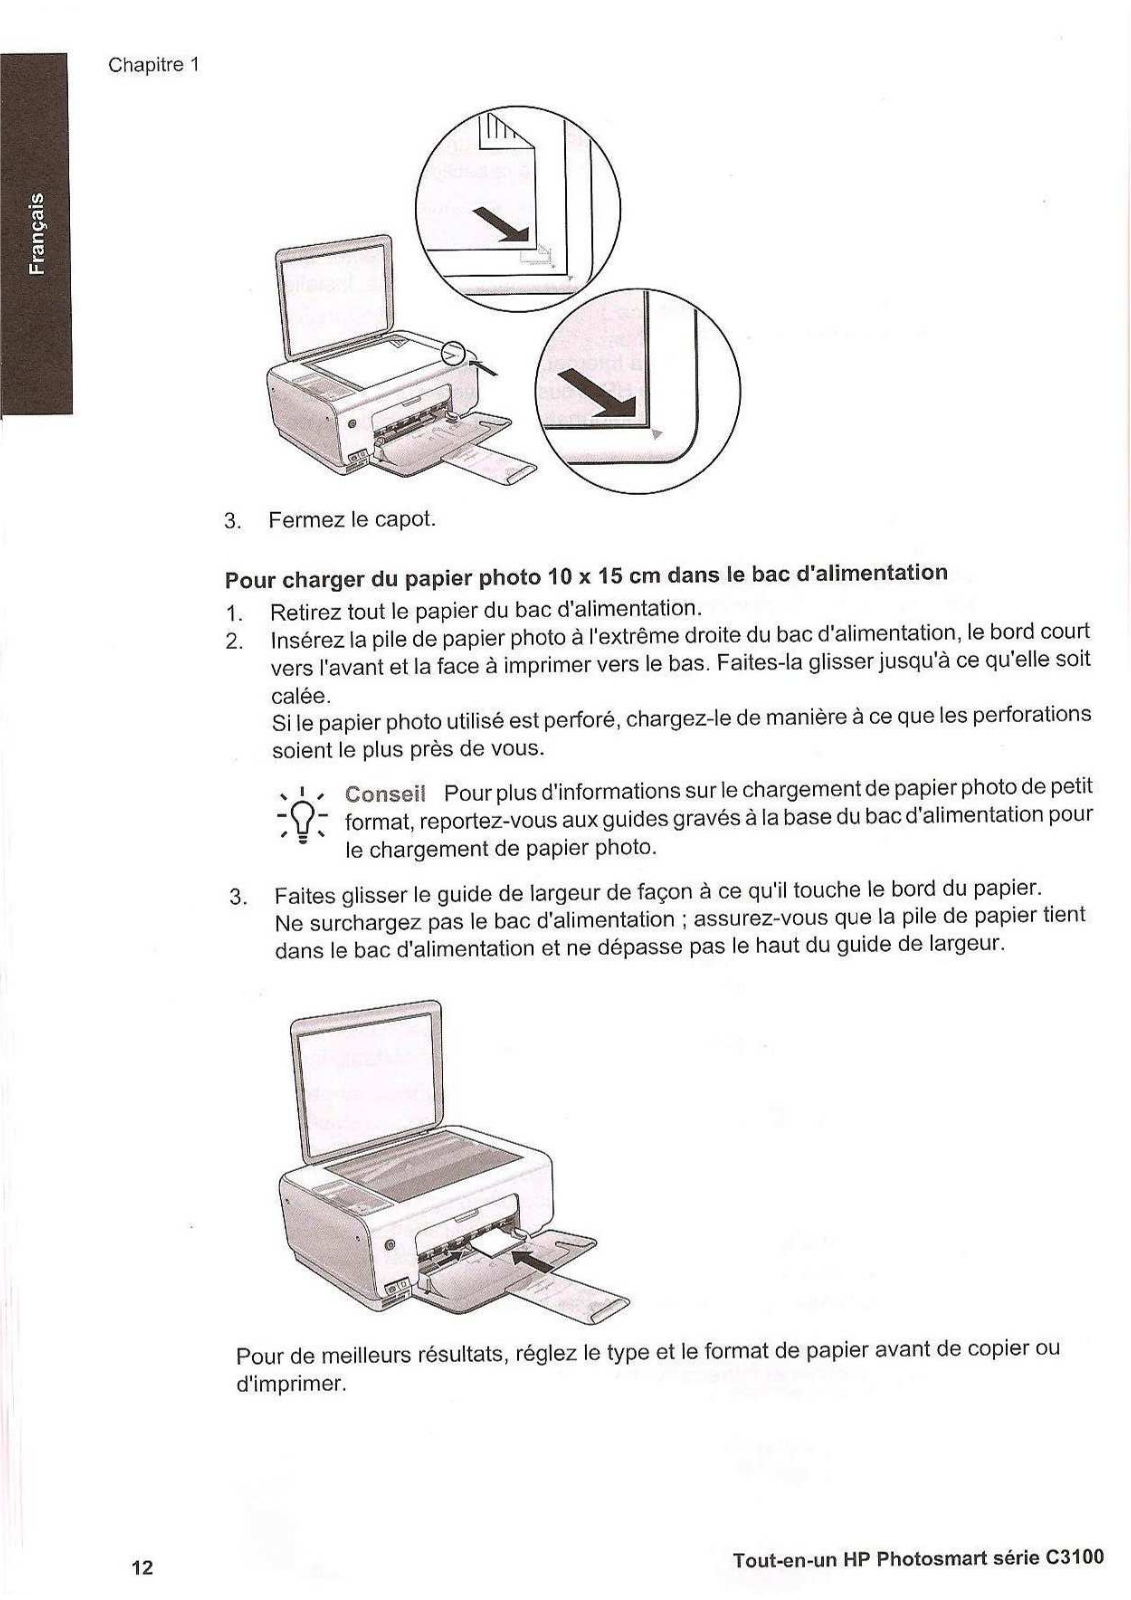
To load 10 x 15 cm ( 4 x 6 inch) photo paper in the input tray 1. Remove all paper from the input tray. 2. Insert the stack of photo paper into the far-right side of the input tray with the
short edge forward and the print side down. Slide the stack of photo paper forward until it stops. If the photo paper you are using has perforated tabs, load the photo paper so that the tabs are closest to you.
Tip For more help on loading small-size photo paper, refer to the guides engraved in the base of the input tray for loading photo paper.
3. Slide the paper-width guide inward until it stops at the edge of the paper. Do not overload the input tray; make sure the stack of paper fits within the input tray and is no higher than the top of the paper-width guide.
Basics Guide 9
H P A
ll-in-O ne overview
For best results, set the paper type and paper size before copying or printing.
Avoid paper jams To help avoid paper jams, follow these guidelines. Remove printed papers from the output tray frequently. Prevent curled or wrinkled paper by storing all unused paper flat in a resealable
bag. Ensure that paper loaded in the input tray lays flat and the edges are not bent or
torn. Do not combine different paper types and paper sizes in the input tray; the entire
stack of paper in the input tray must be the same size and type. Adjust the paper-width guide in the input tray to fit snugly against all paper. Make
sure the paper-width guide does not bend the paper in the input tray. Do not force paper too far forward in the input tray. Use paper types that are recommended for the HP All-in-One.
Make a copy You can make quality copies from the control panel.
To make a copy from the control panel 1. Make sure you have paper loaded in the input tray. 2. Load your original print side down in the right front corner of the glass. 3. Press Start Copy Black or Start Copy Color to begin copying.
Scan an image You can start a scan from your computer or from the HP All-in-One. This section explains how to scan from the control panel of the HP All-in-One only. To use the scan features, the HP All-in-One and computer must be connected and turned on. The HP Photosmart Software (Windows) or HP Photosmart Mac Software (Mac) must also be installed and running on your computer prior to scanning. On a Windows computer, look for the HP Digital Imaging Monitor icon in the
Windows system tray (at the lower right side of the screen, near the time) to verify the software is running.
Chapter 1
10 HP Photosmart C3100 All-in-One series
H P
A ll-
in -O
ne o
ve rv
ie w
Note Closing the HP Digital Imaging Monitor icon in the Windows system tray can cause the HP All-in-One to lose some of its scan functionality. If this happens, you can restore full functionality by restarting your computer or by starting the HP Photosmart Software.
On a Mac, the software is always running.
Tip You can use the HP Photosmart Software (Windows) or HP Photosmart Mac Software (Mac) to scan images, including panorama images. Using this software, you can also edit, print, and even share your scanned images. For more information, see the onscreen Help that came with the HP All-in-One.
To scan to a computer 1. Place your original print side down on the left front corner of the glass. 2. Press Start Scan/Reprints.
A preview image of the scan appears on your computer, where you can edit it. 3. Make any edits to the preview image, and then click Accept when you are
finished.
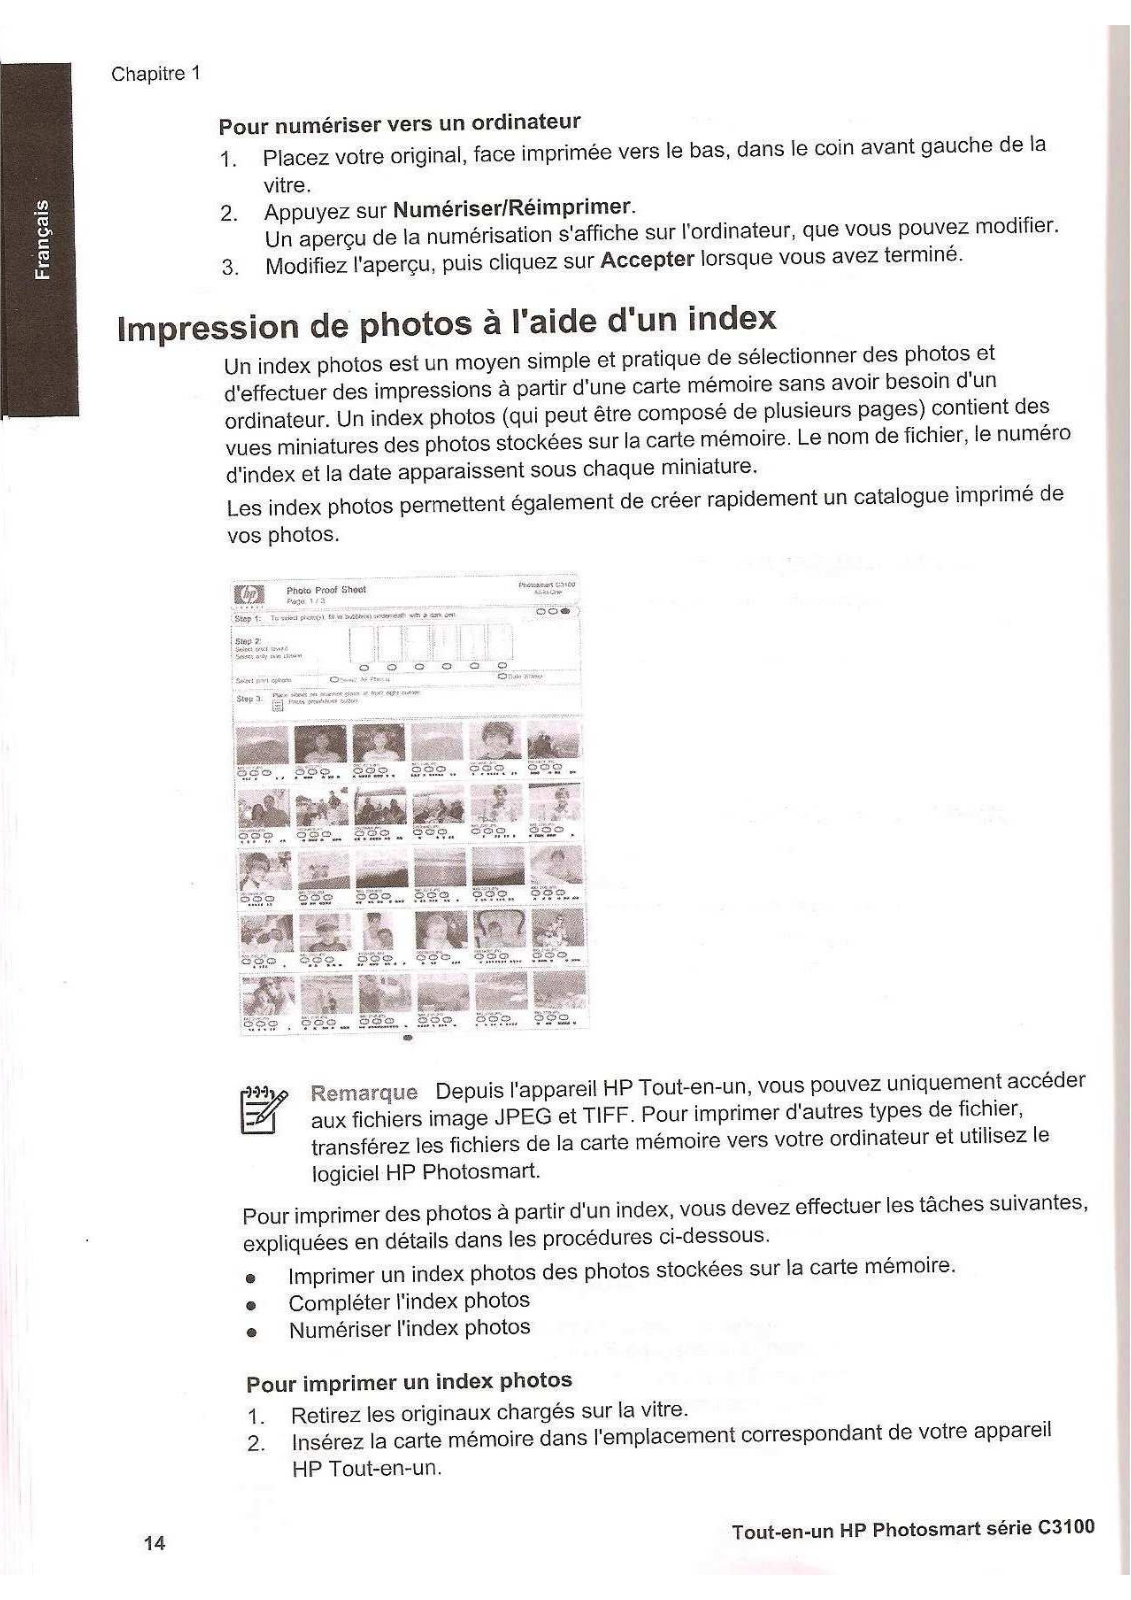
Print photos using a proof sheet A proof sheet is a simple and convenient way to select photos and make prints directly from a memory card without the need for a computer. A proof sheet (which might be several pages long) shows thumbnail views of photos stored on the memory card. The file name, index number, and date appear under each thumbnail. Proof sheets are also a quick way to create a printed catalog of your photos.
Note From the HP All-in-One, you can only access JPEG and TIFF image files. To print other types of files, transfer the files from your memory card to your computer and use the HP Photosmart Software.
Basics Guide 11
H P A
ll-in-O ne overview
In order to print photos from a proof sheet you must complete the following tasks, explained in detail in the procedures below. Print a proof sheet of the photos on your memory card Complete the proof sheet Scan the proof sheet
To print a proof sheet 1. Remove any orignals loaded on the glass. 2. Insert a memory card into the appropriate slot on the HP All-in-One.
The HP All-in-One supports the memory cards described below. Each type of memory card can only be inserted in the appropriate slot for that card.
Top left slot: Secure Digital, MultiMediaCard (MMC), Secure MultiMedia Card, Memory Stick, Magic Gate Memory Stick, Memory Stick Duo (with user-supplied adapter), Memory Stick Pro, xD-Picture Card
Top right slot: Memory Stick Duo (without user-supplied adapter) Bottom slot: CompactFlash (I, II)
3. Press the Proof Sheet button (located above the memory card slots). The Proof Sheet button is the button on the right.
The HP All-in-One prints a proof sheet. 4. When the proof sheet finishes printing, follow the instructions on the proof sheet
to select the photos you want to print., and then scan the proof sheet.
To scan a completed proof sheet 1. Load the proof sheet print side down on the right front corner of the glass. Make
sure the sides of the proof sheet touch the right and front edges. Close the lid.
Chapter 1
12 HP Photosmart C3100 All-in-One series
H P
A ll-
in -O
ne o
ve rv
ie w
2. Make sure the same memory card you used to print the proof sheet is still inserted in the HP All-in-One when you scan that proof sheet.
3. Make sure you have photo paper loaded in the input tray. 4. Press Proof Sheet.
The HP All-in-One scans the proof sheet and prints the selected photos.
Print from a software application Most print settings are automatically handled by the software application. You need to change the settings manually only when you change print quality, print on specific types of paper or transparency film, or use special features.
To print from a software application (Windows) 1. Make sure you have paper loaded in the input tray. 2. On the File menu in your software application, click Print. 3. Make sure the HP All-in-One is the selected printer. 4. If you need to change settings, click the button that opens the Properties dialog
box. Depending on your software application, this button might be called Properties, Options, Printer Setup, Printer, or Preferences.
5. Select the appropriate options for your print job by using the features available on the various tabs.
6. Click OK to close the Properties dialog box. 7. Click Print or OK to begin printing.
To print from a software application (Mac) 1. Make sure you have paper loaded in the input tray. 2. From the File menu in your software application, choose Page Setup. 3. Make sure the HP All-in-One is the selected printer. 4. Specify the page attributes:
Choose the paper size. Select the orientation. Enter the scaling percentage.
5. Click OK. 6. From the File menu in your software application, choose Print.
Basics Guide 13
H P A
ll-in-O ne overview
The Print dialog box appears, and the Copies & Pages panel opens. 7. Change the print settings for each option in the pop-up menu, as appropriate for
your project. 8. Click Print to begin printing.
Replace the print cartridges Follow these instructions when the ink level is low.
Note When the ink level for the print cartridge is low, a message appears on your computer screen. You can also check the ink levels by using the software installed with the HP All-in-One.
When you receive a low-ink warning message, make sure you have a replacement print cartridge available. You should also replace the print cartridges when you see faded text or if you experience print quality issues related to the print cartridges. To order print cartridges for the HP All-in-One, go to www.hp.com/learn/suresupply. If prompted, choose your country/region, follow the prompts to select your product, and then click one of the shopping links on the page.
To replace the print cartridges 1. Make sure the HP All-in-One is on.
Caution If the HP All-in-One is off when you open the print cartridge door to access the print cartridges, the HP All-in-One will not release the cartridges for changing. You might damage the HP All-in-One if the print cartridges are not docked safely when you try to remove them.
2. Make sure you have letter or A4 unused plain white paper loaded in the input tray. 3. Open the print cartridge door.
The print carriage moves to the far right side of the HP All-in-One.
4. Wait until the print carriage is idle and silent, and then lightly press down on a print cartridge to release it. If you are replacing the tri-color print cartridge, remove the print cartridge from the slot on the left. If you are replacing the black or photo print cartridge, remove the print cartridge from the slot on the right.
Chapter 1
14 HP Photosmart C3100 All-in-One series
H P
A ll-
in -O
ne o
ve rv
ie w
1 Print cartridge slot for the tri-color print cartridge 2 Print cartridge slot for the black and photo print cartridges
5. Pull the print cartridge toward you out of its slot. 6. If you are removing the black print cartridge in order to install the photo print
cartridge, store the black print cartridge in the print cartridge protector or an airtight plastic container. If you are removing the print cartridge because it is low or out of ink, recycle the print cartridge. The HP Inkjet Supplies Recycling Program is available in many countries/regions, and lets you recycle used print cartridges free of charge. For more information, go to the following website: www.hp.com/hpinfo/globalcitizenship/environment/recycle/inkjet.html
7. Remove the new print cartridge from its packaging and, being careful to touch only the black plastic, gently remove the plastic tape by using the pink pull tab.
1 Copper-colored contacts 2 Plastic tape with pink pull tab (must be removed before installing) 3 Ink nozzles under tape
Caution Do not touch the copper-colored contacts or ink nozzles. Touching these parts can result in clogs, ink failure, and bad electrical connections.
Basics Guide 15
H P A
ll-in-O ne overview
8. Slide the new print cartridge forward into the empty slot. Then gently push on the upper part of the print cartridge forward until it clicks into the socket. If you are installing the tri-color print cartridge, slide it into the left slot. If you are installing a black or photo print cartridge, slide it into the right slot.
9. Close the print cartridge door.
If you installed a new print cartridge, the HP All-in-One prints a print cartridge alignment sheet.
Note If you have colored paper loaded in the input tray when you align the print cartridges, the alignment will fail. Load unused plain white paper into the input tray, and then try the alignment again. If the alignment fails again, you might have a defective sensor or print cartridge. Contact HP Support. Go to www.hp.com/support. If prompted, choose your country/region, and then click Contact HP for information on calling for technical support.
Clean the HP All-in-One To ensure that your copies and scans remain clear, you might need to clean the glass and lid backing. You might also want to dust the exterior of the HP All-in-One. Clean the glass Clean the lid backing
Chapter 1
16 HP Photosmart C3100 All-in-One series
H P
A ll-
in -O
ne o
ve rv
ie w
Clean the glass Glass that is dirty from fingerprints, smudges, hair, and dust on the main glass surface slows down performance and affects the accuracy of some features.
To clean the glass 1. Turn off the HP All-in-One, unplug the power cord, and raise the lid. 2. Clean the glass with a soft cloth or sponge slightly moistened with a nonabrasive
glass cleaner.
Caution Do not use abrasives, acetone, benzene, or carbon tetrachloride on the glass, since they can damage it. Do not place or spray liquid directly on the glass. The liquid might seep under the glass and damage the device.
3. Dry the glass with a dry, soft, lint-free cloth to prevent spotting. 4. Plug in the power cord, and then turn on the HP All-in-One.
Clean the lid backing Minor debris can accumulate on the white document backing located underneath the lid of the HP All-in-One.
To clean the lid backing 1. Turn off the HP All-in-One, unplug the power cord, and raise the lid. 2. Clean the white document backing with a soft cloth or sponge slightly moistened
with a mild soap and warm water. Wash the backing gently to loosen debris. Do not scrub the backing.
3. Dry the backing with a dry, soft, lint-free cloth.
Caution Do not use paper-based wipes, as these might scratch the backing.
4. If further cleaning is needed, repeat the previous steps using isopropyl (rubbing) alcohol, and wipe the backing thoroughly with a damp cloth to remove any residual alcohol.
Caution Be careful not to spill alcohol on the glass or exterior of the HP All-in-One, as this might damage the device.
5. Plug in the power cord, and then turn on the HP All-in-One.
Basics Guide 17
H P A
ll-in-O ne overview
2 Troubleshooting and support This chapter contains troubleshooting information for the HP All-in-One. Specific information is provided for installation and configuration issues, and some operational topics. For more troubleshooting information, see the onscreen Help that came with your software. Many issues are caused when the HP All-in-One is connected to the computer using a USB cable before the HP All-in-One software is installed on the computer. If you connected the HP All- in-One to your computer before the software installation screen prompts you to do so, you must follow these steps:
Troubleshooting common setup issues 1. Disconnect the USB cable from the computer. 2. Uninstall the software (if you have already installed it). 3. Restart your computer. 4. Turn off the HP All-in-One, wait one minute, then restart it. 5. Reinstall the HP All-in-One software.
Caution Do not connect the USB cable to the computer until prompted by the software installation screen.
For support contact information, see the inside back cover of this guide.
Uninstall and reinstall the software If your installation is incomplete, or if you connected the USB cable to the computer before prompted by the software installation screen, you might need to uninstall and then reinstall the software. Do not simply delete the HP All-in-One application files from your computer. Make sure to remove them properly using the uninstall utility provided when you installed the software that came with the HP All-in-One.
To uninstall from a Windows computer and then reinstall 1. On the Windows taskbar, click Start, Settings, Control Panel. 2. Double-click Add/Remove Programs. 3. Select the HP All-in-One, and then click Change/Remove.
Follow the onscreen instructions. 4. Disconnect the HP All-in-One from your computer. 5. Restart your computer.
Note It is important that you disconnect the HP All-in-One before restarting your computer. Do not connect the HP All-in-One to your computer until after you have reinstalled the software.
6. Insert the HP All-in-One CD-ROM into your computers CD-ROM drive and then start the Setup program.
7. Follow the onscreen instructions and the instructions provided in the Setup Guide that came with the HP All-in-One.
When the software installation is complete, the HP Digital Imaging Monitor icon appears in the Windows system tray. To verify that the software is properly installed, double-click the HP Solution Center icon on the desktop. If the HP Solution Center shows the essential icons (Scan Picture and Scan Document), the software has been properly installed.
18 HP Photosmart C3100 All-in-One series
Tr ou
bl es
ho ot
in g
an d
su pp
or t
To uninstall from a Mac and then reinstall 1. Disconnect the HP All-in-One from your Mac. 2. Open the Applications:Hewlett-Packard folder. 3. Double-click HP Uninstaller.
Follow the onscreen instructions. 4. After the software is uninstalled, restart your computer. 5. To reinstall the software, insert the HP All-in-One CD-ROM into your computers CD-ROM
drive. 6. On the desktop, open the CD-ROM and then double-click HP All-in-One Installer. 7. Follow the onscreen instructions and the instructions provided in the Setup Guide that came
with the HP All-in-One.
Hardware setup troubleshooting Use this section to solve any problems you might encounter while setting up the HP All-in-One hardware.
The HP All-in-One will not turn on Cause The HP All-in-One is not properly connected to a power supply.
Solution Make sure the power cord is firmly connected to both the HP All-in-One and the power
adaptor. Plug the power cord into a grounded power outlet, surge protector, or power strip.
1 Power connection 2 Power cord and adaptor 3 Grounded power outlet
If you are using a power strip, make sure the power strip is on. Or, try plugging the HP All-in-One directly into a grounded power outlet.
Test the power outlet to make sure it is working. Plug in an appliance that you know works, and see if the appliance has power. If not, then there might be a problem with the power outlet.
If you plugged the HP All-in-One into a switched outlet, make sure the switch is on. If it is switched to on but still does not work, then there might be a problem with the power outlet.
Cause You pressed the On button too quickly.
Basics Guide 19
Troubleshooting and support
Solution The HP All-in-One might not respond if you press the On button too quickly. Press the On button once. It might take a few minutes for the HP All-in-One to turn on. If you press the On button again during this time, you might turn the device off.
Warning If the HP All-in-One still does not turn on, it might have a mechanical failure. Unplug the HP All-in-One from the power outlet and contact HP. Go to: www.hp.com/support If prompted, choose your country/region, and then click Contact HP for information on calling for technical support.
I connected the USB cable, but I am having problems using the HP All-in-One with my computer
Cause The USB cable was connected before the software was installed. Connecting the USB cable before prompted can cause errors. Solution You must first install the software that came with the HP All-in-One before connecting the USB cable. During installation, do not plug in the USB cable until prompted by the onscreen instructions. Once you have installed the software, connecting your computer to the HP All-in-One with a USB cable is straightforward. Simply plug one end of the USB cable into the back of your computer and the other into the back of the HP All-in-One. You can connect to any USB port on the back of your computer.
For more information on installing the software and connecting the USB cable, see the Setup Guide that came with the HP All-in-One.
The HP All-in-One does not print Solution If the HP All-in-One and computer are not communicating with each other, try the following: Look at the On light located on the front of the HP All-in-One. If it is not lit, the HP All-
in-One is turned off. Make sure the power cord is firmly connected to the HP All-in-One and plugged into a power outlet. Press the On button to turn on the HP All-in-One.
Make sure the print cartridges are installed. Make sure you have paper loaded in the input tray. Check that the HP All-in-One does not have a paper jam. Check that the print carriage is not jammed.
Chapter 2
20 HP Photosmart C3100 All-in-One series
Tr ou
bl es
ho ot
in g
an d
su pp
or t
Open the print cartridge door to access the print carriage area. Remove any objects that are blocking the print carriage, including any packing materials. Turn the HP All-in- One off and then turn it on again.
Check that the HP All-in-One print queue is not paused (Windows) or stopped (Mac). If it is, choose the appropriate setting to resume printing. For more information about accessing the print queue, see the documentation that came with the operating system installed on your computer.
Check the USB cable. If you are using an older cable, it might not be working properly. Try connecting it to another product to see if the USB cable works. If you experience problems, the USB cable might need to be replaced. Also verify that the cable does not exceed 3 meters (9.8 feet) in length.
Make sure your computer is USB ready. Some operating systems, such as Windows 95 and Windows NT, do not support USB connections. Check the documentation that came with your operating system for more information.
Check the connection from the HP All-in-One to your computer. Verify that the USB cable is securely plugged into the USB port on the back of the HP All-in-One. Make sure the other end of the USB cable is plugged into a USB port on your computer. After the cable is connected properly, turn the HP All-in-One off and then on again.
If you are connecting the HP All-in-One through a USB hub, make sure the hub is turned on. If the hub is on, try connecting directly to your computer.
Check other printers or scanners. You might need to disconnect older products from your computer.
Try connecting the USB cable to another USB port on your computer. After you check the connections, try restarting your computer. Turn the HP All-in-One off and then on again.
If the HP All-in-One is offline, turn the HP All-in-One off and on again. Start a print job. If necessary, remove and then install the software you installed with the HP All-in-One
again. For more information on setting up the HP All-in-One and connecting it to your computer, see the Setup Guide that came with the HP All-in-One.
Error conditions The lights on the HP All-in-One flash in special sequences to inform you about various error conditions. For more information on solving error conditions based on the status lights, see Status light overview on page 5.
Clear paper jams If the HP All-in-One has a paper jam, first check the rear door. If the jammed paper is not in the rear rollers, check the front door.
To clear a paper jam from the rear door 1. Press in the tab on the left side of the rear door to release the door. Remove the door by
pulling it away from the HP All-in-One.
2. Gently pull the paper out of the rollers.
Basics Guide 21
Troubleshooting and support
Caution If the paper tears when you are removing it from the rollers, check the rollers and wheels for torn pieces of paper that might be remaining inside the device. If you do not remove all the pieces of paper from the HP All-in-One, more paper jams are likely to occur.
3. Replace the rear door. Gently push the door forward until it snaps into place. 4. Press Start Copy Black or Start Copy Color to continue the current job.
To clear a paper jam from the front door 1. If necessary, pull the input tray down to open it. Then, lower the print cartridge door.
2. Gently pull the paper out of the rollers.
Caution If the paper tears when you are removing it from the rollers, check the rollers and wheels for torn pieces of paper that might be remaining inside the device. If you do not remove all the pieces of paper from the HP All-in-One, more paper jams are likely to occur.
3. Close the print cartridge door.
4. Press Start Copy Black to continue the current job.
Print cartridge troubleshooting If you are experiencing problems with printing, you might have a problem with one of the print cartridges.
To troubleshoot print cartridges 1. Remove the black print cartridge from the slot on the right. Do not touch the ink nozzles or
the copper-colored contacts. Check for possible damage to the copper-colored contacts or ink nozzles. Make sure the plastic tape has been removed. If it is still covering the ink nozzles, gently remove the plastic tape by using the pink pull tab.
2. Reinsert the print cartridge by sliding it forward into the slot. Then push the print cartridge forward until it clicks into the socket.
Chapter 2
22 HP Photosmart C3100 All-in-One series
Tr ou
bl es
ho ot
in g
an d
su pp
or t
3. Repeat steps 1 and 2 for the tri-color print cartridge on the left side. 4. If the problem persists, print a self-test report to determine if there is a problem with the print
cartridges. This report provides useful information about your print cartridges, including status information.
5. If the self-test report shows a problem, clean the print cartridges. 6. If the problem persists, clean the copper-colored contacts of the print cartridges. 7. If you are still experiencing problems with printing, determine which print cartridge is
experiencing the problem and replace it. For
-
Драйверы
8
-
Инструкции по эксплуатации
1
HP PhotoSmart C3100 инструкция по эксплуатации
(34 страницы)
- Языки:Английский
-
Тип:
PDF -
Размер:
1.31 MB
Просмотр
На NoDevice можно скачать инструкцию по эксплуатации для HP PhotoSmart C3100. Руководство пользователя необходимо для ознакомления с правилами установки и эксплуатации HP PhotoSmart C3100. Инструкции по использованию помогут правильно настроить HP PhotoSmart C3100, исправить ошибки и выявить неполадки.