
English
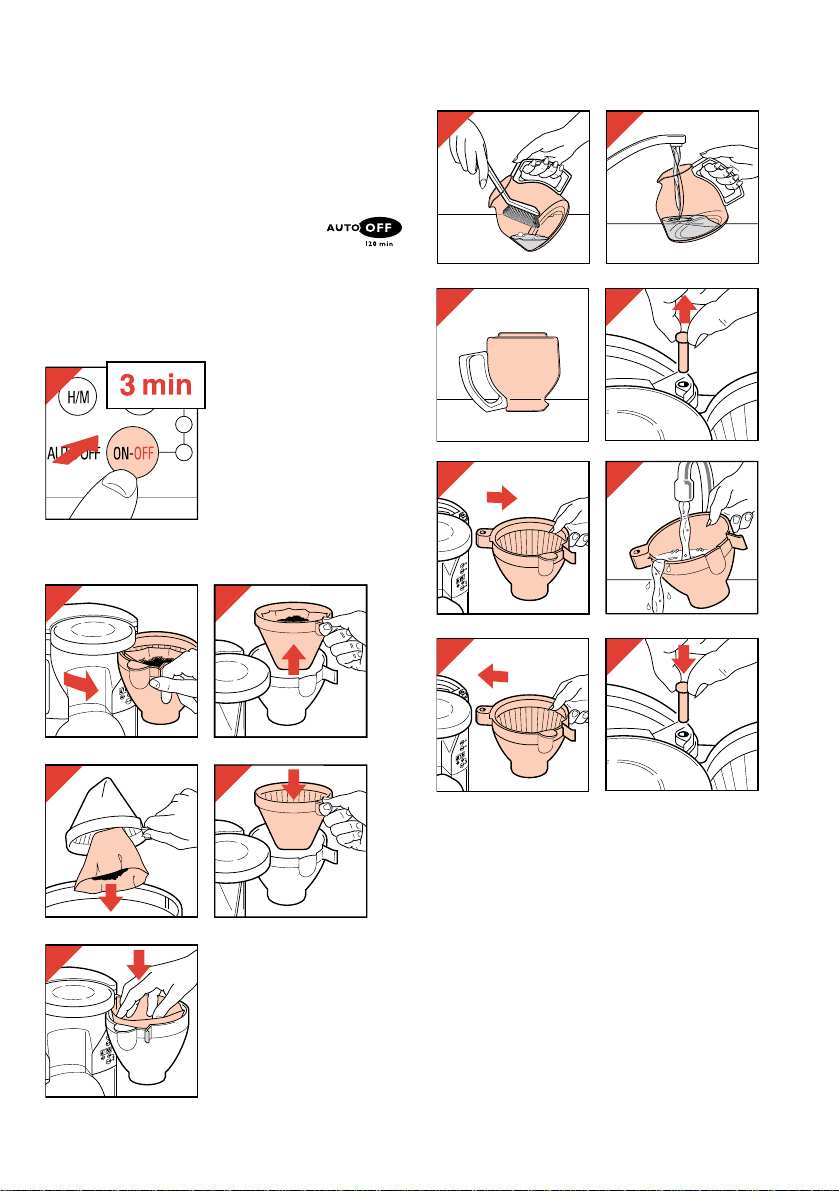
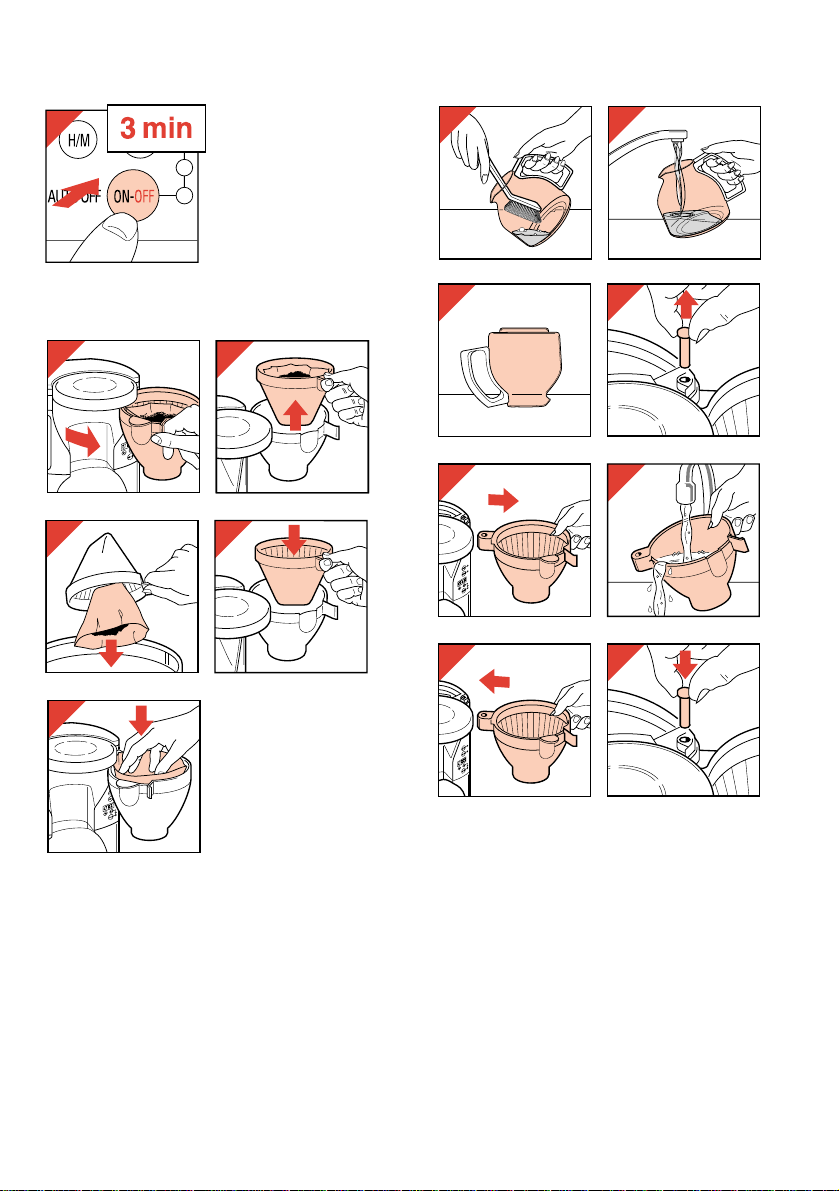
• Before connecting the appliance, please check if the voltageindicated on the appliance corresponds with the mains voltage inyour home.• Do not place the appliance on a hot surface.• Remove the mains plug from the wall socket:- if problems occur during making coffee;- before cleaning the appliance.• Do not allow the mains cord to come into contact with hot surfaces.• Use the appliance out of children’s reach. Prevent them from pullingthe mains cord.• Never use the appliance if the mains plug, the mains cord or theappliance itself is damaged.Before first use- Operate the appliance once without filling the filter with ground coffee.(See section “Making coffee”.)- Next, clean the removable parts as described in section “Cleaning”.Cleaning: please refer to the illustrations (fig. 16 — 27)• Always remove the plug from the wall socket before cleaning theappliance.• Never immerse the appliance in water. You should clean it with a dampcloth. • The removable items should be washed in hot soapy water. Rinse withclean hot water and dry. These items can also be cleaned in adishwasher.To take out the outer filter holder first remove the axis (fig. 23). Do notmislay the axis!Making coffee: please refer to the illustrations (fig. 2 — 15)— To fill the water tank use fresh cold water only.The left hand side level indications correspond to large cups (125 ml).The right hand side level indications correspond to smaller cups (85 ml).- Use filter paper type “1×4 “ or “no. 4”. Do not forget to fold the rims.With some models a permanent filter is supplied. Paper filters are then notrequired.- For large cups: take one full (heaped) measuring spoonful of groundcoffee (“fast filter” type) for each cup. For smaller cups: one levelmeasuring spoonful for each cup.- For types HD 7257 and HD 7258:Less than four large (or six small) cups of coffee: set switch toposition 7.More than four large (or six small) cups of coffee: set switch toposition 8.• The “drip-stop” (automatic stop-valve) ensures that no coffee will drip on tothe hotplate if the jug is removed from the appliance for a moment duringthe brewing process or if the jug is removed after making coffee.Note: the drip-stop will only allow coffee to flow into the jug if the juglid has been placed.
• Automatic power shut-off. For your convenience, and also for extra
safety: if you have not switched off the coffee maker, it will switch offautomatically after 2 hours.Making more coffee straight away?If you have made one jug of coffee and wish to make some more straightaway, please switch the coffee maker off (fig. 15) and allow about threeminutes for it to cool down. Then you can refill the water tank.DescalingDescale your coffee maker regularly. With normal use (two full jugs a day)the following rule applies:hardness up to 18 °DH (22.5 °Clarke) — 2 or 3 times a year;hardness over18 °DH (22.5 °Clarke) — 4 or 5 times a year.Your water supply company can inform you about the hardness of yourwater.- Operate the appliance as described. However, now use ordinary vinegarto fill the water tank and do not fill the filter with ground coffee.— After descaling, let the appliance work twice more with only water to rinseaway the vinegar and scale remainders.- Wash the coffee jug, lid and filter holder.Jug broken? Extra jug wanted?You can order a jug from your dealer or Philips Service Centre.jug type nr.: for coffee maker(s):HD 7909 HD 7255 — 7257HD 7910 HD 7258Replacing the mains cordIf the mains cord of this appliance is damaged, it must be replaced by theoriginal type only.Please apply to your Philips dealer or to the Philips organisation in yourcountry for replacement.
• Assurez-vous avant de brancher l’appareil que le voltage indiqué sur
la plaque signalétique du dessous de l’appareil correspond auvoltage du réseau de votre habitation.• Ne placez pas l’appareil sur une surface chaude.• Débranchez l’appareil:
— si un problème survient pendant la préparation du café
— avant de le nettoyer
• Faites attention à ce que le cordon d’alimentation ne vienne pas en
contact avec les surfaces chaudes.
• Utilisez l’appareil hors de portée des enfants. Faites attention qu’ils
ne tirent pas sur le cordon d’alimentation.• N’utilisez jamais l’appareil si la fiche, le cordon d’alimentation oul’appareil sont endommagés.Avant la première utilisation- Faites fonctionner l’appareil une fois sans café. (Voir paragraphe»Préparation du café».)- Ensuite, nettoyez les parties amovibles comme décrit dans le paragraphe»Nettoyage».Nettoyage (voir aussi les fig. 16 — 27)• Débranchez toujours votre appareil avant de le nettoyer.• N’immergez jamais l’appareil dans l’eau. Vous pouvez le nettoyer avec unchiffon humide.• Les parties amovibles peuvent être nettoyées à l’eau chaude savonneuse.Rincez à l’eau chaude et séchez. Ces éléments peuvent également êtrenettoyés dans un lave-vaisselle.Pour retirer le porte-filtre, enlevez préalablement l’axe (fig. 23). Ne perdezpas l’axe.
Préparation du café: prière de vous référer aux illustrations (fig. 2 — 15)
— Remplissez d’eau fraîche uniquement le réservoir d’eau.Les indications de niveau sur le côté gauche correspondent à de grandestasses (125 ml).Les indications de niveau sur le côté droit correspondent à de petitestasses (85 ml).- Utilisez des filtres papier type «1×4» ou «n° 4». N’oubliez pas de plier lesbords du filtre papier.Suivant les modèles, un filtre permanent peut être utilisé. Dans ce cas lesfiltres papier ne sont pas nécessaires.- Quand vous utilisez des grandes tasses, il est recommandé de mettre unecuillère doseuse bien pleine par tasse.- Quand vous utilisez des petites tasses, il est recommandé de mettre unecuillère doseuse rase par tasse.- Pour les types HD 7257 et HD 7258:
Moins de 4 tasses larges (ou 6 petites tasses) de café: mettez
l’interrupteur sur la position 7 .
Plus de 4 tasses larges (ou 6 petites tasses) de café: mettez
l’interrupteur sur la position 8.• Le système «anti-goutte» empêchera le café de couler sur la plaquechauffante, si vous enlevez la verseuse le temps de vous servir et en finde préparation.
Nota: le système «anti-goutte» ne fonctionne correctement qu’avec le
couvercle placé sur la verseuse.
• Dispositif de coupure automatique. Pour des raisons de sécurité,
l’appareil se coupe automatiquement au bout de 2 heures, si vous avezoublié de l’arrêter.Refaire du café immédiatement?Si vous voulez refaire du café, arrêtez l’appareil (fig. 15) et laissez-lerefroidir environ 3 minutes. Vous pourrez à nouveau remplir le réservoird’eau.DétartrageDétartrez régulièrement votre appareil. En cas d’utilisation moyenne:
2 à 3 fois par an si la dureté de l’eau est inférieure à 30° TH;
4 à 5 fois par an si la dureté de l’eau est supérieure à 30° TH.
La Compagnie des Eaux de votre région vous renseignera sur le degré dedureté de votre eau.Procédez de la façon suivante:
— Faites fonctionner l’appareil une fois avec du vinaigre blanc et sans
café.— Lorsque le détartrage est terminé, faites fonc-tionner l’appareil deux foisavec de l’eau fraîche afin d’éliminer les restes de vinaigre et de tartre.- Lavez la verseuse, le couvercle et le porte-filtre.Votre verseuse est cassée ? Vous pouvez la commander chez votre revendeur ou un réparateurindépendant agréé Philips.
Verseuse type n° pour cafetières réf.:
HD 7909 HD 7255-7257 HD 7910 HD 7258Remplacement du cordonSi le cordon d’alimentation de l’appareil est endommagé, il doit être rem-placé par un cordon équivalent. Adressez-vous à votre revendeur Philips ouau réparateur agréé Philips Appareils Domestiques de votre région.
Français
NederlandsDeutsch
Italiano
• Prüfen Sie vor Inbetriebnahme, ob die Spannungsangabe auf dem
Gerät mit der örtlichen Netzspannung übereinstimmt.
• Stellen Sie das Gerät nicht auf eine heiße Oberfläche.
• Ziehen Sie den Netzstecker aus der Steckdose …— bei Störungen während der Zubereitung des Kaffees,- vor der Reinigung des Gerätes.
• Achten Sie darauf, daß das Netzkabel nicht mit der heißen Heizplatte
in Berührung kommt.• Achten Sie darauf, daß Kinder nicht den Netzstecker aus derSteckdose ziehen oder das Gerät herabziehen können.
• Verwenden Sie das Gerät auf keinen Fall, wenn de Netzstecker, das
Netzkabel oder das Gerät selbst in irgendeiner Hinsicht beschädigt
ist.
Vor dem ersten Gebrauch- Betreiben Sie das Gerät einmal, wie im Abschnitt «Kaffee zubereiten»beschrieben, ohne Kaffee in den Filter zu geben.- Reinigen Sie danach alle abnehmbaren Teile, wie im Abschnitt»Reinigung» beschrieben.Reinigung (siehe auch Abb. 16 — 27)• Ziehen Sie vor jeder Reinigung den Stecker aus der Steckdose.• Tauchen Sie das Gerät niemals in Wasser. Sie können es mit einemfeuchten Tuch abwischen.• Die abnehmbaren Teile können in warmem Wasser gereinigt werden, demSie ein wenig Spülmittel zugefügt haben. Spülen Sie mit klarem, warmemWasser nach, und trocknen Sie ab. Sie können diese Teile auch imGeschirrspüler reinigen.Nehmen Sie den Verriegelungsstift (Abb. 23) heraus, bevor Sie denäußeren Filterhalter abnehmen, und bewahren Sie sie sorgfältig auf.Kaffee zubereiten: sehen Sie sich bitte die Abbildungen 2 bis 15 an.— Füllen Sie den Wasserbehälter nur mit frischem, kaltem Wasser.Die linke Skala der Wasserstandsanzeige entspricht großen Tassen(125 ml). Die rechte Skala entspricht kleinen Tassen (85 ml).- Verwenden Sie Filterpapier Type «1 x 4» bzw. «No. 4». Vergessen Sienicht, die Kanten zu falzen.Einige Modelle werden mit einem Permanentfilter geliefert. Hierfür sindkeine Papierfilter erforderlich.- Für große Tassen: Nehmen Sie einen gehäuften Meßlöffel vollgemahlenem Kaffee pro Tasse.Für kleinere Tassen nehmen Sie einen gestrichenen Meßlöffel voll Kaffeepro Tasse.- Bei Typen HD 7257 und HD 7258:
Weniger als 4 große bzw. 6 kleine Tassen Kaffee: Schalter auf 7.
Mehr als 4 große bzw. 6 kleine Tassen Kaffee: Schalter auf 8.
• Der automatische Tropf-Stop verhindert, daß Kaffee auf dieWarmhalteplatte tropft, wenn sich die Kanne nicht im Gerät befindet.Wichtig: Wegen des automatischen Tropf-Stop kann nur beiaufgesetztem Kannendeckel Kaffee in die Kanne fließen.
• Automatische Stromabschaltung. Zu Ihrer Bequemlichkeit und Ihrer
Sicherheit wird das Gerät nach Ablauf von 2 Stunden ausgeschaltet.Sofort frischen Kaffee zubereitenIst Ihr Kaffee fertig, und Sie möchten sofort noch eine Kanne zubereiten, soschalten Sie das Gerät aus (Abb. 15) und lassen es ca. drei Minutenabkühlen. Danach können Sie den Wasserbehälter neu füllen. EntkalkenEntkalken Sie Ihr Gerät regelmäßig. Bei normalem Gebrauch (zwei Kannentäglich) gilt:
Wasserhärte bis 18°dH: zwei- bis dreimal jährlich;
Wasserhärte über 18°dH: vier- bis fünfmal jährlich.
Ihre Wasserwerke können Sie über die Härte Ihres Wassers informieren.- Betreiben Sie das Gerät wie beschrieben, aber füllen Sie den Wasser-behälter mit Haushaltsessig, ohne Kaffee in den Filter zu geben.— Betreiben Sie das Gerät danach noch zweimal mit frischem Wasser, umKalk- und Essigreste zu entfernen.- Waschen Sie die Kanne, den Deckel und den Filterhalter ab.Kanne zerbrochen? Extra-Kanne nötig?Sie können bei Ihrem Händler oder beim Philips-Kundendienst eine Kanne bestellen:Kanne Typen-Nr.:Für die Geräte:HD 7909 HD 7255-7257HD 7910 HD 7258Auswechseln des NetzanschlußkabelsWenn das Netzanschlußkabel defekt oder beschädigt ist, muß dieses durchein Original-Netzanschlußkabel ersetzt werden. Wenden Sie sich an IhrenPhilips Händler oder an die Philips Service Organisation.
• Controleer, vóórdat u het apparaat aansluit, of de aanduiding van het
voltage op het apparaat overeenkomt met de netspanning in uwwoning.• Zet het apparaat niet op een heet oppervlak.• Neem de stekker uit het stopcontact:— als er bij het koffiezetten problemen optreden;- voordat u het apparaat gaat schoonmaken.• Zorg ervoor dat het snoer niet in aanraking kan komen met heteoppervlakken.• Gebruik het apparaat buiten bereik van kinderen. Let erop dat zij nietaan het snoer kunnen trekken.• Gebruik het apparaat niet als de stekker, het snoer of het apparaatzelf beschadigd is.Vóór het eerste gebruik— Laat het apparaat vóór het eerste gebruik één keer werken zonder koffiein het filter. (Zie “Koffiezetten”.) — Was daarna de losse onderdelen af. (Zie “Schoonmaken”.)Schoonmaken: zie de illustraties (fig. 16 — 27)• Haal altijd de stekker uit het stopcontact voordat u het apparaat gaatschoonmaken.• Dompel het apparaat nooit in water. U kunt het schoonmaken met eenvochtige doek. • De losse delen kunt u afwassen in heet sop. Spoel ze na met heet wateren droog ze af. U kunt de losse delen ook schoonmaken in deafwasmachine.Voor het losnemen van de buitenste filterhouder verwijdert u eerst het asje(fig. 23). Zorg ervoor dat u het asje niet kwijtraakt!Koffiezetten: zie de illustraties (fig. 2 — 15)— Gebruik voor het vullen van het waterreservoir alleen vers, koud water.De linker niveau-aanduidingen gelden voor grote koppen (125 ml)De rechter niveau-aanduidingen gelden voor kleinere koppen (85 ml).- Gebruik papieren filterzakjes type “1 x 4” of “no. 4”. Vergeet niet de randenom te vouwen.Bij sommige versies wordt een permanent filter geleverd. U hoeft dangeen papieren filterzakjes te gebruiken.- Voor grote koppen: 1 volle maatlepel koffiemaalsel (snelfiltermaling) perkop. Voor kleinere koppen: 1 afgestreken maatlepel per kop.- Alleen voor types HD 7257 en HD 7258:
Minder dan vier grote (of zes kleine) koppen koffie: schakelaar in stand
7.
Meer dan vier grote (of zes kleine) koppen koffie: schakelaar in
stand 8.• De ingebouwde “drip-stop” (“druppelstopper”) zorgt ervoor dat er geenkoffie uit de filterhouder op de warmhoudplaat druppelt, wanneer u tijdenshet koffiezetten de kan even uit het apparaat neemt, en wanneer u ná hetkoffiezetten de kan verwijdert.
Let op: de “drip-stop” zal alleen koffie in de kan laten stromen als het
deksel op de kan is geplaatst.• Automatisch uitschakelen. Voor het gemak, en ook voor extraveiligheid: als u de koffiezetter niet hebt uitgeschakeld,schakelt het apparaat zichzelf na 2 uur automatisch uit. Meteen opnieuw koffie zetten?Als u meteen opnieuw koffie wilt zetten, schakel dan de koffiezetter uit(fig. 15) en laat het apparaat ongeveer drie minuten afkoelen. Daarna kunt u het waterreservoir opnieuw vullen.OntkalkenOntkalk uw koffiezetter regelmatig. Bij normaal gebruik (twee volle kannenper dag):
2 à 3 keer per jaar als u zacht water gebruikt (tot 18 °DH);
4 à 5 keer per jaar als u hard water gebruikt (boven 18 °DH).
Uw waterleidingbedrijf kan u over de plaatselijke waterhardheid informeren. — Gebruik het apparaat zoals aangegeven. Vul het waterreservoir nu echter
met gewone azijn in plaats van water, en doe geen gemalen koffie in
het filterzakje.- Laat na het ontkalken het apparaat nog twee keer met alleen koud waterwerken om azijn en kalkresten weg te spoelen.- Was vervolgens de koffiekan, de filterhouder en het deksel af.Kan kapot? Of extra kan?U kunt bij uw dealer of Philips Service Centrum een kan bestellen.kan typenr.: voor koffiezetter(s):HD 7909 HD 7255-7257HD 7910 HD 7258Snoer vervangenIndien het snoer van dit apparaat is beschadigd, dient het uitsluitend doorhet originele type te worden vervangen. Wend u daartoe tot uw Philipsleverancier of tot de Philips organisatie in uw land.
• Prima di collegare l’apparecchio, controllate che la tensione indicata
sull’apparecchio corrisponda a quella della rete locale.• Non appoggiate l’apparecchio su una superficie calda.• Togliete immediatamente la spina dalla presa di alimentazione:— nel caso si verificassero problemi durante la preparazione del caffè— prima di procedere alla pulizia dell’apparecchio.• Evitate che il cavo di alimentazione venga a contatto con superficicalde.
• Durante l’uso, tenete l’apparecchio lontano dalla portata dei bambini.
Fate in modo che non possano tirare il cavo di alimentazione.
• Non utilizzate l’apparecchio nel caso in cui il cavo di alimentazione,
la spina o l’apparecchio risultassero danneggiati.Quando usate la macchina del caffè per la prima volta- Fatela funzionare per una volta senza usare il caffè (ved. il cap.»Preparazione del caffè»).- Pulite poi le parti asportabili dell’apparecchio come descritto nel cap.»Pulizia».Pulizia (ved. anche fig. 16 — 27)— Prima di pulire l’apparecchio togliete sempre la spina dalla presa dialimentazione.Non immergete mai l’apparecchio nell’acqua, pulitelo invece con un pannoumido.- Pulite le parti staccabili con acqua calda e detersivo.Risciacquatele con acqua calda ed asciugatele poi con cura; si possonolavare anche in lavastoviglie.Per togliere la parte esterna del portafiltro occorre per prima cosa togliereil perno (fig. 23). Non perdete tale perno.
Preparazione del caffè (fig. 2-15)
— Versate nel serbatoio solamente acqua fredda. I livelli posti a sinistra indicano la quantità per le tazze grandi (125 ml).I livelli posti a destra indicano la quantità per le tazze piccole (85 ml).- Per ogni tazza grande, usate un misurino ben colmo di caffè macinato(tipo Fast Filter).Per ogni tazza piccola, usate un misurino raso di caffè.Con alcuni modelli viene fornito un filtro permanente. In questo caso i filtridi carta non sono più necessari.- Nei modelli HD 7257 e HD 7258:
Per preparare meno di 4 tazze grandi di caffè (o 6 piccole): regolate
l’interruttore sulla posizione 7.
Per preparare più di 4 tazze grandi di caffè (o 6 piccole): regolate
l’interruttore sulla posizione 8.— Il «ferma gocce» (la valvola di fermo automatica) evita che il caffè gocciolisulla piastra di riscaldamento quando togliete il bricco mentrel’apparecchio sta preparando il caffè e quando togliete il bricco dallapiastra dopo aver preparato il caffè.Nota: il «ferma gocce» funziona solamente se sul bricco è statomesso il coperchio.
• Spegnimento automatico. Per comodità, e per ragioni di sicurezza: se
non avete spento la macchina del caffè, dopo 2 ore si spegneràautomaticamente.Volete preparare dell’altro caffè subito dopo?Se avete appena preparato il caffè e volete prepararne dell’altro subitodopo, spegnete la macchina del caffè (fig. 15) e lasciatela raffred-dare pertre minuti.Poi procedete alla nuova preparazione riempendo il serbatoio.La decalcificazioneDecalcificate regolarmente la macchina del caffè.Con un normale uso (due bricchi al giorno) osservate queste norme:
durezza dell’acqua fino a 18° DH — due o tre volte all’anno
durezza dell’acqua superiore a 18° DH — quattro o cinque volte all’anno.
Potete informarvi della durezza dell’acqua di casa vostra, rivolgendovi alvostro acquedotto.- Fate funzionare per una volta l’apparecchio.
Riempite però il serbatoio con aceto bianco e non usate il caffè.
— Per togliere il sapore di aceto ed i depositi calcarei, ripetete ancora duevolte l’operazione usando solamente acqua.- Lavate il bricco, il coperchio ed il portafiltro.Sostituzione del briccoPer ordinare un bricco supplementare, rivolgetevi al vostro rivenditoreabituale o ad uno dei numerosi Centri Assistenza Philips chiedendo:• il tipo HD 7909 per il mod. HD 7255, HD 7251, e HD 7257• il tipo HD 7910 per il mod. HD 7258.Sostituzione del cavo di alimentazioneSe il cavo di alimentazione di questo apparecchio si dovesse rovinare,occorrerà sostituirlo con un cavo speciale: a questo scopo rivolgetevi alrivenditore Philips o all’organizzazione Philips.Connections — Applicable to U.K. only IMPORTANTWARNING — THIS APPLIANCE MUST BE EARTHEDThe wires in this mains lead are coloured in accordance with thefollowing code:GREEN AND YELLOW — EARTHBLUE — NEUTRALBROWN — LIVEAs the colours of the wires in the mains lead of this appliance may notcorrespond with the coloured markings identifying the terminals in yourplug, proceed as follows:The wire which is coloured GREEN AND YELLOW must be connected
to the terminal which is marked with the letter “E” or by the earth symbol
E or coloured GREEN or GREEN AND YELLOW.
The wire which is coloured BROWN must be connected to the terminalwhich is marked with the letter “L” or coloured RED.The wire which is coloured BLUE must be connected to the terminalwhich is marked with a letter “N” or coloured BLACK.Note: If the terminals of the plug are unmarked or if you are in anydoubt consult a qualified electrician.If a BS 1363 13A plug is used this must be fitted with a 13A fuse.
;
ΕΛΛΗΝΙΚΑ
• Πριν συνδέσετε τη συσκευή, παρακαλούµε ελέγξτε εάν η τάση πουαναφέρεται στη συσκευή αντιστοιχεί στην τάση του σπιτιού σας.• Μην τοποθετείτε τη συσκευή σε θερµές επιφάνειες. • Βγάλτε το καλώδιο απ# την πρίζα του τοίχου:- αν δηµιουργηθούν προβλήµατα ενώ κάνετε καφέ- πριν καθαρίσετε τη συσκευή.• Μην αφήνετε το καλώδιο του ρεύµατος να έρχεται σε επαφή µεζεστές επιφάνειες.• Μην αφήνετε τα παιδιά να πλησιάζουν τη συσκευή #ταν λειτουργεί,ούτε και να τραβούν το καλώδιο του ρεύµατος.• Μη χρησιµοποιείτε ποτέ τη συσκευή εάν διαπιστώσετε #τι υπάρχειβλάβη στο φις, στο καλώδιο του ρεύµατος ή στην ίδια τη συσκευή.Πριν χρησιµοποιήσετε τη συσκευή για πρώτη φορά- Αφήστε την να λειτουργήσει µία φορά χωρίς να γεµίσετε το φίλτροµε αλεσµένο καφέ. (∆είτε παρ. “Ετοιµασία καφέ”).- Μετά καθαρίστε τα αποσπώµενα µέρη µε τον τρ#πο πουπεριγράφεται στην παράγραφο “Καθαρισµ#ς”.Καθαρισµς: παρακαλούµε ανατρέξτε στις εικνες (εικ. 16-27)• Το καλώδιο θα πρέπει πάντοτε να βγαίνει απ# την πρίζα πριν τονκαθαρισµ# της συσκευής.• Μη βυθίζετε ποτέ τη συσκευή στο νερ#. Καθαρίστε την µε ένα υγρ#πανί..• Καθαρίστε τα αποσπώµενα µέρη µε ζεστ# νερ# και σαπούνι.Ξεπλύντε τα µε καθαρ# ζεστ# νερ# και σκουπίστε τα. Τα µέρη αυτάµπορούν να καθαριστούν και σε πλυντήριο πιάτων.• Για να βγάλετε την εξωτερική θήκη του φίλτρου θα πρέπει πρώτανα αφαιρέσετε τον άξονα (εικ.23). Φροντίστε να µη χάσετε τονάξονα!Ετοιµασία καφέ: παρακαλούµε ανατρέξτε στις εικνες (εικ. 2-15)• Γεµίστε το δοχείο χρησιµοποιώντας µ#νο φρέσκο νερ# της βρύσης. Oι ενδείξεις στάθµης στην αριστερή πλευρά αντιστοιχούν σεµεγάλα φλιτζάνια (125 ml).Oι ενδείξεις στάθµης στη δεξιά πλευρά αντιστοιχούν σε µικράφλιτζάνια (85 ml).• Χρησιµοποιείτε χάρτινα φίλτρα τύπου “1Χ4” ή “Νο 4”. Μην ξεχνάτενα διπλώνετε τις άκρες.Μερικά µοντέλα συνοδεύονται απ µνιµο φίλτρο, µε αποτέλεσµανα µη χρειάζονται τα χάρτινα φίλτρα.• Για µεγάλα φλιτζάνια: υπολογίστε (χρησιµοποιώντας το ειδικ#κουτάλι-µεζούρα) µία γεµάτη κουταλιά αλεσµένου καφέ του τύπου“fast filter” για κάθε φλιτζάνι. Για µικρ#τερα φλιτζάνια: µία κοφτήκουταλιά για κάθε φλυτζάνι.Για τους τύπους HD 7257 και 7258:
Για λιγ#τερα απ# τέσσερα µεγάλα (ή έξι µικρά) φλιτζάνια : Γυρίστε
τον διακ#πτη στη θέση 7.
Για περισστερα απ# τέσσερα µεγάλα (ή έξι µικρά) φλιτζάνια: Γυρίστε
τον διακ#πτη στη θέση 8.Η αυτ#µατη βαλβίδα “drip-stop”εµποδίζει τις σταγ#νες του καφέ ναπέφτουν στη θερµή πλάκα στην περίπτωση που πάρετε την κανάτα τηστιγµή που γίνεται ο καφές ή αφού αυτ#ς έχει γίνει.Σηµείωση: Η αυτµατη βαλβίδα αφήνει τον καφέ να τρέχει στηνκανάτα µνο ταν έχετε βάλει το καπάκι στην κανάτα.Αυτµατη διακοπή λειτουργίας. Για την ευκολία σας και περισσ#τερηασφάλεια, αν δεν έχετε σταµατήσει τη λειτουργία της συσκευής, θασταµατήσει αθτοµάτως µετά 2 ώρες.Πώς θα κάνετε αµέσως περισστερο καφέΣτην περίπτωση που έχετε ετοιµάσει µια κανάτα καφέ και θέλετε ναετοιµάσετε αµέσως κι άλλο καφέ, σβήστε τη συσκευή (εικ. 15) καιαφήστε την να κρυώσει για τρία λεπτά περίπου. Στη συνέχειαξαναγεµίστε το δοχείο νερού.Αφαίρεση των καθαλατώσεωνOι καθαλατώσεις που δηµιουργούνται στη συσκευή θα πρέπει νααφαιρούνται σε τακτά χρονικά διαστήµατα. Στην περίπτωσηκανονικής χρήσης (2 γεµάτες κανάτες την ηµέρα) ισχύει ο εξήςκαν#νας:Αν χρησιµοποιείτε νερ# µε σκληρ#τητα µέχρι 18°DH, 2 ή 3 φορές τονχρ#νο.Αν χρησιµοποιείτε νερ# µε σκληρ#τητα πάνω απ 18°, 4 ή 5 φορέςτον χρ#νο.Μπορείτε να πληροφορηθείτε τη σκληρ#τητα του νερού σας απ# τηνεταιρεία υδρεύσεως της περιοχής σας.• Λειτουργήστε τη συσκευή σύµφωνα µε τον τρ#πο που περιγράφεταιπαραπάνω. Θα πρέπει, #µως, τώρα να χρησιµοποιήσετε απλ ξίδι καινα µη βάλετε καφέ στο φίλτρο.• Μετά την αφαίρεση των καθαλατώσεων λειτουργήστε τη συσκευήδύο ακµη φορές µ#νο µε νερ# για να ξεπλυθεί απ# το ξίδι και τατυχ#ν υπ#λοιπα των καθαλατώσεων.- Καθαρίστε την κανάτα, το καπάκι και τη θήκη του φίλτρου.Εσπασε η κανάτα; Χρειάζεστε επιπλέον κανάτα;Μπορείτε να παραγείλετε την κανάτα που ζητάτε µέσω τουπροµηθευτή σας ή µέσω του Service Center της Philips.Κωδικς κανάτας: Για καφετιέρα(-ες)HD 7909 HD 7255 — 57HD 7910 HD 7258Αντικατάσταση του καλωδίου ρεύµατοςΑν το καλώδιο υποστεί βλάβη θα πρέπει να αντικατασταθεί µε ειδικ#καλώδιο του ίδιου τύπου.Απευθυνθείτε στον προµηθευτή σας ή στην αντιπροσωπεία τηςPhilips στη.

English Page 3
Français Page 8
Deutsch Seite 13
Nederlands Pagina 18
Italiano Pagina 23
Español Página 28
Português Página 33
2
• Before connecting the appliance, please
check if the voltage indicated on the
appliance corresponds with the mains
voltage in your home.
• Do not place the appliance on a hot surface.
• Remove the mains plug from the wall
socket:
— if problems occur during making coffee;
— before cleaning the appliance.
• Do not allow the mains cord to come into
contact with hot surfaces.
• Use the appliance out of children’s reach.
Prevent them from pulling the mains cord.
• Never use the appliance if the mains plug,
the mains cord or the appliance itself is
damaged.
Mains cord storage
Excess mains cord can
be stored at the back of
the coffee maker (fig.1).
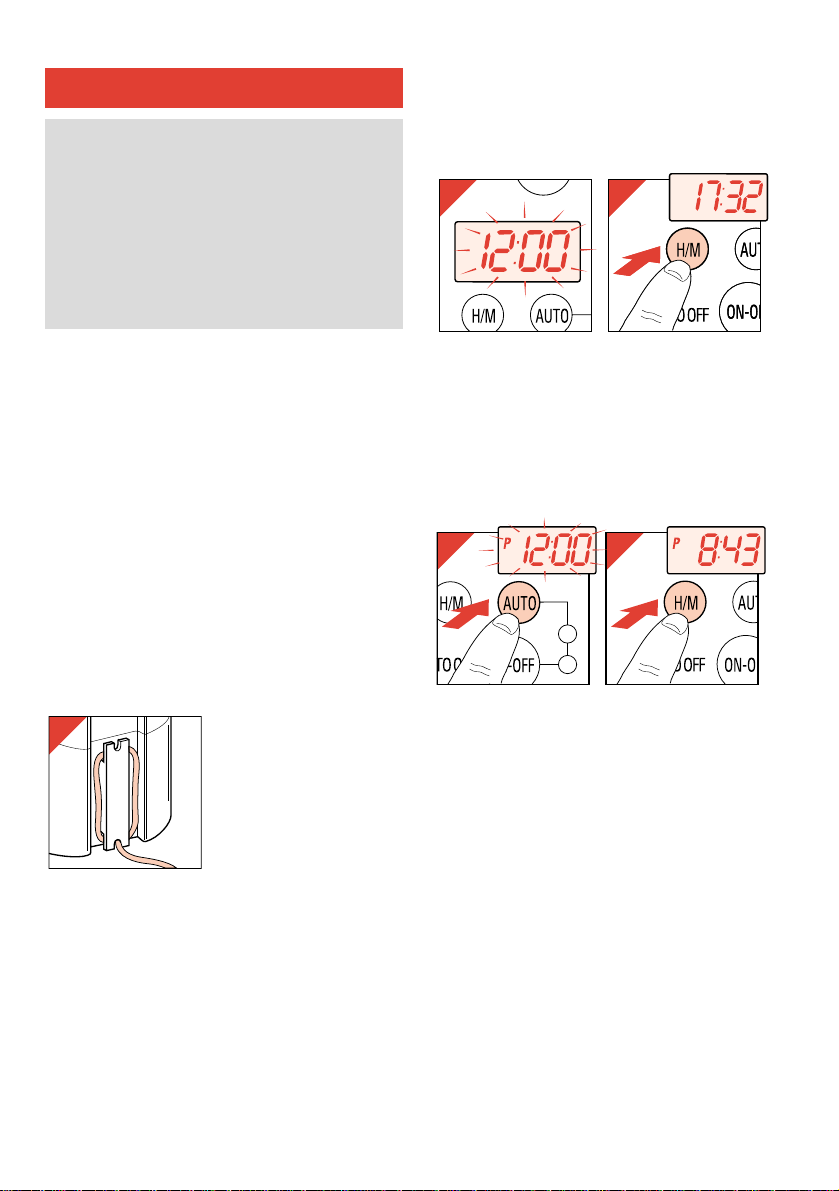
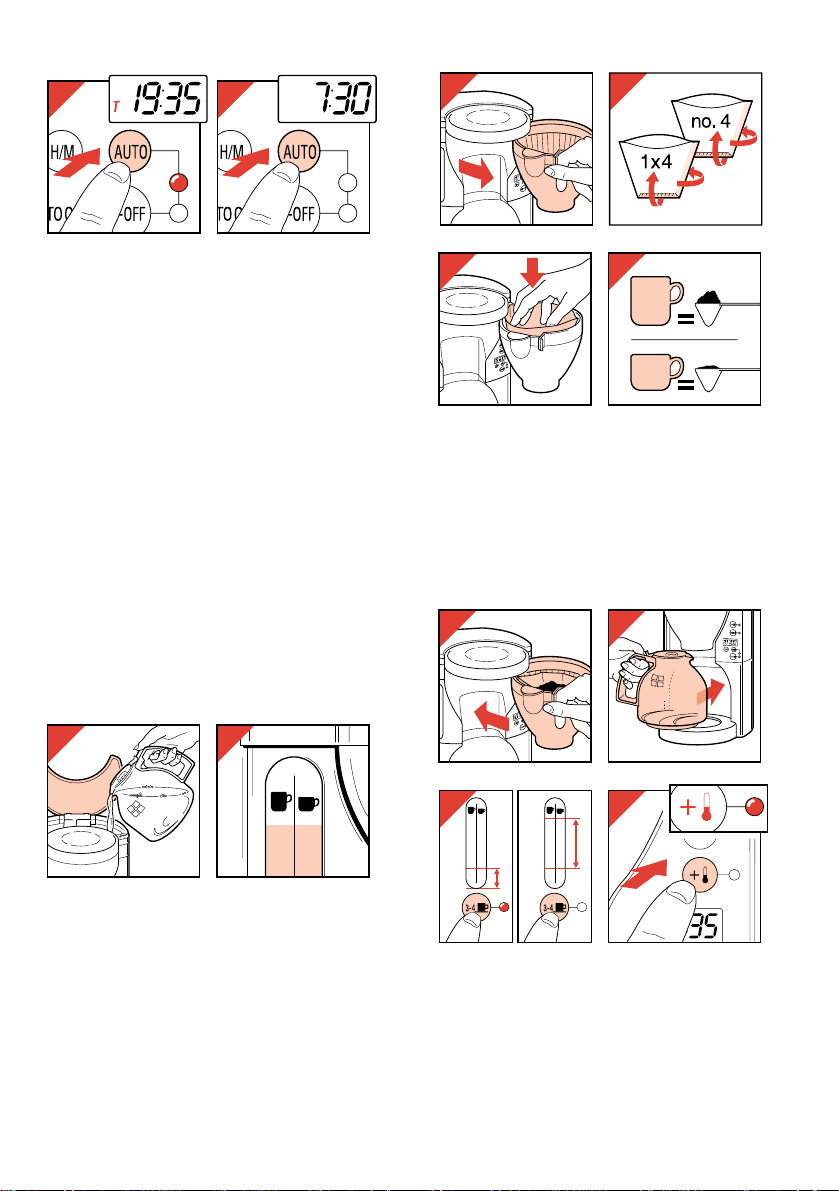
Setting the time of day
You can choose either a 24-hour scale or a
12-hour scale.
24-hour scale
— Insert the mains plug into a mains outlet. In the
display 12:00 will be blinking (fig. 2).
— Press button H/M to set the actual time (fig. 3).
The time indication will scroll rapidly.
— For fine setting/adjustment: depress button H/M
shortly a number of times.
12-hour scale
— Insert the mains plug into a mains outlet while
keeping button AUTO depressed.
In the display P12:00 will be blinking (fig. 4).
— Press button H/M to set the actual time (fig. 5).
The time indication will scroll rapidly.
— For fine setting/adjustment: depress button H/M
shortly a number of times.
Note: P (for «Post Meridiem») will only be
displayed between midday and midnight.
English
3
This coffee maker features automatic switchon at a preset time. To obtain this, the time of
day and the automatic switch-on time must
be set and the AUTO mode must be
selected. (The corresponding yellow pilot
light will illuminate.)
But it is also possible to start brewing rightaway by pressing the ON/OFF button. (The
corresponding red pilot light will illuminate.)
1
3
2
3
54
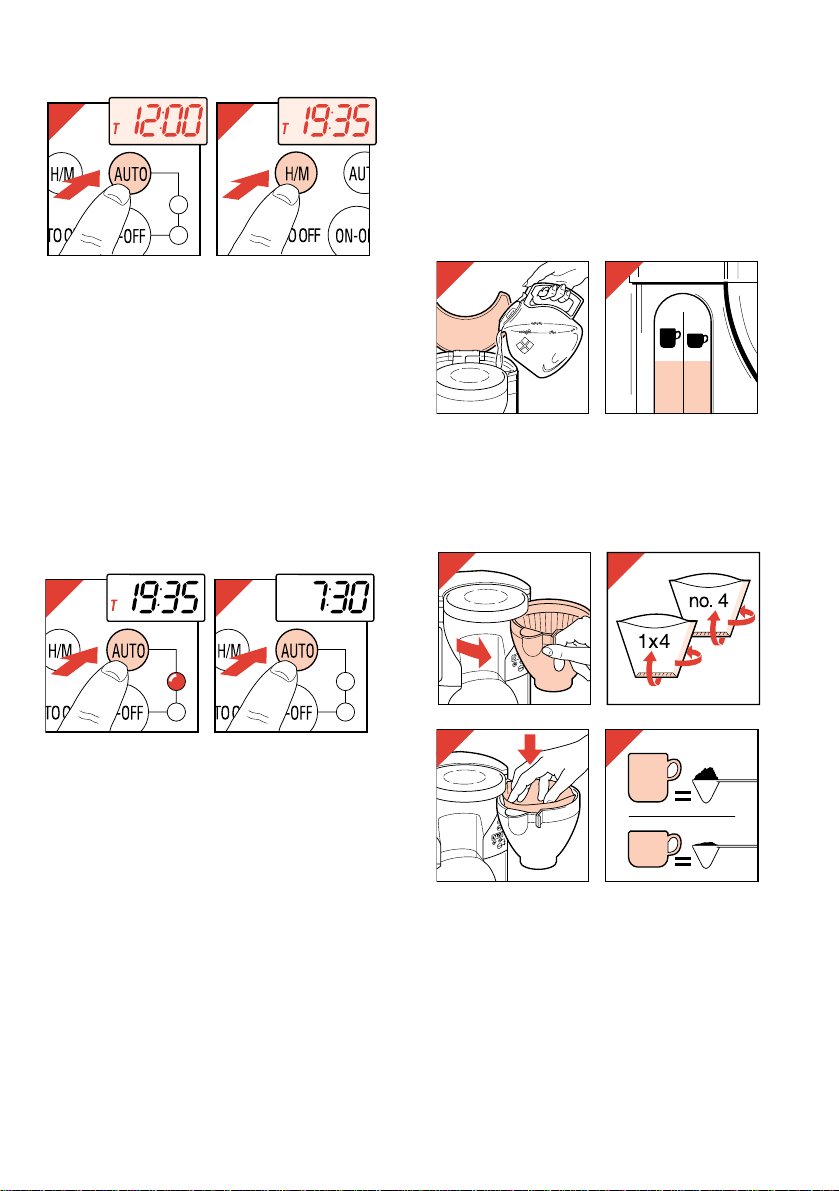
Setting the automatic switch-on time
— Press button AUTO (fig. 6).
In the display T 12.00 will be visible.
— Press button H/M to set the automatic switch-on
time (fig. 7). The time indication will scroll
rapidly.
— For fine setting/adjustment: depress button H/M
shortly a number of times.
— Release the H/M button when ready. The time
of day (without T) will become visible again
after 10 seconds.
• The colon (:) will not blink while the automatic
switch-on time is being displayed.
• If you wait too long (i.e.longer than about 10
seconds) before entering the automatic switchon time, the clock will automatically switch back
to the time of day reading.
• You can always check the automatic switch-on
time by pressing button AUTO (fig. 8). The
yellow pilot light comes on and T appears.
Unless you want the appliance to start operating
at the set time, do not forget to press button
AUTO again to leave the automatic switch-on
mode (fig. 9). (Yellow pilot light goes out.)
• You need not reset the automatic switch-on time
each time you wish to operate the coffee maker
automatically: the setting is stored until you
change it.
• Reset the time of day and the timer after an
electricity breakdown or when the appliance has
been unplugged.
Before first use
— Operate the appliance without adding ground
coffee to the filter. (See section “Making coffee”.)
— Next, clean the removable parts as described in
section “Cleaning”.
Making coffee (fig. 10 — 26)
— To fill the water tank use fresh cold water only
(fig 10).
The left hand side level indications correspond
to large cups (125 ml or 0.22 pint).
The right hand side level indications correspond
to smaller cups (85 ml or 0.15 pint) (fig 11).
— Use filter paper type “1×4 “ or “no. 4”. Do not
forget to fold the bottom and side seals (fig. 13).
With some models a permanent filter is supplied.
Paper filters are then not required.
— For large cups: take one full (heaped) measuring
spoonful of ground coffee (“fast filter” type) for
each cup.
For smaller cups: one level measuring spoonful
for each cup (fig 15).
4
6 7
8 9
10
11
15
10
14
9
13
8
12
12
13
14
15
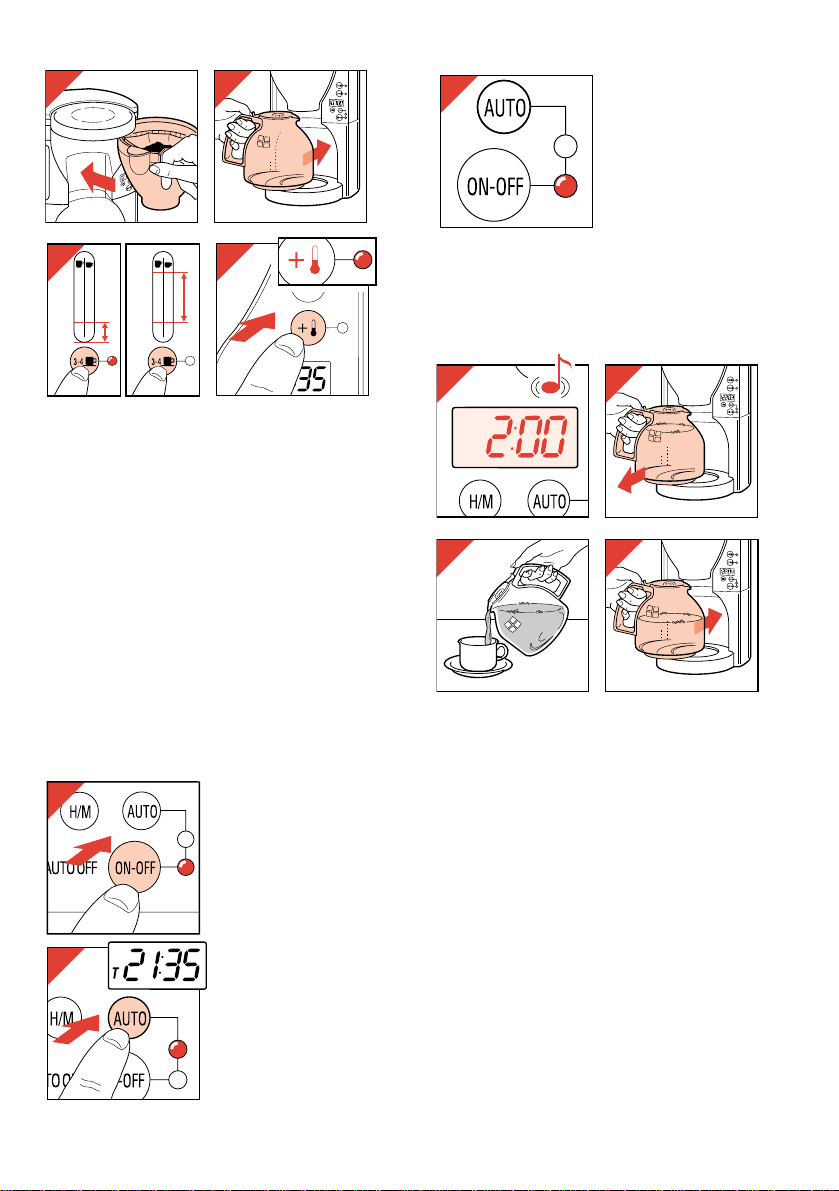
— Up to 4 large (or 6 small) cups of coffee: press
button 3-4 k to make the corresponding red
pilot light come on.
More than 4 large (or 6 small) cups of coffee:
press button 3-4 k to make the corresponding
red pilot light go out (fig. 18).
Note: After setting the appliance to brewing a
small quantity (red pilot light on), do not forget to
reset this button if you want to make a larger
quantity (red pilot light off). If this has been
forgotten, the appliance may incorrectly indicate
that it needs descaling. (See section «Descaling».)
— You may press button EXTRA $ to adjust the
hotplate temperature to your personal
preference (fig. 19). The hotplate temperature is
at maximum if the pilot light is on.
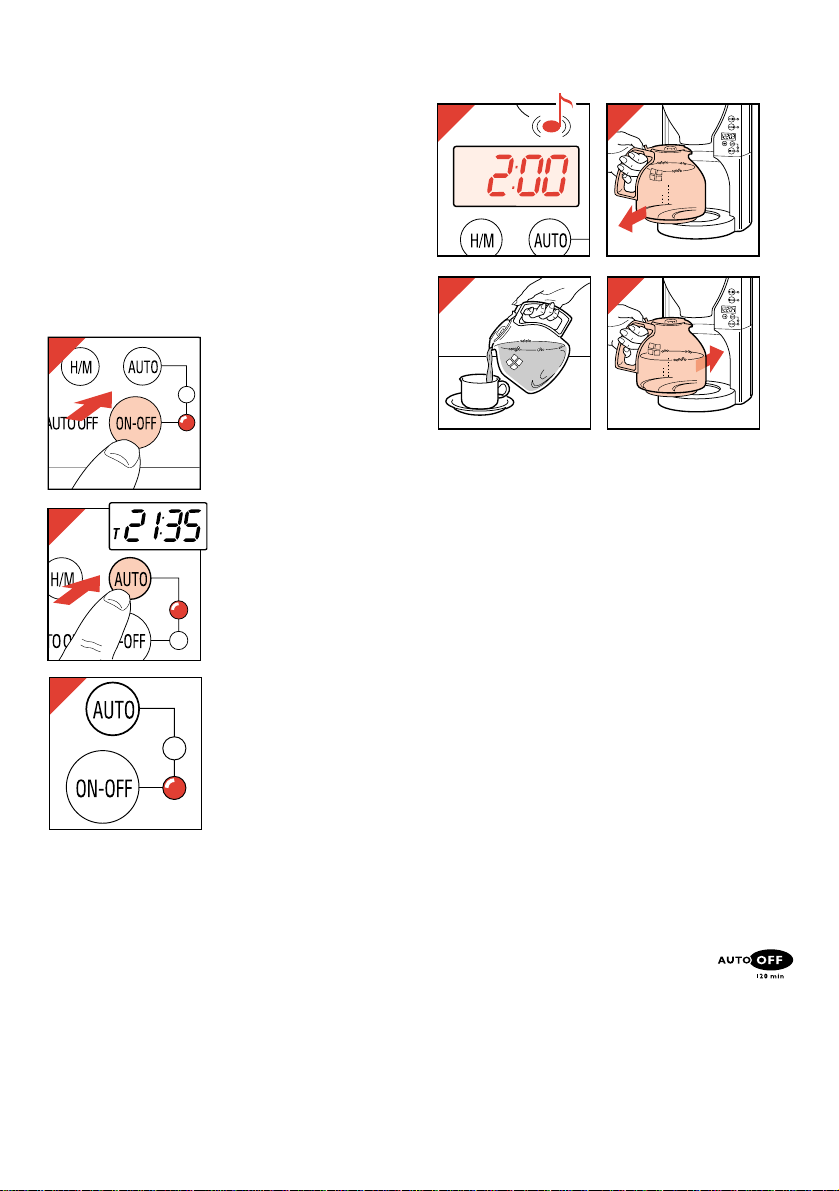
• Switching on
Press button ON/OFF if
you want the coffee
maker to start brewing
rightaway. (Thus without
using the timer) (fig.
20).The corresponding
red pilot light will come
on .
Press button AUTO if
you want the coffee
maker to switch on
automatically at the
set time (within 24 hrs)
(fig. 21). The
corresponding yellow
pilot light will come on.
When the appliance is
switched on automatically, the corresponding
red pilot light will come
on and the yellow light
will go out (fig. 22).
• Hotkeeping time
— As long as the appliance is plugged in, the
display will show the time of day reading (after
you have set this).
— However, when the coffee maker has finished
brewing the time of day reading will be
replaced by 2:00. You can then hear a sound
signal (fig. 23).
The hotkeeping time (max. 2 hours) is counted
down: so the display will inform you how fresh
your coffee is.
After 0:01 the coffee maker switches off
automatically and the normal time of day is
displayed again.
Special features
• “Pre-moistening”. After about a minute of
brewing the coffee maker will stop pumping hot
water. The first amount of hot water then is
allowed to act on the ground coffee (= “simmering”). The aromatic substances of the ground
coffee are then better released, which
considerably enhances the taste and flavour of
the coffee.
5
16
17
22
18
15
10
14
9
13
8
12
11
7
10
6
9
8
5
7
4
6
3
5
4
10
9
8
7
6
5
4
3
19
15
14
13
12
11
10
9
8
7
6
5
4
20
23
25
24
26
21
• “Drip-stop”. The automatic stop-valve ensures
that no coffee will drip on to the hotplate if the
jug is removed from the appliance for a moment
during the brewing process or if the jug is
removed after making coffee.
Note: the drip-stop will only allow coffee to
flow into the jug if the jug lid has been placed.
• Automatic power shut-off.
For your convenience, and also for
extra safety: if you have not switched
off the coffee maker, it will switch off
automatically after 2 hours.
Making more coffee straight away?
If you have made one jug
of coffee and wish to
make some more
straight away, please
switch the coffee maker
off (fig. 27) and allow
about three minutes for it
to cool down. Then you
can refill the water tank.
After use
Cleaning (fig. 33 — 40)
— Always remove the mains plug from the wall
socket before cleaning the appliance.
• Never immerse the appliance in water. You
should clean it with a damp cloth.
• The removable items should be washed in hot
soapy water. Rinse with clean hot water and dry.
These items can also be cleaned in a
dishwasher.
To take out the outer filter holder first remove
the axis (fig. 36). Do not mislay the axis!
6
33
35
34
36
27
28
30
32
29
31
37
39
38
40
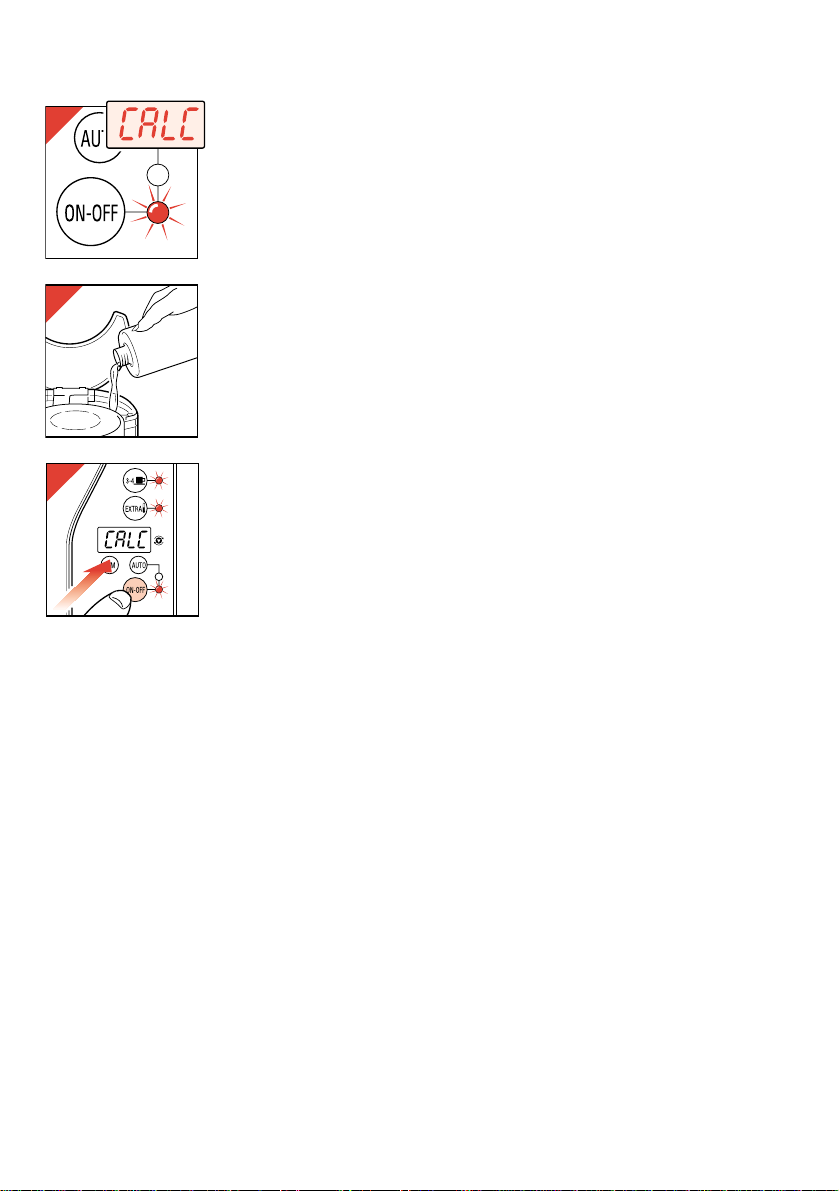
Descaling
If pilot light ON/OFF
starts blinking and the
word CALC alternates
with the actual time
reading (fig. 41), your
appliance needs
descaling.
Fill the water tank with
ordinary vinegar and do
not place a filter with
ground coffee (fig. 42).
Press and hold the on/off
switch for three seconds
when switching on. The
three red pilot lights will
start blinking (fig. 43).
Subsequently the descaling programme begins,
which spans approx. 20 minutes.
— After descaling, let the appliance work twice
more with only water to rinse away the vinegar
and scale remainders.
— Wash the coffee jug, lid and filter holder.
Jug broken? Extra jug wanted?
You can order a jug from your dealer or
Philips Service Centre under type nr. HD 7909.
Replacing the mains cord
If the mains cord of this appliance is damaged, it
must be replaced by the special cord.
Apply to your Philips dealer or to the Philips
organization in your country.
Guarantee: please refer to separate card.
■■■ Delicious coffee recipes
Irish coffee
Put one dinner spoonful of brown sugar into a
special Irish Coffee glass. Add one shot glass of
(Irish) whisky. Pour one cup of hot extra strong
coffee onto this. Top with whipped cream. If you
wish you can garnish this with a biscuit horn and
shredded chocolate.
Café Roma
Pour extra strong coffee into a coffee cup. Stir one
dinner spoonful of Cognac (French brandy)
through the coffee. Pour 5 dinner spoonfuls of
frothed (whisked) milk onto the mixture. Sprinkle
with some cocoa powder.
Granita
Make strong coffee using 850 ml (= 8 large or
10 small cups) of water and 70 g (=10 heaped
measuring spoonfuls) of ground coffee.
Pour the coffee into a shallow bowl and add 125 g
of castor sugar. Put a piece of lemon skin into the
mixture and let it cool down. Then place it into the
freezer and let it freeze. With intervals of approx.
half an hour stir the mixture well until it has
become syrupy. Serve in long drinking glasses; if
you wish with a topping of whipped cream.
7
41
42
43
3 sec

• Assurez-vous avant de brancher l’appareil
que le voltage indiqué sur la plaque
signalétique du dessous de l’appareil
correspond au voltage du réseau de votre
habitation.
• Ne placez pas l’appareil sur une surface
chaude.
• Débranchez l’appareil:
— si un problème survient pendant la
préparation du café
— avant de le nettoyer
• Faites attention à ce que le cordon
d’alimentation ne vienne pas en contact
avec les surfaces chaudes.
• Utilisez l’appareil hors de portée des
enfants. Faites attention qu’ils ne tirent pas
sur le cordon d’alimentation.
• N’utilisez jamais l’appareil si la fiche, le
cordon d’alimentation ou l’appareil sont
endommagés.
Rangement du cordon
Vous pouvez ranger
l’excédent de cordon à
l’arrière de l’appareil
(fig. 1).
Réglage de l’heure
— Branchez l’appareil. Dans le cadran l’affichage
12:00 se met à clignoter (fig. 2).
— Appuyez sur le bouton H/M pour régler l’heure
actuelle (fig. 3). Les heures défilent rapidement.
— Pour un réglage précis: appuyez sur le bouton
H/M brièvement plusieurs fois.
Réglage de la mise en marche automatique
— Appuyez sur le bouton AUTO (fig. 4).
Dans le cadran s’affiche T 12.00.
— Appuyez sur le bouton H/M pour régler l’heure
de la mise en marche automatique (fig. 5). Les
heures défilent rapidement.
— Pour un réglage précis: appuyez sur le bouton
H/M brièvement plusieurs fois.
— Relâchez le bouton H/M. L’heure actuelle
(sans T) réapparaît au bout de 10 secondes.
• Les (:) ne clignotent pas tant que l’heure de
mise en marche automatique est affichée.
• Si vous attendez plus de 10 secondes pour
régler l’heure de mise en marche automatique,
l’horloge revient automatiquement à l’heure
actuelle du jour.
Français
8
Cette cafetière se met en marche à une
heure pré-sélectionnée. Pour ce faire, vous
devez régler auparavant l’heure ainsi que la
mise en marche automatique, et sélectionner
le mode AUTO. (Le voyant jaune s’allume.)
Il est cependant possible de faire du café en
appuyant simplement sur le bouton ON/OFF.
(Le voyant rouge s’allume.)
1
• Vous pouvez toujours contrôler l’heure de mise
en marche automatique en appuyant sur le
bouton AUTO (fig. 6). Le voyant jaune s’allume
et T apparaît.
N’oubliez pas d’appuyer sur le bouton AUTO à
nouveau pour retirer le mode automatique
(fig. 7). (Le voyant jaune s’éteint.)
• Il n’est pas nécessaire de réajuster le dispositif
de mise en marche automatique chaque fois
que vous voulez faire fonctionner la cafetière
automatiquement: le réglage est conservé en
mémoire.
• Réglez l’heure et la mise en marche
automatique après une coupure d’électricité ou
après avoir débranché l’appareil.
Avant la première utilisation
— Faites fonctionner l’appareil deux fois sans
café. (Voir paragraphe “Préparation du café”.)
— Ensuite, nettoyez les parties amovibles comme
décrit dans le paragraphe “Nettoyage”.
Préparation du café (fig. 8 — 24)
— Remplissez d’eau fraîche uniquement le
réservoir d’eau (fig. 8).
Les indications de niveau sur le côté gauche
correspondent à de grandes tasses (125 ml).
Les indications de niveau sur le côté droit
correspondent à de petites tasses (85 ml)
(fig 9).
— Utilisez des filtres papier type “1×4” ou “n° 4”.
N’oubliez pas de replier les bords.
Suivant les modèles, un filtre permanent peut
être utilisé. Dans ce cas les filtres papier ne
sont pas nécessaires.
— Pour de grandes tasses, il est recommandé de
mettre une cuillère doseuse bien pleine par
tasse. Pour de petites tasses, il est
recommandé de mettre une cuillère doseuse
rase par tasse (fig. 13).
— Pour 3 grandes tasses (ou 4 petites) de café:
appuyez sur le bouton 3-4 k pour allumer le
voyant rouge.
Plus de 3 grandes tasses (ou 4 petites) de
café: appuyez sur le bouton 3-4 k pour
éteindre le voyant rouge (fig. 16).
Nota — Après avoir réglé l’appareil pour préparer
une petite quantité de café (témoin lumineux
17
16
14
13
12
11
10
9
8
7
6
5
4
15
3
4
5
6
7
8
9
10
14
13
12
11
10
9
8
7
6
5
4
15
3
4
5
6
7
8
9
10
10
11
8
9
15
10
14
9
13
8
12
12
13
rouge) n’oubliez pas d’appuyer à nouveau sur
ce bouton si vous voulez préparer une quantité
de café supplémentaire (témoin éteint).
Si vous avez oublié de le faire, l’appareil peut
indiquer de manière erronée qu’il a besoin
d’être détartré. (Voir paragraphe “Détartrage”).
— Vous pouvez appuyer sur le bouton EXTRA $
pour ajuster la température de la plaque
chauffante (fig. 17). La température est à son
maximum quand le voyant est allumé.
• Mise en marche
Appuyez sur le bouton
ON/OFF si vous voulez
faire du café. (Sans
utilisation du programmateur.) (Fig. 18.)
Le voyant rouge
s’allume.
Appuyez sur le bouton
AUTO si vous désirez
que la mise en marche
de l’appareil se fasse
automatiquement à une
heure pré-sélectionnée
(dans les 24 heures)
(fig. 19).
Le voyant jaune
s’allume. Quand
l’appareil est mis en
marche automatiquement, le voyant rouge
s’allume et le jaune
s’éteint (fig. 20).
• Durée de maintien à température
— Tant que l’appareil est branché, le cadran
indique l’heure du jour (après l’avoir réglée).
— Cependant, lorsque le café est prêt, l’heure
normale est remplacée par l’indication 2:00.
Vous entendez alors un signal sonore (fig. 21).
Le temps de maintien à température (max.
2 heures) est affiché vous indiquant la fraîcheur
du café.
Après 0:01 la cafetière s’arrête
automatiquement et l’heure du jour est à
nouveau affichée.
Caractéristiques particulières
•“Pré-humidification”. Au bout d’une minute de
fonctionnement, l’écoulement de l’eau chaude
s’arrête. Le café ainsi humidifié dégage un
meilleur arôme et augmente le goût.
• Système “anti-goutte”. Il empêche le café de
couler sur la plaque chauffante, si vous enlevez
la verseuse le temps de vous servir ou en fin de
préparation.
Nota : le système “anti-goutte” ne fonctionne
correctement qu’avec le couvercle placé sur la
verseuse.
• Dispositif de coupure automatique.
Pour des raisons de sécurité,
l’appareil se coupe automatiquement au bout de 2 heures, si vous
avez oublié de l’arrêter.
10
Refaire du café immédiatement ?
Si vous voulez refaire du
café, arrêtez l’appareil
(fig. 25) et laissez-le
refroidir environ 3
minutes. Vous pouvez à
nouveau remplir le
réservoir d’eau.
Après l’emploi
Nettoyage
• Débranchez toujours votre appareil avant de le
nettoyer.
• N’immergez jamais l’appareil dans l’eau. Vous
pouvez le nettoyer avec un chiffon humide.
• Les parties amovibles peuvent être nettoyées à
l’eau chaude savonneuse. Rincez à l’eau
chaude et séchez. Ces éléments peuvent
également être nettoyés dans un lave-vaisselle.
Pour retirer le porte-filtre, enlevez
préalablement l’axe (fig. 34). Ne perdez pas
l’axe.
11

Détartrage
Votre appareil a besoin
d’être détartré lorsque le
voyant “ON/OFF” se
met à clignoter et que le
mot “CALC” alterne
avec l’heure (fig.39).
Remplissez le réservoir
avec du vinaigre blanc
sans mettre de café
dans le filtre (fig.40).
Maintenez appuyé le
bouton marche/arrêt
pendant 3 secondes.
Les 3 voyants rouges
clignotent (fig. 41).
Le programme détartrage commence et va durer
environ 20 minutes.
— Lorsque le détartrage est terminé, faites
fonctionner l’appareil deux fois avec de l’eau
fraîche afin d’éliminer les restes de vinaigre et
de tartre.
Lavez la verseuse, le couvercle et le porte-filtre.
Votre verseuse est cassée?
Vous pouvez la commander chez votre revendeur
ou un réparateur indépendant agréé Philips sous
la référence HD 7909.
Remplacement du cordon
Si le cordon d’alimentation de votre appareil est
endommagé, vous devez vous adresser à un
revendeur ou un réparateur indépendant agréé
Philips de votre région.
Délicieuses recettes
Irish coffee
Mettez une cuillère à soupe de sucre brun dans
un verre spécial pour Irish Coffee. Ajoutez un petit
verre de whisky. Versez dessus une tasse de café
chaud extra fort. Garnissez de crème fouettée.
Vous pouvez garnir avec un biscuit et du chocolat
en paillettes.
Café Roma
Versez du café fort dans une tasse. Ajoutez une
cuillère à soupe de Cognac et mélangez. Versez
5 cuillères à soupe de lait. Saupoudrez de poudre
de cacao.
Granita
Préparez du café fort avec 850 ml d’eau et 70 g
de café. Versez le café dans un bol et ajoutez
125 g de sucre brun. Mettez un zeste de citron
dans le mélange et laissez celui-ci refroidir.
Placez ensuite dans le freezer. Laissez environ
une demi-heure et mélangez jusqu’à ce qu’il
devienne sirupeux. Servez dans des verres hauts,
avec un peu de crème fouettée sur le dessus à
votre goût.
12
Loading…
English
• Before connecting the appliance, please check if the voltage
indicated on the appliance corresponds with the mains voltage in
your home.
• Do not place the appliance on a hot surface.
• Remove the mains plug from the wall socket:
— if problems occur during making coffee;
— before cleaning the appliance.
• Do not allow the mains cord to come into contact with hot surfaces.
• Use the appliance out of children’s reach. Prevent them from pulling
the mains cord.
• Never use the appliance if the mains plug, the mains cord or the
appliance itself is damaged.
Before first use
— Operate the appliance once without filling the filter with ground coffee.
(See section “Making coffee”.)
— Next, clean the removable parts as described in section “Cleaning”.
Cleaning: please refer to the illustrations (fig. 16 — 27)
• Always remove the plug from the wall socket before cleaning the
appliance.
• Never immerse the appliance in water. You should clean it with a damp
cloth.
• The removable items should be washed in hot soapy water. Rinse with
clean hot water and dry. These items can also be cleaned in a
dishwasher.
To take out the outer filter holder first remove the axis (fig. 23). Do not
mislay the axis!
Making coffee: please refer to the illustrations (fig. 2 — 15)
— To fill the water tank use fresh cold water only.
The left hand side level indications correspond to large cups (125 ml).
The right hand side level indications correspond to smaller cups (85 ml).
— Use filter paper type “1×4 “ or “no. 4”. Do not forget to fold the rims.
With some models a permanent filter is supplied. Paper filters are then not
required.
— For large cups: take one full (heaped) measuring spoonful of ground
coffee (“fast filter” type) for each cup. For smaller cups: one level
measuring spoonful for each cup.
— For types HD 7257 and HD 7258:
Less than four large (or six small) cups of coffee: set switch to
position 7.
More than four large (or six small) cups of coffee: set switch to
position 8.
• The “drip-stop” (automatic stop-valve) ensures that no coffee will drip on to
the hotplate if the jug is removed from the appliance for a moment during
the brewing process or if the jug is removed after making coffee.
Note: the drip-stop will only allow coffee to flow into the jug if the jug
lid has been placed.
• Automatic power shut-off. For your convenience, and also for extra
safety: if you have not switched off the coffee maker, it will switch off
automatically after 2 hours.
Making more coffee straight away?
If you have made one jug of coffee and wish to make some more straight
away, please switch the coffee maker off (fig. 15) and allow about three
minutes for it to cool down. Then you can refill the water tank.
Descaling
Descale your coffee maker regularly. With normal use (two full jugs a day)
the following rule applies:
hardness up to 18 °DH (22.5 °Clarke) — 2 or 3 times a year;
hardness over18 °DH (22.5 °Clarke) — 4 or 5 times a year.
Your water supply company can inform you about the hardness of your
water.
— Operate the appliance as described. However, now use ordinary vinegar
to fill the water tank and do not fill the filter with ground coffee.
— After descaling, let the appliance work twice more with only water to rinse
away the vinegar and scale remainders.
— Wash the coffee jug, lid and filter holder.
Jug broken? Extra jug wanted?
You can order a jug from your dealer or Philips Service Centre.
jug type nr.: for coffee maker(s):
HD 7909 HD 7255 — 7257
HD 7910 HD 7258
Replacing the mains cord
If the mains cord of this appliance is damaged, it must be replaced by the
original type only.
Please apply to your Philips dealer or to the Philips organisation in your
country for replacement.
4222 001 76231
• Assurez-vous avant de brancher l’appareil que le voltage indiqué sur
la plaque signalétique du dessous de l’appareil correspond au
voltage du réseau de votre habitation.
• Ne placez pas l’appareil sur une surface chaude.
• Débranchez l’appareil:
— si un problème survient pendant la préparation du café
— avant de le nettoyer
• Faites attention à ce que le cordon d’alimentation ne vienne pas en
contact avec les surfaces chaudes.
• Utilisez l’appareil hors de portée des enfants. Faites attention qu’ils
ne tirent pas sur le cordon d’alimentation.
• N’utilisez jamais l’appareil si la fiche, le cordon d’alimentation ou
l’appareil sont endommagés.
Avant la première utilisation
— Faites fonctionner l’appareil une fois sans café. (Voir paragraphe
«Préparation du café».)
— Ensuite, nettoyez les parties amovibles comme décrit dans le paragraphe
«Nettoyage».
Nettoyage (voir aussi les fig. 16 — 27)
• Débranchez toujours votre appareil avant de le nettoyer.
• N’immergez jamais l’appareil dans l’eau. Vous pouvez le nettoyer avec un
chiffon humide.
• Les parties amovibles peuvent être nettoyées à l’eau chaude savonneuse.
Rincez à l’eau chaude et séchez. Ces éléments peuvent également être
nettoyés dans un lave-vaisselle.
Pour retirer le porte-filtre, enlevez préalablement l’axe (fig. 23). Ne perdez
pas l’axe.
Préparation du café: prière de vous référer aux illustrations (fig. 2 — 15)
— Remplissez d’eau fraîche uniquement le réservoir d’eau.
Les indications de niveau sur le côté gauche correspondent à de grandes
tasses (125 ml).
Les indications de niveau sur le côté droit correspondent à de petites
tasses (85 ml).
— Utilisez des filtres papier type «1×4» ou «n° 4». N’oubliez pas de plier les
bords du filtre papier.
Suivant les modèles, un filtre permanent peut être utilisé. Dans ce cas les
filtres papier ne sont pas nécessaires.
— Quand vous utilisez des grandes tasses, il est recommandé de mettre une
cuillère doseuse bien pleine par tasse.
— Quand vous utilisez des petites tasses, il est recommandé de mettre une
cuillère doseuse rase par tasse.
— Pour les types HD 7257 et HD 7258:
Moins de 4 tasses larges (ou 6 petites tasses) de café: mettez
l’interrupteur sur la position 7 .
Plus de 4 tasses larges (ou 6 petites tasses) de café: mettez
l’interrupteur sur la position 8.
• Le système «anti-goutte» empêchera le café de couler sur la plaque
chauffante, si vous enlevez la verseuse le temps de vous servir et en fin
de préparation.
Nota: le système «anti-goutte» ne fonctionne correctement qu’avec le
couvercle placé sur la verseuse.
• Dispositif de coupure automatique. Pour des raisons de sécurité,
l’appareil se coupe automatiquement au bout de 2 heures, si vous avez
oublié de l’arrêter.
Refaire du café immédiatement?
Si vous voulez refaire du café, arrêtez l’appareil (fig. 15) et laissez-le
refroidir environ 3 minutes. Vous pourrez à nouveau remplir le réservoir
d’eau.
Détartrage
Détartrez régulièrement votre appareil. En cas d’utilisation moyenne:
2 à 3 fois par an si la dureté de l’eau est inférieure à 30° TH;
4 à 5 fois par an si la dureté de l’eau est supérieure à 30° TH.
La Compagnie des Eaux de votre région vous renseignera sur le degré de
dureté de votre eau.
Procédez de la façon suivante:
— Faites fonctionner l’appareil une fois avec du vinaigre blanc et sans
café.
— Lorsque le détartrage est terminé, faites fonc-tionner l’appareil deux fois
avec de l’eau fraîche afin d’éliminer les restes de vinaigre et de tartre.
— Lavez la verseuse, le couvercle et le porte-filtre.
Votre verseuse est cassée ?
Vous pouvez la commander chez votre revendeur ou un réparateur
indépendant agréé Philips.
Verseuse type n° pour cafetières réf.:
HD 7909 HD 7255-7257
HD 7910 HD 7258
Remplacement du cordon
Si le cordon d’alimentation de l’appareil est endommagé, il doit être rem-
placé par un cordon équivalent. Adressez-vous à votre revendeur Philips ou
au réparateur agréé Philips Appareils Domestiques de votre région.
Français
NederlandsDeutsch
Italiano
• Prüfen Sie vor Inbetriebnahme, ob die Spannungsangabe auf dem
Gerät mit der örtlichen Netzspannung übereinstimmt.
• Stellen Sie das Gerät nicht auf eine heiße Oberfläche.
• Ziehen Sie den Netzstecker aus der Steckdose …
— bei Störungen während der Zubereitung des Kaffees,
— vor der Reinigung des Gerätes.
• Achten Sie darauf, daß das Netzkabel nicht mit der heißen Heizplatte
in Berührung kommt.
• Achten Sie darauf, daß Kinder nicht den Netzstecker aus der
Steckdose ziehen oder das Gerät herabziehen können.
• Verwenden Sie das Gerät auf keinen Fall, wenn de Netzstecker, das
Netzkabel oder das Gerät selbst in irgendeiner Hinsicht beschädigt
ist.
Vor dem ersten Gebrauch
— Betreiben Sie das Gerät einmal, wie im Abschnitt «Kaffee zubereiten»
beschrieben, ohne Kaffee in den Filter zu geben.
— Reinigen Sie danach alle abnehmbaren Teile, wie im Abschnitt
«Reinigung» beschrieben.
Reinigung (siehe auch Abb. 16 — 27)
• Ziehen Sie vor jeder Reinigung den Stecker aus der Steckdose.
• Tauchen Sie das Gerät niemals in Wasser. Sie können es mit einem
feuchten Tuch abwischen.
• Die abnehmbaren Teile können in warmem Wasser gereinigt werden, dem
Sie ein wenig Spülmittel zugefügt haben. Spülen Sie mit klarem, warmem
Wasser nach, und trocknen Sie ab. Sie können diese Teile auch im
Geschirrspüler reinigen.
Nehmen Sie den Verriegelungsstift (Abb. 23) heraus, bevor Sie den
äußeren Filterhalter abnehmen, und bewahren Sie sie sorgfältig auf.
Kaffee zubereiten: sehen Sie sich bitte die Abbildungen 2 bis 15 an.
— Füllen Sie den Wasserbehälter nur mit frischem, kaltem Wasser.
Die linke Skala der Wasserstandsanzeige entspricht großen Tassen
(125 ml). Die rechte Skala entspricht kleinen Tassen (85 ml).
— Verwenden Sie Filterpapier Type «1 x 4» bzw. «No. 4». Vergessen Sie
nicht, die Kanten zu falzen.
Einige Modelle werden mit einem Permanentfilter geliefert. Hierfür sind
keine Papierfilter erforderlich.
— Für große Tassen: Nehmen Sie einen gehäuften Meßlöffel voll
gemahlenem Kaffee pro Tasse.
Für kleinere Tassen nehmen Sie einen gestrichenen Meßlöffel voll Kaffee
pro Tasse.
— Bei Typen HD 7257 und HD 7258:
Weniger als 4 große bzw. 6 kleine Tassen Kaffee: Schalter auf 7.
Mehr als 4 große bzw. 6 kleine Tassen Kaffee: Schalter auf 8.
• Der automatische Tropf-Stop verhindert, daß Kaffee auf die
Warmhalteplatte tropft, wenn sich die Kanne nicht im Gerät befindet.
Wichtig: Wegen des automatischen Tropf-Stop kann nur bei
aufgesetztem Kannendeckel Kaffee in die Kanne fließen.
• Automatische Stromabschaltung. Zu Ihrer Bequemlichkeit und Ihrer
Sicherheit wird das Gerät nach Ablauf von 2 Stunden ausgeschaltet.
Sofort frischen Kaffee zubereiten
Ist Ihr Kaffee fertig, und Sie möchten sofort noch eine Kanne zubereiten, so
schalten Sie das Gerät aus (Abb. 15) und lassen es ca. drei Minuten
abkühlen. Danach können Sie den Wasserbehälter neu füllen.
Entkalken
Entkalken Sie Ihr Gerät regelmäßig. Bei normalem Gebrauch (zwei Kannen
täglich) gilt:
Wasserhärte bis 18°dH: zwei- bis dreimal jährlich;
Wasserhärte über 18°dH: vier- bis fünfmal jährlich.
Ihre Wasserwerke können Sie über die Härte Ihres Wassers informieren.
— Betreiben Sie das Gerät wie beschrieben, aber füllen Sie den Wasser-
behälter mit Haushaltsessig, ohne Kaffee in den Filter zu geben.
— Betreiben Sie das Gerät danach noch zweimal mit frischem Wasser, um
Kalk- und Essigreste zu entfernen.
— Waschen Sie die Kanne, den Deckel und den Filterhalter ab.
Kanne zerbrochen? Extra-Kanne nötig?
Sie können bei Ihrem Händler oder beim
Philips-Kundendienst eine Kanne bestellen:
Kanne Typen-Nr.:Für die Geräte:
HD 7909 HD 7255-7257
HD 7910 HD 7258
Auswechseln des Netzanschlußkabels
Wenn das Netzanschlußkabel defekt oder beschädigt ist, muß dieses durch
ein Original-Netzanschlußkabel ersetzt werden. Wenden Sie sich an Ihren
Philips Händler oder an die Philips Service Organisation.
• Controleer, vóórdat u het apparaat aansluit, of de aanduiding van het
voltage op het apparaat overeenkomt met de netspanning in uw
woning.
• Zet het apparaat niet op een heet oppervlak.
• Neem de stekker uit het stopcontact:
— als er bij het koffiezetten problemen optreden;
— voordat u het apparaat gaat schoonmaken.
• Zorg ervoor dat het snoer niet in aanraking kan komen met hete
oppervlakken.
• Gebruik het apparaat buiten bereik van kinderen. Let erop dat zij niet
aan het snoer kunnen trekken.
• Gebruik het apparaat niet als de stekker, het snoer of het apparaat
zelf beschadigd is.
Vóór het eerste gebruik
— Laat het apparaat vóór het eerste gebruik één keer werken zonder koffie
in het filter. (Zie “Koffiezetten”.)
— Was daarna de losse onderdelen af. (Zie “Schoonmaken”.)
Schoonmaken: zie de illustraties (fig. 16 — 27)
• Haal altijd de stekker uit het stopcontact voordat u het apparaat gaat
schoonmaken.
• Dompel het apparaat nooit in water. U kunt het schoonmaken met een
vochtige doek.
• De losse delen kunt u afwassen in heet sop. Spoel ze na met heet water
en droog ze af. U kunt de losse delen ook schoonmaken in de
afwasmachine.
Voor het losnemen van de buitenste filterhouder verwijdert u eerst het asje
(fig. 23). Zorg ervoor dat u het asje niet kwijtraakt!
Koffiezetten: zie de illustraties (fig. 2 — 15)
— Gebruik voor het vullen van het waterreservoir alleen vers, koud water.
De linker niveau-aanduidingen gelden voor grote koppen (125 ml)
De rechter niveau-aanduidingen gelden voor kleinere koppen (85 ml).
— Gebruik papieren filterzakjes type “1 x 4” of “no. 4”. Vergeet niet de randen
om te vouwen.
Bij sommige versies wordt een permanent filter geleverd. U hoeft dan
geen papieren filterzakjes te gebruiken.
— Voor grote koppen: 1 volle maatlepel koffiemaalsel (snelfiltermaling) per
kop. Voor kleinere koppen: 1 afgestreken maatlepel per kop.
— Alleen voor types HD 7257 en HD 7258:
Minder dan vier grote (of zes kleine) koppen koffie: schakelaar in stand
7.
Meer dan vier grote (of zes kleine) koppen koffie: schakelaar in
stand 8.
• De ingebouwde “drip-stop” (“druppelstopper”) zorgt ervoor dat er geen
koffie uit de filterhouder op de warmhoudplaat druppelt, wanneer u tijdens
het koffiezetten de kan even uit het apparaat neemt, en wanneer u ná het
koffiezetten de kan verwijdert.
Let op: de “drip-stop” zal alleen koffie in de kan laten stromen als het
deksel op de kan is geplaatst.
• Automatisch uitschakelen. Voor het gemak, en ook voor extra
veiligheid: als u de koffiezetter niet hebt uitgeschakeld,
schakelt het apparaat zichzelf na 2 uur automatisch uit.
Meteen opnieuw koffie zetten?
Als u meteen opnieuw koffie wilt zetten, schakel dan de koffiezetter uit
(fig. 15) en laat het apparaat ongeveer drie minuten afkoelen.
Daarna kunt u het waterreservoir opnieuw vullen.
Ontkalken
Ontkalk uw koffiezetter regelmatig. Bij normaal gebruik (twee volle kannen
per dag):
2 à 3 keer per jaar als u zacht water gebruikt (tot 18 °DH);
4 à 5 keer per jaar als u hard water gebruikt (boven 18 °DH).
Uw waterleidingbedrijf kan u over de plaatselijke waterhardheid informeren.
— Gebruik het apparaat zoals aangegeven. Vul het waterreservoir nu echter
met gewone azijn in plaats van water, en doe geen gemalen koffie in
het filterzakje.
— Laat na het ontkalken het apparaat nog twee keer met alleen koud water
werken om azijn en kalkresten weg te spoelen.
— Was vervolgens de koffiekan, de filterhouder en het deksel af.
Kan kapot? Of extra kan?
U kunt bij uw dealer of Philips Service Centrum een kan bestellen.
kan typenr.: voor koffiezetter(s):
HD 7909 HD 7255-7257
HD 7910 HD 7258
Snoer vervangen
Indien het snoer van dit apparaat is beschadigd, dient het uitsluitend door
het originele type te worden vervangen. Wend u daartoe tot uw Philips
leverancier of tot de Philips organisatie in uw land.
• Prima di collegare l’apparecchio, controllate che la tensione indicata
sull’apparecchio corrisponda a quella della rete locale.
• Non appoggiate l’apparecchio su una superficie calda.
• Togliete immediatamente la spina dalla presa di alimentazione:
— nel caso si verificassero problemi durante la preparazione del caffè
— prima di procedere alla pulizia dell’apparecchio.
• Evitate che il cavo di alimentazione venga a contatto con superfici
calde.
• Durante l’uso, tenete l’apparecchio lontano dalla portata dei bambini.
Fate in modo che non possano tirare il cavo di alimentazione.
• Non utilizzate l’apparecchio nel caso in cui il cavo di alimentazione,
la spina o l’apparecchio risultassero danneggiati.
Quando usate la macchina del caffè per la prima volta
— Fatela funzionare per una volta senza usare il caffè (ved. il cap.
«Preparazione del caffè»).
— Pulite poi le parti asportabili dell’apparecchio come descritto nel cap.
«Pulizia».
Pulizia (ved. anche fig. 16 — 27)
— Prima di pulire l’apparecchio togliete sempre la spina dalla presa di
alimentazione.
Non immergete mai l’apparecchio nell’acqua, pulitelo invece con un panno
umido.
— Pulite le parti staccabili con acqua calda e detersivo.
Risciacquatele con acqua calda ed asciugatele poi con cura; si possono
lavare anche in lavastoviglie.
Per togliere la parte esterna del portafiltro occorre per prima cosa togliere
il perno (fig. 23). Non perdete tale perno.
Preparazione del caffè (fig. 2-15)
— Versate nel serbatoio solamente acqua fredda.
I livelli posti a sinistra indicano la quantità per le tazze grandi (125 ml).
I livelli posti a destra indicano la quantità per le tazze piccole (85 ml).
— Per ogni tazza grande, usate un misurino ben colmo di caffè macinato
(tipo Fast Filter).
Per ogni tazza piccola, usate un misurino raso di caffè.
Con alcuni modelli viene fornito un filtro permanente. In questo caso i filtri
di carta non sono più necessari.
— Nei modelli HD 7257 e HD 7258:
Per preparare meno di 4 tazze grandi di caffè (o 6 piccole): regolate
l’interruttore sulla posizione 7.
Per preparare più di 4 tazze grandi di caffè (o 6 piccole): regolate
l’interruttore sulla posizione 8.
— Il «ferma gocce» (la valvola di fermo automatica) evita che il caffè goccioli
sulla piastra di riscaldamento quando togliete il bricco mentre
l’apparecchio sta preparando il caffè e quando togliete il bricco dalla
piastra dopo aver preparato il caffè.
Nota: il «ferma gocce» funziona solamente se sul bricco è stato
messo il coperchio.
• Spegnimento automatico. Per comodità, e per ragioni di sicurezza: se
non avete spento la macchina del caffè, dopo 2 ore si spegnerà
automaticamente.
Volete preparare dell’altro caffè subito dopo?
Se avete appena preparato il caffè e volete prepararne dell’altro subito
dopo, spegnete la macchina del caffè (fig. 15) e lasciatela raffred-dare per
tre minuti.
Poi procedete alla nuova preparazione riempendo il serbatoio.
La decalcificazione
Decalcificate regolarmente la macchina del caffè.
Con un normale uso (due bricchi al giorno) osservate queste norme:
durezza dell’acqua fino a 18° DH — due o tre volte all’anno
durezza dell’acqua superiore a 18° DH — quattro o cinque volte all’anno.
Potete informarvi della durezza dell’acqua di casa vostra, rivolgendovi al
vostro acquedotto.
— Fate funzionare per una volta l’apparecchio.
Riempite però il serbatoio con aceto bianco e non usate il caffè.
— Per togliere il sapore di aceto ed i depositi calcarei, ripetete ancora due
volte l’operazione usando solamente acqua.
— Lavate il bricco, il coperchio ed il portafiltro.
Sostituzione del bricco
Per ordinare un bricco supplementare, rivolgetevi al vostro rivenditore
abituale o ad uno dei numerosi Centri Assistenza Philips chiedendo:
• il tipo HD 7909 per il mod. HD 7255, HD 7251, e HD 7257
• il tipo HD 7910 per il mod. HD 7258.
Sostituzione del cavo di alimentazione
Se il cavo di alimentazione di questo apparecchio si dovesse rovinare,
occorrerà sostituirlo con un cavo speciale: a questo scopo rivolgetevi al
rivenditore Philips o all’organizzazione Philips.
Connections — Applicable to U.K. only
IMPORTANT
WARNING — THIS APPLIANCE MUST BE EARTHED
The wires in this mains lead are coloured in accordance with the
following code:
GREEN AND YELLOW — EARTH
BLUE — NEUTRAL
BROWN — LIVE
As the colours of the wires in the mains lead of this appliance may not
correspond with the coloured markings identifying the terminals in your
plug, proceed as follows:
The wire which is coloured GREEN AND YELLOW must be connected
to the terminal which is marked with the letter “E” or by the earth symbol
E or coloured GREEN or GREEN AND YELLOW.
The wire which is coloured BROWN must be connected to the terminal
which is marked with the letter “L” or coloured RED.
The wire which is coloured BLUE must be connected to the terminal
which is marked with a letter “N” or coloured BLACK.
Note: If the terminals of the plug are unmarked or if you are in any
doubt consult a qualified electrician.
If a BS 1363 13A plug is used this must be fitted with a 13A fuse.
;
ΕΛΛΗΝΙΚΑ
• Πριν συνδέσετε τη συσκευή, παρακαλούµε ελέγξτε εάν η τάση που
αναφέρεται στη συσκευή αντιστοιχεί στην τάση του σπιτιού σας.
• Μην τοποθετείτε τη συσκευή σε θερµές επιφάνειες.
• Βγάλτε το καλώδιο απ την πρίζα του τοίχου:
— αν δηµιουργηθούν προβλήµατα ενώ κάνετε καφέ
— πριν καθαρίσετε τη συσκευή.
• Μην αφήνετε το καλώδιο του ρεύµατος να έρχεται σε επαφή µε
ζεστές επιφάνειες.
• Μην αφήνετε τα παιδιά να πλησιάζουν τη συσκευή ταν λειτουργεί,
ούτε και να τραβούν το καλώδιο του ρεύµατος.
• Μη χρησιµοποιείτε ποτέ τη συσκευή εάν διαπιστώσετε τι υπάρχει
βλάβη στο φις, στο καλώδιο του ρεύµατος ή στην ίδια τη συσκευή.
Πριν χρησιµοποιήσετε τη συσκευή για πρώτη φορά
— Αφήστε την να λειτουργήσει µία φορά χωρίς να γεµίσετε το φίλτρο
µε αλεσµένο καφέ. (∆είτε παρ. “Ετοιµασία καφέ”).
— Μετά καθαρίστε τα αποσπώµενα µέρη µε τον τρπο που
περιγράφεται στην παράγραφο “Καθαρισµς”.
Καθαρισµς: παρακαλούµε ανατρέξτε στις εικνες (εικ. 16-27)
• Το καλώδιο θα πρέπει πάντοτε να βγαίνει απ την πρίζα πριν τον
καθαρισµ της συσκευής.
• Μη βυθίζετε ποτέ τη συσκευή στο νερ. Καθαρίστε την µε ένα υγρ
πανί..
• Καθαρίστε τα αποσπώµενα µέρη µε ζεστ νερ και σαπούνι.
Ξεπλύντε τα µε καθαρ ζεστ νερ και σκουπίστε τα. Τα µέρη αυτά
µπορούν να καθαριστούν και σε πλυντήριο πιάτων.
• Για να βγάλετε την εξωτερική θήκη του φίλτρου θα πρέπει πρώτα
να αφαιρέσετε τον άξονα (εικ.23). Φροντίστε να µη χάσετε τον
άξονα!
Ετοιµασία καφέ: παρακαλούµε ανατρέξτε στις εικνες (εικ. 2-15)
• Γεµίστε το δοχείο χρησιµοποιώντας µνο φρέσκο νερ της βρύσης.
Oι ενδείξεις στάθµης στην αριστερή πλευρά αντιστοιχούν σε
µεγάλα φλιτζάνια (125 ml).
Oι ενδείξεις στάθµης στη δεξιά πλευρά αντιστοιχούν σε µικρά
φλιτζάνια (85 ml).
• Χρησιµοποιείτε χάρτινα φίλτρα τύπου “1Χ4” ή “Νο 4”. Μην ξεχνάτε
να διπλώνετε τις άκρες.
Μερικά µοντέλα συνοδεύονται απ µνιµο φίλτρο, µε αποτέλεσµα
να µη χρειάζονται τα χάρτινα φίλτρα.
• Για µεγάλα φλιτζάνια: υπολογίστε (χρησιµοποιώντας το ειδικ
κουτάλι-µεζούρα) µία γεµάτη κουταλιά αλεσµένου καφέ του τύπου
“fast filter” για κάθε φλιτζάνι. Για µικρτερα φλιτζάνια: µία κοφτή
κουταλιά για κάθε φλυτζάνι.
Για τους τύπους HD 7257 και 7258:
Για λιγτερα απ τέσσερα µεγάλα (ή έξι µικρά) φλιτζάνια : Γυρίστε
τον διακπτη στη θέση 7.
Για περισστερα απ τέσσερα µεγάλα (ή έξι µικρά) φλιτζάνια: Γυρίστε
τον διακπτη στη θέση 8.
Η αυτµατη βαλβίδα “drip-stop”εµποδίζει τις σταγνες του καφέ να
πέφτουν στη θερµή πλάκα στην περίπτωση που πάρετε την κανάτα τη
στιγµή που γίνεται ο καφές ή αφού αυτς έχει γίνει.
Σηµείωση: Η αυτµατη βαλβίδα αφήνει τον καφέ να τρέχει στην
κανάτα µνο ταν έχετε βάλει το καπάκι στην κανάτα.
Αυτµατη διακοπή λειτουργίας. Για την ευκολία σας και περισστερη
ασφάλεια, αν δεν έχετε σταµατήσει τη λειτουργία της συσκευής, θα
σταµατήσει αθτοµάτως µετά 2 ώρες.
Πώς θα κάνετε αµέσως περισστερο καφέ
Στην περίπτωση που έχετε ετοιµάσει µια κανάτα καφέ και θέλετε να
ετοιµάσετε αµέσως κι άλλο καφέ, σβήστε τη συσκευή (εικ. 15) και
αφήστε την να κρυώσει για τρία λεπτά περίπου. Στη συνέχεια
ξαναγεµίστε το δοχείο νερού.
Αφαίρεση των καθαλατώσεων
Oι καθαλατώσεις που δηµιουργούνται στη συσκευή θα πρέπει να
αφαιρούνται σε τακτά χρονικά διαστήµατα. Στην περίπτωση
κανονικής χρήσης (2 γεµάτες κανάτες την ηµέρα) ισχύει ο εξής
καννας:
Αν χρησιµοποιείτε νερ µε σκληρτητα µέχρι 18°DH, 2 ή 3 φορές τον
χρνο.
Αν χρησιµοποιείτε νερ µε σκληρτητα πάνω απ 18°, 4 ή 5 φορές
τον χρνο.
Μπορείτε να πληροφορηθείτε τη σκληρτητα του νερού σας απ την
εταιρεία υδρεύσεως της περιοχής σας.
• Λειτουργήστε τη συσκευή σύµφωνα µε τον τρπο που περιγράφεται
παραπάνω. Θα πρέπει, µως, τώρα να χρησιµοποιήσετε απλ ξίδι και
να µη βάλετε καφέ στο φίλτρο.
• Μετά την αφαίρεση των καθαλατώσεων λειτουργήστε τη συσκευή
δύο ακµη φορές µνο µε νερ για να ξεπλυθεί απ το ξίδι και τα
τυχν υπλοιπα των καθαλατώσεων.
— Καθαρίστε την κανάτα, το καπάκι και τη θήκη του φίλτρου.
Εσπασε η κανάτα; Χρειάζεστε επιπλέον κανάτα;
Μπορείτε να παραγείλετε την κανάτα που ζητάτε µέσω του
προµηθευτή σας ή µέσω του Service Center της Philips.
Κωδικς κανάτας: Για καφετιέρα(-ες)
HD 7909 HD 7255 — 57
HD 7910 HD 7258
Αντικατάσταση του καλωδίου ρεύµατος
Αν το καλώδιο υποστεί βλάβη θα πρέπει να αντικατασταθεί µε ειδικ
καλώδιο του ίδιου τύπου.
Απευθυνθείτε στον προµηθευτή σας ή στην αντιπροσωπεία της
Philips στη.
Русский
- Bedienungsanleitung Philips Cafe Roma HD7257
- Philips Cafe Roma HD7257 User Manual
- Manual Usuario Philips Cafe Roma HD7257
- Mode d’emploi Philips Cafe Roma HD7257
- Istruzioni Philips Cafe Roma HD7257
- инструкция Philips Cafe Roma HD7257
- Philips Cafe Roma HD7257の取扱説明書
- Handleiding Philips Cafe Roma HD7257
- Manual de uso Philips Cafe Roma HD7257
Вам нужна инструкция? Мы поможем Вам ее найти и сэкономить Ваше время.
- 2 stron
- 0 mb
Изделие Philips Cafe Roma HD7257, а также другие, которыми Вы пользуетесь ежедневно, наверняка вы получили в комплекте с инструкцией обслуживания. Из опыта наших пользователей мы знаем, что большинство из Вас не уделили этому особого внимания. Большая часть инструкций, сразу же после покупки попадает в корзину для мусора вместе с коробкой — это ошибка. Ознакомьтесь с информацией, касающейся инструкции Philips Cafe Roma HD7257, которая поможет Вам в будущем сэкономить нервы и избежать головной боли.
Важная подсказка — не забывайте хотя бы раз прочитать инструкцию Philips Cafe Roma HD7257
Если вы не хотите каждый раз читать информационные брошюры, касающиеся, тех или Philips Cafe Roma HD7257 иных изделий, достаточно, прочитать их раз — сразу же после покупки устройства. Вы получите основное знания, касающиеся поддержания изделия Philips Cafe Roma HD7257 в хорошем эксплуатационном состоянии, так, чтобы без проблем достигнуть его планируемого цикла работы. Затем инструкцию можно отложить на полку и вернуться к ней только в случае, если вы не уверены, правильно ли проводится техобслуживание изделия. Правильный уход является необходимым элементом Вашего удовольствия Philips Cafe Roma HD7257.
Раз в году пересмотрите шкафчик, в котором держите инструкции для всех устройств, — выбросите те, которыми вы уже не пользуетесься. Это поможет Вам сохранять порядок в своей домашней базе инструкций обслуживания.
Summary of Contents for Philips Cafe Roma HD7257
Что находится в инструкции Philips Cafe Roma HD7257? Почему стоит ее прочитать?
- Гарантия и подробности, касающиеся техобслуживания изделия
Хорошей идеей будет прикрепить чек к странице инструкции. Если что-то плохое случится во время использования Philips Cafe Roma HD7257, у вас будет комплект документов, необходимый для гарантийного ремонта. В этой части инструкции вы найдете информацию об авторизованных сервисных центрахPhilips Cafe Roma HD7257 а также, как самостоятельно правильно ухаживать за оборудованием — так, чтобы не потерять гарантийных прав. - Указания по монтажу и Setup
Не терять нервов и времени на самостоятельную попытку установки и первого запуска изделия. Воспользуйтесь рекомендациями производителя Philips Cafe Roma HD7257 чтобы правильно запустить изделие, без лишнего риска повреждения оборудования. - Информация, касающаяся дополнительных запчастей (входящих в комплект а также являющихся опцией)
Пересматривая эту часть документа вы сможете проверить, доставлен ли ваш Philips Cafe Roma HD7257 с полним комплектом аксессуаров. Вы также сможете узнать, какие дополнительные запчасти или аксессуары для Philips Cafe Roma HD7257 Вы сможете найти и докупить к своему устройству. - Troubleshooting
Самые частые проблемы, касающиеся Philips Cafe Roma HD7257 и методы их решения. Это очень полезная часть руководства по обслуживанию — она позволит Вам сэкономить много времени на поиск решений. 90% проблем с Philips Cafe Roma HD7257 повторяется у многих пользователей. - Требования, касающиеся питания и энергетический класс
Информация, касающаяся количества потребляемой энергии, а также рекомендации, касающиеся установки и питания Philips Cafe Roma HD7257. Прочитайте, чтобы оптимально пользоваться Philips Cafe Roma HD7257 и не использовать большего количества ресурсов, нежели это необходимо для правильной работы изделия. - Специальные функции Philips Cafe Roma HD7257
Здесь вы можешь узнать, как персонализировать изделие Philips Cafe Roma HD7257. Вы узнаете, какие дополнительные функции могут помочь Вам удобно использовать продукт Philips Cafe Roma HD7257 а также, какие функции Вашего устройства оптимальны для выполнения конкретной деятельности.
Как видите в инструкции вы найдете информацию, которая реально поможет Вам в использовании Вашего изделия. Стоит с ней ознакомиться, чтобы избежать разочарований, возникающих из более короткого, нежели предусматривалось, периода исправности изделия Philips Cafe Roma HD7257. Если все же вы не хотите копить инструкции в своем доме, наш сайт поможет Вам в этом — вы должны найти у нас руководство по обслуживанию большинства из своих устройств, а также Philips Cafe Roma HD7257.
Комментарии (1)
A good user manual
The rules should oblige the seller to give the purchaser an operating instrucion of Philips Cafe Roma HD7257, along with an item. The lack of an instruction or false information given to customer shall constitute grounds to apply for a complaint because of nonconformity of goods with the contract. In accordance with the law, a customer can receive an instruction in non-paper form; lately graphic and electronic forms of the manuals, as well as instructional videos have been majorly used. A necessary precondition for this is the unmistakable, legible character of an instruction.
What is an instruction?
The term originates from the Latin word „instructio”, which means organizing. Therefore, in an instruction of Philips Cafe Roma HD7257 one could find a process description. An instruction’s purpose is to teach, to ease the start-up and an item’s use or performance of certain activities. An instruction is a compilation of information about an item/a service, it is a clue.
Unfortunately, only a few customers devote their time to read an instruction of Philips Cafe Roma HD7257. A good user manual introduces us to a number of additional functionalities of the purchased item, and also helps us to avoid the formation of most of the defects.
What should a perfect user manual contain?
First and foremost, an user manual of Philips Cafe Roma HD7257 should contain:
— informations concerning technical data of Philips Cafe Roma HD7257
— name of the manufacturer and a year of construction of the Philips Cafe Roma HD7257 item
— rules of operation, control and maintenance of the Philips Cafe Roma HD7257 item
— safety signs and mark certificates which confirm compatibility with appropriate standards
Why don’t we read the manuals?
Usually it results from the lack of time and certainty about functionalities of purchased items. Unfortunately, networking and start-up of Philips Cafe Roma HD7257 alone are not enough. An instruction contains a number of clues concerning respective functionalities, safety rules, maintenance methods (what means should be used), eventual defects of Philips Cafe Roma HD7257, and methods of problem resolution. Eventually, when one still can’t find the answer to his problems, he will be directed to the Philips service. Lately animated manuals and instructional videos are quite popular among customers. These kinds of user manuals are effective; they assure that a customer will familiarize himself with the whole material, and won’t skip complicated, technical information of Philips Cafe Roma HD7257.
Why one should read the manuals?
It is mostly in the manuals where we will find the details concerning construction and possibility of the Philips Cafe Roma HD7257 item, and its use of respective accessory, as well as information concerning all the functions and facilities.
After a successful purchase of an item one should find a moment and get to know with every part of an instruction. Currently the manuals are carefully prearranged and translated, so they could be fully understood by its users. The manuals will serve as an informational aid.