
Описание
Характеристики
Комплектация
Квадрокоптер DJI Phantom 4 RTK — 1шт
Пульт дистанционного управления для Phantom 4 RTK — 1 шт
Пара пропеллеров — 4 шт
Интеллектуальная полетная батарея — 2шт
Интеллектуальная батарея для ПДУ — 1шт
Зарядное устройство — 1шт
Кабель питания — 1шт
Зарядный Хаб для аккумулятора ПДУ — 1шт
Зарядный Хаб для аккумулятора дрона — 1шт
Документация
Фиксатор подвеса — 1шт
Кабель USB OTG — 1шт
Кабель Micro-USB — 1шт
Кабель USB-С — 1шт
Карта памяти microSD 16Гб — 1шт
Модем — 1шт
Кейс для транспортировки — 1шт
Винт с крестообразным шлицем Phillips — 2шт
Файлы
Оформить заказ
Экспертные мнения
Экспертные мнения
Калькулятор лизинга
Калькулятор лизинга
Стоимость оборудования
833 392 ₽
Сравнение с альтернативами
| Банковский кредит |
Собственные средства |
Лизинг от Аверус |
|
|---|---|---|---|
| Срок финансирования | месяцев | — | месяцев |
| Ставка финансирования | % | % | % |
| Аванс | — | — | % |
| Стоимость имущества | ₽ | ₽ | ₽ |
| Экономия по налогу на прибыль | ₽ | ₽ | ₽ |
| Плата за финансирование | ₽ | ₽ | ₽ |
| Расходы на амортизацию | ₽ | ₽ | ₽ |
| Сумма НДС к вычету | ₽ | ₽ | ₽ |
| Итого стоимость | ₽ | ₽ | ₽ |
Служба поддержки онлайн (Английский)
Пн-Пт с: 9:00 до 17:00 (UTC+1)
Обслуживание по почте
Нужна помощь? Мы всегда готовы помочь!
Характеристики
Дрон
Взлетная масса1391 г
Размер по диагонали 350 мм
Макс. высота полета над уровнем моря6000 м
Макс. скорость набора высоты6 м/с (автоматический полет); 5 м/с (ручное управление)
Макс. скорость снижения3 м/с
Макс. скорость50 км/ч (режим P)
58 км/ч (режим А)
Макс. время полетаОколо 30 минут
Диапазон рабочих температур0°…+40℃
Диапазон рабочих частотОт 2,400 ГГц до 2,483 ГГц (Европа, Япония, Корея)
Мощность передатчика (ЭИИМ)2,4 ГГц
CE (Европа) / MIC (Япония) / KCC (Корея): < 20 дБм
Точность позиционированияRTK включен и работает нормально:
вертикально:±0,1 м; горизонтально: ±0,1 м
RTK выключен:
вертикально: ±0,1 м (система визуального позиционирования);
±0,5 м (спутниковые системы позиционирования)
горизонтально: ±0,3 м (система визуального позиционирования);
±1,5 м (спутниковые системы позиционирования)
Расположение изображенияРасположение центра камеры относительно центра фазы антенны D-RTK под осью корпуса летательного аппарата: (36, 0 и 192 мм) используется в сочетании с координатам изображения выходных данных. Положительные значения осей x, y и z корпуса аппарата указывают вперед, вправо и вниз соответственно.
Спутниковые системы позиционирования
Однополосная передача, высокочувствительный модуль спутниковых систем позиционированияGPS+BeiDou+Галилео (Азия);
GPS+ГЛОНАСС+Галилео (другие страны)
Многополосные многосистемные высокоточные спутниковые системы позиционирования RTKЧасто используемые:
GPS: L1/L2;
ГЛОНАСС: L1/L2;
BeiDou:B1/B2;
Галилео: E1/E5a
Время до первого определения местоположения: < 50 с
Точность позиционирования: в вертикальной плоскости: 1,5 см + 1 мд (среднее квадратическое значение);
в горизонтальной плоскости: 1 см + 1 мд (среднее квадратическое значение)
1 мд означает, что погрешность увеличивается на 1 мм с каждым 1 км движения летательного аппарата.
FAQ
Aircraft body
Aircraft body
Remote Controller
Remote Controller
Aircraft body
How can the Phantom 4 RTK and Phantom 4 Pro be distinguished?
There is a cylindrical white cap on the top of the Phantom 4 RTK.
Is the Phantom 4 RTK’s ESC the same as the Phantom 4 Pro’s?
No, The Phantom 4 RTK has FOC sinusoidal driver ESCs, offering improved noise control.
Can I use the Phantom 4 RTK’s propellers on the Phantom 4 Pro?
What positioning system does the Phantom 4 RTK use?
GPS, GLONASS, BeiDou, and Galileo.
Gimbal
Can the Phantom 4 Pro ND filter be used with the Phantom 4 RTK?
What are the Phantom 4 RTK camera’s specifications?
The Phantom 4 RTK uses the same camera as the Phantom 4 Pro and is equipped with a 1-inch 20-megapixel sensor capable of shooting 4096×2160 at 60fps or 30fps, at a maximum bitrate of 100Mbps using the H.264 codec and also supports H.265. The aperture can be adjusted from F2.8 to F11. Auto and M, A (aperture priority) and S (shutter priority) can be selected. For more details, refer to the specifications.
What are the Phantom 4 RTK camera’s new features?
Each camera has been individually corrected before delivery, and the corresponding Opencv parameter is recorded. The camera can output original images without distortion correction, and output the OPEN-CV distortion correction parameter of the camera in the photo’s XMP information for post-processing.
Remote Controller
What features does the Phantom 4 RTK’s remote controller have?
The 5.5-inch 1080p screen integrated with the Phantom 4 RTK’s remote controller has 1000 cd/m2 of brightness, which is more than twice as bright as conventional smart devices. It makes bright, vivid colors easily visible in direct sunlight. With this screen, a mobile device is not required, simplifying pre-flight preparations, and further reducing video lag. Integration of a Micro-SD card slot and 4G USB Dongle port allow images to be edited instantly. Lastly, the battery supports hot swapping and has an embedded loudspeaker.
Can I operate the Phantom 4 RTK with the MG-1P remote controller?
Can I operate the Phantom 4 RTK with the Phantom 4 Pro remote controller?
Software
Can the Phantom 4 RTK resume mapping farmland from the breakpoint after the battery is swapped?
What coordinate system does the Phantom 4 RTK use for the network RTK mode?
There are three modes for network RTK:
1. The default network RTK uses the WGS84 coordinate system (for Mainland China only).
2. In Base Station mode, the users can set the coordinate system by themselves. Without any settings, the base station will be used as an independent small coordinate system.
3. For Custom Network RTK mode, the coordinate system needs to be judged based on the port configured by the user with an account provided by CORS or a network RTK supplier. The commonly used coordinate systems are WGS84, CGCS2000, and CORS coordinates.
What software is supported for post-processing maps?
The orthophotos on the SD card can be post-processed by PC GS PRO, PhotoScan, and Pix4d for two-dimensional mapping.
What is the Post Processed Kinematic (PPK) data generated by the Phantom 4 RTK?
It provides aircraft-side satellite observation data in RINEX format and photo exposure timestamps.
Why does the Phantom 4 RTK automatically hover instead of landing when it is landing at a height of 1 m?
This occurs when the ground is uneven. Auto or manual landing can be selected with the remote controller and PC GS Pro.
Can the Phantom 4 RTK collect latitude and longitude coordinates? If yes, where can I view them?
Yes, latitude and longitude information can be checked in the photo’s metadata.
Is the Phantom 4 RTK’s mapping accuracy the same as using the Electronic Total Station?
The Electronic Total Station uses laser ranging with millimeter accuracy. However, the measurement time is longer than that of the Phantom 4 RTK.
Can real-time mapping be achieved when PC GS Pro is used without using an SD card?
What is the Phantom 4 RTK’s image transmission resolution?
Battery
What is the Phantom 4 RTK’s battery capacity?
It is the same as that of the Phantom 4 Pro’s battery.
5870mAh, 15.2V and 89.8Wh
How long can the Phantom 4 RTK fly?
About 30 minutes in optimal conditions.
How long does it take to fully charge the Phantom 4 RTK’s battery?
How can I maintain the Phantom 4 RTK’s battery?
It should be stored in a waterproof and moisture-proof place. For long-term storage, ensure that the battery level bar is more than two bars. If it needs to be stored for more than three months, it should be charged and discharged once to maintain the battery activity.
Why does the battery heat up when being stored for a long time?
If the battery is stored for a long time with more than a 65% charge, the battery storage self-discharge mode will be triggered, and the battery will automatically discharge to below 65% of the total power. It is normal to feel moderate heat being emitted from the battery.
Can the battery be used in a low-temperature environment?
When using the battery in a low-temperature environment (-10 °C and below), the battery capacity will drop sharply. It is recommended to warm up the battery to 20 °C and then fly the drone.
Связаться с нами
- Публикация
- Товары1
Инструкции: DJI Phantom 4 RTK планирование миссии для съемки карт/фотограмметрии 100%
- Представляем Вашему вниманию обучающее видео Phantom 4 RTK;
- В этом виде мы научим Вас как правильно спланировать миссию для съемки карт или фотограмметрии;
- Перед тем, как Вы начнете, убедитесь, что имеется подключение к мобильной станции D-RTK 2 или сетевой службе RTK;
- Выберите «План» в нижней левой части экрана, затем «фотограмметрия». Это позволит Вам начать планирование миссии;
- Вы попадете на экран карты, где голубая точка показывает положение пульта управления;
- Двигайте или меняйте масштаб карты, чтобы выбрать местность, которую Вы хотите снять;
- Затем нажмите на карту, чтобы установить первую точку;
- Вы можете нажать в другое место, чтобы установить другую точку или нажать и перенести существующую;
- Двойное нажатие на точку удалит ее;
- Как только будут установлены 4 точки, они автоматически соединятся и образуют маршрут для фотограмметрии;
- Вы можете двигать каждую контрольную точку, чтобы изменить план и форму полета;
- После определения местности для съемки, Вы можете использовать меню в правой стороне экрана, чтобы настроить параметры миссии;
- Это включает высоту полета, скорость и прочее;
- Как только Вы настроите высоту-приложение автоматически рассчитает GSD миссии;
- Нажмите на расширенные настройки для установки перекрытия — по горизонтали и по вертикали или границы под Ваши нужды;
- Сохраните настройки и затем войдите в настройки камеры, где Вы можете настроить соотношение сторон, баланс белого и другие параметры;
- Подвес настроен изначально на -90 градусов, что по умолчанию дает Вам возможность снимать ортоизображения;
- В дополнение, чтобы быть уверенными, что Ваша карта имеет максимальную точность, мы предлагаем отключить коррекцию искажения;
- Сохраните настройки и убедитесь, что все остальное настроено верно;
- После этого нажмите «сохранить» и дайте название миссии;
- Как только будете готовы начать выполнение — нажмите «Invoke»;
- Внимательно прочитайте уведомления и нажмите ОК;
- Как только Вы сдвиньте слайдер «выполнить», Ваш Phantom 4 RTK начнет выполнение задания;
- Во время полета следите, чтобы плоская сторона антенны всегда была направлена на дрон для лучшего качества связи;
- Если аккумулятор близок к разряду до завершения миссии Вы можете вручную остановить выполнение;
- После приземления и замены батареи, Вы можете включить дрон и продолжить выполнение миссии с момента остановки;
- Когда миссия будет завершена, Phantom 4 RTK автоматически вернется в сохраненную точку взлета;
- Вы также можете настроить Phantom 4 RTK так, чтобы он завис, приземлился или вернулся на первую точку после завершения миссии;
- Вы можете начать другую миссию сразу после приземления или начать построение модели, переставив карту памяти из коптера в компьютер, где данные могут быть обработаны локально или загружены в стороннее программное обеспечение.
- Построение карты в Вашего дроны — это только начало;
- Как только миссия будет создана, Вы сможете в любое время найти ее в главных настройках и повторить для создания еженедельных или ежемесячных сравнительных карт.
Товары
Артикул: 3084
Добавить к сравнению
RU
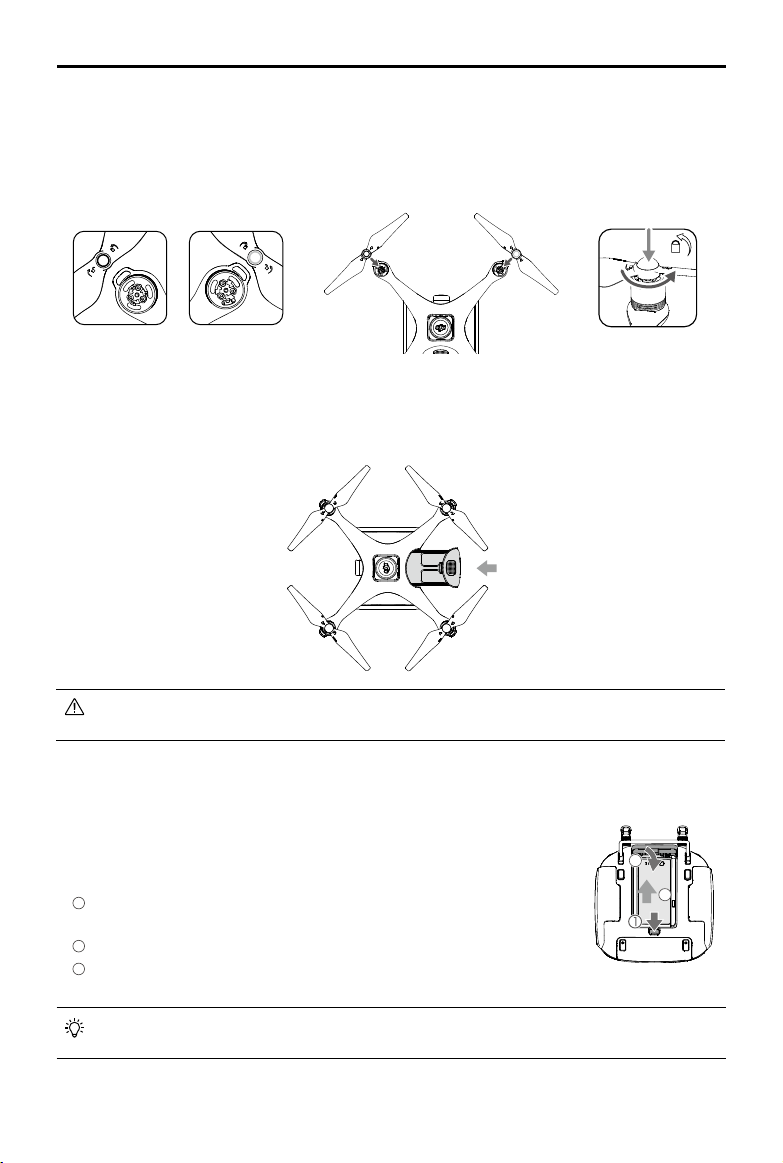
Использование Phantom 4 RTK
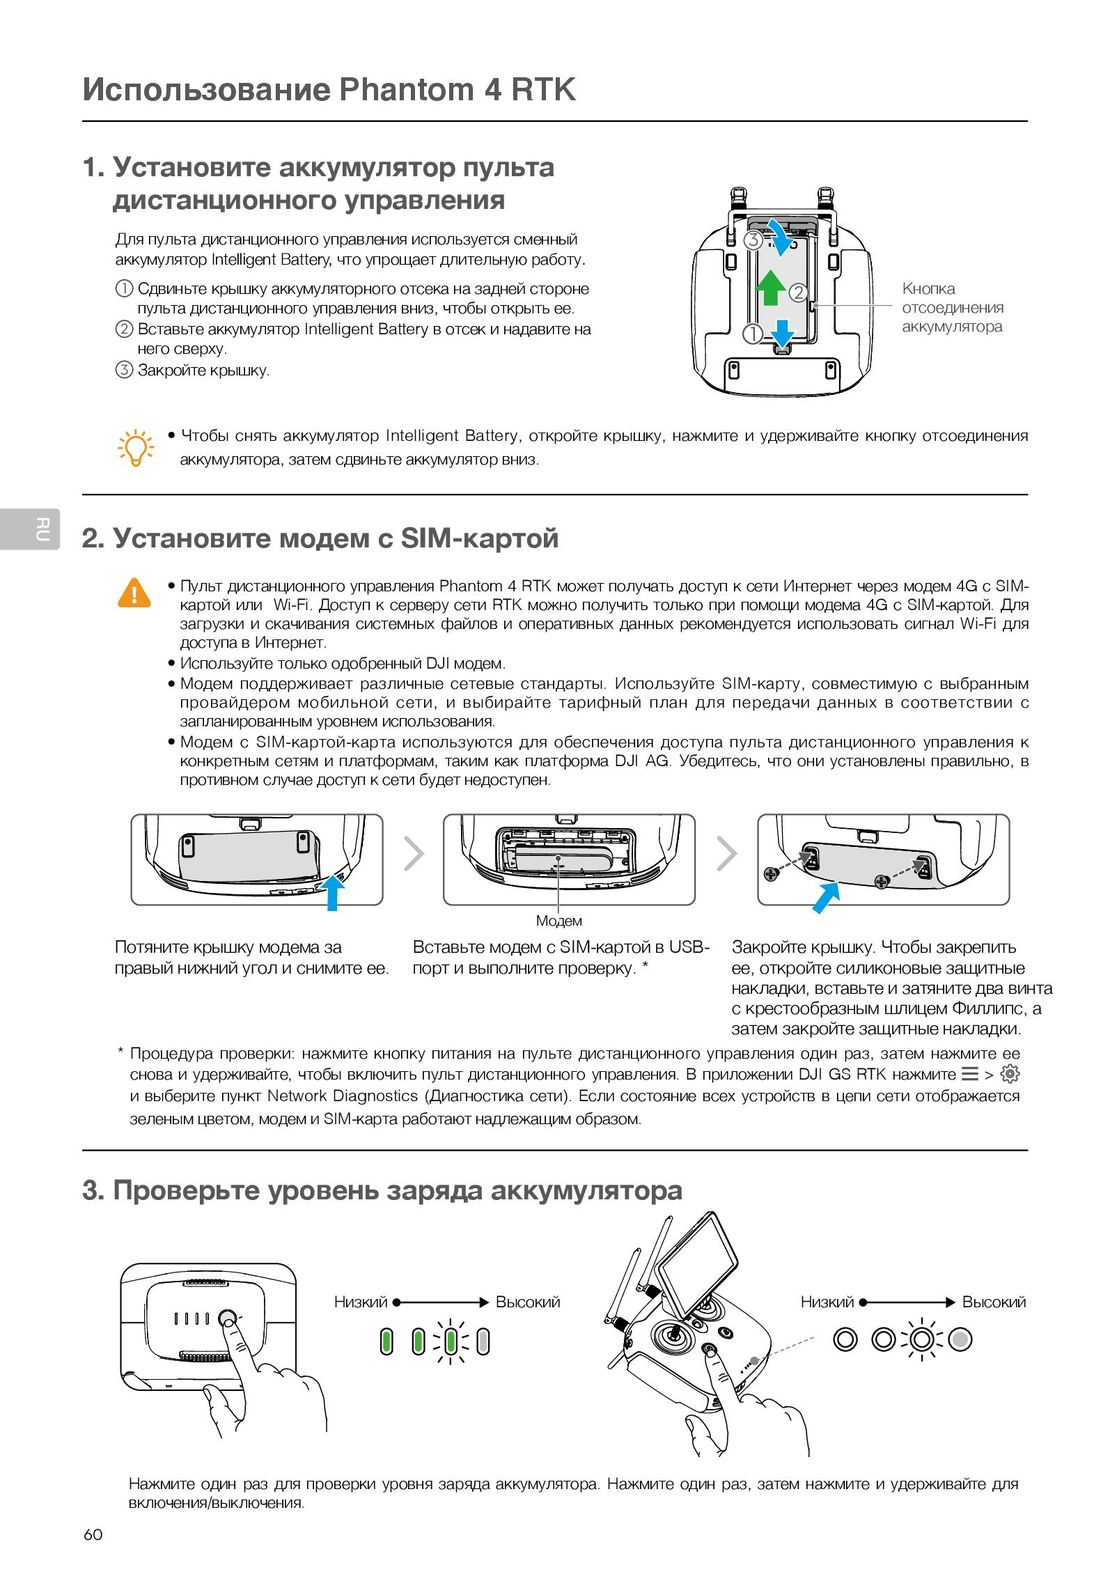
1. Установите аккумулятор пульта
дистанционного управления
Для пульта дистанционного управления используется сменный 3
аккумулятор Intelligent Battery, что упрощает длительную работу.
1 Сдвиньте крышку аккумуляторного отсека на задней стороне 2 Кнопка
пульта дистанционного управления вниз, чтобы открыть ее. отсоединения
2 Вставьте аккумулятор Intelligent Battery в отсек и надавите на аккумулятора
него сверху.
3 Закройте крышку.
● Чтобы снять аккумулятор Intelligent Battery, откройте крышку, нажмите и удерживайте кнопку отсоединения
аккумулятора, затем сдвиньте аккумулятор вниз.
2. Установите модем с SIM-картой
● Пульт дистанционного управления Phantom 4 RTK может получать доступ к сети Интернет через модем 4G с SIM-
картой или Wi-Fi. Доступ к серверу сети RTK можно получить только при помощи модема 4G с SIM-картой. Для
загрузки и скачивания системных файлов и оперативных данных рекомендуется использовать сигнал Wi-Fi для
доступа в Интернет.
● Используйте только одобренный DJI модем.
● Модем поддерживает различные сетевые стандарты. Используйте SIM-карту, совместимую с выбранным
провайдером мобильной сети, и выбирайте тарифный план для передачи данных в соответствии с
запланированным уровнем использования.
● Модем с SIM-картой-карта используются для обеспечения доступа пульта дистанционного управления к
конкретным сетям и платформам, таким как платформа DJI AG. Убедитесь, что они установлены правильно, в
противном случае доступ к сети будет недоступен.
Модем
Потяните крышку модема за Вставьте модем с SIM-картой в USB- Закройте крышку. Чтобы закрепить
правый нижний угол и снимите ее. порт и выполните проверку. * ее, откройте силиконовые защитные
накладки, вставьте и затяните два винта
с крестообразным шлицем Филлипс, а
затем закройте защитные накладки.
* Процедура проверки: нажмите кнопку питания на пульте дистанционного управления один раз, затем нажмите ее
снова и удерживайте, чтобы включить пульт дистанционного управления. В приложении DJI GS RTK нажмите >
и выберите пункт Network Diagnostics (Диагностика сети). Если состояние всех устройств в цепи сети отображается
зеленым цветом, модем и SIM-карта работают надлежащим образом.
3. Проверьте уровень заряда аккумулятора
Низкий Высокий Низкий Высокий
Нажмите один раз для проверки уровня заряда аккумулятора. Нажмите один раз, затем нажмите и удерживайте для
включения/выключения.
60
4

RTK
User Manual
2020.03
v2.2
Searching for Keywords
Search for keywords such as “battery” and “install” to find a topic. If you are using Adobe
Acrobat Reader to read this document, press Ctrl+F on Windows or Command+F on Mac to
begin a search.
Navigating to a Topic
View a complete list of topics in the table of contents. Click on a topic to navigate to that
section.
Printing this Document
This document supports high resolution printing.
Information
There are two kinds of altitudes displayed in the DJI GS RTK app, absolute altitude and relative altitude.
Absolute altitude: The geographical attribute, in relation to longitude and latitude.
Relative altitude: The altitude data of the operation tasks relative to the Home Point. In the same operation,
the absolute altitude for the same point during the operation will vary when taking o from locations with different elevations.
Using this manual
Legends
Warning Important Hints and Tips Reference
Read Before the First Flight
Read the following documents before using the PHANTOMTM 4 RTK:
1. In the Box
2. User Manual
3. Quick Start Guide
4. Disclaimer and Safety Guidelines
5. Intelligent Flight Battery Safety Guidelines
We recommend that you watch all tutorial videos on the ocial DJITM website and read the Disclaimer and
Safety Guidelines before you y. Prepare for your rst ight by reviewing the Quick Start Guide and refer to
the User Manual for more details.
Watch the Tutorial Videos
Please watch the tutorial videos at the link below, which demonstrates how to use the
Phantom 4 RTK safely: http://www.dji.com/product/phantom-4-rtk/info#video
Download the DJI Assistant 2 for Phantom
Download DJI ASSISTANTTM 2 for Phantom from: http://www.dji.com/phantom-4-rtk/info#downloads
The operating temperature of this product is 0° to 40° C. It does not meet the standard operating
temperature for military grade application (-55° to 125° C), which is required to endure greater
environmental variability. Operate the product appropriately and only for applications that it meets the
operating temperature range requirements of that grade.
2020 DJI All Rights Reserved.
2
©

Contents
Information
Using this manual
Legends
Read Before the First Flight
Watch the Tutorial Videos
Download the DJI Assistant 2 for Phantom
Product Prole
Introduction
Features Highlights
Installation
Aircraft Overview
Remote Controller Overview
Aircraft
Prole
Flight Modes
Aircraft Status Indicators
Return to Home (RTH)
Industrial Applications
Vision System and Infrared Sensing System
RTK Functions
Flight Recorder
Attaching and Detaching the Propellers
DJI Intelligent Flight Battery
Remote Controller
Prole
Using the Remote Controller
Remote Controller Status LED
Linking the Remote Controlle
Multi-Aircraft Control Function
Gimbal and Camera
Camera
Gimbal
2
2
2
2
2
2
6
6
6
6
9
10
13
13
13
14
15
20
27
30
31
31
32
38
38
38
42
43
44
47
47
49
2020 DJI All Rights Reserved.
©
3

DJI GS RTK App
Main Screen
Planning View
Camera View
Cloud PPK Service
Flight
Flight Environment Requirements
GEO (Geospatial Environment Online) System
Flight Restrictions
GEO Unlocking
Calibrating the Compass
PreightChecklist
Starting/Stopping the Motors
StoppingMotorsMid-ight
Flight Test
DJI Assistant 2 for Phantom
Installation and Launching
Using DJI Assistant 2 for Phantom
Appendix
Specications
Updating the Firmware 73
51
51
52
54
56
60
60
60
61
63
64
64
65
65
66
68
68
68
70
70
2020 DJI All Rights Reserved.
4
©

Product Prole
This section introduces the Phantom
4 RTK and lists the components of the
aircraft and remote controller.
2020 DJI All Rights Reserved.
©
5
Product Prole
Introduction
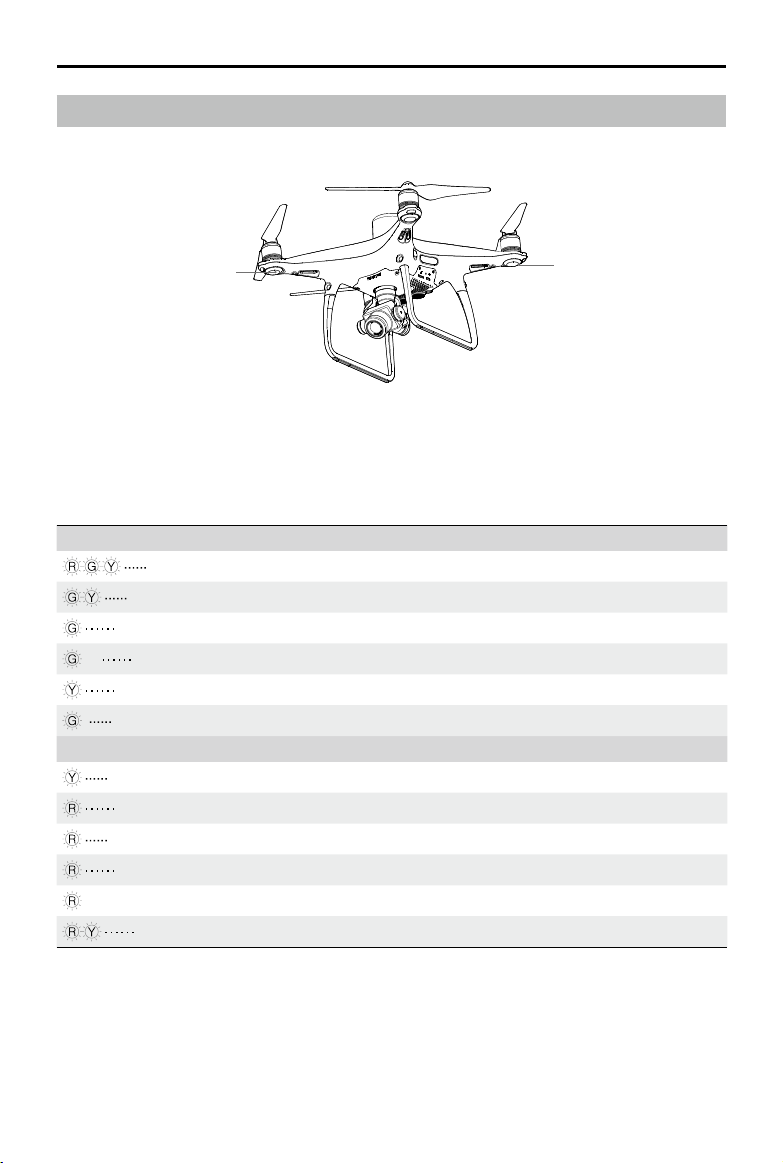
The Phantom 4 RTK is a smart mapping and imaging drone capable of highly accurate mapping functions.
The aircraft has a built-in DJI Onboard D-RTKTM, which provides precision data for centimeter-level
positioning accuracy*. Multi-directional obstacle sensing achieved through vision and infrared sensors
enables intelligent obstacle avoidance during flight and indoor hovering and flight. The Phantom 4 RTK
records videos at 4K and captures 20 megapixel photos. The OCUSYNCTM HD video downlink built into
both the aircraft and remote controller ensures a reliable and stable transmission.
Features Highlights
The Phantom 4 RTK aircraft has a built-in DJI Onboard D-RTK, providing high-precision data for centimeterlevel positioning when used with Network RTK service or a DJI D-RTK 2. Raw satellite observations and
exposure event records can be used for post-processed kinematic (PPK) dierential corrections.
The Phantom 4 RTK can hover and y in extremely low altitude and indoor environments, and provides
multi-directional obstacle sensing and vision positioning functions. Obstacles detection and avoidance in
large range and landing protection enhance ight safety.
The Phantom 4 RTK is equipped with a 24 mm (35 mm format equivalent) wide angle camera, high-
precision and anti-shake gimbal, 1-inch CMOS sensor, mechanical shutter to oer the best in aerial photo
analysis.
Built into the remote controller is the latest DJI OcuSync technology with enhanced anti-interference
capability to deliver a more stable and smoother video downlink. When combined with the receiver in the
aircraft, the remote controller has a transmission range up to 4.3 mi / 7 km (FCC-compliant version). The
remote controller is equipped with a 5.5-inch high luminance monitor, and an integrated DJI GS RTK App
for real-time HD display. Users can plan ight paths and perform ight operations in the app for operation
types of Photogrammetry, Waypoint Flight, Linear Flight, Terrain Awareness Mode, and Block Segmentation.
For Photogrammetry, Linear Flight, Terrain Awareness Mode, and Block Segmentation operations, simply
tap on the map in the app or import les to set a ight area. For waypoint operations, y the aircraft to set
waypoints and congure waypoint actions, then the aircraft will be able to perform automated operations.
The remote controller’s Multi-Aircraft Control mode can be used to coordinate the operation of up to ve
aircraft at the same time, enabling pilots to work very eciently.
Image data from the Phantom 4 RTK can be used to generate maps for eld planning when operating a DJI
AGRASTM aircraft. Users can also import photos to the DJI PC GS Pro application or third-party mapping
software to composite highly accurate maps for dierent applications.
Installation
Preparing the Aircraft
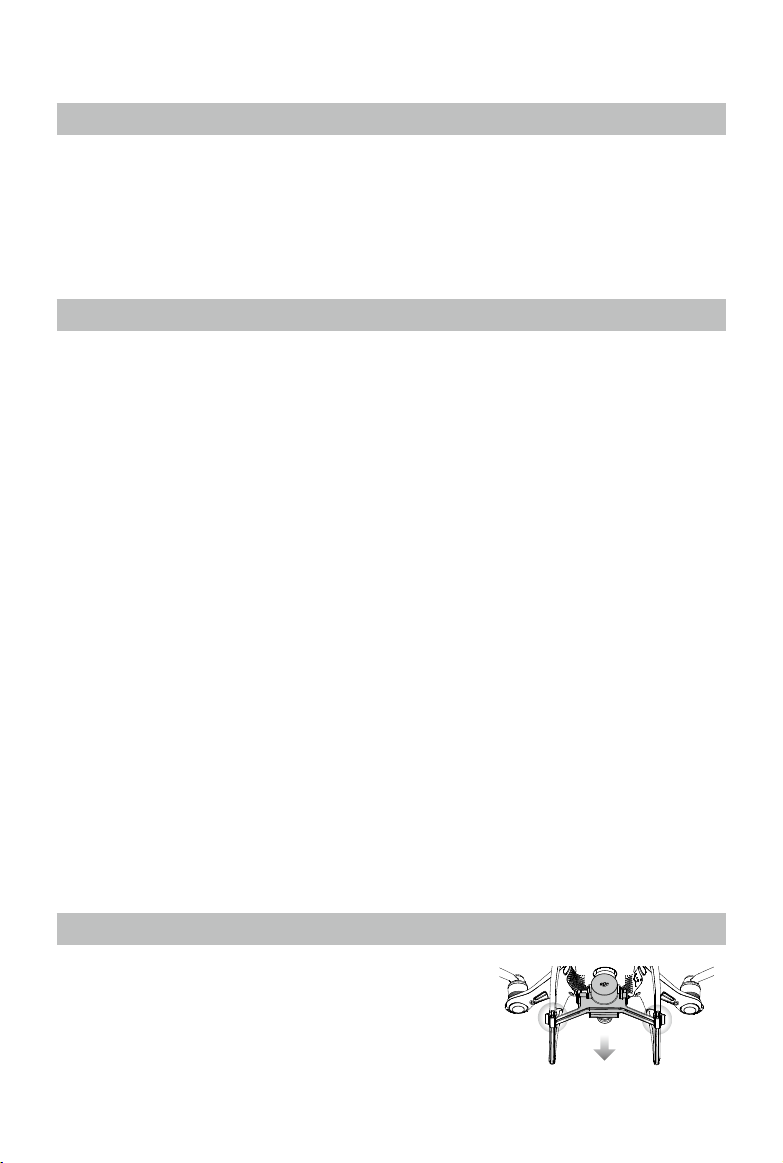
1. Remove the gimbal clamp from the camera as shown below:
* This should be used with Network RTK service, a DJI D-RTK 2 High-Precision GNSS Mobile Station (purchased
additionally) or post-processed kinematic (PPK) data (recommended when RTK signal is weak during operation).
2020 DJI All Rights Reserved.
6
©
Phantom 4 RTK User Manual
2. Attaching the Propellers
Mount the propellers with black propeller rings to the motors with black dots. Mount the propellers with
sliver propeller rings to the motors without black dots. Press the propeller down onto the mounting plate
and rotate in the lock direction until it is secured.
3. Battery Installation
Slide battery into the battery compartment according to the arrow’s direction as shown below.
When the upper and lower buckles on the battery are in place, a click sound indicates the battery is
securely installed. Failure to do so may aect the ight safety of your aircraft.
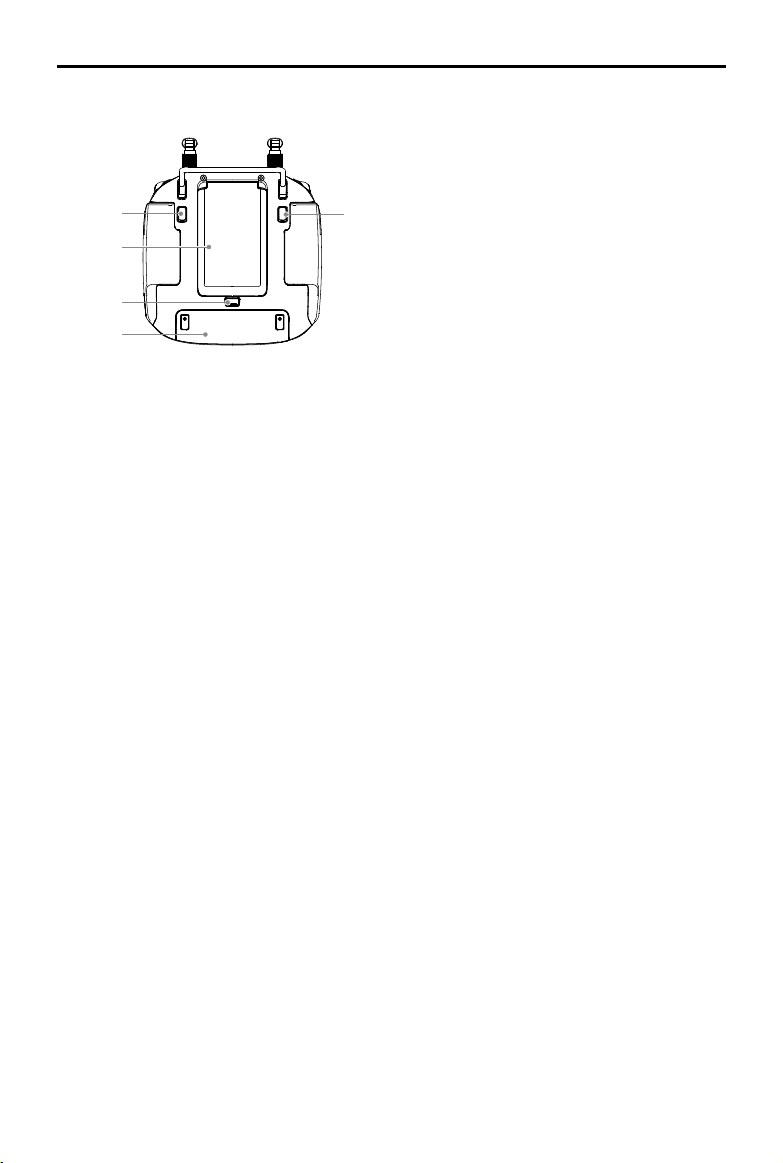
Preparing the Remote Controller
1. Mounting the Remote Controller Battery
The remote controller uses an easily removable interchangeable Intelligent
Battery for long-term operation.
1
Slide the battery compartment cover lock on the back of the remote
controller down to open the cover.
2
Insert the Intelligent Battery into the compartment and push it to the top.
3
Close the cover.
To remove the Intelligent Battery, open the cover, press and hold the battery release button, then
push the battery downward.
2020 DJI All Rights Reserved.
©
3
2
7
Phantom 4 RTK User Manual
2. Mounting the Dongle and SIM Card
1
Lift the dongle compartment cover at the gap at its lower right corner, then remove it.
2
Insert the dongle into the USB port with the SIM card inserted into the dongle and test. *
3
Re-mount the cover. To secure the cover, open the silicone protectors on it, insert and tighten two
Phillips screws, then close the protectors.
* Test procedure: Press the remote controller power button once, then press again and hold to turn the remote
controller on. In the DJI GS RTK app tap > and select Network Diagnostics. If the statuses of all the
devices in the network chain are shown in green the dongle and SIM card are functioning properly.
The Phantom 4 RTK remote controller can access the Internet using a 4G dongle with SIM card or
Wi-Fi signal. For UK, EU, ACUK, or ACEU versions, a Network RTK server can only be accessed
using a 4G dongle with SIM card. For NA, AU or AFUS versions, using a 4G dongle with SIM card is
recommended, but a Wi-Fi signal can also be used. To conrm the version of your unit, please view
the version code after the product name on the label on the product packaging. When uploading or
downloading system logs or operation data, using a Wi-Fi signal for Internet access is recommended.
Only use a DJI approved dongle.
The dongle supports various network standards. Use a SIM card that is compatible with the chosen
mobile network provider and select a mobile data plan according to the planned level of usage.
The dongle and SIM card are used to enable the remote controller to access to specic networks
and platforms, such as the DJI AG platform. Be sure to mount them correctly, or else network access will not be available.
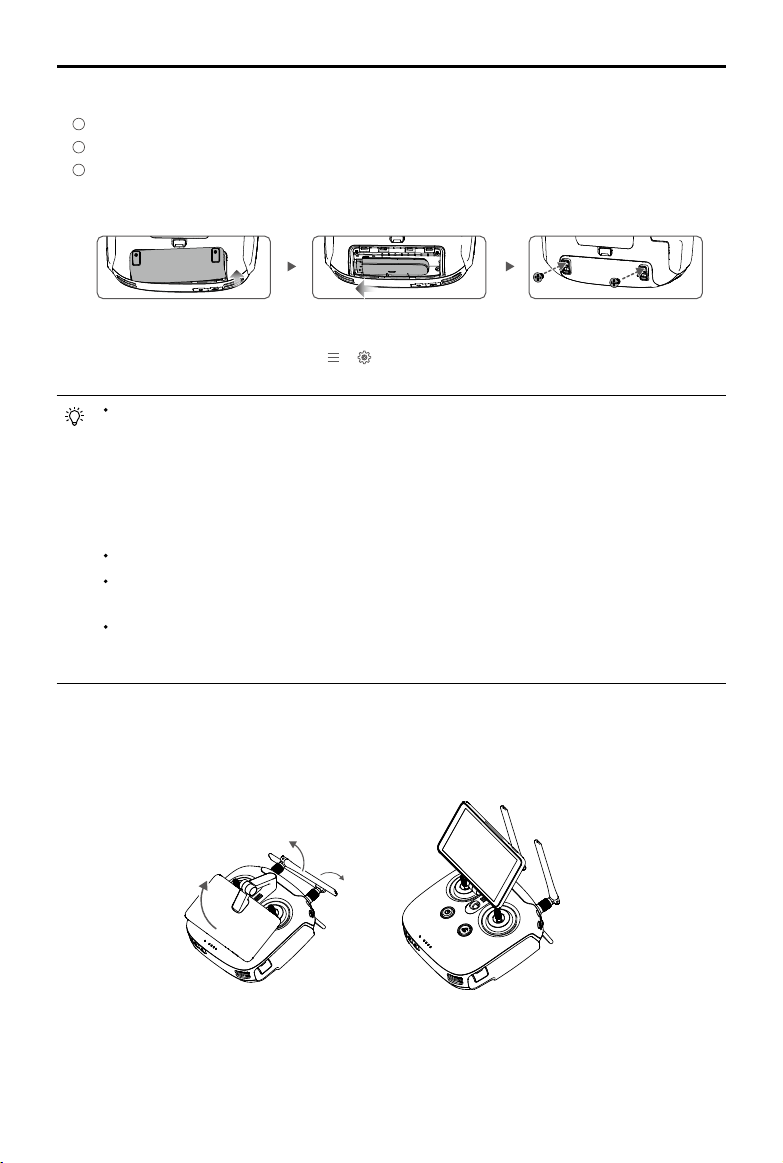
3. Unfolding the Remote Controller
Tilt the display device on the remote controller to the desired position, then adjust the antennas so they
are facing outward.
2020 DJI All Rights Reserved.
8
©
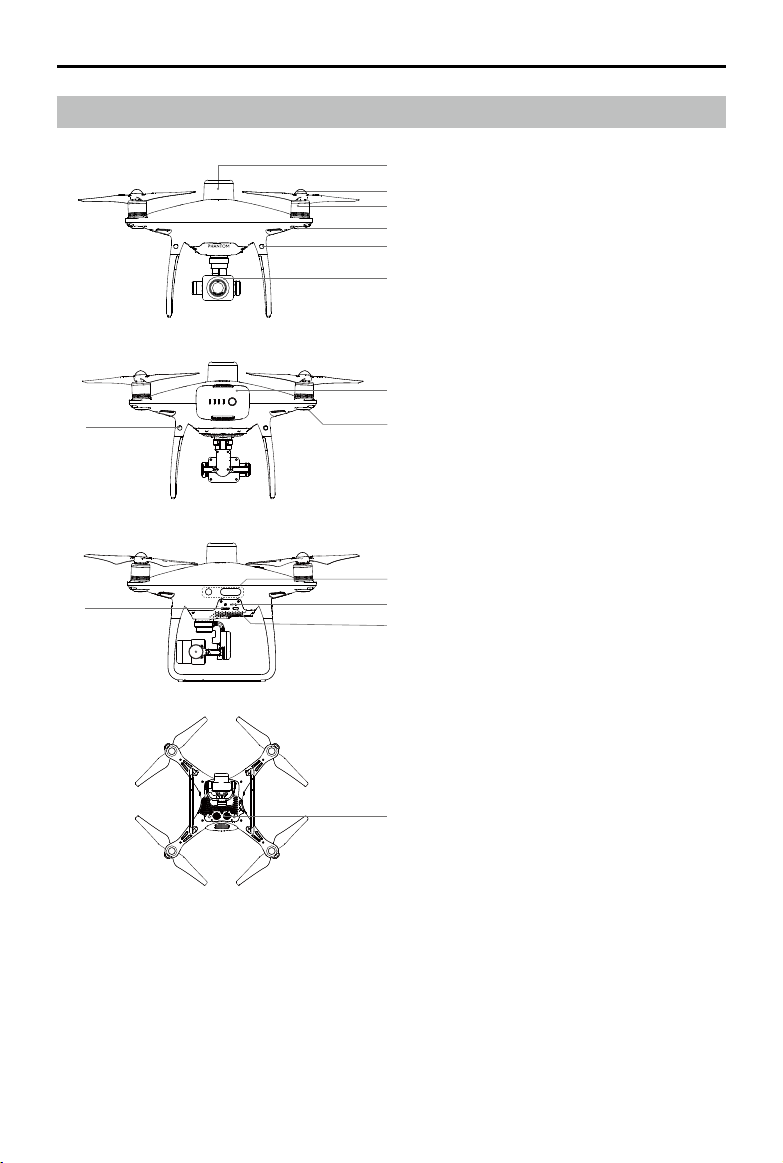
Aircraft Overview
9
13
Phantom 4 RTK User Manual
1
2
3
4
5
6
1. Onboard D-RTK Antenna
2. Propellers
3. Motors
4. Front LEDs
5. Forward Vision System
6. Gimbal and Camera
7. Intelligent Flight Battery
7
8
8. Aircraft Status Indicator
9. Rear Vision System
10. Infrared Sensing System
11. Camera / Linking Status Indicator and
Link Button
12. Micro USB Port
13. Camera microSD Card Slot
10
11
12
14. Downward Vision System
14
2020 DJI All Rights Reserved.
©
9
Phantom 4 RTK User Manual
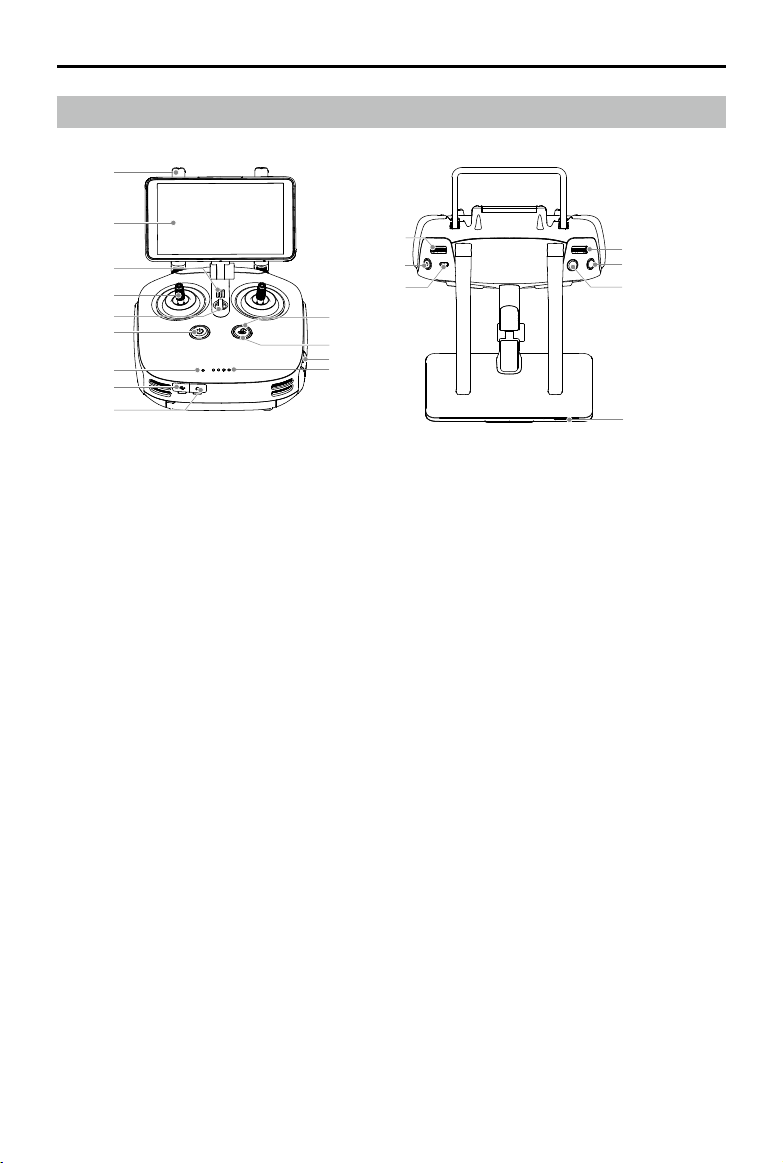
Remote Controller Overview
1
2
3
4
5
6
7
8
9
1. Antennas
Relays aircraft control signals.
2. Display Device
Android-based to run the DJI MG app.
3. Speaker
Audio output.
4. Control Sticks
Controls aircraft movement. Can be set to
Mode 1, Mode 2, or a custom mode.
5. Lanyard Attachment
Used to attach the remote controller lanyard.
6. Power Button
Used to turn the remote controller on and o.
7. Status LED
Indicates whether the remote controller is linked
to the aircraft.
8. USB-C Port
Connects to a computer via a USB-C cable
for conguration. Connects to the aircraft via a
USB-C OTG cable and a Micro USB cable for
aircraft rmware update.
9. 3.5 mm Audio Jack
Used to connect audio input/output devices.
10. Battery Level LEDs
Displays current battery level.
11. MicroSD Card Slot
Provides display device with up to 128 GB of
extra storage.
2020 DJI All Rights Reserved.
10
©
14
15
16
13
12
11
10
20
19
18
17
12. RTH Status LED
Circular LED around the RTH button. Displays
RTH status.
13. RTH Button
Press and hold this button to initiate Return to
Home (RTH).
14. Gimbal Dial
Use this dial to control the tilt of the gimbal.
15. Video Recording Button
Press to start recording video. Press again to
stop recording.
16. Pause Switch
During a Photogrammetry or Waypoint operation,
toggle to pause the operation.
During RTH, toggle to pause RTH.
17. Sleep/Wake Button
Press to sleep/wake the screen; press and hold
to restart.
18. Shutter Button
Press to take a photo.
19. Reserved Button
20. Aircraft Control Switch Dial
Turn and press the dial to switch among
the aircraft when using Multi-Aircraft Control
function.
Phantom 4 RTK User Manual
21. Button C1
Press Button C1 to switch between Map View
and Camera View.
22. Button C2
When you are planning a Waypoint Flight
22
23
21
operation, it adds a waypoint. The button is
disabled in any other operations.
23. Battery Compartment Cover
24
25
Open the cover to mount or remove the Intelligent
Battery from the remote controller.
24. Battery Compartment Cover Lock
Slide the lock down to open the cover.
25. Dongle Compartment Cover
Open the cover to mount or remove the dongle.
2020 DJI All Rights Reserved.
©
11

Aircraft
This section introduces the aircraft components,
features and functions.
2020 DJI All Rights Reserved.
12
©

Aircraft
Profile
The Phantom 4 RTK aircraft includes a flight controller, a communication system, a positioning system,
a propulsion system and an Intelligent Flight Battery. This section describes the functions of these
components.
Flight Modes
The Phantom 4 RTK uses a DJI dedicated ight controller, which provides the ight modes below:
P-mode (Positioning): P-mode works best when the GNSS signal is strong. The aircraft utilizes the GNSS /
RTK module and Vision System to automatically stabilize itself, navigate between obstacles, and perform a
Photogrammetry or Waypoint Flight operation.
When the GNSS signal is strong, the aircraft uses GNSS for positioning. When RTK module is enabled and
the dierential data transmission is good, it provides centimeter-level positioning. When the GNSS signal is
weak and the lighting conditions are sucient, the aircraft uses Vision System for positioning.
When the forward obstacle sensing is enabled and lighting conditions are sucient, the maximum ight
attitude angle is 25° with a maximum ight speed of 31 mph (50 kph). When forward obstacle sensing is
disabled, the maximum ight attitude angle is 35° and the maximum ight speed is 36 mph (58 kph).
A-mode (Attitude): GNSS and Vision System are NOT used for positioning and aircraft can only maintain
altitude using the barometer. It enters A-mode only when there is weak GNSS signal or when the compass
experiences interference where the Vision System is unavailable.
Attitude Mode Warning
The aircraft will y in P-mode by default. It enters A-mode only when there is weak GNSS signal or when the
compass experiences interference where the Vision System is unavailable.
In A-mode, the Vision System and some advanced features are disabled. Therefore, the aircraft cannot
position or auto-brake in this mode and is easily aected by its surroundings, which may result in horizontal
shifting. Use the remote controller to position the aircraft.
Maneuvering the aircraft in A-mode can be dicult. Avoid ying in areas where GNSS signal is weak, or
in conned spaces. The aircraft will otherwise be forced to enter A-mode, leading to potential ight risks,
please land it in a safe place as soon as possible.
2020 DJI All Rights Reserved.
©
13
Phantom 4 RTK User Manual
Aircraft Status Indicators
The Phantom 4 RTK has Front LEDs and Aircraft Status Indicators. The positions of these LEDs are shown
in the gure below:
Front LEDs
The Front LEDs show the orientation of the aircraft. The Front LEDs glow solid red when the aircraft is turned
on to indicate the front (or nose) of the aircraft. The Aircraft Status Indicators communicate the system sta-
tus of the ight controller. Refer to the table below for more information about the Aircraft Status Indicators.
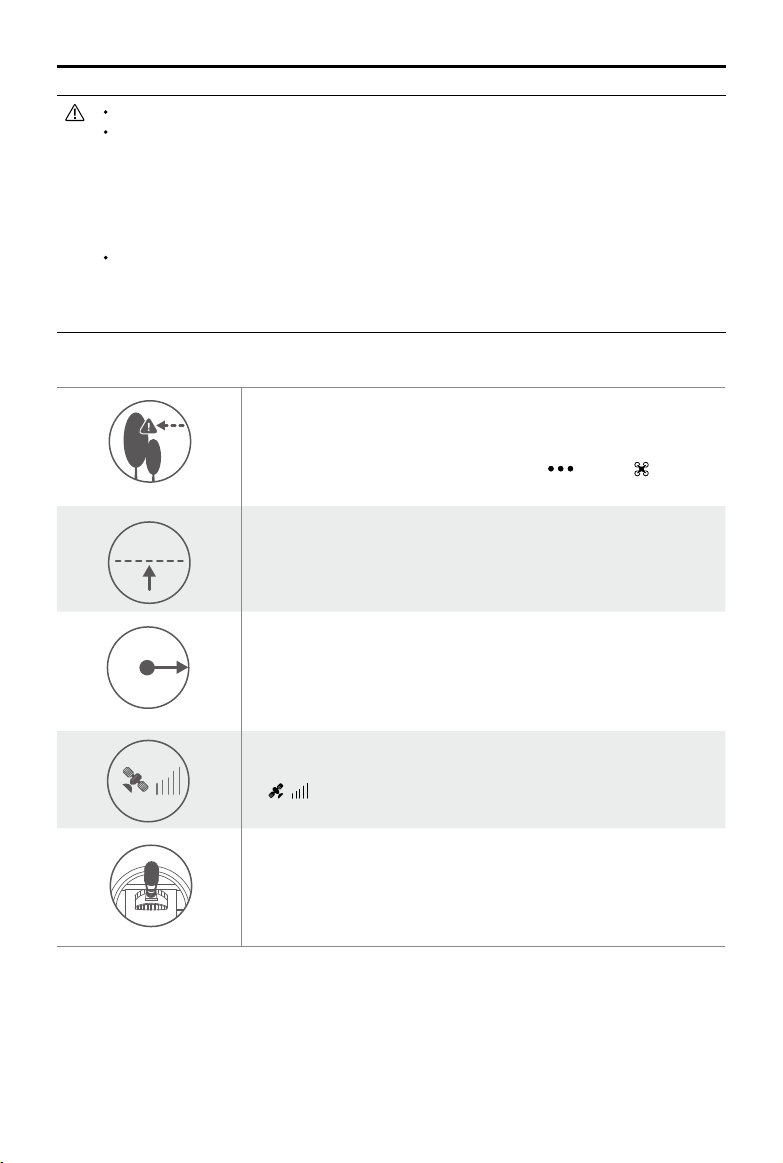
Aircraft Status Indicators
Aircraft Status Indicator Description
Normal
Alternate red, green and yellow ashing Turning On and Self Diagnostic Testing
Alternate green and yellow ashing Warming Up
Slow green ashing P-mode with GNSS or RTK
×2 Two green ashes P-mode with Vision System
Slow yellow ashing A-mode but No GNSS or Vision System
Fast green ashing Braking
Warning
Fast yellow ashing Remote Controller Signal Lost
Slow red ashing Low Battery Warning
Fast red ashing Critical Battery Warning
Red ashing Uneven Placement or Large Sensors Bias
— Solid red Critical Error
Alternate red and yellow ashing Compass Calibration Required
2020 DJI All Rights Reserved.
14
©

Phantom 4 RTK User Manual
Return to Home (RTH)
Return to Home (RTH) function brings the aircraft back to the last recorded Home Point. There are three
types of RTH: Smart RTH, Low Battery RTH, and Failsafe RTH. This section describes these three scenarios
in detail.
GNSS
If a strong GNSS signal was acquired before takeo, the Home Point is the location
Home Point
The aircraft can sense and avoid obstacles when the Forward Vision System is enabled and lighting
conditions are sufficient. The aircraft will automatically climb up to avoid obstacles and descend
slowly as it returns to the Home Point. To ensure the aircraft returns home forwards, it cannot rotate
or y left and right during RTH while the Forward Vision System is enabled.
from which the aircraft launched. The GNSS signal strength is indicated by the GNSS
icon ( Less than 4 bars is considered a weak GNSS signal). The aircraft status
indicators will blink rapidly when the home point is recorded.
Description
Updating the Home Point
You can update the Home Point in the DJI GS RTK app during ight. There are two options for setting the Home
Point:
1. Set the aircraft’s current coordinates as the Home Point.
2. Set the remote controller’s current coordinates as the Home Point.
Ensure the space above the remote controller’s GNSS module (located beneath the DJI logo) is not
obstructed and that there are no tall buildings around when updating the Home Point.
Follow the instructions below to update the Home Point:
1. Go to DJI GS RTK > Fly.
2. Tap > , select in Home Point settings to set the aircraft’s current coordinates as the
Home Point.
3. Tap > , select in Home Point settings to set the remote controller’s current coordinates
as the Home Point.
4. The Aircraft Status Indicator will blink green to indicate that the new Home Point has successfully
been set.
Failsafe RTH
The Forward Vision System allows the aircraft to create a real-time map of its ight route as it ies. If the
Home Point was successfully recorded and the compass is functioning normally, Failsafe RTH will be
automatically activated if the remote controller signal is lost for more than three seconds. The aircraft will
plan its return route and retrace its original ight route home. During RTH, if the remote controller signal is
recovered, users can control the aircraft altitude and speed. Press the RTH button once to cancel RTH.
2020 DJI All Rights Reserved.
©
15

Phantom 4 RTK User Manual
Failsafe Illustration
1 Record Home Point
Blinking Green
4
Signal Lost Lasts (after 3 sec.)
>3S
× ×
Fast Blinking Yellow
2 Conrming Home Point
Blinking Green
5
RTH (adjustable altitude)
Height over HP>Failsafe Altitude
Elevate to Failsafe Altitude
Failsafe Altitude
Fast Blinking Yellow
Height over HP<=Failsafe Altitude
3 Remote Controller Signal Lost
×
Fast Blinking Yellow
6 Landing (after ho vering for 5 secs)
×
Fast Blinking Yellow
Smart RTH
Use the RTH button on the remote controller when GNSS is available to initiate Smart RTH. The aircraft will
then automatically return to the last recorded Home Point. Use the remote controller to control the aircraft’s
speed or altitude to avoid a collision during the Smart RTH process. As the aircraft returns, it will use the
primary camera to identify obstacles as far as 300m in front, allowing it to plan a safe route home. Press and
hold the Smart RTH button once to start the process, and press the Smart RTH button again to terminate
the procedure and regain full control of the aircraft.
Low Battery RTH
The low battery level failsafe is triggered when the DJI Intelligent Flight Battery is depleted to a point that
may aect the safe return of the aircraft. The user can cancel the RTH procedure by pressing the RTH
button on the remote controller. The thresholds for these warnings are automatically determined based on
the aircraft’s current altitude and distance from the Home Point. The Low Battery RTH will only be triggered
once during the same ight.
The aircraft will land automatically if the current battery level can only support the aircraft long enough to
descend from its current altitude. The user cannot cancel the auto landing but can use the remote controller
to alter the aircraft’s orientation during the landing process.
The Battery Level Indicator is displayed in the DJI GS RTK app, and is described below:
Critical Low battery level warning
2020 DJI All Rights Reserved.
16
©
(Red)
Low battery
level warning (Yellow)
Power requires to return home
Sucient battery
level (Green)
Remaining ight time
12:29
Battery level Indicator
Phantom 4 RTK User Manual
Battery Level
Warning
Low battery
level warning
Critical Low
battery level
warning
Estimated
remaining ight
time
Remark
Battery power
is low. Fly the
aircraft back.
The aircraft
must land
immediately.
Estimated
remaining
ight based on
current battery
level.
Aircraft Status
Indicator
Aircraft status
indicator blinks
RED slowly.
Aircraft status
indicator blinks
RED quickly.
N/A N/A N/A
DJI GS RTK
App
N/A
The DJI GS
RTK app
display will
ash red and
the aircraft
will start to
descend.
The remote
controller will
sound an
alarm.
The aircraft will return to the
Home Point automatically and
hover at 2 meters above the
Home Point. Users can also
cancel the RTH process and land
manually. Note: The Low Battery
Level Warning will not prompt
after users cancel RTH and
regain control.
Allow the aircraft to descend and
land automatically.
Flight Instructions
When the Critical low battery level warning is triggered and the aircraft begins to land automatically,
push the left stick upward to make the aircraft hover at its current altitude, giving you an opportunity
to navigate to a more appropriate landing location.
The colored zones and markers on the battery level indicator bar reect the estimated remaining
ight time. They are automatically adjusted according to the aircraft’s current location and status.
The Low Battery Warning threshold set in the Aircraft Battery settings page in the app is only for an
alert and will not trigger RTH.
Precision Landing
The aircraft automatically scans and attempts to match the terrain features underneath during Return to
Home. When current terrain matches home point terrain, the aircraft will start landing immediately to achieve
precision landing.
2020 DJI All Rights Reserved.
©
17
Phantom 4 RTK User Manual
Landing Protection is active during precision landing.
Precision Landing performance is subject to the following conditions:
a) Home point is recorded upon take o, and cannot not be refreshed during ight.
b) Aircraft must take o vertically. Take o altitude must be greater than 7 meters.
c) Home point terrain features remain largely unchanged.
d) Home point terrain with no distinctive features will aect the performance.
e) Lighting conditions cannot be too light nor too dark.
The following actions are available during landing:
a) Pull throttle down to accelerate landing.
b) Moving the control sticks in any other direction will stop Precision Landing. The aircraft will descend
vertically and Landing Protection will remain active.
RTH Safety Notices
The aircraft cannot avoid obstruction during RTH when the Forward Vision
System is disabled. Users can use the remote controller to control aircraft
altitude and speed. It is important to set a suitable Failsafe altitude before
20m
each flight. Launch the DJI GS RTK app, tap
Failsafe Altitude.
If the aircraft is ying under 65 feet (20 meters) and RTH (including Smart
RTH, Low Battery RTH and Failsafe RTH) is triggered, the aircraft will rst
automatically ascend to 65 feet (20 meters) from the current altitude. You
can only cancel the ascending by exiting the RTH.
and tap to set the
2020 DJI All Rights Reserved.
18
©
5m
H
The aircraft will automatically descend and land if RTH is triggered when the
aircraft ies within a 16-feet (5 meters) radius of the Home Point and when
the aircraft altitude is under 98 feet (30 meters), or if the obstacle sensing
function is disabled. The aircraft will not ascend, and will land immediately
at the current location.
Aircraft cannot return to the Home Point when GNSS signal is weak
( [ ] displays grey) or the module is unavailable.
If you move the throttle stick after the aircraft rises above 65 feet (20
meters) but below the pre-set Failsafe RTH altitude, the aircraft will stop
ascending and immediately return to the Home Point.

Phantom 4 RTK User Manual
Obstacle Avoidance During RTH
Aircraft can now sense and actively attempt to avoid obstacles during RTH, provided that the lighting
conditions are adequate for the Forward Vision System. Upon detecting an obstacle, the aircraft will act as
follows:
1. The aircraft will use the primary camera to identify obstacles as far as 984 feet (300 meters) in front,
allowing it to plan a safe route home.
2. The aircraft decelerates when an obstacle is sensed at 49 feet (15 meters) ahead.
3. The aircraft stops and hovers then starts ascending vertically to avoid the obstacle. Eventually, the
aircraft will stop climbing when it is at least 16 feet (5 meters) above the detected obstacle.
4. Failsafe RTH procedure resumes, the aircraft will continue ying to the Home Point at the current altitude.
5 meters
300 meters
15 meters
The Obstacle Sensing function is disabled during RTH descent. Operate with care.
To ensure the aircraft returns home forwards, it cannot rotate during RTH while the Forward Vision
System is enabled.
The aircraft cannot avoid obstacles above, beside, or behind the aircraft.
Landing Protection Function
Landing Protection will activate during auto landing.
1. Landing Protection determines whether the ground is suitable for landing. If so, the aircraft will land
gently.
2. If Landing Protection determines that the ground is not suitable for landing, the aircraft will hover and
wait for pilot conrmation. The aircraft will hover if it detects the ground is not appropriate for landing
even with a critically low battery warning. Only when the battery level decreases to 0% will the aircraft
land. Users retain control of aircraft ight orientation.
3. If Landing Protection is inactive, the DJI GS RTK app will display a landing prompt when the aircraft
descends below 0.3 meters. Tap to conrm or pull down the control stick for 2 seconds to land when
the environment is appropriate for landing.
Landing Protection will not be active in the following circumstances:
•
a) When the user is controlling the pitch/roll/throttle sticks (Landing ground detection will re-activate
when control sticks are not in use)
b) When the positioning system is not fully functional (e.g. drift position error)
c) When the Downward Vision System needs re-calibration
d) When light conditions are not sucient for the Downward Vision System
• If an obstacle is within 1-meter of the aircraft, the aircraft will descend to 0.3m above the ground
and hover. The aircraft will land upon with user conrmation.
2020 DJI All Rights Reserved.
©
19
Phantom 4 RTK User Manual
Industrial Applications
The Phantom 4 RTK can be used for industrial applications including but not limited to, photogrammetry and
power line inspections. Select Photogrammetry, Waypoint Flight, Linear Flight, Terrain Awareness, or Block
Segmentation, plan ight paths, set parameters, and then the aircraft will perform automated operations.
Operation resumption and obstacle avoidance are available. Users can import images to the DJI PC GS Pro
application or a third-party mapping software to composite highly accurate maps for dierent applications.
KML/KMZ les can be imported into the DJI GS RTK app to help plan operations.
KML/KMZ File Import
To plan operations, insert the microSD card with the KML/KMZ les into the microSD card slot on the remote
controller to import the les into DJI GS RTK. For les including polygons, users can view the data on the
map and use it to plan ight areas. For les including line strings, users can only view the data on the map,
but cannot use it for planning.
Preparing Files
1. Create a folder named “DJI” in the root directory of the microSD card. Then create a folder named “KML”
under this folder. (The letters are not case sensitive.)
2. Store the KML/KMZ les into the “KML” folder created above.
Importing Files
1. Insert the microSD card into the microSD card slot on the remote controller. There will be a pop-up
window on the main screen in the DJI GS RTK app then. If not, tap , then tap .
2. Tap the le in the window to select it. To delete the le, swipe to the left and tap . Select les and then
tap to import the les. Wait until the app indicates successful import.
Viewing Files
1. Go DJI GS RTK main screen > > , select KML Files in the drop-down menu on the top to view the
les. They are sort by time. KML le names displayed in the app are the original names of the les. KMZ
les will be named in sequence: doc, doc(1), doc(2), etc.
2. Tap the icon on the right of each le to enter Map View and view the data on the map.
Users can also tap on the left in Camera View or Map View, and then select KML File in the
drop-down menu to enter the le list page.
3. Tap Edit to edit the waypoints for photogrammetry operation planning if the waypoint number is fewer
than 125. Refer to the Photogrammetry section below for details on operation planning. If the waypoint
number is more than 125, users have to reimport KML/KMZ les that meet the requirements.
Photogrammetry
After the operation area has been set, and settings have been congured, the DJI GS RTK app produces
a flight route based on the user’s input. After planning, the aircraft can carry out automated operations
following the ight route. There are three types of Photogrammetry operations: 2D, 3D (Double Grid) and 3D
(Multi-oriented). The 2D ight route is s-shaped and can be used for digital orthophoto map (DOM). The 3D
(Double Grid) ight route consists of s-shaped routes that are crisscrossed to create 3D models. The default
values of the gimbal pitch angle for the two types are dierent. The 3D (Multi-oriented) ight routes consist of
2020 DJI All Rights Reserved.
20
©
Phantom 4 RTK User Manual
a single nadir view ight path and four oblique ight paths to create more accurate 3D models.
Planning a Flight Route
1. Add edge points of the operation area through the two methods below:
View the imported KML/KMZ file, and then tap Edit. The vertices of the polygon in the file will be
converted to the edge points of the operation area.
Go to the main screen in the DJI GS RTK app, tap Plan, and select Photogrammetry to enter Planning
View. Then tap on the map to add edge points.
2. Edit edge points
Move: Drag the point to move.
Fine Tuning: Tap the point to show Fine Tuning buttons. Tap to adjust.
Delete: Tap twice to delete a point.
3. Settings: After points are added, there will be a settings list on the right screen. Congure the settings
and the app will produce a corresponding ight route.
4. Adjust the route direction: Tap and drag the icon near the route to adjust the ight direction of the
produced route.
5. Tap Save, name the operation, and then tap OK.
Waypoint Flight
Fly the aircraft to desired positions, add waypoints and congure settings and actions for each waypoint.
The waypoints will produce a flight route in sequence. After the operation is started, the aircraft will fly
alongside the route and perform pre-set actions at each waypoint.
Planning Route
1. Go to the main screen in the DJI GS RTK app, tap Plan, and select Waypoint Flight to enter Planning View.
2. Fly the aircraft to the desired position, and short press the C2 Button on the remote controller once to
add a waypoint.
The position of the added waypoints cannot be adjusted. Users can edit the waypoint for other
congurations. See details below.
3. Edit waypoints
Tap the added waypoint on the map and there will be a settings list on the screen. Tap < / > to switch
among the waypoints to edit each waypoint.
Altitude: The relative altitude between the aircraft and the Home Point at the selected waypoint. The
aircraft will ascend or descend gradually to the altitude pre-set at the next waypoint if the values at the
two consecutive waypoints are dierent. Tap the button, and then slide up or down anywhere on the
screen to adjust the value.
Heading: The aircraft heading at the selected waypoint. North is 0°, with a positive value indicating
clockwise and a negative value indicating counter clockwise. The aircraft will rotate gradually to the
heading pre-set at the next waypoint if the values at the two consecutive waypoints are dierent. Tap the
button, and then slide up or down anywhere on the screen to adjust the value.
Pitch: The gimbal pitch angle at the selected waypoint. Pitch angle can range from -90° to 0°, with
downward represented by -90° and forward represented by 0°. The gimbal will tilt to the angle pre-set
2020 DJI All Rights Reserved.
©
21
Phantom 4 RTK User Manual
after reaching the selected waypoint. Tap the button, and then slide up or down anywhere on the screen
to adjust the value.
Action: Waypoint actions include: single shot, 3 continuous shots and none.
: Tap to delete the selected waypoint.
Users cannot add waypoints during Edit Mode. Waypoints can be added after tapping Save or
Cancel in the settings list.
4. Route settings: After waypoints are added, tap the route settings button on the lower right corner to
set an ending action for a task, action for when RC signal is lost, aircraft heading, cruising speed, and
route recording. (Note that if route recording is enabled, shooting actions set for all the waypoints will be
disabled, and the raw satellite observations will not be recorded.) Close the menu after conguration.
5. Tap Save, name the operation, and then tap OK.
Linear Flight Mission
The DJI GS RTK app automatically generates linear ight area and several independent ight paths after the
user has set the linear ight points, expansion distance, and linear ight cutting distance. Users perform the
operation, and the aircraft will automatically y alongside the selected ight paths in the linear ight area.
Planning a Flight Route
1. Add linear ight points by:
●
Viewing the imported KML/KMZ le, and then tapping Edit to convert points in the le to points in a
linear ight mission.
●
Going to the main screen in the DJI GS RTK app, tapping Plan, and selecting Linear Flight to enter
Planning View. Then tap on the map to add linear ight points.
2. Edit linear ight points
Move: Drag the point to move.
Delete: Tap twice to delete a point.
3. After points are added, there will be a settings list on the right side of the screen. Congure the settings
accordingly.
Expansion Distance to Left or Right: Adjusts the expansion distance to the left or right of the linear ight
area, where the front is dened by the line that any point on the linear ight path makes with the previous
point.
Linear Flight Cutting Distance: Divides linear ight areas with a long center line into multiple segments
according to this setting.
4. Tap Generate Flight Route. The app will generate the corresponding ight route. Each segment will have
a sub-mission with an independent ight route if the linear ight area is divided. Users can select the
desired ight route before performing the operation. Tap Back to edit the linear ight points and settings
mentioned above if needed.
5. After the ight route is generated, there will be a settings list on the right side of the screen. Congure the
settings accordingly. If sub-missions are created, the settings will apply to all of them.
Height: The altitude of the aircraft during the operation.
Speed: The ight speed during the operation.
Working Mode: The area where images are collected and the ight route generated will vary in dierent
working modes. If Full Coverage is selected, the ight route will include an extra path on both sides of the
linear ight area. If Eciency is selected, the ight route will just cover the linear ight area.
2020 DJI All Rights Reserved.
22
©
Loading…