
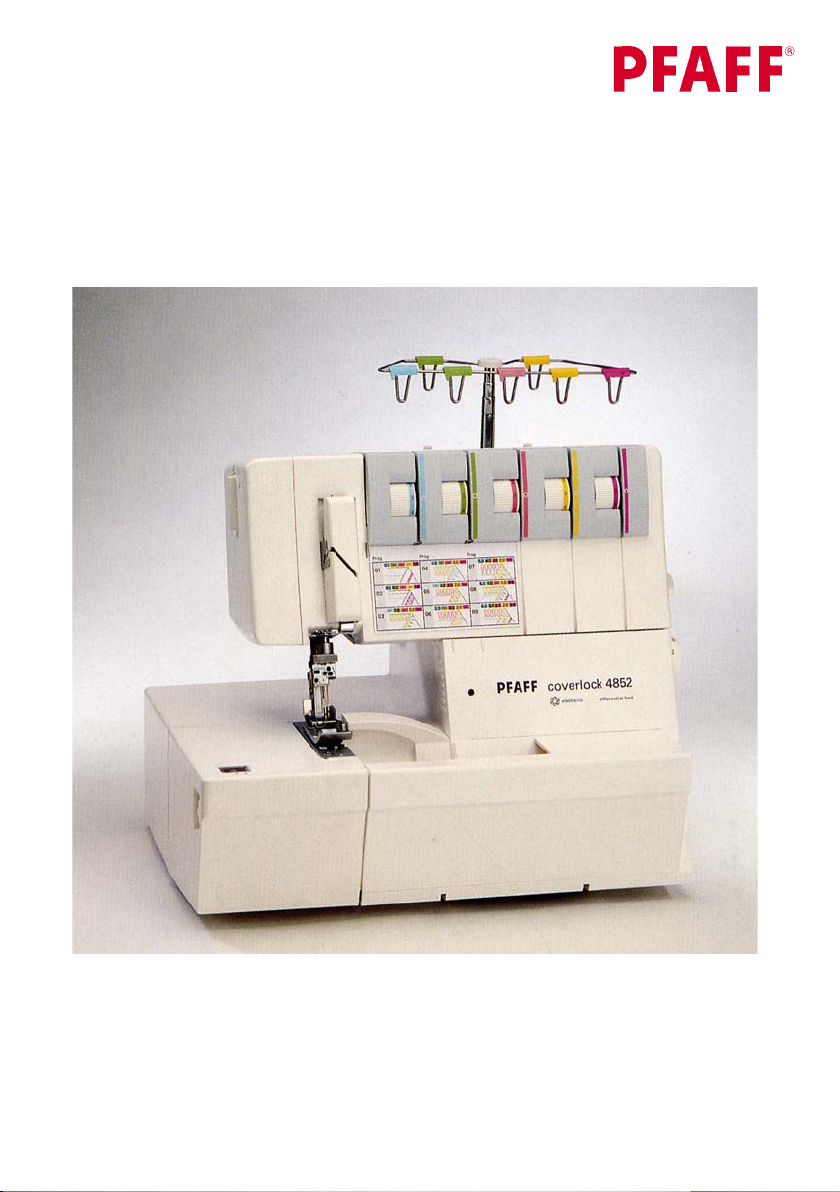
coverlock 4852
Owner´s manual
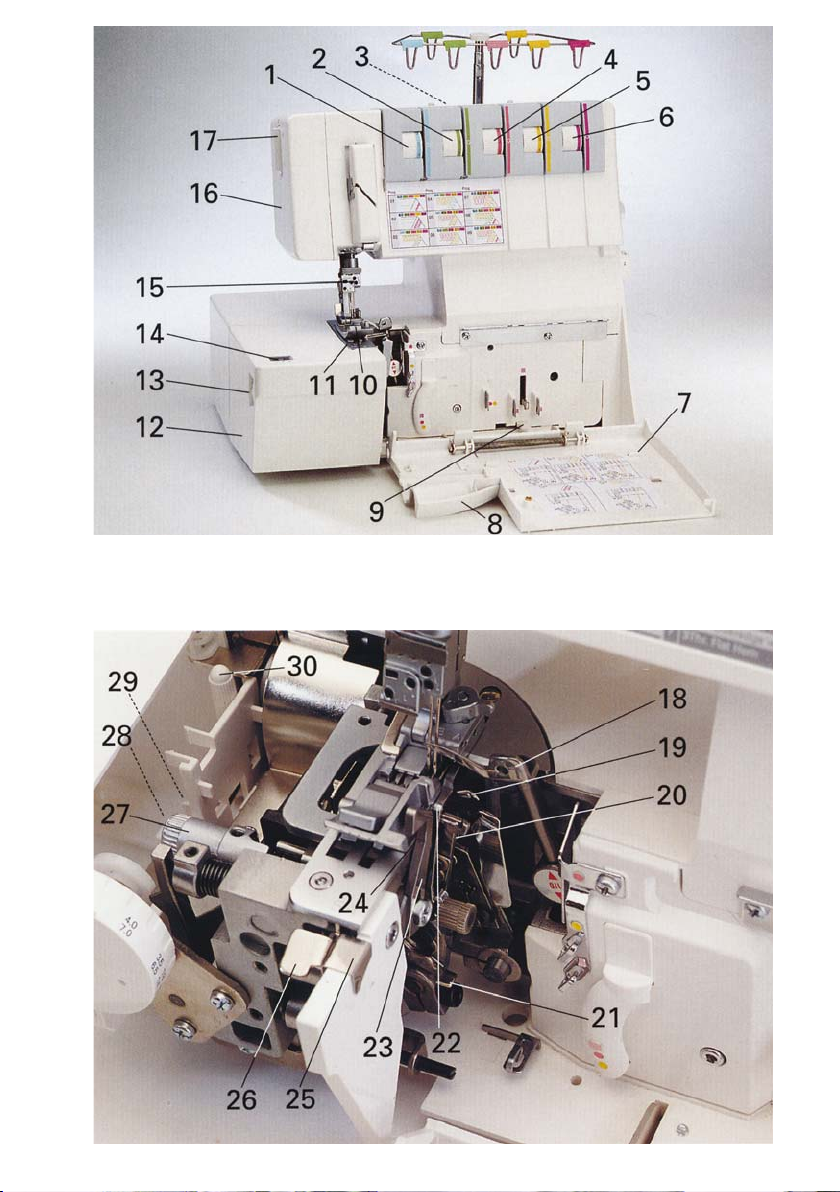

Parts of the coverlock 4852
1 Upper needle-thread tension
2 Upper needle-thread tension
3 Carry handle
4 Thread tension/upper looper thread
5 Thread tension/lower looper thread
6 Thread tension/two-thread chainstitch looper/cover stitch looper
7 Looper cover
8 Blade guard
9 Looper disengaging lever
10 Standard presser foot
11 Needle plate
12 Swivel plate
13 Adjusting knob for seam width
14 Seam width viewing window
15 Needle holder
16 Sewing light cover
17 Adjusting knob for presser foot pressure
18 Upper overedge looper
19 Lower overedge looper
20 Two-thread chainstitch looper
21 Threading aid for the two-thread chainstitch looper/cover stitch
looper
22 Swiveling stitch width latch
23 Movable upper blade
24 Fixed lower blade
25 Clamp spring for serging thread chains
26 Needle plate disengaging lever
27 Handwheel for lowering the upper blade
28 Converter
29 Tweezers
30 Allen key


This household sewing machine is designed to comply with IEC/EN 60335-2-28 and UL1594
IMPORTANT SAFETY INSTRUCTIONS
When using an electrical appliance, basic safety precautions should always be followed,
including the following:
Read all instructions before using this household sewing machine.
DANGER — To reduce the risk of electric
shock:
• A sewing machine should never be left unattended when plugged in. Always unplug this
sewing machine from the electric outlet immediately after using and before cleaning.
• Always unplug before relamping. Replace bulb with same type rated 15 Watt.
WARNING — To reduce the risk of burns, fi re,
electric shock, or injury to persons:
• Do not allow to be used as a toy. Close attention is necessary when this sewing machine is
used by or near children and infi rm persons.
• Use this sewing machine only for its intended use as described in this manual. Use only
attachments recommended by the manufacturer as contained in this manual.
• Never operate this sewing machine if it has a damaged cord or plug, if it is not working
properly, if it has been dropped or damaged, or dropped into water. Return the sewing
machine to the nearest authorized dealer or service center for examination, repair, electrical
or mechanical adjustment.
• Never operate the sewing machine with any air openings blocked. Keep ventilation
openings of the sewing machine and foot controller free from the accumulation of lint, dust,
and loose cloth.
• Keep fi ngers away from all moving parts. Special care is required around the sewing
machine needle and blades.
• Always use the proper needle plate. The wrong plate can cause the needle to break.
• Do not use bent needles.
• Do not pull or push fabric while stitching. It may defl ect the needle causing it to break.
• Switch the sewing machine off (“0”) when making any adjustment in the needle area, such
as threading needle, changing needle, threading bobbin, or changing presser foot, etc.
• Always unplug sewing machine from the electrical outlet when removing covers,
lubricating, or when making any other user servicing adjustments mentioned in the
instruction manual.
• Never drop or insert any object into any opening.
• Do not use outdoors.
• Do not operate where aerosol (spray) products are being used or where oxygen is being
administrated.
• To disconnect, turn all controls to the off (“0”) position, then remove plug from outlet.
• Do not unplug by pulling on cord. To unplug, grasp the plug, not the cord.
SAVE THESE INSTRUCTIONS


Simple, up-to-date sewing
Congratulations! You have bought a high-quality product that provides
unique advantages. Your new coverlock 4852 can take any material in its
stride and will sew through thick and thin for you.
Your PFAFF coverlock features the very latest in design and technology,
and it is just as simple to operate as this instruction manual is to follow.
Before you start sewing, please take the time to read these instructions
carefully. It is certainly time well spent, and is the best way to fi nd out just
what your machine can do and make full use of all its features.
If you have any further questions, just ask your authorized PFAFF dealer.
Your dealer is happy to be of service with any help or advice.
Lets get started! We wish you many enjoyable hours creating your very
own fashions and projects!

Contents
Page
Accessories ………………………………………………………………………………………………….6
Accessories, optional ……………………………………………………………………………………62, 63
Accessory box ……………………………………………………………………………………………….6
Adjusting the machine to Prog. 01, 02 ……………………………………………………………. 34, 35
Changing a spool on a threaded machine ……………………………………………………… 24
Clamp spring …………………………………………………………………………………………………29
Cleaning the machine ……………………………………………………………………………………. 58
Cone thread adapter ………………………………………………………………………………………10
Converter, attaching ……………………………………………………………………………………… 32
Cover stitch, important notes on sewing ………………………………………………………… 44, 45
Differential feed …………………………………………………………………………………………….36, 37
Edge guide …………………………………………………………………………………………………..45
Electrical connection …………………………………………………………………………………….7
Electrical power master switch ……………………………………………………………………… 7
Foot control, connecting ………………………………………………………………………………. 7
Light bulb (sewing lamp), changing ………………………………………………………………60
Loopercover …………………………………………………………………………………………………. 8
Lubricating the machine ……………………………………………………………………………….58
Machine cover ……………………………………………………………………………………………… 6
Maintenance ………………………………………………………………………………………………… 58 — 60
Needle holder ……………………………………………………………………………………………… 13
Needle inserting tool ……………………………………………………………………………………. 13
Needle plate disengaging lever ………………………………………………………………………38
Needle plate, removing ………………………………………………………………………………….38
Needle position …………………………………………………………………………………………….12
Needle threader ………………………………………………………………………………………….. 25
Needle, changing ………………………………………………………………………………………….13
Power table ………………………………………………………………………………………………….35
Presser foot lifter …………………………………………………………………………………………..10
Presser foot pressure …………………………………………………………………………………….28
Presser foot ………………………………………………………………………………………………….. 11
Presser foot, changing …………………………………………………………………………………..11
Program overview ………………………………………………………………………………………… 40 — 43
Rubber feet, cleaning …………………………………………………………………………………….58
Safety instructions …………………………………………………………………………………………1, 2
eam width adjusting knob …………………………………………………………………………….33
Seam width viewing window ……………………………………………………………………….. 33
eam width, setting ……………………………………………………………………………………….. 33
Sewing light cover ………………………………………………………………………………………..60
6

Contents
Page
Sewing problems and their solutions ……………………………………………………………. 61
Specifi cations ……………………………………………………………………………………………….64
Spool dise ……………………………………………………………………………………………………. 10
Spool holder ………………………………………………………………………………………………… 9
Stitch formation correction measures …………………………………………………………… 46 — 56
Stitch length adjustment knob ………………………………………………………………………38
Stitch length, adjusting ………………………………………………………………………………… 38
Stitch width latch, swivelling ………………………………………………………………………… 31
Telescoping thread guide ………………………………………………………………………………9
Thread chain cutter ………………………………………………………………………………………. 29
Thread chart ………………………………………………………………………………………………… 57
Thread guide, clip on …………………………………………………………………………………….. 10
Thread net ……………………………………………………………………………………………………. 9
Thread tensions, setting ………………………………………………………………………………… 39
Thread unreeling disc ……………………………………………………………………………………. 9
Threading aid for the 2 thread chain stitch looped/cover stitch looped …………… 19, 21
Threading paths/overview ……………………………………………………………………………. 26 — 28
Threading the 2 thread chain stitch looped/cover stitch looped (violet) …………..18 — 21
Threading the lower overedge looper (yellow) ………………………………………………. 16, 17
Threading the needle(s) ……………………………………………………………………………….. 22,23
Threading the upper overedge looper (pink) ………………………………………………….. 15
Threading, important note …………………………………………………………………………….. 24
Threading/Thread guides ……………………………………………………………………………….14
Upper blade, changing …………………………………………………………………………………..59
Upper blade, disengaging …………………………………………………………………………….. 30
Upper blade, securing ………………………………………………………………………………….. 39
Waste container …………………………………………………………………………………………… 8
7
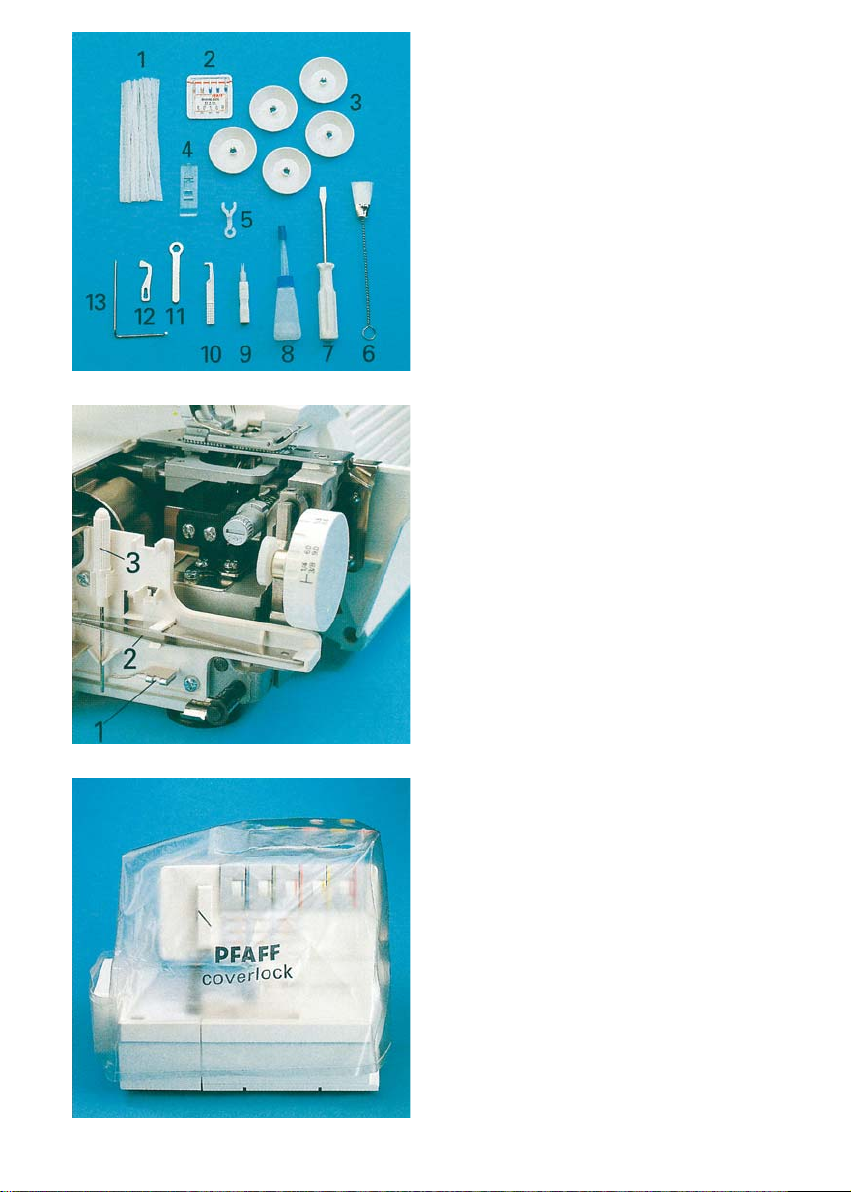
Accessory box
Open the accessory box 49 by gently
pressing the bottom of the box inwards. The
following accessories can be found in the
box:
1 Thread nets (5)
2 Overlock needle system EL X 705,
cat. no. 2002
3 Thread unreeling discs (5)
4 Transparent presser foot (F) for
cover stitch and two thread chainstitch
5 Clip on thread guide
6 Cleaning brush
7 Screw driver
8 Machine oil
9 Needlethreader
10 Needle inserting tool
11 Wrench
12 Replacement upper blade
13 Edge guide
Further accessories
The following accessories can be found
behind the swivel plate 12:
1 Converter
2 Tweezers
3 Allen key
Machine cover
The machine cover protects the machine
from dust and dirt. When the sewing
process is fi nished, push the telescopic
thread guide 32 together. The spool stand
34 must be pushed to its full extent in to the
machine, regardless of whether a spool is
attached. Place the cover over the machine.
The accessories should be stored in the
accessory box or compartments behind the
swivel plate.
88
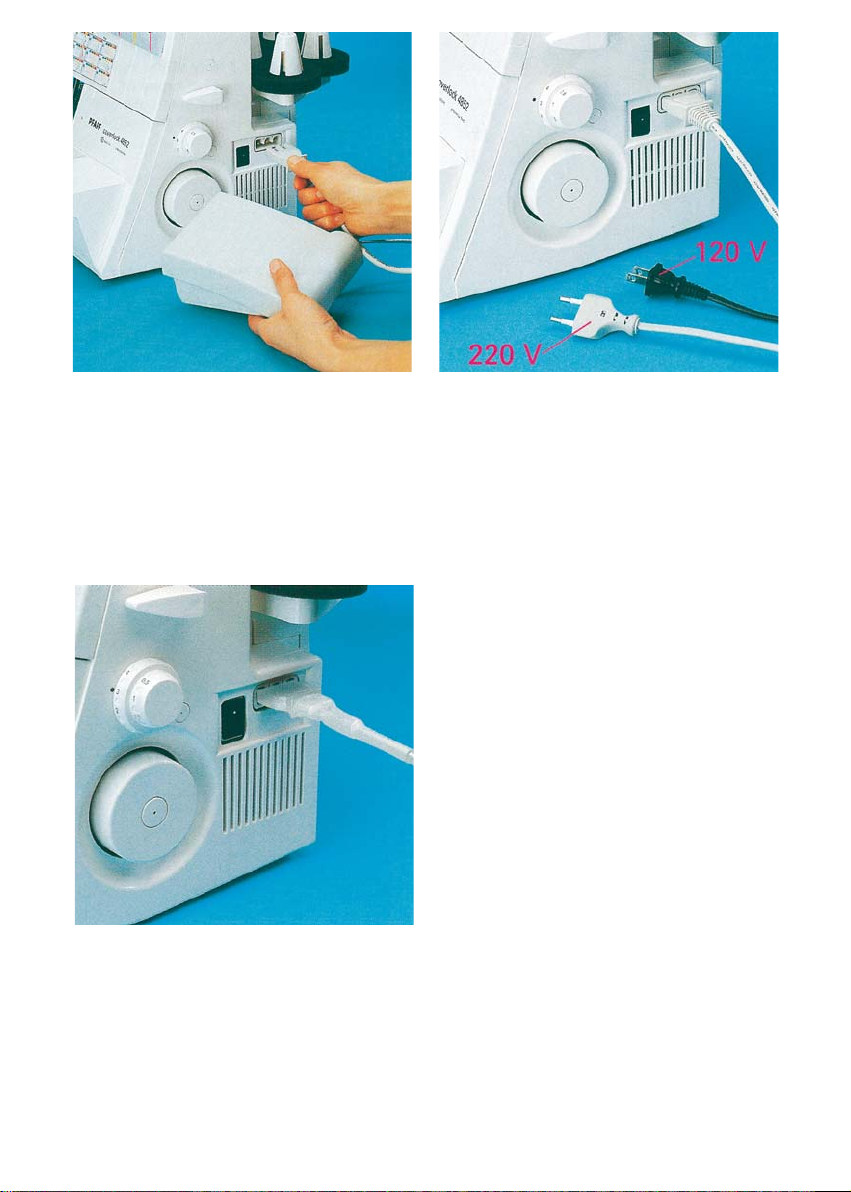
Connecting the foot control
Connect the plug of the foot control to the
connection socket 39 of the machine. The
sewing speed is regulated by activating
the foot control. You may also regulate the
sewing speed by adjusting the slide on the
front side of the foot control.
Setting 3 = half of fi nal speed
Setting 8 = full fi nal speed
Master switch
When you turn on the master switch 38 the
sewing lamp is illuminated. The machine is
now operational.
Electrical connection
Connect the foot control cord with the wall
outlet.
Foot controls to be used:
AE040 — EU
AE044 — Australia
AE046 — United Kingdom
AE043 — USA/Canada
For the USA and Canada
This appliance has a polarized plug (one
blade wider than the other).
To reduce the risk of electric shock, it is
designed to fi t into a plorized outlet only one
way. If the plug does not fi t correctly into the
outlet, reverse the plug. If it still does not fi t,
contact a qualifi ed electrician to install the
proper outlet.
Do not modify the plug in any way.
99
Looper cover
Push the looper cover 7 fully to the right and
then swivel it down. Five types of stitches
and their threading paths are portrayed in
color on the inside of the looper cover.
Note: The electricity supply of the machine
is cut off as soon as the looper cover or
swivel plate 12 is opened, for safety reasons,
i.e. sewing with the machine is no longer
possible.
Waste container
Insert the upper latch of the waste container
45 into the upper slot of the looper cover 7.
Apply pressure to the lower part of the
container until the lower latches fl ick into
place in the lower slots of the looper cover.
1010
To remove the waste container, repeat this
procedure in the reverse order.
Spool holder
Before placing thread cones/spools on
machine you must pull the spool holder 34
fully away from the back of machine.
Telescopic thread guide
Pull the telescopic thread guide 32 upwards
to its highest position.
To ensure optimum thread feed, turn the
telescopic parts slowly until you hear the
locking balls fl ick into place.
Thread net
Synthetic threads generally unwind too
quickly from the thread spool. Thread nets
have been included to allow easy use of
these threads. Pull the thread net (located
in the accessory box) over the spool from
below. Place the spool on the spool holder
catching the bottom of the thread net with
the spool pin.
Thread unreeling disc
The thread unreeling disc (in the accessory
box) is used for small spools/spools with
notched or rough ends. Place the spool on
the spool pin 35. Place the thread unreeling
disc on top of the spool. Make sure the spool
dise 37 is used under the spool.
1111
Spool disc/cone thread adapter
It is advantageous to use the spool dise
37 when sewing with large spools (5,000
10,000 m). To do this, place the cone thread
adapter 36 onto the spool pin 35. With
synthetic threads, the spool discs help
eliminate vibration of the cones/spools
aiding in smoother feeding of the threads.
Clip on thread guide
Use the clip on thread guide accessory when
sewing with decorative thread. Clip this onto
the telescoping thread guide 32 and thread
the machine as shown in the illustration. Use
the thread net and/or the thread unreeling
disc if needed.
Presser foot lifter
The presser foot can be raised and lowered
using the presser foot lifter 43. The
maximum vertical lift of 6.5 mm for the
presser foot for particularly thick fabrics can
be achieved by pressing the presser foot
lifter towards the rear.
1212
Once an initial thread chain has been
created, the presser foot lifter no longer
needs to be raised if you continue working
with the same thread and presser foot. It is
suffi cient to gently lift the front part of the
presser foot using your thumb. Slide the
fabric under the raised part of the presser
foot. The fabric is automatically taken up and
fed into the machine when you activate the
foot control.
Presserfoot
With standard presser foot 10 use setting
”A” on the spring loaded presser foot latch
for the cover stitch (Prog. 02), the 2 thread
chainstitch (Prog. 01), the 5 thread safety
stitch seam (Prog. 09) and the 4 thread
safety stitch seam (Prog. 08).
Transparent presser foot F from the
accessories can also be used for the cover
stitch (Prog. 02).
For all other programs use standard presser
foot 10 and setting ”B” on the springloaded
presser foot latch.
Changing the presser foot
Switch off the electrical power
To remove: Raise the needle(s) to the
highest position by turning the hand wheel
towards you. Raise the presser foot and
press lever A at the rear of the presser foot
holder. The presser foot will be released
automatically from the holder. Pivot the
presser foot clockwise until the front half of
presser foot clears holder and remove by
sliding foot away from you towards back of
machine.
To attach: Place the presser foot behind and
perpendicular to the presser foot holder.
Pivot the presser foot counterclockwise
until the pin of the foot is directly under the
presser foot holder clamp. Lower the presser
foot lever and press lever A, if necessary,
until the foot then clicks into place.
Check: Please lift the presser foot lever to
ensure that the presser foot is properly
locked into place.
1313
Needle position
This machine has 4 needle positions and can
sew with a maximum of two needles at any
one time. The needle positions are 1 1, L2,
R11 and R2. The fastening screw is located
directly above the corresponding needle.
Note: If the needles 1 11 and L2 have been
inserted, the left needle will be somewhat
lower than the right needle.
The different needle positions are depicted
in a schematic drawing in the instruction
manual. Also refer to the examples above
and below. Insert the needle(s) as shown on
the program overview (see pages 40-43).
Note: If the needles R2 and 131 have been
inserted, the left needle will be somewhat
higher than the right needle.
1414
Changing the needle
Switch off the electrical power
To remove: Lower the presser foot and
move the needle(s) to the highest position
by turning the handwheel towards you. Push
the needle inserting tool (from the accessory
box 49) from below upward fully over the
needle. Loosen the fastening screw of the
needle (without removing it) with the Allen
key (behind the swivel plate) and pull the
needle down to remove.
To insert: Insert the needle into hole E of the
needle inserting tool, so that the fl at needle
shank K faces the fl at side L of the inserting
tool. Insert the needle fully into the holder
and tighten the fastening screws. Remove
the needle inserting tool.
Overlock needles types EL X 705, cat. no.
2002 are required for this machine.
1515
Threading the thread guides
Place the spools on the spool pins 35. You
will fi nd information on the thread net,
thread unreeling disc, spool disc and cone
thread adapter on pages 9 and 10. Thread
through the thread guides 31 from the back
to the front following the colored threading
paths.
Lift the carry handle 3 upwards. Thread
through the underside of the carrying handle
and through the rear thread guides 44 using
both hands to pull the thread down until
it slips under the thread guide. Guide the
thread through the tension discs and pull it
down until it is positioned fi rmly between
the tension discs. Return the carrying handle
to its original position.
1616
Note:
Thread in a sequence of 1 to 5.
Threading the upper overedge looper (pink)
Turn the handwheel towards you until the
upper overedge looper 18 is in its highest
position. Thread in a sequence of 1 to 8.
Note:
To make this task easier, use the tweezers
which can be found behind the swivel plate.
Thread through the thread guides 1 to 7,
which are marked with a pink dot.
Thread from the front through the eye of the
upper overedge looper 8. Pull approximately
4” (10 cm) of thread through the looper and
place it to the left under the presser foot.
1717
Threading the lower overedge looper
(yellow)
Turn the handwheel towards you until the
lower overedge looper 19 is on the extreme
right.
Thread in a sequence of 1 to 10.
1818
Note:
To make this task easier, use the tweezers
which can be found behind the swivel plate.
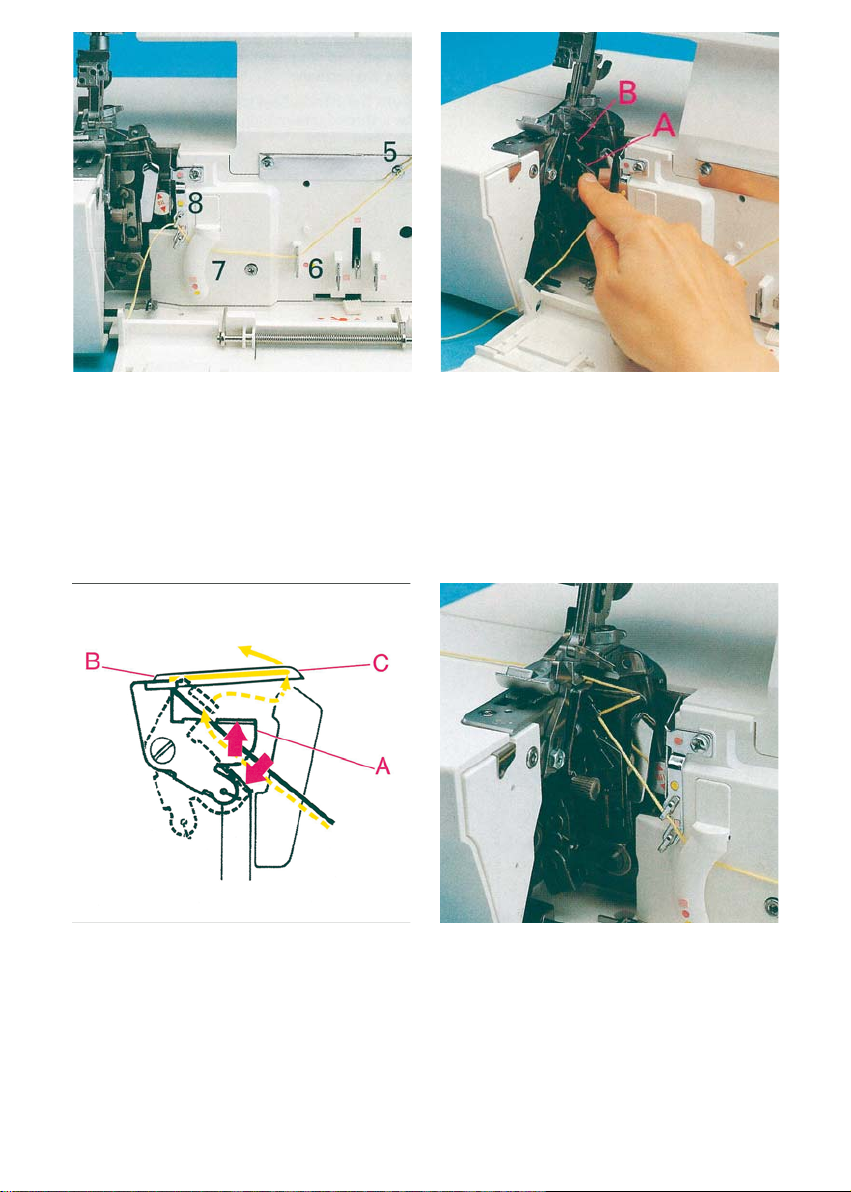
Thread through the thread guides 1 to 8,
marked yellow.
Press lever A downwards and hook the
thread into guide B. Please also refer to the
drawing below.
Note:
The lever returns automatically to its
position as soon as you start sewing.
Thread from the front through the eye of the
lower overedge looper C (= threading point
10).
Pull approximately 4” (10 cm) of thread
through the looper and place it to the left
under the presser foot.
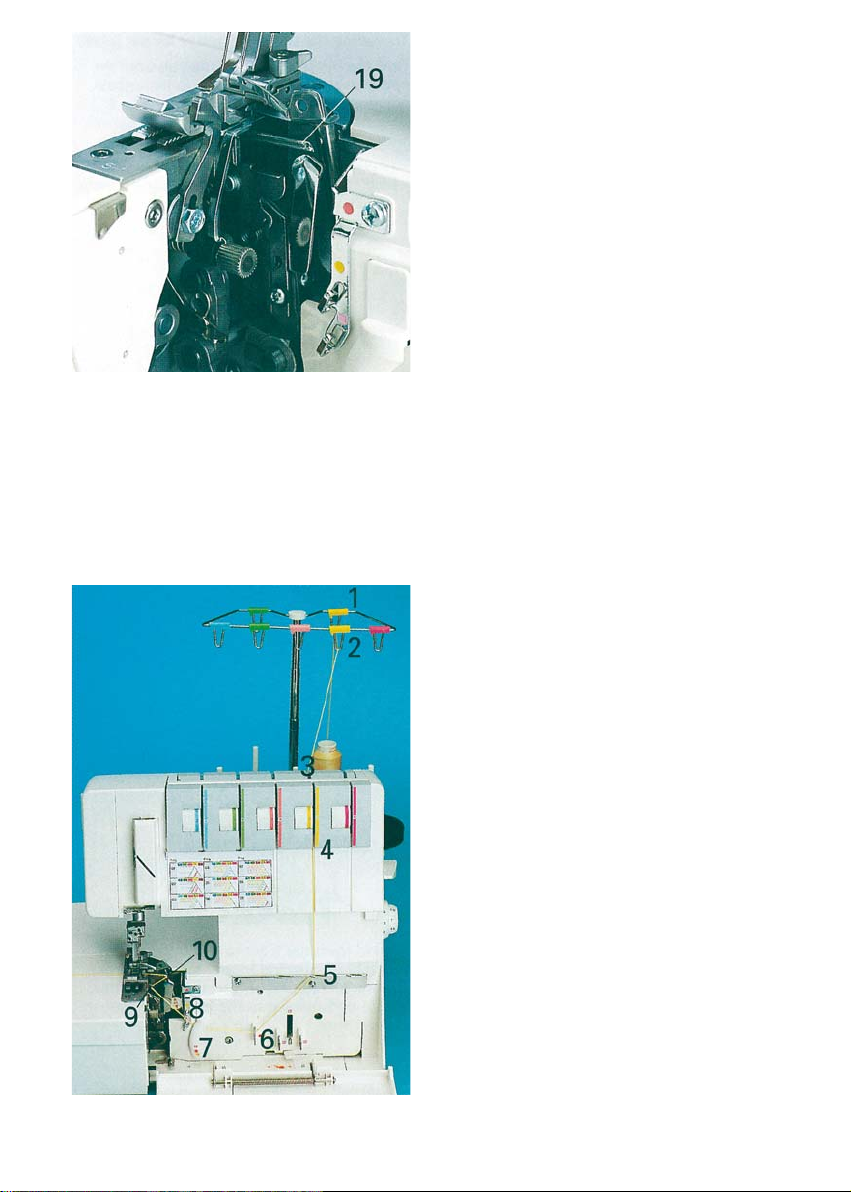
1919
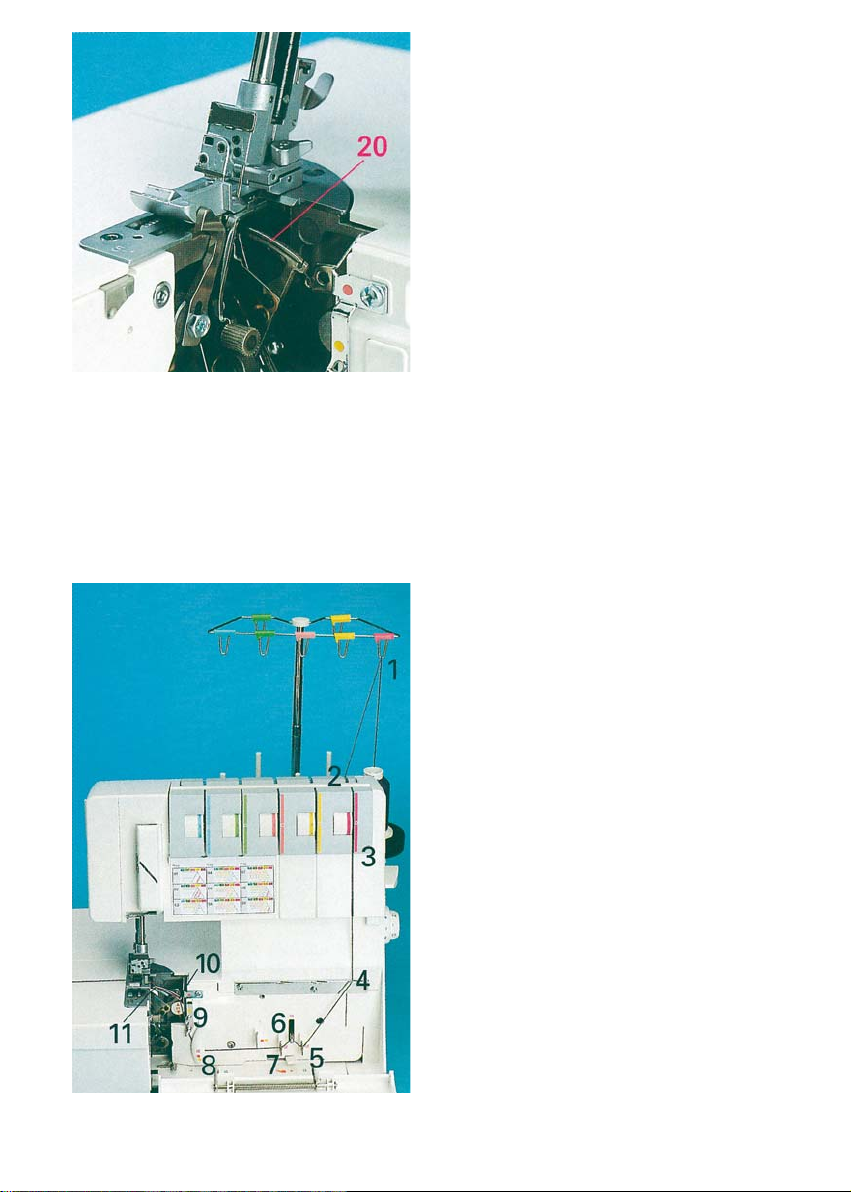
Threading the two thread chainstitch looper
and cover stitch looper (violet) for the
chainstitch
Turn the handwheel towards you until the
two thread chainstitch looper 20 is on the
extreme right.
Thread in a sequence of 1 to 11.
2020
Note:
To make this task easier, use the tweezers
which can be found behind the swivel plate.
Loading…
Скачать инструкцию Pfaff 4852
Pfaff CoverLock 4852 — модель, объединяющая 5/4/3/2 — ниточный оверлок и 3-х игольную 4-х ниточную плоскошовную машину, выполняет 18 операций.
Pfaff 4852 — один из самых удачных современных бытовых коверлоков. Благодаря высокой мощности, грамотной конструкции и качественной японской сборке этого коверлока, вы сможете успешно работать как с самыми легкими,так и с грубыми тканями.
Строчки Pfaff Coverlock 4852
| 4-ниточный обметочный шов | 3-ниточный обметочный широкий шов |
| 3-ниточный обметочный узкий шов | 3-ниточный широкий шов Flatlock |
| 3-ниточный узкий шов Flatlock | 3-ниточный ролевый подрубочный шов |
| 3-ниточная кайма | 2-ниточный обметочный узкий шов |
| 2-ниточный широкий шов Flatlock | 2-ниточный узкий шов Flatlock |
| 2-ниточный ролевый подрубочный шов | 2-ниточная кайма |
| 2-игольный 3-ниточный обметочный шов | 4-ниточный стачивающе-обметочный шов |
| 5-ниточный стачивающе-обметочный шов | Шов цепного стежка |
| 2-игольный широкий распошивальный шов |
Комплектация Pfaff CoverLock 4852:
- Прозрачная лапка для плоского шва и строчки цепного стежка
- Набор игл Сетки для бобин (5 шт)
- Нитесматывающие шайбы (5 шт)
- Подкладочные поролоновые шайбы (5 шт)
- Конусные подставки под бобины (5 шт)
- Нитенаправитель
- Щетка-кисточка
- Отвертка
- Масленка
- Нитевдеватель
- Приспособление для замены игл
- Гаечный ключ
- Запасной верхний нож
- Линейка-направитель
- Конвертор для двухниточных швов
- Пинцет
- Торцовый шестигранный ключ для замены игл
- Защитный чехол
- Педаль
- Руководство по эксплуатации
- Контейнер для обрезков
- Сменная швейная платформа
- Коробка для принадлежностей.
Внимание! В случае, когда при покупке товара предлагаются и скидка, и подарки, вы можете выбрать либо скидку, либо один подарок.
-
Page 1
Owner´s manual coverlock 4852[…]
-
Page 2
[…]
-
Page 3
Parts of the coverlock 4852 1 Upper needle-thread tension 2 Upper needle-thread tension 3 Carry handle 4 Thread tension/upper looper thread 5 Thread tension/lower looper thread 6 Thread tension/two-thread chainstitch looper/cover stitch looper 7 Looper cover 8 Blade guard 9 Looper disengaging lever 10 Standard presser foot 11 Needle plate 12 Swivel[…]
-
Page 4
[…]
-
Page 5
This household sewing machine is designed to comply with IEC/EN 60335-2-28 and UL1594 IMPORT ANT SAFETY INS TRUCTIONS When using an electrical appliance, basic safety precautions should always be followed, including the following: Read all instructions before using this household sewing machine. D ANGER — T o r educe the risk of electric shock: •[…]
-
Page 6
[…]
-
Page 7
Simple, up-to-date sewing Congratulations! Y ou have bought a high-quality product that provides unique advantages. Y our new coverlock 4852 can take any material in its stride and will sew through thick and thin for you. Y our PF AFF coverlock features the very latest in design and technology , and it is just as simple to operate as this instructi[…]
-
Page 8
6 Page Accessories …………………………………………………………………………………………………. 6 Accessories, optional …………………………………………………………………………………… 62, 63 Accessory box ………………………………………………………………….[…]
-
Page 9
7 Page Sewing problems and their solutions ……………………………………………………………. 61 Specifi cations ………………………………………………………………………………………………. 64 Spool dise ………………………………………………………………………………..[…]
-
Page 10
8 8 Accessory box Open the accessory box 49 by gently pressing the bottom of the box inwards. The following accessories can be found in the box: 1 Thread nets (5) 2 Overlock needle system EL X 705, cat. no. 2002 3 Thread unreeling discs (5) 4 T ransparent presser foot (F) for cover stitch and two thread chainstitch 5 Clip on thread guide 6 Cleaning[…]
-
Page 11
9 9 Connecting the foot control Connect the plug of the foot control to the connection socket 39 of the machine. The sewing speed is regulated by activating the foot control. Y ou may also regulate the sewing speed by adjusting the slide on the front side of the foot control. Setting 3 = half of fi nal speed Setting 8 = full fi nal speed Electric[…]
-
Page 12
10 10 Looper cover Push the looper cover 7 fully to the right and then swivel it down. Five types of stitches and their threading paths are portrayed in color on the inside of the looper cover . Note: The electricity supply of the machine is cut off as soon as the looper cover or swivel plate 12 is opened, for safety reasons, i.e. sewing with the m[…]
-
Page 13
11 11 Spool holder Before placing thread cones/spools on machine you must pull the spool holder 34 fully away from the back of machine. T elescopic thread guide Pull the telescopic thread guide 32 upwards to its highest position. T o ensure optimum thread feed, turn the telescopic parts slowly until you hear the locking balls fl ick into place. Th[…]
-
Page 14
12 12 Spool disc/cone thread adapter It is advantageous to use the spool dise 37 when sewing with large spools (5,000 10,000 m). T o do this, place the cone thread adapter 36 onto the spool pin 35 . With synthetic threads, the spool discs help eliminate vibration of the cones/spools aiding in smoother feeding of the threads. Clip on thread guide Us[…]
-
Page 15
13 13 Presserfoot With standard presser foot 10 use setting ”A” on the spring loaded presser foot latch for the cover stitch (Prog. 02), the 2 thread chainstitch (Prog. 01), the 5 thread safety stitch seam (Prog. 09) and the 4 thread safety stitch seam (Prog. 08). T ransparent presser foot F from the accessories can also be used for the cover s[…]
-
Page 16
14 14 Needle position This machine has 4 needle positions and can sew with a maximum of two needles at any one time. The needle positions are 1 1, L2, R11 and R2. The fastening screw is located directly above the corresponding needle. The different needle positions are depicted in a schematic drawing in the instruction manual. Also refer to the exa[…]
-
Page 17
15 15 Changing the needle Switch off the electrical power T o remove: Lower the presser foot and move the needle(s) to the highest position by turning the handwheel towards you. Push the needle inserting tool (from the accessory box 49 ) from below upward fully over the needle. Loosen the fastening screw of the needle (without removing it) with the[…]
-
Page 18
16 16 Threading the thread guides Place the spools on the spool pins 35 . Y ou will fi nd information on the thread net, thread unreeling disc, spool disc and cone thread adapter on pages 9 and 10. Thread through the thread guides 31 from the back to the front following the colored threading paths. Lift the carry handle 3 upwards. Thread through t[…]
-
Page 19
17 17 Threading the upper overedge looper (pink) T urn the handwheel towards you until the upper overedge looper 18 is in its highest position. Thread in a sequence of 1 to 8. Note: T o make this task easier , use the tweezers which can be found behind the swivel plate. Thread through the thread guides 1 to 7 , which are marked with a pink dot. Thr[…]
-
Page 20
18 18 Threading the lower overedge looper (yellow) T urn the handwheel towards you until the lower overedge looper 19 is on the extreme right. Thread in a sequence of 1 to 10. Note: T o make this task easier , use the tweezers which can be found behind the swivel plate.[…]
-
Page 21
19 19 Thread through the thread guides 1 to 8, marked yellow . Thread from the front through the eye of the lower overedge looper C (= threading point 10 ). Press lever A downwards and hook the thread into guide B . Please also refer to the drawing below . Note: The lever returns automatically to its position as soon as you start sewing. Pull appro[…]
-
Page 22
20 20 Threading the two thread chainstitch looper and cover stitch looper (violet) for the chainstitch T urn the handwheel towards you until the two thread chainstitch looper 20 is on the extreme right. Thread in a sequence of 1 to 11. Note: T o make this task easier , use the tweezers which can be found behind the swivel plate.[…]
-
Page 23
21 21 Thread the thread guides which are marked with a violet square in a sequence of 1 to 9. Thread from the front through eye C of the two thread chainstitch looper and the cover stitch looper (= threading point 11). Push lever A upward and hook the thread into slot B . Also refer to the drawing below . Note: The lever returns automatically to it[…]
-
Page 24
22 22 Exception: Threading the two-thread chainstitch looper and cover stitch looper for the cover stitch (violet) (Prog. 02) T urn the handwheel towards you until the two thread chainstitch looper 20 is on the extreme right. Thread in a sequence of 1 to 10. Note: T o make this task easier , use the tweezers which can be found behind the swivel pla[…]
-
Page 25
23 23 Thread the thread guides, as shown in the diagram, in a sequence of 1 to 8 . Some of the threads guides are marked with a violet square. Thread from the front through eye C of the two-thread chainstitch looper and the cover stitch looper (= threading point 10). Press lever A upward and hook the thread into slot B . Also refer to the drawing b[…]
-
Page 26
24 24 Threading the needles Thread in a sequence of 1 to 8. Note: T o make this task easier , use the tweezers which can be found behind the swivel plate. The thread must be guided through the lower slot of thread guide 4 . Pull approximately 4” (10 cm) of thread through the looper and place it to the left under the presser foot. Note: For the co[…]
-
Page 27
25 25 The thread must be guided through the upper slot of thread guide 5 . Exception: Threading needle L2 when sewing a 5- thread safety-stitch seam (Prog. 09), a 4- thread safety-stitch seam (Prog. 08) and a 2-thread chainstitch (Prog. 01) Thread in a sequence of 1 to 9 . Note: T o make this task easier , use the tweezers which can be found behind[…]
-
Page 28
26 26 Important note on threading The needle(s) must always be threaded last so that the needle threads do not run under the looper thread as seen in drawing 1, but instead over the looper thread as depicted in drawing 2. Should this sequence not be followed, thread breakage or missed stitches can occur . If the looper threads break, you must pull […]
-
Page 29
27 27 Needle threader Move the needle(s) into the highest position and lower the presser foot. Place the thread from right to left in notch A of the needle threader (to be found in the accessory box). One of the two triangles must point upwards. Place the needle threader onto the front groove of the needle. Slide the needle threader down to the nee[…]
-
Page 30
28 28 Overview of the threading paths and threading sequences Program 01: 2-thread chainstitch Program 03: 2-thread fl atlock, narrow Program 11: 2-thread serging, narrow Program 12: 2-thread rolled hem Program 13: folded 2-thread rolled hem Program 02: cover stitch Program 04 2-thread fl atlock, wide[…]
-
Page 31
29 29 Overview of the threading paths and threading sequences Program 05: 3-thread overedge. narrow Program 14: 3-thread rolled hem Program 15: folded 3-thread rolled hem Program 16 3-thread fl atlock, narrow Program 07 4-thread overedge seam Program 06: 3-thread overedge, wide Program 17: 3-thread serging, wide Program 18: 3-thread fl atlock, wi[…]
-
Page 32
30 30 Overview of the threading paths and threading sequences Program 09: 5-thread safety-stitch seam Program 10: 2-needle 3-thread assembly seam Presser foot pressure The pre-set presser foot pressure on the machine is suitable for medium heavy fabrics. The presser foot pressure does not need to be adjusted for most fabrics. If you are working wit[…]
-
Page 33
31 31 Thread chain cutter After fi nishing the seam, sew an approx. 6” — 8,1” (15 20 cm) long thread chain. Pull the thread chain from the right to left over the thread chain cutter 33 . This will cut off the thread chain. Clamp spring for serging thread chain 25 Using this feature you can secure the thread chain at the start of the fabric by […]
-
Page 34
32 32 Disengaging the upper blade Switch off the electrical power Move the movable upper blade 23 into its highest position by turning the handwheel towards you. Remove the waste container and open the looper cover and the swivel plate. Push the knob for lowering the upper blade 27 fully to the right. T o lower the upper blade turn the knob towards[…]
-
Page 35
33 33 Swiveling stitch width latch For standard overlock seams: The swiveling stitch width latch 22 remains in the basic position when sewing all types of standard overlock seams (exception: Program 01, 02). For rolled hems: Pull knob (A) to the right and swivel the swiveling stitch width latch 22 downwards. This setting allows you to sew all types[…]
-
Page 36
34 34 Attaching the converter Switch off the electrical power The converter 28 must be attached for all two thread seams (exception: Program 01) and the two needle three thread assembly seam. Open the swivel plate and remove the converter 28 from its storage place. Push the tip of the converter into the back side of the upper overedge looper until […]
-
Page 37
35 35 Setting the seam width The required seam width can be adjusted anywhere between 3.5 and 6 mm by turning the adjusting knob for seam width 13. The setting can be seen through the viewing window 14 . The two thread chainstitch is sewn with a clearance of 6.5 to 9 mm. Illustration A: Should loops project out of the workpiece, move the movable up[…]
-
Page 38
36 36 Adjusting the machine to the cover stitch (Prog. 02) and two thread chainstitch (Prog. 01) This is only necessary if you do not want to trim the fabric edge. Insert the needle(s) (see page 13) according to the overview of the threading paths and threading sequences (see page 26). Open the looper cover and remove the blade guard 8 by pulling i[…]
-
Page 39
37 37 Press the power table 50 downwards into the designated slot on the looper cover . Close looper cover . Note: Please ensure that the upper overedge looper is disengaged before attaching the power table 50 . T o return the machine to its previous settings after sewing with the cover stitch or two thread chainstitch: Open the looper cover and re[…]
-
Page 40
38 38 Differential feed The differential feed consists of two feed dogs ( A + B ), one behind the other , which feed the fabric. The movement of the front feed dog ( A ) and thus the amount of material to be fed can be regulated using the regulator wheel 41 . The setting range is between 0.5 and 2.0. The standard setting is 1.0, where the movement […]
-
Page 41
39 39 Set the regulator wheel for the differential feed 41 to 2.0. Here the front feed dog feeds twice as fast as the rear feed dog. This means that the front feed dog feeds twice as much fabric as the rear feed dog, causing the material to gather . Here you will avoid stretching in the seam when working with knitwear , such as jerseys or gathered […]
-
Page 42
40 40 Adjusting the stitch length Y ou can set the desired stitch length between 0.5 mm to 4.0 mm by turning the stitch length adjustment knob (42) . Note For the two thread chainstitch, the setting should be 3.0 or higher . Removing the needle plate Raise the presser foot and move the needle(s) to the highest position. Remove the presser foot and […]
-
Page 43
41 41 Securing the upper blade Switch off the electrical power It is recommended to secure the movable upper blade 23 before sewing heavy fabrics. Raise the needle(s) to its highest position and open the swivel plate. T ighten the screw fully using the Allen key . This screw should always be slightly loosened again after sewing heavy fabrics. Note:[…]
-
Page 44
42 42 Program Application Needle position Stitch length Stitch width Program 01 2 thread chainstitch Joining fabric layers where a traditional pressed open seam is required. Also works well as a basting stitch for test fi tting garments. 3-4 3.5 Program 02 Cover stitch Sewing hems and fancy stitches. 3-4 3.5 Program 03 2-thread fl atlock, narrow […]
-
Page 45
43 43 Stitch width latch 22 ■ = top ® = bottom Looper disengaging level 9 Power table 50 ● = with ° = without Converter 28 ■ = with ® = without Thread tension The value refer to medium-heavy fabrics and normal polyester thread blue green pink yellow violet ® ▼● ® 5.0 2.0 ® ▼● ® 6.0 6.0 1.0 ■▲ ° ■ 1.5 5.0 ■▲ ° ■ 1.[…]
-
Page 46
44 44 Program Application Needle position Stitch length Stitch width Program 10 2-needle, 3-thread assambly seam Joining and simultaneous serging of light, very stretchy fabrics. 2 5.5 Program 11 2-thread serging, narrow Serging light fabrics. 1.5 5.5 Program 12 2-thread rolled hem Serging very light fabrics. Decorative edges. 1-2 5.5 Program 13 Fo[…]
-
Page 47
45 45 Stitch width latch 22 ■ = top ® = bottom Looper disengaging level 9 Power table 50 ● = with ° = without Converter 28 ■ = with ® = without Thread tension The value refer to medium-heavy fabrics and normal polyester thread blue green pink yellow violet ■▲ ° ■ 5.0 4.0 1.0 ■▲ ° ■ 4.0 1.0 ® ▲ ° ■ 1.5 6.0 ® ▲ ° ■ […]
-
Page 48
46 46 I mportant notes on sewing with the cover stitch The power table is marked with various units of measurement. The upper fi gures are in cm. The lower fi gures are in inches. Note: The hemmer guide H2 is available as an optional accessory . With this optional accessory you can hem your fabric effortlessly without having to press under the he[…]
-
Page 49
47 47 2. If sewing on a tubular item, i.e. pant or sleeve hem: Sew around tubular item, oversewing 4-5 stitches at the beginning of your seam ’ After the last stitch, turn the hand wheel towards you until the needles pierce the fabric and you have heard each needle ”click” (just before the needles are in the lowest position). Edge guide Push […]
-
Page 50
48 48 Stitch formation correction measures cover stitch Program 02 When all tensions are correctly set, the needle threads (green and blue) are just slightly visible on the underside of the fabric. The looper thread (violet) is situated loosely in between. The right needle thread (green) is too loose, causing large loops on the underside of the fab[…]
-
Page 51
49 49 5-thread safety-stitch seam Program 09 Since the 5-thread safety stitch seam con- sists of the 2-thread chainstitch and the 3- thread overedge seam, you can refer to the correction possibilities of these seam below and on page 49. 4-thread safety-stitch seam Program 08 Since the 4-thread safety stitch seam consists of the 2-thread chainstitch[…]
-
Page 52
50 50 4-thread overedge seam Program 07 When all tensions are correctly set, the loops of both looper threads (pink and yellow) are directly on the edge of the fabric. The needle threads (blue and green) are too loose, causing larger loops of needle thread on the underside of the fabric. Set the blue and green thread tension to a higher value. The […]
-
Page 53
51 51 3-thread overedge seam narrow and wide Program 05 and 06 When all tensions are correctly set, the loops of both looper threads (pink and yellow) are directly on the edge of the fabric. The upper looper thread (pink) appears on the underside of the fabric. Set the pink thread tension to a higher value and/or the yellow thread tension to a lowe[…]
-
Page 54
52 52 3-thread fl atlock narrow and wide Program 16 and 18 The needle thread is too tight. Set the needle thread tension (blue) to a lower value. The upper looper thread (pink) appears on the underside of the fabric. Set the pink thread tension to a higher value. The l ower looper thread (yellow) is too loose. Set the yellow thread tension to a hi[…]
-
Page 55
53 53 2-thread fl atlock narrow and wide Program 03 and 04 When all tensions are correctly set, the loops of both threads are directly on the underside of the fabric. Note: The converter (see page 32) must be attached to sew the 2-thread fl atlock seam. The needle thread is too loose or the lower looper thread (yellow) is too tight. Set the relev[…]
-
Page 56
54 54 3-thread rolled hem Program 14 The upper needle thread (green) is too loose. Set the green thread tension to a higher value The upper looper thread (pink) appears on the underside of the fabric. Set the pink thread tension to a higher value and/or the yellow thread tension to a lower value. The lower looper thread (yellow) appears on the top […]
-
Page 57
55 55 3-thread rolled hem (folded) Program 15 The upper looper thread (pink) only partly loops around the fabric edge. Set the pink thread tension to a lower value and/or the yellow thread tension to a higher value. The upper needle thread (green) is too loose. Set the green thread tension to a higher value. The lower looper thread (yellow) appears[…]
-
Page 58
56 56 2-thread rolled hem Program 12 Note: The converter (see page 32) must be attached to sew the 2 thread rolled hem. The upper needle thread (green) is too tight. Set the green thread tension to a lower value and/or the yellow thread tension to a higher value. The lower looper thread (yellow) is too tight. Set the yellow thread tension to a lowe[…]
-
Page 59
57 57 2-thread rolled hem (folded) Program 13 Note: The converter (see page 32) must be attached to sew the 2 thread rolled hem. The upper needle thread (green) is too loose. Set the green thread tension to a higher value and/or the yellow thread tension to a lower value. The lower looper thread (yellow) is too loose. Set the yellow thread tension […]
-
Page 60
58 58 2-needle 3-thread assembly seam Program 10 Note: The converter (see page 32) must be attached to sew the 2-needle 3-thread assembly seam. The upper needle thread (green) is too loose. Set the green thread tension to a higher value. The lower needle thread (blue) is too loose. Set the blue thread tension to a higher value. The lower looper thr[…]
-
Page 61
59 59 Fabric Thread Stitch length Light fabrics: organdy , fi ne knitwear , taffeta, silk, lining fabrics Cotton no. 50 — 70 Synthetic thread no. 70 — 140 2.0 — 4.0 mm Medium heavy fabrics: cotton, tricot, linen, dress fabrics Cotton no. 40 — 60 Synthetic thread no. 70 — 140 2.0 — 4.0 mm Heavy fabrics: tweed, suit fabrics, denim, heavy cloth Cotto[…]
-
Page 62
60 60 Machine maintenance Cleaning the machine Switch off the electrical power Remove the waste container and open the looper cover and swivel plate. Disengage the upper blade (see page 30) and remove the presser foot and the needle plate. Use the accessory brush provided to remove any waste thread from the upper and lower blades, the differential […]
-
Page 63
61 61 Changing the upper blade Switch off the electrical power T o remove: Set the adjusting knob for seam width to 3.5 mm. Fasten the upper blade (see page 39) before loosening the fastening screw ( A ) with the wrench provided in the accessory box. Then remove the upper blade. T o insert: Attach the new upper blade and gently tighten the fastenin[…]
-
Page 64
62 62 Changing the light bulb Switch off the electrical power Using the screw driver in the accessory box loosen the fastening screw to the sewing light cover 16 until the cover can be removed. Push the light bulb fully into its socket. Rotate counter clockwise through half a turn and remove. Guide the new light bulb (max. 15 W) into the socket and[…]
-
Page 65
63 63 Sewing problems and their solutions This machine has been developed with ease of operation in mind. No diffi cult or tricky set tings need to be made. Sewing problems of the kind described below may occur as a result of minor adjustment and operating errors. They can be easily adjusted by following the in structions. Problem Cause Solution N[…]
-
Page 66
64 64 Optional accessory Order No. Use Multi-purpose foot M 29 924 993 82-002 Foot, to which guides Hl, H2 and H3 can be attached. Lace and braiding guide Hl 29 924 993 82-003 Guide for applying lace or braiding (to the under side of the fabric). Hemmer guide H2 29 924 993 82-001 Guide for hemming/turns under one inch while serging. Bias tape guide[…]
-
Page 67
65 65 Optional accessory Order No. Use MuIti-purpose foot C 29 924 993 82-017 For sewing on bands, elastic tape, elastic thread and fi shing line together with the various elastic tape inserts. Elastic tape insert 7.5 mm 29 924 993 82-034 For sewing on elastic tape with a width up to 7.5 mm. Elastic tape insert 10 mm 29 924 993 82-035 For sewing o[…]
-
Page 68
66 66 Specifi cations Maximum sewing speed 1300 stitches/min. Seam width 1.4 mm — 9.0 mm Cover stitch width 5 mm Stitch length 0.5 mm — 4 mm Presser foot exchangeable Lubrication manual Presser foot height 4.5 mm Overedge stroke 2.0 mm Needle system EL X 705, cat no. 2002 Needle siw 80/12, 90/14 Number of threads 2,3,4,5 Dimensions (width x height[…]
-
Page 69
Intellectual property Patents protecting this product are listed on a label positioned underneath the sewing machine. PFAFF and IDT (image) are registered trademarks or trademarks of VSM Group AB.[…]
-
Page 70
Parts of the coverlock 4852 31 Thread guides with color coding 32 T elescoping thread guide 33 Thread chain cutter 34 Thread spool stand 35 Thread spool pin 36 Cone thread adapter 37 Spool disc 38 Electrical power master switch 39 Machine socket, foot control 40 Handwheel 41 Regulator wheel for differential feed 42 Stitch length adjustment knob 43 […]
-
Page 71
[…]
-
Page 72
VSM Group AB • SE-561 84 Huskvarna • SWEDEN www .pfaff.com 29 629 000-20D • English • Inhouse • © 2004 VSM Group AB • Printed in Sweden on environmental-friendly paper[…]
Owners manual
coverlock 4852
Parts of the coverlock 4852
1 Upper needle-thread tension 2 Upper needle-thread tension 3 Carry handle 4 Thread tension/upper looper thread 5 Thread tension/lower looper thread 6 Thread tension/two-thread chainstitch looper/cover stitch looper 7 Looper cover 8 Blade guard 9 Looper disengaging lever 10 Standard presser foot 11 Needle plate 12 Swivel plate 13 Adjusting knob for seam width 14 Seam width viewing window 15 Needle holder 16 Sewing light cover 17 Adjusting knob for presser foot pressure
18 Upper overedge looper 19 Lower overedge looper 20 Two-thread chainstitch looper 21 Threading aid for the two-thread chainstitch looper/cover stitch
looper 22 Swiveling stitch width latch 23 Movable upper blade 24 Fixed lower blade 25 Clamp spring for serging thread chains 26 Needle plate disengaging lever 27 Handwheel for lowering the upper blade 28 Converter 29 Tweezers 30 Allen key
This household sewing machine is designed to comply with IEC/EN 60335-2-28 and UL1594
IMPORTANT SAFETY INSTRUCTIONS When using an electrical appliance, basic safety precautions should always be followed, including the following: Read all instructions before using this household sewing machine.
DANGER — To reduce the risk of electric shock: A sewing machine should never be left unattended when plugged in. Always unplug this
sewing machine from the electric outlet immediately after using and before cleaning. Always unplug before relamping. Replace bulb with same type rated 15 Watt.
WARNING — To reduce the risk of burns, re, electric shock, or injury to persons: Do not allow to be used as a toy. Close attention is necessary when this sewing machine is
used by or near children and in rm persons. Use this sewing machine only for its intended use as described in this manual. Use only
attachments recommended by the manufacturer as contained in this manual. Never operate this sewing machine if it has a damaged cord or plug, if it is not working
properly, if it has been dropped or damaged, or dropped into water. Return the sewing machine to the nearest authorized dealer or service center for examination, repair, electrical or mechanical adjustment.
Never operate the sewing machine with any air openings blocked. Keep ventilation openings of the sewing machine and foot controller free from the accumulation of lint, dust, and loose cloth.
Keep ngers away from all moving parts. Special care is required around the sewing machine needle and blades.
Always use the proper needle plate. The wrong plate can cause the needle to break. Do not use bent needles. Do not pull or push fabric while stitching. It may de ect the needle causing it to break. Switch the sewing machine off (0) when making any adjustment in the needle area, such
as threading needle, changing needle, threading bobbin, or changing presser foot, etc. Always unplug sewing machine from the electrical outlet when removing covers,
lubricating, or when making any other user servicing adjustments mentioned in the instruction manual.
Never drop or insert any object into any opening. Do not use outdoors. Do not operate where aerosol (spray) products are being used or where oxygen is being
administrated. To disconnect, turn all controls to the off (0) position, then remove plug from outlet. Do not unplug by pulling on cord. To unplug, grasp the plug, not the cord.
SAVE THESE INSTRUCTIONS
Simple, up-to-date sewing
Congratulations! You have bought a high-quality product that provides unique advantages. Your new coverlock 4852 can take any material in its stride and will sew through thick and thin for you.
Your PFAFF coverlock features the very latest in design and technology, and it is just as simple to operate as this instruction manual is to follow.
Before you start sewing, please take the time to read these instructions carefully. It is certainly time well spent, and is the best way to nd out just what your machine can do and make full use of all its features.
If you have any further questions, just ask your authorized PFAFF dealer. Your dealer is happy to be of service with any help or advice.
Lets get started! We wish you many enjoyable hours creating your very own fashions and projects!
6
Page
Accessories ………………………………………………………………………………………………….6
Accessories, optional ……………………………………………………………………………………62, 63
Accessory box ……………………………………………………………………………………………….6
Adjusting the machine to Prog. 01, 02 …………………………………………………………….34, 35
Changing a spool on a threaded machine ………………………………………………………24
Clamp spring …………………………………………………………………………………………………29
Cleaning the machine …………………………………………………………………………………….58
Cone thread adapter ………………………………………………………………………………………10
Converter, attaching ………………………………………………………………………………………32
Cover stitch, important notes on sewing …………………………………………………………44, 45
Differential feed …………………………………………………………………………………………….36, 37
Edge guide …………………………………………………………………………………………………..45
Electrical connection …………………………………………………………………………………….7
Electrical power master switch ………………………………………………………………………7
Foot control, connecting ……………………………………………………………………………….7
Light bulb (sewing lamp), changing ………………………………………………………………60
Loopercover ………………………………………………………………………………………………….8
Lubricating the machine ……………………………………………………………………………….58
Machine cover ………………………………………………………………………………………………6
Maintenance …………………………………………………………………………………………………58 — 60
Needle holder ………………………………………………………………………………………………13
Needle inserting tool …………………………………………………………………………………….13
Needle plate disengaging lever ………………………………………………………………………38
Needle plate, removing ………………………………………………………………………………….38
Needle position …………………………………………………………………………………………….12
Needle threader …………………………………………………………………………………………..25
Needle, changing ………………………………………………………………………………………….13
Power table ………………………………………………………………………………………………….35
Presser foot lifter …………………………………………………………………………………………..10
Presser foot pressure …………………………………………………………………………………….28
Presser foot …………………………………………………………………………………………………..11
Presser foot, changing …………………………………………………………………………………..11
Program overview …………………………………………………………………………………………40 — 43
Rubber feet, cleaning …………………………………………………………………………………….58
Safety instructions …………………………………………………………………………………………1, 2
eam width adjusting knob …………………………………………………………………………….33
Seam width viewing window ………………………………………………………………………..33
eam width, setting ………………………………………………………………………………………..33
Sewing light cover ………………………………………………………………………………………..60
Contents
7
Page
Sewing problems and their solutions …………………………………………………………….61
Speci cations ……………………………………………………………………………………………….64
Spool dise …………………………………………………………………………………………………….10
Spool holder …………………………………………………………………………………………………9
Stitch formation correction measures ……………………………………………………………46 — 56
Stitch length adjustment knob ………………………………………………………………………38
Stitch length, adjusting …………………………………………………………………………………38
Stitch width latch, swivelling …………………………………………………………………………31
Telescoping thread guide ………………………………………………………………………………9
Thread chain cutter ……………………………………………………………………………………….29
Thread chart …………………………………………………………………………………………………57
Thread guide, clip on ……………………………………………………………………………………..10
Thread net …………………………………………………………………………………………………….9
Thread tensions, setting …………………………………………………………………………………39
Thread unreeling disc …………………………………………………………………………………….9
Threading aid for the 2 thread chain stitch looped/cover stitch looped ……………19, 21
Threading paths/overview …………………………………………………………………………….26 — 28
Threading the 2 thread chain stitch looped/cover stitch looped (violet) …………..18 — 21
Threading the lower overedge looper (yellow) ……………………………………………….16, 17
Threading the needle(s) ………………………………………………………………………………..22,23
Threading the upper overedge looper (pink) …………………………………………………..15
Threading, important note ……………………………………………………………………………..24
Threading/Thread guides ……………………………………………………………………………….14
Upper blade, changing …………………………………………………………………………………..59
Upper blade, disengaging ……………………………………………………………………………..30
Upper blade, securing …………………………………………………………………………………..39
Waste container ……………………………………………………………………………………………8
Contents
8
Accessory box
Open the accessory box 49 by gently pressing the bottom of the box inwards. The following accessories can be found in the box:
1 Thread nets (5) 2 Overlock needle system EL X 705, cat. no. 2002 3 Thread unreeling discs (5) 4 Transparent presser foot (F) for cover stitch and two thread chainstitch 5 Clip on thread guide 6 Cleaning brush 7 Screw driver 8 Machine oil 9 Needlethreader 10 Needle inserting tool 11 Wrench 12 Replacement upper blade 13 Edge guide
Further accessories
The following accessories can be found behind the swivel plate 12:
1 Converter 2 Tweezers 3 Allen key
Machine cover
The machine cover protects the machine from dust and dirt. When the sewing process is nished, push the telescopic thread guide 32 together. The spool stand 34 must be pushed to its full extent in to the machine, regardless of whether a spool is attached. Place the cover over the machine. The accessories should be stored in the accessory box or compartments behind the swivel plate.
9
Connecting the foot control
Connect the plug of the foot control to the connection socket 39 of the machine. The sewing speed is regulated by activating the foot control. You may also regulate the sewing speed by adjusting the slide on the front side of the foot control.
Setting 3 = half of nal speed Setting 8 = full nal speed
Electrical connection
Connect the foot control cord with the wall outlet.
Foot controls to be used: AE040 — EU AE044 — Australia AE046 — United Kingdom AE043 — USA/Canada
Master switch
When you turn on the master switch 38 the sewing lamp is illuminated. The machine is now operational.
For the USA and Canada
This appliance has a polarized plug (one blade wider than the other). To reduce the risk of electric shock, it is designed to t into a plorized outlet only one way. If the plug does not t correctly into the outlet, reverse the plug. If it still does not t, contact a quali ed electrician to install the proper outlet. Do not modify the plug in any way.
10
Looper cover
Push the looper cover 7 fully to the right and then swivel it down. Five types of stitches and their threading paths are portrayed in color on the inside of the looper cover.
Note: The electricity supply of the machine is cut off as soon as the looper cover or
swivel plate 12 is opened, for safety reasons,
i.e. sewing with the machine is no longer possible.
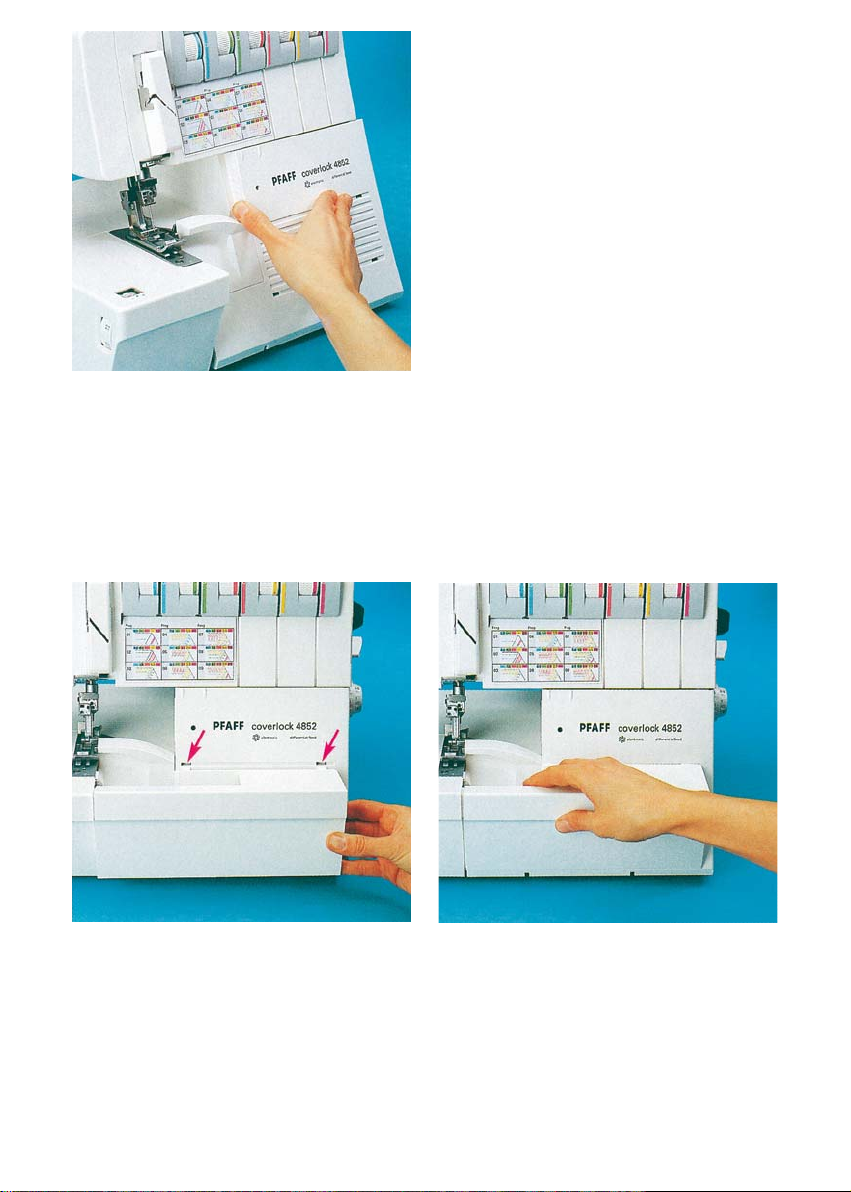
Waste container
Insert the upper latch of the waste container 45 into the upper slot of the looper cover 7.
Apply pressure to the lower part of the container until the lower latches ick into place in the lower slots of the looper cover.
To remove the waste container, repeat this procedure in the reverse order.
11
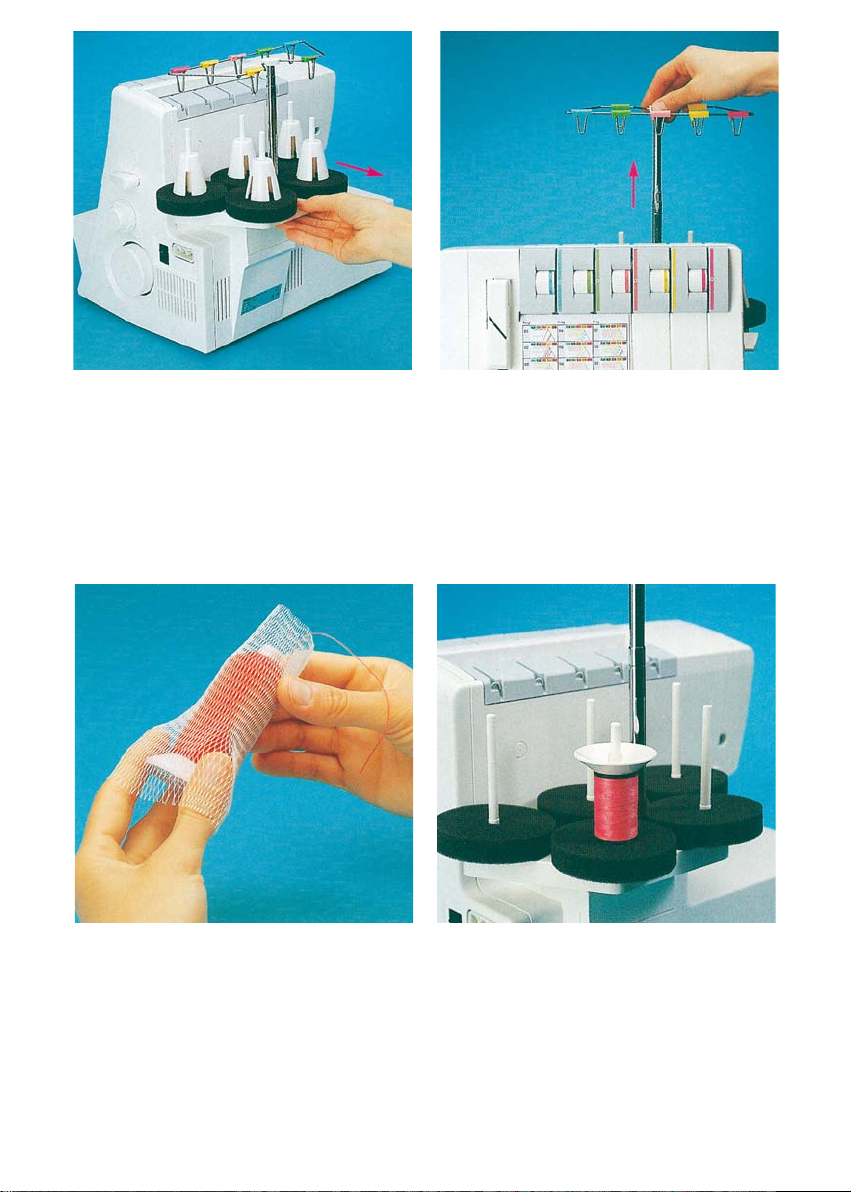
Spool holder
Before placing thread cones/spools on machine you must pull the spool holder 34 fully away from the back of machine.
Telescopic thread guide
Pull the telescopic thread guide 32 upwards to its highest position.
To ensure optimum thread feed, turn the telescopic parts slowly until you hear the locking balls ick into place.
Thread net
Synthetic threads generally unwind too quickly from the thread spool. Thread nets have been included to allow easy use of these threads. Pull the thread net (located in the accessory box) over the spool from below. Place the spool on the spool holder catching the bottom of the thread net with the spool pin.
Thread unreeling disc
The thread unreeling disc (in the accessory box) is used for small spools/spools with notched or rough ends. Place the spool on the spool pin 35. Place the thread unreeling disc on top of the spool. Make sure the spool dise 37 is used under the spool.
12
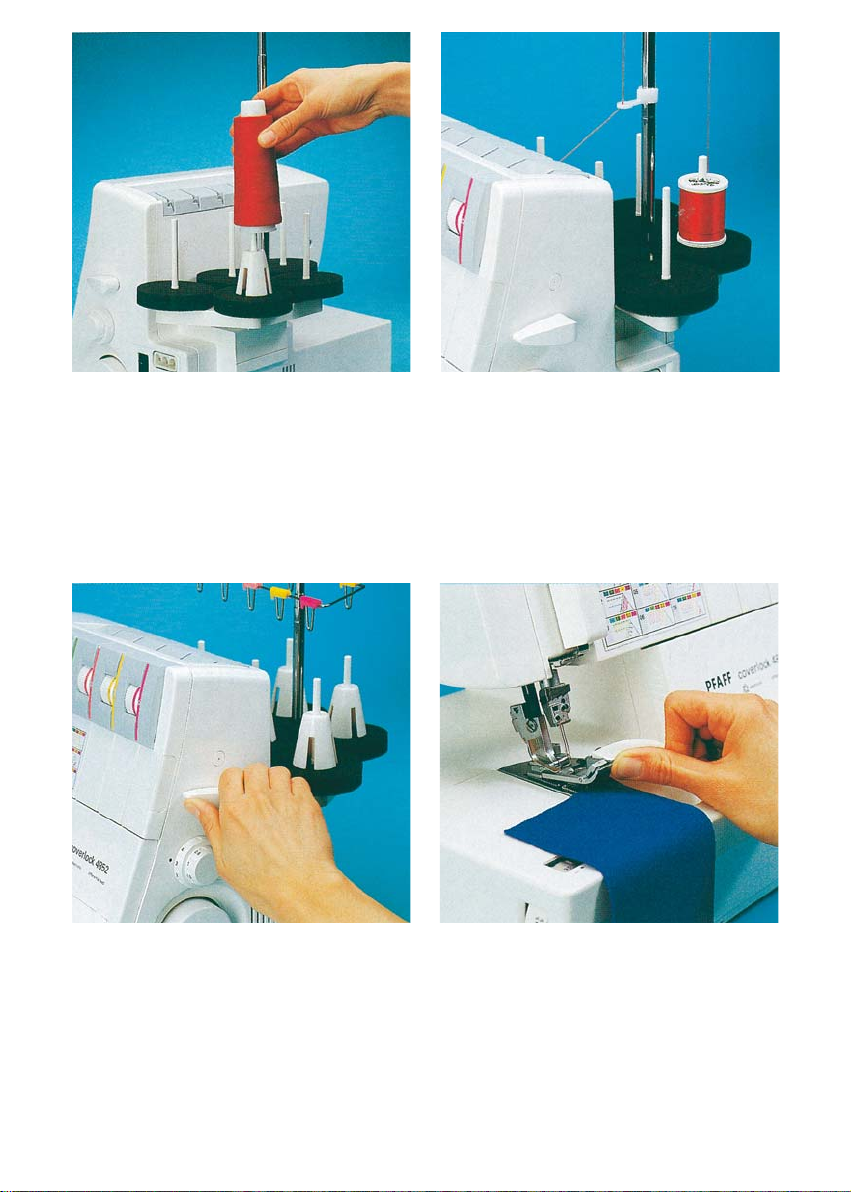
Spool disc/cone thread adapter
It is advantageous to use the spool dise 37 when sewing with large spools (5,000 10,000 m). To do this, place the cone thread adapter 36 onto the spool pin 35. With synthetic threads, the spool discs help eliminate vibration of the cones/spools aiding in smoother feeding of the threads.
Clip on thread guide
Use the clip on thread guide accessory when sewing with decorative thread. Clip this onto the telescoping thread guide 32 and thread the machine as shown in the illustration. Use the thread net and/or the thread unreeling disc if needed.
Presser foot lifter
The presser foot can be raised and lowered using the presser foot lifter 43. The maximum vertical lift of 6.5 mm for the presser foot for particularly thick fabrics can be achieved by pressing the presser foot lifter towards the rear.
Once an initial thread chain has been created, the presser foot lifter no longer needs to be raised if you continue working with the same thread and presser foot. It is suf cient to gently lift the front part of the presser foot using your thumb. Slide the fabric under the raised part of the presser foot. The fabric is automatically taken up and fed into the machine when you activate the foot control.
13
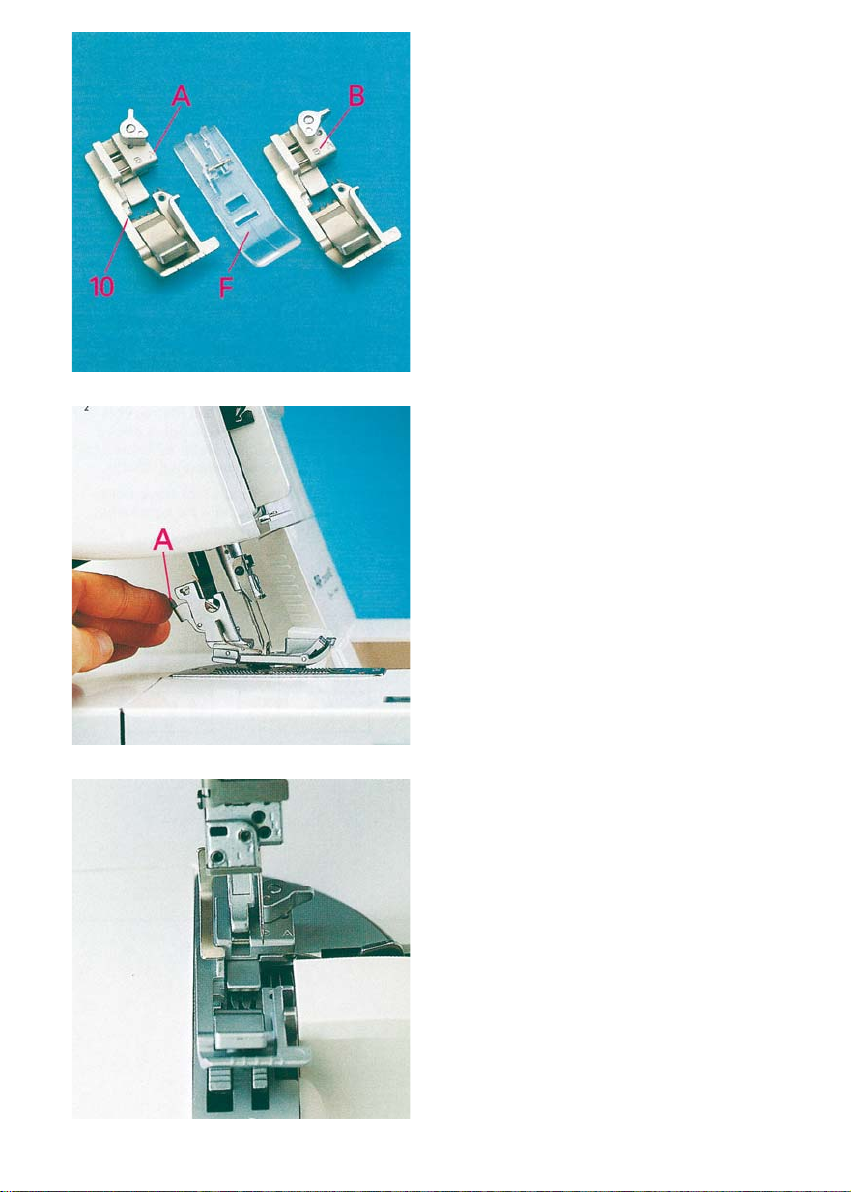
Presserfoot
With standard presser foot 10 use setting A on the spring loaded presser foot latch for the cover stitch (Prog. 02), the 2 thread chainstitch (Prog. 01), the 5 thread safety stitch seam (Prog. 09) and the 4 thread safety stitch seam (Prog. 08).
Transparent presser foot F from the accessories can also be used for the cover stitch (Prog. 02).
For all other programs use standard presser foot 10 and setting B on the springloaded presser foot latch.
Changing the presser foot
Switch off the electrical power
To remove: Raise the needle(s) to the highest position by turning the hand wheel towards you. Raise the presser foot and press lever A at the rear of the presser foot holder. The presser foot will be released automatically from the holder. Pivot the presser foot clockwise until the front half of presser foot clears holder and remove by sliding foot away from you towards back of machine.
To attach: Place the presser foot behind and perpendicular to the presser foot holder. Pivot the presser foot counterclockwise until the pin of the foot is directly under the presser foot holder clamp. Lower the presser foot lever and press lever A, if necessary, until the foot then clicks into place.
Check: Please lift the presser foot lever to ensure that the presser foot is properly locked into place.
14
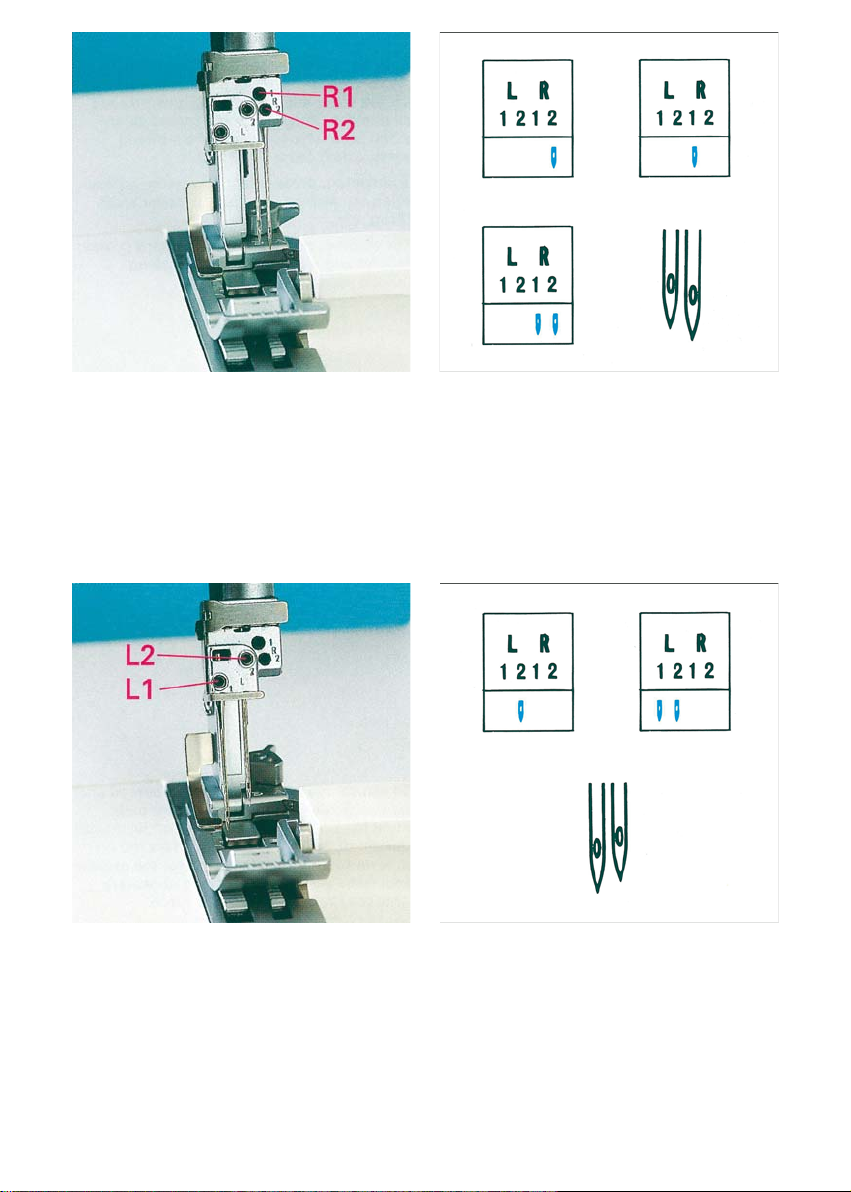
Needle position
This machine has 4 needle positions and can sew with a maximum of two needles at any one time. The needle positions are 1 1, L2, R11 and R2. The fastening screw is located directly above the corresponding needle.
The different needle positions are depicted in a schematic drawing in the instruction manual. Also refer to the examples above and below. Insert the needle(s) as shown on the program overview (see pages 40-43).
Note: If the needles R2 and 131 have been inserted, the left needle will be somewhat higher than the right needle.
Note: If the needles 1 11 and L2 have been inserted, the left needle will be somewhat lower than the right needle.
15
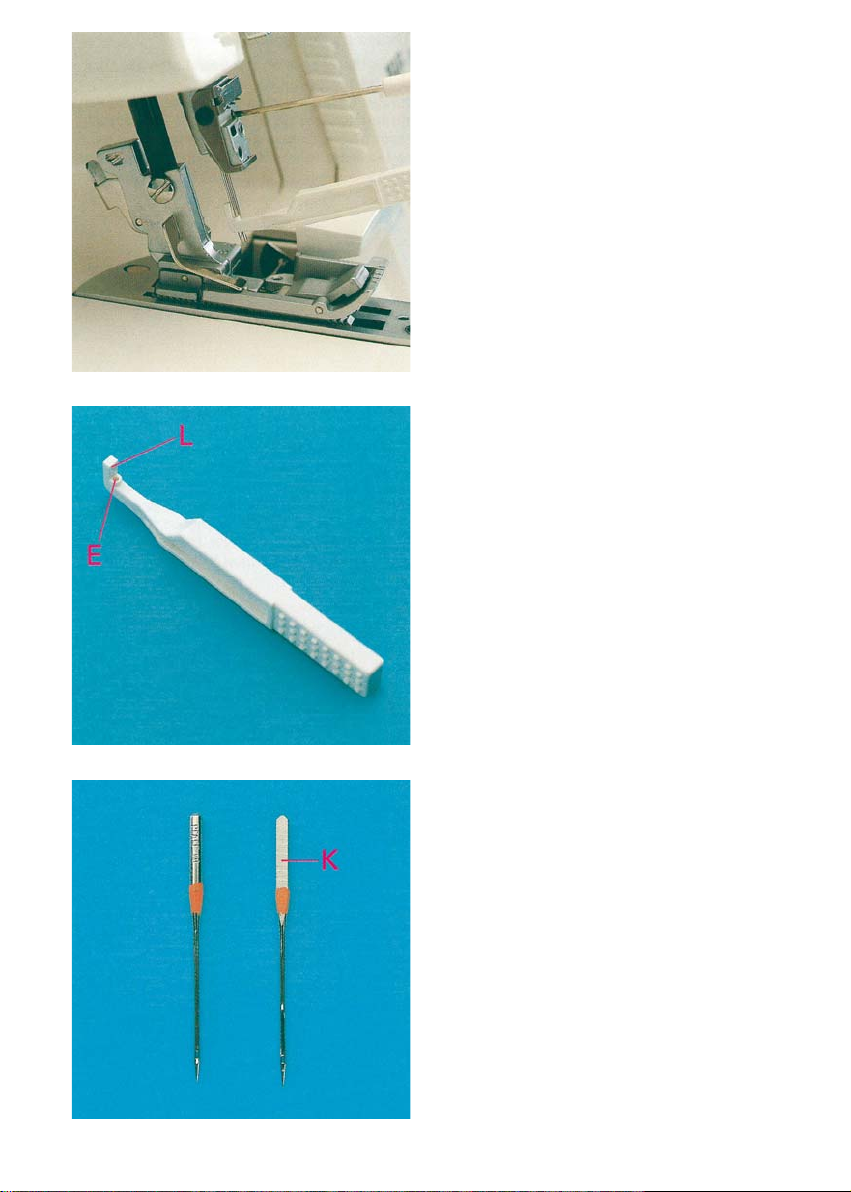
Changing the needle
Switch off the electrical power
To remove: Lower the presser foot and move the needle(s) to the highest position by turning the handwheel towards you. Push the needle inserting tool (from the accessory box 49) from below upward fully over the needle. Loosen the fastening screw of the needle (without removing it) with the Allen key (behind the swivel plate) and pull the needle down to remove.
To insert: Insert the needle into hole E of the needle inserting tool, so that the at needle shank K faces the at side L of the inserting tool. Insert the needle fully into the holder and tighten the fastening screws. Remove the needle inserting tool.
Overlock needles types EL X 705, cat. no.
2002 are required for this machine.
16
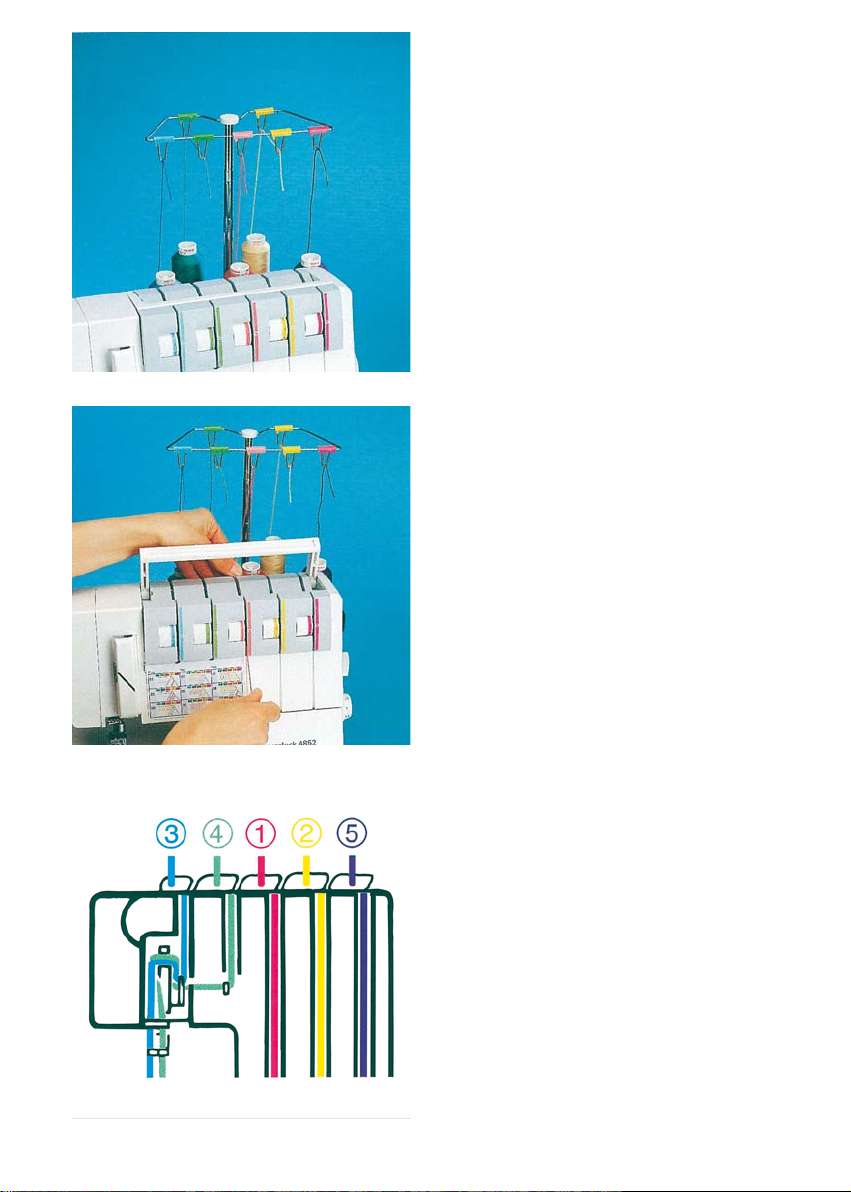
Threading the thread guides
Place the spools on the spool pins 35. You will nd information on the thread net, thread unreeling disc, spool disc and cone thread adapter on pages 9 and 10. Thread through the thread guides 31 from the back to the front following the colored threading paths.
Lift the carry handle 3 upwards. Thread through the underside of the carrying handle and through the rear thread guides 44 using both hands to pull the thread down until it slips under the thread guide. Guide the thread through the tension discs and pull it down until it is positioned rmly between the tension discs. Return the carrying handle to its original position.
Note:
Thread in a sequence of 1 to 5.
17
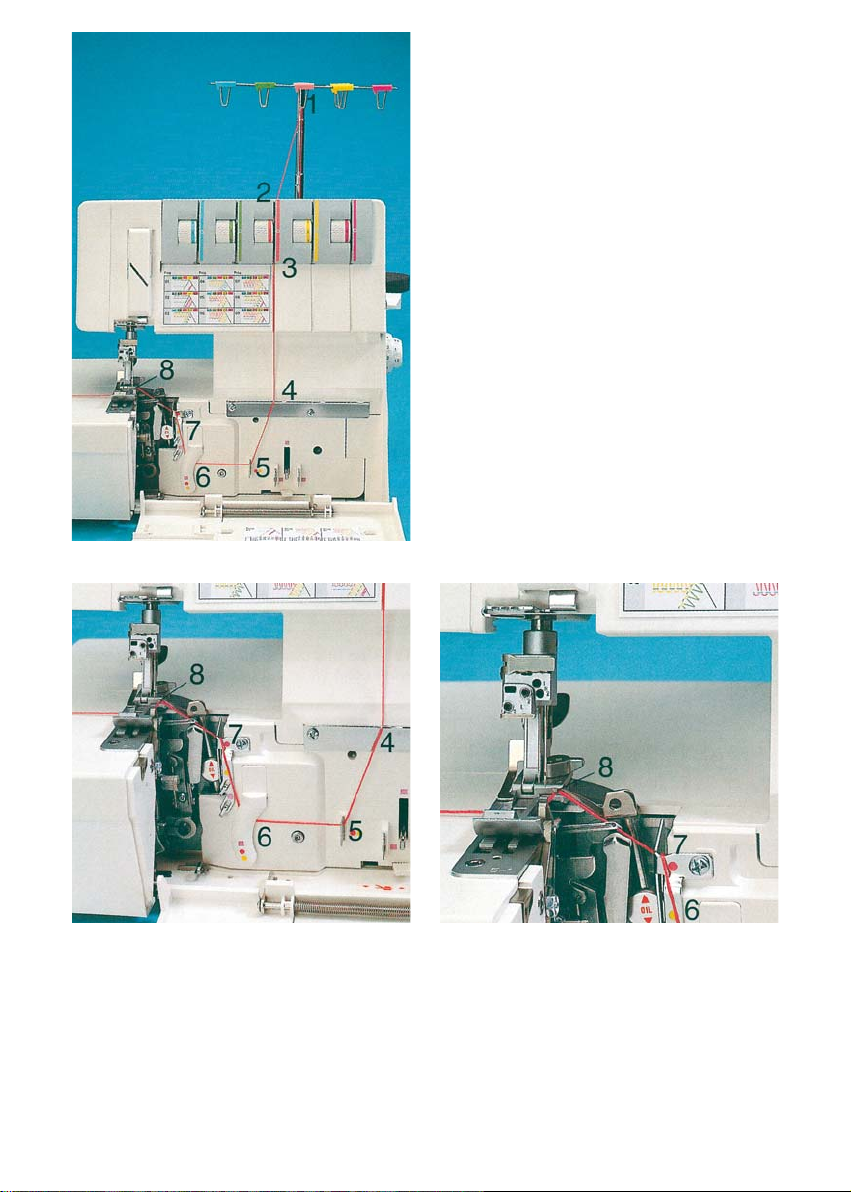
Threading the upper overedge looper (pink)
Turn the handwheel towards you until the upper overedge looper 18 is in its highest position. Thread in a sequence of 1 to 8.
Note:
To make this task easier, use the tweezers which can be found behind the swivel plate.
Thread through the thread guides 1 to 7, which are marked with a pink dot.
Thread from the front through the eye of the upper overedge looper 8. Pull approximately 4 (10 cm) of thread through the looper and place it to the left under the presser foot.
18
Threading the lower overedge looper
(yellow)
Turn the handwheel towards you until the lower overedge looper 19 is on the extreme right.
Thread in a sequence of 1 to 10.
Note:
To make this task easier, use the tweezers which can be found behind the swivel plate.
19
Thread through the thread guides 1 to 8, marked yellow.
Thread from the front through the eye of the lower overedge looper C (= threading point 10).
Press lever A downwards and hook the thread into guide B. Please also refer to the drawing below.
Note:
The lever returns automatically to its position as soon as you start sewing.
Pull approximately 4 (10 cm) of thread through the looper and place it to the left under the presser foot.
20
Threading the two thread chainstitch looper
and cover stitch looper (violet) for the
chainstitch
Turn the handwheel towards you until the two thread chainstitch looper 20 is on the extreme right.
Thread in a sequence of 1 to 11.
Note:
To make this task easier, use the tweezers which can be found behind the swivel plate.
21
Thread the thread guides which are marked with a violet square in a sequence of 1 to 9.
Thread from the front through eye C of the two thread chainstitch looper and the cover stitch looper (= threading point 11).
Push lever A upward and hook the thread into slot B. Also refer to the drawing below.
Note:
The lever returns automatically to its position as soon as you start sewing.
Pull approximately 4 (10 cm) of thread through the looper and place it to the left under the presser foot.
22
Exception:
Threading the two-thread chainstitch looper
and cover stitch looper for the cover stitch
(violet) (Prog. 02)
Turn the handwheel towards you until the two thread chainstitch looper 20 is on the extreme right.
Thread in a sequence of 1 to 10.
Note:
To make this task easier, use the tweezers which can be found behind the swivel plate.
23
Thread the thread guides, as shown in the diagram, in a sequence of 1 to 8. Some of the threads guides are marked with a violet square.
Thread from the front through eye C of the two-thread chainstitch looper and the cover stitch looper (= threading point 10).
Press lever A upward and hook the thread into slot B. Also refer to the drawing below.
Note: The lever returns automatically to its position as soon as you start sewing.
Pull approximately 4 (10 cm) of thread through the looper and place it to the left under the presser foot.
24
Threading the needles
Thread in a sequence of 1 to 8.
Note:
To make this task easier, use the tweezers which can be found behind the swivel plate.
The thread must be guided through the lower slot of thread guide 4.
Pull approximately 4 (10 cm) of thread through the looper and place it to the left under the presser foot.
Note:
For the cover stitch the thread must also be guided through the lower thread guide 7.
25
The thread must be guided through the upper slot of thread guide 5.
Exception:
Threading needle L2 when sewing a 5-
thread safety-stitch seam (Prog. 09), a 4-
thread safety-stitch seam (Prog. 08) and a
2-thread chainstitch (Prog. 01)
Thread in a sequence of 1 to 9.
Note:
To make this task easier, use the tweezers which can be found behind the swivel plate.
Pull approximately 4 (10 cm) of thread through the looper and place it to the left under the presser foot .
26
Important note on threading
The needle(s) must always be threaded last so that the needle threads do not run under the looper thread as seen in drawing 1, but instead over the looper thread as depicted in drawing 2. Should this sequence not be followed, thread breakage or missed stitches can occur.
If the looper threads break, you must pull the needle threads out of the needle eye, rethread the loopier thread and then rethread the needle threads.
Changing a spool on a threaded machine
Cut the threads off close to the spool and replace with new spools. Tie together the threads which are still in the machine with the new threads, and pull the threads out of the needle eyes. Raise the presser foot. Pull on the needle threads until the knots are about 6 inches (15 cm) past the last thread guide in front of the needles. Cut the knots off and pull the threads through the respective needle eyes. The looper threads can be pulled continuously past the looper eye and placed to the left underneath the presser foot.
27
Needle threader
Move the needle(s) into the highest position and lower the presser foot. Place the thread from right to left in notch A of the needle threader (to be found in the accessory box). One of the two triangles must point upwards.
Place the needle threader onto the front groove of the needle. Slide the needle threader down to the needle eye and press it lightly against the needle.
A small metal pin is pushed through the needle eye and the needle is automatically threaded. Thread loops must be pulled to the back.
28
Overview of the threading paths and threading sequences
Program 01:
2-thread chainstitch
Program 03:
2-thread atlock, narrow
Program 11:
2-thread serging, narrow
Program 12:
2-thread rolled hem
Program 13:
folded 2-thread rolled hem
Program 02:
cover stitch
Program 04
2-thread atlock, wide
29
Overview of the threading paths and threading sequences
Program 05:
3-thread overedge. narrow
Program 14:
3-thread rolled hem
Program 15:
folded 3-thread rolled hem
Program 16
3-thread atlock, narrow
Program 07
4-thread overedge seam
Program 06:
3-thread overedge, wide
Program 17:
3-thread serging, wide
Program 18:
3-thread atlock, wide
Program 08:
4-thread safety-stitch seam
30
Overview of the threading paths and threading sequences
Program 09:
5-thread safety-stitch seam Program 10:
2-needle 3-thread assembly seam
Presser foot pressure
The pre-set presser foot pressure on the machine is suitable for medium heavy fabrics. The presser foot pressure does not need to be adjusted for most fabrics. If you are working with light or heavy fabrics then you may need to adjust the pressure. In this case, 6 setting positions are available which you can select using the adjusting knob for the presser foot pressure 17. The standard setting is N.
31
Thread chain cutter
After nishing the seam, sew an approx. 6 — 8,1 (15 20 cm) long thread chain. Pull the thread chain from the right to left over the thread chain cutter 33. This will cut off the thread chain.
Clamp spring for serging thread chain 25
Using this feature you can secure the thread chain at the start of the fabric by pulling it into the seam. Stitch off a minimum 4 (10 cm) long thread chain and raise the presser foot. Remove the thread chain carefully from the swiveling stitch width latch 22. Pull the thread chain forwards and clamp it under the spring.
Butt the fabric up against the front of the needle(s). If necessary, make an approx. 1.5 (3 cm) cut into the fabric along the cut line using a pair of scissors. Lower the presser foot and start sewing. The thread chain pulls automatically into the inside of the seam.
Note:
This feature cannot be used for either the 2-thread safety-stitch seam, the 4-thread safety-stitch seam, the 2-thread chainstitch or for the rolled hem.
32
Disengaging the upper blade
Switch off the electrical power
Move the movable upper blade 23 into its highest position by turning the handwheel towards you. Remove the waste container and open the looper cover and the swivel plate. Push the knob for lowering the upper blade 27 fully to the right.
To lower the upper blade turn the knob towards you until the upper blades clicks into place below. The upper blade is now disengaged.
Engaging the upper blade
Push the knob for lowering the upper blade to the right and swivel the blade back until it clicks into the operating position again. Close the looper cover and the swivel plate and reattach the waste container.
33
Swiveling stitch width latch
For standard overlock seams:
The swiveling stitch width latch 22 remains in the basic position when sewing all types of standard overlock seams (exception: Program 01, 02).
For rolled hems:
Pull knob (A) to the right and swivel the swiveling stitch width latch 22 downwards.
This setting allows you to sew all types of rolled hems.
34
Attaching the converter
Switch off the electrical power
The converter 28 must be attached for all two thread seams (exception: Program 01) and the two needle three thread assembly seam. Open the swivel plate and remove the converter 28 from its storage place.
Push the tip of the converter into the back side of the upper overedge looper until it clicks into place and push the converter onto the overedge looper bracket.
Position the upper overedge looper 18 right next to the needle by turning the handwheel towards you.
To remove the converter, gently push the point of the converter from the eye of the upper overedge looper. You can now remove the converter by pulling it upwards from the overedge looper bracket.
35
Setting the seam width
The required seam width can be adjusted anywhere between 3.5 and 6 mm by turning the adjusting knob for seam width 13. The setting can be seen through the viewing window 14. The two thread chainstitch is sewn with a clearance of 6.5 to 9 mm.
Illustration A: Should loops project out of the workpiece, move the movable upper blade 23 to the right by turning the seam width adjusting knob upwards.
Illustration B: Should the stitching be too tight, move the movable upper blade 23 to the left by turning the seam width adjusting knob downwards.
Note:
The top row of numbers on the dial refers to the seam width of a standard 3 thread overedge seam. The width settings 3.5 mm through 6.0 mm are measured from needle R1 to the outer fabric edge. This width is decreased by 2.0 mm when only using needle R2, i. e. you have a seam width that is completely adjustable from 1.5 mm to 4.0 mm.
The bottom row of numbers refers to the seam of the 4 or 5 thread safety stitch seam. The width settings 6.5 mm through 9 mm are measured from needle L2 to the outer fabric edge.
Measurements are shown in metric and fractions.
36
Adjusting the machine to the cover stitch
(Prog. 02) and two thread chainstitch
(Prog. 01)
This is only necessary if you do not want to trim the fabric edge. Insert the needle(s) (see page 13) according to the overview of the threading paths and threading sequences (see page 26). Open the looper cover and remove the blade guard 8 by pulling it towards you. Lower the swiveling stitch width latch (see page 31) and disengage the upper blade (see page 30). Ensure that the upper blade is disengaged by turning the handwheel towards you.
Disengage the upper overedge looper. Move the upper overedge looper 18 into its lowest position by turning the handwheel towards you.
Move the looper disengaging lever 9 to the left. Ensure that the looper is disengaged by turning the handwheel towards you.
Thread the two thread chainstitch looper and the cover stitch looper (see pages 18 to 21) and then the needle(s) (see page 22 and 23).
37
Press the power table 50 downwards into the designated slot on the looper cover. Close looper cover.
Note:
Please ensure that the upper overedge looper is disengaged before attaching the power table 50.
To return the machine to its previous settings after sewing with the cover stitch or two thread chainstitch:
Open the looper cover and remove the power table.
Move the looper disengaging lever to the right, thus re-engaging the upper overedge looper.
Bring the swiveling stitch width latch into the basic position (see page 31) and engage the upper blade (see page 30).
Push the blade guard into the looper cover and close the looper cover.
38
Differential feed
The differential feed consists of two feed dogs (A + B), one behind the other, which feed the fabric. The movement of the front feed dog (A) and thus the amount of material to be fed can be regulated using the regulator wheel 41. The setting range is between 0.5 and 2.0.
The standard setting is 1.0, where the movement of the front feed dog (A) is synchronized with the rear feed dog (B). This means that the front feed dog feeds the same amount of fabric as the rear feed dog.
Note:
The function of the differential feed also depends on the set stitch length and the type of fabric being used.
Set the regulator wheel for the differential feed 41 to 0.5. At this setting the front feed dog feeds half as fast as the rear feed dog. This means that the front feed dog feeds only half as much fabric as the rear feed dog, causing the fabric to stretch.
Here you will avoid gathering/puckering of the seam when working with very light fabrics, such as silk and taffeta. Instead, a smooth seam (A) will be achieved.
You can also achieve decorative effekts with the differential feed dog. For example the wavelike effect when using a rib knit (B).
39
Set the regulator wheel for the differential feed 41 to 2.0.
Here the front feed dog feeds twice as fast as the rear feed dog. This means that the front feed dog feeds twice as much fabric as the rear feed dog, causing the material to gather.
Here you will avoid stretching in the seam when working with knitwear, such as jerseys or gathered fabrics. Instead, a smooth seam (A) will be achieved.
You can also achieve decorative effects with the differential feed dog. For example the gathering effect when using very light fabrics (B).
The following table contains information on the differential feed settings. However, you
should always test your setting rst on a piece of scrap fabric.
Type of fabric / effect
Differential feed setting gather <2.0>
normal <1.0>
stretch <0.5>
Very light fabrics: silk, satin, poplin, taffeta, linings. Normal fabrics: light and medium-heavy cottons, ne cords, thermal-wear.
Light knitwear: jerseys, polo fabrics, cut-pile pullovers, tricot, ne knitwear and gathered fabrics.
Heavy knitwear: sweatshirt eece, heavy gathered fabrics, heavy knitwear.
Stretch — wavelike effect: medium and light knitwear, jerseys, knitwear, ruf ed sleeve and collar edges, skirt hems, dense stitch lengths.
Gathering: ruf ing light materials and lace, seam allowances for curves, arches on blouses, shirts, skirts, round pockets, aps, stretching or gentle ruf ing of arched sleeves (shoulders), sleeve widths for cuffs or gathered fabrics.
40
Adjusting the stitch length
You can set the desired stitch length between 0.5 mm to 4.0 mm by turning the stitch length adjustment knob (42).
Note
For the two thread chainstitch, the setting should be 3.0 or higher.
Removing the needle plate
Raise the presser foot and move the needle(s) to the highest position. Remove the presser foot and open the swivel plate. Press down the needle plate disengaging lever 26. The needle plate 11 is raised out of its mount. The needle plate can be removed to the left.
Note:
The machine should be unthreaded when removing the needle plate.
Inserting the needle plate
Place the needle plate to the rear on the guide pin (A) and press down at the front until you hear it click into place.
41
Securing the upper blade
Switch off the electrical power
It is recommended to secure the movable upper blade 23 before sewing heavy fabrics. Raise the needle(s) to its highest position and open the swivel plate. Tighten the screw fully using the Allen key. This screw should always be slightly loosened again after sewing heavy fabrics.
Note:
The seam width can no longer be adjusted once the upper blade is secured.
Setting thread tension
The following pages contain directions for setting thread tensions for all programs. Adjust the tension by turning the tensioning wheel until the dot marker is at the desired setting.
The settings for adjusting thread tension are recommendations. Fabric type, thread quality and needle gauge will in uence seam results. Always sew off a test seam onto a piece of scrap fabric and check the thread loops. Adjust the thread tension if necessary.
Adjusting the tension settings is described on pages 46 to 56.
42
Program Application
Needle
position
Stitch
length
Stitch
width
Program 01 2 thread chainstitch
Joining fabric layers where a traditional pressed open seam is required. Also works well as a basting stitch for test tting garments.
3-4 3.5
Program 02 Cover stitch
Sewing hems and fancy stitches.
3-4 3.5
Program 03 2-thread atlock, narrow
Serging light fabrics. Joining stretch fabrics with a atiock seam. 2 5.5
Program 04 2-thread atlock, wide
Serging medium heavy fabrics. Joining stretch fabrics with a atlock seam.
2 5.5
Program 05 3-thread overedge narrow
Serging light (easily frayed) fabrics.
2 5.5
Program 06 3-thread overedge wide
Serging tightly woven (easily frayed) fabrics. 3 5.5
Program 07 4-thread overedge
Joining and simultaneous serging of all fabrics, in particular stretchy fab- rics.
2.5 5.5
Program 08 4-thread safety-stitch seam
Joining and simultaneous serging of tightly woven fabrics. 3 8.5
Program 09 5-thread safety-stitch seam
Joining and simultaneous serging of tightly woven fabrics. 3 8.5
43
Stitch width latch 22
= top = bottom
Looper
disengaging
level 9
Power table 50
= with
= without
Converter 28
= with
= without
Thread tension The value refer to medium-heavy fabrics and normal polyester thread
blue green pink yellow violet
5.0 2.0
6.0 6.0 1.0
1.5 5.0
1.5 5.5
4.0 3.0 2.0
5.0 2.0 2.0
5.0 4.0 2.0 2.0
5.0 1.5 5.5 2.0
5.0 5.0 2.0 2.0 2.0
44
Program Application
Needle
position
Stitch
length
Stitch
width
Program 10 2-needle, 3-thread assambly seam
Joining and simultaneous serging of light, very st
Что подарить рукодельнице?
Рекомендуем подарочный набор в шкатулке.
| Число нитей | 2, 3, 4, 5 |
| Число швейных операций | 18 |
| Ширина стежка | 1 — 9 мм |
| Длина стежка | 1 — 4 мм |
| Максимальная высота подъема лапки | 7 мм |
| Максимальная скорость шитья | 1300 ст/мин |
| Регулировка прижима ткани | Есть |
| Регулировка ширины обреза ткани | Есть |
| Автоматическая заправка петлителя | Есть |
| Стабилизатор силы прокола | Есть |
| Рукавная платформа | Есть |
| Мусоросборник | Есть |
| Контроль натяжения нитей | Ручной |
| Мощность лампы | 15 Вт |
| Цветовая кодировка каждой нити для лёгкой заправки машины | Есть |
| Дифференциальная подача | Есть |
| Нитеобрезатель | Есть |
| Отключение ножа | Есть |
| Чехол | Мягкий |
| Тип игл | ELx705 |
| Страна производства | Япония |
| Гарантия | 12 месяцев |
Скачать инструкцию Pfaff 4852
Pfaff CoverLock 4852 — модель, объединяющая 5/4/3/2 — ниточный оверлок и 3-х игольную 4-х ниточную плоскошовную машину, выполняет 18 операций.
Pfaff 4852 — один из самых удачных современных бытовых коверлоков. Благодаря высокой мощности, грамотной конструкции и качественной японской сборке этого коверлока, вы сможете успешно работать как с самыми легкими,так и с грубыми тканями.
Строчки Pfaff Coverlock 4852
| 4-ниточный обметочный шов | 3-ниточный обметочный широкий шов |
| 3-ниточный обметочный узкий шов | 3-ниточный широкий шов Flatlock |
| 3-ниточный узкий шов Flatlock | 3-ниточный ролевый подрубочный шов |
| 3-ниточная кайма | 2-ниточный обметочный узкий шов |
| 2-ниточный широкий шов Flatlock | 2-ниточный узкий шов Flatlock |
| 2-ниточный ролевый подрубочный шов | 2-ниточная кайма |
| 2-игольный 3-ниточный обметочный шов | 4-ниточный стачивающе-обметочный шов |
| 5-ниточный стачивающе-обметочный шов | Шов цепного стежка |
| 2-игольный широкий распошивальный шов |
Комплектация Pfaff CoverLock 4852:
- Прозрачная лапка для плоского шва и строчки цепного стежка
- Набор игл Сетки для бобин (5 шт)
- Нитесматывающие шайбы (5 шт)
- Подкладочные поролоновые шайбы (5 шт)
- Конусные подставки под бобины (5 шт)
- Нитенаправитель
- Щетка-кисточка
- Отвертка
- Масленка
- Нитевдеватель
- Приспособление для замены игл
- Гаечный ключ
- Запасной верхний нож
- Линейка-направитель
- Конвертор для двухниточных швов
- Пинцет
- Торцовый шестигранный ключ для замены игл
- Защитный чехол
- Педаль
- Руководство по эксплуатации
- Контейнер для обрезков
- Сменная швейная платформа
- Коробка для принадлежностей.
Цена: 49900.00 руб
Купить
Цена: 69900.00 руб
Купить
Цена: 210590.00 руб
Купить
Цена: 42900.00 руб
Купить
Внимание! В случае, когда при покупке товара предлагаются и скидка, и подарки, вы можете выбрать либо скидку, либо один подарок.
- Manuals
- Brands
- Pfaff Manuals
- Sewing Machine
- coverlock 4852
- Owner’s manual
-
Contents
-
Table of Contents
-
Bookmarks
Quick Links
coverlock 4852
Owner´s manual
Related Manuals for Pfaff coverlock 4852
Summary of Contents for Pfaff coverlock 4852
-
Page 1
coverlock 4852 Owner´s manual… -
Page 3: Parts List
Parts of the coverlock 4852 1 Upper needle-thread tension 2 Upper needle-thread tension 3 Carry handle 4 Thread tension/upper looper thread 5 Thread tension/lower looper thread 6 Thread tension/two-thread chainstitch looper/cover stitch looper 7 Looper cover 8 Blade guard 9 Looper disengaging lever 10 Standard presser foot 11 Needle plate 12 Swivel plate…
-
Page 5: Important Safety Instructions
This household sewing machine is designed to comply with IEC/EN 60335-2-28 and UL1594 IMPORTANT SAFETY INSTRUCTIONS When using an electrical appliance, basic safety precautions should always be followed, including the following: Read all instructions before using this household sewing machine. DANGER — To reduce the risk of electric shock: •…
-
Page 7
It is certainly time well spent, and is the best way to fi nd out just what your machine can do and make full use of all its features. If you have any further questions, just ask your authorized PFAFF dealer. Your dealer is happy to be of service with any help or advice. -
Page 8: Table Of Contents
Contents Page Accessories …………………… 6 Accessories, optional ………………..62, 63 Accessory box ………………….6 Adjusting the machine to Prog. 01, 02 …………..34, 35 Changing a spool on a threaded machine …………… 24 Clamp spring ………………….. 29 Cleaning the machine ………………..58 Cone thread adapter ………………..
-
Page 9
Contents Page Sewing problems and their solutions …………..61 Specifi cations ………………….64 Spool dise ……………………10 Spool holder ………………….. 9 Stitch formation correction measures …………..46 — 56 Stitch length adjustment knob …………….. 38 Stitch length, adjusting ………………… 38 Stitch width latch, swivelling ……………… -
Page 10: Accessories
Accessory box Open the accessory box 49 by gently pressing the bottom of the box inwards. The following accessories can be found in the box: Thread nets (5) Overlock needle system EL X 705, cat. no. 2002 Thread unreeling discs (5) Transparent presser foot (F) for cover stitch and two thread chainstitch Clip on thread guide…
-
Page 11: Connecting Foot Control/Master Switch
Connecting the foot control Electrical connection Connect the plug of the foot control to the Connect the foot control cord with the wall connection socket 39 of the machine. The outlet. sewing speed is regulated by activating the foot control. You may also regulate the Foot controls to be used: sewing speed by adjusting the slide on the AE040 — EU…
-
Page 12: Loopercover
Looper cover Push the looper cover 7 fully to the right and then swivel it down. Five types of stitches and their threading paths are portrayed in color on the inside of the looper cover. Note: The electricity supply of the machine is cut off as soon as the looper cover or swivel plate 12 is opened, for safety reasons, i.e.
-
Page 13: Spool Holder
Spool holder Telescopic thread guide Before placing thread cones/spools on Pull the telescopic thread guide 32 upwards machine you must pull the spool holder 34 to its highest position. fully away from the back of machine. To ensure optimum thread feed, turn the telescopic parts slowly until you hear the locking balls fl…
-
Page 14: Cone Thread Adapter
Clip on thread guide Spool disc/cone thread adapter Use the clip on thread guide accessory when It is advantageous to use the spool dise sewing with decorative thread. Clip this onto 37 when sewing with large spools (5,000 the telescoping thread guide 32 and thread 10,000 m).
-
Page 15: Presser Foot
Presserfoot With standard presser foot 10 use setting ”A” on the spring loaded presser foot latch for the cover stitch (Prog. 02), the 2 thread chainstitch (Prog. 01), the 5 thread safety stitch seam (Prog. 09) and the 4 thread safety stitch seam (Prog.
-
Page 16: Needle Position
Needle position The different needle positions are depicted in a schematic drawing in the instruction This machine has 4 needle positions and can manual. Also refer to the examples above sew with a maximum of two needles at any and below. Insert the needle(s) as shown on one time.
-
Page 17: Changing The Needle
Changing the needle Switch off the electrical power To remove: Lower the presser foot and move the needle(s) to the highest position by turning the handwheel towards you. Push the needle inserting tool (from the accessory box 49) from below upward fully over the needle.
-
Page 18
Threading the thread guides Place the spools on the spool pins 35. You will fi nd information on the thread net, thread unreeling disc, spool disc and cone thread adapter on pages 9 and 10. Thread through the thread guides 31 from the back to the front following the colored threading paths. -
Page 19: Threading The Upper Overedge Looper (Pink)
Threading the upper overedge looper (pink) Turn the handwheel towards you until the upper overedge looper 18 is in its highest position. Thread in a sequence of 1 to 8. Note: To make this task easier, use the tweezers which can be found behind the swivel plate. Thread through the thread guides 1 to 7, Thread from the front through the eye of the which are marked with a pink dot.
-
Page 20: Threading The Lower Overedge Looper
Threading the lower overedge looper (yellow) Turn the handwheel towards you until the lower overedge looper 19 is on the extreme right. Thread in a sequence of 1 to 10. Note: To make this task easier, use the tweezers which can be found behind the swivel plate.
-
Page 21
Thread through the thread guides 1 to 8, Press lever A downwards and hook the marked yellow. thread into guide B. Please also refer to the drawing below. Note: The lever returns automatically to its position as soon as you start sewing. Thread from the front through the eye of the Pull approximately 4”… -
Page 22
Threading the two thread chainstitch looper and cover stitch looper (violet) for the chainstitch Turn the handwheel towards you until the two thread chainstitch looper 20 is on the extreme right. Thread in a sequence of 1 to 11. Note: To make this task easier, use the tweezers which can be found behind the swivel plate. -
Page 23
Thread the thread guides which are marked Push lever A upward and hook the thread with a violet square in a sequence of 1 to 9. into slot B. Also refer to the drawing below. Note: The lever returns automatically to its position as soon as you start sewing. -
Page 24
Exception: Threading the two-thread chainstitch looper and cover stitch looper for the cover stitch (violet) (Prog. 02) Turn the handwheel towards you until the two thread chainstitch looper 20 is on the extreme right. Thread in a sequence of 1 to 10. Note: To make this task easier, use the tweezers which can be found behind the swivel plate. -
Page 25
Thread the thread guides, as shown in the Press lever A upward and hook the thread diagram, in a sequence of 1 to 8. Some of into slot B. Also refer to the drawing below. the threads guides are marked with a violet square. -
Page 26
Threading the needles Thread in a sequence of 1 to 8. Note: To make this task easier, use the tweezers which can be found behind the swivel plate. The thread must be guided through the Pull approximately 4” (10 cm) of thread lower slot of thread guide 4. -
Page 27
Exception: Threading needle L2 when sewing a 5- thread safety-stitch seam (Prog. 09), a 4- thread safety-stitch seam (Prog. 08) and a 2-thread chainstitch (Prog. 01) Thread in a sequence of 1 to 9. Note: To make this task easier, use the tweezers which can be found behind the swivel plate. -
Page 28: Changing A Spool On A Threaded Machine
Important note on threading If the looper threads break, you must pull the needle threads out of the needle The needle(s) must always be threaded last eye, rethread the loopier thread and then so that the needle threads do not run under rethread the needle threads.
-
Page 29: Needle Threader
Needle threader Move the needle(s) into the highest position and lower the presser foot. Place the thread from right to left in notch A of the needle threader (to be found in the accessory box). One of the two triangles must point upwards.
-
Page 30
Overview of the threading paths and threading sequences Program 01: Program 02: 2-thread chainstitch cover stitch Program 03: Program 04 2-thread fl atlock, narrow 2-thread fl atlock, wide Program 11: 2-thread serging, narrow Program 12: 2-thread rolled hem Program 13: folded 2-thread rolled hem… -
Page 31
Overview of the threading paths and threading sequences Program 05: Program 06: 3-thread overedge. narrow 3-thread overedge, wide Program 14: Program 17: 3-thread rolled hem 3-thread serging, wide Program 15: Program 18: folded 3-thread rolled hem 3-thread fl atlock, wide Program 16 3-thread fl… -
Page 32: Presser Foot Pressure
Overview of the threading paths and threading sequences Program 09: Program 10: 5-thread safety-stitch seam 2-needle 3-thread assembly seam Presser foot pressure The pre-set presser foot pressure on the machine is suitable for medium heavy fabrics. The presser foot pressure does not need to be adjusted for most fabrics.
-
Page 33: Clamp Spring
Thread chain cutter After fi nishing the seam, sew an approx. 6” — 8,1” (15 20 cm) long thread chain. Pull the thread chain from the right to left over the thread chain cutter 33. This will cut off the thread chain.
-
Page 34
Disengaging the upper blade Switch off the electrical power Move the movable upper blade 23 into its highest position by turning the handwheel towards you. Remove the waste container and open the looper cover and the swivel plate. Push the knob for lowering the upper blade 27 fully to the right. -
Page 35
Swiveling stitch width latch For standard overlock seams: The swiveling stitch width latch 22 remains in the basic position when sewing all types of standard overlock seams (exception: Program 01, 02). For rolled hems: Pull knob (A) to the right and swivel the swiveling stitch width latch 22 downwards. -
Page 36
Attaching the converter Position the upper overedge looper 18 right next to the needle by turning the handwheel Switch off the electrical power towards you. The converter 28 must be attached for all two thread seams (exception: Program 01) and the two needle three thread assembly seam. -
Page 37: Eam Width Adjusting Knob
Setting the seam width Illustration A: Should loops project out of The required seam width can be adjusted the workpiece, move the movable upper anywhere between 3.5 and 6 mm by turning blade 23 to the right by turning the seam the adjusting knob for seam width 13.
-
Page 38
Adjusting the machine to the cover stitch (Prog. 02) and two thread chainstitch (Prog. 01) This is only necessary if you do not want to trim the fabric edge. Insert the needle(s) (see page 13) according to the overview of the threading paths and threading sequences (see page 26). -
Page 39: Power Table
Press the power table 50 downwards into the designated slot on the looper cover. Close looper cover. Note: Please ensure that the upper overedge looper is disengaged before attaching the power table 50. To return the machine to its previous settings after sewing with the cover stitch or two thread chainstitch: Open the looper cover and remove the…
-
Page 40
Differential feed The differential feed consists of two feed dogs (A + B), one behind the other, which feed the fabric. The movement of the front feed dog (A) and thus the amount of material to be fed can be regulated using the regulator wheel 41. -
Page 41
Set the regulator wheel for the differential Here you will avoid stretching in the seam feed 41 to 2.0. when working with knitwear, such as jerseys or gathered fabrics. Instead, a smooth seam Here the front feed dog feeds twice as fast (A) will be achieved. -
Page 42: Needle Plate Disengaging Lever
Adjusting the stitch length You can set the desired stitch length between 0.5 mm to 4.0 mm by turning the stitch length adjustment knob (42). Note For the two thread chainstitch, the setting should be 3.0 or higher. Removing the needle plate Raise the presser foot and move the needle(s) to the highest position.
-
Page 43: Setting Thread Tension
Securing the upper blade Switch off the electrical power It is recommended to secure the movable upper blade 23 before sewing heavy fabrics. Raise the needle(s) to its highest position and open the swivel plate. Tighten the screw fully using the Allen key. This screw should always be slightly loosened again after sewing heavy fabrics.
-
Page 44
Needle Stitch Stitch Program Application position length width Program 01 Joining fabric layers where a 2 thread chainstitch traditional pressed open seam is required. Also works well as a basting stitch for test fi tting garments. Program 02 Sewing hems and fancy stitches. Cover stitch Program 03 Serging light fabrics. -
Page 45
Stitch width latch 22 Looper Power table 50 Converter 28 Thread tension ● = with ■ = with ■ = top ® = bottom The value refer to medium-heavy fabrics and normal polyester thread disengaging ° = without ® = without blue green pink yellow violet level 9… -
Page 46
Needle Stitch Stitch Program Application position length width Program 10 Joining and simultaneous serging of light, very stretchy fabrics. 2-needle, 3-thread assambly seam Program 11 Serging light fabrics. 2-thread serging, narrow Program 12 Serging very light fabrics. 2-thread rolled hem Decorative edges. -
Page 47
Stitch width latch 22 Looper Power table 50 Converter 28 Thread tension ● = with ■ = with ■ = top ® = bottom The value refer to medium-heavy fabrics and normal polyester thread disengaging ° = without ® = without blue green pink yellow violet level 9… -
Page 48
Important notes on sewing with the cover Preparing the fabric: stitch When not using the H2 optional accessory The power table is marked with various units guide, it is useful to press under the fabric of measurement. The upper fi gures are in cm. edge before hemming it. -
Page 49: Edge Guide
2. If sewing on a tubular item, i.e. pant or After the second ”click” tum the handwheel sleeve hem: away from you until the needles are in their highest position. Raise the presser foot (this Sew around tubular item, oversewing 4-5 will release the tension on the threads).
-
Page 50: Stitch Formation Correction Measures Cover Stitch
Stitch formation correction measures cover stitch Program 02 When all tensions are correctly set, the needle threads (green and blue) are just slightly visible on the underside of the fabric. The looper thread (violet) is situated loosely in between. The right needle thread (green) is too loose, causing large loops on the underside of the fabric.
-
Page 51
5-thread safety-stitch seam 4-thread safety-stitch seam Program 09 Program 08 Since the 5-thread safety stitch seam con- Since the 4-thread safety stitch seam sists of the 2-thread chainstitch and the 3- consists of the 2-thread chainstitch and thread overedge seam, you can refer to the the 2-thread fl… -
Page 52
4-thread overedge seam The needle threads (blue and green) are too loose, causing larger loops of needle thread Program 07 on the underside of the fabric. When all tensions are correctly set, the loops Set the blue and green thread tension to a of both looper threads (pink and yellow) are higher value. -
Page 53
3-thread overedge seam The needle thread is too loose, causing loops on the underside of the fabric. narrow and wide Set the relevant needle thread tension to a Program 05 and 06 higher value. When all tensions are correctly set, the loops of both looper threads (pink and yellow) are directly on the edge of the fabric. -
Page 54
3-thread fl atlock The needle thread is too tight. Set the needle thread tension (blue) to a narrow and wide lower value. Program 16 and 18 The upper looper thread (pink) appears on The lower looper thread (yellow) is too the underside of the fabric. -
Page 55
2-thread fl atlock narrow and wide Program 03 and 04 When all tensions are correctly set, the loops of both threads are directly on the underside of the fabric. Note: The converter (see page 32) must be attached to sew the 2-thread fl atlock seam. The needle thread is too loose or the lower looper thread (yellow) is too tight. -
Page 56
3-thread rolled hem The upper needle thread (green) is too loose. Program 14 Set the green thread tension to a higher value The upper looper thread (pink) appears on The lower looper thread (yellow) appears on the underside of the fabric. the top side of the fabric. -
Page 57
3-thread rolled hem (folded) The upper needle thread (green) is too loose. Program 15 Set the green thread tension to a higher value. The upper looper thread (pink) only partly The lower looper thread (yellow) appears on loops around the fabric edge. the top side of the fabric. -
Page 58
2-thread rolled hem Program 12 Note: The converter (see page 32) must be attached to sew the 2 thread rolled hem. The upper needle thread (green) is too tight. Set the green thread tension to a lower value and/or the yellow thread tension to a higher value. -
Page 59
2-thread rolled hem (folded) Program 13 Note: The converter (see page 32) must be attached to sew the 2 thread rolled hem. The upper needle thread (green) is too loose. Set the green thread tension to a higher value and/or the yellow thread tension to a lower value. -
Page 60
2-needle 3-thread assembly seam The lower needle thread (blue) is too loose. Program 10 Set the blue thread tension to a higher value. Note: The converter (see page 32) must be attached to sew the 2-needle 3-thread assembly seam. The upper needle thread (green) is too loose. The lower looper thread (yellow) is too tight. -
Page 61: Thread Chart
Thread chart for 2- , 3- and 4-thread overedge seams Fabric Thread Stitch length Light fabrics: Cotton no. 50 — 70 2.0 — 4.0 mm organdy, fi ne knitwear, Synthetic thread no. 70 — 140 taffeta, silk, lining fabrics Medium heavy fabrics: Cotton no.
-
Page 62: Cleaning The Machine
Lubricate the points shown above with the oil provided (located in the accessory box) every time you clean the machine. One or two drops of PFAFF sewing machine oil are suffi cient. All other parts are manufactured from special materials and do…
-
Page 63
Changing the upper blade Switch off the electrical power To remove: Set the adjusting knob for seam width to 3.5 mm. Fasten the upper blade (see page 39) before loosening the fastening screw (A) with the wrench provided in the accessory box. -
Page 64: Sewing Light Cover
Changing the light bulb Switch off the electrical power Using the screw driver in the accessory box loosen the fastening screw to the sewing light cover 16 until the cover can be removed. Push the light bulb fully into its socket. Rotate counter clockwise through half a turn and remove.
-
Page 65
Sewing problems and their solutions This machine has been developed with ease of operation in mind. No diffi cult or tricky set tings need to be made. Sewing problems of the kind described below may occur as a result of minor adjustment and operating errors. -
Page 66
Optional accessories This machine offers a wide range of optional accessories for special serging details. Consult your PFAFF dealer. Optional accessory Order No. Multi-purpose foot M 29 924 993 82-002 Foot, to which guides Hl, H2 and H3 can be attached. -
Page 67
Optional accessory Order No. MuIti-purpose foot C 29 924 993 82-017 For sewing on bands, elastic tape, elastic thread and fi shing line together with the various elastic tape inserts. Elastic tape insert 29 924 993 82-034 For sewing on elastic tape with a width up to 7.5 mm 7.5 mm. -
Page 68: Specifi Cations
Specifi cations Maximum sewing speed 1300 stitches/min. Seam width 1.4 mm — 9.0 mm Cover stitch width 5 mm Stitch length 0.5 mm — 4 mm Presser foot exchangeable Lubrication manual Presser foot height 4.5 mm Overedge stroke 2.0 mm Needle system EL X 705, cat no.
-
Page 69: Intellectual Property
Intellectual property Patents protecting this product are listed on a label positioned underneath the sewing machine. PFAFF and IDT (image) are registered trademarks or trademarks of VSM Group AB.
-
Page 70: Electrical Power Master Switch
Parts of the coverlock 4852 31 Thread guides with color coding 32 Telescoping thread guide 33 Thread chain cutter 34 Thread spool stand 35 Thread spool pin 36 Cone thread adapter 37 Spool disc 38 Electrical power master switch 39 Machine socket, foot control 40 Handwheel 41 Regulator wheel for differential feed 42 Stitch length adjustment knob…
-
Page 72
VSM Group AB • SE-561 84 Huskvarna • SWEDEN www.pfaff.com…
Что подарить рукодельнице?
Рекомендуем подарочный набор в шкатулке.
| Число нитей | 2, 3, 4, 5 |
| Число швейных операций | 18 |
| Ширина стежка | 1 — 9 мм |
| Длина стежка | 1 — 4 мм |
| Максимальная высота подъема лапки | 7 мм |
| Максимальная скорость шитья | 1300 ст/мин |
| Регулировка прижима ткани | Есть |
| Регулировка ширины обреза ткани | Есть |
| Автоматическая заправка петлителя | Есть |
| Стабилизатор силы прокола | Есть |
| Рукавная платформа | Есть |
| Мусоросборник | Есть |
| Контроль натяжения нитей | Ручной |
| Мощность лампы | 15 Вт |
| Цветовая кодировка каждой нити для лёгкой заправки машины | Есть |
| Дифференциальная подача | Есть |
| Нитеобрезатель | Есть |
| Отключение ножа | Есть |
| Чехол | Мягкий |
| Тип игл | ELx705 |
| Страна производства | Япония |
| Гарантия | 12 месяцев |
Скачать инструкцию Pfaff 4852
Pfaff CoverLock 4852 — модель, объединяющая 5/4/3/2 — ниточный оверлок и 3-х игольную 4-х ниточную плоскошовную машину, выполняет 18 операций.
Pfaff 4852 — один из самых удачных современных бытовых коверлоков. Благодаря высокой мощности, грамотной конструкции и качественной японской сборке этого коверлока, вы сможете успешно работать как с самыми легкими,так и с грубыми тканями.
Строчки Pfaff Coverlock 4852
| 4-ниточный обметочный шов | 3-ниточный обметочный широкий шов |
| 3-ниточный обметочный узкий шов | 3-ниточный широкий шов Flatlock |
| 3-ниточный узкий шов Flatlock | 3-ниточный ролевый подрубочный шов |
| 3-ниточная кайма | 2-ниточный обметочный узкий шов |
| 2-ниточный широкий шов Flatlock | 2-ниточный узкий шов Flatlock |
| 2-ниточный ролевый подрубочный шов | 2-ниточная кайма |
| 2-игольный 3-ниточный обметочный шов | 4-ниточный стачивающе-обметочный шов |
| 5-ниточный стачивающе-обметочный шов | Шов цепного стежка |
| 2-игольный широкий распошивальный шов |
Комплектация Pfaff CoverLock 4852:
- Прозрачная лапка для плоского шва и строчки цепного стежка
- Набор игл Сетки для бобин (5 шт)
- Нитесматывающие шайбы (5 шт)
- Подкладочные поролоновые шайбы (5 шт)
- Конусные подставки под бобины (5 шт)
- Нитенаправитель
- Щетка-кисточка
- Отвертка
- Масленка
- Нитевдеватель
- Приспособление для замены игл
- Гаечный ключ
- Запасной верхний нож
- Линейка-направитель
- Конвертор для двухниточных швов
- Пинцет
- Торцовый шестигранный ключ для замены игл
- Защитный чехол
- Педаль
- Руководство по эксплуатации
- Контейнер для обрезков
- Сменная швейная платформа
- Коробка для принадлежностей.
Цена: 46990.00 руб
Купить
Цена: 210990.00 руб
Купить
Цена: 44900.00 руб
Купить
Внимание! В случае, когда при покупке товара предлагаются и скидка, и подарки, вы можете выбрать либо скидку, либо один подарок.
Посмотреть инструкция для Pfaff coverlock 4852 бесплатно. Руководство относится к категории Швейные машины, 7 человек(а) дали ему среднюю оценку 7.6. Руководство доступно на следующих языках: английский. У вас есть вопрос о Pfaff coverlock 4852 или вам нужна помощь? Задайте свой вопрос здесь
Не можете найти ответ на свой вопрос в руководстве? Вы можете найти ответ на свой вопрос ниже, в разделе часто задаваемых вопросов о Pfaff coverlock 4852.
Какой размер иглы лучше всего использовать?
Какой срок службы у швейной иглы?
Что может повредить иглу при шитье?
Инструкция Pfaff coverlock 4852 доступно в русский?
Не нашли свой вопрос? Задайте свой вопрос здесь
В представленном списке руководства для конкретной модели Оверлока илт распошивальной машины — Pfaff CoverLock 4852. Вы можете скачать инструкции к себе на компьютер или просмотреть онлайн на страницах сайта бесплатно или распечатать.
В случае если инструкция на русском не полная или нужна дополнительная информация по этому устройству, если вам нужны
дополнительные файлы: драйвера, дополнительное руководство пользователя (производители зачастую для каждого
продукта делают несколько различных документов технической помощи и руководств), свежая версия прошивки, то
вы можете задать вопрос администраторам или всем пользователям сайта, все постараются оперативно отреагировать
на ваш запрос и как можно быстрее помочь. Ваше устройство имеет характеристики:Тип: коверлок, Дисплей: нет, Потребляемая мощность (на освещение): 15 Вт, Дифференциальная подача: есть, Автоматическая заправка петлителя: есть, Контроль натяжения нитей: ручной, полные характеристики смотрите в следующей вкладке.
Для многих товаров, для работы с Pfaff CoverLock 4852 могут понадобиться различные дополнительные файлы: драйвера, патчи, обновления, программы установки. Вы можете скачать онлайн эти файлы для конкретнй модели Pfaff CoverLock 4852 или добавить свои для бесплатного скачивания другим посетителями.
Если вы не нашли файлов и документов для этой модели то можете посмотреть интсрукции для похожих товаров и моделей, так как они зачастую отличаются небольшим изменениями и взаимодополняемы.
Обязательно напишите несколько слов о преобретенном вами товаре, чтобы каждый мог ознакомиться с вашим отзывом или вопросом. Проявляйте активность что как можно бльше людей смогли узнать мнение настоящих людей которые уже пользовались Pfaff CoverLock 4852.
Анатолий
2018-02-08 16:00:28
Одна из лучших машин что я знаю я бы сказал безупречна!!!!
павел
2019-05-24 21:42:02
cegth!
Ирина
2019-06-17 20:19:57
Хороший оверлок
михаэль
2019-06-19 01:09:37
только купил.
лезха
2019-07-09 16:18:21
Одна из лучших машин что я знаю я бы сказал безупречна!!!!
Ирина Рябова
2019-07-28 15:14:11
Замечательный коверлок. уже лет 17 в пользовании.
Ирина Рябова
2019-07-28 15:14:51
Замечательный оверлок.
Candy
2019-08-18 18:31:12
perfect
Татьяна
2019-08-20 18:53:14
Замечательный оверлок!
Elvira
2019-10-10 17:45:41
пока всё ок
Elvira
2019-10-10 17:48:29
пока всё ок!
Elvira
2019-10-10 17:52:09
пока всё ок
big smoke
2019-12-27 01:39:06
[email protected]@[email protected]@[email protected]
[email protected]@[email protected]
2019-12-27 01:39:33
[email protected]@[email protected]@mailart.top
[email protected]@[email protected]
2019-12-27 01:40:02
[email protected]@[email protected]@mailart.top
Елена
2020-04-02 14:49:51
Великолепная машина
Елена
2020-05-13 21:24:03
купила б/у ,шьёт все кроме распошивальног шва
Основные и самые важные характеристики модели собраны из надежных источников и по характеристикам можно найти похожие модели.
| Общие характеристики | |
| Тип | коверлок |
| Дисплей | нет |
| Потребляемая мощность (на освещение) | 15 Вт |
| Дифференциальная подача | есть |
| Автоматическая заправка петлителя | есть |
| Контроль натяжения нитей | ручной |
| Стабилизатор силы прокола | есть |
| Нитеобрезатель | есть |
| Отключение ножа | есть |
| Регулировка прижима ткани | есть |
| Регулировка ширины обреза ткани | есть |
| Швейные операции | |
| Число нитей | 2, 3, 4, 5 |
| Число швейных операций | 18 |
| Виды швов | ролевой шов, распошивочный шов, flatlock, цепной стежок |
| Длина стежка | 1 — 4 мм |
| Ширина стежка | 1 — 9 мм |
| Максимальная высота подъема лапки | 7 мм |
| Максимальная скорость шитья | 1300 стежков/мин |
| Особенности | |
| Тип игл | EL x 705 |
| Съемная рукавная платформа | есть |
| Цветная маркировка | есть |
| Лоток для обрезков | есть |
| Чехол | мягкий |
| Размеры (ВхШхГ) | 30х29х35.50 см |
| Вес | 8.6 кг |
Здесь представлен список самых частых и распространенных поломок и неисправностей у Оверлоков и распошивальных машин. Если у вас такая поломка то вам повезло, это типовая неисправность для Pfaff CoverLock 4852 и вы можете задать вопрос о том как ее устранить и вам быстро ответят или же прочитайте в вопросах и ответах ниже.
| Название поломки | Описание поломки | Действие |
|---|---|---|
| Петлитель Не Захватывает Нить Левой Иглы | Петлитель Не Захватывает Нить Левой Иглы | |
| Петлитель Не Захватывает Нить Иглы | При Выполнении Некоторых Строчек (13,19) Петлитель Не Захватывает Нить Иглы А | |
| Сенсорный Дисплей | Не Возможно Управление Сенсором, Кнопочное Управление Активно, Но Рабочей Осталась Только Одна Программа, Т.к. Переключать Виды Строчек И Швов Можно Только Сенсором |
В нашей базе сейчас зарегестрированно 18 353 сервиса в 513 города России, Беларусии, Казахстана и Украины.
СЕРВИС ЦЕНТР SEE-IT
⭐
⭐
⭐
⭐
⭐
Адресс:
ул.Краснобогатырская д 2 стр 2
Телефон:
74997542054
Сайт:
n/a
Время работы
Круглосуточно
СЕРВИС ЦЕНТР SEE-IT
⭐
⭐
⭐
⭐
⭐
Адресс:
Рязанский проспект д 77
Телефон:
74997542054
Сайт:
n/a
Время работы
Круглосуточно
РЕМОНТ ШВЕЙНОГО ОБОРУДОВАНИЯ В МСК
⭐
⭐
⭐
⭐
⭐
Адресс:
ул. Новокузнецкая д.39, стр. 1,
Телефон:
79603338462
Сайт:
n/a
Время работы
Ежедневно: с 0900 до 2000
UTYUZHOK-SERVIS
⭐
⭐
⭐
⭐
⭐
Адресс:
Измайловский бульвар 43
Телефон:
79163322414
Сайт:
n/a
Время работы
Будни: с 1000 до 2000
Суббота: с 1000 до 2000
Воскресенье: с 0000 до 0000
РЕМОНТ ШВЕЙНЫХ МАШИН
⭐
⭐
⭐
⭐
⭐
Адресс:
Ереванская ул., д.2, кор.1
Телефон:
79175442207
Сайт:
n/a
Время работы
Ежедневно: с 0900 до 2100
- Характеристики
- Описание
- Отзывы (4)
- Где купить?
Технические характеристики Коверлок Pfaff CoverLock 4852
Общие характеристики |
|
|---|---|
| Производитель | Pfaff |
| Тип | коверлок |
| Потребляемая мощность (на освещение) | 15 Вт |
| Дифференциальная подача | есть |
| Автоматическая заправка петлителя | есть |
| Контроль натяжения нитей | ручной |
| Стабилизатор силы прокола | есть |
| Нитеобрезатель | есть |
| Отключение ножа | есть |
| Регулировка прижима ткани | есть |
| Регулировка ширины обреза ткани | есть |
Швейные операции |
|
| Число нитей | 2, 3, 4, 5 |
| Число швейных операций | 18 |
| Виды швов | Ролевой шов, распошивочный шов, flatlock, цепной стежок |
| Длина стежка | 1 — 4 мм |
| Ширина стежка | 1 — 9 мм |
| Максимальная высота подъема лапки | 7 мм |
| Максимальная скорость шитья | 1300 стежков/мин |
Особенности |
|
| Тип игл | EL x 705 |
| Съемная рукавная платформа | есть |
| Цветная маркировка | есть |
| Лоток для обрезков | есть |
| Чехол | мягкий |
| Размеры (ВхШхГ) | 30х29х35.50 см |
| Вес | 8.6 кг |
Словарь терминов
- Тип
- В зависимости от функциональности, машины для обработки краев текстильных изделий делятся на три группы: оверлоки, распошивальные машины и коверлоки.
Оверлок — это устройство для обрезания и обметки краев ткани. Современные оверлоки могут быть 2-ниточными, 3-ниточными, 4-ниточными или 5-ниточными и выполнять несколько видов строчки.
Однако не всегда возможностей оверлока достаточно. Например, он не умеет делать плоские, или распошивальные, швы. Для этого существуют специальные распошивальные машины. Они предназначены исключительно для выполнения плоских швов и делают их очень качественно. Распошивальные машины позволяют выполнять плоские обметочные швы на предметах одежды, плотно прилегающих к телу (футболки, джинсы, белье, детская одежда), а также там, где требуется очень прочная строчка (внешние карманы или пояс брюк).
Разумеется, покупка сразу двух устройств — дорогое удовольствие. Именно поэтому в последнее время растущую популярность завоевывают машины, объединяющие возможности оверлока и распошивальной машины, — коверлоки. Коверлоки имеют еще один нижний петлитель — петлитель цепного стежка (также известный как ширитель), который позволяет выполнять плоские распошивальные швы, а также стачивать ткани. - Дифференциальная подача
- Возможность независимой регулировки скорости подачи ткани.
По умолчанию, передний и задний транспортеры подают ткань под лапку с одинаковой скоростью. В некоторых моделях работу одного из транспортеров можно замедлять или ускорять. Это позволяет растягивать ткань или, наоборот, собирать полотно в складки, открывая широкие возможности для экспериментов при работе с тонким текстилем. - Контроль натяжения нитей
- Способ натяжения верхних и нижних нитей машины может быть ручной или автоматический.
Каждый способ имеет свои преимущества и недостатки. Разумеется, автоматика в любом случае облегчает работу пользователю, сводя число возможных ошибок к минимуму. При автоматическом способе каждая из нитей получает независимое натяжение с учетом вида выполняемого шва.
Ручная регулировка повышает вероятность ошибок. Рекомендуется выполнять пробную строчку на небольшом куске ткани и только затем приступать к основному полотнищу. Разумеется, при постоянной работе с машиной швея приобретает опыт и сноровку, и риск погрешностей сводится к минимуму. - Стабилизатор силы прокола
- Наличие функции электронного контроля за силой прокола ткани иглой.
Опция обеспечивает стабильную скорость шитья вне зависимости от толщины ткани. - Нитеобрезатель
- Наличие встроенного лезвия для обрезания нитей по окончании шитья.
В самых простых моделях он представляет собой небольшую пластинку с лезвием, встроенную в край рабочей платформы или игольной пластины.
Некоторые оверлоки для удобства оснащены двумя раздельными обрезателями — для верхних и нижних нитей.
Дорогие автоматические машины могут иметь специальную кнопку — одно нажатие, и машина сама автоматически обрежет нити. - Отключение ножа
- Основное отличие оверлока от швейной машины состоит не только в типах строчек, но и в возможности первого обрезать край ткани. Такая необходимость связана с тем, что ткани, с которыми работают на оверлоке, являются сыпучими. Если трикотаж сначала раскроить и только потом прострочить край, то уже за короткий промежуток времени на нем успевает образоваться махра, которая даже после обметки остается заметной. Одновременное выполнение обреза и обметки края помогает избежать этой проблемы.
Однако в ряде случаев, например при работе с очень сыпучей тканью или выполнении плоского декоративного шва, обрез края не нужен. Поэтому многие машины имеют возможность отключения ножа. - Регулировка прижима ткани
- Возможность регулировки давления, оказываемого лапкой на ткань.
Для тонких тканей обычно требуется большее давление, тогда как для плотного текстиля — меньшее (чтобы облегчить прохождение утолщений). При работе с трикотажем наличие регулятора давления особенно важно, поскольку он имеет свойство сильно растягиваться под прижимной лапкой. Ослабив давление, можно уменьшить эффект растяжения.
У различных моделей давление регулируется неодинаково: при помощи регулятора, вручную, или автоматически.
Автоматическая регулировка учитывает тип ткани и позволяет контролировать постоянство усилия, с которым лапка прижимается к ткани. - Регулировка ширины обреза ткани
- Возможность изменять ширину обреза.
Различные виды швов неодинаково влияют на поведение ткани при обметке. Например, ролевые швы сильно скручивают ткань перед обметкой. Этот процесс можно скорректировать, предварительно слегка увеличив ширину обреза. - Число нитей
- 2-ниточная строчка
Считается, что, чем больше ниток, тем прочнее шов. Так что, если машина умеет выполнять 3- и 4-ниточный шов, то 2-ниточный может оказаться бесполезным. Однако при работе с очень тонкими тканями часто необходим оверлок с конвертером.
Конвертер — это специальная скобка, которая надевается на верхний петлитель, перекрывая его. Конвертер становится связующим звеном между нижним петлителем и иглой для переплетения нитей. В результате получается 2-ниточный шов.
3-ниточная строчка
Наиболее популярными и доступными по цене являются 3-ниточные оверлоки. Шов на них выполняется следующим образом: один стежок создается иглой, а параллельно ему проходит такой же нижний стежок, образованный с помощью нижнего петлителя. Эти стежки скрепляются между собой петлями еще одной нити, создаваемыми верхним петлителем. Таким образом, получается очень прочный и надежный обметочный шов, отлично удерживающий край сыпучей ткани.
4-ниточная строчка
В 4-ниточных оверлоках добавлена еще одна верхняя игла. Такой шов необходим не только для обметки, но и для одновременного сшивания краев ткани. Соответственно, любой 4-ниточный оверлок может выполнять как 4-х, так и 3-ниточные швы.
5-ниточная строчка
Среди непрофессионалов бытует мнение, что машина, способная выполнять 5-ниточный шов, является коверлоком. На самом деле 5-ниточные швы умеют делать и обычные оверлоки с помощью трех игл. Поэтому перед приобретением машины необходимо выяснить, оснащена ли она нижним петлителем цепного стежка, что является признаком настоящего коверлока. - Число швейных операций
- Общее число видов швов и их вариаций (различная длина стежка, ширина шва и т. п.), которые может выполнять машина.
- Виды швов
- Flatlock — это разновидность плоского шва (точнее, это псевдоплоский шов, так как он не является распошивальным). Может быть 2- или 3-ниточным.
Данный шов выполняется при помощи натяжения нижней нити и ослабления верхней.
Flatlock считается самым популярным 3-ниточным обметочным швом. Нередко он также используется в качестве декоративного (чаще в этой роли выступает 2-ниточный вариант).
Распошивочный шов
Этим швом обычно обрабатываются края трикотажных изделий на производстве. На лицевой стороне ткани идет прямая двойная строчка, а на изнаночной — обметка края с застилом.
Такой шов также называется плоским. Именно плоским швом обтачивается, например, нижнее белье, чтобы минимизировать дискомфорт от соприкосновения шва и кожи. Распошивальный шов отличается высокой эластичностью, поэтому незаменим для трикотажных и вязаных изделий.
Ролевой шов
Данный вид шва используется для обметки очень тонких тканей, например шифона. Край ткани скручивается и обметывается тонким швом, причем между стежками фактически не остается свободного пространства.
Цепной стежок
Выполнение цепного стежка возможно при наличии в машине специального цепного петлителя. Это означает, что его могут выполнять все коверлоки.
Цепной стежок — это очень прочный стачивающий шов, который существенно расширяет возможности машины по сравнению с функциями обычного оверлока. - Длина стежка
- Минимально/максимально возможное расстояние между двумя продольными проколами иглы.
Чем короче стежок, тем прочнее шов. Длина стежка зависит от назначения шва. Кроме того, величина этого показателя важна для выполнения декоративной строчки. - Ширина стежка
- Минимально/максимально возможное расстояние между стежками, определяющее ширину всего шва.
Обычно широкими стежками выполняются декоративные и обметочные зигзагообразные строчки. - Максимальная высота подъема лапки
- Расстояние от рабочей поверхности до лапки в верхнем положении.
Для обработки толстых тканей необходимо достаточно высокое значение данного параметра. Разумеется, высота поднятия лапки изменяется во всех моделях. Регулировка может быть плавной или ступенчатой (2-3 уровня). - Максимальная скорость шитья
- Максимальное количество стежков, выполняемых машиной за одну минуту без потери качества шитья.
Специалисты рекомендуют не гоняться за максимально высокими показателями. Обметочная строчка — это почти ювелирная работа. Здесь, в первую очередь, важна не скорость, а качество и стабильность шва. Для достижения высоких результатов все современные оверлоки оснащены автоматической регулировкой усилия прокола ткани иглой с учетом толщины полотна и скорости стежка. - Съемная рукавная платформа
- Возможность снимать часть рабочего столика для удобства отделки узких элементов изделия (штанины, манжеты, рукава и др.).
Некоторые производители называют эту опцию «свободный рукав» — от английского «free arm». - Цветная маркировка
- Наличие у каждого из путей направителей нитей индивидуальной цветной маркировки.
Как правило, в оверлоках одновременно используются несколько нитей, поэтому цветное обозначение путей каждой из них помогает избежать путаницы. - Лоток для обрезков
- Наличие в корпусе машины встроенного контейнера для сбора обрезков и ниток, остающихся после работы с тканью.
- Чехол
- Тип чехла машины для обработки краев текстильных изделий.
Подавляющее большинство устройств снабжено чехлами — мягкими или жесткими.
Мягкий матерчатый чехол защищает корпус от пыли, тогда как жесткий каркасный — также предохраняет от механических повреждений. - Вес
- Общий вес машины без учета дополнительных аксессуаров.
Полная информация о товаре, изготовителе, комплектации, технических характеристиках и функциях содержится в технической документации.
Описание товара
4 отзыва о Коверлок Pfaff CoverLock 4852
Количество отзывов: 4
Ваш отзыв поможет кому-то сделать выбор. Спасибо, что делитесь опытом!
Лучшие варианты покупки по низкой цене
Где купить дёшево? Рассмотрите предложения с доставкой или самовывозом. Сравнение цен онлайн. Выберите удобное для себя место приобретения.
Коверлок Pfaff CoverLock 4852: стоит ли покупать, описание, фото, характеристики, отзывы покупателей, инструкция и аксессуары, сборка аппарата, обзор.
В представленном списке руководства для конкретной модели Оверлока илт распошивальной машины — Pfaff CoverLock 4852. Вы можете скачать инструкции к себе на компьютер или просмотреть онлайн на страницах сайта бесплатно или распечатать.
В случае если инструкция на русском не полная или нужна дополнительная информация по этому устройству, если вам нужны
дополнительные файлы: драйвера, дополнительное руководство пользователя (производители зачастую для каждого
продукта делают несколько различных документов технической помощи и руководств), свежая версия прошивки, то
вы можете задать вопрос администраторам или всем пользователям сайта, все постараются оперативно отреагировать
на ваш запрос и как можно быстрее помочь. Ваше устройство имеет характеристики:Тип: коверлок, Дисплей: нет, Потребляемая мощность (на освещение): 15 Вт, Дифференциальная подача: есть, Автоматическая заправка петлителя: есть, Контроль натяжения нитей: ручной, полные характеристики смотрите в следующей вкладке.
Для многих товаров, для работы с Pfaff CoverLock 4852 могут понадобиться различные дополнительные файлы: драйвера, патчи, обновления, программы установки. Вы можете скачать онлайн эти файлы для конкретнй модели Pfaff CoverLock 4852 или добавить свои для бесплатного скачивания другим посетителями.
Если вы не нашли файлов и документов для этой модели то можете посмотреть интсрукции для похожих товаров и моделей, так как они зачастую отличаются небольшим изменениями и взаимодополняемы.
Обязательно напишите несколько слов о преобретенном вами товаре, чтобы каждый мог ознакомиться с вашим отзывом или вопросом. Проявляйте активность что как можно бльше людей смогли узнать мнение настоящих людей которые уже пользовались Pfaff CoverLock 4852.
Анатолий
2018-02-08 16:00:28
Одна из лучших машин что я знаю я бы сказал безупречна!!!!
павел
2019-05-24 21:42:02
cegth!
Ирина
2019-06-17 20:19:57
Хороший оверлок
михаэль
2019-06-19 01:09:37
только купил.
лезха
2019-07-09 16:18:21
Одна из лучших машин что я знаю я бы сказал безупречна!!!!
Ирина Рябова
2019-07-28 15:14:11
Замечательный коверлок. уже лет 17 в пользовании.
Ирина Рябова
2019-07-28 15:14:51
Замечательный оверлок.
Candy
2019-08-18 18:31:12
perfect
Татьяна
2019-08-20 18:53:14
Замечательный оверлок!
Elvira
2019-10-10 17:45:41
пока всё ок
Elvira
2019-10-10 17:48:29
пока всё ок!
Elvira
2019-10-10 17:52:09
пока всё ок
Елена
2020-04-02 14:49:51
Великолепная машина
Елена
2020-05-13 21:24:03
купила б/у ,шьёт все кроме распошивальног шва
Основные и самые важные характеристики модели собраны из надежных источников и по характеристикам можно найти похожие модели.
| Общие характеристики | |
| Тип | коверлок |
| Дисплей | нет |
| Потребляемая мощность (на освещение) | 15 Вт |
| Дифференциальная подача | есть |
| Автоматическая заправка петлителя | есть |
| Контроль натяжения нитей | ручной |
| Стабилизатор силы прокола | есть |
| Нитеобрезатель | есть |
| Отключение ножа | есть |
| Регулировка прижима ткани | есть |
| Регулировка ширины обреза ткани | есть |
| Швейные операции | |
| Число нитей | 2, 3, 4, 5 |
| Число швейных операций | 18 |
| Виды швов | ролевой шов, распошивочный шов, flatlock, цепной стежок |
| Длина стежка | 1 — 4 мм |
| Ширина стежка | 1 — 9 мм |
| Максимальная высота подъема лапки | 7 мм |
| Максимальная скорость шитья | 1300 стежков/мин |
| Особенности | |
| Тип игл | EL x 705 |
| Съемная рукавная платформа | есть |
| Цветная маркировка | есть |
| Лоток для обрезков | есть |
| Чехол | мягкий |
| Размеры (ВхШхГ) | 30х29х35.50 см |
| Вес | 8.6 кг |
Здесь представлен список самых частых и распространенных поломок и неисправностей у Оверлоков и распошивальных машин. Если у вас такая поломка то вам повезло, это типовая неисправность для Pfaff CoverLock 4852 и вы можете задать вопрос о том как ее устранить и вам быстро ответят или же прочитайте в вопросах и ответах ниже.
| Название поломки | Описание поломки | Действие |
|---|---|---|
| Петлитель Не Захватывает Нить Левой Иглы | Петлитель Не Захватывает Нить Левой Иглы | |
| Петлитель Не Захватывает Нить Иглы | При Выполнении Некоторых Строчек (13,19) Петлитель Не Захватывает Нить Иглы А | |
| Сенсорный Дисплей | Не Возможно Управление Сенсором, Кнопочное Управление Активно, Но Рабочей Осталась Только Одна Программа, Т.к. Переключать Виды Строчек И Швов Можно Только Сенсором |
В нашей базе сейчас зарегестрированно 18 353 сервиса в 513 города России, Беларусии, Казахстана и Украины.
СЕРВИС ЦЕНТР SEE-IT
⭐
⭐
⭐
⭐
⭐
Адресс:
ул.Краснобогатырская д 2 стр 2
Телефон:
74997542054
Сайт:
n/a
Время работы
Круглосуточно
СЕРВИС ЦЕНТР SEE-IT
⭐
⭐
⭐
⭐
⭐
Адресс:
Рязанский проспект д 77
Телефон:
74997542054
Сайт:
n/a
Время работы
Круглосуточно
РЕМОНТ ШВЕЙНОГО ОБОРУДОВАНИЯ В МСК
⭐
⭐
⭐
⭐
⭐
Адресс:
ул. Новокузнецкая д.39, стр. 1,
Телефон:
79603338462
Сайт:
n/a
Время работы
Ежедневно: с 0900 до 2000
UTYUZHOK-SERVIS
⭐
⭐
⭐
⭐
⭐
Адресс:
Измайловский бульвар 43
Телефон:
79163322414
Сайт:
n/a
Время работы
Будни: с 1000 до 2000
Суббота: с 1000 до 2000
Воскресенье: с 0000 до 0000
РЕМОНТ ШВЕЙНЫХ МАШИН
⭐
⭐
⭐
⭐
⭐
Адресс:
Ереванская ул., д.2, кор.1
Телефон:
79175442207
Сайт:
n/a
Время работы
Ежедневно: с 0900 до 2100
-
Страница 1
Owner´s manual coverlock 4852[…]
-
Страница 2
[…]
-
Страница 3
Parts of the coverlock 4852 1 Upper needle-thread tension 2 Upper needle-thread tension 3 Carry handle 4 Thread tension/upper looper thread 5 Thread tension/lower looper thread 6 Thread tension/two-thread chainstitch looper/cover stitch looper 7 Looper cover 8 Blade guard 9 Looper disengaging lever 10 Standard presser foot 11 Needle plate 12 Swivel[…]
-
Страница 4
[…]
-
Страница 5
This household sewing machine is designed to comply with IEC/EN 60335-2-28 and UL1594 IMPORT ANT SAFETY INS TRUCTIONS When using an electrical appliance, basic safety precautions should always be followed, including the following: Read all instructions before using this household sewing machine. D ANGER — T o r educe the risk of electric shock: •[…]
-
Страница 6
[…]
-
Страница 7
Simple, up-to-date sewing Congratulations! Y ou have bought a high-quality product that provides unique advantages. Y our new coverlock 4852 can take any material in its stride and will sew through thick and thin for you. Y our PF AFF coverlock features the very latest in design and technology , and it is just as simple to operate as this instructi[…]
-
Страница 8
6 Page Accessories …………………………………………………………………………………………………. 6 Accessories, optional …………………………………………………………………………………… 62, 63 Accessory box ………………………………………………………………….[…]
-
Страница 9
7 Page Sewing problems and their solutions ……………………………………………………………. 61 Specifi cations ………………………………………………………………………………………………. 64 Spool dise ………………………………………………………………………………..[…]
-
Страница 10
8 8 Accessory box Open the accessory box 49 by gently pressing the bottom of the box inwards. The following accessories can be found in the box: 1 Thread nets (5) 2 Overlock needle system EL X 705, cat. no. 2002 3 Thread unreeling discs (5) 4 T ransparent presser foot (F) for cover stitch and two thread chainstitch 5 Clip on thread guide 6 Cleaning[…]
-
Страница 11
9 9 Connecting the foot control Connect the plug of the foot control to the connection socket 39 of the machine. The sewing speed is regulated by activating the foot control. Y ou may also regulate the sewing speed by adjusting the slide on the front side of the foot control. Setting 3 = half of fi nal speed Setting 8 = full fi nal speed Electric[…]
-
Страница 12
10 10 Looper cover Push the looper cover 7 fully to the right and then swivel it down. Five types of stitches and their threading paths are portrayed in color on the inside of the looper cover . Note: The electricity supply of the machine is cut off as soon as the looper cover or swivel plate 12 is opened, for safety reasons, i.e. sewing with the m[…]
-
Страница 13
11 11 Spool holder Before placing thread cones/spools on machine you must pull the spool holder 34 fully away from the back of machine. T elescopic thread guide Pull the telescopic thread guide 32 upwards to its highest position. T o ensure optimum thread feed, turn the telescopic parts slowly until you hear the locking balls fl ick into place. Th[…]
-
Страница 14
12 12 Spool disc/cone thread adapter It is advantageous to use the spool dise 37 when sewing with large spools (5,000 10,000 m). T o do this, place the cone thread adapter 36 onto the spool pin 35 . With synthetic threads, the spool discs help eliminate vibration of the cones/spools aiding in smoother feeding of the threads. Clip on thread guide Us[…]
-
Страница 15
13 13 Presserfoot With standard presser foot 10 use setting ”A” on the spring loaded presser foot latch for the cover stitch (Prog. 02), the 2 thread chainstitch (Prog. 01), the 5 thread safety stitch seam (Prog. 09) and the 4 thread safety stitch seam (Prog. 08). T ransparent presser foot F from the accessories can also be used for the cover s[…]
-
Страница 16
14 14 Needle position This machine has 4 needle positions and can sew with a maximum of two needles at any one time. The needle positions are 1 1, L2, R11 and R2. The fastening screw is located directly above the corresponding needle. The different needle positions are depicted in a schematic drawing in the instruction manual. Also refer to the exa[…]
-
Страница 17
15 15 Changing the needle Switch off the electrical power T o remove: Lower the presser foot and move the needle(s) to the highest position by turning the handwheel towards you. Push the needle inserting tool (from the accessory box 49 ) from below upward fully over the needle. Loosen the fastening screw of the needle (without removing it) with the[…]
-
Страница 18
16 16 Threading the thread guides Place the spools on the spool pins 35 . Y ou will fi nd information on the thread net, thread unreeling disc, spool disc and cone thread adapter on pages 9 and 10. Thread through the thread guides 31 from the back to the front following the colored threading paths. Lift the carry handle 3 upwards. Thread through t[…]
-
Страница 19
17 17 Threading the upper overedge looper (pink) T urn the handwheel towards you until the upper overedge looper 18 is in its highest position. Thread in a sequence of 1 to 8. Note: T o make this task easier , use the tweezers which can be found behind the swivel plate. Thread through the thread guides 1 to 7 , which are marked with a pink dot. Thr[…]
-
Страница 20
18 18 Threading the lower overedge looper (yellow) T urn the handwheel towards you until the lower overedge looper 19 is on the extreme right. Thread in a sequence of 1 to 10. Note: T o make this task easier , use the tweezers which can be found behind the swivel plate.[…]
-
Страница 21
19 19 Thread through the thread guides 1 to 8, marked yellow . Thread from the front through the eye of the lower overedge looper C (= threading point 10 ). Press lever A downwards and hook the thread into guide B . Please also refer to the drawing below . Note: The lever returns automatically to its position as soon as you start sewing. Pull appro[…]
-
Страница 22
20 20 Threading the two thread chainstitch looper and cover stitch looper (violet) for the chainstitch T urn the handwheel towards you until the two thread chainstitch looper 20 is on the extreme right. Thread in a sequence of 1 to 11. Note: T o make this task easier , use the tweezers which can be found behind the swivel plate.[…]
-
Страница 23
21 21 Thread the thread guides which are marked with a violet square in a sequence of 1 to 9. Thread from the front through eye C of the two thread chainstitch looper and the cover stitch looper (= threading point 11). Push lever A upward and hook the thread into slot B . Also refer to the drawing below . Note: The lever returns automatically to it[…]
-
Страница 24
22 22 Exception: Threading the two-thread chainstitch looper and cover stitch looper for the cover stitch (violet) (Prog. 02) T urn the handwheel towards you until the two thread chainstitch looper 20 is on the extreme right. Thread in a sequence of 1 to 10. Note: T o make this task easier , use the tweezers which can be found behind the swivel pla[…]
-
Страница 25
23 23 Thread the thread guides, as shown in the diagram, in a sequence of 1 to 8 . Some of the threads guides are marked with a violet square. Thread from the front through eye C of the two-thread chainstitch looper and the cover stitch looper (= threading point 10). Press lever A upward and hook the thread into slot B . Also refer to the drawing b[…]
-
Страница 26
24 24 Threading the needles Thread in a sequence of 1 to 8. Note: T o make this task easier , use the tweezers which can be found behind the swivel plate. The thread must be guided through the lower slot of thread guide 4 . Pull approximately 4” (10 cm) of thread through the looper and place it to the left under the presser foot. Note: For the co[…]
-
Страница 27
25 25 The thread must be guided through the upper slot of thread guide 5 . Exception: Threading needle L2 when sewing a 5- thread safety-stitch seam (Prog. 09), a 4- thread safety-stitch seam (Prog. 08) and a 2-thread chainstitch (Prog. 01) Thread in a sequence of 1 to 9 . Note: T o make this task easier , use the tweezers which can be found behind[…]
-
Страница 28
26 26 Important note on threading The needle(s) must always be threaded last so that the needle threads do not run under the looper thread as seen in drawing 1, but instead over the looper thread as depicted in drawing 2. Should this sequence not be followed, thread breakage or missed stitches can occur . If the looper threads break, you must pull […]
-
Страница 29
27 27 Needle threader Move the needle(s) into the highest position and lower the presser foot. Place the thread from right to left in notch A of the needle threader (to be found in the accessory box). One of the two triangles must point upwards. Place the needle threader onto the front groove of the needle. Slide the needle threader down to the nee[…]
-
Страница 30
28 28 Overview of the threading paths and threading sequences Program 01: 2-thread chainstitch Program 03: 2-thread fl atlock, narrow Program 11: 2-thread serging, narrow Program 12: 2-thread rolled hem Program 13: folded 2-thread rolled hem Program 02: cover stitch Program 04 2-thread fl atlock, wide[…]
-
Страница 31
29 29 Overview of the threading paths and threading sequences Program 05: 3-thread overedge. narrow Program 14: 3-thread rolled hem Program 15: folded 3-thread rolled hem Program 16 3-thread fl atlock, narrow Program 07 4-thread overedge seam Program 06: 3-thread overedge, wide Program 17: 3-thread serging, wide Program 18: 3-thread fl atlock, wi[…]
-
Страница 32
30 30 Overview of the threading paths and threading sequences Program 09: 5-thread safety-stitch seam Program 10: 2-needle 3-thread assembly seam Presser foot pressure The pre-set presser foot pressure on the machine is suitable for medium heavy fabrics. The presser foot pressure does not need to be adjusted for most fabrics. If you are working wit[…]
-
Страница 33
31 31 Thread chain cutter After fi nishing the seam, sew an approx. 6” — 8,1” (15 20 cm) long thread chain. Pull the thread chain from the right to left over the thread chain cutter 33 . This will cut off the thread chain. Clamp spring for serging thread chain 25 Using this feature you can secure the thread chain at the start of the fabric by […]
-
Страница 34
32 32 Disengaging the upper blade Switch off the electrical power Move the movable upper blade 23 into its highest position by turning the handwheel towards you. Remove the waste container and open the looper cover and the swivel plate. Push the knob for lowering the upper blade 27 fully to the right. T o lower the upper blade turn the knob towards[…]
-
Страница 35
33 33 Swiveling stitch width latch For standard overlock seams: The swiveling stitch width latch 22 remains in the basic position when sewing all types of standard overlock seams (exception: Program 01, 02). For rolled hems: Pull knob (A) to the right and swivel the swiveling stitch width latch 22 downwards. This setting allows you to sew all types[…]
-
Страница 36
34 34 Attaching the converter Switch off the electrical power The converter 28 must be attached for all two thread seams (exception: Program 01) and the two needle three thread assembly seam. Open the swivel plate and remove the converter 28 from its storage place. Push the tip of the converter into the back side of the upper overedge looper until […]
-
Страница 37
35 35 Setting the seam width The required seam width can be adjusted anywhere between 3.5 and 6 mm by turning the adjusting knob for seam width 13. The setting can be seen through the viewing window 14 . The two thread chainstitch is sewn with a clearance of 6.5 to 9 mm. Illustration A: Should loops project out of the workpiece, move the movable up[…]
-
Страница 38
36 36 Adjusting the machine to the cover stitch (Prog. 02) and two thread chainstitch (Prog. 01) This is only necessary if you do not want to trim the fabric edge. Insert the needle(s) (see page 13) according to the overview of the threading paths and threading sequences (see page 26). Open the looper cover and remove the blade guard 8 by pulling i[…]
-
Страница 39
37 37 Press the power table 50 downwards into the designated slot on the looper cover . Close looper cover . Note: Please ensure that the upper overedge looper is disengaged before attaching the power table 50 . T o return the machine to its previous settings after sewing with the cover stitch or two thread chainstitch: Open the looper cover and re[…]
-
Страница 40
38 38 Differential feed The differential feed consists of two feed dogs ( A + B ), one behind the other , which feed the fabric. The movement of the front feed dog ( A ) and thus the amount of material to be fed can be regulated using the regulator wheel 41 . The setting range is between 0.5 and 2.0. The standard setting is 1.0, where the movement […]
-
Страница 41
39 39 Set the regulator wheel for the differential feed 41 to 2.0. Here the front feed dog feeds twice as fast as the rear feed dog. This means that the front feed dog feeds twice as much fabric as the rear feed dog, causing the material to gather . Here you will avoid stretching in the seam when working with knitwear , such as jerseys or gathered […]
-
Страница 42
40 40 Adjusting the stitch length Y ou can set the desired stitch length between 0.5 mm to 4.0 mm by turning the stitch length adjustment knob (42) . Note For the two thread chainstitch, the setting should be 3.0 or higher . Removing the needle plate Raise the presser foot and move the needle(s) to the highest position. Remove the presser foot and […]
-
Страница 43
41 41 Securing the upper blade Switch off the electrical power It is recommended to secure the movable upper blade 23 before sewing heavy fabrics. Raise the needle(s) to its highest position and open the swivel plate. T ighten the screw fully using the Allen key . This screw should always be slightly loosened again after sewing heavy fabrics. Note:[…]
-
Страница 44
42 42 Program Application Needle position Stitch length Stitch width Program 01 2 thread chainstitch Joining fabric layers where a traditional pressed open seam is required. Also works well as a basting stitch for test fi tting garments. 3-4 3.5 Program 02 Cover stitch Sewing hems and fancy stitches. 3-4 3.5 Program 03 2-thread fl atlock, narrow […]
-
Страница 45
43 43 Stitch width latch 22 ■ = top ® = bottom Looper disengaging level 9 Power table 50 ● = with ° = without Converter 28 ■ = with ® = without Thread tension The value refer to medium-heavy fabrics and normal polyester thread blue green pink yellow violet ® ▼● ® 5.0 2.0 ® ▼● ® 6.0 6.0 1.0 ■▲ ° ■ 1.5 5.0 ■▲ ° ■ 1.[…]
-
Страница 46
44 44 Program Application Needle position Stitch length Stitch width Program 10 2-needle, 3-thread assambly seam Joining and simultaneous serging of light, very stretchy fabrics. 2 5.5 Program 11 2-thread serging, narrow Serging light fabrics. 1.5 5.5 Program 12 2-thread rolled hem Serging very light fabrics. Decorative edges. 1-2 5.5 Program 13 Fo[…]
-
Страница 47
45 45 Stitch width latch 22 ■ = top ® = bottom Looper disengaging level 9 Power table 50 ● = with ° = without Converter 28 ■ = with ® = without Thread tension The value refer to medium-heavy fabrics and normal polyester thread blue green pink yellow violet ■▲ ° ■ 5.0 4.0 1.0 ■▲ ° ■ 4.0 1.0 ® ▲ ° ■ 1.5 6.0 ® ▲ ° ■ […]
-
Страница 48
46 46 I mportant notes on sewing with the cover stitch The power table is marked with various units of measurement. The upper fi gures are in cm. The lower fi gures are in inches. Note: The hemmer guide H2 is available as an optional accessory . With this optional accessory you can hem your fabric effortlessly without having to press under the he[…]
-
Страница 49
47 47 2. If sewing on a tubular item, i.e. pant or sleeve hem: Sew around tubular item, oversewing 4-5 stitches at the beginning of your seam ’ After the last stitch, turn the hand wheel towards you until the needles pierce the fabric and you have heard each needle ”click” (just before the needles are in the lowest position). Edge guide Push […]
-
Страница 50
48 48 Stitch formation correction measures cover stitch Program 02 When all tensions are correctly set, the needle threads (green and blue) are just slightly visible on the underside of the fabric. The looper thread (violet) is situated loosely in between. The right needle thread (green) is too loose, causing large loops on the underside of the fab[…]
-
Страница 51
49 49 5-thread safety-stitch seam Program 09 Since the 5-thread safety stitch seam con- sists of the 2-thread chainstitch and the 3- thread overedge seam, you can refer to the correction possibilities of these seam below and on page 49. 4-thread safety-stitch seam Program 08 Since the 4-thread safety stitch seam consists of the 2-thread chainstitch[…]
-
Страница 52
50 50 4-thread overedge seam Program 07 When all tensions are correctly set, the loops of both looper threads (pink and yellow) are directly on the edge of the fabric. The needle threads (blue and green) are too loose, causing larger loops of needle thread on the underside of the fabric. Set the blue and green thread tension to a higher value. The […]
-
Страница 53
51 51 3-thread overedge seam narrow and wide Program 05 and 06 When all tensions are correctly set, the loops of both looper threads (pink and yellow) are directly on the edge of the fabric. The upper looper thread (pink) appears on the underside of the fabric. Set the pink thread tension to a higher value and/or the yellow thread tension to a lowe[…]
-
Страница 54
52 52 3-thread fl atlock narrow and wide Program 16 and 18 The needle thread is too tight. Set the needle thread tension (blue) to a lower value. The upper looper thread (pink) appears on the underside of the fabric. Set the pink thread tension to a higher value. The l ower looper thread (yellow) is too loose. Set the yellow thread tension to a hi[…]
-
Страница 55
53 53 2-thread fl atlock narrow and wide Program 03 and 04 When all tensions are correctly set, the loops of both threads are directly on the underside of the fabric. Note: The converter (see page 32) must be attached to sew the 2-thread fl atlock seam. The needle thread is too loose or the lower looper thread (yellow) is too tight. Set the relev[…]
-
Страница 56
54 54 3-thread rolled hem Program 14 The upper needle thread (green) is too loose. Set the green thread tension to a higher value The upper looper thread (pink) appears on the underside of the fabric. Set the pink thread tension to a higher value and/or the yellow thread tension to a lower value. The lower looper thread (yellow) appears on the top […]
-
Страница 57
55 55 3-thread rolled hem (folded) Program 15 The upper looper thread (pink) only partly loops around the fabric edge. Set the pink thread tension to a lower value and/or the yellow thread tension to a higher value. The upper needle thread (green) is too loose. Set the green thread tension to a higher value. The lower looper thread (yellow) appears[…]
-
Страница 58
56 56 2-thread rolled hem Program 12 Note: The converter (see page 32) must be attached to sew the 2 thread rolled hem. The upper needle thread (green) is too tight. Set the green thread tension to a lower value and/or the yellow thread tension to a higher value. The lower looper thread (yellow) is too tight. Set the yellow thread tension to a lowe[…]
-
Страница 59
57 57 2-thread rolled hem (folded) Program 13 Note: The converter (see page 32) must be attached to sew the 2 thread rolled hem. The upper needle thread (green) is too loose. Set the green thread tension to a higher value and/or the yellow thread tension to a lower value. The lower looper thread (yellow) is too loose. Set the yellow thread tension […]
-
Страница 60
58 58 2-needle 3-thread assembly seam Program 10 Note: The converter (see page 32) must be attached to sew the 2-needle 3-thread assembly seam. The upper needle thread (green) is too loose. Set the green thread tension to a higher value. The lower needle thread (blue) is too loose. Set the blue thread tension to a higher value. The lower looper thr[…]
-
Страница 61
59 59 Fabric Thread Stitch length Light fabrics: organdy , fi ne knitwear , taffeta, silk, lining fabrics Cotton no. 50 — 70 Synthetic thread no. 70 — 140 2.0 — 4.0 mm Medium heavy fabrics: cotton, tricot, linen, dress fabrics Cotton no. 40 — 60 Synthetic thread no. 70 — 140 2.0 — 4.0 mm Heavy fabrics: tweed, suit fabrics, denim, heavy cloth Cotto[…]
-
Страница 62
60 60 Machine maintenance Cleaning the machine Switch off the electrical power Remove the waste container and open the looper cover and swivel plate. Disengage the upper blade (see page 30) and remove the presser foot and the needle plate. Use the accessory brush provided to remove any waste thread from the upper and lower blades, the differential […]
-
Страница 63
61 61 Changing the upper blade Switch off the electrical power T o remove: Set the adjusting knob for seam width to 3.5 mm. Fasten the upper blade (see page 39) before loosening the fastening screw ( A ) with the wrench provided in the accessory box. Then remove the upper blade. T o insert: Attach the new upper blade and gently tighten the fastenin[…]
-
Страница 64
62 62 Changing the light bulb Switch off the electrical power Using the screw driver in the accessory box loosen the fastening screw to the sewing light cover 16 until the cover can be removed. Push the light bulb fully into its socket. Rotate counter clockwise through half a turn and remove. Guide the new light bulb (max. 15 W) into the socket and[…]
-
Страница 65
63 63 Sewing problems and their solutions This machine has been developed with ease of operation in mind. No diffi cult or tricky set tings need to be made. Sewing problems of the kind described below may occur as a result of minor adjustment and operating errors. They can be easily adjusted by following the in structions. Problem Cause Solution N[…]
-
Страница 66
64 64 Optional accessory Order No. Use Multi-purpose foot M 29 924 993 82-002 Foot, to which guides Hl, H2 and H3 can be attached. Lace and braiding guide Hl 29 924 993 82-003 Guide for applying lace or braiding (to the under side of the fabric). Hemmer guide H2 29 924 993 82-001 Guide for hemming/turns under one inch while serging. Bias tape guide[…]
-
Страница 67
65 65 Optional accessory Order No. Use MuIti-purpose foot C 29 924 993 82-017 For sewing on bands, elastic tape, elastic thread and fi shing line together with the various elastic tape inserts. Elastic tape insert 7.5 mm 29 924 993 82-034 For sewing on elastic tape with a width up to 7.5 mm. Elastic tape insert 10 mm 29 924 993 82-035 For sewing o[…]
-
Страница 68
66 66 Specifi cations Maximum sewing speed 1300 stitches/min. Seam width 1.4 mm — 9.0 mm Cover stitch width 5 mm Stitch length 0.5 mm — 4 mm Presser foot exchangeable Lubrication manual Presser foot height 4.5 mm Overedge stroke 2.0 mm Needle system EL X 705, cat no. 2002 Needle siw 80/12, 90/14 Number of threads 2,3,4,5 Dimensions (width x height[…]
-
Страница 69
Intellectual property Patents protecting this product are listed on a label positioned underneath the sewing machine. PFAFF and IDT (image) are registered trademarks or trademarks of VSM Group AB.[…]
-
Страница 70
Parts of the coverlock 4852 31 Thread guides with color coding 32 T elescoping thread guide 33 Thread chain cutter 34 Thread spool stand 35 Thread spool pin 36 Cone thread adapter 37 Spool disc 38 Electrical power master switch 39 Machine socket, foot control 40 Handwheel 41 Regulator wheel for differential feed 42 Stitch length adjustment knob 43 […]
-
Страница 71
[…]
-
Страница 72
VSM Group AB • SE-561 84 Huskvarna • SWEDEN www .pfaff.com 29 629 000-20D • English • Inhouse • © 2004 VSM Group AB • Printed in Sweden on environmental-friendly paper[…]