
Инструкция и руководство для
Vitek VT-1550SR
118 страниц подробных инструкций и пользовательских руководств по эксплуатации на русском на испанском на французском на итальянском на чешском на немецком на польском
Vt-1550.qxp 16.12.2004 16:38 Page 2

4
13
23
32
41
49
58
68
77
85
94
102
Vita
Steam
VT-1550 SR
112
121
Vt-1550.qxp 16.12.2004 16:38 Page 3

Vt-1550.qxp 16.12.2004 16:38 Page 4

Vt-1550.qxp 16.12.2004 16:38 Page 5

4
ELECTRICAL STEAMER
Steamed products keep fragrance and nutritional benefits increasingly. Automatic double boiler
Vitek allows you taking the first step to the health food. It will not keep you waiting because due to
the fast steam formation technology steam is practically formed at the moment of turning on.
Steam cups are characterized by sufficient capacity and oval form allows cooking fish at large.
Automatic products cooking functions facilitate double boiler application. Enjoy health food and
easiness of cooking in automatic double boiler Vitek.
IMPORTANT INFORMATION
For reasons of safety before using the double boiler, please read this instruction carefully.
Double boiler
• This device generates steam that can result in burns.
• Take care of burns with outgoing steam especially when removing the cover.
• Take care while operating the double boiler – any liquid or condensate is very hot.
• Use special attachments or gloves to remove cover.
• Do not allow children and disabled people using the double boiler unattended.
• Make sure that the power cord does not hang in places where children can seize it.
• Never use the faulty double boiler. Refer to the authorized service center for repair.
• Never immerse the double boiler, power cord or power plug in water – you can be shocked.
• Never place the double boiler on stove or in oven.
• Never move the double boiler with hot products.
• Double boiler is intended only for domestic application.
Products
• Cook meat, fish and seafood up to doneness.
• Always use only defrosting products except for vegetables, fish and seafood.
• If you do not use several steam cups simultaneously then put meat, chicken or fish to the
lower basket to protect products in other steam cups from melted liquids.
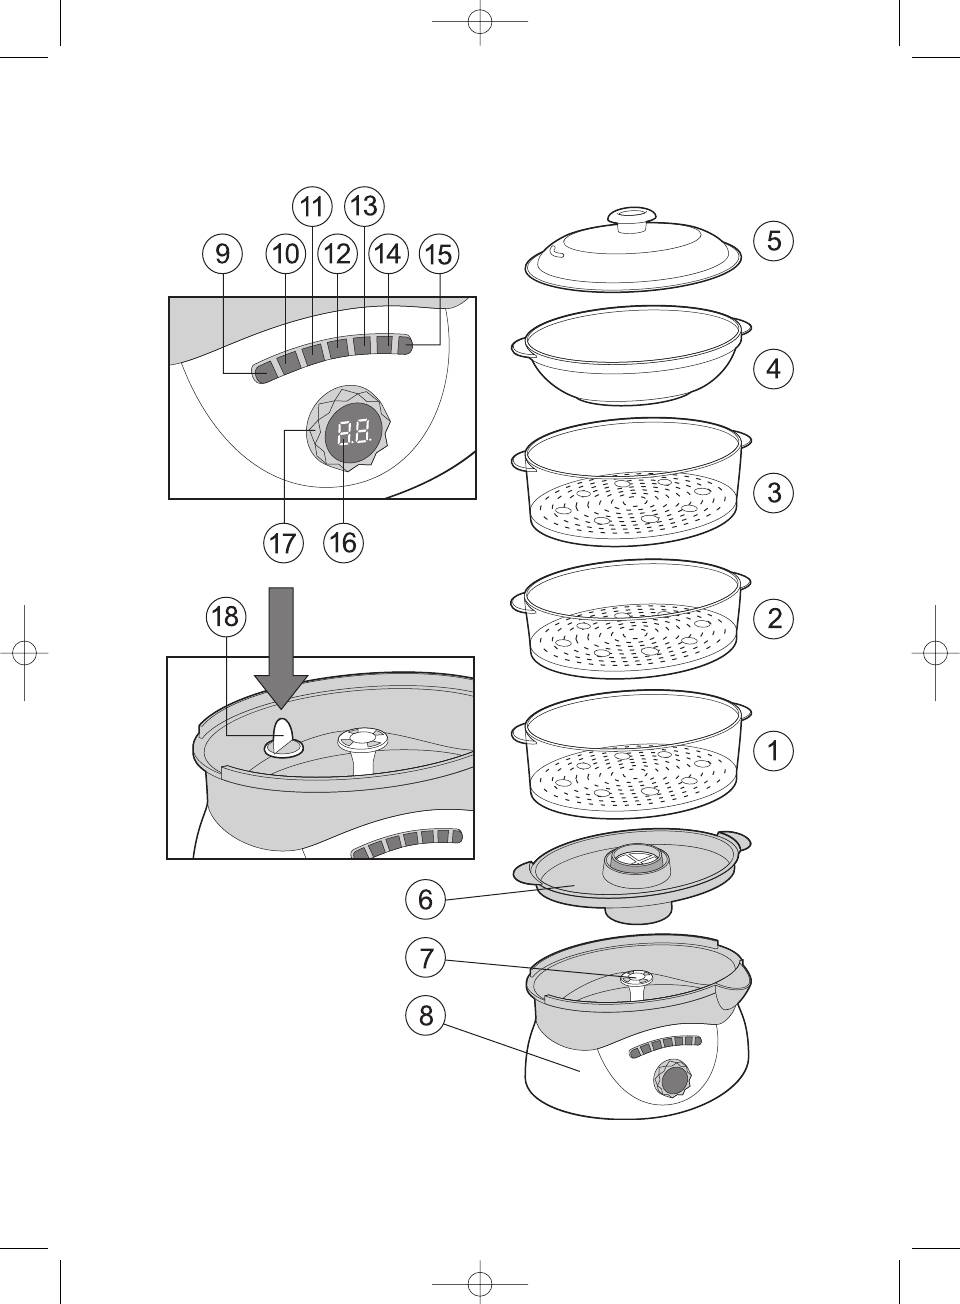
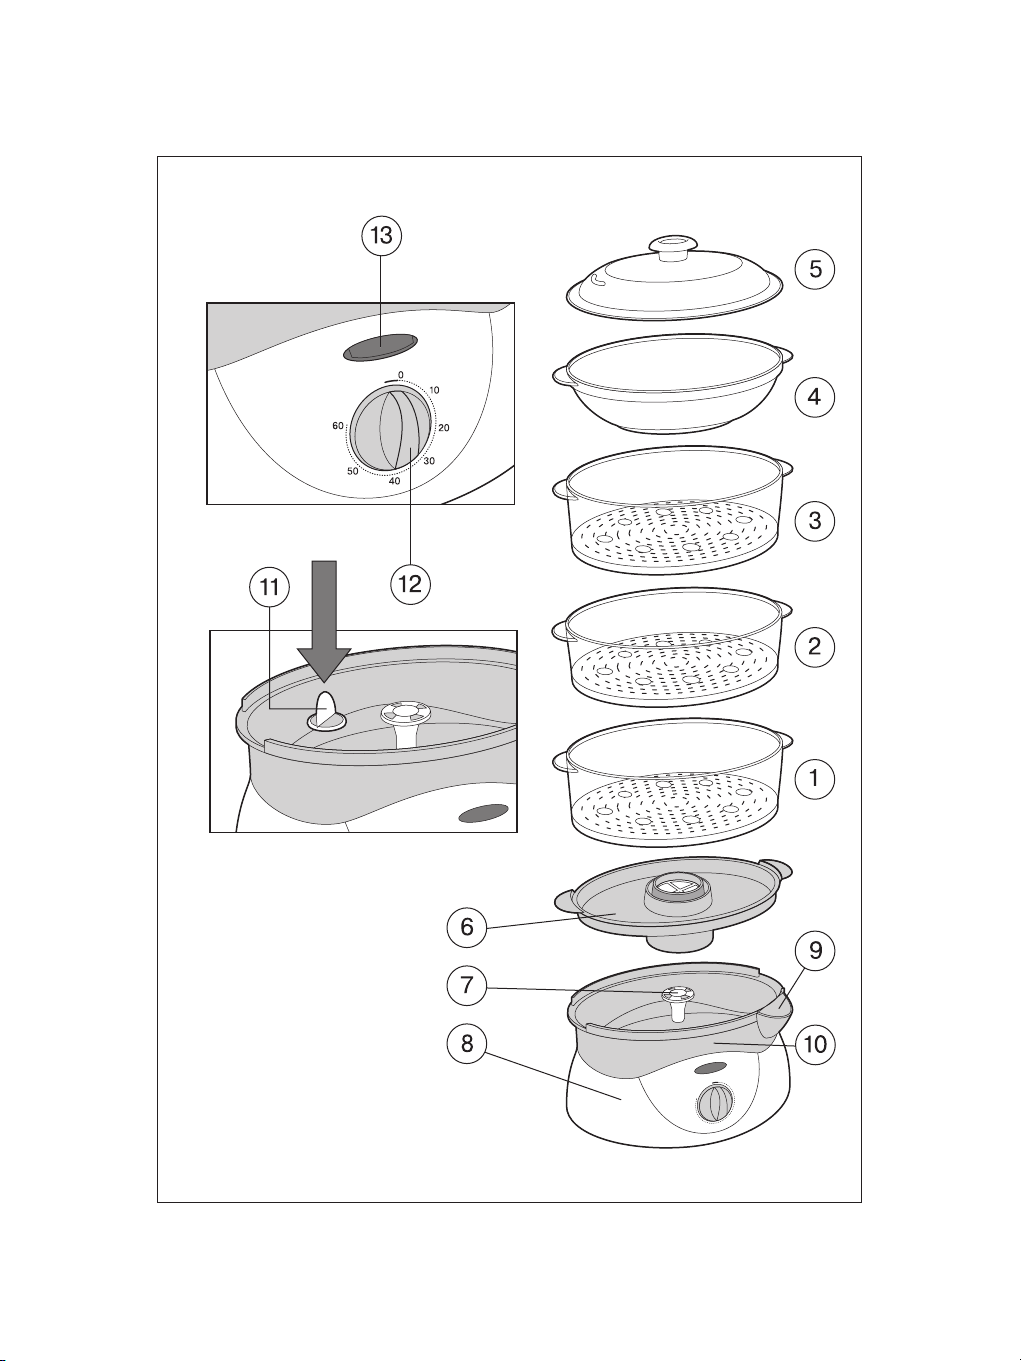
INTRODUCTION INTO DOUBLE BOILER
1. Lower steam cup
2. Medium steam cup
3. Upper steam cup
4. Bowl for rice/soup cooking
5. Cover with steam holes
6. Drain tray with filter
7. Steam sprayer
8. Double boiler casing
9. ON/OFF button
10.Mode button – Keep warm
11.Mode button – Eggs/Meat
12.Mode button – Fish/Vegetables
ENGLISH
Vt-1550.qxp 16.12.2004 16:38 Page 4

13.Mode button – Chicken
14.Mode button – Rice
15.Mode button – Soup
16.Timer
17.Timer setting knob
18.Mesh filter
BEFORE THE FIRST USING
1. Unpack the device and its components.
2. Remove all the labels and stickers.
3. Before using wash the cover, steam cups, steam sprayer and drain tray in warm soapy water.
4. Rinse and dry.
5. Wipe the internal surface of water bowl and double boiler casing with wet cloth.
BEFORE TURNING ON
• Make sure that the line voltage corresponds with operating voltage of the double boiler.
USE
1. Place the double boiler on stable surface in the distance of objects that may be exposed to
steam, for example near walls or hinged cupboards.
2. Set the mesh filter (18) to the water tank. It protects the heating coil of double boiler from
ingress of solid particles.
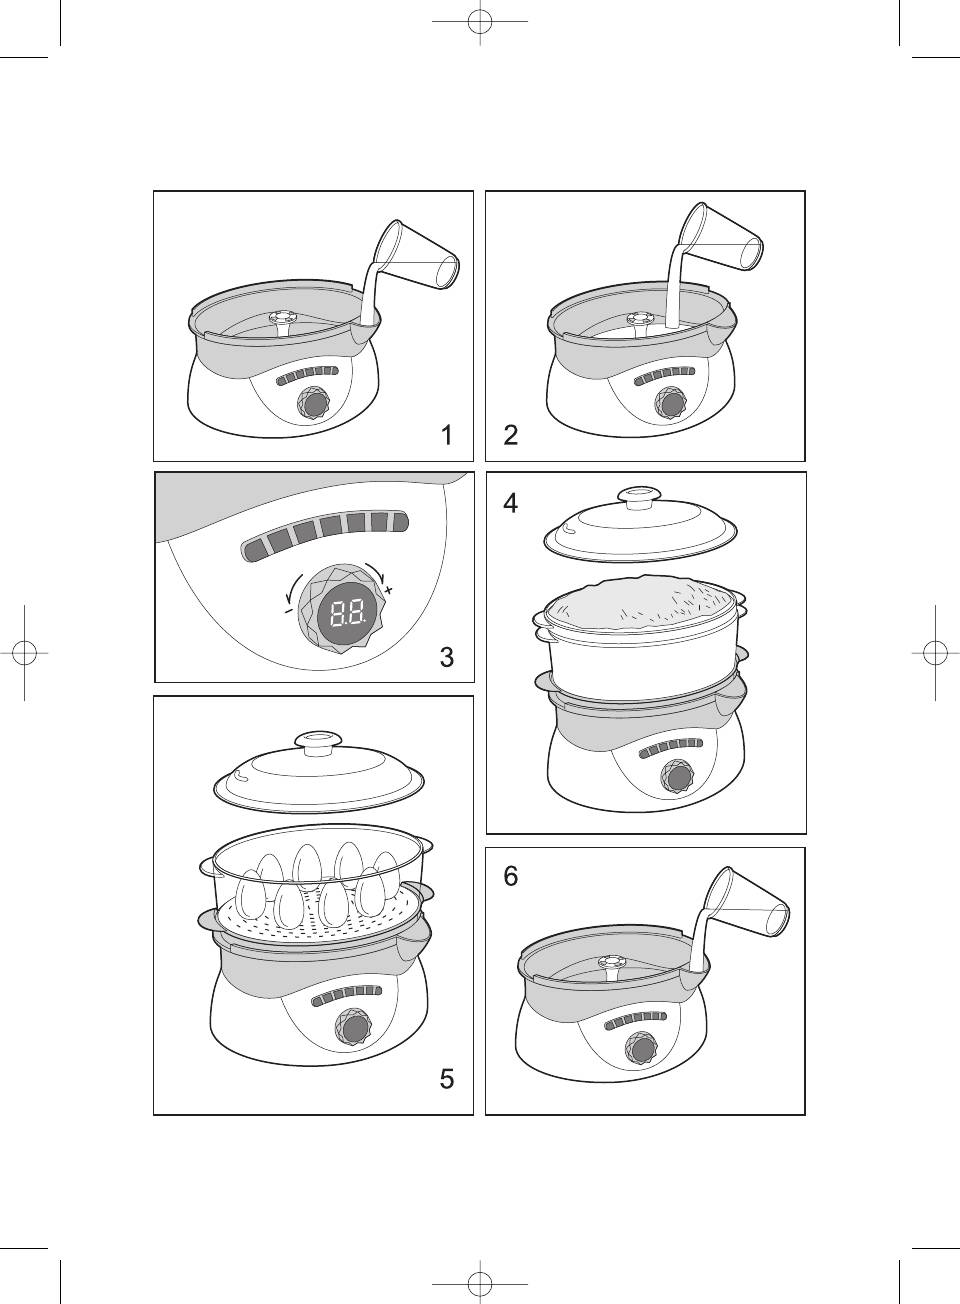
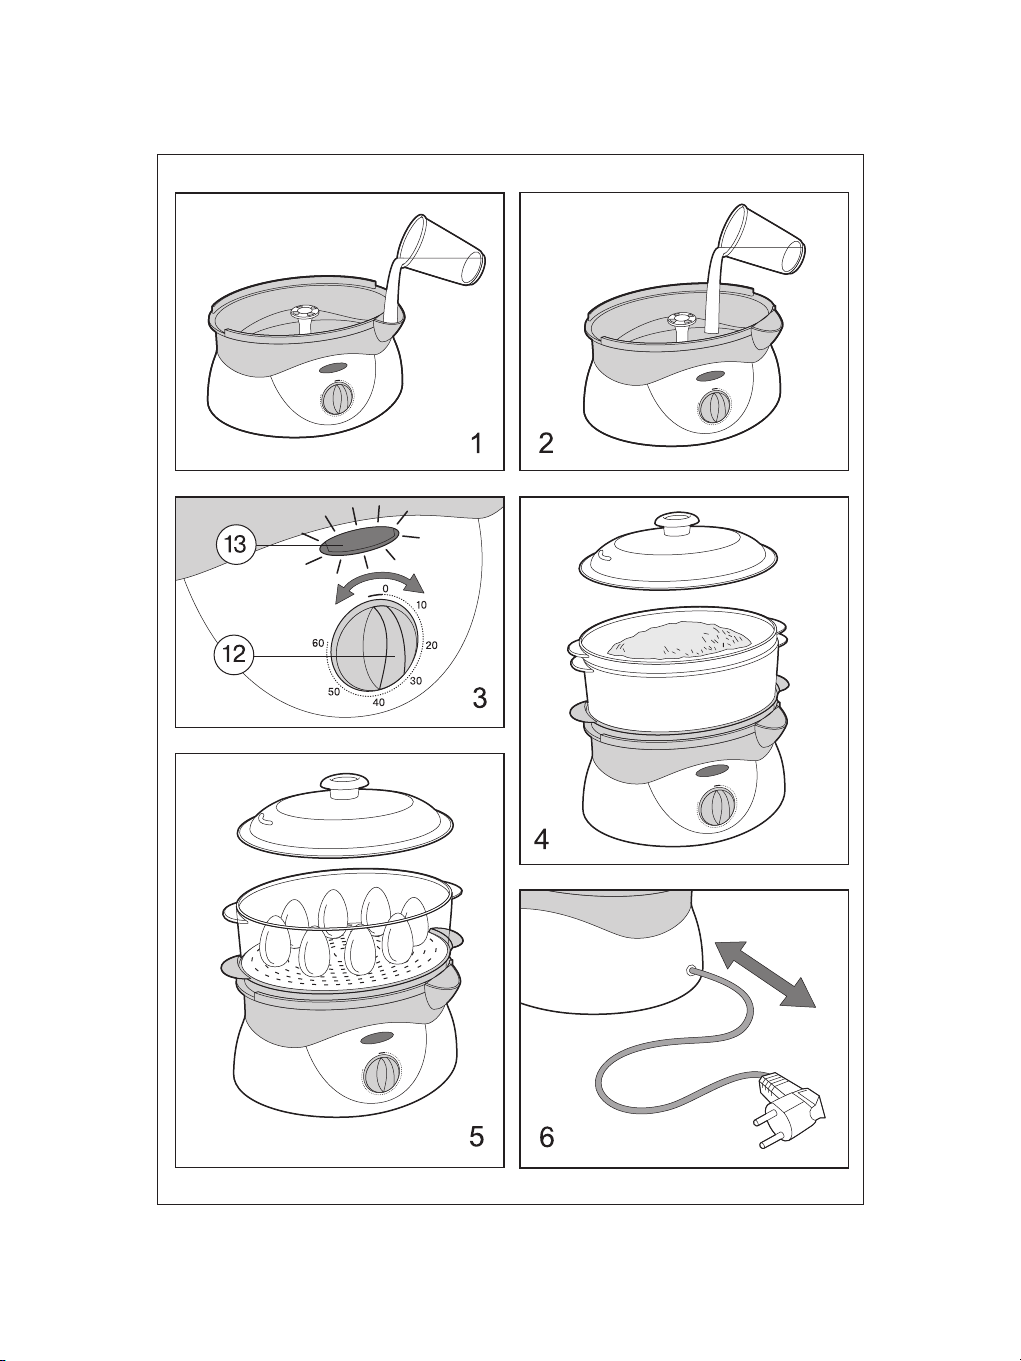
3. Pour cold water to the tank up to the mark:
«Max», if you cook more than 30 minutes;
«Min», if you cook less than 30 minutes.
Fig. 1: Water filling through the filler hole if tray is set (6).
Fig . 2: Water filling to tank of tray is removed (6).
Use the filtered water; it is characterized by reduced hardness that can avoid deposit on heating
coil. Do not pour water above the level «MAX».
Attention: Do not add salt, pepper, spices, herbs into water tank – it can damage heating
coil.
4. Set the tray (6) on water tank.
5. In order to season the products when cooking, you can add fresh or dry herbs to the tray (6).
Advices
Add fresh or dry herbs to the tray (6) to season the products. Choose the herbs to your liking:
thyme, kinza, sweet basil, fennel, curry and estragon, garlic, caraway, horseradish – it is only a
small list of famous spices. You can combine spices to lace the products with new elaborate taste.
If you use fresh herbs then it is necessary to increase volume as compared with the dry herbs in
two times and you certainly need to cut them. Set the lower steam cup (1) on tray (6) and you can
combine the steam cups set (2, 3, 4).
6. Put the products to steam cup. Large pieces of products are recommended to put to the lower
steam cup (1).
5
ENGLISH
Vt-1550.qxp 16.12.2004 16:38 Page 5

6
7. Close the upper cup with cover (5).
8. Insert the power plug to receptacle, choose one of the products cooking modes with buttons
(11 15) if necessary, set the required time for double boiler (Section TIMER SETTING). Upon
turning on the double boiler steam formation process will start approximately in 30 sec.
ATTENTION: Do not touch the double boiler, cover and steam cups when cooking – they
are very hot.
9. Upon completing the cooking process double audio signal will be heard and double boiler will
automatically switch to keep warm mode at that the symbol “
” will flash.
10. In 10 minutes 5 audio signals will be heard and double boiler will automatically turn off.
Attention: To avoid burns, use the kitchen gloves to remove cover and steam cups. Slowly
level up the cover to let off steam; keep the cover over the steam cup to drain water. Do
not touch the steam cups if you want to check the products for doneness, use the kitchen
implements with long handle.
11. Upon using cut the device off the mains. Keep waiting until the double boiler cools down and
before cleaning.
ATTENTION!
• Remember that water inside the tank may be hot though the rest of components of
the double boiler cooled down.
• Do not use the double boiler without trays, steam cups and cover.
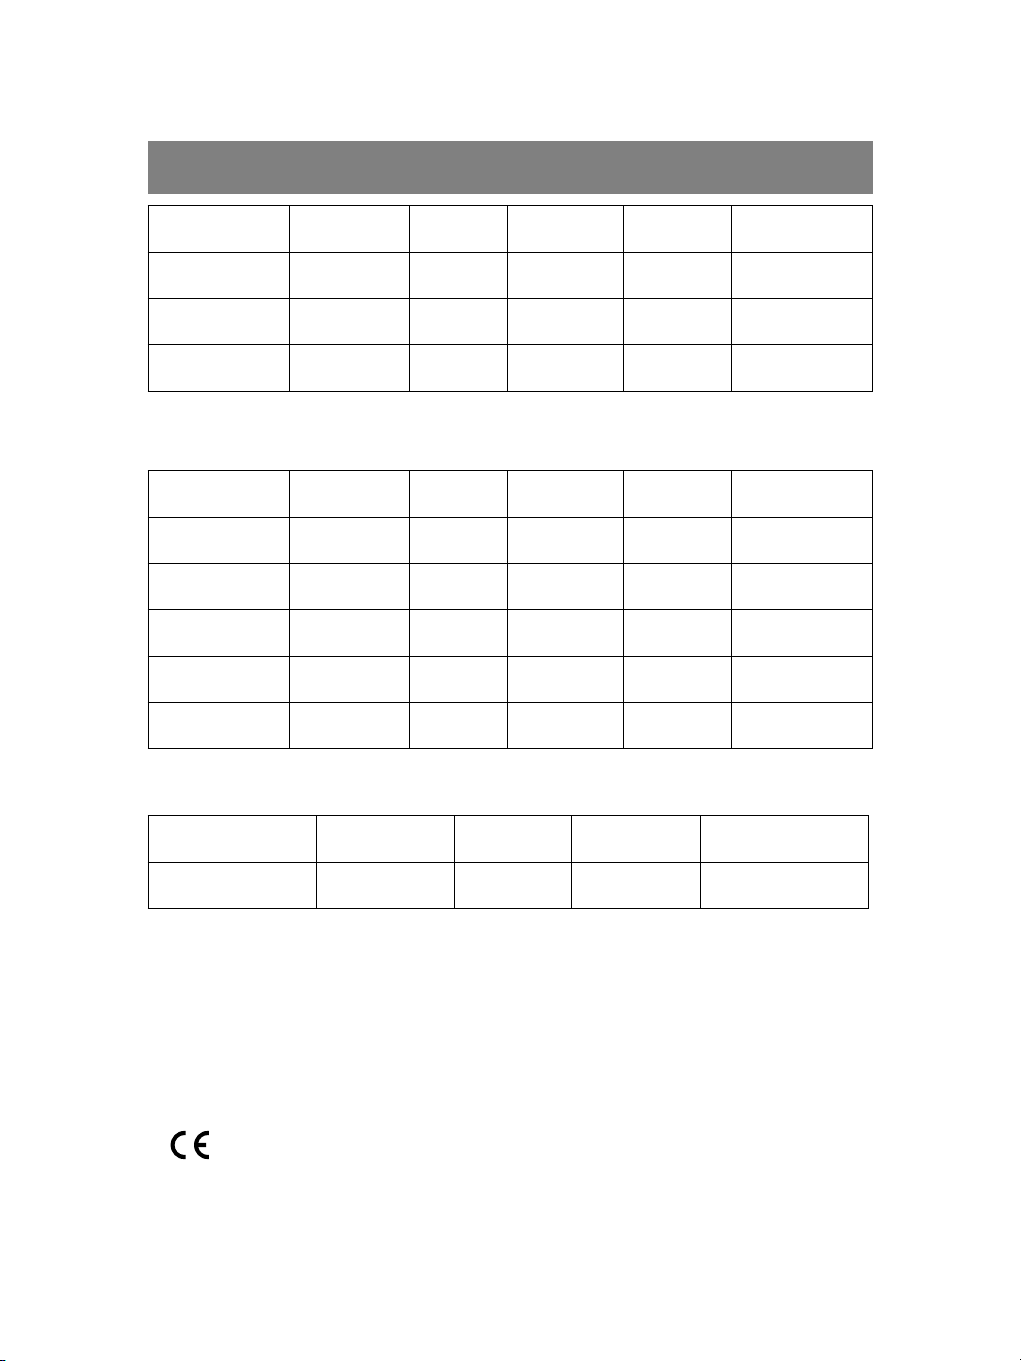
TIMER SETTING
1. Insert the power plug into receptacle, audio signal will be heard double boiler is in waiting
mode to enter automatic menu program (Fig. 3).
2. Press one of the buttons to choose automatic menu mode (10 15).
3. Double boiler has cooking automatic menu for the following categories of products:
Keep warm
Eggs/Meat Fish /Vegetables Chicken Rice
Soup
Minutes 10
15
20
30 42 60
• In order to choose the necessary cooking automatic mode, press one of the buttons
(10 15) – light indicator for the chosen mode will flash and the time of automatic
products cooking will be displayed. In order to turn on the double boiler, press the
button of chosen cooking mode again – at that the light indicator will evenly light and
after a while steam formation will start.
• If you make a mistake when choosing the automatic cooking program, press ON/OFF
button
(9) to reset erroneously entered function then press «correct» button of
ENGLISH
Vt-1550.qxp 16.12.2004 16:38 Page 6

automatic products cooking (10 15) and confirm the chosen cooking mode when
pressing the button again to turn on the double boiler.
• In order to change the products cooking time it is necessary to rotate the timer setting
knob slightly (17) counter/clockwise. Time change will be shown on the timer digital
display. In addition you can change the cooking time when choosing the automatic
cooking mode (light indicator flashes) or when cooking the products.
• In order to turn off the cooking mode, press ON/OFF button
(9); in order to turn off
the double boiler completely, keep ON/OFF button pressed
(9) for two seconds.
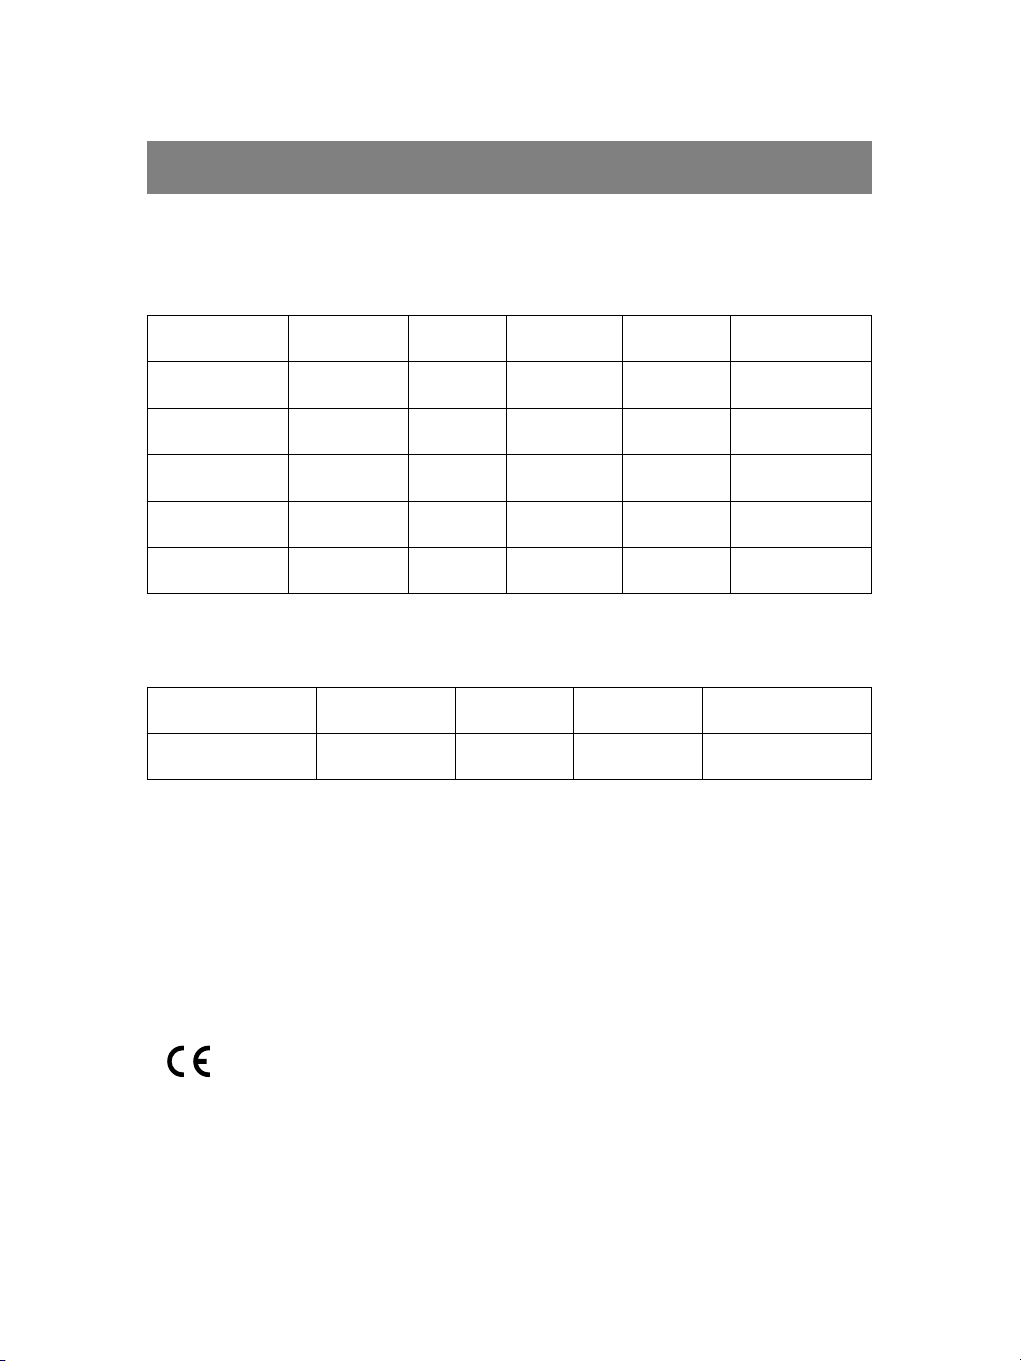
EGGS COOKING
1. Fill water to tank.
2. Set the tray (6).
3. Set the steam cup (1) on tray (6).
4. Put eggs in cavities on the bottom of steam cup (1) and close with cover (5).
5. Turn on the automatic cooking mode with button (11).
6. If necessary, set the required time of double boiler (Section TIMER SETTING).
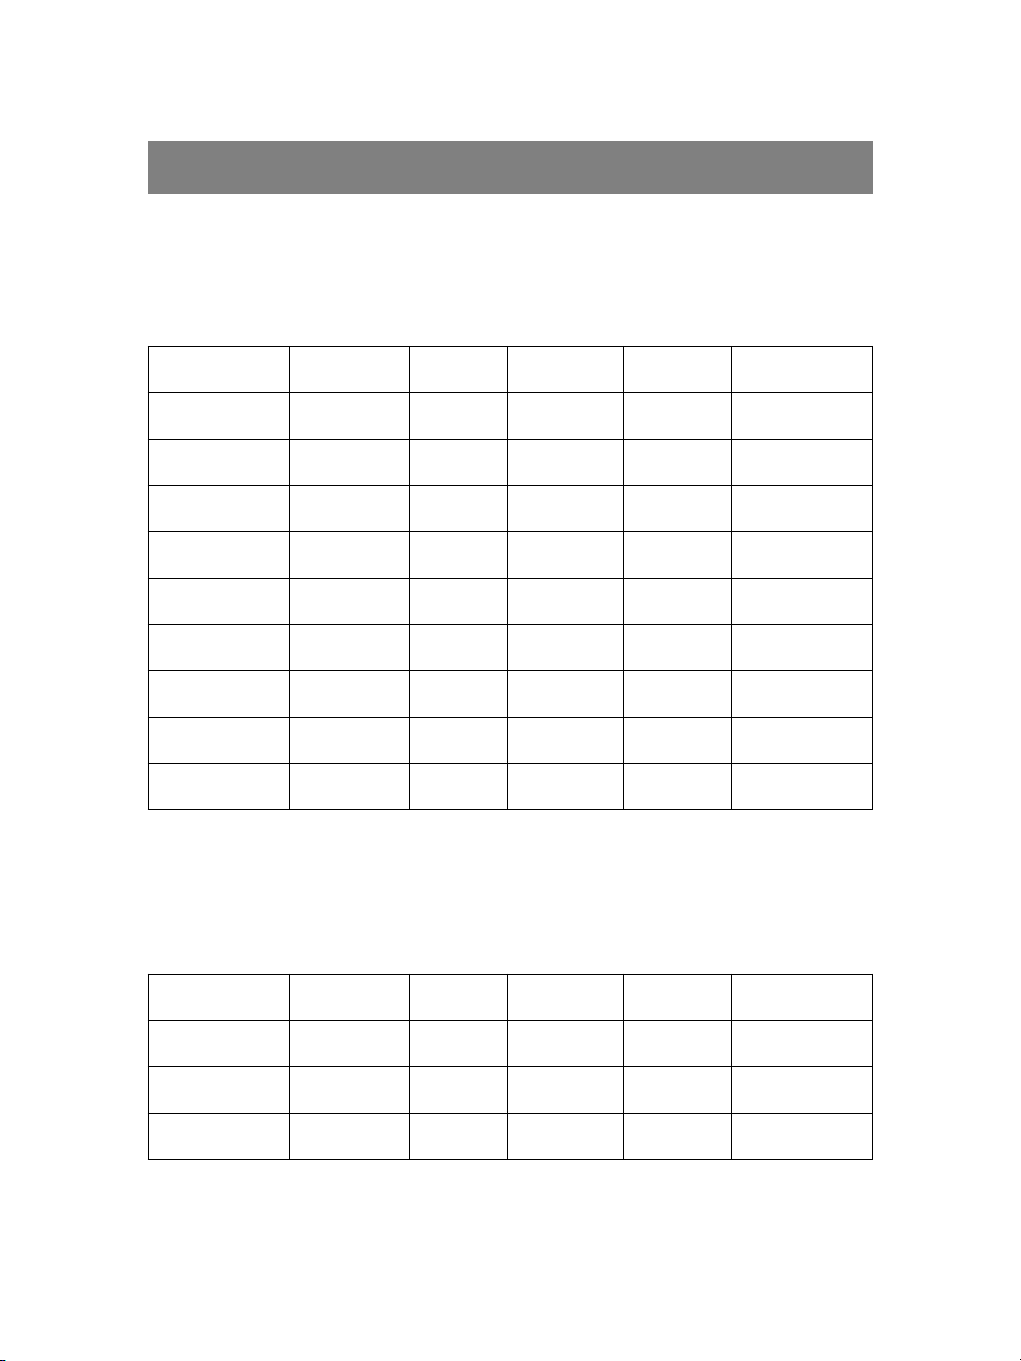
RICE COOKING
1. Fill water to tank.
2. Set the tray (6).
3. Set the steam cup (1) on tray (6).
4. Set the bowl for rice/soup cooking (4) on steam cup (1).
5. Fill 1 bowl of rice to the cup (4) and pour with 1½ glass of water. Maximum amount of rice shall
not exceed 250 g.
6. Close the cup (4) with cover (5).
7. Turn on the automatic cooking mode with button (14).
8. If necessary, set the required time of double boiler (Section TIMER SETTING).
KEEP WARM FUNCTION
Taste and nutritive properties of the cooked products are lost in length of time, that’s why use them
right after cooking, but if it is necessary to keep products hot, press the button «Keep warm» (10)
and if necessary, set the required time of operation (Section TIMER SETTING).
KEEP WARM AUTOMATIC FUNCTION
• Upon expiring the time of automatic products cooking the double boiler will automatically
switch to the mode “Keep warm”.
• Upon completing the mode “Keep warm” 5 audio signals will be heard and double boiler will
turn off automatically.
7
ENGLISH
Vt-1550.qxp 16.12.2004 16:38 Page 7

8
ADDING WATER WHEN COOKING
For the products requiring long cooking:
1. When the water level turns out to be less than minimal, periodical audio signal will be heard and
light indicator of button “
” will flash.
2. Check for water level.
3. Check for timer operation time.
4. Add water through inlet hole (Fig. 6).
5. Set the additional time of double boiler operation (Section TIMER SETTING).
NOTE
After adding water the audio signal will stop ringing and symbol “
” will stop flashing.
AUTOMATIC TURNING OFF FUNCTION
Double boiler will automatically turn off if the device is connected to mains but out of use.
In one minute two audio signals will be heard and double boiler will automatically turn off under the
following conditions:
1. Programming function has not been completed.
2. Chosen program has not been confirmed when pressing the products cooking program button
again (11 15).
Turning off the double boiler is performed when keeping the button “
” (9) pressed for two
seconds
USEFUL TIPS
1. Food cooking time indicated in Table is considered only for reference purposes it
may differ due to size of pieces, volume of products and personal taste. As far as you manage the
double boiler you can select the desired products cooking time.
2. One layer of products is cooked quicker than several layers, that’s why it is necessary to
increase the cooking time according to the volume of products.
3. In order to achieve the best result, make sure that the pieces of products are of equal size; place
the thicker pieces closer to the edges of steam cup.
4. Do not fill the steam cup completely – keep space for steam.
5. When cooking a great volume of products it is necessary to mix them periodically. At that take a
high care and use the kitchen gloves to protect hands from steam and kitchen implements with
long handle.
6. Do not add salt and spices directly in products when cooking.
7. Liquid accumulating in tray (6) is excellently suitable for soup cooking or can be used as bouillon
or base for sauce. But be more careful – it is very hot.
8. Use only completely defrosting products.
9. When using three steam cups simultaneously:
a. Always put the largest pieces of products in the lower cup.
ENGLISH
Vt-1550.qxp 16.12.2004 16:38 Page 8
b. Condensate forming on the upper basket will drain to the lower basket that’s why make
sure of taste compatibility of products to be cooked.
c. When cooking meat, chicken and vegetables always put meat in the lower cup to avoid
ingress of red meat juice to other products.
d. Cooking time of products in the upper cup is usually longer by 5 minutes.
e. When cooking products with different time of doneness, put the products that are cooked
longer to the lower cup. When the products in upper cup are cooked, you can remove it and
close the lower cup with cover and continue products cooking in this cup.
CARE AND OPERATION
CLEANING
1. It is prohibited to immerse power cord, power plug and double boiler in water.
2. Before cleaning turn off the double boiler, cut it off the mains and wait until it cools down
completely.
3. Do not use the abrasive cleaning agents, wire brush and bleaching agents when cleaning steam
baskets, tray, upper cover and double boiler casing.
4. It is recommended to wash the steam cups, bowl for rice cooking, drain tray and cover in warm
water with dishwashing agents. Dishwasher may be used if «soft» mode for dishwashing is
selected.
5. Before regular using fill fresh water to the tank.
6. Do not immerse the double boiler in water; just wipe the casing with wet cloth.
7. Wash the steam cups on regular basis.
DEPOSIT REMOVING
After 2 3 months of using deposits may be formed on heating coil of the double boiler. It is natural
process; it depends on hardness of water used. It is necessary to remove deposits regularly for
normal operation of the double boiler.
1. Fill the water tank with food vinegar.
IMPORTANT INFORMATION: Do not use the deposit removers.
2. Set the tray, steam cup, closed it with cover and turn on the double boiler.
3. Turn on any automatic cooking mode and set the operation time for 25 minutes with timer
setting knob (17).
ATTENTION! If vinegar pours out over the edges of tank then turn off the double boiler
and make sure to pour off some vinegar.
4. Upon completing the timer operation turn off the double boiler, wait until it cools down
completely before removing vinegar.
5.
Rinse the tank with cold water, fill water again, set the tray, steam cup, close it with cover, turn
on the double boiler and set the timer for 5 minutes.
6. Turn off the double boiler, wait until it cools down completely, pour off water, dry the tray,
steam cup, cover and keep stored until the next application.
9
ENGLISH
Vt-1550.qxp 16.12.2004 16:38 Page 9

10:28
Увлажнитель Vitek VT-2334 W
11:11
Пылесос Vitek VT-8100 — обзор и отзыв
17:17
Обзор кофеварки VITEK VT-1514 BK
03:20
Распаковка — Ультразвуковой увлажнитель воздуха Vitek VT-2340
14:35
Xiaomi Mijia 1C vs Vitek PRO VT-1804.Обзор роботов-пылесосов.
02:53
Пароварка Vitek VT1551
Нажмите на кнопку для помощи
| Тип управления | электронное |
| Общий объем | 11 л |
| Индикатор уровня воды | есть |
| Индикация включения | есть |
| Количество ярусов | 2 (съемные силиконовые перегородки разделяют чашу на 4 сектора) |
| Материал корпуса | пластик |
| Материал паровых корзин | пластик |
| Объем резервуара для воды | 1.4 л |
| Режим Быстрый пар | есть |
| Долив воды во время приготовления | есть |
| Звуковой сигнал | есть |
| Количество рецептов автоприготовления | 6 |
| Съемные решетки | есть |
| Таймер | 99 мин |
| Термостат | есть |
| Углубления для варки яиц | есть |
| Дисплей | есть |
| Выключение при недостатке воды | есть |
| Автоприготовление | есть |
| Автоотключение по таймеру | есть |
| Маскимальная потребляемая мощность | 1800 вт |
показать все характеристики
Великолепный дизайн пароварки VT-1560 BK, ее понятное управление, большой объем и функциональность понравится каждому пользователю. В данной пароварке предусмотрены две съемные чаши для приготовления блюд. Их уникальность заключается в наличии специальных силиконовых перегородок, которые препятствуют смешиванию запахов разных продуктов при одновременном их приготовлении. При помощи ЖК-дисплея вы быстро подберете нужный режим готовки и установите таймер. По истечении времени прозвучит характерный звуковой сигнал. Продукты в пароварке готовятся быстро за счет того, что мощное парообразование начинается спустя 15 секунд с момента включения устройства!
Vita Steam
Scent Infusor
Раздел: Бытовая, кухонная техника, электроника и оборудование
Тип: Пароварка
Характеристики, спецификации
Материал изготовления корпуса:
пластик
Материал корзин:
прозрачный пластик
Встроенные рецепты:
есть,5 рецептов
Таймер:
есть,99 мин,с автоотключением,со звуковым сигналом
Объем резервуара для воды:
1.1 л
Индикатор уровня воды:
есть
Инструкция к Пароварке Vitek VT-1550SR

Vt-1550.qxp 16.12.2004 16:38 Page 2
4
13
23
32
41
49
58
68
77
Vita
85
94
Steam
102
112
VT-1550 SR
121
Vt-1550.qxp 16.12.2004 16:38 Page 3
Vt-1550.qxp 16.12.2004 16:38 Page 4
Vt-1550.qxp 16.12.2004 16:38 Page 5

4
ELECTRICAL STEAMER
Steamed products keep fragrance and nutritional benefits increasingly. Automatic double boiler
Vitek allows you taking the first step to the health food. It will not keep you waiting because due to
the fast steam formation technology steam is practically formed at the moment of turning on.
Steam cups are characterized by sufficient capacity and oval form allows cooking fish at large.
Automatic products cooking functions facilitate double boiler application. Enjoy health food and
easiness of cooking in automatic double boiler Vitek.
IMPORTANT INFORMATION
For reasons of safety before using the double boiler, please read this instruction carefully.
Double boiler
• This device generates steam that can result in burns.
• Take care of burns with outgoing steam especially when removing the cover.
• Take care while operating the double boiler – any liquid or condensate is very hot.
• Use special attachments or gloves to remove cover.
• Do not allow children and disabled people using the double boiler unattended.
• Make sure that the power cord does not hang in places where children can seize it.
• Never use the faulty double boiler. Refer to the authorized service center for repair.
• Never immerse the double boiler, power cord or power plug in water – you can be shocked.
• Never place the double boiler on stove or in oven.
• Never move the double boiler with hot products.
• Double boiler is intended only for domestic application.
Products
• Cook meat, fish and seafood up to doneness.
• Always use only defrosting products except for vegetables, fish and seafood.
• If you do not use several steam cups simultaneously then put meat, chicken or fish to the
lower basket to protect products in other steam cups from melted liquids.
INTRODUCTION INTO DOUBLE BOILER
1. Lower steam cup
2. Medium steam cup
3. Upper steam cup
4. Bowl for rice/soup cooking
5. Cover with steam holes
6. Drain tray with filter
7. Steam sprayer
8. Double boiler casing
9. ON/OFF button
10.Mode button – Keep warm
11.Mode button – Eggs/Meat
12.Mode button – Fish/Vegetables
ENGLISH
Vt-1550.qxp 16.12.2004 16:38 Page 4

13.Mode button – Chicken
14.Mode button – Rice
15.Mode button – Soup
16.Timer
17.Timer setting knob
18.Mesh filter
BEFORE THE FIRST USING
1. Unpack the device and its components.
2. Remove all the labels and stickers.
3. Before using wash the cover, steam cups, steam sprayer and drain tray in warm soapy water.
4. Rinse and dry.
5. Wipe the internal surface of water bowl and double boiler casing with wet cloth.
BEFORE TURNING ON
• Make sure that the line voltage corresponds with operating voltage of the double boiler.
USE
1. Place the double boiler on stable surface in the distance of objects that may be exposed to
steam, for example near walls or hinged cupboards.
2. Set the mesh filter (18) to the water tank. It protects the heating coil of double boiler from
ingress of solid particles.
3. Pour cold water to the tank up to the mark:
«Max», if you cook more than 30 minutes;
«Min», if you cook less than 30 minutes.
Fig. 1: Water filling through the filler hole if tray is set (6).
Fig . 2: Water filling to tank of tray is removed (6).
Use the filtered water; it is characterized by reduced hardness that can avoid deposit on heating
coil. Do not pour water above the level «MAX».
Attention: Do not add salt, pepper, spices, herbs into water tank – it can damage heating
coil.
4. Set the tray (6) on water tank.
5. In order to season the products when cooking, you can add fresh or dry herbs to the tray (6).
Advices
Add fresh or dry herbs to the tray (6) to season the products. Choose the herbs to your liking:
thyme, kinza, sweet basil, fennel, curry and estragon, garlic, caraway, horseradish – it is only a
small list of famous spices. You can combine spices to lace the products with new elaborate taste.
If you use fresh herbs then it is necessary to increase volume as compared with the dry herbs in
two times and you certainly need to cut them. Set the lower steam cup (1) on tray (6) and you can
combine the steam cups set (2, 3, 4).
6. Put the products to steam cup. Large pieces of products are recommended to put to the lower
steam cup (1).
Vt-1550.qxp 16.12.2004 16:38 Page 5
6
7. Close the upper cup with cover (5).
8. Insert the power plug to receptacle, choose one of the products cooking modes with buttons
(1115) if necessary, set the required time for double boiler (Section TIMER SETTING). Upon
turning on the double boiler steam formation process will start approximately in 30 sec.
ATTENTION: Do not touch the double boiler, cover and steam cups when cooking – they
are very hot.
9. Upon completing the cooking process double audio signal will be heard and double boiler will
automatically switch to keep warm mode at that the symbol “
” will flash.
10. In 10 minutes 5 audio signals will be heard and double boiler will automatically turn off.
Attention: To avoid burns, use the kitchen gloves to remove cover and steam cups. Slowly
level up the cover to let off steam; keep the cover over the steam cup to drain water. Do
not touch the steam cups if you want to check the products for doneness, use the kitchen
implements with long handle.
11. Upon using cut the device off the mains. Keep waiting until the double boiler cools down and
before cleaning.
ATTENTION!
• Remember that water inside the tank may be hot though the rest of components of
the double boiler cooled down.
• Do not use the double boiler without trays, steam cups and cover.
TIMER SETTING
1. Insert the power plug into receptacle, audio signal will be heard double boiler is in waiting
mode to enter automatic menu program (Fig. 3).
2. Press one of the buttons to choose automatic menu mode (1015).
3. Double boiler has cooking automatic menu for the following categories of products:
Keep warm Eggs/Meat Fish /Vegetables Chicken Rice Soup
Minutes 10 15 20 30 42 60
• In order to choose the necessary cooking automatic mode, press one of the buttons
(1015) – light indicator for the chosen mode will flash and the time of automatic
products cooking will be displayed. In order to turn on the double boiler, press the
button of chosen cooking mode again – at that the light indicator will evenly light and
after a while steam formation will start.
• If you make a mistake when choosing the automatic cooking program, press ON/OFF
button
(9) to reset erroneously entered function then press «correct» button of
ENGLISH
Vt-1550.qxp 16.12.2004 16:38 Page 6
automatic products cooking (1015) and confirm the chosen cooking mode when
pressing the button again to turn on the double boiler.
• In order to change the products cooking time it is necessary to rotate the timer setting
knob slightly (17) counter/clockwise. Time change will be shown on the timer digital
display. In addition you can change the cooking time when choosing the automatic
cooking mode (light indicator flashes) or when cooking the products.
• In order to turn off the cooking mode, press ON/OFF button
(9); in order to turn off
the double boiler completely, keep ON/OFF button pressed
(9) for two seconds.
EGGS COOKING
1. Fill water to tank.
2. Set the tray (6).
3. Set the steam cup (1) on tray (6).
4. Put eggs in cavities on the bottom of steam cup (1) and close with cover (5).
5. Turn on the automatic cooking mode with button (11).
6. If necessary, set the required time of double boiler (Section TIMER SETTING).
RICE COOKING
1. Fill water to tank.
2. Set the tray (6).
3. Set the steam cup (1) on tray (6).
4. Set the bowl for rice/soup cooking (4) on steam cup (1).
5. Fill 1 bowl of rice to the cup (4) and pour with 1½ glass of water. Maximum amount of rice shall
not exceed 250 g.
6. Close the cup (4) with cover (5).
7. Turn on the automatic cooking mode with button (14).
8. If necessary, set the required time of double boiler (Section TIMER SETTING).
KEEP WARM FUNCTION
Taste and nutritive properties of the cooked products are lost in length of time, that’s why use them
right after cooking, but if it is necessary to keep products hot, press the button «Keep warm» (10)
and if necessary, set the required time of operation (Section TIMER SETTING).
KEEP WARM AUTOMATIC FUNCTION
• Upon expiring the time of automatic products cooking the double boiler will automatically
switch to the mode “Keep warm”.
• Upon completing the mode “Keep warm” 5 audio signals will be heard and double boiler will
turn off automatically.
Vt-1550.qxp 16.12.2004 16:38 Page 7
8
ADDING WATER WHEN COOKING
For the products requiring long cooking:
1. When the water level turns out to be less than minimal, periodical audio signal will be heard and
light indicator of button “
” will flash.
2. Check for water level.
3. Check for timer operation time.
4. Add water through inlet hole (Fig. 6).
5. Set the additional time of double boiler operation (Section TIMER SETTING).
NOTE
After adding water the audio signal will stop ringing and symbol “
” will stop flashing.
AUTOMATIC TURNING OFF FUNCTION
Double boiler will automatically turn off if the device is connected to mains but out of use.
In one minute two audio signals will be heard and double boiler will automatically turn off under the
following conditions:
1. Programming function has not been completed.
2. Chosen program has not been confirmed when pressing the products cooking program button
again (1115).
Turning off the double boiler is performed when keeping the button “
” (9) pressed for two
seconds
USEFUL TIPS
1. Food cooking time indicated in Table is considered only for reference purposes it
may differ due to size of pieces, volume of products and personal taste. As far as you manage the
double boiler you can select the desired products cooking time.
2. One layer of products is cooked quicker than several layers, that’s why it is necessary to
increase the cooking time according to the volume of products.
3. In order to achieve the best result, make sure that the pieces of products are of equal size; place
the thicker pieces closer to the edges of steam cup.
4. Do not fill the steam cup completely – keep space for steam.
5. When cooking a great volume of products it is necessary to mix them periodically. At that take a
high care and use the kitchen gloves to protect hands from steam and kitchen implements with
long handle.
6. Do not add salt and spices directly in products when cooking.
7. Liquid accumulating in tray (6) is excellently suitable for soup cooking or can be used as bouillon
or base for sauce. But be more careful – it is very hot.
8. Use only completely defrosting products.
9. When using three steam cups simultaneously:
a. Always put the largest pieces of products in the lower cup.
ENGLISH
Vt-1550.qxp 16.12.2004 16:38 Page 8

b. Condensate forming on the upper basket will drain to the lower basket that’s why make
sure of taste compatibility of products to be cooked.
c. When cooking meat, chicken and vegetables always put meat in the lower cup to avoid
ingress of red meat juice to other products.
d. Cooking time of products in the upper cup is usually longer by 5 minutes.
e. When cooking products with different time of doneness, put the products that are cooked
longer to the lower cup. When the products in upper cup are cooked, you can remove it and
close the lower cup with cover and continue products cooking in this cup.
CARE AND OPERATION
CLEANING
1. It is prohibited to immerse power cord, power plug and double boiler in water.
2. Before cleaning turn off the double boiler, cut it off the mains and wait until it cools down
completely.
3. Do not use the abrasive cleaning agents, wire brush and bleaching agents when cleaning steam
baskets, tray, upper cover and double boiler casing.
4. It is recommended to wash the steam cups, bowl for rice cooking, drain tray and cover in warm
water with dishwashing agents. Dishwasher may be used if «soft» mode for dishwashing is
selected.
5. Before regular using fill fresh water to the tank.
6. Do not immerse the double boiler in water; just wipe the casing with wet cloth.
7. Wash the steam cups on regular basis.
DEPOSIT REMOVING
After 23 months of using deposits may be formed on heating coil of the double boiler. It is natural
process; it depends on hardness of water used. It is necessary to remove deposits regularly for
normal operation of the double boiler.
1. Fill the water tank with food vinegar.
IMPORTANT INFORMATION: Do not use the deposit removers.
2. Set the tray, steam cup, closed it with cover and turn on the double boiler.
3. Turn on any automatic cooking mode and set the operation time for 25 minutes with timer
setting knob (17).
ATTENTION! If vinegar pours out over the edges of tank then turn off the double boiler
and make sure to pour off some vinegar.
4. Upon completing the timer operation turn off the double boiler, wait until it cools down
completely before removing vinegar.
5. Rinse the tank with cold water, fill water again, set the tray, steam cup, close it with cover, turn
on the double boiler and set the timer for 5 minutes.
6. Turn off the double boiler, wait until it cools down completely, pour off water, dry the tray,
steam cup, cover and keep stored until the next application.
Vt-1550.qxp 16.12.2004 16:38 Page 9
10
FOOD COOKING TIME
1. Time of cooking depends on size of products, free space in cup, freshness and personal taste.
2. Time of cooking is indicated with a view to the lower cup, products in the upper cup are cooked
longer approximately by 5 minutes.
3. Depending on small or large volume of products, increase or decrease the time of products
cooking accordingly.
VEGETABLES
• Cut the thick stalks of broccoli cabbage or thick flowerstalks of cauliflower.
• Cook green leaf vegetables for maximum short time – they lose color quickly.
• Add salt and spices after preparation.
• Frozen vegetables are not required to defrost before cooking in double boiler.
Weight/vo
Time of
Vegetables Type
lume,
Herbs
cooking
Recommendations
pcs.
(minutes)
garlic
Artichokes
Fresh 3 medium
estragon
4550 Cut stalks
fennel
citriodora
Fresh
400 g
1315
Keep space for
Asparagus
bay leaf
Frozen
400 g
1618
steam
thyme
garlic
Fresh
400 g
1618
Broccoli
paprika
Frozen
400 g
1518
estragon
anise
Agitate when
Carrot (cut) Fresh 400 g
mint
2022
cooking
fennel
rosemary
Fresh
400 g
1618
Agitate when
Cauliflower
sweet basil
Frozen
400 g
1820
cooking
estragon
Fresh
250 g
thyme
810
Agitate when
Spinach
Frozen
250 g
garlic
1820
cooking
caraway
Agitate when
Beans Fresh 400 g
fennel 1820
cooking
sweet basil
Fresh
400 g
sweet
1012
Agitate when
Peas
Frozen
400 g
marjoram
1518
cooking
(podded)
mint
Potatoes Fresh 400 g fennel 2022
MEAT AND CHICKEN
• Steam cooking of products has lots of advantages because when cooking fat is rendered from
products and drain to tray. But before products cooking it is desirable to remove excess fat.
Meat for grill is perfectly suitable for steam cooking.
• Marinade or fill meat or chicken with sauce before cooking.
• Check products for doneness when piercing.
ENGLISH
Vt-1550.qxp 16.12.2004 16:38 Page 10
• Small sausages are required to cook before steam preparing.
• Use fresh or dry herbs when cooking products to season them.
Weight/
Time of
Herbs
Products Type
Volume,
cooking
Recommendations
pcs.
(minutes)
250 g (4
curry
fillet,
1215
Chicken
pcs.)
rosemary
Cut excess fat
trotters
3035
450 g
thyme
Rump
steak,
400 g
curry
fillet,
(4 pcs.,
Pork
citriodora
510 Cut excess fat
stakes or
thickness
thyme
pieces of
2.5 cm)
fillet
Pieces of
curry
fillet,
Beef
250 g
paprika
810 Cut excess fat
sirloin or
thyme
rump
FISH AND SEAFOOD
• Fish are cooked when meat is easily flaked.
• Frozen fish and seafood may be cooked without preliminary defrosting it is only necessary to
increase time of cooking.
• Use slice of lemon when cooking fish or seafood to season them.
Weight/
Time of
Herbs
Products Type
Volume,
cooking
Recommendations
pcs.
(minutes)
250 g/40
sweet marjoram
Shellfish Fresh
810
0 g
citriodora
citriodora
Cook before
Shrimps Fresh 400 g
6
garlic
reddening
citriodora
Cook before shell
Mussels Fresh 400 g
810
garlic
opening
2 pcs.
Cook before
horseradish
Lobster Frozen
(400 g
2022
reddening
garlic
each)
Fresh,
250 g
mustard
1012
Cook before flaking
Fish fillet
frozen
250 g
sweet marjoram
68
RICE
Make sure to add only water to the water tank when using the bowl for rice boiling but you can add
other liquids to the bowl, for example wine or bouillon. You can add spices, minced onion, parsley,
almond or chipped mushrooms.
Vt-1550.qxp 16.12.2004 16:38 Page 11
12
Time of
Quantity/Water
Products Type
cooking
Recommendations
volume
(minutes)
Maximum volume of
Rice white 200 g/300 ml 3540
rice 250 g
Specifications:
Supply voltage: 220/230 V ~ 50 Hz
Consumed power: 825 W
Waterbowlbulk: 1.1l
Bowl for rice/soup/other products cooking: 1.2 l
The manufacturer reserves the right to change the device specifications without preliminary
notification.
Service time of device is min. 5 years.
ENGLISH
GUARANTEE
Details regarding guarantee conditions can be obtained from the dealer from whom the appliance
was purchased. The bill of sale or receipt must be produced when making any claim under the terms
of this guarantee.
This product conforms to the EMC-Requirements as laid down by the Council Directive
89/336/EEC and to the Law Voltage Regulation (73/23 EEC)
Vt-1550.qxp 16.12.2004 16:38 Page 12
Оглавление
Аннотация для Пароварки Vitek VT-1550SR в формате PDF
Топ 10 инструкций
Другие инструкции
FAQ: Types of Manuals and Their Contents
Vitek Vita Steam VT-1550 SR Manuals come in various types, each serving a specific purpose to help users effectively operate and maintain their devices. Here are the common types of Vitek Vita Steam VT-1550 SR User Guides and the information they typically include:
- User Manuals: Provide comprehensive instructions on how to use the device, including setup, features, and operation. They often include troubleshooting tips, safety information, and maintenance guidelines.
- Service Instructions: Designed for technicians and repair professionals, these manuals offer detailed information on diagnosing and repairing issues with the device. They include schematics, parts lists, and step-by-step repair procedures.
- Installation Guides: Focus on the installation process of the device, providing detailed instructions and diagrams for proper setup. They are essential for ensuring the device is installed correctly and safely.
- Maintenance Manuals: Provide guidance on routine maintenance tasks to keep the device in optimal condition. They cover cleaning procedures, part replacements, and regular servicing tips.
- Quick Start Guides: Offer a concise overview of the essential steps needed to get the device up and running quickly. They are ideal for users who need immediate assistance with basic setup and operation.
Each type of Vitek Vita Steam VT-1550 SR instruction is designed to address specific needs, ensuring users have the necessary information to use, maintain, and repair their devices effectively.
Related Instructions for Vitek Vita Steam VT-1550 SR:
2
VT-SMKC1
Specifications Vitek VT-SMKC1 User Manual (Specifications), @PN9WY6
2
615
99
6
VTM-TLM28P-4K
Manual PDF Manual (@939L8Z), Vitek VTM-TLM28P-4K Monitor (23rd Mar 2025)
24
1327
253
8
VT-1850
Manual instruction Vitek VT-1850 User Manual (Manual instruction), @3AJ921
24
1337
295
9
VT-1839 BK
Manual instruction Vitek Vacuum Cleaner Manual instruction (File: vitek-vt-1839-bk-manual-instruction-48, 04.01.2025)
48
175
34
10
VT-3502
Manual VT-3502 (Clock Radio ePDF Manual, #55X417)
6
84
14
Electric Steamer Devices by Other Brands:
|
Southbend R2 Operator’s Manual #A9XH88: R2 Electric Heater Operator’s manual First in Cooking Built go Last. 22 Dec 2024 | 21 |
|
|
Rasonic RSB-B2TW Operation Manual Rasonic RSB-B2TW Manual (Operation manual), @N75C8A RSB-B2TW / RSB–B2TR 04 Jan 2025 | 26 |
|
|
Philips HD9140 Operation & User’s Manual Electric Steamer #7SQAT5 注册您的产品并在以下网站链接中了解详情 12 Jan 2025 | 4 |
|
|
Shark SC637 Owner’s Manual SC637 Owner’s manual — 4685G3 U.S.: 13 Feb 2025 | 10 |
Categories:
Hot Tub
Air Conditioner
Steam Cleaner
Speaker System
Airbrushes
Media Player
4
8
14
18
23
28
33
38
43
47
52
56
61
66
MANUAL INSTRUCTION
www.vitekaus.com
MMaaggiicc SStteeaamm
VT1551 B

ELECTRIC STEAM COOKER
Steamed products better keep fragrance and nutritional benefits. Electric steamer Vitek allows you taking a further step to a healthy
food.
DESCRIPTION
1. Lower steam cup 1
2. Medium steam cup 2
3. Upper steam cup 3
4. Rice/soup cooking bowl
5. Cover with steam holes
6. Drain tray to collect condensate
7. Steam sprayer
8. Steamer casing
9. Filler opening
10. Water bowl
11. Mesh filter
12. Timer
13. Work indicator
SAFETY RULES
Before using the steamer for the first time, carefully read the operating instructions.
• Keep this manual for future reference.
• Before connecting the device to the AC power outlet, make sure that its operating voltage corresponds to the local power supply.
• Do not use the device outside the house.
• Place the device on a flat stable surface.
• Do not use the device near walls or hinged cupboards: the outgoing hot steam can damage their surface.
• Use only the accessories supplied with the device.
• Before the first use, thoroughly wash all parts that will be contacting food products.
• Before turning on, fill the water bowl with water, otherwise the device can be damaged.
• Be careful when operating the device: any liquid or condensate is very hot.
• Take care not to be burnt with outgoing steam, especially when removing the cover.
• Use special attachments or gloves to remove the cover or steam cups.
• Do not move the steamer with hot products inside.
• Do not allow children and disabled people to use the device unattended.
• Never use the steamer bowls in microwave ovens, on electric or gas stoves.
• Do not leave the device turned on without supervision.
• Disconnect the device from the power outlet when not in use, when fitting or removing the steam cups, and also before cleaning.
• Make sure that the power cord does not hang in places where children can seize it.
• Keep the appliance away from the reach of children.
• Never immerse the device, power cord or power plug into water you can get electric shock.
• Never use the device with damaged power cord or power plug. Apply to the authorized service center for repair.
• The device is designed only for domestic use.
BEFORE THE FIRST USE
• Unpack the device and remove the packing material.
• Wash the steam cups (1, 2, 3), rice/soup bowl (4), the cover (5) and drain tray (6), using a soft detergent.
• Carefully rinse and dry.
• Wipe the internal surface of water bowl (10) with a wet cloth
OPERATION
• Put the steam cooker on a flat stable surface.
• Fit the steam sprayer (7) on its place.
• Place the mesh filter (11) into the pocket in the water bowl (10).
• Fill the water bowl (10) with cold water up the “MAX” level.
• Filling the water bowl can be done in two ways: using the filler opening (9) (Pic. 1) or by pouring water directly into the water bowl
(Pic. 2).
• If during the cooking you find that the amount of water is less than the required minimum, you can add water though the filler open
ing (9), without removing the steam cups (Pic. 1).
Use the filtered water, it is characterized by reduced hardness and will be leaving less scale on the heating coil. Do not pour water
above the “MAX” level.
Warning:
Do not add salt, pepper, spices, herbs, wine, sauce into the water bowl. This can cause damage of the device.
Change water before each use of the device.
• Put the drain tray (6) on the water bowl (10) and make sure it is placed correctly.
• Put one or more steam cup (123) on the drain tray (6).
• Close the upper steam cup with cover (5).
• Insert the power cord plug into the wall socket. The power cord length can be adjusted (Pic. 6).
• Turn the timer knob (12) clockwise and set to the desired cooking time, the indicator (13) will light up (Pic.3).
ENGLISH

5
• When the preset time is finished, the steamer will automatically turn off, the sound signal will be heard and indicator (13) will go
down.
ATTENTION:
• Do not touch the device’s cover and steam cups when cooking they are very hot.
• To avoid skin burns, use the kitchen gloves to remove the cover and steam cups. Slowly raise the cover to let off steam; keep the
cover over the steam cup to drain water.
• Do not touch the steam cups if you want to check the products for readiness, use a kitchen utensil with a long handle.
• Remember that water inside the water bowl may still be hot, when the rest of the steamer components have already cooled down.
• Do not use the steamer without tray, steam cups and cover.
ADVICES ON COOKING:
• Cook meat, fish and seafood till they are fully ready.
• Always use defrosted products, exception can be done for vegetables, fish and seafood.
• When using several steam cups simultaneously, put meat, poultry or fish into the lower cup, to prevent their juice from getting into
other cups.
• Add fresh or dry herbs to the drain tray (6) to season the products. Choose the herbs to your liking: thyme, kinza, sweet basil, fen
nel, curry and estragon, garlic, caraway, horseradish this is only a small list of known spices. You can combine spices to lace the
products with a new elaborate taste. When using fresh herbs, you certainly need to cut them and their amount should be increased
23 times compared to the dry herbs.
COOKING EGGS (Pic. 5)
• Fill water into the water bowl (10).
• Install the drain tray (6).
• Put the steam cup (1,2 or 3) on the tray (6).
• Put eggs in the cavities on the steam cup bottom (1,2 or 3) and close the cup with cover (5).
• Turn on the steam cooker, setting the timer knob (12) to the desired cooking time.
COOKING RICE (Pic. 4)
• Fill water into the water bowl (10).
• Install the drain tray (6).
• Put a steam cup (1,2 or 3) on the tray (6).
• Put the rice/soup cooking bowl (4) on the steam cup.
• Add 1 cup of rice into to the rice bowl (4) and pour 1? glass of water. Maximum amount of rice shall not exceed 250 g.
• Close the rice bowl (4) with the cover (5).
• Turn on the steam cooker, setting the timer knob (12) to the desired cooking time.
ADDING WATER WHEN COOKING
For the products requiring long cooking:
Periodically check for the water level when cooking.
If necessary, add water through the filler opening (9), not removing the steam cups.
USEFUL TIPS AND RECOMMENDATIONS
• Food cooking time indicated in Tables is given only for reference purpose, it may differ due to the piece sizes, product amounts
and personal taste. As you get to know your steamer better, you can adjust the cooking time as needed.
• One layer of products is cooked quicker than several layers, therefore the cooking time should be increased according to the prod
uct amount.
• In order to achieve the best result, cut the product into pieces of equal size; place the thicker pieces closer to the steam cup edges.
• Do not fill the steam cup completely leave some space for steam.
• When cooking a large amount of products, mix them periodically. Be very careful when doing this, use kitchen gloves to protect
hands from steam and kitchen spoon with a long handle.
• Do not add salt and spices directly into products when cooking.
• Liquid accumulating on the tray (6) is excellently suitable for cooking soups or can be used as a broth. But be careful it is very hot.
• Use only completely defrosted products.
When using all three steam cups simultaneously:
Always put the largest pieces of products into the lower cup.
Condensate forming on the upper steam cup will drain to the lower cup, that’s why consider the taste compatibility of the products
to be cooked.
When cooking meat, chicken and vegetables, always put meat in the lower cup to prevent meat juice from getting onto other prod
ucts.
Cooking time of products in the upper cup is usually 5 minutes longer.
When cooking products with different cooking time, put the longer cooking products into the lower cup. When the products in upper
cup are ready, you can remove it, close the lower cup with the cover and continue cooking products in this cup.
CLEANING THE STEAM COOKER
• Before cleaning, turn off the steamer, disconnect it from the power supply and wait until it cools down completely.
• Never immerse power cord, power plug and the steamer itself into water.
• Do not use abrasive cleaning agents when cleaning the steam cups, drain tray, upper cover and the steamer casing.
ENGLISH

6
• We recommend to wash the steam cups, rice cooking bowl, drain tray and cover in warm water with dishwashing agents.
Dishwasher may be used if “soft” dishwashing mode is selected.
• Remove and wash the mesh filter (11).
• Wipe the steamer casing with a wet cloth.
• Wash the steam cups on a regular basis.
REMOVING SCALE
After 23 months of using, scale may be formed on the device heating element. This is natural and depends on the hardness of water
being used. For normal operation of the steam cooker, the scale must be removed regularly.
• Fill the water bowl with food vinegar up to the “MAX” level.
IMPORTANT INFORMATION: Do not use chemical scale removers to clean away the scale.
• Set the tray (6), a steam cup (1, 2 or 3), close it with cover (5) and turn on the steamer for 2025 minutes.
ATTENTION! If vinegar pours out over the water bowl edges, turn off the steamer and carefully pour out some vinegar.
• When the timer has stopped, turn off the steamer, wait until it cools down completely before removing the vinegar.
• Rinse the water bowl with cold water, fill water again, set the tray (6), a steam cup (1, 2, or 3), close it with the cover (5), turn on the
steamer and set the timer to 5 minutes.
• Turn off the steamer, wait until it cools down completely, pour out water, dry the tray, steam cup, and the cover and put the device
to its storage place until the next use.
FOOD COOKING TIME AND RECIPES
• Cooking time depends on the size of products, free space in the cup, product freshness and personal taste.
• The cooking time is indicated for the lower cup, products in the upper cup are cooked approximately 5 minutes longer.
• Depending on smaller or large volume of products, increase or decrease the products cooking time accordingly.
VEGETABLES
• Cut off the thick stalks of broccoli cabbage or thick flowerstalks of cauliflower.
• Cook green leaf vegetables for maximally shor t time they lose color quickly.
• Add salt and spices after preparation.
• Frozen vegetables are not required to be defrosted before cooking in the steam cooker.
MEAT AND CHICKEN
• Steam cooking of products has a lot of advantages, because when cooking, the fat melts from products and drains on the tray. But
before cooking, it is desirable to remove extra fat. Grill meat is perfectly suitable for steam cooking.
• Marinade or pour meat or chicken with sauce before cooking.
• Check the products for readiness, by piercing them.
• Use fresh or dry herbs when cooking products to season them.
ENGLISH
Vegetables Type Weight/ pcs. Herbs
Cooking time
(minutes)
Recommendations
Artichokes Fresh 3 medium
garlic
estragon
fennel
4550 Cut stalks
Asparagus
Fresh
Frozen
400 g
400 g
schizandra
bay leaf
thyme
1315
1618
Leave space for steam
Broccoli
Fresh
Frozen
400 g
400 g
garlic
red pepper
estragon
1618
1518
Carrot (cut) Fresh 400 g
anise
mint
fennel
2022 Mix when cooking
Cauliflower
Fresh
Frozen
400 g
400 g
rosemary
sweet basil
estragon
1618
1820
Mix when cooking
Spinach
Fresh
Frozen
250 g
250 g
thyme
garlic
810
1820
Mix when cooking
Beans Fresh 400 g
caraway
fennel
1820 Mix when cooking
Peas
Fresh
Frozen (podded)
400 g
400 g
sweet basil
sweet marjoram
mint
1012
1518
Mix when cooking
Potatoes Fresh 400 g fennel 2022
7
FISH AND SEAFOOD
• Fish is ready when its meat is easily flaked.
• Frozen fish and seafood may be cooked without being preliminary defrosted, only the cooking time should be increased.
• Use lemon slices when cooking fish or seafood to season them.
RICE
When cooking rice, fill water into the water bowl, and the rice cooking bowl can be filled with another liquid, for example, wine or broth.
You can add spices, minced onion, parsley, almond or chipped mushrooms.
SPECIFICATIONS:
AC voltage: 230 V ~ 50 Hz
Max. power consumption: 900 W
Water bowl capacity: 1.1 liter
Rice/soup cooking bowl capacity: 1.2 liter
The manufacturer reserves the right to change the characteristics of the device without prior warning.
Service life of the unit not less than 5 years
Guarantee
Details regarding guarantee conditions can be obtained from the dealer from whom the appliance was purchased. The bill of sale or
receipt must be produced when making any claim under the terms of this guarantee.
This product conforms to the EMCRequirements as laid down by the Council Directive 89/336/EEC and to the Low
Voltage Regulation (73/23 EEC)
ENGLISH
Products Type
Weight/
pcs.
Herbs
Cooking time
(minutes)
Recommendations
Chicken
fillet,
trotters
250 g (4 pcs.)
450 g
curry
rosemary
thyme
1215
3035
Cut excess fat
Pork
Rump steak, fillet,
stakes or pieces of
fillet
400 g
(4 pcs., 2.5 cm
thick)
curry
schizandra
thym
510 Cut excess fat
Beef
Pieces of fillet, sir
loin or rump
250 g
curry
red pepper
thyme
810 Cut excess fat
Products Type
Weight/
pcs.
Herbs
Cooking time
(minutes)
Recommendations
Shellfish Fresh 250 g/400 g
sweet marjoram
schizandra
810
Shrimps Fresh 400 g
schizandra
garlic
6 Cook till reddening
Mussels Fresh 400 g
schizandra
garlic
810 Cook till shell opening
Lobster Frozen
2 pcs.
(400 g each)
horseradish
garlic
2022 Cook till reddening
Fish fillet
Fresh
Frozen
250 g
250 g
mustard
sweet marjoram
1012
68
Cook till flaking
Products Type
Weight/
pcs.
Cooking time
(minutes)
Recommendations
Rice white 200 g/300 ml 3540
Maximum volume of rice
250 g

8
ELEKTRODAMPFGARER
Dampfgegarte Lebensmittel bewahren zum größten Teil ihr Aroma und ihren Nährwert. Der automatische Dampfgarer Vitek
hilft Ihnen einen Schritt in Richtung gesunder Ernährung zu machen.
BESCHREIBUNG
1. Unterer Gareinsatz «1»
2. Mittlerer Gareinsatz «2»
3. Oberer Gareinsatz «3»
4. Einsatz für die Zubereitung von Reis oder Suppen
5. Deckel
6. Palette für Auffangen der Flüssigkeit
7. Dampfzersträuber
8. Gehäuse des Dampfgarers
9. Einfüllöffnung
10. Wasserbehälter
11. Siebfilter
12. Timer
13. Betriebsindikator des Dampfgarers
VORSICHTSMASSNAHMEN
Lesen Sie sicherheitshalber diese Gebrauchsanweisung vor der Anwendung des Dampfgarers gewissenhaft durch.
• Bewahren Sie diese Gebrauchsanweisung als Auskunftsmaterial.
• Vergewissern Sie sich vor der Einschaltung, dass die Spannung im Stromnetz der Betriebsspannung des Dampfgarers
entspricht.
• Benutzen Sie den Dampfgarer nur in Räumen.
• Stellen Sie das Gerät auf eine glatte stabile Oberfläche auf.
• Stellen Sie den Dampfgarer auf eine stabile Oberfläche, entfernt von Gegenständen, die mit Dampf beschädigt werden
können, z.B. in der Nähe von Wänden oder Hängeschränken.
• Benutzen Sie nur das Zubehör, das zum Lieferumfang gehört.
• Vor der ersten Benutzung spülen Sie ordentlich alle Teile, die mit Lebensmitteln kontaktieren werden.
• Vor dem Einschalten des Dampfgarers füllen Sie den Wasserbehälter mit Wasser, sonst kann das Gerät beschädigt wer?
den.
• Seien Sie aufmerksam bei der Anwendung des Dampfgarers – alle Flüssigkeiten und das Kondensat sind sehr heiß.
• Hüten Sie sich vor Verbrennungen am aufsteigenden Dampf, besonders wenn Sie den Deckel abnehmen.
• Benutzen Sie zum Abnehmen des Deckels oder eines Gareinsatzes Topflappen oder Schutzhandschuhe.
• Verschieben Sie den Dampfgarer nie, wenn er heiße Lebensmittel enthält.
• Lassen Sie Kinder oder behinderte Personen den Dampfgarer nicht ohne Aufsicht benutzen.
• Stellen Sie den Dampfgarer nie in eine Mikrowelle, auf den Herd oder in den Ofen.
• Es ist verboten, den ins Netz eingeschalteten Dampfgarer ohne Aufsicht zu lassen.
• Schalten Sie das Gerät vom Netz ab, wenn es nicht benutzt wird oder beim Einsetzen der der Gareinsätze sowie vor dem
Spülen.
• Achten Sie darauf, dass das Stromkabel nicht an solchen Stellen runterhängt, wo Kinder danach greifen könnten.
• Bewahren Sie das Gerät in einem für Kinder nicht zugänglichen Platz.
• Tauchen Sie den Dampfgarer, das Stromkabel oder die Steckgabel niemals in Wasser – Sie können einen Stromschlag
bekommen.
• Benutzen Sie nicht das Gerät mit beschädigter Netzschnur oder Steckgabel. Wenden Sie sich zur Reparatur an ein
autorisiertes Service?Center.
• Der Dampfgarer ist nur für den privaten Gebrauch bestimmt.
VOR DER ERSTEN BENUTZUNG
• Packen Sie das Gerät aus und entfernen Sie das Verpackungsmaterial.
• Spülen Sie die Gareinsätze (1, 2, 3), den Einsatz für die Zubereitung von Reis oder Suppen (4), den Deckel (5) und die
Palette für das Auffangen von Flüssigkeit (6), gebrauchen Sie dabei ein sanftes Waschmittel.
• Spülen Sie sie ab und trocknen Sie sie gut ab.
• W ischen Sie das Innere des Wasserbehälters (10) und das Gehäuse des Dampfgarers mit einem feuchten Stofflappen
ab.
ANWENDUNG
• Stellen Sie den Dampfgarer auf eine glatte und stabile Oberfläche auf.
• Legen Sie den Dampfzersträuber (7) ein.
• Legen Sie den Siebfilter (11) in den Wasserbehälter (10) ein.
• Füllen Sie Wasser in den Behälter (10) bis zur Markierung «MAX».
• Das Füllen des Wasserbehälters kann man nach zwei Typen machen: ? durch die Einfüllöffnung (9) (Bild 1) oder Wasser
direkt in den Wasserbehälter füllen (Bild 2).
DEUTSCH

9
• Wenn Sie beim Kochen bemerkt haben, dass die Menge gefüllten Wassers weniger als erforderlich ist, können Sie es
durch die Einfüllöffnung (9) nachfüllen, ohne die Gareinsätze abzunehmen (Bild 1).
Verwenden Sie nur gefiltertes Wasser, es ist weniger hart, deshalb wird sich weniger Kesselstein auf dem Heizelement
bilden. Füllen Sie nicht mehr Wasser als bis zur Markierung «MAX» ein.
Achtung:
? Geben Sie in den Wasserbehälter kein Salz, Pfeffer, Gewürze, Kräuter ein, ? das Heizelement könnte dadurch beschädigt
werden.
? Wechseln Sie Wasser vor jeder Benutzung des Dampfgarers.
• Setzen Sie Palette für Auffangen der Flüssigkeit (6) auf den Wasserbehälter (10) und vergewissern Sie sich, dass sie
richtig aufgestellt ist.
• Setzen Sie auf die Palette für Auffangen der Flüssigkeit (6) eine oder mehrere Gareinsätze (1?2?3).
• Decken Sie den Gareinsatz mit dem Deckel (5) zu.
• Stecken Sie die Steckgabel in eine Steckdose. Sie können die Länge der Netzschnur regulieren (Bild 6).
• Drehen Sie die Kurbel des Timers (12) im Uhrzeigersinn und geben Sie gewünschte Kochzeit des Dampfgarers ein, dabei
leuchtet der Indikaror (13) auf (Bild 3).
• Nach dem Beenden der eingegebenen Dauer wird der Dampfgarer automatisch ausgeschaltet, dabei ertönt ein
Tonsignal und der Indikator (13) erlischt.
ACHTUNG:
• Fassen Sie während des Betriebes des Dampfgarers nicht den Deckel oder die Gareinsätze an, ? sie sind sehr heiß.
• Benutzen Sie Topflappen oder Schutzhandschuhe zum Abnehmen des Deckels und der Gareinsätze, um Verbrennungen
zu vermeiden. Heben Sie den Deckel langsam an, um den Dampf entweichen zu lassen; halten Sie den Deckel über dem
Gareinsatz, damit das Wasser von ihm ablaufen kann.
• Wenn Sie das Garsein der Lebensmittel prüfen wollen, verwenden Sie dazu ein Küchenutensil mit einem langen Griff.
• Vergessen Sie nicht, dass das Wasser im Behälter heiß sein kann, sogar dann, wenn alle anderen Bestandteile des
Dampfgarers sich schon abgekühlt haben.
• Benutzen Sie den Dampfgarer nicht, wenn die Palette, die Gareinsätze oder der Deckel nicht aufgesetzt sind.
RATSCHLÄGE:
• Bereiten Sie Fleisch, Fisch und Seekost zu, bis sie gar sind.
• Verwenden Sie immer nur aufgetaute Lebensmittel. Ausnahme gilt nur für Gemüse, Fisch und Seekost.
• Wenn Sie gleichzeitig mehrere Gareinsätze verwenden, legen Sie Fleisch, Geflügel oder Fisch in den unteren Einsatz,
damit die austretende Flüssigkeit nicht auf die Lebensmittel in den anderen Gareinsätzen rinnt.
• Geben Sie frische oder getrocknete Kräuter in die Palette (6) ein, um den Geschmack der Lebensmittel zu bereichern.
Wählen Sie die Kräuter nach Ihrem Geschmack: Thymian, Indische Petersilie, Basilikum, Dill, Curry und Estragon,
Knoblauch, Kümmel, Meerrettich – das ist nur eine kleine Aufstellung von bekannten Kräutern. Sie können Kräuter kom?
binieren, um den Lebensmitteln einen neuen köstlichen Geschmack zu verleihen. Wenn Sie frische Kräuter verwenden,
muss deren Menge im Vergleich zu Trockenkräutern um 2?3 Mal erhöht werden, und sie müssen auch unbedingt klein
geschnitten sein.
ZUBEREITUNG VON EIERN (Bild 5)
• Füllen Sie Wasser in den Behälter (10).
• Befestigen Sie die Palette (6).
• Stellen Sie den Gareinsatz (1, 2 oder 3) auf die Palette (6).
• Legen Sie die Eier in die Vertiefungen im Gareinsatzboden (1, 2 oder 3) und schließen Sie den Deckel (5).
• Schalten Sie den Dampfgarer ein, indem Sie die Kurbel des Timers (12) auf gewünschte Kochzeit einstellen.
ZUBEREITUNG VON REIS (Bild 4)
• Füllen Sie Wasser in den Behälter (10).
• Befestigen Sie die Palette (6).
• Stellen Sie den Gareinsatz (1, 2 oder 3) auf die Palette (6).
• Stellen Sie auf den Gareinsatz (1) den Einsatz für die Zubereitung von Reis/ Suppen (4).
• Füllen Sie 1 Tasse Reis in den Einsatz (4) und geben Sie 1½ Tasse Wasser ein. Die maximale Reismenge darf nicht mehr
als 250 g betragen.
• Schießen Sie den Einsatz (4) mit dem Deckel (5).
• Schalten Sie den Dampfgarer ein, indem Sie die Kurbel des Timers (12) auf gewünschte Kochzeit einstellen.
NACHFÜLLEN VON WASSER WÄHREND DER ZUBEREITUNG
Für Lebensmittel, die eine längere Zubereitungszeit haben:
? Prüfen Sie den Wasserpegel bei der Zubereitung der Lebensmittel.
? Falls erforderlich füllen Sie Wasser durch die Einlassöffnung (Bild 6) ein, ohne die Gareinsütze abzunehmen.
DEUTSCH

10
NÜTZLICHE RATSCHLÄGE
• Die in der Tabelle angegebene Zubereitungszeit darf nur als eine Empfehlung angesehen werden, sie kann aufgrund von
der Stückgröße, der Lebensmittelmenge und den persönlichen Vorzügen variieren. Sobald Sie sich mit dem Dampfgarer
vertraut gemacht haben, können Sie die gewünschte Zubereitungszeit selber wählen.
• Eine Lebensmittelschicht bereitet sich schneller zu, als mehrere Schichten, deshalb muss die Zubereitungszeit gemäß
dieser Lebensmittelmenge erhöht werden.
• Um ein besseres Ergebnis zu erhalten, bemühen Sie sich darum, dass die Lebensmittelstücke von einer Größe sind,
legen Sie die größeren Stücke immer an die Gareinsatzrände
• Füllen Sie den Gareinsatz nicht voll – lassen Sie etwas Raum für die Dampfabkühlung.
• Bei der Zubereitung von einer großen Lebensmittelmenge ist es notwendig sie ab und zu umzurühren. Seien Sie dabei
besonders vorsichtig, benutzen Sie Topflappen oder Schutzhandschuhe, um die Hände vor Dampf zu schützen, oder ein
Kochutensil mit einem langen Griff.
• Geben Sie während der Zubereitung kein Salz oder Gewürze unmittelbar auf die Lebensmittel.
• Die sich in der Palette (6) ansammelnde Flüssigkeit passt hervorragend für dir Zubereitung von Suppen oder kann als
Brühe oder als Saucenfond verwendet werden. Seien Sie vorsichtig – sie ist sehr heiß.
• Verwenden Sie nur vollständig aufgetaute Lebensmittel.
Bei der gleichzeitigen Anwendung der drei Gareinsätze:
? Legen Sie die größten Lebensmittelstücke immer in den unteren Gareinsatz.
? Das Kondensat, das sich im oberen Korb bildet, wird in den unteren ablaufen, deshalb sollten Sie sich davon überzeu?
gen, das die Geschmäcke der zubereitenden Lebensmittel vereinbar sind.
? Bei der Zubereitung von Fleisch, Hähnchen oder Gemüse legen Sie das Fleisch immer in den unteren Einsatz, damit der
rohe Fleischsaft nicht auf die anderen Lebensmittel kommt.
? Die Kochzeit für die Lebensmittel im oberen Einsatz ist gewöhnlich um 5 Minuten länger.
? Bei der Zubereitung von Lebensmitteln mit unterschiedlicher Kochzeit legen Sie in den unteren Einsatz diejenigen, die
am längsten zubereitet werden. Sobald die Lebensmittel im oberen Einsatz gar sind, können Sie sie abnehmen, den
unteren Einsatz mit dem Deckel verschließen und die Lebensmittelzubereitung fortführen.
REINIGUNG DES DAMPFGARERS
• Schalten Sie den Dampfgarer vor der Reinigung aus, schalten Sie ihn von der Stromquelle ab und lassen Sie ihn voll?
ständig abkühlen.
• Es ist verboten das Stromkabel, die Steckgabel oder den Dampfgarer selbst in Wasser zu tauchen.
• Benutzen Sie für die Reinigung der Garkörbe, der Palette, des oberen Deckels und des Gehäuses des Dampfgarers
keine Schleifmittel.
• Es wird empfohlen die Gareinsätze, den Reiseinsatz, die Palette und den Deckel mit warmem Wasser mit dem Zusatz
von einem Spülmittel zu waschen. Sie können auch die Spülmaschine verwenden, wenn Sie eine „sanfte“
Geschirrwaschstufe wählen.
• Nehmen Sie den Siebfilter (11) heraus und spülen Sie ihn.
• W ischen Sie das Gehäuse mit feuchtem Stofflappen.
• Waschen Sie regelmäßig die Gareinsätze.
KESSELSTEINENTFERNUNG
Nach ca. 2?3 Monaten Anwendung kann sich auf dem Heizelement Kesselstein bilden. Das ist ein natürlicher Vorgang, er
hängt von der Härte des von Ihnen verwendeten Wassers ab. Für den störungsfreien Betrieb des Dampfgarers muss der
Kesselstein regelmäßig entfernt werden
• Füllen Sie den Wasserbehälter mit Speiseessig bis zur Markierung «MAX».
WICHTIG: Verwenden Sie keine chemischen Mittel für Kesselsteinentfernung.
• Befestigen Sie die Palette (6), einen Gareinsatz (1, 2 oder 3), schließen Sie den Deckel (5) und schalten Sie den
Dampfgarer für 20?25 Minuten lang ein.
ACHTUNG! Wenn der Essig über den Rand des Behälters ausläuft, schalten Sie den Dampfgarer ab und gießen Sie vor?
sichtig etwas Essig ab.
• Schalten Sie den Dampfgarer nach Ablauf der Timerzeit aus, und lassen Sie ihn vollständig abkühlen, bevor Sie den
Essig abgießen.
• Waschen Sie den Behälter mit kaltem Wasser aus, füllen Sie erneut Wasser ein, befestigen Sie die Palette (6), einen
Gareinsatz (1, 2 oder 3), schließen Sie den Deckel (5), schalten Sie den Dampfgarer ein und stellen Sie den Timer auf 5
Minuten.
• Schalten Sie den Dampfgarer aus, lassen Sie ihn vollständig abkühlen, gießen Sie das Wasser ab, trocknen Sie die
Palette, den Einsatz und den Deckel ab und räumen Sie ihn bis zur nächsten Anwendung weg.
ZUBEREITUNGSZEIT UND REZEPTE
• Die Zubereitungszeit hängt von der Größe der Lebensmittel, von dem Freiraum im Einsatz, der Lebensmittelfrische und
dem persönlichen Geschmack ab.
• Die Zubereitungszeit ist für den unteren Einsatz angegeben, die Lebensmittel in dem oberen Einsatz müssen jeweils um
ca. 5 Minuten länger zubereitet werden.
DEUTSCH
11
• Bei einer kleineren oder größeren Lebensmittelmenge erhöhen oder verringern Sie dementsprechend auch die
Kochzeit.
GEMÜSE
• Schneiden Sie dicke Stengel von Broccolikraut oder Blumenkohl ab.
• Bereiten Sie grünes Blättergemüse innerhalb einer maximal kurzen Zeit zu – sie verlieren an Farbe.
• Fügen Sie Salz und Gewürze erst nach der Zubereitung hinzu.
• Tiefgefrorenes Gemüse muss vor der Zubereitung im Dampfgarer nicht unbedingt aufgetaut werden.
FLEISCH UND GEFLÜGEL
• Der Vorteil vom Dünsten der Lebensmittel besteht darin, dass das Fett während der Zubereitung aus den Lebensmitteln
ausgeschmolzen wird und nach unten abtropft. Es ist jedoch ratsam vor der Zubereitung das überflüssige Fett von den
Lebensmitteln zu entfernen. Grillfleisch passt hervorragend zum Dünsten.
• Marinieren Sie das Fleisch oder das Geflügel vor der Zubereitung oder begießen Sie es mit einer Sauce.
• Prüfen Sie das Garsein der Lebensmittel indem Sie sie durchstechen..
• Verwenden Sie frische oder getrocknete Kräuter während der Zubereitung der Lebensmittel, um deren Geschmack zu
bereichern.
DEUTSCH
Gemüse Art
Gewicht/
Stück
Kräuter
Zubereitungszeit
(Minuten)
Empfehlungen
Artischocken frisch
3 mittegroße
Knoblauch
Estragon
Dill
4550 Stengel abschneiden
Spargel
Frisch
tiefgekühlt
400 g
400 g
Beerentrauben
Lorbeerblatt
Thymian
1315
1618
Lassen Sie Freiraum für
Dampfströmung
Broccoli
frisch
tiefgekühlt
400 g
400 g
Knoblauch
Paprika
Estragon
1618
1518
Möhren (geschnitten) frisch 400 g
Anis
Minze
Dill
2022 Umrühren beim Kochen
Blumenkohl
Frisch
tiefgekühlt
400 g
400 g
Rosmarin
Basilikum
Estragon
1618
1820
Umrühren beim Kochen
Spinat
Frisch
tiefgekühlt
250 g
250 g
Thymian
Knoblauch
810
1820
Umrühren beim Kochen
Bohnen frisch 400 g
Kümmel
Dill
1820 Umrühren beim Kochen
Erbsen
Frisch
Tiefgekühlt
(in Schoten)
400 g
400 g
Basilikum
Majoran
Minze
1012
1518
Umrühren beim Kochen
Kartoffeln frisch 400 g Dill 2022
Lebensmittel Art
Gewicht/
Stück
Kräuter
Zubereitungszeit
(Minuten)
Empfehlungen
Hühnerfleisch
Filet,
Beine
250 g (4 st.)
450 g
Curry
Rosmarin
Thymian
1215
3035
Überflüssiges Fett
abschneiden
Schweinefleisch
Lendenstück, Filet,
Steak oder
Filetstücke
400 g
(4 st., 2.5 cm
dick)
Curry
Beerentrauben
Thymian
510
Überflüssiges Fett
abschneiden
Rindfleisch
Filetstücke, Lende
oder Hüfte
250 g
Curry
Paprika
Thymian
810
Überflüssiges Fett
abschneiden
12
FISCH UND SEEKOST
• Der Fisch ist gar, wenn sich das Fleisch leicht von den Gräten lösen lässt.
• Tiefgekühlter Fisch oder Meeresfrüchte können ohne Auftauung zubereitet werden, es muss nur die Zubereitungszeit
erhöht werden.
• Verwenden Sie Zitronenscheiben während der Zubereitung von Fisch oder Meeresfrüchten, um ihnen einen zusätzlichen
Geschmack zu verleihen.
REIS
Bei dem Verwenden des Einsatzes für die Zubereitung von Reis müssen Sie in den Wasserbehälter nur Wasser eingeben, in
den Einsatzbecher können Sie jedoch eine andere Flüssigkeit geben, z.B. Wein oder Brühe. Sie können dort auch Gewürze,
Hackzwiebeln, Petersilie, Mandeln oder Schnittpilze eingeben.
TECHNISCHE CHARAKTERISTIKEN:
Speisespannung 230 V ~ 50 Hz
Max. Leistungsaufnahme 900 W
Kapazität des Wasserbehälters 1,1 l
Kapazität des Einsatzes für die Zubereitung von Reis/ Suppen/ anderen Lebensmitteln 1,2 l
Der Produzent behält sich das Recht vor die Daten der Geräte ohne Vorankündigung zu ändern.
Die Benutzungsdauer des Gerätes beträgt nicht weniger als 5 Jahre
Gewährleistung
Ausführliche Bedingungen der Gewährleistung kann man beim Dealer, der diese Geräte verkauft hat, bekommen. Bei
beliebiger Anspruchserhebung soll man während der Laufzeit der vorliegenden Gewährleistung den Check oder die
Quittung über den Ankauf vorzulegen.
Das vorliegende Produkt entspricht den Forderungen der elektromagnetischen Verträglichkeit, die in
89/336/EWG «Richtlinie des Rates und den Vorschriften 73/23/EWG über die Niederspannungsgeräte
vorgesehen sind.
DEUTSCH
Lebensmittel Art
Gewicht/
Stück
Kräuter
Zubereitungszeit
(Minuten)
Empfehlungen
Muscheltiere frisch 250 g/400 g
Majoran
Beerentrauben
810
Garnelen frisch 400 g
Beerentrauben
Knoblauch
6
Zubereiten, bis sie eine
rosa Farbe annehmen
Miesmuscheln frisch 400 g
Beerentrauben
Knoblauch
810
Zubereiten, bis sich die
Muscheln öffnen
Hummer tiefgekühlt
2 St. (400g je
Stück)
Meerrettich
Knoblauch
2022
Zubereiten, bis sie eine
rote Farbe annehmen
Fischfilet
frisch,
tiefgekühlt
250 g
250 g
Senf
Majoran
1012
68
Zubereiten, bis es sich
anfängt in Stücke zu
trennen
Lebensmittel Art
Anzahl/
Wassermenge
Zubereitungszeit
(Minuten)
Empfehlungen
Reis weiß 200 g/300 ml 3540
Maximale Reismenge nicht
über 250 g

13
ЭЛЕКТРОПАРОВАРКА
Продукты, приготовленные на пару, в большей степени сохраняют свой аромат и питательную ценность. Пароварка
Vitek позволит вам сделать шаг к здоровому питанию.
ОПИСАНИЕ
1. Нижняя паровая чаша «1»
2. Средняя паровая чаша «2»
3. Верхняя паровая чаша «3»
4. Емкость для варки риса или супа
5. Крышка
6. Поддон для сбора конденсата
7. Распылитель пара
8. Корпус пароварки
9. Заливное отверстие
10. Резервуар для воды
11. Сетчатый фильтр
12. Таймер
13. Индикатор работы пароварки
ПРАВИЛА ТЕХНИКИ БЕЗОПАСНОСТИ
Прежде чем начать пользоваться пароваркой, внимательно прочитайте руководство по эксплуатации.
• Сохраните настоящее руководство по эксплуатации в качестве справочного материала.
• Прежде чем подключить пароварку к электросети, убедитесь, что напряжение, указанное на устройстве,
соответствует напряжению электросети.
• Не используйте пароварку вне помещений.
• Устанавливайте устройство на ровную устойчивую поверхность.
• Не используйте пароварку вблизи стен или навесных шкафов, так как выходящий горячий пар может их
повредить.
• Используйте только те комплектующие, которые входят в комплект поставки.
• Перед первым применением устройства тщательно промойте все детали, которые будут контактировать с
пищевыми продуктами.
• Перед тем как включить пароварку, заполните резервуар водой, в противном случае устройство может быть
повреждено.
• Будьте внимательны при работе с устройством: любая жидкость или конденсат очень горячие.
• Остерегайтесь ожогов выходящим паром, особенно в момент снятия крышки.
• Для снятия крышки или паровых чаш используйте ку хонные прихватки или рукавички.
• Не перемещайте устройство, когда в нем находятся горячие продукты.
• Не позволяйте детям и недееспособным людям пользоваться устройством без присмотра.
• Не допускается использование емкостей пароварки в микроволновых печах, а также на электрических или
газовых плитах.
• Запрещается оставлять устройство включенным в сеть без присмотра.
• Отключайте устройство от сети, если оно не используется, при снятии или установке паровых чаш, а также перед
чисткой.
• Следите за тем, чтобы сетевой шнур не свисал в местах, где за него могут схватиться дети.
• Храните устройство в недоступном для детей месте.
• Никогда не погружайте устройство, сетевой шнур или сетевую вилку в воду вы можете получить удар
электротоком.
• Не пользуйтесь устройством при повреждении сетевого шнура или сетевой вилки. Для ремонта устройства
обратитесь в авторизованный сервисный центр.
• Прибор предназначен только для домашнего использования.
ПЕРЕД ПЕРВЫМ ИСПОЛЬЗОВАНИЕМ
• Извлеките пароварку и удалите упаковочный материал.
• Промойте паровые чаши (1, 2, 3), емкость для варки риса или супа (4), крышку (5) и поддон для сбора конденсата
(6), используя мягкое моющее средство.
• Тщательно ополосните и вытрите.
• Протрите внутреннюю поверхность резервуара для воды (10) влажной тканью.
УКАЗАНИЯ ПО ЭКСПЛУАТАЦИИ
• Установите пароварку на ровную и устойчивую поверхность.
• Установите распылитель пара (7).
• Установите сетчатый фильтр (11) в углубление в резервуаре для воды (10).
• Наполните резервуар (10) холодной водой до максимального уровня МАХ.
• Наполнение резервуара водой можно производить двумя способами: через заливное отверстие (9) (Рис. 1) или
налить воду непосредственно в резервуар (Рис. 2).
РУССКИЙ

14
• Если во время приготовления вы обнаружили, что количество налитой воды меньше нормы, то можете добавить
ее через заливное отверстие (9), не снимая паровые чаши (Рис. 1).
Используйте отфильтрованную воду, она имеет пониженную жесткость, что позволит снизить степень
образования накипи в нагревательном элементе. Не заливайте воду выше отметки MAX.
Предупреждение
Запрещается добавлять в воду соль, перец, приправы, травы, вино, соусы или другие жидкости. Это может
привести к поломке устройства.
Меняйте воду перед каждым использованием пароварки.
• Установите поддон для сбора конденсата (6) на резервуар для воды (10) и убедитесь, что он установлен
правильно.
• Установите на поддон для сбора конденсата (6) одну или несколько паровых чаш (123).
• Накройте паровую чашу крышкой (5).
• Вставьте вилку сетевого шнура в розетку. Вы можете регулировать длину сетевого шнура (Рис. 6).
• Поверните ручку таймера (12) по часовой стрелке и установите нужное время работы пароварки, при этом
загорится индикатор (13) (Рис.3).
• По прошествии установленного времени пароварка автоматически отключится, раздастся звуковой сигнал и
индикатор (13) погаснет.
ВНИМАНИЕ!
• Не дотрагивайтесь во время работы пароварки до крышки и паровых чаш они очень горячие.
• Чтобы не обжечься, используйте кухонные прихватки или рукавички для снятия крышки и паровых чаш. Медленно
приподнимите крышку, чтобы выпустить пар, подержите крышку над паровой чашей для стекания с нее воды.
• Если вы хотите проверить продукты на готовность, используйте кухонную утварь с длинной ручкой.
• Помните, что вода внутри резервуара может быть горячей, когда все остальные компоненты пароварки остыли.
• Не используйте пароварку при неустановленном поддоне, паровых чашах и крышке.
СОВЕТЫ
• Готовьте мясо, рыбу и морские продукты до полной готовности.
• Всегда используйте только размороженные продукты, исключение составляют овощи, рыба и морепродукты.
• Если вы пользуетесь одновременно несколькими паровыми чашами, то кладите мясо, птицу или рыбу в нижнюю
корзину, чтобы выделяющаяся жидкость не стекала на продукты в других паровых чашах.
• Добавляйте свежие или сухие травы в под дон для сбора конденсата (6), чтобы придать продуктам
дополнительный вкус. Выберите травы по своему вкусу: тимьян, кинза, базилик, укроп, карри и эстрагон, чеснок,
тмин, хрен это всего лишь небольшой перечень известных трав. Вы можете комбинировать травы для придания
продуктам новых вкусов. При использовании свежих трав необходимо порезать их и увеличить общее количество
в дватри раза (по сравнению с сухими).
ПРИГОТОВЛЕНИЕ ЯИЦ (Рис. 5)
• Залейте в резервуар (10) воду.
• Установите поддон (6).
• Установите паровую чашу (1, 2 или 3) на поддон (6).
• Положите яйца в углубления на днище паровой чаши (1, 2 или 3) и накройте ее крышкой (5).
• Включите пароварку, установив ручку таймера (12) на необходимое время работы.
ПРИГОТОВЛЕНИЕ РИСА (Рис. 4)
• Залейте в резервуар (10) воду.
• Установите поддон (6).
• Установите одну паровую чашу (1, 2 или 3) на поддон (6).
• Установите на паровую чашу емкость для варки рисасупа (4).
• Засыпьте 1 чашку риса в емкость (4) и залейте 1 1/2 чашки воды. Максимальное количество риса не должно
превышать 250 г.
• Закройте чашу (4) крышкой (5).
• Включите пароварку, установив ручку таймера (12) на необходимое время работы.
ДОБАВЛЕНИЕ ВОДЫ ВО ВРЕМЯ ПРИГОТОВЛЕНИЯ
Для блюд с длительным временем приготовления:
Контролируйте уровень воды во время приготовления продуктов.
При необходимости добавляйте воду через заливочное отверстие (9), не снимая паровые чаши.
ПОЛЕЗНЫЕ СОВЕТЫ И РЕКОМЕНДАЦИИ
• Указанное в таблицах время приготовления пищи следует рассматривать лишь как рекомендуемое, оно может
отличаться изза размера кусков, объема продуктов и личного вкуса. По мере освоения пароварки вы сами
сможете подбирать желаемое время приготовления продуктов.
РУССКИЙ

15
• Один слой продуктов готовится быстрее, чем несколько, поэтому необходимо увеличивать время приготовления
соответственно объему продуктов.
• Для достижения лучшего результата старайтесь, чтобы кусочки продуктов были одинакового размера,
помещайте более толстые кусочки ближе к краям паровой чаши.
• Не заполняйте паровую чашу полностью оставляйте пространство для прохождения пара.
• При приготовлении большого количества продуктов необходимо периодически их перемешивать. Соблюдайте
при этом повышенную осторожность, используйте кухонные прихватки или рукавички для защиты рук от горячего
пара и кухонную утварь с длинной ручкой.
• Не кладите соль или специи непосредственно на продукты во время их приготовления.
• Жидкость, накапливающаяся в поддоне (6), прекрасно подходит для приготовления супов или может
использоваться в качестве бульона. Но будьте осторожны: она очень горячая.
• Используйте только полностью размороженные продукты.
При использовании трех паровых чаш одновременно:
Всегда кладите самые крупные кусочки продуктов в нижнюю чашу.
Конденсат, образующийся на верхней паровой чаше, будет стекать в нижнюю чашу, поэтому убедитесь в
совместимости вкусов приготавливаемых продуктов.
При приготовлении мяса, курицы и овощей всегда кладите мясо в нижнюю чашу, чтобы сок сырого мяса не
попадал на овощи.
Время приготовления продуктов в верхней чаше обычно на 5 минут дольше.
Когда вы приготавливаете продукты с разным временем готовности, положите в нижнюю чашу те, которые
готовятся дольше. Когда будут готовы продукты в верхней чаше, вы можете снять ее, а нижнюю чашу накройте
крышкой и продолжите приготовление продуктов.
ЧИСТКА ПАРОВАРКИ
• Перед чисткой выключите пароварку, отключите ее от сети и дайте ей полностью остыть.
• Запрещается погружать в воду сетевой шнур, сетевую вилку и корпус пароварки.
• Не используйте при чистке паровых корзин, поддона, верхней крышки и корпуса пароварки абразивные
чистящие средства.
• Рекомендуется мыть паровые чаши, емкость для приготовления риса, поддон и крышку в теплой воде со
средством для мытья посуды. Можно использовать посудомоечную машину, установив •легкий• режим мытья
посуды.
• Выньте и промойте сетчатый фильтр (11).
• Протирайте корпус пароварки влажной тканью.
• Регулярно мойте паровые чаши.
СНЯТИЕ НАКИПИ
После 23 месяцев использования прибора в нагревательном элементе может образоваться накипь. Это
естественный процесс, который зависит от жесткости используемой вами воды. Необходимо регулярно снимать
накипь для нормальной работы пароварки.
• Наполните резервуар для воды пищевым уксусом до отметки МАХ.
ВАЖНО: не используйте химические препараты для удаления накипи.
• Установите поддон (6), одну паровую чашу (1, 2 или 3), закройте ее крышкой (5) и включите пароварку на 2025
минут.
ВНИМАНИЕ! Если уксус выливается за края резервуара, то отключите пароварку и, соблюдая осторожность,
отлейте небольшое количество жидкости.
• По окончании работы таймера отключите пароварку от сети и дайте ей полностью остыть, перед тем как вылить
уксус.
• Промойте резервуар холодной водой, еще раз залейте воду, установите поддон (6), одну паровую чашу (1, 2 или
3), закройте ее крышкой (5), включите пароварку и установите таймер на 5 минут.
• Отключите пароварку, дайте ей полностью остыть, слейте воду, просушите поддон, паровую чашу и крышку и
уберите прибор до следующего использования.
ВРЕМЯ ПРИГОТОВЛЕНИЯ ПРОДУКТОВ И РЕЦЕПТЫ
• Время приготовления зависит от объема продуктов, свободного места в чаше, их свежести и вашего вкуса.
• Время приготовления указано в расчете на нижнюю чашу, продукты в верхней чаше готовятся дольше,
приблизительно на 5 минут.
• При большем или меньшем объеме продуктов соответственно увеличивайте или уменьшайте время
приготовления продуктов.
ОВОЩИ
• Отрежьте толстые стебли у капусты брокколи или толстые цветоножки у цветной капусты.
• Готовьте зеленые листовые овощи максимально короткое время они быстро теряют свой цвет.
• Добавляйте соль и специи после приготовления.
• Замороженные овощи не обязательно размораживать перед приготовлением в пароварке.
РУССКИЙ
16
МЯСО И ПТИЦА
• Готовка продуктов на пару имеет преимущество в том, что во время приготовления жир вытапливается из
продуктов и стекает в поддон. Но перед приготовлением продуктов желательно удалить лишний жир. Мясо для
гриля идеально подходит для приготовления на пару.
• Замаринуйте или залейте соусом мясо или птицу перед готовкой.
• Проверяйте продукты на готовность, протыкая их.
• Используйте свежие или сухие травы во время приготовления продуктов для придания им дополнительного
вкуса.
РЫБА И МОРЕПРОДУКТЫ
• Рыба готова, когда мясо легко отделяется от костей.
• Мороженая рыба и морепродукты могут готовиться без предварительного размораживания, нужно только
увеличить время приготовления.
Овощи Вид
Вес/
Колво штук
Травы
Время
приготовления
(минуты)
Рекомендации
Артишоки Свежие 3 средних
чеснок
эстрагон
укроп
4550 Отрежьте стебли
Спаржа
Свежая
Замороженная
400 г
400 г
лимонник
лавровый лист
тимьян
1315
1618
Оставляйте свободное
пространство для
прохождения пара
Брокколи
Свежая
Замороженная
400 г
400 г
чеснок
красный перец
эстрагон
1618
1518
Морковь (порезанная) Свежая 400 г
анис
мята
укроп
2022
Помешивайте при
готовке
Цветная капуста
Свежая
Замороженная
400 г
400 г
розмарин
базилик
эстрагон
1618
1820
Помешивайте при
готовке
Шпинат
Свежий
Замороженный
250 г
250 г
тимьян
чеснок
810
1820
Помешивайте при
готовке
Бобы Свежие 400 г
тмин
укроп
1820
Помешивайте при
готовке
Горох
Свежий
Замороженный
(стручковый)
400 г
400 г
базилик
майоран
мята
1012
1518
Помешивайте при
готовке
Картофель Свежий 400 г укроп 2022
Продукты Вид
Вес/
Колво штук
Травы
Время
приготовления
(минуты)
Рекомендации
Курица
филе,
ножки
250г (4 шт.)
450 г
карри
розмарин
тимьян
1215
3035
Срежьте лишний жир
Свинина
вырезка, филе,
стейки или куски
филе
400 г
(4 шт., толщина
2,5 см)
карри
лимонник
тимьян
510 Срежьте лишний жир
Говядина
куски филе,
филейная часть
или огузок
250 г
карри
красный перец
тимьян
810 Срежьте лишний жир
РУССКИЙ
17
• Используйте ломтики лимона во время приготовления рыбы или морепродуктов для придания им изысканного
вкуса.
РИС
Используя чашу для варки риса, залейте воду в резервуар, а в чашу для риса можно налить другую жидкость
например, бульон. Вы можете добавить в чашу приправы, рубленый лук, петрушку, миндаль или нарезанные грибы.
ТЕХНИЧЕСКИЕ ХАРАКТЕРИСТИКИ
Напряжение питания: 230 В ~ 50 Гц
Максимальная потребляемая мощность: 900 Вт
Вместимость чаши для воды: 1,1 л
Вместимость чаши для приготовления риса/супа/других продуктов: 1,2 л
Производитель оставляет за собой право изменять характеристики приборов без предварительного
уведомления.
СРОК СЛУЖБЫ ПРИБОРА НЕ МЕНЕЕ 5FТИ ЛЕТ
Данное изделие соответствует всем требуемым европейским и российским стандартам
безопасности и гигиены.
Производитель: АНДЕР ПРОДАКТС ГмбХ,
Нойбаугюртель 38/7А, 1070 Вена, Австрия
Продукты Вид
Вес/
Колво штук
Травы
Время
приготовления
(минуты)
Рекомендации
Моллюски Свежие 250 г/400 г
майоран
лимонник
810
Креветки Свежие 400 г
лимонник
чеснок
6
Готовьте до
приобретения
розового цвета
Мидии Свежие 400 г
лимонник
чеснок
810
Готовьте до раскрытия
раковин
Лобстер Мороженый
2 шт. (400 г
каждый)
хрен
чеснок
2022
Готовьте до
приобретения
красного цвета
Рыбное филе
Свежее
Мороженое
250 г
250 г
горчица
майоран
1012
68
Готовьте до
разделения
на кусочки
Продукты Вид
Колво/
Объем воды
Время
приготовления
(минуты)
Рекомендации
Рис Белый 200 г/300 мл 3540
Максимальное количество
риса не более 250 г
РУССКИЙ

18
CUISSEUR ÉLECTRIQUE À VAPEUR
Les aliments préparés à la vapeur gardent mieux leur arôme et la valeur nutritive. Le cuisseur automatique à vapeur Vitek
vous permettra de faire un pas vers l’alimentation saine.
DESCRIPTION
1. Bol inférieur «1»
2. Bol moyen «2»
3. Bol supérieur «3»
4. Bol pour le riz/la soupe
5. Couvercle avec des orifices de sortie de vapeur
6. Lèchefrite avec filtre
7. Diffuseur de vapeur
8. Corps du cuisseur à vapeur
9. Orifice de remplissage
10. Réservoir d’eau
11. Filtre maillé
12. Minuterie
13. Indicateur de marche
RÈGLES DE SÉCURITÉ
Veuillez lire attentivement la présente notice d’exploitation avant de commencer l’utilisation du cuisseur.
• Conserver le présent manuel d’emploi comme ouvrage de renseignement.
• Avant de brancher le cuisseur, assurez?vous que la tension indiquée sur l’appareil correspond à la tension du réseau
électrique.
• N’utilisez pas le cuisseur en plein air.
• Placez le cuisseur sur une surface plate stable.
• N’utlisez pas le cuisseur près des murs ou d’armoires suspendus: la vapeur sortant chaude peut les endommager.
• N’utilisez que les accessoires compris dans le lot délivré.
• Avant la première utilisation du cuisseur lavez soigneusement tous les détails qui seront en contact avec les produits ali?
mentaires.
• Avant de brancher le cuisseur, remplissez le réservoir d’eau, dans le cas contraire l’appareil risque d’être endommagé.
• Soyez attentif en utilisant le cuisseur à vapeur – tout liquide ou eau de condensation sont très chauds.
• Évitez d’être brûlé par la vapeur sortant du cuisseur surtout au moment où vous enlevez le couvercle.
• Utilisez des gants de cuisine pour enlever le couvercle ou le bol de cuisson.
• Ne remuez jamais le cuisseur à vapeur contenant des aliments chauds.
• Ne permettez pas aux enfants et aux personnes incapables d’utiliser le cuisseur à vapeur sans surveillance.
• Il est interdit d’utiliser les récipients du cuisseur dans les fours à micro?ondes, ainsi que sur les plaques électriques ou à
gaz.
• Il est interdit de laissez le cuiseur branché sans surveillance.
• Débranchez le cuisseur de la prise de courant s’il n’est pas utlisé lors de l’enlevement ou du placement des bols à
vapeur, et avant son nettoyage.
• Veuillez à ce que le cordon d’alimentation ne pende pas là où les enfants peuvent le saisir.
• Gardez le cuisseur dans un endroit inaccessible aux enfants.
• N’immergez jamais le cuisseur, le cordon d’alimentation, ni la fiche d’alimentation dans l’eau ou tout autre liquide – vous
risquez d’être électrocutés.
• N’utilisez pas le cuisseur si le câble d’alimentation ou la fiche de branchement sont endommagés, adressez vous à un
centre de service agréé.
• Le cuisseur à vapeur est conçu uniquement pour une utilisation domestique.
AVANT LA PREMIÈRE UTILISATION
• Déballez l’appareil.
• Lavez les bols à vapeur (1, 2, 3), le récipient de cuisson de riz ou soupe (4), le couvercle (5) et la lèchefrite detinée à
recueillir l’eau de condensation (6) à l’aide d’un détergent doux.
• Rincez soigneusement et essuiyez.
• Essuyez la surface inférieure du réservoir d’eau (10) et le corps du cuisseur à vapeur avec un chiffon humide.
UTILISATION
• Placez le cuisseur à vapeur sur une surface plate stable.
• Placez à sa place le diffuseur de vapeur (7).
• Installez le filtre maillé (11) dans le réservoir d’eau (10).
• Versez de l’eau froide dans le réservoir jusqu’à la marque «Max»
• Le remplissage du réservoir d’eau peut se faire de deux manières: ? à travers l’orifice de remplissage (9) (Fig. 1) ou
directement dans le réservoir (Fig. 2).
• Si pendant la cuisson vous remarquez que la quantité d’eau est en dessous de la norme, vous pouvez en ajouter à tra?
FRANÇAIS

19
vers l’orifice de remplissage (9), sans enlever les bols à vapeur (Fig. 1). Utilisez l’eau filtrée moins crue pour diminuer
l’apparition du tartre sur la résistance de chauffage. Ne remplissez pas le réservoir au delà de la marque «MAX..
Attention:
? Ne mettez pas dans le réservoir du sel, du poivre, des fines herbes ou des épices – celà risque d’endommager la résis?
tance de chauffage.
? Changer l’eau avant chaque utilisation du cuisseur à vapeur..
• Installez la lèchefrite (6) sur le réservoir d’eau (10) et assurez?vous qu’elle est installée convenablement.
• Placez sur la lèchefrite (6) un ou quelques bols à vapeur (1?2?3).
• Couvrez le bol à vapeur du couvercle (5).
• Inserez la fiche dans la prise de courant. Vous pouvez régler la longeur du câble d’alimentation (Fig. 6).
• Tournez le bouton de la minuterie (12) dans le sens des aiguilles d’une montre, et sélectionnez la durée de cuisson
désirée, le témoin (13) s’allumera (Fig.3).
• A l’issus du processus de cuisson un signal sonore retentira et le cuisseur à vapeur sera automatiquement déconnecté
et l’indicateur (13) s’éteindra.
ATTENTION:
• Ne touchez pas le couvercle ou les bols à vapeur pendant la cuisson – ils ont très chauds.
• Pour ne pas vous brûler, utlisez les gants ou pinces de cuisine pour enlever le couvercle et les bols à vapeur. Soulevez
légèrement le couvercle pour laisser sortir la vapeur, maintenez le couvercle au?dessus du bol pour en faire couler l’eau.
• Pour vérifier l’état de cuisson des produits utlisez les ustensiles de cuisine à manches longues.
• Souvenez? vous que l’eau dans le réservoir peut être chaude lorsque tous les composants du cuisseur se sont refroidis.
• N’utlisez pas le cuisseur sans lèchefrite, bols à vapeur ou couvercle.
CONSEILS:
• Préparez la viande, le poisson et les fruits de mer jusqu’à la cuisson totale.
• N’utilisez que des produits décongelés, exceptés les légumes, le poisson et les fruits de mer.
• Si vous utlisez simultanément quelques bols à vapeur, placez la viande, la volaille et le poisson dans la corbeille inférieure
pour que le liquide dégagé ne coule pas sur les produits contenu dans les autres bols à vapeur.
• Ajoutez des herbes sèches ou fraîches dans la lèchefrite (6) pour donner du goût aux aliments. Choisissez les herbes
selon votre goût: serpolet, coriandre, basilic, fenouil, carry et estragon, ail, cumin, raifort – ce n’est qu’une brève liste
des herbes connues. Vous pouvez combiner des herbes afin de donner aux aliments un nouveau goût exquis. Si vous
utilisez des herbes fraîches, il en faut une double ou triple quantité par rapport aux herbes sèches et n’oubliez pas de les
découper.
CUISSON DES OEUFS (Fig. 5)
• Versez de l’eau dans le réservoir.
• Mettez en place la lèchefrite (6).
• Placez le bol (1, 2 ou 3) sur la lèchefrite (6).
• Mettez les oeufs dans les creux du bol (1, 2 ou 3) et fermez?le d’un couvercle (5).
• Mettez le cuisseur en marche en selectionant le temps de cuisson à l’aide du bouton (12) de la minuterie.
CUISSON DU RIZ (Fig. 4)
• Versez de l’eau dans le réservoir (10).
• Mettez en place la lèchefrite (6).
• Placez le bol (1, 2 ou 3) sur la lèchefrite (6).
• Placez le bol de cuisson du riz / de la soupe (4) sur le bol inférieur.
• Versez 1 tasse de riz dans le bol (4) et versez?y 1½ de tasse d’eau. La quantité maximale du riz à cuire est de 250 g.
• Fermez le bol (4) avec un couvercle (5)
• Mettez le cuisseur en marche en selectionant le temps de cuisson à l’aide du bouton (12) de la minuterie.
AJOUT D’EAU PENDANT LA CUISSON
Pour les plats à longue cuisson:
? Contrôlez le niveau de l’eau pendant la cuisson.
? Si nécessaire ajoutez de l’eau à travers l’orifice de remplisage (9), sans enlever les bols à vapeur.
CONSEILS UTILES
• Le temps de cuisson indiqué dans le tableau est donné pour référence, il peut être modifié selon la taille des morceaux,
le volume des aliments et selon votre goût personnel. Au fur et à mesure que vous maîtrisez le cuisseur vous serez en
mesure de choisir la durée de cuisson nécessaire.
• Une seule couche des aliments est plus rapide à cuire que plusieurs, c’est pourquoi il faut augmenter le temps de cuis?
son si vous mettez dans l’appareil des aliments en plusieurs couches.
• Pour un meilleur résultat il vaudra mieux que les morceaux soient de la même taille; mettez les plus gros morceaux plus
prés des parois.
FRANÇAIS

20
• Ne remplissez pas le bol à vapeur au maximum – laissez de la place pour la circulation de la vapeur.
• Si vous préparez une large quantité d’aliments, mélangez?les régulièrement. Soyez attentif, utilisez des gants de cuisine
et les ustensiles de cuisine avec longues manches pour protéger les mains contre la vapeur.
• N’ajoutez pas de sel ni des épices directement sur les aliments pendant leur cuisson.
• Le liquide qui s’accumule dans la lèchefrite (6), convient très bien pour la préparation des soupes et peut être utilisé en
guise de bouillon ou comme base d’une sauce. Mais soyez attentif – ce liquide est très chaud.
• Utilisez uniquement des aliments décongelés.
• Si vous utilisez les trois bols simultanément:
a. Mettez toujours les plus grands morceaux dans le bol inférieur.
b. L’eau de condensation qui s’accumule dans le bol supérieur coulera dans le bol inférieur; c’est pourquoi il faut prendre
en compte la compatibilité des goûts des aliments préparés ensemble.
c. Si vous préparez de la viande, du poulet et des légumes, mettez toujours la viande dans le bol inférieur pour que le jus
sortant de la viande crue ne coule pas sur d’autres aliments.
d. Pour les aliments du bol supérieur d’habitude il faut 5 minutes de plus par rapport à la durée de cuisson normale.
e. Si vous allez cuire des aliments à différentes durées de cuisson, mettez ceux qui exigent la plus longue durée de cuisson
dans le bol inférieur. Quand les aliments dans le bol supérieur seront prêts enlevez le bol supérieur et continuez la cuis?
son ayant refermé le bol inférieur avec un couvercle.
NETTOYAGE DU CUISSEUR
• Avant de commencer le nettoyage débranchez l’appareil, déconnectez?le du secteur et laisser?le refroidir.
• Il est interdit d’immerger dans l’eau le cordon d’alimentation, la fiche d’alimentation et l’appareil lui?même.
• Pour le nettoyage des bols, de la lèchefrite, du couvercle et du corps de l’appareil n’utilisez pas des agents abrasifs,
goupillon, agents blanchissants.
• Il est conseillé de laver les bols, la lèchefrite et le couvercle de l’appareil dans l’eau tiède avec un détergent à vaisselle.
Vous pouvez utiliser un lave?vaisselle en le réglant pour un régime de lavage faible.
• Faite sortir et laver le filtre maillé (11).
• Essuyez l’appareil avec un chiffon humide.
• Lavez régulièrement les bols à vapeur.
ENLEVEMENT DU TARTRE
Après 2?3 mois d’utilisation la résistance de chauffage peut se couvrir du tartre. C’est un effet tout à fait normal, il dépend
de la crudité de l’eau utilisée. Il faut régulièrement enlever le tartre pour assurer le bon fonctionnement de l’appareil.
• Remplissez le réservoir d’eau avec du vinaigre alimentaire jusqu’à la marque «MAX».
IMPORTANT: n’utilisez pas des agents antitartre.
• Montez la lèchefrite (6), un bol (1, 2 ou 3), fermez l’appareil du couvercle (5) et branchez?le pendant 20?25 minutes.
ATTENTION! Si le vinaigre déborde du réservoir, débranchez le cuisseur à vapeur et avec précaution deversez un peut
d’eau du réservoir.
• Dès la fin du cycle programmé, débranchez le cuisseur à vapeur, laissez?le refroidir, videz?le ensuite du vinaigre.
• Lavez le réservoir avec de l’eau froide, remplissez le réservoir d’eau, installez la lèchefrite (6), un bol (1, 2 ou 3), couvrez?
le d’un couvercle (5). Branchez le cuisseur à vapeur et réglez la minuterie pour 5 minutes.
• Débranchez le cuisseur à vapeur, laissez?le refroidir ensuite videz?le, séchez la lèchefrite, le bol et le couvercle et rangez?
les jusqu’à la prochaine utilisation.
DURÉE DE CUISSON ET RECETTES
• La durée de cuisson dépend de la taille des aliments, de leur fraîcheur, de la place libre dans le bol et de votre goût per?
sonnel.
• La durée présentée dans le tableau est donnée pour le bol inférieur, dans le bol supérieur les aliments prendrons à peu
près 5 minutes de plus.
• La durée de cuisson varie en fonction de la quantité des aliments: moins il y en a – moins de temps faut?il pour les cuire.
LES LÉGUMES
• Coupez les brins épais du brocoli ou du chou?fleur.
• Faite cuire les légumes en feuille pendant une durée réduite – ils perdent rapidement leur couleur.
• Ajoutez du sel et des épices après la cuisson.
• Il n’est pas obligatoire de décongeler les légumes avant de les cuire dans le cuisseur à vapeur.
FRANÇAIS
VIANDE ET VOLAILLE
• La cuisson à la vapeur a un avantage qui consiste en ce que pendant la cuisson la graisse se dégage des aliments et
coule dans la lèchefrite. Il est tout de même désirable avant la cuisson d’enlever la graisse superflue. La viande au gril
est idéale pour être cuite à la vapeur.
• Marinez la viande ou le poulet ou mettez?les dans une sauce avant de les cuire.
• Vérifiez l’état des aliments en les perçant d’une fourchette.
• Utilisez des herbes sèches ou fraîches pour donner du goût aux aliments pendant la cuisson.
POISSON ET LES FRUITS DE MER
• Le poisson et prêt quand la viande se sépare facilement des os.
• Vous pouvez cuire le poisson congelé et les fruits de mer sans les décongeler, mais dans ce cas il faudra augmenter le
temps de cuisson.
• Utilisez des tranches de citron pour donner du goût supplémentaire au poisson et aux fruits de mer.
21
FRANÇAIS
Légumes Type
Poids/
Pièces
Herbes
Durée de cuis
son (minutes)
Recommandations
Artichauts Frais
3 de taille
moyenne
ail
estragon
fenouil
4550 Coupez les brins
Asperge
Fraîche
Congelée
400 g
400 g
schizandra
laurier
serpolet
1315
1618
Laissez suffisamment de
place pour le passage
de vapeur
Brocoli
Frais
Congelé
400 g
400 g
ail
piment gouge
estragon
1618
1518
Carotte (découpée) Fraîche 400 g
anis
menthe
fenouil
2022
Mélangez pendant la
cuisson
Chou?fleur
Frais
Congelé
400 g
400 g
romarin
basilic
estragon
1618
1820
Mélangez pendant la
cuisson
Epinard Frais Congelé
250 g
250 g
serpolet
ail
810
1820
Mélangez pendant la
cuisson
Fèves Fraîche 400 g
cumin
fenouil
1820
Mélangez pendant la
cuisson
Petits poids
Frais
Congelés (siliqueux)
400 g
400 g
basilic
marjolaine
menthe
1012
1518
Mélangez pendant la
cuisson
Pommes de terre Fraîches 400 g fenouil 2022
Aliments Type
Poids/
Pièces
Herbes
Durée de cuis
son (minutes)
Recommandations
Poulet
filet,
pattes
250g (4 pièces)
450g
carry
romarin
serpolet
1215
3035
Coupez la graisse
superflue
Porc
filet, steaks ou
morceaux de filet
400g
(4 pièces, de
largeur 2,5 cm)
carry
schizandra
serpolet
510
Coupez la graisse
superflue
Bœuf
morceaux de filet ou
culotte
250 g
carry
piment rouge
serpolet
810
Coupez la graisse
superflue
Loading…