
В разное время в инструкциях, касающихся изменения структуры разделов, файловой системы или конвертации MBR и GPT дисков я рекомендовал бесплатные версии программ от Aomei или MiniTool для этих целей, однако со временем многие из доступных ранее в них функций стали требовать приобретения полной версии.
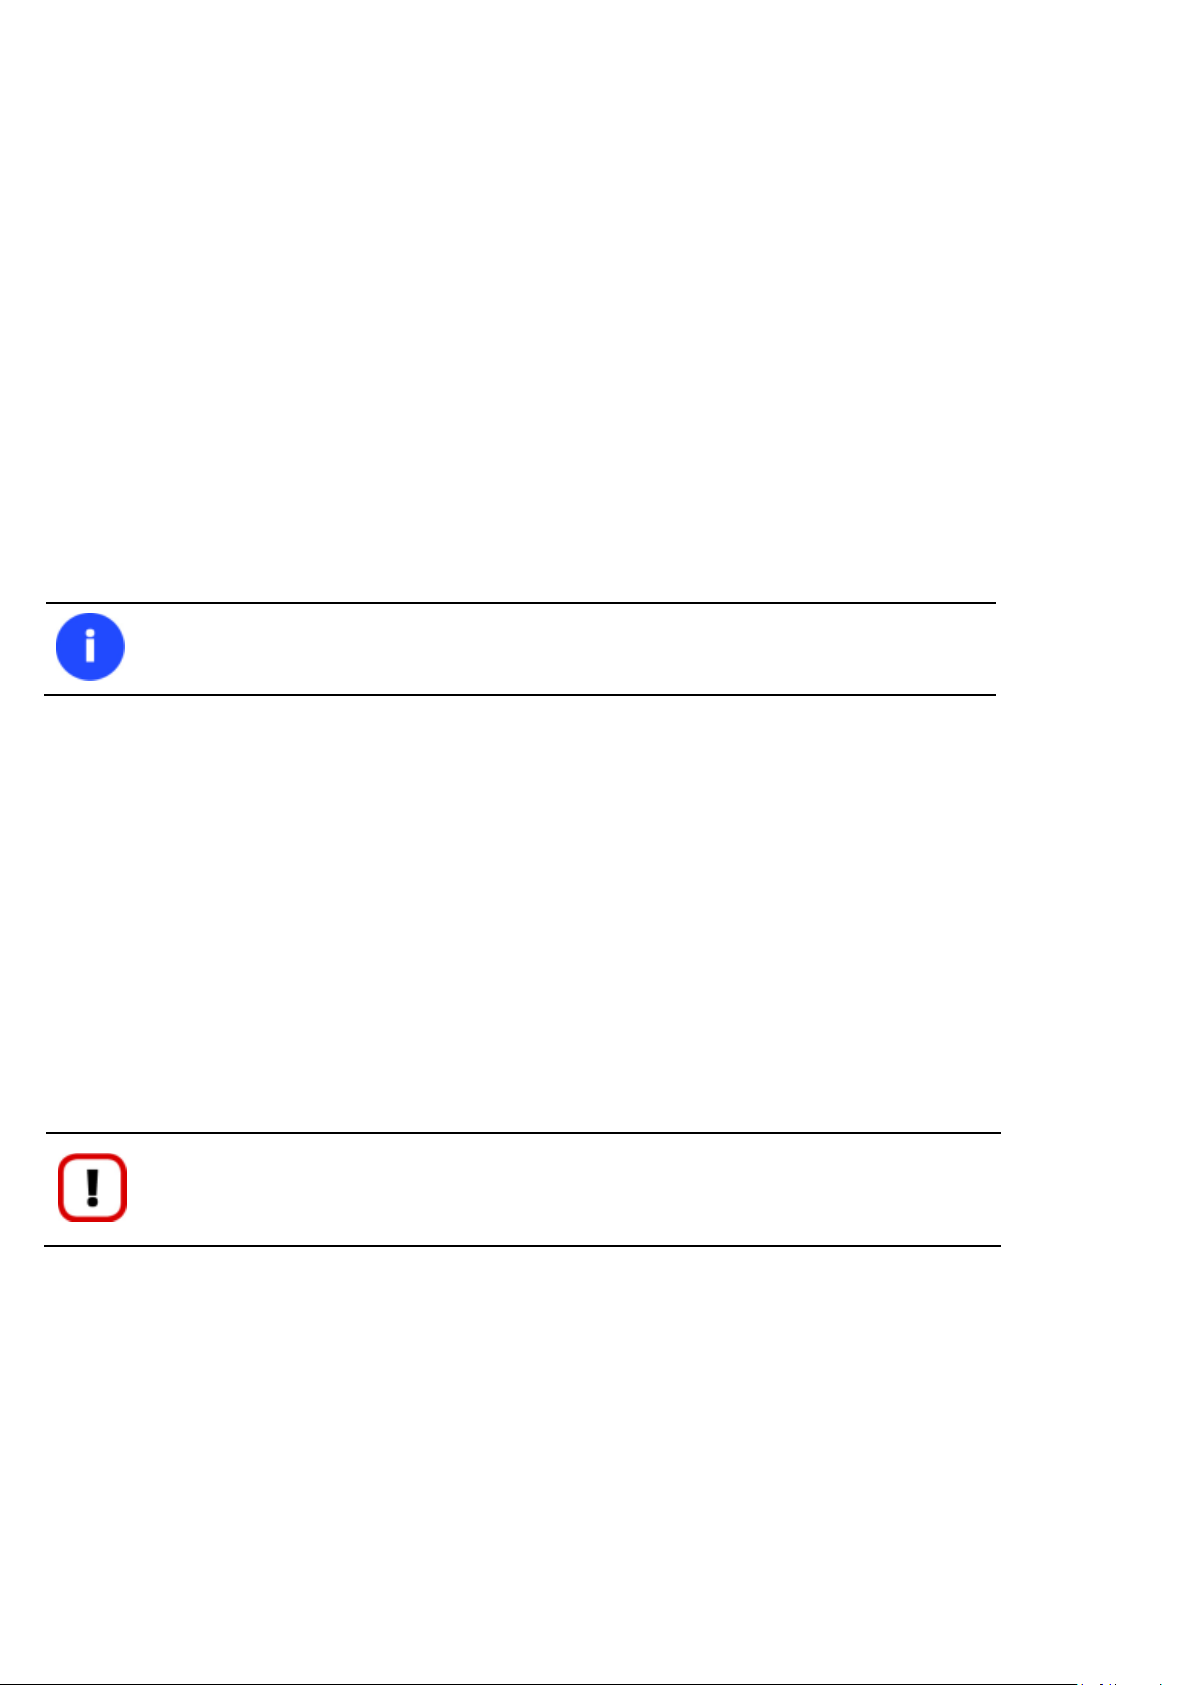
Paragon Partition Manager Community Edition — бесплатная версия ПО для работы с разделами дисков от Paragon, где доступны почти все нужные рядовому пользователю функции, об этом инструменте и пойдет речь далее в обзоре.
Использование и функции Paragon Partition Manager Community Edition
Скачать Paragon Partition Manager CE можно с официального сайта, каких-либо нюансов при установке нет, регистрация не требуется. Единственный возможный минус для моего читателя — отсутствие русского языка интерфейса.

В бесплатной версии программы будет доступна лишь вкладка «Disk and Volumes» (Диски и разделы), две других — для миграции ОС на другой диск и для резервного копирования присутствуют, но не активны.
Работа с программой интуитивно понятна: в зависимости от выбранного объекта (весь диск или раздел) вы увидите соответствующий список операций над ним.
Для дисков список доступных действий будет следующим:

- Convert to Basic — появится только для динамических дисков, конвертация в базовый.
- Properties — просмотр свойств диска
- Convert GPT disk to MBR, Convert MBR disk to GPT — Конвертация GPT в MBR или MBR в GPT (без потери данных).

- View / edit sectors — просмотр, редактирование секторов в HEX-редакторе.

При выборе раздела диска вы можете использовать маркеры в его графическом представлении в правой панели для изменения размеров раздела, либо использовать следующие действия в панели «Operations»:

- Move or resize — перемещение или изменение раздела.
- Format volume — форматирование раздела, при этом поддерживаются не только NTFS и FAT32, но и файловые системы Linux Ext2, Ext3, Ext4, Apple HFS и Resilient FS 3
- Delete partition — удаление раздела.
- Change drive letter — изменение буквы диска.
- Change volume label — изменение метки тома.
- Properties — просмотр свойств раздела.
- Hide partition — скрытие раздела.
- Check file system — проверка файловой системы.
- Test surface — проверка поверхности.
- Convert file system — изменение файловой системы без потери данных (поддерживается NTFS, FAT32, Apple HFS, Resilient FS).
- View / edit sectors — просмотр и редактирование секторов.

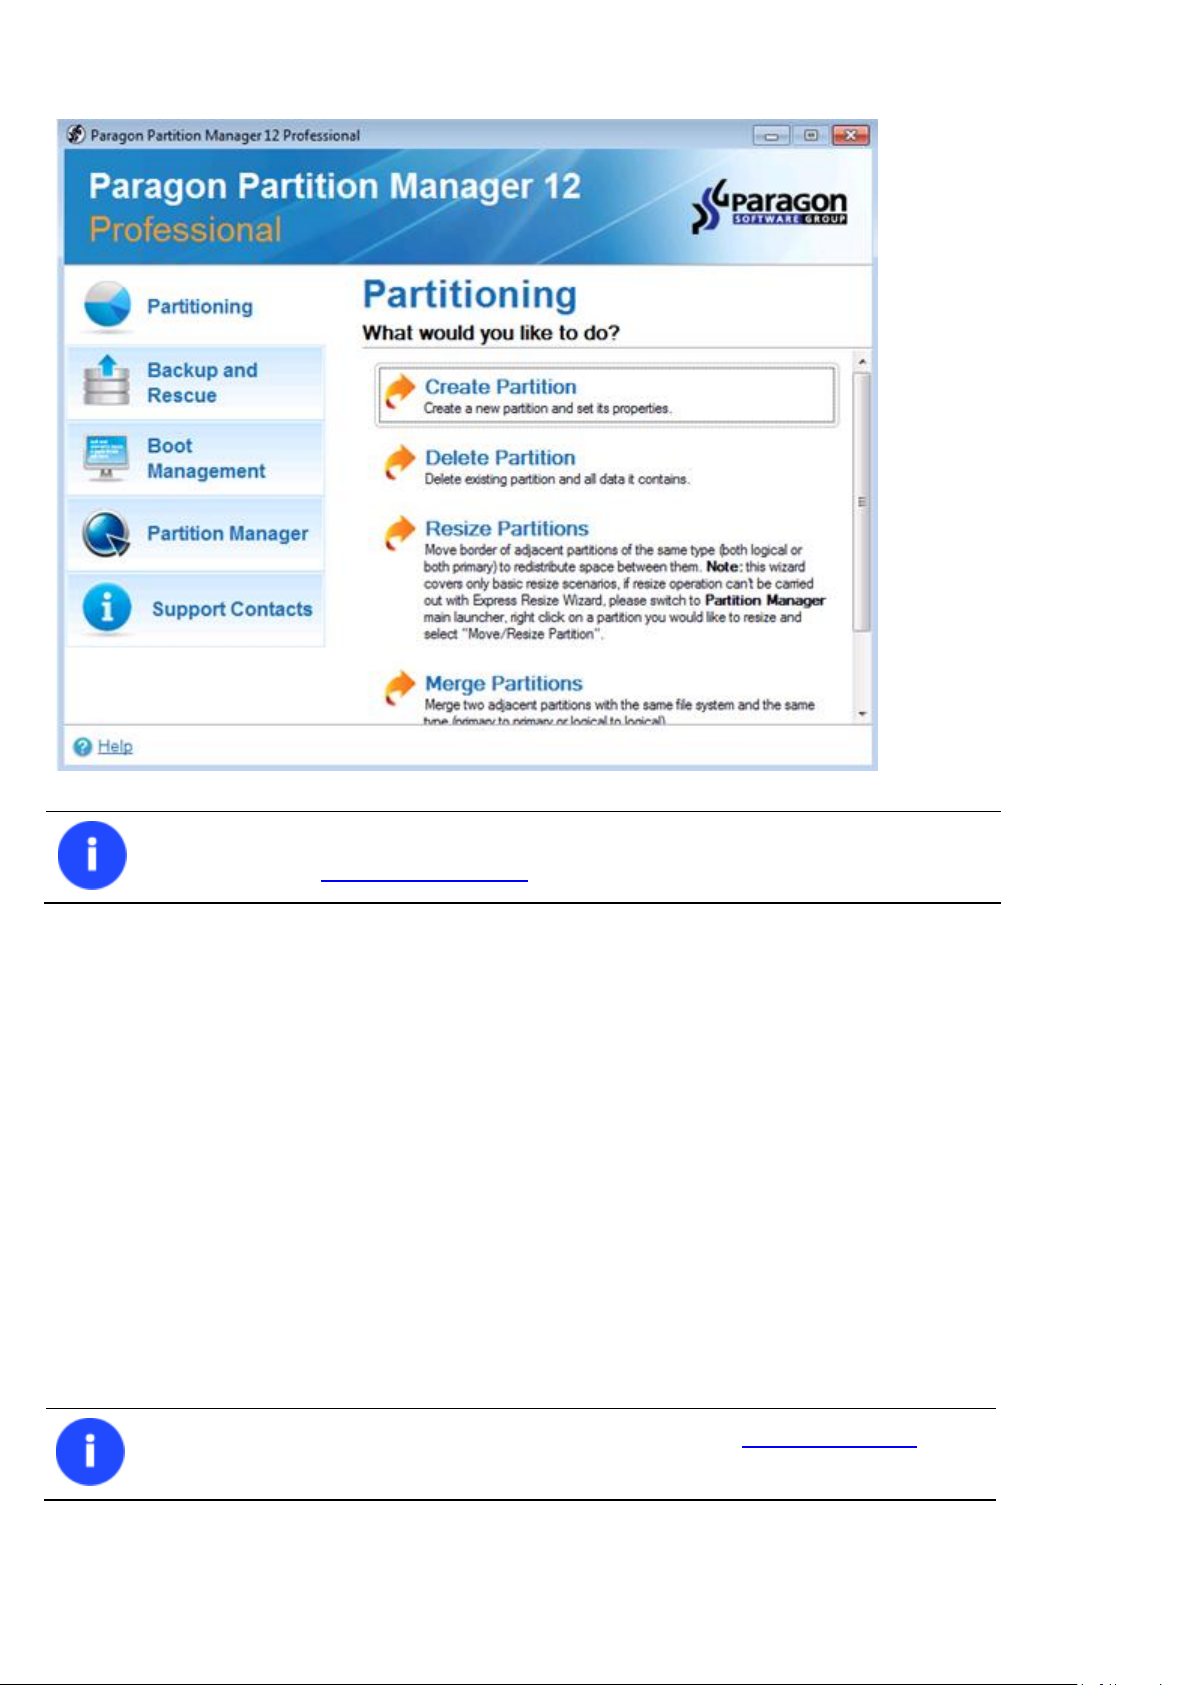
Ещё одна полезная возможность — создание накопителя или образа WinPE с Paragon Partition Manager для выполнения действий над дисками. Найти эту возможность можно в разделе настроек, пункт «Recovery Media Builder»:

Для создания ISO потребуется также загрузить Windows ADK, для простого создания загрузочной флешки можно использовать образ текущей системы, выбрав «Use this Windows image» в поле «Creation Mode».
Подводя итог, Paragon Partition Manager CE — отличный простой и бесплатный инструмент, который с большой вероятностью покроет большую часть потребностей обычного пользователя при работе с дисками или их разделами.
Ранее за ту же доступность большинства функций бесплатно (список которых в ней действительно обширный) я хвалил другую программу — DiskGenius. Рекомендовать продолжаю, к тому же в ней появился русский язык интерфейса. Однако, некоторые функции, например конвертация между динамическим и базовым диском или редактирование секторов, в ней, в отличие от продукта Paragon, недоступны.
PARAGON Software GmbH
Heinrich-von-Stephan-Str. 5c 79100 Freiburg, Germany
Tel. +49 (0) 761 59018201 Fax +49 (0) 761 59018130
Internet www.paragon-software.com Email sales@paragon-software.com
Partition Manager™ 12 Professional
User Manual
Copyright© 1994-2012 Paragon Software GmbH. All rights reserved.

2
Contents
Introduction ………………………………………………………………………………………………………….. 6
What’s New in Partition Manager 12 …………………………………………………………………………………………….. 6
Product Components ………………………………………………………………………………………………. 6
Features Overview ………………………………………………………………………………………………….. 7
Features ………………………………………………………………………………………………………………………………….. 7
User Friendly Fault Minimizing Interface ……………………………………………………………………………………………………………….. 7
Backup Facilities …………………………………………………………………………………………………………………………………………………. 7
Restore Facilities ………………………………………………………………………………………………………………………………………………… 7
Boot Management Facilities ………………………………………………………………………………………………………………………………… 8
Partition/Hard Disk Management Facilities ……………………………………………………………………………………………………………. 8
File System Optimization Facilities ……………………………………………………………………………………………………………………….. 8
Auxiliary Facilities ………………………………………………………………………………………………………………………………………………. 8
Supported Technologies ……………………………………………………………………………………………………………… 9
Supported Virtualization Software ……………………………………………………………………………………………….. 9
Supported File Systems ……………………………………………………………………………………………………………… 10
Supported Media ……………………………………………………………………………………………………………………… 10
Getting Started …………………………………………………………………………………………………….. 10
Distribution …………………………………………………………………………………………………………………………….. 10
Distributive CD …………………………………………………………………………………………………………………………………………………. 11
Online Distribution……………………………………………………………………………………………………………………………………………. 11
Registration ……………………………………………………………………………………………………………………………………………………… 11
How to Download Updates/Upgrades …………………………………………………………………………………………………………………. 12
Contacting Paragon Software GmbH ……………………………………………………………………………………………. 12
System Requirements ……………………………………………………………………………………………………………….. 12
Installation ……………………………………………………………………………………………………………………………… 13
First Start ………………………………………………………………………………………………………………………………… 14
Building Recovery Media ……………………………………………………………………………………………………………. 15
Booting from the Linux/DOS Recovery Media ………………………………………………………………………………… 16
Startup ……………………………………………………………………………………………………………………………………………………………. 16
Boot menu ………………………………………………………………………………………………………………………………………………………. 17
Booting from the WinPE Recovery Media ……………………………………………………………………………………… 19
Startup ……………………………………………………………………………………………………………………………………………………………. 19
Basic Concepts ……………………………………………………………………………………………………… 20
Copyright© 1994-2012 Paragon Software GmbH. All rights reserved.

3
Dynamic Disks ………………………………………………………………………………………………………………………….. 20
GPT versus MBR ……………………………………………………………………………………………………………………….. 21
Apple Boot Camp ……………………………………………………………………………………………………………………… 21
64-bit Support ………………………………………………………………………………………………………………………….. 22
Drive Partitioning ……………………………………………………………………………………………………………………… 22
Windows Components ………………………………………………………………………………………….. 22
Interface Overview …………………………………………………………………………………………………………………… 23
General Layout …………………………………………………………………………………………………………………………………………………. 23
Main Menu ……………………………………………………………………………………………………………………………………………………… 24
Tool Bar …………………………………………………………………………………………………………………………………………………………… 27
Virtual Operations Bar ………………………………………………………………………………………………………………………………………. 27
Common Tasks Bar …………………………………………………………………………………………………………………………………………… 28
Disk Map …………………………………………………………………………………………………………………………………………………………. 29
Explorer Bar …………………………………………………………………………………………………………………………………………………….. 30
Partition List …………………………………………………………………………………………………………………………………………………….. 31
Properties Bar ………………………………………………………………………………………………………………………………………………….. 32
Legend Bar ………………………………………………………………………………………………………………………………………………………. 33
Status Bar ………………………………………………………………………………………………………………………………………………………… 33
Settings Overview …………………………………………………………………………………………………………………….. 33
General Options ……………………………………………………………………………………………………………………………………………….. 33
Backup Image Options ………………………………………………………………………………………………………………………………………. 35
General Copy and Backup Options ……………………………………………………………………………………………………………………… 35
CD/DVD/BD Recording Options ………………………………………………………………………………………………………………………….. 36
Hot Processing Options ……………………………………………………………………………………………………………………………………… 37
Partitioning Options ………………………………………………………………………………………………………………………………………….. 37
E-Mail Options …………………………………………………………………………………………………………………………………………………. 38
Operation Dependency Options …………………………………………………………………………………………………………………………. 39
Virtual Mode Options ……………………………………………………………………………………………………………………………………….. 39
File System Conversion Options …………………………………………………………………………………………………………………………. 40
Log Files Options ………………………………………………………………………………………………………………………………………………. 41
Viewing Disk Properties …………………………………………………………………………………………………………….. 41
Viewing Image Properties ………………………………………………………………………………………………………….. 42
Using the Restore Wizard ………………………………………………………………………………………………………………………………….. 42
Data Backup and Rescue ……………………………………………………………………………………………………………. 44
Creating Backup Images …………………………………………………………………………………………………………………………………….. 44
Copyright© 1994-2012 Paragon Software GmbH. All rights reserved.

4
Restoring System and Data ………………………………………………………………………………………………………………………………… 47
Boot Management ……………………………………………………………………………………………………………………. 50
Partition Management ………………………………………………………………………………………………………………. 51
Basic Partitioning Operations …………………………………………………………………………………………………………………………….. 51
Advanced Partitioning Operations………………………………………………………………………………………………………………………. 60
Changing Partition Attributes …………………………………………………………………………………………………………………………….. 71
Hard Disk Management …………………………………………………………………………………………………………….. 74
Converting Dynamic MBR to Basic ……………………………………………………………………………………………………………………… 74
Converting GPT to Basic MBR …………………………………………………………………………………………………………………………….. 75
Converting Basic MBR to GPT …………………………………………………………………………………………………………………………….. 76
Updating MBR ………………………………………………………………………………………………………………………………………………….. 77
Changing Primary Slot ……………………………………………………………………………………………………………………………………….. 77
Extra Functionality ……………………………………………………………………………………………………………………. 78
View Partition/Hard Disk Properties ……………………………………………………………………………………………………………………. 78
Volume Explorer ………………………………………………………………………………………………………………………………………………. 79
File Transfer Wizard ………………………………………………………………………………………………………………………………………….. 80
Mount Partition ……………………………………………………………………………………………………………………………………………….. 82
Downgrade NTFS Version ………………………………………………………………………………………………………………………………….. 83
Change SID ………………………………………………………………………………………………………………………………………………………. 83
Defragment MFT ………………………………………………………………………………………………………………………………………………. 84
Compact MFT …………………………………………………………………………………………………………………………………………………… 85
Test Surface …………………………………………………………………………………………………………………………………………………….. 85
Check File System Integrity ………………………………………………………………………………………………………………………………… 86
Edit/View Sectors ……………………………………………………………………………………………………………………………………………… 86
Send Log Files …………………………………………………………………………………………………………………………………………………… 87
View Logs ………………………………………………………………………………………………………………………………………………………… 88
Typical Scenarios ………………………………………………………………………………………………….. 89
Backup Scenarios ……………………………………………………………………………………………………………………… 89
Backing up a hard disk or partition to external media (CD/DVD) …………………………………………………………………………….. 89
Backing up a hard disk or partition to a network drive ………………………………………………………………………………………….. 91
Backing up a dual boot Mac to an external USB drive……………………………………………………………………………………………. 93
Recovery Scenarios …………………………………………………………………………………………………………………… 95
Fixing MBR after a boot virus attack ……………………………………………………………………………………………………………………. 95
Correcting BCD (Boot Configuration Data) …………………………………………………………………………………………………………… 96
Fixing Windows startup ability …………………………………………………………………………………………………………………………… 97
Restoring a system partition from external media (CD/DVD) ……………………………………………………………………………….. 100
Copyright© 1994-2012 Paragon Software GmbH. All rights reserved.

5
Restoring a system partition from a network drive ……………………………………………………………………………………………… 103
Restoring a system partition from a local drive …………………………………………………………………………………………………… 106
Restoring a dual boot Mac from an external USB drive ……………………………………………………………………………………….. 108
Copying of data from the corrupted system disk to another hard disk ………………………………………………………………….. 111
Burning of data from the corrupted system disk to CD/DVD ………………………………………………………………………………… 113
Copying of data from a backup to the corrupted system partition ………………………………………………………………………… 115
Restoring separate files and folders from a backup …………………………………………………………………………………………….. 118
Resize Scenarios ……………………………………………………………………………………………………………………… 122
Creating a new partition to detach operating system from the rest of data …………………………………………………………… 122
Increasing size of a system partition by taking unused space of an adjacent partition …………………………………………….. 124
Increasing size of a system partition by taking unused space from any other …………………………………………………………. 126
Increasing size of a system partition by taking unused space of an adjacent logical partition …………………………………… 130
Separating OS from media data ………………………………………………………………………………………………………………………… 131
Merging a system partition with an adjacent logical partition………………………………………………………………………………. 133
Shrinking a system partition to increase size of a data partition …………………………………………………………………………… 135
Resizing partitions of Apple Boot Camp …………………………………………………………………………………………………………….. 137
Creating Dual Boot Systems ……………………………………………………………………………………………………… 139
For Windows computers ………………………………………………………………………………………………………………………………….. 139
Connecting a virtual disk (Connect VD) ……………………………………………………………………………………….. 149
Repartitioning a virtual disk ……………………………………………………………………………………………………………………………… 151
Exchanging data between physical and virtual environments ………………………………………………………………………………. 154
Copying data from a parent virtual disk to one of its snapshots ……………………………………………………………………………. 155
Using 2.2TB+ HDD as internal data storage in Windows XP …………………………………………………………….. 155
Extra Scenarios for WinPE ………………………………………………………………………………………………………… 158
Adding specific drivers …………………………………………………………………………………………………………………………………….. 158
Configuring network ……………………………………………………………………………………………………………………………………….. 159
Saving log files ………………………………………………………………………………………………………………………………………………… 162
Troubleshooter …………………………………………………………………………………………………… 164
Glossary …………………………………………………………………………………………………………….. 166
Copyright© 1994-2012 Paragon Software GmbH. All rights reserved.

6
Our company is constantly releasing new versions and updates to its software, that’s why
images shown in this manual may be different from what you see on your screen.
Introduction
Paragon Partition Manager™ 12 Professional is an integrated set of powerful tools that is specially designed to tackle
most of the problems you might face while using PC. A highly intelligent program engine together with built-in advanced
recovery facilities make it possible to securely carry out partitioning operations of any complexity on physical and virtual
disks, optimize performance of NTFS file system, etc. without fear to lose precious data.
In this manual you will find the answers to many of the technical questions, which might arise while using the program.
What’s New in Partition Manager 12
Split Partition Wizard helps you separate OS and data or different types of data by splitting one partition to two
different partitions of the same type and file system.
Improved Connect VD to connect a virtual disk as if it’s an ordinary physical disk, thus opening up all
functionality available for physical disks to virtual. You’ve now got the option to:
— Mount Paragon’s backups (.pbf images).
— Mount a virtual disk in the non-destructive mode. It’s a special read/write mode, when all changes on the
connected disk are being saved to a snapshot, thus providing complete safety for the original disk’s
contents. If needed, this snapshot can later be merged with its parental disk by using standard tools of
virtualization software vendor.
— Mount a virtual disk in the read-only mode to make sure no data will be changed on the virtual disk during
copy or any other operation on it.
GPT Loader, a special system driver to allow use of all space of modern ultra high capacity drives (larger than
2.2TB) on systems that don’t support it.
WinPE traceroute/ping utility to get detailed information on particular routes and measure transit delays of
packets across an Internet Protocol (IP) network.
Convert NTFS <> HFS file systems without reformatting.
Support of Windows 8.
Support of the restart-free installation.
Product Components
In order to cope with different tasks, the product contains several components:
Windows based set of utilities is the crucial part of the product. With the help of an easy to use launcher you
may find and run tasks of any complexity in the field of data and system protection, hard disk partitioning and
cloning, etc.
Copyright© 1994-2012 Paragon Software GmbH. All rights reserved.

7
Linux/DOS based recovery environment is a multi-platform bootable media that enables to run utilities under
Linux or PTS DOS, and that way to get access to your hard disk for maintenance or recovery purposes. Both
platforms have their strong sides, for instance Linux can boast support of FireWire (i.e. IEEE1394) or USB
devices. It enables to burn CD/DVD discs. However there can be some difficulties with detecting new hardware.
DOS in its turn has no problems of that kind but is limited in features. The Linux/DOS recovery environment
requires no installation and can be of great help when the system fails to boot. Besides it offers a Windows XP
like environment.
WinPE based recovery environment. Especially for keen followers of Windows, our product offers the option to
prepare a WinPE based bootable media. Unlike the Linux/DOS recovery environment it can boast an excellent
hardware support and the same interface as the Windows version can. However its system requirements are
much tougher.
Features Overview
This chapter dwells upon key benefits and technical highlights of the product.
Features
Let us list some of the features:
User Friendly Fault Minimizing Interface
Graphical representation of the data to gain a better understanding.
A handy Launcher to easily find and run the required tasks.
Comprehensive wizards to simplify even the most complex operations.
Resize partitions directly on the Disk Map with the drag-and-drop technique.
A context sensitive hint system for all functions of the program.
Previewing the resulting layout of hard disks before actually executing operations (so-called virtual
operations).
Backup Facilities
Available location for backup images:
— Backup to local mounted partitions.
— Backup to local unmounted (without drive letter assigned) partitions.
— Backup to an external mounted storage to provide for a higher level of data protection and system
independence.
— Backup to external media (CD/DVD) to guarantee a high level of data protection as long as the backup media is
kept secure.
— Backup to a network drive to stand a better chance of success in case of a hard disk failure.
Back up separate partitions or entire disks.
Restore Facilities
Restore an entire disk, separate partitions or only files you need from the previously created backup image.
Restore with Shrink to restore a backup image to a free block of smaller size taking into account only the
amount of actual data of the image.
Copyright© 1994-2012 Paragon Software GmbH. All rights reserved.

8
Boot Management Facilities
Boot Manager Setup Wizard to easily manage several operating systems on one computer.
Partition/Hard Disk Management Facilities
Basic functions for initializing, partitioning and formatting hard disks (create, format, delete). Instead of the
standard Windows disk tools, the program supports all popular file systems.
Express Create Partition Wizard to create a new partition in the most appropriate place of a hard disk, format it
to NTFS and then make it available in the system by assigning a drive letter.
Split Partition Wizard helps you separate OS and data or different types of data by splitting one partition to two
different partitions of the same type and file system.
Merge Partitions Wizard to consolidate the disk space, which originally belongs to two adjacent partitions
(NTFS, FAT16/FAT32), into a single, larger partition.
Redistribute Free Space Wizard to increase free space on one partition by up-taking the on-disk unallocated
space and the unused space of other partitions.
Express Resize Partitions Wizard to increase free space on one partition by up-taking the unused space of an
adjacent partition of a hard disk (including partitions of Apple Boot Camp).
NTFS hot resize upward to enlarge an NTFS partition (system, locked) without rebooting Windows and
interrupting its work.
Convert a file system (FAT16/32, NTFS, Apple HFS) without reformatting.
Mount a partition (assign a drive letter) of any file system type to make it available for your operating system.
Modify file system parameters (make active/inactive, hide/unhide, etc.).
Install New OS Wizard to make a system ready to install a new operating system.
Undelete Partitions Wizard to recover an accidentally deleted partition.
File System Optimization Facilities
MFT defragmentation and shrinking to improve performance of NTFS.
Auxiliary Facilities
GPT Loader is a special system driver to allow use of all space of modern ultra high capacity drives (larger than
2.2TB) on systems that don’t support it.
Conversion of basic MBR disks to basic GPT to enjoy all benefits of the newest partitioning scheme with
minimal effort.
File Transfer Wizard to make such operations as transferring of files/directories or burning of them to CD/DVD
as easy and convenient as possible. Providing access to Paragon backups as regular folders, it may also help to
replace corrupted data from a previously created image in case of an operating system failure.
Volume Explorer is a handy tool when you have different file systems on the disk, whether they contain an
operating system or just data. Volume Explorer will let you explore a file system of any type and provide access
to the necessary files and directories regardless of their security attributes.
Recovery Media Builder to create a bootable recovery media on a CD, DVD disc, or flash memory, which can
later be used to boot and recover your computer in case of an operating system failure. Moreover, with its help
you can save data from partitions of your hard disk directly to compact discs or burn ISO-images. The utility
Copyright© 1994-2012 Paragon Software GmbH. All rights reserved.

9
Boot Corrector is only available for the bootable recovery environment.
supports various formats of laser discs: CD-R/RW, DVD-R/RW, DVD+R/RW, DVD-R, DVD+R double layer, Blu-ray
and can handle multi-session burning.
Network Configuration Wizard to establish a network connection on a bootable recovery media either to save a
backup of a partition/hard disk or just several files on a network computer or retrieve a previously made backup
from a network computer for recovery purposes.
Boot Corrector to fix most of the system boot problems that can be a result of a human factor, program error or
a boot virus activity.
Supported Technologies
Along with using innovative technologies from outside, Paragon has developed a number of its own original
technologies that make its products unique and attractive for customers:
Paragon Hot Backup™ technology to back up locked partitions and hard disks under Windows NT+ family
operating systems providing both high operating efficiency as well as low hardware requirements.
Paragon Power Shield™ technology to provide data consistency in case of a hardware malfunction, power
outages or an operating system failure.
Paragon UFSD™ technology to browse partitions of any file system including hidden and unmounted, modify
and copy files and folders, etc.
Paragon Hot Resize™ technology to enlarge NTFS partitions (system, locked) without rebooting Windows and
interrupting its work.
Paragon Restore with Shrink™ technology to restore a backup image to a free block of smaller size taking into
account only the amount of actual data of the image.
Paragon Smart Partition™ technology to securely perform hard disk partitioning operations of any complexity.
Paragon BTE™ technology to set tasks for execution during the system restart, thus saving from the need to use
a bootable media when modifying system partitions.
Microsoft Volume Shadow Copy Service (VSS) to provide the copy/backup infrastructure for the Microsoft
Windows XP/Vista/7/Server 2003/2008 operating systems. It offers a reliable mechanism to create consistent
point-in-time copies of data known as shadow copies. Developed by Microsoft in close cooperation with the
leading copy/backup solution vendors on the market, it is based on a snapshot technology concept.
Microsoft Dynamic Disk (simple, spanned, striped, mirrored, RAID-5) to offer more management flexibility
without the partition limitation of basic disks. Dynamic storage can be particularly beneficial for large-scale
businesses when dealing with many physical hard disks involving complex setup.
GUID Partition Table (GPT). It is the next generation of a hard disk partitioning scheme developed to lift
restrictions of the old MBR. GPT disks are now supported by Windows Vista/7, Server 2008, Mac OS X and Linux.
Supported Virtualization Software
Microsoft Virtual PC 2007
Microsoft Windows Virtual PC
Copyright© 1994-2012 Paragon Software GmbH. All rights reserved.
10
Snapshot disks of Oracle VirtualBox are not supported.
Unfortunately, support of non-Roman characters for the HFS+ file system is unavailable at
the moment. The company is about to implement it in the nearest future.
Microsoft Virtual Server
Microsoft Hyper-V R1/R2
Oracle Virtual Box 1.0-4.x
VMware Player
VMware Workstation
VMware Server
VMware Fusion
Supported File Systems
Full read/write access to FAT16/FAT32 partitions.
Full read/write access to NTFS (Basic Disks) under Windows, Linux and PTS DOS. Compressed NTFS files are also
supported.
Full read/write access to Ext2FS/Ext3FS/Ext4FS partitions.
Limited read/write access to Apple HFS+ partitions.
Supported Media
Support of both MBR and GPT hard disks (2.2TB+ disks included)
IDE, SCSI and SATA hard disks
SSD (Solid State Drive)
AFD (Advanced Format Drive)
Non-512B sector size drives
CD-R, CD-RW, DVD-R, DVD+R, DVD-RW, DVD+RW, DVD-R, DVD+R double layer and also Blu-ray discs
FireWire (i.e. IEEE1394), USB 1.0, USB 2.0, USB 3.0 hard disks
PC card storage devices (MBR and GPT flash memory, etc.)
Getting Started
In this chapter you will find all the information necessary to get the product ready to use.
Distribution
Paragon Partition Manager 12 is distributed in two ways:
Boxed package from Paragon Software GmbH and resellers
Copyright© 1994-2012 Paragon Software GmbH. All rights reserved.

11
It is recommended to use Internet Explorer 5+ or any compatible browser.
Downloadable package over the Internet at the company’s web-site
Distributive CD
The boxed package includes a distributive CD that is in fact a bootable recovery environment with auto-run of the
Windows installation, thus it can be used as a ready-made solution. But if you’re going to run the Windows components,
you need to install them first (see Installation).
If you want to download an update/upgrade of the product, it will be in form of the downloadable installation package
as described in Online Distribution).
Online Distribution
Partition Manager 12 purchased over the Internet will be in form of an MSI package. After installing the product you can
launch the Recovery Media Builder to prepare a recovery media.
Registration
Paragon Software GmbH provides a wide range of online services through its web-portal — www.paragon-
software.com/support/:
Registration of new users;
Registration of purchased products for registered users;
Available around-the-clock downloading center, where registered users can get product updates/upgrades as
well as all the necessary documentation;
Downloadable free demo versions and open documentation for all users.
To register as a new user
To register as a new user, please do the following:
1. Run an Internet browser and visit the page: www.paragon-software.com/my-account/;
2. Click Create of the Create a Paragon Account section;
3. Fill out a registration form;
4. Click Register.
The most important field in the form is an E-mail address, as it serves as a login to enter the system. Besides your access
password will be sent to this address as well.
To register a new product
If you are a registered user and would like to register Partition Manager 12, please do the following:
1. Run an Internet browser and visit the page: www.paragon-software.com/my-account/;
2. In the Email field of the Authorization section, enter an E-mail used for registration;
3. In the Password field enter a password received after registration;
4. Click Sign in;
5. If the user name and password are valid, you will get to your account;
Copyright© 1994-2012 Paragon Software GmbH. All rights reserved.
12
Visit Paragon Software web site
Registration & updates web-service
www.paragon-software.com/support
Knowledge Base & Technical Support
sales@paragon-software.com
6. Click Register new product of the Products section;
7. Enter your product serial number in the Serial Number field. You can find it in the product box or obtain from
your reseller. Click Next;
8. On the next page you will be asked to provide some additional data. Also you will need to decide whether you
want to get confirmation on registering the product by E-mail or not. Click Next, and then click Finish.
That is all. The product is now registered.
How to Download Updates/Upgrades
Downloading of updates/upgrades can be fulfilled in the following way:
1. Run an Internet browser and visit the page: www.paragon-software.com/my-account/;
2. In the Email field of the Authorization section, enter an E-mail used for registration;
3. In the Password field enter a password received after registration;
4. Click Sign in;
5. If the user name and password are valid, you will get to your account;
6. Select My Downloads of the Products section to see what updates are available for you;
7. Select the desired update and click Download.
Contacting Paragon Software GmbH
If you have any questions about the company products, please do not hesitate to contact Paragon Software GmbH.
System Requirements
For the Windows installation package
Operating systems:
— Windows 2000 Professional (32 bit only)
— Windows XP (32 and 64 bit)
— Windows Vista (32 and 64 bit)
— Windows 7 (32 and 64 bit)
— Windows 8 (32 and 64 bit)
Internet Explorer 5.0 or higher
Intel Pentium CPU or its equivalent, with 300 MHz processor clock speed
Copyright© 1994-2012 Paragon Software GmbH. All rights reserved.
13
During the installation additional free space (up to 1GB) will be required.
In case there is some previous version of the program installed on the computer, the
program will offer the user to uninstall it first.
128 MB of RAM (256+ recommended)
Hard disk drive with 250 MB of available space
SVGA video adapter and monitor
Keyboard
Mouse
For the Linux bootable environment
Intel Pentium CPU or its equivalent, with 300 MHz processor clock speed
256 MB of RAM
SVGA video adapter and monitor
Keyboard
Mouse
For the WinPE bootable environment
Intel Pentium III CPU or its equivalent, with 1000 MHz processor clock speed
At least 512 MB of RAM
SVGA video adapter and monitor
Keyboard
Mouse
Additional requirements
Network card to send/retrieve data to/from a network computer
Recordable CD/DVD drive to burn data to compact discs
External USB hard drive to store data.
Installation
To install Paragon Partition Manager 12, please do the following:
1. Run Setup Application. Click on the *.MSI file. This application will guide you through the process of the
program installation. The setup utility is compiled with the InstallShield SDK, hence it contains the standard user
interface and set of installation steps.
2. Starting Setup. The Welcome page informs that the application is being installed. Click the Next button to
continue.
Copyright© 1994-2012 Paragon Software GmbH. All rights reserved.
14
Do not install the program on network drives. Do not use Terminal Server sessions to install
and run the program. In both cases, the program functionality will be limited.
The program provides wide opportunities in the field of hard disk structure modification, so
just to be on the safe side, please make a backup of your data before carrying out any
operation.
3. Confirm License Agreement. The License Agreement page displays the Paragon License Agreement. Read the
agreement and then select the appropriate option to accept. If you do not agree with any conditions stated
there, the installation process will be interrupted. By clicking the Print button, the License Agreement may also
be printed out.
4. Provide Registration Information. On the Registration page you are to provide your product key and serial
number.
5. Provide Customer Information. On the Customer Information page you are to provide the standard
information, i.e. a user name and an organization. Besides you need to decide whether to make the program
available for all users of this computer (if several) or only for the current one.
6. Select an Installation Folder. The Destination Folder page allows you to choose a folder where the program will
be installed. By default, the installation folder will be created as:
C:\Program Files\Paragon\Paragon Partition Manager 12. To select another folder, click the Change… button.
After you have selected the required folder, click the Next button to continue.
7. Confirm Installation. On the Ready to Install the Program page click the Install button to start the installation or
the Back button to return to any of the previous pages and modify the installation settings.
8. Copying Files. The Copying Files page shows the overall progress of the installation. Click the Cancel button to
abort the setup.
9. Finishing the Installation. The Final page reports the end of the setup process. Click the Finish button to
complete the wizard.
First Start
To start Paragon Partition Manager 12 under Windows, please click the Windows Start button and then select Programs
> Paragon Partition Manager™ 12 > Paragon Partition Manager™.
The first component that will be displayed is called the Express Launcher. Thanks to a well thought-out categorization
and hint system, it provides quick and easy access to wizards and utilities that we consider worth using on a regular
basis. With its help you can also start up the traditional launcher, the help system or go to the program’s home page.
Copyright© 1994-2012 Paragon Software GmbH. All rights reserved.
15
To know more on how to handle the product’s interface and accomplish typical operations,
please consult the Windows Components chapter.
There are other ways to start up this function, please consult the Interface Overview
chapter to know more on the subject.
Building Recovery Media
Recovery Media Builder can help you accomplish the following operations:
Prepare the Linux/DOS recovery environment (included in the installation package) on external media (CD, DVD,
or flash memory) to boot and run utilities under Linux or PTS DOS, and that way to get access to your hard disk
for maintenance or recovery purposes (strongly recommended);
Prepare a custom Linux/DOS recovery environment by adding any data you like to the standard image;
Prepare a bootable recovery environment from any ISO image;
Create from the master CD the Linux/DOS recovery environment on a CD/DVD disc, or flash memory.
Below you can find how to build our Linux/DOS based recovery environment on a thumb drive:
1. Plug in a thumb drive of at least 250 MBs in size. Please note all data on that drive will be deleted.
2. In the Main Menu: select Tools > Recovery Media Builder…
3. On the Wizard’s Welcome page, click the Next button.
Copyright© 1994-2012 Paragon Software GmbH. All rights reserved.
4. Select the Flash Memory option.
Please use Boot Media Builder to prepare the WinPE recovery environment, which you can
get here: www.paragon-software.com/my-account/.
5. Select the Typical option.
16
6. Select the required thumb drive from the list of flash memory devices available in the system at the moment (if
several).
7. You will have to confirm the operation.
Booting from the Linux/DOS Recovery Media
The Linux/DOS recovery environment can be used to boot your computer into Linux or PTS DOS to get access to your
hard disk for maintenance or recovery purposes. It also has the PTS DOS safe mode, which may help in a number of nonstandard situations such as interfering hardware settings or serious problems on the hardware level. In this case, only
basic files and drivers (such as hard disk drivers, a monitor driver, and a keyboard driver) will be loaded.
Startup
To start working with the Linux/DOS recovery environment, please take the following steps:
1. Start up the computer from our Linux/DOS recovery media.
Copyright© 1994-2012 Paragon Software GmbH. All rights reserved.
17
Recovery Media Builder can help you prepare our recovery environment either on a
CD/DVD disc or a thumb drive.
To automatically boot from the recovery media please make sure the on-board BIOS is set
up to boot from CD/USB first.
By default the Normal Mode will be automatically initiated after a 10 second idle period.
While working with the recovery environment you might experience some inconvenience
caused by possible video artifacts. It is just a result of changing video modes and in no way
will affect the program functionality. If this is the case, please wait a bit and everything will
be OK.
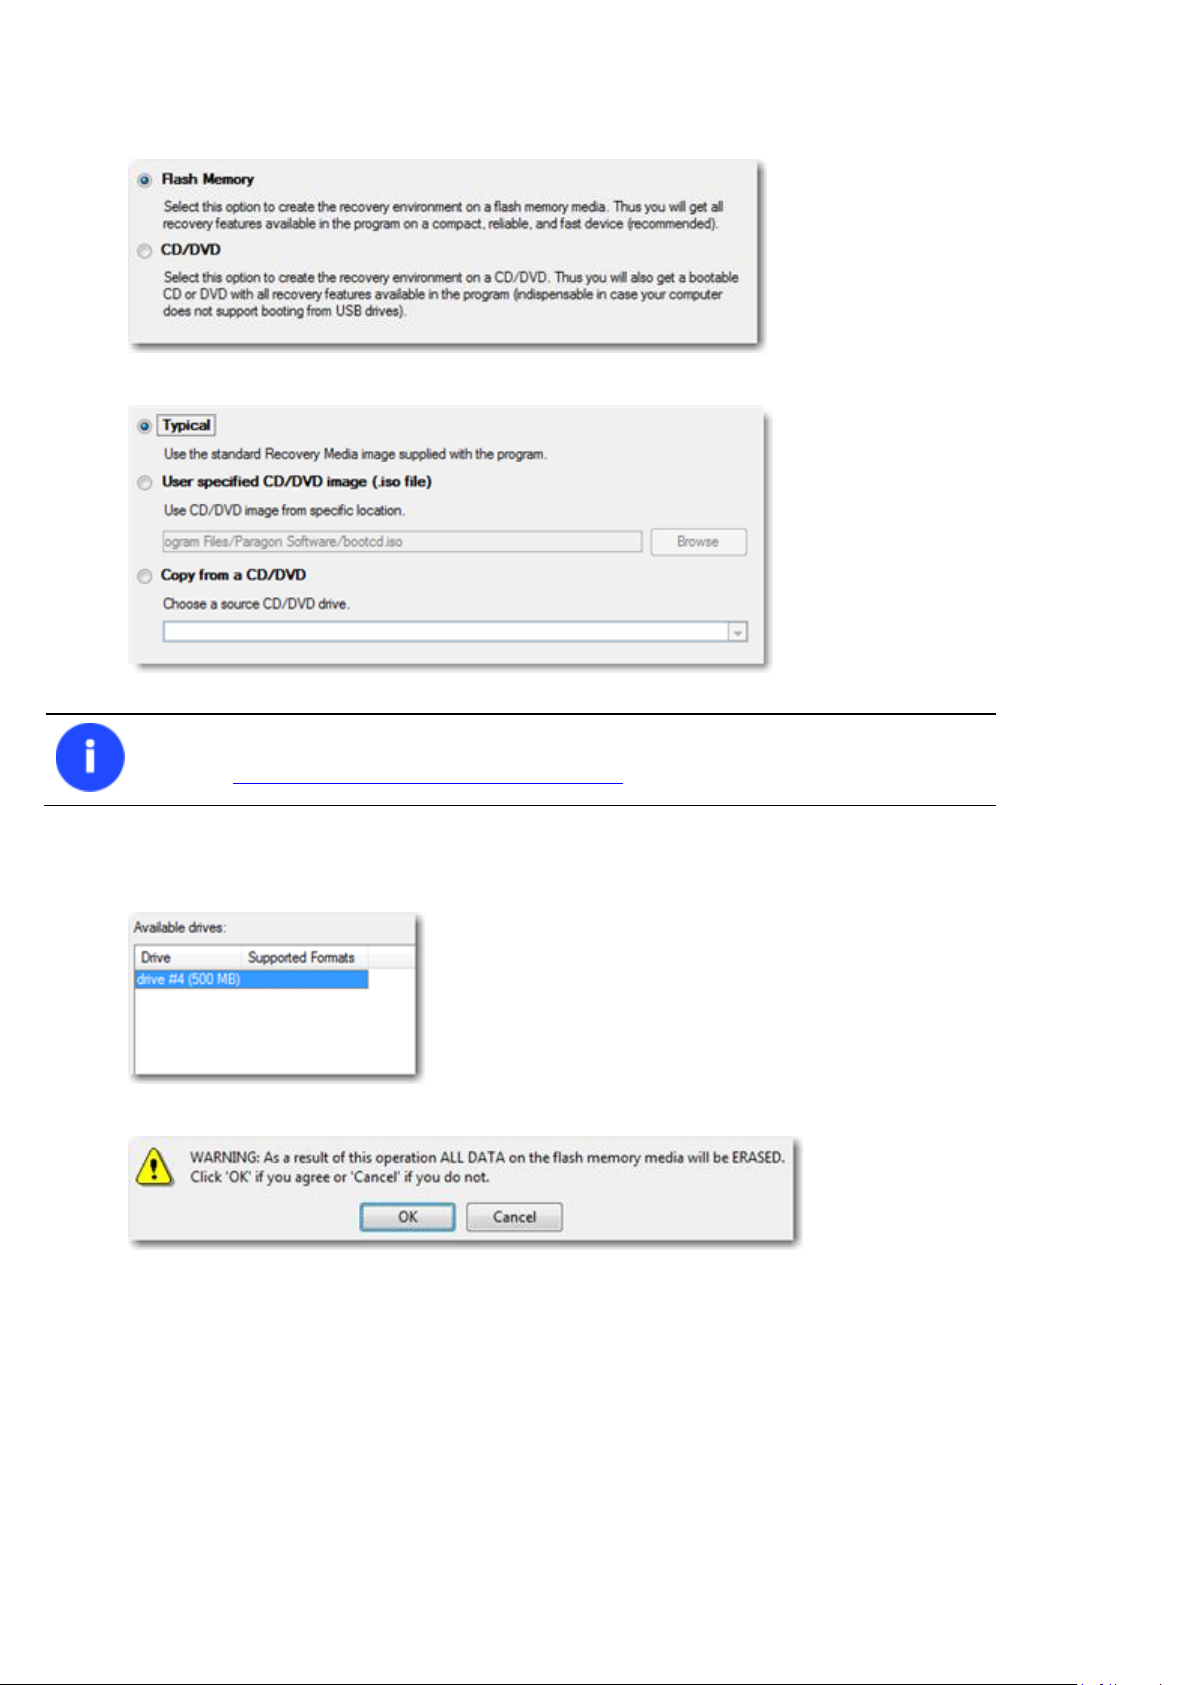
2. Launch a boot mode you need (Normal, Safe, Low-Graphics Safe) in the Boot menu.
3. Click on the required operation to start. Hints on the selected at the moment item will help you make the right
choice.
4. Consult the help system by pressing ALT+F1 to know more on the subject.
Boot menu
The Boot menu contains the following commands:
Normal Mode. Boot into the Linux normal mode. This mode uses the full set of drivers (recommended);
Safe Mode. Boot into the PTS DOS mode. This mode can be used as an alternative of the Linux normal mode if it
fails to work properly;
Low-Graphics Safe Mode. Boot into the PTS DOS safe mode. In this case, only the minimal set of drivers will be
included, like hard disk, monitor, and keyboard drivers. This mode has simple graphics and a simple menu;
Floppy Disk. Reboot the computer from a system floppy disk;
Hard Disk 0. Boot from the primary hard disk;
Find OS(s) on your hard disks. The program will scan hard disks of your computer to find any bootable operating
system.
To move within the menu, please use the arrow keys of the computer keyboard.
Copyright© 1994-2012 Paragon Software GmbH. All rights reserved.
18
If you are going to use network resources, first launch the Network Configuration Wizard to
establish a network connection.
The Linux/DOS recovery environment assigns drive letters to partitions the way it is done in
DOS, i.e. one after another, primary partitions at first. Thus mounted partitions may have
different drive letters from Windows.
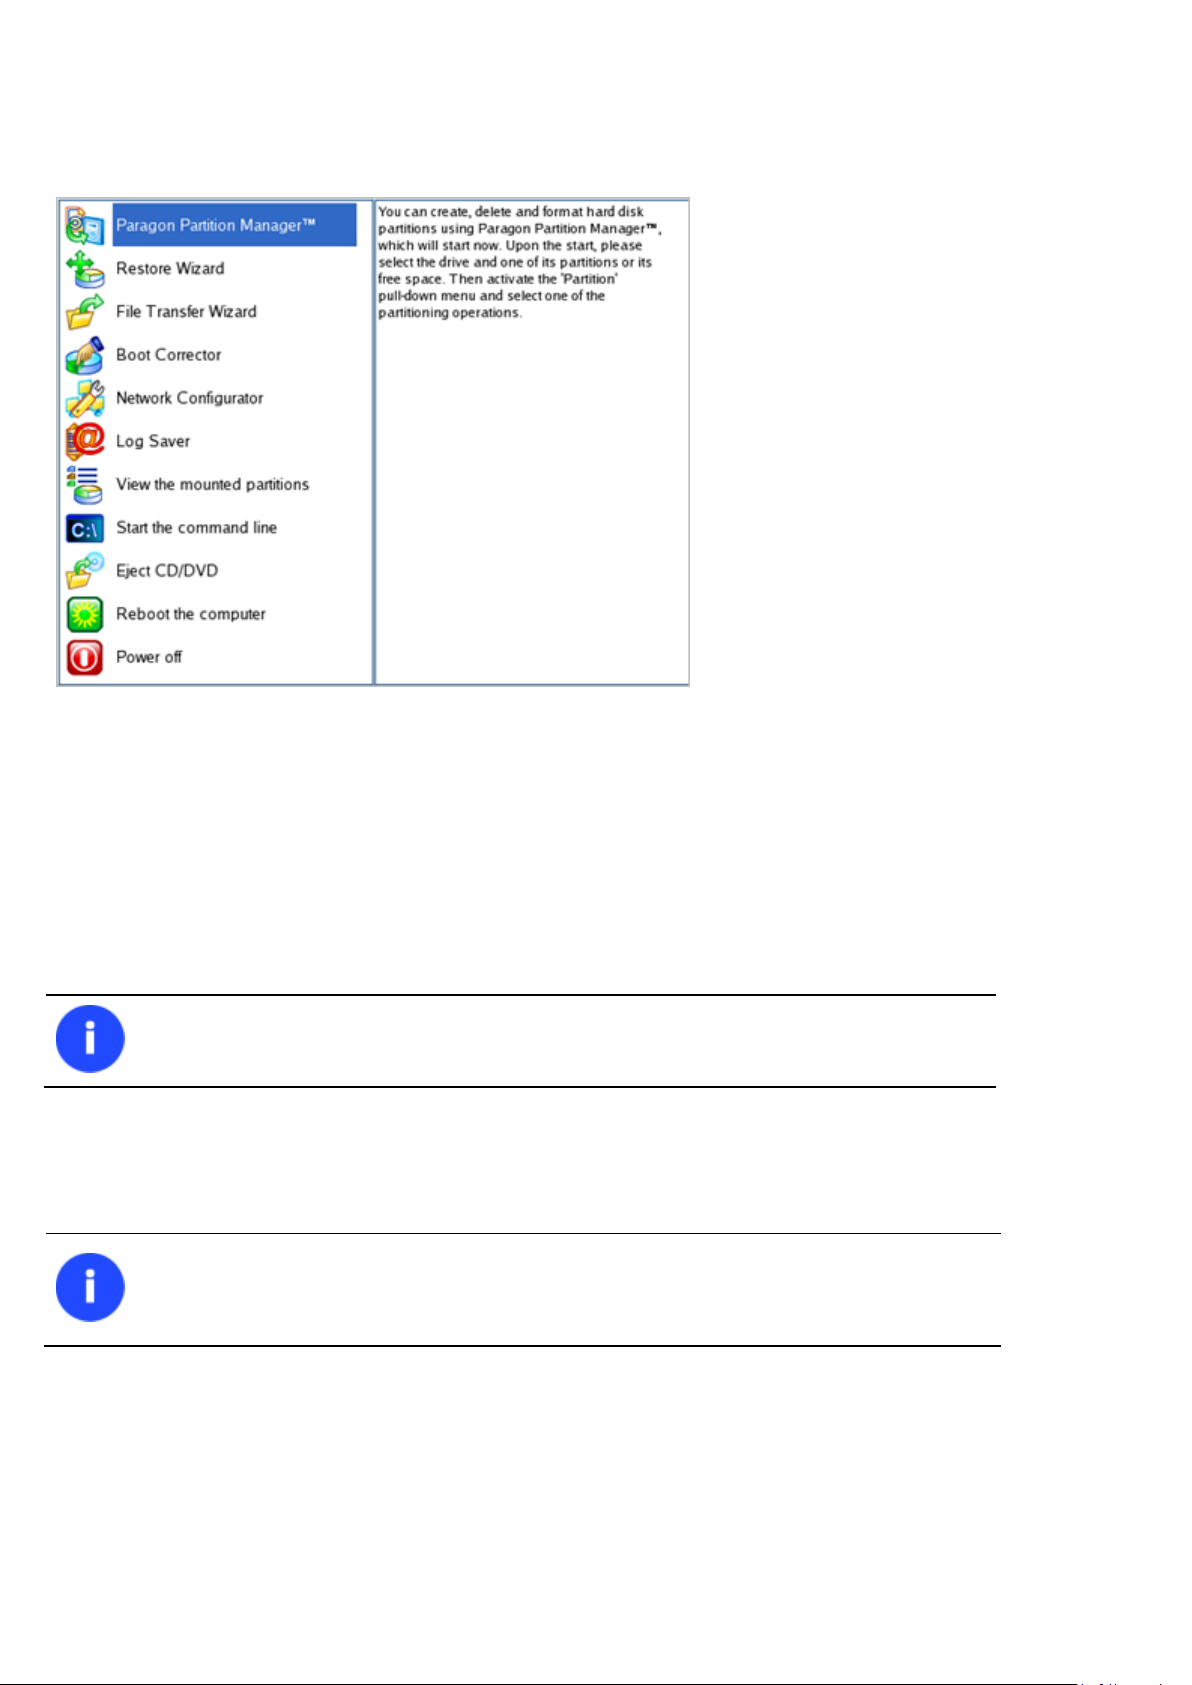
Normal Mode
When the Normal mode is selected, the Linux launch menu appears:
Partition Manager (enables to run wizards and dialogs, to specify program settings, to visualize the operating
environment and the hard disk configuration);
Restore Wizard (allows restoring hard disks and partitions);
File Transfer Wizard (allows coping files/folders to another disk or a partition as well as recording them to
CD/DVD);
Boot Corrector (helps to correct the Windows System Registry without Windows being loaded);
Network Configurator (enables to establish a network connection under Linux);
Log Saver (helps to collect and send the necessary log files to the Technical Support);
View the mounted partitions (the list of all mounted partitions will be displayed);
Eject CD/DVD;
Command Line (allows experienced users to execute any operation);
Reboot the computer;
Power off the computer.
Copyright© 1994-2012 Paragon Software GmbH. All rights reserved.
19
Please use Boot Media Builder to prepare the WinPE recovery environment, which you can
get here: www.paragon-software.com/my-account/.
To automatically boot from the recovery media please make sure the on-board BIOS is set
up to boot from CD/USB first.
To move within the menu, please use the arrow keys of the computer keyboard.
Safe Mode
When the Safe mode is selected, the PTS DOS launch menu appears. It has nearly the same functionality as for the
Normal mode except for the Network Configurator and Log Saver commands. Besides due to certain limitations of the
PTS DOS environment, there is no possibility to burn CD/DVD discs.
Low Graphics Safe Mode
When the Low Graphics mode is selected, the PTS DOS launch menu appears. It has the same functionality and looks
similar to the Safe mode but graphically simpler.
Booting from the WinPE Recovery Media
The WinPE recovery environment can be a real alternative to the Linux/DOS recovery environment. Providing nearly the
same level of functionality it offers an excellent hardware support and the same interface as the Windows version does.
Startup
To start working with the WinPE recovery environment, please take the following steps:
1. Start up the computer from the WinPE recovery media.
2. Once it has been loaded, you will see the Universal Application Launcher. In general it enables to run
components of the product, load drivers for undefined hardware or establish a network connection.
Copyright© 1994-2012 Paragon Software GmbH. All rights reserved.
20
The WinPE based recovery environment offers excellent hardware support. However in
case it doesn’t have a driver for your disk controller, your hard disks will be unavailable.
Please consult the Adding specific drivers scenario to know how to tackle this issue.
3. Click on the required operation to start. Hints on the selected at the moment item will help you make the right
choice.
4. Consult the help system by pressing ALT+F1 to know more on the subject.
Basic Concepts
This chapter explains terms and ideas that show how the program works. To understand these helps to obtain a general
notion of the operation performance and makes it easier for the user to operate the program.
Dynamic Disks
As you probably know, MS-DOS, Microsoft Windows 95/98/Me/NT/2000/XP/Vista/Server 2003/2008 support four
primary partitions per physical hard disk, one of which can be extended. Certainly there is the possibility to create
logical drives within the extended partition. Such types of disks are called basic. Windows XP Professional, Windows
2000, Windows Vista and Windows Server 2003/2008 follow the same strategy: You can have a maximum of four
primary partitions, one of which can be an extended partition with logical drives. However, these operating systems also
introduce a new disk configuration type — dynamic disk — which must be understood to effectively configure and manage
hard disks.
Dynamic disk is a physical disk that doesn’t use partitions or logical drives. Instead, it contains only dynamic volumes.
Regardless of what format you use for the file system, only Win2K computers can access dynamic volumes directly.
Copyright© 1994-2012 Paragon Software GmbH. All rights reserved.

21
It is strongly recommended not to modify the hard disk configuration with Windows Disk
Manager. Otherwise it may lead to unexpected consequences, right up to BSOD and
inability to boot in Windows XP/Vista. Please use our program to correctly update both
MBR and GPT.
However, computers that aren’t running Win2K can access the dynamic volumes remotely when connected to the
shared folders over the network.
Dynamic disks can co-exist on a system with basic disks. The only limitation is that you cannot mix Basic and Dynamic
disks on the same hard drive.
There are five types of dynamic volumes: simple (uses free space from a single disk), spanned (created from free disk
space that is linked together from multiple disks), striped (a volume the data of which is interleaved across two or more
physical disks), mirrored (a fault-tolerant volume the data of which is duplicated on two physical disks, and RAID-5
volumes (a fault-tolerant volume the data of which is striped across an array of three or more disks).
With dynamic storage, you can perform disk and volume management without the need to restart Windows.
Limitations:
Dynamic disks are not supported on portable computers.
Dynamic disks are not supported on Windows XP Home Edition-based computers.
You cannot create mirrored volumes or RAID-5 volumes on Windows XP Home Edition, Windows XP
Professional, or Windows XP 64-Bit Edition-based computers.
Thus, the dynamic disk is a new way of looking at hard disk configuration. Dynamic disks offer you more management
flexibility without the partition limitation of basic disks. Dynamic disks can contain an unlimited number of volumes, but
they cannot contain partitions or logical drives. Dynamic storage can be particularly beneficial for large-scale businesses
when dealing with many physical hard disks involving complex setup.
GPT versus MBR
GUID Partition Table (GPT) is the next generation of a hard disk partitioning scheme developed to lift restrictions of the
old MBR. Being a part of the Extensible Firmware Interface (EFI) standard proposed by Intel to replace the outdated PC
BIOS, it offers a number of crucial benefits:
Up to 128 primary partitions for the Windows implementation (only 4 in MBR);
The maximum allowed partition size is 18 exabytes (only 2 terabytes in MBR);
More reliable thanks to replication and cyclic redundancy check (CRC) protection of the partition table;
A well defined and fully self-identifying partition format (data critical to the platform operation is located in
partitions, but not in un-partitioned or hidden sectors as this is the case with MBR)
Apple Boot Camp
Boot Camp is a special utility to help you set up a dual boot system (Mac OS X and 32-bit Windows XP/Vista) on Intelbased Macs. It enables to securely re-partition your hard disk (resize an existing HFS+ partition to create a separate
partition for Windows) and then launch the installation process. With Boot Camp all the necessary drivers will be at your
disposal. Moreover after Windows has been installed it will serve as a boot manager to choose what operating system
to start up.
Copyright© 1994-2012 Paragon Software GmbH. All rights reserved.

22
64-bit Support
The bulk of software today is written for a 32-bit processor. It can meet the requirements of almost any end user.
However that is not the case when dealing with servers processing large amounts of data with complex calculations of
very large numbers. That is where 64-bit architecture comes into play.
It can boast improved scalability for business applications that enables to support more customer databases and more
simultaneous users on each server. Besides a 64-bit kernel can access more system resources, such as memory
allocation per user. A 64-bit processor can handle over 4 billion times more memory addresses than a 32-bit processor.
With these resources, even a very large database can be cached in memory.
Although many business applications run without problems on 32-bit systems, others have grown so complex that they
use up the 4 GB memory limitation of a 32-bit address space. With this large amount of data, fewer memory resources
are available to meet memory needs. On a 64-bit server, most queries are able to perform in the buffers available to the
database.
Some 32-bit applications make the transition to the 64-bit environment seamlessly others do not. For instance, systemlevel utilities and programs that provide direct hardware access are likely to fail. Our program offers a full-fledged
support of the 64-bit architecture providing fault-tolerant work for such system dependent modules as Hot Processing.
Drive Partitioning
As you probably know a hard drive is to be split into one or more partitions, since it cannot hold data until it is carved up
and space is set aside for an operating system. Until recently most PCs used to have just one partition, which filled the
entire hard disk and contained an OS. The situation has changed however, thanks to new cost-effective high capacity
hard drives, thus opening up numerous possibilities for PC users, such as editing video, archiving music, backing up CD
images, etc. Huge increase in space is great, but it poses a number of problems, most important of which are effective
data organization and speed.
Large drives are always going to take longer to search than smaller volumes, and an operating system is going to have its
work cut out both finding and organizing files. It is for this reason that many people decide to invest in multiple hard
drives, but there is an easy solution – drive partitioning. Partitioning lets you divide a single physical drive into a number
of logical drives, each of which servers as a container with its own drive letter and volume label, thus enabling the
operating system to process data more efficiently. Besides partitioning makes it possible to organize data so that it is
easy to find and manage. You can set aside, for instance, 40 GB of a 160 GB hard drive for the OS, 70 GB for storing
video and another 50 GB for your favorite music collections to provide transparent data storage.
It is also worth mentioning to that with a hard drive properly partitioned, such routine operations as files defragmentation or consistency check will not be that annoying and time-consuming any more.
By detaching the OS from the rest of the data you can tackle one more crucial issue – in case of a system malfunction,
you can get the system back on track in minutes by recovering it from a backup image located on the other partition of
the hard drive.
But that is not all drive partitioning may be used for. If you are willing to play games in Windows while browsing the
Internet in Linux, 100-percent sure that no virus will attack your PC, drive partitioning is a necessity. In order to run
several OSs on a single hard drive you are to create a corresponding number of partitions to effectively delineate the
boundaries of each OS.
Windows Components
In the given section you can find all the information necessary to successfully work with the Windows version of the
product.
Copyright© 1994-2012 Paragon Software GmbH. All rights reserved.
23
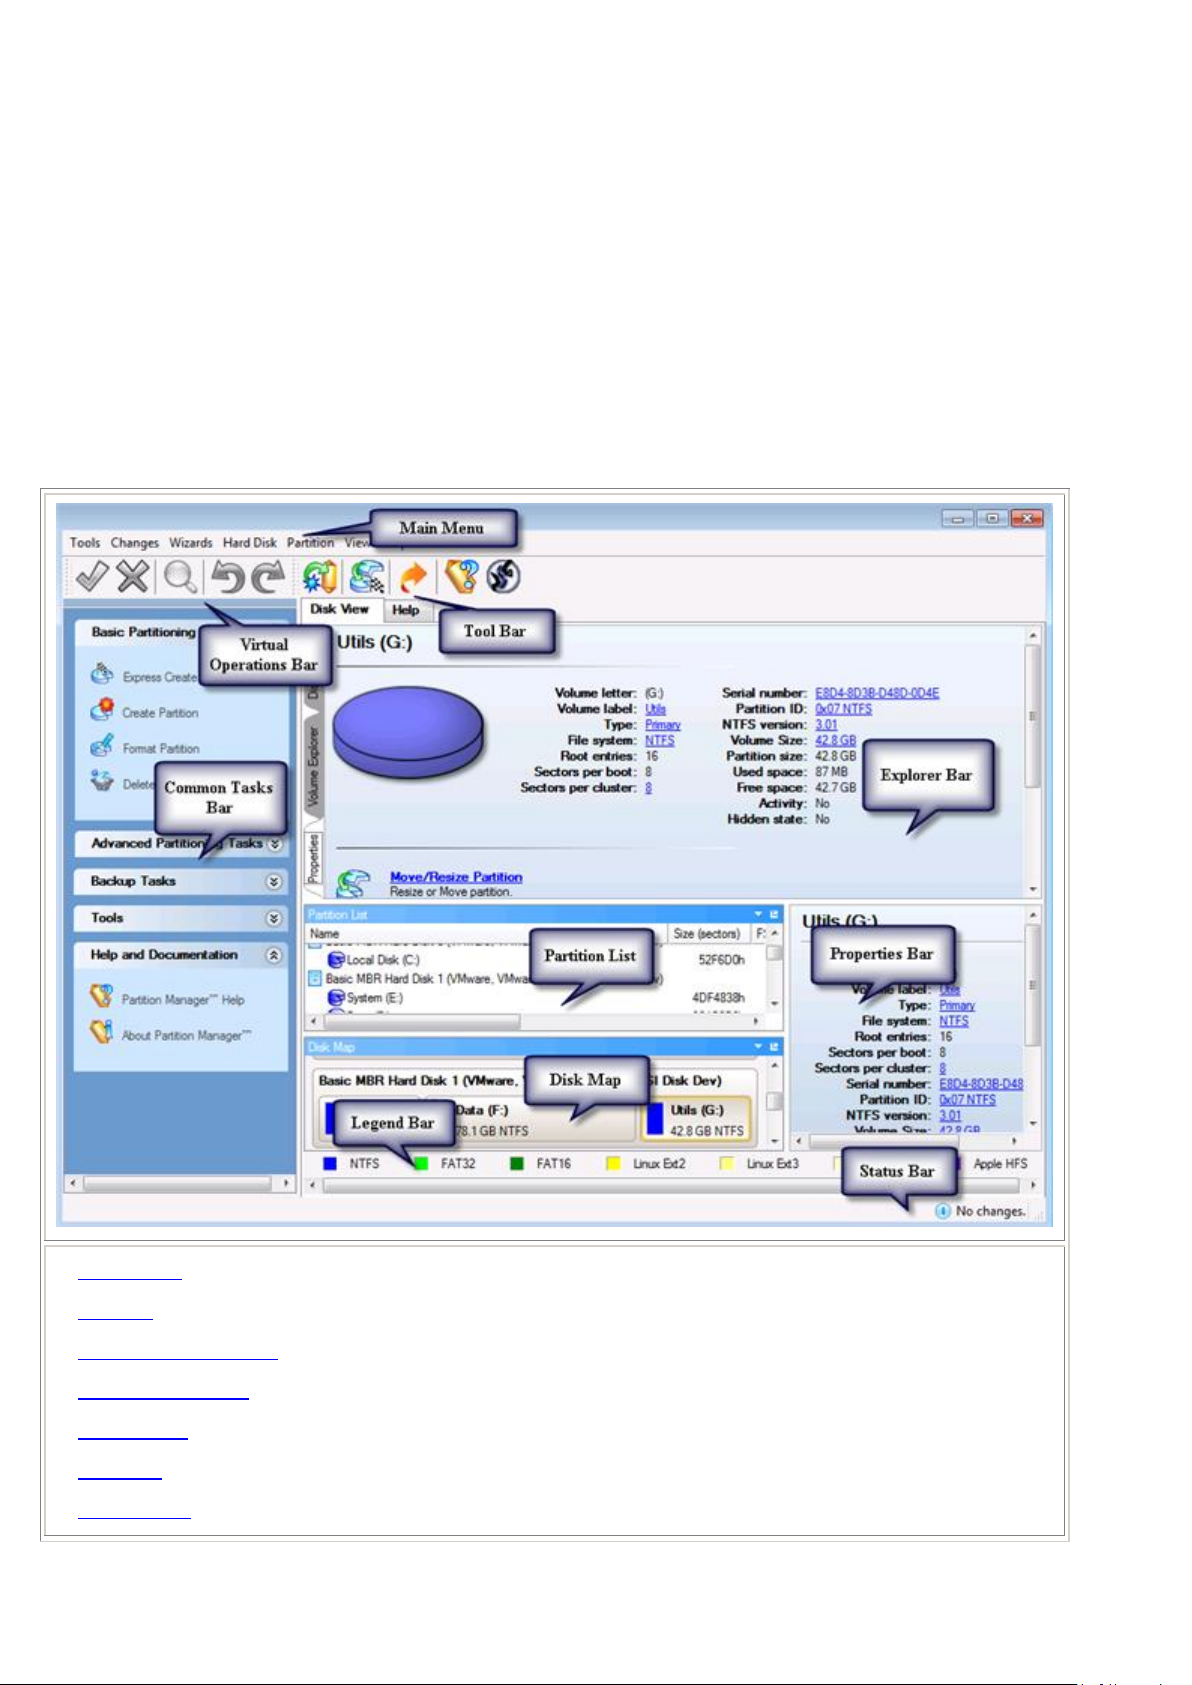
1. Main Menu
2. Tool Bar
3. Virtual Operations Bar
4. Common Tasks Bar
5. Explorer Bar
6. Disk Map
7. Partition List
Interface Overview
This chapter introduces the graphical interface of the program. The design of the interface precludes any mistake being
made on the part of the user. Most operations are performed through the system of wizards. Buttons and menus are
accompanied by easy understandable icons. Nevertheless, any problems that might occur while managing the program
can be tackled by reading this very chapter.
General Layout
When you start the program, the first component that is displayed is called the Launcher. It enables to run wizards and
dialogs, to specify program settings, to visualize the operating environment and the hard disk configuration.
The Launcher’s window can be conditionally subdivided into several sections that differ in their purpose and
functionality:
Copyright© 1994-2012 Paragon Software GmbH. All rights reserved.
24
8. Properties Bar
9. Legend Bar
10. Status Bar
View logs on the carried out operations
Compress and send the log to the Paragon Support Team
A wizard will help you collect and send logs to the Paragon Support Team
Manage several operating systems on one computer
Restore the system even when the current operating system cannot boot
anymore
Transfer data from any media
Edit the general settings of the program
Undo `the last virtual
operation`
Cancel the last virtual operation on the List of Pending Operations
Redo `the last virtual
operation`
Cancel the last undo virtual operation on the List of Pending Operations
Display the List of Pending Operations
Launch the real execution of virtual operations
Cancel all virtual operations on the List of Pending Operations
Refresh the current information about disks
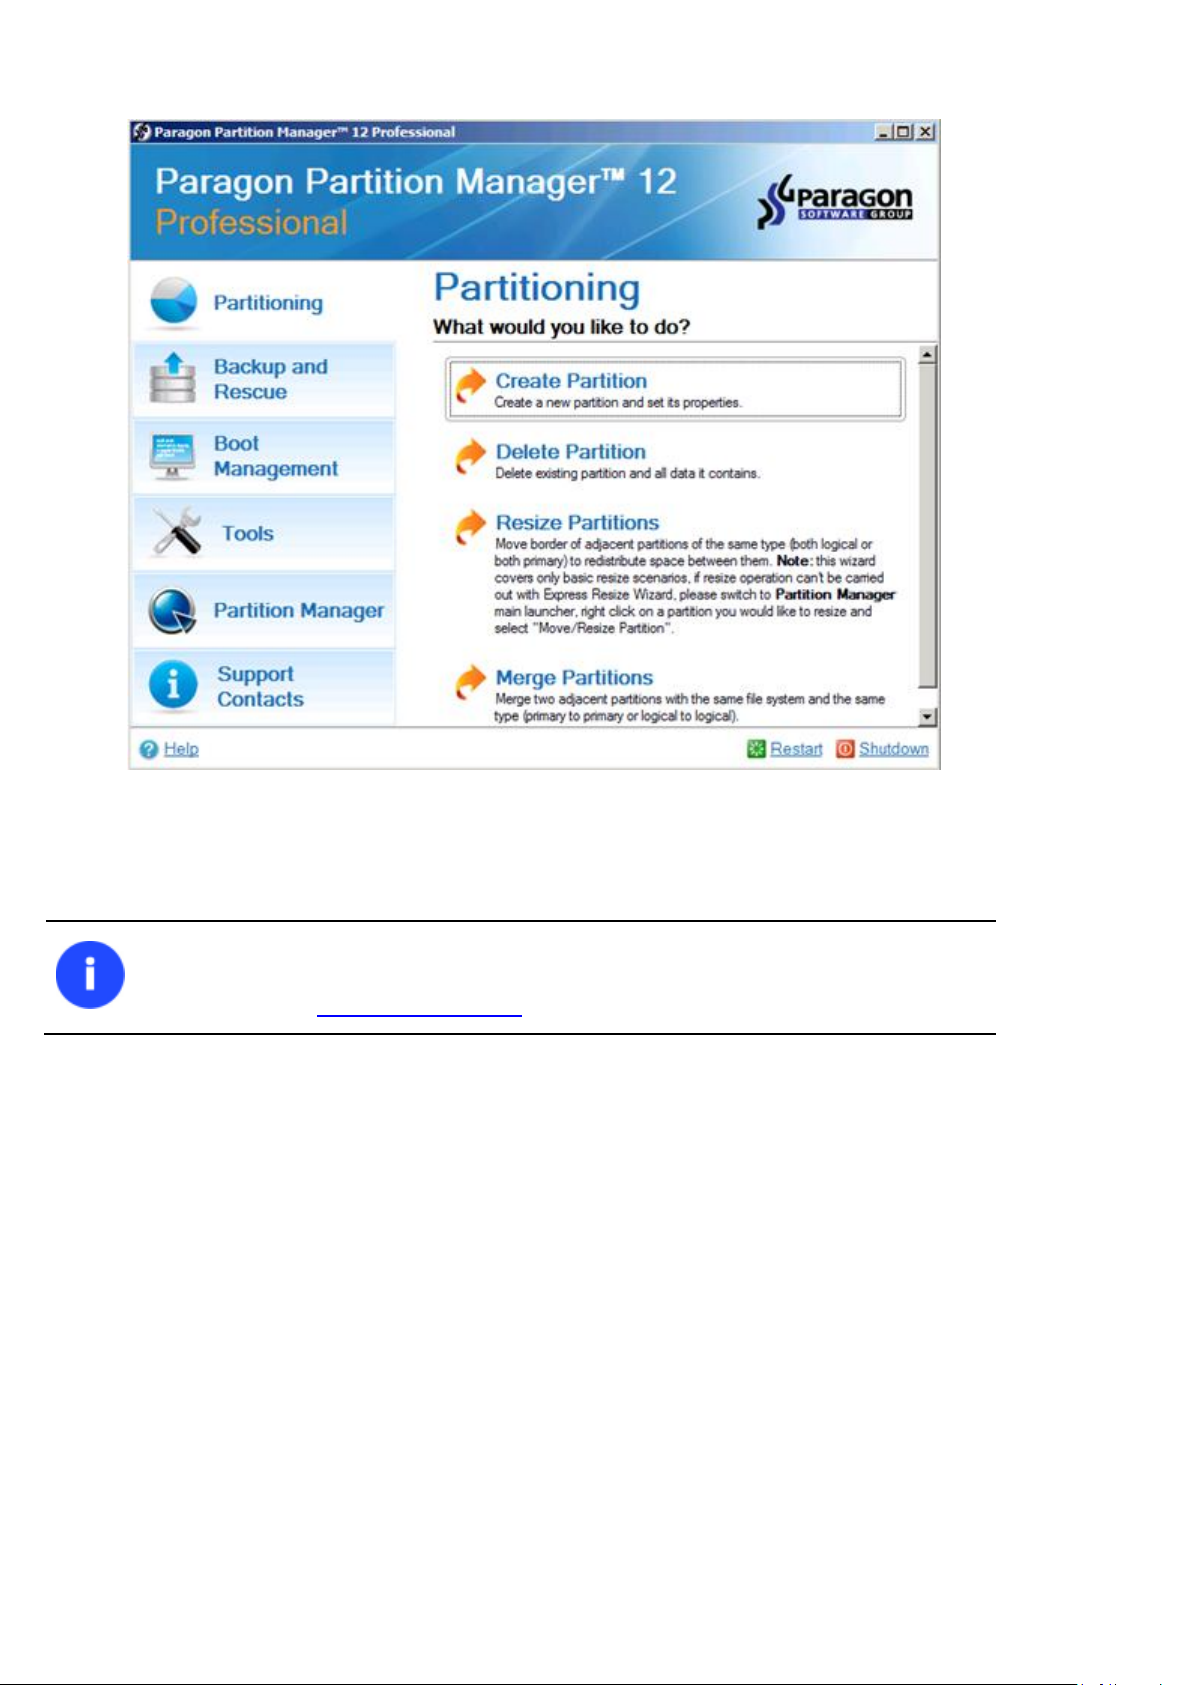
Express Create Partition…
Create an NTFS partition and make it ready for work
Create a partition of any file system
A number of panels offer similar functionality with a synchronized layout. The program enables to conceal some of them
to simplify the interface management.
All panels are separated by vertical and horizontal expandable sliders, allowing the user to customize the screen layout.
Main Menu
The Main Menu provides access to the entire functionality of the program. The available functions are as listed below:
Copyright© 1994-2012 Paragon Software GmbH. All rights reserved.
25
Format a partition of any file system
Delete a partition of any file system
Express Resize Partitions…
Increase free space on one partition by up-taking the unused space of an
adjacent partition
Recover an accidentally deleted partition
Merge adjacent partitions of NTFS, FAT or FAT32 file systems
Separate OS and data or different types of data by splitting one partition to two
different partitions of the same type and file system
Redistribute available disk space of existed partitions
Make your system ready to install a new operating system
Back up Disk or Partition…
Create a sector-based archive of an entire hard disk or separate partitions
Restore an entire hard disk, separate partitions, or files from the backup image
Convert a dynamic MBR disk containing simple volume(s) into a basic MBR disk
Convert to Basic MBR hard
disk…
Convert a basic or a dynamic GPT disk containing simple volume(s) into a basic
MBR disk
Convert a basic MBR disk into a basic GPT disk
Update MBR (Master Boot Record) of the selected hard disk
Modify the primary partitions enumeration for the selected hard disk
Change SID (Security Identifier) value of any found Windows installation
View/edit sectors of the selected hard disk
Get in-depth information on the properties of selected hard disk
Move/Resize the selected partition
Convert file system of the selected partition
Assign drive letter to the selected partition
Remove drive letter for the selected partition
Copyright© 1994-2012 Paragon Software GmbH. All rights reserved.
26
Make the selected partition unavailable for the operating system
Make the selected partition available for the operating system
Make the selected partition bootable by default
Mark Partition as Inactive
Make the selected partition non-bootable by default
Change volume label of the selected partition
Change cluster size of the selected partition
Change serial number of the selected partition
Decrease version of the selected NTFS partition
Change identifier of the selected partition
Change SID (Security Identifier) value of any found Windows installation
Make the selected partition Primary
Make the selected partition Logical
Defragment MFT (Master File Table) of the selected NTFS partition
Shrink MFT (Master File Table) of the selected NTFS partition
Test surface of the selected partition/block of free space
Check File System
Integrity…
Check the selected partition for possible file system errors
View/edit sectors of the selected partition
Get in-depth information on the properties of selected partition
Manage the Launcher layout with several predefined profiles
Manage the Tool Bar representation: show / hide standard and navigation
buttons, text labels and large icons
Display the Common Tasks Bar
Display the Disk Map legend
Select whether the Disk Map will be located on the top of the main window or
at the bottom
Copyright© 1994-2012 Paragon Software GmbH. All rights reserved.
27
Open the Help system (you can also do it by pressing F1)
Open the dialog with information about the program
The Main Menu contents available at the moment may vary depending on the selected
object.
Create an image of a hard disk or
partition
Increase free space on one partition
by up-taking the unused space of an
adjacent partition
Collect and send logs to Support
Switch to Express launcher
Cancel the last virtual operation on the List of Pending Operations
Cancel the last undo virtual operation on the List of Pending
Operations
Display the List of Pending Operations
Launch the real execution of virtual operations
Cancel all virtual operations on the List of Pending Operations
Tool Bar
The Toolbar provides fast access to the most frequently used operations:
Virtual Operations Bar
The program supports previewing the resulting layout of hard disks before actually executing operations (so-called
virtual mode of execution). In fact, when the virtual mode is enabled, the program does not accomplish operations
immediately, but places them on the List of Pending Operations for later execution.
The Virtual Operations Bar enables to manage pending operations.
Copyright© 1994-2012 Paragon Software GmbH. All rights reserved.

28
Virtual mode is an effective way of protection from any troubles, since no operations will
be executed until clicking the Apply button for confirmation, thus giving a second chance to
weigh all pros and cons of this or that particular operation. The program politely reminds
the user that there are unsaved changes by showing the following window:
Starting the Express Create Partition Wizard to create an NTFS partition and make
it ready for work.
Starting the Create Partition Wizard to create a partition of any file system.
Starting the Format Partition Wizard to format an existing partition to one of the
file systems supported by the program.
Starting the Delete Partition Wizard to delete a partition of any file system.
Advanced Partitioning Tasks
Starting the Express Resize Partitions Wizard to redistribute free space between
two adjacent partitions.
Starting the Merge Partitions Wizard to merge adjacent partitions of NTFS, FAT,
FAT32 file systems.
Starting the Redistribute Free Space Wizard to redistribute available disk space of
existing partitions.
Starting the Undelete Partitions Wizard to recover accidentally deleted partitions.
Starting the Sector Backup Wizard to create an archive of a hard disk or separate
partitions.
Starting the Restore Wizard to restore a hard disk, separate partition, or files from
the backup image.
Common Tasks Bar
The Common Tasks Bar is located on the left side of the main window. It is intended for easy access to the program’s
wizards.
The bar contains several tabs. Each tab includes a separate button bar which can be folded by clicking it.
Copyright© 1994-2012 Paragon Software GmbH. All rights reserved.
29
Starting the File Transfer Wizard to transfer data from any media. Besides it
provides access to Paragon backups as regular folders to browse through their
contents or copy required files.
Starting the Boot Manager Setup Wizard to easily manage several operating
systems on one computer.
Starting the Install New OS Wizard to install a new operating system.
Starting the Log Saver Wizard to collect and send logs to Support.
Launching the help system (you can also do it by pressing F1).
Opening the page which contains information about the program. This page will
be displayed in the Explorer Bar.
Disk Map
The Disk Map is displayed in the Explorer Bar when the Disk View tab is selected. It is located either at the top or at the
bottom of the window, depending on the state of the Disk Map Location option (Main Menu: View > Disk Map
Location).
As the name infers, the Disk Map displays the layout of physical and logical disks. Physical disks are represented with
rectangle bars that contain small-sized bars. These small-sized bars represent logical disks. Their color depends on the
file system of the appropriate partition.
Large-sized bars display the following information about physical disks:
Manufacturer,
Model.
Small-sized bars display the following information about logical disks:
Serial number,
Drive letter,
Total size,
File system.
Furthermore, it is possible to estimate the used disk space by looking at the size of the bar’s shaded area. The program
offers to choose from several types of the disk layout scaling. It’s done especially to increase the program usability. For
instance, if you’ve got a high capacity hard drive containing both very large (more than 100 GB) and rather small (less
than 10 GB) partitions, you can select the logarithmic type to make all partitions readable, otherwise (selecting the
Copyright© 1994-2012 Paragon Software GmbH. All rights reserved.

30
The drag-and-drop functionality is not available when the logarithmic type of the disk
layout is selected.
You can switch between these components by clicking tabs on the left side of the Explorer
Bar.
linear type) you won’t be able to see small partitions at all, but thing strips. On the other hand, if the proportional disk
layout is critical for you, the linear type is exactly what you need.
Nevertheless there’s a compromise solution – linear scaling with the minimal limit to small partitions. So if a partition is
too small it will remain readable.
Just click on the arrow icon on the top right side of the Disk Map to select the desired scaling type.
Disk Map is synchronized with the Explorer Bar. Thus by selecting a disk on the Disk Map, the Explorer Bar will
automatically display detailed information on it.
Explorer Bar
The Explorer Bar is located in the center of the main window which emphasizes its importance. The bar displays
reference information including:
The help system
General information on the product including its name, version and a list of helpful links
Detailed information about disks selected on the Disk Map
Volume Explorer utility
Disk Editor utility
According to these categories the Explorer Bar has several tabs:
Disk View, which offers the user the following options:
— Partition List to get a clear-cut picture of the current state of the system hard disks/partitions
— Disk Editor to view/edit sectors of the selected partition/hard disk
— Volume Explorer to browse and export contents of the selected partition/hard disk
— Properties to view detailed information on the selected partition/hard disk in the bright graphical form
Help, which contains the program help and general information on the product.
You can access the desired information by clicking on the appropriate tab.
Copyright© 1994-2012 Paragon Software GmbH. All rights reserved.
Loading…
Paragon Partition Manager 14 Home
PARAGON Software GmbH
Heinrich-von-Stephan-Str. 5c 79100 Freiburg, Germany
Tel. +49 (0) 761 59018201 Fax +49 (0) 761 59018130
Internet www.paragon-software.com Email sales@paragon-software.com
Copyright© 1994-2014 Paragon Software GmbH. All rights reserved.
User Manual
Manual
View the manual for the Paragon Partition Manager 14 Home here, for free. This manual comes under the category not categorized and has been rated by 1 people with an average of a 5.2.
This manual is available in the following languages: English. Do you have a question about the Paragon Partition Manager 14 Home or do you need help?
Ask your question here
Index
- Introduction
- What’s New in Partition Manager 14
- Product Components
- Features Overview
- Features
- User Friendly Fault Minimizing Interface
- Backup Facilities
- Restore Facilities
- Boot Management Facilities
- Partition/Hard Disk Management Facilities
- Auxiliary Facilities
- Supported Technologies
- Supported File Systems
- Supported Media
- Getting Started
- System Requirements
- Installation
- First Start
- Building Recovery Media
- Booting from the Linux/DOS Recovery Media
- Startup
- Boot menu
- Basic Concepts
- pVHD Support
- GPT versus MBR
- uEFI Boot Challenges
- Apple Boot Camp
- 64-bit Support
- Drive Partitioning
- Windows Components
- Interface Overview
- General Layout
- Tool Button
- Ribbon Panel
- Virtual Operations Bar
- Express Mode Button
- Disk Map
- Disk and Partitions List
- Context-sensitive Menu
- Properties Panel
- Status Bar
- Settings Overview
- General Options
- General Copy and Backup Options
- Hot Processing Options
- Partitioning Options
- E-Mail Options
- Virtual Mode Options
- File System Conversion Options
- Log Files Options
- Viewing Disk Properties
- Data Backup and Rescue
- Creating Backup Images
- Restoring System and Data
- Boot Management
- Partition Management
- Basic Partitioning Operations
- Advanced Partitioning Operations
- Changing Partition Attributes
- Hard Disk Management
- Updating MBR
- Extra Functionality
- View Partition/Hard Disk Properties
- Volume Explorer
- Mount Partition
- Test Surface
- Check File System Integrity
- Edit/View Sectors
- Send Log Files
- View Logs
- Typical Scenarios
- Backup Scenarios
- Backing up a hard disk or partition to a network drive
- Backing up a dual boot Mac to an external USB drive
- Recovery Scenarios
- Fixing Windows startup ability
- Restoring a dual boot Mac from an external USB drive
- Copying of data from the corrupted system disk to another hard disk
- Burning of data from the corrupted system disk to CD/DVD
- Copying of data from a backup to the corrupted system partition
- Restoring separate files and folders from a backup
- Resize Scenarios
- Creating a new partition to detach operating system from the rest of data
- Increasing size of a system partition by taking unused space of an adjacent partition
- Increasing size of a system partition by taking unused space from any other
- Increasing size of a system partition by taking unused space of an adjacent logical partition
- Separating OS from media data
- Merging a system partition with an adjacent logical partition
- Shrinking a system partition to increase size of a data partition
- Resizing partitions of Apple Boot Camp
- Creating Dual Boot Systems
- Windows Vista + Windows XP
- Windows XP + Windows Vista
- Troubleshooter
- Glossary
Product Images (3)

Paragon Partition Manager 14 Home specifications
Below you will find the product specifications and the manual specifications of the Paragon Partition Manager 14 Home.
Paragon Partition Manager 14 Home is a system management software designed for PC users. With a minimum storage drive space requirement of 250 MB, minimum RAM of 256 MB, and minimum processor of Intel Pentium 300MHz, the software allows users to prepare system installations on brand new computers.
The software enables users to organize their data for faster access by allowing them to partition and format their hard disk according to their needs. By separating the operating system from data or segmenting different types of data into separate partitions, users can improve system performance and data organization.
Paragon Partition Manager 14 Home also offers the ability to easily split partitions, allowing users to redistribute free space between different partitions without the need for a reboot. This can be particularly useful for users who have neglected to create separate partitions for different types of data in the past.
Overall, Paragon Partition Manager 14 Home provides a convenient solution for managing storage space on a PC and optimizing system performance through efficient data organization.
Minimum storage drive space
250 MB
General
| Brand | Paragon |
| Model | Partition Manager 14 Home | 4023126115218 |
| Product | not categorized |
| EAN | 4023126115218 |
| Language | English |
| Filetype | User manual (PDF) |
System requirements
| Minimum storage drive space | 250 MB |
| Minimum RAM | 256 MB |
| Minimum processor | Intel Pentium 300MHz |
| Platform | PC |
| Mac compatibility | No |
| Compatible operating systems | Windows 8.1 (32/64-bit), Windows 8 (32/64-bit), Windows 7 (32/64-bit), Windows Vista (32/64-bit), Windows XP Home Edition SP2, Windows XP Professional SP2/SP3 (32/64-bit) |
| Minimum system requirements | Internet Explorer 5.0+\r\nCD/DVD/BD-ROM |
License
| Language version | German |
| Type | System management |
show more
Frequently Asked Questions
Can’t find the answer to your question in the manual? You may find the answer to your question in the FAQs about the Paragon Partition Manager 14 Home below.
Does Paragon Partition Manager 14 Home require a minimum of 250 MB storage drive space?
Yes, Paragon Partition Manager 14 Home requires a minimum of 250 MB storage drive space, which means users need to have enough free space on their computer to install and run the software effectively.
Is Paragon Partition Manager 14 Home compatible with Mac operating systems?
No, Paragon Partition Manager 14 Home is not compatible with Mac operating systems, so Mac users will need to look for an alternative software solution.
What is the minimum RAM requirement for using Paragon Partition Manager 14 Home?
The minimum RAM requirement for using Paragon Partition Manager 14 Home is 256 MB, which is relatively low compared to some other software in the same category.
What type of system does Paragon Partition Manager 14 Home manage?
Paragon Partition Manager 14 Home is a system management software, allowing users to manage partitions on their PC effectively.
In what language version is Paragon Partition Manager 14 Home available?
Paragon Partition Manager 14 Home is available in German language version, which may be beneficial for German-speaking users looking for a software solution in their native language.
How can I troubleshoot if the drive partitioning process in Paragon Partition Manager 14 Home fails?
To troubleshoot if the drive partitioning process in Paragon Partition Manager 14 Home fails, you can follow these steps:
1. If the program claims that your partition is in use and suggests restarting the computer, it means that there are operations that cannot be performed while the partition is in use. Agree to reboot your machine to allow the program to accomplish the operation in a special boot-up mode.
2. If you run an operation and restart the machine as required, but it just boots back into Windows without completing the operation, you should run «chkdsk /f» for the partition in question. This command will check and fix any errors on the partition.
3. If you are unable to create a new partition on the disk, there could be a few reasons for this. The program cannot create a new partition on a dynamic disk, and it can only create new partitions within blocks of un-partitioned space. It cannot convert free space on an existing partition into a new partition.
4. If you are unable to copy a partition, it could be because the source or target disk is a dynamic disk, or there are already four primary partitions (or three primary partitions and an extended one) on the target disk.
5. If you need to copy a partition but always get a crossed circle sign when selecting a place to make the copy, it means that the program can only copy a partition to a block of un-partitioned space. If you don’t have any free space on your hard disk, you will need to delete or reduce an existing partition to make room for the copy.
6. If you are unable to do anything with your USB flash drive and get a crossed circle sign when trying to select any area on it, it could be because the USB flash drive doesn’t have the MBR (Master Boot Record). To fix this issue, you can use the «Update MBR» function in the program or use the «fixmbr» command from the Windows installation disc to write a standard code to your flash drive.
7. If the program asks you to restart the computer when trying to back up your system, it is likely that the Hot Processing mode is disabled. You should make it active in the program settings.
8. If you encounter the error message «VSS could not be started for processed volume» when backing up a partition with the VSS mode, it is likely because you are trying to back up a FAT32 partition, which is not supported by VSS. In this case, you should use the Paragon Hot Processing mode instead.
9. If you are unable to back up your hard disk to an external hard drive and the operation is aborted with the error code 0x1100a, it means that the Microsoft VSS service is set as the default Hot Processing mode in the program, but it has not been started in your Windows XP/Windows 2003/Vista. To resolve this issue, you should start the Microsoft Volume Shadow Copy Service in the Services settings of your computer.
These troubleshooting steps should help you resolve any issues you encounter during the drive partitioning process in Paragon Partition Manager 14 Home.
What should I do if I encounter an error message while working with the Windows components in Paragon Partition Manager 14 Home?
If you encounter an error message while working with the Windows components in Paragon Partition Manager 14 Home, follow these steps:
1. First, examine the file you are working with. Check if there are any mistakes or errors in the file. If you find any, correct them using the appropriate buttons or options provided in the software.
2. If the error persists and the file does not contain any mistakes, go back to the Correct Windows Installations page. Here, you can correct the drive letters in the Windows System Registry. Make sure the drive letters are assigned correctly to avoid any conflicts or errors.
3. On the next page, you will see a list of hard disks. If you have multiple hard disks, choose the one that is causing the error. Then, select the required partition from the list. If you are unsure which installation you need, you can use the Properties button to get more information about the selected item.
By following these steps, you should be able to troubleshoot and resolve any error messages related to the Windows components in Paragon Partition Manager 14 Home.
How can I troubleshoot if I am unable to view the logs in Paragon Partition Manager 14 Home?
If you are unable to view the logs in Paragon Partition Manager 14 Home, you can troubleshoot the issue by following these steps:
1. Check your email settings: Ensure that your outgoing mail server (SMTP) and your email address are properly set in the program’s settings. This is necessary for the «Send Log Files» function to work.
2. Generate and send log files: Click on the «Send» button in the program’s built-in mail client. This will generate a template request with compressed log files attached. Send this email to the Paragon Support Team for further assistance. Note that the log files do not contain any confidential information about your operating system or user documents.
3. View logs on operations: To view logs on the operations carried out by the program, click on the «Tool» button and select «View Log Files». This will open a handy dialog where you can study the logs. The information is structurally divided, and you also have the option to see the disk layout before and after an operation.
By following these steps, you should be able to troubleshoot and resolve any issues related to viewing logs in Paragon Partition Manager 14 Home.
What operating system does the Paragon Partition Manager 14 Home use?
The Paragon Partition Manager 14 Home uses PC as the operating system.
Is the manual of the Paragon Partition Manager 14 Home available in English?
Yes, the manual of the Paragon Partition Manager 14 Home is available in English .
Is your question not listed? Ask your question here
В этой публикации, друзья, рассмотрим Paragon Partition Manager CE — бесплатную программу для работы с разделами и дисками. Это не лучшее, но в целом неплохое решение для тех, кто ищет годный бесплатный менеджер дисков для Windows. Программа являет собой урезанную версию известного платного функционального менеджера дисков Paragon Partition Manager. CE в названии программы – это аббревиатура Community Edition, т.е. это публичный выпуск, бесплатный, предназначенный для домашнего некоммерческого использования. Давайте подробно о Paragon Partition Manager CE.
Paragon Partition Manager CE — бесплатная программа для работы с разделами и дисками
Скачать программу можно бесплатно, без регистрации и прочих сложностей на сайте компании Paragon. Поддерживается для Windows начиная с версии 7.
Paragon Partition Manager CE – это и менеджер дисков с базовыми функциями, и одновременно реклама возможностей платного Paragon Partition Manager. В Paragon Partition Manager CE то и дело будем встречать неработающие возможности с отсылкой на их доступность в платной программе.
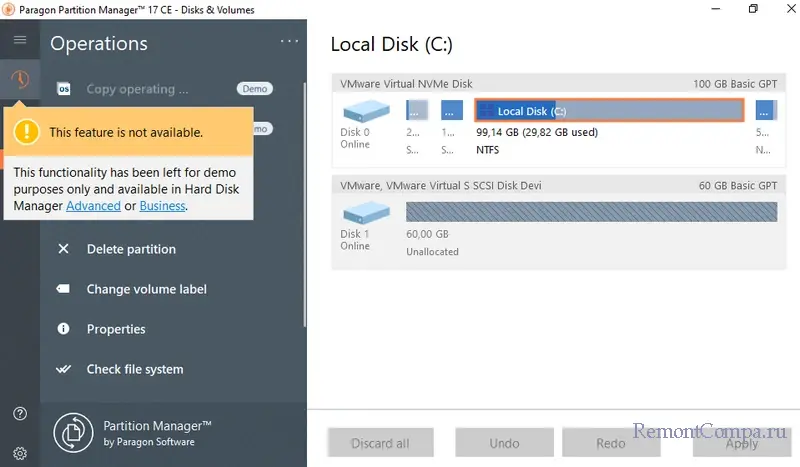
Разочарованием в этой программе для многих станет отсутствие поддержки русского языка. Есть только английский. При работе с такими серьёзными программами чёткое понимание производимых операций очень важно. Возможно, ситуацию как-то поправят современные возможности копирования и перевода текста со скриншота интерфейса ПО.
Тем не менее Paragon Partition Manager CE предлагает намного больше того, что предусматривается ограниченным менеджером дисков самой Windows — штатным управлением дисками. И без учёта языкового нюанса эта программа, в принципе, может быть Must Have для более-менее опытного домашнего пользователя. Например, в одной из статей сайта с её помощью мы решали типичную задачу, с которой может столкнуться каждый из нас – удаление разделов на флешке.
Из доступных операций для дисков в Paragon Partition Manager CE:
Из доступных операций для разделов в Paragon Partition Manager CE:
- Типичные операции с разделами: создание, изменение размеров, удаление. Но эти операции доступны только разделов на основных дисках, не динамических;

- Восстановление удалённых разделов. Доступно, опять же, только для разделов на основных дисках, не динамических;
- Отображение свойств, изменение буквы и метки;
- Форматирование разделов. При форматировании поддерживаются файловые системы FAT32, NTFS, Linux Ext2, Ext3, Ext4, Apple HFS, Resilient FS;
- Конвертирование файловых систем;
- Установка разделов на MBR-дисках активными;
- Конвертирование разделов на MBR-дисках из основных в логические и наоборот;
- Сокрытие разделов;
- Проверка целостности файловой системы. Может быть полезна, в частности, перед выполнением операций с разделами в целях упреждения сбоев и потери данных, если раздел будет содержать ошибки. В ходе проверки проблемы могут быть устранены;
- Тест поверхности разделов на наличие повреждённых или нестабильных секторов. В ходе операции все найденные сомнительные и повреждённые сектора будут помечены в метаданных файловой системы как непригодные для использования, что минимизирует риск потери данных. Тест без удаления данных.
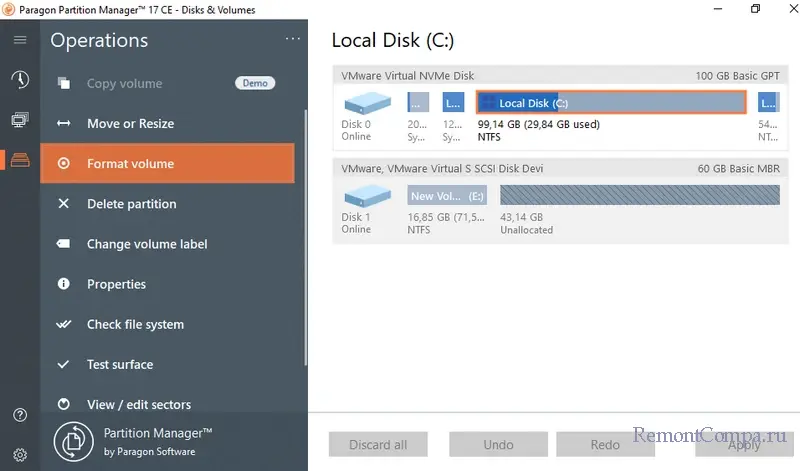
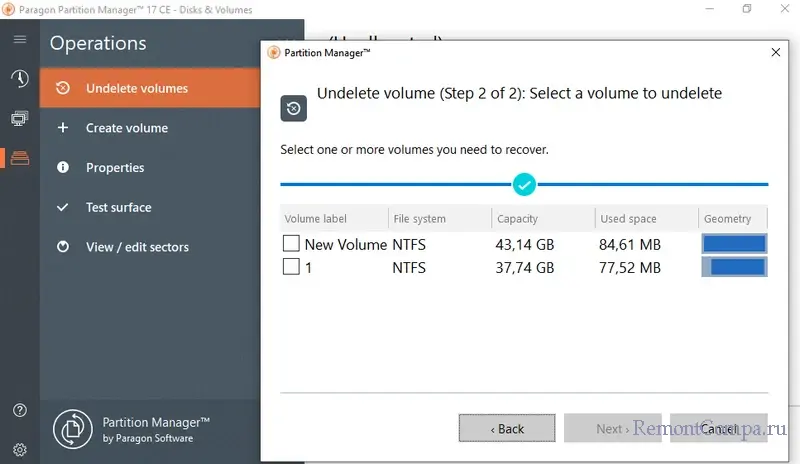
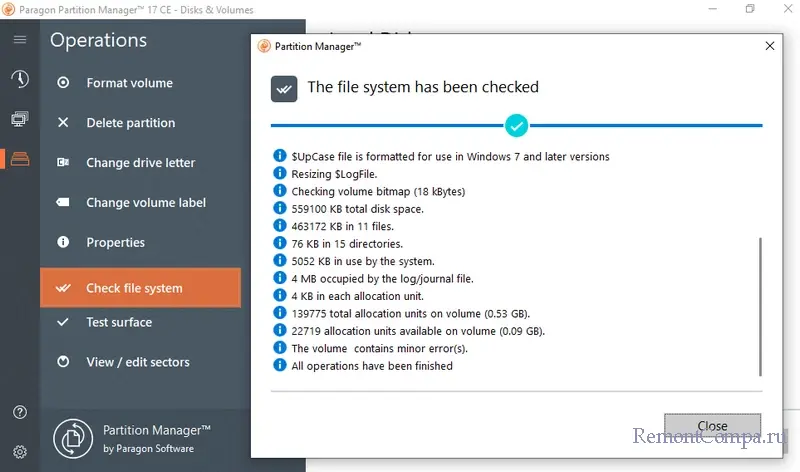
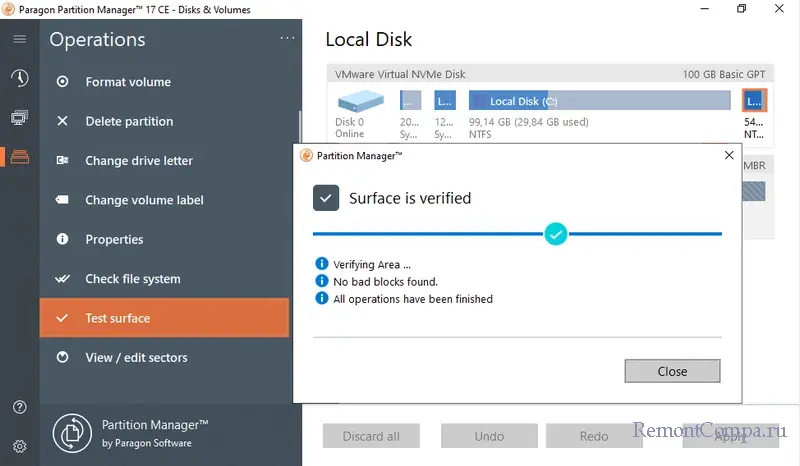
Программа предусматривает создание собственного загрузочного носителя в среде WinPE для выполнения операций, которые не могут быть выполнены в среде работающей Windows или в условиях её неработоспособности. Но, друзья, создание загрузочного носителя требует скачивания пакета Windows ADK. Проще и целесообразнее скачать готовый ISO-образ комплексного реанимационного WinPE с различным годным софтом на борту для решения различных сложностей, которые могут возникнуть при работе с Windows. Из числа этих WinPE отметим WinPE 11-10-8 Sergei Strelec, в среде которого можно установить любую программу, как в обычной Windows, включая Paragon Partition Manager CE.