
Инструкция и руководство для
Panasonic HDC-SD900
119 страниц подробных инструкций и пользовательских руководств по эксплуатации на русском на английском
Инструкция по эксплуатации
HD Видеокамера
Номер модели
HDC-SD900EE
HDC-TM900EE
HDC-HS900EE
Перед пользованием прочтите, пожалуйста, эту инструкцию полностью.
VQT3L08
until
2010/12/27

— 2 —
∫ Сведения о форматах записи
видеоизображения
Можно выбрать форматы записи AVCHD,
1080/50p или iFrame для записи
видеоизображения данной камерой. (l 48, 59)
AVCHD:
В данном формате можно производить запись
изображений высокого качества. Их можно
просматривать на широкоформатных
телевизорах или записать на диск.
1080/50p:
Это режим записи 1080/50p (1920k1080/50
прогрессивный) в котором запись
осуществляется с максимальным качеством*.
Сцены, записанные в режиме 1080/50p, могут
быть сохранены или воспроизведены этим
устройством или HD Writer AE 3.0.
* Это означает максимальный уровень
качества для данной камеры.
iFrame:
Это формат записи для воспроизведения или
редактирования Mac (iMovie’11). С помощью
iMovie’11 видео iFrame можно импортировать
быстрее, чем видео AVCHD. Кроме того,
размер импортируемого файла видео iFrame
будет меньше файла видео AVCHD.
≥ Он не совместим с видео, записанным в
формате AVCHD или 1080/50p.
∫ Ответственность за записанное
содержание
Panasonic не несет ответственности за
повреждения, прямые либо косвенные,
вызванные любого рода проблемами,
приводящие к потере записанного или
редактируемого содержимого, а также не дает
гарантий на какое-либо содержимое, если
запись или редактирование не выполняются
надлежащим образом. Аналогично,
вышесказанное применимо также в случае
любого ремонта камеры (включая любой
другой компонент, связанный с не встроенной
памятью/жестким диском).
∫ Обращение со встроенной
памятью [HDC-TM900]
Данная камера оборудована встроенной
памятью. При использовании данного
компонента обратите внимание на следующее.
Регулярно создавайте резервные копии
данных.
Встроенная память является временным
хранилищем. Во избежание стирания данных
ввиду статического электричества,
электромагнитных волн, поломок и отказов
сохраняйте резервные копии данных на ПК
или диске DVD. (l 108, 121)
≥ Индикатор доступа [ACCESS] (
l 6) светится
во время обращения к карте SD или
встроенной памяти (инициализация, запись,
воспроизведение, удаление и т.д.). Не
выполняйте следующие операции, когда
индикатор светится. Это может привести к
поломке встроенной памяти или
неисправности камеры.
j Выключите питание камеры (выньте
аккумулятор)
j Не вставляйте и не извлекайте
соединительный кабель USB
j Не подвергайте камеру вибрации или
ударам
≥ Об утилизации или передаче данной
камеры. (l 147)
∫ Обращение с жестким диском
[HDC-HS900]
Данная камера оборудована встроенным
жестким диском. Хотя на жестком диске можно
хранить большие объемы данных, есть
несколько моментов, требующих
осторожности. При использовании данного
компонента обратите внимание на следующее.
Не подвергайте жесткий диск воздействию
вибрации и ударов.
Жесткий диск может быть частично поврежден
в результате воздействия окружающей среды и
условий обращения, что приведет к
невозможности чтения, записи и
воспроизведения данных. Не подвергайте
камеру воздействию вибрации и ударов и не
выключайте питание камеры при записи или
воспроизведении.
Если устройство используется в шумном
месте, например, клубе или в месте
проведения массового мероприятия,
запись может прекратиться из-за звуковой
вибрации. В таких местах рекомендуется
вести запись на карту SD.
Регулярно создавайте резервные копии
данных.
Жесткий диск является временным
хранилищем. Во избежание удаления
Информация для вашей безопасности

— 3 —
данных, вызванного статическим
электричеством, электромагнитными
волнами, неисправностями и сбоями,
выполняйте резервное копирование данных
на ПК или диск DVD. (l 108, 121)
При появлении любых нарушений в
работе жесткого диска немедленно
создайте резервную копию данных.
При сбое жесткого диска возможно появление
постоянного шума или прерывистого звука во
время записи или воспроизведения. Постоянное
использование приведет к дальнейшим
повреждениям, со временем жесткий диск может
выйти из строя. Если наблюдается такое явление,
сразу же скопируйте данные с жесткого диска на
ПК, диск DVD и т.д. и обратитесь к своему дилеру.
При выходе из строя жесткого диска
восстановить данные невозможно.
В теплой или холодной среде работа
может остановиться.
Камера отключается с целью защиты
жесткого диска.
Не используйте камеру в условиях
низкого атмосферного давления.
При использовании жесткого диска на
высоте от 3000 м над уровнем моря
возможен его сбой.
Транспортировка
При транспортировке отключайте питание
камеры и соблюдайте осторожность,
чтобы избежать тряски, падения или
ударов камеры.
Обнаружение падения
[
] отображается на экране при
обнаружении падения (состояния
невесомости). Если состояние падения
обнаруживается неоднократно, камера
может прекратить выполнение записи или
воспроизведения с целью защиты
жесткого диска.
≥ Индикатор обращения к жесткому диску
[ACCESS HDD] (l 9) светится во время
доступа к жесткому диску
(инициализация, запись,
воспроизведение, удаление и т.д.). Не
выполняйте следующие операции,
когда индикатор светится. Это может
привести к поломке жесткого диска или
к неисправности камеры.
j Выключите питание камеры (выньте
аккумулятор)
j Не вставляйте и не извлекайте
соединительный кабель USB
j Не подвергайте камеру вибрации или
ударам
≥ Об утилизации или передаче данной
камеры. (l 147)
∫ Карты, которые можно
использовать с данным
устройством
Карты памяти SD, SDHC и SDXC
≥ Карты памяти емкостью 4 ГБ или более
без логотипа SDHC или карты памяти
емкостью 48 ГБ или более без логотипа
SDXC не основаны на технических
характеристиках карт памяти SD.
≥ Более подробная информация о картах
SD приведена нас странице 15.
∫ В настоящей инструкции по
эксплуатации
≥ Карта памяти SD, карта памяти SDHC и
карта памяти SDXC обозначены в
документе как “карта SD”.
≥ Функции, которые могут использоваться
в режиме видеосъемки:
Функции, которые могут использоваться
в режиме фотосъемки:
≥ Функции, которые могут использоваться
в режиме воспроизведения видео:
Функции, которые могут использоваться
в режиме воспроизведения
фотоснимков:
≥ Страницы для справки обозначаются
стрелкой, например: l 00
Данная инструкция по эксплуатации
составлена для моделей ,
и .
Иллюстрации могут незначительно
отличаться от оригинала.
≥ Иллюстрации, использованные в
данной инструкции по эксплуатации,
отображают модель ,
однако части объяснения относятся и
к другим моделям.
≥ В зависимости от модели некоторые
функции не подключены.
≥ Параметры могут отличаться, поэтому
внимательно читайте инструкцию.
≥ Не все модели могут быть доступны, в
зависимости от региона покупки.
HDC-SD900
HDC-TM900
HDC-HS900
HDC-SD900


— 6 —
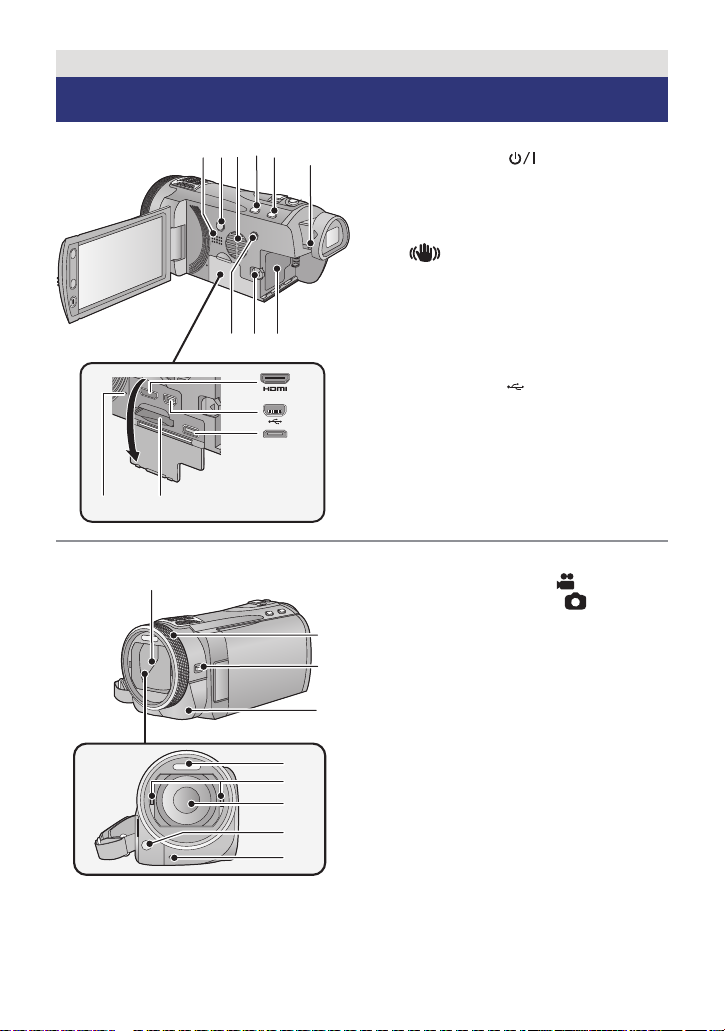
1
Акустическая система
2
Кнопка POWER (ПИТАНИЕ) [
]
(l 17)
3
Впускное отверстие (охлаждающий
вентилятор) (l 22)
4
Кнопка интеллектуального
автоматического режима/ручного
режима [iA/MANUAL] (l 29, 75)
5
Кнопка оптического стабилизатора
изображения [
O.I.S.] (l 47)
6
Диск корректора окуляра (l 23)
7
1080/50p кнопка [1080/50p] (l 48)
8
Рычажок извлечения аккумулятора
[BATT] (l 10)
9
Крепление аккумулятора (l 10)
10 HDMI мини-разъем [HDMI] (l 98, 102)
11 USB терминал [
] (l 109, 114, 129)
12 Мультиразъем AV (l 98, 117)
≥ Используйте мультикабель AV (только
кабель, входящий в комплект поставки).
13 Гнездо для карты памяти (l 16)
14 Индикатор доступа [ACCESS] (l 16)
15 Крышка объектива
≥ Крышка объектива открывается в
режиме записи видео
или
режиме записи стоп-кадров. (l 18)
16 Многофункциональное кольцо
ручного управления (l 75, 78)
17 Кнопка функций камеры
[CAMERA FUNCTION] (l 75)
18 Датчик дистанционного
управления (l 45)
19 Встроенная вспышка (l 55)
20 Крепежная деталь 3D-объектива
(углубление) (l 79)
21 Объектив (LEICA DICOMAR)
≥ Сведения о присоединении бленды
объектива приведены на стр. 23.
22 Вспомогательная лампочка AF (l 74)
23 Индикатор записи (l 39)
Подготовка
Идентификация частей и обращение
с ними
8 9
2 3 4 5
6
7
10
11
12
1
13
14
15
16
17
18
19
21
20
22
23

— 7 —
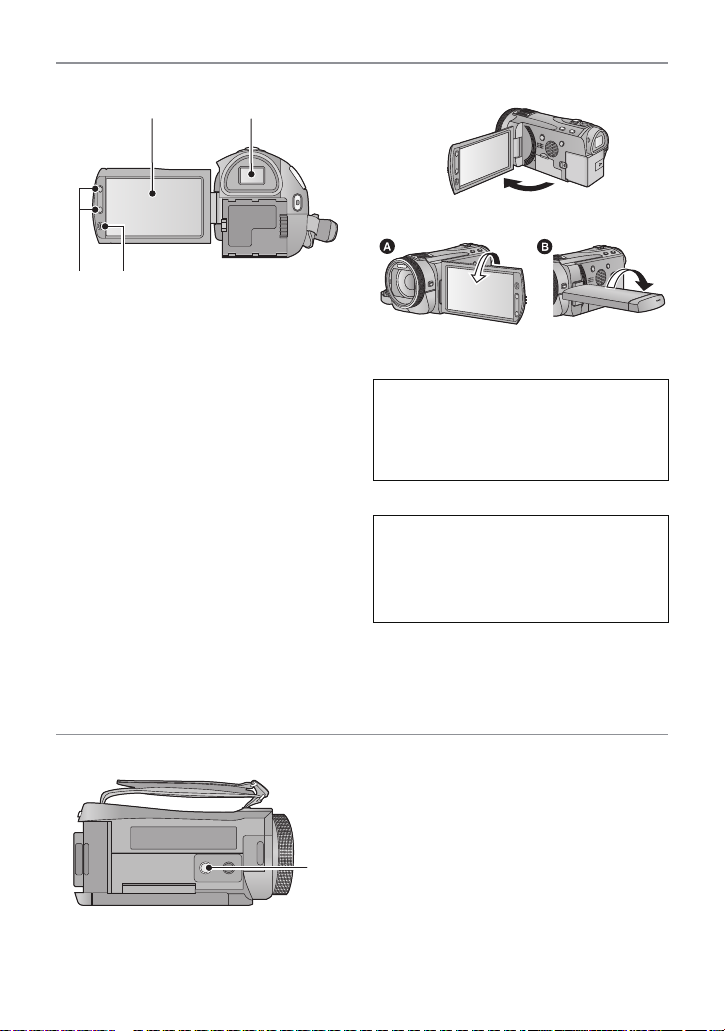
24 Монитор ЖКД (сенсорный экран)
(l 19)
≥ Он может открыться на 90o.
≥ Он может поворачиваться на угол до
180o A в направлении объектива или
90o B в направлении видоискателя.
25 Видоискатель (l 23)
26 Кнопки трансфокатора (l 46)
27 Вспомогательная кнопка начала/
остановки записи (l 22)
≥ Принцип действия этой кнопки такой же,
как и у кнопки начала/остановки записи.
28 Гнездо для штатива
≥ Использование штатива с диаметром
резьбового элемента 5,5 мм или выше
может привести к повреждению данного
аппарата.
24
25
26
27
Ввиду ограничений технологии
производства ЖКД, на экране
жидкокристаллического монитора могут
иметься небольшие яркие или темные
пятна. Однако это не является
неисправностью и не влияет отрицательно
на записанное изображение.
По причине ограничений технологии
производства ЖКД на экране
видоискателя может быть несколько
мелких ярких или темных точек.
Однако это не является
неисправностью и не влияет на
качество записываемого изображения.
28

— 8 —
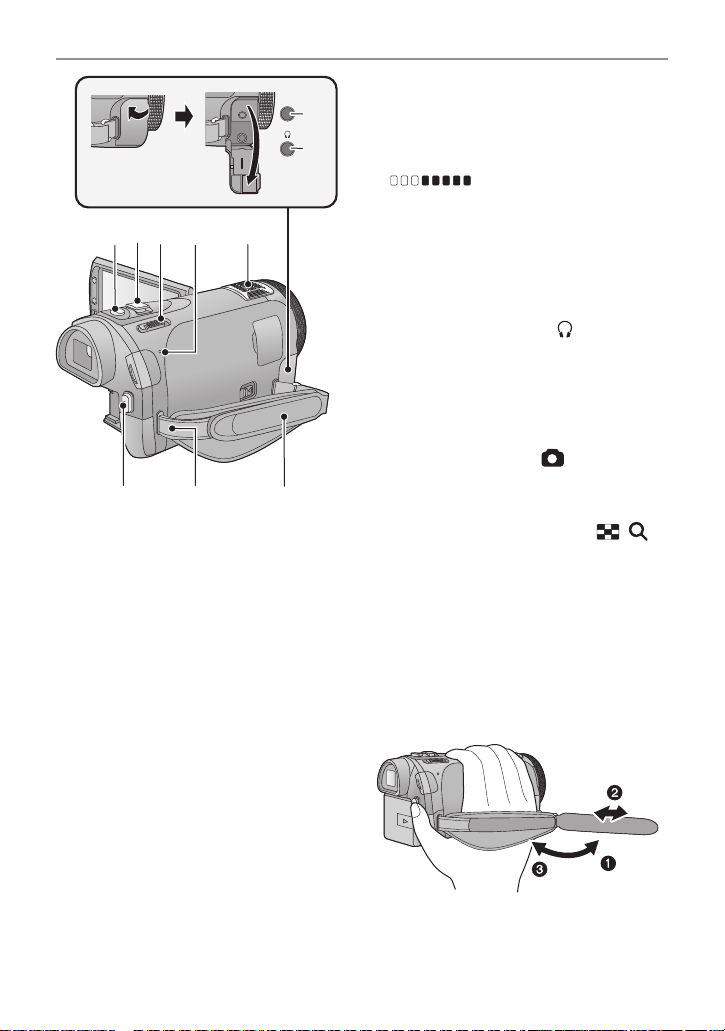
29 Разъем микрофона [MIC]
≥ Совместимый подключаемый микрофон с
питанием можно использовать как внешний
микрофон.
≥ При использовании входа внешнего
микрофона получается стереозвук
(2 канала).
≥
(Индикатор уровня входного
сигнала микрофона) отображается, если
подключен внешний микрофон. (l 68)
≥ При подключении камеры с помощью
адаптера переменного тока иногда могут
слышаться помехи в зависимости от типа
микрофона. В этом случае переключитесь
на питание от аккумулятора, и помехи
прекратятся.
30 Разъем для наушников [
] (l 57)
≥ Чрезмерное звуковое давление,
производимое наушниками или головным
телефоном, может привести к потере слуха.
≥ Прослушивание на полной громкости в
течение длительного времени может
привести к нарушению слуха.
31 Кнопка фотоснимка [
] (l 27)
32 Рычажок трансфокатора [W/T]
(В режиме видеозаписи или в режиме
съемки стоп-кадров) (l 46)
Переключатель отображения
пиктограмм [
/
]/Рычажок
громкости [sVOLr] (В режиме
воспроизведения) (l 32)
33 Переключатель режимов (l 18)
34 Индикатор состояния (l 17)
35 Внутренние микрофоны
36 Кнопка начала/остановки записи (l 25)
37 Фиксатор наплечного ремня
38 Ременная ручка
Отрегулируйте длину ременной ручки по руке.
1 Отбросьте ремень.
2 Установите длину.
3 Закрепите снова ремень.
35
32
31
36
37
34
38
33
MIC
29
30

— 9 —
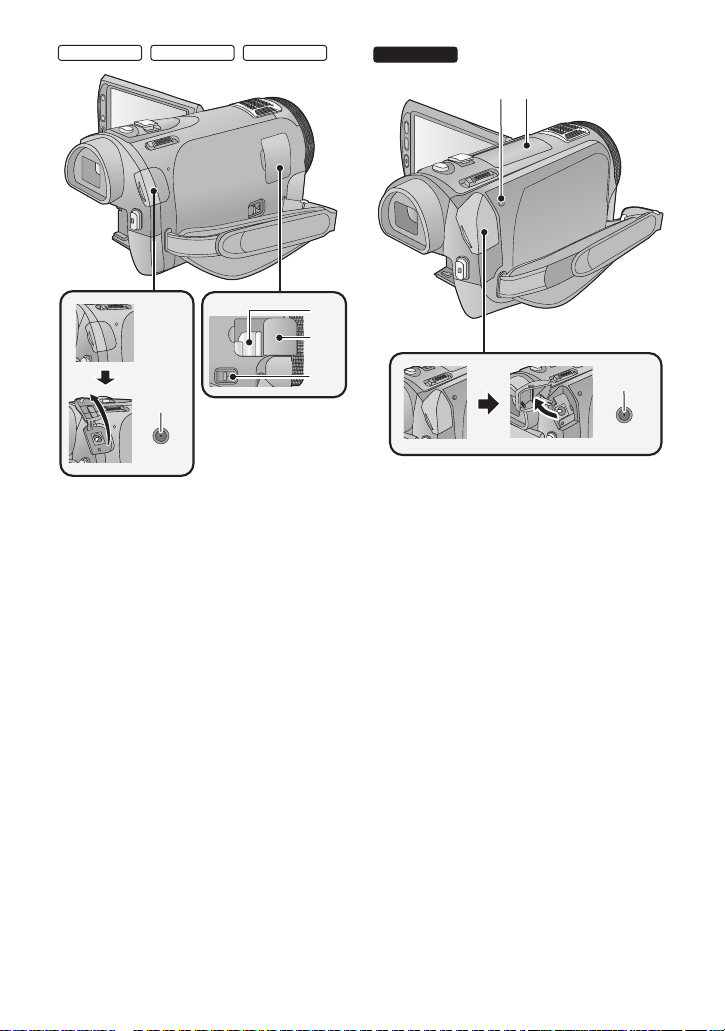
/
39 Крепежная деталь адаптера
колодки (l 158)
40 Крышка адаптера колодки (l 158)
41 Расцепляющий рычажок адаптера
колодки
[SHOE ADAPTOR RELEASE] (l 158)
42 Входное гнездо постоянного тока
[DC IN] (l 11)
≥ Не используйте любые другие
адаптеры переменного тока, за
исключением входящего в комплект.
43 Индикатор доступа к жесткому
диску [ACCESS HDD]
44 Колодка для вспомогательного
оборудования (l 158)
45 Входное гнездо постоянного тока
[DC IN] (l 11)
≥ Не используйте любые другие
адаптеры переменного тока, за
исключением входящего в комплект.
HDC-SD900 HDC-TM900
39
40
41
42
HDC-HS900
44
43
45

— 10 —
∫ Сведения об аккумуляторах, которые можно использовать для данной
камеры
Данную камеру можно использовать с аккумулятором типа VW-VBN130/VW-VBN260.
≥ Камера оснащена функцией распознавания аккумуляторов, которые можно использовать
безопасно. Эту функцию поддерживает специальный аккумулятор (VW-VBN130/
VW-VBN260). Для использования с данной камерой подходят только фирменные изделия
Panasonic и аккумуляторы других производителей, сертифицированные компанией
Panasonic. (Аккумуляторы, которые не поддерживают данную функцию, использовать
нельзя.) Panasonic никоим образом не может гарантировать качество,
производительность или безопасность аккумуляторов, которые были изготовлены
другими компаниями и не являются фирменными изделиями Panasonic.
Как вставлять/извлекать аккумулятор
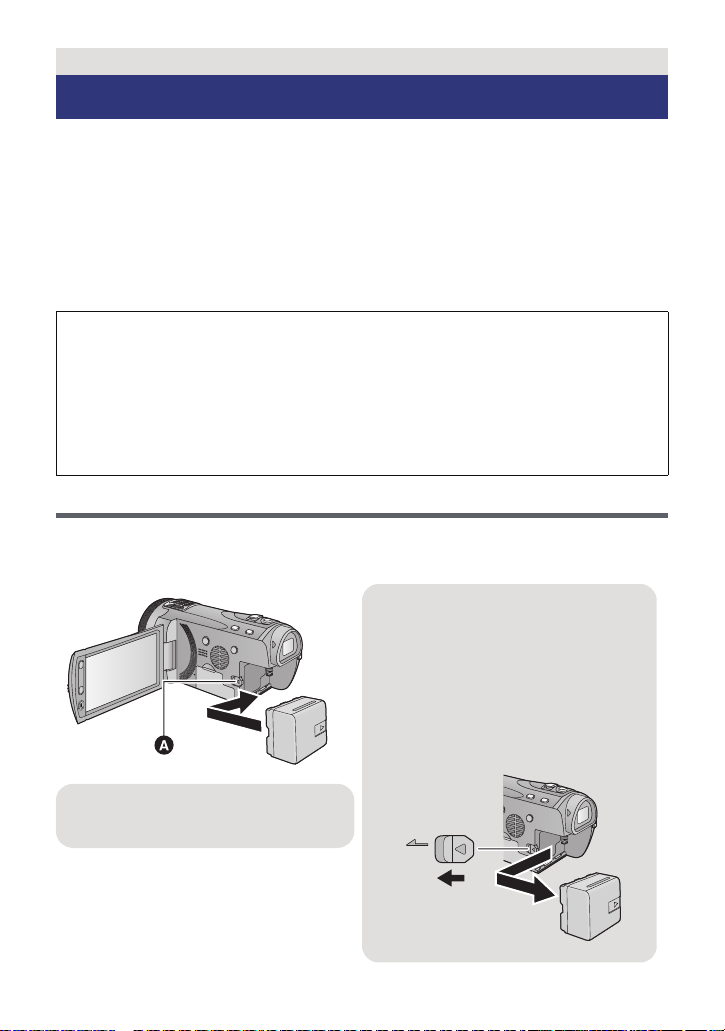
≥ Нажмите кнопку питания для выключения камеры. (
l 17)
Установите аккумулятор, вставив его в направлении, показанном на рисунке.
Подготовка
Питание
Выяснилось, что на некоторых рынках в продаже появились поддельные
аккумуляторные блоки, которые очень похожи на оригинальные. Некоторые из этих
блоков не имеют надлежащей встроенной защиты, отвечающей требованиям
соответствующих стандартов безопасности. Возможно, эти аккумуляторы пожаро- и
взрывоопасны. Пожалуйста, имейте в виду, что мы не несем никакой ответственности за
несчастные случаи или отказ оборудования в результате использования поддельных
аккумуляторов. Чтобы гарантировать использование безопасной продукции, мы
рекомендуем оригинальные аккумуляторные блоки Panasonic.
Как извлечь аккумулятор
Удерживайте кнопку питания до тех пор,
пока не погаснет индикатор состояния.
Затем извлеките аккумулятор, придерживая
камеру, чтобы уберечь ее от падения.
Сдвиньте рычажок извлечения
аккумулятора в направлении, указанном
стрелкой, и извлеките аккумулятор после
его разблокировки.
BATT
A Вставьте аккумулятор до щелчка и
блокировки.

10:41
Panasonic HDC-HS900 Camera test
03:41
Видеокамера Panasonic HDC-SD900
05:38
Panasonic HDC-SD900 camcorder, image quality test — example videos
05:28
BESALU (Biking to) -Panasonic HDC-SD900
13:09
Panasonic HDC-SD900 test review part 1
05:51
Panasonic HDC-HS900 Review
02:59
Panasonic HDC-SD900 vs Sony HDR-CX730 vs Sony HDR-CX700 (2)
03:47
Testvideo: Panasonic HDC-SD90 en HDC-SD900 vergeleken
Нажмите на кнопку для помощи
Инструкция по эксплуатации
HD Видеокамера
Номер модели HDC-SD900EE
HDC-TM900EE
HDC-HS900EE
Перед пользованием прочтите, пожалуйста, эту инструкцию полностью.
VQT3L08

Информация для вашей безопасности
Встроенная память является временным
∫
Сведения о форматах записи
хранилищем. Во избежание стирания данных
видеоизображения
ввиду статического электричества,
Можно выбрать форматы записи AVCHD,
электромагнитных волн, поломок и отказов
1080/50p или iFrame для записи
сохраняйте резервные копии данных на ПК
видеоизображения данной камерой. (
l
48, 59)
или диске DVD. (
l
108, 121)
AVCHD:
≥
Индикатор доступа [ACCESS] (
l
6) светится
В данном формате можно производить запись
во время обращения к карте SD или
изображений высокого качества. Их можно
встроенной памяти (инициализация, запись,
просматривать на широкоформатных
воспроизведение, удаление и т.д.). Не
телевизорах или записать на диск.
выполняйте следующие операции, когда
1080/50p:
индикатор светится. Это может привести к
Это режим записи 1080/50p (1920
k
1080/50
поломке встроенной памяти или
прогрессивный) в котором запись
неисправности камеры.
осуществляется с максимальным качеством*.
j
Выключите питание камеры (выньте
Сцены, записанные в режиме 1080/50p, могут
аккумулятор)
быть сохранены или воспроизведены этим
j
Не вставляйте и не извлекайте
устройством или HD Writer AE 3.0.
соединительный кабель USB
* Это означает максимальный уровень
j
Не подвергайте камеру вибрации или
качества для данной камеры.
ударам
iFrame:
≥
Об утилизации или передаче данной
Это формат записи для воспроизведения или
камеры. (
l
147)
редактирования Mac (iMovie’11). С помощью
∫
Обращение с жестким диском
iMovie’11 видео iFrame можно импортировать
быстрее, чем видео AVCHD. Кроме того,
[HDC-HS900]
размер импортируемого файла видео iFrame
Данная камера оборудована встроенным
будет меньше файла видео AVCHD.
жестким диском. Хотя на жестком диске можно
≥
Он не совместим с видео, записанным в
хранить большие объемы данных, есть
формате AVCHD или 1080/50p.
несколько моментов, требующих
осторожности. При использовании данного
∫
Ответственность за записанное
компонента обратите внимание на следующее.
содержание
Не подвергайте жесткий диск воздействию
Panasonic не несет ответственности за
вибрации и ударов.
повреждения, прямые либо косвенные,
Жесткий диск может быть частично поврежден
вызванные любого рода проблемами,
в результате воздействия окружающей среды и
приводящие к потере записанного или
условий обращения, что приведет к
редактируемого содержимого, а также не дает
невозможности чтения, записи и
гарантий на какое—либо содержимое, если
воспроизведения данных. Не подвергайте
запись или редактирование не выполняются
камеру воздействию вибрации и ударов и не
надлежащим образом. Аналогично,
выключайте питание камеры при записи или
вышесказанное применимо также в случае
воспроизведении.
любого ремонта камеры (включая любой
Если устройство используется в шумном
другой компонент, связанный с не в
строенной
месте, например, клубе или в месте
памятью/жестким диском).
проведения массового мероприятия,
∫
Обращение со встроенной
запись может прекратиться из—за звуковой
вибрации. В таких местах рекомендуется
памятью [HDC-TM900]
вести запись на карту SD.
Данная камера оборудована встроенной
памятью. При использовании данного
Регулярно создавайте резервные копии
компонента обратите внимание на следующее.
данных.
Жесткий диск является временным
Регулярно создавайте резервные копии
хранилищем. Во избежание удаления
данных.
— 2 —
данных, вызванного статическим
≥ Об утилизации или передаче данной
электричеством, электромагнитными
к
амеры. (l 147)
волнами, неисправностями и сбоями,
∫ Карты, которые можно
выполняйте резервное копирование данных
использовать с данным
на ПК или диск DVD. (l 108, 121)
устройством
При появлении любых нарушений в
Карты памяти SD, SDHC и SDXC
работе жесткого диска немедленно
≥ Карты памяти емкостью 4 ГБ или более
создайте резервную копию данных.
без логотипа SDHC или карты памяти
При сбое жесткого диска возможно появление
емкостью 48 ГБ или более без логотипа
постоянного шума или прерывистого звука во
SDXC не основаны на технических
время записи или воспроизведения. Постоянное
характеристиках карт памяти SD.
использование приведет к дальнейшим
≥ Более подробная информация о картах
повреждениям, со временем жесткий диск может
SD приведена нас странице 15.
выйти из строя. Если наблюдается такое явление,
сразу же скопируйте данные с жесткого диска на
∫ В настоящей инструкции по
ПК, диск DVD и т.д. и обратитесь к своему ди
леру.
эксплуатации
При выходе из строя жесткого диска
≥ Карта памяти SD, карта памяти SDHC и
восстановить данные невозможно.
карта памяти SDXC обозначены в
документе как “карта SD”.
В теплой или холодной среде работа
≥ Функции, которые могут использоваться
может остановиться.
в режиме видеосъемки:
Камера отключается с целью защиты
Функции, которые могут использоваться
жесткого диска.
в режиме фотосъемки:
Не используйте камеру в условиях
≥ Функции, которые могут использоваться
низкого атмосферного давления.
в режиме воспроизведения видео:
При использовании жесткого диска на
высоте от 3000 м над уровнем моря
возможен его сбой.
Функции, которые могут использоваться
в режиме воспроизведения
Транспортировка
При транспортировке отключайте питание
фотоснимков:
камеры и со
блюдайте осторожность,
≥ Страницы для справки обозначаются
чтобы избежать тряски, падения или
стрелкой, например: l 00
ударов камеры.
Данная инструкция по эксплуатации
Обнаружение падения
составлена для моделей ,
HDC-SD900
[] отображается на экране при
и .
обнаружении падения (состояния
Иллюстрации могут незначительно
невесомости). Если состояние падения
обнаруживается неоднократно, камера
отличаться от оригинала.
может прекратить выполнение записи или
≥ Иллюстрации, использованные в
воспроизведения с целью защиты
данной инструкции по эксплуатации,
жесткого диска.
отображают модель ,
≥ Индикатор обращения к жесткому диску
однако части объяснения относятся и
[ACCESS HDD] (l 9) светится во время
к другим моделям.
доступа к жесткому ди
ску
≥ В зависимости от модели некоторые
(инициализация, запись,
функции не подключены.
воспроизведение, удаление и т.д.). Не
≥ Параметры могут отличаться, поэтому
выполняйте следующие операции,
внимательно читайте инструкцию.
когда индикатор светится. Это может
≥ Не все модели мо
гут быть доступны, в
привести к поломке жесткого диска или
зависимости от региона покупки.
к неисправности камеры.
jВыключите питание камеры (выньте
аккумулятор)
jНе вставляйте и не извлекайте
соединительный кабель USB
jНе подвергайте камеру вибрации или
ударам
— 3 —
HDC-TM900
HDC-HS900
HDC-SD900

Оглавление
Информация для вашей
Использование меню настроек..…….. 36
безопасности ………..………..…………..……. 2
Использование пульта
дистанционного управления ………….. 44
Пользование кнопками
Подготовка
направления/кнопкой OK….……..…. 45
Идентификация частей и
обращение с ними………………..………..…. 6
Дополнительно (Запись)
Питание….…………..……………..………….... 10
Как вставлять/извлекать
Функция приближения/удаления ……. 46
аккумулятор ……..………..…………..…. 10
О скорости изменения
Зарядка аккумулятора ..……………... 11
масштаба .…..………..…………..………. 46
Время зарядки и записи……………... 12
Кольцо трансфокатора ………………. 46
Запись на карту ……….………..………….... 15
Дополнительное оптическое
Карты, которые можно
увеличение ……………..………..………. 46
использовать с данным
Функция стабилизатора
устройством …..…………..……………… 15
изображения .…..…………..………..……….. 47
Как вставлять/извлекать
Запись 1080/50p…….…..…………..……….. 48
карту SD …………..…………..………..…. 16
Запись с помощью сенсорных
Включение/выключение камеры ……. 17
кнопок ……………..………..…………..……….. 49
Включение и выключение питания
Сенсорные кнопки.……..………..……. 49
с помощью кнопки питания.………... 17
Назначение значков функцийпри
Включение и отключение питания
записи ……………..………..…………..……….. 52
с помощью монитора ЖКД/
Значки функций …..……..………..……. 52
видоискателя ……………..…………..…. 17
Функции записи меню…….………..…….. 58
Выб
ор режима ………………..………………. 18
Запись вручную ………..…………..……….. 75
Использование сенсорного
Баланс белого .…………..………..……. 76
экрана .……..………..…………..……………....19
Ручная настройка скорости
О сенсорном меню ……..……………… 20
затвора/диафрагмы ……………..……. 77
Установка даты и времени ..………..….. 21
Запись при ручной фокусировке…. 78
Запись 3D-видео …..…..…………..……….. 79
Функции, которые недоступны во
Основные сведения
в
ремя 3D-съемки……..………..………. 81
Перед началом записи .……..………..…..22
Выбор носителя для записи
Дополнительно
[HDC-TM900/HDC-HS900] …………..……..24
(Воспроизведение)
Съемка фильмов .…………..………………. 25
Фотосъемка………..………………..………....27
Операции воспроизведения …….…….. 82
Запись стоп—кадров в режиме
Воспроизведение видео с
записи видео…….………..…………..…. 28
использованием значка
Интеллектуальный
операции…….………..…………..………. 82
автоматический режим …..………………. 29
Создание стоп—кадра из
Воспроизведение видео/
видеоизображения..…………..………. 83
стоп—кадров ………..………………..………....31
Покадровый указатель
Использование экрана меню….…..….. 34
выделенного и времени………..……. 83
Использование быстрого меню…... 35
Повтор воспроизведения.……..……. 84
— 4 —

Возобновление предыдущего
Подключение DVD рекордера для
воспроизведения………..…………..…. 84
копирования на диск/
Оптическое увеличение
воспроизведения с диска.………..…… 108
стоп—кадра во время
Подготовка к копированию/
воспроизведения
воспроизведению….……………..….. 108
(масштабирование при
Копирование на диски ……..…..….. 110
воспроизведении)..……..……………... 85
Воспроизведение скопированного
Различные функции
диска …..…..…………..……………..….. 112
воспроизведения .…………..………………. 86
Управление диском, на который
Воспроизведение видео/
выполнено копирование…..…..….. 113
стоп—кадров по дате .…..…………..…. 86
Дублирование с помощью
Воспроизведение наиболее ярких
рекордера дисков Blu-ray,
моментов…..……..………..…………..…. 87
видео устройств и т.п.…….………..…… 114
Изменение настройки
База хранения 3D-видео…………..…… 118
воспроизведения и показ
слайдов …….…..…………..……………... 89
С ПК
Удаление сцен/стоп—кадров….……..….. 91
Разделение сцен
Как можно использовать ПК ….……… 121
(AVCHD, 1080/50p) ………….……….... 92
Лицензионное соглашение с
Разделение сцены для частичного
конечным пользователем ……..….. 123
удаления (iFrame)……..……..………... 93
Операционная среда …………………..… 124
Удаление личной информации ..…. 94
Инсталляция……………..…………..……… 127
Защита сцен/стоп—кадров ………..…. 94
Подключение к персональному
Ус
тановка DPOF….…………..……………....95
компьютеру ………..…………..………..…… 129
Объединение сцены, записанной с
О дисплее ПК ……….……………….... 131
задержкой [HDC-TM900] ……..………..….96
Включение HD Writer AE 3.0 …..……… 132
Просмотр видео/снимков на ТВ ……... 98
Чтение инструкции по
Подключение с помощью мини—
эксплуатации программных
кабеля HDMI …….…………..……….... 101
приложений ……..…..…………..…….. 132
Прослушивание звука в
При использовании Mac ………..……… 133
формате 5.1
(AVCHD, 1080/50p) …………………… 101
Подключение с помощью
Прочее
мультикабеля AV …………..…………. 101
Воспроизведение с использованием
Обозначения ………………..………..……… 135
VIERA Link………………..………..………….. 102
Сообщения .…..…………..……………..…… 138
Воспроизведение 3D-видео ………….. 104
О восстановлении ………………..….. 139
Функции, отсутствующие при
Поиск и устранение
воспроизведении 3D ……..……….... 105
неисправностей ……………..………..…… 140
На что необходимо обратить
внимание при использовании…….… 146
Копирование/
Об авторском праве ..…..…………..…… 153
дублирование
Режимы записи/приблизительное
возможное время записи…..……..…… 154
Копирование данных между
Приблизительное количество
картой SD и встроенной памятью/
записываемых кадров ……………..…… 156
жестким диском
Дополнительные
[HDC-TM900/HDC-HS900] …………..……106
принадлежности………..………………..… 158
— 5 —
Panasonic HDC-SD900
Operating Instructions
High Definition Video Camera
Model No. HDC-SD900
HDC-SD909
HDC-TM900
HDC-HS900
Before use, please read these instructions completely.
VQT3K98
until 2010/12/27
View the manual for the Panasonic HDC-SD900 here, for free. This manual comes under the category camcorders and has been rated by 6 people with an average of a 8.1.
This manual is available in the following languages: English. Do you have a question about the Panasonic HDC-SD900 or do you need help?
Ask your question here
Index
- Information for Your Safety
- Contents
- Preparation
- Basic
- Advanced (Recording)
- Advanced (Playback)
- Copy/Dubbing
- With a PC
- Others
Product Images (6)

Panasonic HDC-SD900 specifications
Below you will find the product specifications and the manual specifications of the Panasonic HDC-SD900.
The Panasonic HDC-SD900 is a camcorder that features a MOS sensor with a total of 9.15 megapixels, allowing for crisp and clear image capture. The optical sensor size is 1/4.1 inches, and the effective megapixels for both image and movie capture are 7.89 and 7.59, respectively. The camcorder has an optical zoom of 12x, which can be enhanced up to 30x through digital zoom. The filter size for the device is 46 millimeters, while the image stabilizer ensures that any unintentional camera movements are minimized.
The camcorder uses memory cards as its media type, with various compatible options such as SD, SDHC, and SDXC cards. The focus adjustment can be set to auto or manual, allowing for flexibility when capturing photos or videos.
Despite not having built-in memory, the Panasonic HDC-SD900 is lightweight and compact, making it a convenient choice for travel or for anyone looking for a device that is easy to handle. Its sleek design is both stylish and functional, while the built-in microphone ensures that audio is captured clearly.
To summarize, the Panasonic HDC-SD900 is a compact and versatile camcorder suitable for capturing images or recording videos. Its powerful zoom feature, manual focus adjustment, and efficient image stabilization make it ideal for different types of shooting. With its compatibility with SD, SDHC, and SDXC memory cards, users can store their media easily. The camcorder’s premium quality and durability make it a reliable choice for those looking for a high performing device that delivers sharp and vibrant results.
Aperture range (F-F)
1.5 — 2.8
Camcorder media type
Memory card
Focus adjustment
Auto/Manual
White balance
Auto, Cloudy, Daylight, Fluorescent
General
| Brand | Panasonic |
| Model | HDC-SD900 | HDC-SD900EG-K |
| Product | camcorder |
| EAN | 5025232613007 |
| Language | English |
| Filetype | User manual (PDF) |
Image sensor
| Total megapixels | 9.15 MP |
| Sensor type | MOS |
| Optical sensor size | 1/4.1 « |
| Effective megapixels (image) | 7.89 MP |
| Effective megapixels (movie) | 7.59 MP |
Lens system
| Optical zoom | 12 x |
| Digital zoom | 30 x |
| Focal length range | 3.45 — 41.4 mm |
| Focal length (35mm film equivalent) | 35 — 420 mm |
| Filter size | 46 mm |
| Image stabilizer | Yes |
| Image stabilizer type | Optical Image Stabilization (OIS) |
Other features
| Aperture range (F-F) | 1.5 — 2.8 |
| Power requirements | 10.3W |
Storage
| Camcorder media type | Memory card |
| Compatible memory cards | SD, SDHC, SDXC |
Focusing
| Focus adjustment | Auto/Manual |
White balance
| White balance | Auto, Cloudy, Daylight, Fluorescent |
| Outdoor white balance | Yes |
| Indoor white balance | Yes |
Flash
Shutter
| Shutter speed (video) | 1/25-1/8000 / 1/50-1/8000 s |
| Shutter speed (photo) | 1/2-1/2000 / 1/2-1/500 s |
Display
| Display diagonal | 3.5 « |
| Display | LCD |
| Touchscreen | Yes |
Design
Camera
| Minimum illumination | 1.6 lx |
| On Screen Display (OSD) languages | CZE, DEU, DUT, ENG, ESP, FRE, ITA, POL, SWE, TUR |
Video
| Maximum video resolution | 1920 x 1080 pixels |
| Video resolutions | 1920 x 1080 pixels |
| Video formats supported | MPEG4 |
| Supported video modes | 1080i, 1080p |
| HD type | Full HD |
Still image
| Maximum image resolution | 4608 x 3072 pixels |
| Still image resolution(s) | 640 x 480,2560 x 1920,2880 x 1920,3072 x 1728,3200 x 2400,3600 x 2400,3840 x 2160,4032 x 3024,4608 x 3072,4864 x 2736 |
| Image formats supported | JPG |
Audio
| Built-in microphone | Yes |
| Built-in speaker(s) | Yes |
Ports & interfaces
| USB 2.0 ports quantity | 1 |
| HDMI | Yes |
| Microphone in | Yes |
Battery
| Battery technology | Lithium-Ion (Li-Ion) |
| Battery voltage | 7.2 V |
Weight & dimensions
| Width | 660 mm |
| Depth | 1460 mm |
| Height | 720 mm |
| Weight | 395 g |
Packaging content
| Cables included | AC, AV, USB |
| Batteries included | Yes |
| Stylus pen | Yes |
| AC adapter included | Yes |
| Lens hood | Yes |
show more
Frequently Asked Questions
Can’t find the answer to your question in the manual? You may find the answer to your question in the FAQs about the Panasonic HDC-SD900 below.
How do I adjust the exposure settings on my Panasonic HDC-SD900?
To adjust the exposure settings, access the camera menu and navigate to the «Exposure» option. From there, you can modify parameters such as brightness, shutter speed, and aperture to control the amount of light entering the camera.
What should I do if my camcorder’s battery is draining too quickly?
If you are experiencing rapid battery drain, consider adjusting the power saving settings in the camera menu. You can optimize settings such as display brightness, idle time, and auto power-off to conserve battery life during operation.
How can I transfer my recorded videos from the camcorder to my computer?
To transfer videos to your computer, connect the camcorder to your computer using the provided USB cable. Then, switch the camcorder to playback mode and follow the on-screen prompts to establish a connection. You can then copy the recorded videos to your computer’s hard drive.
Can I manually adjust the focus on the HDC-SD900?
Yes, the HDC-SD900 offers manual focus control. Navigate to the camera menu and locate the «Focus» option. From there, you can manually adjust the focus point by using the control wheel or touchscreen to achieve precise focus on your subject.
How can I improve audio quality when recording with the HDC-SD900?
To enhance audio quality, consider using an external microphone that is compatible with the camcorder. By connecting an external microphone and adjusting audio settings in the camera menu, you can capture clearer and more professional-sounding audio during your recordings.
What is the total megapixels of the Panasonic HDC-SD900?
The total megapixels of the Panasonic HDC-SD900 is 9.15 MP.
Is the Panasonic HDC-SD900 equipped with image stabilizer?
Yes, the Panasonic HDC-SD900 has an image stabilizer. This means it can help reduce the visibility of camera shake, resulting in smoother and more steady footage.
What type of sensor does the Panasonic HDC-SD900 have?
The Panasonic HDC-SD900 has a MOS sensor.
What is the optical zoom of the Panasonic HDC-SD900?
The Panasonic HDC-SD900 has a 12x optical zoom. This allows the user to zoom in on subjects without losing image quality.
What memory cards are compatible with the Panasonic HDC-SD900?
The Panasonic HDC-SD900 is compatible with SD, SDHC, and SDXC memory cards. This provides flexibility for storing and transferring footage.
What is the weight of the Panasonic HDC-SD900?
The Panasonic HDC-SD900 has a weight of 395 g.
What is the height of the Panasonic HDC-SD900?
The Panasonic HDC-SD900 has a height of 720 mm.
What is the width of the Panasonic HDC-SD900?
The Panasonic HDC-SD900 has a width of 660 mm.
What is the depth of the Panasonic HDC-SD900?
The Panasonic HDC-SD900 has a depth of 1460 mm.
What is the screen size of the Panasonic HDC-SD900?
The screen size of the Panasonic HDC-SD900 is 3.5 «.
What does the abbreviation ‘MP’ stand for?
MP stands for MegaPixels.
What is a megapixel?
The number of megapixels denotes how many pixels there are in the sensor. 1 megapixel equals 1 million pixels. The more pixels, the higher the potential image quality.
Is the manual of the Panasonic HDC-SD900 available in English?
Yes, the manual of the Panasonic HDC-SD900 is available in English .
Is your question not listed? Ask your question here
Operating Instructions
High Definition Video Camera
Model No. HDC-SD900
Before use, please read these instructions completely.
HDC-SD909
HDC-TM900
HDC-HS900
VQT3K98

Information for Your Safety
∫ About the recording format for
recording motion pictures
You can select from AVCHD, 1080/50p or
iFrame recording formats to record motion
pictures using this unit. (l 48, 59)
AVCHD:
You can record high definition quality images
with this format. It is suitable for viewing on a
large format TV or for saving to disc.
1080/50p:
This is a 1080/50p (1920k1080/50
progressive) recording mode that can record
in maximum quality*. The scenes recorded
in 1080/50p can be saved or played back by
this unit or the HD Writer AE 3.0.
* This means the highest quality for this
unit.
iFrame:
This is a recording format suitable for
playing back or editing on Mac (iMovie’11).
Using iMovie’11, iFrame motion pictures can
be imported faster than AVCHD motion
pictures. Also, the imported file size of
iFrame motion pictures will be smaller than
that of AVCHD motion pictures.
≥ It is not compatible with motion picture
recorded in AVCHD or 1080/50p format.
∫ Indemnity about recorded
content
Panasonic does not accept any
responsibility for damages directly or
indirectly due to any type of problems that
result in loss of recording or edited content,
and does not guarantee any content if
recording or editing does not work properly.
Likewise, the above also applies in a case
where any type of repair is made to the unit
(including any other non-built-in memory/
HDD related component).
∫ Handling of built-in memory
[HDC-TM900]
This unit is equipped with the built-in
memory. When using this component, pay
attention to the following points.
Back up data periodically.
The built-in memory is temporary storage. In
order to avoid erasing data due to static
electricity, electromagnetic waves,
breakage, and failures, back up the data to a
PC or DVD disc. (l 108, 121)
≥ Access lamp [ACCESS] (l 6) illuminates
while the SD card or built-in memory is
being accessed (initialization, recording,
playback, deleting etc.). Do not perform
the following operations when the lamp
illuminates. It may damage the built-in
memory or cause a malfunction in the unit.
jTurn the unit off (remove the battery)
jInsert and remove the USB cable
jExpose the unit to vibrations or shock
≥ About disposing of or giving away this unit.
(l 147)
∫ Handling of HDD [HDC-HS900]
This unit is equipped with the built-in HDD.
While the HDD is capable of storing a large
amount of data, there are a few things to
look out for. When using this component,
pay attention to the following points.
Do not expose the HDD to vibrations and
shocks.
Due to the environment and handling
conditions, the HDD may be subject to
partial damages or may not be able to read,
record, and play back data. Do not expose
the unit to vibrations or shock, and do not
turn off the unit during recording or playback.
If the unit is used in a place with loud
sounds, such as a club or venue, the
recording may stop due to sound
vibrations. Recording data on an SD card
is recommended in these places.
— 2 —
Back up data periodically.
The HDD is temporary storage. In order to
avoid erasing data due to static electricity,
electromagnetic waves, breakage, and
failures, back up the data to a PC or DVD
disc. (l 108, 121)
If the HDD experiences any abnormality,
back up data immediately.
Failure in the HDD may produce continuous
noise or choppy sound during recording or
playing back. Continuous use will cause
further deterioration, and may eventually
disable the HDD. If these phenomena are
observed, copy the data on the HDD to a
PC, a DVD disc etc. immediately and
contact your dealer.
Once the HDD is out of order, data cannot
be restored.
Operation may stop in hot or cold
environments.
The unit is disabled in order to protect the
HDD.
Do not use the unit in low atmospheric
pressures.
The HDD may fail if it is used at altitudes of
3000 m or higher above sea level.
Transportation
When the unit is transported, turn off the unit
and be careful not to shake, fall, or impact
the unit.
Falling detection
[ ] is indicated on the screen when it
detects a falling state (a weightless state). If
the falling state is detected repeatedly, the
unit may stop the recording or playback
operation in order to protect the HDD.
≥ HDD access lamp [ACCESS HDD] (l 9)
illuminates while the HDD is being
accessed (initialization, recording,
playback, deleting etc.). Do not perform
the following operations when the lamp
illuminates. It may damage the HDD or
cause a malfunction in the unit.
jTurn the unit off (remove the battery)
jInsert and remove the USB cable
jExpose the unit to vibrations or shock
≥ About disposing of or giving away this unit.
(l 147)
∫ Cards that you can use with
this unit
SD Memory Card, SDHC Memory Card
and SDXC Memory Card
≥ 4 GB or more Memory Cards that do not
have the SDHC logo or 48 GB or more
Memory Cards that do not have the SDXC
logo are not based on SD Memory Card
Specifications.
≥ Refer to page 15 for more details on SD
cards.
∫ For the purposes of these
operating instructions
≥ SD Memory Card, SDHC Memory Card
and SDXC Memory Card are referred to
as the “SD card”.
≥ Functions that can be used for motion
picture recording mode:
Functions that can be used for still picture
recording mode:
≥ Functions that can be used for motion
picture playback mode:
Functions that can be used for still picture
playback mode:
≥ Pages for reference are indicated by an
arrow, for example: l 00
These operating instructions are designed
for use with models ,
, and
. Pictures may be slightly
different from the original.
≥ The illustrations used in these operating
instructions show model ,
however, parts of the explanation refer to
different models.
≥ Depending on the model, some functions
are not available.
≥ Features may vary, so please read
carefully.
≥ Not all models may be available
depending on the region of purchase.
— 3 —

Contents
Information for Your Safety…………………. 2
Preparation
Parts identification and handling ………… 6
Power supply……………………………………. 10
Inserting/removing the battery……….. 10
Charging the battery ……………………. 11
Charging and recording time…………. 12
Recording to a card ………………………….. 15
Cards that you can use
with this unit ……………………………….. 15
Inserting/removing an SD card………. 16
Turning the unit on/off ………………………. 17
Turning the unit on and off
with the power button …………………… 17
Turning the unit on and off
with the LCD monitor/viewfinder ……. 17
Selecting a mode ……………………………… 18
How to use the touch screen …………….. 19
About the touch menu ………………….. 20
Setting date and time………………………… 21
Basic
Before recording ………………………………. 22
Selecting a media to record
[HDC-TM900/HDC-HS900] ………………….24
Recording motion pictures ………………..25
Recording still pictures …………………….. 27
Recording still pictures in
motion picture recording mode………. 28
Intelligent auto mode………………………… 29
Motion picture/Still picture playback ….31
Using the menu screen ……………………..34
Using the quick menu ………………….. 35
Using the Setup Menu ………………………. 36
Using with the remote control ……………44
Operation of direction buttons/
OK button …………………………………… 45
Advanced (Recording)
Zoom in/out function ………………………… 46
About the zoom speed…………………. 46
Ring zoom………………………………….. 46
Extra optical zoom ………………………. 46
Image stabilizer function…………………… 47
1080/50p recording …………………………… 48
Recording with the Touch function……. 49
Touch function icons ……………………. 49
Recording functions of
operation icons ………………………………… 52
Operation icons…………………………… 52
Recording functions of menus………….. 58
Manual recording……………………………… 75
White balance …………………………….. 76
Manual shutter speed/
iris adjustment …………………………….. 77
Recording with manual focus………… 78
Recording 3D video ………………………….. 79
Functions not available during
3D recording ………………………………. 81
Advanced (Playback)
Playback operations…………………………. 82
Motion picture playback using
operation icon …………………………….. 82
Creating still picture from
motion picture …………………………….. 83
Highlight&Time frame index………….. 83
Repeat playback …………………………. 84
Resuming the previous playback…… 84
Zooming in on a still picture
during playback (Playback zoom)….. 85
Various playback functions ………………. 86
Playing back motion pictures/
still pictures by date …………………….. 86
Highlight playback……………………….. 87
Changing the playback settings and
playing back the slide show………….. 89
— 4 —

Deleting scenes/still pictures …………….91
Dividing a scene
(AVCHD, 1080/50p) …………………….. 92
Dividing a scene to partially delete
(iFrame) …………………………………….. 93
Deleting personal information ……….. 94
Protecting scenes/still pictures………. 94
DPOF setting …………………………………….95
Relay scene combining
[HDC-TM900] …………………………………….96
Watching Video/Pictures on your TV ….98
Connecting with
a HDMI mini cable……………………… 101
Listening in 5.1 channel sound
(AVCHD, 1080/50p) …………………… 101
Connecting with
the AV multi cable ……………………… 101
Playback using VIERA Link …………….. 102
3D video playback…………………………… 104
Functions not available during
3D playback ……………………………… 105
Copy/Dubbing
Copying between SD card and
Built-in Memory/HDD
[HDC-TM900/HDC-HS900] ………………..106
Connecting a DVD burner to copy to/
play back a disc ………………………………108
Preparing for copying/
playing back ……………………………… 108
Copying to discs………………………… 110
Playing back the copied disc……….. 112
Managing the copied disc …………… 113
Dubbing with a Blu-ray disc recorder,
video devices, etc…………………………… 114
3D video storage …………………………….. 118
With a PC
What you can do with a PC ……………… 121
End User License Agreement……… 123
Operating environment …………………… 124
Installation ……………………………………… 127
Connecting to a PC ………………………… 129
About the PC display …………………. 131
Starting HD Writer AE 3.0………………… 132
Reading the operating instructions
of the software applications ………… 132
If using Mac ……………………………………. 133
Others
Indications ……………………………………… 135
Messages ………………………………………. 138
About recovery ………………………….. 139
Troubleshooting …………………………….. 140
Cautions for use …………………………….. 146
About copyright……………………………… 153
Recording modes/approximate
recordable time ………………………………. 154
Approximate number of recordable
pictures………………………………………….. 156
Optional accessories ………………………158
— 5 —
Preparation
89
2
3
4
5
6
7
10
11
12
1
1314
15
16
17
18
19
21
20
22
23
Parts identification and handling
1 Speaker
2 Power button [ ] (l 17)
3 Inlet (cooling fan) (l 22)
4 Intelligent auto/Manual button
[iA/MANUAL] (l 29, 75)
5 Optical image stabilizer button
[ O.I.S.] (l 47)
6 Eyepiece corrector dial (l 23)
7 1080/50p button [1080/50p] (l 48)
8 Battery release lever [BATT] (l 10)
9 Battery holder (l 10)
10 HDMI mini connector [HDMI]
(l 98, 102)
11 USB terminal [ ] (l 109, 114, 129)
12 AV multi connector (l 98, 117)
≥ Use the AV multi cable (only the supplied
cable).
13 Card slot (l 16)
14 Access lamp [ACCESS] (l 16)
15 Lens cover
≥ The lens cover opens in motion
picture recording mode or still picture
recording mode. (l 18)
16 Multi manual ring (l 75, 78)
17 Camera function button
[CAMERA FUNCTION] (l 75)
18 Remote control sensor (l 45)
19 Built-in flash (l 55)
20 3D Conversion Lens attachment part
(concave) (l 79)
21 Lens (LEICA DICOMAR)
≥ Please refer to page 23 for details about
attaching the lens hood.
22 AF assist lamp (l 74)
23 Recording lamp (l 39)
— 6 —
24 LCD monitor (Touch screen) (l 19)
≥ It can open up to 90o.
≥ It can rotate up to 180o A towards the lens
or 90o B towards the viewfinder.
Due to limitations in LCD production
technology, there may be some tiny bright
or dark spots on the LCD monitor screen.
However, this is not a malfunction and
does not affect the recorded picture.
25 Viewfinder (l 23)
Due to limitations in LCD production
technology, there may be some tiny bright
or dark spots on the viewfinder screen.
However, this is not a malfunction and
does not affect the recorded picture.
26 Zoom buttons (l 46)
27 Sub recording start/stop button
(l 22)
≥ This button functions in the same manner
as the recording start/stop button.
28 Tripod receptacle
≥ If you attach a tripod which has 5.5 mm
screw or larger, it may damage this unit.
28
— 7 —
34
33
36 37
MIC
29
30
353231
38
29 Microphone terminal [MIC]
≥ A compatible plug-in powered microphone
can be used as an external microphone.
≥ Audio will be stereo (2 ch) with the
external microphone input.
≥ (Microphone input level
meter) is displayed when the external
microphone is connected. (l 68)
≥ When the unit is connected with the AC
adaptor, sometimes noise may be heard
depending on the microphone type. In this
case, please switch to the battery for the
power supply and the noise will stop.
30 Headphone terminal [ ] (l 57)
≥ Excessive sound pressure from
earphones and headphones can cause
hearing loss.
≥ Listening at full volume for long periods
may damage the user’s ears.
31 Photoshot button [ ] (l 27)
32 Zoom lever [W/T] (In motion picture
recording mode or still picture
recording mode) (l 46)
Thumbnail display switch [ / ]/
Volume lever [sVOLr] (In playback
mode) (l 32)
33 Mode switch (l 18)
34 Status indicator (l 17)
35 Internal microphones
36 Recording start/stop button (l 25)
37 Shoulder strap fixture
38 Grip belt
Adjust the length of the grip belt so that it fits
your hand.
1 Flip the belt.
2 Adjust the length.
3 Replace the belt.
— 8 —
//
39
40
41
42
39 Shoe adaptor mounting part (l 158)
40 Shoe adaptor cover (l 158)
41 Shoe adaptor release lever
[SHOE ADAPTOR RELEASE] (l 158)
42 DC input terminal [DC IN] (l 11)
≥ Do not use any other AC adaptors except
the supplied one.
43 HDD access lamp [ACCESS HDD]
44 Accessory shoe (l 158)
45 DC input terminal [DC IN] (l 11 )
≥ Do not use any other AC adaptors except
the supplied one.
— 9 —
Preparation
Removing the battery
Be sure to hold down the power button
until the status indicator goes off. Then
remove the battery while supporting the
unit to prevent it dropping.
Move the battery release lever in the
direction indicated by the arrow and
remove the battery when unlocked.
A Insert the battery until it clicks and
locks.
Power supply
∫ About batteries that you can use with this unit
The battery that can be used with this unit is VW-VBN130/VW-VBN260.
≥ The unit has a function for distinguishing batteries which can be used safely. The
dedicated battery (VW-VBN130/VW-VBN260) supports this function. The only
batteries suitable for use with this unit are genuine Panasonic products and
batteries manufactured by other companies and certified by Panasonic. (Batteries
which do not support this function cannot be used). Panasonic cannot in any way
guarantee the quality, performance or safety of batteries which have been
manufactured by other companies and are not genuine Panasonic products.
It has been found that counterfeit battery packs which look very similar to the
genuine product are made available to purchase in some markets. Some of these
battery packs are not adequately protected with internal protection to meet the
requirements of appropriate safety standards. There is a possibility that these
battery packs may lead to fire or explosion. Please be advised that we are not liable
for any accident or failure occurring as a result of use of a counterfeit battery pack.
To ensure that safe products are used we would recommend that a genuine
Panasonic battery pack is used.
Inserting/removing the battery
≥ Press the power button to turn off the unit. (l 17)
Install the battery by inserting it in the direction shown in the figure.
— 10 —
Charging the battery
When this unit is purchased, the battery is not charged. Charge the battery fully
before using this unit.
The unit is in the standby condition when the AC adaptor is connected. The primary circuit is
always “live” as long as the AC adaptor is connected to an electrical outlet.
Important:
≥ Use the supplied AC adaptor. Do not use the AC adaptor of another device.
≥ Do not use the AC cable with any other equipment as it is designed only for this unit.
Also, do not use the AC cable from other equipment with this unit.
≥ The battery will not be charged if the unit is turned on.
≥ It is recommended to charge the battery in a temperature between 10 °C to 30 °C.
(The battery temperature should also be the same.)
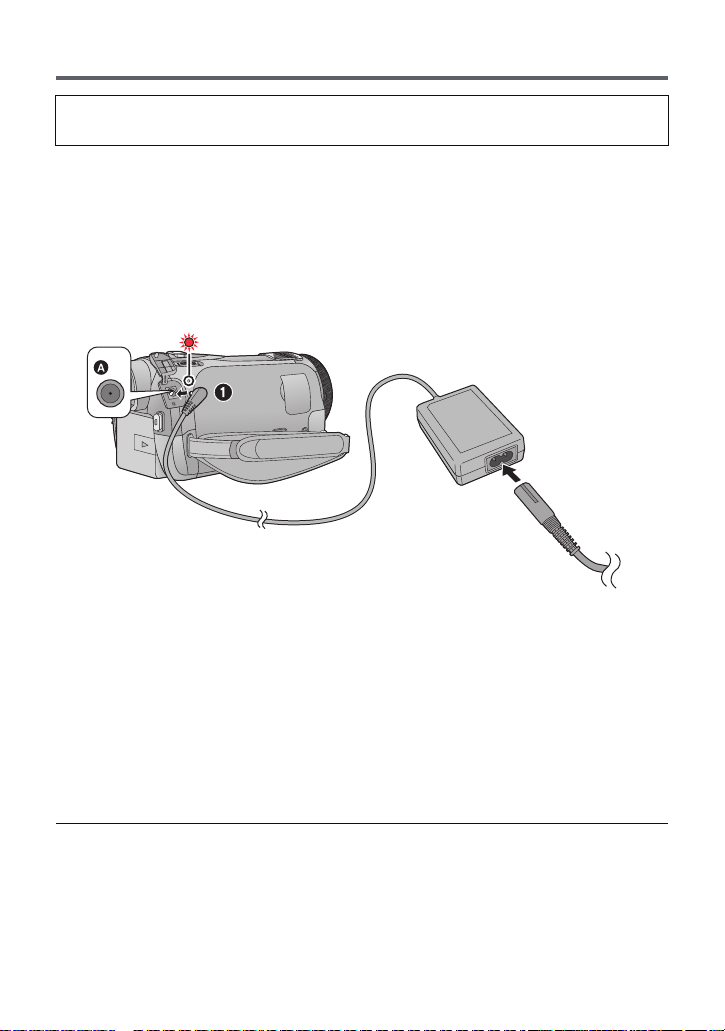
A DC input terminal
≥ Insert the plugs as far as they will go.
1 Connect the AC adaptor to the DC input terminal.
2 Connect the AC cable to the AC adaptor, then the AC outlet.
≥ The status indicator will flash red at an interval of 2 seconds, indicating that charging has
begun.
It will turn off when the charging is completed.
∫ Connecting to the AC outlet
If you turn on the unit while connecting with the AC adaptor, you can use the unit with power
supplied from the outlet.
≥ If the status indicator flashes at a particularly fast or slow rate, refer to page 149.
≥ We recommend using Panasonic batteries (l 12, 13).
≥ If you use other batteries, we cannot guarantee the quality of this product.
≥ Do not heat or expose to flame.
≥ Do not leave the battery(ies) in an automobile exposed to direct sunlight for a long period
of time with doors and windows closed.
— 11 —

Charging and recording time
∫ Charging/Recording time
≥ Temperature: 25 oC/humidity: 60%RH
≥ When using the viewfinder (times in parentheses are when using the LCD monitor)
HDC-SD900/HDC-SD909
Battery model number
[Voltage/Capacity
(minimum)]
Supplied battery/
VW-VBN130 (optional)
[7.2 V/1250 mAh]
VW-VBN260 (optional)
[7.2 V/2500 mAh]
Battery model number
[Voltage/Capacity
(minimum)]
Supplied battery/
VW-VBN130 (optional)
[7.2 V/1250 mAh]
VW-VBN260 (optional)
[7.2 V/2500 mAh]
Charging
time
2h30min
4h30min
Charging
time
2h30min
4h30min
Recording
mode
[1080/50p]
[HA], [HG],
[HX], [HE]
[iFrame]
[1080/50p]
[HA], [HG],
[HX]
[HE]
[iFrame]
HDC-TM900
Recording
mode
[1080/50p]
[HA], [HG],
[HX], [HE]
[iFrame]
[1080/50p]
[HA], [HG],
[HX]
[HE]
[iFrame]
Maximum
continuously
recordable time
1h35min
(1 h 30 min)
1h40min
(1 h 35 min)
1h45min
(1 h 40 min)
3h5min
(2 h 55 min)
3h15min
(3h5min)
3h15min
(3 h 10 min)
3h25min
(3 h 15 min)
Maximum
continuously
recordable time
1h35min
(1 h 30 min)
1h40min
(1 h 35 min)
1h45min
(1 h 40 min)
3h5min
(2 h 55 min)
3h15min
(3h5min)
3h15min
(3 h 10 min)
3h25min
(3 h 15 min)
Actual
recordable
time
55 min
(55 min)
(1 h)
1h5min
(1 h)
1h50min
(1h50min)
(1h55min)
2h5min
(2 h)
Actual
recordable
time
55 min
(55 min)
(1 h)
1h5min
(1 h)
1h50min
(1h50min)
(1h55min)
2h5min
(2 h)
1h
2h
1h
2h
— 12 —

Battery model
number
[Voltage/Capacity
(minimum)]
Supplied battery/
VW-VBN130
(optional)
[7.2 V/1250 mAh]
VW-VBN260
(optional)
[7.2 V/2500 mAh]
Charging
time
2h30min
4h30min
HDC-HS900
Recording
destination
HDD
SD
HDD
SD
Recording
mode
[1080/50p]
[HA]
[HG], [HX],
[HE]
[iFrame]
[1080/50p]
[HA], [HG],
[HX], [HE]
[iFrame]
[1080/50p]
[HA], [HG],
[HX], [HE]
[iFrame]
[1080/50p]
[HA]
[HG], [HX],
[HE]
[iFrame]
Maximum
continuously
recordable
time
1h15min
(1h15min)
1h20min
(1h20min)
1h25min
(1h20min)
1h20min
(1h15min)
1h25min
(1h20min)
1h25min
(1h25min)
2h30min
(2h25min)
2h40min
(2h35min)
2h45min
(2h40min)
2h35min
(2h30min)
2h45min
(2h35min)
2h45min
(2h40min)
2h50min
(2h45min)
Actual
recordable
time
45 min
(45 min)
50 min
(45 min)
50 min
(50 min)
50 min
(45 min)
50 min
(50 min)
55 min
(50 min)
1h30min
(1h30min)
1h40min
(1h35min)
1h40min
(1h40min)
1h35min
(1h30min)
1h40min
(1h35min)
1h45min
(1h40min)
— 13 —

≥ These times are approximations.
≥ The indicated charging time is for when the battery has been discharged completely.
Charging time and recordable time vary depending on the usage conditions such as
high/low temperature.
≥ Recordable time of 3D recording mode is the same. (During 3D recording mode, 1080/50p
and iFrame recording mode can not be used.)
≥ The actual recordable time refers to the recordable time when repeatedly starting/stopping
recording, turning the unit on/off, moving the zoom lever etc.
≥ The batteries heat up after use or charging. This is not a malfunction.
Battery capacity indication
≥ The display changes as the battery capacity reduces.
####
If there is less than 3 minutes remaining, then will become red. If the battery
discharges, then will flash.
≥ The remaining battery capacity is displayed when using the Panasonic battery that you
can use for this unit. The actual time can vary depending on your actual use.
≥ When using the AC adaptor or batteries made by other companies, the remaining
battery capacity will not be shown.
— 14 —
Preparation
Recording to a card
The unit can record still pictures or motion pictures to an SD card, built-in memory or HDD.
To record to an SD card, read the following.
This unit (an SDXC compatible device) is compatible with SD Memory Cards, SDHC
Memory Cards and SDXC Memory Cards. When using an SDHC memory card/SDXC
memory card with other equipment, check the equipment is compatible with these memory
cards.
Cards that you can use with this unit
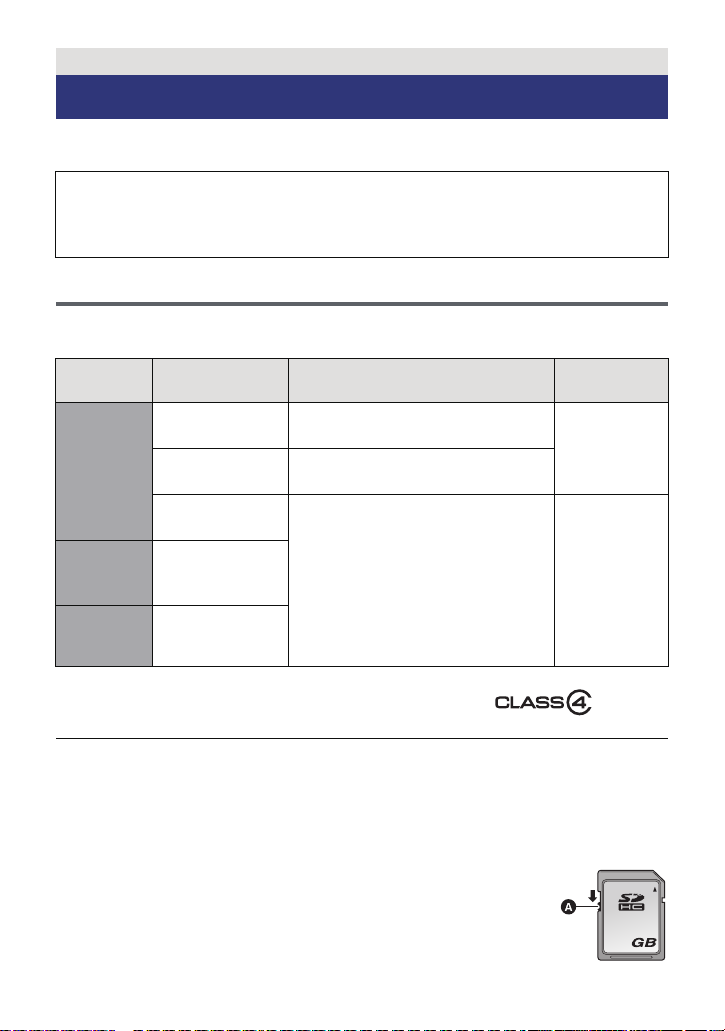
Use SD cards conforming to Class 4 or higher of the SD Speed Class Rating* for
motion picture recording.
Card type Capacity Motion picture recording
8MB/16MB/
SD
Memory
Card
SDHC
Memory
Card
SDXC
Memory
Card
* SD Speed Class Rating is the speed
standard regarding continuous writing.
Check via the label on the card, etc.
4GB/6GB/8GB/
32 MB
64 MB/128 MB/
256 MB
512 MB/1 GB/
12 GB/16 GB/
24 GB/32 GB
48 GB/64 GB
Cannot be used.
Cannot be guaranteed in operation.
2GB
Can be used. Can be used.
e.g.:
Still picture
recording
Cannot be
guaranteed in
operation.
≥
Please confirm the latest information about SD Memory Cards/SDHC Memory Cards/SDXC
Memory Cards that can be used for motion picture recording on the following website.
http://panasonic.jp/support/global/cs/e_cam
(This website is in English only.)
≥ 4 GB or more Memory Cards that do not have the SDHC logo or 48 GB or more Memory
Cards that do not have the SDXC logo are not based on SD Memory Card Specifications.
≥ When the write-protect switch A on SD card is locked, no recording,
deletion or editing will be possible on the card.
≥ Keep the Memory Card out of reach of children to prevent swallowing.
— 15 —
Inserting/removing an SD card
When using an SD card not from Panasonic, or one previously used on other equipment,
for the first time on this unit, format the SD card. (l 41) When the SD card is formatted, all
of the recorded data is deleted. Once the data is deleted, it cannot be restored.
Caution:
Check that the access lamp has gone off.
Access lamp [ACCESS] A
≥ When this unit is accessing the SD
card
or built-in memory
lights up.
, the access lamp
1 Open the LCD monitor.
2
Open the SD card/terminal cover
and insert (remove) the SD card
into (from) the card slot.
≥ Face the label side B in the direction
shown in the illustration and press it
straight in as far as it will go.
≥ Press the centre of the SD card and then
pull it straight out.
3 Securely close the SD card/
terminal cover.
≥ Securely close it until it clicks.
≥ Do not touch the terminals on the back of
the SD card.
≥ Do not apply strong shocks, bend, or drop
the SD card.
≥ Electrical noise, static electricity or the
failure of this unit or the SD card may
damage or erase the data stored on the
SD card.
≥ When the card access lamp is lit, do not:
jRemove the SD card
jTurn the unit off
jInsert and remove the USB cable
jExpose the unit to vibrations or shock
Performing the above while the lamp is on
may result in damage to data/SD card or
this unit.
≥ Do not expose the terminals of the SD
card to water, garbage or dust.
≥ Do not place SD cards in the following
areas:
jIn direct sunlight
jIn very dusty or humid areas
jNear a heater
jLocations susceptible to significant
difference in temperature (condensation
can occur.)
jWhere static electricity or
electromagnetic waves occur
≥ To protect SD cards, return them to their
cases when you are not using them.
≥ About disposing of or giving away the SD
card. (l 150)
— 16 —
Preparation
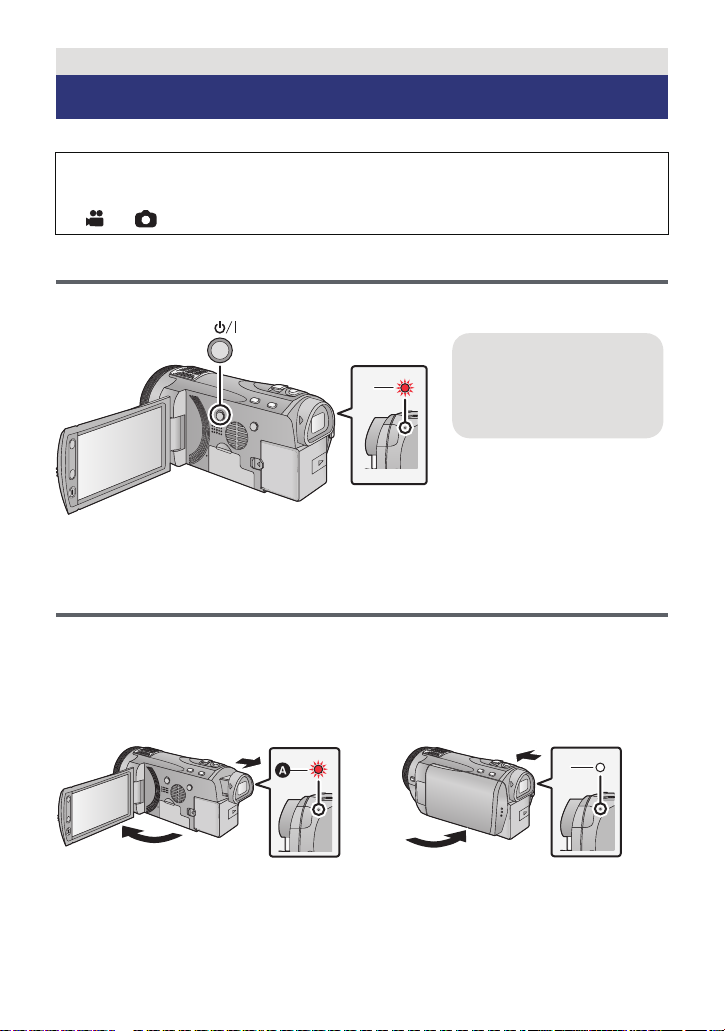
To turn off the unit
Hold down the power button
until the status indicator
goes off.
Turning the unit on/off
You can turn the unit on and off using the power button, the LCD monitor or the viewfinder.
A clicking sound is heard when the unit is shaken.
≥ This is the sound of the lens moving and is not a defect.
This sound will no longer be heard when the unit is turned on and change the mode to
or .
Turning the unit on and off with the power button
Press the power button to turn on the unit.
A The status indicator lights.
Turning the unit on and off with the LCD monitor/
viewfinder
Opening the LCD monitor or extending the viewfinder turns on the unit. Closing the LCD
monitor/viewfinder turns off the unit.
During general use, you may find it convenient to turn the unit on/off using the LCD
monitor or viewfinder.
∫ To turn on the unit
∫ To turn off the unit
A The status indicator lights.
B The status indicator goes off.
— 17 —
≥ The unit will not turn off unless the LCD monitor is closed and the viewfinder is retracted.
≥ The unit will not turn off while recording motion pictures even if the LCD monitor is closed
and the viewfinder is retracted.
≥ In the following cases, opening the LCD monitor or extending the viewfinder does not turn
on the unit. Press the power button to turn on the unit.
jWhen the unit is purchased
jWhen you have turned off the unit using the power button
Preparation
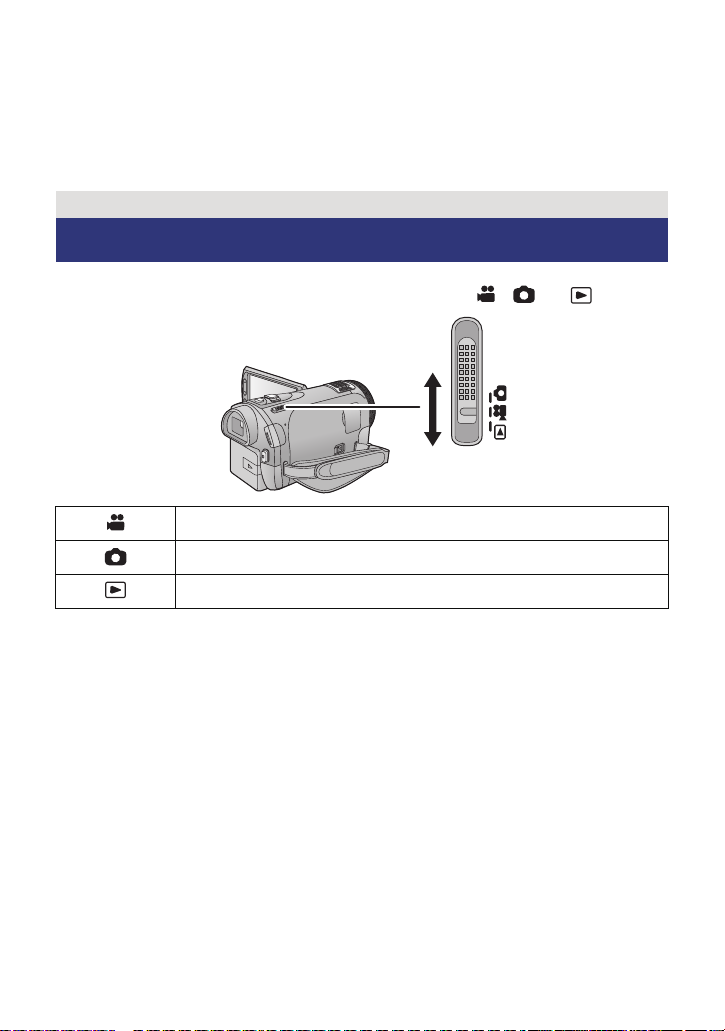
Selecting a mode
Change the mode to recording or playback.
Operate the mode switch to change the mode to , or .
Motion picture recording mode (l 25)
Still picture recording mode (l 27)
Playback mode (l 31, 82)
— 18 —
Preparation
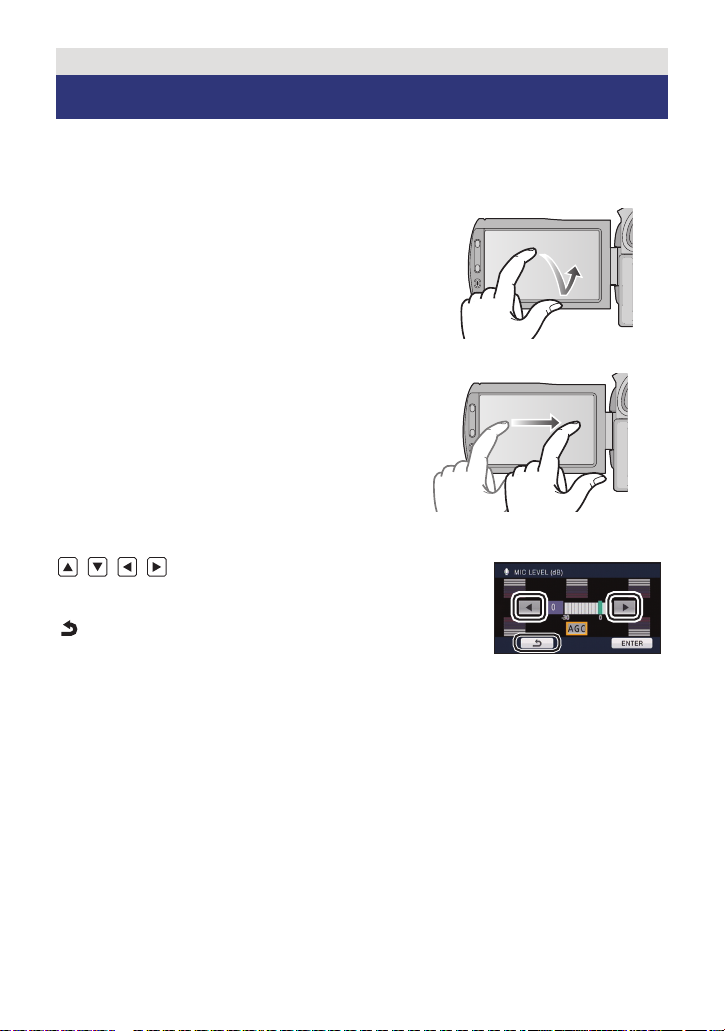
How to use the touch screen
You can operate by directly touching the LCD monitor (touch screen) with your finger.
It is easier to use the stylus pen (supplied) for detailed operation or if it is hard to operate with
your fingers.
∫ Touch
Touch and release the touch screen to select icon or
picture.
≥ Touch the centre of the icon.
≥ Touching the touch screen will not operate while
you are touching another part of the touch screen.
∫ Slide while touching
Move your finger while pressing on the touch screen.
∫ About the operation icons
///:
These icons are used to switch the menu and thumbnail
display page, for item selection and setting etc.
:
Touch to return to the previous screen such as when
setting menus.
— 19 —
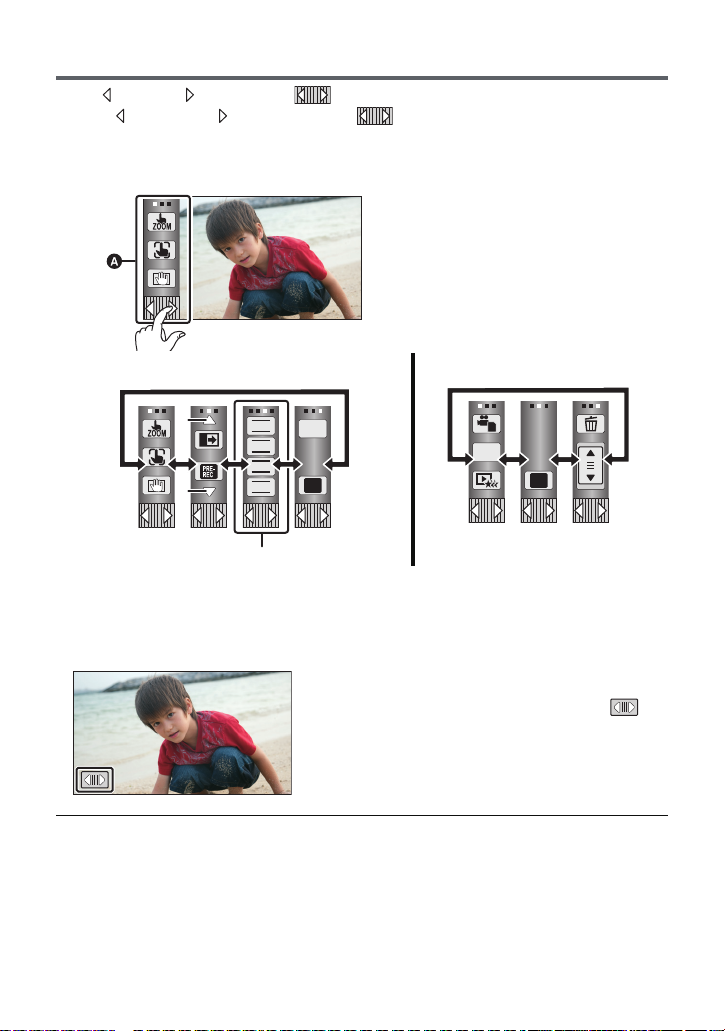
About the touch menu
MENU
Q.
MENU
FOCUS
WB
SHTR
IRIS
Touch (left side)/ (right side) of on the touch menu to switch the operation icons.
Touch (left side)/ (right side) of on the touch menu.
≥ It is also possible to switch the operation icons by sliding the touch menu right or left while
touching it.
A Touch menu
Recording mode Playback mode
B Touch these icons to switch pages upward or downward.
C Displayed only during the manual mode.
∫ To display the touch menu
The touch menu will disappear when no function
is performed for a specific period of time during
recording mode. To display it again, touch .
≥ Do not touch on the LCD monitor with hard pointed tips, such as ball point pens.
≥ Perform the touch screen calibration when the touch is not recognised or wrong location is
recognised. (l 43)
— 20 —
Preparation
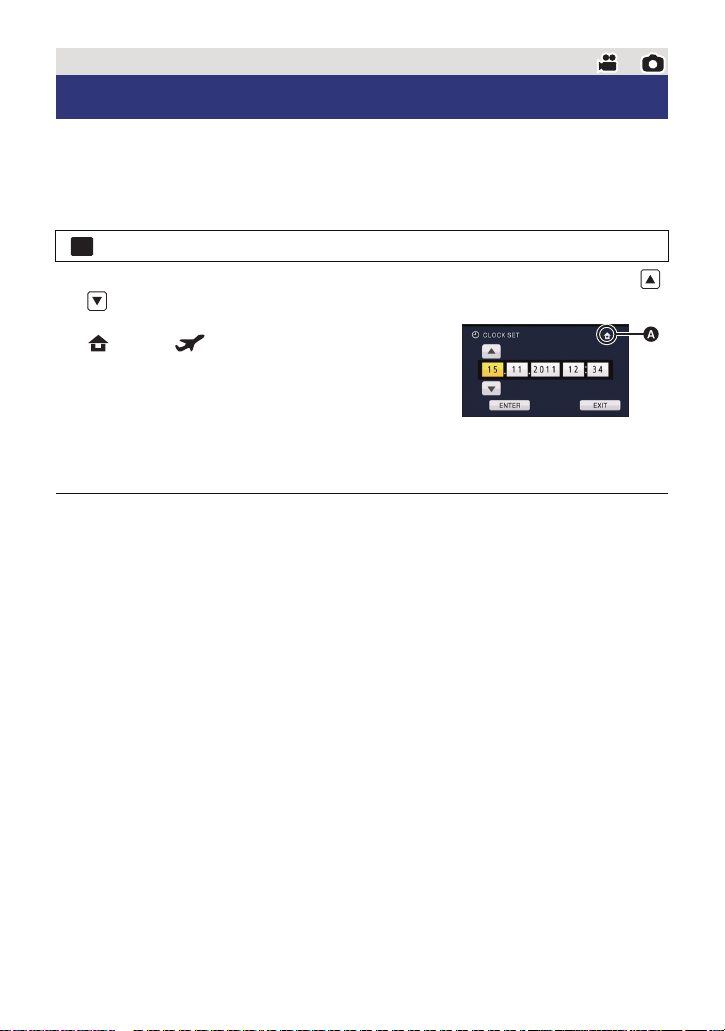
Setting date and time
When the unit is turned on for the first time, a message asking you to set the date and time
will appear.
Select [YES] and perform steps 2 to 3 below to set the date and time.
1 Select the menu. (l 34)
MENU
: [SETUP] # [CLOCK SET]
2 Touch the date or time to be set, then set the desired value using /
.
A Displaying the World time setting (l 36):
[HOME]/ [DESTINATION]
≥ The year can be set between 2000 and 2039.
≥ The 24-hour system is used to display the time.
3 Touch [ENTER].
≥ A message prompting for world time setting may be
displayed. Perform the world time setting by touching the screen. (l 36)
≥ Touch [EXIT] to complete the setting.
≥ The date and time function is driven by a built-in lithium battery.
≥ When this unit is purchased, the clock is set. If the time display becomes [- -], the built-in
lithium battery needs to be charged. To recharge the built-in lithium battery, connect the AC
adaptor or attach the battery to this unit. Leave the unit as it is for approx. 24 hours and the
battery will maintain the date and time for approx. 6 months. (The battery is still being
recharged even if the unit is off.)
— 21 —

Basic
Before recording
∫ Basic camera positioning
1 Hold the unit with both hands.
2 Put your hand through the grip belt.
3 It is convenient to use sub recording start/stop button A when holding the unit around
your waist.
≥ When recording, make sure your footing is stable and there is no danger of colliding with
another person or object.
≥ When you are outdoors, record pictures with the sunlight behind you. If the subject is
backlit, it will become dark in the recording.
≥ Keep your arms near your body and separate your legs for better balance.
≥ Do not cover the microphones or the cooling fan inlet with your hand etc.
∫ Basic motion picture recording
≥ The unit should normally be held steady when recording.
≥ If you move the unit when recording, do so slowly, maintaining a constant speed.
≥ The zoom operation is useful for recording subjects you cannot get close to, but overuse of
zoom in and zoom out can make the resulting motion picture less enjoyable to watch.
— 22 —
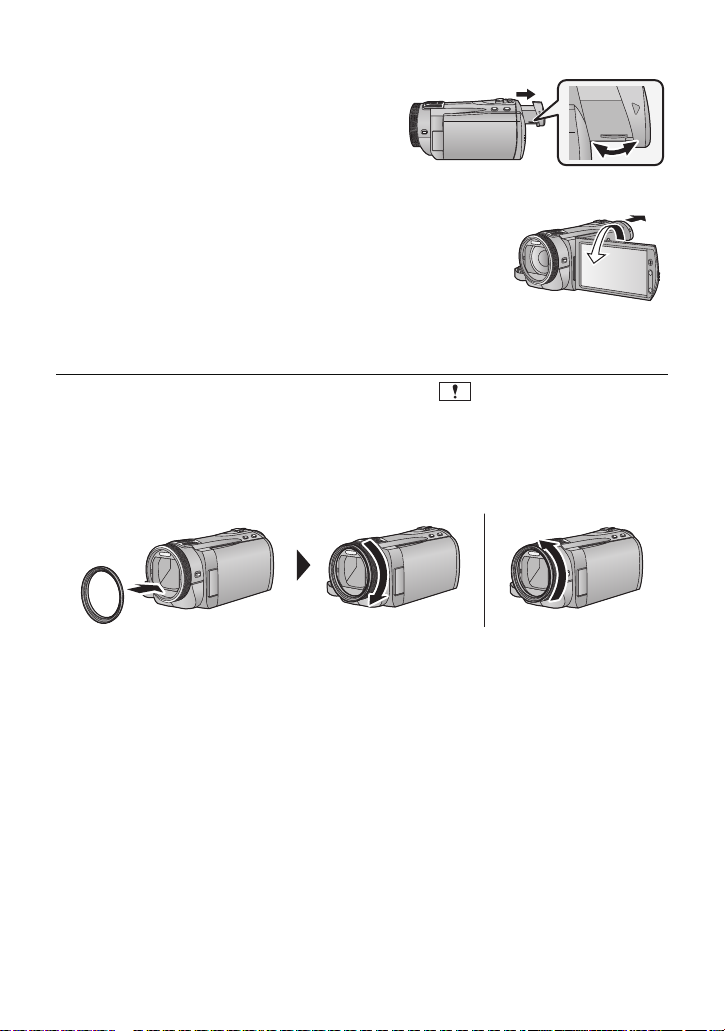
∫ To adjust the image in the viewfinder
Adjust to make the image clear by
rotating the eyepiece corrector dial.
≥ Extend the viewfinder and close the LCD monitor
to turn on the viewfinder.
∫ To record showing the contents to a partner
Extend the viewfinder and rotate the LCD monitor
towards the lens side.
≥ LCD monitor and viewfinder are turned on during the face-to-
face recording when the viewfinder is extended.
≥ The image is horizontally flipped as if you see a mirror image.
(However the image recorded is the same as a normal
recording.)
≥ Record by viewing the image in the viewfinder during the face-to-face recording.
≥ Only some indications will appear on the screen. When appears, return the direction
of the LCD monitor to normal position and check the warning/alarm indication. (l 138)
∫ Attaching/Removing the lens hood
This will reduce the extra light entering the lens in bright sunlight or backlight etc., making it
possible to take clearer pictures.
A Attaching the lens hood
B Removing the lens hood
≥ If you use the Filter kit (optional), the conversion lens (optional) or the 3D Conversion Lens
(optional), remove the lens hood.
— 23 —
Basic
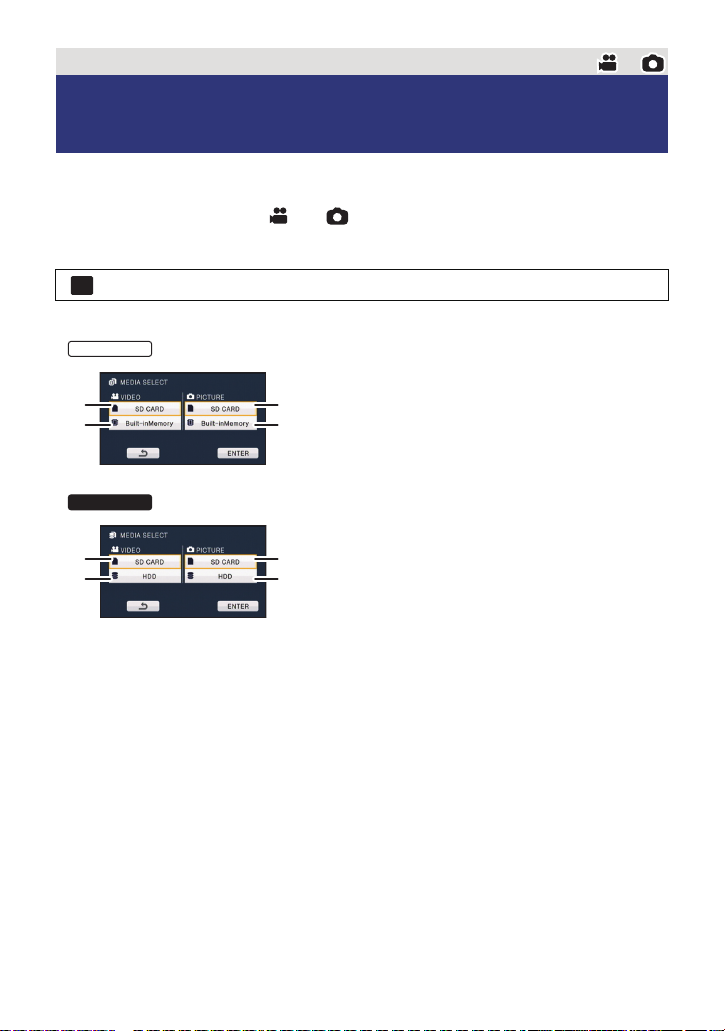
Selecting a media to record [HDC-TM900/
HDC-HS900]
The card, built-in memory, and HDD media can be selected separately to record motion
pictures or still pictures.
1 Change the mode to or .
2 Select the menu. (l 34)
MENU
: [MEDIA SELECT]
3 Touch the media to record motion pictures or still pictures.
A [VIDEO/SD CARD]
B [VIDEO/Built-inMemory]
C [PICTURE/SD CARD]
D [PICTURE/Built-inMemory]
HDC-HS900
E [VIDEO/SD CARD]
F [VIDEO/HDD]
G [PICTURE/SD CARD]
H [PICTURE/HDD]
≥ The media is selected separately to motion pictures or still pictures is highlighted in yellow.
4 Touch [ENTER].
— 24 —
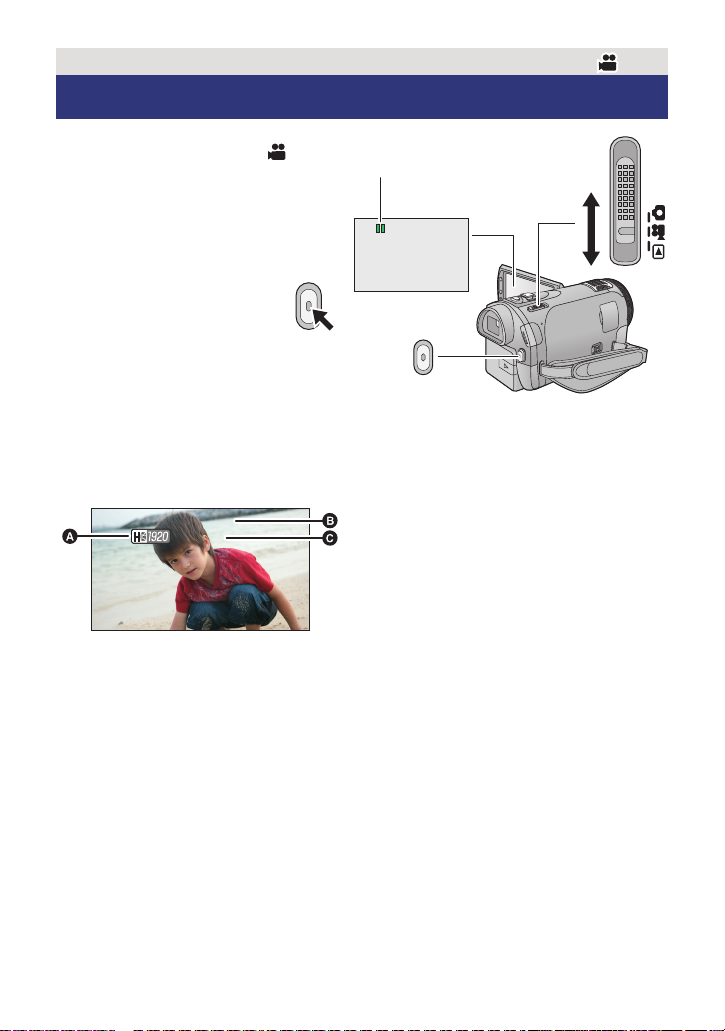
Basic
0h00m00s0h00m00s0h00m00s
R 1h20mR 1h20mR 1h20m
A Recording mode
B Recording time elapsed
Each time the unit is put into recording
pause, the counter display will be reset
to 0h00m00s.
(“h” is an abbreviation for hour, “m” for
minute and “s” for second.)
C Approximate remaining recordable
time
(When the remaining time is less than
1 minute, R 0h00m flashes red.)
≥ Screen display will disappear when no
function is performed for a specific
period of time. To display it again, touch
the screen. (It will not display when AF/
AE tracking is used.)
Recording motion pictures
1 Change the mode to .
2 Open the LCD monitor or
extend the viewfinder.
3 Press the recording start/stop
button to start recording.
A When you begin recording, ;
changes to ¥.
4 Press the recording start/stop
button again to pause
recording.
∫ Screen indications in the motion picture recording mode
— 25 —
≥ There are 3 recording formats that can be used with this unit: AVCHD that records
high-definition motion pictures, 1080/50p that records motion pictures in maximum
quality for this unit and iFrame that records motion pictures suitable for playback
and editing on Mac (iMovie’11). To change the recording format, change the
recording mode (l 59) or press and hold the 1080/50p button. (l 48)
≥ Still pictures can be recorded while recording the motion picture. (l 28)
≥ The images recorded between pressing the recording start/stop button to start recording
and pressing it again to pause recording become one scene.
When you record with the [REC MODE] set to [iFrame], the scenes longer than
approximately 20 minutes will be automatically divided. (Recording will continue.)
≥ (Maximum recordable scenes of a single SD card, built-in memory or HDD)
Recording formats [HA]/[HG]/[HX]/[HE] [1080/50p] [iFrame]
Recordable scenes Approx. 3900 Approx. 3900 Approx. 89100
Different dates (l 86) Approx. 200 Approx. 200 Approx. 900
≥ Maximum number of recordable scenes and maximum number of different dates will be
less than above table when there are both AVCHD scenes and 1080/50p scenes recorded
on an SD card, built-in memory or HDD.
≥ Maximum number of recordable scenes and maximum number of different dates will be
less than above table when there are both iFrame scenes and still pictures recorded on an
SD card, built-in memory or HDD.
≥ While recording is in progress, the recording will not stop even if the LCD monitor is closed
and the viewfinder is retracted.
≥ Put the unit in pause mode when connecting or disconnecting an external microphone with
the MIC terminal.
≥ Please refer to page 154 for detail about the approximate recordable time.
About the compatibility of the recorded
motion pictures
When motion picture is recorded in AVCHD format
≥ Only motion pictures recorded with the recording format set to AVCHD are supported
by AVCHD compatible equipment. Images cannot be played with equipment that does
not support AVCHD (ordinary DVD recorders). Confirm that your equipment supports
AVCHD by referring to the operating instructions.
≥ It is not always possible to play back motion pictures recorded with the recording
format set to AVCHD on AVCHD compatible equipment. In such a case, play back on
this unit instead.
When motion picture is recorded in iFrame format
≥ You can play back on Mac (iMovie’11).
≥ It is not compatible with motion pictures recorded in AVCHD format.
Please refer to page 48 about
1080/50p
— 26 —
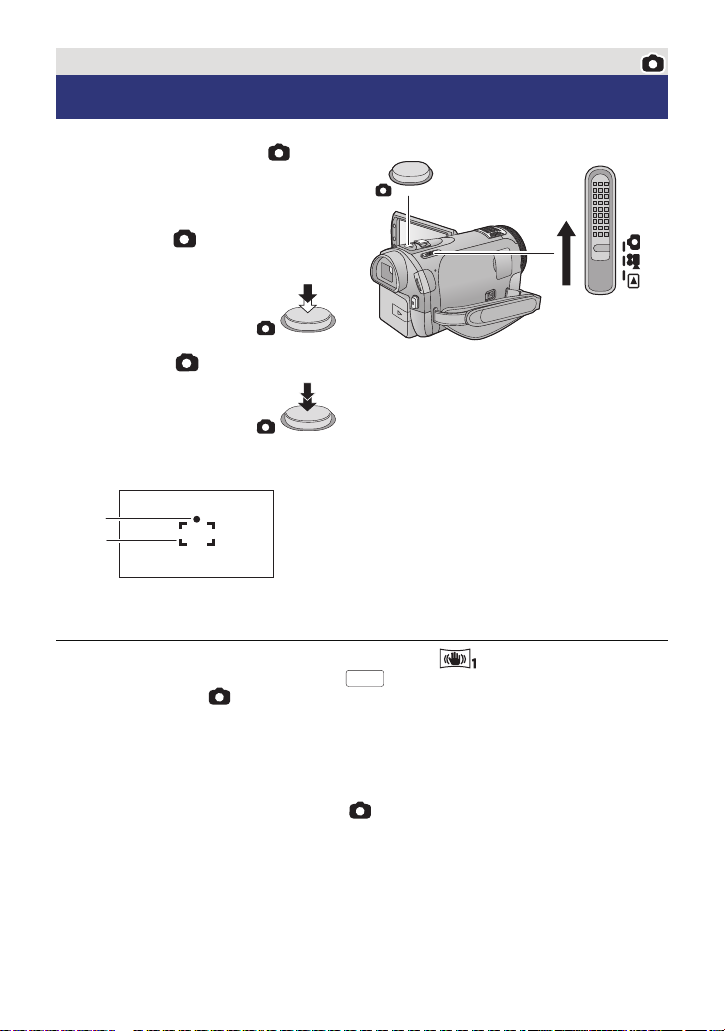
Basic
Recording still pictures
1 Change the mode to .
2 Open the LCD monitor or
extend the viewfinder.
3 Press the button halfway.
(For auto focus only)
4 Press the button fully.
Focus indication:
A Focus indication
± (The white lamp flashes.):
Focusing
¥ (The green lamp lights up.):
When in focus
No mark:
When focusing is unsuccessful.
B Focus area (area inside brackets)
≥ If you set the optical image stabilizer function (l 47) to ([MODE1]), then the image
stabilizer function will be more effective. ( (MEGA optical image stabilizer) will be
displayed when the button is pressed halfway.)
≥ The AF assist lamp lights in dark places.
≥ Focus indication will change to registered focus icon when [FACE RECOG.] is set to [ON].
(l 63)
≥ It is recommended using a flash or tripod when recording still pictures in dark places
because the shutter speed becomes slow.
≥ The screen will become darker when the button is pressed halfway if the shutter
speed is 1/25 or slower.
≥ You can also take a picture just by touching the subject to focus. (Touch shutter: l 51)
≥ To print a picture, save the picture to the SD card (l 106) and print using a PC or a printer.
— 27 —
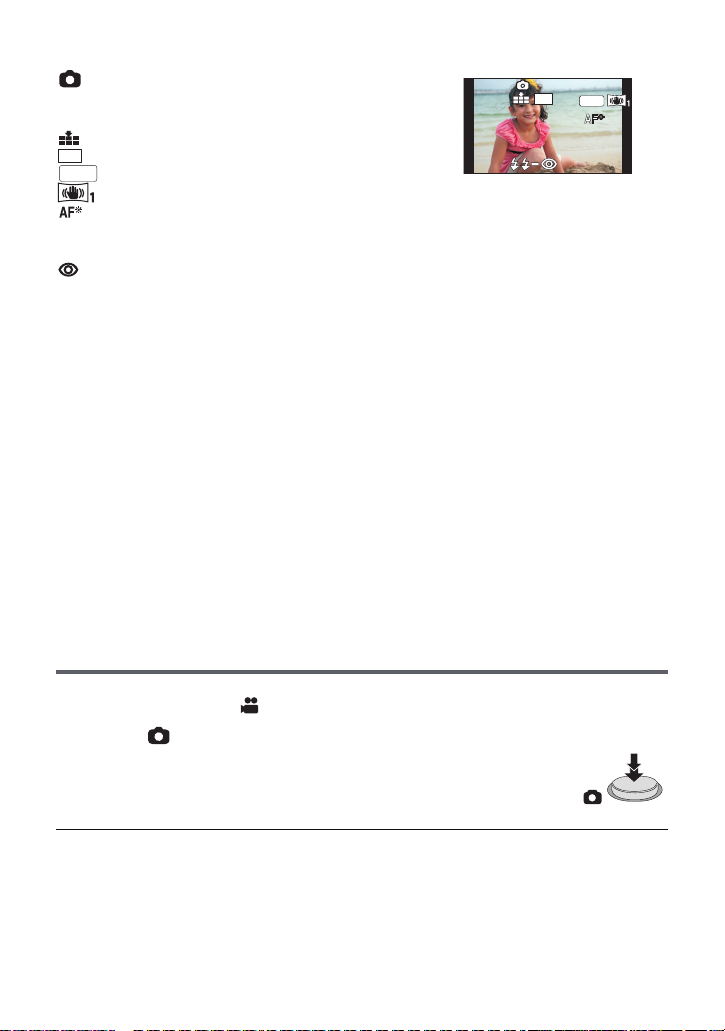
∫ About the screen indications in still picture recording
≥ Screen display will disappear when
no function is performed for a
specific period of time. To display it
again, touch the screen. (It will not
display when AF/AE tracking or
touch shutter is used.)
: Still picture operation indicator (l 135)
R3000: Remaining number of still pictures
(Flashes in red when [0] appears.)
: Quality of still pictures (l 72)
: Size of still pictures (l 71)
: MEGA optical image stabilizer (l 27)
: Optical image stabilizer (l 47)
: AF assist lamp (l 74)
ß: Flash (l 55)
ßj: Flash level (l 55)
: Red eye reduction (l 55)
14.2
M
∫ About the focus indication
≥ The focus indication indicates the status of the auto focus.
≥ The focus indication does not appear in manual focus mode.
≥ The focus indication does not appear or has difficulty focusing in the following cases.
jWhen close subjects and far subjects are included in the same scene
jWhen the scene is dark
jWhen there is a bright part in the scene
jWhen the scene is filled with only horizontal lines
∫ About the focusing area
When there is a contrasting object ahead or behind the subject in the focus area, the subject
may not be focused. If so, move the contrasting object out of the focus area.
≥ Focus area is not displayed in the following conditions.
jWhen the intelligent auto mode (portrait) is used
jWhen AF/AE tracking is used
jWhen the Extra optical zoom is used
jWhen the unit determines that the AF assist lamp is necessary
Recording still pictures in motion picture recording
mode
You can record still pictures even in motion picture recording mode.
¬ Change the mode to .
Press the button fully (press to the bottom) to take the picture.
≥ It is possible to record still pictures while recording motion pictures.
(Simultaneous recording)
≥ Remaining number of recordable pictures is displayed while still pictures
are being recorded.
≥ Built-in flash, Red eye reduction, Self-timer (l 56) do not work.
≥ While recording motion pictures or during the PRE-REC operation, image quality is
different from ordinary still pictures so that motion picture recording takes preference over
still picture recording.
≥ If simultaneous recording is used while recording a motion picture, the recordable time
remaining will shorten. If the unit is turned off or the mode switch operated, the recordable
time remaining may lengthen.
— 28 —
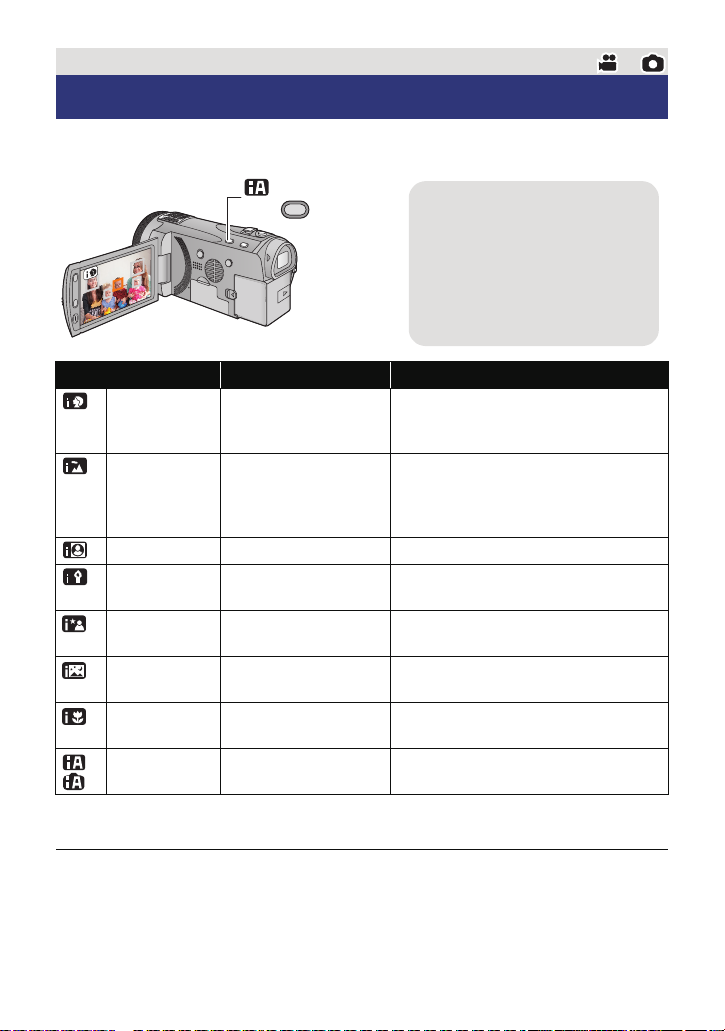
Basic
Intelligent auto/Manual
button
Press this button to switch
intelligent auto mode/manual
mode.
≥ Please refer to page 75 about
manual mode.
Intelligent auto mode
The following modes appropriate for the condition are set just by pointing the unit to what you
want to record.
Mode Scene Effect
Portrait When the object is a
Scenery Recording outdoors The whole landscape will be recorded
*1
Spotlight Under a spotlight Very bright object is recorded clearly.
*1
Low light Dark room or twilight It can record very clearly even in a dark
*2
Night portrait Recording night
*2
Night scenery Recording night
*2
Macro Recording zooming in
*1
Normal Other situations Contrast is adjusted automatically for
*2
*1 In motion picture recording mode only
*2 In still picture recording mode only
person
portrait
scenery
on a flower etc.
Faces are detected and focused
automatically, and the brightness is
adjusted so it is recorded clearly.
vividly without whiting out the
background sky, which may be very
bright.
room or twilight.
A person and the background are
recorded with near real-life brightness.
You can record night scenery vividly by
slowing the shutter speed.
This allows recording while going near to
the object of recording.
clear image.
≥ Depending on the recording conditions, the unit may not enter the desired mode.
≥ In the portrait, spotlight and low light mode, the face will be surrounded by white frame
when detected. In the portrait mode, a subject that is bigger and close to centre of the
screen will be surrounded by an orange frame. (l 64)
≥ It is recommended using a tripod in night portrait and night scenery mode.
— 29 —

≥ Faces cannot be detected depending on the recording conditions, such as when faces are
4)
5)
6)
7)

10 000K
9 000K
8 000K
7 000K
6 000K
5 000K
4 000K
3 000K
2 000K
1 000K
2)
1)
3)
9)
of certain sizes or at certain tilts or when digital zoom is used.
≥ [MIC SETUP] is set to [SURROUND] in the Intelligent Auto Mode. Also, when [REC
MODE] is set to [iFrame] in the intelligent auto mode, [MIC SETUP] will be set to [STEREO
MIC]. (l 67)
∫ Intelligent auto mode
When switching to intelligent auto mode, the auto white balance and auto focus operate and
automatically adjust the colour balance and focusing.
Depending on the brightness of the subject etc., the aperture and shutter speed are
automatically adjusted for an optimum brightness.
≥ Colour balance and focus may not be adjusted automatically depending on light sources or
scenes. If so, manually adjust these settings. (l 76, 78)
Automatic white balance
The illustration shows the range over which automatic white balance functions.
1) The effective range of automatic white balance
adjustment on this unit
2) Blue sky
3) Cloudy sky (rain)
4) Sunlight
5) White fluorescent lamp
6) Halogen light bulb
7) Incandescent light bulb
Sunrise or sunset
9) Candlelight
If the automatic white balance is not functioning normally,
adjust the white balance manually. (l 76)
Auto focus
The unit focuses automatically.
≥ Auto focus does not work correctly in the following situations. Record pictures in the
manual focus mode. (l 78)
jRecording distant and close-up objects at the same time
jRecording a subject behind dirty or dusty window
jRecording a subject that is surrounded by objects with glossy surfaces or by highly
reflective objects
— 30 —
Loading…
FAQ: Types of Manuals and Their Contents
Panasonic HDC-SD900 Manuals come in various types, each serving a specific purpose to help users effectively operate and maintain their devices. Here are the common types of Panasonic HDC-SD900 User Guides and the information they typically include:
- User Manuals: Provide comprehensive instructions on how to use the device, including setup, features, and operation. They often include troubleshooting tips, safety information, and maintenance guidelines.
- Service Instructions: Designed for technicians and repair professionals, these manuals offer detailed information on diagnosing and repairing issues with the device. They include schematics, parts lists, and step-by-step repair procedures.
- Installation Guides: Focus on the installation process of the device, providing detailed instructions and diagrams for proper setup. They are essential for ensuring the device is installed correctly and safely.
- Maintenance Manuals: Provide guidance on routine maintenance tasks to keep the device in optimal condition. They cover cleaning procedures, part replacements, and regular servicing tips.
- Quick Start Guides: Offer a concise overview of the essential steps needed to get the device up and running quickly. They are ideal for users who need immediate assistance with basic setup and operation.
Each type of Panasonic HDC-SD900 instruction is designed to address specific needs, ensuring users have the necessary information to use, maintain, and repair their devices effectively.
Related Instructions for Panasonic HDC-SD900:
3
SC-BT735
Easy setting manual Panasonic Home Cinema speakers Easy setting manual (File: panasonic-sc-bt735-easy-setting-manual-2, Wed 04.2025)
2
362
87
6
Omnivision PV-V4611
36
1207
302
7
DMWSDP1 — HD SD CARD PLAYER
48
1243
274
10
Viera TC-26LX60C
Manual de instrucciones PDF User Manual (@S2KN8T), Panasonic Viera TC-26LX60C TV (Thu 02.2025)
35
1173
259
Camcorder Devices by Other Brands:
|
Sony DXC-D50K Operating Instructions Manual #XAS7Q3: DXC-D50K Camcorder Operating instructions manual 2004 by Sony Corporation 08 Dec 2024 | 98 |
|
|
Sony DCR-TRV720 Operating Instructions Manual #N1FGT8: DCR-TRV720 Camcorder Operating instructions manual ©2000 Sony Corporation 01 Dec 2024 | 156 |
|
|
Samsung HMX-U20BN Operation & User’s Manual Camcorder #37D82L REQUIRED PUBLIC STATEMENT FOR CPOL/BSD/JPEG/ZLIB LICENSED SOFTWARE 07 Mar 2025 | 7 |
|
|
Sony DSC-H50 Service Manual Digital Camera #95TTWQ Revision History 31 Oct 2024 | 73 |
Categories:
Plumbing Product
Rfid Systems
Cordless screwdriver
Compact Loader
Video Card
Video receivers