
Центр безопасности данных
Информация о посещаемых вами сайтах сохраняется в браузере и может быть извлечена из него, в основном в виде файлов cookie. Это могут быть сведения о вас, ваших предпочтениях и устройстве, которые в основном необходимы для повышения удобства работы с сайтом. Такая информация обычно не служит непосредственно для идентификации пользователей, а лишь учитывает ваши интересы при использовании сетевых ресурсов.
Мы уважаем право на неприкосновенность частной жизни, поэтому вы можете установить запрет на использование некоторых типов файлов cookie.
Для получения дополнительных сведений и изменения настроек по умолчанию щёлкните по заголовку каждой категории.
Однако обратите внимание, что блокировка определённых типов файлов cookie может повлиять на удобство работы с сайтом и нашими сервисами, включая LiveChat.
Дополнительная информация
Управление настройками согласия
Обязательные файлы cookie
Всегда активно
Эти файлы cookie необходимы для работы веб-сайта и не могут быть деактивированы в наших системах. Как правило, они активируются только в ответ на ваши действия, аналогичные запросу услуг, такие как настройка уровня конфиденциальности, вход в систему или заполнение форм. Вы можете настроить браузер таким образом, чтобы он блокировал эти файлы cookie или предупреждал вас об их использовании, но в таком случае некоторые разделы веб-сайта не будут работать. Эти файлы cookie не хранят никакой личной информации.
Аналитические/рабочие файлы cookie
Всегда активно
Эти файлы cookie позволяют нам подсчитывать количество посетителей и источники трафика, чтобы оценивать и улучшать работу нашего веб-сайта. Они помогают нам узнавать, какие страницы являются наиболее и наименее популярными, а также отслеживать перемещение пользователей по сайту.
Все данные, собираемые с помощью файлов cookie данного типа, обобщаются и поэтому остаются анонимными. Если вы запретите эти файлы cookie, мы не узнаем, когда вы посещали наш сайт, и не сможем отслеживать его работу.
Информация об использовании содержимого, собранная с помощью файлов cookie, может быть объединена с собранной ранее информацией и использована для анализа, понимания и составления отчётов об общем использовании сайтов. Эти файлы cookie не используются для персонализации наших веб-сайтов и/или отображения контекстной рекламы для вас на других ресурсах.
Функциональные файлы cookie
Функциональные файлы cookie
Эти файлы cookie позволяют использовать дополнительные функции веб-сайта и настраивать его в соответствии со своими предпочтениями. Такие файлы могут размещаться нами или сторонними разработчиками, сервисы которых мы добавили на наши страницы.
Если вы запретите эти файлы cookie, то все сервисы или некоторые из них (например, LiveChat или рейтинги и обзоры) могут работать неправильно.
Рекламные и целевые файлы cookie
Рекламные и целевые файлы cookie
Эти файлы cookie настраиваются через веб-сайт нашими партнёрами по рекламе, которые могут использовать их для сбора данных о ваших интересах и отображения актуальной для вас рекламы на других сайтах.
Они не хранят личную информацию напрямую, а работают посредством уникальной идентификации браузера и устройства. Если вы запретите эти файлы cookie, вы не увидите адресную рекламу на различных сайтах.
Файлы cookie социальных сетей
Файлы cookie социальных сетей
Эти файлы cookie устанавливаются различными социальными сетями, функции которых добавлены на наш сайт. Они позволяют вам обмениваться информацией с друзьями и публиковать её на ваших страницах. Эти файлы cookie отслеживают посещаемые страницы в браузере и собирают информацию о ваших интересах. Это может отразиться на содержимом и сообщениях, отображаемых на других сайтах.
Если вы запретите эти файлы cookie, вы не сможете пользоваться этими функциями обмена данных.
[GETTING STARTED]
USER’S GUIDE
English
www.P-touch.com
INTRODUCTION
With your PT-1280, you can create labels for any application. Select from the
many frames, character sizes and styles to design beautiful custom labels. In
addition, the variety of tape cartridges available allows you to print labels with
different widths and exciting colours.
Read this manual carefully before starting and keep the manual in a handy
place for future reference.
Declaration of Conformity
We BROTHER INDUSTRIES, LTD.
declare that the Labelling System PT-1280 conforms with the following normative
documents:
EMC: EN55022:1998/A1: 2000/A2: 2003 Class B
and follows the provisions of the Electromagnetic Compatibility Directive 89/336/EEC (as
amended by 91/263/EEC and 92/31/EEC). The optional AC adapter also conforms with
EN 60950 and follows the provisions of the Low Voltage Directive 73/23/EEC.
Issued by: BROTHER INDUSTRIES, LTD.
This equipment is marked with the above recycling symbol. It means that at the end
of the life of the equipment you must dispose of it separately at an appropriate collection point and not place it in the normal domestic unsorted waste stream. This will
benefit the environment for all. (European Union only)
15-1, Naeshiro-cho, Mizuho-ku, Nagoya 487-8561, Japan
EN55024:1998/A1: 2001
EN61000-3-2: 2000
EN61000-3-3: 1995/A1: 2001
Personal & Home Company
Development & Production Dept.
Note: Marking is in compliance with EU Directive 2002/96/EC and EN50419.
GENERAL PRECAUTIONS
• Use only Brother TZ tapes with this machine. Do not use tapes that do not have
the mark.
• Do not clean the machine with alcohol or other organic solvents. Only use a soft, dry cloth.
• Do not touch the print head mechanism. Use a soft wipe (e.g. a cotton swab) when
cleaning the print head.
• To avoid injuries, do not touch the edge of the cutter.
• To prevent damage or breakage of the glass, do not press hard on the LCD display.
• Do not put any foreign objects into or heavy objects on the machine.
• Do not leave any rubber or vinyl on the machine for an extended period of time,
otherwise the machine may be stained.
• Do not get the machine wet, such as by touching with wet hands or spilling beverages
on to the machine.
• Do not expose the machine to extremely high temperatures or high humidity. Never
leave it on the dashboard or in the back of your car, near heaters or other hot
appliances. Keep it out of both direct sunlight and rain.
• Avoid using the machine in extremely dusty places.
• Do not pull on the tape being fed from the P-touch, otherwise the tape cassette
may be damaged.
• Do not attempt to cut the tape while printing or feeding since this will damage the tape.
• Do not try to print labels using an empty tape cassette set in the P-touch. Doing so will
damage the print head.
• Remove the batteries and disconnect the AC adapter if you do not intend to use the
machine for an extended period of time. (Note: When power is disconnected for more
than three minutes, all text shown in the display and any text files stored in the
memory will be lost. Language and unit settings will also be cleared.)
• Do not use old and new batteries together or mix alkaline batteries with other type
batteries, or set the positive and negative end in the wrong position. Otherwise the
batteries may have leakage or fracture.
• Use only the suggested AC adapter for this machine to prevent any damage or
failure.
LN7424001
Printed in China
1
1
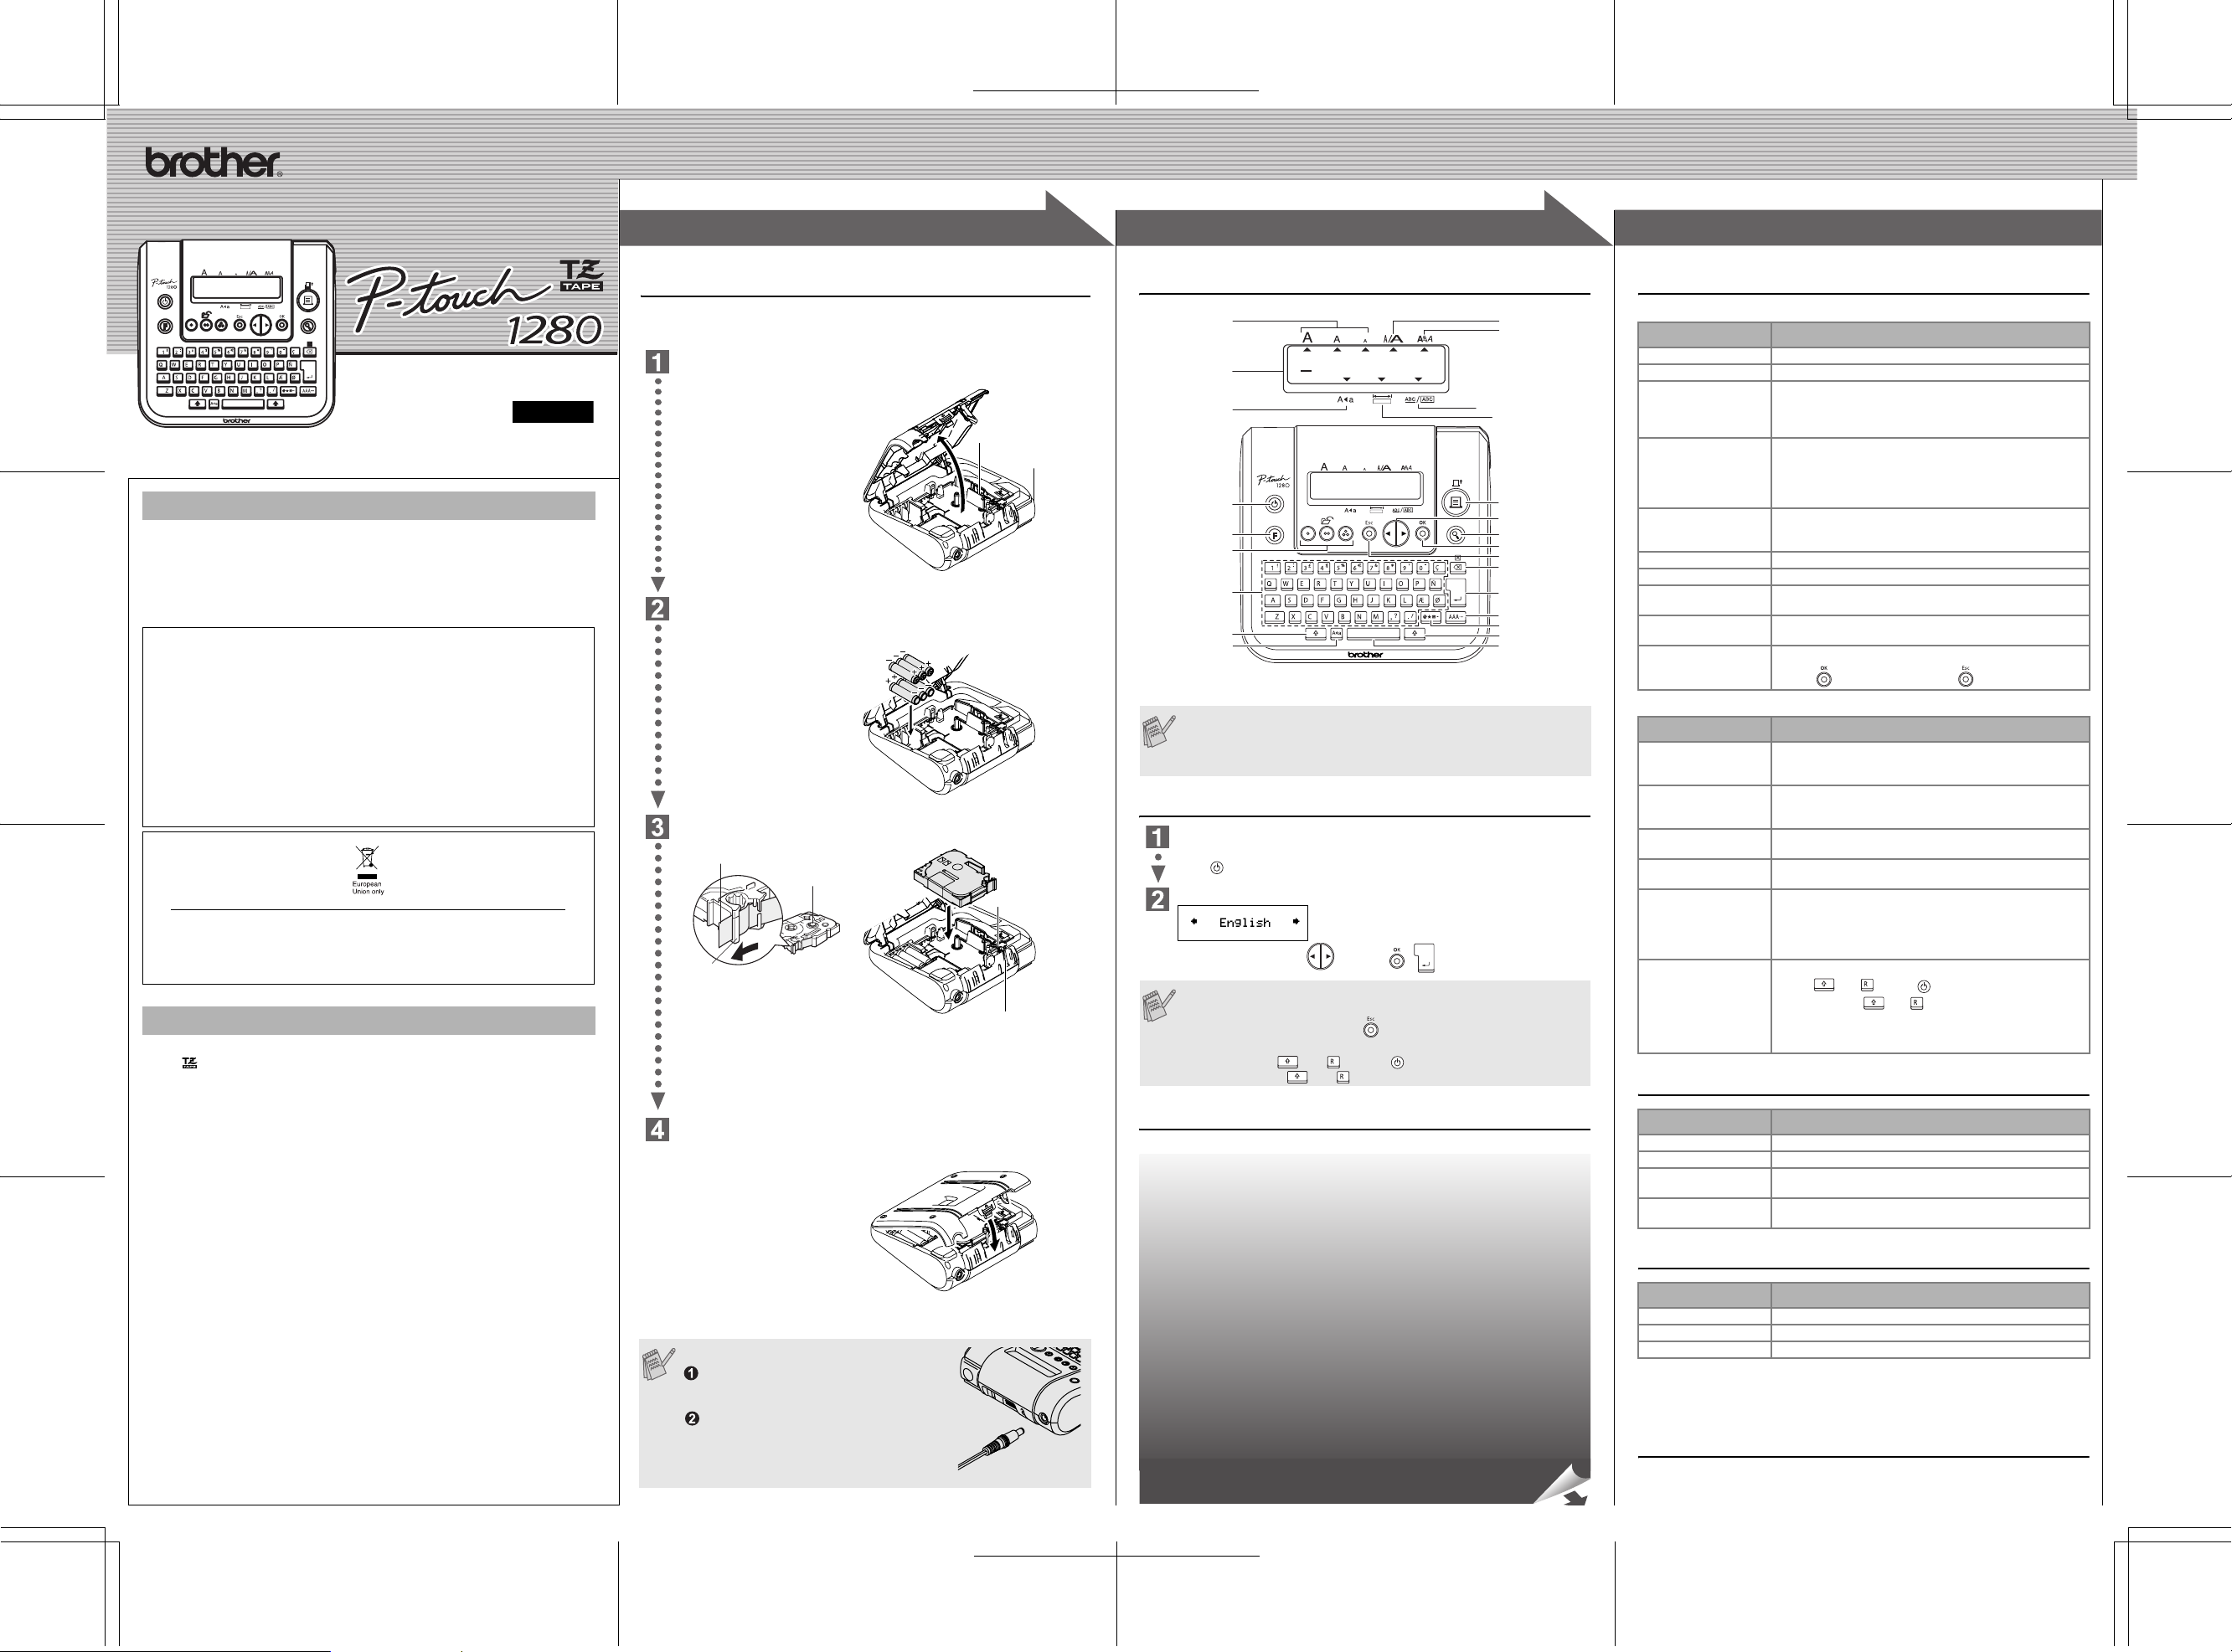
PREPARATION
Power Supply & Tape Cassettes
Make sure that the power is turned off when replacing batteries or tape cassette.
Open the back cover by pressing in the rough area at the top end of the
machine.
If a tape cassette is already
installed, remove it by pulling it
straight up. Also, if batteries are
already installed, remove them.
Insert six new AAA-size alkaline batteries (LR03), making sure that their
poles point in the correct directions. Always replace all six batteries at the
same time using brand new ones.
Insert a tape cassette, making sure that it snaps into place.
End of tape
Toothed Wheel
Tape guide
• Make sure that the end of the tape feeds under the tape guides.
• If the ink ribbon is loose, use your finger to wind the toothed wheel in the
direction of the arrow on the cassette.
• Use only Brother TZ tapes with this machine.
Securely close the back cover, making sure that it snaps into place.
After you have installed the tape,
feed the tape (see Feeding)
once and then push in the tape
cutter lever to cut the tape.
When using optional AC adapter (model G1)
Insert the plug on the adapter cord into
the adapter jack on the top end of the
machine.
Insert the plug into the nearest standard
electrical outlet.
For memory back up, when the AC adapter
is unplugged, please use AAA-size alkaline
batteries (LR03).
Print head
Tape cutter lever
Cutter’s edge
Tape exit slot
2
2
OPERATION
Keyboard & LCD
Size
Cursor
Caps
Power key
Function key
Memory keys
(Favourite Label Memory)
Character keys
Shift key
Caps key
• The LCD shows one row of 15 characters; however, the text that
you enter can be up to 80 characters in length.
• Use Cursor key while holding down Shift key to go to beginning/
end of the text.
Initial Setting
Start your machine
Supply power by using six AAA batteries or the optional AC adapter, and then
press .
Set the language (Language option differ by distribution)
Choose a language with and press / .
• The machine automatically turns off if no key is pressed within 5
minutes.
• To cancel operations, press .
• To initialize the settings, turn off the machine and then while
holding down and , press to turn the machine back on.
Finally, release and .
Creating Labels
See the reverse side for steps of creating labels.
Width
Style
Underline/Frame
Label Length
Print key
Cursor key
Preview key
OK key
ESC key
Backspace key
Enter key
Accent key
Symbol key
Shift key
Space key
3
3
REFERENCE
Troubleshooting
Error message
Message Cause/Remedy
Battery Weak! The batteries are weak.
Check Battery! The installed batteries are about to run out.
Invalid! • There is no text above the cursor when you set Number-
No Text! • You try to print a text file when there is no data stored in
Line Limit! • You try to enter a 3rd line by pressing Enter key.
No Cassette! You try to print a label when there is no cassette installed.
Cutter Error! Tape Cutter lever is used in the middle of printing process.
Full! The maximum number of characters (80 characters) have
Text Too Long! The text length exceeds the selected label length or the
No Frame OK? Printing on 3.5 mm tape with invalid Frame setting ON.
ing.
• Invalid character is selected for Numbering.
• Invalid number is selected for Tab Length or Label Length.
the memory.
• The Print key is pressed when no text is entered.
• You try to set Copies, Numbering or Mirror when no text is
entered.
• You try to print a 2 line text when 3.5 mm or 6 mm tape is
installed.
already been entered.
selected Auto Format setting length.
(Select to print with no Frame, to cancel.)
What to do when…
Problem Solution
The display stays blank
after you have turned on
the machine.
The machine does not
print, or the printed
characters are blurred.
The printed characters
are not formed properly.
The memory has
cleared on its own.
A blank horizontal line
appears through the
printed label.
The machine has
«locked up» (i.e., nothing
happens when a key is
pressed, even though
the machine is on).
• Check that the batteries are correctly inserted.
• If the batteries are weak, replace them.
• Check that the suggested adapter is correctly connected.
• Check that the tape cassette has been inserted correctly.
• If the tape cassette is empty, replace it.
• The batteries may be weak. Replace them.
• The batteries may be weak. Replace them.
• There may be some dust on the print head. Remove the
tape cassette and use a dry cotton swab to gently wipe the
print head with an up-and-down motion.
• The print head can be cleaned more easily if the optional
print head cleaning cassette (TZ-CL3) is used.
• Turn off the machine, and then while holding
down and , press to turn the machine back on.
Finally, release and .
• Note: The text and formats in the display and all text files
stored in the memory are erased. Also, the language and
unit settings will be cleared.
Specifications
Item Specification
Dimensions 160 mm (W) × 151 mm (D) × 60 mm (H)
Weight 470 g (without batteries and tape cassette)
Power supply Six AAA-size alkaline batteries (LR03) or optional AC
Tape cassette Brother TZ tape (width) :
adapter (model G1)
3.5 mm, 6 mm, 9 mm, 12 mm
Accessories (Supplies may differ by distribution.)
Accessories Stock No.
Tape Cassettes See the attached TZ Tape Catalogue.
AC adapter model G1
Cutter unit TC-5 (replacement)
If the cutter blade becomes blunt after repetitive use and the tape cannot be
cut cleanly, replace with new cutter unit (stock no. TC-5) by obtaining from an
authorized brother dealer.
Contact Information
Contact may differ by country. See the Web site. (http://www.P-touch.com/)
[CREATING LABELS]
1
1
MAKING TEXT DESIGNING LABELS PRINTING LABELS COMPLETED LABELS
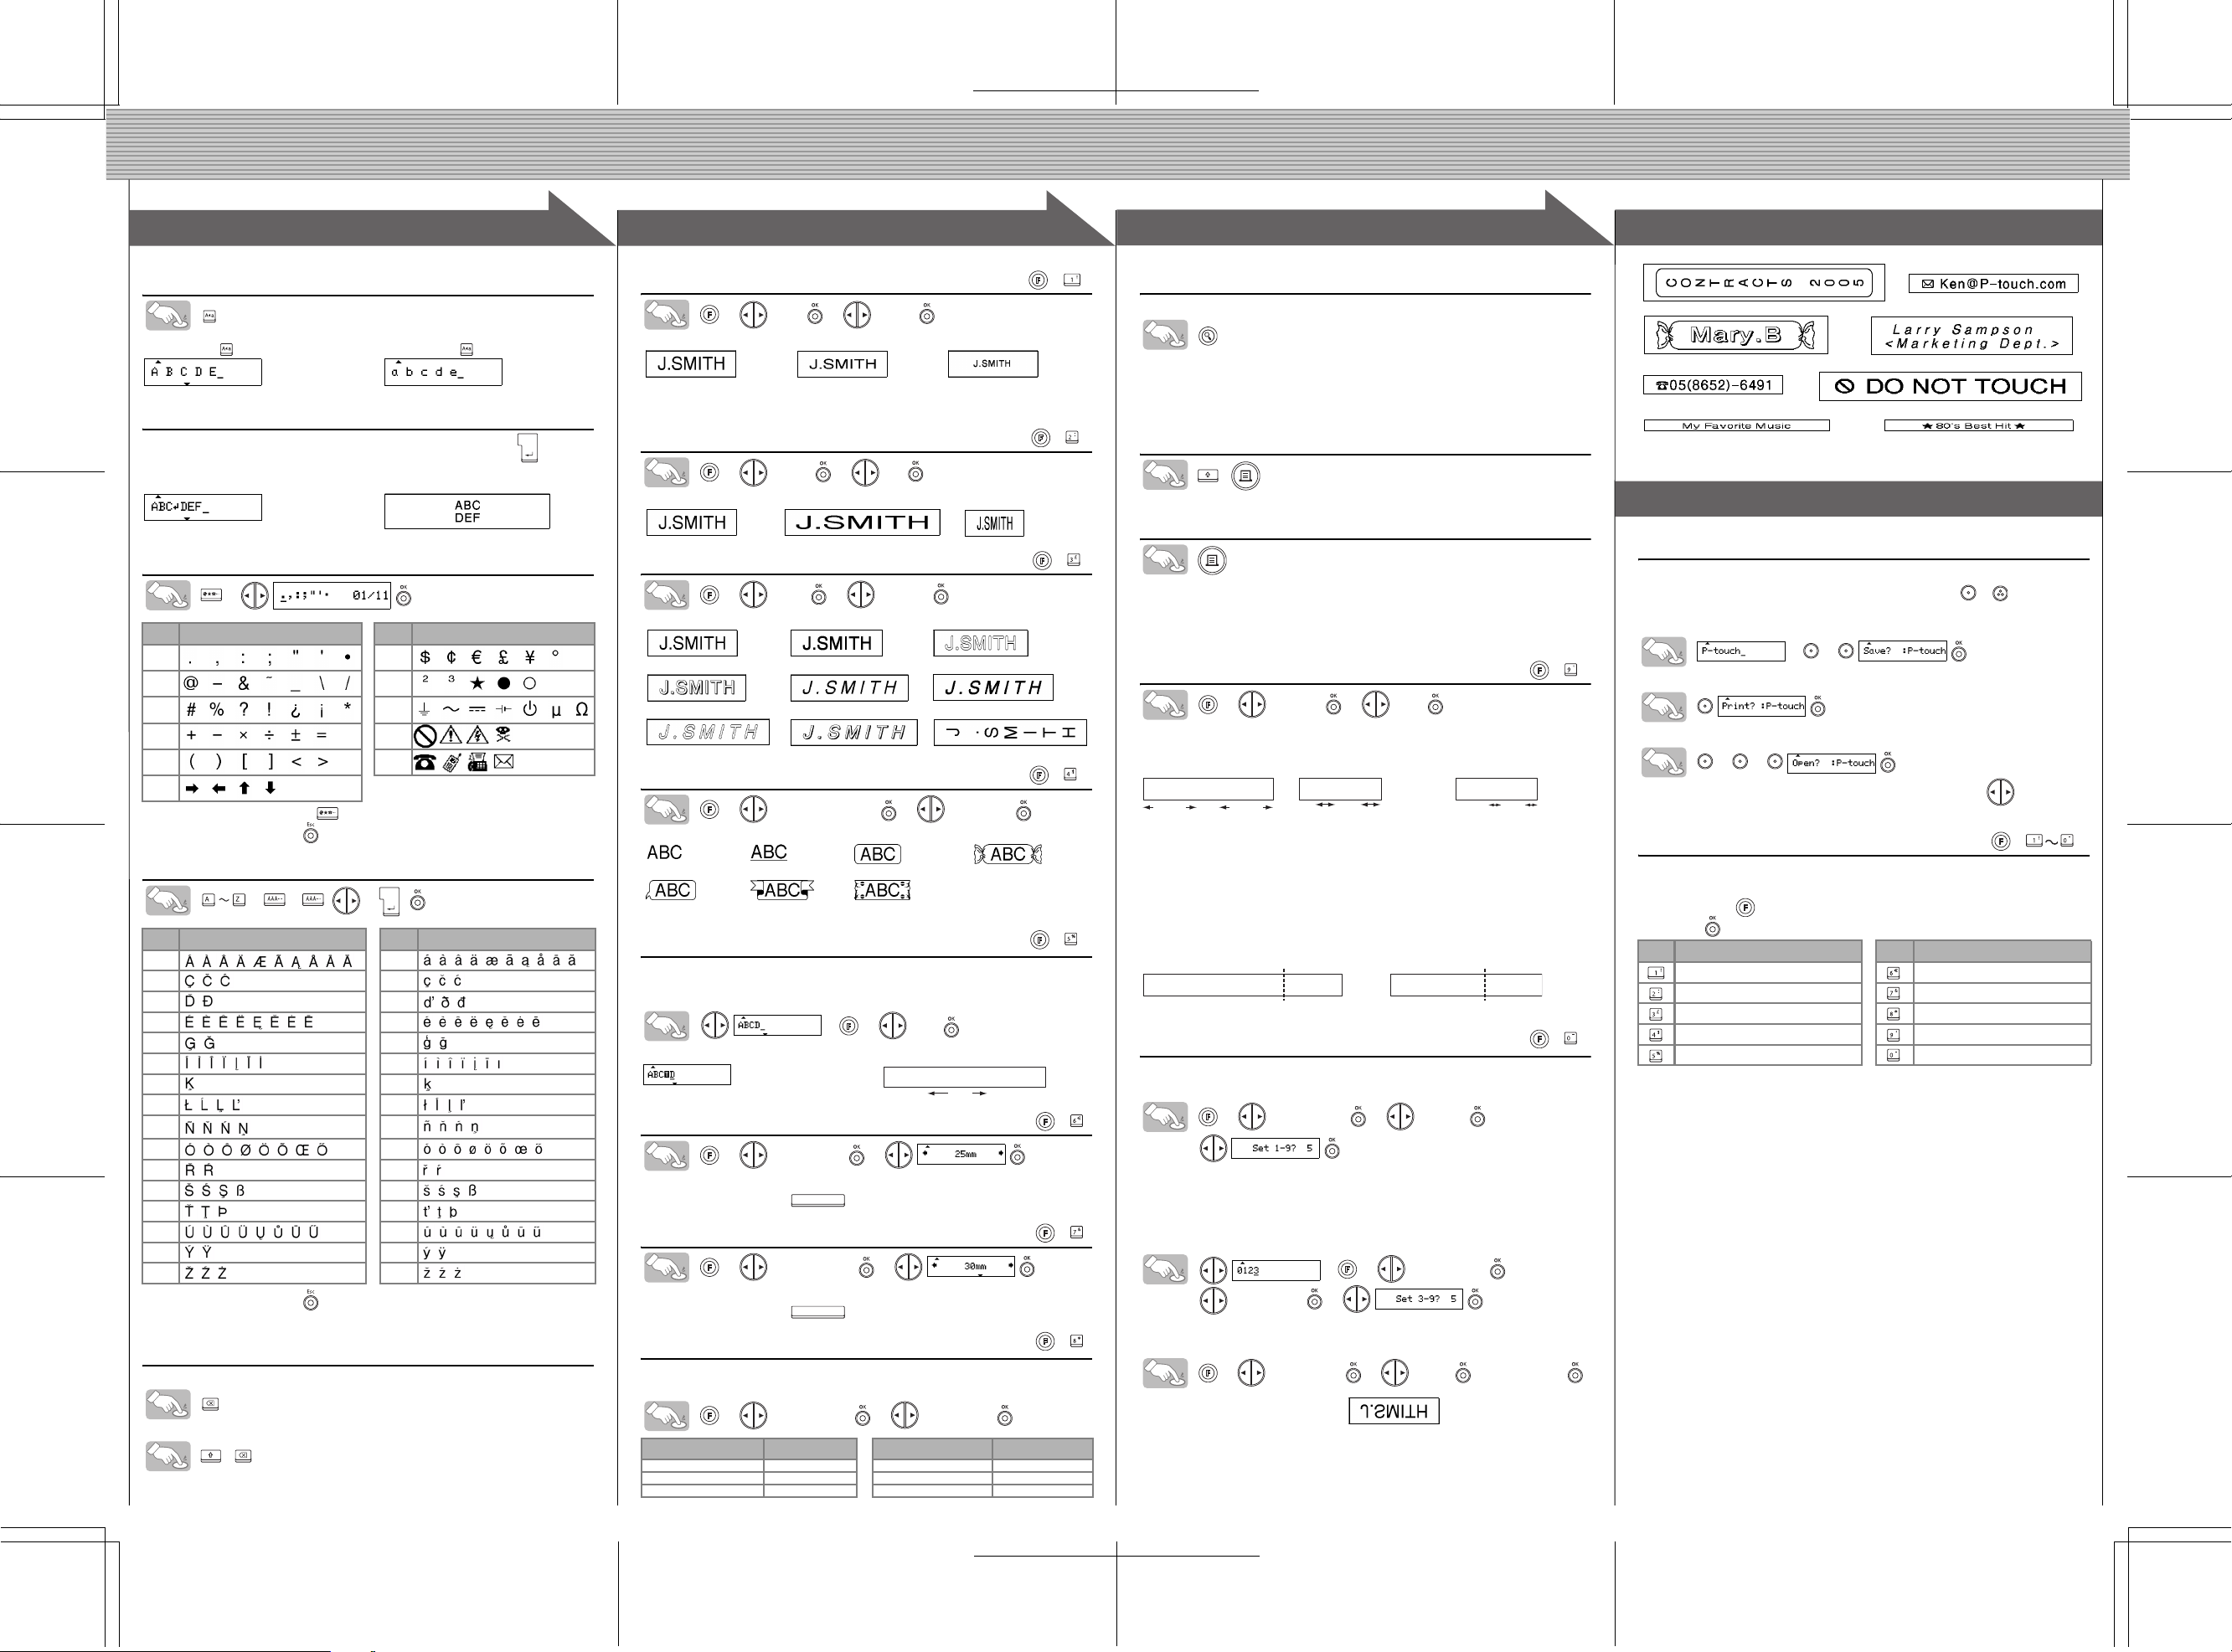
Switching Upper Case/Lower Case
Upper case ( ON) Lower case ( OFF)
Making Two Line Text
Move the cursor to where the second line starts and press .
Use either 9 mm or 12 mm wide tape for two line texts.
Display Label image
Entering Symbols
>
Group
17
28
39
410
511
6
• To go to the next group, press .
• To cancel operations, press .
Symbols
Group
Symbols
Entering Accented Characters
>>/ > /
Accented Characters Accented Characters
Aa
Cc
Dd
Ee
Gg
Ii
Kk
Ll
Nn
Oo
Rr
Ss
Tt
Uu
Yy
Zz
• To cancel operations, press .
• The order of accented characters depends on the language you selected in the LCD.
To Clear
Entries will be deleted backwards.
All text and settings will be cleared.
+
2
2
Setting [Size]
> [Size] > [Large]
[Large] [Medium] [Small]
Automatically adjusts the Large, Medium and Small text size according to the
tape width.
Setting [Width]
> [Width] > [×2]
[Normal] [
×2] [×1/2]
Setting [Style] (Vertical)
> [Style] > [Vertical]
[Normal] [Bold] [Outline]
[Shadow] [Italic] [Italic Bold]
[Italic Outl](Italic Outline)
[Italic Shadow] [Vertical]
Setting [Underline/Frame]
> [Underline/Frame] > [Underline]
[Off] [Underline] [Round] [Candy]
[Callout] [Banner] [Wooden]
Frames will not be printed on 3.5mm tape.
Setting [Tab]
You can make aligned texts by setting tabs.
Example: To set a tab between «ABC» and «D»
Display Label image
Setting [Tab Length]
• You can also select the length by entering the length with Num keys.
• To return to [Auto], press .
Setting [Label Length]
• You can also select the length by entering the length with Num keys.
• To return to [Auto], press .
The cursor should be positioned where you set a tab.
>>
[Tab]
ABC D
Tab
(Auto / 0 — 100mm)
> [Tab Length] >
(Auto / 30 — 300mm)
> [Label Length] >
Setting [Auto Format]
You can choose label length from six formats to create labels for various applications.
> [Auto Format] > [VHS Spine]
Application Length Application Length
VHS Spine 140 mm CD Case Spine 113 mm
MiniDV Spine 42 mm File Tab 82 mm
Audio Tape 89 mm Divider Tab 42 mm
(+)
(+)
(+)
(+)
(+)
(+)
(+)
(+)
3
3
Text Preview
You can preview the text before printing.
• The LCD shows the whole text and the label length (mm), then returns to the original
text.
• Only the text can be previewed, but not the font, style, size, underline/frame or any
additional features.
Feeding (Tape Feed)
+
Printing
• To cut off the label, push in the tape cutter lever on the upper-right corner of the
machine.
• To prevent damage to the tape, do not try to cut while the message «Print» or «Feed»
is displayed.
Setting [Margin] (Tape Margin)
> [Margin] > [Full]
[Full]/[Half]/[Narrow] is for leaving equal margins on both sides of the text.
NOTE: Cut along the printed dots (:) with scissors so the text is centered in the label.
Full Half Narrow
ABC ABC: ABC:
25mm
[Chain Print] is for printing more than 1 copy of a label with minimum margin
<e.g. 1>. You can also create a label containing texts in various styles; print
a text in one style, and before feeding, enter the second text in another style
<e.g. 2>.
FEED THE TAPE BEFORE USING THE CUTTER (see Feeding/Printing).
Otherwise A PART OF THE TEXT MAY BE CUT OFF. Do not try to pull the
tape since this may damage the tape cassette.
Chain Print
<e.g. 1> <e.g. 2>
ABC ABC ABC ABC
25mm
12mm 12mm
ABC
(feed & cut) (feed & cut)
DEF
Using [Print Option]
[Copies]
You can print up to 9 copies of each label.
> [Print Option] > [Copies] >
You can also select the number of copies by entering with Num keys.
[Numbering]
You can print many copies of the same text while increasing a selected
number by 1 after each label is printed.
Example: To print copies of a label containing a serial number (0123, 0124 and 0125)
>>
[Numbering] >
Select the highest number you wish to be printed when setting the number.
[Mirror]
>
[
Print Option
Use clear tape in [Mirror], so the labels could be read correctly from the opposite side when attached on glass, windows or other transparent surfaces.
]
[Print Option] >
>
[
Mirror
]
(+)
4mm4mm
(+)
>
[Mirror Print?]
4
4
Peel the printed label from the backing and apply the label.
USEFUL FUNCTIONS
Favourite Label Memory
You can save frequently used texts in the memory and print directly or open
to edit if needed. You can save one text into each key ( ~ ) (Maximum:
3 texts).
To Save:
>>
To Print:
To Open:
>>
When the saved text contains more than 8 characters, use to scroll the
text.
Function Shortcuts
In addition to the basic steps to search for a function, PT-1280 provides you
with function shortcuts so you can easily jump to a frequently used function
just by pressing and the shortcut key shown in the table below. To confirm, press .
Key Function Key Function
[Size] [Tab Length]
[Width] [Label Length]
[Style] [Auto Format]
[Underline/Frame] [Margin]
[Tab] [Print Option]
(+ )

1
1
2
2
3
3
4
4
E L E C T R
O N I C L A
B E L I N G
S Y S T E M
E L E C T R
O N I C L A
B E L I N G
S Y S T E M
E L E C T R
O N I C L A
B E L I N G
S Y S T E M
USER’S GUIDE
USER’S GUIDE
1
1
2
2
3
3
/ Español
Printed in China
LW6436001
www.brother.com
English
With your PT-1280, you can create labels for any application. Select from the
many frames, character sizes and styles to design beautiful custom labels. In
addition, the variety of tape cartridges available allows you to print labels with
different widths and exciting colors.
Read this manual carefully before starting and keep the manual in a handy
place for future reference.
• Use only Brother TZ tapes with this machine. Do not use tapes that do not have
the
mark.
• Do not clean the machine with alcohol or other organic solvents. Only use a soft, dry
cloth.
• Do not touch the print head mechanism. Use a soft wipe (e.g. a cotton swab) when
cleaning the print head.
• To avoid injuries, do not touch the cutter’s edge.
• To prevent damage or breakage of the glass, do not press hard on the LCD display.
• Do not put any foreign objects into or heavy objects on the machine.
• Do not leave any rubber or vinyl on the machine for an extended period of time,
otherwise the machine may be stained.
• Do not get the machine wet, such as by touching with wet hands or spilling beverages
on to the machine.
• Do not expose the machine to extremely high temperatures or high humidity. Never
leave it on the dashboard, in the back of your car, near heaters or other hot
appliances. Keep it out of both direct sunlight and rain.
• Avoid using the machine in extremely dusty places.
• Do not pull on the tape being fed from the P-touch labeler, otherwise the tape
cassette may be damaged.
• Do not attempt to cut the tape while printing or feeding since this will damage the tape.
• Do not try to print labels using an empty tape cassette set in the P-touch labeler. Doing
so will damage the print head.
• Remove the batteries and disconnect the AC adapter if you do not intend to use the
machine for an extended period of time. (Note: When power is disconnected for more
than three minutes, all text shown in the display and any text files stored in the
memory will be lost. Language and unit settings will also be cleared.)
• Do not use old and new batteries together or mix alkaline batteries with other type
batteries, or set the positive and negative end in the wrong position. Otherwise, the
batteries may leak or be damaged.
• Use only the AC adapter designed exclusively for this machine to prevent any
damage or failure.
INTRODUCTION
FCC NOTICE
This device complies with Part 15 of the FCC Rules. Operation is subject to the following two conditions: (1)
This device may not cause harmful interference, and (2) this device must accept any interference received,
including interference that may cause undesired operation.
This equipment has been tested and found to comply with the limits for a Class B digital device, pursuant to
Part 15 of the FCC Rules. These limits are designed to provide reasonable protection against harmful
interference in a residential installation. This equipment generates, uses, and can radiate radio frequency
energy and, if not installed and used in accordance with the instructions, may cause harmful interference to
radio communications. However, there is no guarantee that interference will not occur in a particular
installation. If this equipment does cause harmful interference to radio or television reception, which can be
determined by turning the equipment off and on, the user is encouraged to try to correct the interference by
one or more of the following measures:
— Reorient or relocate the receiving antenna.
— Increase the separation between the equipment and receiver.
— Connect the equipment to an outlet on a circuit different from that to which the receiver is connected.
— Consult the dealer or an experienced radio/TV technician for help.
— Changes or modifications not expressly approved by Brother Industries, Ltd. could void the user’s
authority to operate the equipment.
GENERAL PRECAUTIONS
Unpacking Your P-touch Labeler
Check that the package contains the followings before using your P-touch
labeler.
Included items may differ by distribution.
Power Supply & Tape Cassettes
Open the back cover by pressing
in the rough area at the top end
of the machine.
If a tape cassette is already
installed, remove it by pulling it
straight up. Also, if batteries are
already installed, remove them.
• Make sure that the power is
turned off when replacing
batteries or tape cassette.
Insert six new AAA-size alkaline
batteries (LR03), making sure
that their poles point in the
correct directions. Always
replace all six batteries at the
same time using brand new
ones.
Insert a tape cassette, making sure that it snaps into place.
• Make sure that the end of the tape feeds under the tape guides.
• If the ink ribbon is loose, use your finger to wind the toothed wheel in the
direction of the arrow on the cassette.
• Use only Brother TZ tapes with this machine.
Securely close the back cover, making sure
that it snaps into place.
After you have installed the tape, feed the tape
(see Feeding) once and then push in the tape
cutter lever to cut the tape.
When using optional AC adapter (model
AD-30/AD-24)
Insert the plug on the adapter cord into
the adapter jack on the top end of the
machine.
Insert the plug into the nearest standard
electrical outlet.
For memory back up, we recommend using
AAA-size alkaline batteries (LR03) together
when using the AC adapter.
TZ tape cassette
Accessories Guide
P-touch 1280
User’s Guide
Warranty Card
Print head
Tape cutter lever
End of tape
Tape guide
Cutter’s edge
Tape exit slot
Toothed Wheel
Keyboard & LCD
Initial Setting
Start your machine
Supply power by using six AAA batteries or the optional AC adapter, and then
press
.
Set the language (English/Spanish/French/Portuguese)
Choose a language with
and press
/
.
Set the unit (inch/mm)
Choose a unit with
and press
/
.
Creating Labels
The LCD shows one row of 15 characters; however, the text that you
enter can be up to 80 characters in length.
• The machine automatically turns off if no key is pressed within 5
minutes.
• To cancel operations, press
.
• To initialize the settings, turn off the machine and then while
holding down
and
, press
to turn the machine back on.
Finally, release
and
.
Size
Cursor
Caps
Power key
Function key
Favorite keys
Character key
Tab key
Caps key
Shift key
Symbol key
Auto Format key
Width
Style
Underline/Frame
Label Length
Print key
Cursor key
(Use with Shift key
to go to top/end of
the text.)
Preview key
OK key
ESC key
Backspace key
Enter key
Shift key
Accent key
Space key
See the under side for steps of creating labels.
Troubleshooting
Error message
What to do when…
Specifications
Accessories
(Supplies may differ by distribution.)
If the cutter blade becomes blunt after repetitive use and the tape cannot be
cut cleanly, replace with new cutter unit (stock no. TC-5) by obtaining from an
authorized brother reseller.
Message
Cause/Remedy
Battery Weak!
The batteries are weak.
Check Battery!
The installed batteries are about to run out.
Invalid!
• There is no text above the cursor when you set Number-
ing.
• Invalid character is selected for Numbering.
• Invalid number is selected for Tab Length or Label Length.
No Text!
• You tried to print a text file when there is no data stored in
the memory.
• The Print key is pressed when no text is entered.
• You tried to set Copies, Numbering or Mirror when no text
is entered.
Line Limit!
• You tried to enter a 3rd line by pressing Enter key.
• You tried to print a 2 line text when 0.13″ (3.5 mm) or 0.23″
(6 mm) tape is installed.
No Cassette!
You tried to print a label when there is no cassette installed.
Cutter Error!
Tape cutter lever is used in the middle of printing process.
Full!
The maximum number of characters (80 characters) have
already been entered.
Text Too Long!
The text length exceeds the selected label length or the
selected Auto Format setting length.
No Frame OK?
Printing on 0.13″ (3.5 mm) tape with invalid Frame setting
ON. (Select
to print with no Frame,
to cancel.)
Problem
Solution
The display stays blank
after you have turned on
the machine.
• Check that the batteries are correctly inserted.
• If the batteries are weak, replace them.
• Check that the AD-30/AD-24 adapter is correctly connected.
The machine does not
print, or the printed
characters are blurred.
• Check that the tape cassette has been inserted correctly.
• If the tape cassette is empty, replace it.
The printed characters
are not formed properly.
• The batteries may be weak. Replace them.
The memory has
cleared on its own.
• The batteries may be weak. Replace them.
A blank horizontal line
appears through the
printed label.
• There may be some dust on the print head. Remove the
tape cassette and use a dry cotton swab to gently wipe the
print head with an up-and-down motion.
• The print head can be cleaned more easily if the optional
print head cleaning cassette (TZ-CL3) is used.
The machine has
«locked up» (i.e., nothing
happens when a key is
pressed, even though
the machine is on).
• Turn off the machine, and then while holding
down
and
, press
to turn the machine back on.
Finally, release
and
.
• Note: The text and formats in the display and all text files
stored in the memory are erased. Also, the language and
unit settings will be cleared.
Item
Specification
Dimensions
6.4″ (W)
× 6.0″ (D) × 2.4″ (H)
(160 mm (W)
× 151 mm (D) × 60 mm (H))
Weight
1.03 lbs. (470 g) (without batteries and tape cassette)
Power supply
Six AAA-size alkaline batteries (LR03) or optional AC
adapter (model AD-30/AD-24)
Tape cassette
Brother TZ tape (width) :
0.13″ (3.5 mm), 0.23″ (6 mm), 0.35″ (9 mm), 0.47″ (12 mm)
Accessories
Stock No.
Tape Cassettes
See the attached «Supplies and Accessories Guide».
AC Adapter
model AD-30/AD-24
Cutter Unit
TC-5 (replacement)
Carrying Case
CC1000
Switching Upper Case/Lower Case
Making Two Line Text
Move the cursor to where the second line starts and press
.
Use either 3/8″ (9 mm) or 1/2″ (12 mm) wide tape for two line text.
Entering Symbols
>
• To go to the next group, press
.
• To cancel operations, press
.
Entering Accented Characters
>
>
/
>
/
• To cancel operations, press
.
• The order of accented characters differ by the selected LCD language.
To Clear
By pressing the Backspace Key, the letters will be deleted one by one.
All text and settings will be cleared.
+
Group
Symbols
Group
Symbols
1
7
2
8
3
9
4
10
5
11
6
Accented Characters
Accented Characters
A
a
C
c
D
d
E
e
G
g
I
i
K
k
L
l
N
n
O
o
R
r
S
s
T
t
U
u
Y
y
Z
z
Upper case (
ON)
Lower case (
OFF)
Display
Label image
Setting [Size]
>
[
Size
]
>
[
Large
]
Automatically adjusts the text size according to the tape width.
Setting [Width]
>
[
Width
]
>
[
×2
]
Setting [Style]
(Vertical)
>
[
Style
]
>
[
Vertical
]
Setting [Underline/Frame]
>
[
Underline/Frame
]
>
[
Underline
]
Frames can not be printed on 9/64″ (3.5mm) tape.
Setting [Tab]
You can make aligned texts by setting tabs.
Example: To set a tab between «ABC» and «D»
The cursor should be positioned where you set a tab.
>
>
[
Tab
]
• You can also set a tab by using the Tab Key on the keyboard.
Setting [Tab Length]
(Auto / 0.0″ — 4.0″)
>
[
Tab Length
]
>
• You can also select the length by entering the length with Num keys.
• To return to [Auto], press
.
Setting [Label Length]
(Auto / 1.2″ — 12.0″)
>
[
Label Length
]
>
• You can also select the length by entering the length with Num keys.
• To return to [Auto], press
.
Setting [Auto Format]
You can choose label length from six formats to create labels for various ap-
plications.
>
[
Auto Format
]
>
[VHS Spine]
Text Preview
You can preview the text before printing.
• The LCD shows the whole text and the label length (inch/mm), then returns to the
original text.
• Only the text can be previewed, not the font, style, size, underline/frame or any
additional features.
Feeding
(Tape Feed)
+
Printing
• To cut off the label, push in the tape cutter lever on the upper-right corner of the
machine.
• To prevent damage to the tape, do not try to cut while the message «Print» or «Feed»
is displayed.
Setting [Margin]
(Tape Margin)
>
[Margin]
>
[Full]
[Full]/[Half]/[Narrow] is for leaving equal margins on both sides of the text.
NOTE:
Cut along the printed dots (:) with scissors so the text is centered in the label.
[Chain Print] is for printing more than 1 copy of a label with minimum margin
<e.g. 1>. You can also create a label containing texts in various styles; print
a text in one style, and before feeding, enter the second text in another style
<e.g. 2>.
FEED THE TAPE BEFORE USING THE CUTTER (see Feeding/Printing).
Otherwise A PART OF THE TEXT MAY BE CUT OFF. Do not try to pull the
tape since this may damage the tape cassette.
Using [Print Option]
[Copies]
You can print up to 9 copies of each label.
>
[
Print Option
]
>
[
Copies
]
>
You can also select the number of copies by entering with Num keys.
[Numbering]
You can print many copies of the same text while increasing a selected
number by 1 after each label is printed.
Example: To print copies of a label containing a serial number (0123, 0124 and 0125)
>
>
[
Print Option
]
>
[
Numbering
]
>
Select the highest number you wish to be printed when setting the number.
[Mirror]
>
[
Print Option
]
>
[
Mirror
]
>
[Mirror Print?]
Use clear tape in [Mirror], so the labels can be read correctly from the oppo-
site side when attached on glass, windows or other transparent surfaces.
Peel the printed label from backing and apply the label.
Memory
(Favorites)
You can save and print your favorite label in seconds at the touch of a button.
There are three Favorite Keys (
~
) to store your three favorite labels.
To Save:
>
>
To Print:
To Open:
>
>
When the saved text contains more than 8 characters, use
to scroll
through the text.
Function Shortcuts
In addition to the basic steps to search for a function, PT-1280 provides you
with function shortcuts so you can easily jump to a frequently used function
just by pressing
and the shortcut key shown in the table below. To con-
firm, press
.
[Large]
[Medium]
[Small]
[Normal]
[
Ч
2]
[
Ч
1/2]
[Normal]
[Bold]
[Outline]
[Shadow]
[Italic]
[Italic Bold]
[Italic Outl](Italic Outline) [Italic Shadow]
[Vertical]
[Off]
[Underline]
[Round]
[Candy]
[Callout]
[Banner]
[Wooden]
Application
Length
Application
Length
VHS Spine
5.5″
CD Case Spine
4.4″
MiniDV Spine
1.6″
File Tab
3.2″
Audio Tape
3.5″
Divider Tab
1.6″
(
+
)
(
+
)
(
+
)
(
+
)
(
+
)
Display
Label image
ABC
D
Tab
(
+
)
(
+
)
(
+
)
(
+
)
1″
1/2″
1/2″
1/6″
1/6″
1″
ABC
ABC
:
ABC
:
Full
Half
Narrow
ABC ABC ABC
ABC
ABC
DEF
<e.g. 1>
<e.g. 2>
(feed & cut)
(feed & cut)
Chain Print
(
+
)
Key
Function
Key
Function
[Size]
[Tab Length]
[Width]
[Label Length]
[Style]
[Auto Format]
[Underline/Frame]
[Margin]
[Tab]
[Print Option]
Should you encounter any problems with your product, please do not
return your product to the store!
After referring to the User’s guide, if you still need assistance, call Brother
Customer Service at:
Voice :
1-877-BROTHER(1-877-276-8437)
Web :
www.brother.com
Fax
:
1-901-379-1210
If you need to locate a service center, please call 1-800-284-HELP or visit
us at www.brother.com
(
+
)
PREPARATION
OPERATION
REFERENCE
[GETTING STARTED]
[CREATING LABELS]
MAKING TEXT
DESIGNING LABELS
PRINTING LABELS
COMPLETED LABELS
USEFUL FUNCTIONS
FAQ: Types of Manuals and Their Contents
Brother P-Touch 1280 Manuals come in various types, each serving a specific purpose to help users effectively operate and maintain their devices. Here are the common types of Brother P-Touch 1280 User Guides and the information they typically include:
- User Manuals: Provide comprehensive instructions on how to use the device, including setup, features, and operation. They often include troubleshooting tips, safety information, and maintenance guidelines.
- Service Instructions: Designed for technicians and repair professionals, these manuals offer detailed information on diagnosing and repairing issues with the device. They include schematics, parts lists, and step-by-step repair procedures.
- Installation Guides: Focus on the installation process of the device, providing detailed instructions and diagrams for proper setup. They are essential for ensuring the device is installed correctly and safely.
- Maintenance Manuals: Provide guidance on routine maintenance tasks to keep the device in optimal condition. They cover cleaning procedures, part replacements, and regular servicing tips.
- Quick Start Guides: Offer a concise overview of the essential steps needed to get the device up and running quickly. They are ideal for users who need immediate assistance with basic setup and operation.
Each type of Brother P-Touch 1280 instruction is designed to address specific needs, ensuring users have the necessary information to use, maintain, and repair their devices effectively.
Related Instructions for Brother P-Touch 1280:
2
Electroknit KH-910
51
627
157
4
S-7200A
Manual #TZGP6M: S-7200A Sewing Machine Manual
6
640
135
5
PT-D200
Features #88YZ6F: PT-D200 Label Maker Features
2
1204
289
6
GT-541
Install procedures PDF User Manual (@A2KIHT), Brother GT-541 Printer (Sun 01.2025)
3
117
23
10
HL-S7000DN
Product safety manual Brother Printer Product safety manual (File: brother-hl-s7000dn-product-safety-manual-19, Sun 11.2024)
19
656
138
Printer Devices by Other Brands:
|
OKIDATA Pacemark 3410 Service Manual PDF Manual (@154K52), OKIDATA Pacemark 3410 Printer (Mon 12.2024) Page: 1 09 Dec 2024 | 249 |
|
|
Imaje Jaime 1000 S4 Plus Manual PDF Manual (@41F5AO), Imaje Jaime 1000 S4 Plus Printer (Sun 03.2025) Jaime 1000 S4 Plus 23 Mar 2025 | 145 |
|
|
Xerox Plaser 5500 User Safety Plaser 5500 (Printer ePDF User Manual, #585XC8) Phaser® 5500 Laser Printer 04 Dec 2024 | 5 |
|
|
HP Compaq Presario,Presario CQ5110F Supplementary Manual PDF User Manual (@7OI7Q2), HP Compaq Presario,Presario CQ5110F Desktop (04th Nov 2024) 3-112 04 Nov 2024 | 2 |
Categories:
Mfps & printers
Multifunction printer
Printer/copier/scanner
Color printers
Laser printers
Document scanner
1
1
2
2
3
3
4
4
1
1
2
2
3
3
Устройство PT-1280 предназначено для создания наклеек любого назначения.
Благодаря широким возможностям выбора рамок, размера шрифта и стилей
можно создавать прекрасные оригинальные наклейки. Кроме того, большой
набор ленточных кассет позволяет печатать яркие наклейки различной ширины.
Перед началом работы внимательно изучите данное руководство. Храните его
в удобном месте для последующего использования.
• С данным устройством разрешается использовать только ленты Brother
TZ. Не используйте ленты, не имеющие маркировки
.
• Не используйте для очистки устройства спирт или другие органические
растворители. Для этой цели используйте только сухую мягкую ткань.
• Не прикасайтесь руками к механизму печатающей головки. Для очистки
печатающей головки используйте мягкий материал (например, ватную палочку).
• Во избежание травм не прикасайтесь к ножу для отрезания ленты.
• Во избежание повреждения стекла не нажимайте сильно на ЖК-дисплей.
• Не допускайте попадания внутрь устройства посторонних предметов и не
кладите тяжелые предметы на устройство.
• Не оставляйте резину или винил на устройстве в течение продолжительного
времени, поскольку это может привести к появлению пятен на устройстве.
• Не допускайте попадания влаги на устройство (например, при прикосновении
мокрыми руками или разлитии жидкости).
• Не подвергайте устройство воздействию высокой температуры или высокой
влажности. Никогда не оставляйте его на приборной панели или на заднем сиденьи
автомобиля, около нагревателей или других нагревающихся аппаратов. Не
подвергайте устройство воздействию прямых солнечных лучей и дождя.
• Не используйте устройство в пыльных помещениях.
• Не тяните за выходящую из устройства P-touch ленту, поскольку в
противном случае возможно повреждение кассеты.
• Не пытайтесь обрезать ленту во время печати или подачи, поскольку в этом
случае возможно повреждение ленты.
• Не пытайтесь выполнять печать наклеек, если установленная в устройстве
P-touch кассета пуста. Это приведет к повреждению печатающей головки.
• Если устройство не будет использоваться продолжительное время, выньте из
устройства батарейки и отсоедините кабель питания. (Примечание: если
питание не подается на устройство более трех минут, текстовые сообщения на
дисплее и текстовые файлы в памяти устройства будут потеряны. Настройки
языка и единиц измерения также будут потеряны.)
• Не используйте одновременно новые и старые батареи и не смешивайте щелочные
батарейки с батарейками другого типа. При установке батареек соблюдайте
правильную полярность. В противном случае батарейки могут дать течь или трещину.
• Во избежание повреждения или сбоя устройства используйте только
рекомендованный блок питания.
ОБЩАЯ ИНФОРМАЦИЯ
ОБЩИЕ МЕРЫ БЕЗОПАСНОСТИ
Клавиатура и ЖК-дисплей
Начальная настройка
Включите устройство
Обеспечьте питание, используя шесть щелочных батареек AAA или
адаптер питания, а затем нажмите
.
Выберите язык (Pусский/Български/English)
Выберите язык с помощью клавиши
> [Язык] и нажмите
.
Выберите единицу измерения
Выберите единицу измерения с помощью клавиши
>
[Единица
изм.] и нажмите
.
Создание наклеек
• На ЖК-дисплее отображается строка длиной в 15 знаков, но
ввести можно текст длиной до 80 знаков.
• Чтобы перевести курсор в начало или конец текста, нажмите
клавишу курсора, одновременно удерживая нажатой клавишу «Shift».
• Если никакая клавиша не будет нажата в течение 5 минут,
устройство автоматически отключится.
• Для отмены операции нажмите
.
• Чтобы восстановить заводские настройки, выключите устройство
и, удерживая нажатой клавиши
и ,
нажмите ,
чтобы
снова включить устройство. Затем отпустите
и
.
Формат
Курсор
Смена регистра
Кнопка питания
Вызов функций
Клавиши памяти
(сохранение
предпочтительных
настроек)
Буквенные
клавиши
Клавиша «Shift»
Клавиша «Caps»
Ширина
Стиль
Подчеркивание/Рамка
Длина наклейки
Печать
Курсор
Предварительный просмотр
Клавиша «ESC»
Клавиша
«Backspace»
Клавиша ВВОД
Клавиша «Shift»
Ввод символов
Клавиша ПРОБЕЛ
Переключение
языка ввода
Клавиша OK
Инструкции по созданию наклеек см. на обороте.
Устранение неисправностей
Сообщение об ошибке
Устранение неполадок
Технические характеристики
Аксессуары
(комплектующие могут отличаться в
зависимости от страны приобретения)
Если после интенсивного использования лезвие ножа затупилось и
плохо обрезает ленту, замените нож на новый (номер TC-5). Его можно
приобрести у официального дилера Brother.
Контактная информация
Контактную информацию для вашей страны см. на веб-сайте по адресу
http://www.brother.ru/.
Сообщение
Причина ошибки/Способ устранения
Батарея садится
Батарейки почти разряжены.
Батарея села!
Установленные батарейки разряжены.
Неверно!
• Нет заданного значения при установке параметра «Нумерация».
• Недействительное значение для параметра «Нумерация».
• Недействительное значение для параметра «Размер
табуляц» или «Длина».
Нет текста!
• Попытка печати текстового файла, когда в памяти нет данных.
• Нажата клавиша печати, когда нет введенного текста.
• Попытка задания параметра «Копии», «Нумерация» или
«Зеркало», когда нет введенного текста.
Огран. строк!
• Попытка ввода 3-й строки нажатием клавиши ВВОД.
• Попытка печати 2-строчного текста при использовании
ленты 3,5 мм или 6 мм.
Нет кассеты!
Попытка печати наклейки, когда кассета не установлена.
Ошибка обрезки!
Кнопка ножа для отрезания ленты использована во
время процесса печати.
Переполнение!
Введено максимальное число знаков (80 знаков).
Огран. текста!
Длина текста превышает заданную длину наклейки или
длину, заданную в параметре «Автоформат».
Без рамки OK?
Печать на ленте 3,5 мм с недействительным значением
(«Вкл.») параметра «Рамка». (Нажмите
для печати
наклейки без рамки или
для отмены.)
Проблема
Решение
После включения
устройства на дисплее
не появляется текст.
• Проверьте, что батарейки установлены правильно.
• Если заряд батареек недостаточный, замените их.
• Проверьте, что рекомендованный блок питания
подсоединен правильно.
Печать не выполняется,
или печатаются
смазанные символы.
• Проверьте, что ленточная кассета установлена
правильно.
• Если ленточная кассета пуста, замените ее.
Искажение
напечатанных символов.
• Возможно, заряд батареек недостаточный. Замените их.
Самопроизвольная
очистка памяти.
• Возможно, заряд батареек недостаточный. Замените их.
Во время печати на
наклейке появляется
белая горизонтальная
полоса.
• Возможно, на печатающую головку попала пыль. Выньте
ленточную кассету и сухой ватной палочкой аккуратно
протрите печатающую головку в направлении вверх-вниз.
• Очистку печатающей головки легче производить при
помощи дополнительной очищающей кассеты для
печатающей головки (TZ-CL3).
Устройство
«заблокировано» (т. е.
при нажатии клавиши
ничего не происходит,
хотя устройство
включено).
• Выключите устройство и, удерживая нажатой
клавиши
и
, нажмите
чтобы снова включить
устройство. Затем отпустите
и
.
• Примечание: При этом текст и настройки на дисплее, а также
все текстовые файлы в памяти будут потеряны. Настройки
языка и единицы измерения также будут потеряны.
Характеристика
Значение
Габариты
160 мм (Ш) x 151 мм (Г) x 60 мм (В)
Масса
470 г (без батареек и кассеты)
Электропитание
Шесть щелочных батареек AAA (LR03) или адаптер питания
(AD-24ES)
Ленточная кассета
Лента Brother TZ, ширина:
3,5 мм, 6 мм, 9 мм, 12 мм
Аксессуары
Спецификации
Ленточные кассеты
См. прилагаемый каталог лент TZ.
Блок питания
AD-24ES
Нож для обрезания ленты TC-5 (сменный)
Переключение верхнего/нижнего регистра
Ввод двухстрочного текста
Переместите курсор на место, где начнется вторая строка, и нажмите
.
Для печати двухстрочных текстов используйте ленту шириной 9 или 12 мм.
Ввод символов
>
• Для перехода к следующей группе символов нажмите
.
• Для отмены операции нажмите
.
Удаление данных
Удаление записей в обратном хронологическом порядке (сначала
самые новые).
Удаление текста и всех настроек (все настройки вернуться к значениям
по умолчанию).
•
+
>
[Текст&Настр.]
.
•
>
[Стереть]
>
[Текст&Настр.]
.
Удаление только текста.
•
+
>
[Текст&Настр.]
>
[Только текст]
.
•
>
[Стереть]
>
[Только текст]
.
Текст можно вводить на русском и на английском языках. Язык
ввода текста можно изменить с помощью клавиши
.
Начальная настройка ввода текста установлена на русский язык.
Группа
Символы
Группа
Символы
1
9
2
10
3
11
4
12
5
13
6
14
7
15
8
16
Верхний регистр (
значение «Вкл.»)
Нижний регистр (
значение «Выкл.»)
Изображение на дисплее
Напечатанная наклейка
Настройка размера [Размер]
>
[
Размер
]
>
[
Большой
]
Параметры «Большой», «Средний» или «Малый» настраиваются
автоматически в соответствии с шириной ленты.
Настройка ширины [Ширина]
>
[
Ширина
]
>
[
×2
]
Настройка стиля [Стиль]
>
[
Стиль
]
>
[
Вертикально
]
Настройка подчеркивания/рамки
[Подчерк./Рамка]
>
[
Подчерк./Рамка
]
>
[
Подчеркивание
]
На ленте шириной 3,5 мм рамки напечатать невозможно.
Настройка табуляции [Табуляция]
С помощью табуляции можно вводить текст с отступом.
Пример: Ввод табуляции между «ABC» и «D».
Курсор надо навести на место ввода табуляции.
>
>
[
Табуляция
]
Настройка размера табуляции
[Размер табуляц.]
(Авто / 0 — 100 мм)
>
[
Размер табуляц.
]
>
• Задать размер табуляции можно также путем ввода значения с помощью цифровых клавиш.
• Для возврата к настройке [Авто] нажмите
.
Настройка длины наклейки
[Длина]
(Авто / 30 — 300 мм)
>
[
Длина
]
>
• Задать длину наклейки можно также путем ввода значения с помощью цифровых клавиш.
• Для возврата к настройке [Авто] нажмите
.
Настройка автоформата
[Автоформат]
Для выбора длины наклейки предусмотрено шесть форматов,
соответствующих наклейкам различного назначения.
>
[
Автоформат
]
>
[Видео VHS]
Предварительный просмотр текста
Перед печатью можно просмотреть текст.
• На ЖК-дисплее отображается весь текст и длина текста (в мм), после чего
появляется исходный текст.
• В предварительном просмотре отображается только текст, но не шрифт, стиль,
размер, подчеркивание/рамка или другие дополнительные параметры.
Протяжка ленты
+
Печать
• Чтобы отрезать наклейку, нажмите на кнопку отрезания ленты, расположенную
в правом верхнем углу устройства.
• Во избежание повреждения ленты не пытайтесь обрезать ленту, когда
отображается сообщение «Печать» или «Протяжка».
Настройка полей ленты [Поля]
>
[
Поля
]
>
[
Широкие
]
С помощью параметров [Широкие]/[Нормальные]/[Узкие] можно
оставлять поля одинаковой ширины по обеим сторонам текста.
ПРИМЕЧАНИЕ: Чтобы текст оказался по центру наклейки, обрежьте наклейку
ножницами по напечатанным точкам (:).
Значение [Без полей] используется при печати более 1 копии наклейки с
полями минимальной ширины (см. пример 1). Можно также создать наклейку с
текстом различных стилей; напечатать текст одного стиля и перед протяжкой
ввести текст другого стиля (см. пример 2).
ПЕРЕД ОБРЕЗКОЙ НАКЛЕЙКИ ПРОТЯНИТЕ ЛЕНТУ (см. «Протяжка ленты»/
«Печать»). В противном случае ЧАСТЬ ТЕКСТА БУДЕТ ОТРЕЗАНА. Не
пытайтесь вытянуть ленту, поскольку это может повредить ленточную кассету.
Настройка [Опции печати]
[Копии]
Можно напечатать до 9 копий каждой наклейки.
>
[
Опции печати
]
>
[
Копии
]
>
Количество копий можно задать путем ввода значения с помощью
цифровых клавиш.
[Нумерация]
Для наклеек, содержащих номер, можно печатать копии, увеличивая
номер на единицу после каждой печати наклейки.
Пример: Печать копий наклейки с серийным номером (0123, 0124 и 0125)
>
>
[
Опции печати
]
>
[
Нумерация
]
>
При задании номера укажите наибольшее число, до которого нужно напечатать.
[Зеркало]
>
[
Опции печати
]
>
[
Зеркало
]
>
[Зеркал. печать?]
При использовании настройки [Зеркало] выполняйте печать на прозрачной
пленке, чтобы можно было правильно прочитать наклейки, приклееные с
обратной стороны стекла или другого прозрачного материала.
Отделите наклейку от основы и наклейте ее.
Сохранение предпочтительных
настроек
Часто используемый текст можно сохранить в памяти; затем его можно
печатать сразу или открыть для редактирования перед началом печати.
Можно сохранить по одному тексту на каждую клавишу (
~
)
(максимально 3 текста).
Сохранить:
>
>
Печатать:
Открыть:
>
>
Если сохраненный текст содержит более 8 знаков, можно прокрутить
текст с помощью клавиши
.
Комбинации клавиш
Помимо стандартных возможностей вызова функций, в PT-1280
предусмотрены комбинации клавиш для быстрого вызова часто
используемых функций; для этого достаточно нажать
и клавишу,
указанную в таблице ниже. Для подтверждения нажмите
.
[Большой]
[Средний]
[Малый]
[Нормальный]
[
Ч
2]
[
Ч
1/2]
[Нормальный]
[Жирный]
[Контур]
[Тень]
[Курсив]
[Курсив+Жирный]
[Курсив+Контур]
[Курсив+Тень]
[Вертикально]
[Выкл.]
[Подчеркивание] [Круглый]
[Конфета]
[Выноска]
[Лента]
[Дерево]
Назначение
Длина
Назначение
Длина
Видео VHS
140 мм
CD
113 мм
Mini DV
42 мм
Папка
82 мм
Аудио
89 мм
Разделитель
42 мм
(
+
)
(
+
)
(
+
)
(
+
)
(
+
)
Изображение на дисплее
Напечатанная наклейка
ABC
D
Табуляция
(
+
)
(
+
)
(
+
)
(
+
)
Широкие
Нормальные
Узкие
ABC ABC ABC
ABC
ABC
DEF
<пример 1>
<пример 2>
(протяните и обрежьте)
(протяните и обрежьте)
Без полей
(
+
)
Клавиша
Функция
Клавиша
Функция
[Размер]
[Размер табуляц.]
[Ширина]
[Длина]
[Стиль]
[Автоформат]
[Подчерк./Рамка]
[Поля]
[Табуляция]
[Опции печати]
[Язык]
[Стереть]
(
+
,
,
)
ПОДГОТОВКА К РАБОТЕ
ЭКСПЛУАТАЦИЯ
СПРАВКА
[ПЕРЕД НАЧАЛОМ РАБОТЫ]
[СОЗДАНИЕ НАКЛЕЕК]
ВВОД ТЕКСТА
ФОРМАТИРОВАНИЕ НАКЛЕЕК
ПЕЧАТЬ НАКЛЕЕК
ГОТОВЫЕ НАКЛЕЙКИ
ПОЛЕЗНЫЕ ФУНКЦИИ
Источник питания и ленточные кассеты
Во время замены батареек или ленточной кассеты питание устройства
должно быть отключено.
Откройте заднюю крышку, нажав на ребристый участок на верхней
части устройства.
Если ленточная кассета уже
установлена, потяните ее
вверх и выньте. Если
батарейки уже установлены,
также выньте их.
Вставьте шесть новых щелочных батареек размера AAA (LR03),
соблюдая правильную полярность. Всегда заменяйте все шесть
батареек одновременно и только на новые батарейки.
Вставьте ленточную кассету до щелчка.
• Конец ленты должен находиться под направляющими ленты.
• Если натяжение печатающей ленты недостаточное, пальцем доверните
зубчатое колесо в направлении, указанном стрелкой на кассете.
• С данным устройством разрешается использовать только ленты Brother TZ.
Плотно закройте заднюю крышку (при этом должен раздаться щелчок).
После установки ленты
протяните ленту (см. раздел
«Протяжка ленты») один раз и
нажмите на кнопку ножа,
чтобы обрезать ленту.
Если используется адаптер питания
(AD-24ES)
Вставьте разъем блока питания в
гнездо для подключения кабеля
питания в верхней части устройства.
Вставьте вилку блока питания в
стандартную электрическую розетку.
Одновременно с блоком питания используйте
щелочные батарейки размера AAA (LR03) для
сохранения данных в памяти устройства при отключении кабеля питания.
Печатающая головка
Кнопка ножа для
отрезания ленты
Конец ленты
Направляющая ленты
Острие ножа
Выходное отверстие ленты
Зубчатое колесо
Руководство пользователя
/ Български
www.brother.com
Напечатано в Китае
LW4562001
Русский