
Onvif device manager это специальная программа, устанавливаемая в качестве программного обеспечения на компьютере с windows и служит для эффективного управления IP сетью из камер, объединенных одним производителем оборудования. Важный пункт состоит в том, чтобы все камеры работали по ONVIF протоколу.
Отметим, что технология распространяется бесплатно в качестве клиентской поддержки покупателя. Обеспечение совместимо с любым windows.

Возможности программы onvif device manager
- Быстрое подключение нужных ip объектов,
- Транслировать видеонаблюдение в режиме реального времени прямо с камер,
- Выводить картинку на экран,
- Настраивать разрешение картинки, ее битрейта и многих других параметров управления,
- Соединять периферию из устройств,
- Каталогизировать допуск,
- Отображать сведения о device: модель, локация, программное обеспечение, название, личный ID, MAC и т.д.,
- Настраивать видеонаблюдение на определенные события (например, пролетающая птица),
- Реагировать на «тревожные» ситуации (скопление очередей у кассы, продолжительность очереди),
- Блокировать обнаружение пользователя и его архива или передачи данных по подобному протоколу для других похожих устройств,
- Сбрасывать и изменять настройки ip,
- Обновлять прошивку утилиты onvif и всех подключенных устройств и их протоколов.
Совместимость onvif менеджера
- камеры с IP,
- видеорегистраторы,
- IP-видеоэнкодеры и другие сетевые устройства,
- DVR
Есть вопросы? Задайте их в нашем Телеграмм-чате Видеонаблюдение в МКД
Вступайте в группу, чтобы получить:
- Прямой доступ к экспертам в сфере видеонаблюдения и организации бизнеса в МКД
- Ответы на все ваши вопросы по установке, обслуживанию и юридическим аспектам от опытных специалистов
- Актуальные лайфхаки и советы по увеличению дохода и минимизации расходов
- Реальные кейсы и успешные истории от тех, кто уже запустил свой бизнес и делится опытом
Где скачать onvif device manager
В установке сторонних программ важно соблюдать безопасность. По этому мы рекомендуем скачать onvif device manager с официального сайта производителя по ссылке — https://sourceforge.net/projects/onvifdm/
Так вы получите последнюю версию программы под нужную вам операционную систему (Microsoft Windows XP, Vista, 7, 8.1, 10)
Также есть второй вариант — скачать код программы с всемирно известного портала разработчиков github — (https://github.com/dxball/ONVIF-Device-Manager)
Русский язык также входит в обслуживание, достаточно скачать этот device и выбрать отображение на русском. Это делается после авторизации.
Установка и запуск
После скачивания необходимо установить данную утилиту
Обратите внимание для корректной работы программы необходимо разрешение брандмауэра Windows
Чтобы запустить рабочие настройки onvif сначала надо войти в утилиту по своему имени и паролю (а до этого, конечно, скачать).
Как правило входа через свой профиль хватает для распознавания камер, но если IP адрес не добавляется автоматически, его можно ввести вручную.

Подключение камеры в ONVIF Device Manager и проверка совместимости
Многие производители интегрируют протокол ONVIF в свои продукты: камеры, видеорегистраторы, видеосерверы, реле и прочие устройства. На примере IP-камеры разберем как узнать интегрирован протокол или нет.
В 90% случаев возможно два варианта:
- Производитель или вендор могут прямо указать на поддержку протокола на упаковке или в инструкции, в технических спецификациях. В этом случае останется только выполнить предварительную настройку для подключения.
- Производитель заложил поддержку протокола, но об этом нигде не упоминается. Для того, чтобы выяснить, поддерживается ли протокол, нужно иметь доступ к настройкам камеры в ее web-интерфейсе.
Очень редко, протокол не интегрирован, но, при поддержке аппаратной платформы, может быть добавлен на уровне прошивки. Обычно, при этом поддержка реализуется не полная и невозможно использовать весь функционал.
Исходя из этого, приходим к выводу, что лучше всего заранее подбирать устройства, где производитель заявляет поддержку протокола, дабы не столкнуться с проблемами при настройке и интеграции.
Но что делать, если протокол поддерживается. Но не заявлен? Рассмотрим на примере камеры, т.к. проверка поддержки протокола в этом случае тесно связана с настройкой самой камеры для подключения в ONVIF Device Manager.
Проверка поддержки протокола камерой
Переходим в web-интерфейс камеры, в ее настройки (для большинства камер характерно, что, если протокол поддерживается, то искать настройки, связанные с ним, нужно в настройках сети или сетевых службах).

Как видно на скриншоте, в настройках есть два интересующих нас пункта:
- Порт ONVIF – сетевой TCP-порт, по которому выполняется подключение камеры по протоколу ONVIF. Порт можно поменять на свой.
- Проверка ONVIF – зашита подключения, необходимость авторизации. При использовании логин и пароль используются те же самые, что и в основной учетной записи камеры (в некоторых случаях, производитель может дать возможность установки отдельного пароля, тогда рядом будет строка указания пароля для подключения по протоколу). Ниже можно будет прочитать о том, почему стоит всегда включать защиту подключения.
Подключение камеры
После проверки поддержки протокола камерой, можно приступить к подключению в десктопном приложении.
Запускаем ONVIF Device Manager и, если камера и ПК находятся в одной локальной сети, программа в автоматическом режиме выполнит поиск доступных устройств.
.png)
Камера сразу определилась. Можно приступать к просмотру и изменению настроек.
Если же на камере был установлен пароль и включена проверка ONVIF, то при попытке подключения будет запрос на логин и пароль.

Выбираем камеру, пытаемся получить видеопоток или зайти в настройки, а приложение требует авторизацию.
Если камера расположена не локально, а удаленно и есть возможность подключения по статике, то используя заданный в настройках камеры порт ONVIF, ее можно также добавить в ONVIF Device Manager.
В окне программы, в самом низу списка камер есть кнопка «Добавить», для добавления камер вручную. Нажимаем кнопку и указываем URL для подключения (IP-адрес и порт).

После применения, камера появится в общем списке. В случае использования проверки ONVIF, программа запросит авторизацию как и в предыдущем пункте, при попытке получить доступ к видеопотоку или настройкам.

Камера появилась в общем списке.
После подключения камеры, можно получить доступ к видеопотоку, настройкам и прочему функционалу программы и камеры, например, управлению движением камеры, если она поддерживает функцию PTZ.

Видеопоток

Управление поворотной камерой с функцией PTZ.
Важные особенности протокола ONVIF и программы ONVIF Device Manager
Также хотелось бы рассказать о двух важных моментах, связанных с протоколом.
- Ранее говорилось о возможности проверки авторизации по ONVIF. Рекомендуется всегда использовать эту функцию. Очень часто бывает так, что на камеру устанавливается пароль и, по стандартным протоколам подключения. она недоступна без авторизации. Но! Особенность ONVIF Device Manager’a позволяет подключаться к просмотру такой камеры. К примеру, некое частное лицо может получить доступ к сети, если сеть не скрыта специально и просматривать ваши камеры, пусть даже и не имея возможности выполнить настройки (а если камера не запаролена, то и настройки поменяет). Рекомендуется всегда пользоваться функцией проверки ONVIF, в настройках камер, дабы избежать ненужных рисков и опасности, что система будет скомпрометирована и доступна для стороннего подключения.
- Второй момент уже более практичен. Как известно, многие сервисы облачного видеонаблюдения работают с протоколом RTSP для подключения камер. Нередки ситуации, когда сложно выяснить, какую RTSP-ссылку нужно использовать для подключения той или иной камеры (особенно актуально для noname камер из китайских маркетплейсов, например, AliExpress). ONVIF Device Manager показывает ссылку на RTSP-поток камер, благодаря этому можно легко узнать ссылку, подключив камеру в программе.
После подключения камеры просто открываем просмотр и сразу же видим ссылку:

Бесплатный обучающий видеокурс «Видеонаблюдение в многоквартирном доме»
Что вы получите от просмотра видеокурса:
- Поэтапный план действий для организации бизнеса видеонаблюдения в многоквартирных домах — от старта до стабильного дохода
- Подробную информацию о расходах, прибыли и юридических аспектах — все в одном видео
- Практические советы и рекомендации, основанные на реальном опыте
- Экспертные разъяснения, которые помогут вам избежать ошибок и эффективно развивать свой бизнес
Onvif Device Manager Complete Installation Guide, ONVIF Device Manager is a software application used to administrate network video servers and cameras within CCTV systems. The User Guide describes the product installation, video encoder, network and analytics configuration, the software update and troubleshooting. Thus, the document is intended for the personnel responsible for administrating CCTV systems and separate network video surveillance devices with the help of ONVIF Device Manager.
• Windows XP SP3 operation system (or higher; Windows 7 recommended)
• Microsoft .NET Framework 4
• 1 Gb RAM (2 Gb recommended)
• 40 Мb of free drive space
1.1ONVIF Device Manager Setup

Setup Wizard will check if Microsoft .NET Framework 4 is installed to the computer. If it is absent, the following message is displayed.
Read More : DW Spectrum Full User Guide
4.Download dotNetFx40_Full_setup.exe and install .NET Framework according to the setup instructions.
5.After Microsoft .NET Framework 4 setup run onvifdm.msi again.
6.Windows User Account Control may ask for the permission to continue the installation. Click Yes.
7.To complete ONVIF Device Manager installation process, click Close.

1.2Starting ONVIF Device Manager
1.Launch ONVIF Device Manager from he desktop or Start menu.
2.During the first launch, Windows Firewall may ask for the permission to open access to the network for onvifdm.exe. Click Allow access.

3.After ONVIF Device Manager has been launched, your device is automatically detected and displayed at the end of the device list on the left. If the device has not been detected automatically, check the connection and click Refresh.

4.To make sure the device is selected correctly, check live video snapshots from the active video channels. If the snapshots are not displayed, check Enable snapshots in Application Settings ( button).
2.1Video Server Identification
2.Select Identification at the top of the menu list.
3.Check that Device ID value coinsides with its serial number.
4.Fill in Name and Location fields.
5.Click Apply. Your settings are saved.
Identification tab contains URI parameter necessary for connecting the device to a video management system.

For correct functioning of access management system, it is necessary to synchronize the time on the device and on the user’s computer. If the device is equipped with a real-time clock with independent power supply, the time is synchronized automatically.
For video servers and cameras not equipped with an RTC-clock or independent power supply, it is necessary to select Synchronize with NTP server option. Otherwise, in case of power cut the time on the device is reset, and it is impossible to access the device from the PC.
Select Network Setting from the device menu. By default, the settings are the following.

2.3.1Settings for a Network with DHCP Server
Nowadays, most networks are equipped with a DHCP server which automatically assigns an IP-address to devices connected. In this case fields IP Address, Subnet Mask and Default Gateway are filled automatically and uneditable.
1.Host name, DNS and NTP servers can either be received from DHCP or entered manually. Select the option you need.
2.After all the settings are selected, click Apply.
3.Wait until the devise reboots.
2.3.2Settings for a Network without DHCP Server
If the network has no DHCP server, the device IP address is determined automatically via ZeroConf protocole (Enable zero config option is checked by default).
1.In computer’s network settings select Receive IP address automatically. (If a static IP address is selected, the video server will not be shown in the device list as belonging to another network).
2.In order to assign the device a static IP address (eg., in a network without DHCP server), select Off in DHCP dropdown. After that fields IP address, Subnet mask and Default gateway are possible to edit manually.
3.Fill in fields Host name, DNS and NTP servers manually.
4.Specify other settings and click Apply.
5.Wait until the device reboots.
2.3.3Discovering device in a network
To make device function without being discovered in the network, select non discoverable option as ONVIF discovery mode.
To make it visible in the list select discoverable.
In most cases a video analytical device is connected to a local network and has a local IP address. In order to get access to the device beyond the local network, or to connect it directly to the Internet, the following settings are necessary.
1.Go to Web page to Network tab.
2.Check Enable NAT traversing.
3.Enter Global IP address.
4.Specify NAT ports and click Apply.

ONVIF Device Manager supports the following types of users.
Anonymous user is not registered in the system and, therefore, can have unlimited access only to those devices from the list where no users from other categories (“user”, “operator”, “administrator”) are registered. On the devices with at least one abovementioned user, anonymous user has right only to view time settings.
Administrator has access to all application sections and features, the rights to reboot the device, reset the settings and update the firmware, create other users with different access rights.
The first user on the device must be created as Administrator.
For the differences in Operator’s and User’s access rights (by default), consult the table on the following page.
CHANGE – the right to change current and create new settings.
VIEW – the settings are not hidden, but it is not permitted to change and create them.
HIDDEN – Certain settings or even the whole section is hidden.
|
Application section or feature |
Operator |
User |
|
Identification |
VIEW |
HIDDEN |
|
Time Settings |
VIEW |
VIEW |
|
Maintenance |
||
|
Configuration backup |
HIDDEN |
HIDDEN |
|
Configuration restore |
HIDDEN |
HIDDEN |
|
Soft factory reset |
HIDDEN |
HIDDEN |
|
Hard factory reset |
HIDDEN |
HIDDEN |
|
Device Reboot |
CHANGE |
HIDDEN |
|
Firmware update |
HIDDEN |
HIDDEN |
|
Network Settings |
VIEW |
VIEW |
|
Users |
HIDDEN |
HIDDEN |
|
Certificates |
VIEW |
VIEW |
|
System Log |
HIDDEN |
HIDDEN |
|
Relays Settings |
CHANGE |
VIEW |
|
Web Page |
CHANGE |
|
|
Events (including filter management) |
CHANGE |
CHANGE |
|
Live Video (including rtsp-link) |
CHANGE |
CHANGE |
|
Video Streaming |
CHANGE |
VIEW |
|
Analytics |
||
|
Object tracking |
CHANGE |
VIEW |
|
Depth calibration |
CHANGE |
VIEW |
|
Service detectors |
CHANGE |
VIEW |
|
Antishaker |
CHANGE |
VIEW |
|
Annotation settings |
CHANGE |
VIEW |
|
Rules |
CHANGE |
VIEW |
|
Metadata |
CHANGE |
VIEW |
|
Profiles |
CHANGE |
VIEW |
|
Settings (Kipod Server) |
CHANGE |
VIEW |
1.To create a new user go to User management tab and click Create.
2.In the next window specify User name, password (2 times), and his role in the system (administrator, operator or user). Click Apply.
The first user on the device must be created as Administrator.
The following message is displayed, and the user is added to the list.
To edit user data, use Modify button. To delete a user, click Delete.
1.After launching ONVIF Device Manager, enter user name and password in the corresponding fields at the left upper corner of the window.
2.To remember login and password for the next application launch, check
Remember before logging in.
2.4.3Viewing Device User Data
Administrator can view the data about device users.
2.Select Access as log type and click Get.

3.To save the log to a separate file use Save button at the right corner.
2.4.4Changing Default User Settings
The list of rights assigned to each user category is possible to edit. For this purpose, device settings are saved in a text file containing program code. The file is edited and imported back to the system.
We strongly recommend that this operation is fulfilled by qualified personnel or our customer service specialists.
1.In order to save the current user settings to a file, go to User Management
tab.
2.Click Backup in Policy section. File save dialogue will open to save the current settings to a .txt file.
3.Edit the file the way you need.
4.In order to upload the edited file, click Restore and select the file on your hard drive.
Safety certificates allow you to transfer data via a safe connection.
1.To upload a certificate click Upload.
2.Select the certificate file from your hard drive (.pem).
3.Enter certificate name and click Upload Certificate.

4.Check the certificate and click Apply.
5.For the correct functioning of the certificate, go to Network Settings and enable HTTPS protocole.
6.Click Apply to save the settings.

2.5.2Deleting a Certificate
1.Disable HTPPS protocole in network settings.
2.In Certificates tab check the certificate and click Delete.
2.6Relays Settings (optionally)
Relays tab contains information on all the relays connected to the device.
To configure a relay, perform the following actions:
1.Select a relay from the list on the left.
2.Set relay mode, idle state and delay time.
To activate or deactivate the relay use the corresponding button.
The appearance and functionality of the web page depends on the device connected and its manufacturing company. For this reason, this section cannot be described within the current document.
Functionalities of devices by Synesis represented on the web page are described in relevant sections of the User Guide.
To open the web page in a separate browser, check Open web in external browser in Application settings ( button).
2.8Recording to a Removable Storage Device
1.Go to Web page to Recorder tab.

2.Connect a USB storage device to the video server and wait until its status changes to Ready.
3.Select recorder activity type for each video channel: Continuous or Event.
Continuous recording is performed in continuos mode regardless to video analytics events. When the removable storage memory is full, the oldest recordings are removed automatically, releasing space for the newer ones.
Event recording is triggered by a video analytics rule, pre- and post-recording time comprising 10 seconds.
4.If one of the channels does not require recording, select Disabled in
Recorder activity.
5.Click Apply to save the settings.
To get the recorder report, use the link in the upper line.

2.8.3Sending Recording Notifications
The system allows sending notifications about the recording to an e-mail specified.
1.To confugure notification sending, go to Mailer tab in Web page.
2.Specify SMTP server name, user name and password (the same as for sender’s e-mail), mail sender and recipient.
3.To save the settings, click Apply.
This section allows viewing all the events registered by the device in text mode.
1.To enable Events section on the device, check Enable events subscription in Application settings (checked by default). To access Application Settings, click .
2.From the dropdown select event subscription type. By default PullPoint if available is selected.
3.Selecting Only Base Subscription, specify port number.
4.To save the settings, click Apply.
2.9.2Metadata Configuration
To optimize separate events search, the application supports Metadata Configuration.
1.In filter expression settings select expression type and enter the expression
to create a filter.
2.Click Add filter. The filter will appear in the filtes list on the left.
3.To specify the filter details unfold More details section.
4.In Prefix list only those prefixes are available which are used in the current
.xml document. In order to be able to create prefixes manually, check Use extended filter editor in Application Settings (, see the previous picture).

For detailed filter management rules consult ONVIF specification http://www.onvif.org/specs/core/ONVIF-Core-Specification-v220.pdf, chapters
9.5.5 and 9.7.3.
The application provides several video transmission settings, common to all the devices connected.
1.Check Show video playback statistics to display this parameter within the video frame (frame per second frequency for rendering and decoding).
2.In order to enable this option, check it in Application settings ( button).
3.Set Video rendering fps.
4.From the dropdown select Video streaming transport. This parameter denotes, via which protocol ONVIF Device Manager receives video stream from netwok video transmitter (NVT).
5.Set the necessary values and click Apply.
3.2Additional Settings (optionally)
The application allows choosing video standard for each channel. For better video reception quality, the standard on the channel and on the video camera should coincide. For example, the camera transmits analogue video via NTSC. For correct video reception, it is necessary to set NTSC video standard on the receiving channel.
1.To configure video channels, go to Web page, Video inputs tab.
2.Select video standard for each channel (PAL or NTSC) and select Apply.

3.3Channel Configuration (optionally)
1.Go to Settings of the selected video channel.

2.Select the receiver from the dropdown.
3.In Uri-field paste rtsp-link to the video, copied from the network device transmitting or processing live video (IP-camera, video-encoder).
4.Specify video resolution.
7.Go to Live video section.
Here you can see the video, the link to which you have specified.
3.4Video Streaming (optionally)
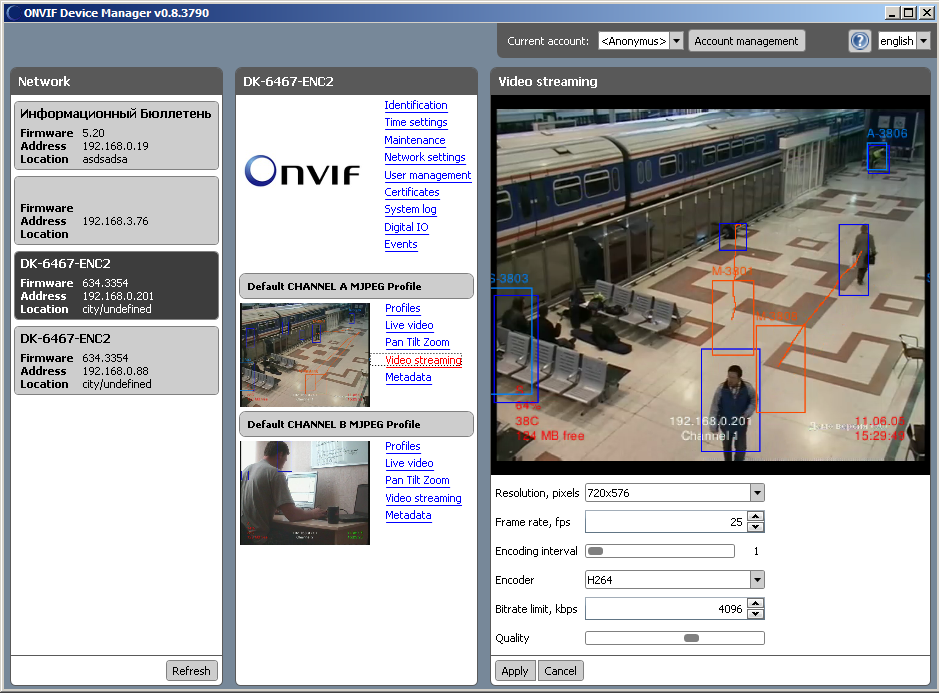
This section allows you to configure the following parameters of displaying video:
Encoder and resolution (pixels) of the video (selected in the dropdown).
Frame rate (frame per second) denotes how many frames per second are captured by the video camera connected to the device. This parameter is uneditable and shown just for information.
Encoding interval (number of frames) denotes at which rate the frames coming from the camera are encoded. For example, when encoding interval comprises 25, it means that 1 frame from 25 captured per second is encoded and transmitted to the user. The maximum value reduces the load to the channel, but may cause skipping information from the frames that were not encoded. Reducing encoding interval will increase the frequency of picture update, as well as the load to the channel. The parameter is set with the help of slider bar.
Bitrate limit (kbps) is the amount of information required to play one second of video. The less the bitrate is, the less the final video file size will be. But when the bitrate is considerably reduced, the program will have to use stronger compression algorithms, which reduces video quality, too. The value is entered manually or with the help of spin box.
Quality is the parameter which enables to reduce the load to the channel by means of reducing the picture definition. The parameter is set with the help of slider bar: the left most position corresponds to the highest picture definition, the right most to the lowest load to the video channel.
GOV length is possible to edit only in case the encoder is Н264. This parameter denotes the length of picture group between the two key frames. The higher this value is, the less is the load to the network, but the quality of the video is affected. The value is entered manually or with the help of spin box.

Set the necessary values and click Apply.
4.Video analytics Configuration
4.1Default Annotation and Analytics Configuration.
ONVIF Device Manager has default annotation and analytics settings and is ready to use with any device. It is possible to view the settings with a double- click on Annotation Module Default Annotation and Analytics Module Default Analytics respectively.
To modify analytics module, click on Analytics Module Default Analytics and then click Modify.
4.2Object Tracker Configuration

1.Specify the region where object tracking should be applied. For this, move the sides of the red rectangle by dragging its corners with the mouse left button.
2.In order to create additional corners, double click on one of rectangle sides in any place. Holding mouse left button, move the new point to the necessary position until a new polygon corner is formed. The same way create other polygon corners.
3.Position the polygon so that its borders correspond to the tracking region.
4.Check Enable object tracker to make other parameters editable.
5.Set necessary contrast sensitivity by moving the slider. This value denotes how contrastive an object should be to be detected against the backround. For example, at high contrast sensitivity a peson in dark clothes is more likely to be detected against dark background.
6.By moving the slider, set displacement sensitivity. It denotes which distance a person or vehicle should cover in the video to be detected as a moving object. At high displacement sensitivity, a short distance is enough for detection.
7.Video analytics can be configured to track only objects moving in a certain direction. For this, select the directions you need at the octangular figure on the left. The selected directions turn gray after a mouse click.
8.To select all the directions at once, use All button. None button diselects everything.
9.To save the settings click Apply.
Calibration allows relating object sizes in the video with their real sizes. ONVIF Device Manager supports two types of calibration.
This calibration type requires specifying the following parameters:
• Marker real height, cm
1.Open Depth calibration tab in Analytics section.
2.Select Height Marker calibration type.
3.Select an object in the video that has equal height at its different parts (eg., a fence). It is important to measure the height from the ground.
4.Set both markers against objects of the same height (see the picture). Marker height can be changed by dragging its upper and lower points (the cursor assuming the form of a vertical arrow).

5.To move the marker, drag it to the necessary position with the mouse left button.
6.Fill in the necessary fields under the video: from the dropdown select matrix format, specify focal length and height of the real object related to the markers.
7.Save the settings by clicking Apply.
Does not require specifying matrix format and camera focal length. For this calibration type it is necessary to specify height and width of the real object (mm) shown in the video at different distance from the camera. The easiest way is calibration by a person’s picture.
2.The person stands within camera view in the background. The first 2D- marker should be positioned in such a way that vertically it corresponded to the person’s height and horizontally to the space he takes.
3.The first 2D-marker remains in the same position. The person moves to the foreground within camera view and stands in the same position as the first time. Place the second marker the same way as the first.
4.Fill in the parameters under the video: real object width and height (mm).
5.Save the settings by clicking Apply.

4.4Настройка сервисных детекторов
1.Go to Tampering detectors tab in Analytics section.
2.Check situations that require automatic notification.

3.Save the settings by clicking Apply.
1.In Antishaker tab check Enable Antishaker.
2.In the video select a region containing typical scene elements against which the camera should be stabilized (road, columns, fence). For this, holding left mouse button move the blue rectangle corner points until it is reduced to a needed size.
3.Some moving elements like large vehicles and shaking trees can be present in antihaker zone. But it is highly recommended to exclude elements certainly not suitable for stabilization, like black video frame or the sky.

4.Save the settings by clicking Apply.
1.In Analytics tab in Available modules section select Annotation Module Default Annotation and click Modify.
2.In annotation window select elements to show in the video.
• Annotate system information
• Annotate calibration results

3.To save the settings, click Apply.
4.7Configuring Analytics in Text Format
Alongside with the described ways of configuring analytics and annotation, the application provides an alternative way of configuring with disabled video plugins.
This way is used to configure analytics on devices by certain manufacturers, like Axis, or in case it is necessary to configure parameters absent in video plugin.
1.In order to enable this way of configuration, uncheck Enable pugins in Application settings ( button).
2.Go to Analytics tab of the selected channel.
3.Check necessary options and set exact number values in the relevant fields.
4.Annotation and Rules are configured the same way with disabled plugins.
4.8Additional Video Analytics Settings
Besides configuration in manual or text format, the application supports analytics configuration via the file containing program code.
It is strongly recommended that this type of configuration is performed by specially trained personnel, as incorrectly changed parameters can damage the system.
1.Go to Web page to video analytics tab.
2.In Extended paramenters section download the source file of each channel by clicking Download. The file is saved to your hard drive.
3.Edit the file the way you need and save the changes.
4.Click Browse on the relevant channel and select the edited file from the hard drive. Click Apply. The status will change from Default to Changed.
5.To remove the edited file from the system and restore the default settings, click Delete.

A tripwire rule means defining a tripwire in tracking zone, crossing which in one or both directions is regarded as an alarm event. For example, the tripwire is drawn in the driveway to the yard. An event is generated each time a person or vehicle come into the yard.
1.Go to Analytics tab of the selected video channel.
2.Click Create in Available Rules section.
3.In the next window specify the rule name.
4.In Type dropdown select Trip Wire Rule.
A video frame will open with a red line in the center of the screen. Here you can define the rule settings.
6.Move the line by dragging its end points until it reaches necessary length and position.
7.Define in which directions crossing the line is meaningful. For this purpose, click on one of the arrows in the middle of the line. When crossing the line in this direction, an alarm event is created. When both directions are selected (two arrows are marked), the event is registered in all the cases of crossing the line.

8.To save the settings, click Apply.
A region rule enables you to set a region and allow or forbid certain actions inside it. Depending on the settings, an alarm event is generated each time the rule is violated.
1.To create a region rule go to Analytics tab of the relevant channel.
2.Click Create in Available rules section.
3.In the next window specify the rule name.
4.In Type dropdown select Region Rule. Click Continue.
The video frame will open, where you can define the rule settings.
5.In the center of the frame there is a red rectangle. You can change its size and shape by dragging its corner points with the left mouse button until it covers the rule region (if the rule region is tetragonal by shape).
6.In order to add another corner (in case the rule region has the form of a polygon with five or more corners), double click on one of its sides in any place to form a new point. Drag it to form a new corner of the polygon.
7.Create other polygon corners and align its sides with the borders of the rule region (see the picture below).
8.Under the video check the options the analytics should react to in the rule region.
9.Motion tracks moving within the region.
10.Loitering means someone’s walking around a place during a certain time, or insignificant moving at a low speed. In order to detect such behaviour, check Loitering and specify its time.
11.To detect runnig within the region, select Speeding over… with specifying speed and time.
12.To generate an event when an object was abandoned withing the rule region check Abandoned item.
13.Save the settings by clicking Apply.

ONVIF Device Manager is optimized to control a Pan-Tilt-Zoom camera. While connecting the camera, follow the manufacturer’s instructions. The correctly connected camera is displayed in the device list.
1.Go to Web page to PTZ Node.
2.Default PTZ Speed including Pan min, Pan max, Tilt min and Tilt max
correspond to PelcoD standard. Change the settings, if necessary.
3.Specify PTZ-node address for each channel (number value). Zero value is also an address, it does not mean absence of device.
4.To save the settings, click Apply.

6.2Camera Movement Settings

2.Adjust camera position with the help of arrow buttons in the center of the screen and zoom buttons at the right top corner. This view will be used as home position.
3.Open Quick Settings section in the right lower corner of the screen.
The camera will turn back to this position each time you click Home in the left part of the screen.
5.The same way set additional camera position. In Quick Settings section enter the name of the camera new position and click Set Preset. The preset is displayed in the list in the left part of the screen.
6.In order to set the camera in preset position, select it in the list and click Go to. The camera will automatically turn to this position.
7.In Quick Settings section set tilt, pan and zoom speed.
8.Select camera move type: relative or absolute. For absolute move the exact final position is specified, for the relative – the final position is calculated basing on the current camera position.
Profile is a complex of the following settings:
• Video Source Configuration
• Video Encoder Configuration
• Video Analytics Configuration
The application allows creating profiles of different configuration, eg., a profile without video analytics, only transmitting video, or a profile supporting PTZ configuration for a separate camera. Disabling unused functions helps unload video transmission channel. To change configuration, it is enough to select another profile without changing the settings manually.
By default there are two profiles for H264 and JPEG encoders.
1.To create a new profile, click Create in Profiles tab.

2.In the next window specify the profile name and check audio and/or video source configuration.
3.Configuration of the checked source will be included in the profile. Uncheck audio configuration to reduce the load to the channel (eg., in case your device does not transmit audio).
4.To continue profile configuration click Edit.
5.In the next window check profile components you need.
6.In the right column default configuration is described. To view and change default configuration settings, click on the gray button in the corresponding line.
7.In the left window highlight a setting and click Select. The details will show in the window on the left.
8.The same way select and configure other profile components. Click Apply.
9.After the profile settings are configured, select it in the list on the left.
All the profile components will appear in the configured channel menu.
10.To delete a profile from the list, highlight it and click Delete.
Metadata is text information associated with a video analytics event. To view it, open Metadata tab of the relevant channel.
In Metadata details you can view detailed information on the selected metadata fragment.

For Metadata configuration see the picture below.
For detailed rules of filter management consult ONVIF specification http://www.onvif.org/specs/core/ONVIF-Core-Specification-v220.pdf, chapters
9.5.5 and 9.7.3.

9.Maintenance and troubleshooting
This document provides only the easiest ways of troubleshooting. If you are not sure you will manage yourself, consult our support service (support@synesis.ru phone.+7 (495) 660-77-47)
Information on what may have caused the trouble in the application is contained in System log.
1.In order to get the information about the operations on the device, go to
System log tab.
2.Select System as log type and click Get.

3.To save the information into a separate file (.txt) and click icon.
Configuration backup allows restoring the correct settings in case they have been damaged, reset or lost after the device break down. It is possible to back up all the settings, except video stream processing parameters that are stored in the form of profiles.
1.To save the current settings, go to Maintenance tab.
2.Click Backup in Configuration line. You will be offered to save the settings into a separate file with .backup extension.
When necessary, you can import the backup file with the help of Restore
button.
9.2Configuration Backup in Packet Mode
1.In order to restore configuration on several devices simultaneously, click button in the right top corner and select Batch settings restore ( button in Background tasks window).
2.In filters select the device manufacturer, model and firmware version.

3.Check only the devices requiring settings restore and click Batch Upgrade.
4.In the next window select the backup file.
5.Settings restore will start in the background mode.
6.After the restore is completed, the following message will appear.
7.In order to clear the list, click Remove all finished tasks.
9.3Firmware Upgrade (for devices by Synesis)
9.3.1Firmware Upgrade for a Single Device
Firmware version is regularly upgraded and is available to download from Synesis website (http://synesis.ru/ru/surveillance/downloads).
1.Download a file from Synesis web-site (with .bin extension), corresponding to your device.
2.Click Upgrade at Maintenance tab.
The following message is displayed:
3.You can switch the process to the background or check automatically close when finished option.
4.After the process has been finished, the following message is displayed.
Firmware update does not affect video analytics settings and other functions, so recurrent device configuration is not required.
9.3.2Firmware Upgrade in Batch Mode
ONVIF Device Manager allows upgrading the firmware in batch mode for all the devices connected.
1.Click icon in the top right corner to open Background tasks window.
2.In Backgroud tasks click .
3.In filters select manufacturer and the model of devices to upgrade.

4.Leave checked only those devices in the list that reqire upgrade.
5.Click Batch upgrade. The upgrade will start in batch mode.
6.In order to cancel firmware upgrade, click Cancel all running tasks. After the upgrade is complete, the following message will appear.
7.To clear the list, click Remove all finished tasks.
Device reboot can help repair insignificant faults of video analytics or other functions, caused by hardware failures. When you need to solve a problem with your device individually, it is recommended to reboot it first.
Click Reboot in Maintenance tab. The following message is displayed.
After the reboot the device appears in the list on the left.
During soft reset all except the network settings are discarded. Soft reset is applied in cases when the network is configured correctly, but the rest of the settings should be discarded.
Click Soft Reset at Maintenance tab. After reset the following message is displayed.
During hard factory reset all the settings are discarded. If your network settings do not coincide with the default application settings, you will have to configure the network again.
Click Hard Reset in maintenance tab. After the reset the following message is displayed.
Менеджер устройств ONVIF (ONVIF Device Manager — onvifdm) — открытая реализация клиента (приемной части) системы охранного видеонаблюдения на базе международного стандарта ONVIF. В состав приложения входит библиотека ONVIF, которая позволяет взаимодействовать с сетевыми устройствами, такими как IP-камеры, видеоэнкодеры, считыватели ключей, турникеты, датчики дыма. Менеджер устройств ONVIF и библиотека могут быть использованы при разработке коммерческого или любительского ПО, например, для удаленного наблюдения за коттеджем, определения длины очереди в магазине, фотографирования птиц.
В новой версии
- Улучшено быстродействие и стабильность
- Доработано управление профилями c гибкой настройкой конфигурации
- Реализовано управление купольной камерой
- Реализованы функции безопасности: менеджер аккаунтов с возможностью их смены без разрыва соединения, загрузка и выгрузка сертификатов
- Управление цифровыми входами-выходами устройства
- Отображение событий (метод PullPoint Subscription)
- Улучшено отображение метаданных
- Функция записи видео в файл временно недоступна
Особенности реализации
- Декодирование видео при помощи библиотеки FFMPEG
- Графический интерфейс пользователя со скинами на базе WPF
- Асинхронность реализована при помощи F# async workflow
- Многоуровневое кеширование запросов для увеличения скорости работы с IP-устройствами
Дистрибутив приложения
Готовый дистрибутив приложения для платформы Windows XP/Vista/7 можно загрузить с нашего сайта: ONVIF Device Manager v.0.9.4006.
Исходные коды
Загрузить исходные коды для Visual Studio 2010 (языки F#, C#, C++) можно на странице проекта onvifm портала SourceForge. Исходные коды распространяются на основе двух типов лицензий: 1) универсальной общественной лицензии GNU версии 2.0 бесплатно и 2) коммерческой лицензии на платной основе (для тех, кто собирается продавать свои продукты на базе библиотеки ONVIF или желает получать гарантированную техническую поддержку). В настоящий момент новая версия приложения на SourceForge еще не доступна.
Совместимость с оборудованием
Менеджер устройств ONVIF совместим с IP-устройствами, поддерживающих одноименных стандарт, например, камеры Axis и Hikvision. Наиболее полно возможности приложения раскрываются с видеоаналитическим устройством “MagicBox”, особенно по части видеоаналитики и событий. Полный список совместимого оборудования представлен на сайте форума ONVIF. Стоить отметить, что процедура сертификации оборудования очень несовершенна, и устройства рекомендуется брать на тестирование.
О стандарте ONVIF
Международный форум ONVIF (англ. — Open Network Video Interface Forum) основан компаниями “Axis Communications”, “Bosch Security Systems” и “Sony” в 2008 году с целью разработки и распространения открытого стандарта для систем физической безопасности на базе IP-протокола (IP-based security).
Стандарт ONVIF, разрабатываемый членами форума, определяет протоколы взаимодействия таких устройств как IP-камеры, энкодеры, видеорегистраторы, видеодисплеи, системы управления видео и контроля доступа.
Стандарт является некоммерческим и открыт для производителей, разработчиков программного обеспечения, системных интеграторов и конечных пользователей.
Сегодня число участников форума ONVIF превысило 300 компаний и число сертифицированных продуктов превысило 800. Де-факто стандарт доминирующим в России.
Разработчики ONVIF выбрали наиболее перспективные технологии и адаптировали их для IP-видеонаблюдения. В частности, спецификация ONVIF построена на современных веб-сервисах, описываемых языком WSDL, протоколах RTSP, SOAP, стандарте видеосжатия H.264, MPEG-4, MJPEG. Стандарт определяется следующие аспекты взаимодействия передающих устройств (IP-камеры, кодера, ip-видеосервера) с принимающими устройствами (системами управления видео, видеорегистраторы/DVR): 1) конфигурирование сетевого интерфейса; 2) обнаружение устройств по протоколу WS-Discovery; 3) управление профилями работы камеры; 4) настройка поточной передачи медиа-данных; 5) обработка событий; 6) управление приводом купольной камеры (PTZ); 7) видеоаналитика (видеоанализ);  защита (управление доступом, шифрование).
Важным преимуществом стандарта ONVIF является хорошая поддержка видеоаналитики, встраиваемой в конечные IP-устройства, например, камеры и энкодеры. Таким образом, устройства наблюдения могут осуществлять локальное детектирование, сопровождение и распознавание объектов. Эти оперативные метаданные анализа вместе с видео и изображениями будут переданы через IP-сеть по протоколам ONVIF на пульт охраны и в архив.
Стандарт ONVIF регламентирует вопросы информационной безопасности и защиты от несанкционированного доступа в сетях IP-видеонаблюдения, такие как идентификация и аутентификация клиентов, управление учетными записями и правами доступа.
В следующей таблице показаны сервисы, необходимые для каждого типа устройства. Обязательные сервисы обозначены буквой M. Если опциональная функция реализована в устройстве, то соответствующий сервис, который должен подержится, обозначен буквой C.
Сервисы устройства ONVIF версии 2.0
| Сервис ONVIF |
Передатчик (NVT) |
Хранилище (NVS) |
Дисплей (NVD) |
Видеоаналитика (NVA) |
| Устройство (Device) | M | M | M | M |
| Событие (Event) | M | M | M | M |
| Медиа (Media) | M | |||
| Привод купольной камеры (PTZ) | C | |||
| Изображение (Imaging ) | ||||
| Аналитика (Analytics) | M | |||
| Управление записью (Recording Control) |
C | |||
| Поиск по записи (Recording Search) |
M | |||
| Управление воспроизведением (Replay Control) |
M | |||
| Ввод/вывод устройства (Device IO) |
M | M | ||
| Приемник (Receiver) | C | M | M | |
| Дисплей (Display) | M | |||
| Аналитическое устройство (Analytics Device) |
M |
Стандарт ONVIF позволяется организовать взаимодействие между IP-устройствами не только в локальных, но и в глобальных вычислительных сетях (WAN). Так стандарт рассматривает сценарии межсетевого взаимодействия: 1) устройство находится в локальной сети, а клиент (принимающая сторона) находится в глобальной сети; 2) устройство находится в глобальной сети, а клиент – в локальной; 3) устройство и клиент находятся в разных локальных сетях; 4) устройство и клиент находится в глобальной сети. Для соединения устройства и клиента для перечисленных сценариев используется Прокси обнаружения (Discovery proxy).
If you want to test your IP camera to make sure it is compatible with ONVIF just use the ONVIF Device Manager. It’s FREE software (you can find it here).
Read this article to get the software running like the picture below.

What is ONVIF Device Manager?
ONVIF Device Manager is a FREE software used to test and manage network video transmitters such as IP cameras, DVRs, NVRs and Encoders which are compliant with the ONVIF protocol. It was developed by the company Synesis located in Moscow, Russia and it’s distributed under the GNU General Public License.
==> If you don’t know what ONVIF is, I highly recommend you to read the article: What is ONVIF which has a good introduction on the topic and also the article ONVIF protocol, the benefits, and drawbacks which shows in details some important information you should know.
The last version of the ONVIF Device Manager is the 2.2.5.
At least this is the last official version I could find available for downloading (just in case you have a newer version, please leave a comment below this article).
Just click the link below to download the ONVIF Device Manager 2.2.5.
The ONVIF Device Manager Interface
The interface of the software is very basic. On the left side, there are boxes to input the username and password the software should use when trying to connect to the camera and the basic information about the IP camera that was found.

Note the “Add” button on the bottom left side which allows you to input the camera IP manually in case the software didn’t find the camera automatically.
After pressing this button a new window pops up to let you input the information.
Just replace the IP address and don’t change the rest of the information that is there. As you can see in the picture, I just input the IP 192.168.2.180 so the ONVIF Device Manager can find my IP camera in the network.
If your IP camera uses another ONVIF port other than the 80, just input the port number after the IP Address and use a colon (:) to separate the information:
eg: http://192.168.2.180:8899/onvif/device_service
Note: In most cases, you don’t need to change the port number, however sometimes the IP camera comes with a different ONVIF port setup. Just check the camera manual or the network menu to make sure you have the correct info.
ONVIF Device Manager Camera Info
After adding the IP camera to the software, you can select the camera on the left side and see the information on the right side of the software.
There’s a menu on the right top and a live video preview at the bottom right.

Now it’s easy, you just to navigate through the menus to check the information you need and also see the live video stream and profiles available in the camera.
Camera live view
Just click the “live view” menu to watch the live video streaming from your IP camera. That is the proof your camera works with the ONVIF protocol.

The ONVIF Device Manager can pull different videos streaming from the IP camera with different resolution, frame rate, and compression. All depends on the configuration that is available in the camera profiles.
If you see a low-quality or choppy video stream, don’t worry because that could be related to the profile the software is pulling the video from. You just need to go the camera menu and adjust the profiles accordingly or test other profiles by just selecting them in the ONVIF Device Manager interface (more on that later).
IP camera profiles
The number of video profiles available in the IP camera depends on the make and model your using. Professional security cameras use to have a higher number of profiles available ( usually in the more expensive models).
The ONVIF Device Manager can show you which profile is being pulled from the camera and what is the RTSP command used to stream the video.
See the picture below for details.

Can you see there’s a text string at the bottom of the image ?
This one shows rtsp://192.168.2.180:554/onvif/profile2/media.smp.
That’s the RTSP command used to stream the video and you can see it contains the profile2 information, which means the software is pulling the 2nd camera profile. The video quality depends on this camera profile configuration.
ONVIF Device Manager Menus
See the information provided by the ONVIF Device Manager
Identification: All the camera details such as Name, Location, Manufacturer, Hardware, Model, Firmware, Device ID, IP, MAC, and ONVIF Version.

Time settings: It’s very important to keep the correct date and time in your devices, so they can work correctly. You can check this information here.

Maintenance: It’s possible to reset the device just by sending ONVIF commands to it. This menu shows the options for Soft Reset, Hard Reset, and Reboot.

Network settings: This menu shows everything related to the device network such as IP address, DHCP, ports, and DNS configuration.

User management: You can manage the device users from this menu, It’s possible to create, modify, delete and even backup and restore policies.

Certificates: If your device is using a secure version of the http protocol, you can manage the certificates from this menu.

System log: Check the log directly from this menu.

Relays: If your IP camera or device has I/O inputs you can see them here.

Webpage: This menu just allows you to check the camera via a web browser, a separated browser is opened to let you login and manage the camera.

Events: You can see everything is happening in the device just by looking at this menu which shows Device initialization, recording, etc.

Live Video: This screen basically shows the live video stream and the RTSP and profile information ( as explained earlier).

Video Streaming: You can change the video settings such as resolution, frame rate, compression, GOV (Group of Vectors), quality and encoding interval.

Image settings: This menu allows the configuration related to the camera image quality, such as brightness, color saturation, white balance, exposure, etc.

Camera metadata: Metadata about the events such as video analytics is shown here. The camera or device must have such features.

PTZ control: If you are using a PTZ camera, it’s possible to control it from this menu by sending ONVIF compliant commands.

Profiles: Here you can see the profiles available in the camera, the image below show an example with 7 of them (this camera allows to have up to 10 profiles).

Conclusion
You can use the ONVIF Device Manager to test your IP cameras before using it with surveillance software and platforms, so you can make sure the protocol is implemented and you can also find out which version it’s using.
Please read the other articles about ONVIF, since it’s very important to know as much as possible about this protocol. See the links below.
This post guides you through the steps of Onvif Device Manager Download. The complete download and installation processes are illustrated step by step.
Many times, we encounter issues in connecting different security surveillance devices from different manufacturers with each other. Different company devices fail to recognize and add with other manufacturer’s surveillance products.
It becomes difficult for end users, integrators, and manufacturers to comply with other security systems. To fill this gap, a common forum is developed to make every product compatible with others. This medium is known as ONVIF.
The Onvif Device Manager is important for knowing device IPs, adding devices, device management, firmware updation, security features, etc.
The Onvif Device Manager (ODM) is a software application. It is used for managing CCTV Devices from different manufacturers. With its help, these security surveillance devices can talk with each other.
You will get the complete information, features and installation to operation procedure in this article. The demonstration of every function is given to guide users to use the Onvif Device Manager Tool to its full capacity. Before going for these steps, let’s know some basics about ONVIF.
What is ONVIF?
The full form of ONVIF is Open Network Video Interface Forum. This forum is created to standardize different IP-based products from different industries. Different IP-based products mean IP CCTV Cameras, NVRs, Video Management Software, etc.
ONVIF develops and maintains standards from different manufacturers for communication of their devices. It ensures the interoperability of these products seamlessly.
ONVIF simply standardizes products irrespective of their organization and makes their connectivity and expansion easier. This way CCTV industry grows and encourages innovation within the industry.
What is ONVIF Device Manager?
ONVIF Device Manager (ODM) is a software application used for managing IP-based security cameras, network video recorders (NVRs), and other surveillance devices that comply with the ONVIF standard.
It is an open forum for different security surveillance industries to make their IP products interoperable. They can communicate, support and function with one another. Onvif Device Manager is free software. It can be downloaded and used by any user.
The journey of ONVIF has been very interesting. It was founded in 2008 by Axis Communications, Bosch Security Systems, and Sony Corporation.
It was designed and developed by akolomentsev, andreyvrana, loganabbott, michaelkuz, nptitsyn, and sergeyhilkevich developers. ONVIF was first introduced in the security industry in late 2008. It has been updated many times since its inception. It is a compact and powerful software with a 22MB file size.
What are the Special Features & Functions of ONVIF Download Manager?
Here, we are mentioning some key features of this ODM Software.
1- Device Discovery
It discovers ONVIF-compliant devices on the network. It further makes the device addition and management process easier.
2- Device Management
It helps in managing and maintaining devices. You can configure the devices and customize their various functions like network settings, device settings, etc.
3- Live View
You can monitor your connected devices live from any remote place. It gives you all the opportunity to be connected with your people and places from anywhere.
4- Recording Configuration
You can schedule the device recording system. You can set it for manual recording or motion detection recording. You can set the recording location and video format as per your choice.
5- Event Handling
You can select events and activities as per the level of their sensitivity. You can detect motion and audio. You can set the alarm and message frequency at the time of threats.
6- PTZ Control
Through this app, you can manage CCTV devices like PTZ cameras. You can check the zoom-in on objects, pan the camera horizontally, and tilt it vertically from your remote locations.
7- Firmware Management
This ODM has all the capabilities to upgrade firmware. It can easily manage the firmware of added cameras and NVRs and upgrade them.
8- Security Features
ODM generally contains security characteristics such as user authentication and encrypted communication. This way it ensures the integrity and confidentiality of data transmitted between the software and devices.
9- Device Information
It provides all the information about the device to users. Information such as device serial number, IP address, firmware, model number, etc can be known by this Onvif download manager.
10- System Log
It retains all the log information in its memory for troubleshooting and auditing purposes. This information is helpful in checking the proper functioning of the system events within the device.
These are some of the main functions of this product.
This Onvif Device Manager Software is compatible with Windows, Mac and Linux Operating Systems. You can download and install it on these systems and easily operate them.
Here, the download button is shared for this software. You can get it by clicking the button. It is given in a compressed file format. You have to decompress it to install it on your system. The complete installation procedure and the functions of every option are demonstrated below.
It will guide you through every step given in the software. The complete elaborated analysis is narrated for better understanding and comprehension.
Get the ONVIF Device Manager Link Button.
Onvif Device Manager Download & Complete Operation Steps
We have given every step and option of the ODM here. They are supported by images for better understanding.
Step 1- Installation of Onvif Device Manager on Windows OS
The download button is shared. You have to click the button to get the executable files. They are in a compressed file format. Decompress them and double-click the application file.
You get the following page.
It represents that Windows is configuring files. After that, the installation begins automatically. As you can see in the below picture.
The file installation process is in progress. When it finishes the installation, you get the icon on the desktop.
As you can see in the picture, the ODM is installed correctly. This way the installation process is complete.
Step 2- Add Devices and Operate their Features
When you double-click the icon, the interface of the software opens. This page is the homepage of the ODM.
You have to add the device for various operations. For that, you have to log in to it by their Username and Password.

Mention the username and password to connect the camera or NVR. When you enter the respective username and password of the security devices, you get them connected with the app.
The image shows that the device is connected. In our case, we have connected the TVT IP Camera with the ONVIF APP.

Double-click the icon and get the following window on the screen.

As you can see in this figure, the device is added. When you click the marked area, the connected device and its features appear on the screen.
You can see here the connected device or devices show up on the screen. Their features and functions also surface on the screen.
This way you can add cameras and monitor them on the screen.
Step 3- Set Recording, Playback & Snapshots Features
Go to the homepage and find the setting option.

When you click the settings option as shown in the image, you get the following window.

There are options given for recordings, playbacks, and snapshots. You can set them as per your requirements. You can set it separately for individual devices also.
This you can check playbacks from remote areas, you can take snaps at will, and store recordings. It is easy to operate.
Step 4- Manage the Features & Functions of the Connected Device(s)
In this step, we will give you a complete and detailed demonstration of its various characteristics.
Here, when you click the ‘Identification’ option, this page appears. It gives the connected device details.

You can rename the location and know the device’s IP address and model number. It also tells you about the firmware device serial number and Mac address. You can mention the location and know the Onvif version.
When you click the time settings option, this page surfaces.

Here, you can manually set the time zone and standard time. If the device is online it can adjust its time automatically.
When you click the maintenance option, you get this page. Here you can customize your device or go for the factory reset option.

If you have to reset the device to the company’s standards, you can do it here. You can reboot the device and you can also upgrade the firmware.
When you click the ‘Network Settings’ option, you get the whole set of options.

You can reset the IP address, port, and DNS server. You can do them and then press the apply button to reset these options.
When you click the ‘User Management’ option, you get the following page. Here, you can reset the username and password of the device.

The reset of the username and password is easy. You can easily do them.
When you click the ‘Certificates’ option, you get this page.

It shows the particular device instruction and specification report. You can read it for information.
When you click the web page, this page appears on the screen.
It shows you the added devices on the screen.

You have to mention the username and password to show the camera on the screen. The app connects the camera for monitoring.

As you can see here, you can see your device and do monitoring. You can also make adjustments for better viewing.
When you click the ‘Events’ option, this page emerges on the screen.

This feature gives you the option to set motion detection, motion alarm, push notifications, etc. These are smart features. They make the surveillance more protected.
Step 5- Manage the Image and Video Quality of the Device
When you click the live video option, you get this window. It shows all the connected devices on a single screen.

With this feature, you can easily view all the connected devices with this ODM App.
When you click the ‘Video Streaming’ option, you get the devices on the screen.

You can reset the resolution of the device or devices, you can set their frame rates per second here. This way, you can adjust the image and video quality. You can also adjust the recording standards.
When you click the image settings function, you get a page with multiple settings options.

You can adjust the colour, sharpness, brightness, contrast, etc. of the images.
When you click the ‘Analytics’ option, this page comes on the screen.

When you press the analytics button, you get all the technical information regarding your device.
When you select the profiles options, the ONVIF profile features open. It has various profiles for images, videos, audio, etc. You can adjust them as needed and benefit from them.

This way you download, install, and operate the ONVIF Download Manager Software. The complete and detailed analysis is mentioned here to guide users in its proper operations.
Conclusion
The ODM Download and other functions are demonstrated in this post. The download button is given to get the app and use it accordingly. It has a very vast list of features and functions. You can see all of these options and their functions with images.
Please share your opinion and queries about the software. You can send them in the comment section. Your suggestions and queries are important to us. We will respond to you.
Thank You.
What is ONVIF Device Manager?
It is software that represents ONVIF-compliant devices, their IPs, configurations, analytics, etc. It is a powerful app for Onvif-compliant device monitoring too.
What is ONVIF used for?
The full form of ONVIF is Open Network Video Interface Forum. Its main objective is to provide interfaces to different IP-based cameras and NVRs. It adds different manufacturers’ IP-based cameras to each other. It is also used for other security devices like access systems.
Is ONVIF free?
Yes, ONVIF is totally free. It can be used and circulated without any charge or issue.
How do I know if my camera is ONVIF compatible?
You have to connect the devices to ONVIF-based software. Those products that are ONVIF compatible will show up on the ONVIF interface.
Is ONVIF secure?
The TLS (Transport Layer Security) certifies the authenticity of the Apps. It has certified that the ONVIF is secure against threats, tampering, and eavesdropping.
How do I connect to ONVIF?
You can easily connect to ONVIF Device Manager Software by following these steps.
Log in to your camera’s admin interface. …
Tap on “Configuration” then go to “Settings”
Tick “Your Device” and “Enable ONVIF”, followed by “Save”
Tap on “Add” to add a new user.
This way you will connect your device to Onvif.
Who created ONVIF?
The journey of ONVIF has been very interesting. It was founded in 2008 by Axis Communications, Bosch Security Systems, and Sony Corporation. It was designed and developed by akolomentsev, andreyvrana, loganabbott, michaelkuz, nptitsyn, and sergeyhilkevich developers.
How do I enable ONVIF on my IP camera?
You have to log in to the device to the ONVIF forum and then go to the settings option. There you will find the option to enable the ONVIF for your device.
What is ONVIF compatibility?
The ONVIF compatibility means the communication of different security surveillance devices from different manufacturers. It further means they can be added together and compatible with each other.
What is ONVIF software?
ONVIF (Open Network Video Interface Forum) is a forum where different IP-based security surveillance devices from different manufacturers can communicate with each other.