
View the manual for the Novation Launchkey Mini MK3 here, for free. This manual comes under the category midi keyboards and has been rated by 8 people with an average of a 8.4.
This manual is available in the following languages: English. Do you have a question about the Novation Launchkey Mini MK3 or do you need help?
Ask your question here
Novation Launchkey Mini MK3 specifications
Below you will find the product specifications and the manual specifications of the Novation Launchkey Mini MK3.
The Novation Launchkey Mini MK3 is a MIDI-keyboard that offers a compact and portable solution for music producers and performers. With its small form factor and lightweight design, it is easy to carry and ideal for on-the-go creativity.
The keyboard features 25 velocity-sensitive mini keys, allowing for precise and expressive playing. It also includes eight rotary knobs, 16 RGB backlit pads, and dedicated transport controls, providing hands-on control over various aspects of music production.
The Launchkey Mini MK3 is designed to seamlessly integrate with popular music production software, making it compatible with both Mac and PC systems. Additionally, it supports iOS devices, expanding its versatility to mobile music production.
With its extensive control options, the Launchkey Mini MK3 enables users to manipulate virtual instruments, effects, and mixing parameters. The RGB backlit pads can be used for triggering drum samples or launching clips, while the rotary knobs offer real-time control over parameters such as volume, filters, and effects.
Despite its small size, the keyboard does not compromise on build quality. It is constructed with durable materials, ensuring reliability during extended use. The mini keys provide a comfortable playing experience, while the overall design is intuitive and user-friendly.
Overall, the Novation Launchkey Mini MK3 offers a compact and feature-rich MIDI-keyboard option for musicians and producers. With its portable design and extensive control capabilities, it proves to be a valuable tool for creative expression and music production.
General
| Brand | Novation |
| Model | Launchkey Mini MK3 | NOVLKMIN3 |
| Product | midi-keyboard |
| Language | English |
| Filetype | User manual (PDF) |
Frequently Asked Questions
Can’t find the answer to your question in the manual? You may find the answer to your question in the FAQs about the Novation Launchkey Mini MK3 below.
How do I connect the Novation Launchkey Mini MK3 to my computer?
Simply connect the USB cable from the keyboard to your computer’s USB port. The keyboard will automatically be recognized by your computer as a MIDI device.
How do I assign the knobs and buttons on the Launchkey Mini to control specific parameters?
To assign the knobs and buttons, you need to use the Novation software called «Components». Download and install it from Novation’s website. Once you have opened Components, you can easily assign the desired parameters to the knobs and buttons using the intuitive interface.
How can I change the velocity and sensitivity settings of the Launchkey Mini?
You can adjust the velocity and sensitivity settings directly on the keyboard. Press the «Velocity» button followed by the corresponding pad to select the desired velocity sensitivity. Use the same process to adjust the overall sensitivity of the pads.
Can I use the Launchkey Mini MK3 with mobile devices such as smartphones or tablets?
Yes, you can use the Launchkey Mini with mobile devices. However, you will need an appropriate USB adapter or cable to connect the keyboard to your mobile device. Once properly connected, you can use the Launchkey Mini with compatible music production apps on your mobile device.
How do I update the firmware of the Launchkey Mini MK3?
To update the firmware, you need to download and install the «Novation Components» software from Novation’s website if you haven’t already. Once installed, connect the Launchkey Mini to your computer and open the Components software. It will prompt you if there is a firmware update available for your keyboard, and you can proceed with the update process from there.
Is the manual of the Novation Launchkey Mini MK3 available in English?
Yes, the manual of the Novation Launchkey Mini MK3 is available in English .
Is your question not listed? Ask your question here
1
Novation
A division of Focusrite Audio Engineering Ltd.
Windsor House
Turnpike Road
Cressex Business Park
High Wycombe
Buckinghamshire
HP12 3FX
United Kingdom
Tel: +44 1494 462246
Fax: +44 1494 459920
e-mail: sales@novationmusic.com
Web: http://www.novationmusic.com
Trade marks
The Novation trade mark is owned by Focusrite Audio Engineering Ltd. All other brand,product and company names
and any other registered names or trade marks mentioned in this manual belong to their respective owners.
Disclaimer
Novation has taken all possible steps to ensure that the information given here is both correct and complete. In no
event can Novation accept any liability or responsibility for any loss or damage to the owner of the equipment, any
third party, or any equipment which may result from use of this manual or the equipment which it describes. The information provided in this document may be modified at any time without prior warning. Specifications and appearance
may differ from those listed and illustrated.
COPYRIGHT AND LEGAL NOTICES
Novation is a registered trade mark of Focusrite Audio Engineering Limited. Launchkey Mini is a trade mark of Focusrite Audio Engineering Plc.
2019 © Focusrite Audio Engineering Limited. All rights reserved.
2

Contents
Introduction Page 4
●Key Features
●What’s in the box
●Getting started with your Launchkey Mini [MK3]
●Getting Connected
●Launchkey Mini Setup examples
●Hardware Overview
●Rear view
●Top Panel
Using the Launchkey Mini [MK3] Page 10
Working with Ableton Live
●Setup
●Session Mode
●Launching Clips
●Launching Scenes
●Stop, Solo, Mute
●Record/Capture MIDI
●Playing and recording drums
●Using Ableton Live’s Mixer
●Volume and Pan
●Sends
●Device
●Installation
Arp Page 21
●Arpeggiator Rotary Knobs
●Tempo
●Swing
●Gate
●Mutate
●Deviate
●Arp Modes
●Arp Rates
●Arp Octaves
●Arp Rhythms
●Arp Latch
●Arp Pads
Fixed Chord Page 25
Custom Modes and Components Page 26
●Setting up Custom Modes
Working with Apple Logic Pro X Page 27
Working with Reason 10 Page 31
Working with HUI Page 32
(Pro Tools, Cubase)
Vegas mode Page 35
32

Introduction
The Launchkey Mini [MK3] is Novation’s most portable MIDI keyboard controller. Though compact
in size, Launchkey Mini is packed with powerful features and a streamlined workflow that will
elevate your music production and performance.
Launchkey Mini integrates perfectly with Ableton Live (and other DAWs) for both production and
performance. You can navigate and control Live’s Session View, play and record clips, adjust
effects and much more without ever looking at your computer. Additionally, we provide you with a
license for Ableton Live Lite should you need one.
Launchkey Mini features a creative arpeggiator (‘Arp’), as well as ‘Fixed Chord’ mode – both of
which make finding new musical ideas easier. Launchkey Mini’s pads bring your Ableton Session
to your fingertips in full RGB colour, so you know exactly which clips you’re launching. Finally, you
can make Launchkey Mini the perfect controller for your studio or on the go with Custom modes,
where you can customise knobs and pads using Novation Components.
The Launchkey Mini also features a standard TRS MIDI Out 3.5mm jack for connecting to your
hardware synths and drum machines. This means you can use many of the Launchkey Mini’s
functions without a computer!
If you need any support please contact us at support.novationmusic.com.
Key Features
● Ableton Live integration – Launch clips and scenes, control Live’s mixer, play instruments
and Drum Racks, capture MIDI, and more
● Integration with other DAWs (Apple Logic Pro X, Propellerhead’s Reason, etc. and HUI)
● Connect to your hardware with a standard TRS MIDI Out 3.5mm jack
● 25 velocity-sensitive mini-keys
● 16 velocity-sensitive RGB pads
● 8 rotary knobs
● Powerful and creative Arpeggiator for generating ideas quickly
● Fixed Chord mode
● Play and Record transport control
● Custom modes for user-defined mappings of knobs and pads
What’s in the box
● Launchkey Mini
● USB Type-A to B cable (1.5 meters)
● Safety Instructions
* TRS MIDI Out 3.5mm to MIDI DIN converters are available for purchase at
https://novationmusic.com.
4
Getting started with your Launchkey Mini [MK3]
We’ve made getting up and running with Launchkey Mini as easy as possible, whether you’re a
brand new beatmaker or a seasoned producer. Our ‘Easy Start Tool’ provides a step-by-step guide
on getting set up that is tailored to your needs.
We’ll give you exactly what you need, whether you’ve never made music before, or if you just want
to download your included software.
When connecting Launchkey Mini to your computer, it will appear as a ‘Mass Storage Device’, just
like a USB drive. Open this up and click the link ‘Click Here to Get Started.url’.
This will open our online Easy Start Tool, which will get you up and running, or take you straight to
your included software – you choose!
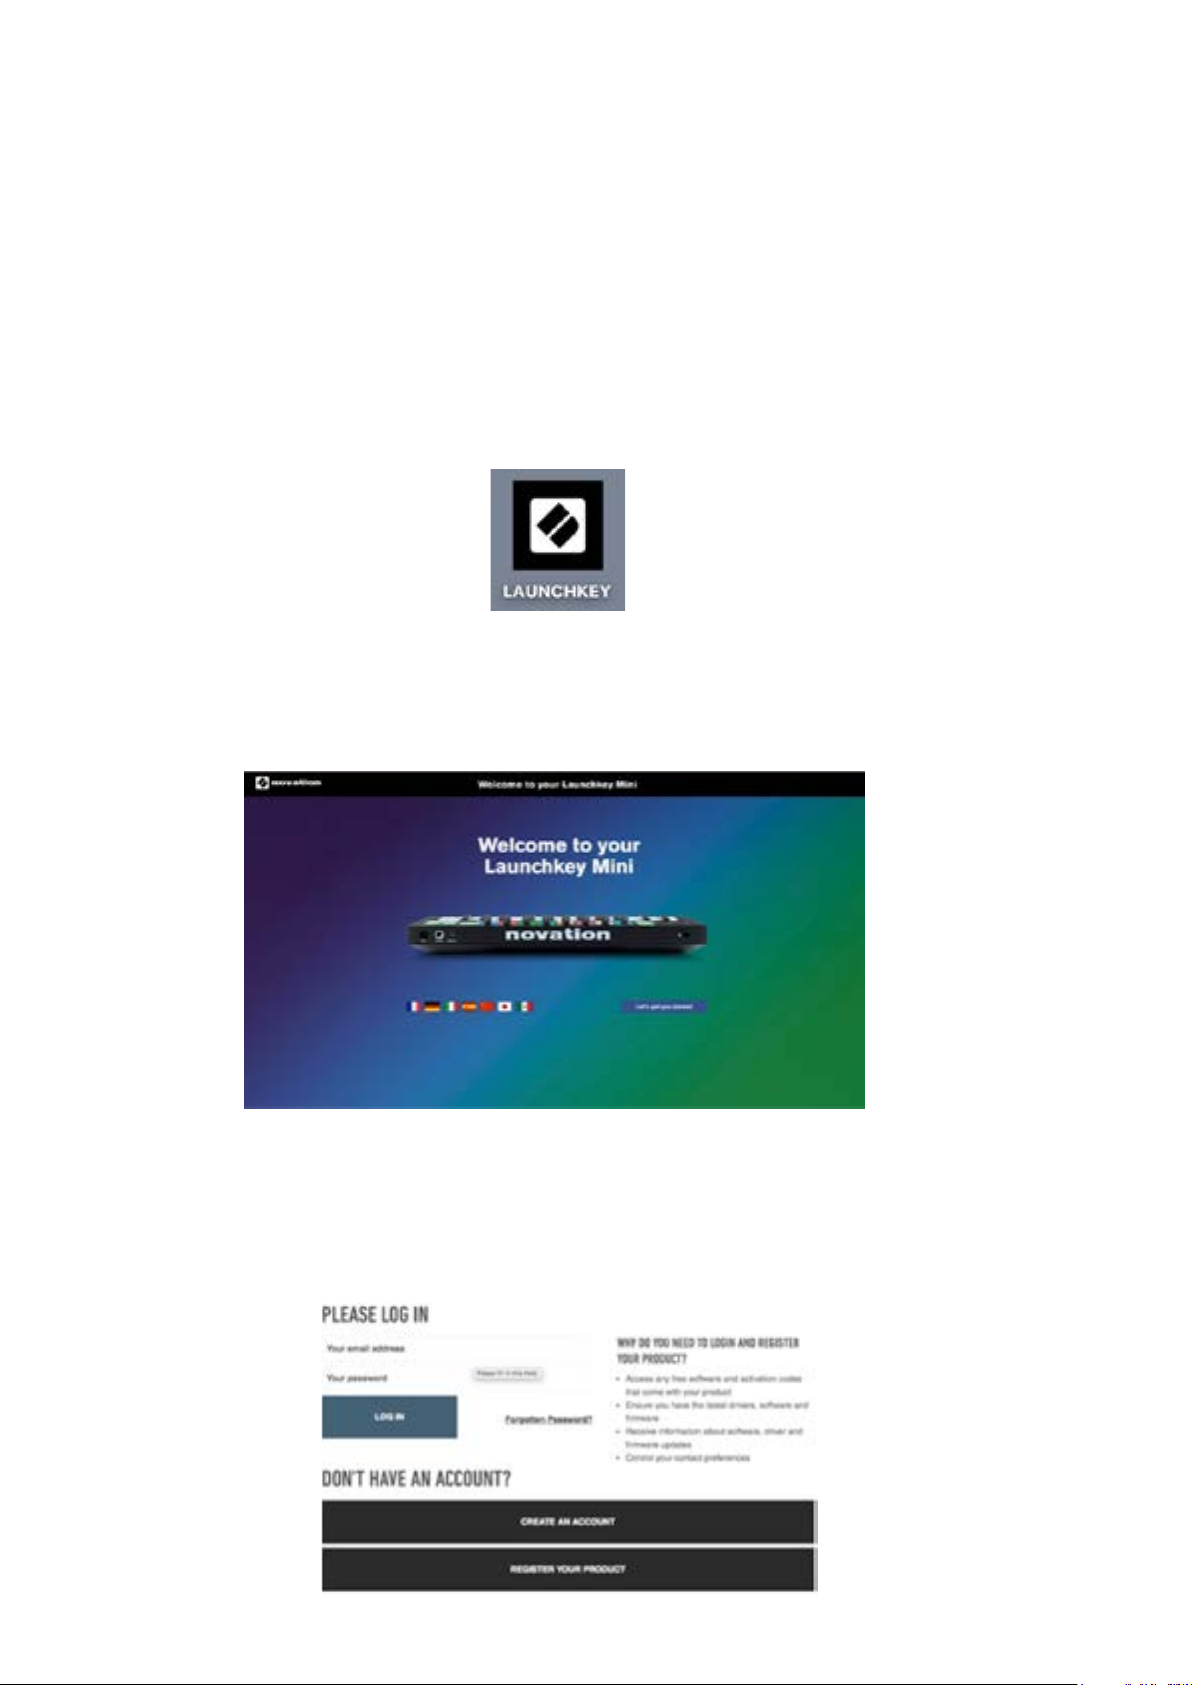
Mass Storage Device icon
As part of this process, you may register your Launchkey Mini [MK3] to get access to your
included software. We give you everything you need to start making tracks.
Easy to Start Tool Welcome page
Alternatively, you can also register your Launchkey Mini by going to
https://customer.novationmusic.com/register (pictured below). You’ll then need to make an account
and enter the serial of your Launchkey, which will give you access to the bundled software.
54
Getting Connected
ios
Stop
Solo
Mute
Arp Fixed
Chord
Transpose
Shift
Pitch
Modulation
Arp
Tempo
Swing
Gate
Mutate
Channel
Octave
Program Change
Session
Drum
Custom
Device
Arp Mode
Up Down
Up/Down Played Random Chord
Mutate
Rate
Octave
1/4 1/8
1/16 1/32
Triplet 1 2 3 4 o oxo oxxo
Rhythm Latch
Deviate
Volume Pan Sends Custom
Random Deviate On/Off
Track
Capture MIDI
+
—
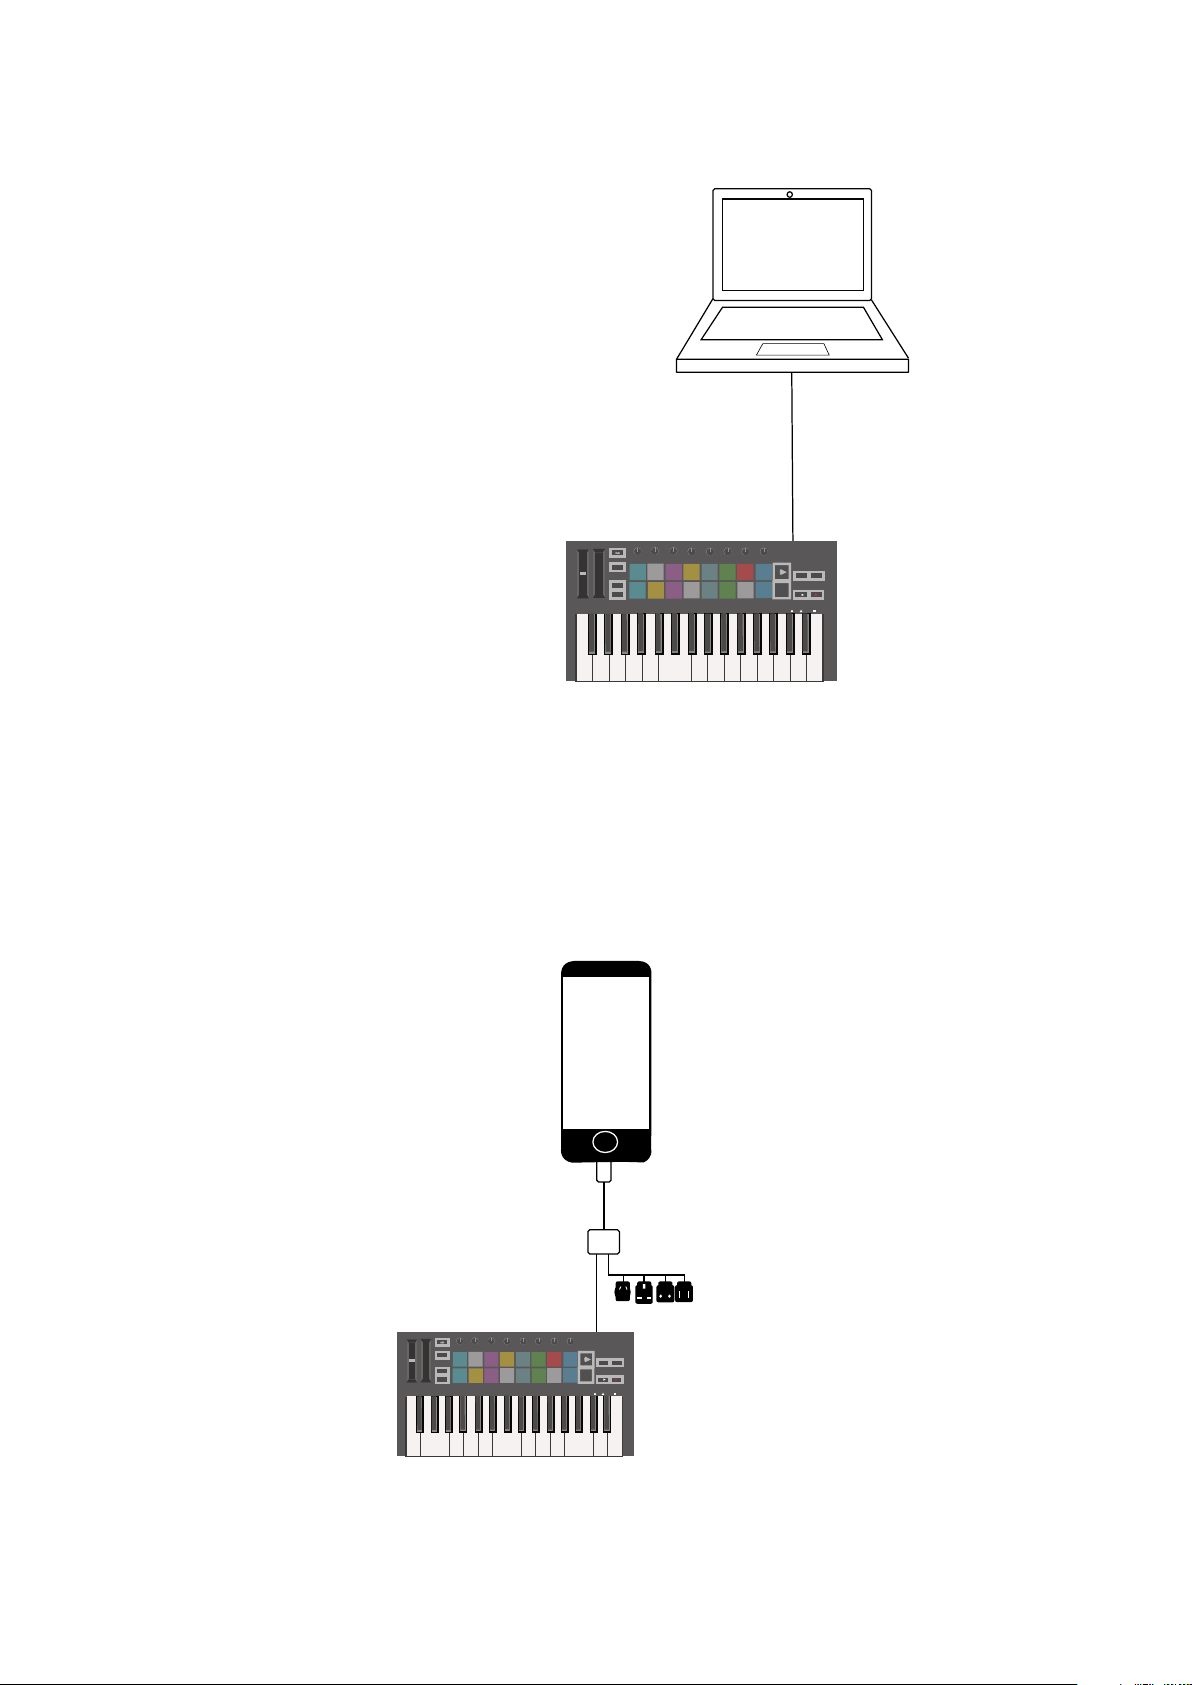
Connecting to a Computer
Pitch
Arp Mode
Up Down
Modulation
Shift
Transpose
Channel
Octave
+
—
Program Change
Up/Down Played Random Chord Mutate
Arp
Swing Gate
Mutate
Tempo
Session Drum
Rate
Deviate
Volume Pan Sends Custom
Device
Custom
Octave
1/4 1/8 1/16 1/32 Triplet 1 2 3 4 o oxo oxxo
Rhythm Latch
Random Deviate On/Off
Arp Fixed
Chord
Track
Stop
Solo
Mute
Capture MIDI
The Launchkey Mini is bus-powered, meaning it turns on as soon as you connect it to your
computer with a USB cable.
Connecting to Mobile devices
iOS
To operate the Launchkey Mini with an iOS device, use Apple’s Lightning to USB 3 Camera
Adapter with a separate Lightning charger.
6
Android
Android
Android
Pitch
Arp Mode
Up Down
Modulation
Up/Down Played Random Chord
Arp
Shift
Transpose
Channel
Octave
+
—
Program Change
Swing Gate
Mutate
Tempo
Session
Mutate
Deviate
Volume Pan Sends Custom
Device
Drum
Custom
Rate
Octave
1/4 1/8 1/16 1/32 Triplet 1 2 3 4 o oxo oxxo
Rhythm Latch
Random Deviate On/Off
Arp Fixed
Chord
Track
Stop
Solo
Mute
Capture MIDI
To operate the Launchkey Mini with an Android device we recommend a USB OTG
to USB adapter.
Using as a standalone MIDI controller
Arp Mode
Pitch
Modulation
Up Down
Up/Down Played Random Chord Mutate
Swing Gate
Tempo
Arp
Shift
Session Drum
Transpose
Channel
Program Change
Octave
+
—
Custom
Rate
1/4 1/8 1/16 1/32 Triplet 1 2 3 4 o oxo oxxo
Mutate
Deviate
Volume Pan Sends Custom
Device
Octave
Rhythm Latch
Random Deviate On/Off
Arp Fixed
Chord
Track
Stop
Solo
Mute
Capture MIDI
If you want to use the 3.5mm MIDI output on the Launchkey Mini without a computer, you can
power the unit with a standard USB power supply (5V DC, minimum 500mA).
Note that the Launchkey Mini is only compatible with Circuit using TRS MIDI Type A adapters.
Many other Novation products (such as Launchpad Pro) will also require a Type A adapter to
properly communicate with the Launchkey Mini.
76

Hardware Overview
Stop
Solo
Mute
Arp Fixed
Chord
Transpose
Shift
Pitch
Modulation
Arp
Tempo
Swing
Gate
Mutate
Channel
Octave
Program Change
Session
Drum
Custom
Device
Deviate
Volume Pan Sends Custom
Track
Capture MIDI
+
—
1
2
3
4
5
6
7
8
9
10
Arp Mode
Up Down
Up/Down Played Random Chord
Mutate
Rate
Octave
1/4 1/8
1/16 1/32
Triplet 1 2 3 4 o oxo oxxo
Rhythm Latch
Random Deviate On/Off
1. Pitch and Modulation touch strips for bending pitch or adding modulation.
2. Press Shift and other buttons to access secondary functions (in grey).
3. Transpose lets you transpose your keyboard plus or minus 11 semitones. Press Shift and
Transpose to select MIDI Channel output for the keyboard.
4. Octave + and — buttons move the keyboard up or down across 7 octaves (C-1 to C5).
5. Rotary knobs control hardware, software parameters, or settings on the Launchkey itself.
6. Pads are great for triggering clips in Ableton Live’s Session View and playing drums.
Holding Shift lights up the top row of pads, with the current pad mode lit the brightest. You
can then switch between the 3 pad modes:
● Session – For triggering clips and navigating Live’s Session View.
● Drum – For playing drums with the velocity-sensitive pads.
● Custom – For playing a custom selection of notes with personalised colours.
Edit custom modes on https://components.novationmusic.com/launchkey-mini-mk3
7. Press the Arp button to enable the Arpeggiator.
8. While holding the Fixed Chord button, press and release the keys that you wish to be
part of the stored, ‘fixed’ chord.
9. This button controls your DAW’s playback.
10. The Record button starts the recording process in your DAW.
8

Rear view
Top Panel
98
Using the Launchkey Mini [MK3]
The Launchkey Mini is designed to work seamlessly with Ableton Live, offering deep integration
through powerful production and performance controls. Launchkey Mini also boasts a powerful
arpeggiator (‘Arp’) and a ‘Fixed Chord’ mode – both of which can be used with Live, other DAWs,
or standalone with your outboard gear. In addition, you can modify the Launchkey Mini to suit your
needs with Custom Modes. Continue reading for explanations of all of Launchkey Mini’s functionality.
Working with Ableton Live 10
Installation
If you don’t yet own Ableton Live 10, register your Launchkey Mini at novationmusic.com/register
to download and install your included copy of Ableton Live 10 Lite. If you’ve never used Ableton
Live before, we recommend visiting our Easy Start Tool (see ‘Getting Started with your Launchkey
Mini [MK3]’). There you’ll find videos covering installation, the software’s basic features, and how
to get started making music with your Launchkey Mini.
Setup
With Ableton Live installed, get your Launchkey Mini up and running by plugging it into your Mac or
PC’s USB port. When you open Live your Launchkey Mini will be automatically detected and enter
Session mode.
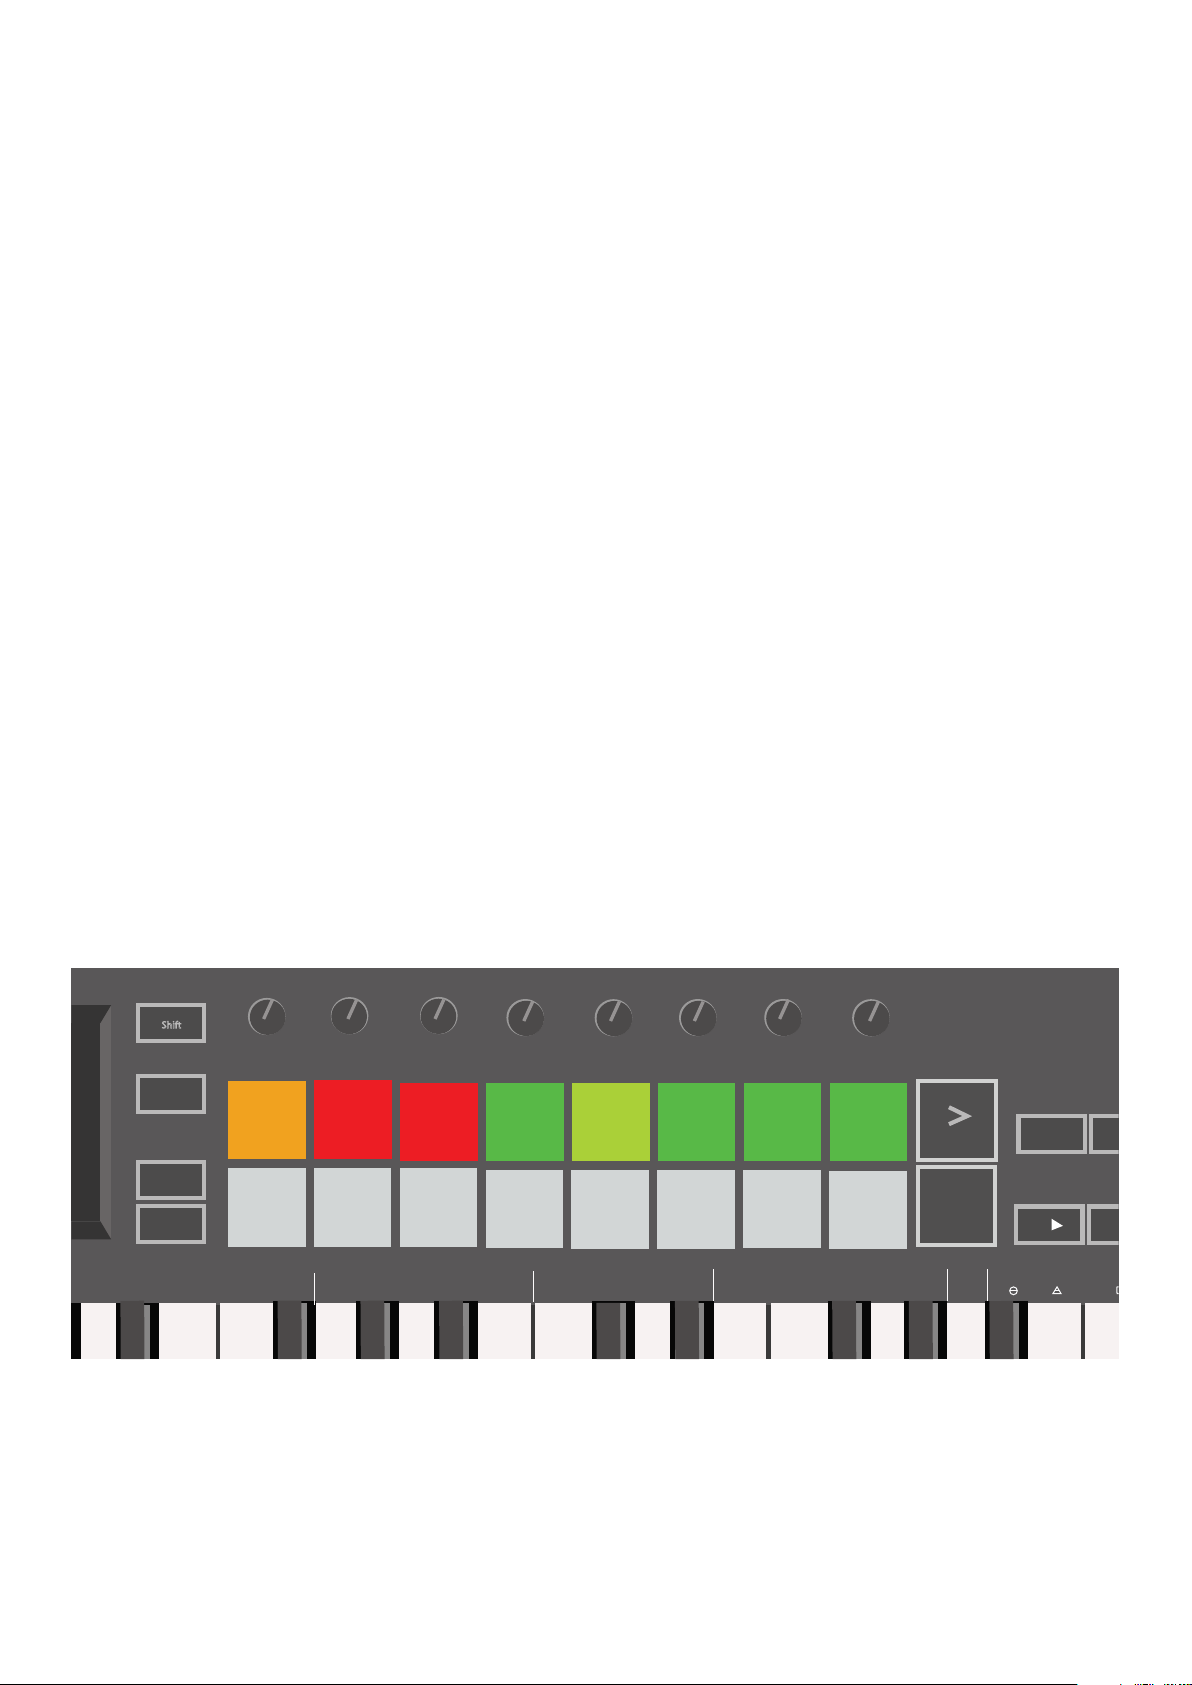
If you press Shift on the Launchkey your pad lights should look like the image below. The first 3
pads (orange) select pad behaviour, while the 5 pads to the right (green) select knob behaviour.
Tempo
Arp
Shift
Session Drum
Transpose
Channel
Octave
+
—
Program Change
Up/Down Played Random Chord Mutate
Swing Gate
Custom
Rate
1/4 1/8 1/16 1/32 Triplet 1 2 3 4 o oxo oxxo
Mutate
Device
Deviate
Volume Pan Sends Custom
Octave
Rhythm Latch
Stop
Track
Solo
Mute
Random Deviate On/Off
Hold Shift to see these default pad colours
If your pads do not resemble the image above you’ll need to configure Live’s Control Surface
Preferences. To do this, find the ‘Link/MIDI’ Preferences menu in Ableton Live:
Windows: Options > Preferences > Link/MIDI
Mac: Live > Preferences > Link/MIDI
10
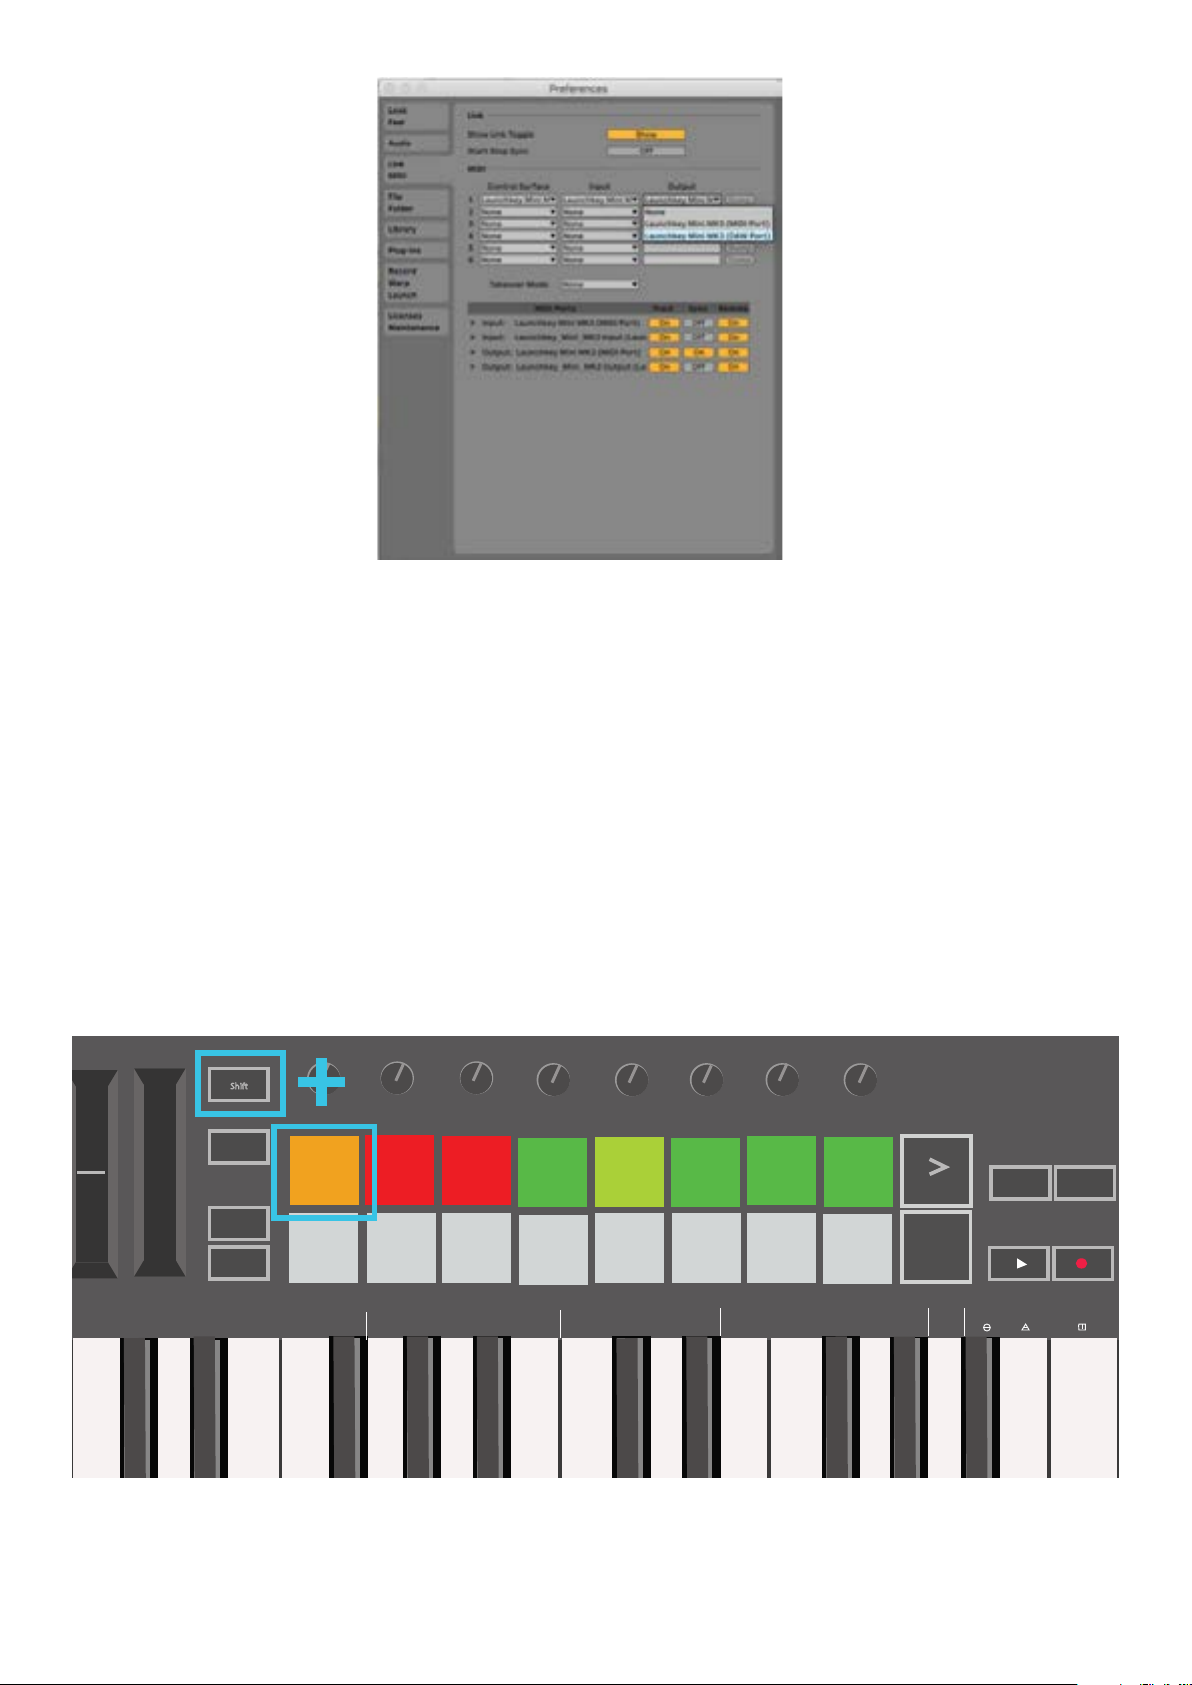
In the Link/MIDI tab you’ll need to copy the settings shown above. First, select the Launchkey
Mini [MK3] from the Control Surface menu. Then, under Input and Output select Launchkey Mini
(Launchkey Mini InControl) or Launchkey Mini MIDI IN2 (Windows). Finally, match the Track, Sync
and Remote settings.
If you’re having trouble getting your Launchkey Mini working with Ableton Live, be sure to visit our
Easy Start Tool for video explanations.
Session Mode
To access Session mode on the Launchkey Mini hold Shift and press the Session pad
(the top left pad).
Pitch
Up Down
Modulation
Arp
Shift
Transpose
Channel
Octave
+
—
Program Change
Up/Down Played Random Chord Mutate
Tempo
Session Drum
Swing Gate
Rate
1/4 1/8 1/16 1/32 Triplet 1 2 3 4 o oxo oxxo
Custom
Mutate
Device
Deviate
Volume Pan Sends Custom
Octave
Rhythm Latch
Stop
Solo
Mute
Random Deviate On/Off
Arp Fixed
Chord
Track
Capture MIDI
1110
Loading…
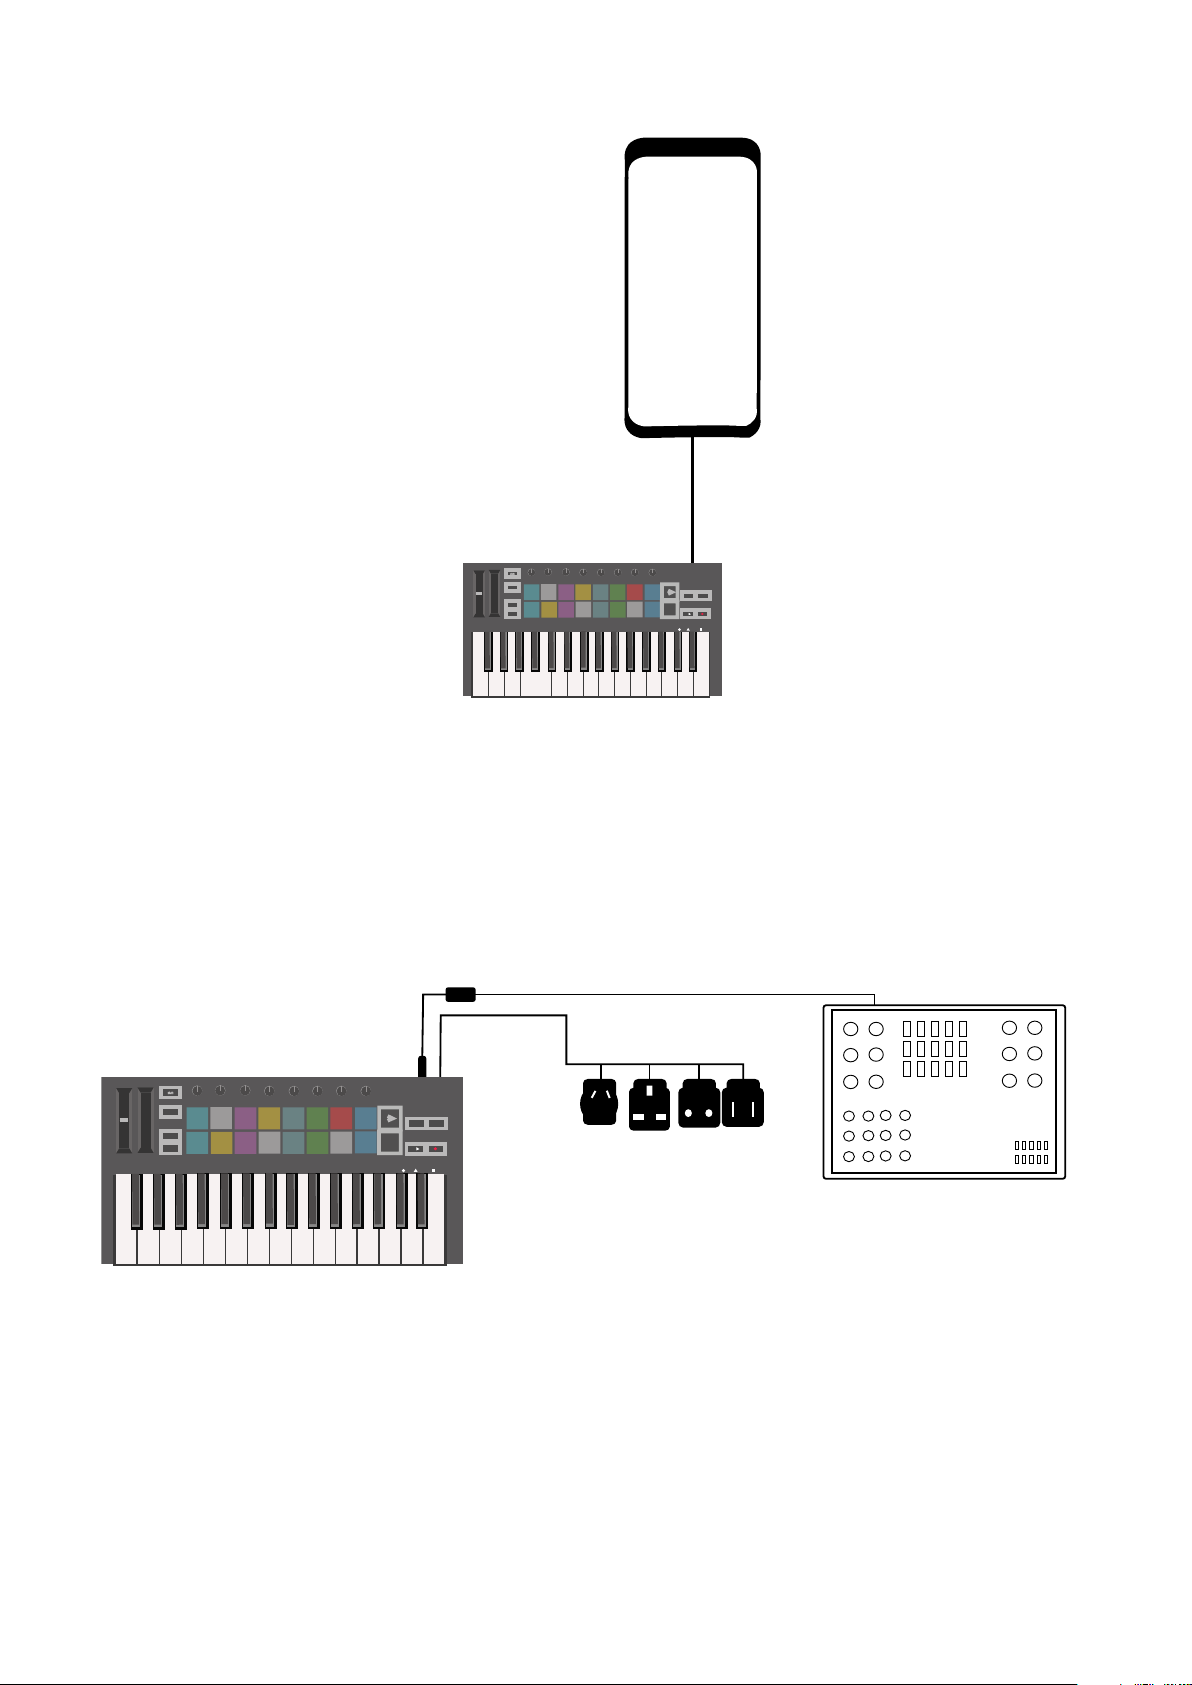
Novation has recently launched an updated version of their Launchkey Mini (Mk3) MIDI keyboard controller and it seemed like an excellent companion to the Novation Circuit groovebox I already owned.
The Launchkey Mini Mk3 is reasonably priced, it’s from the same maker as the Circuit, and they look very good together: both of them are exactly the same height and are made of the same materials.
My goal was to use both devices side by side, using the Circuit’s controls to arrange and manipulate the sound, while using the Launchkey to play the actual notes. That means I don’t need to map each and every control of the Circuit into the Launchkey, since I’m using the Launchkey mostly to have a «regular» keyboard to play on (as well as using the arpeggiator functionality), while using the Circuit to control the sound of each patch, the session and the mixer.
The Setup
I’m running the most recent firmware on both devices:
- Circuit: v1.8
- Launchkey Mini Mk3: v1.01
There are two ways to connect the devices: (i) using MIDI cables for a hardware-only setup, or (ii) using an intermediary computer as an USB MIDI host.
The Launchkey only has a MIDI Out connector for hardware setups, but it appears to also support MIDI In when using it through USB.
Make sure that the Circuit has the correct settings, refer to
this cheatsheet by /u/kikomn. Turn on the Circuit holding the Shift button to access the settings menu, and save the settings by pressing Play.
Hardware only with MIDI
As MIDI devices have been shrinking in size, a new MIDI plug standard has been developed around a common 1/8″ (3.5mm) TRS connector (think headphones), this means that in order to connect with regular MIDI devices an adaptor is required. Also, there are 2 variations of this new plug: Type A and Type B. And both look exactly the same.
The Circuit includes 2 TRS-to-DIN breakout adaptors, and being a slightly older device, it uses Type B. The Launchkey Mini does not include any breakout adaptors, but it uses Type A.
This means I was not able to use the 2 adaptors included in the Circuit to connect it to the Launchkey, since they require different types on each end. Instead, I ordered a Type A breakout cable from Amazon, and I used one Type B adaptor from the Circuit with a regular MIDI cable.
In other words, the required chain would be:
Circuit MIDI In <-> Type B TRS MIDI adaptor <-> Standard MIDI cable <-> Type A TRS MIDI adaptor <-> Launchkey Mini Mk3 MIDI Out
However, what I ended up doing was purchasing a 3.5mm TRS cable (standard audio «AUX» cable), which I then cut in half, rewired 2 cables and soldered everything back again. It’s a super simple soldering project that shouldn’t take you more than a few minutes, just make sure to verify the connections with a multimeter. The end result is a much smaller cable that doesn’t need any adaptors.
Here’s a great post by Eric Skogen that has all the schematics you would need and a more detailed explanation of the «Mini MIDI» standard, but in summary, you have to identify the Tip and Ring cables and switch them up.
Software based (USB Host)
Another option is to use a computer as a MIDI Host to link between different MIDI devices and route their signals to each other.
On macOS Catalina (10.15) I’m using a small application called MIDIRouter. The app has a dependency on the portmidi library; it won’t run without it, but it won’t tell you if you don’t have it. If you already have brew, you can install the dependency by typing brew install portmidi into your terminal.
MIDIRouter is as simple as it gets. Make sure to keep your computer awake with the app running, and then just configure it to:
- MIDI In: Launchkey Mini
- MIDI Out: Circuit
Layouts for Launchkey (Custom Modes)
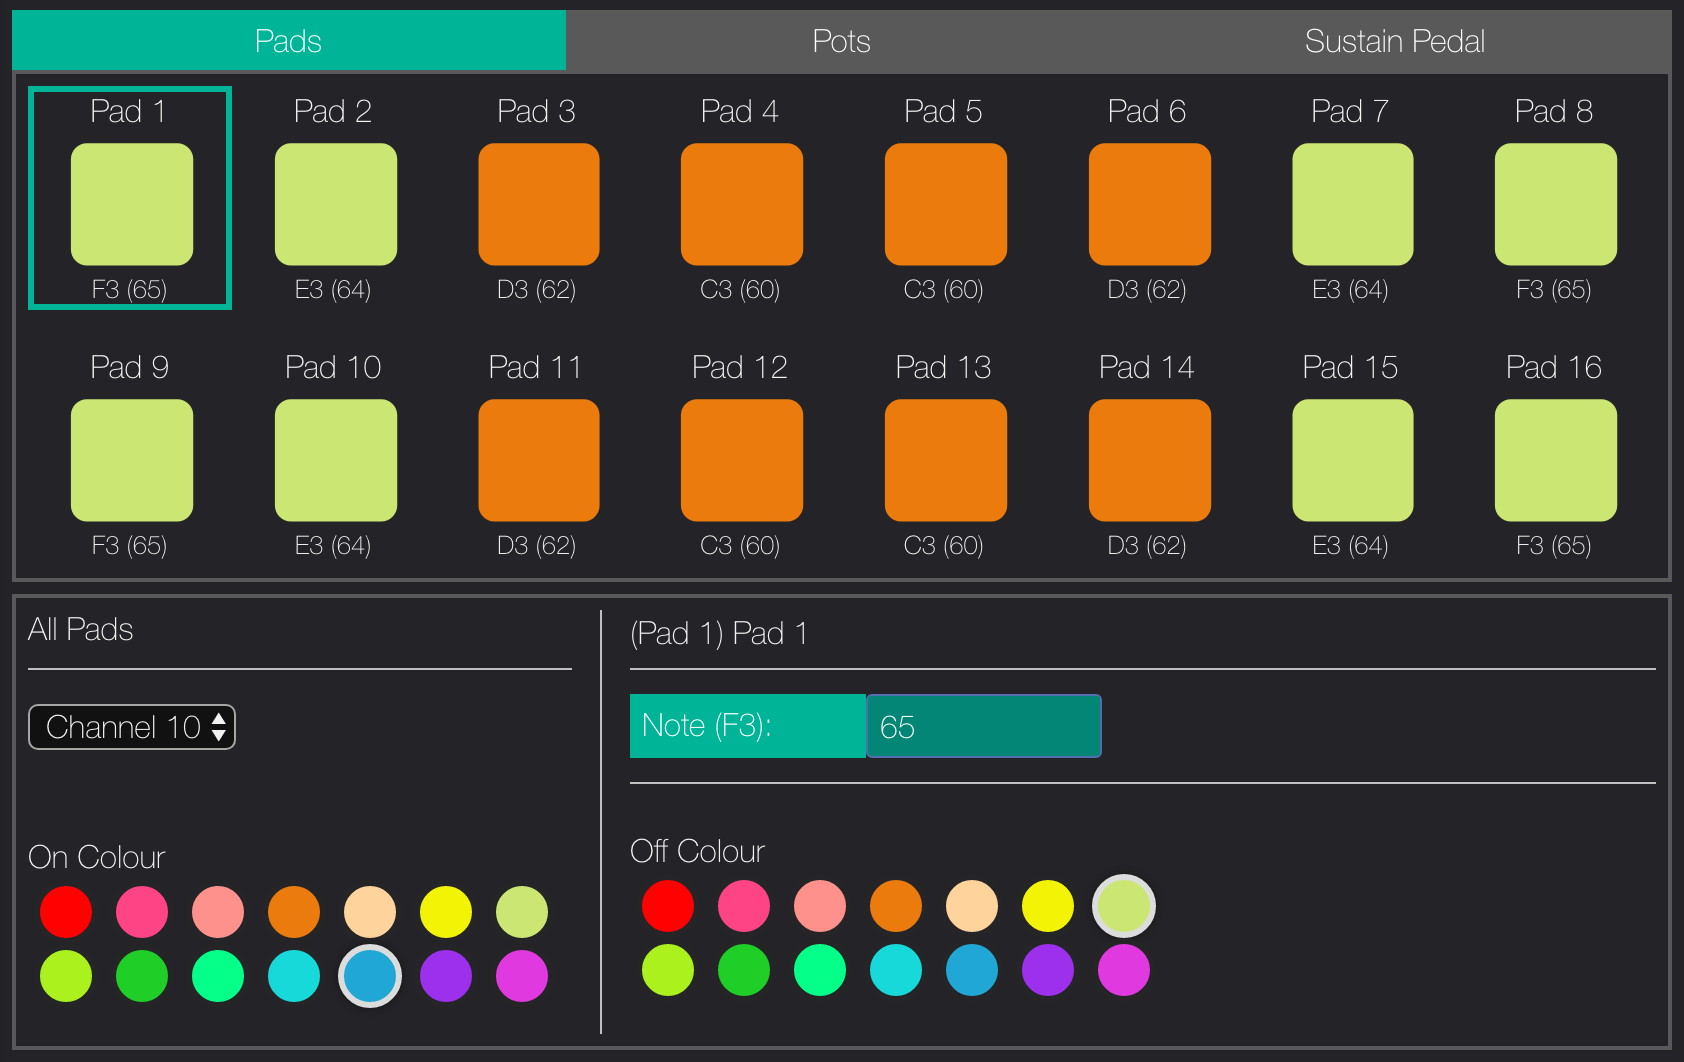
The Circuit has a very simple MIDI interface:
- Synth 1 is on Channel 1
- Synth 2 is on Channel 2
- Drums are on Channel 10, specifically:
- Drum 1: 60 (C3)
- Drum 2: 62 (D3)
- Drum 3: 64 (E3)
- Drum 4: 65 (F3)
The Circuit only supports 4 different drum samples, but the Launchkey has 16 pads (2 rows, 8 columns). I repeated each drum 4 times in a mirrored pattern for «better» finger-drumming.
Other than that, I didn’t mess with the pots since I’m not planning on using them on the Launchkey. The Circuit has encoders while the Launchkey has pots, and that makes for a weird mapping. I’m not sure if the Launchkey Mini Mk3 supports linking PGM parameters to the pads, but if it did it’d allow for some sweet configurations.
General Notes
Scales
Remember to change scale mode in the Circuit to chromatic (bottom right) to be able to use the keyboard properly, selecting any other scale will make you keyboard play the closest note in the scale (ie. in a C major scale, pressing the C key on the Launchkey will play a C note as expected, but pressing the C# key will also play a C note). I guess this would make it easier to «improvise» by mashing the keyboard carelessly when using a scale?
MIDI Channel Control
To switch between the Synth 1 and Synth 2, you have to change the MIDI channel in the Launchkey, this is done by pressing both the Shift and Transpose buttons on the Launchkey and then selecting the channel with the pads:
- MIDI Channel 1 = Circuit’s Synth 1 = top row leftmost pad on the Launchkey
- MIDI Channel 2 = Circuit’s Synth 2 = top row, second pad left-to-right on the Launchkey
I would love it if it’d be possible to program the Launchkey to use the bottom row of the pads to select and display the current MIDI channel, from 1 to 8. Maybe using PGM parameters in a future update?
Tempo
If you want to properly use the arp functions in the Launchkey, it must be synced to the Circuit’s master tempo.
There are 3 options that I’ve though of, but I have not tried them all yet. More testing is required and I will update this post onxe I have some results.
- Use the Launchkey as the tempo master. Turn off the Circuit’s
MIDI Clock Txwhile keeping theMIDI Clock Rxturned on. Adjust the tempo in the Launchkey and the Circuit should sync to it. TheTempobutton in the Circuit should display the current tempo - When using the USB Host connectivity, the Launchkey appears to have a
MIDI Inport, which should enable the Circuit to act as a tempo master (MIDI Clock Txon,MIDI Clock Rxoff). - Setup both tempos manually. Turn off both the
MIDI Clock RxandMIDI Clock Txon the Circuit’s setting to prevent them from being overridden by the Launchkey internal tempo, or viceversa. Good luck.
Macro Controls
Macro controls (the 8 encoders in the Circuit) are funky when mapped to the Launchkey’s pots. I’ve never liked mixing encoders (infinite revolutions) with potentiometers (limited turning), so I prefer not to use them at the moment.
Record & Play
The Record and Play buttons on the Launchkey do nothing. You have to use the Circuit’s.
Pitch Bend and Modulation
I have not been able to use the sustain and modulation touch bands on the Launchkey, it appears that the Circuit does not support pitch and modulation controls at all.
Sustain Pedal
I have not tested using a sustain pedal. I probably won’t anytime soon, since I would mostly be using the setup for bass lines and arp chords.
References
- /u/kikomn Circuit MIDI cheatsheet on reddit
- /u/jumping-trains reddit comment
- A simplified guide to TRS MIDI by Eric Skogen
Novation’s Launchkey Mini Mk3 is an incredibly multi-faceted midi controller and is a powerful addition to any Ableton Live setup. This midi keyboard has a wealth of features that make it ideal for use with Ableton Live.
This tutorial will teach you everything needed in order to use the Novation Launchkey Mini Mk3 with Ableton Live, including the processes of linking, setting up and midi mapping the Launchkey Mini Mk3.
Article Contents
- Does the Novation Launchkey Mini Mk3 work with Ableton Live?
- Does the Novation Launchkey Mini Mk3 come with ableton Live included?
- How to connect the Launchkey Mini Mk3 to ableton
- How to midi map the Novation Launchkey Mini Mk3 in Ableton Live
- The Limitations of midi mapping the Launchkey Mini Mk3
- Saving your Launchkey Mini Mk3 Midi Mappings is cumbersome
- Ableton MIDI mappings are one-to-one
- Limited Ableton parameter options to map to
- A great solution to these problems
- Why can’t I hear my Push in Ableton Live?
Does the Novation Launchkey Mini Mk3 work with Ableton Live?
In a nutshell, the Novation Launchkey Mini Mk3 is able to work fully with Ableton Live.
Ableton live provides a default midi remote script for the Launchkey Mini Mk3, meaning it will work with Ableton Live as soon as you connect it (see the section below on how to connect to ableton).
All versions of Ableton Live, from Intro to Suite, are able to be utilized in collaboration with any equipment that sends MIDI data. This is applicable to all releases of Live, such as 9, 10, and 11. As the Launchkey Mini Mk3 is a MIDI enabled tool, it will be completely compatible with Ableton Live.
You can create your own custom Ableton midi mappings easily, which allows you to control much of the functionality in Ableton Live with your Launchkey Mini Mk3.
Does the Novation Launchkey Mini Mk3 come with ableton Live included?
Yes the Launchkey Mini Mk3 comes with a free copy of Ableton Live Lite. Although it has unlimited usage, the available features are a lot less than what is available in the full versions of Ableton Live Standard or Suite.
There are three main versions with Ableton Live: Intro, Standard and Suite. Though Intro and Standard are both comprehensive, Suite offers much more, such as 70GB of library sounds, in comparison to Standard’s 10GB.
Ableton Live Suite includes many more Audio and MIDI effects compared to Standard, so if you want to ensure you have everything, we recommend going with Ableton Live Suite.
How to connect the Launchkey Mini Mk3 to ableton
Connecting the Novation Launchkey Mini Mk3 with Ableton Live is pretty simple, and when the two are linked you’ll be able to adjust the software’s parameters from your midi keyboard.
1. Connect the Launchkey Mini Mk3 to your computer via USB.
First, connect the USB cable to both the Launchkey Mini Mk3 and your computer.
2. Launch Ableton Live and open the MIDI preferences.
Double click the Ableton Live icon to launch the software. Then, in the top menu of Ableton, go to the Preferences menu by opening the ‘Live’ menu and clicking ‘Preferences’.
3. Select the Launchkey Mini Mk3 from the list of available devices.
Click the the MIDI Sync tab, make sure that Input and Output for the Launchkey Mini Mk3 are checked.
4. Ensure that the proper ‘Track’, ‘Remote’ and ‘Sync’ boxes are checked for both input and output.
- Track: When checked, this allows MIDI notes and CC messages to be sent/received.
- Sync: This option enables MIDI clock syncing between Ableton live and the external device.
- Remote: Allows external MIDI controllers to remotely control parameters within Ableton Live.
.
In the ‘MIDI’ section of this tab, make sure the ‘Track’ and ‘Remote’ boxes are checked for both the Input and Output of the Launchkey Mini Mk3 (Sync can also be optionally checked).
The Launchkey Mini Mk3 will now be setup and ready to use with Ableton Live.
How to midi map the akai mpk mini in Ableton Live
After successfully connecting the Novation Launchkey Mini Mk3 to Ableton live following the steps above, you can now MIDI map the physical knobs, pads, keys etc on the device to functionality within Ableton Live by doing the following:
1. Select the MIDI Map Mode button in the top right corner of the Live window. The button should turn orange, indicating that the MIDI Map Mode is enabled.
2. Select the parameter you wish to control in Ableton by clicking it with the cursor, the parameter will become highlighted.
3. Move a control on the Launchkey Mini Mk3, such as a knob or fader.
4. The parameter you selected is now mapped to the physical control which you moved on the Launchkey Mini Mk3.
5. Moving the physical control on your Launchkey Mini Mk3 will now move the position of the corresponding parameter in Ableton.
6. Repeat steps 2 – 4 for any other parameters you wish to map.
7. When you’re finished mapping, press the MIDI Map Mode button again to disable it.
The Limitations of midi mapping the Launchkey Mini Mk3
For the fastest way to map your Launchkey Mini Mk3, you can’t go wrong with Ableton’s midi mapping system, but make sure you take into account these limitations…
Saving your Launchkey Mini Mk3 Midi Mappings is cumbersome
Be aware that when saving your mappings, they will be stored with the Ableton session. Therefore, starting a new session will require you to re-map your controls.
Ableton MIDI mappings are one-to-one
Through a one-to-one MIDI mapping, each control on your Launchkey Mini Mk3 can only be assigned to 1 parameter in Ableton Live.
Limited Ableton parameter options to map to
Ableton’s internal midi mapping mode is unfortunately missing many control options. Options such as selected track and selected device control aren’t possible using this method. You can see a list of all available Ableton midi mapping options here.
We have a great solution to these problems
If you’re looking to get the most out of your Launchkey Mini Mk3, our Ableton Midi Script Creator tool ‘Control Surface Studio‘ is exactly what you need!
With it, you’ll be able to:
– save and re-use your Launchkey Mini Mk3’s mappings across all of your Ableton Live sessions,
– map multiple Ableton parameters to a single control on your Launchkey Mini Mk3,
– access many more Ableton parameter controls for your Launchkey Mini Mk3, than Live’s internal midi mapping mode allows.
Learn more about Control Surface Studio and see how it can help you by clicking here!
FAQ / Troubleshooting
Why can’t I hear my Launchkey Mini Mk3 in Ableton Live?
There are several possible causes:
1. Make sure that the Launchkey Mini Mk3 is connected properly to your computer via USB and that the cable is not damaged.
2. Make sure that the Launchkey Mini Mk3 is selected as your audio input and output device in your audio settings.
3. Make sure that the correct driver is installed for the Launchkey Mini Mk3.
4. Make sure that the Launchkey Mini Mk3 is selected as the input device in Ableton’s MIDI Preferences.
Novation Launchkey Mini MK3 — это компактный MIDI-контроллер, который подойдет как начинающим музыкантам, так и профессионалам. Этот устройство позволяет управлять DAW (Digital Audio Workstation), виртуальными инструментами и плагинами. Launchkey Mini MK3 имеет 25 мини-клавиш, включая встроенные музыкальные шаблоны и фиксированные мощности, что делает его идеальным выбором для создания музыки в движении.
В данной статье мы расскажем вам, как настроить Novation Launchkey Mini MK3, чтобы вы могли использовать его на полную мощность. Мы рассмотрим настройку контроллера в Ableton Live, настройку контроллера в других DAW и обычные настройки, такие как настройка динамической чувствительности клавиш и режимов программирования барабанов.
Будьте готовы к тому, что настройка вашего нового MIDI-контроллера займет некоторое время, но всего за несколько шагов вы сможете настроить его под ваши индивидуальные потребности.
Содержание
- Установка драйверов
- Шаг 1: Подключите Launchkey Mini MK3 к компьютеру
- Шаг 2: Загрузите драйверы с официального сайта
- Шаг 3: Установите драйверы
- Шаг 4: Проверьте установку драйвера
- Подключение к компьютеру
- Шаг 1. Подключите кабель USB к Novation Launchkey Mini MK3
- Шаг 2. Драйверы для устройства
- Шаг 3. Настройте MIDI-клавиатуру в своей DAW-программе
- Настройка в Ableton Live
- Шаг 1: Подключение контроллера
- Шаг 2: Настройка MIDI-каналов
- Шаг 3: Настройка маппинга
- Шаг 4: Сохранение настроек
- Использование с другими DAW
- Ableton Live
- FL Studio
- Logic Pro
- Привязка к MIDI-контроллеру
- Шаг 1: Подключение MIDI-контроллера
- Шаг 2: Установка драйверов
- Шаг 3: Настройка программного обеспечения
- Шаг 4: Настройка MIDI-контроллеров
- Вопрос-ответ
- Как подключить Novation Launchkey Mini MK3 к компьютеру?
- Можно ли использовать Novation Launchkey Mini MK3 с iPad?
- Как настроить кнопки и ручки на Novation Launchkey Mini MK3?
- Как изменить октаву на Novation Launchkey Mini MK3?
- Можно ли изменить чувствительность клавиш на Novation Launchkey Mini MK3?
- Как использовать Novation Launchkey Mini MK3 с Ableton Live?
- Как настроить арпеджиатор на Novation Launchkey Mini MK3?
Установка драйверов
Шаг 1: Подключите Launchkey Mini MK3 к компьютеру
Перед установкой драйверов необходимо подключить миди-клавиатуру Launchkey Mini MK3 к компьютеру через USB-кабель.
Шаг 2: Загрузите драйверы с официального сайта
Для установки драйверов необходимо загрузить последнюю версию с официального сайта Novation. Перейдите на страницу поддержки и выберите Вашу модель: https://novationmusic.com/support/home.
Шаг 3: Установите драйверы
После того как драйверы были загружены, необходимо запустить инсталлятор и следовать инструкциям по установке. В процессе установки драйвера может потребоваться перезагрузка компьютера.
Шаг 4: Проверьте установку драйвера
После установки драйвера, проверьте его работу, подключив Launchkey Mini MK3 к программе для создания музыки. Если устройство успешно подключено и работает, то драйверы установлены правильно.
Подключение к компьютеру
Шаг 1. Подключите кабель USB к Novation Launchkey Mini MK3
Для начала необходимо подключить устройство к компьютеру. Для этого в комплекте с MIDI-клавиатурой должен быть кабель USB. Он подключается к разъему на задней панели устройства и к USB-порту на компьютере.
Шаг 2. Драйверы для устройства
Перед первым использованием Novation Launchkey Mini MK3 вам нужно установить необходимые драйверы. В системах Windows драйверы автоматически загружаются при подключении устройства. Если драйверов нет, их можно скачать с официального сайта производителя.
В macOS драйверы нужно установить из пакета Novation USB driver, который также можно загрузить с официального сайта.
Шаг 3. Настройте MIDI-клавиатуру в своей DAW-программе
После установки драйверов вы можете начать использовать Novation Launchkey Mini MK3 в своей DAW-программе. Для этого нужно открыть настройки программы и выбрать MIDI-устройство в списке входных устройств. Обычно его имя начинается с «Launchkey Mini».
После того, как вы выбрали устройство, проверьте, настроены ли ноты, контроллеры и другие параметры правильно. Если настройки корректны, MIDI-клавиатура готова к работе.
В случае проблемы настройки и подключения обращайтесь к технической документации, которая также доступна на официальном сайте Novation.
Настройка в Ableton Live
Шаг 1: Подключение контроллера
Перед началом настройки Novation Launchkey Mini MK3 нужно его подключить к компьютеру с помощью USB-кабеля. Далее запустите Ableton Live.
Шаг 2: Настройка MIDI-каналов
В меню настроек Ableton Live выберите пункт «Preferences» и перейдите во вкладку «MIDI». Настройте MIDI-каналы для контроллера. Для этого установите галочку напротив «Launchkey Mini MK3» и выберите MIDI-каналы для «Input» и «Output».
Шаг 3: Настройка маппинга
Откройте окно настроек контроллера Novation Launchkey Mini MK3 в Ableton Live нажатием на кнопку «MIDI» в правом верхнем углу программы. Далее выберите вкладку «User».
На этой вкладке вы можете присвоить желаемые функции каждой кнопке контроллера. Для этого выберите нужную функцию из списка слева и нажмите на кнопку, которую хотите назначить. Настройте MIDI-каналы для каждой кнопки, если это необходимо.
Шаг 4: Сохранение настроек
После настройки маппинга сохраните настройки контроллера Novation Launchkey Mini MK3 в Ableton Live. Для этого выберите в меню «File» пункт «Save Live Set As…» и сохраните настройки в папку, где хранится проект.
Теперь вы можете пользоваться контроллером Novation Launchkey Mini MK3 в Ableton Live и облегчить себе работу в программе.
Использование с другими DAW
Ableton Live
Если вы используете Ableton Live как вашу DAW, то Novation Launchkey Mini MK3 будет работать без проблем. Просто подключите его через USB и запустите Ableton Live. Launchkey Mini MK3 автоматически распознается и можно начинать работу.
Если вы хотите использовать Launchkey Mini MK3 для запуска и остановки записи, а также для управления микшером в Ableton Live, то вы должны выбрать режим «InControl» в программном обеспечении Novation. Это позволит вам быстро переключаться между запуском и остановкой записи и редактированием уровней громкости.
FL Studio
Если в вашем распоряжении есть FL Studio, Novation Launchkey Mini MK3 также может быть использован без проблем. Подключитесь через USB и запустите FL Studio. В меню «Options» выберите «MIDI Settings» и сделайте Launchkey Mini MK3 «Input» устройством.
Вы можете настроить Launchkey Mini MK3 для управления клавишами, треками, микшером и даже инструментами в FL Studio. Просто выберите соответствующие настройки в программном обеспечении Novation и вы можете начинать работу.
Logic Pro
Если вы предпочитаете Logic Pro, Novation Launchkey Mini MK3 будет работать и в этой DAW. Подключите Launchkey Mini MK3 через USB к вашему компьютеру. Запустите Logic Pro и выберите Launchkey Mini MK3 в меню настроек MIDI.
Вы можете использовать Launchkey Mini MK3 для управления клавиатурой, сэмплером, плагином и многими другими функциями в Logic Pro. Не забудьте выбрать «InControl» режим в программном обеспечении Novation для контроля над микшером, запуском и остановкой записи и другими функциями.
Привязка к MIDI-контроллеру
Привязка к MIDI-контроллеру позволяет использовать Launchkey Mini MK3 в качестве MIDI-клавиатуры с любым программным обеспечением, поддерживающим MIDI. Для этого необходимо выполнить следующие шаги:
Шаг 1: Подключение MIDI-контроллера
Подключите Launchkey Mini MK3 к компьютеру или устройству, поддерживающему MIDI, с помощью USB-кабеля.
Шаг 2: Установка драйверов
Если необходимо, установите драйверы для Launchkey Mini MK3. Драйверы можно найти на сайте Novation.
Шаг 3: Настройка программного обеспечения
Откройте программу, поддерживающую MIDI. В настройках программы выберите Launchkey Mini MK3 в качестве устройства ввода MIDI.
Шаг 4: Настройка MIDI-контроллеров
При необходимости настройки MIDI-контроллеров, выберите соответствующие настройки в программном обеспечении.
Теперь Launchkey Mini MK3 готов к использованию в качестве MIDI-клавиатуры.
Вопрос-ответ
Как подключить Novation Launchkey Mini MK3 к компьютеру?
Чтобы подключить Novation Launchkey Mini MK3 к компьютеру, нужно использовать кабель USB, который идет в комплекте. Подключите один конец кабеля к Novation Launchkey Mini MK3, а другой — к компьютеру. Драйверы для устройства установятся автоматически.
Можно ли использовать Novation Launchkey Mini MK3 с iPad?
Да, Novation Launchkey Mini MK3 можно использовать с iPad, даже без компьютера. Для этого вам потребуется кабель USB-C для связи с iPad, а также приложение Novation Components для настройки устройства.
Как настроить кнопки и ручки на Novation Launchkey Mini MK3?
Чтобы настроить кнопки и ручки на Novation Launchkey Mini MK3, нужно использовать приложение Novation Components. Здесь вы можете настроить функции каждого элемента управления в соответствии со своими потребностями.
Как изменить октаву на Novation Launchkey Mini MK3?
Чтобы изменить октаву на Novation Launchkey Mini MK3, используйте кнопки Octave Up и Octave Down. Они расположены на левой стороне клавиатуры, над группой кнопок для управления арпеджиатором.
Можно ли изменить чувствительность клавиш на Novation Launchkey Mini MK3?
Да, чувствительность клавиш на Novation Launchkey Mini MK3 можно изменить. Для этого используйте утилиту настройки Novation Components. Здесь вы можете настроить чувствительность клавиш на разные уровни в зависимости от ваших потребностей.
Как использовать Novation Launchkey Mini MK3 с Ableton Live?
Чтобы использовать Novation Launchkey Mini MK3 с Ableton Live, нужно сначала выбрать его в качестве MIDI-контроллера в настройках Ableton Live. Затем вы можете настроить элементы управления на Novation Launchkey Mini MK3 в соответствии с вашими потребностями и начать работу.
Как настроить арпеджиатор на Novation Launchkey Mini MK3?
Чтобы настроить арпеджиатор на Novation Launchkey Mini MK3, используйте группу кнопок над клавишами. Нажмите кнопку Arp, чтобы включить арпеджиатор, а затем выберите режим и настройте параметры арпеджиатора в соответствии с вашими потребностями.