
Netdiscover is an ultimate scanning tools used to get the internal IP address and MAC address of live hosts in the network. Netdiscover is preinstalled tool in Kali Linux, if you are using Kali Linux then you dont need to install netdiscover. No doubt nmap is best tool for scanning network but Netdiscover is also good tool for finding Internal IP address and MAC address. So this tool is continuously exit on Kali Linux repository, before it was in backtrack repository as well.
Netdiscover is a very attractive tool for discovering hosts on wired or wireless network. It can be used in both active and passive mode.
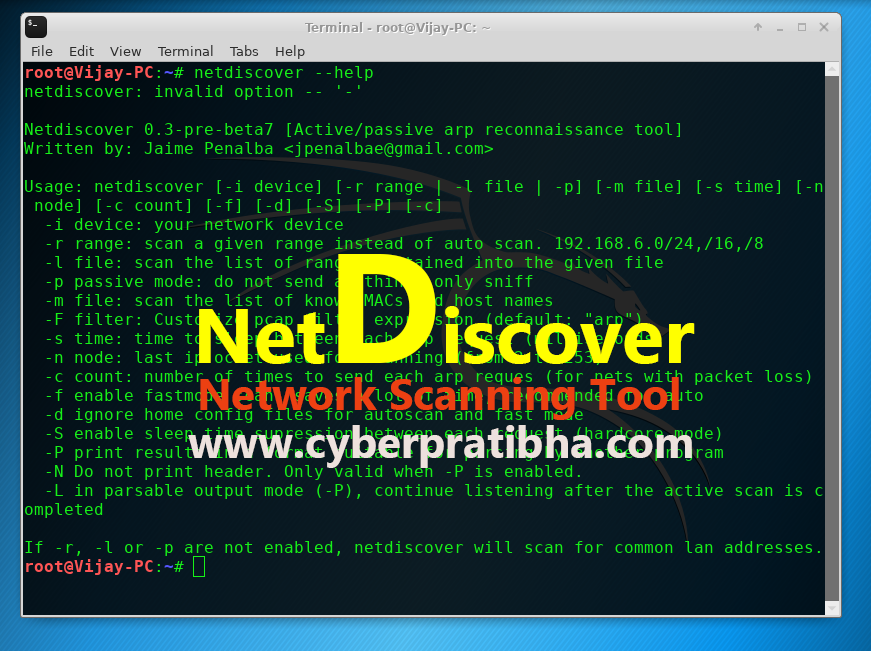
Inactive Mode it send requests to hosts for getting information but in otherhand it is working in silent mode called passive mode or listening mode. To start and check for available options in netdiscover run following command.
#netdiscover –help

lots of switches can be used with different manners for getting desired result. Nediscover work only in internal network so you must know network you are connecting. use following command to check the IP Address:
#ifconfig

So My network is 192.168.43.0/24 and network device is eth0. -r for range of network. So I used following sytax to get result.
#netdiscover -i eth0 -r 192.168.43.0/24

When you hit enter the result will display on the screen.

So If you have any question please leave the comment. And one more thing happy hunting!
Время на прочтение5 мин
Количество просмотров37K
Приветствую тебя, мой дорогой читатель, в третьей части серии статей «Приручение черного дракона. Этичный хакинг с Kali Linux”.
Полный список статей прилагается ниже, и будет дополняться по мере появления новых.
Приручение черного дракона. Этичный хакинг с Kali Linux:
Часть 1. Вводная часть. Подготовка рабочего стенда.
Часть 2. Фазы атаки.
Часть 3. Footprinting. Разведка и сбор информации.
Часть 4. Сканирование и типы сканирования. Погружение в nmap.
Часть 5. Методы получения доступа к системе.
Часть 6. Пост-эксплуатация. Способы повышения привилегий.
Часть 7. Пост-эксплуатация. Закрепление в системе.
Часть 8. Методы и средства внешней разведки.
Сегодня мы поговорим о первой фазе абсолютно любой атаки называемой футпринтинг (разведка и сбор информации о цели).
Я расскажу о том какой тип информации можно получить данным методом, какие инструменты сбора информации существуют и какие техники применяются.
Если в целом разделять тестирование на проникновение по типам, то можно выделить условно три типа тестов: тип белый ящик (whitebox), тип серый ящик (greybox), и тип черный ящик (blackbox). Поговорим немного о каждом из вышеупомянутых методов.
Тестирование по типу «белого ящика» используется в том случае, когда проверяющий систему специалист хорошо ее знает и имеет полный доступ ко всем ее компонентам.
Тестирование по типу «черного ящика» используется в том случае, когда проверяющий систему специалист не знает о ней ровным счетом ничего (она представляет для него закрытый черный ящик без каких-либо вспомогательных подсказок, как его открыть). Именно этот метод используется для того, чтобы сымитировать реальную атаку злоумышленником на наши сетевые ресурсы, или ресурсы нашей организации. И для того, чтобы получить доступ к полностью закрытой системе, необходимо применить целый арсенал инструментов и методологий сбора всей возможной информации, которая может быть нам полезна в дальнейшем.
Тестирование по типу «серого ящика» используется в том случае, когда проверяющий систему специалист имеет лишь ограниченную информацию о тестируемом объекте.
И так, из вышеперечисленного следует, что самый близкий к реальному сценарию тип тестирования это «черный ящик», когда у нас есть цель о которой мы ничего не знаем.
Для начала рассмотрим самый простой сценарий, в котором мы будем искать атакуемое устройство в локальной сети. Не зная о нем ничего, кроме того, что это некий веб-сервер расположенный в той же сети, к которой подключен наш компьютер.
И так, погнали!:)
Запускаем машину Kali Linux и Metasploitable2 (о том, как их скачать и установить я писал в самой первой части серии).
Открываем терминал в Kali и переходим в привилегированный режим командой sudo -s
Далее, по понятным причинам, нам необходимо узнать IP адрес нашей цели, для того, чтобы начать с ней работать. Это можно сделать двумя способами:
1) Набрать команду arp-scan -l которая выведет нам весь список устройств в сети кроме нашей машины с Kali;
2) Узнать для начала IP адрес нашей машины, командой ip address, а затем просканировать всю сеть утилитой netdiscover, которая выдаст нам тот же результат, что и arp-scan.
Проверим оба варианта. Сперва просканируем сеть с помощью arp-scan:

Введем команду ip address и получим следующий результат:

Как видно на скриншоте, команда вывела нам список сетевых интерфейсов на нашем устройстве со всей подробной информацией о них, включая физические MAC-адреса и IP адреса. Первый интерфейс loopback с адресом 127.0.0.1 он нам не особо интересен, а вот второй eth0 – это и есть тот самый сетевой интерфейс который получает от нашего виртуального маршрутизатора адрес: 192.168.238.128 (у вас он может быть другим, но это не столь важно).
Далее попробуем просканировать всю сеть утилитой netdiscover
наберем команду netdiscover -r 192.168.238.0/24 и посмотрим на результат:

Для того, чтобы остановить сканирование нажмем сочетание клавиш Ctrl+C.
И так, мы видим в списке несколько устройств.
Если нашей целью является некий веб-сервер, то вполне логично предположить, что у него должен быть открыт рабочий порт HTTP (по-умолчанию 80) либо HTTPS (по-умолчанию 443). В этом нам поможет мощнейший сетевой сканер nmap, у которого просто обширнейший функционал, но подробнее с ним мы познакомимся несколько позже, а пока просто запустим nmap с указанием единичного адреса цели (либо всей сети).
Сканирование займет какое-то время, после чего nmap выведет нам результат.

Как мы видим на скриншоте выше, у одного из хостов с адресом 192.168.238.129 nmap обнаружил огромное количество открытых служебных портов. В том числе и 80-й порт http.
Отлично! Попробуем ввести его в адресной строке браузера и посмотрим что там.

Бинго! Это именно тот ресурс который мы хотели найти. Теперь нам известен его IP адрес и нам так же известно какие сервисы кроме http на нем еще открыты. Для сбора большей информации сканером nmap используем ключ -sV (scan version), который позволит нам узнать тип и семейство операционной системы, версию отдельных сервисов, что вполне может быть полезно при дальнейшем поиске уязвимостей цели.

И тут мы сразу видим, что у ftp используется устаревшая версия 2.3.4 под которую существует эксплоит в виде бэкдора не требующий от нас знания логина и пароля администратора сервера либо вообще любого его пользователя. В этой части мы не будем ничего взламывать, а лишь проведем разведку и соберем всю необходимую для дальнейшего нападения информацию.
Что ж, продолжаем собирать информацию о нашем атакуемом ресурсе. Для того, чтобы узнать как можно больше о содержимом веб-сервиса и проверить его на наличие уязвимостей, воспользуемся таким замечательным инструментом, как сканер веб-серверов nikto. Он проверит нашу цель на наличие различных уязвимостей, что наверняка нам будет полезно в дальнейшем.

Список довольно таки внушительный. Где-то сканер нашел страницу phpMyAdmin для управления базой данных MySQL и директорию test которая может быть интересна для дальнейшего исследования. Так же сканер обнаружил, что ресурс подвержен атаке на основе межсайтовой трассировки XST и позволяет применить к некоторым формам XSS-атаку.
Надо сказать, не плохую работу мы проделали и собрали довольно много полезной информации о цели, которая уже сейчас позволила бы нам провести ряд атак и получить контроль над системой.
Естественно, примеры рассматриваемые в настоящей серии статей самые простые. Но как показывает практика, довольно часто начинающие (и не только) специалисты обслуживающие IT инфраструктуру компании допускают одни и те же «детские» ошибки, связанные с несвоевременным обновлением устаревших версий ПО сетевого оборудования и ОС на рабочих ПК (тут можно вспомнить эпидемию связанную с RouterOS версий младше 6.41, или эксплоит под Windows CVE-2017-0144 с кодовым названием Eternal Blue), отключением брандмауэра «потому что с ним что-то не работает, а разбираться в этом лень» и многим банальным на первый взгляд вещам. И я сейчас нисколько не преувеличиваю, а описываю все то, с чем сталкивался лично в работе.
Именно эти ошибки чаще всего и становятся той самой роковой точкой входа для злоумышленника.
На этом я прощаюсь с тобой, дорогой читатель, до новых встреч! В следующей раз мы рассмотрим методы и типы сканирования подробнее, а так же изучим все основные возможности сканера nmap.
Network discovery represents an important phase in the Information Gathering activity: it is the process of identifying live hosts on the network. This means that its purpose is not to find all possible informations about the targets (like open ports or vulnerabilities), but just to understand their logical location inside the network. Mapping targets is useful to model network infrastructure.
Nmap
Nmap is the most famous and complete tool for network discovery and scanning: it is considered the “Swiss army knife” of network Security tools and it can be used to perform a large variety of tasks.
Installation
If you are using Kali Linux, Nmap is already part of your arsenal. Otherwise you can install it from package repositories by using apt-get install nmap or yum install nmap or similar commands depending on your Linux distro. You can even download the latest release from https://nmap.org/download.html.
Usage
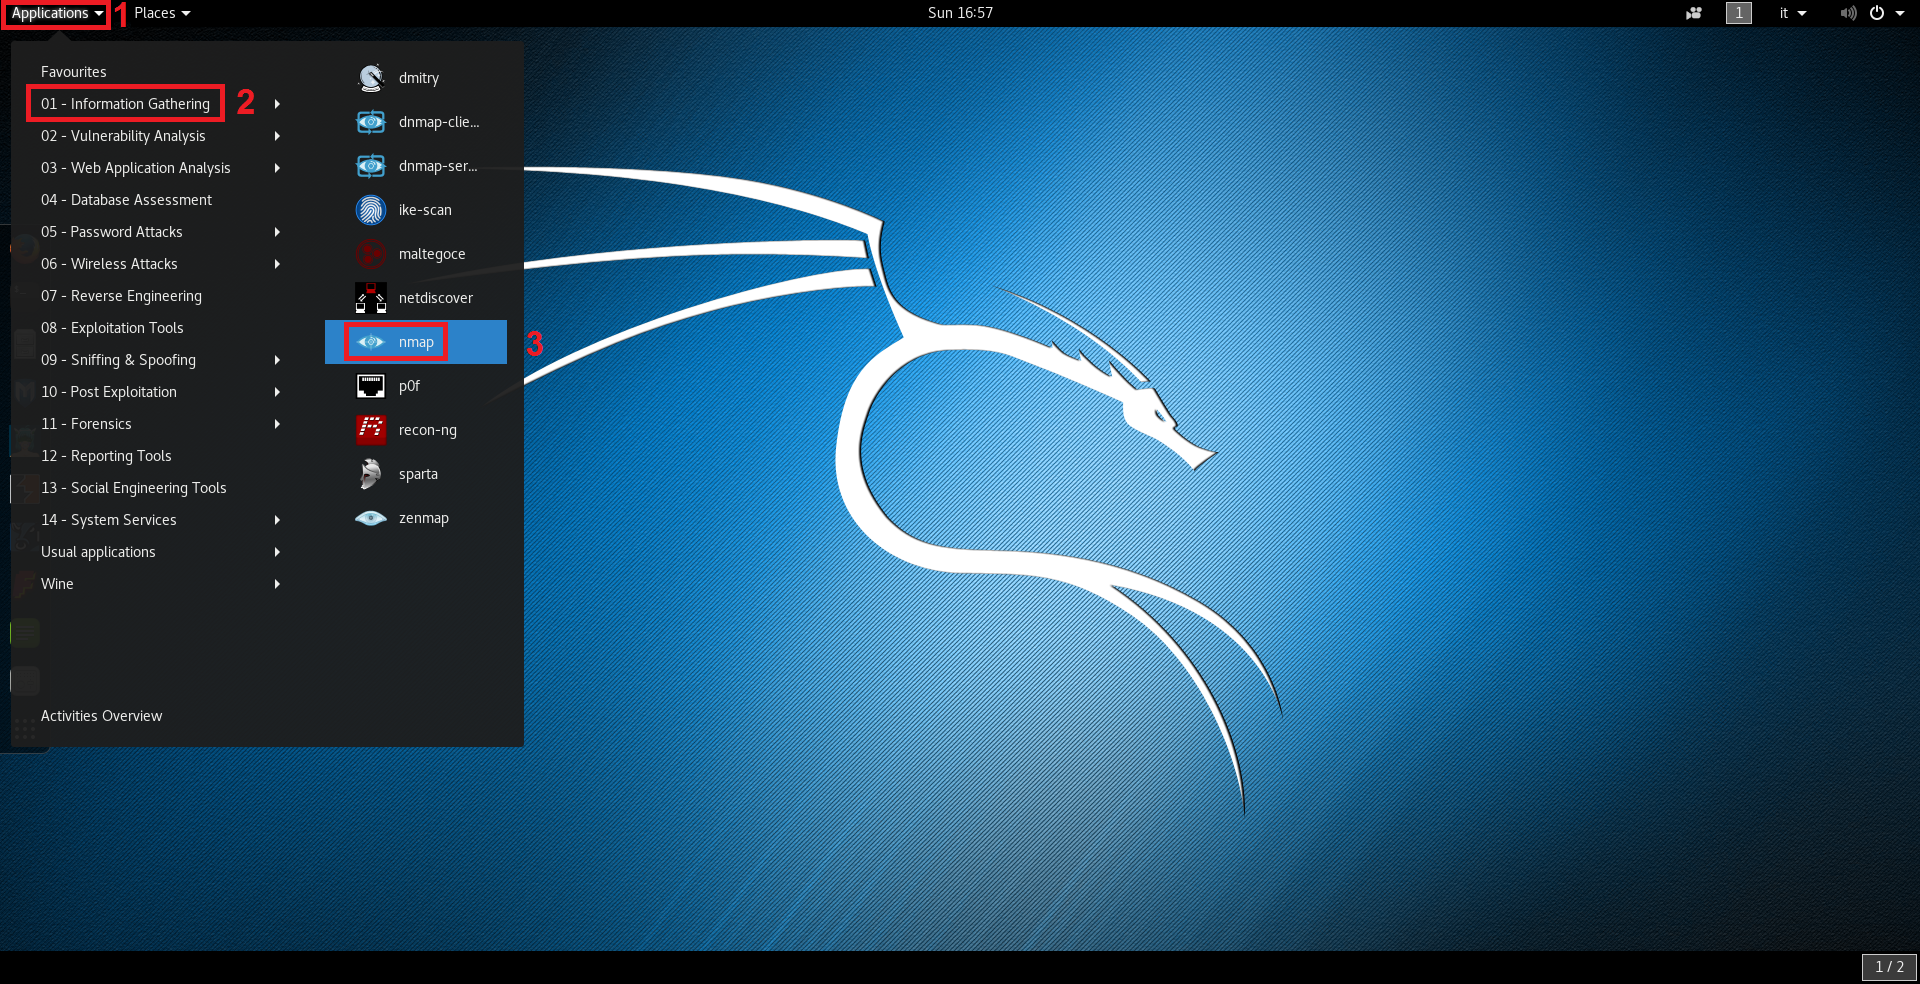
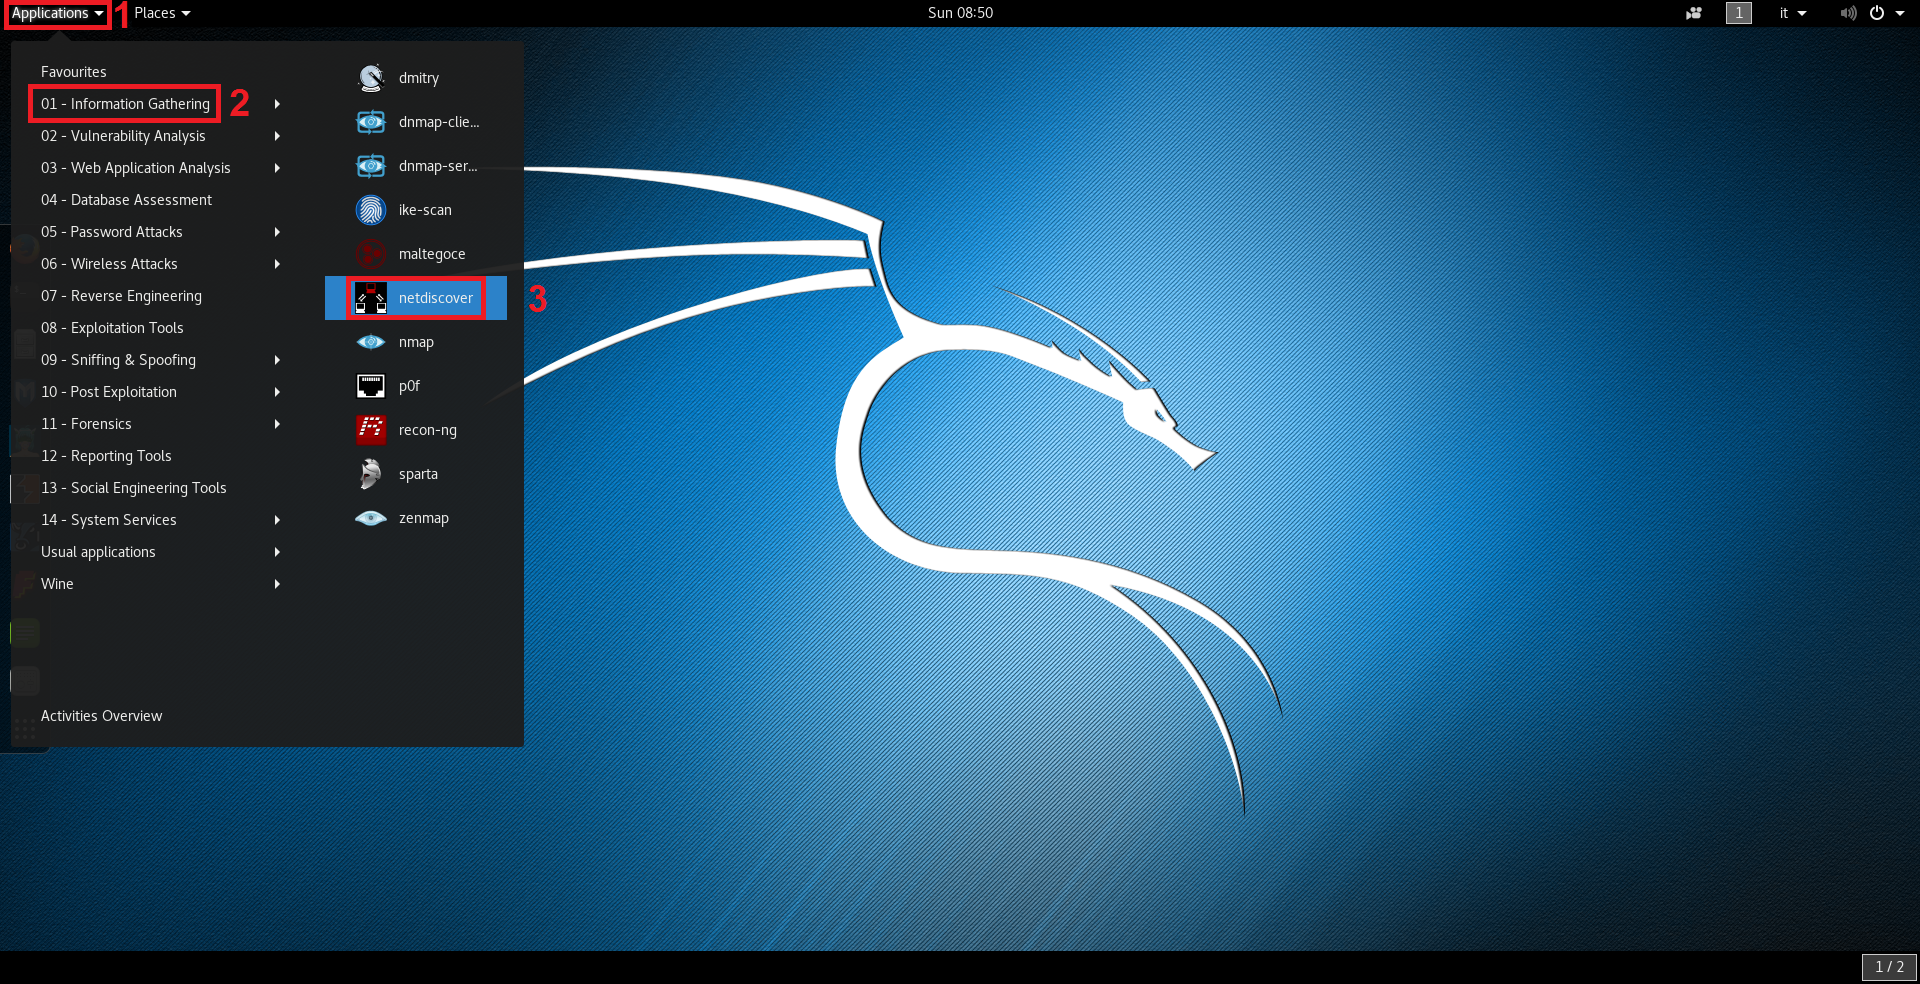
In Kali Linux, Nmap can be started by navigating in the applications menu by clicking on Applications > Information Gathering > nmap like shown in the following image:
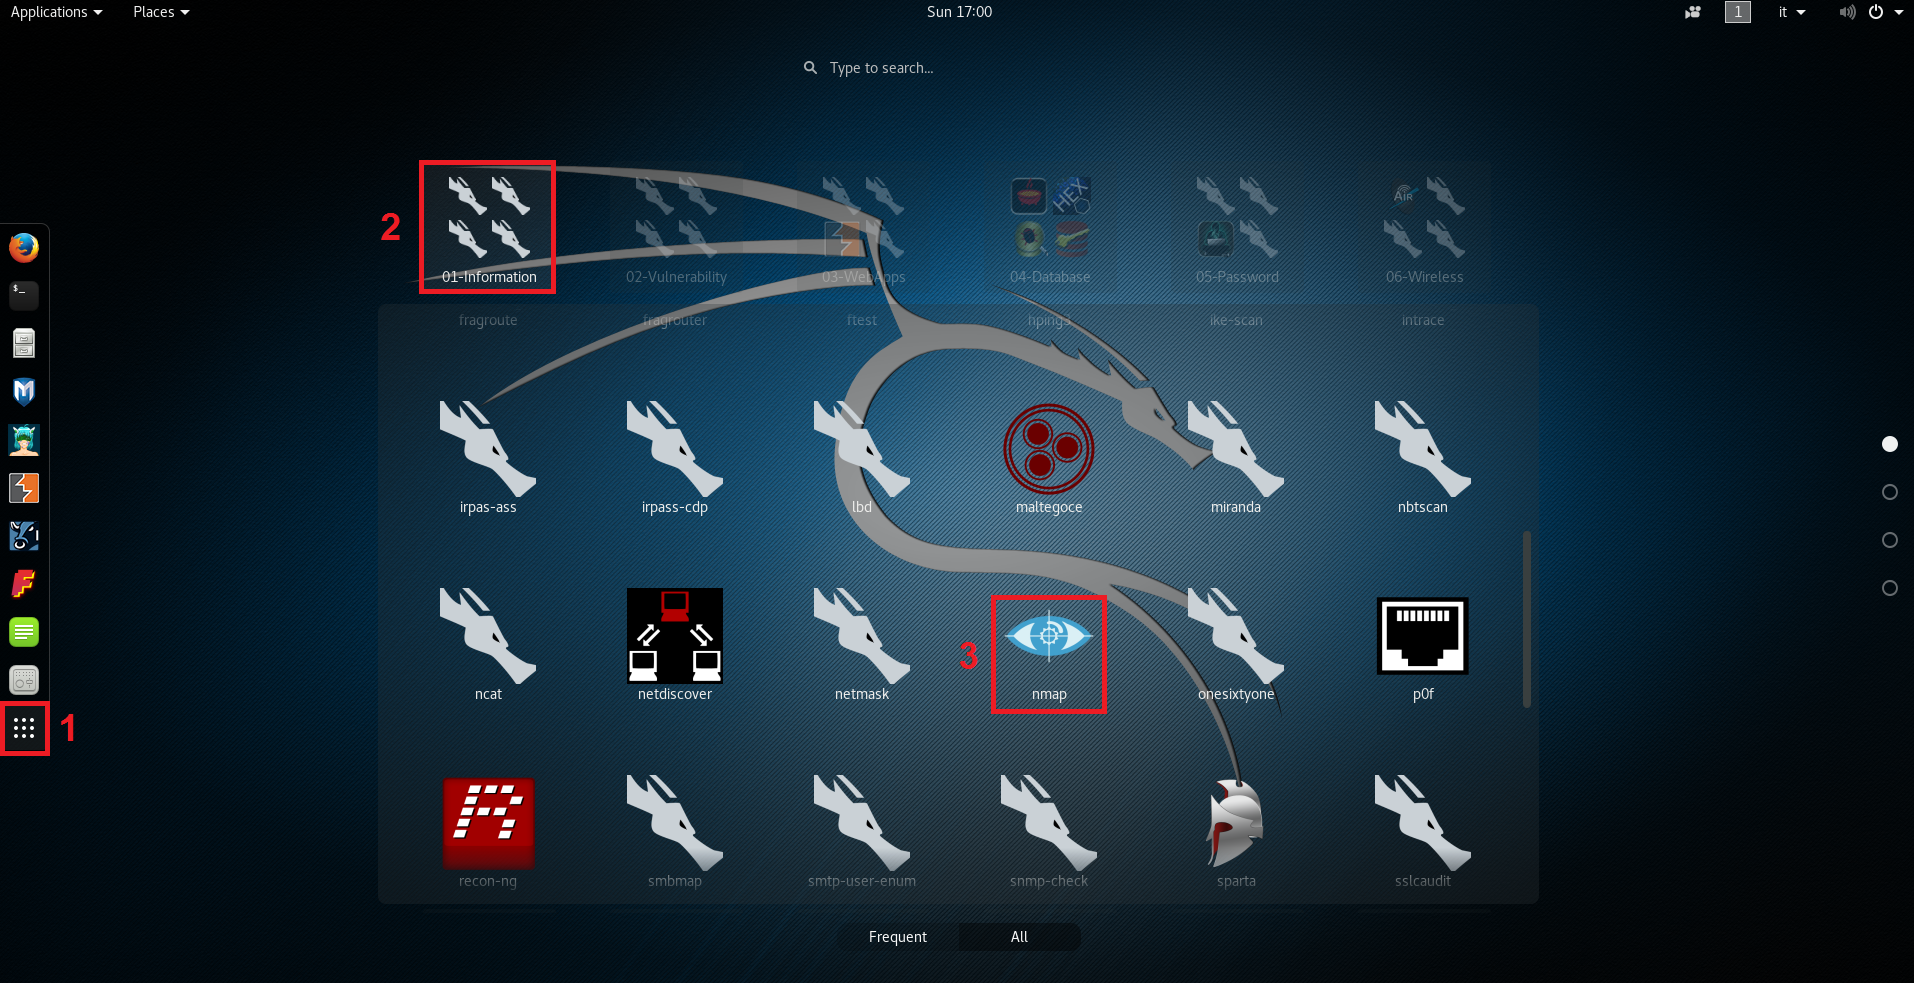
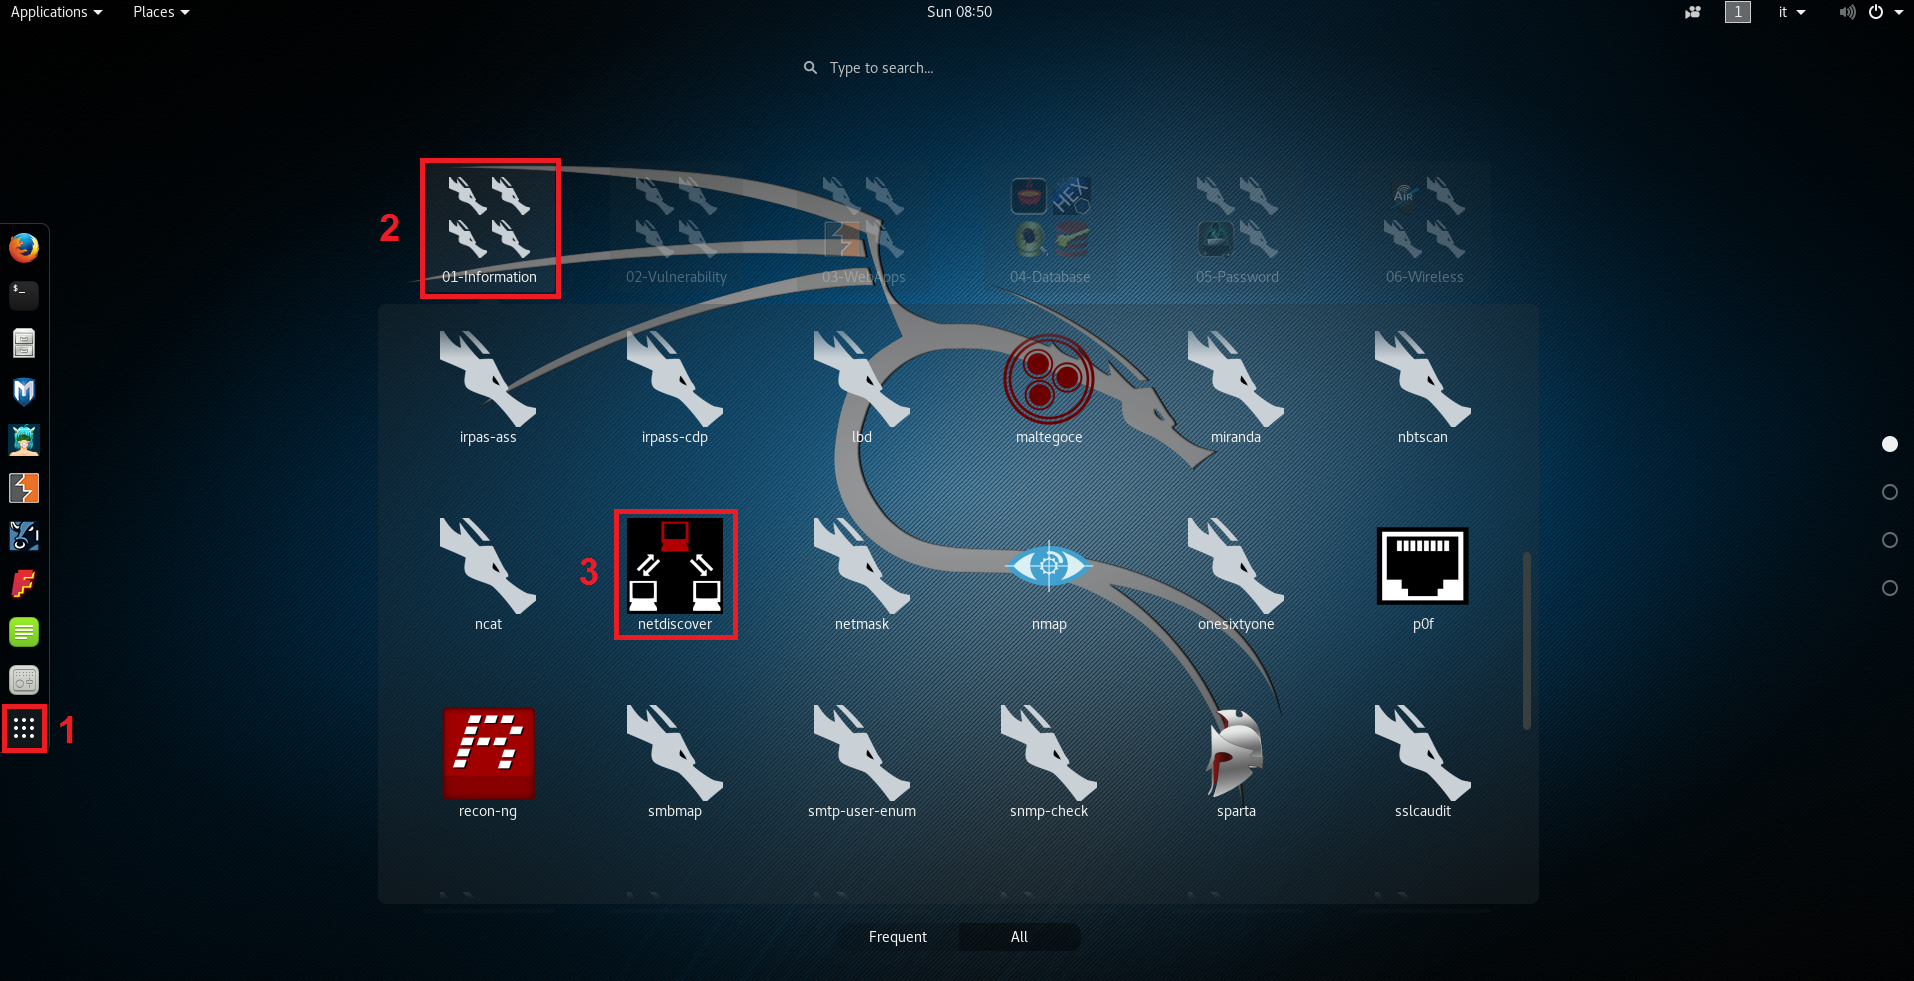
Same thing can be done by clicking on the “Show application” menu:
Another possibility is launching it by simply opening the Terminal and typing nmap. In any case, we are prompted with tool version and usage instructions:
root@kali:~# nmap
Nmap 7.25BETA2 ( https://nmap.org )
Usage: nmap [Scan Type(s)] [Options] {target specification}
TARGET SPECIFICATION:
  Can pass hostnames, IP addresses, networks, etc.
  Ex: scanme.nmap.org, microsoft.com/24, 192.168.0.1; 10.0.0-255.1-254
  -iL <inputfilename>: Input from list of hosts/networks
  -iR <num hosts>: Choose random targets
  --exclude <host1[,host2][,host3],...>: Exclude hosts/networks
  --excludefile <exclude_file>: Exclude list from file
HOST DISCOVERY:
  -sL: List Scan - simply list targets to scan
  -sn: Ping Scan - disable port scan
  -Pn: Treat all hosts as online -- skip host discovery
  -PS/PA/PU/PY[portlist]: TCP SYN/ACK, UDP or SCTP discovery to given ports
  -PE/PP/PM: ICMP echo, timestamp, and netmask request discovery probes
  -PO[protocol list]: IP Protocol Ping
  -n/-R: Never do DNS resolution/Always resolve [default: sometimes]
  --dns-servers <serv1[,serv2],...>: Specify custom DNS servers
  --system-dns: Use OS's DNS resolver
  --traceroute: Trace hop path to each host
...............................................................................
EXAMPLES:
  nmap -v -A scanme.nmap.org
  nmap -v -sn 192.168.0.0/16 10.0.0.0/8
  nmap -v -iR 10000 -Pn -p 80
SEE THE MAN PAGE (https://nmap.org/book/man.html) FOR MORE OPTIONS AND EXAMPLES
There is a huge list of parameters through which it is possible to perform a great quantity of activities: host discovery, port scanning, service/version detection, OS detection, Firewall/IDS evasion and spoofing, running scripts using Nmap Scripting Engine (NSE) and so on (above only HOST DISCOVERY options are reported).
Host discovery
In this article, we focus on host discovery techniques.
We can list hosts belonging to a certain subnet by setting the “-sL” switch; this can be helpful to check the IP addresses belonging to that subnet. The range can be expressed, for example, using the Classless Inter-Domain Routing (CIDR) notation:
root@kali:~# nmap -sL 192.168.1.0/24

Starting Nmap 7.25BETA2 ( https://nmap.org ) at 2016-09-18 15:37 CEST
Nmap scan report for 192.168.1.0
Nmap scan report for 192.168.1.1
Nmap scan report for 192.168.1.2
Nmap scan report for 192.168.1.3
.....................................................................
Nmap scan report for 192.168.1.253
Nmap scan report for 192.168.1.254
Nmap scan report for 192.168.1.255
Nmap done: 256 IP addresses (0 hosts up) scanned in 4.26 seconds
Keep in mind this does not send any packet to the hosts: it only makes a list based on the specified network; Nmap by default always tries to do a reverse DNS resolution on the hosts to discover their names.
Instead, if we want to perform a network discovery, we can use the “-sn” switch; this option takes as input an IP address or a range and checks if a host is online or not by sending Address Resolution Protocol (ARP) requests or Internet Control Message Protocol (ICMP) requests depending on the target subnet location (local or remote).
In fact referring to the ISO/OSI stack model, since ARP is a layer 2 protocol, it cannot discover remote systems due to its non routable nature; in that case Nmap automatically switches to ICMP requests which are instead layer 3.
Everytime it is possible, i.e. for hosts on the local subnet, it is better to use ARP discovery since it is faster and highly relayable (ICMP requests can be filtered by Firewalls).
root@kali:~# nmap -sn 192.168.1.0/24

Starting Nmap 7.25BETA2 ( https://nmap.org ) at 2016-09-18 16:25 CEST
Nmap scan report for 192.168.1.1
Host is up (0.0011s latency).
MAC Address: 00:11:22:33:44:55 (Router manufacturer)
Nmap scan report for 192.168.1.100
Host is up (0.00015s latency).
MAC Address: 00:0C:29:59:72:BC (VMware)
Nmap scan report for 192.168.1.201
Host is up (0.00012s latency).
MAC Address: 00:0C:29:A2:56:2B (VMware)
Nmap scan report for 192.168.1.10
Host is up.
Nmap done: 256 IP addresses (4 hosts up) scanned in 3.06 seconds
Of course this activity is more intrusive than just listing hosts, but it is a necessary step to understand which machines are up or not.
We can see that in the network defined by the range 192.168.1.0-255 there are 4 hosts that responded to our ARP requests. For every host discovered it is reported its Media Access Control (MAC) address. This value is made by 6 couples of numbers separated by the colon symbol and represents the host in a unique way since refers to the machine network card (the first three couples indicate the manufacturer).
Analizying network packets
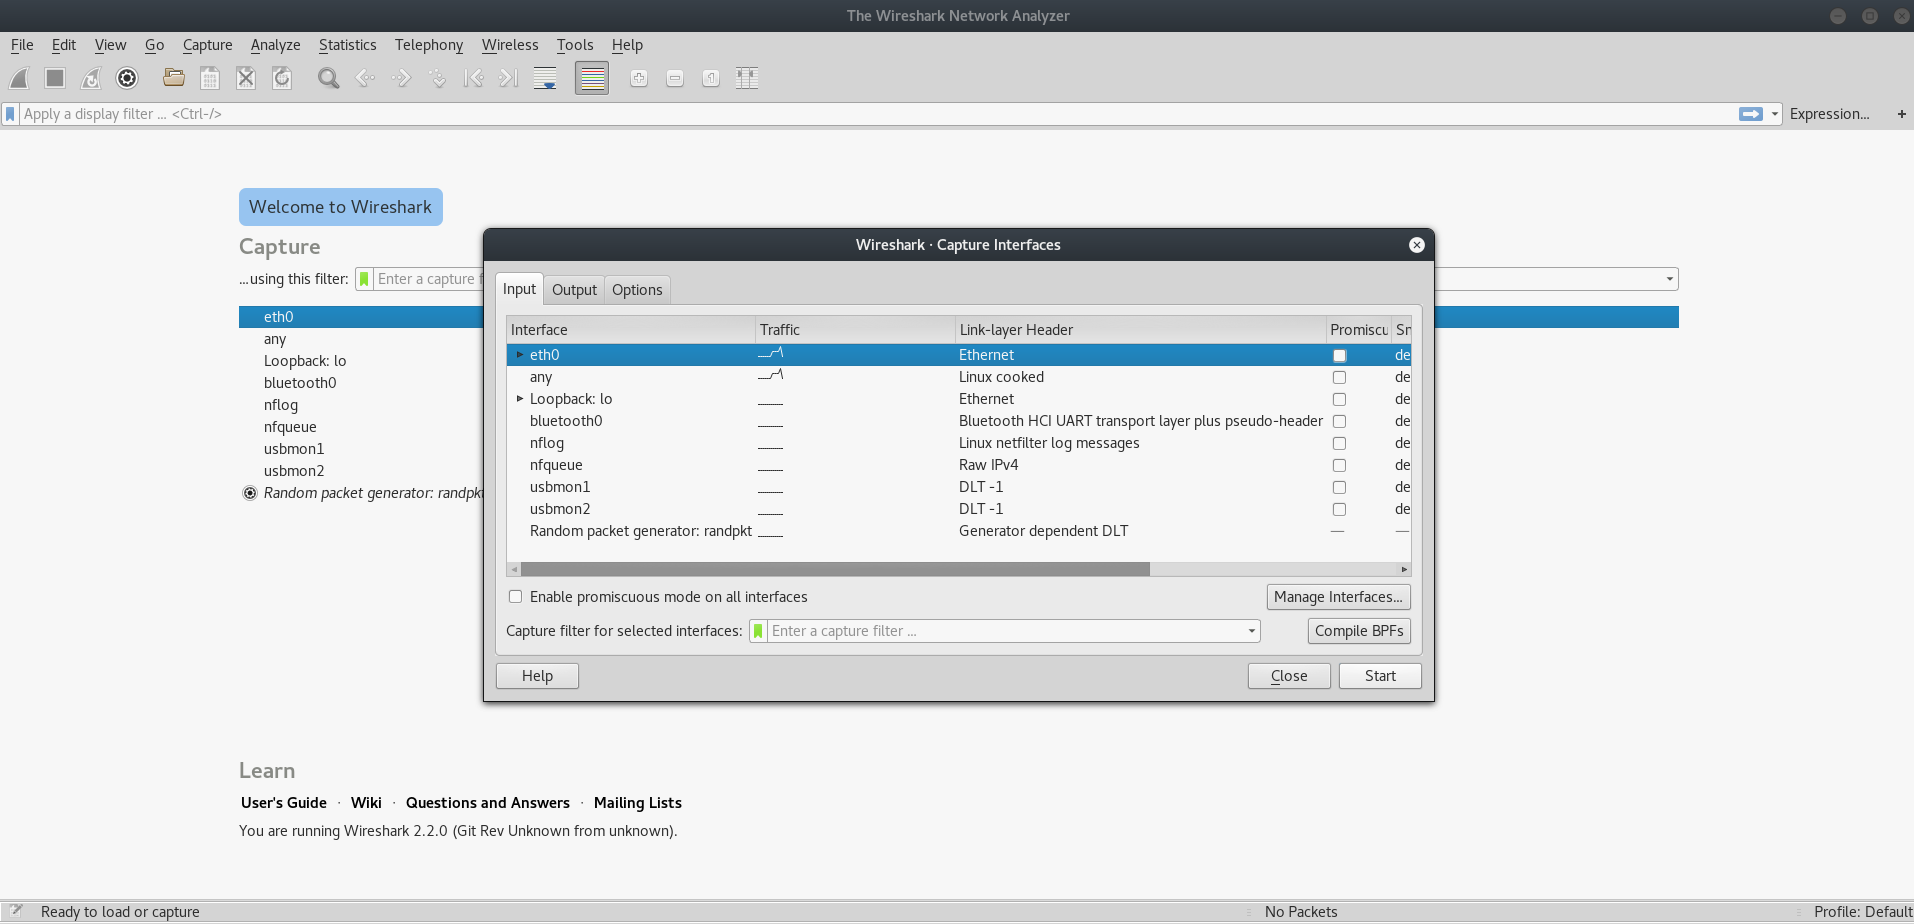
We can check the discovery activity with a network packet analyzer/sniffer like Wireshark: in Kali, Applications > Sniffing & Spoofing > wireshark.
Once the tool is launched we need to set the network interface we want to listen on, in this case eth0; this can be done by clicking on Capture > Options and then selecting the interface:
Clicking on the Start button launches the packets capture. If now we restart the above Nmap scan we can check its activity in Wireshark main window. The following image shows, as expected, broadcast ARP requests made to the entire range 192.168.1.0-255 by the Kali machine which has IP address 192.168.1.10:
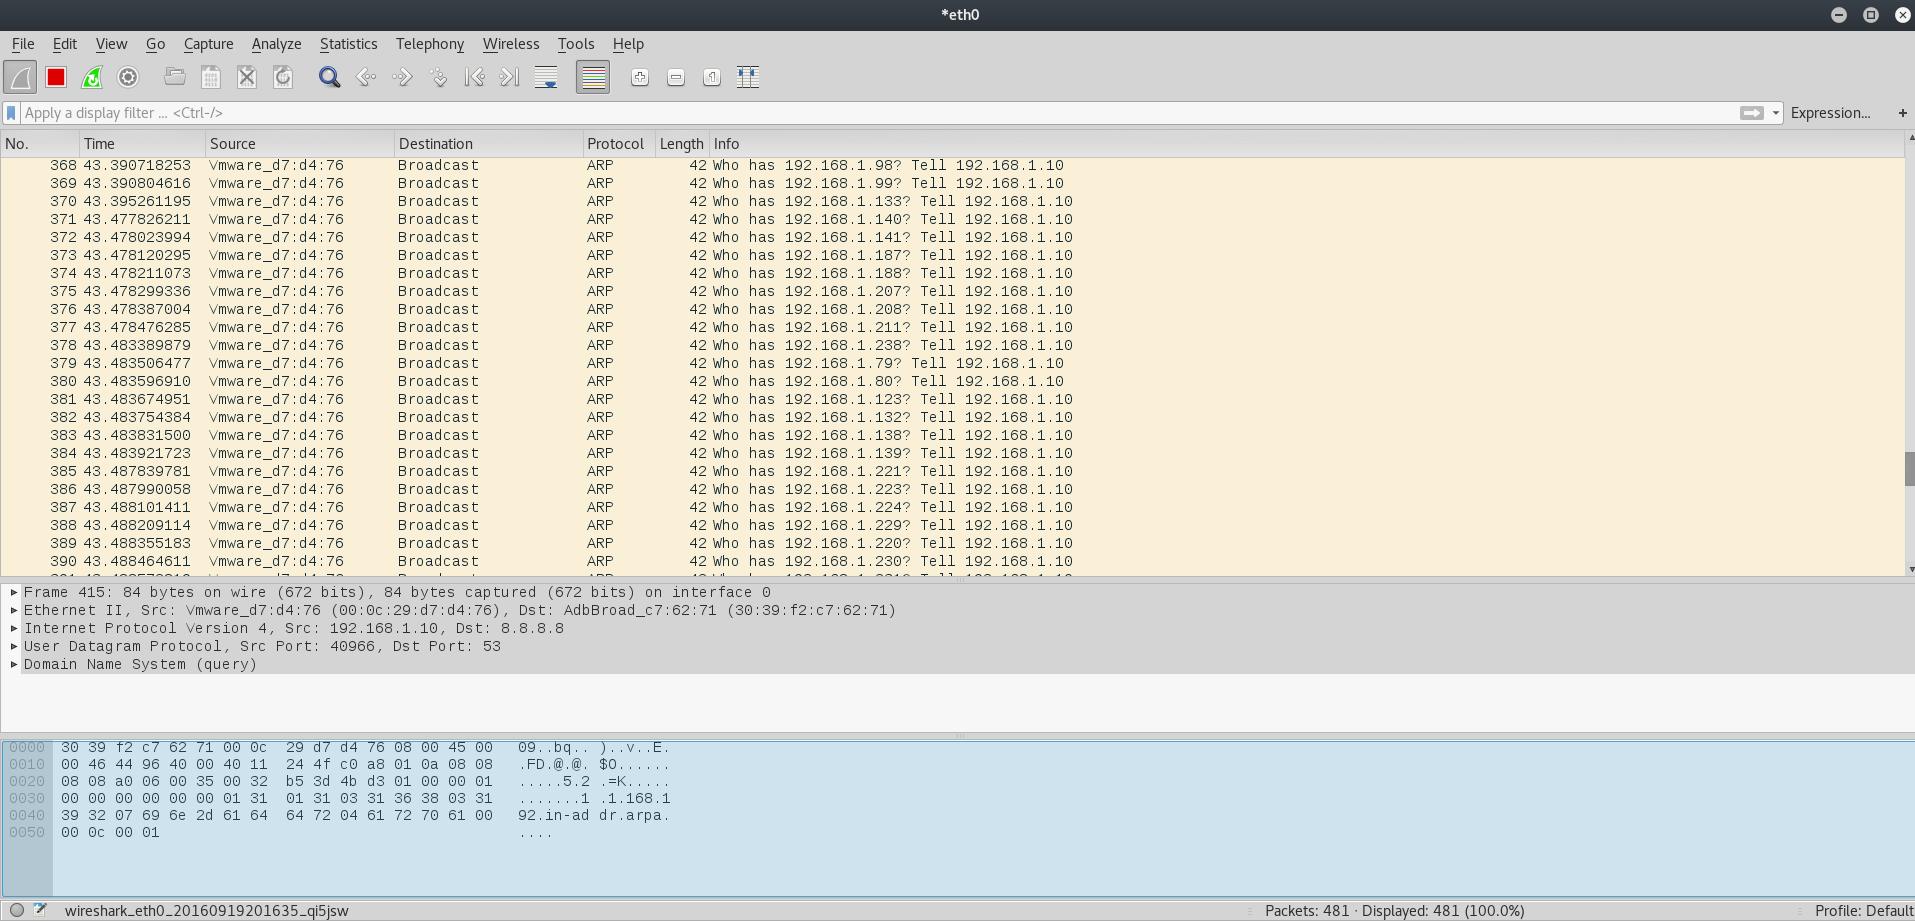
If a machine has the requested IP address, it will respond declaring its MAC address. Data collected in this way are saved in the ARP cache, which is nothing more than a table containing the list of IP addresses with their associated MAC address.
Netdiscover
Netdiscover is my preferred tool for local network discovery: it is pretty fast and offers the possibility to perform both active and passive ARP reconnaissance.
Installation
If you are using Kali Linux, you have it already available. Otherwise, if for example you are using Ubuntu, you can install it from package repositories by using apt-get install netdiscover . You can even download the latest release from https://sourceforge.net/projects/netdiscover/.
Usage
In Kali Linux, Nmap can be started by navigating in the applications menu by clicking on Applications > Information Gathering > netdiscover like shown in the following image:
Same thing can be done by clicking on the “Show application” menu:
This opens up a Terminal with usage instructions:
Netdiscover 0.3-pre-beta7 [Active/passive arp reconnaissance tool]
Written by: Jaime Penalba <jpenalbae@gmail.com>

Usage: netdiscover [-i device] [-r range | -l file | -p] [-m file] [-s time] [-n node] [-c count] [-f] [-d] [-S] [-P] [-c]
  -i device: your network device
  -r range: scan a given range instead of auto scan. 192.168.6.0/24,/16,/8
  -l file: scan the list of ranges contained into the given file
  -p passive mode: do not send anything, only sniff
  -m file: scan the list of known MACs and host names
  -F filter: Customize pcap filter expression (default: "arp")
  -s time: time to sleep between each arp request (milliseconds)
  -n node: last ip octet used for scanning (from 2 to 253)
  -c count: number of times to send each arp reques (for nets with packet loss)
  -f enable fastmode scan, saves a lot of time, recommended for auto
  -d ignore home config files for autoscan and fast mode
  -S enable sleep time supression between each request (hardcore mode)
  -P print results in a format suitable for parsing by another program
  -N Do not print header. Only valid when -P is enabled.
  -L in parsable output mode (-P), continue listening after the active scan is completed

If -r, -l or -p are not enabled, netdiscover will scan for common lan addresses.
They are pretty explanatory; an example of active ARP reconnaissance is this one:
root@kali:~# netdiscover -r 192.168.1.0/24
 Currently scanning: Finished!   |   Screen View: Unique Hosts
 4 Captured ARP Req/Rep packets, from 4 hosts.   Total size: 240
 _____________________________________________________________________________
   IP            At MAC Address     Count     Len  MAC Vendor / Hostname
 -----------------------------------------------------------------------------
 192.168.1.1     00:11:22:33:44:55      1      60  Router Manufacturer
 192.168.1.100   00:0c:29:59:72:bc      1      60  VMware, Inc.
 192.168.1.200   00:0c:29:3a:cb:5b      1      60  VMware, Inc.
 192.168.1.201   00:0c:29:a2:56:2b      1      60  VMware, Inc.
As reported the tool scanned the subnet 192.168.1.0/24 by sendind ARP request on the network and finding out the same four hosts seen before.
If we want to maintain a low profile to avoid getting caught, we can set up a passive ARP discovery; in this case we just sit sniffing the network traffic:
root@kali:~# netdiscover -p
 Currently scanning: (passive)   |   Screen View: Unique Hosts
 10 Captured ARP Req/Rep packets, from 4 hosts.   Total size: 600
 _____________________________________________________________________________
   IP            At MAC Address     Count     Len  MAC Vendor / Hostname
 -----------------------------------------------------------------------------
 192.168.1.201   00:0c:29:a2:56:2b      5     300  VMware, Inc.
 192.168.1.1     00:11:22:33:44:55      2     120  Router Manufacturer
 192.168.1.200   00:0c:29:3a:cb:5b      1      60  VMware, Inc.
 192.168.1.100   00:0c:29:59:72:bc      2     120  VMware, Inc.
Of course this will take longer w.r.t. the active scan, but it is difficult to detect since we are just listening for ARP requests and responses on the network made by other systems.
Conclusions
We have seen how to use Nmap and Netdiscover for discovering live hosts inside a network. They are both useful tools even if Nmap is better for a port scanning and service detection purpose (in a forthcoming article we will take a look at how it can be used to perform these tasks).
Обнаружение активных хостов в сети — это важный этап при выполнении теста на проникновение. В этой статье я покажу, как с помощью Netdiscover обнаружить хосты в сети и получить информацию о MAC-адресе и производителе сетевой карты устройства.
Еще по теме: Обнаружение хостов сети с помощью Nmap
Использование Netdiscover для обнаружения хостов в сети
В качестве стенда я будут использовать Kali Linux (атакующая ОС), Metasploitable (целевой хост в сети) и OWASP BWA (целевой хост в сети).
Откройте Kali Linux и выполните команду:
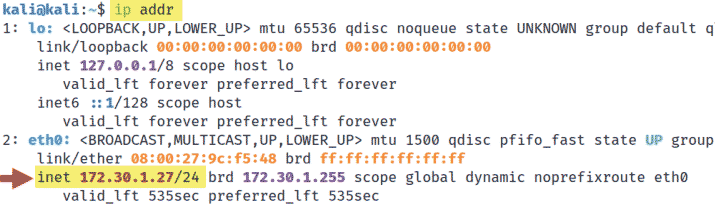
Как видите на скрине, команда отобразила все сетевые интерфейсы. Интерфейс eth0 (Ethernet) — обычно физический сетевой интерфейс, но поскольку я использую VirtualBox для виртуализации Kali Linux, то в этом случае — виртуальный сетевой интерфейс.
Имейте в виду, беспроводные сетевые интерфейсы называются wlan (wlan1 или wlan2 и т.д.).
Адрес inet, отображаемый под интерфейсом eth0 — это IP-адрес моей машины Kali Linux. IP-адрес в вашем случае будет отличаться. Вы должны знать IP своей машины — важно для определения возможного сетевого идентификатора нашей подключенной сети.
Netdiscover — это инструмент сканирования, который использует ARP для обнаружения подключенных к сети хостов.
Запускаем Netdiscover для сканирования всей сети:
|
kali@kali:~$ sudo netdiscover —r 172.30.1.0/24 |
Параметр
–r позволяет указать диапазон сканирования.
Можно выполнить пассивное сканирование сети, используя параметр
–p, который позволяет пассивно прослушивать любые сообщения, которыми могут обмениваться хосты в сети.
Синтаксис:
|
netdiscover [—i устройство] [—r диапазон | —l файл | —p] [—m файл] [—F фильтр] [—s время] [—c количество] [—n узел] [—dfPLNS] |
Параметры:
- —i устройство — ваше сетевое устройство
- —r диапазон — сканирование заданного диапазона вместо автоматического сканирования. 192.168.6.0/24,/16,/8.
- —l файл — просмотреть список диапазонов, содержащихся в данном файле.
- —p — ничего не отправлять, только сканировать.
- —m файл — просмотреть список известных MAC-адресов и имен хостов.
- —F фильтер— настроить выражение фильтра pcap (по умолчанию: «arp»).
- —s время — время ожидания между каждым ARP-запросом (в миллисекундах).
- —c количество — количество раз отправки каждого ARP-запроса (для сетей с потерей пакетов).
- —n узел — последний октет исходного IP, использованный для сканирования (от 2 до 253).
- —d — игнорировать файлы домашней конфигурации для автосканирования и быстрого режима.
- —f — включить сканирование в быстром режиме, экономит много времени, рекомендуется для автоматического.
- —P — печатать результаты в формате, пригодном для анализа другой программой, и останавливаться после активного сканирования.
-
—L — аналогичен
—P, но продолжает прослушивание после завершения активного сканирования. - —N — Не печатать заголовок. Действителен только при включении -P или -L.
- —S — включить подавление времени ожидания между каждым запросом (хардкорный режим).
Если
—r,
—l или
—p не задействованы, тогда netdiscover будет сканировать общие адреса локальной сети.
На следующем снимке экрана показаны результаты Netdiscover при использовании на работающих хост-компьютерах в сети 172.30.1.0/24:

На скрине видно, что Netdiscover обнаружил два хоста и отобразил информацию об IP-адресе, MAC-адресе, производителе и имени хоста. Позже, используя информацию о производителе сетевой карты, пентестер сможет начать поиск уязвимостей.
РЕКОМЕНДУЕМ:
- Скрытое сканирование хостов с Nmap
- Установка и использование сканера Naabu

Netdiscover – simple ARP Scanner to scan for live hosts in a network
Netdiscover is a simple ARP scanner that can be used to scan for live hosts in a network. It can scan for multiple subnets also. It simply produces the output in a live display(ncurse). This can be used in the first phases of a pentest where you have access to a network. Netdiscover is a simple initial-recon tool that can be very handy.
Features:
- Simple Arp Scanner
- Works in both Active & Passive modes
- Produces a live display of identified hosts
- Able to scan multiple subnets
- Timing Options
Options:
  -i device: your network device
  -r range: scan a given range instead of auto scan. 192.168.6.0/24,/16,/8
  -l file: scan the list of ranges contained into the given file
  -p passive mode: do not send anything, only sniff
  -m file: scan the list of known MACs and host names
  -F filter: Customize pcap filter expression (default: "arp")
  -s time: time to sleep between each arp request (miliseconds)
  -n node: last ip octet used for scanning (from 2 to 253)
  -c count: number of times to send each arp reques (for nets with packet loss)
  -f enable fastmode scan, saves a lot of time, recommended for auto
  -d ignore home config files for autoscan and fast mode
  -S enable sleep time supression betwen each request (hardcore mode)
  -P print results in a format suitable for parsing by another program
  -N Do not print header. Only valid when -P is enabled.
  -L in parsable output mode (-P), continue listening after the active scan is completed
Lab: Simple Host discovery & Related Options
Netdiscover runs simply by calling executing the command in auto mode
Syntax: netdiscover <options>

Specifying Range
We can scan a specific range with -r option
Syntax: netdiscover -r <range>

Command: netdiscover -r 192.168.1.0/24

Multiple Ranges from a File
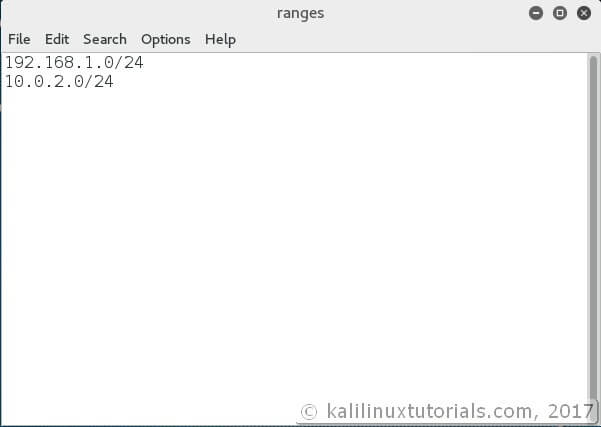
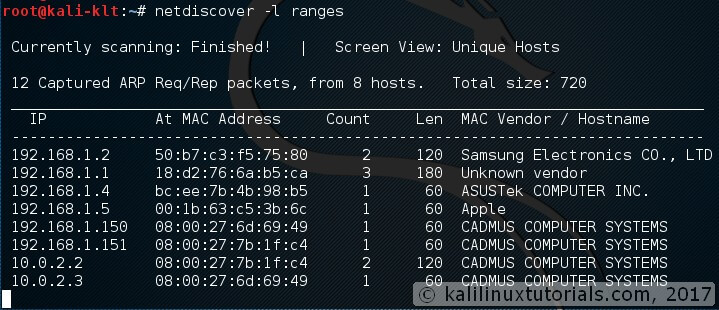
We can also scan for multiple ranges. This is useful when you have a large network with multiple subnets & networks. For this, simply we need specify all the ranges we want to scan in a file line-by-line
Syntax: netdiscover -l <file containing ranges>

Command: netdiscover -l ranges
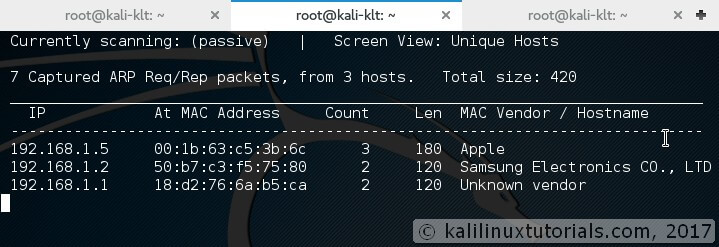
Passive Scanning
Sometimes it’s better to stay quiter. -p option helps on this but at the cost of patience.
Syntax: netdiscover -p -r <range,optional>
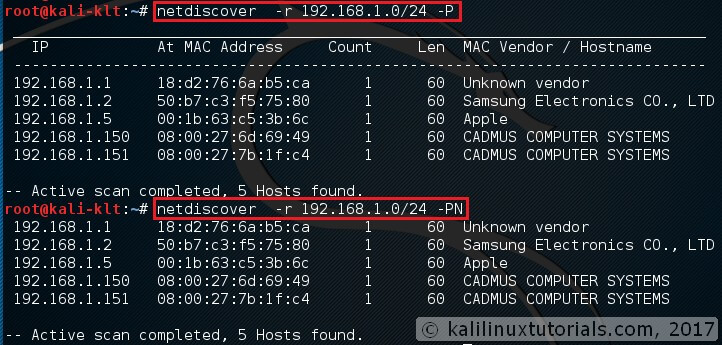
Parsable Outputs
There is a parsable output option also in case you want to pipe it to a file.
Syntax: netdiscover -P<parsable> -N<ommit headers>

Command: netdiscover-r 192.168.1.1/24 -PN
Conclusion
Netdiscover is a simple arp scanner which can be used to enumerate hosts. I would like to share with you one of my experience. Out of curiosity, I tried running the tool in my company network. The network has a firewall & I am part of the monitoring team which needs to look for network traffic anomalies. So me & my team can get the info even if somebody is performing a ping between internal hosts. We have detected ping scans, web server scans with nikto etc from our internal network. So I had a clear idea about my target network. So I ran the tool in passive mode. It ran for about 7 hours & I got more than 100 IPs. I cross-checked this result with my monitoring tool and the numbers were about the same. But interestingly not even a single alert was generated from the monitoring tool. I also wondered why it didn’t detect that my interface was in promiscuous mode. So I got 2 major results out of this. One is that I got all the IPs in the network which were live over a period of time. The second is that my monitoring tool was not capable or was not configured to detect promiscuous interfaces in the network. So here are my suggestions.
- Never perform a scanning activity without having a clear knowledge of your network.
- As the Kali Linux slogan says “The quieter you are, the more you are able to hear”
- Use the results from such activities in a constructive way
So if you learned something new from this tutorial, please support me by sharing it with those whom this will benefit.