
User’s Manual / Manuel de l’utilisateur
MultiSync 70GX
MultiSync 90GX
2
2

Index
Warning ……………………………………………………………………………………………………………………………………………1
Contents …………………………………………………………………………………………………………………………………………2
Display Setup ………………………………………………………………………………………………………………………………….3
Mounting ………………………………………………………………………………………………………………………………………… 7
Flexible Arm Installation ………………………………………………………………………………………………………………..8
Controls ………………………………………………………………………………………………………………………………………….. 9
Recommended Use ……………………………………………………………………………………………………………………….. 12
Specications ………………………………………………………………………………………………………………………………. 15
Features …………………………………………………………………………………………………………………………………………17
Troubleshooting ……………………………………………………………………………………………………………………………. 18
References ……………………………………………………………………………………………………………………………………. 19
Limited Warranty ………………………………………………………………………………………………………………………….20
Manufacturer’s Recycling and Energy Information ………………………………………………………………….. 21
Avertissement ………………………………………………………………………………………………………………………………23
Contenu …………………………………………………………………………………………………………………………………………24
Conguration de I’afchage …………………………………………………………………………………………………………25
Montage ………………………………………………………………………………………………………………………………………..29
Installation du bras exible …………………………………………………………………………………………………………30
Commandes ………………………………………………………………………………………………………………………………….. 31
Usage recommandé ………………………………………………………………………………………………………………………34
Fiche technique ……………………………………………………………………………………………………………………………. 37
Fonctions ………………………………………………………………………………………………………………………………………39
Dépannage …………………………………………………………………………………………………………………………………… 40
Références ……………………………………………………………………………………………………………………………………. 41
Garantie limitée ……………………………………………………………………………………………………………………………42
Informations du fabricant relatives
au recylage et aux économies d’énergie ………………………………………………………………………………….. 43
Advertencia …………………………………………………………………………………………………………………………………..46
Contenido ……………………………………………………………………………………………………………………………………..47
Supervise la disposición ……………………………………………………………………………………………………………… 48
Motaje …………………………………………………………………………………………………………………………………………..52
Cómo instalar el brazo exible …………………………………………………………………………………………………….53
Controles ………………………………………………………………………………………………………………………………………54
Uso recomendado………………………………………………………………………………………………………………………….57
Especicaciones ……………………………………………………………………………………………………………………………59
Características …………………………………………………………………………………………………………………………….. 61
Solución de problemas ………………………………………………………………………………………………………………….62
Referencias ……………………………………………………………………………………………………………………………………63
Información del fabricante sobre reciclado y energía ………………………………………………………………..64
WARNING
TO PREVENT FIRE OR SHOCK HAZARDS, DO NOT EXPOSE THIS UNIT TO RAIN OR MOISTURE. ALSO, DO NOT USE
THIS UNIT’S POLARIZED PLUG WITH AN EXTENSION CORD RECEPTACLE OR OTHER OUTLETS UNLESS THE PRONGS
CAN BE FULLY INSERTED.
REFRAIN FROM OPENING THE CABINET AS THERE ARE HIGH VOLTAGE COMPONENTS INSIDE. REFER SERVICING
TO QUALIFIED SERVICE PERSONNEL.
CAUTION
CAUTION: TO REDUCE THE RISK OF ELECTRIC SHOCK, MAKE SURE POWER CORD IS UNPLUGGED FROM
WALL SOCKET. TO FULLY DISENGAGE THE POWER TO THE UNIT, PLEASE DISCONNECT THE POWER
CORD FROM THE AC OUTLET. DO NOT REMOVE COVER (OR BACK). NO USER SERVICEABLE PARTS
INSIDE. REFER SERVICING TO QUALIFIED SERVICE PERSONNEL.
This
electric shock. Therefore, it is dangerous to make any kind of contact with any part inside this unit.
This symbol alerts the user that important literature concerning the operation and maintenance of this
unit has been included. Therefore, it should be read carefully in order to avoid any problems.
symbol warns user that uninsulated voltage within the unit may have sufficient magnitude to cause
Canadian Department of Communications Compliance Statement
DOC: This Class B digital apparatus meets all requirements of the Canadian
Interference-Causing Equipment Regulations.
C-UL: Bears the C-UL Mark and is in compliance with Canadian Safety Regulations
according to
CAN/CSA C22.2 No. 60950-1.
FCC Information
1.
Use the attached specified cables with the
(L195GH)
(1)
color monitors so as not to interfere with radio and television reception.
Please use the supplied power cord or equivalent to ensure FCC compliance.
(2) Please use the supplied shielded video signal cable. Please use the supplied USB
cable with ferrite cores.
Use of other cables and adapters may cause interference with radio and television
reception.
MultiSync® 70GX2™ (L175GG) or 90GX2™
2.
This equipment has been tested and found to comply with the limits for a Class B digital
device, pursuant to part 15 of the FCC Rules. These limits are designed to provide reason
able protection against harmful interference in a residential installation. This equipment
generates, uses, and can radiate radio frequency energy, and, if not installed and used in
accordance with the instructions, may cause harmful interference to radio communications.
However, there is no guarantee that interference will not occur in a particular installation.
If this equipment does cause harmful interference to radio or television reception, which
can be determined by turning the equipment off and on, the user is encouraged to try to
correct the interference by one or more of the following measures:
• Reorient or relocate the receiving antenna.
• Increase the separation between the equipment and receiver.
• Connect the equipment into an outlet on a circuit different from that to which the receiver
is connected.
• Consult your dealer or an experienced radio/TV technician for help.
If necessary, the user should contact the dealer or an experienced radio/television techni
cian for additional suggestions. The user may find the following booklet, prepared by the
Federal Communications Commission, helpful: ”How to Identify and Resolve Radio-TV
Interference Problems.“ This booklet is available from the U.S. Government Printing Office,
Washington, D.C., 20402, Stock No. 004-000-00345-4.
1
—
—
Contents
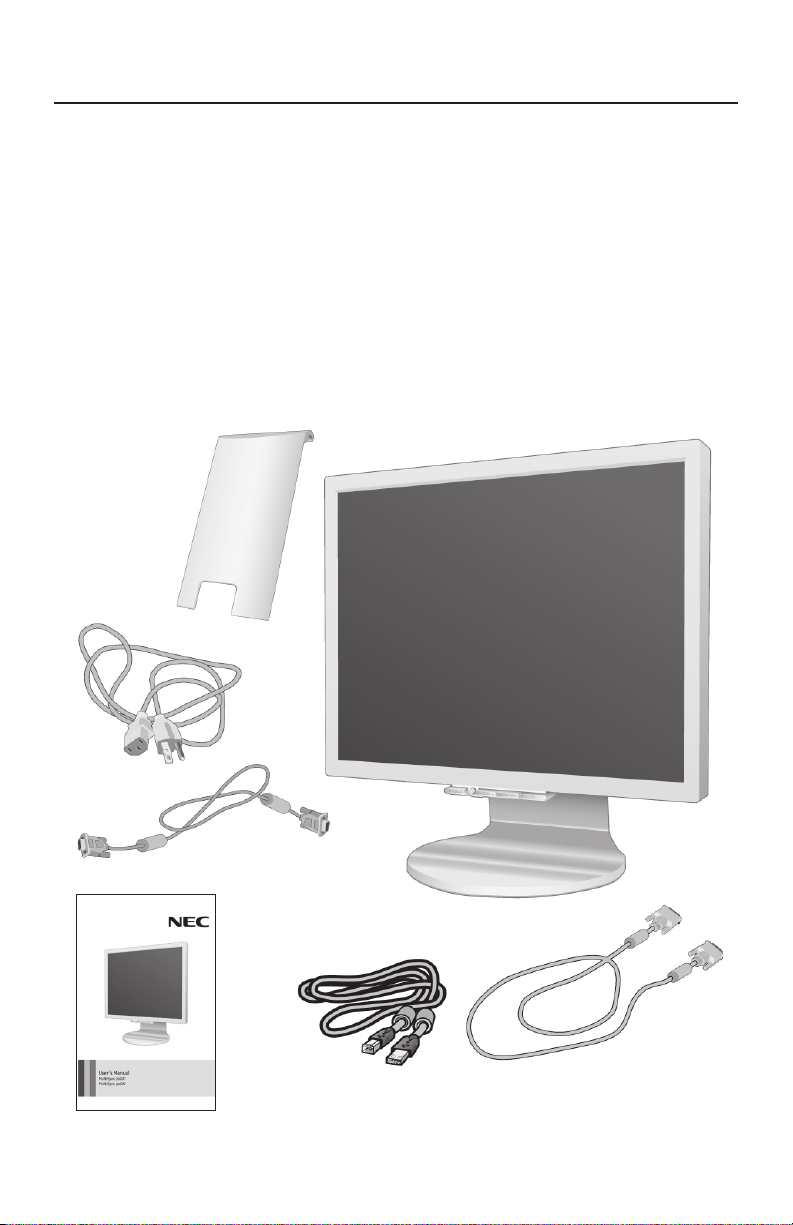
Your new NEC MultiSync® LCD
monitor box* should contain the following:
• MultiSync 70GX2 or 90GX2 monitor
• Power Cord
• User’s Manual
• USB Cable
• Video Signal Cable
(mini D-SUB 15 pin to mini D-SUB 15 pin)
• Video Signal Cable (DVI-D to DVI-D)
• Cable Cover
Cable
Cover
Power Cord
Mini D-SUB Cable
USB Cable
DVI-D Cable
User’s Manual
*Remembertosaveyouroriginalboxandpackingmaterialtotransportorshipthemonitor.
2

Display Setup
To attach the MultiSync® LCD monitor to your system, follow these instructions:
1. Turn off the power to your computer.
2. For the PC or MAC with DVI digital output : Connect the DVI signal cable to the
connector of the display card in your system
For the PC with Analog output: Connect the 15-pin mini D-SUB signal cable to the
connector of the display card in your system (Figure 2). Tighten all screws.
For MAC setup: Connect the Macintosh cable adapter to the computer, then attach
the 15-pin mini D-SUB signal cable to the Macintosh cable adapter
Tighten all screws.
NOTE: To obtain the MultiSync Macintosh cable adapter, call
NEC Display Solutions of America, Inc. at (800) 632-4662.
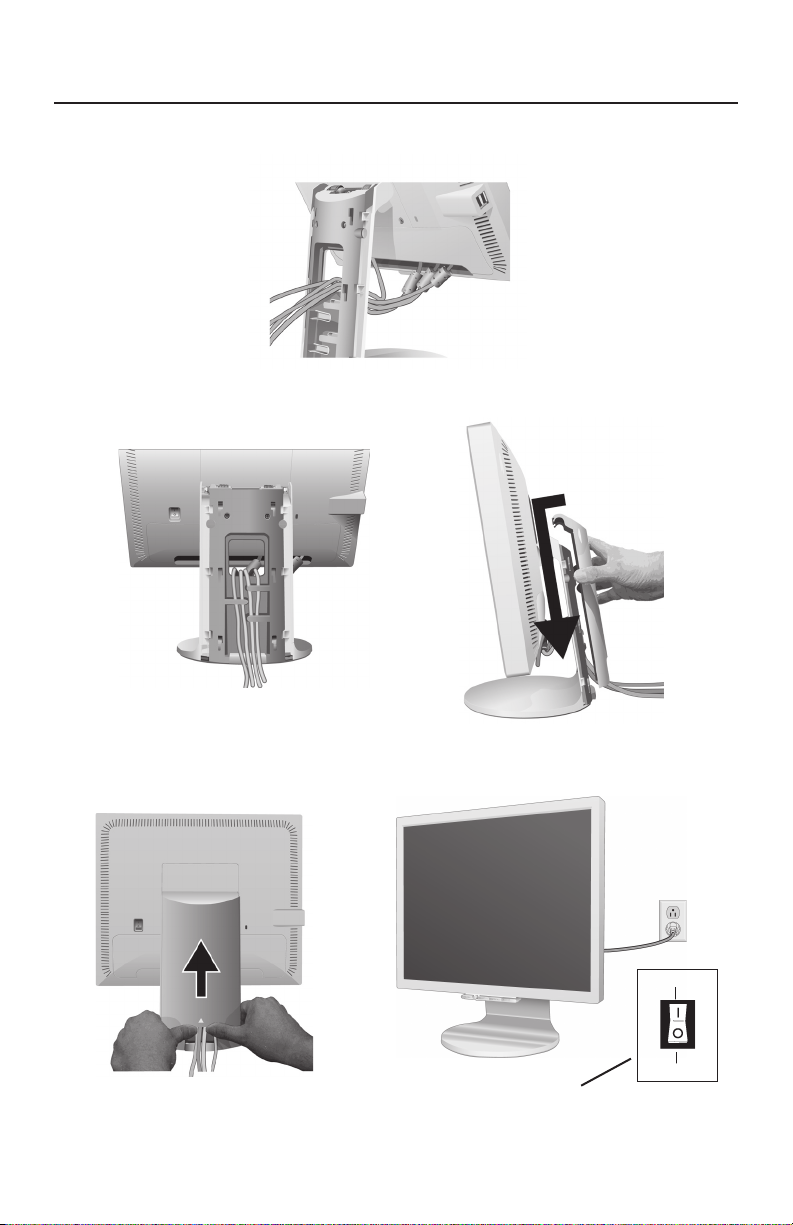
3. Remove the connector cover (Figure 4).
4. Place hands on each side of the monitor and tilt the LCD panel 30° (Figure 5).
5. Connect all cables to the appropriate connectors through the square hole in the stand
(Figure 6).
6. Place the connector cover onto the back cabinet (Figure 7).
7. Place all cables into the hooks (Figure 8).
8. Place hands on each side if the monitor to tilt the LCD panel back 5° (Figure 9).
9. Place the cable cover onto the stand (Figure 9). To remove the cable cover, push
the notch at the bottom of the cover up (towards the top of the monitor) in order to
unhook the cover from the stand (Figure 10).
10. Connect the power cord to the power outlet
NOTE: If you use this monitor at AC125-240V, please refer to Recommended Use
section of this manual for proper selection of power cord.
11. The vacation switch on the back side of the monitor must be turned on (Figure 11).
Turn on the monitor with the front power button and power on the computer.
NOTE: The vacation switch is a true on/off switch. If this switch is in the OFF
position, the monitor cannot be turned on using the front button.
DO NOT switch on/off repeatedly.
12. Analog input only: No-Touch Auto Adjust automatically adjusts the monitor to optimal
settings upon initial setup most of the time. For further adjustments, use the following
OSM® controls:
• Auto Adjust Contrast • Auto Adjust
Refer to the Controls section of this User ’s Manual for a full description of these
OSM controls.
NOTE: For download information on the Windows® 95/98/Me/2000/XP INF
file for your monitor, refer to the References section of this User’s Manual.
NOTE: If you have any problems, please refer to the Troubleshooting section of
this User’s Manual.
(Figure 1). Tighten all screws.
(Figure 3).
(Figure 11).
3
Display Setup –continued
Figure 1 Figure 2 Figure 3
DVI Signal Cable
Figure 4
Figure 6
Macintosh Cable Adapter (not included)
Note: Some Macintosh systems do not require a
Macintosh Cable Adapter
Figure 5
4
Display Setup –continued
Figure 7
Figure 8
Figure 10
Figure 9
Figure 11
ON Position
OFF Position
Vacation
Switch
5
Display Setup –continued
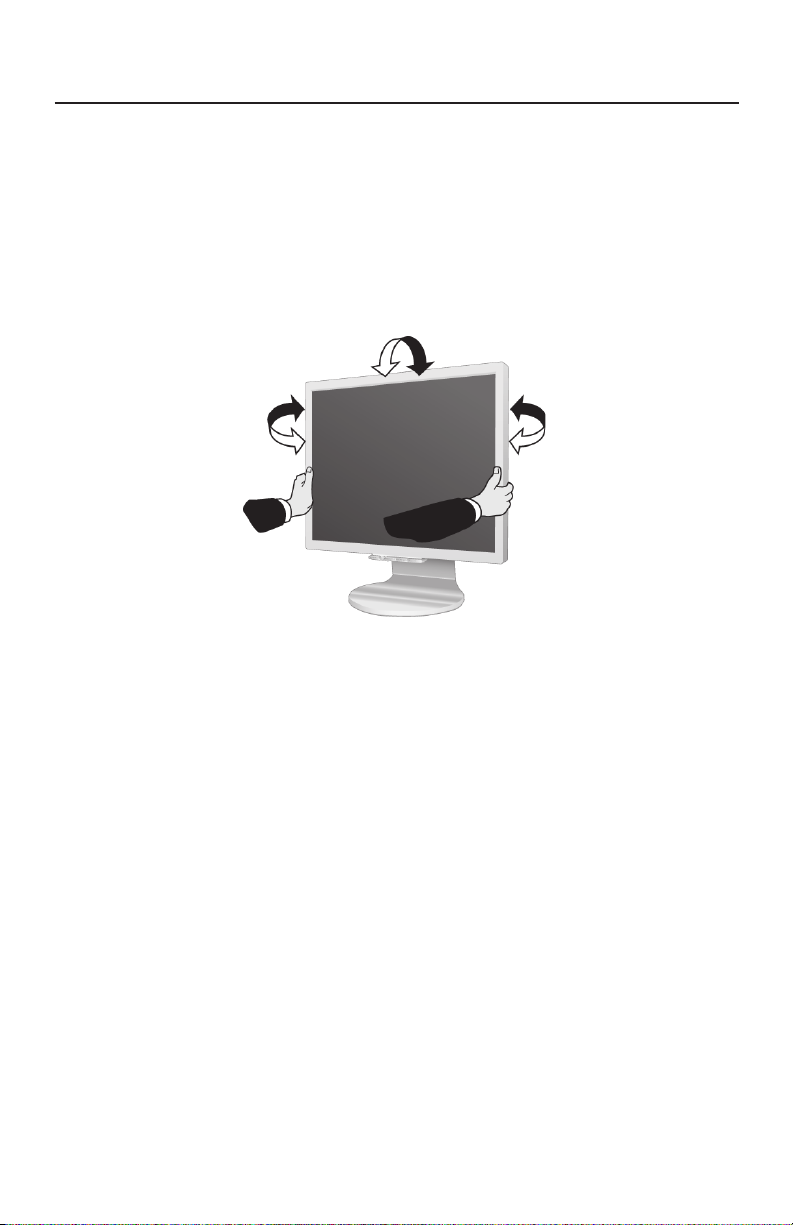
Tilt and Swivel
Grasp both sides of the monitor screen with your hands and adjust the tilt and
swivel as desired
NOTE: Handle with care when tilting and swiveling the monitor screen.
(Figure TS.1)
.
Figure TS.1
6
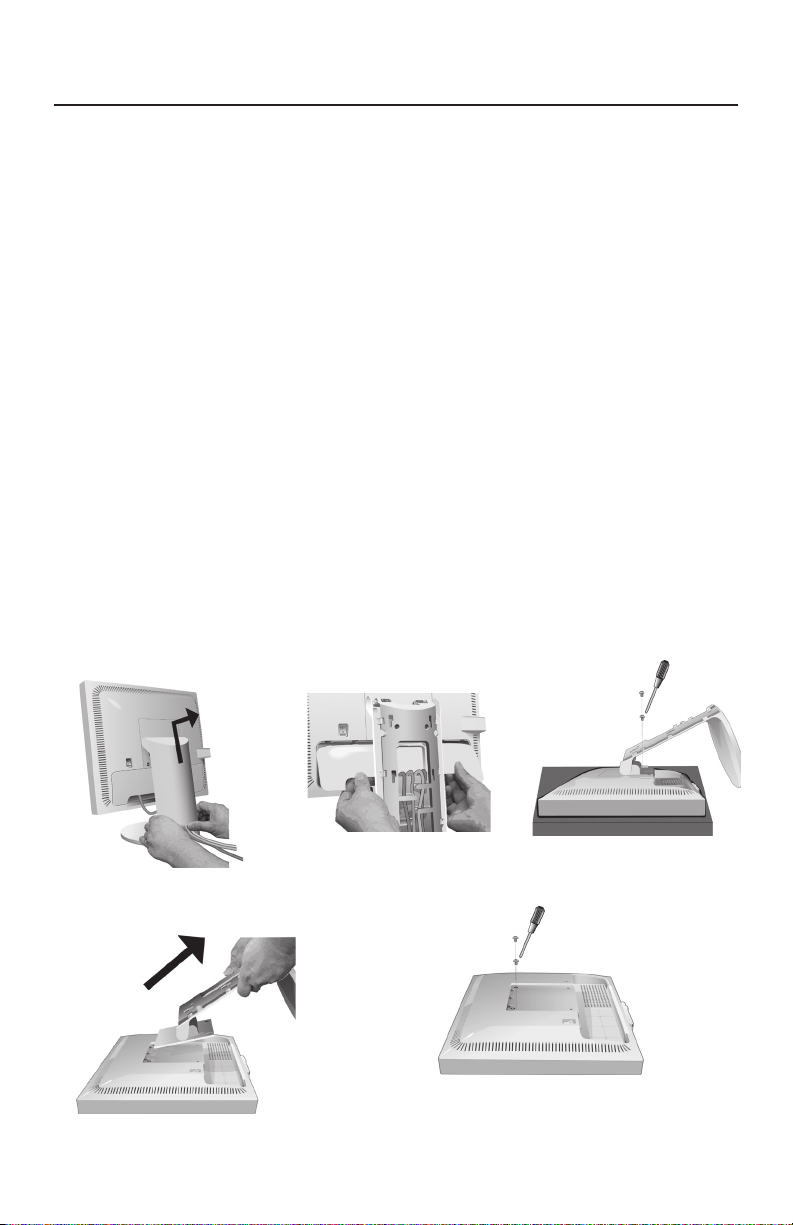
Mounting
Remove Monitor Stand for Mounting
1. Place hands on each side of the monitor and tilt the LCD panel 5˚ degrees.
Remove the cable cover (Figure M.1).
Remove the connector cover (Figure M.2).
2. Disconnect all cables.
3. Place monitor face down on a non-abrasive surface (Figure M.3).
NOTE: Handle with care when the monitor is facing down to avoid
damaging the front buttons.
4. Remove the 2 screws connecting the stand to the monitor (Figure M.3).
5. Lift up the stand to unlatch the upper hooks and remove the stand (Figure M.4).
6. Remove the 2 screws on the top of the monitor (Figure M.5). The monitor is
now ready for mounting in an alternate manner.
7. Connect the cables and replace the connector cover on the back of the monitor.
8. Reverse this process to reattach stand.
NOTE: Use only VESA-compatible alternative mounting method.
Handle with care when removing stand.
Figure M.1
Figure M.4
Figure M.2
Figure M.3
Figure M.5
7
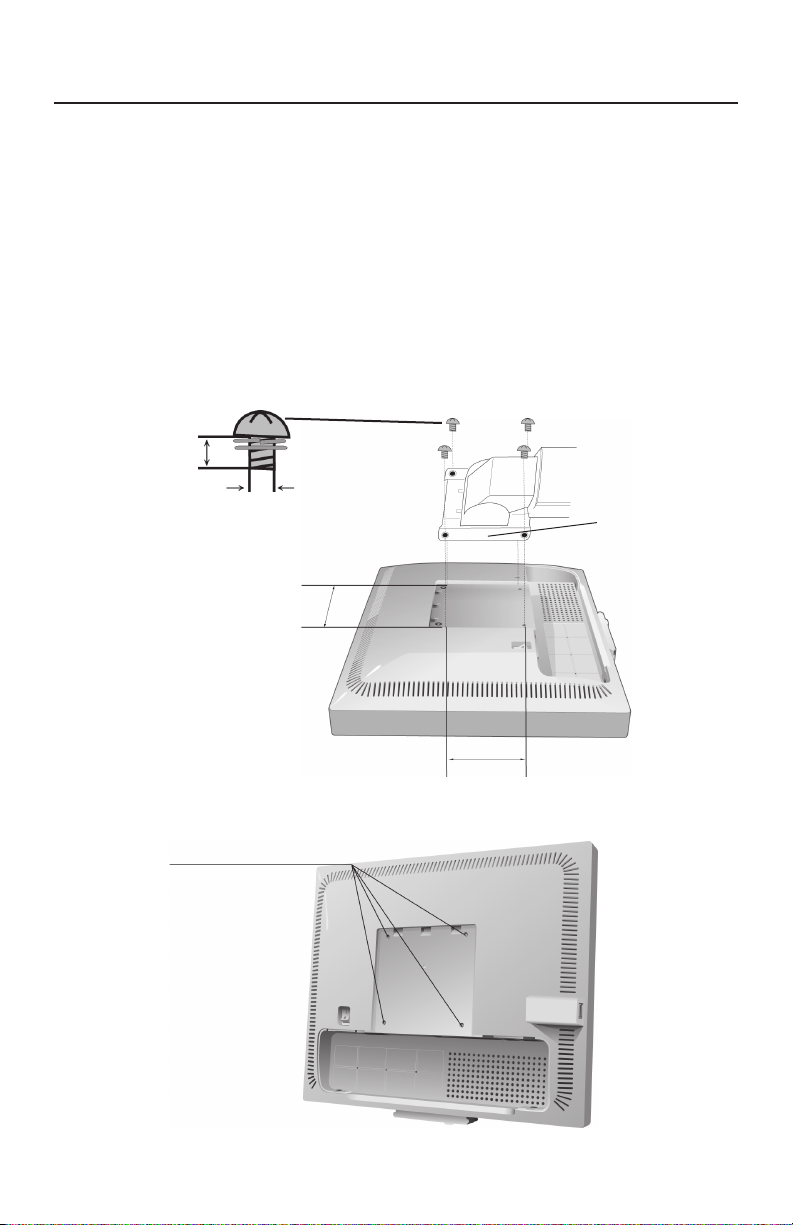
Flexible Arm Installation
This LCD monitor is designed for use with a flexible arm. To mount the monitor to
a flexible arm:
1. Follow the instructions on how Remove Monitor Stand for Mounting to remove
the stand.
2. Use the 4 screws to attach the arm to the monitor (Figure F.1).
NOTE
: The LCD monitor should only be used with an approved arm (e.g. GS mark).
To meet the safety requirements, the monitor must be mounted to an arm which
guaranties the necessary stability under consideration of the weight of the monitor.
12mm
M4
4 x 12mm with lock washer and flat washer
100mm
Figure F.1
4 Screws (M4)
(Max Depth: 8.5 mm)
Thickness of Bracket (Arm)
2.0~3.2mm
100mm
Weight of LCD assembly:
70GX2 — 4.0 kg (MAX)
90GX2 — 4.8 kg (MAX)
8
Controls
OSM® (On-Screen Manager) control buttons on the front of the monitor function
as follows:
To access OSM menu, press any of the control buttons (MENU/EXIT, Left, Right, Down, Up).
To change signal input, press the SELECT button.
NOTE: OSM must be closed in order to change signal input.
Button Menu
MENU/EXIT Exits the OSM controls.
Exits to the OSM main menu.
Left/Right Moves the highlighted area left/right to select control menus.
Moves the bar left/right to increase or decrease the adjustment.
Down/Up
SELECT
RESET/DV MODE Resets the highlighted control menu to the factory setting.
Switches the DV MODE.
NOTE: When RESET is pressed in the main and sub-menu, a warning window will appear
allowing you to cancel the
Brightness/Contrast Controls
BRIGHTNESS
Adjusts the overall image and background screen brightness.
CONTRAST
Adjusts the image brightness in relation to the background.
AUTO Contrast (Analog input only)
Adjusts the image displayed to optimal settings.
DV MODE
Allows you to select the suitable setting for Movies, Photos, etc.
Moves the highlighted area down/up to select one of the controls.
Active Auto Adjust function. Enter the OSM sub menu.
RESET function by pressing the MENU/EXIT button.
Auto Adjust (Analog input only)
Automatically adjusts the Image Position, H. Size and Fine settings.
Image Controls (Analog input only)
LEFT / RIGHT
Controls Horizontal Image Position within the display area of the LCD.
DOWN / UP
Controls Vertical Image Position within the display area of the LCD.
H.SIZE
Adjust this setting to increase or decrease the horizontal size
FINE
Adjust this setting to improve focus, clarity, and image stability.
9
Controls –continued
AccuColor® Control Systems
AccuColor® Control Systems: Six color presets select the desired color setting (sRGB
and NATIVE color presets are standard and cannot be changed).
R,G,B: Increases or decreases Red, Green or Blue color depending upon which is
selected. The change in color will appear on screen and the adjustment (increase
or decrease) will be shown by the bars.
NATIVE:
sRGB: sRGB mode dramatically improves the color fidelity in the desktop
environment by using a single standard RGB color space. With this color supported environment, the operator could easily and confidently communicate color
without further color management overhead in the most common situations.
NOTE: When MOVIE, GAMING, or PHOTO is selected as the DV MODE,
NATIVE is selected automatically as the six color preset and cannot be changed.
Original color presented by the LCD panel that is unadjustable.
Tools
OFF TIMER: Monitor will automatically power-down when the end user has selected
a predetermined amount of time.
LED BRIGHTNESS: You can adjust the Blue LED brightness
HOT KEY: You can adjust the brightness and contrast directly. When this function is
set to ON, you can adjust the brightness with
up or down control while the OSM menu is off.
FACTORY PRESET: Selecting Factory Preset allows you to reset all OSM control settings back to the factory settings. The RESET button will need to be held down for
several seconds to take effect. Individual settings can be reset by highlighting the
control to be reset and pressing the RESET button.
left or right control
and contrast with
Menu Tools
LANGUAGE: OSM® control menus are available in eight languages.
OSM LEFT/RIGHT: You can choose where you would like the OSM control
image to appear horizontally on your screen.
OSM DOWN/UP: You can choose where you would like the OSM control image to
appear vertically on your screen.
OSM TURN OFF: The OSM control menu will stay on as long as it is in use. In the
OSM Turn Off submenu, you can select how long the monitor waits after the last
touch of a button to shut off the OSM control menu.
OSM LOCK OUT: This control completely locks out access to all OSM control func-
tions except Brightness and Contrast. When attempting to activate OSM controls
while in the Lock Out mode, a screen will appear indicating the OSM controls are
locked out. To activate the OSM Lock Out function, press SELECT, then right control
button and hold down simultaneously. To deactivate the OSM Lock Out, press
SELECT, then left control button and hold down simultaneously while in the OSM
menu.
10

Controls –continued
RESOLUTION NOTIFIER: If this option is ON, a message will appear on the screen
after 30 seconds notifying the user that the optimal resolution is not being used.
The optimal resolution is 1280 x 1024.
Information
The Information menu indicates the current input, display resolution, horizontal
and vertical frequency, and polarity settings of the monitor. The model and serial
numbers of your monitor are also indicated.
OSM® Warning: OSM Warning menus disappear with Exit button.
NO SIGNAL: This function gives a warning when there is no signal present.
After power is turned on or when there is a change of input signal or video is inactive, the No Signal window will appear.
RESOLUTION NOTIFIER: This function gives a warning if a resolution other
than the optimal resolution is used. After power is turned on or when there is a
change of input signal or the video signal doesn’t have proper resolution, the
Resolution Notifier window will open. This function can be disabled in the Menu
Tools.
OUT OF RANGE: This function gives a recommendation of the optimized
resolution and refresh rate. After the power is turned on or there is a change of input
signal or the video signal doesn’t have proper timing, the Out Of Range menu will
appear.
11
Recommended Use
Safety Precautions and Maintenance
FOR OPTIMUM PERFORMANCE, PLEASE NOTE
THE FOLLOWING WHEN SETTING UP AND USING
THE MULTISYNC® LCD COLOR MONITOR:
• DO NOT OPEN THE MONITOR. There are no user serviceable parts inside and opening or
removing covers may expose you to dangerous shock hazards or other risks. Refer all servicing to
qualified service personnel.
• Do not spill any liquids into the cabinet or use your monitor near water.
• Do not insert objects of any kind into the cabinet slots, as they may touch dangerous voltage
points, which can be harmful or fatal or may cause electric shock, fire or equipment failure.
• Do not place any heavy objects on the power cord. Damage to the cord may cause shock or fire.
• Do not place this product on a sloping or unstable cart, stand or table, as the monitor may fall,
causing serious damage to the monitor.
• When operating the MultiSync LCD monitor with its AC 125-240V power supply, use a power
supply cord that matches the power supply voltage of the AC power outlet being used. The power
supply cord you use must have been approved by and comply with the safety standards of your
country. (Type H05VV-F should be used in Europe)
• In UK, use a BS-approved power cord with molded plug having a black (5A) fuse installed for use
with this monitor. If a power cord is not supplied with this monitor, please contact your supplier.
• Do not place any objects onto the monitor and do not use the monitor outdoors.
• The inside of the flourescent tube located within the LCD monitor contains mercury.
Please follow the bylaws or rules of your municipality to dispose of the tube properly.
• Do not bend power cord.
• Do not use monitor in high temperatured, humid, dusty, or oily areas.
• Do not cover vent on monitor.
Immediately unplug your monitor from the wall outlet and refer servicing to qualified service personnel under the following conditions:
• When the power supply cord or plug is damaged.
• If liquid has been spilled, or objects have fallen into the monitor.
• If the monitor has been exposed to rain or water.
• If the monitor has been dropped or the cabinet damaged.
• If the monitor does not operate normally by following operating instructions.
• If glass is broken, handle with care.
• If monitor or glass is broken, do not come in contact with the liquid crystal and handle with care.
CAUTION
• Handle with care when transporting. Save packaging for transporting.
• Allow adequate ventilation around the monitor so that heat can properly dissipate.
Do not block ventilated openings or place the monitor near a radiator or other heat
sources. Do not put anything on top of monitor.
• The power cable connector is the primary means of detaching the system from the
power supply. The monitor should be installed close to a power outlet which is easily accessible.
Image Persistence
Please be aware that LCD Technology may experience a phenomenon known as Image Persistence.
Image Persistence occurs when a residual or “ghost” image of a previous image remains visible on
the screen. Unlike CRT monitors, LCD monitors’ image persistence is not permanent, but constant images being displayed for a long period of time should be avoided.
To alleviate image persistence, turn off the monitor for as long as the previous image was displayed.
For example, if an image was on the monitor for one hour and a residual image remains, the monitor
should be turned off for one hour to erase the image.
As with all personal display devices, NEC DISPLAY SOLUTIONS recommends displaying moving
images and using a moving screen saver at regular intervals whenever the screen is idle or turning off
the monitor when not in use.
12
Recommended Use –continued
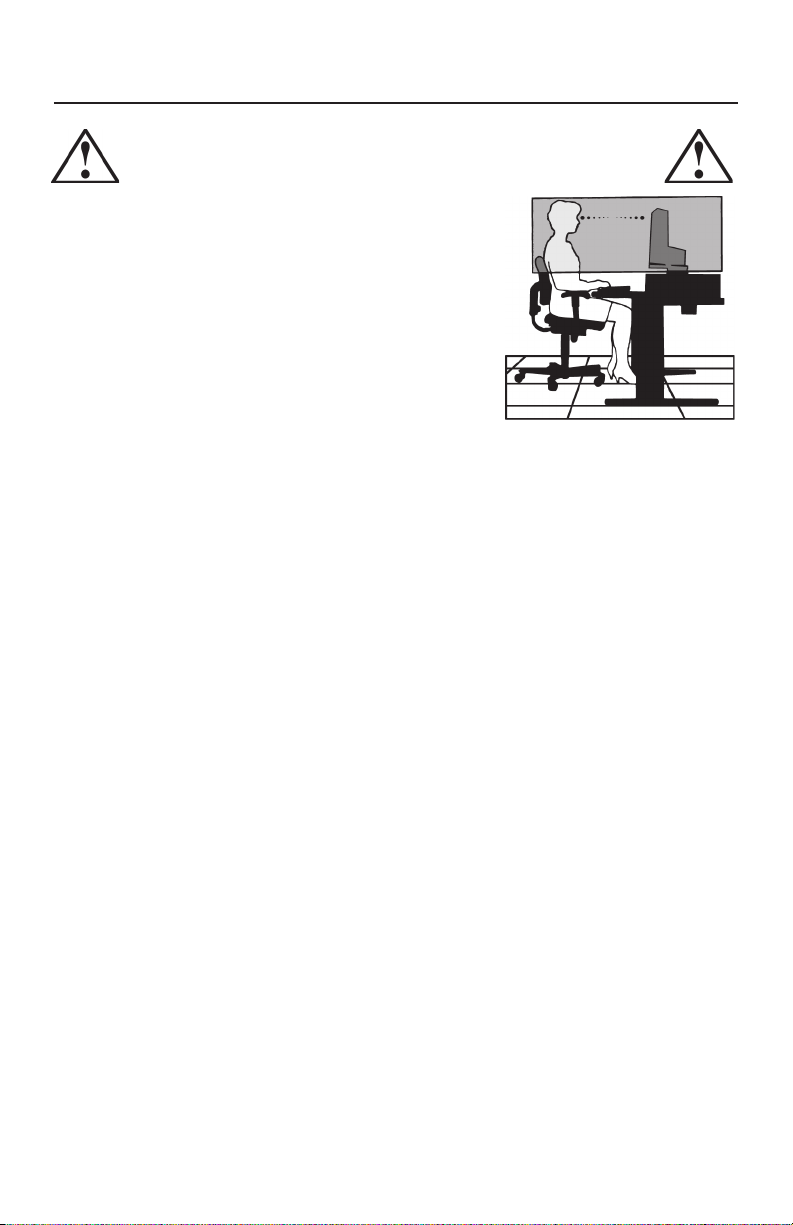
CORRECT PLACEMENT AND ADJUSTMENT OF THE MONITOR
CAN REDUCE EYE, SHOULDER AND NECK FATIGUE. CHECK THE
FOLLOWING WHEN YOU POSITION THE MONITOR:
• For optimum performance, allow 20 minutes for warm-up.
•
Adjust the monitor height so that the top of the screen is at or
slightly below eye level. Your eyes should look slightly downward
when viewing the middle of the screen.
•
Position your monitor no closer than 16 inches and no further
away than 28 inches from your eyes. The optimal distance is
20 inches.
• Rest your eyes periodically by focusing on an object at least
20 feet away. Blink often.
• Position the monitor at a 90° angle to windows and other light
sources to minimize glare and reflections. Adjust the monitor
tilt so that ceiling lights do not reflect on your screen.
• If reflected light makes it hard for you to see your screen, use an anti-glare filter.
• Adjust the monitor’s brightness and contrast controls to enhance readability.
• Use a document holder placed close to the screen.
• Position whatever you are looking at most of the time (the screen or
reference material) directly in front of you to minimize turning your head
while you are typing.
• Get regular eye checkups.
Ergonomics
To realize the maximum ergonomics benefits, we recommend the following:
•
Use the preset Size and Position controls with standard signals
•
Use the preset Color Setting
•
Use non-interlaced signals with a vertical refresh rate between 60-75Hz
•
Do not use primary color blue on a dark background, as it is difficult to see and
may produce eye fatigue to insufficient contrast.
For more detailed information on setting up a healthy work environment, write the American National
Standard for Human Factors Engineering of Visual Display Terminal Workstations – ANSI-HFS
Standard No. 100-1988 – The Human Factors Society, Inc. P.O. Box 1369, Santa Monica, California
90406.
Cleaning the LCD Panel
• When the liquid crystal panel becomes dusty or dirty, wipe gently with soft cloth.
• Please do not rub the LCD panel with coarse material.
• Please do not apply pressure to the LCD surface.
• Please do not use OA cleaner. OA cleaner will cause deterioration or discolor the LCD surface.
Cleaning the Cabinet
• Unplug the power supply
• Gently wipe the cabinet with a soft cloth
• To clean the cabinet, dampen the cloth with a neutral detergent and water, wipe the cabinet and
follow with a dry cloth.
NOTE: Many plastics are used on the surface of the cabinet. DO NOT clean with benzene,
thinner, alkaline detergent, alcoholic system detergent, glass cleaner, wax, polish cleaner,
soap powder, or insecticide. Do not touch rubber or vinyl to the cabinet for a long time.
of fluids and fabrics can cause the paint to deteriorate, crack or peel.
13

Recommended Use –continued
To avoid scratches
• Do not touch LCD panel with coarse material or hard objects.
• Use only a soft cloth for cleaning the surface of the LCD panel.
To avoid stains
• Clean fingerprints, water drips, chemical spills, etc. from the LCD panel immediately or
discoloration and spots will occur. If the LCD panel is rubbed with too much force, cracking
may occur, which will lead to abnormalities in the display.
To avoid breakage or screen trouble
• Do not push hard on the LCD panel surface.
• Do not set heavy objects on the LCD panel surface.
• Do not leave the LCD panel under constant pressure.
14
Specications
Monitor MultiSync® Notes
Specifications 70GX
LCD Module Diagonal : 17.0 inch Active matrix; thin film transistor (TFT)
Viewable Image Size : 17.0 inch liquid crystal display (LCD); 0.264 mm
Native Resolution (Pixel Count) : 1280 x1024 dot pitch; 400cd/m
700:1 contrast ratio, typical
Input Signal Video : ANALOG 0.7 Vp-p/75 Ohms Digital Input: DVI-D
Sync : Separate sync. TTL Level Positive/Negative
Horizontal sync. Positive/Negative
Vertical sync. Positive/Negative
Composite sync. Positive/Negative*
Sync on Green (Video 0.7Vp-p and Sync Negative 0.3Vp-p)*
Display Colors 16,194,277 Dependent on display card used.
Maximum Left/Right : 85°/85° (CR>5)
Viewing Angles Up/Down : 85°/70° (CR>5)
Synchronization Horizontal : 31.5 kHz to 81.1 kHz Automatically
Range Vertical : 56.0 Hz to 75.0 Hz Automatically
Resolutions Supported 720 x 400*
640 x 480*
800 x 600*
832 x 624*
1024 x 768*
1152 x 864*
1152 x 870*
1280 x 1024 @ 60 Hz to 75 Hz…………..NEC DISPLAY SOLUTIONS
cites recommended resolution at 60 Hz
for optimal display performance.
Active Display Area Horizontal : 337.9 mm/13.3 inches
Vertical : 270.3 mm/10.6 inches
USB Hub I/P: USB Specification Revision 2.0
Port: Upstream 1
Downstream 4
Load Current: Maximum 0.5A per port
Power Supply 100 – 240 V~ 50/60 Hz
Current Rating 1.0 — 0.5 A
Dimensions 367.0 mm (W) x 390.5 mm (H) x 203.0 mm (D)
14.4 inches (W) x 15.4 inches (H) x 8.0 inches (D)
Weight 5.7 kg
12.6 lbs
Environmental Considerations
Operating Temperature : 5°C to 35°C/41°F to 95°F
Humidity : 30% to 80%
Altitude : 0 to 12,000 Feet
Storage Temperature : -10°C to 60°C/-14°F to 140°F
Humidity : 10% to 85%
Altitude : 0 to 40,000 Feet
*1 Interpolated Resolutions: When resolutions are shown that are lower than the pixel count of the LCD module, text may appear
different. This is normal and necessary for all current flat panel technologies when displaying non-native resolutions full screen. In flat
panel technologies, each dot on the screen is actually one pixel, so to expand resolutions to full screen, an interpolation of the resolution
must be done.
*2 If your display is not showing a picture of the SOG and Composite sync. signal, please contact our hotline for assistance.
NOTE: Technical specifications are subject to change without notice.
2
2
2
2
1
VGA text Some systems may not support all
1
@ 60 Hz to 75 Hz modes listed.
1
@ 56 Hz to 75 Hz
1
@ 75 Hz
1
@ 60 Hz to 75 Hz
1
@ 75 Hz
1
@ 75 Hz
white luminence;
15
Specications
Monitor MultiSync® Notes
Specifications 90GX
LCD Module Diagonal : 19.0 inch Active matrix; thin film transistor (TFT)
Viewable Image Size : 19.0 inch liquid crystal display (LCD); 0.294 mm
Native Resolution (Pixel Count) : 1280 x1024 dot pitch; 400cd/m
700:1 contrast ratio, typical
Input Signal Video : ANALOG 0.7 Vp-p/75 Ohms Digital Input: DVI-D
Sync : Separate sync. TTL Level Positive/Negative
Horizontal sync. Positive/Negative
Vertical sync. Positive/Negative
Composite sync. Positive/Negative*
Sync on Green (Video 0.7Vp-p and Sync. Negative 0.3Vp-p)*
Display Colors 16,777,216 Dependent on display card used.
Maximum Left/Right : 85°/85° (CR>5)
Viewing Angles Up/Down : 85°/70° (CR>5)
Synchronization Horizontal : 31.5 kHz to 81.1 kHz Automatically
Range Vertical : 56.0 Hz to 75.0 Hz Automatically
Resolutions Supported 720 x 400*
640 x 480*
800 x 600*
832 x 624*
1024 x 768*
1152 x 864*
1152 x 870*
1280 x 1024 @ 60 Hz to 75 Hz…………..NEC DISPLAY SOLUTIONS
cites recommended resolution at 60 Hz
for optimal display performance.
Active Display Area Horizontal : 376.3 mm/14.8 inches
Vertical : 301.1 mm/11.9 inches
USB Hub I/P: USB Specification Revision 2.0
Port: Upstream 1
Downstream 4
Load Current: Maximum 0.5A per port
Power Supply 100 – 240 V~ 50/60 Hz
Current Rating 1.1-0.55A
Dimensions 412.5 mm (W) x 407.3 mm (H) x 203.0 mm (D)
16.2 inches (W) x 16.0 inches (H) x 8.0 inches (D)
Weight 6.5 kg
14.3 lbs
Environmental Considerations
Operating Temperature : 5°C to 35°C/41°F to 95°F
Humidity : 30% to 80%
Altitude : 0 to 12,000 Feet
Storage Temperature : -10°C to 60°C/-14°F to 140°F
Humidity : 10% to 85%
Altitude : 0 to 40,000 Feet
2
2
2
1
VGA text Some systems may not support all
1
@ 60 Hz to 75 Hz modes listed.
1
@ 56 Hz to 75 Hz
1
@ 75 Hz
1
@ 60 Hz to 75 Hz
1
@ 75 Hz
1
@ 75 Hz
white luminence;
2
*1 Interpolated Resolutions: When resolutions are shown that are lower than the pixel count of the LCD module, text may appear
different. This is normal and necessary for all current flat panel technologies when displaying non-native resolutions full screen. In flat
panel technologies, each dot on the screen is actually one pixel, so to expand resolutions to full screen, an interpolation of the resolution
must be done.
*2 If your display is not showing a picture of the SOG and Composite sync. signal, please contact our hotline for assistance.
NOTE: Technical specifications are subject to change without notice.
16

Features
Thin-frame design creates more desktop space for you to work and play, while the flat screen’s
crisp, bright images and crystal-clear text deliver a comfortable viewing experience.
No Touch Auto Adjust™ automatically adjusts your optimal image settings upon initial
power-on.
AccuColor® Control System allows you to change between six color settings on your display
to match your personal preference.
Redesigned OSM® controls allow you to quickly and easily adjust all elements of your screen
image.
NaViSet™ software offers an expanded and intuitive graphical interface, allowing you to
more easily adjust OSM® display settings via mouse and keyboard.
USB 2.0 hub adds excitement to your computing by connecting you to digital cameras,
scanners and more.
ErgoDesign® Features: Enhanced human ergonomics to improve the working environment,
protect the health of the user and save money. Examples include OSM controls for quick and
easy image adjustments, tilt base for preferred angle of vision, small footprint and compliance
with MPRII and TCO guidelines for lower emissions.
Plug and Play: The Microsoft® solution with the Windows®95/98/Me/2000/XP operating
system facilitates setup and installation by allowing the monitor to send its capabilities (such
as screen size and resolutions supported) directly to your computer, automatically optimizing
display performance.
IPM® (Intelligent Power Manager) System: Provides innovative power-saving methods that
allow the monitor to shift to a lower power consumption level when on but not in use, saving
two-thirds of your monitor energy costs, reducing emissions and lowering the air conditioning costs of the workplace.
Multiple Frequency Technology: Automatically adjusts monitor to the display card’s scanning
frequency, thus displaying the resolution required.
FullScan® Capability: Allows you to use the entire screen area in most resolutions, significantly
expanding image size.
VESA Standard Mounting Interface: Allows users to connect their MultiSync® monitor to any
VESA standard third party mounting arm or bracket. Allows for the monitor to be mounted
on a wall or an arm using any third party compliant device.
OptiClear® DVM: Provides rich color saturation, remarkable clarity, and true-to-life contrast
to enhance the user’s overall visual perception.
17

Troubleshooting
No picture
• The signal cable should be completely connected to the display card/computer.
• The display card should be completely seated in its slot.
• Make sure the Vacation Switch is in the ON position.
• Front Power Switch and computer power switch should be in the ON position.
• Check to make sure that a supported mode has been selected on the display card or system
being used. (Please consult display card or system manual to change graphics mode.)
• Check the monitor and your display card with respect to compatibility and recommended
settings.
• Check the signal cable connector for bent or pushed-in pins.
• Check the signal input, “INPUT 1” or “INPUT 2”.
Power Button does not respond
• Unplug the power cord of the monitor from the AC outlet to turn off and reset the monitor.
• Check the Vacation Switch on the back side of the monitor.
Image Persistence
• Please be aware that LCD Technology may experience a phenomenon known as Image
Persistence. Image Persistence occurs when a residual or “ghost” image of a previous image remains visible on the screen. Unlike CRT monitors, LCD monitors’ image persistence
is not permanent, but constant images being displayed for a long period of time should be
avoided.
To alleviate image persistence, turn off the monitor for as long as the previous image was
displayed. For example, if an image was on the monitor for one hour and a residual image remains, the monitor should be turned off for one hour to erase the image.
As with all personal display devices, NEC DISPLAY SOLUTIONS recommends displaying
moving images and using a moving screen saver at regular intervals whenever the screen
is idle or turning off the monitor when not in use.
Image is unstable, unfocused or swimming is apparent
• Signal cable should be completely attached to the computer.
• Use the OSM Image Adjust controls to focus and adjust display by increasing or decreasing the fine total. When the display mode is changed, the OSM Image Adjust settings may
need to be re-adjusted.
• Check the monitor and your display card with respect to compatibility
and recommended signal timings.
•
If your text is garbled, change the video mode to non-interlace and use 60Hz refresh rate.
LED on monitor is not lit (no blue or amber color can be seen)
• Power Switch should be in the ON position and power cord should be connected.
• Make sure the Vacation Switch is in the ON position.
• Make sure the LED Brightness Control within the OSM is at the proper setting.
Display image is not sized properly
• Use the OSM Image Adjust controls to increase or decrease the H.SIZE.
•
Check to make sure that a supported mode has been selected on the display card or system being
used. (Please consult display card or system manual to change graphics mode.)
No Video
• If no video is present on the screen, turn the Vacation Switch off and on again.
•
Make certain the computer is not in a power-saving mode (touch the keyboard or mouse).
USB Hub does not operate
• Make sure the USB cable is properly connected. Refer to the User’s Manual of the USB
device
.
18

References
NEC Monitor Customer Service & Support
Customer Service and Technical Support:
Fax: (800) 695-3044
Parts and Accessories/Macintosh
Cable Adapter: (800) 632-4662
Warranty Information: www.necdisplay.com
Online Technical Support www.necdisplay.com
Sales and Product Information
Sales Information Line: (888) 632-6487
Canadian Customers: (866) 771-0266, Ext#: 4037
Government Sales: (800) 284-6320
Government Sales email: gov@necdisplay.com
Electronic Channels
World Wide Web: www.necdisplay.com
Product Registration: www.necdisplay.com
European Operations: www.nec-display-solutions.com
Drivers and Downloads www.necdisplay.com
(800) 632-4662
19
Loading…
Have a look at the manual NEC Multisync 90gx2 Pro Users Manual online for free. It’s possible to download the document as PDF or print. UserManuals.tech offer 1168 NEC manuals and user’s guides for free. Share the user manual or guide on Facebook, Twitter or Google+.
							MultiSync 70GX
2
MultiSync 90GX
2
User’s Manual
							Index
Warning, Caution ......................................................................................................................... English-1
Declaration ................................................................................................................................... English-1
Canadian Department of Communications Compliance Statement ............................................ English-2
Declaration of Conformity ............................................................................................................ English-2
Contents ....................................................................................................................................... English-3
Quick Start ................................................................................................................................... English-4
Controls ........................................................................................................................................ English-8
Recommended use .................................................................................................................... English-10
Recommended use .................................................................................................................... English-10
Recommended use .................................................................................................................... English-10
Specifications for MultiSync 70GX
2 Pro ..................................................................................... English-12
Specifications for MultiSync 90GX
2 Pro ..................................................................................... English-13
Features..................................................................................................................................... English-14
Troubleshooting.......................................................................................................................... English-15
TCO’03 ....................................................................................................................................... English-16
Manufacturer’s Recycling and Energy Information ..................................................................... English-17
							English
English-1
WARNING
CAUTION
CAUTION:TO REDUCE THE RISK OF ELECTRIC SHOCK, MAKE SURE POWER CORD IS UNPLUGGED FROM
WALL SOCKET. TO FULLY DISENGAGE THE POWER TO THE UNIT, PLEASE DISCONNECT THE
POWER CORD FROM THE AC OUTLET.DO NOT REMOVE COVER (OR BACK). NO USER
SERVICEABLE PARTS INSIDE. REFER SERVICING TO QUALIFIED SERVICE PERSONNEL.
This symbol warns user that uninsulated voltage within the unit may have sufficient magnitude to cause
electric shock. Therefore, it is dangerous to make any kind of contact with any part inside this unit.
This symbol alerts the user that important literature concerning the operation and maintenance of this unit
has been included. Therefore, it should be read carefully in order to avoid any problems.
Caution:
When operating the MultiSync 70GX2 Pro, 90GX2 Pro with a 220-240V AC power source in Europe, use the power cord
provided with the monitor.
In the UK, a BS approved power cord with a moulded plug has a Black (five Amps) fuse installed for use with this equipment.
If a power cord is not supplied with this equipment please contact your supplier.
When operating the MultiSync 70GX
2 Pro, 90GX2 Pro with a 220-240V AC power source in Australia, use the power cord
provided with the monitor. If a power cord is not supplied with this equipment please contact your supplier.
For all other cases, use a power cord that matches the AC voltage of the power outlet and has been approved by and
complies with the safety standard of your particular country.TO PREVENT FIRE OR SHOCK HAZARDS, DO NOT EXPOSE THIS UNIT TO RAIN OR MOISTURE. ALSO, DO NOT
USE THIS UNITS POLARIZED PLUG WITH AN EXTENSION CORD RECEPTACLE OR OTHER OUTLETS UNLESS
THE PRONGS CAN BE FULLY INSERTED.
REFRAIN FROM OPENING THE CABINET AS THERE ARE HIGH VOLTAGE COMPONENTS INSIDE. REFER
SERVICING TO QUALIFIED SERVICE PERSONNEL.
Declaration
Declaration of the Manufacturer
We hereby certify that the colour monitor
MultiSync 70GX2 Pro (L175GG), 90GX2 Pro
(L195GH) are in compliance with
Council Directive 73/23/EEC:
– EN 60950-1
Council Directive 89/336/EEC:
– EN 55022
– EN 61000-3-2
– EN 61000-3-3
– EN 55024and marked with
NEC Display Solutions, Ltd.
4-13-23, Shibaura,
Minato-Ku
Tokyo 108-0023, Japan
Windows is a registered trademark of Microsoft Corporation. NEC is a registered trademark of NEC Corporation. ENERGY STA R is a
U.S. registered trademark.
OmniColor is a registered trademark of NEC Display Solutions Europe GmbH in the countries of EU and Switzerland.
ErgoDesign is a registered trademark of NEC Display Solutions, Ltd. in Austria, Benelux, Denmark, France, Germany, Italy, Norway,
Spain, Sweden, U.K.
NaViSet is a trademark of NEC Display Solutions Europe GmbH in the countries of EU and Switzerland.
MultiSync is a registered trademark of NEC Display Solutions, Ltd. in the countries of U.K., Italy, Austria, Netherlands, Switzerland,
Sweden, Spain, Denmark, Germany, Norway and Finland.
All other brands and product names are trademarks or registered trademarks of their respective owners.
As an E
NERGY STA R® Partner, NEC Display Solutions of America, Inc. has determined that this product meets the ENERGY STA R guidelines
for energy efficiency. The E
NERGY STA R emblem does not represent EPA endorsement of any product or service.
							English-2
Canadian Department of Communications Compliance
Statement
DOC: This Class B digital apparatus meets all requirements of the Canadian Interference-Causing Equipment Regulations.
C-UL: Bears the C-UL Mark and is in compliance with Canadian Safety Regulations according to CAN/CSA C22.2 No. 60950-1.
FCC Information
1. Use the attached specified cables with the MultiSync 70GX2 Pro (L175GG), 90GX2 Pro (L195GH) colour monitor so as
not to interfere with radio and television reception.
(1) The power supply cord you use must have been approved by and comply with the safety standards of U.S.A.,
and meet the following condition.
Power supply cord Non shield type, 3-conductor
Length 2.0 m
Plug shape
U.S.A
(2) Please use the supplied shielded video signal cable. Use of other cables and adapters may cause interference
with radio and television reception.
2.This equipment has been tested and found to comply with the limits for a Class B digital device, pursuant to part 15 of
the FCC Rules. These limits are designed to provide reasonable protection against harmful interference in a residential
installation. This equipment generates, uses, and can radiate radio frequency energy, and, if not installed and used in
accordance with the instructions, may cause harmful interference to radio communications. However, there is no
guarantee that interference will not occur in a particular installation. If this equipment does cause harmful interference
to radio or television reception, which can be determined by turning the equipment off and on, the user is encouraged
to try to correct the interference by one or more of the following measures:
•Reorient or relocate the receiving antenna.
•Increase the separation between the equipment and receiver.
•Connect the equipment into an outlet on a circuit different from that to which the receiver is connected.
•Consult your dealer or an experienced radio/TV technician for help.
If necessary, the user should contact the dealer or an experienced radio/television technician for additional
suggestions. The user may find the following booklet, prepared by the Federal Communications Commission, helpful:
“How to Identify and Resolve Radio-TV Interference Problems.” This booklet is available from the U.S. Government
Printing Office, Washington, D.C., 20402, Stock No. 004-000-00345-4.
Declaration of Conformity
This device complies with Part 15 of FCC Rules. Operation is subject to the following two conditions. (1) This device may not
cause harmful interference, and (2) this device must accept any interference received, including interference that may cause
undesired operation.
U.S. Responsible Party: NEC Display Solutions of America, Inc.
Address: 500 Park Blvd, Suite 1100
Itasca, Illinois 60143
Tel. No.: (630) 467-3000
Type of Product: Display Monitor
Equipment Classification: Class B Peripheral
Model: MultiSync 70GX
2 Pro (L175GG), 90GX2 Pro (L195GH)
We hereby declare that the equipment specified above conforms
to the technical standards as specified in the FCC Rules.
							English
English-3
Contents
Your new NEC MultiSync LCD monitor box* should contain the following:
•MultiSync 70GX
2 Pro, 90GX2 Pro monitor with tilt/swivel adjust stand
•Power Cord
•Video Signal Cable (15-pin mini D-SUB male to 15-pin mini D-SUB male)
•Video Signal Cable (DVI-D to DVI-D)
•USB Cable
•User’s Manual
•Cable Cover
•CD ROM (includes complete User’s Manual in PDF format).
To see the User’s Manual, Acrobat Reader 4.0 must be installed on your PC.
MEN
U/E
XITS
EL
ET C
/1–
2R
ES
ET/D
V MOD
E
*Remember to save your original box and packing material to transport or ship the monitor.
Power Cord
User’s Manual 15-pin mini D-SUB male to
15-pin mini D-SUB maleCD-ROM Cable Cover USB Cable
DVI-D to DVI-D
							English-4
Quick Start
To attach the MultiSync LCD monitor to your system, follow these instructions:
1. Turn off the power to your computer.
2.For the PC or MAC with DVI digital output: Connect the DVI signal cable to the connector of the display card in your
system (Figure A.1). Tighten all screws.
For the PC with Analog output: Connect the 15-pin mini D-SUB signal cable to the connector of the display card in your
system (Figure A.2). Tighten all screws.
For the MAC: Connect the Macintosh cable adapter to the computer, then attach the 15-pin mini D-SUB signal cable to
the Macintosh cable adapter (Figure B.1). Tighten all screws.
NOTE:Some Macintosh systems do not require a Macintosh cable adapter.
3. Remove the connector cover (Figure C.1).
4. Place hands on each side of the monitor to tilt the LCD panel 30 degrees angles (Figure C.2).
5. Connect all cables to the appropriate connectors through the square hole in the stand (Figure C.3).
Figure A.1 Figure B.1
Macintosh
Cable Adapter
(not included)
Figure A.2
DVI signal cable
Figure C.1 Figure C.2
Figure C.3
							English
English-5
6. Place the connector cover onto the back cabinet (Figure C.4).
7. Place all cables into the hooks (Figure C.5).
8. Place hands on each side if the monitor to tilt the LCD panel back 5° (Figure C.6).
9. Place the cable cover onto the stand (Figure C.6). To remove the cable cover, push the notch at the bottom of the cover up
(towards the top of the monitor) in order to unhook the cover from the stand (Figure C.7).
10. Connect the power cord to the power outlet (Figure D.1).
NOTE:Please refer to Caution section of this manual for proper selection of AC power cord.
11. The vacation switch on the back side of the monitor must be turned on (Figure D.1). Turn on the monitor with the front
power button and the computer.
NOTE:The vacation switch is a true on/off switch. If this switch is on the OFF position, the monitor cannot be turned on
using the front button. DO NOT switch on/off repeatedly.
12. No-Touch Auto Adjust automatically adjusts the monitor to optimal settings upon initial setup for most timings.
For further adjustments, use the following OSM controls:
• Auto Adjust Contrast (Analog input only)
• Auto Adjust (Analog input only)
Refer to the Controls section of this User’s Manual for a full description of these OSM controls.
NOTE:If you have any problems, please refer to the Troubleshooting section of this User’s Manual.
Figure C.6 Figure C.7 Figure C.4 Figure C.5
Figure D.1
OFF PositionON Position
Vacation Switch
M
ENU
/
E
XITS
EL
E
CT
/1–2R
ES
E
T/
DV
MO
D
E
							English-6
Figure M.1
Remove Monitor Stand for Mounting
To prepare the monitor for alternate mounting purposes:
1. Place hands on each side of the monitor to tilt the LCD panel 5 degrees angles.
Remove the cable cover (Figure M.1).
Remove the connector cover (Figure M.2).
2. Disconnect all cables.
3. Place monitor face down on a non-abrasive surface (Figure M.3).
4. Remove the 2 screws connecting the stand to the monitor (Figure M.3).
Tilt and Swivel
Grasp both sides of the monitor screen with your hands and adjust the tilt and swivel as desired (Figure TS.1).
NOTE:Handle with care when tilting and swivelling the monitor screen.
Figure TS.1
Figure M.2
M
EN
U/
EX
ITSEL
ECT
/
1–
2RES
E
T/
DV

MO
DE
Figure M.3
							English
English-7
Figure M.4 Figure M.5
5. Lift up the stand to unlatch the upper hooks and remove the stand (Figure M.4).
6. Remove the 2 screws on the top of the monitor (Figure M.5). The monitor is now ready for mounting in an alternate
manner.
7. Connect the cables and place the connector cover on the back of the monitor.
8. Reverse this process to re-attach stand.
NOTE:Use only VESA-compatible alternative mounting method.
Handle with care when removing stand.
Flexible Arm Installation
This LCD monitor is designed for use with a flexible arm. To mount the monitor to a flexible arm:
1. Follow the instructions on how Remove Monitor Stand for Mounting to remove the stand.
2. Use the 4 screws to attach the arm to the monitor (Figure F.1).
NOTE:The LCD monitor should only be used with an approved arm (e.g. GS mark). To meet the safety requirements, the
monitor must be mounted to an arm, which guaranties the necessary stability under consideration of the weight of
the monitor.
Thickness of Bracket (Arm)
2.0~3.2mm
4 Screws (M4)
(Max Depth: 8.5mm)
Weight of LCD assembly: 70GX
2 Pro - 4.0kg (MAX)
90GX2 Pro - 4.8kg (MAX) 100mm
100mmFigure F.1
12mm
M4
4 x 12mm with lock washer
and flat washer
							English-8
Controls
OSM (On-Screen Manager) control buttons on the front of the monitor
function as follows:
To access OSM menu, press any of the control buttons (MENU/EXIT, Left, Right, Down, Up).
To change signal input, press the SELECT button.
To change DV MODE, press the RESET/DV MODE button.
NOTE:OSM must be closed in order to change signal input.
NOTE:When RESET is pressed in the main and sub-menu, a warning window will appear allowing you to cancel the
RESET function by pressing the MENU/EXIT button.
Brightness/Contrast Controls
BRIGHTNESS
Adjusts the overall image and background screen brightness.
CONTRAST
Adjusts the image brightness in relation to the background.
DV MODE
Dynamic Visual Mode allows you to select setting for Movie, Photo and etc.
AUTO CONTRAST (Analog input only)
Adjusts the image displayed to optimal settings.
Auto Adjust (Analog input only)
Automatically adjusts the Image Position, H. Size and Fine settings.
Image Controls (Analog input only)
LEFT / RIGHT
Controls Horizontal Image Position within the display area of the LCD.
DOWN / UP
Controls Vertical Image Position within the display area of the LCD.
H.SIZE
Adjusts the horizontal size by increasing or decreasing this setting.
FINE
Improves focus, clarity and image stability by increasing or decreasing this setting.
Menu
Open OSM main menu.
Exits the OSM controls.
Exits to the OSM main menu.
Button
MENU/EXIT
Left/Right
Down/Up
SELECT
RESET/DV MODEMoves the highlighted area left/right to select control menus.
Moves the bar left/right to increase or decrease the adjustment.
Direct adjust of brightness if HOT KEY is set to ON.
Enters the OSM menu if HOT KEY is set to OFF.
Moves the highlighted area down/up to select one of the controls.
Direct adjust of contrast if HOT KEY is set to ON.
Enters the OSM menu if HOT KEY is set to OFF.
Active Auto Adjust function. Enter the OSM sub menu.
Resets the highlighted control menu to the factory setting. Switches the DV Mode. 4-Direction-KeyUp
DownRight Left
All NEC manuals
Comments (0)
Related Manuals for NEC Multisync 90gx2 Pro Users Manual
Помнится, недавно мы знакомились с неожиданной новинкой NEC — моделью 1970GX и немало покритиковали ее, решив, что эксперимент будет признан неудачным. Однако ситуация обернулась иначе и в нашей лаборатории уже следующая модель — 90GX2.
Методика
Тест состоит из трех частей:
- знакомство с поставкой
- субъективная оценка путем попытки выполнения обычной работы
- проведение объективных замеров и тестов на базе программно-аппаратного комплекса iXBT (описание методики)
Знакомство
Удивительно, но NEC ввел новую категорию в линейку своих LCD-мониторов — игровые (gaming). Туда попало целых четыре модели: LCD1770GX, 70GX 2, 90GX 2 и даже новейший LCD20WGX 2. Если первые три модели представляют отсталую технологию TN+film, то последняя — усовершенствованную S-IPS. Таким образом, единственное, что объединяет все эти мониторы, — это глянцевое покрытие OptiClear, вызывающее шквал критики покупателей.
В ближайшее время мы планируем провести тестирование LCD20WGX2, а пока познакомимся с 90GX2 (и через несколько дней и 70GX2). Неужели NEC придумал что-то новое, что потребовало вместо 1970GX запускать новую модель, да еще и с новым индексом (пропала аббревиатура «LCD» и двухзначный индекс сменил четырехзначный)?
Сюрпризы начинаются сразу: во-первых, 90GX2 на пути от 1970GX потерял регулировки и по высоте, и вокруг оси (обычно у NEC заложен небольшой корректирующий поворот). Во-вторых, 90GX2 очевидно не предполагает использования фирменного подвесного комплекта колонок (soundbar), поскольку разъема питания (DC Out) также уже нет. Напоследок блок меню стал серебристым, да еще и с очень прокитайским синим диодом (в нем спрятан сюрприз!).
В коробке помимо монитора есть кабель питания, видеокабель для подключения с D-SUB и DVI коннекторами и провод для встроенного USB-хаба. Хаб рассчитан на четырех потребителей, два из которых подключаются сзади (ввиду использования фальшпанели речь, видимо, может идти о постоянном подключении), а два могут быть включены через коннекторы на левом (от пользователя) торце экрана.
Технические характеристики
Производитель заявил следующие параметры для монитора:
| Матрица | 19″ TN+film TFT, точка 0.294 |
| Яркость | 400 кд/м2 |
| Контраст | 700:1 |
| Время отклика | 4 мс (gray-to-gray), 8мс полный цикл |
| Количество цветов | 16,7 млн |
| Углы обзора | 170 от центра по горизонтали, 150 и по вертикали при 5:1. |
| Рекомендуемый режим | 1280×1024@60 Гц |
| Источники сигнала | D-Sub, DVI |
| Дополнительно | USB2-хаб на 4 устройства |
| Вес | 6.5кг |
| Габаритные размеры | 412×407×203 мм |
| Энергопотребление | 54 Вт в рабочем режиме, 3 Вт в спящем |
| Управление | c помощью меню через кнопки на панели или программно пакетом NaviSet. |
| Комплектация | руководство пользователя и программное обеспечение на CD, кабель питания, сигнальный D-SUB кабель и кабель питания. |
Заметили? Вертикальные углы вдруг «сузились» — если для 1970GX заявляли 170, то с GX2 японцы поосторожничали (и правильно). Правда, оказалось целых 16,7 млн цветов — неужели не поскупились на новый блок? И уменьшилась глубина.
Стенд
Операционная система Windows2000 Server. Компьютер на базе CPU Intel P4 2,4 ГГц, 512 МБ памяти, двухканальный контроллер Adaptec SCSI-160 со SCSI DVD-ROM Pioneer и жесткими дисками по 18 ГБ 10kRPM. Видеокарта NVIDIA Geforce4 Ti-4400 с DVI и ТВ-входом. Звук — Microsoft Digital Sound System 80 (2.1), подключенная к Creative SB Live! 1024.
Рядом стоит откалиброванный LCD-монитор NEC MultiSync LCD2070NX (20″, S-IPS 16мс), используемый для визуального сравнения цветопередачи и скорости отклика.
Субъективная оценка
Как обычно, монитор установлен и выступает в роли «рабочей лошадки» — на нем выполняются все привычные действия.
Настраиваем
Первая проблема — найти какую-нибудь подставку, на которую можно поставить 90GX2. В офисной мебели часто предлагаются П-образные конструкции, на которые можно и поставить монитор, и под которой можно хранить аксессуары типа ручек. Если вы попытаетесь обойтись без отдельной поставки, то придется как-то решать проблему нахождения экрана на уровне груди, а не глаз. А по любым нормам нормаль к экрану должна быть именно на уровне глаз. Попытка смотреть на экран сверху вниз ведет к сутулости и заболеванию позвоночника.
Правда, домашние пользователи могут взять пару томов энциклопедии. Ведь 90GX2 позиционируется как игровое (домашнее?) решение, а в этих условиях дизайн уже не главное. Главное — уберечь зрение.
Вторая задача — так разместить экран, чтобы за вашей спиной не было никаких осветительных приборов или просто контрастных предметов. Иначе вместо работы вам придется заниматься вынужденным созерцанием себя и предметов, за своей спиной (кстати, чем не находка для начальников отделов или родителей с мелкими детьми дома?). Поэтому пусть лучше монитор стоит на фоне окна, чем в темном углу.
Затем подключите провода, закройте две фальшпанели на задней части 90GX2 (не забыв подключить стационарные USB-приборы) и включите монитор. Веселый синий диод укажет, что знакомство перешло в новую фазу, для чего вам придется познакомиться с кнопками управления (меню). Кстати, теперь они серебристые (у 1970GX были черными):
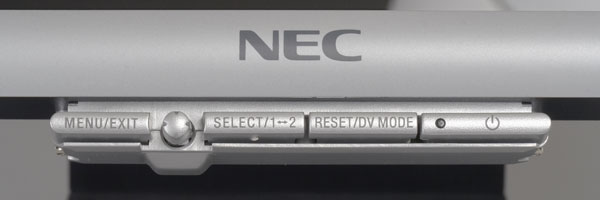
- Menu/Exit для входа или выхода из меню;
- Select для выбора источника сигнала (DVI/D-Sub);
- Джойстик, имеющий 4 положения, аналогичные стрелкам;
- Reset/DV Mode для сброса настроек или переключения между предустановленными профилями;
- Включение питания.
Само меню абсолютно стандартно для обновленных NEC-ов и максимально удобно, разве что теперь скорость реагирования значительно увеличена (почти мгновенна — разгон налицо!).
Джойстик у нашего монитора не вызвал никаких нареканий на ложные срабатывания, как это бывало у ранних моделей. Это радует, ведь нет ничего противнее залипания в момент настройки.
Из интересного в меню можно отметить регулировку яркости синего диода и грамотный русский перевод.
Смотрим
Вспоминая отзывы о 1970GX, мы пытались найти отличия… и не нашли. Несомненно, OptiClear увеличил живость цветов и контрастность изображения. Плюс, наверняка более-менее грамотные настройки цветопередачи (если такое вообще применимо к TN+film) помогают хоть как-то приблизиться к качеству изображения у S-IPS, но углы… эти углы портят все. Особенно в условиях отсутствия регулировки по высоте — постоянно то верхняя, то нижняя часть экрана темнеют, заставляя детали теряться. И даже приличный боковой обзор выглядит лишь хорошей миной при плохой игре.
Кто еще пострадает от узкого диапазона вертикальных углов? Если в офисе, то любой коллега, который подойдет и попросит что-то показать с вашего экрана. Но, помнится, мы уже договорились считать 90GX2 домашним выбором. Поэтому больше никакого офиса! Только домашние, которым тоже бывает интересно посмотреть в экран. Еще бы увидеть все…
Зато можно оценить, как видны полутона. На нашем HTML LCD-тесте просматриваются темные от 4.4.4 и светлые ниже 253.253.253. Кстати, надо отметить, что заводская настройка контрастности в 50% явно велика — в идеале ее надо сбрасывать в 0, что приведет к бОльшей отчетливости по контрольным точкам яркости (говоря простым языком, обычный 3D-мерный интерфейс Windows будет более правильным и объемным по границам кнопок и тулбаров). Правда, мы тут же теряем темные полутона, которые становятся синеватыми. Особенно хорошо это видно на примере нашего автомобильного фона (темно-серо-черная тень под передним бампером и колесами). Так что золотой серединой можно считать настройку в 20% от максимума, что поможет и в играх для большей красоты, и в Windows для удобства.
Последним шагом в знакомстве мы оцениваем равномерность подсветки. Так, у 1970GX с этим особых проблем не было, а у 90GX2? Увы, но проблема налицо и она существенная (фото это хорошо иллюстрирует). Остается подозревать, что дело лишь в неудачном экземпляре. Хотя как-то слишком сильно упало качество у LG.Philips за последний год — все модели имеют проблемы со световыми пятнами!
Работаем
Говоря о доме, мы, с одной стороны, можем представить, что монитор будет использоваться как средство выполнения офисной работы на дому (характерно для менеджеров), а с другой — как способ готовить задания для школьников (рефераты, доклады, и прочее). Поэтому прогоним 90GX2 по полному циклу: Word, Excel, PowerPoint, Photoshop.
Сначала загружаем в Word многостраничный документ. При пролистывании и плавной прокрутке текст сохраняет необходимую читаемость. Даже при аналоговом подключении (а дома далеко не у всех присутствуют современные видеокарты с DVI) четкость букв сохраняется на адекватном уровне. Правда, проблема с углами особенно хорошо видна на белом фоне.
Photoshop и тестовые фотографии выявили ту самую тонкую грань в настройках контрастности — то светлые полутона вымываются, то темные приобретают паразитные оттенки.
В Internet Explorer сеанс посещения форума iXBT.com, а также нескольких новостных сайтов, не вызвал вопросов — имеющиеся анимированные блоки выглядят в меру четко, текст листается и читается без проблем.
Во всех данных приложениях неудачная засветка матрицы себя не проявила.
Смотрим кино
Для оценки матрицы используем DVD-версии фильмов:
| Desperado (Отчаянный) | Основные планы темные (старая Америка: бары, дома), есть динамические сцены со стрельбой и драками. | Версия Superbit высокого качества (уровень редких оригинальных дисков). |
| StarWars The Fanton Menace (Эпизод I) | Сочетание компьютерной анимации и обычного кино. Очень динамичный эпизод с гонками, яркие фоны. | Оригинальный диск. |
| DVD-версия ТВ-концерта группы «Парк Горького», ТВ-клипы. | Качество средне-телевизионное, очень сильное сжатие — малый поток. Отражает качество большинства «рыночных» дисков. | Оригинальный диск. |
| Концерт Пола Маккартни | Качество среднее, много полностью меняющих планов (зал консерватории). | Оригинальный диск. |
Для просмотра используется DVD-плеер PowerDVD 6, полный экран.
Ускорение матрицы не пошло на пользу 90GX2 (а точнее зрителям) — все артефакты невысокого качества изображения монитор исправно показывает. Поэтому концертные диски безжалостно откладываются в сторону. И наступает черед диска, который лишь единожды смог «смутить» монитор, — Звездные Войны. Здесь 90GX2 абсолютно на высоте — он легко справляется с выводом меняющихся планов, а яркости вполне хватает для придания светлым «каньонам» нужного ощущения пространства и объема.
Диск с Отчаянным, а точнее его темные сцены, стоят немного особняком — проблема с отражениями в OptiClear встает в полный рост! Смотреть подобные сцены можно (и нужно) только в сумраке, без каких-либо контрастных предметов домашнего обихода (торшеры, ночники, настольные лампы, аквариумы) и желательно надеть на себя темную одежду. В остальном напрягает лишь контрастность темных фрагментов и очень сильная засветка, которая перестает раздражать только при переключении сцен на светлые уличные.
Играем
Для проверки ощущения от игры традиционно используем Return to Castle Wolfenstein, эпизод 2, со сценами «на улице» и «внутри» небольших помещений. Все настройки видео — в максимум (но DV Mode — Normal, так как в режиме Game изображение слишком высветляется).
Пожалуй, можно смело сказать, что визуально 90GX2, бесспорно, является самым быстрым монитором, который мы видели. Даже наш эталонный NEC 2070NX подмыливал в ряде мест визуально сильнее, чем 90GX2. Это видно, например, на контурах яркого светильника на темной стене или на листьях дерева: если S-IPS 16 мс в движении слегка терял четкость контуров, то 4 мс TN+film таких проблем не испытывал.
Однако мы опять столкнулись с тем, что сильная засветка контуров матрицы может мешать игроку. Так, например, при смене эпизодов на темном фоне белые пятна смотрелись очень нехорошо.
Поэтому по игровому направлению в скоростной компоненте мы смело признаем 90GX2 отличным шагом после 1970GX.
Итоги
Высочайшая скорость матрицы слегка разгладила недовольные морщины от сильной засветки и неудобного конструктива. Странное сочетание, но что поделать? Объективное тестирование
Поскольку мы уже похвалили матрицу за скорость, то будет интересно проверить, как это может быть представлено сухими цифрами.
Оценка скорости матрицы
| яркость 100%, контраст 50% (заводские) | |||
| режим | время вкл. | выкл. | полный цикл |
| 0-100-0 | 4.9 | 1.5 | 6.4 |
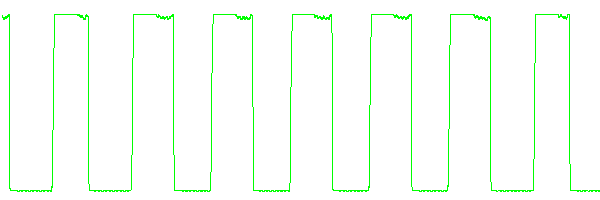
|
|||
| режим | время вкл. | выкл. | полный цикл |
| 0-50-0 | 4.5 | 0.9 | 5.4 |
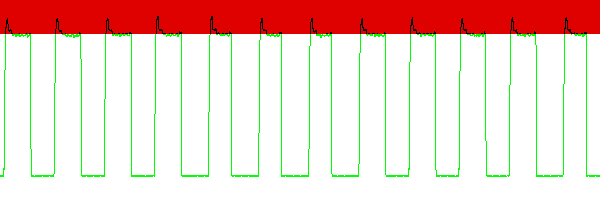
|
|||
| режим | время вкл. | выкл. | полный цикл |
| 50-100-50 | 4.4 | 4.9 | 9.3 |

|
|||
| режим | время вкл. | выкл. | полный цикл |
| 30-70-30 | 4.0 | 3.1 | 7.1 |
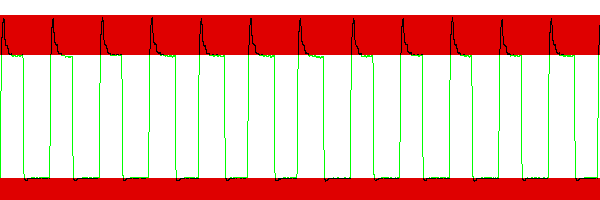
|
|||
| режим | время вкл. | выкл. | полный цикл |
| 10-90-10 | 4.9 | 1.4 | 6.3 |
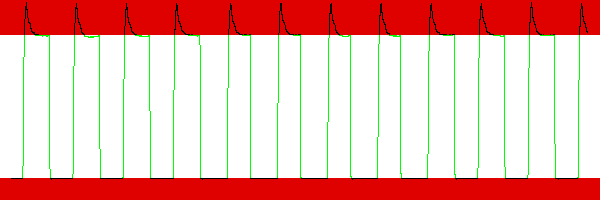
|
|||
| режим | время вкл. | выкл. | полный цикл |
| 45-55-45 | 4.5 | 4.7 | 9.2 |
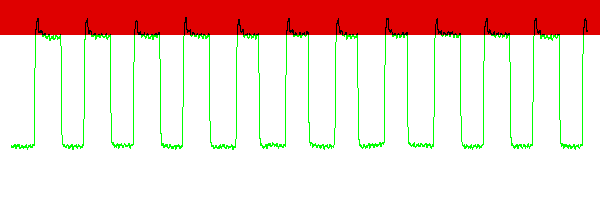
|
Сначала смотрим цифры. Во-первых, впервые мы видим то, что заявленное время отклика действительно равно фактическому. Для TN+film обратное всегда было нормой, но 90GX2 сломал это правило.
Затем смотрим на графики: елки-палки, вот это ошибки овердрайва! Даже не ошибки, а ОШИБИЩИ. Насколько корявой реализации разгона мы еще не встречали. В любом режиме операция rise загоняет яркость гораздо выше заданной. Что до fall, то и на нем есть явные провалы. Но ввиду суммарно очень малого времени полного цикла мы не успеваем глазом уследить паразитные прыжки яркости, а только отмечаем конец цикла.
С точки зрения теории, это, конечно, полное безобразие. И наверняка можно сэмулировать ситуацию, когда эти ошибки будут очевидны на экране (и мы их поймали, взяв модифицированную версию теста с бегущей черной строкой по серому фону, когда за черным текстом краткосрочно мелькает белая тень). Но с точки зрения практики — 99% покупателей будет счастливы от такой скорости матрицы и большее им не интересно.
Тем не менее мы фиксируем рекорд и ждем сравнения с формально не менее быстрыми BenQ и Samsung…
Оценка цветопередачи
Калибруем датчик Pantone, проводим замеры цветопередачи при следующих настройках яркости и контраста:
|
данные для заводских установок яркость: 100 |
У 90GX2 равномерно по всей прямой сбита яркость всех каналов, плюс индивидуально яркость каналов также различна. Лишь только синий к 100% яркости приходит «правильно», оставляя два других канала для более тщательной калибровки. В этом плане ситуация абсолютно симметрична ранее виденному у 1970GX.
Что касается яркости, то с одной стороны пиковая яркость белого увеличилась почти на 40 Кд (с 307 у 1970GX), но и черный свет оказался с бОльшей засветкой — более 0,9 Кд. В итоге расчетный коэффициент контрастности в 380:1 лишь на 15 единиц оказался выше предыдущей модели. Но все же оказался выше. И, тем не менее, это нельзя признать качественным результатом, особенно на фоне сильной засветки контура матрицы. Да и обещанные 400 Кд яркости и 700:1 не наблюдаются.
И напоследок проверим температуру в контрольных точках шкалы серого:
| 50% | 75% | 100% | |
| яркость 100, контраст 50 (заводские) | 6610 | 6330 | 6270 |
Здесь 90GX2 явно прибавил в точности, хотя эталонных 6500 и не обнаружилось. Итоговые выводы
NEC сделал экономичное решение для hardcore-игроков. Тем, кто готов положить на алтарь скорости все остальные качества. Если вы из таких — это ваш выбор. Только постарайтесь выбрать монитор без излишне ярких светлых пятен. Они так пачкают репутацию NEC.
Плюсы:
- очень высокая скорость матрицы;
- встроенный USB-хаб;
- высокая яркость;
- быстрое меню;
- удобный пакет NaviSet.
Минуcы:
- OptiClear сильно бликует;
- нет регулировки по высоте;
- сильная засветка матрицы.
Средняя текущая цена (количество предложений) этой модели в московской рознице: Н/Д(0)
Дополнительные материалы:
- описание методики тестирования
- другие модели производителя: 1960NXi, 1980FXi, 1980SXi, 1970NX, 1970GX, 2070NX, 2080UX+, 2180UX.
Монитор предоставлен на тестирование
компанией «ДИСТИ»
NEC 90GX2 — MultiSync — 19″ LCD Monitor Monitor PDF User Guides and Manuals for Free Download: Found (4) Manuals for NEC 90GX2 — MultiSync — 19″ LCD Monitor Device Model (Operation & User’s Manual, Specifications)
The NEC 90GX2 — MultiSync — 19″ LCD Monitor stands out in the crowded market of display technology. Renowned for its impressive performance and reliability, it strikes a balance between professional-grade capabilities and accessible price points. Whether you are using it for graphic design, content consumption, or daily productivity tasks, the 90GX2 offers a wonderful viewing experience that caters to diverse user needs.
One of the significant advantages of the NEC 90GX2 is its crisp image quality. The monitor features a 1280 x 1024 resolution, providing clear and vibrant visuals. The brightness level of 250 cd/m² combined with a contrast ratio of 800:1 ensures that colors pop while dark shades remain deep and rich. This quality is particularly appreciated in graphic-intensive applications where color accuracy is fundamental.
Additionally, the NEC 90GX2 boasts a fast response time of just 8 ms, minimizing motion blur during fast action sequences and making it suitable for both gaming and multimedia purposes. Its viewing angles of 170° horizontal and 160° vertical further enhance its usability, enabling multiple users to view content comfortably from various angles.
The design aesthetics of the NEC 90GX2 also deserve mention. The monitor’s sleek and professional look allows it to blend seamlessly in any workspace. The thin bezels make the LCD monitor a stylish addition, while the sturdy stand provides ample stability. Moreover, it supports height adjustment, tilt, and swivel features, allowing users to customize their viewing experience for comfort over extended periods.
In terms of connectivity, the NEC 90GX2 is equipped with multiple input options, including VGA and DVI-D ports, making it compatible with various devices. This versatility is essential for users who frequently switch between different computers or devices. The inclusion of a built-in 3-port USB hub also proves beneficial, enabling easy connections for peripherals, all while keeping the workspace neat and organized.
While the NEC 90GX2 is undoubtedly a remarkable monitor, it still has areas for improvement. For users who require ultra-high-definition content, the 1280 x 1024 resolution may feel somewhat limiting in today’s market dominated by Full HD and 4K displays. Furthermore, the lack of built-in speakers could be a disadvantage for users looking for an all-in-one multimedia experience.
To summarize, the NEC 90GX2 — MultiSync — 19″ LCD Monitor is an excellent choice for anyone seeking a dependable and high-performing monitor for various applications. Here are some of its key features:
- Resolution: 1280 x 1024
- Brightness: 250 cd/m²
- Contrast Ratio: 800:1
- Response Time: 8 ms
- Viewing Angles: 170° horizontal, 160° vertical
- Connectivity: VGA, DVI-D, and USB hub
- Ergonomics: Height adjustment, tilt, and swivel support
In conclusion, if you are in search of a solid and reliable monitor that can perform adeptly across various tasks without breaking the bank, the NEC 90GX2 — MultiSync — 19″ LCD Monitor is well worth considering. Its combination of quality, design, and ergonomic features make it a valuable addition to any workspace.