

-
Описание
-
Videos
Содержание: скрывать
- 2 параметры
- 3 Структура продукта
- 4 функции
- 5 Использование в первый раз
- 6 Предупреждение FCC
- 7 УСТРАНЕНИЕ НЕПОЛАДОК
- Популярные вопросы
МОДЕЛЬ: YB058
ПОЖАЛУЙСТА, ВНИМАТЕЛЬНО ПРОЧИТАЙТЕ ЭТО РУКОВОДСТВО ПЕРЕД ИСПОЛЬЗОВАНИЕМ ПРОДУКТА И ХРАНИТЕ ЕГО ДОЛЖНЫМ ОБРАЗОМ
Уважаемый клиент
Благодарим вас за выбор беспроводных наушников MINISO. Перед началом использования внимательно ознакомьтесь с этим руководством, чтобы обеспечить оптимальную производительность и долговечность вашего устройства.
Наушники MINISO сочетают в себе стильный дизайн, компактные размеры, высококачественный звук и множество полезных функций. Все модели в нашей серии имеют патент на уникальный внешний вид, что подчеркивает их индивидуальность.
Наши наушники используют передовые технологии, что позволяет вам наслаждаться превосходным звуком в любых условиях — будь то дома, на улице, в поездках или на работе. Они обеспечивают отличное воспроизведение музыки на ноутбуках, цифровых музыкальных плеерах и других аудиоустройствах, улучшая качество вашей жизни с помощью великолепной музыки.
Предостережения
- Для обеспечения безопасности и долговечности наушников, следуйте этим рекомендациям:
- Контроль громкости и времени использования: Регулируйте уровень громкости и время прослушивания, чтобы избежать повреждения слуха.
- Безопасность в потенциально опасных условиях: Не используйте наушники в условиях, где это может быть опасно, например, вблизи дорожного движения.
- Вождение: Не слушайте музыку и не отвечайте на телефонные звонки во время вождения, чтобы не отвлекаться от управления транспортным средством.
- Хранение: Держите наушники в недоступном для детей месте, чтобы предотвратить их неправильное использование.
- Обращение с устройством: Не бросайте наушники, чтобы избежать повреждений при падении.
- Температурный режим: Не храните и не используйте наушники при температуре ниже -20°C или выше 45°C, чтобы не сократить срок их службы и аккумулятора.
- Модификации: Не модифицируйте, не разбирайте и не пытайтесь отремонтировать наушники самостоятельно.
- Батарея: Не заменяйте батарею самостоятельно. Утилизируйте батарею в соответствии с местными нормами и правилами или передайте на переработку в специализированное учреждение. Не выбрасывайте и не бросайте батарею в огонь.
- Длительное неиспользование: Если наушники не используются долгое время, заряжайте их каждые 3 месяца для продления срока службы.
параметры
| Параметр | Значение |
|---|---|
| Модель | YB058 |
| Частота Bluetooth | 2.4 GHz |
| Расстояние соединения | 10 м |
| Емкость зарядного устройства | 230 мАч |
| Время воспроизведения музыки | 4 ч |
| Время звонка | 3.5 ч |
| Метод работы | Сенсорное управление |
| Вес наушников | 3.2 г |
| Вес зарядного кейса | 27 г |
| Емкость аккумулятора наушников | 30 мАч |
| Время ожидания | 100 дней |
| Решение | JL6973D4 |
Структура продукта
- Правый наушник
- Сенсорная панель
- Контакт для зарядки
- Левый наушник
- Зарядное устройство
функции
| Функция | Инструкции по зарядному чехлу |
| включать | 1. Take earphones out of the charging case 2. Long press touch panel for 2-3 seconds |
| Отключить | 1. Put earphones into charging case; or 2. Long press touch panel for around 5 seconds |
| спаривание | Автоматическое сопряжение после включения |
| Инструкции к наушникам | |
| Воспроизведение / Пауза | Двойное нажатие на сенсорную панель любого из наушников. |
| Следующий трек | Трижды нажмите сенсорную панель правого наушника. |
| Предыдущий трек | Нажмите сенсорную панель левого наушника три раза. |
| Sid & Voice Assistant | Нажмите и удерживайте сенсорную панель в течение 2 секунд, пока не услышите звуковой сигнал, затем включится голосовой помощник. |
| Прием звонка | Двойное нажатие сенсорной панели любого из наушников. |
| Конец вызова | Двойное нажатие сенсорной панели любого из наушников. |
| Отклонить вызов | Длительное нажатие сенсорной панели любого из наушников в течение 2 секунд. |
| Главный и дополнительный переключатель | 1. When using both earphones, put any one of them into the charging case, and the other one will become the main earphone 2. When using a single earphone, when taking out the other one, it will connect automatically |
| Объем + | Нажмите один раз на сенсорную панель правого наушника, чтобы увеличить громкость, при достижении максимальной громкости раздастся звуковой сигнал. |
| Объем — | Нажмите один раз на сенсорную панель левого наушника, чтобы уменьшить громкость, без подсказок при достижении минимальной громкости. |
Использование в первый раз
- Держите расстояние между наушниками и мобильным телефоном в пределах 1 метра. Выньте наушники из зарядного чехла: они автоматически включатся и перейдут в режим сопряжения. При этом белый индикатор на наушниках будет мигать 3 раза. После этого левый и правый наушники автоматически соединятся. Если белый индикатор на одном наушнике мигает, а на другом нет, это означает, что наушники успешно сопряжены между собой.
- Включите Bluetooth на мобильном телефоне, найдите доступные устройства и выберите «MINISO-Y13058». Как только соединение будет установлено, индикатор на наушниках погаснет.
- Если сопряжение не удалось, повторите указанные выше действия. Если сопряжение прошло успешно, наушники будут автоматически подключаться при извлечении из зарядного чехла и отключаться при возврате обратно.
Продукция и аксессуары
1*Device, 1*User Manual, 1*Type-C Charging Cable
Предупреждение FCC
Соответствие требованиям FCC
Это устройство соответствует Части 15 Правил FCC. Для его правильной эксплуатации необходимо соблюдать два условия:
- Устройство не должно создавать вредных помех.
- Устройство должно принимать любые помехи, включая те, которые могут вызвать сбои в работе.
Важно: Изменения или модификации, не одобренные официальным представителем, могут лишить пользователя права на эксплуатацию устройства.
Примечание: Оборудование было протестировано и признано соответствующим стандартам цифровых устройств класса B по Части 15 Правил FCC. Эти стандарты обеспечивают разумную защиту от вредных помех при установке в жилых зонах. Данное оборудование генерирует, использует и может излучать радиочастотную энергию, что в случае неправильного использования может вызвать помехи в радиосвязи. Тем не менее, нет гарантии, что помехи не возникнут при конкретной установке.
Если оборудование создает помехи для радио- или телевизионного приема (что можно определить, включив и выключив устройство), рекомендуется предпринять следующие шаги для устранения помех:
- Измените ориентацию или расположение приемной антенны.
- Увеличьте расстояние между оборудованием и приемником.
- Подключите устройство к розетке, отличной от той, к которой подключен приемник.
- Обратитесь за помощью к дилеру или квалифицированному специалисту по радио- и телевизионным техникам.
Заявление FCC о радиационном воздействии:
Это оборудование соответствует ограничениям FCC на радиационное воздействие, установленным для неконтролируемой среды.
Этот передатчик не должен располагаться рядом или работать вместе с любой другой антенной или передатчиком.
УСТРАНЕНИЕ НЕПОЛАДОК
- Не удается выполнить сопряжение беспроводных наушников с мобильным телефоном.
- Решение: Убедитесь, что наушники находятся в режиме сопряжения (проверьте инструкции в руководстве пользователя). Также проверьте, включена ли функция Bluetooth на вашем телефоне. Если наушники уже были ранее сопряжены с телефоном, удалите их из списка сохраненных устройств и попробуйте снова подключить, следуя указаниям в руководстве пользователя.
- Не удается включить беспроводные наушники.
- Решение: Проверьте, разряжена ли батарея наушников. Подключите наушники к зарядной базе и убедитесь, что они заряжаются. Если после зарядки наушники не включаются, возможно, они нуждаются в дополнительной проверке или ремонте.
- Можно ли заменить аккумулятор беспроводных наушников?
- Ответ: Нет, аккумулятор наушников заменяемый. Литий-полимерный аккумулятор в наушниках является встроенным и не предназначен для замены пользователем. Если батарея перестает держать заряд, рекомендуется обратиться в сервисный центр для профессиональной диагностики и замены.
- Беспроводные наушники отключились от телефона при радиусе 10 метров.
- Решение: Bluetooth-соединение может быть подвержено помехам от преград, таких как металлические объекты или другие устройства. Убедитесь, что между наушниками и подключенным устройством нет преград, и попробуйте использовать наушники в пределах рекомендуемого радиуса действия Bluetooth (до 10 метров) для стабильного соединения.
- Не слышно воспроизведения звука, когда наушники подключены к компьютеру или телефону.
- Решение: Проверьте, что аудиовыход на вашем компьютере или телефоне настроен на использование беспроводных наушников. Убедитесь, что Bluetooth на компьютере поддерживает профиль A2DP (Advanced Audio Distribution Profile) для передачи стереозвука. Также проверьте уровень громкости на устройстве и убедитесь, что он не установлен на минимуме или в беззвучном режиме.
- Могу ли я управлять приложениями своего телефона через наушники после подключения беспроводных наушников к телефону?
- Ответ: Некоторые приложения могут не поддерживать управление через наушники из-за ограничений в их настройках или отсутствии необходимого функционала. Обратите внимание на возможности вашего приложения и убедитесь, что оно совместимо с управлением через Bluetooth-устройства.
Популярные вопросы
Videos: MINISO Disney 100 Celebration Collection

Table of Contents
- MINISO H99 PEA Series Clip-On Wireless Earphones
- Accessories
- Parameters
- Product Structure
- Functions
- Cautions
- Troubleshooting
- 1. Wireless earphones fail to be paired with the phone.
- 2. Cannot tum on the wireless earphones.
- 3. Can the battery of the wireless earphones be replaced?
- 4. The wireless earphones got disconnected with the phone within
- 5. Cannot hear audio playing when the earphones are connected to the
- 6. Can I operate the Apps of my phone through the earphones after
- FCC Warning
- IC Warning
- Read User Manual Online (PDF format)
- Download This Manual (PDF format)
MINISO H99 PEA Series Clip-On Wireless Earphones
USER MANUAL
MODEL: H99
PLEASE READ THIS MANUAL CAREFULLY BEFORE USING THE PRODUCT AND KEEP rr
PROPERLY
Accessories
- Device*1,
- User Manual*1,
- Type-C Charging Cable*1
Parameters
- BT Version: 5.3
- BT Name: MINISO-H99
- Charging Port: Type-C
- Earphone Battery Capacity: 30mAh
- Music Playback Time: 4h
- Charging Time: 1.5h
- Transmission Distance: 1 Om
- Charging Case Battery Capacity: 300mAh
Product Structure

Functions
| Functions | Charging Case Instructions |
|---|---|
| Turn On | Take the earphones out of charging case |
| Turn Off | Put the earphones into charging case |
| Pairing Mode | For first time connection, open the upper lid of charging case, |
the earphones enter pairing mode automatically.
Search for MINISO-H99 and choose to connect, there is a prompt after the
earphones are connected successfully. The next time you turn on, the earphones
will connect automatically with the last device.
Manual Pairing| If the automatic is not successful ( single earphone with no
sound or the earphones are disconnected), you can do the manual connection.
1.Erase the Bluetooth connection record of the phone with earphones, and turn
off the phone’s Bluetooth.
2.Take the earphones out after putting them into the charging case for 10
seconds. then wa it for 5 seconds.
3.Reopen the phone’s Bluetooth, and search for MINISO-H99 to connect.
Play/Pause| Single press on the left or right earphone
Next Track| Double press on right earphone
Previous Track| Double press on left earphone
ANSWER/EndCall| Single press on the left or right earphone
Reject.Call| Double press on the left or right earphone
Activate Phone’s Voice Assistant| Press the left or right earphone three times
Cautions
1. Reasonable control of the volume and time of usage is required to avoid
hearing damage.
2. For your safety, do not use in potentially hazardous condition.
3. Do not listen to music, call up or answer the phone while driving to avoid
danger caused by distraction.
4. Keep out of reach of children to avoid danger caused by improper use.
5. Do not throw to avoid damage caused by dropping.
6. Do not store under 0″C or above 40 C to avoid shortening the lifespan of
earphones and battery.
7. Do not modify, disassemble and repair the product.
8. Irreplaceable battery. It should be disposed of according to local rules &
regulations or be recycled by professional institute. Do not throw away or
toss into fire.
9. When not in use for a long time, charge the earphones once every 3 months
to extend its service life.
Troubleshooting
1. Wireless earphones fail to be paired with the phone.
Solution: Check if the earphones are in pairing mode, and whether the phone
has BT function on. Check the list on your phone, remove earphones from the
list, follow the instructions of user manual to pair the earphones with your
phone again.
2. Cannot tum on the wireless earphones.
Solution: Check the battery to see if it is low.
3. Can the battery of the wireless earphones be replaced?
Answer: No. The lithium polymer battery in the earphones is irreplaceable.
4. The wireless earphones got disconnected with the phone within
10meters.
Solution: BT is wireless so that it is very sensitive to objects between the
earphones and the connected device. Check if there are any metal or other
objects that may affect the connection within the effective distance.
5. Cannot hear audio playing when the earphones are connected to the
computer or phone.
Solution: Check whether the computer’s audio output is already connected to
wireless device and whether the Bluetooth in the computer supports A2DP
protocol. Make sure the volume is up on your phone or computer.
6. Can I operate the Apps of my phone through the earphones after
connecting the wireless earphones to the phone?
Answer: Some apps may not support being operated through the earphones due to
their settings.
FCC Warning
This device complies with Part 15 of the FCC Rules, Operation is subject to
the following two conditions:
(1)This device may not cause harmful interference, and
(2)This device must accept any interference received, including interference
that may cause undesired operation.
Caution: Changes or modifications not expressly approved by the party
responsible for compliance could void the user’s authority to operate the
equipment.
NOTE: This equipment has been tested and found to comply with the limits
for a Class B digital device, pursuant to Part 15 of the
FCC Rules. These limits are designed to provide reasonable protection against
hannful interference in a residential installation.
This equipment generates, uses and can radiate radio frequency energy and, if
not installed and used in accordance with the instructions, may cause hannful
interference to radio communications. However, there is no guarantee that
interference will not occur in a particular installation. If this equipment
does cause harmful interference to radio or television reception, which can be
detennined by turning the equipment off and on, the user is encouraged to by
to correct the interference by one or more of the following measures:
– Reorient or relocate the receiving antenna.
– Increase the separation between the equipment and receiver.
– Connect the equipment into an outlet on a circuit different from that to
which the receiver is connected.
– Consult the dealer or an experienced radio/TV technician for help.
FCC Radiation Exposure Statement:
This equipment complies with FCC radiation exposure limits set forth for an
uncontrolled environment.
This transmitter must not be co-located or operating in conjunction with any
other antenna or transmitter.
IC Warning
This device complies with Industry Canada license-exempt RSS standard(s).
Operation is subject to the following two conditions:
(1) This device may not cause interference, and
(2) This device must accept any interference, including interference that may
cause undesired operation of the device.
Read User Manual Online (PDF format)
Read User Manual Online (PDF format) >>
Download This Manual (PDF format)
Download this manual >>
IMPORTANT SAFETY NOTES
Before using this product, read this manual carefully and keep it properly for future reference.
- Do not use this product for a prolonged time to avoid affecting your hearing.
- Do not use this product when driving.
- Do not play music in an extra-large voice.
Please use this product according to the local laws and regulations. - Please keep it dry.
- Containing a rechargeable battery, this product cannot be dismantled, altered, or replaced by yourself. Do not expose it to sunlight or fire sources.
- This mark indicates the product should not be disposed of in the same way as other household wastes in EU regions. The product should be recycled to ensure sustainable reuse of resources and to prevent potential harm to the environment and human health caused by non-control of waste management. To recycle the used appliance, apply the recycling system or contact the franchiser to recycle the product according to the environmental protection requirements.
PRODUCT AND ACCESSORIES
- Multifunctional button (MFB)
- LED indicator light
- Charging indicator light
- USB charging port
- Earphones’ charging contact point
- Charging cable
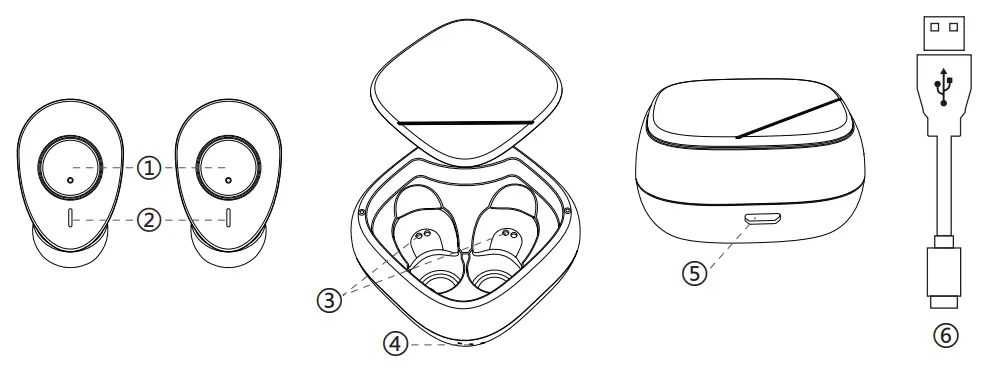
SPECIFICATIONS
| BT VERSION | V5.1 | FREQUENCY RANGE | 20Hz~20kHz |
| BT PAIRING NAME | MINISO-M1 | SENSITIVITY | 95±3dB |
| FUNCTION | Siri awakening, phone call, music | CHARGING PORT | micro USB |
| INPUTN | DC5V,500mA | TRANSMISSION DISTANCE | 10m |
| BATTERY | DC3.7V lithium battery 280mAh (charging case) | MUSIC TIME | 4~5h |
| DC3.7V lithium battery 40mAh (earphones) | CHARGING TIME | 1~2h | |
| STANDBY TIME | 90h | CALL TIME | 4~5h |
USAGE INSTRUCTIONS
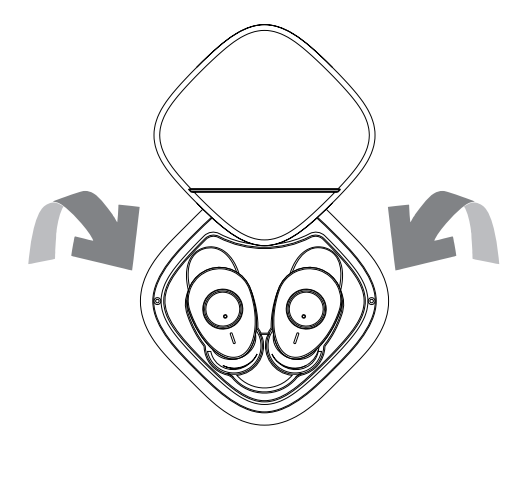
Wearing Earphones
Take out the earphones from the charging compartment and wear them on your ears according to the LIR mark printed inside.
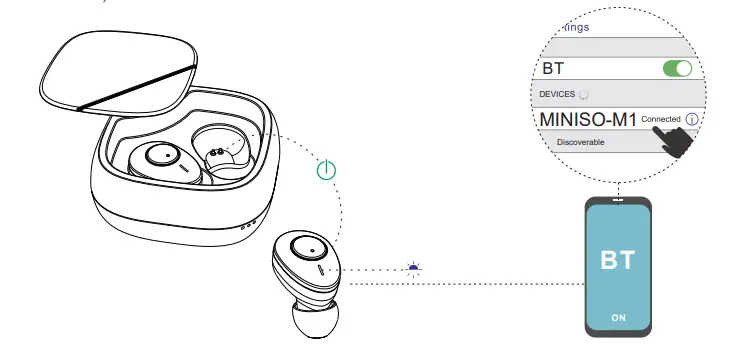
Pairing
After being taken out of the charging compartment, the earphones will be paired while the LED indicator will flash red and blue alternatively. Initiate the BT function on your mobile phone connected, after which the LED indicator will flash blue. and search Miniso M1 to
- Charging
- Charging compartment:
- After connecting the charging cable with the compatible DC adapter,
- plug the other end of the charging cable into the charging port to charge.
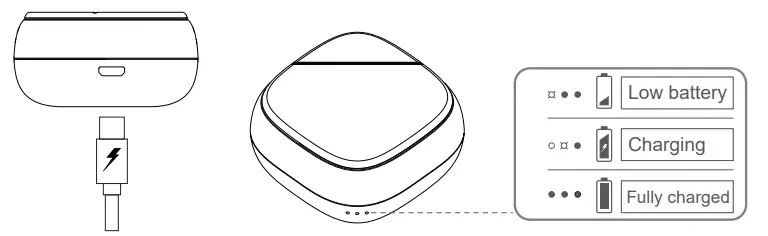
Charging earphones
Put the earphones into the charging compartment, making sure that the ear- phones’ charging contact points are in touch with the thimble inside the charging case to charge the earphones.The LED indicator light will stay on red when charging and turn off after charging Earphones will automatically power off when charging.
Functions/Operation of Earphones
| Function | Operation |
| Turn on | Take out the earphones from the charging case or long press MFB for 2 secs (at any one of the earphones) |
| Turn off | Put the earphones back to the charging compartment or press MFB for 3 secs (at any one of the earphones) |
| Pairing | Turn on BT and click “MINISO-M1” to connect |
| Single ear mode | Take out an earphone from the charging case. Single ear mode is on after pairing with the phone. |
| Both ears mode | Take out both earphones from the charging case. Stereo both ears mode is on after pairing with the phone.
Or take the other earphone out when using single ear mode to enter stereo both ears mode after auto pairing. |
| Disconnect | BT Disconnect from the phone |
| Play/Pause | Click on MFB(of any one of the earphones) |
| Redial | Double click on MFB(of any one of the earphones) |
| Next/Previous song | Press MFB of the left earphone for 3 secs to the next, press MFB of the right earphone for 3 secs to the previous |
| Siri
awakening |
Press any MFB for 1 sec to awaken Siri |
| Receiving call | When there is incoming call, click on MFB to receive call (at any one of the earphones) |
| Rejecting call | When there is incoming call, press MFB (at any one of the earphones) for 1 secs to reject call. |
| Low power prompt | Earphones will automatically turn off when the voltage is lower than 3.2V. |
FCC Warning
This device complies with Part 15 of the FCC Rules, Operation is subject to the following two conditions
- This device may not cause harmful interference, and
- This device múst accepts any interference received, including interference that may cause undesired operation.
Caution
Changes or modifications not expressly approved by the party responsible for compliance could void the user’s authority to operate the equipment. NOTE: This equipment has been tested and found to comply with the limits for a Class B digital device, pursuant to Part 15 of the FCC Rules. These limits are designed to provide reasonable protection against harmful interference in a residential installation. This equipment generates, uses, and can radiate radio frequency energy and, if not installed and used in accordance with the instructions, may cause harmful interference to radio communications. However, there is no guarantee that interference will not occur in a particular installation. If this equipment does cause harmful interference to radio or television reception, which can be determined by turning the equipment off and on, the user is encouraged to try to correct the interference by one or more of the following measures -Reorient or relocate the receiving antenna. -Increase the separation between the equipment and receiver. – Connect the equipment into an outlet on a circuit different from that to which the receiver is connected. –Consult the dealer or an experienced radio/TV technician for help.
FCC Radiation Exposure Statement
- This equipment complies with FCC radiation exposure limits set forth for an uncontrolled environment.
- This transmitter must not be co-located or operating in conjunction with any other antenna or transmitter.
Views: 279
MINISO BT-551 Bluetooth Stereo Headsets For Neck User Guide
Product Description
- Connect line
- Receiver line
- USB charging port
- MIC
- Indicator light
- Multifunction button
- Ear tip
- Volume – / up
- Volume + / next
Specifications and parameters
- Bluetooth version: Bluetooth 4.2
- Size: about 30CM
- Main material: ABS
- Bluetooth effective distance: about 10mUse time: 4 ~ 5 hours
- Standby time: 250 hours
- Charging time: about 2 hours
- Charging current: 80mA
- Battery capacity: 100mA
Basic operation
Boot Long
press multifunction key 3S to blue light, blue lamp flickers 3 times, then achieve boot function (vibration once), red and blue light alternate flicker, realize automatic enter bluetooth pair pattern
To turn it off
Long press the multi-function key 3S, shutdown (vibration once), red light.
Pairing
- When the power is turned off, the long press is a 3S, the blue light is switched to the red light and the blue light flashes into the matching mode, the red and blue light is flashing
- Press the MFB button for 6 seconds to enter the matching mod when the machine is off. (do not have the back function in the matching mode)
Connection
The headset is in pairing mode, the blue light flashes in 10 seconds, turns on the bluetooth on the phone, searches for the corresponding bluetooth pairing name (BT – 551), and clicks the connection.
Disconnect
In the connection state, the blue light is 10 seconds brighter and the headset is outside the receiver or the Bluetooth is turned off, causing the connection to disconnect and enter the reconnect mode
Back to the
- When connecting, turn off the headset and reboot (the phone is not turned off) to initiate a reconnect
- When the earphones and the phone are at a valid distance, the headphone is disconnected from the phone, and the headset enters the connected mode, within 5min (before), the headset can return to the effective range and initiate the reconnect
- The headphones can only go back to the last device
Low electricity
When the battery voltage is 3.3 V, start the low-power reminder, 1min to the voice “low battery please charge”, the battery voltage in 5min is no less than the power of voltage (3.0v), the headset automatically shuts down, the red light flashes 1timesin 5 seconds.
Automatic shutdown
In the boot state, if there is no device connection, the Bluetooth headset will be automatically closed after 5 minutes and the red light will flash 3 times
Drag and drop function
The headset turns on A bluetooth connection and turns off the bluetooth. The headset restarts to connect to phone B, then opens the connection record of phone A, clicks the connection, realizes the function of one and two, and the blue light flashes in seconds.
The volume adjustment
In the connection state, press the V + key to trigger the add sound action, the sound is added to the voice, and the Apple phone will synchronize the volume, at the maximum volume there is a hint, the maximum volume is a hint “drip”.
In the connection state, press the v-button briefly to trigger the reduction, and the voice is reduced to one, and the iPhone is in sync
Music operation
The last song: in the connection state, the long press V – button 2 seconds to trigger the last action, play a song Next: in connection state, the long press V + button 2 seconds to trigger the next action, play the next song.
Charger and current
Before using any of the chargers for this earphone, please check the specifications of the charger label is follow the requirements, recommend the charger output voltage is: 5 v, and the output current is 80 ma, it is very likely charging voltage is too high to damage the bluetooth headset, charging, normally on a red light.
Precautions and warnings
- Fire prevention, moisture-proof, and anti-fall.
- Use the distribution data line to charge the bluetooth headset, and use other data lines to cause damage to the bluetooth headset.
- The dental headset is equipped with the function of the absorbent stone, such as a metal plate or electronic equipment in the body, please consult with the doctor to purchase or try out the bluetooth headset.
FCC STATEMENT :
This device complies with Part 15 of the FCC Rules. Operation is subject to the following two conditions: (1) This device may not cause harmful interference, and(2) This device must accept any interference received, including interference that may cause undesired operation. Warning: Changes or modifications not expressly approved by the party responsible for compliance could void the user’s authority to operate the equipment.
NOTE:
This equipment has been tested and found to complywith the limits for a Class B digital device, pursuant to Part 15of the FCC Rules. These limits are designed to provide reasonable protection against harmful interference in a residential installation. This equipment generates uses andcan radiate radio frequency energy and, if not installed and used following the instructions, may cause harmful interference to radio communications.
However, there is noguarantee that interference will not occur in a particular installation. If this equipment does cause harmful interference to radio or television reception, which can be determined by turning the equipment off and on, the user is encouraged to correct the interference by one or more of the following measures: Reorient or relocate the receiving antenna. Increase the separation between the equipment andreceiver. Connect the equipment to an outlet on a circuit different from that to which the receiver is connected. Consult the dealer or an experienced radio/TV technician for help.
RF warning statement:
The device has been evaluated to meet general RF exposure requirements. The device can be used in portable exposure conditions without restriction.
REFERENCE LINK
https://www.miniso-au.com/en-au/product/54208/wireless-in-ear-headphones-black-model-bt-551
Document Download |
‹
›
Miniso BT-551 Manual Online:
3,
2547
votes
Miniso BT-551 User Manual
Miniso BT-551 User Guide
Miniso BT-551 Online Manual
Text of Miniso BT-551 User Guide:
Related Products and Documents (Headsets):
-
Sennheiser L 2020 Headsets User manual manual
L 2020
sennheiser/l-2020.pdf, 7 -
Elecom LBT-HS350 Headsets Manual
LBT-HS350
elecom/lbt-hs350.pdf, 2 -
Philips DVP5992/37B Headsets Quick start manual
DVP5992/37B
philips/dvp5992-37b.pdf, 2 -
AT&T TL7600 Headsets Operation & user’s manual
TL7600
at-t/tl7600.pdf, 56 -
Sony MDR-100ABN Headsets Reference manual
MDR-100ABN
sony/mdr-100abn.pdf, 2 -
AT&T PBH10 Headsets Operation & user’s manual
PBH10
at-t/pbh10.pdf, 15 -
Insignia NS-MCHMRJ9P2 Headsets Quick setup manual
NS-MCHMRJ9P2
insignia/ns-mchmrj9p2.pdf, 2 -
RCA 2100 Headsets Quick setup manual
2100
rca/2100.pdf, 20
Comparable Devices:
| # | Manufacturer | Model | Document Type | File | Updated | Pages | Size |
|---|---|---|---|---|---|---|---|
| 1 | SNAKESCOPE | SSV-700 | Operator’s manual | snakescope/ssv-700-DNM.pdf | 09 Oct 2023 | 2 | |
| 2 | Grace | MX 2013 | Manual | grace/mx-2013-3TT.pdf | 06 Sep 2023 | 40 | |
| 3 | Hitachi | RAS-18FH6 | Service manual | hitachi/ras-18fh6-JN2.pdf | 24 Mar 2025 | 96 | |
| 4 | Maytag | MFF2558KEB | Use & care manual | maytag/mff2558keb-62W.pdf | 29 Mar 2025 | 88 | |
| 5 | IHI Shibaura | G-FLOW22 | Operation & user’s manual | ihi-shibaura/g-flow22-594.pdf | 10 Feb 2025 | 51 | |
| 6 | Noctua | NH-U9 TR4-SP3 | Installation manual | noctua/nh-u9-tr4-sp3-5R5.pdf | 15 Dec 2023 | 2 |
Similar Resources:
Headsets Instructions:
-
Toshiba Laptop 8100 — Tecra — PIII 600 MHz
Toshiba 8100 — Tecra — PIII 600 MHz User Guide (Doc Type: Laptop Specification)
8100 — Tecra — PIII 600 MHz, 2
-
Zte Cell Phone Valet Z665C
Valet Z665C (Cell Phone ePDF Guide, #L19I57)
Valet Z665C, 44
-
Vacmaster Food Saver VP115
Operation & user’s manual for Vacmaster VP115 Food Saver
VP115, 16
-
Lightolier Indoor Furnishing ProSpec 37000
Lightolier ProSpec 37000 Indoor Furnishing Specification
ProSpec 37000, 4
-
JBL Amplifier AVR580
JBL AVR580 User Guide (Owner’s manual), @89863S
AVR580, 72
-
Keating Of Chicago Fryer Instant Recovery 004341
Instant Recovery 004341 (Fryer ePDF Guide, #6SB525)
Instant Recovery 004341, 2
-
Valor Indoor Fireplace tuscany 637
Indoor Fireplace Owner’s manual (Valor tuscany 637)
tuscany 637, 8
-
Genee Document Camera 6100
Document Camera PDF Manual
6100, 27
-
Epson Printer Stylus Office B1100
Epson Stylus Office B1100 User Guide (Doc Type: Printer Startup manual)
Stylus Office B1100, 2
-
Omron Blood Pressure Monitor M3
Omron M3 Guide (Instruction manual), @T4VA7M
M3, 16
-
Universal Security Instruments Security System HS-5300
Security System Owner’s manual (Universal Security Instruments HS-5300)
HS-5300, 4
-
Titan Paint Sprayer PowrTex 1200 SF
PowrTex 1200 SF (Paint Sprayer ePDF Guide, #VWV84Q)
PowrTex 1200 SF, 28