
Всем привет, сегодня первое впечатление от мультиметра не мелькавшей тут фирмы MESTEK. Все началось с того, что у меня после трех лет забарахлил «народный» HoldPeak HP-890CN, просто показывает на всем 0L. Вот решил сменить его на что-то похожее. Подробнее под катом…
Доставка почтой с треком.
Безликая черная коробка:
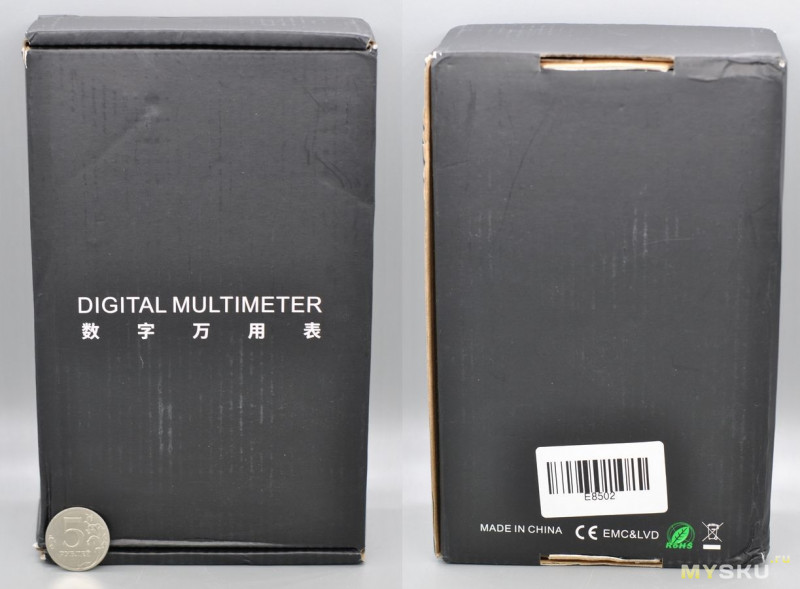
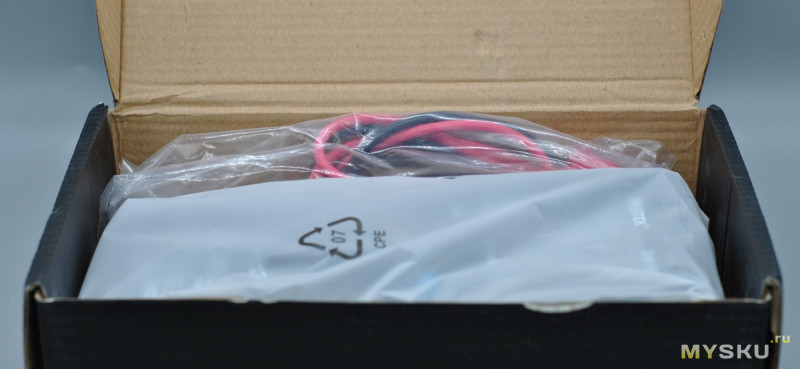
Открываем:
Характеристики:
Отсчеты: 9999
Максимальное напряжение: 600V CAT IV и 1000V CAT III
True RMS: 1 кГц
Диапазоны DC напряжения: 999.9mV/9.999V/99.99V/999.9V
Разрешение DC напряжения: 0.1mV/1mV/10mV/100mV
Точность DC напряжения: ± (0.5% reading + 3 знака)
Диапазоны AC напряжения: 999.9mV/9.999V/99.99V/750.0V
Разрешение AC напряжения: 0.1mV/1mV/10mV/100mV
Точность AC напряжения: 999.9mV ~ 99.99V: ± (0.8% + 3 знака); 750.0V: ± (1% + 5 знаков)
Диапазоны DC тока: 99.99μA/999.9mA/600mA/10A
Разрешение DC тока: 0.01μA/0.01mA/0.1mA/10mA
Точность DC тока: 99.99μA ~ 600mA: ± (0.8% + 3 знака); 10A: ± (1.2% + 3 знака)
Диапазоны AC тока: 99.99mA/600mA/10A
Разрешение AC тока: 0.01mA/0.1mA/10mA
Точность AC тока: 99.99mA ~ 600mA: ± (1% + 3 знака); 10A: ± (1.5% + 3 знака)
Диапазоны частоты: 9.999Hz/99.99Hz/999.9Hz/9.999KHz/99.99KHz/999.9KHz/9.999MHz
Разрешение частоты: 0.001Hz/0.01Hz/0.1Hz/0.001KHz/0.01KHz/0.1KHz/0.001MHz
Точность частоты: ± (1% + 3 знака)
Диапазоны сопротивления: 999.9Ω/9.999kΩ/99.99kΩ/999.9kΩ/9.999MΩ/99.99MΩ
Разрешение сопротивления: 0.1Ω/1Ω/10Ω/100Ω/1kΩ/10kΩ
Точность сопротивления: 999.9Ω ~ 9.999MΩ: ± (0.8% + 3 знака); 99.99MΩ: ± (1.2% + 5 знаков)
Диапазоны емкости: 9.999nF/99.99nF/999.9nF/9.999μF/99.99μF/999.9μF/9.999mF/99.99mF
Разрешение емкости: 0.001nF/0.01nF/0.1nF/1nF/10nF/100nF/1μF/10μF
Точность емкости: 9.999nF ~9.999mF: ± (4% + 3 знака); 99.99mF: ± (5% + 3 знака)
Диапазон диодов: 0.15 ~ 3V
Разрешение диодов: 0.001V
Прозвонка: 100Ω
Разрешение прозвонки: 1Ω
Диапазон температуры: -20~1000°C / -4~1832°F
Разрешение температуры: 1°C / 1°F
Точность температуры: ± (1% + 3 знака)
Предупреждение о низком заряде: ниже чем 2.4V
Рабочая температура/влажность: 0~40°C; <80%RH
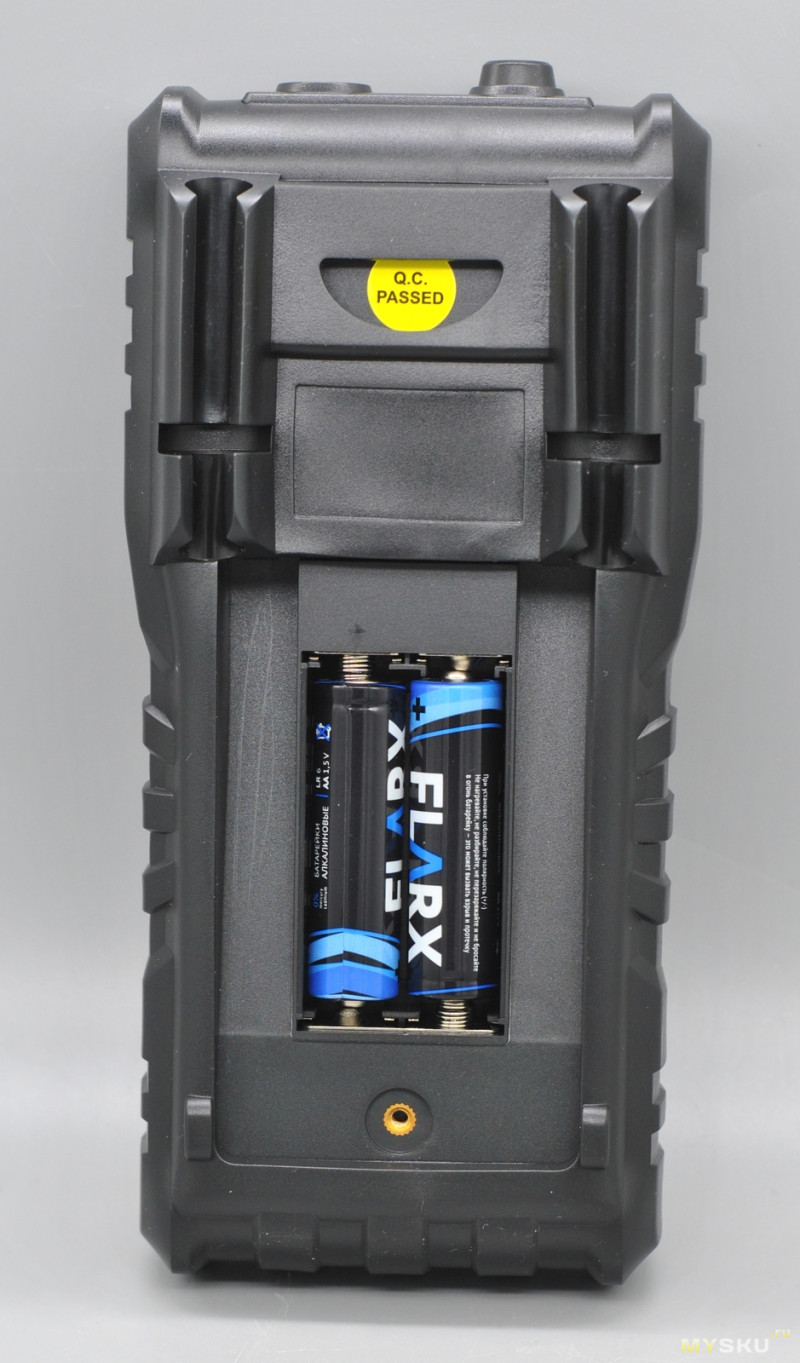
Питание: 2 * 1.5V AA батареи
Размеры: 18.5 * 8.8 * 5.2 сс
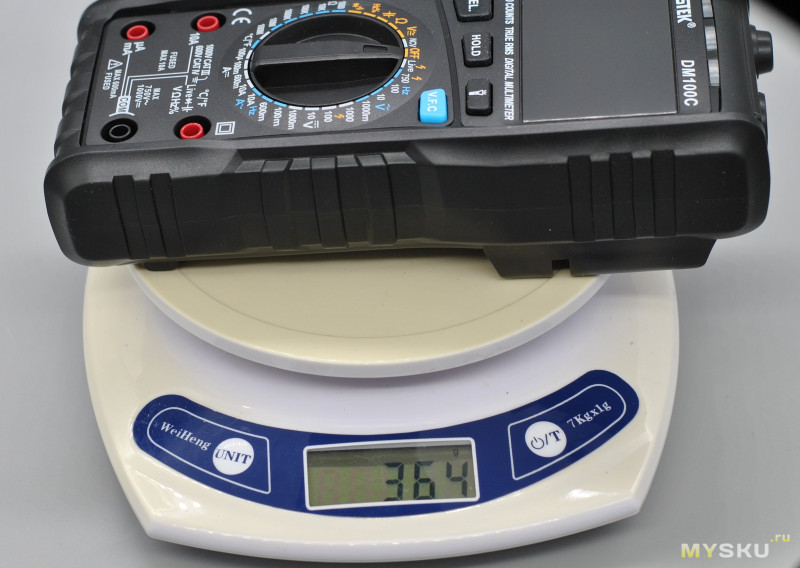
Масса: 320 г.
Комплект поставки:
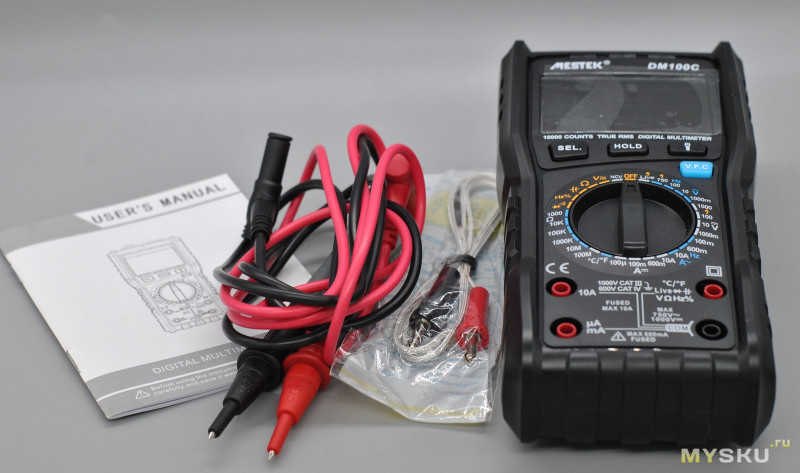
- Мультиметр
- Пара щупов
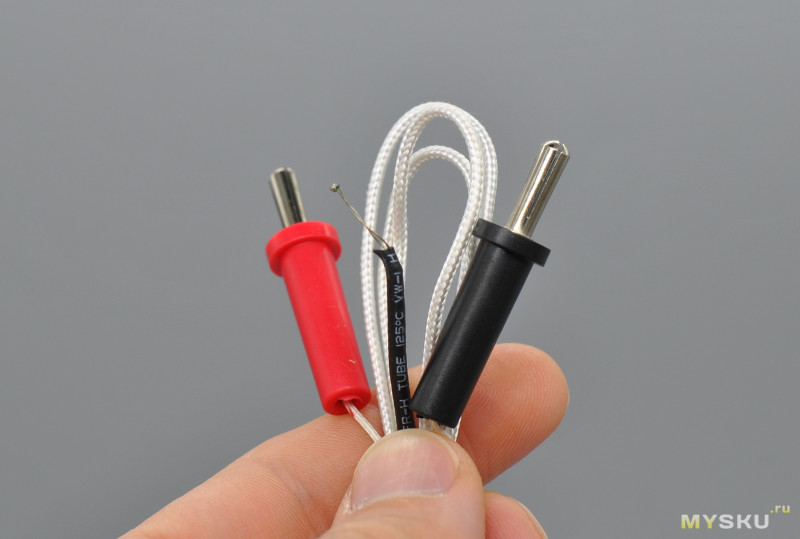
- Термопара
- Руководство пользователя
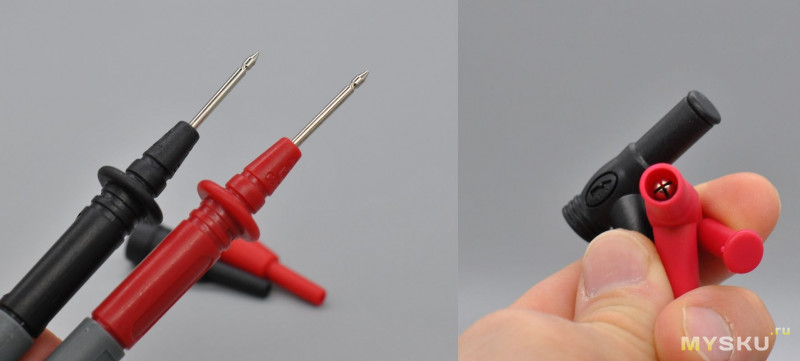
Щупы, длина 1 метр:
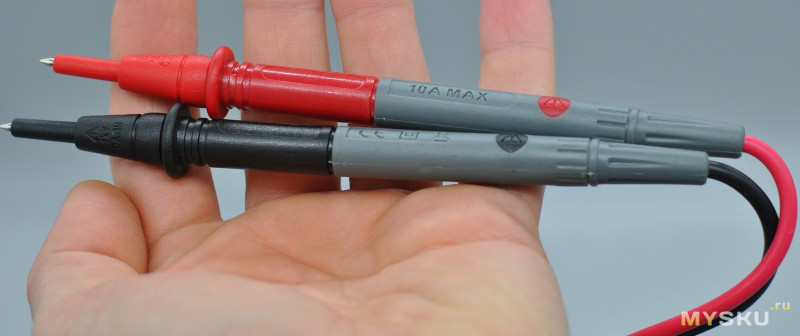
Не силикон как у HP-890CN, но и не совсем дубовые.
Колпачки для щупов:
Термопара:
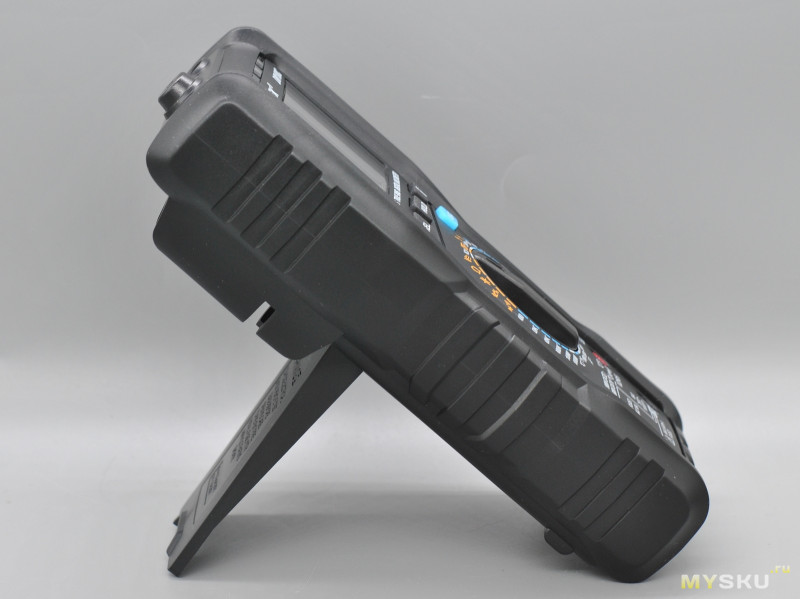
Внешний вид прибора:

Черный дисплей на черном корпусе, внешне прибор смотрится неплохо. На корпусе резиновая вставка для защиты от ударов.
Размеры не карманные: 19х8,5х5 см.
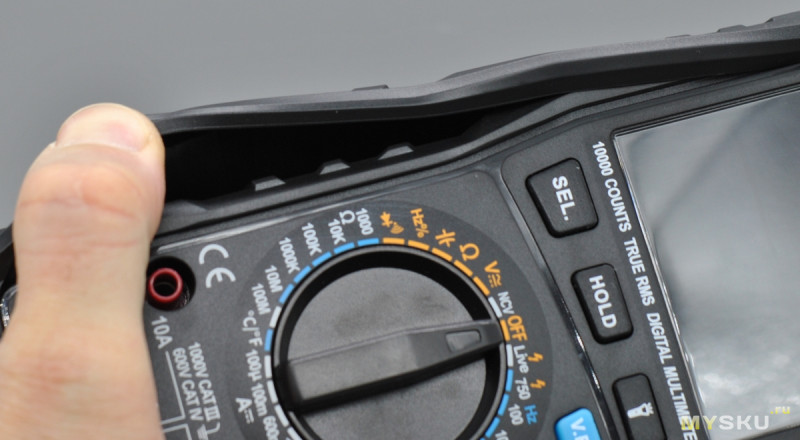
Помимо селектора режимов, есть четыре кнопки:
SEL — выбор,
HOLD — «заморозка» показаний,
VFC — Фильтр нижних частот.
V.F.C. помогает уменьшить нежелательные шумы. При включённом фильтре, мультиметр продолжает измерять напряжение или ток, без учёта заблокированных нежелательных частот высших гармоник. Это улучшает измерения составных синусоидальных волн, которые генерируются инверторами и частотно-регулируемыми электроприводами.
Активация фонарика.
Есть откидная стойка (магнита нет):
Ха-ха, вот чего не хватало HoldPeak’у — фонарика:
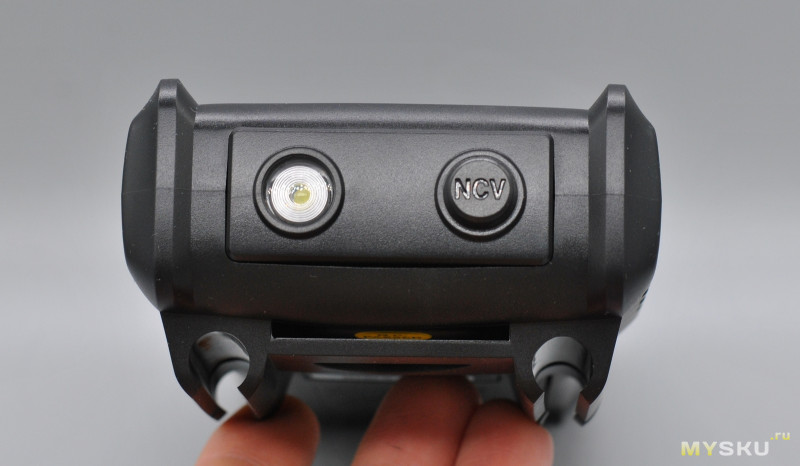
на верхнем торце также датчик детектора проводки.
Щупы можно закрепить на чехле, этого тоже не хватало HoldPeak’у:
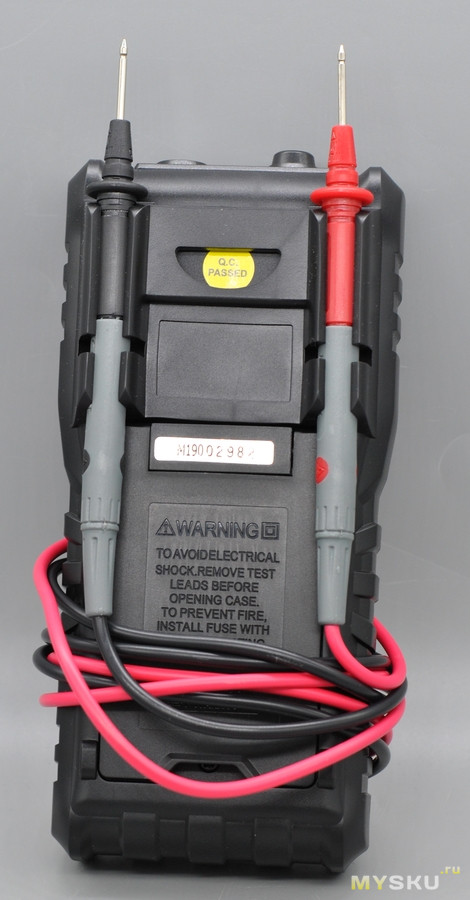
Чехол сидит плотно:
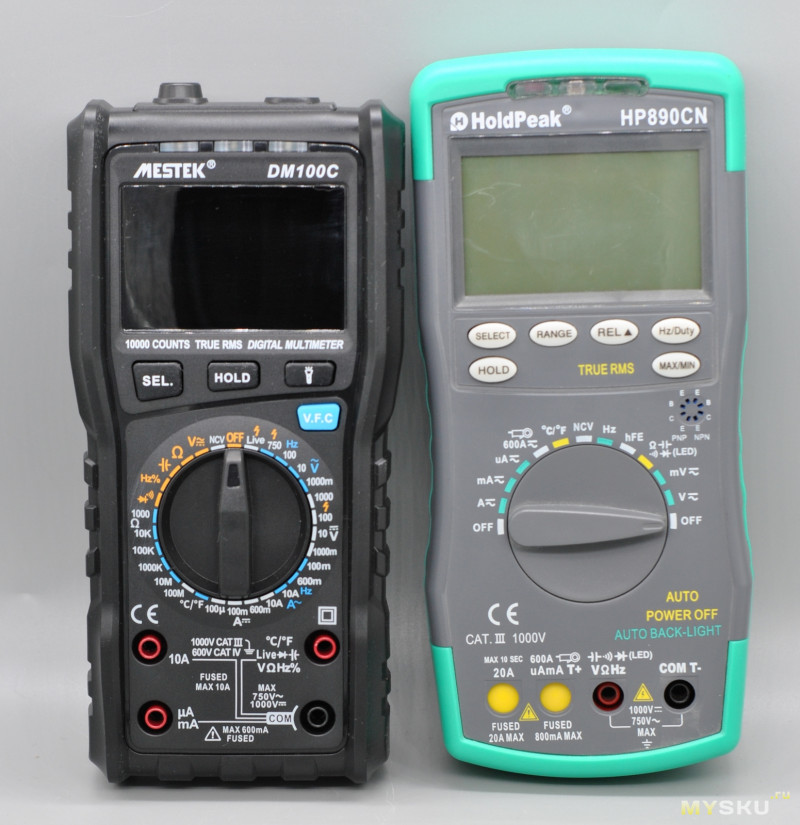
Сравнение размеров с многократно уже упомянутым HP-890CN:
Питание прибора 2хАА:
Масса DM100C:
Все символы экрана:
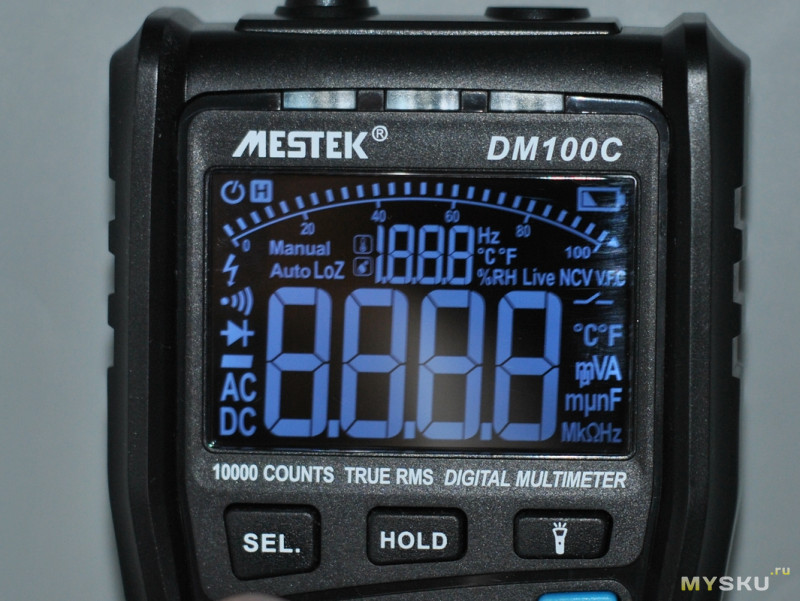
углы обзора экрана максимально возможные. Над экраном три диода.
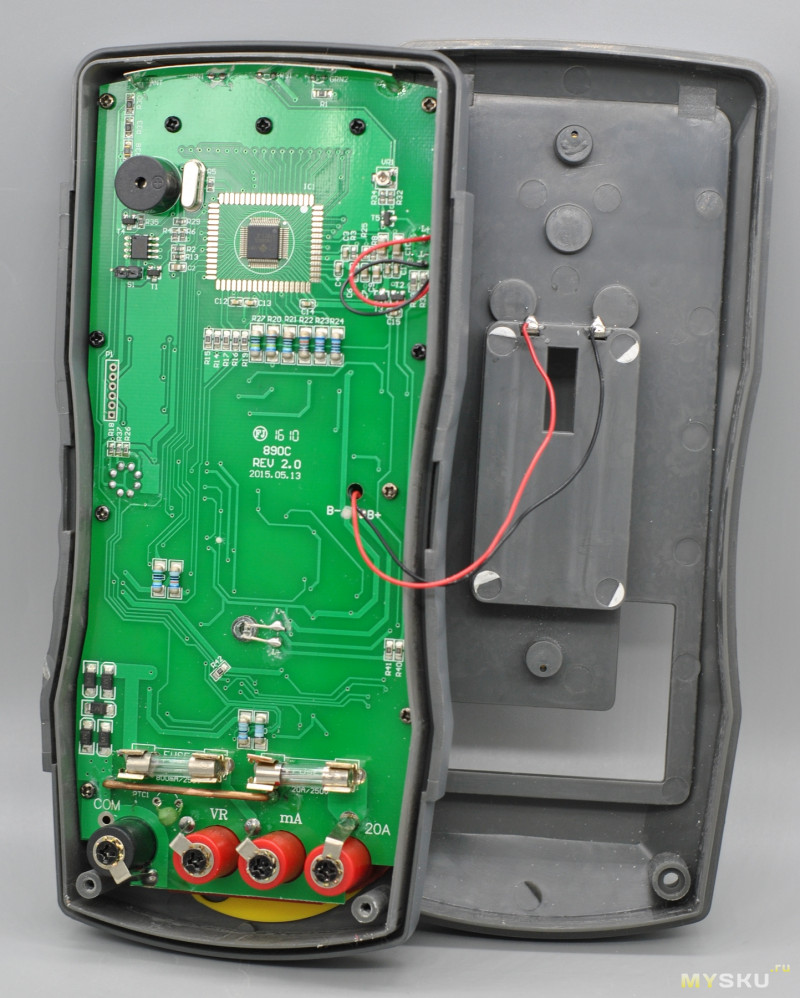
Начинка:
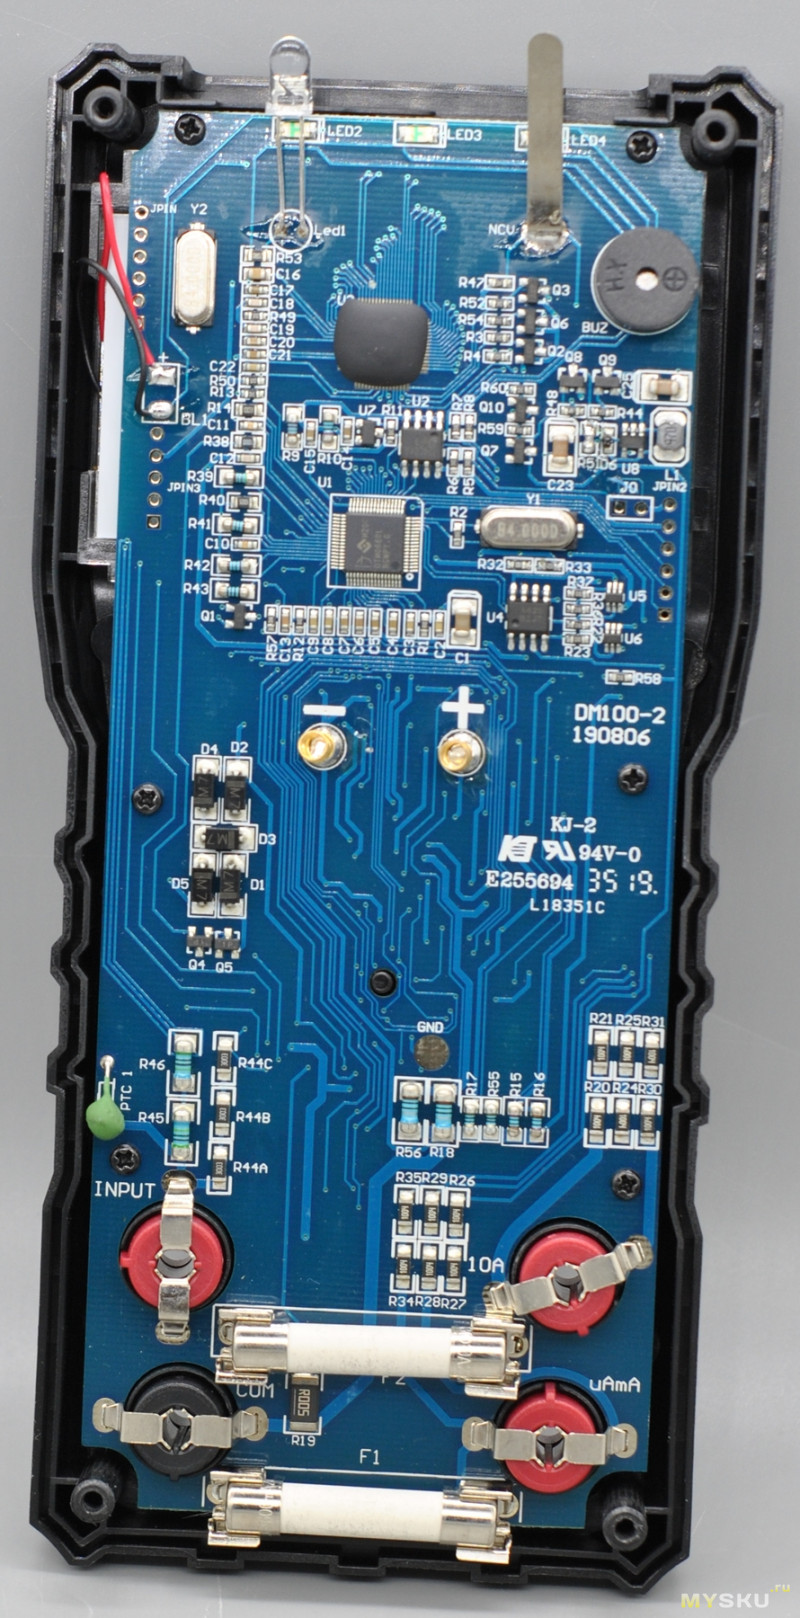
Мультиметр построен на популярном тайваньском чипе DTM0660L клоне HYCON HY12P65.
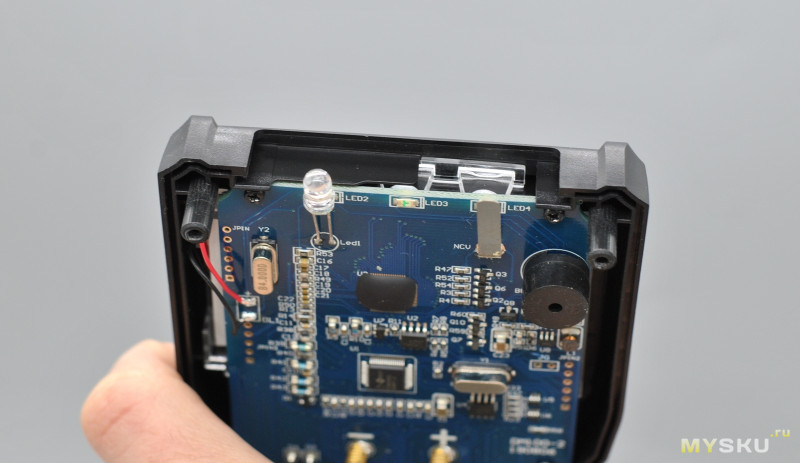
Датчик NCV и диод фонарика:
Большая проблемка натянуть чехол на корпус мультиметра:
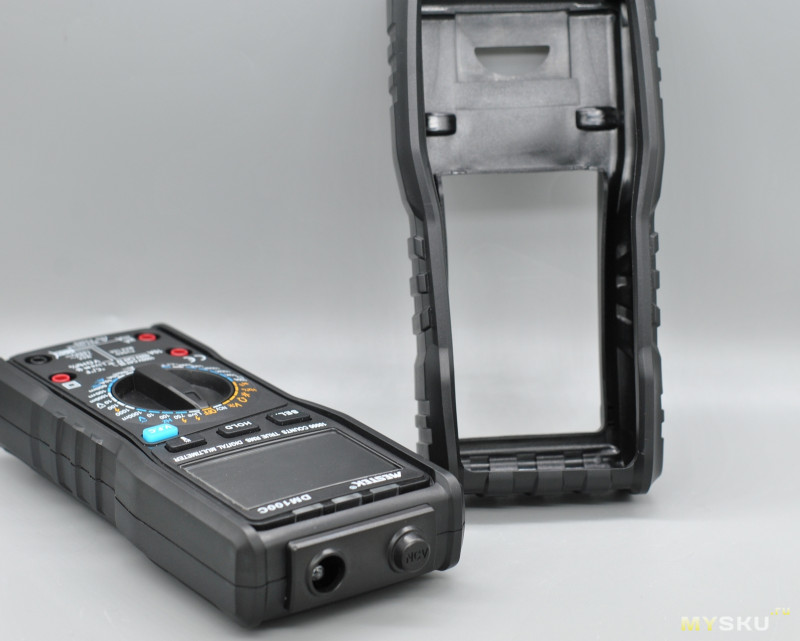
и пока собирал, сломал линзу диодика, плата за разборку, все дела.
Начинка HP-890CN для сравнения:
Чип, как видим, тот же.
Я использую мультиметр в быту для простейших задач, поэтому и тесты будут бытовые. Никаких сравнений с прецензионными источниками питания и мультиметрами за много-много денег.
Начнем с самого важного:

Тут все отлично.
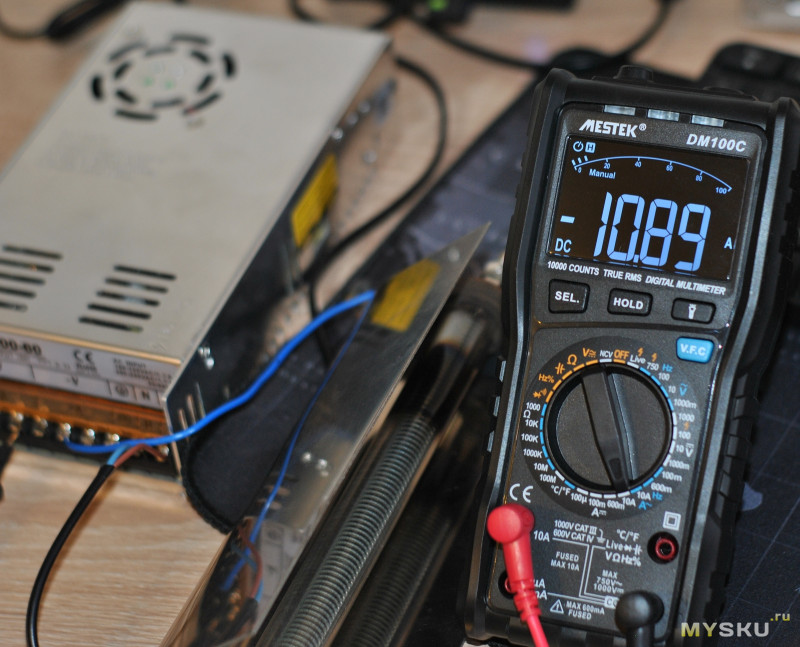
Проверка, что там в розетке:
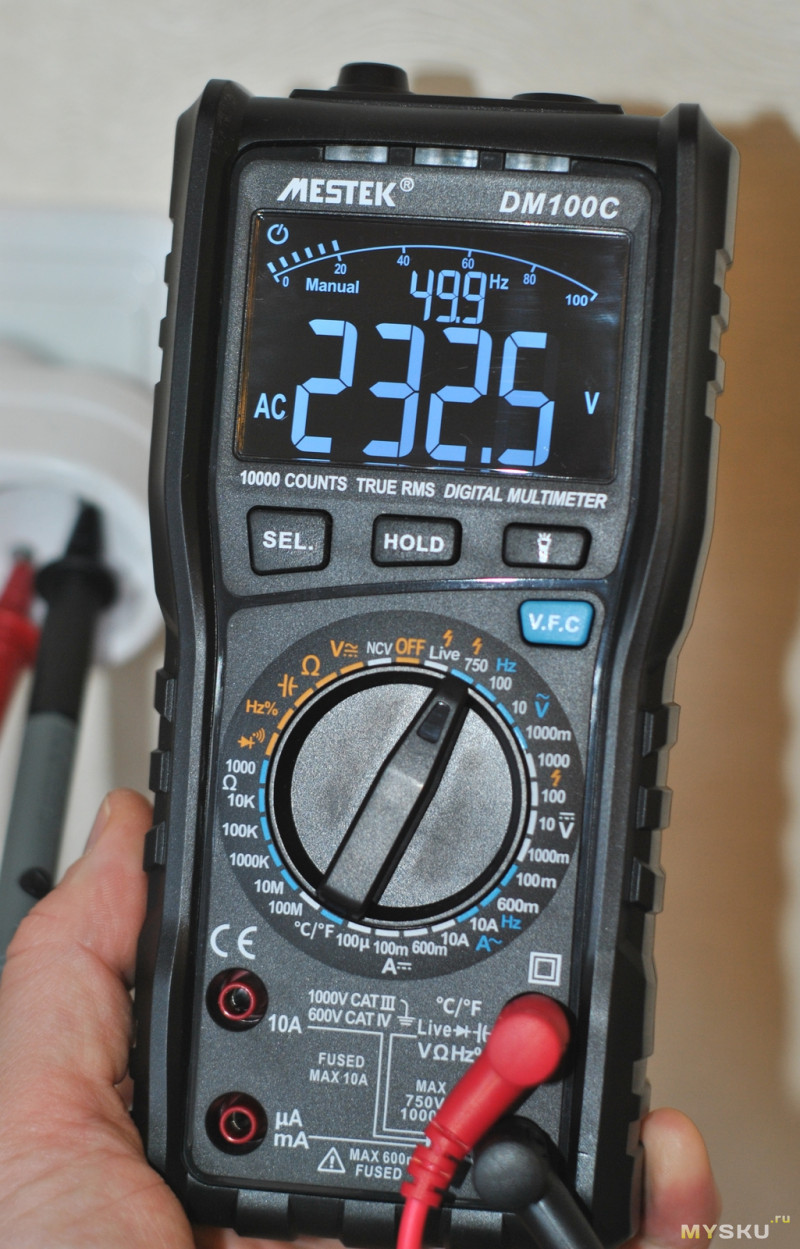
Помимо цифр на экране есть аналоговая шкала для облегчения восприятия. Ну и реверсивный контрастный экран хорошо читаем.
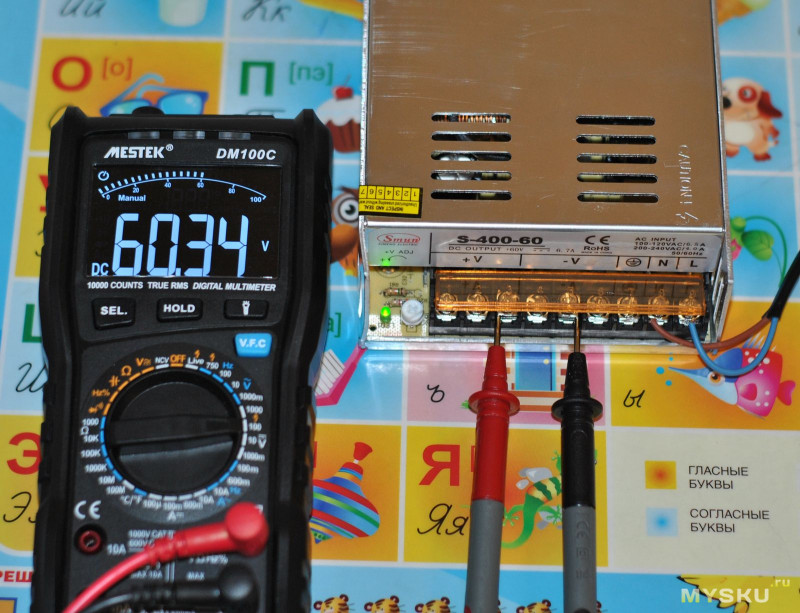
Постоянное напряжение:
Бесконтактный поиск проводки работает:
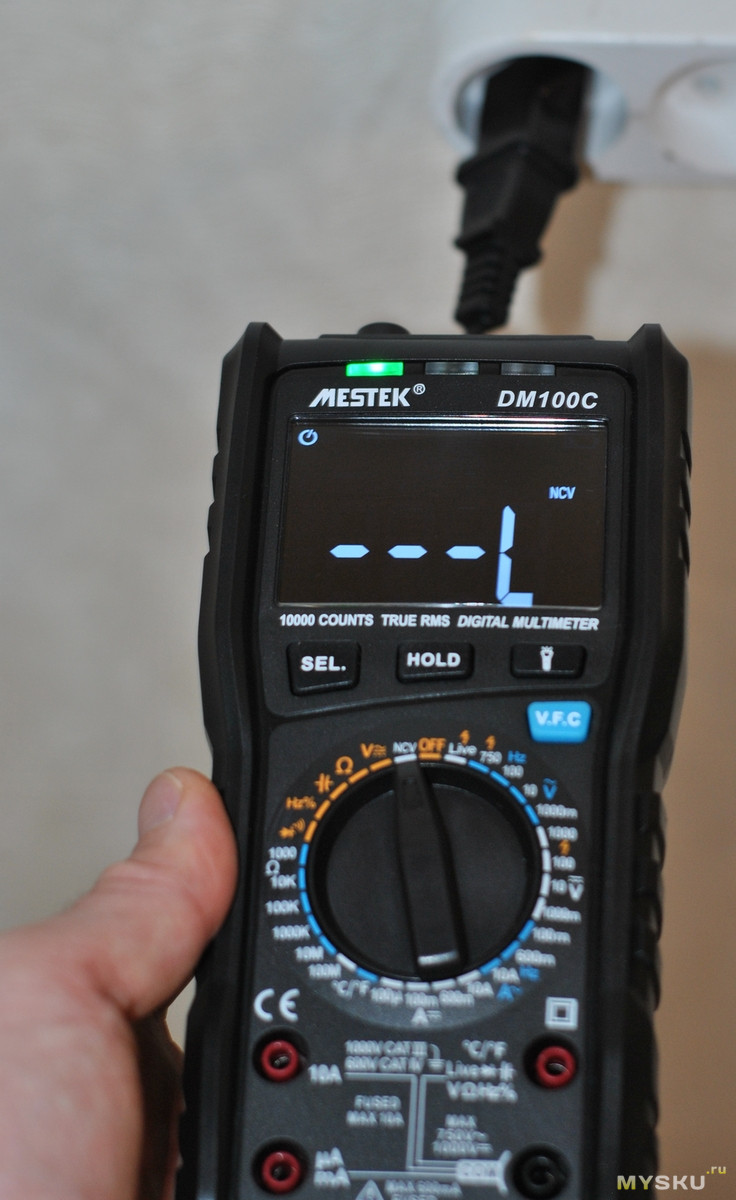
есть так же определение фазы в сети.
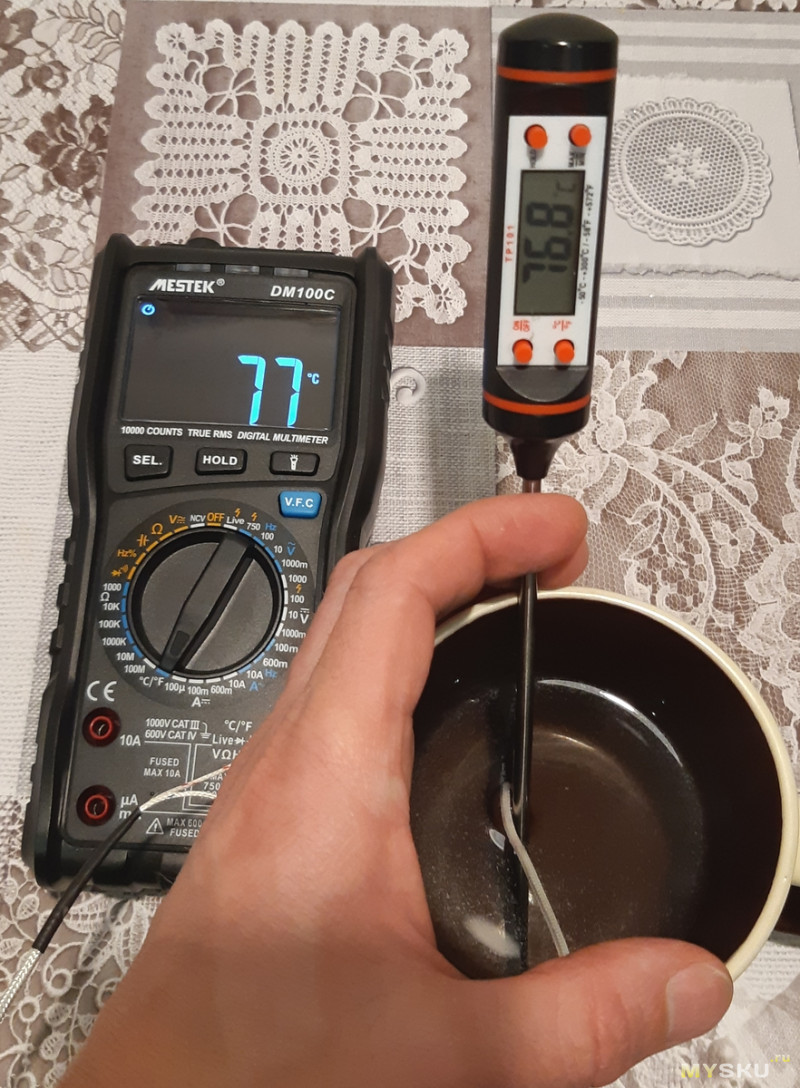
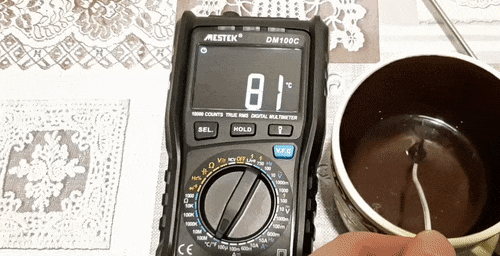
Термопара порадовала широким диапазоном и точностью:
Работает шустро:
Измерение резисторов и конденсаторов:
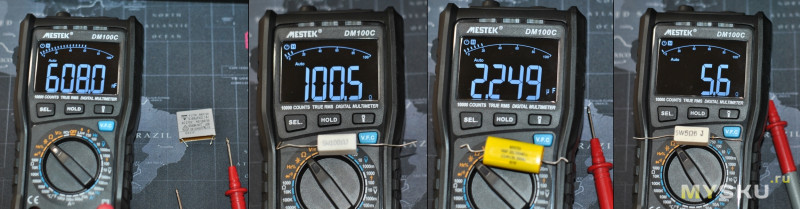
Измерение силы тока:
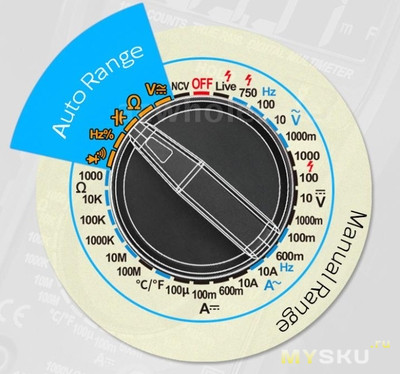
Напрягает, конечно, что не все измеряемые величины имеют автодиапазон и надо щелкать лишний раз селектором:
Так вот родственный прибор, на замену HoldPeak’у. Вроде как следующая ступень после «тестера» вроде DT-830. Меня устраивает.
Спасибо за внимание. Удачных покупок!
")
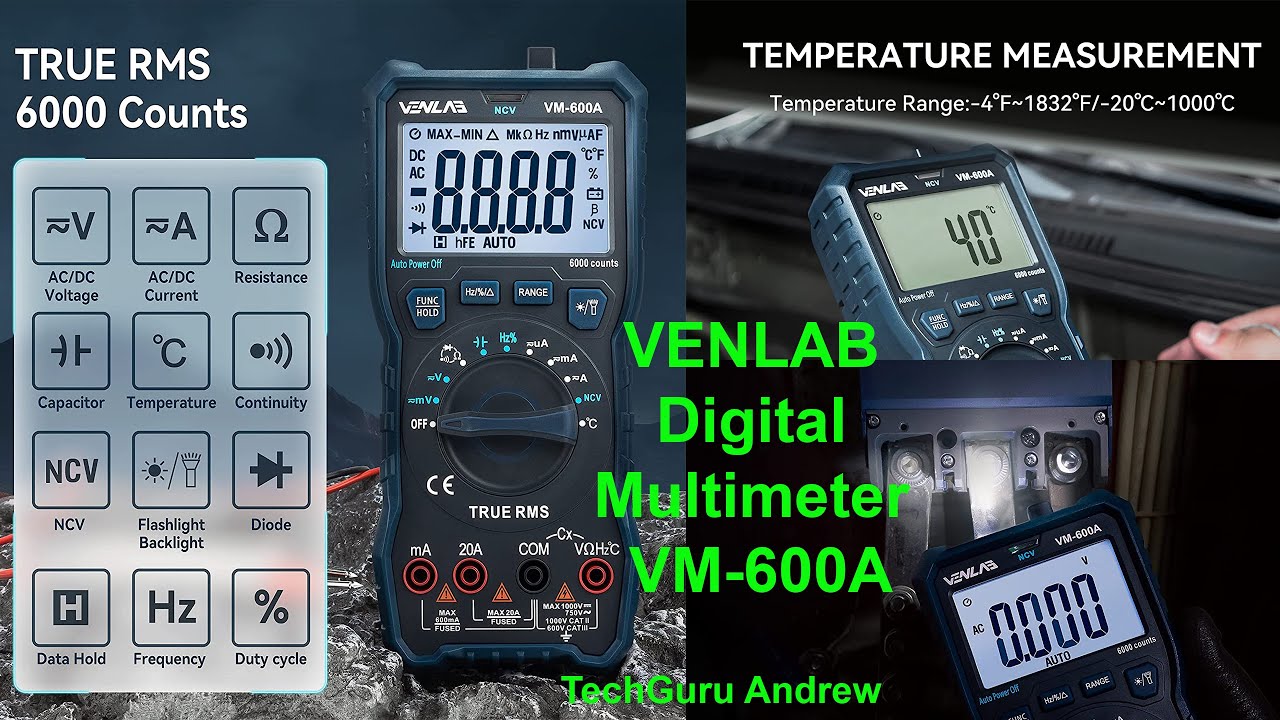
Цифровой мультиметр MESTEK DM100 привлек внимание нашей ремонтной радиомастерской во время поиска дешевого универсального измерителя. Честно говоря, сложно понять кто здесь делает ребрендинг (MESTEK против MASTECH), но в принципе это не очень важно — обе фирмы вполне достойные в своём сегменте.
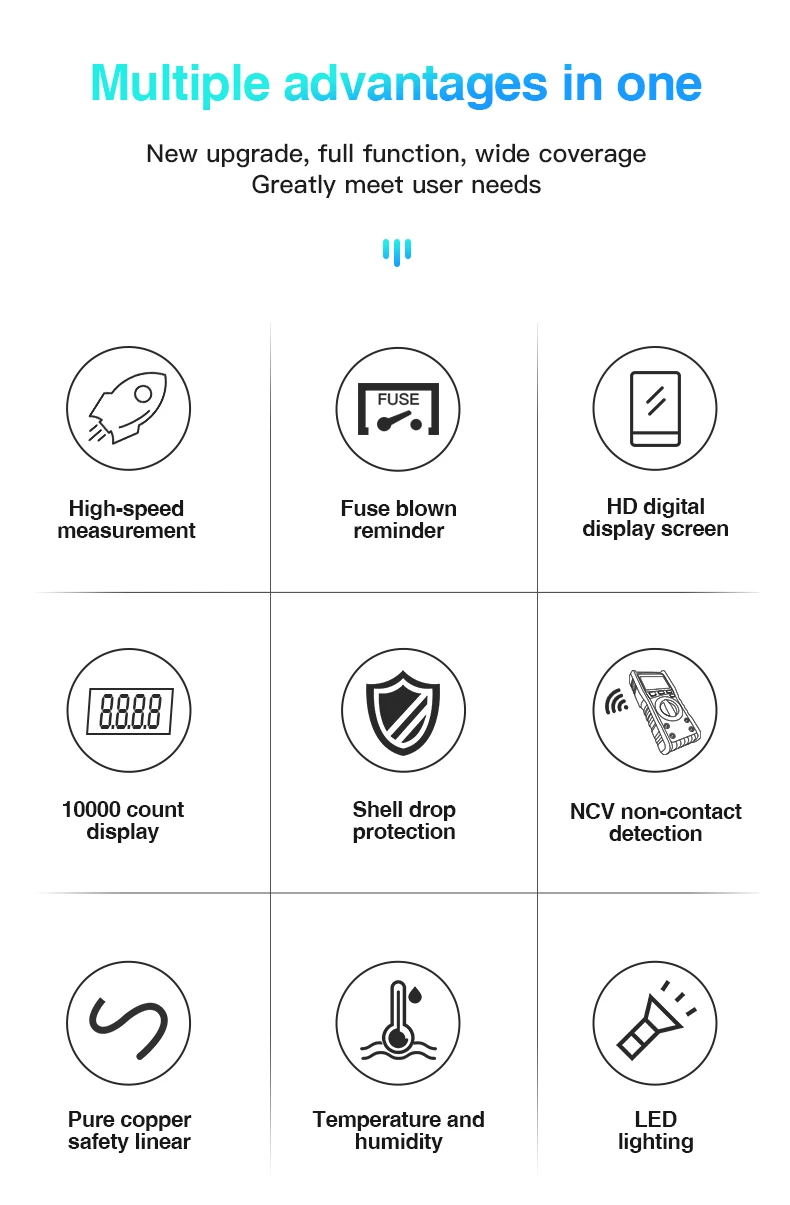
- интеллектуальная обработка данных
- 10000 отсчетов, аналоговая плюс двойная цифровая шкала
- Высокая скорость измерения напряжения / сопротивления / емкости
- VFC (voltage frequency converter). VFC — функция измерения в цепях преобразователей напряжение-частота VFC ( Voltage-Frequency converter). Это включение в измерительную цепь фильтра, который отсеивает неравномерности и частотные всплески напряжения и, следовательно, измеряется только усредненное значение. Может применяться в цепях инверторов, частотных преобразователей и других источников, использующих ШИМ или цифровой синтез формы напряжения
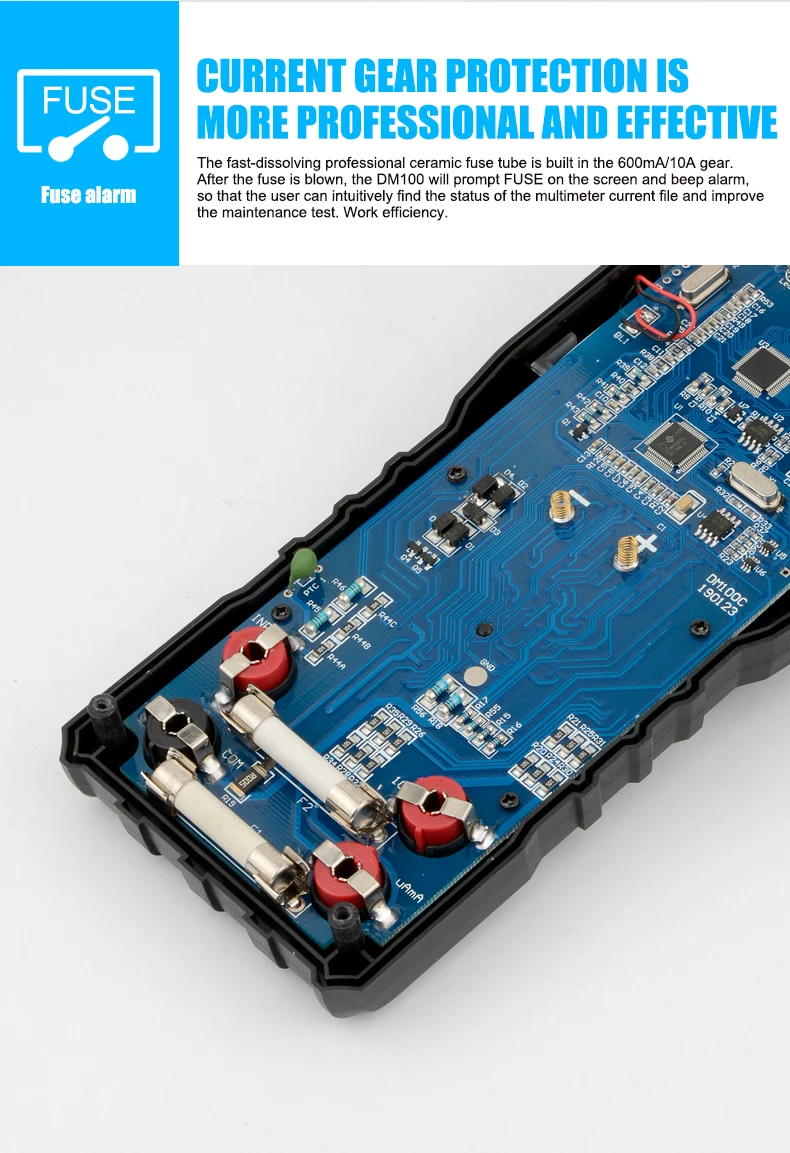
- Индикация перегорания предохранителя
- TrueRMS 1 кГц
- определение целостности цепи со звуковой и световой индикацией
- нагрузочный тест батарей 1,5 В / 9 В
- NCV бесконтактный датчик напряжения
- Автоматическая идентификация диодов
- Определение фазового провода
- Измерение напряжения переменного тока и частоты
- Измерение температуры и влажности окружающей среды
- Измерение емкости конденсаторов и сопротивлений
- AC+DC — раздельное одновременное измерение постоянной и переменной составляющих напряжения.
- Питание: 2 батарейки АА (в комплект не входят)

Характеристики MESTEK DM100
| Режим | Диапазон | Разрешение | Погрешность |
| Постоянное напряжение | 0~999.9mV/9.999V/99.99V/999.9V | 0.1mV/1mV/10mV/100mV | ±1.2%+3 |
| Переменное напряжение | 0~999.9mV/9.999V/99.99V/750V | 0.1mV/1mV/10mV/100mV | ±1.5%+3) |
| Постоянный ток | 0~999.9mA/99.99mA/600mA/10.00A | 0.1mA/0.01mA/0.1mA/10mA | ±1.0%+3) |
| Переменный ток | 0~99.99mA/600mA/10.00A | 0.01mA/0.1mA/10mA | ±1.0%+3 |
| Сопротивление | 0~999.9Ω | 0.1Ω | ±0.8%+3) |
| 0~9.999KΩ/99.99KΩ/999.9KΩ | 1Ω/10Ω/100Ω | ±0.8%+3 | |
| 0~9.999MΩ/99.99MΩ | 1KΩ/10KΩ | ±1.2%+5 | |
| Емкость | 0~9.999nF/99.99nF/999.9nF | 0.001nF/0.01nF/0.1nF | ±4.0%+5 |
| 0~9.999μF/99.99μF/999.9μF | 1nF/10nF/100nF | ±4.0%+5 | |
| 0~9.999mF | 1μF | ±4.0%+0 | |
| Диоды | 0,15 В ~ 3 В Прямой постоянный ток: около 1 мА; Напряжение: около 3,2 В | ||
| Прозвонка | Сопротивление 0 ~ 100 Ом. При сопротивлении менее 15 Ом, встроенный зуммер звучит постоянно и горит зеленый индикатор. Если сопротивление составляет от 15 до 30 Ом сигнал зуммера прерывистый, индикатор горит зеленым. | ||
| Характеристики | |||
| Количество отсчетов | 10000 | ||
| Дисплей | VA инверсный дисплей, аналоговая шкала + двойная цифровая шкала | ||
| Окружающая температура | 0°C~60°C | 0.1°C | ±2°C |
| Окружающая влажность | 20-95% | 1% | ±5.0% RH |
| Тест батарей | 0~1.5 В(ток разряда 40mA) | ||
| 0~9 В(ток разряда 20mA) | |||
| Проверка зуммера (Buzzer) | 2KHz/2.7KHz/3V(Проверка пассивных и активных зуммеров) | ||
| True RMS | 1 кГц | ||
| Измерение частоты переменного тока | Отображение частоты одновременно с измерением переменного напряжения | ||
| Скорость выборки | Скорость выборки 10 раз/сек | ||
| V.F.C | Voltage-Frequency converter. Действительное значение 40 Гц — 400 Гц (VFC: 2 кГц, демпфирование, 3 дБ) | ||
| Сигнализация перегорания предохранителя | Сигнализация перегорания предохранителей 600mA/10A: надпись FUSE на экране со звуковой сигнализацией | ||
| Сигнализация неправильного подключения | Сигнализация о неправильном подключении может предотвратить повреждение прибора из-за неправильной выбора режима работы | ||
| Фиксация данных | Да | ||
| Фонарик | Да | ||
| Автоотключение | Автоматическое выключение при отсутствии манипуляций через 15 минут | ||
| NCV | Бесконтактное обнаружение переменного напряжения | ||
| LIVE (фаза) | Индикация фазы при подключении одного щупа | ||
| Входное сопротивление | 10 MΩ | ||
| Защита от перегрузки | Полная защита от перегрузки при входном напряжении менее 250 В | ||
| Сигнализация разряда батареи | менее 2.4 В | ||
| Общие параметры | |||
| Питание | 2 шт. AA | ||
| Уровень безопасности | CATIII 1000V |
Стоит MESTEK DM100 с буквой С почти 40 долларов, простая версия чуть дешевле.

Питание всего 2 пальчиковые АА батарейки, что просто идеально, так как Крона 9 В садится очень быстро и стоит дорого, а севший литиевый АКБ не всегда есть время заряжать.

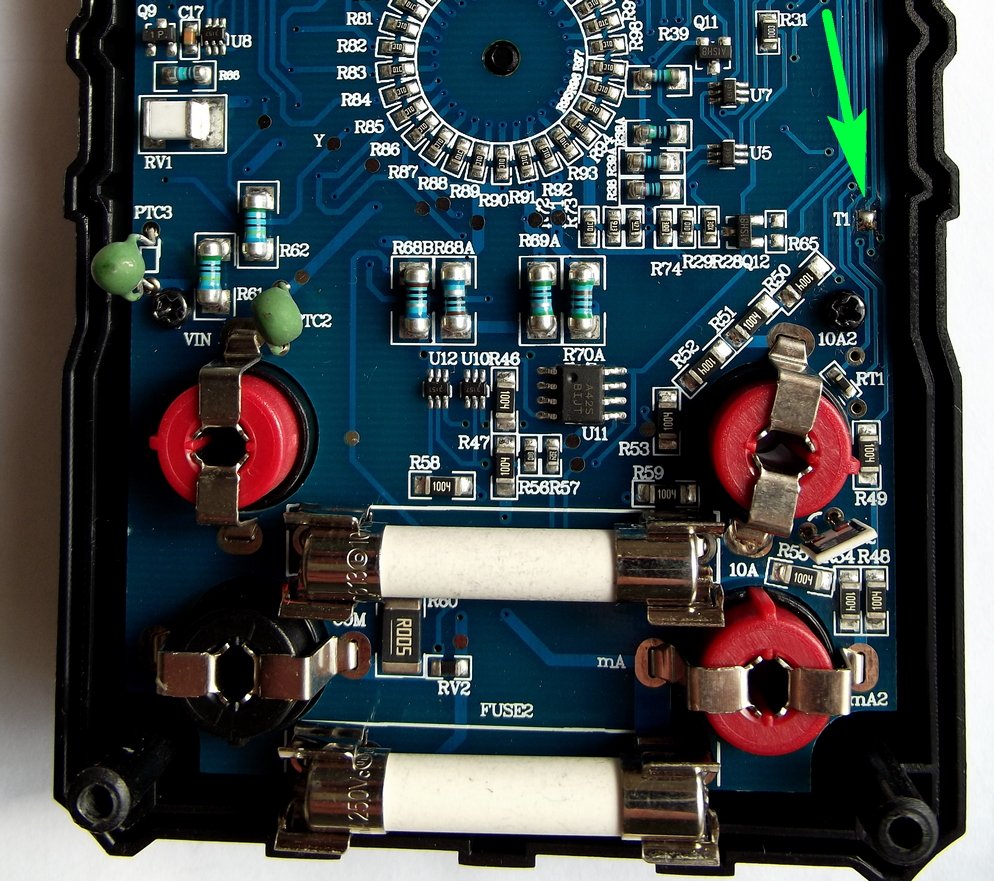
Изучение платы и схемы
Интересно, что в самом низком диапазоне измерений DM100 имеет 3 знака после запятой. И конечно для полноты обзора стоит заглянуть под крышку.

Что удивило, так это количество элементов, напаянных на плате, там имеется более сотни резисторов! Есть также интегральные микросхемы, десяток транзисторов, датчики на плате и другие пассивные элементы.

При рассмотрении схемы вот это «колесо из резисторов 310» сбило с толку. Это похоже на ручку положения энкодера и оно как оказалось не имеет никакого отношения к измерению. Выводы в микроконтроллере просто считываются с помощью АЦП.

Все это доказывает, что DM100 не является совсем уж недорогой версией мультиметра, а производитель позволил дизайнерам проявить изобретательность.
Для наших потребностей мультиметр должен измерять лучше всего I, U и R. Остальные дополнительные функции особо не нужны. Чтобы измерить частоту, емкость или индуктивность, обычно используются устройства, специально предназначенные для этого.
В данном обзоре не будем описывать все эти дополнительные возможности, такие как NCV или расширенные диапазоны измерения, это каждый может найти в инструкции. Также не собираемся хвалить или критиковать те или иные моменты. Каждый может оценить стоимость того, что он хочет купить.


Можем лишь добавить, что измеритель MESTEK DM100 оправдал ожидания с точки зрения скорости измерения, точности и определения токов утечки электролитических конденсаторов.

Мультиметр имеет ручную смену диапазонов измерения. Непонятно почему такие вещи все еще производятся. Может быть это имеет смысл для образовательных целей. Однако, когда дело доходит до практического использования, это неудобное решение. К примеру AN870 с автовыбором заметно лучше с точки зрения эргономики, хотя и намного дешевле! Фото ниже относятся к MESTEK DM100 и ANENG AN870:
Правда иногда ручное изменение полезно. У нас есть UNI-T с автоматическим диапазоном, и иногда раздражает если значение находится на границе, оно мигает точкой, то есть изменяет диапазон вперед и назад, и значение толком не отображается.
- June 4, 2024
- MESTEK
Table of Contents
- MESTEK DM100C Digital Multimeter
- OVERVIEW
- Safety Information
- Input protection measures
- INSTRUCTIONS FOR INSTRUMENT INDICATION
- Schematic diagram of the Instrument
- Description of function button
- Description of Input socket
- Accessories
- OPERATION MANUAL
- Normal operation
- Measurement Guide
- TECHNICAL INDICATORS
- Comprehensive indicators
- Precision Index
- DC voltage
- Instrument maintenance
- Read User Manual Online (PDF format)
- Download This Manual (PDF format)
MESTEK DM100C Digital Multimeter

OVERVIEW
This instrument is a 9999-counter, hand-held digital multimeter with true
virtual value and manual Automatics integration. It has a large, double, in
vert digital LCD display with simulation bars and illumination lights which
are easy for users to read. It has the functions of alarm for fuse tube fused,
wrong insertion of measurement probe, overload protection and batt hereunder
voltage indication. It is an ideal multifunction instrument forfeit her
professionals, factories, schools, enthusiasts or families. It is designed and
manufactured according to the safety requirement for electronic measuring
instruments and handheld digital multimeters specified in the international
electrical safety standard IEC-61010.1t meets the requirements of IEC61010’s
600V CAT IV, 1000V CAT. Il and Pollution Degree 2. Before using the
instrument, please read the instruction manual carefully and pay attention to
the safe working practices.
Safety Information
Safety Instructions
When using this instrument, the user must observe all standard safety
procedures for the following two aspects: A Safety procedure for preventing
electric shock. B Safety procedures for the prevention of incorrect use of the
instrument. To ensure your personal safety, please use the measurement probe
provided with the instrument. Check and make sure they are intact before use.
Safety Precautions
When using the instrument near a device with large electromagnetic
interference, the reading of the instrument will be unstable. A large error
may occur. Do not use the instrument or the measurement probe when its
appearance is damaged. If the instrument is not used correctly. the safety
functions provided by the instrument may expire. You must be extremely careful
when working around bare conductors or buses. Do not use the instrument near
explosive gas, steam or dust. Measurements must be taken using the correct
input terminal, functions, and ranges.
- The input value must not exceed the input limit specified for each range to prevent damage to the instrument.
- When the instrument is connected to the line to be tested, do not touch the input terminal that is not used.
- When the measured voltage exceeds 60Vdc or 30Vac RMS, operate carefully to prevent electric shock.
- When measuring with a measurement probe, place your finger behind the guard ring of the measurement probe.
- Before converting the range, you must ensure that the measurement probe has left the circuit under test.
- For all DC functions, to avoid the risk of electric shock due to possible incorrect readings, use the AC function first to confirm the presence of any AC voltage. Then, choose a DC voltage range equal to or greater than the AC voltage.
- Before performing resistance, diode, capacitance measurement or make -and-break test, the power of the circuit under test must be cut off and all high voltage capacitors in the circuit under test must be discharged.
- Do not measure resistance or perform make-and-break tests on live circuits.
- Check the fuse tube of the instrument before making current measurements. Before connecting the instrument to the circuit under test, turn off the power of the circuit under test.
- When performing TV service or measuring the power-switching circuit, you must be careful of the high voltage pulse in the circuit under test to avoid damage to the instrument.
- This meter is powered by 2 sets of 1.5V AA batteries, which must be correctly installed in the battery compartment of the instrument.
- When the battery under voltage symbol appears, replace the battery immediately. Insufficient battery power can cause incorrect instrument readings that can result in electric shock or personal injuries.
- Do not exceed 1000V when making measurement category Ill voltage measurement; do not exceed 600V when making measurement category IV voltage measurement.
- Do not use the instrument when the outer casing (or part of the outer casing) of the instrument has been removed.
Security Symbol:
- Refer to the instruction manual for warning, important safety mark before usage. Incorrect usage can result in damage to the device or its components.
- AC (alternating current)
- DC (direct current)
- AC or DC
- Earth
- Double insulation protection
- Fuse
- Conforms to the directives of European Union
- High voltage warning
- Disconnected fuse tube
CAT. II Class ll| 1000 V overvoltage protection
CAT. IV Class IV 600 V overvoltage protection
Safe maintenance habits
Safe maintenance habits
- When opening the instrument case or removing the battery cover, first pull out the measurement probe.
- When repairing the instrument, the specified replacement parts must be used.
- Before turning on the instrument, you must shut down all relevant power sources, and you must also ensure that you do not have static electricity to avoid damaging the components of the instrument.
- Calibration and maintenance of the instrument can only be performed by professionals.
- When opening the casing of instrument, it must be noticed that some of the capacitors in the instrument retain dangerous voltages even after the instrument is turned off.
- If any abnormality is observed on the instrument, the instrument should be immediately disused and sent for repair, and make sure that it cannot be used until it passes the inspection.
- When it isn’t used for a long time, please remove the battery and avoid storing it in a place with high temperature and humidity.
Input protection measures
- *The maximum input voltage that can be withstood is 1000V DC voltage or 750V AC voltage when making voltage measurement.
- an AC voltage of less than 600V or equivalents voltage can be withstood when making measurements on frequency, resistance, on-off and diode.
-
- it can be protected by a fuse tube(F600mA/250V) when measuring HA Current and mA current.
- In order to avoid damage to the instrument, if the red instrument is inserted by mistake into the current jack in other gears except the current gear, the screen will show LE Ad, and the buzzer will give an alarm, prompting the measurement probe to be inserted in a wrong jack. At this time, the red measurement probe should be reinserted in the right jack once again for measurement.
- In the UA and mA gear, if the fuse tube is fused, the screen will display FUSE and the symbol. prompting that the fuse tube is disconnected after the measurement probe is inserted into/mA jack. At this time, the fuse tube of the corresponding specification needs to be replaced again before the measurement can be continued. The same prompt function is also available in the 1OA current gear.
INSTRUCTIONS FOR INSTRUMENT INDICATION
Schematic diagram of the Instrument
- Non-contact voltage sensing area
- Non-contact voltage indicator light
- Liquid-crystal display
- SEL Button
- Hold Button
- .Flashlight Button
- VFC Button
- Range Rotary Knob
- 10A Terminal
- mA/uA Terminal
- VQ t*Live Hz % C/F Terminal
Symbols Description
- Battery under voltage/ low battery
- Automatic shutdown function
- High voltage warning
- Negative input polarity
- AC input
- DC input
- Continuity test mode
- Diode test mode
- AUTO Auto range mode
- HOLD Reading hold
- C/F Voltage Frequency Conversion
- Duty cycle
- NCV Non-contact
- AC voltage detection mode
- VFC Frequency conversion voltage measurement


Description of function button

Description of Input socket

Accessories

OPERATION MANUAL
Normal operation
Reading Hold Mode
The reading hold mode can keep the current reading on the display. The
reading hold mode can be exited by either changing the measurement function
gear or by pressing the HOLD button only once. To enter and exit the reading
hold mode: 1. Press the “H” button, the reading will be held and the” H
“symbol will be displayed on the LCD at the same time. 2. Press the” H “button
again to return the instrument to its normal measurement state.
Lighting function
The instrument equipped with the lighting function facilitates the user to
operate in darker lighting conditions. Turn on or off the flashlight as
follows: 1. Press the” ” button to turn on the light. 2. Press the” “button
once again to turn off the light.
Frequency conversion voltage measurement function
In the automatic AC and DC voltage gear, press the SEL button to switch to the
AC voltage gear, and then press the V.F.QC button to enter the frequency
convers ion voltage measurement function, which can measure the frequency
conversion voltage stably.
Automatic shutdown function
The instrument will emit a ticktack sound to automatically cut off the power
and go to dormancy state after no operation is taken 15 minutes after
starting. Press the SEL and V.F.C buttons in the auto p close-down mode to
reboot.
Measurement Guide
The instrument adopts manual/automatic integrated design to measure voltage or
resistance by choosing either auto range measurement or manual range
measurement.
Measuring AC and DC voltages
Any voltage above 1000V DC or 75OV AC rams can’t be measured to prevent
electric shock and/or damage to the instrument. The voltage of more than 1000V
DC or 750V AC rams can’t be imposed between the common terminal and earth to
prevent electric shock and/or damage to the instrument.
The DC voltage range of this instrument is:999.9mV/9.999V/99.99V/999.9v and
999. 9V; the AC voltage range is: 999.mV, 9.999V, 99.99V and 750V. Measurement
of AC or DC voltage:
- Rotate the rotary switch to the V gear to enter the auto range measurement mode (press the SEL button to switch between AC and DC voltage), or rotate the knob to 1000mV, 10V, 100V, 1000V or 1000mV in V , or 1000mV, 10V, 100V, 750V of V gear, enter manual range measurement mode to measure DC or AC voltage.
- Connect the black measurement probe and the red measurement probe to the COM input socket and the V input socket, respectively.
- Use another two terminals of the measurement probe to measure the voltage value of the circuit under test. (connection in parallel with the circuit to be tested)
- The measured voltage value is read by the liquid crystal display, and the voltage value can be directly displayed in the automatic gear. If the manual voltage gear is used, the knob needs to be rotated to the appropriate gear to read the voltage value. When measuring AC voltage, the display will display both voltage value and frequency values at the same time. When measuring DC voltage, he display will simultaneously display the polarity of the voltage to which the red measurement probe is connected.
Note:
- Din the 1000mV range of DC and AC, even if the measurement probe isn’t entered or connected, the reading will be displayed on the instrument. In this case, short-circuit the “V-“and” COM” terminals to make the instrument display return to zero.
- Under the AC voltage function of the auto range, press the V.F.C button to measure the AC frequency conversion voltage.
- The AC voltage value measured using this instrument is the true RMS (root mean square). For sine waves and other waveforms (no DC offset), such as square waves, triangle waves, and staircase waveforms, these measurements are accurate.
Measuring resistance
- To avoid damage to the instrument or the device under test, turn off all power to the circuit under test and fully discharge all high-voltage capacitors before measuring resistance.
The unit of resistance is ohms (0). The instrument’s resistance range is
999.9, 9.999k, 99.99k, 999.9k, 9.999M, 99.99M. Measuring resistance:
- Rotate the rotary switch to the gear to the auto range measurement mode, or rotate the knob to 1000,10K,10OK, 1000K,10M, 100M in gear to enter the auto range measurement mode.
- Connect the black test pen and the red test pen to the COM input socket and the V/ input socket, respectively.
- Use another two terminals of the measurement probe to measure the resistance value of the circuit under test.
- Read the measured resistance value from the LCD. The resistance value can be directly displayed in the automatic gear. If the manual resistance gear is used, the knob needs to be rotated to the appropriate gear to read the resistance value.
Note:
- The measured resistance value on the circuit will usually differ from the rated value of the resistor.
- When measuring low resistance please short-circuit the resistance of the two shorts to read the shot of the test leads in order to keep the accuracy of the measurement. After measuring the measured resistance, the resistance value needs to be subtracted.
- In the 10OM gear, it takes a few seconds for stabilizing the reading. This is normal for high resistance measurements.
- When the instrument is in the open circuit or the resistance of the measured object is too large, the display will show “OL”, indicating that the measured value is out of range.
Test of the Diodes/Buzzer and continuity
To avoid damage to the instrument or the device under test, all power to the
circuit under test should be cut off and all high voltage capacitors should be
fully discharged before measuring the diode. In order to avoid damage to the
instrument under test, al power to the circuit under test should be cut off
and all high voltage capacitors should be fully discharged before the buzzer
make-and-break test.
- Tenth rotary switch to the 9ear.
- Connect the black measurement probe and the red measurement probe to the COM input socket and the VI input socket, respectively.
- Connect the black measurement probe and the red measurement probe to the two terminals of the object to be tested.
- The starting mode is continuity test mode only, press the SEL button, switch to diode test mode only, press’s the SEL button again.it switches to continuity or diode test mode, press the SEL button once again, it switches to continuity test mode only.
- If the object to be measured is a diode, place the red and black measurement probes at the positive and negative terminals of the diode respectively. The instrument will display the forward bias value of the diode under test. If the polarity of the measurement probe is reversed or the polarity of the test point connected to the diode is reversed, the instrument will display OL”. In the circuit, a normal diode should produce a forward voltage drop of 0.5V to 0.8V; however, the reading of reverse bias will depend on the change in resistance of the other channels between the two measurement probes.
- 1f the resistance of the circuit under test is less than about 1000, the instrument will automatically switch to the continuity measurement mode, When the resistance of the circuit under test is more than about 152, the instrument will automatically switch to the continuity measurement mode, and the indicator light (green light) induced will be on for a long time. The buzzer will make a continuo us sound. When the resistance of the circuit under test is between about 15-300, the indicator light (green light) will fast and the buzzer will make discontinuous Sound.
Measuring capacitance
To avoid damage to the instrument or the device under test, turn off all power
to the circuit under test and fully discharge all high-voltage capacitors
before measuring electric capacity. The DC voltage gear is used to determine
that the capacitors have been discharged.
The instrument’s capacitance range is 9.999nF, 99.99nF, 999.9nF, 9.999uF 99.99
F and 999.9uF.9.999mF, 99.99mF. Measuring capacitance:
- Turn the rotary switch to the t gear.
- Connect the black measurement probe and red measurement probe to the COM input socket and Input socket respectively.
- Use another two terminals of the measurement probe to measure the electric capacity value of the electric capacity to be tested, and read the measured value from the liquid-crystal display. Note: Owen measuring large capacitance, it takes time to stabilize the reading.
When measuring the electric capacity with the polarity, pay attention to the
corresponding polarity and avoid damage to the instrument.
Measurement frequency
Do not measure any frequency of the voltage above 250V DC or AC rams to
prevent electric shock and/or damage to the instrument.
Measuring frequency:
- Rotate the rotary switch to the HZ% position.
- Connect the black measurement probe and the red measurement probe to the COM input socket and the Hz input socket, respectively.
- Measure the frequency value of the circuit under test with another two terminals of the measurement probe. 4. Read the frequency value from the LCD. The frequency and duty cycle values are displayed simultaneously.
Measuring current
When the open-circuit voltage to the earth exceeds 250V, be sure to not
attempt to make current measurements on the circuit, If the fuse is burnt out
during the measurement, you may damage the instrument or hurt yourself. To
avoid damage to the instrument or the device under test, check the fuse of the
instrument before making current measurements. When measuring. use the correct
input socket, function gear and range. When the measurement probe is plugged
into the current input socket, do not connect the other terminal of the
measurement probe in parallel to any circuit
The instrument’s DC current range is 99.99uA, 99.99mA, 600.0mA, 10.00A, the
alternating current measuring range is 99.99mA, 600.OmA and 10.00A; Measuring
current:
- Turn the rotary switch to the appropriate gear
- Connect the black measurement probe to the COM input socket. Connect the red measurement probe to Thea/mA input socket if the measured current is less than 600mA;if the measured current is between 600mA and 10A,connect the red measurement probe to the 10A input socket.
- Disconnect the circuit to be tested. Connect the black measurement probe to the terminal of the disconnected circuit (with lower voltage) and the red measurement probe to the terminal of the disconnected circuit (with higher voltage).
- Connect the power to the circuit and read the displayed reading. In the AC current gear, the screen simultaneously displays the current value and frequency. If the display only shows “OL”, which means that the input exceeds the selected range, the rotary switch should be placed at a higher range.
NCV test
Rotate the rotary switch to the NCV gear to dose the top of the instrument to
the conductor. If the instrument detects the AC voltage, the instrument will
light the corresponding signal strength indicator according to the detected
signal strength. When the sensed voltage is low, the screen will display-L,
the green indicator light is on for a long time. When the sensed voltage is
high, the screen displays – H, the two red indicators light up, and the buzzer
sounds an alarm at different frequencies.
Note:
- Even if no indication exists, the voltage mastic exist. Do not rely on non-contact voltage detectors to determine if a wire has a voltage. Detection operations may be affected by factors such as socket design, insulation thickness and type.
- When the voltage is entered into the input terminal of the instrument, the voltage sensing indicator may also be bright due to the presence of induced voltage.
- Interference sources in the external environment (such as flashing light, motor, etc.) may trigger non-contact voltage detection by mistake.
Live Line and Natural Line Distinguish
- Rotate the rotary switch to the Live gear.
- Connect the red measurement probe to the V input socket.
- Insert a single measurement probe into the power socket L jack or dose to the live wire. If the instrument detects the AC voltage, it will judge whether the voltage is a firewire according to the detected signal strength. If it is judged to be a live line, the display will send display LIVE and the green indicator light will be on, the buzzer will send an alarm with different intensities.
Temperature measurement
Set the range switch to °C/°F gear and the screen will display normal
temperature. You can also insert the red plug of the thermocouple into the C
terminal and the black plug into the COM jack. When the reading is stable, the
temperature value can be read directly from the display. The default unit of
this gear is “C, press SEL button to switch to °F.
TECHNICAL INDICATORS
Comprehensive indicators
Environmental conditions for usage 600V CATIV and 100OV CAT. Ill Pollution
degree: 2 Altitude above sea level< 2000 m. Temperature and humidity in the
working environment: 0-40 OC (-80% RH, it isn’t considered when <10°C).
Storage environment temperature and humidity -10-60 OC (when <70% RH, remove
the battery). Temperature coefficient: 0.1 accuracy/OC (<18 OC or >28 OC).
- Maximum allowable voltage between the measuring terminal and the earth: 1000V DC or 750V AC RMS
- Protection of the fuse tube: mA gear: fuse tube FF 600mA/250V; A-gear fuse tube FF 10A/250V
- Conversion rate: about 3 times / second
- Display: 9999 counts displayed by LCD. The unit symbol is automatically displayed according to the measurement function gear,
- Overage indication: The LCD will display “OL.
- Indication for low voltage battery: When the battery voltage is lower than the normal working voltage, “will be displayed. Indication of input polarity:”” is automatically displayed.
- Power supply: 2 x 1.5V AA battery
- External dimensions: 185x88x52mm
- Weight: about 350g (including battery).
Precision Index
Accuracy: (% reading+ word), the warranty period is one year from the date of
delivery. Reference conditions: ambient temperature 18° C to 28C, relative
humidity is not more than 80%.
DC voltage

- Input impedance: 10M Maximum
- input voltage: 1000Vdc or 750Vac rms.
- Input impedance : 1OM
- Maximum input voltage: 1000Vdc or 750Vac rms.
1AC voltage


- Input impedance: 1OM
- Maximum input voltage: 1000Vdc or 750V ac rms.
- Frequency response: 40Hz-1KHz true RMS (VFC: 2KHz attenuation -3dB)
Frequency

- Range of Input voltage: 200mV-10V ac RMS
- Overload protection: 600V DCIAC
Resistance

Diode

- Overload protection: 600V DCIAC
Buzzer and continuity Test

- Overload protection: 600V DCIAC
Capacitance
Overload protection: 600V DCIAC

Direct current

- Overload protection: mA range fuse tube (FF630mA/250V);10A range fuse tube (FF10A/250V).
- Maximum input current: mA gear: 600mA DC or AC RMS; 10A gear: 10A DC or AC RMS
- When the measured current is greater than 5A, the continuous measurement time is no longer than 10 seconds, and the current measurement must be stopped for 1 minute after the measurement.
Alternating current

Overload protection: mA range fuse (FF630mA/250V); 10A range fuse
(FF10A/250V). Maximum input current: mA gear: 600mA DC or AC RMS; 10A gear:
10A DC or AC RMS When the measured current is greater than 5A, the continuous
measurement time is no longer than 15 seconds, and the current measurement
must be stopped for 1 minute after the measurement. Frequency response: 40Hz-
1KHz, true RMS
Temperature

Overload protection: 600VDCIAC 5.
Instrument maintenance
This section provides basic maintenance information, including instructions
for replacing the fuse and replacing the battery. Do not attempt to repair the
instrument unless you are an experienced service man with relevant
calibration. performance testing, and maintenance information. This section
provides basic maintenance information, including instructions for replacing
the fuse and replacing the battery. Do not attempt to repair the instrument
unless you are an experienced service man with relevant calibration,
performance testing, and maintenance information. To avoid electric shock or
damage to the instrument, do not wet the inside of the instrument. The
connection wire between the measurement probe and input signal must be removed
before opening the case or battery cover. Regularly clean the case of the
instrument with a damp clothed small amount of detergent. Do not use abrasives
or chemical solvents. Input sockets that are dirty or damp may affect
readings.
Cleaning the input socket:
- Turn off the instrument and pull all the measurement probes out of the input socket.
- Remove any dirt from the socket.
- Use a new cotton ball dipped in detergent or lubricant to clean each socket.
The lubricant can be used to prevent socket contamination relevant to the
moisture.
To avoid electric shock or personal injury caused by incorrect readings,
replace the battery immediately when the” “symbol appears on the display of
the instrument. One-use the specified fuse (600mA/250V, 10A/250V fast-thawing
fuse) To avoid electric shock or personal injury, turn off and check that the
measurement probe has been disconnected from the measurement circuit before
opening the battery cover and replacing it with a new one.
Please replace the battery according to the following steps:
- Turn off the power of the instrument.
- Pull all the measurement probes out of the input socket.
- Loosen the screws that secure the battery cover with a screwdriver.
- Remove the cover of the battery.
- Replace with a new 2 x 1. 5VAA battery
- Install the battery cover and tighten the screws.
Read User Manual Online (PDF format)
Read User Manual Online (PDF format) >>
Download This Manual (PDF format)
Download this manual >>
Этот инструмент является счетчиком 9999, ручным цифровым мультиметром с истинным виртуальным значением и ручной/автоматической интеграцией. Он имеет большой, двойной, инвертированный цифровой ЖК-дисплей с имитацией баров и элементы освещения, которые легко для пользователей для чтения. Он имеет функции сигнализации для предохранителя, неправильной вставки измерительного зонда, защиты от перегрузки и индикации низкого напряжения батареи. Это отличный многофункциональный инструмент для профессионалов, заводов, школ, энтузиастов или семей.
Особенности:
10000 отсчетов, аналоговые полосы и цифровой двойной дисплей, интеллектуальная двухъядерный обработка данных измерений.
Ручной диапазон и автоматическая конструкция диапазона.
V.f. C Функция измерения напряжения переменной частоты, NCV Бесконтактное измерение напряжения, AC напряжение и частота тока тест, автоматическая идентификация диода и ВКЛ/ВЫКЛ.
Автоматическая функция будильника предохранителя отключена, и мультиметр ручка неправильная вставка анти-ожога функция будильника.
1 кГц реальное эффективное измерение, 99.9mF большой диапазон емкости.
Живая однонастольная ручка распознавания fire line.
Зонд-20 ~ 1000 градусов измерения температуры.
Технические характеристики:
Материал: АБС-пластик
Диапазон передач: Автоматический диапазон/ручной диапазон
Дисплей: Обратный дисплей av-экран с аналоговыми полосами и цифровым двойным дисплеем, 10000 отсчетов
Рабочая среда: 600 V CA T I V и 1000 V CA T III
Туры RMS: 1 кГц
Диапазон напряжения постоянного тока: 999,9 мВ/9,999 в/99,99 в/999,9 в
Разрешение напряжения постоянного тока: 0.1мв/1МВ/10мв/100мв
Точность напряжения постоянного тока: ± (0.5% Чтение + 3 цифры)
Диапазон напряжения переменного тока: 9,999 мВ/99,99 в/750,0 в/в
Разрешение напряжения переменного тока: 0.1мв/1МВ/10мв/100мв
Точность напряжения переменного тока: 999,9 мВ ~ 99,99 в: ± (0.8% Чтение + 3 цифры); 750,0 в: ± (1% Чтение + 5 цифр)
Диапазон постоянного тока: 99,99 μA/999,9 мА/600 мА/10 А
Разрешение тока постоянного тока: 0,01 μA/мА/10 мА
Точность тока постоянного тока: 99,99 μA ~ 600 мА: ± (0.8% Чтение + 3 цифры); 10A: ± (1.2% Чтение + 3 цифры)
Диапазон переменного тока: 99,99 мА/600 мА/10 А
Переменный ток Разрешение: 0.01mA/0.1mA/10mA
Точность тока переменного тока: 99,99 мА ~ 600 мА: ± (1% Чтение + 3 цифры); 10А: ± (1.5% Чтение + 3 цифры)
Частотный диапазон: 9,999 Гц/99,99 Гц/999,9 Гц/9,999 кГц/99,99 кГц/999,9 кГц/9,999 МГц
Частотное Разрешение: 0,001 Гц/0,01 Гц/0,1 Гц/0,001 кГц/0,01 кГц/0,1 кГц/0,001 МГц
Точность частоты: ± (1% Чтение + 3 цифры)
Диапазон сопротивления: 999,9 Ω/9,999k Ω/99,99k Ω/999,9k Ω/9,999m Ω/99,99m Ω
Разрешение сопротивления: 0,1 Ω/1Ω/10Ω/100Ω/1kΩ/10kΩ
Точность сопротивления: 999,9 Ω ~ 9999 m Ω: ± (0.8% Чтение + 3 цифры); 99,99 m Ω: ± (1.2% Чтение + 5 цифр)
Постоянной ёмкости, универсальный конденсатор Диапазон: 9.999nF/99.99nF/999.9nF/9,999 мкФ/99,99 мкФ/999,9 мкФ/9.999mF/99.99mF
Разрешение емкости: 0.001nF/0.01nF/0.1nF/1nF/10nF/100nF/1μF/10μF
Точность емкости: 9.999nF ~ 9.999mF: ± (4% Чтение + 3 цифры); 99.99mF: ± (5% Чтение + 3 цифры)
Диапазон диодов: 0,15 ~ 3 в
Разрешение диода: 0,001 в
Зуммер и диапазон непрерывности: 100Ω
Зуммер и разрешение непрерывности: 1Ω
Диапазон температур:-20 ~ 1000 °C/-4 ~ 1832 °F
Разрешение температуры: 1 °C/1 °F
Точность температуры: ± (1% Чтение + 3 цифры)
Подсказка о низком напряжении: менее 2,4 В
Рабочая температура/Влажность: 0 ~ 40 °C; <80% относительной влажности
Температура хранения/Влажность:-10 ~ 60 °C; <70% относительной влажности
Источник питания: 2*1,5 в AA батареи (не входят в комплект)
Размер изделия: около 18,5*8,8*5,2 см/7,29*3,47 * дюйма
Вес изделия: около 11,3 г/унций
Посылка Размеры: Approx.20.5 * 13*6 см/8,07*5,12*2,36 в
Вес посылка: около 17,43 г/унций
Посылка список:
1 * мультиметр
1 * пара тестовых зондов
1 * измерительный датчик температуры
1 * Руководство пользователя (на английском языке)

1) Мы принимаем Alipay, West Union, TT. Все основные кредитные карты принимаются через безопасный платежный процессор ESCROW.
2) оплата должна быть произведена в течение 3 дней с момента заказа.
3) Если вы не можете проверить немедленно после окончания аукциона, рекомендуем подождать несколько минут и повторить. Платежи должны быть завершены в течение 3-х дней.

1. Доставка по всему миру. (За исключением некоторых стран и армейской почтовой службы/почтовых отделений флота)
2. Заказы обрабатываются своевременно после подтверждения оплаты.
3. Мы отправляем только по подтвержденным адресам заказа. Адрес Вашего заказа должен совпадать с адресом доставки.
4. Изображения не являются фактическим товаром и только для справки.
5. Время доставки предоставляется перевозчиком и не включает выходные и праздничные дни. Сроки доставки могут меняться, особенно во время курортного сезона.
6. Если вы не получили ваш груз в течение 45 дней с момента оплаты, пожалуйста, свяжитесь с нами. Мы отследим отправку и свяжемся с вами как можно скорее. Наша цель – удовлетворение клиентов!
7. Из-за наличия на складе и разницы во времени, мы выберем для быстрой доставки ваш товар с нашего первого доступного склада.
8. Время доставки:

1. У вас есть 7 дней, чтобы связаться с нами и 30 дней, чтобы вернуть его с даты его получения. Если данный товар находится в вашем распоряжении более 7 дней, он считается пользованным товаром и МЫ НЕ ПРОИЗВОДИМ ВОЗВРАТ ИЛИ ЗАМЕНУ. Исключений нет! Стоимость доставки покрывается как продавцом, так и покупателем пополам.
2. Все возвращенные товары должны быть в оригинальной упаковке, и вы должны предоставить нам номер отслеживания доставки, конкретную причину возврата, и ваш po #.
3. Мы вернем вам полную сумму выигравшей цены, при получении товара в его первоначальном состоянии и упаковке со всеми компонентами и аксессуарами в комплекте, после того как покупатель и продавец отменят сделку с AliExpress. Или вы можете выбрать замену.
4. Мы будем нести всю стоимость доставки, если продукт (ы) является (являются) не как рекламируется.

1. 12 месяцев ограниченная гарантия производителя на дефектные предметы (за исключением предметов, поврежденных и/или неправильно использованных после получения). Аксессуары поставляются с 3-месячной гарантией.
2. Дефектные товары должны быть сообщены и возвращены в течение гарантийного срока (и в оригинальной упаковке, если это возможно). Вы должны описать дефект и предоставить номер вашего заказа. Мы не ремонтируем и не заменяем товары с истекшей гарантией. Оставляя заказ на Aliexpress, вы соглашаетесь со всеми приведенными выше правилами!

Мы поддерживаем высокие стандарты качества и стремимся к 100% удовлетворенности клиентов! Отзывы покупателей очень важны. Мы просим вас, ПРЕЖДЕ чем оставлять нам нейтральный или отрицательный отзыв, связаться с нами, чтобы мы могли разрешить проблему к общему удовольствию.
Невозможно решить проблемы, если мы о них не знаем!
В данной статье представлены полезные советы по использованию Mustek dm100c, а также инструкция на русском языке. Ознакомьтесь с этой информацией, чтобы научиться эффективно использовать данный продукт.

Перед началом использования устройства обязательно ознакомьтесь с инструкцией на русском языке. Важно понимать все особенности и функции Mustek dm100c.
🔴 Купил мультиметр Mestek DM100C 🔴
При работе с Mustek dm100c следуйте инструкции и не пропускайте ни одного этапа настройки. Это поможет избежать проблем и насладиться комфортным использованием устройства.
Большой обзор и инструкция как пользоваться мультиметром (тестер) Mestek DM90E
Не забудьте проверить, что у вас установлены последние обновления для Mustek dm100c. Они могут содержать исправления ошибок и улучшения функционала.
Мультиметр Mestec DM100C с алиэкспресс. Обзор и вскрытие

Лучше всего хранить инструкцию Mustek dm100c на русском языке в доступном месте, чтобы при необходимости всегда можно было в нее обратиться.
Мини обзор Мультиметр MESTEK DM100C
Во время использования Mustek dm100c регулярно очищайте линзу и поверхность сканирования. Это поможет сохранить качество сканирования и продлить срок службы устройства.
Крутой мультиметр из Китая с фонариком! MESTEK DM100C
Используйте оригинальные расходные материалы и аксессуары для Mustek dm100c. Это гарантирует совместимость и качество сканирования.
Мультиметр Mestek DM100B. А может он?…
Не перегружайте устройство Mustek dm100с сканированием большого количества документов одновременно. Рекомендуется сканировать поэтапно, чтобы избежать ошибок и сбоев.

Мультиметр. 10 советов как пользоваться мультиметром. Как прозванивать мультиметром. Multimeter.
При работе с Mustek dm100с используйте только зарекомендовавшие себя программные решения. Подобранные специализированные программы значительно упростят работу и увеличат функциональность устройства.
Перевод тестора MESTEK DM100C на usb.

Учтите особенности сканируемых материалов, чтобы достичь наилучших результатов. Например, для сканирования фотографий рекомендуется использовать режим с повышенным разрешением.
Не стесняйтесь обращаться за помощью к производителю Mustek, если у вас возникли проблемы или вопросы по использованию Mustek dm100с. Они всегда готовы помочь вам решить любую проблему.
Мультиметр. Как пользоваться мультиметром. Тестер. Полная инструкция как пользоваться тестером.