
IQuick Start
Quick Start Thank you for purchasing the MSI MPG Z390 GAMING PRO CARBON AC/ MPG Z390 GAMING PRO CARBON motherboard. This Quick Start section provides demonstration diagrams about how to install your computer. Some of the installations also provide video demonstrations. Please link to the URL to watch it with the web browser on your phone or tablet. You may have even link to the URL by scanning the QR code.
Kurzanleitung Danke, dass Sie das MSI MPG Z390 GAMING PRO CARBON AC/ MPG Z390 GAMING PRO CARBON Motherboard gewhlt haben. Dieser Abschnitt der Kurzanleitung bietet eine Demo zur Installation Ihres Computers. Manche Installationen bieten auch die Videodemonstrationen. Klicken Sie auf die URL, um diese Videoanleitung mit Ihrem Browser auf Ihrem Handy oder Table anzusehen. Oder scannen Sie auch den QR Code mit Ihrem Handy, um die URL zu ffnen.
Prsentation rapide Merci davoir choisi la carte mre MSI MPG Z390 GAMING PRO CARBON AC/ MPG Z390 GAMING PRO CARBON. Ce manuel fournit une rapide prsentation avec des illustrations explicatives qui vous aideront assembler votre ordinateur. Des tutoriels vido sont disponibles pour certaines tapes. Cliquez sur le lien fourni pour regarder la vido sur votre tlphone ou votre tablette. Vous pouvez galement accder au lien en scannant le QR code qui lui est associ.
MSI MPG Z390 GAMING PRO CARBON AC/ MPG Z390 GAMING PRO CARBON. , . . , — . , QR-.
II Quick Start
1
2
3
6
4 5
7
8
9
Installing a Processor/ Installation des Prozessors/ Installer un processeur/
IIIQuick Start
Installing DDR4 memory/ Installation des DDR4-Speichers/ Installer une mmoire DDR4/ DDR4
DIMMB2 DIMMB2 DIMMB1
DIMMA2 DIMMA2 DIMMA2 DIMMA1
1
1
2
2
3
3
IV Quick Start
RE SE
T S W
PO WER
SW
POWER LED+ POWER LED-
HDD LED
HD D L
ED RE
SE T S
W
JFP1
HDD LED HDD LED — HDD LED +
POWER LED — POWER LED +
POWER LED
Connecting the Front Panel Header/ Anschlieen der Frontpanel-Stiftleiste/ Connecter un connecteur du panneau avant/
1
2 10
9
JFP1
1 HDD LED + 2 Power LED +
3 HDD LED — 4 Power LED —
5 Reset Switch 6 Power Switch
7 Reset Switch 8 Power Switch
9 Reserved 10 No Pin
VQuick Start
Installing the Motherboard/ Installation des Motherboards/ Installer la carte mre/
2
1
VI Quick Start
1
2 3
4
5
Installing SATA Drives/ Installation der SATA-Laufwerke/ Installer le disque dur SATA/ SATA
VIIQuick Start
1
2
3
4
5
6
Installing a Graphics Card/ Einbau der Grafikkarte/ Installer une carte graphique/
VIII Quick Start
Connecting Peripheral Devices/ Peripheriegerte/ Connecter un priphrique anschliessen/
IXQuick Start
Connecting the Power Connectors/ Stromanschlsse anschliessen/ Connecter les cbles du module dalimentation/
ATX_PWR1 CPU_PWR1
CPU_PWR2
X Quick Start
1
4
2
3
Power On/ Einschalten/ Mettre sous-tension/
1Contents
Contents Safety Information ……………………………………………………………………………………. 3
Specifications …………………………………………………………………………………………… 4 JCORSAIR1 Connector Specification ……………………………………………………………. 9
Package contents …………………………………………………………………………………….. 9
Rear I/O Panel ……………………………………………………………………………………….. 10 LAN Port LED Status Table……………………………………………………………………….. 10 Audio Ports Configuration ………………………………………………………………………… 10 Realtek Audio Console …………………………………………………………………………….. 11 Installing Antennas ………………………………………………………………………………….. 13
Overview of Components ………………………………………………………………………… 14 CPU Socket …………………………………………………………………………………………….. 15 DIMM Slots ……………………………………………………………………………………………… 16 PCI_E1~6: PCIe Expansion Slots ……………………………………………………………….. 17 M2_1~2: M.2 Slots (Key M) ……………………………………………………………………….. 19 SATA1~6: SATA 6Gb/s Connectors …………………………………………………………….. 20 CPU_PWR1~2, ATX_PWR1: Power Connectors …………………………………………… 22 JFP1, JFP2: Front Panel Connectors …………………………………………………………. 23 JUSBC1: USB 3.1 Gen2 Type-C Connector …………………………………………………. 23 JUSB1~2: USB 3.1 Gen1 Connectors …………………………………………………………. 24 JUSB3~4: USB 2.0 Connectors ………………………………………………………………….. 24 CPU_FAN1, PUMP_FAN1, SYS_FAN1~5: Fan Connectors …………………………….. 25 JAUD1: Front Audio Connector …………………………………………………………………. 26 JCI1: Chassis Intrusion Connector …………………………………………………………….. 26 JTPM1: TPM Module Connector ………………………………………………………………… 27 JCOM1: Serial Port Connector ………………………………………………………………….. 27 JTBT1: Thunderbolt Add-on Card Connector ……………………………………………… 27 JRGB1~2, JRAINBOW1: RGB LED connectors …………………………………………….. 28 JCORSAIR1: CORSAIR Connector ……………………………………………………………… 29 JBAT1: Clear CMOS (Reset BIOS) Jumper ………………………………………………….. 30
Onboard LEDs ………………………………………………………………………………………… 31 EZ Debug LED …………………………………………………………………………………………. 31 DIMM LEDs …………………………………………………………………………………………….. 31 XMP LED ………………………………………………………………………………………………… 31 JPWRLED1: LED power input ……………………………………………………………………. 31
Installing OS, Drivers & Utilities ………………………………………………………………. 32 Installing Windows 10 …………………………………………………………………………….. 32 Installing Drivers …………………………………………………………………………………….. 32
2 Contents
Installing Utilities ……………………………………………………………………………………. 32
BIOS Setup …………………………………………………………………………………………….. 33 Entering BIOS Setup ………………………………………………………………………………… 33 Resetting BIOS ………………………………………………………………………………………… 34 Updating BIOS …………………………………………………………………………………………. 34 EZ Mode …………………………………………………………………………………………………. 35 Advanced Mode ………………………………………………………………………………………. 37 OC Menu…………………………………………………………………………………………………. 38
3Safety Information
Safety Information yThe components included in this package are prone to damage from electrostatic
discharge (ESD). Please adhere to the following instructions to ensure successful computer assembly.
yEnsure that all components are securely connected. Loose connections may cause the computer to not recognize a component or fail to start.
yHold the motherboard by the edges to avoid touching sensitive components.
y It is recommended to wear an electrostatic discharge (ESD) wrist strap when handling the motherboard to prevent electrostatic damage. If an ESD wrist strap is not available, discharge yourself of static electricity by touching another metal object before handling the motherboard.
yStore the motherboard in an electrostatic shielding container or on an anti-static pad whenever the motherboard is not installed.
yBefore turning on the computer, ensure that there are no loose screws or metal components on the motherboard or anywhere within the computer case.
yDo not boot the computer before installation is completed. This could cause permanent damage to the components as well as injury to the user.
y If you need help during any installation step, please consult a certified computer technician.
yAlways turn off the power supply and unplug the power cord from the power outlet before installing or removing any computer component.
yKeep this user guide for future reference.
yKeep this motherboard away from humidity.
yMake sure that your electrical outlet provides the same voltage as is indicated on the PSU, before connecting the PSU to the electrical outlet.
yPlace the power cord such a way that people can not step on it. Do not place anything over the power cord.
yAll cautions and warnings on the motherboard should be noted.
y If any of the following situations arises, get the motherboard checked by service personnel:
Liquid has penetrated into the computer.
The motherboard has been exposed to moisture.
The motherboard does not work well or you can not get it work according to user guide.
The motherboard has been dropped and damaged.
The motherboard has obvious sign of breakage.
yDo not leave this motherboard in an environment above 60C (140F), it may damage the motherboard.
4 Specications
Specifications
CPU
Supports Intel Core 9000 Series family/ 8th Gen Intel Core / Pentium Gold / Celeron processors for LGA 1151 socket * Please go to www.intel.com for more compatibility information.
Chipset Intel Z390 Chipset
Memory
y4x DDR4 memory slots, support up to 64GB*
ySupports DDR4 4400(OC)/ 4300(OC)/ 4266(OC)/ 4200(OC)/ 4133(OC)/ 4000(OC)/ 3866(OC)/ 3733(OC)/ 3600(OC)/ 3466(OC)/ 3400(OC)/ 3333(OC)/ 3300(OC)/ 3200(OC)/ 3000(OC) / 2800(OC)/ 2666/ 2400/ 2133 MHz*
ySupports Dual-Channel mode
ySupports non-ECC, un-buffered memory
ySupports Intel Extreme Memory Profile (XMP) * Please refer www.msi.com for more information on compatible memory.
Expansion Slot y3x PCIe 3.0 x16 slots (support x16/x0/x4, x8/x8/x4 modes)
y3x PCIe 3.0 x1 slots
Onboard Graphics
y1x HDMI port 1.4, supports a maximum resolution of 4096×2160@24Hz
y1x DisplayPort port 1.2, supports a maximum resolution of 4096X2304@60Hz
Multi-GPU ySupports 2-Way NVIDIA SLI Technology
ySupports 3-Way AMD CrossFire Technology
Storage
Intel Z390 Chipset
y6x SATA 6Gb/s ports*
y2x M.2 slots (Key M)*
Support up to PCIe 3.0 x4 and SATA 6Gb/s, 2242/ 2260/ 2280/ 22110 storage devices
Intel Optane Memory Ready** * M.2 slots and SATA ports share the bandwidth. Please refer to page 20 for details.
** Before using Intel Optane memory modules, please ensure that you have updated the drivers and BIOS to the latest version from MSI website.
Continued on next page
5Specications
Continued from previous page
RAID
Intel Z390 Chipset
ySupports RAID 0, RAID1, RAID 5 and RAID 10 for SATA storage devices
ySupports RAID 0 and RAID 1 for M.2 PCIe storage devices
LAN 1x Intel I219-V Gigabit LAN controller
Wirsless LAN & Bluetooth
(for MPG Z390 GAMING PRO CARBON AC only)
Intel Wireless-AC 9560
ySupports 802.11 a/b/g/n/ac, MU-MIMO Rx, 2.4GHz/ 5GHz (160MHz) up to 1.73Gbps
ySupports Bluetooth2.1, 2.1+EDR, 3.0,4.0, 5
USB
Intel Z390 Chipset
y5x USB 3.1 Gen2 (SuperSpeed USB 10Gbps) ports (1 Type-C and 3 Type-A ports on the back panel, 1 Type-C internal connector)
y4x USB 3.1 Gen1 (SuperSpeed USB) ports available through the internal USB connectors
y6x USB 2.0 (High-speed USB) ports (2 Type-A ports on the back panel, 4 ports available through the internal USB connectors)
Audio
Realtek ALC1220P Codec
y7.1-Channel High Definition Audio
ySupports S/PDIF output
Back Panel Connectors
y1x PS/2 keyboard/ mouse combo port
y2x USB 2.0 Type-A ports
y1x DisplayPort port
y1x HDMI port
y3x USB 3.1 Gen2 Type-A ports
y1x USB 3.1 Gen2 Type-C port
y1x LAN (RJ45) port
y2x Wi-Fi Antenna connectors (for MPG Z390 GAMING PRO CARBON AC only)
y5x OFC audio jacks
y1x Optical S/PDIF OUT connector
Continued on next page
6 Specications
Continued from previous page
Internal Connectors
y1x 24-pin ATX main power connector
y1x 8-pin ATX 12V power connector
y1x 4-pin ATX 12V power connector
y6x SATA 6Gb/s connectors
y1x USB 3.1 Gen2 Type-C port
y2x USB 3.1 Gen1 connectors (supports additional 4 USB 3.1 Gen1 ports)
y2x USB 2.0 connectors (supports additional 4 USB 2.0 ports)
y1x 4-pin CPU fan connector
y1x 4-pin Water Pump connector
y5x 4-pin system fan connectors
y1x Serial port connector
y1x Front panel audio connector
y2x System panel connectors
y1x Thunderbolt Add-on Card Connector
y1x Chassis Intrusion connector
y1x TPM module connector
y2x 4-pin RGB LED connectors
y1x 3-pin RAINBOW LED connector
y1x 3-pin CORSAIR LED connector
Debug LED y4x EZ Debug LED
I/O Controller NUVOTON NCT6797 Controller Chip
Hardware Monitor
yCPU/System temperature detection
yCPU/System fan speed detection
yCPU/System fan speed control
Form Factor yATX Form Factor
y9.6 in. x 12 in. (24.3 cm x 30.4 cm)
BIOS Features
y1x 128 Mb flash
yUEFI AMI BIOS
yACPI 6.1, SMBIOS 2.8
yMulti-language
Continued on next page
7Specications
Continued from previous page
Software
yDrivers
yDRAGON CENTER
yMYSTIC LIGHT
yNahimic Audio
yOpen Broadcaster Software (OBS)
yCPU-Z MSI GAMING
yMSI App Player (BlueStacks)
y Intel Extreme Tuning Utility
yGoogle Chrome, Google Toolbar, Google Drive
yNorton Internet Security Solution
Dragon Center Features
yGAME OPTIMIZATION
yOC Performance
yHardware Monitor
yEyerest
yLAN Manager
yLive Update
Please refer to http://download.msi. com/manual/mb/DRAGONCENTER2. pdf for more details.
Special Features
yAudio
Audio Boost 4
Nahimic 3
Voice Boost
yNetwork
GAMING LAN with Gaming LAN Manager
Intel CNVi WiFi (MPG Z390 GAMING PRO CARBON AC)*
yStorage
Twin Turbo M.2
yFan
Pump Fan
GAMING Fan Control * MPG Z390 GAMING PRO CARBON doesnt support Intel CNVi WiFi
Continued on next page
8 Specications
Continued from previous page
Special Features
yLED
Mystic Light
Mystic Light Extension (RGB)
Mystic Light Extension (RAINBOW)
Mystic Light Extension (CORSAIR)
Mystic light SYNC
EZ DEBUG LED
yProtection
DDR4 Steel Armor
PCI-E Steel Armor
M.2 Shield Frozr
Pre-installed IO shielding
yPerformance
Multi GPU SLI Technology
Multi GPU CrossFire Technology
DDR4 Boost
Core Boost
GAME Boost
USB with type A+C
INTEL Turbo USB 3.1 Gen 2
yVR
VR Ready
yGamer Experience
GAMING HOTKEY
GAMING MOUSE Control
APP Player
yBIOS
Click BIOS 5
9Package contents
JCORSAIR1 Connector Specification
Supporting CORSAIR RGB Products Maximum connection
Lighting Node PRO LED Strip 20* * In the case of 20% brightness
HD120 RGB Fan 6
SP120 RGB Fan 6
LL120 RGB Fan 6
Package contents Please check the contents of your motherboard package. It should contain:
Motherboard MPG Z390 GAMING PRO CARBON
MPG Z390 GAMING PRO CARBON AC
Cable
SATA 6Gb/s Cables 2 2
LED Y CABLE 1 1
LED JCORSAIR CABLE 1 1
LED JRAINBOW CABLE 1 1
Accessories
Antenna Set N/A 1
SLI HB BRIDGE M 1 1
M.2 Screw 2 2
Case Badge 1 1
SATA Cable Lables 1 1
VIP Card 1 1
Application DVD Driver DVD 1 1
Documentation User Manual 1 1
Quick Installation Guide 1 1
Important If any of the above items are damaged or missing, please contact your retailer.
10 Rear I/O Panel
Rear I/O Panel
Link/ Activity LED
Status Description
Off No link
Yellow Linked
Blinking Data activity
Speed LED
Status Description
Off 10 Mbps connection
Green 100 Mbps connection
Orange 1 Gbps connection
LAN Port LED Status Table
Audio Ports Configuration
Audio Ports Channel
2 4 6 8
Center/ Subwoofer Out
Rear Speaker Out
Line-In/ Side Speaker Out
Line-Out/ Front Speaker Out
Mic In
(: connected, Blank: empty)
Audio Ports
Optical S/PDIF-Out
Wi-Fi Antenna connectors
LAN
USB 3.1 Gen2
USB 3.1 Gen2 USB 3.1 Gen2 Type-C
DisplayPort
PS/2
USB 2.0
11Rear I/O Panel
Realtek Audio Console After Realtek Audio Console is installed. You can use it to change sound settings to get better sound experience.
yDevice Selection — allows you to select a audio output source to change the related options. The check sign indicates the devices as default.
yApplication Enhancement — the array of options will provide you a complete guidance of anticipated sound effect for both output and input device.
yMain Volume — controls the volume or balance the right/left side of the speakers that you plugged in front or rear panel by adjust the bar.
yAdvanced Settings — provides the mechanism to deal with 2 independent audio streams.
y Jack Status — depicts all render and capture devices currently connected with your computer.
yConnector Settings — configures the connection settings.
Auto popup dialog When you plug into a device at an audio jack, a dialogue window will pop up asking you which device is current connected.
Each jack corresponds to its default setting as shown on the next page.
Important The pictures above for reference only and may vary from the product you purchased.
Jack StatusConnector Settings
Device Selection
Main Volume
Application Enhancement Advanced Settings
12 Rear I/O Panel
AUDIO INPUT
Rear Front
Side Center/ Subwoofer
Audio jacks to headphone and microphone diagram
Audio jacks to stereo speakers diagram
Audio jacks to 7.1-channel speakers diagram
AUDIO INPUT
13Rear I/O Panel
Installing Antennas 1. Combine the antenna with the base.
2. Screw two antenna cables tight to the WiFi antenna connectors as shown.
1
2
3. Place the antenna as high as possible.
14 Overview of Components
Overview of Components
DIMMA1
CPU_PWR2
CPU_PWR1
CPU Socket
PCI_E1
SYS_FAN2
M2_1
M2_2
PCI_E2
PCI_E3
PCI_E4
PCI_E5
PCI_E6
DIMMA2
DIMMB1
DIMMB2
CPU_FAN1
SYS_FAN1
PUMP_FAN1
JCORSAIR1
ATX_PWR1
JUSB1
JUSB2
JUSB4 JUSB3
JUSBC1
JFP2
SATA12
SATA34
SATA56
JRAINBOW1
JCI1
JBAT1
JTPM1
JFP1
JTBT1
JPWRLED1
JCOM1
JRGB2
JAUD1
SYS_FAN5
SYS_FAN4 SYS_FAN3
JRGB1
CNVI_1
15Overview of Components
CPU Socket
Introduction to the LGA 1151 CPU The surface of the LGA 1151 CPU has two notches and a golden triangle to assist in correctly lining up the CPU for motherboard placement. The golden triangle is the Pin 1 indicator.
Important yAlways unplug the power cord from the power outlet before installing or removing
the CPU.
yPlease retain the CPU protective cap after installing the processor. MSI will deal with Return Merchandise Authorization (RMA) requests if only the motherboard comes with the protective cap on the CPU socket.
yWhen installing a CPU, always remember to install a CPU heatsink. A CPU heatsink is necessary to prevent overheating and maintain system stability.
yConfirm that the CPU heatsink has formed a tight seal with the CPU before booting your system.
yOverheating can seriously damage the CPU and motherboard. Always make sure the cooling fans work properly to protect the CPU from overheating. Be sure to apply an even layer of thermal paste (or thermal tape) between the CPU and the heatsink to enhance heat dissipation.
yWhenever the CPU is not installed, always protect the CPU socket pins by covering the socket with the plastic cap.
y If you purchased a separate CPU and heatsink/ cooler, Please refer to the documentation in the heatsink/ cooler package for more details about installation.
yThis motherboard is designed to support overclocking. Before attempting to overclock, please make sure that all other system components can tolerate overclocking. Any attempt to operate beyond product specifications is not recommended. MSI does not guarantee the damages or risks caused by inadequate operation beyond product specifications.
50.77 mm
Distance from the center of the CPU to the nearest DIMM slot.
16 Overview of Components
DIMM Slots
DIMMA1 DIMMB1
Channel A Channel B
DIMMA2 DIMMB2
Memory module installation recommendation
DIMMB2 DIMMB2 DIMMB1
DIMMA2 DIMMA2 DIMMA2 DIMMA1
Important yAlways insert memory modules in the DIMMA2 slot first.
yDue to chipset resource usage, the available capacity of memory will be a little less than the amount of installed.
yBased on Intel CPU specification, the Memory DIMM voltage below 1.35V is suggested to protect the CPU.
yPlease note that the maximum capacity of addressable memory is 4GB or less for 32-bit Windows OS due to the memory address limitation. Therefore, we recommended that you to install 64-bit Windows OS if you want to install more than 4GB memory on the motherboard.
ySome memory may operate at a lower frequency than the marked value when overclocking due to the memory frequency operates dependent on its Serial Presence Detect (SPD). Go to BIOS and find the Memory Try It! to set the memory frequency if you want to operate the memory at the marked or at a higher frequency.
y It is recommended to use a more efficient memory cooling system for full DIMMs installation or overclocking.
yThe stability and compatibility of installed memory module depend on installed CPU and devices when overclocking.
17Overview of Components
PCI_E1~6: PCIe Expansion Slots
PCI_E1: PCIe 3.0 x16 (CPU lanes)
PCI_E2: PCIe 3.0 x1 (PCH lanes)
PCI_E3: PCIe 3.0 x1 (PCH lanes)
PCI_E4: PCIe 3.0 x8 (CPU lanes)
PCI_E5: PCIe 3.0 x1 (PCH lanes)
PCI_E6: PCIe 3.0 x4 (PCH lanes)
x16 x8 x8
x8 x8
Multiple graphics cards installation recommendation
Important If you install a large and heavy graphics card, you need to use a tool such as MSI Gaming Series Graphics Card Bolster to support its weight to prevent deformation of the slot.
x4
18 Overview of Components
Important yFor a single PCIe x16 expansion card installation with optimum performance, using
the PCI_E1 slot is recommended.
yWhen adding or removing expansion cards, always turn off the power supply and unplug the power supply power cable from the power outlet. Read the expansion cards documentation to check for any necessary additional hardware or software changes.
Installing SLI graphics cards For power supply recommendations for SLI configurations, please refer to the user guide of your graphics card to make sure you meet all the system requirements.
To install SLI graphics cards:
1. Turn off your computer and disconnect the power cord, install two graphics cards into the PCI_E1 and PCI_E4 slots.
2. Connect the two cards together using the SLI Bridge Connector.
3. Connect all PCIe power connectors of the graphics cards.
4. Reconnect the power cord, power up the computer and install the drivers and software included in your graphics card package.
5. Right-click the Windows desktop and select NVIDIA Control Panel from the menu, click on Configure SLI, Surround, PhysX in the left task pane and select Maximize 3D performance in the SLI configuration menu, and then click Apply.
19Overview of Components
Important y Intel RST only supports PCIe M.2 SSD with UEFI ROM.
y Intel Optane Memory Ready for all M.2 slots.
M2_1~2: M.2 Slots (Key M)
1
2
3 30
5
M2_1
M2_2
Installing M.2 module
1. Remove the screw from the base screw.
2. Remove the base screw.
3. Tighten the base screw into the hole of the distance to the M.2 slot as the length your M.2 module.
4. Insert your M.2 module into the M.2 slot at a 30-degree angle.
5. Put the screw in the notch on the trailing edge of your M.2 module and tighten it into the base screw.
4
Using M.2 Shield Frozr We provide the M.2 Shield Frozr on the M2_2 slot to help dissipate heat away from the M.2 module. Before installing the M.2 module, you need to remove 3 screws that secure the M.2 Shield Frozr, lift the M.2 Shield Frozr and remove the protective film from the thermal pad.
Video Demonstration Watch the video to learn how to Install M.2 module.
20 Overview of Components
SATA1~6: SATA 6Gb/s Connectors These connectors are SATA 6Gb/s interface ports. Each connector can connect to one SATA device.
Important yPlease do not fold the SATA cable at a 90-degree angle. Data loss may result during
transmission otherwise.
ySATA cables have identical plugs on either sides of the cable. However, it is recommended that the flat connector be connected to the motherboard for space saving purposes.
SATA1
SATA3
SATA2
SATA4
SATA5 SATA6
M.2 & SATA combination table
Slot Available SATA connectors
M2_1 PCIe SATA PCIe SATA PCIe SATA
M2_2 PCIe PCIe SATA SATA SATA1 SATA2 SATA3 SATA4 SATA5 SATA6
(SATA: M.2 SATA SSD, PCIe: M.2 PCIe SSD, : available, : unavailable)
21Overview of Components
M.2 slots with examples of various combination possibilities
1xM.2 PCIe SSD + 6xSATA HDDs
2xM.2 PCIe SSDs + 4xSATA HDDs
1xM.2 PCIe SSD + 1xM.2 SATA SSD + 5xSATA HDDs
SA TA
4 SA
TA 4
SA TA
4
SA TA
4 SA
TA 4
SA TA
2 SA
TA 2
SA TA
2
SA TA
1 SA
TA 1
SA TA
1
SA TA
1 SA
TA 1
SA TA
3 SA
TA 3
SA TA
3
SA TA
3 SA
TA 3
M.2 PCIe
M.2 PCIe
M.2 PCIe
M.2 SATA
M.2 PCIe
M.2 SATA
M.2 SATA
1xM.2 SATA SSD + 5xSATA HDDs
M.2 SATA
2xM.2 SATA SSDs + 4xSATA HDDs
SA TA
6 SA
TA 6
SA TA
6 SA
TA 6
SA TA
5
SA TA
5
22 Overview of Components
24
131
12
ATX_PWR1
1 +3.3V 13 +3.3V
2 +3.3V 14 -12V
3 Ground 15 Ground
4 +5V 16 PS-ON#
5 Ground 17 Ground
6 +5V 18 Ground
7 Ground 19 Ground
8 PWR OK 20 Res
9 5VSB 21 +5V
10 +12V 22 +5V
11 +12V 23 +5V
12 +3.3V 24 Ground
5 4 1 8 CPU_PWR1
1 Ground 5 +12V
2 Ground 6 +12V
3 Ground 7 +12V
4 Ground 8 +12V
Important Make sure that all the power cables are securely connected to a proper ATX power supply to ensure stable operation of the motherboard.
CPU_PWR1~2, ATX_PWR1: Power Connectors These connectors allow you to connect an ATX power supply.
3 2 1 4 CPU_PWR2
1 Ground 3 +12V
2 Ground 4 +12V
23Overview of Components
JFP1, JFP2: Front Panel Connectors These connectors connect to the switches and LEDs on the front panel.
1 2 10
9
+ +
+ —
— —
— +
Power LED
HDD LED Reset Switch
Reserved
Power Switch
JFP1
1 HDD LED + 2 Power LED +
3 HDD LED — 4 Power LED —
5 Reset Switch 6 Power Switch
7 Reset Switch 8 Power Switch
9 Reserved 10 No Pin
1JFP2
+
+ —
—
Speaker
Buzzer 1 Speaker — 2 Buzzer +
3 Buzzer — 4 Speaker +
JUSBC1: USB 3.1 Gen2 Type-C Connector This connector allows you to connect USB 3.1 Gen2 Type-C connector on the front panel. The connector possesses a foolproof design. When you connect the cable, be sure to connect it with the corresponding orientation.
JUSBC1 USB Type-C Cable
USB Type-C port on the front panel
24 Overview of Components
JUSB3~4: USB 2.0 Connectors
1
2 10
9
1 VCC 2 VCC
3 USB0- 4 USB1-
5 USB0+ 6 USB1+
7 Ground 8 Ground
9 No Pin 10 NC
Important yNote that the VCC and Ground pins must be connected correctly to avoid possible
damage.
y In order to recharge your iPad,iPhone and iPod through USB ports, please install MSI
DRAGON CENTER utility.
JUSB1~2: USB 3.1 Gen1 Connectors These connectors allow you to connect USB 3.1 Gen1 ports on the front panel.
Important Note that the Power and Ground pins must be connected correctly to avoid possible damage.
1
10 11
20
1 Power 11 USB2.0+
2 USB3_RX_DN 12 USB2.0-
3 USB3_RX_DP 13 Ground
4 Ground 14 USB3_TX_C_DP
5 USB3_TX_C_DN 15 USB3_TX_C_DN
6 USB3_TX_C_DP 16 Ground
7 Ground 17 USB3_RX_DP
8 USB2.0- 18 USB3_RX_DN
9 USB2.0+ 19 Power
10 NC 20 No Pin
25Overview of Components
Switching fan mode and adjusting fan speed You can switch between PWM mode and DC mode and adjust fan speed in BIOS > HARDWARE MONITOR.
Select PWM mode or DC mode
Important Make sure fans are working properly after switching the PWM/ DC mode.
There are gradient points of the fan speed that allow you to adjust fan speed in relation to CPU temperature.
PWM Mode pin definition
1 Ground 2 +12V
3 Sense 4 Speed Control Signal
DC Mode pin definition
1 Ground 2 Voltage Control
3 Sense 4 NC
Pin definition of fan connectors
CPU_FAN1, PUMP_FAN1, SYS_FAN1~5: Fan Connectors Fan connectors can be classified as PWM (Pulse Width Modulation) Mode or DC Mode. PWM Mode fan connectors provide constant 12V output and adjust fan speed with speed control signal. DC Mode fan connectors control fan speed by changing voltage. When you plug a 3-pin (Non-PWM) fan to a fan connector in PWM mode, the fan speed will always maintain at 100%, which might create a lot of noise. You can follow the instruction below to adjust the fan connector to PWM or DC Mode.
CPU_FAN1/ PUMP_FAN1
Default PWM Mode fan connectors
Default DC Mode fan connectors
1
SYS_FAN1~2 SYS_FAN3~5
1
1
26 Overview of Components
JCI1: Chassis Intrusion Connector This connector allows you to connect the chassis intrusion switch cable.
Normal
(default)
Trigger the chassis intrusion event
Using chassis intrusion detector 1. Connect the JCI1 connector to the chassis intrusion switch/ sensor on the chassis.
2. Close the chassis cover.
3. Go to BIOS > SETTINGS > Security > Chassis Intrusion Configuration.
4. Set Chassis Intrusion to Enabled.
5. Press F10 to save and exit and then press the Enter key to select Yes.
6. Once the chassis cover is opened again, a warning message will be displayed on screen when the computer is turned on.
Resetting the chassis intrusion warning 1. Go to BIOS > SETTINGS > Security > Chassis Intrusion Configuration.
2. Set Chassis Intrusion to Reset.
3. Press F10 to save and exit and then press the Enter key to select Yes.
JAUD1: Front Audio Connector This connector allows you to connect audio jacks on the front panel.
1
2 10
9
1 MIC L 2 Ground
3 MIC R 4 NC
5 Head Phone R 6 MIC Detection
7 SENSE_SEND 8 No Pin
9 Head Phone L 10 Head Phone Detection
27Overview of Components
1
2 14
13
1 LPC Clock 2 3V Standby power
3 LPC Reset 4 3.3V Power
5 LPC address & data pin0 6 Serial IRQ
7 LPC address & data pin1 8 5V Power
9 LPC address & data pin2 10 No Pin
11 LPC address & data pin3 12 Ground
13 LPC Frame 14 Ground
JTPM1: TPM Module Connector This connector is for TPM (Trusted Platform Module). Please refer to the TPM security platform manual for more details and usages.
1
2 10
9
1 DCD 2 SIN
3 SOUT 4 DTR
5 Ground 6 DSR
7 RTS 8 CTS
9 RI 10 No Pin
JCOM1: Serial Port Connector This connector allows you to connect the optional serial port with bracket.
JTBT1: Thunderbolt Add-on Card Connector This connector allows you to connect the add-on Thunderbolt I/O card.
1
1 FORCE_PWR 2 SCI_EVENT
3 SLP_S3# 4 SLP_S5#
5 GND
28 Overview of Components
JRGB1~2, JRAINBOW1: RGB LED connectors The JRGB connector allows you to connect the 5050 RGB LED strips 12V. The JRAINBOW connector allows you to connect the WS2812B Individually Addressable RGB LED strips 5V.
1
JRGB
Extension cable LED strip
1 JRGB1
1
JRGB2
1 +12V 2 G
3 R 4 B
JRAINBOW1
JRGB2
JRGB1
CAUTION Do not connect the wrong type of LED strips. The JRGB connector and the JRAINBOW connector provide different voltages, and connecting the 5V LED strip to the JRGB connector will result in damage to the LED strip.
Important yThe JRGB connector supports up to 2 meters continuous 5050 RGB LED strips
(12V/G/R/B) with the maximum power rating of 3A (12V).
yThe JRAINBOW connector supports up to 72 LEDs WS2812B Individually Addressable RGB LED strips (5V/Data/Ground) with the maximum power rating of 3A (5V).
yAlways turn off the power supply and unplug the power cord from the power outlet before installing or removing the RGB LED strip.
yPlease use MSIs software to control the extended LED strip.
1
JRAINBOW Rainbow RGB LED extension cable
WS2812B Individually Addressable RGB LED strips 5V
1
JRAINBOW1
1 +5V 2 Data
3 No Pin 4 Ground
29Overview of Components
JCORSAIR1: CORSAIR Connector The JCORSAIR1 connector allows you to connect the CORSAIR Individually Addressable RGB LED strips 5V or CORSAIR RGB LED fans with the CORSAIR fan hub. Once all items are connected properly, you can control the CORSAIR RGB LED strips and fans with MSI’s software.
Important yFans must start at 1 and continue in series. 1 > 2 > 3 > 4 > 5 > 6. Any fan not
connected in series will break communication and the RGB LED lighting function will not work.
yQuantity of RGB LED Fans or RGB LED Lighting PRO strips supported may differ between models. Please refer to the motherboard specification.
yCORSAIR RGB LED Fan and CORSAIR Lighting Node PRO cant be used at the same time.
1 JCORSAIR1
1 +5V 2 Data
3 Ground
JCORSAIR1 connector
JCORSAIR1 connector
SATA power
CORSAIR RGB LED Extension Cable 1
6
2
5
3
4
CORSAIR fan hub
CORSAIR RGB LED Fan Connection
CORSAIR Lighting Node PRO Connection
CORSAIR RGB LED fan
30 Overview of Components
JBAT1: Clear CMOS (Reset BIOS) Jumper There is CMOS memory onboard that is external powered from a battery located on the motherboard to save system configuration data. If you want to clear the system configuration, set the jumper to clear the CMOS memory.
Keep Data (default)
Clear CMOS/ Reset BIOS
Resetting BIOS to default values 1. Power off the computer and unplug the power cord
2. Use a jumper cap to short JBAT1 for about 5-10 seconds.
3. Remove the jumper cap from JBAT1.
4. Plug the power cord and power on the computer.
31Onboard LEDs
Onboard LEDs EZ Debug LED These LEDs indicate the debug status of the motherboard.
CPU — indicates CPU is not detected or fail.
DRAM — indicates DRAM is not detected or fail.
VGA — indicates GPU is not detected or fail.
BOOT — indicates the booting device is not detected or fail.
DIMM LEDs
DIMM LEDs These LED indicate the memory modules are installed.
XMP LED This LED indicates the XMP (Extreme Memory Profile) mode is enabled.
XMP LED
JPWRLED1: LED power input This connector is used by retailers to demonstrate onboard LED light effects.
JPWRLED1 — LED power input
32 Installing OS, Drivers & Utilities
Installing OS, Drivers & Utilities Please download and update the latest utilities and drivers at www.msi.com
Installing Windows 10 1. Power on the computer.
2. Insert the Windows 10 installation disc/USB into your computer.
3. Press the Restart button on the computer case.
4. Press F11 key during the computer POST (Power-On Self Test) to get into Boot Menu.
5. Select the Windows 10 installation disc/USB from the Boot Menu.
6. Press any key when screen shows Press any key to boot from CD or DVD… message.
7. Follow the instructions on the screen to install Windows 10.
Installing Drivers 1. Start up your computer in Windows 10.
2. Insert MSI Driver Disc into your optical drive.
3. Click the Select to choose what happens with this disc pop-up notification, then select Run DVDSetup.exe to open the installer. If you turn off the AutoPlay feature from the Windows Control Panel, you can still manually execute the DVDSetup.exe from the root path of the MSI Driver Disc.
4. The installer will find and list all necessary drivers in the Drivers/Software tab.
5. Click the Install bu
MSI MPG Z390 Gaming Pro Carbon AC
1
Quick Start
DDR4 Memory
Graphics Card
SATA Hard Disk Drive
SATA DVD Drive
Phillips Screwdriver
Chassis
Power Supply Unit
A Package of Screws
Thermal Paste
Quick Start
Thank you for purchasing the MSI
®
MPG Z390 GAMING PRO CARBON AC/ MPG Z390
GAMING PRO CARBON motherboard. This Quick Start section provides demonstration
diagrams about how to install your computer. Some of the installations also provide
video demonstrations. Please link to the URL to watch it with the web browser on your
phone or tablet. You may have even link to the URL by scanning the QR code.
Preparing Tools and Components
Intel
®
LGA 1151 CPU
CPU Fan
View the manual for the MSI MPG Z390 Gaming Pro Carbon AC here, for free. This manual comes under the category motherboards and has been rated by 1 people with an average of a 5.4.
This manual is available in the following languages: English. Do you have a question about the MSI MPG Z390 Gaming Pro Carbon AC or do you need help?
Ask your question here
Index
- Quick Start
- Specifications
- Package contents
- Block Diagram
- Rear I/O Panel
- Overview of Components
- Onboard LEDs
- Installing OS, Drivers & Utilities
- MYSTIC LIGHT
- Nahimic 3
- BIOS Setup
- RAID Configuration
- Intel® Optane™ Memory Configuration
- Troubleshooting
Product Images (7)

MSI MPG Z390 Gaming Pro Carbon AC specifications
Below you will find the product specifications and the manual specifications of the MSI MPG Z390 Gaming Pro Carbon AC.
The MSI MPG Z390 Gaming Pro Carbon AC is an ATX form factor motherboard, designed to support Intel processors and provide a stable foundation for gaming and high-performance computing. With its four DIMM memory slots, it can accommodate up to 64GB of DDR4 RAM, ensuring smooth multitasking and efficient data processing. The motherboard supports various memory clock speeds ranging from 2133MHz to 4400MHz, offering flexibility for different memory modules.
In terms of storage options, the MSI MPG Z390 Gaming Pro Carbon AC supports both HDD and SSD drives, allowing users to choose the storage configuration that best suits their needs. The motherboard also features a Gigabit Ethernet interface for fast and reliable networking capabilities.
An important feature of this motherboard is its support for Intel® Optane™ Memory, which enhances system performance by accelerating the responsiveness of traditional hard drives. This feature enables faster boot times and improved overall system performance.
The MSI MPG Z390 Gaming Pro Carbon AC is part of the Intel motherboard chipset family, ensuring compatibility with Intel processors and providing a stable and efficient platform for demanding tasks. It is specifically designed to support Windows 10 operating systems, ensuring seamless compatibility with the latest software.
In terms of design, the motherboard features premium components and construction, ensuring reliability and durability over time. This motherboard offers a solid foundation for gaming enthusiasts and high-performance computing users, providing the necessary features and capabilities for an optimal computing experience. Overall, the MSI MPG Z390 Gaming Pro Carbon AC is a reliable and feature-rich motherboard suitable for demanding tasks and gaming purposes.
Motherboard form factor
ATX
Supported storage drive types
HDD & SSD
Ethernet interface type
Gigabit Ethernet
Intel® Optane™ Memory Ready
Yes
Processor socket
LGA 1151 (Socket H4)
General
| Brand | MSI |
| Model | MPG Z390 Gaming Pro Carbon AC | MPG Z390 GAMING PRO CARBON AC |
| Product | motherboard |
| EAN | 0824142169858, 4719072595029 |
| Language | English |
| Filetype | User manual (PDF) |
Memory
| Memory slots type | DIMM |
| Number of memory slots | 4 |
| Supported memory types | DDR4-SDRAM |
| Memory channels | Dual-channel |
| Supported memory clock speeds | 2133,2400,2666,2800,3000,3200,3300,3333,3400,3466,3600,3733,3866,4000,4133,4200,4266,4300,4400 MHz |
| Maximum internal memory | 64 GB |
| Supported memory module capacities | 16GB |
| Unbuffered memory | Yes |
Features
| Motherboard form factor | ATX |
| Motherboard chipset family | Intel |
| Windows operating systems supported | Windows 10 |
| Audio output channels | 7.1 channels |
| Motherboard chipset | Intel Z390 |
| Component for | PC |
| Audio chip | Realtek ALC1220P |
Storage controllers
| Supported storage drive types | HDD & SSD |
| RAID levels | 0, 1,5, 10 |
| Supported storage drive interfaces | M.2, SATA III |
Network
| Ethernet interface type | Gigabit Ethernet |
| Ethernet LAN | Yes |
| LAN controller | Intel® I219-V |
| Wi-Fi | Yes |
| Wi-Fi standards | 802.11a, Wi-Fi 5 (802.11ac), 802.11b, 802.11g, Wi-Fi 4 (802.11n) |
| Bluetooth | Yes |
| Bluetooth version | 5.0 |
Processor special features
| Intel® Optane™ Memory Ready | Yes |
Processor
| Processor socket | LGA 1151 (Socket H4) |
| Compatible processor series | Intel Celeron, Intel Core i3, Intel Core i5, Intel Core i7, Intel Pentium |
| Processor manufacturer | Intel |
BIOS
Internal I/O
| Number of SATA II connectors | 0 |
| ATX Power connector (24-pin) | Yes |
| EPS power connector (8-pin) | Yes |
| Number of Parallel ATA connectors | 0 |
| Number of SATA III connectors | 6 |
| USB 2.0 connectors | 2 |
| USB 3.2 Gen 1 (3.1 Gen 1) connectors | 2 |
| USB 3.2 Gen 2 (3.1 Gen 2) connectors | 0 |
| CPU fan connector | Yes |
| Number of chassis fan connectors | 5 |
| Serial port headers | 1 |
| Front panel audio connector | Yes |
| Thunderbolt headers | 1 |
| Chassis intrusion connector | Yes |
| TPM connector | Yes |
| RGB LED pin header | Yes |
| Number of SATA connectors | 0 |
Graphics
| Parallel processing technology support | 2-Way SLI, 3-Way CrossFireX |
| DirectX version | 12.0 |
| Maximum resolution | 4096 x 2304 pixels |
Expansion slots
| PCI Express x1 (Gen 3.x) slots | 3 |
| PCI Express x16 (Gen 3.x) slots | 3 |
| Number of M.2 (M) slots | 2 |
Other features
| Serial port via internal header | Yes |
Rear panel I/O ports
| PS/2 ports quantity | 1 |
| Ethernet LAN (RJ-45) ports | 1 |
| Headphone outputs | 1 |
| Microphone in | Yes |
| S/PDIF out port | Yes |
| USB 2.0 ports quantity | 2 |
| HDMI ports quantity | 1 |
| DisplayPorts quantity | 1 |
| USB 3.2 Gen 1 (3.1 Gen 1) Type-A ports quantity | 0 |
| USB 3.2 Gen 1 (3.1 Gen 1) Type-C ports quantity | 0 |
| USB 3.2 Gen 2 (3.1 Gen 2) Type-A ports quantity | 3 |
| USB 3.2 Gen 2 (3.1 Gen 2) Type-C ports quantity | 1 |
| eSATA ports quantity | 0 |
| Firewire (IEEE 1394) ports | 0 |
| VGA (D-Sub) ports quantity | 0 |
| DVI-D ports quantity | 0 |
| WiFi-AP antenna jack | 2 |
Weight & dimensions
show more
Frequently Asked Questions
Can’t find the answer to your question in the manual? You may find the answer to your question in the FAQs about the MSI MPG Z390 Gaming Pro Carbon AC below.
How do I properly install the MSI MPG Z390 Gaming Pro Carbon AC motherboard into my computer case?
Begin by inserting the motherboard standoffs into the case, aligning them with the corresponding mounting holes on the motherboard. Then, carefully place the motherboard on top of the standoffs and secure it using screws. Ensure that all connectors are correctly aligned and firmly connected.
How can I connect the front panel ports (power button, USB ports, etc.) to the motherboard?
Locate the front panel connectors on the motherboard, which are usually labeled. Match the corresponding connectors from the case’s front panel cables to the appropriate pins on the motherboard, ensuring correct alignment. Take note of the positive and negative polarity for each connection and connect them accordingly.
Which slots should I use for my graphics card and other expansion cards?
The primary graphics card should typically be installed in the top PCI Express x16 slot, as it provides the best bandwidth. The motherboard may also have secondary PCIe slots for additional expansion cards, which you can choose based on your specific needs.
How do I update the BIOS firmware on the MSI MPG Z390 Gaming Pro Carbon AC motherboard?
Visit the official MSI website and locate the support page for your motherboard model. Download the latest BIOS firmware file onto a USB flash drive. Restart your computer, access the BIOS settings by pressing the designated key during startup, and navigate to the BIOS update section. From there, select the USB flash drive as the update source and follow the instructions to complete the update process.
How can I adjust the fan speeds and monitor the temperature of my system using the MSI MPG Z390 Gaming Pro Carbon AC motherboard?
Install the appropriate software provided by MSI, such as MSI Dragon Center or MSI Command Center, onto your computer. These applications allow you to customize fan curves, set target temperatures, and monitor system temperatures in real-time. Additionally, the motherboard may have dedicated fan headers and temperature sensors, which you can manage in the BIOS settings.
Is the MSI MPG Z390 Gaming Pro Carbon AC compatible with Intel processors?
Yes, the MSI MPG Z390 Gaming Pro Carbon AC is compatible with Intel Celeron, Intel Core i3, Intel Core i5, Intel Core i7, and Intel Pentium processors. This allows users to choose from a wide range of Intel processors to meet their specific needs.
Does the MSI MPG Z390 Gaming Pro Carbon AC support Gigabit Ethernet?
Yes, the MSI MPG Z390 Gaming Pro Carbon AC has a Gigabit Ethernet interface. This provides users with a fast and reliable network connection, allowing for smooth and uninterrupted online gaming and streaming experiences.
How many memory slots does the MSI MPG Z390 Gaming Pro Carbon AC have?
The MSI MPG Z390 Gaming Pro Carbon AC has 4 memory slots. This allows users to expand their system’s memory capacity up to a maximum of 64GB. Having more memory slots also provides flexibility for future upgrades.
Can the MSI MPG Z390 Gaming Pro Carbon AC support non-ECC memory?
Yes, the MSI MPG Z390 Gaming Pro Carbon AC supports non-ECC memory. This means that users can use non-ECC memory modules, which are typically more affordable compared to ECC (Error-Correcting Code) memory modules.
Is the MSI MPG Z390 Gaming Pro Carbon AC Intel® Optane™ Memory Ready?
Yes, the MSI MPG Z390 Gaming Pro Carbon AC is Intel® Optane™ Memory Ready. This means that users can take advantage of Intel® Optane™ Memory technology to enhance system performance and responsiveness, providing faster boot times and quicker application loading.
What is the width of the MSI MPG Z390 Gaming Pro Carbon AC?
The MSI MPG Z390 Gaming Pro Carbon AC has a width of 304 mm.
What is the depth of the MSI MPG Z390 Gaming Pro Carbon AC?
The MSI MPG Z390 Gaming Pro Carbon AC has a depth of 243 mm.
Is the manual of the MSI MPG Z390 Gaming Pro Carbon AC available in English?
Yes, the manual of the MSI MPG Z390 Gaming Pro Carbon AC is available in English .
Is your question not listed? Ask your question here
Содержание
- Обзор и тест материнской платы MSI MPG Z390 GAMING PRO CARBON
- Технические характеристики
- Упаковка и комплектация
- Внешний вид и особенности
- Интерфейс UEFI BIOS
- Фирменное программное обеспечение
- Тестовый стенд
- Разгон процессора и памяти
- Результаты тестирования
- Заключение
- MSI MPG Z390 GAMING PRO CARBON User Manual
- MSI MPG Z390 GAMING PRO CARBON Manual
- MSI MPG Z390 GAMING PRO CARBON manual content summary:
- MSI Z390-A Pro – обзор материнской платы
- Особенности
- Технические характеристики
- Минусы
- Обзор MSI MPG Z390 Gaming Pro Carbon
- Технологии MSI MPG Z390 Gaming Pro Carbon
- AUDIO BOOST 4 c NAHIMIC 3
- Подсветка MSI MYSTIC LIGHT
- Защита основных слотов и разъёмов
- Качественная элементная база
- Упаковка и комплект поставки MSI MPG Z390 Gaming Pro Carbon
- MSI MPG Z390 Gaming Pro Carbon
- Фотографии MSI MPG Z390 Gaming Pro Carbon
- Технические характеристики
- MSI MPG Z390 Gaming Pro Carbon
- Предназначение
- Материнская плата MSI Intel Z390 MPG Z390 GAMING PRO CARBON в Томске
- Материнская плата MSI Intel Z390 MPG Z390 GAMING PRO CARBON
- Краткие сведения
- Скачать прайс-лист Adobe Systems
- Описание
- Основные характеристики
- Доставка в Томске
- Контакты в Томске
Обзор и тест материнской платы MSI MPG Z390 GAMING PRO CARBON
Одним из последних чипсетов, представленных компанией Intel для платформы Intel LGA1151-2, является Intel Z390, ориентированный в первую очередь на процессоры Intel 9-о поколения. Относительно Intel Z370, в Z390 появилась поддержка беспроводных модулей CNVi и было реализовано шесть высокоскоростных портов USB 3.1 Gen2 (10 Гбит/сек), а значит производителям потребуется использовать меньшее количество контроллеров, что, потенциально, может повлиять на меньшую стоимость.
И, неизменно, появление нового чипсета привело к выпуску новых моделей материнских плат. В случае компании MSI это еще сопровождалось сменой названий линеек на более короткие, о чем мы уже писали в обзоре платы MSI MPG Z390 GAMING PLUS.
Следующей платой из игровой серии MPG, прибывшей к нам, стала более продвинутая MSI MPG Z390 GAMING PRO CARBON.
Технические характеристики
- Сокет: Intel LGA1151-2;
- Поддерживаемые процессоры: 8-е и 9-е поколение процессоров Intel Core/Pentium/Celeron;
- Чипсет: Intel Z390;
- Оперативная память: 4 x DIMM DDR4-2133–4400+(O.C.), макс. до 64 Гбайт;
- Слоты расширения: 3 x PCI-E x16 v3.0 (режимы работы x16/x0/x4 или x8/x8/x4) и 3 x PCI-E x1 v3.0;
- Встроенная графика: интегрирована в процессор, порты 1 x DisplayPort 1.2 (макс. разрешение 4096×2304@60Гц), 1 x HDMI 1.4 (макс. разрешение 4096×2160@24Гц);
- Поддержка Multi-GPU: 3-Way AMD CrossFire или 2-Way Nvidia SLI;
- Интерфейсы системы хранения: чипсет Intel Z390 – 6 x SATA 6 Гбит/сек (поддержка RAID 0/1/5/10), 2 x слота M.2 (Key M) 2242/ 2260/ 2280/ 22110 (режим работы PCIe 3.0 x4 32 Гбит/сек и SATA 6 Гбит/сек, поддержка RAID 0/1). Есть поддержка Intel Optane Memory. Примечание: Есть ограничения одновременную работу портов SATA и слотов M.2;
- Порты USB: чипсет Intel Z390 – 5 x USB 3.1 Gen2 (10 Гбит/сек, 1 х тип С и 3 х тип А на задней панели и 1 х тип С внутренний коннектор), 4 x USB 3.1 Gen1 (5 Гбит/сек) (внутренние коннекторы USB), 6 x USB 2.0 (480 Мбит/сек) (2 порта на задней панели и 4 порта доступны через внутренние коннекторы USB);
- Звук: HD-кодек 7.1, Realtek ALC1220P-VB2;
- Сетевая карта: 1 х 10/100/1000 Мбит/сек, Intel I219-V;
- Форм-фактор: ATX;
- Размеры: 30,4 см х 24,3 см.
Разъемы на плате:
- 1 x 24-пин ATX основной коннектор питания;
- 1 x 8-пин ATX 12V коннектор питания;
- 1 x 4-пин ATX 12V коннектор питания;
- 6 x коннекторов SATA 6 Гбит/сек;
- 1 x коннектор USB 3.1 Gen2 тип С;
- 2 x коннектора USB 3.1 Gen1 (на 4 порта);
- 2 x коннектора USB 2.0 (на 4 порта);
- 1 x 4-пин коннектор вентилятора CPU;
- 1 x 4-пин коннектор подключения помпы;
- 5 x 4-пин коннектора системных вентиляторов;
- 1 x коннектор COM-порта;
- 1 x коннектор звуковых разъемов передней панели;
- 2 x коннектора для подключения индикаторов и органов управления передней панели;
- 1 x коннектор порта Thunderbolt;
- 1 x разъем датчика открытия корпуса;
- 1 x коннектор TPM модуля;
- 2 х 4-пин RGB LED коннектор;
- 1 х 3-пин RAINBOW LED коннектор;
- 1 х 3-пин CORSAIR LED коннектор.
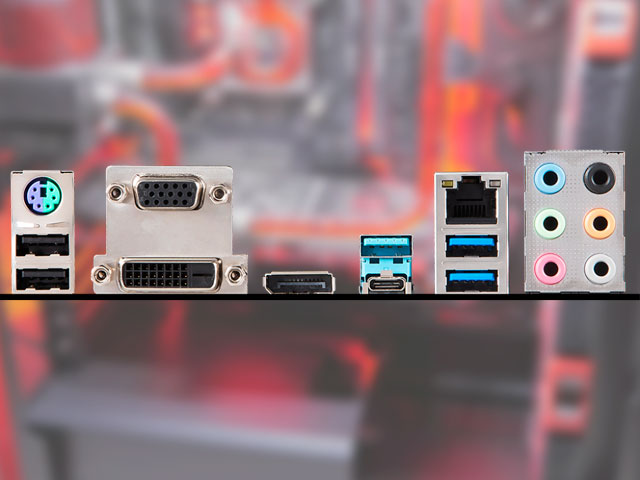
Порты ввода/вывода задней панели:
- 1 x комбинированный PS/2 клавиатура/мышь;
- 2 x USB 2.0;
- 1 x HDMI;
- 1 x DisplayPort;
- 3 x USB 3.1 Gen2 тип А;
- 1 x USB 3.1 Gen2 тип С;
- 1 x LAN (RJ45);
- 1 x коннектор Optical S/PDIF;
- 5 x звуковых разъемов OFC.
Упаковка и комплектация
Внешнее оформление коробки с материнской платой MSI MPG Z390 GAMING PRO CARBON не такое яркое, как можно было встретить в платах предыдущих поколений, но все-таки смотрится лицевая сторона стильно. По ней легко определяется модель, указано название чипсета Intel Z390, поддержка подсветки Mystic Light и предустановленная задняя панель ввода-вывода.
Интереснее смотрится обратная сторона, где представлен внешний вид платы, краткие характеристики и отражаются технологии, разбитые на группы:
- Производительность: Core Boost (оптимизированная разводка компонент, качественная система питания, обеспечивающие лучший разгон процессоров), двойное дополнительное питание 4+8-пин (до 540 Вт), оптимизированная разводка цепей питания памяти DDR4 Boost, наличие высокоскоростных портов USB 3.1 Gen2 и технологии защиты Steel Armor (металлическая рамка) для слотов памяти и двух слотов PCI-E x16.
- Модные: поддержка RGB-подсветки Mystic Light, качественная звуковая подсистема Audio Boost 4 и предустановленная задняя панель ввода-вывода.
- Охлаждение: наличие радиатора M.2 Shield Frozr для слота M.2 и оптимизация воздушного потока с реализаций точек подключения дополнительных вентиляторов.
Говоря о наборе аксессуаров, то внутри коробки можно найти все необходимое. Начиная от различных инструкций, наклеек, DVD-диска и .
. заканчивая кабелями: 2 x SATA, кабели для подключения подсветки различных типов, 2-Way SLI-мост, пара винтов.
Внешний вид и особенности
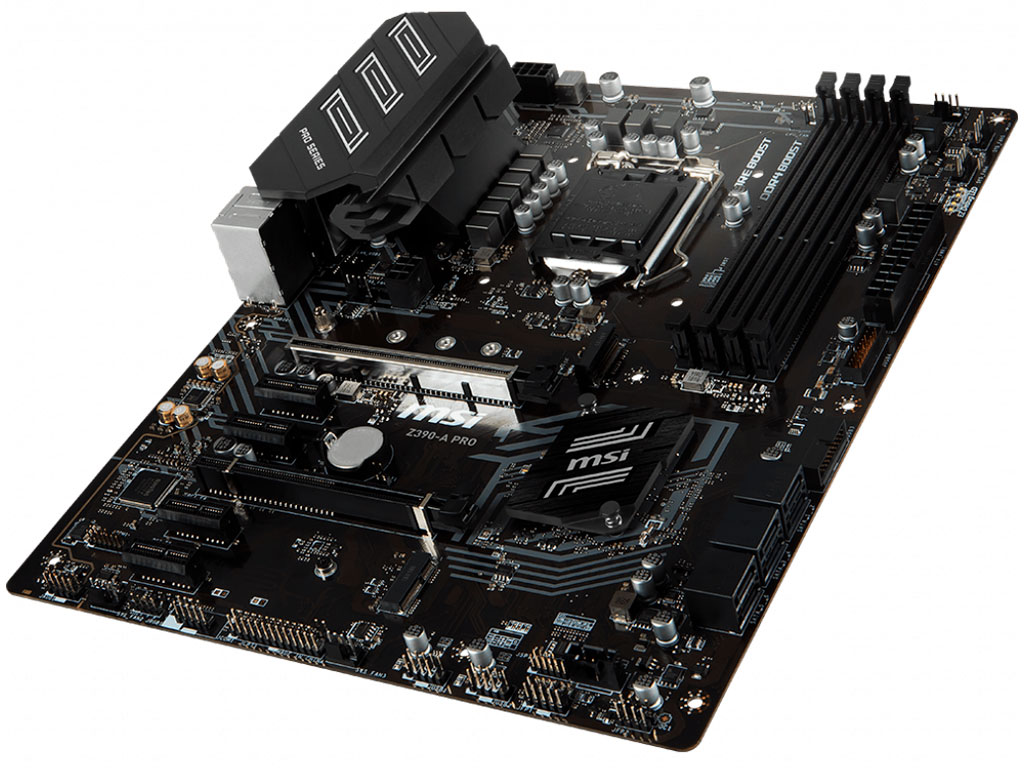
В материнской плате MSI MPG Z390 GAMING PRO CARBON производитель в первую очередь уделил внимание стильному внешнему виду, в котором эффект усиливается наличием кожуха с карбоновой вставкой, зонами с RGB-подсветкой Mystic Light и, на первый взгляд, достаточно массивным радиатором чипсета Intel Z390. Учитывая используемый чипсет плата предназначена для сборки платформы на сокете Intel LGA1151-2 (процессоры 8-о и 9-о поколений).
Выполнена она в форм-факторе ATX с размерами 30,4 см х 24,3 см. С точки зрения компоновки слотов, то тут все без изысков, хотя можно заметить солидный набор портов. Бросается наличие семи 4-пин разъемов подключения кулера, помпы, системных вентиляторов, «разбросанных» на плате (три справа вверху, один ниже сокета, еще три – самая нижняя часть платы). Из интересного, на обратной стороне (по левому краю), находится одна из зон с RGB-светодиодами.
Отдельного внимания заслуживает усиленная система питания, в которой появилось 4-пин и 8-пин разъемы питания ATX12V, и охлаждение на базе двух разноцветных радиаторов. Это будет особенно актуально при разгоне процессоров Intel 9-о поколения (при разгоне процессора Intel Core i5-9600K мы наблюдали рост потребления системы с 90 Вт в простое до 300 Вт под нагрузкой).
Для радиаторов применен надежный винтовой способ фиксации. Один из них окрашен в серебристый цвет, другой – в черный. Максимальная температура самого горячего, зафиксированная при разгоне пирометром, составила 47,7 °С. Температура ощущается, но не пальцы не жгет.
11-и фазная система питания получена за счет ШИМ-контроллера uPI Semiconductor uP9521P и удвоителей фаз. За питание ядер процессора отвечают 10-ь фаз, в каждой из которых задействуется пара мосфетов On Semiconductor NTMFS4C024N и NTMFS4C029N. Фаза питания, предназначенная для встроенной графики процессора, состоит из трех мосфетов: двух NTMFS4C024N и одного NTMFS4C029N.
Вместе с тем производитель не забыл сделать плату максимально совместимой с различными технологиями RGB-подсветки, часть из коннекторов разместив над слотами оперативной памяти (RGB 5050 12V и Corsair) и внизу платы (RGB 5050 12V и RAINBOW 5V, между передней аудио-панелью и разъемом питания вентилятора). Так что, в целом, проблем с подключением подсветки не будет.
Слоты оперативной памяти реализованы на базе технологии MSI DDR4 Boost с оптимизацией разводки платы для минимизации электромагнитных помех, а для самих слотов применена защита Steel Armor. В итоге, за счет четырех слотов, можно получить максимальный объем памяти 64 Гбайта, и работать, в режиме разгона, она может на частоте до 4400 МГц (в настройках UEFI BIOS доступны большие частоты).
Рядом со слотами привычно расположились, из того, о чем мы не писали: 24-пин разъем питания EATX, светодиодные индикаторы EZ Debug LED, колодка двух портов USB 3.1 Gen1 (5 Гбит/сек) и один внутренний порт USB 3.1 Gen2 тип С (10 Гбит/сек).
Конфигурация и компоновка слотов PCI-E, а также M.2, вполне типичная для плат топ-уровня. Всего на плате имеется три слота PCI-E x16 (режимы работы x16/x0/x4 или x8/x8/x4), причем два верхних получили защиту Steel Armor. «Расстояние» между этими позволяет задействовать связку из трех видеокарт в режиме AMD CrossFire (двух в режиме Nvidia SLI), причем в первом слот может быть установлена видеокарта, занимающая три слота, а в два нижних – двухслотовые. Остальные три слота – это PCI-E x1 3.0.
Говоря о слотах M.2, то они «полноформатные» (типоразмер 2242/ 2260 /2280/22110) и каждый из них способен работать в режиме PCIe x4 3.0 (32 Гбит/сек) или SATA (6 Гбит/сек), в том числе и в RAID 0/1. Один из них разместился над верхним слотом PCI-E x16, а второй в нижней части.
Но, конечно же, имеются ограничения, накладываемые возможностями чипсета Intel Z390. Возможные варианты работы отмечены в таблице ниже.
Оригинально компания MSI подошла к реализации системы охлаждения SSD накопителя, устанавливаемого в нижний слот M.2. Она называется M.2 Shield Frozr – это большая пластина-радиатор, которая частично контактирует с основным, достаточно крупным, радиатором чипсета, обеспечивая еще и эффектный внешний вид. Температура последнего, кстати, составила 33,4 °С.
Из оставшегося доступного набора интерфейсов внизу разместились: разъем датчика открытия корпуса, колодка COM-порта, 2 х USB 2.0 (на два порта каждая), Thunderbolt, системная панель. Справа внизу: 6 x SATA 3 (6 Гбит/сек) и колодка на два порта USB 3.1 Gen1 (5 Гбит/сек).
Дополнительных контроллеров на плате не так много. В первую очередь отметим использование изолированной на печатной плате звуковой подсистемы MSI Audio Boost 4 на базе 7.1 HD-кодека Realtek ALC1220P-VB2, накрытого металлическим экраном, в которой применяются японские конденсаторы Nippon Chemi-Con. Еще один это контроллер Nuvoton NCT6797D-M, отвечающий за работу портов ввода-вывода и мониторинг.
Также имеется гигабитный сетевой контроллер Intel I219-V. Вместе с тем имеется слот для установки беспроводного модуля Wi-Fi/Bluetooth и он используетсяв плате MSI Z390 GAMING PRO CARBON AC.
Из-за особенностей задней панели ввода-вывода использовать его в материнской плате MSI Z390 GAMING PRO CARBON будет проблематично – в заглушке не предусмотрено место. Устанавливать отдельно панель в корпус не надо, так как она закреплена кожухе на материнской платы.
Вообще на задней панели ввода-вывода разместился только основной набор портов, хотя хотелось бы большего:
- 1 x комбинированный PS/2 клавиатура/мышь;
- 2 x USB 2.0;
- 1 x HDMI;
- 1 x DisplayPort;
- 3 x USB 3.1 Gen2 тип А;
- 1 x USB 3.1 Gen2 тип С;
- 1 x LAN (RJ45);
- 1 x коннектор Optical S/PDIF;
- 5 x звуковых разъемов OFC.
Интерфейс UEFI BIOS
Интерфейс Click BIOS 5 является фирменным для плат MSI и в плане настроек, относительно предшественников, плат на базе чипсета Intel Z370, в материнской плате MSI MPG Z390 GAMING PRO CARBON изменений нет, они такие же, как и в обзоре платы MSI MPG Z390 GAMING PLUS.
Имеются два режима настройки (простой EZ Mode и расширенный Advanced), переход между которыми осуществляется через клавишу F7.
Настройка частот процессора и памяти, таймингов, напряжений, осуществляется через раздел OC и набор опций достаточен, чтобы обеспечить хороший разгон.
Возможно сохранить профили с разными настройками и доступен мониторинг с управлением работой вентиляторов.
Фирменное программное обеспечение
Основными утилитами, доступными через меню DVD-диска материнской платы MSI MPG Z390 GAMING PRO CARBON, являются MSI Dragon Center и Mystic Light. Первая обеспечивает доступ ко всем остальнымприложениям MSI, вторая – берет на себя управление RGB-подсветкой и они также уже были описаны в обзоре платы Z390 GAMING PLUS, поэтому подробно останавливаться на этом не будем.
Тестовый стенд
- Процессор Intel Core i5-9600K;
- Термопаста ARCTIC MX-2;
- Система охлаждения Noctua NH-U14S;
- Материнская плата MSI MPG Z390 GAMING PRO CARBON;
- Оперативная память: 2 x 8 Гбайт DDR4-3000 Kingston HyperX Savage HX430C15SB/8 и 2 x 8 Гбайт DDR4-2666 Corsair Vengeance RGB PRO (CMW16GX4M2A2666C16);
- Видеокарта ASUS Radeon R9 390 8Gb DirectCU II;
- Накопители SSD Kingston HyperX Fury 240 Gb;
- Блок питания be quiet! Dark Power Pro 11 850W;
- Корпус открытый стенд.
Фото сборки материнская плата + процессор + система охлаждения + память.
Зоны RGB-подсветки – правая нижняя сторона платы и …
Разгон процессора и памяти
При тестировании материнской платы MSI MPG Z390 GAMING PRO CARBON использовался процессор Intel Core i5 9600K и, как показали многократные эксперименты, это оказался не самый удачный экземпляр.
С точки зрения теста стабильности LinX 0.7.2, пределом оказалась частота 4700 МГц при напряжении 1.27 В. Повышение лимитов, напряжений системного агента и ввода-вывода до 1.15 В не помогло, хотя система работала (проходила бенчмарки) на частоте 4800 МГц при 1.30-1.33 В (температура ядер доходила до 89 °С). Активация профилей, оставшихся от других тестирощиков, для процессоров i7-9700K и i9-9900K (частота 4900 МГц, Vcore=1.35 В), также не дала положительного результата даже при множителе х48.
Что касается памяти, то изначально тестирование проводилось с комплектом памяти Kingston HyperX Savage HX430C15SB/8, но недавнее тестирование комплекта памяти 2 x 8 Гбайт DDR4-2666 Corsair Vengeance RGB PRO (CMW16GX4M2A2666C16) и полученный результат 3733 МГц заставил нас все перепроверить. За счет чуть большей частоты системной шины 100.75 МГц комплект работал на частоте 3766 МГц с таймингами 21-23-23-45 при напряжении памяти 1.35 В.
Результаты тестирования
Заключение
Оценивая материнскую плату MSI MPG Z390 GAMING PRO CARBON на фоне MSI MPG Z390 GAMING PLUS, то в ней сохранились преимущества предшественницы и их даже стало больше. В первую очередь отметим более продвинутую систему питания с качественным охлаждением, наличие кожуха с предустановленной задней панелью ввода-вывода, внутреннего порта USB 3.1 Gen2 тип С, несколько зон подсветки Mystic Light. В ней отсутствует большая часть недостатков, таких как наличие для одного слота M.2 (M.2 Shield Frozr), возможность работы пары видеокарт в режиме x8+x8, включая поддержку связки Nvidia SLI.
Так что в плане сборки игровой системы, рассчитанной на перспективу, протестированная плата подходит лучше. Однако часть недостатков осталось, связанная с использованием нового чипсета Intel Z390 и минимизацией дополнительных контроллеров (а нужны ли они?). Например, по-прежнему использование накопителей в слотах M.2 ограничивает использование портов SATA. Кроме того «улучшения» повлияли и на конечную стоимость MSI MPG Z390 GAMING PRO CARBON, которая в рознице продается от 17000 рублей. Она получается дороже почти на 4500 рублей относительно Z390 GAMING PLUS и это немалая разница.
- Стильный внешний вид;
- Предустановленная задняя панель ввода-вывода;
- 11-и фазная система питания;
- Качественное охлаждение;
- Применение радиатора M.2 Shield Frozr для одного из слотов M.2;
- Наличие внешнего и внутреннего портов USB 3.1 Gen2 тип С (10 Гбит/сек);
- Поддержка AMD CrossFire (3-Way) и Nvidia SLI (2-Way);
- Две зоны RGB-подсветки Mystic Light с возможностью подключения дополнительных лент;
- Удобный интерфейс Click BIOS 5;
- Широкий набор фирменного программного обеспечения;
- Хорошие возможности разгона.
- Ограничение на работу слотов M.2 и портов SATA;
- Низкая «плотность» портов на задней панели ввода-вывода;
- Относительно высокая цена.
Источник
MSI MPG Z390 GAMING PRO CARBON User Manual
MSI MPG Z390 GAMING PRO CARBON Manual
MSI MPG Z390 GAMING PRO CARBON manual content summary:
- MSI MPG Z390 GAMING PRO CARBON | User Manual — Page 1
Quick Start Thank you for purchasing the MSI® MPG Z390 GAMING PRO CARBON AC/ MPG Z390 GAMING PRO CARBON motherboard. This Quick Start section provides demonstration diagrams about how to install your computer. Some of the installations also provide video demonstrations. Please link to the - MSI MPG Z390 GAMING PRO CARBON | User Manual — Page 2
Installing a Processor https://youtu.be/4ce91YC3Oww 2 1 3 7 4 5 9 6 8 2 Quick Start - MSI MPG Z390 GAMING PRO CARBON | User Manual — Page 3
Installing DDR4 memory http://youtu.be/T03aDrJPyQs 1 2 3 1 2 3 DIMMA2 DIMMB2 DIMMA2 DIMMB2 DIMMB1 DIMMA2 DIMMA1 Quick Start 3 - MSI MPG Z390 GAMING PRO CARBON | User Manual — Page 4
Connecting the Front Panel Header http://youtu.be/DPELIdVNZUI POPWOEWRELREHLDD-EDDL+ED RESET SW POWER SW Power LED Power Switch — -+ — ++ JFP1 2 1 + 10 9 Reserved HDD LED Reset Switch 1 HDD LED + 2 3 HDD LED — 4 5 Reset Switch 6 7 Reset Switch 8 9 Reserved 10 Power LED + - MSI MPG Z390 GAMING PRO CARBON | User Manual — Page 5
Installing the Motherboard 1 2 Quick Start 5 - MSI MPG Z390 GAMING PRO CARBON | User Manual — Page 6
Installing SATA Drives http://youtu.be/RZsMpqxythc 2 1 3 5 4 6 Quick Start - MSI MPG Z390 GAMING PRO CARBON | User Manual — Page 7
Installing a Graphics Card http://youtu.be/mG0GZpr9w_A 1 3 2 5 4 6 Quick Start 7 - MSI MPG Z390 GAMING PRO CARBON | User Manual — Page 8
Connecting Peripheral Devices 8 Quick Start - MSI MPG Z390 GAMING PRO CARBON | User Manual — Page 9
Connecting the Power Connectors http://youtu.be/gkDYyR_83I4 ATX_PWR1 CPU_PWR1 CPU_PWR2 Quick Start 9 - MSI MPG Z390 GAMING PRO CARBON | User Manual — Page 10
Power On 2 1 3 4 10 Quick Start - MSI MPG Z390 GAMING PRO CARBON | User Manual — Page 11
. 1 Preparing Tools and Components 1 Installing a Processor 2 Installing DDR4 memory 3 Connecting the Front Panel Header 4 Installing the Motherboard 5 Installing SATA Drives 6 Installing a Graphics Card 7 Connecting Peripheral Devices 8 Connecting the Power Connectors 9 Power On. 10 - MSI MPG Z390 GAMING PRO CARBON | User Manual — Page 12
. 43 EZ Debug LED. 43 DIMM LEDs . 43 XMP LED . 43 JPWRLED1: LED power input 43 Installing OS, Drivers & Utilities 44 Installing Windows® 10 44 Installing Drivers 44 Installing Utilities 44 MYSTIC LIGHT. 45 Device LED effect control screen 45 Nahimic 3 . 48 Installation and Update 48 - MSI MPG Z390 GAMING PRO CARBON | User Manual — Page 13
to Non-RAID 78 Rebuilding RAID Array 79 Installing RAID Driver 80 Installing Intel® Rapid Storage Technology Software 80 Intel® Optane™ Memory Configuration 81 System Requirements 81 Installing the Intel® Optane™ memory 81 Removing the Intel® Optane™ memory 83 Troubleshooting 84 Contents 13 - MSI MPG Z390 GAMING PRO CARBON | User Manual — Page 14
Please go to www.intel.com for more compatibility information. Intel® Z390 Chipset y 4x DDR4 memory slots, support up to 64GB* y Supports DDR4 4400(OC)/ 4300(OC)/ 4266(OC)/ 4200(OC)/ have updated the drivers and BIOS to the latest version from MSI website. Continued on next page 14 Specifications - MSI MPG Z390 GAMING PRO CARBON | User Manual — Page 15
RAID LAN Wirsless LAN & Bluetooth® (for MPG Z390 GAMING PRO CARBON AC only) USB Audio Back Panel Connectors Continued from previous page Intel® Z390 Chipset y Supports RAID 0, RAID1, RAID 5 and RAID 10 for SATA storage devices y Supports RAID 0 and RAID 1 for M.2 PCIe storage devices 1x Intel I219 - MSI MPG Z390 GAMING PRO CARBON | User Manual — Page 16
ATX 12V power connector y 6x SATA 6Gb/s connectors y 1x USB 3.1 Gen2 Type-C port y 2x USB 3.1 Gen1 connectors (supports additional 4 USB 3.1 Gen1 ports) y 2x USB 2.0 connectors (supports additional 4 USB 2.0 ports) y 1x 4-pin CPU fan connector y 1x 4-pin Water Pump connector y 5x 4-pin system fan - MSI MPG Z390 GAMING PRO CARBON | User Manual — Page 17
.msi. com/manual/mb/DRAGONCENTER2. pdf for more details. y Audio Audio Boost 4 Nahimic 3 Voice Boost y Network GAMING LAN with Gaming LAN Manager Intel CNVi WiFi (MPG Z390 GAMING PRO CARBON AC)* y Storage Twin Turbo M.2 y Fan Pump Fan GAMING Fan Control * MPG Z390 GAMING PRO CARBON - MSI MPG Z390 GAMING PRO CARBON | User Manual — Page 18
y Performance Multi GPU — SLI Technology Multi GPU — CrossFire Technology DDR4 Boost Core Boost GAME Boost USB with type A+C INTEL Turbo USB 3.1 Gen 2 y VR VR Ready y Gamer Experience GAMING HOTKEY GAMING MOUSE Control APP Player y BIOS Click BIOS 5 18 Specifications - MSI MPG Z390 GAMING PRO CARBON | User Manual — Page 19
: Motherboard SATA 6Gb/s Cables Cable LED Y CABLE LED JCORSAIR CABLE LED JRAINBOW CABLE Antenna Set SLI HB BRIDGE M Accessories M.2 Screw Case Badge SATA Cable Lables VIP Card Application DVD Driver DVD User Manual Documentation Quick Installation Guide MPG Z390 GAMING PRO CARBON - MSI MPG Z390 GAMING PRO CARBON | User Manual — Page 20
Block Diagram Switch PCI Express Bus DMI 3.0 Processor 4x SATA 6Gb/s 1x M.2 2x SATA 6Gb/s Switch 1x M.2 PCH 4x USB 3.1 Gen1 6x USB 2.0 NV6797 Super I/O P/S2 Mouse / Keyboard Realtek ALC1220P (Rear + Front) Audio Jacks 2 Channel DDR4 Memory PCIe x1 slot PCIe x1 slot PCIe x1 slot Intel - MSI MPG Z390 GAMING PRO CARBON | User Manual — Page 21
Rear I/O Panel PS/2 Wi-Fi Antenna connectors Audio Ports LAN USB 3.1 Gen2 DisplayPort USB 2.0 USB 3.1 Gen2 USB 3.1 Gen2 Type-C Optical S/PDIF-Out LAN Port LED Status Table Link/ Activity LED Status Off Yellow Blinking Description No link Linked Data activity Speed LED Status Off Green - MSI MPG Z390 GAMING PRO CARBON | User Manual — Page 22
Realtek Audio Console After Realtek Audio Console is installed. You can use it to change sound settings to get better sound experience. Application Enhancement Advanced Settings Device Selection Main Volume Connector Settings Jack Status y Device Selection — allows you to select a audio output - MSI MPG Z390 GAMING PRO CARBON | User Manual — Page 23
Audio jacks to headphone and microphone diagram Audio jacks to stereo speakers diagram AUDIO INPUT Audio jacks to 7.1-channel speakers diagram AUDIO INPUT Rear Front Side Center/ Subwoofer Rear I/O Panel 23 - MSI MPG Z390 GAMING PRO CARBON | User Manual — Page 24
Installing Antennas 1. Combine the antenna with the base. 2. Screw two antenna cables tight to the WiFi antenna connectors as shown. 2 1 3. Place the antenna as high as possible. 24 Rear I/O Panel - MSI MPG Z390 GAMING PRO CARBON | User Manual — Page 25
Overview of Components CPU_PWR2 CPU_PWR1 CPU Socket DIMMA1 DIMMA2 DIMMB1 DIMMB2 CPU_FAN1 JRGB2 JCORSAIR1 PUMP_FAN1 SYS_FAN1 CNVI_1 SYS_FAN2 PCI_E1 PCI_E2 JBAT1 PCI_E3 JTPM1 PCI_E4 PCI_E5 PCI_E6 JAUD1 ATX_PWR1 JUSB1 JUSBC1 M2_1 JRGB1 JRAINBOW1 SYS_FAN3 SYS_FAN4 SYS_FAN5 JTBT1 JUSB4 JUSB3 - MSI MPG Z390 GAMING PRO CARBON | User Manual — Page 26
Component Contents Port Name Port Type CPU_FAN1, PUMP_FAN1, SYS_FAN1
5 Fan Connectors CPU_PWR1
2, ATX_PWR1 Power Connectors CPU Socket LGA1151 CPU Socket DIMMA1/A2/B1/B2 DIMM Slots JAUD1 Front Audio Connector JBAT1 Clear CMOS (Reset BIOS) Jumper JCI1 Chassis Intrusion Connector JCOM1
cap after installing the processor. MSI will deal with Return Merchandise Authorization (RMA) requests if only the motherboard comes with the protective cap on for more details about installation. y This motherboard is designed to support overclocking. Before attempting to overclock, please make
address limitation. Therefore, we recommended that you to install 64-bit Windows OS if you want to install more than 4GB memory on the motherboard. y Some memory may operate at a lower frequency than the marked value when overclocking due to the memory frequency operates dependent on its Serial
cards installation recommendation x16 x8 x8 x8 x8 x4 Important If you install a large and heavy graphics card, you need to use a tool such as MSI Gaming Series Graphics Card Bolster to support its weight to prevent deformation of the slot. Overview of Components 29
power supply recommendations for SLI configurations, please refer to the user guide of your graphics card to make sure you meet all the cards. 4. Reconnect the power cord, power up the computer and install the drivers and software included in your graphics card package. 5. Right-click the Windows
M2_1
Источник
MSI Z390-A Pro – обзор материнской платы
Материнская плата ATX форм-фактора MSI Z390-A Pro привлекательна за счёт возможностей по разгону (overclocking) и низкой цены – от 8000 руб. ($130). Благодаря своему потенциалу, геймерская матплата подходит как продвинутым пользователям, жаждущим гипервысокой производительности, так и желающим сэкономить на покупке видеокарты и в дальнейшем сделать апгрейд своего ПК.

Особенности
MSI разрабатывает продукцию с расчётом на самостоятельную сборку, поэтому плата Z390-A Pro подходит тем, кто не желает доплачивать около 2000 рублей за заказ сборки в магазине.
Сокет LGA1151-v2 позволяет установить как бюджетные процессоры, так и 8-ми ядерные Intel 8—9-го поколения с частотой до 5000 МГц.
Система питания Core Boost обеспечивает стабильное напряжение процессора и защиту от перегрузки.
Мосфеты материнской платы защищены от перегрева при разгоне массивными, стильно оформленными радиаторами.

Армированный разъем PCI x16 не даст себя выломать даже тяжёлой видеокарте в полтора килограмма.
MSI Z390-A Pro украшена RGB-подсветкой, управляемой совместно с подсветкой других устройств, будь то башенный кулер или видеокарта. Так что выбирайте корпус со стеклянной крышкой. На Новый год ваша комната будет украшена системным блоком в качестве гирлянды.
Система, собранная на базе Z390-A Pro от бренда MSI, подойдёт как для развлечений и игр на «ультра» настройках, так и для работы: от набора текста до 3D моделирования.
Технические характеристики
Материнской плата MSI Z390-A Pro, формата ATX, игровая, с разгоном, на чипсете Intel Z390.
Socket: Intel LGA 1151 v2 подходит как для бюджетных процессоров Inlel Celeron и Pentium G серий, так и средних и топовых по производительности Intel Core i3, i5, i7, i9 восьмого—девятого поколений.
Процессор Intel Core i7 или i9 рекомендую покупать только с видеокартой RTX 2070 Super и выше, иначе разницу в FPS не заметите, упор будет в GPU.
BIOS: American Megatrends inc. (Ami) + надстройка UEFI BIOS.

Оперативная память (ОЗУ): DDR4 DIMM*4 слота, 2133—4400 МГц, 2 канала, максимальный объём 64 Гб.
Звуковая карта Realtek ALC892, 7.1 каналов, 6 разъёмов.
Интегрированная видеокарта с выходами VGA (D-Sub), DVI-D и Display Port.
Материнская плата Z390-A Pro поддерживает такие накопители, как: M.2 (SATA PCI-E 4x) и SATA3: 6 шт. со скоростью передачи данных 6 Гбит/с. Имеется RAID контроллер с режимом 0, 10, 5, 1.
Разъёмы USB внутренние: USB 2.0 – 4 шт.; USB 3.0 – 4 шт. Разъёмы USB на задней панели: USB 2.0 – 2 шт.; USB Type C 3.1 – 1 шт.; USB Type-A 3.1 Gen2 – 1 шт. и USB 3.0 – 2 шт.
Комбинированный разъём для подключения старой мыши или клавиатуры PS/2 также присутствует на задней панели.
Для охлаждения системы на матплате есть два коннектора питания процессорного кулера 4-pin и
пять разъемов 4-pin для корпусных вентиляторов. Устаревшие 3-pin отсутствуют.
Питание: главный разъем питания: 24-pin; 8-pin для питания процессора, 9 фаз питания.

Слоты PCI-E 3.0: 1x – 4 шт.; 16x – 2 шт.; поддержка технологии CrossFire, для работы двух видеокарт AMD.
Не расстраивайтесь отсутствию режима SLI для работы двух видеоадаптеров nVidia, что та, что другая технология почти не одной игрой не поддерживается, а где она кое-как работает, там прироста производительности не даёт.
Встроенная сетевая карта: LAN RJ-45 – вход для стандартного кабеля, витой пары, для подключения интернета. Контроллер: Intel I219-V, 1 Гбит/с.
В комплект входит материнская плата MSI Z390-A Pro, металлическая пластинка с отверстиями для выходов на задней панели, коробка, CD-диск с драйверами и ПО, бумажная инструкция, карточка с кодом регистрации на сайте, наклейка логотип MSI и два SATA кабеля. Инструкцию можете скачать в формате PDF.

Минусы
Всё-таки системная плата MSI Z390-A Pro относится к бюджетной категории, вот за счёт чего снижена цена:
В MSI Z390-A Pro отсутствует встроенный Wi-Fi адаптер. Если не приобрести отдельный USB адаптер, а пользоваться кабельным соединением, то при перестановке мебели могут возникнуть неудобства, придётся покупать удлинитель витой пары, пускать шнур по полу или ковырять плинтус. А если дома животные или дети…
Цена на MSI Z390-A Pro завышена по сравнению с платами без разгона. Если вы не увлекаетесь оверклокингом, вам проще купить плату без разгона на 2—3 тыс. руб. дешевле. Обычные материнки не предназначены для условий работы при высоких температурах, поэтому в них используются соответствующие недорогие материалы, отсутствуют «навороты» – дополнительные технологии, и детали вроде лишних фаз питания и радиаторов. Этот недостаток усиливает тот факт, что современное железо имеет достойную производительность, что на нём и так хорошо идут современные игры.
Однако не жалеющие переплачивать за качество выбирают материнские платы вроде MSI Z390-A Pro не ради разгона, а ради большей надёжности.
Минусы MSI Z390-A Pro, скорее придирки, о которых говорят в комментариях и отзывах:
- Маловато RGB подсветки, всего одна короткая ленточка;
- Тонкий текстолит прогибается при установке, что нормально для ценовой категории Z390 серии;
- Материнская плата якобы поднимает частоту процессора, когда он в простое;
- Подсвистывают дроссели;
- Спорный недостаток – коричневый цвет текстолита.
Системная плата Z390-A Pro оправдывает ожидания, несмотря на небольшую стоимость. Ближайшие 5 лет она будет держать планку одной из лучших бюджетных материнских плат. Однако не советую её приобретать для бюджетного компьютера под онлайн-игры вроде WoT, WoW, PUBG, Fortnite и т. п., иначе плата не раскроет и половины своего потенциала.
Источник
Обзор MSI MPG Z390 Gaming Pro Carbon
Если посмотреть на сегментацию игровых матплат MSI, то модель MSI MPG Z390 Gaming Pro Carbon, входящая в серию MSI Performance GAMING, находится недалеко от топовых решений. Дизайн этой платы, как и других «карбонов» от MSI, вдохновлён самыми быстрыми спорткарами, а у радиаторов матплаты есть карбоновые вставки. В общем, всё намекает на то, что с помощью такой платы нужно собирать мощный ПК, который справится как с любыми современными играми, так и с серьёзной работой, вроде обработки видео или 3D-графики.
Технологии MSI MPG Z390 Gaming Pro Carbon
AUDIO BOOST 4 c NAHIMIC 3
Вот уже много лет подряд инженеры и программисты MSI стараются улучшить аудиоподсистему своих материнских плат, отдавая особое предпочтение передаче голоса. Благодаря технологии Nahimic, которая доросла уже до третьей версии. Аудиокарты материснких плат MSI отлично передают голос игрока. Из голоса будет удалён фоновый шум микрофона, эхо, и прочие артефакты, которые мешают нормальному общению. Кстати, такая технология должна отлично подойти для стримеров. Потому что звук – один из важнейших компонентов хорошей трансляции.
Подсветка MSI MYSTIC LIGHT
Ни один современный игровой ПК не может обойтись без красивой подсветки. Поэтому у MSI MPG Z390 Gaming Pro Carbon появилась поддержка системы синхронизируемой подсветки MYSTIC LIGHT. Благодаря ей плата, и все совместимые с MYSTIC LIGHT устройства, будут светиться одним цветом. Или же синхронно воспроизводить один и тот же эффект, выбранный пользователем. Кроме того, у платы есть несколько разъёмов для обычных и адресуемых светодиодных лент.
Защита основных слотов и разъёмов
Технология MSI STEEL ARMOR защитит слоты для видеокарт и оперативной памяти от помех, деформаций и высокого напряжения. На слотах для оперативки и двух верхних PCIe 3.0 x16 используются усиленные точки пайки и заземления, благодаря которым достигается защита от перегрузки по току. Два верхних разъёма PCIe 3.0 x16 также получили дополнительные металлические каркасы, которые защитят пластиковый слот от деформаций при неправильной установке громоздких видеокарт. Также стоит отметить встроенную защитную панель портов ввода-вывода, которая защитит их от электромагнитных помех.
Качественная элементная база
Игровые материнские платы MSI часто получают улучшенные электронные компоненты вместо стандартных. В результат плата лучше переживает высокие температуры и длительные нагрузки. Да и в целом живёт дольше. В случае с MSI MPG Z390 Gaming Pro Carbon, используются твердотельный японские конденсаторы SOLID CAP со сроком службы до 10 лет и дроссели Titanium Choke, которые справляются с высокими температурами лучше стандартных.
Упаковка и комплект поставки MSI MPG Z390 Gaming Pro Carbon
Матплата упакована в привычную для MSI коробку. На её лицевой стороне изображён стилизованный спорткар, а на обратной стороне перечислены основные особенности платы. В комплекте, кроме стандартного набора из бумажек и дисков с драйверами, находится набор наклеек, мостик SLI, кабели SATA и удлинители для светодиодных лент.
MSI MPG Z390 Gaming Pro Carbon
Матплата выполнена в распространённом форм-факторе ATX, её габариты составляют 24,3 x 30,4 см. Текстолит платы окрашен в чёрный, а вот часть радиаторов – в контрастирующий белый. Также радиаторы получили карбоновые вставки, а их плавные изгибы напоминают кузова спортивных автомобилей. Здесь стоит похвалить инженеров MSI, ведь материнские матплаты и спортивные автомобили – очень разные продукты. И совместить их между собой – та ещё задачка, с которой они успешно справились.
Подсистема питания процессора насчитывает 12 фаз. При этом 10 фаз отданы для питания вычислительных ядер CPU, одна фаза предназначена для встроенного видеоядра, и ещё одна фаза – для оперативной памяти. Для питания процессора используются два разъёма. Основной насчитывает 8 контактов, а дополнительный – 4 контакта. Для запуска ПК необходимо подать питание только на основной разъём, а воспользоваться дополнительным можно в том случае, если планируется разгон. Для питания самой матплаты используется обычный 24-конатктный разъём. А рядом с ним находятся светодиоды EZ Debug LED, с помощью которых можно понять, с каким компонентом (процессором, памятью, видеокартой или загрузочным диском) системы случилась проблема при загрузке.
Для оперативной памяти доступно 4 слота DDR4. Максимальный объём памяти составляет 64 Гбайт, а максимальна скорость доступа – 4400 МГц. Для того, чтобы память стабильно работала и брала высокие частоты при разгоне, её слоты получили дополнительное экранирование. Также у них оптимизирована разводка дорожек питания и передачи данных. В MSI такая технология называется DDR4 BOOST.
MSI MPG Z390 Gaming Pro Carbon поддерживает одновременную установку до трёх видеокарт AMD и до двух – от NVIDIA. Это значит, что три её слота PCIe 3.0 x16 разведены по следующей схема: x16, x8, x4. Для остальной периферии доступно три слота PCIe 3.0 x1.
Накопители SATA подключаются к шести стандартным разъёмам, а для быстрых SSD формата M.2 предусмотрены два слота. Они поддерживают установку накопителей длиной до 110 мм, и могут работать как в режимах PCIe 3.0, так и в SATA. Поддержка каждого из режимов зависит не только от подключенного диска M.2, но и от количества подключенных дисков SATA. На самом деле, зависимостей, как и вариантов подключений здесь очень много, и чтобы не перечислять их все в этом абзаце, мы предлагаем ознакомиться с таблицей подключений из официальной инструкции к матплате.
На обратной стороне находятся следующие порты ввода-вывода:
- 1x PS/2
- 2x USB 2.0
- 3x USB 3.1 Gen2
- 1x USB 3.1 Gen2 Type-C
- 1x HDMI
- 1x DisplayPort
- 1x Ethernet
- 5x Аудиоразъёмы 3,5-мм
- 1x Оптический S/PDIF
Фотографии MSI MPG Z390 Gaming Pro Carbon
Технические характеристики
- Процессорный разъём
- Совместимые процессоры
- Чипсет
- Оперативная память
- Слоты PCIe 3.0 x16
- Остальные слоты PCIe 3.0
- NVIDIA SLI
- AMD CrossFireX
- Разъёмы SATA
- Разъёмы M.2
- Беспроводная сеть
- Bluetooth
- Локальная сеть
- Аудио
- Разъёмы на задней панели
- Клавиши на задней панели
- Разъёмы для вентиляторов и подсветки
- Распаянные колодки разъёмов
- Переключатели и кнопки
- Габариты
- Ориентировочная цена
MSI MPG Z390 Gaming Pro Carbon
Компания MSI привела БИОСы своих материнских плат к единому внешнему виду. Они получили простой и понятный дизайн, а все настройки разнесены по нескольким пунктам, для упрощения работы с платой.
Предназначение
Системная плата MSI MPG Z390 Gaming Pro Carbon создавалась с оглядкой на быстрые и дорогие спорткары, поэтому она станет отличной основой для мощного игрового ПК. Кроме красивого дизайна у неё есть к этому все остальные предпосылки: улучшенные электронные компоненты, защищённые порты и конечно же, подсветка.
Источник
Материнская плата MSI Intel Z390 MPG Z390 GAMING PRO CARBON в Томске
Код производителя: MPG Z390 GAMING PRO CARBON , Softline ID: +0401523
Материнская плата MSI Intel Z390 MPG Z390 GAMING PRO CARBON


Краткие сведения
ATX • 1×LGA 1151 • Intel Z390 • DDR4 • GbE • USB 3.0 • SATA3 • HDMI • звук4.0/5.1/7.1/Стерео 2.0 • 5 × audio jack • COM
Скачать прайс-лист Adobe Systems
Описание
MSI MPG Z390 GAMING PRO CARBON — геймерская материнская плата форм-фактора ATX построена на чипсете Intel Z390 для разъема LGA 1151 с поддержкой процессоров 9-го/8-го поколений Intel Core / Pentium Gold / Celeron. Поддержка памяти DDR4 с частотой до 4400 МГц (в режиме разгона).
Плата имеет гибко настраиваемую полноцветную подсветку Mystic Light и множеством оптимизаций. 16,8 млн цветов, 17 визуальных эффектов управляются в один клик.
Проводные сетевые интерфейсы материнских плат MSI оптимизированы под игры. За счет использования современнейших контроллеров и дополнительных программных оптимизаций минимизируются лаги при игре через интернет.
Основные характеристики
| Форм-фактор | ATX |
| Сокет | 1 × LGA 1151 |
| Поддержка процессоров | Intel Celeron, Core i3 Gen8, Core i3 Gen9, Core i5 Gen8, Core i5 Gen9, Core i7 Gen8, Core i7 Gen9, Core i9 Gen8, Pentium |
| Чипсет | Intel Z390 |
| Слоты оперативной памяти | 4 × DIMM 288-pin |
| Тип памяти | DDR4 2666 МГц |
| Контроллер LAN | Intel I219V |
| Контроллер Intel Z390 | 2 × M.2 • RAID 0/1 6 × SATA3 • 7-pin • RAID 0/1/5/10 |
| Операционная система | Windows 10 64-bit |
| Тип комплектации | BOX/RTL |
✅ MSI Intel Z390 MPG Z390 GAMING PRO CARBON купить в Томске и других городах России
✅ Купите MSI Intel Z390 MPG Z390 GAMING PRO CARBON по выгодной цене
✅ Заказать MSI Intel Z390 MPG Z390 GAMING PRO CARBON в интернет-магазине с доставкой
Доставка в Томске
Осуществляется транспортной компанией, курьером или в пункты самовывоза от 4 до 9 рабочих дней после оплаты или подтверждения заказа.
Электронные лицензии отправляются на электронную почту заказчика.
Точная стоимость и срок доставки в Томске рассчитываются при оформлении заказа.
Контакты в Томске
Томске По работе интернет-магазина обращайтесь по общему телефону: 8 (800) 200-08-60 .
Обработка заказов, отправка электронных ключей (лицензий) и физическая доставка осуществляются по рабочим дням, с 9 до 18 часов (Мск).
Источник
Одним из последних чипсетов, представленных компанией Intel для платформы Intel LGA1151-2, является Intel Z390, ориентированный в первую очередь на процессоры Intel 9-о поколения. Относительно Intel Z370, в Z390 появилась поддержка беспроводных модулей CNVi и было реализовано шесть высокоскоростных портов USB 3.1 Gen2 (10 Гбит/сек).
И, неизменно, появление нового чипсета привело к выпуску новых моделей материнских плат…

Одним из последних чипсетов, представленных компанией Intel для платформы Intel LGA1151-2, является Intel Z390, ориентированный в первую очередь на процессоры Intel 9-о поколения. Относительно Intel Z370, в Z390 появилась поддержка беспроводных модулей CNVi и было реализовано шесть высокоскоростных портов USB 3.1 Gen2 (10 Гбит/сек), а значит производителям потребуется использовать меньшее количество контроллеров, что, потенциально, может повлиять на меньшую стоимость.
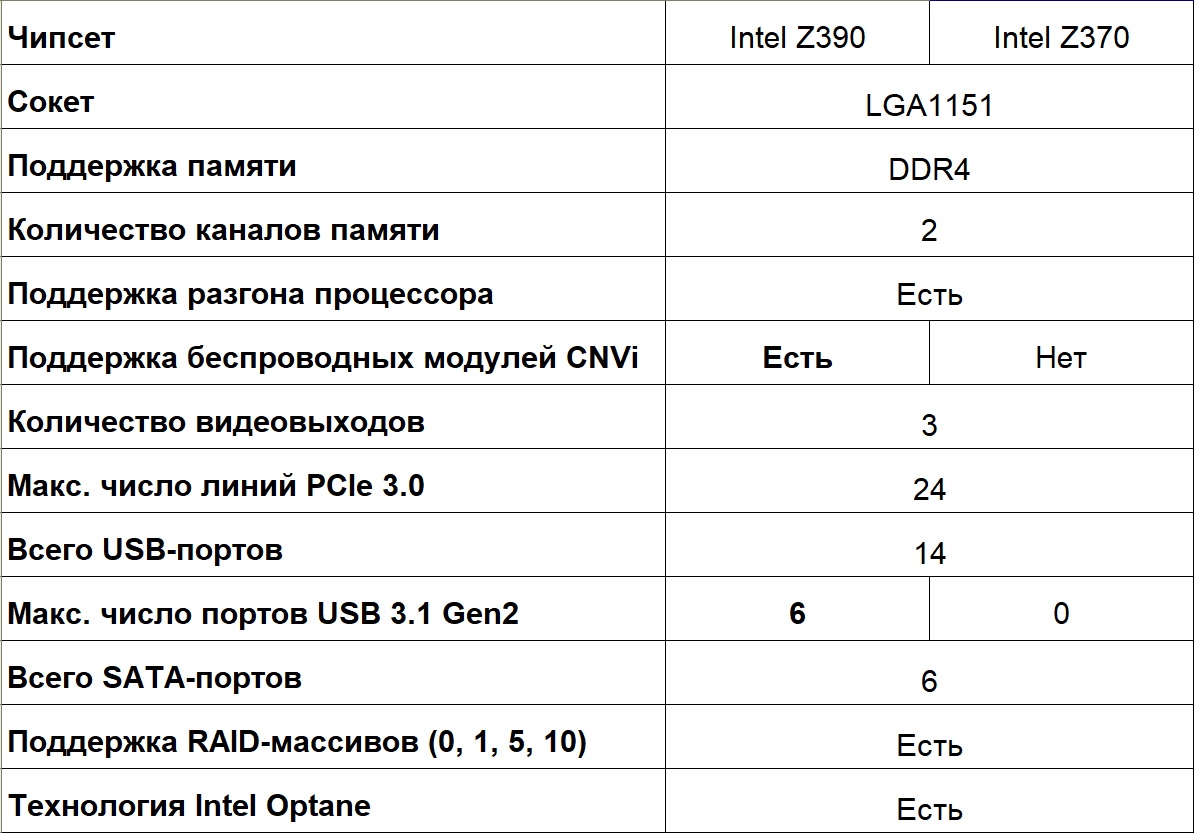
И, неизменно, появление нового чипсета привело к выпуску новых моделей материнских плат. В случае компании MSI это еще сопровождалось сменой названий линеек на более короткие, о чем мы уже писали в обзоре платы MSI MPG Z390 GAMING PLUS.
Следующей платой из игровой серии MPG, прибывшей к нам, стала более продвинутая MSI MPG Z390 GAMING PRO CARBON.
Технические характеристики
- Сокет: Intel LGA1151-2;
- Поддерживаемые процессоры: 8-е и 9-е поколение процессоров Intel Core/Pentium/Celeron;
- Чипсет: Intel Z390;
- Оперативная память: 4 x DIMM DDR4-2133–4400+(O.C.), макс. до 64 Гбайт;
- Слоты расширения: 3 x PCI-E x16 v3.0 (режимы работы x16/x0/x4 или x8/x8/x4) и 3 x PCI-E x1 v3.0;
- Встроенная графика: интегрирована в процессор, порты 1 x DisplayPort 1.2 (макс. разрешение 4096×2304@60Гц), 1 x HDMI 1.4 (макс. разрешение 4096×2160@24Гц);
- Поддержка Multi-GPU: 3-Way AMD CrossFire или 2-Way Nvidia SLI;
- Интерфейсы системы хранения: чипсет Intel Z390 – 6 x SATA 6 Гбит/сек (поддержка RAID 0/1/5/10), 2 x слота M.2 (Key M) 2242/ 2260/ 2280/ 22110 (режим работы PCIe 3.0 x4 32 Гбит/сек и SATA 6 Гбит/сек, поддержка RAID 0/1). Есть поддержка Intel Optane Memory. Примечание: Есть ограничения одновременную работу портов SATA и слотов M.2;
- Порты USB: чипсет Intel Z390 – 5 x USB 3.1 Gen2 (10 Гбит/сек, 1 х тип С и 3 х тип А на задней панели и 1 х тип С внутренний коннектор), 4 x USB 3.1 Gen1 (5 Гбит/сек) (внутренние коннекторы USB), 6 x USB 2.0 (480 Мбит/сек) (2 порта на задней панели и 4 порта доступны через внутренние коннекторы USB);
- Звук: HD-кодек 7.1, Realtek ALC1220P-VB2;
- Сетевая карта: 1 х 10/100/1000 Мбит/сек, Intel I219-V;
- Форм-фактор: ATX;
- Размеры: 30,4 см х 24,3 см.
Разъемы на плате:
- 1 x 24-пин ATX основной коннектор питания;
- 1 x 8-пин ATX 12V коннектор питания;
- 1 x 4-пин ATX 12V коннектор питания;
- 6 x коннекторов SATA 6 Гбит/сек;
- 1 x коннектор USB 3.1 Gen2 тип С;
- 2 x коннектора USB 3.1 Gen1 (на 4 порта);
- 2 x коннектора USB 2.0 (на 4 порта);
- 1 x 4-пин коннектор вентилятора CPU;
- 1 x 4-пин коннектор подключения помпы;
- 5 x 4-пин коннектора системных вентиляторов;
- 1 x коннектор COM-порта;
- 1 x коннектор звуковых разъемов передней панели;
- 2 x коннектора для подключения индикаторов и органов управления передней панели;
- 1 x коннектор порта Thunderbolt;
- 1 x разъем датчика открытия корпуса;
- 1 x коннектор TPM модуля;
- 2 х 4-пин RGB LED коннектор;
- 1 х 3-пин RAINBOW LED коннектор;
- 1 х 3-пин CORSAIR LED коннектор.
Порты ввода/вывода задней панели:
- 1 x комбинированный PS/2 клавиатура/мышь;
- 2 x USB 2.0;
- 1 x HDMI;
- 1 x DisplayPort;
- 3 x USB 3.1 Gen2 тип А;
- 1 x USB 3.1 Gen2 тип С;
- 1 x LAN (RJ45);
- 1 x коннектор Optical S/PDIF;
- 5 x звуковых разъемов OFC.
Упаковка и комплектация
Внешнее оформление коробки с материнской платой MSI MPG Z390 GAMING PRO CARBON не такое яркое, как можно было встретить в платах предыдущих поколений, но все-таки смотрится лицевая сторона стильно. По ней легко определяется модель, указано название чипсета Intel Z390, поддержка подсветки Mystic Light и предустановленная задняя панель ввода-вывода.
Интереснее смотрится обратная сторона, где представлен внешний вид платы, краткие характеристики и отражаются технологии, разбитые на группы:
- Производительность: Core Boost (оптимизированная разводка компонент, качественная система питания, обеспечивающие лучший разгон процессоров), двойное дополнительное питание 4+8-пин (до 540 Вт), оптимизированная разводка цепей питания памяти DDR4 Boost, наличие высокоскоростных портов USB 3.1 Gen2 и технологии защиты Steel Armor (металлическая рамка) для слотов памяти и двух слотов PCI-E x16.
- Модные: поддержка RGB-подсветки Mystic Light, качественная звуковая подсистема Audio Boost 4 и предустановленная задняя панель ввода-вывода.
- Охлаждение: наличие радиатора M.2 Shield Frozr для слота M.2 и оптимизация воздушного потока с реализаций точек подключения дополнительных вентиляторов.
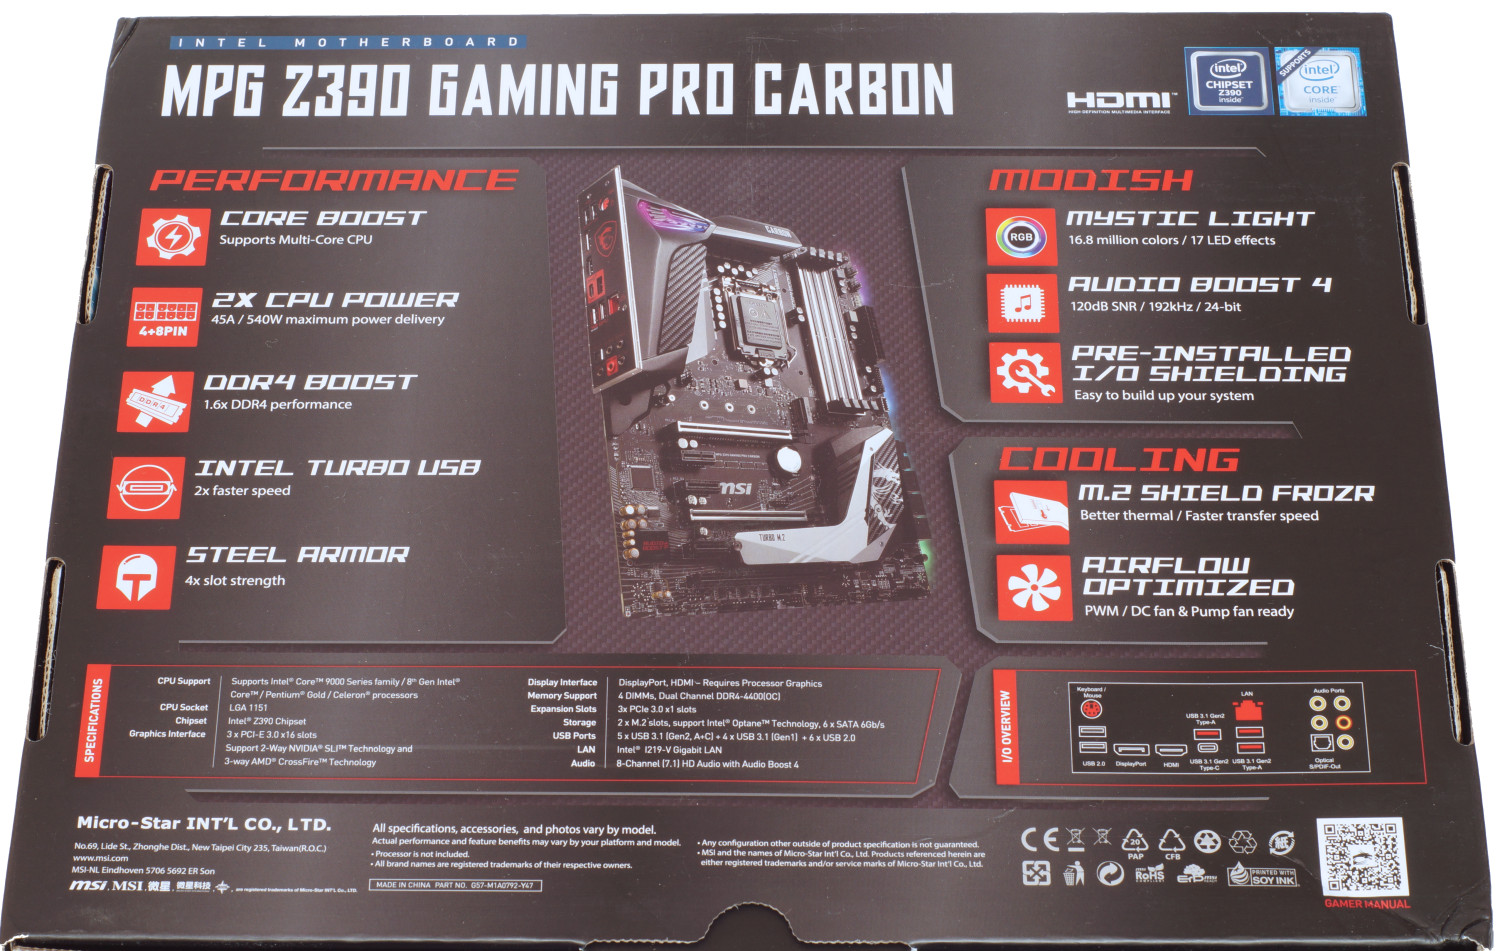
Говоря о наборе аксессуаров, то внутри коробки можно найти все необходимое. Начиная от различных инструкций, наклеек, DVD-диска и …
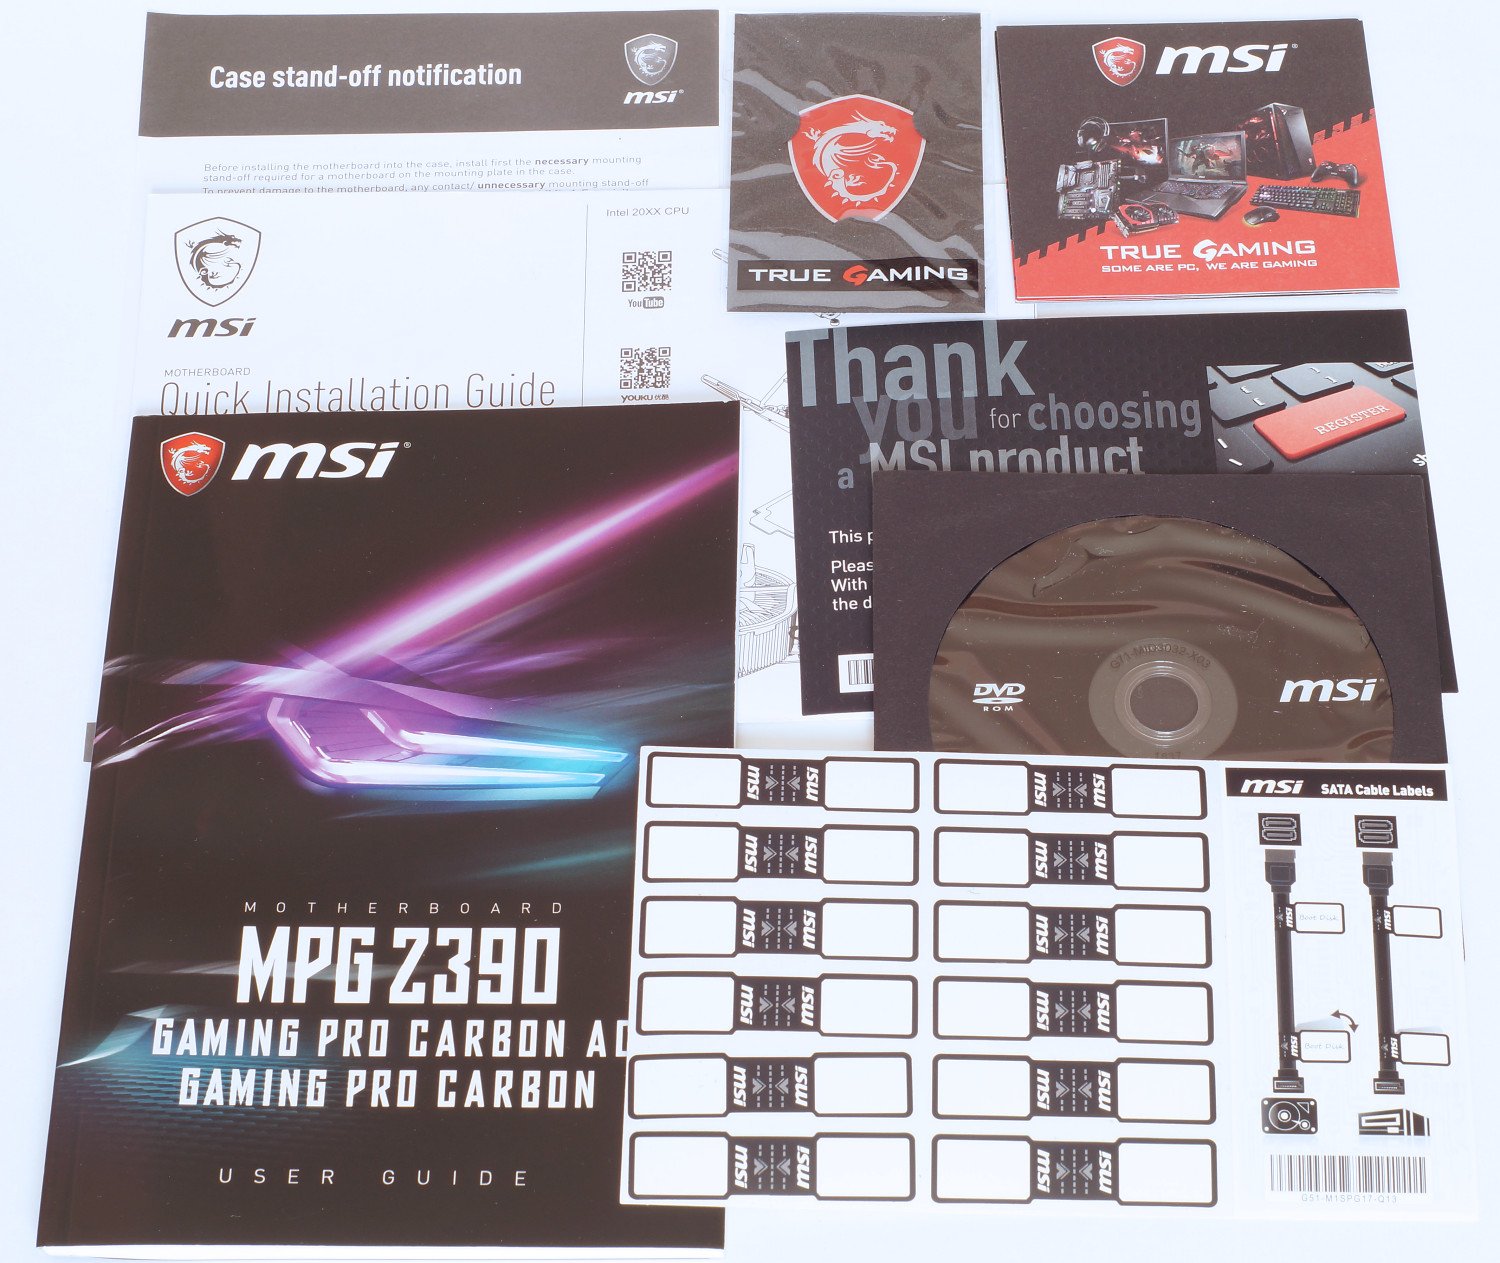
… заканчивая кабелями: 2 x SATA, кабели для подключения подсветки различных типов, 2-Way SLI-мост, пара винтов.

Внешний вид и особенности
В материнской плате MSI MPG Z390 GAMING PRO CARBON производитель в первую очередь уделил внимание стильному внешнему виду, в котором эффект усиливается наличием кожуха с карбоновой вставкой, зонами с RGB-подсветкой Mystic Light и, на первый взгляд, достаточно массивным радиатором чипсета Intel Z390. Учитывая используемый чипсет плата предназначена для сборки платформы на сокете Intel LGA1151-2 (процессоры 8-о и 9-о поколений).
Выполнена она в форм-факторе ATX с размерами 30,4 см х 24,3 см. С точки зрения компоновки слотов, то тут все без изысков, хотя можно заметить солидный набор портов. Бросается наличие семи 4-пин разъемов подключения кулера, помпы, системных вентиляторов, «разбросанных» на плате (три справа вверху, один ниже сокета, еще три – самая нижняя часть платы). Из интересного, на обратной стороне (по левому краю), находится одна из зон с RGB-светодиодами.
Отдельного внимания заслуживает усиленная система питания, в которой появилось 4-пин и 8-пин разъемы питания ATX12V, и охлаждение на базе двух разноцветных радиаторов. Это будет особенно актуально при разгоне процессоров Intel 9-о поколения (при разгоне процессора Intel Core i5-9600K мы наблюдали рост потребления системы с 90 Вт в простое до 300 Вт под нагрузкой).
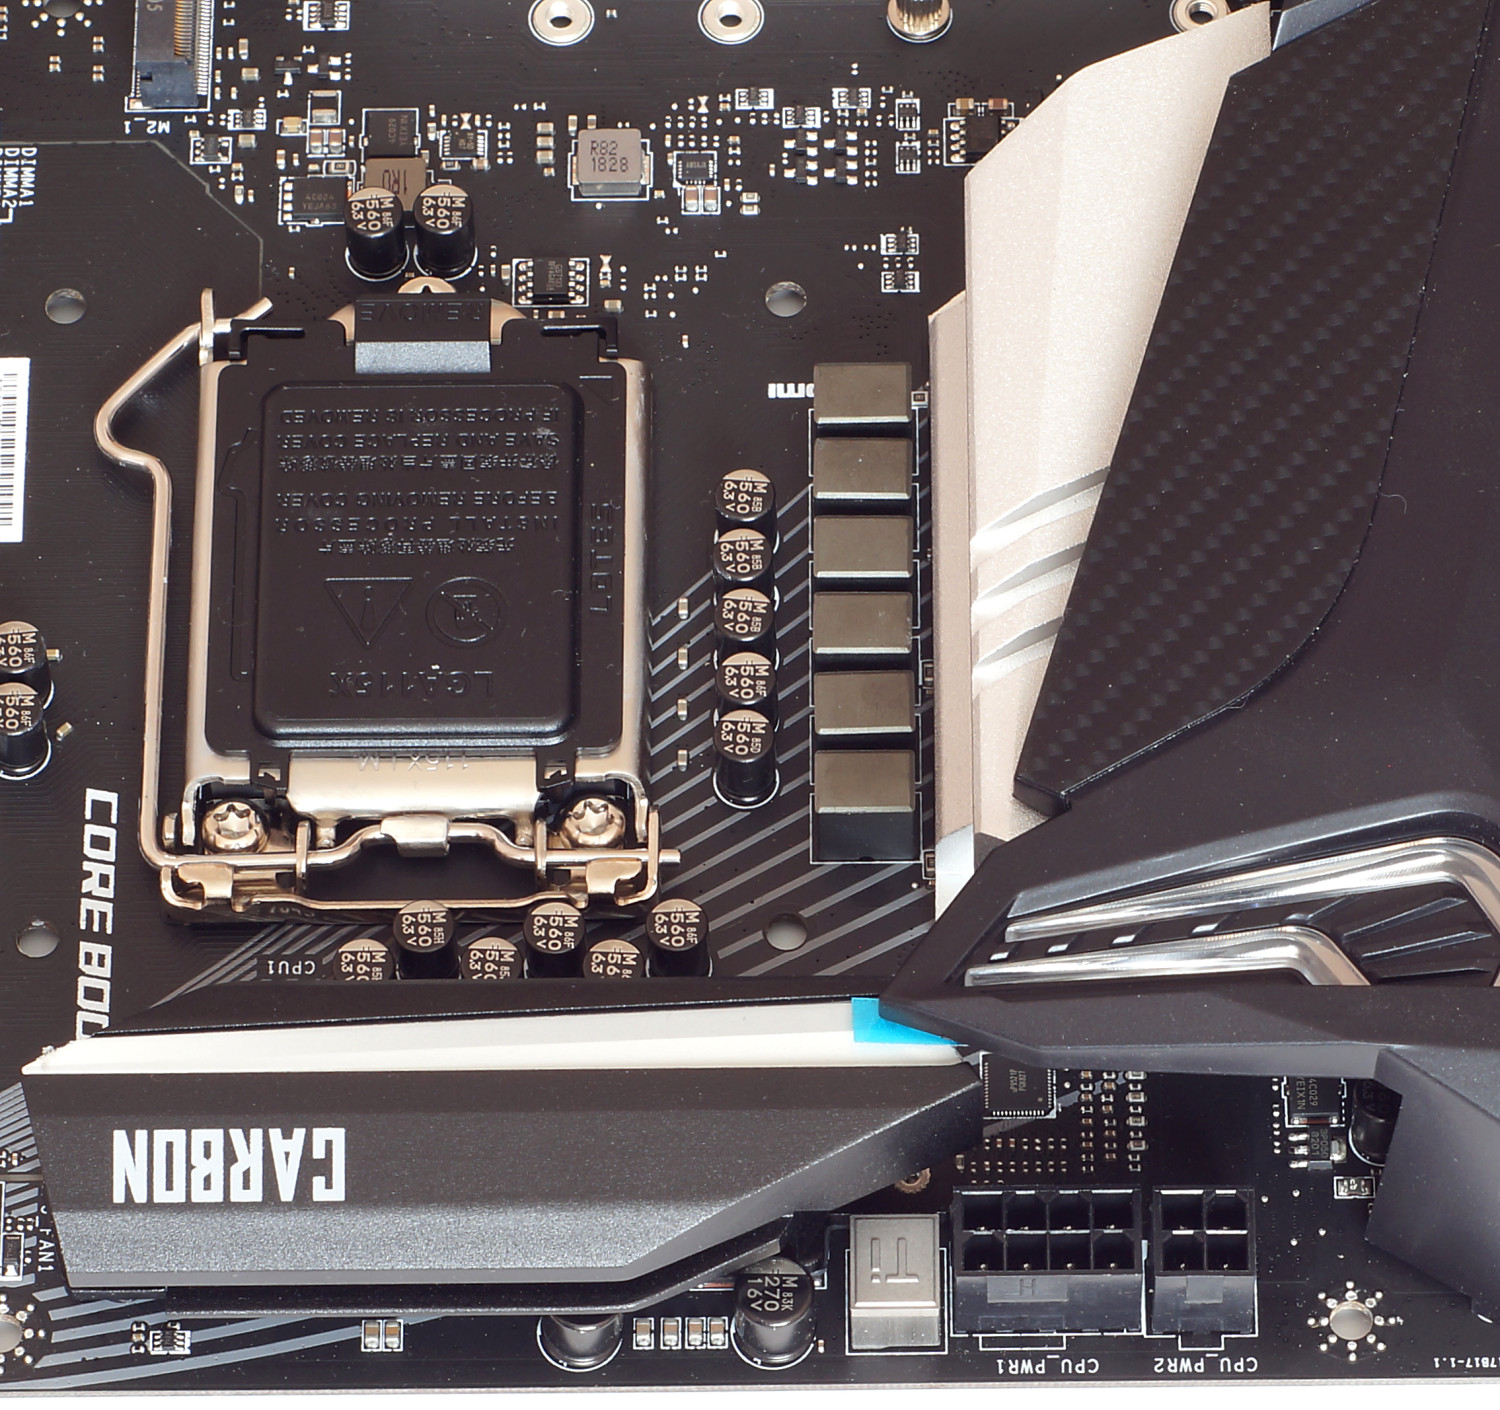
Для радиаторов применен надежный винтовой способ фиксации. Один из них окрашен в серебристый цвет, другой – в черный. Максимальная температура самого горячего, зафиксированная при разгоне пирометром, составила 47,7 °С. Температура ощущается, но не пальцы не жгет.
11-и фазная система питания получена за счет ШИМ-контроллера uPI Semiconductor uP9521P и удвоителей фаз. За питание ядер процессора отвечают 10-ь фаз, в каждой из которых задействуется пара мосфетов On Semiconductor NTMFS4C024N и NTMFS4C029N. Фаза питания, предназначенная для встроенной графики процессора, состоит из трех мосфетов: двух NTMFS4C024N и одного NTMFS4C029N.
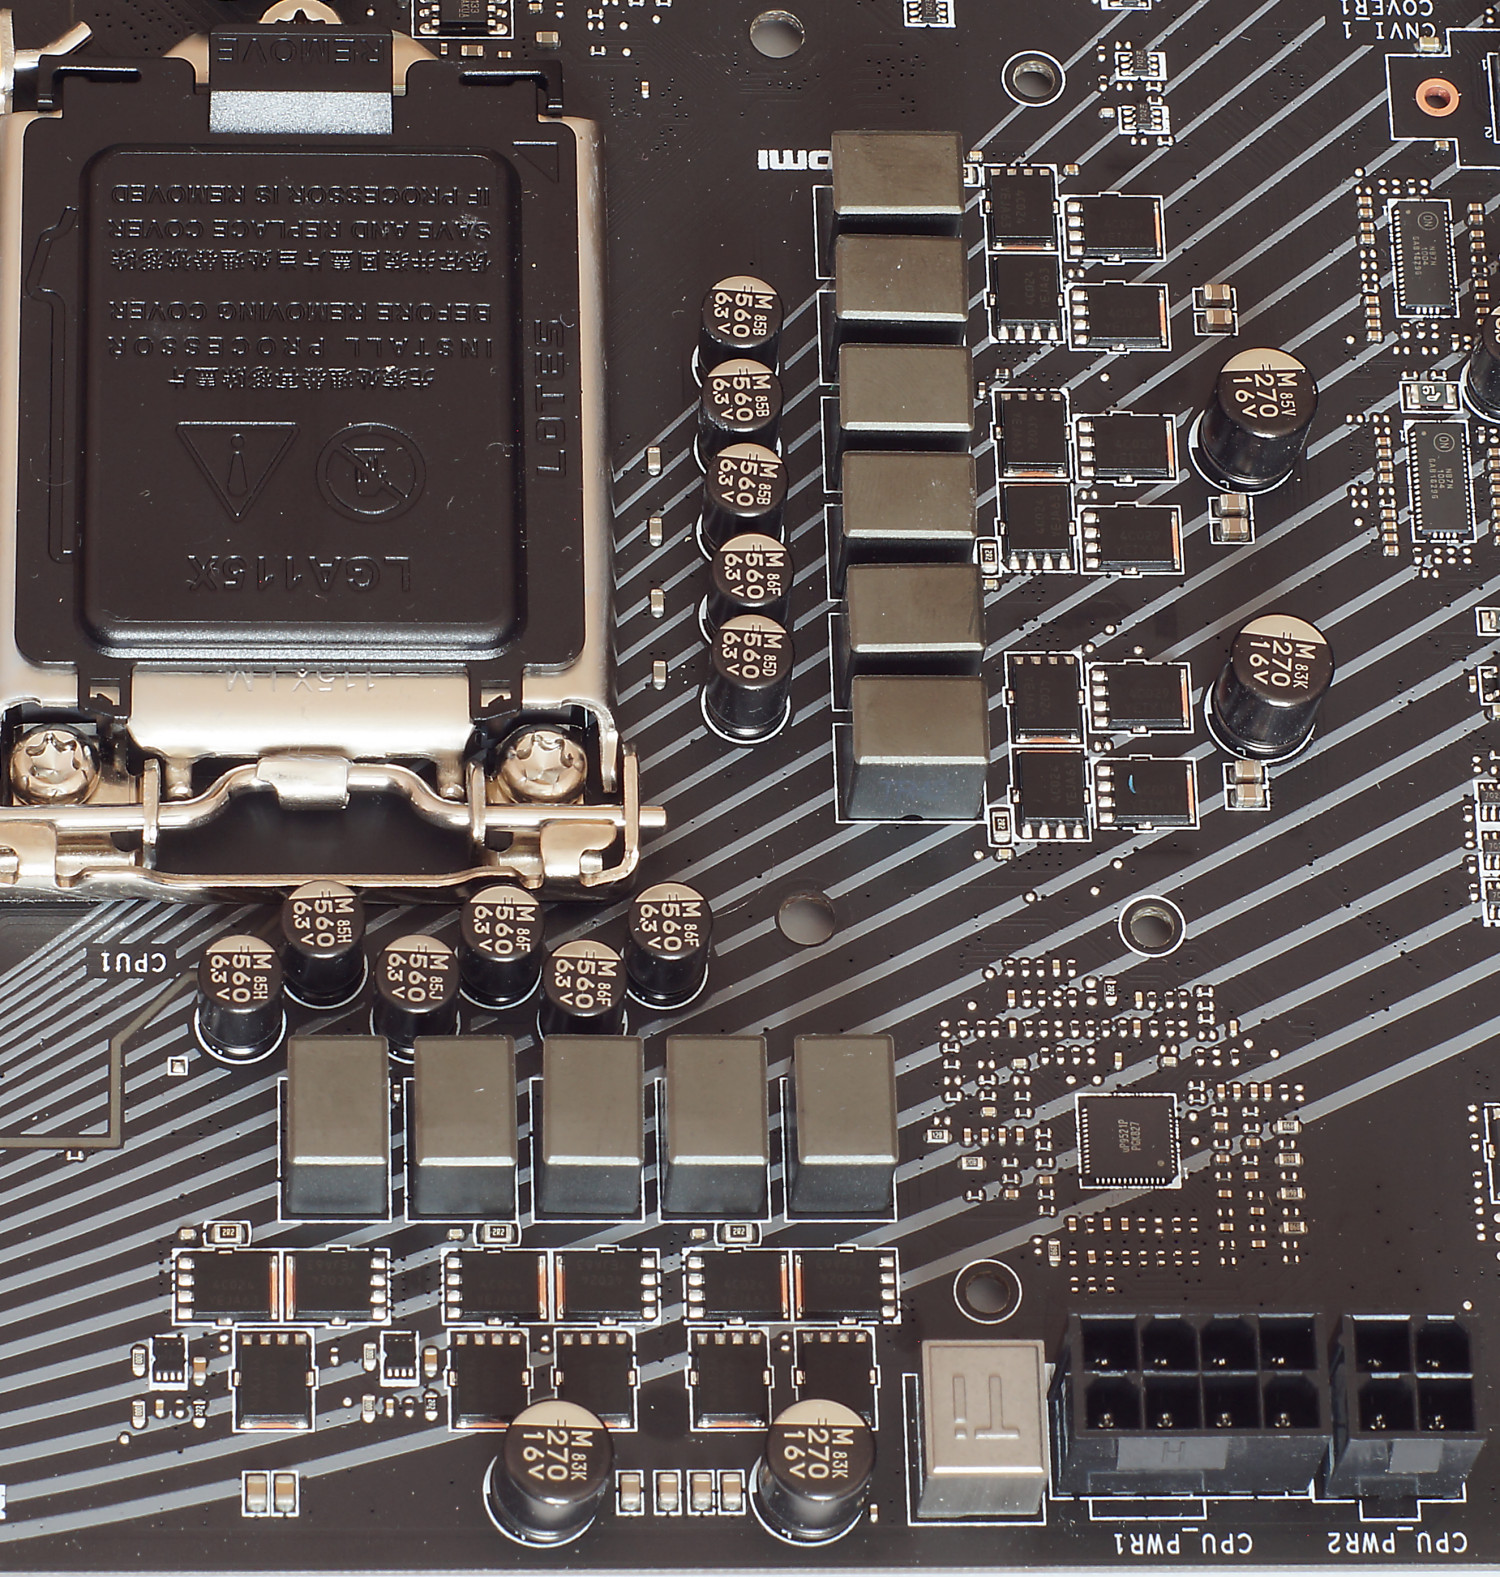
Вместе с тем производитель не забыл сделать плату максимально совместимой с различными технологиями RGB-подсветки, часть из коннекторов разместив над слотами оперативной памяти (RGB 5050 12V и Corsair) и внизу платы (RGB 5050 12V и RAINBOW 5V, между передней аудио-панелью и разъемом питания вентилятора). Так что, в целом, проблем с подключением подсветки не будет.
Слоты оперативной памяти реализованы на базе технологии MSI DDR4 Boost с оптимизацией разводки платы для минимизации электромагнитных помех, а для самих слотов применена защита Steel Armor. В итоге, за счет четырех слотов, можно получить максимальный объем памяти 64 Гбайта, и работать, в режиме разгона, она может на частоте до 4400 МГц (в настройках UEFI BIOS доступны большие частоты).
Рядом со слотами привычно расположились, из того, о чем мы не писали: 24-пин разъем питания EATX, светодиодные индикаторы EZ Debug LED, колодка двух портов USB 3.1 Gen1 (5 Гбит/сек) и один внутренний порт USB 3.1 Gen2 тип С (10 Гбит/сек).
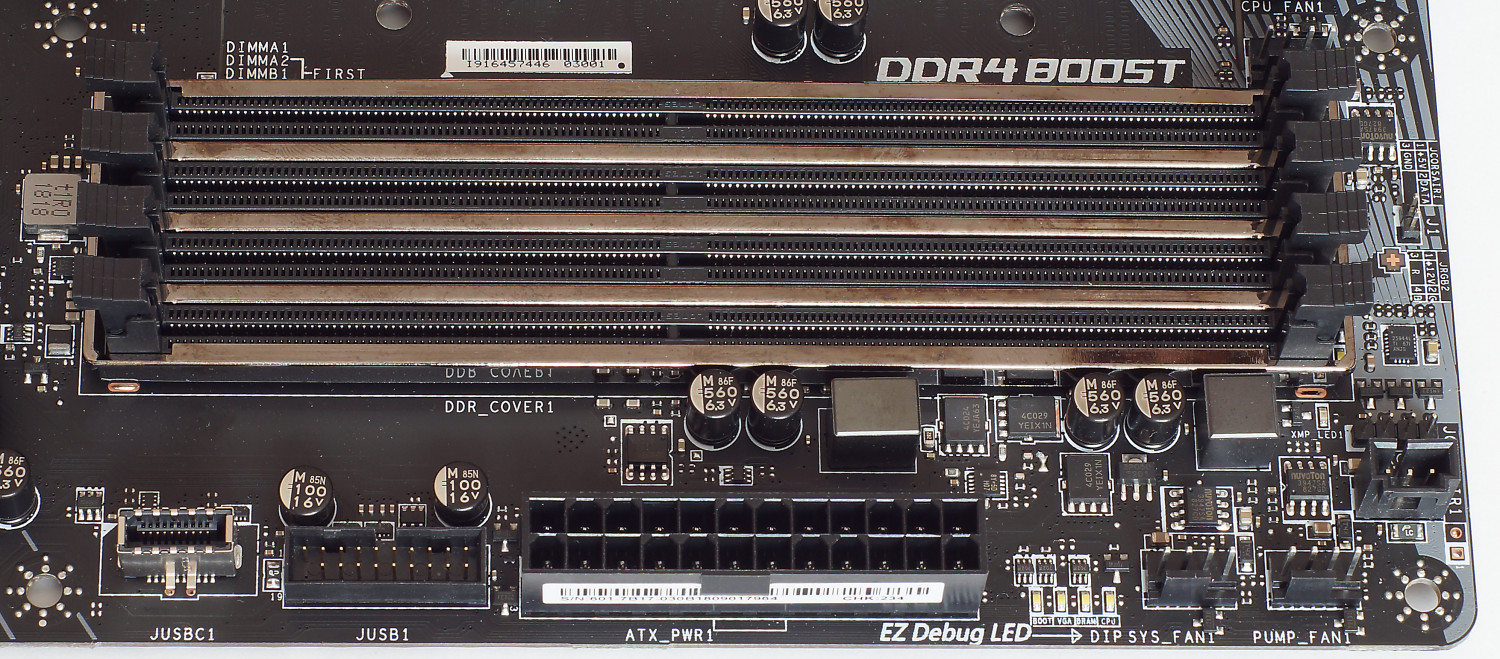
Конфигурация и компоновка слотов PCI-E, а также M.2, вполне типичная для плат топ-уровня. Всего на плате имеется три слота PCI-E x16 (режимы работы x16/x0/x4 или x8/x8/x4), причем два верхних получили защиту Steel Armor. «Расстояние» между этими позволяет задействовать связку из трех видеокарт в режиме AMD CrossFire (двух в режиме Nvidia SLI), причем в первом слот может быть установлена видеокарта, занимающая три слота, а в два нижних – двухслотовые. Остальные три слота – это PCI-E x1 3.0.

Говоря о слотах M.2, то они «полноформатные» (типоразмер 2242/ 2260 /2280/22110) и каждый из них способен работать в режиме PCIe x4 3.0 (32 Гбит/сек) или SATA (6 Гбит/сек), в том числе и в RAID 0/1. Один из них разместился над верхним слотом PCI-E x16, а второй в нижней части.
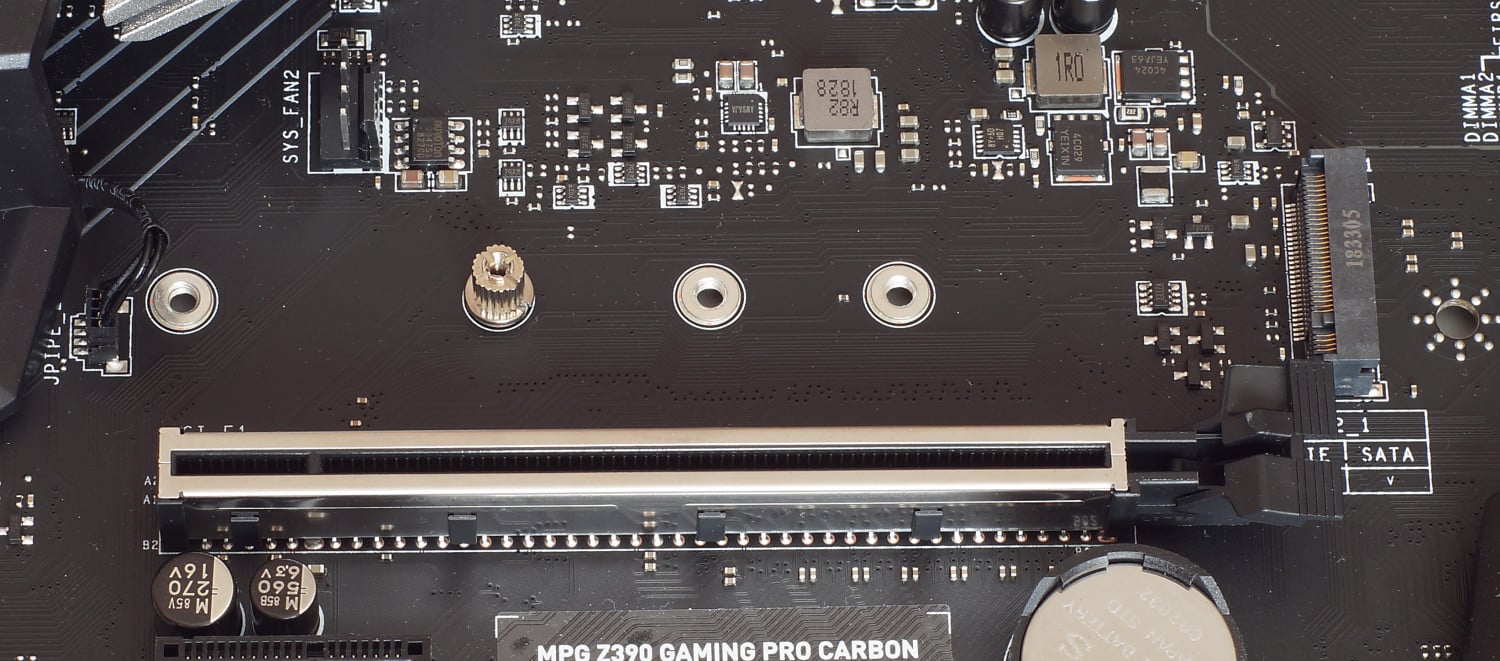
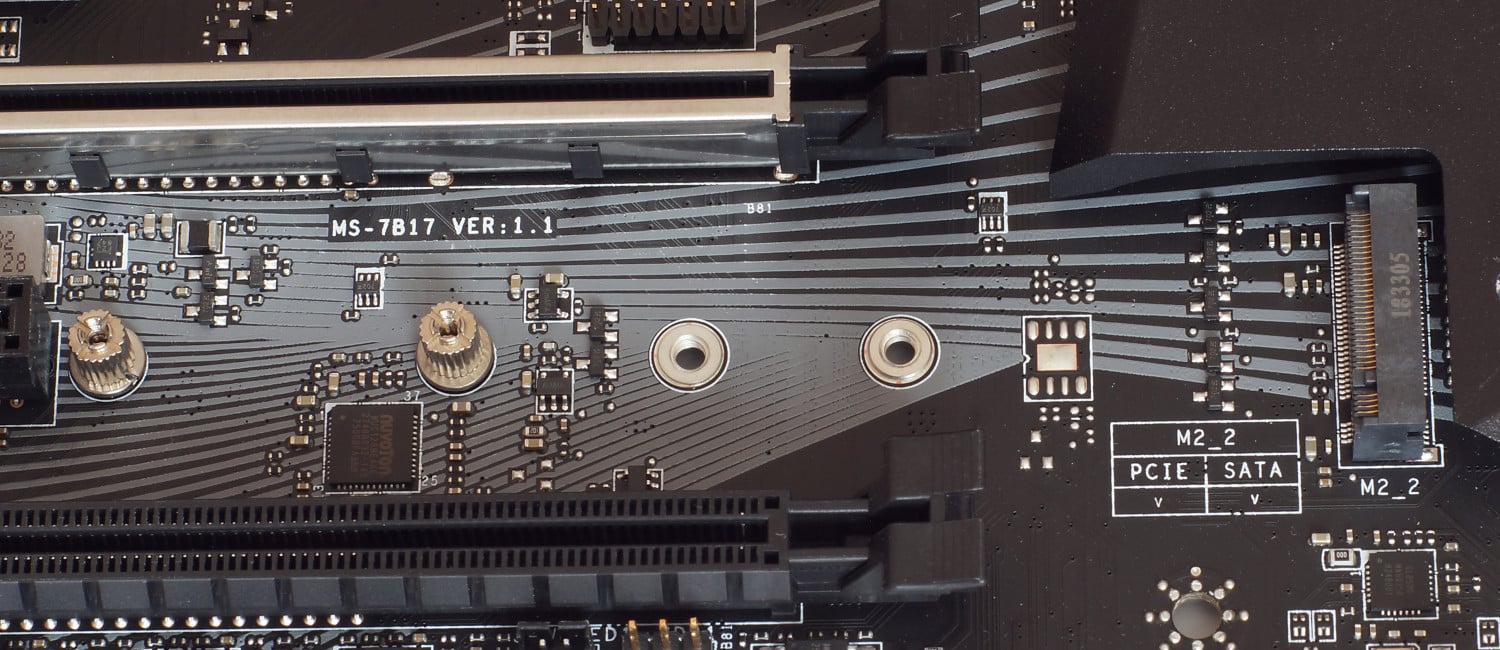
Но, конечно же, имеются ограничения, накладываемые возможностями чипсета Intel Z390. Возможные варианты работы отмечены в таблице ниже.
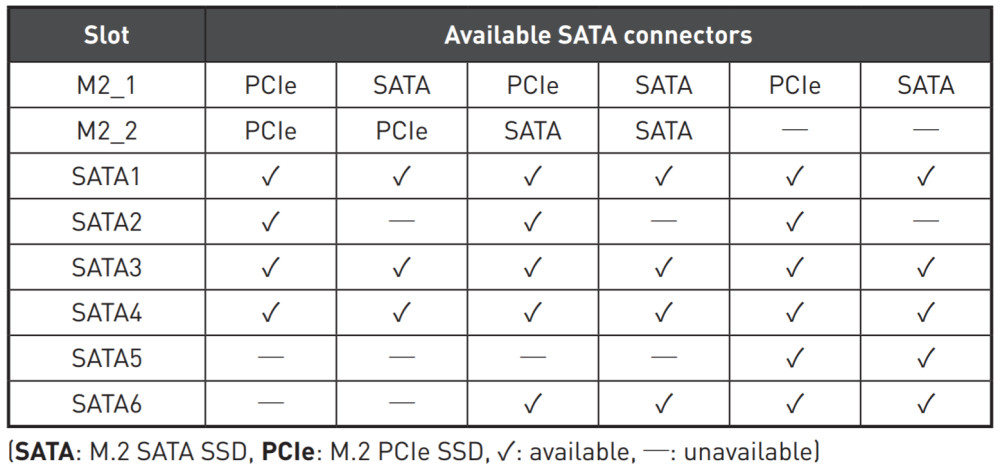
Оригинально компания MSI подошла к реализации системы охлаждения SSD накопителя, устанавливаемого в нижний слот M.2. Она называется M.2 Shield Frozr – это большая пластина-радиатор, которая частично контактирует с основным, достаточно крупным, радиатором чипсета, обеспечивая еще и эффектный внешний вид. Температура последнего, кстати, составила 33,4 °С.
Из оставшегося доступного набора интерфейсов внизу разместились: разъем датчика открытия корпуса, колодка COM-порта, 2 х USB 2.0 (на два порта каждая), Thunderbolt, системная панель. Справа внизу: 6 x SATA 3 (6 Гбит/сек) и колодка на два порта USB 3.1 Gen1 (5 Гбит/сек).

Дополнительных контроллеров на плате не так много. В первую очередь отметим использование изолированной на печатной плате звуковой подсистемы MSI Audio Boost 4 на базе 7.1 HD-кодека Realtek ALC1220P-VB2, накрытого металлическим экраном, в которой применяются японские конденсаторы Nippon Chemi-Con. Еще один это контроллер Nuvoton NCT6797D-M, отвечающий за работу портов ввода-вывода и мониторинг.

Также имеется гигабитный сетевой контроллер Intel I219-V. Вместе с тем имеется слот для установки беспроводного модуля Wi-Fi/Bluetooth и он используетсяв плате MSI Z390 GAMING PRO CARBON AC.
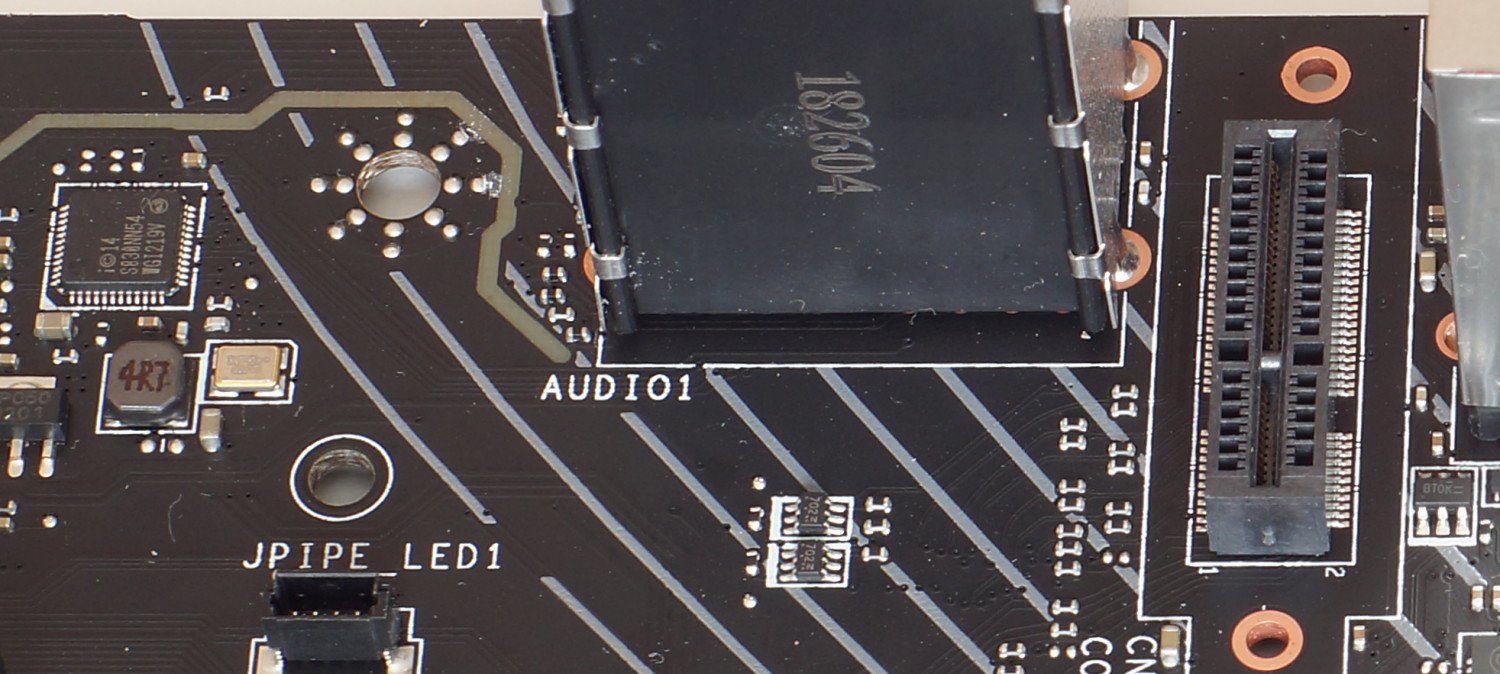
Из-за особенностей задней панели ввода-вывода использовать его в материнской плате MSI Z390 GAMING PRO CARBON будет проблематично – в заглушке не предусмотрено место. Устанавливать отдельно панель в корпус не надо, так как она закреплена кожухе на материнской платы.
Вообще на задней панели ввода-вывода разместился только основной набор портов, хотя хотелось бы большего:
- 1 x комбинированный PS/2 клавиатура/мышь;
- 2 x USB 2.0;
- 1 x HDMI;
- 1 x DisplayPort;
- 3 x USB 3.1 Gen2 тип А;
- 1 x USB 3.1 Gen2 тип С;
- 1 x LAN (RJ45);
- 1 x коннектор Optical S/PDIF;
- 5 x звуковых разъемов OFC.
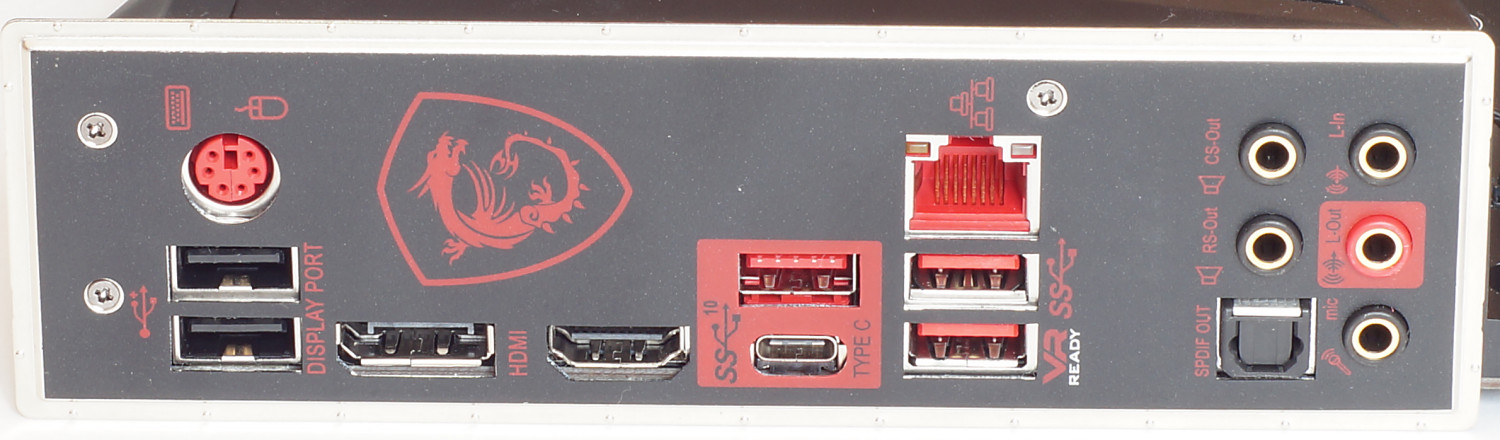
Интерфейс UEFI BIOS
Интерфейс Click BIOS 5 является фирменным для плат MSI и в плане настроек, относительно предшественников, плат на базе чипсета Intel Z370, в материнской плате MSI MPG Z390 GAMING PRO CARBON изменений нет, они такие же, как и в обзоре платы MSI MPG Z390 GAMING PLUS.
Имеются два режима настройки (простой EZ Mode и расширенный Advanced), переход между которыми осуществляется через клавишу F7.
Настройка частот процессора и памяти, таймингов, напряжений, осуществляется через раздел OC и набор опций достаточен, чтобы обеспечить хороший разгон.
Возможно сохранить профили с разными настройками и доступен мониторинг с управлением работой вентиляторов.
Фирменное программное обеспечение
Основными утилитами, доступными через меню DVD-диска материнской платы MSI MPG Z390 GAMING PRO CARBON, являются MSI Dragon Center и Mystic Light. Первая обеспечивает доступ ко всем остальнымприложениям MSI, вторая – берет на себя управление RGB-подсветкой и они также уже были описаны в обзоре платы Z390 GAMING PLUS, поэтому подробно останавливаться на этом не будем.
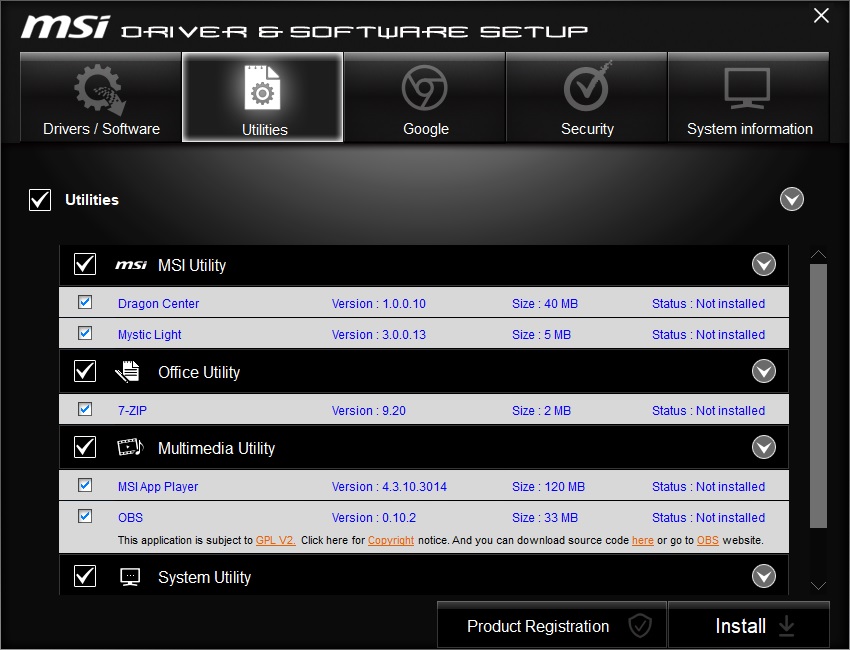
Тестовый стенд
- Процессор Intel Core i5-9600K;
- Термопаста ARCTIC MX-2;
- Система охлаждения Noctua NH-U14S;
- Материнская плата MSI MPG Z390 GAMING PRO CARBON;
- Оперативная память: 2 x 8 Гбайт DDR4-3000 Kingston HyperX Savage HX430C15SB/8 и 2 x 8 Гбайт DDR4-2666 Corsair Vengeance RGB PRO (CMW16GX4M2A2666C16);
- Видеокарта ASUS Radeon R9 390 8Gb DirectCU II;
- Накопители SSD Kingston HyperX Fury 240 Gb;
- Блок питания be quiet! Dark Power Pro 11 850W;
- Корпус открытый стенд.
Фото сборки материнская плата + процессор + система охлаждения + память.
Зоны RGB-подсветки – правая нижняя сторона платы и …
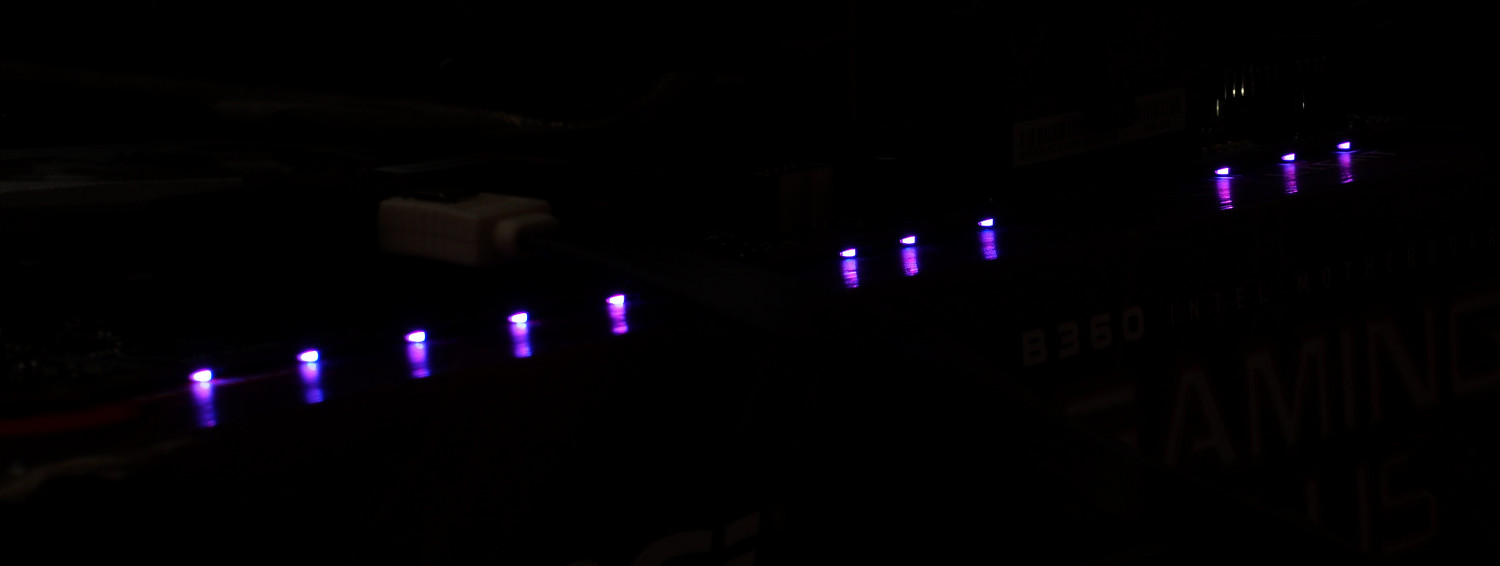
… кожух.
Разгон процессора и памяти
При тестировании материнской платы MSI MPG Z390 GAMING PRO CARBON использовался процессор Intel Core i5 9600K и, как показали многократные эксперименты, это оказался не самый удачный экземпляр.
С точки зрения теста стабильности LinX 0.7.2, пределом оказалась частота 4700 МГц при напряжении 1.27 В. Повышение лимитов, напряжений системного агента и ввода-вывода до 1.15 В не помогло, хотя система работала (проходила бенчмарки) на частоте 4800 МГц при 1.30-1.33 В (температура ядер доходила до 89 °С). Активация профилей, оставшихся от других тестирощиков, для процессоров i7-9700K и i9-9900K (частота 4900 МГц, Vcore=1.35 В), также не дала положительного результата даже при множителе х48.
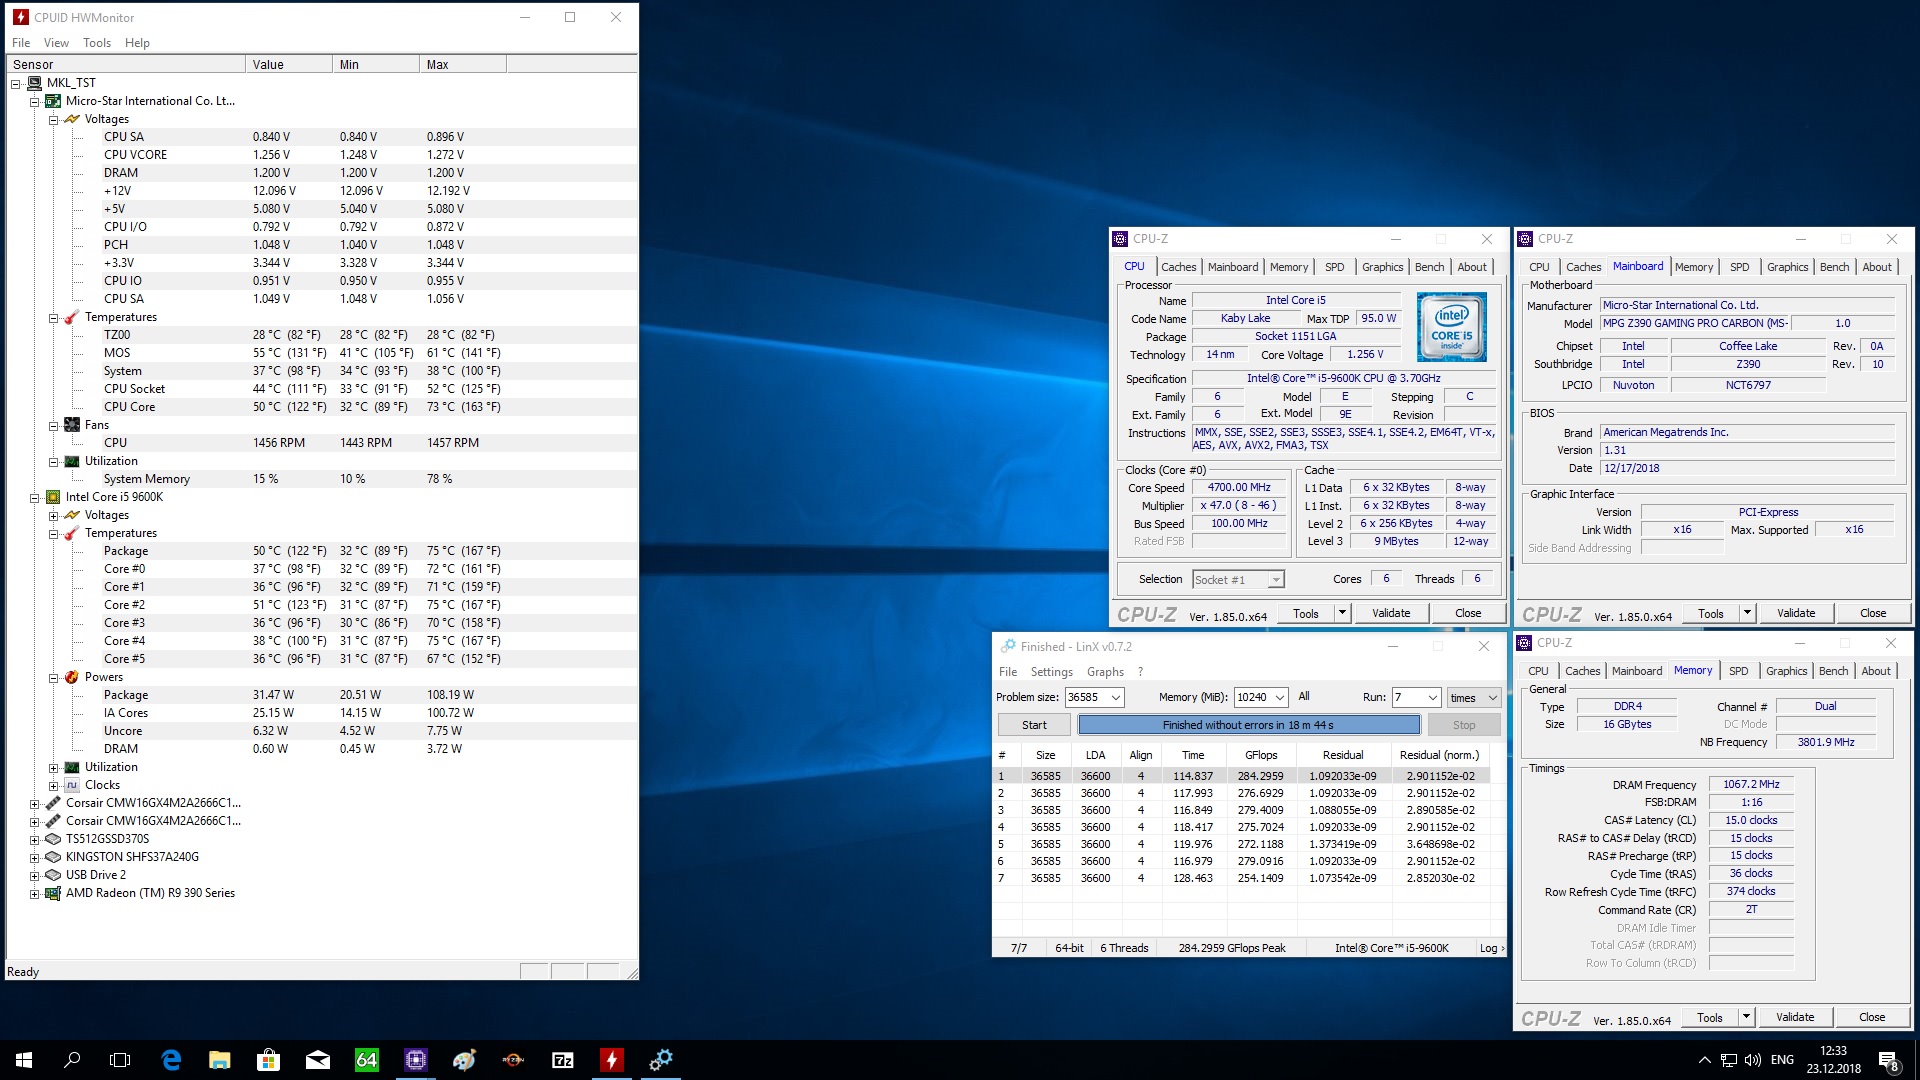
Что касается памяти, то изначально тестирование проводилось с комплектом памяти Kingston HyperX Savage HX430C15SB/8, но недавнее тестирование комплекта памяти 2 x 8 Гбайт DDR4-2666 Corsair Vengeance RGB PRO (CMW16GX4M2A2666C16) и полученный результат 3733 МГц заставил нас все перепроверить. За счет чуть большей частоты системной шины 100.75 МГц комплект работал на частоте 3766 МГц с таймингами 21-23-23-45 при напряжении памяти 1.35 В.
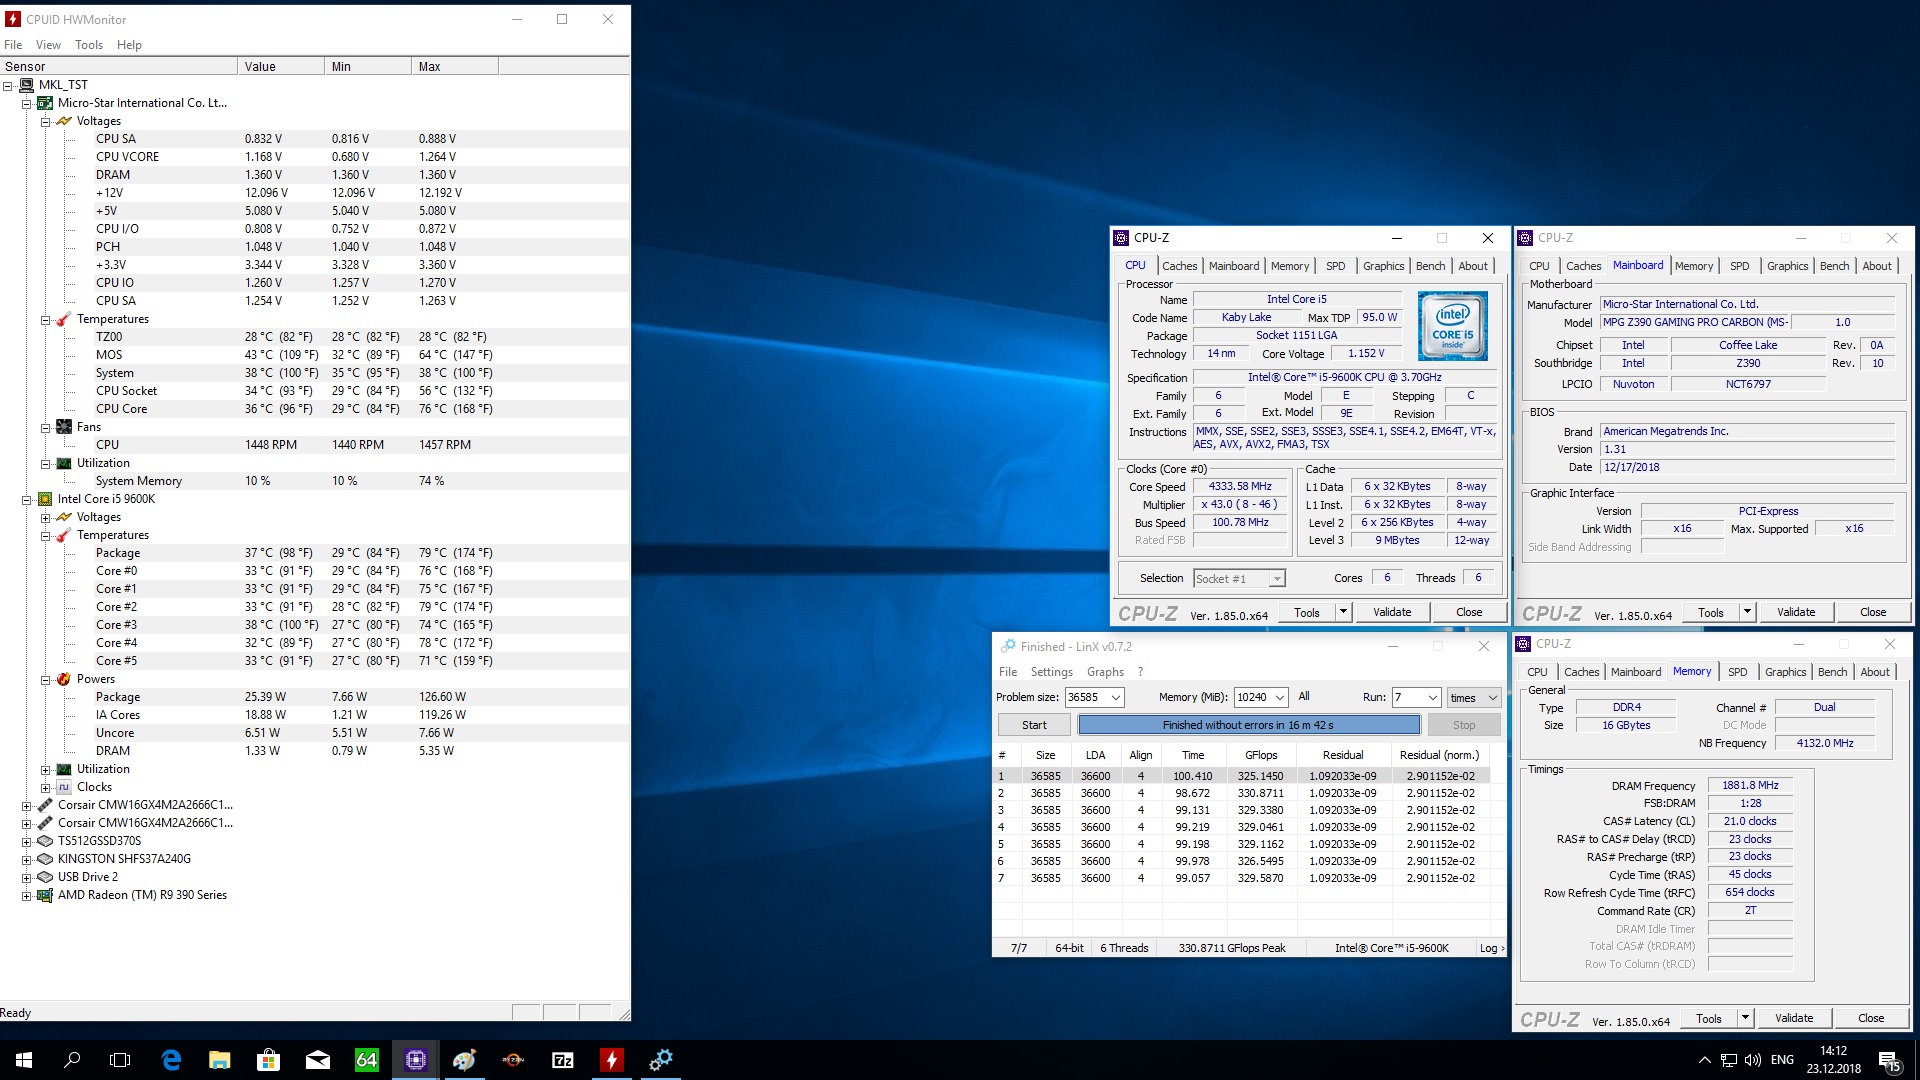
Результат достойный.
Результаты тестирования


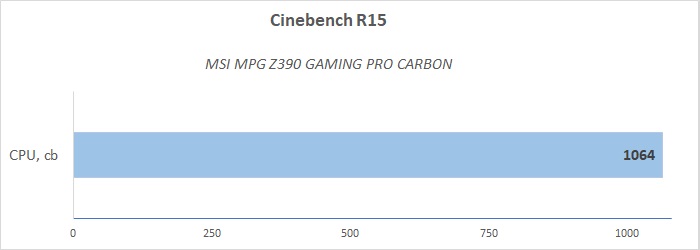
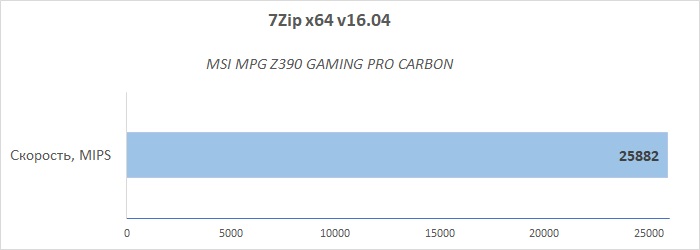
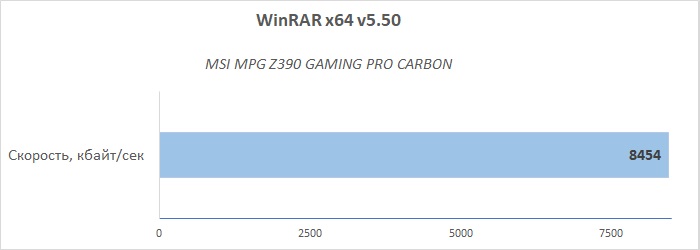
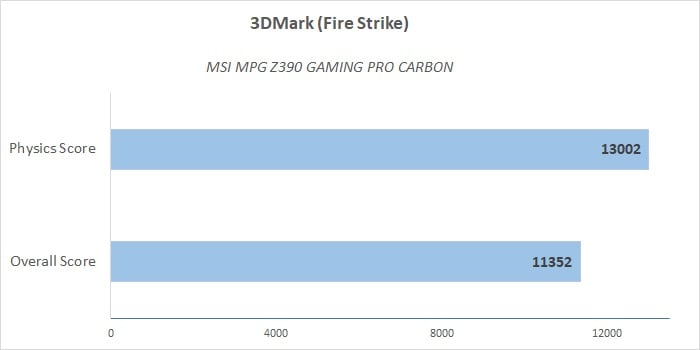
Заключение
Оценивая материнскую плату MSI MPG Z390 GAMING PRO CARBON на фоне MSI MPG Z390 GAMING PLUS, то в ней сохранились преимущества предшественницы и их даже стало больше. В первую очередь отметим более продвинутую систему питания с качественным охлаждением, наличие кожуха с предустановленной задней панелью ввода-вывода, внутреннего порта USB 3.1 Gen2 тип С, несколько зон подсветки Mystic Light. В ней отсутствует большая часть недостатков, таких как наличие для одного слота M.2 (M.2 Shield Frozr), возможность работы пары видеокарт в режиме x8+x8, включая поддержку связки Nvidia SLI.
Так что в плане сборки игровой системы, рассчитанной на перспективу, протестированная плата подходит лучше. Однако часть недостатков осталось, связанная с использованием нового чипсета Intel Z390 и минимизацией дополнительных контроллеров (а нужны ли они?). Например, по-прежнему использование накопителей в слотах M.2 ограничивает использование портов SATA. Кроме того «улучшения» повлияли и на конечную стоимость MSI MPG Z390 GAMING PRO CARBON, которая в рознице продается от 17000 рублей. Она получается дороже почти на 4500 рублей относительно Z390 GAMING PLUS и это немалая разница.
Плюсы:
- Стильный внешний вид;
- Предустановленная задняя панель ввода-вывода;
- 11-и фазная система питания;
- Качественное охлаждение;
- Применение радиатора M.2 Shield Frozr для одного из слотов M.2;
- Наличие внешнего и внутреннего портов USB 3.1 Gen2 тип С (10 Гбит/сек);
- Поддержка AMD CrossFire (3-Way) и Nvidia SLI (2-Way);
- Две зоны RGB-подсветки Mystic Light с возможностью подключения дополнительных лент;
- Удобный интерфейс Click BIOS 5;
- Широкий набор фирменного программного обеспечения;
- Хорошие возможности разгона.
Минусы:
- Ограничение на работу слотов M.2 и портов SATA;
- Низкая «плотность» портов на задней панели ввода-вывода;
- Относительно высокая цена.
I
Quick Start
Quick Start
Thank you for purchasing the MSI
®
MPG Z390 GAMING PRO
CARBON AC/ MPG Z390 GAMING PRO CARBON motherboard. This
Quick Start section provides demonstration diagrams about how to
install your computer. Some of the installations also provide video
demonstrations. Please link to the URL to watch it with the web
browser on your phone or tablet. You may have even link to the URL
by scanning the QR code.
Kurzanleitung
Danke, dass Sie das MSI
®
MPG Z390 GAMING PRO CARBON
AC/ MPG Z390 GAMING PRO CARBON Motherboard gewählt
haben. Dieser Abschnitt der Kurzanleitung bietet eine Demo zur
Installation Ihres Computers. Manche Installationen bieten auch
die Videodemonstrationen. Klicken Sie auf die URL, um diese
Videoanleitung mit Ihrem Browser auf Ihrem Handy oder Table
anzusehen. Oder scannen Sie auch den QR Code mit Ihrem Handy,
um die URL zu öffnen.
Présentation rapide
Merci d’avoir choisi la carte mère MSI
®
MPG Z390 GAMING PRO
CARBON AC/ MPG Z390 GAMING PRO CARBON. Ce manuel fournit
une rapide présentation avec des illustrations explicatives qui
vous aideront à assembler votre ordinateur. Des tutoriels vidéo
sont disponibles pour certaines étapes. Cliquez sur le lien fourni
pour regarder la vidéo sur votre téléphone ou votre tablette. Vous
pouvez également accéder au lien en scannant le QR code qui lui est
associé.
Быстрый старт
Благодарим вас за покупку материнской платы MSI
®
MPG
Z390 GAMING PRO CARBON AC/ MPG Z390 GAMING PRO CARBON.
В этом разделе представлена информация, которая
поможет вам при сборке комьютера. Для некоторых
этапов сборки имеются видеоинструкции. Для просмотра
видео, необходимо открыть соответствующую ссылку в
веб—браузере на вашем телефоне или планшете. Вы также
можете выполнить переход по ссылке, путем сканирования