
23.10.2011

Компьютерный интерфейс 828 Mk II для шины FireWire заменяет модель 828. Новое устройство отличается большим количеством независимых входов-выходов, поддержкой частоты дискретизации 96 кГц, наличием 16-канального MIDI-интерфейса, поддержкой SMPTE-синхронизации, возможностью автономного использования (для управления есть шесть регуляторов и жидкокристаллический дисплей в две строки по 16 символов), пятисегментными светодиодными индикаторами уровней, более развитым мониторным микшером.
Есть два микрофонных/инструментальных входа на передней панели (комбинированные разъемы XLR/джек) с регуляторами чувствительности, кнопками фантомного питания (48 В) и посылами (джеки, до АЦП), восемь симметричных аналоговых входов и восемь выходов (джеки, номинальная чувствительность входов индивидуально переключается +4/-10 дБ), оптический цифровой интерфейс (переключается между двухканальным форматом SPDIF и восьмиканальным форматом ADAT, в формате ADAT поддерживаются четыре канала с частотой дискретизации 88,2 или 96 кГц), электрический цифровой интерфейс формата SPDIF (RCA, поддерживает 24/96), два основных аналоговых выхода (джеки), стереовыход для наушников (джек на передней панели), MIDI-вход и выход, вход и выход Word clock (BNC), вход и выход SMPTE (джеки), вход ADAT-синхронизации (девятиконтактный D-Sub), вход (джек) для педального переключателя (управляет врезкой при записи), два разъема FireWire (возможно одновременное использование нескольких устройств).
Аналого-цифровые и цифро-аналоговые преобразователи поддерживают разрядность 24 бита и частоту дискретизации 96 кГц. Возможна независимая регулировка уровней основных выходов и выхода для наушников. Выход для наушников программно настраивается на дублирование одной из пар выходов или независимую работу. Одновременно можно использовать 20 аудиовходов и 22 выхода.
SMPTE-синхронизация совместима с программами, поддерживающими синхронизацию посредством ASIO2.
Для микширования и мониторинга используется система CueMix DSP. Возможно создание до четырех независимых мониторных стереомиксов, вывод их через любые четыре аналоговые или цифровые пары выходов. Функция CueMix Bounce Back позволяет направить один из миксов обратно в компьютер. Есть восемь пэтчей для сохранения настроек.
Прилагаются драйверы для MacOS 9, MacOS X (10.2 или выше) и Windows Me/2000/XP (поддерживают ASIO, WDM, Wave, GSIF, Core Audio, Core MIDI), программы управления CueMix Console и SMPTE Console, аудиопрограмма AudioDesk для MacOS.
Устройство однорэковое, питается от сети.
При необходимости система может быть расширена дополнительными интерфейсами 828 и 896.
Большой выбор музыкального оборудования со скидками от надежных поставщиков на яндекс маркет — ПРОВЕРИТЬ
Реклама. ООО «ЯНДЕКС», ИНН 7736207543, erid: 5jtCeReNx12oajqr5zKYax3
29 мая 2004
Компьютерный интерфейс 828 Mk II (935$) для шины FireWire заменяет модель 828. Новое устройство отличается большим количеством независимых входов-выходов, поддержкой частоты дискретизации 96 кГц, наличием 16-канального MIDI-интерфейса, поддержкой SMPTE-синхронизации, возможностью автономного использования (для управления есть шесть регуляторов и жидкокристаллический дисплей в две строки по 16 символов), пятисегментными светодиодными индикаторами уровней, более развитым мониторным микшером.
Есть два микрофонных/инструментальных входа на передней панели (комбинированные разъемы XLR/джек) с регуляторами чувствительности, кнопками фантомного питания (48 В) и посылами (джеки, до АЦП), восемь симметричных аналоговых входов и восемь выходов (джеки, номинальная чувствительность входов индивидуально переключается +4/-10 дБ), оптический цифровой интерфейс (переключается между двухканальным форматом SPDIF и восьмиканальным форматом ADAT, в формате ADAT поддерживаются четыре канала с частотой дискретизации 88,2 или 96 кГц), электрический цифровой интерфейс формата SPDIF (RCA, поддерживает 24/96), два основных аналоговых выхода (джеки), стереовыход для наушников (джек на передней панели), MIDI-вход и выход, вход и выход Word clock (BNC), вход и выход SMPTE (джеки), вход ADAT-синхронизации (девятиконтактный D-Sub), вход (джек) для педального переключателя (управляет врезкой при записи), два разъема FireWire (возможно одновременное использование нескольких устройств).

Аналого-цифровые и цифро-аналоговые преобразователи поддерживают разрядность 24 бита и частоту дискретизации 96 кГц. Возможна независимая регулировка уровней основных выходов и выхода для наушников. Выход для наушников программно настраивается на дублирование одной из пар выходов или независимую работу. Одновременно можно использовать 20 аудиовходов и 22 выхода.
SMPTE-синхронизация совместима с программами, поддерживающими синхронизацию посредством ASIO2.
Для микширования и мониторинга используется система CueMix DSP. Возможно создание до четырех независимых мониторных стереомиксов, вывод их через любые четыре аналоговые или цифровые пары выходов. Функция CueMix Bounce Back позволяет направить один из миксов обратно в компьютер. Есть восемь пэтчей для сохранения настроек.
Прилагаются драйверы для MacOS 9, MacOS X (10.2 или выше) и Windows Me/2000/XP (поддерживают ASIO, WDM, Wave, GSIF, Core Audio, Core MIDI), программы управления CueMix Console и SMPTE Console, аудиопрограмма AudioDesk для MacOS.
Устройство однорэковое, питается от сети.
Дополнительная информация:
A&T Trade
Мониторинг цен по объявлениям
Средняя 729.
790 (15.04.2004), 750 (11.06.2004), 870 (19.10.2004), 800 (02.02.2005), 700 (17.02.2005), 750 (19.03.2005), 750 (26.03.2005), 720 (26.03.2005), 720 (28.03.2005), 700 (09.10.2005), 700 (19.10.2005), 750 (04.12.2005), 700 (06.01.2006), 650 (19.03.2006), 700 (02.07.2006), 680 (22.10.2006), 600 (19.11.2006), 800 (30.09.2007).
Приводятся цены по объявлениям, ранее размещенным на сайте МО в разделе Продажа. Полный список здесь.
Большой выбор музыкального оборудования со скидками от надежных поставщиков на яндекс маркет — ПРОВЕРИТЬ
Реклама. ООО «ЯНДЕКС», ИНН 7736207543, erid: 5jtCeReNx12oajqr5zKYax3

828x
User Guide for Mac
™
1280 Massachusetts Avenue
Cambridge, MA 02138
Business voice: (617) 576-2760
Business fax: (617) 576-3609
Web site: www.motu.com
Tech support: www.motu.com/support

About the Mark of the Unicorn License Agreement and
Limited Warranty on Software
TO PERSONS WHO PURCHASE OR USE THIS PRODUCT: carefully read all the
terms and conditions of the “click-wrap” license agreement presented to you when
you install the software. Using the software or this documentation indicates your
acceptance of the terms and conditions of that license agreement.
Mark of the Unicorn, Inc. (“MOTU”) owns both this program and its documentation.
Both the program and the documentation are protected under applicable copyright,
trademark, and trade-secret laws. Your right to use the program and the
documentation are limited to the terms and conditions described in the license
agreement.
Reminder of the terms of your license
This summary is not your license agreement, just a reminder of its terms. The actual
license can be read and printed by running the installation program for the software.
That license agreement is a contract, and clicking “Accept” binds you and MOTU to
all its terms and conditions. In the event anything contained in this summary is
incomplete or in conflict with the actual click-wrap license agreement, the terms of the
click-wrap agreement prevail.
YOU MAY: (a) use the enclosed program on a single computer; (b) physically transfer
the program from one computer to another provided that the program is used on only
one computer at a time and that you remove any copies of the program from the
computer from which the program is being transferred; (c) make copies of the
program solely for backup purposes. You must reproduce and include the copyright
notice on a label on any backup copy.
YOU MAY NOT: (a) distribute copies of the program or the documentation to others;
(b) rent, lease or grant sublicenses or other rights to the program; (c) provide use of
the program in a computer service business, network, time-sharing, multiple CPU or
multiple user arrangement without the prior written consent of MOTU; (d) translate,
adapt, reverse engineer, decompile, disassemble, or otherwise alter the program or
related documentation without the prior written consent of MOTU.
MOTU warrants to the original licensee that the disk(s) on which the program is
recorded be free from defects in materials and workmanship under normal use for a
period of ninety (90) days from the date of purchase as evidenced by a copy of your
receipt. If failure of the disk has resulted from accident, abuse or misapplication of the
product, then MOTU shall have no responsibility to replace the disk(s) under this
Limited Warranty.
THIS LIMITED WARRANTY AND RIGHT OF REPLACEMENT IS IN LIEU OF,
AND YOU HEREBY WAIVE, ANY AND ALL OTHER WARRANTIES, BOTH
EXPRESS AND IMPLIED, INCLUDING BUT NOT LIMITED TO WARRANTIES
OF MERCHANTABILITY AND FITNESS FOR A PARTICULAR PURPOSE. THE
LIABILITY OF MOTU PURSUANT TO THIS LIMITED WARRANTY SHALL BE
LIMITED TO THE REPLACEMENT OF THE DEFECTIVE DISK(S), AND IN NO
EVENT SHALL MOTU OR ITS SUPPLIERS, LICENSORS, OR AFFILIATES BE
LIABLE FOR INCIDENTAL OR CONSEQUENTIAL DAMAGES, INCLUDING
BUT NOT LIMITED TO LOSS OF USE, LOSS OF PROFITS, LOSS OF DATA OR
DATA BEING RENDERED INACCURATE, OR LOSSES SUSTAINED BY THIRD
PARTIES EVEN IF MOTU HAS BEEN ADVISED OF THE POSSIBILITY OF
SUCH DAMAGES. THIS WARRANTY GIVES YOU SPECIFIC LEGAL RIGHTS
WHICH MAY VARY FROM STATE TO STATE. SOME STATES DO NOT ALLOW
THE LIMITATION OR EXCLUSION OF LIABILITY FOR CONSEQUENTIAL
DAMAGES, SO THE ABOVE LIMITATION MAY NOT APPLY TO YOU.
Update Policy
In order to be eligible to obtain updates of the program, you must complete and return
the attached Mark of the Unicorn Purchaser Registration Card to MOTU.
Copyright Notice
Copyright © 2013, 2012, 2011, 2010, 2009, 2008, 2007, 2006, 2005, 2004, 2003 by
Mark of the Unicorn, Inc. All rights reserved. No part of this publication may be
reproduced, transmitted, transcribed, stored in a retrieval system, or translated into
any human or computer language, in any form or by any means whatsoever, without
express written permission of Mark of the Unicorn, Inc., 1280 Massachusetts
Avenue, Cambridge, MA, 02138, U.S.A.
Limited Warranty on Hardware
Mark of the Unicorn, Inc. and S&S Research (“MOTU/S&S”) warrant this equipment
against defects in materials and workmanship for a period of TWO (2) YEARS from
the date of original retail purchase. This warranty applies only to hardware products;
MOTU software is licensed and warranted pursuant to separate written statements.
If you discover a defect, first write or call Mark of the Unicorn at (617) 576-2760 to
obtain a Return Merchandise Authorization Number. No service will be performed on
any product returned without prior authorization. MOTU will, at its option, repair or
replace the product at no charge to you, provided you return it during the warranty
period, with transportation charges prepaid, to Mark of the Unicorn, Inc., 1280
Massachusetts Avenue, MA 02138. You must use the product’s original packing
material for in shipment, and insure the shipment for the value of the product. Please
include your name, address, telephone number, a description of the problem, and
the original, dated bill of sale with the returned unit and print the Return Merchandise
Authorization Number on the outside of the box below the shipping address.
This warranty does not apply if the equipment has been damaged by accident,
abuse, misuse, or misapplication; has been modified without the written permission
of MOTU, or if the product serial number has been removed or defaced.
ALL IMPLIED WARRANTIES, INCLUDING IMPLIED WARRANTIES OF
MERCHANTABILITY AND FITNESS FOR A PARTICULAR PURPOSE, ARE
LIMITED IN DURATION TO TWO (2) YEARS FROM THE DATE OF THE
ORIGINAL RETAIL PURCHASE OF THIS PRODUCT.
THE WARRANTY AND REMEDIES SET FORTH ABOVE ARE EXCLUSIVE
AND IN LIEU OF ALL OTHERS, ORAL OR WRITTEN, EXPRESS OR IMPLIED.
No MOTU/S&S dealer, agent, or employee is authorized to make any modification,
extension, or addition to this warranty.
MOTU/S&S ARE NOT RESPONSIBLE FOR SPECIAL, INCIDENTAL, OR
CONSEQUENTIAL DAMAGES RESULTING FROM ANY BREACH OF
WARRANTY, OR UNDER ANY LEGAL THEORY, INCLUDING LOST PROFITS,
DOWNTIME, GOODWILL, DAMAGE OR REPLACEMENT OF EQUIPMENT
AND PROPERTY AND COST OF RECOVERING REPROGRAMMING, OR
REPRODUCING ANY PROGRAM OR DATA STORED IN OR USED WITH
MOTU/S&S PRODUCTS.
Some states do not allow the exclusion or limitation of implied warranties or liability for
incidental or consequential damages, so the above limitation or exclusion may not
apply to you. This warranty gives you specific legal rights, and you may have other
rights which vary from state to state.
MOTU, AudioDesk, Mark of the Unicorn and the unicorn silhouette logo are
trademarks of Mark of the Unicorn, Inc.
Thunderbolt and the Thunderbolt logo are trademarks of Intel Corporation in the U.S.
and/or other countries.
This equipment has been type tested and found to comply with the limits for a class B digital device,
pursuant to Part 15 of the FCC Rules. These limits are designed to provide reasonable protection
against harmful interference in a residential installation. This equipment generates, uses, and can
radiate radio frequency energy and, if not installed and used in accordance with the instruction manual,
may cause harmful interference to radio communications. However, there is no guarantee that
interference will not occur in a particular installation. If this equipment does cause interference to radio
or television equipment reception, which can be determined by turning the equipment off and on, the
user is encouraged to try to correct the interference by any combination of the following measures:
• Relocate or reorient the receiving antenna
• Increase the separation between the equipment and the receiver
• Plug the equipment into an outlet on a circuit different from that to which the receiver is connected
If necessary, you can consult a dealer or experienced radio/television technician for additional
assistance.
PLEASE NOTE: only equipment certified to comply with Class B (computer input/output devices,
terminals, printers, etc.) should be attached to this equipment, and it must have shielded interface
cables in order to comply with the Class B FCC limits on RF emissions.
WARNING: changes or modifications to this unit not expressly approved by the party
responsible for compliance could void the user’s authority to operate the equipment.

Contents
Part 1: Getting Started
7
Quick Reference: 828x Front Panel
Quick Reference: 828x Rear Panel
8
9
Quick Reference: MOTU Audio Setup
About the 828x
11
17
Packing List and System Requirements
Installing the 828x Software
19
23
Installing the 828x Hardware
Part 2: Using the 828x
MOTU Audio Setup
39
Front Panel Operation
45
55
Configuring Host Audio Software
Reducing Monitoring Latency
63
69
CueMix FX
MOTU SMPTE Setup
115
Part 3: Appendices
Troubleshooting
121
123
Audio I/O reference
III

SAFETY PRECAUTIONS AND ELECTRICAL REQUIREMENTS
CAUTION! READ THIS SAFETY GUIDE BEFORE YOU BEGIN INSTALLATION OR OPERATION. FAILURE TO COMPLY WITH SAFETY INSTRUCTIONS
COULD RESULT IN BODILY INJURY OR EQUIPMENT DAMAGE.
HAZARDOUS VOLAGES: CONTACT MAY CAUSE ELECTRIC SHOCK OR BURN. TURN OFF UNIT BEFORE SERVICING.
WARNING: TO REDUCE THE RISK OF FIRE OR ELECTRICAL SHOCK, DO NOT EXPOSE THIS APPLIANCE TO RAIN OR OTHER MOISTURE.
CAUTION: TO REDUCE THE RISK OF ELECTRICAL SHOCK, DO NOT REMOVE COVER. NO USER-SERVICEABLE PARTS INSIDE. REFER SERVICING TO
QUALIFIED SERVICE PERSONNEL.
WARNING: DO NOT PERMIT FINGERS TO TOUCH THE TERMINALS OF PLUGS WHEN INSTALLING OR REMOVING THE PLUG TO OR FROM THE OUTLET.
WARNING: IF NOT PROPERLY GROUNDED THE MOTU 828x COULD CAUSE AN ELECTRICAL SHOCK.
The MOTU 828x is equipped with a three-conductor cord and grounding type plug which has a grounding prong, approved by Underwriters’ Laboratories and the Canadian Standards Association.
This plug requires a mating three-conductor grounded type outlet as shown in Figure A below. If the outlet you are planning to use for the MOTU 828x is of the two prong type, DO NOT REMOVE OR
ALTER THE GROUNDING PRONG IN ANY MANNER. Use an adapter as shown below and always connect the grounding lug to a known ground. It is recommended that you have a qualified
electrician replace the TWO prong outlet with a properly grounded THREE prong outlet. An adapter as illustrated below in Figure B is available for connecting plugs to two-prong receptacles.
Figure A Figure B
Grounding lug
Screw
3-prong plug
Grounding prong
Properly grounded 3-prong outlet
3-prong plug
Mak e sur e th is i s con nec ted to
a known ground.
Adapter
Two-prong receptacle
WARNING: THE GREEN GROUNDING LUG EXTENDING FROM THE ADAPTER MUST BE CONNECTED TO A PERMANENT GROUND SUCH AS TO A
PROPERLY GROUNDED OUTLET BOX. NOT ALL OUTLET BOXES ARE PROPERLY GROUNDED.
If you are not sure that your outlet box is properly grounded, have it checked by a qualified electrician. NOTE: The adapter illustrated is for use only if you already have a properly grounded two-prong
receptacle. Adapter is not allowed in Canada by the Canadian Electrical Code. Use only three wire extension cords which have three-prong grounding type plugs and three-prong receptacles which
will accept the MOTU 828x plug.
IMPORTANT SAFEGUARDS
1. Read these instructions. All the safety and operating instructions should be read before operating the 828x.
2. Keep these instructions. These safety instructions and the 828x owner’s manual should be retained for future reference.
3. Heed all warnings. All warnings on the 828x and in the owner’s manual should be adhered to.
4. Follow all Instructions. All operating and use instructions should be followed.
5. Do not use the 828x near water.
6. Cleaning — Unplug the 828x from the computer and clean only with a dry cloth. Do not use liquid or aerosol cleaners.
7. Ventilation — Do not block any ventilation openings. Install in accordance with the manufacturer’s instructions.
8. Heat — Do not install the 828x near any heat sources such as radiators, heat registers, stoves, or another apparatus (including an amplifier) that produces heat.
9. Overloading — Do not overload wall outlets and extension cords as this can result in a risk of fire or electrical shock.
10. Grounding — Do not defeat the safety purpose of the polarized or grounding-type plug. A polarized plug has two blades with one wider than the other. A grounding-type plug has two blades and a third grounding prong. The wide blade
or the third prong are provided for your safety. If the provided plug does not fit into your outlet, consult and electrician for replacement of the obsolete outlet.
11. Power cord — Protect the 828x power cord from being walked on or pinched by items placed upon or against them. Pay particular attention to cords and plugs, convenience receptacles, and the point where they exit from the unit.
12. Power switch — Install the 828x so that the power switch can be accessed and operated at all times.
13. Disconnect — The main plug is considered to be the disconnect device for the 828x and shall remain readily operable.
14. Accessories — Only use attachments/accessories specified by the manufacturer.
15. Placement — Use only with the cart, stand, tripod, bracket or table specified by the manufacturer, or sold with the 828x. When a cart is used, use caution when moving the cart/apparatus combination to avoid injury from tip-over.
16. Surge protection — Unplug the 828x during lightning storms or when unused for long periods of time.
17. Servicing — Refer all servicing to qualified service personnel. Servicing is required when the 828x has been damaged in any way, such as when a power-supply cord or plug is damaged, liquid has been spilled or objects have fallen
into the 828x, the 828x has been exposed to rain or moisture, does not operate normally, or has been dropped.
18. Power Sources — Refer to the manufacturer’s operating instructions for power requirements. Be advised that different operating voltages may require the use of a different line cord and/or attachment plug.
19. Installation — Do not install the 828x in an unventilated rack, or directly above heat-producing equipment such as power amplifiers. Observe the maximum ambient operating temperature listed below.
20. Power amplifiers- Never attach audio power amplifier outputs directly to any of the unit’s connectors.
21. Replacement Parts — When replacement parts are required, be sure the service technician has used replacement parts specified by the manufacturer or have the same characteristics as the original part. Unauthorized substitutions
may result in fire, electric shock or other hazards.
22. Safety Check — Upon completion of any service or repairs to this MOTU 828x, ask the service technician to perform safety checks to determine that the product is in safe operating conditions.
ENVIRONMENT
Operating Temperature: 10°C to 40°C (50°F to 104°)
TO REDUCE THE RISK OF ELECTRICAL SHOCK OR FIRE
Do not handle the power cord with wet hands. Do not pull on the power cord when disconnecting it from an AC wall outlet. Grasp it by the plug. Do not expose this apparatus to rain or moisture. Do not place objects containing liquids on it.
AC INPUT
100 — 240VAC ~ • 50 / 60Hz • 20 Watts.

Part 1
Getting Started


10
111213141516
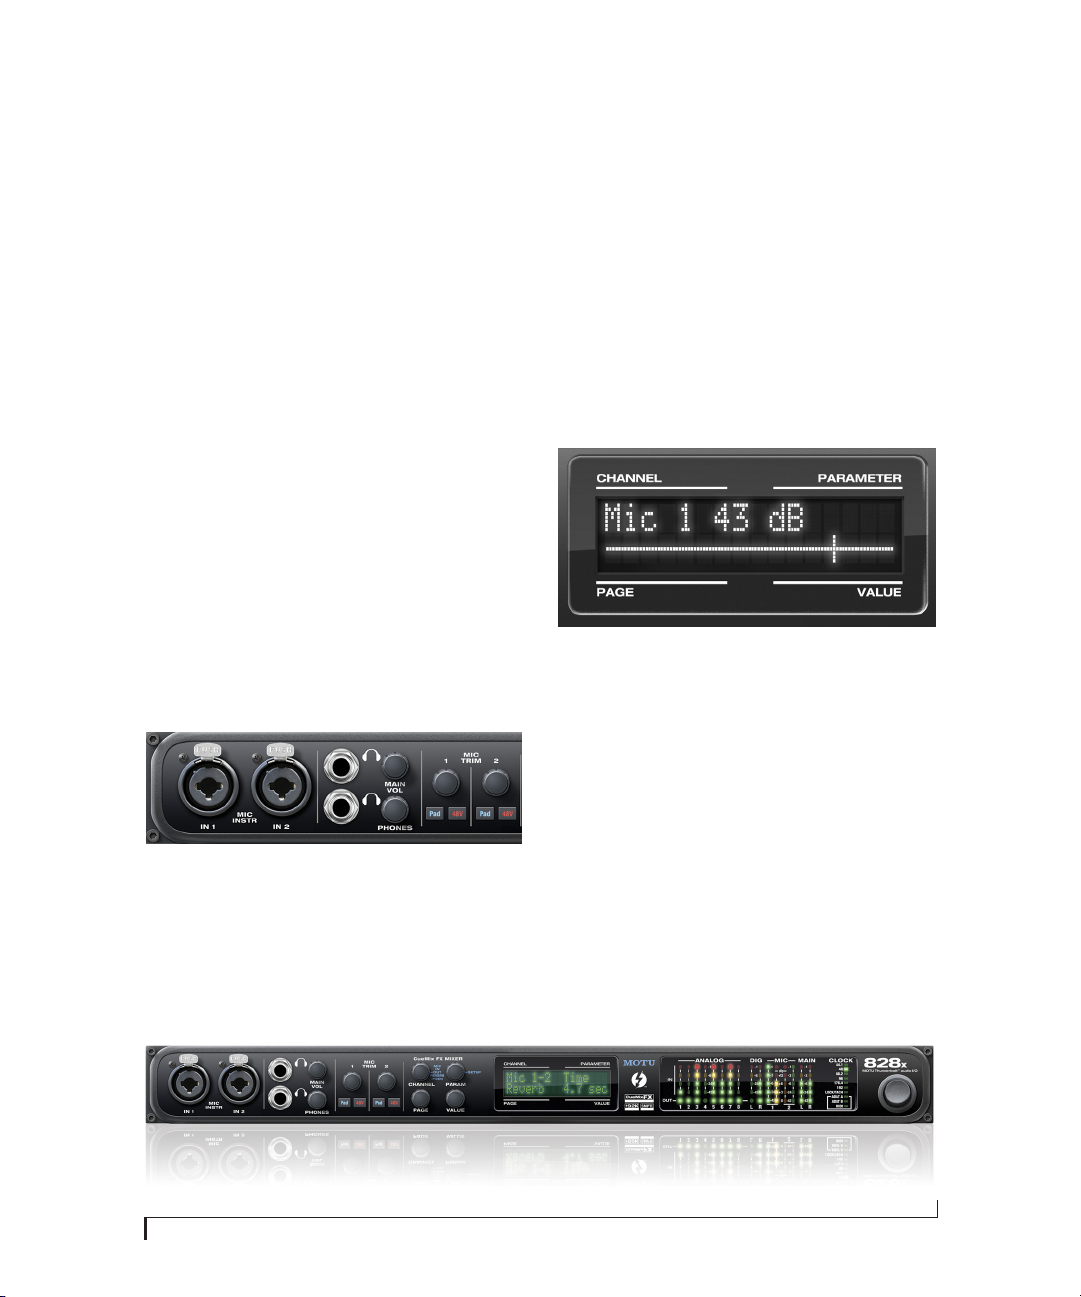
CueMix FX settings, depending on which knobs you turn.
The labels above and below the LCD refer to the four
digital rotary encoders to the left of the LCD. These knobs
let you access and program all settings in the 828x.
four main sections of the mixer: mix busses, inputs,
outputs and the reverb module. Push the PARAM knob to
enter the SETUP menu, which provides global 828x
settings, such as the global sample rate, etc.
phantom power for each mic input. The Precision Digital
Trim™ knob provides 53 dB of gain.
(when the 828x is operating at 44.1/48 kHz), but it can
mirror any other output pair (digital or analog). For
example, at 88.2/96 kHz, it defaults to mirroring the
main outs. As the primary phone jack, it has its own
13. The multi-purpose backlit LCD shows system settings or
off, signals that hit zero or above will clip (a hard digital
clip). However, with V-Limit turned on, signals can go as
high as +12 dB above zero with no digital clipping. If the
signal then goes above +12 dB, it will clip, even with
V-Limit engaged.
14. Push the CHANNEL knob repeatedly to cycle among the
VOL knob to control output level.
8. Five-segment metering for the main outs. Use the MAIN
9. These lights indicate the global sample rate at which the
15. Use these buttons to toggle the -20 dB pad and 48V
828x is operating. Use the MOTU Audio Setup software to
set the sample rate or to choose an external clock source,
from which the sample rate will be derived. When no
clock signal is currently present, one of these LEDs
flashes rapidly.
16. From the factory, the PHONES jack is a discrete output
10. Thunderbolt and USB are “plug-and-play” protocols. That
dedicated volume knob (to its right).
means that you can turn off the 828x and turn it back on
without restarting your computer.
LOCK/TACH LED glows when lockup has been achieved.
The ADAT and MIDI LEDs blink when there is optical
audio or MIDI activity, respectively.
panel TRS analog and SPDIF outputs. Their threshold is
around -42 dB. They do not indicate clipping in any way;
11. When the 828x is resolving to SMPTE time code, the
use your host audio software level meters to calibrate
12. These round LEDs indicate signal presence on the 8 rear-
output levels.
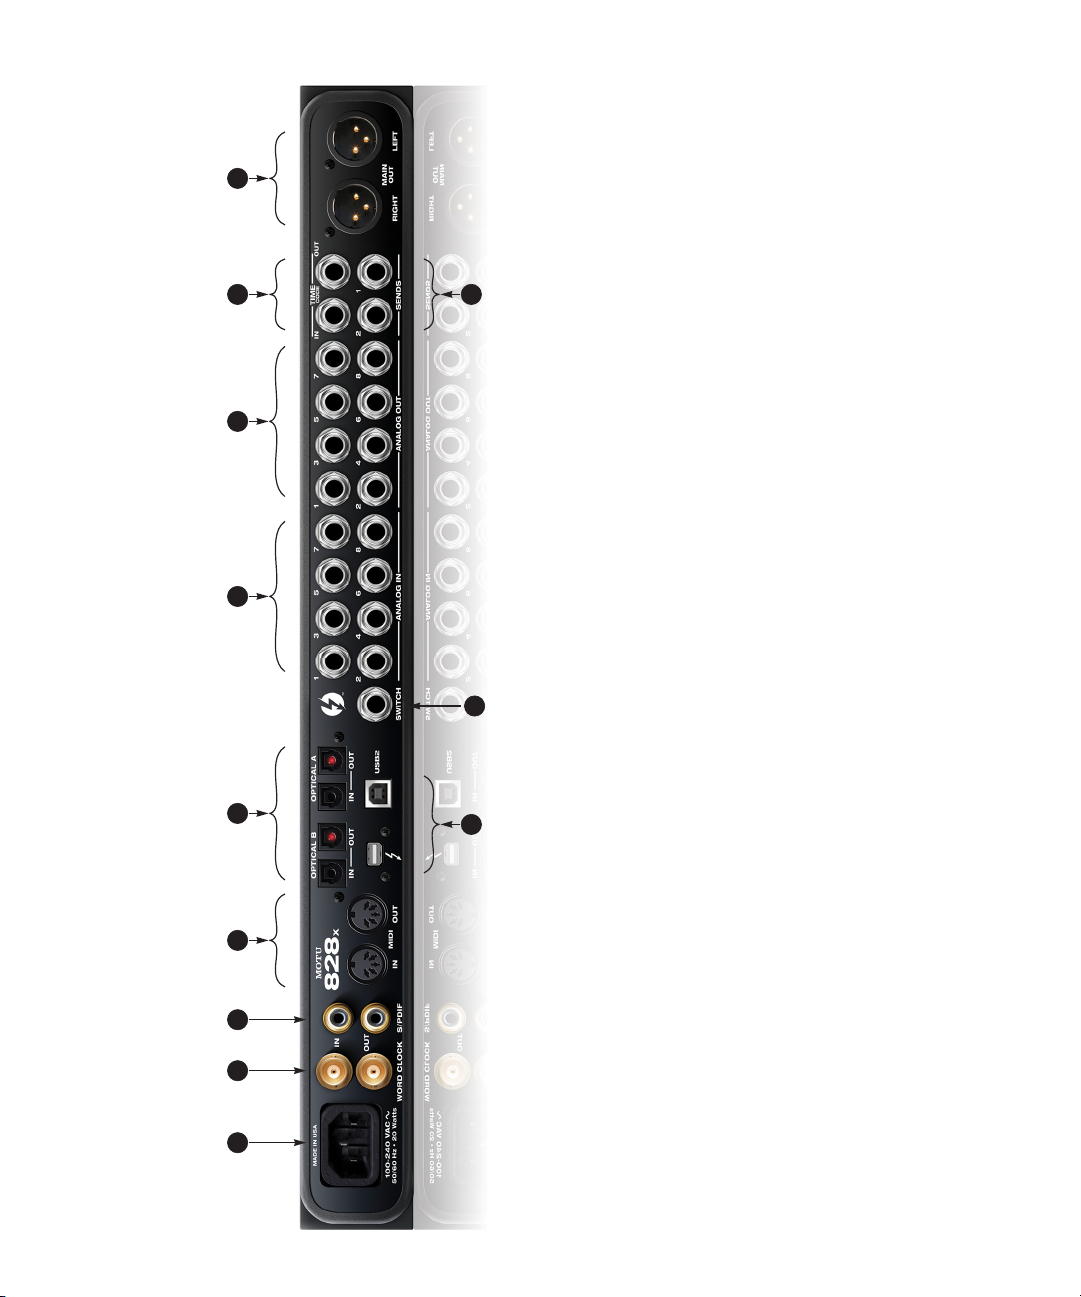
Quick Reference: 828x Front Panel
of headroom above zero with no clipping or digital
distortion. See “Mic/guitar inputs meters with V-Limit™
compressor” on page 46 for details. Use the rear panel
sends to route these inputs to your favorite outboard
gear. Use any rear-panel input as a return.
and effects. There are eight stereo mix busses: each bus
mixes all inputs (or any subset you wish) to a stereo
output of your choice. You can apply EQ, compression,
and reverb to inputs, outputs and mix busses. The four
knobs to the left of the LCD correspond directly to the
four labeled sections of the LCD. Use the CHANNEL knob
to choose the input, output or mix you wish to edit. Push
it to switch among inputs, outputs and busses, then turn
it to choose the desired channel or bus. Use the PAGE,
PARAM and VALUE knobs to access the mix settings for
the chosen channel.
4. This section controls the 828x’s built-in CueMix FX mixer
analog TRS input jacks on the rear panel.
5. This bank of four-segment input meters is for the 8
two front-panel mic/guitar inputs. The meters show
input levels from -42 to -1 in the first column of LEDs,
plus an additional range in a second column from zero to
+12 dB (including clip). Both inputs are equipped with
6. Four-segment stereo metering for S/PDIF input.
7. This section provides two ten-segment meters for the
V-Limit™, a hardware limiter. With the limiter turned
2 31 4 5 6 7 8 9
quarter-inch guitar cable. Both the low-impedance XLR
jack and the high-impedance TRS jack are equipped with
a preamp (so don’t connect a +4 line level XLR cable!)
headphone jack. Its output is hard-wired to mirror the
XLR main outs on the rear panel. From the factory, the
MAIN VOL knob next to it controls the main outs and this
jack, but MAIN VOL can be programmed to control any
combination of outputs. See “The Monitor Group” on
page 91 for details. Push the knob once to view the
current volume setting in the LCD display; push it again
to mute the monitor group; push a third time to return to
the previous volume. Note: if the Monitor Group is
programmed to not include the main outs, the MAIN VOL
knob will no longer control the volume of this phone
jack, either.
gain for the XLR mic input and the hi-Z TRS guitar/instru-
ment input. Both inputs have preamps, so you can plug
just about anything into them: a microphone, a guitar, a
synth — but don’t plug in a +4 signal here (due to the
preamps): use a rear-panel TRS input instead. Use the
trim knob and the “MIC” input level meters over in the
metering section to calibrate the input signal level. The
meters cover both the TRS and XLR input. These mic
inputs are also equipped with the 828x’s V-Limit™
1. These XLR/TRS combo jacks accept either a mic cable or a
2. The upper phone jack is a standard quarter-inch stereo
3. These two trim knobs provide approximately 53 dB of
hardware limiter, which provides an additional +12 dB
1012
supply the pre amplified input signal from the mic/
guitar/instrument inputs on the front panel. Use them to
insert your favorite compressor, EQ, reverb or other
outboard effect. Use any TRS input as a return.
punch-in and punch-out during recording. For details
about how to set this up, see “Enable Pedal” on page 44.
Thunderbolt or USB 2.0, using a standard Thunderbolt or
USB cable. If you use Thunderbolt, you can daisy-chain
up to six Thunderbolt devices together, with the 828x at
the end of the chain (because it has one Thunderbolt
port). For details, see “Connecting multiple 828x inter-
10. These two quarter-inch balanced TRS send outputs
11. Connect a standard foot switch here for hands-free
12. Connect the 828x to the computer here via either
faces” on page 35.
6 7 8 9
approximately 1 dB increments from either front panel
LCD or the included CueMix FX software. The trim can be
adjusted over a range of -96 to +22 dB.
(tip/ring/sleeve) quarter-inch connectors that can also
accept an unbalanced plug. They are equipped with
24-bit 192 kHz converters.
jacks. Use them to resolve the 828x directly to time code
and transmit time code to other devices.
You can connect them to a set of powered studio
monitors and then control the volume from the front
panel MAIN VOL knob.
To hear audio playback from your host audio software on
these main outs, assign the audio tracks (and master
fader) to these main outs. You can also use CueMix FX to
7. The 828x’s eight analog outputs are balanced +4dB TRS
8. These are quarter-inch analog SMPTE input and output
9. These two XLR jacks serve as the 828x’s main outputs.
monitor live 828x inputs here as well.
11
Quick Reference: 828x Rear Panel
compatible device, such as an effects processor or DAT
machine. Be sure to set the format in the MOTU Audio
Setup software (or using the front panel LCD). (See
“Optical input/output” on page 43) for details.) ADAT
optical supplies eight channels of 24-bit digital I/O per
bank (4 channels per bank at 96kHz). TOSLink is stereo at
sample rates up to 96 kHz.
One special note: you can choose independent formats
for each bank, A and B, as well as IN and OUT within each
bank. For example, you could choose ADAT for the optical
A IN (for, say, eight channels of input from your digital
mixer) and stereo TOSLink for the optical A OUT (for, say,
your DAT machine).
inputs are balanced TRS (tip/ring/sleeve) quarter-inch
connectors that can also accept an unbalanced plug.
They do not have microphone preamps, so they are best
used for synthesizers, drum machines, effects proces-
sors, and other instruments with line level signals (either
-10 dB or +4 dB). These inputs are also equipped with
the 828x’s Precision Digital Trim™ feature: digitally
6. Equipped with 24-bit 192 kHz converters, these 8 analog
controlled analog trims that let you adjust input level in
2 3 4 5
1
tional power supply.
variety of applications, such as for digital transfers with
devices that cannot slave to the clock supplied by their
digital I/O connection with the 828x.
and output at all supported sample rates (up to 96 kHz).
Connect the 828x’s MIDI OUT port to the MIDI IN port on
the other device. Conversely, connect the 828x’s MIDI IN
port to the MIDI OUT port on the other device. You can
connect different devices to each port, such as a control-
ler device to the IN port and a sound module to the OUT
port. You can also daisy-chain MIDI devices, but be sure
to manage their MIDI channels (so that they don’t
receive or transmit on the same channel).
either to an ADAT-compatible “lightpipe” device (such as
1. The 828x is equipped with an auto-switching interna-
2. These are standard BNC word clock jacks. Use them for a
3. These jacks provide stereo, 24-bit S/PDIF digital input
4. Connect a MIDI device here using standard MIDI cables.
a digital mixer) or to a S/PDIF optical (“TOSLink”)
5. These optical digital I/O connectors can be connected
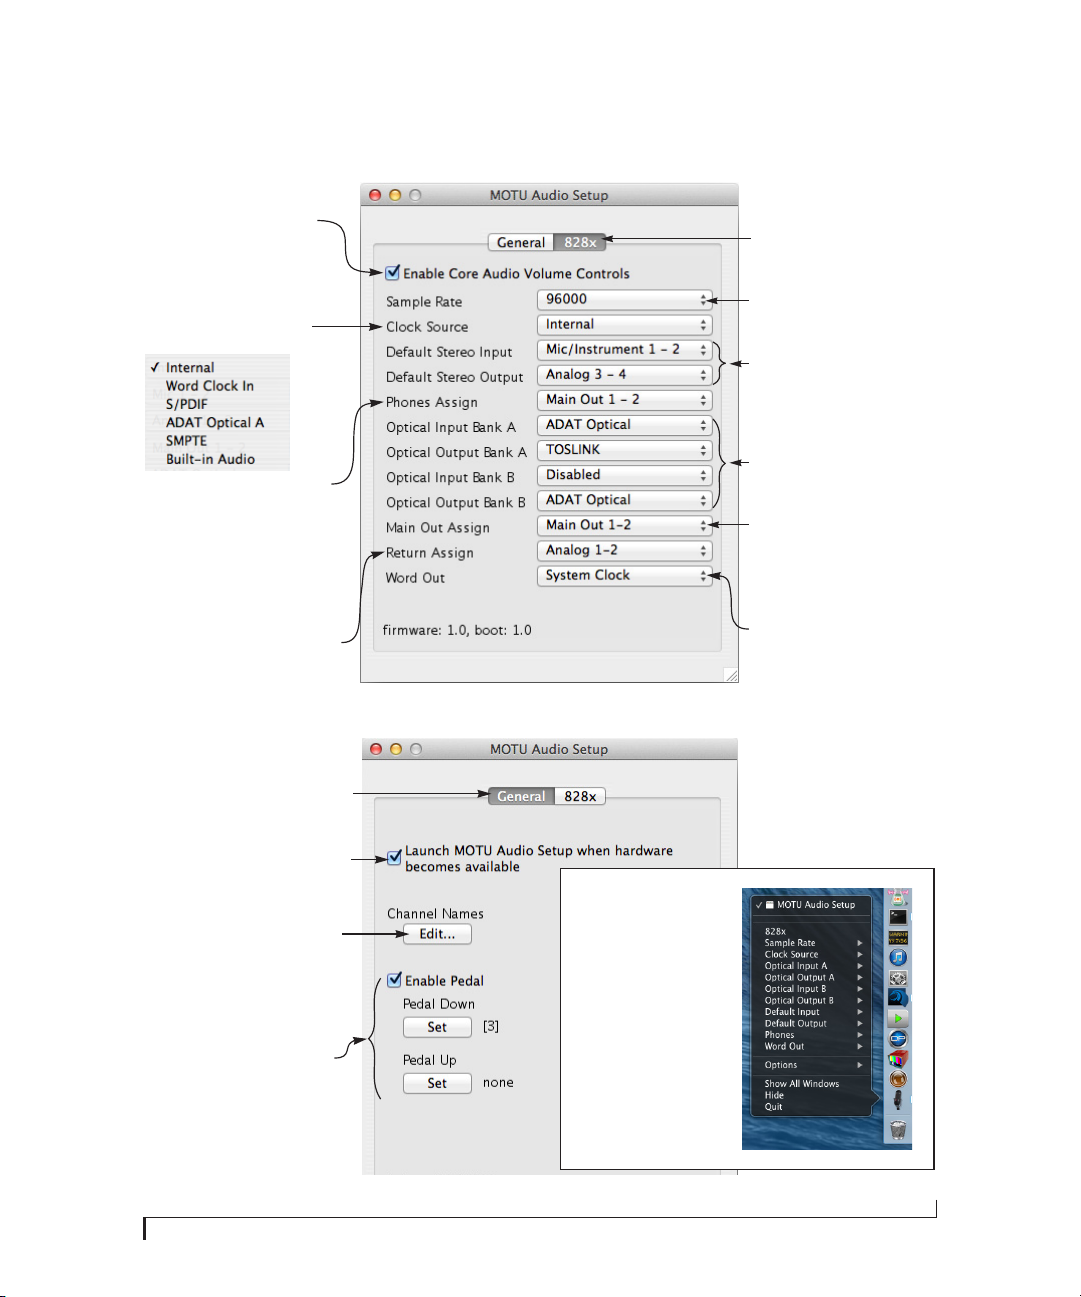
Quick Reference: MOTU Audio Setup
CHAPTER
Lets you to use the Mac’s volume
controls to control the output level of
the 828x when it is being used as the
audio output hardware for your Mac.
Determines the clock source for your
828x. If you’re just using the analog ins
and outs, set this to ‘Internal’. The other
settings are for digital transfers via
S/PDIF or optical ports, or for slaving
the 828x to word clock.
This menu lets you choose what you will
hear from the PHONES jack. To mirror the
main outs, choose Main Out 1-2, or you can
mirror any other output pair. To hear the
phones as their own independent output,
choose Phones 1-2 (at 44.1 or 48 kHz. At
higher sample rates, the phones must
mirror any other available output pair.)
The 828x driver provides a stereo return
back to the computer. This return feeds the
signal on any 828x output pair directly back
to the computer, where you can record,
process, monitor or otherwise use it. This is a
great way to “bounce” full mixes, complete
with live audio routed through the 828x
only, back into the computer.
Click the tabs to access general MOTU
interface settings or settings specific to
the 828x (or other connected interface).
Choose the global sample rate for the
system here.
Specifies the stereo input and output
pair when the 828x is chosen for
Mac OS X audio I/O.
Each optical bank can be configured
independently for ADAT or TOSLink.
Disable them when not in use to
conserve DSP and bus bandwidth.
Choose the output pair you would like
the main outs to mirror, or choose Main
Outs to operate them as their own
independent pair.
If you are running an 828x interface at a
high sample rate (88.2, 96, 176.4 or 192
kHz), this option appears in the interface tab. It lets you choose a word clock
output rate that either matches the
global sample rate (e.g. 96kHz) or
reduces it to the corresponding 1x rate
(e.g. 48kHz instead of 192 kHz).
Click the General tab to access these settings.
Check this option if you would like the MOTU
Audio Setup icon to appear in the application
dock as soon as a MOTU interface is detected
(switched on, plugged in, etc.)
This button opens another dialog that lets
you assign your own customized names to
each 828x input and output. For example, if
you have a lead vocal mic plugged into
input 1, you could name it “Lead Vox”. Your
customized names then appear in your host
audio application (if it supports Core Audio
input naming).
If you have a foot switch connected to the
828x, these settings let you map the foot
switch to any computer keyboard key for
both the up and down position. For
details about how to set this up, see
“Enable Pedal” on page 44.
In the standard Mac OS X
fashion, MOTU Audio Setup
appears in the dock when
you launch it. If the Launch
option is checked (as shown
above), the icon appears as
soon as you switch on your
828x interface. If you click
and hold on the dock icon
(instead of clicking it) or
control-click, a menu of
hardware settings appears
as shown to the right. You
can view and configure any
hardware settings from this
menu, without opening the
MOTU Audio Setup window.
9

10

CHAPTER
1
About the 828x
Overview . . . . . . . . . . . . . . . . . . . . . . . . . . . . . . . . . . . . . . . . . . . . 11
The 828x Rear Panel . . . . . . . . . . . . . . . . . . . . . . . . . . . . . . . . . 12
The 828x Front Panel . . . . . . . . . . . . . . . . . . . . . . . . . . . . . . . . 14
16-bit and 24-bit recording . . . . . . . . . . . . . . . . . . . . . . . . . . 15
CueMix FX 32-bit floating point mixing and effects . . 15
AudioDesk . . . . . . . . . . . . . . . . . . . . . . . . . . . . . . . . . . . . . . . . . . . 16
Digital Performer . . . . . . . . . . . . . . . . . . . . . . . . . . . . . . . . . . . . 16
Other Host Audio Software . . . . . . . . . . . . . . . . . . . . . . . . . . 16
OVERVIEW
The 828x is a hybrid Thunderbolt™/USB2 audio
interface for Mac and Windows with on-board
effects and mixing that offers 28 inputs and 30
outputs at 44.1 or 48 kHz. Both analog and digital
I/O are offered at sample rates up to 96 kHz, and
analog recording and playback is offered at rates up
to 192 kHz. All inputs and outputs can be accessed
simultaneously. The 828x consists of a standard
19-inch, single-space, rack-mountable I/O unit
that connects directly to a computer via a standard
Thunderbolt or USB cable.
The 828x offers the following main features:
■
Universal computer connectivity with
Thunderbolt or high-speed USB2
■
Eight 24-bit analog quarter-inch (TRS) inputs
■
Eight 24-bit analog quarter-inch (TRS) outputs
■
Two combo XLR/TRS mic/guitar inputs with
preamps, individual sends, 48V phantom power,
20 dB pad, and Precision Digital Trim™
■
Two XLR main outputs
■
Operation on all analog I/O at standard sample
rates up to 192 kHz
■
Digitally controlled analog trim for all analog
inputs
Two banks of optical digital I/O that provide 16
■
channels of ADAT optical at 48 kHz, 8 channels of
S/MUX optical I/O at 96 kHz or two banks of
stereo TOSLink at rates up to 96 kHz
RCA S/PDIF at sample rates up to 96 kHz
■
■
Word clock I/O
MIDI I/O
■
■
On-board SMPTE synchronization with
dedicated SMPTE I/O jacks
■
Foot switch for hands-free punch-in/out
■
Two headphone jacks with independent volume
control
■
Programmable main volume knob
■
CueMix™ FX no-latency mixing, monitoring
and effects processing
■
Front-panel LCD programming for the mixer
and all other settings
■
Extensive front panel metering and status LEDs
■
Auto-switching international power supply
■
Stand-alone operation
■
Mac and Windows drivers for multi-channel
operation and across-the-board compatibility w ith
any audio software on current Mac and Windows
systems
■
AudioDesk™, full-featured audio workstation
software
With a variety of I/O formats, mic preamps, nolatency mixing and processing of live input and
synchronization capabilities, the 828x is a
complete, portable “studio in a box” when used
with a Mac or Windows computer.
11

THE 828X REAR PANEL
The 828x rear panel has the following connectors:
Eight balanced quarter-inch (TRS) analog
■
outputs (with 24-bit 192 kHz converters)
■
Eight balanced quarter-inch (TRS) analog
inputs (with 24-bit 192 kHz converters)
Two XLR “main” analog outputs with 24-bit
■
192 kHz converters
■
Two balanced quarter-inch (TRS) analog sends
(for the front-panel mic/guitar inputs)
■
Balanced TRS quarter-inch analog in/out
dedicated for SMPTE time code
■
Two sets of optical connectors (in and out),
individually switchable among ADAT optical
“lightpipe”, 96 kHz S/MUX optical or S/PDIF
“TOSLink”
■
RCA S/PDIF in/out
■
MIDI IN and MIDI OUT
■
Word clock in/out
■
Foot pedal jack
■
One Thunderbolt connector
■
One high-speed USB2 connector
28 inputs and 30 outputs
All 828x inputs and outputs can be used simultaneously, for a total of 28 inputs and 30 outputs
when operating at 44.1 or 48 kHz:
Connection Input Output
Analog 24-bit 192 kHz on bal/unbal TRS 8 8
Mic/guitar 24-bit 192 kHz on XLR/TRS combo 2 —
Main outputs 24-bit 192 kHz on XLR — stereo
Headphone output* — stereo
ADAT optical digital† 16 16
RCA S/PDIF 24-bit 96kHz digital stereo stereo
Total 28 30
* The phone jack next to the MAIN VOL knob is
hard-wired to (mirrors) the XLR main outs. The
PHONES output can operate as an independent
output pair, or it can mirror any other 828x output
pair, such as the main outs.
† The 828x optical connectors support several
standard optical I/O formats, which provide
varying channel counts. See “Optical” on page 13
for details about optical bank operation.
With the exception of the phone jack on the front
panel labeled “(MAIN)”, all inputs and outputs are
discrete. For example, using a mic input does not
“steal” an input from the TRS analog I/O bank.
12
Analog
All analog inputs are equipped with 24-bit 192 kHz
A/D converters. All analog outputs have 24-bit
192 kHz D/A converters. All audio is transferred to
and from the computer in a 24-bit data stream.
All quarter-inch analog inputs can accept either a
balanced or unbalanced plug.
ABOUT THE 828X

The quarter-inch outputs are referenced to a +4
dBu line level output signal. The inputs have
+22 dB of input gain and -96 dB of cut, allowing
them to accommodate both -10 dBu and +4 dBu
level signals.
Precision Digital Trim™
All of the 828x’s analog inputs are equipped with
digi tally c ontrolled analog trims, adjustable in 1 dB
increments. The mic/guitar input trims can be
adjusted using front-panel digital rotary encoders
that provide feedback in the front panel LCD with
up to 53 dB of boost. All analog inputs, including
eight rear-panel TRS analog inputs, can be
trimmed using the front panel LCD or using the
828x’s included CueMix FX control software for
Mac and Windows. This gives you finely-tuned
control of trim settings for synths, effects modules,
and a wide variety of analog inputs for optimum
levels. Different trim configurations can then be
saved as preset configurations for instant recall.
Mic/guitar sends
Before A/D conversion, the pre-amplified signal
from e ach f ront-panel mic/g uitar input is routed to
one of the two rear-panel quarter-inch analog
sends, so that you can insert a favorite outboard
EQ, compressor, amp or effects processor to the
mic/guitar input signal before it is converted to
digital form. The resulting output from the
out boa rd ge ar c an b e fed back i nto t he 828 x vi a one
of the eig ht T RS a nalog inpu ts on t he rea r pa nel , fo r
routing to the computer and/or inclusion in the
828x’s built-in monitor mixes.
Main Outs
The main outs are equipped with 24-bit 192 kHz
D/A converters and serve as independent outputs
for the computer or for the 828x’s on-board
CueMix FX mixes.
Optical
The two optical banks provide 16 channels of
ADAT optical at 44.1 or 48 kHz, 8 channels of S/
MUX optical I/O at 96 kHz or two banks of stereo
TOSLink at rates up to 96 kHz. The banks operate
independently, including input and output,
allowing you to mix and match any optical formats.
For example, you could receive 4 channels of
96 kHz S/MUX input on Bank A while at the same
time sending 96 kHz stereo optical S/PDIF
(“TOSLink”) from the Bank A output.
S/PDIF
The 828x rear panel provides S/PDIF input and
output in two different formats: RCA “coax” and
optical “TOSLink”. The RCA jacks are dedicated to
the S/PDIF format. The TOSLink jacks can be used
for either TOSLink or ADAT optical, as discussed
earlier.
MIDI I/O
The 828x’s standard MIDI IN and MIDI OUT jacks
supply 16 channels of MIDI I/O to and from the
computer via the 828x’s Thunderbolt connection.
Timing accuracy can be sample-accurate with host
software that supports it.
On-board SMPTE synchronization
The 828x can resolve directly to SMPTE time code
via the quarter-inch SMPTE input, without a
separate synchronizer. A SMPTE out jack is also
provided for time code generation. The 828x
provides a DSP-driven phase-lock engine with
sophisticated filtering that provides fast lockup
times and sub-frame accuracy.
The included MOTU SMPTE Setup™ software
includes a complete set of tools for generating and
regenerating SMPTE time code, providing a way to
slave other devices to the computer.
ABOUT THE 828X
13

Word clock
The 828x supports standard word clock synchronization at any supported sample rate. When the
828x is operating at 96 kHz, it can generate word
clock output at either 96 or 48 kHz. Half-rate
output is supported for all high sample rates (from
88.2 to 192 kHz).
Punch in/out
The quarter-inch Punch in/out jack accepts a
standard foot switch. When you push the foot
switch, the 828x triggers a programmable
keystroke on the computer keyboard. For example,
with MOTU’s Digital Performer audio sequencer
software, the foot switch triggers the 3 key on the
numeric keypad, which toggles recording in
Digital Performer. Therefore, pressing the foot
switch is the same as pressing the 3 key. The 828x
Control Panel software lets you program any
keystroke you wish.
instruments inputs. Individual 48 volt phantom
power and a 20 dB pad can be supplied
independently to each mic input. The Precision
Digital Trim™ knobs on the front panel for each
mic/instrument input provide up to 53 dB of boost
in precise 1 dB increments.
As explained in “Mic/guitar sends” on page 13, the
pre-amplified signal can be routed to external
outboard gear before being routed back into the
828x.
Mic/guitar input overload protection
Both mic/guitar inputs are equipped with
V-Limit™, a hardware limiter that helps prevent
digital clipping from overloaded input signals.
With V-Limit enabled, signals can go above zero
dB (with limiting applied) to as high as +12 dB
above zero with no distortion due to digital
clipping.
Hybrid Thunderbolt/USB 2.0 connectivity
Thunderbolt is a new, high-performance, highbandwidth connectivity standard for Mac and
Windows computers. High-speed USB 2.0 is a
widely adopted standard for connecting peripheral
devices to personal computers.
To fully support both formats, your 828x audio
interface is equipped with both a Thunderbolt
connector and a high-speed USB 2.0 connector,
and you can use either port (one or the other) to
connect the 828x to your computer. This gives you
maximum flexibility and compatibility with
today’s ever-expanding universe of Mac and
Windows computers.
THE 828X FRONT PANEL
Mic/guitar inputs with preamps
The two mic/instrument inputs (front panel and
rear panel) are equipped with preamps and
“combo” XLR/TRS jacks, which accept XLR
microphone inputs or quarter-inch guitar/
Additional or alternative protection can be applied
to the mic/guitar inputs by enabling the 828x’s Soft
Clip feature, which engages just before clipping
occurs and helps reduce perceptible distortion.
Headphone output and main volume control
The 828x front panel provides two independent
headphone jacks with independent volume knobs,
one of which also controls the XLR main outs on
the rear panel. Alternately, this MAIN VOL knob
can be programmed to control any combination of
outputs (analog or digital). For example, it can
control monitor output for an entire 5.1 or 7.1
surround mix.
Programmable backlit LCD display
Any 828x setting, including the powerful
CueMix FX on-board 16-bus mixer with effects,
can be accessed directly from the front panel using
the four rotary encoders and the 2×16 backlit LCD
display.
14
ABOUT THE 828X

Metering section
The front panel of the 828x displays several banks
of input and output metering. The threshold for
these lights is approximately -42 dB. The four- and
five-segment input meters provide dedicated
multi-segment metering for their respective inputs,
as do the five-segment main out meters.
Two ten-segment meters for the two front-panel
mic/guitar inputs show input levels from -42 to -1
in the first column of LEDs, plus an additional
range in a second column from zero to +12 dB
(including clip). Both inputs are equipped with VLimit™, a hardware limiter. With the limiter turned
off, signals that hit zero or above will clip (a hard
digital clip). However, with V-Limit turned on,
si gnals ca n go a s high as +1 2 dB ab ove ze ro wit h no
digital clipping. If the signal then goes above +12
dB, it will clip, even with V-Limit engaged.
independent of the computer. Effects can even be
applied when the 828x is operating stand-alone
(without a computer) as a complete rack-mounted
mixer. Input signals to the computer can be
recorded wet, dry, or dry with a wet monitor mix
(for musicians during recording, for example).
Effects include reverb, parametric EQ and
compression/limiting. The 828x’s Classic Reverb™
provides five different room types, three frequency
bands with adjustable crossover points, shelf
filtering and reverb lengths up to 60-seconds.
Two forms of compression are supplied: a standard
compressor with conventional threshold/ratio/
attack/release/gain controls and the Leveler™, an
accurate model of the legendary LA-2A optical
compressor, which provides vintage, musical
automatic gain control.
Clock
The
lights indicate the global sample rate (as
chosen in the MOTU Audio Setup software). The
LOCK and TACH LEDs provide feedback for the
828x’s on-board SMPTE synchronization features.
The ADAT and MIDI LEDs indicate audio and
MIDI activity, respectively.
16-BIT AND 24-BIT RECORDING
The 828x system handles all data with a 24-bit
signal path, regardless of the I/O format. You can
record and play back 16-bit or 24-bit audio files at
any supported sample rate via any of the 828x’s
analog or digital inputs and outputs. 24-bit audio
files can be recorded with any compatible host
application that supports 24-bit recording.
CUEMIX FX 32-BIT FLOATING POINT
MIXING AND EFFECTS
All 828x inputs and outputs can be routed to the
on-board CueMix FX 16-bus (8 stereo) digital
mixer driven by hardware-based DSP with 32-bit
floating point precision. The mixer allows you to
apply no-latency effects processing to inputs,
outputs or busses directly in the 828x hardware,
CueMix FX also provides 7-band parametric EQ
modeled after British analog console EQs,
featuring 4 filter styles (gain/Q profiles) to
effectively cover a wide range of audio material.
Low-pass and high-pass filters are also supplied
with slopes that range from 6 to 36 dB. The EQ
employs extremely high precision 64-bit floating
point processing.
The 828x’s flexible effects architecture allows you to
apply EQ and compression on every input and
output (a total of 58 channels), with enough DSP
resources for at least one band of parametric EQ
and compression on every channel at 48 kHz.
However, DSP resources are allocated dynamically
and a DSP meter in the CueMix FX software
(included) allows you to keep tabs on the 828x’s
processing resources. Each input, output and mix
bus provides a send to the Classic Reverb
processor, which then feeds reverb returns to mix
busses and outputs, with a selectable split point
between them to prevent send/return feedback
loops.
ABOUT THE 828X
15

AUDIODESK
AudioDesk is a full-featured, 24-bit audio
workstation software package included with the
828x system (for Mac OS X only). AudioDesk
provides multi-channel waveform editing,
automated virtual mixing, graphic editing of ramp
automation, real-time effects plug-ins with 32-bit
floating point processing, crossfades, support for
many third-party audio plug-ins, background
processing of file-based operations, sampleaccurate editing and placement of audio, and more.
DIGITAL PERFORMER
The 828x system is fully integrated with MOTU’s
award-winning Digital Performer audio sequencer
software package.
OTHER HOST AUDIO SOFTWARE
The 828x system includes a standard Mac OS X
CoreAudio driver for multichannel I/O with any
audio application that supports CoreAudio.
16
ABOUT THE 828X

CHAPTER
2
Packing List and
System Requirements
PACKING LIST
The 828x ships with the items listed below. If any of
these items are not present in your 828x box when
you first open it, please immediately contact your
dealer or MOTU.
■
One 828x
One USB cable
■
■
One power cord
■
One 828x Mac/Windows manual
■
One cross-platform installer disc
■
Product registration card
MAC SYSTEM REQUIREMENTS
The 828x system requires the following Mac
system:
■
PowerPC G4 CPU 1 GHz or faster (including
PowerPC G5 CPUs and all Intel processor Macs)
■
1 GB RAM; 2 GB or more recommended
■
Mac OS X version 10.5.8 or later required
■
Available Thunderbolt or high-speed USB 2.0
port
■
A large hard drive (preferably at least 250 GB)
PLEASE REGISTER TODAY!
Please register your 828x today. There are two ways
to register.
Visit www.motu.com/register
■
OR
Fill out and mail the included product
■
registration card
As a registered user, you will be eligible to receive
technical support and announcements about
product enhancements as soon as they become
available. Only registered users receive these
special update notices, so please register today.
Be sure to do the same for the included AudioDesk
software, which must be registered separately. You
can do so online or by filling out and mailing the
included software registration card found at the
beginning of your AudioDesk manual. Please be
sure to register AudioDesk as well, so that you will
be eligible to receive technical support and
announcements about AudioDesk software
enhancements as soon as they become available.
Thank you for taking the time to register your new
MOTU products!
17

18
PACKING LIST AND SYSTEM REQUIREMENTS

3
CHAPTER
Installing the 828x Software
OVERVIEW
Installation. . . . . . . . . . . . . . . . . . . . . . . . . . . . . . . . . . . . . . . . . . . 19
MOTU Audio driver . . . . . . . . . . . . . . . . . . . . . . . . . . . . . . . . . . 19
MOTU Audio Setup . . . . . . . . . . . . . . . . . . . . . . . . . . . . . . . . . . 20
Core MIDI and Audio MIDI Setup . . . . . . . . . . . . . . . . . . . . 20
CueMix FX . . . . . . . . . . . . . . . . . . . . . . . . . . . . . . . . . . . . . . . . . . . 21
MOTU SMPTE Setup . . . . . . . . . . . . . . . . . . . . . . . . . . . . . . . . . 21
AudioDesk workstation software . . . . . . . . . . . . . . . . . . . . 22
INSTALLATION
Before you connect the 828x to your computer and
power it on, run the 828x software installer. This
ensures that all the 828x components are properly
installed in your system.
Run the MOTU Audio installer
Install the 828x software as follows:
1
Insert the MOTU Audio Installer disc; or, if you
have downloaded the MOTU Audio installer,
locate the folder containing the download.
2
Read the
Read Me
file for installation assistance
and other important information.
3
Open the
4
Follow the directions that the installer gives you.
MOTU Audio Installer
application.
Drivers are installed, along with MOTU Audio
Setup, CueMix FX, and other components,
summarized in the table below.
MOTU AUDIO DRIVER
Core Audio
technology built into Mac OS X that provides all of
its standardized audio features. More specifically,
we use
audio driver model. The MOTU Core Audio driver
provides multi-channel audio input and output
with any Mac OS X Core Audio-compatible
software.
is a term that refers to the software
Core Audio to refer to Mac OS X’s standard
Software component Purpose For more information
MOTU Audio and MIDI drivers Provides multi-channel audio input and output for MOTU Thun-
MOTU Audio Setup Provides access to all of the settings in the 828x and other MOTU
CueMix FX Gives you complete control over the 828x’s CueMix FX on-board
MOTU SMPTE Setup Provides access to the 828x system’s SMPTE time code sync fea-
AudioDesk Provides complete multi-track recording, mixing and processing.
derbolt, FireWire and USB Audio devices with host audio software.
interfaces. Required for 828x operation.
mixer, which provides no-latency monitoring, mixing and processing of live inputs through your 828x.
tures.
Optional.
“MOTU Audio driver” on page 19
chapter 5, “MOTU Audio Setup”
(page 39)
chapter 9, “CueMix FX” (page 69)
chapter 10, “MOTU SMPTE
Setup” (page 115)
AudioDesk User Guide
19

For details about using the 828x with Core Audio
applications, see chapter 7, “Configuring Host
Audio Software” (page 55).
This can usually be found in /Applications/
Utilities. If it has been moved, just search for Aud io
MIDI Setup.
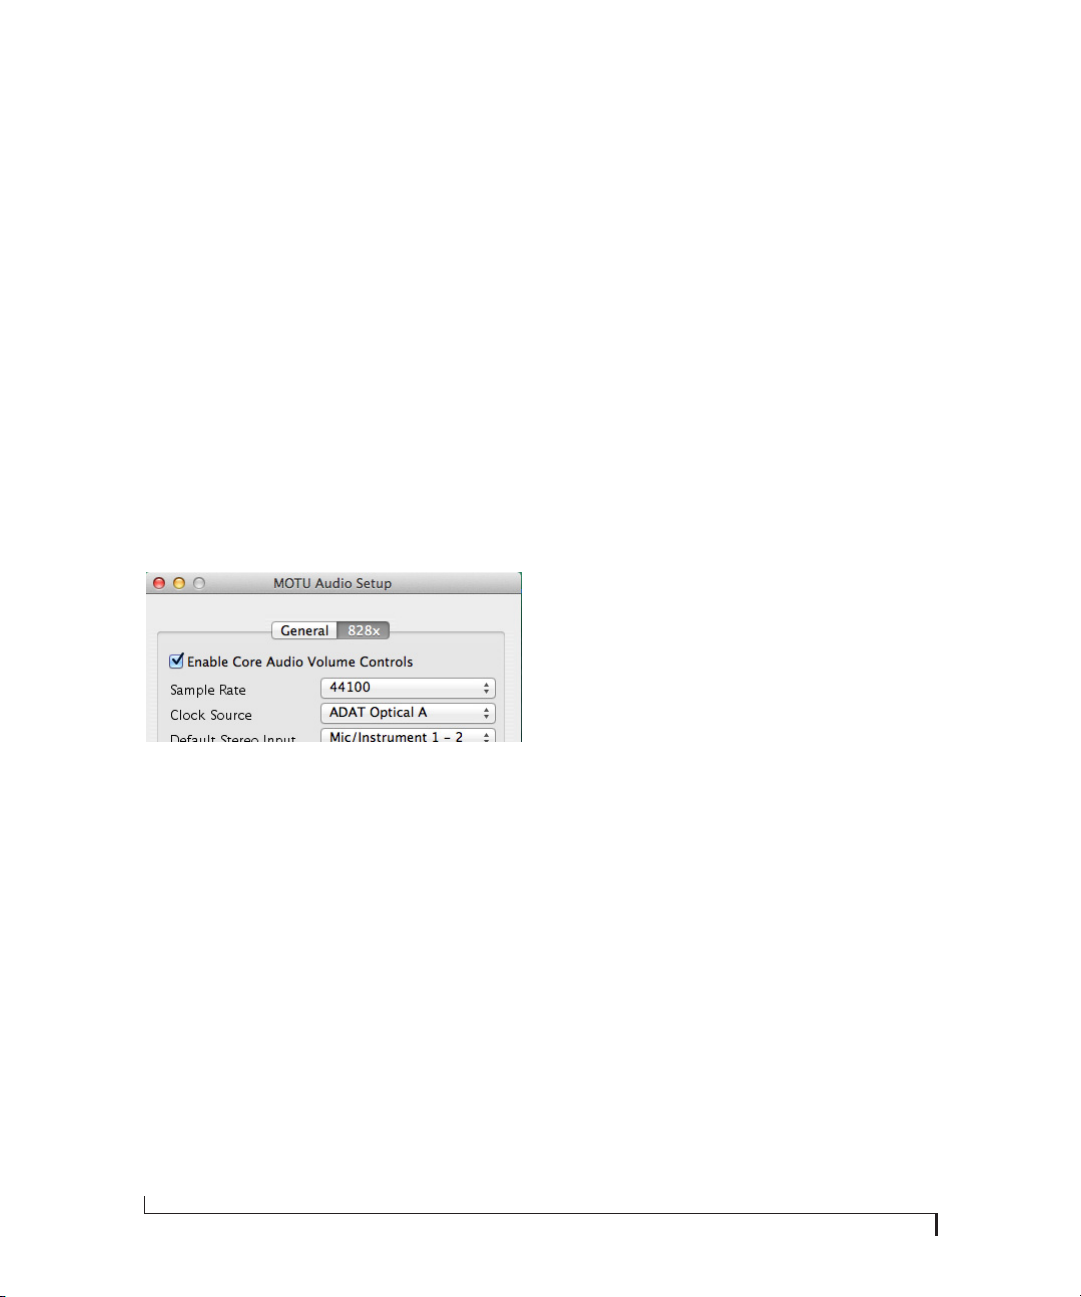
MOTU AUDIO SETUP
MOTU Audio Setup (available in the Applications
folder) gives you access to all of the settings in the
828x, such as the clock source and sample rate. For
complete details, see chapter 5, “MOTU Audio
Setup” (page 39).
CORE MIDI AND AUDIO MIDI SETUP
Core MIDI is the “under-the-hood” portion of Mac
OS X that handles MIDI services for MIDI
hardware and software. Core MIDI provides many
universal MIDI system management features,
including MIDI communication between your
828x interface and all Core MIDI compatible
software.
Audio MIDI Setup is a utility included with
Mac OS X that allows you to configure your 828x
interface for use with all Core MIDI compatible
applications. Audio MIDI Setup provides:
■ A “virtual” studio on your Mac that graphically
represents your MIDI hardware setup and that is
shared by all Core MIDI-compatible programs
■ A simple, intuitive list of your MIDI devices
whenever you need it in any Core MIDIcompatible program
Launching Audio MIDI Setup
1 Make sure your 828x interface is connected and
turned on.
3 Confirm that the MIDI interface is present in the
MIDI Devices tab (or window) in Audio MIDI
Setup.
If the interface does not appear, or if it is grayed
out, check your cable connections and click Rescan
MIDI.
Figure 3-1: The 828x interface as it appears in the MIDI tab of Audio
MIDI Setup.
Connecting MIDI devices to the 828x
Once your 828x interface appears in Audio MIDI
Setup, you are ready to add devices, indicate how
they are connected, and identify properties they
may have for particular purposes. This
information is shared with all Core MIDI
compatible applications.
To add a device in Audio MIDI Setup:
2 Launch the Audio MIDI Setup utility.
20
1 Click Add Device.
INSTALLING THE 828X SOFTWARE
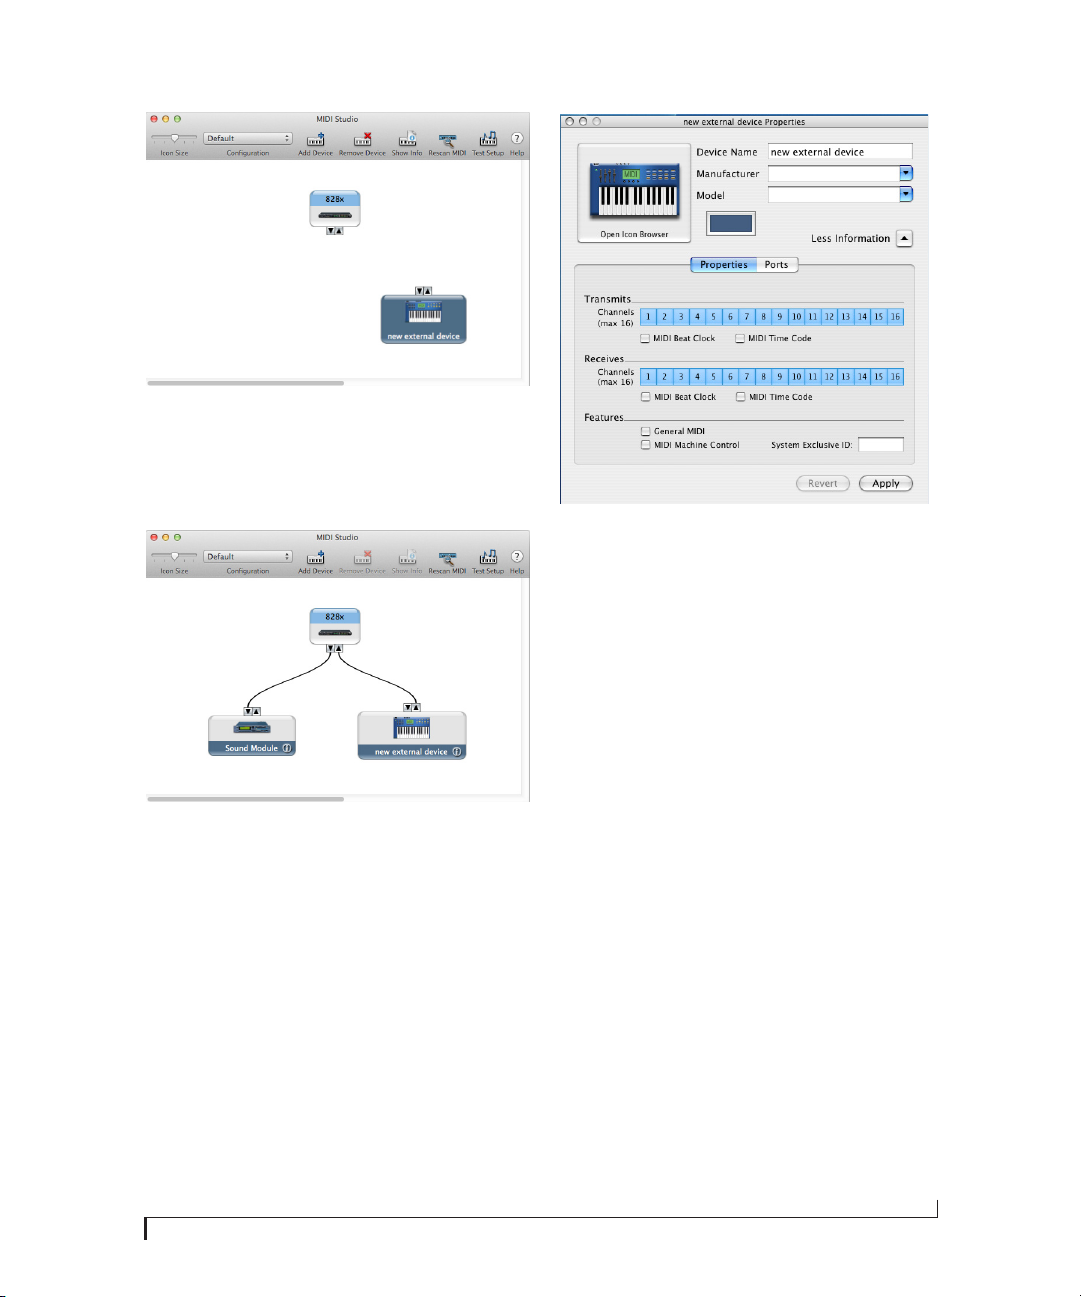
Figure 3-2: Adding a MIDI device.
2 Drag on its input and output arrows to draw
connections to the 828x that match its physical
connection.
Figure 3-3: Connecting devices to the 828x. In this example, a controller keyboard is connected to the 828x’s MIDI IN, and a sound module
is connected to the 828x MIDI OUT.
3 Double-click the device to make settings, such
as input and output channels, that further describe
the device.
Figure 3-4: Device settings.
4 Repeat the above steps for each MIDI device
connected to the interface.
5 When you are finished, quit Audio MIDI Setup.
Your configuration is automatically saved as the
default configuration, and it is shared with all Core
MIDI-compatible software.
CUEMIX FX
CueMix FX (available in the Applications folder)
provides control over the 828x’s no-latency
CueMix FX on-board mixing, effects processing,
an instrument tuner, a full-featured oscilloscope,
and other audio analysis tools. For details, see
chapter 9, “CueMix FX” (page 69).
MOTU SMPTE SETUP
MOTU SMPTE Setup (available in the
Applications folder) software provides a complete
set of tools to resolve the 828x to SMPTE time
code, and to generate SMPTE for striping,
regenerating or slaving other devices to the
computer. For details, see chapter 10, “MOTU
SMPTE Setup” (page 115).
INSTALLING THE 828X SOFTWARE
21
AUDIODESK WORKSTATION SOFTWARE
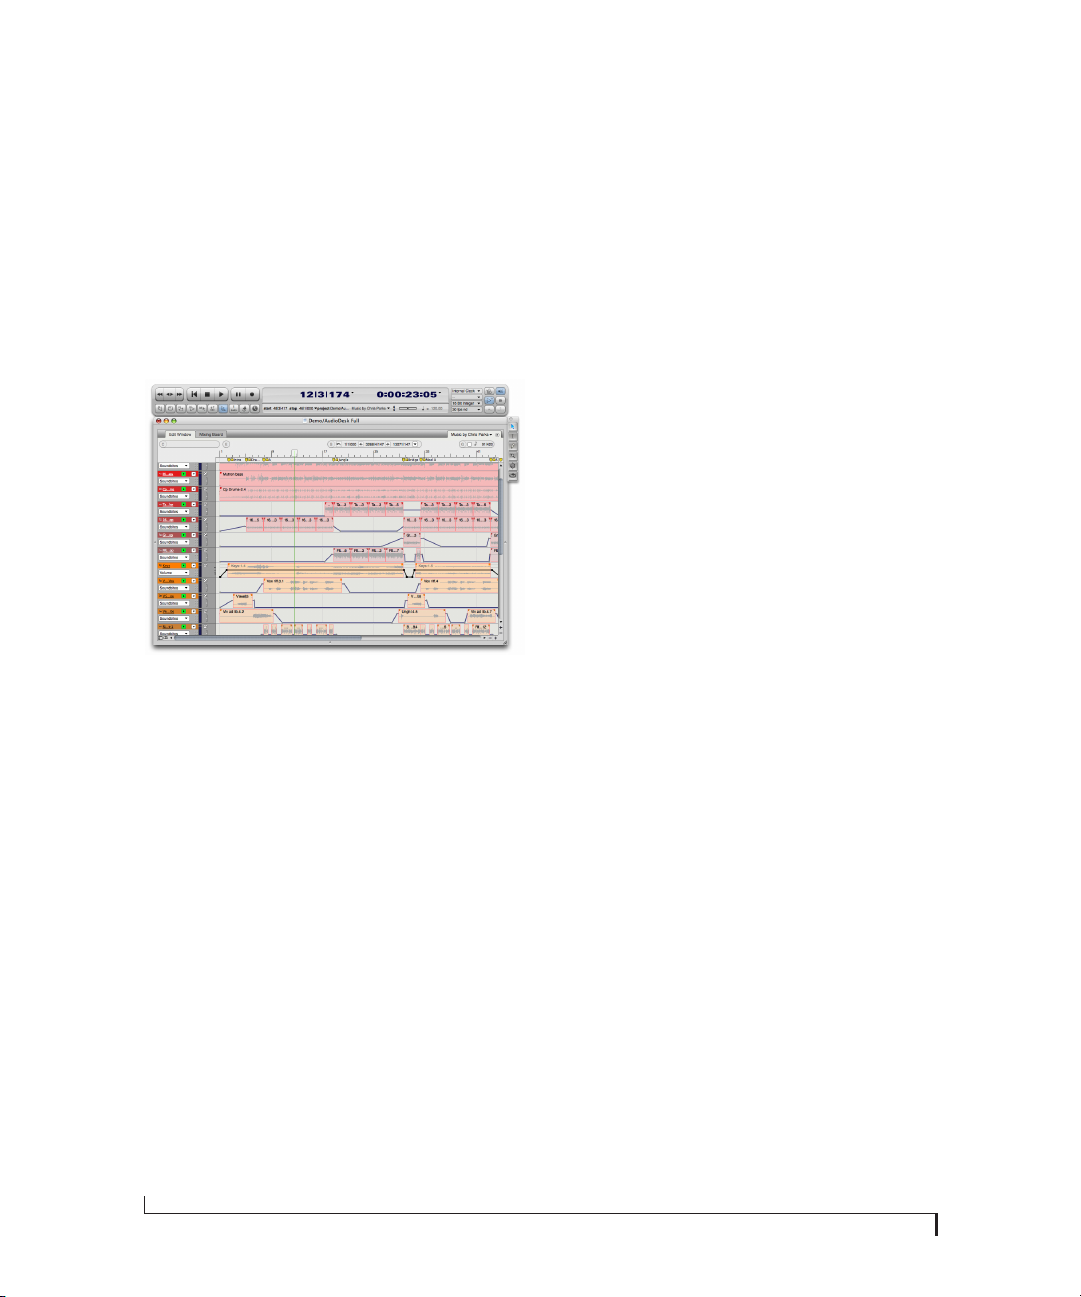
AudioDesk is an advanced workstation software
package for the 828x that lets you record, edit, mix,
process, bounce and master multi-track digital
audio recording projects. Advanced features
include real-time 32-bit effects processing, 24-bit
recording, and much more.
See the AudioDesk User Guide included with your
828x system for details.
Figure 3-5: AudioDesk for Mac OS X.
22
INSTALLING THE 828X SOFTWARE

CHAPTER
4 Installing the 828x Hardware
OVERVIEW
Here’s an overview for installing the 828x:
Connect the 828x interface . . . . . . . . . . . . . . . . . . . . . . . . . . 23
Connect the 828x to the computer.
Connect audio inputs and outputs . . . . . . . . . . . . . . . . . . 25
Make optical and analog connections as desired.
Connect MIDI gear . . . . . . . . . . . . . . . . . . . . . . . . . . . . . . . . . . . 29
Connect a controller, synth or control surface.
Connect a foot switch. . . . . . . . . . . . . . . . . . . . . . . . . . . . . . . . 29
Connect a footswitch to trigger any keystroke.
A typical 828x setup . . . . . . . . . . . . . . . . . . . . . . . . . . . . . . . . . 30
An example setup for computer-based mixing/FX.
Operating the 828x as a converter . . . . . . . . . . . . . . . . . . . 31
An example of using the 828x as an expander.
Making sync connections . . . . . . . . . . . . . . . . . . . . . . . . . . . . 32
If you need to resolve the 828x with other devices,
make the necessary sync connections.
Syncing to SMPTE timecode . . . . . . . . . . . . . . . . . . . . . . . . . 33
Syncing S/PDIF devices . . . . . . . . . . . . . . . . . . . . . . . . . . . . . . 34
Syncing word clock devices. . . . . . . . . . . . . . . . . . . . . . . . . . 35
Connecting multiple 828x interfaces . . . . . . . . . . . . . . . . 35
CONNECT THE 828X INTERFACE
Your 828x audio interface is equipped with both a
Thunderbolt connector and a high-speed USB 2.0
connector, and you can use either port (one or the
other) to connect the 828x to your computer. This
gives you maximum flexibility and compatibility
with today’s ever-expanding universe of Mac and
Windows computers.
The 828x is a Thunderbolt 1 device. It is compatible
with Thunderbolt 1 and Thunderbolt 2.
Should I use Thunderbolt or USB 2.0?
If your computer has both Thunderbolt and
USB 2.0, then it is your choice, and your decision
may depend mostly on other peripherals you may
have.
If your computer does not have a Thunderbolt
port, then obviously you will need to connect the
828x to one of its high-speed USB 2.0 ports.
If you are connecting with Thunderbolt
Using a standard Thunderbolt cable, connect one
end of the cable to the Thunderbolt socket on the
828x, and connect the other end to any available
Thunderbolt port on the computer.
Connecting multiple Thunderbolt devices
Thunderbolt allows you to connect multiple
devices to a host computer, through multiple
Thunderbolt ports on the host, or by daisychaining up to six devices from a single host
Thunderbolt port. Since the 828x has one
Thunderbolt port on it, place it at the end of the
daisy chain.
Thunderbolt is designed to provide enough
bandwidth to easily support the 828x and other
Thunderbolt devices, such as hard drives and
23

displays. You should not hesitate to connect other
Thunderbolt devices like these to your computer,
along with the 828x, as your needs require.
Also see “Connecting multiple 828x interfaces” on
page 35.
Follow these instructions to determine whether
your computer supports USB 1.1, 2.0, or 3.0:
1 From the Apple menu, choose About this Mac.
2 Click More Info.
USB 3.0, USB 2.0 and USB 1.1
There are primarily three types of USB host
controllers widely available on current personal
computers. USB 1.1 controllers support simple
peripherals that don’t require a high speed
connection, such as a computer keyboard, a
mouse, or a printer. USB 3.0 and 2.0 controllers
support high speed devices such as the 828x. Since
the 828x requires a high speed connection, it must
be connected to a USB 3.0 or 2.0 host controller or
hub.
For the most reliable connection, it is
recommended that you connect the 828x directly
to one of your computer’s USB 2.0-or 3.0compatible ports. However, since USB 3.0 and 2.0
hubs are c ompatible wi th both typ es of device s, the
828x can be connected to a USB 3.0/2.0 hub along
with USB 1.1 devices if necessary. The 828x will not
operate properly if it is connected to a USB 1.1 hub.
3 Click System Report.
4 In the Hardware section of the System Report,
click USB.
5 You will see a section for each USB bus in the
USB Device Tree window. USB 3.0 ports will
appear in the USB 3.0 SuperSpeed bus, USB 2.0
ports appear as USB Hi-Speed bus, and USB 1.0
ports will be identified by USB Bus. Click the
di scl osure tri ang le t o se e mo re de tail on t he d evi ces
connected.
If you are connecting with USB 2.0 or 3.0
1 Before you b egin, make sure your computer and
the 828x are switched off.
2 Plug the flat “type A” plug of the 828x USB cable
(included) into a USB2-equipped socket on the
computer.
3 Plug the squared “type B” plug of the USB cable
into the 828x I/O.
24
INSTALLING THE 828X HARDWARE
CONNECT AUDIO INPUTS AND OUTPUTS
The 828x audio interface has the following audio
input and output connectors:
■ 8 balanced, +4 dB quarter-inch analog outputs
■ 8 balanced +4 dB quarter-inch analog inputs
■ 2 mic/guitar combo jack inputs with preamps
■ 2 quarter-inch sends for the mic/guitar inputs
■ 2 XLR main outs
■ 2 pairs of optical in/out banks switchable
between ADAT (“Lightpipe”) or optical S/PDIF
(TOSLink)
■ 1 pair of RCA S/PDIF in and out
Here are a few things you should keep in mind as
you are making these connections to other devices.
Mic/guitar inputs with preamps
Connect a microphone, guitar, instrument or other
analog input to the front panel XLR/quarter-inch
combo jack with either a standard mic cable or a
balanced cable with a quarter-inch plug.
Phantom power
If you are connecting a condenser microphone or
another device that requires phantom power,
engage the corresponding front-panel phantom
power switch.
Tr i m
Both the low-impedance XLR mic input and the
high-impedance quarter-inch guitar input are
equipped with 53 dB of digitally controlled analog
trim. Use the detented trim knobs to adjust the
input level as needed for each input. The LCD
prov ides visual feedback as you turn the tri m knob.
Figure 4-3: The LCD gives you feedback as you turn the TRIM knobs for
the two mic/guitar inputs.
The 828x’s input trims are digitally controlled, so
they allow you to make fine-tuned adjustments in
approximately 1dB increments. You can also adjust
trim in the MOTU CueMix FX software. See “Input
trim” on page 75.
Figure 4-1: Mic/guitar inputs.
☛ Do not connect a +4 (line level) XLR cable to
the front-panel inputs (because of the preamps).
Use a rear-panel quarter-inch input instead.
Figure 4-2: 828x front panel
INSTALLING THE 828X HARDWARE
-20 dB pad
Each mic input (XLR jack) is equipped with a
-20 dB pad switch, to accommodate input signals
that could overdrive the input.
☛ The pad is not available for the TRS jack.
25
Combo jack summary
Use these general guidelines for the 48V phantom
power, pad and trim settings on the two combo
input jacks:
Input 48V Pad Trim
Condenser mic On As needed As needed
Dynamic mic Off As needed As needed
1 Push the CHANNEL knob repeatedly until you
see “I:” (which stands for Input) in the CHANNEL
section of the LCD (Figure 4-5).
2 Turn the CHANNEL KNOB until you see the
desired analog input or output pair. For example,
analog inputs 1-2 appear as “I:An 1-2”
(Figure 4-5), which means Input analog 1-2.
Guitar Off n/a As needed
-10 dB Line level via TRS Off n/a As needed
-10 dB Line level via XLR Off -20 dB +12dB
+4 dB line level (XLR only) Off -20 dB Zero
Quarter-inch analog
The eight quarter-inch analog inputs and outputs
(Figure 4-4) are balanced (TRS) connectors that
can also accept an unbalanced plug.
The quarter-inch outputs are calibrated to produce
a +4 dBu line level output signal.
Quarter-inch analog input trims
The quarter-inch inputs are calibrated to
accommodate either +4 or -10 dBu signals and are
equipped with digitally controlled analog trims
that provide +22 dB of gain and -96 dB of cut. You
can use either the front panel LCD or the included
CueMix FX software to adjust the input trim. To
adjust these trims using CueMix FX, see “Input
trim” on page 75. To adjust the trims using the
front panel LCD:
3 From the factory, analog inputs are grouped in
stereo pairs (1-2, 3-4, etc.) If you need to split a pair
to deal with it as two individual mono inputs, turn
the PARAMETER knob until you see PAIR in the
parameter section of the LCD (Figure 4-5). Turn
the VALUE knob to choose MONO. Then turn the
CHANNEL knob again to select the desired input
you are adjusting.
Figure 4-5: The settings for analog inputs 1 and 2 (as a pair).
4 After splitting the stereo pair, if necessary, turn
the PARAM knob until you see the TRIM
parameter in the LCD (Figure 4-6):
Figure 4-4: 828x back panel
26
INSTALLING THE 828X HARDWARE
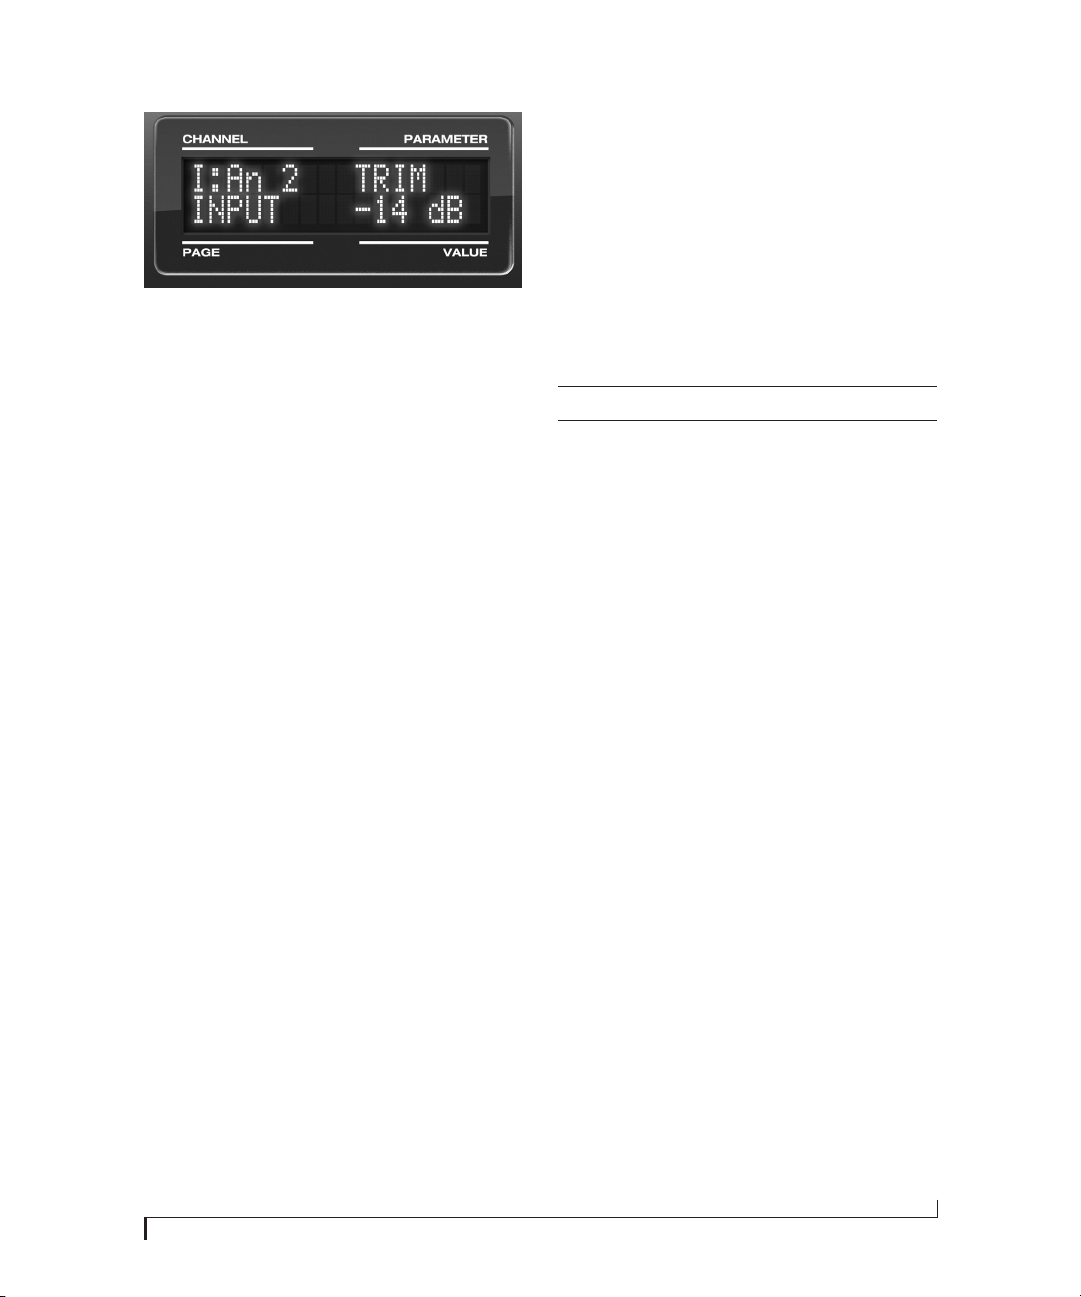
Figure 4-6: Setting the input trim for a TRS analog input pair.
5 Turn the VALUE knob to adjust the trim.
Mic/guitar/instrument sends
Each front-panel XLR/TRS input has a
corresponding send on the rear panel (Figure 4-4).
The output from this send is the pre-amplified and
calibrated signal from the corresponding mic or
guitar input, which you can then route to any other
device, such as compressor, guitar amp, outboard
EQ, reverb unit, etc. Use any 828x input (analog or
digital) as a return back into the 828x. From there,
you will be able to route the signal anywhere in the
system, such as to the computer and/or to any
CueMix FX mix bus.
XLR main outs
The XLR main outputs serve as independent
outputs. From the factory, the main out volume is
controlled by the MAIN VOL knob on the front
panel, although this knob can be programmed to
control any combination of outputs. For details, see
“The Monitor Group” on page 91. In a standard
studio configuration, the main outs are intended
for a pair of studio monitors, but they can also be
used as additional outputs for any purpose.
Optical
The 828x rear panel provides two sets of ADAT
optical (“lightpipe”) connectors: Bank A and B
(Figure 4-4). Each bank provides an input and
output connector. All four connectors can operate
independently and offer two different optical
formats: ADAT optical or TOSLink (optical S/
PDIF). For example, you could connect 8-channel
ADAT optical input from your digital mixer and
stereo TOSLink output to an effects processor.
The 828x supplies +12dB of digital trim (boost) for
each optical input, which can be adjusted from
CueMix FX (“Input trim” on page 75) or the front
panel (“The IN (inputs) menu” on page 49).
Below is a summary of optical formats:
Format 44.1 or 48 kHz 88.2 or 96 kHz
ADAT optical 8 channels 4 channels
TOSLink stereo stereo
Optical operation at 44.1 or 48 kHz
When configured for ADAT “lightpipe”, an optical
connector provides 8 channels at 44.1 and 48 kHz.
ADAT optical operation at 88.2 or 96 kHz
When configured for ADAT “lightpipe”, an optical
con nec tor prov ide s four c hann els at 88 .2 or 96 kH z
(2x sample rates). When using the ADAT lightpipe
format at a 2x rate, be sure to choose either Type I
or Type I I ope ration, as exp lain ed i n “A DAT SM UX
Typ e” on pa ge 4 8 .
Using optical I/O to operate the 828x as a
16-channel expander
When the 828x is not connected directly to a
computer via Thunderbolt or USB, the sixteen
optical output channels can be programmed (via
the CueMix FX mixer) to mirror the incoming
signal on any combination of the 828x’s inputs. By
connecting the 828x optical outputs to another
device, such as another ADAT-optical equipped
interface or a digital mixer, you add up to sixteen
additional inputs to your system (or eight inputs at
the 2x sample rates).
To learn how to program the 828x when it is
operating as a stand-alone expander in this
fashion, see chapter 6, “Front Panel Operation”
(page 45).
INSTALLING THE 828X HARDWARE
27
Choosing a clock source for optical connections
When connecting an optical device, make sure that
its digital audio clock is phase-locked (in sync
with) the 828x, as explained in “Making sync
connections” on page 32. There are two ways to do
this:
1. Resolve the optical device to the 828x
2. Resolve the 828x to the optical device
For 1), choose Internal (or any other clock source
except ADAT optical) as the clock source for the
828x in MOTU Audio Setup.
For 2), choose either ADAT Optical A or ADAT
Optical B as the 828x’s clock source (Figure 4-7). Be
sure to choose the optical port that the device is
connected to.
For details about using the clock source setting and
the MOTU Audio Setup software in general, see
chapter 5, “MOTU Audio Setup” (page 39).
Using word clock to resolve optical devices
If the optical device you are connecting to the 828x
has word clock connectors on it, you can use them
to resolve the device to the 828x, similar to the
diagram shown in Figure 4-16 on page 34 for S/
PDIF devices with word clock. Also see “Syncing
word clock devices” on page 35.
S/PDIF
If you make a S/PDIF digital audio connection to
another device, be sure to review the digital audio
clocking issues, as explained in “Syncing S/PDIF
devices” on page 34.
The 828x supplies +12dB of digital trim (boost) for
the S/PDIF input pair, which can be adjusted from
CueMix FX (“Input trim” on page 75) or the front
panel (“The IN (inputs) menu” on page 49).
Figure 4-7: Resolving the 828x to an optical device.
28
INSTALLING THE 828X HARDWARE
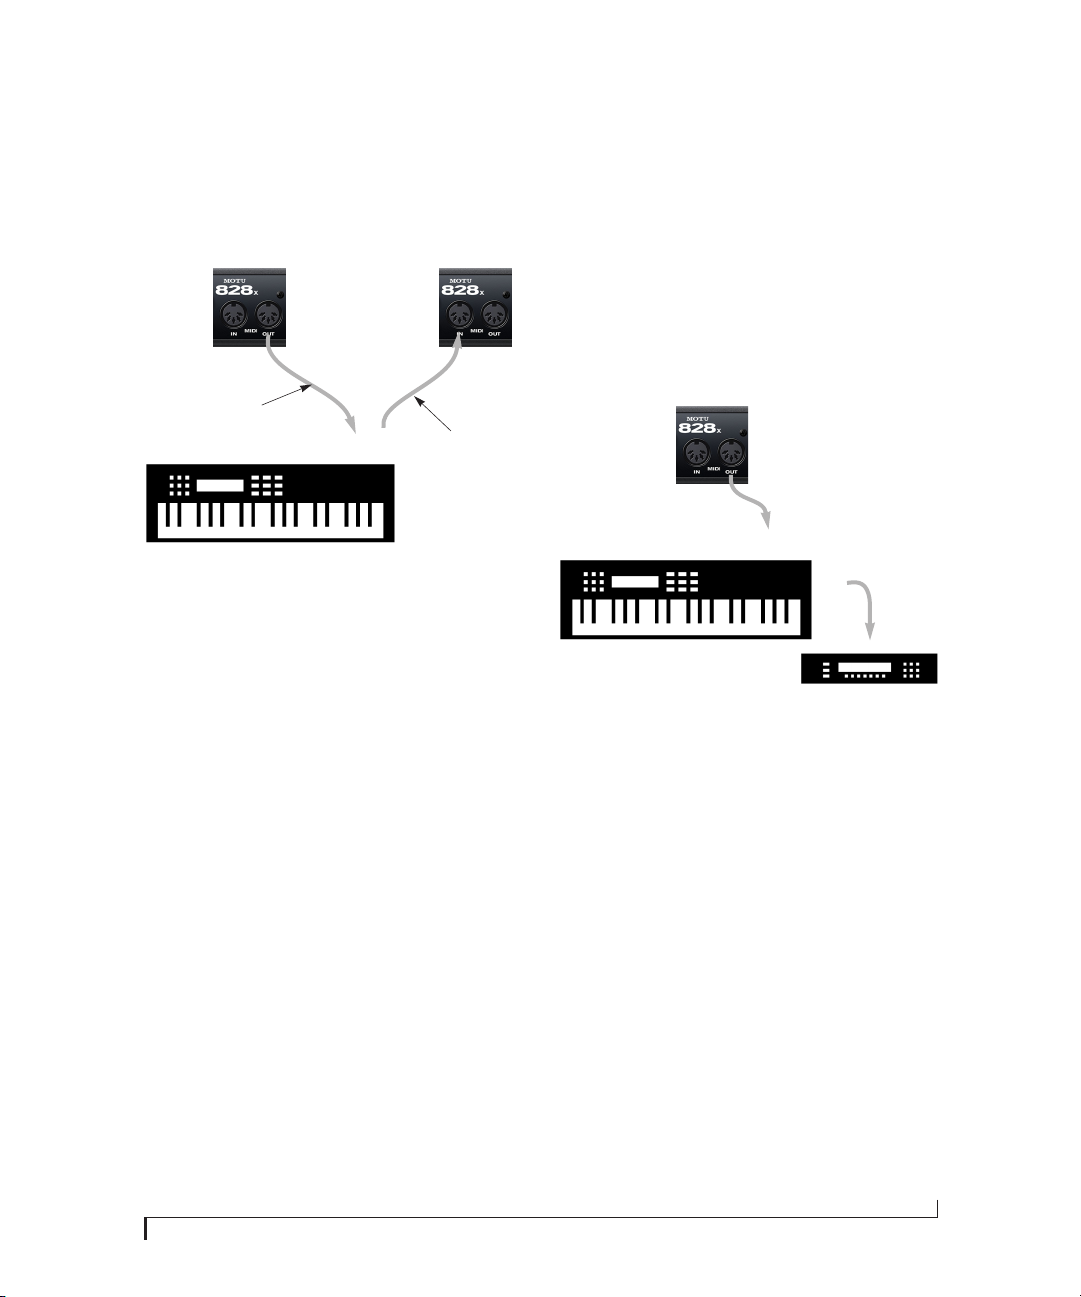
CONNECT MIDI GEAR
Connect your MIDI device’s MIDI IN jack to the
828x’s MIDI OUT jack (Connection A below).
Conversely, connect the MIDI device’s MIDI OUT
jack to the 828x’s MIDI IN jack (Connection B).
828x
rear panel
MIDI
OUT
Connection A
MIDI Device
Figure 4-8: Connecting a MIDI device to the 828x.
MIDI
cables
MIDI INMIDI
OUT
One-way MIDI connections
MIDI devices that do not receive MIDI data, such
as a dedicated keyboard controller, guitar
controller, or drum pad, only need Connection B
shown in Figure 4-8. Similarly, devices that never
send data, such as a sound module, only need
Connection A. Make both connections for any
device that needs to both send and receive MIDI
data.
MIDI
IN
Connection B
Connecting additional gear with MIDI THRUs
If you need to connect several pieces of MIDI gear,
run a MIDI cable from the MIDI THRU of a dev ice
already connected to the 828x to the MIDI IN on
the additional device as shown below in Figure 4-9.
The two devices then share the 828x’s MIDI OUT
port. This means that they share the same set of 16
MIDI channels, too, so try to do this with devices
that listen to only one MIDI channel (such as
effects modules), which makes it easier to avoid
MIDI channel conflicts.
828x
rear panel
MIDI
OUT
MIDI
MIDI Device
Figure 4-9: Connecting additional devices with MIDI THRU ports.
IN
MIDI
THRU
MIDI IN
MIDI
cable
CONNECT A FOOT SWITCH
If you would like to use a foot switch with your
828x, connect it to the PUNCH IN/OUT jack. See
“Quick Reference: MOTU Audio Setup” on page 9
for information about how to program the foot
switch to trigger any computer keystroke you wish.
INSTALLING THE 828X HARDWARE
29
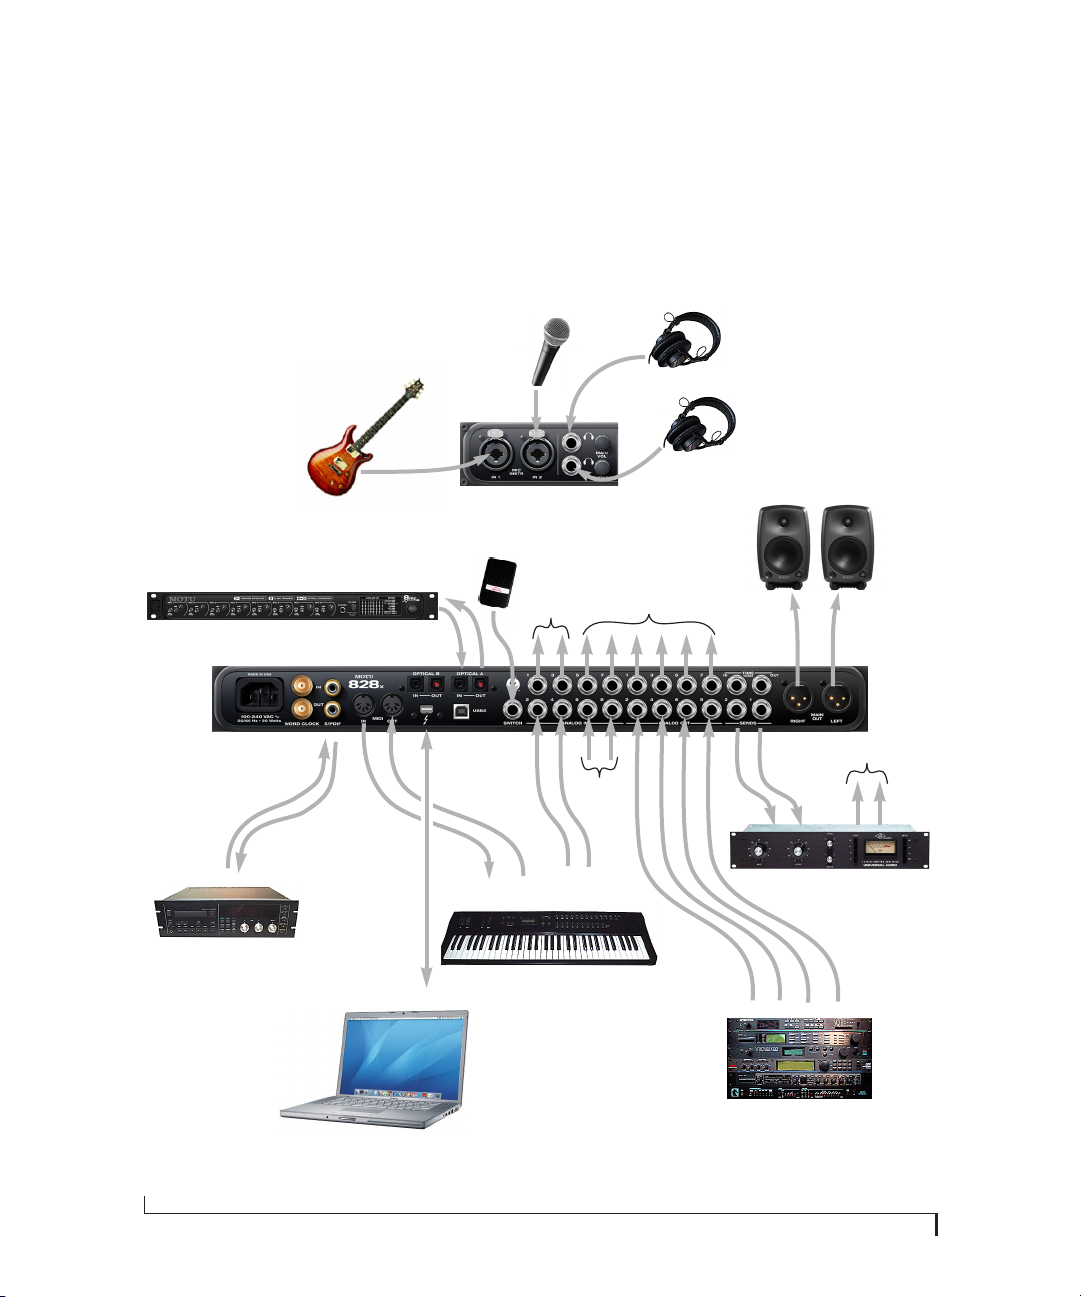
A TYPICAL 828X SETUP
Here is a typical 828x studio setup. This rig can be
operated without an external mixer. All mixing and
pro cessing c an be done in the computer w ith audio
software. During recording, you can use the 828x’s
CueMix FX no-latency monitoring to listen to
what you are recording via the main outs,
Mic 1
headphone outs, or any other output pair. You can
control monitoring either from the front panel or
from the included CueMix FX software. The two
front-panel guitar/mic inputs can be routed to
outboard effects processors, such as a compressor,
EQ or reverb, via the rear panel sends.
Headphones
828x back
panel
S/PDIF
DAT deck
Guitar
MOTU 8pre and/or
other optical devices
828x front
panel
8-channel
ADAT optical
Thunderbolt or USB
foot
switch
MIDI IN/OUT
sends to
FX unit
(in rack
below)
quarter-inch
analog outs
synthesizer
other outputs (stage
monitors, surround
monitors, etc.)
send
returns
Main
studio monitors
to send returns
Compressor, reverb or
other outboard gear
quarter-inch analog outs
30
Mac
synths, samplers, effects units, etc.
Figure 4-10: A typical 828x studio setup.
INSTALLING THE 828X HARDWARE
Loading…
Заказы на сайте обрабатываются в течение 1-2 часов в рабочее время. Если заказ сделан после 18:00 или в выходные/праздничные дни, он будет обработан утром следующего рабочего дня. Товар
резервируется под заказ на 3 рабочих дня для частных лиц и на 5 рабочих дней для юридических лиц. Если вы не можете забрать заказ в указанные сроки, обязательно предупредите менеджеров, иначе
резерв будет аннулирован, и товар поступит в свободную продажу.
Доставка по Москве осуществляется в будние дни с 12:00 до 18:00. Стоимость доставки в пределах МКАД составляет 480 рублей для ручной клади, 680 рублей для грузов весом от 7 до 10 кг и 950 рублей
для крупногабаритных грузов (свыше 10 кг). За пределы МКАД доставка стоит 950 рублей плюс 50 рублей за каждый километр. Минимальная сумма заказа за МКАД — 3000 рублей. Обратите внимание, что
курьеры не встречаются у метро, в машинах или других местах, кроме указанного адреса. Крупногабаритные грузы доставляются до подъезда, а подъем обсуждается индивидуально с курьером.
Оплата возможна как наличными (для частных лиц), так и безналичным расчетом (для юридических лиц и ИП). При доставке вы можете оплатить заказ курьеру. Для заказов в регионы минимальная сумма
составляет 3000 рублей. Доставка осуществляется через транспортные компании: Деловые Линии, ЖелДорЭкспедиция, ПЭК и EMS. Услуги транспортных компаний оплачиваются покупателем при получении
товара.
Сроки и условия доставки могут быть изменены в зависимости от обстоятельств. Подробности уточняйте у менеджера при оформлении заказа.