
В настоящий момент товары недоступны для заказа на samsung.com/ru
В настоящий момент товары недоступны для заказа на samsung.com/ru
Выберите свое местоположение и язык.
24″ FHD-монитор CF39 [C24F390FHI]
C24F390FHI
-
Использование
Что делать, если заблокировались настройки в меню монитора SamsungЧасто задаваемые вопросы о технике Мониторы Samsung. Узнайте подробнее о ‘Что делать, если заблокировались настройки в меню монитора Samsung’ с помощью службы поддержки Samsung.
-
Питание
Что делать, если монитор Samsung не включаетсяУзнайте подробнее о «Что делать, если монитор Samsung не включается» с помощью службы поддержки Samsung. Часто задаваемые вопросы о Мониторах и SSD Samsung.
-
Как настроить частоту обновления экрана на мониторе SamsungУзнайте подробнее о ‘Как настроить частоту обновления экрана на мониторе Samsung’ с помощью службы поддержки Samsung. Часто задаваемые вопросы о Мониторах и SSD Samsung.
-
Изображение
Что делать, если на мониторе Samsung возникли полосыЧасто задаваемые вопросы о технике Мониторы и SSD Samsung. Узнайте подробнее о ‘Что делать, если на мониторе Samsung возникли полосы’ с помощью службы поддержки Samsung.
-
Установка / Подключение
Что делать, если нет сигнала при подключении монитора SamsungЧасто задаваемые вопросы о компьютерной технике Samsung. Узнайте подробнее о ‘Что делать, если нет сигнала при подключении монитора Samsung’ с помощью службы поддержки Samsung.
-
Установка / Подключение
Как подключить монитор Samsung к компьютеруЧасто задаваемые вопросы о компьютерной технике Samsung. Узнайте подробнее о ‘Как подключить монитор Samsung к компьютеру’ с помощью службы поддержки Samsung.
-
Использование
Как настроить режим отдыха глаз на мониторе SamsungЧасто задаваемые вопросы о компьютерной технике Samsung. Узнайте подробнее о ‘Как настроить режим отдыха глаз на мониторе Samsung’ с помощью службы поддержки Samsung.
-
Установка / Подключение
Как установить драйвер для монитора SamsungЧасто задаваемые вопросы о мониторах Samsung. Узнайте подробнее о ‘Как установить драйвер для монитора Samsung’ с помощью службы поддержки Samsung.
-
Использование
Как отключить демо-режим на мониторе SamsungЧасто задаваемые вопросы о компьютерной технике Samsung. Узнайте подробнее о ‘Как отключить демо-режим на мониторе Samsung’ с помощью службы поддержки Samsung.
-
Изображение
Что делать, если изображение на мониторе Samsung мерцает или исчезаетЧасто задаваемые вопросы о компьютерной технике Samsung. Узнайте подробнее о ‘Что делать, если изображение на мониторе Samsung мерцает или исчезает’ с помощью службы поддержки Samsung.
-
TV_Прочее
Безопасное расстояние для установки монитора SamsungЧасто задаваемые вопросы о Мониторы и SSD Samsung. Узнайте подробнее о «Безопасное расстояние для установки монитора Samsung» с помощью службы поддержки Samsung.
-
{{file.description}}
- Версия {{file.fileVersion}}
- {{file.fileSize}} MB
- {{file.fileModifiedDate}}
- {{file.osNames}}
ДОПОЛНИТЕЛЬНАЯ ИНФОРМАЦИЯ
Информация о гарантии
Узнайте, что входит в гарантийные обязательства
Индивидуальная поддержка
Получите помощь от официальных центров поддержки
Новости и уведомления
Обьявления о важных продуктах и услугах
Samsung C24F390
C22F390FH* C22F392FH* C24F390FH* C24F392FH* C24F394FH* C24F396FH* C24F399FH*
C27F390FH* C27F391FH* C27F396FH* C27F397FH* C27F398FW* C32F391FW* C32F395FW* C32F397FW*
Curved Monitor
The color and the appearance may differ depending on the product, and the specifications are subject to change without prior
notice to improve the performance.
The contents of this manual are subject to change without notice to improve quality.
© Samsung
Samsung owns the copyright for this manual.
Use or reproduction of this manual in parts or entirety without the authorization of Samsung is prohibited.
Trademarks other than that of Samsung are owned by their respective owners.
• An administration fee may be charged if either
‒ (a) an engineer is called out at your request and there is no defect in the product
(i.e. where you have failed to read this user manual).
‒ (b) you bring the unit to a repair centre and there is no defect in the product
(i.e. where you have failed to read this user manual).
• The amount of such administration charge will be advised to you before any work or home visit is carried out.
Manual
View the manual for the Samsung C24F390 here, for free. This manual comes under the category monitors and has been rated by 1 people with an average of a 7.4.
This manual is available in the following languages: English. Do you have a question about the Samsung C24F390 or do you need help?
Ask your question here
Index
- Before Using the Product
- Preparations
- Connecting and Using a Source Device
- Screen Setup
- Adjusting OSD (On Screen Display) settings
- Setup and Reset
- Installing the Software
- Troubleshooting Guide
- Specifications
- Appendix
Product Images (2)

Samsung C24F390 specifications
Below you will find the product specifications and the manual specifications of the Samsung C24F390.
The Samsung C24F390 is a computer monitor designed for optimal display performance. Its sleek design adds a stylish touch to any desk or workspace. The monitor features a 23.5-inch curved display that provides an immersive viewing experience, allowing users to fully immerse themselves in their content.
With a Full HD resolution of 1920 x 1080 pixels, the Samsung C24F390 delivers clear and detailed images. The curved display enhances the depth perception and reduces eye strain, providing a comfortable viewing experience over extended periods.
Equipped with AMD FreeSync technology, this monitor ensures smooth and fluid gameplay by synchronizing the monitor’s refresh rate with the graphics card. This eliminates screen tearing and stuttering, allowing gamers to fully enjoy their gaming experience.
The Samsung C24F390 has a fast response time of 4 milliseconds, reducing motion blur and ghosting in fast-paced scenes, making it suitable for both gaming and multimedia applications. The monitor also features a wide viewing angle of 178 degrees, ensuring optimal image quality from various viewing positions.
Connectivity options include HDMI and VGA ports, allowing easy connection to various devices such as computers, gaming consoles, and media players.
Overall, the Samsung C24F390 offers a visually pleasing and immersive display experience with its curved design, Full HD resolution, and advanced display technologies. Its sleek design and connectivity options make it a versatile monitor suitable for a variety of applications.
General
| Brand | Samsung |
| Model | C24F390 | C24F390 |
| Product | monitor |
| Language | English |
| Filetype | User manual (PDF), Datasheet (PDF) |
Frequently Asked Questions
Can’t find the answer to your question in the manual? You may find the answer to your question in the FAQs about the Samsung C24F390 below.
How do I reset the Samsung C24F390 monitor to its factory settings?
To reset the Samsung C24F390 monitor to its factory settings, follow these steps:
1. Make sure the monitor is powered on.
2. Press the JOG button located on the back of the monitor.
3. Use the navigation buttons on the monitor to navigate to the «Menu» option.
4. Press the JOG button to enter the menu.
5. Navigate to the «System» or «Settings» option in the menu.
6. Select the «Reset» or «Factory Reset» option.
7. Confirm the reset by selecting «Yes» or «OK» when prompted.
8. Wait for the monitor to reset to its factory settings. This may take a few moments.
9. Once the reset is complete, the monitor will restart and display the default settings.
Please note that performing a factory reset will erase any customized settings and restore the monitor to its original state.
Why is the FreeSync feature not working on my Samsung C24F390 monitor?
The FreeSync feature may not be working on your Samsung C24F390 monitor due to the following reasons:
1. Compatibility: FreeSync is only supported on specific AMD graphics card models. Make sure you have an AMD graphics card that supports FreeSync. Refer to the manual for a list of supported graphics cards.
2. Enable FreeSync: To enable FreeSync, access the OSD (On-Screen Display) menu of the monitor and navigate to the FreeSync settings. Set FreeSync to either «Standard Engine» or «Ultimate Engine» mode.
3. AMD Radeon Settings: Open the AMD Radeon Settings on your computer by right-clicking on the desktop and selecting «AMD Radeon Settings» and then «Display». Ensure that the «AMD FreeSync» feature is set to «On».
4. Game Settings: Depending on the game option settings, the screen may flicker when playing games. Try decreasing the game setting values to remove the flicker. Installing the latest drivers from the AMD website may also help resolve this issue.
5. Resolution: The response rate during gameplay may fluctuate depending on the resolution. Higher resolutions generally decrease the response rate.
If you encounter any further issues with the FreeSync feature, it is recommended to contact the Samsung Service Center for assistance.
How can I optimize the Eco Saving Plus feature on my Samsung C24F390 monitor to save more energy?
To optimize the Eco Saving Plus feature on your Samsung C24F390 monitor and save more energy, follow these steps:
1. Press the JOG button located on the back of the monitor to access the menu.
2. Navigate to the «Eco Saving Plus» option in the menu using the navigation buttons.
3. Select the «Eco Saving Plus» option to enter the submenu.
4. Choose the desired energy-saving level from the available options:
— «Off»: Deactivate the Eco Saving Plus function.
— «Auto»: Automatically reduce power consumption by about 10% over the current setting.
— «Low»: Save up to 25% energy compared to the maximum brightness.
— «High»: Save up to 50% energy compared to the maximum brightness.
5. Select the desired energy-saving level by pressing the JOG button.
6. Exit the menu by navigating to the «Exit» or «Back» option and pressing the JOG button.
By optimizing the Eco Saving Plus feature, you can effectively reduce power consumption and save energy while using your Samsung C24F390 monitor.
Why is the off timer not turning off my Samsung C24F390 monitor after the specified period of inactivity?
The off timer may not be turning off your Samsung C24F390 monitor after the specified period of inactivity due to the following reasons:
1. Off Timer Setting: Ensure that the Off Timer mode is turned on in the monitor settings. Access the menu using the JOG button and navigate to the Off Timer option. Set it to «On» if it is currently set to «Off».
2. Timer Duration: Check the duration set for the off timer. The off timer can be set within a range of 1 to 23 hours. Make sure the specified number of hours is appropriate for your needs.
3. Power Supply Regulations: In some regions, the off timer may be set to automatically activate 4 hours after the monitor powers on, in accordance with power supply regulations. If you do not want the timer to activate, go to the menu, navigate to the System settings, and set the Off Timer to «Off».
If the issue persists, it is recommended to contact the Samsung Service Center for further assistance in troubleshooting the off timer function on your Samsung C24F390 monitor.
How do I switch between PC mode and AV mode on my Samsung C24F390 monitor?
To switch between PC mode and AV mode on your Samsung C24F390 monitor, follow these steps:
1. Press the JOG button located on the back of the monitor to access the menu.
2. Use the navigation buttons to scroll through the menu options and select «Source» or «Input».
3. Press the JOG button to enter the source/input menu.
4. Navigate to the desired mode, either «PC» or «AV», using the navigation buttons.
5. Press the JOG button to select the mode.
6. Exit the menu by navigating to the «Exit» or «Back» option and pressing the JOG button.
By following these steps, you can easily switch between PC mode and AV mode on your Samsung C24F390 monitor. PC mode is typically used when connecting a computer or laptop, while AV mode is used for connecting devices such as gaming consoles, DVD players, or set-top boxes.
What is HDMI?
HDMI stands for High-Definition Multimedia Interface. An HDMI cable is used to transport audio and video signals between devices.
What screen dimensions does my monitor have?
The size of your monitor is usually expressed in inches, 1 inch is 2.54 centimetres. The size is the diagonal size of your monitor, so you measure the screen from bottom left to top right.
Is the manual of the Samsung C24F390 available in English?
Yes, the manual of the Samsung C24F390 is available in English .
Is your question not listed? Ask your question here
Код: 107336
Извините, товара сейчас нет в наличии
Бесплатная доставка
по Красноярску
Извините, товара сейчас нет в наличии
Новости интернет-магазина «Лаукар»:
Дополнительная информация в категории Монитор:
В интернет-магазине бытовой техники «Лаукар» Вы можете скачать инструкцию к товару Монитор Samsung C24F390FHI совершенно бесплатно.
Все инструкции, представленные на сайте интернет-магазина бытовой техники «Лаукар», предоставляются производителем товара.
Перед началом использования товара рекомендуем Вам ознакомиться с инструкцией по применению.
Для того чтобы скачать инструкцию, Вам необходимо нажать на ссылку «скачать инструкцию», расположенную ниже, а в случае, если ссылки нет,
Вы можете попробовать обратиться к данной странице позднее,
возможно специалисты интернет-магазина бытовой техники «Лаукар» еще не успели загрузить для скачивания инструкцию к товару:
Монитор Samsung C24F390FHI.

Фирма-производитель оставляет за собой право на внесение изменений в конструкцию, дизайн и комплектацию товара: Монитор Samsung C24F390FHI. Пожалуйста, сверяйте информацию о товаре с информацией на
официальном сайте компании производителя.

USER MANUAL
Curved Monitor
C22F390FH* C22F392FH* C24F390FH* C24F392FH* C24F394FH* C24F396FH* C24F399FH*
C27F390FH* C27F391FH* C27F396FH* C27F397FH* C27F398FW* C32F391FW* C32F395FW* C32F397FW*
The color and the appearance may differ depending on the product, and the specifications are subject to change without prior
notice to improve the performance.
The contents of this manual are subject to change without notice to improve quality.
© Samsung Electronics
Samsung Electronics owns the copyright for this manual.
Use or reproduction of this manual in parts or entirety without the authorization of Samsung Electronics is prohibited.
Trademarks other than that of Samsung Electronics are owned by their respective owners.
(For India Only)
This product is RoHS compliant.
For more information on safe disposal and recycling visit our
website www.samsung.com/in or contact our Helpline numbers —
18002668282, 180030008282.
Table of contents
Before Using the Product
Securing the Installation Space 4
Precautions for storage 4
Safety Precautions 5
Cleaning 5
Electricity and Safety 5
Installation 6
Operation 7
Preparations
Parts 9
Control Panel 9
Direct Key guide 10
Function Key Guide 11
Changing Brightness, Contrast and Sharpness
settings 13
Changing the Volume setting 13
Reverse Side 14
Adjusting the Product Tilt 15
Anti-theft Lock 16
Precautions for moving the monitor 17
Installing the Wall Mount
(Not for C27F397FH* / C32F397FW* models) 18
Wall Mount Kit Specifications (VESA)
(Not for C27F397FH* / C32F397FW* models) 18
Installation 19
Attaching the Stand (C22F390FH* / C22F392FH*
/ C24F390FH* / C24F392FH* / C24F394FH*
/ C24F399FH* / C27F390FH* / C27F391FH* /
C32F391FW*) 19
Attaching the Stand (C24F396FH* / C27F396FH*
/ C27F397FH* / C27F398FW* / C32F395FW* /
C32F397FW*) 20
Removing the Stand (C22F390FH* / C22F392FH*
/ C24F390FH* / C24F392FH* / C24F394FH*
/ C24F399FH* / C27F390FH* / C27F391FH* /
C32F391FW*) 21
Removing the Stand (C24F396FH* / C27F396FH*
/ C27F397FH* / C27F398FW* / C32F395FW* /
C32F397FW*) 22
Connecting and Using a Source Device
Pre-connection Checkpoints 23
Connecting and Using a PC 23
Connection Using the D-SUB Cable (Analog Type) 23
Connection Using the HDMI or HDMI-DVI Cable 24
Connection Using an DP Cable 24
Connecting to Headphones 25
Connecting the Power 26
Correct posture to use the product 27
Driver Installation 27
Setting Optimum Resolution 27
Screen Setup
SAMSUNG MAGIC Bright 28
Brightness 29
Contrast 29
Sharpness 29
Color 29
SAMSUNG MAGIC Upscale 30
HDMI Black Level 30
Eye Saver Mode 30
Game Mode 30
Response Time 30
Picture Size 31
Screen Adjustment 31
Adjusting OSD (On Screen
Display) settings
Transparency 32
Position 32
Language 32
Display Time 32
2

Table of contents
Setup and Reset
FreeSync 33
Eco Saving Plus 35
Off Timer 35
PC/AV Mode 35
Source Detection 35
Key Repeat Time 35
Power LED On 36
Reset All 36
Information 36
Installing the Software
Easy Setting Box 37
Restrictions and Problems with the Installation 37
System Requirements 37
Troubleshooting Guide
Requirements Before Contacting Samsung Customer
Service Center 38
Testing the Product 38
Checking the Resolution and Frequency 38
Check the following. 38
Q & A 40
Specifications
General 41
Standard Signal Mode Table 43
Appendix
Responsibility for the Pay Service
(Cost to Customers) 45
Not a product defect 45
A Product damage caused by customer’s fault 45
Others 45
3
Chapter 01
Before Using the Product
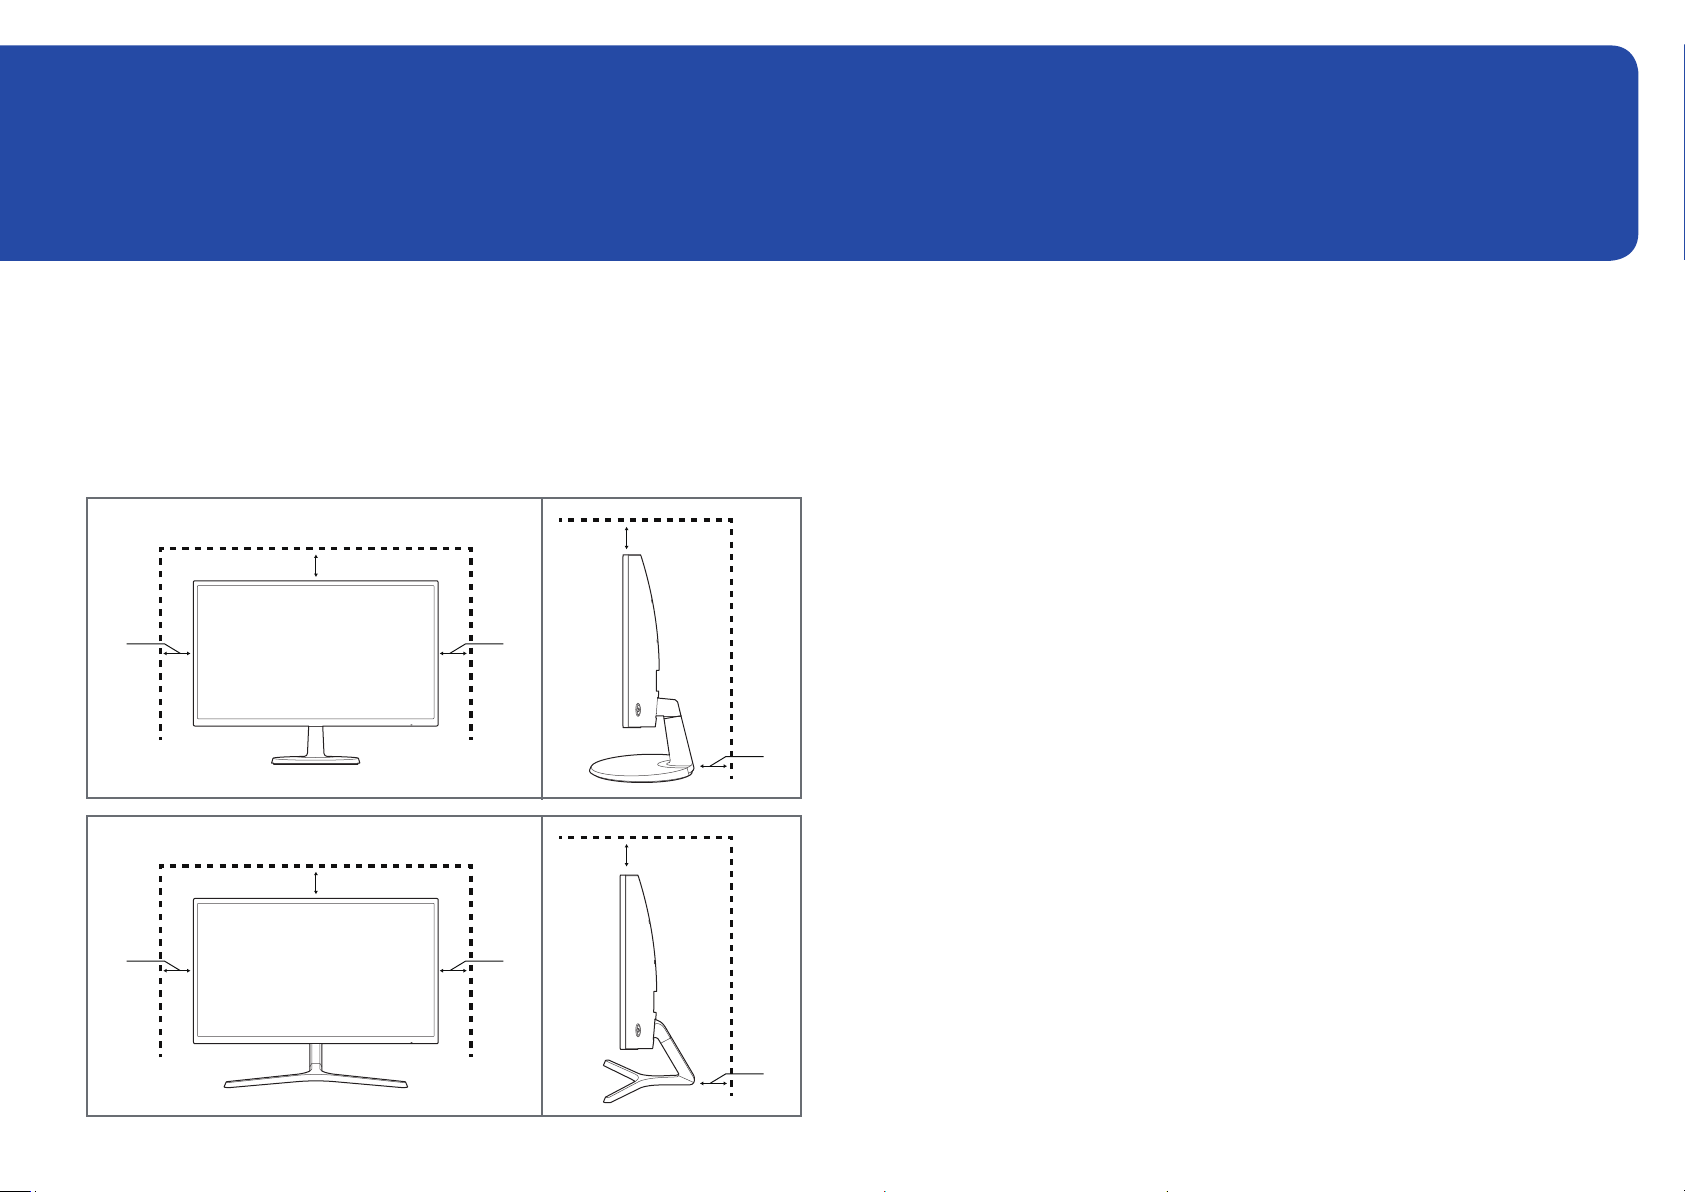
Securing the Installation Space
Ensure some space around the product for ventilation. An internal temperature rise may cause fire and
damage the product. Be sure to allow the amount of space as shown below or greater when installing
the product.
―
The exterior may differ depending on the product.
10 cm
10 cm
10 cm 10 cm
10 cm
10 cm
10 cm
Precautions for storage
High-glossy models can develop white stains on the surface if an ultrasonic wave humidifier is used
nearby.
―
Contact your nearest Samsung Customer Service Center if you want to clean the inside of the product
(Service fee will be charged.)
Do not press the monitor screen with hands or other objects. There is a risk of damaging the screen.
10 cm 10 cm
10 cm
4

Safety Precautions
Warning
A serious or fatal injury may result if instructions are not followed.
Electricity and Safety
Warning
• Do not use a damaged power cord or plug, or a loose power socket.
Caution
Personal injury or damage to properties may result if instructions are
not followed.
Cleaning
―
Exercise care when cleaning as the panel and exterior of advanced LCDs are easily scratched.
―
Take the following steps when cleaning.
Power off the product and computer.
1
Disconnect the power cord from the product.
2
―
Hold the power cable by the plug and do not touch the cable with wet hands. Otherwise, an electric
shock may result.
Wipe the monitor with a clean, soft and dry cloth.
3
‒ Do not apply a cleaning agent that contains alcohol, solvent, or surfactant to the monitor.
‒ Do not spray water or detergent directly on the product.
Wet a soft and dry cloth in water and wring thoroughly to clean the exterior of the product.
4
Connect the power cord to the product when cleaning is finished.
5
Power on the product and computer.
6
• Do not use multiple products with a single power socket.
• Do not touch the power plug with wet hands.
• Insert the power plug all the way in so it is not loose.
• Connect the power plug to a grounded power socket (type 1 insulated devices only).
• Do not bend or pull the power cord with force. Be careful not to leave the power cord under a heavy
object.
• Do not place the power cord or product near heat sources.
• Clean any dust around the pins of the power plug or the power socket with a dry cloth.
Caution
• Do not disconnect the power cord while the product is being used.
• Only use the power cord provided with your product by Samsung. Do not use the power cord with
other products.
• Keep the power socket where the power cord is connected unobstructed.
‒ The power cord must be disconnected to cut off power to the product when an issue occurs.
• Hold the plug when disconnecting the power cord from the power socket.
5

Installation
Warning
• DO NOT PLACE CANDLES, INSECT REPELLANTS OR CIGARETTES ON TOP OF THE PRODUCT. DO NOT
INSTALL THE PRODUCT NEAR HEAT SOURCES.
• Do not install the product in poorly ventilated spaces such as a bookcase or closet.
• Install the product at least 10cm away from the wall to allow ventilation.
• Keep the plastic packaging out of the reach of children.
‒ Children may suffocate.
• Do not install the product on an unstable or vibrating surface (insecure shelf, sloped surface, etc.)
‒ The product may fall and become damaged and/or cause an injury.
‒ Using the product in an area with excess vibration may damage the product or cause a fire.
• Do not install the product in a vehicle or a place exposed to dust, moisture (water drips, etc.), oil, or
smoke.
• Do not expose the product to direct sunlight, heat, or a hot object such as a stove.
‒ The product lifespan may be reduced or a fire may result.
• Do not install the product within the reach of young children.
‒ The product may fall and injure children.
• Edible oil (such as soybean oil) may damage or distort the product. Keep the product away from oil
pollution. And do not install or use the product in the kitchen or near the kitchen stove.
Caution
• Do not drop the product while moving.
• Do not set down the product on its front.
• When installing the product on a cabinet or shelf, make sure that the bottom edge of the front of
the product is not protruding.
‒ The product may fall and become damaged and/or cause an injury.
‒ Install the product only on cabinets or shelves of the right size.
• Set down the product gently.
‒ Product failure or personal injury may result.
• Installing the product in an unusual place (a place exposed to a lot of fine dust, chemical
substances, extreme temperatures or a significant presence of moisture, or a place where
the product will operate continuously for an extended period of time) may seriously affect its
performance.
‒ Be sure to consult Samsung Customer Service Center if you want to install the product at such a
place.
6

Operation
Warning
• There is a high voltage inside the product. Never disassemble, repair or modify the product
yourself.
‒ Contact Samsung Customer Service Center for repairs.
• To move the product, first disconnect all the cables from it, including the power cable.
• If the product generates abnormal sounds, a burning smell or smoke, disconnect the power cord
immediately and contact Samsung Customer Service Center.
• Do not let children hang from the product or climb on top of it.
‒ Children may become injured or seriously harmed.
• If the product is dropped or the outer case is damaged, turn off the power and disconnect the
power cord. Then contact Samsung Customer Service Center.
‒ Continued use can result in a fire or electric shock.
• Do not leave heavy objects or items that children like (toys, sweets, etc.) on top of the product.
‒ The product or heavy objects may fall as children try to reach for the toys or sweets resulting in a
serious injury.
• During a lightning or thunderstorm, power off the product and remove the power cable.
• Do not drop objects on the product or apply impact.
• Do not move the product by pulling the power cord or any cable.
• If a gas leakage is found, do not touch the product or power plug. Also, ventilate the area
immediately.
• Do not insert metallic objects (chopsticks, coins, hairpins, etc) or objects that burn easily (paper,
matches, etc) into the product (via the vent or input/output ports, etc).
‒ Be sure to power off the product and disconnect the power cord when water or other foreign
substances have entered the product. Then contact Samsung Customer Service Center.
• Do not place objects containing liquid (vases, pots, bottles, etc) or metallic objects on top of the
product.
‒ Be sure to power off the product and disconnect the power cord when water or other foreign
substances have entered the product. Then contact Samsung Customer Service Center.
• Do not lift or move the product by pulling the power cord or any cable.
• Do not use or keep combustible spray or an inflammable substance near the product.
• Ensure the vents are not blocked by tablecloths or curtains.
‒ An increased internal temperature may cause a fire.
7

Caution
• Leaving the screen fixed on a stationary image for an extended period of time may cause
afterimage burn-in or defective pixels.
‒ Activate power-saving mode or a moving-picture screen saver if you will not be using the
product for an extended period of time.
• Disconnect the power cord from the power socket if you do not plan on using the product for an
extended period of time (vacation, etc).
‒ Dust accumulation combined with heat can cause a fire, electric shock or electric leakage.
• Use the product at the recommended resolution and frequency.
‒ Your eyesight may deteriorate.
• Do not put AC/DC adapters together.
• Remove the plastic bag from the AC/DC adapter before you use it.
• Do not let water enter the AC/DC adapter device or get the device wet.
‒ An electric shock or fire may result.
‒ Avoid using the product outdoors where it can be exposed to rain or snow.
‒ Be careful not to get the AC/DC adapter wet when you wash the floor.
• Do not put the AC/DC adapter near to any heating apparatus.
‒ Otherwise, a fire may result.
• Keep the AC/DC adapter in a well-ventilated area.
• If you place the AC/DC power adapter so that it is hanging with the cord input facing upwards,
water or other foreign substances could enter the Adapter and cause the Adapter to malfunction.
Make sure to rest the AC/DC power adapter flat on a table or the floor.
• Do not touch the screen when the product has been turned on for an extended period of time as it
will become hot.
• Store small accessories out of the reach of children.
• Exercise caution when adjusting the product angle or stand height.
‒ Your hand or finger may get stuck and injured.
‒ Tilting the product at an excessive angle may cause the product to fall and an injury may result.
• Do not place heavy objects on the product.
‒ Product failure or personal injury may result.
• When using headphones or earphones, do not turn the volume too high.
‒ Having the sound too loud may damage your hearing.
• Do not hold the product upside-down or move it by holding the stand.
‒ The product may fall and become damaged or cause an injury.
• Looking at the screen too close for an extended period of time can deteriorate your eyesight.
• Do not use humidifiers or stoves around the product.
• Rest your eyes for more than 5 minutes for every 1 hour of product use.
8
Chapter 02
Preparations
Parts
Control Panel
―
The color and shape of parts may differ from what is shown. Specifications are subject to change
without notice to improve quality.
C22F390FH* / C22F392FH* /
C24F390FH* / C24F392FH* /
C24F394FH* / C24F399FH* /
C27F390FH* / C27F391FH*
Power LED
C27F398FW* / C32F395FW* /
C32F397FW*
C24F396FH* / C27F396FH* /
C27F397FH*
LEFT
PRESS(ENTER)
JOG Button
C32F391FW*
UP
DOWN
RIGHT
Icons Description
Multi directional button that helps navigate.
JOG Button
Power LED
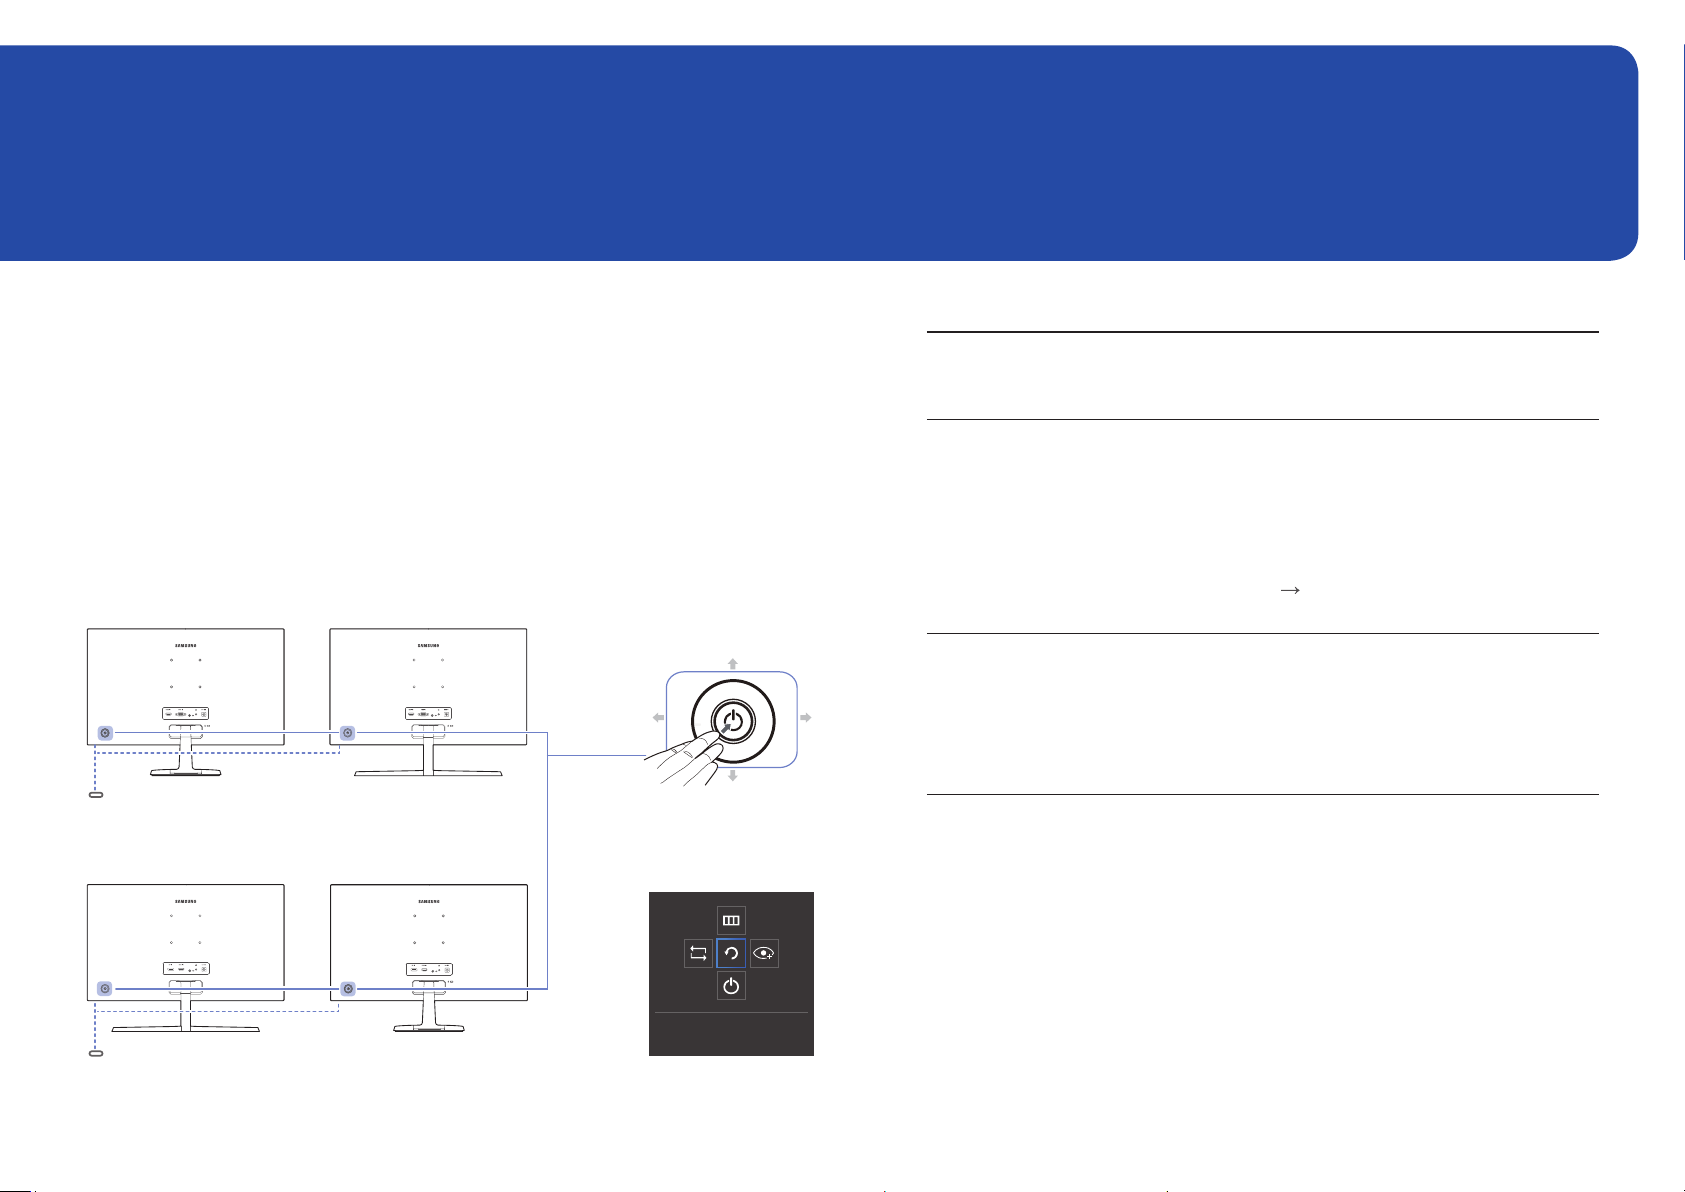
Function Key Guide
―
The JOG button is located on the rear left side of the product. The
button can be used to move up, down, left or right, or as Enter.
This LED is power status indicator and works as
• Power On (Power button): Off
• Power saving mode: Blinking
• Power Off (Power button): On
―
The power Indicator operation can be swapped by changing in
the menu. (System
functional variation maybe haven’t this function.
Press the JOG button when the screen is turned on. The Function
Key Guide will appear. To access the onscreen menu when the
guide is displayed, press the corresponding direction button
again.
―
Function Key Guide may vary depending on the function or
product model. Please refer to the actual product.
Power LED On) Actual models because of
Power LED
Return
Function Key Guide
9
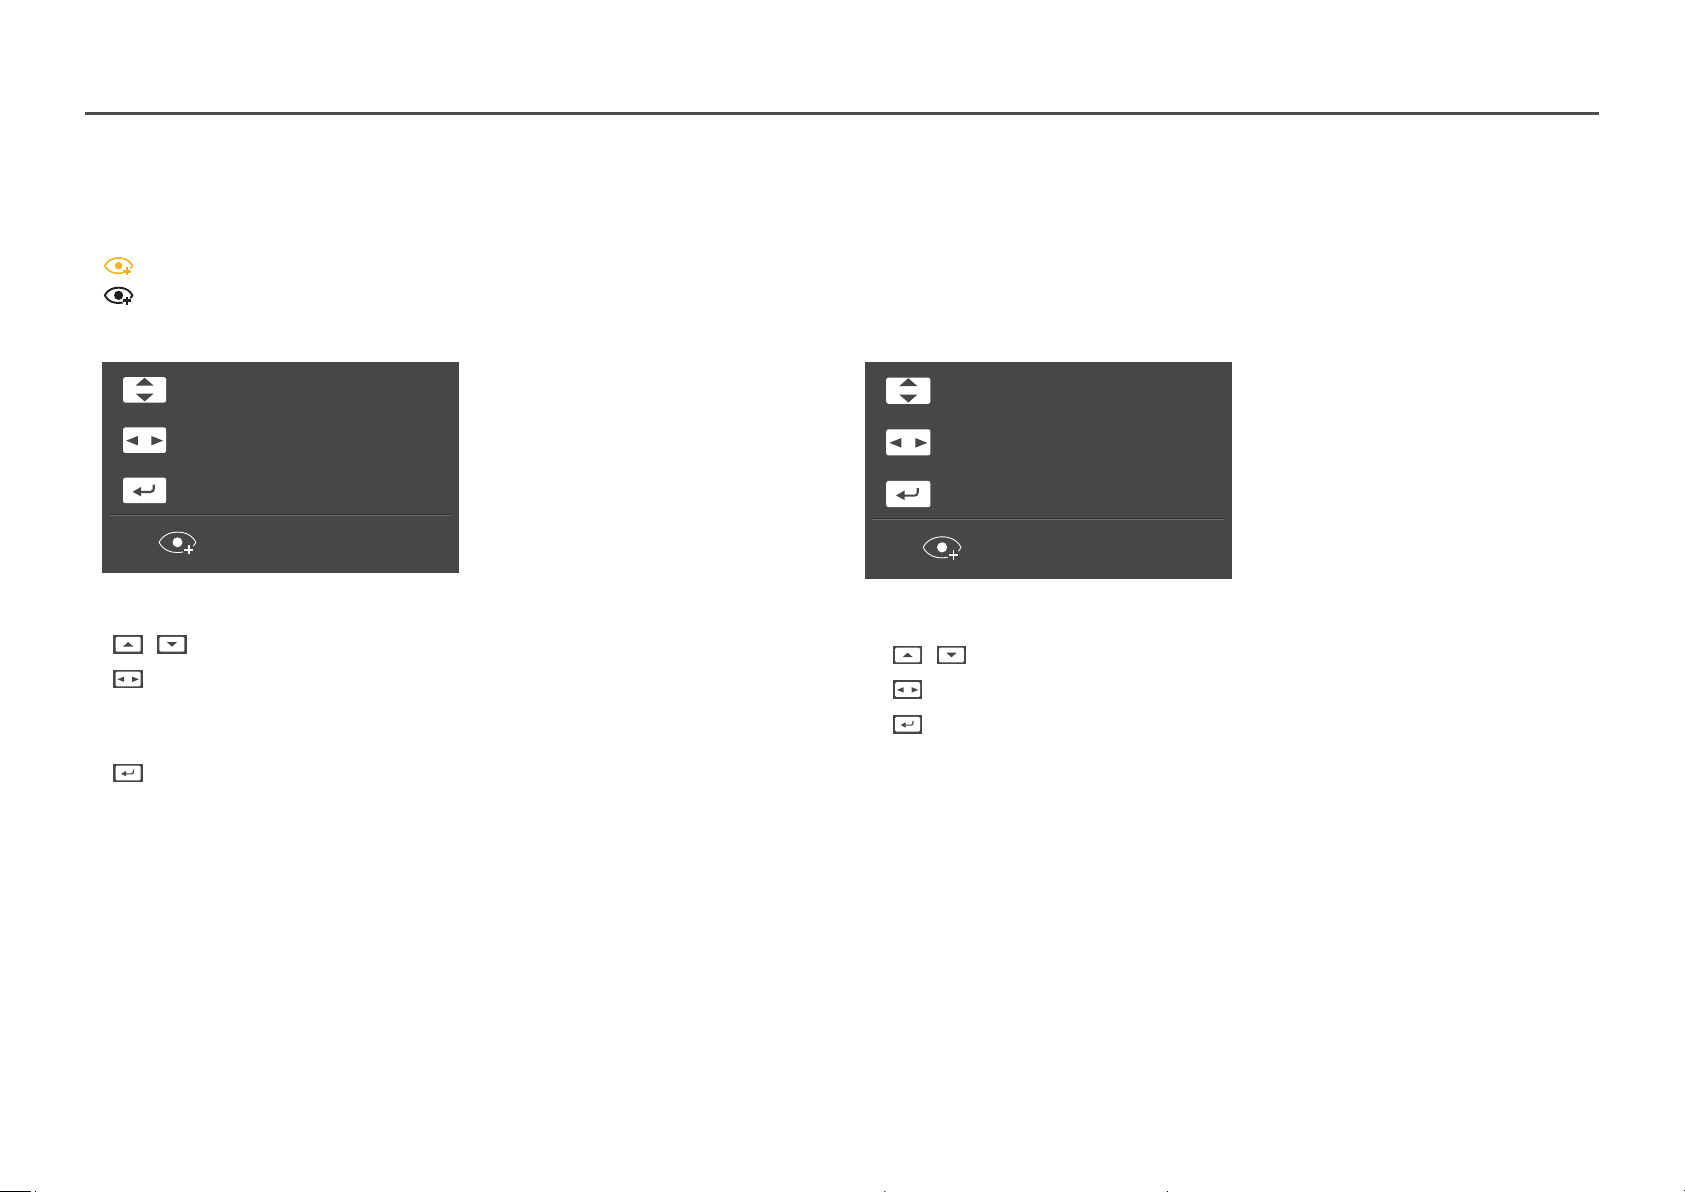
Direct Key guide
―
The shortcut button screen (OSD menu) shown below is displayed only when the monitor screen is turned on, the computer resolution changes, or the input source changes.
―
The function buttons page shows if Eye Saver Mode is enabled.
: On
: Off
Analog mode
Brightness
Auto Adjustment
Features
Eye Saver Mode Off
―
Analog mode option
• / : Adjust Brightness, Contrast, Sharpness.
: Auto Adjustment.
•
―
Changing the resolution in Display Properties will activate the Auto Adjustment function.
―
This function is only available in Analog mode.
• : Display Function Key Guide.
HDMI / DisplayPort mode
Brightness
Volume
Features
Eye Saver Mode Off
―
HDMI / DisplayPort mode option
• / : Adjust Brightness, Contrast, Sharpness.
: Adjust Volume, Mute.
•
: Display Function Key Guide.
•
10
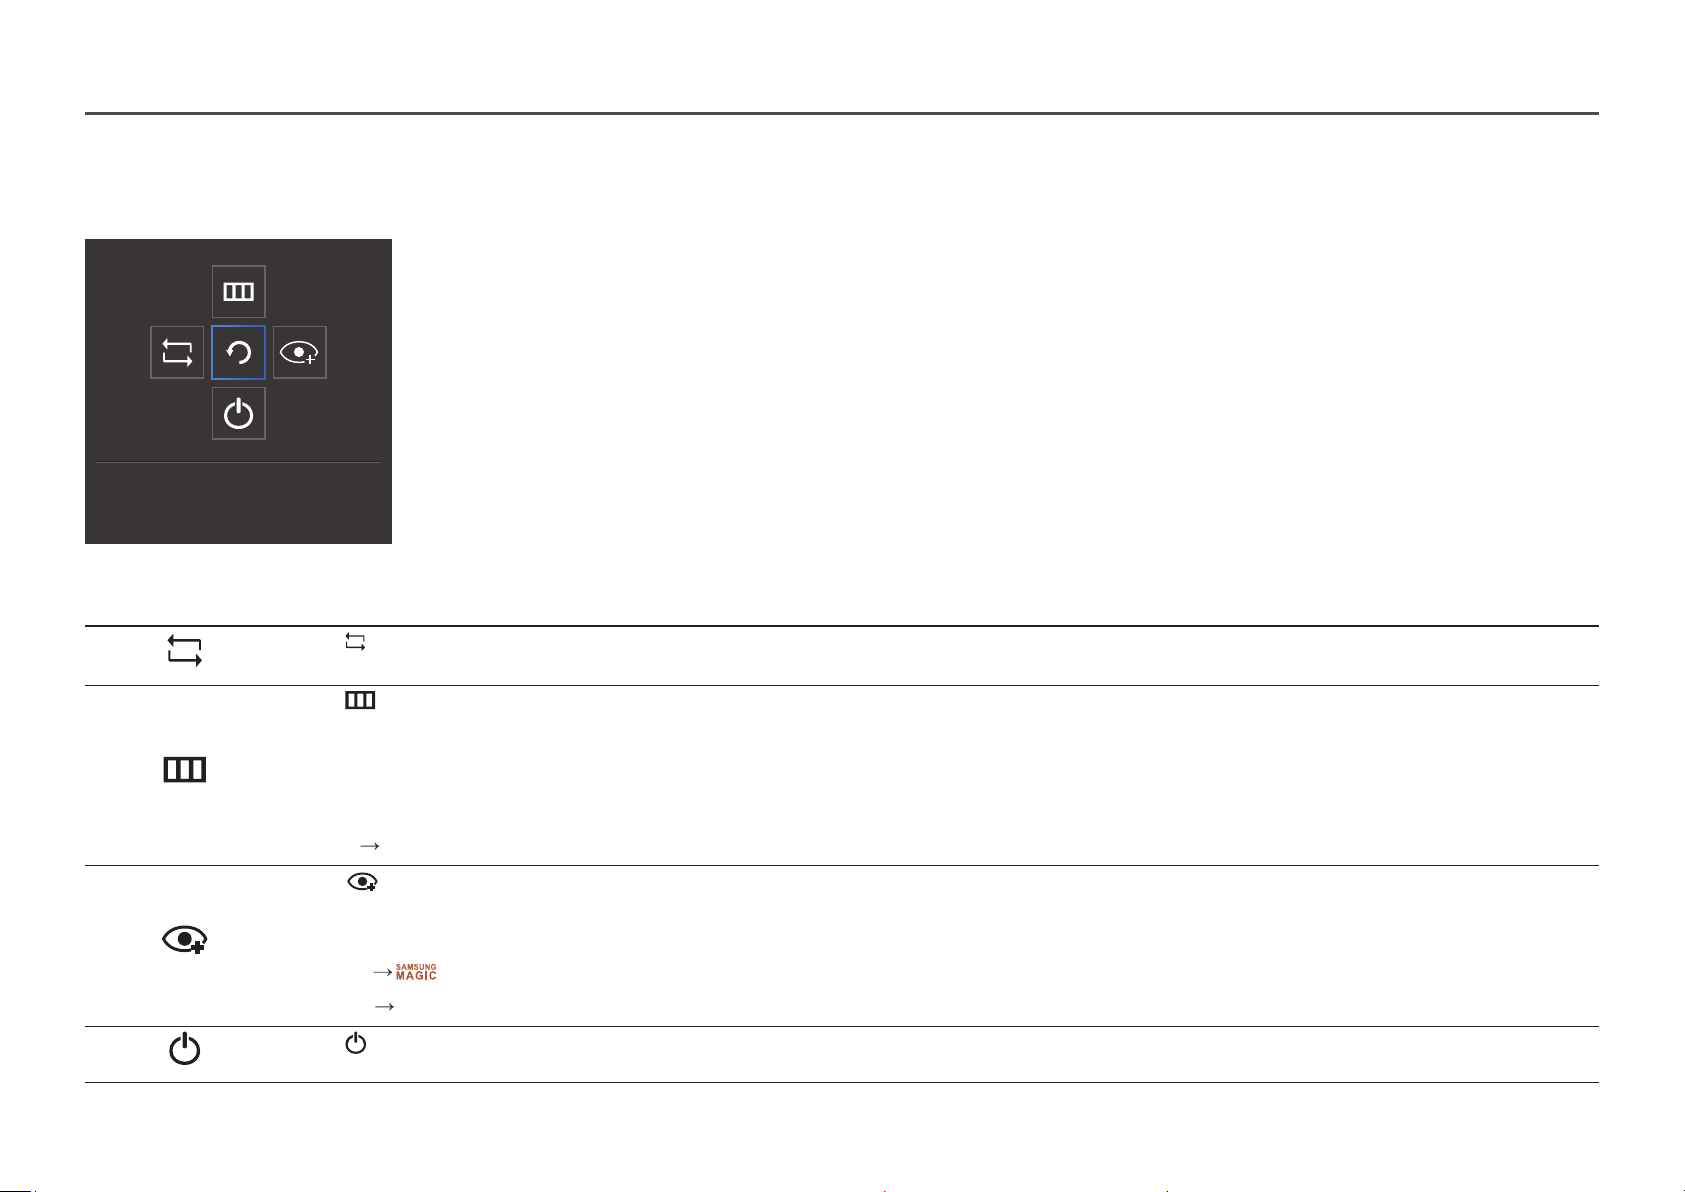
Function Key Guide
―
To enter the main menu or to use other items, press the JOG button to display the Function Key Guide. You can exit by pressing the JOG button again.
UP/DOWN/LEFT/RIGHT: Move to the item you want. The description for each item will appear when the focus changes.
PRESS(ENTER): The selected item will be applied.
Return
Icons Description
Selects to change the input signal by moving the JOG button in the Function Key Guide screen. A message will appear on the top left corner of the screen if the input signal has
been changed.
Selects by moving the JOG button in the function key guide screen.
The OSD (On Screen Display) of your Monitor’s feature appears.
OSD control lock: Maintain the current settings, or lock the OSD control to prevent unintended changes to settings.
Enable/Disable: To lock/unlock the OSD control, press the LEFT button for 10 seconds when the main menu displayed.
―
If the OSD control is locked, Brightness and Contrast can be adjusted. Eye Saver Mode is available.
System
FreeSync, Power LED On is available. Information can be viewed.
Selects by moving the JOG button in the function key guide screen.
Press to enable or disable Eye Saver Mode.
The items below are not available if the Eye Saver Mode function is enable.
• Picture
• System
Selects to turn the Monitor off by moving the JOG button in the function key guide screen.
―
Actual models because of functional variation, Function key guide options will be different.
Bright, Brightness, Color, Game Mode
Eco Saving Plus
11

When the monitor displays nothing (i.e. Power saving mode or Non-signal mode), 2 direct keys for
control source and power could be used as below.
JOG Button Power saving/Non-signal mode
UP
Down
Source Change
PRESS(ENTER) for 2 seconds
When the monitor displays the Main menu the JOG Button could be used as below.
Power Off
JOG Button Action
UP/DOWN
LEFT
RIGHT
PRESS(ENTER)
Move the option
Exit the Main menu.
Close Sublist without saving value.
Value decreases in the slider.
Move to next depth.
Value increases in the slider.
Move to next depth.
Save the value and close Sublist.
12
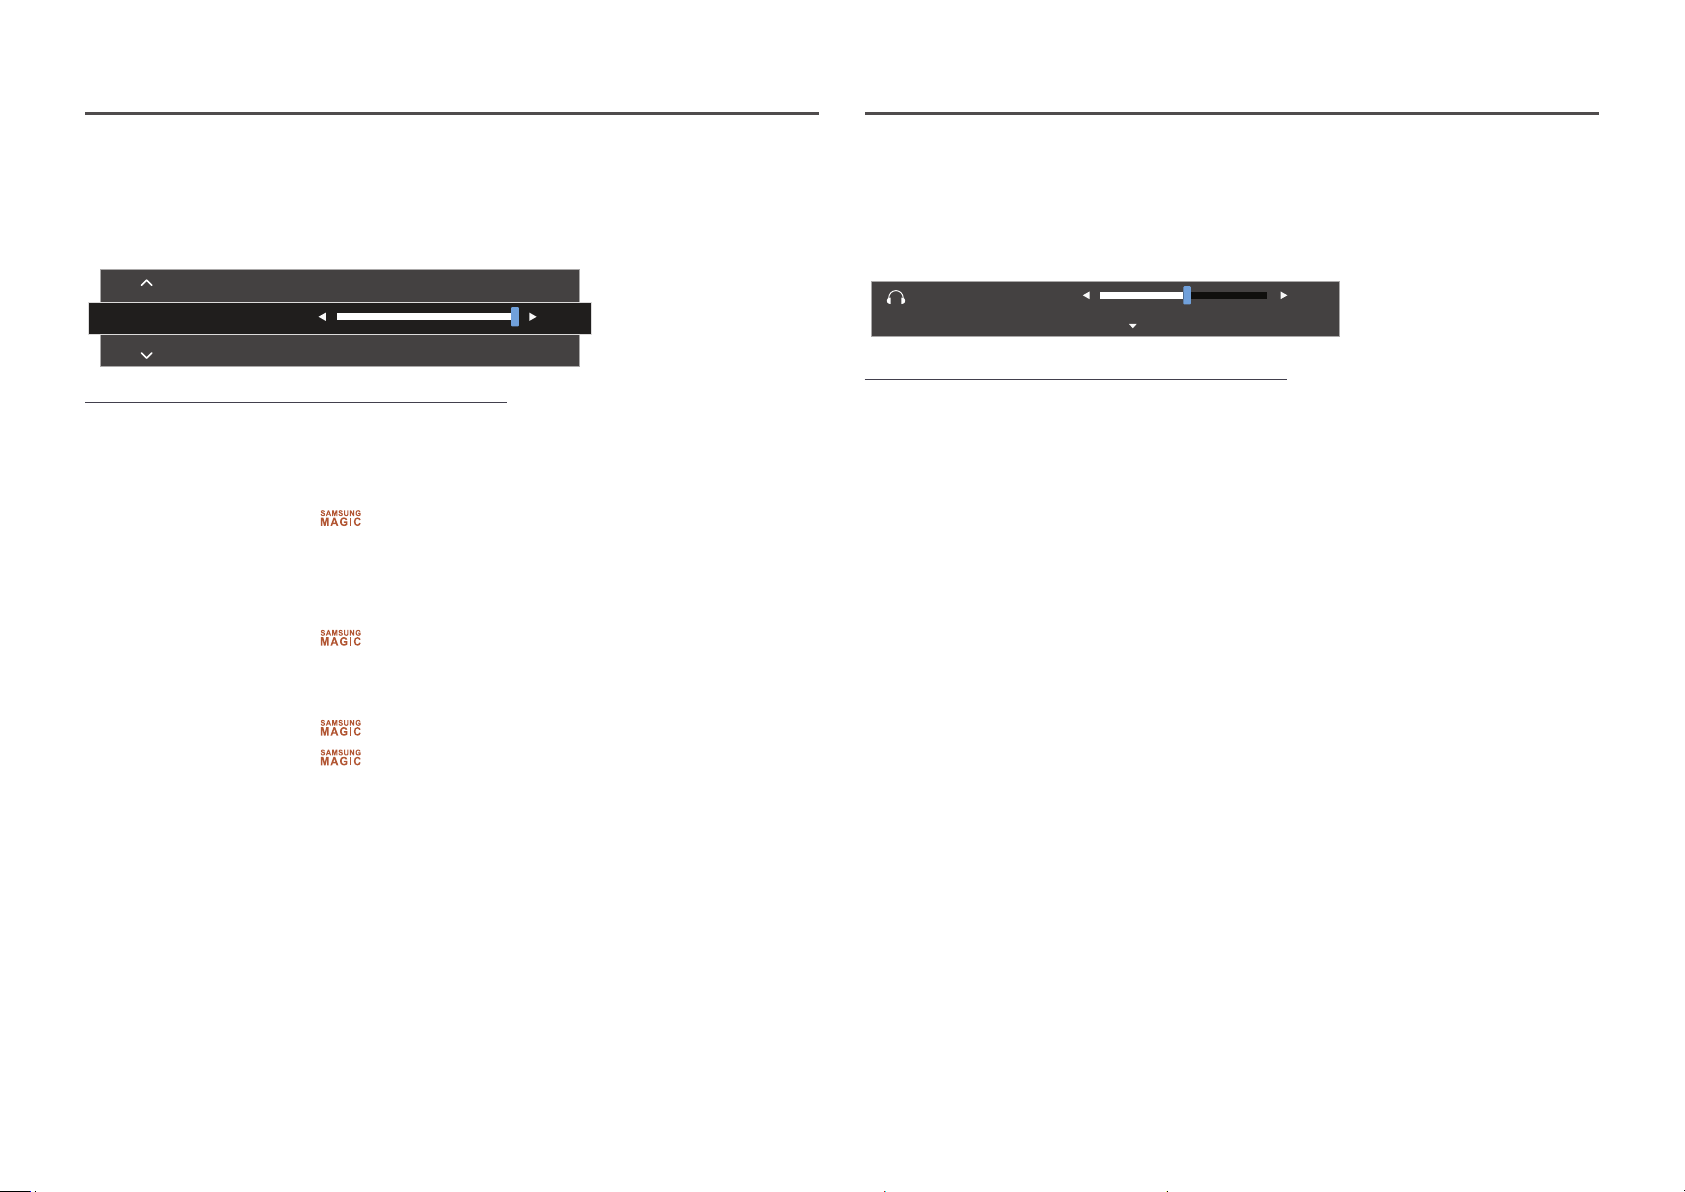
Changing Brightness, Contrast and Sharpness settings
Changing the Volume setting
You can adjust Brightness, Contrast or Sharpness by moving the JOG button up or down, if no OSD
menu is displayed.
Sharpness
Brightness
Contrast
―
The displayed image may differ depending on the model.
―
The default brightness can vary depending on the region.
Brightness
―
This menu is not available when
―
This menu is not available when Eco Saving Plus is enabled.
―
This menu is not available when Eye Saver Mode is enabled.
Contrast
―
This menu is not available when
―
This menu is not available when Game Mode is enabled.
Sharpness
―
This menu is not available when
―
This menu is not available when
―
This menu is not available when Game Mode is enabled.
Bright is set to Dynamic Contrast mode.
Bright is in Cinema or Dynamic Contrast mode.
Bright is in Cinema or Dynamic Contrast mode.
Upscale is in Mode1 or Mode2 mode.
100
You can adjust Volume by moving the JOG button left or right, if no OSD menu is displayed.
This function is only available in HDMI / DisplayPort mode.
Volume
Mute
―
The displayed image may differ depending on the model.
―
If the audio quality of a connected input device is poor, the Auto Mute function on the product may mute
the sound or cause choppy audio when applying the headphones or speakers. Set the input volume for the
input device to at least 20% and control the volume using the volume control (JOG button LEFT/RIGHT) on
the product.
―
What is Auto Mute?
The function mutes the audio to improve sound effect when there is sound noise or when the input
signal is weak, usually due to a problem with the volume of an input device.
―
To activate the Mute function, access the Volume control screen, then use the JOG button to move the
focus down.
To deactivate the Mute function, access the Volume control screen, then increase or decrease the Volume.
50
13
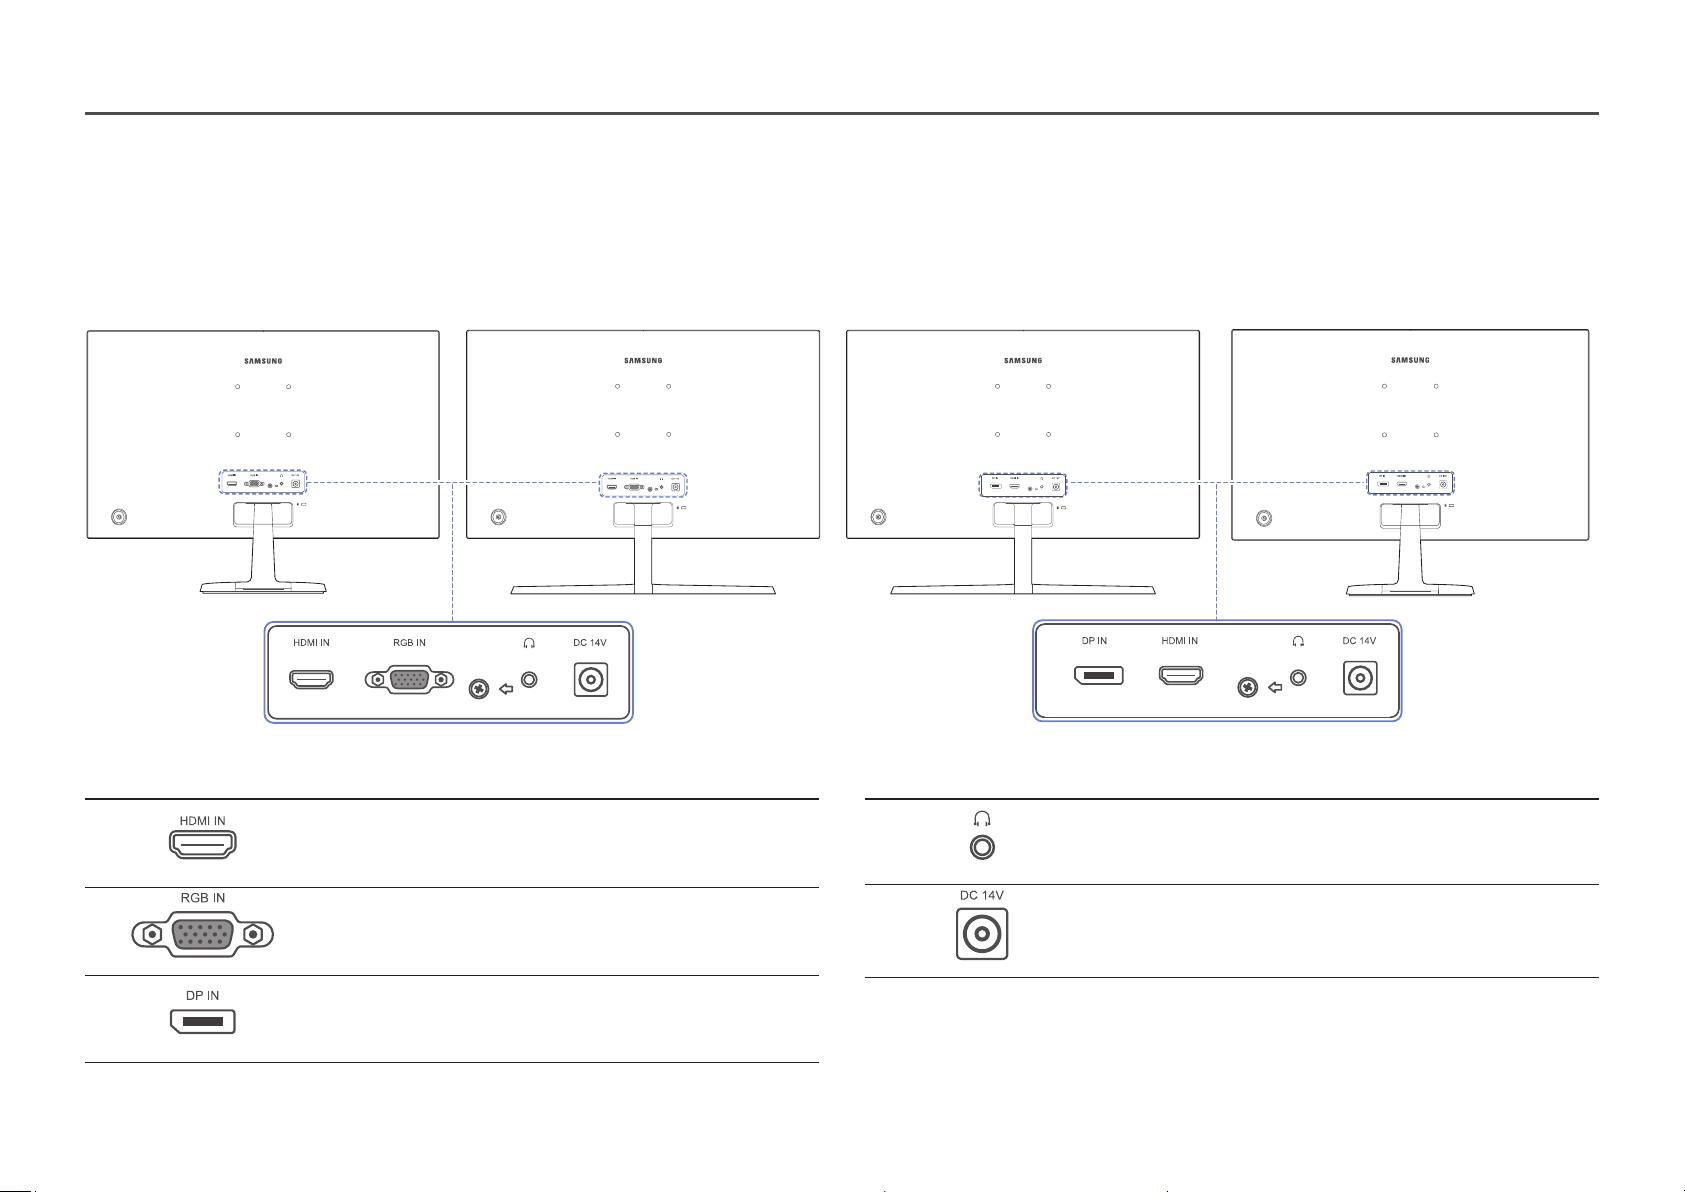
Reverse Side
―
The color and shape of parts may differ from what is shown. Specifications are subject to change without notice to improve quality.
C22F390FH* / C22F392FH* / C24F390FH* /
C24F392FH* / C24F394FH* / C24F399FH* /
C27F390FH* / C27F391FH*
C24F396FH* / C27F396FH* / C27F397FH* C32F391FW*C27F398FW* / C32F395FW* / C32F397FW*
Port Description
Connects to a source device using an HDMI cable or HDMI-DVI cable.
Connect to a PC using the D-SUB cable.
Connects to a PC using a DP cable.
Port Description
Connect to an audio output device such as headphones.
Connects to the AC/DC adapter.
14
Loading…
Samsung C24F390FHI
РУКОВОДСТВО ПОЛЬЗОВАТЕЛЯ
C22F390FH* C22F392FH* C24F390FH* C24F392FH* C24F394FH* C24F396FH* C24F399FH*
C27F390FH* C27F391FH* C27F396FH* C27F397FH* C27F398FW* C32F391FW* C32F395FW* C32F397FW*
Изогнутый монитор
• Плата за обслуживание может взиматься в следующих случаях:
‒ (a) Если вы вызовите специалиста, и он не обнаружит неисправности устройства.
(Это возможно, если вы не знакомы с настоящим руководством.)
‒ (b) Если вы передадите устройство в ремонтный центр, и его специалисты не обнаружат неисправности
устройства.
(Это возможно, если вы не знакомы с настоящим руководством.)
• Размер этой платы будет сообщен вам перед тем, как сотрудник компании выедет на место.
Цвет и дизайн изделия зависят от модели, характеристики изделия могут изменяться без предварительного уведомления с целью
усовершенствования.
Содержание этого руководства может изменяться без уведомления для улучшения качества изделия.
© Samsung
Авторские права на это руководство принадлежат компании Samsung.
Использование или воспроизведение данного руководства целиком или его отдельных частей без разрешения Samsung запрещено.
Торговые марки, не относящиеся к Samsung, принадлежат их соответствующим владельцам.
Инструкция
Посмотреть инструкция для Samsung C24F390FHI бесплатно. Руководство относится к категории мониторы, 1 человек(а) дали ему среднюю оценку 9.5. Руководство доступно на следующих языках: русский. У вас есть вопрос о Samsung C24F390FHI или вам нужна помощь?
Задайте свой вопрос здесь
Изображения продукта (2)

Ниже вы найдете технические характеристики изделия и руководства по эксплуатации Samsung C24F390FHI.
Главная
| Бренд | Samsung |
| Модель | C24F390FHI |
| Изделие | монитор |
| Язык | русский |
| Тип файла | Руководство пользователя (PDF) |
Часто задаваемые вопросы
Не можете найти ответ на свой вопрос в руководстве? Вы можете найти ответ на свой вопрос ниже, в разделе часто задаваемых вопросов о Samsung C24F390FHI.
Что такое HDMI?
HDMI расшифровывается как «интерфейс для мультимедиа высокой четкости». Кабель HDMI используется для передачи аудио- и видеосигналов между устройствами.
Каковы размеры экрана монитор?
Размер монитор обычно выражается в дюймах, 1 дюйм — 2,54 сантиметра. Под размером понимается размер диагонали монитор, поэтому экран необходимо измерять от нижнего левого угла к верхнему правому.
Инструкция Samsung C24F390FHI доступно в русский?
Да, руководствоSamsung C24F390FHI доступно врусский .
Не нашли свой вопрос? Задайте свой вопрос здесь