
101 страница подробных инструкций и пользовательских руководств по эксплуатации на русском на английском
English
— Eng-9 —
Operation
(NN-ST340W)
To Use Turbo Defrost (0.1~2.0 kg):
Notes:
1. Turbo Defrost can be used to defrost many cuts of meat, poultry and fish by weight. To use, simply program Turbo Defrost
and the weight of the food in kg (1.0) and tenths of a kg (0.1). The oven will determine the defrosting time and power levels.
Once the oven is programmed, the defrosting time will appear in the display. For best results the minimum recommended
weight is 0.2 kg.
2. BONE-IN ROASTS, such as a Beef Rib Roast or Pork Loin Rib Roast have a smaller muscle than a boneless roast of the
same weight. Therefore, for bone-in roasts weighing over 2 kg reduce weight by 0.5 kg. For bone-in roasts weighing less
than 2 kg, reduce weight by 0.25 kg.
3. Turn over or remove or shield food when buzzer rings in the middle of cooking.
1. Put the food into the oven
2. Select the Weight of Food
3. Press
Defrosting time appears in the display window and begings to count
down.
Example: To defrost 1.5 kg of meat.
Food
Maximum Weight
Minced meat, Chicken Pieces, Chops
2 kg
Beef roast, lamb, pork, whole chickens
2 kg
Whole fish, scallops, prawns, fish fillets
1 kg
once
5 times
342W/M)
342W
2. Select the Weight of Food
Example: To defrost 1.5 kg of meat.
Food
Maximum Weight
Minced meat, Chicken Pieces, Chops
2 kg
Beef roast, lamb, pork, whole chickens
2 kg
Whole fish, scallops, prawns, fish fillets
1 kg
once
5 times
3. Press
Defrosting time appears in the display window and begings to count
down.
(Continued)
0.2 kg.
English

English
Operation
(NN-ST340W)
— Eng-10 —
To Set Clock: Example: To set 11:25 a.m.
1. Press.
Colon will blink in
the display window.
3. Press once.
Colon stops blinking; time of
day is entered and locked in
the display window.
Time counts up in minutes.
2. Enter time of day using the number pads.
Time appears in the display window; colon
is blinking.
Notes:
1. To reset time of day, repeat steps 1-3.
2. The clock will keep the time of day as long as oven is plugged in and electricity is supplied.
3. Clock is a 24-hour display.
4. Oven will not operate while colon is blinking.
11 times
twice
5 times
To set:
Notes:
1. Child Safety Lock can be set when colon or time of day is displayed.
2. This feature allows you to prevent operation of the oven by a young child; however, the door will open.
3. To set or cancel child safety lock, Start pad or Stop/Reset pad must be pressed 3 times within 10 seconds.
Colon or time of day is
displayed
Press 3 times
Display Window
To cancel:
Display Window
Press 3 times
Colon or time of day is
displayed
or
or
Clock Setting
To Use Child Safety Lock
342W/M)
(Continued)
English

English
— Eng-11 —
Operation
(NN-ST340W)
1. Put the food into the oven
2. Select Pads
Press the desired food category pad until the desired weight appears in
the Display Window.
3. Press
The cooking time appears in the display window and begings to count
down.
Menu No.
Pads
1 tap
2 taps
3 taps
4 taps
1
Porridge
2 servs
4 servs
—
—
2
Omelet
1 serv
2 servs
3 servs
4 servs
3
Pudding
4 servs
8 servs
—
—
4
Vegetables
120 g
180 g
250 g
370 g
5
Potatoes
200 g
400 g
600 g
—
6
Fresh Pasta
150 g
250 g
375 g
—
7
Soup
2 servs
4 servs
6 servs
—
8
Fish
100 g
200 g
300 g
400 g
9
Chicken
200 g
400 g
600 g
800 g
Auto Reheat:
Pad
1 tap
2 taps
3 taps
4 taps
Auto Reheat
200 g
400 g
600 g
800 g
Auto Cook:
To Reheat/Cook Using Auto Cook Pads
342W
342W/M)
3. Press
The cooking time appears in the display window and begings to count
down.
(Continued)
English

English
— Eng-12 —
Operation
(NN-ST340W) (Continued)
Auto Reheat
Pre-cooked foods are reheated automatically by setting the
food’s serving. You need not select power level or reheating
time. The foods should be at refrigerator or room tempera-
ture. Use suitable sized dish and cover with a lid or
microwave safe plastic.
Note: When reheating items such as soups, stews, and
casseroles, it is recommended that they are stirred at half of
reheating time and at completion of reheating.
1. Porridge
Suitable for cooking different kinds of porridge such as buck-
wheat, millet and rice. Place the porridge with water in a suit-
able size container. Use the following as a guide:
Then place the container into the oven and press «Porridge»
key. Do not forget to stir and remove the cover when «Beep».
* For Millet, immerse them into warm water for 30 minutes
before cooking.
2. Omelet
This program is suitable for cooking the omelet from eggs.
Use the casserole dish for cooking. You can cook the omelet
using your recipe or the following as a guide:
Whisk eggs with milk for 3-5 minutes by mixer, add salt and
pepper on taste. Put mixture into greased casserole dish and
place in the oven on glass tray. Select «Omelet» and cook
until the cooking time will finish. After cooking, covered, let
stand for 3 minutes. Serve the hot cooked omelet with melt-
ed butter, sauces or grated cheese.
3. Pudding
Suitable for cooking of puddings with berries or fruits. Use
the following recipe as a guide:
1. Mix up margarine, sugar and eggs for 5 minutes by mixer.
Stir flour, vanilline powder and baked powder. Pour the
flour into other mixture and make sticky pastry.
2. Add berries into pastry or put them on the bottom of dish.
Place pastry in the dish and make the even surface.
3. Place in the oven and select «Pudding». Cooking until
stopped program. Before serve take out the pudding and
powder with sugar.
4. Vegetables
This program is suitable for cooking fresh vegetables such
as: potatos, carrots, onions, beetroot, cabbage, cauliflower,
pumpkin, marrow, mushroom and etc. and the mixture of
them. Vegetables should be trimmed, prepared and cut into
even sized pieces. Add 2-4 tablespoon to
1
/
4
cup of water if
vegetables appear slightly dehydrated or a softer texture is
desired. Place in a suitably sized plate or casserole dish and
cover with plastic wrap or a fitting lid. Stir at the beep. If
desired, butter, herbs, etc. may be added but do not add salt
until the completion of cooking.
5. Potatoes
Potatoes should be trimmed or prepared and cut into evenly
sliced pieces. Add 1 to 3 tablespoon of water to potatoes. If
dehydrated or softer texture is desired. Place in a appropri-
ate size dish and cover with plastic wrap or well fitting lid.
Halfway through the cooking time, stir potatoes. At the end of
the cooking time, stir potatoes and let stand, covered, for 2
to 3 minutes.
Ingredients
4 servs
dish 20 cm
8 servs
dish 28 cm
Margarine
100 g
(
1
/
2
pack.)
200 g
(1 pack.)
Sugar
75 g
(
1
/
4
cup)
150 g
(
1
/
2
cup)
Egg
1 p.
2 pcs.
Wheat flour
100 g
(
2
/
3
cup)
200 g
(1
1
/
3
cup)
Vanilline powder
2 g
(
1
/
3
tsp.)
4 g
(
1
/
2
tsp.)
Baked powder
3 g
(
1
/
2
tsp.)
5 g
(1 tsp.)
Frozen berries (cherry,
rusberry, bilberry etc.)
150 g
300 g
Products
Water
Milk
Salt
Sugar
Buckwheat
200 g
400 ml
1
/
2
t.sp
Millet*
130 g
450 ml
1 t.sp
2 tb. sp
Rice
130 g
400 ml
1
/
2
t.sp
1 tb. sp
Ingredients
Eggs
Milk or cream
Salt, pepper
Butter
1 serv.
2 pcs.
125 ml
2 serv.
4 pcs.
250 ml
3 serv.
6 pcs.
375 ml
4 serv.
8 pcs.
500 ml
on taste
for greasing of casserole
342W/M)
cups)
English

English
Operation
(NN-ST340W) (Continued)
— Eng-13 —
6. Fresh Pasta
This program is designed to cook pasta.
Put the macaroni onto a heatproof dish with high brims,
which is suitable for use in the microwave mode. Fill it up
with the boiling water, add salt, vegetable oil, and select the
program for cooking according to recommendations given in
the following chart:
(The water level must be 1 — 2 cm higher than pasta).
Do not cover the dish.
Stir after the beep.
After the cooking is completed, pour out the water, add the
butter, stir, and leave for appr. 5 minutes.
7. Soup
This program is suitable for cooking traditional soups, such
as: meat sol’yanka, shchi, rassol’nik. Soups can be cooked
with broth or water. The broth or water should be a room
temperature. Use the following as a guide:
It is advisable to use medium size vegetables. Vegetables
should be trimmed. All ingredients should be cut into even
sized pieces. For 1.5L soup you will need 2.5 liter pot.
Place all ingredients from the first part of the table in the pot,
stir well, cover with plastic wrap and cook using the auto
menu «Vegetables». After that add the rest ingredients, stir
well, and cook using the auto menu «Soup». After beep stir
well and go on cooking until finish of the program. Before
serving leave for 10 minutes in the switched off microwave
oven. Serve with sour cream.
8. Fish
Suitable for cooking whole fish and fish fillets. Select fish
suitable for microwave cooking and place in a single layer in
a shallow dish, with skin-side down. Add butter, spices,
herbs, or lemon juice to flavor. Overlap thin edges of fillets to
prevent overcooking. If stuffing whole fish with seasoning,
cooking time may need to be extended. Shield the eye and
tail area of whole fish with small amounts of aluminum foil to
prevent overcooking. Cover dish securely with plastic wrap
or fitted lid. Allow large amounts of fish to stand for 3 to 5
minutes after cooking before serving. (thickness of fish
should not be more than 3 cm)
9. Chicken
Suitable for cooking chicken pieces such as wings, drum-
sticks, thighs, half breasts etc. Chicken pieces should be
thawed completely before cooking. Marinate chicken pieces
prior to cooking, add 1 to 5 tablespoon oil, for added flavor
and color. Place marinated chicken pieces on heat-proof
dish. Cover with plastic wrap or a fitting lid.
Program
“Pasta” –
press once
Pasta
150 g
Boiling
water
750 ml
Vegetable
oil
1 tb.sp.
Salt
To taste
“Pasta” –
press twice
250 g
1000 ml
2 tb.sp.
To taste
“Pasta” –
press 3 times
375 g
1250 ml
3 tb.sp.
To taste
Ingredients
4 services (1.5 liter)
Rassol’nik
Chshi
Solyanka
Smocked meat
products (ham,
sausages)
—
—
200 g
Pickled
cucumbers
3 pcs.
—
3 pcs.
Onions
1 pcs.
1 pcs.
2 pcs.
Paprika
—
—
1 pcs.
Tomato sauce
4 tb.sp.
4 tb.sp.
4 tb.sp.
Potatos
2-3 pcs.
2-3 pcs.
—
Cabbage
—
200 g
—
Carrots
1 pcs.
1 pcs.
—
Vegetable oil
2 tb.sp.
2 tb.sp.
—
Add and press “SOUP”
Broth or water
1000 ml
1000 ml
1000 ml
Olives
—
—
8-10 pcs.
Lemon
1
/
2
pcs.
—
1
/
2
pcs.
Parsley, salt,
pepper
On taste
342W/M)
English

English
Operation
(NN-ST340W)
— Eng-14 —
This feature allows you to program standing Time after cooking is completed and to program the oven as a minute or 10 sec-
onds timer or program delay start.
To use as a Kitchen Timer: Example: To count 5 minutes
1. Press.
3. Press.
Time counts down without
operating oven.
2. Set desired amount of time.
(Up to 99 minutes and 50 seconds.)
To Set Standing Time: Example: To stand for 5 minutes after cooking (3 mins. at Medium)
1. Press 3 times.
Set the desired cook-
ing program. (See
page 8 for directions.)
5. Press.
Cooking starts.
After cooking,
standing time
will count down
without operat-
ing oven.
2. Press 3 times.
3. Press.
4. Press 5 times.
Set desired amount
of standing time.
(Up to 99 minutes
and 50 seconds.)
To Set Delay Time: Example: To start cooking 5 minutes later (3 mins. at Medium)
1. Press.
5. Press.
Delayed time
counts down.
After delay
time, the cook-
ing will start.
2. Press 5 times.
Set desired amount of
delay time.
(Up to 99 minutes and
50 seconds.)
3. Press 3 times.
Set the desired cooking
program. (See page 8
for directions.)
4. Press 3 times.
Notes:
1. If oven door is opened while Standing Time, Delay Time or Kitchen Timer has been set, the time in the display window will
continue to count down.
2. Delay Time and Standing Time can not be programmed before any Auto control function. This is to prevent the standing tem-
perature of the food from rising before defrosting or cooking begins. A change in the starting temperature could cause in
accurate results.
3. When using Standing Time or Delay Time, it’s up to 2 Micro Power stages.
5 times
5 times
3 times
5 times
3 times
Timer Setting
(Kitchen Timer/Standing Time/Delay Time)
342W/M)
(Continued)
English

English
— Eng-15 —
Before Requesting Service
ALL THESE THINGS ARE NORMAL:
The oven causes interference with
Some radio and TV interference might occur when you cook with the microwave
my TV.
oven. This interference is similar to the interference caused by small appliances
such as mixers, vacuums, hair dryers, etc. It does not indicate a problem with your
oven.
Steam accumulates on the oven
During cooking, steam and warm air are given off from the food. Most of the steam
door and warm air comes from
and warm air are removed from the oven by the air which circulates in the oven
the oven vents.
cavity. However, some steam will condense on cooler surfaces such as the oven
door. This is normal.
I accidentally operate my
Operating the oven empty for a short time will not damage the oven.
microwave oven without any food
However, we do not recommend this to be done.
in it.
The oven is not plugged in securely.
Remove plug from outlet, wait 10 sec-
onds and re-insert.
Circuit breaker or fuse is tripped or
blown.
Contact the specified service center.
There is a problem with the outlet.
Plug another appliance into the outlet to
check if the outlet is working.
Oven will not turn on.
The roller ring and oven bottom are dirty.
Clean these parts according to care of
your oven (See next page).
When the oven is turning on,
there is noise coming from
Glass Tray.
The Child Lock was activated by press-
ing Start Pad 3 times.
Deactivate Lock by pressing Stop/Reset
Pad 3 times.
The word «Child» appears in the
Display Window.
The door is not closed completely.
Close the oven door securely.
Oven will not start cooking.
PROBLEM
POSSIBLE CAUSE
REMEDY
Start Pad was not pressed after pro-
gramming.
Press Start Pad.
Another program has already
been entered into the oven.
Press Stop/Reset Pad to cancel the pre-
vious program and program again.
The program has not been entered cor-
rectly.
Program again according to the
Operating Instructions.
Stop/Reset Pad has been pressed acci-
dentally.
Program oven again.
Oven will not start cooking.
For NN-ST340W:
If it seems there is a problem with the oven, contact an authorized Service Centre.
342W/M:
English

English
— Eng-16 —
Care of your Microwave Oven
1.
The oven should be cleaned regularly and any food
deposits removed.
2.
Turn the oven off and remove the power plug from the wall
socket before cleaning.
3.
Keep the inside of the oven clean. When food splatters or
spilled liquids adhere to oven walls, wipe with a damp
cloth. Mild detergent may be used if the oven gets very
dirty. The use of harsh detergent or abrasives is not rec-
ommended.
4.
The outside oven surfaces should be cleaned with a damp
cloth. To prevent damage to the operating parts inside the
oven, water should not be allowed to seep into the ventila-
tion openings.
5.
Do not allow the Control Panel to become wet. Clean with
a soft, damp cloth. Do not use detergents, abrasives or
spray-on cleaners on the Control Panel.
When cleaning the Control Panel, leave oven door open to
prevent oven from accidentally turning on. After cleaning
press Stop/Reset Pad to clear display window or make
sure TIME/WEIGHT SELECT DIAL is set to zero position.
6.
If steam accumulates inside or around the outside of the
oven door, wipe with a soft cloth. This may occur when the
microwave oven is operated under high humidity condi-
tions and in no way indicates malfunction of the unit.
7.
It is occasionally necessary to remove the glass tray for
cleaning. Wash the tray in warm sudsy water or in a dish-
washer.
8.
The roller ring and oven cavity floor should be cleaned
regularly to avoid excessive noise. Simply wipe the bottom
surface of the oven with mild detergent, water or window
cleaner and dry. The roller ring may be washed in mild
sudsy water or dish washer. Cooking vapors collect during
repeated use but in no way affect the bottom surface or
roller ring wheels. When removing the roller ring from cavi-
ty floor for cleaning, be sure to replace in the proper posi-
tion.
9.
When it becomes necessary to replace the oven light,
please consult a dealer to have it replaced.
10. Failure to maintain the oven in a clean condition could
lead to deterioration of the surface that could adversely
affect the life of the appliance and possibly result in a haz-
ardous situation.
English

English
Technical Specifications
— Eng-17 —
* IEC Test Procedure
Specifications subject to change without notice.
As for the voltage requirement, the production month, country and serial number, please refer to the identification plate on the
microwave oven.
NN-SM330W
NN-ST340W
Power Source:
220 V 50 Hz
Power Consumption:
5.3 A, 1,125 W
6.2 A, 1,275 W
Cooking Power:
700 W
800 W
Outside Dimensions (W x H x D):
488 mm x 279 mm x 405 mm
Oven Cavity Dimensions (W x H x D):
315 mm x 206 mm x 353 mm
Operating Frequency:
2,450 MHz
Net Weight:
Approx. 12.0 kg
Approx. 12.5 kg
342W/M
332W
485 mm x 287 mm x 400 mm
12.4
12.7
315 mm x 227 mm x 349 mm
800 W
5.9 A 1,270 W
English

English
— Eng-18 —
Quick Guide
(NN-ST340W)
To Use
Turbo Defrost Pads
(
☞ page 9)
Press.
Select the weight of food.
To Set / Cancel
Child Safety Lock
(
☞ page 10)
Press 3 times.
To Set:
Display
Press 3 times.
To Cancel:
Display
or
To Cook Use
Auto Cook Pads
(
☞ page 11)
Select the servings.
Press.
Example:
Press.
Set weight.
To Cook Use
Auto Reheat Pad
(
☞ page 11)
Feature
To Cook / Reheat /
Defrost by Micro
Power and Time
Setting
(
☞ page 
How to Operate
Select power.
Set the cooking time.
Press.
To Set Clock
(
☞ page 10)
Press.
Set time of day.
Press.
342W/M)
Reheat Use
English

06:27
PANASONIC NN GT 261 — подробная инструкция на микроволновку
04:03
Panasonic NN ST 271 и 251 — подробная инструкция на микроволновки
06:21
Panasonic NN ST 342 — подробная инструкция на микроволновку
04:51
Микроволновая печь Panasonic NN ST25HB
02:19
Panasonic Microwave NNST342W reviewed by a product expert — Appliances Online
13:11
ОНЛАЙН ТРЕЙД.РУ — Микроволновая печь СОЛО Panasonic NN-ST342WZPE, Код товара: 115063
Нажмите на кнопку для помощи
Operating Instructions and Cookbook
Инструкция по эксплуатации и рецепты приготовления блюд
Інструкція з експлуатації та книга рецептів
Microwave Oven
Микроволновая печь
Мікрохвильова піч
For home use
Для домашнего использования
Для домашнього використання
Models No.
NN-SM332W
Before operating this oven, please read these instructions completely and keep for future reference.
Please read these instructions carefully before using this product, and save this manual for future use.
Перед началом эксплуатации данной микроволновой печи, пожалуйста, ознакомьтесь с инструкцией
Пожалуйста, перед началом эксплуатации данного продукта внимательно прочитайте инструкцию по эксплуатации
Будь ласка, перед початком експлуатації цього продукту уважно прочитайте інструкцію з експлуатації й збережіть її
Перед використанням цієї печі, будь ласка, повністю прочитайте ці інструкції і збережіть їх для
и сохраните ее для использования в дальнейшем.
и сохраните ее для использования в дальнейшем.
подальших довідок.
для використання у майбутньому.
Models: NN-ST340W
NN-ST342 W/M
NN-SM330W

English

Table of Contents
Before Operating
Installation and Connection……………………………………………………………………………………………………………………………2
Safety Instructions ……………………………………………………………………………………………………………………………………….3
Important Information……………………………………………………………………………………………………………………………………4
Feature Diagram ………………………………………………………………………………………………………………………………………….5
Control Panel (NN-ST340W) …………………………………………………………………………………………………………………………6
Operation and Hints
342W/M)
English
English
For NN-SM330W:
For NN-ST340W:
332W:
To Cook/Reheat/Defrost by MICRO POWER AND TIME…………………………………………………………………………………..7
342W/M:
To Set Micro Power and Time………………………………………………………………………………………………………………………..8
To Use Turbo Defrost……………………………………………………………………………………………………………………………………9
Clock Setting……………………………………………………………………………………………………………………………………………..10
To Use Child Safety Lock…………………………………………………………………………………………………………………………….10
To Reheat/Cooking Using Auto Cook Pads……………………………………………………………………………………………….11-13
Timer Setting (Kitchen Timer/Standing Time/Delay Time)………………………………………………………………………………..14
Quick Guide (NN-ST340W) …………………………………………………………………………………………………………………………18
Using Auto Cook Pads……
342W/M)
Maintenance
Before Requesting Service ………………………………………………………………………………………………………………………….15
Care of your Microwave Oven ……………………………………………………………………………………………………………………..16
Technical Specifications………………………………………………………………………………………………………………………………17
Cooking Guide
Introduction ……………………………………………………………………………………………………………………………………………….19
Cookware and Utensil Guide ……………………………………………………………………………………………………………………….20
Microwave Cooking & Techniques ……………………………………………………………………………………………………………21-22
To Reheat by Micro Power and Time…………………………………………………………………………………………………………….23
Defrosting Guidelines/Turbo Defrost……………………………………………………………………………………………………………..24
Defrosting Tips and Techniques……………………………………………………………………………………………………………………25
Microwave Recipe Preparation and Techniques ………………………………………………………………………………………..26-27
Common Queries Answered………………………………………………………………………………………………………………………..27
Everyday Basics ………………………………………………………………………………………………………………………………………..28
Fish and Shellfish……………………………………………………………………………………………………………………………………….29
Poultry………………………………………………………………………………………………………………………………………………….30-31
Main Fare Meats……………………………………………………………………………………………………………………………………32-33
Vegetable Varieties ………………………………………………………………………………………………………………………………..34-36
Rice, Pasta and Cereal…………………………………………………………………………………………………………………………..37-38
Desserts ……………………………………………………………………………………………………………………………………………………39
— Eng-1 —
Installation and Connection
Examine your microwave oven
Unpack the oven, remove all packing material, and examine
the oven for any damage such as dents, broken door latches
or cracks in the door. If you find any damage, notify your
dealer immediately. Do not install a damaged microwave
oven.
Earthing instructions
English
English
IMPORTANT: THIS UNIT HAS TO BE PROPERLY EARTHED FOR PERSONAL SAFETY.
If your AC outlet is not earthed, it is the personal responsibility of the customer to have it replaced with a properly earthed
wall socket.
Operation voltage
The voltage has to be the same as specified on the label on
the oven. If a higher voltage than specified is used, it may
cause a fire or other damages.
Placement of the Oven
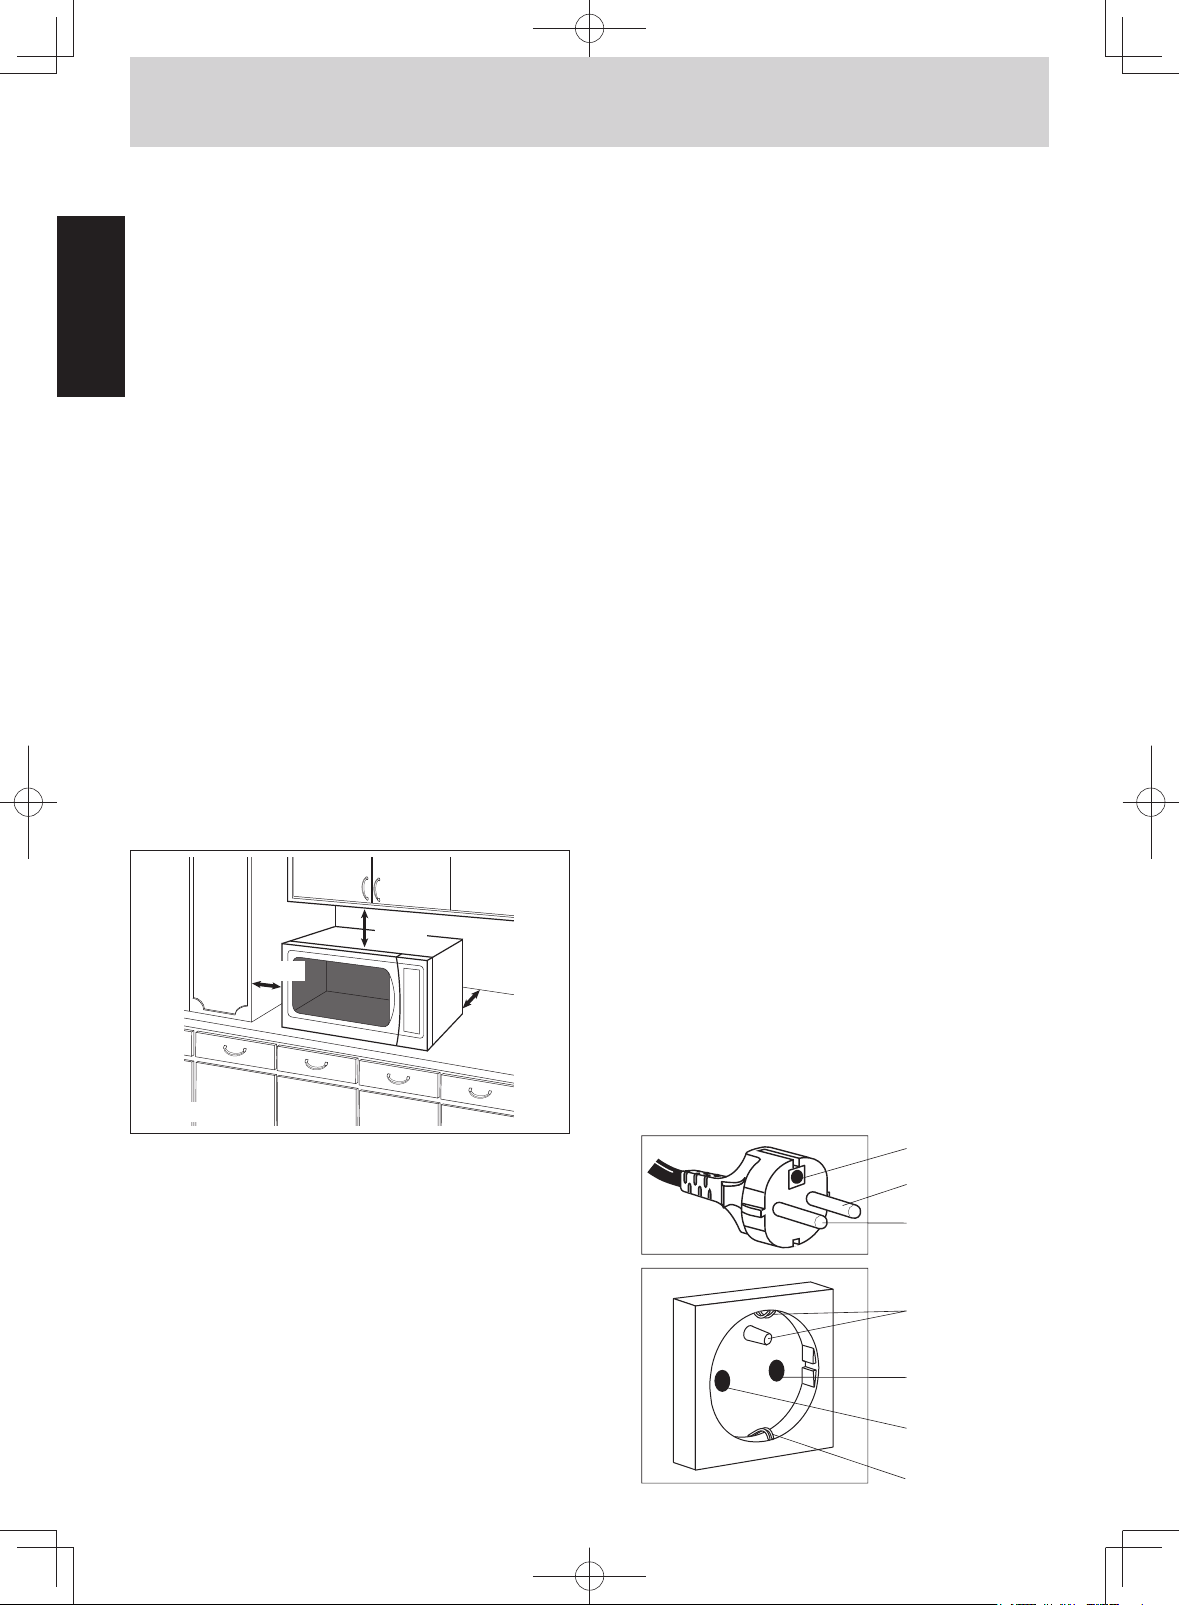
1. Place the oven on a flat and stable surface, more than 85
cm above the floor.
2. When this oven is installed, it should be easy to isolate the
appliance from the electricity supply by pulling out the plug
or operating a circuit breaker.
3. For proper operation, ensure a sufficient air circulation for
the oven.
Counter-top use:
Allow 15 cm of space on the top of the oven, 10 cm at
back and 10 cm on both sides. If one side of the oven is
placed flush to a wall, the other side or top must not be
blocked.
15 cm
10 cm
Counter-top
10 cm
OPEN
WARNING
1. The door seals and door seal areas should be cleaned
with a damp cloth.
The appliance should be inspected for damage to the door
seals and door seal areas and if these areas are damaged
the appliance should not be operated until it has been
repaired by a service technician trained by the manufacturer.
2. Do not operate this appliance if it has a damaged
CORD OR PLUG, if it is not working properly, or if it has
been damaged or dropped.
If the supply cord of this appliance is damaged, it must be
replaced by the manufacturer or its service agent or a similarly qualified person in order to avoid a hazard.
3. Do not attempt to tamper with or make any adjustments or
repairs to the door, control panel housing, safety interlock
switches or any other part of the oven. Do not remove the
outer panel from the oven which gives protection against
exposure to microwave energy.
It is dangerous for anyone other than a service technician trained by the manufacturer to perform repair
service.
4. The oven light must be replaced by a service technician
trained by the manufacturer. When it becomes necessary
to replace the oven light, please consult your dealer.
5. Liquids or other foods must not be heated in sealed containers since they are liable to explode.
6. Only allow children to use the oven without supervision
when adequate instructions have been given so that the
child is able to use the oven in a safe way and understands the hazards of improper use.
7. This appliance is not intended for use by persons (including children) with reduced physical, sensory or mental
capabilities, or lack of experience and knowledge, unless
they have been given supervision or instruction concerning
use of the appliance by a person responsible for their
safety.
8. Young children should be supervised to ensure that they
do not play with the appliance.
Attention!
This product is designed to plug to AC power outlet with (the
third) safety earth wire. For your safety, do not ignore that
safety earth wire, because in such case this product does
not provide with conditions of electric shock defense, foresaw by product’s design. You have to ask qualified specialist
to install required outlet as it is shown on the picture.
4. Do not place this oven near an electric or gas cooker
range.
5. The feet should not be removed.
6. This oven is only for household usage. Do not use outdoors.
7. Avoid using the microwave oven in high humidity.
8. The power cord should not touch the outside of the oven.
Keep the cord away from hot surfaces. Do not let the cord
hang over the edge of table or work top. Do not immerse
cord, plug or oven in water.
9. Do not block the air vents. If they are blocked during operation, the oven may be overheated or damaged. When
using any cloth over the oven, the air intake and exhaust
should not be blocked.
10.The microwave oven shall not be placed in a cabinet.
earth
neutral
phase
earth
phase
neutral
earth
— Eng-2 —

Safety Instructions
Use of your oven
1. Do not use the oven for any reason other than the preparation of food. This oven is specifically designed to heat or
cook food. Do not use this oven to heat chemicals or other
non-food products.
2. Before use, check utensils/containers are suitable for use
in microwave ovens.
3. Do not attempt to use this microwave oven to dry newspaper, clothing or any other materials.
They may catch on fire.
4. When the oven is not being use, do not store any objects
other than oven accessories inside the oven in case it is
accidentally turned on.
5. The appliance shall not be operated by MICROWAVE
WITHOUT FOOD IN THE OVEN, operation in this manner
may damage the appliance.
6. If smoke is observed, turn the Timer to zero or press
Stop/Reset pad and leave the door closed. Disconnect the
power cord, or shut off power at the fuse or the circuit
breaker panel in order to stifle any flames.
7. Appliances are not intended to be operated by means of an
external timer or separate remote control system.
In accordance with para. 2 Cl. 5 of the Russian Federal
Law “On consumer rights protection”, the manufacturer
hereby assigns the use period of the present device to be
In accordance with para. 2 Cl. 5 of the Russian Federal
7 years from the date of production under the condition
Law “On consumer rights protection”, the manufacturer
that the present device is used in strict compliance with
hereby assigns the use period of the present device to be
the present manual and applicable technical standards.
7 years from the date of production under the condition
that the present device is used in strict compliance with
Accessories
the present manual and applicable technical standards.
The oven comes equipped with a variety of accessories.
Always follow directions given for use of the accessories.
Accessories
The oven comes equipped with a variety of accessories.
Glass Tray
Always follow directions given for use of the accessories.
1. Do not operate the oven without Roller Ring and Glass
Tray in place.
Glass Tray
2. Never use another type of glass tray than the one special-
1. Do not operate the oven without Roller Ring and Glass
ly designed for this oven.
Tray in place.
3. If Glass Tray is hot, let it to cool before cleaning or placing
2. Never use another type of glass tray than the one specialin water.
ly designed for this oven.
4. Glass Tray can turn in either direction.
3. If Glass Tray is hot, let it to cool before cleaning or placing
in water.
5. If the food or cooking vessel on Glass Tray touches the
oven walls and make the turntable stop rotating, the
4. Glass Tray can turn in either direction.
turntable will automatically rotate in the opposite direction.
5. If the food or cooking vessel on Glass Tray touches the
This is normal.
oven walls and make the turntable stop rotating, the
6. Do not cook foods directly on Glass Tray.
turntable will automatically rotate in the opposite direction.
This is normal.
Roller Ring
6. Do not cook foods directly on Glass Tray.
1. Roller Ring and the oven floor should be cleaned frequent-
ly to prevent noise and build-up of remaining food.
Roller Ring
2. Roller Ring must always be used for cooking together with
1. Roller Ring and the oven floor should be cleaned frequentGlass Tray.
ly to prevent noise and build-up of remaining food.
2. Roller Ring must always be used for cooking together with
Glass Tray.
Maintenance of your oven
1. Service
WHEN YOUR OVEN REQUIRES SERVICING call your
local Panasonic engineer (Customer Support). It is hazardous for anyone other than a competent person to carry
out any service or repair operation which involves the
removal of a cover which gives protection against exposure to microwave energy.
2. Door Seals
Do not attempt to tamper with or make any adjustments or
repairs to door, control panel housing, safety interlock
switches or any other part of the oven. Do not remove
outer panel from oven.
The door seals and door seal areas should always be kept
clean – use a damp cloth.
N.B. The appliance should be inspected for damage to the
door seals and door seal areas. If these areas are damaged the appliance should not be operated until it has
been repaired by a service technician trained by the manufacturer.
3. Oven Light
The oven lamp must be replaced by a service technician
trained by the manufacturer. DO NOT attempt to remove
the outer casing from the oven.
English
English
— Eng-3 —

Important Information
1
2
3
4
5
6
7
8
9
0
—
=
~
!
1) Cooking Times
• Cooking times given in the cookbook are approximate. The
cooking time depends on the condition, temperature and
amount of food and on the type of cooking ware.
• Begin with the minimum cooking time to help prevent overcooking. If the food is not sufficiently cooked you can
always cook it for a little longer.
English
N.B.: If the recommended cooking times are exceeded
English
the food will be spoiled and in extreme circumstances
could catch fire and possibly damage the interior of the
oven.
2) Small Quantities of Foods
• Small quantities of food or foods with low moisture content
can burn, dry out or catch on fire if cooked too long. If
materials inside the oven should ignite, keep the oven door
closed, turn the oven off and remove the plug from the
socket.
3) Eggs
• Do not cook eggs in their shells and whole hard-boiled
eggs by MICROWAVE. Pressure may build up and the
eggs will explode.
4) Piercing Skin
• Food with non porous skins, such as potatoes, egg yolks,
chicken wings and sausages must be pierced before cooking by MICROWAVE to prevent bursting.
5) Meat Thermometer
• Use a meat thermometer to check the degree of cooking of
roasts and poultry only when the meat has been removed
from the oven. Do not use a conventional meat thermometer when using MICROWAVE because it may cause
sparking.
6) Liquids
• When heating liquids, e.g. soup, sauces and beverages in
your microwave oven, overheating the liquid beyond boiling
point can occur without evidence of bubbling. This could
result in a sudden boil over of the hot liquid. To prevent this
possibility the following steps should be taken:
a) Avoid using straight-sided containers with narrow necks.
b) Do not overheat.
c) Stir the liquid before placing the container in the oven
and again halfway through the cooking time.
d) After heating, allow it to stand in the oven for a short
time, stirring again before carefully removing the
container.
e) Microwave heating of beverages can result in delayed
eruptive boiling, therefore care has to be taken when
handling the container.
7) Paper/Plastic
• When heating food in plastic or paper containers, check the
oven frequently as these types of containers ignite if overheated.
• Do not use recycled paper products (ex. Kitchen Roll)
unless the paper product is labeled as safe for microwave
oven use. Recycled paper products may contain impurities
which may cause sparks and/or fires when use.
• Remove wire twist-ties from roasting bags before placing
the bags in oven.
Utensils/Foil
• Do not heat any closed cans or bottles because they might
explode.
• Metal containers or dishes with metallic trim should not be
used during Microwave cooking. Sparking will occur.
• If you use any aluminum foil, meat spikes or metal ware,
the distance between them and the oven walls and door
should be at least 2 cm to prevent sparking.
9) Feeding Bottles/Baby Food Jars
• The top and teat or lid must be removed from feeding bottles or baby food jars before placing in the oven.
• The contents of feeding bottles and baby food jars are to
be stirred or shaken.
• The temperature has to be checked before consumption to
avoid burns.
10) Place in Use
This appliance is intended to be used in household and
similar applications such as:
• staff kitchen areas in shops, offices and other working
environments;
• farm houses;
• by clients in hotels, motels and other residential
environments;
• bed and breakfast type environments.
— Eng-4 —
Feature Diagram
NN-ST340W
NN-SM330W
342W/M
1
2
332W
1
87n5
6
8
6
2
k
2
k
Oven Window
Door Safety Lock System
Pull Door Handle
Pull to open the door. Opening the door during cook-
l
m
4
7n5
l
4
m
j
9
ing will stop the cooking process without cancelling
the program. It is quite safe to open the door at any
time during a cooking program and there is no risk of
Microwave exposure.
For NN-ST342W/M model, cook resumes as soon as
For NN-ST340W model, cook resumes as soon as
the door is closed and Start Pad is pressed.
Control Panel
Glass Tray
a. DO NOT operate the oven without the Roller Ring
and Glass Tray in place.
b. Only use the Glass Tray specifically designed for
this oven. Do not substitute any other Glass Tray.
c. If the Glass Tray is hot, allow to cool before clean-
ing or placing in water.
d. DO NOT cook directly on the Glass Tray. Always
place food on a microwave-safe dish, or on a rack
set in a microwave-safe dish.
e. If food or utensil on the Glass Tray touches oven
walls, causing the tray to stop moving, the tray will
automatically rotate in the opposite direction. This is
normal.
f. Glass Tray can rotate in either direction.
Roller Ring
a. Roller Ring should be cleaned regularly to avoid
excessive noise.
b. Roller Ring and Glass Tray should be used at the
same time.
Identification Plate
Oven Air Vent
Time/Weight Select Dial
Cook Mode Select Dial
Waveguide Cover (do not remove)
Power Supply Cord
Power Supply Plug
Warning Label
Note:
The illustration is for reference only.
English
English
— Eng-5 —

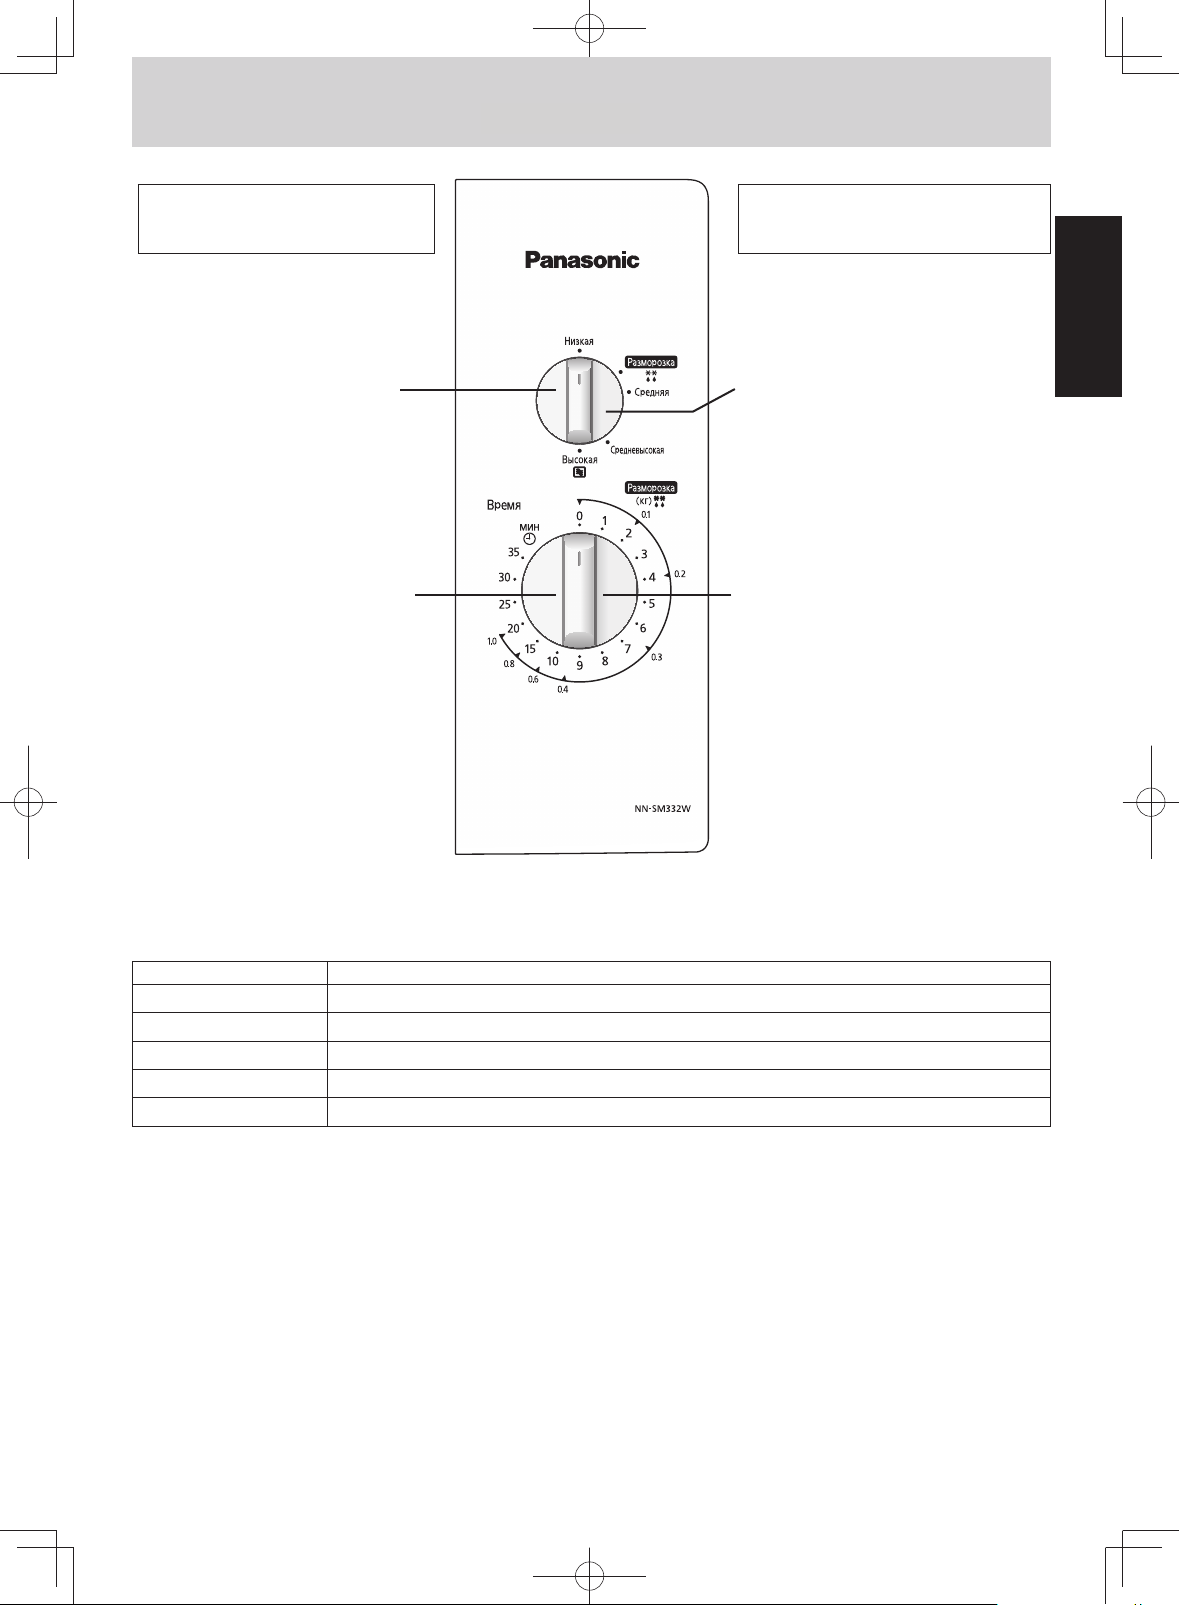
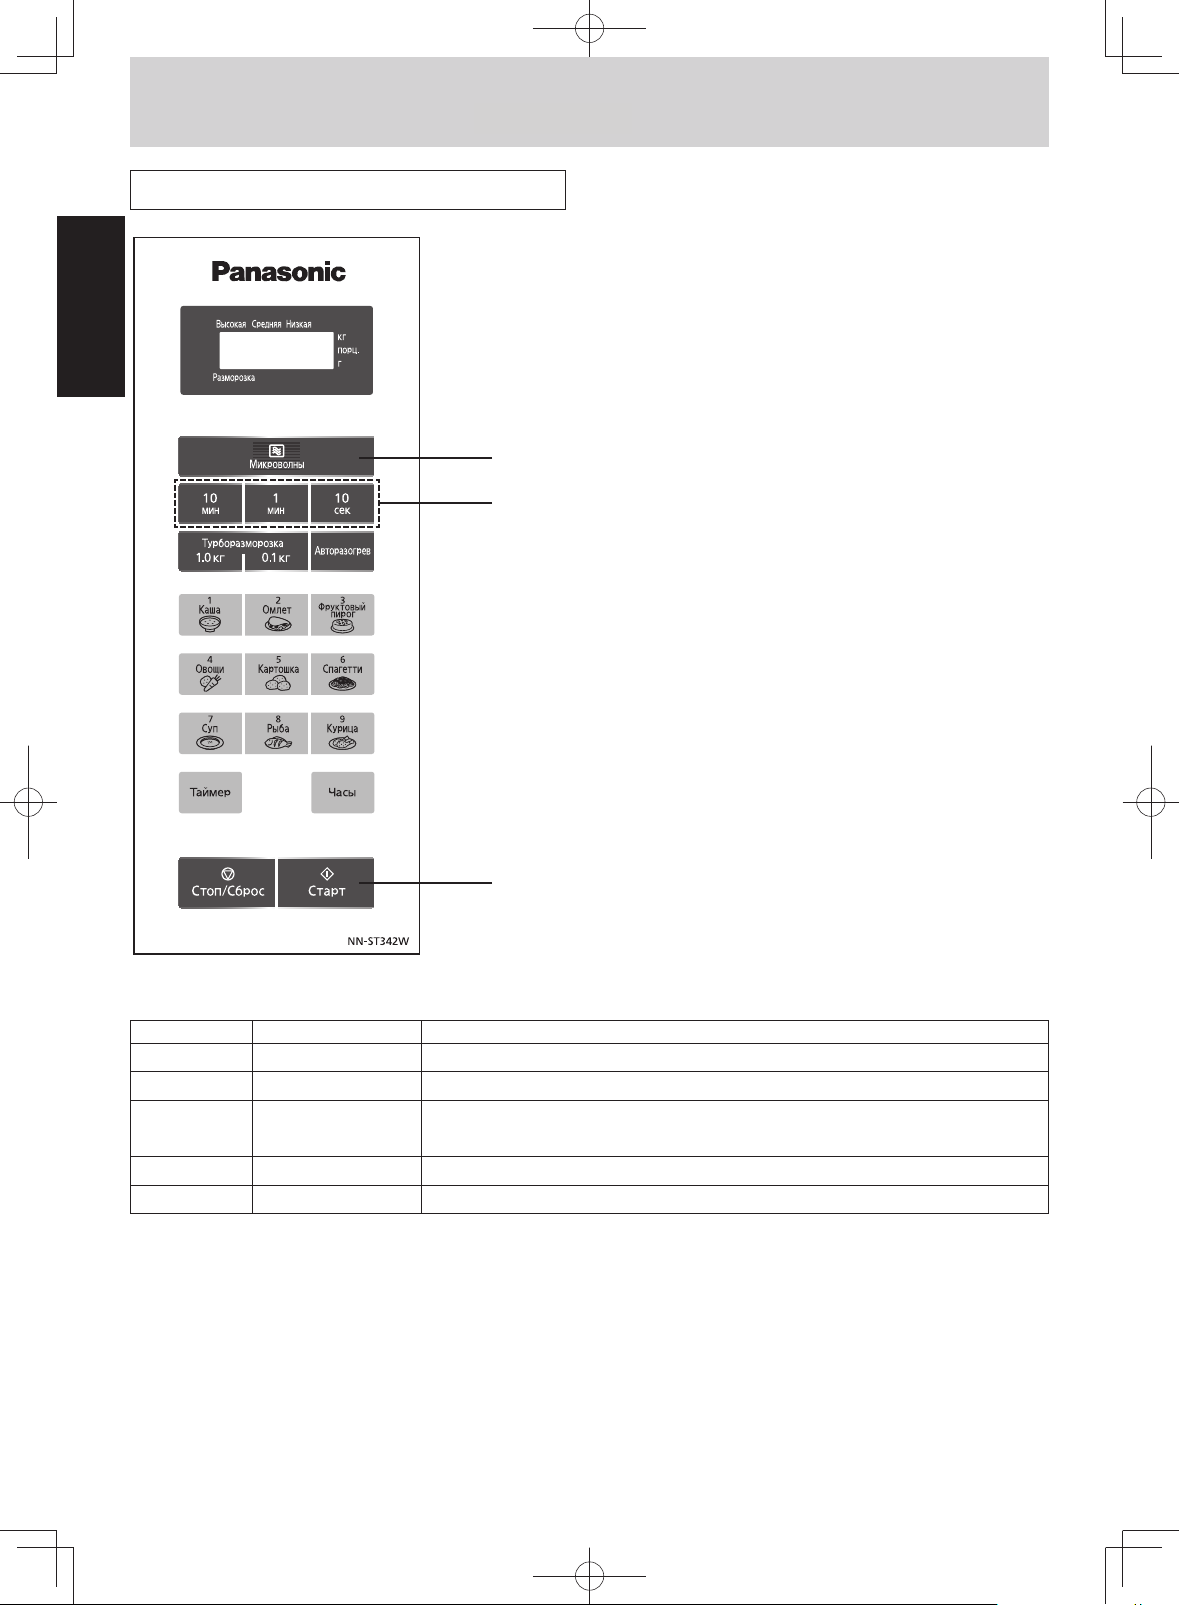
Control Panel (NN-ST340W)
(1)
(1)
English
English
(2)
(2)
(4)
(4)
342W/M)
(3)
(3)
(5)
(5)
(7)
(7)
(6)
(8)
(6)
(8)
(9) (10)
(9)
342W
(1) Display Window
(2) Micro Power Pad
(3) Time Pads
(4) Turbo Defrost Pads
(5) Auto Reheat Pad
(6) Auto Cook Pads
(7) Timer Pad
(8) Clock Pad
(9) Stop/Reset Pad
Before cooking: One tap clears your instructions.
During cooking: One tap temporarily stops the cooking process. Another tap cancels all your instructions and colon or
time of day appears in the display window.
(10) Start Pad
After cooking program setting, one tap allows oven to begin functioning. If door is opened or Stop/Reset Pad is pressed
once during oven operation, Start Pad must be pressed again to restart oven.
(10)
Beep Sound:
When a pad is pressed correctly, a beep will be heard.
If a pad is pressed and no beep is heard, the unit did not or cannot accept the instruction. The oven will beep twice between
programmed stages. At the end of any complete program, the oven will beep 5 times.
Note:
If no any operation after cooking program setting, 6 minutes later, the oven will automatically cancel the cooking program. The
display will revert back to clock or colon display.
— Eng-6 —
Operation (NN-SM330W)
332W)
To Set Cooking
To Set Cooking and
Program
Reheating Program
1. Put the food into the
oven
To Defrost by Setting
Weight of Food
1. Put the food into the
oven
2. Set the Power Level 2. Set the Power Level at
Defrost
3. Set the Cooking Time
Note: When selecting the time for
shorter than 5 minutes, turn
Time/Weight Select Dial past 5 minutes
and then return to the correct time.
3. Set the Weight of Food
Note: When selecting weight for less
than 0.2 kg, turn Time/Weight Select
Dial past 0.2 kg and then return to correct weight.
English
English
Power Level Example of Use
HIGH Boil water. Cook fresh fruit, vegetables, rice, pasta, noodles and desserts.
MEDIUM-HIGH Cook poultry, meat, cakes, desserts and heat milk.
MEDIUM Cook pot roasts, casseroles and meat loaves, melt chocolate. Cook eggs and cheeses. Cook fish.
DEFROST Thaw foods.
LOW Keep cooked foods warm, simmer slowly.
Notes:
1. As soon as the TIME/WEIGHT SELECT DIAL is turned, the oven will start cooking the food.
2. ALWAYS RETURN TIME/WEIGHT SELECT DIAL BACK TO «0» position if food is removed from oven before set cooking time
is complete and when oven is not in use.
3. TO STOP OVEN when a cooking program is set, open the door—microwaves automatically stop entering the oven cavity
because of the safety door lock system. If the remaining cooking time is not required, turn the Time/Weight Select Dial back
to «0» before closing the door.
— Eng-7 —
Operation (NN-ST340W)
342W/M)
To Set Micro Power and Time
English
English
1. Put the food into the oven
2. Press to Select Power
2. Press to Select Power
see chart below
(see chart below)
3. Set Cooking Time
(HIGH up to 30 minutes
3. Set Cooking Time
Others up to 99 minutes and 50 seconds)
(HIGH up to 30 minutes
Others up to 99 minutes and 50 seconds)
4. Press
The time in the display window will count down.
4. Press
The time in the display window will count down.
342W
No. of taps
1 HIGH Boil water. Cook fresh fruit, vegetables, rice, pasta, noodles and dessert.
2 MEDIUM-HIGH Cook poultry, meat, cakes, desserts and heat milk.
3 MEDIUM
4 DEFROST Thaw foods.
5 LOW Keep cooked foods warm, simmer slowly.
Notes:
1. For 2 or 3 stage cooking, repeat steps 2 and 3 above before pressing Start pad.
2. When selecting High power on the first stage, you can skip step 2.
Power Level Example of Use
Cook pot roasts, casseroles and meat loaves, melt chocolate. Cook eggs and
cheeses. Cook fish.
— Eng-8 —
Operation (NN-ST340W)
342W/M)
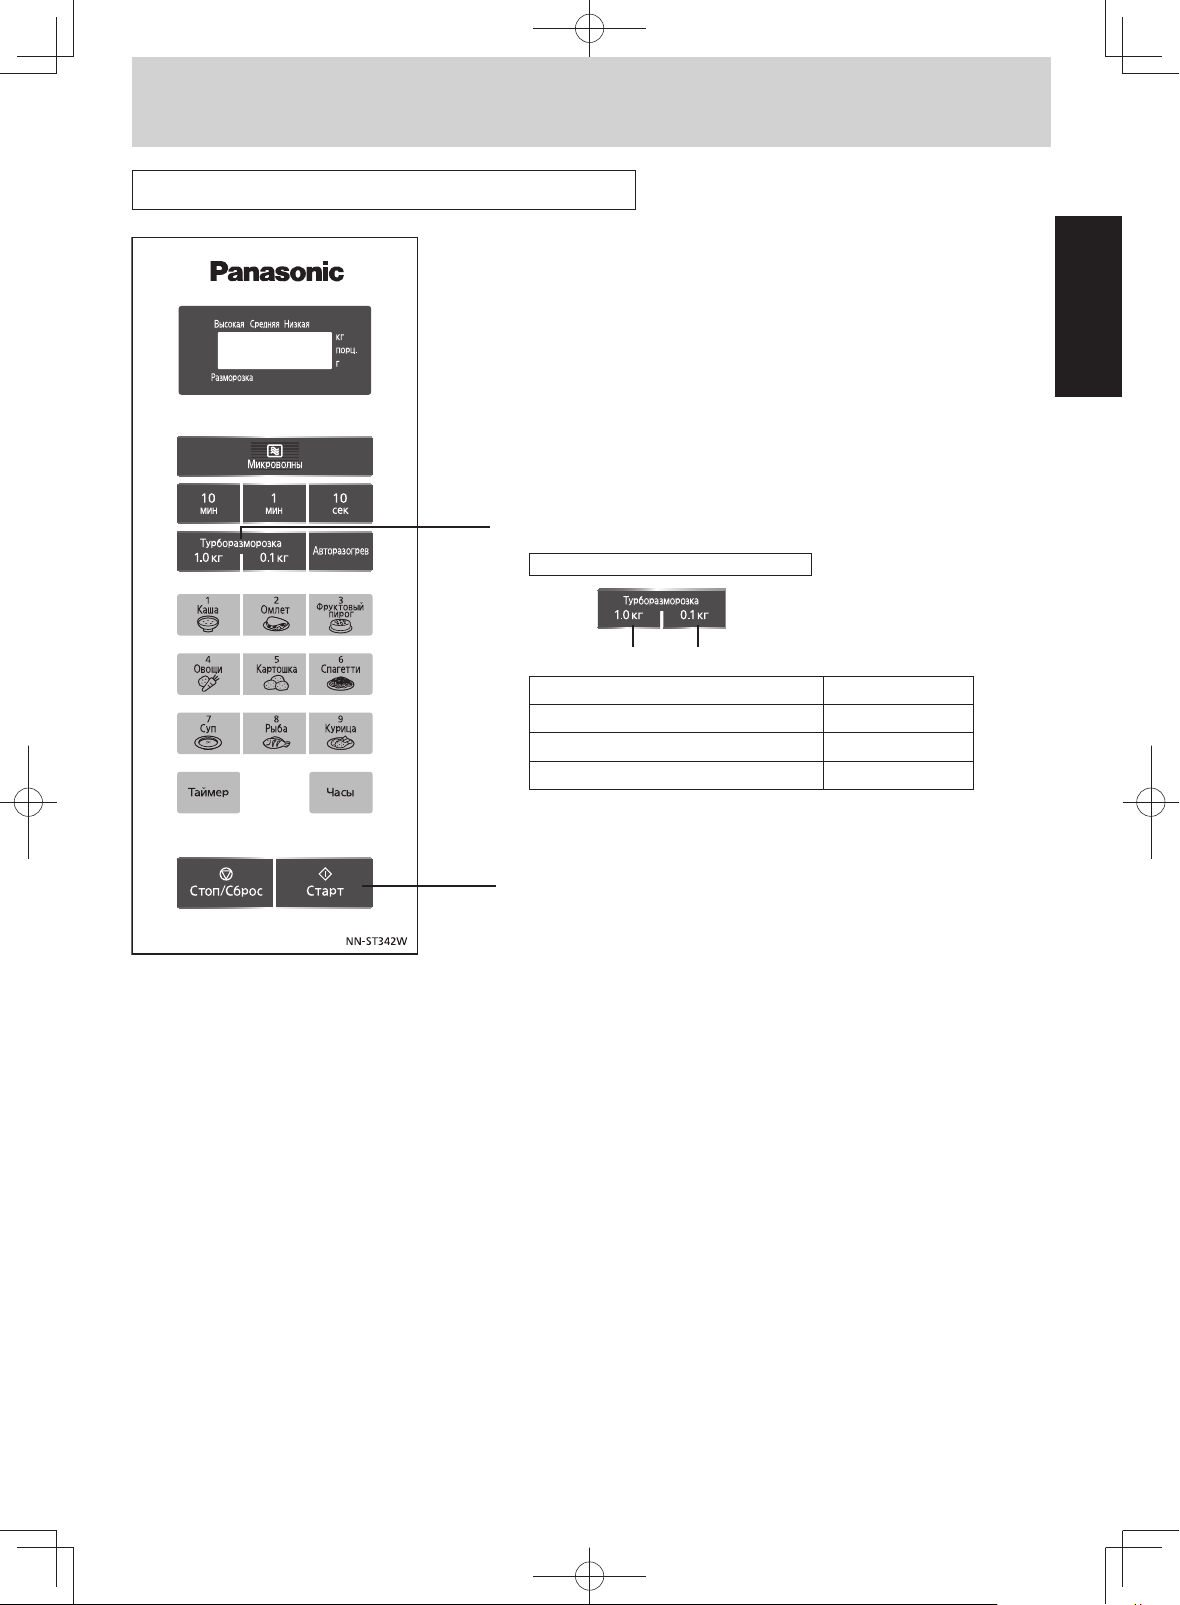
To Use Turbo Defrost (0.1~2.0 kg):
1. Put the food into the oven
2. Select the Weight of Food
2. Select the Weight of Food
Example: To defrost 1.5 kg of meat.
Example: To defrost 1.5 kg of meat.
Minced meat, Chicken Pieces, Chops 2 kg
Minced meat, Chicken Pieces, Chops 2 kg
Beef roast, lamb, pork, whole chickens 2 kg
Beef roast, lamb, pork, whole chickens 2 kg
Whole fish, scallops, prawns, fish fillets 1 kg
Whole fish, scallops, prawns, fish fillets 1 kg
once 5 times
once 5 times
Food Maximum Weight
Food Maximum Weight
(Continued)
English
English
3. Press
Defrosting time appears in the display window and begings to count
3. Press
down.
Defrosting time appears in the display window and begings to count
342W
Notes:
1. Turbo Defrost can be used to defrost many cuts of meat, poultry and fish by weight. To use, simply program Turbo Defrost
and the weight of the food in kg (1.0) and tenths of a kg (0.1). The oven will determine the defrosting time and power levels.
Once the oven is programmed, the defrosting time will appear in the display. For best results the minimum recommended
weight is 0.2 kg.
2. BONE-IN ROASTS, such as a Beef Rib Roast or Pork Loin Rib Roast have a smaller muscle than a boneless roast of the
same weight. Therefore, for bone-in roasts weighing over 2 kg reduce weight by 0.5 kg. For bone-in roasts weighing less
than 2 kg, reduce weight by 0.25 kg.
3. Turn over or remove or shield food when buzzer rings in the middle of cooking.
0.2 kg.
down.
— Eng-9 —
Operation (NN-ST340W)
342W/M)
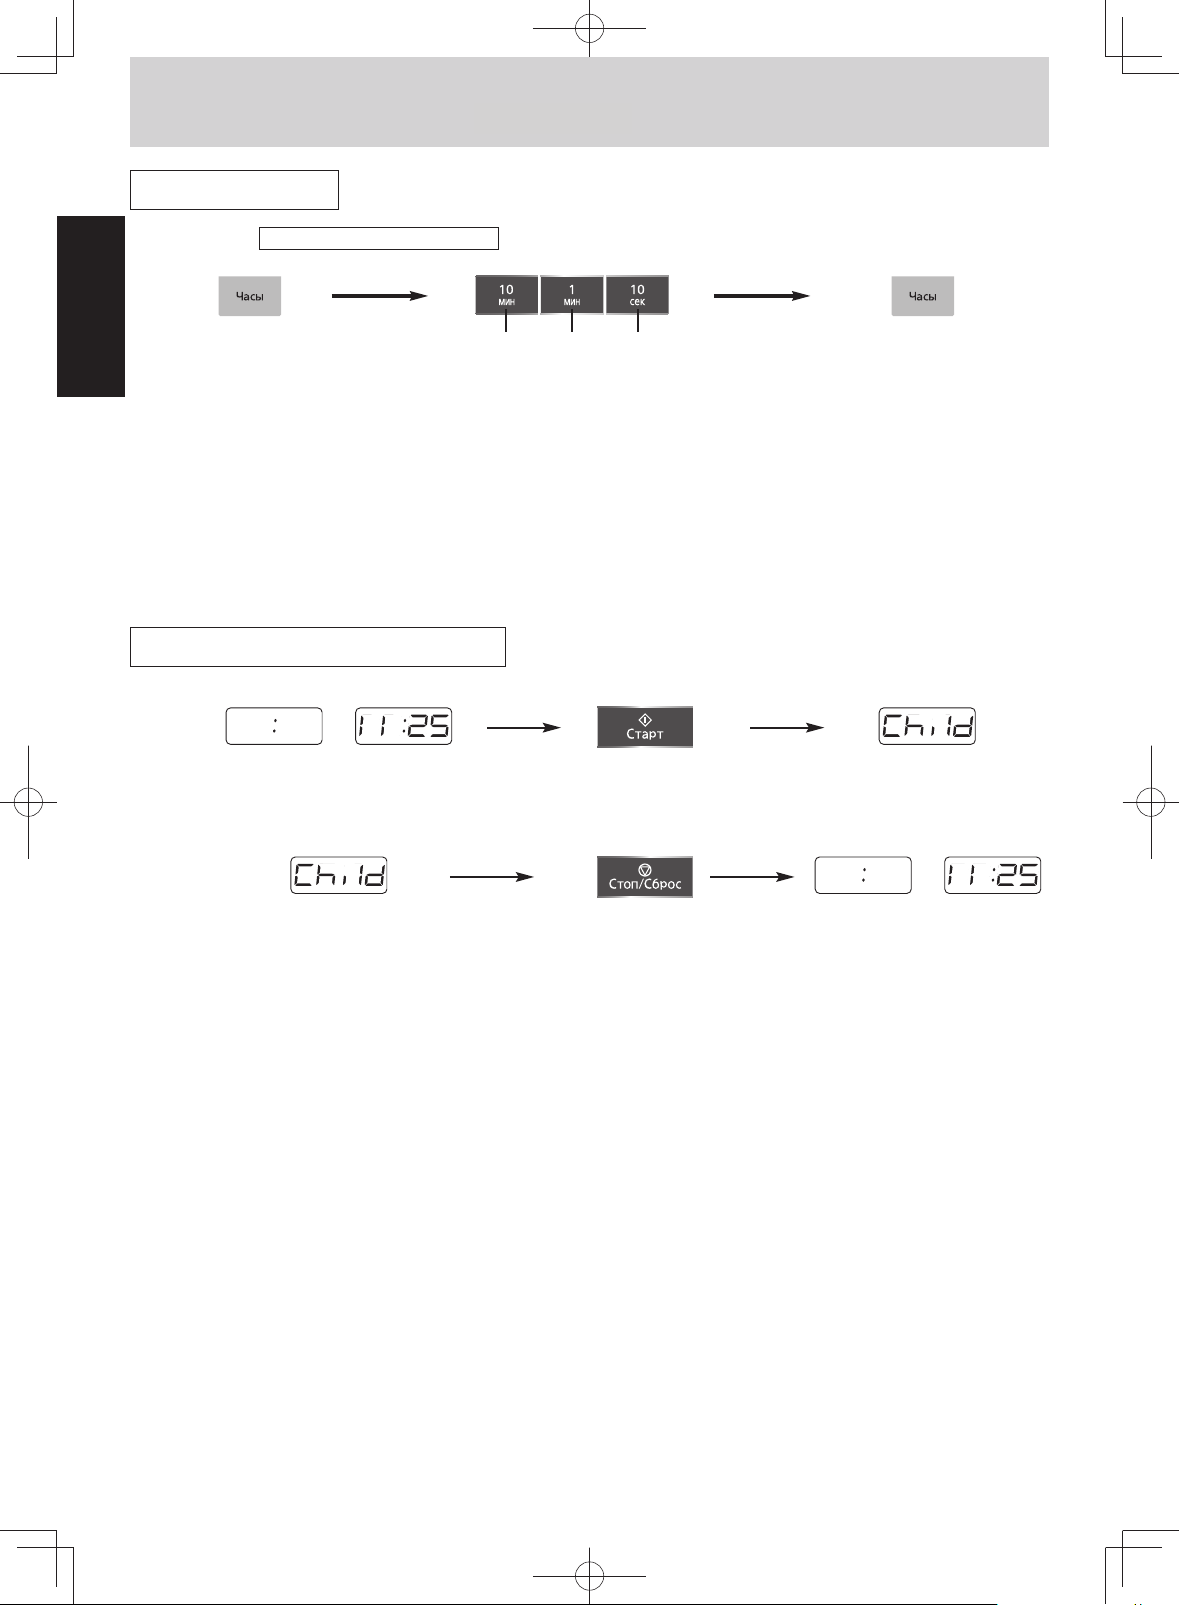
Clock Setting
To Set Clock: Example: To set 11:25 a.m.
(Continued)
English
English
1. Press.
Colon will blink in
the display window.
Notes:
1. To reset time of day, repeat steps 1-3.
2. The clock will keep the time of day as long as oven is plugged in and electricity is supplied.
3. Clock is a 24-hour display.
4. Oven will not operate while colon is blinking.
2. Enter time of day using the number pads.
11 times twice 5 times
Time appears in the display window; colon
is blinking.
To Use Child Safety Lock
To set:
or
Colon or time of day is
displayed
To cancel:
Press 3 times Display Window
3. Press once.
Colon stops blinking; time of
day is entered and locked in
the display window.
Time counts up in minutes.
or
Display Window Press 3 times Colon or time of day is
Notes:
1. Child Safety Lock can be set when colon or time of day is displayed.
2. This feature allows you to prevent operation of the oven by a young child; however, the door will open.
3. To set or cancel child safety lock, Start pad or Stop/Reset pad must be pressed 3 times within 10 seconds.
— Eng-10 —
displayed
Operation (NN-ST340W)
342W/M)
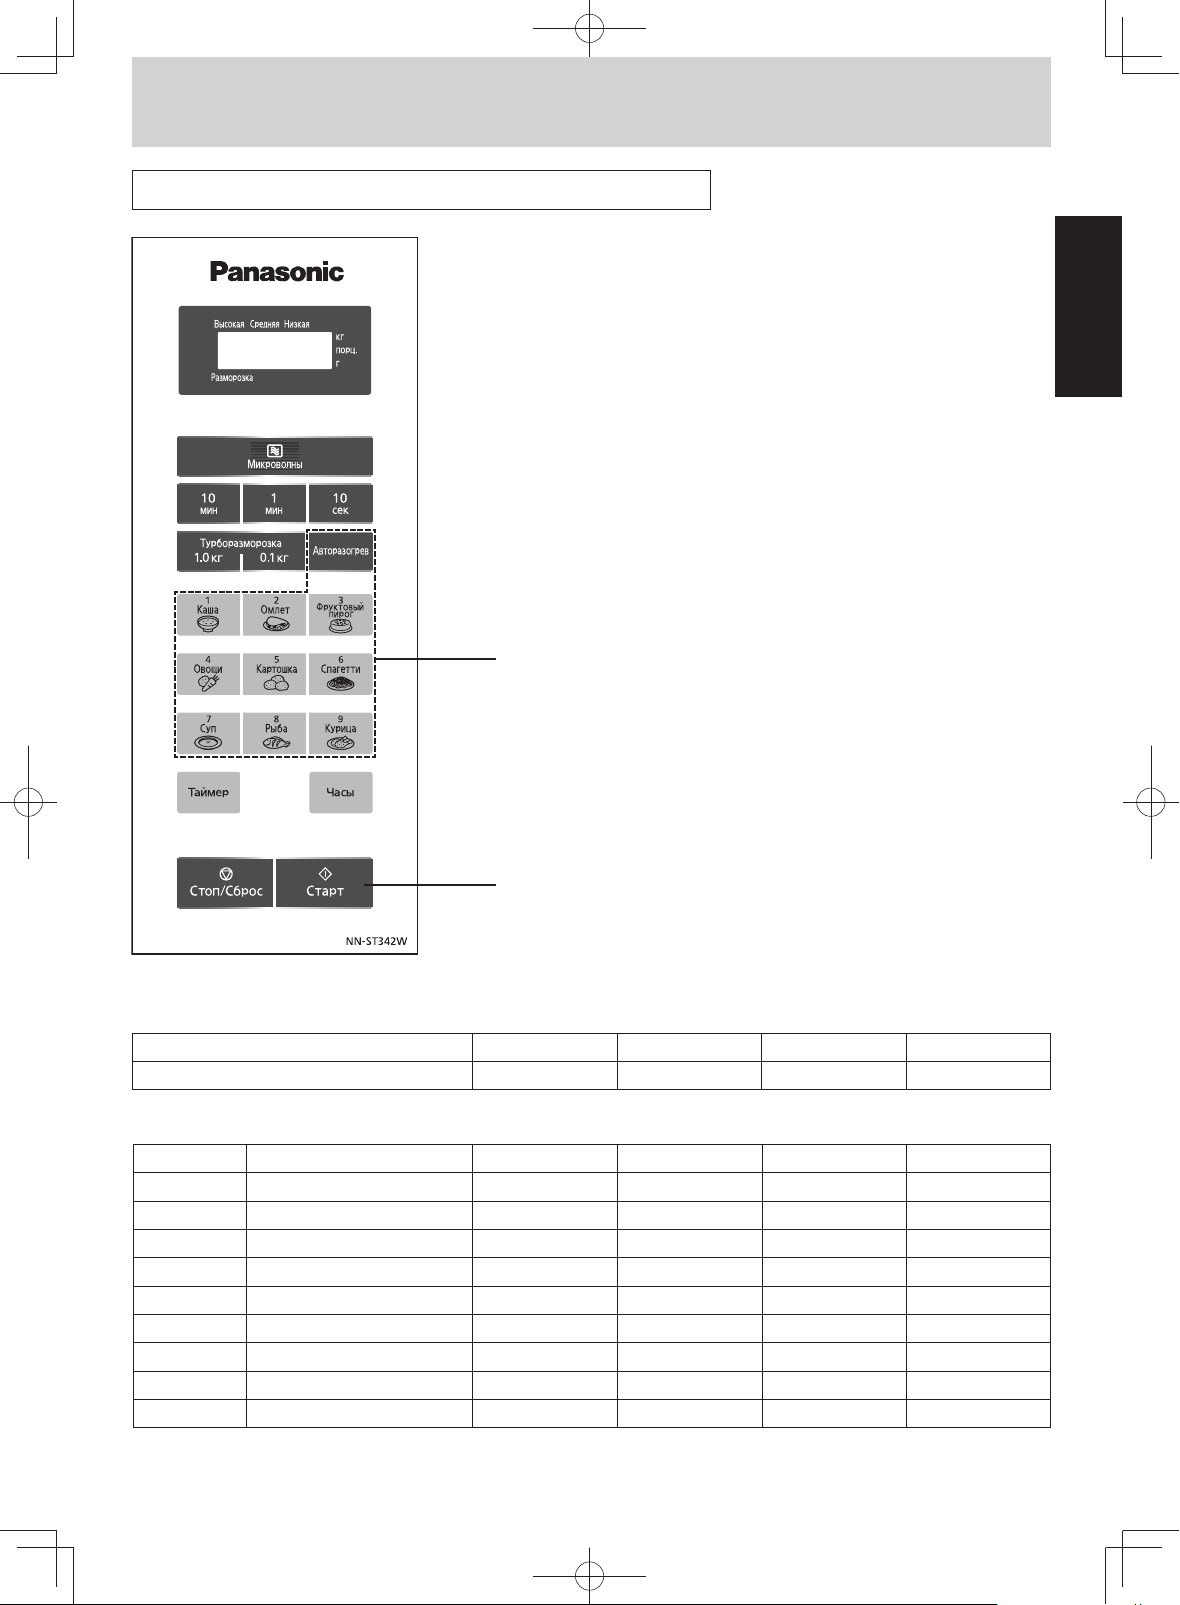
To Reheat/Cook Using Auto Cook Pads
1. Put the food into the oven
2. Select Pads
Press the desired food category pad until the desired weight appears in
the Display Window.
(Continued)
English
English
3. Press
The cooking time appears in the display window and begings to count
3. Press
down.
The cooking time appears in the display window and begings to count
342W
Auto Reheat:
Pad 1 tap 2 taps 3 taps 4 taps
Auto Reheat 200 g 400 g 600 g 800 g
Auto Cook:
Menu No. Pads 1 tap 2 taps 3 taps 4 taps
1 Porridge 2 servs 4 servs — —
2 Omelet 1 serv 2 servs 3 servs 4 servs
3 Pudding 4 servs 8 servs — —
4 Vegetables 120 g 180 g 250 g 370 g
5 Potatoes 200 g 400 g 600 g —
6 Fresh Pasta 150 g 250 g 375 g —
7 Soup 2 servs 4 servs 6 servs —
8 Fish 100 g 200 g 300 g 400 g
9 Chicken 200 g 400 g 600 g 800 g
down.
— Eng-11 —

Operation (NN-ST340W) (Continued)
342W/M)
Auto Reheat
Pre-cooked foods are reheated automatically by setting the
food’s serving. You need not select power level or reheating
time. The foods should be at refrigerator or room temperature. Use suitable sized dish and cover with a lid or
microwave safe plastic.
Note: When reheating items such as soups, stews, and
casseroles, it is recommended that they are stirred at half of
reheating time and at completion of reheating.
English
English
1. Porridge
Suitable for cooking different kinds of porridge such as buckwheat, millet and rice. Place the porridge with water in a suitable size container. Use the following as a guide:
Products
Water
Milk
Salt
Sugar
Then place the container into the oven and press «Porridge»
key. Do not forget to stir and remove the cover when «Beep».
* For Millet, immerse them into warm water for 30 minutes
before cooking.
Buckwheat
200 g
400 ml
1
/2 t.sp
Millet*
130 g
450 ml
1 t.sp
2 tb. sp
Rice
130 g
400 ml
1
/2 t.sp
1 tb. sp
2. Omelet
This program is suitable for cooking the omelet from eggs.
Use the casserole dish for cooking. You can cook the omelet
using your recipe or the following as a guide:
Ingredients
Eggs
Milk or cream
Salt, pepper
Butter
Whisk eggs with milk for 3-5 minutes by mixer, add salt and
pepper on taste. Put mixture into greased casserole dish and
place in the oven on glass tray. Select «Omelet» and cook
until the cooking time will finish. After cooking, covered, let
stand for 3 minutes. Serve the hot cooked omelet with melted butter, sauces or grated cheese.
1 serv.
2 pcs.
125 ml
2 serv.
4 pcs.
250 ml
for greasing of casserole
3 serv.
6 pcs.
375 ml
on taste
4 serv.
8 pcs.
500 ml
3. Pudding
Suitable for cooking of puddings with berries or fruits. Use
the following recipe as a guide:
Ingredients
Margarine
Sugar
Egg 1 p. 2 pcs.
Wheat flour
Vanilline powder
Baked powder
Frozen berries (cherry,
rusberry, bilberry etc.)
1. Mix up margarine, sugar and eggs for 5 minutes by mixer.
Stir flour, vanilline powder and baked powder. Pour the
flour into other mixture and make sticky pastry.
2. Add berries into pastry or put them on the bottom of dish.
Place pastry in the dish and make the even surface.
3. Place in the oven and select «Pudding». Cooking until
stopped program. Before serve take out the pudding and
powder with sugar.
4 servs
dish 20 cm
100 g
1
(
/2 pack.)
75 g
1
/4 cup)
(
100 g
2
/3 cup)
(
2 g
1
/3 tsp.)
(
3 g
(1/2 tsp.)
150 g 300 g
8 servs
dish 28 cm
200 g
(1 pack.)
150 g
(1/2 cup)
200 g
(11/3 cup)
cups)
4 g
(1/2 tsp.)
5 g
(1 tsp.)
4. Vegetables
This program is suitable for cooking fresh vegetables such
as: potatos, carrots, onions, beetroot, cabbage, cauliflower,
pumpkin, marrow, mushroom and etc. and the mixture of
them. Vegetables should be trimmed, prepared and cut into
even sized pieces. Add 2-4 tablespoon to 1/4 cup of water if
vegetables appear slightly dehydrated or a softer texture is
desired. Place in a suitably sized plate or casserole dish and
cover with plastic wrap or a fitting lid. Stir at the beep. If
desired, butter, herbs, etc. may be added but do not add salt
until the completion of cooking.
5. Potatoes
Potatoes should be trimmed or prepared and cut into evenly
sliced pieces. Add 1 to 3 tablespoon of water to potatoes. If
dehydrated or softer texture is desired. Place in a appropriate size dish and cover with plastic wrap or well fitting lid.
Halfway through the cooking time, stir potatoes. At the end of
the cooking time, stir potatoes and let stand, covered, for 2
to 3 minutes.
— Eng-12 —

Operation (NN-ST340W) (Continued)
342W/M)
6. Fresh Pasta
This program is designed to cook pasta.
Put the macaroni onto a heatproof dish with high brims,
which is suitable for use in the microwave mode. Fill it up
with the boiling water, add salt, vegetable oil, and select the
program for cooking according to recommendations given in
the following chart:
Program
“Pasta” –
press once
“Pasta” –
press twice
“Pasta” –
press 3 times
(The water level must be 1 — 2 cm higher than pasta).
Do not cover the dish.
Stir after the beep.
After the cooking is completed, pour out the water, add the
butter, stir, and leave for appr. 5 minutes.
Pasta
150 g
250 g 1000 ml 2 tb.sp. To taste
375 g 1250 ml 3 tb.sp. To taste
Boiling
water
750 ml
Vegetable
oil
1 tb.sp.
Salt
To ta s t e
7. Soup
This program is suitable for cooking traditional soups, such
as: meat sol’yanka, shchi, rassol’nik. Soups can be cooked
with broth or water. The broth or water should be a room
temperature. Use the following as a guide:
Ingredients
4 services (1.5 liter)
Smocked meat
products (ham,
sausages)
Pickled
cucumbers
Onions 1 pcs.1 pcs.2 pcs.
Paprika ——1 pcs.
Tomato sauce 4 tb.sp.4 tb.sp.4 tb.sp.
Potatos 2-3 pcs.2-3 pcs.Cabbage —200 g—
Carrots 1 pcs.1 pcs.Vegetable oil 2 tb.sp.2 tb.sp.—
Add and press “SOUP”
Broth or water 1000 ml1000 ml1000 ml
Olives ——8-10 pcs.
Lemon
Parsley, salt,
pepper
It is advisable to use medium size vegetables. Vegetables
should be trimmed. All ingredients should be cut into even
sized pieces. For 1.5L soup you will need 2.5 liter pot.
Place all ingredients from the first part of the table in the pot,
stir well, cover with plastic wrap and cook using the auto
menu «Vegetables». After that add the rest ingredients, stir
well, and cook using the auto menu «Soup». After beep stir
well and go on cooking until finish of the program. Before
serving leave for 10 minutes in the switched off microwave
oven. Serve with sour cream.
1
/2 pcs.
On taste
Rassol’nikChshiSolyanka
——200 g
3 pcs.—3 pcs.
1
/2 pcs.—
8. Fish
Suitable for cooking whole fish and fish fillets. Select fish
suitable for microwave cooking and place in a single layer in
a shallow dish, with skin-side down. Add butter, spices,
herbs, or lemon juice to flavor. Overlap thin edges of fillets to
prevent overcooking. If stuffing whole fish with seasoning,
cooking time may need to be extended. Shield the eye and
tail area of whole fish with small amounts of aluminum foil to
prevent overcooking. Cover dish securely with plastic wrap
or fitted lid. Allow large amounts of fish to stand for 3 to 5
minutes after cooking before serving. (thickness of fish
should not be more than 3 cm)
9. Chicken
Suitable for cooking chicken pieces such as wings, drumsticks, thighs, half breasts etc. Chicken pieces should be
thawed completely before cooking. Marinate chicken pieces
prior to cooking, add 1 to 5 tablespoon oil, for added flavor
and color. Place marinated chicken pieces on heat-proof
dish. Cover with plastic wrap or a fitting lid.
English
English
— Eng-13 —
Operation (NN-ST340W)
342W/M)
(Continued)
Timer Setting (Kitchen Timer/Standing Time/Delay Time)
This feature allows you to program standing Time after cooking is completed and to program the oven as a minute or 10 seconds timer or program delay start.
To use as a Kitchen Timer: Example: To count 5 minutes
English
English
5 times
1. Press. 3. Press.
To Set Standing Time: Example: To stand for 5 minutes after cooking (3 mins. at Medium)
2. Set desired amount of time.
(Up to 99 minutes and 50 seconds.)
Time counts down without
operating oven.
5 times3 times
1. Press 3 times.
Set the desired cooking program. (See
page 8 for directions.)
2. Press 3 times. 3. Press. 4. Press 5 times.
Set desired amount
of standing time.
(Up to 99 minutes
and 50 seconds.)
5. Press.
Cooking starts.
After cooking,
standing time
will count down
without operating oven.
To Set Delay Time: Example: To start cooking 5 minutes later (3 mins. at Medium)
5 times 3 times
1. Press.
2. Press 5 times.
Set desired amount of
delay time.
(Up to 99 minutes and
50 seconds.)
3. Press 3 times.
Set the desired cooking
program. (See page 8
for directions.)
4. Press 3 times.
5. Press.
Delayed time
counts down.
After delay
time, the cooking will start.
Notes:
1. If oven door is opened while Standing Time, Delay Time or Kitchen Timer has been set, the time in the display window will
continue to count down.
2. Delay Time and Standing Time can not be programmed before any Auto control function. This is to prevent the standing temperature of the food from rising before defrosting or cooking begins. A change in the starting temperature could cause in
accurate results.
3. When using Standing Time or Delay Time, it’s up to 2 Micro Power stages.
— Eng-14 —

Before Requesting Service
ALL THESE THINGS ARE NORMAL:
The oven causes interference with Some radio and TV interference might occur when you cook with the microwave
my TV. oven. This interference is similar to the interference caused by small appliances
such as mixers, vacuums, hair dryers, etc. It does not indicate a problem with your
oven.
Steam accumulates on the oven During cooking, steam and warm air are given off from the food. Most of the steam
door and warm air comes from and warm air are removed from the oven by the air which circulates in the oven
the oven vents. cavity. However, some steam will condense on cooler surfaces such as the oven
door. This is normal.
I accidentally operate my Operating the oven empty for a short time will not damage the oven.
microwave oven without any food However, we do not recommend this to be done.
in it.
PROBLEM POSSIBLE CAUSE REMEDY
English
English
Oven will not turn on.
When the oven is turning on,
there is noise coming from
Glass Tray.
Oven will not start cooking.
For NN-ST340W:
Oven will not start cooking.
The word «Child» appears in the
Display Window.
342W/M:
The oven is not plugged in securely. Remove plug from outlet, wait 10 sec-
Circuit breaker or fuse is tripped or
blown.
There is a problem with the outlet. Plug another appliance into the outlet to
The roller ring and oven bottom are dirty. Clean these parts according to care of
The door is not closed completely. Close the oven door securely.
Start Pad was not pressed after programming.
Another program has already
been entered into the oven.
The program has not been entered correctly.
Stop/Reset Pad has been pressed accidentally.
The Child Lock was activated by pressing Start Pad 3 times.
onds and re-insert.
Contact the specified service center.
check if the outlet is working.
your oven (See next page).
Press Start Pad.
Press Stop/Reset Pad to cancel the pre-
vious program and program again.
Program again according to the
Operating Instructions.
Program oven again.
Deactivate Lock by pressing Stop/Reset
Pad 3 times.
If it seems there is a problem with the oven, contact an authorized Service Centre.
— Eng-15 —

Care of your Microwave Oven
1. The oven should be cleaned regularly and any food
deposits removed.
2. Turn the oven off and remove the power plug from the wall
socket before cleaning.
3. Keep the inside of the oven clean. When food splatters or
spilled liquids adhere to oven walls, wipe with a damp
cloth. Mild detergent may be used if the oven gets very
dirty. The use of harsh detergent or abrasives is not rec-
English
English
ommended.
4. The outside oven surfaces should be cleaned with a damp
cloth. To prevent damage to the operating parts inside the
oven, water should not be allowed to seep into the ventilation openings.
5. Do not allow the Control Panel to become wet. Clean with
a soft, damp cloth. Do not use detergents, abrasives or
spray-on cleaners on the Control Panel.
When cleaning the Control Panel, leave oven door open to
prevent oven from accidentally turning on. After cleaning
press Stop/Reset Pad to clear display window or make
sure TIME/WEIGHT SELECT DIAL is set to zero position.
6. If steam accumulates inside or around the outside of the
oven door, wipe with a soft cloth. This may occur when the
microwave oven is operated under high humidity conditions and in no way indicates malfunction of the unit.
7. It is occasionally necessary to remove the glass tray for
cleaning. Wash the tray in warm sudsy water or in a dishwasher.
8. The roller ring and oven cavity floor should be cleaned
regularly to avoid excessive noise. Simply wipe the bottom
surface of the oven with mild detergent, water or window
cleaner and dry. The roller ring may be washed in mild
sudsy water or dish washer. Cooking vapors collect during
repeated use but in no way affect the bottom surface or
roller ring wheels. When removing the roller ring from cavity floor for cleaning, be sure to replace in the proper position.
9. When it becomes necessary to replace the oven light,
please consult a dealer to have it replaced.
10. Failure to maintain the oven in a clean condition could
lead to deterioration of the surface that could adversely
affect the life of the appliance and possibly result in a hazardous situation.
— Eng-16 —

Technical Specifications
332W
NN-SM330W NN-ST340W
Power Source: 220 V 50 Hz
Power Consumption: 5.3 A, 1,125 W 6.2 A, 1,275 W
Cooking Power: 700 W 800 W
Outside Dimensions (W x H x D): 488 mm x 279 mm x 405 mm
Oven Cavity Dimensions (W x H x D): 315 mm x 206 mm x 353 mm
Operating Frequency: 2,450 MHz
Net Weight: Approx. 12.0 kg Approx. 12.5 kg
* IEC Test Procedure
Specifications subject to change without notice.
As for the voltage requirement, the production month, country and serial number, please refer to the identification plate on the
microwave oven.
12.4 12.7
5.9 A 1,270 W
800 W
485 mm x 287 mm x 400 mm
315 mm x 227 mm x 349 mm
342W/M
English
English
— Eng-17 —
Quick Guide (NN-ST340W)
342W/M)
Feature
To Cook / Reheat /
Defrost by Micro
Power and Time
Setting
English
English
To Use
Turbo Defrost Pads
To Set Clock
To Set / Cancel
Child Safety Lock
(☞ page
(☞ page 9)
(☞ page 10)
(☞ page 10)
How to Operate
Select power. Set the cooking time. Press.
Press.Select the weight of food.
Press. Set time of day. Press.
To Set: Display
Press 3 times.
To Cancel: Display
or
Press 3 times.
To Cook Use
Reheat Use
Auto Reheat Pad
(☞ page 11)
To Cook Use
Auto Cook Pads
(☞ page 11)
Press.Set weight.
Example:
Select the servings. Press.
— Eng-18 —

Introduction
Cooking with Microwave Energy
Microwaves are a form of high frequency electromagnetic waves (approx 12cm wavelength) similar to those used by a
radio. Electricity is converted into microwave energy by the magnetron tube. The microwaves travel from the magnetron
tube to the oven cavity where they are reflected, transmitted or absorbed.
English
English
Reflection
Microwaves are reflected by metal
just as a ball is bounced off a wall.
A combination of stationary (interior
walls) and rotating metal (turntable
or stirrer fan) helps assure that the
microwaves are well distributed within the oven cavity to produce even
cooking.
Transmission
Microwaves pass through some
materials such as paper, glass and
plastic much like sunlight shining
through a window. Because these
substances do not absorb or reflect
the microwave energy, they are ideal
materials for microwave oven cooking containers.
Absorption
Microwaves are absorbed by food.
They penetrate to a depth of about 2
to 4cm. Microwave energy excites
the molecules in the food (especially
water, fat and sugar molecules), and
causes them to vibrate very quickly.
The vibration causes friction and heat
is produced. In large foods, the heat
which is produced by friction is conducted to the center to finish cooking.
— Eng-19 —

Cookware and Utensil Guide
Microwave
Aluminuim Foil For Shielding
Browning Dish Yes
Dinnerware: Oven/Microwave Safe Yes
English
English
Disposable Polyeser Paperboard Dishes Yes *
Glassware: Oven Glassware & Ceramic Yes
Metal Cookware No
Wire Rack No
Metal Twist-ties No
Oven Cooking Bag Yes
Oven Rack No
Non Oven/Microwave Safe No
Non-heat Resistant No
Paper Towels and Napkins Yes *
Plastic Dishes: Microwave Safe Yes *
Non-microwave Safe No
Plastic Wrap Yes *
Straw, Wicker, Wood Yes *
Thermometers: Microwave Safe Yes
Conventional No
Wax Paper Yes
*Caution
• Plastics:
Plastic dishes, cups and some freezer containers should be used with care in a microwave oven. Choose plastic
containers carefully, as some plastic containers may become soft, melt and scorch.
• Paper Products and Freezer Wrap:
Waxed paper, paper plates, cups and napkins should not be used for heating or cooking food by Combination and Grill.
Freezer wrap should not be used as it is not heat resistant and bake paper may be short periods of time for covering or
lining.
— Eng-20 —
Microwave Cooking Techniques
English
English
Dish Size
Follow the dish sizes given in the
recipes, as these affect the cooking
times. A quantity of food spread in a
bigger dish cooks more quickly.
Standing Time
Dense foods e.g. meat, jacket potatoes and cakes, require STANDING
TIME (inside or outside of the oven)
after cooking, to allow heat to finish
conducting to cook the centre completely.
Meat Joints
Stand 15 mins. wrapped in tin foil.
Jacket Potatoes
Stand 10 mins. wrapped in tin foil.
Light Cakes
Stand 5 mins. before removing from
dish.
Rich dense Cakes
Stand 15-20 mins.
Cling Film
Cling film helps keep the food moist
and the trapped steam assists in
speeding up cooking times. However,
it should be pierced before cooking,
to allow excess steam to escape.
Always take care when removing
cling film from a dish as the build-up
of steam will be very hot. Always purchase cling film that states on the
packet “suitable for microwave cooking” and use as a covering only. Do
not line dishes with cling film.
Quantity
Small quantities cook faster than
large quantities, also small meals will
reheat quicker than large portions.
If food is not cooked after STANDING
TIME, return to oven and cook for
additional time.
Moisture Content
Many fresh foods e.g. vegetables and
fruit, vary in their moisture content
throughout the season- jacket potatoes are a particular example of this.
For this reason cooking times may
have to be adjusted throughout the
year. Dry ingredients e.g. rice, pasta,
can dry out further during storage
and cooking times may differ from
ingredients freshly purchased.
Density
Porous airy foods heat quicker than
dense heavy foods.
Fish
Stand 2-5 mins.
Egg Dishes
Stand 2-3 mins.
Precooked Convenience Food
Stand for 5 mins.
Plated Meals
Stand for 2-5 mins.
Vegetables
Boiled potatoes benefit from standing
1-2 mins., however most other types
can be served immediately.
Piercing
The skin or membrane on some
foods will cause steam to build up
during cooking. These foods must be
pierced or a strip of skin should be
peeled before cooking to allow the
steam to escape. Eggs, potatoes,
apples, sausages etc, will all need to
be pierced before cooking. DO NOT
ATTEMPT TO BOIL EGGS IN THEIR
SHELLS.
— Eng-21 —

Microwave Cooking Techniques
English
English
(Continued)
Covering
Cover foods with microwave cling film
or a self-fitting lid. Cover fish, vegetables, casseroles, soups. Do not cover
cakes, sauces, jacket potatoes, pastry items.
Turning and Stirring
Some foods require stirring during
cooking. Meat and poultry should be
turned after half the cooking time. All
liquid must be stirred before and during heating. Water, especially must
be stirred before and during heating,
to avoid eruption.
Starting Temperature
The colder the food, the longer it
takes to heat up. Food from a fridge
takes longer to reheat than food at
room temperature.
Shape
Even shapes cook evenly. Food
cooks better by microwaves when in
a round container rather than a
square one.
Spacing
Foods cook more quickly and evenly
if spaced apart. NEVER pile foods on
top of each other.
Arranging
Individual foods e.g. chicken portions
or chops, should be placed on a dish
so that the thicker parts are on the
outside.
Checking Food
It is essential that food is checked during and after a recommended cooking time, even if an AUTO PROGRAM
has been used (just as you would check food cooked in a convectional oven). Return the food to the oven for
further cooking if necessary.
— Eng-22 —

To Reheat by
Micro Power and Time
Reheat by Setting Power and Time — Frozen Convenience Foods
FROZEN ITEM POWER TIME SPECIAL INSTRUCTIONS
(Pre-cooked) (in minutes)
BREAD &
BAKED PRODUCT
Bread 1 slice HIGH 10 — 15 sec Do not let bread get hot, or it will become rubbery and dry
1 loaf HIGH 2 — 5 out. Remove whole loaf from original wrapper.
6 rolls MEDIUM 1 — 2 Place on paper towel to absorb moisture.
English
English
Cheesecake (600 g) DEFROST 2 — 3 Remove from container. Defrost on plate.
Muffins — 4 (350 g) MEDIUM 2 — 3 Place onto paper towel lined plate.
Scones — 6 (400 g) MEDIUM 1 — 2 Defrost on paper lined plate. Stand 2 minutes.
PIES
Fruit Pie (500 g) DEFROST 6 — 8 Remove from foil container and place uncovered into a
Meat Pie (300 g) DEFROST 4 — 6 Place onto paper towel lined plate.
Pizza (350 g) HIGH 5 — 7 Remove from package and place onto paper towel or follow
FROZEN MEAL
Fish in Sauce (200 g) MEDIUM 6 — 7 Pierce corner of bag. Heat on a plate.
Instant Casserole MEDIUM 4 — 6 Pierce pouch.
in Pouch (serves 2) Heat on a plate or bowl.
Lasagne (300 g) MEDIUM 10 — 12 Remove from foil container, place into serving dish.
Plate Food DEFROST 3 — 4 Arrange food evenly on a dinner plate. Add butter or gravy
g
g
g
g
then pie dish.
HIGH 4 — 6
g
then
MEDIUM 2 — 3
g
manufacturer’s instructions.
g
g
then where desired. Cover plate with plastic wrap.
HIGH 2 — 3
TV style dinner (400 g) MEDIUM 8 — 10 Remove foil cover and replace with plastic wrap.
Vegetables & Sauce MEDIUM 8 — 10 Pierce corner of bag. Heat on a plate.
(in the bag) (400 g)
MISCELLANEOUS
Chicken Pieces (500 g) DEFROST 5 — 7 Place onto paper towel lined plate.
Croissants — 4 (250 g) MEDIUM 2 — 3 Place onto paper towel lined plate.
Fish Fingers — 8 (200 g) DEFROST 3 — 5 Place onto paper towel lined plate.
Sausage Rolls (250 g) MEDIUM 3 — 5 Place onto paper towel lined plate.
g
g
g
then
HIGH 6 — 8
g
g
then
HIGH 2 — 3
g
— Eng-23 —
Defrosting Guidelines/Turbo Defrost
This feature allows you to enter the
weight in kilos and the oven will
select the correct defrosting time for
most foods. However, do not use for
English
English
Separate chops and small items e.g.
Quiche slice where possible.
porous foods e.g. bread and cakes
etc.
Tips for Defrosting
Give large joints of meat further
standing to ensure meat is not still icy
in the center.
During the defrosting process, the
oven will bleep to remind you to
check the food i.e. turn, shield or
break the food apart, as shown
below.
Break up small items e.g. scallops,
minced meat, halfway through
defrosting.
Remove wrappers from meat. Place
on microwave rack or up-turned
saucer.
Shield edges, back of fat of joints and
thin edges of fish with small pieces of
SMOOTH tin foil to prevent overdefrosting.
— Eng-24 —
Turn dense foods and meat 2-3 times
during defrosting.

Defrosting Tips and Techniques
Preparation for Freezing:
1. Heavy-duty plastic wraps, bags and freezer wrap are suitable.
2. Freeze meats, poultry and fish in packages with only 1 or 2 layers of food. To aid in separating layers, place two
pieces of wax paper between them.
3. REMOVE ALL AIR and seal securely.
4. LABEL package with type and cut of meat, date and weight.
5. Defrosting times given in the charts are for thoroughly frozen foods (i.e. at least 24 hours in freezer maintained at
-18°C or lower).
Defrosting Technique:
1. Remove from wrapper and set on a roasting rack in a dish on Glass Tray.
2. Throughout the defrosting time, remove any defrosted portions of mince or cubed meat, etc.
3. After defrosting, large roasts may still be icy in the centre. Let stand, 15 to 30 minutes, in refrigerator to
complete defrosting.
Defrosting Chart (by setting time):
FOOD APPROX. TIME INSTRUCTION
(minutes per 500 g)
MEAT
Beef
Minced Beef 8 — 11 Halfway through the defrost cycle, break apart minced beef, separate
Roast: Topside 12 — 15 chops and remove meat that is defrosted.
Beef Tenderloin 12 — 15
Chuck or Rump 10 — 13 Turn meat over two to three times during defrosting.
Sirloin, rolled 11 — 14
Steak 8 — 10 Shield edges and unevenly shaped ends of roasts halfway through the
Miscellaneous 8 — 12 defrost cycle.
Pork/Lamb
Roast 9 — 12 Large roasts may still be icy in centre. Let stand.
Chops 8 — 11
Ribs 8 — 12
English
English
POULTRY Turn poultry over two to four times during defrosting. Halfway through the
Chicken defrost cycle, shield end of drumsticks, wings, breast bones and ends of
whole 9 — 12 poultry with foil.
pieces 8 — 11
fillets 8 — 10 Break apart chicken pieces and remove small pieces such as wings,
Duck 10 — 12 which may be defrosted before larger pieces.
Turkey 10 — 13
Rinse poultry under cold water to remove ice crystals. Let stand 5 to 10
minutes, before cooking.
FISH & SHELLFISH
Fish Fillets 9 — 11 Halfway through the defrost cycle, turn whole fish or blocks of fillets over.
Whole Fish 9 — 12 Also, break apart prawns or scallops. Remove any pieces that are
Crabmeat 8 — 10 defrosted.
Lobster Tails 8 — 10
Sea Scallops 8 — 10 Let stand, 5 to 10 minutes, before cooking.
Green Prawns 10 — 12
— Eng-25 —

Microwave
Recipe Preparation
and
Techniques
Converting Your Favourite Conventional
Recipes for Microwave Cooking
When adapting conventional recipes for microwave cooking, reduce the conventional cooking time by one quarter
or one third.
e.g. A chicken which takes 1 hour to cook in a moderate
oven will take 15 to 20 minutes on MEDIUM Power in
English
English
your microwave oven.
Use similar microwave recipes to help you adapt conventional recipes. Remember, it is always best to undercook a
recipe and then add an extra minute or two to finish it off.
Here are some other tips that may help:
• Reduce liquids in a conventional recipe by one half to
two thirds, e.g. 1cup (250 ml) should be reduced to
cup (125 ml).
• Add more thickening such as flour or cornflour to sauces
and gravies if you do not reduce the liquid.
• Reduce seasonings slightly in a recipe where ingredients
do not have time to simmer by microwave.
• Do not salt meats, poultry or vegetables before cooking;
otherwise, they will toughen and dry out.
• If one ingredient takes longer to cook than the others,
precook it in the microwave oven first. Onion, celery and
potato are examples.
• If meat or vegetables are not being browned before
cooking, omit any oil or fat that would have been used
for browning.
• Reduce leavening agents for cakes by one quarter and
increase liquids by one quarter.
• Biscuits require a stiff dough. Increase flour by about 20
percent. Substitute brown sugar for white sugar and use
biscuit recipes that have dark spices or require icing.
Because of the short cooking time, biscuits don’t have to
brown. Chill dough for half an hour before baking. This
produces a crisper biscuit. Bake biscuits on a glass tray
lined with greaseproof paper.
• Since microwaves penetrate foods about two centimetres from the top, bottom and sides, mixtures in round
shapes and rings cook more evenly. Corners receive
more energy and may overcook.
• Items with a lot of water, such as rice and pasta, cook in
about the same time as they would on a conventional
stove. (Refer to Rice and Pasta chapter.)
Select recipes that convert easily to microwave cooking
such as casseroles, stews, baked chicken, fish and vegetable dishes. The results from foods such as grilled
meats, cooked souffles or two-crust pies could be less
than satisfactory. Never
microwave oven.
attempt to deep fry in your
Menu Planning for Microwave Cooking
How to Keep Everything Hot at The Same Time
Plan your meals so that the food will not all need last
minute cooking or attention at the same time. The special
features of microwave cookery make it easy to serve
meals with everything piping hot. Cooking of some foods
may be interrupted while you start others, without harming
the nutritional value or flavour of either.
A recipe which requires standing time can be microwaved
first and another food cooked while it stands. Dishes prepared in advance can be reheated briefly before serving.
It does take some experience and time to cook with confidence. Microwaves are fast so you will have to do some
experimenting. You might find you will use your conven-
1
⁄2
tional range in conjunction with your microwave oven. For
example, while cooking the roast in the microwave oven,
you can be cooking the vegetables and gravy on the
range top. This can also be done the other way around.
Prepare your meals as follows.
1. Firstly, cook the most dense item (roast or casserole).
Drain and retain meat juice from joints then cover with
foil.
2. Cook the potatoes, rice or pasta.
3. Cover with foil for standing.
4. Cook greens and other vegetables.
5. Cover with foil for standing.
6. Cook the gravy with the retained meat juices, stock and
thickening.
7. Carve the roast and serve the vegetables and gravy.
While you are learning to plan meals, you may get a bit
behind time. Don’t worry. Dinner servings may be suitably
reheated on MEDIUM-HIGH, at 2 minutes per serving.
If you prefer not to use foil, cover food with saucepan lids.
A metal lid will retain the heat for at least 15 minutes.
Meanwhile, how can you cook all the vegetables at the
same time? Simply place potatoes and pumpkin in one
dish and less dense vegetables such as broccoli, cabbage, cauliflower, beans and peas in another. Sprinkle
greens with water. Cover with a lid or plastic wrap. Cook
on HIGH for approximately 6 to 8 minutes for a serving for
four people. Remember, if you increase the quantity of
vegetables, increase the cooking time. Fresh and frozen
vegetables can be mixed on a vegetable platter, but
remember the latter are not as dense as fresh vegetables,
as they have been blanched before freezing.
If vegetables are cut to a similar size, they can be cooked
in separate ramekins or small dishes at the same time.
— Eng-26 —

Microwave Recipe Preparation and Techniques
Microwave
Recipe Preparation
and
Techniques
(Continued)
Increasing & Decreasing Recipes
Increasing
• To increase a recipe from 4 to 6 servings, increase each
ingredient listed by half.
• To increase a recipe from 4 to 8 servings, double each
ingredient listed.
• For larger quantities of a recipe, a large dish should be
used. Make sure that the dish is deep enough to prevent
the recipe from boiling over during cooking.
• Make sure to cover, stir or rearrange food as directed in
the recipe and always check the food during cooking.
• Increase standing times by 5 minutes per 500g.
• Use the same Power Level recommended in the original
recipe.
• Increase the cooking times by:
for 6 servings; and an extra
8 servings.
Decreasing
• To decrease a recipe from 4 to 2 servings, decrease each
ingredient listed by half.
• For small quantities, a small dish should be used. Make
sure that the dish is large enough to prevent the recipe
from boiling over during cooking.
• Use the same Power Level recommended in the original
recipe.
• Decrease the cooking times by
cooking time.
1
⁄3 of original cooking time
1
⁄2 of original cooking time for
1
⁄2 to 2⁄3 of the original
g
Cooking for One
• To decrease a recipe from 4 to 1 serving, quarter each
• To decrease a recipe from 4 to 1 serving, quarter each
ingredient listed.
ingredient listed.
• A smaller dish should be used, making sure that the dish
• A smaller dish should be used, making sure that the dish
is still large enough to prevent the recipe from boiling
is still large enough to prevent the recipe from boiling
over.
over.
• Use the same Power Level recommended in the original
• Use the same Power Level recommended in the original
recipe.
recipe.
• Quarter the original cooking times, then add extra time, if
• Quarter the original cooking times, then add extra time, if
needed.
needed.
• Make sure to cover, stir or rearrange food as directed in
• Make sure to cover, stir or rearrange food as directed in
original recipe and always check the food during cooking.
original recipe and always check the food during cooking.
Converting Recipes from Other Sources
When the recipe is written with a wattage different than
your oven, adjust the cooking time by approximately 10%
per 100 watts, e.g. 6 minutes would be adjusted by 36 seconds. Alternately, adjust the power level by one level. If
your wattage is higher than the recipe: (1) Adjust time
downward or (2) Adjust power level downward. If your
wattage is lower than the recipe: (1) adjust time upward or
(2) adjust power level upward (when possible).
Common Queries Answered
English
English
Problem Cause Solution
Food cools quickly after being Food not cooked through. Put back in oven for extra time.
MICROWAVED. Remember foods at fridge temperature
Food cooks too slowly when cooked Oven not receiving correct Oven should be on a separate 13 amp circuit.
by MICROWAVE. power.
Food temperature from fridge Extra time required for cooking colder foods.
colder than room temperature.
Meat is tough when cooked by Power setting too high. Use reduced power level for meats.
MICROWAVE.
Meat salted before cooking. Do not salt before cooking. Salt if necessary
Cakes remain uncooked in center Too short cooking and/or Add extra cooking time/standing time.
when cooked by MICROWAVE. standing a time.
Scrambled or poached eggs tough Cooking time too long. Take care cooking small quantities of eggs,
and rubbery when cooked by once spoiled they cannot be saved.
MICROWAVE.
Quiche/Egg custards tough and Power level too high. Use reduced power levels for these items.
rubbery when cooked by
MICROWAVE.
Cheese sauce tough and stringy Cheese cooked with sauce. Add at the end of cooking time, the heat of
when cooked by MICROWAVE. the sauce will melt the cheese.
Vegetables are dry when cooked by Cooked uncovered. Low Cover with a lid or cling film. Add extra
MICROWAVE. moisture content e.g. old root 2-4 tbsps of water. Slat after cooking.
vegetables. Salt added before
cooking.
Condensation appears on the door This is normal and means the Wipe condensation off with a soft cloth.
of your oven. food is cooking faster than the
moisture can be expelled from
the oven.
Turntable rotates in both directions. This is normal.
require more cooking time than food at room
temperature.
after cooking.
— Eng-27 —

Everyday Basics
GRANOLA C
EREAL
Makes: approximately 4 cups (1 litre)
Ingredients:
500 ml (2 cups) oats
165 ml (
85 ml (
60 ml (
60 ml (
English
English
5 ml (1 teaspoon) vanilla essence
85 ml (
85 ml (
2
/3 cup) chopped nuts
1
/3 cup) wheat germ
1
/4 cup) brown sugar
1
/4 cup) honey
1
/3 cup) raisins
1
/3 cup) coconut
Method:
1. Place oats in 2-litre casserole dish, cook on HIGH for 2
to 3 minutes, stirring twice.
2. Add nuts, wheat germ, and brown sugar. Stir in honey
and vanilla. Cook on HIGH for 3 to 5 minutes, stirring
twice during cooking.
3. Add raisins, coconut and allow to cool. Stir to a crumble texture. Store in an airtight container.
TOMATO AND ONION
Serves 4
Ingredients:
approx. 3 tomatoes, thinly sliced
1 onion, thinly sliced
1
/2 teaspoon) basil
2 ml (
salt and pepper to taste
Method:
1. Place all ingredients into 2-litre casserole dish.
2. Cook, covered, on HIGH for 6 to 8 minutes. Serve with
barbequed steak or grilled meat.
SCRAMBLED EGGS
Serves: 2
Ingredients:
4 x 61 g eggs
g
60 ml (4 tablespoons) milk
pinch of salt
Method:
1. In 1-litre casserole dish, beat eggs lightly with
whisk. Add milk and salt. Whisk until well combined.
Cover dish with plastic wrap and cook on MEDIUM
for 2 to 2
2. Stir egg and cook for further 2
1
/2 minutes.
1
/2 to 3 minutes.
Stand, covered, for 1 minute before serving.
POACHED EGGS
Serves: 2
Ingredients:
125 ml (
2 x 61 g eggs
Method:
1. Place one quarter of a cup of water, dash of vinegar
2. Break egg into the water and with toothpick pierce the
1
/2 cup) hot tap water
dash of vinegar
pinch of salt
g
and pinch of salt into 2 ramekin dishes or small glass
bowls.
egg yolk twice and egg white several times.
3. Cover dish with plastic wrap and cook on MEDIUM for
1
/2 minutes. Stand, covered, for 1 minute before
1 to 1
serving.
Note: The size of the eggs will alter cooking time.
GRAVY
Makes: 500 ml (2 cups)
Ingredients:
30 ml (2 tablespoons) dripping or pan juice
1 small onion, finely chopped
30 ml (2 tablespoons) flour
15 ml (1 tablespoon) tomato paste
375 ml (1
1
/2 cups) beef stock, divided
salt and pepper
Method:
1. Place dripping or pan juices and onion in 2-cup (500 ml)
jug. Cook on HIGH for 2 minutes.
2. Add flour, tomato paste and half of the beef stock. Stir
well. Cook on HIGH for 2 minutes. Add remaining stock.
3. Stir well and cook on HIGH for a further 2 minutes.
Season with salt and pepper. Serve with the meat of
your choice.
BASIC WHITE SAUCE
Makes: 250 ml (1 cup)
Ingredients:
30 ml (2 tablespoons)butter
30 ml (2 tablespoons)flour
1
310 ml (1
/4 cups) milk
Method:
1. Place butter in 4-cup (1-litre) jug. Cook on HIGH for 30
to 40 seconds.
2. Stir in flour, salt and pepper. Gradually add milk,
stirring until smooth.
3. Cook on HIGH for 3 to 4 minutes, stirring twice.
Tip: For cheese sauce, stir in 125 ml (
cheese once sauce has thickened.
HINT:
TO COOK BACON RASHERS:
Place bacon between 2 sheets of paper towel on a pie
plate and cook on HIGH for 2 to 3 minutes.
HINT:
TO DRY FRESH BREADCRUMBS:
Place 250 ml (1 cup) of breadcrumbs on the base of
plate and heat on HIGH for 2 to 3 minutes, stirring once
during heating.
salt and white pepper
1
/2 cup) grated
— Eng-28 —
Loading…
FAQ: Types of Manuals and Their Contents
Panasonic NN-ST342W Manuals come in various types, each serving a specific purpose to help users effectively operate and maintain their devices. Here are the common types of Panasonic NN-ST342W User Guides and the information they typically include:
- User Manuals: Provide comprehensive instructions on how to use the device, including setup, features, and operation. They often include troubleshooting tips, safety information, and maintenance guidelines.
- Service Instructions: Designed for technicians and repair professionals, these manuals offer detailed information on diagnosing and repairing issues with the device. They include schematics, parts lists, and step-by-step repair procedures.
- Installation Guides: Focus on the installation process of the device, providing detailed instructions and diagrams for proper setup. They are essential for ensuring the device is installed correctly and safely.
- Maintenance Manuals: Provide guidance on routine maintenance tasks to keep the device in optimal condition. They cover cleaning procedures, part replacements, and regular servicing tips.
- Quick Start Guides: Offer a concise overview of the essential steps needed to get the device up and running quickly. They are ideal for users who need immediate assistance with basic setup and operation.
Each type of Panasonic NN-ST342W instruction is designed to address specific needs, ensuring users have the necessary information to use, maintain, and repair their devices effectively.
Related Instructions for Panasonic NN-ST342W:
1
SXNP10 — DIGITAL PIANO
Driver manual Panasonic SXNP10 — DIGITAL PIANO User Guide (Driver manual), @PB39A6
4
116
24
2
S-45MK2E5A
264
1444
275
3
KARAOKE MATE 32-1158
Owner’s manual Panasonic Karaoke System Owner’s manual (File: panasonic-karaoke-mate-32-1158-owner-s-manual-12, 02nd Dec 2024)
12
788
127
4
WVBM1700 — 17″ B/W MONITOR
16
1124
225
6
KX-TG6611CX
40
1203
301
7
DMR-ES20P
Service manual Panasonic DVD Recorder Service manual (File: panasonic-dmr-es20p-service-manual-75, Thursday 24-10-2024)
75
871
192
10
KX-TC1466AGB
Service manual Panasonic Telephone Service manual (File: panasonic-kx-tc1466agb-service-manual-14, 16th Dec 2024)
14
112
27
Microwave Oven Devices by Other Brands:
|
Samsung FC139STF Owner’s Instructions Manual Microwave Oven #56G51R Code No.: DE68—02329U 05 May 2025 | 36 |
|
|
Amana ACO1520A Owner’s Manual Amana Microwave Oven Owner’s manual (File: amana-aco1520a-microwave-oven-46, Tuesday 19-11-2024) R 19 Nov 2024 | 46 |
|
|
KitchenAid WOC54EC7A Installation Instructions Manual #LW391U: WOC54EC7A Microwave Oven Installation instructions manual INSTALLATION INSTRUCTIONS 16 Feb 2025 | 16 |
|
|
Whirlpool GSC308 PRS00 Parts List #66J427: GSC308 PRS00 Oven Parts list OVEN PARTS 23 Jan 2025 | 12 |
Categories:
Rfid Systems
Transmitters
Plumbing Product
Fax
Blu-ray Drive
Steam Cleaner
Operating Instructions and Cookbook Инструкция по эксплуатации и рецепты приготовления блюд Інструкція з експлуатації та книга рецептів Microwave Oven Микроволновая печь Мікрохвильова піч For home use Для домашнего использования Для домашнього використання NN-ST340W ModelsModels: No. NN-SM330W
PУCCKИЙ — Rus-1 —
Содержание Перед началом эксплуатации Установка и подключение……………………………………………………………………………………………………………..2 Меры безопасности
Установка и подключение Проверка микроволновой печи Распакуйте микроволновую печь и удалите упаковочный материал. Проверьте печь на наличие таких повреждений и дефектов, как вмятины, неисправность запоров дверцы, трещины в дверце. При обнаружении каких-либо неисправностей сразу же обратитесь к
Меры безопасности PУCCKИЙ Назначение микроволновой печи 1. Не используйте печь ни для каких иных целей, кроме приготовления пищи. Эта печь разработана специально для разогрева и приготовления пищи. Не используйте печь для разогрева каких-либо химических веществ или непищевых продуктов. 2.
Важная информация 1) Время приготовления 7) Бумага/ Пластик • Время приготовления блюд в сборнике рецептов указано приблизительно. • Время приготовления зависит от состояния продуктов, их температуры, а также от типа используемой посуды. Во избежание переваривания пищи следует сначала устанавливать
Принципиальная схема устройства NN-ST340W 342W/M 8 8 n 7! 5 27 2 l = 4 4 m ~ 1 1 6 6 k PУCCKИЙ 2 2 332W NN-SM330W 8 8 7n ! 5 2 27 l = 4 4 j 0 m ~ 9 9 1 1 k — 6 6 2 11 Смотровое окно печи 22 Система блокировки дверцы 33 Ручка открывания дверцы Потяните, чтобы открыть дверь. Открытие дверцы во время
Панель управления (NN-ST340W) 342W/M) (1) (1) (2) (2) (3) (5) (5) (6) (7) (7) (8) (9) (9) (10) (6) (8) (10) (1) (2) (3) (4) (5) (6) (7) (8) (9) Окошко дисплея Клавиша установки мощности микроволнового режима Клавиши установки времени Клавиши турборазморозки Turbo Defrost Клавиша Авторазогрева
Основные операции (NN-SM330W) 332W) Установка Для установки программы программы приготовленияи приготовления разогрева 1. Поместите пищу в Разморозка с установкой веса продукта 1. Поместите пищу в печь PУCCKИЙ 1. печь Поместите пищу в печь 2. Установите уровень мощности 2. Установите уровень
Основные операции (NN-ST340W) 342W/M) Установка микроволновой мощности и времени приготовления 1. Поместите пищу в печь (См. прилагаемую ниже таблицу). 3. Установите время приготовления 3. (Максимальная Установите время приготовления мощность Высокая — не более 30 минут. Другие значениямощность
Основные операции (NN-ST340W) 342W/M) (Продолжение) Использование турборазморозки (0,1 — 2,0 кг) 1. Поместите пищу в печь PУCCKИЙ 2. Установите вес замороженного продукта Например: для размораживания 1,5 кг мяса. продукта 2. Установите вес замороженного Например: для размораживания 1,5 кг мяса.
Основные операции (NN-ST340W) 342W/M) (Продолжение) Установка часов Для установки часов: Например: Чтобы установить 11:25 утра. 11 раз два раза 5 раз 1. Нажмите. В окне дисплея начнёт мигать двоеточие. 2. Используя цифровые клавиши, введите текущее время. На дисплее будет отображаться установленное
Основные операции (NN-ST340W) 342W/M) (Продолжение) Разогревание/приготовление пищи с использованием программ автоматического приготовления PУCCKИЙ 1. Поместите пищу в печь 2. Выберите нужную программу Выбеpите кнопку, соответствующую желаемой категоpии пpодукта. 3. Нажмите отсчет времени на
(Продолжение) Основные операции (NN-ST340W) 342W/M)(Продолжение) Авторазогрев 3. Фруктовый пирог Готовые блюда можно разогреть, установив вес порций. Вам не нужно устанавливать мощность или время разогрева. Продукты должны иметь комнатную температуру или температуру холодильника. Используйте посуду
(Продолжение) Основные операции (NN-ST340W) 342W/M)(Продолжение) 6. Спагетти Программа предназначена для приготовления макаронных изделий. Выложите макароны в жаропрочную посуду с высокими бортиками, пригодную для использования в микроволновом режиме. Залейте кипятком, добавьте соль, растительное
Основные операции (NN-ST340W) 342W/M) (Продолжение) Установка таймера, времени устойки или отсрочки включения Возможность запрограммировать время устойки блюда после его приготовления, использовать печь как минутный или секундный таймер, а также установить задержку запуска программы. Для
Перед обращением в сервисный центр Нормальные явления при работе микроволновой печи: При включении микроволновой печи возникают помехи в работе телевизора. При работе микроволновой печи могут возникать помехи в работе радио и телевизоров. Подобные помехи возникают при работе небольших электро
Уход и техническое обслуживание микроволновой печи 1. Необходимо постоянно чистить данную микроволновую печь и убирать остатки пищи. 2. Перед чисткой печи выключите ее и отсоедините кабель питания от сетевой розетки. 3. Внутренние поверхности микроволновой печи должны быть чистыми. Если частицы
Технические характеристики NN-SM330W 332W Источник электропитания: Потребляемая мощность: Выходная мощность: NN-ST340W 342W/M 220 В 50 Гц 5,3 А 1125 Вт 5,9 A 1270 BT 6,2 А 1275 Вт 700 Вт 800 BT 800 Вт Габаритные размеры (Ш х В х Г): 488мм ммxx287 279мм ммx x400 405мм мм 485 Внутренние размеры (Ш х
Краткое руководство пользователя (NN-ST342W/M) (NN-ST340W) Функция Способ управления Приготовление/ Разогревание/ Разморозка продуктов в микроволновом режиме с Выберите мощность. установкой времени (см. стр. Установите время приготовления. Нажмите. Нажмите. Для установки часов (см. стр. 10)
Введение Приготовление пищи с использованием энергии микроволн Микроволны (СВЧ) — одна из форм высокочастотных электромагнитных колебаний (с длиной волны приблизительно 12 см), сходная с радиоволнами. Электрическая энергия превращается в микроволновую за счет трубки магнетрона. Микроволны
Посуда и емкости, пригодные для использования в микроволновой печи Микроволновой режим Алюминиевая фольга Для экранирования волн Блюдо для поджаривания Да Столовая посуда: для духовки/пригодная для СВЧ не для духовки/пригодная для СВЧ Да Нет Одноразовая посуда из полиэстера Да* Стеклянная посуда:
Особенности приготовления пищи в микроволновой печи PУCCKИЙ PУCCKИЙ Размер посуды Размер посуды влияет на время приготовления пищи. Поэтому следует использовать посуду такого размера, который указан в рецепте. Пища, помещенная в большую емкость, приготовится быстрее, чем то же количество,
Особенности приготовления в микроволновой печи Особенности приготовления пищипищи в микроволновой печи (Продолжение) Пища должна быть накрыта крышкой или пищевой пленкой, пригодной для использования в микроволновой печи. Следует накрывать рыбу, овощи, запеканки, супы. Не требуют крышки соусы,
Разогревание пищи с заданием мощности и времени Разогревание пищи с заданием мощности и времени / Готовые к употреблению замороженные продукты PУCCKИЙ Готовый к употреблению замороженный продукт Мощность Время (в мин.) Хлеб и хлебобулочные изделия 1 кусок хлеба 1 батон 6 булочек Ввсокая Ввсокая
Размораживание/Турборазморозка Во время процесса размораживания будет раздаваться звуковой сигнал, чтобы напомнить Вам о необходимости проверить продукт: перевернуть, закрыть экранирующей пленкой или разделить на более мелкие части, как показано на рисунке внизу. Благодаря этой функции можно
Технология размораживания и полезные советы Подготовка к замораживанию продуктов 1. Для заморозки продуктов подходят плотная пластиковая упаковка, специальные мешочки и пленка. 2. Мясо, птицу и рыбу следует замораживать в упаковке в 1-2 слоя, между слоями нужно проложить 2 кусочка вощеной бумаги,
Рекомендации Планирование меню для приготовления в микроволновой печи Чтобы адаптировать обычные рецепты для приготовления в микроволновой печи, сократите обычное время приготовления до четверти или трети. Например, если для приготовления курицы в умеренно горячей духовке требуется 1 час, то для ее
Рекомендации (Продолжение) Как увеличить/уменьшить количество порций в рецепте Расчет рецепта на одного человека PУCCKИЙ Увеличение • Чтобы увеличить количество порций с 4 до 6, увеличьте количество каждого ингредиента в полтора раза. • Чтобы увеличить количество порций с 4 до 8, увеличьте
Блюда на каждый день Каша «Гранола» Помидоры с чесноком 4 порции Ингредиенты: Примерно 3 порезанных на тонкие ломтики помидора 1 мелко порубленная луковица 2 мл (1/2 ч. ложки) базилика Соль, перец по вкусу Способ приготовления: 1. Положите все ингредиенты в 2-литровую кастрюлю 2. Готовьте, накрыв
Рыба и морепродукты Указания по приготовлению рыбы и морепродуктов в микроволновой печи Почистите рыбу перед началом приготовления. Положите её одним слоем и не заворачивайте края. Креветки и морские гребешки уложите одним слоем. Накройте блюдо плёнкой. Установите нужную мощность и минимальное
Птица Указания по приготовлению целой птицы в микроволновой печи Установите необходимое время приготовления, исходя из веса птицы и минимального количества минут, указанного для 500 г. Установите мощность и время. После завершения процесса приготовления проверьте внутреннюю температуру с помощью
Птица PУCCKИЙ Курица по-китайски 4 порции Ингредиенты: 10 сушёных китайских грибов 10мл (2 чайных ложки) кунжутного масла 1 зубчик чеснока, рубленый 500г цыплёнок рубленый 10 водных каштанов, рубленых 125г ростков бамбука, рубленых 15мл (1 столовая ложка) соевого соуса 10мл (2 чайных ложки)
Основные блюда из мяса Указания по приготовлению мягких частей мяса в микроволновой печи Выбирайте одинаковые по форме куски мяса, чтобы добиться лучшего результата. Указания по приготовлению более жёстких частей мяса в микроволновой печи Более жёсткое мясо, например для жаркого, нужно готовить в
Основные блюда из мяса Способ приготовления: Посуда: 1,5-2,0-х литровая кастрюля, пищевая плёнка 1. Положите лук, масло, мясо, томатный и соевый соусы, перемешайте. 2. Готовьте на средне высокой мощности 12-15 минут под плёнкой, перемешайте один раз в процессе приготовления. Добавьте муку и сухой
Блюда из овощей Указания по приготовлению различных блюд из овощей Приготовление сушеных бобов или гороха в микроволновой печи Положите овощи в ёмкость. Добавьте 2-3 столовые ложки воды на каждые 500 г овощей. Посолите воду или добавьте соль по окончании приготовления. Не солите сами овощи.
Блюда из овощей Для лучшего результата овощи накройте крышкой и готовьте на максимальной мощности. Продукт PУCCKИЙ Спаржа Бобы (измельченные) Свёкла Указания по приготовлению 250 г 250 г 4 целых (1 кг) Закрытая посуда, добавить 1/4 стакана воды Закрытая посуда, добавить 1/4 стакана воды Закрытая
Блюда из овощей Цветная капуста в белом соусе Запеканка из картофеля 4 порции Ингредиенты: 750 г очищенного и порезанного ломтиками картофеля Соль по вкусу 250 мл (1 стакан) сметаны 60 мл (1/4 стакана) молока 3 стебля зелёного лука 2 ломтика бекона, мелко нарезанного 125 мл (1/2 стакана) тёртого
Рис, макароны и каши Указания по приготовлению риса и других круп в микроволновой печи Следуйте приведённым в таблице указаниям относительно размеров посуды, количества воды и времени приготовления. Кладите крупу в кипящую воду. Добавляйте соль и масло в соответствии с указаниями на упаковке. Время
Рис, макароны и каши Тортеллини с беконом и луком Рис с овощами 4 порции Ингредиенты: 30 г (2 ст. ложки) сливочного масла 100 г (1шт.) нашинкованная луковица 100 г (1-2 шт.) мелко нарезанной моркови 80 г (1/2 банки) консервированной кукурузы 100 г (1/3 пачки) свежезамороженного зелёного горошка 200
Десерты PУCCKИЙ Пудинг с маслом по-шотландски 4-6 порций Ингредиенты: 400 г (1 банка) сладкого сгущённого молока 30 г сливочного масла 5 мл (1 ч. ложка) ванильной эссенции 125 мл (1/2 стакана) молока 190 мл (3/4 стакана) просеянной муки 250 мл (1 стакан) коричневого сахара 125 мл (1/2 стакана)