
Contents Connections Playback Settings Tips Appendix
.
Network Integrated Amplifier
PM7000N
Front panel Rear panel
Remote control
unit
Owner’s Manual
1
Index

Contents Connections Playback Settings Tips Appendix
Accessories
Inserting the batteries
Operating range of the remote control unit
Features
High quality sound
High performance
Part names and functions
Front panel
Rear panel
Remote control unit
6
Connections
7
Connecting speakers
7
Connecting the speaker cables
8
Connecting the subwoofer
8
Connecting speakers
9
Connecting a playback device
11
Connecting a recording device
11
Connecting to a device with digital audio output connectors
14
Connecting a USB memory device to the USB port
17
Connecting to a home network (LAN)
Wired LAN
Wireless LAN
Connecting devices with remote control connectors
Performing operations by RC on this unit without visual contact
Remotely connecting Marantz audio devices
Connecting the power cord
24
24
25
26
27
28
29
31
32
32
33
34
34
34
35
Front panel Rear panel
Remote control
unit
2
Index

Contents Connections Playback Settings Tips Appendix
Playback
Basic operation
Turning the power on
Switching the power to standby
Selecting the input source
Adjusting the volume
Turning off the sound temporarily (Muting)
Listening to Internet Radio
Listening to Internet Radio
Playing back files stored on PC or NAS
Playing back files stored on PC or NAS
Playing a USB memory device
Playing files stored on USB memory devices
Listening to music on a Bluetooth device
Listening to music on a Bluetooth device
Pairing with other Bluetooth devices
Reconnecting to this unit from a Bluetooth device
Getting the HEOS App
HEOS Account
Playing from streaming music services
Listening to the same music in multiple rooms
Playing digital input
AirPlay function
37
37
37
38
38
38
39
40
41
42
44
45
47
48
49
50
51
52
53
56
Playing songs from your iPhone, iPod touch or iPad
Playing iTunes music with this unit
Play a song from your iPhone, iPod touch or iPad on multiple
synced devices (AirPlay 2)
Spotify Connect function
Playing Spotify music with this unit
Convenience functions
Adding to HEOS Favorites
Playing back HEOS Favorites
Deleting a HEOS Favorites
Adjusting the tone
Playback in source direct mode
Switching the display’s brightness
Using the sleep timer
Recording
60
62
63
63
64
65
65
66
66
67
67
68
68
69
69
70
Front panel Rear panel
Remote control
unit
3
Index

Contents Connections Playback Settings Tips Appendix
Settings
Menu map
Menu operation
Inputting characters
Using the number buttons
Using the cursor buttons
Audio
Volume Limit
Subwoofer — Low Pass Filter
General
TV Input
IR Control
Language
Auto-Standby
Usage Data
Firmware
Information
Reset
71
76
77
77
78
79
79
79
80
80
81
81
81
82
82
85
85
Network
Network Information
Network & USB-A
Wi-Fi
Bluetooth
Network Control
Friendly Name
Connection
Settings
Diagnostics
HEOS Account
You have not signed in
You have already signed in
86
86
86
86
86
87
87
88
91
92
93
93
93
Front panel Rear panel
Remote control
unit
4
Index

Contents Connections Playback Settings Tips Appendix
Tips
Tips
Troubleshooting
Power does not turn on / Power is turned off
Operations cannot be performed through the remote control unit
Display on this unit shows nothing
No sound comes out
Sound is interrupted or noise occurs
Desired sound does not come out
AirPlay cannot be played back
USB memory devices cannot be played back
File names on the USB memory device are not displayed properly
Bluetooth cannot be played back
The Internet radio cannot be played back
Music files on PC or NAS cannot be played back (Music server)
Various online services cannot be played
Cannot connect to a wireless LAN network
Audio from digital devices cannot be played back (Coaxial/
Optical)
The input source switches to “Optical 1”, “Optical 2” or “Coaxial”
Update/upgrade error messages
Resetting network settings
95
97
98
99
99
100
101
103
104
105
106
106
107
108
109
109
111
111
112
113
Appendix
Playing back a USB memory devices
D/A converter
Playing back a Bluetooth device
Playing back files stored on a PC and NAS
Playing back Internet Radio
Last function memory
Explanation of terms
Trademark information
Specifications
Index
License
114
115
116
117
118
118
119
123
124
128
130
Front panel Rear panel
Remote control
unit
5
Index
Quick Start Guide
Safety Instructions
Cautions on Using Batteries
Notes on radio
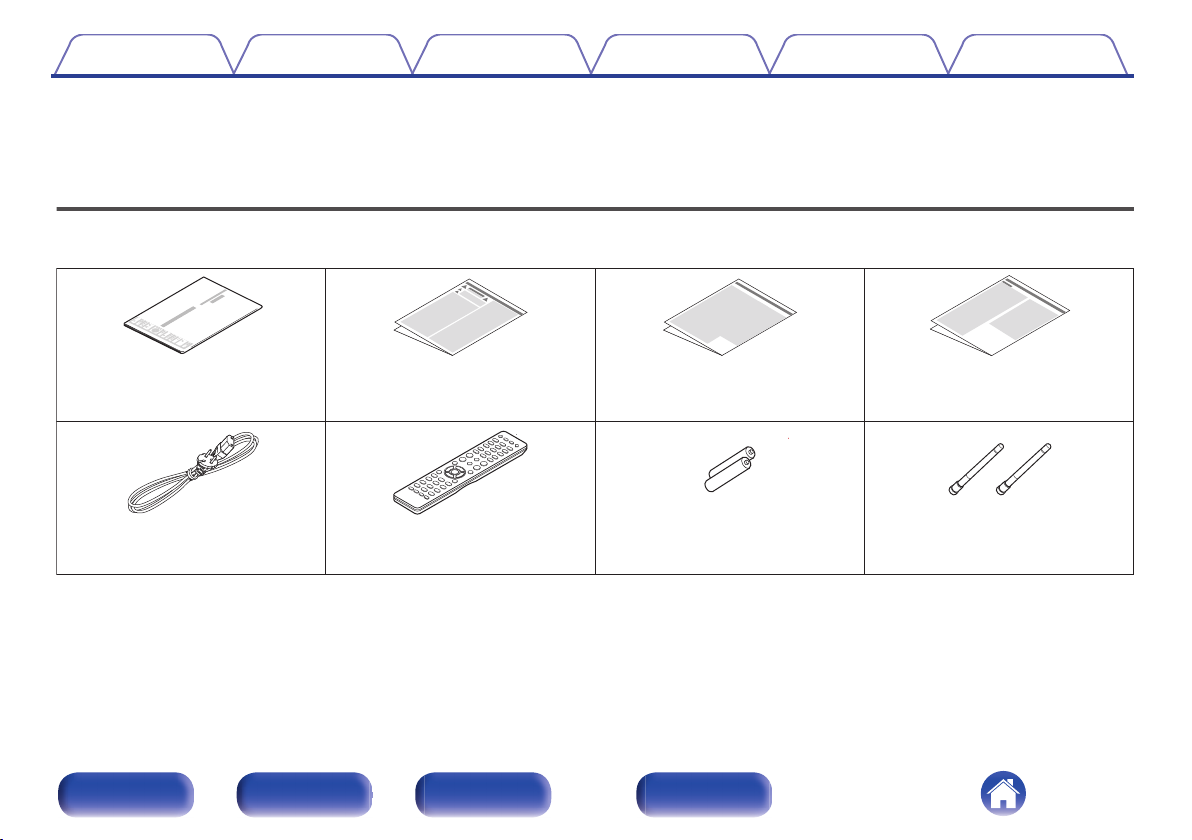
Power cord
Remote control unit
(RC004PM)
R03/AAA batteries
External antennas for
Bluetooth/wireless
connectivity
Contents Connections Playback Settings Tips Appendix
Thank you for purchasing this Marantz product.
To ensure proper operation, please read this owner’s manual carefully before using the product.
After reading this manual, be sure to keep it for future reference.
Accessories
Check that the following parts are supplied with the product.
.
Front panel Rear panel
Remote control
unit
6
Index
Contents
Connections Playback Settings Tips Appendix
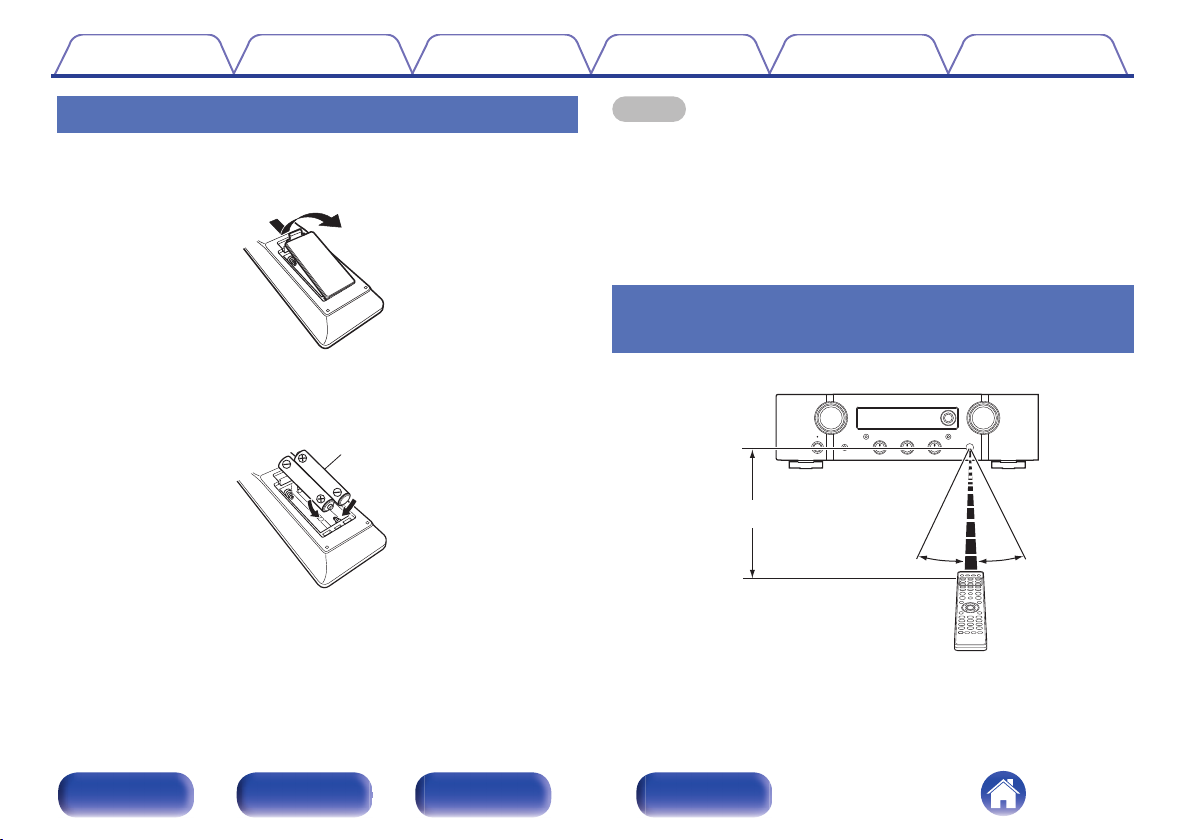
Inserting the batteries
1
2
3
Remove the rear lid in the direction of the arrow and
remove it.
.
Insert two batteries correctly into the battery
compartment as indicated.
.
Put the rear lid back on.
NOTE
To prevent damage or leakage of battery fluid:
0
Do not use a new battery together with an old one.
0
Do not use two different types of batteries.
0
Remove the batteries from the remote control unit if it will not be in use for long
0
periods.
If the battery fluid should leak, carefully wipe the fluid off the inside of the battery
0
compartment and insert new batteries.
Operating range of the remote control
unit
Point the remote control unit at the remote sensor when operating it.
.
Front panel Rear panel
Remote control
unit
7
Index
Contents
Connections Playback Settings Tips Appendix
Features
High quality sound
All-discrete current feedback amplifier
0
Marantz’s proprietary current feedback circuit using discrete
components is adopted in the power amplifier. The high-speed amplifier
uses technology developed for the higher-grade amplifiers.
0
HDAM®SA3
This unit contains the HDAM®SA3 developed for the higher-grade
amplifiers. HDAM®SA3 is used in the current feedback power amplifier
circuits of this unit.
Improved instantaneous current supply
0
It’s well known that amplifiers with the same specifications can have
different sound quality. The secret to Marantz’s high quality is thought to
be the performance of the speaker driver. The power amplifier of this
unit is capable of delivering an instantaneous current of over 32 A,
providing powerful speaker performance.
Short power line layout
0
A short power line layout that integrates the power circuit and the output
level of the power amplifier is used to improve instantaneous current
supply.
This layout uses the minimum necessary lines with a large current,
arranged symmetrically on the left and right.
Newly developed phono equalizer circuit
0
A new phono equalizer circuit developed for the PM7000N is used in
the phono equalizer amplifier for the MM cartridge.
Double shielded toroidal transformer
0
This unit features a toroidal transformer that produces less vibration and
magnetic leakage flux compared to conventional power transformers.
Large-capacitance block electrolytic capacitor
0
The power circuit of the power amplifier contains a new high-capacity
15000 μF condenser developed with concepts used in the higher-grade
amplifiers.
Front panel Rear panel
Remote control
unit
8
Index
Contents
Support for High Quality Audio playback via USB and networks
0
This unit supports the playback of high resolution audio formats such as
DSD (2.8/5.6 MHz) and WAV/FLAC/Apple Lossless Audio Codec
(ALAC) files up to 192 kHz/24 bits.
Peripheral circuitry off function minimizes audio output signal
0
interference
In order to minimize noise from peripheral circuitry that could interfere
with the audio signal, this unit is equipped with a function to turn off the
network and USB memory playback, Wi-Fi and Bluetooth circuit, as well
as a function to turn off the display.
Connections Playback Settings Tips Appendix
High performance
Tone control function
0
This unit has a tone control function for adjustment of bass (low
frequency) and treble (high frequency) sound to produce your preferred
tone. (v p. 68)
Supports a variety of devices with digital inputs
0
Equipped with two optical digital inputs and one coaxial digital input to
connect televisions and other devices with digital inputs. This unit also
has an automatic playback function. When a device connected to this
unit by digital connection is turned on, this unit automatically turns on
and plays audio from the device.
Can be operated with the remote control of your TV
0
By learning the infrared signal of the remote control of your TV, you can
operate this unit with the remote control of the TV. (v p. 81)
0
The device is equipped with a AirPlay® function in addition to
network functions such as Internet radio etc.
You can enjoy a wide variety of content, including listening to Internet
Radio, playing audio files stored on your PC. This unit also supports
Apple AirPlay which lets you stream your music library from an iPhone®,
iPad®, iPod touch® or iTunes®.
Front panel Rear panel
Remote control
unit
9
Index
Contents
0
Supports AirPlay 2® wireless audio
Connections Playback Settings Tips Appendix
Sync multiple AirPlay 2 compatible devices/speakers for simultaneous
playback.
This unit supports AirPlay 2 and requires iOS 11.4 or later.
Wireless connection with Bluetooth devices can be carried out
0
easily
You can enjoy music simply by connecting wirelessly with your
smartphone, tablet, PC, etc.
Support for Gapless playback
0
Playback with no gap between music files.
(for WAV/FLAC/Apple Lossless/DSD only)
0
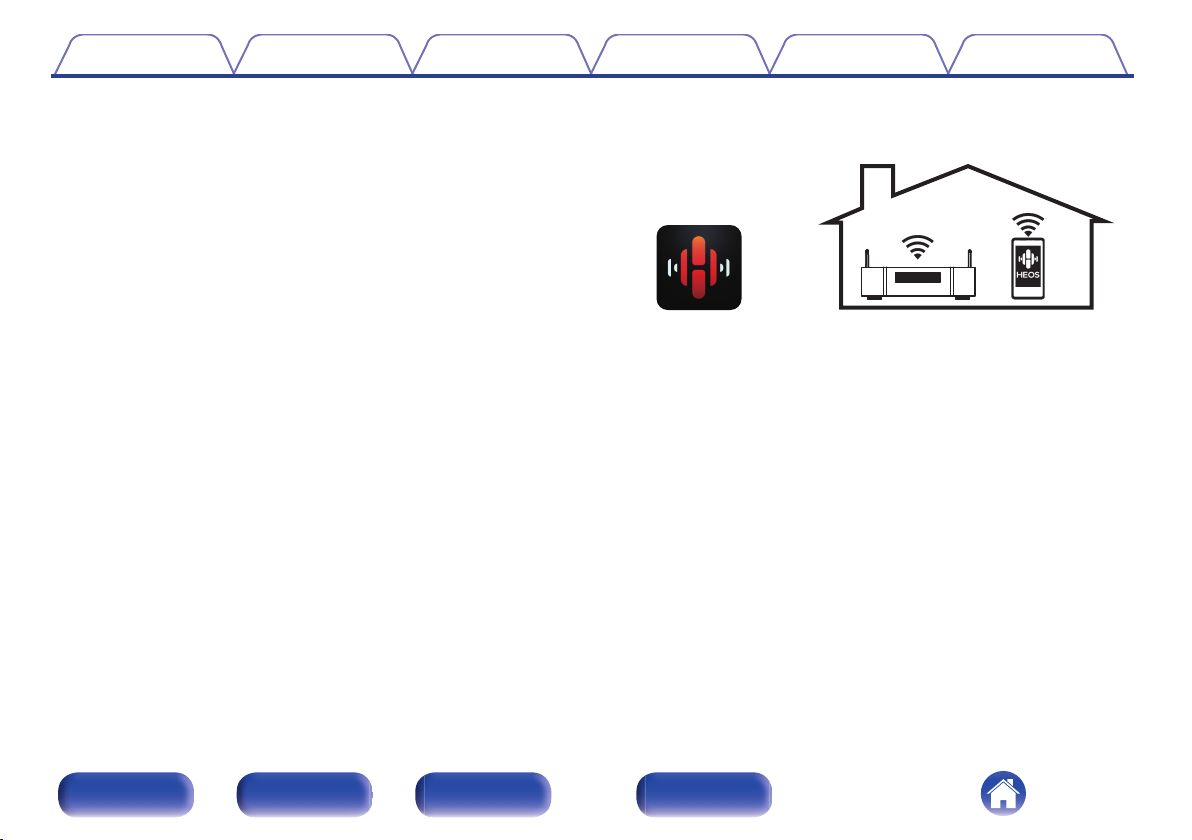
Compatible with the HEOS Appz for performing basic operations
of the unit with an iPad, iPhone or Android™ devices (Google,
Amazon Kindle Fire)
Download the appropriate HEOS App for your iOS or Android devices. This unit
z
needs to be connected to the same LAN or Wi-Fi (wireless LAN) network that
the iPad, iPhone or Android devices are connected to.
HEOS provides streaming music from your favorite online music
0
sources
.
HEOS wireless multi-room sound system that enables you to enjoy your
favorite music anywhere and everywhere around your home. By utilizing
your existing home network and the HEOS App (available for iOS,
Android and Amazon devices), you can explore, browse, and play
music from your own music library or from many online streaming music
services.
When multiple HEOS devices are connected to the same network,
HEOS devices can be grouped to play back the same music on all
devices simultaneously, or different music can be played on each
separate HEOS device.
OLED (Organic Light Emitting Diode) display that can display 3
0
lines
Equipped with auto standby mode function that reduces power
0
consumption
Front panel Rear panel
Remote control
unit
10
Index

Contents
Connections Playback Settings Tips Appendix
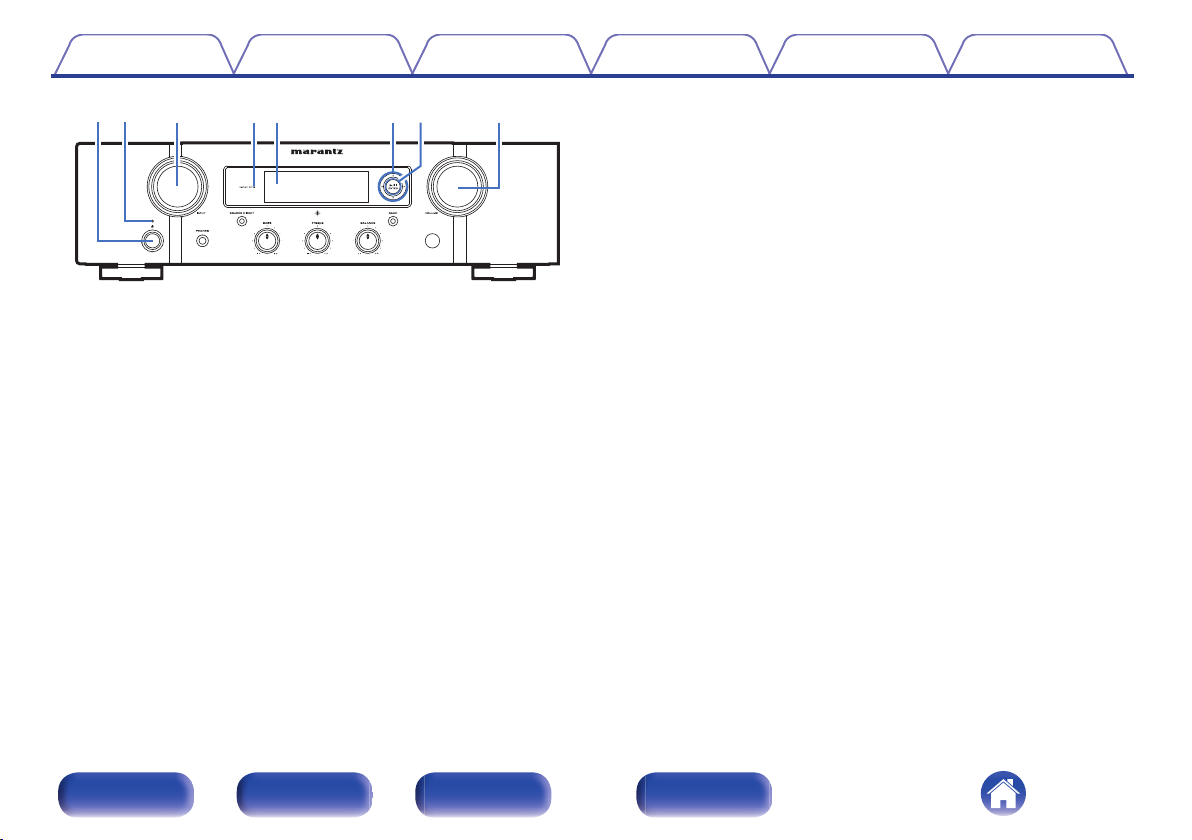
Part names and functions
Front panel
.
For details, see the next page.
Front panel Rear panel
Remote control
unit
11
Index
Contents
.
Power operation button (X)
A
Connections Playback Settings Tips Appendix
This turns the power on/off (standby). (v p. 37)
Power indicator
B
Lights as follows according to unit status:
Not lit:
0
When powered on
0
Red:
0
During normal standby (When “Auto-Play” is set to
0
“Off” (v p. 80))
Orange:
0
When “Auto-Play” is set to “On” (v p. 80)
0
When “Network Control” is set to “On” (v p. 87)
0
INPUT SELECTOR knob
C
This switches input sources. (v p. 38)
DISPLAY OFF indicator
D
This indicator lights up when the display is off.
(v p. 69)
Display
E
This displays various pieces of information.
Cursor buttons (uio p)
F
These select items.
Playback/Pause/ENTER button (1/3/ENTER)
G
Plays back and pauses tracks, and enters the selected content.
VOLUME knob
H
Adjusts the volume. (v p. 38)
Front panel Rear panel
Remote control
unit
12
Index
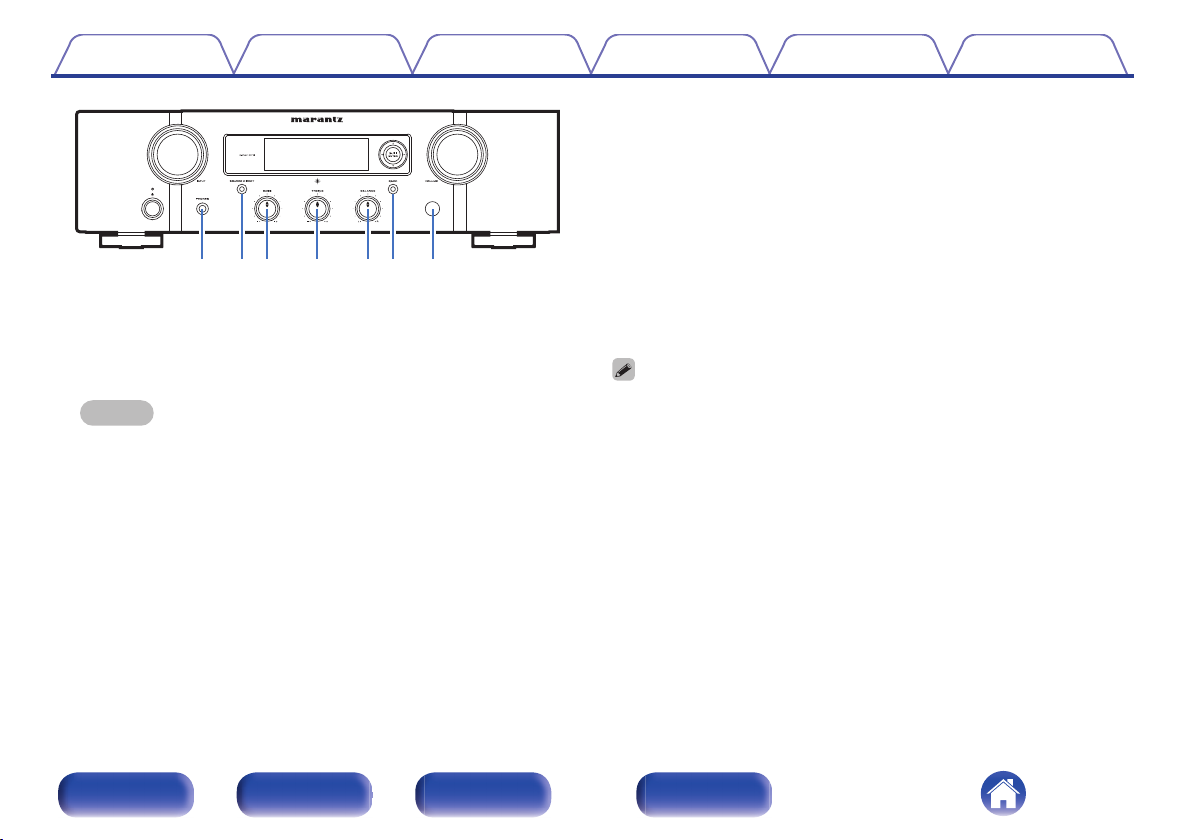
Contents Connections Playback Settings Tips Appendix
BASS control knob
K
This setting adjusts the volume level for the bass. (v p. 68)
TREBLE control knob
L
This setting adjusts the volume level for the treble. (v p. 68)
BALANCE control knob
M
This adjusts the balance of the volume output from the left and right
speakers. (v p. 68)
BACK button
.
Headphones jack (PHONES)
I
Used to connect headphones.
When the headphones are plugged into this jack, audio will no longer
be output from the speaker connectors or the PRE OUT connector.
NOTE
To prevent hearing loss, do not raise the volume level excessively when using
0
headphones.
SOURCE DIRECT button/indicator
J
This turns source direct mode on/off. (v p. 68)
N
Returns to the previous item.
Remote control sensor
O
This receives signals from the remote control unit. (v p. 7)
0
a, b and c can be adjusted when 0 is off (Source direct mode is off).
Front panel Rear panel
Remote control
unit
13
Index
Contents
Connections Playback Settings Tips Appendix
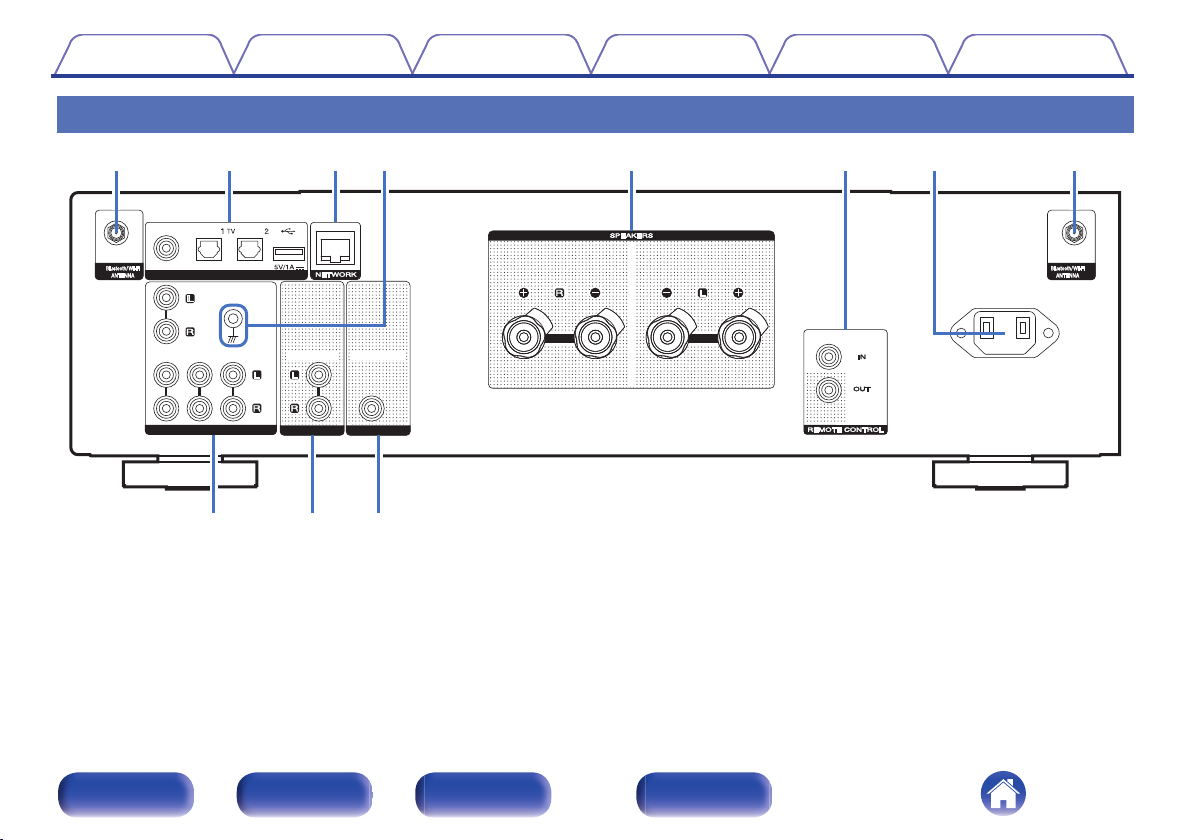
Rear panel
.
For details, see the next page.
Front panel Rear panel
Remote control
unit
14
Index
Contents Connections Playback Settings Tips Appendix
DIGITAL AUDIO IN connectors
B
Used to connect devices equipped with digital audio output
0
connectors. (v p. 29)
This is used to connect USB storages (such as USB memory
0
devices). (v p. 31)
NETWORK connector
C
Used to connect to a LAN cable when connecting to a wired LAN
network. (v p. 32)
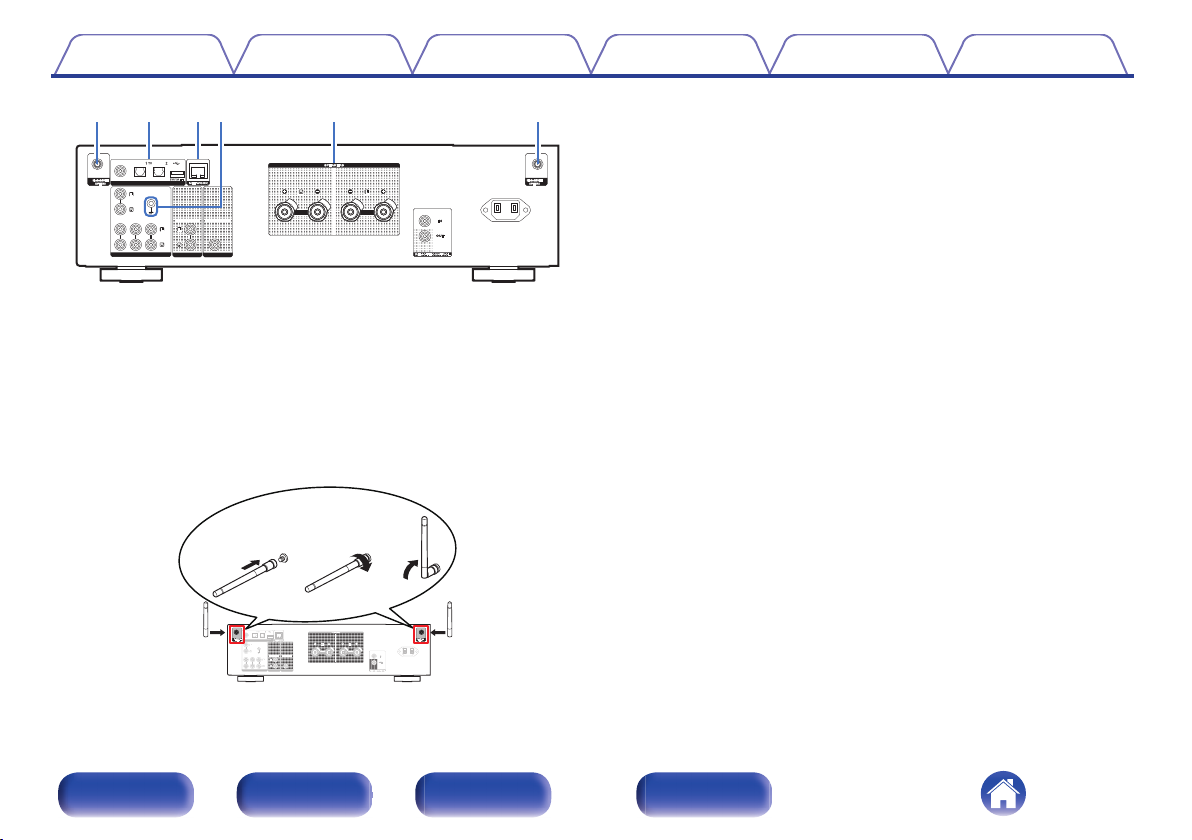
.
Bluetooth/wireless LAN antenna connectors
A
Used to connect the included external antennas for Bluetooth/wireless
connectivity when connecting to a network via wireless LAN, or when
connecting to a handheld device via Bluetooth. (v p. 33)
Place the external antennas for Bluetooth/wireless connectivity
A
evenly over the screw terminal of rear.
Turn clockwise until the antennas is fully connected.
B
Rotate the antenna upwards for best reception.
C
SIGNAL GND terminal
D
Used to connect a ground wire for the turntable. (v p. 27)
Speaker terminals (SPEAKERS)
E
Used to connect speakers. (v p. 24)
Front panel Rear panel
.
Remote control
unit
15
Index
Contents
.
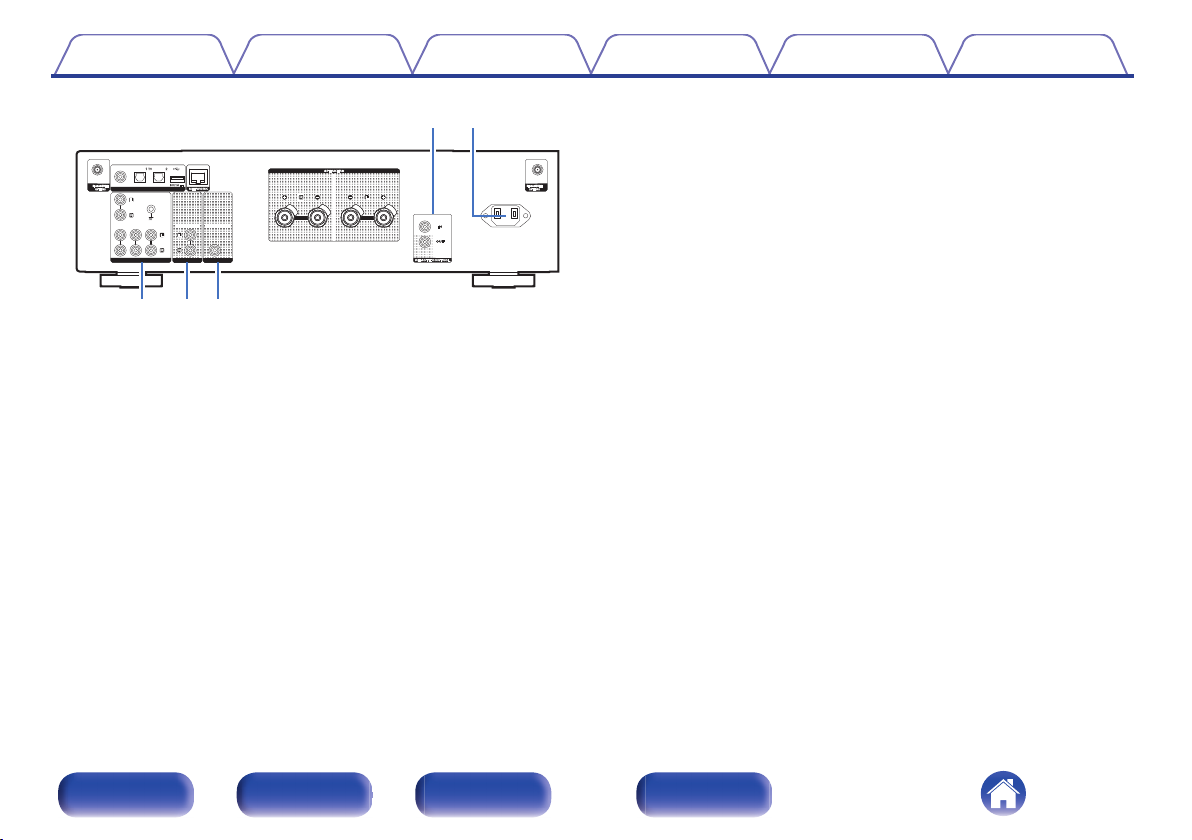
REMOTE CONTROL connectors
F
Connections Playback Settings Tips Appendix
Used to connect to a Marantz audio device that is compatible with the
remote control function. (v p. 34)
AC inlet (AC IN)
G
Used to connect the power cord. (v p. 35)
AUDIO IN connectors
H
Used to connect devices equipped with analog audio output
connectors.
“Connecting a playback device” (v p. 27)
0
“Connecting a recording device” (v p. 28)
0
AUDIO OUT connectors
I
Used to connect the input connector of a recorder. (v p. 28)
PRE OUT connector
J
Used to connect a subwoofer with a built-in amplifier. (v p. 25)
Front panel Rear panel
Remote control
unit
16
Index
Contents
Connections Playback Settings Tips Appendix
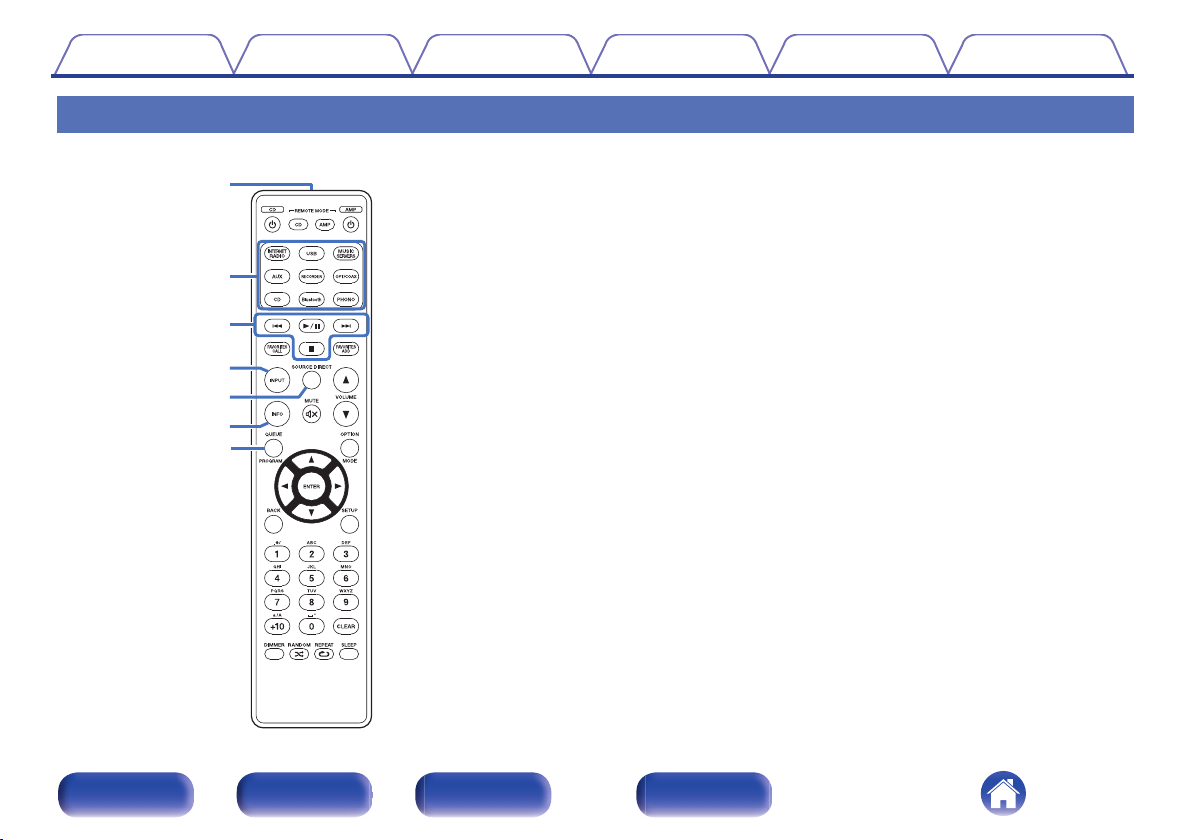
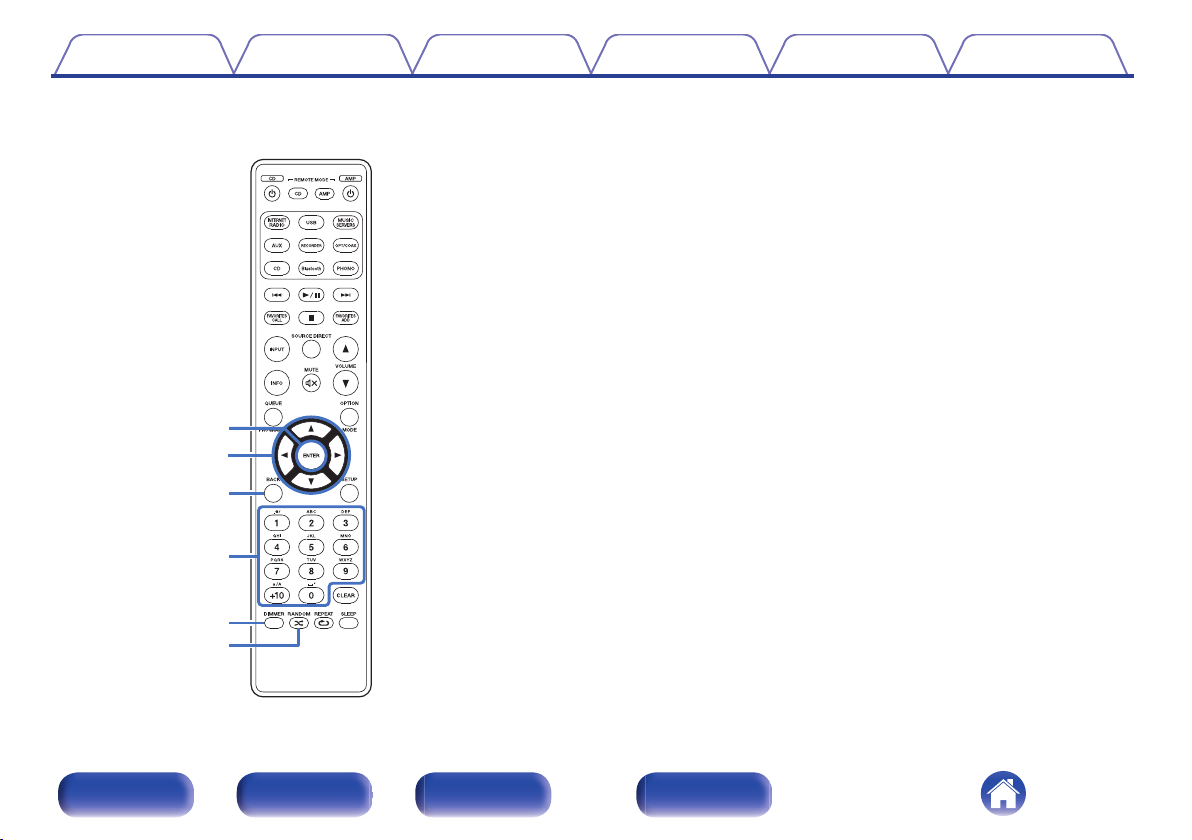
Remote control unit
Remote control signal transmitter
A
This transmits signals from the remote control unit. (v p. 7)
Input source select buttons
B
These select the input source. (v p. 38)
System buttons
C
These perform playback related operations.
Input source select button (INPUT)
D
This switches input sources. (v p. 38)
SOURCE DIRECT button
E
This turns source direct mode on/off. (v p. 68)
Information button (INFO)
F
This switches the track information shown in the display during
playback.
QUEUE button
G
This displays the queue.
“Listening to Internet Radio” (v p. 39)
0
“Playing back files stored on PC or NAS” (v p. 41)
0
“Playing a USB memory device” (v p. 44)
0
Front panel Rear panel
Remote control
unit
17
Index
Contents Connections Playback Settings Tips Appendix
ENTER button
H
This determines the selection.
Cursor buttons (uio p)
I
These select items.
BACK button
J
Returns to the previous item.
Number/letter buttons (0 – 9, +10)
K
These enter letters or numbers into the unit. (v p. 77)
DIMMER button
L
Adjust the display brightness of this unit. (v p. 69)
M
RANDOM button (P)
Switches the random playback.
Front panel Rear panel
Remote control
unit
18
Index

Contents Connections Playback Settings Tips Appendix
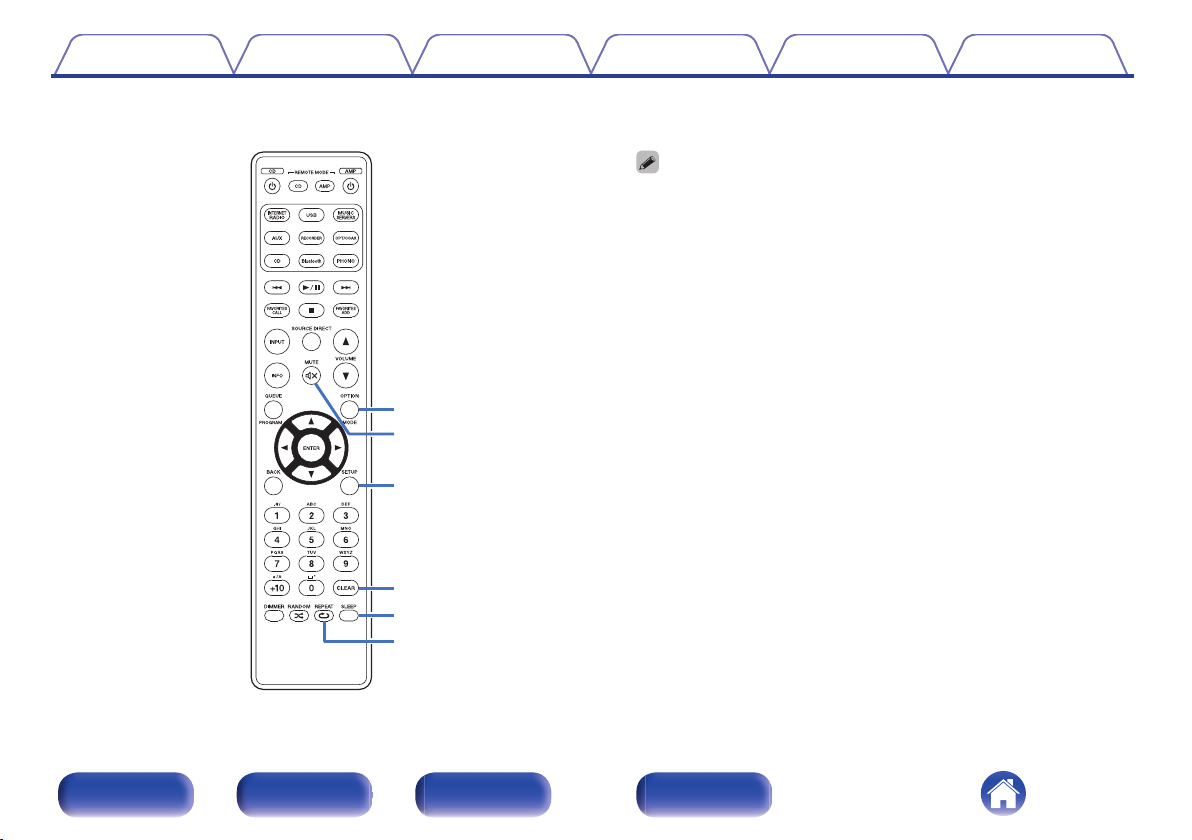
Power operation button (AMP X)
N
This turns the power on/off (standby). (v p. 37)
Remote mode select button
O
(REMOTE MODE AMP)
Switches the remote control operating mode to this unit.
FAVORITES ADD / CALL buttons
P
This allows you to register content to “HEOS Favorites” and call
registered content.
“Adding toHEOS Favorites” (v p. 66)
0
“Playing backHEOS Favorites” (v p. 67)
0
VOLUME buttons (df)
Q
Adjusts the volume. (v p. 38)
Front panel Rear panel
Remote control
unit
19
Index
Contents
Connections Playback Settings Tips Appendix
OPTION button
R
This displays the option menu on the display.
0
An option menu is not displayed for some input sources.
0
MUTE button (:)
S
This mutes the output audio. (v p. 38)
SETUP button
T
The setting menu is displayed on the display. (v p. 76)
CLEAR button
U
This cancels the settings.
SLEEP button
V
This sets the sleep timer. (v p. 69)
W
REPEAT button (L)
Switches the repeat playback.
Front panel Rear panel
Remote control
unit
20
Index
Contents
Connections Playback Settings Tips Appendix
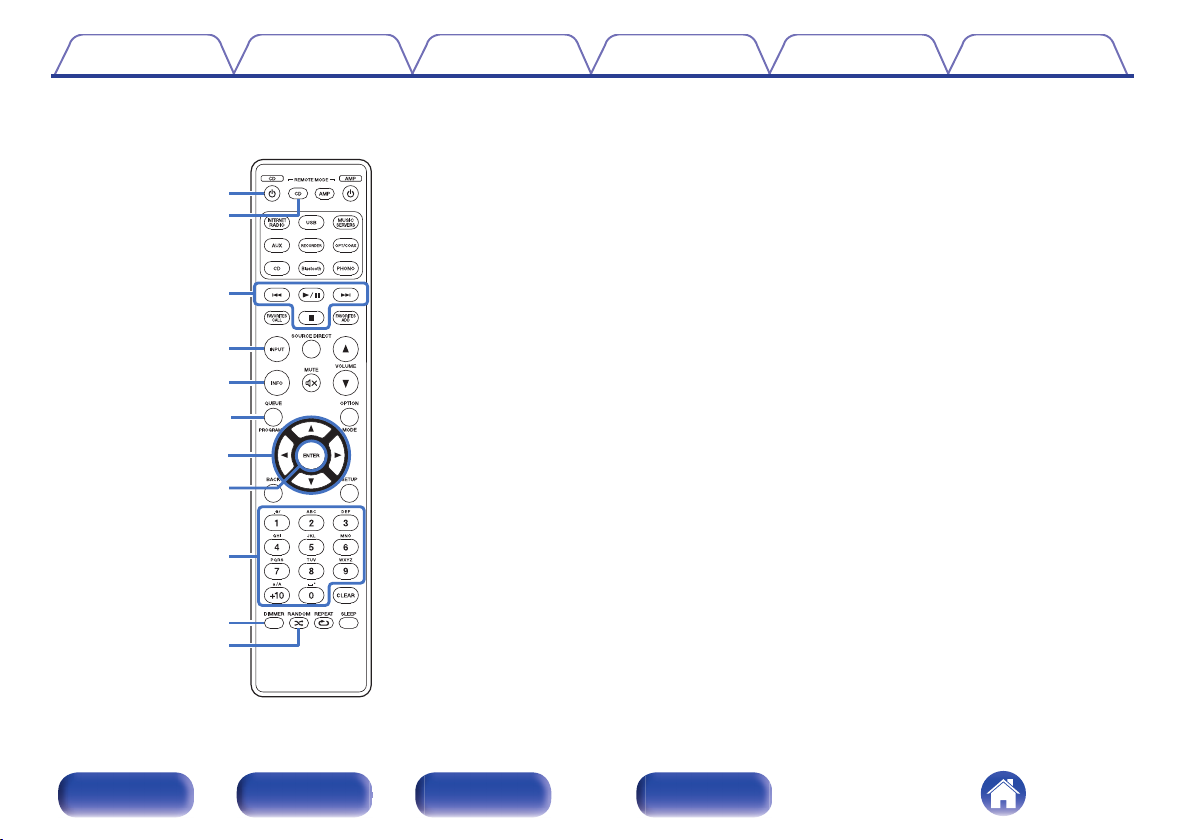
o
CD player operations
A Marantz CD player can be operated.
Power operation button (CD X)
A
Remote mode select button
B
(REMOTE MODE CD)
System buttons
C
Skip buttons (8, 9)
0
Play/pause button (1/3)
0
Stop button (2)
0
Input source select button (INPUT)
D
Information button (INFO)
E
PROGRAM button
F
Cursor buttons (uio p)
G
ENTER button
H
Number buttons (0 – 9, +10)
I
DIMMER button
J
K
RANDOM button (P)
Front panel Rear panel
Remote control
unit
21
Index
Contents Connections Playback Settings Tips Appendix
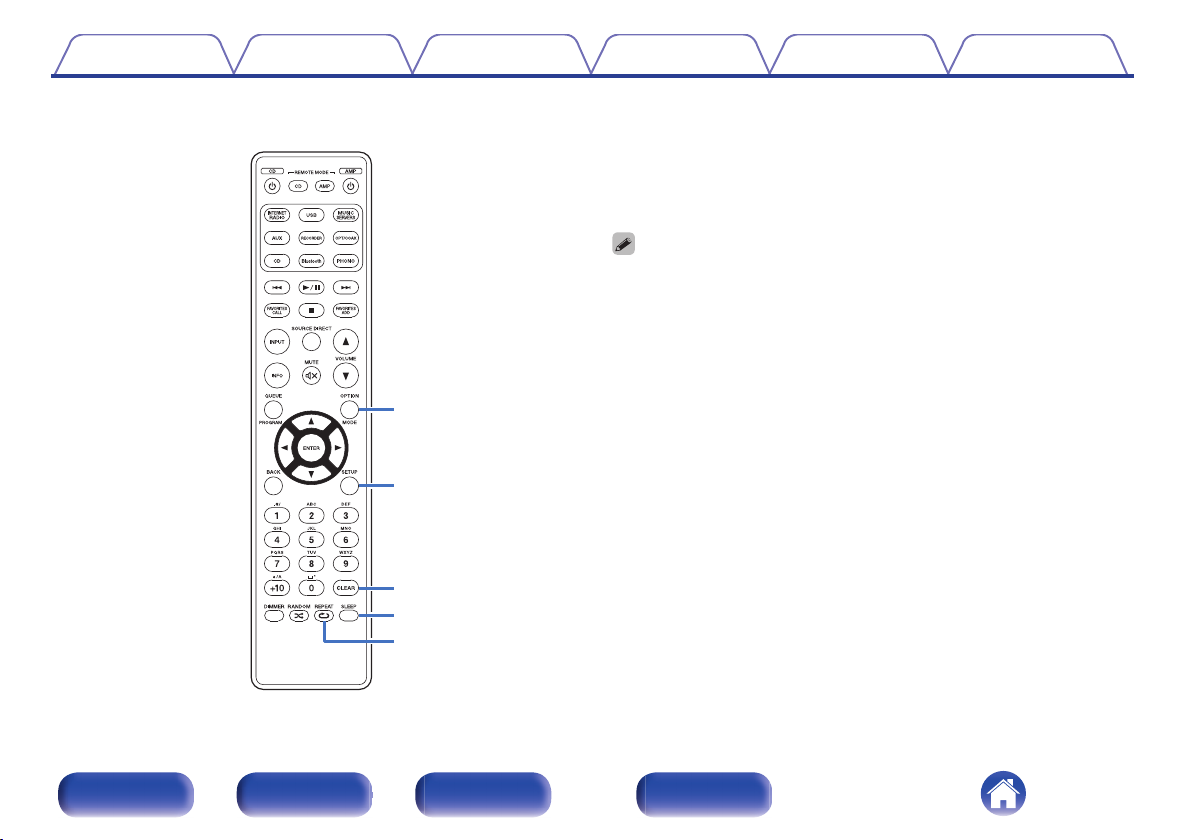
MODE button
L
SETUP button
M
CLEAR button
N
SLEEP button
O
P
REPEAT button (L)
The remote control may not operate some products.
0
Front panel Rear panel
Remote control
unit
22
Index
Contents Connections Playback Settings Tips Appendix
o
Contents
Connecting speakers 24
Connecting a playback device 27
Connecting a recording device 28
Connecting to a device with digital audio output connectors 29
Connecting a USB memory device to the USB port 31
Connecting to a home network (LAN) 32
Connecting devices with remote control connectors 34
Connecting the power cord 35
NOTE
Do not plug in the power cord until all connections have been completed.
0
Do not bundle power cords with connection cables. Doing so can result in
0
humming or noise.
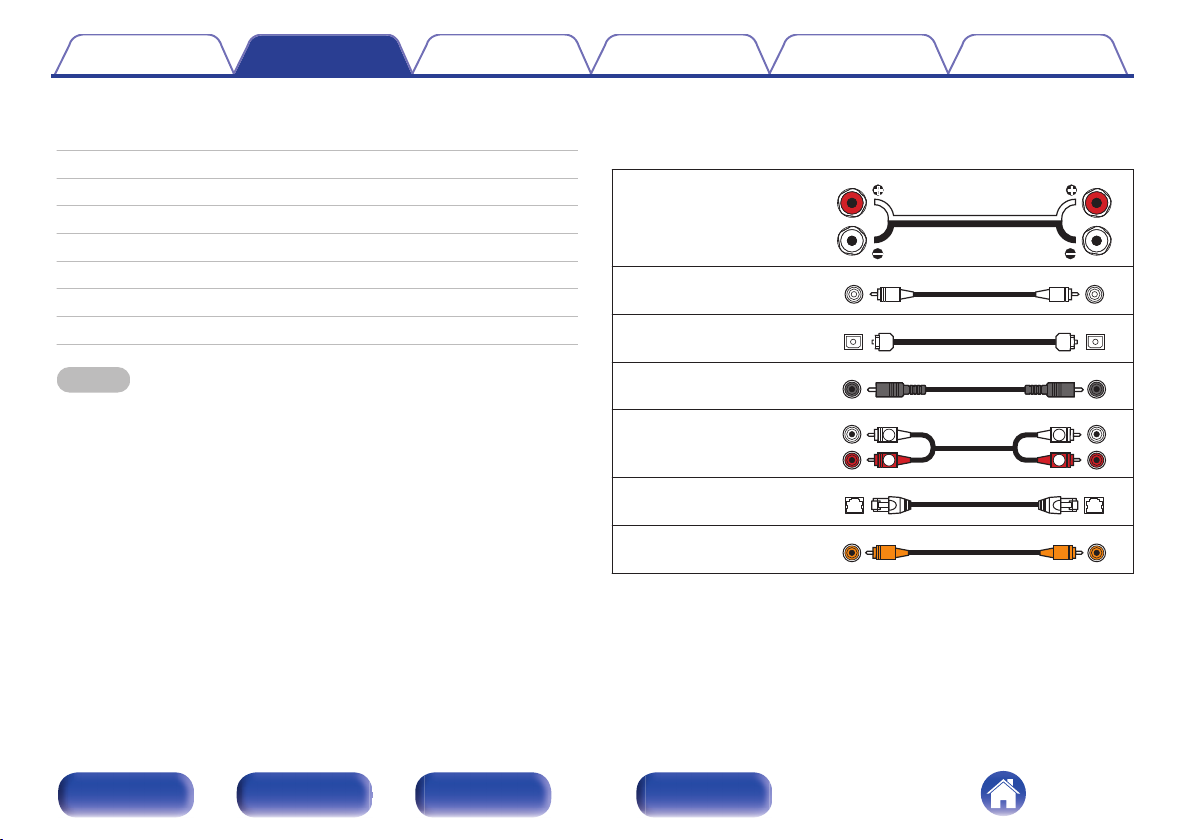
o
Cables used for connections
Provide necessary cables according to the devices you want to
connect.
Speaker cable
.
Subwoofer cable
Optical cable
Coaxial digital cable
.
.
.
Audio cable
.
LAN cable
Remote connector cable
.
.
Front panel Rear panel
Remote control
unit
23
Index
Contents
Connections Playback Settings Tips Appendix
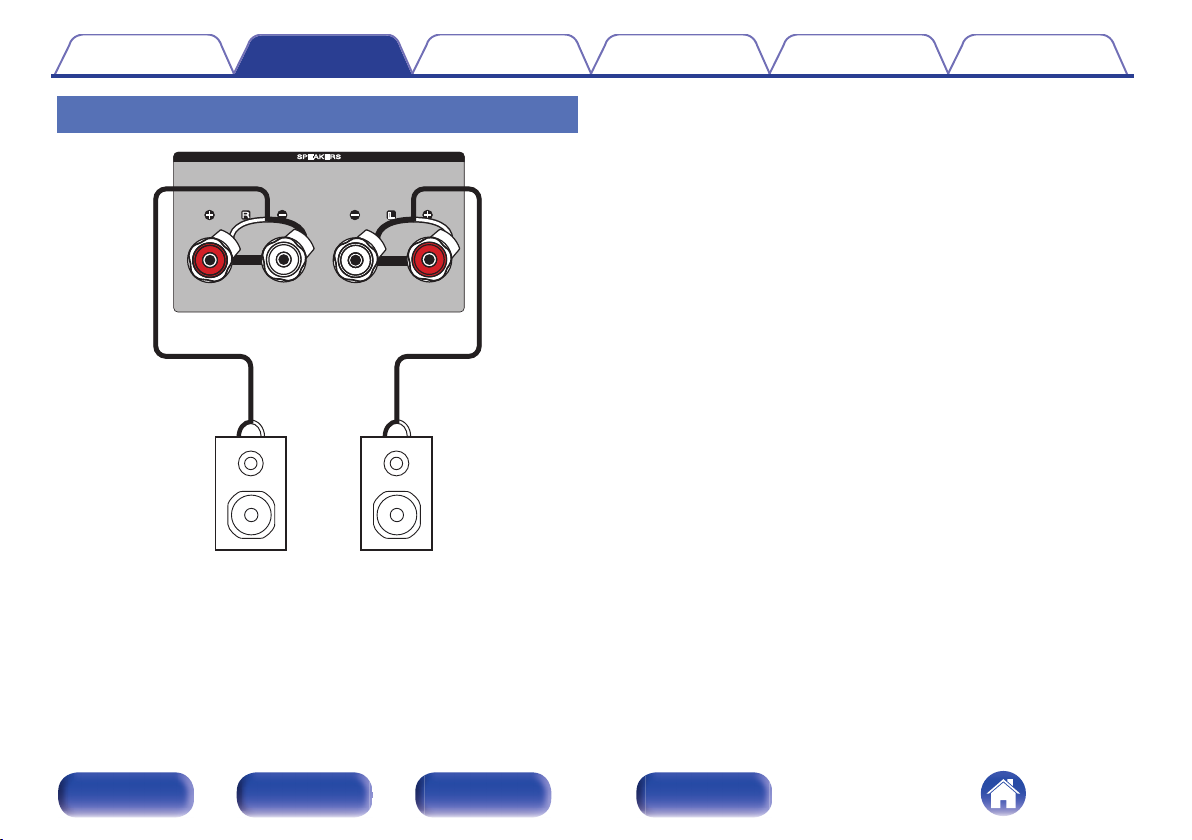
Connecting speakers
NOTE
Disconnect this unit’s power plug from the power outlet before connecting the
0
speakers. Also, turn off the subwoofer.
Connect so that the speaker cable core wires do not protrude from the speaker
0
terminal. The protection circuit may be activated if the core wires touch the rear
panel or if the + and — sides touch each other. “Protection circuit” (v p. 122)
Never touch the speaker terminals while the power cord is connected. Doing so
0
could result in electric shock.
Use speakers with an impedance of 4 – 16 Ω/ohms.
0
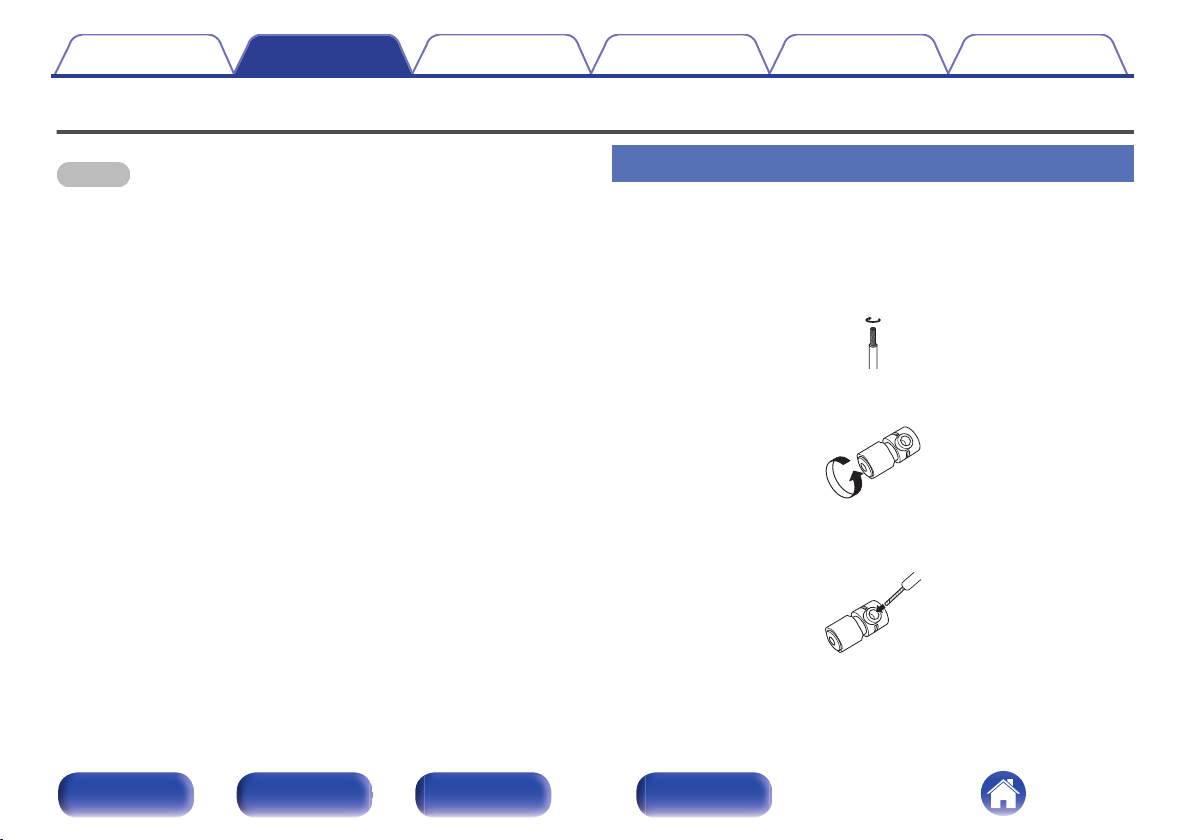
Connecting the speaker cables
Carefully check the left (L) and right (R) channels and + (red) and — (white)
polarities on the speakers being connected to this unit, and be sure to
connect the channels and polarities correctly.
Peel off about 10 mm of sheathing from the tip of the speaker
1
cable, then either twist the core wire tightly or terminate it.
.
Turn the speaker terminal counterclockwise to loosen it.
2
.
Insert the speaker cable’s core wire to the hilt into the
3
speaker terminal.
.
Front panel Rear panel
Remote control
unit
24
Index
Contents
Connections Playback Settings Tips Appendix
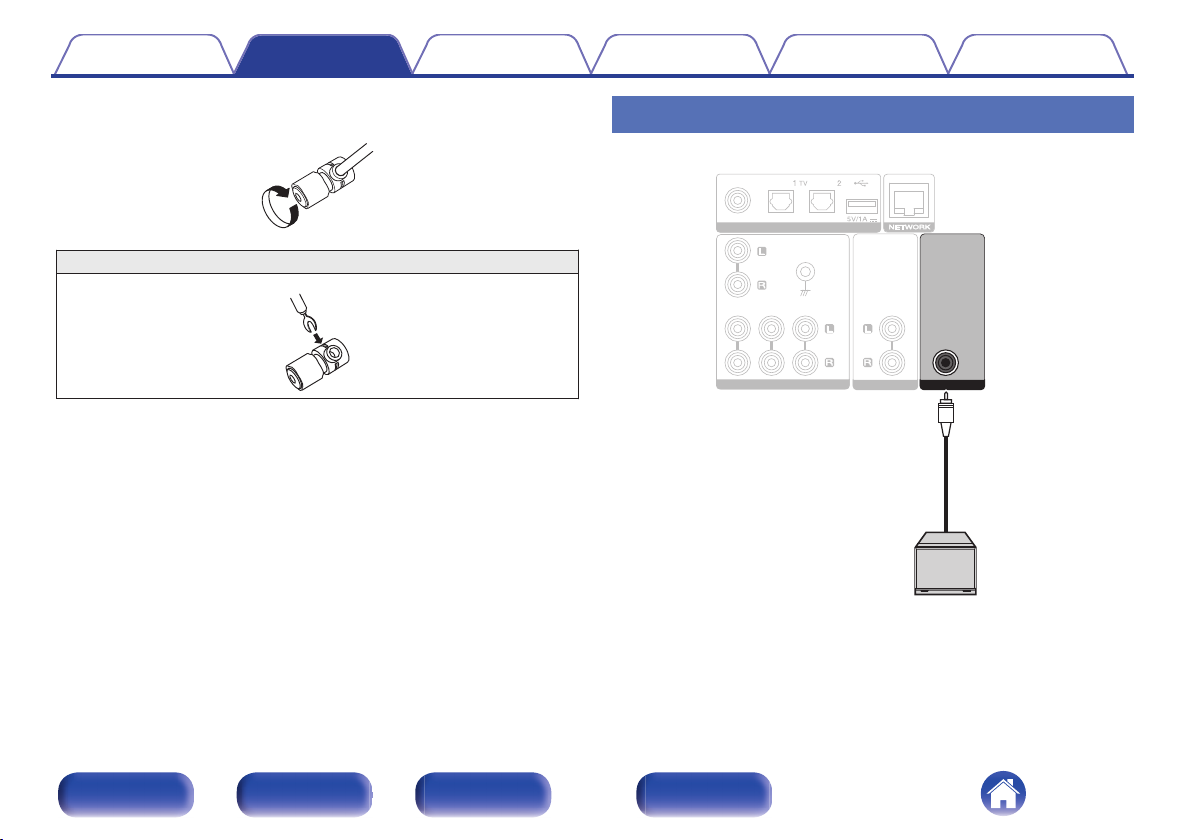
Turn the speaker terminal clockwise to tighten it.
4
.
Spade lug connector
.
Connecting the subwoofer
Use a subwoofer cable to connect the subwoofer.
.
Front panel Rear panel
Remote control
unit
25
Index
Contents
Connections Playback Settings Tips Appendix
Connecting speakers
.
Front panel Rear panel
Remote control
unit
26
Index

GND
AUDIO
OUT
L
R
AUDIO
OUT
LR
AUDIO
OUT
LR
L
L
R
R
L
L
R
R
Turntable
Tuner
CD player
Contents Connections Playback Settings Tips Appendix
Connecting a playback device
You can connect turntables, tuners and CD players to this unit.
This unit is compatible with turntables equipped with a moving magnet (MM) phono cartridge. When you connect this unit to a turntable with a low output
moving coil (MC) cartridge, use a commercially available MC head amp or a step-up transformer.
If you set this unit’s input source to “PHONO” and accidentally increase the volume without connecting a turntable, you may hear a humming noise from
the speakers.
NOTE
The earth terminal (SIGNAL GND) of this unit is not for safety grounding purposes. If this terminal is connected when there is a lot of noise, the noise can be reduced. Note
0
.
that depending on the turntable, connecting the ground line may have the reverse effect of increasing noise. In this case, it is not necessary to connect the ground line.
Front panel Rear panel
Remote control
unit
27
Index
LR
L
L
R
R
L
L
R
R
LR
AUDIO INAUDIO OUT
Recording device
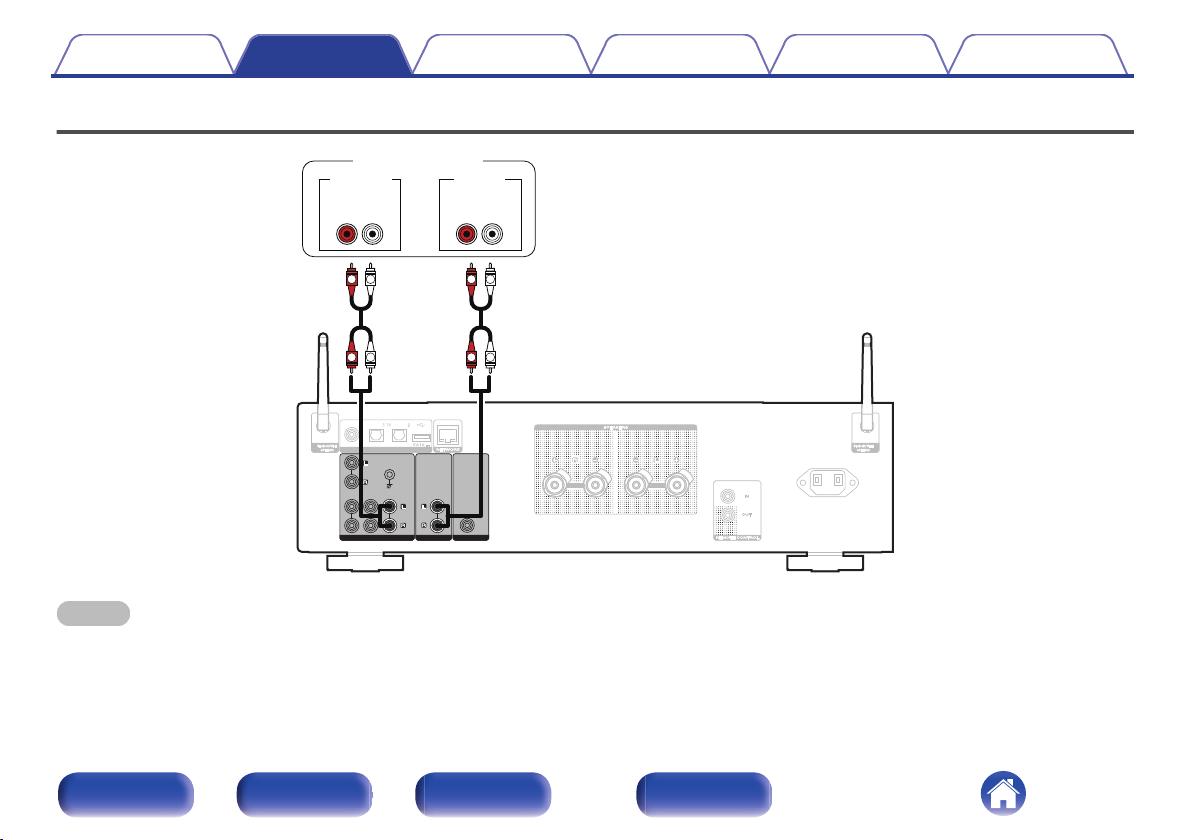
Contents Connections Playback Settings Tips Appendix
Connecting a recording device
NOTE
Never insert the short-circuiting pin plug into the analog audio output connectors (AUDIO OUT RECORDER). Doing so could result in damage.
0
Front panel Rear panel
.
Remote control
unit
28
Index
OPTICAL
OUT
COAXIAL
OUT
TV / Satellite
receiver etc.
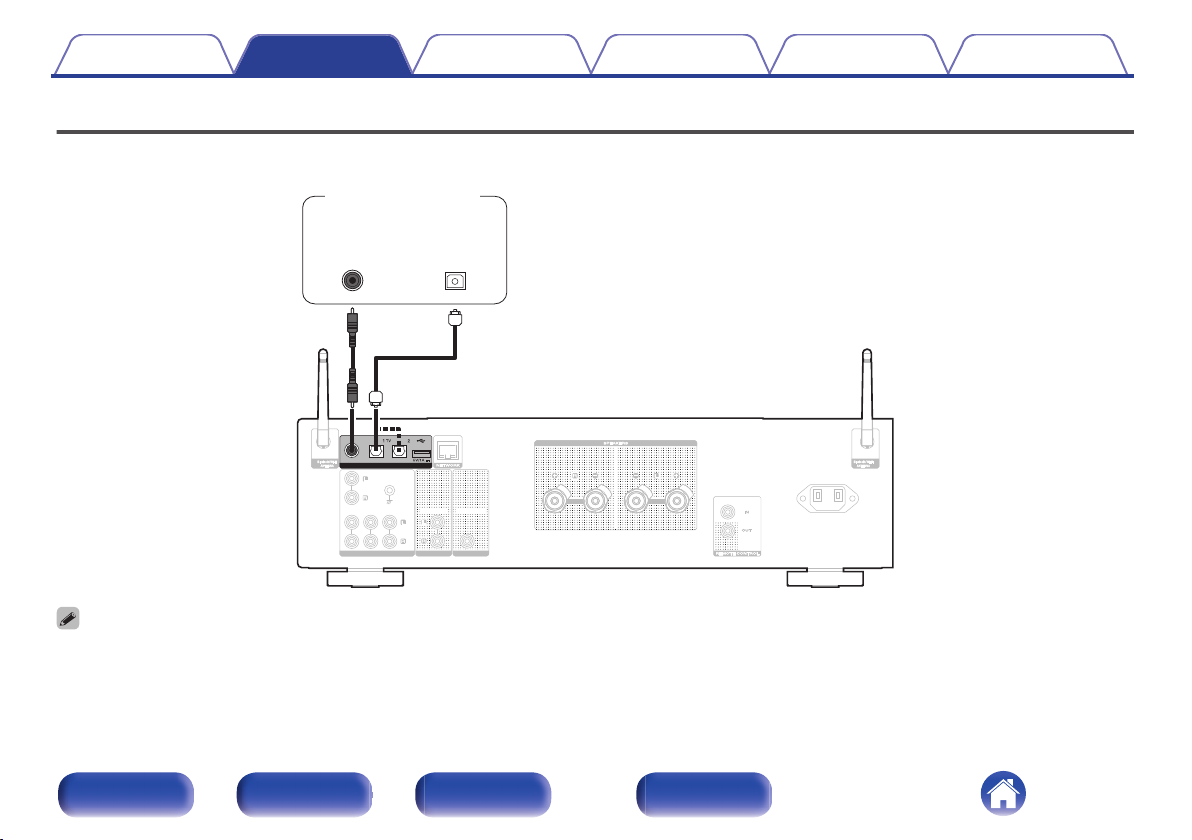
Contents Connections Playback Settings Tips Appendix
Connecting to a device with digital audio output connectors
Use this connection to input digital audio signals to this unit, and convert the signals for playback using the D/A converter of this unit. (v p. 60)
.
When connecting a TV to this unit, turn off the audio output of the TV’s internal speakers. See the owner’s manual of your TV for details.
0
Front panel Rear panel
Remote control
unit
29
Index
Contents Connections Playback Settings Tips Appendix
NOTE
Linear PCM signals with a sampling frequency of 32 kHz, 44.1 kHz, 48 kHz, 88.2 kHz, 96 kHz, 176.4 kHz, or 192 kHz can be input into this unit.
0
Do not input non-PCM signals, such as Dolby Digital, DTS and AAC. This causes noise and could damage the speakers.
0
Specifications of supported audio formats
o
See “D/A converter” (v p. 115).
Front panel Rear panel
Remote control
unit
30
Index
Loading…
Marantz PM7000N
.
Network Integrated Amplifier
Owner’s Manual
Contents Connections Playback Settings Tips Appendix
1
Front panel Rear panel
Remote control
unit
Index
Manual
View the manual for the Marantz PM7000N here, for free. This manual comes under the category receivers and has been rated by 7 people with an average of a 8.9.
This manual is available in the following languages: English. Do you have a question about the Marantz PM7000N or do you need help?
Ask your question here
Index
- synced devices (AirPlay 2)
- v p. 68)
- v p. 81)
- v p. 37)
- v p. 80))
- v p. 80)
- v p. 87)
- v p. 38)
- (v p. 69)
- v p. 38)
- v p. 68)
- v p. 68)
- v p. 68)
- v p. 68)
- v p. 7)
- v p. 33)
- v p. 29)
- v p. 31)
- v p. 32)
- v p. 27)
- v p. 24)
- v p. 34)
- v p. 35)
- v p. 27)
- “Connecting a recording device” (v p. 28)
- v p. 28)
- v p. 25)
- v p. 7)
- v p. 38)
- v p. 38)
- v p. 68)
- “Listening to Internet Radio” (v p. 39)
- v p. 41)
- v p. 44)
- v p. 77)
- v p. 69)
- v p. 37)
- “Adding toHEOS Favorites” (v p. 66)
- “Playing backHEOS Favorites” (v p. 67)
- v p. 38)
- v p. 38)
- v p. 76)
- v p. 69)
- v p. 122)
- v p. 60)
- v p. 115).
- v p. 44)
- (v p. 88)
- v p. 86)
- v p. 118) for details.
- (v p. 67)
- (v p. 66)
- v p. 117) for
- v p. 114) for details.
- v p. 87)
- v p. 93) in the
- v p. 29))
- v p. 80)
- v p. 115).
- v p. 87)
- v p. 51).
- v p. 87)
- v p. 112)
- v p. 112)
- v p. 32)
- v p. 77).
- v p. 88)
- (v p. 32)
- v p. 86)
- v p. 86)
- v p. 86)
- v p. 29)
- v p. 68)
- v p. 68)
- v p. 87)
- (v p. 79)
- v p. 21)
- v p. 35)
- v p. 37)
- v p. 69)
- v p. 81)
- v p. 122)
- v p. 24)
- v p. 37)
- v p. 7)
- v p. 7)
- v p. 7)
- v p. 81)
- v p. 69)
- v p. 23)
- v p. 24)
- v p. 24)
- v p. 38)
- v p. 38)
- v p. 38)
- v p. 38)
- v p. 13)
- v p. 47)
- v p. 32)
- v p. 88)
- v p. 27)
- v p. 27)
- v p. 79)
- v p. 68)
- v p. 25)
- v p. 68)
- v p. 26)
- v p. 32)
- v p. 86)
- v p. 63)
- v p. 31)
- v p. 86)
- v p. 44)
- v p. 114)
- (v p. 86)
- v p. 32)
- v p. 118)
- v p. 91)
- v p. 91)
- v p. 91)
- v p. 40)
- v p. 117)
- v p. 32)
- v p. 86)
- v p. 117)
- v p. 90)
- v p. 89)
- v p. 60)
- v p. 60)
- v p. 80)
- v p. 97)
- (v p. 87)
- (v p. 80)
- AirPlay
- Auto Standby
- Bluetooth device
- Display’s brightness
- Firmware update
- Menu map
- NAS , 117
- Rear panel
- USB memory device , 44
Product Images (2)

Marantz PM7000N specifications
Below you will find the product specifications and the manual specifications of the Marantz PM7000N.
The Marantz PM7000N is a receiver that offers high-quality audio performance and a range of features. It is designed to provide a reliable and durable audio experience for users.
With its advanced audio technologies, the Marantz PM7000N delivers rich and detailed sound, allowing users to enjoy their music with clarity and depth. It features high-resolution audio playback, allowing for a more immersive listening experience.
The receiver is built with high-quality components and construction, ensuring its reliability and longevity. It is designed to withstand regular use and provides consistent performance over time.
The Marantz PM7000N also offers a range of connectivity options, allowing users to easily connect their devices and enjoy their favorite music. It features Bluetooth and Wi-Fi capabilities, enabling wireless streaming from various sources.
Furthermore, the receiver comes with built-in HEOS technology, allowing for multi-room audio streaming and control. This feature enhances users’ flexibility in enjoying their music throughout their home.
In addition, the Marantz PM7000N has a user-friendly interface, making it easy to navigate and control. It comes with a remote control and is also compatible with various smartphone applications, providing convenience and accessibility to users.
Overall, the Marantz PM7000N is a reliable and high-quality receiver that delivers exceptional audio performance. With its range of features and durable construction, it is a suitable choice for those seeking a superior audio experience.
General
| Brand | Marantz |
| Model | PM7000N |
| Product | receiver |
| Language | English |
| Filetype | User manual (PDF), Datasheet (PDF) |
Frequently Asked Questions
Can’t find the answer to your question in the manual? You may find the answer to your question in the FAQs about the Marantz PM7000N below.
How do I switch between different audio sources on the Marantz PM7000N?
To select different audio sources, use the «Source Select» button on the front panel or the remote control. Each press of the button will cycle through the available sources, such as CD, USB, Network, or Phono. The currently selected source is indicated on the display.
Can I adjust the bass and treble levels on the Marantz PM7000N?
Yes, you can adjust the bass and treble levels to personalize the sound. Press the «Tone Control» button on the remote control or the front panel, and use the corresponding knobs to adjust the bass and treble according to your preference. The adjustments will be reflected in the sound output.
How do I connect external speakers to the Marantz PM7000N?
To connect external speakers, locate the speaker terminals labeled «Left» and «Right» on the back panel of the receiver. Carefully insert the speaker wires into these terminals, ensuring proper polarity. Tighten the terminals securely to maintain a stable connection.
How can I connect my smartphone or tablet to the Marantz PM7000N via Bluetooth?
To connect your mobile device via Bluetooth, ensure that Bluetooth is enabled on both the receiver and your smartphone/tablet. On the receiver, press the «Bluetooth» button on the front panel or remote control to enter pairing mode. On your mobile device, search for available Bluetooth devices and select «Marantz PM7000N» from the list. Follow any further prompts to complete the pairing process.
Is it possible to fine-tune the FM/AM radio stations on the Marantz PM7000N?
Absolutely! Use the «Tuning» knob on the front panel or the remote control to manually tune FM/AM radio stations. Keep turning the knob slowly until you find the desired station. The frequency will be displayed on the screen, allowing you to fine-tune and lock onto the specific station’s signal accurately.
Can bluetooth devices of different brands be connected to each other?
Yes, bluetooth is a universal method that allows different devices equipped with bluetooth to connect to each other.
What is bluetooth?
Bluetooth is a way of exchanging data wirelessly between electronic devices via radio waves. The distance between the two devices that exchange data can in most cases be no more than ten metres.
What is HDMI?
HDMI stands for High-Definition Multimedia Interface. An HDMI cable is used to transport audio and video signals between devices.
When is my volume too loud?
A volume above 80 decibels can be harmful to hearing. When the volume exceeds 120 decibels, direct damage can even occur. The chance of hearing damage depends on the listening frequency and duration.
How can I best clean my receiver?
A slightly damp cleaning cloth or soft, dust-free cloth works best to remove fingerprints. Dust in hard-to-reach places is best removed with compressed air.
Wat is Dolby Atmos?
Dolby Atmos is a technology that ensures that the sound is reflected from the ceiling to where you are listening. This makes it possible to create a 5.1 effect with only 1 speaker.
Is the manual of the Marantz PM7000N available in English?
Yes, the manual of the Marantz PM7000N is available in English .
Is your question not listed? Ask your question here
Хорошее руководство по эксплуатации
Законодательство обязывает продавца передать покупателю, вместе с товаром, руководство по эксплуатации Marantz PM7000N. Отсутствие инструкции либо неправильная информация, переданная потребителю, составляют основание для рекламации в связи с несоответствием устройства с договором. В законодательстве допускается предоставлении руководства в другой, чем бумажная форме, что, в последнее время, часто используется, предоставляя графическую или электронную форму инструкции Marantz PM7000N или обучающее видео для пользователей. Условием остается четкая и понятная форма.
Что такое руководство?
Слово происходит от латинского «instructio», тоесть привести в порядок. Следовательно в инструкции Marantz PM7000N можно найти описание этапов поведения. Цель инструкции заключается в облегчении запуска, использования оборудования либо выполнения определенной деятельности. Инструкция является набором информации о предмете/услуге, подсказкой.
К сожалению немного пользователей находит время для чтения инструкций Marantz PM7000N, и хорошая инструкция позволяет не только узнать ряд дополнительных функций приобретенного устройства, но и позволяет избежать возникновения большинства поломок.
Из чего должно состоять идеальное руководство по эксплуатации?
Прежде всего в инструкции Marantz PM7000N должна находится:
— информация относительно технических данных устройства Marantz PM7000N
— название производителя и год производства оборудования Marantz PM7000N
— правила обслуживания, настройки и ухода за оборудованием Marantz PM7000N
— знаки безопасности и сертификаты, подтверждающие соответствие стандартам
Почему мы не читаем инструкций?
Как правило из-за нехватки времени и уверенности в отдельных функциональностях приобретенных устройств. К сожалению само подсоединение и запуск Marantz PM7000N это слишком мало. Инструкция заключает ряд отдельных указаний, касающихся функциональности, принципов безопасности, способов ухода (даже то, какие средства стоит использовать), возможных поломок Marantz PM7000N и способов решения проблем, возникающих во время использования. И наконец то, в инструкции можно найти адресные данные сайта Marantz, в случае отсутствия эффективности предлагаемых решений. Сейчас очень большой популярностью пользуются инструкции в форме интересных анимаций или видео материалов, которое лучше, чем брошюра воспринимаются пользователем. Такой вид инструкции позволяет пользователю просмотреть весь фильм, не пропуская спецификацию и сложные технические описания Marantz PM7000N, как это часто бывает в случае бумажной версии.
Почему стоит читать инструкции?
Прежде всего здесь мы найдем ответы касательно конструкции, возможностей устройства Marantz PM7000N, использования отдельных аксессуаров и ряд информации, позволяющей вполне использовать все функции и упрощения.
После удачной покупки оборудования/устройства стоит посвятить несколько минут для ознакомления с каждой частью инструкции Marantz PM7000N. Сейчас их старательно готовят или переводят, чтобы они были не только понятными для пользователя, но и чтобы выполняли свою основную информационно-поддерживающую функцию.
Модель Marantz PM7000N сочетает в себе функции полноценного потокового стримера и высококлассного аналогового интегрального усилителя. В аппарате задействована топология схем с обратной связью по току и фирменные дискретные усилительные модули третьего поколения HDAM SA3. Такая конструкция позволяет минимизировать уровень шумов, увеличить скорость нарастания выходного сигнала, повысить динамический диапазон и значительно расширить диапазон частот, обеспечивая превосходное качество звучания при прослушивании как обычных стереозаписей, так и Hi-Res-аудиоформатов. В итоге, согласно информации производителя, обеспечивается более динамичный, точный и детальный саунд. В тщательно проработанном сильноточном блоке питания Marantz PM7000N установлен экранированный тороидальный трансформатор и пара высокоемкостных конденсаторов (каждый по 15000 мкФ). При этом обеспечивается мощность в 60 Вт при нагрузке в 8 Ом. Цепи модели оснащены качественными аудиофильскими комплектующими, а для охлаждения применяются радиаторы, изготовленные из алюминия.
Благодаря поддержке беспроводной многофункциональной экосистемы HEOS перед усилителем открываются большие возможности в плане доступа к таким потоковым сервисам, как Spotify (Free или Premium), Amazon Music HD, Deezer, Tidal и пр. Данный аппарат можно интегрировать в беспроводную мультирум-инсталляцию, построенную на базе HEOS-устройств. Для управления Marantz PM7000N предусмотрены пульт и приложение. Командовать «интегральником» также можно посредством голосовых помощников Google Assistant, Amazon Alexa, или Apple Siri.
Фронтальную панель усилителя украшает трехстрочный OLED-дисплей. Поддерживается Apple AirPlay 2, двухдиапазонный Wi-Fi и Bluetooth. Доступ к аудиобиблиотекам, хранящимся на PC, Mac или NAS-серверах, осуществляется через WLAN или с помощью LAN-порта. По локальной сети и при использовании встроенного в тыльную панель корпуса USB-порта поддерживается воспроизведение форматов ALAC, FLAC, WAV до 24 бит/192 кГц и DSD до 5,6 МГц. На борту имеется MM-фонокорректор, входная секция которого использует полевые FET-транзисторы. В коммутации следует выделить отключаемый экранированный блок цифровых входов. Существует возможность подключения активного сабвуфера, а для подсоединения акустических систем задействованы две пары фирменных винтовых клемм Marantz SPKT-1+.
Mederma gel is designed to tackle a range of scar types including acne scars, burn scars, injury and surgical scars, old scars and more. It contains Cepalin® botanical extract, for old and new scars.
- CLINICALLY SHOWN to visibly reduce the overall appearance of scars caused by a variety of reasons
- UNIQUE TRIPLE ACTION FORMULA penetrates beneath the skin surface to seal in moisture, renew cells and aid formation of collagen
- #1 RECOMMENDED BRAND: Mederma is the #1 recommended brand of scar treatments*
*Of U.S physicians and pharmacists surveyed by an independent market research firm
For best results, start using Mederma® Advanced Scar Gel as soon as your wound has closed and continue using daily for at least 8 weeks on new scars and 3-6 months on existing scars. Make sure the scab has come off naturally. Don’t use Mederma on stitches – wait until any stitches have been removed. When using Mederma on old scars, you may start using immediately. Do not apply to broken skin.
- For external use only.
- When using this product, do not get into eyes.
- Stop use and ask a doctor if condition worsens or if symptoms last more than 7 days or clear up and occur again within a few days.
- Do not use on deep or puncture wounds, animal bites, or serious burns.
- Keep out of reach of children. If swallowed, get medical help or contact a Poison Control Center right away.
Unique Triple Action Formula
Products
Mederma® Products
Does Mederma Advanced Scar Gel work on atrophic scars?
Mederma Advanced Scar Gel can be used on atrophic scars such as acne and chicken pox scars. Mederma gel may help to smooth and soften the edges of the pox mark but it will not cause the indented area to fill in. By smoothing the edges, the mark may become less noticeable.
How long should I use Mederma Advanced Scar Gel?
Mederma Advanced Scar Gel should be applied once a day for 8 weeks on new scars and 3 to 6 months on old scars. For optimal results, use the product as directed, one time daily, each day, every day. Massage gently until the product is absorbed. If peeling or flaking occurs, try using less of the product. Like other scar products, Mederma should never be applied onto broken skin.
What type of scars can I treat with the Mederma Advanced Scar Gel?
You can use Mederma Advanced Scar Gel on scars resulting from surgery, accidents, injury, burns and acne. You can use Mederma for ice pick scars and pockmarks caused by acne and chicken pox too. The product is very convenient to use because you only have to apply it once a day.
Is Mederma Advanced Scar Gel paraben free?
Mederma Advanced Gel is not paraben free. Mederma ingredients include methylparaben, a preservative commonly used in many skin care products. If you prefer to use a paraben free product for your scar treatment, Mederma PM Cream is paraben free.
What are the Mederma Advanced Scar Gel ingredients?
Mederma Advanced Scar Gel contains the following ingredients: Allantoin, Water (purified), PEG 200, Alcohol, Xanthan Gum, Allium Cepa (Onion) Bulb Extract, Lecithin, Methylparaben, Sorbic Acid, Panthenol, Sodium Hyaluronate, Fragrance.
This full listing of ingredients can be found on the package for your easy reference.
What is Mederma Advanced scar gel’s Duration of Use before Desired Result are Achieved?
Thank you for your interest in Mederma. Mederma Advanced Scar Gel may be applied for up to 6 months when applied as directed. Once you achieve your desired result you can stop at any time prior to 6 months.Mederma has not been tested for use longer than 6 months.
See all FAQs