
Levenhuk Strike PRO Telescopes
User Manual
Návod k použití
Bedienungsanleitung
Instrukcja obsługi
Инструкция по эксплуатации
Посібник користувача
Levenhuk Strike 900 PRO
Levenhuk Strike 950 PRO
Levenhuk Strike 1000 PRO
Radost zaostřit
Mit Vergnügen näher dran!
Radość przybliżania
Приближает с удовольствием
Наближує з радістю

Levenhuk Strike 900 PRO
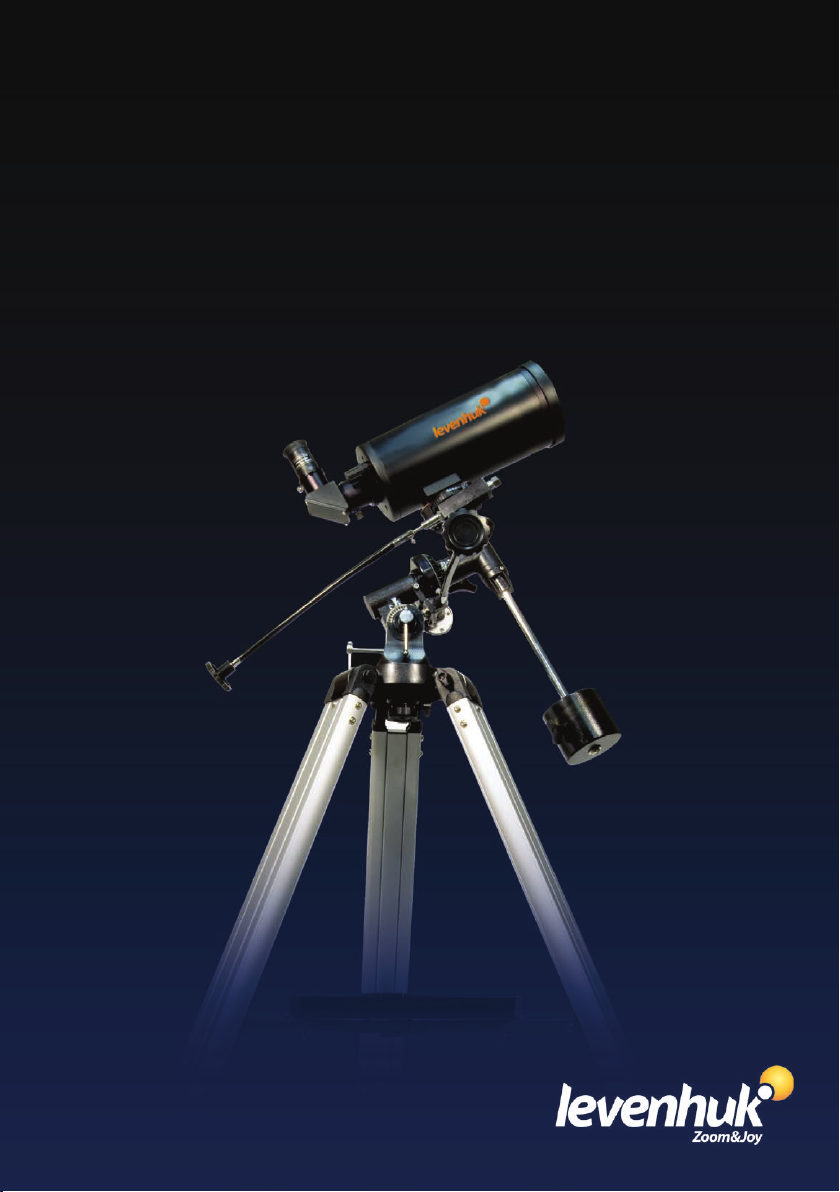
A
12
11
4
10
8
7
6
5
9
3
a
13
B
D
C
2
1
H
G
F
b
c
EN
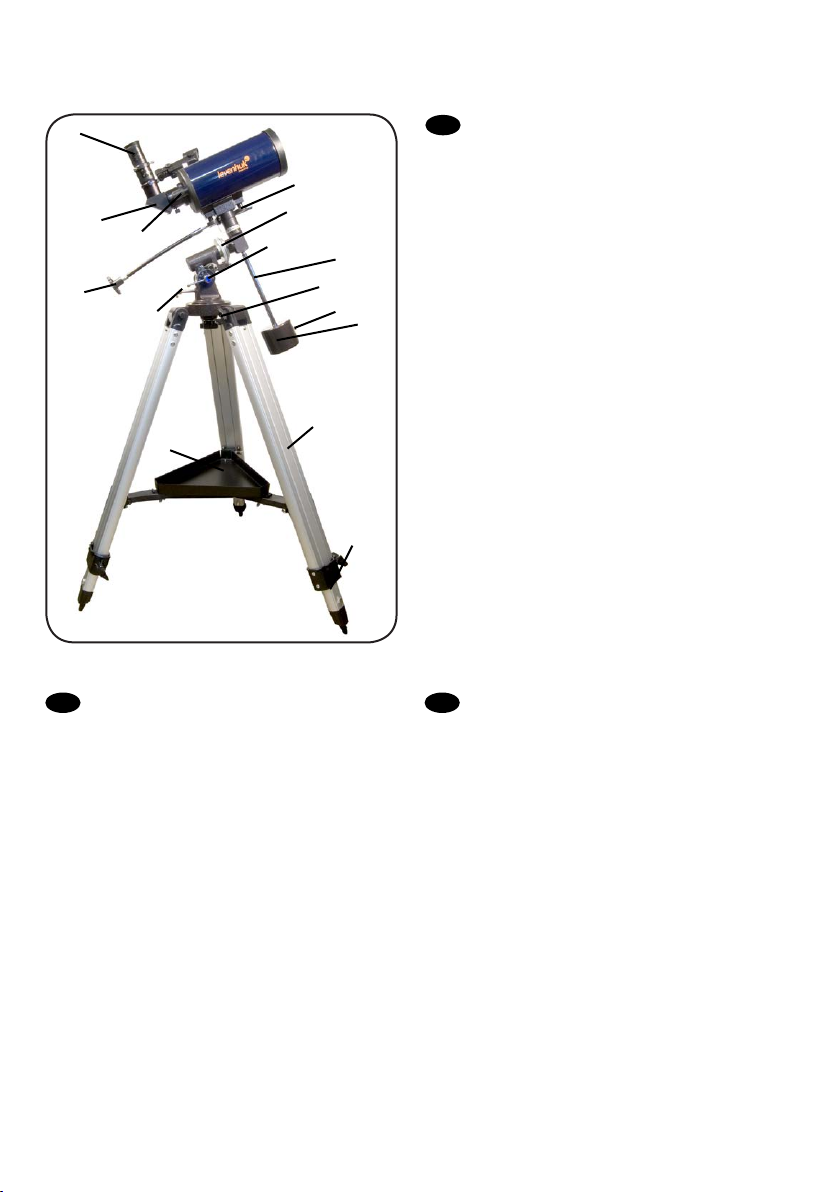
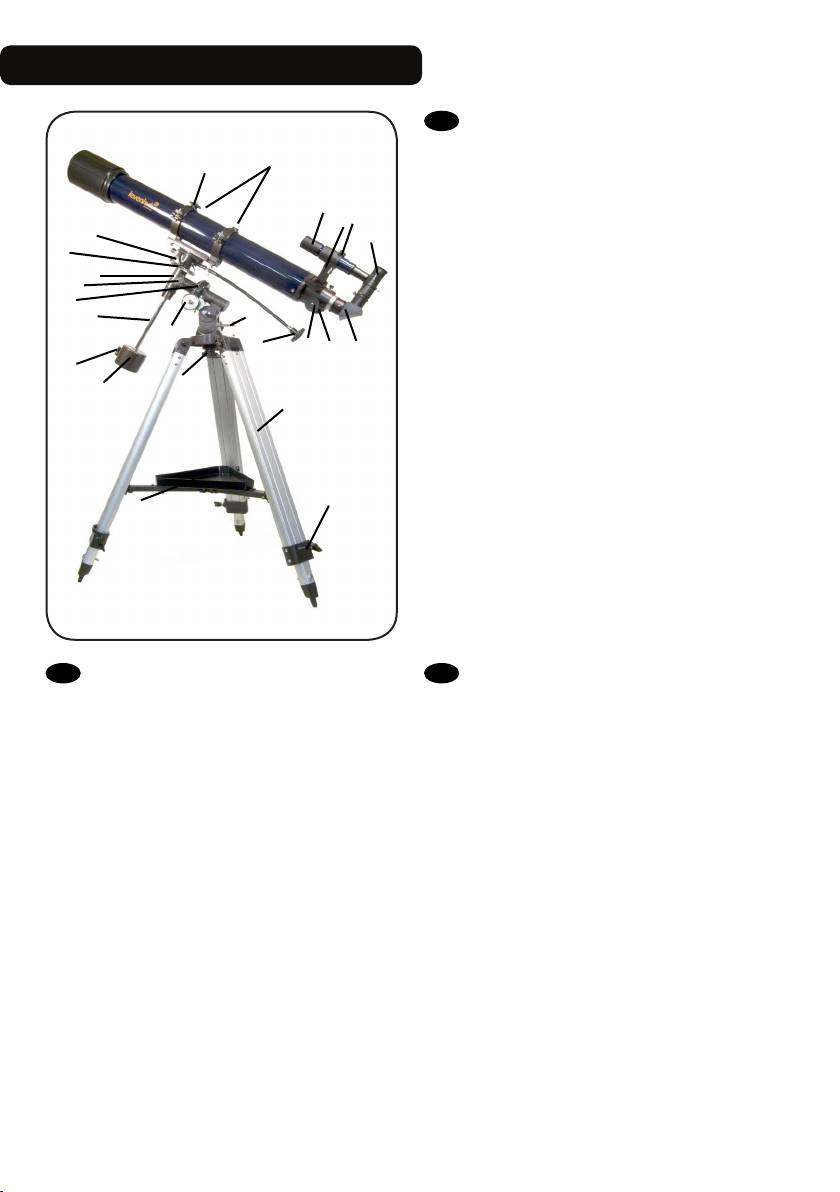
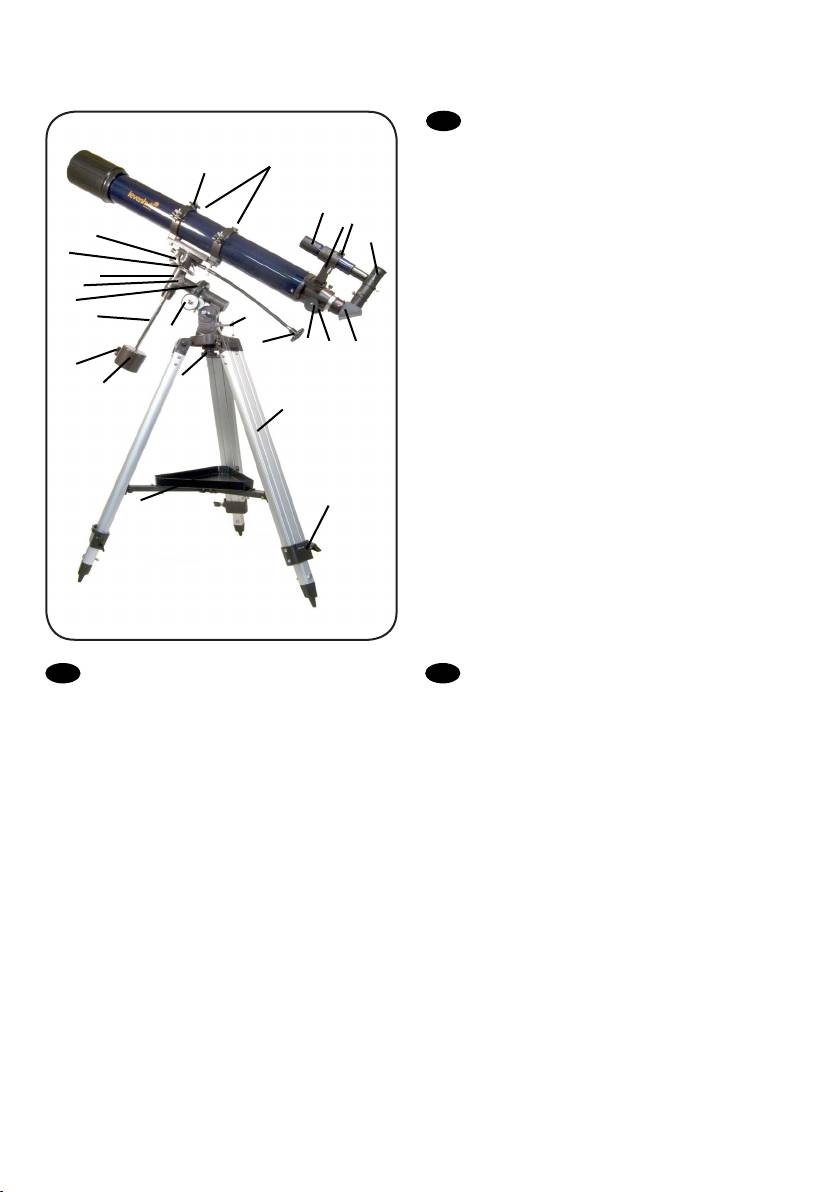
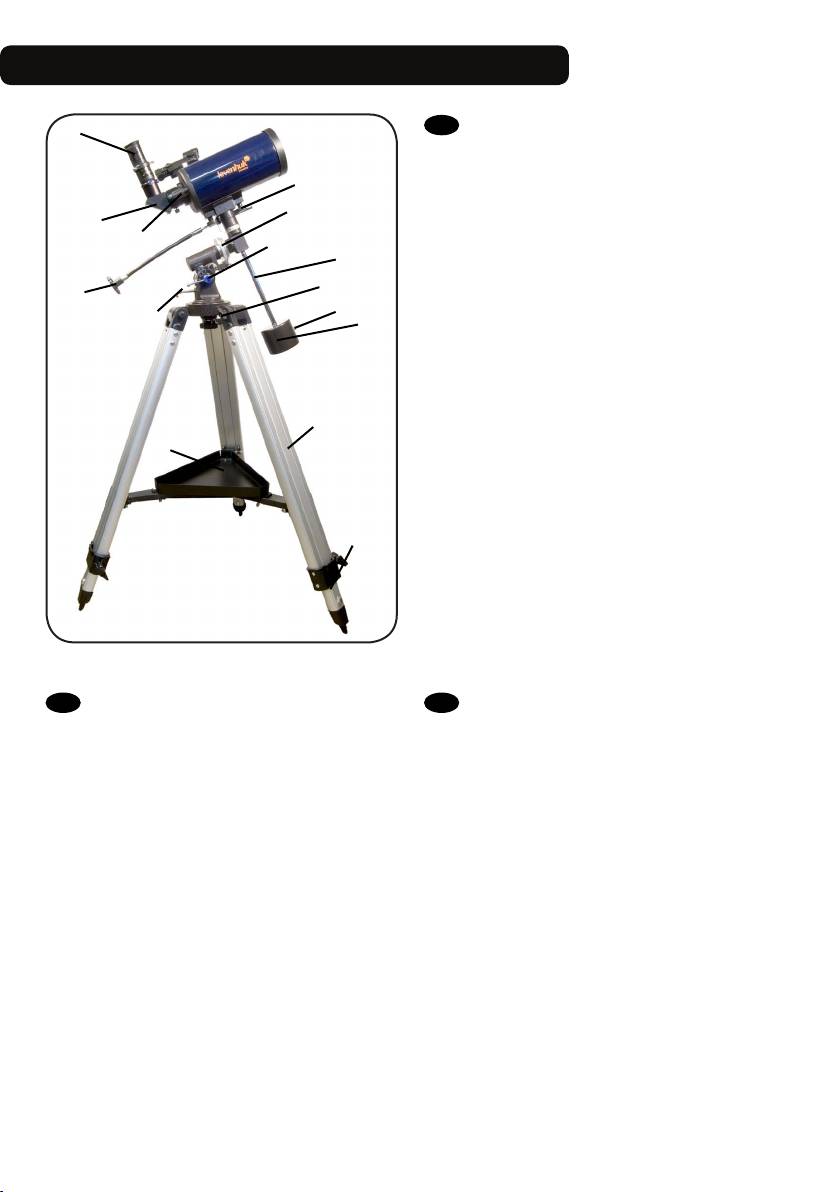
A Piggyback bracket
B Finderscope
C Finderscope bracket
D Adjustment screws
E Eyepiece
F Diagonal mirror
E
G Focuser tube
H Focusing knob
1 Dec. slow-motion control
2 Latitude adjustment T-bolt
3 Azimuth adjustment knob
4 Latitude lock knob
5 Counterweight
6 Counterweight lock screw
7 Counterweight rod
8 R.A. axis scale
9 R.A. slow-motion control
10 R.A. lock knob
11 Dec. axis scale
12 Dec. lock knob
13 Ring clamps
a Accessory tray
b Tripod leg
c Height adjustment clamp
DE
A Huckepackschiene
B Sucherrohr
C Sucherrohr-Halterung
D Stellschrauben
E Okular
F Diagonalspiegel
G Okularauszug
H Fokussierrad
1 Deklinations-Feinabstimmung
2 Polhöhen-Stellschraube
3 Azimut-Stellknopf
4 Polhöhen-Arretierung
5 Gegengewicht
6 Gegengewichts-Halteschraube
7 Gegengewichtsstange
8 Rektaszensionsskala
9 Rektaszensions-Feinabstimmung
10 Rektaszensions-Arretierung
11 Deklinationsskala
12 Deklinations-Arretierung
13 Rohrschellen
a Zubehörablage
b Stativbein
c Sicherungsschraube
СZ
A Piggyback foto držák
B Pointační dalekohled
C Konzola pointačního dalekohledu
D Stavěcí šrouby
E Okulár
F Diagonální zrcátko
G Tubus okulárového výtahu
H Zaostřovací šroub
1 Ovládání jemného nastavení deklinace
2 Šroub nastavení zeměpisné šířky
3 Šroub nastavení azimutu
4 Aretační šroub zeměpisné šířky
5 Protiváha
6 Aretační šroub protiváhy
7 Tyč protiváhy
8 Stupnice osy rektascenze
9 Ovládání jemného nastavení rektascenze
10 Aretační šroub osy rektascenze
11 Stupnice osy deklinace
12 Aretační šroub osy deklinace
13 Objímky
a Odkládací přihrádka pro příslušenství
b Noha stativu
c Svorka výškového nastavení
1
RU
A Платформа для фотокамеры
A
12
11
4
10
8
7
6
5
9
3
13
B
D
C
2
1
H
G
F
b
B Искатель
C Крепление искателя
D Юстировочные винты
E Окуляр
F Диагональное зеркало
E
G Фокусировочный узел
H Ручка фокусировки
1 Ручка управления тонкими движениями по оси
склонения
2 Регулировочный винт полярной оси по широте
3 Фиксатор азимута
4 Фиксатор широты места наблюдения
5 Противовес
6 Винт фиксации противовеса
7 Ось противовеса
8 Координатный круг прямого восхождения
9 Ручка управления тонкими движениями по оси
прямого восхождения
10 Фиксатор оси прямого восхождения
a
c
11 Координатный круг склонения
12 Фиксатор оси склонения
13 Кольца трубы
a Лоток для аксессуаров
b Ножка треноги
c Фиксатор высоты ножек треноги
PL
A Wspornik typu „piggyback”
B Celownica
C Wspornik celownicy
D Śruby regulacyjne
E Okular
F Lustro ukośne
G Tubus ogniskujący
H Pokrętło ustawiania ostrości
1 Pokrętło mikroruchów w osi deklinacji
2 Śruba młoteczkowa regulacji w poziomie
3 Pokrętło regulacji w poziomie
4 Pokrętło blokujące szerokości geogracznej
5 Przeciwwaga
6 Śruba blokująca przeciwwagi
7 Pręt przeciwwagi
8 Skala osi rektascensji
9 Pokrętło mikroruchów w osi rektascensji
10 Pokrętło blokujące w osi rektascensji
11 Skala osi deklinacji
12 Pokrętło blokujące w osi deklinacji
13 Zaciski pierścienia
a Tacka na akcesoria
b Noga statywu
c Zacisk regulacji wysokości
UA
A Транспортний кронштейн
B Видошукач
C Кронштейн видошукача
D Регулювальні гвинти
E Окуляр
F Діагональне дзеркало
G Труба фокусувача
H Ручка фокусування
1 Вузол управління повільним рухом схилення
2 Т-болт налаштування широти
3 Ручка налаштування азимута
4 Ручка блокування широти
5 Противага
6 Гвинт блокування противаги
7 Стержень противаги
8 Шкала вісі прямого піднесення
9 Вузол управління повільним рухом прямого
піднесення
10 Ручка блокування прямого піднесення
11 Шкала вісі схилення
12 Ручка блокування схилення
13 Скоби кілець
a Лоток для аксесуарів
b Ніжка триноги
c Скоба налаштування висоти
2
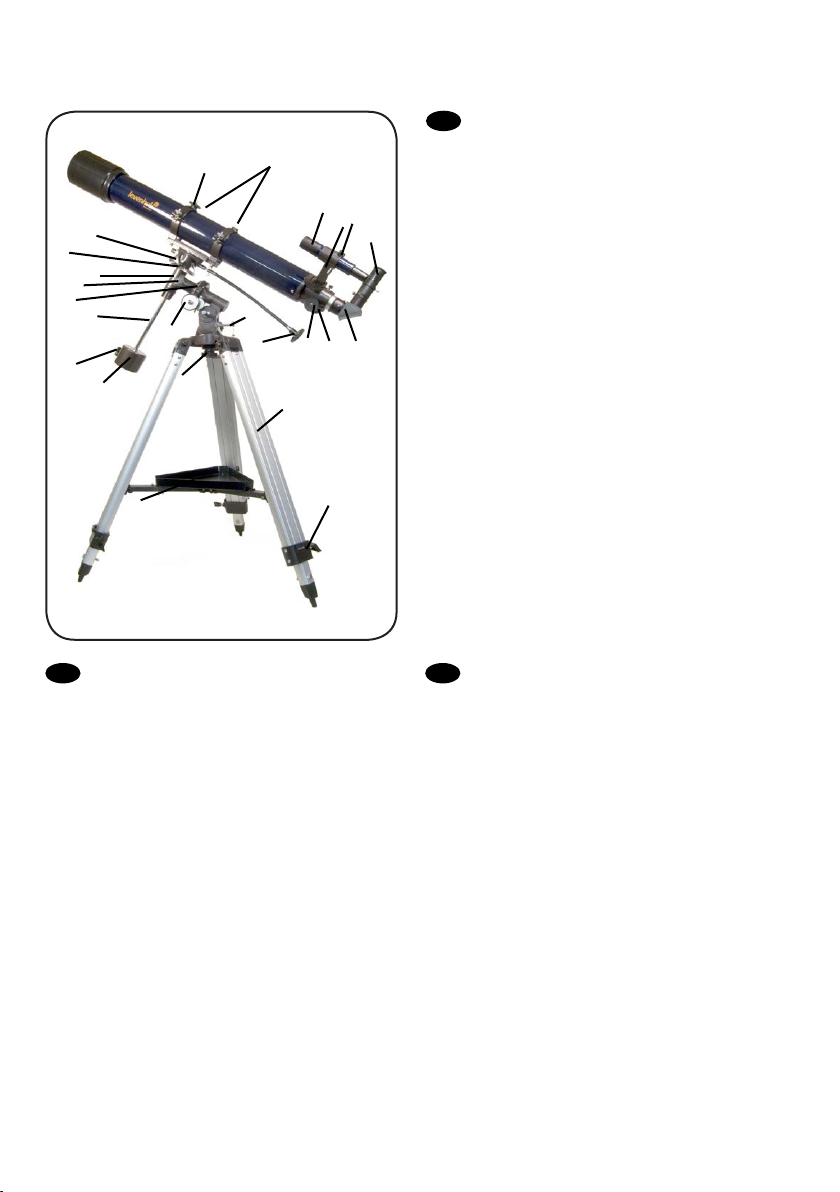
Levenhuk Strike 950 PRO / 1000 PRO
A
B
2
DE
C
3
a
8
A Okular
B Diagonalspiegel
C Fokussierrad
1 Rektaszensionsskala
2 Rektaszensions-Feinabstimmung
3 Polhöhen-Stellschraube
4 Azimut-Stellknopf
5 Gegengewicht
6 Gegengewichts-Halteschraube
7 Gegengewichtsstange
8 Deklinations-Arretierung
9 Deklinationsskala
a Zubehörablage
b Stativbein
c Sicherungsschraube
EN
A Eyepiece
B Diagonal mirror
9
1
C Focusing knob
1 R.A. axis scale
2 R.A. slow-motion control
3 Latitude adjustment T-bolt
7
4
6
5
4 Azimuth adjustment knob
5 Counterweight
6 Counterweight lock screw
7 Counterweight rod
8 Dec. lock knob
9 Dec. axis scale
a Accessory tray
b Tripod leg
c Height adjustment clamp
b
c
СZ
A Okulár
B Diagonální zrcátko
C Zaostřovací šroub
1 Stupnice osy rektascenze
2 Ovládání jemného nastavení rektascenze
3 šroub nastavení zeměpisné šířky
4 Šroub nastavení azimutu
5 Protiváha
6 Aretační šroub protiváhy
7 Tyč protiváhy
8 Aretační šroub osy deklinace
9 Stupnice osy deklinace
a Odkládací přihrádka pro příslušenství
b Noha stativu
c Svorka výškového nastavení
3
A
RU
A Окуляр
B Диагональное зеркало
9
B
C
2
3
1
8
7
4
6
5
C Ручка фокусировки
1 Координатный круг прямого восхождения
2 Ручка управления тонкими движениями по оси
склонения
3 Фиксатор широты места наблюдения
4 Фиксатор азимута
5 Противовес
6 Винт фиксации противовеса
7 Ось противовеса
8 Фиксатор оси склонения
9 Координатный круг склонения
a Лоток для аксессуаров
b Ножка треноги
b
a
c
c Фиксатор высоты ножек треноги
PL
A Okular
B Lustro ukośne
C Pokrętło ustawiania ostrości
1 Skala osi rektascensji
2 Pokrętło mikroruchów w osi rektascensji
3 Śruba młoteczkowa regulacji w poziomie
4 Pokrętło regulacji w poziomie
5 Przeciwwaga
6 Śruba blokująca przeciwwagi
7 Pręt przeciwwagi
8 Pokrętło blokujące w osi deklinacji
9 Skala osi deklinacji
a Tacka na akcesoria
b Noga statywu
c Zacisk regulacji wysokości
UA
A Окуляр
B Діагональне дзеркало
C Ручка фокусування
1 Шкала вісі прямого піднесення
2 Вузол управління повільним рухом прямого
піднесення
3 Т-болт налаштування широти
4 Ручка налаштування азимута
5 Противага
6 Гвинт блокування противаги
7 Стержень противаги
8 Ручка блокування схилення
9 Шкала вісі схилення
a Лоток для аксесуарів
b Ніжка триноги
c Скоба налаштування висоти
4

1
2
33
34
5
35
Altitude adjustment knob
EN
3
4
2
1
5
36
1
Šroub nastavení elevace
СZ
DE
Höhenwinkel-Stellknopf
PL
Pokrętło regulacji w pionie
RU
Винт регулировки высоты
UA
Гвинт налаштування висоти
EN
Brightness control
2
СZ
Regulátor jasu
DE
Helligkeitsregler
PL
Pokrętło regulacji jasności
RU
Регулятор яркости
UA
Вузол управління яскравістю
EN
Azimuth adjustment knob
3
СZ
Šroub nastavení azimutu
DE
Azimut-Stellknopf
PL
Pokrętło regulacji w poziomie
RU
Винт регулировки азимута
UA
Гвинт налаштування азимута
EN
Scope
4
СZ
Hledáček
DE
Visier
PL
Szukacz
RU
Искатель
UA
Шукач
EN
Battery compartment cover
5
СZ
Kryt prostoru pro baterii
DE
Batteriefachdeckel
PL
Pokrywa komory baterii
RU
Крышка батарейного отсека
UA
Кришка відділення батарей
6

5
1
2
EN
R.A. adjustment
1
СZ
Nastavení rektascenze
DE
Rektaszensionseinstellung
PL
Regulacja w osi rektascensji
RU
Фиксатор прямого восхождения
UA
Налаштування прямого сходження
EN
Altitude adjustment (up-down)
2
СZ
Nastavení elevace (nahoru-dolů)
DE
Höhenwinkeleinstellung (auf/ab)
PL
Regulacji w pionie (góra – dół)
RU
Регулировка высоты (вверх-вниз)
UA
Налаштування висоти (вверх-вниз)
EN
Azimuth adjustment (left-right)
3
СZ
Nastavení azimutu (doleva-doprava)
DE
Azimuteinstellung (links/rechts)
PL
Regulacji w poziomie (lewo – prawo)
RU
Регулировка азимута (влево-вправо)
UA
Налаштування азимуту (вліво-вправо)
EN
R.A. scale
4
СZ
Stupnice rektascenze
DE
Rektaszensionsskala
PL
Dokładna regulacja w osi deklinacji
RU
Шкала прямого восхождения
UA
Шкала прямого сходження
4
3
EN
Dec. adjustment
5
СZ
Nastavení deklinace
DE
Deklinationseinstellung
PL
Regulacja w osi deklinacji
RU
Фиксатор оси склонения
UA
Налаштування схилення
EN
R.A. ne adjustment
6
СZ
Jemné nastavení rektascenze
DE
Rektaszensions-Feineinstellung
PL
Dokładna regulacja w osi rektascensji
RU
Тонкая регулировка прямого восхождения
UA
Точне налаштування прямого сходження
EN
R.A. adjustment
7
СZ
Nastavení rektascenze
DE
Rektaszensionseinstellung
PL
Regulacja w osi rektascensji
RU
Фиксатор прямого восхождения
Налаштування прямого сходження
UA
EN
Dec. ne adjustment
8
СZ
Jemné nastavení deklinace
DE
Deklinations-Feineinstellung
PL
Skala osi rektascensji
RU
Тонкая регулировка склонения
UA
Точне налаштування схилення
6
7
8
7
EN
Diagonal mirror
1
СZ
Diagonální zrcátko
DE
Diagonalspiegel
PL
Lustro ukośne
RU
Диагональное зеркало
UA
Діагональне дзеркало
EN
Barlow lens
2
СZ
Barlowova čočka
3
2
1
8
DE
PL
RU
UA
EN
3
СZ
DE
PL
RU
UA
Barlow-Linse
Soczewka Barlowa
Линза Барлоу
Лінза Барлов
Eyepiece
Okulár
Okular
Okular
Окуляр
Окуляр
7
9
10
1
12
EN
Big Dipper
1
6
2
4
3
5
11
1
СZ
Velká medvědice
DE
Großer Wagen
PL
Wielka Niedźwiedzica
RU
Большая Медведица
UA
Велика Ведмедиця
EN
Little Dipper
2
СZ
Malý medvěd
DE
Kleiner Wagen
PL
Mała Niedźwiedzica
RU
Малая Медведица
UA
Мала Ведмедиця
EN
Polaris
3
СZ
Polárka
DE
Polarstern
PL
Gwiazdą Polarną
RU
Полярная звезда
UA
Полярна зірка
2
3
EN
R.A. lock knob
1
СZ
Aretační šroub osy rektascenze
DE
Rektaszensions-Arretierung
PL
Pokrętło blokujące w osi rektascenji
RU
Фиксатор оси прямого восхождения
UA
Ручка блокування прямого піднесення
EN
R.A. settling circle
2
СZ
Kruh pro nastavení osy rektascenze
DE
Rektaszensions-Teilkreis
PL
Tarcza ze współrzędnymi rektascensji
RU
Установочный круг прямого восхождения
UA
Круг налаштування прямого піднесення
EN
Arrow
3
СZ
Šipka
DE
Pfeil
PL
Strzałka
RU
Стрелка
UA
Стрілка
EN
NCP
4
СZ
NCP
DE
NHP
PL
NCP
RU
СНП
UA
NCP
EN
Cassiopeia
5
СZ
Kasiopeja
DE
Kassiopeia
PL
Kasjopeja
RU
Кассиопея
UA
Кассіопея
EN
β Crucis
6
СZ
β Crucis
DE
β Crucis
PL
β Crucis
RU
β Crucis
UA
β Хреста
8
1
12
10
6
13
8
2
5
9
EN
Zenith
1
СZ
Zenit
DE
Zenit
PL
Zenit
RU
Зенит
UA
Зеніт
EN
Right Ascension
6
СZ
Rektascenze
DE
Rektaszension
PL
Rektascensja
RU
Прямое восхождение
UA
Пряме піднесення
EN
Plane of local horizon
9
СZ
Rovina lokálního horizontu
DE
Lokale Horizontebene
PL
Płaszczyzna horyzontu
RU
Плоскость местного горизонта
UA
Площина місцевого горизонту
EN
Mount aligned on North Celestial Pole
12
СZ
Montáž nastavená na severní nebeský pól
DE
Am nördlichen Himmelspol ausgerichtete Montierung
PL
Montaż ustawiony na północny biegun niebieski
RU
Монтировка выровнена на Северный небесный полюс
UA
Кріплення, вирівняне на Північний небесний полюс
EN
Meridian line
2
СZ
Poledník
DE
Meridianlinie
PL
Południk niebieski
RU
Линия меридиана
UA
Лінія меридіану
EN
Plane of Celestial Equator
7
СZ
Rovina nebeského rovníku
DE
Himmelsäquatorebene
PL
Równik niebieski
RU
Плоскость небесного экватора
UA
Площина небесного екватора
1
2 3 4
14
EN
Object you are viewing
10
СZ
Pozorovaný objekt
DE
Betrachtetes Objekt
PL
Obserwowany obiekt
RU
Наблюдаемый объект
UA
Об’єкт, який
спостерігається
5
4
EN
Latitude
3
СZ
Zeměpisná šířka
DE
Breite
PL
Szerokość
RU
Широта
UA
Широта
EN
Focuser
1
СZ
Okulárový výtah
DE
Okularauszug
PL
Tubus ogniskujący
RU
Фокусер
UA
Фокусувач
EN
Eyepiece holder
2
СZ
Držák okuláru
DE
Okularhalterung
PL
Wyciąg okularowy
RU
Держатель окуляра
UA
Держак окуляра
9
3
11
7
EN
Nadir
4
СZ
Nadir
DE
Nadir
PL
Nadir
RU
Надир
UA
Надир
EN
Polaris
8
СZ
Polárka
DE
Polarstern
PL
Gwiazdą Polarną
RU
Полярная звезда
UA
Полярна зірка
EN
Apparent movement of stars
11
СZ
Zdánlivý pohyb hvězd
DE
Scheinbare Sternbewegung
PL
Pozorny ruch gwiazd
RU
Видимое движение звезд
UA
Видиме переміщення зірок
EN
Declination
13
СZ
Deklinace
DE
Deklination
PL
Deklinacja
RU
Склонение
UA
Схилення
EN
Extender
3
СZ
Nástavec
DE
Verlängerung
PL
Przedłużenie
RU
Экстендер (удлинитель фокуса)
UA
Розширювач
EN
T-adapter
4
СZ
T-adaptér
DE
T-Adapter
PL
T-adapter
RU
Т-адаптер
UA
Т-подібний
адаптер
EN
5
СZ
DE
PL
RU
UA
EN
5
СZ
DE
PL
RU
UA
13
N E S W
S V J Z
N O S W
N E S W
С В Ю З
ПВН С ПВД З
Camera
Fotoaparát
Kamera
Aparat
fotograczny
Камера
Фотокамера

Levenhuk Strike PRO Telescopes
EN
Congratulations on your purchase of a high-quality Levenhuk telescope!
These instructions will help you set up, properly use, and care for your telescope. Please read them
thoroughly before getting started.
CAUTION! Never look directly at the Sun – even for an instant – through your telescope or nderscope without a
professionally made solar lter that completely covers the front of the instrument, or permanent eye damage
may result. To avoid damage to the internal parts of your telescope, make sure the front end of the nderscope is
covered with aluminum foil or another non-transparent material.
Children should use the telescope under adult supervision only.
All parts of the telescope will arrive in one box. Be careful when unpacking it. We recommend keeping
the original shipping containers. In the event that the telescope needs to be shipped to another location, having the proper shipping containers will help ensure that your telescope survives the journey
intact. Make sure all the parts are present in the packaging. Be sure to check the box carefully, as
some parts are small. No tools are needed other than those provided. All screws should be tightened
securely to eliminate exing and wobbling, but be careful not to overtighten them, as that may strip
the threads.
During assembly (and anytime, for that matter), do not touch the surfaces of the optical elements
with your ngers. The optical surfaces have delicate coatings on them that can easily be damaged if
touched. Never remove lenses or mirrors from their housing, or the product warranty will be null and
void.
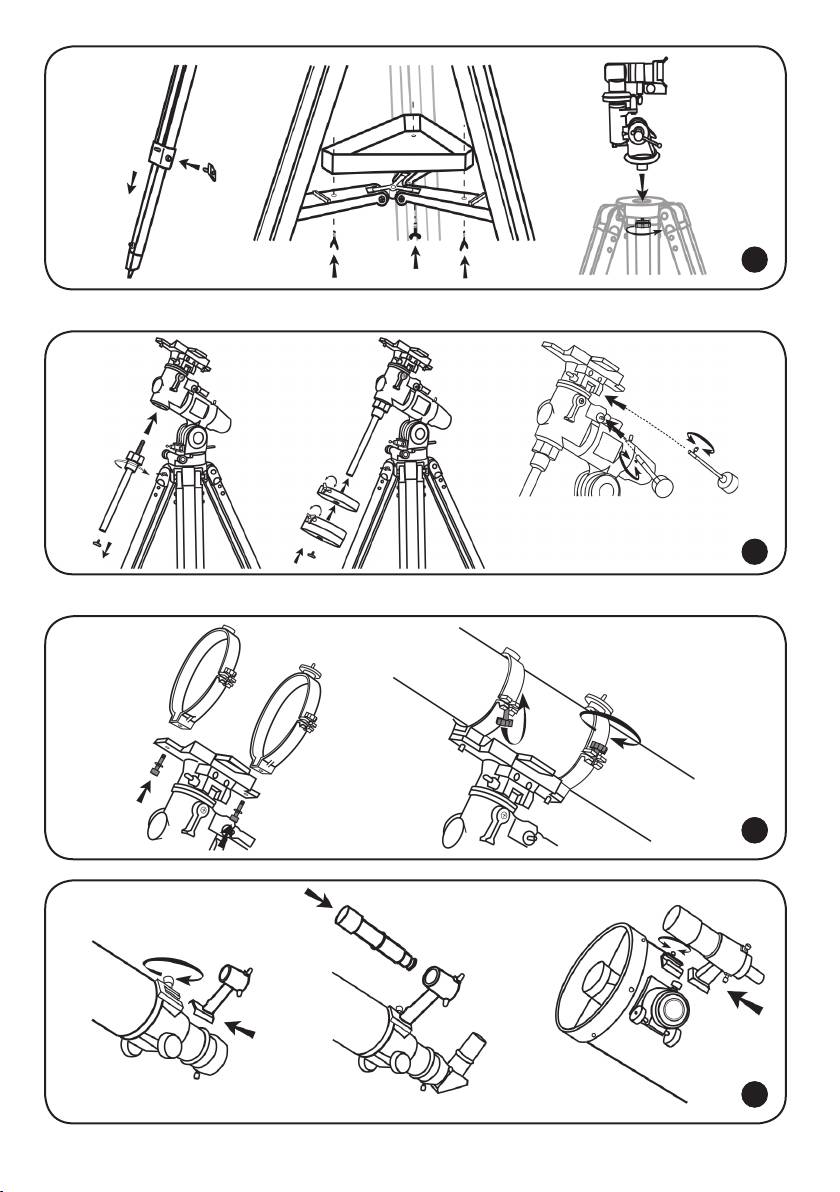
Telescope assembly
• Slowly loosen the tripod locking knobs and gently pull out the lower section of each tripod leg.
Tighten the clamps to hold the legs in place. Spread the tripod legs apart to stand the tripod
upright.
• Adjust the height of each tripod leg until the tripod head is properly leveled. Note that the tripod
legs may not be the same length when the equatorial mount is leveled.
• Place the accessory tray on top of the bracket, and secure it with thumbscrews from underneath.
• Attach the mount to the tripod head. If the mount does not t on the tripod, loosen the azimuth
lock knob. Retighten it after assembly.
• Take the counterweight rod.
• Screw the counterweight rod into the threaded hole on the end of the declination shaft.
• Unscrew the threaded cap from the end of the counterweight rod.
• Take the counterweight(s) and slide them halfway along the counterweight rod. Tighten the counterweight thumbscrews.
• Replace the threaded cap on the end of the counterweight rod.
• Attach the slow-motion controls to the worm gear mechanisms. Tighten the locking screws to
secure the control in place.
• Remove the telescope tube from its packaging.
• Remove the ring clamps by releasing their thumbscrews and opening their hinges.
• Using the bolts provided, fasten the ring clamps to the mount with a wrench.
• Place the telescope tube between the rings and balance it. Close the hinges around the telescope and retighten the thumbscrews. Do not overtighten.
2
1
3
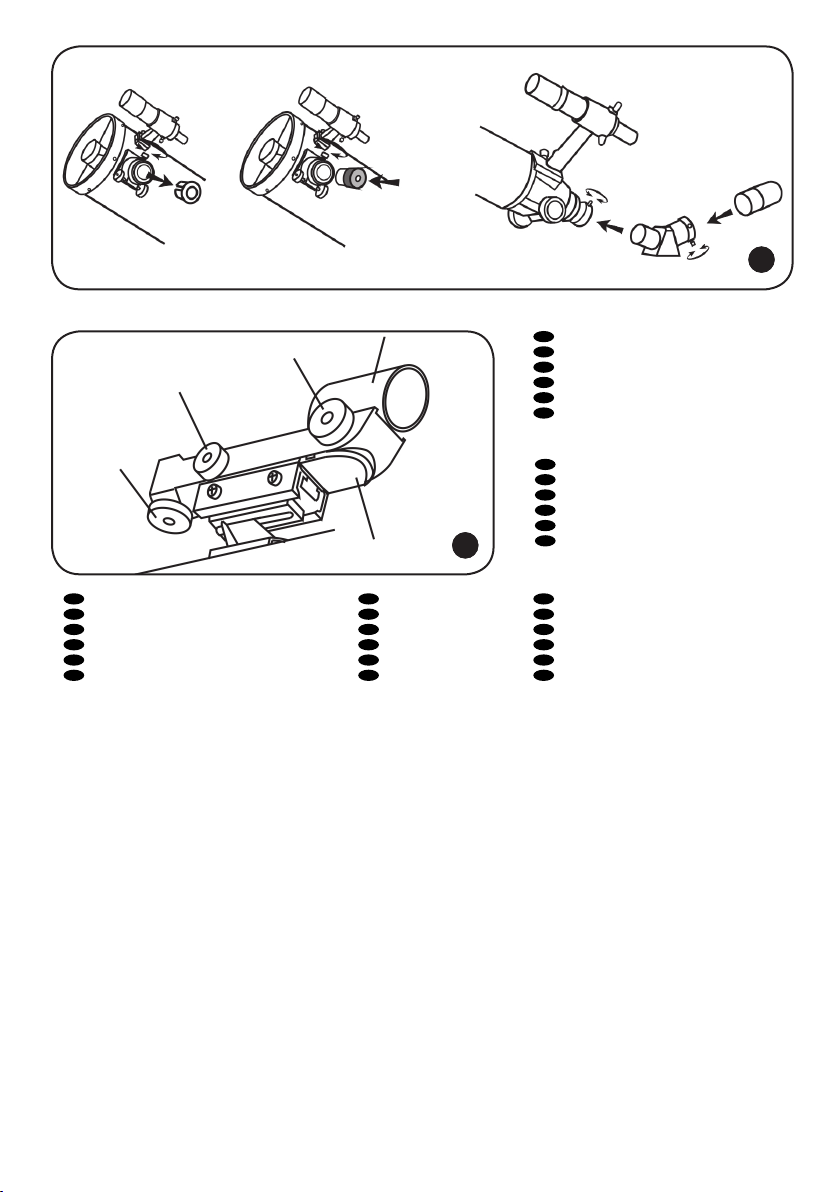
Finderscope assembly
• Take the nderscope bracket. Carefully remove the rubber ring.
• Place the ring on the nderscope and position it into the groove halfway along the tube.
• Insert the nderscope bracket into a holder on the telescope tube and lock it in place with a
thumbscrew.
• Insert the nderscope into the bracket, so that the rubber ring locks it in place.
10
4

Eyepiece assembly
• Unthread the thumbscrews on the focuser tube.
• Insert the diagonal mirror into the focuser tube and secure it by retightening the thumbscrews.
• Unthread the thumbscrews on the diagonal mirror.
• Insert the desired eyepiece into the diagonal mirror and secure it by retightening the
thumbscrews.
5
Red dot nder
The red dot nder is a zero magnication pointing tool that uses a coated glass window to superimpose the image of a small red dot onto the night sky. The red dot nder is equipped with a variable
brightness control, azimuth adjustment knob, and altitude adjustment knob. The nder is powered by
a 3-volt lithium battery located underneath at the front.
To use the red dot nder, simply look through the sight tube and move your telescope until the red dot
overlaps the object. Make sure to keep both eyes open when sighting.
Like all nderscopes, the red dot nder must be properly aligned with the telescope before use. This is
a simple process using the azimuth and altitude adjustment knobs.
• Open the battery compartment by pulling down the cover and remove the plastic shipping cover
over the battery.
• Turn on the red dot nder by rotating the variable brightness control clockwise until you hear a
click. Continue rotating the control knob to increase the brightness level.
• Insert a low power eyepiece into the focuser. Locate a bright object and aim the telescope so that
the object is in the center of the eld of view.
• With both eyes open, look through the sight tube at the object. If the red dot overlaps the object,
your red dot nder is perfectly aligned. If not, turn its azimuth and altitude adjustment knob until
the red dot overlaps the object.
6
Balancing the telescope
A telescope should be balanced before each observing session. Balancing reduces stress on the telescope mount and allows precise slow-motion movements. A balanced telescope is especially crucial
when using the optional clock drive for astrophotography. The telescope should be balanced after all
accessories (eyepiece, camera, etc.) have been attached. Before balancing your telescope, make sure
that your tripod is balanced and on a stable surface. For photography, point the telescope in the direction you will be taking photos before performing the balancing steps.
R.A. Balancing
• For best results, adjust the altitude of the mount to between 15º and 30º if possible, by using the
altitude adjustment T-bolt.
• Slowly unlock the R.A. and Dec. lock knobs. Rotate the telescope until both the optical tube and
the counterweight rod are horizontal to the ground, and the telescope tube is to the side of the
mount.
• Tighten the Dec. lock knob.
• Move the counterweights along the counterweight rod until the telescope is balanced and remains
stationary when released.
• Tighten the counterweight screws to secure the counterweights.
Dec. Balancing
All accessories should be attached to the telescope before balancing around the declination axis. The
R.A. balancing should be done before proceeding with Dec. balancing. For best results, adjust the
altitude of the mount to between 60º and 75º if possible.
• Release the R.A. lock knob and rotate around the R.A. axis so that the counterweight rod is in a
horizontal position. Tighten the R.A. lock knob.
• Unlock the Dec. lock knob and rotate the telescope tube until it is parallel to the ground.
• Slowly release the telescope and determine in which direction it rotates. Loosen the telescope
ring clamps and slide the telescope tube forward or backward between the rings until it is balanced.
• Once the telescope no longer rotates from its parallel starting position, retighten the tube rings
and the Dec. lock knob. Reset the altitude axis to your local latitude.
11

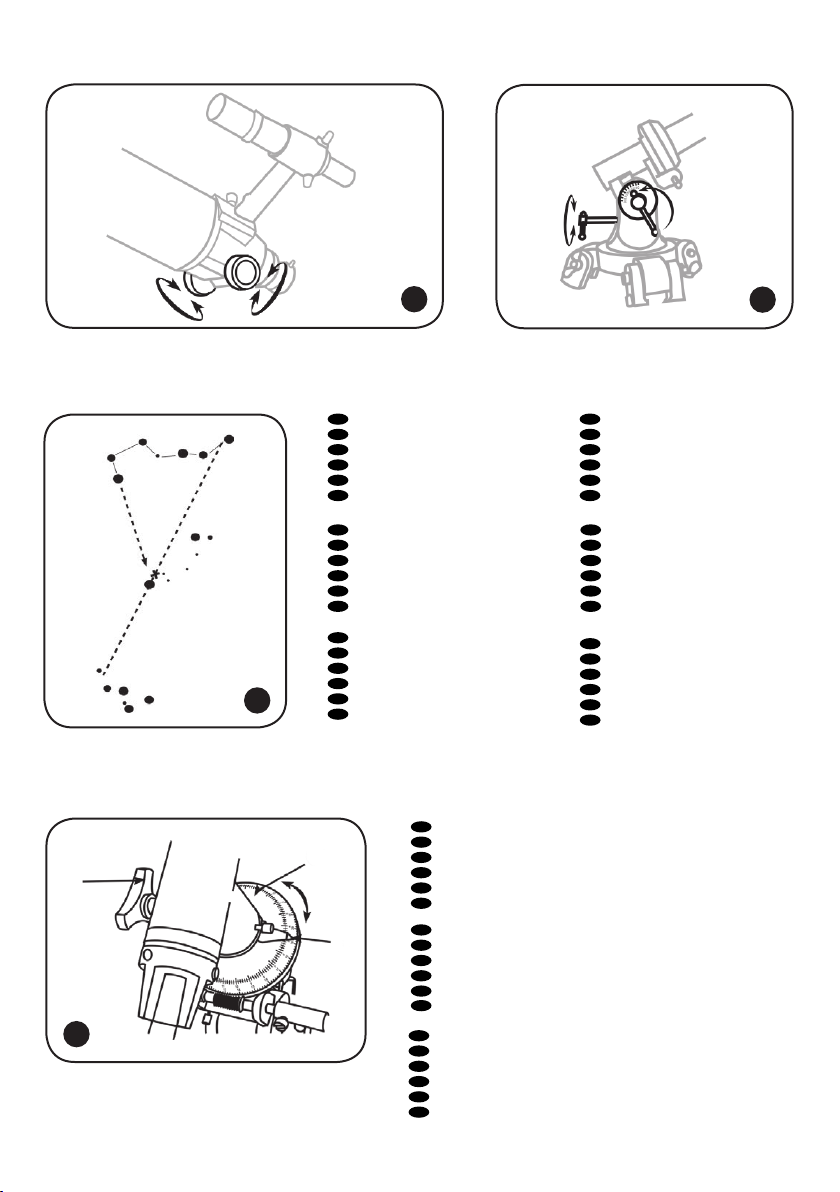
Operating the mount
The mount has controls for both conventional altitude (up-down) and azimuth (left-right) directions of
motion. These two adjustments are suggested for large direction changes and for terrestrial viewing.
To adjust azimuth, loosen the big knob under the mount base and rotate the mount head about the
azimuth axis. Use the altitude adjustment T-bolts to set the required altitude.
In addition, the EQ2 mount has R.A. (hour angle) and Dec. controls for polar-aligned astronomical
observing. Loosen the lock knobs to make large direction changes. Use the slow-motion controls for ne
adjustment after the lock knobs have both been locked. An additional scale is included for the altitude
axis. This allows polar alignment at your local latitude.
7
Barlow lens
A Barlow lens increases the magnifying power of an eyepiece, while reducing the eld of view. It
expands the cone of the focused light before it reaches the focal point, so that the telescope’s focal
length appears longer to the eyepiece. In addition to increasing magnication, the benets of using
a Barlow lens include improved eye relief, and reduced spherical aberration of the eyepiece. For this
reason, a Barlow plus a lens often outperform a single lens producing the same magnication. And the
best advantage is that a Barlow lens can potentially double the number of eyepieces in your collec-
8
tion.
Focusing
Slowly rotate the focus knobs under the focuser one way or the other until the image in the eyepiece is
sharp. The image usually has to be nely refocused over time, due to small variations caused by temperature changes, exures, etc. This often happens with short focal ratio telescopes, particularly when
they haven’t yet reached outside temperature. Refocusing is almost always necessary when you change
an eyepiece, add or remove a Barlow lens.
9
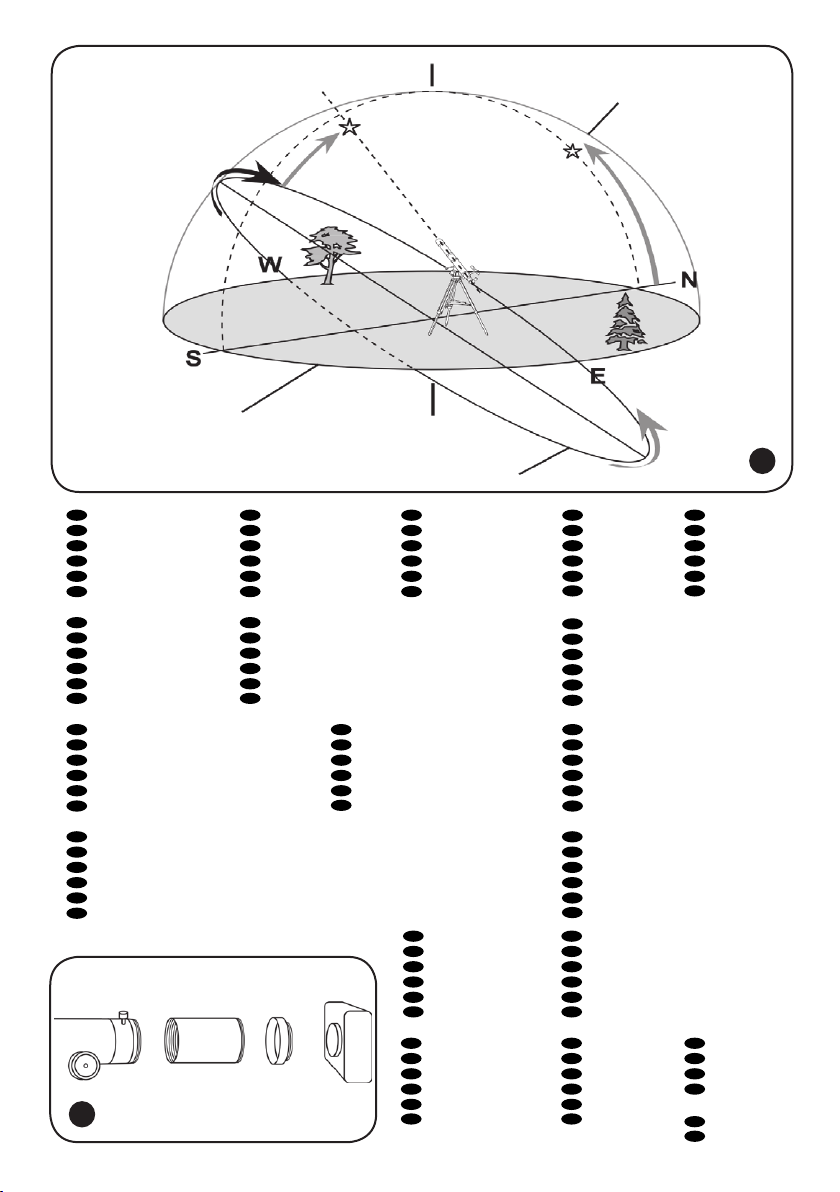
Polar adjustment
In order for your telescope to track objects in the sky you have to align your mount. This means tilting
the head over so that it points to the North (or South) celestial pole. For people in the Northern
Hemisphere this is rather easy as the bright star Polaris is very near the North Celestial Pole. For casual
observing, rough polar alignment is adequate. Make sure your equatorial mount is leveled and the
nderscope is aligned with the telescope before beginning.
Look up your latitude on a map, road maps are good for this purpose. Now look at the side of your
mount head, there you will see a scale running from 0 to 90°. Loosen the mount latch slightly rotating the lock handle counterclockwise. A thumbscrew located underneath the mount head pushes the
latch plate, thus changing the angle. Turn the screw until the pointer on the latitude scale is set at the
latitude of your observation site.
Loosen the Dec. lock knob and rotate the telescope tube until the pointer on the setting circle reads
90°. Retighten the Dec. lock knob. Loosen the azimuth lock knob and move the mount so that the R.A.
axis points roughly at Polaris. Use the two azimuth adjustment knobs above the “N” to make ne adjustments in azimuth if needed. For more accurate alignment, look through the nderscope and center
the Polaris on the crosshairs using the azimuth and latitude adjustment knobs.
After a while you will notice your target drifting slowly North or South depending on the direction of
the pole relative to Polaris. To keep the target in the center of the view, turn only the R.A. slow-motion control.
After your telescope is polar aligned, no further adjustments in the azimuth and latitude of the mount
should be made in the observing session, nor should you move the tripod. Only movements in R.A. and
DEC axis should be made in order to keep an object in the eld.
In the Southern Hemisphere you must align the mount to the SCP by locating its position with star
patterns, without the convenience of a nearby bright star. The closest star is the faint 5.5-mag. Sigma
Octantis which is about one degree away. Two sets of pointers which help to locate the SCP are α and
β Crucis (in the Southern Cross) and a pointer running at a right angle to a line connecting α and β
Centauri.
10
11
Tracking celestial objects
When observing through a telescope, astronomical objects appear to move slowly through the telescope’s eld of view. When the mount is correctly polar aligned, you only need to turn the R.A.
slow-motion control to follow or track objects as they move through the eld.
If the object is too faint you may want to use setting circles on an equatorial mount. Setting circles al-
12

low you to locate celestial objects whose celestial coordinates have been determined from star charts.
The telescope’s R.A. setting circle is scaled in hours, from 1 to 24, with small lines in between representing 10 minute increments. The upper set of numbers applies to observations in the Northern
Hemisphere, while the numbers below them apply to observations in the Southern Hemisphere.
Setting (calibrating) the R.A. setting circle: in order to set your Right Ascension circle you must rst
nd a star in your eld of view with known coordinates. A good one would be the 0.0 magnitude star
Vega in the Constellation Lyra. From a star chart we know the R.A. coordinate of Vega is 18h 36m.
Loosen the R.A. and DEC. lock knobs on the mount and adjust the telescope so that Vega is centered in
the eld of view of the eyepiece. Tighten the R.A. and DEC. lock knobs to lock the mount in place. Now
rotate the R.A. setting circle until it reads 18h36m. You are now ready to use the setting circles to nd
objects in the sky.
12
A German Equatorial mount has an adjustment, sometimes called a wedge, which tilts the mount’s
polar axis so that it points at the appropriate Celestial Pole (NCP or SCP). Once the mount has been
polar aligned, it needs to be rotated around the polar axis only to keep an object centered. Do not
reposition the mount base or change the latitude setting. The mount has already been correctly aligned
for your geographical location (i.e. Latitude), and all remaining telescope pointing is done by rotating
the telescope tube around the polar (R.A.) and declination axes.
13
A problem for many beginners is recognizing that a polar-aligned, equatorial mount acts like an alt-azimuth mount which has been aligned to a celestial pole. The wedge tilts the mount to an angle equal
to the observer’s Latitude, and therefore it swivels around a plane which is parallel to the celestial
(and Earth’s) equator. This is now its “horizon”; but remember that part of the new horizon is usually
blocked by Earth. This new “azimuth” motion is called Right Ascension (R.A.). In addition, the mount
swivels North (+) and South (-) from the Celestial Equator towards the celestial poles. This plus or
minus “altitude” from the celestial equator is called Declination (Dec.).
Now, consider pointing the telescope to the western or eastern horizon. If the counterweight is pointing North, the telescope can be swiveled from one horizon to the other around the Dec. axis in an arc
that passes through the NCP (any Dec. arc will pass through the NCP if the mount is polar-aligned). It
can be seen then that if the optical tube needs to be pointed at an object north or south of this arc, it
has to be also rotated around the R.A. axis.
Pointing in any direction other than due North requires a combination of R.A. and Dec. positions.
Telescopes with long focal lengths often have a “blind spot” when pointing near the zenith, because
the eyepiece-end of the optical tube bumps into the mount’s legs. To avoid this, the tube can be very
carefully slipped up inside the ring clamps. This can be done safely because the tube is pointing almost
vertically, and therefore moving it does not cause a Dec. balance problem. It is very important to move
the tube back to the Dec. balanced position before observing other sky areas.
Something which can also be a problem is that the optical tube often rotates so that the eyepiece,
nderscope and the focusing knobs are in less convenient positions. The diagonal mirror can be rotated
to adjust the eyepiece. However, to adjust the positions of the nderscope and focusing knobs, loosen
the tube rings holding the telescope tube and gently rotate it. Do this when you are going to observe
an area for while, as it is inconvenient to repeat every time you briey go to a new area.
Finally, there are a few things to consider to ensure that you are comfortable during the viewing
session. First is setting the height of the mount above the ground by adjusting the tripod legs. You must
consider the height that you want your eyepiece to be, and if possible plan on sitting on a comfortable
chair or stool. Very long optical tubes need to be mounted higher or you will end up crouching or lying
on the ground when looking at objects near the zenith. However, a short optical tube can be mounted
lower so that there is less movement due to vibration sources, such as wind. This is something that
should be decided before going through the effort of polar aligning the mount.
Camera adapter
To attach a camera to your telescope you may need an adapter to get the camera focused. Some reectors require wider motion range than the one allowed by the focuser; some refractors are designed
to be used with diagonal mirrors and thus need a longer focal length when used with camera.
To achieve that, simply attach an extender to the focuser of your telescope and then attach the camera with a T-adapter to the extender.
14
13

Specications
Levenhuk Strike 900 PRO Levenhuk Strike 950 PRO Levenhuk Strike 1000 PRO
Optical design achromatic refractor Maksutov-Cassegrain Maksutov-Cassegrain
Aperture 90 mm 90 mm 102 mm
Focal length 900 mm; f/10 1250 mm; f/13.9 1300 mm; f/12.8
Highest practical power 180x 180x 200x
Limiting stellar magnitude 11.8 11.7 12.0
Resolution threshold 1.5 arcsec. 1.5 arcsec 1.3 arcsec.
Eyepiece SUPER 10 mm (90x),
SUPER 25 mm (36x),
Plössl 6.3 mm (143x)
Finderscope 6×30 red dot red dot
Mount EQ2 EQ1 EQ2
Tripod aluminum; 710–1250 mm
(28.0–49.2 in)
SUPER 10 mm (125x),
SUPER 20 mm (62x),
Plössl 6.3 mm (198x)
aluminum; 710–1250 mm
(28.0–49.2 in)
SUPER 10 mm (130x),
SUPER 25 mm (65x),
Plössl 6.3 mm (206x)
aluminum; 710–1250 mm
(28.0–49.2 in)
Batteries safety instructions
• Always purchase the correct size and grade of battery most suitable for the intended use.
• Always replace the whole set of batteries at one time; taking care not to mix old and new ones, or
batteries of different types.
• Clean the battery contacts and also those of the device prior to battery installation.
• Make sure the batteries are installed correctly with regard to polarity (+ and -).
• Remove batteries from equipment that is not to be used for an extended period of time.
• Remove used batteries promptly.
• Never attempt to recharge primary batteries as this may cause leakage, re, or explosion.
• Never short-circuit batteries as this may lead to high temperatures, leakage, or explosion.
• Never heat batteries in order to revive them.
• Remember to switch off devices after use.
• Keep batteries out of the reach of children, to avoid risk of ingestion, suffocation, or poisoning.
Care and maintenance
• Never, under any circumstances, look directly at the Sun through this device without a special
lter, or look at another bright source of light or at a laser, as this may cause PERMANENT
RETINAL DAMAGE and may lead to BLINDNESS.
• Take necessary precautions when using the device with children or people who have not read or
who do not fully understand these instructions.
• Do not try to disassemble the device on your own for any reason, including to clean the mirror. For
repairs and cleaning of any kind, please contact your local specialized service center.
• Protect the device from sudden impact and excessive mechanical force.
• Do not touch the optical surfaces with your ngers. To clean the telescope exterior, use only special cleaning wipes and special optics cleaning tools from Levenhuk.
• Store the device in a dry, cool place away from hazardous acids and other chemicals, away from
heaters, open re and other sources of high temperatures.
• Replace the dust cap over the front end of the telescope whenever it is not in use. This prevents
dust from settling on the mirror or lens surfaces.
• Seek medical advice immediately if a small part or a battery is swallowed.
14

Levenhuk Limited Warranty
All Levenhuk telescopes, microscopes, binoculars and other optical products, except for accessories, carry a
lifetime warranty against defects in materials and workmanship. All Levenhuk accessories are warranted to be
free of defects in materials and workmanship for six months from date of retail purchase. Levenhuk will repair or
replace such product or part thereof which, upon inspection by Levenhuk, is found to be defective in materials or
workmanship. As a condition to the obligation of Levenhuk to repair or replace such product, the product must be
returned to Levenhuk together with proof of purchase satisfactory to Levenhuk.
This warranty does not cover consumable parts, such as batteries.
A Return Authorization (RA) Number must be obtained in advance of return. Contact the local Levenhuk branch to
receive the RA number to be displayed on the outside of your shipping container. All returns must be accompanied by
a written statement setting forth the name, address and telephone number of the owner, including a description of
any claimed defects. Parts or products for which replacement is made will become the property of Levenhuk.
The customer will be responsible for all costs of transportation and insurance to and from Levenhuk or its authorized
dealers and will be required to prepay such costs.
Levenhuk will use reasonable efforts to repair or replace any product covered by this warranty within thirty days of
receipt. If a repair or replacement will require more than thirty days, Levenhuk will notify the customer accordingly.
Levenhuk reserves the right to replace any product that has been discontinued from its product line with a new
product of comparable value and function.
This warranty does not apply to any defects or damages resulting from alteration, modication, neglect, misuse,
usage of improper power sources, damage in transportation, abuse, or any cause other than normal use, or to
malfunction or deterioration due to normal wear. Levenhuk disclaims all warranties, express or implied, whether of
merchantability or tness for a particular use, except as expressly set forth herein. The sole obligation of Levenhuk
under this limited warranty will be to repair or replace the covered product, in accordance with the terms set forth
herein. Levenhuk disclaims liability for any loss of prots, loss of information, or for any general, special, direct,
indirect or consequential damages which may result from breach of any warranty, or arising out of the use or inability
to use any Levenhuk product. Any warranties which are implied and which cannot be disclaimed will be limited in
duration to a term of six months for accessories from the date of retail purchase.
Some states/provinces do not allow the exclusion or limitation of incidental or consequential damages, so the above
limitations and exclusions may not apply to you. This warranty gives you specic legal rights, and you may have other
rights which vary from state to state or province to province.
Levenhuk reserves the right to modify or discontinue any product without prior notice.
NOTE: This warranty is valid to USA and Canadian customers who have purchased this product from an authorized
Levenhuk dealer in the USA or Canada. Warranty outside the USA or Canada is valid only to customers who purchased
from an authorized Levenhuk dealer in the specic country or international distributor. Please contact them for any
warranty service.
If warranty problems arise, or if you need assistance in using your product, contact the local Levenhuk branch:
Levenhuk Worldwide:
USA: www.levenhuk.com
Canada: www.levenhuk.ca
Czech Republic: www.levenhuk.cz
Netherlands: www.levenhuk.nl
Poland: www.levenhukoptics.pl
Russia: www.levenhuk.ru
Ukraine: www.levenhuk.ua
EU: www.levenhuk.eu
Purchase date ______________________________________Signature ____________________________________ Stamp
Telescope extras and accessories
The unique kit of this telescope sets it apart from the counterparts and makes
it a perfect gift for any aspiring astronomer. You will nd everything you need
for your observations after unpacking the colorful box, including:
1. “You’ve got a telescope now. What next?” handbook. This practical
handbook was created specically for beginning astronomers. It contains valuable information on over 280 celestial objects and the cosmos in general, as
well as colorful star charts and facts on the design of different telescopes.
15
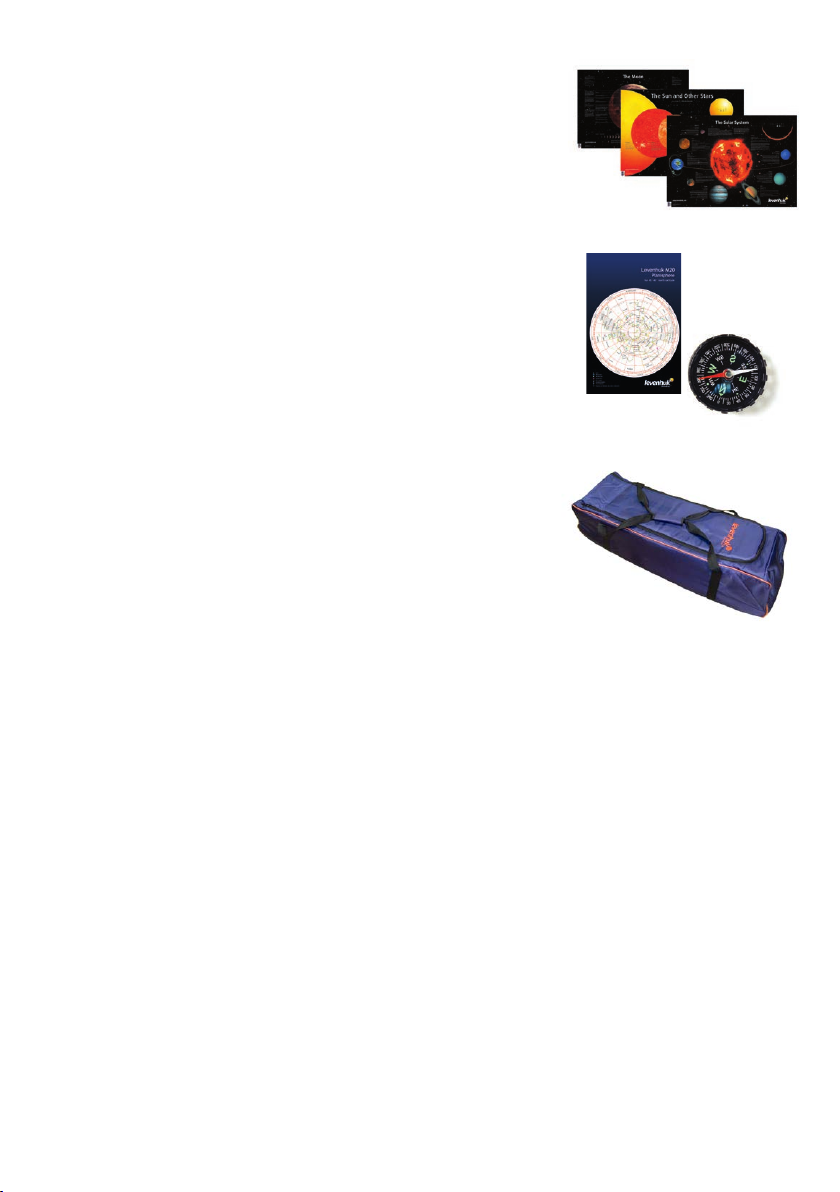
2. Stellarium. This is a 3D planetarium that allows you to plan your
observations and explore the night sky several years in the future.
The database of this software contains over 600,000 stars, planets of
the Solar System, the Moon, comets and asteroids, galaxies, nebulae
and star clusters. All this can be rendered in just a few moments and
studied directly on your computer!
3. Set of posters (The Moon, The Sun and other stars, The Solar
System). These posters will help you explore the universe and learn
interesting facts about the Solar system, its planets and satellites,
as well as various distant stars. Colorful illustrations and captions
present necessary information in an easy-to-read format. The posters
are 84 cm x 60 cm (A1).
4. Planisphere. This rotating star chart is a handy tool that allows
you to nd out what celestial objects and constellations are visible
above the horizon at a given date and time. All you need to do is align
the viewer and the star chart, therefore, providing a date and time.
5. Compass. It is truly an invaluable tool that can help you orient
yourself to the Northern pole on your observation site. Afterwards,
it is easy to locate Polaris in the night sky, which provides a starting
point for further observations.
We also wanted to make sure that your telescope is protected when
moved or stored. Therefore, we have added a telescope case to the
kit: Levenhuk Zongo 80 (Strike 900 PRO) or Levenhuk Zongo 60
(Strike 950 PRO, Strike 1000 PRO).
The case is made of a sturdy waterproof material and the padded
lining protects the telescope from any impacts. The case is also tted
with handle straps, full-length zippers and separate compartments for
the mount and accessories.
Sooner or later, you will see everything there is to see with the standard kit and decide it is time to
delve deeper into the cosmos. The additional accessories we are providing will see to it! We have
included:
• a 6.3 mm eyepiece, a wonderful all-purpose eyepiece that allows you to achieve higher magnications, necessary for observations of the Moon and planets;
• a solar lter that allows you to observe the Sun without risking permanent eye damage;
• a lunar lter that reduces the glare of the lunar surface and enhances the details of the landscape;
• four lters that will come in handy for planetary observations, enhancing the features of the
surface;
• a 2x Barlow lens that is capable of doubling the focal length of the telescope. It, therefore, dou-
bles the magnication of any eyepiece used.
All this allows you to use your Levenhuk Strike PRO to the maximum of its capabilities, opening a
gateway into the mysterious cosmos, straight after purchase! These accessories and the telescope itself
are safe even for your children to use, and their quality and reliability make sure that you can enjoy
high-quality views of the universe for years to come.
16
Loading…
Levenhuk Strike PRO Telescopes
User Manual
Levenhuk Strike 900 PRO
Návod k použití
Bedienungsanleitung
Levenhuk Strike 950 PRO
Instrukcja obsługi
Levenhuk Strike 1000 PRO
Инструкция по эксплуатации
Посібник користувача
Radost zaostřit
Mit Vergnügen näher dran!
Radość przybliżania
Приближает с удовольствием
Наближує з радістю

Levenhuk Strike 900 PRO
EN
A Piggyback bracket
13
B Finderscope
A
C Finderscope bracket
D Adjustment screws
B
D
E Eyepiece
C
12
F Diagonal mirror
E
11
G Focuser tube
H Focusing knob
4
10
1 Dec. slow-motion control
8
2 Latitude adjustment T-bolt
7
2
3 Azimuth adjustment knob
9
1
4 Latitude lock knob
H
G
F
5 Counterweight
6
6 Counterweight lock screw
3
5
7 Counterweight rod
b
8 R.A. axis scale
9 R.A. slow-motion control
10 R.A. lock knob
11 Dec. axis scale
12 Dec. lock knob
c
13 Ring clamps
a
a Accessory tray
b Tripod leg
c Height adjustment clamp
DE
СZ
A Huckepackschiene
A Piggyback foto držák
B Sucherrohr
B Pointační dalekohled
C Sucherrohr-Halterung
C Konzola pointačního dalekohledu
D Stellschrauben
D Stavěcí šrouby
E Okular
E Okulár
F Diagonalspiegel
F Diagonální zrcátko
G Okularauszug
G Tubus okulárového výtahu
H Fokussierrad
H Zaostřovací šroub
1 Deklinations-Feinabstimmung
1 Ovládání jemného nastavení deklinace
2 Polhöhen-Stellschraube
2 Šroub nastavení zeměpisné šířky
3 Azimut-Stellknopf
3 Šroub nastavení azimutu
4 Polhöhen-Arretierung
4 Aretační šroub zeměpisné šířky
5 Gegengewicht
5 Protiváha
6 Gegengewichts-Halteschraube
6 Aretační šroub protiváhy
7 Gegengewichtsstange
7 Tyč protiváhy
8 Rektaszensionsskala
8 Stupnice osy rektascenze
9 Rektaszensions-Feinabstimmung
9 Ovládání jemného nastavení rektascenze
10 Rektaszensions-Arretierung
10 Aretační šroub osy rektascenze
11 Deklinationsskala
11 Stupnice osy deklinace
12 Deklinations-Arretierung
12 Aretační šroub osy deklinace
13 Rohrschellen
13 Objímky
a Zubehörablage
a Odkládací přihrádka pro příslušenství
b Stativbein
b Noha stativu
c Sicherungsschraube
c Svorka výškového nastavení
1
RU
A Платформа для фотокамеры
13
B Искатель
A
C Крепление искателя
D Юстировочные винты
B
D
E Окуляр
C
12
F Диагональное зеркало
E
11
G Фокусировочный узел
H Ручка фокусировки
4
10
1 Ручка управления тонкими движениями по оси
8
склонения
7
2
2 Регулировочный винт полярной оси по широте
9
1
3 Фиксатор азимута
H
G
F
4 Фиксатор широты места наблюдения
6
5 Противовес
3
5
6 Винт фиксации противовеса
b
7 Ось противовеса
8 Координатный круг прямого восхождения
9 Ручка управления тонкими движениями по оси
прямого восхождения
10 Фиксатор оси прямого восхождения
c
11 Координатный круг склонения
a
12 Фиксатор оси склонения
13 Кольца трубы
a Лоток для аксессуаров
b Ножка треноги
c Фиксатор высоты ножек треноги
PL
UA
A Wspornik typu „piggyback”
A Транспортний кронштейн
B Celownica
B Видошукач
C Wspornik celownicy
C Кронштейн видошукача
D Śruby regulacyjne
D Регулювальні гвинти
E Okular
E Окуляр
F Lustro ukośne
F Діагональне дзеркало
G Tubus ogniskujący
G Труба фокусувача
H Pokrętło ustawiania ostrości
H Ручка фокусування
1 Pokrętło mikroruchów w osi deklinacji
1 Вузол управління повільним рухом схилення
2 Śruba młoteczkowa regulacji w poziomie
2 Т-болт налаштування широти
3 Pokrętło regulacji w poziomie
3 Ручка налаштування азимута
4 Pokrętło blokujące szerokości geogracznej
4 Ручка блокування широти
5 Przeciwwaga
5 Противага
6 Śruba blokująca przeciwwagi
6 Гвинт блокування противаги
7 Pręt przeciwwagi
7 Стержень противаги
8 Skala osi rektascensji
8 Шкала вісі прямого піднесення
9 Pokrętło mikroruchów w osi rektascensji
9 Вузол управління повільним рухом прямого
10 Pokrętło blokujące w osi rektascensji
піднесення
11 Skala osi deklinacji
10 Ручка блокування прямого піднесення
12 Pokrętło blokujące w osi deklinacji
11 Шкала вісі схилення
13 Zaciski pierścienia
12 Ручка блокування схилення
a Tacka na akcesoria
13 Скоби кілець
b Noga statywu
a Лоток для аксесуарів
c Zacisk regulacji wysokości
b Ніжка триноги
c Скоба налаштування висоти
2
Levenhuk Strike 950 PRO / 1000 PRO
A
EN
A Eyepiece
B Diagonal mirror
9
C Focusing knob
1 R.A. axis scale
1
2 R.A. slow-motion control
B
C
3 Latitude adjustment T-bolt
8
4 Azimuth adjustment knob
7
5 Counterweight
4
6 Counterweight lock screw
2
6
7 Counterweight rod
3
5
8 Dec. lock knob
9 Dec. axis scale
a Accessory tray
b Tripod leg
c Height adjustment clamp
b
a
c
DE
СZ
A Okular
A Okulár
B Diagonalspiegel
B Diagonální zrcátko
C Fokussierrad
C Zaostřovací šroub
1 Rektaszensionsskala
1 Stupnice osy rektascenze
2 Rektaszensions-Feinabstimmung
2 Ovládání jemného nastavení rektascenze
3 Polhöhen-Stellschraube
3 šroub nastavení zeměpisné šířky
4 Azimut-Stellknopf
4 Šroub nastavení azimutu
5 Gegengewicht
5 Protiváha
6 Gegengewichts-Halteschraube
6 Aretační šroub protiváhy
7 Gegengewichtsstange
7 Tyč protiváhy
8 Deklinations-Arretierung
8 Aretační šroub osy deklinace
9 Deklinationsskala
9 Stupnice osy deklinace
a Zubehörablage
a Odkládací přihrádka pro příslušenství
b Stativbein
b Noha stativu
c Sicherungsschraube
c Svorka výškového nastavení
3

A
RU
A Окуляр
B Диагональное зеркало
9
C Ручка фокусировки
1 Координатный круг прямого восхождения
1
B
2 Ручка управления тонкими движениями по оси
C
склонения
8
3 Фиксатор широты места наблюдения
7
4 Фиксатор азимута
4
2
5 Противовес
6
6 Винт фиксации противовеса
3
5
7 Ось противовеса
8 Фиксатор оси склонения
9 Координатный круг склонения
a Лоток для аксессуаров
b Ножка треноги
c Фиксатор высоты ножек треноги
b
a
c
PL
UA
A Okular
A Окуляр
B Lustro ukośne
B Діагональне дзеркало
C Pokrętło ustawiania ostrości
C Ручка фокусування
1 Skala osi rektascensji
1 Шкала вісі прямого піднесення
2 Pokrętło mikroruchów w osi rektascensji
2 Вузол управління повільним рухом прямого
3 Śruba młoteczkowa regulacji w poziomie
піднесення
4 Pokrętło regulacji w poziomie
3 Т-болт налаштування широти
5 Przeciwwaga
4 Ручка налаштування азимута
6 Śruba blokująca przeciwwagi
5 Противага
7 Pręt przeciwwagi
6 Гвинт блокування противаги
8 Pokrętło blokujące w osi deklinacji
7 Стержень противаги
9 Skala osi deklinacji
8 Ручка блокування схилення
a Tacka na akcesoria
9 Шкала вісі схилення
b Noga statywu
a Лоток для аксесуарів
c Zacisk regulacji wysokości
b Ніжка триноги
c Скоба налаштування висоти
4
1
2
33
34
5

35
EN
Altitude adjustment knob
1
4
СZ
Šroub nastavení elevace
3
DE
Höhenwinkel-Stellknopf
PL
2
Pokrętło regulacji w pionie
RU
Винт регулировки высоты
UA
Гвинт налаштування висоти
EN
Brightness control
1
2
СZ
Regulátor jasu
DE
Helligkeitsregler
PL
Pokrętło regulacji jasności
RU
Регулятор яркости
UA
Вузол управління яскравістю
5
36
EN
Azimuth adjustment knob
EN
Scope
EN
Battery compartment cover
3
4
5
СZ
Šroub nastavení azimutu
СZ
Hledáček
СZ
Kryt prostoru pro baterii
DE
Azimut-Stellknopf
DE
Visier
DE
Batteriefachdeckel
PL
Pokrętło regulacji w poziomie
PL
Szukacz
PL
Pokrywa komory baterii
RU
Винт регулировки азимута
RU
Искатель
RU
Крышка батарейного отсека
UA
Гвинт налаштування азимута
UA
Шукач
UA
Кришка відділення батарей
6

5
1
4
7
2
6
8
7
3
EN
R.A. adjustment
EN
Dec. adjustment
1
5
СZ
Nastavení rektascenze
СZ
Nastavení deklinace
DE
Rektaszensionseinstellung
DE
Deklinationseinstellung
PL
Regulacja w osi rektascensji
PL
Regulacja w osi deklinacji
RU
Фиксатор прямого восхождения
RU
Фиксатор оси склонения
UA
Налаштування прямого сходження
UA
Налаштування схилення
EN
Altitude adjustment (up-down)
EN
R.A. ne adjustment
2
6
СZ
Nastavení elevace (nahoru-dolů)
СZ
Jemné nastavení rektascenze
DE
Höhenwinkeleinstellung (auf/ab)
DE
Rektaszensions-Feineinstellung
PL
Regulacji w pionie (góra – dół)
PL
Dokładna regulacja w osi rektascensji
RU
Регулировка высоты (вверх-вниз)
RU
Тонкая регулировка прямого восхождения
UA
Налаштування висоти (вверх-вниз)
UA
Точне налаштування прямого сходження
EN
Azimuth adjustment (left-right)
EN
R.A. adjustment
3
7
СZ
Nastavení azimutu (doleva-doprava)
СZ
Nastavení rektascenze
DE
Azimuteinstellung (links/rechts)
DE
Rektaszensionseinstellung
PL
Regulacji w poziomie (lewo – prawo)
PL
Regulacja w osi rektascensji
RU
Регулировка азимута (влево-вправо)
RU
Фиксатор прямого восхождения
UA
Налаштування азимуту (вліво-вправо)
UA
Налаштування прямого сходження
EN
R.A. scale
EN
Dec. ne adjustment
4
8
СZ
Stupnice rektascenze
СZ
Jemné nastavení deklinace
DE
Rektaszensionsskala
DE
Deklinations-Feineinstellung
PL
Dokładna regulacja w osi deklinacji
PL
Skala osi rektascensji
RU
Шкала прямого восхождения
RU
Тонкая регулировка склонения
UA
Шкала прямого сходження
UA
Точне налаштування схилення
EN
Diagonal mirror
1
СZ
Diagonální zrcátko
DE
Diagonalspiegel
PL
Lustro ukośne
RU
Диагональное зеркало
UA
Діагональне дзеркало
EN
Barlow lens
2
СZ
Barlowova čočka
3
DE
Barlow-Linse
PL
Soczewka Barlowa
RU
Линза Барлоу
UA
2
Лінза Барлов
EN
Eyepiece
1
3
СZ
Okulár
DE
Okular
PL
Okular
8
RU
Окуляр
UA
Окуляр
7

9
10
EN
Big Dipper
EN
NCP
1
4
1
СZ
Velká medvědice
СZ
NCP
6
DE
Großer Wagen
DE
NHP
PL
Wielka Niedźwiedzica
PL
NCP
RU
Большая Медведица
RU
СНП
UA
Велика Ведмедиця
UA
NCP
2
EN
Little Dipper
EN
Cassiopeia
2
5
СZ
Malý medvěd
СZ
Kasiopeja
DE
Kleiner Wagen
DE
Kassiopeia
PL
Mała Niedźwiedzica
PL
Kasjopeja
4
3
RU
Малая Медведица
RU
Кассиопея
UA
Мала Ведмедиця
UA
Кассіопея
EN
Polaris
3
EN
β Crucis
6
СZ
Polárka
СZ
β Crucis
DE
Polarstern
DE
β Crucis
5
PL
Gwiazdą Polarną
PL
β Crucis
RU
11
Полярная звезда
RU
β Crucis
UA
Полярна зірка
UA
β Хреста
EN
R.A. lock knob
1
СZ
Aretační šroub osy rektascenze
DE
Rektaszensions-Arretierung
2
PL
Pokrętło blokujące w osi rektascenji
1
RU
Фиксатор оси прямого восхождения
UA
Ручка блокування прямого піднесення
EN
R.A. settling circle
2
3
СZ
Kruh pro nastavení osy rektascenze
DE
Rektaszensions-Teilkreis
PL
Tarcza ze współrzędnymi rektascensji
RU
Установочный круг прямого восхождения
UA
Круг налаштування прямого піднесення
12
EN
Arrow
3
СZ
Šipka
DE
Pfeil
PL
Strzałka
RU
Стрелка
UA
Стрілка
8

1
12
10
8
6
13
3
2
5
9
4
11
13
7
EN
Zenith
EN
Meridian line
EN
Latitude
EN
Nadir
EN
N E S W
1
2
3
4
5
СZ
Zenit
СZ
Poledník
СZ
Zeměpisná šířka
СZ
Nadir
СZ
S V J Z
DE
Zenit
DE
Meridianlinie
DE
Breite
DE
Nadir
DE
N O S W
PL
Zenit
PL
Południk niebieski
PL
Szerokość
PL
Nadir
PL
N E S W
RU
Зенит
RU
Линия меридиана
RU
Широта
RU
Надир
RU
С В Ю З
UA
Зеніт
UA
Лінія меридіану
UA
Широта
UA
Надир
UA
ПВН С ПВД З
EN
Right Ascension
EN
Plane of Celestial Equator
EN
Polaris
6
7
8
СZ
Rektascenze
СZ
Rovina nebeského rovníku
СZ
Polárka
DE
Rektaszension
DE
Himmelsäquatorebene
DE
Polarstern
PL
Rektascensja
PL
Równik niebieski
PL
Gwiazdą Polarną
RU
Прямое восхождение
RU
Плоскость небесного экватора
RU
Полярная звезда
UA
Пряме піднесення
UA
Площина небесного екватора
UA
Полярна зірка
EN
Plane of local horizon
EN
Object you are viewing
EN
Apparent movement of stars
9
10
11
СZ
Rovina lokálního horizontu
СZ
Pozorovaný objekt
СZ
Zdánlivý pohyb hvězd
DE
Lokale Horizontebene
DE
Betrachtetes Objekt
DE
Scheinbare Sternbewegung
PL
Płaszczyzna horyzontu
PL
Obserwowany obiekt
PL
Pozorny ruch gwiazd
RU
Плоскость местного горизонта
RU
Наблюдаемый объект
RU
Видимое движение звезд
UA
Площина місцевого горизонту
UA
Об’єкт, який
UA
Видиме переміщення зірок
спостерігається
EN
Mount aligned on North Celestial Pole
EN
Declination
12
13
СZ
Montáž nastavená na severní nebeský pól
СZ
Deklinace
DE
Am nördlichen Himmelspol ausgerichtete Montierung
DE
Deklination
PL
Montaż ustawiony na północny biegun niebieski
PL
Deklinacja
RU
Монтировка выровнена на Северный небесный полюс
RU
Склонение
UA
Кріплення, вирівняне на Північний небесний полюс
UA
Схилення
EN
Focuser
EN
Extender
1
3
СZ
Okulárový výtah
СZ
Nástavec
DE
Okularauszug
DE
Verlängerung
PL
Tubus ogniskujący
PL
Przedłużenie
RU
Фокусер
RU
Экстендер (удлинитель фокуса)
UA
Фокусувач
UA
Розширювач
1
EN
Eyepiece holder
EN
T-adapter
EN
Camera
2
4
5
СZ
Držák okuláru
СZ
T-adaptér
СZ
Fotoaparát
DE
Okularhalterung
DE
T-Adapter
DE
Kamera
2 3 4
PL
Wyciąg okularowy
PL
T-adapter
PL
Aparat
5
RU
Держатель окуляра
RU
Т-адаптер
fotograczny
14
UA
Держак окуляра
UA
Т-подібний
RU
Камера
адаптер
UA
Фотокамера
9
Levenhuk Strike 900 PRO Telescope PDF User Guides and Manuals for Free Download: Found (2) Manuals for Levenhuk Strike 900 PRO Device Model (Manual , Operation & User’s Manual)
The Levenhuk Strike 900 PRO is an exceptional product that stands out in the world of microscopy. Designed for enthusiasts and professionals alike, it offers a refined experience for both educational and research purposes. This microscope strikes a perfect balance between affordability and advanced features, making it a worthwhile investment. In this review, we’ll explore various aspects of the Levenhuk Strike 900 PRO, from its design to its optical performance, to help you understand why it’s gaining popularity among users.
One of the first aspects that draw attention is the sleek design and build quality of the Levenhuk Strike 900 PRO. The microscope features a robust metal body that ensures durability while keeping the weight manageable. The adjustable LED illumination system is a notable highlight, allowing users to achieve optimal lighting for their specimens. The design is not only functional but also aesthetically pleasing, making it a great addition to any lab or educational setting.
When it comes to optics, the Levenhuk Strike 900 PRO doesn’t disappoint. It comes equipped with high-quality glass optics, delivering clear and crisp images. The optical system is capable of magnifying specimens from 40x to 400x, which is perfect for detailed examinations. The achromatic lenses are designed to minimize chromatic aberration, ensuring that colors remain true and vibrant. This level of optical performance is crucial for anyone serious about microscopy.
Key Features of the Levenhuk Strike 900 PRO:
- High-quality glass optics with 40x to 400x magnification.
- Durable metal construction for longevity.
- Adjustable LED illumination for optimal lighting.
- Wide field of view, providing a better perspective on specimens.
- Stage clips and mechanical stage for enhanced specimen tracking.
- Easily customizable with additional eyepieces and filters.
Another advantage of the Levenhuk Strike 900 PRO is its user-friendly design. The adjustable mechanical stage is a game-changer, as it allows for precise movement of specimens without the need to reposition the microscope. Furthermore, the built-in coaxial focus mechanism ensures smooth and accurate focusing, elevating the user experience. These features are particularly beneficial for students who may be new to microscopy, as they ease the learning curve associated with using advanced equipment.
The microscope also comes with a comprehensive set of accessories, including prepared slides and a user manual that guides you through setup and operation. This inclusion significantly enhances the overall value of the Levenhuk Strike 900 PRO. Whether you’re an experienced microscopist or a beginner, having everything you need in one package makes the experience much more convenient.
However, no product is without its drawbacks. While the Levenhuk Strike 900 PRO offers remarkable features, its weight could pose a challenge for frequent transportation or field studies. Additionally, while it supports various eyepiece options, users looking for extreme magnification might find the upper limit of 400x a bit restrictive. Nonetheless, for the vast majority of applications, this microscope performs admirably.
In conclusion, the Levenhuk Strike 900 PRO is a robust and versatile microscope ideal for both education and research. Its excellent build quality, optical performance, and user-friendly features make it a standout product in its category. Whether you are a student, hobbyist, or professional researcher, you will find that this microscope meets your needs with aplomb. If you are looking for a reliable piece of equipment that won’t break the bank while still offering superb functionality, the Levenhuk Strike 900 PRO should certainly be on your radar.
FAQ: Types of Manuals and Their Contents
Levenhuk Strike 900 PRO Manuals come in various types, each serving a specific purpose to help users effectively operate and maintain their devices. Here are the common types of Levenhuk Strike 900 PRO User Guides and the information they typically include:
- User Manuals: Provide comprehensive instructions on how to use the device, including setup, features, and operation. They often include troubleshooting tips, safety information, and maintenance guidelines.
- Service Instructions: Designed for technicians and repair professionals, these manuals offer detailed information on diagnosing and repairing issues with the device. They include schematics, parts lists, and step-by-step repair procedures.
- Installation Guides: Focus on the installation process of the device, providing detailed instructions and diagrams for proper setup. They are essential for ensuring the device is installed correctly and safely.
- Maintenance Manuals: Provide guidance on routine maintenance tasks to keep the device in optimal condition. They cover cleaning procedures, part replacements, and regular servicing tips.
- Quick Start Guides: Offer a concise overview of the essential steps needed to get the device up and running quickly. They are ideal for users who need immediate assistance with basic setup and operation.
Each type of Levenhuk Strike 900 PRO instruction is designed to address specific needs, ensuring users have the necessary information to use, maintain, and repair their devices effectively.
Related Instructions for Levenhuk Strike 900 PRO:
3
DTX 500 Mobi
100
388
74
4
Wezzer BASE L60
15
778
179
7
Ra 200N F5 OTA
40
371
86
10
MED 20 Series
36
265
59
Telescope Devices by Other Brands:
|
Orion 23013 Instruction Manual Orion 23013 User Manual (Instruction manual), @6W8L1T IN 055 Rev B 0199 26 Oct 2024 | 12 |
|
|
Seben 900/60 Owner’s Manual Seben Telescope Owner’s manual (File: seben-90060-owner-s-manual-13, Sat 11.2024) Seben Star Commander 900-60 Refractor Telescope 23 Nov 2024 | 13 |
|
|
Bresser Skylux 70 Instruction Manual PDF User Guide (@N9MK6Q), Bresser Skylux 70 Telescope (Fri 03.2025) Skylux 70/700 07 Mar 2025 | 64 |
|
|
Meade Infinity Quick Start Manual Meade Infinity Guide (Quick start manual), @VY298R Attach red-dot finder 28 Dec 2024 | 2 |
Categories:
Science Education products
Magnifiers
Weather Station
3D Glasses
Kitchen Appliances
Sports & Outdoors