
Главная » Телескопы Levenhuk » Телескопы Levenhuk Skyline (архив) » Телескоп Levenhuk Skyline 130х900 EQ
|
|
Levenhuk Рефлектор Ньютона. Апертура: 130 мм. Фокусное расстояние: 900 мм.
|
Телескоп Levenhuk Skyline 130х900 EQ – это рефлектор
Ньютона, сочетающий сравнительно небольшие габариты трубы
и большую апертуру. В первую очередь, его можно
рекомендовать наблюдателям, занимающимся в основном
поиском и наблюдением тусклых объектов близкого и
далекого космоса – комет, туманностей, галактик, звездных
скоплений. Впрочем, благодаря сравнительно большому
фокусному расстоянию и отсутствию хроматической аберрации
(искажений цветопередачи), телескоп не разочарует и при
наблюдении деталей на дисках планет и подробностей лунной
поверхности. Экваториальная монтировка телескопа позволит
удобно сопровождать суточное движение объекта. При этом
телескоп остается достаточно легким и небольшим по
размерам, чтобы не быть обременительным при автомобильном
выезде под темное и прозрачное загородное небо.
Зеркала телескопа имеют защитное покрытие, которое
обеспечит многолетнюю работу инструмента. Прочная и
легкая алюминиевая труба установлена на экваториальную
монтировку, оснащенную ручками тонких движений и
допускающую установку электропривода часовой оси
(приобретается отдельно). Такая монтировка имеет
специальные координатные круги, с помощью которых, после
несложной настройки, можно находить объекты по их
экваториальным небесным координатам, а также сопровождать
суточное движение объекта вращением только одной ручки.
Тренога регулируется по высоте и имеет удобную полочку
для принадлежностей, оптический искатель с 6-кратным
увеличением позволит быстро навести телескоп на нужный
участок неба. С телескопом поставляются 2 окуляра,
имеющие поле зрения 52 градуса и фокусные расстояния 10
мм и 25 мм, и дающие с телескопом увеличение 90 и 36
крат. Линзы окуляров изготовлены из стекла и имеют
многослойное просветление. Входящая в комплект линза
Барлоу позволяет поднять увеличение телескопа до 180х.
Реечное фокусировочное устройство имеет посадочный
диаметр под окуляры стандарта 1,25” (31,75 мм), и
позволяет использовать с телескопом множество других,
имеющихся на рынке, окуляров, помимо входящих в комплект,
чтобы получать другие увеличения вплоть до максимально
полезного 260 крат.
Основные особенности:
- Рефлектор Ньютона с апертурой 130 мм при довольно
компактной трубе - Просветляющее и защитное покрытие на зеркалах
телескопа - Экваториальная монтировка для удобного ведения
небесных объектов - Легкая алюминиевая тренога с регулировкой
высоты - Набор дополнительных аксессуаров в комплекте
- Подходит для наблюдения объектов дальнего космоса
и изучения планет и спутников
Комплектация:
- Телескоп Levenhuk Skyline 130х900 EQ
- Монтировка экваториальная EQ2
- Тренога алюминиевая с лотком для аксессуаров
- Искатель оптический 6×24
- Окуляр 25 мм (36x)
- Окуляр 10 мм (90x)
- Линза Барлоу 2x
- Инструкция по эксплуатации и гарантийный
талон
Серия телескопов Skyline создавалась для тех, кто
хочет получить несложный в эксплуатации,
транспортабельный инструмент для визуальных
астрономических наблюдений. Как начинающие любители
астрономии, так и опытные наблюдатели, выбирающие
мобильный инструмент в дополнение к уже имеющимся,
останутся довольны характеристиками и комплектацией
телескопов этой серии.
Инструкция по сборке и настройке телескопа
Levenhuk Skyline EQ:
|
Тип телескопа |
рефлектор |
|
Оптическая схема |
Ньютона |
|
Покрытие оптики |
диоксид кремния |
|
Диаметр главного зеркала (апертура), мм |
130 |
|
Форма линзы (зеркала) |
сферическая |
|
Фокусное расстояние, мм |
900 |
|
Максимальное полезное увеличение, крат |
260 |
|
Светосила (относительное отверстие) |
f/6,9 |
|
Разрешающая способность, угл. секунд |
1,1 |
|
Проницающая способность (звездная величина, приблизительно) |
12,5 |
|
Окуляры в комплекте |
SUPER 25 мм (36x) SUPER 10 мм (90x) |
|
Посадочный диаметр окуляров, дюймов |
1,25 |
|
Линза Барлоу в комплекте |
2x |
|
Искатель |
оптический, 6х24 |
|
Фокусер |
односкоростной, реечный, 1,25 |
|
Тренога |
алюминиевая |
|
Высота треноги, мм |
регулируемая, 700–1270 |
|
Тип управления телескопом |
ручной |
|
Тип монтировки |
экваториальная, немецкого типа, EQ2 |
|
Уровень пользователя |
для опытных |
|
Предмет наблюдения |
объекты дальнего космоса |
Телескоп Levenhuk Skyline 130х900 EQ — Всего: 19
2 17
Анна
(2020-11-04 12:58):
Подскажите пожалуйста,подходит ли для данного телескопа линза Барлоу Bresser 3x,1,25” ахроматическая?
Ответ:
Линза Барлоу Bresser 3x,1,25” ахроматическая подходит к телескопу Levenhuk Skyline 130х900 EQ.
Леонид
(2018-11-20 08:27):
Подойдёт ли этот телескоп для наблюдения планет солнечной системы?
Ответ:
Телескоп Levenhuk Skyline 130х900 EQ, рассчитан на наблюдения за объектами дальнего космоса. Для наблюдения за планетами, обратите внимание на телескоп Levenhuk Skyline 90х900 EQ, https://www.levenhuk.ru/products/levenhuk_skyline_90x900eq/ .
Николай
(2017-05-04 09:58):
Добрый день! В характеристиках указано Предмет наблюдения — объекты дальнего космоса. Можете более подробно объяснить, что к ним относится и удобно ли наблюдать планеты солнечной системы в данный телескоп? Какие Предметы наблюдения (разделы) ещё есть?
Ответ:
В телескоп Levenhuk Skyline 130х900 EQ можно наблюдать планеты Солнечной системы. К объектам глубокого космоса относятся: туманности, галактики, звездные скопления и т.д. Предметы наблюдения: объекты дальнего космоса, планеты Солнечной системы, наземные объекты.
Вадим
(2014-10-23 11:06):
Здравствуйте! подскажите, пож-та, должен ли регулятор тонких движений по оси прямого восхождения вращаться только если прилагать значительные усилия. Когда на монтировке отсутствует телескоп и противовес, она поворачивается без усилий. http://i.imgur.com/EoU5f96.png
Ответ:
Необходимо пользоваться ручками тонких движений. Возможно, сложность заключается в том что нет балансировки и также стоит отметить что не должны быть сильно затянуты винты фиксирующие оси.
Анастасия
(2014-09-09 09:25):
Скажите пожалуйста, а какие светофильтры подойдут на этот телескоп?
Ответ:
С посадочным диаметром 1,25”, например набор светофильтров Levenhuk F8 «Солнечная система»: http://www.levenhuk.ru/products/levenhuk-ra-filters-set-f8/.
Марина
(2014-07-19 03:28):
Получила в подарок, достойно справляется с моими запросами.
Вопрос: какой аксессуар следует приобрести для фото на Sony Alpha через Levenhuk Skyline 130х900?
Подойдёт ли Т-кольцо Bresser (M42x0,75)?
Ответ:
Спасибо за Ваш отзыв. Да, Т-кольцо Bresser для камер Minolta 7000, Sony Alpha подойдет.
Валерий
(2014-07-05 06:24):
Подскажите пожалуйста, более функционален, в том числе и для наблюдения объектов дальнего коспоса будет этот аппарат иил Levenhuk Strike 950 PRO?
Ответ:
Levenhuk Strike 950 PRO будет более функционален, т.к. в него можно смотреть не только объекты дальнего космоса, но и планеты.
Алексей
(2012-12-19 02:04):
Алексей (2012-01-03 08:10):
LEVENHUK Skyline 130х900 EQ какой окуляр надо приобрести что бы заниматься астрофотографией с Nikon.
Ответ:
Вам понадобится Т-кольцо Bresser для камер Nikon http://www.4glaza.ru/products/bresser_accessories_4920000/
И Снова добрый день.
Приобрел Е адаптер. — фокуса нет.
Приобрел линзу Барлоу с резьбой для Т адаптера- фокус есть — НО!!! увеличение в 2 раза. Луна помещается только в 2-3 кадрах.
Ответ:
Спасибо за Ваш отзыв.
Игорь
(2012-08-25 05:02):
Можно ли получить увеличение больше 260, если, к примеру, прицепить линзу Барлоу с 5-и кратным увеличением? Что в этом случае случиться с изображением? Совсем-ли негодным для наблюдений оно станет?
Ответ:
Можно, но это нецелесообразно, для этого будет нужен окуляр 17,3 мм. Для этой модели наиболее оптимально подойдет 2х ЛБ.
Alex
(2012-04-10 04:48):
Добрый день.
Как-то разочарован полностью данным аппаратом, о каких дисках планет идет речь в описании, когда даже с окуляром увеличением 90 практически ничего на луне не видно. Юстировка не причем — все четко, но увеличения не хватает. Планета выглядит как кружок 3-5 мм радиусом. Практически ничего разглядеть невозможно. Это так и должно быть?
Ответ:
Получаемая картинка зависит от условий наблюдений, также рекомендуем Вам использовать при наблюдениях комплектную линзу Барлоу 2х.
Александр
(2012-03-31 04:25):
Если сравнивать данный телескоп с русскими телескопами. С каким можно сравнить
Ответ:
Уточните, пожалуйста, какие именно марки российских производителей Вы имеете в виду?
Алексей
(2012-01-06 09:00):
фокусировка от автомобиля на улице до луны и дальше — невозможна. нехватает минимального расстояния. По этому я и спрашиваю — в прямом фокусе неполучается, значит нужен какой то окуляр?
Ответ:
Использование камеры и окуляра совместно невозможно.
Алексей
(2012-01-05 08:45):
Алексей (2012-01-03 08:10):
LEVENHUK Skyline 130х900 EQ какой окуляр надо приобрести что бы заниматься астрофотографией с Nikon.
Ответ:
Вам понадобится Т-кольцо Bresser для камер Nikon http://www.4glaza.ru/products/bresser_accessories_4920000/
Кольцо есть. Нехватает фокуса фотоаппарата.
Ответ:
Установка зеркальной фотокамеры, не предусматривает установки окуляра. Фотоаппарат Вы устанавливаете без окуляра и без объектива.
Алексей
(2012-01-03 08:10):
LEVENHUK Skyline 130х900 EQ какой окуляр надо приобрести что бы заниматься астрофотографией с Nikon.
Ответ:
Вам понадобится Т-кольцо Bresser для камер Nikon http://www.4glaza.ru/products/bresser_accessories_4920000/
Юрис
(2011-10-11 12:23):
А что такое юстировка?
Ответ:
Юстировка это настройка помогающая быстро выровнять первичное и вторичное зеркала рефлектора Ньютона.
Юрис
(2011-10-09 01:50):
Помогите Пожалуйста ! Купил телескоп СELESTRON OMNI 150 дождался ясной погоды, вынес его на балкон и приступил к наблюдению луны. Видимость луны была идеальной. Через три дня я захотел еще посмотреть в телескоп, но не смог его настроить луна была мутной и у меня не получалось настроить резкость, после чего мне пришлось убрать его в коробку. Подскажите в чем причина? и как настроить фокус ?
Ответ:
Вероятно, требуется юстировка телескопа.
Сади
(2011-09-04 11:41):
Помогите пожалуйста! Не могу выбрать между LEVENHUK Skyline 130х900 EQ и LEVENHUK Astro L230 EQ! Мне нужно высокая четкость и, что бы далеко видел! И еще бы хотелось но не обязательно что бы можно было делать фотки! Помогите пожалуйства заранее спасибо!
Ответ:
LEVENHUK Skyline 130х900 EQ будет предпочтительнее, т.к. он имеет 130мм апертуру и надежную конструкцию. Т-резьба на окулярном узле есть, зеркалку повесить на него можно.
Никита
(2011-05-27 10:32):
Ещё вопрос! Имеет ли смысл сравнивать эту модель с BRESSER Pollux 150/1400 EQ2? Точнее сказать великали разница, в качестве и дальности видения? Что предпочтительнее? Может стоит ограничится LEVENHUK Skyline 130х900 EQ?
Ответ:
Имеет смысл. Разница велика. BRESSER Pollux 150/1400 EQ2 мощнее этой модели, и, соответственно дороже.
Никита
(2011-05-23 11:35):
Здравствуйте! А можно ли в данный телескоп наблюдать за солнцем?
Ответ:
Это возможно с использованием солнечного фильтра.
далее
Добавить вопрос/отзыв о Телескоп Levenhuk Skyline 130х900 EQ
:

Levenhuk Skyline EQ Telescopes
Levenhuk Skyline 70х900 EQ
Levenhuk Skyline 90х900 EQ
Levenhuk Skyline 130х900 EQ
Levenhuk Skyline 120х1000 EQ
User Manual
Návod k použití
Bedienungsanleitung
Instrukcja obsługi
Инструкция по эксплуатации
Посібник користувача
Radost zaostřit
Mit Vergnügen näher dran!
Radość przybliżania
Приближает с удовольствием
Наближує з радістю


Levenhuk Skyline EQ Telescopes
СZ
Zrcadlový teleskop (reektor)
A. Sekundární zrcátko
B. Prachové víčko
C. Tubus okulárového výtahu
D. Konzola pointačního dalekohledu
E. Pointační dalekohled
F. Šrouby konzol pointačního dalekohledu:
G. Okulár
H. Zaostřovací šroub
I. Piggyback foto držák
J. Optický tubus
K. Primární zrcátko
1. Stupnice osy rektascenze
2. Ovládání jemného nastavení deklinace
3. Šroub nastavení zeměpisné šířky
4. Aretační šroub zeměpisné šířky
5. Ovládání jemného nastavení rektascenze
6. Protiváha
7. Aretační šroub protiváhy
8. Tyč protiváhy
9. Aretační šroub osy rektascenze
10. Stupnice osy deklinace
11. Aretační šroub osy deklinace
12. Objímky
a. Odkládací přihrádka pro příslušenství
b. Noha stativu
DE
Reector
A. Sekundärspiegel
B. Staubschutzkappe
C. Okularauszug
D. Sucherrohr-Halterung
E. Sucherrohr
F. Stellschrauben
G. Okular
H. Fokussierrad
I. Huckepackschiene
J. Teleskoptubus
K. Primärspiegel
1. Rektaszensionsskala
2. Deklinations-Feinabstimmung
3. Polhöhen-Stellschraube
4. Azimut-Arretierung
5. Rektaszensions-Feinabstimmung
6. Gegengewicht
7. Gegengewichts-Halteschraube
8. Gegengewichtsstange
9. Rektaszensions-Arretierung
10. Deklinationsskala
11. Deklinations-Arretierung
12. Rohrschellen
a. Zubehörablage
b. Stativbein
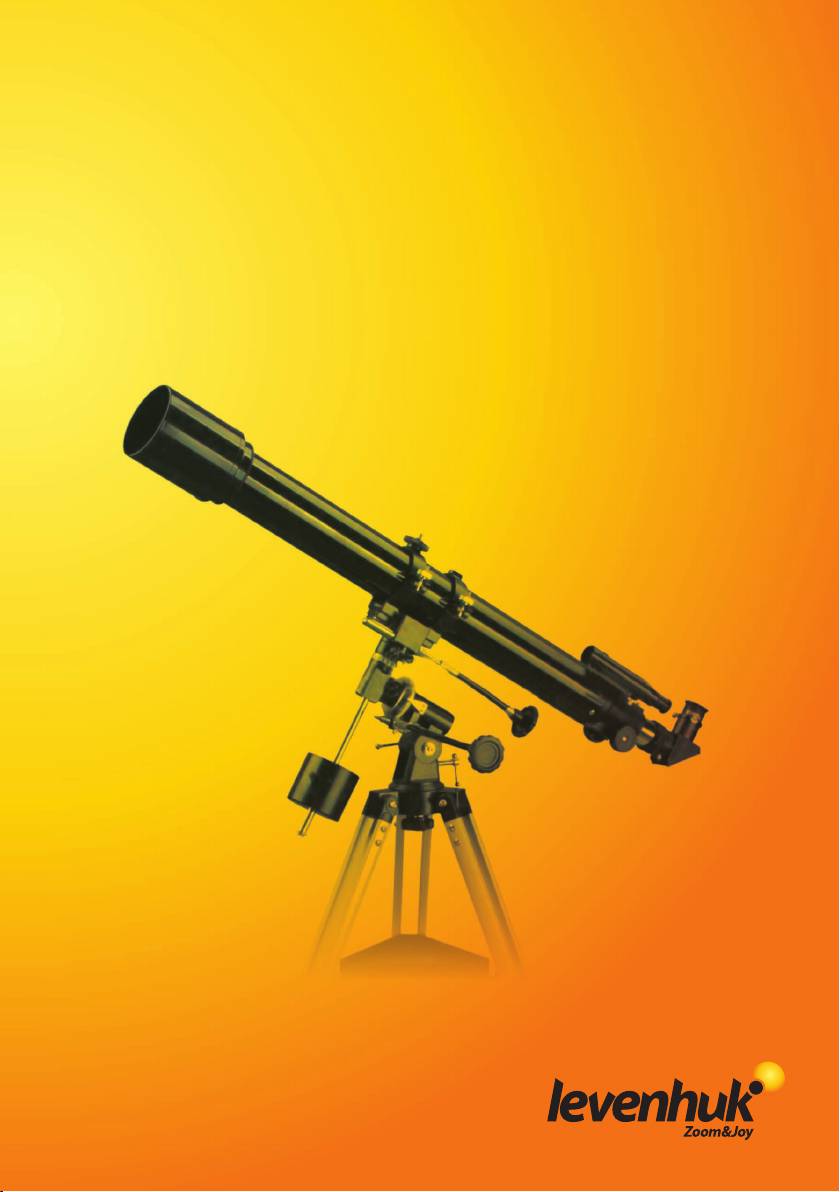
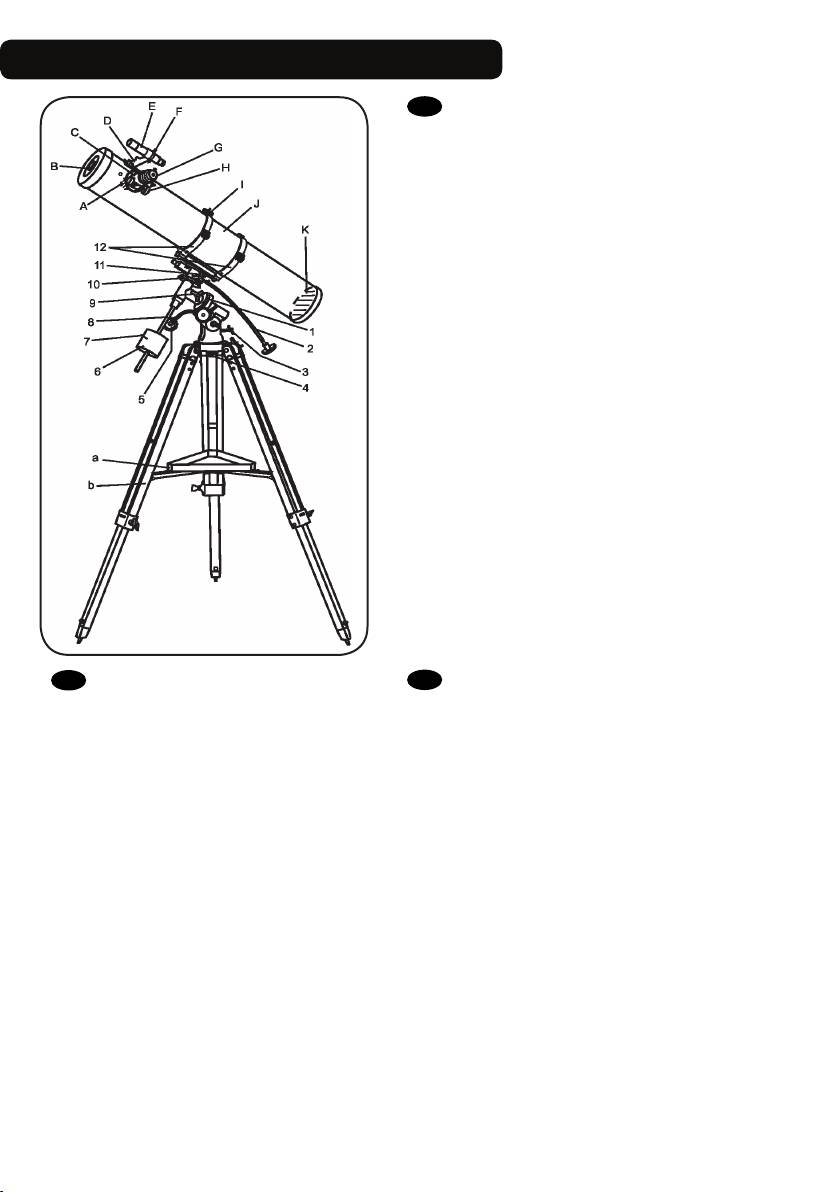
EN
Reector
A. Secondary mirror
B. Dust cap
C. Focuser tube
D. Finderscope bracket
E. Finderscope
F. Adjustment screws:
G. Eyepiece
H. Focusing knob
I. Piggyback bracket
J. Telescope tube
K. Primary mirror
1. R.A. axis scale
2. Dec. slow-motion control
3. Altitude adjustment T-bolt
4. Azimuth lock knob
5. R.A. slow-motion control
6. Counterweight
7. Counterweight lock screw
8. Counterweight rod
9. R.A. lock knob
10. Dec. axis scale
11. Dec. lock knob
12. Ring clamps
a. Accessory tray
b. Tripod leg

PL UA
Teleskop zwierciadlany
A. Lustro wtórne
B. Osłona przeciwpyłowa
C. Tubus ogniskujący
D. Wspornik celownicy
E. Celownica
F. Śruby regulacyjne
G. Okular
H. Pokrętło ustawiania ostrości
I. Wspornik typu „piggyback”
J. Tubus teleskopu
K. Lustro główne
1. Skala osi rektascensji
2. Pokrętło mikroruchów w osi deklinacji
3. Śruba młoteczkowa regulacji w poziomie
4. Pokrętło blokujące teleskop w poziomie
5. Pokrętło mikroruchów w osi rektascensji
6. Przeciwwaga
7. Śruba blokująca przeciwwagi
8. Pręt przeciwwagi
9. Pokrętło blokujące w osi rektascensji
10. Skala osi deklinacji
11. Pokrętło blokujące w osi deklinacji
12. Zaciski pierścieni
a. Tacka na akcesoria
b. Noga statywu
RU
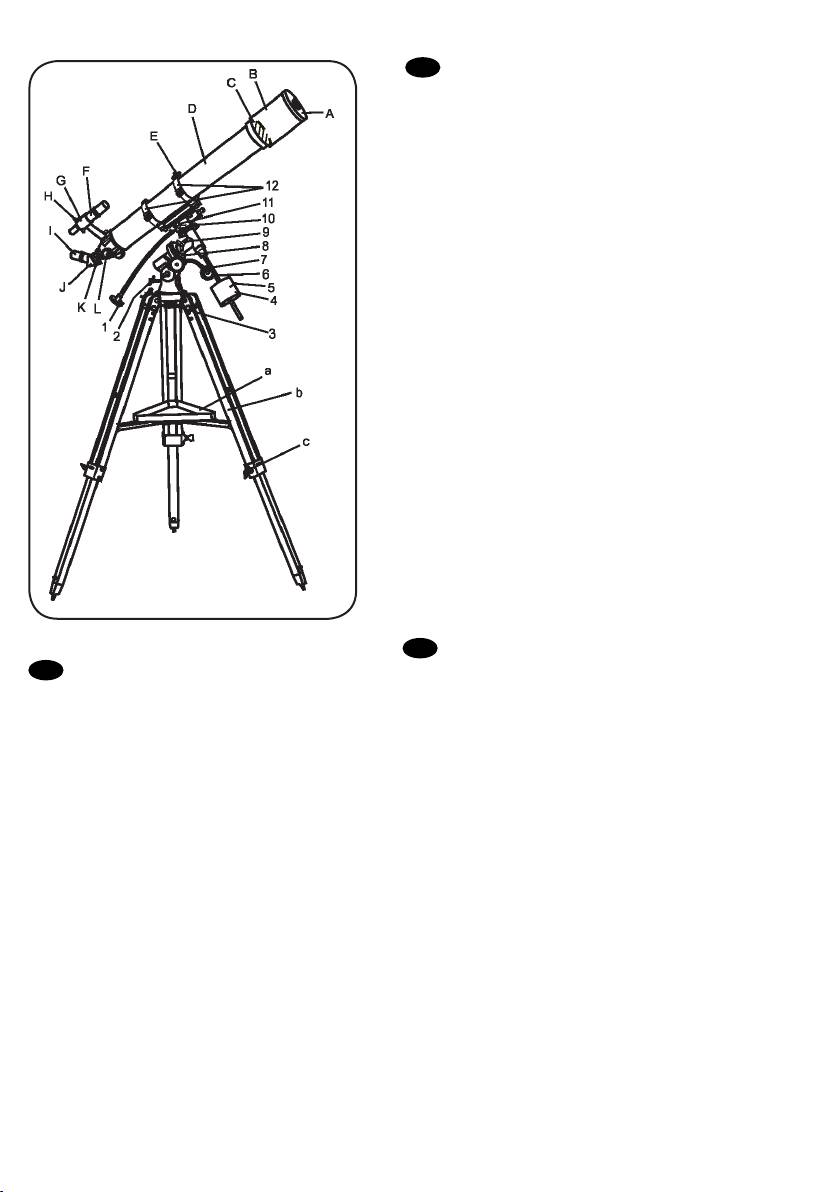
Tелескоп-рефлектор
A. Положение вторичного зеркала
B. Бленда
C. Фокусировочный узел
D. Крепление искателя
E. Искатель
F. Юстировочные винты искателя
G. Окуляр
H. Ручка фокусировки
I. Платформа для фотокамеры
J. Труба телескопа
K. Положение главного зеркала
1. Шкала оси прямого восхождения
2. Ручка управления тонкими движениями по оси
склонения
3. Регулировочный винт полярной оси по широте
места наблюдения
4. Фиксатор широты места наблюдения
5. Ручка управления тонкими движениями по оси
прямого восхождения
6. Противовес
7. Винт фиксации противовеса
8. Ось противовеса
9. Фиксатор оси прямого восхождения
10. Шкала оси склонения
11. Фиксатор оси склонения
12. Кольца трубы
a. Лоток для аксессуаров
b. Ножка треноги
Рефлектор
A. Вторинне дзеркало
B. Кришка від пилу
C. Труба фокусувача
D. Кронштейн видошукача
E. Видошукач
F. Регулювальні гвинти:
G. Окуляр
H. Ручка фокусування
I. Транспортний кронштейн
J. Труба телескопа
K. Первинне дзеркало
1. Шкала вісі прямого піднесення
2. Вузол управління повільним рухом схилення
3. Т-подібний болт налаштування висоти
4. Ручка блокування азимута
5. Вузол управління повільним рухом прямого
піднесення
6. Противага
7. Гвинт блокування противаги
8. Стержень противаги
9. Ручка блокування прямого піднесення
10. Шкала вісі схилення
11. Ручка блокування схилення
12. Скоби кілець
a. Лоток для аксесуарів
b. Ніжка триноги

Levenhuk Skyline EQ Telescopes
СZ
Čočkový teleskop (refraktor)
A. Prachové víčko
B. Rosnice
C. Čočka objektivu
D. Optický tubus
E. Piggyback foto držák
F. Pointační dalekohled
G. Konzola pointačního dalekohledu
H. Stavěcí šrouby
I. Okulár
J. Diagonální zrcátko
K. Tubus okulárového výtahu
L. Zaostřovací šroub
1. Ovládání jemného nastavení deklinace
2. Šroub nastavení zeměpisné šířky
3. Aretační šroub zeměpisné šířky
4. Protiváha
5. Aretační šroub protiváhy
6. Tyč protiváhy
7. Ovládání jemného nastavení rektascenze
8. Stupnice osy rektascenze
9. Aretační šroub osy rektascenze
10. Stupnice osy deklinace
11. Aretační šroub osy deklinace
12. Objímky
a. Odkládací přihrádka pro příslušenství
b. Noha stativu
c. Pojistný šroub
DE
Refractor
A. Staubschutzkappe
B. Taukappe
C. Objektivlinse
D. Optischer Tubus
E. Huckepackschiene
F. Sucherrohr
G. Sucherrohr-Halterung
H. Stellschrauben
I. Okular
J. Diagonalspiegel
K. Okularauszug
L. Fokussierrad
1. Deklinations-Feinabstimmung
2. Polhöhen-Stellschraube
3. Azimut-Arretierung
4. Gegengewicht
5. Gegengewichts-Halteschraube
6. Gegengewichtsstange
7. Rektaszensions-Feinabstimmung
8. Rektaszensionsskala
9. Rektaszensions-Arretierung
10. Deklinationsskala
11. Deklinations-Arretierung
12. Rohrschellen
a. Zubehörablage
b. Stativbein
c. Sicherungsschraube
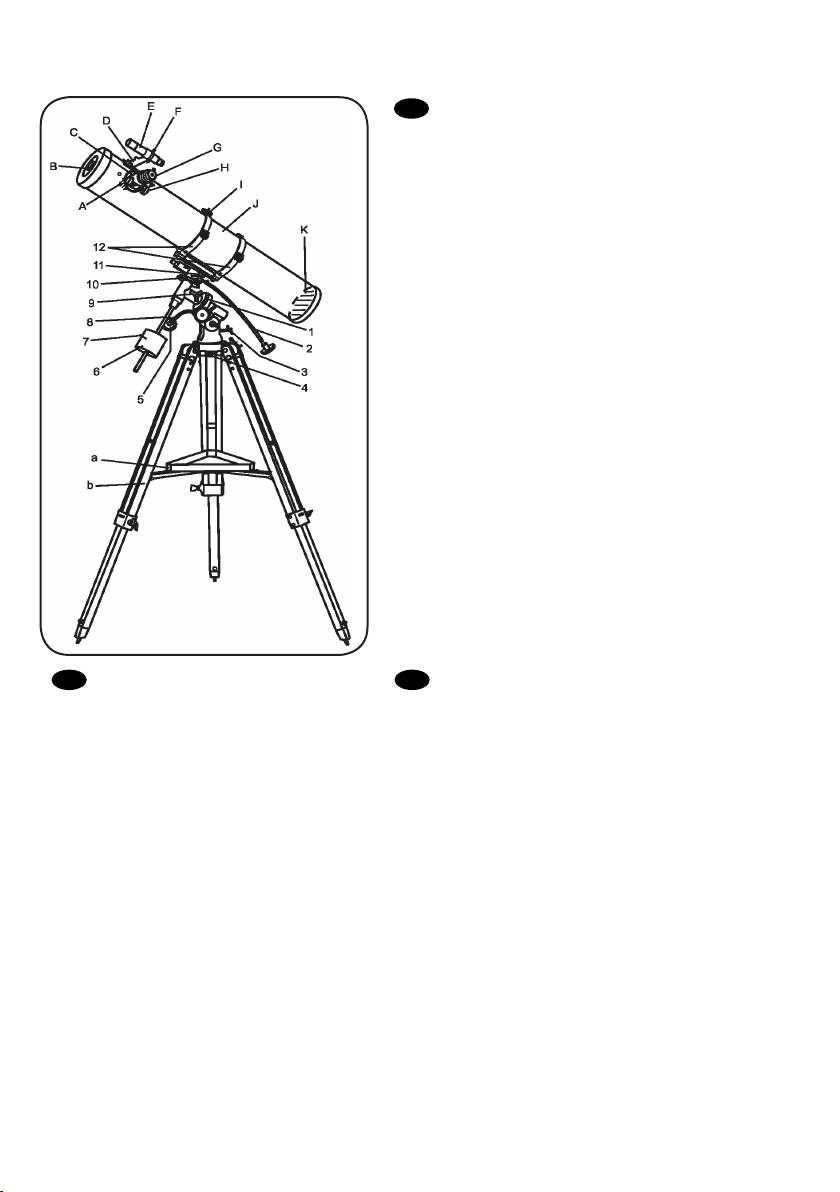
EN
Refractor
A. Dust cap
B. Dew cap
C. Objective lens
D. Optical tube
E. Piggyback bracket
F. Finderscope
G. Finderscope bracket
H. Adjustment screws
I. Eyepiece
J. Diagonal mirror
K. Focuser tube
L. Focusing knob
1. Dec. slow-motion control
2. Altitude adjustment T-bolt
3. Azimuth lock knob
4. Counterweight
5. Counterweight lock screw
6. Counterweight rod
7. R.A. slow-motion control
8. R.A. axis scale
9. R.A. lock knob
10. Dec. axis scale
11. Dec. lock knob
12. Ring clamps
a. Accessory tray
b. Tripod leg
c. Lock screw

RU
Tелескоп-рефрактор
A. Пылезащитная крышка
B. Бленда
C. Линза объектива
D. Труба телескопа
E. Платформа для фотокамеры
F. Искатель
G. Крепление искателя
H. Юстировочные винты искателя
I. Окуляр
J. Диагональное зеркало
K. Фокусировочный узел
L. Ручка фокусировки
1. Ручка управления тонкими движениями по оси
склонения
2. Регулировочный винт полярной оси по широте
места наблюдения
3. Ручка фиксатора широты места наблюдения
4. Противовес
5. Винт фиксации противовеса
6. Ось противовеса
7. Ручка управления тонкими движениями по оси
прямого восхождения
8. Шкала оси прямого восхождения
9. Фиксатор оси прямого восхождения
10. Шкала оси склонения
11. Фиксатор оси склонения
12. Кольца трубы
a. Лоток для аксессуаров
b. Ножка треноги
c. Фиксатор высоты ножек треноги
PL
Teleskop zwierciadlany
A. Osłona przeciwpyłowa
B. Odrośnik
C. Soczewka obiektywowa
D. Tuba optyczna
E. Wspornik typu „piggyback”
F. Celownica
G. Wspornik celownicy
H. Śruby regulacyjne
I. Okular
J. Lustro ukośne
K. Tubus ogniskujący
L. Pokrętło ustawiania ostrości
1. Pokrętło mikroruchów w osi deklinacji
2. Śruba młoteczkowa regulacji w poziomie
3. Pokrętło blokujące teleskop w poziomie
4. Przeciwwaga
5. Śruba blokująca przeciwwagi
6. Pręt przeciwwagi
7. Pokrętło mikroruchów w osi rektascensji
8. Skala osi rektascensji
9. Pokrętło blokujące w osi rektascensji
10. Skala osi deklinacji
11. Pokrętło blokujące w osi deklinacji
12. Zaciski pierścieni
a. Tacka na akcesoria
b. Noga statywu
c. Śruba blokująca
UA
Рефрактор
A. Кришка від пилу
B. Кришка від роси
C. Лінза об’єктива
D. Оптична труба
E. Транспортний кронштейн
F. Видошукач
G. Кронштейн видошукача
H. Регулювальні гвинти
I. Окуляр
J. Діагональне дзеркало
K. Труба фокусувача
L. Ручка фокусування
1. Вузол управління повільним рухом схилення
2. Т-подібний болт налаштування висоти
3. Ручка блокування азимута
4. Противага
5. Гвинт блокування противаги
6. Стержень противаги
7. Вузол управління повільним рухом прямого
піднесення
8. Шкала вісі прямого піднесення
9. Ручка блокування прямого піднесення
10. Шкала вісі схилення
11. Ручка блокування схилення
12. Скоби кілець
a. Лоток для аксесуарів
b. Ніжка триноги
c. Гвинт блокування

1
2
EN
long
1
СZ
dlouhý
DE
1
PL
RU
UA
lange
długi
длинный
довгий
EN
shot
2
СZ
krátký
DE
kurz
PL
krótki
RU
короткий
UA
короткий
2
33
54

6 7
8
4
1
2
EN
R.A. adjustment
1
СZ
Nastavení rektascenze
DE
Rektaszensionseinstellung
PL
Regulacja w osi rektascensji
RU
Фиксатор прямого восхождения
UA
Налаштування прямого сходження
EN
Altitude adjustment (up-down)
2
СZ
Nastavení elevace (nahoru-dolů)
DE
Höhenwinkeleinstellung (auf/ab)
PL
Regulacji w pionie (góra – dół)
RU
Регулировка высоты (вверх-вниз)
UA
Налаштування висоти (вверх-вниз)
EN
Azimuth adjustment (left-right)
3
СZ
Nastavení azimutu (doleva-doprava)
DE
Azimuteinstellung (links/rechts)
PL
Regulacji w poziomie (lewo – prawo)
RU
Регулировка азимута (влево-вправо)
UA
Налаштування азимуту (вліво-вправо)
5
3
EN
R.A. scale
4
СZ
Stupnice rektascenze
DE
Rektaszensionsskala
PL
Dokładna regulacja w osi deklinacji
RU
Шкала прямого восхождения
UA
Шкала прямого сходження
EN
Dec. adjustment
5
СZ
Nastavení deklinace
DE
Deklinationseinstellung
PL
Regulacja w osi deklinacji
RU
Фиксатор оси склонения
UA
Налаштування схилення
EN
R.A. ne adjustment
6
СZ
Jemné nastavení rektascenze
DE
Rektaszensions-Feineinstellung
PL
Dokładna regulacja w osi rektascensji
RU
Тонкая регулировка прямого
восхождения
UA
Точне налаштування прямого
сходження
6
7
8
EN
R.A. ne adjustment
7
СZ
Jemné nastavení rektascenze
DE
Rektaszensions-Feineinstellung
PL
Dokładna regulacja w osi
rektascensji
Тонкая регулировка прямого
RU
восхождения
Точне налаштування прямого
UA
сходження
EN
Dec. ne adjustment
8
СZ
Jemné nastavení deklinace
DE
Deklinations-Feineinstellung
PL
Skala osi rektascensji
RU
Тонкая регулировка склонения
UA
Точне налаштування схилення
9

EN
Diagonal mirror
1
СZ
Diagonální zrcátko
DE
Diagonalspiegel
PL
Lustro ukośne
RU
Диагональное зеркало
UA
3
2
1
Діагональне дзеркало
EN
Barlow lens
2
СZ
Barlowova čočka
DE
Barlow-Linse
PL
Soczewka Barlowa
RU
Линза Барлоу
UA
Лінза Барлов
EN
Eyepiece
3
СZ
Okulár
DE
Okular
PL
Okular
RU
Окуляр
UA
Окуляр
10
11 12
1
14
1 1
2
4
3
5
EN
Big Dipper
СZ
6
13
Velká medvědice
DE
Großer Wagen
PL
Wielka Niedźwiedzica
RU
Большая Медведица
UA
Велика Ведмедиця
EN
Little Dipper
2
СZ
Malý medvěd
DE
Kleiner Wagen
PL
Mała Niedźwiedzica
RU
Малая Медведица
UA
Мала Ведмедиця
EN
Polaris
3
СZ
Polárka
DE
Polarstern
PL
Gwiazdą Polarną
RU
Полярная звезда
UA
Полярна зірка
2
3
EN
R.A. lock knob
1
СZ
Aretační šroub osy rektascenze
DE
Rektaszensions-Arretierung
PL
Pokrętło blokujące w osi rektascenji
RU
Фиксатор оси прямого восхождения
UA
Ручка блокування прямого піднесення
EN
R.A. settling circle
2
СZ
Kruh pro nastavení osy rektascenze
DE
Rektaszensions-Teilkreis
PL
Tarcza ze współrzędnymi rektascensji
RU
Установочный круг прямого восхождения
UA
Круг налаштування прямого піднесення
EN
NCP
4
СZ
NCP
DE
NHP
PL
NCP
RU
СНП
UA
NCP
EN
Cassiopeia
5
СZ
Kasiopeja
DE
Kassiopeia
PL
Kasjopeja
RU
Кассиопея
UA
Кассіопея
β Crucis
EN
6
β Crucis
СZ
β Crucis
DE
β Crucis
PL
β Crucis
RU
UA
β Хреста
EN
Arrow
3
СZ
Šipka
DE
Pfeil
PL
Strzałka
RU
Стрелка
UA
Стрілка

1
13
11
6
14
9
2
7
5
10
EN
Zenith
1
СZ
Zenit
DE
Zenit
PL
Zenit
RU
Зенит
UA
Зеніт
EN
Right Ascension
6
СZ
Rektascenze
DE
Rektaszension
PL
Rektascensja
RU
Прямое восхождение
UA
Пряме піднесення
EN
Plane of local horizon
10
СZ
Rovina lokálního horizontu
DE
Lokale Horizontebene
PL
Płaszczyzna horyzontu
RU
Плоскость местного горизонта
UA
Площина місцевого горизонту
EN
Mount aligned on North Celestial Pole
13
СZ
Montáž nastavená na severní nebeský pól
DE
Am nördlichen Himmelspol ausgerichtete
Montierung
PL
Montaż ustawiony na północny biegun niebieski
Монтировка выровнена на Северный
RU
небесный полюс
UA
Кріплення, вирівняне на Північний небесний
полюс
EN
2
СZ
DE
PL
RU
UA
EN
7
СZ
DE
PL
RU
UA
1
2
3
16
Meridian
Poledník
Meridian
Południk
Меридиан
Меридіан
Meridian line
Poledník
Meridianlinie
Południk niebieski
Линия меридиана
Лінія меридіану
4
5
4
EN
Latitude
3
СZ
Zeměpisná šířka
DE
Breite
PL
Szerokość
RU
Широта
UA
Широта
EN
Plane of Celestial Equator
8
СZ
Rovina nebeského rovníku
DE
Himmelsäquatorebene
PL
Równik niebieski
RU
Плоскость небесного экватора
UA
Площина небесного екватора
EN
Object you are viewing
11
СZ
Pozorovaný objekt
DE
Betrachtetes Objekt
PL
Obserwowany obiekt
RU
Наблюдаемый объект
UA
Об’єкт, який
спостерігається
EN
Declination
14
СZ
Deklinace
DE
Deklination
PL
Deklinacja
RU
Склонение
UA
Схилення
EN
Focuser
1
СZ
Okulárový výtah
DE
Okularauszug
PL
Tubus ogniskujący
RU
Фокусер
UA
Фокусувач
EN
Eyepiece holder
2
СZ
Držák okuláru
DE
Okularhalterung
PL
Wyciąg okularowy
RU
Держатель окуляра
UA
Держак окуляра
3
12
8
EN
Nadir
4
СZ
Nadir
DE
Nadir
PL
Nadir
RU
Надир
UA
Надир
EN
Apparent movement of stars
12
СZ
Zdánlivý pohyb hvězd
DE
Scheinbare Sternbewegung
PL
Pozorny ruch gwiazd
RU
Видимое движение звезд
UA
Видиме переміщення зірок
EN
Extender
3
СZ
Nástavec
DE
Verlängerung
PL
Przedłużenie
RU
Экстендер (удлинитель фокуса)
UA
Розширювач
EN
T-adapter
4
СZ
T-adaptér
DE
T-Adapter
PL
T-adapter
RU
Т-адаптер
UA
Т-подібний
адаптер
EN
5
СZ
DE
PL
RU
UA
EN
9
СZ
DE
PL
RU
UA
EN
Camera
5
СZ
Fotoaparát
DE
Kamera
PL
Aparat fotograczny
RU
Камера
UA
Фотокамера
15
N E S W
S V J Z
N O S W
N E S W
С В Ю З
ПВН С ПВД З
Polaris
Polárka
Polarstern
Gwiazdą Polarną
Полярная звезда
Полярна зірка

EN
Levenhuk Skyline EQ Telescopes
Congratulations on your purchase of a high-quality Levenhuk telescope!
These instructions will help you set up, properly use, and care for your telescope. Please read them thoroughly before getting started.
CAUTION! Never look directly at the Sun – even for an instant – through your telescope or nderscope without a
professionally made solar lter that completely covers the front of the instrument, or permanent eye damage may
result. To avoid damage to the internal parts of your telescope, make sure the front end of the nderscope is covered
with aluminum foil or another non-transparent material.
Children should use the telescope under adult supervision only.
All parts of the telescope will arrive in one box. Be careful when unpacking it. We recommend keeping the
original shipping containers. In the event that the telescope needs to be shipped to another location, having
the proper shipping containers will help ensure that your telescope survives the journey intact. Make sure
all the parts are present in the packaging. Be sure to check the box carefully, as some parts are small. No
tools are needed other than those provided. All screws should be tightened securely to eliminate exing and
wobbling, but be careful not to overtighten them, as that may strip the threads.
During assembly (and anytime, for that matter), do not touch the surfaces of the optical elements with your
ngers. The optical surfaces have delicate coatings on them that can easily be damaged if touched. Never
remove lenses or mirrors from their housing, or the product warranty will be null and void.
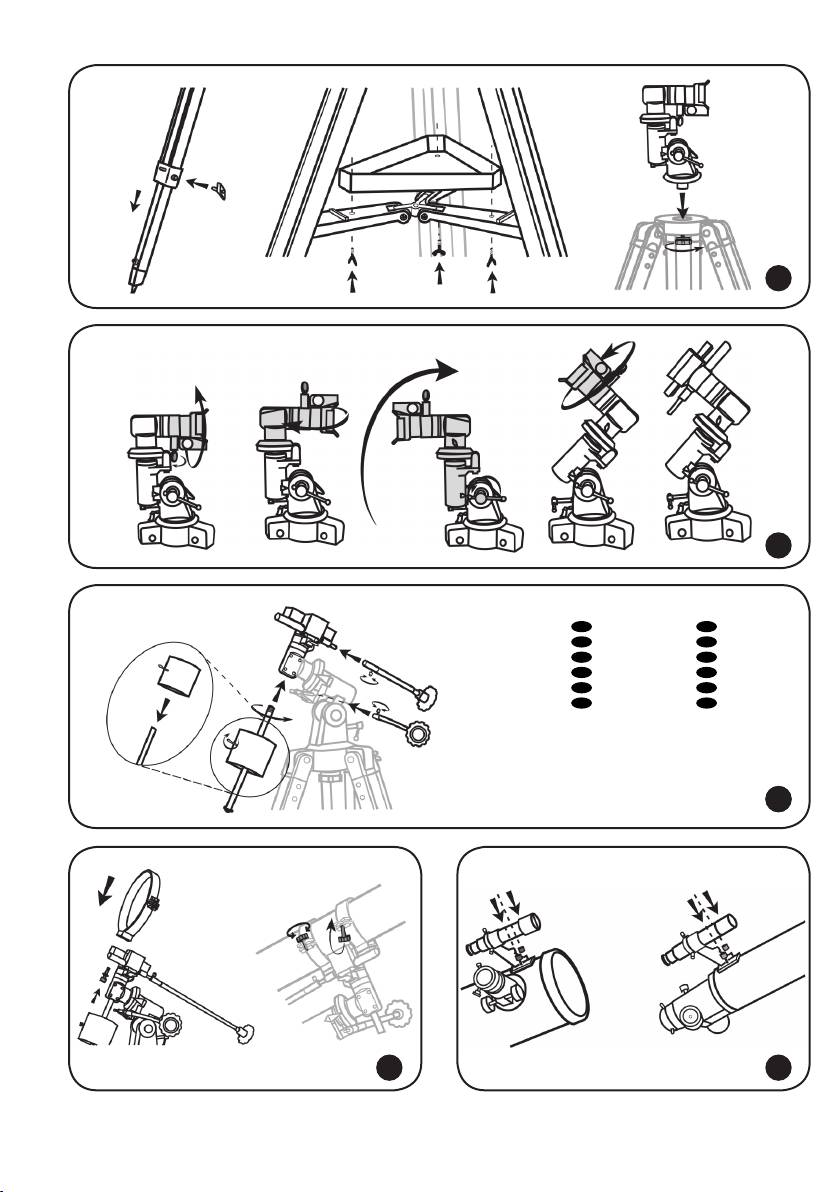
Telescope assembly
• Slowly loosen the tripod locking knobs and gently pull out the lower section of each tripod leg. Tighten
the clamps to hold the legs in place.
• Spread the tripod legs apart to stand the tripod upright.
• Adjust the height of each tripod leg until the tripod head is properly leveled. Note that the tripod legs
may not be the same length when the equatorial mount is leveled.
• Place the accessory tray on top of the bracket, and secure it with thumbscrews from underneath.
• Attach the equatorial mount to the tripod head.
• Turn the azimuth adjustment knob up and tighten the knurled knob underneath the tripod head to
secure mount to tripod.
• Orient the mount vertically.
• Loosen the Dec. lock knob. Rotate the mount 180°.
• Loosen the R.A. lock knob located on the opposite side. Rotate the mount 180°.
• Loosen the latitude lock knob. Set the angle according to your location latitude. Rotate the mount
180°.
• Retighten the Dec. and R.A. lock knobs.
• Slide the counterweights halfway along the counterweight rod. Holding the counterweights with one
hand, screw the counterweight rod into the threaded hole on the mount.
• Tighten locknut on the counterweight rod until it is locked.
• Attach the slow-motion control to the worm gear mechanism.
• Tighten the locking screws to secure the control in place.
• Remove the ring clamps from the telescope by releasing their thumbscrews and opening their hinges.
• Using the bolts provided, fasten the ring clamps to the mount with a wrench.
• Remove the telescope tube from its packaging.
• Place the telescope tube between the rings and balance it.
• Close the hinges around the telescope and retighten the thumbscrews. Do not over tighten.
• Locate the nderscope optical assembly.
• Unthread two screws in the back of the telescope tube (for reectors – in the front of the telescope
tube)
• Place the nderscope base above the holes on the tube.
• Lock the nderscope base into position by tightening the screws.
• Unthread the thumbscrews on the end of the focuser tube to remove the black plastic cap.
• Insert the desired eyepiece and secure it by retightening the thumbscrews.
• For refractors: First, insert the diagonal mirror into the focuser tube and retighten the thumbscrews to
hold the diagonal in place. Then insert the desired eyepiece into diagonal and secure it by retightening
the thumbscrews.
1
2
3
4
5
6

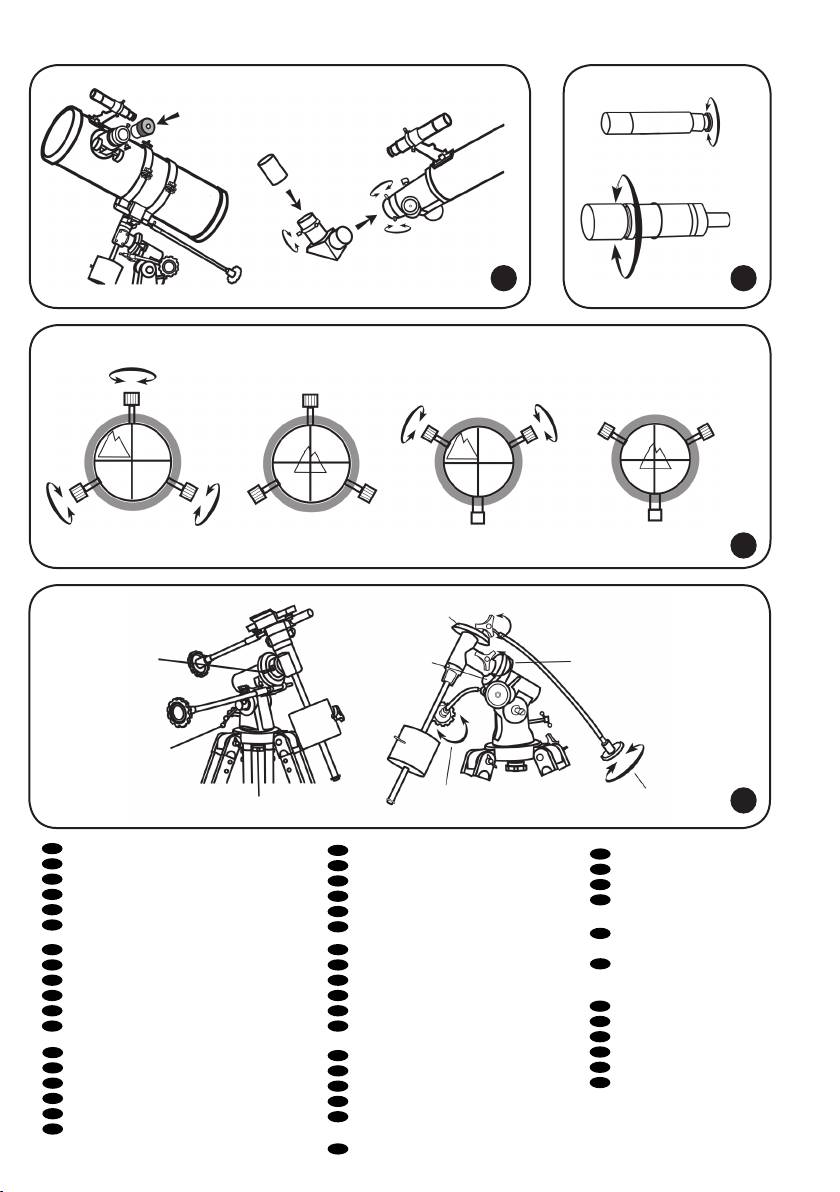
Aligning the nderscope
Optical nderscopes are very useful accessories. When they are correctly aligned with the telescope, objects can be quickly located and brought to the center of the view. Alignment is best done outdoors in day
light when it’s easier to locate objects. If it is necessary to refocus your nderscope, sight on an object that
is at least 500 yards away. For 5×24 and 6×24 nderscopes: turn the scope end to adjust the focus. For 6×30
nderscopes: loosen the locking ring by unscrewing it back toward the bracket. The front lens holder can
now be turned in and out to focus. When focus is reached, lock it in position with the locking ring.
Choose a distant object that is at least 500 yards away and point the telescope at the object. Adjust the
telescope so that the object is in the center of the view in your eyepiece. Check the nderscope to see if
the object is also centered on the crosshairs.
For 5×24 and 6×24 nderscopes: use three adjustment screws to center the nderscope crosshairs on the
object. For 6×30 nderscopes: adjust two windage screws only.
8
7
Balancing the telescope
A telescope should be balanced before each observing session. Balancing reduces stress on the telescope
mount and allows precise slow-motion movements. A balanced telescope is especially crucial when using the
optional clock drive for astrophotography. The telescope should be balanced after all accessories (eyepiece,
camera, etc.) have been attached. Before balancing your telescope, make sure that your tripod is balanced
and on a stable surface. For photography, point the telescope in the direction you will be taking photos
before performing the balancing steps.
R.A. Balancing
• For best results, adjust the altitude of the mount to between 15º and 30º if possible, by using the altitude
adjustment T-bolt.
• Slowly unlock the R.A. and Dec. lock knobs. Rotate the telescope until both the optical tube and the coun-
terweight rod are horizontal to the ground, and the telescope tube is to the side of the mount.
• Tighten the Dec. lock knob.
• Move the counterweights along the counterweight rod until the telescope is balanced and remains station-
ary when released.
• Tighten the counterweight screws to secure the counterweights.
Dec. Balancing
All accessories should be attached to the telescope before balancing around the declination axis. The R.A.
balancing should be done before proceeding with Dec. balancing.
• For best results, adjust the altitude of the mount to between 60º and 75º if possible.
• Release the R.A. lock knob and rotate around the R.A. axis so that the counterweight rod is in a horizontal
position. Tighten the R.A. lock knob.
• Unlock the Dec. lock knob and rotate the telescope tube until it is parallel to the ground.
• Slowly release the telescope and determine in which direction it rotates. Loosen the telescope ring
clamps and slide the telescope tube forward or backward between the rings until it is balanced.
• Once the telescope no longer rotates from its parallel starting position, retighten the tube rings and the
Dec. lock knob. Reset the altitude axis to your local latitude.
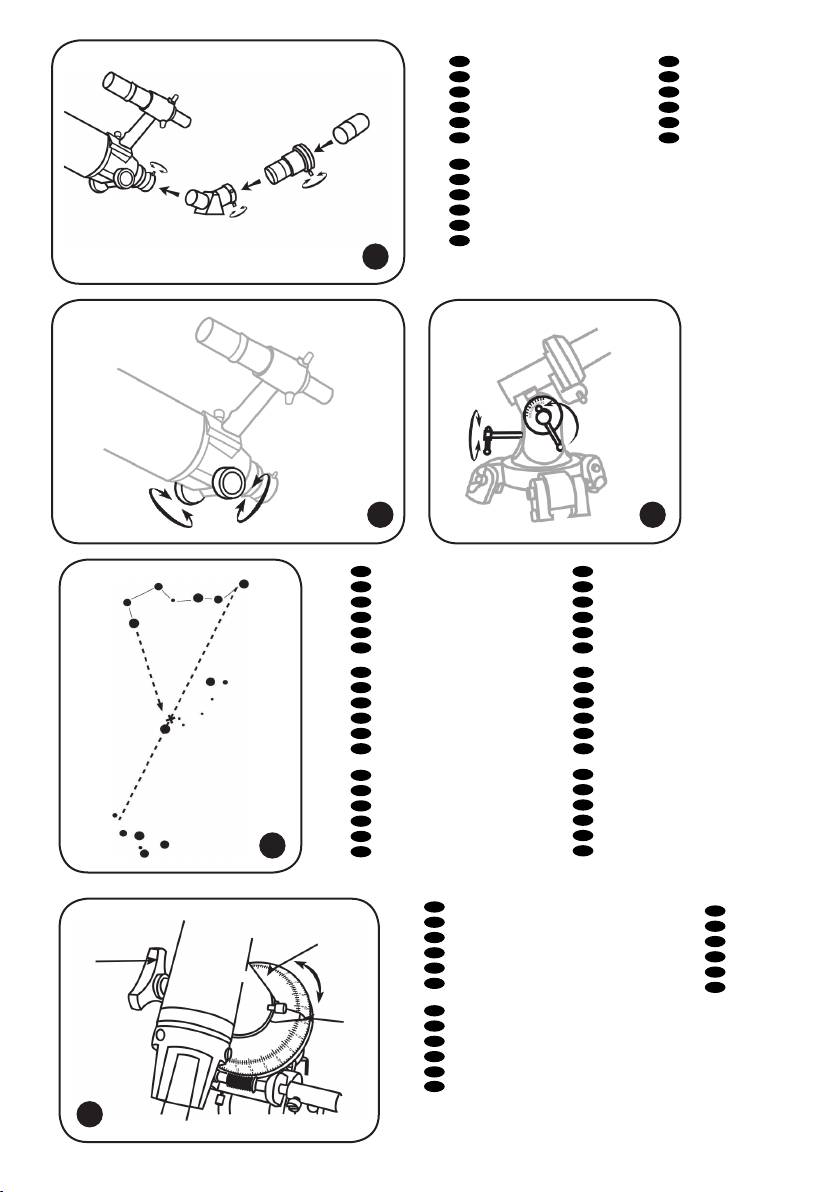
Operating the mount
The mount has controls for both conventional altitude (up-down) and azimuth (left-right) directions of motion. These two adjustments are suggested for large direction changes and for terrestrial viewing. To adjust
azimuth, loosen the big knob under the mount base and rotate the mount head about the azimuth axis. Use
the altitude adjustment T-bolts to set the required altitude.
In addition, the EQ2 mount has R.A. (hour angle) and Dec. controls for polar-aligned astronomical observing.
Loosen the lock knobs to make large direction changes. Use the slow-motion controls for ne adjustment
after the lock knobs have both been locked. An additional scale is included for the altitude axis. This allows
polar alignment at your local latitude.
9
Barlow lens
A Barlow lens increases the magnifying power of an eyepiece, while reducing the eld of view. It expands
the cone of the focused light before it reaches the focal point, so that the telescope’s focal length appears
longer to the eyepiece. In addition to increasing magnication, the benets of using a Barlow lens include
improved eye relief, and reduced spherical aberration of the eyepiece. For this reason, a Barlow plus a lens
often outperform a single lens producing the same magnication. And the best advantage is that a Barlow
lens can potentially double the number of eyepieces in your collection.
10

Focusing
Slowly rotate the focus knobs under the focuser one way or the other until the image in the eyepiece is
sharp. The image usually has to be nely refocused over time, due to small variations caused by temperature changes, exures, etc. This often happens with short focal ratio telescopes, particularly when they
haven’t yet reached outside temperature. Refocusing is almost always necessary when you change an eyepiece, add or remove a Barlow lens.
11
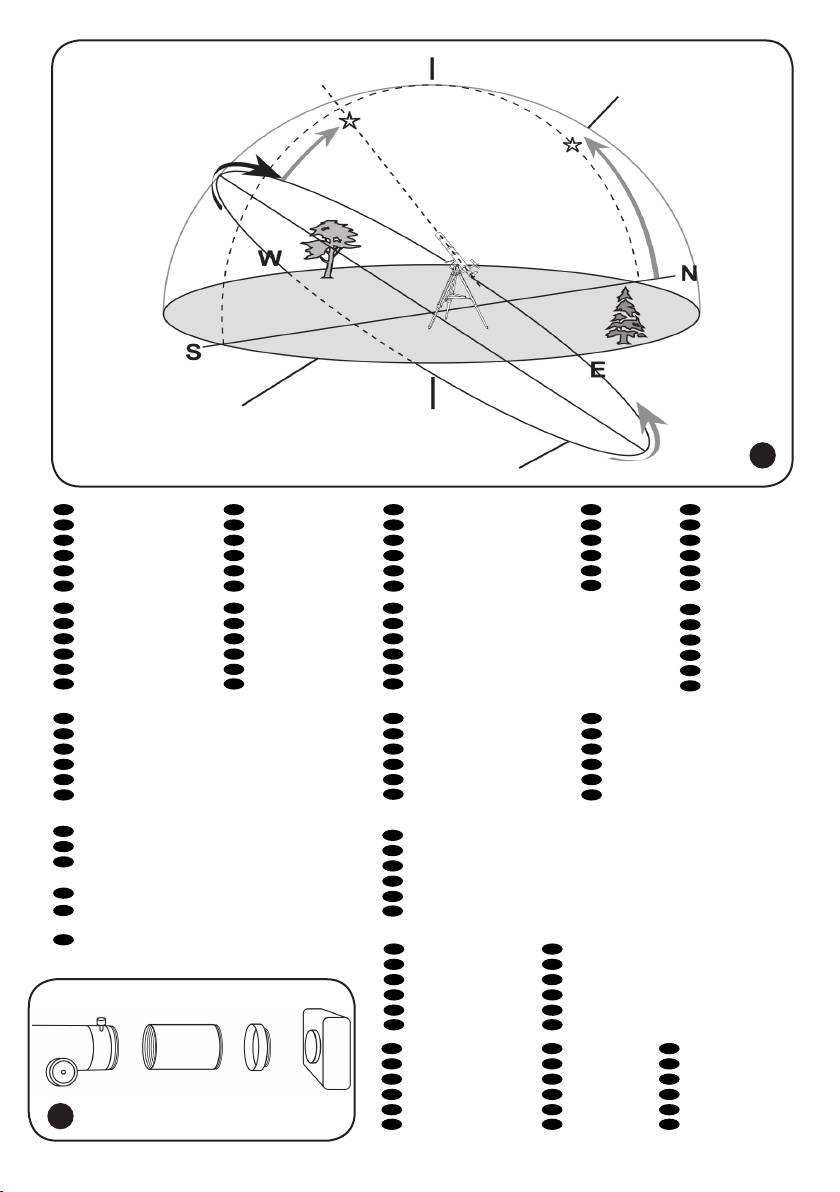
Polar adjustment
In order for your telescope to track objects in the sky you have to align your mount. This means tilting the
head over so that it points to the North (or South) celestial pole. For people in the Northern Hemisphere
this is rather easy as the bright star Polaris is very near the North Celestial Pole. For casual observing, rough
polar alignment is adequate. Make sure your equatorial mount is leveled and the nderscope is aligned with
the telescope before beginning.
Look up your latitude on a map, road maps are good for this purpose. Now look at the side of your mount
head, there you will see a scale running from 0 to 90°. Loosen the mount latch slightly rotating the lock
handle counterclockwise. A thumbscrew located underneath the mount head pushes the latch plate, thus
changing the angle. Turn the screw until the pointer on the latitude scale is set at the latitude of your
observation site.
Loosen the Dec. lock knob and rotate the telescope tube until the pointer on the setting circle reads 90°.
Retighten the Dec. lock knob. Loosen the azimuth lock knob and move the mount so that the R.A. axis
points roughly at Polaris. Use the two azimuth adjustment knobs above the “N” to make ne adjustments in
azimuth if needed. For more accurate alignment, look through the nderscope and center the Polaris on the
crosshairs using the azimuth and latitude adjustment knobs.
After a while you will notice your target drifting slowly North or South depending on the direction of the
pole relative to Polaris. To keep the target in the center of the view, turn only the R.A. slow-motion control.
After your telescope is polar aligned, no further adjustments in the azimuth and latitude of the mount
should be made in the observing session, nor should you move the tripod. Only movements in R.A. and DEC
axis should be made in order to keep an object in the eld.
In the Southern Hemisphere you must align the mount to the SCP by locating its position with star patterns,
without the convenience of a nearby bright star. The closest star is the faint 5.5-mag. Sigma Octantis which
is about one degree away. Two sets of pointers which help to locate the SCP are α and β Crucis (in the
Southern Cross) and a pointer running at a right angle to a line connecting α and β Centauri.
12
13
Tracking celestial objects
When observing through a telescope, astronomical objects appear to move slowly through the telescope’s
eld of view. When the mount is correctly polar aligned, you only need to turn the R.A. slow-motion control
to follow or track objects as they move through the eld. A R.A. motor drive can be added to automatically
track celestial objects by counteracting the rotation of Earth.
If the object is too faint you may want to use setting circles on an equatorial mount. Setting circles allow
you to locate celestial objects whose celestial coordinates have been determined from star charts.
The telescope’s R.A. setting circle is scaled in hours, from 1 to 24, with small lines in between representing
10 minute increments. The upper set of numbers applies to observations in the Northern Hemisphere, while
the numbers below them apply to observations in the Southern Hemisphere.
Setting (calibrating) the R.A. setting circle: in order to set your Right Ascension circle you must rst nd a
star in your eld of view with known coordinates. A good one would be the 0.0 magnitude star Vega in the
Constellation Lyra. From a star chart we know the R.A. coordinate of Vega is 18h 36m. Loosen the R.A. and
DEC. lock knobs on the mount and adjust the telescope so that Vega is centered in the eld of view of the
eyepiece. Tighten the R.A. and DEC. lock knobs to lock the mount in place. Now rotate the R.A. setting
circle until it reads 18h36m. You are now ready to use the setting circles to nd objects in the sky.
A German Equatorial mount has an adjustment, sometimes called a wedge, which tilts the mount’s polar
axis so that it points at the appropriate Celestial Pole (NCP or SCP). Once the mount has been polar aligned,
it needs to be rotated around the polar axis only to keep an object centered. Do not reposition the mount
base or change the latitude setting. The mount has already been correctly aligned for your geographical
location (i.e. Latitude), and all remaining telescope pointing is done by rotating the telescope tube around
the polar (R.A.) and declination axes.
A problem for many beginners is recognizing that a polar-aligned, equatorial mount acts like an alt-azimuth mount which has been aligned to a celestial pole. The wedge tilts the mount to an angle equal to the
observer’s Latitude, and therefore it swivels around a plane which is parallel to the celestial (and Earth’s)
equator. This is now its “horizon”; but remember that part of the new horizon is usually blocked by Earth.
15
14

This new “azimuth” motion is called Right Ascension (R.A.). In addition, the mount swivels North (+) and
South (-) from the Celestial Equator towards the celestial poles. This plus or minus “altitude” from the
celestial equator is called Declination (Dec.).
Now, consider pointing the telescope to the western or eastern horizon. If the counterweight is pointing
North, the telescope can be swiveled from one horizon to the other around the Dec. axis in an arc that passes through the NCP (any Dec. arc will pass through the NCP if the mount is polar-aligned). It can be seen
then that if the optical tube needs to be pointed at an object north or south of this arc, it has to be also
rotated around the R.A. axis.
Pointing in any direction other than due North requires a combination of R.A. and Dec. positions.
Telescopes with long focal lengths often have a “blind spot” when pointing near the zenith, because the
eyepiece-end of the optical tube bumps into the mount’s legs. To avoid this, the tube can be very carefully
slipped up inside the ring clamps. This can be done safely because the tube is pointing almost vertically, and
therefore moving it does not cause a Dec. balance problem. It is very important to move the tube back to
the Dec. balanced position before observing other sky areas.
Something which can also be a problem is that the optical tube often rotates so that the eyepiece, nderscope and the focusing knobs are in less convenient positions. The diagonal mirror can be rotated to adjust
the eyepiece. However, to adjust the positions of the nderscope and focusing knobs, loosen the tube rings
holding the telescope tube and gently rotate it. Do this when you are going to observe an area for while, as
it is inconvenient to repeat every time you briey go to a new area.
Finally, there are a few things to consider to ensure that you are comfortable during the viewing session.
First is setting the height of the mount above the ground by adjusting the tripod legs. You must consider the
height that you want your eyepiece to be, and if possible plan on sitting on a comfortable chair or stool.
Very long optical tubes need to be mounted higher or you will end up crouching or lying on the ground when
looking at objects near the zenith. However, a short optical tube can be mounted lower so that there is less
movement due to vibration sources, such as wind. This is something that should be decided before going
through the effort of polar aligning the mount.
Camera adapter
To attach a camera to your telescope you may need an adapter to get the camera focused. Some reectors
require wider motion range than the one allowed by the focuser; some refractors are designed to be used
with diagonal mirrors and thus need a longer focal length when used with camera.
To achieve that, simply attach an extender to the focuser of your telescope and then attach the camera
with a T-adapter to the extender.
16
Specications
Levenhuk Skyline
120х1000 EQ
Optical design reector reector refractor refractor
Aperture 120 mm 130 mm 90 mm 70 mm
Focal length 1000 mm; f/8.8
Highest practical power 230x 260x 180x 140x
Limiting stellar magnitude 12.2 12.5 11.8 11.2
Resolution threshold 1.2 arcsec. 1.1 arcsec. 1.5 arcsec. 1.9 arcsec.
Eyepiece 1.25”; SUPER10 &
Finderscope 5×24 6×24 6×30 6×24
Mount EQ1 EQ2 EQ2 EQ1
Tripod
39.37”; f/8.8
SUPER25
aluminum;
710-1230 mm
27.953” — 48.425”
Levenhuk Skyline
130х900 EQ
900 mm; f/6.9
35.433”; f/6.9
1.25”; SUPER10 &
SUPER25
aluminum;
700-1250 mm
27.953” — 49.213”
Levenhuk Skyline
90х900 EQ
900 mm; f/10
35.433”; f/10
1.25”; SUPER10 &
SUPER25
aluminum;
700-1250 mm
27.953” — 49.213”
Levenhuk Skyline
70х900 EQ
900 mm; f/12.9
35.433”; f/12.9
1.25”; SUPER10 &
SUPER25
aluminum;
650-1200 mm
25.591” — 47.244”

Batteries safety instructions
• Always purchase the correct size and grade of battery most suitable for the intended use.
• Always replace the whole set of batteries at one time; taking care not to mix old and new ones, or
batteries of different types.
• Clean the battery contacts and also those of the device prior to battery installation.
• Make sure the batteries are installed correctly with regard to polarity (+ and -).
• Remove batteries from equipment that is not to be used for an extended period of time.
• Remove used batteries promptly.
• Never attempt to recharge primary batteries as this may cause leakage, re, or explosion.
• Never short-circuit batteries as this may lead to high temperatures, leakage, or explosion.
• Never heat batteries in order to revive them.
• Remember to switch off devices after use.
• Keep batteries out of the reach of children, to avoid risk of ingestion, suffocation, or poisoning.
Care and maintenance
• Never, under any circumstances, look directly at the Sun through this device without a special
lter, or look at another bright source of light or at a laser, as this may cause PERMANENT RETINAL
DAMAGE and may lead to BLINDNESS.
• Take necessary precautions when using the device with children or people who have not read or who
do not fully understand these instructions.
• Do not try to disassemble the device on your own for any reason, including to clean the mirror. For
repairs and cleaning of any kind, please contact your local specialized service center.
• Protect the device from sudden impact and excessive mechanical force.
• Do not touch the optical surfaces with your ngers. To clean the telescope exterior, use only special
cleaning wipes and special optics cleaning tools from Levenhuk.
• Store the device in a dry, cool place away from hazardous acids and other chemicals, away from heaters, open re and other sources of high temperatures.
• Replace the dust cap over the front end of the telescope whenever it is not in use. This prevents dust
from settling on the mirror or lens surfaces.
• Seek medical advice immediately if a small part or a battery is swallowed.
Levenhuk Limited Warranty
All Levenhuk telescopes, cameras for telescopes, microscopes and binoculars are warranted to be free of defects in
materials and workmanship for three years from date of retail purchase. All Levenhuk accessories are warranted to be
free of defects in materials and workmanship for six months from date of retail purchase. Levenhuk will repair or replace
such product or part thereof which, upon inspection by Levenhuk, is found to be defective in materials or workmanship.
As a condition to the obligation of Levenhuk to repair or replace such product, the product must be returned to Levenhuk
together with proof of purchase satisfactory to Levenhuk.
A Return Authorization (RA) Number must be obtained in advance of return. Contact the local Levenhuk branch to receive
the RA number to be displayed on the outside of your shipping container. All returns must be accompanied by a written
statement setting forth the name, address and telephone number of the owner, including a description of any claimed
defects. Parts or products for which replacement is made will become the property of Levenhuk.
The customer will be responsible for all costs of transportation and insurance to and from Levenhuk or its authorized
dealers and will be required to prepay such costs.
Levenhuk will use reasonable efforts to repair or replace any product covered by this warranty within thirty days of
receipt. If a repair or replacement will require more than thirty days, Levenhuk will notify the customer accordingly.
Levenhuk reserves the right to replace any product that has been discontinued from its product line with a new product of
comparable value and function.
This warranty does not apply to any defects or damages resulting from alteration, modication, neglect, misuse, usage
of improper power sources, damage in transportation, abuse, or any cause other than normal use, or to malfunction or
deterioration due to normal wear.
Levenhuk disclaims all warranties, express or implied, whether of merchantability or tness for a particular use, except
as expressly set forth herein. The sole obligation of Levenhuk under this limited warranty will be to repair or replace the
covered product, in accordance with the terms set forth herein. Levenhuk disclaims liability for any loss of prots, loss of
information, or for any general, special, direct, indirect or consequential damages which may result from breach of any
warranty, or arising out of the use or inability to use any Levenhuk product.
Any warranties which are implied and which cannot be disclaimed will be limited in duration to a term of three years
for telescopes, cameras for telescopes, microscopes and binoculars or six months for accessories from the date of retail
purchase.
Some states/provinces do not allow the exclusion or limitation of incidental or consequential damages, so the above
limitations and exclusions may not apply to you. This warranty gives you specic legal rights, and you may have other rights
which vary from state to state or province to province.
Levenhuk reserves the right to modify or discontinue any product without prior notice.
Loading…
Перейти к контенту
Телескопы Levenhuk
- Размер инструкции: 1.32 Мб
- Формат файла: pdf
Если вы потеряли инструкцию от телескопа Levenhuk Skyline 130х900 EQ, можете скачать файл для просмотра на компьютере или печати.
Инструкция для телескопа Levenhuk Skyline 130х900 EQ на русском языке. В руководстве описаны возможности и полезные функции, а также правила эксплуатации. Перед использованием внимательно ознакомьтесь с инструкцией.
Чтобы не читать всю инструкцию вы можете выполнить поиск по содержимому внутри инструкции и быстро найти необходимую информацию. Рекомендации по использованию помогут увеличить срок службы телескопа Levenhuk Skyline 130х900 EQ. Если у вас появилась проблема, то найдите раздел с описанием неисправностей и способами их решения. В нем указаны типичные поломки и способы их решения.
Levenhuk Skyline EQ Telescopes
Levenhuk Skyline 70х900 EQ
Levenhuk Skyline 90х900 EQ
Levenhuk Skyline 130х900 EQ
Levenhuk Skyline 120х1000 EQ
User Manual
Návod k použití
Bedienungsanleitung
Instrukcja obsługi
Инструкция по эксплуатации
Посібник користувача
Radost zaostřit
Mit Vergnügen näher dran!
Radość przybliżania
Приближает с удовольствием
Наближує з радістю

Levenhuk Skyline EQ Telescopes
Zrcadlový teleskop (reektor)
СZ
A. Sekundární zrcátko
B. Prachové víčko
C. Tubus okulárového výtahu
D. Konzola pointačního dalekohledu
E. Pointační dalekohled
F. Šrouby konzol pointačního dalekohledu:
G. Okulár
H. Zaostřovací šroub
I. Piggyback foto držák
J. Optický tubus
K. Primární zrcátko
1. Stupnice osy rektascenze
2. Ovládání jemného nastavení deklinace
3. Šroub nastavení zeměpisné šířky
4. Aretační šroub zeměpisné šířky
5. Ovládání jemného nastavení rektascenze
6. Protiváha
7. Aretační šroub protiváhy
8. Tyč protiváhy
9. Aretační šroub osy rektascenze
10. Stupnice osy deklinace
11. Aretační šroub osy deklinace
12. Objímky
a. Odkládací přihrádka pro příslušenství
b. Noha stativu
Reector
DE
Reector
EN
A. Sekundärspiegel
A. Secondary mirror
B. Staubschutzkappe
B. Dust cap
C. Okularauszug
C. Focuser tube
D. Sucherrohr-Halterung
D. Finderscope bracket
E. Sucherrohr
E. Finderscope
F. Stellschrauben
F. Adjustment screws:
G. Okular
G. Eyepiece
H. Fokussierrad
H. Focusing knob
I. Huckepackschiene
I. Piggyback bracket
J. Teleskoptubus
J. Telescope tube
K. Primärspiegel
K. Primary mirror
1. Rektaszensionsskala
1. R.A. axis scale
2. Deklinations-Feinabstimmung
2. Dec. slow-motion control
3. Polhöhen-Stellschraube
3. Altitude adjustment T-bolt
4. Azimut-Arretierung
4. Azimuth lock knob
5. Rektaszensions-Feinabstimmung
5. R.A. slow-motion control
6. Gegengewicht
6. Counterweight
7. Gegengewichts-Halteschraube
7. Counterweight lock screw
8. Gegengewichtsstange
8. Counterweight rod
9. Rektaszensions-Arretierung
9. R.A. lock knob
10. Deklinationsskala
10. Dec. axis scale
11. Deklinations-Arretierung
11. Dec. lock knob
12. Rohrschellen
12. Ring clamps
a. Zubehörablage
a. Accessory tray
b. Stativbein
b. Tripod leg
Tелескоп-рефлектор
RU
A. Положение вторичного зеркала
B. Бленда
C. Фокусировочный узел
D. Крепление искателя
E. Искатель
F. Юстировочные винты искателя
G. Окуляр
H. Ручка фокусировки
I. Платформа для фотокамеры
J. Труба телескопа
K. Положение главного зеркала
1. Шкала оси прямого восхождения
2. Ручка управления тонкими движениями по оси
склонения
3. Регулировочный винт полярной оси по широте
места наблюдения
4. Фиксатор широты места наблюдения
5. Ручка управления тонкими движениями по оси
прямого восхождения
6. Противовес
7. Винт фиксации противовеса
8. Ось противовеса
9. Фиксатор оси прямого восхождения
10. Шкала оси склонения
11. Фиксатор оси склонения
12. Кольца трубы
a. Лоток для аксессуаров
b. Ножка треноги
Teleskop zwierciadlany
PL UA
Рефлектор
A. Lustro wtórne
A. Вторинне дзеркало
B. Osłona przeciwpyłowa
B. Кришка від пилу
C. Tubus ogniskujący
C. Труба фокусувача
D. Wspornik celownicy
D. Кронштейн видошукача
E. Celownica
E. Видошукач
F. Śruby regulacyjne
F. Регулювальні гвинти:
G. Okular
G. Окуляр
H. Pokrętło ustawiania ostrości
H. Ручка фокусування
I. Wspornik typu „piggyback”
I. Транспортний кронштейн
J. Tubus teleskopu
J. Труба телескопа
K. Lustro główne
K. Первинне дзеркало
1. Skala osi rektascensji
1. Шкала вісі прямого піднесення
2. Pokrętło mikroruchów w osi deklinacji
2. Вузол управління повільним рухом схилення
3. Śruba młoteczkowa regulacji w poziomie
3. Т-подібний болт налаштування висоти
4. Pokrętło blokujące teleskop w poziomie
4. Ручка блокування азимута
5. Pokrętło mikroruchów w osi rektascensji
5. Вузол управління повільним рухом прямого
6. Przeciwwaga
піднесення
7. Śruba blokująca przeciwwagi
6. Противага
8. Pręt przeciwwagi
7. Гвинт блокування противаги
9. Pokrętło blokujące w osi rektascensji
8. Стержень противаги
10. Skala osi deklinacji
9. Ручка блокування прямого піднесення
11. Pokrętło blokujące w osi deklinacji
10. Шкала вісі схилення
12. Zaciski pierścieni
11. Ручка блокування схилення
a. Tacka na akcesoria
12. Скоби кілець
b. Noga statywu
a. Лоток для аксесуарів
b. Ніжка триноги
Levenhuk Skyline EQ Telescopes
Čočkový teleskop (refraktor)
СZ
A. Prachové víčko
B. Rosnice
C. Čočka objektivu
D. Optický tubus
E. Piggyback foto držák
F. Pointační dalekohled
G. Konzola pointačního dalekohledu
H. Stavěcí šrouby
I. Okulár
J. Diagonální zrcátko
K. Tubus okulárového výtahu
L. Zaostřovací šroub
1. Ovládání jemného nastavení deklinace
2. Šroub nastavení zeměpisné šířky
3. Aretační šroub zeměpisné šířky
4. Protiváha
5. Aretační šroub protiváhy
6. Tyč protiváhy
7. Ovládání jemného nastavení rektascenze
8. Stupnice osy rektascenze
9. Aretační šroub osy rektascenze
10. Stupnice osy deklinace
11. Aretační šroub osy deklinace
12. Objímky
a. Odkládací přihrádka pro příslušenství
b. Noha stativu
c. Pojistný šroub
Refractor
DE
Refractor
EN
A. Staubschutzkappe
A. Dust cap
B. Taukappe
B. Dew cap
C. Objektivlinse
C. Objective lens
D. Optischer Tubus
D. Optical tube
E. Huckepackschiene
E. Piggyback bracket
F. Sucherrohr
F. Finderscope
G. Sucherrohr-Halterung
G. Finderscope bracket
H. Stellschrauben
H. Adjustment screws
I. Okular
I. Eyepiece
J. Diagonalspiegel
J. Diagonal mirror
K. Okularauszug
K. Focuser tube
L. Fokussierrad
L. Focusing knob
1. Deklinations-Feinabstimmung
1. Dec. slow-motion control
2. Polhöhen-Stellschraube
2. Altitude adjustment T-bolt
3. Azimut-Arretierung
3. Azimuth lock knob
4. Gegengewicht
4. Counterweight
5. Gegengewichts-Halteschraube
5. Counterweight lock screw
6. Gegengewichtsstange
6. Counterweight rod
7. Rektaszensions-Feinabstimmung
7. R.A. slow-motion control
8. Rektaszensionsskala
8. R.A. axis scale
9. Rektaszensions-Arretierung
9. R.A. lock knob
10. Deklinationsskala
10. Dec. axis scale
11. Deklinations-Arretierung
11. Dec. lock knob
12. Rohrschellen
12. Ring clamps
a. Zubehörablage
a. Accessory tray
b. Stativbein
b. Tripod leg
c. Sicherungsschraube
c. Lock screw
Tелескоп-рефрактор
RU
A. Пылезащитная крышка
B. Бленда
C. Линза объектива
D. Труба телескопа
E. Платформа для фотокамеры
F. Искатель
G. Крепление искателя
H. Юстировочные винты искателя
I. Окуляр
J. Диагональное зеркало
K. Фокусировочный узел
L. Ручка фокусировки
1. Ручка управления тонкими движениями по оси
склонения
2. Регулировочный винт полярной оси по широте
места наблюдения
3. Ручка фиксатора широты места наблюдения
4. Противовес
5. Винт фиксации противовеса
6. Ось противовеса
7. Ручка управления тонкими движениями по оси
прямого восхождения
8. Шкала оси прямого восхождения
9. Фиксатор оси прямого восхождения
10. Шкала оси склонения
11. Фиксатор оси склонения
12. Кольца трубы
a. Лоток для аксессуаров
b. Ножка треноги
c. Фиксатор высоты ножек треноги
Рефрактор
UA
A. Кришка від пилу
Teleskop zwierciadlany
PL
B. Кришка від роси
A. Osłona przeciwpyłowa
C. Лінза об’єктива
B. Odrośnik
D. Оптична труба
C. Soczewka obiektywowa
E. Транспортний кронштейн
D. Tuba optyczna
F. Видошукач
E. Wspornik typu „piggyback”
G. Кронштейн видошукача
F. Celownica
H. Регулювальні гвинти
G. Wspornik celownicy
I. Окуляр
H. Śruby regulacyjne
J. Діагональне дзеркало
I. Okular
K. Труба фокусувача
J. Lustro ukośne
L. Ручка фокусування
K. Tubus ogniskujący
1. Вузол управління повільним рухом схилення
L. Pokrętło ustawiania ostrości
2. Т-подібний болт налаштування висоти
1. Pokrętło mikroruchów w osi deklinacji
3. Ручка блокування азимута
2. Śruba młoteczkowa regulacji w poziomie
4. Противага
3. Pokrętło blokujące teleskop w poziomie
5. Гвинт блокування противаги
4. Przeciwwaga
6. Стержень противаги
5. Śruba blokująca przeciwwagi
7. Вузол управління повільним рухом прямого
6. Pręt przeciwwagi
піднесення
7. Pokrętło mikroruchów w osi rektascensji
8. Шкала вісі прямого піднесення
8. Skala osi rektascensji
9. Ручка блокування прямого піднесення
9. Pokrętło blokujące w osi rektascensji
10. Шкала вісі схилення
10. Skala osi deklinacji
11. Ручка блокування схилення
11. Pokrętło blokujące w osi deklinacji
12. Скоби кілець
12. Zaciski pierścieni
a. Лоток для аксесуарів
a. Tacka na akcesoria
b. Ніжка триноги
b. Noga statywu
c. Гвинт блокування
c. Śruba blokująca
1
2
EN
long
EN
shot
1
2
СZ
dlouhý
СZ
krátký
DE
lange
DE
kurz
1
PL
długi
PL
krótki
RU
длинный
RU
короткий
UA
довгий
UA
короткий
2
33
54
6 7
8
4
1
5
7
2
6
8
9
3
EN
R.A. adjustment
1
EN
R.A. scale
4
EN
R.A. ne adjustment
7
СZ
Nastavení rektascenze
СZ
Stupnice rektascenze
СZ
Jemné nastavení rektascenze
DE
Rektaszensionseinstellung
DE
Rektaszensionsskala
DE
Rektaszensions-Feineinstellung
PL
Regulacja w osi rektascensji
PL
Dokładna regulacja w osi deklinacji
PL
Dokładna regulacja w osi
RU
Фиксатор прямого восхождения
RU
Шкала прямого восхождения
rektascensji
UA
Налаштування прямого сходження
UA
Шкала прямого сходження
RU
Тонкая регулировка прямого
EN
Altitude adjustment (up-down)
EN
Dec. adjustment
восхождения
2
5
СZ
Nastavení elevace (nahoru-dolů)
СZ
Nastavení deklinace
UA
Точне налаштування прямого
DE
Höhenwinkeleinstellung (auf/ab)
DE
Deklinationseinstellung
сходження
PL
Regulacji w pionie (góra – dół)
PL
Regulacja w osi deklinacji
EN
Dec. ne adjustment
RU
Регулировка высоты (вверх-вниз)
RU
Фиксатор оси склонения
8
СZ
Jemné nastavení deklinace
UA
Налаштування висоти (вверх-вниз)
UA
Налаштування схилення
DE
Deklinations-Feineinstellung
EN
Azimuth adjustment (left-right)
EN
PL
3
R.A. ne adjustment
Skala osi rektascensji
6
СZ
Nastavení azimutu (doleva-doprava)
СZ
RU
Jemné nastavení rektascenze
Тонкая регулировка склонения
DE
Azimuteinstellung (links/rechts)
DE
UA
Rektaszensions-Feineinstellung
Точне налаштування схилення
PL
Regulacji w poziomie (lewo – prawo)
PL
Dokładna regulacja w osi rektascensji
RU
Регулировка азимута (влево-вправо)
RU
Тонкая регулировка прямого
UA
Налаштування азимуту (вліво-вправо)
восхождения
UA
Точне налаштування прямого
сходження
EN
Diagonal mirror
EN
Eyepiece
1
3
СZ
Diagonální zrcátko
СZ
Okulár
DE
Diagonalspiegel
DE
Okular
PL
Lustro ukośne
PL
Okular
RU
Диагональное зеркало
RU
Окуляр
UA
Діагональне дзеркало
UA
Окуляр
3
EN
Barlow lens
2
СZ
Barlowova čočka
DE
Barlow-Linse
2
PL
Soczewka Barlowa
RU
Линза Барлоу
1
UA
Лінза Барлов
10
11 12
EN
Big Dipper
EN
NCP
1 1
4
СZ
Velká medvědice
СZ
NCP
6
DE
Großer Wagen
DE
NHP
PL
Wielka Niedźwiedzica
PL
NCP
RU
Большая Медведица
RU
СНП
UA
Велика Ведмедиця
UA
NCP
2
EN
Little Dipper
EN
Cassiopeia
2
5
СZ
Malý medvěd
СZ
Kasiopeja
DE
Kleiner Wagen
DE
Kassiopeia
PL
Mała Niedźwiedzica
PL
Kasjopeja
4
3
RU
Малая Медведица
RU
Кассиопея
UA
Мала Ведмедиця
UA
Кассіопея
EN
Polaris
EN
β Crucis
3
6
СZ
Polárka
СZ
β Crucis
DE
Polarstern
DE
β Crucis
PL
Gwiazdą Polarną
PL
β Crucis
5
RU
Полярная звезда
RU
β Crucis
13
UA
Полярна зірка
UA
β Хреста
EN
R.A. lock knob
1
EN
Arrow
3
СZ
Aretační šroub osy rektascenze
СZ
Šipka
DE
Rektaszensions-Arretierung
DE
2
Pfeil
PL
Pokrętło blokujące w osi rektascenji
PL
Strzałka
1
RU
Фиксатор оси прямого восхождения
RU
Стрелка
UA
Ручка блокування прямого піднесення
UA
Стрілка
EN
R.A. settling circle
2
3
СZ
Kruh pro nastavení osy rektascenze
DE
Rektaszensions-Teilkreis
PL
Tarcza ze współrzędnymi rektascensji
RU
Установочный круг прямого восхождения
UA
Круг налаштування прямого піднесення
14
1
13
11
9
6
14
3
2
7
5
10
4
12
15
8
EN
Zenith
EN
Meridian
EN
Latitude
EN
Nadir
EN
N E S W
1
2
3
4
5
СZ
Zenit
СZ
Poledník
СZ
Zeměpisná šířka
СZ
Nadir
СZ
S V J Z
DE
Zenit
DE
Meridian
DE
Breite
DE
Nadir
DE
N O S W
PL
Zenit
PL
Południk
PL
Szerokość
PL
Nadir
PL
N E S W
RU
Зенит
RU
Меридиан
RU
Широта
RU
Надир
RU
С В Ю З
UA
Зеніт
UA
Меридіан
UA
Широта
UA
Надир
UA
ПВН С ПВД З
EN
Right Ascension
EN
Meridian line
EN
Plane of Celestial Equator
EN
Polaris
6
7
8
9
СZ
Rektascenze
СZ
Poledník
СZ
Rovina nebeského rovníku
СZ
Polárka
DE
Rektaszension
DE
Meridianlinie
DE
Himmelsäquatorebene
DE
Polarstern
PL
Rektascensja
PL
Południk niebieski
PL
Równik niebieski
PL
Gwiazdą Polarną
RU
Прямое восхождение
RU
Линия меридиана
RU
Плоскость небесного экватора
RU
Полярная звезда
UA
Пряме піднесення
UA
Лінія меридіану
UA
Площина небесного екватора
UA
Полярна зірка
EN
Plane of local horizon
EN
Object you are viewing
EN
Apparent movement of stars
10
11
12
СZ
Rovina lokálního horizontu
СZ
Pozorovaný objekt
СZ
Zdánlivý pohyb hvězd
DE
Lokale Horizontebene
DE
Betrachtetes Objekt
DE
Scheinbare Sternbewegung
PL
Płaszczyzna horyzontu
PL
Obserwowany obiekt
PL
Pozorny ruch gwiazd
RU
Плоскость местного горизонта
RU
Наблюдаемый объект
RU
Видимое движение звезд
UA
Площина місцевого горизонту
UA
Об’єкт, який
UA
Видиме переміщення зірок
спостерігається
EN
Mount aligned on North Celestial Pole
13
EN
Declination
14
СZ
Montáž nastavená na severní nebeský pól
СZ
Deklinace
DE
Am nördlichen Himmelspol ausgerichtete
DE
Deklination
Montierung
PL
Deklinacja
PL
Montaż ustawiony na północny biegun niebieski
RU
Склонение
RU
Монтировка выровнена на Северный
UA
Схилення
небесный полюс
UA
Кріплення, вирівняне на Північний небесний
EN
Focuser
EN
Extender
полюс
1
3
СZ
Okulárový výtah
СZ
Nástavec
DE
Okularauszug
DE
Verlängerung
PL
Tubus ogniskujący
PL
Przedłużenie
RU
Фокусер
RU
Экстендер (удлинитель фокуса)
UA
Фокусувач
UA
Розширювач
EN
Eyepiece holder
EN
T-adapter
EN
Camera
1
2
4
5
СZ
Držák okuláru
СZ
T-adaptér
СZ
Fotoaparát
DE
Okularhalterung
DE
T-Adapter
DE
Kamera
2
3
4
PL
Wyciąg okularowy
PL
T-adapter
PL
Aparat fotograczny
5
RU
Держатель окуляра
RU
Т-адаптер
RU
Камера
16
UA
Держак окуляра
UA
Т-подібний
UA
Фотокамера
адаптер
|
Код: 36233 Извините, товара сейчас нет в наличии
Бесплатная доставка Извините, товара сейчас нет в наличии Сравнить Новости интернет-магазина «Лаукар»:23.04.2025 26.02.2025 17.02.2025 Дополнительная информация в категории Телескоп:Наблюдать звездное небо через телескоп — увлекательное и полезное занятие Таблица Авторизованных сервисных центров по брендам. Описание Инструкция Отзывы (0) В интернет-магазине бытовой техники «Лаукар» Вы можете скачать инструкцию к товару Телескоп Levenhuk Skyline 130х900 EQ совершенно бесплатно. Все инструкции, представленные на сайте интернет-магазина бытовой техники «Лаукар», предоставляются производителем товара. Для того чтобы скачать инструкцию, Вам необходимо нажать на ссылку «скачать инструкцию», расположенную ниже, а в случае, если ссылки нет, Скачать инструкцию Смотреть инструкцию 
Фирма-производитель оставляет за собой право на внесение изменений в конструкцию, дизайн и комплектацию товара: Телескоп Levenhuk Skyline 130х900 EQ. Пожалуйста, сверяйте информацию о товаре с информацией на |