
Всем доброго времени суток.
Сегодня я хочу поделиться с вами своими впечатлениями об универсальном многофункциональном уровне, приобретенном на просторах eBay. Дело в том, что у меня впереди назревает небольшой ремонт встроенного шкафа-купе, который предполагает под собой полное его внутренне преобразование — будет установлено множество полочек и перегородок, ну а поскольку я планирую делать это самостоятельно, то хочется мне того или нет, надо позаботиться о приобретении всего нужного инструмента: шуруповерта, электролобзика, уровня…
Не то, чтобы у меня дома не было строительного уровня, но все требует совершенства и обновления  И вот, как раз в это время, когда я прикидывал чего мне не хватает для того, чтобы запланированные строительные работы прошли успешно, мне на глаза попался лот, представляющий собой многофункциональный строительный инструмент (если можно так сказать), объединяющий в себе линейку (сантиметры, дюймы), рулетку (длина 2,5 метра), обычный строительный уровень и лазерный уровень (для упрощения восприятия, в дальнейшем будем звать наш инструмент «уровень»). И все это стоило дешевле 5$! Чего же тут думать — надо брать Тем более более последнее мое исследование инструмента из Китая меня более чем порадовало. В общем, заказ был оформлен и оплачен, а спустя 3 недели успешно получен в местном почтовом отделении. Маршрут следования посылки можно посмотреть здесь.
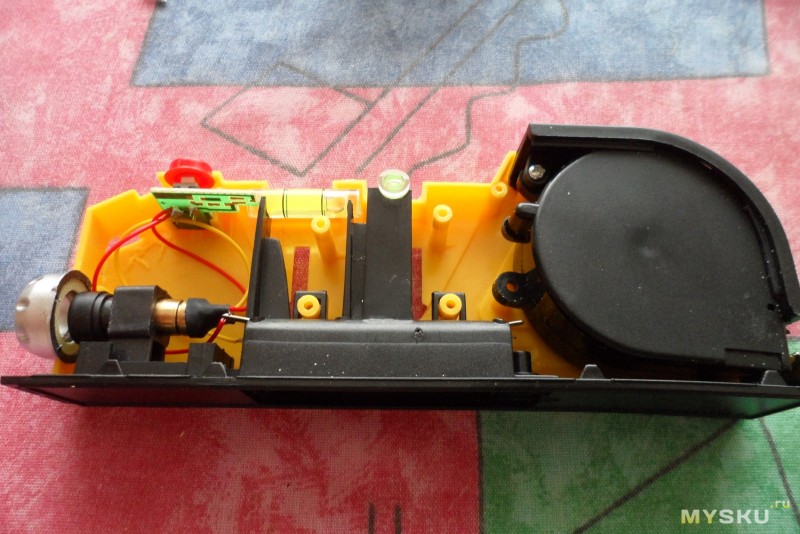
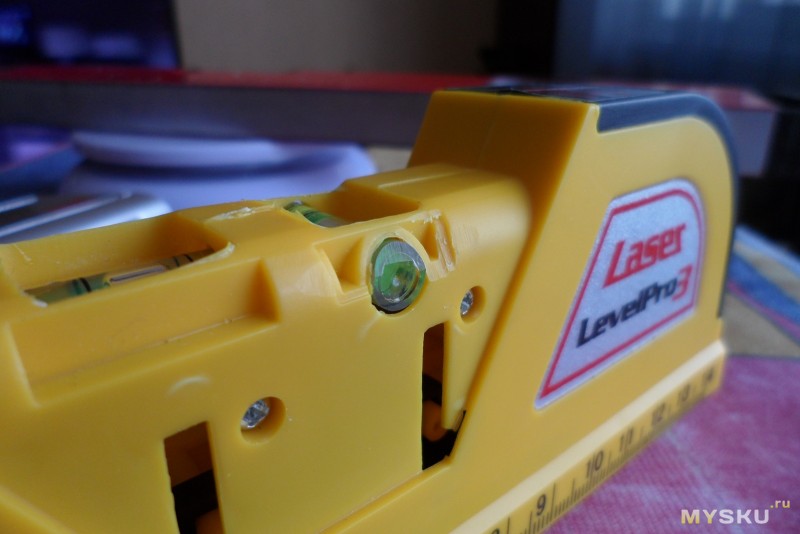
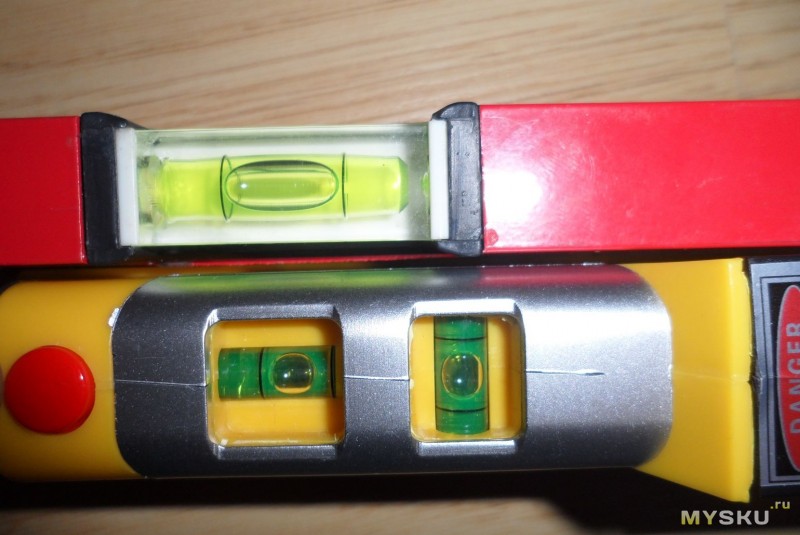
Пришел уровень без какой-либо оригинальной заводской упаковки — в обычном целлофановом пакетике. Несмотря на столь слабенькую упаковку, содержимое посылки за время путешествия из Китая в Беларусь совершенно не пострадало и выглядело точь-в-точь как на фотографиях продавца. Основной материал, используемый для изготовления уровня — желтый пластик, для придания инструменту более привлекательного вида есть вставки черного и серебряного цвета. Уровень носит гордое название «Laser LevelPro 3», что как бы намекает на то, что до появления на свет этого чуда китайской инженерной мысли у него было как минимум 2 предшественника На верхнем торце можно увидеть 2 пластиковые колбы заполненные зеленой жидкостью с пузырьком воздуха — обычный строительный уровень и кнопку включения лазерного уровня. По бокам нанесена шкала линейки — сантиметровая на левом боку и дюймовая на правом. В нижней грани уровня находится батарейный отсек — питается устройство от 2 батареек типоразмера ААА.
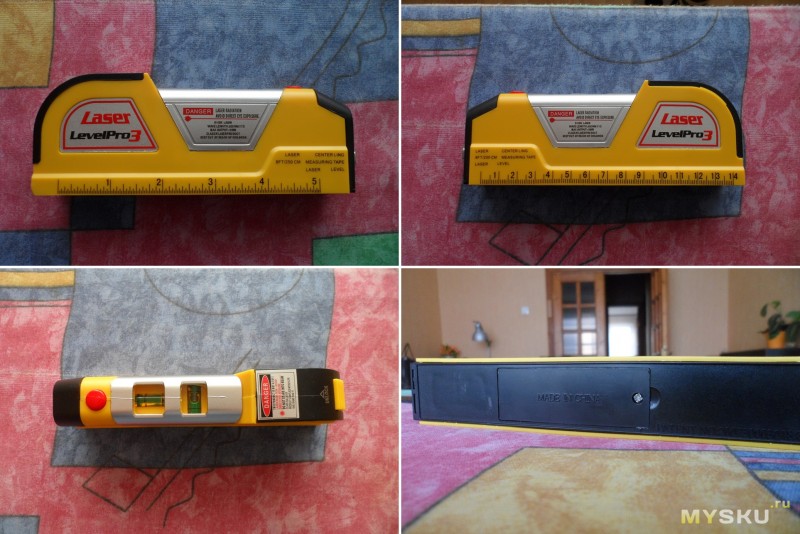
Если рассмотреть уровень более детально, то на переднем торце можно найти «Глазок» лазера, а на заднем — замок рулетки. Кроме того, на уровне имеется множество предупреждающих надписей о том, что луч лазера опасен для зрения и его категорически направлять в глаза.
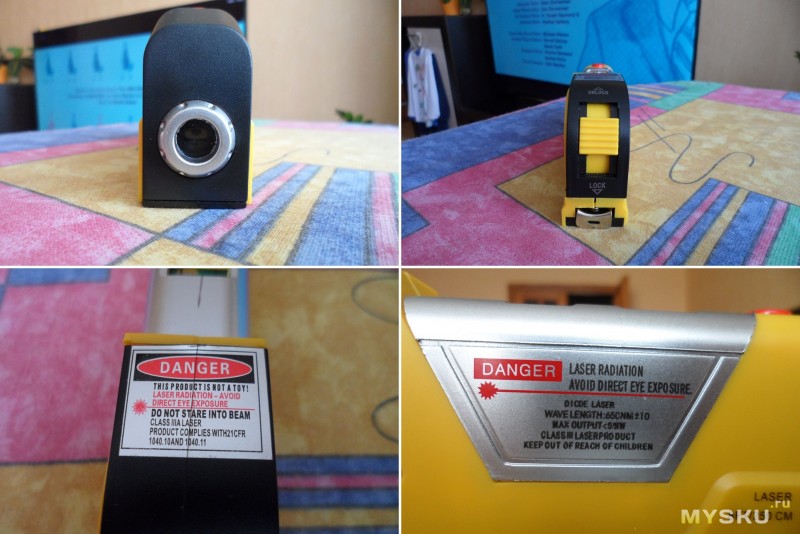
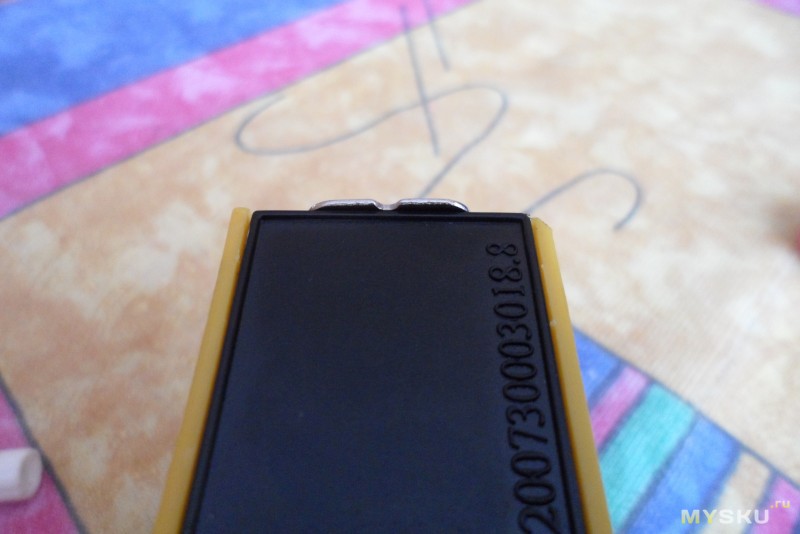
Вообще, тут мне хочется сказать несколько слов об общем качестве изготовления данного изделия. Предполагается, что строительный уровень — инструмент точный и, следовательно, должен быть сделан хорошо и аккуратно. Но это не про наш вариант. В обозреваемом экземпляры зазоры гуляют, качество обработки внутренностей страдает, где-то что-то торчит, где-то чего-то не хватает (все это будет видно дальше на фото) Но в общем и целом, на работу это не влияет, хотя хотелось бы качества получше. Итак, помимо надписей о вреде «лазерной радиации» на нижней грани уровня можно найти указание на то, что наш уровень защищен патентом №200730003018.8.
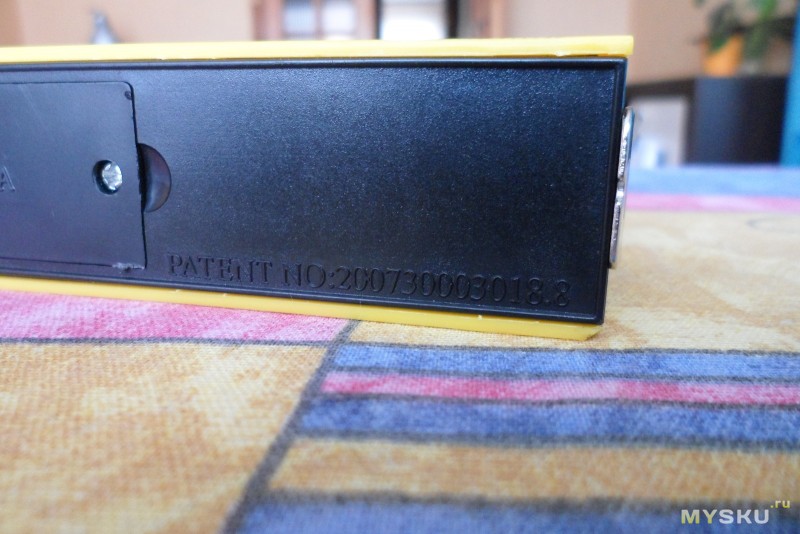
Признаться честно, сперва я подумал, что эта одна из тех надписей, которые китайцы делают для придания своим изделиям пущей важности, но на самом деле не имеющих никакого смысла. Однако я ошибался. Информацию по патенту №200730003018.8 удалось найти при помощи гугла тут.

Гуглопервод:
Лазерный уровень
Китай патент CN200730003018.8;
Вид сзади и вид спереди симметрии, опустив взгляд;
Название Лазерный уровень;
Номер заявки 200,730,003,018.8;
Номер публикации 300 744 318;
Дата подачи заявки 1 февраля 2007;
Дата публикации 13 февраля 2008;
Изобретатель Ян Строительство;
Агент Пекин Ze; Агент Ву Xiaolei; Правопреемник Ян Юй.
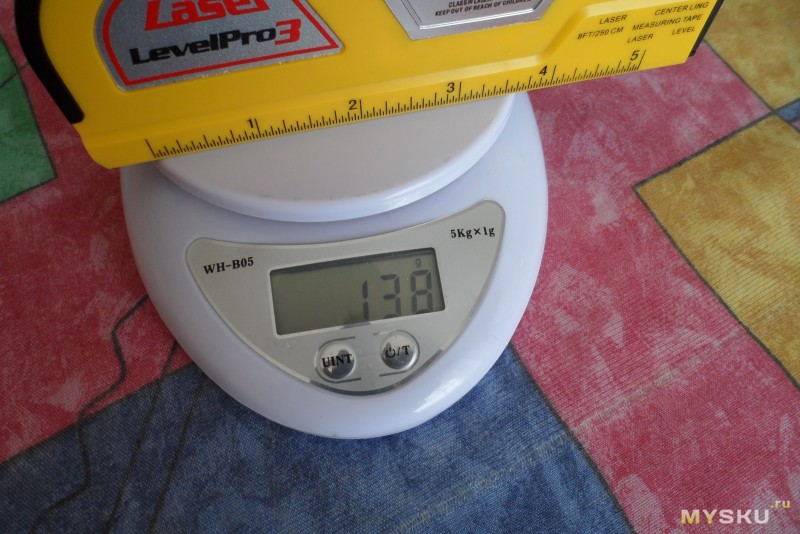
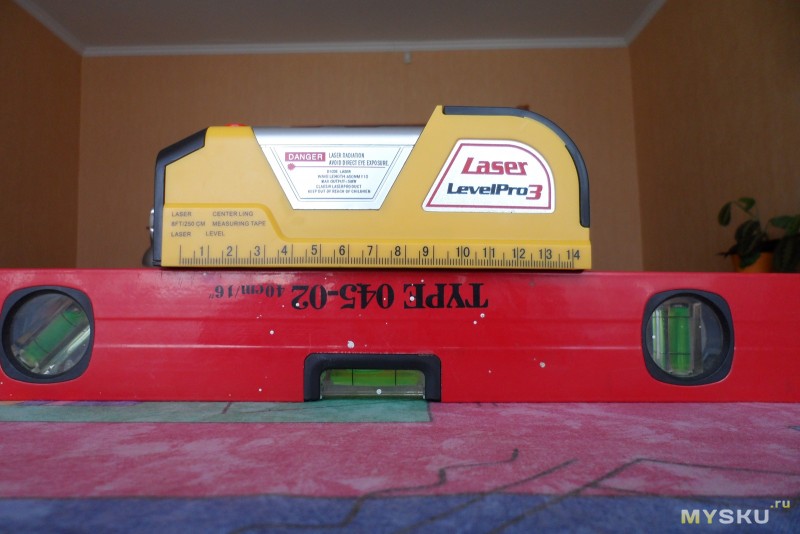
Вес устройства 138 грамм, что вполне приемлемо для такого изделия.
В принципе, больше ничего интересного во внешнем виде уровня нет, а это значит, что можно переходить к его проверке. Для начала начнем с рулетки, ведь нельзя быть уверенным в том, что 1 китайский сантиметр равен 1 полноценному сантиметру Что же, давайте проверим.
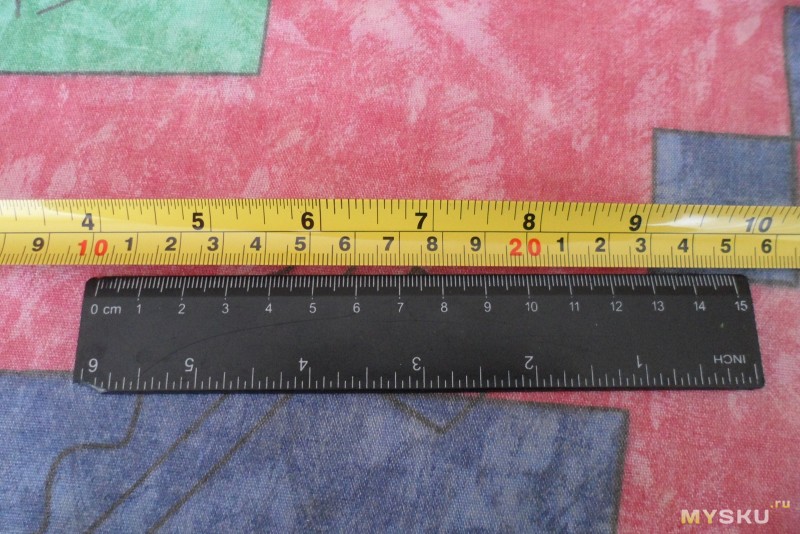
С рулеткой все в порядке, разметка четкая и соответствует норме. Замок рулетки так же справляется со своими функциями отлично — она точно случайно не скрутится.
Теперь проверим нижнюю сторону уровня на его ровность — ведь именно от этого зависит точность получаемых данных. Но перед тем, как это сделать, надо убрать то, что видно сразу — край рулетки выступает за пределы уровня, а это значит, что он будет мешать измерениям.
Разбираем уровень. Соединены все части этого пазла при помощи пластиковых защелок и и 2 винтиков, скрытых за накладкой серого цвета.

Откручивая их я уже прикидывал как буду ловить рулетку и какие мучения меня ожидают при ее обратной укладке и сматывании… Но после того, как уровень был разобран я увидел, что полотно рулетки спрятано в пластиковый кожух, так что если уровень сломается, то можно будет извлечь из него рулетку и пользоваться ей отдельно
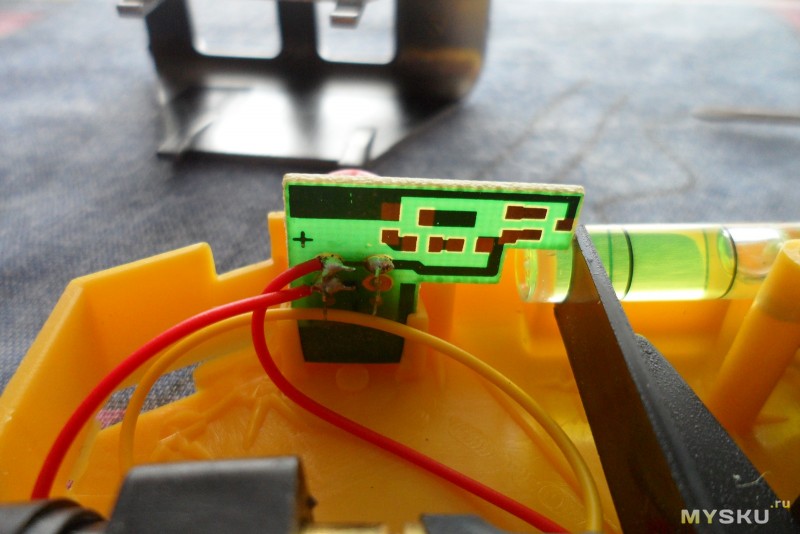
Плата управления лазерным уровнем:
«Глазок» лазера. Вид изнутри.
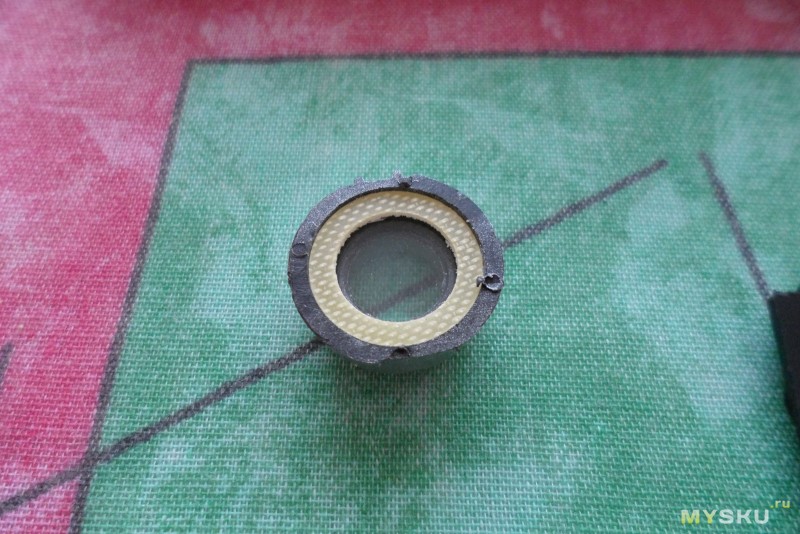
Изначально я думал, что это линза, улучшающая характеристики луча. Но как выяснилось, это обычный пластик, который скорее выполняет защитную функцию, нежели улучшает характеристики устройства. Особенно с учетом того, что без него луч получается гораздо ярче. На фото верхнее фото с защитным стеклом, а нижнее без (отличия по яркости хорошо заметны на весах).
Сперва думал убрать глазок, но потом решил его оставить. Инструмент то строительный и будет использоваться по своему прямому назначению, так что лучше пусть будет защита, чем открытая зона. В процессе разборки из уровня вывалилось несколько кусков пластика, оставшихся после обработки корпуса.

А еще взору открылось качество обработки пластика во всей своей красе:
Для того, чтобы рулетка не выступала над корпусом под нее был подложен кусочек стирки, подогнанный под нужный размер (к сожалению фото сделать забыл  ), после чего уровень был собран обратно и проверен на ровность получившейся плоскости.
Вроде как все ровно. Проверяем жидкостный уровень:
Переходим в другую комнату:

Видим наличие уклона на обеих уровнях. Эх, кривоватый пол у меня Но в целом, показания сходятся.
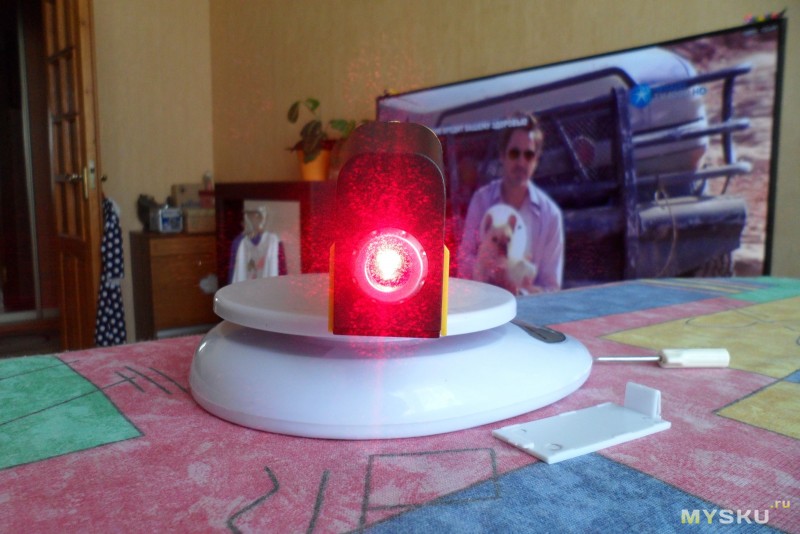
Теперь на очереди лазерный уровень. Вставляем батарейки, включаем — работает. Уже неплохо
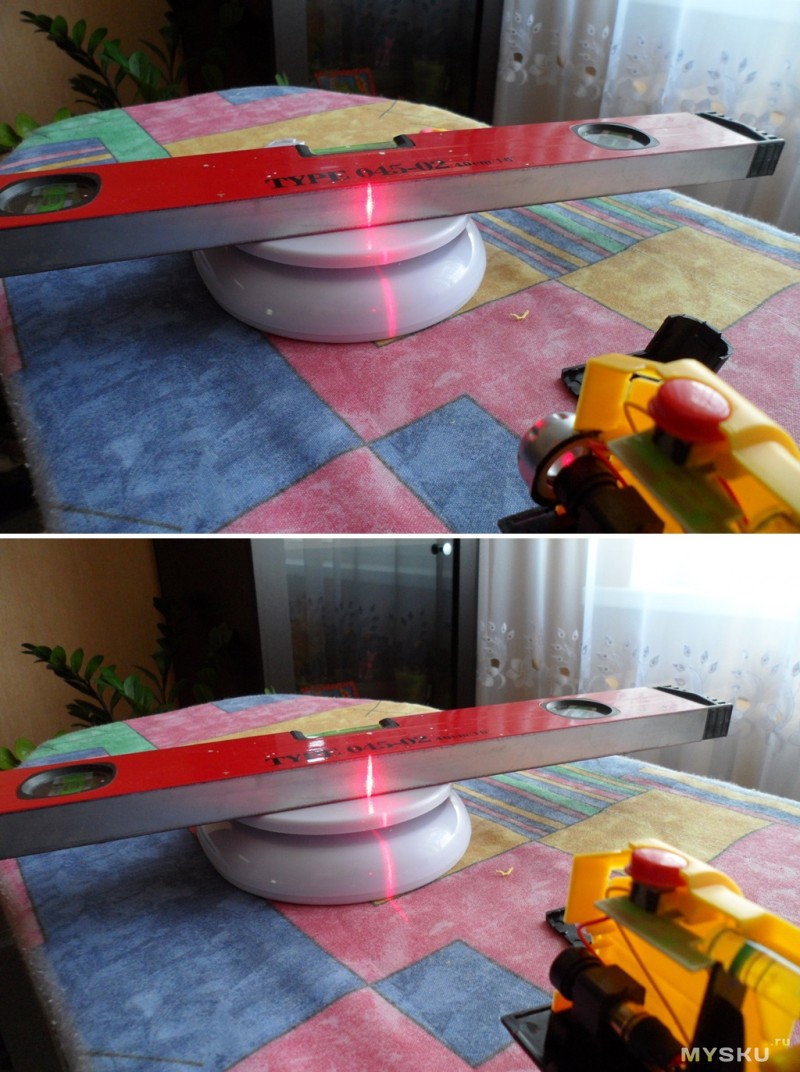
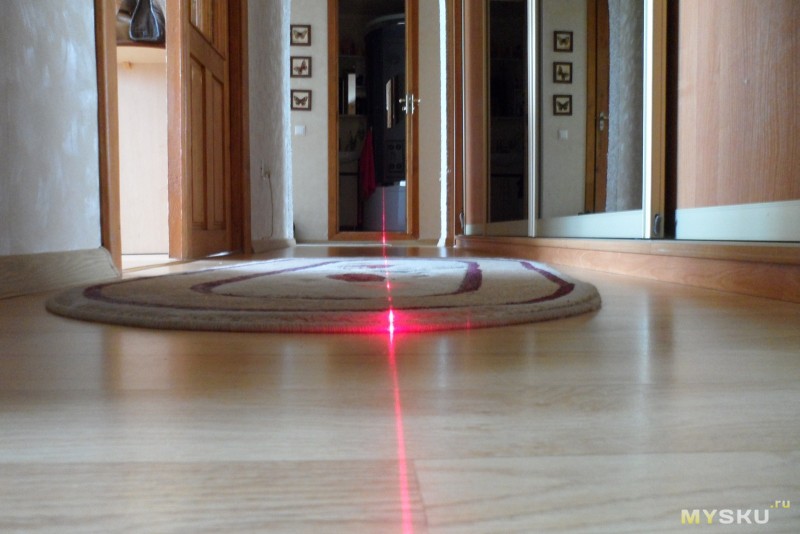
Теперь надо бы проверить и его точность. Особо хитрых способов проверки на ум не пришло, потому воспользовался самым простым. Берем кусочек малярной ленты, приклеиваем ее на вертикальную поверхность и под уровень рисуем вертикальную линию (кому не жалко, можно рисовать сразу на двери или обоях ). Отходим на максимально возможное расстояние (у меня коридор длиной метров 6) и поставив уровень на ровную горизонтальную поверхность пытаемся наложить одну линию на другую.
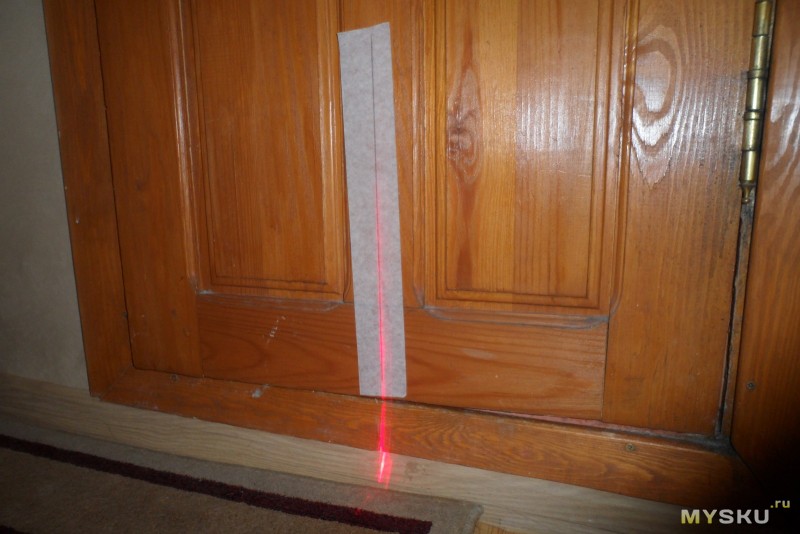
Совпало Сам не ожидал. Лазер виден по всей длине коридора, то есть получается не только вертикальная, но и горизонтальная линии.
Кажется, все. Вернее, почти все. Больно мне было интересны возможности лазерного уровня в плане дальности зоны действия. Дождавшись пока стемнеет, высунувшись в окно, начал проверку Луч на стене подъезда. Расстояние от уровня до поверхности — метров 10.
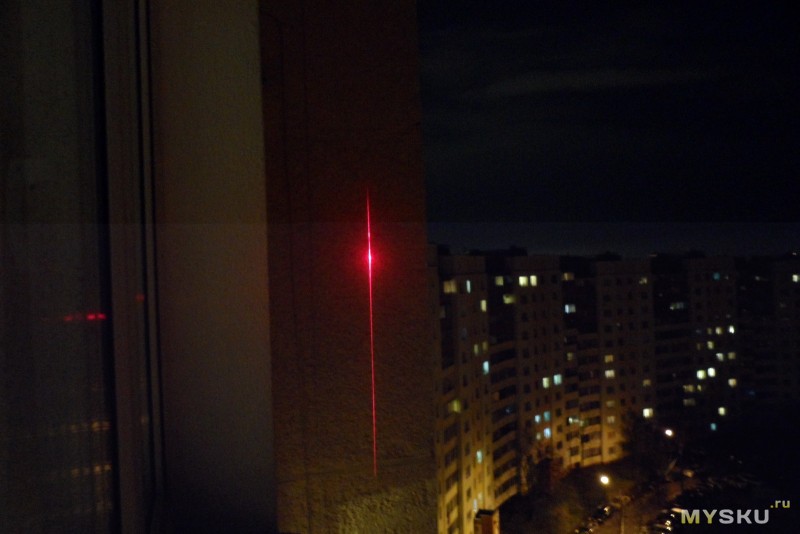
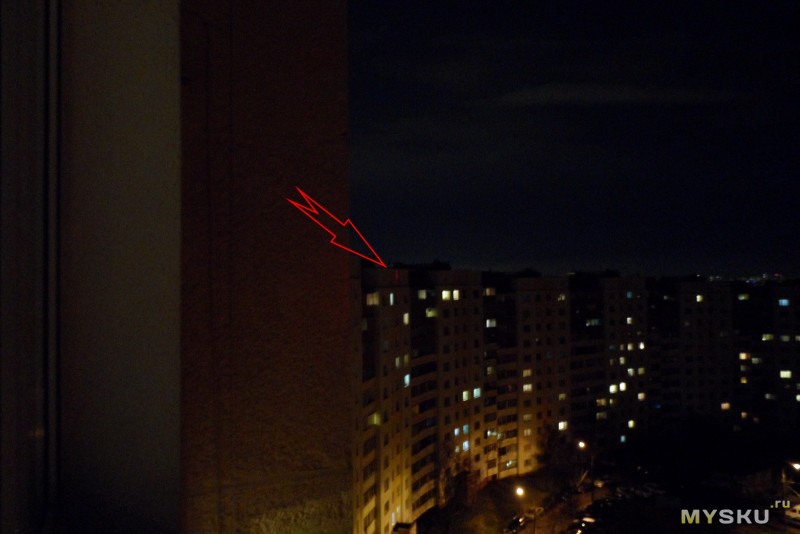
Хорошо, но мало. Смещаемся чуть в сторону. Луч от уровня на доме. Расстояние от уровня до поверхности — примерно 3,5-4 подъезда, если взять ширину подъезда в 20 метров (сам подъезд 2 метра + по 9 метров в каждую сторону от него квартиры) получается что-то около 70-80 метров. Луч виден, но уровень по нему уже не выставить Но с другой стороны это свидетельствует о том, что его хватит для любых мелких работ, какие бы вы не затеяли в своей квартире (Фото кликабельно).
Подводя итог всему, что написано выше. Уровень показался мне очень интересным. Он очень пригодится если вы работаете самостоятельно, а с учетом его функциональности и низкой цены, считаю эту покупку очень удачной. Конечно, пришлось немного повозиться, чтобы заставить его работать правильно, но тут приходится выбирать — дорого и сразу или бюджетно, но с доработками Но в целом, это вполне себе рабочее устройство, которое поможет при мелких строительных/ремонтных работах.
На этом в принципе все. Спасибо за внимание и потраченное время.
(Many of the links in this article redirect to a specific reviewed product. Your purchase of these products through affiliate links helps to generate commission for Storables.com, at no extra cost. Learn more)
Introduction
Welcome to this comprehensive guide on how to use the Levelpro3 Laser Level! Whether you’re a professional contractor, a DIY enthusiast, or someone who frequently works on home improvement projects, having a reliable laser level is essential for achieving accurate and precise leveling and alignment. In this article, we will provide you with a detailed overview of the Levelpro3 Laser Level and guide you through its setup, calibration, and operation to ensure optimal results.
The Levelpro3 Laser Level is a state-of-the-art tool that utilizes laser technology to project a level or plumb line onto various surfaces. It is designed to make leveling, aligning, and measuring tasks faster and more efficient. With its user-friendly interface and advanced features, the Levelpro3 Laser Level is suitable for both professionals and individuals undertaking DIY projects.
Before we delve into the specifics of using the Levelpro3 Laser Level, it is important to note that safety should always be your top priority while operating any tool. Familiarize yourself with the manufacturer’s safety guidelines and take necessary precautions to protect yourself and others around you. Now, let’s take a closer look at the Levelpro3 Laser Level and its key features.
Key Takeaways:
- The Levelpro3 Laser Level is a versatile and reliable tool that simplifies leveling and alignment tasks, offering self-leveling capabilities, multiple projection modes, and a durable construction for both professionals and DIY enthusiasts.
- Prioritizing safety, following setup and calibration procedures, and utilizing helpful tips and tricks can enhance the efficiency and accuracy of using the Levelpro3 Laser Level, ensuring precise measurements and professional-looking results.
Overview of the Levelpro3 Laser Level
The Levelpro3 Laser Level is a high-quality leveling tool designed to provide accurate and precise leveling and alignment for a wide range of applications. It features a robust construction, intuitive interface, and advanced laser technology to ensure reliable and efficient results.
One of the standout features of the Levelpro3 Laser Level is its self-leveling capability, which allows the device to automatically adjust and find its true horizontal or vertical level. This feature eliminates the need for manual adjustments and ensures that your measurements are consistently accurate.
The Levelpro3 Laser Level also offers a laser range of up to 100 feet, making it suitable for various indoor and outdoor applications. Whether you’re working on a construction site, installing cabinets, or laying tiles, this laser level provides a clear and visible laser line to guide your work and ensure precise alignment.
Additionally, the Levelpro3 Laser Level offers multiple projection modes, including horizontal, vertical, and cross-line modes. This versatility allows you to tackle a wide range of leveling and alignment tasks with ease. The laser level also features a locking mechanism to secure the laser in a specific position, allowing for more advanced alignment and layout work.
The Levelpro3 Laser Level is equipped with a durable casing that protects it from dust, debris, and other hazards commonly encountered on job sites. It is also designed to withstand minor impacts and falls, ensuring its longevity and reliability.
Furthermore, this laser level comes with a variety of helpful accessories, including a tripod stand, a wall mount bracket, and a carrying case. These accessories enhance the usability and portability of the Levelpro3 Laser Level, making it a convenient tool to have for both indoor and outdoor projects.
Now that we have covered the key features and capabilities of the Levelpro3 Laser Level, it’s time to explore the necessary safety precautions before using this tool.
Important Safety Precautions
Before using the Levelpro3 Laser Level, it is crucial to adhere to the following safety precautions to ensure your own safety and the safety of those around you:
- Read the user manual: Familiarize yourself with the manufacturer’s instructions and guidelines provided in the user manual. This will ensure that you understand the proper operation, maintenance, and safety procedures for the Levelpro3 Laser Level.
- Protective gear: Always wear appropriate personal protective equipment (PPE) such as safety goggles and gloves while operating the laser level. This will shield your eyes and hands from potential hazards and debris.
- Avoid direct eye exposure: Do not stare directly into the laser beam emitted by the Levelpro3 Laser Level. Laser beams can cause serious eye damage, so exercise caution and avoid direct exposure. If you need to look at the laser line, do so briefly and indirectly.
- Secure the work area: Clear the work area of any obstructions, tripping hazards, or bystanders. Ensure that the surface on which you are using the laser level is stable and level. This will help prevent accidents and ensure accurate measurements.
- Power source: Check the battery or power source of the Levelpro3 Laser Level and ensure it is fully charged or connected properly. Using a low battery or a faulty power connection can lead to inaccurate readings or unexpected laser beam interruptions.
- Avoid moisture and extreme temperatures: Keep the Levelpro3 Laser Level away from moisture, high humidity, and extreme temperatures. Exposure to these conditions can damage the components and affect the performance of the laser level.
- Transportation and storage: Always store the laser level in its protective case to prevent damage during transportation or when not in use. Store it in a cool, dry place, away from direct sunlight and potential sources of impact or vibration.
- Regular maintenance: Regularly inspect the Levelpro3 Laser Level for any signs of damage or wear. Clean the device gently with a soft cloth to remove dust and debris. Avoid using abrasive cleaners or solvents, as these can damage the surface of the laser level.
By following these safety precautions, you can minimize the risk of accidents, protect your eyesight, and ensure the proper functioning of your Levelpro3 Laser Level. Now that we have covered the safety measures, let’s dive into the setup process for this laser level.
Setting Up the Levelpro3 Laser Level
Setting up the Levelpro3 Laser Level is a straightforward process. Follow these steps to ensure a proper and stable setup:
- Choose a level surface: Find a stable surface to place the laser level. This can be a table, a tripod, or a mounting bracket depending on the application. Ensure that the surface is level and secure to avoid any movement or vibrations during operation.
- Mounting the laser level: If you are using a tripod, attach the Levelpro3 Laser Level to the tripod head using the mounting bracket or adapter provided. Make sure it is securely fastened to prevent any wobbling or movement during operation.
- Powering on the laser level: If the Levelpro3 Laser Level is battery-powered, insert the appropriate batteries into the designated compartment. If it has a power cord, connect it to a reliable power source. Turn on the laser level using the power button or switch.
- Adjusting the laser beam: Once the laser level is powered on, you may need to adjust the position or direction of the laser beam. Some models have manual adjustment knobs, while others offer electronic controls. Refer to the user manual for specific instructions on how to adjust the laser level.
- Checking the level: Make sure the Levelpro3 Laser Level is properly leveled before proceeding with your measurements. Many models have a built-in self-leveling system that automatically levels the laser within a certain range. Wait for the self-leveling process to complete, and confirm that the indicator signals that the level is accurate.
- Testing the laser beam: After the laser is leveled, test the visibility and accuracy of the laser beam. Do this by projecting the laser onto a nearby wall or surface. The laser should produce a clear, visible line without any distortions or deviations. Adjust the laser position if necessary.
- Securing the laser level: Once the laser level is properly set up and aligned, make sure to secure it in place. Use any locking mechanisms or clamps provided to prevent any accidental movement or displacement during use.
It is important to note that each Levelpro3 Laser Level model may have slightly different setup procedures. Always refer to the user manual for specific instructions related to your particular model. With the laser level properly set up, calibrated, and leveled, you are now ready to begin using it for various leveling and alignment tasks. In the next sections, we will explore the different operations and applications of the Levelpro3 Laser Level.
Calibrating the Laser Level
Calibrating the Levelpro3 Laser Level is an essential step to ensure accurate and reliable measurements. The calibration process may vary slightly depending on the model, so be sure to consult the user manual for specific instructions. Here is a general guide to calibrating a laser level:
- Choose a stable surface: Find a level and stable surface where you can set up the laser level for calibration. This can be a table or any other flat surface.
- Power on the laser level: Turn on the Levelpro3 Laser Level and allow it to go through the self-leveling process if applicable. Make sure the laser level is properly leveled before proceeding with the calibration.
- Find a reference point: Locate a reference point that is known to be level or plumb. This can be a marked reference line on a wall, a shelf, or any other surface that you are confident is level or plumb.
- Place the laser level on the reference point: Carefully place the Levelpro3 Laser Level on the reference point. Ensure that it is stable and securely positioned.
- Adjust the laser alignment: Look at the laser beam projected by the laser level and compare it to the reference point. Use the adjustment knobs or controls provided on the laser level to align the laser beam with the reference point. It is important to make small, precise adjustments to ensure accuracy.
- Verify the alignment: Once you have made the necessary adjustments, double-check the alignment of the laser beam with the reference point. Repeat the process if needed until the laser beam aligns perfectly with the reference point.
- Lock the calibration: Once you are satisfied with the calibration, use any locking mechanism or clamps provided to secure the laser level in place. This will prevent any accidental movement or displacement during use.
- Test the calibration: To ensure the calibration is accurate, project the laser onto a nearby wall or surface and check if the laser beam produces a clear, straight line without any deviations. If the calibration is off, repeat the calibration process from step 3.
Calibrating the Levelpro3 Laser Level is a crucial step that should be done periodically or whenever you suspect that the measurements are not accurate. By calibrating your laser level, you can trust that it will provide precise and dependable results for all your leveling and alignment tasks.
Now that we have covered the calibration process, let’s explore the basic operation of the Levelpro3 Laser Level for horizontal and vertical leveling.
Basic Operation of the Levelpro3 Laser Level
The Levelpro3 Laser Level offers intuitive and user-friendly operation, making it suitable for both professionals and individuals undertaking DIY projects. Here is a step-by-step guide on how to operate the Levelpro3 Laser Level for horizontal and vertical leveling:
Horizontal Leveling:
- Set up the laser level: Follow the steps outlined earlier to set up the Levelpro3 Laser Level on a stable surface. Ensure that it is properly leveled and calibrated before proceeding.
- Power on the laser level: Turn on the laser level and allow it to go through the self-leveling process if applicable.
- Identify the leveling line: Look for the horizontal leveling line projected by the laser level. This will be a straight, level line emitted from the laser beam.
- Position the leveling line: Rotate the laser level or adjust its position until the leveling line aligns with the desired reference point. This can be a marked line on a wall, the top of a shelf, or any other horizontal surface you wish to match.
- Lock the laser level: Once the leveling line is aligned with the reference point, use any provided locking mechanism or clamps to secure the laser level in place. This will prevent any accidental movement and ensure consistent horizontal leveling.
Vertical Leveling:
- Set up the laser level: Similar to horizontal leveling, set up the Levelpro3 Laser Level on a stable surface and ensure it is properly leveled and calibrated.
- Power on the laser level: Turn on the laser level and allow it to go through the self-leveling process if applicable.
- Identify the vertical leveling line: Look for the vertical leveling line projected by the laser level. This will be a straight, plumb line emitted from the laser beam.
- Position the leveling line: Rotate the laser level or adjust its position until the leveling line aligns with the desired vertical reference point. This can be a marked line on a wall, a door frame, or any other vertical surface you wish to match.
- Lock the laser level: Once the leveling line is aligned with the reference point, use the provided locking mechanism or clamps to secure the laser level in place. This will prevent any accidental movement and ensure consistent vertical leveling.
As you can see, operating the Levelpro3 Laser Level for horizontal and vertical leveling is a simple and straightforward process. However, it is important to remember to always follow the manufacturer’s instructions and guidelines for your specific model, as the operation may vary slightly.
In the next sections, we will explore how to use the Levelpro3 Laser Level for alignments and provide some useful tips and tricks for efficient usage.
Using the Levelpro3 Laser Level for Horizontal Leveling
The Levelpro3 Laser Level is a versatile tool that allows for precise horizontal leveling in various applications. Here’s a step-by-step guide on using the Levelpro3 Laser Level for horizontal leveling:
- Set up the laser level: Place the Levelpro3 Laser Level on a stable surface or mount it on a tripod, ensuring it is securely positioned.
- Power on the laser level: Turn on the laser level and wait for it to complete the self-leveling process.
- Identify the leveling line: Look for the horizontal leveling line projected by the laser level. This line represents a level reference point.
- Position the leveling line: Rotate or adjust the laser level until the leveling line aligns with the desired reference point. This can be a mark, a beam, or any other horizontal surface that you want to match or create.
- Lock the laser level: Once the leveling line is aligned with the reference point, use the locking mechanism or clamps provided to secure the laser level in place. This prevents the laser from moving or shifting during use.
- Use a measuring tool: With the horizontal leveling line projected by the Levelpro3 Laser Level, you can now use a measuring tool, such as a tape measure or ruler, to take measurements and align other objects or surfaces horizontally.
Whether you’re installing shelves, hanging pictures, or setting up cabinets, the Levelpro3 Laser Level ensures accurate horizontal leveling, saving you time and effort. Remember to always double-check the leveling line before proceeding with any measurements or adjustments.
Next, let’s explore how to use the Levelpro3 Laser Level for vertical leveling.
Using the Levelpro3 Laser Level for Vertical Leveling
The Levelpro3 Laser Level is not limited to horizontal leveling—it also provides precise vertical leveling for a wide range of applications. Follow these steps to use the Levelpro3 Laser Level for vertical leveling:
- Set up the laser level: Choose a stable surface or mount the Levelpro3 Laser Level on a tripod, ensuring it is securely positioned.
- Power on the laser level: Turn on the laser level and wait for it to complete the self-leveling process.
- Identify the leveling line: Look for the vertical leveling line projected by the laser level. This line represents a plumb reference point.
- Position the leveling line: Rotate or adjust the laser level until the leveling line aligns with the desired vertical reference point. This can be a mark on a wall, a door frame, or any other vertical surface that you want to match or create.
- Lock the laser level: Once the leveling line is aligned with the reference point, use the locking mechanism or clamps provided to secure the laser level in place. This prevents the laser from moving or shifting during use.
- Use a measuring tool: With the vertical leveling line projected by the Levelpro3 Laser Level, you can use a measuring tool, such as a tape measure or ruler, to take measurements and align other objects or surfaces vertically.
Vertical leveling is essential for tasks like aligning cabinets, installing frames, or hanging doors, ensuring precise and accurate alignment. Always verify the leveling line to ensure it is perfectly plumb before proceeding with any measurements or adjustments.
The Levelpro3 Laser Level’s versatility in providing both horizontal and vertical leveling makes it a valuable tool for a wide range of projects. In the next section, we will explore how you can use the Levelpro3 Laser Level for various alignments.
Using the Levelpro3 Laser Level for Alignments
The Levelpro3 Laser Level is not only useful for leveling tasks, but it can also be utilized for precise alignments in various applications. Here’s how you can use the Levelpro3 Laser Level for alignments:
Aligning Objects:
- Set up the laser level: Place the Levelpro3 Laser Level on a stable surface or mount it on a tripod, ensuring it is securely positioned.
- Power on the laser level: Turn on the laser level and wait for it to complete the self-leveling process.
- Identify the leveling line: Look for the laser line projected by the Levelpro3 Laser Level, whether horizontal or vertical, depending on the alignment needed.
- Position the objects: Adjust the position of the objects you want to align, such as shelves or cabinets, until the edges or marks of the objects align with the projected laser line.
- Confirm alignment: Double-check the alignment by using a measuring tool or a level to ensure that the objects are straight and properly aligned.
- Secure the objects: Once the objects are aligned, fix or secure them in place using suitable fasteners, adhesive, or clamps to maintain their alignment.
Aligning Tiles or Wall Decorations:
- Set up the laser level: Position the Levelpro3 Laser Level on a stable surface or mount it on a tripod, ensuring it is securely positioned.
- Power on the laser level: Turn on the laser level and wait for it to complete the self-leveling process.
- Identify the leveling line: Look for the horizontal or vertical laser line projected by the Levelpro3 Laser Level, depending on the alignment needed.
- Position the tiles or decorations: Arrange the tiles or wall decorations so that their edges or markings align with the projected laser line, ensuring a straight and even layout.
- Verify the alignment: Use a spirit level or a measuring tool to verify that the tiles or decorations are aligned uniformly along the laser line.
- Secure the tiles or decorations: Once the tiles or decorations are aligned properly, affix them to the wall using an appropriate adhesive or fasteners to ensure they stay in place.
The Levelpro3 Laser Level’s ability to project a clear laser line enables precise alignments, making it a versatile tool for a range of projects. Whether you’re aligning objects, tiles, or wall decorations, the Levelpro3 Laser Level ensures accurate alignment, resulting in professional-looking results.
Now that we have explored how to use the Levelpro3 Laser Level for alignments, let’s move on to some tips and tricks to help you efficiently use this tool.
Tips and Tricks for Efficiently Using the Levelpro3 Laser Level
The Levelpro3 Laser Level is a powerful tool for achieving accurate leveling and alignment in various projects. Here are some tips and tricks to help you maximize the efficiency and effectiveness of your Levelpro3 Laser Level:
- Use a laser detector: In situations where the laser line is not easily visible due to distance or lighting conditions, consider using a laser detector. A laser detector will help you locate the laser line accurately, even in bright or outdoor environments.
- Collaborate with a partner: When working on larger projects or long-distance alignments, having a partner to assist you can greatly enhance efficiency. While one person positions and aligns the objects, the other person can verify the accuracy from a distance.
- Utilize the locking mechanism: The Levelpro3 Laser Level typically comes with a locking mechanism or clamps. Use them to secure the laser level in position to avoid accidental movements or shifts during operation, ensuring consistent and reliable results.
- Take advantage of multiple modes: The Levelpro3 Laser Level often offers multiple projection modes, such as horizontal, vertical, and cross-line modes. Familiarize yourself with these modes and utilize them as needed for different alignment tasks.
- Consider using a tripod: Using a tripod with your Levelpro3 Laser Level offers stability and flexibility. A tripod allows you to set up the laser level at different heights and positions, making it easier to align objects or surfaces accurately.
- Take measurements from multiple points: To ensure precise alignment, take measurements from multiple points along the laser line. This helps verify consistency and detect any potential deviations in the alignment.
- Perform regular maintenance: Keep your Levelpro3 Laser Level in optimal condition by performing regular maintenance. Clean the laser lens and casing regularly to ensure clear projection and protect it from dust and debris. Check the batteries and power source, and replace them as needed.
- Store the laser level in its case: When not in use, store your Levelpro3 Laser Level in its protective case. This protects it from damage, dust, and moisture, ensuring its longevity and reliable performance.
- Refer to the user manual: Always refer to the user manual specific to your Levelpro3 Laser Level model. It contains important information, operation instructions, and troubleshooting tips that will help you use the tool effectively and address any issues you may encounter.
By following these tips and tricks, you can make the most out of your Levelpro3 Laser Level and ensure efficient and accurate leveling and alignment in your projects. Always prioritize safety and refer to the manufacturer’s guidelines to operate the laser level properly.
In the next section, we will address some common issues that you may encounter with the Levelpro3 Laser Level and provide troubleshooting solutions.
When using the Levelpro3 Laser Level, make sure to calibrate it on a stable surface before use to ensure accurate leveling and alignment.
Troubleshooting Common Issues with the Levelpro3 Laser Level
While the Levelpro3 Laser Level is a reliable tool, you may encounter some common issues during its operation. Here are some troubleshooting tips to help you address these issues:
Issue: Laser beam is not visible
Solution:
- Check the battery or power source and ensure it is properly connected and charged. Replace the batteries if necessary.
- Verify that the laser level is turned on and that the laser beam is not obstructed by any barriers or debris.
- If working in bright lighting conditions, consider using a laser detector, which can help locate the laser beam accurately.
Issue: Inaccurate leveling or alignment
Solution:
- Make sure the leveling bubbles on the laser level are centered. If not, adjust the position until they are level.
- Check if the laser level is on a stable surface and securely mounted. Vibration or movement can affect the accuracy of the leveling.
- Perform a calibration of the laser level according to the manufacturer’s instructions to ensure accurate measurements.
- Double-check the position of the reference points or objects you are aligning and make necessary adjustments if they are not accurately placed.
Issue: Self-leveling function not working
Solution:
- Ensure that the laser level is on a stable surface and not tilted beyond its leveling range.
- Check if the leveling base or tripod is secure and not causing any interference with the self-leveling mechanism.
- Clean the leveling base and sensors to remove any dust or debris that may be affecting the self-leveling function.
- If the issue persists, consult the manufacturer’s support or customer service for further assistance or repair.
Issue: Laser line is distorted or uneven
Solution:
- Check if the laser level lens is clean and free from any dust or debris. Use a soft cloth or lens cleaning solution to gently clean the lens if needed.
- Make sure the laser level is securely mounted and not experiencing any vibrations or movements during operation.
- Verify that the surface on which the laser level is projected is smooth and not causing any diffractions or irregularities in the laser line.
- If the issue persists, consider calibrating the laser level again to ensure accurate projection.
If you encounter any other issues with your Levelpro3 Laser Level, refer to the user manual or contact the manufacturer’s support for specific troubleshooting steps or to obtain warranty service. Remember to always prioritize safety and follow the manufacturer’s guidelines for proper tool usage and maintenance. With the troubleshooting tips provided, you should be able to efficiently tackle any common issues that arise while using the Levelpro3 Laser Level. In the next section, we will conclude our article with a summary and final thoughts.
Conclusion
The Levelpro3 Laser Level is a versatile and reliable tool that enhances accuracy and efficiency in leveling and alignment tasks. Through this comprehensive guide, we have covered the important aspects of using a Levelpro3 Laser Level, including its overview, safety precautions, setup process, calibration, basic operations, alignments, and troubleshooting common issues.
By following the step-by-step instructions provided, you can confidently set up and operate the Levelpro3 Laser Level for horizontal and vertical leveling. Whether you’re aligning objects, tiles, or wall decorations, this laser level ensures precise measurements and professional-looking results.
Remember to prioritize safety by wearing protective gear and adhering to the manufacturer’s safety guidelines. Regular maintenance and calibration of the Levelpro3 Laser Level are essential to ensure accurate and reliable measurements. Utilize the various modes and features of the laser level to match specific alignment needs.
Additionally, implementing the tips and tricks shared in this guide will enhance your efficiency and productivity while using the Levelpro3 Laser Level. Using a laser detector, collaborating with a partner, or taking measurements from multiple points are just a few strategies to optimize your results.
If you encounter any issues or inconsistencies with your Levelpro3 Laser Level, refer to the troubleshooting section or consult the user manual for specific solutions. In case of persistent problems, contacting the manufacturer’s support or customer service will ensure proper assistance.
Overall, the Levelpro3 Laser Level is a valuable tool that simplifies and improves a variety of leveling and alignment tasks. It empowers professionals and DIY enthusiasts alike to achieve accurate and precise results in their projects.
So, whether you’re a contractor, a renovation enthusiast, or a DIY hobbyist, the Levelpro3 Laser Level is a tool worth investing in. Its reliability, ease of use, and versatility make it an indispensable asset for any project that requires accurate leveling and alignment.
With the knowledge gained from this guide, you’re ready to confidently use the Levelpro3 Laser Level to achieve precise measurements and professional-level results. Happy leveling and aligning!
Frequently Asked Questions about How To Use Level Pro 3 Laser Level
QWhat are the key features of the Levelpro3 Laser Level?
A
The Levelpro3 Laser Level comes with features such as self-leveling, horizontal and vertical laser lines, a magnetic base, and a durable design for both indoor and outdoor use.
QCan the Levelpro3 Laser Level be used for DIY projects at home?
A
Yes, the Levelpro3 Laser Level is perfect for DIY projects such as hanging pictures, installing shelves, and aligning tiles. Its easy-to-use design makes it suitable for both professionals and beginners.
QHow do I ensure accurate measurements when using the Levelpro3 Laser Level?
A
To ensure accurate measurements, it’s important to place the level on a stable surface and allow it to self-level. Avoid any obstructions that may interfere with the laser lines for precise results.
QIs the Levelpro3 Laser Level suitable for professional construction projects?
A
Absolutely! The Levelpro3 Laser Level is designed to meet the demands of professional construction projects, providing reliable and accurate laser lines for tasks such as framing, installing cabinets, and laying out foundations.
QWhat are some tips for maximizing the use of the Levelpro3 Laser Level?
A
To maximize the use of the Levelpro3 Laser Level, consider using a laser detector for outdoor projects, calibrating the level as needed, and taking advantage of its versatile mounting options for various applications.
At Storables.com, we guarantee accurate and reliable information. Our content, validated by Expert Board Contributors, is crafted following stringent Editorial Policies. We’re committed to providing you with well-researched, expert-backed insights for all your informational needs.
Здравствуйте, друзья!
Сегодня я хотел бы рассказать о приборе, который от части все-таки помогает мне на мелком леваке. Да, я не спорю, лазерный нивелир он не заменит, однако, для моих задач этого и не требуется.
Итак, встречаем супер-лазерный уровень с рулеткой!

Первое, что бросается в глаза — это сантиметровая шкала на подошве.

Лично для меня это не плюс и не минус, т.к. шкалой я вообще пользуюсь редко. Плюс у меня уже есть уровень Stanley со шкалой. Этот уровень я еще покажу, т.к. именно с ним и будет проводиться сравнение.
Подошка китайского уровня выполнена из алюминия, не магнитится.

Однако, если есть необходимость, в это продольное углубление, думаю, можно будет впихнуть парочку неодимовых магнитов, чтоб уровень можно было примагнитить, скажем, к профилю для гипсокартона.
Коротко про рулетку.
Длина ленты составляет 2,5м, как и заявлено. Излом «на вылет» составляет примерно 1,4 метра. Т.е. Вы в горизонт вытягиваете из рулетки ленту и эта лента переламывается под собственным весом при достижении отметки примерно в 1,4-1,45м.
Однако, должен отметить, что на ленте две шкалы — дециметровая и дюймовая.

Я не оговорился — шкала именно дециметровая. Сантиметровая шкала — это когда … 8, 9, 10, 11, 12 … 18, 19, 20, 21, 22 …, а дециметровая — когда 8, 9, 10, 1, 2, … 8, 9, 20, 1, 2 …

На счет кнопки так же хотелось бы вставить важные 5 копеек. Пока кнопка не нажата — лента зафиксирована. Как только Вы нажимаете на кнопку — лента начинает сматываться с бешеной скоростью. Будьте осторожны, иначе лента может долбануть ограничителем по пальцам с такой силой, что можно будет спокойно прикурить от искр, посыпавшихся из Ваших глаз. Рулеткой на данном уровне я практически не пользуюсь, у меня есть гораздо более удобная рулетка Stanley, у нее такой проблемы нет.
Далее переходим к капсулам.
На уровне есть три капсулы для выставления чего-нибудь по вертикали, горизонтали, либо по диагонали под 45 градусов.

Для последней капсулы есть «сверху» дополнительное окошко.

Теперь переходим к тестированию этих самых пузырьковых капсул.
Для тестирования я взял пузырьковый уровень Stanley, о котором я уже рассказывал.
Для начала давайте его немного повертим. В самом прямом смысле слова. Для начала я его просто поставил на стол, чтоб «считать» показания. Сейчас нам не важно покажет он «да, все точно по уровню» или нет. Нам на данном этапе важно просто посмотреть изменятся ли его показания в процессе переворачивания.

Итак, пузырек практически «прилип» к правой вертикальной черте. Теперь развернем его на 180 градусов. Обратите внимание — на фото сверху в правой части находится вертикальная капсула, а на фото снизу — диагональная. Это чтоб не говорили, что я дважды одно и то же фото выложил.

Показания абсолютно те же. Пузырек не изменил свое положение ни на миллиметр.
Теперь давайте перевернем уровень вверх ногами.

И развернем еще раз на 180 градусов.

Данный уровень на всех 4 фото дал одни и те же показания. Это говорит о том, что данный уровень имеет достаточно высокую точность. Если бы это было не так — положение пузырька бы менялось от фото к фото. Но этого не происходит.
Еще один важный момент — никакого мусора на столе не было, Я специально протер поверхность перед тем, как сделать эти 4 фото.
Ну а теперь, друзья, поставим один уровень на другой и посмотрим что будет.

Обратите внимание — уровень Стенли выставлен точно в уровень, пузырек точно посередине. На китайском уровне пузырек тоже посередине, но с еле-еле заметным отклонением влево. В пределах допуска, потому на данном этапе поставим зачет.
Теперь, не меняя положения уровня Стенли, развернем китайский уровень на 180 градусов.

Обратите внимание — Стенли как был точно в уровень, так и остался. А вот китайский, хоть и в пределах допуска, но показывает отклонение, при чем уже в другую сторону. При чем это отклонение более ярко выражено по сравнению с предыдущим фото. Но если в целом, будем считать, что тест пройден.
Тот же тест, но на вертикаль.

Обратите внимание — Стенли выставлен точно по уровню, а китайский уровень показывает уклон — пузырек «прилип» к правой черте. Такое отклонение уже гораздо более выражено, чем в предыдущем зачете.
Теперь развернем китайский уровень на 180 градусов сверху вниз и посмотрим что изменится.

Самое интересное, что не изменилось почти ничего. Пузырек все так же «ушел вправо», но чуть-чуть меньше. Стенли же по-прежнему остался точно в уровень.
И, наконец, диагональ.

А вот тут, что интересно, показания полностью совпали.
Из этих трех нехитрых тестов можно сделать вывод, что наявленной точности в 0,25мм/м данный уровень не соответствует. Однако, он вполне имеет право на существование и пригодится тем, кому не требуется супер-высокая точность. И еще один вывод — каждый такой уровень надо проверять индивидуально. Например, мой показал точно только диагональ. Горизонталь он показал с отклонениями, но в пределах допуска, а вертикаль показал еще хуже.
И последнее, что нам осталось глянуть — лазерная дискотека. Видите вот этот «глазок» слева от наклейки?

Вот этот глазок и является переключателем режимов. Более того, он же является еще и источником лазеров. В таблице же указано, какой тип лазера можно получить в том или ином положении глазка. В верхнем положении мы получаем горизонталь, в среднем — крест, а в нижнем — вертикаль. Вживую же это выглядит примерно вот так:


Важный момент — для креста уровень должен находиться строго вертикально, иначе углов в 90 градусов добиться будет сложно и будет нечто вот такое, хоть и в меньшей степени.

При таком расположении уровня мы получаем не 4х90, а 2 тупых и 2 острых угла.
Теперь давайте я покажу как можно применить вертикаль или горизонталь.
Самый простой способ — выставить уровень по уровню, включить горизонтальный лазер, а затем расположить его, скажем, вдоль стены.

Да, я не спорю, сейчас лазер светит немного криво, но я и не пытался его выставить точно в уровень. Суть этого фото в другом — луч попадает на две стены. Т.е. произвести «карандашную» разметку (например, для дальнейшего сверления отверстий) по данной линии абсолютно реально.
Можно добиться такого же эффекта, но чуточку иначе. Переводим уровень в режим «вертикаль» и прикладываем к стене, но уже ставим уровень «подошвой» на стену.

Получилось по сути то же самое — луч попадает на обе стены.
Однако, хочу отметить один ультра-важный момент — луч, попадающий (в моем случае) на входную стену не будет точно горизонтальным.

Это связано с тем, что стена, на которую «поставлен» уровень, имеет завал. И завал есть почти на каждой стене за редчайшим исключением.
А теперь, друзья, немного другой способ выставления лазера. Я его использую для установки карнизов для штор. Как правило, моими заказчиками являются одинокие женщины, обитающие в хрущевках. Ремонт далеко не на высоте (посмотрите насколько криво сделана потолочная плитка и насколько криво приклеен пенопластовый потолочный плинтус), стены и потолки кривые, потому выставлять лазер у уровень нет смысла — на фоне кривых стен и потолка он будет смотреться криво. Поэтому в данном случае я выставляю лазер «на глаз», чтоб он был примерно параллельно потолку с перекосом в до 1-1,5 см на всю длину карниза.

Затем делаю разметку, сверлю, и прикручиваю. Такой способ значительно ускоряет работу. Ранее я просто отменял от края стены дырку на нужной высоте, прикручивал кронштейн, прикладывал карниз, выставляя его по уровню, делал разметку у противоположного конца, снимал карниз, сверлил, прикручивал, а затем снова то же самое для крепления центрального кронштейна. Получалось долго и достаточно муторно. А так я измерил ширину посещения, справа и слева, и с помощью обычной рулетки в один заход отметил все 3 отверстия. Сразу просверлил, сразу прикрутил, сразу собрал. Минус такого способа в том, что потом иногда приходится чуток корректировать сам карниз, чтоб он смотрелся ровно.
А чтоб решение задачи стало еще проще — для удобства я ставлю уровень на штатив. Да, самый обычный штатив от фотокамеры, дополнительно укомплектованный креплением под смартфоны. Выглядит это примерно вот так.

Однако, бывают ситуации, когда лазер требуется выставить в уровень. Для этого я уже использую уровень самого штатива.

Как видите, выставить луч точно по горизонтали вполне реально.

Итак, подведем итоги.
1) уровень не обладает супер-высокой точностью, однако, погрешность (в моем случае) в пределах допуска
2) заявленной точности в 0,25мм/м уровень не соответствует
3) пригодится всем, кому нужна длинная вертикальная/горизонтальная линия, но при этом не требуется супер-высокая точность.
Да, я не спорю, этот малыш не заменит лазерный нивелир, однако, мне этого и не нужно. Стоит покупать или нет — решайте сами.
ManualsPro
AikTryee
AikTryee Levelpro3 Multipurpose Laser Level Instruction Manual
- July 20, 2024
- AikTryee
Table of Contents
- AikTryee Levelpro3 Multipurpose Laser Level
- INTRODUCTION
- SPECIFICATIONS
- WHAT’S IN THE BOX
- PRODUCT OVERVIEW
- FEATURES
- SETUP GUIDE
- CARE & MAINTENANCE
- PROS & CONS
- CUSTOMER REVIEWS
- FREQUENTLY ASKED QUESTIONS
- VIDEO – PRODUCT OVERVIEW
- Read User Manual Online (PDF format)
- Download This Manual (PDF format)
AikTryee Levelpro3 Multipurpose Laser Level

INTRODUCTION
With the AikTryee Levelpro3 Multipurpose Laser Level, you can be more precise.
This tool is intended to make measuring and leveling easy. This laser level is
very accurate and easy to use, making it great for both do-it-yourselfers and
skilled builders. It is made of long-lasting Acrylonitrile Butadiene Styrene
(ABS) and is small (3.34 L x 1.1 W inches), which makes it easy to carry and
store. Six LR44 batteries power the Levelpro3, which works reliably with a
4.5-volt DC power source and 3.5 watts of power. This model was made by
AikTryee, a company that is known for making new tools, and it is priced so
that it will work well without breaking the bank. For accurate leveling, the
AikTryee Levelpro3 is the best tool for the job, whether you’re doing home
improvements or hiring a professional.
SPECIFICATIONS
| Brand | AikTryee |
|---|---|
| Material | Acrylonitrile Butadiene Styrene |
| Product Dimensions | 3.34 L x 1.1 W Inches |
| Style | Laser, Standard, Multipurpose, Horizontal |
| Operation Mode | Manual |
| Manufacturer | AikTryee |
| Item Weight | 6 ounces |
| Item Model Number | Levelpro3 |
| Batteries | 6 LR44 batteries required |
| Power Source | DC |
| Voltage | 4.5 Volts (DC) |
| Wattage | 3.5 watts |
WHAT’S IN THE BOX
- Laser Level
- Manual
PRODUCT OVERVIEW

FEATURES
- Multifunctional Use: The AikTryee Levelpro3 is a flexible tool that can be used indoors to hang shelves, cabinets, tiles, and picture frames, among other things. It gives accurate measurement lines.
- Laser Modes: It has three laser modes—vertical, horizontal, and cross-line—so it can be used for different positioning tasks and be used accurately on different surfaces.

- Easy to Use: It has a single slider button for changing modes, which makes it simple for users to choose the laser line style they want.
- Accuracy: Made to give stable and exact readings, making sure that projects are aligned and leveled correctly.
- Bubble Levels: This set has three bubble levels (0°, 90°, and 45°) that can be used to check both horizontal and vertical lines and improve the accuracy of measurements.
- Integrated Measuring Tape: It comes with an 8-foot measuring tape that can be used for both imperial and metric readings. The tape has fine graduations of 1/32″ and 1mm for accurate measures.
- Durable Construction: It is made of acrylonitrile butadiene styrene (ABS), which makes it strong and reliable for a long time.
- Small Size: The device is only 3.34 x 1.1 inches, so it’s small and easy to carry around. This makes it useful for many situations.
- Battery Power: It runs on 6 LR44 batteries, which are a stable source of power for the laser.
- DC Power: The laser level uses 4.5 volts of direct current, which makes sure that the power is used efficiently.
- Wattage: Only uses 3.5 watts of power, which helps save energy.
- Horizontal and Vertical Line Control: This feature makes it easy to switch between horizontal and vertical lines so that everything is lined up correctly.
- Multiple Uses: It can be used for many different things, from home improvement jobs to work-related tasks.
- High-Quality Construction: Made to be both high-quality and affordable, showing that the maker cares about value.

SETUP GUIDE
- Take it out of the box: Take the laser level out of the box along with all of its parts.
- Insert Batteries: Open the battery box and put in 6 LR44 batteries, making sure they are lined up correctly with the polarity marks.
- Use the slider button to pick the laser mode that works best for you. You can choose between vertical, horizontal, or cross-line modes.
- Place on Surface: If you need to set the laser level, put it on a stable surface or mounting base.
- Set the Bubble Levels: Make sure the laser level is lined up properly by checking and setting the bubble levels.
- To use the laser, slide the mode switch to turn it on and project the line you want.
- Measurements Aligned: Use the built-in tape measure to correctly mark and measure places.
- Check Alignment: Make sure that the laser lines are lined up correctly with your measurement marks.
- Make Changes: If you need to, move the laser level around to fix any problems with its balance.
- Lock Measurements: If your project needs it, use the measuring tape that came with it to lock the measurements in place.
- Use a tape measure: Pull the 8-foot measuring tape back when you’re done taking measurements.
- Switch powers: For different jobs, you can switch between the laser’s powers.
- Secure the Level: Make sure the laser level is firmly in place so it doesn’t move while it’s being used.
- Finish the Project: Make the numbers and lines that your project needs.
- Turn Off: When you’re done, turn off the laser level and take the batteries out if you won’t be using it for a while.
CARE & MAINTENANCE
- Clean the laser level often: Use a soft, dry cloth to wipe the surface clean of dust and dirt.
- Stay away from wetness: Keep the laser level away from water and moisture to keep the internal parts from getting damaged.
- How to Store It: To make the laser level last longer, keep it in a dry, cool place when not in use.
- Check Batteries: To get the best performance, check the battery levels often and change them as needed.
- Protect from Impact: To keep the internal parts from getting damaged, don’t drop or hit the laser level.
- Check for Damage: Give the laser level regular checks for any signs of damage or wear, and fix any problems right away.
- Use as Intended: To keep the laser level in good shape, only use it for what it was made for.
- If you think the accuracy is off, you should re-calibrate the laser level according to the directions that came with it.
- Avoid Extreme temps: Keep the laser level away from temps that are too high or too low; they could make it less useful.
- Do Not Disassemble: Do not take the gadget apart yourself to keep it from breaking and voiding the guarantee.
- Take Care: Be gentle with the laser level when you’re moving or changing it.
- Taking Out the Batteries: If you are going to store the laser level for a long time, take out the batteries to stop them from leaking.
- Check the alignment. Regularly: Check the balance on a regular basis to make sure it stays correct.
- Use Soft Cloths: To keep the surface from getting scratched, only clean with soft, lint-free cloths.
PROS & CONS
Pros:
- Versatile Functionality: Suitable for various applications, including laser, standard, multipurpose, and horizontal use.
- Compact Design: Small and lightweight, making it easy to carry and maneuver.
- Durable Construction: Made from Acrylonitrile Butadiene Styrene (ABS) for long-lasting performance.
- Affordable: Priced competitively, offering great value for its features.
- Manual Operation: Simple to use with manual controls.
Cons:
- Battery Dependent: Requires 6 LR44 batteries, which might need frequent replacements.
- Limited Power Source: Operates only on DC power, limiting usage flexibility compared to rechargeable models.
CUSTOMER REVIEWS
- Emily C. – ★★★★★ “The AikTryee Levelpro3 is incredibly accurate and easy to use. It’s perfect for my home projects and has made leveling so much simpler!”
- John D. – ★★★★☆ “Great tool for the price. It’s compact and gets the job done, but I wish the batteries lasted a bit longer. Overall, a solid choice.”
- Sarah W. – ★★★★★ “I love this laser level! It’s versatile and precise. The build quality is excellent, and it fits comfortably in my toolkit.”
- Mark L. – ★★★☆☆ “Decent leveler, but the manual operation can be a bit cumbersome. The battery life could also be improved.”
- Laura H. – ★★★★★ “Fantastic value for money. The AikTryee Levelpro3 is reliable and easy to use. It’s become an essential tool for my renovation projects.”
FREQUENTLY ASKED QUESTIONS
What is the price of the AikTryee Levelpro3 Multipurpose Laser Level?
The AikTryee Levelpro3 Multipurpose Laser Level is priced at $9.95.
What are the dimensions of the AikTryee Levelpro3 Multipurpose Laser Level?
The dimensions of the AikTryee Levelpro3 Multipurpose Laser Level are 3.34
inches in length and 1.1 inches in width.
What material is used to make the AikTryee Levelpro3 Multipurpose Laser Level?
The AikTryee Levelpro3 Multipurpose Laser Level is made from Acrylonitrile
Butadiene Styrene (ABS).
What is the weight of the AikTryee Levelpro3 Multipurpose Laser Level?
The AikTryee Levelpro3 Multipurpose Laser Level weighs 6 ounces.
What is the power source for the AikTryee Levelpro3 Multipurpose Laser Level?
The AikTryee Levelpro3 Multipurpose Laser Level is powered by DC.
What is the voltage of the AikTryee Levelpro3 Multipurpose Laser Level?
The AikTryee Levelpro3 Multipurpose Laser Level operates at 4.5 volts (DC).
How many batteries are required for the AikTryee Levelpro3 Multipurpose Laser
Level?
The AikTryee Levelpro3 Multipurpose Laser Level requires 6 LR44 batteries.
What is the wattage of the AikTryee Levelpro3 Multipurpose Laser Level?
The AikTryee Levelpro3 Multipurpose Laser Level has a wattage of 3.5 watts.
What is the manufacturer of the AikTryee Levelpro3 Multipurpose Laser Level?
The manufacturer of the AikTryee Levelpro3 Multipurpose Laser Level is
AikTryee.
The AikTryee Levelpro3 Multipurpose Laser Level is not turning on. What should
I check?
Ensure that the batteries are properly installed and fully charged. Check the
battery compartment for any corrosion or dirt. If the device still does not
turn on, there may be an issue with the internal connections or power switch.
The laser lines from my AikTryee Levelpro3 are faint or not visible. What
could be the issue?
The laser lines may be faint if the batteries are low or not installed
correctly. Ensure the batteries are fresh and properly inserted. Also, check
if the laser lens is clean and free from dust or obstructions. If the problem
persists, the laser module might need servicing.
My AikTryee Levelpro3 Multipurpose Laser Level is not leveling correctly. What
should I do?
Make sure the device is placed on a stable, flat surface. If it still does not
level correctly, check if the leveling bubbles or electronic level indicators
are functioning properly. If the device is out of calibration, you might need
to recalibrate it according to the manufacturer’s instructions.
The laser lines of my AikTryee Levelpro3 Multipurpose Laser Level are
misaligned. What can I do to fix this?
Ensure that the device is set up on a stable surface and not disturbed. Check
if the device needs recalibration or if there is any damage to the laser lens.
The AikTryee Levelpro3 Multipurpose Laser Level is displaying error messages.
What do they mean?
Error messages can indicate various issues, such as calibration errors,
battery problems, or internal faults.
The AikTryee Levelpro3 Multipurpose Laser Level is not projecting a horizontal
or vertical line. What should I check?
Ensure that the device is on a stable, level surface and that the laser lens
is clean. If the problem persists, it may be an issue with the internal
components or alignment.
VIDEO – PRODUCT OVERVIEW
Read User Manual Online (PDF format)
Read User Manual Online (PDF format) >>
Download This Manual (PDF format)
Download this manual >>
На чтение4 мин
Опубликовано
Обновлено
Fixit Laser Levelpro3 – это универсальное решение для профессионального выравнивания и измерения на строительных объектах. Данный инструмент идеально подходит для ремонта или строительства, а его использование значительно упрощает выполнение различных задач.
Одной из ключевых функций Fixit Laser Levelpro3 является возможность настройки уровня. С помощью этого инструмента вы сможете точно и легко определить горизонтальные и вертикальные плоскости, а также выполнить множество других задач. В данной статье мы предоставим пошаговую инструкцию по настройке уровня Fixit Laser Levelpro3.
Шаг 1: Включите уровень и убедитесь, что он находится на стабильной поверхности. Это необходимо для получения точных результатов.
Шаг 2: Расположите уровень на противоположных стенах или поверхностях, которые вы хотите выровнять. Например, если вам нужно проверить горизонтальность фундамента, поместите уровень на двух противоположных сторонах фундамента.
Шаг 3: С помощью встроенных оптических прицелов или лазерного луча выровняйте уровень по горизонтали или вертикали. Вам понадобятся отметки на стенах или поверхностях, чтобы определить, насколько точно выровнен уровень.
Шаг 4: После того, как выровняли уровень, зафиксируйте его в этом положении. Для этого используйте специальные крепления или стойку, поставив уровень на нее.
Теперь вы готовы использовать Fixit Laser Levelpro3 для выполнения различных строительных задач. Обратите внимание, что правильная настройка уровня является основой для получения точных результатов при измерении и выравнивании.
Fixit Laser Levelpro3: пошаговая настройка уровня
- Снимите уровень из упаковки и проверьте его на наличие повреждений или дефектов.
- Установите батарею, следуя указаниям по положению положительного и отрицательного контактов.
- Включите уровень, нажав на кнопку питания на корпусе. Убедитесь, что индикатор питания загорается.
- Поставьте уровень на ровную поверхность и дождитесь, пока он самопроверится и настроится.
- Выберите нужный режим работы, нажав на соответствующую кнопку на инструменте. Fixit Laser Levelpro3 поддерживает режимы горизонтальной и вертикальной линий, а также точечной метки.
- Установите уровень на нужной поверхности, направляя лазерную линию в нужном направлении. Можно использовать встроенный штатив или специальные крепления на стены или потолок.
- Проверьте, насколько точно уровень показывает горизонтальные или вертикальные линии на нужной поверхности. При необходимости корректируйте позицию уровня.
- По завершении работы выключите уровень, нажав на кнопку питания, и сохраните его в безопасном месте.
Следуя этим простым инструкциям, вы сможете использовать Fixit Laser Levelpro3 для точной и профессиональной настройки уровня поверхностей в любых условиях. При использовании инструмента рекомендуется ознакомиться с инструкцией пользователя для получения дополнительной информации и рекомендаций по использованию.
Подготовка к настройке
Перед тем, как приступить к настройке уровня Fixit Laser Levelpro3, вам необходимо выполнить несколько подготовительных действий:
1. Убедитесь в наличии всех необходимых комплектующих.
Перед началом работы убедитесь, что у вас есть все компоненты, которые поставляются вместе с уровнем Fixit Laser Levelpro3. Это включает в себя сам уровень, подставку для уровня, батареи, инструкцию по эксплуатации и другие дополнительные аксессуары.
2. Подготовьте рабочую площадку.
Перед настройкой уровня Fixit Laser Levelpro3 убедитесь, что рабочая площадка свободна от препятствий и имеет достаточное освещение. Уровень лазерный, поэтому ему нужно ограниченное количество преград для точной работы.
3. Проверьте состояние батарей.
Уровень Fixit Laser Levelpro3 работает от батарей. Перед началом настройки убедитесь, что батареи в уровне заряжены или установлены новые. Это позволит вам избежать непредвиденных сбоев в работе уровня в процессе его настройки.
4. Ознакомьтесь с инструкцией по эксплуатации.
Перед началом настройки рекомендуется ознакомиться с инструкцией по эксплуатации, которая поставляется вместе с уровнем Fixit Laser Levelpro3. В инструкции вы найдете подробные инструкции и рекомендации по настройке уровня, а также по его эксплуатации и обслуживанию.
После выполнения всех подготовительных действий вы будете готовы приступить к настройке уровня Fixit Laser Levelpro3 и выполнять все необходимые процедуры с высокой точностью и эффективностью.
Настройка уровня Laser Levelpro3
1. Подготовьте уровень
Убедитесь, что уровень Laser Levelpro3 находится в исправном состоянии. Проверьте, что уровень имеет достаточный уровень заряда батареи и что все его компоненты находятся в хорошем состоянии.
2. Расстановка уровня
Расположите уровень Laser Levelpro3 на стабильной и ровной поверхности, такой как штатив. Убедитесь, что уровень горизонтально и вертикально выровнен.
3. Включение уровня
Нажмите кнопку включения на уровне Laser Levelpro3. Дождитесь, пока индикатор питания зажжется, указывая, что уровень включен и готов к работе.
4. Проверка калибровки
Убедитесь, что уровень Laser Levelpro3 правильно откалиброван. Для этого проверьте, что лазерная линия горизонтального и вертикального уровней совпадает с маркерами на поверхности.
5. Использование оптического центрирования
Для точной настройки уровня Laser Levelpro3 используйте оптическое центрирование. Следуйте инструкциям, предоставленным с уровнем, чтобы достичь наилучших результатов.
После выполнения всех вышеуказанных шагов у вас будет настроенный уровень Laser Levelpro3, готовый к использованию в различных проектах. Помните, что правильная настройка уровня является важной составляющей для достижения точных измерений и качественных результатов.
Проверка качества настройки
После того как вы завершили настройку уровня Fixit Laser Levelpro3, рекомендуется провести проверку качества настройки, чтобы убедиться, что уровень работает правильно и точно.
Вот несколько шагов для проведения проверки:
- Установите уровень на ровную поверхность или на специальную подставку для проверки.
- Включите уровень и проверьте, что лазерный луч проецируется точно по горизонтали и вертикали.
- Проверьте, что лазерный луч имеет одинаковую интенсивность на всем протяжении.
- Убедитесь, что пузырек уровня находится в центре мочки уровня.
- Поверните уровень на 180 градусов и проверьте, что лазерный луч остается параллельным и точным.
Если при проверке вы обнаружите, что уровень не работает правильно, попробуйте повторить настройку согласно указаниям в руководстве пользователя. Если проблема не устраняется, свяжитесь с сервисным центром Fixit для получения дополнительной помощи.