

LabelManager 210D
The easy-to-use label maker for your desktop
User Guide
LM210D_manual_US_cover1.indd 1LM210D_manual_US_cover1.indd 1 7/9/2007 9:30:03 AM7/9/2007 9:30:03 AM
www.dymo.com

Contents
About Your New Label Maker ………………………………………………………….. 5
Product Registration………………………………………………………………………………….5
Getting Started ……………………………………………………………………………. 5
Connecting the Power …………………………………………………………………………………..5
Inserting the Batteries ……………………………………………………………………………….5
Connecting the Optional Power Adapter ………………………………………………………6
Inserting the Tape Cassette ……………………………………………………………………………6
Using the Label Maker for the First Time ……………………………………………. 7
Getting to Know the Label Maker ……………………………………………………..7
Power …………………………………………………………………………………………………………7
LCD Display ………………………………………………………………………………………………….8
Format ……………………………………………………………………………………………………….8
Insert ………………………………………………………………………………………………………….8
Settings ………………………………………………………………………………………………………8
CAPS Mode ………………………………………………………………………………………………….8
Num Lock ……………………………………………………………………………………………………9
Backspace ……………………………………………………………………………………………………9
Clear …………………………………………………………………………………………………………..9
Navigation Keys …………………………………………………………………………………………..9
Cancel ………………………………………………………………………………………………………..9
Formatting Your Label …………………………………………………………………… 9
Changing the Font Size …………………………………………………………………………………9
Adding Font Styles ……………………………………………………………………………………..10
Adding Borders and Underline Styles …………………………………………………………….10
Creating Two-Line Labels …………………………………………………………………………….11
Aligning the Text ………………………………………………………………………………………..11
Using Mirror Text ………………………………………………………………………………………..11
Using Symbols and Special Characters ……………………………………………… 12
Adding Symbols …………………………………………………………………………………………12
Adding Punctuation ……………………………………………………………………………………13
2

Using the Currency Key ………………………………………………………………………………. 13
Adding International Characters ………………………………………………………………….. 13
Printing Options …………………………………………………………………………. 13
Previewing Your Label ……………………………………………………………………………….. 13
Printing Multiple Labels …………………………………………………………………………….. 14
Creating Fixed-Length Labels ……………………………………………………………………… 14
Adjusting the Print Contrast ……………………………………………………………………….. 14
Using the Label Maker Memory ……………………………………………………… 15
Saving a Label ………………………………………………………………………………………….. 15
Opening Saved Labels ………………………………………………………………………………… 15
Inserting Saved Text ………………………………………………………………………………….. 15
Caring for Your Label Maker ………………………………………………………….. 16
Troubleshooting …………………………………………………………………………. 17
Documentation Feedback ……………………………………………………………..18
Environmental Information ………………………………………………………….. 19
3

1
2
3
4
5
6
7
8
9101112
13
14
15
16
17 18 19 20 21
2322
Figure 1 DYMO® LabelManager® 210D Electronic Label Maker
1 Tape cutter 9 Accented character 17 AC power connector
2 Print 10 Punc tuation 18 Clear
3 Save 11 Space bar 19 Open
4 OK 12 Insert 20 Navigation
5 Number lock 13 Caps 21 LCD d isp lay
6 Backspace 14 Form at 22 Cancel
7 Currency 15 Settings 23 Preview
8 Return 16 On/Off
4

About Your New Label Maker
With the DYMO® LabelManager® 210D electronic label maker, you can create a wide
variety of high-quality, self-adhesive labels. You can choose to print your labels in many
different font sizes and styles. The label maker uses DYMO D1 tape cassettes in widths of
1/4” (6 mm), 3/8” (9 mm), or 1/2” (12 mm). These tape cassettes are available in a wide
range of colors.
Visi t www.dymo.com for information on obtaining labels and accessories for your
label maker.
Product Registration
Visi t www.dymo.com/registration to register your label maker online.
Getting Started
Follow the instructions in this section to print your first label.
Connecting the Power
The label maker is powered by standard batteries or an AC power adapter. To save power,
the label maker automatically turns off after two minutes of inactivity.
Inserting the Batteries
The label maker uses six high-capacity AA alkaline batteries.
To insert the batteries
1. Slide the battery compartment cover away from
the label maker. See Figure 2.
2. Insert the batteries following the polarity
markings (+ and –).
3. Replace the cover.
Ç Remove the batteries if the label maker will not
be used for a long period of time.
5
Connecting the Optional Power Adapter
Figure 4
Remove
cardboard insert
Guideposts
An optional 9 Volt, 1.5 A power adapter can also be used to
power the label maker. Connecting the AC adapter to the
label maker disconnects the batteries as a power source.
To connect the power adapter
1. Plug the power adapter into the power connector on the
top, left side of the label maker.
2. Plug the other end of the power adapter into a power
outlet.
Ç Make sure the label maker power is turned off
before you disconnect the power adapter from the
main power source. Otherwise, your most recent
memory settings will be lost.
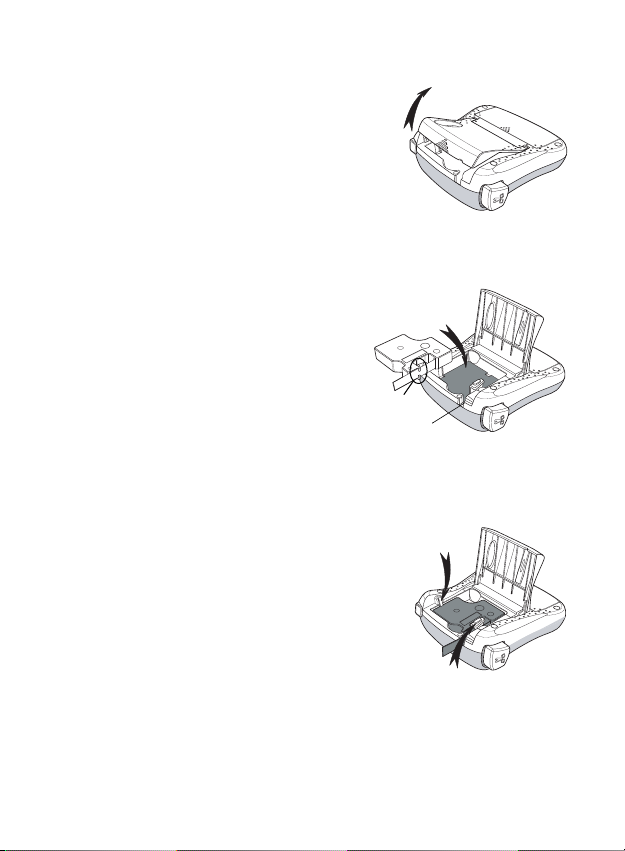
Inserting the Tape Cassette
Your label maker comes with one tape cassette. Visit
www.dymo.com for information about
purchasing additional tape cassettes.
To insert the tape cassette
1. Lift the tape cassette cover to open the tape
compartment. See Figure 3.
Ç Before using the label maker for the first time,
remove the protective cardboard insert from the tape
exit slot. See Figure 4.
2. Insert the cassette with the label facing up and
positioned between the guideposts.
3. Press firmly until cassette clicks into place. See Figure 5.
4. Close the tape cassette cover.
6
Dymo LabelManager 210D
www.dymo.com
User Guide
The easy-to-use label maker for your desktop
LM210D_manual_US_cover1.indd 1LM210D_manual_US_cover1.indd 1 7/9/2007 9:30:03 AM7/9/2007 9:30:03 AM
Manual
View the manual for the Dymo LabelManager 210D here, for free. This manual comes under the category label printers and has been rated by 2 people with an average of a 6.9.
This manual is available in the following languages: English. Do you have a question about the Dymo LabelManager 210D or do you need help?
Ask your question here
Index
- LM210D_USCover.pdf
- LM210D-US
- LM210D_US_BackCover
Product Images (3)

Dymo LabelManager 210D specifications
Below you will find the product specifications and the manual specifications of the Dymo LabelManager 210D.
The Dymo LabelManager 210D is a label printer that offers reliable and efficient label printing capabilities. With a maximum resolution of 180 x 180 DPI, it provides clear and legible printed labels. The printer utilizes direct thermal print technology, which eliminates the need for ink or toner cartridges, making it a cost-effective option.
Featuring a QWERTZ keyboard layout, the LabelManager 210D allows for quick and easy text entry, ensuring smooth and effortless label creation. The device also offers a label memory capacity of 9 labels, allowing users to store frequently used labels for convenient future printing.
In terms of dimensions, the LabelManager 210D measures 224 millimeters in width, 198 millimeters in depth, and 103 millimeters in height. It is compact and space-saving, making it suitable for various work environments.
The label printer is powered by 6 AA batteries, providing sufficient power for extended usage. It supports D1 tape with a width of 6 millimeters, offering versatility in label size options. With 7 different styles and 8 box types, users can customize their labels to suit their specific needs.
Additional features of the Dymo LabelManager 210D include the ability to underline text and print labels with a fixed length. These features enhance the functionality and flexibility of the printer, ensuring precise and professional-looking labels.
Overall, the Dymo LabelManager 210D is a reliable and practical label printer that offers efficient label printing capabilities. With its compact design, versatile labeling options, and user-friendly features, it is an ideal choice for various labeling tasks.
Maximum resolution
180 x 180 DPI
Number of batteries supported
6
General
| Brand | Dymo |
| Model | LabelManager 210D | S0828980 |
| Product | label printer |
| EAN | 3501170784433 |
| Language | English |
| Filetype | User manual (PDF) |
Printing
| Maximum resolution | 180 x 180 DPI |
| Print technology | Direct thermal |
Design
| Keyboard layout | QWERTZ |
| Product color | Black, Silver |
Other features
| Label memory | 9 label(s) |
| Tape size | 6 mm |
| Print preview | Yes |
Weight & dimensions
| Width | 224 mm |
| Depth | 198 mm |
| Height | 103 mm |
Power
| Number of batteries supported | 6 |
| Battery type | AA |
Performance
| Tape type | D1 |
| Number of styles | 7 |
| Number of box types | 8 |
| Underline | Yes |
| Fixed length | Yes |
| Number of fonts | 1 |
| Number of printing lines (max) | 2 |
show more
Frequently Asked Questions
Can’t find the answer to your question in the manual? You may find the answer to your question in the FAQs about the Dymo LabelManager 210D below.
How do I load the label cassette into the Dymo LabelManager 210D?
To load the label cassette, simply open the label cassette compartment on the back of the device, insert the cassette until it clicks into place, and close the compartment securely.
How can I change the font size on the LabelManager 210D?
To change the font size, press the «Size» button until the desired font size is displayed on the screen. You can choose between small, medium, and large font sizes.
What should I do if the labels are not printing correctly or are cutting off?
If you’re experiencing issues with label printing or cutting, please make sure that the label cassette is properly inserted and that the labels are correctly aligned. Additionally, check for any obstructions or debris that could be affecting the printing process.
Is it possible to format text on the LabelManager 210D?
Absolutely! You can format text on the LabelManager 210D by using features such as bold, italic, underline, and vertical text. Simply press the respective formatting buttons on the device, highlight the desired text, and select the formatting option.
How can I conserve battery life on the LabelManager 210D?
To conserve battery life, ensure that the device is turned off when not in use. It’s also recommended to adjust the screen contrast to a lower level, use the device’s auto power-off feature, and replace the batteries when they are running low.
Does Dymo LabelManager 210D have a maximum resolution of 180 x 180 DPI?
Yes, Dymo LabelManager 210D has a maximum resolution of 180 x 180 DPI. This ensures clear and sharp printing for labels.
What is the keyboard layout of Dymo LabelManager 210D?
The keyboard layout of Dymo LabelManager 210D is QWERTZ. This layout is commonly used in many European countries, including Germany, Austria, and Switzerland.
How many labels can be stored in the label memory of Dymo LabelManager 210D?
Dymo LabelManager 210D can store up to 9 label(s) in its label memory. This allows for quick and easy access to frequently used labels.
How many batteries does Dymo LabelManager 210D support?
Dymo LabelManager 210D supports 6 batteries. This provides a reliable power source for continuous label printing.
What is the tape size supported by Dymo LabelManager 210D?
Dymo LabelManager 210D supports tape size of 6 mm. This allows for versatile labeling options.
What is the height of the Dymo LabelManager 210D?
The Dymo LabelManager 210D has a height of 103 mm.
What is the width of the Dymo LabelManager 210D?
The Dymo LabelManager 210D has a width of 224 mm.
What is the depth of the Dymo LabelManager 210D?
The Dymo LabelManager 210D has a depth of 198 mm.
What does DPI stand for?
DPI stands for Dots Per Inch and is the number of ink droplets (per inch) that end up on the paper when printing.
Is the manual of the Dymo LabelManager 210D available in English?
Yes, the manual of the Dymo LabelManager 210D is available in English .
Is your question not listed? Ask your question here
User manual
View the manual for the Dymo LabelManager 210D here, for free. This manual comes under the category label printers and has been rated by 2 people with an average of a 6.9. This manual is available in the following languages: English. Do you have a question about the Dymo LabelManager 210D or do you need help?
Ask your question here
Frequently Asked Questions
Can’t find the answer to your question in the manual? You may find the answer to your question in the FAQs about the Dymo LabelManager 210D below.
What is the height of the Dymo LabelManager 210D?
The Dymo LabelManager 210D has a height of 103 mm.
What is the width of the Dymo LabelManager 210D?
The Dymo LabelManager 210D has a width of 224 mm.
What is the depth of the Dymo LabelManager 210D?
The Dymo LabelManager 210D has a depth of 198 mm.
What does DPI stand for?
DPI stands for Dots Per Inch and is the number of ink droplets (per inch) that end up on the paper when printing.
Is the manual of the Dymo LabelManager 210D available in English?
Yes, the manual of the Dymo LabelManager 210D is available in English .
Is your question not listed? Ask your question here
Manual
View the manual for the Dymo LabelManager 210D here, for free. This manual comes under the category label printers and has been rated by 2 people with an average of a 6.9. This manual is available in the following languages: English. Do you have a question about the Dymo LabelManager 210D or do you need help?
Ask your question here
Frequently Asked Questions
Can’t find the answer to your question in the manual? You may find the answer to your question in the FAQs about the Dymo LabelManager 210D below.
Is the manual of the Dymo LabelManager 210D available in English?
Yes, the manual of the Dymo LabelManager 210D is available in English .
Is your question not listed? Ask your question here
FAQ: Types of Manuals and Their Contents
Dymo LabelManager 210D Manuals come in various types, each serving a specific purpose to help users effectively operate and maintain their devices. Here are the common types of Dymo LabelManager 210D User Guides and the information they typically include:
- User Manuals: Provide comprehensive instructions on how to use the device, including setup, features, and operation. They often include troubleshooting tips, safety information, and maintenance guidelines.
- Service Instructions: Designed for technicians and repair professionals, these manuals offer detailed information on diagnosing and repairing issues with the device. They include schematics, parts lists, and step-by-step repair procedures.
- Installation Guides: Focus on the installation process of the device, providing detailed instructions and diagrams for proper setup. They are essential for ensuring the device is installed correctly and safely.
- Maintenance Manuals: Provide guidance on routine maintenance tasks to keep the device in optimal condition. They cover cleaning procedures, part replacements, and regular servicing tips.
- Quick Start Guides: Offer a concise overview of the essential steps needed to get the device up and running quickly. They are ideal for users who need immediate assistance with basic setup and operation.
Each type of Dymo LabelManager 210D instruction is designed to address specific needs, ensuring users have the necessary information to use, maintain, and repair their devices effectively.
Related Instructions for Dymo LabelManager 210D:
1
LabelManager 210D
Operation & user’s manual Dymo Label Maker Operation & user’s manual (File: dymo-labelmanager-210d-label-maker-40, 27.12.2024)
40
1202
229
2
LabelManager 120P
Overview Dymo LabelManager 120P Guide (Overview), @UC3E5M
2
1031
196
3
DYMO Compact
1
1426
214
4
Electronic Weighing Equipment PE5
Operator’s manual Dymo Scale Operator’s manual (File: dymo-electronic-weighing-equipment-pe5-scale-8, Tuesday 05-11-2024)
8
1073
258
6
LabelManager 420P
Quick start manual PDF User Manual (@7Q62KJ), Dymo LabelManager 420P Label Maker (04/01/2025)
14
357
68
7
LabelManager 400
37
351
53
8
LabelManager Series
28
1444
246
10
LabelManager Series
62
1486
223
Label Maker Devices by Other Brands:
|
Weber Geset 125 Original User Manual Geset 125 (Label Maker ePDF User Manual, #5J442Y) Original User’s Manual 30 Dec 2024 | 57 |
|
|
BIXOLON DX Series How To Mount BIXOLON Printer Accessories How to mount (File: bixolon-dx-series-how-to-mount-2, 02nd May 2025) 1. Turn the Power Switch Off at the rear of the Printer. 02 May 2025 | 2 |
|
|
Avery Dennison TTX 450 Operation & User’s Manual #T5IWEQ: TTX 450 Label Maker Operation & user’s manual User Manual 09 Mar 2025 | 40 |
|
|
Epson TM-C3500 Series Technical Reference Manual Epson TM-C3500 Series User Guide (Technical reference manual), @189Y9G Technical Reference Guide 21 Mar 2025 | 210 |
Categories:
Print Server
Electronic dictionary
Postal Equipment
Clock
Label Maker
Battery Charger