
Загрузить Руководство Пользователя Siemens EQ.500 в формате PDF: siemens-EQ.500-RU
Просто и вкусно: удобное и интуитивно понятное управление для потрясающего кофе.
- aromaDouble Shot: кофе двойной крепости без лишней горечи, благодаря двум последовательным сеансам измельчения
Для крепкого кофе и великолепного аромата — aromaDouble Shot.
Функция aromaDouble Shot — это процесс двойного измельчения и заваривания, созданный для получения наилучшего аромата. Более короткое время экстракции предотвращает горькое послевкусие и гарантирует, что только лучшее от кофейных зерен попадет в вашу чашку, что идеально подходит для приготовления большого количества кофе с самым интенсивным ароматом.
- autoMilk Clean: функция полностью автоматической очистки паром молочной системы.
Автоматическая очистка всей молочной системы — autoMilk Clean
Приготовление действительно хорошего, ароматного кофе доставляет удовольствие, а очистка кофемашины — нет. Siemens разработал функцию автоматической очистки молочной системы. Этот полностью автоматический процесс очистки паром начинается после приготовления каждого напитка, позволяя вам расслабиться и насладиться чашкой отличного кофе.
- CeramDrive: высококачественная керамическая мельница, сделанная из износостойкой керамики.
Идеально измельченные зерна для более насыщенного аромата — ceramDrive.
Керамическая кофемолка высочайшего качества измельчает кофейные зерна до особенно равномерной консистенции, позволяя раскрыться аромату и получить идеальный кофе. Поскольку керамика практически не изнашивается, длительное наслаждение кофе высшего качества гарантировано.
- coffeeSelect display: легкий выбор и приготовление кофейных и молочных напитков прикосновением к клавишам на ярком цифровом дисплее
Дисплей coffeeSelect
Простой и удобный в использовании дисплей делает приготовление кофе приятным. Полноцветный дисплей coffeeSelect обеспечивает интуитивно понятное управление. Каждый рецепт напитка наглядно представлен и может быть выбран одним касанием. Поэтому вы легко можете приготовить кофе с помощью полностью автоматических кофемашин Siemens.
- iAroma System: умное приготовление и идеальный вкус благодаря уникальной технологии.
Для крепкого кофе и великолепного аромата — aromaDouble Shot.
Функция aromaDouble Shot — это процесс двойного измельчения и заваривания, созданный для получения наилучшего аромата. Более короткое время экстракции предотвращает горькое послевкусие и гарантирует, что только лучшее от кофейных зерен попадет в вашу чашку, что идеально подходит для приготовления большого количества кофе с самым интенсивным ароматом.
Техническая спецификация
Вкус
- Многообразие напитков нажатием одной кнопки: эспрессо, кофе, капучино, латте маккиято. Быстро и удобно.
- AromaDouble Shot — приготовление напитка двойной крепости
Комфорт
- coffeeSelect display: Легкий выбор и приготовление кофейных и молочных напитков прикосновением к клавишам на ярком цифровом дисплее
- Возможность использования высоких стаканов для латте-макиато: высота капучинатора регулируется до 15 см.
- Съемная емкость для воды 1.7л
Характеристики
- ceramDrive: высококачественная кофемолка из прочной керамики
- OneTouch кофе с молоком со специальной мелкопористой молочной пеной возможно благодаря инновационной молочной системе для приготовления капучино.
- Выбор напитков: капучино, эспрессо, молочная пена, горячая вода, кофе, латте маккиято
- Быстрый разогрев системы: первая чашка кофе за рекордно короткое время
- Давление помпы 15 бар
- Отсек для молотого кофе
Гигиена
- Удобная дверца на передней панели приборов позволяет с легкостью очистить поддон для капель и блок заваривания
- Съемный заварочный блок
- Программа автоматического ополаскивания при выключении, включении
- AutoMilk Clean: автоматическая чистка молочной системы паром
- Капучинатор легко разбирается, все части можно мыть в посудомоечной машине
- Съемный отсек для кофейной гущи, дренажный поддон для капель, решетка
- Полностью автоматическая программа удаления накипи и очистки системы (комбинированная программа calc`n`clean доступна)
Дополнительно
- Отсек для кофейных зерен (270гр) c изоляцией для снижения шума
- Регулируемая степень помола (многоступенчатая)
- Возможность использования фильтра для воды: использование очищенной воды для приготовления напитка продлевает срок службы прибора
- Выбор языка для сообщений на дисплее
- Блокировка от детей
- Мощность: 1500 Ватт
Аксессуары
- Дополнительные аксессуары: таблетки для очистки (TZ80001), таблетки для декальценации (TZ80002), фильтр для воды BRITA Intenza (TZ70003), набор для обслуживания полностью автоматических кофемашин (TZ80004), контейнер для молока (TZ80009N)
Техническая информация
Тип
| Возможность вращения прибора | Не |
|---|---|
| Дизайн резервуара для воды | интегрированная, прозрачная, съемная, фильтр для воды Brita |
Размер и вес
| Размеры | 373 x 276 x 452 мм |
|---|---|
| Кол-во чашек Эспрессо/ Капучино | 1-2 |
| Вес нетто | 8,4 кг |
Комфорт
| Количество отсеков для зерен | 1 |
|---|---|
| Управление | Электронный |
| Тип дисплея | TFT-дисплей с сенсорными управлением |
| baristaMode | Не |
| Сигнализатор рабочего состояния | Да |
| Резервуар для отработанного кофе | Да |
| Программирование | время выключения, демонстрационный модуль, жесткость воды, защита от детей, звук кнопок, температура кофе, фильтр для воды, язык |
| Программирование | Да |
| Устройство безопасности | Предохранитель с тепловым реле |
| Диалоговый дисплей | Да |
Технические особенности
| Мощность подключения | 1 500 Вт |
|---|---|
| Частота | 50 Гц |
| Тип штепсельной вилки | Вилка с заземлением |
| Напряжение | 220-240 В |
Общая информация
| Марка | Siemens |
|---|---|
| Название модели/ международный код | TP501R09 |
| EAN-код | 4 242 003 837 115 |
| Тип прибора | полноавтом.кофемашина эспрессо |
| Страна производства | SI |
Ремонт и обслуживание


en
Table of contents
Safety ………………………………………..8
General information ………………………8
Intended use………………………………..8
User group restrictions…………………..8
Safe use ……………………………………..9
Environmental protection and
energy saving ……………………………12
Disposing of packaging ……………….12
Tips for saving energy………………….12
Installation and connection …………12
Scope of supply………………………….12
Installing and connecting the ap-
pliance………………………………………12
Familiarising yourself with your
appliance ………………………………….13
Appliance ………………………………….13
Controls…………………………………….13
Display ……………………………………..13
Drinks overview…………………………14
Accessories………………………………15
Before using for the first time………15
Perform the initial start-up …………….15
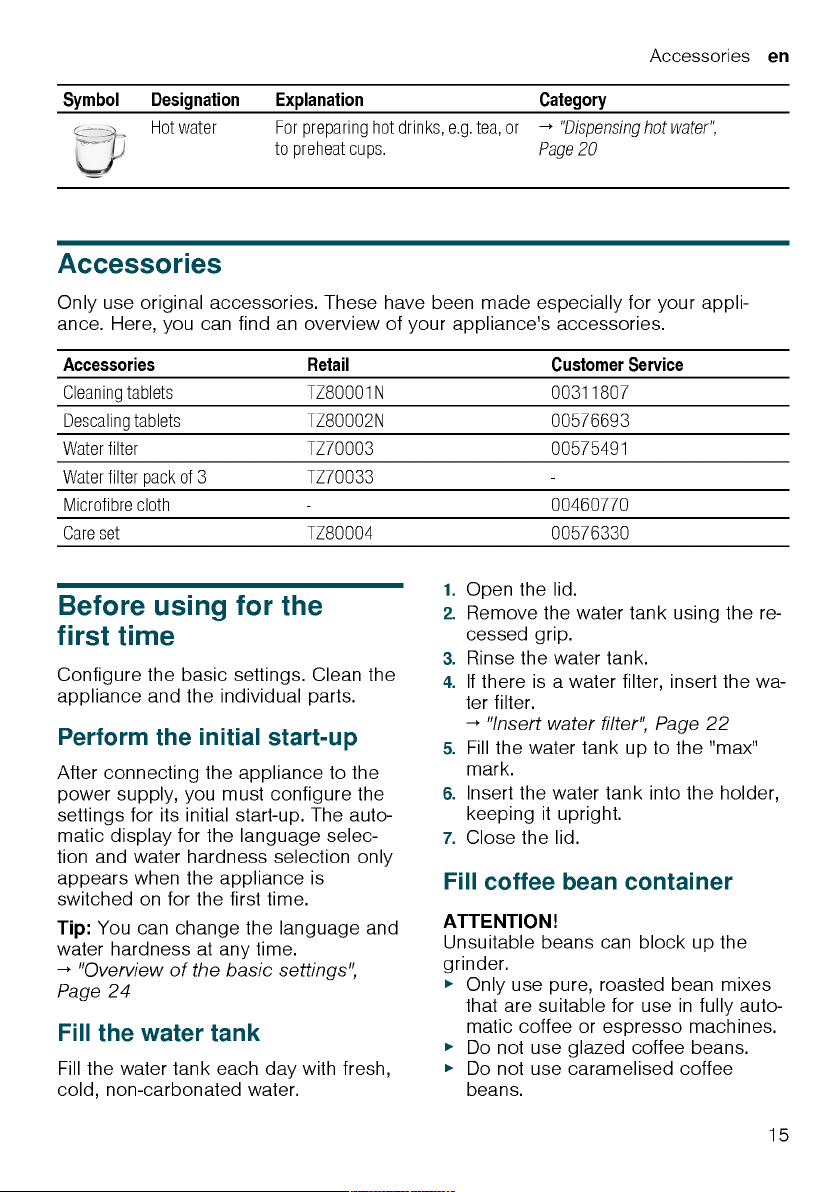
Fill the water tank………………………..15
Fill coffee bean container……………..15
Setting the language……………………16
Setting the water hardness……………16
General information …………………….16
Basic operation …………………………17
Switching the appliance on and
off…………………………………………….17
Dispensing drinks ……………………….17
Dispensing a coffee drink made
from fresh beans ………………………..18
Dispensing a coffee drink made
from ground coffee ……………………..18
Dispensing drinks with milk…………..18
Using the milk container ………………19
Dispensing coffee drink with milk…..19
Dispensing special drinks …………….20
Dispensing milk froth …………………..20
Dispensing hot water …………………..20
Drink settings……………………………..21
Water filter …………………………………22
Childproof lock………………………….23
Activating the childproof lock ………..23
Deactivating the childproof lock …….23
Cup heater1……………………………….23
Basic settings……………………………23
Overview of the basic settings ………24
Changing the basic settings………….24
Cleaning and maintenance ………….25
Dishwasher-safe components ……….25
Cleaning agent …………………………..25
Cleaning the appliance ………………..26
Cleaning the drip tray and coffee
dregs container ………………………….26
Cleaning the ground coffee com-
partment ……………………………………26
Cleaning the milk system ……………..27
Cleaning the milk container…………..27
Cleaning brewing unit ………………….27
Service programmes……………………28
Rectifying faults ………………………..32
Malfunctions ………………………………32
Notifications on the display panel…..33
Problem with results ……………………35
Transportation, storage and dis-
posal………………………………………..37
Activate frost protection ……………….37
Disposing of your old appliance…….37
1
Depending on the appliance specifications
6

After-sales service……………………..37
E number and FD number ……………38
Warranty conditions …………………….38
Technical specifications……………..38
en
7

en Safety
Safety
Please read the safety information to ensure that you use the appliance safely.
General information
Here you can find general information about this information
product.
¡ Read this manual carefully. Only then can you operate the appli-
ance safely and efficiently.
¡ This manual is intended for the user of the appliance.
¡ Observe the safety instructions and warnings.
¡ Keep the manual and the product information in a safe place for
future reference or for the next owner.
¡ Check the appliance for damage after unpacking it. Do not con-
nect the appliance if it has been damaged in transit.
Intended use
Please read the information on intended use to ensure that you
use the appliance safely and correctly.
Only use this appliance:
¡ as specified in this instruction manual.
¡ for preparing hot drinks.
¡ Up to an altitude of max. 2000 m above sea level.
User group restrictions
Avoid risks to children and vulnerable persons.
This appliance may be used by children aged 8 or over and by
people who have reduced physical, sensory or mental abilities or
inadequate experience and/or knowledge, provided they are supervised or have been instructed onhow to use the appliance
safely and have understood theresulting dangers.
Do not let children play with the appliance.
Children must not perform cleaning or user maintenance unless
they are at least 8 years old and are being supervised.
8

Familiarising yourself with your appliance en
2. Place the appliance on a level, wa-
ter-resistant surface that is capable
of bearing its weight.
3. Using the mains plug, connect the
appliance to an earthed socket that
has been correctly installed.
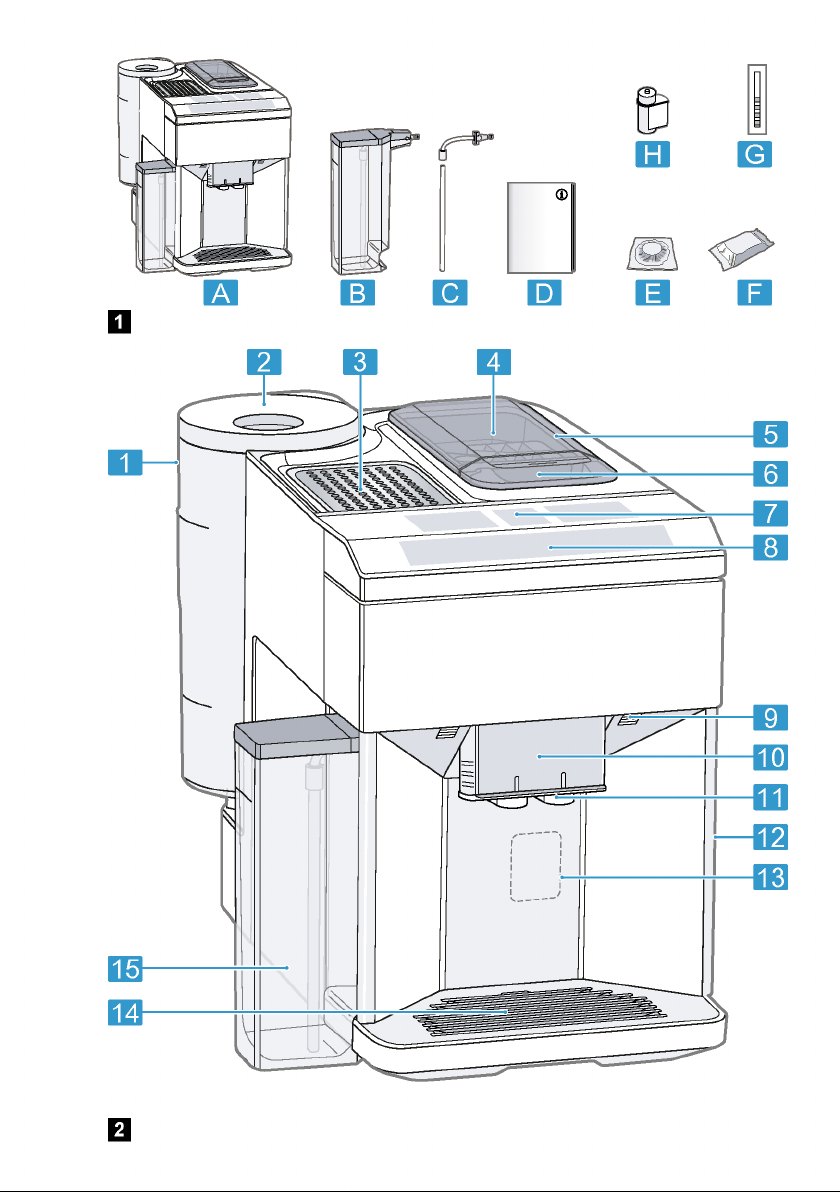
Familiarising yourself
with your appliance
Familiarise yourself with the parts of
your appliance.
Appliance
Here you can find an overview of the
parts of your appliance.
Note:Individual details and colours
may differ, depending on the appliance
model.
→Fig. 2
Water tank
Cover for water tank
Cup heater
Aroma lid
Bean container
1
Rating plate
Drip tray
Milk container
1
Depending on the appliance specifications
Controls
Here you can find an overview of the
symbols on your appliance. Press the
symbols to make a selection, start the
dispensing process or make/adjust a
setting.
Symbol Explanation
Switch appliance on/off
Open menu/leave menu
Note:The menu buttons are only
visible when the menu is open.
Navigate upwards in the menu
Navigate downwards in the menu
Confirm/save in the menu
Go back in the menu
Dispense two cups
Select coffee strength
Adjusting the amount
Start/stop
Ground coffee compartment
Display
Control panel
Cup lighting
Cover
Outlet system
Brewing chamber door
1
Depending on the appliance specifications
1
Display
The display shows the selected drinks,
settings and setting options, as well as
messages about the appliance’s operating status.
The display shows additional information and action steps. The information
is hidden after a short period, or by
pressing a button. The action steps are
hidden when they have been completed.
13
en Before using for the first time
▶
Do not use coffee beans that have
been treated with additives containing sugar.
▶
Do not add ground coffee.
1. Open the lid.
2. Fill with the coffee beans.
The appliance will adjust to the coffee beans with the next dispensing
process.
3. Close the lid.
Tip:To keep the coffee beans at their
best, store them in a sealed container
in a cool place.
You can keep the coffee beans in the
bean container for a number of days
without them losing their aroma.
Setting the language
1. Press to switch the appliance on.
a The display will show the language
that is preset.
2. Press or until the display
shows the desired language.
3. Press .
Tip:You can change the language at
any time.
→«Overview of the basic settings»,
Page24
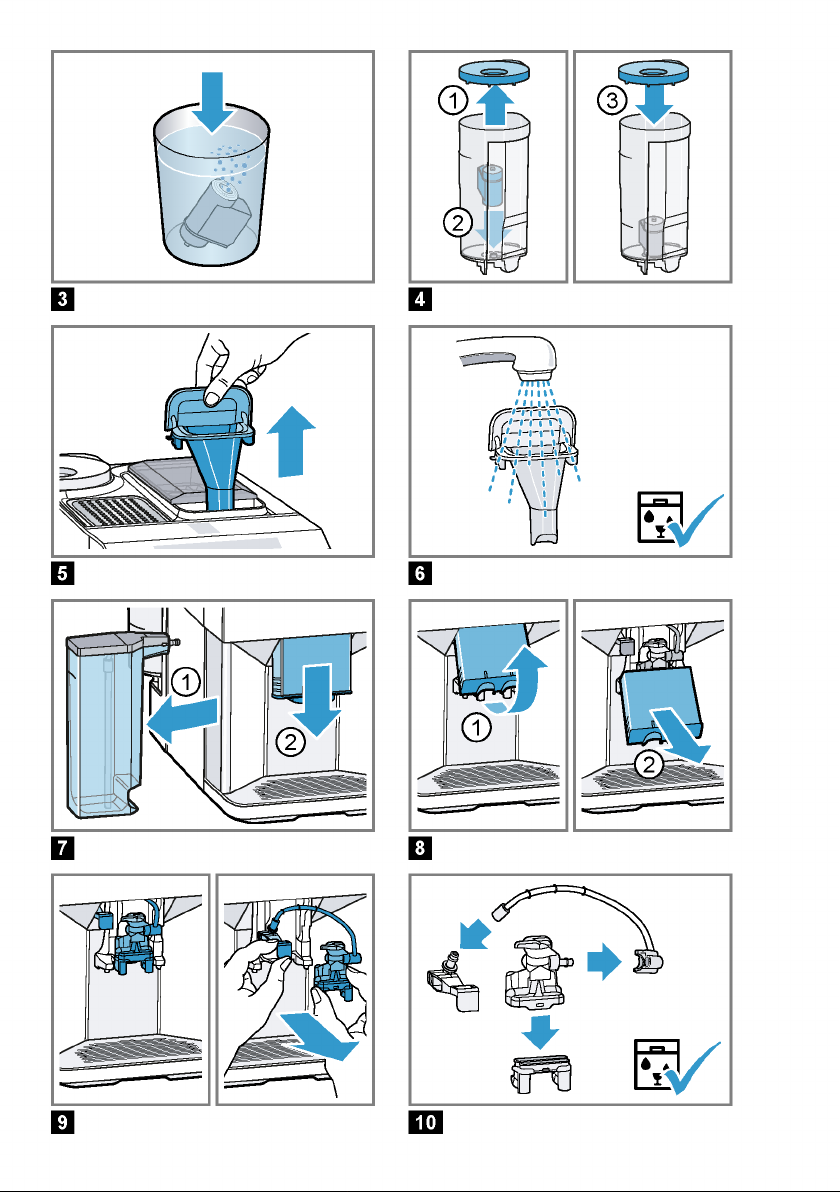
Setting the water hardness
It is important to set the water hardness
correctly, so that the appliance indicates in good time that it needs descaling. You can use the enclosed test strip
to determine the water hardness, or
ask your local water company.
1. Briefly dip the test strip in fresh tap
water.
2. Allow the water to drip off the test
strip.
a The test strip will indicate the water
hardness after 1minute.
3. If a water softening system is in-
stalled in your house, select «Softening system».
4. Press or until the display
shows the desired water hardness.
The table shows the allocation of the
levels to the different degrees of water hardness:
Level German de-
grees in °dH
Total hardness in
(mmol/l)
1 1-7 0.18 — 1.25
2 8-14 1.42 — 2.49
3 15-21 2.67 — 3.74
1
4
1
Factory setting (may vary according to
22-30 3.92 — 5.34
model)
5. Press .
6. Check whether the bean container
has been filled.
7. Press .
a The appliance now rinses itself.
a When the symbols for drink selection
and the buttons light up on the operating panel, the appliance is ready
for use.
Tip:You can change the water hardness at any time.
→«Overview of the basic settings»,
Page24
General information
Please bear this information in mind so
that you can get the best out of your
appliance.
Notes
¡ The appliance has been pro-
grammed at the factory with standard settings for optimum operation.
¡ The grinder has been factory-set for
optimum operation. If coffee is only
dispensed drop by drop or is too
thin with too little crema, you can adjust the grinding level when the
16


en Basic operation
Notes
¡ If you do not change any settings for
approx.5seconds, the appliance
will exit settings mode. The settings
will be automatically saved.
¡ With a number of settings your cof-
fee is prepared in several steps.
Wait until the process is fully completed.
Dispensing a coffee drink
made from fresh beans
1. Place your pre-warmed cup under
the outlet system.
2. Press the drinks symbol for a coffee
drink without milk.
a The display will show the drink and
your current settings.
→«Drink settings», Page21
3. Change the settings where neces-
sary:
‒ Use to adjust the amount.
→«Adjusting the amount»,
Page21
‒ Use to adjust the coffee
strength.
→«Adjusting the coffee strength»,
Page21
4. Press .
The coffee beans are freshly ground
for each brewing process.
a The coffee is brewed and then dis-
pensed into the cup.
Tip
¡ You can press to stop the dis-
pensing process early.
¡ Find out how to make coffee drinks
with milk.
→«Dispensing drinks with milk»,
Page18
Dispensing a coffee drink
made from ground coffee
ATTENTION!
The ground coffee compartment can
become blocked.
▶
Do not used coffee beans.
▶
Do not use instant coffee.
▶
Use a soft brush to gently direct the
ground coffee residue into the shaft.
Note
When using ground coffee, the
following selections are not available:
¡ Two cups at once
¡ Coffee strength
¡ AromaDouble Shot
1. Place your pre-warmed cup under
the outlet system.
2. Press the symbol for your desired
drink.
3. Press repeatedly until the display
shows «Gr. coffee».
4. Open the ground coffee compart-
ment.
5. Add a maximum of 2 level tea-
spoons of ground coffee, max. 12g.
6. Close the ground coffee compart-
ment.
7. Press .
a The coffee is brewed and then dis-
pensed into the cup.
Tip
¡ You can press to stop the dis-
pensing process prematurely.
¡ If you would like another drink with
ground coffee, repeat the process.
¡ Always add the ground coffee just
before making the drink.
Dispensing drinks with milk
18
You can use your appliance to dispense coffee drinks with milk and milk
froth.


Basic operation en
5. Press to stop the dispensing pro-
cess.
Drink settings
Prepare a drink according to your
taste.
Adjusting the coffee strength
1. Press the symbol for your desired
drink.
2. To select the strength of the coffee,
press .
You can select the following coffee
strengths:
– Mild
– Regular
– Strong
– Very strong
– AromaDouble Shot
Tip:For a strong taste of coffee, select a high coffee strength when setting a large capacity.
Selecting ground coffee
1. Press the symbol for your desired
drink.
2. Press repeatedly until the display
shows «Gr. coffee».
→«Dispensing a coffee drink made
from ground coffee», Page18
AromaDouble Shot
You can dispense an extra-strong coffee by using the AromaDouble Shot
function.
The longer coffee is brewed, the more
bitter substances and undesirable
aromas are released. The bitter substances and undesirable aromas affect
the taste and digestibility of the coffee.
To ensure that only pleasant-tasting
and easily digestible aromatic substances are released, fresh coffee
beans are ground and brewed when
half the quantity has been prepared.
Tip:You can select the AromaDouble
Shot function for any drink containing a
proportion of at least35ml coffee
volume.
Note:The AromaDouble Shot function
is not available for every drink and
drink volume.
Adjusting the amount
1. Press the symbol for your desired
drink.
2. Press repeatedly until the desired
volume is shown on the display.
Dispensing two cups at once
Depending on the appliance model,
you can prepare two cups at the same
time for certain drinks.
Note
The «Two cups at once» function is not
available for the following selections:
¡ Ground coffee
¡ AromaDouble Shot
¡ Volume smaller than 35ml
1. Press the symbol for your desired
drink.
2. Press .
a The setting is shown on the display.
3. Place two cups on the left and right
below the outlet system.
4. Press .
The drink is prepared in 2 steps. The
beans are ground in 2 grinding operations.
a The drink is brewed and then runs
into the cup.
5. Wait until the process is completed.
Grinder
Your appliance has an adjustable
grinder, which you can use to customise the grinding level of your coffee
beans.
21

en Basic settings
Overview of the basic settings
Setting Selection Description
Cleaning and care Milk system
Descale
Clean
calc’nClean
Cup warmer
1
Cup warmer off
2
Cup warmer on
Water filter New filter
No filter
Coffee temp. normal
high
max.
Languages See options on the appliance. Set menu language.
Autom. switch-off See options on the appliance. Set how long the appliance
Water hardness 1 (soft)
2 (medium)
3 (hard)
4 (very hard)
2
Water-softening system
Key tones Key tones on
2
Key tones off
Factory settings Full reset?
Continue: OK
Cancel: ←
1
Depending on the appliance specifications
2
Factory setting (may vary according to model)
Start service programme.
→«Service programmes»,
Page28
Switch cup heater on or off.
→«Cup heater», Page23
Set use of the water filter.
Set the temperature for coffee
drinks.
Note:The setting is effective for
all preparation types.
Changes are immediately displayed.
should wait after preparing the
last drink before automatically
switching itself off.
Set the appliance to the local water hardness.
→«Setting the water hardness»,
Page16
Switch the button tones on or off.
Restore settings to the factory
settings.
Note:All individual settings will
be deleted and reset to the factory settings.
Changing the basic settings
1. Press .
24
2. Use or to select the desired
basic setting and press .
a The display will show the setting op-
tions and the navigation symbols will
light up. The display indicates the
current setting.

Cleaning and maintenance en
¡ If you accidentally interrupt the ser-
vice programme, you must reset it.
→«Resetting a service programme»,
Page29
Tips
¡ If you use a water filter, this prolongs
the time interval until a service programmes needs to be performed.
¡ You can combine the cleaning and
descaling programmes using the
calc’nClean service programme.
→«Using calc’nClean», Page30
¡ Clean your appliance with a soft,
damp cloth immediately after a service programme to remove any descaling solution residues and prevent corrosion.
Resetting a service programme
Take the following steps if the service
programme is interrupted, e.g. due to a
power failure.
1. Rinse out the water tank.
2. Fill the water tank with fresh, non-
carbonated water up to the «max»
marking.
3. Press .
a The appliance will rinse itself for ap-
prox.2minutes.
4. Empty and clean the drip tray.
5. Insert the drip tray and close the
door.
6. Restart the service programme.
Using the milk system cleaning
programme
Rinse the milk system with water, if necessary. The rinsing process takes approx. 1minute.
Requirement:The brewing unit is
cleaned.
→«Cleaning brewing unit», Page27
1. Press .
2. Use and to select «Cleaning
and care» and press .
3. Use and to select «Milk sys-
tem» and press .
4. To start the programme, press .
a The display will guide you through
theprogramme.
5. Remove and empty the milk con-
tainer.
6. Clean the milk container, milk tube
and suction pipe.
7. Fit the components and insert the
milk container.
→Fig. 19
8. Place an empty glass under the out-
let system and press .
The milk system will now clean itself
automatically.
a The program has ended and the ap-
pliance is ready for operation.
Tip:If you want to clean the milk system particularly thoroughly, clean regularly by hand.
→«Cleaning the milk system», Page27
Using the descaling programme
Run the descaling programme when
your appliance prompts you. The process takes approx.30minutes.
Requirement:The brewing unit is
cleaned.
→«Cleaning brewing unit», Page27
1. Press .
2. Use and to select «Cleaning
and care» and press .
3. Use and to select «Descale»
and press .
4. To start the programme, press .
a The display will guide you through
theprogramme.
5. Empty and insert the drip tray.
6. Remove and empty the milk con-
tainer.
7. Clean the milk container, milk tube
and suction pipe.
29

en Cleaning and maintenance
8. Fit the components and insert the
milk container.
→Fig. 19
9. If there is a water filter, remove it.
10.Press .
11.Empty the water tank and fill with
lukewarm water up to the «0.5l calc»
mark.
12.Dissolve one Siemens descaling tab-
let in the water tank and press .
13.Place a container with a capacity of
1l under the outlet system and
press .
a The descaling programme will run
for approx.20minutes.
14.If «Refill descaler.» is shown on the
display, add more descaling solution
and press .
15.Rinse the water tank.
16.Press .
17.If there is a water filter, insert the wa-
ter filter.
→«Insert water filter», Page22
18.Press .
19.Fill the tank with fresh water up to
the «max» mark.
20.Press .
a The descaling programme takes ap-
prox.1minute and rinses the appliance.
21.Empty and insert the drip tray.
22.Remove and empty the milk con-
tainer.
23.Clean the milk container, milk tube
and suction pipe.
24.Fit the components and insert the
milk container.
→Fig. 19
a The program has ended and the ap-
pliance is ready for operation.
Using the cleaning programme
Run the cleaning programme when
your appliance prompts you. The process takes approx.9minutes.
Requirement:The brewing unit is
cleaned.
→«Cleaning brewing unit», Page27
1. Press .
2. Use and to select «Cleaning
and care» and press .
3. Use and to select «Clean»
and press .
4. To start the programme, press .
a The display will guide you through
theprogramme.
5. Empty and insert the drip tray.
6. Open the ground coffee compart-
ment.
7. Place one Siemens cleaning tablet
into the ground coffee compartment.
8. Close the ground coffee compart-
ment and press .
9. Place a container with a capacity of
1l under the outlet system and
press .
a The cleaning programme takes ap-
prox. 7minutes.
10.Empty and insert the drip tray.
a The program has ended and the ap-
pliance is ready for operation.
Using calc’nClean
You can combine the cleaning and descaling programmes using the
calc’nClean service programme. Run
the calc’nClean programme when your
appliance prompts you. The process
takes approx.43minutes.
Requirement:The brewing unit is
cleaned.
→«Cleaning brewing unit», Page27
1. Press .
2. Use and to select «Cleaning
and care» and press .
3. Use and to select
«calc’nClean» and press .
4. To start the programme, press .
a The display will guide you through
theprogramme.
30
Loading…
View the manual for the Siemens EQ.500 TP503R09 here, for free. This manual comes under the category coffee makers and has been rated by 8 people with an average of a 9.4.
This manual is available in the following languages: English. Do you have a question about the Siemens EQ.500 TP503R09 or do you need help?
Ask your question here
Siemens EQ.500 TP503R09 specifications
Below you will find the product specifications and the manual specifications of the Siemens EQ.500 TP503R09.
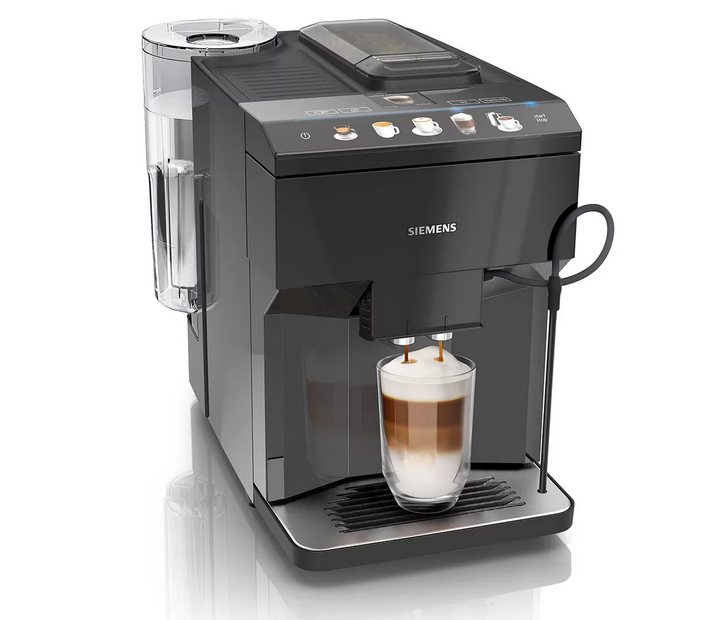
The Siemens EQ.500 TP503R09 is a countertop espresso machine designed to provide versatility and convenience in coffee preparation. With a water tank capacity of 1.7 liters, it offers ample supply for multiple cups of coffee. This espresso machine supports both coffee beans and ground coffee as input types, allowing users to choose their preferred option.
Featuring a built-in grinder, the Siemens EQ.500 TP503R09 ensures fresh and finely ground beans for a flavorful coffee experience. It is capable of making various types of coffee, including espresso, cappuccino, latte macchiato, and caffe crema. This machine also comes with a reservoir for brewed coffee, providing a convenient place to keep your freshly brewed cups.
To enhance the quality of the coffee, the Siemens EQ.500 TP503R09 is equipped with a water filter. This feature helps to reduce impurities and improve the taste of the final product. Additionally, the removable water tank enables easy cleaning and refilling.
With its sleek and compact design, this espresso machine fits well on any countertop, adding aesthetic appeal to your kitchen. The Siemens EQ.500 TP503R09 combines functionality and durability by employing premium materials in its construction, ensuring reliable performance over time.
Overall, the Siemens EQ.500 TP503R09 offers a versatile and convenient coffee making experience. With its various features and capabilities, it caters to the diverse preferences of coffee enthusiasts.
Appliance placement
Countertop
General
| Brand | Siemens |
| Model | EQ.500 TP503R09 | TP503R09 |
| Product | coffee maker |
| EAN | 4242003837344 |
| Language | English |
| Filetype | User manual (PDF) |
Performance
| Appliance placement | Countertop |
| Product type | Espresso machine |
| Water tank capacity | 1.7 L |
| Coffee maker type | Fully-auto |
| Coffee input type | Coffee beans, Ground coffee |
| Reservoir for brewed coffee | Cup |
| Capacity in cups | 2 cups |
| Built-in grinder | Yes |
| Water filter | Yes |
| Grinder type | Ceramic grinder |
| Built-in milk frother | Yes |
| Maximum operating pressure | 15 bar |
| Steam pipe | Yes |
| Dishwasher-proof parts | Yes |
| Calc-clean function | Yes |
| Coffee beans capacity | 270 g |
| Adjustable grinder settings | Yes |
| Programmable | Yes |
| Adjustable temperature | Yes |
| Certification | CE, Eurasian, Morocco, Ukraine, VDE |
| Adjustable coffee strength | — |
| Hot water system | Yes |
| Adjustable coffee spout height | Yes |
| Water hardness selector | Yes |
| Self-cleaning | Yes |
Cooking functions & programs
| Coffee making | Yes |
| Espresso making | Yes |
| Cappuccino making | Yes |
| Latte Macchiato making | Yes |
| Caffe Crema making | Yes |
| Hot milk making | Yes |
| Multi beverage | Yes |
Ergonomics
| Removable water tank | Yes |
| Easy to clean | Yes |
| Easy to use | Yes |
| Removable brewing/infusion unit | Yes |
| Detachable capsule magazine | Yes |
| Backlight buttons | Yes |
| Built-in display | Yes |
| Product color | Black |
| Control type | Touch |
| Display type | TFT |
| Cord length | 1 m |
| Removable drip tray | Yes |
| Calc indicator | Yes |
Power
| Power | 1500 W |
| Programmable auto power off | Yes |
| Auto power off | Yes |
| AC input frequency | 50 Hz |
| AC input voltage | 220–240 V |
Weight & dimensions
| Width | 373 mm |
| Depth | 276 mm |
| Height | 452 mm |
| Weight | 8384 g |
Packaging data
| Package weight | 9600 g |
| Package width | 510 mm |
| Package depth | 343 mm |
| Package height | 428 mm |
Logistics data
| Pallet width | 800 mm |
| Pallet length | 1200 mm |
| Pallet height | 2200 mm |
| Quantity per pallet | 24 pc(s) |
show more
Frequently Asked Questions
Can’t find the answer to your question in the manual? You may find the answer to your question in the FAQs about the Siemens EQ.500 TP503R09 below.
Why does my coffee maker Siemens EQ.500 TP503R09 not turn on?
Make sure the power cable is securely plugged into an electrical outlet and that the outlet is functioning. Check if the coffee maker’s power switch is turned on as well.
How can I adjust the strength of my coffee with the Siemens EQ.500 TP503R09?
To adjust the coffee strength, simply select the desired strength level using the menu options on the coffee maker’s control panel.
How can I increase the temperature of the coffee brewed by my Siemens EQ.500 TP503R09?
Access the temperature settings in the preferences menu of the coffee maker’s control panel. From there, you can increase or decrease the temperature as per your preference.
Why is my coffee not hot enough when brewed with the Siemens EQ.500 TP503R09?
Ensure that the coffee maker is preheated before brewing, as this helps in achieving the desired temperature. Additionally, you may want to check the temperature setting in the preferences menu to ensure it is set to the desired level.
How do I clean the milk frother of my Siemens EQ.500 TP503R09?
Detach the milk frother from the coffee maker, then clean it by hand with warm soapy water. Rinse it thoroughly and make sure to remove any milk residue. Reattach the milk frother once it is completely dry.
Does the Siemens EQ.500 TP503R09 have a built-in grinder?
Yes, the Siemens EQ.500 TP503R09 has a built-in grinder. This means that users can grind their own coffee beans for a fresh and flavorful cup of coffee.
Can the Siemens EQ.500 TP503R09 make cappuccinos?
Yes, the Siemens EQ.500 TP503R09 can make cappuccinos. This allows users to enjoy frothy and creamy cappuccinos at home.
Is the water tank of the Siemens EQ.500 TP503R09 removable?
Yes, the water tank of the Siemens EQ.500 TP503R09 is removable. This makes it easy for users to refill and clean the tank.
What is the water tank capacity of the Siemens EQ.500 TP503R09?
The water tank capacity of the Siemens EQ.500 TP503R09 is 1.7 L. This means that users can make multiple cups of coffee without having to refill the tank frequently.
Can the Siemens EQ.500 TP503R09 make espresso?
Yes, the Siemens EQ.500 TP503R09 can make espresso. This allows users to enjoy a strong and concentrated shot of espresso whenever they want.
What is the weight of the Siemens EQ.500 TP503R09?
The Siemens EQ.500 TP503R09 has a weight of 8384 g.
What is the height of the Siemens EQ.500 TP503R09?
The Siemens EQ.500 TP503R09 has a height of 452 mm.
What is the width of the Siemens EQ.500 TP503R09?
The Siemens EQ.500 TP503R09 has a width of 373 mm.
What is the best way to descale my coffee maker?
To descale the coffee maker, it is recommended to use a liquid descaling agent which is labelled as suitable for coffee machines.
What is the depth of the Siemens EQ.500 TP503R09?
The Siemens EQ.500 TP503R09 has a depth of 276 mm.
How often should I descale my coffee maker?
How often a coffee machine needs to be descaled depends on how often it is used and the hardness of the water.
If hard water is used it is recommended to descale once a month, if soft water is used once a quarter is sufficient.
What does the grind say about the taste of the coffee?
How the coffee beans are ground strongly influences the taste of the coffee. If the coffee beans are very finely ground you will have a stronger taste and if the grind is coarser you will have a milder taste.
What certifications does the Siemens EQ.500 TP503R09 have?
The Siemens EQ.500 TP503R09 has the following certifications: CE, Eurasian, Morocco, Ukraine, VDE.
What is espresso?
Espresso is a small amount of concentrated coffee.
How long can I keep coffee beans?
The best-before date can be found on the packaging of the coffee beans. This best-before date applies as long as the bag is closed.
What is the best way to store coffee?
It is recommended to store coffee in an airtight and clean container.
Is the manual of the Siemens EQ.500 TP503R09 available in English?
Yes, the manual of the Siemens EQ.500 TP503R09 is available in English .
Is your question not listed? Ask your question here
|
Код: 135643 Извините, товара сейчас нет в наличии
Бесплатная доставка Извините, товара сейчас нет в наличии Сравнить Новости интернет-магазина «Лаукар»:23.04.2025 26.02.2025 17.02.2025 Дополнительная информация в категории Кофемашина:Кофемашины — термины и определения Таблица Авторизованных сервисных центров по брендам. Описание Инструкция Отзывы (0) В интернет-магазине бытовой техники «Лаукар» Вы можете скачать инструкцию к товару Кофемашина Siemens TP501R09 EQ.500 classic совершенно бесплатно. Все инструкции, представленные на сайте интернет-магазина бытовой техники «Лаукар», предоставляются производителем товара. Для того чтобы скачать инструкцию, Вам необходимо нажать на ссылку «скачать инструкцию», расположенную ниже, а в случае, если ссылки нет, Скачать инструкцию Смотреть инструкцию 
Фирма-производитель оставляет за собой право на внесение изменений в конструкцию, дизайн и комплектацию товара: Кофемашина Siemens TP501R09 EQ.500 classic. Пожалуйста, сверяйте информацию о товаре с информацией на |