
Код: 108569
63 730
рублей
Бесплатная доставка
по Красноярску
?
под заказ
(7-14 дней)
Новости интернет-магазина «Лаукар»:
Дополнительная информация в категории Кофемашина:
В интернет-магазине бытовой техники «Лаукар» Вы можете скачать инструкцию к товару Кофемашина Philips EP 2231/40 совершенно бесплатно.
Все инструкции, представленные на сайте интернет-магазина бытовой техники «Лаукар», предоставляются производителем товара.
Перед началом использования товара рекомендуем Вам ознакомиться с инструкцией по применению.
Для того чтобы скачать инструкцию, Вам необходимо нажать на ссылку «скачать инструкцию», расположенную ниже, а в случае, если ссылки нет,
Вы можете попробовать обратиться к данной странице позднее,
возможно специалисты интернет-магазина бытовой техники «Лаукар» еще не успели загрузить для скачивания инструкцию к товару:
Кофемашина Philips EP 2231/40.

Фирма-производитель оставляет за собой право на внесение изменений в конструкцию, дизайн и комплектацию товара: Кофемашина Philips EP 2231/40. Пожалуйста, сверяйте информацию о товаре с информацией на
официальном сайте компании производителя.

Fully automatic
espresso machine
1200 series
2200 series
3200 series
RU RU РУКОВОДСТВО ПОЛЬЗОВАТЕЛЯ
KK ПАЙДАЛАНУШЫ НҰСҚАУЛЫҒЫ
www.philips.com/coee-care
OMNIA COVER_FRONT_A5_WE/EE/RCA.indd 3 03-12-18 15:38
My Coffee Choice
A2A1 A3 A4
A14
A6
A8A7
A9
A12
A13
A10
A11
A5
A17
A15
A
B1 B2 B3 B4 B5
B10B11
B7B6 B8 B9
B
A19A18
A16
A20 A21 A22 A23 A24

Classic Milk Frother
1200 series
2200 series
3200 series
EP2020
EP2021
EP2224
EP3221
EP2030
EP2035
EP2231
EP3241
EP3243
EP3246
LatteGo
Classic Milk Frother
EP1220
A19 A20 A21 A22 A23 A24
A17A18 A16 A14 A24 A23 A21 A15 A9 A4 A12
C
D
Русский
Оглавление
Обзор кофемашины (рис. A) _______________________________________________________________________ 7
Панель управления (рис. B) ________________________________________________________________________ 8
Введение ____________________________________________________________________________________________ 8
Перед первым использованием___________________________________________________________________ 9
Приготовление напитков___________________________________________________________________________ 10
Настройка параметров кофемашины_____________________________________________________________ 13
Удаление и установка варочной группы _________________________________________________________ 15
Очистка и уход_______________________________________________________________________________________ 15
Фильтр для очистки воды AquaClean _____________________________________________________________ 18
Установка степени жесткости воды ______________________________________________________________ 20
Процедура очистки от накипи (продолжительность 30 мин.) __________________________________ 20
Заказ аксессуаров___________________________________________________________________________________ 22
Поиск и устранение неисправностей _____________________________________________________________ 22
Технические характеристики ______________________________________________________________________ 28
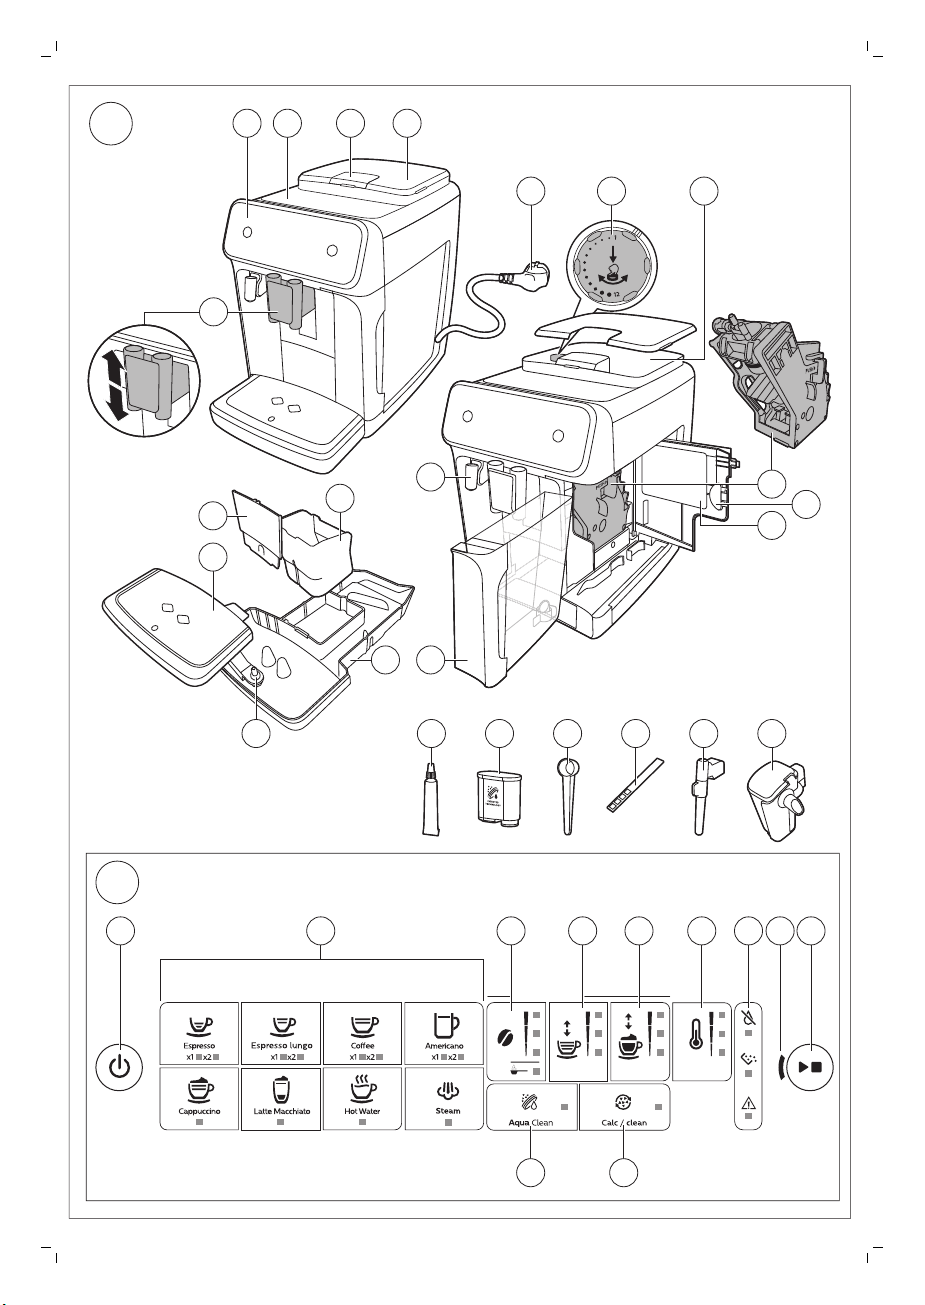
Обзор кофемашины (рис. A)
A1 Панель управления A10 Сервисная дверца
A2 Площадка для чашек A11 Этикетка с данными, содержащая номер модели
7
Русский
A3 Отделение для
предварительно молотого
кофе
A4 Крышка контейнера для
кофейных зерен
A5 Регулируемый носик выхода
кофе
A6 Вилка сетевого шнура A15 Передняя панель контейнера для кофейной гущи
A7 Переключатель регулировки
помола
A8 Контейнер для кофейных зерен A17 Поддон для капель
A9 Варочная группа A18 Индикатор заполнения поддона для капель
A12 Резервуар для воды
A13 Носик для подачи горячей воды
A14 Контейнер для кофейной гущи
A16 Крышка поддона для капель
Дополнительные принадлежности
A19 Тюбик со смазкой A22 Тестовая полоска для измерения жесткости воды
A20 Фильтр для очистки воды
AquaClean
A21 Мерная ложка A24 LatteGo (емкость для молока) (Только модели
A23 Классический вспениватель молока (Только
модели EP1220, EP2020, EP2021, EP224)
EP2030, EP2035, EP2231, EP3241, EP3243, EP3246)
Русский

8
Русский
Панель управления (рис. B)
Обзор всех кнопок и значков см. на рис. B. Ниже приводится соответствующее описание.
Некоторые кнопки и значки относятся только к конкретным моделям.
B1 Кнопка включения/выключения B7 Значки предупреждений
B2 Значки напитков* B8 Индикатор запуска
B3 Значок уровня крепости/предварительно
молотого кофе
B4 Значок объем напитка B10 Значок очистки от накипи
B5 Значок количество молока (только модели
EP3241, EP3243, EP3246)
B6 Значок температуры кофе (только модель
EP3221)
* Ниже приводится обзор всех значков напитков и номера моделей, имеющих эти значки.
Эспрессо (Espresso),
кофе (Coffee),
горячая вода (Hot water)
Эспрессо лунго (Espresso
lungo)
Американо (Americano) EP3221, EP3241, EP3243, EP3246
Капучино (Cappuccino) EP2030, EP2035, EP2231, EP3241, EP3243, EP3246
Латте макиато (Latte
Macchiato)
Пар (Steam)
EP1220, EP2020, EP2021, EP2224, EP3221, EP2030, EP2035, EP2231,
EP3241, EP3243, EP3246
EP3221
EP3241, EP3243, EP32146
EP1220, EP2020, EP2021, EP2224, EP3221
B9 Кнопка «Старт/стоп»
B11 Значок фильтра AquaClean
Введение
Поздравляем с приобретением автоматической кофемашины Philips! Чтобы воспользоваться
всеми преимуществами поддержки Philips, зарегистрируйте продукт на веб-сайте
www.philips.com/welcome.
Перед первым использованием кофемашины внимательно ознакомьтесь с данным
руководством и сохраните его на будущее.
Чтобы помочь вам начать и оптимально использовать свою кофемашину, Philips предоставляет
разнообразную поддержку. В комплекте вы найдете:
1 Руководство пользователя с инструкциями по эксплуатации на основе изображений, а также
более подробной информацией по очистке и обслуживанию устройства.
Существует несколько версий эспрессо-кофемашины, в которых имеются различные
функции.
этикетке с данными на внутренней панели сервисной дверцы (см. поз А11, рис. А).
Каждая версия имеет свой собственный номер модели. Номер модели указан на
5 sec.
30 sec.
3 min.
3 sec.
Русский
2 Отдельную брошюру с инструкциями по способам безопасного использования
кофемашины.
3 Для получения онлайн-поддержки (ответы на часто задаваемые вопросы, фильмы и пр.)
отсканируйте QR-код на обложке брошюры или посетите веб-сайт по адресу
www.philips.com/coffee-care
При тестировании машины мы использовали настоящий кофе. Мы тщательно очистили
машину, однако в ней по-прежнему могут присутствовать следы кофе. При этом мы
гарантируем, что устройство полностью новое.
Кофемашина автоматически регулирует количество молотого кофе, необходимого для
получения наилучшего вкуса напитка. Нужно приготовить не менее 5 чашек кофе, чтобы
кофемашина выполнила автоматическую настройку.
Перед первым использованием обязательно промойте LatteGo (капучинатор) или классический
вспениватель молока.
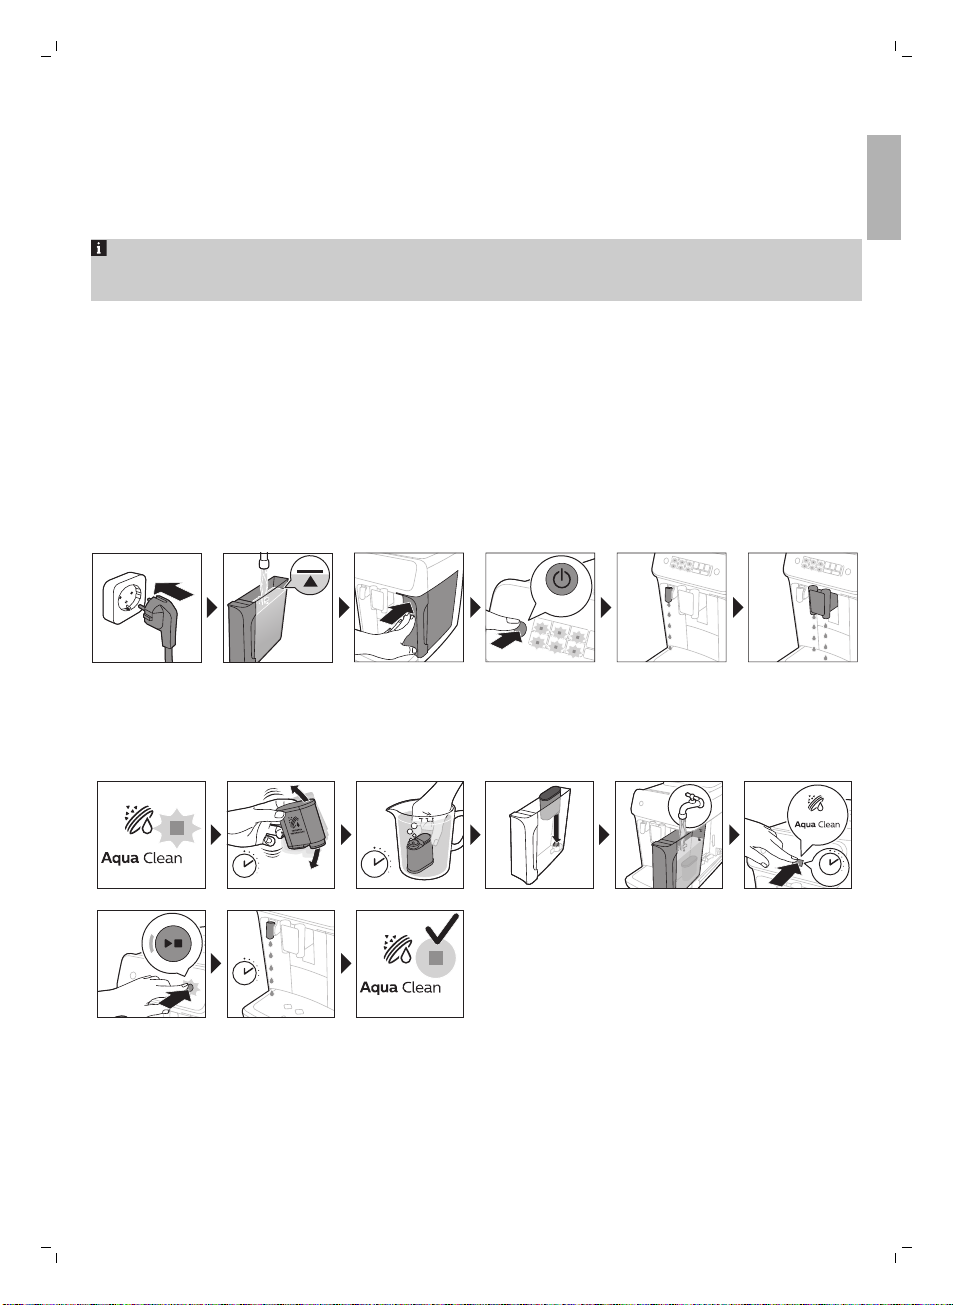
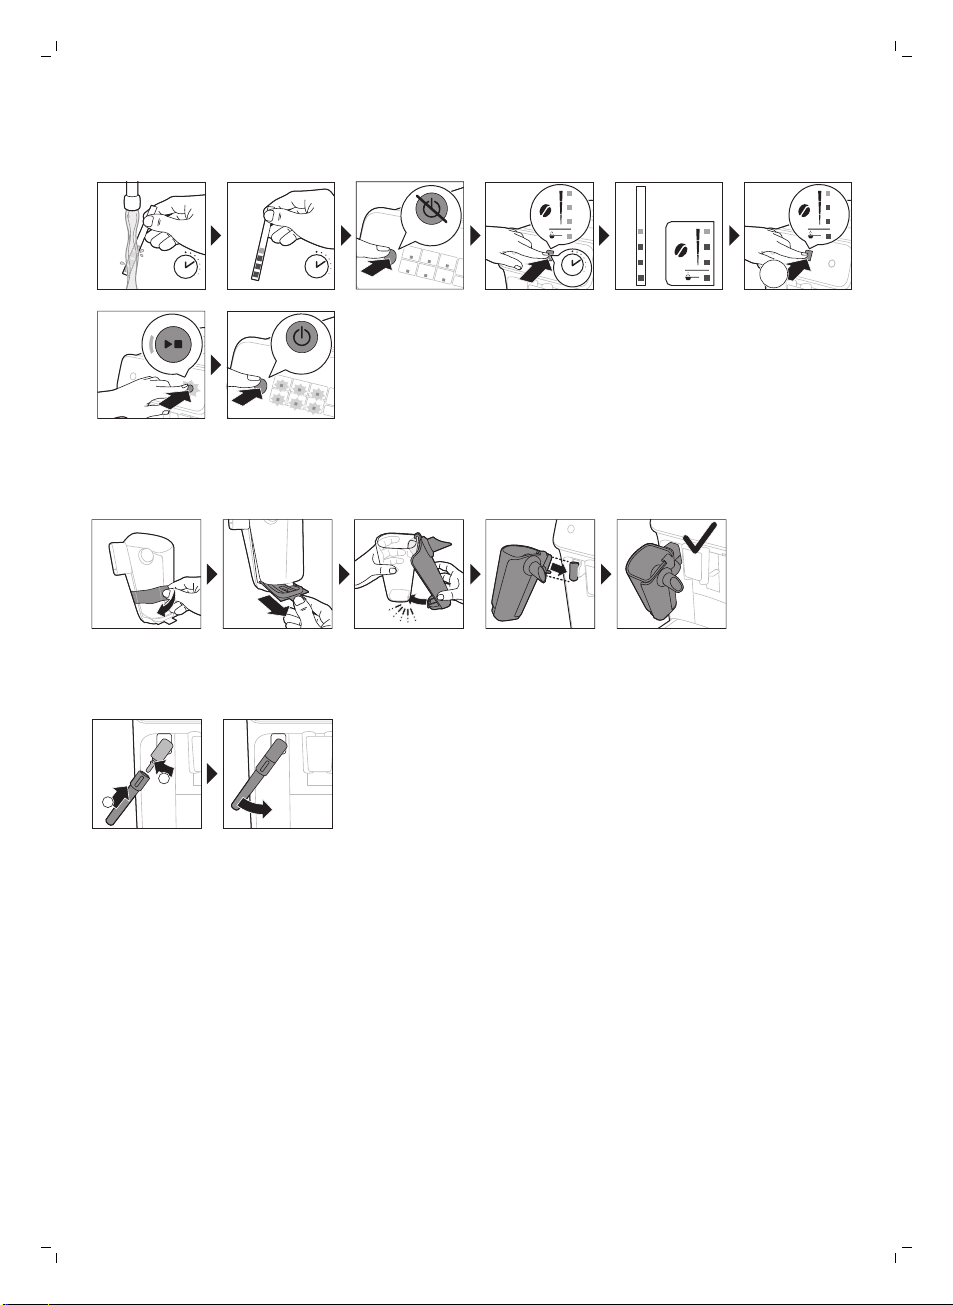
Перед первым использованием
1. Промывка кофемашины
9
Русский
2. Активация фильтра для очистки воды AquaClean
(продолжительность – 5 мин.)
Для получения дополнительной информации см. главу «Фильтр для очистки воды AquaClean».
1 sec.
OFF
1 min.
3 sec.
=
3x
ON
10
Русский
3. Установка степени жесткости воды
Для получения дополнительной информации см. раздел «Установка степени жесткости воды».
4. Сборка LatteGo (только для моделей EP2030 EP2035,
EP2231, EP3241, EP3243, EP3246)
5. Сборка классического вспенивателя молока (только для
моделей EP1220, EP2020, EP2021, EP224)
Приготовление напитков
Общие шаги
1 Заполните резервуар для воды водопроводной водой и засыпьте в контейнер кофейные
зерна.
2 Нажмите кнопку включения/выключения, чтобы включить кофемашину.
—
Кофемашина начнет нагреваться и запустит цикл автоматической промывки. Во время
нагрева индикаторы значков напитков один за другим медленно загораются и гаснут.
—
Когда все индикаторы значков напитков будут гореть непрерывно, кофемашина готова к
использованию.
3 Поставьте чашку под носик выхода кофе. Сдвиньте носик выхода кофе вверх или вниз, чтобы
настроить его высоту в зависимости от размера чашки или стакана (Рис. 1).
Русский
Персонализация напитков
Эта кофемашина позволяет регулировать настройки напитка по вашему вкусу. После выбора
напитка вы можете:
1 Отрегулировать уровень крепости, нажав значок уровня крепости (Рис. 2). Имеется 3 уровня
крепости, минимальный является самым мягким, а максимальный — самым крепким.
2 Отрегулировать объем напитка, нажав значок объема напитка (Рис. 3) и/или значок объема
молока (EP3241, EP3243, EP3246 только). Существует 3 количественных уровня: минимальный,
средний, максимальный.
Можно также настроить температуру кофе с учетом ваших предпочтений.
Приготовлениекофе из зерен
1 Чтобы приготовить обычный кофе, нажмите значок напитка по вашему выбору.
—
Загораются индикаторы крепости и объема и отображаются выбранные предыдущие
настройки.
—
Теперь вы можете настроить напиток с учетом предпочитаемого вами вкуса.
2 Нажмите кнопку «Старт/стоп»
—
Индикатор значка напитка мигает, пока идет подача напитка.
Только для моделей EP3221, EP3241, EP3243, EP3246. Американо изготавливается из
эспрессо и воды. Когда варится американо, кофемашина сначала подает эспрессо, а затем
воду.
3 Чтобы прервать выдачу кофе до завершения процедуры, нажмите кнопку «Старт/стоп»
еще раз.
.
11
Русский
Чтобы приготовить 2 чашки кофе одновременно, дважды нажмите значок напитка.
Загорается индикатор 2x.
Приготовление напитков на молочной основе с LatteGo
(капучинатор)
LatteGo состоит из капучинатора, рамки и крышки для хранения. Чтобы избежать
протекания, убедитесь перед заполнением капучинатора, что рамка и капучинатор правильно
установлены.
1 Чтобы выполнить сборку LatteGo, сначала установите верхнюю часть капучинатора под
фиксатором в верхней части рамки (Рис. 4). Затем нажмите до упора на нижнюю часть
капучинатора. Вы услышите щелчок, когда он встанет на место (Рис. 5).
Примечание. Прежде чем подсоединять капучинатор и рамку, убедитесь, что они чистые.
2 Слегка наклоните LatteGo и поместите на носик (Рис. 6) подачи горячей воды (Рис. 6). Затем
нажмите на него до упора, пока он не зафиксируется на месте (Рис. 7).
3 Заполните LatteGo молоком до уровня, указанного на капучинаторе для приготовления
вашего напитка (Рис. 8). Не заполняйте капучинатор выше отметки максимального уровня
(MAX).
Если вы персонализировали объем молока, может потребоваться заполнять капучинатор
больше или меньше того уровня, который указан для этого напитка на LatteGo.
Для достижения оптимальных результатов всегда используйте молоко непосредственно
из холодильника.
12
Русский
4 Поставьте чашку на поддон для капель.
5 Нажмите значок напитка на молочной основе по вашему выбору.
—
Теперь вы можете отрегулировать напиток с учетом своих предпочтений.
6 Нажмите кнопку «Старт/стоп»
—
Индикатор значка напитка мигает, пока идет подача напитка. Для приготовления
капучино или латте маккиато кофемашина сначала подает молоко, а затем кофе.
—
Чтобы прекратить подачу молока, прежде чем кофемашина выдаст заданный объем,
нажмите кнопку «Старт/стоп»
7 Чтобы остановить подачу уже смешанного напитка (молоко и кофе) до завершения работы
кофемашины, нажмите и удерживайте кнопку «Старт/стоп»
.
.
.
Вспенивание молока с помощью классического
вспенивателя молока
Всегда используйте молоко непосредственно из холодильника для обеспечения наилучшего
качества пены.
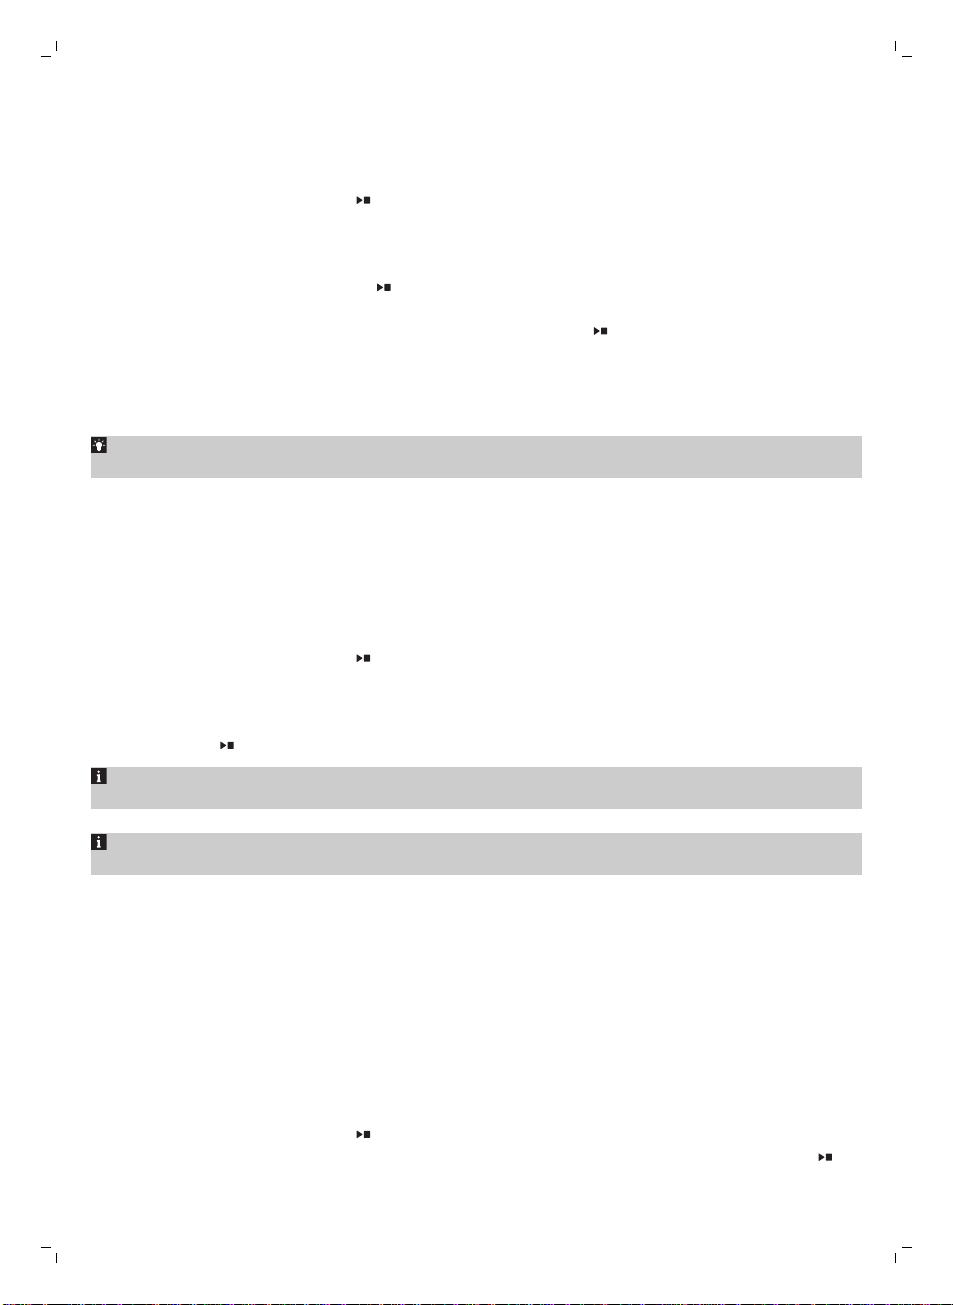
1 Наклоните черную силиконовую ручку на кофемашине влево и надвиньте на нее (Рис. 9)
вспениватель молока (Рис. 9).
2 Налейте в чашку для молока примерно 100мл молока для приготовления капучино или
примерно 150мл молока для латте маккиато.
3 Погрузите вспениватель молока примерно на 1 см в молоко.
4 Нажмите значок (Рис. 10) пара (Рис. 10).
—
Индикатор значка пара загорится, а индикатор запуска начнет мигать.
5 Нажмите кнопку «Старт/стоп»
—
Кофемашина начнет нагреваться, пар под давлением пропускается через молоко и
взбивается молочная пена.
6 Когда молочная пена в кувшине для молока достигнет требуемого объема, нажмите кнопку
«Старт/стоп»
еще раз, чтобы остановить вспенивание молока.
, чтобы начать взбивать пену молока (Рис. 11).
Никогда не взбивайте молоко дольше 90секунд. Взбивание автоматически отключается
через 90секунд.
Не перемещайте чашку для молока во время взбивания, чтобы получить наилучшее
качество молочной пены.
Приготовление напитка из молотого кофе
Вы можете использовать при желании предварительно молотый кофе вместо зерен —
например, если вы предпочитаете другой сорт кофе или кофе без кофеина.
1 Откройте крышку отделения для молотого кофе и засыпьте в него одну мерную ложку (без
верха) предварительно молотого кофе (Рис. 12). Затем закройте крышку.
2 Поставьте чашку под носик выхода кофе.
3 Выберите напиток.
4 Нажмите значок уровня крепости и удерживайте его в течение 3 секунд (Рис. 13).
—
Загорится индикатор предварительно молотого кофе, а индикатор запуска начнет мигать.
5 Нажмите кнопку «Старт/стоп»
6 Чтобы прервать выдачу кофе до завершения процедуры, нажмите кнопку «Старт/стоп»
еще раз.
.
Loading…
Table of Contents
- Philips EP2231/40 Coffee Maker
- Introduction
- Machine overview
- Control panel
- Before first use
- Brewing drinks
- Adjusting machine settings
- Removing and inserting the brew group
- Cleaning and maintenance
- AquaClean water filter
- AquaClean icon and light
- Replacing the AquaClean water filter (5 min.)
- Deactivating the AquaClean reminder
- Setting the water hardness
- Descaling procedure (30 min.)
- What to do if the descaling procedure is interrupted
- Ordering accessories
- Warning icons
- Troubleshooting
- Technical specifications
- FAQs
- Read User Manual Online (PDF format)
- Download This Manual (PDF format)
Philips EP2231/40 Coffee Maker

Introduction
Congratulations on your purchase of a Philips fully automatic coffee machine!
To fully benefit from the support that Philips offers, please register your
product at www.philips.com/welcome. Read the
separate safety booklet carefully before you use the machine for the first
time and save it for future reference. To help you get started and get the
best out of your machine, Philips offers support in multiple ways.
In the box you find the:
- This user manual with picture-based usage instructions and more detailed information on cleaning and maintenance.
- The separate safety booklet with instructions on how to use the machine in a safe way.
- For online support (frequently asked questions, movies etc.), scan the QR code on the cover of this booklet or visit www.philips.com/coffee-care
Machine overview
- A1 Control panel
- A2 Cup holder
- A3 Pre-ground coffee compartment
- A4 Lid of bean hopper
- A5 Adjustable coffee spout
- A6 Mains plug
- A7 Grind setting knob
- A8 Coffee bean hopper
- A9 Brew group
- A10 Service door
- A11 Data label with type number
- A12 Water tank
- A13 Hot water spout
- A14 Coffee grounds container
- A15 Front panel of coffee grounds container
- A16 Drip tray cover
- A17 Drip tray
- A18 Drip tray full’ indicator

Control panel
- B1 On/off button
- B2 Drink icons*
- B3 Aroma strength/pre-ground coffee icon
- B4 Drink quantity icon
- B5 Milk quantity icon (specific types only)
- B6 Coffee temperature icon (specific types only)
- B7 Warning icons
- B8 Start light
- B9 Start/stop»» button
- B10 Calc/ Clean icon
- B11 AquaClean icon

Before first use
Brewing drinks
General steps
- Fill the water tank with tap water and fill the bean hopper with beans.
- Press the on/off button to switch on the machine.
- The machine starts heating up and performs the automatic rinsing cycle. During heating up, the lights in the drinks icons light up and go out slowly one by one.
- When all lights in the drink icons light up continuously, the machine is ready for use.
- Place a cup under the coffee dispensing spout. Slide the coffee dispensing spout up or down to adjust its height to the size of the cup or glass you are using
Personalizing drinks
- This machine allows you to adjust the settings of a drink to your own preference. After selecting a drink you can:
- Adjust the aroma strength by tapping the aroma strength icon There are 3 strengths, the lowest is the mildest and the highest is the strongest.
- Adjust the drinking quantity by tapping the drinking quantity and/or the milk quantity icon (specific types only). There are 3 quantities: low, medium, and high.
Brewing coffee with beans
- To brew a coffee, tap the drink icon of your choice.
- The aroma strength and quantity lights go on and show the previously selected setting.
- You can now adjust the drink to your preferred taste (see ‘Personalizing drinks’).
- Press the start/stop button.
- The light in the drink icon flashes while the drink is being dispensed
Brewing milk-based drinks with LatteGo (milk container)
- To assemble LatteGo, first, insert the top of the milk container under the hook at the top of the frame
- Then press home the bottom part of the milk container. You hear a click when it locks into place
- Slightly tilt LatteGo and put it on the hot water spout Then press it home until it locks into place 7
- Fill LatteGo with milk up to the level indicated on the milk container for the drink you are brewing Do not fill the milk container beyond the maximum indication
- Place a cup on the drip tray.
- Tap the milk-based drink icon of your choice.
- You can now adjust the drink to your own preference (see ‘Personalizing drinks’).
- Press the start/stop button.
- The light in the drink icon flashes while the drink is being dispensed. When you brew a cappuccino or latte macchiato, the machine first dispenses milk and then coffee.
- To stop dispensing milk before the machine has dispensed the preset amount, press the start/stop button.
- To stop dispensing the complete drink (milk and coffee) before the machine is finished, press and hold the start/stop button.
Frothing milk with a classic milk frother
- Tilt the black silicone handle on the machine to the left and slide the milk frother onto it
- Fill a milk jug with approx. 100 ml milk for cappuccino and approx. 150 ml milk for latte macchiato.
- Insert the milk frother approx. 1 cm into the milk.
- Tap the steam icon
- The light in the steam icon goes on and the start light starts pulsing.
- Press the start/stop button to froth the milk (
- The machine starts heating up, steam is forced into the milk and the milk is frothed.
- When the milk foam in the milk jug has reached the required volume, press the start/stop button again to stop frothing milk
Brewing coffee with pre-ground coffee
- You can choose to use pre-ground coffee instead of beans, for example, if you prefer a different coffee variety or decaffeinated coffee.
- Press the on/off button to switch on the machine and wait until it is ready for use.
- Open the lid of the pre-ground coffee compartment and pour one leveled measuring scoop of preground coffee into it (Fig. 12). Then close the lid.
- Place a cup under the coffee dispensing spout.
- Select a single drink.
- Press the aroma strength icon for 3 seconds
- The pre-ground coffee light goes on and the start light starts pulsing.
- Press the start/stop button.
- To stop dispensing coffee before the machine is finished, press the start/stop button again
Brewing iced coffee (specific types only)
- Take a glass and fill it halfway with ice cubes.
- Place the glass under the coffee dispensing spout.
- Tap the iced coffee icon
- The aroma strength and quantity lights go on.
- You can now adjust the drink to your preferred taste.
Dispensing hot water
- If attached, remove LatteGo or the milk frother.
- Tap the hot water icon
- The drink quantity lights go on and show the previously selected drink setting for hot water.
- Adjust the hot water quantity to your preference by tapping the drink quantity icon
- Press the start/stop button.
- The light in the hot water icon flashes and hot water is dispensed from the hot water spout
- To stop dispensing hot water before the machine is finished, press the start/stop button again.
Adjusting machine settings
Adjusting the standby time
- Press the on/off button to switch off the machine.
- When the machine is switched off: press and hold the Calc / Clean icon (Fig. 17) until the Calc / Clean light and the Aroma strength lights go on (Fig. 18).
- Tap the Aroma strength icon to select the required stand-by time: 15, 30, 60, or 180 minutes. Respectively 1, 2, 3, or 4 lights of the Aroma strength icon light up.
- When you have finished setting the stand-by time, press the start/stop button. The machine switches off.
- Press the on/off button to switch on the machine again.
Adjusting grinder settings
You can change the coffee strength with the grind setting knob inside the
bean container. The lower the grind setting, the finer the coffee beans are
ground and the stronger the coffee. There are 12 different grind settings you
can choose from. The machine has been set up to get the best taste out of your
coffee beans. Therefore we advise you not to adjust the grind setting until
you have brewed 100-150 cups (approx. 1 month of use).
Removing and inserting the brew group
Go to www.philips.com/coffee-care for
detailed video instructions on how to remove, insert and clean the brew group.
Removing the brew group from the machine
- Switch off the machine.
- Remove the water tank and open the service door
- Press the PUSH handle and pull at the grip of the brew group to remove it from the machine
Reinserting the brew group
- Check if the brew group is in the correct position. The arrow on the yellow cylinder on the side of the brew group has to be aligned with the black arrow and N
- If they are not aligned, push down the lever until it is in contact with the base of the brew group
- Slide the brew group back into the machine along the guiding rails on the sides until it locks into position with a click Do not press the PUSH button.
- Close the service door and place back the water tank.

Cleaning and maintenance
- Regular cleaning and maintenance keep your machine in top condition and ensures good-tasting coffee for a long time with a steady coffee flow.
- Consult the table below for a detailed description of when and how to clean all detachable parts of the machine.
- You can find more detailed information and video instructions at www.philips.com/coffee-care.
- See figure D for an overview of which parts can be cleaned in the dishwasher


AquaClean water filter
The AquaClean water filter can be placed in the water tank to preserve the
taste of your coffee. It also diminishes the need for descaling by reducing
limescale build-up in your machine.
AquaClean icon and light

Your machine is equipped with an AquaClean water filter light to indicate the
status of the filter. Use the table below to see what actions are required
when the light is on or when it is flashing.
Activating the AquaClean water filter (5 min.)
- The machine does not automatically detect that a filter has been placed in the water tank. Therefore you need to activate each new AquaClean water filter that you install with the AquaClean icon.
When the orange AquaClean light is off, you can still activate an AquaClean
water filter, but you will need to descale the machine first.
- Your machine has to be completely limescale-free before you start to use the AquaClean water filter.
Before activating the AquaClean water filter, it has to be prepared by
soaking it in water as described below.
- If you don’t do this, air might be drawn into the machine instead of water, which makes a lot of noise and prevents the machine from being able to brew coffee.
- Make sure that the machine is switched on.
- Shake the filter for about 5 seconds
- Immerse the filter upside down in a jug with cold water and shake/press it
- Insert the filter vertically onto the filter connection in the water tank. Press it down to the lowest possible point
- Fill the water tank with fresh water and place it back into the machine.
- If attached, remove the LatteGo.
- Place a bowl under the hot water spout/milk frother.
- Press the AquaClean icon for 3 seconds. The start light starts to pulse.
- Press the Start/Stop button to start the activation process.
- Hot water will be dispensed from the hot water spout/milk frother (3 min.).
- When the activation process is finished, the blue AquaClean light goes on to confirm that the AquaClean water filter has been activated correctly.
Replacing the AquaClean water filter (5 min.)
After 95 liters of water have flowed through the filter, the filter will cease
to work. The AquaClean light turns orange and starts to flash to remind you to
replace the filter. As long as it flashes, you can replace the filter without
having to descale the machine first. If you do not replace the AquaClean water
filter, the orange light will go out eventually. In that case, you can still
replace the filter but you first need to descale the machine.
When the orange AquaClean light flashes:
- Take out the old AquaClean water filter.
- Install a new filter and activate it as described in the chapter Activating the AquaClean water filter (5 min.).
Replace the AquaClean water filter at least every 3 months, even if the
machine does not yet indicate that replacement is required.
Deactivating the AquaClean reminder
If you do not want to use Philips AquaClean water filters anymore, you can
always deactivate the AquaClean reminders (AquaClean light flashing orange):
- Press the on/off button to switch off the machine.
- When the machine is switched off, press and hold the AquaClean icon until the light in this icon goes on. The start light starts flashing.
- Tap the AquaClean icon again to deactivate the reminders. The light in the AquaClean icon goes off.
- Press the start/stop button to confirm your choice.
- Press the on/off button to switch on the machine again. The AquaClean reminders are now deactivated.
Note: The activation of a new AquaClean filter will automatically re-
activate the AquaClean reminders.
Setting the water hardness
We advise you to adjust the water hardness to the water hardness in your
region for optimal performance and a longer lifetime for the machine. This
also prevents you from having to descale the machine too often. The default
water hardness setting is 4: hard water.
Use the water hardness test strip supplied in the box to determine the
water hardness in your region:
- Immerse the water hardness test strip in tap water or hold it under the tap for 1 second (Fig. 45).
- Wait 1 minute. The number of squares on the test strip that turn red indicates the water hardness (Fig. 46).
Set the machine to the correct water hardness:
- Press the on/off button to switch off the machine.
- When the machine is switched off, tap and hold the aroma strength icon until all lights in the icon go on (Fig. 2).
- Tap the aroma strength icon 1, 2, 3, or 4 times. The number of lights that are on should be the same as the number of red squares on the test strip (Fig. 47). When there are no red squares on the test strip (so all squares are green) please select 1 light.
- When you have set the correct water hardness, press the start/stop button.
- Press the on/off icon to switch on the machine.
Since you only set the water hardness once, the aroma strength function is
used to select the water hardness. This does not affect the aroma strength of
the drinks you make afterward.
Descaling procedure (30 min.)
Please use Philips descaler only. Under no circumstances should you use a
descaler based on sulfuric acid, hydrochloric acid, sulfamic or acetic acid
(vinegar) as this may damage the water circuit in your machine and not
dissolve the limescale properly. Not using the Philips descaler will void your
warranty. Failure to descale the appliance will also void your warranty. You
can buy Philips descaling solution in the online shop at www.philips.com
/coffee-care.
When the Calc / Clean light starts to flash slowly, you need to descale the
machine.
- Make sure that the machine is switched on.
- If attached remove LatteGo or milk frother.
- Remove the drip tray and the coffee grounds container, empty them, and put them back into place.
- Remove the water tank and empty it. Then remove the AquaClean water filter.
- Pour the whole bottle of Philips descaler into the water tank and then fill it with water up to the Calc.
- Clean indication (Fig. 48). Then place it back into the machine.
- Place a large container (1.5 l) under the coffee dispensing spout and the water spout.
- Press the Calc / Clean icon for 3 sec. and then press the start/stop button.
- The first phase of the descaling procedure starts. The descaling procedure lasts approx. 30 minutes and consists of a descaling cycle and a rinsing cycle. During the descaling cycle, the Calc / Clean light flashes to show that the descaling phase is in progress.
- Let the machine dispense the descaling solution until the display reminds you that the water tank is empty.
- Empty the water tank, rinse it and then refill it with fresh water up to the Calc / Clean indication.
- Empty the container and place it back under the coffee dispensing spout and the water spout. Press the start/stop button again. The second phase of the descaling cycle, the rinsing phase, starts and lasts 3 minutes. During this phase, the lights on the control panel go on and off to show that the rinsing phase is in progress.
- Wait until the machine stops dispensing water. The descaling procedure is finished when the machine stops dispensing water.
- The machine will now heat up again. When the lights in the drink icons light up continuously, the machine is ready for use again.
- Install and activate a new AquaClean water filter in the water tank (see ‘Activating the AquaClean water filter (5 min.)’).
When the descaling procedure is finished, the AquaClean light flashes for a
while to remind you to install a new AquaClean water filter.
Tip: Using the AquaClean filter reduces the need for descaling!
What to do if the descaling procedure is interrupted
You can exit the descaling procedure by pressing the on/off button on the
control panel. If the descaling procedure is interrupted before it is
completely finished, do the following:
- Empty and rinse the water tank thoroughly.
- Fill the water tank with fresh water up to the Calc/Clean level indication and switch the machine back on. The machine will heat up and perform an automatic rinsing cycle.
- Before brewing any drinks, perform a manual rinsing cycle. To perform a manual rinsing cycle, first, dispense half a water tank of hot water by repeatedly tapping the hot water icon (Fig. 15) and then brew
- 2 cups of pre-ground coffee without adding ground coffee.
Ordering accessories
To clean and descale the machine, only use the Philips maintenance products.
These products can be purchased from your local retailer, from authorized
service centers, or online at www.philips.com/parts-and-
accessories. To find a full
list of spare parts online, enter the model number of your machine. You can
find the model number on the inside of the service door.
- Descaling solution CA6700
- AquaClean water filter CA6903
- Brew group grease HD5061
Warning icons

Warning icon Solution

Troubleshooting
| Machines with classic milk frother: the milk frother is dirty.| Thoroughly
clean the milk frother (see ‘Cleaning the classic milk frother ‘).
—|—|—
| The type of milk used is not suitable for frothing.| Different types of
milk result in different amounts of froth and different froth qualities. We
have tested the following milk types which proved to deliver a good milk froth
result: semi-skimmed or full-fat cow’s milk and lactose-free milk.
Milk is leaking from the bottom of the LatteGo milk container.| The frame and
the milk container are not assembled properly.| First insert the top of the
milk container under the hook at the top of the frame. Then press home the
bottom part of the milk container. You hear a click when it locks into place.
The machine seems to be leaking.| The machine uses water to rinse the internal
circuit and brew group. This water flows through the internal system directly
into the drip tray. This is normal.| Empty the drip tray every day or as soon
as the ‘drip tray full’ indicator pops up through the drip tray cover. Tip:
Place a cup under the dispensing spout to collect rinsing water and reduce the
amount of water in the drip tray.
| The drip tray is too full and has overflowed which makes it look like the
machine is leaking.| Empty the drip tray every day or as soon as the ‘drip
tray full’ indicator pops up through the drip tray cover.
| The water tank is not fully inserted and air is drawn into the machine.|
Make sure the water tank is in the correct position: remove it and insert it
again pushing it as far as possible.
| The brew group is dirty/clogged.| Rinse the brew group.
| The machine is not placed on a horizontal surface.| Place the machine on a
horizontal surface so that the drip tray does not overflow and the ‘drip tray
full’ indicator works properly.
| The water tank is not fully inserted and air is drawn into the machine.|
Make sure the water tank is in the correct position: remove it and insert it
again pushing it as far as possible.
I cannot activate the AquaClean water filter and the machine asks for
descaling.| The filter has not been installed or replaced in time after
thestarted to flash. This means your limescale free.| Descale your machine
first and then install the AquaClean water filter.
The new water filter does not fit.| You are trying to install another filter
than the AquaClean water| Only the AquaClean water filter fits into the
machine.
| The rubber ring on the AquaClean| Place back the rubber ring on the
Problem| Cause| Solution
—|—|—
Coffee does not come out or coffee comes out slowly.| The AquaClean water
filter was not prepared properly for installation.| Remove the AquaClean water
filter and try to brew a coffee again. If this works, make sure that you have
prepared the AquaClean water filter properly before you place it back. See
chapter ‘AquaClean water filter’ for step-by-step instructions.
| | After a long period of non-use, you need to prepare the AquaClean water
filter for use again and then place it back. See step 1 – 3 of chapter
‘Activating the AquaClean water filter’.
| The AquaClean water filter is clogged.| Replace the AquaClean water filter
every 3 months. A filter that is older than 3 months can become clogged.
| The grinder is set to a too fine setting.| Set the grinder to a coarser
(higher) setting. Note that this will impact the coffee taste.
| The brew group is dirty.| Remove the brew group and rinse it under the tap
(see ‘Cleaning the brew group under the tap’).
| The coffee dispensing spout is dirty.| Clean the coffee dispensing spout
and its holes with a pipe cleaner or needle.
| The pre-ground coffee compartment is clogged| Switch off the machine and
remove the brew group. Open the lid of the pre- ground coffee compartment and
insert the spoon handle into it. Move the handle up and down until the clogged
ground coffee falls down (Fig. 28).
| The machine circuit is blocked by limescale.| Descale the machine with
Philips descaler. Always descale the machine when the descaling light starts
to flash.
The machine grinds the coffee beans, but coffee does not come out.| The pre-
ground coffee compartment is clogged.| Switch off the machine and remove the
brew group. Open the lid of the pre- ground coffee compartment and insert the
spoon handle into it. Move the handle up and down until the clogged ground
coffee falls down (Fig. 28).
The milk does not froth.| Machines with LatteGo: LatteGo is incorrectly
assembled.| Make sure that the milk container is properly assembled to the
frame of LatteGo (‘click’).
| Machines with LatteGo: the milk| Disassemble LatteGo and rinse both parts
| Machines with classic milk frother: the milk frother is dirty.| Thoroughly
clean the milk frother (see ‘Cleaning the classic milk frother ‘).
—|—|—
| The type of milk used is not suitable for frothing.| Different types of
milk result in different amounts of froth and different froth qualities. We
have tested the following milk types which proved to deliver a good milk froth
result: semi-skimmed or full-fat cow’s milk and lactose-free milk.
Milk is leaking from the bottom of the LatteGo milk container.| The frame and
the milk container are not assembled properly.| First insert the top of the
milk container under the hook at the top of the frame. Then press home the
bottom part of the milk container. You hear a click when it locks into place.
The machine seems to be leaking.| The machine uses water to rinse the internal
circuit and brew group. This water flows through the internal system directly
into the drip tray. This is normal.| Empty the drip tray every day or as soon
as the ‘drip tray full’ indicator pops up through the drip tray cover. Tip:
Place a cup under the dispensing spout to collect rinsing water and reduce the
amount of water in the drip tray.
| The drip tray is too full and has overflowed which makes it look like the
machine is leaking.| Empty the drip tray every day or as soon as the ‘drip
tray full’ indicator pops up through the drip tray cover.
| The water tank is not fully inserted and the air is drawn into the
machine.| Make sure the water tank is in the correct position: remove it and
insert it again pushing it as far as possible.
Technical specifications
The manufacturer reserves the right to improve the technical specifications of
the product. All the preset quantities are approximate.

FAQs
What country produces Philips EP2231/40?
This machine was manufactured in China, according to the label information.
How many times can coffee grounds be used again in an espresso maker?
Apart from drinking another shot of espresso, the coffee you get after your
espresso is excellent for many things.
Can I make espresso using regular coffee?
You’ll be happy to know regular pre-ground coffee can be used for an espresso
machine, provided it has the right fine grind
What distinguishes espresso from coffee?
Because of its lower grounds-to-water ratio, espresso is thicker and more
potent than coffee.
What happens to my machine if I don’t descale it?
If mineral scale accumulation is not cleaned, it can obstruct water flow and
stop a machine from operating.
Which espresso ratio is ideal?
A lungo, or long shot, is normally approximately 1:3, whereas a conventional
espresso is often 1:2–1:2.5. It’s crucial to keep in mind that these ratios
are more like suggestions than strict regulations.
How long is the lifespan of a Philips espresso maker?
With regular usage, inexpensive home espresso machines last three to five
years. Infrequent usage can enhance this lifetime even further.
What is the ideal ratio for coffee?
We advise using a 17:1 water-to-coffee ratio in your home brewer.
How many times rinse after descaling?
While some individuals just perform one cycle of rinsing, we advise performing
two cycles to make sure your machine has been thoroughly cleansed with your
descaling solution.
Descaler may be left overnight.
Let it overnight for even greater effects, but you might not want to go that
long without a cup of tea.
Can the Philips EP2231/40 produce iced coffee?
For instance, the Philips EP2231/40 Series Espresso Machine with LatteGo
enables you to prepare delectable iced coffee from scratch every morning using
fresh beans.
How long is the Philips EP2231/40 good for?
The AquaClean filter that comes with the Philips EP2231/40 has to be descaled
after 5,000 cups. Even at three cups each day, it means you won’t need to
descale for almost five years!
Regular coffee can the Philips EP2231/40 make?
There are five coffee options available on the Philips EP2231/40: cappuccino,
latte macchiato, Americano, espresso, and ordinary coffee.
Is Philips superior to Delonghi?
We compared a few important aspects of each range, such as pricing, quality,
and the variety of products available in each category.
Download the PDF Link;Philips Coffee Maker pdf
Read User Manual Online (PDF format)
Read User Manual Online (PDF format) >>
Download This Manual (PDF format)
Download this manual >>
Log in or create an account
Register your product
You instantly have access to manuals, tailored support and more. Plus, it’s quick and easy.
Manuals & Documentation
-
CO_2024_EP2XXX_EU Declaration of Conformity_en_GB PDF
file,
636.8 kB
October 22, 2024 -
CO_2024_EP2XXX_EU Declaration of Conformity_en_GB PDF
file,
636.8 kB
October 22, 2024 -
CO_2024_EP2XXX_EU Declaration of Conformity_en_GB PDF
file,
636.8 kB
October 22, 2024 -
CO_2024_EP2XXX_EU Declaration of Conformity_en_GB PDF
file,
636.8 kB
October 22, 2024 -
CO_2024_EP2XXX_EU Declaration of Conformity_en_GB PDF
file,
636.8 kB
October 22, 2024 -
CO_2024_EP2XXX_EU Declaration of Conformity_en_GB PDF
file,
636.8 kB
October 22, 2024 -
CO_2024_EP2XXX_EU Declaration of Conformity_en_GB PDF
file,
636.8 kB
October 22, 2024 -
CO_2024_EP2XXX_EU Declaration of Conformity_en_GB PDF
file,
636.8 kB
October 22, 2024 -
CO_2024_EP2XXX_EU Declaration of Conformity_en_GB PDF
file,
636.8 kB
October 22, 2024 -
CO_2024_EP2XXX_EU Declaration of Conformity_en_GB PDF
file,
636.8 kB
October 22, 2024 -
CO_2024_EP2XXX_EU Declaration of Conformity_en_GB PDF
file,
636.8 kB
October 22, 2024 -
CO_2024_EP2XXX_EU Declaration of Conformity_en_GB PDF
file,
636.8 kB
October 22, 2024 -
CO_2024_EP2XXX_EU Declaration of Conformity_en_GB PDF
file,
636.8 kB
October 22, 2024 -
CO_2024_EP2XXX_EU Declaration of Conformity_en_GB PDF
file,
636.8 kB
October 22, 2024 -
CO_2024_EP2XXX_EU Declaration of Conformity_en_GB PDF
file,
636.8 kB
October 22, 2024 -
CO_2024_EP2XXX_EU Declaration of Conformity_en_GB PDF
file,
636.8 kB
October 22, 2024 -
CO_2024_EP2XXX_EU Declaration of Conformity_en_GB PDF
file,
636.8 kB
October 22, 2024 -
CO_2024_EP2XXX_EU Declaration of Conformity_en_GB PDF
file,
636.8 kB
October 22, 2024 -
CO_2024_EP2XXX_EU Declaration of Conformity_en_GB PDF
file,
636.8 kB
October 22, 2024 -
CO_2024_EP2XXX_EU Declaration of Conformity_en_GB PDF
file,
636.8 kB
October 22, 2024 -
CO_2024_EP2XXX_EU Declaration of Conformity_en_GB PDF
file,
636.8 kB
October 22, 2024 -
CO_2024_EP2XXX_EU Declaration of Conformity_en_GB PDF
file,
636.8 kB
October 22, 2024 -
CO_2024_EP2XXX_EU Declaration of Conformity_en_GB PDF
file,
636.8 kB
October 22, 2024 -
CO_2024_EP2XXX_EU Declaration of Conformity_en_GB PDF
file,
636.8 kB
October 22, 2024 -
CO_2024_EP2XXX_EU Declaration of Conformity_en_GB PDF
file,
636.8 kB
October 22, 2024 -
CO_2024_EP2XXX_EU Declaration of Conformity_en_GB PDF
file,
636.8 kB
October 22, 2024 -
CO_2024_EP2XXX_EU Declaration of Conformity_en_GB PDF
file,
636.8 kB
October 22, 2024 -
CO_2024_EP2XXX_EU Declaration of Conformity_en_GB PDF
file,
636.8 kB
October 22, 2024 -
CO_2024_EP2XXX_EU Declaration of Conformity_en_GB PDF
file,
636.8 kB
October 22, 2024 -
CO_2024_EP2XXX_EU Declaration of Conformity_en_GB PDF
file,
636.8 kB
October 22, 2024 -
CO_2024_EP2XXX_EU Declaration of Conformity_en_GB PDF
file,
636.8 kB
October 22, 2024 -
CO_2024_EP2XXX_EU Declaration of Conformity_en_GB PDF
file,
636.8 kB
October 22, 2024 -
CO_2024_EP2XXX_EU Declaration of Conformity_en_GB PDF
file,
636.8 kB
October 22, 2024 -
CO_2024_EP2XXX_EU Declaration of Conformity_en_GB PDF
file,
636.8 kB
October 22, 2024 -
CO_2024_EP2XXX_EU Declaration of Conformity_en_GB PDF
file,
636.8 kB
October 22, 2024 -
CO_2024_EP2XXX_EU Declaration of Conformity_en_GB PDF
file,
636.8 kB
October 22, 2024 -
CO_2024_EP2XXX_EU Declaration of Conformity_en_GB PDF
file,
636.8 kB
October 22, 2024 -
CO_2024_EP2XXX_EU Declaration of Conformity_en_GB PDF
file,
636.8 kB
October 22, 2024 -
CO_2024_EP2XXX_EU Declaration of Conformity_en_GB PDF
file,
636.8 kB
October 22, 2024 -
CO_2024_EP2XXX_EU Declaration of Conformity_en_GB PDF
file,
636.8 kB
October 22, 2024 -
CO_2024_EP2XXX_EU Declaration of Conformity_en_GB PDF
file,
636.8 kB
October 22, 2024 -
CO_2024_EP2XXX_EU Declaration of Conformity_en_GB PDF
file,
636.8 kB
October 22, 2024 -
CO_2024_EP2XXX_EU Declaration of Conformity_en_GB PDF
file,
636.8 kB
October 22, 2024 -
CO_2024_EP2XXX_EU Declaration of Conformity_en_GB PDF
file,
636.8 kB
October 22, 2024 -
CO_2024_EP2XXX_EU Declaration of Conformity_en_GB PDF
file,
636.8 kB
October 22, 2024 -
CO_2024_EP2XXX_EU Declaration of Conformity_en_GB PDF
file,
636.8 kB
October 22, 2024 -
CO_2024_EP2XXX_EU Declaration of Conformity_en_GB PDF
file,
636.8 kB
October 22, 2024 -
CO_2024_EP2XXX_EU Declaration of Conformity_en_GB PDF
file,
636.8 kB
October 22, 2024 -
CO_2024_EP2XXX_EU Declaration of Conformity_en_GB PDF
file,
636.8 kB
October 22, 2024 -
CO_2024_EP2XXX_EU Declaration of Conformity_en_GB PDF
file,
636.8 kB
October 22, 2024 -
CO_2024_EP2XXX_EU Declaration of Conformity_en_GB PDF
file,
636.8 kB
October 22, 2024 -
CO_2024_EP2XXX_EU Declaration of Conformity_en_GB PDF
file,
636.8 kB
October 22, 2024 -
CO_2024_EP2XXX_EU Declaration of Conformity_en_GB PDF
file,
636.8 kB
October 22, 2024 -
CO_2024_EP2XXX_EU Declaration of Conformity_en_GB PDF
file,
636.8 kB
October 22, 2024 -
CO_2024_EP2XXX_EU Declaration of Conformity_en_GB PDF
file,
636.8 kB
October 22, 2024 -
CO_2024_EP2XXX_EU Declaration of Conformity_en_GB PDF
file,
636.8 kB
October 22, 2024 -
CO_2024_EP2XXX_EU Declaration of Conformity_en_GB PDF
file,
636.8 kB
October 22, 2024 -
CO_2024_EP2XXX_EU Declaration of Conformity_en_GB PDF
file,
636.8 kB
October 22, 2024 -
CO_2024_EP2XXX_EU Declaration of Conformity_en_GB PDF
file,
636.8 kB
October 22, 2024 -
CO_2024_EP2XXX_EU Declaration of Conformity_en_GB PDF
file,
636.8 kB
October 22, 2024 -
CO_2024_EP2XXX_EU Declaration of Conformity_en_GB PDF
file,
636.8 kB
October 22, 2024 -
CO_2024_EP2XXX_EU Declaration of Conformity_en_GB PDF
file,
636.8 kB
October 22, 2024 -
CO_2024_EP2XXX_EU Declaration of Conformity_en_GB PDF
file,
636.8 kB
October 22, 2024 -
Series 2200 EP2231/40 Fully automatic espresso machines PDF
file,
May 23, 2025